

Page 1

COMPACT DISC PLAYER
CDJ-1000MK3
Operating Instructions
Page 2
Thank you for buying this Pioneer product.
Please read through these operating instructions so you will know how to operate your model properly. After you have finished reading
the instructions, put them away in a safe place for future reference.
In some countries or regions, the shape of the power plug and power outlet may sometimes differ from that shown in the explanatory
drawings. However the method of connecting and operating the unit is the same.
IMPORTANT
CAUTION
RISK OF ELECTRIC SHOCK
DO NOT OPEN
The lightning flash with arrowhead symbol,
within an equilateral triangle, is intended to
alert the user to the presence of uninsulated
"dangerous voltage" within the product's
enclosure that may be of sufficient
magnitude to constitute a risk of electric
shock to persons.
NOTE:
THE NO USER-SERVICEABLE PARTS COMPARTMENT WARNING IS LOCATED ON THE APPLIANCE BOTTOM.
1)
Read these instructions.
2)
Keep these instructions.
3)
Heed all warnings.
4)
Follow all instructions.
5)
Do not use this apparatus near water.
6)
Clean only with dry cloth.
7)
Do not block any ventilation openings.
Install in accordance with the
CAUTION:
TO PREVENT THE RISK OF ELECTRIC
SHOCK, DO NOT REMOVE COVER (OR
BACK). NO USER-SERVICEABLE PARTS
INSIDE. REFER SERVICING TO QUALIFIED
SERVICE PERSONNEL.
Only use attachments/accessories
11)
specified by the manufacturer.
Use only with the cart, stand, tripod,
12)
bracket, or table specified by the
manufacturer, or sold with the apparatus.
When a cart is used, use caution when
moving the cart/apparatus combination to
avoid injury from tip-over.
manufacturer’s instructions.
8)
Do not install near any heat sources such
as radiators, heat registers, stoves,
or other apparatus (including amplifiers)
that produce heat.
9)
Do not defeat the safety purpose of the
polarized or grounding-type plug.
A polarized plug has two blades with one
wider than the other. A grounding type
plug has two blades and a third grounding
prong. The wide blade or the third prong
are provided for your safety. If the provided
plug does not fit into your outlet, consult
an electrician for replacement of the
obsolete outlet.
10)
Protect the power cord from being walked
on or pinched particularly at plugs,
convenience receptacles, and the point
where they exit from the apparatus.
NOTE: This equipment has been tested and found to comply with the limits for a Class B digital device, pursuant to
Part 15 of the FCC Rules. These limits are designed to provide reasonable protection against harmful interference in
a residential installation. This equipment generates, uses, and can radiate radio frequency energy and, if not
installed and used in accordance with the instructions, may cause harmful interference to radio communications.
However, there is no guarantee that interference will not occur in a particular installation. If this equipment does
cause harmful interference to radio or television reception, which can be determined by turning the equipment off
and on, the user is encouraged to try to correct the interference by one or more of the following measures:
– Reorient or relocate the receiving antenna.
– Increase the separation between the equipment and receiver.
– Connect the equipment into an outlet on a circuit different from that to which the receiver is connected.
– Consult the dealer or an experienced radio/TV technician for help.
Unplug this apparatus during lightning
13)
storms or when unused for long periods of
time.
Refer all servicing to qualified service
14)
personnel. Servicing is required when the
apparatus has been damaged in any way,
such as power-supply cord or plug is
damaged, liquid has been spilled or
objects have fallen into the apparatus, the
apparatus has been exposed to rain or
moisture, does not operate normally, or
has been dropped.
The exclamation point within an equilateral
triangle is intended to alert the user to the
presence of important operating and
maintenance (servicing) instructions in the
literature accompanying the appliance.
D1-4-2-3_En-A
P1-4-2-2_En
D8-10-1-2_En
WARNING
This equipment is not waterproof. To prevent a fire
or shock hazard, do not place any container filed
with liquid near this equipment (such as a vase or
flower pot) or expose it to dripping, splashing, rain
or moisture.
IMPORTANT NOTICE
THIS EQUIPMENT IS LOCATED ON THE BOTTOM.
PLEASE WRITE THIS SERIAL NUMBER ON YOUR
ENCLOSED WARRANTY CARD AND KEEP IN A
SECURE AREA. THIS IS FOR YOUR SECURITY.
Information to User
Alteration or modifications carried out without
appropriate authorization may invalidate the user’s
right to operate the equipment.
CAUTION: This product satisfies FCC regulations
when shielded cables and connectors are used to
connect the unit to other equipment. To prevent
electromagnetic interference with electric appliances
such as radios and televisions, use shielded cables
and connectors for connections.
This Class B digital apparatus complies with
Canadian ICES-003.
Cet appareil numérique de la Classe B est conforme
à la norme NMB-003 du Canada.
WARNING: Handling the cord on this product or
cords associated with accessories sold with the
product will expose you to chemicals listed on
proposition 65 known to the State of California and
other governmental entities to cause cancer and
birth defect or other reproductive harm.
Wash hands after handling
WARNING
To prevent a fire hazard, do not place any naked
flame sources (such as a lighted candle) on the
equipment.
VENTILATION CAUTION
When installing this unit, make sure to leave space
around the unit for ventilation to improve heat
radiation (at least 5 cm at rear, and 3 cm at each
side).
WARNING
Slots and openings in the cabinet are provided for
ventilation to ensure reliable operation of the
product, and to protect it from overheating. To
prevent fire hazard, the openings should never be
blocked or covered with items (such as newspapers,
table-cloths, curtains) or by operating the
equipment on thick carpet or a bed.
POWER-CORD CAUTION
Handle the power cord by the plug. Do not pull out the
plug by tugging the cord and never touch the power
cord when your hands are wet as this could cause a
short circuit or electric shock. Do not place the unit, a
piece of furniture, etc., on the power cord, or pinch the
cord. Never make a knot in the cord or tie it with other
cords. The power cords should be routed such that they
are not likely to be stepped on. A damaged power cord
can cause a fire or give you an electrical shock. Check
the power cord once in a while. When you find it
damaged, ask your nearest PIONEER authorized
service center or your dealer for a replacement.
– THE SERIAL NUMBER FOR
K015 En
D3-4-2-1-3_A_En
D1-4-2-6-1_En
D8-10-2_En
D8-10-3a_En
D8-10-1-3_EF
D36-P4_A_En
D3-4-2-1-7a_A_En
D3-4-2-1-7b_A_En
S002_En
CAUTION
This product is a class 1 laser product, but this
product contains a laser diode higher than Class 1.
To ensure continued safety, do not remove any covers
or attempt to gain access to the inside of the product.
Refer all servicing to qualified personnel.
The following caution label appears on your unit.
Location: top of the CD drive
CAUTION
ATTENTION
ADVARSEL
VARNING
CLASS 3B INVISIBLE LASER RADIATION
WHEN OPEN, AVOID EXPOSURE TO BEAM.
RADIATIONS LASER INVISIBLES DE CLASSE 3B QUAND
OUVERT. ÉVITEZ TOUT EXPOSITION AU FAISCEAU.
KLASSE 3B USYNLIG LASERSTRÅLING VED ÅBNING.
UNDGÅ UDSÆTTELSE FOR STRÅLING.
KLASS 3B OSYNLIG LASERSTRÅLNING NÄR DENNA DEL
ÄR ÖPPNAD. UNDVIK ATT UTSÄTTA DIG FÖR STRÅLEN.
2
VORSICHT
PRECAUCIAÓN
VAR O!
CLASS 1
LASER PRODUCT
BEI GEÖFFNETER ABDECKUNG IST UNSICHTBARE LASERSTRAHLUNG
DER KLASSE 3B IM GERÄTEINNEREN VORHANDEN. NICHT DEM
LASERSTRAHLAUSSETZEN!
CUANDO SE ABRE HAY RADIACIÓN LÁSER DE CLASE 3B
INVISIBLE. EVITE LA EXPOSICIÓN A LOS RAYOS LÁSER.
AVATTAESSA OLET ALTTIINA NÄKYMÄTTÖMÄLLE
LUOKAN 3B LASERSÄTEILYLLE. ÄLÄ KATSO SÄTEESEEN.
DRW2308-A
D3-4-2-1-8_B_En
Page 3

Contents
Contents/Specifications
Before Operating
Specifications ........................................................................... 3
Features ................................................................................... 4
Handling Precautions ............................................................... 5
Discs Usable with This Unit ..................................................... 6
Connections ............................................................................. 8
Names and Functions of Parts ............................................... 10
Basic Operations
Loading and Removing Discs ................................................. 13
DJ Player Operation ............................................................... 14
Auto cueing ...................................................................... 14
Starting playback .............................................................. 14
To stop playback ............................................................... 14
To pause playback ............................................................ 14
Fast forward / Fast reverse .............................................. 14
Track search ...................................................................... 15
Folder search (MP3 only) .................................................. 15
Cue point settings ............................................................ 15
To change the playing speed ............................................ 16
Applying master tempo .................................................... 16
Jog dial functions ............................................................. 16
Jog sensitivity adjustment ................................................ 16
Mixing different tracks ..................................................... 17
About WAVE display ......................................................... 17
About TEXT display .......................................................... 17
Advanced Operations
Advanced Operations ............................................................. 18
Scratch play ...................................................................... 18
Spin play ........................................................................... 18
Braking ............................................................................. 18
Loop playback ................................................................... 18
To perform hot cue ........................................................... 19
Reverse play ..................................................................... 19
About fader start play ....................................................... 19
Relay play using two players ............................................ 19
Operations Using Memory Cards........................................... 20
Recording to memory cards ............................................. 20
To call up recorded data .................................................... 21
To delete information recorded on memory cards ........... 21
To copy memory card data ............................................... 21
Display during recording of cue and loop points .............. 21
Other
Troubleshooting ...................................................................... 22
Specifications
1. General
System ................................ Compact disc digital audio system
Power requirements ........................................ AC 120 V, 60 Hz
Power consumption .......................................................... 28 W
Operating temperature..................................... +5 °C to +35 °C
Operating humidity................................................. 5 % to 85 %
(There should be no condensation of moisture.)
Weight................................................................ 4.2 kg (9.26 lb)
Dimensions ............................. 320 (W) x 370 (D) x 105 (H) mm
12 – 5/8 (W) x 14 – 9/16 (D) x 4 – 1/8 (H) in
2. Audio section
Frequency response ........................................... 4 Hz to 20 kHz
Signal-to-noise ratio ............................... 115 dB or more (JEITA)
Distortion .......................................................... 0.006 % (JEITA)
3. Accessories
÷ Operating instructions ......................................................... 1
÷ Power cord .......................................................................... 1
÷ Audio cable .......................................................................... 1
÷ Control cord ......................................................................... 1
÷ Forced eject pin
(housed in a groove in the bottom panel) ............................ 1
÷ SD memory card .................................................................. 1
÷ Limited warranty .................................................................. 1
NOTE:
Specifications and design are subject to possible modification
without notice.
3
Page 4

Features
Features
The CDJ-1000MK3 compact disc player is designed for use by
DJs providing all the functions and performance required in disco
clubs while offering performance, sound quality and functionality superior to any analog player.
JOG DIAL
The large 206 mm diameter jog dial enables better handling
than an analog turntable.
¶ PITCH BEND
This function changes the music tempo depending on direction
of jog dial rotation and speed of movement.
¶ SCRATCH PLAY
In the VINYL mode when the surface of the jog dial is pressed
playback is discontinued and then continues according to the
direction and speed the dial is rotated. You can also adjust the
startup when the jog dial is touched and released to create new
DJ techniques.
¶ FRAME SEARCH
Moves the disc from pause position in frame increments (1/75
sec) when the jog dial is rotated in pause mode.
¶ SUPER FAST SEARCH
Rotate the jog dial while holding depressed the SEARCH button,
TRACK SEARCH button, or FOLDER SEARCH button. When this
is done, search will be performed faster than the normal search,
track search, or folder search operations.
¶ JOG ADJUST (Jog Sensitivity Adjustment)
This function allows you to adjust the felt resistance when rotating the jog dial.
¶ TEMPO CONTROL RANGE
The maximum variable range can be set to four variable ranges:
±6 %, ±10 %, ±16 % and WIDE to facilitate adjustment.
¶ TEMPO CONTROL RESET
Resets the tempo to 0 % regardless of slider position.
¶ MASTER TEMPO
Changes music tempo without changing pitch.
CUE
¶ BACK CUE
After storing the cue point in memory, press the CUE button
while playing the unit to go back to the cue point and start over.
¶ AUTO CUE
Auto cue automatically locates the song’s start point even if it
differs from the track’s frame, allowing the player to start in-
stantly at a press of the PLAY button.
¶ CUE POINT SAMPLER
The sound from the memorized cue point can be reproduced by
one touch, which can be used as the start point check and the
sampler.
REAL TIME SEAMLESS LOOP
This function simplifies setting and releasing loops. This function lets you set a loop while you are playing a track. A loop can
also be set at the end of the track so that the track does not
stop. In addition, an ADJUST mode has been added to enable
one-touch adjustments to Loop-in and Loop-out points and facilitate loop operation.
ON JOG DISPLAY
The center of the jog dial displays information regarding disc status, cue point position, sound memory status, jog dial touchdetection, and VINYL mode.
WAVE DISPLAY
This display makes it possible to find the breakpoint between
tracks in advance and use it as mix point or end point in the
same way as you can on an analog record by checking the position of the needle in the groove.
CUE/LOOP MEMORY
This unit is equipped with a function allowing cue points and
loop points for individual discs to be recorded on SD memory
cards or MultiMedia Cards (MMC); the recorded data can then
be called up when playing the respective disc.
HOT CUE
UP to three hot cue points (A, B, C) can be preset, thus allowing
playback to be performed instantly from either of those points.
The hot cue function can be used to record not only cue points,
but loop points as well.
REVERSE PLAY
Set the DIRECTION switch to its forward position ([REV] position) to play the music backwards.
TEMPO CONTROL
100 mm high-precision slider coupled with a 0.02 % incre-
ment digital display (within a ±6 % range) allows exact control of
speed to make tempo adjustments easy and accurate.
RELOOP
Allows you to replay a loop any number of times.
Press the RELOOP button after releasing loop play to return to
the loop start point. Clever use of on and off in combination with
the rhythm make it possible to create new sound effects.
PLAYING ADDRESS
This bar graph provides a visual representation of track playback
progress that enables you to see current playback position just
like you can on an analog record by checking needle position.
The length of the bar shows current position and a flashing bar
provides advance notice of track end.
SLOT IN
Discs are loaded directly without opening doors or trays, making
track selection that much faster.
FADER START
When a Pioneer DJ mixer (sold separately) is connected, the
mixer’s fader operation can be used to perform quick start and
back cue.
MULTI READ
Allows playback of CD-R, CD-RW discs (recorded in music CD or
MP3 format). (Note that some discs may not play properly due
to characteristics of the individual disc, recorder, or disc soiling
and scratches.)
MP3 DJ PLAY
MP3 files recorded on CD-ROM can be played with DJ functions.
4
Page 5
Handling Precautions
Handling Precautions
Installation location
¶ Placing and using the player for long periods on heat-generat-
ing sources such as amplifiers or near spotlights, etc. will affect product performance. Avoid placing the player on heatgenerating sources.
¶ Install this player as far as possible away from tuners and TV
sets. The player installed in close proximity to such equipment may cause noise or degradation of the picture.
Noise may be noticeable when an indoor antenna is used. In
such cases, make use of an outdoor antenna or turn off power
to the player.
¶ When the unit is used in a loud-sound environment, e.g., near
a speaker, sound skip may occur. Install the unit away from
the speaker or reduce the listening volume.
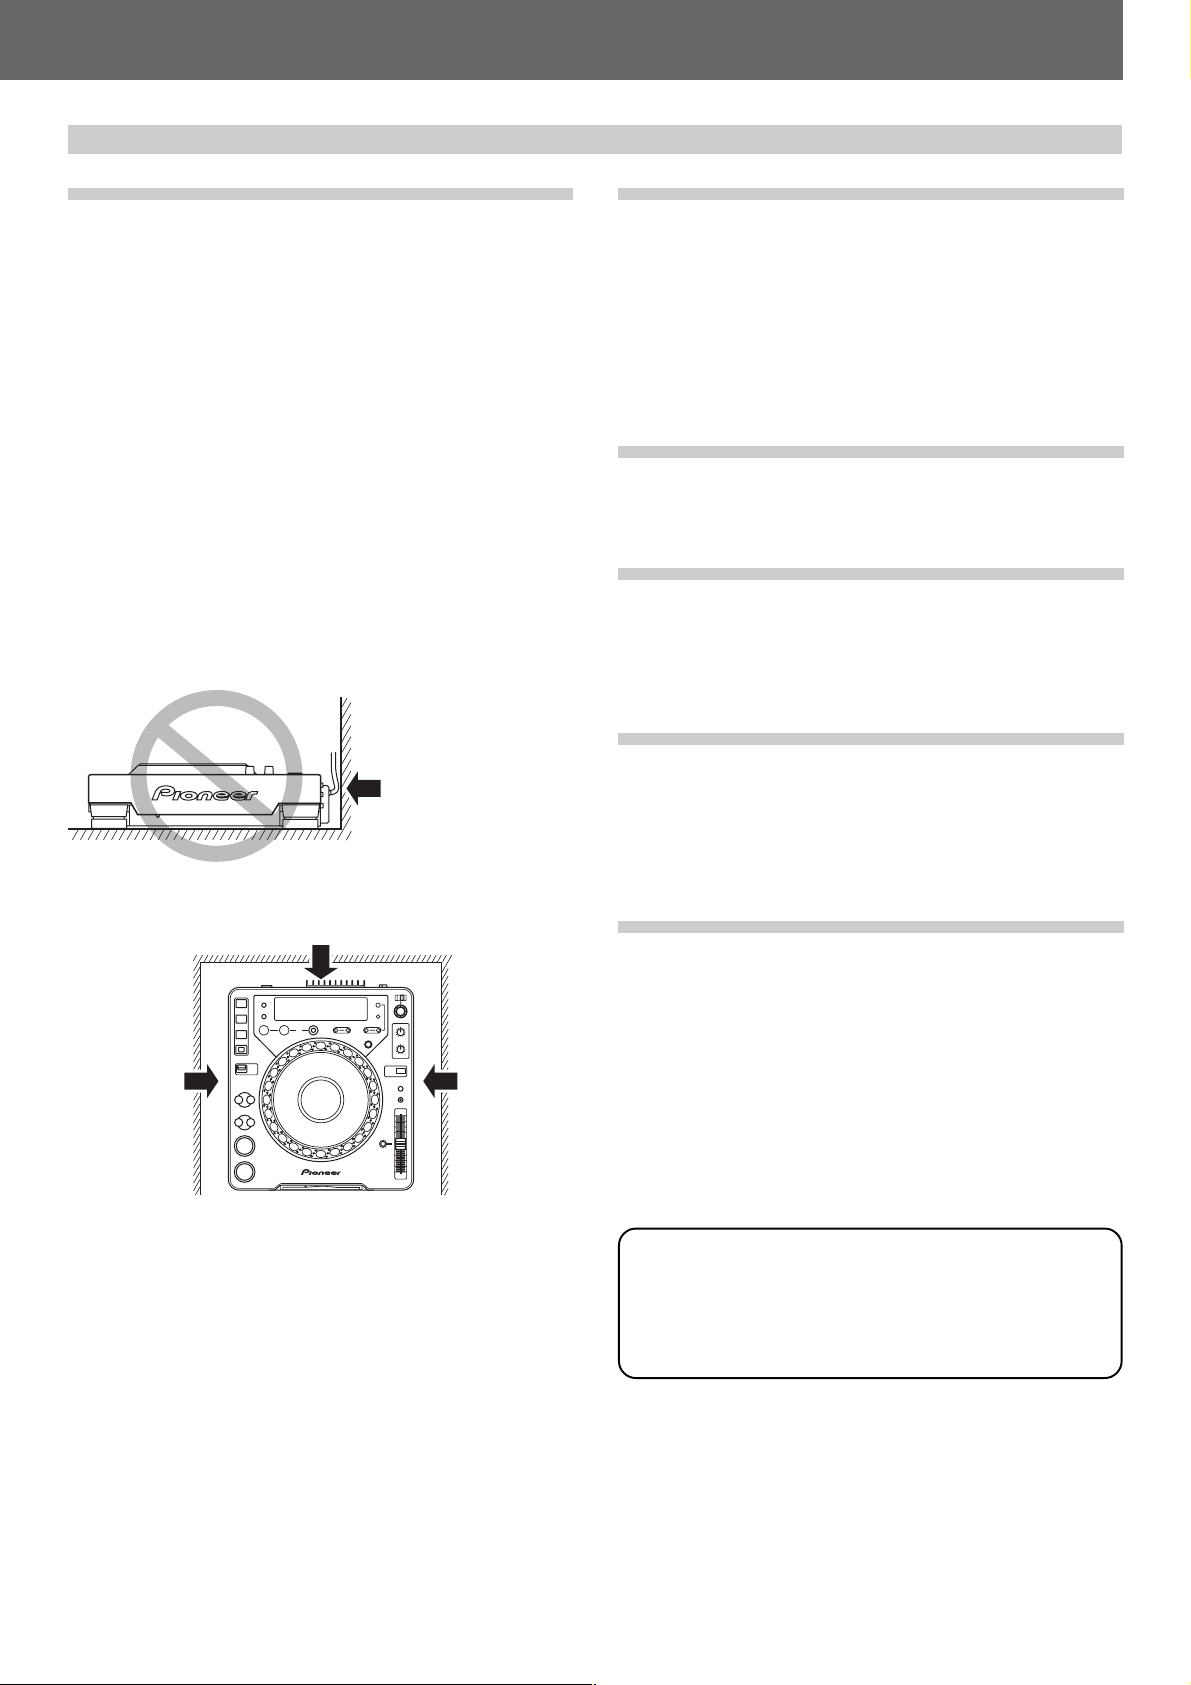
¶ Place this unit on a level surface and a stable platform.
Take adequate note of the following precautions when preparing a place for installation:
Be sure the player, including its video, audio and power supply
cords, does not touch vibrating materials. Any vibration other
than that transmitted through the insulators may cause the disc
to skip. Take special care when using the player while it is installed in a carrying case.
Do not place on or
against vibrating
materials!
Leave space to allow for heat
dissipation.
Leave space to
allow for heat
dissipation.
Leave space to
allow for heat
dissipation.
Moving the unit
■ Never move the unit during playback!
During playback, a disc rotates at very high speed; moving the
player during playback may result in scratches or other damage
to the disc.
■ When moving the unit is necessary
Before moving the unit, remove any disc and disconnect the
power. Malfunctions or damage may result if the unit is moved
with a disc loaded.
About the carrying case
The upper surface of the jog dial is equipped with a touch-sensitive switch. When placing the player in its carrying case, avoid
placing any pressure on the jog dial.
Condensation
When this unit is brought into a warm room from previously cold
surroundings or when the room temperature rises sharply, condensation may form inside the unit and impair its performance.
In such cases, allow the unit to stand for about an hour or raise
the room temperature gradually.
Cleaning the player
To clean the player wipe with a polishing or a soft, dry cloth. For
stubborn dirt, moisten a soft cloth with a weak solution of neutral detergent (diluted in five to six parts water), wring the cloth
well, and wipe away the dirt. Use a dry cloth to wipe the surface
dry. Do not use volatile liquids such as benzene or thinner which
will damage the unit.
About the lens cleaner
The player’s pickup lens should not become dirty in normal use.
If for some reason, the lens becomes soiled and malfunctions,
contact your nearest PIONEER authorized service center. Lens
cleaners for CD players are commercially available, but special
care should be exercised in their use as some may cause damage to the lens.
Regarding data recorded on memory cards
It is the users responsibility to make regular backups of important
memory card data. Pioneer disclaims any responsibility for damage
to or loss of memory card data, or other incidental damages arising
from incompatibilities of the player and memory card, static electricity or other external causes.
5
Page 6
Discs Usable with This Unit (Types of discs playable on this unit/Playing MP3 files)
Discs Usable with This Unit
Types of discs playable on this unit
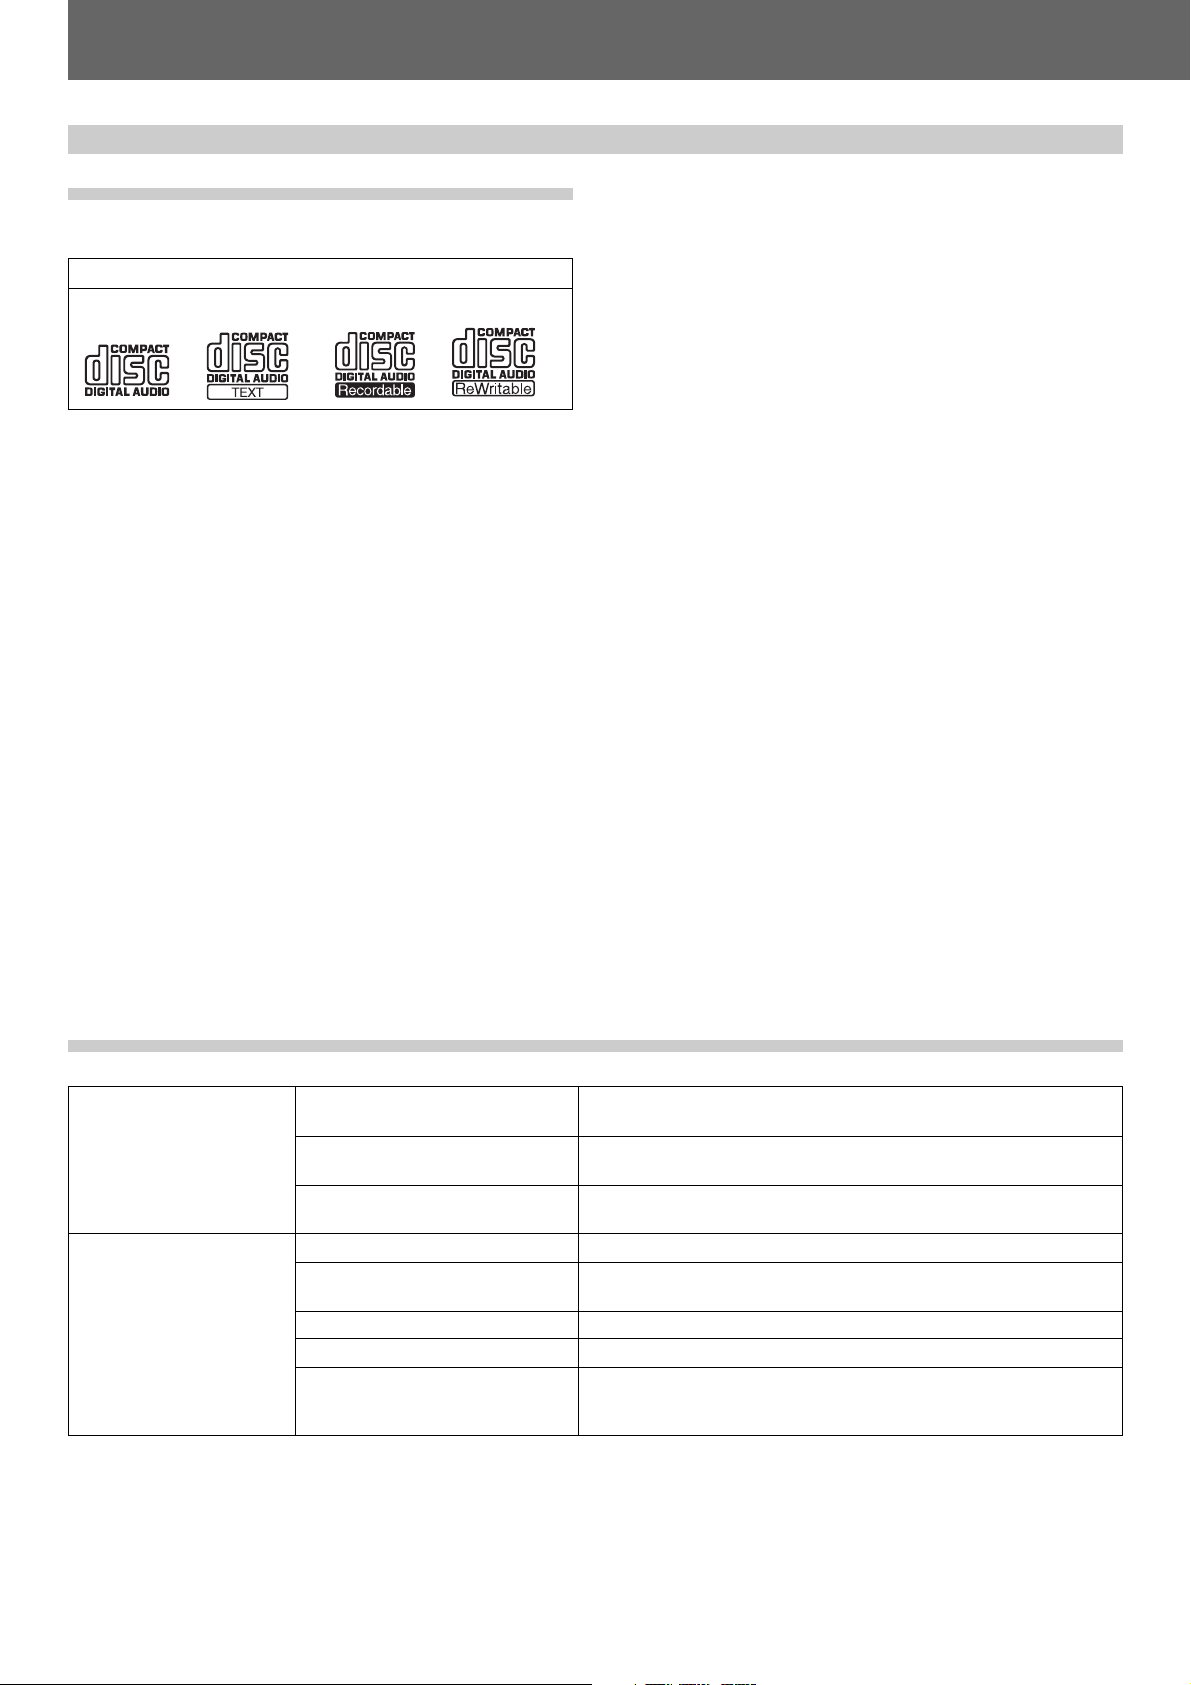
¶ The following marks and logos are displayed on disc labels,
packaging, or jackets.
Types and Logos of playable discs
CD CD-TEXT
(Note 1)
Note 1) Regarding TEXT display:
The number of characters that can be displayed is up to 48. When
a display exceeds 16 characters in length, the display will scroll.
Only alpha-numerics and a limited number of symbols can be
displayed (☞
P. 17).
Note 2) CD-R/CD-RW discs:
This player supports playback of CD-R/CD-RW discs recorded in
audio CD format or MP3.
* For details, consult the Operating Instructions for your recorder.
When playing 8 cm CDs, always use an 8 cm CD adapter
(☞
P. 13).
CD-R
(Note 2)
CD-RW
(Note 2)
Notes:
Some CD-R/CD-RW discs recorded on standalone recorders
or computer drives may not be playable back on this player,
due to a variety of reasons, including disc characteristics,
scratches, dirt, player lens dirt or condensation, etc.
Some discs recorded on computer drives may not be playable
on this player, depending on the recording application used,
its settings, and operating environment. Be sure to use the
correct formatting for the discs used. For details, consult the
application author.
This unit cannot play partially recorded CD-R or CD-RW discs
that have not been finalized.
For detailed information regarding the handling of CD-R/CDRW discs, consult the handling precautions supplied with each
disc.
■ Regarding CD-R/RW discs
Due to the unique construction of CD-R/RW discs, leaving them
for extended periods of time in the pause (or cue standby) mode
at a single point may result in the discs’ becoming difficult to
play at that place. The same symptom may also occur if the loop
function is used to play back a single point on the disc excessively.
As a result, users are advised to construct backup archive discs
when playing discs containing important data.
Playing MP3 files
MP3 files must follow the format requirements listed below.
MP3 format
Disc format
MPEG-1
MPEG-2
ID3 tag
File extension
Folder layers
Maximum number of folders
Maximum number of files
CD-R recording method
■ About DualDisc playback
This product is designed to conform to standards for music CDs.
No warranty is made for operation or performance when used
with discs not conforming to such music CD standards.
Supports Audio Layer-3 sampling frequency 32 kHz, 44.1 kHz, 48 kHz,
Bit Rate 32 Kbps to 320 Kbps.
Supports Audio Layer-3 sampling frequency 16 kHz, 22.05 kHz, 24 kHz,
Bit Rate 16 Kbps (stereo) to 160 Kbps.
Supports ID3 Vers. 1.0/1.1/2.2/2.3/2.4.
Displays title, album, artist.
.mp3, .MP3, .mP3, .Mp3
Maximum 8 layers; files in folders exceeding 8 layers cannot be
played.
99 (99 folders + 1 root)
999 (per folder)
Record following the ISO9660 CD-ROM file system.
Supports only Disc At Once or Track At Once.
CDJ-1000MK3 does not support Packet Write recorded discs.
* CDJ-1000MK3 is not equipped with a File Sort function; tracks will be played in the order in which they were recorded.
* Plays MP3 files stored on CD-ROM. Cannot play MP3 files stored on SD memory cards or MultiMedia cards (MMC).
* Startup time increases with the number of folders.
6
Page 7
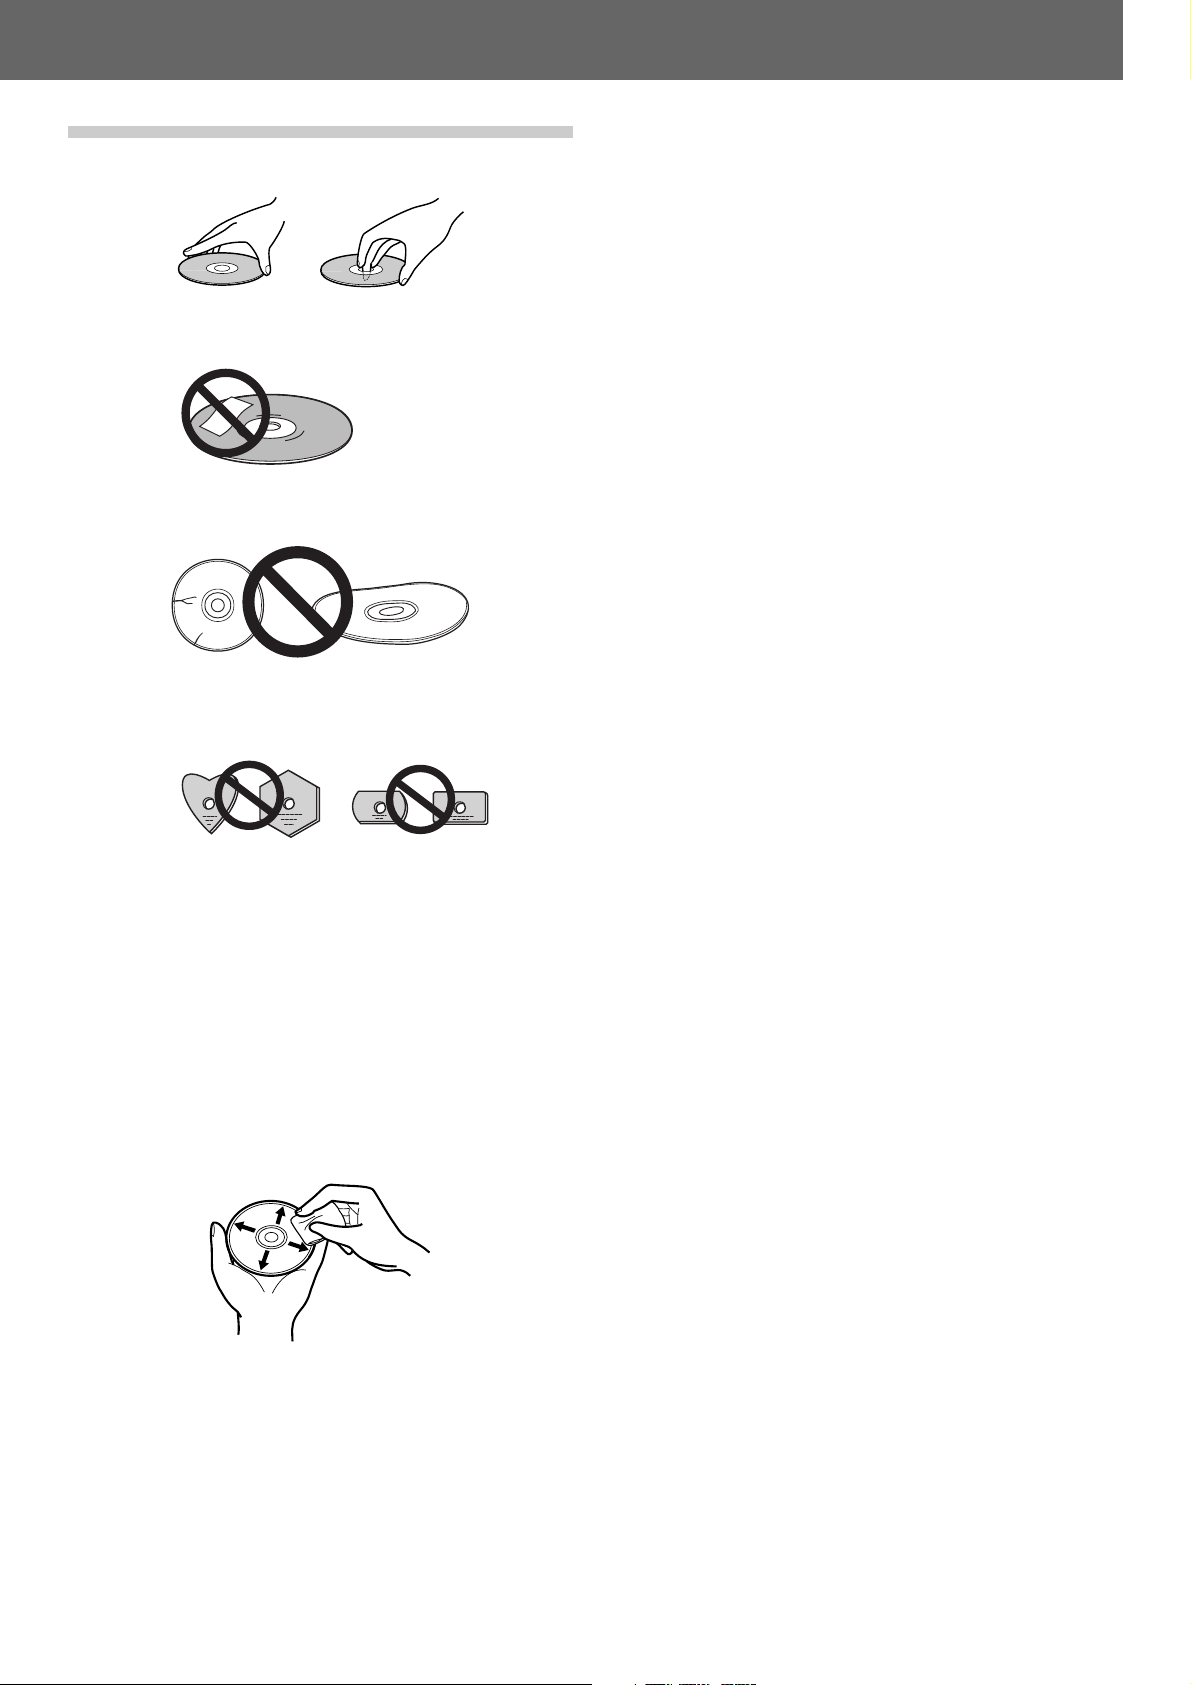
Handling discs
■ When holding discs, do not touch their signal surfaces. Hold
by the edges, or by one edge and the center hole.
■ Do not affix gummed labels or tape to the disc surface. Also,
do not scratch or damage the label.
■ Discs rotate at high speeds inside the player. Do not use dam-
aged, cracked or warped discs.
Discs Usable with This Unit (Handling discs)
■ Do not play a disc with a special shape
¶ Do not play a disc having other shape than a circular disc,
such as heart shaped disc. Otherwise malfunction may occur.
■ Storing discs
¶ Discs are made of the same kinds of plastic used for con-
ventional analog audio records. Be careful not to allow discs
to warp. Always store discs in their cases vertically, avoiding
locations with high heat, humidity, or extremely low temperatures. Avoid leaving discs in cars; the interior of a car in
direct sunlight can become extremely hot.
¶ Always read and abide by the precautionary notes listed on
disc labels.
■ Cleaning discs
¶ Always keep your discs clean by wiping them gently with a
soft cloth from the inner edge toward the outer edge.
¶ When cleaning discs, the use of a commercial CD cleaning kit
is recommended.
¶ If a disc becomes very dirty, dampen a soft cloth with water,
(be sure to wring it out well) and wipe the away dirt gently.
Remove any water drops with another soft, dry cloth.
¶ Do not use record cleaning sprays or anti-static agents on discs.
Never clean discs with benzene, thinner, or other volatile solvents or damage to the disc surface may result.
7
Page 8
Connections
Connections
Always turn off power switch and disconnect power cord when making or changing connections.
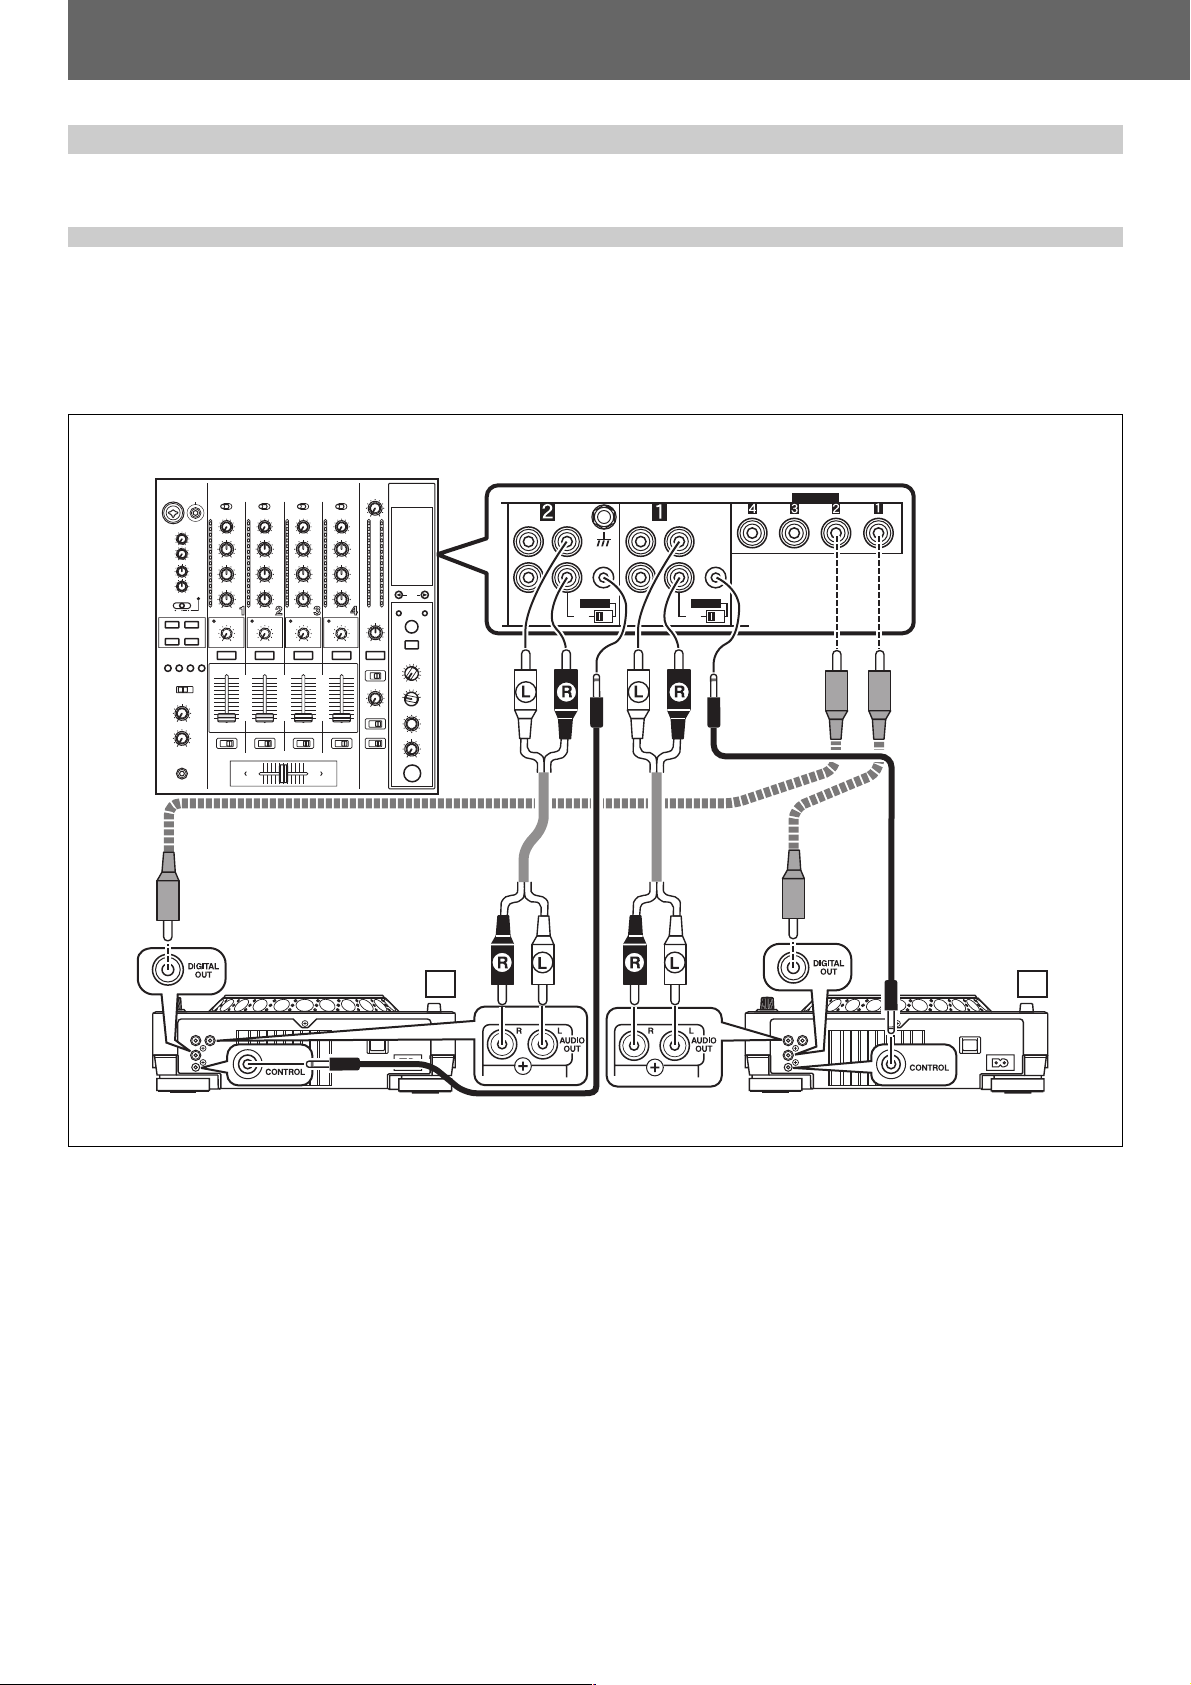
1. Connection to a Pioneer DJ mixer (audio output and control connector)
Using the auxiliary audio cable, connect the white plug to the L (left) jack, and the red plug to the R (right) jack.
In addition, by connecting the furnished control cord, the DJ mixer can be used to control this unit for fader start play and back cue
operations.
Note that digital connections can be made only with mixers equipped with digital input connectors (models DJM-800, DJM-1000, etc.).
Use a commercially available coaxial digital cable to connect this unit’s DIGITAL OUT connector to the DJ mixer’s DIGITAL IN connector.
Connection example DJM-800:
DJM-800
PHONO
SIGNAL GND
CONTROL
DIGITAL
CD
LINE
CD
L
CONTROL
R
DIGITAL
CD
CD
L
R
DIGITAL IN
Commercially available
coaxial digital signal cable
Commercially available
coaxial digital signal cable
Accessory
audio cable
Accessory
audio cable
Accessory
control cord
CDJ-1000MK3CDJ-1000MK3
B A
Accessory control cord
¶ When making connections to the DJM-1000, the furnished audio cables can be used to connect one set of the CD/LINE connectors
to player A, and the other set of CD/LINE connectors to a second player B. When making digital audio connections, a commercially
available coaxial digital signal cable must be used to connect the CD player’s DIGITAL OUT connector to one of the DIGITAL IN
connectors (4 to 6) of the DJM-1000 mixer.
¶ When connecting to the DJM-600, DJM-300, or DJM-500, use the furnished audio cables to connect the CD1 connectors to player
A, and CD2 connectors to player B.
¶ When connecting to DJM-909 or DJM-707, use the furnished audio cables to connect the CH1 CD connectors to player A, and CH2
CD connectors to player B.
¶ When connecting to DJM-3000, connect player A to CH-1 LINE 1, and player B to CH-2 LINE 3.
¶ When connecting this CD player to other audio mixers, connect the player’s AUDIO OUT connectors to the mixer’s LINE IN or AUX
IN connectors. (★ DO NOT connect to the PHONO connectors, since it may result in distorted sound or improper playback.)
8
Page 9

Before Operating (Names and Functions of Parts)Connections
2. Control cord connections for relay play
By using the accessory control cord to connect the control connectors of two DJ CD Players, automatic relay play can be performed.
(☞ P.19)
CDJ-1000MK3 CDJ-1000MK3
Accessory control cord
3. Connecting other components
A Connecting a stereo amplifier (when not using DJ mixer)
Stereo amplifier
Connect to CD or AUX IN connectors.
(Do not connect to PHONO IN connectors.)
CDJ-1000MK3
Accessory audio cable
B Connecting a component equipped with DIGITAL IN connectors
CD recorder or amplifier with
DIGITAL IN connectors, etc.
Commercially available
coaxial digital signal cable
¶ The DIGITAL OUT connectors produce audio data only (without subcodes; CD graphics are not supported).
Depending on the CD recorder or other component connected, some recording or other functions may be limited. For details,
consult the operating instructions for the connected component.
CDJ-1000MK3
4. Connecting the power cord
After completing all other connections, connect one end of the accessory power cord to the AC inlet on the rear side of the player, and
connect the other end to a standard AC wall outlet, or to the auxiliary power outlet on your amplifier.
9
Page 10

Names and Functions of Parts
Names and Functions of Parts
35
34
33
32
31
30
29
1 2 3 4 5 6 7 8 9 10 11
Rear panel
12
13
14
15
16
17
18
19
Front panel
20
363837
39 40
28
27
25
1. Display selector button (TEXT MODE)
Each time this button is pressed, the display alternates between
WAVE and TEXT (track name/album name/artist name). ☞ P. 1 7
When playing MP3, WAVE display may not be possible, depending
on the track.
2. TIME MODE/AUTO CUE button
TIME MODE:
Each time the button is pressed, the display’s time display alternates
between the current elapsed play time and the remaining play time
(REMAIN).
When playing MP3, the REMAIN time may not display immediately,
depending on the track.
¶ The current TIME MODE setting is retained in memory even when
the power is turned off.
AUTO CUE:
When the button is held depressed for 1 second or more, the AUTO
CUE mode is alternately enabled and disabled.
When the button is held depressed for 5 seconds or more, the AUTO
CUE level is toggled. ☞ P. 1 4
¶ The current AUTO CUE on/off and AUTO CUE level settings are
retained in memory even when power is turned off.
3. LOOP IN/REALTIME CUE (IN ADJUST) button/indicator
Realtime cue ☞ P. 1 5
Loop-in point input ☞ P. 1 8
Loop-in point adjust ☞ P. 1 8
4. LOOP OUT (OUT ADJUST) button/indicator
Loop-out point input ☞ P. 1 8
Loop-out point adjust ☞ P. 1 8
5. RELOOP/EXIT button ☞ P. 1 8
6. Display ☞ P. 12 (51 to 66)
21
22
23 41 42 43 442426
7. FOLDER SEARCH buttons (|, \) ☞ P. 1 5
During MP3 playback, layered CD-ROM folder search will be performed in the designated direction.
8. CUE/LOOP CALL buttons (2, 3 ) ☞ P. 2 1
Use to call cue points and loop points recorded in external memory
(when memory card is loaded).
9. CUE/LOOP MEMORY button ☞ P. 2 0
Use to record cue points and loop points to external memory (when
memory card is loaded).
10. CUE/LOOP DELETE button ☞ P. 2 1
Use to delete cue points and loop points from external memory (when
memory card is loaded).
11. EJECT UNLOCK/LOCK switch
UNLOCK: Disc is ejected when button is pressed, even if pressed
during play.
LOCK: Disc cannot be ejected if button is pressed during play. Set
unit to pause mode and then press button to eject disc.
12. EJECT button (0)
When button is pressed, disc rotation stops and disc is ejected from
port.
If the EJECT UNLOCK/LOCK switch is set to the [LOCK] position,
the disc will not be ejected unless the unit is set to the pause mode
before pressing the EJECT button.
13. JOG ADJUST dial
Use to adjust the felt resistance (light/heavy) of the jog dial when it is
rotated.
10
Page 11

Before Operating (Names and Functions of Parts)Names and Functions of Parts
14. VINYL SPEED ADJUST TOUCH/BRAKE dial
When the JOG MODE SELECT button is set to [VINYL], this dial
determines the deceleration speed until play stops when the surface of the jog dial is pressed or the PLAY/PAUSE button is pressed.
When the VINYL SPEED ADJUST TOUCH/BRAKE dial is rotated
counterclockwise, play stops quickly; when the dial is rotated clockwise, play decelerates more slowly before coming to a stop.
15. VINYL SPEED ADJUST RELEASE/START dial
When the JOG MODE SELECT button is set to [VINYL], this dial
determines the acceleration speed until full playback speed is reached
when the jog dial is released or the PLAY/PAUSE button is pressed.
When the VINYL SPEED ADJUST RELEASE/START dial is rotated
counterclockwise, play accelerates to full speed quickly; when the
dial is rotated clockwise, play accelerates more slowly before reaching full speed.
16. JOG MODE SELECT button
VINYL mode: When the surface of the jog dial is pressed during
playback, play stops, and if the jog dial is then rotated, sound is produced in accordance with the degree of rotation.
¶ The currently set jog mode is stored in memory even when power
is turned off.
CDJ mode: The above action does not occur when the jog dial is
pressed.
17. VINYL indicator
Lights when jog mode is set to VINYL mode.
18. CDJ indicator
Lights when jog mode is set to CDJ mode.
19. TEMPO control range selector button
(TEMPO ±6/±10/±16/WIDE)
Each time this button is pressed, the tempo adjust slider’s variable
range alternates between ±6 %, ±10 %, ±16 % and WIDE.
20. MASTER TEMPO button/indicator ☞ P. 1 6
When pressed, the master tempo function alternates ON/OFF.
21. Tempo adjust slider
When moved toward the user (+ front), the track tempo increases,
and when moved away from the user (– rear), the tempo decreases.
22. Tempo reset indicator
Regardless of the position of the tempo adjust slider, this indicator
lights when the tempo adjustment is at “0” (normal tempo).
23. TEMPO RESET button
Regardless of the position of the tempo adjust slider, pressing this
button causes the tempo to be reset instantly to “0” (normal tempo).
Pressing the button once again releases the reset.
24. Jog dial display ☞ P. 12 (71 to 75)
25. Jog dial (+FWD/–REV) ☞ P. 1 6
26. Play/pause indicator
Lights during playback, and flashes during pause mode.
27. PLAY/PAUSE button (6) ☞ P. 1 4
28. Cue indicator ☞ P. 1 4
When a cue point has been set, lights except during search.
Flashes in the pause mode to slow that a new cue point can be
input.
29. CUE button
Cue point setting ☞ P. 1 5
Back cue ☞ P. 1 5
Cue point sampler ☞ P. 15
30. SEARCH buttons (1, ¡) ☞ P. 1 4
31. TRACK SEARCH buttons (4, ¢) ☞ P. 1 5
32. Reverse indicator (REV)
Lights when DIRECTION selector switch is set to reverse [REV].
33. DIRECTION selector switch (FWD/REV)
When set to [REV] (near side), reverse play is enabled. ☞ P. 19
34. HOT CUE REC MODE button ☞ P. 1 9
Switches the function of the HOT CUE button (record/call)
¶ Defaults to call mode when power is first turned on.
35. HOT CUE button/indicator (A, B, C) ☞ P. 19
When the indicators A, B, C light red, the hot cue point recording
mode is enabled for that point. When any of the indicators A, B, C
light green (HOT CUE point) or orange (HOT LOOP point), the respective call-up mode is enabled, and if the corresponding button is
pressed, playback starts from the set hot cue (loop) point. When an
indicator is not lighted, no hot cue (loop) point has been recorded.
Rear Panel
36. CONTROL connector
When the accessory control cord is used to connect this connector
to the corresponding CONTROL connector on a Pioneer DJ mixer,
the DJ mixer can be used to control the CD player for fader start play
and back cue.
Also, by connecting this connector to the CONTROL connector on
another Pioneer DJ CD player, automatic relay play can be performed.
☞ P. 1 9
37. AUDIO OUT L, R connectors
RCA-type analog audio output jacks.
38. DIGITAL OUT connector
RCA type coaxial digital output connectors used to connect a DJ
mixer or AV amplifier, CD player, etc., equipped with digital input
connectors. The digital outputs here support all DJ and other functions, but only audio data is output (without subcodes; CD graphics
are not supported).
39. POWER — OFF/_ ON switch
40. AC inlet (AC IN)
Use the accessory power cord to connect this inlet to a standard AC
power outlet.
Front Panel
41. Memory card indicator ☞ P. 2 0
This indicator lights with a memory card is loaded and the door is
closed, and flashes during memory card access.
¶ Do not open the door or turn off power while the indicator is flash-
ing.
42. Memory card door and slot ☞ P. 2 0
43. Forced eject hole ☞ P. 13
44. Disc loading slot ☞ P. 1 3
11
Page 12

Names and Functions of Parts
Display Section
51 52 53 54 55 56 57 58 59 60 61 62
63 64 65 66
51. Calendar display (1 to ;, )
The tracks following the currently playing track are lighted. If more
than 21 following tracks are set, the indicator will light. An underline appears underneath track numbers for which cue points or loops
have been set.
52. Track number/folder number display (TRACK/FLD)
When playing an audio CD, the [TRACK] indicator lights, and the
two-digit track number appears (01 to 99).
When playing MP3, [TRACK] lights and the track number is displayed
(01 to 999). During folder search, the [FLD] indicator lights, and a
two-digit folder number is displayed (00 to 99).
53. MEMORY display
If the currently selected track includes cue memory or loop memory,
the [MEMORY] indicator lights and the MEMORY display indicates
the relative starting position of the cue or loop. Two dots are used to
display 1 point, and even if multiple starting positions are included
within a single point, only one point is displayed.
54. Dot matrix display (100x7 dots)
The dot matrix is used to display TEXT, WAVE, guides and other information. Text up to 48 characters can be displayed (text longer
than 16 characters is scrolled). ☞ P. 17
When WAVE display is used, the entire track is scaled so as to fit
into the width of the display (100 dots width), with playback level
shown across the display.
55. ALL track number display
When playing an audio CD, this display shows the total number of
tracks on the disc. During MP3 playback, the number of tracks inside the folder is shown.
56. Auto cue indicator (A.CUE)
Lights when auto cue is ON.
57. REMAIN indicator
This indicator lights to indicate that track’s remaining time is being
displayed.
58. Time (minutes) display (M)
59. Time (seconds) display (S)
60. Frame display (F)
Seventy-five frames equal one second.
61. Master tempo indicator (MT)
Lights when the master tempo function is ON.
62. TEMPO display
Displays change in playing speed (tempo) caused by movement of
the tempo adjust slider.
63. CUE point indicator
When a point is recorded in the CUE button or LOOP IN button for
the currently selected track, the [CUE] indicator lights and the point’s
relative starting position is shown in the display (2 lighted dots).
64. Playing address display
To provided a quick grasp of the current track’s elapsed time and
remaining playing time, the entire track is shown as a bar graph scaled
over the entire width of the display.
¶ During elapsed time display, the bar graph’s indicator segments
turn on from left to right.
¶ During remaining time display, the bar graph indicator segments
turn off from left to right.
¶ When a track has less than 30 seconds of remaining play time,
the graph flashes slowly; when less than 15 seconds remain, the
flashing becomes quicker.
65. BPM display (0 to 360 BPM)
This display shows the Beats-Per-Minute (BPM) of the currently playing track (detection range 70 to 180 BPM). The automatic BPM counter may be unable to compute the correct BPM for some tracks.
66. Tempo control range display (±6, ±10, ±16, WIDE)
Displays the variable range of the tempo adjust slider as selected
with the tempo control range selector button.
Jog dial display
71
72
73
74
75
71. Operation display
This display shows the relative playing position, with one revolution
equivalent to 135 frames. During playback, the display rotates, and it
stops during pause mode.
72. Cue point position indicator
Indicates position of cue points.
73. Audio memory status indicator
This indicator flashes during audio memory write, and lights when
writing has been sufficiently completed. When the indicator is flashing, it may not be possible to record real time cue points, or hot cue
points. The indicator also flashes when memory insufficiency occurs due to scratch operation.
74. Jog touch detection indicator
In VINYL mode, this indicator lights to indicate that the jog dial surface has been touched.
75. VINYL mode indicator
Lights during VINYL mode.
12
Page 13

Before Operating (Names and Functions of Parts)Before Operating (Names and Functions of Parts)Loading and Removing Discs
Loading and Removing Discs
Precautions when playing 8 cm CD singles
1 When playing 8 cm CD singles, be sure to use an adapter de-
Insert with label
surface upwards
2 Use only 8 cm disc adapters that feature the ' logo mark (rec-
Hold evenly when inserting
Forced eject function
1. Set the rear panel POWER switch to ON.
Do not attempt to force a disc into the slot when the POWER
switch is turned OFF, since the disc or loading mechanism may
be damaged.
2. Insert the disc into the loading slot.
¶ Hold the disc with label surface upwards and insert evenly into
the front-panel disc loading slot.
¶ When using 8 cm discs, place the disc into an adapter first.
This unit spins at high speed to provide high performance.
When playing 8 cm discs with an adaptor, for safety reasons the rotation speed is reduced as a result scratch and
reverse speeds will be lower.
¶ Only one disc can be loaded at a time. Do not attempt to load two
or more discs simultaneously, or to load a second disc when another disc is already loaded.
¶ When loading a disc, do not apply bending force on the disc, or
attempt to force the disc into the mechanism. Also, when the loading mechanism begins to pull the disc into the player or to eject a
disc, do not attempt to forcibly override the mechanism’s movement, since the disc or loading mechanism may be damaged.
3. When the EJECT UNLOCK/LOCK switch is set to [UNLOCK],
press the EJECT (0) button to eject a loaded disc.
If the EJECT UNLOCK/LOCK switch is set to [LOCK] , during playback press the PLAY/PAUSE (6) button to first
stop the disc, then press the EJECT (0) button. If a cue
point has been set, during playback press the CUE button
to initiate back cue, then press the EJECT (0) button to
eject the disc.
¶ When the button is pressed, disc rotation will stop and the disc
will be ejected partway from the loading slot.
If a disc fails to be ejected when the EJECT (0) button is
pressed or otherwise when you cannot remove a disc, insert the provided pin into the forced eject hole at the front of
the player (see illustration) and press to eject the disc.
When using the forced eject function, be sure to following
the accompanying precautions.
1 Turn off the player’s power and wait for at least one
2 Use only the provided accessory pin for this procedure
signed for 8 cm CDs. Before loading the disc into the player,
confirm that the disc is fastened correctly by the adapter’s tabs.
If an 8 cm disc is loaded by mistake without an adapter, immediately press the EJECT (0) button and remove the disc. If the
disc is not ejected the first time the EJECT (0) button is pressed,
press the button again.
ommended compatible adapters). When mounting the disc to
an adapter, confirm that the disc is able to rotate freely, and is
not bent or warped.
minute.
Attempting the forced eject function immediately after turning off the power may
cause the following dangers:
¶ The disc may be ejected while still rotating, resulting
in personal injury.
¶ The disc may be damaged due to the disc clamp’s
rotating in an unstable condition.
(do not use other pointed objects). The forced eject pin
is located on the bottom surface of the player.
When the accessory pin is inserted fully into the forced
eject hole, the disc will be ejected from the loading slot
by about 5 mm to 10 mm. It can then be grasped with the
fingers and removed.
Note:
Do not attempt to press the disc back into the slot while the [EJECT]
indicator is lighted. If the disc is pressed back in while the [EJECT]
indicator is lighted, the loading mechanism may stop. In this case,
press the EJECT (0) button again, and do not attempt to reload the
disc until the [EJECT] indicator has turned OFF.
Forced eject hole
13
Page 14

DJ Player Operation
/
DJ Player Operation
MP3 FOLDER SEARCH
TIME MODE
AUTO CUE
LOOP IN/
REALTIME
CUE
TRACK
SEARCH
4, ¢
SEARCH
1, ¡
CUE
PLAY/PAUSE
6
|, \
Jog dial
EJECT UNLOCK/LOCK
EJECT
VINYL
SPEED
ADJUST
TOUCH
/BRAKE
VINYL
SPEED
ADJUST
RELEASE
/START
CUE LOOP
CALL
2, 3
0
Auto cueing
This function automatically sets the cue point (☞ P. 15) just before actual
sound begins when a disc is loaded, or when performing track search or
changing tracks.
If the search continues for ten seconds without finding the point, the
cue point is set at the track’s beginning.
¶ Turning auto cueing on and off
Pressing the TIME MODE/AUTO CUE button and holding it down
for a second or more causes auto cueing to be alternately turned on
and off.
When AUTO CUE is on, the [A.CUE] indicator will be lit up.
¶ AUTO CUE on/off status is stored in memory and persists even
when the power is turned off.
¶ It can change the AUTO CUE level.
7 Changing the AUTO CUE level
1. Press the TIME MODE/AUTO CUE button for over 5 sec-
onds.
¶ The display will indicate [A.CUE–60db] (in the original state).
2. Press the CUE LOOP CALL button (2, 3) to change the
level.
¶ It can choose from –36 dB, –42 dB, –48 dB, –54 dB, –60 dB, –66 dB,
–72 dB and –78 dB.
¶ When the TIME MODE/AUTO CUE button is pressed or 15 sec-
onds elapses, the level change mode is canceled.
¶ Even if you turn the power off, the set level will remain in memory.
Starting playback
1. Insert a disc in the player.
This unit spins discs at high speeds to provide high performance. As
a result, disc loading takes a couple of seconds.
2. If auto cueing is on, press the PLAY/PAUSE button (6).
¶ Press the PLAY/PAUSE button only after the current time lights
in the display. The silent portion at the beginning of the displayed
track will be skipped and playback will begin instantaneously from
the first bars of the track.
¶ When jog mode is set to [VINYL], the playback may accelerate
slowly until it reaches full speed. (☞ “To pause playback”).
When one track’s playback ends, the next track is cued. The cue indicator (the outer ring on the CUE button) lights, and the outer ring on
the PLAY/PAUSE button flashes to indicate the unit is in the play
standby mode.
When the PLAY/PAUSE button (6) is pressed, the next track be-
gins its playback.
If auto cueing is off, playback will begin automatically from
the first track.
When auto cueing is off, playback will continue after the first track
has been played, with all subsequent tracks being played in sequence.
14
To stop playback
1. Press the EJECT button (0) when the EJECT UNLOCK/
LOCK switch is set to [UNLOCK].
When the EJECT UNLOCK/LOCK switch is set to [LOCK],
press the PLAY/PAUSE button (6) during playback, or
when a Cue point has been set, press the CUE button
(back cue) before pressing the EJECT button (0) to eject
the disc.
¶ Playback will stop and the disc will be ejected.
¶ Note that the CDJ-1000MK3 does not come with a stop button.
Resume function
When the EJECT UNLOCK/LOCK switch is in the [UNLOCK] position,
even if the EJECT button is pressed by mistake, if the PLAY/PAUSE
button is pressed quickly (before the [EJECT] indicator lights in the display), the unit will revert to the status it was in before the EJECT button
was pressed. However, the audio output will stop during that time.
¶ Following disc eject, if the same disc is reinserted, the unit will return
to the same status it was in before the disc was ejected (with exception of loop).
¶ Following disc eject, if the FOLDER SEARCH button (|, \) or TRACK
SEARCH button (4, ¢) is pressed, the resume function will be
canceled.
To pause playback
During playback, press the PLAY/PAUSE button (6).
¶ The outer rings of the PLAY/PAUSE button and CUE button will flash,
and playback will be interrupted.
¶ If the PLAY/PAUSE button is pressed again, the button’s outer ring
will light and playback will resume.
¶ In CDJ mode, broken playback sound will be output even during pause.
If you wish for no sound to be output, lower the output level of the
audio mixer.
¶ In VINYL mode, setting the VINYL SPEED ADJUST TOUCH/BRAKE
dial modifies the speed of deceleration until playback reaches full
pause. Rotating the dial clockwise causes the disc to decelerate slowly
before the pause.
¶ In VINYL mode, setting the VINYL SPEED ADJUST RELEASE/
START dial modifies the speed at which the disc accelerates when
pause is released until reaching full playback speed. Rotating the dial
clockwise causes the disc to accelerate more slowly to full speed.
¶ After setting the unit to pause, if no subsequent operation is performed
for 100 minutes, the disc rotation will automatically stop. In this event,
pressing the PLAY/PAUSE button will cause playback to resume.
Fast forward/Fast reverse
Press one of the SEARCH buttons (1, ¡) during playback.
Press and hold the ¡ button for fast forward the disc; press and hold
the 1 button for fast reverse.
¶ When playing MP3, fast forward/fast reverse are supported only for
tracks inside the same folder.
¶ When playing MP3, fast forward/fast reverse times may be slower
depending on the track.
7 Super-fast search
Rotate the jog dial while pressing one of the SEARCH buttons (1, ¡).
¶ Hold down one of the SEARCH buttons (1, ¡) while turning the
jog dial in the desired direction to enter super-fast forward or superfast reverse mode.
¶ The speed of the search operation varies in response to the speed at
which the jog dial is turned.
¶ During super-fast search, the search direction is determined by the
direction the jog dial is turned. The direction of the pressed SEARCH
button (1, ¡) is ignored.
¶ When the jog dial rotation stops, the unit returns to playback mode.
¶ When the SEARCH button (1, ¡) is released, super-fast search is
canceled.
¶ When playing MP3, fast forward/fast reverse is supported only tracks
inside the same folder.
¶ When playing MP3, fast forward/fast reverse times may be slower
depending on the track.
Page 15

Before Operating (Names and Functions of Parts)Before Operating (Names and Functions of Parts)DJ Player Operation
Track search
Press one of the TRACK SEARCH buttons (4, ¢).
¶ Each time the button is pressed, the track search is performed in the
direction corresponding to the arrow on the button (during playback
of a track, to return to the beginning of the preceding track, press the
4 button twice). During playback of MP3s, the first track found in
the direction pressed will be searched, and only those tracks inside
the same folder are searched. If folder search is not performed when
a CD-ROM is inserted, the tracks in the root directory only are
searched. In cases in which there are no tracks in the root directory,
playback will start from the track with the lowest number in the folder.
¶ When the button is held depressed, track search is performed con-
tinuously. If the button is held depressed for two seconds or more,
the search speed increases.
¶ By pressing the 4 button twice at the beginning of the first track
(Track No.1), the last track will be searched. During playback of MP3s,
when the 4 button is pressed at the track with the lowest number,
the last track in the same folder will be searched.
¶ By pressing the ¢ button at the last track, the first track (Track
No.1) will be searched. During playback of MP3s, when the ¢ button is pressed at the last track, the track with the lowest number in
the same folder will be searched.
7 Super-fast track search
Rotate the jog dial while pressing one of the TRACK
SEARCH buttons (4, ¢).
¶ To perform super-fast track search, hold the button depressed while
rotating the jog dial in the direction you wish to perform the search;
super-fast track search will be performed in proportion to the degree
of jog dial rotation.
¶ During super-fast track search, the search direction is determined by
the direction of rotation of the jog dial. The direction of the pressed
TRACK SEARCH button is ignored.
¶ When the TRACK SEARCH button is released, super-fast track search
is canceled.
Folder search (MP3 only)
Folder search is used when searching tracks in a CD-ROM with folder
layers.
Press one of the FOLDER SEARCH buttons (|, \).
¶ Every time the FOLDER SEARCH button is pressed, the folders will
be skipped to the specified direction. The root directory is displayed
as folder number [00], folder name [ROOT].
¶ By holding either of the FOLDER SEARCH buttons depressed, fold-
ers will be searched continuously. If the button is held for two seconds or more, the search speed increases.
¶ When reverse search is performed from the lowest-numbered folder,
the last folder will be searched.
¶ When forward search is performed from the last folder on the disc,
the lowest-numbered folder will be searched.
¶ Folders with no playable tracks (empty folders) will be ignored, and
the next folder will be searched.
7 Super-fast folder search
Rotate the jog dial while pressing one of the FOLDER
SEARCH buttons (|, \).
¶ By turning the jog dial in the intended search direction while pressing
either of the FOLDER SEARCH buttons, folder numbers will be
searched corresponding to the direction of rotation of the jog dial.
¶ During super-fast folder search, the search direction is determined by
the direction the jog dial is rotated. The direction indicated by the
pressed FOLDER SEARCH button is ignored.
¶ When the FOLDER SEARCH button is released, super-fast folder
search is canceled.
Cue point settings
Once a cue point has been stored in memory, during playback it can be
used to place the player in a state where it is ready to begin playback
from the cueing position by pressing the CUE button.
7 Setting the cue point in the CDJ mode
1. During playback, press the PLAY/PAUSE button (6) to
pause playback at the point you wish to begin playback.
2. Search for the precise position of the cue point.
¶ Using frame numbers to specify cue points.
Cue points may be specified in 1-frame units (where 75 frames
are equivalent to 1 second).
Use the jog dial or the SEARCH button (1, ¡) to advance
frames. One rotation of the jog dial is equivalent to 135 frames;
when the SEARCH button is pressed, the player advances 1 frame
in the specified direction.
¶ Listen to the sound at the current frame to determine the cue
point.
Turn the jog dial slowly and then return it to just before the point
from which you wish to begin playback. (The cue point thus defined will consist of that point directly after the sound which can
be heard during a cueing pause.)
3. Press the CUE button when you reach the desired frame
number or hear the sound at the point from which you
wish to begin cueing.
¶ The sound will mute and the current time will appear in the dis-
play, indicating that the cue point has been stored to memory.
¶ When a new cue point is stored in memory the previous setting
will be erased.
[Amending the cue point]
1. During playback, press the CUE button.
¶ The player will return to the specified cue point.
2. Press one of the SEARCH buttons (1, ¡) to set to audible pause mode.
3. In the CDJ mode, to set the cue point, go through steps 2
and 3 as mentioned above.
7 Setting the cue point in the VINYL mode
1. During playback, when playback reaches the desired cue
point, either press and hold the surface of the jog dial, or
press the PLAY/PAUSE button (6) to pause playback.
2. While continuing to press the surface of the jog dial, rotate it to return playback to the audio point just before
the point you wish playback to begin.
3. When the audio is at the desired cue point, press the CUE
button while continuing to press on the surface of the
jog dial.
¶ Cue point memory setting is completed when the current time
lights in the display.
¶ When a new cue point is stored in memory the previous setting
will be erased.
[Amending the cue point]
1. During playback, press the CUE button.
¶ The player will return to the specified cue point.
2. In the VINYL mode, to set the cue point, go through steps
2 and 3 as mentioned above.
¶ The SEARCH buttons (1, ¡) can now be used to modify the
cue point, in the same way as for the CDJ mode.
7 Realtime cue
During playback, press the LOOP IN/REALTIME CUE button
at the desired cue point.
¶ This point will then be recorded as the new cue point.
7 Checking cue points (Cue point sampler)
After setting a cue point, hold the CUE button depressed.
¶ As long as the CUE button is held depressed, the sound at the set
cued point can be heard.
¶ During cue point sampler, if the CUE button is released, back cue will
be performed to the set cue point.
¶ In the case of MP3, cue point sampler can be performed only within
the same folder.
7 Returning to a Cue point (Back cue)
1. During playback, press the CUE button.
¶ The player will return to the specified cue point.
2. Press the PLAY/PAUSE button (6).
¶ Playback will begin immediately from the specified cue point.
¶ In the case of MP3, back cue can be performed within the same
folder. So long as the cue point is not overwritten, it will remain in
memory after folder search as well.
15
Page 16

DJ Player Operation
MP3 FOLDER SEARCH
TEXT MODE
TRACK
SEARCH
4, ¢
SEARCH
1, ¡
CUE
PLAY/PAUSE
6
|, \
ADJUST
JOG
MODE
SELECT
TEMPO
±6/±10/±16/WIDE
MASTER
TEMPO
TEMPO
RESET
Jog dial Tempo adjust slider
JOG
To change the playing speed
Move the tempo adjust slider forward or back.
When moved toward the user (+) the playing speed (tempo) becomes
faster, and when moved away (–) the playing speed becomes slower.
¶ The degree of change in tempo is shown on the display.
¶ Even when changing the tempo, the pitch (key) can be kept stable
(see section below, “Applying master tempo”).
7 Selecting the range of tempo adjustment
Press the TEMPO ±6/±10/±16/WIDE button.
Each time the button is pressed the tempo adjust slider’s variable range
alternates in the order ±6 %/±10 %/±16 %/WIDE. When ±6 % is selected, the unit of change is 0.02 %; when ±10 % is selected, the unit of
change is 0.05 %; when ±16 % is selected, the unit of change is 0.05 %,
and when WIDE is selected, the unit of change is 0.5 %.
¶ The variable setting value is shown on the display.
¶ The variable range in the WIDE setting is as follows:
¶ When power is first turned on, the setting defaults to ±10 %.
¶ At –100 %, playback stops.
With CD play: ±100 %
With MP3 play: +70 % to –100 %
7 Tempo Reset
Press the TEMPO RESET button.
The tempo reset indicator lights and the tempo change ratio becomes
“0” (normal tempo) regardless of the position of the tempo adjust slider.
¶ If the TEMPO RESET button is pressed again, the reset is canceled
(tempo change ratio reverts to that set with the tempo adjust slider).
¶ When power is first turned on, this function defaults to OFF.
Applying master tempo
Press the MASTER TEMPO button during playback.
The MASTER TEMPO button and the [MT] indicator light. The speed
(tempo) can now be changed using the tempo adjust slider but the pitch
(key) does not change.
¶ Sound quality will be degraded when subjected to digital processing.
¶ When power is first turned on, this function defaults to OFF.
Jog dial functions
1. Pitch bend: Rotate jog dial during playback.
(When the jog mode is set to [VINYL], touch only the sides of the jog
dial. If the top surface is touched a different function is performed.)
¶ In proportion to the amount of rotation, the playback speed is ac-
celerated (FWD+) or decelerated (REV–). When in the reverse
mode, the playback speed accelerates when the dial is rotated in
the REV– direction, and decelerates when rotated in the FWD+
direction.
¶ When dial rotation is stopped, playback reverts to the previous
speed.
2. Scratch play: Rotate jog dial during playback.
See “Scratch play” in the Advanced Operations.
3. Frame search: Rotate jog dial during pause.
When jog mode is set to [CDJ], the audible pause mode is enabled
and when set to [VINYL], inaudible pause is performed; the CD audio
is played at a speed corresponding to the speed of jog dial rotation.
¶ The pause position will change in units of 1 frame.
¶ One rotation of the jog dial corresponds to 1.8 seconds of CD
playback (135 frames).
4. Spin play: Rotate jog dial during playback or pause.
See “Spin play” in the Advanced Operations.
5. Super-fast search: Rotate jog dial during playback, while
holding SEARCH button depressed.
To perform high-speed search, hold the SEARCH button (1, ¡)
depressed while rotating the jog dial in the desired direction of search;
high-speed search will be performed in proportion to the degree of
jog dial rotation.
¶ The speed of the search operation varies in response to the speed
at which the jog dial is turned.
¶ The search is performed in the direction of jog dial rotation, with-
out regard to which SEARCH button is pressed.
¶ When dial rotation is stopped, playback returns to normal.
¶ When the SEARCH button is released, this mode is canceled.
¶ When playing MP3, fast forward/fast reverse can be performed
only within the same folder.
6. Super-fast track search: Rotate jog dial while holding
TRACK SEARCH button depressed.
To perform high-speed track search, hold the TRACK SEARCH but-
ton (4, ¢) depressed while rotating the jog dial in the desired
direction of search; high-speed track search will be performed in proportion to the amount of jog dial rotation.
¶ The search is performed in the direction of jog dial rotation, with-
out regard to which TRACK SEARCH button is pressed.
¶ When the TRACK SEARCH button is released, this mode is
canceled.
¶ When playing MP3, search is performed only within the same
folder.
7. Super-fast folder search: Rotate jog dial while holding
FOLDER SEARCH button depressed (during MP3 play).
To perform super-fast folder search, hold the FOLDER SEARCH button (|, \) depressed while rotating the jog dial in the desired direction of search; super-fast folder search will be performed in proportion to the amount of jog dial rotation.
¶ The search is performed in the direction of jog dial rotation, with-
out regard to which FOLDER SEARCH button is pressed.
¶ When the FOLDER SEARCH button is released, this mode is
canceled.
Note:
The surface of the jog dial is equipped with a built-in switch;
do not rest objects on the dial or subject it to strong forces.
Do not set drinks on the surface, since a spill could enter the
mechanism and cause malfunctions.
Jog sensitivity adjustment
By rotating the JOG ADJUST dial, the sensation of resistance felt when
rotating the jog dial can be adjusted.
Rotate JOG ADJUST dial.
¶ When rotated clockwise, resistance increases.
¶ When rotated counterclockwise, resistance decreases.
¶ Adjust the setting within the scale’s gray zone to set the jog dial sen-
sation equivalent to that of the CDJ-1000MK2.
JOG ADJUST
LIGHT
HEAVY
Gray zone
16
Page 17

Before Operating (Names and Functions of Parts)Before Operating (Names and Functions of Parts)DJ Player Operation
Mixing different tracks
(Example: Mix track B with currently playing track A from the main speakers.)
¶ Connect player CD1 to the DJ mixer’s CH1, and connect player CD2
to CH2.
¶ Raise the TRIM, CHANNEL FADER, and MASTER LEVEL settings
appropriately so that sound is produced from player CD1.
1. Set the DJ Mixer’s CROSS FADER slider at its left side
(CH1).
¶ Track A is heard from speakers.
2. Load a CD on player CD2.
3. Press the TRACK SEARCH buttons (4, ¢) on player
CD2 to find and select track B.
4. Set the DJ Mixer’s MONITOR SELECTOR button CH2 to
ON.
5. Rotate the DJ Mixer’s MONITOR LEVEL so that track B
can be heard from the headphones.
¶ Only track A is heard from the main speakers.
6. Set cueing for track B on the headphones.
1 With player CD2 in the playback mode, press the PLAY/PAUSE
button (6) to hear the point you wish to cue.
¶ When the jog mode is set to [CDJ], the unit will enter audible
pause mode (sound can be heard); when set to [VINYL], the
unit will enter inaudible pause mode (no sound can be heard).
2 Rotate player CD2’s jog dial and search for the track’s cue point
(first beat).
3 When you have settled on the cue point, press the CUE button on
player CD2.
¶ The player’s sound will be muted and cueing will be completed.
7. Simultaneously press player CD2’s PLAY/PAUSE button
(6) when track A is heard from the speakers.
¶ Only track A will be heard from the main speakers.
¶ Track B will be heard from the headphones.
8. Move the tempo adjust slider to match the tempo
(BPM=Beat Per Minutes) of tracks A and B.
Move the tempo adjust slider of player CD2 so that the BPM of track
B matches those of track A.
¶ When the two BPM rates match, the BPM synchronization is com-
plete.
9. Press the CUE button on player CD2.
¶ Player CD2 will enter pause mode at the cue point.
10.As soon as track A is heard from the speakers, press the
PLAY/PAUSE button (6) on player CD2.
¶ Track B begins playing.
11.While checking the sound on the headphones, gradually
move the DJ Mixer’s CROSS FADER slider from left to
right side (CH2).
¶ The sound of track A from the speakers will steadily become mixed
with the sound of track B.
¶ When the DJ Mixer’s CROSS FADER slider has moved all the way
to the right side, the sound heard from the speaker will have
changed from track A to track B, and the operation is complete.
About the WAVE display
The WAVE display shows the changes in a track’s bass beat (bass drum,
etc.), thus allowing the DJ to understand where breaks and end points
come in the track. When the TEXT MODE button is set for WAVE display, the selected track is shown rescaled to fit within the full range (100
points) of the display.
¶ After a track change, some time is required before the entire track’s
WAVE display can be shown. By prerecording desired tracks’ WAVE
patterns on a memory card, the next time the track is played its WAVE
pattern can be displayed instantly (☞ P. 21).
¶ If a track’s low-frequency beat changes are too low in volume, the
break points in the track may not be displayed properly.
¶ If a search or pause operation is performed during the time the wave-
form is being read, the waveform will not be displayed properly.
¶ Read-ahead of the WAVE pattern is not possible during MP3 play-
back.
About TEXT display
When the TEXT MODE button is used to select TEXT display, the display shows CD-TEXT, including the names of tracks, albums, and artists.
During MP3 playback, the display shows ID3 tag track name (if no ID3
tag is recorded, the display shows the file name) /ID3 tag album name/
ID3 tag artist name.
¶ Each item can display up to 48 characters of text; text longer than 16
characters is scrolled.
¶ Text may include alphanumerics and some symbols.
¶ If no text is available, the [NO TEXT] message will be displayed.
When a track name is selected in TEXT display, the [ ] icon will be
displayed followed by the track name (with MP3, the ID3 tag’s title name
or file name will be displayed).
Also, during MP3 play, the bit rate will be displayed following the track
name.
When an album name is selected in TEXT display, the [ ] icon will be
displayed followed by the album name.
Pioneer
When an artist name is selected in TEXT display, the [ ] icon will be
displayed followed by the artist’s name.
Pioneer PRO DJ
When folder search is performed with MP3, the folder name is displayed
during the search.
Pioneer DJ
7 Long mix play
If the BPM rates match, mixing of tracks A and B will sound good even if
the CROSS FADER slider is in the middle position.
7 Fader start play
Using the cross fader start function of a Pioneer DJ mixer, step 10 above
can be eliminated for even simpler mixing. In addition, when the CROSS
FADER slider is returned to its original position, the status returns to that
in step 9 (player CD2 at its cue point), so that you can repeat the same
play as many times as you like.
17
Page 18

Advanced Operations
Advanced Operations
LOOP IN/REALTIME
CUE (IN ADJUST)
HOT CUE A
HOT CUE B
HOT CUE C
HOT CUE
REC MODE
DIRECTION
FWD/REV
SEARCH
1, ¡
CUE
PLAY/PAUSE
6
LOOP OUT
(OUT ADJUST)
Jog dial
RELOOP/EXIT
VINYL
SPEED
ADJUST
TOUCH
/BRAKE
VINYL
SPEED
ADJUST
RELEASE
/START
JOG
MODE
SELECT
Scratch play
When jog mode is set to [VINYL], pressing the top surface of the jog dial
and turning it causes playback to occur in proportion to the speed and
direction of jog dial rotation.
1. Press the JOG MODE SELECT button so the [VINYL] indicator lights.
2. During playback, press the top surface of the jog dial.
¶ Playback will slow and stop (the deceleration time until full stop
[“response characteristics”] can be set separately). If the jog dial
is rotated before playback decelerates to full stop, sound will stop,
and playback will then be performed in response to the direction
and speed of jog dial rotation in step 3.
3. Rotate the jog dial in the direction and at the speed you
wish playback to be performed.
¶ Playback will be heard in the direction and speed proportional to
the jog dial rotation.
4. Remove hand from jog dial.
¶ Playback will either acceleration or decelerate to return to its sta-
tus before the jog dial was touched (the acceleration/deceleration
time until playback returns to its previous condition [“response
characteristics”] can be set separately).
7 How to set the deceleration response
characteristics (time required for playback to
decelerate to full stop when jog dial surface is
pressed):
Rotate the VINYL SPEED ADJUST TOUCH/BRAKE dial.
¶ This dial allows you to adjust the slowdown in speed (response char-
acteristics) until playback stops.
¶ This is the same setting as the deceleration speed adjustment used
when the PLAY/PAUSE button (6) is pressed in VINYL mode to
temporarily pause playback (☞ P. 14).
7 How to set reacceleration response
characteristics (time required for playback to
return to previous speed when hand is removed
from jog dial surface):
Rotate the VINYL SPEED ADJUST RELEASE/START dial.
¶ This dial allows you to adjust the slowdown or increase in speed until
playback returns to normal playback (response characteristics).
¶ This is the same setting as the acceleration speed adjustment used
when the PLAY/PAUSE button (6) is pressed in VINYL mode to
resume playback (☞ P. 14).
Spin play
During playback in VINYL mode, either press the surface of the jog dial
or press the PLAY/PAUSE button (6) to pause playback, then rotate
the jog dial quickly; playback will occur in the direction and at a speed
proportional to the direction and speed of jog dial rotation, even if you
then release your hand from the jog dial.
Braking
¶ During playback in VINYL mode, if the PLAY/PAUSE button (6) is
pressed to pause playback, the sound decelerates at the braking speed
set with the VINYL SPEED ADJUST TOUCH/BRAKE dial.
¶ When the PLAY/PAUSE button (6) is pressed once again to resume
playback, the sound accelerates at the speed set with the VINYL
SPEED ADJUST RELEASE/START dial.
Loop playback
7 Defining a loop
1. Press the PLAY/PAUSE button (6) to begin playback.
2. During playback or pause, press the LOOP IN/REALTIME
CUE button.
¶ This operation is not required if a prerecorded cue point has al-
ready been set as the loop start point.
3. When playback reaches the desired loop-out point, press
the LOOP OUT button.
¶ Playback will begin between the loop-in and loop-out points.
¶ During MP3 play, the loop can be set only between points set
within the same track.
¶ When the loop has been set, the RELOOP/EXIT button lights.
7 To cancel a loop
During loop playback, press the RELOOP/EXIT button.
¶ When the playback reaches the loop-out point, it will continue nor-
mally, without returning to the loop-in point.
7 To change a loop-in point
1. During loop play, press the LOOP IN/REALTIME CUE (IN
ADJUST) button.
¶ The display will show the in-point time; the LOOP IN/REALTIME
CUE button will change to quick flashing, while the LOOP OUT
button light will go out.
2. Press the SEARCH button (1, ¡) or rotate the jog dial.
¶ The loop-in point will change in one-frame increments. The per-
missible range for adjusting an in point is ±30 frames, and it must
be set before any out point.
¶ In the case of MP3, adjustment of loop positions is possible only
within the same track where cue points are set.
¶ Loop-in point cannot be modified during reverse play and scratch
play.
¶ When the LOOP IN/REALTIME CUE button is pressed or 30 sec-
onds elapses, the adjustment mode is canceled and loop play
resumes.
7 To change a loop-out point
1. During loop play, press the LOOP OUT (OUT ADJUST)
button.
¶ The display will show the out-point time; the LOOP OUT button
will change to quick flashing, while the LOOP IN/REALTIME CUE
button light will go out.
2. Press the SEARCH button (1, ¡) or rotate the jog dial.
¶ The loop-out point will change in one-frame increments.
¶ The loop-out point cannot be moved to a position before the loop-
in point.
¶ In the case of MP3, adjustment of loop positions is possible only
within the same track where cue points are set.
¶ Loop-out point cannot be modified during reverse play and scratch
play.
¶ When the LOOP OUT button is pressed or 30 seconds elapses,
the adjustment mode is canceled and loop play resumes.
18
Page 19

Before Operating (Names and Functions of Parts)Advanced Operations
7 To return to a loop (Reloop)
During playback after leaving a loop, press the RELOOP/EXIT
button.
¶ Playback will return to the loop-in point of the previously set loop, and
loop play will resume.
¶ In the case of MP3 playback, reloop cannot be performed to a folder
different from the one currently selected.
¶ Reloop cannot be performed when the RELOOP/EXIT button is not
lighted.
To perform hot cue
Up to three hot-cue points (A, B, C, including loop data) can be set in
advance. In this way, playback can be started from either of those points
instantly.
7 Setting hot-cue points
1. Press he HOT CUE REC MODE button so that HOT CUE A,
B, C buttons are lighted red.
2. During playback or pause, press the desired button (A, B,
C) at the point you wish to set as a hot cue in that button.
¶ The pressed button will flash red for 2 seconds, and the position
and playback header data at that point will be recorded. When the
button is pressed during loop playback, the data for the currently
playing loop will be recorded. The playback direction is not recorded.
¶ While data is being recorded, it is not possible to record data to
other HOT CUE buttons, input cue points, or perform search or
scratch.
¶ When a memory card is loaded, the newly stored hot cue points
will automatically be backed up to the memory card. ☞ P. 2 0
¶ If hot cue points are stored while performing scratch, the play-
back may temporarily stop.
About fader start play
When the accessory control cord is used to connect this unit’s CON-
TROL jack to the corresponding CONTROL jack on a Pioneer DJ mixer,
moving the mixer’s channel fader causes the CUE standby on the CD
player to be released, thus instantly starting playback. The mixer’s cross
fader can also be used to control fader start on the player. Also, when
the fader lever is returned to its original position, the player can be made
to return to its cue point (back cue). For details regarding connection,
☞ P. 8 .
Relay play using two players
When the accessory control cord is used to connect the CONTROL jacks
of this player and another Pioneer CDJ series CD player, the two players
can be made to perform automatic relay play (☞ P. 9).
¶ Set the two players’ auto cue function to ON (the [A.CUE] indicator
lights in the display).
¶ Set your audio mixer’s fader control to its center position.
1. Begin playback on the first player.
2. When the currently playing track finishes, the second
player automatically begins playback.
3. The first player then pauses at the beginning of the its
next track in the CUE standby mode.
¶ This process is repeated automatically, alternating playback on both
players.
¶ By exchanging the disc on the waiting player and cueing it to a
desired track, you can play a continuing series of desired tracks
from different discs.
¶ By setting a cue point on the waiting player, it is possible to start
from playback from a specifically desired point on a track ☞ P. 1 5
“Cue point settings”.
7 Beginning hot cue
1. Press the HOT CUE REC MODE button so that the HOT
CUE A, B, C buttons’ indicators are lighted either green
or orange.
¶ Buttons containing hot cue points will light green.
¶ Buttons containing loop data will light orange.
¶ Buttons containing no hot cue points will remain unlighted.
2. During playback, pause, or cue standby, press the button
(A, B, or C) in which the desired start point has been set.
¶ Playback will start instantly based on the data set in the button.
¶ When loop data has been recorded to a HOT CUE button, loop
play will start instantly.
¶ Loop data recorded in a HOT CUE button produces a loop inde-
pendent from any loops set with the LOOP IN/REALTIME CUE
and LOOP OUT buttons; the RELOOP/EXIT button can be used
to cancel the loop, and LOOP OUT (OUT ADJUST) button can be
used to edit the loop-out point, and those edited modifications are
directly applied to the data recorded in the HOT CUE button.
¶ In the case of MP3 playback, hot cue playback cannot be per-
formed on any loop that overlaps multiple folders.
¶ When inserting a CD or memory card, it is possible to restore the
hot cue points previously recorded to the memory card (☞ P. 21).
Reverse play
Set the DIRECTION FWD/REV switch to the [REV] position.
The [REV] indicator will light and playback will begin in the reverse direction.
¶ Playback acceleration/deceleration produced with jog dial rotation will
operate in reverse.
¶ During reverse playback, it is not possible to create new loops or to
edit loop-out points.
¶ If track search or loop play are performed, the audio memory status
indicator (jog dial display) will flash for 1 to 2 seconds, and scratch/
reverse operations may be temporarily disabled.
¶ In the case of MP3, reverse play that overlaps multiple folders is not
possible.
¶ During MP3 play, reverse playback may not occur immediately with
some tracks.
Note:
¶ Relay play may not occur properly if both players’ audio out-
put connectors are not connected to the same audio mixer.
¶ If the power is disconnected to the currently operating player,
the waiting player may start playback in some cases.
¶ Since the control cords require different connections, it is
not possible to combine fader start and relay play simultaneously.
19
Page 20

Operations Using Memory Cards
Operations Using Memory Cards
■ Using memory cards
This player supports the use of SD memory cards or MultiMedia Cards
for the recording of disc identification data, cue point data, loop point
data, and hot cue data.
★ SD memory cards must be formatted in accordance with “SD
Memory Card Specifications Part2 FILE SYSTEM SPECIFICATION
Version 1.0” (commercially purchased SD memory cards are fac-
tory formatted to the above standards). Unformatted cards cannot be used (the [UNFORMAT] message will be displayed).
★ Memory cards formatted on computers or in digital cameras
may not be usable with this player.
★ MultiMedia Cards (MMC) formatted on the CDJ-1000 or CDJ-
1000MK2 have the following limitations:
¶ MP3 data cannot be recorded.
¶ Loop data set in hot cues cannot be recorded.
¶ It is not possible to use a computer to copy or backup the
cards.
¶ When recording loop points, a single loop point requires
two points of memory area.
¶ The cards cannot be reformatted in this unit.
To protect important data (SD memory card)
Write-protect switch
Rear view
Notes:
¶ Do not open the card door or turn off power while the CARD
indicator is flashing, since the recorded data may be damaged.
¶ Memory cards are precision electronic devices. Do not bend or
drop them, or subject them to strong forces or impacts. Also,
avoid using or storing memory cards in environments subject
to static electricity or electrical noise.
¶ Memory cards can be broken when subjected to impacts or
static electricity. Be very careful when handling them, and make
regular backups of important recorded data (☞ P. 21).
Pioneer disclaims any responsibility for damage to or loss of
memory card data, or other incidental damages arising from
such loss.
CUE/LOOP
MEMORY
CUE/LOOP
DELETE
CUE/LOOP
CALL
2, 3
¶ Set the write-protect switch to the [LOCK] position to prevent fur-
ther writing to the card. Return the switch to its original position if
you wish to record further data on the card.
■ Loading a memory card
Memory
CARD indicator
Label
surface up
Memory card
Memory card door
Open the memory card door, and insert the memory card, label side up
and with the beveled edge toward the front. Insert the card slowly, holding it flat, and push it in until it stops. Shut the memory card door.
The display will show [SD CARD] (for cards conforming to the SD memory
card standard) or [CDJ CARD] (for cards formatted with the CDJ-1000 or
CDJ-1000MK2), followed by the number of discs recorded on the card.
¶ Removing the memory card
Open the memory card door and wait until the CARD indicator lamp
goes out, then press in the memory card slightly and allow it to eject;
grasp the end of the card and pull out carefully.
Recording to memory cards
¶ Up to 100 points (total of both cue and loop points) can be stored for
each disc. When 100 points have been stored, attempts to record
further points will result in the display of the [POINT FULL] message,
and no further points can be recorded.
¶ If insufficient memory space exists on the card to record the current
points, the [CARD FULL] message will appear.
¶ If the card has been set to write-protect, the [CARD PROTECTED]
message will be displayed.
■ Recording a cue point
1. Use the auto cue function or CUE button to input a cue
point.
2. Press the CUE/LOOP MEMORY button.
¶ The display will show the cue point position data, and the word
[CARD MEMORY] will appear in the display, indicating that the
cue point has been stored in the memory card.
¶ If no memory card is loaded, the [NO CARD] message will appear.
¶ If the memory card door is open without any memory card being
loaded, the message [CLOSE CARD DOOR] will appear in the
display.
■ Recording a loop point
1. Set a loop-in point and loop-out point and begin loop playback.
2. During loop playback, press the CUE/LOOP MEMORY button.
¶ The display will show the cue point position data, and the word
[CARD MEMORY] will appear in the display, indicating that the
loop-in and loop-out points have been stored in the memory card.
¶ If no memory card is loaded, the [NO CARD] message will appear.
¶ If the memory card door is open without any memory card being
loaded, the message [CLOSE CARD DOOR] will appear in the
display.
20
■ Recording hot cue points A, B, C
Hot cue points A, B, and C are automatically recorded on the memory
card.
Page 21

Before Operating (Names and Functions of Parts)Operations Using Memory Cards
■ WAVE display
Wave displays are automatically recorded on the SD memory card.
To call up recorded data
■ To recall a memorized cue/loop point
When a memory card is loaded, and cue/loop point data is recorded, the
calendar display and playing address display will appear red.
1. Press the CUE/LOOP CALL button.
¶ When the CALL button (3) is pressed, the cue/loop points will be
called up in order, beginning with the one closest to the beginning
of the disc, and the unit will enter pause mode at the cue/loop in
point.
2. Press the PLAY/PAUSE button (6).
¶ Play/loop play will begin.
■ To recall a memorized hot cue point
Hot cue points A, B, and C are recorded automatically on the memory
card. If hot cue points are recorded at the time a disc is inserted, the
HOT CUE buttons A, B, C will flash green or orange. To call up one of the
recorded hot cue points, press the corresponding button A, B, or C. The
flashing green or orange indicator will light steadily (sound will not begin
instantly when the call is made). If you have no need of calling one of the
hot cue points, press the HOT CUE REC MODE button. The indicators
will change to red, and the hot cue setting mode will be enabled. (To
subsequently call up one of the hot cue points previously recorded on
the memory card, remove the disc or memory card and reinsert it so that
the A, B, and C buttons flash once again. Then press the desired flashing
button).
■ WAVE display
When playing a track with which you have previously used the WAVE
display function, the recorded WAVE pattern will automatically be recalled and displayed.
To copy memory card data
1. With no disc or memory card loaded:
Hold the CUE/LOOP MEMORY button pressed for 5 seconds or more.
¶ The display will scroll the [COPY MODE] [CARD A IN] messages.
2. Insert the original source memory card into the memory
card slot.
¶ The display will show the [READING] message; after several min-
utes, the [CARD B IN] message will appear.
3. Remove the source card and insert the target memory
card.
¶ Be sure to delete earlier contents of the target card to provide
sufficient recording capacity.
¶ The display will show the [WRITING] message, and after several
minutes, the [CARD A IN] message will appear.
4. Remove the target card, and once more insert the original source card.
¶ The display will show the [READING] message; after several min-
utes, the [CARD B IN] message will appear.
5. Repeat steps 3 and 4 as required.
¶ The copying process is completed when the display shows the
[COMPLETE] message.
¶ Copying of a full 32 MB SD memory card will require a maximum
of 4 cycles of recording steps 3 to 4.
¶ If the target card has insufficient memory capacity to complete the
copying process, the [CAPACITY ERROR] message will appear.
¶ If you possess a computer with memory card reader/writer, the reader/
writer can be used to copy your SD memory cards. (MultiMedia Cards
formatted on the CDJ-1000 or CDJ-1000MK2 cannot be copied using
a computer.)
☞ P. 20, precautions regarding memory card formatting.
To delete information
recorded on memory cards
■ To delete individual cue/loop points
1. Press the CUE/LOOP CALL button.
¶ When the CALL button (3) is pressed, the cue/loop points will be
called up in order, beginning with the one closest to the beginning
of the disc, and the unit will enter pause mode at the cue/loop in
point.
2. Press the CUE/LOOP DELETE button at the cue/loop point
you wish to delete.
¶ The display will show the [DELETE] message, and the selected
cue point or loop point data will be erased from the memory card.
■ To delete all cue/loop point information for an
entire disc
1. Load the disc whose cue/loop point information you wish
to erase.
2. Hold the CUE/LOOP DELETE button depressed for 5 or
more seconds.
¶ The display will scroll the [DISC DELETE? PUSH MEMORY] con-
firmation message.
3. Press the CUE/LOOP MEMORY button.
¶ All cue and loop data for the loaded disc will be deleted from the
memory card.
¶ If any button other than the CUE/LOOP MEMORY button is
pressed, the delete mode will be canceled.
■ To delete all memory card data
1. With no disc loaded, hold the CUE/LOOP DELETE button
depressed for 5 seconds or more.
¶ The display will scroll the [ALL DELETE? PUSH MEMORY] confir-
mation message.
2. Press the CUE/LOOP MEMORY button.
¶ All data will be deleted from the memory card.
¶ If any button other than the CUE/LOOP MEMORY button is
pressed, the delete mode will be canceled.
Display during
recording of cue and loop points
Display Message
[CARD MEMORY]
[CANNOT MEMORIZE
ON THIS CARD]
[CARD FULL]
[CARD PROTECTED]
[INTERNAL MEMORY]
followed by [NO CARD]
[INTERNAL MEMORY]
followed by [CLOSE
CARD DOOR]
[UNFORMAT]
[CARD ERROR]
[POINT FULL]
Insert memory card when recording cue point data, loop point data, hot
cue data, or WAVE data. If no memory card is loaded, point data will be
lost in the event the power is turned off or the current disc is removed.
Cue point or loop point has been successfully stored in the memory card.
Displayed during MP3 playback when a
card formatted on the CDJ-1000 or CDJ1000MK2 has been loaded and recorded
operations are performed. Point data
cannot be recorded to the card.
Insufficient space remains on the memory
card. Point data is not recorded to the card.
The memory card’s LOCK (wrote protect)
function is enabled, and point data cannot
be written to the card.
No memory card is loaded.
A memory card is loaded, but the memory
card door has not been closed. Close the
door and retry.
The loaded memory card does not
conform to SD memory card standards, or
to CDJ-1000, CDJ-1000MK2 (MMC)
formatting standards. Point data cannot
be recorded to the card.
The loaded memory card appears to be
damaged.
The total number of recorded cue points
and loop points has reached 100.
Meaning
21
Page 22

Troubleshooting
Troubleshooting
Incorrect operations can be mistaken as malfunctions. If you believe the unit is not operating correctly, consult the chart below. Sometimes incorrect
operation may be due to a malfunction in another component. If the problem is not fixed, check the other components used with the player. If the
problem still persists, contact your nearest Pioneer authorized service center or dealer for service.
Symptom
Disc doesn’t eject even when
EJECT button (0) is pressed.
Play doesn’t commence even when
the disc is inserted.
Playback immediately stops when
started.
MP3 can’t be played.
Can’t search for MP3 tracks.
No sound is audible.
Sound is distorted, noise is output.
With certain discs, loud noise is
produced or play stops.
When the auto cue function is set
ON, track search is not finished.
Back cue function cannot be carried
out even though the CUE button is
pressed in playback mode.
Pressing the LOOP OUT button
does not start loop play.
The jog dial does not operate as
desired.
The picture of the TV screen is
fluctuated or FM broadcast is
interfered with noise.
The disc is not rotating when power
is ON.
Can’t record cue point memory.
Probable Diagnosis
¶ Power plug is disconnected from outlet.
¶ The EJECT UNLOCK/LOCK switch is set to the
[LOCK] position.
¶ The auto cue function is set to on.
¶ Disc is loaded upside down.
¶ Smudges on the disc, etc.
¶ Format is wrong.
¶ You attempted to search (fast forward/reverse) for
files in a different folder.
¶ Output cables are connected incorrectly or are
loose.
¶ Incorrect operation of audio mixer.
¶ Pin plugs and/or terminals are dirty.
¶ Player is in pause mode.
¶ Output cables are connected incorrectly or are
loose.
¶ Pin plugs and/or terminals are dirty.
¶ Interference is being picked up from a TV set.
¶ Disc has a bad scratch or warp.
¶ Disc is extremely dirty.
¶ If the sound muted portion between selections is
long, searching time will be long.
(If the point cannot be found within ten seconds,
the cue point is set at the track’s beginning.)
¶ The cue point is not set yet.
¶ In the case of MP3, back cue cannot be per-
formed if no cue point is located within the
currently playing folder.
¶ No cue points (loop-in points) have been set.
¶ In the case of MP3, loop cannot be performed if
no loop-in point is located within the currently
playing track.
¶ Incorrect JOG MODE [VINYL/CDJ] is set.
¶ Interference is being picked up from the CD
player.
¶ The disc rotation stops automatically if no
operation has been performed for 100 minutes or
more in pause mode.
¶ After the disc’s final track finishes playing, if the
[END] display continues for 100 minutes without
any further operation input, disc rotation will
automatically stop.
¶ No memory card is loaded.
¶ Memory card has been set for write-protect.
¶ When playing MP3, a MultiMedia Card recorded
on the CDJ-1000 or CDJ-1000MK2 is loaded.
¶ SD memory card not formatted properly.
¶ Memory card door is open.
Remedy
¶ Connect plug to wall outlet.
¶ Go to pause mode or cue standby mode
before pressing the EJECT button (0).
¶ Set the EJECT UNLOCK/LOCK switch to the
[UNLOCK] position before pressing the EJECT
button (0).
¶ Hold down the TIME MODE/AUTO CUE
button for 1 second or longer to turn off the
auto cue function.
¶ Load the disc correctly with the label side up.
¶ Clean the smudges from the disc.
¶ See section “Playing MP3 files” on page 6.
¶ MP3 searches can be performed only within
the same folder.
¶ Recheck connections.
¶ Check the settings of the audio mixer
switches and sound volume controls.
¶ Clean away dirt.
¶ Press the PLAY/PAUSE button (6).
¶ Connect to audio mixer's LINE INPUT
terminals. (Do not connect to MIC terminals.)
¶ Clean away dirt.
¶ Switch OFF TV set, move player away from TV
set.
¶ Replace disc.
¶ Clean disc.
¶ Press TIME MODE/AUTO CUE button for
more than 1 second to set the auto cue
function OFF.
¶ Set the cue point. (See page 15.)
¶ Set a cue point.
¶ Press the JOG MODE SELECT button to set
the desired JOG MODE [VINYL] or [CDJ].
¶ Turn off POWER switch of the player, or move
the player away from the TV or tuner.
¶ Playback can be started by pressing the PLAY/
PAUSE button (6). Press the EJECT button
(0) to eject the disc.
¶ Insert memory card.
¶ Set write-protect switch to allow writing to card.
MultiMedia Cards recorded on the CDJ-1000 or
CDJ-1000MK2 cannot be used for recording
during MP3 playback.
¶ Insert memory card formatted in compliance
with SD memory card standards.
¶ Close memory card door.
22
Page 23

Troubleshooting (Error message display)
¶ This component may fail to operate properly due to influence of static electricity or other external influences. In this case, try turning
off the POWER switch, and turn on the power again only when the disc has fully stopped rotating.
¶ This unit cannot play partially recorded CD-R or CD-RW discs that have not been finalized.
¶ This unit plays only standard 12 cm discs and 8 cm discs mounted in proper disc adapters; it cannot play irregularly shaped discs
(damage or malfunctions may occur).
¶ When playing 8 cm discs mounted on adapters, some speed loss may be experienced when using scratch and reverse operations.
This unit for high performance when rotating discs at high speed, but when 8 cm discs are mounted in adapters, the rotation speed
is reduced for safety. This is not a malfunction.
¶ BPM values measured with this unit may differ from published values found on CD labels, or those measured on Pioneer DJ mixers.
This is a result of differences in BPM measuring methods, and is not a malfunction.
¶ When playing CD-R/RW discs, some degradation in performance may be experienced depending on the recording quality of the
individual disc.
Error message display
When the unit is unable to operate properly, an error code is displayed on the display panel. Check the error code displayed against the
following table and take the recommended action to correct the error. If an error code other than any of the error codes listed in the
table below is displayed or if the same error code is displayed even after corrective action has been taken, contact your nearest Pioneer
Service Station or contact the store from which you purchased your player for assistance.
Error code
E–72 01
E–83 01
E–83 02
E–83 03
E-83 04
E-83 05
E–91 01
Error type
TOC READ ERROR
PLAYER ERROR
MP3 DECODER ERROR
DATA FORMAT ERROR
MECHANICAL TIME OUT
Error content
Can’t read TOC data.
Can’t play this disc properly.
Can’t play this disc properly.
Mechanical operation did not end within
specified time.
Cause and remedy
Disc is cracked.
= Replace disc.
Disc is dirty.
= Clean disc.
If other discs operate normally, problem is with
this disc.
Does not conform to MP3 format.
= Change to disc conforming to MP3 format.
Foreign object in disc loading slot.
= Remove foreign object.
23
Page 24

Selecting fine audio equipment such as the unit
you’ve just purchased is only the start of your
musical enjoyment. Now it’s time to consider how
you can maximize the fun and excitement your
equipment offers. This manufacturer and the
Electronic Industries Association’s Consumer
Electronics Group want you to get the most out of
your equipment by playing it at a safe level. One that
lets the sound come through loud and clear without
annoying blaring or distortion-and, most importantly,
without affecting your sensitive hearing.
Sound can be deceiving. Over time your hearing
“comfort level” adapts to higher volumes of sound.
So what sounds “normal” can actually be loud and
harmful to your hearing. Guard against this by
setting your equipment at a safe level BEFORE your
hearing adapts.
To establish a safe level:
• Start your volume control at a low setting.
• Slowly increase the sound until you can hear it
comfortably and clearly, and without distortion.
Once you have established a comfortable sound
level:
• Set the dial and leave it there.
Taking a minute to do this now will help to prevent
hearing damage or loss in the future. After all, we
want you listening for a lifetime.
We Want You Listening For A Lifetime
Used wisely, your new sound equipment will
provide a lifetime of fun and enjoyment. Since
hearing damage from loud noise is often
undetectable until it is too late, this manufacturer
and the Electronic Industries Association’s
Consumer Electronics Group recommend you avoid
prolonged exposure to excessive noise. This list of
sound levels is included for your protection.
Decibel
Level Example
30 Quiet librar y, soft whispers
40
Living room, refrigerator, bedroom away from traffic
50 Light traffic, normal conversation, quiet office
60 Air conditioner at 20 feet, sewing machine
70 Vacuum cleaner, hair dryer, noisy restaurant
Average city traffic, garbage disposals, alarm clock
80
at two feet.
THE FOLLOWING NOISES CAN BE DANGEROUS
UNDER CONSTANT EXPOSURE
90
Subway, motorcycle, truck traffic, lawn mower
100 Garbage truck, chain saw, pneumatic drill
120 Rock band concert in front of speakers,
thunderclap
140 Gunshot blast, jet plane
180 Rocket launching pad
Information courtesy of the Deafness Research Foundation.
S001_En
Should this product require service in the U.S.A. and you wish
to locate the nearest Pioneer Authorized Independent Service
Company, or if you wish to purchase replacement parts,
operating instructions, service manuals, or accessories, please
call the number shown below.
800 – 782 – 7210
Please do not ship your product to Pioneer without first calling
the Customer Support Division at the above listed number for
assistance.
PIONEER ELECTRONICS (USA), INC.
CUSTOMER SUPPORT DIVISION
P.O. BOX 1760, LONG BEACH,
CA 90801-1760, U.S.A.
For warranty information please see the Limited Warranty
sheet included with your product.
Supply of this product only conveys a license for private, non-commercial use and does not convey a license nor imply any right to
use this product in any commercial (i.e. revenue-generating) real
time broadcasting (terrestrial, satellite, cable and/or any other media), broadcasting/streaming via internet, intranets and/or other
networks or in other electronic content distribution systems, such
as pay-audio or audio-on-demand applications. An independent
license for such use is required. For details, please visit
http://www.mp3licensing.com.
Should this product require service in Canada, please contact a
Pioneer Canadian Authorized Dealer to locate the nearest Pioneer Authorized Service Company in Canada.
Alternatively, please contact the Customer Service Department
at the following address:
Pioneer Electronics of Canada, Inc.
300 Allstate Parkway
Markham, ON L3R OP2
(905) 479-4411
1 (877) 283-5901
For warranty information please see the Limited Warranty
sheet included with your product.
MPEG Layer-3 audio coding technology licensed from Fraunhofer
IIS and Thomson multimedia.
PIONEER CORPORATION 4-1, Meguro 1-Chome, Meguro-ku, Tokyo 153-8654, Japan
PIONEER ELECTRONICS (USA) INC.
Multimedia and Mass Storage Division: 2265 East 220th Street, Long Beach, CA 90810, U.S.A. TEL: 800-444-OPTI (6784)
PIONEER ELECTRONICS OF CANADA, INC.
Industrial Products Department: 300 Allstate Parkway, Markham, Ontario L3R OP2, Canada TEL: 905-479-4411
Printed in <DRB1397-B><05L00000>
Published by Pioneer Corporation.
Copyright © 2005 Pioneer Corporation.
All rights reserved.
 Loading...