

Page 1
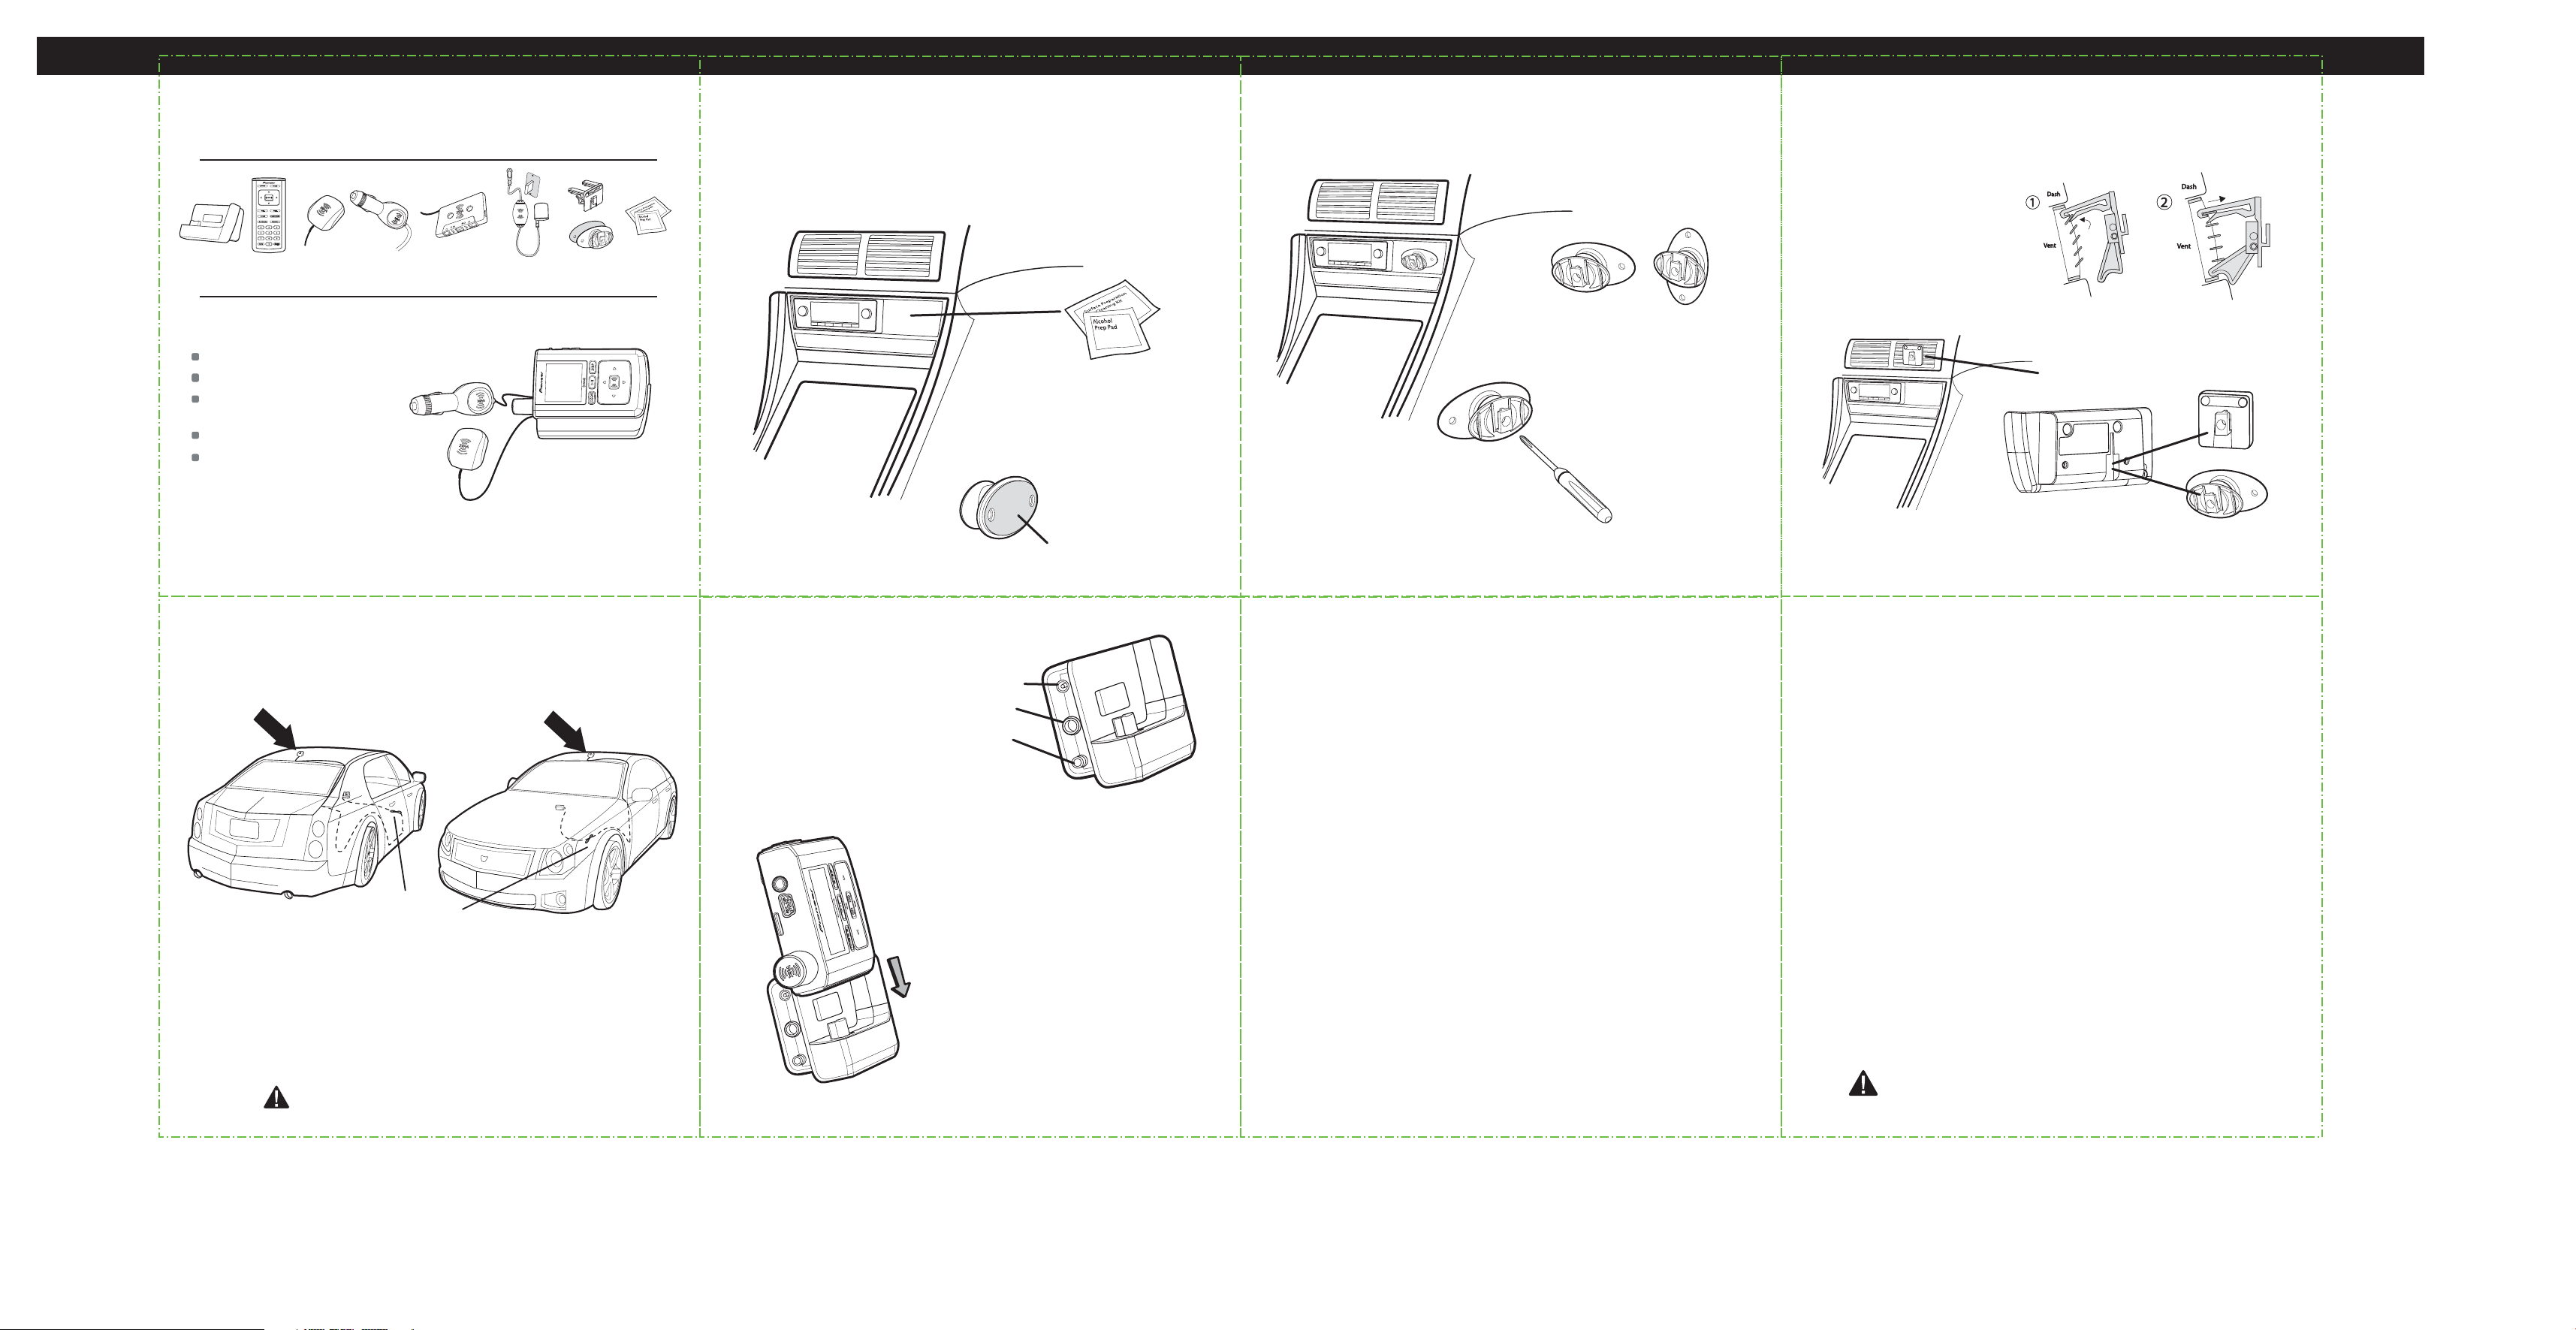
What’s in the box?
inno™ car kit CD-INCAR2
Setup: In Vehicle
Choose the best way to mount your car cradle.
How to use the swivel mount
To install the swivel mount, first find a suitable location. The swivel mount’s adhesive
is very strong and may be difficult to remove. Do not install this mount on leather
surfaces and make sure the air temperature is at least 60ºF.
2. Firmly press the swivel mount to the surface for 30 seconds. Allow 24 hours
before using the mount.
How to use the vent mount
To install the vent mount, find a horizontal vent that is strong enough to hold your
inno and its car cradle.
1. To insert the vent mount,
push it into the vent as shown.
car cradle power adapter XM SureConnectcassette
remote car antenna
adapter
mounts cleaning kit
inno™ car kit
Listen to Live XM and recorded XM content*
Play MP3 and WMA files
Manage your tracks, favorite
channels, and playlists
Listen in your vehicle
Car Kit CD-INCAR2 is not compatible
with GEX-INNO1 and was designed to
work with GEX-INNO2BK only
*Hardware and required monthly subscription sold separately. Installation cost and other fees and taxes, including a
one-time activation fee may apply. Subscription fee is consumer only. XM products, programming, services, and fees are
subject to change, at any time, without notice. Channels with frequent explicit language are indicated with an XL. Channel
blocking is available for XM radio receivers by calling 1-800-XM-RADIO. Subscriptions subject to Customer Agreement
available at xmradio.com. XM service only available in the 48 contiguous United States. ©2006 XM Satellite Radio Inc.
All rights reserved.
How to install the antenna
Every vehicle is different; for your safety, follow all instructions carefully. Consult a
professional installer if you have questions.
option 1
Keep excess cable behind
or under the dashboard.
Mount the antenna to the roof or trunk of the vehicle. During installation, make sure
you are outdoors and not obstructed by tall buildings.
Warning: Failure to properly install the antenna may result in injury to
yourself or to others if it becomes detached during an accident.
option 2
1. Clean the mounting surface with the
surface preparation kit. Peel away the
adhesive liner.
How to receive XM through your car stereo
Plug in all of the connectors once
you have mounted the radio,
installed the antenna or used the
included XM SureConnect and
plugged in the power adapter.
The line out should be used with
the included cassette adapter for
the best sound quality.
XM Antenna or
XM SureConnect
(See included XM
SureConnect guide for
more information)
1. Insert your inno into the car cradle.
2. Turn your inno player on.
3. Turn on your car stereo. Look for a
channel that sounds like it is receiving a
weak or no station. (88.1 - 107.9).
4. On your inno player press the XM
button. Scroll down to “Settings” choose
“FM Modulator” then pick “FM Frequency.”
You may be in either “Live XM” or “My
Music” modes. (You will not hear any
music in the “My Music” mode unless you
have recorded content or mp3s).
5. Follow the on screen instructions to choose the
same frequency as you chose on your car
stereo. You should now be able to hear XM
through your car stereo.
power
line out
Peel off adhesive liner
Either orientation may be used.
You can adjust the tension of
the mount with a screwdriver.
Be careful not to loosen it too
much when you are adjusting it,
or the swivel may come apart.
(not included)
If you need to remove the mount, carefully lift the adhesive pad with your fingers or a
spoon. Warming with a hair dryer for several minutes will help soften the adhesive.
Protect your ears
- Take care so that the earbud cable is not caught by your arm or other objects while
walking or exercising.
- Do not turn up the volume too high. Doctors warn against prolonged exposure to
high volume.
- Stop using your inno or turn the volume down if you have ringing in your ears.
Sound can be deceiving. Over time your hearing “comfort level” adapts to higher volumes
of sound. So what sounds “normal” can actually be loud and harmful to your hearing. Set
your equipment at a safe level BEFORE your hearing adapts.
To establish a safer level: Start your volume control at a low setting; Slowly increase
the sound until you can hear it comfortably and clearly, without distortion.
Once you have established a comfortable sound level: Set the dial and leave
it there; taking a minute to do this now will help to preserve hearing.
Pioneer and the Consumer Electronics Association recommend you avoid prolonged exposure
to excessive noise. Under constant exposure such as sustained listening, sound levels above
85 decibels can be dangerous without hearing protection. (For reference, a garbage disposal
or loud shouting at 3 feet away are around 80 decibels; a food blender or gas lawn mower at
3 feet away are around 90 decibels.) The longer your exposure and/or higher the sound level,
the greater the danger of permanent hearing damage. Pioneer disclaims all liability for
hearing loss, bodily injury or property damage as a result of use or misuse of this product.
On all complaints and concerns call Customer Support at 1-800-421-1404
For hook-up and operation of your unit or to locate an Authorized Service Company, please call or write:
PIONEER ELECTRONICS SERVICE, INC.
P.O. BOX 1760, LONG BEACH, CALIFORNIA 90810
1-800- 421-1404
www.pioneerelectronics.com
To remove the vent mount, push
it into the vent and lift upwards
slightly to release the mount’s hooks
from the vent vane.
Installed vent mount
or
2. Attach the car cradle to either
mount by sliding it into place.
FCC Statement
Please note that the power cable that has been supplied with your device is supplied with permanently
attached ferrite beads. It is the responsibility of the user to use the power cable with the ferrite beads.
The user is cautioned that changes or modifications not expressly approved by XM Satellite Radio Inc. can
void the user’s authority to operate this device.
This device complies with Part 15 of the FCC Rules. Operation is subject to the following two conditions:
(1) This device may not cause harmful interference.
(2) This device must accept any interference received, including interference that may cause
undesired operation.
This equipment has been tested and found to comply with the limits for a Class B digital device, pursuant
to Part 15 of the FCC Rules. These limits are designed to provide reasonable protection against harmful
interference in a residential installation.
This equipment generates, uses, and can radiate radio frequency energy and, if not installed and used in
accordance with the installation instructions, may cause harmful interference to radio communications.
However, there is no guarantee that interference will not occur in a particular installation. If this
equipment does cause harmful interference to radio or television reception, which can be determined by
turning the equipment off and on, the user is encouraged to try to correct the interference by one or more
of the following measures:
- Reorient or relocate the receiving antenna of the affected receiver.
- Increase the separation between the XM equipment and the affected receiver.
- Connect the XM equipment into an outlet on a circuit different from that to which the
affected receiver is connected.
- Consult the dealer or an experienced radio/TV technician for help.
Warning: The FCC and FAA have not certified the inno Satellite Radio Receiver for
use in any aircraft (neither portable nor permanent installation). Therefore, XM
Satellite Radio cannot support this type of application or installation.
Page 2
Printed on Recycled Paper
©2006 Pioneer Electronics Service, Inc. All rights reserved.
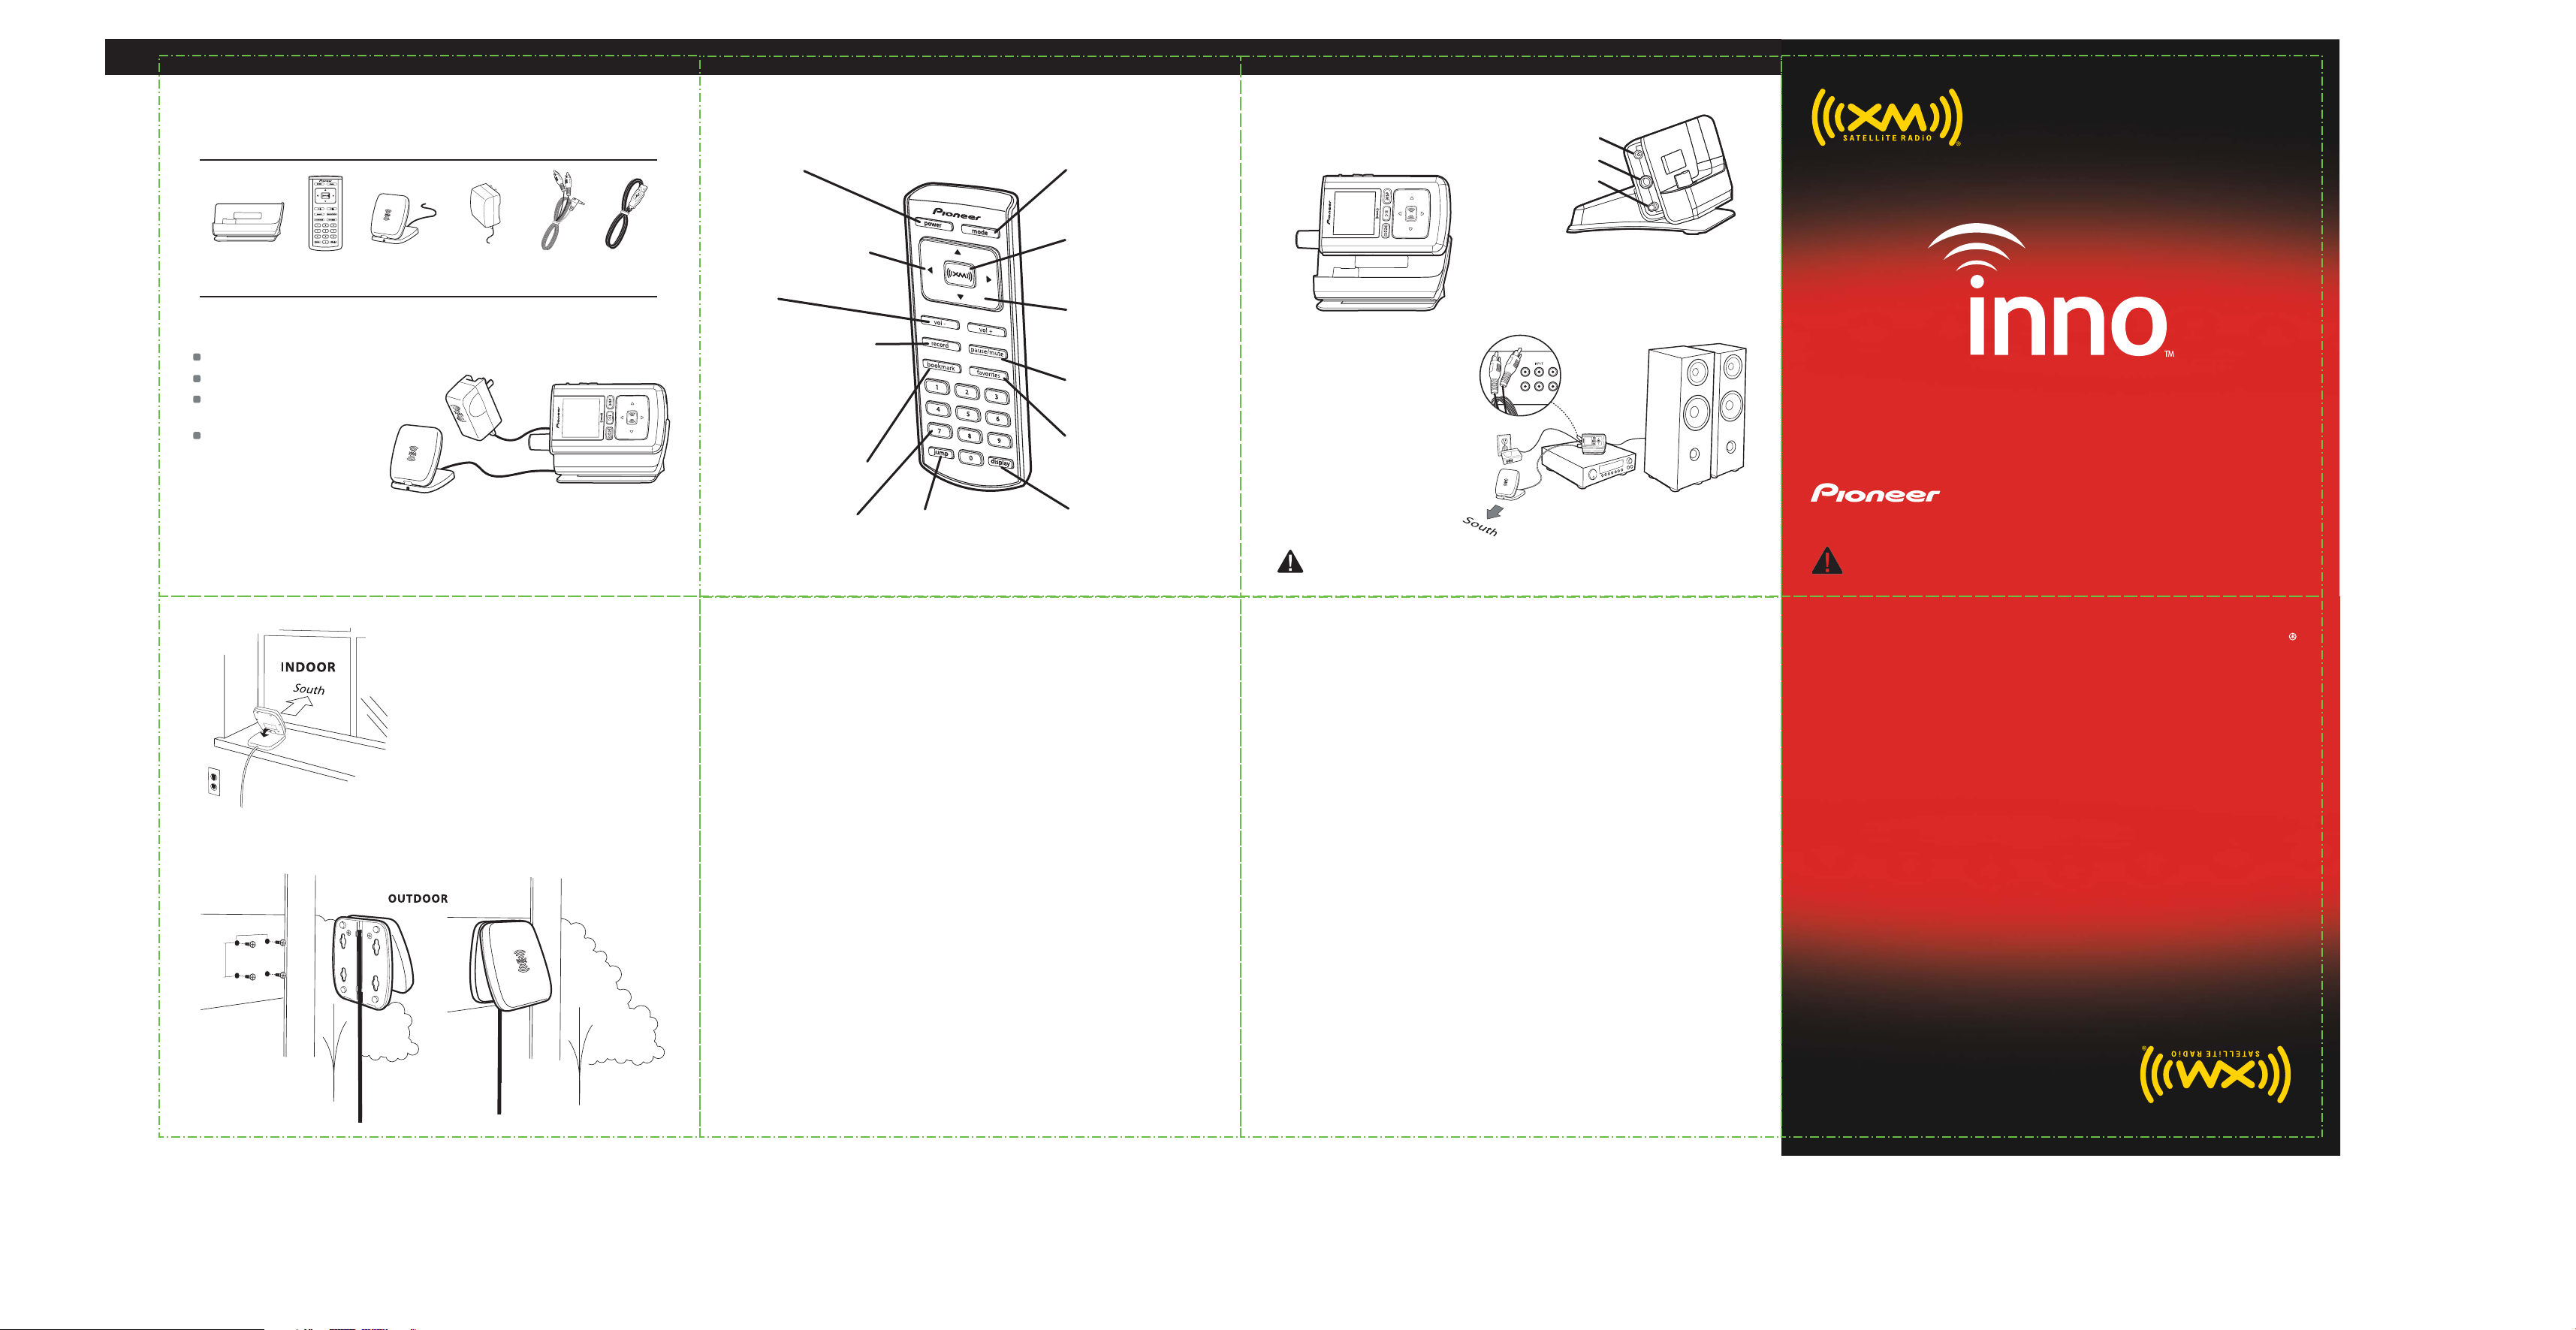
inno™ home kit CD-INHOME2
Remote
Setup: At Home
What’s in the box?
home dock RCA cable
remote
home antenna
home AC
power adapter
USB cable
inno™ home kit
Listen to Live XM and recorded XM content
Play MP3 and WMA files
Manage your tracks, favorite channels,
and playlists
Listen in your home or office
*Hardware and required monthly subscription sold separately. Subscription required to maintain access to saved XM
programming. Installation cost and other fees and taxes, including a one-time activation fee may apply. Subscription fee is
consumer only. XM products, programming, services, and fees are subject to change, at any time, without notice. Channels
with frequent explicit language are indicated with an XL. Channel blocking is available for XM radio receivers by calling
1-800-XM-RADIO. Subscriptions subject to Customer Agreement available at xmradio.com. XM service only available in the
48 contiguous United States. ©2006 XM Satellite Radio Inc. All rights reserved.
Power button
Left arrow button –
Pressing the left arrow button
also allows you to “back out” of
any menu you have selected.
Volume
Record –
Press and release to
start recording a song, or to
stop recording. Press and hold
to start recording a channel. If
you’re already recording a
channel, pressing and holding
this button ends recording after
the current song.
Bookmark –
Tag interesting
songs or tracks.
Numeric keypad –
Select
XM channels by channel number.
Jump –
Switch to previous
channel you listened to.
Mode –
“Live XM” or “My
Music” (recorded content).
Access
XM button –
menus and confirm
selections.
Arrow buttons –
Select menu entries, change
channels, cycle through
categories, skip to next or
previous songs, and more.
Pause/Mute –
Pause
playback or mute Live XM.
Favorites –
Go to
favorite channels.
Display –
Change what’s
being shown on the display.
power
1. Insert inno into the home dock.
line out
antenna
2. Connect inno to your audio
system. Connect the power
adapter, RCA cable and home
antenna.
3. You can also connect inno to
your computer. See your inno
user guide for installation and
requirements.
WARNING: Use only the USB supplied in the package. Other USB cables may not allow
your inno to charge its battery or communicate with your PC.
install guide
CD-INHOME2 & CD-INCAR2
Important: This manual contains important safety and operating information. Please read, understand, and follow the
instructions in this manual. Failure to do so could result in personal injury, death, and/or damage to your inno
accessories, and/or to your vehicle or property
4. Place the home antenna in
or near a southern facing
window for optimal indoor
reception.
5. To optimize signal reception, you may mount the home antenna
outdoors, facing south.
1 3/8 in
1 1/8 in
LIMITED WARRANTY
WARRANTY VALID ONLY IN COUNTRY OF PRODUCT PURCHASE
WARRANTY
Pioneer Electronics (USA) Inc. (PUSA), and Pioneer Electronics of Canada, Inc. (POC), warrants that products
distributed by PUSA in the U.S.A., and by POC in Canada that fail to function properly under normal use due to
a manufacturing defect when installed and operated according to the owner’s manual enclosed with the unit
will be repaired or replaced with a unit of comparable value, at the option of PUSA or POC, without charge to
you for parts or actual repair work. Parts supplied under this warranty may be new or rebuilt at the option of
PUSA or POC.
THIS LIMITED WARRANTY APPLIES TO THE ORIGINAL OR ANY SUBSEQUENT OWNER OF THIS PIONEER
PRODUCT DURING THE WARRANTY PERIOD PROVIDED THE PRODUCT WAS PURCHASED FROM AN
AUTHORIZED PIONEER DISTRIBUTOR/DEALER IN THE U.S.A. OR CANADA. YOU WILL BE REQUIRED TO
PROVIDE A SALES RECEIPT OR OTHER VALID PROOF OF PURCHASE SHOWING THE DATE OF ORIGINAL
PURCHASE. THE PRODUCT MUST BE DELIVERED WITHIN THE WARRANTY PERIOD, TRANSPORTATION
PREPAID, ONLY FROM WITHIN THE COUNTRY OF PURCHASE AS EXPLAINED IN THIS DOCUMENT. YOU WILL
BE RESPONSIBLE FOR REMOVAL AND INSTALLATION OF THE PRODUCT. PUSA OR POC, AS APPROPRIATE,
WILL PAY TO RETURN THE REPAIRED OR REPLACEMENT PRODUCT TO YOU WITHIN THE COUNTRY OF
PURCHASE.
ACCESSORY WARRANTY PERIOD…………………...… 1 Year Parts & Labor
WHAT IS NOT COVERED
IF THIS PRODUCT WAS PURCHASED FROM AN UNAUTHORIZED DISTRIBUTOR, THERE
ARE NO WARRANTIES, EXPRESS OR IMPLIED, INCLUDING THE IMPLIED WARRANTY OF MERCHANTABILITY
AND THE IMPLIED WARRANTY OF FITNESS FOR A PARTICULAR PURPOSE AND THIS PRODUCT IS SOLD
STRICTLY “AS IS” AND “WITH ALL FAULTS”. PIONEER SHALL NOT BE LIABLE FOR ANY CONSEQUENTIAL
AND/OR INCIDENTAL DAMAGES. PIONEER DOES NOT WARRANT ANY PRODUCT LISTED ABOVE WHEN IT IS
USED IN A TRADE OR BUSINESS OR IN ANY INDUSTRIAL OR COMMERCIAL APPLICATION. THIS WARRANTY
DOES NOT APPLY IF THE PRODUCT HAS BEEN SUBJECTED TO POWER IN EXCESS OF ITS PUBLISHED POWER
RATING. THIS WARRANTY DOES NOT COVER ANY APPEARANCE ITEM, USER ATTACHED ANTENNA, ANY
DAMAGE TO THE PRODUCT RESULTING FROM ALTERATIONS, MODIFICATIONS NOT AUTHORIZED IN
WRITING BY PIONEER, ACCIDENT, MISUSE OR ABUSE, DAMAGE DUE TO LIGHTNING OR TO POWER
SURGES, SUBSEQUENT DAMAGE FROM LEAKING, DAMAGE FROM INOPERATIVE BATTERIES, OR THE USE
OF BATTERIES NOT CONFORMING TO THOSE SPECIFIED IN THE OWNER’S MANUAL. THIS WARRANTY DOES
NOT COVER THE COST OF PARTS OR LABOR WHICH WOULD BE OTHERWISE PROVIDED WITHOUT CHARGE
UNDER THIS WARRANTY OBTAINED FROM ANY SOURCE OTHER THAN A PIONEER AUTHORIZED SERVICE
COMPANY OR OTHER DESIGNATED LOCATION. THIS WARRANTY DOES NOT COVER DEFECTS OR DAMAGE
CAUSED BY THE USE OF UNAUTHORIZED PARTS OR LABOR FROM IMPROPER MAINTENANCE. ALTERED,
DEFACED, OR REMOVED SERIAL NUMBERS VOID THIS ENTIRE WARRANTY.
NO OTHER WARRANTIES
IN THE U.S.A. - PIONEER LIMITS ITS OBLIGATIONS UNDER ANY IMPLIED WARRANTIES INCLUDING, BUT NOT
LIMITED TO, THE IMPLIED WARRANTIES OF MERCHANTABILITY AND FITNESS FOR A PARTICULAR PURPOSE,
TO A PERIOD NOT TO EXCEED THE WARRANTY PERIOD. NO WARRANTIES SHALL APPLY AFTER THE
WARRANTY PERIOD. SOME STATES DO NOT ALLOW LIMITATIONS ON HOW LONG AN IMPLIED WARRANTY
LASTS AND SOME STATES DO NOT ALLOW THE EXCLUSIONS OR LIMITATIONS OF INCIDENTAL OR
CONSEQUENTIAL DAMAGES, SO THE ABOVE LIMITATIONS OR EXCLUSIONS MAY NOT APPLY TO YOU. THIS
WARRANTY GIVES YOU SPECIFIC LEGAL RIGHTS AND YOU MAY HAVE OTHER RIGHTS WHICH MAY VARY
FROM STATE TO STATE.
IN CANADA – EXCEPT AS EXPRESSLY PROVIDED HEREIN, THERE ARE NO REPRESENTATIONS, WARRANTIES,
OBLIGATIONS OR CONDITIONS, IMPLIED, STATUTORY OR OTHERWISE, APPLICABLE TO THIS PRODUCT.
TO OBTAIN SERVICE
PUSA has appointed a number of Authorized Service Companies throughout the U.S.A. should your product
require service. To receive warranty service you need to present your sales receipt showing place and date of
original owner’s transaction. If shipping the unit you will need to package it carefully and send it,
transportation prepaid by a traceable, insured method, to an Authorized Service Company. Package the
product using adequate padding material to prevent damage in transit. Include your name, address and
telephone number where you can be reached during business hours.
CD-INCAR2
CD-INHOME2
All other trademarks are property of their repective owners.
inno is a trademark of Pioneer Electronics (U.S.A.) Inc.
XM name and related logos are trademarks of XM Satellite Radio Inc.
http://www.pioneerelectronics.com
1-800-421-1404
LONG BEACH, CALIFORNIA 90810
P.O. BOX 1760
PIONEER ELECTRONICS SERVICE, INC.
XM Satellite Radio Inc, Proprietary and Confidential
10-18-06
 Loading...