

Page 1

Avid Unity™
TransferManager
User’s Guide
Release 1.0
a
tools for storytellers®
Page 2

Copyright and Disclaimer
Product specifications are subject to change without notice and do not represent a commitment on the part of Avid Technology, Inc.
The software described in this document is furnished under a license agreement. The software may not be reverse assembled and
may be used or copied only in accordance with the terms of the license agreement. It is against the law to copy the software on any
medium except as specifically allowed in the license agreement. Avid products or portions thereof are protected by one or more of
the following United States patents: 4,746,994; 4,970,663; 5,045,940; 5,063,448; 5,077,604; 5,245,432; 5,267,351; 5,309,528;
5,325,200; 5,355,450; 5,396,594; 5,440,348; 5,452,378; 5,467,288; 5,513,375; 5,528,310; 5,557,423; 5,568,275; 5,577,190;
5,583,496; 5,584,006; 5,627,765; 5,634,020; 5,640,601; 5,644,364; 5,654,737; 5,701,404; 5,715,018; 5,719,570; 5,724,605;
5,726,717; 5,729,673; 5,731,819; 5,745,637; 5,752,029; 5,754,180; 5,754,851; 5,781,188; 5,799,150; 5,812,216; 5,828,678;
5,842,014; 5,852,435; 5,883,670; 5,889,532; 5,892,507; 5,905,841; 5,912,675; 5,929,836; 5,929,942; 5,930,445; 5,930,797;
5,946,445; 5,966,134; 5,977,982; 5,986,584; 5,987,501; 5,995,079; 5,995,115; 5,999,190; 5,999,406; 6,009,507; 6,011,562;
6,014,150; 6,016,152; 6,016,380; 6,018,337; 6,023,531; 6,023,703; 6,031,529; 6,035,367; 6,038,573; 6,052,508; 6,058,236;
6,061,758; 6,072,796; 6,084,569; 6,091,422; 6,091,778; 6,105,083; 6,118,444; 6,130,676; 6,134,379; 6,134,607; D352,278;
D372,478; D373,778; D392,267; D392,268; D392,269; D395,291; D396,853; D398,912. Additional U.S. and foreign patents pending.
No part of this document may be reproduced or transmitted in any form or by any means, electronic or mechanical, including photocopying and recording, for any purpose without the express written permission of Avid Technology, Inc.
© 2000 Avid Technology, Inc. All rights reserved.
The following disclaimer is required by Apple Computer, Inc.
APPLE COMPUTER, INC. MAKES NO WARRANTIES WHATSOEVER, EITHER EXPRESS OR IMPLIED, REGARDING THIS PRODUCT,
INCLUDING WARRANTIES WITH RESPECT TO ITS MERCHANTABILITY OR ITS FITNESS FOR ANY PARTICULAR PURPOSE. THE
EXCLUSION OF IMPLIED WARRANTIES IS NOT PERMITTED BY SOME STATES. THE ABOVE EXCLUSION MAY NOT APPLY TO YOU.
THIS WARRANTY PROVIDES YOU WITH SPECIFIC LEGAL RIGHTS. THERE MAY BE OTHER RIGHTS THAT YOU MAY HAVE WHICH
VARY FROM STATE TO STATE.
The following disclaimer is required by Sam Leffler and Silicon Graphics, Inc. for the use of their TIFF library:
Copyright © 1988–1997 Sam Leffler
Copyright © 1991–1997 Silicon Graphics, Inc.
Permission to use, copy, modify, distribute, and sell this software [i.e., the TIFF library] and its documentation for any purpose is
hereby granted without fee, provided that (i) the above copyright notices and this permission notice appear in all copies of the software and related documentation, and (ii) the names of Sam Leffler and Silicon Graphics may not be used in any advertising or publicity relating to the software without the specific, prior written permission of Sam Leffler and Silicon Graphics.
THE SOFTWARE IS PROVIDED “AS-IS” AND WITHOUT WARRANTY OF ANY KIND, EXPRESS, IMPLIED OR OTHERWISE, INCLUDING WITHOUT LIMITATION, ANY WARRANTY OF MERCHANTABILITY OR FITNESS FOR A PARTICULAR PURPOSE.
IN NO EVENT SHALL SAM LEFFLER OR SILICON GRAPHICS BE LIABLE FOR ANY SPECIAL, INCIDENTAL, INDIRECT OR CONSEQUENTIAL DAMAGES OF ANY KIND, OR ANY DAMAGES WHATSOEVER RESULTING FROM LOSS OF USE, DATA OR PROFITS,
WHETHER OR NOT ADVISED OF THE POSSIBILITY OF DAMAGE, AND ON ANY THEORY OF LIABILITY, ARISING OUT OF OR IN
CONNECTION WITH THE USE OR PERFORMANCE OF THIS SOFTWARE.
The following disclaimer is required by the Independent JPEG Group:
Portions of this software are based on work of the Independent JPEG Group.
The following disclaimer is required by Paradigm Matrix:
Portions of this software licensed from Paradigm Matrix.
2
Page 3

The following disclaimer is required by Ray Sauers Associates, Inc.:
“Install-It” is licensed from Ray Sauers Associates, Inc. End-User is prohibited from taking any action to derive a source code equivalent of “Install-It,” including by reverse assembly or reverse compilation, Ray Sauers Associates, Inc. shall in no event be liable for any
damages resulting from reseller’s failure to perform reseller’s obligation; or any damages arising from use or operation of reseller’s
products or the software; or any other damages, including but not limited to, incidental, direct, indirect, special or consequential Damages including lost profits, or damages resulting from loss of use or inability to use reseller’s products or the software for any reason
including copyright or patent infringement, or lost data, even if Ray Sauers Associates has been advised, knew or should have known
of the possibility of such damages.
The following disclaimer is required by Videomedia, Inc.:
“Videomedia, Inc. makes no warranties whatsoever, either express or implied, regarding this product, including warranties with
respect to its merchantability or its fitness for any particular purpose.”
“This software contains V-LAN ver. 3.0 Command Protocols which communicate with V-LAN ver. 3.0 products developed by Videomedia, Inc. and V-LAN ver. 3.0 compatible products developed by third parties under license from Videomedia, Inc. Use of this software
will allow “frame accurate” editing control of applicable videotape recorder decks, videodisc recorders/players and the like.”
The following notice is required by Altura Software, Inc. for the use of its Mac2Win software and Sample Source
Code:
©1993–1998 Altura Software, Inc.
The following notice is required by Ultimatte Corporation:
Certain real-time compositing capabilities are provided under a license of such technology from Ultimatte Corporation and are subject to copyright protection.
Attn. Government User(s). Restricted Rights Legend
U.S. GOVERNMENT RESTRICTED RIGHTS. This Software and its documentation are “commercial computer software” or “commercial
computer software documentation.” In the event that such Software or documentation is acquired by or on behalf of a unit or agency
of the U.S. Government, all rights with respect to this Software and documentation are subject to the terms of the License Agreement,
pursuant to FAR §12.212(a) and/or DFARS §227.7202-1(a), as applicable.
Trademarks
AirPlay, AudioVision, Avid, Avid Xpress, CamCutter, Digidesign, FieldPak, Film Composer, HIIP, Image Independence, Marquee,
Media Composer, Media Recorder, NewsCutter, OMF, OMF Interchange, Open Media Framework, Pro Tools, Softimage, and
tools for storytellers are registered trademarks and 888 I/O, AirSPACE, AirSPACE HD, AniMatte, AudioSuite, AutoSync, AVIDdrive,
AVIDdrive Towers, AvidNet, Avid Production Network, AvidProNet, AVIDstripe, Avid Unity, AVX, DAE, D-Fi, D-FX, D-Verb, ExpertRender, FilmScribe, HyperSPACE, HyperSPACE HDCAM, Intraframe, iS9, iS18, iS23, iS36, Lo-Fi, Magic Mask, Matador, Maxim, MCXpress, MEDIArray, MediaDock, MediaDock Shuttle, Media Fusion, Media Illusion, MediaLog, Media Reader, MediaShare, Meridien,
NaturalMatch, OMM, Open Media Management, QuietDrive, Recti-Fi, rS9, rS18, Sci-Fi, Sound Designer II, SPACE, SPACE Shift, Symphony, Vari-Fi, Video Slave Driver, and VideoSPACE are trademarks of Avid Technology, Inc.
Macintosh is a trademark of Apple Computer, Inc., registered in the U.S. and other countries. Microsoft, Windows, and Windows NT
are registered trademarks of Microsoft Corporation. All other trademarks contained herein are the property of their respective owners.
Avid Unity TransferManager User’s Guide • Part 0130-04603-01 Rev. A •
November 2000
3
Page 4

Contents
Using This Guide
Who Should Use This Guide . . . . . . . . . . . . . . . . . . . . . . . . . . . . . . . . . . 6
About This Guide. . . . . . . . . . . . . . . . . . . . . . . . . . . . . . . . . . . . . . . . . . . . 7
Symbols and Conventions . . . . . . . . . . . . . . . . . . . . . . . . . . . . . . . . . . . . 7
If You Need Help . . . . . . . . . . . . . . . . . . . . . . . . . . . . . . . . . . . . . . . . . . . . 8
Related Information. . . . . . . . . . . . . . . . . . . . . . . . . . . . . . . . . . . . . . . . . . 9
If You Have Documentation Comments . . . . . . . . . . . . . . . . . . . . . . . 10
How to Order Documentation. . . . . . . . . . . . . . . . . . . . . . . . . . . . . . . . 10
Chapter 1 TransferManager Overview
About TransferManager . . . . . . . . . . . . . . . . . . . . . . . . . . . . . . . . . . . . . 11
TransferManager in a Workgroup Environment . . . . . . . . . . . . . . . . 12
Transfer Options . . . . . . . . . . . . . . . . . . . . . . . . . . . . . . . . . . . . . . . . . . . . 13
Chapter 2 Transferring Files
Media Compatibility Between Avid Applications . . . . . . . . . . . . . . 16
Transferring Clips from Within an Avid Application to
Another Workgroup . . . . . . . . . . . . . . . . . . . . . . . . . . . . . . . . . . . . . . . 16
Setting Up the Avid System for Transfers . . . . . . . . . . . . . . . . . . 16
Transferring Files . . . . . . . . . . . . . . . . . . . . . . . . . . . . . . . . . . . . . . . 19
Transferring Objects from One Workgroup to
Another Workgroup . . . . . . . . . . . . . . . . . . . . . . . . . . . . . . . . . . . . . . . 20
Transferring Files from a Remote Workgroup to Your
Avid System . . . . . . . . . . . . . . . . . . . . . . . . . . . . . . . . . . . . . . . . . . . . . . 22
Transferring Files to a Playback Device. . . . . . . . . . . . . . . . . . . . . . . . 23
4
Page 5

Working with Rundowns . . . . . . . . . . . . . . . . . . . . . . . . . . . . . . . . . . . . 24
Transferring Files from an Ingest Device . . . . . . . . . . . . . . . . . . . . . . 26
Monitoring Transfers. . . . . . . . . . . . . . . . . . . . . . . . . . . . . . . . . . . . . . . . 27
Monitoring the Transfer from Within the Avid Application . . 27
Monitoring Transfers from Your Browser . . . . . . . . . . . . . . . . . . 30
Chapter 3 Using TransferManager in a Non–Avid Unity Environment
Transferring Clips . . . . . . . . . . . . . . . . . . . . . . . . . . . . . . . . . . . . . . . . . . 37
Setting Up the Avid System for Transfers . . . . . . . . . . . . . . . . . . 38
Transferring Data . . . . . . . . . . . . . . . . . . . . . . . . . . . . . . . . . . . . . . . 41
Chapter 4 Troubleshooting
Suggested Troubleshooting Guidelines . . . . . . . . . . . . . . . . . . . . . . . 42
Verifying Network Connectivity. . . . . . . . . . . . . . . . . . . . . . . . . . . . . . 43
Index
5
Page 6

Using This Guide
The Avid Unity™ TransferManager application allows you to move
media and manage the transfer of media to and from workgroups in
an Avid Unity environment. You can also use TransferManager in a
non–Avid Unity environment to move media between workstations.
n
Your system might not contain certain features that are described in your
documentation. Our documents describe all features regardless of which
model you purchased. This document describes the TransferManager
application in a non–Avid Unity environment and an Avid Unity workgroup
environment. It also describes the TransferManager browser available for the
workgroup environment.
Who Should Use This Guide
This guide is designed for anyone who is setting up or using
TransferManager.
This guide assumes that you already have a site network in place.
Setting up and configuring a site network is beyond the scope of this
guide.
6
Page 7

This guide also assumes you have followed the procedures in the
Avid Unity Workgroup Setup Guide to set up your TransferManager
server.
About This Guide
The information provided in this guide will help you to understand
the user interface (UI) in this application, how to use the application,
and how to troubleshoot basic problems that can arise during daily
operation.
The Contents lists the topics included in this guide. They are presented
with the following overall structure:
• Chapter 1 explains the functions of different windows and dialog
boxes you see when operating the TransferManager software.
• Chapter 2 explains how to transfer information between sending
and receiving systems.
• Chapter 3 explains how to transfer information between two
clients that are not part of the Avid Unity environment.
• Chapter 4 describes tools to use if problems occur.
Symbols and Conventions
Unless noted otherwise, the material in this document applies to the
Windows NT
applies to a specific operating system, it is marked as follows:
• (Windows
the Windows NT operating system.
• (Macintosh) or (Macintosh only) means the information applies to
the Macintosh operating system.
®
and Macintosh® operating systems. When the text
®
) or (Windows only) means the information applies to
7
Page 8

The majority of screen shots in this document were captured on a
Windows NT system, but the information applies to both
Windows NT and Macintosh systems. Where differences exist, both
Windows NT and Macintosh screen shots are shown.
The TransferManager documentation uses the following special
symbols and conventions:
1. Numbered lists, when the order of the items is important.
a. Alphabetical lists, when the order of secondary items is
important.
• Bulleted lists, when the order of the items is unimportant.
- Indented dashed lists, when the order of secondary items is
unimportant.
Courier Bold font identifies text that you type.
Look here in the margin
for tips.
n
c
w
In the margin, you will find tips that help you perform tasks more
easily and efficiently.
A note provides important related information, reminders, recommendations,
and strong suggestions.
A caution means that a specific action you take could cause harm to
your computer or cause you to lose data.
A warning describes an action that could cause you physical harm.
Follow the guidelines in this guide or on the unit itself when
handling electrical equipment.
If You Need Help
1. Retry the action, carefully following the instructions given for that
task in this guide.
8
Page 9

2. Check the documentation that came with your hardware for
maintenance or hardware-related issues.
3. Check the release notes supplied with your Avid application for
information on accessing the Avid Web site and the Avid
Knowledge Center.
4. For customer support, contact your local Avid Reseller, or contact
Avid Customer Support directly:
• Broadcast customers — call 800-NEWS-DNG (639-7364).
• Postproduction customers — call 800-800-AVID (2843).
Related Information
The following documents provide more information about
TransferManager and other workgroup products:
• Avid Unity MediaManager User’s Guide
• Avid Unity MediaManager Administrator’s Guide
• Avid Unity MediaManager Release Notes
• Avid Unity TransferManager Release Notes
• Avid Products Collaboration Guide
This guide provides step-by-step instructions for transferring
project files, audio files, and graphics and effects files between
various Avid products.
The most recent update of the Avid Products Collaboration Guide is
provided online. Check the release notes supplied with your Avid
application for information on accessing online documentation.
9
Page 10

If You Have Documentation Comments
Avid Technology continuously seeks to improve its documentation.
We value your comments about this guide, the Help, and other
Avid-supplied documentation.
Simply e-mail your documentation comments to Avid Technology at
TechPubs@avid.com
Please include the title of the document, its part number, revision, and
the specific section you are commenting on in all correspondence.
How to Order Documentation
To order additional copies of this documentation from within the
United States, call Avid Telesales at 800-949-AVID (2843). If you are
placing an order from outside the United States, contact your local
Avid representative.
10
Page 11

CHAPTER 1
TransferManager Overview
This chapter provides an overview of Avid Unity TransferManager as
discussed in the following sections:
• About TransferManager
• TransferManager in a Workgroup Environment
• Transfer Options
Read through the chapter to become familiar with the
TransferManager options. When you are ready to transfer files, follow
the procedures in Chapter 2.
About TransferManager
TransferManager can transfer media to and from another workgroup’s
TransferManager. In a broadcast environment, TransferManager can
send finished sequences to a configured playback device or input
media from a configured ingest device.
TransferManager receives and queues transfer requests from one or
more clients. Transfers are then initiated by the TransferManager
server to offload the client. You can monitor TransferManager status
through a Web-based user interface (UI). You can also monitor your
own transfer from within your Avid application.
11
Page 12

You can also use TransferManager in a non–Avid Unity environment.
For information on using TransferManager to move media between
workstations, see Chapter 3.
TransferManager in a Workgroup Environment
The workgroup environment consists of the following functional
components:
• Avid Unity MediaNet file server and storage
• Avid Unity MediaManager to track and manage Avid Unity media
®
• Supported Avid editors (Media Composer
Avid Xpres s
• TransferManager server that will manage the transfer of media to
and from the workgroup and to and from other workgroups
• Fibre Channel network that connects the Avid editing systems,
MediaManager, and TransferManager to the Avid Unity MediaNet
environment
• Ethernet network used as a general-purpose communication
network
®
, NewsCutter®)
, Symphony™,
The following diagram shows a typical shared-storage workgroup
configuration.
12
Page 13
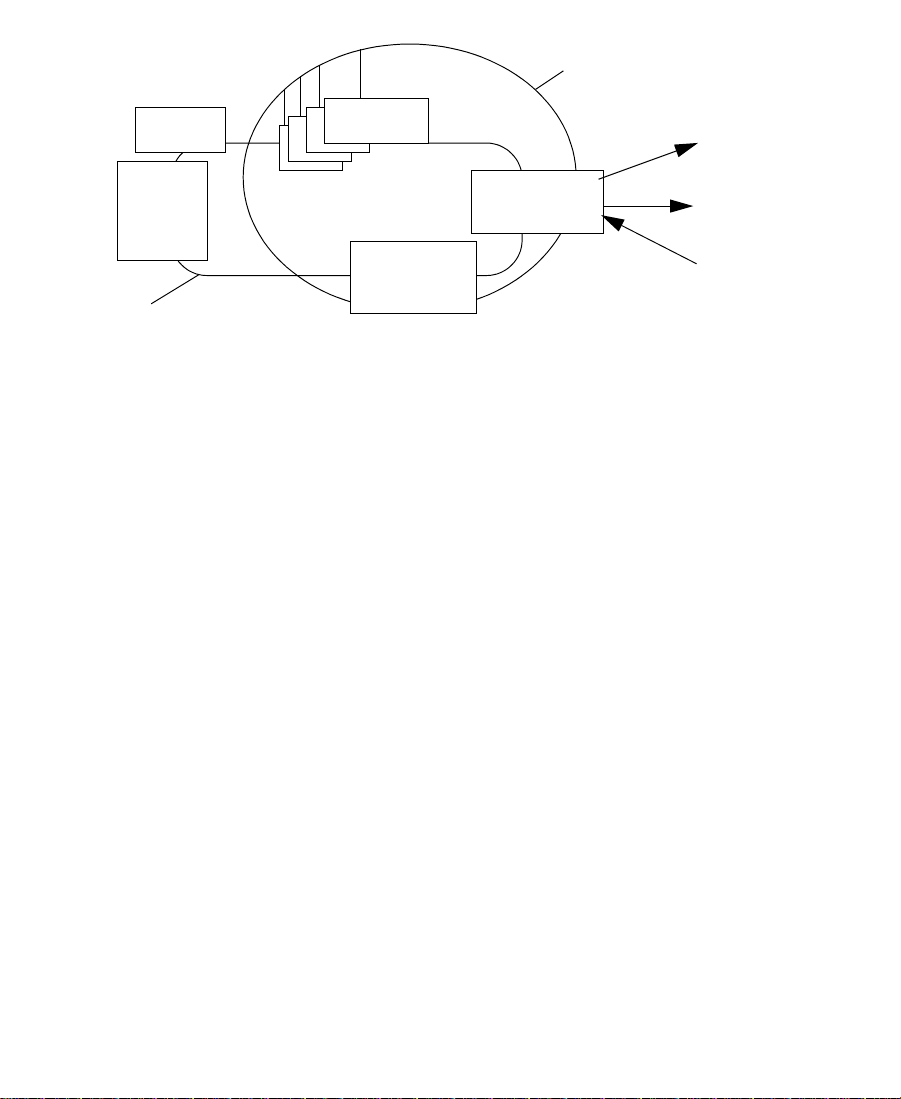
Ethernet
MediaNet
file server
Avid Unity
storage
Fibre Channel
The workgroup enables collaborative workflows by allowing multiple
editors to share media. For information on installing the
TransferManager client software and the TransferManager server
software, see the Avid Unity TransferManager Release Notes.
Transfer Options
When you use TransferManager in a workgroup environment, you can
transfer files in a number of ways.
• You can perform a remote transfer from the MediaManager user
interface. See “Transferring Objects from One Workgroup to
Another Workgroup” on page 20.
Supported
Avid systems
MediaManager
server
TransferManager server
To a playback
device
To another workgroup
From an ingest
device
• You can perform a transfer from within the Avid editing system
(for example, NewsCutter) to another workgroup or playback
device. See “Transferring Clips from Within an Avid Application
to Another Workgroup” on page 16.
• You can pull media from a remote MediaManager directly to your
Avid system’s bin. See “Transferring Files from a Remote
Workgroup to Your Avid System” on page 22.
13
Page 14

• If you are working in an Avid Unity for News workgroup, you can
transfer finished sequences to a configured playback device. See
“Transferring Files to a Playback Device” on page 23.
14
Page 15

CHAPTER 2
Transferring Files
This chapter describes how to transfer files and how to use the
TransferManager Status window to monitor the status of transfers in
your workgroup.
This chapter discusses the following topics:
• Media Compatibility Between Avid Applications
• Transferring Clips from Within an Avid Application to Another
Workgroup
• Transferring Objects from One Workgroup to Another
Workgroup
• Transferring Files from a Remote Workgroup to Your Avid
System
• Transferring Files to a Playback Device
• Working with Rundowns
• Transferring Files from an Ingest Device
• Monitoring Transfers
15
Page 16

Media Compatibility Between Avid Applications
The type of system on which your application is running determines
what can be sent between systems. Before you transfer data between
Avid applications, consider whether the media, files, or compositions
are compatible between applications.
For additional information about compatibility, see the Avid Products
Collaboration Guide.
Transferring Clips from Within an Avid Application to Another Workgroup
If TransferManager is properly installed and enabled on your Avid
editing system, it starts automatically whenever you start the Avid
application. When you complete a sequence, you can transfer it from
the Avid application to any other connected workgroup. Once you
send the sequence, you are free to work on another project while the
transfer is taking place.
Setting Up the Avid System for Transfers
To activate TransferManager each time you start your Avid editing
system and to have the application notify you of incoming transfers:
1. In the Avid application, click the Settings button in the Project
window.
2. Double-click Transfer in the Settings scroll list.
The Transfer Settings window opens.
3. Click the Settings tab.
16
Page 17

4. Do one of the following:
• Select Refuse All Requests if you do not want to receive files
from another workgroup.
• Select User Dialog To Accept/Refuse and one of the following
methods for accepting transfers:
- Wait for User Action (No Timeout) — User receives a
message request for a transfer. User must click OK for the
transfer to occur.
- Accept After Timeout — Automatically accepts the file after
the timeout.
- Refuse After Timeout — Does not accept the file after the
timeout.
•In the Timeout (seconds) text box, enter the amount of time
you want to set for the timeout.
5. Select “Highlight mixed-resolution items.”
17
Page 18

If a sequence contains DV 25 and DV 50 media within the same
sequence, that sequence will be highlighted in red in the bin.
TransferManager cannot send sequences that contain both DV 25
and DV 50 media to playback. This feature allows you to easily
identify those sequences.
6. Click OK.
7. Click the TMClient.ini tab.
8. Type the TransferManager server computer name in the Server
text box.
9. Type the name of your workgroup in the Workgroup text box. This
can be any name you give your workgroup.
10. If your environment includes another workgroup that includes
another TransferManager server, click Add.
11. In the other Workgroups area, type the name of the other
TransferManager server and the name of the other workgroup.
12. Click OK.
18
Page 19

Transferring Files
To send clips or sequences to another workgroup from within the
Avid application:
1. Open the bin that contains the clips or sequences you want to
send.
2. Select a clip or sequence.
• (Windows) Ctrl+click to select multiple clips or sequences.
• (Macintosh) Shift+click to select multiple clips or sequences.
3. From the Transfer menu, choose Send To Workgroup.
4. From the Send To Workgroup submenu, choose the available
workgroup to which you want to send the files.
The files are sent to the TransferManager server, where they are
then sent to the selected workgroup. You can now work on
another project while the transfer is taking place.
For information on monitoring the transfer of the files, see
“Monitoring the Transfer from Within the Avid Application” on
page 27.
19
Page 20

Transferring Objects from One Workgroup to Another Workgroup
If you want to transfer objects to another workgroup, you must have
the TransferManager application installed in the workgroup. The
Web-based user interface of MediaManager allows users to access
TransferManager to transfer media from one workgroup to another.
Because the user interface is Web-based, each workgroup will have a
unique uniform resource locator (URL) associated with it. This makes
navigating to other workgroups quick and easy.
n
n
You may want to bookmark the workgroups for easy access.
To transfer media, you must have two Web browsers running, one for the
originating workgroup and one for the destination workgroup.
To transfer media objects to another workgroup:
1. If you have not already done so, start your browser and open your
local MediaManager.
2. Open the remote MediaManager.
3. Click Services in the mode selector of the remote MediaManager.
Mode selector
20
Page 21

The Services control frame appears.
4. In your local MediaManager, click the objects that you want to
transfer to the remote MediaManager:
• (Windows) Ctrl+click or click Select All to select multiple
objects.
• (Macintosh) Shift+click or click Select All to select multiple
objects.
5. Drag the selected files to the Inbox icon of the remote
MediaManager.
A dialog box appears.
6. Do one of the following:
• Click Launch TransferManager status if you want to monitor
the transfer. The TransferManager status window opens. For
more information, see “Transferring Files to a Playback
Device” on page 23.
• Click Close if you do not want to monitor the transfer.
21
Page 22

Transferring Files from a Remote Workgroup to Your Avid System
TransferManager allows you to move files from a remote workgroup
to your Avid system bin. To “pull” files from the external workgroup,
you must use MediaManager from the originating workgroup. You
drag the objects from the remote MediaManager and drop them in the
Avid system bin.
To transfer objects from a remote workgroup to your Avid system:
1. In the Settings scroll list of the Avid system Project window, click
to select the appropriate OMM settings (see “Configuring Avid
Systems to Work with MediaManager” in the Avid Unity
MediaManager User’s Guide).
2. Open the Avid system bin in which you want to store the media
objects that you want to transfer.
3. If you have not already done so, open the remote MediaManager.
4. Perform a search or browse operation that returns the object or
objects that you want to transfer.
5. In the results frame, click the objects you want to transfer and drag
them to the Avid system bin:
• (Windows) Ctrl+click or click Select All to select multiple
objects.
• (Macintosh) Shift+click or click Select All to select multiple
objects.
A message appears, asking if you want to initiate the transfer.
6. Click Now or Later:
• If you select Now, the objects are transferred.
• If you select Later, the objects are not transferred until you
retrieve them. To retrieve them, choose Retrieve from the
Transfer menu.
22
Page 23

The imported objects appear in the bin. To monitor the transfer,
see “Monitoring Transfers” on page 27.
Transferring Files to a Playback Device
In a broadcast environment, you can transfer a finished sequence to a
configured playback device.
To send a finished sequence to a playback device:
1. Open the bin that contains the sequence you want to send.
2. Select the sequence.
3. From the Transfer menu, choose Send To Playback.
4. From the Send To Playback submenu, choose the available
playback device to which you want to send the sequence.
The Send to Playback dialog box appears.
n
n
If necessary, you can set the sequence to high priority by clicking the circle in
the Play While Transferring (PWT) column next to the sequence you have
sent.
If you try to send a sequence or clip with the same tape ID as one the
TransferManager already has, you will receive an error message.
5. Click OK.
23
Page 24

The sequence is sent to the TransferManager server, where it is
sent to the selected playback device. You can now work on
another project while the transfer is taking place.
For information on monitoring the transfer of the files, see
“Monitoring the Transfer from Within the Avid Application” on
page 27.
Working with Rundowns
In a broadcast environment, you can enable the TransferManager
scheduling feature to allow interaction with the Newsroom Computer
System (NRCS). You can select the files to send to playback, and the
schedule list from the NRCS determines the order in which the files
are played back.
To use the TransferManager with rundowns:
1. Click the Start button, point to Programs, point to Avid, and then
select TransferManager Configuration.
The TransferManager Configuration window opens.
24
Page 25

2. In the Playlist Information area, select “Use Newsroom rundowns
to schedule transfers.”
3. Type the computer name of the Newsroom Server.
4. Type the User name and password.
5. If you know the name of the schedule file, type it in the Schedule
File Name text box. If not, click Browse to find the schedule. The
schedule file specifies which rundowns to use at which time.
6. Click OK.
7. Restart the TransferManager server. (Anytime the configuration
information changes, you must restart the server.)
8. Open the bin that contains the sequences you want to send.
25
Page 26

9. Select the sequences.
10. From the Transfer menu, choose Send To Playback.
11. From the Send To Playback submenu, choose the available
playback device to which you want to send the sequence.
The Send to Playback dialog box appears.
12. Click OK.
The sequences are transferred based upon the order they appear in
the NRCS rundown list.
n
If you set one of the sequences to high priority by clicking the circle in the
Play While Transferring (PWT) column next to the sequence, that sequence
will have priority over the rundown list.
For information on monitoring the transfer of files, see
“Monitoring the Transfer from Within the Avid Application” on
page 27.
Transferring Files from an Ingest Device
In a broadcast environment, you can transfer files from a configured
ingest device to your Avid system bin.
To transfer files from the ingest device to your Avid system bin:
1. Ensure that the ingest device is properly connected. For more
information, see the documentation supplied with your ingest
device.
2. Open the ingest device’s application that allows you to see the
files located on the ingest device.
A list of files located on the ingest device appears.
3. Open the bin on your Avid system where you want to ingest the
files.
26
Page 27

4. Press Alt+Tab to bring the ingest device’s application to the
foreground.
5. Click the media file you want to ingest.
6. Drag the file to your Avid system bin.
A message appears asking if you want to initiate the transfer.
7. Click Now or Later:
• If you select Now, the objects are transferred.
• If you select Later, the objects are not transferred until you
retrieve them. To retrieve them, choose Retrieve from the
Transfer menu.
For information on monitoring the transfer of files, see
“Monitoring the Transfer from Within the Avid Application” on
page 27.
Monitoring Transfers
You can monitor the transfer of files either from the Avid application
or from the TransferManager Status window using a Web browser. If
you monitor from within the Avid application, you will see only the
files you transferred. If you open the TransferManager Status window,
you will see all TransferManager activity. If you have administrative
privileges or you initiated the transfer, you can also cancel, retry,
pause, or resume transfers.
Monitoring the Transfer from Within the Avid Application
Once you transfer a file from within the Avid application, you can
monitor the transfer.
To monitor the file transfer:
1. From the Transfer menu, choose Status.
27
Page 28
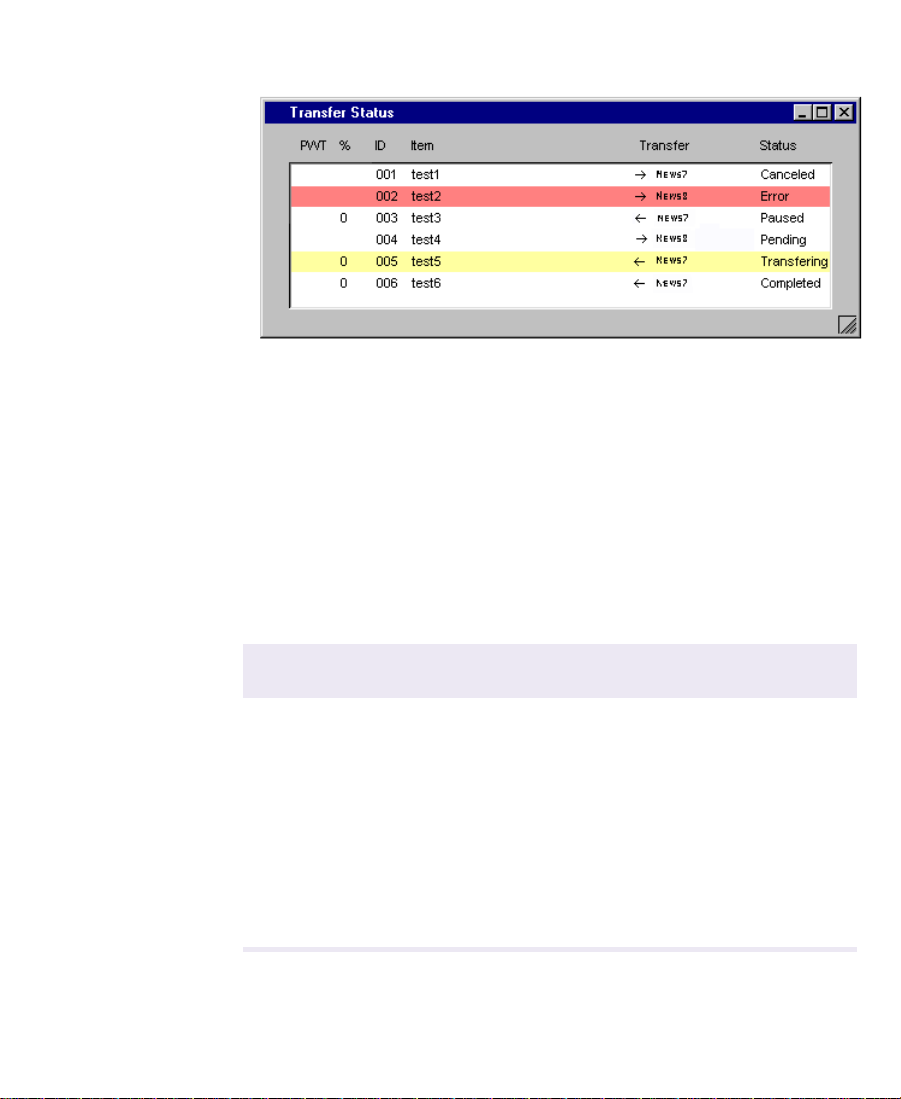
The Transfer Status window opens.
2. Right-click the status of a particular transfer to access the transfer
status options.
n
A plus sign in the PWT column indicates the clip or sequence has been set to
a high priority.
3. Use the following chart to determine the status options during a
transfer.
When the transfer status is You can
Transferring Pause or cancel the transfer
Paused Resume or cancel the transfer
Error (plus information indicating
the error)
Pending Cancel the transfer
Completed or Canceled Clear the transfer
28
Retry or clear the transfer
Page 29

Sorting the Transfer Status Columns
You might want to view the status or locations of the transfers in
alphabetical order. This would make it easy to view all the completed,
paused, or canceled transfers together.
To sort a transfer status column:
1. From the Transfer menu, choose Status.
The Transfer Status window opens.
2. Access the sort options:
• (Windows) Right-click the column to choose the sort options.
• (Macintosh) Press and hold the Status column until the Sort
menu appears.
3. Choose either Sort, Sort Reversed, or No Sort. Sort will list the
information in alphabetical order.
29
Page 30

Monitoring Transfers from Your Browser
You can monitor the TransferManager activity from your Web
browser. The TransferManager Status window provides information
on the progress of all transfers. The Status window provides a list of
transfers that are pending, running, paused, recently completed,
failed, or canceled. The History window shows a list of all past
transfers (since the last time the TransferManager server was
restarted). The transfer Detail window shows details associated with a
given transfer.
n
If you bring up multiple browsers on the same system and they all have the
same TransferManager status URL, only the first browser will correctly
refresh itself to show the transfer completed. The other browsers, which will be
slightly out of sync and behind, stop showing updates to the transfer when the
first browser shows the transfer completed. The secondary browsers will
update themselves the next time a transfer starts, forcing a complete refresh.
To access the TransferManager browser:
1. Start your Web browser, and open your local MediaManager.
Mode selector
2. Click Services in the mode selector.
The Services control frame appears.
30
Page 31

Mode selector
3. Click Inbox.
The TransferManager browser window opens.
31
Page 32
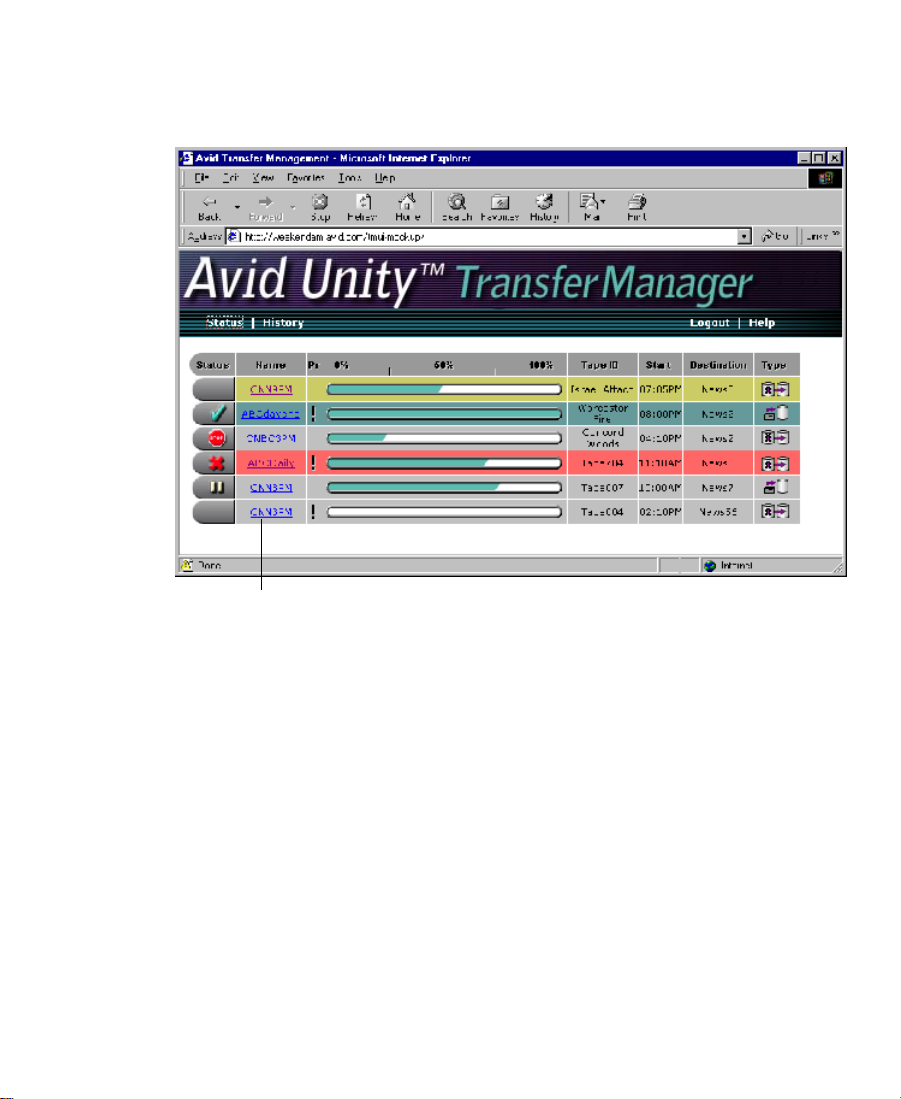
Status Window
The Status window shows all the current transfer activity.
Hyperlink name
Ta bl e 2 -1 describes the information displayed in the TransferManager
Status window.
32
Page 33

Table 2-1 TransferManager Status Window Details
Status Window
Column
Status Displays the status of the current transfers.
Name Shows the name of the media being transferred. When you click a hyperlink, the
Priority Allows you to set the priority of each transfer.
Progress Indicator The progress indicator is updated as a transfer progresses. Green segments are
Description
The color of the status row indicates the following:
Gray with no icon = Transfer is pending or in the queue.
Gray with Stop icon = Transfer has been canceled.
Gray with Pause icon = Transfer has been paused.
Yellow with no icon = Transfer is running.
Red with X icon = Transfer has failed.
Green with check mark icon = Transfer has completed successfully.
Detail window opens.
added to the thermometer to indicate the percentage of the transfer that has
completed.
TapeID The TapeID of a clip is the same TapeID used in the Avid application. This helps
identify a particular piece of media.
Start Shows the time the transfer was started (not the time the transfer request was
submitted to the TransferManager server.)
Destination Indicates the name of the workgroup receiving the transfer.
Type Shows an icon representing the transfer type. The icon represents a
workgroup-to-workgroup transfer. On Air icons are applicable for workgroup
environments connected to a playback system.
33
Page 34

Detail Window
The Transfer Detail window displays all available information for a
particular transfer.
To view the details of a particular transfer:
1. Access the TransferManager Status window. See “Monitoring
Transfers from Your Browser” on page 30.
Hyperlink
2. Click the hyperlink of the transfer for which you want additional
information.
The Transfer Detail window opens.
34
Page 35

n
The Transfer Detail window background color matches the status of the
transfer. If you accessed the Transfer Detail window from the History
window, the background matches the History window background.
Command buttons appear at the bottom of the Detail window if the
active user entered TransferManager from the MediaManager Inbox,
the user owns the transfer, or the MediaManager user has
administrative privileges.
35
Page 36

History Window
The TransferManager History window allows you to view the history
of all transfers since the last time you rebooted the TransferManager
server.
To view the history of any transfers:
1. Open the TransferManager Status window. See “Monitoring
Transfers from Your Browser” on page 30.
2. Click History in the mode selector.
The History window opens.
The History window displays canceled, failed, or successfully
completed transfers. The History window does not show pending,
paused, or in-progress transfers.
The History window does not update as transfers complete. To get
information on any transfers that have completed after the History
window was opened, refresh the window.
36
Page 37

CHAPTER 3
Using TransferManager in a
Non–Avid Unity
Environment
In a non–Avid Unity environment, TransferManager can be used to
transfer compositions and media from one Avid editing system to
another Avid editing system. If you are transferring compositions or
clips, you simply select the item from a bin and transfer it. If data is
being sent to you from another Avid editing system, you simply
choose to accept it.
• Transferring Clips
• Setting Up the Avid System for Transfers
• Transferring Data
Transferring Clips
If TransferManager is properly installed and enabled on your Avid
editing system, it starts automatically whenever you start the Avid
application. When you complete a sequence, you can transfer it from
your Avid system to another Avid system. Each system must have the
TransferManager software installed. Once you send the sequence, you
37
Page 38

are free to work on another project while the transfer is taking place.
However, until the transfer operation is complete, certain operations
will run more slowly. In the case of playback and recording, you might
experience interruptions.
Setting Up the Avid System for Transfers
To set up the application to notify you of incoming transfers:
1. In the Avid application, click the Settings button in the Project
window.
2. Double-click Transfer in the Settings scroll list.
The Transfer Settings window opens.
3. Click the Settings tab.
4. Do one of the following:
38
Page 39

• Select Refuse All Requests if you do not want to receive files
from another workgroup.
• Select User Dialog To Accept/Refuse and one of the following
methods for accepting transfers:
- Wait for User Action (No Timeout) — User receives a
message request for a transfer. User must click OK for the
transfer to occur.
- Accept After Timeout — Automatically accepts the file after
the timeout.
- Refuse After Timeout — Does not accept the file after the
timeout.
•In the Timeout (seconds) text box, enter the amount of time
you want to set for the timeout.
5. Deselect “Highlight mixed-resolution items.” This does not apply
to workstation-to-workstation clients.
6. Click OK.
7. Click the TMClient.ini tab.
39
Page 40

8. In the Other Workgroups area, click Add.
The Add Workgroup To List dialog box appears.
9. In the Server text box, type the computer name of the other
workstation from which you want to send or receive transfers.
10. In the Workgroup text box, type the name you want to see in the
Transfer menu for that workstation. You can use any name in this
text box.
11. Click OK.
n
If you want to edit the names of any of the workstations, click Edit and make
the changes.
40
Page 41

Transferring Data
To send clips or sequences to another Avid editing system:
1. Open the bin that contains the clips or sequences you want to
send.
2. Select a clip or sequence.
• (Windows) Ctrl+click to select multiple clips or sequences.
• (Macintosh) Shift+click to select multiple clips or sequences.
3. From the Transfer menu, choose Send To Workgroup and then
choose the available workstation to which you want to send the
files.
The compositions, clips, and any available media are sent to the
destination system.
For information on monitoring the transfer of the files, see
“Monitoring the Transfer from Within the Avid Application” on
page 27.
41
Page 42

CHAPTER 4
Troubleshooting
This chapter describes how to detect problems you might encounter
when using TransferManager as discussed in the following topics:
• Suggested Troubleshooting Guidelines
• Verifying Network Connectivity
Suggested Troubleshooting Guidelines
The following guidelines can help you troubleshoot problems:
• Verify that TransferManager is running on both the sending and
the receiving systems. TransferManager must be running on both
systems.
• Verify that the network cables are securely connected between the
computer and the site network.
• Verify that the network is operating and that your computer can
detect the presence of the destination system. See “Verifying
Network Connectivity” on page 43.
• If your computer has an optional network board, run the
diagnostic programs that were provided with the board to verify
that the board is functioning properly.
42
Page 43

• If the system times out during transfers to your own computer or
any other computer, ask the network administrator to verify that
the Domain Name Server (DNS) specified in the TCP/IP
properties of the Network settings in the Control Panel is active
and connected to the network.
Verifying Network Connectivity
You can use the Windows NT operating system ping command to
verify the network connection between your computer and another
system on the network.
n
Before you use the ping command, make sure you know the system name or
network address of the system you are pinging.
To check network connectivity:
1. Click the Start button, and then click Run.
The Run dialog box appears.
2. Type the following command in the Open text box:
systemname
ping
where systemname is the name of the system you are verifying.
The Windows NT Console window opens, showing the status of
the pinging.
43
Page 44

Index
A C D E F H I M N P R S T W
A
Accepting transfers 17, 39
C
Commands
ping
43
Compatibility of media 16
D
Destination
in Status window
Detail window
described
Detecting problems 42
34
33
E
Ethernet network 12
F
Fibre Channel network 12
H
History window
described
36
I
Ingest device
transferring files from
M
Media compatibility 16
26
44
Page 45

N
T
Name
in Status window
Network
board
42
detecting presence on 43
Network connectivity 42
33
P
ping command 43
Presence on the network, detecting 43
Priority
in Status window
Progress indicator
in Status window
33
33
R
Rundowns
working with
24
S
Schedules
working with
Settings scroll list
Transfer settings
Start
in Status window
Status window
described
24
16, 38
33
32
TapeID
in Status window
Timing out during transfers 43
Transfer
options
13
settings 16, 38
Transferring
files from a remote workgroup to an Avid
system
files from one workgroup to another
workgroup
files from within an Avid application 16, 37
Transfers
method of accepting incoming
monitoring 27
monitoring from browser 30
sorting 29
Troubleshooting 42
Type column
in Status window
33
22
20
17, 39
33
W
Workgroup environment
TransferManager in
typical configuration with TransferManager
12
12
45
 Loading...