

Page 1

Avid Unity™ MediaNetwork
Management Guide
make manage move | media
™
Avid
®
Page 2

Copyright and Disclaimer
Product specifications are subject to change without notice and do not represent a commitment on the part
of Avid Technology, Inc. The software described in this document is furnished under a license agreement.
You can obtain a copy of that license by visiting Avid's Web site at www.avid.com. The terms of that license
are also available in the product in the same directory as the software. The software may not be reverse
assembled and may be used or copied only in accordance with the terms of the license agreement. It is
against the law to copy the software on any medium except as specifically allowed in the license
agreement. Avid products or portions thereof are protected by one or more of the following United States
patents: 4,746,994; 4,970,663; 5,045,940; 5,267,351; 5,309,528; 5,355,450; 5,396,594; 5,440,348;
5,452,378; 5,467,288; 5,513,375; 5,528,310; 5,557,423; 5,568,275; 5,577,190; 5,584,006; 5,640,601;
5,644,364; 5,654,737; 5,715,018; 5,724,605; 5,726,717; 5,729,673; 5,745,637; 5,752,029; 5,754,851;
5,799,150; 5,812,216; 5,852,435; 5,883,670; 5,905,841; 5,929,836; 5,929,942; 5,930,445; 5,946,445;
5,987,501; 5,995,115; 6,016,152; 6,018,337; 6,023,531; 6,035,367; 6,038,573; 6,058,236; 6,061,758;
6,091,778; 6,105,083; 6,118,444; 6,128,001; 6,130,676; 6,134,607; 6,137,919; 6,141,007; 6,141,691;
6,157,929; 6,198,477; 6,201,531; 6,211,869; 6,223,211; 6,239,815; 6,249,280; 6,269,195; 6,301,105;
6,317,158; 6,317,515; 6,327,253; 6,330,369; 6,351,557; 6,353,862; 6,357,047; 6,392,710; 6,404,435;
6,407,775; 6,417,891; 6,426,778; D396,853; D398,912. Additional U.S. and foreign patents pending. No
part of this document may be reproduced or transmitted in any form or by any means, electronic or
mechanical, including photocopying and recording, for any purpose without the express written permission
of Avid Technology, Inc.
Copyright © 2003 Avid Technology, Inc. and its licensors. All rights reserved. Printed in USA.
The following disclaimer is required by Apple Computer, Inc.
APPLE COMPUTER, INC. MAKES NO WARRANTIES WHATSOEVER, EITHER EXPRESS OR IMPLIED,
REGARDING THIS PRODUCT, INCLUDING WARRANTIES WITH RESPECT TO ITS
MERCHANTABILITY OR ITS FITNESS FOR ANY PARTICULAR PURPOSE. THE EXCLUSION OF
IMPLIED WARRANTIES IS NOT PERMITTED BY SOME STATES. THE ABOVE EXCLUSION MAY NOT
APPLY TO YOU. THIS WARRANTY PROVIDES YOU WITH SPECIFIC LEGAL RIGHTS. THERE MAY BE
OTHER RIGHTS THAT YOU MAY HAVE WHICH VARY FROM STATE TO STATE.
The following disclaimer is required by Sam Leffler and Silicon Graphics, Inc. for the use of
their TIFF library:
Copyright © 1988–1997 Sam Leffler
Copyright © 1991–1997 Silicon Graphics, Inc.
Permission to use, copy, modify, distribute, and sell this software [i.e., the TIFF library] and its
documentation for any purpose is hereby granted without fee, provided that (i) the above copyright notices
and this permission notice appear in all copies of the software and related documentation, and (ii) the
names of Sam Leffler and Silicon Graphics may not be used in any advertising or publicity relating to the
software without the specific, prior written permission of Sam Leffler and Silicon Graphics.
THE SOFTWARE IS PROVIDED “AS-IS” AND WITHOUT WARRANTY OF ANY KIND, EXPRESS,
IMPLIED OR OTHERWISE, INCLUDING WITHOUT LIMITATION, ANY WARRANTY OF
MERCHANTABILITY OR FITNESS FOR A PARTICULAR PURPOSE.
IN NO EVENT SHALL SAM LEFFLER OR SILICON GRAPHICS BE LIABLE FOR ANY SPECIAL,
INCIDENTAL, INDIRECT OR CONSEQUENTIAL DAMAGES OF ANY KIND, OR ANY DAMAGES
WHATSOEVER RESULTING FROM LOSS OF USE, DATA OR PROFITS, WHETHER OR NOT ADVISED
OF THE POSSIBILITY OF DAMAGE, AND ON ANY THEORY OF LIABILITY, ARISING OUT OF OR IN
CONNECTION WITH THE USE OR PERFORMANCE OF THIS SOFTWARE.
The following disclaimer is required by the Independent JPEG Group:
Portions of this software are based on work of the Independent JPEG Group.
The following disclaimer is required by Paradigm Matrix:
Portions of this software licensed from Paradigm Matrix.
Page 3

The following disclaimer is required by Ray Sauers Associates, Inc.:
“Install-It” is licensed from Ray Sauers Associates, Inc. End-User is prohibited from taking any action to
derive a source code equivalent of “Install-It,” including by reverse assembly or reverse compilation, Ray
Sauers Associates, Inc. shall in no event be liable for any damages resulting from reseller’s failure to
perform reseller’s obligation; or any damages arising from use or operation of reseller’s products or the
software; or any other damages, including but not limited to, incidental, direct, indirect, special or
consequential Damages including lost profits, or damages resulting from loss of use or inability to use
reseller’s products or the software for any reason including copyright or patent infringement, or lost data,
even if Ray Sauers Associates has been advised, knew or should have known of the possibility of such
damages.
The following disclaimer is required by Videomedia, Inc.:
“Videomedia, Inc. makes no warranties whatsoever, either express or implied, regarding this product,
including warranties with respect to its merchantability or its fitness for any particular purpose.”
“This software contains V-LAN ver. 3.0 Command Protocols which communicate with V-LAN ver. 3.0
products developed by Videomedia, Inc. and V-LAN ver. 3.0 compatible products developed by third parties
under license from Videomedia, Inc. Use of this software will allow “frame accurate” editing control of
applicable videotape recorder decks, videodisc recorders/players and the like.”
The following disclaimer is required by Altura Software, Inc. for the use of its Mac2Win
software and Sample Source Code:
©1993–1998 Altura Software, Inc.
The following disclaimer is required by Ultimatte Corporation:
Certain real-time compositing capabilities are provided under a license of such technology from Ultimatte
Corporation and are subject to copyright protection.
The following disclaimer is required by 3Prong.com Inc.:
Certain waveform and vector monitoring capabilities are provided under a license from 3Prong.com Inc.
Attn. Government User(s). Restricted Rights Legend
U.S. GOVERNMENT RESTRICTED RIGHTS. This Software and its documentation are “commercial
computer software” or “commercial computer software documentation.” In the event that such Software or
documentation is acquired by or on behalf of a unit or agency of the U.S. Government, all rights with
respect to this Software and documentation are subject to the terms of the License Agreement, pursuant to
FAR §12.212(a) and/or DFARS §227.7202-1(a), as applicable.
Trademarks
888 I/O, AirPlay, AirSPACE, AirSPACE HD, AniMatte, AudioSuite, AudioVision, AutoSync, Avid, AVIDdrive,
AVIDdrive Towers, AvidNet, AvidNetwork, AVIDstripe, Avid Unity, Avid Xpress, AVoption, AVX, CamCutter,
ChromaCurve, ChromaWheel, DAE, D-Fi, D-fx, Digidesign, Digidesign Audio Engine, Digidesign Intelligent
Noise Reduction, DigiDrive, DINR, D-Verb, Equinox, ExpertRender, FieldPak, Film Composer, FilmScribe,
FluidMotion, HIIP, HyperSPACE, HyperSPACE HDCAM, IllusionFX, Image Independence, Intraframe, iS9,
iS18, iS23, iS36, Lo-Fi, Magic Mask, make manage move | media, Marquee, Matador, Maxim, MCXpress,
Media Composer, MediaDock, MediaDock Shuttle, Media Fusion, Media Illusion, MediaLog,
Media Reader, Media Recorder, MEDIArray, MediaShare, Meridien, MetaSync, NaturalMatch, NetReview,
NewsCutter, OMF, OMF Interchange, OMM, Open Media Framework, Open Media Management,
ProEncode, Pro Tools, QuietDrive, Recti-Fi, rS9, rS18, Sci-Fi, Softimage, Sound Designer II, SPACE,
SPACEShift, Symphony, Trilligent, UnityRAID, Vari-Fi, Video Slave Driver, VideoSPACE, and Xdeck are
either registered trademarks or trademarks of Avid Technology, Inc. in the United States and/or other
countries.
iNEWS, iNEWS ControlAir, and Media Browse are trademarks of iNews, LLC.
Macintosh and Mac OS are trademarks of Apple Computer, Inc., registered in the U.S. and other countries.
Microsoft, MS-DOS, Windows, and Windows NT are either registered trademarks or trademarks of
Microsoft Corporation in the United States and/or other countries. All other trademarks contained herein
are the property of their respective owners.
Page 4

GOT FOOTAGE?
Editors — Filmmakers — Special Effects Artists — Game Developers — Animators — Educators —
Broadcasters — Content creators of every genre — Just finished an incredible project and want to
share it with the world?
Send us your reels and we may use your footage in our show reel or demo!*
For a copy of our release and Avid’s mailing address, go to www.avid.com/footage.
*Note: Avid cannot guarantee the use of materials submitted.
Avid Unity MediaNetwork Management Guide • Part 0130-05491-01 • February 2003
Page 5

Contents
Using This Guide . . . . . . . . . . . . . . . . . . . . . . . . . . . . . . . . . . . . 13
Who Should Use This Guide . . . . . . . . . . . . . . . . . . . . . . . . . . . . . . . . . 13
About This Guide . . . . . . . . . . . . . . . . . . . . . . . . . . . . . . . . . . . . . . . . . . 13
Symbols and Conventions . . . . . . . . . . . . . . . . . . . . . . . . . . . . . . . . . . . 14
If You Need Help . . . . . . . . . . . . . . . . . . . . . . . . . . . . . . . . . . . . . . . . . . 16
Related Information . . . . . . . . . . . . . . . . . . . . . . . . . . . . . . . . . . . . . . . . 17
If You Have Documentation Comments . . . . . . . . . . . . . . . . . . . . . . . . . 18
How to Order Documentation . . . . . . . . . . . . . . . . . . . . . . . . . . . . . . . . . 18
Avid Educational Services . . . . . . . . . . . . . . . . . . . . . . . . . . . . . . . . . . . 18
Chapter 1 MediaNetwork Management Overview. . . . . . . . . . . . . . . . . . . 19
Management Tasks and Overall Considerations . . . . . . . . . . . . . . . . . . 19
Directory and File Limits . . . . . . . . . . . . . . . . . . . . . . . . . . . . . . . . . 21
Trilligent Clusters. . . . . . . . . . . . . . . . . . . . . . . . . . . . . . . . . . . . 21
LANserver EX . . . . . . . . . . . . . . . . . . . . . . . . . . . . . . . . . . . . . . 22
MediaNetwork . . . . . . . . . . . . . . . . . . . . . . . . . . . . . . . . . . . . . . 23
Management Tools. . . . . . . . . . . . . . . . . . . . . . . . . . . . . . . . . . . . . . . . . 24
Setup Manager . . . . . . . . . . . . . . . . . . . . . . . . . . . . . . . . . . . . . . . . 24
Administration Tool . . . . . . . . . . . . . . . . . . . . . . . . . . . . . . . . . . . . . 25
Monitor Tool . . . . . . . . . . . . . . . . . . . . . . . . . . . . . . . . . . . . . . . . . . . 26
Getting Help with the Monitor Tool. . . . . . . . . . . . . . . . . . . . . . . . . . 27
Configuring a Workgroup . . . . . . . . . . . . . . . . . . . . . . . . . . . . . . . . . . . . 28
Creating a Data Drive Set . . . . . . . . . . . . . . . . . . . . . . . . . . . . . . . . 28
Creating an Allocation Group . . . . . . . . . . . . . . . . . . . . . . . . . . . . . . 29
Creating New Workspaces . . . . . . . . . . . . . . . . . . . . . . . . . . . . . . . 31
Creating User Accounts . . . . . . . . . . . . . . . . . . . . . . . . . . . . . . . . . . 32
Protecting Data . . . . . . . . . . . . . . . . . . . . . . . . . . . . . . . . . . . . . . . . 33
Page 6

Chapter 2 Setup Manager . . . . . . . . . . . . . . . . . . . . . . . . . . . . . . . . . . . . . . 35
Setup Manager Overview . . . . . . . . . . . . . . . . . . . . . . . . . . . . . . . . . . . . 35
Getting Help with the Setup Manager. . . . . . . . . . . . . . . . . . . . . . . . 37
Starting the Setup Manager . . . . . . . . . . . . . . . . . . . . . . . . . . . . . . . . . . 37
Using Setup Manager in a Fail-Over Configuration . . . . . . . . . . . . . . . . 37
Fail-Over Configuration Guidelines. . . . . . . . . . . . . . . . . . . . . . . . . . 38
Determining the Active File Manager . . . . . . . . . . . . . . . . . . . . . . . . 38
Starting and Stopping the File Manager . . . . . . . . . . . . . . . . . . . . . . . . . 38
Starting the File Manager . . . . . . . . . . . . . . . . . . . . . . . . . . . . . . . . . 39
Stopping the File Manager . . . . . . . . . . . . . . . . . . . . . . . . . . . . . . . . 39
Logging Out and Stopping the File Manager Changes . . . . . . . . . . 40
Stopping the File Manager . . . . . . . . . . . . . . . . . . . . . . . . . . . . . 41
Online Drive Recovery . . . . . . . . . . . . . . . . . . . . . . . . . . . . . . . . . . . . . . 41
AutoRecovery for Failed Drives . . . . . . . . . . . . . . . . . . . . . . . . . . . . . . . 42
Before You Begin . . . . . . . . . . . . . . . . . . . . . . . . . . . . . . . . . . . . . . . 42
Enabling AutoRecovery for Failed Drives . . . . . . . . . . . . . . . . . . . . . 42
Chapter 3 Configuring General, Fail-Over, and Remote Error
Notification Parameters . . . . . . . . . . . . . . . . . . . . . . . . . . . . . 43
Configuring General Settings . . . . . . . . . . . . . . . . . . . . . . . . . . . . . . . . . 43
Configuring File Manager Fail-Over . . . . . . . . . . . . . . . . . . . . . . . . . . . . 45
Fail-Over Configuration Procedure Overview. . . . . . . . . . . . . . . . . . 46
Step 1: Setting Up the Fail-Over Connection on the
First File Manager . . . . . . . . . . . . . . . . . . . . . . . . . . . . . . . . . . 47
Step 2: Setting Up the Fail-Over Connection on the
Second File Manager . . . . . . . . . . . . . . . . . . . . . . . . . . . . . . . 48
Step 3: Validating the Connections for File Manager
Fail-Over . . . . . . . . . . . . . . . . . . . . . . . . . . . . . . . . . . . . . . . . . 49
Step 4: Starting the First and Second File Managers . . . . . . . . 49
Setting Up E-mail Error Notification . . . . . . . . . . . . . . . . . . . . . . . . . . . . 50
Configuring the E-mail Error Notification Service . . . . . . . . . . . . . . . 50
Setting Up E-mail Error Notification Contacts. . . . . . . . . . . . . . . . . . 51
6
Page 7

Chapter 4 Managing the Drive Hardware . . . . . . . . . . . . . . . . . . . . . . . . . 53
Creating a New Data Drive Set . . . . . . . . . . . . . . . . . . . . . . . . . . . . . . . 54
Creating a Data Drive Set Automatically . . . . . . . . . . . . . . . . . . . . . 54
Creating a Data Drive Set Manually. . . . . . . . . . . . . . . . . . . . . . . . . 55
Creating a Data Drive Set from Raw Drives . . . . . . . . . . . . . . . 55
Creating Spare Data Drives from Raw Drives . . . . . . . . . . . . . . 56
Adding Storage to Your Environment. . . . . . . . . . . . . . . . . . . . . . . . . . . 57
Adding Active Data Drives to a Data Drive Set . . . . . . . . . . . . . . . . . . . 58
Hot Swapping MEDIArray II Drives . . . . . . . . . . . . . . . . . . . . . . . . . 58
Adding Drives That Were Data Drives in Another
Data Drive Set . . . . . . . . . . . . . . . . . . . . . . . . . . . . . . . . . . . . . . . 58
Adding Drives That Were Previously Used with Another
Application . . . . . . . . . . . . . . . . . . . . . . . . . . . . . . . . . . . . . . . . . . 59
Creating Data Drives from Raw Drives . . . . . . . . . . . . . . . . . . . . . . 60
Removing Drives from Your Environment . . . . . . . . . . . . . . . . . . . . . . . 61
Removing Active Data Drives from a Data Drive Set. . . . . . . . . . . . 61
Physically Removing Storage from Your Environment . . . . . . . . . . 62
Setting Drive Mode Pages . . . . . . . . . . . . . . . . . . . . . . . . . . . . . . . . . . . 63
Deleting a Data Drive Set . . . . . . . . . . . . . . . . . . . . . . . . . . . . . . . . . . . . 64
Rebuilding a Data Drive Set . . . . . . . . . . . . . . . . . . . . . . . . . . . . . . . . . . 64
Bringing the Data Drive Set Online and Taking the
Data Drive Set Offline . . . . . . . . . . . . . . . . . . . . . . . . . . . . . . . . . . . . . 65
Bringing the Data Drive Set Online . . . . . . . . . . . . . . . . . . . . . . . . . 65
Taking the Data Drive Set Offline . . . . . . . . . . . . . . . . . . . . . . . . . . 66
Chapter 5 Administration Tool. . . . . . . . . . . . . . . . . . . . . . . . . . . . . . . . . . 67
Understanding the Administration Tool User Interface. . . . . . . . . . . . . . 67
User Interface Management . . . . . . . . . . . . . . . . . . . . . . . . . . . . . . 68
Message Area . . . . . . . . . . . . . . . . . . . . . . . . . . . . . . . . . . . . . . 68
List Area . . . . . . . . . . . . . . . . . . . . . . . . . . . . . . . . . . . . . . . . . . 68
Window Buttons. . . . . . . . . . . . . . . . . . . . . . . . . . . . . . . . . . . . . 69
User Interface Window Descriptions . . . . . . . . . . . . . . . . . . . . . . . . 69
Getting Help with the Administration Tool . . . . . . . . . . . . . . . . . . . . 70
Opening the Administration Tool . . . . . . . . . . . . . . . . . . . . . . . . . . . . . . 70
Before Performing Administrative Functions . . . . . . . . . . . . . . . . . . 70
7
Page 8

Logging In to the Administration Tool . . . . . . . . . . . . . . . . . . . . . . . . . . . 71
Administration Tool Preferences Window . . . . . . . . . . . . . . . . . . . . . . . . 71
Setting Administration Tool Preferences . . . . . . . . . . . . . . . . . . . . . 72
Preference Tabs. . . . . . . . . . . . . . . . . . . . . . . . . . . . . . . . . . . . . 72
Undoing or Canceling Preference Changes. . . . . . . . . . . . . . . . 73
Saving Preference Changes . . . . . . . . . . . . . . . . . . . . . . . . . . . 73
Exporting and Importing Preferences . . . . . . . . . . . . . . . . . . . . . . . . 74
Setting the Administration Password . . . . . . . . . . . . . . . . . . . . . . . . 75
Setting User Account Preferences . . . . . . . . . . . . . . . . . . . . . . . . . . 76
Setting Workspace Preferences . . . . . . . . . . . . . . . . . . . . . . . . . . . . 77
Setting Workspace and Monitor Graph Bar Colors. . . . . . . . . . . . . . 79
Setting Warning Preferences . . . . . . . . . . . . . . . . . . . . . . . . . . . . . . 80
Setting Logo Preferences . . . . . . . . . . . . . . . . . . . . . . . . . . . . . . . . . 81
Reestablishing a Connection to the File Manager . . . . . . . . . . . . . . . . . 82
Chapter 6 Managing Allocation Groups . . . . . . . . . . . . . . . . . . . . . . . . . . 83
The Allocation Group Management Window. . . . . . . . . . . . . . . . . . . . . . 83
Allocation Group Usage Guidelines . . . . . . . . . . . . . . . . . . . . . . . . . . . . 84
Creating Allocation Groups . . . . . . . . . . . . . . . . . . . . . . . . . . . . . . . . . . . 85
Adding Drives to Allocation Groups . . . . . . . . . . . . . . . . . . . . . . . . . . . . 87
Removing Drives from Allocation Groups . . . . . . . . . . . . . . . . . . . . . . . . 88
Identifying Drives. . . . . . . . . . . . . . . . . . . . . . . . . . . . . . . . . . . . . . . . . . . 90
Renaming Allocation Groups . . . . . . . . . . . . . . . . . . . . . . . . . . . . . . . . . 91
Deleting Allocation Groups . . . . . . . . . . . . . . . . . . . . . . . . . . . . . . . . . . . 92
Chapter 7 Managing Workspaces . . . . . . . . . . . . . . . . . . . . . . . . . . . . . . . 93
The Workspace Management Window . . . . . . . . . . . . . . . . . . . . . . . . . . 94
Workspace List . . . . . . . . . . . . . . . . . . . . . . . . . . . . . . . . . . . . . . . . . 95
Reading the Workspace List . . . . . . . . . . . . . . . . . . . . . . . . . . . 95
Changing the Workspace List Graph Display . . . . . . . . . . . . . . 96
Creating Workspaces . . . . . . . . . . . . . . . . . . . . . . . . . . . . . . . . . . . . . . . 98
Duplicating Workspaces . . . . . . . . . . . . . . . . . . . . . . . . . . . . . . . . . . . . . 99
Adjusting Workspace Size . . . . . . . . . . . . . . . . . . . . . . . . . . . . . . . . . . 100
Renaming Workspaces . . . . . . . . . . . . . . . . . . . . . . . . . . . . . . . . . . . . . 102
Deleting Workspaces . . . . . . . . . . . . . . . . . . . . . . . . . . . . . . . . . . . . . . 102
8
Page 9

Protecting Workspaces. . . . . . . . . . . . . . . . . . . . . . . . . . . . . . . . . . . . . 103
Workspace Protection Recommendations. . . . . . . . . . . . . . . . . . . 104
Capacity of Odd Number of Drives . . . . . . . . . . . . . . . . . . . . . . . . 105
Enabling Protection of New Files Only. . . . . . . . . . . . . . . . . . . . . . 106
Disabling Protection of New Files Only . . . . . . . . . . . . . . . . . . . . . 106
Synchronizing All Files. . . . . . . . . . . . . . . . . . . . . . . . . . . . . . . . . . 107
Optimizing Workspaces . . . . . . . . . . . . . . . . . . . . . . . . . . . . . . . . . . . . 107
Moving Workspaces . . . . . . . . . . . . . . . . . . . . . . . . . . . . . . . . . . . . . . . 109
Collecting Workspace Statistics . . . . . . . . . . . . . . . . . . . . . . . . . . . . . . 111
Chapter 8 Managing User Accounts and Access Privileges. . . . . . . . . 113
The User Management Window. . . . . . . . . . . . . . . . . . . . . . . . . . . . . . 114
Creating User Accounts . . . . . . . . . . . . . . . . . . . . . . . . . . . . . . . . . . . . 114
Number of Users Versus Licensed Client Seats . . . . . . . . . . . . . . 116
Configuring User Accounts and Permissions . . . . . . . . . . . . . . . . . . . . 116
Example 1 – Standalone Workgroup Using Local User
Accounts . . . . . . . . . . . . . . . . . . . . . . . . . . . . . . . . . . . . . . . . . . . 117
Example 2 – Standalone Workgroup Using Local Groups. . . . . . . 118
Example 3 – Network Workgroup Using Domain User
Accounts . . . . . . . . . . . . . . . . . . . . . . . . . . . . . . . . . . . . . . . . . . . 120
Example 4 – Network Workgroup Using Domain Groups . . . . . . . 121
Duplicating User Accounts . . . . . . . . . . . . . . . . . . . . . . . . . . . . . . . . . . 123
Modifying User Accounts . . . . . . . . . . . . . . . . . . . . . . . . . . . . . . . . . . . 124
Deleting User Accounts . . . . . . . . . . . . . . . . . . . . . . . . . . . . . . . . . . . . 125
Disabling Guest Accounts . . . . . . . . . . . . . . . . . . . . . . . . . . . . . . . . . . 126
Workspace Access Privileges . . . . . . . . . . . . . . . . . . . . . . . . . . . . . . . 127
Changing Workspace Access Privileges . . . . . . . . . . . . . . . . . . . . . . . 128
Chapter 9 Monitoring System Usage and Messages . . . . . . . . . . . . . . . 129
The Connection Monitor Window . . . . . . . . . . . . . . . . . . . . . . . . . . . . . 129
Changing the Monitor List Graph Display. . . . . . . . . . . . . . . . . . . . . . . 130
The Log File . . . . . . . . . . . . . . . . . . . . . . . . . . . . . . . . . . . . . . . . . . . . . 130
Viewing and Managing the Log File . . . . . . . . . . . . . . . . . . . . . . . . . . . 131
9
Page 10

Appendix A Managing Drive Problems. . . . . . . . . . . . . . . . . . . . . . . . . . . . 133
Identifying Bad Drives . . . . . . . . . . . . . . . . . . . . . . . . . . . . . . . . . . . . . . 133
Replacing the Data Drive Set . . . . . . . . . . . . . . . . . . . . . . . . . . . . . . . . 134
Before You Begin . . . . . . . . . . . . . . . . . . . . . . . . . . . . . . . . . . . . . . 134
How Online Drive Recovery Works . . . . . . . . . . . . . . . . . . . . . . . . 134
Recovering a Drive . . . . . . . . . . . . . . . . . . . . . . . . . . . . . . . . . . . . . . . . 135
Damaged Files . . . . . . . . . . . . . . . . . . . . . . . . . . . . . . . . . . . . . . . . 137
AutoRecovery for Failed Drives . . . . . . . . . . . . . . . . . . . . . . . . . . . . . . 138
Verifying AutoRecovery for Failed Drives. . . . . . . . . . . . . . . . . . . . 138
Replacing Bad Storage . . . . . . . . . . . . . . . . . . . . . . . . . . . . . . . . . . . . . 139
Appendix B Advanced Support Tools . . . . . . . . . . . . . . . . . . . . . . . . . . . . 141
The Server Log Viewer . . . . . . . . . . . . . . . . . . . . . . . . . . . . . . . . . . . . . 141
The Text Console . . . . . . . . . . . . . . . . . . . . . . . . . . . . . . . . . . . . . . . . . 142
The NtStatDump Tool . . . . . . . . . . . . . . . . . . . . . . . . . . . . . . . . . . . . . . 142
The RecoverDisks Tool. . . . . . . . . . . . . . . . . . . . . . . . . . . . . . . . . . . . . 142
The Avid Unity Profiler Tool . . . . . . . . . . . . . . . . . . . . . . . . . . . . . . . . . 143
Appendix C Using the Text Console for Remote Administration. . . . . . . 145
Starting the Text Console . . . . . . . . . . . . . . . . . . . . . . . . . . . . . . . . . . . 145
Using the Text Console. . . . . . . . . . . . . . . . . . . . . . . . . . . . . . . . . . . . . 146
Command Categories . . . . . . . . . . . . . . . . . . . . . . . . . . . . . . . . . . . . . . 146
The User Command Category . . . . . . . . . . . . . . . . . . . . . . . . . . . . 148
The Workspace Command Category . . . . . . . . . . . . . . . . . . . . . . . 148
The On/Offline Command Category . . . . . . . . . . . . . . . . . . . . . . . . 150
The Disk Command Category . . . . . . . . . . . . . . . . . . . . . . . . . . . . 150
The Stats Command Category . . . . . . . . . . . . . . . . . . . . . . . . . . . . 151
10
Index . . . . . . . . . . . . . . . . . . . . . . . . . . . . . . . . . . . . . . . . . . . . . 153
Page 11

Tables
Table 1 Trilligent File Manager Directories and Files . . . . . . . . . . .21
Table 2 LANserver EX Directories and Files . . . . . . . . . . . . . . . . .22
Table 3 MediaNetwork File Manager Directories and Files . . . . . .23
Table 4 File Manager Recommended IP Addresses . . . . . . . . . . .46
Table 5 Preference Window Tabs . . . . . . . . . . . . . . . . . . . . . . . . .72
Table 6 Preference File Locations . . . . . . . . . . . . . . . . . . . . . . . . .74
Table 7 Workspace Access Levels. . . . . . . . . . . . . . . . . . . . . . . .127
Table 8 Command Categories . . . . . . . . . . . . . . . . . . . . . . . . . . .147
Table 9 User Subcommands . . . . . . . . . . . . . . . . . . . . . . . . . . . .148
Table 10 Workspace Subcommands . . . . . . . . . . . . . . . . . . . . . . .149
Table 11 On/Offline Subcommands . . . . . . . . . . . . . . . . . . . . . . . .150
Table 12 Stats Subcommand . . . . . . . . . . . . . . . . . . . . . . . . . . . . .151
11
Page 12

12
Page 13

Using This Guide
Congratulations on your purchase of an Avid Unity™ MediaNetwork
workgroup, an Avid Unity LANshare, a Trilligent
LANserver. All of these products provide a high-performance distributed
file system that contains high-capacity shared media storage for
workgroups of connected Avid
media to an in-house network or the Internet.
n
This document describes the features for all MediaNetwork environments.
Therefore, your system might not contain certain features that are covered
in the documentation.
Who Should Use This Guide
This management guide is intended for system administrators responsible
for the setup and day-to-day management of a MediaNetwork workgroup
or a Trilligent cluster. You should have a basic understanding of how to use
and manage Windows NT
and should be familiar with the basic MediaNetwork concepts described in
the Avid Unity MediaNetwork System Overview.
®
™
Cluster, or a Trilligent
®
editing workstations, or for streaming
, Windows® 2000, and Mac OS® X systems,
About This Guide
This guide provides task-oriented instructions for the configuration,
management, and basic troubleshooting of your environment.
Page 14

Using This Guide
The Contents lists all topics included in the book, presented with the
following overall structure:
• Chapter 1 provides an overview of the MediaNetwork configuration
process.
• Chapters 2 to 4 introduce the Setup Manager and describe how you use
it to configure your environment parameters and to configure your
drives as a data drive set.
• Chapters 5 to 9 introduce the Administration Tool and describe how
you use it to perform initial workspace configuration and day-to-day
tasks.
• The Appendixes describe how to manage drive problems and the
advanced support tools available to you.
• A detailed Index helps you quickly locate specific topics.
Symbols and Conventions
14
Unless noted otherwise, the material in this document applies to the
Windows 2000 or Windows NT and Mac OS X operating systems. When
the text applies to a specific operating system, it is marked as follows:
• (Windows) or (Windows only) means the information applies to the
Windows 2000 or Windows NT operating system.
• (Macintosh) or (Macintosh only) means the information applies to the
Mac OS X operating system.
Page 15

Symbols and Conventions
Avid documentation uses the following symbols and conventions:
Symbol or Convention Meaning or Action
n
c
w
> This symbol indicates menu commands (and
t
k This symbol represents the Apple or Command key.
A note provides important related information,
reminders, recommendations, and strong
suggestions.
A caution means that a specific action you take could
cause harm to your computer or cause you to lose
data.
A warning describes an action that could cause you
physical harm. Follow the guidelines in this
document or on the unit itself when handling
electrical equipment.
subcommands) in the order you select them. For
example, File > Import means to open the File menu
and then select the Import command.
This symbol indicates a single-step procedure.
Multiple arrows in a list indicate that you perform
one of the actions listed.
Press and hold the Command key and another key to
perform a keyboard shortcut.
Margin tips In the margin, you will find tips that help you
perform tasks more easily and efficiently.
Italic font Italic font is used to emphasize certain words and to
indicate variables.
Courier Bold font
Click Quickly press and release the left mouse button
Double-click Click the left mouse button (Windows) or the mouse
Courier Bold font identifies text that you type.
(Windows) or the mouse button (Macintosh).
button (Macintosh) twice rapidly.
15
Page 16

Using This Guide
Symbol or Convention Meaning or Action (Continued)
Right-click Quickly press and release the right mouse button
(Windows only).
Drag Press and hold the left mouse button (Windows) or
the mouse button (Macintosh) while you move the
mouse.
Ctrl+key
k+key
If You Need Help
If you are having trouble using your system, you should:
1. Retry the action, carefully following the instructions given for that task
in this guide. It is especially important to check each step of your
workflow.
2. Check the release notes supplied with your Avid application for the
latest information that might have become available after the hardcopy
documentation was printed.
3. Check the documentation that came with your Avid application or your
hardware for maintenance or hardware-related issues.
4. Visit the online Knowledge Center at www.avid.com/support. Online
services are available 24 hours per day, 7 days per week. Search this
online Knowledge Center to find answers, to view error messages, to
access troubleshooting tips, to download updates, and to read/join
online message-board discussions.
Press and hold the first key while you press the
second key.
16
5. For Technical Support, please call 800-800-AVID (800-800-2843).
For Broadcast On-Air Sites and Call Letter Stations, call
800-NEWS-DNG (800-639-7364).
Page 17

Related Information
The following documents provide more information about configuring and
managing your work environment:
• Avid Unity MediaNetwork Site Preparation Guide
• Avid Unity MediaNetwork File Manager Setup Guide
• Avid Unity MediaNetwork Upgrade Notes
• Avid Unity MediaNetwork System Overview
• Avid Unity MediaNetwork Troubleshooting Guide
• Avid Unity MediaNetwork Macintosh Fibre Channel Client Setup
Guide
• MediaNetwork Macintosh Fibre Channel Client Quick Start Card
• Avid Unity MediaNetwork Windows Fibre Channel Client Setup Guide
• MediaNetwork Windows Fibre Channel Client Quick Start Card
• Avid Unity MediaNetwork Macintosh Ethernet Client Setup Guide
Related Information
• MediaNetwork Macintosh Ethernet Client Quick Start Card
• Avid Unity MediaNetwork Windows Ethernet Client Setup Guide
• MediaNetwork Windows Ethernet Client Quick Start Card
• Avid Unity MediaNetwork Release Notes
• Avid Unity MediaNetwork Media Server Setup Guide
• Avid Unity MediaNetwork PortServer Setup Guide
• Avid Unity MediaNetwork Supported Configurations
• Avid Unity MediaNetwork File Manager Failover Installation Notes
• Avid Unity LANserver EX Setup Guide
• Avid Unity LANserver Upgrade Notes
• Avid Unity LANserver Release Notes
MediaNetwork also provides Help systems that include complete
information about using the Setup Manager, the Administration Tool, and
the Monitor Tool.
17
Page 18

Using This Guide
If You Have Documentation Comments
Avid Technology continuously seeks to improve its documentation. We
value your comments about this guide, the Help, the Online Publications
CD-ROM, and other Avid-supplied documentation.
Simply e-mail your documentation comments to Avid Technology at
TechPubs@avid.com
Please include the title of the document, its part number, and the specific
section you are commenting on in all correspondence.
How to Order Documentation
To order additional copies of this documentation from within the
United States, call Avid Sales at 800-949-AVID (800-949-2843). If you
are placing an order from outside the United States, contact your local
Avid representative.
Avid Educational Services
For information on courses/schedules, training centers, certifications,
courseware, and books, please visit www.avid.com/training or call
Avid Sales at 800-949-AVID (800-949-2843).
18
Page 19

Chapter 1
MediaNetwork Management Overview
MediaNetwork allows you to centrally manage very large amounts of
storage that multiple clients can access to share video, audio, and effects
media in an intuitive, collaborative environment.
This chapter provides an overview of the tasks you need to perform, the
configuration factors you need to consider, and the tools needed to manage
your workgroup.
This chapter discusses:
• Management Tasks and Overall Considerations
• Management Tools
• Configuring a Workgroup
Management Tasks and Overall Considerations
As an administrator, you are responsible for:
• Initial setup and configuration of the workgroup — You must
configure the data drive set, one or more allocation groups,
workspaces, and user accounts.
Page 20

Chapter 1 MediaNetwork Management Overview
• Day-to-day administration — You probably need to reconfigure
MediaNetwork to accommodate new users and evolving projects.
MediaNetwork also provides comprehensive monitoring functionality
that allows you to check total MediaNetwork activity as well as that of
each connected client.
• Troubleshooting — When problems occur with the storage hardware,
the File Manager, or a client, you need to diagnose the problem and, if
possible, fix it. MediaNetwork provides easy-to-understand error,
warning, and informational messages that inform you of problems as
well as tools that help you diagnose and fix problems.
How you answer the following strategic questions determines your
priorities when making configuration decisions and trade-offs (possibly
affecting several aspects of your configuration).
• What is your site type?
In-house and rental editing suites probably require very different
administration requirements, particularly in terms of workspace access
restrictions and how often you need to reconfigure workspaces and
users. For more information on managing workspaces, see Chapter 7.
20
• Does your workgroup include dual-stream uncompressed clients?
If so, you will need to set up special hardware and allocation group
configurations. For more information on managing allocation groups,
see Chapter 6.
• How large is your data drive set and does it include more than one
drive type?
If your data drive set is very large or has different drive types, you
probably need to assign your data drives to more than one allocation
group. For more information on managing the drive hardware, see
Chapter 4.
• Will your client users be working on individual projects with their own
media or will they be collaborating on team projects that use the same
source media?
These factors affect how you should allocate workspaces and user
accounts. For more information on managing allocation groups, see
Chapter 6.
Page 21

• Is security more important than ease of access at your site?
Individual password user accounts combined with tightly controlled
workspace access privileges provide the most security at the cost of
restricting user flexibility. For more information on managing user
accounts and access privileges, see Chapter 8.
Directory and File Limits
The following section provides directory and file limits for Trilligent
Clusters, LANshare LANserver EX and Trilligent LANserver EX, and
MediaNetwork environments.
Trilligent Clusters
For Trilligent Clusters, MediaNetwork Release 3.2 supports up to 250,000
files on a 1-GB File Manager or up to 1.9 million files on a 2-GB File
Manager. You can also increase the number of directories on the file
system to more than 10,000. Doing so, however, decreases the total
number of files you can store, by 32,000, each time you cross a
10,000-directory boundary. MediaNetwork warns you if you exceed either
the directory or the file limits.
Management Tasks and Overall Considerations
Tabl e 1 shows the dynamic relationship between the number of directories
you have and the number of files you can store on 1-GB and 2-GB File
Managers.
Table 1 Trilligent File Manager Directories and Files
1-GB File Manager
Maximum Number of
Directories
10,000 250,000 1,900,000
20,000 218,000 1,868,000
30,000 186,000 1,836,000
40,000 154,000 1,804,000
Files
2-GB File Manager
Maximum Number of
Files
21
Page 22

Chapter 1 MediaNetwork Management Overview
Table 1 Trilligent File Manager Directories and Files (Continued)
LANserver EX
1-GB File Manager
Maximum Number of
Directories
50,000 122,000 1,772,000
60,000 90,000 1,740,000
Files
2-GB File Manager
Maximum Number of
Files
On a LANserver EX, MediaNetwork Release 3.2 supports 10,000
directories and up to 250,000 files for LANshare or up to 300,000 files for
Trilligent streaming. You can also increase the number of directories on the
file system to more than 10,000. Doing so, however, decreases the total
number of files you can store, by 32,000, each time you cross a
10,000-directory boundary. MediaNetwork warns you if you exceed either
the directory or the file limits.
Tabl e 2 shows the dynamic relationship between the number of directories
you have and the number of files you can store on the 2-GB LANshare
LANserver EX and the 2-GB Trilligent LANserver EX.
22
Table 2 LANserver EX Directories and Files
2-GB LANshare
LANserver EX
Maximum Number of
Directories
10,000 250,000 300,000
20,000 218,000 268,000
30,000 186,000 236,000
Files
2-GB Trilligent
LANserver EX
Maximum Number of
Files
Page 23

MediaNetwork
Management Tasks and Overall Considerations
MediaNetwork Release 3.2 supports a 768-MB or 1-GB File Manager that
can have up to 250,000 files, or a 2-GB File Manager that can have up to
500,000 files. You can also increase the number of directories on the file
system to more than 10,000. Doing so, however, decreases the total
number of files you can store, by 32,000, each time you cross a
10,000-directory boundary. MediaNetwork warns you if you exceed either
the directory or the file limits.
c
The metadata for 500,000 files can use as many as 15 data drives on
your drive set. If the metadata expands into a MEDIArray
™
II drive
enclosure that is set up as a single-user allocation group for 1:1 video,
it could severely impact the performance of finishing clients.
Tabl e 3 shows the dynamic relationship between the number of directories
you have and the number of files you can store on 768-MB, 1-GB, and
2-GB File Managers.
Table 3 MediaNetwork File Manager Directories and Files
768-MB and 1-GB File
Managers Maximum
Directories
10,000 250,000 500,000
20,000 218,000 468,000
30,000 186,000 436,000
40,000 154,000 404,000
50,000 122,000 372,000
Number of Files
2-GB File Manager
Maximum Number of
Files
60,000 90,000 340,000
23
Page 24

Chapter 1 MediaNetwork Management Overview
Notes on Dynamic Directory and File Limits
Large numbers of directories and files on the File Manager can effect the
performance of the MediaNetwork workgroup management tools.
• As you reach the upper limits for the number of directories and files,
the tools used to manage the MediaNetwork workgroup (the Monitor
Tool, the Setup Manager, and the Administration Tool) run slowly.
They run at a lower system priority than the File Manager software and
require more time to manage metadata.
• While the dynamic directory and file limits are calculated correctly by
MediaNetwork Release 3.2, the dynamic limits are not shown
correctly in the Setup Manager or the Administration Tool. This has no
effect on performance; it strictly affects the display of limit
information.
Management Tools
Setup Manager
24
MediaNetwork provides several tools that allow you to configure and
perform day-to-day management. For more information on using these
management tools, see the following sections:
• Setup Manager
• Administration Tool
• Monitor Tool
You use the Setup Manager to perform storage hardware management
tasks, including:
• Creating and managing a data drive set
• Specifying drives as data drives or spare drives
• Starting and stopping the File Manager service to perform system
maintenance
• Adding drives to and removing drives from the data drive set
Page 25
Management Tools
• Performing drive maintenance and error recovery operations
The Setup Manager runs only from the File Manager. For a detailed
description of the Setup Manager, see Chapter 2.
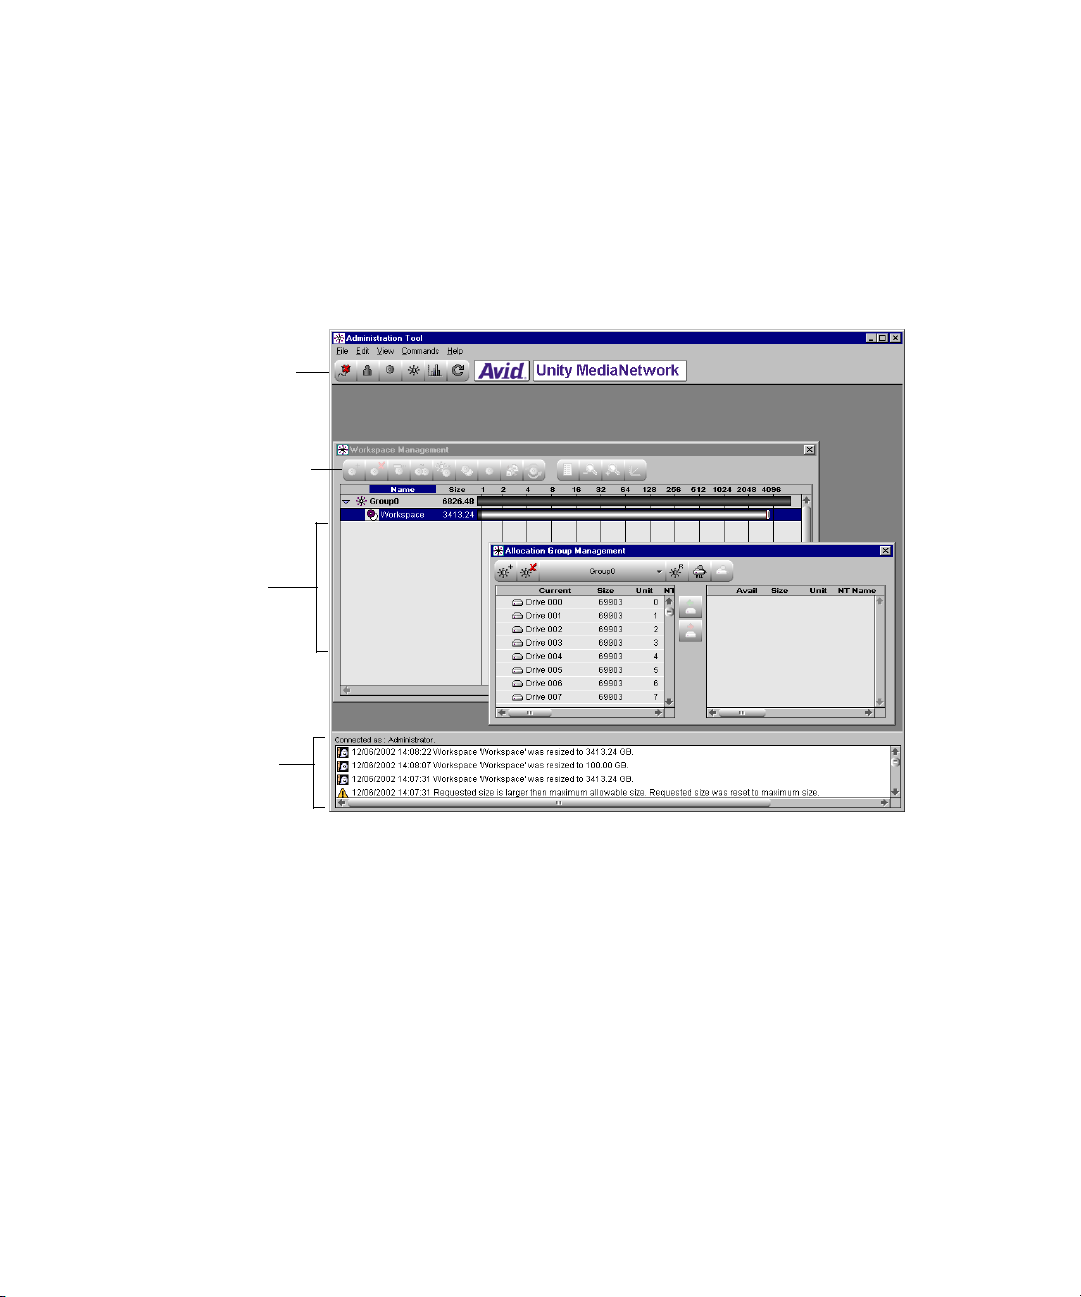
Administration Tool
The Administration Tool is the primary tool for the initial setup and
administration of allocation groups, workspaces, users, and client
connection privileges. It also allows you to monitor storage activity. Use
the Administration Tool to:
• View, create, rename, and delete allocation groups.
• Add drives to allocation groups.
• View, create, rename, adjust the size of, protect, and delete
workspaces.
• View, create, edit, and delete user accounts (with optional passwords)
and assign user access privileges.
25
Page 26
Chapter 1 MediaNetwork Management Overview
• Monitor system usage, including total system bandwidth use, number
of active MediaNetwork clients or media servers, and bandwidth
consumption per client or server.
• View a list of error, warning, and informational messages.
• Open multiple windows at the same time.
Management
window buttons
Window buttons
List area
Message
area
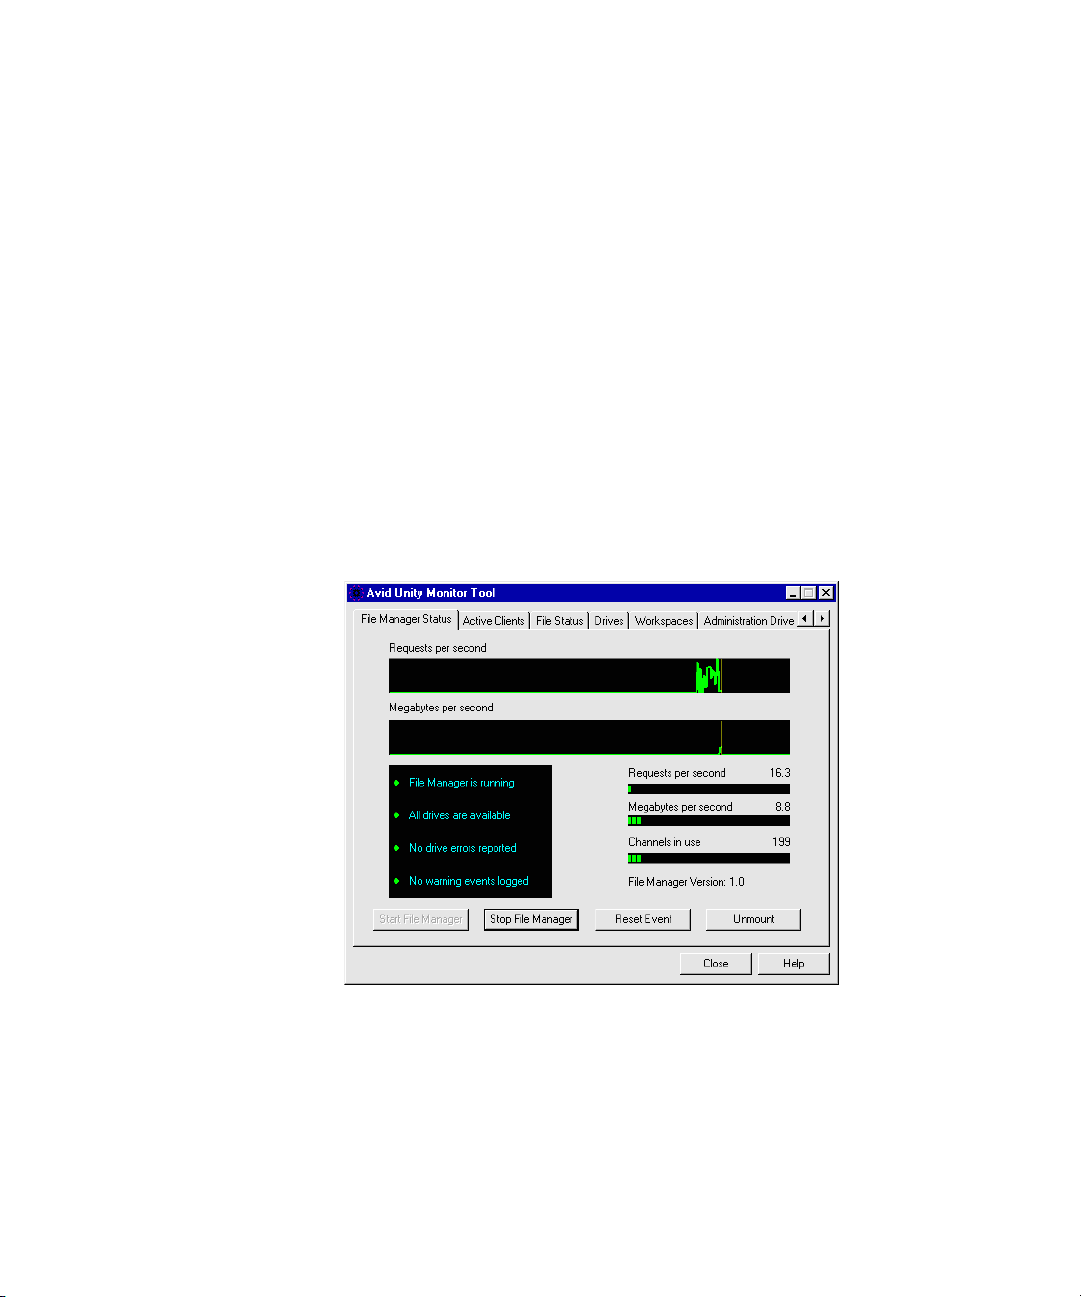
Monitor Tool
26
You can open the Administration Tool from the File Manager or from any
MediaNetwork client or media server, where it communicates with the File
Manager through the Fibre Channel network. For a detailed description of
the Administration Tool, see Chapter 5.
The Monitor Tool provides low-level, performance-monitoring functions.
Using the Monitor Tool, you can view:
• The current status of each drive, including name, number, available
storage, percentage of storage used, and the number of affected files, if
any
Page 27
Management Tools
• A list of the workspaces
• The status of communications between the File Manager and the
MediaNetwork clients or media servers
• Information on the metadata maintained by the File Manager
• File Manager memory usage
• Counts and service times for MediaNetwork client or for Media Server
requests
You can also use the Monitor Tool to start and stop the File Manager
service and to set advanced MediaNetwork features, such as clearing the
administrator’s password.
When the Monitor Tool opens, File Manager status information appears.
Getting Help with the Monitor Tool
The Help system provides procedures and reference information for all
features of the Monitor Tool.
27
Page 28

Chapter 1 MediaNetwork Management Overview
Configuring a Workgroup
Your primary responsibility as an administrator is to ensure that
MediaNetwork is configured properly.
This section provides a quick look at the tasks you must perform to
establish a workgroup, and includes:
• Creating a Data Drive Set
• Creating an Allocation Group
• Creating New Workspaces
• Creating User Accounts
• Protecting Data
Creating a Data Drive Set
The data drive set defines the drives that the MediaNetwork software can
use to store data. Each MediaNetwork workgroup can have only one data
drive set.
28
n
To create a data drive set:
1. From the File Manager desktop, click the Start button, point to
Programs, point to AvidUnity, and then select Setup Manager.
2. Click Raw Drives in the left section of the window.
You can create your data drive set with no spare drives or with two spare
drives. Having spare drives allows you to perform online drive repairs if a
drive fails. If you are not running the optional UnityRAID
software, you should consider having spare drives.
3. Select the drives you want in the data drive set in the right section of
the window.
4. Choose Create Data Drive Set from the Drive Set menu.
5. Click OK.
The data drive set is created.
™
protection
Page 29

6. If you did not use all of the drives in the data drive set, select the
remaining drives in the right section of the window, and choose Make
Drive Spare from the Drives menu.
7. Click Data Drive Set in the left section of the window.
All of the drives should move from Raw Drives to Data Drive Set.
8. Quit the Setup Manager.
For more information about data drive sets, see Chapter 4.
Creating an Allocation Group
An allocation group defines how the drives in a data drive set are
partitioned to store data. If you have drives of different sizes, they must be
in separate allocation groups.
To create a new allocation group:
1. Open the Administration Tool from the File Manager console, from
any Windows client, or from a Macintosh client.
Configuring a Workgroup
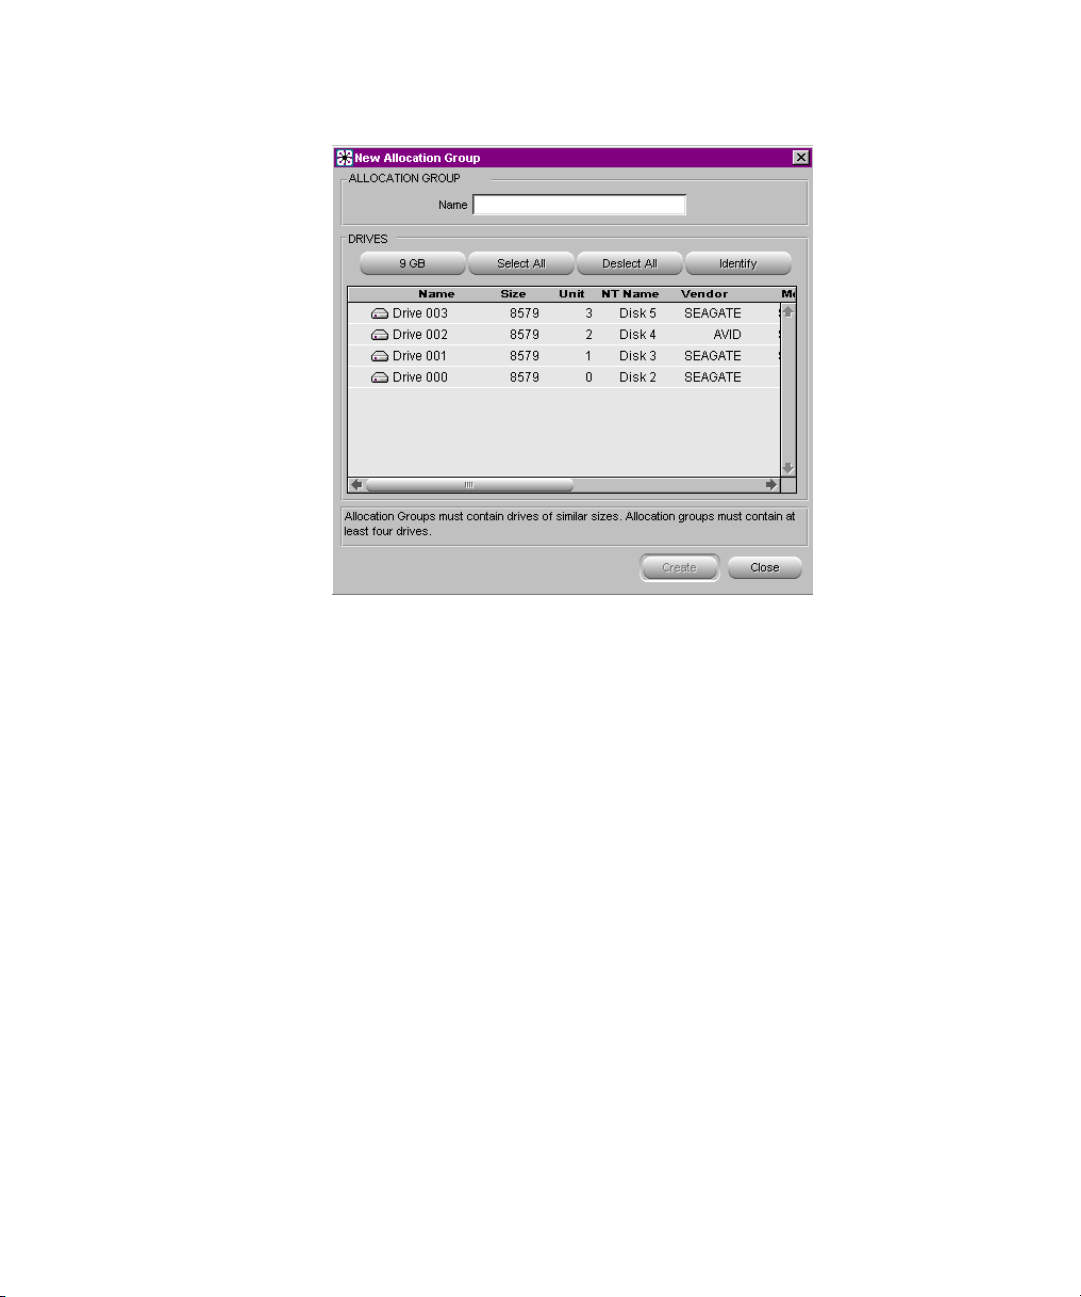
2. Click the Allocation Group Management button.
3. Click the Create New Allocation Group button.
The New Allocation Group dialog box opens.
29
Page 30
Chapter 1 MediaNetwork Management Overview
4. Type a name for the allocation group.
30
5. Select the appropriate GB (gigabyte) size from the Drive button.
6. Select all the drives you want to assign to the new allocation group
(four-drive minimum) by clicking them.
7. Click the Create button to create a new allocation group containing all
the selected drives.
A dialog box opens and prompts you to confirm that you want to create
a new allocation group.
The new allocation group appears in the allocation group list.
8. Leave the Administration Tool running.
For more information about allocation groups, see Chapter 6.
Page 31

Creating New Workspaces
Workspaces are locations to store and segregate data. You can allow users
to access some or all of the workspaces, and assign permissions for how
each user can access the data in a workspace.
To create a new workspace:
1. Click the Create New Workspace button in the Workspace
Management window.
The New Workspace window opens.
Configuring a Workgroup
2. Select the allocation group on which you want to create the workspace.
3. Type a name for the workspace.
4. Type a size for the workspace. The maximum size allowed is listed
next to the text box.
5. Click to select Protected or Unprotected.
31
Page 32

Chapter 1 MediaNetwork Management Overview
6. Set the User Access privileges.
7. Click Create.
8. Leave the Administration Tool running.
For more information about workspaces, see Chapter 7.
n
You can create as many workspaces as you need to support different
projects. Due to the physical restrictions of drive letters, Avid Unity can
only mount a maximum of 21 workspaces for Ethernet client use.
Creating User Accounts
User accounts allow individual users, or groups of users, access to the
workgroup. These accounts allow users to mount or map MediaNetwork
workspaces on their Avid workstations.
To create a user account:
1. From the Administration Tool, click the User Management button.
2. Do one of the following:
t Click the New User button.
t Select New User from the Commands menu.
The New User dialog box opens.
32
Page 33

Configuring a Workgroup
Protecting Data
3. Type a user name
4. Type a password, then type it again to confirm it.
5. Select privileges and workspace access rights.
6. (Option) Click Save Settings if you want this to be your default user
account.
7. Click Create.
8. Close the Administration Tool.
For more information about user accounts, see Chapter 8.
Protection is a feature that offers high levels of data integrity by ensuring
that two copies of media data are written onto different physical drives to
avoid data loss in the event of drive failure. This allows workspaces that
are protected to be repaired very quickly with no data loss upon drive
failure.
33
Page 34

Chapter 1 MediaNetwork Management Overview
The disadvantage is that protected workspaces use twice as much space as
unprotected workspaces. However, because of the data protection and
recovery speed that protection offers, Avid recommends that you always
protect your workspaces. New workspaces are protected by default unless
you specify otherwise in your preferences.
For more information about workspaces, see Chapter 7.
Select one of the following strategies, depending on your security
requirements.
• Create a user account for each user.
This strategy offers optimum security, allowing each user access to the
appropriate workspaces regardless of the MediaNetwork client at
which they are working.
• Create a user account with appropriate access privileges for each
project (multiple users can use the same account simultaneously).
This strategy offers moderate security and convenience, giving users
working on each project appropriate access and requiring far less
administrative effort than individual user accounts.
34
Page 35

Chapter 2
Setup Manager
This chapter introduces the Setup Manager and describes its basic
operations.
To find out how to use the Setup Manager to set general and File Manager
fail-over parameters, see Chapter 3. For detailed descriptions of how to use
the Setup Manager to manage and troubleshoot your drive hardware, see
Chapter 4 and Appendix A.
This chapter discusses:
• Setup Manager Overview
• Starting the Setup Manager
• Using Setup Manager in a Fail-Over Configuration
• Starting and Stopping the File Manager
• Online Drive Recovery
• AutoRecovery for Failed Drives
Setup Manager Overview
You use the Setup Manager to set general and File Manager fail-over
parameters, to configure and manage your data drive set, and to start and
stop the File Manager service. You also use the Setup Manager to add
drives and to perform drive maintenance and error recovery operations.
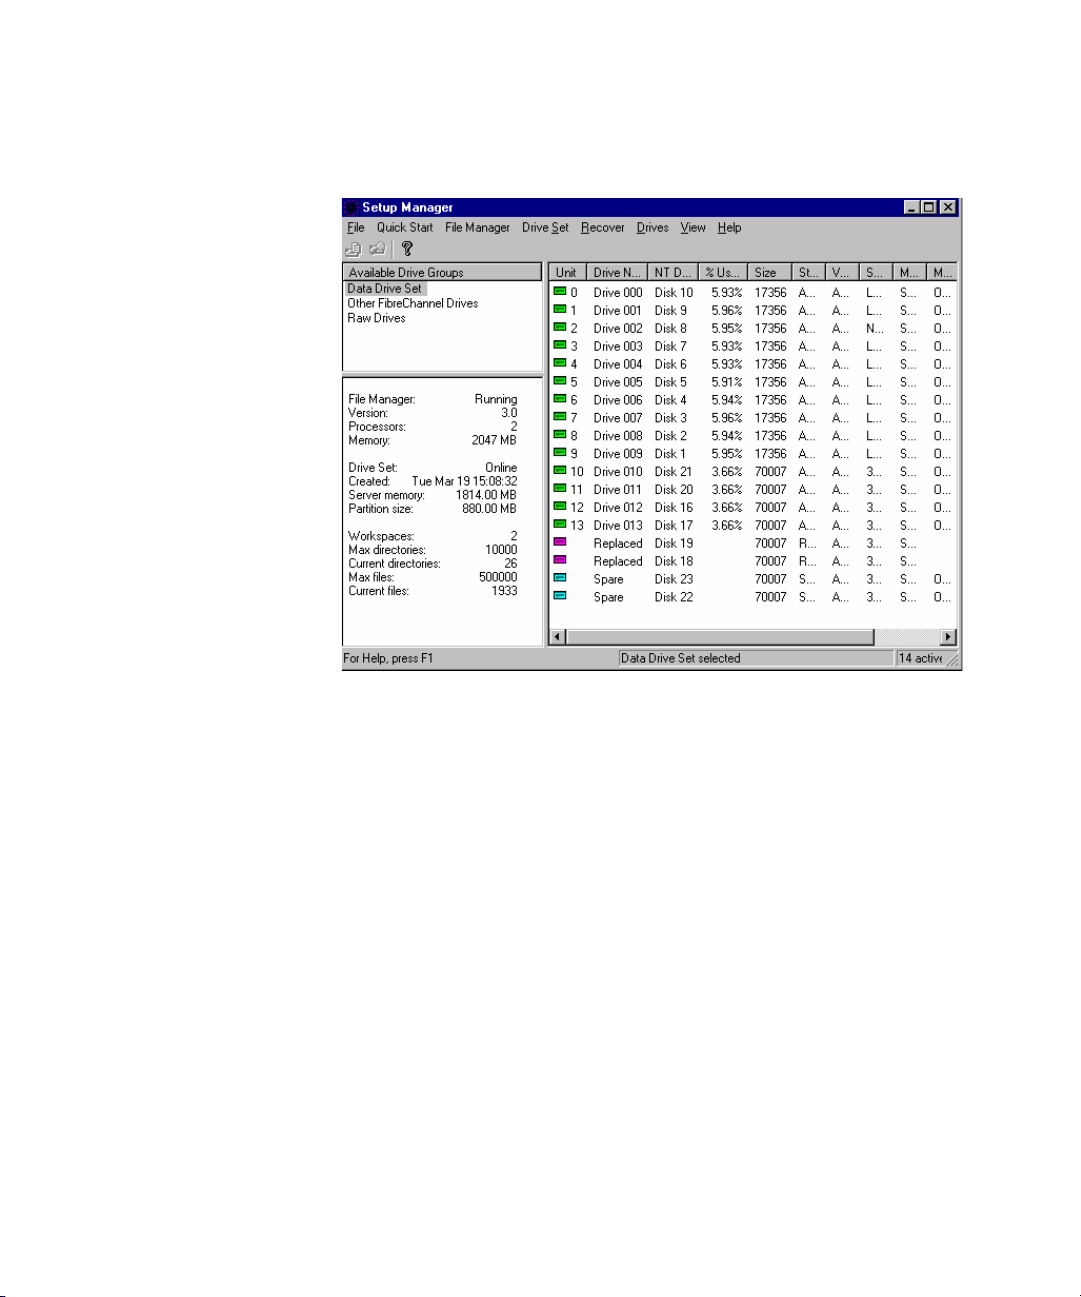
Page 36

Chapter 2 Setup Manager
Drive group
list
Information
area
The Setup Manager divides all drives into one of three groups, reflecting
their current usage allocations and state. The three drive groups are:
Drive list
36
Drive Group Description
Data Drive Set Shows active data drives and spare drives in the data drive
set.
Other
FibreChannel
Drives
Shows drives that are not appropriately initialized for use in
an allocation group. These drives can be used for other
purposes in your environment.
Raw Drives Shows raw drives that are marked for use but are not
allocated for a specific purpose. Raw drives cannot be used
until allocated.
When you select the drive group that you want to view in the drive group
list, all the drives in that group then appear in the drive list. The drive list
displays the name, size, status, unit number, and other technical
information about each drive. You might need to click the right scroll
arrow to see all the information.
Page 37

You access all Setup Manager functions from the various menus in the
menu bar.
The information area provides information about the data drive set and the
status of the File Manager.
Getting Help with the Setup Manager
The Help system provides procedures and reference information for all
features of the Setup Manager.
Starting the Setup Manager
To start the Setup Manager:
t From the File Manager desktop, click the Start button, point to
Programs, point to AvidUnity, and then select Setup Manager.
Starting the Setup Manager
n
n
Until you initialize the e-mail error notification service (see “Setting Up
E-mail Error Notification” on page 50), the Setup Manager will open the
E-mail Configuration dialog box. The open dialog box asks you whether
you want it to appear each time Setup Manager starts. Click OK to stop the
dialog box from appearing again.
Until you configure your data drive set, the Setup Manager information
area will contain a message box warning you that it is not connected to the
File Manager or that the File Manager is not running. This is normal; the
File Manager does not come online until you create a data drive set.
Using Setup Manager in a Fail-Over Configuration
If you have a fail-over configuration with redundant File Managers, one
File Manager assumes the active role and the other the passive role when
the system starts.
37
Page 38

Chapter 2 Setup Manager
Fail-Over Configuration Guidelines
In fail-over configurations, you should always:
• Stop the passive File Manager before performing any hardware
management tasks that involve stopping the File Manager service
(such as adding drives to the data drive set or performing a software
upgrade).
• Use the Setup Manager on the active File Manager to perform
hardware management tasks.
Determining the Active File Manager
To determine the active File Manager:
1. On both File Managers, click Start, point to Programs, point to
AvidUnity, and then select Setup Manager.
The Setup Manager opens.
2. Check the File Manager status in the information area of the Setup
Manager.
One File Manager should indicate Running; this is the active File
Manager. The other File Manager should indicate Standby Mode; this
is the passive File Manager.
Starting and Stopping the File Manager
The File Manager software runs as a Windows service that starts
automatically whenever the server is online. However, various
maintenance and administration functions require that you stop the File
Manager and then restart it. Therefore, you can access these functions from
the Setup Manager.
38
Page 39

Starting the File Manager
To restart the File Manager after it has been manually stopped or has
failed for any reason:
t Choose Start File Manager from the Setup Manager’s File Manager
menu.
Stopping the File Manager
Maintaining metadata integrity is very important to ensure you do not lose
any data files. Avid recommends you use the following shutdown
procedure to avoid problems with metadata integrity.
Starting and Stopping the File Manager
c
In a fail-over configuration, you must stop the standby File Manager
before stopping the active File Manager whenever you perform
operations that require you to stop the File Manager. Otherwise, the
active File Manager will fail over to the standby File Manager as the
active File Manager stops.
To stop the File Manager software:
1. Click the Start button, point to AvidUnity, and then select Monitor
Tool.
The Monitor Tool window opens.
2. Click the Stop File Manager button.
The AvidMon window opens asking if you are sure you want to stop
the File Manager.
3. Click OK.
The File Manager Shutting Down dialog box opens stating that it is
saving multiple copies of the metadata.
- Wait for the process to finish, the dialog box to close, and the
lights in the Monitor Tool to change to yellow.
- Do not add or change any hardware in the MediaNetwork
workgroup until after the File Manager software stops
successfully.
4. Close the Monitor Tool.
39
Page 40

Chapter 2 Setup Manager
Shutting Down the Windows Operating System
To shut down the Windows operating system:
5. Make sure the File Manager software has successfully written a local
copy of the metadata file:
- Open the partition where Avid Unity is installed (typically,
D:\Program Files\ Avid Technology\AvidUnity\).
- Find the PartitionDump.bin file with a modification date from
when you stopped the File Manager (if upgrading or modifying the
system in any way, copy the PartitionDump.bin and the
RecoveryInfo.dat to another partition before you continue).
6. If the PartitionDump.bin file exists with the correct time and date,
continue with Shutting Down the Windows NT System.
1. Click the Start button and then select Shut Down.
The Shut Down Windows dialog box opens.
2. Click “Shut down this computer?”
3. Click Yes. Wait for the dialog box stating that it is safe to restart the
computer.
4. Turn off the power to the File Manager.
Logging Out and Stopping the File Manager Changes
To log out from the File Manager and leave the File Manager software
running:
1. Click the Start button and then select Shut Down.
The Shut Down Windows dialog box opens.
2. Select “Close all programs and logon as a different user” and click
Ye s.
The Avid Unity File Manager dialog box opens, asking if you want to
stop the File Manager software and save the metadata before you log
out.
3. Click No to log out from the File Manager and leave the File Manager
software running.
40
Page 41

Stopping the File Manager
Online Drive Recovery
c
If you stop the File Manager, no clients will be able to access
MediaNetwork workspaces.
To stop the File Manager software and log out from the File Manager:
1. Click the Start button, point to Programs, point to AvidUnity, and
select Monitor Tool.
The Monitor Tool opens.
2. Click the Stop File Manager button.
A message appears asking if you are sure you want to stop the File
Manager software.
3. Click OK.
A dialog box opens indicating that the File Manager is stopping and
saving metadata.
4. Click the Start button and then select Shut Down.
The Shut Down Windows dialog box opens.
5. Select “Shut down the computer?”
6. Click Yes to stop the File Manager or restart the File Manager.
Online Drive Recovery
If drive problems occur, a “Drive Error Analysis Needed” message will
appear in the File Manager Status tab of the Monitor Tool. The online
drive recovery feature is designed to recover a drive while the system
remains online. This significantly improves workflow because clients no
longer need to unmount workspaces during a drive repair. To perform an
online drive repair, see “Recovering a Drive” on page 135.
There are several issues to consider:
•Only connected clients can continue working during online repair.
• Clients are denied write access at some point during online repair.
41
Page 42

Chapter 2 Setup Manager
AutoRecovery for Failed Drives
The AutoRecovery for Failed Drives operation can detect a media error
and automatically recover a drive. This operation helps you maintain a
7x24 work environment, and offers an alternative to using the Setup
Manager to manually intervene and replace failed drives.
n
AutoRecovery requires that you use mirroring, and should never be viewed
as a substitute for mirroring.
Considerations
System performance degrades during the AutoRecovery for Failed Drives
operation. AutoRecovery is disabled by default. Leave it disabled if you
need to maintain full capacity during specific hours, and manually perform
repairs during lower traffic periods (for example, at 2:00
Before You Begin
You need to meet the following conditions before enabling AutoRecovery:
• Set up e-mail error notification: see “Setting Up E-mail Error
Notification” on page 50.
• Have at least one spare MEDIArray II drive (for each size drive in
your system) available to use as the replacement for the bad drive.
Enabling AutoRecovery for Failed Drives
A.M.).
42
To enable AutoRecovery for failed drives:
1. Click the Start button, point to Programs, point to AvidUnity, and then
select Setup Manager.
The Setup Manager window opens.
2. Choose Enable AutoRecovery from the Recover menu.
For more information on how MediaNetwork runs and verifies an
AutoRecovery, see “Verifying AutoRecovery for Failed Drives” on
page 138.
Page 43

Chapter 3
Configuring General,
Fail-Over, and Remote Error
Notification Parameters
You can use the Setup Manager to set general parameters, to configure File
Manager fail-over, and to set up remote error notification by e-mail.
This chapter discusses:
• Configuring General Settings
• Configuring File Manager Fail-Over
• Setting Up E-mail Error Notification
Configuring General Settings
General configuration settings allow you to fine-tune system performance
by limiting the number of open files as well as specifying how the File
Manager writes metadata and interprets available or missing drives during
startup.
c
Inappropriate configuration of the settings described in this section
could result in degraded system performance. Contact Avid Customer
Support before attempting to change these settings.
Page 44

Chapter 3 Configuring General, Fail-Over, and Remote Error Notification Parameters
To configure general settings:
1. Click Start, point to Programs, point to AvidUnity, and then select
Setup Manager.
The Setup Manager opens.
2. Choose General Configuration from the File Menu.
The General Configuration Options dialog box opens.
44
n
3. Type a name for the File Manager in the Virtual File Manager Name
text box. Give the File Manager a name that is different from the
Computer Name defined in the system’s Network properties.
In a fail-over configuration, you must specify the same virtual File
Manager Name for both File Managers.
4. Choose the maximum number of open files allowed by the system
from the “Maximum open files” text box. The default is 5000 files for
LANShare, 10,000 files for a 1-gigabyte (GB) system, and 80,000 files
for a 2-GB system.
In general, you should use the default number. For large and active
systems, you can increase this figure as needed.
Page 45

Configuring File Manager Fail-Over
5. Choose the number of missing drives allowed when the File Manager
starts from the “Number of allowed missing drives when the server
starts” pop-up menu. If more drives than the number specified are
missing from the data drive set, the File Manger will not start.
Choosing a higher number allows the File Manager to start even if it
cannot find the expected number of drives.
The File Manager can function with one drive missing by default when
all workspaces are protected. If more than one drive is missing or some
workspaces are not protected, the system will report errors.
6. Choose the number of seconds the system waits for the last drives
during startup from the “Seconds to wait for last drive(s) to appear”
pop-up menu. A high number causes the File Manager to continue to
search longer for drives during startup.
This option allows the system to accommodate the various start times
required for different drives on the system.
7. Click OK.
Configuring File Manager Fail-Over
If properly configured with a redundant File Manager, MediaNetwork
supports automatic fail-over to the passive File Manager when the active
File Manager fails. Because there is communication between drive sets and
there is polling over the Ethernet, any lack of response from the active File
Manager indicates that it is offline and is not due to a failed connection
between the two File Managers.
n
In a fail-over configuration, neither File Manager is assigned to a primary
or backup role — the first system online becomes the active File Manager
and the second system online becomes the passive File Manager. If both
systems are online at the same time, the active role is negotiated
arbitrarily between the two systems. For this reason, Avid recommends
that you physically label and refer to your first and second File Managers
as FM1 and FM2.
45
Page 46

Chapter 3 Configuring General, Fail-Over, and Remote Error Notification Parameters
For information on installing a second File Manager and setting up the IP
addresses, see the Avid Unity MediaNetwork File Manager Setup Guide.
Tabl e 4 lists the recommended IP addresses. If you use different addresses,
be sure to note them and have them available before proceeding with the
configuration.
Table 4 File Manager Recommended IP Addresses
IP Address Description
192.168.1.1
192.168.2.1 Primary File Manager Ethernet Connector 2
192.168.3.1 Primary File Manager Ethernet NIC (Network Interface
192.168.1.2 Fail-over File Manager Ethernet Connector 1
192.168.2.2 Fail-over File Manager Ethernet Connector 2
192.168.3.2 Fail-over File Manager Ethernet NIC
a. This is the default IP address to use for configuring the Fibre
a
Channel switch initially. Change this IP address to comply with
your specific IP addressing conventions when configuring the
Fibre Channel switch for use in your network.
Primary File Manager Ethernet Connector 1
Card)
Fail-Over Configuration Procedure Overview
Configuring File Manager fail-over requires the following steps:
• “Step 1: Setting Up the Fail-Over Connection on the First File
Manager” on page 47
46
• “Step 2: Setting Up the Fail-Over Connection on the Second File
Manager” on page 48
• “Step 3: Validating the Connections for File Manager Fail-Over” on
page 49
• “Step 4: Starting the First and Second File Managers” on page 49
Page 47

Configuring File Manager Fail-Over
Step 1: Setting Up the Fail-Over Connection on the First File Manager
To set up the fail-over connection on the first File Manager:
1. Click Start, point to Programs, point to AvidUnity, and then select
Setup Manager.
The Setup Manager window opens.
2. Stop the File Manager service by choosing Stop File Manager from the
File Manager menu.
3. Choose File Manager Fail-Over Configuration from the File menu.
The File Manager Fail-Over Configuration dialog box opens.
4. Make sure that the “Enable redundant operation” check box is
selected.
5. Type a virtual server name in the Virtual Server Name text box. This
name must be the same for both the first and second File Managers.
6. Leave the Monitor port set to 5000. If you have another application
that uses port 5000, change the Monitor port to an available port
number. This port number must be the same on both the first and
second File Managers.
7. In the First network path area, choose the first built-in Ethernet adapter
port from the Network Adapter pop-up menu.
8. Type 192.168.1.1 in the Primary File Manager Ethernet
Connector 1 IP address in the Local Machine First path IP address text
box.
9. Type 192.168.1.2 in the Fail-Over File Manager Ethernet
Connector 1 IP address in the Remote Machine First path IP address
text box.
10. In the Second network path area, choose the port of the Ethernet NIC
from the Network Adapter pop-up menu.
11. Type 192.168.2.1 in the Primary File Manager Ethernet
Connector 2 IP address in the Local Machine Second path IP address
text box.
47
Page 48

Chapter 3 Configuring General, Fail-Over, and Remote Error Notification Parameters
12. Type 192.168.2.2 in the Fail-Over File Manager Ethernet
Connector 2 address in the Remote Machine Second path IP address
text box.
13. Leave the Setup Manager and the File Manager Fail-Over
Configuration dialog box open.
Step 2: Setting Up the Fail-Over Connection on the Second File Manager
To set up the fail-over connection on the second File Manager:
1. Stop the second File Manager.
2. Make sure that the “Enable redundant operation” check box is
selected.
3. Type a virtual server name in the Virtual Server Name text box. This
name must be the same for both the first and second File Managers.
4. Leave the Monitor port set to 5000. If you have another application
that uses port 5000, change the Monitor port to an available port
number. This port number must be the same for both the first and
second File Managers.
48
5. In the First network path area, choose the second built-in Ethernet
adapter from the Network Adapter pop-up menu.
6. Type 192.168.1.2 in the Fail-Over File Manager Ethernet
Connector 1 IP address in the Local Machine First path IP address text
box.
7. Type 192.168.1.1 in the Primary File Manager Ethernet
Connector 1 IP address into the Remote Machine First path IP address
text box.
8. In the Second network path area, choose the port of the Ethernet NIC
from the Network Adapter pop-up menu.
9. Type 192.168.2.2 in the Fail-Over File Manager Ethernet
Connector 2 IP address into the Local Machine Second path IP address
text box.
10. Type 192.168.2.1 in the Primary File Manager Ethernet
Connector 2 IP address into the Remote Machine Second path IP
address text box.
Page 49

Configuring File Manager Fail-Over
11. Leave the Setup Manager and the File Manager Fail-Over
Configuration dialog box open.
Step 3: Validating the Connections for File Manager Fail-Over
To validate the connections for File Manager fail-over:
1. Click the Validate Receive button on the first File Manager.
The Validate Fail-Over Connections dialog box opens.
Numbers in the Packets Received text boxes indicate the number of
packets received from the first File Manager.
2. Click the Validate Send button on the second File Manager.
The Validate Fail-Over Connections dialog box opens.
Numbers in the Successful Round Trips text boxes indicate successful
communication with the second File Manager and a valid connection.
The indicator box, under Waiting for response, is green.
n
Step 4: Starting the First and Second File Managers
If you have data traveling over only one of the fail-over network paths, you
probably have a network configuration problem. Recheck your
configuration.
3. Close the Setup Manager on both File Managers.
To start the first and second File Managers:
1. From the first File Manager, click Start, point to Programs, point to
AvidUnity, and then select Monitor Tool.
The Monitor Tool opens.
2. Click Start File Manager.
3. From the second File Manager, click Start, point to Programs, point to
AvidUnity, and then select Monitor Tool.
The Monitor Tool opens.
4. Click Start File Manager.
49
Page 50

Chapter 3 Configuring General, Fail-Over, and Remote Error Notification Parameters
Setting Up E-mail Error Notification
You can configure MediaNetwork to notify you when problems occur. A
Windows service will regularly poll the client log file
(UnityClientLogs.txt) and, if any errors are logged, will send a concise
summary of those errors to one or more e-mail accounts, will sound an
audible alarm on the File Manager, or both.
n
If you subscribe to a text messaging service, you can configure the error
notification service to send messages to your alphanumeric pager. To find
out how to use e-mail to send a message to your pager, contact your
paging service provider.
Configuring the E-mail Error Notification Service
To configure the e-mail error notification service:
1. Click Start, point to Programs, point to AvidUnity, and then select
Setup Manager.
The Setup Manager opens.
2. Choose E-mail Configuration from the File menu.
The E-mail Configuration dialog box opens.
3. Configure the General parameters as follows:
- Enable E-mail — Set this option to enable the e-mail error
notification service.
- Poll Frequency — Specify the frequency (by setting an interval in
seconds) with which the error notification service checks for
problems.
50
- Wait Period — Specify the amount of time to pass between
notification messages. Unless you specify a period, the system will
send messages each time it polls for problems or errors.
Page 51

- Enable Alarm — Set this option to enable an audible alarm on the
File Manager to warn you of any logged errors. When the alarm
sounds, select the Turn Off Alarm button to stop the sound.
- SMTP — Specify the IP address or host name of your SMTP
server. If you are unsure of this address, contact your network
administrator.
- Port — Specify the port number of your SMTP server. If you are
unsure of the port number, contact your network administrator.
The default value (25) is appropriate in most instances.
4. Specify the list of contacts that you want the error notification service
to e-mail when a logged error occurs. For more information, see
“Setting Up E-mail Error Notification Contacts” on page 51.
Setting Up E-mail Error Notification Contacts
You can add to, edit, and delete your Setup Manager e-mail notification
list.
Setting Up E-mail Error Notification
To add an e-mail account to the Contact list:
1. Click the Add button.
The Add Contact dialog box opens.
2. Type a Name for the contact account.
3. Type the e-mail address (in the standard person@domain.com format)
to which the message should be sent.
4. Click the Add button to add the account to the Contact list and clear
the Name and E-mail fields.
5. To add more accounts, repeat steps 2 to 4.
6. When you are done, click Close.
The Add Contact dialog box closes.
51
Page 52

Chapter 3 Configuring General, Fail-Over, and Remote Error Notification Parameters
To edit an existing contact:
1. Select the contact in the Contact list and click Edit.
The Edit Contact dialog box opens.
2. Change the Name and E-mail address information.
3. Click Change.
The changes are applied.
To remove a contact:
t Select the contact in the Contact list and click Remove.
The contact is removed from the list.
52
Page 53

Chapter 4
Managing the Drive Hardware
This chapter describes how to configure and manage your drive hardware
as a data drive set.
n
You perform all drive management operations described in this chapter
from the Setup Manager. For more information about how to start and use
the Setup Manager, see Chapter 2.
This chapter discusses:
• Creating a New Data Drive Set
• Adding Storage to Your Environment
• Adding Active Data Drives to a Data Drive Set
• Removing Drives from Your Environment
• Setting Drive Mode Pages
• Deleting a Data Drive Set
• Rebuilding a Data Drive Set
• Bringing the Data Drive Set Online and Taking the Data Drive Set
Offline
Page 54

Chapter 4 Managing the Drive Hardware
Creating a New Data Drive Set
After you install all the hardware and software that comprise your
environment, you must create a data drive set, which is the set of physical
drives that provides the large, virtual file system. A data drive set can be
set up either automatically with the Configuration Assistant or manually.
However, if you have specific requirements for configuring the data drive
set (for example, if you want to specify how many drives should be
designated as spares), you will need to create your data drive set manually.
Creating a Data Drive Set Automatically
To create a data drive set as quickly as possible, use the Setup Manager
Configuration Assistant. The Configuration Assistant automatically
creates a basic data drive set consisting of:
• Active data drives (all but one of the available drives)
• A single spare data drive
54
n
Avid strongly recommends keeping at least one spare drive of each data
drive size in your data drive set, even if you are using mirroring. (For
example, if you have 18-GB and 73-GB drives in your data drive set, you
should have at least one spare of each size). Therefore, if you have mixed
drive sizes, you should create the data drive set manually.
To run the Configuration Assistant:
1. Choose Configuration Assistant from Setup Manager in the Quick
Start menu.
The Setup Manager dialog box opens, describing the data drive set that
the Configuration Assistant is going to create.
Page 55

2. Click OK.
When the configuration operation is completed, your working data drive
set will be ready for you to perform further configurations from the
Administration Tool. For information about the Administration Tool see
Chapter 5.
Creating a Data Drive Set Manually
This section describes how to manually create a data drive set consisting of
data drives and optional spare data drives.
Creating a New Data Drive Set
n
Creating a Data Drive Set from Raw Drives
If you have an existing data drive set, do not perform this procedure.
To create a data drive set from Fibre Channel drives that are in a raw
state:
1. Click Start, point to Programs, point to AvidUnity, and then select
Setup Manager.
The Setup Manager opens.
2. Select the Raw Drives group in the drive group list, and click it to
display all the attached raw drives in the drive list.
3. Select a minimum of four raw drives of the same size that will become
data drives in your new data drive set.
4. Choose Create Data Drive Set from the Drive Set menu to create a data
drive set from the selected raw drives.
A progress indicator appears, indicating that the Setup Manager is
building the data drive set.
55
Page 56

Chapter 4 Managing the Drive Hardware
When the data drive set has been built successfully, the File Manager and
data drive set come online automatically.
To use the new data drive set:
t Open the Administration Tool and use it to assign the data drives to
one or more allocation groups. For more information, see “Addi ng
Drives to Allocation Groups” on page 87.
Creating Spare Data Drives from Raw Drives
n
Avid recommends keeping at least one spare drive of each data drive size
in your data drive set (for example, if you have 18-GB and 73-GB drives in
your data drive set, you should have at least one spare of each size).
To create a spare data drive:
1. Click Start, point to Programs, point to AvidUnity, and then select
Setup Manager.
The Setup Manager opens.
2. Select the Raw Drives group in the drive group list, and click it to
display all the attached raw drives in the drive list.
3. Select a raw drive.
4. Choose Make Drive Spare from the Drives menu.
The drive becomes a spare data drive and is moved from the Raw
Drives group into the Data Drive Set group.
A spare data drive is required before you can replace a failing drive (see
“Replacing the Data Drive Set” on page 134).
For information about manually adding a new spare drive to the
MEDIArray II drive, see “Adding Storage to Your Environment” on
page 57.
56
Page 57

Adding Storage to Your Environment
Adding Storage to Your Environment
The Metachecker utility checks the MediaNetwork metadata integrity.
Metachecker is run automatically anytime you add a drive to or remove a
drive from your data drive set. Do not run this utility manually unless
directed by Avid Customer Support.
To physically add new MEDIArray II drives to your environment:
1. Stop the File Manager service (see “Starting and Stopping the File
Manager” on page 38). In a fail-over configuration, stop the passive
File Manager before stopping the active File Manager. Otherwise, the
system will perform a fail-over to the passive system in the middle of
the shutdown.
2. Shut down and turn off power to the File Manager system. In a failover configuration, shut down both File Managers.
3. Turn off power to the MEDIArray II drive enclosures.
4. Add the new MEDIArray II drives, installing new MEDIArray II
enclosures to accommodate the drives if necessary as described in the
Avid Unity MediaNetwork File Manager Setup Guide.
c
5. Turn on power to the MEDIArray II drive enclosures.
6. Reset the Fibre Channel switch.
7. Start the File Manager. In a fail-over configuration, restart only one
File Manager.
8. Open the Setup Manager.
The newly added drives will appear in the Raw Drives group, the
Other FibreChannel Drives group, or an additional Data Drive Set
group, depending on how they have been used previously.
If the newly added drives create another Data Drive Set group, you
must delete that new data drive set before attempting to bring your
environment online. See “Deleting a Data Drive Set” on page 64. If the
newly added drives appear in the Other FibreChannel Drives group,
you need to make them Raw.
57
Page 58

Chapter 4 Managing the Drive Hardware
n
If the new drives are not listed, there is probably something wrong with
their physical connections. Do not proceed any further and see the
Avid Unity MediaNetwork File Manager Setup Guide.
9. Add the new drives to the data drive set (see “Adding Active Data
Drives to a Data Drive Set” on page 58).
10. In a fail-over configuration, restart the other File Manager.
Adding Active Data Drives to a Data Drive Set
The Setup Manager allows you to enlarge your data drive set by adding
active data drives to your existing data drive set. Available drives appear in
the Raw Drives group, the Other FibreChannel Drives group, or the Data
Drive Set group, depending on whether they are newly added and how they
were previously used.
n
Hot Swapping MEDIArray II Drives
If you are adding new, previously unused drives, proceed to “Creating
Data Drives from Raw Drives” on page 60.
MediaNetwork does not support hot swapping the MEDIArray II drives in
the data drive set. You cannot remove a MEDIArray II drive from a
MEDIArray II enclosure while the File Manager is running.
Adding Drives That Were Data Drives in Another Data Drive Set
If the drives added to your data drive set were used previously in another
data drive set, two Data Drive Set groups appear in the drive group list:
• One Data Drive Set group contains the newly added drives, including
the drives you added from another data drive set. This group also
includes any missing drives.
• The other Data Drive Set group is your existing data drive set.
58
Page 59

Adding Active Data Drives to a Data Drive Set
c
c
You must delete the data drive set containing the newly added drives
before you can use the new drives in your existing data drive set.
To add data drives previously used in another data drive set to your
current data drive set:
1. From the File Manager desktop, click the Start button, point to
Programs, point to AvidUnity, and then select the Setup Manager.
The Setup Manager opens.
2. Select the Data Drive Set group that contains the drives you want to
add to your data drive set.
All the drives in that group appear in the drive list.
Do not proceed unless you are sure that you have selected the correct
data drive set. Deleting a Data Drive Set group causes all data on that
data drive set to be lost.
3. Choose Delete Data Drive Set from the Drives menu.
The data drive set is deleted and all the drives in it become raw.
Therefore, they now appear in the Raw Drives group.
4. Proceed to “Creating Data Drives from Raw Drives” on page 60.
Adding Drives That Were Previously Used with Another Application
If the drives you want to add to your data drive set were used previously in
another environment, they will appear in the Other FibreChannel Drives
group.
To add the drives to your current data drive set:
1. From the File Manager desktop, click the Start button, point to
Programs, point to AvidUnity, and then select the Setup Manager.
The Setup Manager opens.
2. Select the Other FibreChannel Drives group.
All the drives in that group appear in the drive list.
59
Page 60

Chapter 4 Managing the Drive Hardware
3. Select the drives from the drive list that you want to add as data drives
to your data drive set.
4. Choose Make Drive Raw from the Drives menu to remove any
formatting and information on the drives.
c
Making the drives into raw drives causes all data on the selected data
drive set to be lost.
5. Proceed to “Creating Data Drives from Raw Drives” on page 60.
Creating Data Drives from Raw Drives
To create data drives from raw drives:
1. From the File Manager desktop, click the Start button, point to
Programs, point to AvidUnity, and then select the Setup Manager.
The Setup Manager opens.
2. Select the Raw Drives group.
All the drives in that group appear in the drive list.
3. Select the raw drives from the drive list that you want to add as data
drives to your data drive set.
4. Choose Make Drive Spare from the Drives menu.
The raw drives are added to the Data Drive Set group as spare data
drives.
60
5. Select the newly created spare data drives from the Data Drive Set
group.
6. Choose Add Additional Drives from the Drive Set menu.
A progress indicator appears. As soon as the data drive set has been
successfully enlarged, the File Manager and data drive set come online
automatically.
7. Use the Administration Tool to assign the newly added drives to one or
more allocation groups. For more information, see “Adding Drives to
Allocation Groups” on page 87.
Page 61

Removing Drives from Your Environment
Removing Drives from Your Environment
You can remove drives from your data drive set, as long as the following
conditions are met after you have done so:
• The data drive set contains at least four drives.
• The data drive set contains enough drives to support the space
allocated to your workspaces.
n
This is the total amount of storage allocated to the workspaces, not the
actual amount of data stored on the workspaces.
• The data drive set contains at least the number of drives currently
required to store the file system’s metadata.
The process for removing drives involves removing the drives from the
data drive set (which requires that you first remove them from any
allocation groups to which they are assigned), then physically removing
them from the MEDIArray II drive enclosure.
Removing Active Data Drives from a Data Drive Set
To remove active data drives from an existing data drive set:
1. Use the Administration Tool to remove the drives from any allocation
groups to which they are assigned. Make your workspaces smaller if
necessary. For more information, see “Adjusting Workspace Size” on
page 100.
When prompted to optimize all workspaces on the allocation group,
click Yes to optimize the workspaces and move all data from the drives
you want to remove. Make sure that this completes successfully. For
more information, see “Removing Drives from Allocation Groups” on
page 88.
2. In the Setup Manager, select the Data Drives Set group.
All the drives in that group appear in the drive list.
3. Select the drives that you want to remove.
61
Page 62

Chapter 4 Managing the Drive Hardware
n
In addition to the drive name, a good way to confirm that a drive is not in
an allocation group and therefore available for removal is that its % Used
is 0.00%.
4. Choose Remove Selected Drives from the Drive Set menu to remove
formatting from the drives.
5. Click Yes to confirm the removal.
6. Click Yes when a message box opens, informing you that the data
drive set must be taken offline.
The Server Offline Control dialog box opens.
7. Type the number of seconds to wait until the server goes offline and
click OK.
8. When the data drive set comes back online, select the Raw Drives
group in the Setup Manager.
The drives you removed from the data drive set should now appear in
the data drive set.
You can now physically remove the MEDIArray II drives (see “Physically
Removing Storage from Your Environment” on page 62).
Physically Removing Storage from Your Environment
To physically remove MEDIArray II drives from your environment:
1. Stop the File Manager service (see “Starting and Stopping the File
Manager” on page 38). In a fail-over configuration, stop the passive
File Manager before stopping the active File Manager. Otherwise, the
system will perform a fail-over to the passive system in the middle of
the shutdown.
2. Shut down and turn off power to the File Manager system. In a
fail-over configuration, shut down both File Managers.
3. Turn off power to the MEDIArray II drive enclosures.
4. Remove the new MEDIArray II drives (and MEDIArray II drive
enclosures, if required) as described in the Avid Unity MediaNetwork
File Manager Setup Guide.
62
Page 63

Setting Drive Mode Pages
5. Turn on power to the MEDIArray II drive enclosures.
6. Reset the Fibre Channel switch.
7. Restart the File Manager. In a fail-over configuration, restart both File
Managers.
8. Restart the Setup Manager. In a fail-over configuration, restart the
Setup Manager on both File Managers and determine the active File
Manager (see “Determining the Active File Manager” on page 38).
n
You must use the Setup Manager on the active File Manager to perform
the next step in this procedure.
9. Check that the drives no longer appear in the Raw Drives group.
Setting Drive Mode Pages
Mode pages, which can be configured, are part of the drive firmware that
determines how the drive handles data. When you create data drives, the
Setup Manager configures the mode pages to efficiently handle media data
in your environment.
If drive mode pages are incorrect (for example, they were changed by
another application), the Setup Manager warns you by changing the Mode
Page column value in the drive list from Okay to Incorrect.
To reconfigure drives with the correct mode pages:
1. From the File Manager desktop, click the Start button, point to
Programs, point to AvidUnity, and then select the Setup Manager.
The Setup Manager opens.
2. Select the appropriate drives.
3. Choose Set Mode Pages from the Drives menu.
The mode pages are corrected.
63
Page 64

Chapter 4 Managing the Drive Hardware
Deleting a Data Drive Set
c
This procedure will cause all data on the data drive set to be lost.
To delete an existing data drive set:
1. Take the data drive set offline (see “Taking the Data Drive Set
Offline” on page 66).
2. From the File Manager desktop, click the Start button, point to
Programs, point to AvidUnity, and then select the Setup Manager.
The Setup Manager opens.
3. Select the Data Drive set group in the drive group list.
4. Choose Delete Data Drive Set from the Drive Set menu.
A dialog box opens and prompts you to confirm this choice.
A progress indicator opens, showing that the Setup Manager is
deleting the data drive set.
After the data drive set is deleted, all of the data drives previously in your
data drive set will appear in the Raw Drives group.
Rebuilding a Data Drive Set
64
c
This procedure will cause all data on the data drive set to be lost.
To rebuild an existing data drive set:
1. Delete the existing data drive set (see “Deleting a Data Drive Set” on
page 64).
After the data drive set is deleted, all of the data drives will appear in
the Raw Drives group.
2. Select the Raw Drives group in the drive group list and click it to
display all the attached raw drives in the drive list.
3. Select all the raw drives that you want to become data drives in the
new data drive set.
Page 65

Bringing the Data Drive Set Online and Taking the Data Drive Set Offline
4. Choose Create Data Drive Set from the Drive Set menu to rebuild the
data drive set.
A progress indicator opens, showing that the Setup Manager is
building the data drive set.
As soon as the data drive set has been built successfully, the data drive set
comes online automatically.
Bringing the Data Drive Set Online and Taking the
Data Drive Set Offline
Some hardware operations (for example, repairing the data drive set)
require that you first take the data drive set offline and then bring it online
again. You can also take the data drive set offline to prevent client access
to all of your workspaces.
Data drive set sharing status is indicated in three ways:
• Information area of the Setup Manager
• Take Offline command in the Drive Set menu of the Setup Manager
(available when the data drive set is online)
• Bring Online command in the Drive Set menu of the Setup Manager
(available when the data drive set is offline).
Bringing the Data Drive Set Online
To bring the data drive set online:
1. From the Setup Manager, select the Data Drive Set group in the drive
group list.
2. Choose Bring Online from the Drive Set menu.
The data drive set comes online.
65
Page 66

Chapter 4 Managing the Drive Hardware
Taking the Data Drive Set Offline
n
Before taking the data drive set offline, you should identify any clients that
have workspaces mounted (using the Monitor Tool Active Client tab) and
warn the clients that you are taking the data drive set offline.
To take the data drive set offline:
1. From the Setup Manager, select the Data Drive Set group in the drive
group list.
2. Choose Take Offline from the Drive Set menu.
A dialog box opens, prompting you to specify the delay that you want
to occur (in seconds) before the data drive set is brought offline so that
clients can unmount all workspaces.
3. Type the required delay or accept the default (60 seconds) and click
OK.
After the specified delay, the data drive set goes offline.
66
Page 67

Chapter 5
Administration Tool
The Administration Tool is used for the initial setup and day-to-day
administration of allocation groups, workspaces, users, and client
connection privileges. It also allows you to monitor your environment’s
activity.
This chapter provides an overview of the Administration Tool and
describes the basics of how to use it (opening the tool, logging in, setting
preferences, and so on).
This chapter discusses:
• Understanding the Administration Tool User Interface
• Opening the Administration Tool
• Logging In to the Administration Tool
• Administration Tool Preferences Window
• Reestablishing a Connection to the File Manager
Understanding the Administration Tool User Interface
The Administration Tool, which you can run on the MediaNetwork File
Manager or any client, has a user interface (UI) where controls are grouped
by function and are displayed by clicking the appropriate management
window buttons.
Page 68

Chapter 5 Administration Tool
You can open multiple management windows in a session, and retain
window placement and sizes between sessions.
Management
window buttons
Window buttons
List area
Message area
User Interface Management
This section briefly describes each component of the Administration
Tool’s UI.
Message Area
The message area shows your connection status, along with information
from the message log.
List Area
You can
open
multiple
windows
68
The contents of the list area are different for each window, but each list has
similar functions, such as:
• You can expand and contract by clicking the list opener.
Page 69

Understanding the Administration Tool User Interface
• You can select a single object by clicking.
• You can select multiple objects by Shift+clicking.
• You can select multiple objects by clicking a selection box and
dragging it.
• You can rename an object by clicking its name and typing a new one.
n
Clicking an icon in the list area selects the object without making its name
editable. Clicking directly on an item’s name makes the name editable as
well as selecting the item.
Window Buttons
Each window has buttons that provide access to the most common
operations with a single click.
User Interface Window Descriptions
The following table describes the five windows in the Administration
Tool:
Window Allows You To
File Manager View and change your File Manager connection.
User
Management
View, create, edit, and delete user accounts (with optional
passwords) and assign access privileges to workspaces.
Workspace
Management
Allocation
Group
Management
Connection
Monitor
View, create, rename, adjust the size of, protect, optimize, and
delete workspaces.
View, create, rename, and delete allocation groups. It also
allows you to add and remove drives from existing allocation
groups.
Monitor system usage, including total system bandwidth use,
number of active clients, and client bandwidth consumption.
69
Page 70

Chapter 5 Administration Tool
Getting Help with the Administration Tool
The Help system provides procedures and reference information for all
features of the Administration Tool.
Opening the Administration Tool
You can open the Administration Tool from the File Manager console,
from any Windows client, from a Macintosh client, and in more than one
location simultaneously. You can do this on Fibre Channel clients but not
Ethernet clients. This allows you to monitor usage and to perform other
administrative tasks from the most convenient location without having to
return to another running copy of the Administration Tool to shut it down
before doing your work.
c
Performing administrative functions on more than one
Administration Tool at the same time can cause unexpected results.
For example, if two administrators are deleting the same user account
at the same time, a second user account might also be accidentally
deleted.
Before Performing Administrative Functions
It is critical that clients unmount workspaces when the administrator
performs the following functions:
• Stopping and restarting the File Manager (unmount all workspaces)
• Taking the data drive set offline (unmount all workspaces)
• Rebooting the File Manager (unmount all workspaces)
• Changing users’ access (unmount only the affected workspaces)
• Optimizing workspaces (unmount only the affected workspaces)
c
If a client is using a workspace when it is taken offline, the connection
to the workspace is broken and data might be lost.
70
Page 71

Logging In to the Administration Tool
Logging In to the Administration Tool
If you have specified an administration password (see “Setting the
Administration Password” on page 75), the Administration Tool prompts
you to supply that password to log in. If you enter the wrong password, an
error message appears and the login window reappears.
Regular users can log in to the Administration Tool and view the
Workspace management window. However, they can view only the
workspaces they have Read/Write access to, and must be given privileges
to adjust the size of their workspaces.
Administration Tool Preferences Window
The Administration Tool allows you to set preferences that specify a wide
range of options (such as the administration password, user interface
colors, and graph display options). You also use the tool to configure your
environment by creating default names and setting access privileges for
new workspaces and users.
You can also export entire sets of preferences that can be imported later
and applied to workspaces and users. With the exception of administration
passwords, preferences are system specific. For more information, see
“Exporting and Importing Preferences” on page 74.
71
Page 72

Chapter 5 Administration Tool
Setting Administration Tool Preferences
To open the Preferences window:
t Choose Preferences from the File menu.
Preference Tabs
72
The Preferences window contains six tabs, each containing options and
default values related to an aspect of Administration Tool functionality.
Tabl e 5 describes the Preferences window tabs.
Table 5 Preference Window Tabs
Tab Specifies
Administration Administrator password. See “Setting the Administration
Password” on page 75.
User Default name, password, and access privileges for new
users. Also specifies view preferences (icon/text) for
access privileges. See “Setting User Account Preferences”
on page 76.
Page 73

Table 5 Preference Window Tabs (Continued)
Tab Specifies
Workspace Default name, access privileges, and size for new
workspaces. See “Setting Workspace Preferences” on
page 77.
Color User interface colors. See “Setting Workspace and
Monitor Graph Bar Colors” on page 79.
Warnings Percent used warnings for both workspaces and allocation
groups See “Setting Warning Preferences” on page 80.
Logo Logo text for the main window. See “Setting Logo
Preferences” on page 81.
Undoing or Canceling Preference Changes
If you need to undo any changes you make, the Preferences window offers
three options to revert to earlier preferences or to cancel your changes:
Administration Tool Preferences Window
• Click the Revert Panel button to return the preferences to their last
saved values.
• Click the Factory Settings button to return the preferences back to the
original values set at installation time.
• Click the Cancel button to close the Preferences window without
saving your changes.
Saving Preference Changes
To view preference changes immediately or to apply some changes and
then continue changing preferences, click the Apply button. This saves
your changes without closing the Preferences window.
When you have finished making preference changes, click OK. This saves
all your changes and closes the Preferences window.
73
Page 74

Chapter 5 Administration Tool
Preferences are saved locally to a file on the system on which you are
running the Administration Tool. Tab le 6 shows the location of the
preferences file on different system types.
Table 6 Preference File Locations
System Type File Location
File Manager or
Windows client
Macintosh client System Folder/Preferences/Avid Unity Preferences
MediaNetwork installation directory (D:\Program
Files\Avid Technology\AvidUnity by default)
If you want to make preferences available on other clients, you need to
export your preferences to a shared drive, workspace, or floppy disk (see
“Exporting and Importing Preferences” on page 74).
Exporting and Importing Preferences
The Administration Tool allows you to export and import preferences.
This allows you to save multiple preferences sets to accommodate
different usage situations and multiple administrators, and to provide
consistent settings across multiple systems on which the Administration
Tool can be run.
Additionally, you can export preference sets to a shared drive (or
workspace if you know that it will not be deleted) for import into the
Administration Tool on any client in your environment.
74
To export the current preference:
1. Choose Export Preferences from the File menu.
The File Selection dialog box opens.
2. Select a location and name for the exported preferences file that you
want to create and click OK.
Page 75

To import a preference:
1. Choose Import Preferences from the File menu.
The File Selection dialog box opens.
2. Navigate to and select the Preferences file that you want to import, and
click OK.
Setting the Administration Password
The Administration tab of the Preferences window allows you to specify
an administration password to restrict access to the Administration Tool
(see “Logging In to the Administration Tool” on page 71).
Administration Tool Preferences Window
c
To protect your configuration, Avid recommends that you specify an
administration password the first time you use the tool after creating
your data drive set. If you do not set an administration password,
anyone can access the tool.
To set the administration password:
1. Choose Preferences from the File menu.
The Preferences window opens.
2. Click the Administration tab.
75
Page 76

Chapter 5 Administration Tool
3. Type the current administration password (if any) and the new
administration password twice (the second time for verification
purposes) in the text boxes.
4. (Option) Select Enable Automatic Refresh, and enter a refresh interval.
5. Click Apply to save your new password.
n
Be sure to remember the administration password. If you forget it, you can
regain access to the Administration Tool by resetting the password from
the Monitor Tool. For more information, see the tool’s Help system.
Setting User Account Preferences
The User tab of the Preferences window allows you to specify the default
user names, passwords, and access privileges for new user accounts (and
the Guest user account). You also can specify whether access privileges
are displayed as icons or text in the user list display. For more information,
see Chapter 8.
To set user preferences:
1. Choose Preferences from the File menu.
The Preferences window opens.
76
Page 77

Administration Tool Preferences Window
2. Click the User tab.
3. Type the name for the user account in the Name text box.
4. Type the login password for the user account in the Password text box.
5. Choose the access privileges for the user account (No Access, Read
Access, Read/Write Access, or Selected User Access) from the Access
Privileges pop-up menu.
6. Select whether access privileges will be displayed as text, colored
squares, or icons in the user list display from the User Access Icons
area.
7. Click Apply or OK to save your changes. Alternatively, you can click
Revert Panel to revert to your previous user preferences or click
Cancel to close the window without saving the new preferences.
Setting Workspace Preferences
The Workspace tab of the Preferences window allows you to specify the
default names, access privileges, and sizes for new workspaces. You also
can specify default scaling settings for the workspace list in the Workspace
tab. For more information about the Workspace tab, see Chapter 7.
77
Page 78

Chapter 5 Administration Tool
n
You also can set your workspace graph scaling preferences by setting them
dynamically and saving them from the Workspace tab.
To set workspace preferences:
1. Choose Preferences from the File menu.
The Preferences window opens.
2. Click the Workspace tab.
78
3. Set new values for the preferences that you want to change:
- Type the name for the workspace in the Name text box.
- Type the size, in gigabytes, for the workspace in the Size (GB) text
box.
- Choose the access privileges for the workspace (No Access, Read
Access, Read/Write Access, or Selected Workspace Access) from
the Access Privileges pop-up menu.
- If you do not want protection to be enabled by default for the
workspace, deselect the Protection Enabled option.
- Shift+select to choose a column view (either Normal or Detailed)
only for data you want to display.
Page 79

Administration Tool Preferences Window
4. Click Apply or OK to save your changes. Alternatively, you can click
Revert Panel to revert to your previous user preferences or click
Cancel to close the window without saving the new preferences.
Setting Workspace and Monitor Graph Bar Colors
The Color tab of the Preferences window contains controls that allow you
to change the color of the workspace and monitor graph bars in the
Administration Tool’s UI.
To set the workspace and monitor graph bar colors:
1. Choose Preferences from the File menu.
The Preferences window opens.
2. Click the Color tab.
3. Choose the graph bar element that you want to change from the Color
menu.
4. Select the red, green, and blue color component values by moving the
corresponding sliders. As you alter the values, the color of the selected
graph bar element changes in the preview bars.
5. Select and change other graph bar elements by repeating steps 3 and 4.
79
Page 80

Chapter 5 Administration Tool
6. Click Apply or OK to save your color changes. Alternatively, you can
click Revert Panel to revert to your previous color preferences or click
Cancel to close the window without saving the new preferences.
Setting Warning Preferences
The Warnings tab of the Preferences window allows you to set warnings
and alarms for both workspaces and allocation groups.
To set warnings preferences:
1. Choose Preferences from the File menu.
The Preferences window opens.
2. Click the Warnings tab.
80
3. Choose percent used values for workspace and allocation groups.
- The Workspace Management window will highlight yellow if the
warning level is exceeded.
- The Workspace Management window will highlight red if the
alarm level is exceeded.
Page 81

Administration Tool Preferences Window
4. Click Apply or OK to save your changes. Alternatively, you can click
Revert Panel to revert to your previous warnings preferences or click
Cancel to close the window without saving the new preferences.
n
You can disable these warnings if you do not want them to be active.
Setting Logo Preferences
The Logo tab of the Preferences window gives you the option to create a
text logo, which displays next to the Management Window toolbar.
To set logo preferences:
1. Choose Preferences from the File menu.
The Preferences window opens.
2. Click the Logo tab.
3. Type the logo text.
4. Click Apply or OK to save your changes. Alternatively, you can click
Revert Panel to revert to your previous user preferences or click
Cancel to close the window without saving the new preferences.
81
Page 82

Chapter 5 Administration Tool
Reestablishing a Connection to the File Manager
If the Administration Tool’s connection to the File Manager is disrupted
during a session, the Connect icon will display an “X” mark.
To reestablish your connection to the File Manager:
1. Click the Connect icon.
The Login window opens.
2. Enter your user name and password, then click OK.
If the File Manager is running, you will reconnect.
If the File Manager is down, you will receive an error message.
82
Page 83

Chapter 6
Managing Allocation Groups
Allocation groups are partitions, each containing four or more assigned
data drives from the larger data drive set. This chapter describes how to
create and manage allocation groups in your file system.
This chapter discusses:
• The Allocation Group Management Window
• Allocation Group Usage Guidelines
• Creating Allocation Groups
• Adding Drives to Allocation Groups
• Removing Drives from Allocation Groups
• Identifying Drives
• Renaming Allocation Groups
• Deleting Allocation Groups
The Allocation Group Management Window
You perform most allocation group operations from the Allocation Group
Management window. You create new allocation groups from a separate
window, which is described in “Creating Allocation Groups” on page 85.
Page 84

Chapter 6 Managing Allocation Groups
The Allocation Group Management window contains two sections. The
left side displays all the drives in your current selection. The right side
displays a list of all available drives.
Allocation
Group
Management
toolbar
Current allocation group Available drives
Add/Remove drive
buttons
The toolbar buttons allow you to add, delete, and rename drives, as well as
identify all drives or specific drives. Two context-sensitive buttons allow
you to add drives to and remove drives from the allocation group.
Allocation Group Usage Guidelines
You can assign all of your data drives to one large allocation group. To
further optimize performance, you can use allocation groups to configure
your file system.
If your environment supports clients with very high bandwidth
requirements, you will need to set up specific hardware and allocation
group configurations to support them. For more information, see the
Avid Unity MediaNetwork Supported Configurations.
84
Page 85

Creating Allocation Groups
In such an environment, you can use allocation groups to isolate clients
that need very high bandwidth and thus eliminate the competition from
other clients trying to access the same drives. For example, when
uncompressed media is in its own allocation group and a single client is
using the uncompressed media, that client is serviced independently from
any other clients in the workgroup. This logic can also be applied to
separating audio and video media.
In other situations, allocation groups are more flexible, allowing you to
assign drives in your file system configuration to allocation groups with
few limitations other than the following guidelines:
• Use only one drive type (size) per allocation group.
• Use a minimum of four drives per allocation group.
• Divide very large data drive sets (over 60 drives) into several
allocation groups to minimize the risk of two drives used in a protected
workspace failing at the same time.
Creating Allocation Groups
An allocation group is a set of physical drives that form a subset of the data
drive set to accommodate different drive types, clients with different data
rate requirements (for instance, clients that use compressed and
uncompressed media), and so on.
To create a new allocation group:
1. Open the Administration Tool, and click the Allocation Group
Management button. For more information on opening the
Administration Tool, see “Opening the Administration Tool” on
page 70.
2. Do one of the following:
t Click the Create New Allocation Group button.
t Select New Allocation Group from the Commands menu.
The New Allocation Group dialog box opens.
85
Page 86

Chapter 6 Managing Allocation Groups
3. Type a name for the allocation group.
86
4. Select all the drives you want to assign to the new allocation group
(four-drive minimum) by clicking them.
If you are creating allocation groups containing specific drives in the
MEDIArray II drive enclosures:
a. Click the Identify button. The drive light flashes on the drive being
identified.
b. If the identified drive is the drive you want in the MEDIArray II
drive enclosure, click the drive. If it is not the drive you wanted,
select another drive.
c. Repeat steps a and b until you have selected all the drives you
want in the allocation group.
5. Click the Create button to create a new allocation group containing all
the selected drives.
A dialog box opens, asking you to confirm that you want to create a
new allocation group.
The new allocation group appears in the allocation group list.
Page 87

Adding Drives to Allocation Groups
You can add unassigned data drives from the data drive set to an allocation
group at any time to increase its storage capacity.
Adding Drives to Allocation Groups
n
When you optimize, you make a copy of a file on a nearly full workspace or
drive, move it to an emptier workspace or drive, then delete the original.
You must maintain sufficient free space on your workspace or drive to
make a copy of your largest file, or optimization will fail.
To add drives to an allocation group:
1. Open the Administration Tool, and click the Allocation Group
Management button. For more information on opening the
Administration Tool, see “Opening the Administration Tool” on
page 70.
2. Select the allocation group where you want to add drives.
3. Select all the drives you want to add to the allocation group by clicking
them.
If you want to add specific drives from the MEDIArray II drive
enclosures:
a. Click the Identify Drive button. The drive light flashes on the drive
being identified.
b. If the identified drive is the drive you wanted in the MEDIArray II
drive enclosure, click the drive name. If it is not the drive you
wanted, select another drive.
c. Repeat steps a and b until you have selected all the drives you
want to add to the allocation group.
87
Page 88

Chapter 6 Managing Allocation Groups
4. Click the Add Drive button to add the selected drives to the allocation
group.
A dialog box opens, asking whether you want to optimize all
workspaces on the allocation group now:
Add Drive button
t Click Yes to add the drives and optimize all workspaces on the
allocation group immediately.
A progress indicator appears while the optimization process
occurs.
t Click No only if, because of time constraints, you must add the
drives without an immediate optimization. You must manually
optimize all workspaces on the allocation group as soon as
possible afterward. (See “Optimizing Workspaces” on page 107.)
The selected drives are added to the allocation group.
Removing Drives from Allocation Groups
You can remove drives from any existing allocation group that has no
workspaces on it. Drives removed from the allocation group are returned to
the data drive set’s pool of unassigned data drives.
88
Page 89

Removing Drives from Allocation Groups
To remove drives from an allocation group:
1. Open the Administration Tool, and click the Allocation Group
Management button. For more information on opening the
Administration Tool, see “Opening the Administration Tool” on
page 70.
2. Select the allocation group from which you want to remove drives.
3. Select the drives that you want to remove from the drive list.
Remove Drive button
4. Click the Remove Drive button. This button is only active if at least
four drives are not selected and they can accommodate all assigned
workspaces.
A dialog box opens, asking whether you want to optimize all
workspaces on the allocation group now:
t Click Yes to remove the drives and optimize all workspaces on the
allocation group immediately.
A progress indicator appears while the optimization process
occurs.
t Click No only if, because of time constraints, you must remove the
drives without an immediate optimization of all workspaces on the
allocation group. You must manually optimize all workspaces on
the allocation group as soon as possible afterward. (See
“Optimizing Workspaces” on page 107.)
The selected drives are removed from the allocation group.
89
Page 90

Chapter 6 Managing Allocation Groups
Identifying Drives
Identifying a drive causes a light to blink on the physical drive itself. You
can identify one drive, selected drives, or all drives, and then specify the
number of seconds you want the light to blink.
To identify drives:
1. Open the Administration Tool, and click the Allocation Group
Management button. For more information on opening the
Administration Tool, see “Opening the Administration Tool” on
page 70.
2. Select the drives you want to identify.
3. Do one of the following:
t Click the Identify Drives button.
t Select Identify Drive from the Commands menu.
90
4. Click either the “each” or “all” button, and specify the number of
seconds you want the light to blink on the drive.
- When you choose “Identify each” on a selection of drives, the light
will blink until each drive has been individually identified.
- When you choose “Identify all” on a selection of drives, the light
will blink simultaneously on all the drives.
5. Click Identify.
Page 91

Renaming Allocation Groups
You can rename an allocation group at any time. Any changes you make
are applied automatically in the Workspace Management window.
Renaming Allocation Groups
n
The following characters are illegal in allocation group names: \, /, :, *, ?,
", <, >, and |.
To rename an allocation group:
1. Open the Administration Tool, and click the Allocation Group
Management button. For more information on opening the
Administration Tool, see “Opening the Administration Tool” on
page 70.
2. Select the allocation group name you want to change.
3. Click the Rename Allocation Group button.
The Rename Allocation Group dialog box opens.
4. Type a new name (maximum of 27 characters).
5. Click OK.
91
Page 92

Chapter 6 Managing Allocation Groups
Deleting Allocation Groups
You can delete any allocation group that does not have any workspaces on
it. As a result, all drives previously assigned to the allocation group return
to the data drive set’s pool of unassigned data drives.
To delete an allocation group:
1. Ensure that no workspaces exist on the allocation group that you want
to delete (see Chapter 7).
2. Open the Administration Tool, and click the Allocation Group
Management button. For more information on opening the
Administration Tool, see “Opening the Administration Tool” on
page 70.
3. Select the allocation group you want to delete.
Delete Allocation Group button
92
4. Click the Delete Allocation Group button.
A dialog box opens and prompts you to confirm that you really want to
delete the allocation group.
5. Click OK to confirm.
The allocation group is deleted.
Page 93

Chapter 7
Managing Workspaces
Workspaces are virtual volumes that exist on allocation groups and can be
resized dynamically. Workspaces allow you to easily segment your data
drive set to accommodate projects and users.
This chapter describes how to create, rename, and delete workspaces. It
also tells you how to manipulate the amount of storage allocated to each
workspace, how to move a workspace and its contents to another allocation
group, and how to protect a workspace against drive failure.
This chapter discusses:
• The Workspace Management Window
• Creating Workspaces
• Duplicating Workspaces
• Adjusting Workspace Size
• Renaming Workspaces
• Deleting Workspaces
• Protecting Workspaces
• Optimizing Workspaces
• Moving Workspaces
• Collecting Workspace Statistics
Page 94

Chapter 7 Managing Workspaces
The Workspace Management Window
You perform workspace functions from the Workspace Management
window of the Administration Tool, which allows you to:
• Create, delete, and rename workspaces.
• Manipulate the amount of storage allocated to each workspace.
• Protect a workspace against drive failure by duplicating files on more
than one drive (a form of mirroring).
• Monitor how much free space exists on each workspace, and how
much unallocated space exists in each data drive set.
• Move a workspace and its contents to another allocation group.
Graph menu buttons
Workspace
menu buttons
94
Allocation
groups with
workspace lists
Page 95

Workspace List
The workspace list displays all workspaces under the allocation groups on
which they reside. For more information, see “Reading the Workspace
List” on page 95 and “Changing the Workspace List Graph Display” on
page 96.
Reading the Workspace List
The workspace list represents data drive set, allocation group, and
workspace sizes and usage. Color coding (customizable from the
Preferences window) allows each bar to represent up to four characteristics
for protected workspaces. The following icons identify the protected and
unprotected workspaces:
Icon Description
Unprotected workspace
The Workspace Management Window
n
Protected workspace
Unprotected workspace, with some files protected
Protected workspace, with some file unprotected
You may want to synchronize files when you have either an unprotected
workspace with some files protected, or a protected workspace with some
files unprotected.
95
Page 96

Chapter 7 Managing Workspaces
For the data drive set and allocation groups, the bar colors represent:
• Used space — Total drive space in the data drive set or allocation
group allocated to workspaces.
• Available space — Total drive space in the data drive set or allocation
group still available for allocation to workgroups.
Used space Available space
Available space
Used space
Changing the Workspace List Graph Display
The workspace list graph can be customized, allowing you to display data
drive set and workspace sizes by using either linear or logarithmic scales,
and to adjust the scale divisions and the graph view size.
96
Page 97

The Workspace Management Window
Selecting a Linear or Logarithmic Graph Display
The workspace list graph can display the data drive set and workspace
sizes by using one of two scales:
Scale Button Description
Linear When linear scaling is being used, the Linear
Scale button is hidden and the Log Scale button
is displayed. Click the Log Scale button if you
want to switch to the logarithmic scale.
Logarithmic When logarithmic scaling is being used, the Log
Scale button appears dimmed and the Linear
Scale button is active. Click the Linear Scale
button if you want to switch to the linear scale.
The linear scale is easier to read because each division of the scale
represents an equal amount. The logarithmic scale allows you to view
more information in a small space but is harder to read.
Scaling the Graph
In either scale, numeric divisions are displayed in gigabytes (GB).
To increase or decrease the size of the graph view, do one of the
following:
t Click the Increase Scale or Decrease Scale button
t Select Increase Scale or Decrease Scale from the Commands menu.
97
Page 98

Chapter 7 Managing Workspaces
Display Detailed Workspaces
You can display your workspaces using either a Normal View or a
Detailed View. Normal View is workspace name, workspace size, and the
graph bars. Detailed View is all the columns that can be displayed (which
can be set in Preferences) such as size, available space, maximum space,
percentage used, mirrored, and so on.
To switch between a normal view and a detailed view:
t Click the Display Detailed View button.
Creating Workspaces
New workspaces inherit their attributes (name, size, and access privileges)
from the Workspace tab preferences or when you click the Save Settings
button. For more information, see “Setting Workspace Preferences” on
page 77.
98
To create a new workspace:
1. Open the Administration Tool, and click the Workspace Management
button. For more information on opening the Administration Tool, see
“Opening the Administration Tool” on page 70.
2. Do one of the following:
t Click the Create New Workspace button.
t Select Create New Workspace from the Commands menu.
The New Workspace window opens.
Page 99

Duplicating Workspaces
3. Select the allocation group on which you want to create the workspace.
4. Type a name for the workspace.
5. Type a size for the workspace. The maximum size allowed is listed
next to the text box.
6. Click to select Protected or Unprotected.
7. Set the Access to all user(s) privileges.
8. Click Create.
Duplicating Workspaces
When you duplicate workspaces, they inherit the attributes (name, size,
and access privileges) of the workspace from which they were created.
n
The contents of the original workspace are not duplicated.
99
Page 100

Chapter 7 Managing Workspaces
To duplicate a workspace:
1. Open the Administration Tool, and click the Workspace Management
button. For more information on opening the Administration Tool, see
“Opening the Administration Tool” on page 70.
2. Select the workspace you want to duplicate.
3. Do one of the following:
t Click the Duplicate Workspace button.
t Select Duplicate Workspace from the Commands menu.
The New Workspace window opens, with all the settings set for the
workspace you selected.
4. Click Create.
The new workspace has the same name as the original with the lowest
available integer as a suffix (for example, a duplicate of workspace
Original Name will be named Original Name 1) and inherits the access
privileges and size of the original workspace.
If there is no room for a workspace of the same size as the original, the
operation fails and displays a “Not enough unallocated space on the
partition” error message.
Adjusting Workspace Size
There are occasions when you must change the size of workspaces. For
example, you might need to make a workspace larger to create room for a
digitize procedure planned for later in the day or for some new media files.
Alternatively, you might need to make a workspace smaller to create space
for other workspaces or to reserve storage for another day.
n
100
Do not adjust workspaces while clients are creating files or files are being
written to them. You can select multiple workspaces and adjust them at the
same time.
The workspace list allows you to select workspaces for renaming, deletion,
and moving to another allocation group. It also allows you to manipulate
workspace size.
 Loading...