

Page 1

Avid Unity™ MediaNet
Management Guide
Release 2.0
Page 2

Copyright and Disclaimer
Product specifications are subject to change without notice and do not represent a commitment on
the part of Avid Technology, Inc. The software described in this document is furnished under a
license agreement. You can obtain a copy of that license by visiting Avid’s Web site at
www.avid.com. The terms of that license are also available in the product in the same directory as
the software. The software may not be reverse assembled and may be used or copied only in
accordance with the terms of the license agreement. It is against the law to copy the software on any
medium except as specifically allowed in the license agreement. Avid products or portions thereof
are protected by one or more of the following United States patents: 4,746,994; 4,970,663;
5,045,940; 5,063,448; 5,077,604; 5,245,432; 5,267,351; 5,309,528; 5,325,200; 5,355,450;
5,396,594; 5,440,348; 5,452,378; 5,467,288; 5,513,375; 5,528,310; 5,557,423; 5,568,275;
5,577,190; 5,583,496; 5,584,006; 5,627,765; 5,634,020; 5,640,601; 5,644,364; 5,654,737;
5,701,404; 5,715,018; 5,719,570; 5,724,605; 5,726,717; 5,729,673; 5,731,819; 5,745,637;
5,752,029; 5,754,180; 5,754,851; 5,781,188; 5,799,150; 5,812,216; 5,828,678; 5,842,014;
5,852,435; 5,883,670; 5,889,532; 5,892,507; 5,905,841; 5,912,675; 5,929,836; 5,929,942;
5,930,445; 5,930,797; 5,946,445; 5,966,134; 5,977,982; 5,986,584; 5,987,501; 5,995,079;
5,995,115; 5,999,190; 5,999,406; 6,009,507; 6,011,562; 6,014,150; 6,016,152; 6,016,380;
6,018,337; 6,023,531; 6,023,703; 6,031,529; 6,035,367; 6,038,573; 6,052,508; 6,058,236;
6,061,758; 6,072,796; 6,084,569; 6,091,422; 6,091,778; 6,105,083; 6,118,444; 6,128,001;
6,128,681; 6,130,676; 6,134,379; 6,134,607; 6,137,919; 6,141,007; 6,141,691; 6,154,221;
6,157,929; 6,160,548; 6,161,115; 6,167,404; 6,174,206; 6,192,388; 6,198,477; 6,208,357;
6,211,869; 6,212,197; 6,215,485; 6,223,211; D352,278; D372,478; D373,778; D392,267; D392,268;
D392,269; D395,291; D396,853; D398,912. Additional U.S. and foreign patents pending. No part of
this document may be reproduced or transmitted in any form or by any means, electronic or
mechanical, including photocopying and recording, for any purpose without the express written
permission of Avid Technology, Inc.
© 2001 Avid Technology, Inc. All rights reserved. Printed in USA.
The following disclaimer is required by Sam Leffler and Silicon Graphics, Inc. for the
use of their TIFF library:
Copyright © 1988-1997 Sam Leffler
Copyright © 1991-1997 Silicon Graphics, Inc.
Permission to use, copy, modify, distribute, and sell this software [i.e., the TIFF library] and its
documentation for any purpose is hereby granted without fee, provided that (i) the above copyright
notices and this permission notice appear in all copies of the software and related documentation,
and (ii) the names of Sam Leffler and Silicon Graphics may not be used in any advertising or
publicity relating to the software without the specific, prior written permission of Sam Leffler and
Silicon Graphics.
THE SOFTWARE IS PROVIDED “AS-IS” AND WITHOUT WARRANTY OF ANY KIND, EXPRESS,
IMPLIED OR OTHERWISE, INCLUDING WITHOUT LIMITATION, ANY WARRANTY OF
MERCHANTABILITY OR FITNESS FOR A PARTICULAR PURPOSE.
IN NO EVENT SHALL SAM LEFFLER OR SILICON GRAPHICS BE LIABLE FOR ANY SPECIAL,
INCIDENTAL, INDIRECT OR CONSEQUENTIAL DAMAGES OF ANY KIND, OR ANY DAMAGES
WHATSOEVER RESULTING FROM LOSS OF USE, DATA OR PROFITS, WHETHER OR NOT
ADVISED OF THE POSSIBILITY OF DAMAGE, AND ON ANY THEORY OF LIABILITY, ARISING OUT
OF OR IN CONNECTION WITH THE USE OR PERFORMANCE OF THIS SOFTWARE.
Attn. Government User(s). Restricted Rights Legend
U.S. GOVERNMENT RESTRICTED RIGHTS. This Software and its documentation are “commercial
computer software” or “commercial computer software documentation.” In the event that such
Software or documentation is acquired by or on behalf of a unit or agency of the U.S. Government,
all rights with respect to this Software and documentation are subject to the terms of the License
Agreement, pursuant to FAR §12.212(a) and/or DFARS §227.7202-1(a), as applicable.
Page 3

Trademarks
AirPlay, AudioVision, Avid, Avid Xpress, CamCutter, Digidesign, FieldPak, Film Composer, HIIP,
Image Independence, Marquee, Media Composer, Media Recorder, NewsCutter, OMF,
OMF Interchange, Open Media Framework, Pro Tools, and Softimage are registered trademarks and
888 I/O, AirSPACE, AirSPACE HD, AniMatte, AudioSuite, AutoSync, AVIDdrive, AVIDdrive Towers,
AvidNet, Avid Production Network, AvidProNet, AVIDstripe, Avid Unity, AVX, DAE, D-Fi, D-fx, D-Verb,
ExpertRender, FilmScribe, HyperSPACE, HyperSPACE HDCAM, Intraframe, iS9, iS18, iS23, iS36,
Lo-Fi, Magic Mask, make manage move | media, Matador, Maxim, MCXpress, MEDIArray,
MediaDock, MediaDock Shuttle, Media Fusion, Media Illusion, MediaLog, Media Reader,
MediaShare, Meridien, NaturalMatch, OMM, Open Media Management, QuietDrive, Recti-Fi, rS9,
rS18, Sci-Fi, Sound Designer II, SPACE, SPACEnet, SPACEShift, Symphony, Vari-Fi,
Video Slave Driver, and VideoSPACE are trademarks of Avid Technology, Inc.
Macintosh is a trademark of Apple Computer, Inc., registered in the United States and other
countries. Windows NT and Windows 2000 are registered trademarks of Microsoft Corporation. All
other trademarks contained herein are the property of their respective owners.
Avid Unity MediaNet Management Guide • Part 0130-04884-01 Rev. A • July 2001
Page 4

Page 5

Contents
Using This Guide
Who Should Use This Guide . . . . . . . . . . . . . . . . . . . . . . . . . . . . . . . . . . .xi
About This Guide . . . . . . . . . . . . . . . . . . . . . . . . . . . . . . . . . . . . . . . . . . . .xi
Symbols and Conventions . . . . . . . . . . . . . . . . . . . . . . . . . . . . . . . . . . . . xii
If You Need Help . . . . . . . . . . . . . . . . . . . . . . . . . . . . . . . . . . . . . . . . . . . xiii
Related Information. . . . . . . . . . . . . . . . . . . . . . . . . . . . . . . . . . . . . . . . . xiii
If You Have Documentation Comments . . . . . . . . . . . . . . . . . . . . . . . .xiv
Chapter 1 MediaNet Management Overview
Management Tasks . . . . . . . . . . . . . . . . . . . . . . . . . . . . . . . . . . . . . . . . . 1-2
Configuring Your Workgroup. . . . . . . . . . . . . . . . . . . . . . . . . . . . . . . . 1-2
Overall Considerations . . . . . . . . . . . . . . . . . . . . . . . . . . . . . . . . . . 1-3
Setting Up and Managing Your Drive Hardware . . . . . . . . . . . . 1-4
Assigning Drives to Allocation Groups . . . . . . . . . . . . . . . . . . . . 1-4
Creating and Sizing Workspaces . . . . . . . . . . . . . . . . . . . . . . . . . . 1-4
Data Protection . . . . . . . . . . . . . . . . . . . . . . . . . . . . . . . . . . . . . . . . . 1-5
Access Control (Users and Access Privileges) . . . . . . . . . . . . . . . 1-6
Management Tools . . . . . . . . . . . . . . . . . . . . . . . . . . . . . . . . . . . . . . . . . 1-7
Setup Manager . . . . . . . . . . . . . . . . . . . . . . . . . . . . . . . . . . . . . . . . . 1-7
Administration Tool. . . . . . . . . . . . . . . . . . . . . . . . . . . . . . . . . . . . . 1-8
Monitor Tool . . . . . . . . . . . . . . . . . . . . . . . . . . . . . . . . . . . . . . . . . . . 1-9
Chapter 2 The Setup Manager
Setup Manager Overview. . . . . . . . . . . . . . . . . . . . . . . . . . . . . . . . . . . . 2-2
Starting the Setup Manager . . . . . . . . . . . . . . . . . . . . . . . . . . . . . . . . . . 2-4
Page 6

vi
Using the Setup Manager in a Failover Configuration . . . . . . . . . . . 2-4
Failover Configuration Guidelines . . . . . . . . . . . . . . . . . . . . . . . . 2-4
Determining the active File Manager . . . . . . . . . . . . . . . . . . . . . . 2-5
Starting and Stopping the File Manager Service . . . . . . . . . . . . . . . . 2-5
Chapter 3 Configuring General, Failover, and Remote Error
Notification Parameters
Configuring General Settings . . . . . . . . . . . . . . . . . . . . . . . . . . . . . . . . 3-2
Configuring File Manager Failover . . . . . . . . . . . . . . . . . . . . . . . . . . . 3-4
Failover Configuration Procedure Overview . . . . . . . . . . . . . . . 3-5
Step 1: Setting Up the Failover Connection on the First
File Manager . . . . . . . . . . . . . . . . . . . . . . . . . . . . . . . . . . . . . . . . . 3-5
Step 2: Setting Up the Failover Connection on the Second
File Manager . . . . . . . . . . . . . . . . . . . . . . . . . . . . . . . . . . . . . . . . . 3-6
Step 3: Validating the Failover Connections . . . . . . . . . . . . . . . . 3-8
Step 4: Starting the First and Second File Managers. . . . . . . . . . 3-8
Setting Up Email Error Notification. . . . . . . . . . . . . . . . . . . . . . . . . . . 3-9
Configuring the Email Error Notification Service . . . . . . . . . . . 3-9
Setting Up Email Error Notification Contacts. . . . . . . . . . . . . . 3-10
Chapter 4 Managing Your MediaNet Drive Hardware
Creating a New Drive Set . . . . . . . . . . . . . . . . . . . . . . . . . . . . . . . . . . . 4-2
Using The Configuration Assistant to Create a Drive Set . . . . . 4-2
Manually Creating a Drive Set. . . . . . . . . . . . . . . . . . . . . . . . . . . . 4-3
Adding New Storage to Your MediaNet workgroup . . . . . . . . . . . . 4-5
Adding Active Data Drives to an Existing Drive Set. . . . . . . . . . . . . 4-6
Adding Drives That Were Previously Used as Data Drives
in Another Drive Set . . . . . . . . . . . . . . . . . . . . . . . . . . . . . . . . . . 4-6
Adding Drives That Have Been Previously Used With
Another Application (For Example, MediaShare F/C) . . . . . 4-7
Creating Data Drives from Raw Drives . . . . . . . . . . . . . . . . . . . . 4-8
Removing Drives From Your MediaNet workgroup . . . . . . . . . . . . 4-9
Removing Active Data Drives From an Existing Drive Set. . . . 4-9
Page 7

Physically Removing Storage from Your MediaNet
workgroup . . . . . . . . . . . . . . . . . . . . . . . . . . . . . . . . . . . . . . . . . . 4-10
Setting Drive Mode Pages . . . . . . . . . . . . . . . . . . . . . . . . . . . . . . . . . . 4-11
Deleting an Existing Data Drive Set . . . . . . . . . . . . . . . . . . . . . . . . . . 4-12
Rebuilding an Existing Data Drive Set . . . . . . . . . . . . . . . . . . . . . . . . 4-12
Bringing the Drive Set Online and Taking It Offline . . . . . . . . . . . . 4-13
Bringing the Drive Set Online. . . . . . . . . . . . . . . . . . . . . . . . . . . . 4-13
Taking the Drive Set Offline . . . . . . . . . . . . . . . . . . . . . . . . . . . . . 4-14
Identifying a Drive . . . . . . . . . . . . . . . . . . . . . . . . . . . . . . . . . . . . . . . . 4-14
Chapter 5 The Administration Tool
About the Administration Tool User Interface . . . . . . . . . . . . . . . . . . 5-2
User Interface Component Descriptions. . . . . . . . . . . . . . . . . . . . 5-3
User Interface Tab Descriptions . . . . . . . . . . . . . . . . . . . . . . . . . . . 5-4
Getting Help With the Administration Tool . . . . . . . . . . . . . . . . 5-5
Starting The Administration Tool . . . . . . . . . . . . . . . . . . . . . . . . . . . . . 5-5
Logging Into the Administration Tool . . . . . . . . . . . . . . . . . . . . . . . . . 5-5
Administration Tool Preferences. . . . . . . . . . . . . . . . . . . . . . . . . . . . . . 5-6
Setting Administration Tool Preferences . . . . . . . . . . . . . . . . . . . 5-6
Exporting and Importing Preferences . . . . . . . . . . . . . . . . . . . . . 5-10
Setting the Administration Password . . . . . . . . . . . . . . . . . . . . . 5-11
Setting Workspace and Monitor Graph Bar Colors. . . . . . . . . . 5-12
Changing Your User Account Preferences . . . . . . . . . . . . . . . . . 5-13
Changing Your Workspace Tab Preferences . . . . . . . . . . . . . . . 5-14
Changing Your Monitor Tab Preferences . . . . . . . . . . . . . . . . . . 5-16
Reestablishing the Administration Tool’s Connection
to the File Manager . . . . . . . . . . . . . . . . . . . . . . . . . . . . . . . . . . . . . . 5-17
vii
Chapter 6 Managing Allocation Groups
Allocation Groups Tab . . . . . . . . . . . . . . . . . . . . . . . . . . . . . . . . . . . . . . 6-2
Allocation Group Usage Guidelines. . . . . . . . . . . . . . . . . . . . . . . . . . . 6-3
Creating a New Allocation Group . . . . . . . . . . . . . . . . . . . . . . . . . . . . 6-4
Adding Drives to an Existing Allocation Group. . . . . . . . . . . . . . . . . 6-5
Page 8

viii
Removing Drives from an Existing Allocation Group . . . . . . . . . . . 6-7
Renaming an Allocation Group . . . . . . . . . . . . . . . . . . . . . . . . . . . . . . 6-8
Deleting an Allocation Group. . . . . . . . . . . . . . . . . . . . . . . . . . . . . . . . 6-9
Chapter 7 Managing Workspaces
The Workspace Tab . . . . . . . . . . . . . . . . . . . . . . . . . . . . . . . . . . . . . . . . 7-2
The Workspace List . . . . . . . . . . . . . . . . . . . . . . . . . . . . . . . . . . . . . 7-3
Context-Sensitive Buttons . . . . . . . . . . . . . . . . . . . . . . . . . . . . . . . 7-6
Creating New Workspaces . . . . . . . . . . . . . . . . . . . . . . . . . . . . . . . . . . 7-7
Duplicating Existing Workspaces. . . . . . . . . . . . . . . . . . . . . . . . . . . . . 7-8
Changing Workspace Size . . . . . . . . . . . . . . . . . . . . . . . . . . . . . . . . . . . 7-9
Increasing Workspace Size. . . . . . . . . . . . . . . . . . . . . . . . . . . . . . 7-10
Decreasing Workspace Size . . . . . . . . . . . . . . . . . . . . . . . . . . . . . 7-10
Workspace Resize Utility Feature Reference. . . . . . . . . . . . . . . 7-11
Renaming Workspaces. . . . . . . . . . . . . . . . . . . . . . . . . . . . . . . . . . . . . 7-12
Deleting Workspaces . . . . . . . . . . . . . . . . . . . . . . . . . . . . . . . . . . . . . . 7-13
Protecting Workspaces. . . . . . . . . . . . . . . . . . . . . . . . . . . . . . . . . . . . . 7-14
Enabling Protection . . . . . . . . . . . . . . . . . . . . . . . . . . . . . . . . . . . . 7-14
Enabling Protection of New Files Only . . . . . . . . . . . . . . . . . . . 7-15
Disabling Protection of New Files Only . . . . . . . . . . . . . . . . . . . 7-16
Protecting All Files . . . . . . . . . . . . . . . . . . . . . . . . . . . . . . . . . . . . 7-16
Unprotecting All Files . . . . . . . . . . . . . . . . . . . . . . . . . . . . . . . . . . 7-17
Optimizing Workspaces. . . . . . . . . . . . . . . . . . . . . . . . . . . . . . . . . . . . 7-17
Moving a Workspace to Another Allocation Group . . . . . . . . . . . . 7-18
Chapter 8 Managing User Accounts and Access Privileges
The User Tab . . . . . . . . . . . . . . . . . . . . . . . . . . . . . . . . . . . . . . . . . . . . . . 8-2
The Guest Account . . . . . . . . . . . . . . . . . . . . . . . . . . . . . . . . . . . . . . . . . 8-3
Creating User Accounts . . . . . . . . . . . . . . . . . . . . . . . . . . . . . . . . . . . . . 8-3
Duplicating Existing User Accounts . . . . . . . . . . . . . . . . . . . . . . . . . . 8-4
Renaming User Accounts . . . . . . . . . . . . . . . . . . . . . . . . . . . . . . . . . . . 8-5
Changing User Passwords. . . . . . . . . . . . . . . . . . . . . . . . . . . . . . . . . . . 8-6
Deleting User Accounts . . . . . . . . . . . . . . . . . . . . . . . . . . . . . . . . . . . . . 8-7
Page 9

Workspace Access Privileges. . . . . . . . . . . . . . . . . . . . . . . . . . . . . . . . . 8-8
Access Privilege Notes. . . . . . . . . . . . . . . . . . . . . . . . . . . . . . . . . . . 8-9
Changing Workspace Access Privileges. . . . . . . . . . . . . . . . . . . . . . . . 8-9
Enabling and Disabling Workspace Resize Privilege. . . . . . . . . . . . 8-11
Enabling Workspace Resize Privilege . . . . . . . . . . . . . . . . . . . . . 8-11
Disabling Workspace Resize Privilege . . . . . . . . . . . . . . . . . . . . 8-11
Chapter 9 Monitoring System Usage and Messages
The Monitor Tab . . . . . . . . . . . . . . . . . . . . . . . . . . . . . . . . . . . . . . . . . . . 9-2
Changing the Monitor List Graph Display . . . . . . . . . . . . . . . . . . . . . 9-3
Selecting Linear or Logarithmic Graph Display . . . . . . . . . . . . . 9-3
Scaling the Graph . . . . . . . . . . . . . . . . . . . . . . . . . . . . . . . . . . . . . . . 9-3
Saving Your Monitor List Graph Settings. . . . . . . . . . . . . . . . . . . 9-4
The Log Tab . . . . . . . . . . . . . . . . . . . . . . . . . . . . . . . . . . . . . . . . . . . . . . . 9-4
Viewing and Managing the Log File. . . . . . . . . . . . . . . . . . . . . . . . . . . 9-5
Appendix A Managing Drive Problems
ix
Identifying Bad Drives . . . . . . . . . . . . . . . . . . . . . . . . . . . . . . . . . . . . . . A-2
Repairing the Drive Set by Swapping Out a Bad Data Drive . . . . . . A-2
To Repair the Drive Set . . . . . . . . . . . . . . . . . . . . . . . . . . . . . . . . . . A-3
Replacing Bad Storage . . . . . . . . . . . . . . . . . . . . . . . . . . . . . . . . . . . . . . A-5
Appendix B Advanced Support Tools
Server Log Viewer . . . . . . . . . . . . . . . . . . . . . . . . . . . . . . . . . . . . . . . . . . B-2
Text Console . . . . . . . . . . . . . . . . . . . . . . . . . . . . . . . . . . . . . . . . . . . . . . . B-2
Disk Error Analyzer . . . . . . . . . . . . . . . . . . . . . . . . . . . . . . . . . . . . . . . . B-2
NtStatDump . . . . . . . . . . . . . . . . . . . . . . . . . . . . . . . . . . . . . . . . . . . . . . . B-3
RecoverDisks . . . . . . . . . . . . . . . . . . . . . . . . . . . . . . . . . . . . . . . . . . . . . . B-3
Avid Unity Profiler
™ . . . . . . . . . . . . . . . . . . . . . . . . . . . . . . . . . . . . . . . . . . . . . . . . . . B-4
Page 10

x
Appendix C Remote Administration Using the Text Console
Running the Text Console . . . . . . . . . . . . . . . . . . . . . . . . . . . . . . . . . . . C-2
Installing a Telnet Server on the File Manager System for
Remote Operation . . . . . . . . . . . . . . . . . . . . . . . . . . . . . . . . . . . . C-2
Running the Text Console Remotely Via Telnet . . . . . . . . . . . . . C-2
Running the Text Console Locally . . . . . . . . . . . . . . . . . . . . . . . . C-3
Using the Text Console . . . . . . . . . . . . . . . . . . . . . . . . . . . . . . . . . . . . . C-4
Command Categories. . . . . . . . . . . . . . . . . . . . . . . . . . . . . . . . . . . . . . . C-4
User Command Category . . . . . . . . . . . . . . . . . . . . . . . . . . . . . . . . . . . C-6
Workspace Command Category. . . . . . . . . . . . . . . . . . . . . . . . . . . . . . C-6
On/Offline Command Category . . . . . . . . . . . . . . . . . . . . . . . . . . . . . C-8
Disk Command Category . . . . . . . . . . . . . . . . . . . . . . . . . . . . . . . . . . . C-8
Stats Category Commands . . . . . . . . . . . . . . . . . . . . . . . . . . . . . . . . . . C-9
Index
Page 11

Using This Guide
Congratulations on your purchase of Avid Unity™ MediaNet Release
2.0, a high-performance distributed file system that provides
high-capacity shared media storage for a workgroup of connected
®
systems.
Av id
Who Should Use This Guide
This reference guide is intended for MediaNet system administrators
responsible for the setup and day-to-day management of a MediaNet
workgroup. You should already have a basic understanding of how to
use and manage Windows NT
®
Server systems.
n
Before you read this guide, you should already be familiar with the basic
MediaNet concepts described in the Avid Unity MediaNet System
Overview.
About This Guide
This guide is intended to provide a task-oriented guide to
configuration, management, and basic troubleshooting of your
MediaNet workgroup.
Page 12

xii
The Contents lists all topics included in the book which are presented
with the following overall structure:
• Chapter 1 provides an overview of the MediaNet configuration
process.
• Chapters 2 through 4 introduce the Setup Manager and describe
how to use it to configure your MediaNet workgroup parameters
and configure your drive hardware as a drive set.
• Chapters 5 through 9 introduce the Administration Tool and
describe how you use it to perform initial workspace
configuration and day-to-day management tasks.
• The Appendices describe how to manage drive problems and the
MediaNet advanced support tools.
Symbols and Conventions
Using This Guide
n
c
The MediaNet documentation uses the following special symbols and
conventions:
1. Numbered lists, when order is important.
a. Alphabetical lists, when the order of secondary items is
important.
• Bulleted lists, when the order of the items is unimportant.
- Indented dashed lists, when the order of subtopics is
unimportant.
t One arrow in a list indicates a single-step procedure. Multiple
arrows in a list indicate that you perform one of the actions listed.
A note provides important related information, reminders, recommendations,
and strong suggestions.
A caution means that a specific action you take could cause harm to
your computer or cause you to lose data.
Page 13

If You Need Help
If you are having trouble using MediaNet, you should:
1. Retry the action, carefully following the instructions given for that
task in your MediaNet documentation.
2. Check the documentation that came with your hardware for
maintenance or hardware-related issues.
3. Check the Customer Service and News and Publications sections
of the Avid Web site at http://www.avid.com for the latest FAQs,
Tips & Techniques, Film + Television Update, and other Avid
online offerings.
4. Check the Avid Bulletin Board, “Avid Online,” for information on
product and user conferences. If you do not find the solution to
your problem, you can exchange information with other Avid
customers and Avid Customer Support representatives.
5. Contact your local Avid Reseller; in North America, you may
contact Avid Customer Support at 800-800-AVID (2843).
xiii
n
For general information, call your local Avid Reseller; in North America, call
the Avid Customer Relations Desk at 800-894-5654.
Related Information
The following documents provide more information about your
MediaNet workgroup:
• Avid Unity MediaNet System Overview
You should be familiar with the basic MediaNet concepts
described in the Avid Unity MediaNet System Overview before
proceeding with this guide.
• Avid Unity MediaNet for Windows Clients Quick Start Card
• Avid Unity MediaNet for Macintosh Clients Quick Start Card
Page 14

xiv
• Avid Unity MediaNet Site Preparation Guide
• Avid Unity MediaNet Setup Guide
• Avid Unity MediaNet Release Notes
• Avid Products Collaboration Guide
The most recent update of the Avid Products Collaboration Guide is
available in the Documentation section of the Avid Customer
Service Knowledge Center. To access the Avid Customer Service
Knowledge Center, click the Avid Customer Service link at
www.avid.com and select Knowledge Center.
MediaNet also provides Help systems that provide complete
information about using the Setup Manager, the Administration Tool,
and the Monitor Tool.
If You Have Documentation Comments
Avid Technology continuously seeks to improve its documentation.
We value your comments about this manual or other Avid-supplied
documentation.
Simply e-mail your documentation comments to Avid Technology at
TechPubs@avid.com
Please include the title of the document, its part number, revision, and
the specific section you’re commenting on in all correspondence.
How to Order Documentation
To order additional copies of this documentation from within the
United States, call Avid Telesales at 800-949-AVID (2843). If you are
placing an order from outside the United States, contact your local
Avid representative.
Using This Guide
Page 15

CHAPTER 1
MediaNet Management Overview
The MediaNet workgroup allows you to centrally manage very large
amounts of storage that multiple MediaNet clients can access to share
video, audio, and effects media in an intuitive, collaborative
workgroup.
This chapter provides an overview of the tasks that you will need to
perform, the factors you should consider when configuring MediaNet,
and the tools you will use to manage your workgroup.
Topics in this chapter include:
• Management Tasks
• Configuring Your Workgroup
• Management Tools
Page 16

1-2
Management Tasks
As a MediaNet administrator, you are responsible for:
• Initial setup and configuration of the workgroup — You m ust
configure the drive set, one or more allocation groups,
workspaces, and user accounts before MediaNet can be used.
• Day-to-day administration — You will probably need to
frequently reconfigure MediaNet (for example, by creating,
deleting, or resizing workspaces; by creating and deleting user
accounts; and by changing access privileges) to accommodate new
users and evolving projects.
MediaNet also provides comprehensive monitoring functionality
that allows you to check total MediaNet activity as well as that of
each connected client.
• Troubleshooting — When problems occur with the storage
hardware, the File Manager, or a client, you will need to try and
diagnose the problem and, if possible, fix it. MediaNet provides
easy-to-understand error messages that inform you of problems in
your MediaNet workgroup as well as tools that help you diagnose
and fix problems.
Configuring Your Workgroup
Ensuring that the MediaNet workgroup is always configured to
optimize workflow in what can be a rapidly changing working
environment is the primary responsibility of a MediaNet
administrator.
This section provides information that will enable you to make the
appropriate decisions to efficiently perform this task.
MediaNet Management Overview
Page 17

Overall Considerations
The following strategic considerations will determine your priorities
when making configuration decisions and trade-offs (possibly
impacting more than one aspect of your configuration):
• What is your site type?
In-house and rental editing suites will probably require very
different administration requirements, particularly in terms of
workspace access restrictions and how often you need to
reconfigure workspaces and users.
• Does your workgroup include dual-stream uncompressed
clients?
If so, you will need to set up special hardware and allocation
group configurations.
• How large is your drive set and does it include more than one
drive type?
1-3
If your drive set is very large, or has different drive types, you will
probably need to assign your data drives to more than one
allocation group.
• Will your client users be working on individual projects with
their own media or will they be collaborating on team projects
that use the same source media?
These factors affect how you should allocate workspaces and user
accounts.
• Is security or ease of access more important at your site?
Individual password user accounts combined with tightly
controlled workspace access privileges provide the most security
at the cost of restricting user flexibility.
The following sections provide a high-level overview of the
configuration implications of your answers to these questions.
Configuring Your Workgroup
Page 18

1-4
Setting Up and Managing Your Drive Hardware
Setting up your hardware to create a drive set is very straightforward
and should only need to be done during the initial setup of your
MediaNet installation, unless you want to add or remove drives later.
The most important decision you must make is how many spare data
drives to allocate so that they can be rapidly swapped in for faulty
data drives. Avid recommends that you allocate at least one spare
drive for each drive size in your drive set.
For more information, see Chapter 4.
Assigning Drives to Allocation Groups
MediaNet requires you to assign the data drives in your drive set that
you want to be available as storage to one or more allocation groups.
Because MediaNet handles the drives in each allocation group as a
separate unit, creating multiple allocation groups allows you to:
• Support dual-stream uncompressed clients (also requires a special
hardware configuration).
• Break up very large drive sets into smaller units that reduce the
scope of data loss in the event of a drive failure in an unprotected
environment (see “Data Protection” on page 1-5).
• Efficiently accommodate drives of different speeds and sizes.
For more information about creating and managing allocation groups,
see Chapter 6.
Creating and Sizing Workspaces
Because workspaces are virtual rather than physical partitions, they
are very easy to create, resize dynamically, and delete to accommodate
your workgroup’s needs. This flexibility allows you to tailor your
MediaNet Management Overview
Page 19

1-5
workspace allocation to accurately meet the current needs of your
workgroup. You can reconfigure your workspaces later to
accommodate future projects or users because it is not inconvenient or
time consuming.
First, you must consider how you want to allocate workspaces. For
example, do you want to allocate them to accommodate projects,
teams, individual users, or a combination of one or more of these?
Once you have determined how you plan to allocate workspaces,
you’ll need to determine how much storage each workspace will
require (a function of media duration and, for video, resolution) and
allocate space accordingly.
n
Data Protection
When sizing workspaces in a multiple workspace configuration, you should
consider reserving some space rather than assigning all of it immediately.
Once space is allocated, it tends to be filled quickly and you might need space
later to accommodate a new project or user or to extend or protect an existing
workspace. In these situations, it tends to be much easier to use space held in
reserve than to take it away from an existing workspace.
When allocating and sizing workspaces, you should also consider
whether access restrictions are required and whether protection for
data integrity is necessary for each workspace. For more information,
see “Data Protection” on page 1-5.
For more information about allocating and sizing workspaces, see
Chapter 7.
Protection is a technique that offers high levels of data integrity by
ensuring that two copies of media data are written onto different
physical drives to avoid data loss in the event of drive failure. This
allows workspaces that are protected to be repaired very quickly with
no data loss upon drive failure.
Configuring Your Workgroup
Page 20

1-6
The disadvantage is that protected workspaces use twice as much
space as an unprotected workspace. However, because of the data
protection and recovery speed that protection offers, Avid
recommends that you always protect your workspaces. New
workspaces are therefore protected by default unless you specify
otherwise in your preferences.
For more information, see Chapter 7.
Access Control (Users and Access Privileges)
User accounts control access to MediaNet and its workspaces. Access
privileges associated with the user account determine whether a client
user can mount a given workspace and, if so, whether the user has full
access (read/write) or read-only access to it.
To determine how you want to set up user accounts and access
privileges for your workgroup, you first need to weigh the importance
of access control against user inconvenience and administration effort
(particularly in a workgroup where users and projects frequently
change).
Once you have decided the importance of security, you can decide
upon an access control strategy that best meets your needs.
Example strategies include:
• Create a user account for each user.
• Create a user account with appropriate access privileges for each
MediaNet Management Overview
This strategy offers optimum security, allowing each user access to
the appropriate workspaces regardless of the MediaNet client at
which they are working.
project (multiple users can use the same account simultaneously).
This strategy offers moderate security and convenience, giving users
working on each project appropriate access and requiring far less
administrative effort than individual user accounts.
Page 21

1-7
• Create a user account with appropriate access privileges for each
client.
This strategy offers moderate security and convenience, provided that
users work at clients that provide access to the workspaces they
need to use.
n
Passwords are optional. If you want to provide users with access to only
appropriate workspaces but security is not an issue (that is, you trust users
not to use other user’s accounts), you can use any of the previously described
strategies without assigning passwords for user accounts.
For more information, see Chapter 8.
Management Tools
MediaNet provides several tools that you will use to configure and
perform day-to-day management of your MediaNet workgroup:
• Setup Manager
• Administration Tool
• Monitor Tool
The following sections give an overview of each of these tools.
Setup Manager
You use the Setup Manager to perform storage hardware management
tasks, including:
• Creating and managing a drive set
• Specifying drives as data drives or spare drives
• Starting and stopping the File Manager service to perform system
maintenance
Management Tools
Page 22
1-8
• Adding drives to and removing drives from the drive set
• Performing drive maintenance and error recovery operations
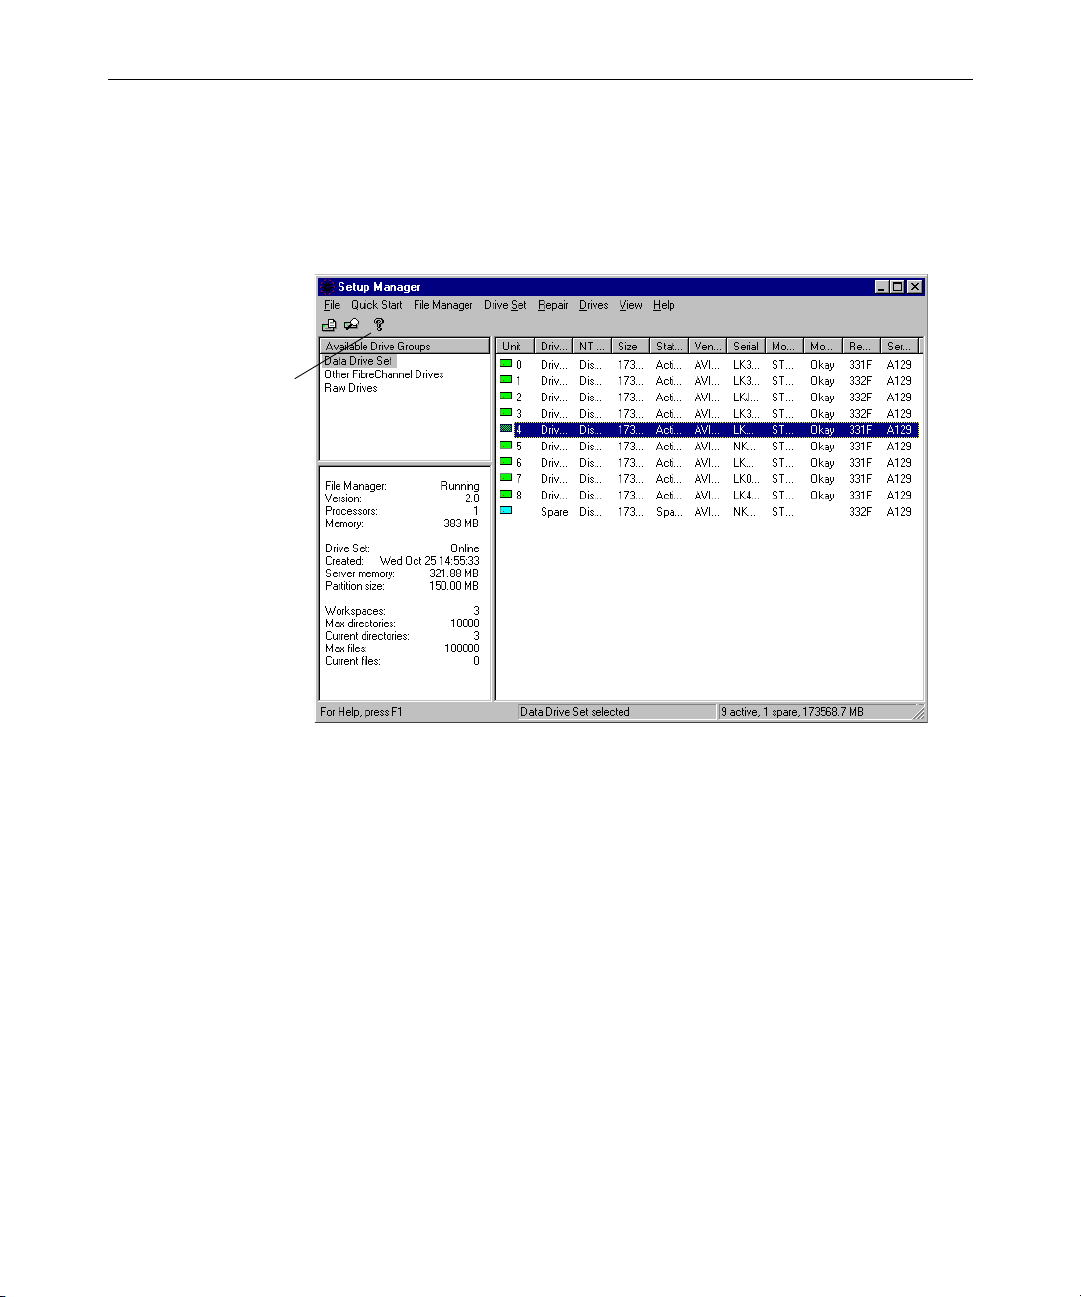
Help button
Figure 1-1 Setup Manager
The Setup Manager runs only from the File Manager. For a detailed
overview of the Setup Manager, see Chapter 2.
Administration Tool
The Administration Tool is the primary tool for initial setup and
day-to-day administration of allocation groups, workspaces, and
users. It also allows you to monitor storage activity. Using the
Administration Tool, you can:
• View, create, rename, and delete allocation groups
• Add drives to allocation groups
MediaNet Management Overview
Page 23
• View, create, rename, resize, protect, and delete workspaces
• View, create, edit, and delete user accounts (with optional
passwords) and assign user access privileges
• Monitor system usage, including total system bandwidth use,
how many MediaNet clients are active, and how much bandwidth
each client is consuming
• View a list of error, warning, and informational messages
1-9
Monitor Tool
Figure 1-2 Administration Tool
You can run the Administration Tool from the File Manager or from
any MediaNet client, in which case it communicates with the File
Manager through the Fibre Channel network.For a detailed overview
of the Administration Tool, see Chapter 5.
The Monitor Tool provides low-level performance-monitoring
functions. Using the Monitor Tool, you can view:
Management Tools
Page 24

1-10
• The current status of each drive, including name, number,
available storage, percentage of storage used, and the number of
affected files, if any
• A list of the workspaces that exist on the MediaNet workgroup
• The status of communications between the File Manager and the
MediaNet clients
• Information on the metadata maintained by the File Manager
• File Manager memory usage
• Counts and service times for MediaNet client requests
You can also use the Monitor Tool to start and stop the File Manager
service and to set some advanced MediaNet features, such as clearing
the administrator’s password.
To start the Monitor Tool:
t From the File Manager console, click the Start button, point to
Programs, point to AvidUnity, and then click Server Monitor.
The Monitor Tool opens, displaying File Manager Status information
and controls.
MediaNet Management Overview
Page 25

Figure 1-3 Monitor Tool
1-11
For more information about the Monitor Tool, see the tool’s Help
system. To access the Help system, click the Help button.
Management Tools
Page 26

1-12
MediaNet Management Overview
Page 27

CHAPTER 2
The Setup Manager
This chapter introduces the Setup Manager and describes its basic
operations.
To find out how to use the Setup Manager to set general and File
Manager failover parameters, see Chapter 3. For detailed descriptions
of how to use the Setup Manager to manage and troubleshoot your
drive hardware, see Chapter 4 and Appendix A.
This chapter discusses:
• Setup Manager Overview
• Starting the Setup Manager
• Using the Setup Manager in a Failover Configuration
• Starting and Stopping the File Manager Service
Page 28
2-2
Setup Manager Overview
You use the Setup Manager to set general and File Manager failover
parameters, to configure and manage your drive set, and to start and
stop the File Manager service. You also use the Setup Manager to add
drives and to perform drive maintenance and error recovery
operations.
This section provides an overview of the Setup Manager and the
operations that you can perform from it.
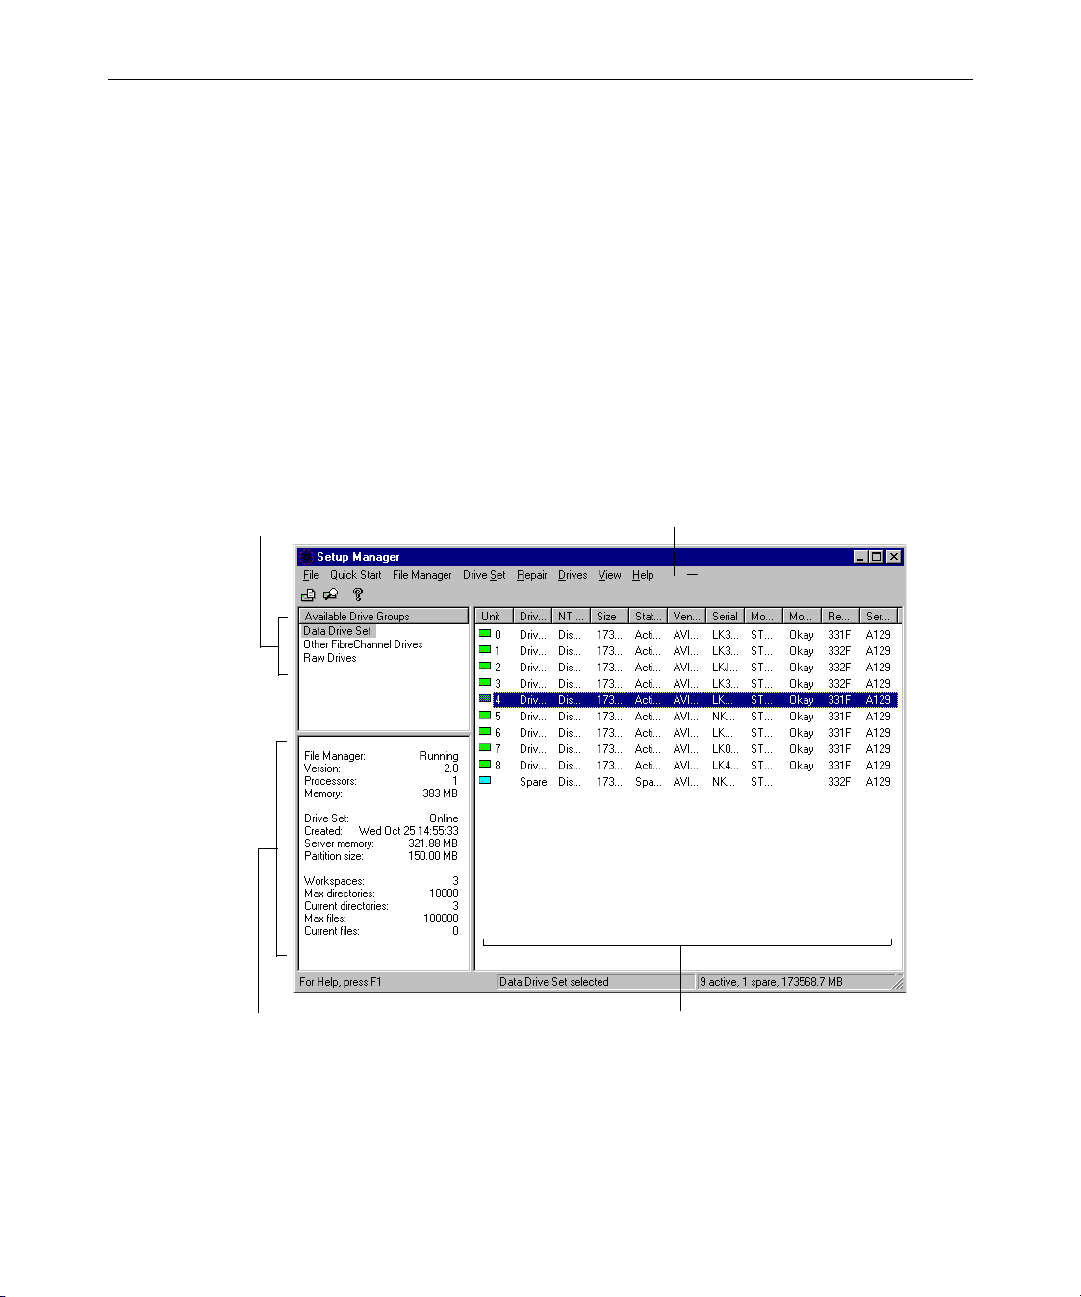
Drive group list (Click an entry to select a
group to display in the drive list.)
Information area
Figure 2-1 Setup Manager Example Display
Menu bar
Drive list
The Setup Manager
Page 29

The Setup Manager divides all drives present in the MediaNet
workgroup into one of three groups, reflecting their current usage
allocations and state. The three drive groups are:
Drive Group Description
Data Drive Set Shows active data drives and spare drives in the drive set.
2-3
Other
FibreChannel
Drives
Raw Drives Shows raw drives that have been marked for use by the
Shows drives that have not been appropriately initialized
for use in the MediaNet workgroup (for example, drives
that were previously part of a MediaShare™ F/C
installation). These drives may be used for other purposes in
your environment.
MediaNet workgroup but that have not been allocated for a
specific purpose. Raw drives cannot be used until allocated.
You select the drive group that you want to view by clicking its entry
in the drive group list. All the drives in that group then appear in the
drive list, which displays the name, size, status, unit number, and
other technical information about each drive. You might need to scroll
right to see all the information. The drive list supports multiple
selections by using standard Windows NT modifiers (Shift+click to
select a list of consecutive entries, Ctrl+click to add individual entries).
You access all Setup Manager functions from the various menus in the
menu bar.
The information area provides information about the drive set and the
status of the File Manager.
To access a comprehensive Help system that provides step-by-step
procedures and reference information for all features of the Setup
Manager, click the Help button (Question Mark icon) or choose Help
Topics from the Help menu.
Page 30

2-4
Starting the Setup Manager
To start the Setup Manager:
t From the File Manager desktop, click the Start button, point to
Programs, point to Avid Unity MediaNet, and click Setup
Manager.
n
n
Until you initialize the email error notification service (see “Setting Up
Email Error Notification” on page 3-9), the Setup Manager will display the
Email Configuration dialog box asking you whether you want to do so each
time it starts. Click OK to stop the dialog box from appearing again.
Until you configure your drive set, the Setup Manager information area will
contain a message warning you that it is not connected to the File Manager or
that the File Manager is not running. This is normal; the File Manager does
not come online until you create a drive set.
Using the Setup Manager in a Failover Configuration
If your MediaNet workgroup has a failover configuration with
redundant File Managers, one File Manager assumes the active role
and the other the passive role when the cluster comes up.
Failover Configuration Guidelines
The Setup Manager
In failover configurations, you should always:
• Stop the passive File Manager before performing any hardware
management tasks that involve stopping the File Manager service
(such as adding drives to the drive set or when performing a
software upgrade).
Page 31

• Perform MediaNet hardware management tasks using the Setup
Manager on the active File Manager.
Determining the active File Manager
To determine the active File Manager:
1. On both File Managers, click Start, point to Programs, point to
Avid Unity MediaNet, and then click Setup Manager. The Setup
Manager window opens.
2. Check File Manager status on the lower-left side of the Setup
Manager window.
One File Manager should indicate Running; this is the active File
Manager. The other File Manager should indicate Standby Mode;
this is the passive File Manager.
2-5
Starting and Stopping the File Manager Service
The MediaNet File Manager software runs as a Windows NT service
that starts automatically whenever the server system comes online.
However, various maintenance and administration functions require
that you stop the MediaNet File Manager and then restart it, so these
functions are made readily available from the Setup Manager.
Starting the MediaNet File Manager
To restart the MediaNet File Manager service after it has been
manually stopped or has failed for any reason:
t Choose Start File Manager from the Setup Manager’s File
Manager menu.
Page 32

2-6
Stopping the MediaNet File Manager
c
In a failover configuration, you must stop the passive File Manager
before stopping the active File Manager whenever you perform
operations that require you to stop the File Manager. Otherwise, the
system will failover to the passive system in the middle of the
shutdown.
To stop the MediaNet File Manager service:
1. Ensure that no clients have workspaces mounted. To do this, check
client access from the Monitor tab of the Administration Tool, and
then ask any client with workspaces mounted to unmount them.
2. Choose Stop File Manager from the File Manager menu.
The Setup Manager
Page 33

CHAPTER 3
Configuring General, Failover, and Remote Error Notification Parameters
You can use the Setup Manager to set general MediaNet workgroup
parameters, configure File Manager failover, and to set up remote
error notification by email.
This chapter discusses:
• Configuring General Settings
• Configuring File Manager Failover
• Setting Up Email Error Notification
Page 34
3-2
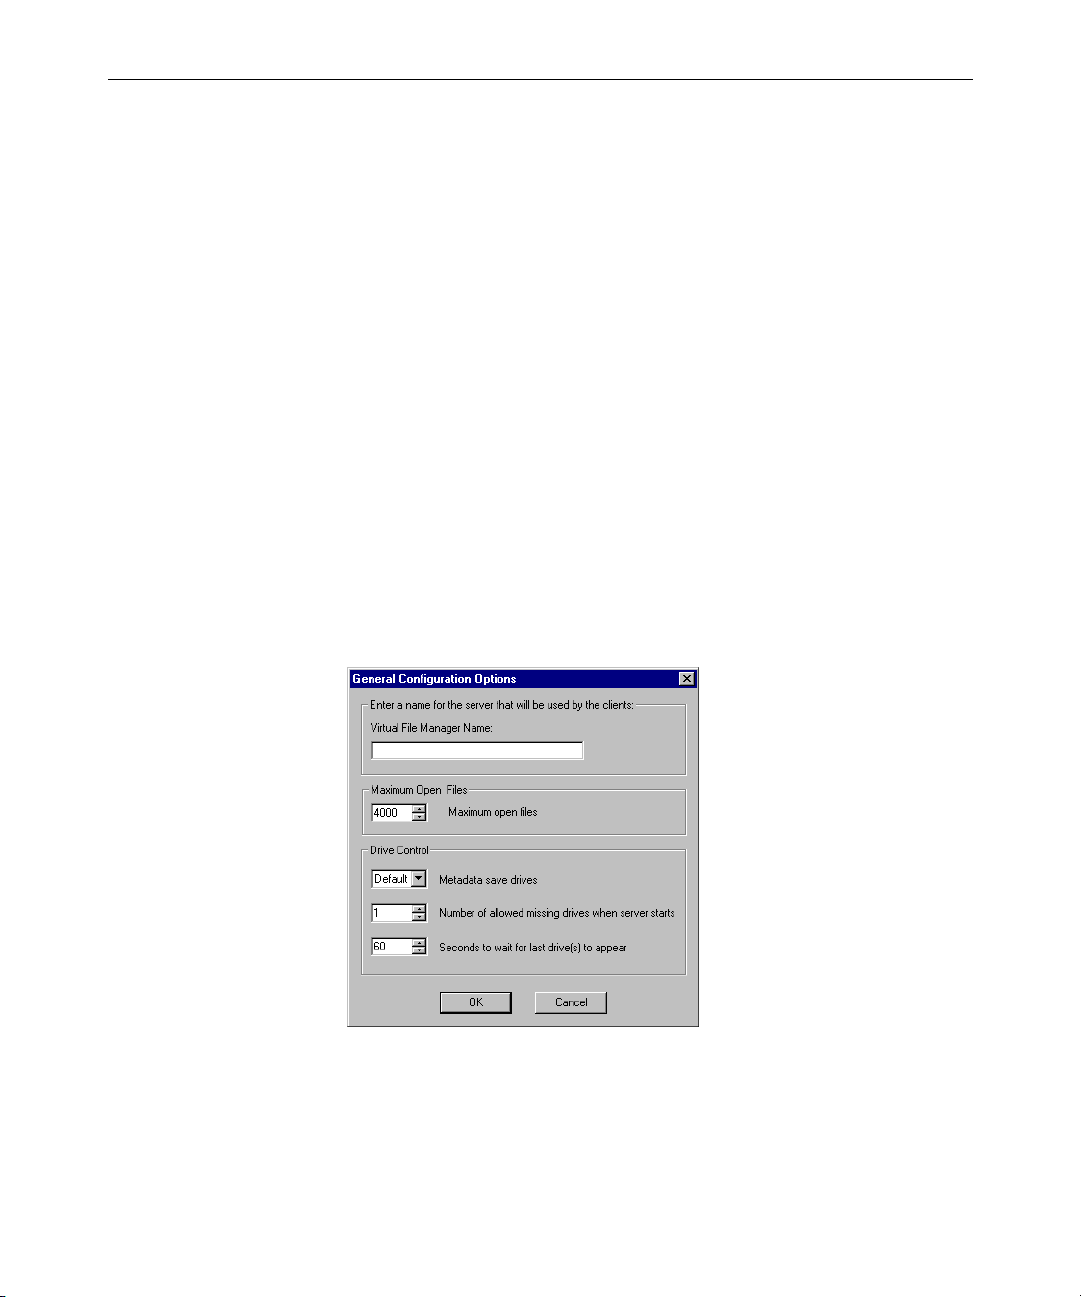
Configuring General Settings
General configuration settings allow you to fine-tune system
performance by allowing you to limit the number of open files as well
as specify how the File Manager writes metadata and interprets
available or missing drives during startup.
c
Inappropriate configuration of the settings described in this section
could result in degraded system performance. Contact Avid
Customer Support before attempting to change these settings.
To configure general settings:
1. Click Start, point to Programs, point to AvidUnity, and then click
Setup Manager. The Setup Manager window opens.
2. Choose General Configuration from the File Menu.
The General Configuration Options dialog box appears.
3. To give the File Manager a name to represent it to clients that is
different from the Computer Name defined in the system’s
Network properties, specify it in the Virtual File Manager Name
text box.
Configuring General, Failover, and Remote Error Notification Parameters
Page 35

3-3
n
In a failover configuration, you must specify the same virtual File Manager
Name for both File Managers.
4. Enter a number for the maximum open files allowed by the
system. The default is 4000.
In general, you should use the default figure for maximum
number of open files allowed by the system. For large and active
systems, you can raise this figure as needed.
5. Choose the number of drives that you would like the system to
use for writing metadata. The default setting allows the system to
write metadata across all available drives. Avid recommends that
you use the default setting.
Your choice for the number of metadata save drives is a trade-off
between throughput optimization and the time it takes to write
the metadata. If you limit the metadata save drives to a small
number, for example, the remaining drives will be freed up for the
reading and writing of media files only, which will optimize
throughput. The system, however, will take longer to write the
metadata.
6. Enter the number of missing drives to allow when the File
Manager starts. If more drives than the number specified are
missing from the drive set, the File Manger will not start. Entering
a higher number allows the File Manager to start even if it cannot
find the expected number of drives.
The File Manager can function with one drive missing by default
when all workspaces are protected. If more than one drive is
missing or some workspaces are not protected, the system will
report errors.
7. Enter the number of seconds for the system to wait for the last
drives to appear during startup. A higher number of seconds
causes the File Manager to continue searching for drives for the
specified duration during startup.
This option allows the system to accommodate the various
power-up times required for different drives on the system.
Page 36

3-4
Configuring File Manager Failover
If properly configured with a redundant File Manager, MediaNet
supports automatic failover to the passive File Manager in the event
that the active File Manager fails. Communication using the first three
drives in the drive set as well as polling over two cross-connected
Ethernet paths ensures that any lack of response from the initially
active File Manager is because it has really gone offline and is not due
to a failure of network connections between the two File Managers.
n
In a failover configuration, neither File Manager is assigned to a primary or
backup role — the first system to come online becomes the active File
Manager and the second to come online becomes the passive File Manager. If
both systems come online at the same time, the active role is negotiated
arbitrarily between the two systems. For this reason, Avid recommends that
you physically label and refer to your first and second File Managers FM1
and FM2.
For information on installing a second File Manager and setting up the
IP addresses, see the Avid Unity MediaNet Setup Guide. The
recommended IP addresses are listed here in Table 1 for your
reference. If you use different addresses, be sure to note them and have
them available before proceeding.
Table 1 Avid-Recommended Failover IP Addresses
Physical Host
IP Address
192.168.1.1 FM01A Primary File Manager built-in
192.168.2.1 FM01B Primary File Manager Network
Name
Description
Interface Card (NIC)
192.168.1.2 FM02A Backup File Manager built-in
192.168.2.2 FM02B Backup File Manager NIC
Configuring General, Failover, and Remote Error Notification Parameters
Page 37

Failover Configuration Procedure Overview
Configuring File Manager Failover requires the following steps:
• Step 1: Setting Up the Failover Connection on the First File
Manager.
• Step 2: Setting Up the Failover Connection on the Second File
Manager.
• Step 3: Validating the Failover Connections
• Step 4: Starting the First and Second File Managers.
Step 1: Setting Up the Failover Connection on the First File Manager
To set up the failover connection on the first File Manager:
1. Click Start, point to Programs, point to AvidUnity, and then click
Setup Manager. The Setup Manager window opens.
3-5
2. Stop the File Manager service by choosing Stop File Manager from
the File Manager menu.
3. Choose File Manager Failover Configuration from the File menu.
The File Manager Failover Configuration dialog box appears.
4. Make sure that the Enable redundant operation box is checked.
5. Type a virtual server name into the Virtual Server Name text box.
This name must be the same on both the first and second File
Managers.
6. Leave the Monitor port set to 5000. If you have another application
that uses port 5000, change the Monitor port to an available port
number. This port number must be the same on both the first and
second File Managers.
7. In the First network path area, choose the built-in Ethernet adapter
from the Network Adapter pull-down menu.
Page 38

3-6
8. Type the first File Manager built-in IP address into the Local
Machine First path IP address text box. This should be the first IP
address from the list of recommended failover addresses (see
Ta bl e 1 ).
9. Type the second File Manager built-in IP address into the Remote
Machine First path IP address text box. This should be the third IP
address from the list of recommended failover addresses (see
Ta bl e 1 ).
10. In the Second network path area, choose the first port of the
Ethernet NIC from the Network Adapter pull-down menu.
11. Type the first File Manager Ethernet NIC IP address into the Local
Machine Second path IP address text box. This should be the
second IP address from the list of recommended failover
addresses (see Table 1).
12. Type the second File Manager Ethernet NIC IP address into the
Remote Machine Second path IP address text box. This should be
the forth IP address from the list of recommended failover
addresses (see Table 1).
13. Leave the Setup Manager and the Failover Server Configuration
dialog box open.
Step 2: Setting Up the Failover Connection on the Second File Manager
To set up the failover connection on the second File Manager:
1. Click Start, point to Programs, point to AvidUnity, and then click
Setup Manager. The Setup Manager window opens.
2. Stop the File Manager service by choosing Stop File Manager from
the File Manager menu.
3. Choose File Manager Failover Configuration from the File menu.
The File Manager Failover Configuration dialog box appears.
4. Make sure that the Enable redundant operation box is checked.
Configuring General, Failover, and Remote Error Notification Parameters
Page 39

3-7
5. Type a virtual server name into the Virtual Server Name text box.
This name must be the same on both the first and second File
Managers.
6. Leave the Monitor port set to 5000. If you have another application
that uses port 5000, change the Monitor port to an available port
number. This port number must be the same on both the first and
second File Managers.
7. In the First network path area, choose the built-in Ethernet adapter
from the Network Adapter pull-down menu.
8. Type the second File Manager built-in IP address into the Local
Machine First path IP address text box. This should be the third IP
address from the list of recommended failover addresses (see
Ta bl e 1 ).
9. Type the first File Manager built-in IP address into the Remote
Machine First path IP address text box. This should be the first IP
address from the list of recommended failover addresses (see
Ta bl e 1 ).
10. In the Second network path area, choose the first port of the
Ethernet NIC from Network Adapter.
11. Type the second File Manager Ethernet NIC IP address into the
Local Machine Second path IP address text box. This should be the
forth IP address from the list of recommended failover addresses
(see Table 1).
12. Type the first File Manager Ethernet NIC IP address into the
Remote Machine Second path IP address text box. This should be
the second IP address from the list of recommended failover
addresses (see Table 1).
13. Leave the Setup Manager and the Failover Server Configuration
dialog box open.
Page 40

3-8
Step 3: Validating the Failover Connections
To validate connections for File Manager Failover:
1. Click the Validate Receive button on one of the File Managers. The
Validate failover connections dialog box opens.
Numbers appearing in the Packets Received text boxes indicate
the number of packets received from the first File Manager.
2. Click the Validate Send button on the other File Manager. The
Validate failover connections dialog box opens.
Numbers appearing in the Successful Round Trips text boxes
indicate successful communication with the second File Manager
and a valid connection. The indicator box, under Waiting for
response, should also be green.
n
If you have data traveling over only one of the failover network paths, recheck
your configuration. This indicates that you probably have a network
configuration problem.
3. Exit the Setup Manager on both File Managers.
Step 4: Starting the First and Second File Managers
To start the first and second File Managers:
1. On the first File Manager, click Start, point to Programs, point to
AvidUnity, and then click Monitor Tool. The Monitor Tool
window opens.
2. Click Start File Manager.
3. On the second File Manager, click Start, point to Programs, point
to Trilligent, and then click Monitor Tool. The Monitor Tool
window opens.
4. Click Start File Manager.
Configuring General, Failover, and Remote Error Notification Parameters
Page 41

Setting Up Email Error Notification
MediaNet storage can be configured to notify you when problems
occur. This error notification functionality is performed by a Windows
NT service that regularly polls the client log file (UnityClientLogs.txt)
and, if any errors are logged, sends a concise summary of those errors
to one or more email accounts and/or sounds an audible alarm on the
File Manager.
3-9
n
If you subscribe to an appropriate text messaging service, you can configure
the error notification service to send messages to your alphanumeric pager. To
find out how to send a message to your pager using email, contact your
paging service provider.
Configuring the Email Error Notification Service
To configure the MediaNet Storage error notification service:
1. Click Start, point to Programs, point to AvidUnity, and then click
Setup Manager. The Setup Manager window opens.
2. Choose Email Configuration from the File menu. The Email
Configuration dialog box appears.
3. Configure the General parameters appropriately:
Enable Email — Set this option to enable the email error
notification service.
Poll Frequency — Specify the frequency (by setting an interval in
seconds) with which the error notification service should check for
problems.
Wait Period — Specify the time period you would like to pass
between messages. Unless you specify a period, the system will
send messages each time it polls for problems or errors.
Enable Alarm — Set this option to enable an audible alarm on the
File Manager to warn you of any logged errors. When the alarm
sounds, click the Turn Off Alarm button to stop the sound.
Page 42

3-10
SMTP — Specify the IP address or host name of your SMTP
server. If you are unsure of this address, contact your network
administrator.
Port — Specify the port number of your SMTP server. If you are
unsure of the port number, contact your network administrator.
The default value (25) should be appropriate in most instances.
4. Specify the list of contacts that you want the error notification
service to email when a logged error occurs. For more information,
see the following section.
Setting Up Email Error Notification Contacts
You can add, edit, and delete contacts that you want the error
notification service to email when a logged error occurs.
To add an email account to the contact list:
1. Click the Add button. The Add Contact dialog box appears.
2. Specify a Name for the contact account.
3. Specify the Email address (in the standard person@domain.com
format) to which the message should be sent.
4. Click the Add button to add the account to the contact list and
clear the Name and Email fields.
5. To add more accounts, repeat steps 2 through 4. When you are
done, click the Close button to close the Add Contact dialog box.
To edit an existing contact:
1. Select its entry in the Contact list and click Edit. The Edit Contact
dialog box appears.
2. Change the Name and Email information as appropriate.
3. Click Change to commit the changes.
To remove a contact:
t Select the contact entry in the Contact list and click Remove.
Configuring General, Failover, and Remote Error Notification Parameters
Page 43

CHAPTER 4
Managing Your MediaNet Drive Hardware
This chapter describes how to configure and manage your drive
hardware as a MediaNet drive set.
n
You perform all drive management operations described in this chapter from
the Setup Manager. For more information about how to start and use the
Setup Manager, see Chapter 2.
This chapter describes:
• Creating a New Drive Set
• Adding New Storage to Your MediaNet workgroup
• Adding Active Data Drives to an Existing Drive Set
• Removing Drives From Your MediaNet workgroup
• Setting Drive Mode Pages
• Deleting an Existing Data Drive Set
• Rebuilding an Existing Data Drive Set
• Bringing the Drive Set Online and Taking It Offline
• Identifying a Drive
Page 44

4-2
Creating a New Drive Set
After all the hardware and software that comprise a MediaNet
workgroup are installed, you must create a drive set, which is the set
of physical drives that provides the large virtual MediaNet file system.
A drive set consists of:
• Data drives
• Optional spare data drives (Avid recommends at least one spare
drive of each drive size in your drive set)
The easiest way to create a drive set is to run the Setup Manager’s
Configuration Assistant, which automatically creates a drive set
consisting of a group of active data drives and a single spare data
drive.
However, if you have specific requirements about how you want your
drive set configured (for example, if you want to specify how many
drives should be designated as spares), you will need to create your
drive set manually.
This section first tells you how to use the Configuration Assistant and
then tells you how to configure your drive set manually.
Using The Configuration Assistant to Create a Drive Set
To enable you to set up a drive set as quickly as possible, the Setup
Manager provides a Configuration Assistant that will automatically
create a basic drive set consisting of:
• Active data drives (all but one of the available drives)
• A single spare data drive
Managing Your MediaNet Drive Hardware
Page 45

4-3
n
Avid recommends that you leave at least one spare of each data drive size in
your drive set (for example, if you have 18-GB and 50-GB drives in your
drive set, you should leave at least one spare of each size). Therefore, if you
have mixed drive sizes, you should create your drive set manually.
To run the Configuration Assistant:
1. Choose Configuration Assistant from the Setup Manager Quick
Start menu. A dialog box appears, describing the drive set that the
Configuration Assistant is going to create.
2. Click OK to proceed.
When the configuration operation is complete, your working drive set
will come online ready for you to perform further configuration from
the Administration Tool.
Manually Creating a Drive Set
This section describes how to create a drive set consisting of data
drives and optional spare data drives manually.
Manually Creating a Data Drive Set From Raw Drives
To create a data drive set from Fibre Channel drives that are in a raw
state:
1. Click Start, point to Programs, point to Avid Unity, and then click
Setup Manager. The Setup Manager window opens.
Page 46

4-4
2. If the Raw Drives group is not already selected in the drive group
list, click its entry to display all the attached raw drives in the
drive list.
3. Select a minimum of four raw drives that you want to become
data drives in your new drive set.
4. Choose Create Data Drive Set from the Drive Set menu to create a
drive set from the selected raw drives.
A progress indicator appears, indicating that the Setup Manager is
building the drive set.
When the drive set has been successfully built, the File Manager and
drive set come online automatically.
To use the new drive set, use the Administration Tool to assign the
data drives to one or more allocation groups. For more information,
see “Adding Drives to an Existing Allocation Group” on page 6-5.
Manually Creating Spare Data Drives from Raw Drives
n
Managing Your MediaNet Drive Hardware
Avid recommends that you leave at least one spare of each data drive size in
your drive set (for example, if you have 18-GB and 50-GB drives in your
drive set, you should leave at least one of each size spare).
To create a spare data drive:
1. Click Start, point to Programs, point to Avid Unity, and then click
Setup Manager. The Setup Manager window opens.
2. If the Raw Drives group is not already selected in the drive group
list, click its entry to display all the attached raw drives in the
drive list.
3. Select a drive from the Raw Drives group.
4. Choose Make Drive Spare from the Drives menu.
The drive becomes a spare data drive and is moved from the Raw
Drives group into the Data Drive Set.
Page 47

A spare data drive is required before you can replace a failing drive
(see “Repairing the Drive Set by Swapping Out a Bad Data Drive” on
page A-2).
For information about adding a new spare drive to the MEDIArray,
see “Adding New Storage to Your MediaNet workgroup” on page 4-5.
Adding New Storage to Your MediaNet workgroup
To physically add new MEDIArray drives to your MediaNet
environment:
1. Stop the File Manager service (see “Starting and Stopping the File
Manager Service” on page 2-5). In a failover configuration, stop
the passive File Manager before stopping the active File Manager.
Otherwise, the system will failover to the passive system in the
middle of the shutdown.
4-5
2. Shut down and power off the File Manager system. In a failover
configuration, shut down both File Managers.
3. Turn off power to the MEDIArray enclosures.
4. Add the new MEDIArray drives, installing new MEDIArray
enclosures to accommodate the drives if necessary as described in
the Avid Unity MediaNet Setup Guide.
5. Turn on power to the MEDIArray enclosures.
6. Reset the Fibre Channel switch.
7. Restart the File Manager system. In a failover configuration,
restart only a single File Manager.
8. Restart the Setup Manager.
The newly added drives should appear in the Raw Drives group,
the Other FibreChannel Drives group, or in an additional Data
Drive Set group, depending on how they have previously been
used.
Page 48

4-6
c
n
If the newly added drives create an additional Data Drive Set group,
you must delete that new drive set (and, optionally, add the new
drives to your existing drive set) before attempting to bring
MediaNet online. See “Deleting an Existing Data Drive Set” on
page 4-12.
If the new drives are not listed, there is probably something wrong with their
physical connections; do not go any further in the procedure and see the Avi d
Unity MediaNet Setup Guide.
9. Add the new drives to the Drive set (see “Adding Active Data
Drives to an Existing Drive Set” on page 4-6).
10. In a failover configuration, restart the second File Manager.
Adding Active Data Drives to an Existing Drive Set
The Setup Manager allows you to enlarge your drive set by adding
more active data drives to your existing MediaNet drive set. Available
drives can appear in the Raw Drives group, the Other FibreChannel
Drives group, or the Data Drive Set group, depending on whether
they are newly added and how they were previously used.
n
If you are adding new, previously unused drives, proceed directly to
“Creating Data Drives from Raw Drives” on page 4-8.
Adding Drives That Were Previously Used as Data Drives in Another Drive Set
If the drives you want to add to your drive set were previously used in
another drive set, two Data Drive Set entries should appear in the
drive group list:
• The Data Drive Set entry that contains the newly added drives
should contain the number of drives that you have added from
Managing Your MediaNet Drive Hardware
Page 49

4-7
another drive set and probably indicate that many drives are
missing.
• The other Data Drive Set entry should be indicative of your
existing drive set.
You must delete the data drive set containing the newly added drives
before you can use the new drives in your existing drive set.
To add data drives previously used in another drive set to your
current drive set:
1. Select the Data Drive Set group that contains the drives that you
want to add to your drive set. All the drives in that group appear
in the drive list.
c
Do not proceed unless you are absolutely sure that you have
selected the correct data drive set. Deleting the Data Drive Set group
will cause all data on that drive set to be lost.
2. Choose Delete Data Drive Set from the Drive menu.
The data drive set is deleted and all the drives in it become raw
(and are therefore displayed in the Raw Drives group).
3. Proceed to “Creating Data Drives from Raw Drives” on page 4-8.
Adding Drives That Have Been Previously Used With Another Application (For Example, MediaShare F/C)
If the drives you want to add to your drive set have been previously
used in an environment other than MediaNet (for example,
MediaShare F/C), they should appear in the Other FibreChannel
Drives group.
To add the drives to your drive set:
1. Select the Other FibreChannel Drives group. All the drives in that
group appear in the drive list.
Page 50

4-8
2. Select the drives from the drive list that you want to add as data
drives to your drive set.
3. Choose Make Drive Raw from the Drive menu to remove any
existing formatting and information on the drives.
c
Making the drives raw will cause all data on the selected drive set to
be lost.
4. Proceed to “Creating Data Drives from Raw Drives” on page 4-8.
Creating Data Drives from Raw Drives
To create data drives from raw drives:
1. Select the Raw Drives group. All the drives in that group appear in
the drive list.
2. Select the raw drives from the drive list that you want to add as
data drives to your drive set.
3. Choose Make Drive Spare from the Drives menu. The raw drives
are added to the Data Drive Set group as spare data drives.
4. Select the newly created spare data drives from the Data Drive Set
group.
5. Choose Add Additional Drives from the Drive Set menu.
A progress indicator appears. As soon as the drive set has been
successfully enlarged, the File Manager and drive set come online
automatically.
6. To use the newly added drives, use the Administration Tool to
assign them to one or more allocation groups. For more
information, see “Adding Drives to an Existing Allocation Group”
on page 6-5.
Managing Your MediaNet Drive Hardware
Page 51

Removing Drives From Your MediaNet workgroup
You can remove drives from your drive set, as long as the following
conditions will still be met after you have done so:
• The drive set will still contain at least four drives.
• The drive set will still contain enough drives to support the space
allocated to your workspaces. Note that this is the total amount of
storage allocated to the workspaces, not the actual amount of data
stored on the workspaces.
• The drive set will still contain at least the number of drives
currently required to store the file system’s metadata.
The process for removing drives involves removing the drives from
the drive set (which requires that you first remove them from any
allocation groups to which they are assigned), then physically
removing them from the MEDIArray enclosure.
4-9
Removing Active Data Drives From an Existing Drive Set
To remove active data drives from an existing data drive set:
1. Use the Administration Tool to remove the drives from any
allocation groups to which they are assigned.
When prompted to optimize all workspaces on the allocation
group, click Yes to optimize the workspaces and move all data off
the drives you want to remove. For more information, see
“Removing Drives from an Existing Allocation Group” on
page 6-7.
2. In the Setup Manager, select the Data Drives Set group. All the
drives in that group appear in the drive list.
3. Select the drives that you want to remove. (Tip: In addition to the
drive name, a good way to confirm that a drive is not in an
allocation group and therefore available for removal is that its %
Used is 0.00%.)
Page 52

4-10
4. Choose Remove Selected Drives from the Drive Set menu to
remove existing formatting from the drives.
5. Click Yes to confirm the removal.
6. Click Yes when you are informed that the drive set must be taken
off-line. The Server Offline Control dialog box appears.
7. Enter the number of seconds to wait until the server goes off-line
and click OK.
8. When the drive set comes back online, check that the drives have
been removed by selecting the Raw Drives group in the Setup
Manager; the drives you removed from the drive set should now
appear there.
You can now physically remove the MEDIArray drives (see
“Physically Removing Storage from Your MediaNet workgroup” on
page 4-10).
Physically Removing Storage from Your MediaNet workgroup
To physically remove MEDIArray drives from your MediaNet
workgroup:
1. Stop the File Manager service (see “Starting and Stopping the File
Manager Service” on page 2-5). In a failover configuration, stop
the passive File Manager before stopping the active File Manager.
Otherwise, the system will failover to the passive system in the
middle of the shutdown.
2. Shut down and power off the File Manager system. In a failover
configuration, shut down both File Managers.
3. Turn off power to the MEDIArray enclosures.
4. Remove the new MEDIArray drives (and MEDIArray enclosures,
if required) as described in the Avid Unity MediaNet Setup Guide.
5. Turn on power to the MEDIArray enclosures.
6. Reset the Fibre Channel switch.
Managing Your MediaNet Drive Hardware
Page 53

7. Restart the File Manager system. In a failover configuration,
restart both File Managers.
8. Restart the Setup Manager. In a failover configuration, restart the
Setup Manager on both File Managers and determine the active
File Manager (see “Determining the active File Manager” on
page 2-5). You must use the Setup Manager on the active File
Manager to perform the remainder of the steps in this procedure.
9. Check that the drives no longer appear in the Raw Drives group.
Setting Drive Mode Pages
Mode pages are a configurable part of the drive firmware that
determines how the drive handles data. When you create data drives,
the Setup Manager configures the mode pages to efficiently handle
media data in the MediaNet workgroup.
4-11
If drive mode pages ever become incorrect (for example, if changed by
another application), the Setup Manager warns you by changing the
Mode Page column value from Okay to Incorrect.
To reconfigure drives with the correct mode pages:
1. Select the appropriate drives.
2. Choose Set Mode Pages from the Drives menu.
Page 54

4-12
Deleting an Existing Data Drive Set
To delete an existing drive set:
c
This procedure will cause all data on the drive set to be lost.
1. Take the drive set offline (see “Taking the Drive Set Offline” on
page 4-14).
2. If the Data Drives group is not already selected in the drive group
list, click its entry to select it.
3. Choose Delete Data Drive Set from the Drive Set menu. A dialog
box appears prompting you to confirm this choice.
A progress indicator appears, showing that the Setup Manager is
deleting the drive set.
After the drive set is deleted, all of the data drives previously in your
drive set will appear in the Raw Drives group.
Rebuilding an Existing Data Drive Set
To rebuild an existing drive set:
This procedure will cause all data on the drive set to be lost.
c
1. Delete the existing drive set (see “Deleting an Existing Data Drive
Set” on page 4-12).
After the drive set is deleted, all of the data drives will appear in
the Raw Drives group.
2. If the Raw Drives group is not already selected in the drive group
list, click its entry to display all the attached raw drives in the
drive list.
3. Select all the raw drives that you want to become data drives in
the new drive set.
Managing Your MediaNet Drive Hardware
Page 55

4-13
4. Choose Create Data Drive Set from the Drive Set menu to rebuild
the drive set.
A progress indicator appears, showing that the Setup Manager is
building the drive set.
As soon as the drive set has been successfully built, the drive set comes
online automatically.
Bringing the Drive Set Online and Taking It Offline
Some hardware operations (for example, repairing the drive set)
require that you first take the drive set offline and then bring it online
again. You can also take the drive set offline to prevent client access to
all your workspaces.
Drive set sharing status is indicated in the information area of the
Setup Manager, and by the Take Offline (available when the drive set
is online) and Bring Online (available when the drive set is offline)
entries in the Drive Set menu.
Bringing the Drive Set Online
To bring the drive set online:
1. If the Data Drives group is not already selected in the drive group
list, click its entry to select it.
2. Choose Bring Online from the Drive Set menu.
The drive set comes online.
Page 56

4-14
Taking the Drive Set Offline
n
Identifying a Drive
Before taking the drive set offline, you should identify any clients that have
workspaces mounted using the Monitor Tool Active Client tab and warn the
clients that you are taking the drive set offline.
To take the drive set offline:
1. If the Data Drives group is not already selected in the drive group
list, click its entry to select it.
2. Choose Take Offline from the Drive Set menu.
A dialog box appears, prompting you to specify the delay that you
want to occur (in seconds) before the drive set is brought offline so
that any clients that have not already done so can unmount all
workspaces.
3. Specify the required delay or accept the default (30 seconds) and
then click OK.
After the specified delay, the drive set goes offline.
The Setup Manager provides a function that can flash the LED on a
selected drive to physically identify it in its MEDIArray drive
enclosure.
To see the drive being identified, you must be close enough to the
physical drives so you can see which drive is flashing. An alternative
method is to have someone watch the drives while you perform this
function.
To identify a drive:
1. Select one or more drives you want to identify.
2. Choose Identify from the Drives menu.
Managing Your MediaNet Drive Hardware
Page 57

4-15
The LED on the selected drive blinks immediately for 15 seconds
after you choose Identify. To cancel the identify function, press
Esc.
n
When determining the identified drive, be aware that normal MediaNet
activity causes random drives to blink every 20 seconds as metadata is
written to them.
Page 58

4-16
Managing Your MediaNet Drive Hardware
Page 59

CHAPTER 5
The Administration Tool
The Administration Tool is the primary tool for initial setup and
day-to-day administration of allocation groups, workspaces, and
users. It also allows you to monitor MediaNet activity.
This chapter provides an overview of the Administration Tool and
describes the basics of how to use it (starting the tool, logging in,
setting preferences, and so on).
This chapter discusses the following topics:
• About the Administration Tool User Interface
• Starting The Administration Tool
• Logging Into the Administration Tool
• Administration Tool Preferences
• Reestablishing the Administration Tool’s Connection to the File
Manager
Page 60

5-2
About the Administration Tool User Interface
The Administration Tool, which you can run on the MediaNet File
Manager or any client, has a tab-based user interface (UI) in which
information and controls are grouped together by function and are
presented together on tabs in a single window.
Menus corresponding to each tab offer many of the same functions
(with corresponding shortcut keys), but are only active when that tab
is selected. At all other times, the menu and its entries appear
dimmed, indicating that they are unavailable.
Tabs (Click to select.)
List opener
List
area
Figure 5-1 Administration Tool Example Display
Help button
Message area
Contextsensitive
buttons
Information
area
The Administration Tool
Page 61

User Interface Component Descriptions
This section provides a brief description of each component of the
Administration Tool UI.
Message Area
The message area typically shows the File Manager status or any
existing error conditions. Informational messages that enter the
message log are also displayed in the message area for several
seconds.
5-3
List Area
n
Error messages that appear in the message area are often rapidly overwritten
by status messages. You should check the Log tab on a regular basis if you are
concerned about problems with MediaNet. For more information, see “The
Log Tab” on page 9-4.
The contents of the list area are different for each tab, but each list
behaves in a similar manner, supporting (as applicable):
• Collapsible views. Any item with nested items is indicated by a list
opener. Open and close these items by clicking the list opener.
• Selection of a single item by clicking.
• Where applicable, selection of multiple items by Shift+clicking.
• Where applicable, selection of multiple items by clicking a
selection box and dragging it.
• Where applicable, renaming of an object by clicking on its name
and typing.
Clicking an icon in the list area selects the associated item without
making the name editable. Clicking directly on an item’s name makes
the name editable as well as selecting the item.
Page 62

5-4
Context-Sensitive Buttons
Each tab has a collection of context-sensitive buttons that provide
access to the most common operations with a single click. Where
button action is only applicable under certain conditions or when a
particular item or items are selected, that button is only active in those
circumstances and appears dimmed at all other times. All button
actions are duplicated as menu commands.
Information Area
Where applicable, the information area shows information about items
selected in the list area.
User Interface Tab Descriptions
Each of the five user interface tabs groups information and controls
together by functions.
The Administration Tool
Ta b Allows You To
User View, create, edit, and delete user accounts (with optional
passwords) and to assign users access privileges to workspaces.
Workspace View, create, rename, resize, protect, optimize, and delete
workspaces.
Allocation
Group
Monitor Monitor system usage, including total system bandwidth use,
Log View a list of error, warning, and informational messages.
View, create, rename, and delete allocation groups. It also
allows you to add and remove drives from existing allocation
groups.
how many clients are active, and how much bandwidth each
client is consuming.
Page 63

Getting Help With the Administration Tool
The Help system provides step-by-step procedures and reference
information for all features of the Administration Tool. To access the
Help system, click the Help button (Question Mark icon) in the
Administration Tool window to view information about the current
tab displayed.
Starting The Administration Tool
You can run the Administration Tool from the File Manager console or
any Windows client and in more than one location simultaneously.
This allows you to monitor usage and to perform other administrative
tasks from the most convenient location without having to return to
another running copy of the Administration Tool to shut it down
before doing your work. However, performing administrative
functions on more than one Administration Tool at the same time can
cause unexpected results. For example, if two administrators are
deleting the same user account at the same time, a second user account
might also be accidentally deleted.
5-5
Logging Into the Administration Tool
If you have specified an administration password (see “Setting the
Administration Password” on page 5-11), the Administration Tool
prompts you to supply that password to log in. If you enter the wrong
password, an error message appears and the tool closes.
Page 64

5-6
Administration Tool Preferences
The Administration Tool allows you to set preferences that specify a
wide range of options that affect the operation of the tool itself (such as
the administration password, user interface colors, and graph display
options) and the MediaNet configuration that you use the tool to
create (such as default names and access privileges for new
workspaces and users).
You can also export entire sets of preferences. Such exported
preference sets can be imported later and applied. For more
information, see “Exporting and Importing Preferences” on page 5-10.
Setting Administration Tool Preferences
You set preferences from the Preferences window.
The Administration Tool
To open the Preferences window:
t Choose Preferences from the File menu with any tab selected.
Page 65

Tabs (Click to select.)
Click to revert to
factory default
settings.
Click to revert
settings to their
last saved state.
Click to apply
your preference
changes.
5-7
Click to apply
your preference
changes and exit.
Click to cancel
your preference
changes and exit.
Preference Tabs
Figure 5-2 Preferences Window
The Preferences window contains several preference tabs (listed in
Table 5-1), each containing options and default values related to a
particular aspect of Administration Tool functionality. To display a
preference tab, you click its tab at the top of the window.
Page 66

5-8
Table 5-1 Preference Tabs
Ta b Specifies
Administration Administrator password. See “Setting the Administration
Password” on page 5-11.
User Default name, password, and access privileges for new
users. View preferences (iconic/text) for access privileges.
See “Changing Your User Account Preferences” on
page 5-13.
Workspace Default name, access privileges, and size for new
workspaces. Workspace graph view (linear/log) and
scaling options. See “Changing Your Workspace Tab
Preferences” on page 5-14.
Color User interface colors. See “Setting Workspace and Monitor
Graph Bar Colors” on page 5-12.
Monitor Monitor graph view (linear/log) and scaling options. See
“Changing Your Monitor Tab Preferences” on page 5-16.
Reverting or Cancelling Preference Changes
If you need to undo any changes you have made, the Preferences
window offers three options to revert to earlier values or cancel your
changes:
• Click the Revert Panel button to revert the preferences on the
current preference panel to their last saved values.
• Click the Factory Settings button to revert the preferences on the
current preference panel back to the original values set at
installation time.
• Click the Cancel button to close the Preferences window
immediately without saving your changes.
The Administration Tool
Page 67

Saving Preference Changes
If you want to view appearance changes immediately or if you want to
apply some changes and then continue changing these or other
preferences, click the Apply button. This saves your changes
immediately without closing the Preferences window.
When you have finished making preferences changes, click OK. This
saves all your changes and closes the Preferences window.
Preferences are saved locally to a file on the system on which you are
running the Administration Tool. Table 5-2 shows the location of the
preferences file on different system types.
Table 5-2 Preference File Locations
System type File Location
5-9
File Manager or
Windows NT client
Macintosh client System Folder:Preferences:Avid Unity Preferences
MediaNet installation directory (d:\Program
Files\Avid Technology\AvidUnity by default).
If you want to make preferences available on other clients, you need to
export your preferences to a shared drive, workspace, or floppy disk
(see “Exporting and Importing Preferences” on page 5-10).
Page 68

5-10
Exporting and Importing Preferences
The Administration Tool can export and import preferences, allowing
you to save multiple preference sets to accommodate different
MediaNet usage situations, multiple administrators, or to provide
consistent settings across multiple systems on which the
Administration Tool can be run.
Additionally, you can export preference sets to a shared drive (or
workspace if you know that it will not be deleted) so that they can be
imported into the Administration Tool on any client in the MediaNet
workgroup.
Exporting a Preference Set
To export your current preference set:
1. Choose Export Preferences from the File menu. A file selection
dialog box appears.
2. Specify a location and name for the exported preferences file that
you want to create and then click OK.
Importing a Preference Set
To import a preference set:
1. Choose Import Preferences from the File menu. A file selection
dialog box appears.
2. Navigate to and select the preferences file that you want to import
and then click OK.
The Administration Tool
Page 69
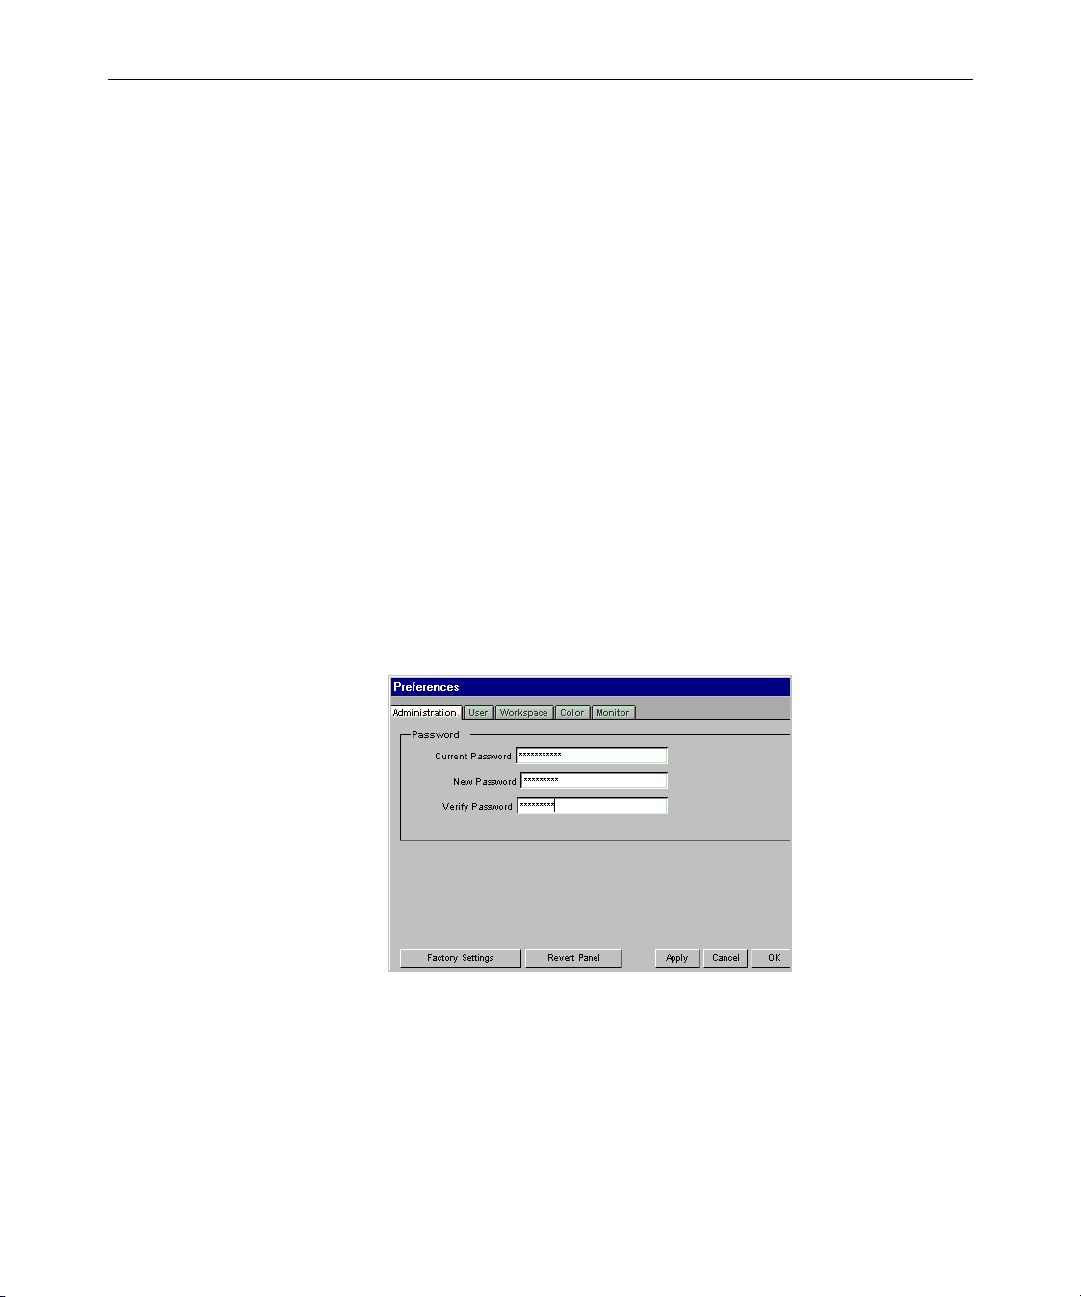
Setting the Administration Password
The Administration preference tab allows you to specify an
administration password to restrict access to the Administration Tool
(see “Logging Into the Administration Tool” on page 5-5).
5-11
n
To protect your MediaNet configuration from being damaged by
unauthorized client users, Avid recommends that you specify an
administration password the first time that you use the tool after you have
created your drive set. If security is not an issue, and you do not set an
administration password, anyone can gain instant password-free access to the
tool.
To set the administration password:
1. If necessary, open the Preferences window by choosing
Preferences from the File menu.
2. Click the Administration tab to select it.
3. Enter the current administration password (if any) and the new
administration password twice (the second time for verification
purposes).
4. Save your new password by clicking Apply. You are immediately
prompted to supply the new password.
Page 70
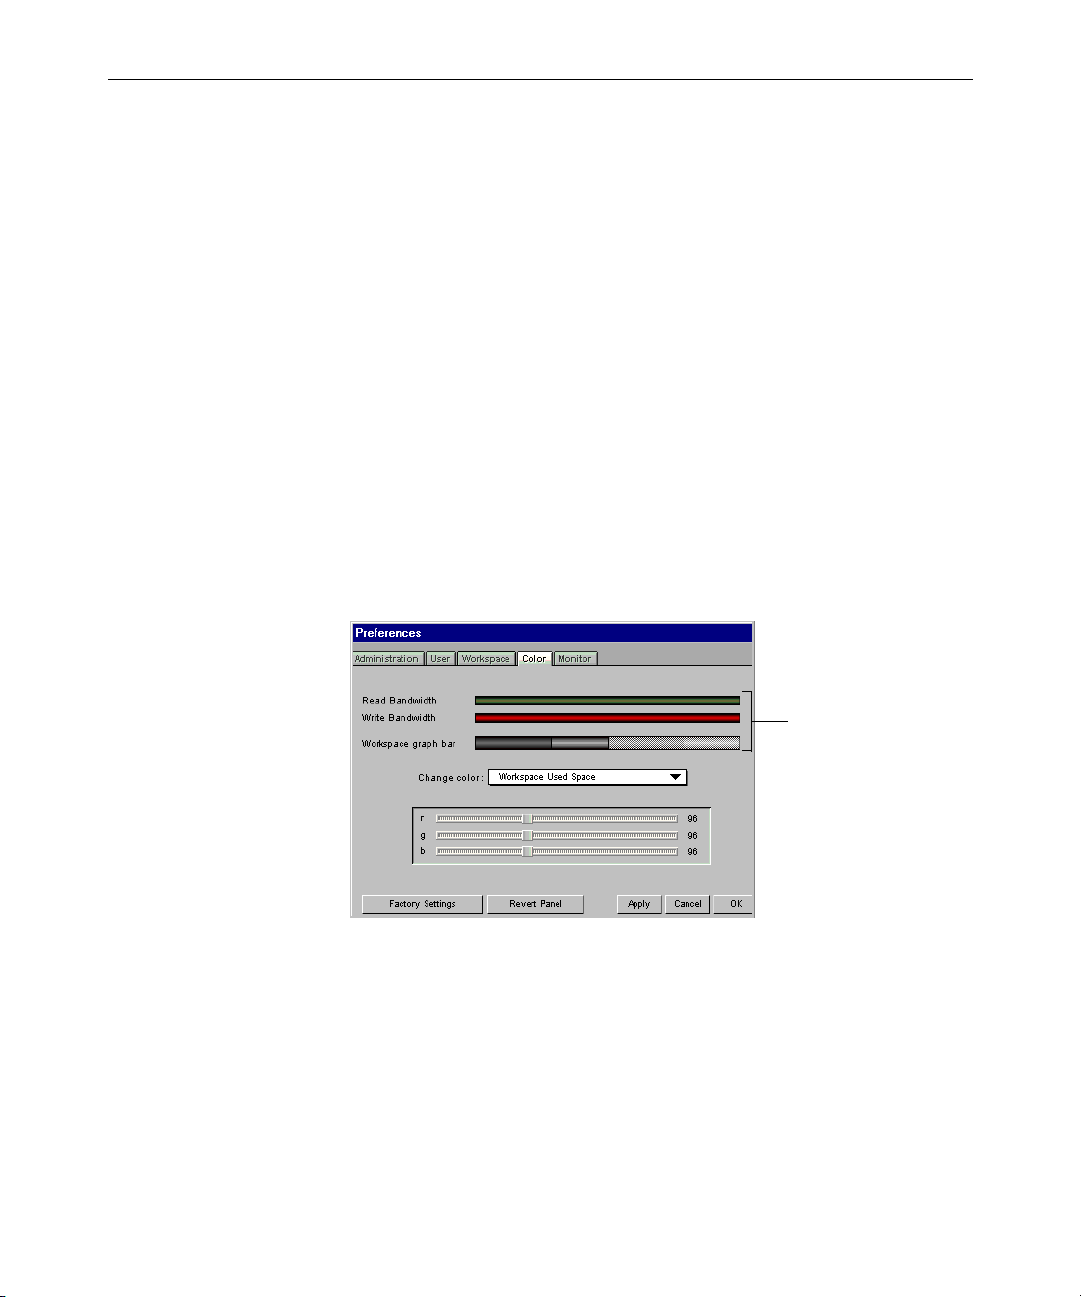
5-12
n
If you set an administration password, be sure to remember it. If forgotten,
you can only regain access to the Administration Tool by resetting the
password from the Monitor Tool.
Setting Workspace and Monitor Graph Bar Colors
The Color preferences tab contains controls that allow you to change
the color of the workspace and monitor graph bars in the
Administration Tool’s UI.
To set the workspace and monitor graph bar colors:
1. If necessary, open the Preferences window by choosing
Preferences from the File menu.
2. Click the Color tab to select it.
Preview bars
The Administration Tool
3. Select the graph bar element that you want to change from the
Change Color pop-up menu.
4. Select the red, green, and blue color component values that you
want by moving the corresponding sliders. As you alter the
values, you can see the color of the selected graph bar element
change on the preview bars.
Page 71

5. Select and change other graph bar elements by repeating steps 3
and 4 as necessary.
6. Save the color changes by clicking Apply or OK (as appropriate).
Alternatively, you can revert to your previous color preferences or
cancel out of the Preferences window altogether.
Changing Your User Account Preferences
The User preference tab allows you to specify a default user name,
password, and access privileges for newly created user accounts (as
well as the Guest user account). Another option allows you to specify
whether access privileges default to being displayed as icons or text in
the user list display. For more information, see Chapter 8.
To change your user preferences:
1. If necessary, open the Preferences window by choosing
Preferences from the File menu.
5-13
2. Click the User tab to select it.
3. Type the default name that you want to appear when you create a
new user account in the Name text box.
Page 72

5-14
4. Type the default login password for newly created user accounts
in the Password text box.
5. Select default access privileges to workspaces for newly created
user accounts (No Access, Read Access, or Read/Write Access)
from the Access Privileges pop-up menu.
6. Select whether you want access privileges to be displayed as text,
colored squares, or icons in the user list display by selecting the
appropriate User Access Icons option.
7. Save your changes by clicking Apply or OK (as appropriate).
Alternatively, you can revert to your previous user preferences or
cancel out of the Preferences window altogether.
Changing Your Workspace Tab Preferences
The Workspace preferences tab allows you to specify the default name,
access privileges, and size for newly created workspaces. You can also
specify default scaling settings for the workspace list on the
Workspace tab. For more information about the Workspace tab, see
Chapter 7.
n
The Administration Tool
You can also set your workspace graph scaling preferences by setting them
dynamically and saving them from the Workspace tab.
To change your workspace preferences:
1. If necessary, open the Preferences window by choosing
Preferences from the File menu.
2. Click the Workspace tab to select it.
Page 73

3. Set new values for the preferences that you want to change:
• Type the default name for newly created workspaces in the
Name text box.
• Type the default size (in GB) for newly created workspaces in
the Size text box.
5-15
• Select default access privileges for newly created workspaces
(No Access, Read Access, or Read/Write Access) from the
Access Privileges pop-up menu.
• If you do not want protection to be enabled by default for
newly created workspaces, deselect the Protection Enabled
option.
• Select the default graph scale type (linear or log) for the
workspace list from the Type pop-up menu.
Linear scaling provides a typical decimal scale graph. Log
scaling provides a logarithmic scale graph that allows larger
data values to fit into a smaller space.
• Type the default division size (in GB) for the workspace list in
the GB per Division text box.
• Type the default overall size to be displayed (in GB) in the
workspace list in the Zoom text box.
Page 74

5-16
4. Save your changes by clicking Apply or OK (as appropriate).
Alternatively, you can revert to your previous Workspace tab
preferences or cancel out of the Preferences window altogether.
Changing Your Monitor Tab Preferences
The Monitor preferences tab allows you to specify default scaling
settings for the Monitor tab graph display. For more information about
the Monitor tab, see Chapter 9.
n
You can also set your monitor graph scaling preferences by setting them
dynamically and saving them from the Monitor tab.
To change the default Monitor tab preferences:
1. If necessary, open the Preferences window by choosing
Preferences from the File menu.
2. Click the Monitor tab to select it.
3. Set new values for the preferences that you want to change:
The Administration Tool
• Choose the default graph scale type (linear or log) for the
monitor list from the Type pop-up menu.
Page 75

• Type the default division size (in MB) for the monitor list
display in the MB per Division text box.
• Type the default overall size to be displayed (in MB) in the
monitor list display in the Zoom text box.
4. Save your changes by clicking Apply or OK (as appropriate).
Alternatively, you can revert to your previous Monitor tab
preferences or cancel out of the Preferences window altogether.
Reestablishing the Administration Tool’s Connection to the File Manager
If the Administration Tool’s connection to the File Manager service on
the File Manager is disrupted during a session (for example, because
the File Manager service is stopped and restarted), the tool does not
poll for and attempt to reconnect to the server automatically. However,
you can reestablish the connection manually.
5-17
To reestablish your connection to the File Manager:
t Choose Establish Connection from the File menu.
The Administration Tool attempts to reconnect to the File Manager. If
it succeeds and an administration password has been set, you will be
required to log in (see “Logging Into the Administration Tool” on
page 5-5) before regaining access to Administration Tool functionality.
Page 76

5-18
The Administration Tool
Page 77

CHAPTER 6
Managing Allocation Groups
Allocation groups are MediaNet partitions that each contain several
(four or more) assigned data drives from the larger drive set. This
chapter describes how to create and manage allocation groups in your
MediaNet file system, describing how to create, rename, and delete
allocation groups as well as how to add and remove drives from them.
This chapter describes:
• Allocation Groups Tab
• Allocation Group Usage Guidelines
• Creating a New Allocation Group
• Adding Drives to an Existing Allocation Group
• Removing Drives from an Existing Allocation Group
• Renaming an Allocation Group
• Deleting an Allocation Group
Page 78

6-2
Allocation Groups Tab
All operations related to allocation groups are performed from the
Allocation Groups tab in the Administration Tool. From here you can
create and delete allocation groups and assign drives to them.
This section provides an overview of the Allocation Groups tab and
the operations that you can perform from it. The remainder of this
chapter contains detailed, task-oriented descriptions of all allocationgroup-related operations.
Allocation
group list
Check to
select drive
Contextsensitive
buttons
Drive list
For more information, scroll right.
Figure 6-1 Allocation Groups Tab Example Display
The Allocation Groups tab contains two sections. To the left is a
selectable list containing the MediaNet drive set and all existing
allocation groups. To the right is a drive list whose contents are
determined by the item that you select in the allocation group list.
Managing Allocation Groups
Page 79

If the drive set is selected, the drive list shows all data drives in the
drive set, with drives that are already assigned to allocation groups
shown in yellow. If an allocation group is selected, the drive list shows
all the data drives in that allocation group.
The context-sensitive buttons that appear to the right of the drive list
duplicate entries in the Allocation Group menu. When active, they
allow you to create a new allocation group, to delete a selected
allocation group, to identify a selected drive physically in its
MEDIArray enclosure by flashing its drive light for several seconds, to
remove a selected drive from the allocation group, and to add a new
drive to the selected allocation group.
Allocation Group Usage Guidelines
You can assign all of your data drives to one large allocation group,
but because MediaNet handles the drives in each allocation group
separately, you can use allocation groups to configure your file system
to optimize performance.
6-3
If your MediaNet workgroup must support MediaNet clients with
very high bandwidth requirements to access uncompressed media,
you will need to set up specific hardware and allocation group
configurations to support them. For more information, see the
Avid Unity MediaNet Release 2.0 Supported Configurations Guide.
In such an environment, you can use allocation groups to isolate
MediaNet clients that need very high bandwidth and thus eliminate
the competition from other MediaNet clients trying to access the same
drives. For example, when uncompressed media is in its own
allocation group and a single MediaNet client is using the
uncompressed media, that MediaNet client is serviced independently
from any other MediaNet clients in the MediaNet workgroup. This
logic can also be applied to separating audio and video media.
Page 80

6-4
In other situations, allocation groups are more flexible, allowing you
to assign drives in your MediaNet file system configuration to
allocation groups with few limitations other than the following
guidelines:
• Use only one drive type (size and speed) per allocation group.
• Use a minimum of four drives per allocation group.
• It can be a good idea to break very large drive sets (over 60 drives)
into more than one allocation group to minimize the risk of two
drives used in a protected workspace failing at the same time.
Creating a New Allocation Group
An allocation group is a set of physical drives that form a subset of the
drive set to accommodate different drive types, clients with different
data rate requirements (for instance, clients that use compressed and
uncompressed media), and so on.
Managing Allocation Groups
To create a new allocation group:
1. Click the Allocation Groups tab in the Administration Tool to
access the allocation group functions.
2. Select the drive set in the allocation group list.
3. Select all the drives that you want to assign to the new allocation
group (four-drive minimum) by clicking the check boxes beside
their drive names. (Tip: To check all unassigned drives, choose
Select All Drives from the Allocation Groups menu; to deselect all
checked drives, choose Deselect All Drives from the Allocation
Groups menu.)
In cases where you are creating allocation groups containing
specific drives in the MEDIArray enclosures:
a. Click Identify Drive or choose Identify Drive from the
Allocation Group menu.
Page 81

b. If the identified drive is physically the drive you wanted in the
MEDIArray enclosure, click the check box beside the drive
name. If it is not the drive you wanted, identify another drive.
c. Repeat steps a and b until you have selected all the drives you
want in the allocation group.
4. Click New Group to create a new allocation group containing all
the selected drives or click Cancel to stop the operation. A dialog
box appears, asking you to confirm that you want to create a new
allocation group.
The new allocation group appears in the allocation group list in
the Allocation Groups tab.
Adding Drives to an Existing Allocation Group
You can add unassigned data drives from the drive set to an allocation
group at any time to increase its storage capacity.
6-5
To add extra drives to an existing allocation group:
1. Click the Allocation Groups tab to access the allocation group
functions.
2. Select the allocation group that you want to enlarge in the
allocation group list.
3. Click the Add Drive button. The Add Drives to Allocation Group
dialog box appears, displaying a selectable list of all active data
drives that are not assigned to any allocation group.
Page 82

6-6
4. Select all the drives that you want to add to the allocation group
by clicking the check boxes beside their drive names. (Tip: To
check all unassigned drives, choose Select All Drives from the
Allocation Groups menu; to deselect all checked drives, choose
Deselect All Drives from the Allocation Groups menu.)
In cases where you want to add specific drives from the
MEDIArray enclosures:
Managing Allocation Groups
a. Click Identify Drive or choose Identify Drive from the
Allocation Group menu. The drive light flashes on the drive
being identified.
b. If the identified drive is physically the drive you wanted in the
MEDIArray enclosure, click the check box beside the drive
name. If it is not the drive you wanted, identify another drive.
c. Repeat steps a and b until you have selected all the drives you
want to add to the allocation group.
5. Click Add Drive(s) to add the selected drives to the allocation
group or click Cancel to stop the operation.
A dialog box appears, telling you that you must optimize all
workspaces on the allocation group and asking you whether you
want to do so now:
Page 83

- Click Yes to add the drives and optimize all workspaces on the
allocation group immediately. A progress indicator appears
while the optimization takes place.
- Click No only if, because of time constraints, you must add
the drives without an immediate optimization of all
workspaces on the allocation group. You must manually
optimize all workspaces on the allocation group as soon as
possible afterwards. See “Optimizing Workspaces” on
page 7-17).
The selected drives are added to the allocation group.
Removing Drives from an Existing Allocation Group
You can remove drives from any existing allocation group that has no
workspaces on it or that has enough space to accommodate the
workspaces on it without the space provided by the drives you want
to remove. Drives removed from the allocation group are returned to
the drive set’s pool of unassigned data drives.
6-7
To remove drives from an allocation group:
1. Click the Allocation Groups tab to access the allocation group
functions.
2. Select the appropriate allocation group from the allocation group
list.
3. Select the drive or drives that you want to remove from the drive
list by clicking the check boxes beside their drive names.
4. Click the Remove Drive button (only active if at least four drives
are not selected and if those remaining drives can accommodate
all assigned workspaces).
Page 84

6-8
A dialog box appears, telling you that you must optimize all
workspaces on the allocation group and asking you whether you
want to do so now:
- Click Yes to remove the drives and optimize all workspaces on
the allocation group immediately. A progress indicator
appears while the optimization takes place.
- Click No only if, because of time constraints, you must remove
the drives without an immediate optimization of all
workspaces on the allocation group. You must manually
optimize all workspaces on the allocation group as soon as
possible afterwards. See “Optimizing Workspaces” on
page 7-17).
All the selected drives are removed from the allocation group.
Renaming an Allocation Group
n
Managing Allocation Groups
You can rename an allocation group at any time. Any changes you
make are automatically propagated to the Workspace and Monitor
tabs.
To rename an allocation group:
1. Click the Allocation Groups tab to access the allocation group
functions.
The following characters are illegal in allocation group names: \, /, :, *, ?, ",
<, >, and | . If you attempt to enter an illegal character, the system beeps and
the character is ignored.
2. Click the allocation group name that you want to change and type
a new name (maximum 27 characters). Any invalid characters are
ignored.
3. Press Enter (Windows NT) or Return (Macintosh) or click
elsewhere in the allocation group list to effect the change. If the
name is empty, the allocation group will revert to its original
Page 85

name. If you enter no name or a duplicate name, the name is not
changed. The allocation group might move in the list of
workspaces, to maintain sorted order by name.
Deleting an Allocation Group
You can easily delete any allocation group that does not have any
workspaces on it, returning all drives previously assigned to the
allocation group to the drive set’s pool of unassigned data drives.
To delete an allocation group:
1. Ensure that no workspaces exist on the allocation group that you
want to delete (see Chapter 7).
2. Click the Allocation Groups tab to access the allocation group
functions.
3. Select the allocation group that you want to delete.
6-9
4. Click the Delete Group button. A dialog box appears prompting
you to confirm that you really want to delete the allocation group.
Click OK to confirm.
The allocation group is deleted.
Page 86

6-10
Managing Allocation Groups
Page 87

CHAPTER 7
Managing Workspaces
Workspaces are virtual volumes that exist on allocation groups and
can be resized dynamically. Workspaces allow you to easily segment
your drive set to accommodate projects and users.
This chapter describes how to create, rename, and delete workspaces.
It also tells you how to manipulate the amount of storage allocated to
each workspace, how to move a workspace and its contents to another
allocation group, and how to protect a workspace against drive failure.
This chapter describes:
• The Workspace Tab
• Creating New Workspaces
• Duplicating Existing Workspaces
• Changing Workspace Size
• Renaming Workspaces
• Deleting Workspaces
• Protecting Workspaces
• Optimizing Workspaces
• Moving a Workspace to Another Allocation Group
Page 88
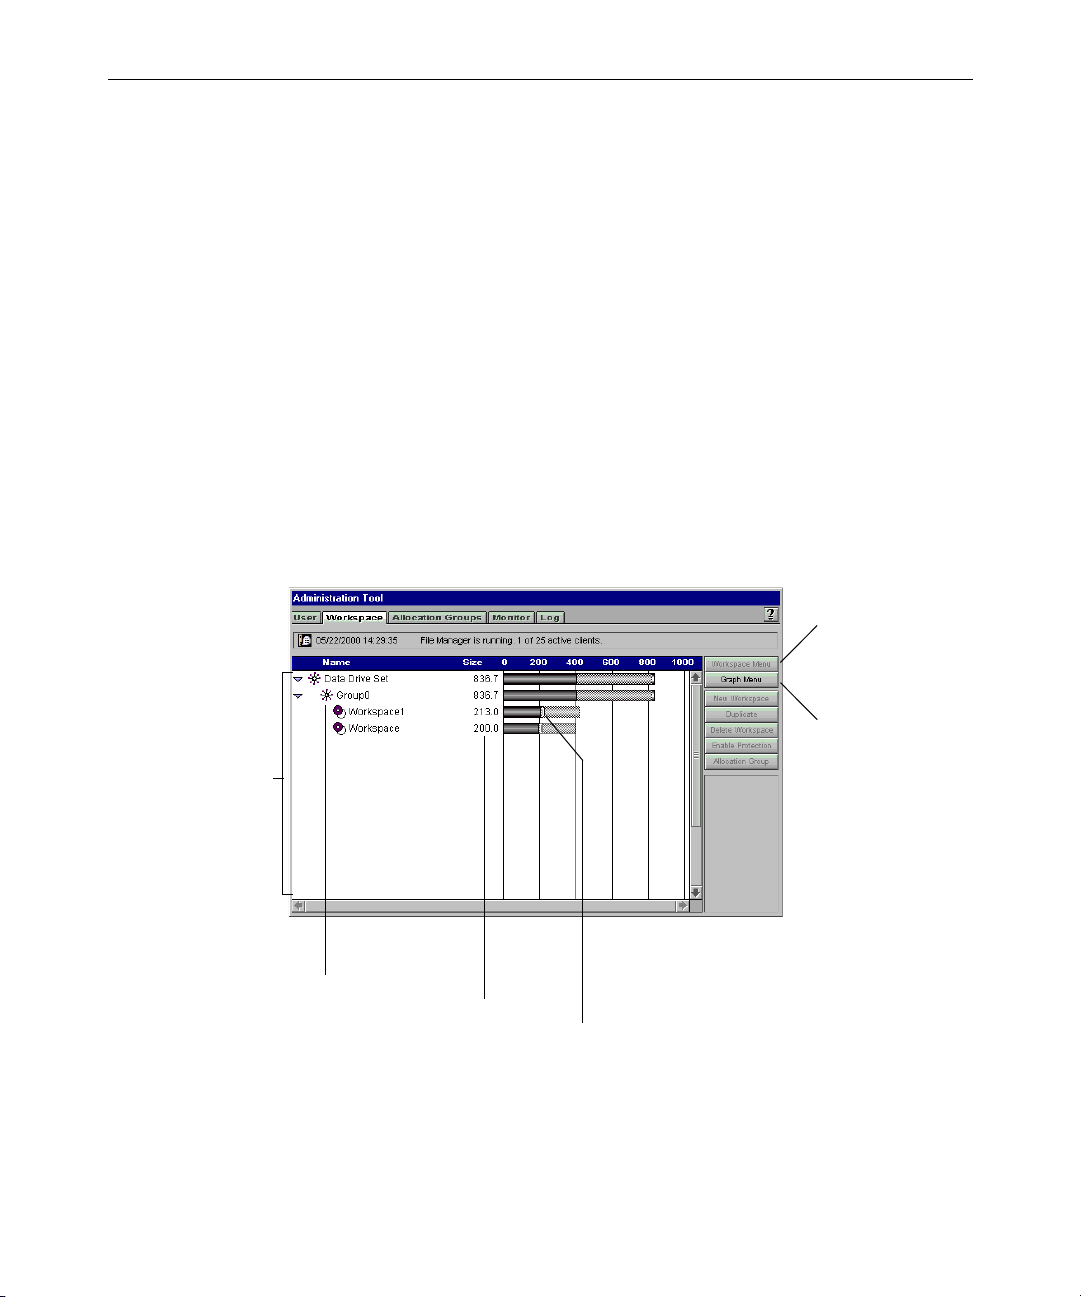
7-2
The Workspace Tab
All workspace functions are performed from the Workspace tab,
which allows you to:
• Create, delete, and rename workspaces.
• Manipulate the amount of storage allocated to each workspace.
• Protect a workspace against drive failure by duplicating files on
more than one drive (a form of mirroring).
• Monitor how much free space exists on each workspace, and how
much unallocated space exists in each drive set.
• Move a workspace and its contents to another allocation group.
Click to access
workspacemanipulation
buttons.
Workspace
list
Managing Workspaces
Click to access
graph-scaling
buttons.
Allocation group
Numeric size text box
Resize handle
Figure 7-1 Workspace Tab Example Display
Page 89
This section provides an overview of the Workspace tab and the
Unprotected
workspace
Protected
workspace
operations that you can perform from it. The remainder of this chapter
contains detailed, task-oriented descriptions of all workspace-related
operations.
The Workspace List
The workspace list displays all workspaces under the allocation groups
on which they reside. For more information, see “Reading the
Works pa ce Li st ” on page 7-3 and “Changing the Workspace List
Graph Display” on page 7-5.
The workspace list allows you to easily select workspaces for
renaming, deletion, and moving to another allocation group. It also
allows you to freely manipulate workspace size by pressing and
holding the Alt key (on the MediaNet server or a Windows client) or
the Option key (on a Macintosh client) and dragging the workspace
resize handles or by entering values into the corresponding numeric
size text boxes.
7-3
Reading the Workspace List
The workspace list represents drive set, allocation group, and
workspace sizes and usage. Color coding (customizable from the
Preferences window) allows each bar to represent up to four
characteristics for protected workspaces.
Each workspace entry has an icon that shows whether it is protected
or unprotected and indicates workspace size numerically and in the
form of a graph that indicates space allocation and usage with a
customizable linear or logarithmic scale.
Page 90

7-4
All
Unall
ocated storage
Space allocated for duplicate data but unused
Space used to accommodate duplicate data
Space allocated for original data but unused
Space used by original data
ocated storage
For the drive set and allocation groups, the bar colors represent:
• Allocated storage — Total drive space in the drive set/allocation
group (as applicable) allocated to workspaces.
• Unallocated storage — Total drive space in the drive
set/allocation group (as applicable) still available for allocation to
workgroups.
For workspaces, the bar colors represent (from left to right):
• Space used by original data.
• Space allocated to accommodate original data but unused.
(Protected workspaces
only)
(Protected workspaces
only)
Managing Workspaces
• Space used to accommodate duplicate data (measured from the
resize handle). Note that if this color zone is smaller than that
representing the space used by original data, then the workspace
is not fully protected.
• Space allocated to accommodate duplicate data but unused.
Page 91

Changing the Workspace List Graph Display
The workspace list graph is customizable, allowing you to display
drive set and workspace sizes, using either linear or logarithmic scales,
and to adjust the scale divisions and the graph view size.
You change the appearance by using the Graph context-sensitive
buttons (selectable by clicking the Graph Menu button).
Selecting Linear or Logarithmic Graph Display
The workspace list graph can display the drive set and workspace
sizes by using two scales:
• Linear scale — When linear scaling is being used, the Linear Scale
button appears dimmed and the Log Scale button is active. Click
the Log Scale button if you want to switch to the logarithmic scale.
• Logarithmic scale — When logarithmic scaling is being used, the
Log Scale button appears dimmed and the Linear Scale button is
active. Click the Linear Scale button if you want to switch to the
linear scale.
7-5
The linear scale is easier to read because each division of the scale
represents an equal amount. The logarithmic scale allows you to view
more information in a small space but is less intuitive.
Scaling the Graph
Linear and Logarithmic scale divisions can be increased or decreased
by clicking on the Division up and down arrow buttons or by choosing
Increase Division or Decrease Division from the Monitor menu.
In either scale, numeric divisions are displayed in GB. You can
increase or decrease the size of the graph view by choosing Increase
Zoom or Decrease Zoom from the Graph submenu.
Page 92

7-6
Saving Your Workspace List Graph Settings
If you prefer your modified workspace list graph display to the
default display, you can save your settings as the new default values.
When you do this, the new settings overwrite those in your
preferences and are then used as the defaults for future
Administration Tool sessions.
To save your workspace list graph settings, click the Save Settings
button.
Context-Sensitive Buttons
The context-sensitive buttons that appear to the right of the workspace
list feature two selector buttons at the top that allow you to switch
between different sets of related functions. The selector representing
the active functions appears dimmed. The two sets of functions are:
• Workspace Menu commands — This set of buttons duplicates
frequently used workspace-manipulation commands from the
Works pa ce menu.
Managing Workspaces
• Graph Menu commands — This set of buttons duplicates the
graph-scaling commands from the Graph submenu of the
Works pa ce menu.
Page 93

Creating New Workspaces
Newly created workspaces inherit their attributes (name, size, and
access privileges) from your Workspace tab preferences. For more
information, see “Changing Your Workspace Tab Preferences” on
page 5-14.
To create a new workspace:
1. Click the Workspace tab to access the workspace functions.
2. Select the allocation group on which you want to create the
workspace.
3. If all storage in the allocation group is allocated to existing
workspaces, make an existing workspace smaller by dragging its
resize handle.
4. Click the New Workspace button to create a new workspace with
the default name, access privileges, and size specified in your
workspace preferences. If there is no room for a workspace of the
default size, the operation fails and displays a “Not enough
unallocated space on the partition” error message.
7-7
If there is already a workspace with the default name, the newly
created workspace will be named default name 1. If that name is
already taken (for instance, if you generate multiple new
workspaces at once by repeatedly clicking New Workspace
without renaming each one as it is created), the newly created
workspace will be named default name 2, and so on.
The last new workspace you created appears alphabetically in the
workspace list.
5. If necessary, rename any newly created workspace by clicking on
its name and typing a new one. For more information, see
“Renaming Workspaces” on page 7-12.
6. If necessary, change the size of any newly created workspace from
the default value by pressing and holding the Alt key (on the
MediaNet server or a Windows client) or the Option key (on a
Page 94

7-8
Macintosh client) and dragging the workspace resize handle. For
more information, see “Changing Workspace Size” on page 7-9.
7. If required, change the access privileges for each newly created
workspace. For details, see “Changing Workspace Access
Privileges” on page 8-9.
Duplicating Existing Workspaces
Workspaces created by duplication inherit the attributes (name, size,
and access privileges) of the workspace from which they were created.
n
The contents of the original workspace are not duplicated.
To duplicate a workspace:
1. Click the Workspace tab to access the workspace functions.
2. If all storage is allocated to existing workspaces, make an existing
workspace smaller by dragging its resize handle.
3. Select an existing workspace.
4. Choose Duplicate from the Workspace menu to copy the selected
workspace. The newly created workspace has the same name as
the original and the lowest available integer as a suffix (for
example, a duplicate of workspace Original Name will be named
Original Name 1) and inherits the access privileges and size of the
original workspace.
If there is no room for a workspace of the same size as the original,
the operation fails and displays a “Not enough unallocated space
on the partition” error message.
5. If necessary, rename any newly created workspace by clicking on
its name and typing a new one. For more information, see
“Renaming Workspaces” on page 7-12.
6. If necessary, change the size of any newly created workspace from
the default value by pressing and holding the Alt key (on the
Managing Workspaces
Page 95

MediaNet server or a Windows client) or the Option key (on a
Macintosh client) and dragging the workspace resize handle. For
more information, see “Changing Workspace Size” on page 7-9.
7. If required, change user access privileges for each newly created
workspace. For more information, see “Changing Workspace
Access Privileges” on page 8-9.
Changing Workspace Size
You might want to make a workspace larger to make room for a
digitize procedure planned for later in the day or that is already under
way. You might want to make a workspace smaller to make space for
other workspaces or to reserve storage for another day.
7-9
n
n
Avid recommends that you do not resize workspaces while clients are creating
files on them.
You dynamically change the size of any workspace by:
t Pressing and holding the Alt key (on the MediaNet server or a
Windows client) or the Option key (on a Macintosh client) and
dragging the workspace resize handles.
The corresponding Size text box updates as the size changes. You
can also enter a valid value directly by typing it into a workspace’s
Size text box.
MediaNet also provides a Workspace Resize utility on client workstations
that allows authorized users to resize their workspaces when they need more
storage to complete a task. To learn how to grant workspace resize privilege to
users, see “Enabling and Disabling Workspace Resize Privilege” on
page 8-11. For more information about the Workspace Resize utility, see
“Workspace Resize Utility Feature Reference” on page 7-11.
Page 96

7-10
Increasing Workspace Size
To increase a workspace’s size:
1. Click the Workspace tab to access the workspace functions.
2. If all storage is already allocated, make some workspaces smaller
or delete workspaces to make space available.
3. Resize the workspace using one of the following methods:
- Press and hold the Alt (Windows) or Option (Macintosh) key
and drag the workspace resize handle to the right to increase
its size. You cannot move the handle beyond the point
corresponding to allocating all storage to workspaces. The
numerical display of current size updates as you drag the
handle. When you release the handle, it stays where placed
and the size is set.
- Enter the required size directly. Click the workspace’s Size text
box, type the required value, and then press Enter (Windows)
or Return (Macintosh) or click elsewhere in the workspace list
to effect the change. If the value is too large or otherwise
invalid, the workspace size will revert to its original value.
Decreasing Workspace Size
n
Managing Workspaces
You cannot reduce workspace size below the amount already allocated to files.
For empty workspaces, minimum workspace size is 1 GB.
To decrease a workspace’s size:
1. Click the Workspace tab to access the workspace functions.
2. Resize the workspace using one of the following methods:
- Press and hold the Alt (Windows) or Option (Macintosh) key
and drag the workspace resize handle to the left to decrease its
size. The numerical display of current size updates as you
drag the handle. When you release the handle, it stays where
placed and the size is set.
Page 97

- Enter the required size directly. Click the workspace’s Size text
box, type the required value, and then press Enter (Windows)
or Return (Macintosh) or click elsewhere in the workspace list
to effect the change. If the value is too large or otherwise
invalid, the workspace size will revert to its original value.
Workspace Resize Utility Feature Reference
7-11
n
The following information is for both Windows and Macintosh clients. The
screenshots were taken from a Windows client.
When users log in to the Workspace Resize utility, they see a list of
workspaces to which they have access. Each workspace in the list has a
row with the following information:
• Workspace Na m e: The name of the workspace along with the icon
that indicates whether the workspace is protected.
Protected Workspace
• Capacity: Total storage capacity allocated to the workspace.
• Ava ilable: Amount of the total storage capacity that is still
available for use.
• Used: Amount of the total storage capacity that has been used.
• Maximum: The maximum size that this workspace can be resized
to; the Maximum amount is equal to the current capacity of the
workspace plus the total amount of unused storage space in the
allocation group.
Unprotected Workspace
n
The total amount of unused storage space on the drive set is equal to the sum
of the Available space for all workspaces on the drive set.
Page 98
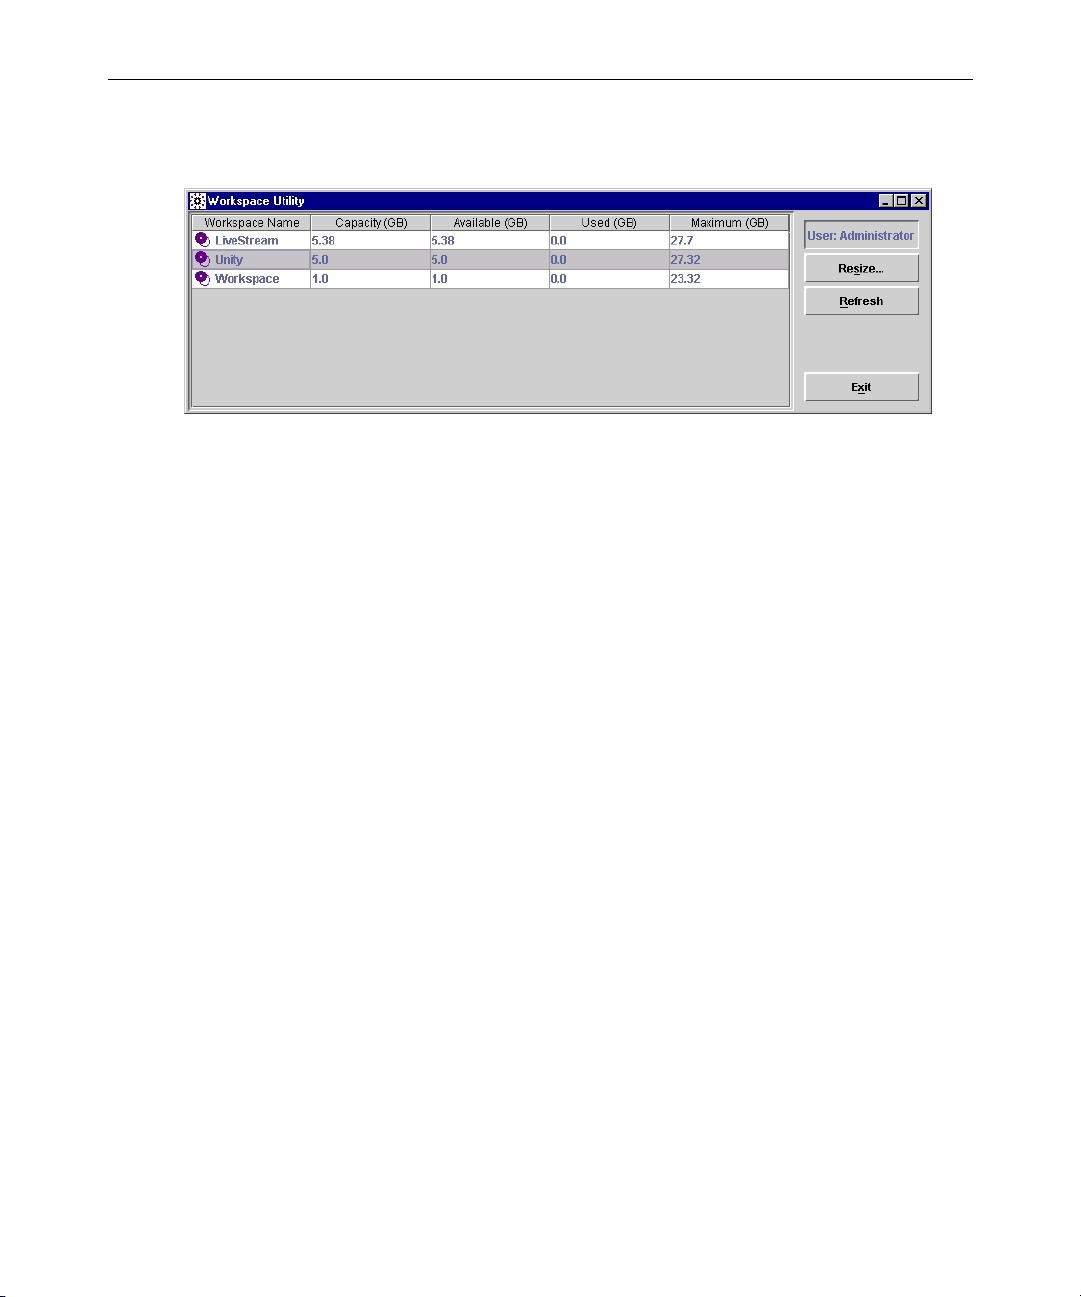
7-12
In addition to the workspace list, the Workspace Resize utility has the
following features:
• User: Displays the user account of the currently logged-in user.
• Resize: Displays the Resize Workspace dialog box for the
currently selected workspace. This feature is only enabled if the
user has been specified for resize access in the Administration
To ol .
• Refresh: Refreshes the workspace list with any changes that have
been made to the workspaces in the Administration Tool.
• Exit: Closes the Workspace Resize utility.
Renaming Workspaces
You can rename a workspace at any time, even when it is being used
by client workstations. The only effect on users is that the workspace
name will be different the next time they need to mount it.
n
Managing Workspaces
The following characters are illegal in workspace names: \, /, :, *, ?, ", <, >,
and | . If you attempt to enter an illegal character, the system beeps and the
character is ignored.
Page 99

To rename a workspace:
1. Click the Workspace tab to access the workspace functions.
2. Click on the workspace name that you want to change and type a
new name (maximum 27 characters). Any invalid characters are
ignored.
3. Press Enter (Windows) or Return (Macintosh) or click elsewhere in
the workspace list to effect the change. If the name is empty, the
workspace will revert to its original name. If you enter no name or
a duplicate name, the name is not changed. The workspace might
move in the list of workspaces, to maintain sorted order by name.
7-13
n
If a client has a workspace mounted when its name changes, the user of that
system might not see the name change immediately. However, the name
change will show up the next time that the workspace is manipulated from
that client.
Deleting Workspaces
You can easily delete any workspace that is not currently mounted by
any clients.
c
When you delete a workspace, all media data stored there is lost.
You should make absolutely sure that all media on a workspace is
either no longer needed, moved, or backed up before deleting a
workspace.
To delete a workspace:
1. Ensure that the workspace to be deleted is not currently mounted
on any clients. To do this, check access from the Monitor tab and
then ask any client with that workspace mounted to unmount it.
2. Click the Workspace tab to access the workspace functions.
3. Select the workspace that you want to delete.
Page 100

7-14
4. Choose Delete Workspace from the Workspace menu. A dialog
box appears, prompting you to confirm that you really want to
delete the workspace. Click OK to confirm.
The workspace is deleted.
Protecting Workspaces
Protection offers very high levels of data integrity (at the cost of
doubling drive space requirements) by storing duplicates of all media
files. This allows drive sets containing malfunctioning drives
containing protected media files to be repaired very quickly with no
data loss.
Enabling Protection
n
Protecting new files
versus protecting
existing files
Managing Workspaces
To enable protection for a workspace:
1. Click the Workspace tab to access the workspace functions.
2. Select a workspace from the workspace list.
3. Click the Enable Protection button to enable protection for the
workspace.
The Enable Protection setting only affects files written to the workspace from
that point onward; existing files are not affected. When set, all new files
written to the workspace are protected; existing files are not affected.
The doubled space requirements of protection mean that you might
not always want to protect files written to a workspace. Equally, you
might not want to tie up the Administration Tool while large numbers
of existing files on a workspace are protected or unprotected when
you change the protection state of a workspace.
 Loading...