

Page 1

Avid Unity™ MediaNet
Administration Guide
Release 1.1
a
tools for storytellers™
Page 2

Copyright and Disclaimer
Product specifications are subject to change without notice and do not represent a commitment on the part of Avid Technology, Inc.
The software described in this document is furnished under a license agreement. The software may not be reverse assembled and
may be used or copied only in accordance with the terms of the license agreement. It is against the law to copy the software on any
medium except as specifically allowed in the license agreement. Avid products or portions thereof are protected by one or more of
the following United States patents: 4,746,994; 4,970,663; 5,045,940; 5,063,448; 5,077,604; 5,245,432; 5,267,351; 5,309,528;
5,325,200; 5,355,450; 5,396,594; 5,440,348; 5,452,378; 5,467,288; 5,513,375; 5,528,310; 5,557,423; 5,568,275; 5,577,190;
5,583,496; 5,584,006; 5,627,765; 5,634,020; 5,640,601; 5,644,364; 5,654,737; 5,701,404; 5,715,018; 5,719,570; 5,724,605;
5,726,717; 5,729,673; 5,731,819; 5,745,637; 5,752,029; 5,754,180; 5,754,851; 5,781,188; 5,799,150; 5,812,216; 5,828,678;
5,842,014; 5,852,435; 5,883,670; 5,889,532; 5,892,507; 5,905,841; 5,912,675; 5,929,836; 5,929,942; 5,930,445; 5,930,797;
5,946,445; D352,278; D372,478; D373,778; D392,267; D392,268; D392,269; D395,291; D396,853; D398,912. Additional U.S. and foreign patents pending. No part of this document may be reproduced or transmitted in any form or by any means, electronic or
mechanical, including photocopying and recording, for any purpose without the express written permission of Avid Technology, Inc.
© 1999 Avid Technology, Inc. All rights reserved. Printed in USA.
The following disclaimer is required by Apple Computer, Inc.
APPLE COMPUTER, INC. MAKES NO WARRANTIES WHATSOEVER, EITHER EXPRESS OR IMPLIED, REGARDING THIS PRODUCT,
INCLUDING WARRANTIES WITH RESPECT TO ITS MERCHANTABILITY OR ITS FITNESS FOR ANY PARTICULAR PURPOSE. THE
EXCLUSION OF IMPLIED WARRANTIES IS NOT PERMITTED BY SOME STATES. THE ABOVE EXCLUSION MAY NOT APPLY TO YOU.
THIS WARRANTY PROVIDES YOU WITH SPECIFIC LEGAL RIGHTS. THERE MAY BE OTHER RIGHTS THAT YOU MAY HAVE WHICH
VARY FROM STATE TO STATE.
The following disclaimer is required by Sam Leffler and Silicon Graphics, Inc. for the use of their TIFF library:
Copyright © 1988-1997 Sam Leffler
Copyright © 1991-1997 Silicon Graphics, Inc.
Permission to use, copy, modify, distribute, and sell this software [i.e., the TIFF library] and its documentation for any purpose is
hereby granted without fee, provided that (i) the above copyright notices and this permission notice appear in all copies of the software and related documentation, and (ii) the names of Sam Leffler and Silicon Graphics may not be used in any advertising or publicity relating to the software without the specific, prior written permission of Sam Leffler and Silicon Graphics.
THE SOFTWARE IS PROVIDED “AS-IS” AND WITHOUT WARRANTY OF ANY KIND, EXPRESS, IMPLIED OR OTHERWISE, INCLUDING WITHOUT LIMITATION, ANY WARRANTY OF MERCHANTABILITY OR FITNESS FOR A PARTICULAR PURPOSE.
IN NO EVENT SHALL SAM LEFFLER OR SILICON GRAPHICS BE LIABLE FOR ANY SPECIAL, INCIDENTAL, INDIRECT OR CONSEQUENTIAL DAMAGES OF ANY KIND, OR ANY DAMAGES WHATSOEVER RESULTING FROM LOSS OF USE, DATA OR PROFITS,
WHETHER OR NOT ADVISED OF THE POSSIBILITY OF DAMAGE, AND ON ANY THEORY OF LIABILITY, ARISING OUT OF OR IN
CONNECTION WITH THE USE OR PERFORMANCE OF THIS SOFTWARE.
The following disclaimer is required by the Independent JPEG Group:
Portions of this software are based on work of the Independent JPEG Group.
The following disclaimer is required by Paradigm Matrix:
Portions of this software licensed from Paradigm Matrix.
2
Page 3

The following disclaimer is required by Ray Sauers Associates, Inc.:
“Install-It” is licensed from Ray Sauers Associates, Inc. End-User is prohibited from taking any action to derive a source code equivalent of “Install-It,” including by reverse assembly or reverse compilation, Ray Sauers Associates, Inc. shall in no event be liable for any
damages resulting from reseller’s failure to perform reseller’s obligation; or any damages arising from use or operation of reseller’s
products or the software; or any other damages, including but not limited to, incidental, direct, indirect, special or consequential Damages including lost profits, or damages resulting from loss of use or inability to use reseller’s products or the software for any reason
including copyright or patent infringement, or lost data, even if Ray Sauers Associates has been advised, knew or should have known
of the possibility of such damages.
The following disclaimer is required by Videomedia, Inc.:
“Videomedia, Inc. makes no warranties whatsoever, either express or implied, regarding this product, including warranties with
respect to its merchantability or its fitness for any particular purpose.”
“This software contains V-LAN ver. 3.0 Command Protocols which communicate with V-LAN ver. 3.0 products developed by Videomedia, Inc. and V-LAN ver. 3.0 compatible products developed by third parties under license from Videomedia, Inc. Use of this software
will allow “frame accurate” editing control of applicable videotape recorder decks, videodisc recorders/players and the like.”
The following notice is required by Altura Software, Inc. for the use of its Mac2Win software and
Sample Source Code:
©1993–1998 Altura Software, Inc.
The following notice is required by Number Nine Visual Technology Corporation for the use of its Number Nine software drivers:
©1992–1997 Number Nine Visual Technology Corporation. The original Number Nine software drivers have been modified by Avid
Technology, Inc.
Attn. Government User(s). Restricted Rights Legend
U.S. GOVERNMENT RESTRICTED RIGHTS. This Software and its documentation are “commercial computer software” or “commercial
computer software documentation.” In the event that such Software or documentation is acquired by or on behalf of a unit or agency
of the U.S. Government, all rights with respect to this Software and documentation are subject to the terms of the License Agreement,
pursuant to FAR §12.212(a) and/or DFARS §227.7202-1(a), as applicable.
Trademarks
AirPlay, AudioVision, Avid, CamCutter, Digidesign, FieldPak, Film Composer, HIIP, Image Independence, Marquee, Media Composer,
Media Recorder, NewsCutter, OMF, OMF Interchange, Open Media Framework, Pro Tools, and Softimage are registered trademarks
and 888 I/O, AniMatte, AudioSuite, AutoSync, AVIDdrive, AVIDdrive Towers, AvidNet, AVIDstripe,
Avid Unity, Avid Xpress, AVX, DAE, D-Fi, D-FX, D-Verb, ExpertRender, FilmScribe, Intraframe, iS9, iS18, iS23, iS36, Lo-Fi, Magic Mask,
Matador, MCXpress, MEDIArray, MediaDock, MediaDock Shuttle, Media Fusion, Media Illusion, MediaLog, Media Reader, MediaShare, Meridien, NaturalMatch, OMM, QuietDrive, Recti-Fi, rS9, rS18, Sci-Fi, Sound Designer II, Symphony, tools for storytellers,
Vari-Fi, and Video Slave Driver are trademarks of Avid Technology, Inc., or its subsidiaries or divisions.
Macintosh is a trademark of Apple Computer, Inc., registered in the United States and other countries. Windows NT is a registered
trademark of Microsoft Corporation. All other trademarks contained herein are the property of their respective owners.
Avid Unity MediaNet Administration Guide • Part 0130-04386-01 Rev. A • Dec. 1999
3
Page 4

Contents
Using This Guide
Who Should Use This Guide . . . . . . . . . . . . . . . . . . . . . . . . . . . . . . . . . . 9
About This Guide
Symbols and Conventions
If You Need Help
Related Information
If You Have Documentation Comments
How to Order Documentation
Chapter 1 Introduction
Avid Unity MediaNet Environment Overview . . . . . . . . . . . . . . . . . 14
MediaNet Storage
MediaNet from the User’s Perspective
Avid Unity MediaNet Configuration
Overall Considerations
Setting Up and Managing Your Drive Hardware
Assigning Drives to Allocation Groups
Creating and Sizing Workspaces
Access Control (Users and Access Privileges)
Data Protection
Tasks and Tools
. . . . . . . . . . . . . . . . . . . . . . . . . . . . . . . . . . . . . . . . . . . . . . . . . . 23
Ta sk s
. . . . . . . . . . . . . . . . . . . . . . . . . . . . . . . . . . . . . . . . . . . . . . . . . . . 24
Tools
The MediaNet Setup Manager
. . . . . . . . . . . . . . . . . . . . . . . . . . . . . . . . . . . . . . . . . . . . 9
. . . . . . . . . . . . . . . . . . . . . . . . . . . . . . . . . . . 10
. . . . . . . . . . . . . . . . . . . . . . . . . . . . . . . . . . . . . . . . . . . 11
. . . . . . . . . . . . . . . . . . . . . . . . . . . . . . . . . . . . . . . . . 11
. . . . . . . . . . . . . . . . . . . . . . . 12
. . . . . . . . . . . . . . . . . . . . . . . . . . . . . . . . 12
Architecture . . . . . . . . . . . . . . . . . . . . . . . . . . . 15
. . . . . . . . . . . . . . . . . . . . . 17
Overview . . . . . . . . . . . . . . . . 17
. . . . . . . . . . . . . . . . . . . . . . . . . . . . . . . . . . 17
. . . . . . . . . . . . 19
. . . . . . . . . . . . . . . . . . . . 19
. . . . . . . . . . . . . . . . . . . . . . . . . . 20
. . . . . . . . . . . . . . . 21
. . . . . . . . . . . . . . . . . . . . . . . . . . . . . . . . . . . . . . . . . . . . . 22
. . . . . . . . . . . . . . . . . . . . . . . . . . . . . . . . . . . . . . . . . . . . . 23
. . . . . . . . . . . . . . . . . . . . . . . . . . . . . . . 25
4
Page 5

The Administration Tool. . . . . . . . . . . . . . . . . . . . . . . . . . . . . . . . . . . . . 26
The Monitor Tool
. . . . . . . . . . . . . . . . . . . . . . . . . . . . . . . . . . . . . . . . . . . 27
Chapter 2 MediaNet Setup Manager
MediaNet Setup Manager Overview . . . . . . . . . . . . . . . . . . . . . . . . . . 29
Starting the MediaNet Setup Manager
Creating a New Drive Set
Using the Configuration Assistant to Create a Drive Set
Creating an Administration Drive Manually
Creating an
Identifying the Administration Drive
Creating the Data Drive Set
Creating a Data Drive Set from an Existing
MediaShare F/C File System . . . . . . . . . . . . . . . . . . . . . . . . . . . . 35
Adding Spare Data Drives to the Data Drive Set
Adding New MEDIArray Drives to Your
MediaNet Environment. . . . . . . . . . . . . . . . . . . . . . . . . . . . . . . . . . . . 36
Adding Active Data Drives to an Existing Drive Set
Adding Drives That Were Previously Used as
Data Drives in Another Drive Set . . . . . . . . . . . . . . . . . . . . . . . 37
Adding Drives That Are Not Raw or That Were Used
Previously as Data Drives in Another Drive Set. . . . . . . . . . . 38
Adding Raw Drives
Managing Drive Problems
Identifying Bad Drives
Repairing t
Recovering from an Administration Drive Failure
Replacing Bad Drives
Setting Drive Mode Pages
Deleting an Existing Data Drive Set
Rebuilding an Existing Data Drive Set
he Drive Set by Swapping Out Bad Data Drives. . 40
. . . . . . . . . . . . . . . . . . . . . . . . . . . . . . . . . . . . 31
Administration Drive . . . . . . . . . . . . . . . . . . . . . 33
. . . . . . . . . . . . . . . . . . . . . . . . . . . . . . . . . . . . . 39
. . . . . . . . . . . . . . . . . . . . . . . . . . . . . . . . . . . . 43
. . . . . . . . . . . . . . . . . . . . . . . . . . . . . . . . . . . 44
. . . . . . . . . . . . . . . . . . . . . . . . 31
. . . . . 32
. . . . . . . . . . . . . . . 33
. . . . . . . . . . . . . . . . . . 34
from Raw Drives . . . . . . . . . . . . . . 34
. . . . . . . . . . . . 36
. . . . . . . . . . . . 37
. . . . . . . . . . . . . . . . . . . . . . . . . . . . . . . . . . . 39
. . . . . . . . . . . . . . . . . . . . . . . . . . . . . . . . . . 39
. . . . . . . . . . 42
. . . . . . . . . . . . . . . . . . . . . . . . . . . 44
. . . . . . . . . . . . . . . . . . . . . . . . 45
5
Page 6

Bringing the Drive Set Online and Taking It Offline. . . . . . . . . . . . 45
Bringing the Drive Set Online
Taking the Drive Set Offline
Starting and Stopping the MediaNet File Manager
Reestablishing MediaNet Setup Manager’s Connection to the
MediaNet File Manager. . . . . . . . . . . . . . . . . . . . . . . . . . . . . . . . . . . . 48
. . . . . . . . . . . . . . . . . . . . . . . . . . . . . . 46
Chapter 3 Using the Administration Tool
Administration Tool User Interface Overview. . . . . . . . . . . . . . . . . . 50
User Interface Component Descriptions
User Interface Tab Descriptions
Getting Help with the Administration Tool
Starting the Administration Tool
Logging In
Setting Administration
Setting the Administration Password
Setting
Changing Your User
Changing Your Workspace Tab
Changing Your Monitor Tab Preferences
Exporting and Importing Preferences
Exporting a Preference Set
Importing a Preference Set
Reestablishing Administration Tool’s Connection to the
MediaNet File Manager. . . . . . . . . . . . . . . . . . . . . . . . . . . . . . . . . . . . 65
. . . . . . . . . . . . . . . . . . . . . . . . . . . . . . . . . . . . . . . . . . . . . . 54
Tool Preferences . . . . . . . . . . . . . . . . . . . . . . 54
Workspace and Monitor Graph Bar Colors . . . . . . . . . . 59
Preferences . . . . . . . . . . . . . . . . . . . . . . . . . . 60
. . . . . . . . . . . . . . . . . . . . . . . . . . . . 46
. . . . . . . . . . . . . 47
. . . . . . . . . . . . . . . . . . . 51
. . . . . . . . . . . . . . . . . . . . . . . . . . . 52
. . . . . . . . . . . . . . . . 53
. . . . . . . . . . . . . . . . . . . . . . . . . . . . . 53
. . . . . . . . . . . . . . . . . . . . . . 57
Preferences . . . . . . . . . . . . . . . . 61
. . . . . . . . . . . . . . . . . . . 62
. . . . . . . . . . . . . . . . . . . . . . 64
. . . . . . . . . . . . . . . . . . . . . . . . . . . . 64
. . . . . . . . . . . . . . . . . . . . . . . . . . . . 64
Chapter 4 Managing Allocation Groups
Overview of the Allocation Groups Tab . . . . . . . . . . . . . . . . . . . . . . . 67
Allocation Group Usage Guidelines
Creating a New Allocation Group
Assigning an Allocation Group to a Single User for
Uncompressed Finishing. . . . . . . . . . . . . . . . . . . . . . . . . . . . . . . . . . . 70
Adding Drives to an Existing Allocation Group
6
. . . . . . . . . . . . . . . . . . . . . . . . . . 68
. . . . . . . . . . . . . . . . . . . . . . . . . . . . 69
. . . . . . . . . . . . . . . . 71
Page 7

Removing Drives from an Existing Allocation Group . . . . . . . . . . . 72
Renaming an Allocation Group
Deleting an Allocation Group
Chapter 5 Managing Workspaces
Overview of the Workspace Tab . . . . . . . . . . . . . . . . . . . . . . . . . . . . . . 75
Reading the Workspace List
Changing the Workspace List
Selecting Linear or Logarithmic Graph Display
Scaling the Graph
Saving Your Workspace List Graph Settings
Creating New Workspaces
Duplicating Existing Workspaces
Changing Workspace Size
Increasing Workspace Size
Decreasing Workspace Size
Renaming Workspaces
Deleting Workspaces
Protecting Workspaces
Enabling Protection of New Files Only
Disabling Protection of
Protecting All Files
Unprotecting All Files
Optimizing Workspace Protection and Efficiency
When Should I Optimize a Workspace?
Optimizing a Workspace
Moving a Workspace to Another Allocation Group
. . . . . . . . . . . . . . . . . . . . . . . . . . . . . . . . . . . . . . 83
. . . . . . . . . . . . . . . . . . . . . . . . . . . . . . . . . . . . . . . . 84
. . . . . . . . . . . . . . . . . . . . . . . . . . . . . . . . . . . . . . . 85
. . . . . . . . . . . . . . . . . . . . . . . . . . . . . . . . . . . . . . 87
. . . . . . . . . . . . . . . . . . . . . . . . . . . . . . 72
. . . . . . . . . . . . . . . . . . . . . . . . . . . . . . . . 73
. . . . . . . . . . . . . . . . . . . . . . . . . . . . . . 77
Graph Display. . . . . . . . . . . . . . . 78
. . . . . . . . . 78
. . . . . . . . . . . . . . . . . . . . . . . . . . . . . . . . . . . 79
. . . . . . . . . . . . 79
. . . . . . . . . . . . . . . . . . . . . . . . . . . . . . . . . . . 79
. . . . . . . . . . . . . . . . . . . . . . . . . . . . . 81
. . . . . . . . . . . . . . . . . . . . . . . . . . . . . . . . . . . 82
. . . . . . . . . . . . . . . . . . . . . . . . . . . . . . . 82
. . . . . . . . . . . . . . . . . . . . . . . . . . . . . . . 83
. . . . . . . . . . . . . . . . . . . . 86
New Files Only . . . . . . . . . . . . . . . . . . . 86
. . . . . . . . . . . . . . . . . . . . . . . . . . . . . . . . . . . 87
. . . . . . . . . . . . . . . 88
. . . . . . . . . . . . . . . . . . . . 88
. . . . . . . . . . . . . . . . . . . . . . . . . . . . . . . . . 89
. . . . . . . . . . . . . 90
Chapter 6 Managing User Accounts
The User Tab . . . . . . . . . . . . . . . . . . . . . . . . . . . . . . . . . . . . . . . . . . . . . . . 92
The Guest User Account
Creating User Accounts
Duplicating Existing User Accounts
. . . . . . . . . . . . . . . . . . . . . . . . . . . . . . . . . . . . . . 94
7
. . . . . . . . . . . . . . . . . . . . . . . . . . . . . . . . . 93
. . . . . . . . . . . . . . . . . . . . . . . . . . . 95
Page 8

Renaming User Accounts . . . . . . . . . . . . . . . . . . . . . . . . . . . . . . . . . . . . 96
Changing User Passwords
Deleting User Accounts
Workspace Access Privileges
Access Privilege
Changing Workspace
. . . . . . . . . . . . . . . . . . . . . . . . . . . . . . . . . . . 97
. . . . . . . . . . . . . . . . . . . . . . . . . . . . . . . . . . . . . . 97
. . . . . . . . . . . . . . . . . . . . . . . . . . . . . . . . . 98
Notes . . . . . . . . . . . . . . . . . . . . . . . . . . . . . . . . . . . 99
Access Privileges . . . . . . . . . . . . . . . . . . . . 99
Chapter 7 Monitoring System Usage and Messages
The Monitor Tab . . . . . . . . . . . . . . . . . . . . . . . . . . . . . . . . . . . . . . . . . . . 102
Changing the Monitor List Graph Display
Selecting Linear or Logarithmic Graph Display
Scaling the Graph
Saving Your Monitor List Graph Settings
The Log Tab
Viewing and Managing the Log File
. . . . . . . . . . . . . . . . . . . . . . . . . . . . . . . . . . . . . . . . . . . . . . . 104
. . . . . . . . . . . . . . . . . . . . . . . . . . . . . . . . . . 103
. . . . . . . . . . . . . . . . . . . . . . . . . 105
Index
. . . . . . . . . . . . . . . . 103
. . . . . . . . 103
. . . . . . . . . . . . . . 104
8
Page 9

Using This Guide
Congratulations on your purchase of Avid Unity™ MediaNet
Release 1.1, a high-performance distributed file system that provides
high-capacity shared media storage for a workgroup of connected
®
systems.
Avi d
Who Should Use This Guide
This reference guide is intended for MediaNet administrators
responsible for the setup and day-to-day running of a MediaNet
workgroup.
About This Guide
The Contents lists all topics included in the book. They are presented
with the following overall structure:
•The Introduction in Chapter 1
beginning concepts, general administration concepts, tasks and
tools, and configuration strategies. Chapter 2
the MediaNet Setup Manager. Chapter 3
helps you get oriented with
describes how to use
describes how to use the
9
Page 10

Avid Unity Administration Tool. You should read all of these
chapters.
• The main body of the guide (Chapter 4
Chapter 7
administration tasks, with clear and comprehensive step-by-step
procedures.
• A detailed Index helps you quickly locate specific topics.
) follows the natural flow of your day-to-day
Symbols and Conventions
The MediaNet documentation uses the following special symbols and
conventions:
1. Numbered lists, when order is important.
a. Alphabetical lists, when the order of secondary items is
important.
• Bulleted lists, when the order of the items is unimportant.
- Indented dashed lists, when the order of subtopics is
unimportant.
Look here in the margin
for tips.
In the margin you will find tips that help you perform tasks more
easily and efficiently.
, Chapter 5, Chapter 6, and
n
c
A note provides important related information, reminders, recommendations,
and strong suggestions.
A caution means that a specific action you take could cause harm to
your computer or cause you to lose data.
10
Page 11

If You Need Help
If you are having trouble using MediaNet, you should:
1. Retry the action, carefully following the instructions given for that
task in this guide.
2. Check the documentation that came with your hardware for
maintenance or hardware-related issues.
3. Check the Customer Service and News and Publications sections
of the Avid Web site at http://www.avid.com for the latest FAQs,
Tips & Techniques, Film + Television Update, and other Avid
online offerings.
4. Check the Avid Bulletin Board, “Avid Online,” for information on
product and user conferences. If you do not find the solution to
your problem, you can exchange information with other Avid
customers and Avid Customer Support representatives.
5. Contact your local Avid Reseller; in North America, you may
contact Avid Customer Support at 800-800-AVID (2843).
n
For general information, call your local Avid Reseller; in North America, call
the Avid Customer Relations Desk at 800-894-5654.
Related Information
The following documents provide more information about MediaNet:
• Avid Unity MediaNet for Windows NT Clients Quick Start Card
• Avid Unity MediaNet for Macintosh Clients Quick Start Card
• Avid Unity MediaNet Site Preparation Guide
11
Page 12

• Avid Unity MediaNet Setup Guide
• Avid Unity MediaNet Release Notes
• Avid Products Collaboration Guide
The most recent update of the Avid Products Collaboration Guide is
available in the Documentation section of the Avid Customer
Service Knowledge Center. To access the Avid Customer Service
Knowledge Center, click the Avid Customer Service link at
www.avid.com and select Knowledge Center.
MediaNet also provides Help systems that provide complete
information about using the Setup Manager, the Administration Tool,
and the Monitor Tool.
If You Have Documentation Comments
Avid Technology continuously seeks to improve its documentation.
We value your comments about this manual or other Avid-supplied
documentation.
Simply e-mail your documentation comments to Avid Technology at
TechPubs@avid.com
Please include the title of the document, its part number, revision, and
the specific section you’re commenting on in all correspondence.
How to Order Documentation
To order additional copies of this documentation from within the
United States, call Avid Telesales at 800-949-AVID (2843). If you are
placing an order from outside the United States, contact your local
Avid representative.
12
Page 13

CHAPTER 1
Introduction
Avid Unity MediaNet is a high-performance distributed file system
that provides high-capacity shared media storage for a number of
connected Avid systems.
This chapter describes:
• Avid Unity MediaNet Environment Overview
• Avid Unity MediaNet Configuration Overview
• Tasks and Tools
• The MediaNet Setup Manager
• The Administration Tool
• The Monitor Tool
13
Page 14
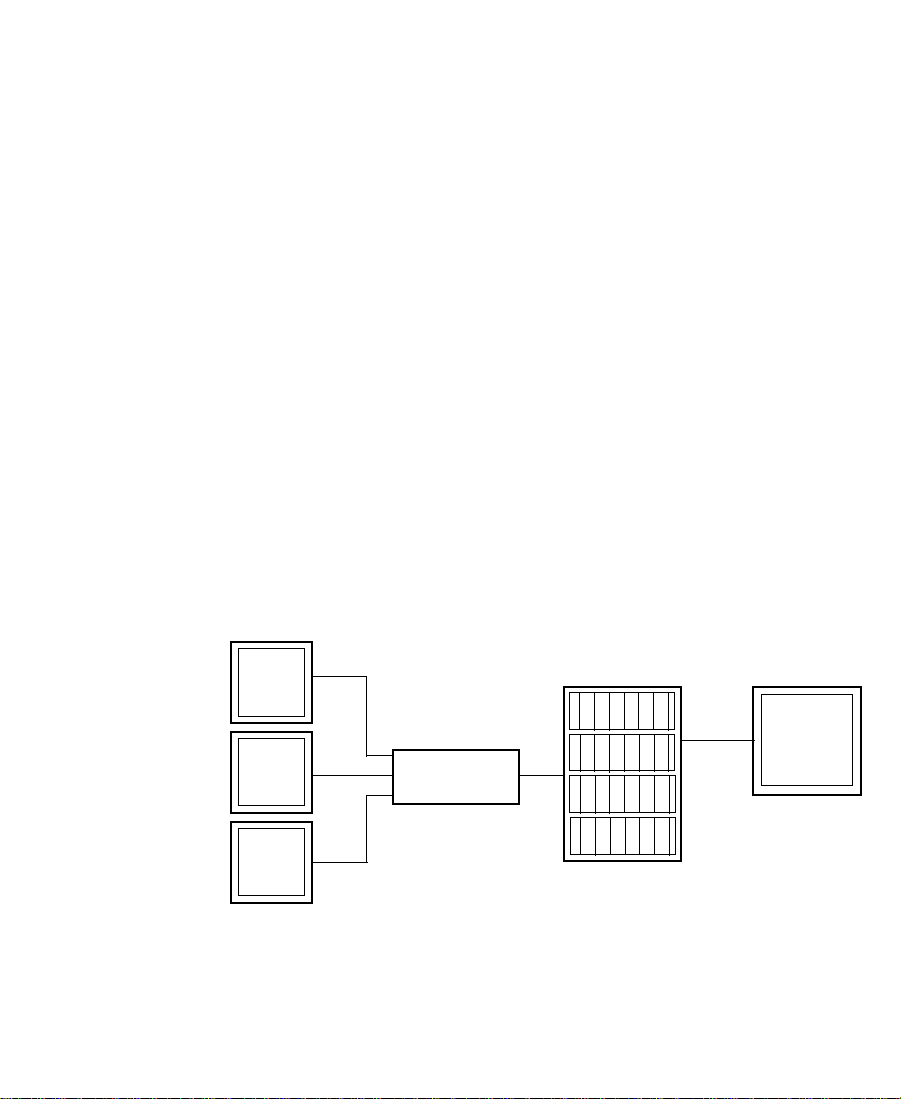
Avid Unity MediaNet Environment Overview
The MediaNet environment consists of:
• MediaNet clients — Avid systems enabled to use the MediaNet
file system.
• Fibre Channel network — High-bandwidth network technology
that supports the high throughput required to allow multiple
users to share video and audio simultaneously. A Fibre Channel
switch provides the backbone of the network.
• Shared Fibre Channel drives — A collection of fibre channel
™
drives enclosed in one or more rack-mountable MEDIArray
enclosures and managed as a single virtual unit by the MediaNet
File Manager service on the MediaNet Server.
®
• MediaNet Server — A Windows NT
server on which the
MediaNet File Manager that controls the MediaNet file system
runs.
Together, these components enable up to nine client workstations to
simultaneously connect to the shared drives and to record, play, and
edit video and audio media in real time.
Client
Client
Client
.
.
(Up to nine clients total)
.
Fibre Channel
network connections
MediaNet
Server
Switch
Fibre Channel
drives
Figure 1-1 MediaNet Environment Architectural Overview
14
Page 15
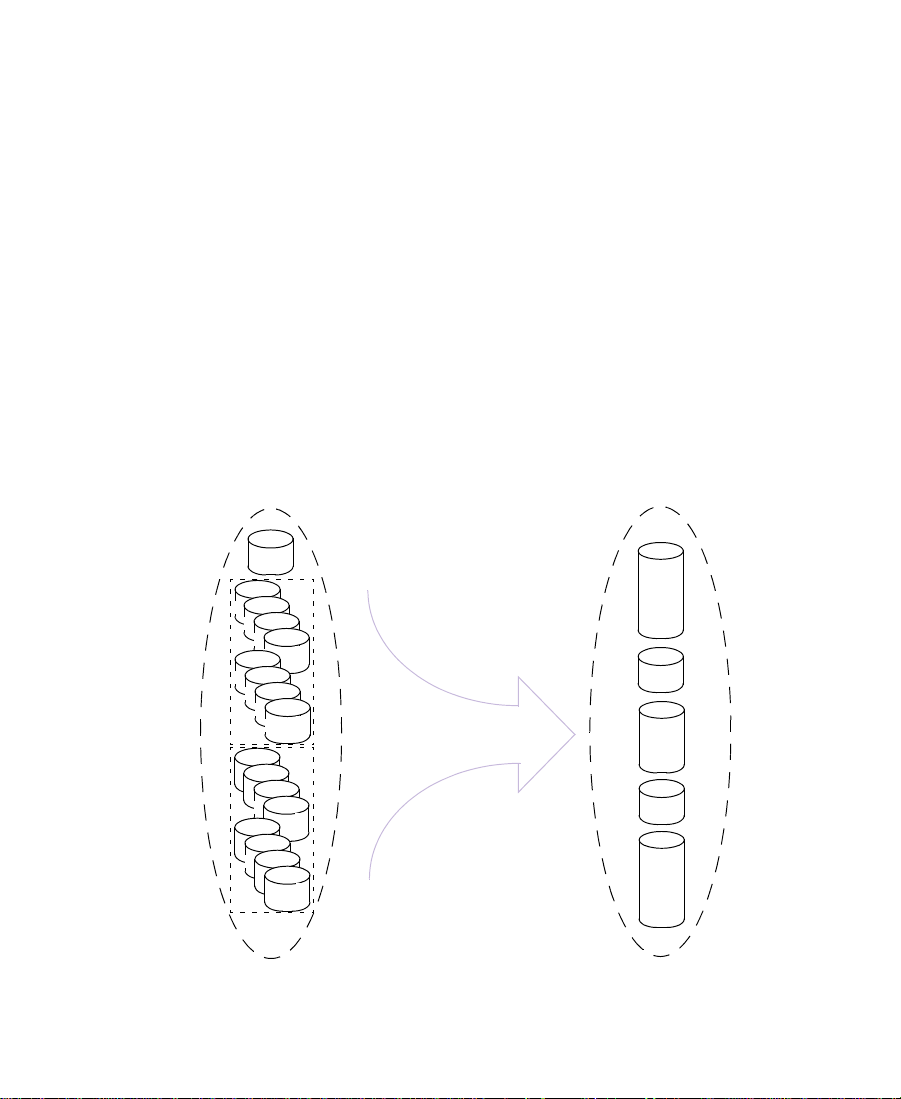
MediaNet Storage Architecture
MediaNet simplifies the management of your storage hardware by
combining all of your physical data drives into a drive set that provides
a single, large file system. To use the MediaNet file system, you must
first assign all data drives in the drive set into allocation groups that are
individually managed file system partitions that span multiple
physical drives. Although you can assign all of your data drives to a
single allocation group, performance considerations might require you
to divide your drives into multiple allocation groups.
Allocation groups can be divided, according to your particular needs
at any given time, into one or more dynamically resizable virtual
volumes, or workspaces. These workspaces are the MediaNet elements
that are made available for mounting on client workstations (the drive
set and allocation groups are transparent to client users).
Physical (Hardware) Perspective
Allocation group 1
Data drives
(& optional
spares)
Allocation group 2
Drive Set
Administration drive
The drive set is partitioned into
one or more allocation groups.
These are transparent to the
user who sees only one or more
workspaces available to them.
15
Logical (User’s) Perspective
Workspaces
of various sizes
MediaNet Workspaces
Page 16

Access to MediaNet is controlled by allocating user accounts with read
access, write access, or both to each workspace. Data integrity can be
ensured by optionally protecting workspaces. Protection involves a
redundant configuration in which files written to protected
workspaces are duplicated on more than one drive. This allows a
protected workspace to be quickly repaired with no data loss after a
drive fails.
A summary of the MediaNet storage architecture follows:
• The MediaNet storage hardware is managed as a drive set that
forms the core of the MediaNet file system. Physically, the drive
set comprises a number of different types of drives:
- Administration drive — A special drive that facilitates
communication about the MediaNet file system between
client workstations and the MediaNet File Manager.
- Data drives — Contain the media data that client
workstations store and access on the drive set.
- Spare drives — Spare drives can be quickly swapped for bad
data drives in the event of failure.
• The data drives in the drive set are assigned into one or more file
system partitions called allocation groups.
• Each allocation group is subdivided and managed as an unlimited
number of virtual workspaces. Each workspace has a set of
characteristics that you can change at any time:
- Size — Each workspace can be set to any size such that the
sum of the sizes of all the workspaces does not exceed the total
size of the allocation group.
- Protection — If active, media files written to the workspace
are duplicated on different physical drives to avoid data loss
in the event of drive failure. A protected workspace uses twice
as much storage space as an unprotected workspace.
- Access privileges — Determine whether users can mount,
read, or read and write to a workspace.
16
Page 17

MediaNet from the User’s Perspective
MediaNet client users mount MediaNet workspaces on their
workstations (requiring a user account to do so). Once mounted,
workspaces behave like local media drives that can be accessed by
others working on the same project. If properly configured, this allows
several users to access the same media and to start using it
immediately after it has been created.
Avid Unity MediaNet Configuration Overview
The MediaNet environment allows you to centrally manage very large
amounts of storage that multiple MediaNet clients can access to share
video, audio, and effects media in an intuitive, collaborative
workgroup. As administrator, it is your job to make sure that
MediaNet is always configured to optimize workflow in what can be a
rapidly changing working environment.
Overall Considerations
The following strategic considerations will determine your priorities
when making configuration decisions and trade-offs (possibly
impacting more than one aspect of your configuration):
• What is your site type?
In-house and rental editing suites will probably require very
different administration requirements, particularly in terms of
workspace access restrictions and how often you need to
reconfigure workspaces and users.
• Does your workgroup include dual-stream uncompressed clients?
If so, you will need to set up special hardware and allocation
group configurations.
17
Page 18

• How large is your drive set and what kinds of clients do you need
to support?
If your drive set is very large, or has different drive types, you will
probably need to assign your data drives to more than one
allocation group to optimize performance.
• Will your client users be working on individual projects with their
own media or will they be collaborating on team projects that use
the same source media?
These factors affect how you should allocate workspaces and user
accounts.
• Is security or ease of access more important at your site?
Individual password user accounts combined with tightly
controlled workspace access privileges provide the most security
at the cost of restricting user flexibility.
• Which is more important at your site: the integrity and speed at
which your media can be recovered in the event of hardware
failure or maximizing available storage space?
These factors determine whether you will want to protect your
workspaces.
The following sections provide a high-level overview of the
configuration implications of your answers to these questions.
18
Page 19

Setting Up and Managing Your Drive Hardware
Setting up your hardware to create a drive set is very straightforward
and should only need to be done during the initial setup of your
MediaNet installation, unless you later want to add or remove drives.
The most important decisions you must make are which drive to
allocate an administration drive and whether you want to allocate
spare data drives so that they can be rapidly swapped in for faulty
data drives.
For more information, see Chapter 2
Assigning Drives to Allocation Groups
MediaNet requires you to assign the data drives in your drive set that
you want to be available as storage to one or more allocation groups.
Because MediaNet handles the drives in each allocation group as a
separate unit, creating multiple allocation groups allows you to:
• Support dual-stream uncompressed clients (also requires a special
hardware configuration).
• Break up very large drive sets into smaller units that reduce the
scope of data loss in the event of a drive failure in an unprotected
environment (see “Data Protection” on page 22
• Efficiently accommodate drives of different speeds and sizes.
For more information about creating and managing allocation groups,
see Chapter 4
.
.
).
19
Page 20

Creating and Sizing Workspaces
Because workspaces are virtual rather than physical partitions, they
are very easy to create, resize dynamically, and delete to accommodate
your environment’s needs. This flexibility allows you to tailor your
workspace allocation to accurately meet the needs of your
environment now — reconfiguring your workspaces later to
accommodate future projects or users is not inconvenient or time
consuming.
First, you must consider how you want to allocate workspaces. Do you
want to allocate them to accommodate projects, teams, individual
users, or a combination of one or more of these?
Once you have determined how you plan to allocate workspaces,
you’ll need to determine how much storage each workspace will
require (a function of media duration and, for video, resolution) and
allocate space accordingly.
n
When sizing workspaces, you should consider reserving some space rather
than assigning all of it immediately. Once space is allocated, it tends to be
filled quickly and you might later need space to accommodate a new project or
user or to extend or protect an existing workspace. In such a situation, it
tends to be much easier to use space held in reserve than to take it away from
an existing workspace.
When allocating and sizing workspaces, you should also consider
whether access restrictions are required and whether protection for
data integrity is necessary for each workspace. For more information,
see “Access Control (Users and Access Privileges)” on page 21
“Data Protection” on page 22
For more information about allocating and sizing workspaces, see
Chapter 5
.
20
.
and
Page 21

Access Control (Users and Access Privileges)
User accounts control access to MediaNet and its workspaces. Access
privileges associated with the user account determine whether a client
user can mount a given workspace and, if so, whether the user has full
access (read/write) or read-only access to it.
To determine how you want to set up user accounts and access
privileges for your environment, you first need to weigh the
importance of access control against user inconvenience and
administration effort (particularly in an environment where users and
projects frequently change).
Once you have decided the importance of security, you can decide
upon an access control strategy that best meets your needs.
Example strategies include:
• Create a user account for each user.
This strategy offers optimum security, allowing each user access to
the appropriate workspaces regardless of the MediaNet client at
which they are working.
• Create a user account with appropriate access privileges for each
project (multiple users can use the same account simultaneously).
This strategy offers moderate security and convenience, giving users
working on each project appropriate access and requiring far less
administrative effort than individual user accounts.
• Create a user account with appropriate access privileges for each
client.
This strategy offers moderate security and convenience, provided that
users work at clients that provide access to the workspaces they
need to use.
21
Page 22

n
Passwords are optional. If you want to provide users with access to only
appropriate workspaces but security is not an issue (that is, you trust users
not to use other user’s accounts), you can use any of the previously described
strategies without assigning passwords for user accounts.
For more information, see Chapter 6
Data Protection
Protection is a technique that offers high levels of data integrity by
ensuring that two copies of media data are written onto different
physical drives to avoid data loss in the event of drive failure. This
allows workspaces that are protected to be repaired very quickly with
no data loss upon drive failure.
The disadvantage is that protected workspaces use twice as much
space as an unprotected workspace. However, because of the data
protection and recovery speed that protection offers, new workspaces
are protected by default unless you specify otherwise in your
preferences. Additionally, protection can be turned on and off at any
time.
For more information, see Chapter 5
.
.
22
Page 23

Tasks and Tools
This section introduces the tasks that a MediaNet administrator is
responsible for and the tools that MediaNet provides to facilitate these
tasks.
Tasks
As administrator of an MediaNet workgroup, you are responsible for:
• Initial setup and configuration of the environment — You must
configure the drive set (comprising an administration drive and
data drives), one or more allocation groups, workspaces, and user
accounts before MediaNet can be used.
• Day-to-day administration — You will probably need to
frequently reconfigure MediaNet (by creating, deleting, and
resizing workspaces; by creating and deleting users; and by
changing access privileges) to accommodate new users and
evolving projects. For more information, see Chapter 4
and Chapter 6
MediaNet also provides comprehensive monitoring functionality
that allows you to check the total MediaNet activity as well as that
of each connected client. For more information, see Chapter 7
, Chapter 5,
.
.
• Troubleshooting — When problems occur with the storage
hardware, the MediaNet File Manager, or a client, you will need to
try and diagnose the problem and, if possible, fix it. MediaNet
provides easy-to-understand error messages that inform you of
problems in your MediaNet environment as well as mechanisms
to fix many of them.
23
Page 24

Tools
MediaNet provides three tools for configuration and day-to-day
administration of your MediaNet environment:
• MediaNet Setup Manager — You use the MediaNet Setup
Manager, which runs locally on the MediaNet Server, to set up and
administer the storage in your drive set.
For more information, see “The MediaNet Setup Manager” on
page 25.
• Avid Unity Administration Tool — You use the Administration
Tool, which can run on the File Manager or any MediaNet client,
for day-to-day MediaNet administration. It allows you to easily
implement and dynamically alter your MediaNet configuration so
that it is always optimized to meet the rapidly changing needs of
your particular installation as well as to monitor MediaNet
activity.
For more information, see “The Administration Tool” on page 26
• Avid Unity Monitor Tool — The Monitor Tool, which runs locally
on the MediaNet Server, provides low-level MediaNet
performance-monitoring functions, and allows you to start and
stop the MediaNet File Manager process.
For more information, see “The Monitor Tool” on page 27
24
.
.
Page 25

The MediaNet Setup Manager
The MediaNet Setup Manager runs locally on the MediaNet server
where you use it to set up and manage your storage hardware. You use
it to create and manage a drive set, to assign drives to various tasks
(such as administration drive, data drive, or spare), and to start and
stop the MediaNet File Manager. You also use the Setup Manager to
add and remove drives and to perform drive maintenance and error
recovery operations.
Figure 1-2 MediaNet Setup Manager
For a detailed overview of the MediaNet Setup Manager, see
Chapter 2
.
25
Page 26
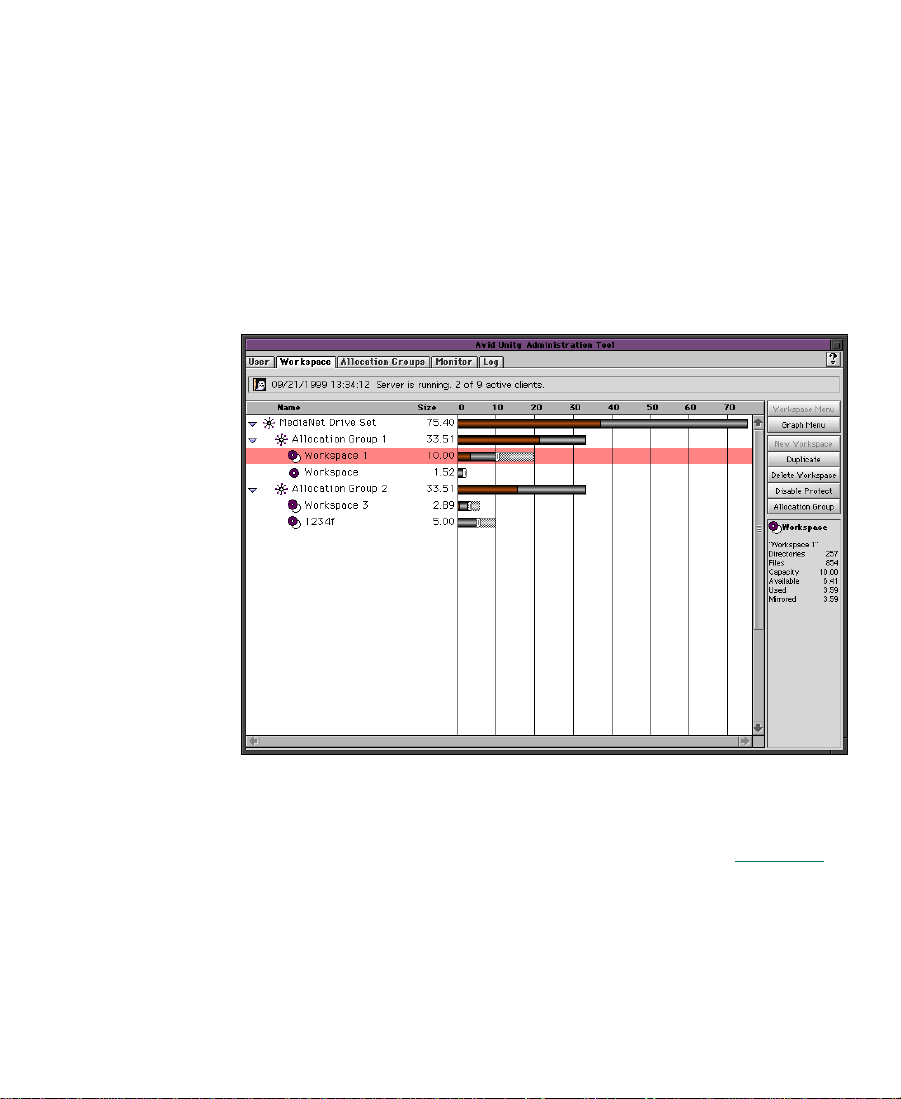
The Administration Tool
The Administration Tool is the primary tool for initial setup and dayto-day administration of allocation groups, workspaces, and users. It
also allows you to monitor MediaNet activity.
The Administration Tool can run locally on the MediaNet server or on
any MediaNet client, in which case it communicates with the
MediaNet File Manager service on the MediaNet Server through Fibre
Channel.
Figure 1-3 Administration Tool
For a detailed overview of the Administration Tool, see Chapter 3
26
.
Page 27
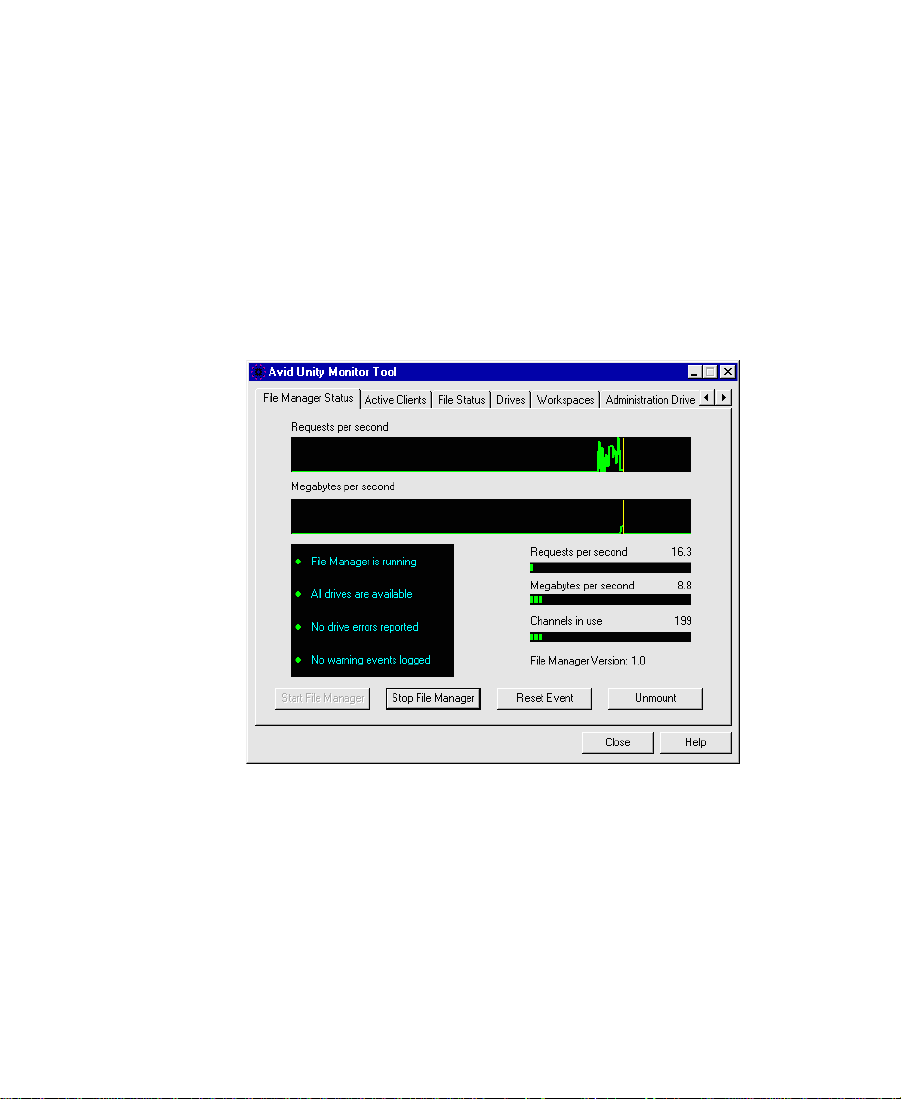
The Monitor Tool
The Monitor Tool also offers a wealth of technical information about
the status of the MediaNet environment and allows you to start and
stop the File Manager from its user interface.
You start the Monitor Tool from the MediaNet Server console by
clicking the Start button, pointing to Programs, pointing to Avid Unity
MediaNet, and clicking Monitor Tool. The Avid Unity Monitor Tool
opens, displaying MediaNet File Manager summary information and
the Start File Manager and Stop File Manager buttons.
Figure 1-4 Monitor Tool
For more information about the Avid Unity Monitor Tool, see the
tool’s Help system. To access the Help system, click the Help button.
27
Page 28

CHAPTER 2
MediaNet Setup Manager
This chapter describes the MediaNet Setup Manager and tells you
how to use it to create, manage, and troubleshoot a drive set. It also
describes how to start and stop the MediaNet Server.
This chapter describes:
• MediaNet Setup Manager Overview
• Starting the MediaNet Setup Manager
• Creating a New Drive Set
• Adding New MEDIArray Drives to Your MediaNet
Environment
• Adding Active Data Drives to an Existing Drive Set
• Managing Drive Problems
• Setting Drive Mode Pages
• Deleting an Existing Data Drive Set
• Rebuilding an Existing Data Drive Set
• Bringing the Drive Set Online and Taking It Offline
• Starting and Stopping the MediaNet File Manager
• Reestablishing MediaNet Setup Manager’s Connection to the
MediaNet File Manager
28
Page 29

MediaNet Setup Manager Overview
All drive operations are performed from the MediaNet Setup
Manager, from which you can create a drive set and administration
drive, allocate spares, and repair the drive set in the event of drive
problems. You can also start and stop the MediaNet server.
This section provides an overview of the MediaNet Setup Manager
and the operations that you can perform from it. The remainder of this
chapter contains detailed, task-oriented descriptions of all driverelated operations.
Drive group list (Click an entry to select a
group to display in the drive list.)
Information area
Menu bar
Drive list
Figure 2-1 MediaNet Setup Manager Example Display
29
Page 30

The MediaNet Setup Manager divides all drives present in the
MediaNet environment into one of four groups, reflecting their
current usage allocations and state. The four drive groups are:
Drive Group Description
Administration
Drives
Data Drive Set Shows active data drives and spare drives in the drive set.
Other
FibreChannel
Drives
Raw Drives Shows raw drives that have not been allocated for any other
Shows the administration drive.
Shows drives that are not raw, but that have not been
appropriately initialized for use in the MediaNet
environment (for example, drives that were previously part
of a MediaShare™ F/C installation).
purpose. Raw drives cannot be used until allocated.
You select the drive group that you want to view by clicking its entry
in the drive group list. All the drives in that group then appear in the
drive list, which displays the name, size, status, unit number, and
other technical information about each drive. You might need to scroll
right to see all the information. The drive list supports multiple
selections by using standard Windows NT modifiers (Shift+click to
select a list of consecutive entries, Ctrl+click to add individual entries).
All MediaNet Setup Manager functions are accessed from the various
menus provided in the menu bar.
The information area provides information about the drive set and the
status of the File Manager.
To access a comprehensive Help system that provides step-by-step
procedures and reference information for all features of the MediaNet
Setup Tool, click the Help button (yellow Question Mark icon) or
choose Help Topics from the Help menu.
30
Page 31

Starting the MediaNet Setup Manager
To start the MediaNet Setup Manager from the MediaNet Server
console, click the Start button, point to Programs, point to Avid Unity
MediaNet, and click Setup Manager.
n
The first time you start the MediaNet Setup Manager to configure your
MediaNet drive set, the Setup Manager information area will contain a
message warning you that it is not connected to with the File Manager or that
the File Manager is not running. This is normal; the File Manager does not
come online until you create a drive set.
Creating a New Drive Set
A drive set is the set of physical drives that provides the large virtual
MediaNet file system that is then divided into logical workspaces. A
drive set consists of:
• An administration drive
• Data drives
• Optional spare data drives
The easiest way to create a drive set is to run the Configuration
Assistant, which will also automatically create a drive set consisting of
an administration drive, a group of active data drives, and a single
spare data drive.
However, if you have specific requirements about how you want your
drive set configured (for example, if you want to specify how many
drives should be designated as spares), you will need to create your
drive set manually.
This section first tells you how to use the Configuration Assistant and
then tells you how to configure your MediaNet drive set manually by
creating an administration drive and a group of active data drives.
31
Page 32

Using the Configuration Assistant to Create a Drive Set
After all the hardware and software that comprise an Avid Unity
MediaNet environment are installed, you must set up a drive set
consisting of an administration drive and data drives before you can
access the File Manager.
All these steps can be performed manually, but to enable you to set up
your MediaNet drive set as quickly as possible, the tool also provides
a Configuration Assistant that will perform these tasks automatically.
The Configuration Assistant can also be used to re-create a basic setup
after you delete your drive set (or if one is not present for any other
reason).
Specifically, the Configuration Assistant creates:
• An administration drive (if one is not already present)
• Active data drives (all but one of the available drives)
• A single spare data drive
To start the Configuration Assistant, choose Configuration Assistant
from the Quick Start menu. A dialog box appears describing the drive
set that the Configuration Assistant is going to create.
Click OK to proceed. When the configuration operation is complete,
your working drive set will come online ready for you to perform
further configuration from the Administration Tool.
32
Page 33

Creating an Administration Drive Manually
The administration drive has a critical role in the operation of the
MediaNet environment, facilitating communication between clients
and the MediaNet File Manager about the MediaNet file system.
Because of their specialized role, administration drives are physically
differentiated from other drives by being equipped with special
firmware when they are created.
n
Creating an Administration Drive
Only 18-GB 10,000 RPM drives are suitable for use as administration drives.
You cannot download the administration drive firmware onto 9-GB drives.
To assure optimum administration drive performance, it is a good idea
to use the first drive in the first (bottom) drive enclosure as the active
administration drive, unless it is not operating correctly. This drive
should appear first in the Raw Drives group (confirm this by selecting
the drive and clicking the Identify Drive button). The MediaNet
hardware is configured so that this drive is able to operate with
optimum efficiency.
If for any reason you cannot use the first drive in the first enclosure,
you should assign the second drive as the active administration drive.
To create an active administration drive for your drive set:
1. Identify and select the most appropriate drive from the Raw
Drives group.
2. Choose Create Administration Drive from the Drive Set menu.
The Setup Manager installs the special firmware and configures the
drive, which then appears in the Administration Drives group.
n
Your drive set can only contain one administration drive. If you try to create
an additional administration drive while one is present, the operation will fail.
33
Page 34

Identifying the Administration Drive
To identify the administration drive in the MEDIArray enclosure, look
for the drive with the most activity. The activity LED on the
administration drive blinks at a faster rate than the LEDs on other
drives.
Creating the Data Drive Set from Raw Drives
To create a data drive set from Fibre Channel drives that are in a raw
state:
1. If the Raw Drives group is not already selected in the drive group
list, click its entry to display all the attached raw drives in the
drive list.
2. Select a minimum of four raw drives that you want to become
data drives in your new drive set.
3. Choose Create Data Drive Set from the Drive Set menu to create a
MediaNet drive set from the selected raw drives.
A progress indicator appears, indicating that the Setup Manager is
building the drive set.
When the drive set has been successfully built, the MediaNet File
Manager and drive set come online automatically.
To use the new drive set, use the Administration Tool to assign the
data drives to one or more allocation groups. For more information,
see “Adding Drives to an Existing Allocation Group” on page 71
34
.
Page 35

Creating a Data Drive Set from an Existing MediaShare F/C File System
The Setup Manager is able to recognize existing MediaShare F/C
drives that are added to the MediaNet hardware setup and enables
you to make these drives part of your data drive set.
c
This procedure will destroy any existing data on the MediaShare
F/C drives.
To create a drive set from drives in a MediaShare F/C installation:
1. If the Other FibreChannel Drives group is not already selected in
the drive group list, click its the entry to display all the attached
MediaShare F/C drives in the drive list.
2. Select all the MediaShare F/C drives in the drive list.
3. Choose Make Drive Raw from the Drive menu to remove the
existing MediaShare F/C formatting and information on the
drives.
4. If the Raw Drives group is not already selected in the drive group
list, click its entry to display all the attached raw drives in the
drive list.
5. Select the raw drives that you want to become data drives in your
new drive set.
6. Choose Create Data Drive Set from the Drive Set menu to create a
MediaNet drive set from the selected raw drives.
A progress indicator appears, indicating that the Setup Manager is
building the drive set.
When the drive set has been successfully built, the MediaNet File
Manager and drive set come online automatically.
To use the new drive set, use the Administration Tool to assign the
data drives to one or more allocation groups. For more information,
see “Adding Drives to an Existing Allocation Group” on page 71
35
.
Page 36

Adding Spare Data Drives to the Data Drive Set
To add a spare data drive to the Data Drive Set after the drive set is
created:
1. Select a drive from the Raw Drives group.
2. Choose Make Drive Spare from the Drives menu.
The drive becomes a spare data drive and is moved from the Raw
Drives group into the Data Drive Set.
A spare data drive is required before a failing drive can be replaced
(see “Managing Drive Problems” on page 39
For information about adding a new spare drive to the MEDIArray,
see the “Adding New MEDIArray Drives to Your MediaNet
Environment” on page 36.
).
Adding New MEDIArray Drives to Your MediaNet Environment
To add new MEDIArray drives to your MediaNet environment:
1. Shut down the File Manager (see “Starting and Stopping the
MediaNet File Manager” on page 47).
2. Shut down the MediaNet Server.
3. Turn off power to the MEDIArray enclosures.
4. Add the new MEDIArray drives, if necessary, installing new
MEDIArray enclosures to accommodate the drives as described in
the Avid Unity MediaNet Setup Guide.
5. Turn on power to the MEDIArray enclosures.
6. Restart the MediaNet Server.
7. Restart the MediaNet Setup Manager.
36
Page 37

The newly added drives should appear in the Raw Drives group,
the Other FibreChannel Drives group, or in an additional Data
Drive Set group, depending on how they have previously been
used.
c
n
If the newly added drives create an additional Data Drive Set group,
you must delete that new drive set (and optionally, add the new
drives to your existing drive set) before attempting to bring
MediaNet online. See “Deleting an Existing Data Drive Set” on
page 44.
If the new drives are not listed, there is probably something wrong with their
physical connections; do not go any further in the procedure and refer to the
Avid Unity MediaNet Setup Guide.
8. Add the new drives to the Drive set (see “Adding Active Data
Drives to an Existing Drive Set” on page 37).
Adding Active Data Drives to an Existing Drive Set
The MediaNet Setup Manager allows you to enlarge your drive set by
adding more active data drives to your existing MediaNet drive set.
Available drives can appear in the Raw Drives group, the Other
FibreChannel Drives group, or the Data Drive Set group, depending
on whether they are newly added and how they were previously used.
Adding Drives That Were Previously Used as Data Drives in Another Drive Set
If the drives you want to add to your drive set were previously used in
another drive set, two Data Drive Set entries should appear in the
drive group list; the entry that contains the newly added drives should
contain the number of drives that you have added from another drive
37
Page 38

set and show many missing drives. You must delete the data drive set
containing the newly added drives to use them.
To add the drives to your drive set:
1. Select the Data Drive Set group that contains the drives that you
want to add to your drive set. All the drives in that group appear
in the drive list.
c
Do not proceed unless you are absolutely sure that you have
selected the correct data drive set. Deleting the Data Drive Set group
will cause all data on that drive set to be lost.
2. Choose Delete Data Drive Set from the Drive menu.
The data drive set is deleted and all the drives in it become raw.
3. Proceed to “Adding Raw Drives” on page 39
.
Adding Drives That Are Not Raw or That W ere Used Pre viously as Data Drives in Another Drive Set
If the drives you want to add to your drive set are not raw or were
used previously in another drive set, they should appear in the Other
FibreChannel Drives group.
To add the drives to your drive set:
1. Select the Other FibreChannel Drives group. All the drives in that
group appear in the drive list.
2. Choose Make Drive Raw from the Drive menu to remove any
existing formatting and information on the drives.
3. Proceed to “Adding Raw Drives” on page 39
38
.
Page 39

Adding Raw Drives
1. Select the Raw Drives group. All the drives in that group appear in
2. Select the raw drives that you want to add as data drives to your
3. Choose Make Drive Spare from the Drives menu. The raw drives
4. Select the newly created spare data drives from the Data Drive Set
5. Choose Add Additional Drives from the Drive Set menu.
6. To use the newly added drives, use the Administration Tool to
the drive list.
drive set from the drive list.
are added to the Data Drive Set group as spare data drives.
group.
A progress indicator appears. As soon as the drive set has been
successfully enlarged, the File Manager and drive set come online
automatically.
assign them to one or more allocation groups. For more
information, see “Adding Drives to an Existing Allocation
Group” on page 71.
Managing Drive Problems
If you have spare drives available and your workspaces are protected,
the Setup Manager can quickly repair the drive set after failure of one
or more data drives or the administration drive.
Identifying Bad Drives
When drive problems occur, a “Drive Error Analysis Needed”
message appears in the File Manager Status tab of the Monitor Tool.
When you see this message, you should run the MediaNet Analyzer
utility, which should identify any drive problems in your MEDIArray.
Additional information to help you identify problem drives can be
39
Page 40

obtained from the File Status tab of the Monitor tool, which shows
information about the locations of bad blocks in damaged files. You
should then perform whatever steps are suggested by the data from
the drive analysis to repair your drive set.
Repairing the Drive Set by Swapping Out Bad Data Drives
The Replace Failed Data Drive operation removes a malfunctioning
data drive from the drive set, replacing it with a good spare data drive,
and then re-creating (as much as possible) the data that was on the old
drive on the new drive. The malfunctioning data drive is then
removed from the drive set and is returned to the Raw Drives group.
Because the Replace Failed Data Drive operation is typically required
because a drive is malfunctioning, the data on that drive might not be
accessible. The drive might have been physically removed from the
drive enclosure. The Replace Failed Data Drive operation performs the
best recovery possible with the understanding that it might be
operating in a malfunctioning environment.
When replacing drives, the Replace Failed Data Drive command
recovers all salvageable data from the old drive to create data on the
new drive in the exact image of the old drive. It recovers data from a
duplicate copy if it is accessible, or from the drive being replaced if
there is no duplicate present or if the duplicate cannot be read.
To repair the drive set:
1. Identify any clients that have workspaces mounted (by checking
client access from the Administration Tool Monitor tab) and warn
the clients that you are taking the drive set offline for repairs.
2. Take the drive set offline (see “Bringing the Drive Set Online and
Taking It Offline” on page 45).
3. If the Data Drives group is not already selected in the drive group
list, click its entry to display all the attached active and spare data
drives.
40
Page 41

4. Ensure that there is a spare data drive to replace the bad data drive
you want to remove from the drive set.
5. Select the drive to be replaced along with the spare drive.
6. Choose Replace Failed Data Drive from the Repair menu.
A progress indicator appears, showing that the Setup Manager is
repairing the drive set. When the drive set has been repaired, the
previously spare drive will appear in the Data Drive Set group
marked as active, and the previously active or missing drive that
was replaced will appear in the Raw Drives group.
7. Bring the repaired drive set online (see “Bringing the Drive Set
Online and Taking It Offline” on page 45).
After the drive set is repaired, it is possible that some data could not be
re-created on the new drives. For example, if a file is not duplicated
and a drive that contained some of its data completely fails, there is no
way to recover the original data.
When this occurs, the part of any file that could not be recovered is
replaced with a sequence of question mark (?) characters, and those
files are moved to special Damaged Files directories that are created as
a subdirectory of the directory containing the unrecoverable file or
files. You can find these Damaged Files directories, which might be
scattered throughout the file system, by using the Windows NT Find
utility.
n
Once found, you should check the damaged files to see whether
anything useful can be recovered and then delete those of no use to
free up space.
After you correct drive problems by repairing the drive set, you should reset
the drive error indicator on the Monitor Tool by clicking the Reset Event
button. If the drive error notification remains lit, the drive problems might
have led to incomplete duplication of files on a protected workspace (see
“Optimizing Workspace Protection and Efficiency” on page 88
41
).
Page 42

Recovering from an Administration Drive Failure
If the administration drive fails, the drive set goes offline and cannot
be brought online again until it is replaced. The following operation
will automatically load the administration firmware on another drive.
No data is lost; the MediaNet file system is able to recover to its last
state as soon as the administration drive is replaced.
To replace a failed administration drive:
1. If the Administration Drives group is not already selected in the
drive group list, click its entry to display all the attached active
and spare data drives in the drive list.
In most cases, the group should be empty, but if the failed
administration drive still appears in the Administration Drives
group, select the failed administration drive and choose Make
Drive Raw from the Drives menu.
2. Ensure that there is a raw drive available to replace the bad
administration drive. If none exists, create one by doing one of the
following:
• Select a a drive from the Other FibreChannel Drives group
and choose Make Drive Raw from the Drives menu.
Alternatively, you can
create an administration
drive by selecting a
specific raw drive and
choosing Make
Administration Drive
from the Drives menu.
• Add a new drive to the MediaNet environment (for more
information, see the Avid Unity MediaNet Setup Guide).
3. Choose Replace Administration Drive from the Repair menu.
The MediaNet Setup Manager selects the best drive candidate and
starts creating a new administration drive. If administration
firmware does not already exist on the chosen drive, the operation
loads it automatically (prompting you to confirm that this is OK
with a dialog box).
When complete, the new administration drive appears in the
Administration Drives group. For information on removing the failed
administration drive from the Fibre Channel MEDIArray, see the
Avid Unity MediaNet Setup Guide.
42
Page 43

Replacing Bad Drives
To replace a MEDIArray drive:
1. Repair the drive set by following the steps described in
“Managing Drive Problems” on page 39
2. Select the bad drive swapped out by the Repair Drive operation
from the Raw Drives group and then choose Identify from the
Drives menu to physically identify that drive in the MEDIArray
enclosure.
3. Shut down the File Manager (see “Starting and Stopping the
MediaNet File Manager” on page 47).
4. Shut down the MediaNet Server.
5. Turn off power to the MEDIArray enclosures.
6. Replace the problem MEDIArray drive.
.
n
n
For detailed instructions on replacing drives, see the Avid Unity MediaNet
Setup Guide.
7. Turn on power to the MEDIArray enclosures.
8. Restart the MediaNet Server.
9. Restart the File Manager (see “Starting and Stopping the
MediaNet File Manager” on page 47).
The Windows NT operating system upon which the MediaNet File Manager
runs does not support hot swapping drives. That is, new drives physically
added to a MEDIArray enclosure are not recognized until you restart the
MediaNet Server.
43
Page 44

Setting Drive Mode Pages
Mode pages are a configurable part of the drive firmware that
determines how the drive handles data. When you create data drives,
the Setup Manager configures the mode pages to efficiently handle
media data in the MediaNet environment.
If drive mode pages ever become incorrect (for example, if changed by
another application), the Setup Manager warns you by changing the
Mode Page column value from Okay to Incorrect. You should then
reconfigure the correct mode pages by choosing Set Mode Pages from
the Drives menu.
Deleting an Existing Data Drive Set
To delete an existing drive set:
c
This procedure will cause all data on the drive set to be lost.
1. Take the drive set offline (see “Taking the Drive Set Offline” on
page 46).
2. If the Data Drives group is not already selected in the drive group
list, click its entry to select it.
3. Choose Delete Data Drive Set from the Drive Set menu. A dialog
box appears prompting you to confirm this choice.
A progress indicator appears, showing that the Setup Manager is
deleting the drive set.
After the drive set is deleted, all of the data drives previously in your
drive set will appear in the Raw Drives group.
44
Page 45

Rebuilding an Existing Data Drive Set
To rebuild an existing drive set:
c
This procedure will cause all data on the drive set to be lost.
1. Delete the existing drive set (see “Deleting an Existing Data
Drive Set” on page 44).
After the drive set is deleted, all of the data drives will appear in
the Raw Drives group.
2. If the Raw Drives group is not already selected in the drive group
list, click its entry to display all the attached raw drives in the
drive list.
3. Select all the raw drives that you want to become data drives in
the new drive set.
4. Choose Create Data Drive Set from the Drive Set menu to rebuild
the drive set.
A progress indicator appears, showing that the Setup Manager is
building the drive set.
As soon as the drive set has been successfully built, the drive set comes
online automatically.
Bringing the Drive Set Online and Taking It Offline
Some hardware operations (for example, repairing the drive set)
require that you first take the drive set offline and then bring it online
again. You can also take the drive set offline to prevent client access to
all your workspaces.
Drive set sharing status is indicated in the information area, and by the
Take Offline (available when the drive set is online) and Bring Online
(available when the drive set is offline) entries in the Drive Set menu.
45
Page 46

Bringing the Drive Set Online
To bring the drive set online:
1. If the Data Drives group is not already selected in the drive group
list, click its entry to select it.
2. Choose Bring Online from the Drive Set menu.
The drive set comes online.
Taking the Drive Set Offline
To take the drive set offline:
1. Identify any clients that have workspaces mounted (by checking
client access from the Administration Tool Monitor tab) and warn
the clients that you are taking the drive set offline.
2. If the Data Drives group is not already selected in the drive group
list, click its entry to select it.
3. Choose Take Offline from the Drive Set menu.
A dialog box appears, prompting you to specify the delay that you
want to occur (in seconds) before the drive set is brought offline so
that any clients that have not already done so can unmount all
workspaces.
4. Specify the required delay or accept the default (30 seconds) and
then click OK.
After the specified delay, the drive set goes offline.
46
Page 47

Starting and Stopping the MediaNet File Manager
The MediaNet File Manager process runs as a Windows NT service
that starts automatically whenever the server system comes online.
However, various maintenance and administration functions require
that you stop the MediaNet File Manager and then restart it, so these
functions are made readily available from the Setup Manager.
Starting the MediaNet File Manager
To restart the MediaNet File Manager service after it has been
manually stopped or has failed for any reason, choose Start File
Manager from the File Manager menu.
Stopping the MediaNet File Manager
To stop the MediaNet File Manager service:
1. Ensure that no clients have workspaces mounted. To do this, check
client access from the Monitor tab of the Administration Tool, and
then ask any client with workspaces mounted to unmount them.
2. Choose Stop File Manager from the File Manager menu.
47
Page 48

Reestablishing MediaNet Setup Manager’s Connection to the MediaNet File Manager
If the MediaNet Setup Manager’s connection to the MediaNet File
Manager service on the MediaNet Server is disrupted during a session
(for example, because the MediaNet File Manager service is stopped
and restarted), the tool does not poll for and attempt to reconnect to
the server automatically. However, you can reestablish the connection
manually.
To reestablish your connection to the MediaNet File Manager, choose
Establish Connection from the File menu.
The MediaNet Setup Manager attempts to reconnect to the MediaNet
File Manager.
48
Page 49

CHAPTER 3
Using the Administration Too l
This chapter provides an overview of the Administration Tool and
describes the basics of how to use it (starting the tool, logging in,
setting preferences, and so on). The final section describes how to
create a basic MediaNet configuration quickly, using the
Administration Tool’s Configuration Assistant.
This chapter describes:
• Administration Tool User Interface Overview
• Starting the Administration Tool
• Setting Administration Tool Preferences
• Reestablishing Administration Tool’s Connection to the
MediaNet File Manager
49
Page 50
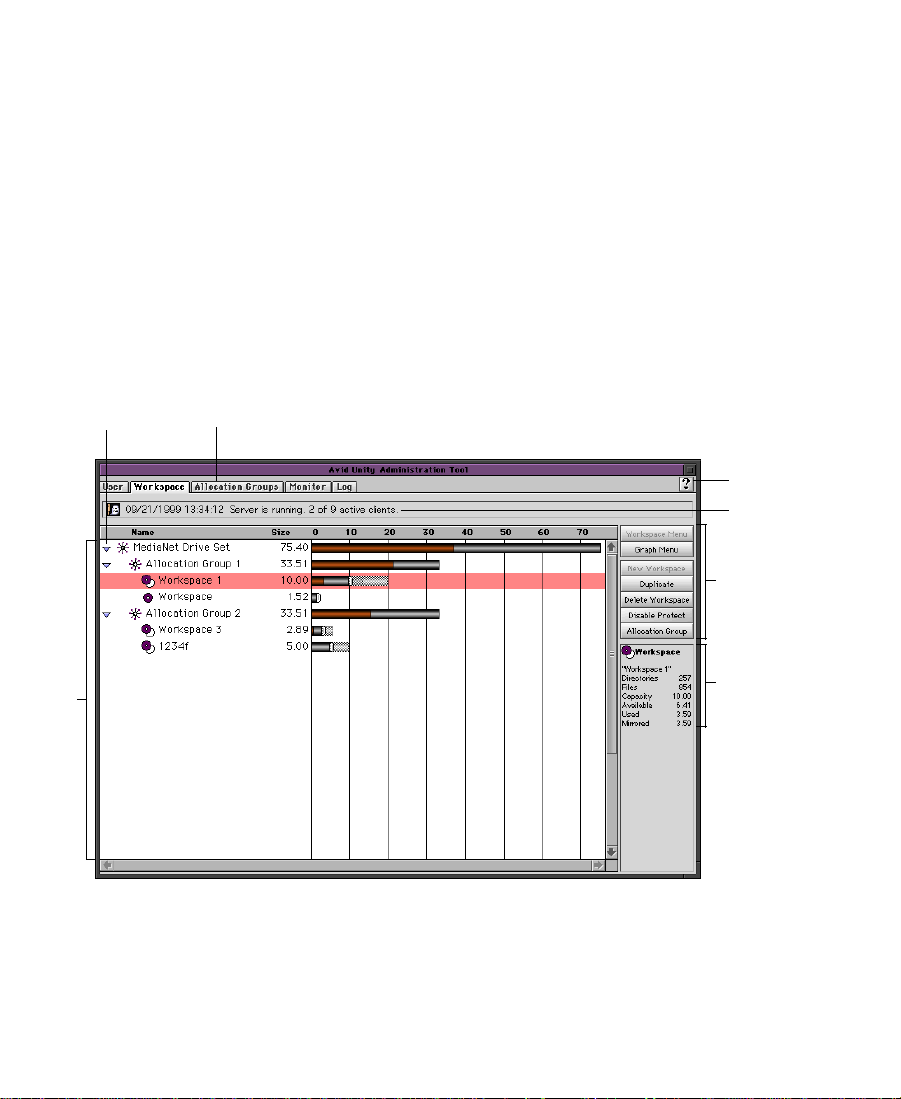
Administration Tool User Interface Overview
The Administration Tool, which you can run on the MediaNet Server
or any MediaNet client, has a tab-based user interface (UI) in which
information and controls are grouped together by function and are
presented together on tabs in a single window.
Menus corresponding to each tab offer many of the same functions
(with corresponding shortcut keys), but are only active when that tab
is selected. At all other times, the menu and its entries appear
dimmed, indicating that they are unavailable. Some functions are also
available on a context shortcut menu that can be accessed by
Ctrl+clicking over the list area on any tab.
List opener
List
area
Tabs (Click to select.)
Figure 3-1 Administration Tool Example Display
Help button
Message area
Contextsensitive
buttons
Information
area
50
Page 51

User Interface Component Descriptions
This section provides a brief description of each component of the
Administration Tool UI.
Message Area
The message area typically shows the MediaNet File Manager status
or any existing error conditions. Informational messages that enter the
message log are also displayed in the message area for several
seconds.
n
Error messages that appear in the message area are often rapidly overwritten
by status messages. You should check the Log tab on a regular basis if you are
concerned about problems with MediaNet. For more information, see “The
Log Tab” on page 104.
List Area
The contents of the list area are different for each tab, but each list
behaves in a similar manner, supporting (as applicable):
• Collapsible views. Any item with nested items is indicated by a list
opener. Open and close these items by clicking the list opener.
• Selection of a single item by clicking (in the User and Hardware
tabs).
• Where applicable, selection of multiple items by Shift+clicking.
• Where applicable, selection of multiple items by clicking a
selection box and dragging it.
Clicking an icon in the list area selects the associated item without
making the name editable. Clicking directly on an item’s name makes
the name editable as well as selecting the item.
51
Page 52

Context-Sensitive Buttons
Each tab has a collection of context-sensitive buttons that provide
access to the most common operations with a single click. Where
button action is only applicable under certain conditions or when a
particular item or items are selected, that button is only active in those
circumstances and appears dimmed at all other times. All button
actions are duplicated as menu commands.
Information Area
Where applicable, the information area shows information about items
selected in the list area.
User Interface Tab Descriptions
Each of the five user interface tabs groups information and controls
together by functions.
Ta b Allows You To
User View, create, edit, and delete user accounts (with optional
passwords) and to assign users access privileges to workspaces.
Workspace View, create, rename, resize, protect, and delete workspaces.
Allocation
Group
Monitor Monitor system usage, including total system bandwidth use,
Log View a list of error, warning, and informational messages.
View, create, rename, and delete allocation groups. It also
allows you to add and remove drives from existing allocation
groups.
how many clients are active, and how much bandwidth each
client is consuming.
52
Page 53

Getting Help with the Administration Tool
The Help system provides step-by-step procedures and reference
information for all features of the Administration Tool.
To access the Help system, click the Help button (Question Mark icon)
in the Administration Tool window to view information about the
current tab displayed.
Starting the Administration Tool
You can run the Administration Tool from the MediaNet server or any
client and in more than one location simultaneously. This allows you
to monitor usage and to perform other administrative tasks from the
most convenient location without having to return to another running
copy of the Administration Tool to shut it down before doing your
work. However, performing administrative functions on more than
one Administration Tool at the same time can cause unexpected
results. For example, if two administrators are deleting the same user
account or workspace at the same time, a second user account or
workspace might also be deleted.
n
To start the tool:
• On the MediaNet server or a Windows NT client, click the Start
button, point to Programs, point to Avid Unity MediaNet, and
click Administration Tool.
®
• On a Macintosh
the system drive and double-click the Administration Tool entry.
If the Administration Tool connects to the MediaNet File Manager but no
administration drive is found, you will not be able to log in because the
administration password is stored on the administration drive. The only
available options are then to run the Configuration Assistant (which creates
client, open the Avid Unity MediaNet folder on
53
Page 54

an administration drive as well as configuring other necessary components)
or to create an administration drive manually (see “Creating an
Administration Drive Manually” on page 33).
Logging In
If you have specified an administration password (see “Setting the
Administration Password” on page 57), the Administration Tool
prompts you to supply that password to log in. If you enter the wrong
password, an error message appears and the Administration Tool
closes.
Setting Administration Tool Preferences
The Administration Tool allows you to set preferences that specify a
wide range of options that affect the operation of the tool itself (such as
the administration password, user interface colors, and graph display
options) and the MediaNet configuration that you use the tool to
create (such as default names and access privileges for new
workspaces and users).
You can also export entire sets of preferences. Such exported
preference sets can be imported later and applied. For more
information, see “Exporting and Importing Preferences” on page 64
You set preferences from the Preferences window. To open the
Preferences window, choose Preferences from the File menu with any
tab selected.
54
.
Page 55

Tabs (Click to select.)
Click to apply
your preference
changes and exit.
Click to revert to
factory default
settings.
Click to revert
settings to their
last saved state.
Click to apply
your preference
changes.
Click to cancel
your preference
changes and exit.
Figure 3-2 Preferences Window
The Preferences window contains several preference tabs (listed in
Ta bl e 3 -1
), each containing options and default values related to a
particular aspect of Administration Tool functionality. To display a
preference tab, you simply click its tab at the top of the window.
55
Page 56

Table 3-1 Preference Tabs
Ta b Specifies
Administration Administrator password. See “Setting the Administration
Password” on page 57.
User Default name, password, and access privileges for new
users. View preferences (iconic/text) for access privileges.
See “Changing Your User Preferences” on page 60.
Workspace Default name, access privileges, and size for new
workspaces. Workspace graph view (linear/log) and
scaling options. See “Changing Your Workspace Tab
Preferences” on page 61.
Color User interface colors. See “Setting Workspace and
Monitor Graph Bar Colors” on page 59.
Monitor Monitor graph view (linear/log) and scaling options. See
“Changing Your Monitor Tab Preferences” on page 62.
Reverting or Canceling Preference Changes
If you need to undo any changes you have made, the Preferences
window offers two options to revert to earlier values. Click the Revert
Panel button to revert the preferences on the current preference panel
to their last saved values. Click the Factory Settings button to revert
the preferences on the current preference panel back to the original
values set at installation time.
You can also click the Cancel button to close the Preferences window
immediately without saving your changes.
56
Page 57

Saving Preference Changes
If you want to view appearance changes immediately or if you want to
apply some changes and then continue changing these or other
preferences, click the Apply button. This saves your changes
immediately without closing the Avid Unity Preferences window.
When you have finished making preferences changes, click OK. This
saves all your changes and closes the Preferences window.
Preferences are saved locally to a file named Preferences in the
Avid Unity MediaNet installation directory on the system on which
you are running the Administration Tool.
If you want to make preferences available on other clients, you need to
export your preferences to a shared drive, workspace, or floppy disk
(see “Exporting and Importing Preferences” on page 64
Setting the Administration Password
The Administration preference tab allows you to specify an
administration password to restrict access to the Administration Tool
(see “Logging In” on page 54
).
).
n
To protect your MediaNet configuration from being damaged by
unauthorized client users, Avid recommends that you specify an
administration password the first time that you use the tool after you have
created your drive set. If security is not an issue, and you do not set an
administration password, anyone can gain instant password-free access to the
tool.
57
Page 58

To set the administration password:
1. If necessary, open the Preferences window by choosing
Preferences from the File menu.
2. Click the Administration tab to select it.
3. Enter the current administration password (if any) and the new
administration password twice (the second time for verification
purposes).
4. Save your new password by clicking Apply. You are immediately
prompted to supply the new password.
n
If you set an administration password, be sure to remember it. If forgotten,
you can only regain access to the Administration Tool by resetting the
password from the Monitor Tool.
58
Page 59

Setting Workspace and Monitor Graph Bar Colors
The Color preference tab contains controls that allow you to change
the color of the workspace and monitor graph bars in the
Administration Tool’s UI.
To set the workspace and monitor graph bar colors:
1. If necessary, open the Preferences window by choosing
Preferences from the File menu.
2. Click the Color tab to select it.
Preview bars
3. Select the graph bar element that you want to change from the
Change Color pop-up menu.
4. Select the red, green, and blue color component values that you
want by moving the corresponding sliders. As you alter the
values, you can see the color of the selected graph bar element
change on the preview bars.
5. Select and change other graph bar elements by repeating steps 3
and 4 as necessary.
6. Save the color changes by clicking Apply or OK (as appropriate).
Alternatively, you can revert to your previous color preferences or
cancel out of the Preferences window altogether.
59
Page 60
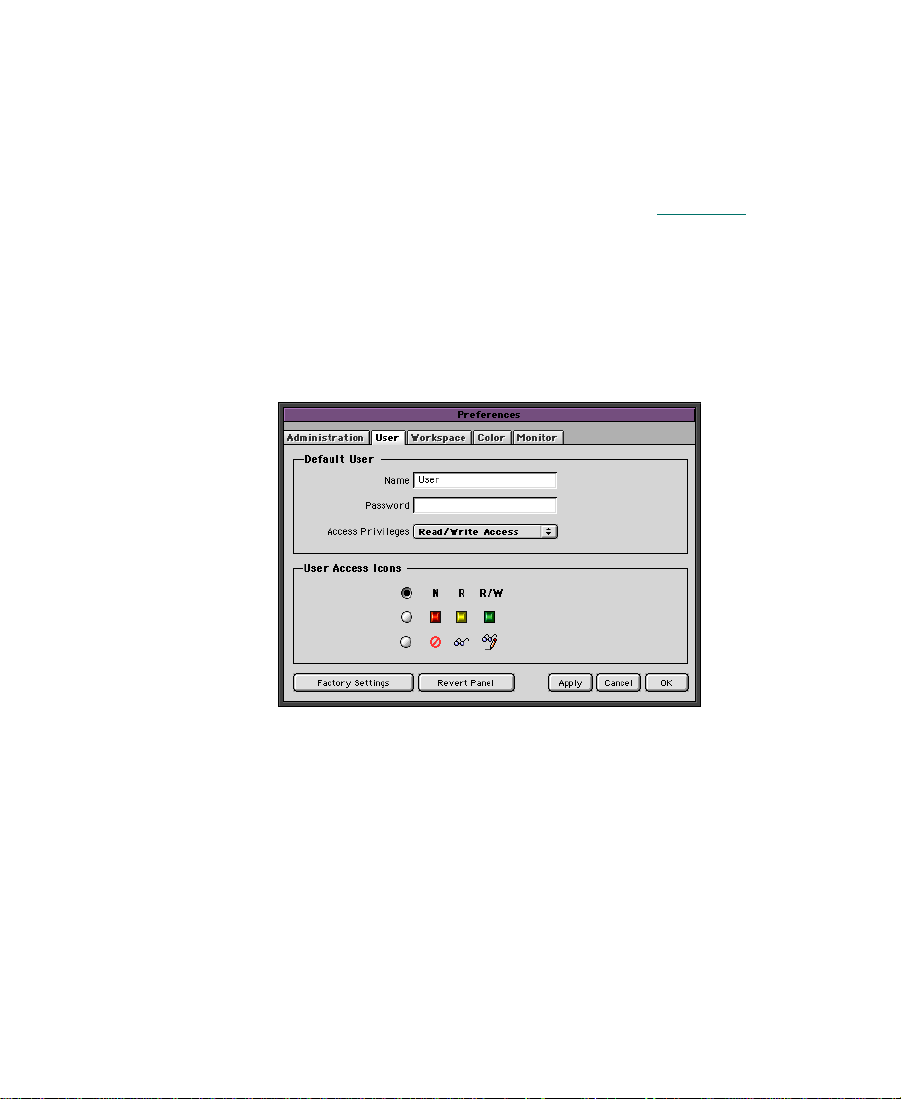
Changing Your User Preferences
The User preference tab allows you to specify a default user name,
password, and access privileges for newly created user accounts (as
well as the Guest user account). Another option allows you to specify
whether access privileges default to being displayed as icons or text in
the user list display. For more information, see Chapter 6
To change your user preferences:
1. If necessary, open the Preferences window by choosing
Preferences from the File menu.
2. Click the User tab to select it.
.
3. Type the default name that you want to appear when you create a
new user account in the Name text box.
4. Type the default login password for newly created user accounts
in the Password text box.
5. Select default access privileges to workspaces for newly created
user accounts (No Access, Read Access, or Read/Write Access)
from the Access Privileges pop-up menu.
6. Select whether you want access privileges to be displayed as text,
colored squares, or icons in the user list display by selecting the
appropriate User Access Icons option.
60
Page 61
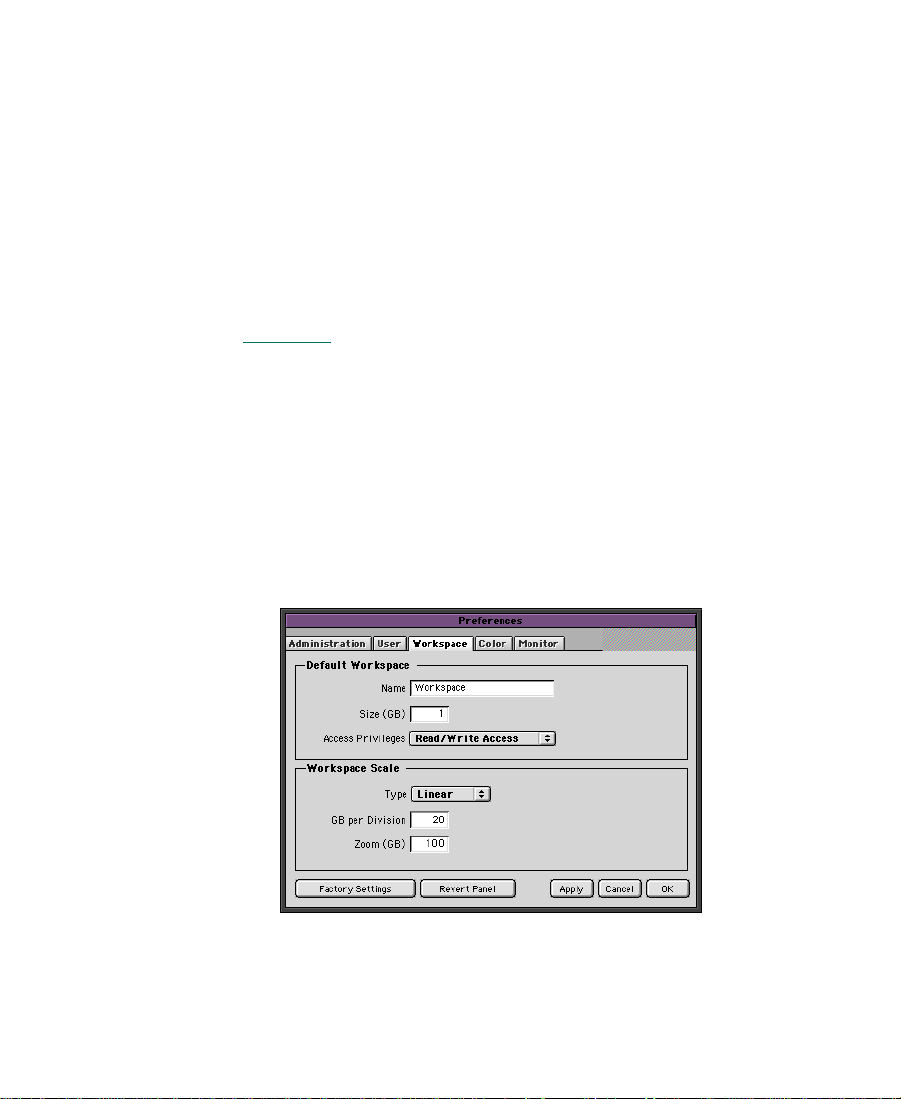
7. Save your changes by clicking Apply or OK (as appropriate).
Alternatively, you can revert to your previous user preferences or
cancel out of the Preferences window altogether.
Changing Your Workspace Tab Preferences
The Workspace preference tab allows you to specify the default name,
access privileges, and size for newly created workspaces. You can also
specify default scaling settings for the workspace list on the
Workspace tab. For more information about the Workspace tab, see
Chapter 5
.
n
You can also set your workspace graph scaling preferences by setting them
dynamically and saving them from the Workspace tab.
To change your workspace preferences:
1. If necessary, open the Preferences window by choosing
Preferences from the File menu.
2. Click the Workspace tab to select it.
61
Page 62

3. Set new values for the preferences that you want to change:
• Type the default name for newly created workspaces in the
Name text box.
• Type the default size (in GB) for newly created workspaces in
the Size text box.
• Select default access privileges for newly created workspaces
(No Access, Read Access, or Read/Write Access) from the
Access Privileges pop-up menu.
• Select the default graph scale type (linear or log) for the
workspace list from the Type pop-up menu.
Linear scaling provides a typical decimal scale graph. Log
scaling provides a logarithmic scale graph that allows larger
data values to fit into a smaller space.
• Type the default division size (in GB) for the workspace list in
the GB per Division text box.
• Type the default overall size to be displayed (in GB) in the
workspace list in the Zoom text box.
4. Save your changes by clicking Apply or OK (as appropriate).
Alternatively, you can revert to your previous Workspace tab
preferences or cancel out of the Preferences window altogether.
Changing Your Monitor Tab Preferences
The Monitor preference tab allows you to specify default scaling
settings for the Monitor tab graph display. For more information about
.
n
the Monitor tab, see Chapter 7
You can also set your monitor graph scaling preferences by setting them
dynamically and saving them from the Monitor tab.
62
Page 63

To change the default Monitor tab preferences:
1. If necessary, open the Preferences window by choosing
Preferences from the File menu.
2. Click the Monitor tab to select it.
3. Set new values for the preferences that you want to change:
• Choose the default graph scale type (linear or log) for the
monitor list from the Type pop-up menu.
• Type the default division size (in MB) for the monitor list
display in the MB per Division text box.
• Type the default overall size to be displayed (in MB) in the
monitor list display in the Zoom text box.
4. Save your changes by clicking Apply or OK (as appropriate).
Alternatively, you can revert to your previous Monitor tab
preferences or cancel out of the Preferences window altogether.
63
Page 64

Exporting and Importing Preferences
The Administration Tool’s ability to export and import preferences
allows you to save multiple preference sets to accommodate different
MediaNet usage situations or multiple administrators.
Additionally, you can export preference sets to a shared drive (or
workspace if you know that it will not be deleted) so that they can be
imported into the Administration Tool on any client in the MediaNet
environment.
Exporting a Preference Set
To export your current preference set:
1. Choose Export Preferences from the File menu. A file selection
dialog box appears.
2. Specify a location and name for the exported preferences file that
you want to create and then click OK.
Importing a Preference Set
To import a preference set:
1. Choose Import Preferences from the File menu. A file selection
dialog box appears.
2. Navigate to and select the preferences file that you want to import
and then click OK.
64
Page 65

Reestablishing Administration Tool’s Connection to the MediaNet File Manager
If the Administration Tool’s connection to the MediaNet File Manager
service on the MediaNet Server is disrupted during a session (for
example, because the MediaNet File Manager service is stopped and
restarted), the tool does not poll for and attempt to reconnect to the
server automatically. However, you can reestablish the connection
manually.
To reestablish your connection to the MediaNet File Manager, choose
Establish Connection from the File menu.
The Administration Tool attempts to reconnect to the MediaNet File
Manager. If it succeeds and an administration password has been set,
you will be required to log in (see “Logging In” on page 54
regaining access to Administration Tool functionality.
) before
65
Page 66

CHAPTER 4
Managing Allocation Groups
Allocation groups are MediaNet partitions that each contain several
(four or more) assigned data drives from the larger drive set. This
chapter describes how to create and manage allocation groups in your
MediaNet file system, describing how to create, rename, and delete
allocation groups as well as how to add and remove drives from them.
This chapter describes:
• Overview of the Allocation Groups Tab
• Allocation Group Usage Guidelines
• Creating a New Allocation Group
• Assigning an Allocation Group to a Single User for
Uncompressed Finishing
• Adding Drives to an Existing Allocation Group
• Removing Drives from an Existing Allocation Group
• Renaming an Allocation Group
• Deleting an Allocation Group
66
Page 67
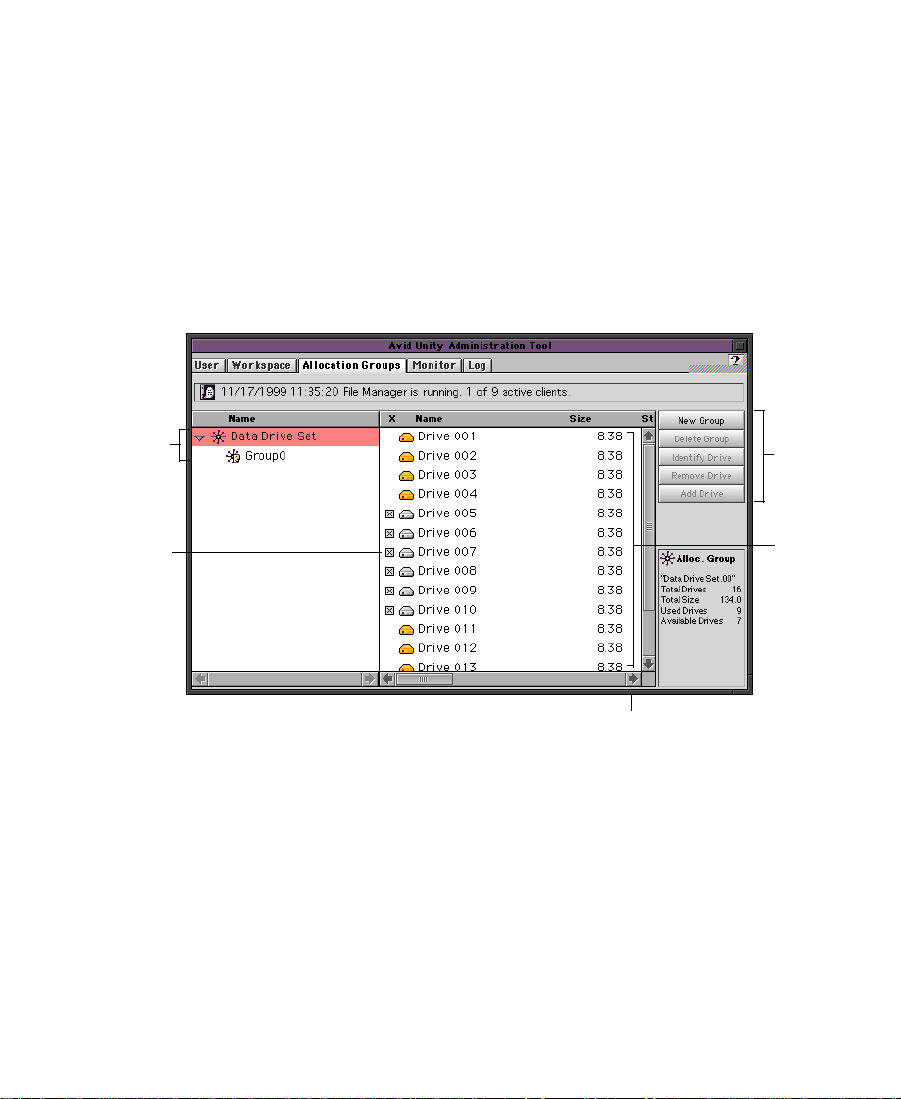
Overview of the Allocation Groups Tab
All operations related to allocation groups are performed from the
Allocation Groups tab in the Administration Tool. From here you can
create and delete allocation groups and assign drives to them.
This section provides an overview of the Allocation Groups tab and
the operations that you can perform from it. The remainder of this
chapter contains detailed, task-oriented descriptions of all allocationgroup-related operations.
Allocation
group list
Check to
select drive
Contextsensitive
buttons
Drive list
For more information, scroll right.
Figure 4-1 Allocation Groups Tab Example Display
The Allocation Groups tab contains two sections. To the left is a
selectable list containing the MediaNet drive set and all existing
allocation groups. To the right is a drive list whose contents are
determined by the item that you select in the allocation group list.
If the MediaNet drive set is selected, the drive list shows all data
drives in the drive set, with drives that are already assigned to
67
Page 68

allocation groups shown in yellow. If an allocation group is selected,
the drive list shows all the data drives in that allocation group.
The context-sensitive buttons that appear to the right of the drive list
duplicate entries in the Allocation Group menu. When active, they
allow you to create a new allocation group, to delete a selected
allocation group, to identify a selected drive physically in its
MEDIArray enclosure by flashing its drive light for several seconds, to
remove a selected drive from the allocation group, and to add a new
drive to the selected allocation group.
Allocation Group Usage Guidelines
You can assign all of your data drives to one large allocation group,
but because MediaNet handles the drives in each allocation group
separately, the drives can be used to configure your file system to
optimize performance.
If your MediaNet environment must support MediaNet clients with
very high bandwidth requirements to access uncompressed media,
you will need to set up specific hardware and allocation group
configurations to support them. For more information, see the
Avid Unity MediaNet Release 1.1 Release Notes.
In such an environment, you use allocation groups to isolate
MediaNet clients that need very high bandwidth and thus eliminate
the competition from other MediaNet clients trying to access the same
drives. For example, when uncompressed media is in its own
allocation group and a single MediaNet client is using the
uncompressed media, that MediaNet client is serviced independently
of any other MediaNet clients in the MediaNet environment. This
logic can also be applied to separating audio and video media.
68
Page 69

In other situations, allocation groups are more flexible, allowing you
to assign drives in your MediaNet file system configuration to
allocation groups with few limitations other than the following
guidelines:
• Use only one drive type (size and speed) per allocation group.
• Use a minimum of four drives per allocation group.
• Break drive sets of over 60 drives into more than one allocation
group to minimize the risk of two drives used in a protected
workspace failing at the same time.
Creating a New Allocation Group
An allocation group is a set of physical drives that form a subset of the
drive set to accommodate different drive types, clients with different
data rate requirements (for instance, clients that use compressed and
uncompressed media).
To create a new allocation group:
1. Click the Allocation Groups tab in the Administration Tool to
access the allocation group functions.
2. Select the drive set in the allocation group list.
3. Select all the drives that you want to assign to the new allocation
group by clicking the check box beside their drive names (fourdrive minimum).
In cases where you are creating allocation groups containing
specific drives in the MEDIArray enclosure:
a. Click Identify Drive or choose Identify Drive form the
Allocation Group menu.
b. If the identified drive is physically the drive you wanted in the
MEDIArray enclosure, click the check box beside the drive
name. If it is not the drive you wanted, identify another drive.
69
Page 70

c. Repeat steps a and b until you have selected all the drives you
want in the allocation group.
4. Click New Group to create a new allocation group containing all
the selected drives or click Cancel to stop the operation. A dialog
box appears, asking you to confirm that you want to create a new
allocation group.
The new allocation group appears in the allocation group list in
the Allocation Groups tab.
Assigning an Allocation Group to a Single User for Uncompressed Finishing
To assign an allocation group to a single user for uncompressed
finishing:
n
When allocation groups are created, they are configured for multiple users by
default. You should only configure an allocation group to a single user when
the allocation group contains the supporting hardware.
1. Click the Allocation Groups tab in the Administration Tool to
access the allocation group functions.
2. Select the drive set in the allocation group list.
3. Select the allocation group you want assign for single user
finishing.
4. Choose Single User from the Allocation Group menu.
When the allocation group is set for Single User, Multiple Users is
selectable in the Allocation Group menu.
70
Page 71

Adding Drives to an Existing Allocation Group
You can add unassigned data drives from the drive set to an allocation
group at any time to increase its storage capacity.
To add extra drives to an existing allocation group:
1. Click the Allocation Groups tab to access the allocation group
functions.
2. Select the allocation group that you want to enlarge in the
allocation group list.
3. Click the Add Drive button. The Add Drives to Allocation Group
dialog box appears, displaying a selectable list of all active data
drives that are not assigned to any allocation group.
4. Select all the drives that you want to add to the allocation group.
You can check the physical location of a drive in the MEDIArray
enclosures by selecting it and clicking the Identify Drive button.
5. Click Add Drive(s) to add the selected drives to the allocation
group or click Cancel to stop the operation.
6. Optimize all workspaces that are already allocated and in use on
the allocation group you just enlarged (see “Optimizing
Workspace Protection and Efficiency” on page 88).
71
Page 72

Removing Drives from an Existing Allocation Group
You can remove drives from any existing allocation group that has no
workspaces on it or that has enough space to accommodate the
workspaces on it without the space provided by the drives you want
to remove. Drives removed from the allocation group are returned to
the drive set’s pool of unassigned data drives.
To remove drives from an allocation group:
1. Click the Allocation Groups tab to access the allocation group
functions.
2. Select the appropriate allocation group from the allocation group
list.
3. Select the drive or drives that you want to remove from the drive
list.
4. Click the Remove Drive button (only active if at least four drives
are not selected and that those drives can accommodate all
assigned workspaces).
All workspaces on the allocation group are optimized and the
selected drives are removed from the allocation group.
Renaming an Allocation Group
You can rename an allocation group at any time. Any changes you
make are automatically propagated to the Workspace and Monitor
tabs.
To rename an allocation group:
1. Click the Allocation Groups tab to access the allocation group
functions.
72
Page 73

The following
characters are illegal in
allocation group names:
\, /, :, *, ?, ", <, >, and | .
If you attempt to enter
an illegal character, the
system beeps and the
character is ignored.
2. Click the allocation group name that you want to change and type
a new name (maximum 27 characters). Any invalid characters are
ignored.
3. Press Enter (Windows NT) or Return (Macintosh) or click
elsewhere in the allocation group list to effect the change. If the
name is empty, the allocation group will revert to its original
name. If you enter no name or a duplicate name, the name is not
changed. The allocation group might move in the list of
workspaces, to maintain sorted order by name.
Deleting an Allocation Group
You can easily delete any allocation group that does not have any
workspaces on it, returning all drives previously assigned to the
allocation group to the drive set’s pool of unassigned data drives.
To delete an allocation group:
1. Ensure that no workspaces exist on the allocation group that you
want to delete (see Chapter 5
).
2. Click the Allocation Groups tab to access the allocation group
functions.
3. Select the allocation group that you want to delete.
4. Click the Delete Group button. A dialog box appears prompting
you to confirm that you really want to delete the allocation group.
Click OK to confirm.
The allocation group is deleted.
73
Page 74

CHAPTER 5
Managing Workspaces
Workspaces are virtual volumes that exist on allocation groups and
can be resized dynamically and that allow you to easily segment your
drive set to accommodate projects and users (strategies for which are
outlined in Chapter 1
This chapter describes how to create, rename, and delete workspaces.
It also tells you how to manipulate the amount of storage allocated to
each workspace, how move a workspace and its contents to another
allocation group, and how to protect a workspace against drive failure.
This chapter describes:
• Overview of the Workspace Tab
• Creating New Workspaces
).
• Duplicating Existing Workspaces
• Changing Workspace Size
• Renaming Workspaces
• Deleting Workspaces
• Protecting Workspaces
• Optimizing Workspace Protection and Efficiency
• Moving a Workspace to Another Allocation Group
74
Page 75

Overview of the Workspace Tab
All workspace functions can be performed from the Workspace tab,
which allows you to:
• Create, delete, and rename workspaces.
• Manipulate the amount of storage allocated to each workspace.
• Move a workspace and its contents to another allocation group.
• Protect a workspace against drive failure.
• Monitor how much free space exists on each workspace, and how
much unallocated space exists in each drive set.
Drive set
Workspace
list
Click to access
workspace
manipulation
buttons.
Click to access
graph scaling
buttons.
Allocation group
Resize handle
Numeric size text box
Figure 5-1 Workspace Tab Example Display
75
Page 76
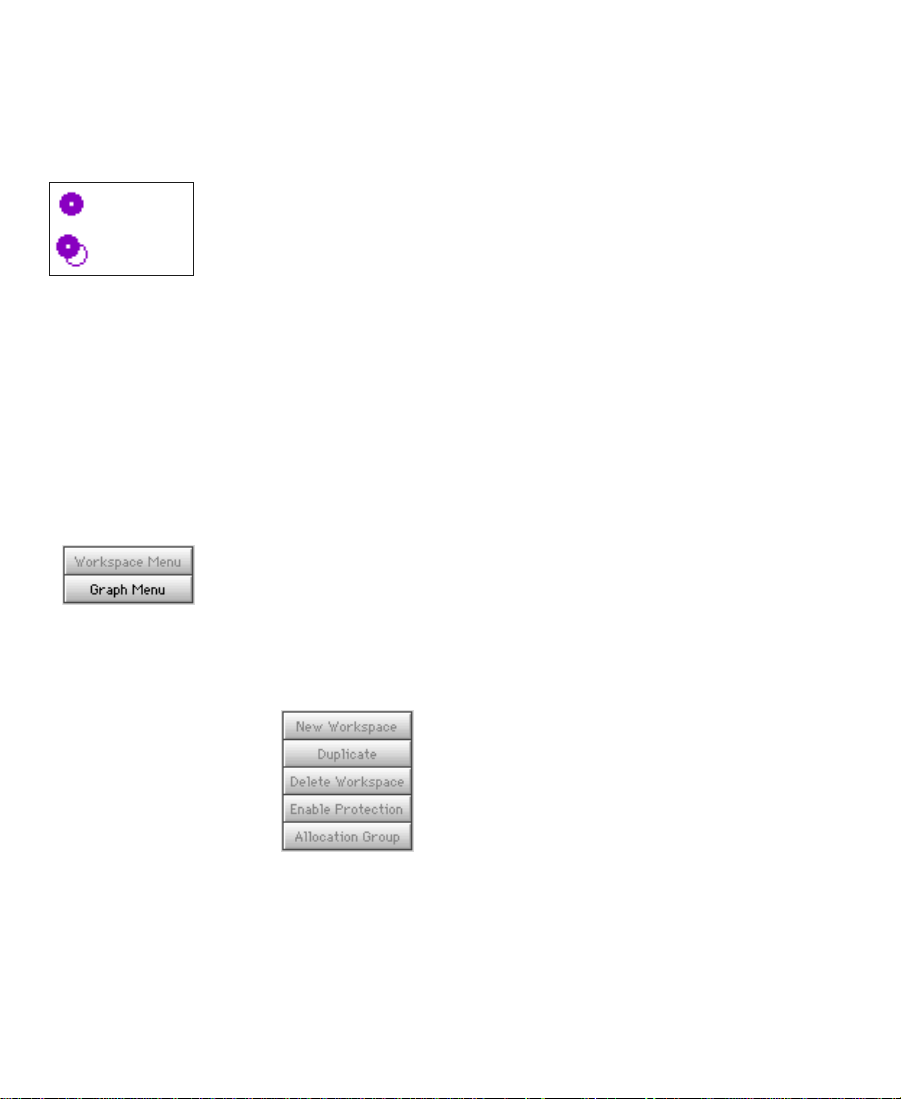
This section provides an overview of the Workspace tab and the
Unprotected
workspace
Protected
workspace
operations that you can perform from it. The remainder of this chapter
contains detailed, task-oriented descriptions of all workspace-related
operations.
The workspace list displays all workspaces under the allocation groups
on which they reside. Each workspace entry has an icon that shows
whether it is protected or unprotected and indicates workspace size
numerically and in the form of a graph that indicates space allocation
and usage with a customizable linear or logarithmic scale.
The workspace list allows you to easily select workspaces for
renaming, deletion, and moving to another allocation group. It also
allows you to freely manipulate workspace size by pressing and
holding the Alt key (on the MediaNet server or a Windows NT client)
or the Option key (on a Macintosh client) and dragging the workspace
resize handles or by entering values into the corresponding numeric
size text boxes.
The context-sensitive buttons that appear to the right of the workspace
list feature two selector buttons at the top that allow you to switch
between different sets of related functions. The selector representing
the active functions appears dimmed. The two sets of functions are:
• Workspace Menu commands — This set of buttons duplicates key
workspace manipulation commands from the Workspace menu.
76
Page 77

• Graph Menu commands — When selected, this set of buttons
duplicates the graph scaling commands from the Graph submenu
of the Workspace menu.
Reading the Workspace List
The workspace list represents drive set, allocation group, and
workspace sizes and usage in the form of horizontal bars of a graph
display. Color coding (customizable from the Preferences window)
allows each bar to represent up to four characteristics for protected
workspaces.
Allocated storage
Space allocated for duplicate data but unused
Space used to accommodate duplicate data
Space allocated for original data but unused
Space used by original data
Unallocated storage
For the drive set and allocation groups, the bar colors represent:
• Allocated storage — Total drive space in the drive set/allocation
group (as applicable) allocated to workspaces.
• Unallocated storage — Total drive space in the drive set/
allocation group (as applicable) still available for allocation to
workgroups.
77
Page 78

For workspaces, the bar colors represent (from left to right):
• Space used by original data.
• Space allocated to accommodate original data but unused.
• (For protected workspaces only) Space used to accommodate
duplicate data (measured from the resize handle). Note that if this
color zone is smaller than that representing the space used by
original data, then the workspace is not fully protected.
• (For protected workspaces only) Space allocated to accommodate
duplicate data but unused.
Changing the Workspace List Graph Display
The workspace list graph is customizable, allowing you to display
drive set and workspace sizes, using either linear or logarithmic scales,
and to adjust the scale divisions and the graph view size.
You change the appearance by using the Graph context-sensitive
buttons (selectable by clicking the Graph Menu button).
Selecting Linear or Logarithmic Graph Display
The workspace list graph can display the drive set and workspace
sizes by using two scales:
• Linear scale — When linear scaling is being used, the Linear Scale
button appears dimmed and the Log Scale button is active. Click
the Log Scale button if you want to switch to the logarithmic scale.
• Logarithmic scale — When logarithmic scaling is being used, the
Log Scale button appears dimmed and the Linear Scale button is
active. Click the Linear Scale button if you want to switch to the
linear scale.
The linear scale is easier to read because each division of the scale
represents an equal amount. The logarithmic scale allows you to view
more information in a small space but is less intuitive.
78
Page 79

Scaling the Graph
Linear and Logarithmic scale divisions can be increased or decreased
by clicking on the Division up and down arrow buttons or by choosing
Increase Division or Decrease Division from the Monitor menu.
In either scale, numeric divisions are displayed in GB. You can
increase or decrease the size of the graph view by choosing Increase
Zoom or Decrease Zoom from the Graph submenu.
Saving Your Workspace List Graph Settings
If you prefer your modified workspace list graph display to the
default display, you can save your settings as the new default values.
When you do this, the new settings overwrite those in your
preferences and are then used as the defaults for future
Administration Tool sessions.
To save your workspace list graph settings, click the Save Settings
button.
Creating New Workspaces
Newly created workspaces inherit their attributes (name, size, and
access privileges from your Workspace tab preferences). For more
information, see “Changing Your Workspace Tab Preferences” on
page 61.
To create a new workspace:
1. Click the Workspace tab to access the workspace functions.
2. Select the allocation group on which you want to create the
workspace.
79
Page 80

3. If all storage in the allocation group is allocated to existing
workspaces, make an existing workspace smaller by dragging its
resize handle.
4. Click the New Workspace button to create a new workspace with
the default name, access privileges, and size specified in your
workspace preferences. If there is no room for a workspace of the
default size, the operation fails and displays a “Not enough
unallocated space on the partition” error message.
If there is already a workspace with the default name, the newly
created workspace will be named default name 1. If that name is
already taken (for instance, if you generate multiple new
workspaces at once by repeatedly clicking New Workspace
without renaming each one as it is created), the newly created
workspace will be named default name 2, and so on.
5. The last new workspace you created appears alphabetically in the
workspace list and is selected so that you need only start typing to
rename it. You can also rename workspaces at any time in the
future. For more information, see “Renaming Workspaces” on
page 83.
6. If necessary, change the size of any newly created workspace from
the default value by pressing and holding the Alt key (on the
MediaNet server or a Windows NT client) or the Option key (on a
Macintosh client) and dragging the workspace resize handle. For
more information, see “Changing Workspace Size” on page 82
.
7. If required, change the access privileges for each newly created
workspace. For details, see “Workspace Access Privileges” on
page 98.
80
Page 81

Duplicating Existing Workspaces
Workspaces created by duplication inherit the attributes (name, size,
and access privileges) of the workspace from which they were created.
To duplicate a workspace:
1. Click the Workspace tab to access the workspace functions.
2. If all storage is allocated to existing workspaces, make an existing
workspace smaller by dragging its resize handle.
3. Select an existing workspace.
4. Choose Duplicate from the Workspace menu to copy the selected
workspace. The newly created workspace has the same name as
the original and the lowest available integer as a suffix (for
example, a duplicate of workspace Original Name will be named
Original Name 1) and inherits the access privileges and size of the
original workspace.
If there is no room for a workspace of the same size as the original,
the operation fails and displays a “Not enough unallocated space
on the partition” error message.
5. The last new workspace you created is selected so that you need
only start typing to rename it. You can also rename workspaces at
any time in the future. For more information, see “Renaming
Workspaces” on page 83.
6. If necessary, change the size of any newly created workspace from
the default value by pressing and holding the Alt key (on the
MediaNet server or a Windows NT client) or the Option key (on a
Macintosh client) and dragging the workspace resize handle. For
more information, see “Changing Workspace Size” on page 82
7. If required, change user access privileges for each newly created
workspace. For more information, see “Workspace Access
Privileges” on page 98.
81
.
Page 82

Changing Workspace Size
You might want to make a workspace larger to make room for a
digitize procedure planned for later in the day or that is already under
way. You might want to make a workspace smaller to make space for
other workspaces or to reserve storage for another day.
Avid recommends that
you do not resize
workspaces while
clients are creating files
on them.
You dynamically change the size of any workspace by pressing and
holding the Alt key (on the MediaNet server or a Windows NT client)
or the Option key (on a Macintosh client) and dragging the workspace
resize handles. The corresponding Size text box updates as the size
changes. You can also enter a valid value directly by typing it into a
workspace’s Size text box.
Increasing Workspace Size
To increase a workspace’s size:
1. Click the Workspace tab to access the workspace functions.
2. If all storage is already allocated, make some workspaces smaller
or delete workspaces to make space available.
3. Resize the workspace by pressing and holding the Alt or Option
key (as appropriate for the system) and dragging the workspace
resize handle to the right to increase its size. You cannot move the
handle beyond the point corresponding to allocating all storage to
workspaces. The numerical display of current size will update as
the handle is dragged. When the handle is released, it stays where
placed and the size is set.
Alternatively, you can enter the required size directly. Click the
workspace’s Size text box, type the required value, and then press
Enter (Windows NT) or Return (Macintosh) or click elsewhere in
the workspace list to effect the change. If the value is too large or
otherwise invalid, the workspace size will revert to its original
value.
82
Page 83

Decreasing Workspace Size
To decrease a workspace’s size:
1. Click the Workspace tab to access the workspace functions.
You cannot reduce
workspace size below
the amount already
allocated to files. For
empty workspaces,
minimum workspace
size is 1 GB.
2. Resize the workspace by pressing and holding the Alt or Option
key (as appropriate for the system) and then dragging the
workspace resize handle to the left. The numerical display of
current size will update as the resize handle is dragged. When the
handle is released, it stays where it has been placed and the size is
set.
Alternatively, you can enter the required size directly. Click the
workspace’s Size text box, type the required value, and then press
Enter (Windows NT) or Return (Macintosh) or click elsewhere in
the workspace list to effect the change. If the value is invalid, the
workspace size will revert to its original value.
Renaming Workspaces
You can rename a workspace at any time, even when it is being used
by client workstations. The only effect on users is that the workspace
name will be different the next time they need to mount it.
To rename a workspace:
1. Click the Workspace tab to access the workspace functions.
The following
characters are illegal in
workspace names: \, /,
:, *, ?, ", <, >, and | . If
you attempt to enter an
illegal character, the
system beeps and the
character is ignored.
2. Click on the workspace name that you want to change and type a
new name (maximum 27 characters). Any invalid characters are
ignored.
3. Press Enter (Windows NT) or Return (Macintosh) or click
elsewhere in the workspace list to effect the change. If the name is
empty, the workspace will revert to its original name. If you enter
no name or a duplicate name, the name is not changed. The
83
Page 84

workspace might move in the list of workspaces, to maintain
sorted order by name.
n
If a client has a workspace mounted when its name changes, the user of that
system might not see the name change immediately. However, the name
change will show up in the Finder the next time that the workspace is
manipulated in the Finder.
Deleting Workspaces
You can easily delete any workspace that is not currently mounted by
any clients.
c
When you delete a workspace, all media data stored there is lost.
You should make absolutely sure that all media on a workspace is
either no longer needed or backed up before deleting a workspace.
To delete a workspace:
1. Ensure that the workspace to be deleted is not currently mounted
on any clients. To do this, check access from the Monitor tab and
then ask any client with that workspace mounted to unmount it.
2. Click the Workspace tab to access the workspace functions.
3. Select the workspace that you want to delete.
4. Choose Delete Workspace from the Workspace menu. A dialog
box appears prompting you to confirm that you really want to
delete the workspace. Click OK to confirm.
The workspace is deleted.
84
Page 85

Protecting Workspaces
Protection offers very high levels of data integrity (at the cost of
doubling drive space requirements) by storing duplicates of all media
files. This allows malfunctioning drives containing protected media
files to be repaired very quickly with no data loss.
Protecting new files
versus protecting
existing files
The doubled space requirements of protection mean that you might
not always want to protect files written to a workspace. Equally, you
might not want to tie up the Administration Tool while large numbers
of existing files on a workspace are protected or unprotected when
you change the protection state of a workspace.
Because of these factors, MediaNet differentiates between its treatment
of new and existing files with respect to protection, providing a setting
that applies only to new files as well as operations that act on all files:
• Enable Protection/Disable Protection — Switching this setting
takes place instantaneously and only affects files written to the
workspace from that point onward; existing files are not affected.
When set, all new files written to the workspace are protected;
existing files are not affected.
• Protect All Files/Unprotect All Files — These operations allow
you to protect or unprotect all existing files on a workspace and to
set the protection state of the workspace (enabled or disabled) to
match.
85
Page 86

Enabling Protection of New Files Only
Enabling protection of
new files for a
workspace does not
cause all existing files
on that workspace to be
protected. This will not
happen until you
perform the Protect All
Files operation.
To enable protection of new files for a workspace:
1. Click the Workspace tab to access the workspace functions.
2. Select an unprotected workspace from the workspace list.
3. Click Enable Protection to enable protection for the selected
workspace.
The Protected Workspace icon replaces the Unprotected
Workspace icon in the workspace list.
4. If the selected workspace contains existing files that are not
already protected and you want them to be, you will need to
perform the Protect All Files operation. For more information, see
“Protecting All Files” on page 87
Disabling Protection of New Files Only
Disabling protection of
new files for a
workspace does not
cause all existing files
on that workspace to be
unprotected. This will
not happen until you
perform the Unprotect
All Files operation.
To disable protection of new files for a workspace:
1. Click the Workspace tab to access the workspace functions.
2. Select a protected workspace from the workspace list.
3. Click Disable Protection to disable protection for the selected
workspace.
The Unprotected Workspace icon replaces the Protected
Workspace icon in the workspace list.
.
4. If the selected workspace contains existing files that are already
protected and you do not want them to be, you will need to
perform the Unprotect All operation. For more information, see
“Unprotecting All Files” on page 87
86
.
Page 87

Protecting All Files
To protect all files on a workspace (and to enable protection):
1. Mount the workspace by using the Chooser.
2. Click the Workspace tab to access the workspace functions.
3. Select a workspace from the workspace list.
4. Choose Protect All from the Workspace menu. A progress
indicator appears showing how many files remain to be protected.
As soon as the files have all been protected, the progress indicator
closes and the Protected Workspace icon replaces the Unprotected
Workspace icon in the workspace list.
Unprotecting All Files
To make all files on a workspace unprotected (and to disable
protection):
1. Click the Workspace tab to access the workspace functions.
2. Select a workspace from the workspace list.
3. Choose Protect All from the Workspace menu. A progress
indicator appears showing how many files remain to be
unprotected.
As soon as the files have all been unprotected, the progress indicator
closes and the Unprotected Workspace icon replaces the Protected
Workspace icon in the workspace list.
87
Page 88

Optimizing Workspace Protection and Efficiency
Optimization is an operation that ensures that all files on a protected
workspace are duplicated (and therefore protected from drive failure)
and that all files on any workspace are distributed evenly across the
drives in the allocation group to ensure optimal performance.
When Should I Optimize a Workspace?
Under typical conditions, all files written to protected workspaces are
duplicated on more than one drive to ensure data redundancy in case
of drive failures. However, drive problems or extraordinarily heavy
system load can sometimes make it necessary for MediaNet to write
some parts of a file only once to ensure that all read and write
operations proceed in real time without interruption.
You can tell that a workspace is not optimally protected if the “Drive
error analysis needed” message is displayed on the File Manager
Status tab of the Monitor Tool after the Reset Event button is clicked
(for more information, see “Identifying Bad Drives” on page 39
the Avid Unity Monitor Tool Help).
and
When this condition occurs, you should optimize affected workspaces
as soon as possible to ensure that all files on your workspaces are
duplicated (and therefore protected from drive failure).
Workspace optimization also ensures that all files on workspace are
distributed evenly across the drives in the allocation group to ensure
optimal MediaNet file system performance. Optimization is therefore
necessary (and performed automatically) whenever you move a
workspace from one allocation group to another (see “Moving a
Workspace to Another Allocation Group” on page 90).
88
Page 89

Optimizing a Workspace
To optimize a workspace:
1. If you are running the Administration Tool on a Macintosh client,
mount the workspace.
2. Click the Workspace tab to access the workspace functions.
3. Select a workspace from the workspace list.
4. Choose Optimize All Files from the Workspace menu. A progress
indicator appears showing how many files remain to be
duplicated.
As soon as all files on the workspace have been duplicated correctly
and distributed optimally across all drives in the allocation group, the
progress indicator closes. On the File Manager Status tab of the
Monitor Tool, the “Drive error analysis needed” message should
replaced by “No drive errors reported (provided that no other
workspaces still need optimizing).
n
Files on the workspace that are open (that is, in use by MediaNet clients at the
time) are skipped during optimization. If this happens, you will need to
optimize the workspace again after the files are closed to ensure that the
workspace is fully optimized.
89
Page 90

Moving a Workspace to Another Allocation Group
To move a workspace and all its contents to another allocation group:
n
If there are many files on the workspace, this operation can take some time
because the workspace must be optimized (see “Optimizing Workspace
Protection and Efficiency” on page 88) to move the files from the drives of
the original allocation group to the drives of the destination allocation group.
1. Click the Workspace tab to access the workspace functions.
2. Select the workspace you want to move from the workspace list.
3. Click the Allocation Group button (from the Workspace Menu set
of context-sensitive buttons).
A dialog box appears, warning you that the workspace must be
optimized as part of the operation.
4. Click OK to proceed (or Cancel to stop the operation).
The Set Allocation Group dialog box appears.
5. Choose the allocation group onto which you want to move the
workspace from the pop-up menu.
6. Click OK to move the workspace (or click Cancel to stop the
operation).
The workspace is moved. Existing files are moved and new files
written to the workspace are written to the destination allocation
group.
90
Page 91

CHAPTER 6
Managing User Accounts
User accounts are used to control access to the MediaNet file system
and to assign access privileges to workspaces. This chapter describes
how to assign user accounts with associated passwords and access
privileges to accommodate projects, employees, or clients (strategies
for which are outlined in Chapter 1
This chapter describes:
• The User Tab
• Creating User Accounts
• Duplicating Existing User Accounts
• Renaming User Accounts
• Changing User Passwords
).
• Deleting User Accounts
• Workspace Access Privileges
91
Page 92
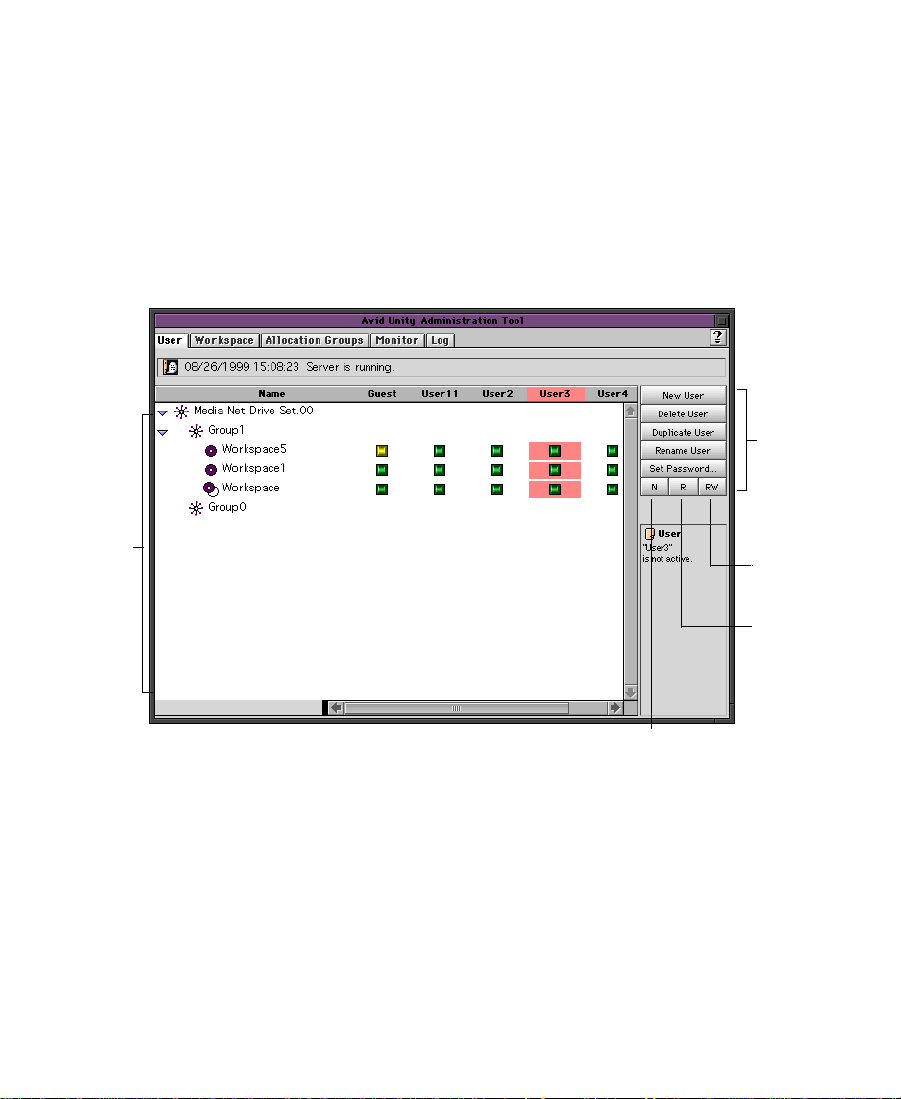
The User Tab
All user functions are performed from the User tab, which allows you
to create, rename, and delete user accounts and to assign access
privileges to workspaces.
This section provides an overview of the User tab and the operations
that you can perform from it. The remainder of this chapter contains
detailed, task-oriented descriptions of all user-related operations.
Contextsensitive
buttons
User table
Read/write
button
Read-only
button
No access button
Figure 6-1 User Tab Example Display
The main section of the User tab contains a selectable table in which
user accounts are represented as column headings, workspaces as row
headings, and user workspace access privileges as the table cells. This
table allows you to easily select user accounts for renaming or deletion
and to manipulate access privileges for selected user accounts and
workspaces.
92
Page 93

The context-sensitive buttons that appear to the right of the User table
duplicate commands from the User menu. When active, they allow
you to create a new user account, to delete selected user accounts, to
duplicate a selected user account, to set a selected user account’s
password, and to change the access privileges for selected cells in the
user table.
The Guest User Account
The Guest user account is special in several ways. The Guest user
account cannot be deleted, cannot be renamed, and has no password.
When the Guest user account is the only user selected, the Delete User
and Set Password functions and the User Name edit box are disabled.
If several users including Guest are selected, the Delete User function
is enabled, but does not delete the Guest user account.
To disable the Guest user account, change its access privileges to all
workspaces to No Access (see “Workspace Access Privileges” on
page 98).
93
Page 94

Creating User Accounts
Newly created user accounts inherit their attributes (name, password,
and access privileges) from your User tab preferences. For more
information, see “Changing Your User Preferences” on page 60
To create new user accounts:
1. Click the User tab to access the user functions.
2. Click the New User button to create a new user account with the
default name, password, and access privileges specified in your
user preferences.
If there is already a user account with the default name, the newly
created user account will be named default name 1. If that name is
already taken (for instance, if you generate multiple new user
accounts at once by repeatedly clicking New User without
renaming each one as it is created), the newly created user account
will be named default name 2, and so on.
.
n
If the maximum number of licensed users has already been created, the
operation will fail and an error message will be displayed in the message area.
3. The last new user account you created is selected so that you need
only start typing to rename the user account. You can also rename
user accounts at any time in the future. For more information, see
“Renaming User Accounts” on page 96
4. (Option) Change the user account’s password. For more
information, see “Changing User Passwords” on page 97
5. (Option) Change the user account’s workspace access privileges.
For more information, see “Workspace Access Privileges” on
page 98.
94
.
.
Page 95

Duplicating Existing User Accounts
User accounts created by duplication inherit the name and access
privileges of the user account from which they were created.
To duplicate a user account:
1. Click the User tab to access the user functions.
2. Select the existing user account that you want to duplicate.
3. Click the Duplicate User button to duplicate the selected user
account. The newly created user account has the same name as the
original and the lowest available integer as a suffix (for example, a
duplicate of user account Original Name will be named Original
Name 1) and inherits the access privileges of the original user
account.
4. The last new user account you create is selected so that you need
only start typing to rename it. You can also rename user accounts
at any time. For more information, see “Renaming User
Accounts” on page 96.
5. (Option) Change the new user account password. For more
information, see “Changing User Passwords” on page 97
.
6. (Option) Change the new user account workspace access
privileges. For more information, see “Workspace Access
Privileges” on page 98.
95
Page 96

Renaming User Accounts
You can rename a user account at any time, even when it is being used
by a user to access MediaNet at the time. The only effect on the user is
that the user will need to use the new name the next time MediaNet
workspaces are mounted.
To rename a user account:
1. Click the User tab to access the user functions.
2. In the User table, click the name of the user account that you want
to change. The user name is highlighted.
3. Click the Rename User button to access the Change User Name
dialog box.
The following
characters are illegal in
user account names: \,
/, :, *, ?, ", <, >, and | . If
you attempt to enter an
illegal character, the
system beeps and the
character is ignored.
4. Type a new user name up to 31 characters in length, and then click
OK (or click Cancel to stop the change). Any invalid characters are
ignored. If you enter no characters, the change will be ignored.
If the name is a duplicate of an existing name, an error message
will appear and, after the message is dismissed, the user account
will revert to its original name. Because the User table lists user
accounts alphabetically, the order can be revised after a name is
changed.
n
The Guest user account cannot not be renamed and will not appear
highlighted when you select it. For more information, see “The Guest User
Account” on page 93.
96
Page 97

Changing User Passwords
You can change user passwords at any time to accommodate a new
user, to reestablish access for an existing user who has forgotten their
password, or to disable access to an account.
To change a user password:
1. Click the User tab to access the user functions.
2. Select the user whose password you want to change.
3. Click the Password button to access the Change User Password
dialog box.
4. Enter and verify the new password, and then click OK (or click
Cancel to stop the change).
n
You set the administration password from the Avid Unity Preferences
window (see “Setting the Administration Password” on page 57
Deleting User Accounts
To delete one or more user accounts:
1. Ensure that the user to be deleted is not currently active by
checking access from the Monitor tab.
2. Click the User tab to access the user functions.
3. Select the user or user accounts that you want to delete from the
User table.
4. Click the Delete User button.
If a selected user account is being used to access MediaNet from a
client, an alert box appears warning you of this and asking you if
you really want to proceed. If you go ahead and delete the user
account, its connection to the MediaNet File Manager is broken
).
97
Page 98

immediately and any mounted workspaces are unmounted as
soon as they are accessed using the Finder.
If just the Guest user account is selected, the Delete button and menu
item will be disabled as though no user is selected. If several user
accounts including the Guest user account are selected and deleted,
then the operation proceeds but the Guest user account is not deleted.
Workspace Access Privileges
MediaNet offers three levels of access to each workspace, which are
shown in Ta b le 6 -1
Table 6-1 Access Levels
Access Level Description
No Access Workspace cannot be read or written to.
Read Access Workspace can be read but not written to.
.
Read/Write Access Workspace can be read and written to.
One of these access levels is assigned to determine each user’s access
privileges to each workspace. Default access privileges are initially
assigned for each new user and new workspace by using the default
settings specified in your preferences (see “Changing Your User
Preferences” on page 60). You can increase or decrease these defaults
to provide customized access for each user to every workspace if
necessary.
For example, you might need to increase the access privileges for a
user who does not have write access to the appropriate workspace, or
for a workspace that does not provide the appropriate access to one or
more users.
98
Page 99

Access Privilege Notes
As access privileges are increased, the newly accessible workspaces
are immediately mountable.
If a user has a workspace mounted with read-only privileges, and is
granted read/write privileges, the new privileges apply immediately,
without remounting the workspace.
If a user is already at the workspace selection stage when the access
privileges are removed, then newly inaccessible workspaces will
remain in the display. However, attempting to actually mount the
workspaces will be unsuccessful.
If a user has a workspace mounted with read/write privileges, and
these are reduced to read-only privileges, the new privileges apply
immediately, without remounting the workspace. If a file is open for
writing, the user retains write privilege to that file until it is closed.
If a user has a workspace mounted and their privileges to that
workspace are reduced to none, then the workspace will be
automatically unmounted the next time that workspace is accessed. If
there are files open when the workspace is unmounted, they should be
closed.
Changing Workspace Access Privileges
The User tab displays access privileges in the User table in which user
accounts are represented as column headings, workspaces as row
headings, and access privileges as the table cells. This table provides a
flexible selection mechanism that allows you to easily select one or
more access values that you want to change.
99
Page 100

Ta bl e 6 - 2 shows how to select the access values you want to change.
Table 6-2 User Table Selections
Items to Select Represented by Selection Action
Individual access value Table cell Click a table cell.
Access for all users to a
specific workspace
Access to all workspaces
for a specific user
Multiple access values Multiple cells, rows, or
Table row Click a workspace name.
Table column Click a user name.
Shift+click the
columns
appropriate access
values, workspaces, or
user names.
To change access privileges:
1. Make sure that no user account whose access privileges you
intend to downgrade is being used by a client who currently has
workspaces mounted. Do this by checking client access from the
Monitor tab and then asking anyone using the user account to
unmount all workspaces.
2. Click the User tab to access the user functions.
3. Select the access permission value or values that you want to
change from the User table (see Ta bl e 6- 2
).
4. Click the access button that reflects the level of access that you
want to grant (one of No access, read-only access, and Read/Write
access).
The access level you specified is applied to all selected cells and
the User table is updated to reflect these changes.
100
 Loading...