

Page 1

Avid Unity™ MediaManager
Installation and Setup Guide
make manage move | media
™
Avid
®
Page 2

Copyright and Disclaimer
Product specifications are subject to change without notice and do not represent a commitment on the part
of Avid Technology, Inc.
The software described in this document is furnished under a license agreement. You can obtain a copy of
that license by visiting Avid's Web site at www.avid.com. The terms of that license are also available in the
product in the same directory as the software. The software may not be reverse assembled and may be
used or copied only in accordance with the terms of the license agreement. It is against the law to copy the
software on any medium except as specifically allowed in the license agreement.
Avid products or portions thereof are protected by one or more of the following United States Patents:
4,746,994; 4,970,663; 5,045,940; 5,267,351; 5,309,528; 5,355,450; 5,396,594; 5,440,348; 5,452,378;
5,467,288; 5,513,375; 5,528,310; 5,557,423; 5,577,190; 5,583,496; 5,584,006; 5,627,765; 5,640,601;
5,644,364; 5,654,737; 5,715,018; 5,719,570; 5,724,605; 5,726,717; 5,729,673; 5,745,637; 5,752,029;
5,754,851; 5,799,150; 5,812,216; 5,828,678; 5,842,014; 5,852,435; 5,999,406; 6,038,573; 6,061,758;
6,141,007; 6,211,869; 6,532,043; 6,546,190; 6,596,031; 6,636,869; 6,747,705; 6,763,523; 6,766,357;
6,813,622; 6,847,373; D352,278; D372,478; D373,778; D392,267; D392,268; D392,269; D395,291;
D396,853; D398,912. Other patents are pending.
No part of this document may be reproduced or transmitted in any form or by any means, electronic or
mechanical, including photocopying and recording, for any purpose without the express written permission
of Avid Technology, Inc.
Copyright © 2005 Avid Technology, Inc. and its licensors. All rights reserved.
The following disclaimer is required by Apple Computer, Inc.
APPLE COMPUTER, INC. MAKES NO WARRANTIES WHATSOEVER, EITHER EXPRESS OR IMPLIED,
REGARDING THIS PRODUCT, INCLUDING WARRANTIES WITH RESPECT TO ITS
MERCHANTABILITY OR ITS FITNESS FOR ANY PARTICULAR PURPOSE. THE EXCLUSION OF
IMPLIED WARRANTIES IS NOT PERMITTED BY SOME STATES. THE ABOVE EXCLUSION MAY NOT
APPLY TO YOU. THIS WARRANTY PROVIDES YOU WITH SPECIFIC LEGAL RIGHTS. THERE MAY BE
OTHER RIGHTS THAT YOU MAY HAVE WHICH VARY FROM STATE TO STATE.
The following disclaimer is required by Sam Leffler and Silicon Graphics, Inc. for the use of
their TIFF library:
Copyright © 1988–1997 Sam Leffler
Copyright © 1991–1997 Silicon Graphics, Inc.
Permission to use, copy, modify, distribute, and sell this software [i.e., the TIFF library] and its
documentation for any purpose is hereby granted without fee, provided that (i) the above copyright notices
and this permission notice appear in all copies of the software and related documentation, and (ii) the
names of Sam Leffler and Silicon Graphics may not be used in any advertising or publicity relating to the
software without the specific, prior written permission of Sam Leffler and Silicon Graphics.
THE SOFTWARE IS PROVIDED “AS-IS” AND WITHOUT WARRANTY OF ANY KIND, EXPRESS,
IMPLIED OR OTHERWISE, INCLUDING WITHOUT LIMITATION, ANY WARRANTY OF
MERCHANTABILITY OR FITNESS FOR A PARTICULAR PURPOSE.
IN NO EVENT SHALL SAM LEFFLER OR SILICON GRAPHICS BE LIABLE FOR ANY SPECIAL,
INCIDENTAL, INDIRECT OR CONSEQUENTIAL DAMAGES OF ANY KIND, OR ANY DAMAGES
WHATSOEVER RESULTING FROM LOSS OF USE, DATA OR PROFITS, WHETHER OR NOT ADVISED
OF THE POSSIBILITY OF DAMAGE, AND ON ANY THEORY OF LIABILITY, ARISING OUT OF OR IN
CONNECTION WITH THE USE OR PERFORMANCE OF THIS SOFTWARE.
The following disclaimer is required by the Independent JPEG Group:
Portions of this software are based on work of the Independent JPEG Group.
The following disclaimer is required by Paradigm Matrix:
Portions of this software licensed from Paradigm Matrix.
2
Page 3

The following disclaimer is required by Ray Sauers Associates, Inc.:
“Install-It” is licensed from Ray Sauers Associates, Inc. End-User is prohibited from taking any action to
derive a source code equivalent of “Install-It,” including by reverse assembly or reverse compilation, Ray
Sauers Associates, Inc. shall in no event be liable for any damages resulting from reseller’s failure to
perform reseller’s obligation; or any damages arising from use or operation of reseller’s products or the
software; or any other damages, including but not limited to, incidental, direct, indirect, special or
consequential Damages including lost profits, or damages resulting from loss of use or inability to use
reseller’s products or the software for any reason including copyright or patent infringement, or lost data,
even if Ray Sauers Associates has been advised, knew or should have known of the possibility of such
damages.
The following disclaimer is required by Videomedia, Inc.:
“Videomedia, Inc. makes no warranties whatsoever, either express or implied, regarding this product,
including warranties with respect to its merchantability or its fitness for any particular purpose.”
“This software contains V-LAN ver. 3.0 Command Protocols which communicate with V-LAN ver. 3.0
products developed by Videomedia, Inc. and V-LAN ver. 3.0 compatible products developed by third parties
under license from Videomedia, Inc. Use of this software will allow “frame accurate” editing control of
applicable videotape recorder decks, videodisc recorders/players and the like.”
The following disclaimer is required by Altura Software, Inc. for the use of its Mac2Win
software and Sample Source Code:
©1993–1998 Altura Software, Inc.
Attn. Government User(s). Restricted Rights Legend
U.S. GOVERNMENT RESTRICTED RIGHTS. This Software and its documentation are “commercial
computer software” or “commercial computer software documentation.” In the event that such Software or
documentation is acquired by or on behalf of a unit or agency of the U.S. Government, all rights with
respect to this Software and documentation are subject to the terms of the License Agreement, pursuant to
FAR §12.212(a) and/or DFARS §227.7202-1(a), as applicable.
Trademarks
888 I/O, Adrenaline, AirPlay, AirSPACE, AirSPACE HD, AirSpeed, AniMatte, AudioSuite, AudioVision,
AutoSync, Avid, Avid DNA, Avid DNxcel, Avid DNxHD, AVIDdrive, AVIDdrive Towers, Avid Mojo, AvidNet,
AvidNetwork, AVIDstripe, Avid Unity, Avid Xpress, AVoption, AVX, CamCutter, ChromaCurve,
ChromaWheel, DAE, D-Fi, D-fx, Digidesign, Digidesign Audio Engine, Digidesign Intelligent Noise
Reduction, DigiDrive, Digital Nonlinear Accelerator, DigiTranslator, DINR, D-Verb, Equinox, ExpertRender,
FieldPak, Film Composer, FilmScribe, FluidMotion, HIIP, HyperSPACE, HyperSPACE HDCAM, IllusionFX,
Image Independence, Intraframe, iS9, iS18, iS23, iS36, LaunchPad, Lo-Fi, Magic Mask,
make manage move | media, Marquee, Matador, Maxim, MCXpress, Media Composer, MediaDock,
MediaDock Shuttle, Media Fusion, Media Illusion, MediaLog, Media Reader, Media Recorder, MEDIArray,
MediaShare, Meridien, MetaSync, MissionControl, NaturalMatch, Nearchive, NetReview, NewsCutter,
Nitris, OMF, OMF Interchange, OMM, Open Media Framework, Open Media Management, ProEncode,
Pro Tools, QuietDrive, Recti-Fi, RetroLoop, rS9, rS18, Sci-Fi, Softimage, Sound Designer II, SPACE,
SPACEShift, SpectraGraph, SpectraMatte, Symphony, Trilligent, UnityRAID, Vari-Fi, Video Slave Driver,
VideoSPACE, and Xdeck are either registered trademarks or trademarks of Avid Technology, Inc. in the
United States and/or other countries.
iNEWS, iNEWS ControlAir, and Media Browse are trademarks of iNews, LLC.
Macintosh is a trademark of Apple Computer, Inc., registered in the U.S. and other countries. Microsoft and
Windows are either registered trademarks or trademarks of Microsoft Corporation in the United States
and/or other countries. All other trademarks contained herein are the property of their respective owners.
Footage
Arizona Images — KNTV Production — Courtesy of Granite Broadcasting, Inc.,
Editor/Producer Bryan Foote.
Canyonlands — Courtesy of the National Park Service/Department of the Interior.
Tornados + Belle Isle footage — Courtesy of KWTV News 9.
WCAU Fire Story — Courtesy of NBC-10, Philadelphia, PA.
Women in Sports – Paragliding — Courtesy of Legendary Entertainment, Inc.
3
Page 4

GOT FOOTAGE?
Editors — Filmmakers — Special Effects Artists — Game Developers — Animators — Educators —
Broadcasters — Content creators of every genre — Just finished an incredible project and want to
share it with the world?
Send us your reels and we may use your footage in our show reel or demo!*
For a copy of our release and Avid’s mailing address, go to www.avid.com/footage.
*Note: Avid cannot guarantee the use of materials submitted.
Avid Unity MediaManager Installation and Setup Guide • 0130-06037-01B • March 2005
4
Page 5

Contents
Using This Guide. . . . . . . . . . . . . . . . . . . . . . . . . . . . . . . . . . . . . . . . 9
Symbols and Conventions . . . . . . . . . . . . . . . . . . . . . . . . . . . . . . . . . . . . . . 10
If You Need Help. . . . . . . . . . . . . . . . . . . . . . . . . . . . . . . . . . . . . . . . . . . . . . 11
Related Information. . . . . . . . . . . . . . . . . . . . . . . . . . . . . . . . . . . . . . . . . . . . 11
How to Order Documentation . . . . . . . . . . . . . . . . . . . . . . . . . . . . . . . . . . . . 12
Avid Educational Services. . . . . . . . . . . . . . . . . . . . . . . . . . . . . . . . . . . . . . . 12
Chapter 1 Installing Avid Unity MediaManager Server Hardware . . . . . . . . 13
Hardware Requirements . . . . . . . . . . . . . . . . . . . . . . . . . . . . . . . . . . . . . . . . 14
Turning On the MediaManager Server . . . . . . . . . . . . . . . . . . . . . . . . . . . . . 14
Installing MediaNetwork Client Software. . . . . . . . . . . . . . . . . . . . . . . . . . . . 14
Installing the MediaManager Server Dongle . . . . . . . . . . . . . . . . . . . . . . . . . 15
Chapter 2 Installing MediaManager Server and Client Software . . . . . . . . . 17
Setup Overview. . . . . . . . . . . . . . . . . . . . . . . . . . . . . . . . . . . . . . . . . . . . . . . 18
Setting the Total Paging File Size . . . . . . . . . . . . . . . . . . . . . . . . . . . . . 18
Renaming Your Server. . . . . . . . . . . . . . . . . . . . . . . . . . . . . . . . . . . . . . 19
Software Installation Overview . . . . . . . . . . . . . . . . . . . . . . . . . . . . . . . . . . . 20
Upgrading from a Previous Release of MediaManager . . . . . . . . . . . . . . . . 21
Upgrade Installation Checklist . . . . . . . . . . . . . . . . . . . . . . . . . . . . . . . . 21
Saving the Existing Database . . . . . . . . . . . . . . . . . . . . . . . . . . . . . . . . 22
Removing a Previous Release of MediaManager . . . . . . . . . . . . . . . . . 23
Installing the MediaManager Software on MediaManager Server . . . . . 23
New MediaManager Installation . . . . . . . . . . . . . . . . . . . . . . . . . . . . . . . . . . 27
Installing IIS Lockdown Tool . . . . . . . . . . . . . . . . . . . . . . . . . . . . . . . . . . . . . 29
Page 6

Enabling MDB Manager . . . . . . . . . . . . . . . . . . . . . . . . . . . . . . . . . . . . . . . . 31
Setting the MediaManager Server Home Page . . . . . . . . . . . . . . . . . . . . . . 32
Installing the MediaManager Client Software. . . . . . . . . . . . . . . . . . . . . . . . 32
Installing the MediaManager Client Software (Windows) . . . . . . . . . . . 33
Installing the MediaManager Client Software (Macintosh) . . . . . . . . . . 34
Logging Into the Avid Unity MediaNetwork Environment . . . . . . . . . . . . . . . 35
Connecting to Avid Unity MediaNetwork (Windows) . . . . . . . . . . . . . . . 35
Mapping MediaNetwork Workspaces . . . . . . . . . . . . . . . . . . . . . . . 35
Unmapping MediaNetwork Workspaces. . . . . . . . . . . . . . . . . . . . . 36
Connecting to Avid Unity MediaNetwork (Macintosh) . . . . . . . . . . . . . . 37
Mounting Workspaces . . . . . . . . . . . . . . . . . . . . . . . . . . . . . . . . . . 37
Changing Your Password. . . . . . . . . . . . . . . . . . . . . . . . . . . . . . . . 38
Unmounting Workspaces . . . . . . . . . . . . . . . . . . . . . . . . . . . . . . . . 38
Logging Out . . . . . . . . . . . . . . . . . . . . . . . . . . . . . . . . . . . . . . . . . . 38
Rebooting the MediaManager Server . . . . . . . . . . . . . . . . . . . . . . . . . . 39
Chapter 3 Configuring Avid Editing Systems to Work with MediaManager 41
Specifying MediaManager Settings . . . . . . . . . . . . . . . . . . . . . . . . . . . . . . . 42
Specifying the MediaManager Server . . . . . . . . . . . . . . . . . . . . . . . . . . 42
Specifying the MediaManager User Settings . . . . . . . . . . . . . . . . . . . . 43
Setting the Default Access Control from the Editing System. . . . . . . . . 44
Chapter 4 Installing MediaManager Select Players . . . . . . . . . . . . . . . . . . . . 47
Network Overview . . . . . . . . . . . . . . . . . . . . . . . . . . . . . . . . . . . . . . . . . . . . 49
Recommended Network Configuration . . . . . . . . . . . . . . . . . . . . . . . . . . . . 50
MediaManager Select Players. . . . . . . . . . . . . . . . . . . . . . . . . . . . . . . . 50
Name Resolution. . . . . . . . . . . . . . . . . . . . . . . . . . . . . . . . . . . . . . . . . . 51
PortServer Pro. . . . . . . . . . . . . . . . . . . . . . . . . . . . . . . . . . . . . . . . . . . . 51
Network Devices (Switches and Routers) . . . . . . . . . . . . . . . . . . . . . . . 52
Latency . . . . . . . . . . . . . . . . . . . . . . . . . . . . . . . . . . . . . . . . . . . . . . 52
Dropped Packets . . . . . . . . . . . . . . . . . . . . . . . . . . . . . . . . . . . . . . 52
6
Page 7

Bandwidth . . . . . . . . . . . . . . . . . . . . . . . . . . . . . . . . . . . . . . . . . . . . 53
Insufficient Bandwidth . . . . . . . . . . . . . . . . . . . . . . . . . . . . . . . . . . . 53
Hardware and Operating System Requirements . . . . . . . . . . . . . . . . . . . . . 55
Installation Prerequisites . . . . . . . . . . . . . . . . . . . . . . . . . . . . . . . . . . . . . . . . 55
Upgrading From a Previous Release of MediaManager Select Players . . . . 55
Installing the Avid Player Software . . . . . . . . . . . . . . . . . . . . . . . . . . . . . . . . 56
Installing the Avid Player on a Windows System . . . . . . . . . . . . . . . . . . 56
Installing the Avid Player on a Macintosh Client . . . . . . . . . . . . . . . . . . 57
Installing the Browser Player and ProLog Player Software (Windows Only) 58
Running Windows Update. . . . . . . . . . . . . . . . . . . . . . . . . . . . . . . . . . . . . . . 59
Dual-Monitor Option . . . . . . . . . . . . . . . . . . . . . . . . . . . . . . . . . . . . . . . . . . . 60
Configuring the PortServer Pro Connection . . . . . . . . . . . . . . . . . . . . . . . . . 61
Configure the PortServer Pro from a License Pool Server (Standard). . 61
Specifying an Ethernet Attached Server . . . . . . . . . . . . . . . . . . . . . . . . 62
List of Terms . . . . . . . . . . . . . . . . . . . . . . . . . . . . . . . . . . . . . . . . . . 65
Index . . . . . . . . . . . . . . . . . . . . . . . . . . . . . . . . . . . . . . . . . . . . . . . . . 69
7
Page 8

8
Page 9

Using This Guide
Congratulations on your purchase of an Avid Unity™ MediaManager, a
powerful tool for managing media in an Avid Unity MediaNetwork shared
storage environment.
This guide is intended for MediaManager administrators responsible for the
setup of MediaManager in a MediaNetwork environment.
n
The documentation describes the features and hardware of all models.
Therefore, your system might not contain certain features and hardware that
are covered in the documentation.
Page 10

Using This Guide
Symbols and Conventions
Avid documentation uses the following symbols and conventions:
Symbol or Convention Meaning or Action
n
c
w
> This symbol indicates menu commands (and
t
k
Margin tips
(Windows), (Windows
only), (Macintosh), or
(Macintosh only)
A note provides important related information,
reminders, recommendations, and strong suggestions.
A caution means that a specific action you take could
cause harm to your computer or cause you to lose data.
A warning describes an action that could cause you
physical harm. Follow the guidelines in this document
or on the unit itself when handling electrical
equipment.
subcommands) in the order you select them. For
example, File > Import means to open the File menu
and then select the Import command.
This symbol indicates a single-step procedure.
Multiple arrows in a list indicate that you perform one
of the actions listed.
This symbol represents the Apple or Command key.
Press and hold the Command key and another key to
perform a keyboard shortcut.
In the margin, you will find tips that help you perform
tasks more easily and efficiently.
This text indicates that the information applies only to
the specified operating system, either Windows XP or
Macintosh OS X.
10
Italic font Italic font is used to emphasize certain words and to
indicate variables.
Courier Bold font
Ctrl+key or mouse action
k+key or mouse action
Courier Bold font identifies text that you type.
Press and hold the first key while you press the last
key or perform the mouse action. For example,
k+Option+C or Ctrl+drag.
Page 11

If You Need Help
If you are having trouble using MediaManager:
1. Retry the action, carefully following the instructions given for that task in
this guide. It is especially important to check each step of your workflow.
2. Check for the latest information that might have become available after
the documentation was published in one of two locations:
- If release notes are available, they ship with your application.
- If ReadMe files are available, they are supplied in your Avid
If You Need Help
application folder.
n
Release notes and ReadMe files are also available on the Avid Knowledge
Base.
3. Check the documentation that came with your Avid application or your
hardware for maintenance or hardware-related issues.
4. Visit Avid Online Support at www.avid.com/onlineSupport/. Online
support is available 24 hours per day, 7 days per week. Search the
Knowledge Base to find answers, to view error messages, to access
troubleshooting tips, to download updates, and to read/join online
message-board discussions.
Related Information
The following documents provide more information about MediaManager:
• Avid Unity MediaManager Administrator’s and User’s Guide
• Avid Unity MediaManager ReadMe
n
For the latest product information, see the Avid Knowledge Base:
www.avid.com/onlineSupport/.
11
Page 12

Using This Guide
How to Order Documentation
To order additional copies of this documentation from within the
United States, call Avid Sales at 800-949-AVID (800-949-2843). If you are
placing an order from outside the United States, contact your local
Avid representative.
Avid Educational Services
For information on courses/schedules, training centers, certifications,
courseware, and books, please visit www.avid.com/training or call Avid Sales
at 800-949-AVID (800-949-2843).
12
Page 13

Chapter 1
Installing Avid Unity MediaManager Server Hardware
This chapter describes how to add the Avid Unity MediaManager server to the
Avid Unity workgroup. The MediaManager server is a MediaNetwork client
in the Avid Unity environment. For an overview of the MediaManager and
supported configurations, see “MediaManager Overview” in the Help.
Follow the procedures in the Avid Unity MediaNetwork Windows Fibre
Channel Client Setup Guide to make your MediaManager server operational
in the Avid Unity environment. Follow the procedures in “Installing
MediaNetwork for a Windows 2000 Client” section.
This chapter contains the following sections:
• Hardware Requirements
• Turning On the MediaManager Server
• Installing MediaNetwork Client Software
• Installing the MediaManager Server Dongle
Page 14

Chapter 1 Installing Avid Unity MediaManager Server Hardware
Hardware Requirements
For a list of the hardware and software required, see the Avid Unity
MediaManager ReadMe file.
n
The ReadMe file is available on the Avid Knowledge Base.
Turning On the MediaManager Server
When you finish connecting the MediaManager server hardware and cables,
you can start the MediaManager server. Before you start the MediaManager
server, make sure the MediaNetwork file server is running.
To start your MediaManager server:
1. Turn on the power to all the components and start the MediaManager
server in the following order:
a. Turn on all the peripherals connected to the MediaManager server.
Make sure their power lights are on.
b. Press the Power button on the MediaManager server.
The MEDIASwitch port lights turn on as the MediaManager server
becomes ready.
2. Make sure the MediaManager server starts properly.
Installing MediaNetwork Client Software
14
After your MediaManager server starts properly, install the Avid Unity
MediaNetwork client software on the MediaManager server. For information
on installing the MediaNetwork client software, see the Avid Unity
MediaNetwork Windows Fibre Channel Client Setup Guide.
Page 15
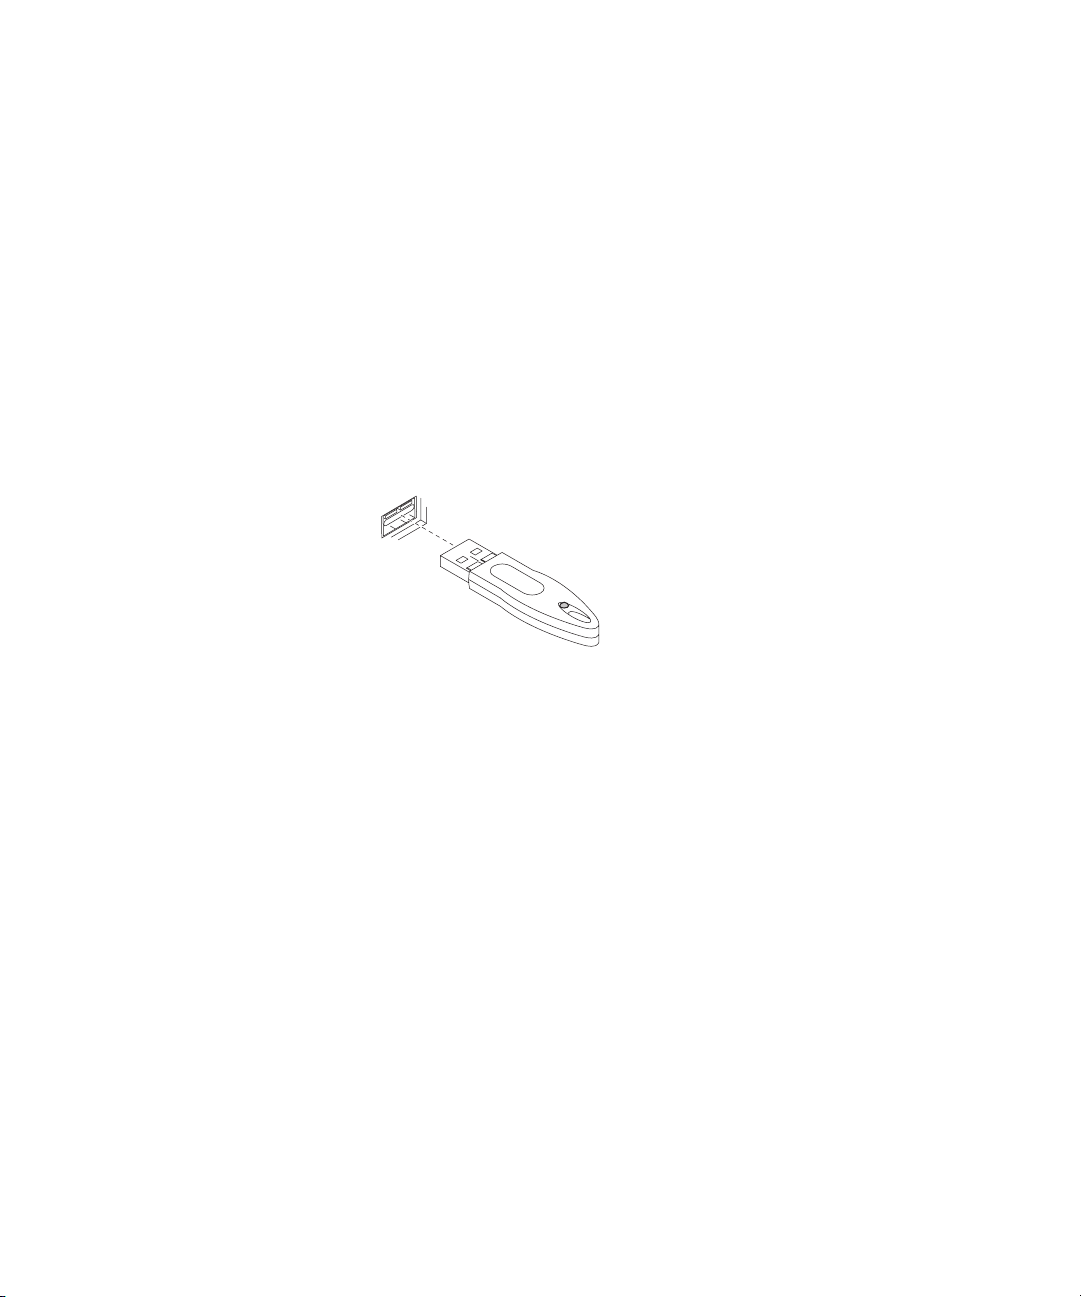
Installing the MediaManager Server Dongle
Installing the MediaManager Server Dongle
Before installing the MediaManager server software, attach the
MediaManager server dongle (also called an application key) to a USB port on
the computer. The computer recognizes the application key when it is booting.
If the dongle is not installed, only an evaluation license will be available. The
evaluation license allows only ten logins to the MediaManager server. After
ten logins, you must reinstall the MediaManager server software to use it.
To install the dongle:
t Connect the dongle to a USB port on the MediaManager server computer.
c
If you lose your application key, you must purchase another key from
Avid at the full market cost of your software.
15
Page 16

Chapter 1 Installing Avid Unity MediaManager Server Hardware
16
Page 17

Chapter 2
Installing MediaManager Server and Client Software
After you have installed the MediaNetwork client software on your
MediaManager server, install the MediaManager server software.
• Setup Overview
• Software Installation Overview
• Upgrading from a Previous Release of MediaManager
• New MediaManager Installation
• Installing IIS Lockdown Tool
• Enabling MDB Manager
• Setting the MediaManager Server Home Page
• Installing the MediaManager Client Software
• Logging Into the Avid Unity MediaNetwork Environment
Page 18

Chapter 2 Installing MediaManager Server and Client Software
Setup Overview
To properly set up MediaManager to work in the Avid Unity MediaNetwork
environment, perform the following procedures:
• Setting the Total Paging File Size
• Renaming Your Server
Setting the Total Paging File Size
The MediaManager server is shipped with the Total Paging File size set
correctly. If you ever need to check the Total Paging File size to verify it is set
properly, perform the following procedure.
To set the paging file size:
1. Right-click the My Computer icon on your desktop, and select Properties.
The System Properties dialog box opens.
2. Click the Advanced tab.
18
3. Click Performance Options.
4. In Virtual Memory, click Change.
5. Select drive C.
6. Set the Initial size and Maximum size to 2048 MB.
7. Click OK.
Page 19

Renaming Your Server
Setup Overview
c
If you want to change your MediaManager server computer’s name,
perform this procedure before you install the MediaManager software. If
you change the name after installing the MediaManager server software,
you will need to uninstall and reinstall all the MediaManager software.
Microsoft SQL Server has already been installed on your MediaManager
server system. It is during the installation procedure that a name is given to the
server system. If you have multiple servers, you might want to change the
computer name. To rename the MediaManager server system to a name you
want, change the computer name and then restart your system.
To name your MediaManager server system:
1. Click the Start button, and select Settings > Control Panel.
2. Double-click System.
3. Click the Network Identification tab.
4. Click Properties.
5. In Computer name text box, type a new name for the computer, and then
click OK.
19
Page 20

Chapter 2 Installing MediaManager Server and Client Software
Software Installation Overview
The following sections provide the steps for installing the MediaManager
software.
• If you are upgrading from a previous release, follow the procedures in
“Upgrading from a Previous Release of MediaManager” on page 21.
• If you are installing the software for the first time, follow the procedures
in “New MediaManager Installation” on page 27.
The following table outlines where the TransferManager and MediaManager
software should be installed. If your environment includes both
TransferManager and MediaManager, use this table as a guide. For
information on installing the TransferManager software, see the Avid Unity
TransferManager Release Notes.
Installed on
MediaManager
Software
TransferManager Server ✓✓
TransferManager Client ✓b
MediaManager Server ✓
MediaManager Client ✓
Avid Unity MediaNetwork
Client
a. Install only if in a peer-to-peer environment (not an Avid Unity environment).
b. Install only if a TransferManager server is part of your Avid Unity environment.
n
After installing MediaManager v4.5, if you decide to reinstall an older version
of MediaManager, make sure you uninstall v4.5, before reinstalling the older
Server
✓✓ ✓
Installed on
TransferManager
Server
Installed on Avid
Editing Client
a
✓
version of MediaManager. When uninstalling v4.5, you should use the Control
Panel’s Add/Remove application and reboot your computer after the uninstall
is complete.
20
Page 21

Upgrading from a Previous Release of MediaManager
Upgrading from a Previous Release of
MediaManager
For current information relating to upgrading from a previous release, see the
Avid Unity MediaManager ReadMe. The ReadMe is available on the
MediaManager CD-ROM. You can access the most up-to-date ReadMe file
from the
Avid Customer Support Knowledge Base.
n
n
If this is your first time installing the software, see “New MediaManager
Installation” on page 27.
If your workgroup includes a Media Browse server and you are reinstalling
the MediaManager server software, you need to reenter the URL for the Media
Browse server in the Media Browse Notification option. See “Media Browse
Notification” in the Help.
Upgrade Installation Checklist
The following table provides a checklist of steps for upgrading the
MediaManager server software and references on where to find more
information about each step.
MediaManager Upgrade Installation Check List
Task Section Reference
Before you begin:
! Check your configuration. “Installing Avid Unity MediaManager Server
Hardware” on page 13 and Avid Unity
MediaManager ReadMe.
! Save the existing database. “Saving the Existing Database” on page 22
! Remove previous version of MediaManager “Removing a Previous Release of
MediaManager” on page 23
! Install MediaManager server software. “Installing the MediaManager Software on
MediaManager Server” on page 23
21
Page 22

Chapter 2 Installing MediaManager Server and Client Software
Saving the Existing Database
Avid recommends that you back up the entire MediaManager database before
you upgrade. This process can take a long time, depending upon the number of
media objects. You should perform this procedure when MediaManager’s
usage is low or has no activity.
To specify the location in which to store MediaManager backup files:
1. Click Administration in the mode selector.
2. Click the System Setup icon in the Functions list.
The System Setup window opens.
3. Specify the location (drive and directory) for your MediaManager backup
files. The default directory is
removable device or another hard disk to back up your database.
4. Click Submit.
The new location for MediaManager backup files is stored.
To back up the MediaManager database:
C:\backup
. You might want to choose a
22
1. Click Administration in the mode selector.
2. Click the Backup icon in the Functions list.
The Create Backup window opens.
3. Type a new backup file name, or select an existing one:
- To create a new backup, select New and then type the name of the file
in the text box.
- To overwrite an existing backup file, select Existing and then choose
an existing file from the list.
4. (Option) Type a description to be associated with the backup in the
Description text box.
5. Click Start.
The backup procedure begins. This process can take a long time,
depending upon the number of media objects.
Page 23

Upgrading from a Previous Release of MediaManager
Removing a Previous Release of MediaManager
You can use this procedure to remove MediaManager server software and
MediaManager client software.
To remove a previous release of MediaManager:
1. Click Start and select Settings > Control Panel.
2. Double-click Add/Remove Programs.
3. Select the Avid MediaManager program you want to remove and click
Remove.
4. Follow the instructions given to complete the removal.
- Choose to remove all components of the MediaManager software.
- Choose to delete all shared files.
Installing the MediaManager Software on MediaManager Server
c
During this installation, you will be asked for an Avid Unity administrator
user name and password. Your Avid Unity administrator must also create
the same user account with the same password on the Avid Unity system
using the Avid Unity Administration Tool. Remember not to use the true
admin but create a different user and use that. For example, you could
name this user MMAdmin. This user must not be the Administrator
account. For information on setting up Avid Unity user accounts, see your
Avid Unity documentation. The user you create on Avid Unity must have
read/write access to all the workspaces that MediaManager needs to
access.
Depending on the previous release that you are upgrading from, if you want to
reuse your database, you must perform the database conversion process, by
running the Database Updater during the server software installation
procedure.
If you are converting your database, make sure you have done the following
before starting the server software installation.
• IMPORTANT: Back up your existing database. Once you back up the
database, move the saved database off the MediaManager server. You will
want to have a backup stored somewhere other than the server. See
“Saving the Existing Database” on page 22.
23
Page 24

Chapter 2 Installing MediaManager Server and Client Software
• Make sure that your virus protection software is not active and that any
script blocking or dynamic checking of files is not running on your virus
protection software. This will interfere with the conversion process.
• Make sure your database is as clean as possible. Before converting, make
sure you have removed any unwanted files and precomputes that would
add to the conversion time.
• Make sure you have enough disk space to perform the conversion process.
You need enough free space on your 32-GB drive to accommodate two
times your database size. You can view the free disk space and your
database size on the Server Statistics page in Administration mode of
MediaManager.
n
MediaManager server installation depends on the existence of drive C to
which it has read/write access. Some MediaManager services will not work
correctly without a drive C.
To install MediaManager server software when upgrading from a
previous release:
1. Remove any previous release of MediaManager server software from the
system. See “Removing a Previous Release of MediaManager” on
page 23.
2. Insert the MediaManager CD in the CD-ROM drive of your
MediaManager server system.
3. Click ReadMe/Browse Media, to open the ReadMe file.
View the ReadMe file for important information about the MediaManager,
then return to the installation frontend window.
4. Click Install Products.
5. Update your database:
a. Click Use Database Updater.
b. Click Next.
c. Select a destination location for the Database Updater program and
click Next.
24
The SQL Server Login dialog box opens.
d. The UserID sa appears in the text box. Leave sa as the UserID, and do
not enter any password.
Page 25

Upgrading from a Previous Release of MediaManager
e. Click Next to continue.
A dialog box opens indicating the SQL database will be updated.
f. Click OK and then click Yes.
When the update is complete the installation frontend window opens.
6. Click Install MediaManager Server.
7. If the installer finds a previous version of MediaManager installed on your
system, a dialog box opens indicating you need to remove the previous
version before you can continue with the installation. Do the following:
a. Click OK and following the procedure in “Removing a Previous
Release of MediaManager” on page 23.
b. After your system restarts, return to step 6 to install MediaManager
server software.
8. Click Next.
9. Select the applicable country and click Next.
10. In the Software License Agreement window, read the agreement, and then
click Yes to accept the terms of the agreement.
n
11. In the Enable Media Database Manager (MDB) window, do one of the
following:
t Click No, if your clients do not use the Media tool or if your
workgroup environment is MXF/AAF.
t Click Yes, if you have clients in your OMF workgroup environment
that use the Media tool.
Enabling MDB Manager is necessary only if you are using a client in your
OMF workgroup environment that intends to use the Media tool. The
MDB Manager is not supported in an MXF/AAF workgroup. If you
choose not to enable the MDB Manager at this time you can enable it
later. See “Enabling MDB Manager” on page 31.
If you enable MDB Manager, you might experience slower performance if
your two largest workspaces together total more than 30,000 files. If you
experience slower performance and you have MDB Manager enabled, check
your workspaces and clean up or reorganize your workspaces to reduce the
file count. If you are experiencing slow performance, you may want to reduce
the allocation size of the two largest workspaces. If you are experiencing
slower than normal performance, on the MediaManager system, check the
Windows Task Manager for the amount of memory MDB_Agent.exe is using. If
25
Page 26

Chapter 2 Installing MediaManager Server and Client Software
memory usage exceeds 1.5 GB, significant activity likely is occurring on
MediaManager. You might want to reduce the number of transactions to
MediaManager until the MDB Manager is able to catch up with the workload.
12. Click Next.
13. Select a destination location for your MediaManager server program. The
default is:
C:\Program Files\Avid
14. Click Next.
The Select Program Folder dialog box opens.
15. Accept the default folder, and click Next to open the SQL Server Login
dialog box.
16. The UserID sa appears in the text box. Leave sa as the UserID, and do not
enter any password.
17. Click Next to continue.
A dialog box opens, indicating the installer has found an existing database
and asks if you want to reuse the current version.
26
c
18. Click Yes.
The Services Setup dialog box opens.
19. Type a user name and password. These must match an existing
administrative name and password on the Avid Unity system created using
the Avid Unity Administration Tool. For example, you could name the
user MMAdmin. If you are performing an upgrade and previously you
used the default Administrator account, you must create a new user on the
Avid Unity system and enter that user here.
In case of an upgrade, do not use the default Unity Administrator
account. If you use the Administrator account, you will be unable to log in
again to your system.
20. Click Next.
When the installation is complete, a dialog box opens.
21. Select “Yes, I want to restart my computer now.”
22. Click Finish.
23. Continue with “Installing IIS Lockdown Tool” on page 29.
Page 27

New MediaManager Installation
New MediaManager Installation
c
n
During this installation, you will be asked for an Avid Unity user name
and password. This Unity user must be created within the Avid Unity
Administration Tool and must be granted read/write access to all Unity
workspaces that MediaManager needs to access. The user SHOULD NOT
be the Unity Administrator. Once created, this user should not be deleted
or have its password changed.
For current information relating to installing MediaManager, see the Avid
Unity MediaManager ReadMe. The ReadMe is available on the
MediaManager CD-ROM. You can access the most up-to-date ReadMe file
from the Avid Customer Support Knowledge Base.
If your workgroup includes a Media Browse server and you are reinstalling
the MediaManager server software, you need to reenter the URL for the Media
Browse server in the Media Browse Notification option. See “Media Browse
Notification” in the Help
To install MediaManager server software:
1. Insert the MediaManager CD in the CD-ROM drive of your
MediaManager server system.
2. Click ReadMe/Browse Media, to open the ReadMe file.
View the ReadMe file for important information about MediaManager,
then return to the installation frontend window.
3. Click Install Products.
4. Click Install MediaManager Server.
5. In the Welcome window, click Next.
6. Select the applicable country and click Next.
7. In the Software License Agreement window, read the agreement, and then
click Yes to accept the terms of the agreement.
27
Page 28

Chapter 2 Installing MediaManager Server and Client Software
8. In the Enable Media Database Manager (MDB) window, do one of the
following:
t Click No, if your clients do not use the Media tool or if your
workgroup environment is MXF/AAF.
t Click Yes, if you have clients in your OMF workgroup environment
that use the Media tool.
Enabling MDB Manager is necessary only if you are using a client in your
OMF workgroup environment that intends to use the Media tool. The
MDB Manager is not supported in an MXF/AAF workgroup. If you
choose not to enable the MDB Manager at this time you can enable it
later. See “Enabling MDB Manager” on page 31.
n
If you enable MDB Manager, you might experience slower performance if
your two largest workspaces together total more than 30,000 files. If you
experience slower performance and you have MDB Manager enabled, check
your workspaces and clean up or reorganize your workspaces to reduce the
file count. If you are experiencing slow performance, you may want to reduce
the allocation size of the two largest workspaces. If you are experiencing
slower than normal performance, on the MediaManager system, check the
Windows Task Manager for the amount of memory MDB_Agent.exe is using. If
memory usage exceeds 1.5 GB, significant activity likely is occurring on
MediaManager. You might want to reduce the number of transactions to
MediaManager until the MDB Manager is able to catch up with the workload.
9. Click Next.
10. Select a destination location for your MediaManager server program. The
default is:
C:\Program Files\Avid
11. Click Next.
The Select Program Folder dialog box opens.
12. Accept the default folder, and click Next.
The SQL Server Login dialog box opens.
13. The UserID sa appears in the text box. Leave sa as the UserID, and do not
enter any password.
28
14. Click Next to continue.
A dialog box opens asking if you want to create a database.
Page 29

Installing IIS Lockdown Tool
15. Click Yes.
The Services Setup dialog box opens.
16. Type a user name and password. These must match an existing
administrative name and password on the Avid Unity system created using
the Avid Unity Administration Tool. For example, you could name the
user MMAdmin.
c
Do not use the default Administrator account. If you use the
Administrator account, you will be unable to log in again to your system.
17. Click Next.
When the installation is complete, a dialog box opens.
18. Select “Yes, I want to restart my computer now.”
19. Click Finish.
20. Continue with “Installing IIS Lockdown Tool” on page 29.
Installing IIS Lockdown Tool
The Microsoft Internet Information Services (IIS) Lockdown tool is an
optional software package that improves the security on the system running
the MediaManager server application. It closes unused doors that hackers
could exploit. The tool does not affect the MediaManager server application.
If you decide to install the IIS Lockdown tool, use the following procedure. If
you install the software incorrectly it can prevent you from running
MediaManager. If the system displays Microsoft 404 errors when you attempt
to access the MediaManager application, reinstall the IIS Lockdown tool.
Installing the IS Lockdown Tool
After you install the MediaManager server software, install the Microsoft
Internet Information Services (IIS) IIS Lockdown v2.1 tool on the server.
29
Page 30

Chapter 2 Installing MediaManager Server and Client Software
To install the IIS Lockdown tool:
1. Download the IIS Lockdown v2.1 executable file from the Microsoft Web
site.
a. Go to www.microsoft.com.
b. Search for IIS Lockdown.
c. Follow the download procedure on the Microsoft Web site.
2. Double-click the IISLockd.exe file that you downloaded.
The IIS Lockdown installation wizard opens.
3. Click Next to begin the installation.
4. Click Next to accept the license agreement.
5. In the Select Server Template window, select Dynamic Web server (ASP
enabled) and click Next.
30
6. In the URLScan window, uncheck “Install URLScan filter: on the server”
and click Next.
Page 31

7. Continue clicking Next in the following windows.
Enabling MDB Manager
8. Click Finish.
Enabling MDB Manager
MDB Manager needs to be enabled on your MediaManager server only if you
have added a client to the OMF workgroup environment on which you plan to
use the Media tool. When you initially install the MediaManager Server
software, you are asked if you need MDB Manager installed. If you answer
No, MDB is not enabled. If you then add an editing system into your OMF
workgroup environment that needs the MDB Manager running, you must
enable MDB Manager on the MediaManager server.
To enable MDB Manager:
1. On the MediaManager server, add the MDB_StartCntrl.exe file that
resides on the desktop to your startup folder, do the following:
t Drag the MDB_StartCntrl.exe file to Start > Programs > Startup.
t Drop the file into the cascading menu.
31
Page 32

Chapter 2 Installing MediaManager Server and Client Software
2. Double-click the MDB_StartCntrl.exe file to start the MDB agent.
3. Click OK in the “MDB successfully started” dialog box.
MDB Manager is enabled.
Setting the MediaManager Server Home Page
After you have installed the software, you can set your Internet Explorer home
page on the MediaManager server to the MediaManager login screen.
To set MediaManager as your home page:
1. Start the Internet Explorer application.
2. In the Address field, type the Uniform Resource Locator (URL) for
MediaManager, for example:
http://MediaManager server name/omm/default.asp
(MediaManager server name is the computer name of the MediaManager
server.)
3. Select Tools > Internet Options.
In the Home page area, click Use Current.
4. Click OK.
Installing the MediaManager Client Software
Install the MediaManager client software on an Avid editing system within
your workgroup.
n
32
The MediaManager CD contains both the Macintosh and Windows client
software. The CD recognizes whether your system is a Macintosh or a
Windows client and presents the correct installer for your system.
Page 33

Installing the MediaManager Client Software
Installing the MediaManager Client Software (Windows)
The following procedure installs the MediaManager client software on an
Avid editing system using the Windows operating system within your
workgroup.
To install the MediaManager client software on a Windows system:
1. Remove any previous release of MediaManager client software from the
client system. See “Removing a Previous Release of MediaManager” on
page 23.
2. Insert the MediaManager CD in the CD-ROM drive of your Avid editing
system.
3. Click ReadMe/Browse Media, to open the ReadMe file.
View the ReadMe file for important information about the MediaManager
client software, then return to the installation frontend window.
4. Click Install Products.
5. Click Install MediaManager Client.
6. In the Welcome window, click Next to start the install.
7. Select the applicable country, and click Next.
8. In the Software License Agreement window, read the agreement, and then
click Yes to accept the terms of the agreement.
9. A dialog box might open directing you to enable MDB Manager if the
Avid editing client on which you are installing MediaManager client uses
the Media tool. If you are added a client to an OMF workgroup
environment that did not use the Media tool, and now you are adding an
editing client (for example, Media Composer Adrenaline) on which the
Media tool will be used, you must enable MDB. See “Enabling MDB
Manager” on page 31.
10. Select “Yes, I want to restart my computer now.”
11. Click Finish.
33
Page 34

Chapter 2 Installing MediaManager Server and Client Software
Installing the MediaManager Client Software (Macintosh)
The following procedure installs the MediaManager client software on an
Avid editing system using the Macintosh operating system within your
workgroup.
To install the MediaManager client software on a Macintosh:
1. Insert the MediaManager CD in the CD-ROM drive of your Avid editing
system.
The AvidMM Installer window opens.
2. Double-click Avid MediaManager Installer.
The Installer opens.
3. Click Install.
4. Select the applicable country, and click OK.
5. Scroll to the bottom of the license agreement, and click Yes.
n
n
If the installer does not find an Avid editing application on your system, an
error message appears. You must have an Avid editing application installed
before you install the MediaManager client software.
If you are a Pro Tools® client, use the Custom Install and select the plug-in.
Using the Easy Install for a Pro Tools client will not install the required
plug-in.
The installation occurs, and a dialog box opens, indicating an Internet
Explorer plug-in has been installed and you should restart your Internet
Explorer application after the installation is complete.
6. Click OK.
7. A dialog box might open directing you to enable MDB Manager if the
Avid editing client on which you are installing MediaManager client uses
the Media tool. If you are added a client to an OMF workgroup
environment that did not use the Media tool, and now you are adding an
editing client (for example, Media Composer Adrenaline) on which the
Media tool will be used, you must enable MDB. See “Enabling MDB
Manager” on page 31.
34
Page 35

Logging Into the Avid Unity MediaNetwork Environment
8. Click OK. After you have finished the installation, see “Enabling MDB
Manager” on page 31.
A dialog box opens, indicating the installation was successful.
9. Click Quit, and restart the Internet Explorer application.
Logging Into the Avid Unity MediaNetwork
Environment
After the MediaManager software is installed and the clients and server are
connected to the network, connect to the Avid Unity MediaNetwork
environment to map the client to the Avid Unity workspaces.
If you are mapping to Avid Unity from a Windows client, see “Connecting to
Avid Unity MediaNetwork (Windows)” on page 35. If you are mapping to
Avid Unity from a Macintosh client, see “Connecting to Avid Unity
MediaNetwork (Macintosh)” on page 37.
You can also use the Avid Unity Connection Manager to map and unmap the
MediaNetwork workspaces. For information about using the Avid Unity
Connection Manager, see the Avid Unity MediaNetwork documentation.
Connecting to Avid Unity MediaNetwork (Windows)
To connect to the MediaNetwork environment, you need a MediaNetwork user
name and password. They allow you to map available MediaNetwork
workspaces to your MediaNetwork client.
Your MediaNetwork user name and password might be the same as your user
name and password for your MediaNetwork client, or they might be different.
Check with your MediaNetwork administrator to get your MediaNetwork user
name and password.
Mapping MediaNetwork Workspaces
To map a MediaNetwork workspace:
1. Make sure your Avid editing application is not running.
2. Right-click the My Computer icon on your desktop, and select Map
Network Drive.
35
Page 36

Chapter 2 Installing MediaManager Server and Client Software
The Map Network Drive dialog box opens.
3. Select an available drive letter from the Drive menu.
4. Double-click Avid Unity Network, in the Shared Directories list, to see
the available MediaNetwork File Manager.
5. Double-click MediaNetwork File Manager to see the available
MediaNetwork workspaces.
- If your user name and password are the same on the MediaNetwork
client and the MediaNetwork File Manager, the available workspaces
appear.
- If your user name, password, or both are different on the
MediaNetwork client and the MediaNetwork File Manager, the Enter
Network Password dialog box opens. Type your valid MediaNetwork
user name and password, and click OK. The available workspaces
appear.
6. Select the workspace that you want to map. A path to the workspace
appears in the Path menu.
7. Click Reconnect at Logon to have the workspace available the next time
you log in to the MediaNetwork client.
8. Click OK. The workspace window opens on your desktop.
n
Unmapping MediaNetwork Workspaces
36
Do not unmap this workspace drive.
To unmap a mapped workspace:
1. Make sure your Avid editing application is not running.
2. Right-click the My Computer icon on your desktop, and select Disconnect
Network Drive.
The Disconnect Network Drive dialog box opens.
3. In the Network Drive list, select the mapped workspace you want to
disconnect.
4. Click OK.
The workspace is no longer mapped to your MediaNetwork client.
Page 37

Logging Into the Avid Unity MediaNetwork Environment
Connecting to Avid Unity MediaNetwork (Macintosh)
To connect to the MediaNetwork environment:
1. Select Apple P menu > Chooser. The Chooser window opens.
2. Click the Avid Unity icon in the upper left portion of the window.
3. In the Select an Avid File Server list, select Avid Unity.
4. Click OK. The “Connect to” dialog box opens.
5. Determine how you want to log in:
t Click Guest if you don’t have an assigned user name. The
administrator might have given Guest limited access and permissions
to work with files. Continue with step 8.
t Click Registered User if you have an assigned user name.
6. Type your user name in the Name text box.
7. Type your password in the Password text box.
8. Click OK. A dialog box opens, showing the workspaces you can mount on
your desktop.
Mounting Workspaces
To mount a MediaNetwork workspace:
1. Select the workspace you want to mount. If you want to mount more than
one workspace, Shift+click the additional workspace names.
2. Make sure that the “Synchronize time with server” check box is selected.
This synchronizes your MediaNetwork client time to the MediaNetwork
File Manager time and helps prevent time-related file creation and access
problems.
3. Click OK. The selected workspaces appear on the desktop.
4. Click Cancel to end the login procedure.
37
Page 38

Chapter 2 Installing MediaManager Server and Client Software
Changing Your Password
To change your MediaNetwork password:
1. Select Apple P menu > Chooser. The Chooser window opens.
2. Click the Avid Unity icon in the upper left portion of the window.
3. In the Select an Avid File Server list, select Avid Unity.
4. Click OK. The “Connect to” dialog box opens.
5. Click Registered User.
6. Type your user name in the Name text box.
7. Click Set Password. The Change Password dialog box opens.
8. Type your current password in the Old password text box.
9. Type your new password in the New Password text box.
10. Click OK. A message box opens, asking you to reenter your new
password for confirmation.
11. Click OK. The Confirm password dialog box opens.
12. Type your new password in the New Password text box.
13. Click OK. A message box opens, telling you that your password was
14. (Option) Click Cancel to leave your current password active.
Unmounting Workspaces
To unmount a MediaNetwork workspace:
1. Select the MediaNetwork workspace that you no longer want to use. If
2. Drag the workspaces to the Trash. The icons are removed from the
Logging Out
To log out of MediaNetwork:
1. Quit your Avid application.
2. Select all the MediaNetwork workspaces on the desktop.
3. Drag them to the Trash.
38
changed.
you want to unmount more than one workspace, Shift+click the additional
workspace names.
desktop.
Page 39

Logging Into the Avid Unity MediaNetwork Environment
Rebooting the MediaManager Server
To reboot the MediaManager Server:
1. Restart the MediaManager server computer.
2. Log in as a valid Avid Unity user. This should be the same Avid Unity
user name that you used during the MediaManager installation.
3. Map to an Avid Unity drive.
n
Do not unmap this Avid Unity drive from MediaManager.
39
Page 40

Chapter 2 Installing MediaManager Server and Client Software
40
Page 41

Chapter 3
Configuring Avid Editing Systems to Work with MediaManager
Before you can interact with MediaManager, you need to configure your Avid
editing system, see “Specifying MediaManager Settings” on page 42.
MediaManager supports two workgroup modes; OMF and MXF/AAF. The
type of media files you can check into MediaManager and supported editing
applications depends on the workgroup mode. For compatibility issues when
working in either an OMF or an MXF/AAF workgroup, see “Understanding
the Workgroup Modes” in the MediaManager Help.
After you specify these settings, you can check in clips to and check out clips
from MediaManager by using the drag-and-drop method. You can also
manually check in clips. For procedures on checking in media objects, see
“Adding Media Objects to MediaManager Using an Editor” in the Help.
Page 42

Chapter 3 Configuring Avid Editing Systems to Work with MediaManager
Specifying MediaManager Settings
You must specify the MediaManager location to let your Avid editing system
know where to look for it on the network, see “Specifying the MediaManager
Server” on page 42.
The Avid editing system’s MediaManager user settings allow you to select the
check in process, project access control, and login, see “Specifying the
MediaManager User Settings” on page 43.
For complete information on using settings, see the Help for your Avid editing
system.
Specifying the MediaManager Server
The MM Host settings is a Site setting, which is a single setting that applies to
all users of a particular editing system. If you want to access another
MediaManager server, you must modify the MM Host settings to reflect the
server.
42
To specify your MediaManager location:
1. In your Avid editing application, click the Settings tab in the Project
window.
The Settings scroll list appears.
2. Double-click MM Host.
The MM Host Settings dialog box opens.
3. In the MediaManager Host Name text box, type the computer name of
your MediaManager server.
It is important to type the correct computer name. This is the location
where the editing system looks to check in the digitized or recorded
media. You can also enter the IP address instead of the computer name.
4. Click OK.
Page 43

Specifying the MediaManager User Settings
To specify your MediaManager User settings:
1. In your Avid editing application, click the Settings tab in the Project
window.
The Settings scroll list appears.
2. Double-click MM User.
The MM User Settings dialog box opens.
Specifying MediaManager Settings
3. In the User Name text box, type a user name. This name must be a known
MediaManager user. For information on creating a new user, see
“Creating User Accounts” in the Help.
4. Select “Automatic Login at Project Selection” if you want to log in to
MediaManager automatically every time you open a project.
5. Select “Automatic checkins during AutoSave” if you want any changes
you have made to be automatically checked in every time an AutoSave
occurs.
6. Set the Default Project Access Class option, see “Setting the Default
Access Control from the Editing System” on page 44.
43
Page 44

Chapter 3 Configuring Avid Editing Systems to Work with MediaManager
7. (Option) If you want all referenced effects checked in when an auto-save
or manual save occurs, select “Checkin Rendered Effects After Drag and
Drop.
8. Click Login to establish the connection to MediaManager.
The Login dialog box opens.
9. Type your password, and click OK.
Look at the MM User Settings dialog box again. If you have successfully
logged in, the Login button now appears as Logout.
n
The connection defined in your MM Host settings identifies the
MediaManager location to which you will be checking in media objects. You
can check out objects from a different MediaManager by dragging and
dropping clips from that MediaManager to a bin without changing the
MM Host settings.
Setting the Default Access Control from the Editing System
Before you begin checking in objects from your editing system to
MediaManager, set the access control. Access control allows you to share your
projects with other users or keep them private. The Avid editing system’s MM
User Settings dialog box allows you to specify whether projects will be public
or private by default.
n
n
The Avid editing application setting for default project access should match
the MediaManager server setting established by the MediaManager
Administrator.
The MediaManager default access overrides the user selection for access to
projects. That is, if you create a project on an Avid editing system that has the
same name as a project in MediaManager, the access control set by the
MediaManager will override to Avid editing application’s access control. For
more information, see “Understanding the Default Access” in the Help.
44
To set the access control:
1. In the Avid editing application, click the Settings tab in the Project
window.
The Settings scroll list appears.
Page 45

Public
icon
Private
icon
Specifying MediaManager Settings
2. Double-click MM User.
The MM User Settings dialog box opens.
3. From the Default Project Access Class area, select either Private or Public.
If you select Public, the project appears in MediaManager with an open
lock icon. If you select Private, the project appears in MediaManager with
a user locked icon.
- When Public is selected, everyone with access to MediaManager can
view your project.
- When Private is selected, only you, the MediaManager administrator,
and a set of MediaManager users that have been given access can
view your project.
You or an administrator can add users to a private project. See “Changing
Access Control” in the Help.
If you want to change project access after you have already checked in the
objects to MediaManager. See “Changing Access Control” in the Help.
45
Page 46

Chapter 3 Configuring Avid Editing Systems to Work with MediaManager
46
Page 47

Chapter 4
Installing MediaManager Select Players
The MediaManager Select Players provide added functionally for viewing
clips and select lists. This chapter describes network configurations and the
installation process for the MediaManager Select Players. For information
about using the MediaManager Browser Player and the ProLog Player, see
“Working with the MediaManager Browser Player and ProLog Player
(Windows only)” in the Help. For information about using the Avid Player, see
“Working with the Avid Player” in the Help.
MediaManager Select Players
Player Description
MediaManager Browser Player Provides added functionally to the
MediaManager Viewer, that allows you to
review clips and create subclips, which you can
place into select lists (Windows only)
MediaManager ProLog Player Includes the Browser Player features and also
allows you to view and modify a clip’s metadata,
and add locators and locator comments. You can
also resize the viewer. (Windows only)
Avid Player Allows reviewers to view published select lists.
(Macintosh and Windows)
Page 48

Chapter 4 Installing MediaManager Select Players
This chapter covers the following topics:
• Network Overview
• Recommended Network Configuration
• Hardware and Operating System Requirements
• Installation Prerequisites
• Upgrading From a Previous Release of MediaManager Select Players
• Installing the Avid Player Software
• Installing the Browser Player and ProLog Player Software (Windows
Only)
• Running Windows Update
• Dual-Monitor Option
• Configuring the PortServer Pro Connection
48
Page 49

Network Overview
Each environment will contain a number of interconnected components,
customized to the individual needs of the organization using it. The following
illustration shows a sample network configuration.
Sample Network Configuration
Network Overview
49
Page 50

Chapter 4 Installing MediaManager Select Players
Recommended Network Configuration
To get the best performance from your network, you must properly configure
these three components:
• MediaManager Select Players
• PortServer Pro
• Network Devices (Switches and Routers)
The PortServer Pro responds to requests from the MediaManager Select
Players (Player). The PortServer Pro retrieves data from Avid Unity storage
and sends it to the Player. The PortServer Pro should be connected to the
network by a gigabit link.
The network devices are responsible for moving the data between the Player
and the PortServer Pro. All network links, except the link from the switch to
the Player, need to be gigabit links.
The following illustration shows the Player connection to the PortServer Pro.
MediaManager Select Players
For optimal performance, the Player’s network interface card (NIC) needs to
be configured to a link speed of 100 megabits per second (Mbps) and full
duplex. Most NICs are set to auto-negotiate speed and duplex by default.
Occasionally, the switch and the Player will not auto-negotiate for the
50
Page 51

Recommended Network Configuration
optimum speed and duplex (for example, half duplex instead of full duplex).
Throughput performance is significantly degraded when this occurs
(maximum throughput of approximately 70 Mbps instead of 100 Mbps). There
are several ways to check the negotiated speed and duplex:
• Some NICs have external lights that indicate negotiated speed and duplex.
For information on how to interpret the lights, see the NIC documentation.
n
Name Resolution
• Some NICs have software utilities that show the negotiated speed and
duplex (for example, Intel
• Most switches have lights that indicate the negotiated speed and duplex.
For information on how to interpret the lights, see the switch
documentation.
• Many switches have command line interfaces. The negotiated speed and
duplex can be checked through this interface.
If both sides of the Player link (NIC and switch port) are not configured for
100 Mbps full duplex, the network interface settings need to be set manually.
Turn off auto-negotiation on both the switch and the NIC, and explicitly set
both of them to 100 Mbps and full duplex.
The Player and the switch ports need to be set to 100 Mbps and full duplex.
The Player needs to do both forward name resolution (machine name to IP
address) and reverse name resolution (IP address to machine name). You can
do this by using whichever preferred name resolution method you use on your
network (DNS, hosts file, and so forth).
®
PROSet II utility)
PortServer Pro
If name resolution is improperly configured, you might experience the
following symptoms:
• Long connect times to MediaManager (30 seconds or more)
• Long time to retrieve selects lists (30 seconds or more)
• Failure to connect to the PortServer Pro
For optimal performance, the PortServer Pro’s gigabit NIC needs to be
connected to a gigabit switch port.
51
Page 52

Chapter 4 Installing MediaManager Select Players
To check the negotiated settings for the Alacritech® gigabit card:
t Click the Start button, and select Programs > Alacritech > slicuser.
This program will show the current status of the Alacritech gigabit card. Link
speed should be 1000 Mbps and full duplex.
If your PortServer Pro does not have an Alacritech gigabit card, check the
manufacturer’s documentation for the NIC that is in your PortServer Pro.
n
The PortServer Pro and the switch ports need to be set to 1000 Mbps and full
duplex.
Network Devices (Switches and Routers)
Excessive network latency, dropped packets, and insufficient available
bandwidth will impact Player performance. If media playback is not
performing as expected (for example, hesitant video, and out-of-sync audio),
check the following network aspects.
Latency
The MediaManager Select network is designed to run on a LAN where roundtrip packet latencies are typically less than 1 millisecond (ms). Several
scenarios can introduce increased latencies into the network:
• Slow or overloaded router
• Oversubscribed network links
• Long-distance (for example, kilometers) or WAN links
n
Dropped Packets
Network latencies between the Player and the server should be less than 1 ms.
52
Dropped packets will degrade performance as well. Each dropped packet
usually takes approximately 200 ms to recover; this may cause noticeable
pauses in playback on the Player. The “TCP Segments Retransmitted” counter
will indicate if TCP packets are being dropped. If a packet is dropped, it will
be retransmitted and the counter will be incremented. One way to check the
counter on the PortServer Pro is through the command:
netstat -s
Page 53

Recommended Network Configuration
If this counter is increasing, most likely a problem exists on the network. This
could be due to overloaded routers, overloaded network links, incorrectly
configured network equipment, electro-magnetic interference or faulty
equipment.
Bandwidth
n
n
Dropped packets result in noticeable pauses during playback.
The MediaManager Select network protocol requires a peak throughput
greater than the data rate of the media being played. This means that the
network needs a full 100 Mbps available bandwidth from end to end when
playing higher resolution media.
To make sure there are no network bottlenecks, run traffic over a gigabit
network backbone with each individual machine the sole client on the
100-Mbps link. The following illustration shows the recommended
configuration. All links between the two switches are gigabit links.
The backbone path between the PortServer Pro switch and the Player switch
should always be gigabit links.
Recommended Network Configuration
Insufficient Bandwidth
When a network is not configured with a gigabit network backbone, Player
systems compete for bandwidth on the 100-Mb links. The following
illustration shows a 100-Mb network link in the path between the two
switches. Avid recommends that you avoid this network configuration.
53
Page 54

Chapter 4 Installing MediaManager Select Players
If both Player systems are active at the same time, the bandwidth available to
each Player is reduced. The less bandwidth available to each Player, the longer
it takes to complete data reads over the network, resulting in degraded
performance (pauses in playback).
Network Configuration to Aviod
54
Page 55

Hardware and Operating System Requirements
Hardware and Operating System Requirements
For a list of the hardware and operating system requirements, see the
Avid MediaManager Select Players ReadMe file. You can access the ReadMe
file from the installation CD or from the
Base.
Avid Customer Support Knowledge
Installation Prerequisites
For a list of the software prerequisites, see the Avid MediaManager Select
Player ReadMe file. You can access the ReadMe file from the installation CD
or from the
Avid Customer Support Knowledge Base.
Upgrading From a Previous Release of MediaManager Select Players
If you are upgrading to a new version of the Browser Player or Avid Player
you need to remove the older version before installing the new version.
To remove a previous release of MediaManager Select Players:
1. Click Start and select Settings > Control Panel.
2. Double-click Add/Remove Programs.
3. Select the MediaManager program you want to remove, either
MediaManager Browser Player or Avid Player, and click Remove.
4. Follow the instructions given to complete the removal.
55
Page 56

Chapter 4 Installing MediaManager Select Players
Installing the Avid Player Software
The Avid Player software allows you to review select lists. Select lists are
created in MediaManager and are collections of master clips, subclips, and
fully-rendered sequences.
You are permitted to install the Avid Player software on multiple clients to
allow flexibility regarding which clients you use to access and review the
media. The Avid Player software should be installed on computers that are for
your internal use only. Use of all software copies installed remains subject to
the software license agreement accompanying the system.
n
n
n
Before you can play media in the Avid Player using an ethernet attached
server, you must install the MediaNetwork Ethernet Attached Client software.
You do not need the EAC software if you have Fibre Channel attached clients.
Avid recommends that you do not install the Avid Player software on a
MediaManager server, because a sound card is required and the server does
not ship with a sound card.
After installing the Avid Player v2.5, if you decide to reinstall an older version
of the Avid Player, make sure you uninstall v2.5, before reinstalling the older
version of the Avid Player. When uninstalling v2.5, you should use the Control
Panel’s Add/Remove application and reboot your computer after the uninstall
is complete.
Installing the Avid Player on a Windows System
To install the Avid Player software on a Windows system:
1. Remove any previous release of Avid Player software from the system.
See “Upgrading From a Previous Release of MediaManager Select
Players” on page 55.
2. Insert the Avid Player CD into the CD-ROM drive.
3. Click ReadMe/Browse Media, to open the ReadMe file.
56
View the ReadMe file for important information about the Avid Player,
then return to the installation frontend window.
4. Click Install Avid Player.
5. In the Welcome window, click Next.
Page 57

6. In the Country Selection window, select your country and then click Next.
7. In the Software License Agreement window, read the agreement, and then
click Yes to accept the terms of the agreement.
8. In the dialog box, select either Editing system or Non-Editing system.
9. Click Next.
10. In the Choose Destination Location window, indicate a location for the
application files, and then click Next.
The installation begins.
11. Select “Yes, I want to restart my computer now” and click Finish.
You only need to restart your computer once, even when you are
performing multiple installations on the same system.
Installing the Avid Player on a Macintosh Client
To install the Avid Player software on a Macintosh client:
1. Quit all Macintosh applications.
2. Insert the Avid Player CD into the CD-ROM drive.
Installing the Avid Player Software
3. Double-click the Avid Player CD-ROM icon.
The AvidPlayer folder opens.
4. Double-click the Avid Player Install icon.
The Avid Player Install window opens.
5. (Option) Click Switch Disk to change the location for the application
files.
6. Click Install.
7. In the Country License List dialog box, select a your country and click
OK.
8. In the Software License Agreement window, read the agreement, and do
one of the following:
t Click Yes, to accept the terms of the agreement and begin the install.
t Click No, to end the installation.
9. Click Quit, when the install complete dialog box opens.
57
Page 58

Chapter 4 Installing MediaManager Select Players
Installing the Browser Player and ProLog Player Software (Windows Only)
You are permitted to install the Browser Player and ProLog Player software on
multiple clients to allow flexibility regarding which clients you use to access
and review the media. The Browser Player and ProLog Player software should
be installed on computers that are for your internal use only. Use of all
software copies installed remains subject to the software license agreement
accompanying the system.
n
n
n
Before you can play media in the Browser Player or ProLog Player using an
ethernet attached server, you must install the MediaNetwork Ethernet
Attached Client software. You do not need the EAC software if you have Fibre
Channel attached clients.
Avid recommends that you do not install the MediaManager Browser Player
software on a MediaManager server, because a sound card is required and the
server does not ship with a sound card.
After installing MediaManager Select Players v2.5, if you decide to reinstall
an older version of MediaManager Select Players, make sure you uninstall
v2.5, before reinstalling the older version of MediaManager Select Players.
When uninstalling v2.5, you should use the Control Panel’s Add/Remove
application and reboot your computer after the uninstall is complete.
To install the Browser Player and ProLog Player software:
1. Remove any previous release of MediaManager Select Player software
from the system. See “Upgrading From a Previous Release of
MediaManager Select Players” on page 55.
2. Insert the Avid MediaManager Browser Player CD into your computer’s
CD-ROM drive.
3. Click ReadMe/Browse Media, to open the ReadMe file.
58
View the ReadMe file for important information about the Browser Player
and ProLog Player, then return to the installation frontend window.
4. Click Install Products.
5. Click Install MediaManager Browser Player.
6. In the Welcome window, click Next.
Page 59

7. Select the applicable country and click Next.
8. In the Software License Agreement window, read the agreement, and then
click Yes to accept the terms of the agreement.
9. In the dialog box, select either Editing system or Non-Editing system, and
then click Next.
10. In the Choose Destination window, indicate a location for the application
files, and then click Next.
The installation begins.
11. Choose whether to restart your computer, and click Finish.
You only need to restart your computer once, even when you are
performing multiple installations on the same system.
The MediaManager Browser Player and ProLog Player are installed.
Running Windows Update
Running Windows Update
c
n
Run Windows Update on the machines where you installed the Player.
This will update your video and network drivers. Do not run Windows
Update on your Avid editing system.
To run Windows Update:
1. Click the Start button, and select Settings > Control Panel.
2. Double-click Add/Remove Programs.
3. Click Add New Programs, and then click Windows Update.
4. Click “Scan for updates.”
5. Follow the instruction on the Web site to update your system.
To download the latest drivers, you might need to go to your video card and
network card manufacturer’s Web sites.
59
Page 60

Chapter 4 Installing MediaManager Select Players
Dual-Monitor Option
n
The Player can send video to a second monitor if you have a Matrox® G550
DualHead
you have use of the controls to run the Player. The second output sends videoonly to a second screen, which may be a video projector.
Before you can run the dual-monitor option, you must install the Matrox G550
DualHead graphics card on your client machine. This card lets you power two
displays using one computer.
To install the Matrox G550 DualHead graphics card, see the Matrox
Millennium G550 documentation included in the box with the graphics card.
If the version of the Matrox G550 driver is before 5.86.032, then obtain a
driver from the Matrox Web site.
If the video-only display device you connect to the Matrox card does not have
a digital input, use the adapter that came with the video card to convert digital
output to a standard VGA output. The Player uses the HD-15 connector, and
the video-only display device uses the DVI connector.
®
graphics card. One output goes to your computer screen, where
60
Page 61

Configuring the PortServer Pro Connection
Configuring the PortServer Pro Connection
The procedures in this section explain how to configure the PortServer Pro
connection for the first time you connect to the Player.
How to access the configuration dialog box:
• The first time you connect to the Avid Player, you are asked to configure
your PortServer Pro connection.
• From the Avid Player, select Options > PortServer Setup.
• From the Browser Player or ProLog Player, right-click the viewer and
select PortServer Pro.
n
Contact your system administrator if you want to change your connection to a
PortServer Pro.
There are two ways to connect your system to a PortServer Pro.
• When you use the Player to play media on a desktop computer, you should
get a PortServer Pro from the License Pool Server. See “Configure the
PortServer Pro from a License Pool Server (Standard)” on page 61.
• When you use the Player to play media in a screening room, you should
manually specify a PortServer Pro. This guarantees that you have a
dedicated connection between Unity and the Player. See “Specifying an
Ethernet Attached Server” on page 62. This configuration is the most
common.
Configure the PortServer Pro from a License Pool Server (Standard)
When you use the Player to play media on a desktop computer, you do not
need a dedicated connection to the PortServer Pro. You can get a PortServer
Pro from the License Pool Server.
n
You can access the Avid Ethernet Attached Client Configuration dialog box, by
selecting Options > PortServer Setup.
To get a PortServer Pro from a list maintained by a License Pool Server:
1. Click the Start button, and select Programs > Avid Player > Avid Player.
You will now be asked to connect your system to a PortServer Pro.
2. Click Yes.
61
Page 62

Chapter 4 Installing MediaManager Select Players
A configuration dialog box appears.
3. Select “Get a list of servers from License Pool Server(s).”
4. Type the IP address or DNS name of the Unity File Manager in the Server
List text box. If you have multiple file managers, add them to the list.
5. Click Add.
6. Click OK.
Specifying an Ethernet Attached Server
When you use the Player to play media in a screening room, you should
manually specify a PortServer Pro. This guarantees that you have a dedicated
connection between Avid Unity and the Player.
n
62
You can access the Avid Ethernet Attached Client Configuration dialog box, by
selecting Options > PortServer Setup.
To specify a dedicated PortServer Pro connection:
1. Click the Start button, and select Programs > Avid Player > Avid Player.
You will now be asked to connect your system to a PortServer Pro.
2. Click Yes.
Page 63

A configuration dialog box opens.
Configuring the PortServer Pro Connection
3. Select “Manually specify Ethernet Attached Server(s).”
4. Type the IP address of the Gigabit Ethernet adapter on the Ethernet
Attached Server in the Server List text box. (This specifies your dedicated
connection.)
5. Click Add.
6. Click OK.
For information on using the Avid Player, see “Working with the Avid Player”
in the Help.
63
Page 64

Chapter 4 Installing MediaManager Select Players
64
Page 65

List of Terms
attribute name Information in each record is recorded as a predetermined set of attributes.
Each attribute describes a feature of the object: for example, its name, creation
date, or tape ID.
Avid Unity
MediaNetwork
browser A browser is an application program that provides a way to look at and interact
data The information about media objects physically stored on drives (optionally
database services The software applications that drive the database functions.
drag tool (Macintosh) The drag tool is the destination for drag-and-drop check-out of
effect The manipulation of an audio or video signal. Types of film or video effects
Avid Unity MediaNetwork allows you to connect the latest in shared storage
environments to your MediaNetwork clients. The shared storage lets you set
up a collaborative user environment where several editors can work on a
project at the same time using the same media files and audio files.
with all the information on the World Wide Web.
mirrored for data security).
media objects to Avid systems. It is always located at the top right of the
MediaManager user interface, regardless of the selected mode.
include special effects (F/X) like morphing; simple effects like dissolves,
fades, superimpositions, and wipes; complex effects like keys and DVEs;
motion effects like freeze frame and slow motion; and title and character
generation. Effects usually have to be rendered because most systems cannot
accommodate multiple video streams in real time.
See also rendering.
Fibre Channel Fibre Channel is a technology for transmitting data between computer devices
at a data rate of up to 1 Gbps (one billion bits per second). Fibre Channel is
especially suited for connecting computer servers to shared storage devices
and for interconnecting storage controllers and drives.
Page 66

List of Terms
JPEG format A JPEG file is a graphic image created by choosing from a range of
compression qualities (actually, from one of a suite of compression
algorithms). When you create a JPEG file or convert an image from another
format to a JPEG file, you are asked to specify the quality of image you want.
Since the highest quality results in the largest file, you can make a trade-off
between image quality and file size.
master clip The media object that refers to the media files recorded or digitized from tape
or other sources.
MediaNetwork
server
The MediaNetwork server controls user access to the shared storage
subsystem by logging in users through controlled user accounts with
passwords. It also controls which workspaces a user can mount on the
MediaNetwork client desktop and whether the user has read or write access to
the files on the workspace. This allows a system administrator to control a
user’s privileges and to manage the shared environment, preventing
overwriting or damage to shared media files and audio files.
media objects Master clips, sequences, effects, and any other type of object that references
digital media.
metadata Data about data; for example, the clips associated with media files.
mirroring Duplication of the data on multiple drives in a redundant configuration. In a
mirrored configuration, if one data drive fails, the mirrored drive is
automatically used instead.
motion effect An effect that speeds up or slows down the presentation of media in a track.
record For every media object, the database stores an associated record that contains
specific information about the object.
rendering Merging effect layers to create one stream of digital video for playback in real
time.
resync The resync process ensures that all the media on Avid Unity has been checked
in to MediaManager. When media files are copied into a shared storage
environment manually, resync is necessary to make the compositional
metadata (the clips associated with media files) appear in MediaManager.
sequence An edited composition that often includes audio and video clips and rendered
effects connected by applied transitions.
66
Page 67

List of Terms
SQL Server Structured Query Language (SQL) is a standard interactive and programming
language for getting information from and updating a database. Although SQL
is both an ANSI and an ISO standard, many database products support SQL
with proprietary extensions to the standard language. Queries take the form of
a command language that lets you select, insert, update, and find out the
location of data.
subclip 1. An edited part of a clip. In a sequence, a subclip can be bound by any
variation of clip beginnings, endings, and IN or OUT points.
2. A subclip created by marking IN and OUT points in a clip and by saving
the frames between the marks. The subclip does not contain pointers to
media files. The subclip references the master clip, which alone contains
pointers to the media files.
TCP/IP network
connection
Transmission Control Protocol/Internet Protocol (TCP/IP) is the basic
communication language or protocol of the Internet. It can also be used as a
communications protocol in the private networks called intranets and in
extranets. When you are set up with direct access to the Internet, your
computer is provided with a copy of the TCP/IP program just as every other
computer that you might send messages to or get information from also has a
copy of TCP/IP.
TransferManager The TransferManager system manages the transfer of media to and from
workgroups.
Uniform Resource
Locator (URL)
workspaces MediaManager clients mount MediaNetwork workspaces on their
A Uniform Resource Locator (URL) is the address of a file (resource)
accessible on the Internet.
workstations (requiring a user account to do so). Once mounted, workspaces
behave like local media drives that can be accessed by others working on the
same project. When the workspaces are properly configured, several users can
access the same media and start using it immediately after it has been created.
67
Page 68

List of Terms
68
Page 69

Index
A
Access Control
44
setting
Application key
installing
15
B
Backup files
procedure
22
D
Database
backing up
Dongle
installing
15
H
Home page
setting 32
I
22
L
Login
42
setup
M
MDB Manager
enabling
MediaManager
specifying settings
MediaManager client
installing
MediaManager server
installing
rebooting
removing software
renaming
MediaNetwork
changing password
connecting (Macintosh) 37
installing client software
logging 35
MM Host
specifying settings
31
32, 33
13
39
19
42
23
38
14
42
Installing
IIS Lockdown software
MediaManager client software 32, 33
MediaManager server hardware
MediaManager server software (new)
MediaManager server software (upgrade) 23
29
13
27
O
OMM (Open Media Management)
creating settings for
41
Page 70

Index
P
Performing database backup 22
PortServer Pro
connecting to the license pool server
61
setup
specifying an Ethernet attached server
Private
making projects
Projects
making private
sharing
Public
making projects
44
44
44
44
R
Reboot
MediaManager server
Removing
MediaManager server software
39
61
62
23
S
Settings
for configuring Avid systems
MediaManager
Starting
MediaManager server
42
T
Tools
IIS Lockdown installation
W
Workspaces
mounting (Macintosh)
unmapping
70
36
41
14
29
37
 Loading...