

Page 1

Pro Tools
TDM Installation Guide
Version 5.1.1 for Windows 2000
Digidesign Inc.
3401-A Hillview Avenue
Palo Alto, CA 94304 USA
tel: 650·842·7900
fax: 650·842·7999
Technical Support (USA)
650·842·6699
650·856·4275
Product Information (USA)
650·842·6602
800·333·2137
Fax on Demand (USA)
1·888·USE·DIGI (873·3444)
International Offices
Visit the Digidesign Web site
for contact information.
World Wide Web
www.digidesign.com
Digidesign FTP Site
ftp.digidesign.com
Page 2

Copyright
This User’s Guide is copyrighted ©2001 by Digidesign, a
division of Avid Technology, Inc. (hereafter “Digidesign”), with
all rights reserved. Under copyright laws, this manual may not
be duplicated in whole or in part without the written consent of
Digidesign.
DIGIDESIGN, AVID and PRO TOOLS are trademarks or
registered trademarks of Digidesign and/or Avid Technology,
Inc. All other trademarks are the property of their respective
owners.
All features and specifications subject to change without
notice.
PN 932709178-00 REV A 05/01
Page 3

contents
Chapter 1. Pro Tools TDM System Requirements
Pro Tools TDM Systems
System Requirements
Digidesign Registration
About the Pro Tools Guides
Chapter 2. Connecting SCSI Drives
SCSI Requirements
Connecting SCSI Drives
Initializing and Maintaining SCSI Drives
Using Macintosh Drives on Windows Systems
Chapter 3. Installing Pro Tools Hardware
Pro Tools TDM Cards
Installing Pro Tools Cards
Connecting Audio Interfaces
Detecting Pro Tools Cards
Chapter 4. Connecting Your Studio
The 888/24 I/O Interface
Changing Operating Levels of Individual 888/24 I/O Channels
Making Signal Connections to the 888/24 I/O
Using 888/24 I/O As Standalone Audio Converter
The 882/20 I/O Interface
Making Signal Connections to the 882/20 I/O
Using 882/20 I/O As Standalone Audio Converter
The 1622 I/O Interface
Making Signal Connections to the 1622 I/O Interface
Using 1622 I/O As Standalone Audio Converter
. . . . . . . . . . . . . . . . . . . . . . . . . . . . . . . . . . . . . . . . . . . . . . . . . . . . 1
. . . . . . . . . . . . . . . . . . . . . . . . . . . . . . . . . . . . . . . . . . . . . . . . . . . . . 2
. . . . . . . . . . . . . . . . . . . . . . . . . . . . . . . . . . . . . . . . . . . . . . . . . . . . 3
. . . . . . . . . . . . . . . . . . . . . . . . . . . . . . . . . . . . . . . . . . . . . . . . . 4
. . . . . . . . . . . . . . . . . . . . . . . . . . . . . . . . . . . . . . . . . . . . 5
. . . . . . . . . . . . . . . . . . . . . . . . . . . . . . . . . . . . . . . . . . . . . . . . . . . . . . . 5
. . . . . . . . . . . . . . . . . . . . . . . . . . . . . . . . . . . . . . . . . . . . . . . . . . . . 7
. . . . . . . . . . . . . . . . . . . . . . . . . . . . . . . . . . . . . . . . . 7
. . . . . . . . . . . . . . . . . . . . . . . . . . . . . . . . . . . 10
. . . . . . . . . . . . . . . . . . . . . . . . . . . . . . . . . . . . . 11
. . . . . . . . . . . . . . . . . . . . . . . . . . . . . . . . . . . . . . . . . . . . . . . . . . . . . 11
. . . . . . . . . . . . . . . . . . . . . . . . . . . . . . . . . . . . . . . . . . . . . . . . . . 13
. . . . . . . . . . . . . . . . . . . . . . . . . . . . . . . . . . . . . . . . . . . . . . . . 15
. . . . . . . . . . . . . . . . . . . . . . . . . . . . . . . . . . . . . . . . . . . . . . . . . 16
. . . . . . . . . . . . . . . . . . . . . . . . . . . . . . . . . . . . . . . . . . . 17
. . . . . . . . . . . . . . . . . . . . . . . . . . . . . . . . . . . . . . . . . . . . . . . . . 17
. . . . . . . . . . . . . . . . . . . . . . . . . . . . . . . . . . . 23
. . . . . . . . . . . . . . . . . . . . . . . . . . . . . . . . 24
. . . . . . . . . . . . . . . . . . . . . . . . . . . . . . . . . . . . . . . . . . . . . . . . . 25
. . . . . . . . . . . . . . . . . . . . . . . . . . . . . . . . . . . 29
. . . . . . . . . . . . . . . . . . . . . . . . . . . . . . . . 30
. . . . . . . . . . . . . . . . . . . . . . . . . . . . . . . . . . . . . . . . . . . . . . . . . . . 31
. . . . . . . . . . . . . . . . . . . . . . . . . . . . . . . . . . 36
. . . . . . . . . . . . . . . . . . . . . . . . . . . . . . . 1
. . . . . . . . . . . . . . . . . . . . . . . 22
. . . . . . . . . . . . . . . . . . . . . . . . . . . . . . 34
Contents
iii
Page 4

Connecting Equipment with Digital Audio Ins and Outs
Connecting Effects Units
Connecting MIDI Devices
Connecting SMPTE Synchronization Devices
. . . . . . . . . . . . . . . . . . . . . . . . . . . . . . . . . . . . . . . . . . . . . . . . . . 37
. . . . . . . . . . . . . . . . . . . . . . . . . . . . . . . . . . . . . . . . . . . . . . . . . . 38
. . . . . . . . . . . . . . . . . . . . . . . . . . . . . . . . . . . . 39
. . . . . . . . . . . . . . . . . . . . . . . . . . . . 37
Chapter 5. Installing Pro Tools Software
Upgrading to Windows 2000
Configuring Your Computer
Installing Pro Tools Software
Cannot Create DAE Deck Or Error Number 4
. . . . . . . . . . . . . . . . . . . . . . . . . . . . . . . . . . . . . . . . . . . . . . . 41
. . . . . . . . . . . . . . . . . . . . . . . . . . . . . . . . . . . . . . . . . . . . . . . . 42
. . . . . . . . . . . . . . . . . . . . . . . . . . . . . . . . . . . . . . . . . . . . . . . 45
. . . . . . . . . . . . . . . . . . . . . . . . . . . . . . . . . . . . . . 41
. . . . . . . . . . . . . . . . . . . . . . . . . . . . . . . . . . . . 46
Chapter 6. Checking Your TDM System and Launching Pro Tools
Starting Up Your System
Running DigiTest
Launching Pro Tools For the First Time
Installing the Demo Session
Opening the Demo Session
Chapter 7. Calibrating the 888/24 I/O
About Calibration
Calibrating the 888/24 I/O
Appendix A. Slot Order
Card Order Guidelines For Each Pro Tools System
. . . . . . . . . . . . . . . . . . . . . . . . . . . . . . . . . . . . . . . . . . . . . . . . . . 47
. . . . . . . . . . . . . . . . . . . . . . . . . . . . . . . . . . . . . . . . . . . . . . . . . . . . . . . 48
. . . . . . . . . . . . . . . . . . . . . . . . . . . . . . . . . . . . . . . . 49
. . . . . . . . . . . . . . . . . . . . . . . . . . . . . . . . . . . . . . . . . . . . . . . 51
. . . . . . . . . . . . . . . . . . . . . . . . . . . . . . . . . . . . . . . . . . . . . . . . 52
. . . . . . . . . . . . . . . . . . . . . . . . . . . . . . . . . . . . . . . 53
. . . . . . . . . . . . . . . . . . . . . . . . . . . . . . . . . . . . . . . . . . . . . . . . . . . . . . . 53
. . . . . . . . . . . . . . . . . . . . . . . . . . . . . . . . . . . . . . . . . . . . . . . . 54
. . . . . . . . . . . . . . . . . . . . . . . . . . . . . . . . . . . . . . . . . . . . . . . . . . . . . . 57
. . . . . . . . . . . . . . . . . . . . . . . . . . . . . . . . 57
. . . . . . . . . . . . . . . 47
Appendix B. DigiTest Error Codes
Index
TDM Installation Guide
iv
. . . . . . . . . . . . . . . . . . . . . . . . . . . . . . . . . . . . . . . . . . . . . . . . . . . . . . . . . . . . . . . . . . . . . 61
. . . . . . . . . . . . . . . . . . . . . . . . . . . . . . . . . . . . . . . . . . . . 59
Page 5

chapter 1
Pro Tools TDM System Requirements
Pro Tools TDM Systems
Pro Tools 5.1 for Windows 2000 Pro supports
the following TDM (Time Division Multiplexing) systems.
Pro Tools MIX-Series
(Pro Tools 24 MIX, MIXplus and MIX3)
A core system includes:
• MIX Core card
• MIX Farm card (MIXplus contains one card
and MIX3 contains two cards)
• Pro Tools software
• Digidesign audio interface (sold separately)
A core system provides:
• Up to 64 tracks of recording and playback of
24-bit and 16-bit audio files
• TDM digital mixing and DSP plug-in environment
• Non-linear, random-access editing and mix
automation
• MIDI recording, playback and editing
Pro Tools 24
A core system includes:
• d24 Audio card
• DSP Farm card
• Pro Tools software
• Digidesign audio interface (sold separately)
A core system provides:
• Up to 32 tracks of recording and playback of
24-bit and 16-bit audio files
• TDM digital mixing and DSP plug-in environment
• Non-linear, random-access editing and mix
automation
• MIDI recording, playback and editing
Pro Tools 24 requires a MIX Farm card to
support up to 64 tracks.
Audio Interfaces
To record and play audio you must have one of
the following Digidesign audio interfaces:
888/24 I/O
◆
Analog: XLR (balanced or unbalanced) con-
nectors, +4 dBu or –10 dBV
◆
Digital: XLR (AES/EBU) or RCA (S/PDIF) con-
nectors
Chapter 1: Pro Tools TDM System Requirements
1
Page 6

882/20 I/O
◆
Analog: 1/4" TRS (balanced or unbalanced)
connectors, +4 dBu or –10 dBV
◆
Digital: RCA (S/PDIF) connectors
1622 I/O
◆
Analog: 1/4" TRS (balanced or unbalanced)
connectors. Inputs are variable from +4 dBu to
–10 dBV; outputs are selectable between +4 dBu
or –10 dBV
Digital: RCA (S/PDIF) connectors
◆
Digidesign ADAT Bridge I/O
◆
Analog: 1/4" TRS (balanced) connectors, +4
dBu or –10 dBV
Digital: XLR (AES/EBU) or RCA (S/PDIF) con-
◆
nectors
◆
Optical: Two pairs of EIAJ fiber optic connectors
System Requirements
The CPU, hard disk, monitoring and MIDI requirements for Pro Tools differ depending on
your system configuration. The requirements
for each configuration are listed below.
Compatibility Information
Digidesign can only assure compatibility and
provide support for hardware and software it
has tested and approved. For a list of Digidesignqualified computers, operating systems, and
third-party devices, refer to the latest compatibility information on the Digidesign Web site:
www.digidesign.com/
Computer Requirements
◆
A Digidesign-qualified, uniprocessor
Pentium II or Pentium III-based (highly recommended) computer:
• 256 MB RAM (required for 64-voice performance).
• 1 unused PCI slot for Pro Tools 24 MIX systems.
• 2 unused adjacent PCI slots for
Pro Tools 24 or Pro Tools 24 MIXplus systems.
• 3 unused adjacent PCI slots for Pro Tools 24
MIX3 systems.
• For expanded systems, the expansion chassis card takes the place of the Pro Tools card
in the PCI slot and the Pro Tools card is
placed in the chassis.
• VIA Apollo Pro133 (for Pentium III),
tel 440BX (for Pentium II or III).
• Phoenix or Award BIOS.
• A CD-ROM drive.
• An AGP display card is strongly recommended.
• Windows 2000 Professional Edition with
Service Pack 1 or higher.
◆
A 17-inch or larger color monitor. Black and
white monitors are not supported.
◆
Additional RAM is highly recommended if
you plan to use other audio or MIDI applications concurrently with Pro Tools.
or
, In-
TDM Installation Guide
2
Page 7

Hard Drive Requirements
For audio recording and storage, all Pro Tools
TDM systems require one or more Digidesignqualified SCSI drives attached to a qualified PCI
SCSI HBA card or qualified built-in SCSI HBA
connector on the motherboard.
FAT32 drives are highly recommended for
both system and storage drives.
Pro Tools MIX-series systems
24-bit performance, use 4 hard drives, with audio files distributed among them.
Pro Tools 24 systems
performance, use 2 hard drives, with audio files
distributed among them.
IDE drives are not supported for use as studio
drives on Windows-based Pro Tools systems. If
you intend to use an IDE drive, your session
must be limited to 16 bits. 24-bit sessions are
not compatible with IDE drives.
For best 32-track, 24-bit
It is recommended that you remove IDE
drives and drivers from any Pro Tools
system. SCSI boot drives provide better
Pro Tools performance. However, if you
are using an Expansion Chassis, IDE
drives and drivers must be removed
from your system. For more information, see the
stallation Guide.
Pro Tools Expanded System In-
For best 64-track,
For 64-track sessions that have substantial edit
densities (such as one edit every third of a second across 64 voices) or large amounts of crossfades, up to four SCSI drives may be required, allocated with 16 tracks per drive and two drives
per SCSI channel.
Refer to the Digidesign Web site for compatible
hard drives and SCSI HBA cards:
www.digidesign.com/
MIDI Requirements
Both USB and serial MIDI interfaces work effectively with Pro Tools. Serial MIDI interfaces offer the tightest possible MIDI timing.
Digidesign Registration
Make sure to complete and return the registration card included with Pro Tools TDM system.
Registered users are entitled to one year of free
technical support, and will receive periodic software updates and upgrade notices.
For audio recording and storage, all Pro Tools
TDM systems require one or more Digidesignqualified drives.
To provide full 64-track, 24-bit, 48 kHz performance, a TDM system must include at least two
Digidesign-qualified SCSI hard drives attached
to a qualified SCSI HBA (host bus adapter) card.
Chapter 1: Pro Tools TDM System Requirements
3
Page 8
About the Pro Tools Guides
PDF versions of the Pro Tools guides are installed automatically with Pro Tools, and can be
easily accessed from the Help menu in
Pro Tools. To read the guide online, or print it,
you must install
Pro Tools Installer CD).
Conventions Used in This Guide
Digidesign guides use the following conventions to indicate menu choices and key commands:
Convention Action
Acrobat Reader
(included on the
Choose and Select
The words “choose” and “select” are often interchangeable in conversational english. In this
guide, however, there is a distinction between
the two terms.
Select
When the guide instructs you to
something, it stays selected. This is the case with
dialog box options and menu items that enable
or disable an option.
Choose
something, a one-time action is performed. This
is the case with most menu commands; they
perform their chosen action only once.
When the guide instructs you to
select
choose
File > Save
Session
Control+N While pressing the Control key,
Shift-click While pressing the Shift key, click
Right-click Click with the right mouse button
The following symbols are used to highlight important information:
Choose Save Session from the
File menu
press the N key
the mouse button
User Tips are helpful hints for getting the
most from your system.
Important Notices include information that
could affect your data or the performance of
your system.
Cross References point to related sections in
other Digidesign guides.
TDM Installation Guide
4
Page 9

chapter 2
Connecting SCSI Drives
Pro Tools sessions and audio files are stored on
SCSI hard drives. SCSI hard drives are the recommended recording media for Pro Tools TDM systems.
Although Pro Tools lets you record to your system drive, this is generally not recommended.
Performance for recording and playback on system drives is worse than on non-system drives,
resulting in lower track counts and fewer plugins.
SCSI hard drives offer several advantages over
ATA/IDE drives. First, SCSI drives can be external and therefore provide portable audio storage
that is easily moved between systems. Second,
SCSI drives offer better performance when recording to large numbers of tracks. Furthermore, 24-bit sessions cannot be guaranteed to
record or playback from ATA/IDE drives.
SCSI Requirements
For 64-track sessions that have substantial edit
densities (such as one edit every third of a second across 64 voices) or large amounts of crossfades, up to four SCSI drives may be required, allocated with 16 tracks per drive and two drives
per SCSI channel.
SCSI drives must provide a data transfer rate of
at least 9 MB per second of sustained throughput.
Pro Tools 24 requires a MIX Farm card (or
the discontinued Pro Tools 24 Expansion
Kit) to support up to 64 tracks.
Refer to the Digidesign Web site for compatible
hard drives and HBA cards:
www.digidesign.com/
Software RAID is not supported for audio
drives.
High-Performance SCSI Drives and SCSI Host Bus Adapters
To provide full 64-track, 24-bit, 48 kHz performance, a Pro Tools TDM system must include at
least two Digidesign-qualified SCSI hard drives
attached to a qualified SCSI HBA host bus
adapter (HBA) card.
Chapter 2: Connecting SCSI Drives
5
Page 10
SCSI Cables
Use shorter SCSI cables to improve reliability.
Table 1 provides guidelines for maximum cable
lengths according to SCSI type.
Table 1: Maximum cable length and number of drives
supported according to SCSI type
SCSI type and
transfer rate
Fast SCSI
10 MB/sec
Wide SCSI
20 MB/sec
Ultra SCSI
20 MB/sec
(8-bit narrow)
Ultra SCSI
40 MB/sec
(16-bit wide)
Ultra SCSI
20 MB/sec
(8-bit narrow)
Ultra SCSI
40 MB/sec
(16-bit wide)
maximum
cable length
3 meters 8
3 meters 16
3 meters 5
3 meters 5
1.5 meters 6–8
1.5 meters 6–8
maximum #
of drives
Using these guidelines:
• 64 mono tracks of 24-bit audio takes up about
480 MB of hard drive space per minute.
• 64 mono tracks of 16-bit audio takes up about
320 MB of hard drive space per minute.
• 32 mono tracks of 24-bit audio takes up about
240 MB of hard drive space per minute.
• 32 mono tracks of 16-bit audio takes up about
160 MB per minute.
A 9-gigabyte drive holds:
• 18 minutes of 64 tracks, 24-bit audio
• 28 minutes of 64 tracks, 16-bit audio
• 37 minutes of 32 tracks, 24-bit audio
• 56 minutes of 32 tracks, 16-bit audio
Distribute Audio Across Multiple Drives
For best recording and playback performance,
don’t record and play back all audio files in a
session from the same drive. Instead, use
Pro Tools disk allocation features to distribute
audio files between multiple SCSI drives. See the
Pro Tools Reference Guide
for details.
Ultra2 SCSI
Low Voltage Differential (LVD)
80 MB/sec
12 meters 16
Disk Space for Audio Tracks
Audio tracks recorded at 24-bit resolution at a
CD-fidelity sampling rate of 44.1 kHz require
about 7.5 MB of hard drive space per minute.
The same tracks recorded at 16-bit resolution require about 5 MB per minute. Stereo tracks require about twice as much hard drive space.
TDM Installation Guide
6
Separate Video and Audio Files
If you are working with imported movies, store
movie files on a different SCSI bus than audio
files. If audio files reside on disks connected to a
SCSI HBA card, store video data on drives connected to a different SCSI bus.
Dual-Channel SCSI HBA Cards
If you use a dual-channel SCSI HBA card, equally
allocate audio files to drives connected to each
of the two busses on the card for optimal performance.
Page 11

Connecting SCSI Drives
To connect an external SCSI drive:
1
Turn off power to both the computer and the
hard drive.
2
Attach a SCSI cable from the SCSI port of the
hard drive to the SCSI port of the SCSI HBA card
or computer depending on your system’s SCSI
requirements.
3
Secure the cable’s connectors to the hard drive
and computer. Loose cables can cause data loss.
4
Connect additional drives by daisy-chaining
from one drive to another. Keep cable lengths to
a minimum (see Table 1).
5
Verify that the last SCSI device connected is
properly terminated. See “SCSI Termination” on
page 7.
6
Attach power cables to the hard drives.
SCSI Termination
If your computer’s SCSI chain is not properly
terminated, your system will not function correctly. Terminate only the last device on the
chain, using the termination type recommended by the hard drive manufacturer.
Use either an external terminator plug or enable
the device’s internal terminators. If you are using a terminator plug, it is recommended that
you purchase and use an
active
terminator.
Initializing and Maintaining SCSI Drives
SCSI hard drives used for audio recording on
TDM systems must be formatted for the FAT32,
FAT16 or NTFS files system. Under Windows
2000, FAT32 and NTFS drive partition sizes are
almost limitless. FAT16 partitions have a limit of
4096 MB.
TDM Windows systems require that you use Microsoft Windows Disk Administration software
for drive formatting and partitioning. Use only
one disk utility for all drives in a system.
Pro Tools for Windows 2000 allows you to
connect Macintosh-formatted hard drives
and play sessions created on Pro Tools for
Macintosh when using MacOpener from
DataViz. A demo version of MacOpener is
included on your Pro Tools CD-ROM.
To format a new drive:
1
Turn on your hard drives, computer, and any
other peripherals.
2
Use Microsoft’s Disk Management software,
located in the Administrative Tools control
panel under Computer Management > Storage.
Refer to your Windows 2000 manual or help for
information on how to use the Disk Management software.
Do not enable internal termination and install an external terminator plug on the
same drive. This causes SCSI errors. See
your hard drive’s documentation for information regarding which type of termination
it uses.
Chapter 2: Connecting SCSI Drives
7
Page 12

Formatting Drives
High-Level Formatting
There are two different types of formatting:
high-level formatting and low-level formatting.
Low-Level (Physical) Formatting
Low-level formatting means completely erasing
the hard drive and rewriting each sector address
on the drive. In low-level formatting, the sector
and track addresses, error-correction codes, and
other details are written on the platters of the
hard drive in the form of a magnetic pattern. A
low-level format permanently erases all data on
the drive.
When is Low-Level Formatting Necessary?
Virtually all hard drives come pre-formatted
from the manufacturer. Low-level formatting is
generally unnecessary except in rare circumstances. They are:
If you want to change the Sector Size of the
◆
drive. This is not recommended by Digidesign.
Digidesign systems only recognize 512-byte sectors.
◆
If you want to perform permanent deletion of
data.
◆
If a drive is being changed from one platform
to another. For example if you are switching
from a Macintosh to a Windows-based system,
the drive must be high-level re-formatted for the
new operating system.
High-level formatting a drive replaces the drive’s
directory, volume partition map and drivers. Information about the drive is created and drivers
that communicate this information to the host
CPU are installed. The drive itself is not erased,
nor is verification performed.
When is High-Level Formatting Necessary?
It is generally necessary to high-level format a
hard drive in one of the following cases:
◆
If a new drive is being prepared for use on a
computer for the first time and the drive is not
already high-level formatted.
◆
If you suspect that the directories containing
the drive’s information have become corrupted.
Partitioning Drives
Partitioning divides a physical drive into multiple, unique volumes, almost as if you were creating virtual hard drives. Partitioning is usually
performed when the drive is high-level formatted.
Windows 2000 allows drives formatted
with the NTFS or FAT32 file systems to be
seen as whole volumes. FAT16 formatted
drives have a partition size limit of 4096
MB. Single Pro Tools audio files cannot exceed 2048 MB in size.
If you choose low-level formatting, keep in
mind that it can take up to three hours or more
(depending on the size of the drive). Avoid
power interruptions and computer bus resets
during the format operation or permanent damage to the drive could occur. In addition, leave
the drive powered on for at least 30 minutes
prior to formatting so that the drive has time to
make any necessary thermal adjustments or recalibrations.
TDM Installation Guide
8
Page 13

Seek Times on Partitioned Drives
Seek times are actually faster on partitioned
drives (assuming that reads and writes are performed on a single partition), since the heads
only have to seek within the partition boundaries, rather than the whole capacity of the
drive.
In addition, smaller partitions perform faster
than larger partitions. However, this comes at
the expense of contiguous storage space. When
you partition a drive, find the compromise that
best suits your performance and storage requirements.
Avoid distributing audio files within a session over different partitions on the same
drive since this adversely affects drive performance.
Increased fragmentation increases the chance of
disk errors, which can interfere with playback of
audio, and result in performance errors.
Optimizing (Defragmenting) Drives
To prevent fragmentation, you can optimize
your drive, which rearranges your files into a
contiguous format. Most optimizing software
lets you run a check on a drive to find out the
percentage of fragmentation. If your drive
shows moderate to heavy fragmentation, consider optimizing it.
If you use your system for intensive editing, or if
you frequently delete audio or fade files from
your hard drive, optimize your drives on a
weekly basis, or even every few days, since it
doesn’t take long for even a large hard drive to
become fragmented.
Avoiding File Fragmentation
For maximum recording and playback efficiency, write data to your hard drive in a contiguous fashion. This minimizes the seek requirements to play back the data. Unfortunately,
your computer can’t always store the sound files
in this way and must write to disk wherever it
can find space.
To avoid fragmentation, format drives with
higher cluster sizes (such as 32K or 64K.)
In multitrack recording, audio tracks are written
in discrete files, spaced evenly across the disk.
While fragmentation of individual files may be
zero, the tracks are far enough apart that playback is still very seek-intensive. Also, the remaining free space on the disk is discontiguous,
increasing the likelihood of file fragmentation
on subsequent record passes.
Back Up Data Before Optimizing
Since your files are rewritten by the optimization process, always make a backup copy of the
data on your hard drive before you optimize it.
Additionally, use a hard drive utility to find and
repair any problems before optimizing data. If
there is any damage to your hard drive's directories prior to optimizing, serious data loss may result.
Chapter 2: Connecting SCSI Drives
9
Page 14

Using Macintosh Drives on Windows Systems
Pro Tools for Windows enables you record and
play back sessions directly from a Macintoshformatted (HFS or HFS+) drive connected to a
Windows system. This functionality requires
that all Macintosh session and audio files be
stored on Macintosh-formatted drives.
To mount HFS or HFS+ drives on a Windows system, you must use the MacOpener
utility by DataViz. A demo version of MacOpener is included with Pro Tools Windows.
For details on sharing sessions between
Macintosh and Windows systems, see the
Pro Tools Reference Guide.
Installing the MacOpener Utility
The MacOpener installer was placed on your
hard drive when you installed Pro Tools, in the
following location:
Program Files\Digidesign\Pro Tools\Pro Tools Utilities\MacOpener 2000 Demo
To Install MacOpener:
1 Locate the macopener2000.exe file in the
above location and double-click it to launch the
installer.
2 Follow the on-screen instructions to install
MacOpener.
3 When installation is complete, restart your
computer.
™
software
To enable the settings on the MacOpener Driver:
1 Choose Start > Programs > MacOpener 5.0 >
MacOpener Driver Preferences.
2 Under Driver Settings, select Enable Mac-
Opener Driver.
3 Under Extension Mapping, select Do not add
the PC extension to the Mac file name.
Mounting HFS Drives
If the MacOpener utility is installed and enabled, no additional steps are required to mount
HFS drives. They appear as normal system drives
after you connect them and restart your computer.
Formatting and Maintaining HFS and HFS+ Drives
Although you can use MacOpener to format HFS
and HFS+ drives from a Windows machine, it is
not recommended for use with Pro Tools. We
recommend that you connect the drives to a
Macintosh computer (if possible) and use the
ExpressPro-Tools software from ATTO (included
on the Mac Pro Tools CD-ROM).
Windows Disk Utility Software on HFS Drives
Do not use a Windows disk utility software (such
as Norton Utilities for Windows) on HFS drives.
These utilities do not recognize HFS-formatted
drives and try to reformat them. This causes format errors on the HFS drive, resulting in data
loss.
Enabling the MacOpener Driver
When you are finished installing MacOpener,
the MacOpener driver must be enabled to
mount HFS and HFS+ drives.
TDM Installation Guide10
If you need to perform disk maintenance on an
HFS-formatted drive, connect the drive to a
Macintosh computer and use a Macintosh utility.
Page 15
chapter 3
Installing Pro Tools Hardware
WARNING: There have been changes in
the installation process since the last release of Pro Tools. To avoid problems,
please read and follow the installation instructions carefully.
Pro Tools TDM Cards
Pro Tools TDM cards differ depending on the
system configuration. Card components for
each configuration are listed below.
If you are installing an expanded system in
your computer, or using an Expansion
Chassis to add additional cards to your system, refer to the
included with your Pro Tools system.
Pro Tools MIX-Series Hardware
Pro Tools MIX-series hardware comes in three
configurations:
Pro Tools 24 MIX Includes a single MIX Core
card and a 5-node TDM ribbon cable for connecting to other optional TDM-equipped cards.
Pro Tools 24 MIXplus Includes a MIX Core card,
a MIX Farm card, and a 5-node TDM ribbon cable for connecting the MIX Core to the MIX
Farm and other optional TDM-equipped cards.
Expanded Systems Guide
Pro Tools MIX3 Includes a MIX Core card, two
MIX Farm cards, and a 5-node TDM ribbon cable for connecting the MIX Core to the MIX
Farm cards and other optional TDM-equipped
cards.
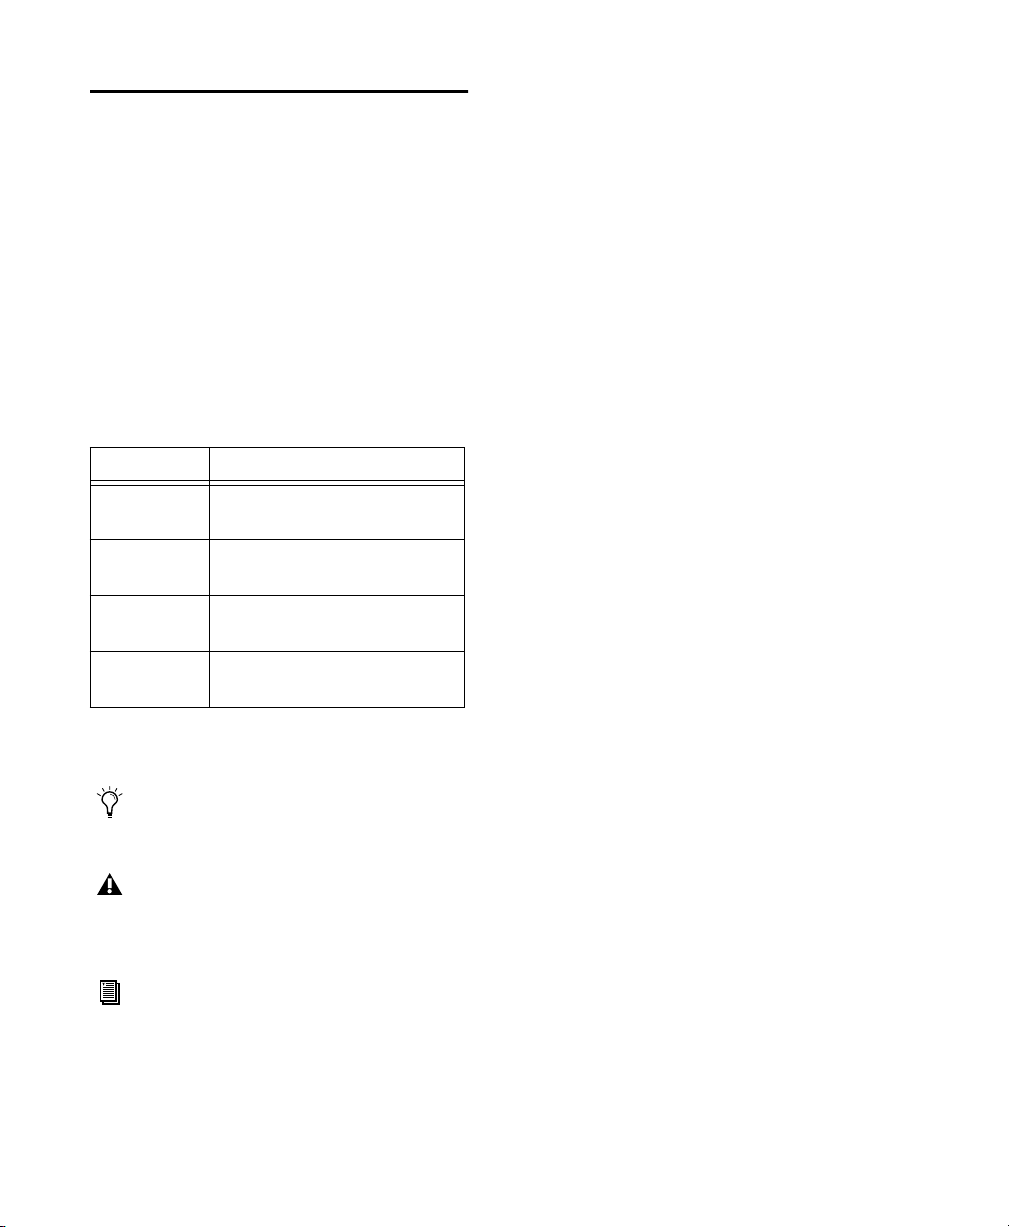
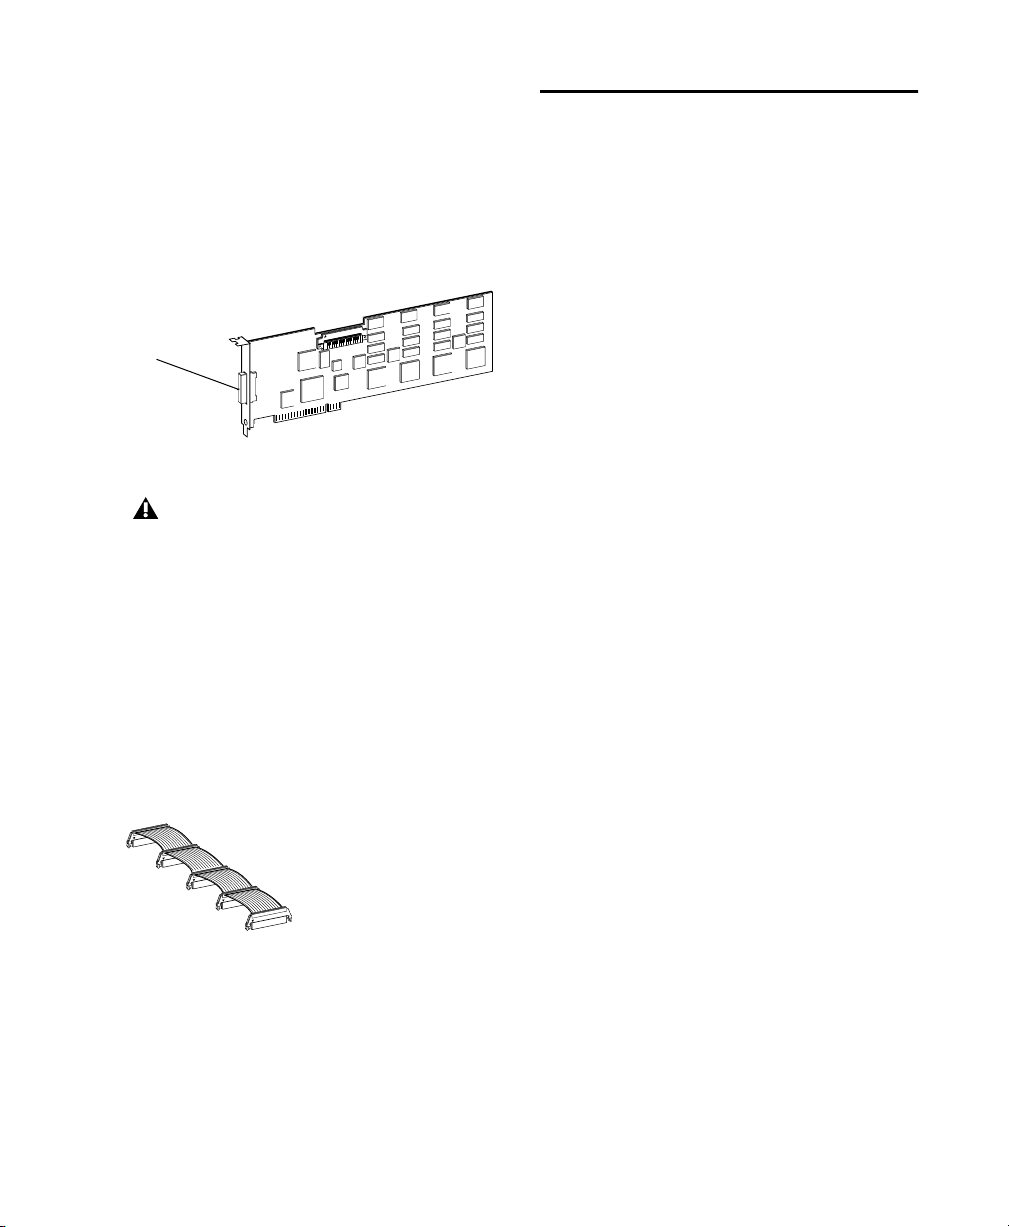
The MIX Core Card
The MIX Core card provides 24-bit, 64-track, 16channel I/O, direct-to-disk recording and playback to your Pro Tool MIX-series system, as well
as DSP power for its mixing and processing capabilities.
audio interface port
audio interface
DigiSerial
port
port
DigiSerial port
MIX Core card
This card includes a connector for attaching a
single 888/24 I/O, 882/20 I/O, or 1622 I/O Audio Interface. If you purchase the optional 16channel peripheral cable adapter, you can attach two 8-channel audio interfaces. The DigiSerial port is for connecting a Digidesign Universal Slave Driver, or a 9-pin device for use with
the Pro Tools MachineControl option.
Chapter 3: Installing Pro Tools Hardware 11
Page 16
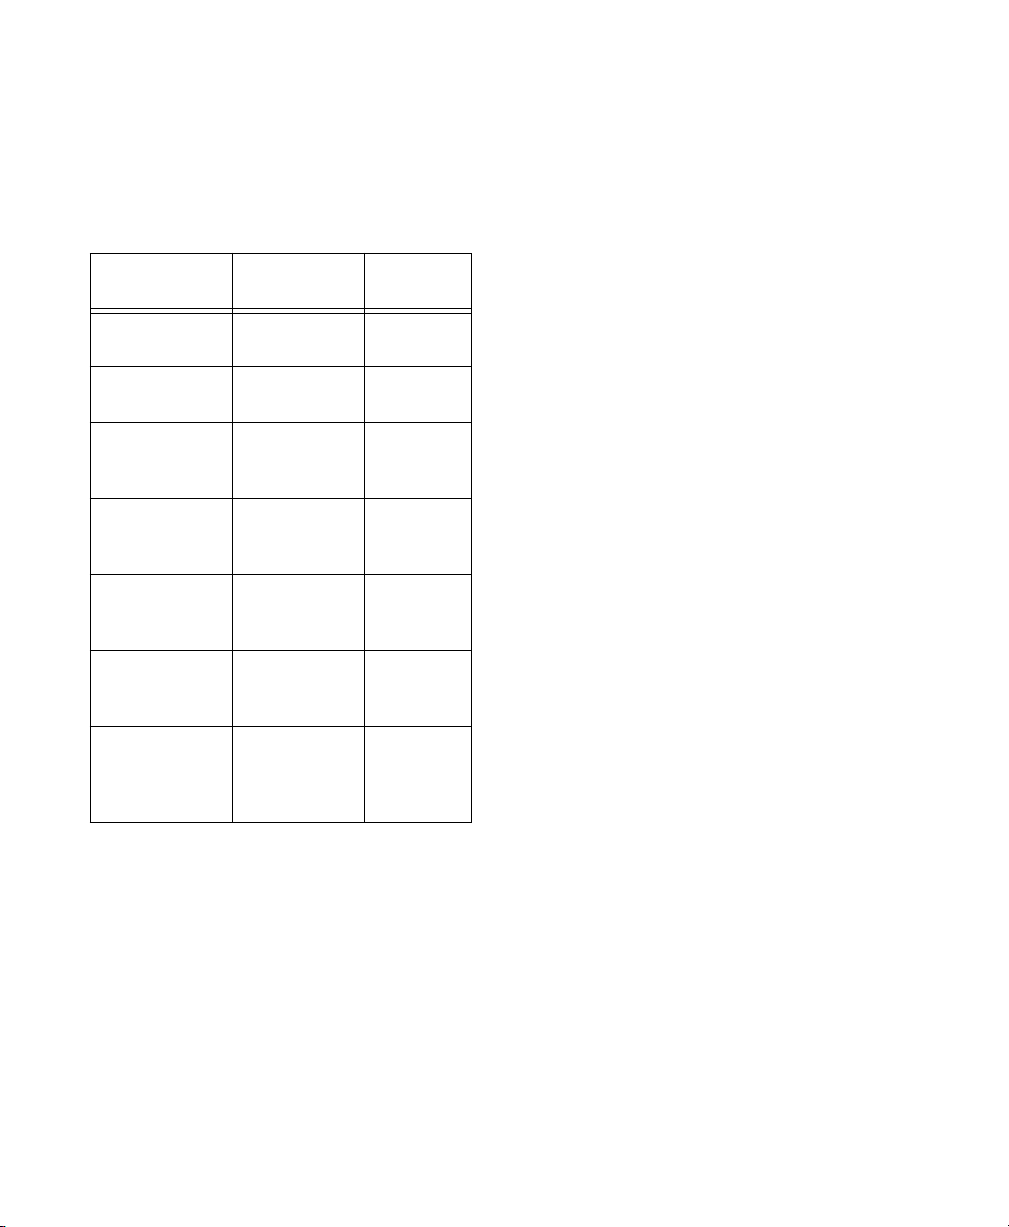
The MIX Farm Card
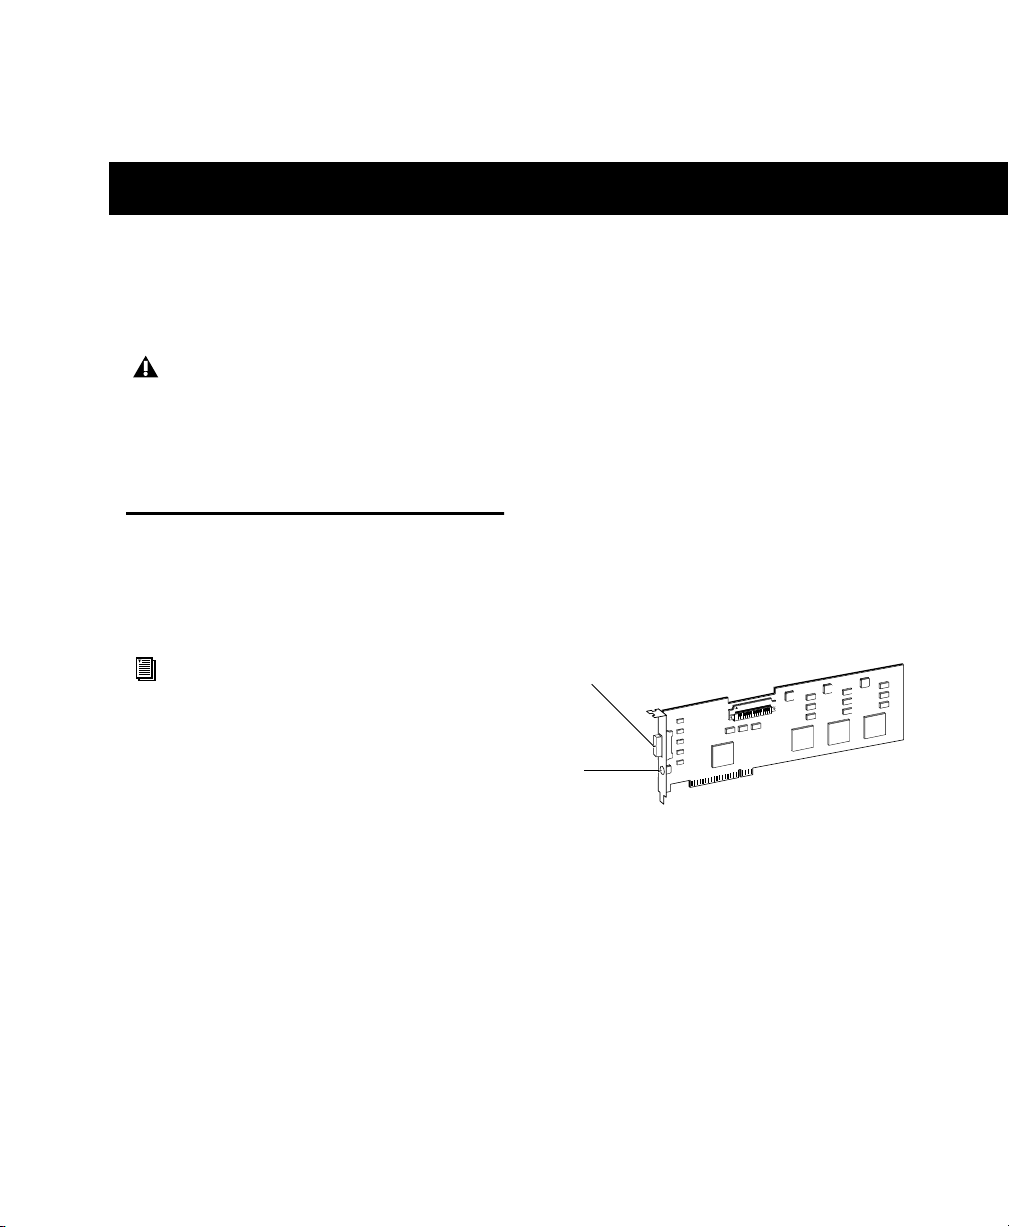
The d24 Audio Card
The MIX Farm card provides more DSP power
for mixing, processing, and DSP software such
as the DigiRack plug-ins included with
Pro Tools. It also provides a connector for attaching a single 888/24 I/O, 882/20 I/O, or
1622 I/O Audio Interface. If you purchase the
optional 16-channel peripheral cable adapter,
you can attach two 8-channel audio interfaces.
The DigiSerial port is for connecting a Digidesign Universal Slave Driver, or a 9-pin device for
use with the Pro Tools MachineControl option.
audio interface
port
DigiSerial
audio interface
port
port
DigiSerial port
MIX Farm card
Pro Tools 24 Hardware
Pro Tools 24 system hardware consists of a d24
audio card, a DSP Farm card, and a 5-node TDM
ribbon cable for connecting them.
The d24 audio card provides 24-bit, 32-track, 16channel I/O, direct-to-disk recording and playback capabilities to your Pro Tools 24 system. It
also provides a connector for attaching a single
888/24 I/O, 882/20 I/O, or 1622 I/O Audio Interface. If you purchase the optional 16-channel
peripheral cable adapter, you can attach two 8channel audio interfaces.
audio interface
port
audio interface
DigiSerial
port
port
DigiSerial port
d24 card
The DigiSerial port is for connecting an optional
Digidesign Universal Slave Driver, or a 9-pin device for use with the Pro Tools MachineControl
option.
TDM Installation Guide12
Page 17
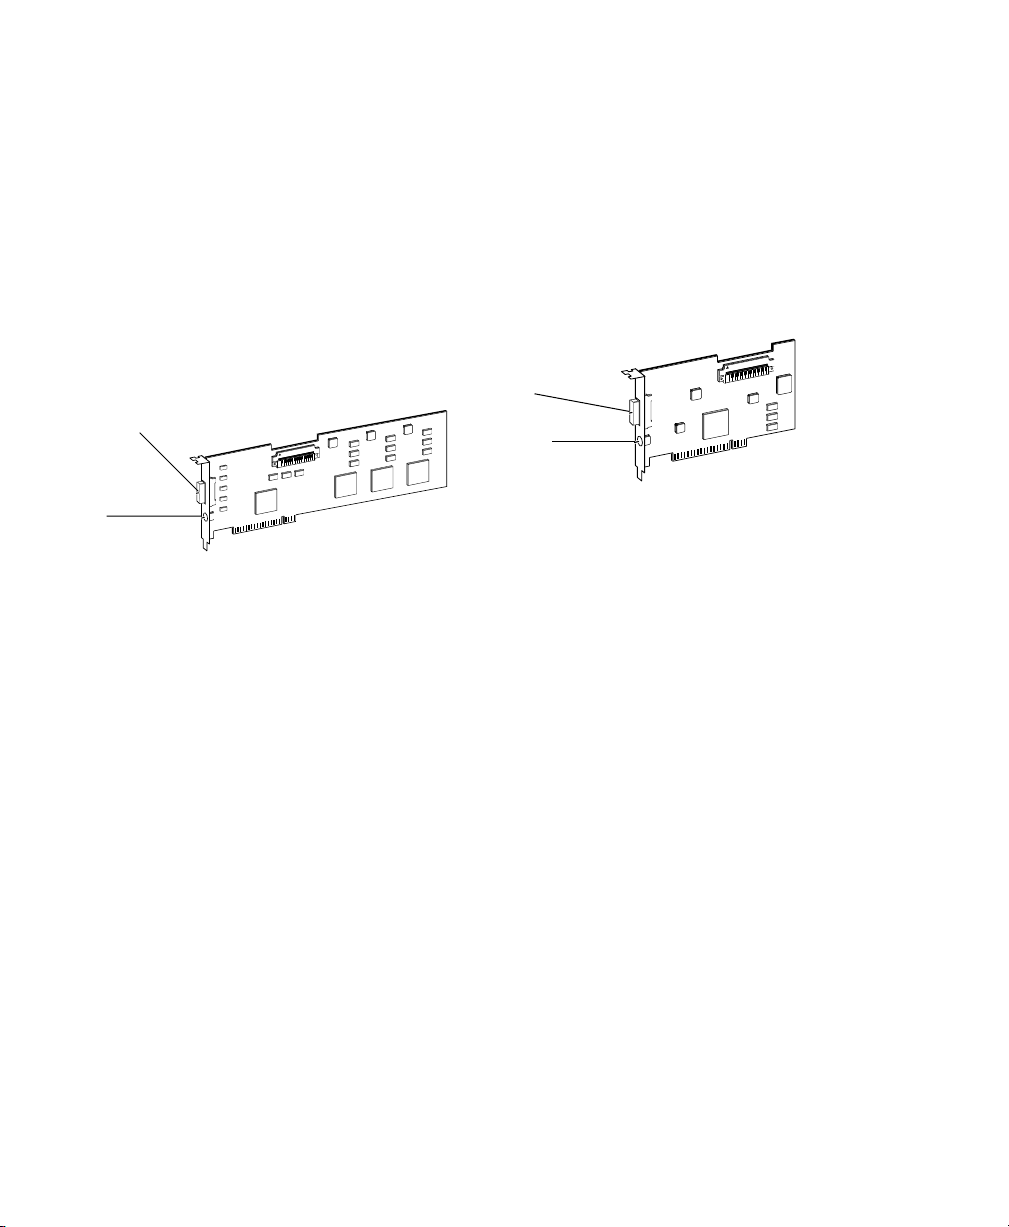
The DSP Farm
The DSP Farm provides the power for the
Pro Tools 24 system’s mixing and processing capabilities. It powers DSP software such as the DigiRack plug-ins included with Pro Tools. It also
provides a connector for attaching an 8-channel
audio interface.
audio interface
port
audio interface
port
DSP Farm card
Installing Pro Tools Cards
Before you begin to physically install your
Pro Tools cards, we recommended temporarily
disable the warning option, “Display a message
before installing an unsigned file.” This expedites and automates much of the installation
process. If you do not temporarily disable the
warning, warning messages (that you are installing an unsigned driver) appear after each DSP
chip during the detecting Pro Tools phase of installation.
To temporarily disable the warning option:
1 Turn on your computer.
The 1622 I/O Audio Interface is not supported by the DSP Farm. It must be connected to a MIX Core, MIX Farm, or d24
card. Only one 1622 I/O can be connected
to any of these cards. The optional 16channel peripheral cable adapter is not supported by the 1622 I/O.
The TDM Ribbon Cable
The TDM ribbon cable is used to connect multiple cards in your Pro Tools system so they can
share data along the TDM bus.
TDM Ribbon Cable
A 5-node cable comes with your system. If you
plan to use your system with an expansion chassis, you can order a TDM cable with more nodes
from your Digidesign dealer.
2 Right-click the My Computer icon located on
your Windows desktop.
3 Choose Properties.
4 Select the Hardware Tab.
5 In the Device Manager section of the dialog
box that appears, select the Driver Signing button.
6 In Driver Signing Options, select “Ignore – In-
stall All Files Regardless Of File Signature.”
7 Click OK twice.
8 Turn your computer off.
9 Proceed with physically installing your
Pro Tools cards.
Chapter 3: Installing Pro Tools Hardware 13
Page 18
To install Pro Tools cards:
1 Turn off your computer and any peripherals.
Leave your computer’s power cable plugged in
so the computer is grounded.
2 Open the computer case. For additional de-
tails on installing a card in your computer, refer
to its User’s Guide.
Before handling any card, discharge any
static electricity from your clothes or body
by touching a grounded metal surface, such
as the power supply case inside your computer.
3 Remove the metal access port cover behind
the expansion slot you want to use by removing
the screw (if present) and sliding the cover out
from the access port.
4 If installing a SCSI HBA card, install it in the
lowest or highest PCI slot in your computer.
5 Install the primary MIX Core or d24 card
(clock master with primary audio interface) in
the next available slot.
6 Install the remaining TDM cards in slots adja-
cent to the MIX card or d24 card.
Pro Tools cards must be installed in a specific order that is dependent on the slot numbering of
the model of computer you are using.
See Appendix A, “Slot Order” for more details on determining slot order.
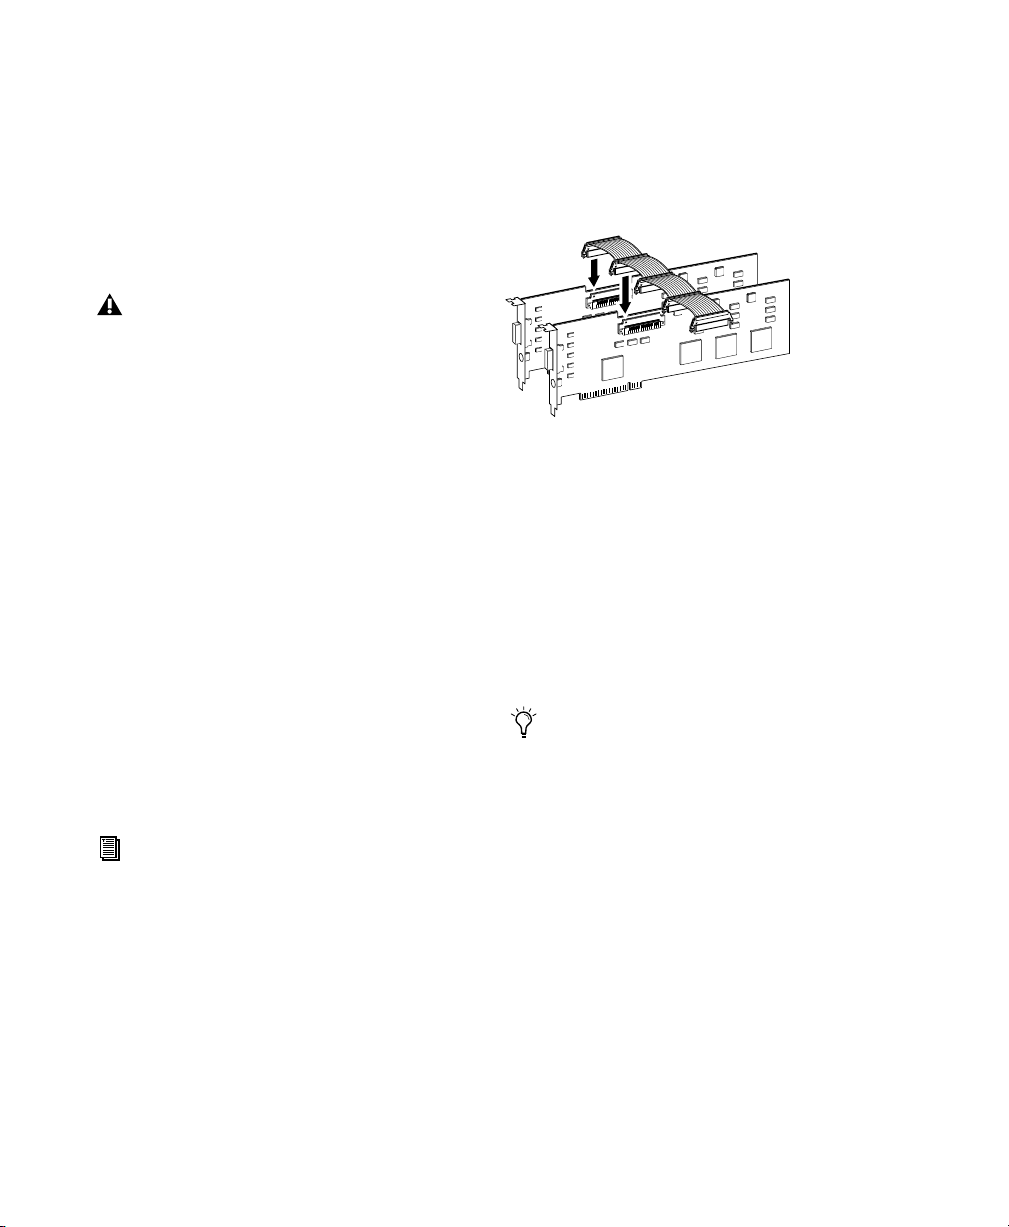
Connect all TDM cards with the TDM ribbon cable:
1 Connect the first node of the cable to the first
TDM card. Make sure the TDM cable is facing
the right direction—align the white triangles on
the cable plug with the triangle on the card.
Attaching the TDM ribbon cable to MIX Core and
MIX Farm cards
2 Push down gently but firmly until the node is
fully connected to the card. When the plug is
properly seated, the two tabs on the side of the
cable’s TDM connector click shut. To detach the
ribbon cable, squeeze the tabs on the TDM connector inward.
3 Attach the remaining nodes on the TDM cable
to subsequent cards.
It is OK to have ribbon connectors that go
unused. They should reside after the last
TDM card.
4 Secure the cards in place with the slot access
port screws you removed earlier and close your
computer.
Group similar cards together (put all MIX Farm
cards next to each other, for example).
7 If installing a SCSI HBA card, install it in the
highest numbered remaining slot.
TDM Installation Guide14
Page 19
Connecting Audio Interfaces
Pro Tools provides you with a choice of the
888/24 I/O, 882/20 I/O, 1622 I/O, or ADAT
Bridge I/O interfaces. These devices supply the
inputs and outputs for your system.
For instructions on connecting an ADAT
Bridge I/O, see the ADAT Bridge I/O Installation Guide.
Connect the Pro Tools audio interfaces:
1 Connect the primary audio interface to the
primary Mix Core or d24 card with the provided
interface cable. The primary audio interface
functions as the clock master.
2 Connect additional audio interfaces to subse-
quent Digidesign audio cards.
If you are connecting both 888/24 and 882/20
or 1622 I/O Audio Interfaces to your system, for
best system performance, connect the 888/24 to
your core Pro Tools card, followed by any additional 888/24 interfaces to the next highest-priority cards. Then connect the 882/20 or
1622 I/O interfaces to subsequent cards.
The 1622 I/O Audio Interface is not supported by the DSP Farm. It must be connected to a MIX Core, MIX Farm, or d24
card. Only one 1622 I/O can be connected
to any of these cards. The optional 16channel peripheral cable adapter is not supported by the 1622 I/O.
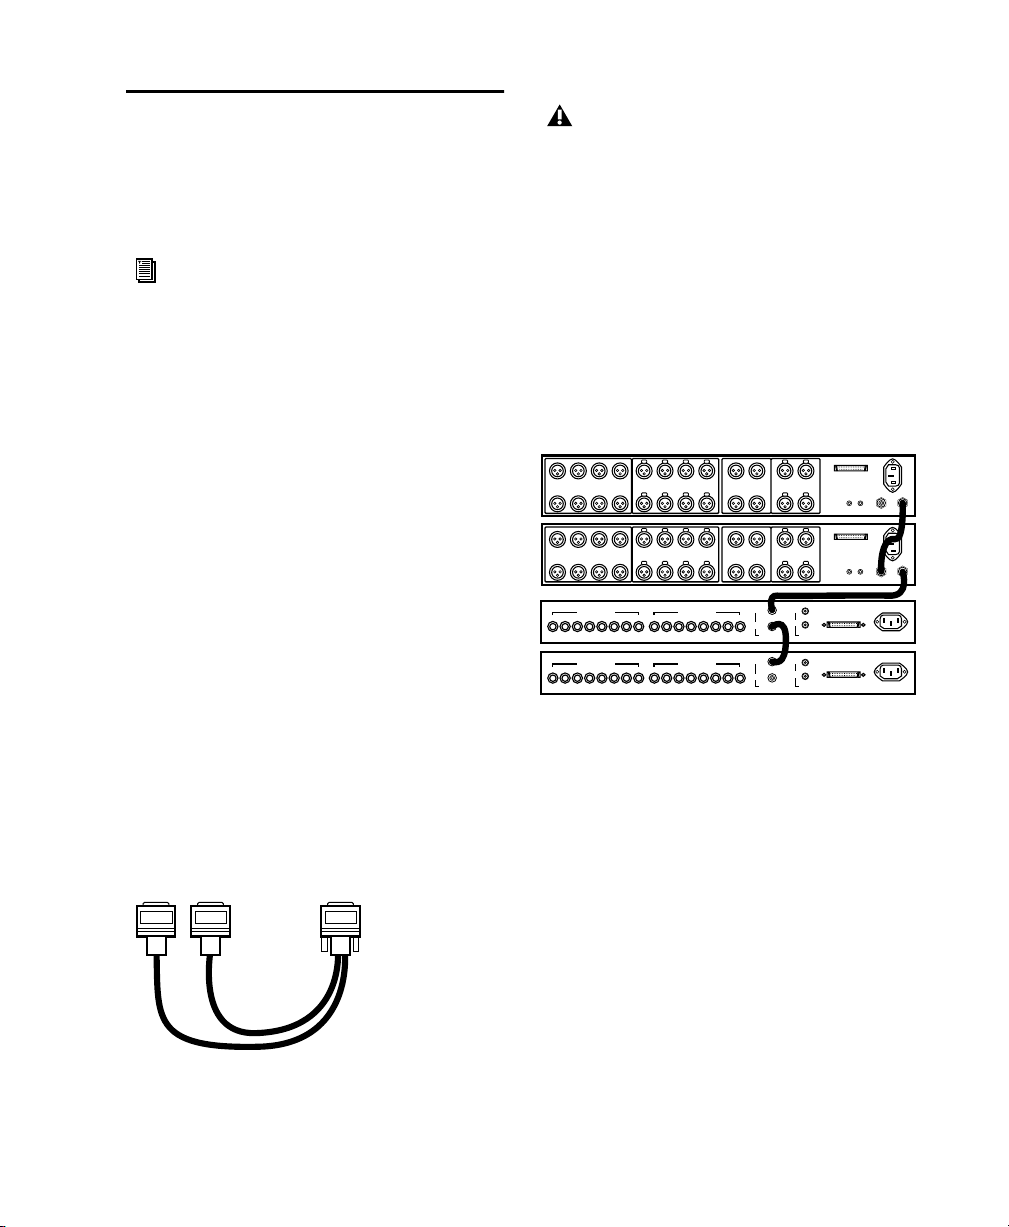
3 If using multiple audio interfaces, connect the
Slave Clock Out of the primary interface to the
Slave Clock In of the second interface with the
provided BNC cable. Connect the Slave Clock
Out of the second interface to the Slave Clock In
of the next audio interface (and so forth).
78563412785634125/6
ANALOG OUTPUT ANALOG INPUT AES/EBU OUTPUT AES/EBU INPUT
78563412785634125/6
ANALOG OUTPUT ANALOG INPUT AES/EBU OUTPUT AES/EBU INPUT
ANALOG OUTPUTSANALOG INPUTS
1234567812345678
ANALOG OUTPUTSANALOG INPUTS
1234567812345678
1/2
7/8
3/4
1/2
7/8
3/4
IN
OUT
IN
OUT
IN
SLAVE CLOCK
SLAVE CLOCKINS/PDIF
COMPUTER
5/6
1/2
7/8
3/4
S/PDIFINS/PDIF
SLAVE CLOCKINSLAVE CLOCK
OUT
OUT
COMPUTER
5/6
1/2
7/8
3/4
S/PDIFINS/PDIF
SLAVE CLOCKINSLAVE CLOCK
OUT
OUT
IN
COMPUTER
OUT
S/PDIF
COMPUTER
OUT
Connecting multiple audio interfaces together
You can use Digidesign’s 16-channel peripheral
cable adapter (optional) to connect two 8-channel audio interfaces to a single MIX Core, MIX
I/O, d24, or MIX Farm card.
to audio interface
to Audio
cables
Interface
cable
to Audio
Interface
cable
to Pro Tools
to Pro Tools card
card
Optional 16-channel peripheral cable adapter
Chapter 3: Installing Pro Tools Hardware 15
Page 20

Detecting Pro Tools Cards
To detect Pro Tools Cards:
1 Start or restart or your computer.
2 Start up Windows 2000, logging in with Ad-
ministrator privileges.
3 The Found New Hardware Wizard dialog pops
up automatically. Click Next. If Digidesign DSP
devices are found and installed automatically,
skip to step 13.
4 Select the “Search For A Suitable Driver For My
Device (Recommended)” option in the Install
Hardware Device Drivers dialog. Click Next.
5 In the Locate Driver Files dialog, check (only)
the CD-ROM option under Optimal Search Locations. Click Next.
6 In the Locate File window, select the Drivers
folder (on your Pro Tools CD-ROM). Click
Open.
7 Open “dalwdm.inf” or “dalwdm.”
If you do not follow the steps above or if you
cancel any of the steps, your computer may not
recognize your Pro Tools cards and you may receive the error message, “Cannot Create DAE
Deck.” To resolve this error message, see “Cannot Create DAE Deck Or Error Number 4” on
page 46.
8 Click OK in the Found New Hardware Wizard
dialog.
9 Click Next to install the multimedia controller
in the Driver Files Search Results dialog.
10 Click Yes in the Digital Signature Not Found
dialog, if present.
11 Click Finish in the Completing Found New
Hardware dialog (indicating that a DSP is found.
12 Repeat step 10 for each DSP chip found.
There are 6 DSP chips on MIX cards, 4 DSP chips
on DSP Farm cards, and 1 on d24 cards.
13 Re-enable the warning option, “Display a
message before installing an unsigned file.” See
“Installing Pro Tools Cards” on page 13.
14 You are now ready to install Pro Tools Soft-
ware.
TDM Installation Guide16
Page 21
chapter 4
Connecting Your Studio
Pro Tools can be connected to a mixer, amplification system, digital recorders, and SMPTE synchronization devices.
Instructions are based on the following audio interfaces:
• 888/24 I/O
• 882/20 I/O
• 1622 I/O
If you have an ADAT Bridge I/O interface,
refer to the ADAT Bridge I/O User’s Guide
for details on connecting it to your studio.
At the end of the chapter is general information
on connecting Pro Tools to digital equipment,
effects units, MIDI gear, and SMPTE synchronization devices.
The 888/24 I/O Interface
This section explains each of the connectors and
indicators on the front and back panels of the
888/24 I/O interface, how they are used, and offers suggestions for connecting the 888/24 I/O
to your studio.
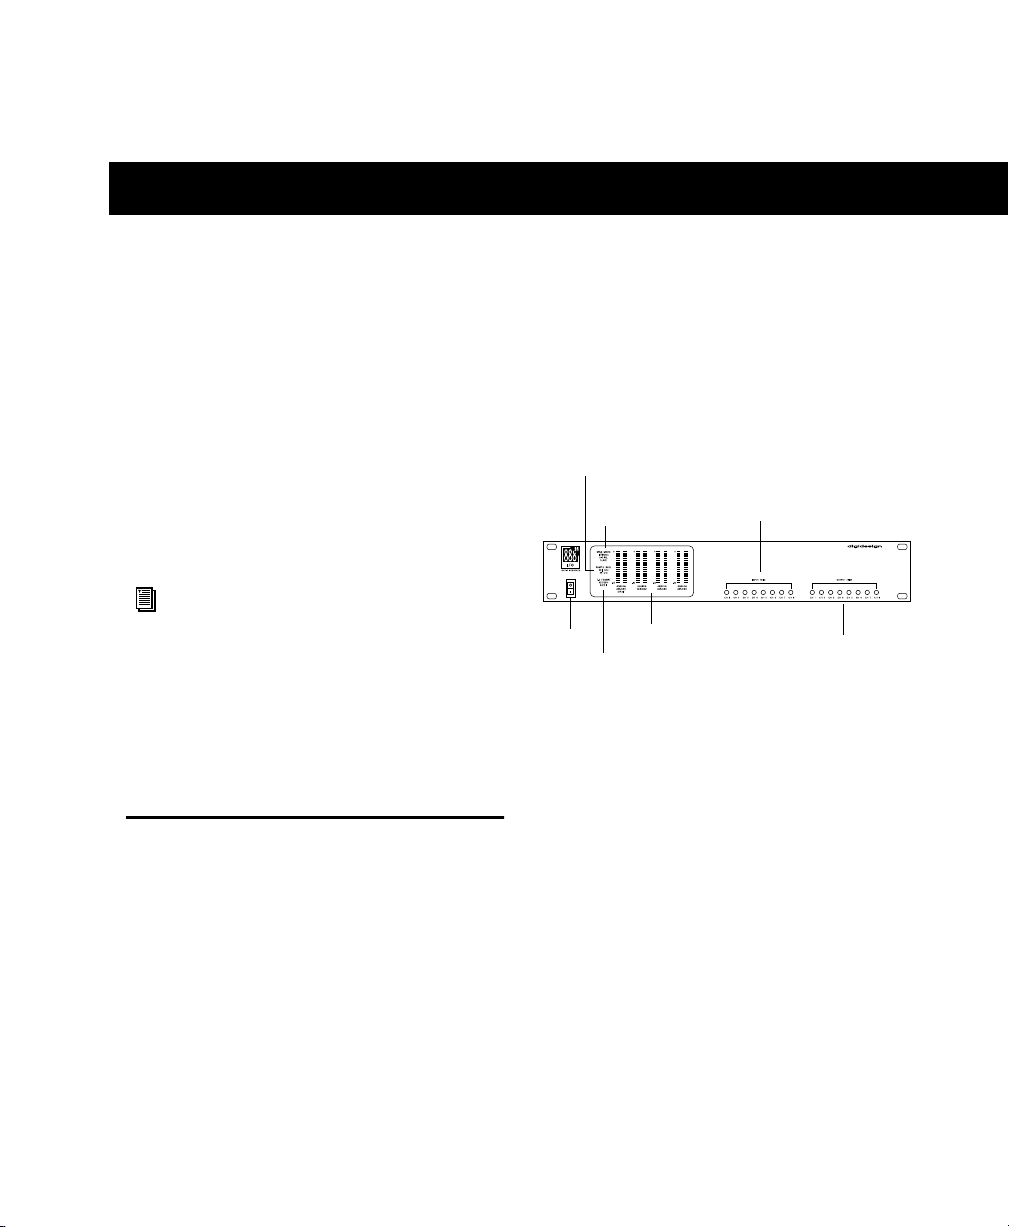
888/24 I/O Front Panel
The 888/24 I/O has the following front panel indicators, moving from left to right:
Sample
Rate
Sync
Mode
Power
Front panel of the 888/24 I/O
Level Meters
1–2 Format
Power
This switch applies power to the 888/24. The “I”
position is on. The “O” position is off.
Input Level
Trims
Output Level
Trims
Chapter 4: Connecting Your Studio 17
Page 22

Sync Mode
The Sync Mode LEDs indicate which sample rate
clock reference is currently used by the analogto-digital converters (ADCs) and the digital-toanalog converters (DACs).
Internal This is the 888/24 I/O standard setting.
In this mode, the 888/24 I/O sample rate is generated by its internal crystal oscillator (whose
frequency is determined by the Sample Rate setting in the Session Setup window). Activate internal mode whenever the 888/24 I/O is not
synchronized to an external clock source.
Digital This setting indicates that an AES/EBU or
S/PDIF word clock signal is currently the source
for the 888/24 I/O sample rate. This is the setting to use for inputting material from DAT recorders or other digital devices.
To use the 888/24 I/O digital inputs and outputs
as effects sends and returns to digital effects devices, set the 888/24 I/O to Internal mode. Set
the digital effects device to accept an external
digital clock (from the 888/24 I/O) so it synchronizes itself to Pro Tools.
The 888/24 I/O can only synchronize to and receive word clock lock on channels 1–2 of its digital inputs. To synchronize your system to an
external digital clock source, it must be connected to digital inputs 1–2 of the 888/24 I/O.
In an expanded Pro Tools system, the system
clock is carried by the audio interface connected
to the first Pro Tools card in your system. This
audio interface acts as the master interface in
your system. All other audio interfaces are
slaved to it.
Because some digital audio devices do not
output proper clock when they are not playing back, leaving the 888/24 I/O in Digital
mode may cause Pro Tools audio playback
quality to suffer, or play back at the wrong
pitch. If you are using digital I/O, reset the
Sync Mode from Digital to Internal after inputting material.
Slave This LED is lit when the 888/24 I/O sample rate is synchronized to another Digidesign
audio interface or synchronization peripheral.
In this mode, the sample rate of the slave interface is derived from the frequency of the incoming master clock signal present at the Slave
Clock In (256x) port.
The 888/24 I/O automatically switches to this
mode when a Slave Clock Out signal from another Digidesign interface, Universal Slave
Driver, Video Slave Driver, or SMPTE Slave
Driver is connected to the 888/24 I/O Slave
Clock In port.
In expanded Pro Tools systems, the Super Clock
output of the master audio interface locks all
other interfaces together with sample accuracy,
keeping all signals phase-synchronous.
When slaving to a Digidesign Universal
Slave Driver, Video Slave Driver, or SMPTE
Slave Driver, set the clock source to Internal.
The audio interface automatically switches
to Slave mode when it detects the 256x input clock
TDM Installation Guide18
Page 23

Sample Rate and 1–2 Format Indicators
These LEDs indicate the sample rate of the
888/24 I/O internal crystal oscillator and the
digital format (AES/EBU or S/PDIF) of the audio
input signal to channels 1 and 2.
The choice of digital format for these two channels is made in the Session Setup window or
Hardware Setup dialog. Digital input pairs 3–4,
5–6, and 7–8 of the 888/24 I/O are always
AES/EBU. Sample Rate is set in the Session Setup
window or Hardware Setup dialog in Pro Tools.
The 888/24 I/O provides the following sample
rates:
48 kHz This is a standard sampling rate of many
professional audio devices. It is recommended
for use with devices that cannot receive digital
transfers at 44.1 kHz.
44.1 kHz This is the compact disc standard sampling rate and the Pro Tools default sample rate.
To avoid the need for sample rate conversion,
use this rate when you are recording material
that will ultimately be published on a compact
disc.
When you are using an external digital
source such as a DAT recorder, the front
panel of the 888/24 I/O indicates only the
internal oscillator sample rate, not that of
the external digital source.
Level Meters
The 888/24 I/O level meters monitor the channel outputs of Pro Tools. Input levels are monitored on-screen in the Pro Tools software.
The 888/24 I/O is factory calibrated so that a
meter reading of –18 dB corresponds to the
888/24 I/O nominal operating level (which can
be set to either +4 dBu or –10 dBV). If you sent
the output to an analog device with a VU meter,
this would correspond to “0 VU” on the VU
meter.
The red LED indicators on the audio interface
indicate both full-code (highest level before
clipping) and clipping of Pro Tools output signals. The on-screen meters in Pro Tools software
indicate clipping when at least three consecutive full-code samples follow each other.
Input Level Trims
The 888/24 I/O analog inputs are factory calibrated at a –18 dB nominal level, referenced to a
full code signal. This means that at the nominal
reference input level (either +4 dBu or –10 dBV),
you have 18 dB of headroom before clipping.
The input level trim pots allow adjustment of
the 888/24 I/O input levels to match the operating level of your external equipment. Adjustments can be made with a Phillips screwdriver.
Output Level Trims
The 888/24 I/O analog outputs are factory calibrated at a –18 dB nominal level, referenced to a
full code signal. This means that at the nominal
reference output level (either +4 dBu or
–10 dBV), you have 18 dB of headroom before
clipping. The output level trim pots allow adjustment of the 888/24 I/O output levels to
match the operating level of your external
equipment. Adjustments can be made with a
Phillips screwdriver.
Chapter 4: Connecting Your Studio 19
Page 24

To calibrate the input and output levels of the
888/24 I/O to match your mixing console or
other devices in your studio, use Calibration
Mode and the Signal Generator TDM Plug-In in
Pro Tools.
Instructions for calibrating the 888/24 I/O
appear in Chapter 7, “Calibrating the
888/24 I/O.”
888/24 I/O Back Panel
The 888/24 I/O has the following back panel
connectors, moving from left to right:
Power
Analog Inputs
Analog Outputs
Back panel of the 888/24 I/O
AES/EBU
Outputs
Analog Audio Outputs
AES/EBU
Inputs
Interface
50-pin
S/PDIF
I/O
Input
Slave
Clock
I/O
1–8 of the 888/24 I/O are software selectable in
pairs between analog or digital format, analog
input to a channel pair is disabled when digital
input format is chosen for that channel.
The 888/24 I/O analog audio connectors are balanced XLRs with pin 2 wired hot, (or “+”); pin 3
cold, (or “–”); and pin 1 ground.
AES/EBU Digital Outputs 1–8
The 888/24 I/O AES/EBU output jacks are balanced, 3-conductor, XLR connectors which output a 24-bit digital data stream. Output is continuously active on both the AES/EBU and
S/PDIF jacks even when the 888/24 I/O input selector is set to analog.
AES/EBU Digital Inputs 1–8
The AES/EBU digital format is used in many professional digital audio devices, including some
DAT recorders. The AES/EBU inputs on the
888|24 interface are balanced, 3-conductor XLR
connectors which accept a full 24-bit digital
data stream.
For AES/EBU connections, we strongly recommend using 110-ohm cables with a length that
does not exceed 30 meters.
These are balanced male XLR connectors for analog audio output connections. All eight output
channels are continuously active. The
888/24 I/O analog outputs feature 24-bit digitalto-analog converters.
Analog Audio Inputs
These are balanced female XLR connectors for
analog audio input connections. The
888/24 I/O analog inputs feature 24-bit analogto-digital converters. Because input channels
TDM Installation Guide20
Input channels 1–8 of the 888/24 I/O are software selectable in pairs between analog or digital format. Digital input to a channel pair is disabled when analog input format is chosen for
that channel in the Hardware Setup dialog. Input to AES/EBU input channels 1–2 is disabled
when S/PDIF digital format is chosen for these
inputs in the Pro Tools Session Setup window.
Page 25

50-pin Interface Connector
This 50-pin Computer connector is used to connect the 888/24 I/O to a MIX card, d24 audio
card, Disk I/O card, or a DSP Farm card. The necessary cable is supplied with your audio interface. If you plan to connect two 888/24 audio
interfaces to a single MIX card or d24 card, a 16channel peripheral cable adapter is necessary.
(This cable is available from your Digidesign
dealer.)
S/PDIF Digital Input/Output
When the 888/24 I/O Sync Mode is set to Internal, connecting a valid Slave Clock Out signal to
this port causes the 888/24 I/O to automatically
switch to Slave mode. When the 888/24 I/O is
the master interface or the first interface in a
chain, Digital mode overrides the Slave Clock
input, and an incoming Slave Clock Out signal
will not switch the 888/24 I/O to Slave mode.
Because crucial timing data is passed over these
ports, use high-quality, 75-ohm RG-59 cables
for making connections, and keep total cable
length to less than 3 meters between interfaces.
The Sony Philips Digital Interface Format
(S/PDIF) is used in many professional and consumer CD players and DAT recorders. The
888/24 I/O S/PDIF in/out jacks are unbalanced
2-conductor phono (RCA) jacks which utilize a
full 24-bit digital data stream. To avoid RF interference, use 75-ohm coaxial cable for S/PDIF
transfers and do not exceed a cable length of 10
meters.
Because input channels 1–2 of the 888/24 I/O
are software selectable between analog or digital
format, input to these two digital channels is
disabled when analog input is chosen or when
AES/EBU digital format is chosen in the
Pro Tools Session Setup window. Output is continuously active on both the AES/EBU and
S/PDIF output jacks, regardless of which digital
input format is selected for channels 1–2.
Slave Clock In/Out
The Slave Clock Out jack is a standard BNC type
connector that outputs a 256 times sample rate
Super Clock signal for slaving and synchronizing multiple Digidesign interfaces and synchronization peripherals together.
Power Input
This connector accepts a standard AC power cable. The interface automatically selects power
(100 V to 240 V) and automatically works with a
standard modular cable to connect to AC power
receptacles in any country.
Chapter 4: Connecting Your Studio 21
Page 26

Changing Operating Levels of
Individual 888/24 I/O
Channels
The 888/24 I/O is factory set to +4 dBu operating levels for input and output. However, the
888/24 I/O allows you to individually switch
any of its analog inputs or outputs to either a
+4 dBu or –10 dBV operating level by moving
internal jumpers on its circuit board.
output level adjustment switches
+4 dBu or -10 dBV
input level adjustment
switches +4 dBu or -10 dBV
Input and output level switches inside the 888/24 I/O
To change the operating level of an input channel:
1 Turn off your computer and the 888/24 I/O.
output level
adjustment switches
+4 dBu or -10 dBV
input level
adjustment switches
+4 dBu or -10 dBV
5 Inside the 888/24 I/O chassis, next to each of
the channel input trims, there is a jumper
switch with a removable cap. Locate the jumper
switch for the channel you want to modify.
Gently lift the cap off the 3-pronged connector.
Place it in the position corresponding to the operating level that you desire. For +4 dBu levels,
place it over the rear two prongs. For –10 dBV
levels, place it over the front two prongs.
6 When you have made the desired changes, re-
place the top of the 888/24 I/O.
7 Replace the four front panel screws using the
hex wrench.
8 Replace the top screws with a Phillips screw-
driver.
pull off jumper
pull off
jumper
-10
+4
-10
4
+
-10
4
+
place
place jumper
in this position
jumper in
to set input
this position
to +4 dBu level
to set input
to +4 dBu
level
place
place jumper
jumper in
in this position
to set input
this position
to -10 dBV level
to set input
to -10 dBV
level
Setting the input level jumper switches
2 With a Phillips screwdriver, remove the screws
from the top of the 888/24 I/O.
3 Using the 1/16-inch hex wrench included
with the 888/24 I/O, carefully remove the front
four panel screws as noted on the bag containing the hex wrench.
4 Lift the top off of the 888/24 I/O.
TDM Installation Guide22
To change the operating level of an output
channel:
1 Turn off your computer and the 888/24 I/O.
2 Using the 1/16-inch hex wrench included
with the 888/24 I/O, carefully remove the front
four panel screws as noted on the bag containing the hex wrench.
3 With a Phillips screwdriver, remove the screws
from the top of the 888/24 I/O and lift the top
off of the 888/24 I/O.
Page 27

4 To find the channel output switches, detach
the front part of the ribbon cable at the right
side of the chassis. To do this, grip both sides of
the black connector and gently pull up.
5 With the ribbon cable out of the way you’ll
see eight 3-pronged jumper switches, each with
a removable cap. Locate the switch for the channel you want to modify.
remove jumper
place
jumper in
this position
to set
output to
+4 dBu level
0
-1
4
+
place jumper
in this position
to set output
to +4 dBu level
place
place jumper
in this position
jumper in
to set output
to -10 dBV level
this position
to set
output to
-10 dBV
level
detach
detach
ribbon cable
ribbon
cable
Setting the output level jumper switches
6 Gently lift the cap off of the jumper switch.
Place it in the position corresponding to the operating level that you desire. For +4 dBu levels,
place it over the left two prongs. For –10 dBV
levels, place it over the right two prongs.
7 When you have made the desired changes, re-
connect the ribbon cable and put the top back
on the 888/24 I/O.
8 Replace the four front panel screws using the
hex wrench.
Making Signal Connections to
the 888/24 I/O
Depending on how you plan to use the
888/24 I/O, the way you connect it to your studio will vary.
Choosing Between +4 dBu and
–10 dBV Operation Modes
The 888/24 I/O can be set to operate at +4 dBu
or –10 dBV input and output levels (see “Changing Operating Levels of Individual 888/24 I/O
Channels” on page 22). It is important that you
determine which line level mode is appropriate
for your studio. In +4 dBu operating mode, the
888/24 I/O is a 24-bit digital audio device capable of producing audio signals at or near
+26 dBu. Check the owner’s manual for your
mixer, power amplifier or effects processor to see
if it can handle this load. If it cannot, consider
setting the 888/24 I/O to operate at –10 dBV
line levels.
Consider the following when connecting a
mixer:
◆ If your mixer cannot handle more than 1.5 V
(RMS) inputs at +4 dBu, then set the 888/24 I/O
to run at –10 dBV line level.
◆ If your mixer can handle up to 8.5 V (RMS) in-
puts, or has pads or attenuators on its inputs,
then you can use the +4 dBu setting on the
888/24 I/O.
9 Replace the top screws with a Phillips screw-
driver.
Most manuals contain device input specifications, including whether or not there are pads or
attenuators. Consult the manufacturer of your
mixer or power amplifier for further information.
Chapter 4: Connecting Your Studio 23
Page 28

Setting Up Your Studio
The following diagram illustrates a typical studio setup, with the 888/24 I/O connected to a
mixing console, effects and other equipment.
Digital Inputs/Outputs
Channel 3-4
To Digital Effects Devices
Analog
Audio
Outputs 5-8
Tape Returns
or Inputs 1-4
Computer 1
1/2
5/6
AES/EBU INPUT
3/4
/2
1
7/8
UT
P
/
5/6
S
F
I
D
P
/
S
O
4
AES/EBU OUTP
3/
N
8
7/
Analog
Audio
Inputs 5-8
Channel
Outputs 1-4
I
Digital Inputs/Outputs
To DAT Recorder
1
3
T
2
5
G INPU
LO
ANA
4
7
6
1
8
3
2
5
LOG OUTPUT
ANA
4
7
6
8
K
C
O
L
C
E
V
A
L
S
K
T
C
U
O
O
L
C
E
V
A
L
S
N
I
F
I
D
T
U
Channel 1-2
Effects Devices
Digital Effects Devices
(set to external sync)
DAT Recorder
Using 888/24 I/O As
Standalone Audio Converter
The 888/24 I/O can be used apart from
Pro Tools as a standalone 8-channel, 24-bit, analog-to-digital or digital-to-analog converter.
Before you use the 888/24 I/O in standalone
mode:
1 Turn off the 888/24 I/O.
2 Do not turn on your computer while the
888/24 I/O is in standalone mode. If you do, the
888/24 I/O stops functioning in standalone
mode.
Instruments
Connected to Console
Power Amp
and Speakers
Typical studio configuration
The 888/24 I/O analog audio connectors are balanced XLRs with pin 2 wired hot (or “+”), pin 3
cold (or “–”), and pin 1 ground.
If you are connecting a balanced system, connect pin 1 and shield at the input only (not at
the output). This prevents ground loops between the shield and pin 1 conductor.
If you are connecting an unbalanced signal to
the 888/24 I/O inputs or outputs, connect only
pin 2 to the “+” signal, and pins 1 and 3 to
ground at all inputs only.
To use the 888/24 I/O as a standalone A/D
converter:
1 Turn off any digital devices that send a word
clock signal to the 888/24 I/O channel 1–2 digital input ports.
2 Turn on the 888/24 I/O. The 888/24 I/O
searches briefly for a word clock signal on channels 1–2 of its digital input ports.
3 If the 888/24 I/O does not detect word clock,
it functions as a standalone A/D converter using
its internal clock. In this mode, use analog inputs 1–8 and AES/EBU outputs 1–8.
The default sample rate of the 888/24 I/O
in standalone A/D mode is 44.1 kHz.To
change this default setting to 48 kHz, you
must open the 888/24 I/O and manually reset it by moving an internal jumper switch.
Instructions for doing this are provided in
the 888/24 I/O Installation Guide.
TDM Installation Guide24
Page 29

To use the 888/24 I/O as a standalone D/A
converter:
1 Make sure that a digital device providing a
word clock signal is connected to AES/EBU inputs 1–2 of the 888/24 I/O and turned on.
2 Turn on the 888/24 I/O. The 888/24 I/O
searches for a valid word clock or a word clock
signal on channels 1–2 of its digital input ports.
3 When a valid word clock lock is recognized,
the 888/24 I/O enters Digital mode and function as a standalone D/A converter using
AES/EBU inputs 1–8 and analog outputs 1–8.
The 888/24 I/O D/A sample rate is determined
by the sample rate it detects on channels 1–2 of
its AES/EBU inputs.
The 888/24 I/O defaults to listening to a
digital word clock signal on channels 1–2 of
its AES/EBU digital input ports. To use a
S/PDIF device as your source of word clock,
you must reset this default by opening the
888/24 I/O and moving an internal jumper
switch. Instructions for doing this are provided in the 888/24 I/O Installation Guide.
That guide also provides instructions for
changing other standalone mode default parameters such as sample rate and DAC
muting.
The 882/20 I/O Interface
This section explains all of the connectors and
indicators on the front and back panels of the
882/20 I/O interface, how they are used, and offers suggestions for connecting the 882/20 I/O
to your studio.
882/20 I/O Interface Front Panel
The 882/20 I/O has the following front panel indicators, moving from left to right:
Ch 1–2
Input
20
Power
Sync Mode
Front panel of the Digidesign 882/20 I/O
Power
This switch applies power to the 882/20. The “I”
position is on. The “O” position is off.
Sync Mode
Sample
Rate
Signal
Present
LEDs
To return the 888/24 I/O to Pro Tools-based
operation:
■ Turn on your computer.
– or –
■ If your computer is on, launch Pro Tools.
The Sync Mode LEDs indicate which sample rate
clock reference is currently used by the analogto-digital converters (ADCs) and the digital-toanalog converters (DACs).
Internal This is the 882/20 I/O standard setting.
In this mode, the 882/20 I/O sample rate is generated by its internal crystal oscillator (whose
frequency is determined by the Sample Rate setting in the Session Setup window). Activate internal mode whenever the 882/20 I/O is not
synchronized to an external clock source.
Chapter 4: Connecting Your Studio 25
Page 30

Digital This setting indicates that a S/PDIF word
clock signal is the source for the 882/20 I/O
sample rate. This is the setting you would use for
inputting material from DAT machines or other
S/PDIF digital devices.
To use the 882/20 I/O digital input and output
as an effects send and return to a digital effects
device, set the 882/20 I/O to Internal mode. Set
the digital effects device to accept an external
digital clock (from the 882/20 I/O) so it synchronizes with Pro Tools.
In an expanded system, the system clock is carried by the audio interface connected to the first
Pro Tools card in your system. This audio interface acts as the master interface in your system,
and all other audio interfaces slave to it. Only
the master interface allows you to set the Sync
Mode. Slaved interfaces do not allow this parameter selection.
Because some digital audio devices do not
output proper clock when they are not playing back, leaving the 882/20 I/O in Digital
mode may cause Pro Tools audio playback
quality to suffer, or to play back at the
wrong pitch. If you are using digital I/O, reset the Sync Mode from Digital to Internal
after inputting material.
Slave This LED is lit when the 882/20 I/O sample rate is synchronized to another Digidesign
audio interface or synchronization peripheral.
In this mode, the sample rate of the slave interface is derived from the frequency of the incoming master clock signal present at the Slave
Clock In (256x) port. The 882/20 I/O automatically switches to this mode when a Slave Clock
Out signal from another Digidesign interface,
Universal Slave Driver, Video Slave Driver, or
SMPTE Slave Driver is connected to its Slave
Clock In port.
In expanded Pro Tools systems, the Super Clock
output of the master audio interface locks all
other interfaces together with sample accuracy,
keeping all signals phase-synchronous.
When slaving to a Digidesign Universal
Slave Driver, Video Slave Driver, or SMPTE
Slave Driver, set the clock source to Internal.
The audio interface automatically switches
to Slave mode when it detects the 256x input clock.
Ch 1–2 Input
This LED indicates the format (analog or digital)
of the audio input signal to channels 1 and 2. In
Pro Tools, you choose analog or digital input for
these two channels in the Session Setup window. Input channels 3 through 8 of the
882/20 I/O are always analog.
Sample Rate
These LEDs display the current sample rate of
the 882/20 I/O internal crystal oscillator, which
can be either 44.1 kHz or 48 kHz. In Pro Tools,
this is set in the Session Setup window.
The 882/20 I/O provides the following sample
rates:
48 kHz This is a standard sampling rate of many
professional audio devices. It is recommended
for use with devices that cannot receive digital
transfers at 44.1 kHz.
TDM Installation Guide26
Page 31

44.1 kHz This is the compact disc standard sampling rate and the Pro Tools default sample rate.
To avoid the need for sample rate conversion,
use this rate when you are recording material
that will ultimately be published on a compact
disc.
When you are using an external digital
source such as a DAT recorder, the front
panel of the 882/20 I/O indicates only the
internal oscillator sample rate, not that of
the external digital source.
Signal Present LEDs
These LEDs indicate whether signal is present
(above the level of –30 dB) at a given channel’s
output. These LEDs indicate the presence of
channel output signals, not input signals. Input
signals are monitored on-screen in the Pro Tools
software. The LEDs do not indicate clipping.
Clipping is indicated by the on-screen meters in
Pro Tools software.
Analog Audio Inputs
These are balanced, 1/4-inch TRS jacks for analog audio input connections. The 882/20 I/O
analog inputs feature 20-bit analog-to-digital
converters.
Input operating levels are switchable between
+4 dBu and –10 dBV operation. Unbalanced
connections are supported through the use of
standard 1/4-inch TRS mono phone plugs.
Because input channels 1–2 of the 882/20 I/O
are software selectable between analog or S/PDIF
digital format, input to these two analog channels is disabled when S/PDIF digital input format is chosen in the Pro Tools Hardware Setup
dialog.
The 882/20 I/O analog inputs are factory calibrated at a –14 dB nominal level, referenced to a
full code signal. This means that at the nominal
reference input level (either +4 dBu or –10 dBV),
you have 14 dB of headroom before clipping.
882/20 I/O Back Panel
The 882/20 I/O has the following back panel
connectors, moving from left to right:
Slave
Clock
In/Out
Analog
Inputs
Back panel of the Digidesign 882/20 I/O
Analog
Outputs
S/PDIF
I/O
50-pin
Interface
Power
Analog Audio Outputs
These are balanced, 1/4-inch TRS jacks for analog audio output connections. The 882/20 I/O
analog outputs feature 20-bit digital-to-analog
converters.
All eight output channels are continuously active. Output operating levels are switchable between +4 dBu and –10 dBV operation. Unbalanced connections are supported through the
use of standard 1/4-inch TRS mono phone
plugs.
The 882/20 I/O analog outputs are factory calibrated at a –14 dB nominal level, referenced to a
full code signal. This means that at the nominal
reference output level (either +4 dBu or
–10 dBV), you have 14 dB of headroom before
clipping.
Chapter 4: Connecting Your Studio 27
Page 32

Slave Clock In/Out
The Slave Clock Out jack is a standard BNC type
connector that outputs a 256x audio sample rate
master Super Clock signal for slaving and synchronizing multiple Digidesign interfaces and
synchronization peripherals together.
The Slave Clock In jack is a standard BNC type
connector designed to receive a Slave Clock Out
signal from another Digidesign interface, a Universal Slave Driver
SMPTE Slave Driver
Digidesign interfaces and synchronization peripherals together.
When the 882/20 I/O Sync Mode is set to Internal, connecting a valid Slave Clock Out signal to
this port causes the 882/20 I/O to automatically
switch to Slave mode. When the 882/20 I/O is
the master interface or the first interface in a
chain, Digital mode overrides the Slave Clock
input, and an incoming Slave Clock Out signal
will not switch the 882/20 to Slave mode.
Because crucial timing data is passed over these
ports, use high-quality, 75-ohm RG-59 cables
for making connections, and keep total cable
length to less than 3 meters between interfaces.
™
, Video Slave Driver™, or
™
for synchronizing multiple
Hardware Setup dialog. To avoid RF interference, use 75-ohm coaxial cable for S/PDIF transfers and do not exceed a cable length of 10
meters.
50-pin Interface Connector
This 50-pin connector is used to connect the
882/20 I/O to a MIX card, d24, Disk I/O, or DSP
Farm card. The necessary cable is supplied with
your audio interface. If you plan to connect two
882/20 I/O interfaces to a MIX card or d24 card,
a 16-channel peripheral cable adapter is necessary. (This cable is available from your Digidesign dealer.)
Power Input
This connector accepts a standard AC power cable. The interface automatically selects power
(100 V to 240 V), and automatically works with
a standard modular cable to connect to AC
power receptacles in any country.
S/PDIF Digital Input/Output
The Sony Philips Digital Interface Format
(S/PDIF) is used in many professional and consumer CD players and DAT recorders. The
882/20 I/O S/PDIF jacks are unbalanced, 2-conductor, phono (RCA) jacks. Because input channels 1–2 of the 882/20 I/O are software selectable between analog or digital format, input to
these two digital channels is disabled when analog input is chosen in the Hardware Setup dialog in Pro Tools. Output is continuously active
on the S/PDIF output jack, even if the
882/20 I/O input selector is set to Analog in the
TDM Installation Guide28
Page 33

Making Signal Connections to
the 882/20 I/O
Depending on how you plan to use the
882/20 I/O, the way you connect it to your studio will vary.
Choosing Between +4 dBu and
–10 dBV Operation Modes
The 882/20 I/O can be set to operate at +4 dBu
or –10 dBV input and output levels. It is important that you determine which line level mode
is appropriate for your studio. In +4 dBu operating mode, the 882/20 I/O is a 20-bit digital audio device capable of producing audio signals at
or near +18 dBu. Check the owner’s manual for
your mixer, power amplifier or effects processor
to see if it can handle this load. If it cannot, consider setting the 882/20 I/O to operate at
–10 dBV line levels.
Setting Up Your Studio
The following diagrams provide general suggestions for connecting studio gear to your system.
Figure 1 illustrates a studio setup with the
882/20 I/O connected to a mixing console, with
effects and other gear routed into the console as
well.
S/PDIF Digital Input/Output
N
I
T
U
O
78
O
L
C
E
V
A
L
S
Analog
Audio
Outputs 1-6
K
C
N
I
T
U
O
F
I
D
P
/
S
To DAT Recorder
ER
T
U
P
M
O
C
DAT Recorder
Effects Devices
Power Amp
and Speakers
Inputs/Outputs 7-8
To Effects Device
Effects Device
Connected to Console
Instruments
1
Analog
Audio
Inputs 1-6
Channel
Outputs 1-6
S
T
U
P
N
I
G
O
L
A
N
A
2345678
S
T
U
P
T
U
O
G
O
L
A
N
A
123456
Tape Returns
or Inputs 1-6
Consider the following when connecting a
mixer:
◆ If your mixer cannot handle more than 1.5 V
(RMS) inputs at +4 dBu, set the 882/20 I/O to
operate at –10 dBV line level.
◆ If your mixer can handle up to 8.5 V (RMS) in-
puts, or has pads or attenuators on its inputs,
then you can use the +4 dBu setting on the
882/20 I/O.
Most manuals contain device input specifications, including whether or not there are pads or
attenuators. Consult the manufacturer of your
mixer or power amplifier for further information.
Figure 1. Typical studio configuration with mixer
connections
Figure 2 diagram shows a setup without a mixer,
where effects and monitoring gear are connected directly to the 882/20 I/O.
Mic Preamp,
Direct Box, Synth, etc.
Analog
Audio
Inputs 1-2
2345678
1
S
T
U
P
N
I
G
O
L
A
N
A
Inputs/Outputs
Outputs 1-2
O
L
A
N
A
123456
Analog
Audio
3-8
Analog
Audio
S
T
U
P
T
U
O
G
78
Power Amp
and Speakers
S/PDIF Digital Input/Output
To DAT Recorder
R
E
T
U
P
M
O
C
N
I
N
I
T
U
O
IF
D
T
/P
S
U
O
K
C
O
L
C
E
V
A
L
S
Effects Devices
DAT Recorder
Figure 2. Typical studio configuration without a mixer
Chapter 4: Connecting Your Studio 29
Page 34

Using 882/20 I/O As
Standalone Audio Converter
The 882/20 I/O can be used apart from
Pro Tools as a standalone 2-channel, 20-bit, analog-to-digital or digital-to-analog converter.
The 882/20 I/O always operates at
–10 dBV when in standalone mode.
Before you use the 882/20 I/O in standalone
mode:
1 Turn off the 882/20 I/O.
2 Do not turn on your computer while the
882/20 I/O is in standalone mode. If you do, the
882/20 I/O stops functioning in standalone
mode.
To use the 882/20 I/O as a standalone A/D
converter:
1 Turn off any digital devices that send a word
clock signal to the 882/20 I/O S/PDIF digital input.
To use the 882/20 I/O as a standalone D/A
converter:
1 Make sure that a digital device providing a
word clock signal is connected to the S/PDIF input of the 882/20 I/O and that the device is
powered on.
2 Turn on the 882/20 I/O. The 882/20 I/O
searches for a valid word clock on its S/PDIF input.
3 When a valid word clock lock is recognized,
the 882/20 I/O enters Digital mode and function as a standalone D/A converter using the
S/PDIF input and analog outputs 1–2.
The 882/20 I/O sample rate is determined by the
sample rate that it detects on its S/PDIF input.
To return the 882/20 I/O to Pro Tools-based
operation:
■ Turn on your computer.
– or –
■ If your computer is on, launch Pro Tools.
2 Turn on the 882/20 I/O. The 882/20 I/O
searches briefly for a word clock signal on channels 1–2 of its digital input ports.
3 If the 882/20 I/O does not detect word clock,
it functions as a standalone A/D converter using
its internal clock. Use analog inputs 1–2 and the
S/PDIF output in this mode.
In standalone mode, the 882/20 only operates at a 44.1 kHz sample rate. If you want
to convert analog signals into 48 kHz digital audio, you must launch Pro Tools (or
any other software which supports the
882/20 I/O) to change the default sample
rate.
TDM Installation Guide30
Page 35

The 1622 I/O Interface
This section explains the connectors and indicators on the front and back panels of the
1622 I/O interface, how they are used, and offers suggestions for connecting the 1622 I/O to
your studio.
1622 I/O Front Panel
The 1622 I/O has the following front panel indicators, moving from left to right:
Internal This is the 1622 I/O standard setting. In
this mode, the 1622 I/O sample rate is generated
by its internal crystal oscillator (whose frequency is determined by the Sample Rate setting
in the Session Setup window). Activate internal
mode whenever the 1622 I/O is not synchronized to an external clock source.
Digital This setting indicates that a S/PDIF word
clock signal is the source for the 1622 I/O sample rate. This is the setting to use for inputting
material from DAT machines or other S/PDIF
digital devices.
Sample
Rate
Sync
Mode
Power
Ch 1–2 Input
Front panel of the Digidesign 1622 I/O
Input Meters
Output Meters
Channel 15–16
Direct Inputs
Power
This switch applies power to the 1622 I/O. The
“I” position is on. The “O” position is off.
Sync Mode
The Sync Mode LEDs indicate which sample rate
clock reference is currently used by the analogto-digital converters (ADCs) and the digital-toanalog converters (DACs).
To use the 1622 I/O digital input and output as
an effects send and return to a digital effects device, set the 1622 I/O to Internal mode. Set the
digital effects device to accept an external digital
clock (from the 1622 I/O) so it synchronizes
with Pro Tools.
In expanded Pro Tools systems, the Super Clock
output of the master audio interface locks all
other interfaces together with sample accuracy,
keeping all signals phase-synchronous.
Because some digital audio devices do not
output proper clock when they are not playing back, leaving the 1622 I/O in Digital
mode may cause Pro Tools audio playback
quality to suffer, or to play back at the
wrong pitch. If you are using digital I/O, reset the Sync Mode from Digital to Internal
after inputting material.
Slave This LED is lit when the 1622 I/O is synchronized to another Digidesign audio interface
or synchronization peripheral. In this mode, the
sample rate of the slave interface is derived from
the frequency of the incoming master clock signal present at the Slave Clock In (256x) port. If
the Sync Mode is set to Internal, connecting a
Chapter 4: Connecting Your Studio 31
Page 36

Slave Clock Out signal from another Digidesign
interface or synchronization peripheral to the
1622 I/O Slave Clock In port automatically
switches it to Slave mode.
In expanded Pro Tools systems, the Super Clock
output of the master audio interface locks all
other interfaces together with sample accuracy,
keeping all signals phase-synchronous.
When slaving to a Digidesign Universal
Slave Driver, Video Slave Driver, or SMPTE
Slave Driver, set the clock source to Internal.
The audio interface automatically switches
to Slave mode when it detects the 256x input clock.
Ch 1–2 Input
This LED indicates the format (analog or digital)
of the audio input signal to channels 1–2. In
Pro Tools, you choose analog or digital input for
these two channels in the Session Setup window
or the Hardware Setup dialog. Input channels 3
through 16 of the 1622 I/O are always analog.
Sample Rate
These LEDs display the current sample rate of
the 1622 I/O internal crystal oscillator, which
can be either 44.1 kHz or 48 kHz. In Pro Tools,
this is set in the Session Setup window or in the
Hardware Setup dialog.
The 1622 I/O provides the following sample rates:
48 kHz This is a standard sampling rate of many
professional audio devices. It is recommended
for use with devices that cannot receive digital
transfers at 44.1 kHz.
44.1 kHz This is the compact disc standard sampling rate and the Pro Tools default sample rate.
To avoid the need for sample rate conversion,
use this rate when you are recording material
that will ultimately be published on a compact
disc.
When you are using an external digital
source such as a DAT recorder, the front
panel of the 1622 I/O indicates only the internal oscillator sample rate, not that of the
external digital source.
Input Meters
These LEDs indicate whether signal is present at
a given channel’s input. Segment 1 (green) indicates –20.0 dB. Segment 2 (yellow) indicates
–3.0 dB. Segment 3 (red) indicates –0.1 dB.
Output Meters
These LEDs indicate whether signal is present at
one of the two outputs. Segment 1 (green) indicates –20.0 dB. Segment 2 (yellow) indicates
–3.0 dB. Segment 3 (red) indicates –0.1 dB.
Channel 15–16 Direct Inputs
These are balanced, 1/4-inch TRS jacks for convenient front panel audio input connections.
Inputs can be individually calibrated from
+4 dBu to –10 dBV line levels and higher in 2 dB
gain steps, using the Other Options dialog
(choose Setups > Hardware and click Other Options). This allows the 1622 I/O to accommodate any standard line-level input, including
synthesizers, samplers and effects devices. Unbalanced connections are supported through
the use of standard 1/4-inch TRS mono phone
plugs.
TDM Installation Guide32
Page 37

1622 I/O Back Panel
The 1622 I/O has the following back panel connectors, moving from left to right:
S/PDIF
Slave
Clock
In/Out
I/O
60-pin
Interface
Power
Input
Analog
Outputs
Analog
Inputs
1–14
Back panel of the Digidesign 1622 I/O
Analog Audio Inputs 1–14
These are balanced, 1/4-inch TRS jacks for analog audio input connections.
Inputs can be individually calibrated from
+4 dBu to –10 dBV line levels and higher in 2 dB
gain steps, using the Other Options dialog
(choose Setups > Hardware and click Other Options). This allows the 1622 I/O to accommodate any standard, line-level input, including
synthesizers, samplers and effects devices. Unbalanced connections are supported through
the use of standard 1/4-inch TRS mono phone
plugs.
The 1622 I/O analog inputs are factory calibrated at a –14 dB nominal level, referenced to a
full code signal. This means you can have up to
14 dB of headroom before clipping, depending
on the input levels you set in the Other Options
dialog.
Because input channels 1–2 of the 1622 I/O are
software selectable between analog or S/PDIF
digital format, input to these two analog channels is disabled when S/PDIF digital input format is chosen in the Pro Tools Hardware Setup
dialog.
Analog Audio Outputs L-R
These are balanced, 1/4-inch TRS jacks for analog audio output connections. They carry
Pro Tools main output channels 1–2. The analog outputs feature 24-bit digital-to-analog converters. Both output channels are continuously
active. Output operating levels are switchable
between +4 dBu and –10 dBV operation.
Unbalanced connections are supported through
the use of standard 1/4-inch TRS mono phone
plugs.
The 1622 I/O analog outputs are factory calibrated at a –14 dB nominal level, referenced to a
full code signal. This means that at the nominal
reference output level (either +4 dBu or
–10 dBV), you have 14 dB of headroom before
clipping.
Slave Clock In/Out
The Slave Clock Out jack is a standard BNC type
connector that outputs a 256x audio sample rate
master Super Clock signal for slaving and synchronizing multiple audio interfaces and synchronization peripherals together.
When the 1622 I/O Sync Mode is set to Internal,
connecting a valid Slave Clock signal to the
Slave Clock In port causes the 1622 I/O to automatically switch to Slave mode. When the
1622 I/O is the master interface or the first interface in a chain, Digital mode overrides the Slave
Clock input, and an incoming Slave Clock Out
signal will not switch the 1622 I/O to Slave
mode.
Chapter 4: Connecting Your Studio 33
Page 38

Because crucial timing data is passed over these
ports, use high-quality, 75-ohm RG-59 cables
for making connections, and keep total cable
length to less than 3 meters between interfaces.
S/PDIF Digital Input/Output
The Sony Philips Digital Interface Format
(S/PDIF) is used in many professional and consumer CD players and DAT recorders. The
1622 I/O S/PDIF jacks are 24-bit capable, unbalanced, 2-conductor, phono (RCA) jacks.
Because input channels 1–2 of the 1622 I/O are
software selectable between analog or digital
format, input to these two digital channels is
disabled when analog input is chosen in the
Hardware Setup dialog in Pro Tools.
Output is continuously active on the S/PDIF
output jack, even if the 1622 I/O input selector
is set to analog in the Hardware Setup dialog. To
avoid RF interference, use 75-ohm coaxial cable
for S/PDIF transfers and do not exceed a cable
length of 10 meters.
Making Signal Connections to
the 1622 I/O Interface
Depending on how you plan to use the
1622 I/O, the way you connect it to your studio
will vary.
Adjusting 1622 I/O Gain Levels
The 1622 I/O input levels are adjustable
through the Pro Tools software to accommodate
a variety of equipment output levels. For optimum fidelity and signal-to-noise performance,
adjust these inputs according to the devices that
you connect to them.
When you have set up, configured, and
launched Pro Tools, refer to the instructions below for adjusting input gain levels for the
1622 I/O.
For best signal-to-noise performance, set the
1622 I/O input gain to +4 dBu when recording devices that provide this output level.
60-pin Interface Connector
This 60-pin connector is used to connect the
1622 I/O to a MIX or d24 card. The appropriate
interface cable is supplied with the 1622 I/O.
Power Input
This connector accepts a standard AC power cable. The 1622 I/O automatically selects power
(100 V to 240 V), and automatically works with
a standard modular cable to connect to AC
power receptacles in any country.
TDM Installation Guide34
To adjust input level gain on the 1622 I/O:
1 Connect the instrument or device to the
1622 I/O.
2 In Pro Tools, choose Setups > Hardware.
3 Click Other Options.
4 Set the input trim slider to match the output
level of the connected instrument. (Refer to the
manufacturer’s documentation for details.) If
you do not know the output level of the device,
use the default input trim level, then fine tune
the input level gain using the procedure below.
5 Select the desired output gain level, +4 dBu or
–10 dBV, and click Done.
Page 39

To fine tune the input level gain:
1 Create an Auxiliary Input track. This can be ei-
ther mono or stereo depending on the device
you are monitoring.
2 Set the track input to the 1622 I/O input
channel you just set in the Other Options dialog.
3 Play the instrument at maximum volume,
sending a steady signal to the 1622 I/O. (You
will not be able to hear the input signal while
adjusting your levels in this dialog, but you can
see the levels on the input meters of the
1622 I/O.)
4 Note where the instrument output signal reg-
isters on the on-screen meters in Pro Tools.
5 In the Other Options dialog, adjust the chan-
nel input trim slider to increase or decrease gain
until you are able to achieve maximum signal
level without clipping.
Setting Up Your Studio
The diagrams below provide suggestions for
connecting studio gear to your system. Figure 3
illustrates a studio setup with the 1622 I/O connected to a mixing console, with effects and
other gear routed into the console as well.
S/PDIF Digital Input/Output
To DAT Recorder
Analog
Audio
Tape Returns
or Inputs 1-2
Outputs 1-2
Audio Inputs 1-16
(15-16 on front panel)
Channel
Outputs 1-16
Instruments
Connected to Console
Analog
Figure 3. Typical studio configuration with a mixer
Figure 4 illustrates a setup without a mixer,
where effects processors and monitoring gear
are connected directly to the 1622 I/O.
DAT Recorder
Effects Devices
Power Amp
and Speakers
Adjusting Input Sliders in the Other Options dialog
6 Repeat as necessary for other instruments/in-
puts.
7 Click Store, then Done.
8 Click OK when you have finished.
Input trim level, output line level, and sample rate settings are stored in non-volatile
memory so that the 1622 I/O retains them
when used in standalone mode.
Mic Preamp,
Direct Box, Synth, etc.
Analog
Audio
Inputs 1-14
(15-16 on front panel)
Analog
Audio
Outputs 1-2
Power Amp
and Speakers
S/PDIF Digital Input/Output
To DAT Recorder
DAT Recorder
Figure 4. Typical studio configuration without a mixer
Chapter 4: Connecting Your Studio 35
Page 40

Using 1622 I/O As Standalone
Audio Converter
The 1622 I/O can be used apart from Pro Tools
as a standalone 2-channel, 20-bit analog-to-digital, or 24-bit digital-to-analog converter.
Input and output levels are determined by the
settings last saved by clicking the Store button
in the Other Options dialog (choose Setups >
Hardware and click Other Options).
If no input level settings are stored, input
levels default to +4 dBu and output levels
default to –10 dBV.
There are no panning controls in standalone
mode. Odd-numbered channels are hardpanned left and even-numbered channels hardpanned right. Mono instruments play out of
output L or R, but not both. Stereo instruments
play out of both outputs L and R. Output gain
must be controlled directly from connected instruments.
Before you use the 1622 I/O in standalone mode:
1 Turn off the 1622 I/O.
To use the 1622 I/O as a standalone A/D
converter:
1 Turn off any digital devices that send a word
clock signal to the 1622 I/O S/PDIF digital input.
2 Turn on the 1622 I/O. The 1622 I/O searches
briefly for a word clock signal on channels 1–2
of its digital input ports.
3 If the 1622 I/O does not detect word clock, it
functions as a standalone A/D converter using
its internal clock. Use analog inputs 1–16 and
the S/PDIF output in this mode.
To use the 1622 I/O as a standalone 24-bit D/A
converter:
1 Make sure that a digital device providing a
word clock signal is connected to the S/PDIF input of the 1622 I/O and that the device is powered on.
2 Turn on the 1622 I/O. The 1622 I/O searches
for a valid word clock on its S/PDIF input port.
3 When a valid word clock lock is recognized,
the 1622 I/O enters Digital mode and function
as a standalone D/A converter using the S/PDIF
input and analog outputs 1–2.
2 Do not turn on your computer while the
1622 I/O is in standalone mode. If you do, the
1622 I/O stops operating in standalone mode.
TDM Installation Guide36
To return the 1622 I/O to Pro Tools-based
operation:
■ Turn on your computer.
– or –
■ If your computer is on, launch Pro Tools.
Page 41

Connecting Equipment with Digital Audio Ins and Outs
Because the 888/24 I/O, 882/20 I/O, 1622 I/O,
and ADAT Bridge I/O feature digital inputs and
outputs, Pro Tools allows you to digitally record
to or from a digital device such as a DAT recorder. The 888/24 I/O and ADAT Bridge I/O
provide both AES/EBU and S/PDIF digital audio
input and output. The 882/20 I/O and 1622 I/O
provide S/PDIF digital audio input and output.
Connecting Effects Units
The 888/24 I/O, 882/20 I/O, 1622 I/O, and
ADAT Bridge I/O audio interfaces allow you to
connect effects units to your system by using
any analog (or digital) inputs/outputs as Auxiliary Inputs/Outputs for effects sends and returns. When an effects unit is attached this way,
you can send a variable amount of a track’s output to the effects unit using a send fader in
Pro Tools.
If you plan to use a DAT player, CD recorder, or
other digital input and output device with your
Pro Tools system, be sure the external device
supports either the AES/EBU or S/PDIF format.
Connect your interface’s AES/EBU inputs and
outputs to only another AES/EBU device. Connect S/PDIF inputs and outputs only to another
S/PDIF device.
To connect your Pro Tools system to a DAT
recorder:
1 Connect the digital output of the audio inter-
face to the digital input of the DAT deck. Audio
channels 1 and 2 will be sent out of these outputs.
2 Connect the digital output of the DAT to the
digital input of the audio interface. The DAT recorder is routed to Pro Tools inputs 1 and 2.
Five separate send controls on each Pro Tools
track allow you to route audio to any of the
available outputs connected to your system or
through any of the 32-internal busses in the
Pro Tools TDM Mixer. Outputs can be returned
to mono or stereo Auxiliary Inputs for automated mixing or processing.
When you are using an effect in this send-type
of configuration, make sure the unit’s internal
mix or balance between direct (unprocessed)
and wet (effected) signal is set so that only the
processed signal is returned to Pro Tools. On
most effect units, a balance setting of 100%
(completely wet) is the appropriate setting.
If you’ve been using an effects unit in an instrument setup, such as a guitar effects rack, you’ll
probably find the balance to be below 50%. If
the unit has separate dry and effect level knobs,
turn dry level control off. If you don’t do this,
the dry, unprocessed signal is present in an effect’s output along with the desired processed
sound, and you’ll have trouble accurately controlling the effect balance in your final mix.
Chapter 4: Connecting Your Studio 37
Page 42

Connecting Effects Units Digitally
To use your audio interface’s inputs and outputs
as effects sends & returns to a digital effects device, set your interface to Internal mode (unless
it is already synchronized to an external clock
source such as a DAT deck). Then, set your digital effects devices to accept an external digital
clock so that they synchronize themselves to
Pro Tools. In the Pro Tools Hardware Setup dialog, set the input of the channel pair to which
you have connected the digital effects device to
Digital, and set the Sync Mode to Internal.
Connecting MIDI Devices
By adding a Windows 2000-compatible MIDI interface to your system, you can take advantage
of all the MIDI features of Pro Tools, including
recording and editing tracks, syncing to MIDI
Time Code or MIDI beat clock (this requires an
appropriate MIDI interface) and the use of MIDI
Controllers.
For information on configuring a MIDI control surface for use with Pro Tools, see the
Pro Tools MIDI Control Surfaces Guide.
To connect MIDI devices to your system:
1 Connect the MIDI interface to your computer
according to the MIDI interface’s documentation.
2 Install any MIDI driver and/or controller soft-
ware required by the MIDI interface. (When
your MIDI interface hardware and software is installed, confirm that it is working properly. To
do so, use the procedure provided with the interface’s documentation.)
3 Connect the MIDI OUT of your MIDI device
or controller to the MIDI IN of your MIDI interface.
4 Connect the MIDI IN of your MIDI device or
controller to the MIDI OUT of your MIDI interface.
TDM Installation Guide38
Page 43

Connecting SMPTE Synchronization Devices
If you intend to synchronize Pro Tools to external devices with SMPTE using MIDI Time Code,
your system must be connected properly. This
section provides setup suggestions for synchronizing Pro Tools to audio or video tape. For details on SMPTE and synchronization, see the
Pro Tools Reference Guide.
Pro Tools and Synchronization
Pro Tools supports a type of SMPTE synchronization known as SMPTE Trigger through the use
of SMPTE-to-MIDI Time Code converters. This
type of synchronization allows Pro Tools to
chase and start (or stop) playback and recording
while slaved to other systems. With SMPTE Trigger alone, when playback or recording starts,
there is no further synchronization, and
Pro Tools plays back at a rate determined by the
internal clock of the audio interface or selected
external clock source.
For fairly short pieces of audio program material, SMPTE Trigger is acceptable, especially if
the sync master has a fairly stable transport or is
resolved to house sync or a black burst generator. In this case, the master transport and
Pro Tools will probably not drift very far apart in
such a short period of time.
Trigger Sync for Audio Post Applications
(recommended for short duration audio regions)
Video Tape Recorder
VITC Video out
OR
SMPTE
LTC and VITC to MIDI Time
Code Convertor
Composite
Video out
RGB Monitor
MIDI Time
Code out
MIDI Interface
to computer
Computer
Computer
Monitor
Synchronization setup using SMPTE Trigger alone
On the other hand, if the audio piece is several
minutes long, or if the sync master has an unstable transport (as in the case of a low quality recording deck striped with SMPTE, for example),
SMPTE Trigger alone is probably not an acceptable solution, since the two systems may drift
apart noticeably over the duration of the source
material.
A better alternative is to use Digidesign’s Universal Slave Driver.
Chapter 4: Connecting Your Studio 39
Page 44

The Digidesign Universal Slave Driver
The Universal Slave Driver (USD) is a multi-purpose synchronization peripheral that provides
virtually all of the functions and connections
needed to achieve synchronization to a variety
of devices.
The USD allows synchronization of Pro Tools to
Linear Time Code (LTC), external video black
burst, or word clock signal. It supports all major
industry-standard clocks and formats and can
also act as a standalone MIDI Time Code (MTC)
or VITC reader/generator.
In addition, the Universal Slave Driver offers extremely fast lockup, near-sample accurate synchronization, and an exceptionally low-jitter
clock. These features provide professional performance and maximum audio fidelity under a
wide range of synchronization conditions.
For more information on Digidesign’s USD,
please refer to the Universal Slave Driver User’s
Guide that came with your USD.
LTC or VITC-locked Sync for music/audio applications
with Digidesign’s Universal Slave Driver
(for resolving to LTC or VITC)
Video Tape Recorder
SMPTE
BI-PHASE / TACH / GPI
PC SERIAL
Composite
Video out
RGB Monitor
VIDEO REF
OR
IN
L
T
C
OUT
I
N
MAC SERIAL
VIDEO
MTC OUT
VITC Video out
L
T
C
O
U
T
IN
A
E
E
S
S
O
I
OUT
U
N
T
WORD CLOCK
serial output
direct to
MIX or d24 card's
DigiSerial port
IN
9-PIN IN / ACC
OUT
SUPER CLOCK (256X)
9-PIN OUT
85-264VAC, 47-63HZ, 115 W
A
Computer Computer
Monitor
Synchronization setup using a USD
TDM Installation Guide40
Digidesign Universal Slave Driver
Page 45

chapter 5
Installing Pro Tools Software
WARNING: There have been changes in
the installation process since the last release of Pro Tools. To avoid problems,
please read and follow the installation instructions carefully.
The complete Pro Tools software installation
process includes:
• Un-installing any previously installed versions of Pro Tools.
• Upgrading to Windows 2000 (if necessary).
• Preparing your computer for Pro Tools.
• Installing Pro Tools software.
The first time you launch Pro Tools after software installation, will be prompted to enter
your Pro Tools serial number and configure
hardware. Instructions for this begin in
“Launching Pro Tools For the First Time” on
page 49.
Before you begin installing Pro Tools software,
Pro Tools hardware should already be installed.
For more information on installing Hardware,
see Chapter 3, “Installing Pro Tools Hardware.”
Upgrading to Windows 2000
IBM IntelliStation E Pro Model 6846 users who
downgraded from Windows 2000 to Windows
NT (to be compatible with Pro Tools 5.0.1) will
need to recover Windows 2000.
To recover Windows 2000:
1 Start or restart your computer.
2 Press F11 during the message, “To start the
IBM product recovery program, press F11.” This
message appears briefly, so you will need to be
quick. If you miss it, allow the E Pro to boot into
Windows and restart again.
3 Select Full Recovery of Windows 2000 in the
“IBM Product Recovery Program”.
4 Follow the on-screen instructions. You will
warned that recovery process will erase everything on that drive. The recovery process takes
about 40 minutes.
5 You now have Windows 2000. Proceed to the
Pro Tools installation process.
Chapter 5: Installing Pro Tools Software 41
Page 46

Configuring Your Computer
To ensure optimum performance with
Pro Tools, configure your computer before installing the Pro Tools software.
Before you make any changes to your computer’s system settings, make a backup copy
of your Registry (that is where many of
these essential settings are stored). By doing
so, you will be able to restore your system’s
original settings in case of trouble. See your
Windows 2000 User’s Guide for details.
If your computer does not provide the BIOS
configuration options included in this section, or if you do not feel comfortable
changing system parameters or deleting
drivers, consult with a Windows 2000 system administrator, or your computer dealer
or manufacturer for assistance.
Different BIOS manufacturers often use different names to describe the same system function.
Some manufacturers do not provide a particular
configuration option at all. Consequently, the
names and options that appear in your computer’s BIOS may differ from those described in
this manual.
To modify your computer’s BIOS:
1 Start or restart your computer.
2 During power up, enter BIOS Setup by press-
ing the appropriate key on your computer keyboard. On most computers, this is F1, F2 or the
Delete key. Refer to the documentation that
came with your computer.
3 When you are in BIOS Setup, disable Plug &
Play OS, if present. (Most likely in M Pro)
4 Disable PCI Parity, if present. (Most likely in M
Pro)
There are five parts to configuring your computer :
1 Configuring your BIOS.
2 Configuring your SCSI BIOS.
3 Installing the SCSI drivers.
4 Setting Display Performance.
5 Setting Application Response.
Configuring Your BIOS
BIOS (Basic Input/Output System) parameters
vary depending on the make and model of the
computer. Refer to the documentation that
came with your computer for more details.
TDM Installation Guide42
5 Enable SCSI support, if your computer is
equipped with built-in SCSI hardware. SCSI support parameters are typically found on the Devices & I/O Options page of the BIOS setup
utility. If you do not have built-in SCSI hardware
and using a SCSI host adapter card instead, you
do not need to set this setting.
6 Disable Power Management, if present.
7 Enable PCI Dynamic Bursting, if present.
8 Enable PCI Master 0 WS Write, if present.
9 Disable PCI Delay Transaction, if present.
10 Disable PCI#2 Access #1 Retry, if present.
11 Save settings.
12 Exit BIOS setup and restart your computer.
Page 47

Configuring Your SCSI BIOS
In addition to configuring your BIOS, you must
also modify the settings of your built-in SCSI
hardware or SCSI adapter card. This allows SCSI
hard drives to work properly with Pro Tools.
This procedure varies on different computers.
Consult your computer’s User Guide.
Installing the ATTO or Adaptec SCSI Drivers
Pro Tools requires the use of SCSI host adapters
and SCSI drives. For Pro Tools to run at maximum efficiency with these devices, install the
Digidesign approved SCSI driver (ATTO or
Adaptec, depending on the card you are using).
To modify your computer’s SCSI BIOS:
1 Start your computer. If your computer is al-
ready on, restart it.
2 During power up, when the text message re-
garding the SCSI BIOS appears, press the key
combination listed on the screen to enter the
SCSI BIOS. The SCSI BIOS setup utility appears.
3 Consult your SCSI host bus adapter’s User
Guide to set the following parameters:
• Maximum Sync Transfer Rate parameter to
20 MB/sec for each SCSI ID and SCSI channel connected to your audio drives.
• If you are using an ATTO HBA, change the
PCI Burst Size to 32 Bytes.
• If you are using an Adaptec HBA, enable
the Host Adapter BIOS option.
4 Save these settings.
5 Exit SCSI BIOS setup and restart your com-
puter.
If you are using the ATTO EPCI-DC card
that came in Digidesign’s SCSI64 Kit, these
parameters are already set correctly for use
with Pro Tools.
Check Digidesign’s Compatibility Documents for a list of Digidesign approved computers and supported SCSI driver versions:
www.digidesign.com/compato
The full name of the ATTO driver is:
■ ATTO ExpressPCI
The full name of the Adaptec drivers for the IBM M
Pro is:
■ Adaptec
AHA290/291/294x/394x/4944/AIC78xx
If you need to install the ATTO or Adaptec
driver, consult the driver manufacturer’s documentation.
Chapter 5: Installing Pro Tools Software 43
Page 48

Setting Display Performance
Setting Application Response
Configure your computer’s video display for optimal performance with Pro Tools. You can
avoid disk performance issues by changing two
video display parameters on your system.
To change video display parameters:
1 Right-click on the desktop.
2 Go to Properties.
3 Select the Settings tab.
4 Go to Advanced.
5 Select the Troubleshooting tab.
6 Disable all accelerations by manually moving
the slider to None (from its default setting of
Full).
7 Click OK.
8 Select the Effects tab.
9 Deselect the Show Windows Contents While
Dragging box.
10 Click OK.
The final step in configuring your computer is
setting your system’s Application Response parameter.
To configure Application Response:
1 From the Start Menu, choose Settings > Con-
trol Panel.
2 Double-click on System.
3 Click the Advanced tab.
4 Click Performance Options.
5 Under Application Response select Back-
ground Services.
6 Click OK, twice.
Specific settings vary, depending on the type of
video card in your computer. For a complete list
of compatible video cards and their settings, refer to the latest compatibility information on
the Digidesign web site:
www.digidesign.com/
TDM Installation Guide44
Page 49

Installing Pro Tools Software
Documentation This component contains Pro
Tools documentation and release notes.
To install Pro Tools, you must log on to
Windows 2000 as Administrator. If you do
not have Administrator privileges or do not
know how to set them up, see your Windows 2000 User’s Guide.
To install Pro Tools software:
1 If you are using virus-protection software,
turn it off or remove it and restart your computer. Avoid running virus-protection software
while using Pro Tools since it adversely affects
system performance.
2 Place the Pro Tools Installer CD for Windows
2000 in your CD-ROM drive. Locate and doubleclick the blue icon named “Setup.”
3 Click Next.
4 Click OK to accept the License Agreement.
5 Select the hard drive on which to install
Pro Tools from the Install pop-up menu. For
maximum reliability, install Pro Tools on your
startup drive.
6 Click Next.
7 We recommend you choose the Typical Install
option. However, if you Custom Install, the next
window will ask you to choose the options you
want to install. To install any of these items, select them from the following list:
Program Files This component contains the Pro
Tools executable and all support DLLs.
Plug-Ins This component contains the core plugins. These files are required by Pro Tools.
System Files This component contains Digidesign System Files. These files are required by Pro
Tools.
Pro Tools Utilities This component contains the
DigiTest utility and calibration test tones.
Acrobat Reader This component contains the
Acrobat 4.0 Reader installer.
Codecs This component contains the Pro Tools
Audio Codecs: MP3, RealAudio, and Windows
Media.
MacOpener Demo
8 This component contains
the MacOpener Demo installer.
USD Setup
9 This component contains the Uni-
versal Slave Driver Setup application.
Answerbase This component contains standalone Pro Tools multi-lingual information databases. Note: these files require approximately 37
MB of disk space.
10 Click Next.
11 Select a “work environment.” This is an ini-
tial set of Pro Tools Preferences. These Preference “sets” have been pre-configured to include
some of the more popular settings for post production, audio, and audio with MIDI. Click
Next.
Preference settings can be customized at any
time in Pro Tools. See the
ence Guide
for more information about Pref-
Pro Tools Refer-
erences.
Controllers This component contains the Pro
Tools Control Surface Personalities.
Chapter 5: Installing Pro Tools Software 45
Page 50

12 For Pro Tools MIX-series systems, you are
prompted to install the Surround Mixer plug-in.
This plug-in is required for mixing, mastering,
and monitoring in surround. Select Standard
Pro Tools if your monitoring is configured for
Film Format. Select ProControl for DTS Format
if your monitoring is configured for DTS. Select
Stereo if your monitoring is configured for Stereo. Then click Next.
13 When installation is complete, click Finish to
restart your computer.
Using MIDI
4 With your computer on, right-click the My
Computer icon (located on your Widows desktop).
5 Choose Properties > Hardware > Device Man-
ager.
6 Expand the Sound, Video and Game Control-
lers list.
7 In Multimedia Devices, you should see an “!”
icon next to all of the Pro Tools DSP chips that
are not properly installed.
8 Select one of these “!” icons and press Delete.
Click OK in the Confirm Devise Remove dialog.
Pro Tools in Windows 2000 uses your Multimedia Setup to which MIDI devices are available,
and what their properties are. Refer to your device’s installation and usage documentation to
properly configure the device.
Cannot Create DAE Deck Or Error Number 4
Your computer may not recognize your
Pro Tools cards if you did not follow all of the
steps above, or if you upgrade from Windows
NT to Windows 2000.
If you receive error message number 4 or “Cannot Create DAE Deck,” when you launch
Pro Tools, complete the instructions below.
To correct a “Cannot Create DAE Deck” error:
1 Turn your computer off.
2 Confirm that all your Pro Tools cards are
seated correctly and cables are tightly fastened.
9 Repeat step 8 for each of these “!” icons, until
they are all removed. Then, click OK.
10 You are ready to install your Pro Tools cards.
See “Detecting Pro Tools Cards” on page 16.
3 Start your computer and launch Pro Tools. If
the error does not re-appear, you do not need to
continue with these steps.
TDM Installation Guide46
Page 51

chapter 6
Checking Your TDM System and Launching
Pro Tools
Before you launch Pro Tools, run the DigiTest diagnostics application located in the Digidesign
Utilities folder (see “Running DigiTest” on
page 48). DigiTest finds your cards and confirms
that they are correctly installed and working.
When DigiTest has completed and you have rebooted your computer, launch Pro Tools for the
first time. Pro Tools provides dialogs to validate
your software and configure your TDM cards
and audio interfaces (see “Launching Pro Tools
For the First Time” on page 49).
When you have completed initial configuration, you can install and play the demo session
included on the Pro Tools Installer CD (see “Installing the Demo Session” on page 51).
If you haven’t already installed Pro Tools
software, do so now. See Chapter 5, “Installing Pro Tools Software” for instructions.
Starting Up Your System
Whenever you start your system, you must turn
on all of your system components in a specific
order.
Start your Pro Tools System in this order:
1 Turn on your external hard drives. Wait ap-
proximately ten seconds for them to come up to
speed.
2 Lower the volume of all output devices, then
turn on your Pro Tools audio interfaces. Wait at
least ten seconds for them to initialize.
3 Turn on your computer. Or, if it is already on,
restart it.
Chapter 6: Checking Your TDM System and Launching Pro Tools 47
Page 52

Running DigiTest
Run the DigiTest diagnostics application to
identify TDM cards and verify that they are correctly installed and working.
DigiTest is included on the Pro Tools Installer CD and installed with Pro Tools.
DigiTest resides in the Digidesign Utilities
folder.
3 Test cards.
• To test only one Digidesign card in your system, click the button that corresponds to this
card.
• To test all Digidesign cards at once, press the
“Test All Cards” button.
4 When prompted, recycle power on all
Pro Tools peripherals and disconnect all cables
from Audiomedia and SampleCell. Press Continue.
Before you run DigiTest, lower the volume
of all output devices. Very loud digital noise
may be emitted during the test.
To run DigiTest:
1 Turn off Pro Tools.
2 Go to Start > Programs > Digidesign >
Pro Tools > DigiTest.
Figure 5. DigiTest
5 Check the “Test I/O Box.”
LEDs on your digital interfaces may light up
during this test. This is normal. Continue to
test.
6 Exit DigiTest by clicking on the “close” box on
the top right hand corner of the application
window.
7 Reboot your computer.
TDM Installation Guide48
Page 53

Errors and Undetected Cards
Complete the steps below if:
■ There is a problem with a component in your
system and an error message has been displayed
to the right of the corresponding card’s button
in DigiTest.
– or –
■ A supported card is installed but not automat-
ically detected during DigiTest.
If a supported card is installed and is not
automatically detected:
1 Close DigiTest.
2 Power down your system.
3 Reinstall the cards (see “Installing Pro Tools
Cards” on page 13).
4 Check the card seating.
5 Check the ribbon cable connection.
6 Power up.
7 Begin DigiTest again.
Launching Pro Tools For the
First Time
Validate Pro Tools Software
When launching Pro Tools the first time, you
are prompted to enter a serial number to validate your software.
To validate Pro Tools software:
1 Double-click the Pro Tools application in the
Pro Tools folder inside the Digidesign folder.
2 Enter the serial number in the dialog when
prompted, making sure to observe any spaces,
then click Validate.
Serial number entry for Pro Tools
For descriptions of all error codes, refer to
Appendix B, “DigiTest Error Codes.” For test details, click the Info button to the right of the reported error, then click Failures in the pop-up
window and change Failures to Detailed.
If a card continues to fail DigiTest, contact
Digidesign.
Chapter 6: Checking Your TDM System and Launching Pro Tools 49
Page 54

Configuring Pro Tools TDM Cards
and Audio Interfaces
The first time you run Pro Tools, the Hardware
Setup dialog automatically opens after you validate Pro Tools software. The Hardware Setup dialog prompts you to configure the parameters
for each Pro Tools card and audio interface in
your system.
3 From the Interface Port pop-up, select the port
to which your audio interface is connected (port
A or port B).
Choose port A if only one audio interface is connected to the card. If two audio interfaces are
connected to your card, follow the steps below
for each port and interface.
4 From the Interface pop-up, choose the audio
interface connected to the card you selected in
the previous step.
5 From the Sample Rate pop-up, select the de-
sired sample rate for the current card and interface (the sample rate of the demo session is
44100 Hz).
6 From the Sync Mode pop-up, select the appro-
priate sync mode on the currently selected interface (Internal or Digital). In most cases you will
use Internal. Digital is used primarily for inputting data from DAT or other digital sources.
Hardware Setup dialog
If you have a system with multiple TDM cards
and audio interfaces, you must configure each
by selecting the appropriate items from the popup menus in this dialog.
You must select the card, identify the interface
connected to it, then set the parameters for that
interface—repeating this for each card and interface in your system.
Some parameters explained below do not
apply to all Pro Tools configurations.
To configure Pro Tools hardware:
1 If the Hardware Setup dialog isn’t on-screen,
choose Setups > Hardware in Pro Tools.
2 From the Card pop-up, select the Digidesign
card type.
TDM Installation Guide50
7 From the Digital Format pop-up, select the de-
sired digital format of Channels 1–2 of the currently selected interface (AES/EBU or S/PDIF).
8 From the Ch 1–2 Input pop-up, select the in-
put format of Channels 1–2 of the currently selected interface (Analog or Digital).
9 From the H/W Buffer pop-up, select the audio
buffer size, in samples, for host processing tasks
such as Real-Time AudioSuite (RTAS) plug-in
processing.
Select a minimum of 128 samples. Select
larger buffer sizes for slower computers.
10 From the CPU Usage Limit pop-up, select the
maximum percentage of CPU resources to allocate to host processing tasks.
Select a minimum percentage of 65%. Select
higher CPU usage percentages for slower
computers.
Page 55

11 Click Recalibrate Inputs to recalibrate the an-
alog-to-digital convertors of the audio interface
and remove any DC offset that has built up in
them. (For an explanation of DC offset, see the
DigiRack Plug-Ins Guide).
Installing the Demo Session
Install the demo session included on the
Pro Tools Installer CD.
12 Click Other Options for additional configu-
ration options specific to the audio interface.
These include:
• Setting the input format (analog or digital)
of each pair of input channels on an
888/24 I/O.
• Configuring the level sensitivity and peak
hold settings for the output level meters on
the front panel of the 888/24 I/O.
• Selecting S/PDIF compatibility with Tascam DA30 DAT recorders.
To record to or from a Tascam® DA30
DAT recorder, you must set S/PDIF compatibility to “Tascam.” To record to or from a
non-Tascam DA30 DAT recorder, set
S/PDIF compatibility to “Other.”
• Enabling or disabling DAC Muting (mutes
the 888/24 I/O digital-to-analog convertors
when its output level falls below a certain
threshold, to reduce noise).
• Setting the input and output levels of a
1622 I/O.
To install the demo session:
1 Insert the Pro Tools Installer CD in your CD-
ROM drive.
2 Double-click the file “Install Pro Tools Demo
Session.”
3 Select “Pro Tools SoundCheck TDM.”
Pro Tools SoundCheck TDM is the session used
for testing your system.
4 Choose a drive on which to install the demo
session.
5 Click Install. When installation is complete,
click OK to return to the Finder.
Note that you can also install “Be There,” for a
demonstration of Pro Tools capabilities. However, since Be There is not used for testing purposes, installing it is optional. Be There is tailored to fit the size and configuration of your
Pro Tools system.
13 Configure the Other Options parameters as
desired and click Done.
14 Click OK to close the Hardware Setup dialog.
15 Choose File > Quit to close Pro Tools.
Chapter 6: Checking Your TDM System and Launching Pro Tools 51
Page 56

Opening the Demo Session
To hear Pro Tools in actions, open the demo session and begin playback.
To open the demo session:
1 Locate and open the demo session folder.
2 Double-click the file, “Pro Tools SoundCheck
TDM.”
If this is the first time you are launching
Pro Tools, a dialog appears prompting you
to use the Hardware dialog to configure your
system. Click OK. See “Configuring
Pro Tools TDM Cards and Audio Interfaces” on page 50.
To play the demo session:
1 Adjust the volume control on your monitor-
ing system so that it is set relatively low. You can
adjust levels as the demo begins to play.
2 Press the Spacebar on your keyboard to begin
playback. To stop playback, press the Spacebar
again.
Welcome to Pro Tools!
If you weren’t able to play the demo session,
see the Pro Tools Reference Guide for troubleshooting tips.
TDM Installation Guide52
Page 57

chapter 7
Calibrating the 888/24 I/O
Before you use the 888/24/I/O Audio Interface,
calibrate its input and output levels to the level
of your mixing console.
The 888/24 I/O is factory-calibrated so that its
input operating level is set to +4 dB nominal
with 18 dB headroom nominal at full code,
unity gain, making calibration unnecessary for
most professional applications.
If you do need to recalibrate your interface or
other components of your studio, you can use
the alignment procedure described in this chapter.
About Calibration
Calibrating levels on a digital recording device is
different from calibrating levels on an analog recording device. Unlike analog devices, most digital devices do not have a standard “0 VU” level
setting that corresponds to nominal input and
output levels. Instead, with an interface such as
the 888/24 I/O, the meters are calibrated in deci-
bels below peak (digital clipping) level.
Headroom
The concept of headroom is slightly different for
analog and digital devices.
Analog Most analog devices allow for a certain
amount of headroom above 0 VU. If you send a
signal above 0 VU to an analog recorder, you
still have a margin of headroom, and if tape saturation occurs, it does so fairly gracefully, giving
the audio a compressed sound that some find
desirable.
Digital Digital devices, on the other hand, do
not allow for signals that exceed the dynamic
range of the input. When a signal exceeds the
maximum input level for a digital device, clipping occurs, causing digital distortion, which is
harsh and usually undesirable.
The AES Standard For Headroom
The AES (Audio Engineering Society) standard
for headroom is currently –18 dB for nominal
level in a digital audio system. The exact value
you use is determined by the amount of headroom available in the rest of your system. For example, if your mixing console has 15 dB of
headroom above nominal level, then you may
want to calibrate the 888/24 I/O to have 15 dB
of headroom.
Chapter 7: Calibrating the 888/24 I/O 53
Page 58

The Calibration Process
Analog To calibrate the input level of an analog
device to a mixing console’s output level, you
would typically send a 1 kHz tone at 0 VU from
the console to the analog deck and align the recording deck’s meters to read 0 VU.
To calibrate the 888/24 I/0:
1 Launch Pro Tools by opening the Digidesign
folder, then the Pro Tools folder, and doubleclicking Pro Tools.
2 In Pro Tools, create a new session by choosing
File > New Session.
Digital With a digital recording device such as
the 888/24 I/O, in order to allow for headroom,
you must align a 0 VU tone from the console to
a value less than zero on the 888/24 I/O, by exactly the amount of headroom that you want.
For example, to have 12 dB of headroom above
0 VU with the 888/24 I/O, you must align the
incoming 0 VU 1kHz tone to a level of –12 dB.
For 18 dB of headroom, you would align it to
–18 dB. (Since it is assumed that you are using
the 888/24 I/O with a +4 dBu console, a 0 VU
signal level coming out of the console is actually
equivalent to a nominal +4 dBu level signal.)
Calibrating the 888/24 I/O
To calibrate the 888/24 I/O, put Pro Tools in a
special operating mode called Calibration mode,
then use the Signal Generator plug-in to generate a test tone for alignment.
The Pro Tools Installer includes several pre-configured calibration session templates that cover
most common calibration setups. You can use
these in addition to the calibration procedure
given below.
Turn down your monitoring system before
beginning calibration! The Signal Generator plug-in emits a continuous signal when
inserted on a track.
3 Choose Setups > Preferences and click Opera-
tions.
4 Enter the desired Calibration Reference Level
value in dB. A level of –18 dB is typical. (It isn’t
necessary to type a minus sign here.)
5 Click Done.
6 Create a new mono audio track by choosing
File > New Track.
7 Insert the Signal Generator TDM plug-in on
the track.
8 Set Signal Generator’s output level. This
should be the same value you entered as the Calibration Reference Level.
9 Set Signal Generator’s frequency to 1000 Hz.
10 Set Signal Generator’s signal waveform to
Sine.
11 Route the track’s output to Bus 1.
12 Create a mono Auxiliary Input track for each
888/24 I/O output you want to calibrate. Set the
output assignment for each of these Auxiliary
Inputs to its respective 888/24 I/O output.
13 Set the input of each Auxiliary Input track to
Bus 1.
TDM Installation Guide54
Page 59

14 Create an additional mono Auxiliary Input
track for each 888/24 I/O input you want to calibrate. Set the input assignment for each of
these Auxiliary Inputs to its respective
888/24 I/O input. Then set the output of each of
these Auxiliary Inputs to an unused bus pair (for
example Bus 31–32) so that feedback doesn’t occur when monitoring main outputs 1–2.
15 Connect an external VU meter to each of the
888/24 I/O outputs in turn. (One at a time as
you calibrate).
16 Set all Pro Tools track faders to their default
of 0 dB by Shift-Option-clicking each fader in
the session.
17 Adjust the 888/24 I/O output level trim pots
with a Phillips screwdriver to align the outputs
to read “0 VU” on the external VU meter.
18 Connect each output of the 888/24 I/O di-
rectly to its input. Connect channel 1 output to
channel 1 input, and so on for each channel.
19 In Pro Tools, select Operations > Calibration
Mode.
The names of all uncalibrated tracks begin to
flash. In addition, the track volume indicator of
each Auxiliary Input track receiving an external
input signal now displays the reference level
coming from the calibrated output.
20 Adjust the 888/24 I/O input level trim pots
with a Phillips screwdriver to align the inputs to
match the reference level. When the level is
properly matched, the track name stops flashing.
The Automatch indicator arrows on each track
show the direction of adjustment required for
alignment:
◆ When the incoming level is higher than the
reference level, the down arrow appears lit
(blue). In this case, trim the 888/24 I/O input
level down.
◆ When the incoming level is lower than the
reference level the up arrow appears lit (red). In
this case, trim the 888/24 I/O input level up.
When you have properly aligned the incoming
peak signal levels to match the calibration reference level, both Automatch indicator arrows
lights: the up arrow red and the down arrow
blue.
21 When you have finished, deselect Opera-
tions > Calibration Mode.
Calibrating a System with Both
888/24 I/O and 882/20 I/O Audio
Interfaces
The 888/24 I/O is factory preset with 18 dB of
headroom in its +4 dB line level operating
mode. The 882/20 I/O, however, is fixed at
14 dB of headroom and its inputs are not adjustable.
When setting up an 882/20 I/O (particularly in
systems using a combination of the 882/20 I/O
and 888/24 I/O), make sure that you use a headroom setting of –14 dB for your system. This
helps ensure that recorded audio files have the
same relative levels regardless of which interface
they are recorded with.
Chapter 7: Calibrating the 888/24 I/O 55
Page 60

TDM Installation Guide56
Page 61

appendix a
Slot Order
Card Order Guidelines For
Each Pro Tools System
The following are card installation guidelines
for each Pro Tools TDM system. Install your
cards in the following order, starting with the
lowest numeric slot.
The guidelines below may include optional
cards not present in your system.
All Pro Tools TDM cards must be grouped
in successive order, in order for the ribbon
cable to connect them properly.
Pro Tools MIX-Series
(Pro Tools 24 MIX, MIXplus and MIX3):
1 MIX Core cards
2 MIX Farm cards
3 MIX I/O cards
Card order for Pro Tools 24:
1 Pro Tools d24 audio cards
2 DSP Farm cards
Card order for mixed systems:
1 MIX Core card
SCSI host bus adapter (HBA) cards can be
placed in either the first or last slot.
Most computers have AGP slots (in a fixed
location) for their display card. This is
strongly recommended. However, if the display card for your computer monitor is a
PCI card, place it in the second to last slot.
2 MIX Farm card
3 MIX I/O cards
4 DSP Farm cards
At this time, d24 cards are not supported on
mixed Pro Tools TDM for Windows 2000 configurations.
Systems Using an Expansion Chassis
If you are using an expansion chassis, refer to
the Pro Tools Expanded Systems Guide, and any recent addendum, included with your Pro Tools
system for instructions on connecting an expansion chassis to your computer.
Appendix A: Slot Order 57
Page 62

TDM Installation Guide58
Page 63

appendix b
DigiTest Error Codes
DigiTest Error Codes
Code Description
Err3 Cards from different Pro Tools
systems are incorrectly mixed.
See “Card Order Guidelines For
Each Pro Tools System” on
page 57.
Err4 Cards marked with this error are
installed in the wrong order. See
“Card Order Guidelines For Each
Pro Tools System” on page 57.
Err5 Too many cards of this type are
installed in the system. Refer to
the Digidesign Web site for compatibility information:
www.digidesign.com/compato/
Err6 A card is installed in a reserve
slot. For example, a Digidesign
card is installed in the slot
reserved for the Expansion Chassis Host Interface card. Refer to
“Card Order Guidelines For Each
Pro Tools System” on page 57, as
well as related installation guides.
Err1010 Too many MIX Core cards
installed. The maximum number
of MIX Core cards allowed is 7.
Err1011 Too many MIX Farm cards
installed. The maximum number
of MIX Farm cards allowed is 7.
DigiTest Error Codes
Code Description
Err1012 Too many total MIX cards
installed. The maximum number
of total MIX cards allowed is 7.
Err1020 Too many d24 Core cards
installed. The maximum number
of d24 Core cards allowed is 2.
Err1021 Too many MIX I/O cards installed.
The maximum number of MIX I/O
cards allowed is 2.
Err1022 Too many total d24 cards
installed. The maximum number
of total d24 cards allowed is 2.
Err1220 SCSI Accelerator card is installed
in the wrong slot. See “Card Order
Guidelines For Each Pro Tools
System” on page 57 for correct
location of the card.
Err1221 Expansion Chassis Host Interface
card is installed in the wrong slot.
See “Card Order Guidelines For
Each Pro Tools System” on
page 57 for correct location of the
card.
Err1301 A Core card is not installed. At
least one Cord card is needed.
Err1310 A DSP Farm card is not installed.
At least one DSP Farm card is
needed.
Appendix B: DigiTest Error Codes 59
Page 64

TDM Installation Guide60
Page 65

index
Numerics
1-2 Format of 888/24 I/O 19
1622 I/O Audio Interface 15
as standalone converter 36
back panel 33
connecting to studio 34
connections & levels 2
front panel 31
input meters 32
output meters 32
16-channel peripheral cable adapter 15
44.1 kHz sample rate
of 1622 I/O 32
of 882/20 I/O 27
of 888/24 I/O 19
48 kHz sample rate
of 1622 I/O 32
of 882/20 I/O 26
of 888/24 I/O 19
50-pin Interface connector
of 882/20 I/O 28
of 888/24 I/O 21
60-pin Interface connector of 1622 I/O 34
882/20 I/O Audio Interface 15, 25
+4dBu mode 23, 29
-10dBV mode 29
as standalone converter 30
back panel 27
connecting to studio 29
connections & levels 2
front panel 25
888/24 I/O Audio Interface 15
as standalone converter 24
back panel 20
calibrating 53
changing operating levels 22
connecting to studio 17
connections & levels 1
front panel 17
A
ADAT Bridge I/O 15
connections & levels 2
AES/EBU
configuring 50
of 888/24 I/O 20
analog audio inputs
of 1622 I/O 33
of 882/20 I/O 27
of 888/24 I/O 20
analog audio outputs
of 1622 I/O 33
of 882/20 I/O 27
of 888/24 I/O 20
Audio Interface 17, 50
cable 15
configuring 50
connecting to MIX 24 systems 15
primary 14, 15
requirements 1
B
backing up data 9
Index 61
Page 66

C
cable length of SCSI drives 6
calibrating the 888/24 I/O 20, 54
Calibration Mode of 888/24 I/O 20
card order 57
Pro Tools 24 57
Pro Tools 24 MIX 57
Pro Tools 24 MIX Plus 57
Ch 1-2 Input
of 1622 I/O 32
of 882/20 I/O 26
clipping 53
clock master 14, 15
compatibility information for Pro Tools 2
computer requirements 2
configuring Expanded Pro Tools systems 47
connecting
digital recorders 37
effects units 37
external SCSI drive 7
SMPTE synchronization devices 39
studio 17
CPU requirements 2
D
d24 card 12
DAC Muting option
Hardware Setup dialog 51
DAT recorder 51
connecting to Pro Tools 37
DC offset 51
Demo Session 47
installing 51
playing 52
DigiSerial port 11, 12
digital distortion 53
Digital Sync mode of 888/24 I/O 18
DigiTest 48
DSP Farm 13
E
effects units, connecting to Pro Tools 37
expanded Pro Tools Systems, configuring 11
Expansion Chassis 11
using with Pro Tools 57
F
formatting hard drives
high-level 8
low-level 8
fragmentation 9
H
hard drives
optimizing 9
requirements 3
Hardware Setup dialog
configuring Pro Tools with 52
DAC Muting option 51
headroom 53
HFS Drives, formatting 10
high-level formatting 8, 10
I
input gain levels of 1622 I/O
setting 34
Input level trims of 888/24 I/O 19
Input meters of 1622 I/O 32
Installer CD 45
installing
Demo Session 51
Pro Tools cards 14
Pro Tools software 45
Surround Mixer 46
Internal Sync mode of 888/24 I/O 18
L
level meters for 888/24 I/O 19
low-level formatting 8
M
Macintosh sessions, playing 10
MacOpener 10
MIDI
connections 38
requirements 3
MIX Core card 11
MIX Farm card 12
TDM Installation Guide62
Page 67

O
operating levels
changing on 888/24 I/O 22
optimizing hard drives 9
Other Options dialog 51
output gain levels of 1622 I/O 35
Output level trims of 888/24 I/O 19
Output meters of 1622 I/O 32
P
partitioning hard drives 8
Power Input
of 1622 I/O 34
of 882/20 I/O 28
of 888/24 I/O 21
Power switch
of 1622 I/O 31
of 888/24 I/O 17
Preferences 45
Pro Tools
installing software 45
Pro Tools 24
capabilities 1
installing system hardware 12
Pro Tools 24 MIX
capabilities 1
Pro Tools 24 MIX Plus
capabilities 1
Pro Tools SoundCheck session 51
R
recalibrate Inputs button 51
S
S/PDIF 50
S/PDIF digital input/output
of 1622 I/O 34
of 882/20 I/O 28
of 888/24 I/O 21
Sampling rates
of 1622 I/O 32
of 882/20 I/O 26
of 888/24 I/O 19
SCSI
cable length 6
requirements 5
termination 7
seek times of hard drives 9
setting input gain level of 1622 I/O 34
setting output gain levels of 1622 I/O 34
signal connections
to 1622 I/O 34
to 888/24 I/O 23
Signal Generator plug-in with 888/24 I/O 20
Signal Present LEDs of 882/20 I/O 27
signal-to-noise performance of 1622 I/O 34
Slave Clock In/Out
of 1622 I/O 33
of 882/20 I/O 28
of 888/24 I/O 21
Slave LED
of 1622 I/O 31
of 882/20 I/O 26
Slave Sync mode of 888/24 I/O 18
slot order on Macintosh computers 57
Standalone mode
1622 I/O Audio Interface 36
882/20 I/O Audio Interface 30
888/24 I/O Audio Interface 24
starting up your system 47
studio configuration
of 1622 I/O with mixer connections 35
of 1622 I/O without a mixer 35
of 882/20 I/O with mixer connections 29
of 882/20 I/O without a mixer 29
of 888/24 I/O with a mixer 24
without a mixer 29
studio setup
with 1622 I/O 35
with 882/20 I/O 29
with 888/24 I/O 24
Super Clock signal of 888/24 I/O 21
Surround Mixer plug-in, installing 46
Sync Mode LEDs
of 1622 I/O 31
of 882/20 I/O 25
of 888/24 I/O 18
system requirements 2
system startup 47
Index 63
Page 68

T
Tascam DA30 DAT recorder 51
TDM Ribbon cable 13
termination of SCSI drives 7
U
Universal Slave Driver 40
User Tools install option 45
V
validating Pro Tools software 49
W
wiring scheme for 888/24 I/O 24
TDM Installation Guide64
 Loading...