

Page 1

User Guide
Pro Tools® M-Powered™ Essential
Version 8.0.2
Page 2

Legal Notices
This guide is copyrighted ©2009 by Digidesign, a division of
Avid Technology, Inc. (hereafter “Digidesign”), with all rights
reserved. Under copyright laws, this guide may not be
duplicated in whole or in part without the written consent of
Digidesign.
003, 96 I/O, 96i I/O, 192 Digital I/O, 192 I/O, 888|24 I/O,
882|20 I/O, 1622 I/O, 24-Bit ADAT Bridge I/O, AudioSuite,
Avid, Avid DNA, Avid Mojo, Avid Unity, Avid Unity ISIS,
Avid Xpress, AVoption, Axiom, Beat Detective, Bomb Factory,
Bruno, C|24, Command|8, Control|24, D-Command, D-Control,
D-Fi, D-fx, D-Show, D-Verb, DAE, Digi 002, DigiBase,
DigiDelivery, Digidesign, Digidesign Audio Engine, Digidesign
Intelligent Noise Reduction, Digidesign TDM Bus, DigiDrive,
DigiRack, DigiTest, DigiTranslator, DINR, D-Show, DV Toolkit,
EditPack, Eleven, HD Core, HD Process, Hybrid, Impact,
Interplay, LoFi, M-Audio, MachineControl, Maxim, Mbox,
MediaComposer, MIDI I/O, MIX, MultiShell, Nitris, OMF,
OMF Interchange, PRE, ProControl, Pro Tools M-Powered,
Pro Tools, Pro Tools|HD, Pro Tools LE, QuickPunch, Recti-Fi,
Reel Tape, Reso, Reverb One, ReVibe, RTAS, Sibelius,
Smack!, SoundReplacer, Sound Designer II, Strike, Structure,
SYNC HD, SYNC I/O, Synchronic, TL Aggro, TL AutoPan, TL
Drum Rehab, TL Everyphase, TL Fauxlder, TL In Tune, TL
MasterMeter, TL Metro, TL Space, TL Utilities, Transfuser,
Trillium Lane Labs, Vari-Fi Velvet, X-Form, and XMON are
trademarks or registered trademarks of Digidesign and/or Avid
Technology, Inc. Xpand! is Registered in the U.S. Patent and
Trademark Office. All other trademarks are the property of their
respective owners.
This product is subject to the terms and conditions of a
software license agreement provided with the software. The
product may only be used in accordance with the license
agreement.
Product features, specifications, system requirements, and
availability are subject to change without notice.
Guide Part Number 9329-61710-00 REV A June, 2009
Documentation Feedback
We're always looking for ways to improve our documentation.
If you have comments, corrections, or suggestions regarding
our documentation, email us at techpubs@digidesign.com.
Page 3

contents
Chapter 1. Welcome to Pro Tools M-Powered Essential . . . . . . . . . . . . . . . . . . . . . . . . . 1
Pro Tools M-Powered Essential Systems . . . . . . . . . . . . . . . . . . . . . . . . . . . . . . . . . . . . . . . . 1
Pro Tools M-Powered Essential Capabilities . . . . . . . . . . . . . . . . . . . . . . . . . . . . . . . . . . . . . . 1
How Pro Tools M-Powered Essential Differs from Pro Tools M-Powered. . . . . . . . . . . . . . . . . . . 2
System Requirements and Compatibility . . . . . . . . . . . . . . . . . . . . . . . . . . . . . . . . . . . . . . . . 2
Conventions Used in This Guide . . . . . . . . . . . . . . . . . . . . . . . . . . . . . . . . . . . . . . . . . . . . . . 3
Chapter 2. Installing Pro Tools on Mac . . . . . . . . . . . . . . . . . . . . . . . . . . . . . . . . . . . . . . . . 5
Installation Overview . . . . . . . . . . . . . . . . . . . . . . . . . . . . . . . . . . . . . . . . . . . . . . . . . . . . . . 5
Installing Pro Tools M-Powered Essential Software . . . . . . . . . . . . . . . . . . . . . . . . . . . . . . . . . 5
Launching Pro Tools M-Powered Essential . . . . . . . . . . . . . . . . . . . . . . . . . . . . . . . . . . . . . . . 7
Additional Software on the Pro Tools Installer Disc . . . . . . . . . . . . . . . . . . . . . . . . . . . . . . . . . 7
Uninstalling Pro Tools . . . . . . . . . . . . . . . . . . . . . . . . . . . . . . . . . . . . . . . . . . . . . . . . . . . . . 8
Chapter 3. Installing Pro Tools on Windows . . . . . . . . . . . . . . . . . . . . . . . . . . . . . . . . . . . . 9
Installation Overview . . . . . . . . . . . . . . . . . . . . . . . . . . . . . . . . . . . . . . . . . . . . . . . . . . . . . . 9
Installing Pro Tools M-Powered Essential Software . . . . . . . . . . . . . . . . . . . . . . . . . . . . . . . . 10
Launching Pro Tools M-Powered Essential . . . . . . . . . . . . . . . . . . . . . . . . . . . . . . . . . . . . . . 11
Additional Software on the Pro Tools Installer Disc . . . . . . . . . . . . . . . . . . . . . . . . . . . . . . . . 11
Uninstalling Pro Tools . . . . . . . . . . . . . . . . . . . . . . . . . . . . . . . . . . . . . . . . . . . . . . . . . . . . 12
Chapter 4. Configuring Your System . . . . . . . . . . . . . . . . . . . . . . . . . . . . . . . . . . . . . . . . . . 13
Starting Up or Shutting Down Your System . . . . . . . . . . . . . . . . . . . . . . . . . . . . . . . . . . . . . 13
Configuring Pro Tools M-Powered Essential Software . . . . . . . . . . . . . . . . . . . . . . . . . . . . . . 14
Optimizing a Mac System for Pro Tools . . . . . . . . . . . . . . . . . . . . . . . . . . . . . . . . . . . . . . . . 20
Optimizing a Windows System for Pro Tools . . . . . . . . . . . . . . . . . . . . . . . . . . . . . . . . . . . . 22
Contents iii
Page 4

Appendix A. Hard Drive Configuration and Maintenance. . . . . . . . . . . . . . . . . . . . . . . . 25
Supported Drive Formats and Drive Types. . . . . . . . . . . . . . . . . . . . . . . . . . . . . . . . . . . . . . 25
Formatting an Audio Drive. . . . . . . . . . . . . . . . . . . . . . . . . . . . . . . . . . . . . . . . . . . . . . . . . 26
Partitioning Drives . . . . . . . . . . . . . . . . . . . . . . . . . . . . . . . . . . . . . . . . . . . . . . . . . . . . . . 27
Hard Disk Storage Space . . . . . . . . . . . . . . . . . . . . . . . . . . . . . . . . . . . . . . . . . . . . . . . . . 30
Appendix B. Resources . . . . . . . . . . . . . . . . . . . . . . . . . . . . . . . . . . . . . . . . . . . . . . . . . . . . . 31
About the Pro Tools Guides . . . . . . . . . . . . . . . . . . . . . . . . . . . . . . . . . . . . . . . . . . . . . . . . 31
About www.digidesign.com . . . . . . . . . . . . . . . . . . . . . . . . . . . . . . . . . . . . . . . . . . . . . . . . 32
Index . . . . . . . . . . . . . . . . . . . . . . . . . . . . . . . . . . . . . . . . . . . . . . . . . . . . . . . . . . . . . . . . . . . . . 33
Pro Tools M-Powered Essential User Guideiv
Page 5

chapter 1
Welcome to Pro Tools M-Powered Essential
Welcome to Pro Tools® M-Powered™ Essential.
This guide provides step-by-step instructions
to install and configure Pro Tools M-Powered
Essential software.
Pro Tools M-Powered Essential Systems
The basic components of a Pro Tools M-Powered
Essential system are as follows:
• M-Audio interface qualified for Pro Tools
M-Powered Essential
(included)
• Mac or Windows computer qualified for
Pro Tools M-Powered Essential (not included)
• Pro Tools M-Powered Essential software
(included)
For a list of qualified M-Audio interfaces and
minimum system requirements, refer to the
compatibility information on the Digidesign
website: (www.digidesign.com/compatibility)
.
Pro Tools M-Powered Essential Capabilities
Pro Tools M-Powered Essential software provides the following capabilities:
• 24-bit audio resolution, at sample rates up to
96 kHz (depending on the M-Audio interface)
• Up to 16 total mono/stereo audio tracks, 4
Aux tracks, 8 Instrument tracks, 8 MIDI tracks,
1 Master Fader
• Playback of up to 16 tracks of mono or stereo
digital audio, and playback of up to 15 tracks
while recording 1 track (stereo or mono), or
up to 14 tracks while recording 2 mono or stereo tracks.
• Normal and loop recording
• Up to 4 internal mix busses
• Up to 5 sends per track
• Processing with up to 3 plug-ins per track
• Undo or redo up to 10 operations
• Comprehensive set of RTAS effects and virtual
instrument plug-ins
• Big collection of loops for music creation
• Torq LE, DJ software with ReWire technology
Pro Tools uses your computer’s CPU to mix
and process audio tracks (host processing).
Computers with faster clock speeds yield the
best performance and more plug-in processing.
Chapter 1: Welcome to Pro Tools M-Powered Essential 1
Page 6
How Pro Tools M-Powered
Non-supported
feature
Essential Differs from
Pro Tools M-Powered
Pro Tools M-Powered Essential is a powerful,
easy-to-use software application that allows you
to create and mix music on your Mac or PC. You
get to experience the look and feel of
Pro Tools M-Powered with the simplified workflow of Pro Tools M-Powered Essential.
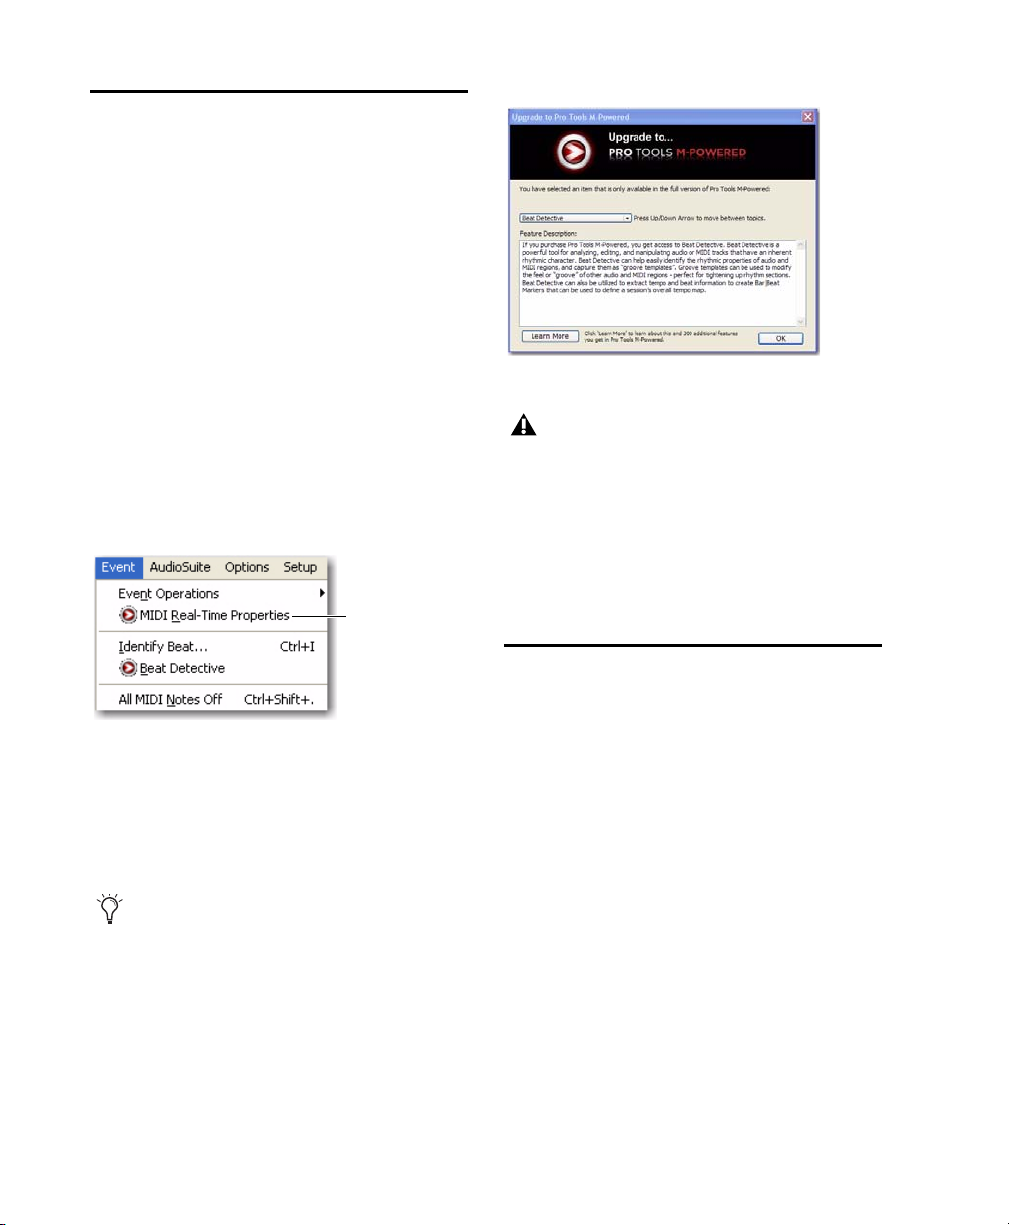
What Menus with Icons Mean
Certain Pro Tools M-Powered features are not
available in Pro Tools M-Powered Essential.
These features have an icon before their menu
name in Pro Tools menus. This icon helps you
identify them as non-supported features.
Menu items with non-supported feature icons
When you select the menu item, you’ll see a dialog that tells you more about the feature. In the
dialog you can move up and down between topics, or click Learn More to learn about other features in Pro Tools M-Powered.
To disable the non-supported feature icons,
choose Help > Display M-Powered Purchase
Reminders.)
Display M-Powered Information dialog
Shuffle mode and Spot mode are the
equivalent of menu items that have the
non-supported feature icon.
Learning About Pro Tools M-Powered
You can learn more about Pro Tools M-Powered
by going to:
http://www.digidesign.com/mpowered
System Requirements and Compatibility
Pro Tools M-Powered Essential can be used with
a qualified M-Audio interface, running on a
qualified Windows or Mac computer that meets
the minimum system requirements.
A DVD drive is required to use the Pro Tools Installer disc.
For complete system requirements and a list of
operating systems, hard drives, and third-party
devices, refer to the latest information on the
Digidesign website:
www.digidesign.com/compatibility
Pro Tools M-Powered Essential User Guide2
Page 7
MIDI Requirements
USB MIDI interfaces work effectively with
Pro Tools systems on Mac or Windows. Serial
MIDI interfaces are supported on Windows systems only.
Only USB MIDI interfaces are compatible
with Pro Tools systems for Mac OS X.
Modem-to-serial port adapters and serial
MIDI devices are not supported.
For a list of supported adapters, visit the Digidesign website at:
www.digidesign.com/compatibility
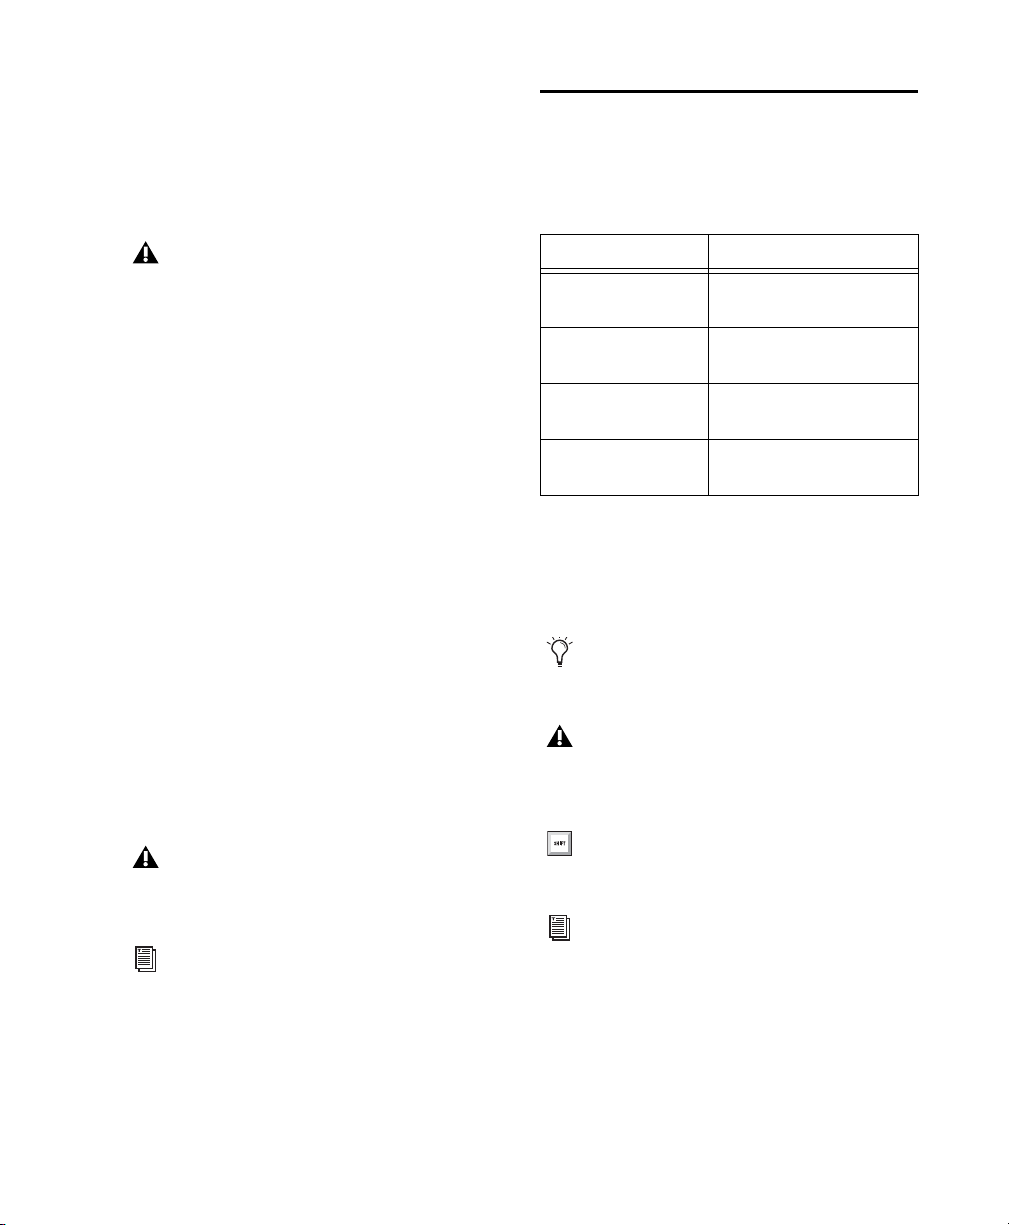
Conventions Used in This Guide
This guide uses the following conventions to indicate menu choices and key commands:
:
Convention Action
File > Save Choose Save from the File
menu
Control+N Hold down the Control key
Control-click Hold down the Control key
and press the N key
and click the mouse button
Hard Drive Requirements
Pro Tools M-Powered Essential can be used on
your system drive. For optimal audio recording
and playback, all Pro Tools systems require one
or more Digidesign-qualified drives.
For a list of minimum system requirements, visit
the Digidesign website:
www.digidesign.com/compatibility
If you are using an ATA/IDE or FireWire hard
drive, initialize your drive with the Disk Utility
application included with Apple System software (Mac) or the Windows Disk Management
(Windows).
Always back up any important data on your
drive before formatting it, as it will erase all
data on the drive.
For more information, see Appendix A, “Hard
Drive Configuration and Maintenance.”
Right-click Click with the right mouse
button
The names of Commands, Options, and Settings
that appear on-screen are in a different font.
The following symbols are used to highlight important information:
User Tips are helpful hints for getting the
most from your Pro Tools system.
Important Notices include information that
could affect your data or the performance of
your system.
Shortcuts show you useful keyboard or
mouse shortcuts.
Cross References point to related sections in
this guide and other Pro Tools or M-Audio
guides.
Chapter 1: Welcome to Pro Tools M-Powered Essential 3
Page 8

Pro Tools M-Powered Essential User Guide4
Page 9

chapter 2
Installing Pro Tools on Mac
This chapter contains information for Mac systems only. If you are installing Pro Tools M-Powered Essential on a Windows computer, see
Chapter 3, “Installing Pro Tools on Windows.”
Installation Overview
Installation of Pro Tools M-Powered Essential on
a Mac includes the following steps:
1 Installing your M-Audio drivers and connect-
ing the M-Audio interface to your computer.
(See the instructions that came with your
M-Audio interface.)
2 “Installing Pro Tools M-Powered Essential
Software” on page 5.
3 “Launching Pro Tools M-Powered Essential”
on page 7.
4 Configuring your system for improved perfor-
mance (see Chapter 4, “Configuring Your System”).
Installing Pro Tools M-Powered Essential Software
Make sure you’ve installed your M-Audio interface drivers and connected the interface to your
computer. Once that’s done, you’re ready to install Pro Tools.
For information on connecting your M-Audio
interface, see the printed M-Audio hardware
interface guide that came with it.
To install Pro Tools M-Powered Essential:
1 Make sure you are logged in as an Administra-
tor for the account where you want to install
Pro Tools.
For details on Administrator privileges in
Mac OS X, see your Apple OS X documentation.
2 Insert the Pro Tools M-Powered Essential In-
staller disc in your DVD drive.
3 On the Installer disc, locate and double-click
Install Pro Tools MP Essential.mpkg.
Install Pro Tools MP Essential.mpkg icon
Chapter 2: Installing Pro Tools on Mac 5
Page 10
4 Follow the on-screen instructions to proceed
with installation.
5 Click Continue each time you are prompted.
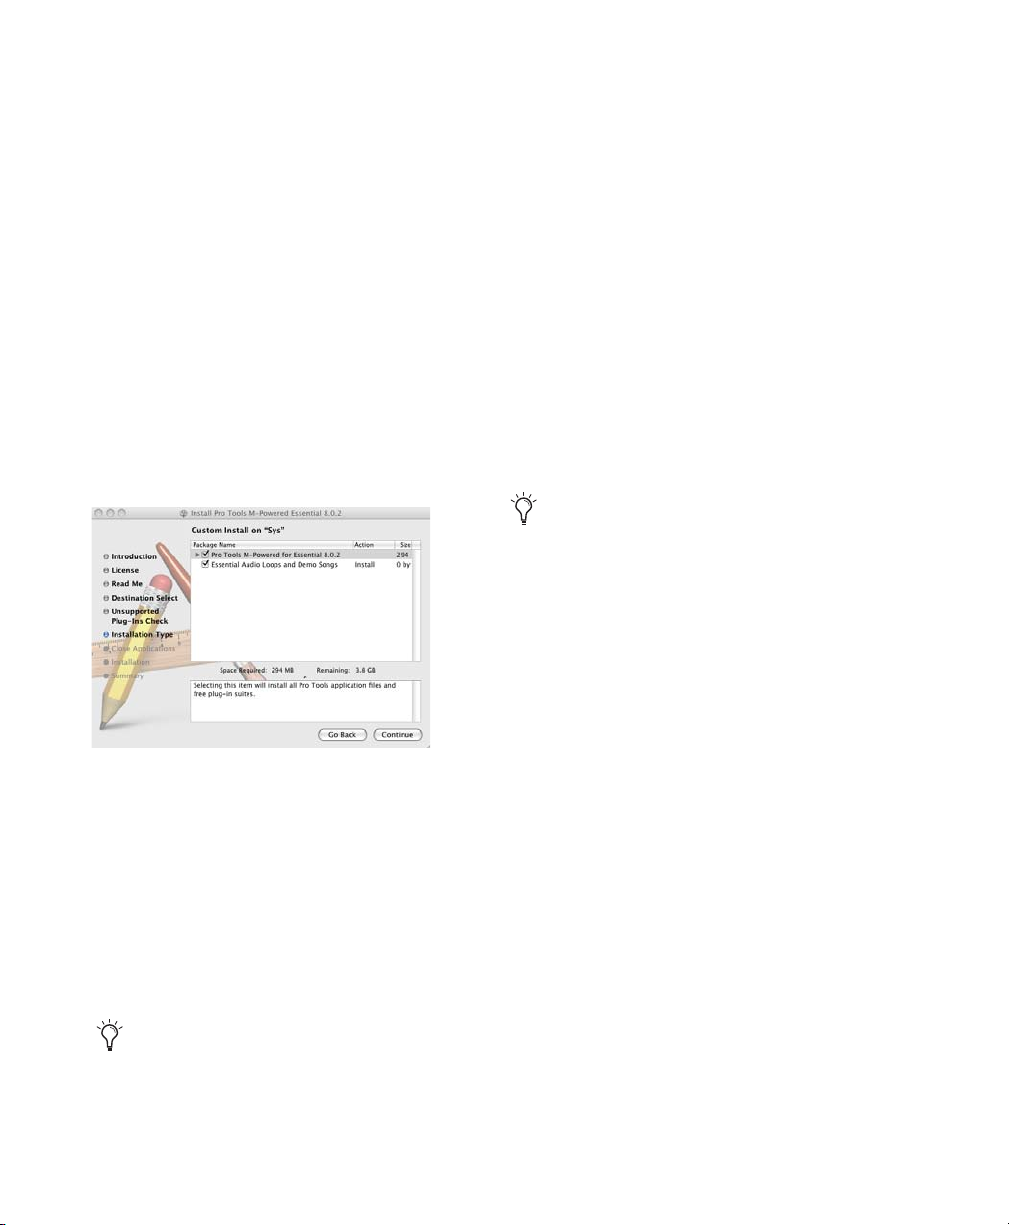
6 At the “Installation Type” dialog, do the fol-
lowing:
• To install all Pro Tools application files
(which includes the free plug-in suite and
associated content), leave the Pro Tools box
checked.
– and –
• To install additional loops and demo songs,
check the Essential Audio Loops and Demo
Song box. For more information, see “Essential Audio Loops and Demo Songs” on
page 6.
Essential Audio Loops and Demo Songs
Pro Tools M-Powered Essential installation includes an option to install Essential Audio Loops
and Demo Songs.
The audio loops are pro-quality audio loops that
you can use to quickly sketch out musical ideas.
The demo songs let you see and hear many of
the things you’ll soon be doing in Pro Tools.
Once these loops and demo songs are installed,
they can be found in the following locations:
• Applications/Digidesign/Pro Tools
Essential Loops
• Applications/Digidesign/Pro Tools
Essential Demo Songs
You also have the option of choosing the
location where the loops and demo songs are
installed.
Installation Type dialog
7 Click Continue.
8 Click Install.
9 If prompted, enter your Administrator pass-
word and click OK to authenticate the installation.
10 Follow the remaining on-screen instructions.
11 When installation is complete, click Restart.
The Pro Tools Installer disc includes additional software for your system. For more information, see “Additional Software on the
Pro Tools Installer Disc” on page 7.
Pro Tools M-Powered Essential User Guide6
Page 11
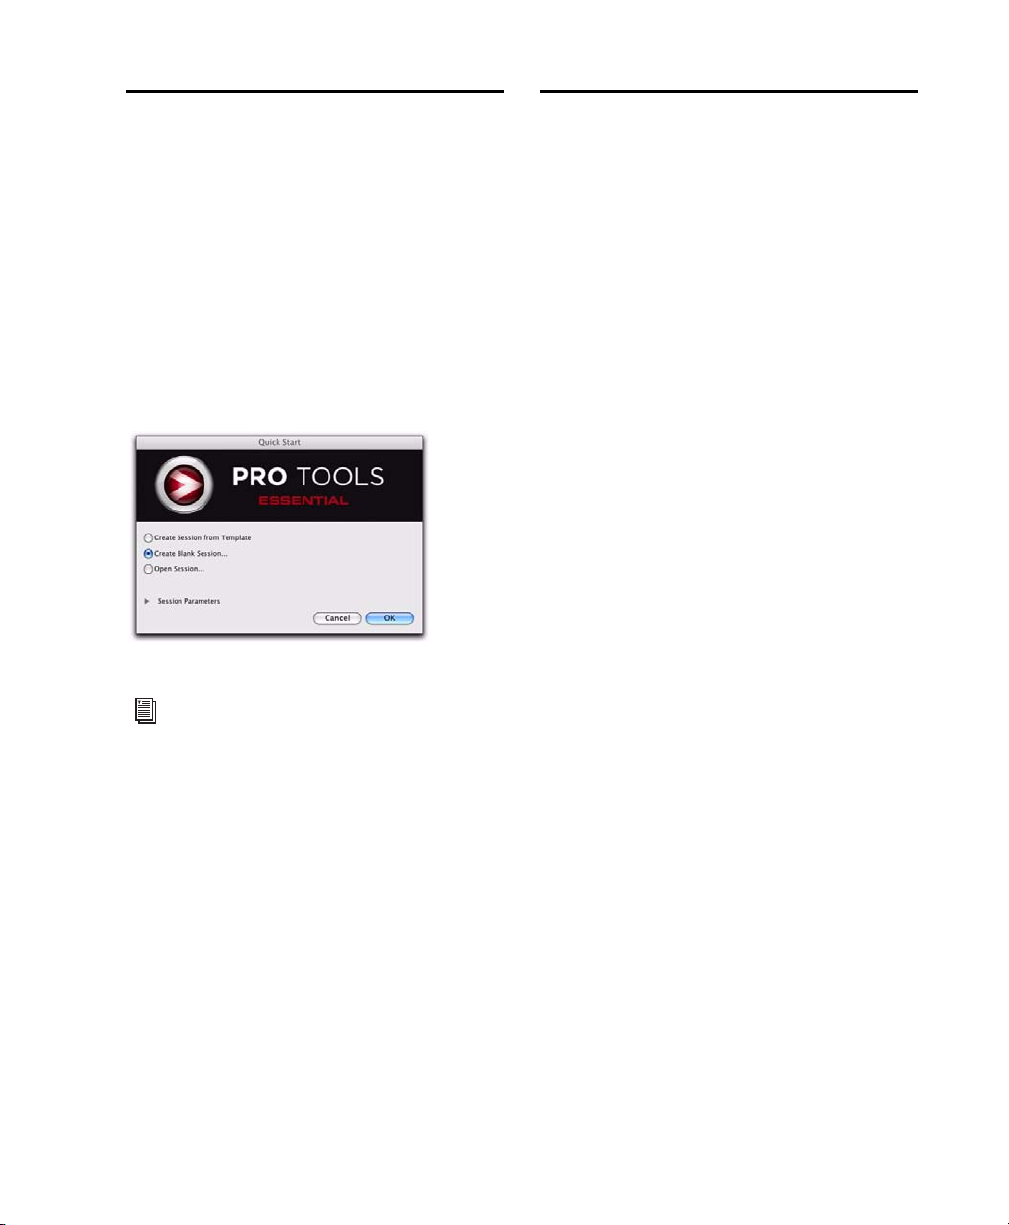
Launching Pro Tools M-Powered Essential
1 Click the Pro Tools M-Powered Essential icon
in the Dock (or double-click the application
icon in the Pro Tools folder inside the Digidesign folder).
2 Use the Quick Start dialog to do one of
the following:
• Create a new session from template.
• Create a new blank session.
• Open any other session on your system.
Quick Start dialog
Additional Software on the Pro Tools Installer Disc
The Pro Tools M-Powered Essential Installer
disc provides additional software for your
system, including Torq LE, DJ software and the
MP3 Export option. Once you've completed
your Pro Tools installation, you can install
them separately. Go to the Additional Files/3rd
Party Content folder on the Pro Tools
M-Powered Essential Installer disc.
Torq LE, DJ Software
Your Pro Tools package also includes Torq LE,
DJ software. You can use Torq LE with Pro Tools
using ReWire technology.
MP3 Export Option
The MP3 Export Option lets you create MP3
files from Pro Tools sessions when using Bounce
to Disk or exporting a region as a new audio
file.
For more information on creating and saving
Sessions, see the Pro Tools Reference Guide.
Chapter 2: Installing Pro Tools on Mac 7
Page 12

Uninstalling Pro Tools
If you need to uninstall Pro Tools software from
your computer, use the Uninstaller application.
To uninstall Pro Tools from your computer:
1 Make sure you are logged in as an Administra-
tor for the account where Pro Tools is installed.
For details on Administrator privileges in
Mac OS X, see your Apple OS X documentation.
2 Go to Applications/Digidesign/Pro Tools/
Pro Tools Utilities and double-click
Uninstall Pro Tools.
3 Click Continue to proceed with the uninstall.
4 Choose the type of uninstall you want to per-
form:
Safe Uninstall Leaves certain plug-ins and system files needed for compatibility with some
Avid products. Use Safe Uninstall if you are using an Avid application or preparing to update
to a CS (customer support) release.
Clean Uninstall Removes all Pro Tools files, including system files, Digidesign plug-ins, and
MIDI patch names. Use Clean Uninstall whenever you are preparing to upgrade, or to troubleshoot from a clean system.
5 Click Uninstall.
6 Enter your Administrator password and click
OK.
7 Click Finish to close the Installer window.
Pro Tools M-Powered Essential User Guide8
Page 13

chapter 3
Installing Pro Tools on Windows
This chapter contains information for Windows
systems only. If you are installing Pro Tools
M-Powered Essential on a Mac computer, see
Chapter 2, “Installing Pro Tools on Mac.”
Installation Overview
Installing Pro Tools M-Powered Essential on a
Windows computer includes the following
steps:
1 Installing your M-Audio drivers and connect-
ing the M-Audio interface to your computer.
(See the instructions that came with your
M-Audio interface.)
2 “Installing Pro Tools M-Powered Essential
Software” on page 10.
3 “Launching Pro Tools M-Powered Essential”
on page 11.
4 Configuring your system for improved perfor-
mance (see Chapter 4, “Configuring Your System”).
Chapter 3: Installing Pro Tools on Windows 9
Page 14

Installing Pro Tools M-Powered Essential Software
Make sure you’ve installed your M-Audio interface drivers and connected the interface to your
computer. Once that’s done, you’re ready to install Pro Tools.
For information on connecting your M-Audio
interface, see the printed M-Audio hardware
interface guide that came with it.
To install Pro Tools M-Powered Essential:
1 Start Windows, logging in with Administrator
privileges. For details on Administrator privileges, refer to your Windows documentation.
2 Insert the Pro Tools M-Powered Essential In-
staller disc for Windows in your DVD drive and
do one of the following:
• If Windows AutoRun is enabled, a splash
screen pic appears. Follow the on-screen instructions.
– or –
• If Windows AutoRun is disabled, locate and
double-click Setup.exe on the Installer disc.
Setup.exe icon
In Vista, if the User Account Control dialog
appears, click Allow.
3 When the InstallShield Wizard appears, fol-
low the on-screen instructions to proceed with
installation and click Next when prompted.
4 At the “Select Features” dialog, do the follow-
ing:
• To install all Pro Tools application files
(which includes the free plug-in suite and
associated content), leave the Pro Tools box
checked.
• To install additional loops and demo songs,
check the Essential Audio Loops and Demo
Song box. For more information, see “Essential Audio Loops and Demo Songs” on
page 11.
Select Features dialog
5 Click Next.
6 Click Install.
In Windows Vista, a series of Windows
Security dialogs may appear.Click “Install”
on each one until they go away.
In Windows XP, a series of Software Installation dialogs about the driver not passing
Windows Logo testing may appear. Click
Continue Anyway on each one until they go
away.
7 Wait for the installer to finish installing all
components before proceeding to the next step.
8 When installation is complete, click Finish.
Pro Tools M-Powered Essential User Guide10
Page 15

Essential Audio Loops and Demo Songs
Pro Tools M-Powered Essential installation includ es an opt ion to in stall Essential Audio Loops
and Demo Songs.
The audio loops are pro-quality audio loops that
you can use to quickly sketch out musical ideas.
The demo songs let you see and hear many of
the things you’ll soon be doing in Pro Tools.
Once these loops and demo songs are installed,
they can be found in the following locations:
• Programs\Digidesign\Pro Tools
Essential Loops
• Programs\Digidesign\Pro Tools
Essential Demo Songs
Quick Start dialog
For more information on creating and saving
Sessions, see the Pro Tools Reference Guide.
You also have the option of choosing the
location where the loops and demo songs are
installed.
Launching Pro Tools M-Powered Essential
1 Double-click the Pro Tools M-Powered short-
cut on your desktop (or the application in
Program Files\Digidesign\Pro Tools).
2 Use the Quick Start dialog to do one of
the following:
• Create a new session from template.
• Create a new blank session.
• Open any other session on your system.
Additional Software on the Pro Tools Installer Disc
The Pro Tools M-Powered Essential Installer
disc provides additional software for your
system, including Torq LE, DJ software and the
MP3 Export option. Once you've completed
your Pro Tools installation, you can install
them separately. Go to the Additional Files/3rd
Party Content folder on the Pro Tools
M-Powered Essential Installer disc.
Torq LE, DJ Software
Your Pro Tools package also includes Torq LE,
DJ software. You can use Torq LE with Pro Tools
using ReWire technology.
MP3 Export Option
The MP3 Export Option lets you create MP3
files from Pro Tools sessions when using Bounce
to Disk or exporting a region as a new audio
file.
Chapter 3: Installing Pro Tools on Windows 11
Page 16

Uninstalling Pro Tools
Use the Uninstall Pro Tools application to uninstall Pro Tools software from your computer.
To uninstall Pro Tools from your computer:
1 Start Windows, logging in with Administrator
privileges. For details on Administrator privileges, refer to your Windows documentation.
2 Go to C:\Program Files\Digidesign\
Pro Tools\Pro Tools Utilities and double-click
Uninstall Pro Tools.exe.
3 Click Next.
4 Click Uninstall to proceed with the uninstalla-
tion.
Pro Tools M-Powered Essential User Guide12
Page 17

chapter 4
Configuring Your System
After you have connected your system and installed Pro Tools software, you are ready to start
up and configure your Pro Tools system.
Starting Up or Shutting Down Your System
To ensure that the components of your
Pro Tools system communicate properly with
each other, you need to start them in a particular order.
Start up your Pro Tools system in this order:
1 Lower the volume of all output devices (such
as speakers and headphones) in your system.
2 Turn on any external hard drives. Wait ap-
proximately ten seconds for them to spin up to
speed.
3 Turn on any control surfaces, such as
Command|8.
4 Turn on any MIDI interfaces, MIDI devices, or
synchronization peripherals.
Shut down your Pro Tools system in this order:
1 Quit Pro Tools and any other running applica-
tions.
To quit Pro Tools, choose File > Exit
(Windows) or Pro Tools > Quit (Mac).
2 Turn off or lower the volume of all output de-
vices (such a speakers and headphones) in your
system.
3 Turn off your computer.
4 For Pro Tools M-Powered Essential systems
that use hardware requiring external power,
turn off the hardware.
5 Turn off any MIDI interfaces, MIDI devices, or
synchronization peripherals.
6 Turn off any control surfaces.
7 Turn off any external hard drives.
5 For Pro Tools M-Powered Essential systems
that use hardware requiring external power,
turn on the hardware.
6 Turn on your computer.
7 Launch Pro Tools or any third-party audio or
MIDI applications.
Chapter 4: Configuring Your System 13
Page 18

Configuring Pro Tools M-Powered Essential Software
Pro Tools System Settings
In the Playback Engine dialog, Pro Tools lets you
adjust the performance of your system by
changing system settings that affect its capacity
for processing, playback, and recording
In most cases, the default settings for your system provide optimum performance, but you
may want to adjust them to accommodate large
or processing-intensive Pro Tools sessions.
For some M-Audio interfaces, you can only
change the Hardware Buffer Size in M-Audio interface’s control panel (while Pro Tools is
closed). For more information, see “Pro Tools
Hardware Settings and M-Audio Control Panel”
on page 18.
Hardware Buffer Size
The Hardware Buffer Size (H/W Buffer Size) controls the size of the buffer used to handle host
processing tasks such as Real-Time AudioSuite
(RTAS) plug-ins. The H/W Buffer setting can also
be used to manage monitoring latency.
Lower Hardware Buffer Size settings reduce
monitoring latency, and are useful when you are
recording live input.
Higher Hardware Buffer Size settings allow for
more audio processing and effects, and are useful when you are mixing and using more RTAS
plug-ins.
In addition to causing slower screen response and monitoring latency, higher
Hardware Buffer Size settings can increase
the latency caused by RTAS plug-ins, and
affect the accuracy of plug-in automation,
mute data, and MIDI track timing.
To change the Hardware Buffer Size:
1 Choose Setup > Playback Engine.
Playback Engine dialog for Pro Tools M-Powered
Essential, with Structure Essential plug-in installed.
(M-Audio Fast Track Ultra shown)
Pro Tools M-Powered Essential User Guide14
2 From the H/W Buffer Size pop-up menu, select
the audio buffer size, in samples.
3 Click OK.
RTAS Processors
The RTAS Processors setting determines the
number of processors in your computer allocated for RTAS (Real-Time AudioSuite) plug-in
processing.
With computers that have multiple processors,
or that feature multi-core processing or hyperthreading, this setting lets you enable multiprocessor support for RTAS plug-ins. Used in combination with the CPU Usage Limit setting, the
RTAS Processors setting lets you control the way
RTAS processing and other Pro Tools tasks are
handled by the system.
Page 19

For example:
• For sessions with large numbers of RTAS plugins, you can allocate 2 or more processors to
RTAS processing and set a high CPU Usage
Limit.
• For sessions with few RTAS plug-ins, you can
allocate fewer processors to RTAS processing
and set a low CPU Usage Limit to leave more
CPU resources available for automation accuracy, screen response, and video.
• Depending on the importance of video and
overall screen response, and on the density of
automation being employed, try different
combinations of RTAS Processors and CPU Us-
age Limit settings to achieve the best results.
For example, to improve screen response in a
medium-sized session using a moderate number of RTAS plug-ins, try reducing the number
of RTAS plug-ins, but keep the CPU Usage Limit
set to the maximum (up to 99% on a single
processor system).
To set the number of RTAS Processors:
1 Choose Setup > Playback Engine.
2 From the RTAS Processing pop-up menu, select
the number of available processors you want to
allocate. The number of processors available varies depending on how many processors are
available on your computer:
• Select 1Processor to limit RTAS processing
to one CPU in the system.
• Choose 2 Processors to enable load balancing across two available processors.
• On systems running four or more processors, choose the number of processors for
RTAS processing.
System Usage Window and RTAS Processing
The System Usage window (Windows > System
Usage) displays the combined amount of RTAS
processing occurring on all enabled processors
with a single indicator, regardless of how many
processors are available in the system. If the System Usage Window shows that you are at the
limit of available resources, increase the number
of RTAS processors and adjust the CPU Usage
Limit setting.
CPU Usage Limit
The CPU Usage Limit setting controls the percentage of CPU resources allocated to Pro Tools
host processing tasks. Used in combination with
the RTAS Processors setting, the CPU Usage Limit
setting lets you control the way Pro Tools tasks
are carried out by the system.
•Lower CPU Usage Limit settings limit the effect
of Pro Tools processing on other CPU-intensive tasks, such as screen redraws, and are useful when you are experiencing slow system
response, or when running other applications
at the same time as Pro Tools.
•Higher CPU Usage Limit settings allocate more
processing power to Pro Tools, and are useful
for playing back large sessions or using more
RTAS plug-ins.
The maximum available CPU Usage Limit depends on the number of processors in your computer and on the number of processors you specify for RTAS processing. This value can range
from 85% for single-processor computers, and
99% for multiprocessor computers (which dedicate one entire processor to Pro Tools).
3 Click OK.
Chapter 4: Configuring Your System 15
Page 20

On multiprocessor computers, the maximum
CPU Usage Limit is reduced when you use all your
processors (as selected in the RTAS Processing
pop-up menu). For example, on dual-processors,
the limit is 90%. On four-processor computers,
the limit is 95%.
Increasing the CPU Usage Limit may slow
down screen responses on slower computers.
To change the CPU Usage Limit:
1 Choose Setup > Playback Engine.
2 From the CPU Usage Limit pop-up menu, select
the percentage of CPU processing you want to
allocate to Pro Tools.
3 Click OK.
RTAS Engine (RTAS Error Suppression)
The RTAS Engine option determines RTAS error
reporting during playback and recording. This is
especially useful when working with instrument
plug-ins.
You should only enable RTAS error suppression
if you are experiencing frequent RTAS errors
that are interrupting your creative workflow.
When RTAS error suppression is enabled, you
can experience a degradation of audio quality.
However, this may be acceptable in order to
avoid interrupting playback and recording
when working with instrument plug-ins. Be sure
to disable RTAS error suppression when you
need to ensure the highest possible audio quality, such as for a final mix.
To enable RTAS error suppression:
1 Choose Setup > Playback Engine.
2 Select Ignore Errors During Playback/Record.
3 On Mac, you can also select Minimize Additional
I/O Latency.
4 Click OK.
RTAS Error Suppression Options
Ignore Errors During Playback/Record When en-
abled, Pro Tools continues to play and record
even if the RTAS processing requirements exceed the selected CPU Usage Limit. This can result
in pops and clicks in the audio, but does not
stop the transport.
Minimize Additional I/O Latency When enabled,
any additional latency due to suppressing RTAS
errors during playback and record is minimized
to 128 samples. Suppressing RTAS errors requires at least 128 samples of additional buffering on some systems. If this option is disabled,
the buffer is half the H/W Buffer Size, or at least
128 samples (whichever is greater). If you are on
an older, slower computer, you may want to disable this option to avoid adverse performance.
This option is only available if the Ignore Errors
During Playback/Record option is enabled.
Pro Tools M-Powered Essential User Guide16
Page 21

DAE Playback Buffer Size
The DAE Playback Buffer Size setting determines
the amount of memory DAE allocates for disk
buffers. In addition to levels, the DAE Playback
Buffer Size shows values in milliseconds, which
indicate the amount of audio buffered when the
system reads from disk.
The optimum DAE Playback Buffer Size for most
disk operations is 1500 msec; Level 2 (Default).
• DAE Playback Buffer Size settings lower than
1500 msec; Level 2 (Default) may improve
playback and recording initiation speed, as
well as preview in context in DigiBase browsers. However, a lower setting may make it difficult to play or record tracks reliably with
sessions containing a large number of tracks
or a high density of edits, or with systems that
have slower or heavily-fragmented hard
drives.
• DAE Playback Buffer Size settings higher than
1500 msec; Level 2 (Default) allow higher track
count, higher density of edits in a session, or
the use of slower hard drives. However, a
higher setting may increase the time lag when
starting playback or recording, starting preview in context from DigiBase browsers, or
cause a longer audible time lag while editing
during playback.
Using a larger DAE Playback Buffer Size
leaves less system memory for other tasks.
The default setting of 1500 msec (Level 2) is
recommended unless you are encountering
–9073 (“Disk too slow or fragmented”)
errors.
To change the DAE Playback Buffer Size:
1 Choose Setup > Playback Engine.
2 From the DAE Playback Buffer pop-up menu, se-
lect a buffer size. Memory requirements for each
setting are shown at the bottom of the Playback
Engine dialog.
3 Click OK.
If Pro Tools needs more system memory for the
DAE Playback Buffer, it will prompt you to restart your computer.
Cache Size
The Cache Size setting determines the amount
of memory DAE allocates to pre-buffer audio for
playback and looping when using Elastic Audio.
Minimum Reduces the amount of system memory used for disk operations and frees up memory for other system tasks. However, performance when using Elastic Audio features may
decrease.
Normal Is the optimum Cache Size for most sessions.
Large Improves performance when using Elastic
Audio features, but it also decreases the amount
of memory available for other system tasks, such
as RTAS processing.
Using a larger Cache Size leaves less system
memory for other tasks. The default setting
of Normal is recommended unless you are
encountering -9500 (“Cache too small”)
errors.
To change the Cache Size:
1 Choose Setup > Playback Engine.
2 From the Cache Size pop-up menu, select a
disk cache size.
3 Click OK.
Chapter 4: Configuring Your System 17
Page 22

Pro Tools Hardware Settings and M-Audio Control Panel
Th e Ha rdware S etu p dialog in P ro To o ls (Setup >
Hardware) displays the name of your M-Audio
peripheral, and tells you that various hardware
functions can be changed in the M-Audio Control Panel.
Using the M-Audio Control Panel, you can
change settings in the following areas:
• Mixer Settings
• Output Settings
• Hardware Settings (including sample rate,
hardware buffer size, and sync source).
You can set the sample rate when creating a
new Pro Tools session by selecting a different sample rate in the New Session dialog.
(Refer to
details.)
To change M-Audio Control Panel settings:
1 If Pro Tools M-Powered Essential is running,
exit Pro Tools.
2 Launch the M-Audio Control Panel as follows:
• For FireWire interfaces, launch M-Audio
FW Audio.
• For PCI interfaces, launch M-Audio Delta
Audio.
• For USB Interfaces, launch the M-Audio
control panel with the name of your interface.
3 To change settings in the M-Audio Control
Panel, refer to the documentation that came
with your M-Audio interface.
4 When finished, close the M-Audio Control
Panel.
the Pro Tools Reference Guide for
Clock Source (Sync Source)
If your M-Audio interface has digital I/O (such as
S/PDIF I/O), you need to set the Clock Source
(called Sync Source in the M-Audio Control
Panel).
With Pro Tools M-Powered Essential, you cannot set the Clock Source in the Pro Tools Session
Setup window. Instead, you must set the Sync
Source in the M-Audio Control Panel.
To select the Clock Source:
1 If Pro Tools M-Powered Essential is running,
exit Pro Tools.
2 Launch the M-Audio Control Panel as follows:
• For FireWire interfaces, launch M-Audio
FW Audio.
• For PCI interfaces, launch M-Audio Delta
Audio.
• For USB Interfaces, launch the M-Audio
control panel with the name of your interface.
3 Click the Settings tab.
4 Select a Sync Source.
Your digital input device must be connected
and turned on. If your input device is not
turned on, leave the Sync Source set to Internal.
For more information on selecting the Sync
Source for your M-Audio interface, refer to
your M-Audio interface documentation.
5 Click OK.
Pro Tools M-Powered Essential User Guide18
Page 23
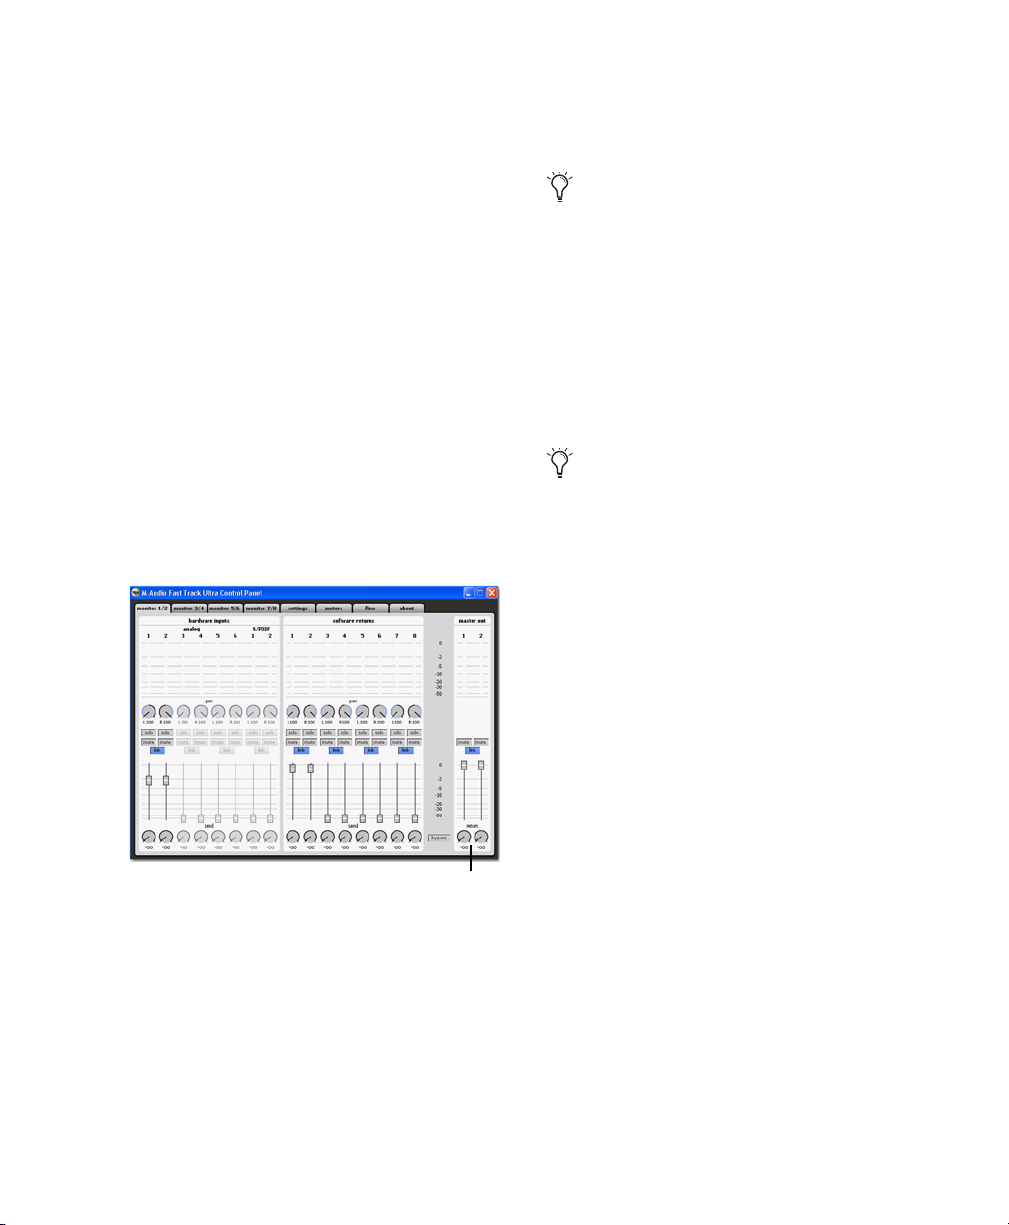
M-Audio Mixer Direct Monitoring
Master out 1–2 control
Direct or low-latency monitoring is not
available from within Pro Tools M-Powered
Essential. However, with M-Audio devices that
have Control Panel mixers with a direct
monitoring feature, it is possible to create a
low-latency monitoring path while recording in
Pro Tools M-Powered Essential.
7 When you are finished recording, turn off the
mixer output control in the Control Panel
mixer.
You can leave the M-Audio Control Panel
open while working in Pro Tools M-Powered
Essential.
Configuring I/O Setup
To create a low-latency monitoring path:
1 In Pro Tools, record-enable the tracks you
want to record and mute their output.
2 Open the M-Audio Control Panel for your
M-Audio interface.
3 In the Control Panel mixer for your interface,
route the input channels you want to monitor
to the main outputs of the mixer by clicking the
corresponding output control.
Control Panel mixer for M-Audio Fast Track Ultra
Using the I/O Setup dialog, you can label
Pro Tools input, output, insert, and bus signal
paths. The I/O Setup dialog provides a graphical
representation of the inputs, outputs, and signal
routing of the M-Audio interface.
Pro Tools M-Powered Essential bypasses the
M-Audio mixer that is displayed in the M-Audio Control Panel. The interface’s hardware
inputs and outputs show up directly in
Pro Tools I/O Setup.
Pro Tools M-Powered Essential has default I/O
Setup settings that will get you started. Use the
I/O Setup dialog only if you want to rename or
remap the default I/O paths.
4 Adjust the output level and balance with the
Control Panel mixer volume and pan controls.
5 In Pro Tools, begin recording.
6 To listen back to the recorded tracks, unmute
the tracks in Pro Tools and begin playback.
Chapter 4: Configuring Your System 19
Page 24
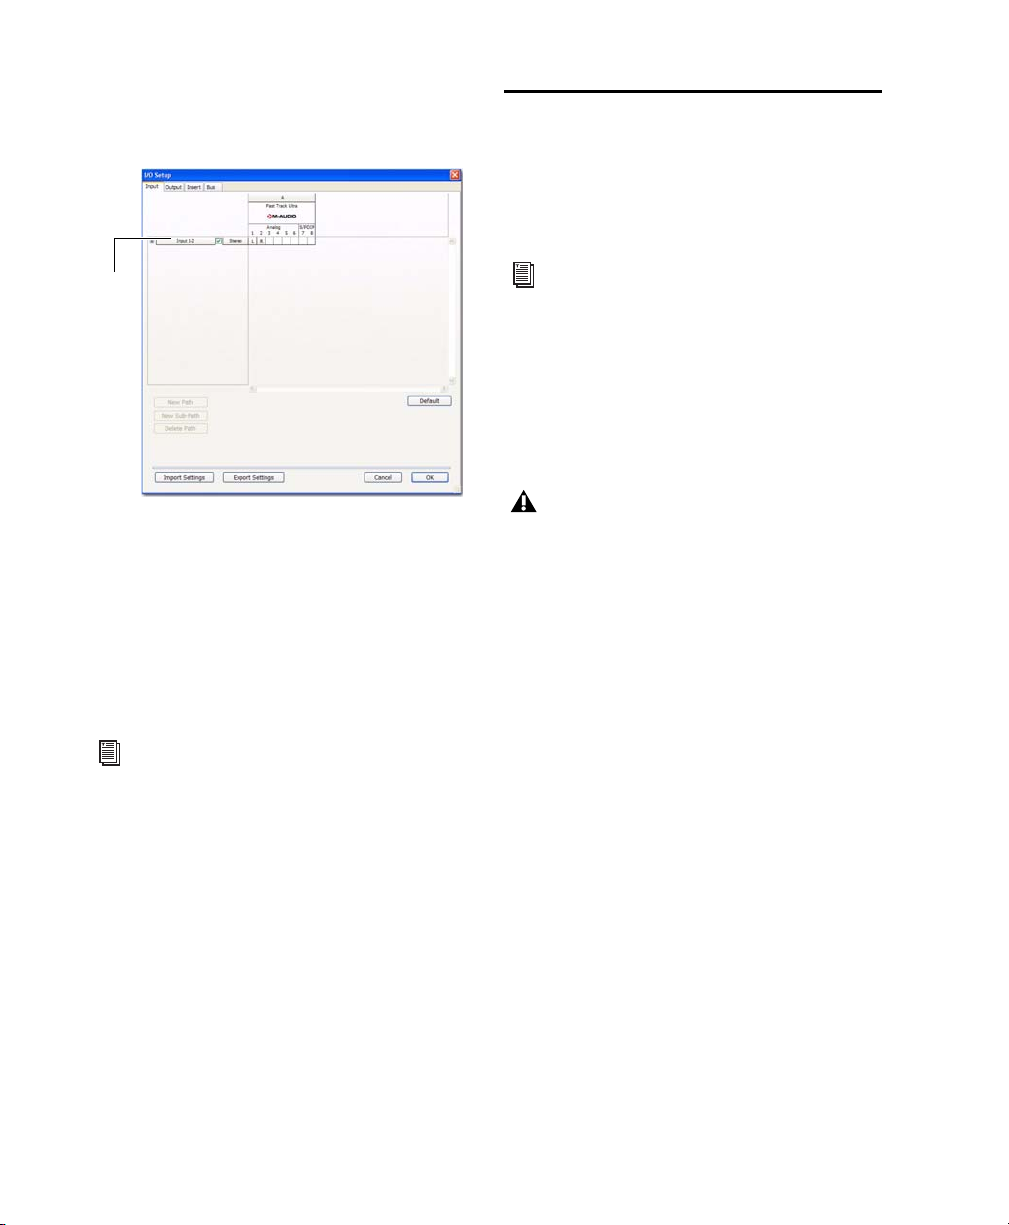
To rename I/O paths in I/O Setup:
Path
Name
1 Choose Setup > I/O.
Optimizing a Mac System for Pro Tools
To ensure optimum performance with
Pro Tools, configure your computer before using
Pro Tools software.
For Windows System Optimization, see
“Optimizing a Windows System for
Pro Tools” on page 22.
Before configuring your computer, make sure
you are logged in as an Administrator for the account where you want to install Pro Tools. For
details on Administrator privileges in Mac OS X,
refer to your Apple OS X documentation.
I/O Setup dialog for Pro Tools M-Powered Essential
(M-Audio Fast Track Ultra shown)
2 Click the Input, Output, Insert, or Bus tab to dis-
play the corresponding connections.
3 To change the name of a path or subpath, dou-
ble-click directly on the Path Name, type a new
name for the path, and press Enter.
4 Click OK.
See the Pro Tools Reference Guide for more
information on renaming I/O paths.
Backing Up Your System Configuration
After configuring your system and Pro Tools,
you should save an image of your system drive
using a backup utility (such as Norton Ghost).
By doing this, you can quickly restore your system configuration and settings if you encounter
any problems.
Do not use the Mac OS X automatic Software Update feature, as it may upgrade
your system to a version of Mac OS that has
not yet been qualified for Pro Tools.
For details on qualified versions of Mac OS,
refer to the latest compatibility information
on the Digidesign website
(www.digidesign.com/compatibility).
Turning Off Software Update
To turn off the Software Update feature:
1 Choose System Preferences from the Apple
menu and click Software Update.
2 Click the Software Update tab.
3 Deselect Check for Updates.
Pro Tools M-Powered Essential User Guide20
Page 25

Turning Off Energy Saver
To turn off the Energy Saver feature:
1 Choose System Preferences from the Apple
menu and click Energy Saver.
2 Click the Sleep tab and do the following:
• Set the computer sleep setting to Never.
• Set the display sleep setting to Never.
• Deselect Put the hard disk(s) to sleep when
possible option.
• Under “Spotlight”
• “Show Spotlight search field”
• “Show Spotlight window”
For a complete list of Pro Tools keyboard
shortcuts, see the Keyboard Shortcuts Guide
(Help > Keyboard Shortcuts).
To disable or reassign Mac OS X keyboard
shortcuts:
1 Choose System Preferences from the Apple
menu and click Keyboard & Mouse.
Setting Processor Performance
To set the Processor Performance:
1 Choose System Preferences from the Apple
menu and click Energy Saver.
2 Click the Options tab and set Processor Perfor-
mance to Highest.
Disable or Reassign Mac Keyboard Shortcuts Used by Pro Tools
To have the full complement of Pro Tools
M-Powered Essential keyboard shortcuts, you
need to disable or reassign any conflicting Mac
OS X Keyboard Shortcuts in the Apple System
Preferences, including the following:
• “Show Help menu”
• Under “Keyboard Navigation”
• “Move focus to the window drawer”
• Under “Dock, Exposé, and Dashboard”
• “Automatically hide and show the Dock”
•“All windows”
• “Application windows”
•“Desktop”
•“Dashboard”
•“Spaces”
2 Click the Keyboard Shortcuts tab.
3 Do one of the following:
• Deselect the Mac OS X options that conflict
with Pro Tools keyboard shortcuts.
– or –
• Assign different, non-conflicting keyboard
shortcuts to the corresponding Mac OS X
options.
Reassign Spaces Keyboard Shortcuts
If you want to use Spaces, you should reassign
the Spaces keyboard shortcuts to avoid conflicts
with important Pro Tools keyboard shortcuts.
You can reassign Spaces keyboard shortcuts to
use a combination of modifier keys (Command+Option+Control+Shift) in addition to
the default Spaces keyboard shortcut assignments to avoid these conflicts.
To reassign Spaces keyboard shortcuts to use
modifier key combinations that do not conflict
with Pro Tools keyboard shortcuts:
1 Choose System Preferences from the Apple
menu and click Exposé & Spaces.
2 Click the Spaces tab.
3 Ensure that Enable Spaces is selected.
Chapter 4: Configuring Your System 21
Page 26

4 Press and hold Command+Option+Con-
trol+Shift and select “Control+Option+Shift+Command+F8” from the “To activate Spaces” pop-up
menu.
5 Press and hold Command+Option+Con-
trol+Shift and select “Control+Option+Shift+Command+Arrow Keys” from the “To switch between
spaces” pop-up menu.
6 Press and hold Command+Option+Con-
trol+Shift and select “Control+Option+Shift+Command+Number Keys” from the “To switch directly
to a space” pop-up menu.
Disabling Spotlight Indexing
The Mac OS X Spotlight feature automatically
indexes files and folders on local hard drives in
the background. In most cases, this is not a concern for normal Pro Tools operation. However,
if Spotlight starts indexing drives while recording in a Pro Tools session with high track counts
for an extended period of time, it can adversely
affect Pro Tools system performance. You may
want to disable Spotlight indexing for all local
drives before using Pro Tools for big recording
projects.
Disabling Spotlight indexing also disables
the Find function in Mac OS X.
To disable Spotlight indexing:
1 Choose System Preferences from the Apple
menu and click Spotlight.
2 In the Spotlight window, click the Privacy tab.
3 To prevent indexing of a drive, drag its icon
from the desktop into the list.
Enabling Journaling for Audio Drives
To yield higher performance from audio drives,
enable journaling.
To enable journaling:
1 Launch the Disk Utility application, located in
Macintosh HD/Applications/Utilities.
2 Select the volume in the left column of the
Disk Utility window.
3 Click Enable Journaling in the toolbar.
Optimizing a Windows System for Pro Tools
To ensure optimum performance with
Pro Tools M-Powered, configure your computer
before using Pro Tools hardware and software.
For Mac System Optimization, see “Optimizing a Mac System for Pro Tools” on
page 20.
Before configuring your computer, make sure
you are logged in as an Administrator for the account where you want to install Pro Tools. For
details on Administrator privileges, see your
Windows documentation.
Required Optimizations
To ensure optimum performance with
Pro Tools, configure the following settings before using Pro Tools hardware and software.
When you are finished changing Windows
system settings, restart your computer.
Enabling DMA
Enabling your computer's DMA (Direct Memory
Access) frees up CPU bandwidth so your computer can do other Pro Tools tasks.
In most cases the DMA option will already be set
correctly, as Windows detects and activates
DMA mode by default.
Pro Tools M-Powered Essential User Guide22
Page 27

To enable DMA for any IDE hard drives:
1 Right-click Computer (Windows Vista) or My
Computer (Windows XP).
2 In the left-hand pane of the Computer Man-
agement window under System Tools, click on
Device Manager.
3 In the right-hand pane, click the plus (+) sign
to expand IDE ATA/API Controllers.
4 Right-click on the Primary IDE Controller and se-
lect Properties.
5 Click the Advanced Settings tab.
6 For each device, do one of the following:
• Check the box Enable DMA (Windows Vista)
– or –
• Set the Transfer Mode to DMA if available
(Windows XP)
7 Click OK.
8 Repeat the above steps for any additional IDE
Channels.
9 Close the Computer Management window.
Disabling System Standby and Power Management
When using Pro Tools, the Windows System
Standby power scheme must be set to Always On.
This helps prevent long record or playback
passes from stopping due to system resources
powering down.
To configure Windows Power Management
(Windows Vista):
1 Choose Start > Control Panel.
2 Double-click Power Options.
3 In the Power Options window, select High Per-
formance.
4 Click Change plan settings.
5 In the Edit Plan Settings window, click Change
advanced power settings.
6 In the Power Options dialog, reveal Hard disk >
Turn off hard disk after.
7 Click the Setting option.
8 Select the value in the Setting (Minutes) field
and press Backspace on your computer keyboard.
9 Press Enter. The hard disk setting changes to
Never and the Power Options dialog closes.
10 In the Edit Plan Settings window, click Save
changes and close the window.
To configure Windows Power Management
(Windows XP):
1 Choose Start > Control Panel.
2 Double-click Power Options.
3 Click the Power Schemes tab.
4 From the Power Schemes pop-up menu, select
Always.
5 Verify that the following settings are set to
Never:
• Turn off hard disks
• System standby
•System hibernates
6 Click OK.
Chapter 4: Configuring Your System 23
Page 28

Disabling User Account Control
(Windows Vista Only)
For optimal performance with Pro Tools on
Windows Vista, disable User Account Control
(UAC).
To disable User Account Control (UAC):
1 Choose Start > Control Panel.
2 Double-click User Accounts.
3 Click Turn User Account Control on or off.
4 Deselect the Use User Account Control (UAC) to
help protect your computer option.
Disabling System Startup Items
The fewer items in use by your computer, the
more resources are available for Pro Tools. Some
startup applications may be consuming unnecessary CPU resources, and can be turned off.
If you disable any of the following startup items,
do so carefully:
• Portable media serial number (required for
some applications that utilize a copy protection key)
• The Plug and Play service
•Event log
• Cryptographic services
5 Click OK.
Recommended Optimizations
Pro Tools can also be affected by other software
and hardware drivers installed on your computer. For best possible performance, it is recommended (but not required) that you do the following:
• Avoid running any unneeded programs at
the same time as Pro Tools.
• Turn off any software utilities that run in
the background, such as Windows Messenger, calendars, and disk maintenance programs.
• Turn off any non-essential USB devices
while running Pro Tools.
• If your video display card supports it, enable Bus Mastering in the manufacturer’s
Control Panel. See the manufacturer’s instructions for details.
To Disable System Startup Items:
1 From the Start menu, type “msconfig” in Start
Search (Windows Vista) or in Run (Windows XP)
and click OK to open the System Configuration
Utility.
2 Under the General tab, choose Selective
Startup.
3 Deselect Load Startup Items and click OK.
4 Click Restart to restart the computer.
5 After restarting, the computer displays a Sys-
tem Configuration message. Check to see if
Pro Tools performance has increased before you
deselect the Don't show this message again option. If performance has not changed, run
“msconfig” and return your computer Startup
Selection back to Normal Startup - load all device
drives and services. Alternatively, try disabling
Startup items and non-essential processes individually.
Pro Tools M-Powered Essential User Guide24
Page 29

appendix a
Hard Drive Configuration and Maintenance
Pro Tools M-Powered Essential software must be
installed on your system drive.
Session files (the documents you create for each
song or project) and audio (the files you record
or import into each session) can then be created
and recorded to your system drive or to an external (or secondary internal) hard drive. For small,
simple sessions (loops, MIDI, or only a few
tracks), you can probably use your system drive.
For best performance, however, we recommend
using one or more hard drives that you dedicate
to be your audio drives.
For example, it’s OK to install and play back the
included demo session on your system drive (assuming there is enough space available). However, if you plan to record and play back many
tracks simultaneously, or if you are using an
older or slower computer, you should use an external or secondary internal audio drive to store
your Pro Tools M-Powered Essential sessions and
audio.
If you use an external or secondary internal audio drive, it is recommended that you start with
a newly formatted one. You should also periodically defragment your audio drive to ensure
continued system performance.
Always back up any important data on your
drive before formatting it, as it will erase all
data on the drive.
Supported Drive Formats and Drive Types
Drive Formats
Mac Mac systems should use drives formatted
with HFS+ or HFS file system only.
HFS drives are supported as Transfer drives
only.
Windows Windows XP systems should use drives
formatted as NTFS only.
Windows systems can also support Mac
drives formatted with HFS+ system (also
commonly referred to as Mac OS Extended).
Refer to the Pro Tools Reference Guide for
more information.
Hard drive performance depends on factors including system configuration, number of tracks,
session sample rate, density of edits, and the use
of crossfades and other processes such as Beat
Detective in a session.
For complete hard drive requirements, visit the
Digidesign website at:
www.digidesign.com/compatibility
Appendix A: Hard Drive Configuration and Maintenance 25
Page 30

FireWire Hard Drives
Digidesign recommends qualified FireWire
drives and (on Windows systems) a qualified
FireWire host adapter.
For complete information on track count and
the supported number and configuration of
FireWire drives, visit the Digidesign website at:
www.digidesign.com/compatibility
IDE/ATA/SATA Hard Drives
A qualified internal IDE/ATA/SATA drive may be
used as a dedicated audio drive.
For complete information on track count with
internal drives, visit the Digidesign website at:
www.digidesign.com/compatibility
Formatting an Audio Drive
Always back up any important data on your
drive before formatting it, as it will erase all
data on the drive.
2 Click the Erase tab.
Disk Utility (Mac OS X)
3 Select the drive you want to initialize in the
column on the left side of the window.
4 Choose the Mac OS Extended (Journaled) for-
mat.
Do not choose the “Case-Sensitive” format
option. Pro Tools will not operate properly
with case-sensitive formatted drives.
5 Type a name for the new volume.
Formatting Mac Audio Drives
For optimum performance, audio drives should
be formatted as Mac OS Extended (Journaled).
To format an audio drive:
1 Launch the Disk Utility application, located in
Macintosh HD/Applications/Utilities.
Pro Tools M-Powered Essential User Guide26
6 If you plan to connect the drive to a Mac OS 9
computer, select Install Mac OS 9 Drivers.
7 Click Erase.
The drive appears on the Desktop with the new
volume name.
Page 31

Formatting Windows Audio Drives
For optimal performance, audio drives should
be formatted as NTFS.
Pro Tools only supports Basic drive types.
Do not convert the drive to a Dynamic type.
To format an audio drive:
1 Right-click Computer (Windows Vista) or My
Computer (Windows XP) and choose Manage.
2 Under Storage, choose Disk Management.
Disk Management window (Windows XP)
4 If the volume is “Unallocated,” do the follow-
ing:
• In the Disk Management window, Rightclick the hard drive you will use for audio
and choose New Partition.
• In the New Partition Wizard window, click
Next.
• When prompted, select the partition type.
Digidesign recommends using Primary partitions, instead of Extended partitions.
• Follow the on-screen instructions to select
a partition size and other partition settings.
• When prompted, choose a file system. For
optimum performance, audio drives
should be formatted as NTFS.
• Select Perform a quick format.
•Make sure Enable file and folder compression
is not selected.
• Set the Allocation unit size to Default.
• Click OK.
3 If the volume is “Healthy,” do the following:
Healthy volumes are volumes that have previously been partitioned and formatted.
• In the Disk Management window, rightclick the hard drive you will use for audio
and choose Format.
• In the Format window, name the volume.
• Choose a file system. For optimum performance, audio drives should be formatted as
NTFS.
• Select Perform a quick format.
•Make sure Enable file and folder compression
is not selected.
• Set the Allocation unit size to Default.
• Click OK.
Partitioning Drives
Partitioning creates a logical volume or volumes
on a physical drive, almost as if you were creating virtual hard drives. Partitions can then be
formatted with the appropriate file system
(NTFS for Windows, HFS+ for Mac).
Mac OS allows drives larger than 4096 MB
to be seen as whole volumes. Drives must be
initialized with a disk utility that recognizes the 2 terabyte limit. Single Pro Tools
audio files cannot exceed 3.4 GB in size.
Windows XP allows drives formatted with
the NTFS file system to be seen as whole
volumes. Single Pro Tools audio files cannot exceed 3.4 GB in size.
Appendix A: Hard Drive Configuration and Maintenance 27
Page 32

Seek Times on Partitioned Drives
Seek times are actually faster on partitioned
drives (assuming that reads and writes are performed on a single partition), since the heads
only have to seek within the partition boundaries, rather than the whole capacity of the drive.
Smaller partitions perform faster than larger partitions, but this comes at the expense of contiguous storage space. When you partition a drive,
you will need to find the compromise that best
suits your performance and storage requirements.
playback will still be very seek-intensive. Also,
the remaining free space on the disk will be discontiguous, increasing the likelihood of file
fragmentation on subsequent record passes.
Increased fragmentation increases the chance of
disk errors, which can interfere with playback of
audio, and result in performance errors.
On Windows, to avoid fragmentation, format drives with higher cluster sizes (such as
32K).
Optimizing (Defragmenting) Drives
Avoid distributing audio files within a session over different partitions on the same
drive since this will adversely affect drive
performance.
Mac Systems
When working with larger files (such as video),
you can limit fragmentation by backing up your
important files to another disk, erasing the files
from the original hard disk, then copying the
files back, instead of doing a defragmentation.
Window Systems
Periodically defragment audio drives to maintain
system performance.
For maximum recording and playback efficiency, data should be written to your hard
drive in a contiguous fashion—minimizing the
seek requirements to play back the data. Unfortunately, your computer can’t always store the
sound files in this way and must write to disk
wherever it can find space.
To prevent fragmentation, you can optimize
your drive, which rearranges your files into a
contiguous format. Most optimizing software
lets you run a check on a drive to find out the
percentage of fragmentation. If your drive
shows moderate to heavy fragmentation, you
should consider optimizing it.
If you use your system for intensive editing, or if
you frequently delete audio or fade files from
your hard drive, you may need to optimize your
drives on a weekly basis, or even every few days,
since it doesn’t take long for even a large hard
drive to become fragmented.
Backing Up Data Before Optimizing
Since your files will be rewritten by the optimization process, always make a backup copy of
the data on your hard drive before you optimize
it. You should also use a hard drive utility to find
and repair any problems before optimizing data
or re-initializing your drives. If there is any damage to your hard drive's directories prior to optimizing, serious data loss may result.
In multitrack recording, audio tracks are written
in discrete files, spaced evenly across the disk.
While fragmentation of individual files may be
zero, the tracks may be far enough apart that
Pro Tools M-Powered Essential User Guide28
Page 33

Defragmenting Windows Audio Drives
To defragment an audio drive (Windows Vista):
1 Choose Start > Control Panel.
2 Click System and Maintenance.
3 Click Performance Information and Tools.
4 Click Advanced Tools.
5 Click Open Disk Defragmenter.
6 In the Disk Defragmenter window, click the
Defragment Now button.
The Defragment Now command defragments all your hard drives. This can take a
lot of time, especially on systems with multiple drives.
Advanced users can use the command line
tool Defrag.exe to defragment individual
drives. See your Windows Vista documentation for more information.
To defragment an audio drive (Windows XP):
1 Right-click My Computer and choose Manage.
2 Under Storage, choose Disk Defragmenter.
3 In the Disk Defragmenter window, choose the
drive you want to defragment
4 Click the Defragment button and follow the
on-screen instructions.
When defragmenting is complete, close the
Computer Management window.
Appendix A: Hard Drive Configuration and Maintenance 29
Page 34

Hard Disk Storage Space
Mono audio tracks recorded with 16-bit resolution at 44.1 kHz (CD quality) require approximately
5 MB of hard disk space per minute. The same tracks recorded with 24-bit resolution require about
7.5 MB per minute.
Stereo audio tracks recorded with 16-bit resolution at 44.1 kHz (CD quality) require approximately
10 MB of hard disk space per minute. The same tracks recorded with 24-bit resolution require about
15 MB per minute.
Table 2 lists the required disk space for certain track numbers and track lengths, to help you estimate
your hard disk usage.
Table 2. Required hard drive space for audio tracks (44.1 kHz and 48 kHz sessions shown)
Number of Tracks and Length 16-bit at
44.1 kHz
1 mono track, 1 minute 5 MB 5.5 MB 7.5 MB 8.2 MB
16-bit at
48 kHz
24-bit at
44.1 kHz
24-bit at
48 kHz
1 stereo track (or two mono
tracks), 5 minutes
1 stereo track (or two mono
tracks), 60 minutes
24 mono tracks, 5 minutes 600 MB 662 MB 900 MB 991 MB
24 mono tracks, 60 minutes 7 GB 7.8 GB 10.5 GB 11.6 GB
32 mono tracks, 5 minutes 800 MB 883 MB 1.2 GB 1.3 GB
32 mono tracks, 60 minutes 9.4 GB 10.4 GB 14 GB 15.4 GB
50 MB 55 MB 75 MB 83 MB
600 MB 662 MB 900 MB 991 MB
Pro Tools M-Powered Essential User Guide30
Page 35

appendix b
Resources
Whether you are new to Pro Tools or just starting out with your new system, we encourage
you to read and utilize the many guides that
Pro Tools provides. There are also useful online
resources available, giving you everything from
Pro Tools tips to Pro Tools answers.
About the Pro Tools Guides
In addition to any printed guides included with
your system, PDF versions of the printed guides
and many additional Pro Tools guides are installed automatically during Pro Tools installation (see “Documentation Installed Automatically with Pro Tools” on page 32).
Printed copies of the Pro Tools Reference
Guide and other guides in the Pro Tools
guide set can be purchased separately from
the DigiStore (www.digidesign.com).
Printed Guides
A printed M-Audio hardware interface guide is
included for your respective M-Audio interface.
It gives you detailed instructions for setting up
and configuring hardware for optimum performance.
Guides Accessible in Pro Tools
The main Pro Tools guides are accessible from
the Pro Tools Help menu. (Choose Help, then select a guide.)
These include:
• Intro to Pro Tools, which has tutorials on using
Pro Tools
• Essential User Guide, which gives you detailed
instructions for setting up and configuring
software and hardware for optimum performance.
• Essential Plug-ins Guide, which describes the
plug-ins inc luded with P ro Tools for both rea ltime and file-based audio processing.
• Essential Menus Guide, which covers all the
Pro Tools on-screen menus.
• Pro Tools Shortcuts Guide, which provides a
complete list of keyboard and Right-click
shortcuts for Pro Tools.
You can download the manual for whatever
interface you have. Go to:
http://www.m-audio.com/manuals
Appendix B: Resources 31
Page 36

Documentation Installed Automatically with Pro Tools
In addition to the guides in the Help menu, you
get useful PDF versions of many Pro Tools
guides (such as the Pro Tools Reference Guide)
when you install Pro Tools.
Usually, references to Pro Tools M-Powered
in the guides are synonymous with
Pro Tools M-Powered Essential.
This documentation can be found in the following locations:
Mac Applications/Digidesign/Documentation
Windows C:\Program Files\Digidesign\
Documentation
To view or print PDF guides, you can use
Adobe Reader or Apple Preview (Mac only).
About www.digidesign.com
The Digidesign website (www.digidesign.com) is
your best online source for information to help
you get the most out of your Pro Tools system.
The following are just a few of the services and
features available.
Product Registration Register your purchase online.
Support and Downloads Contact Digidesign
Technical Support or Customer Service; download software updates and the latest online
manuals; browse the Compatibility documents
for system requirements; search the online
Answerbase; or join the worldwide Pro Tools
community on the Digidesign User Conference.
Training and Education Study on your own using
courses available online or find out how you can
learn in a classroom setting at a certified
Pro Tools training center.
Products and Developers Learn about Digidesign
products; download demo software or learn
about our Development Partners and their plugins, applications, and hardware.
News and Events Get the latest news from
Digidesign or sign up for a Pro Tools demo.
Pro Tools Accelerated Videos Watch the series of
free tutorial videos. Accelerated Videos are designed to help you get up and running with
Pro Tools and its plug-ins quickly.
Helpful Online Resources
Once you get going, here are some helpful online resources:
• Get useful information, help, and tips from
the worldwide community of Pro Tools users
at Digidesign User Conference (DUC). Go to:
http://duc.digidesign.com
• For questions about installation, visit
Digidesign’s online Answerbase. Go to:
http://www.digidesign.com/answerbase
• If you can’t find your answer on the DUC or
Answerbase, contact Digidesign
email support. Go to:
http://www.digidesign.com/tsr
Pro Tools M-Powered Essential User Guide32
Page 37

index
C
Cache Size 17
Clean Uninstall (Mac) 8
Clock Source 18
CPU Usage Limit 15
D
DAE Playback Buffer Size 17
DMA option (Windows), enabling 22
drive formatting
Mac 26
Windows 27
drive maintenance 25
drive requirements 3
E
Energy Saver (Mac), turning off 21
F
FireWire requirements 26
H
hard drives
drive formats 25
FireWire requirements 26
formatting 26, 27, 26
IDE/ATA requirements 26
maintenance 25, 28
optimizing 28
partitioning 27
requirements 3
space requirements 30
Hardware Buffer Size 14
Hardware Setup dialog 18
I
I/O Setup 19
IDE/ATA requirements 26
Ignore Errors During Playback/Record option 16
installing Pro Tools
Mac 5
Windows 10
J
journaling (Mac), enabling 22
K
key commands 3
M
M-Audio Control Panel 18
Minimize Additional I/O Latency option 16
O
optimizing hard drives 28
P
partitioning hard drives 27
Playback Engine
RTAS Processors setting 14
plug-ins
multiprocessors 15
RTAS Processors setting 14
power
management settings (Windows) 23
Pro Tools
capabilities 1, 14
installing (Mac) 5, 10
removing (Windows) 8, 12
processor performance (Mac) 21
Index 33
Page 38

R
removing Pro Tools
Windows 8, 12
RTAS Processors setting 14, 15
S
Safe Uninstall (Mac) 8
Software Update (Mac), turning off 20
Spotlight indexing (Mac), disabling 22
Startup items (Windows), disabling 24
system
optimization (Mac) 20
recommended optimizations (Windows) 24, 22
shutting down 13
system settings
Cache Size 17, 18, 15
Hardware Buffer Size 14
I/O Setup 19
U
uninstalling Pro Tools
Windows 8, 12
User Account Control (UAC)
disabling 24
W
website 32
Pro Tools M-Powered Essential User Guide34
Page 39

www.digidesign.com
DIGIDESIGN
2001 Junipero Serra Boulevard
Daly City, CA 94014-3886 USA
TECHNICAL SUPPORT (USA)
Visit the Digidesign Online Support Center
at www.digidesign.com/support
PRODUCT INFORMATION
For company and product information,
visit us on the web at www.digidesign.com
 Loading...