

Page 1

Avid
Installation Guide for
®
Editing Applications
Page 2

Legal Notices
Product specifications are subject to change without notice and do not represent a commitment on the part of Avid
Technology, Inc.
This product is subject to the terms and conditions of a software license agreement provided with the software. The
product may only be used in accordance with the license agreement.
Avid products or portions thereof are protected by one or more of the following United States Patents: 5,355,450;
5,396,594; 5,440,348; 5,528,310; 5,557,423; 5,577,190; 5,584,006; 5,724,605; 5,726,717; 5,745,637; 5,752,029;
5,754,851; 5,812,216; 5,905,841; 5,959,610, 6,057,829, 6,091,778, 6,105,083, 6,118,444, 6,141,691, 6,160,548,
6,201,531; 6,269,195; 6,330,369; 6,336,093, 6,353,862, 6,404,435; 6,407,775, 6,426,778; 6,477,271, 6,489,969;
6,512,522; 6,546,190; 6,552,731, 6,553,142; 6,570,624; 6,571,255, 6,583,824; 665,450; 6,678,461; 6,687,407;
6,704,445; 6,728,682, 6,747,705; 66,763,134,6,766,063; 6,791,556; 6,810,157, 6,847,373; 6,871,003; 6,871,161,
6,901,211; 6,907,191; 6,928,187, 7,043,058; 7,081,900; 7,103,231; 7,145,567; 7,266,241, 7,280,117; 7,403,561;
7,433,519; 7,441,193, 7,545,957; 7,671,871; 7,684,096; 7,725,812; 7,729,423; 7,916,363 ; 7,930,624; and
D515,095, D396,853. Other patents are pending.
Avid products or portions thereof are protected by one or more of the following European Patents: 0506870;
0635188; 0674414; 0752174; 0811290; 0811292; 0811293; 0857293; 0976108; 0988756; 1050048; 1068734;
1111910; 1173850; 1629675. Other patents are pending.
©2011 Avid Technology, Inc.and its licensors. All Rights Reserved.
Attn. Government User(s). Restricted Rights Legend
U.S. GOVERNMENT RESTRICTED RIGHTS. This Software and its documentation are “commercial computer
software” or “commercial computer software documentation.” In the event that such Software or documentation is
acquired by or on behalf of a unit or agency of the U.S. Government, all rights with respect to this Software and
documentation are subject to the terms of the License Agreement, pursuant to FAR §12.212(a) and/or DFARS
§227.7202-1(a), as applicable.
Trademarks
Avid, the Avid logo, and Digidesign are trademarks or registered trademarks of Avid Technology, Inc. in the United
States and/or other countries. See www.avid.com/US/about-avid/legal-notices/trademarks for more information on
Avid's trademarks.
Adobe and Photoshop are either registered trademarks or trademarks of Adobe Systems Incorporated in the
United States and/or other countries. Apple and Macintosh are trademarks of Apple Computer, Inc., registered in
the U.S. and other countries. Windows is either a registered trademark or trademark of Microsoft Corporation in the
United States and/or other countries. All other trademarks contained herein are the property of their respective
owners.
Installation Guide for Avid Editing Applications • 9320-65079-00 Rev A • November 2011
2
Page 3

Contents
Chapter 1 Installation Guide for Avid Editing Applications . . . . . . . . . . . . . . . . . 5
Chapter 2 Guide d'installation des applications de montage Avid . . . . . . . . . . 39
Chapter 3 Installationshandbuch für Avid-Editing-Anwendungen . . . . . . . . . . 75
Chapter 4 Manuale di installazione per le applicazioni di montaggio Avid . . 111
Chapter 5 Guía de instalación para aplicaciones de edición Avid . . . . . . . . . 147
Chapter 6 Avid 編集アプリケーションのインストール・ガイド . . . . . . . . . . . . . 181
Chapter 7 Avid
Chapter 8 Avid
Chapter 9 Avid
편집 어플리케이션 설치 가이드 . . . . . . . . . . . . . . . . . . . . . . . . . 215
編輯應用程式安裝手冊. . . . . . . . . . . . . . . . . . . . . . . . . . . . . . . . . 245
编辑应用程序安装指南。 . . . . . . . . . . . . . . . . . . . . . . . . . . . . . . . 275
3
Page 4

4
Page 5

1 Installation Guide for Avid Editing Applications
The most current information about your Avid editing application is available in
the online version of the ReadMe. You should always check online for the most
up-to-date release notes or ReadMe because the online version is updated
whenever new information becomes available. To view these online versions,
select ReadMe from the Help menu of your Avid editing application, or visit the
Knowledge Base at www.avid.com/readme.
Installing the Avid editing application directly from the Avid Installation DVD
requires your system to support a dual-layer DVD. If your system does not have a
DVD drive that supports a dual-layer DVD, you can download the Avid editing
application from the Avid Download Center at
www.avid.com/support/downloads.
Once you install your Avid editing application, you will activate the software with
the Avid License Control tool. The Avid License Control tool also activates
editing options. For information about the editing options, see “Activating
Options and Features” on page 34.
n If you have an active Avid Support Contract, you might have the option to
upgrade your software. See the instructions provided on the Avid Download
Center for your upgrade or that came with your upgrade kit for more information.
c If you change your system configuration — for example, by replacing your
hard drive, replacing a network adapter, or by upgrading your operating
system — you must first deactivate your Avid software. For information on
deactivation, see “Deactivating the Avid Editing Application and Options” on
page 35.
Page 6

Before Installing the Avid Editing Application
Read through the following procedures prior to installing the editing application.
Procedures are provided for upgrade customers or new users. Choose the
applicable procedure for your installation:
New Users
If you are a new user and have never installed the editing application on your
system, follow the instructions from page 6 to page 19. Start with “Installing the
Avid Editing Application” on page 6.
Existing Users
If you are upgrading from a previous version of the editing application, you must
uninstall the previous version before installing and activating the new software.
n Before you uninstall your Avid editing application, write down your System ID.
You will need your old System ID to activate your new software.
Follow the instructions from page 20 to page 29. Start with “Upgrading the Avid
Editing Application” on page 20.
Installing the Avid Editing Application
For all Avid editing applications, log in as a user with administrative privileges,
install the application, and initially start the application as a user with
administrative privileges. If you are working in a shared storage environment,
mount your workspaces. You may then subsequently run the Avid editing
application as a regular User.
n Installing the editing application software might take some time. For the
individual editing application, it might take 5 to 15 minutes to install. Installing
the entire editing application suite might take up to 35 minutes to install.
6 Installation Guide for Avid Editing Applications
Page 7

(Windows) To install the Avid editing application software:
1. Quit all active applications.
2. Insert the editing application DVD.
3. Click to Install the Avid Editor Suite or Individual Product and follow the on
screen instructions.
n If the FilesInUse dialog box appears, you can safely select Ignore and continue.
n If you receive user access warnings during the installation, select Continue
Anyway to continue your installation.
4. When prompted, select “Yes, restart my computer.”
5. Continue with “Starting the Avid Editing Application” on page 8.
(Macintosh) To install the Avid Editing application software:
1. Quit all applications.
2. Insert the editing application DVD.
3. Double-click EditingApplicationName.pkg.
4. Click to Install the Avid Editor Suite or Individual Product and follow the on
screen instructions.
5. When prompted, select “Yes, restart my computer.”
6. Continue with “Starting the Avid Editing Application” on page 8.
Installing the Avid Editing Application 7
Page 8
Starting the Avid Editing Application
The installation process adds a desktop or Dock icon and a pointer to your Avid
editing application in the Start menu.
If you install your Avid editing application on a laptop computer, a dialog box
might open with a message about incompatible power management schemes.
Avid recommends you use the “High Performance” power option for Windows 7
when you work with the Avid editing applications. Other power schemes might
affect performance of editing functions (for example, capture and digital cuts).
After you install the software for your Avid editing application and start the
application for the first time, you must activate your copy of the application.
(Windows) To start your Avid editing application, do one of the
following:
t Click Start > All Programs > Avid > Avid editing application.
t Double-click the Avid editing application desktop icon.
The Welcome window opens.
(Macintosh) To start your Avid editing application, do one of the
following:
1. Click the alias icon for your Avid editing application on the Dock.
2. Or, select Go > Applications, and then double-click the Avid editing
application folder. Then double-click the Avid editing application file.
8 Installation Guide for Avid Editing Applications
Page 9
The Welcome window opens.
Starting the Avid Editing Application 9
Page 10

3. Select one of the options to activate your software.
t To activate using Electronic Activation, select “I want to activate my
software using the Internet, another computer, or a volume license
server,” click Continue.
The Avid License Control tool opens. Follow the steps in “Activating
the Avid Editing Application using Electronic Activation” on page 12.
t To activate with a Hardware Key or dongle, select “I want to use a
dongle to activate my software,” attach your entitled dongle and then
click Continue.
The system confirms your information. When the activation is
complete, a message informs you that your software has been
successfully activated.
t To run in Trial Mode, select “I want to run a fully-featured trial version
of the Avid editing application for 30 days,” click Continue.
Your software has been successfully activated.
For additional information about Trial Mode, see “Running the 30-Day
Trial” on page 30.
10 Installation Guide for Avid Editing Applications
Page 11

What Will I Need to Activate My Avid Editing Application?
Identification (ID)
Numbers: Where you can find them:
Activation ID The inside cover of this guide.
If you purchased from the Avid web store, you receive your
Activation ID through an Avid e-mail.
If you purchased from the Avid web store, log in to your Store
account at http://account.avid.com/.
System ID For a new user, the inside cover of this guide.
For an existing user, you will need your old System ID.
If you purchased online, you received your System ID from
Avid by e-mail.
The Avid editing application splash screen (Help > About
Avid editing application).
The Console of the Avid editing application (Tools > Console,
then scroll to System ID).
If you purchased from the Avid web store, you can view your
System ID number by logging in to your Store account at
http://account.avid.com/
.
What Will I Need to Activate My Avid Editing Application? 11
Page 12

Identification (ID)
Numbers: Where you can find them:
System ID (continued) Once activated, the License Profile tab of the Avid License
Control tool displays information about your system. Click
Copy to copy the information to your Clipboard. You can then
cut and paste from the clipboard to an e-mail or create a text
file. This is helpful if you need to save this information for
your records or need to send system information to Avid
Customer Support.
Device ID Only needed if you are activating your software on a system
that is not connected to the Internet. This will be provided to
you through the Avid License Control tool during activation.
Activating the Avid Editing Application using Electronic
Activation
• With Internet access - See “Activating using Electronic Activation with an
Internet Connection” on page 13.
• Without Internet access - See “Activating using Electronic Activation
without an Internet Connection” on page 17.
• Through a Volume License Server - See “Activating the Avid Editing
Application using a Volume License Server” on page 19.
12 Installation Guide for Avid Editing Applications
Page 13
Activating using Electronic Activation with an Internet
Connection
1. With the Avid License Control tool open, click Activate next to the Avid
editing application.
Activating using Electronic Activation with an Internet Connection 13
Page 14
The following opens.
2. Select “I am connected to the Internet and will use this computer,” then click
Continue.
14 Installation Guide for Avid Editing Applications
Page 15
A window opens which allows you to enter system information and register
your product.
3. Enter your system identification number in the System ID text box. To find
your System ID, see “What Will I Need to Activate My Avid Editing
Application?” on page 11.
4. Enter your activation identification number in the Activation ID text box. To
find your Activation ID, see “What Will I Need to Activate My Avid Editing
Application?” on page 11.
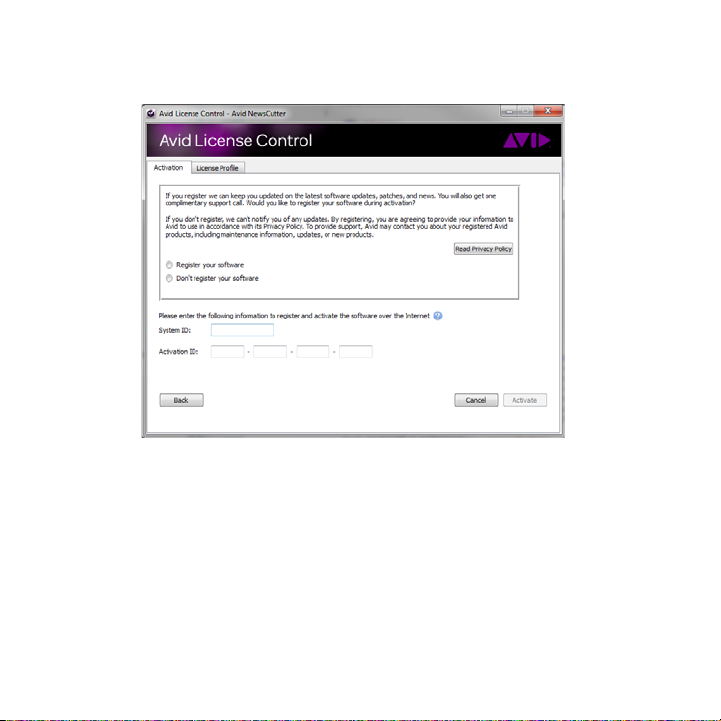
5. If you want to review Avid’s privacy policy, click Read Privacy Policy.
Activating using Electronic Activation with an Internet Connection 15
Page 16

6. Do one of the following:
t Select “Register your software,” and then click Continue.
A registration dialog box opens. Avid’s online registration lets you
receive important updates and maintenance information.
t Select “Don’t register your software,” and then click Activate.
The Avid License Control tool confirms your system information.
When the activation is complete, a message informs you that your
software has been successfully activated.
n If you do not want to register your software now, you can register at any time by
selecting Special > Register in your Avid editing application.
7. If you choose to register your software, do the following:
a. In the Register dialog box, type your name, address, and contact
information in the appropriate text boxes. Asterisks (*) indicate
required fields.
b. Click Next
A registration dialog box opens.
c. Enter the appropriate product and customer information.
d. Click Activate and Register.
8. If the Avid editing application is open, you should restart it for the changes
to take affect.
16 Installation Guide for Avid Editing Applications
Page 17

Activating using Electronic Activation without an Internet
Connection
1. With the Avid License Control tool open, click Activate next to the Avid
editing application.
The Activation window opens.
2. Select “I am not connected to the Internet and will be using another
computer that is connected to the Internet,” then click Continue.
3. Enter your system identification number in the System ID text box. To find
your System ID, see “What Will I Need to Activate My Avid Editing
Application?” on page 11.
n Your Device ID displays at the bottom of the Activation page, write this number
down to use later.
4. Enter your activation identification number in the Activation ID text box. To
find your Activation ID, see “What Will I Need to Activate My Avid Editing
Application?” on page 11.
5. Click Next.
Activating using Electronic Activation without an Internet Connection 17
Page 18
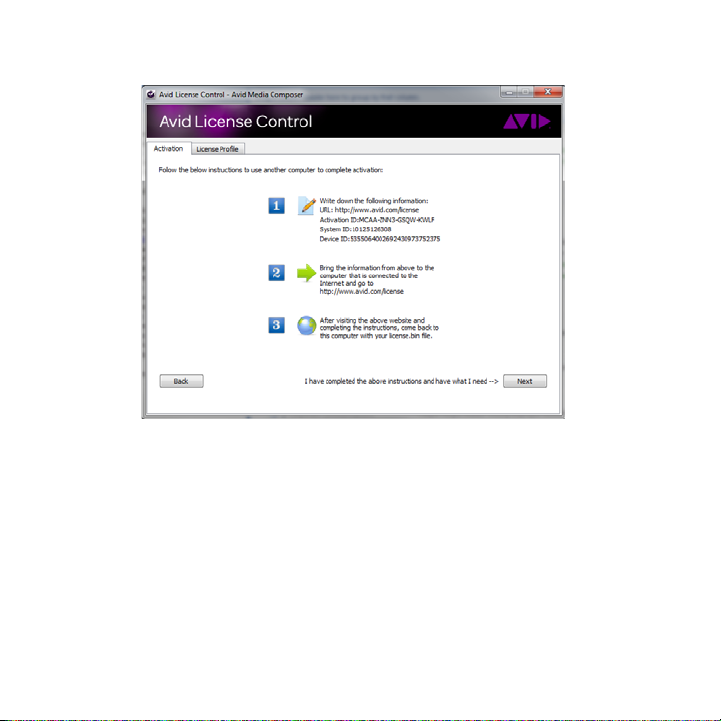
6. Follow the instructions in the Avid License Control tool, then click Next.
7. On a computer with an Internet connection, open a Web browser and
navigate to http://avid.com/license.
8. Follow the onscreen instructions on the web page.
The website creates a license.bin file. This file contains license information
needed to activate your Avid editing application.
18 Installation Guide for Avid Editing Applications
Page 19

9. Once you retrieve the license.bin file, return to the computer you want to
activate.
10. In the Avid License Control tool, click Browse and navigate to the
license.bin file on your system, then click Open.
The Activation tool confirms your system information. When the activation
is complete, a message informs you that your software has been successfully
activated and the button changes to Deactivate.
n Repeat the previous steps for each editing application or option you need to
activate.
11. If the Avid editing application is open, you should restart for any changes to
take effect.
Activating the Avid Editing Application using a Volume License
Server
You can activate and manage multiple editing clients using a volume license
server. For more information, see the FlexNet Device Manager for Avid guide on
the Knowledge Base.
Activating the Avid Editing Application using a Volume License Server 19
Page 20

Upgrading the Avid Editing Application
You can upgrade your Avid editing application from either an existing software
license or a dongle license. If you upgrade from a dongle license or are changing
product models, then your upgrade kit includes a dongle updater card, upgrade
code, and software activation code. Please see the instructions in your upgrade kit
to update your software.
If you previously purchased PhraseFind, PhraseFind Language Packs or
ScriptSync, your license activation should automatically update. If you purchase
new options, you will be provided with a new Activation ID.
n Upgrading your dongle license to a software license disables your dongle. Once
you have activated your software license, you do not need and are not able to use
the dongle to run your Avid editing application.
If you upgrade your existing license and you have an active Avid Support
Contract, please read the instructions provided on the Avid Download Center or
that came with your upgrade kit before updating your system. All Avid Support
Contract customers must use the Versioner.avd. file to upgrade their software as
described in the last procedure in this topic. For more information, view the
“Software Licensing Upgrade Process for Support Customers” topic on the Avid
Knowledge Base (www.avid.com/US/support).
Below are high level steps you should follow if you are upgrading your Avid
editing system, PhraseFind or ScriptSync options.
20 Installation Guide for Avid Editing Applications
Page 21

Upgrade Workflow
1. Uninstall your existing Avid editing application.
See “Uninstalling the Avid Editing Application” on page 36.
PhraseFind and ScriptSync uninstall with your Avid editing application.
n Before you uninstall your Avid editing application, write down your System ID.
You will need your old System ID to activate your new software.
2. Install your new Avid editing application.
See “Installing the Avid Editing Application” on page 6.
PhraseFind and ScriptSync install with your Avid editing application. If you
previously purchased PhraseFind, PhraseFind Language Packs or
ScriptSync, your license activation should automatically update. If you
purchase new options, you will be provided with a new Activation ID.
3. Activate your Avid editing application.
Depending on your setup, see the following upgrade steps.
For more information about the Avid License Control tool, see “Activating
the Avid Editing Application using Electronic Activation” on page 12.
4. Activate PhraseFind, PhraseFind Language Pack, or ScriptSync.
See “Activating the Avid Editing Application using Electronic Activation”
on page 12.
Upgrading the Avid Editing Application 21
Page 22

To upgrade your Avid editing application with an Internet connection
from an existing software license:
1. Go to the following location:
(Windows) Start/All Programs/Avid/Utilities/License Control
(Macintosh) Applications/Utilities/Avid Utilities/License Control
The Avid License Control tool opens.
2. Click Activate next to the Avid editing application.
The Activation window opens.
3. Select “I am connected to the Internet and will use this computer,” then click
Continue.
A window opens which allows you to enter system information and register
your product.
4. If your Systems ID does not display, enter your system identification number
in the System ID text box. For existing customers, use your old System ID.
To find your System ID if it does not display, see “What Will I Need to
Activate My Avid Editing Application?” on page 11.
n If your previous editor included purchased options, for example PhraseFind or
ScriptSync, these options will activate automatically with your upgrade.
5. Enter your activation identification number in the Activation ID text box.
Use the Activation ID number for your new version of the software.
22 Installation Guide for Avid Editing Applications
Page 23

6. Do one of the following:
t If you have never registered your product, select “Register your product
with Avid Technology, Inc. now.” If you want to review Avid’s privacy
policy, click Read Privacy Policy. Then click Next.
A registration dialog box opens. Avid’s online registration lets you
receive important updates and maintenance information.
t Select “Don’t register at this time,” and then click Activate.
The Activation tool confirms your system information. When the
activation is complete, a message informs you that your software has
been successfully activated.
n If you do not want to register your software now, you can register at any time by
selecting Special > Register in your Avid editing application.
7. If you chose to register your software in step 6, do the following:
a. In the Register dialog box, type your name, address, and contact
information in the appropriate text boxes. Asterisks (*) indicate
required fields.
b. Click Next
A registration dialog box opens.
c. Enter the appropriate product and customer information.
d. Click Activate and Register.
The Activation tool confirms your system information. When the
activation is complete, a message informs you that your software has
been successfully activated and the button changes to Deactivate.
8. Click OK.
Upgrading the Avid Editing Application 23
Page 24

To upgrade your Avid editing application with an Internet connection
from a dongle license to a software license:
1. Attach your dongle to your Avid editing system.
2. Go to the following location:
(Windows) Start/All Programs/Avid/Utilities/License Control
(Macintosh) Applications/Utilities/Avid Utilities/License Control
The Avid License Control tool opens.
3. Click Activate next to the Avid editing application.
The Activation dialog box opens.
4. Select “I am connected to the Internet and will use this computer,” then click
Continue.
A window opens which allows you to enter system information and register
your product.
5. If your Systems ID does not display, enter your system identification number
in the System ID text box. For existing customers, use your old System ID.
To find your System ID if it does not display, see “What Will I Need to
Activate My Avid Editing Application?” on page 11.
n If your previous editor included purchased options, for example PhraseFind or
ScriptSync, these options will activate automatically with your upgrade.
6. Enter your activation identification number in the Activation ID text box. To
find your Activation ID, see “What Will I Need to Activate My Avid Editing
Application?” on page 11.
24 Installation Guide for Avid Editing Applications
Page 25

7. Do one of the following:
t If you have never registered your product, select “Register your product
with Avid Technology, Inc. now.” If you want to review Avid’s privacy
policy, click Read Privacy Policy. Then click Next.
A registration dialog box opens. Avid’s online registration lets you
receive important updates and maintenance information.
t Select “Don’t register at this time,” and then click Activate.
The Activation tool confirms your system information. When the
activation is complete, a message informs you that your software has
been successfully activated.
n If you do not want to register your software now, you can register at any time by
selecting Special > Register in your Avid editing application.
8. If you chose to register your software in step 7, do the following:
a. In the Register dialog box, type your name, address, and contact
information in the appropriate text boxes. Asterisks (*) indicate
required fields.
b. Click Next
A registration dialog box opens.
c. Enter the appropriate product and customer information.
d. Click Activate.
Upgrading the Avid Editing Application 25
Page 26

9. The system asks if you are sure you want to deactivate your dongle. Click
OK.
The Activation tool confirms your system information. When the activation
is complete, a message informs you that your software has been successfully
activated.
10. Click OK.
To upgrade your Avid editing application without an Internet
connection to a software license:
1. Go to the following location:
(Windows) Start/All Programs/Avid/Utilities/License Control
(Macintosh) Applications/Utilities/Avid Utilities/License Control
The Avid License Control tool opens.
2. Click Activate next to the Avid editing application.
The Activation window opens.
3. Select “I am not connected to the Internet and will be using another
computer that is connected to the Internet,” then click Continue.
4. If your Systems ID does not display, enter your system identification number
in the System ID text box. For existing customers, use your old System ID.
To find your System ID if it does not display, see “What Will I Need to
Activate My Avid Editing Application?” on page 11.
n If your previous editor included purchased options, for example PhraseFind or
ScriptSync, these options will activate automatically with your upgrade.
n Your Device ID displays at the bottom of the Activation page, write this number
down to use later.
26 Installation Guide for Avid Editing Applications
Page 27

5. Enter your activation identification number in the Activation ID text box. To
find your Activation ID, see “What Will I Need to Activate My Avid Editing
Application?” on page 11.
n Leave the Avid License Control tool open on the system you need to activate. You
will need to enter additional information.
6. Click Next.
7. Follow the instructions in the Avid License Control tool, then click Next.
8. On a computer with an Internet connection, open a Web browser and
navigate to http://avid.com/license.
9. Follow the onscreen instructions on the web page.
The website creates a license.bin file. This file contains license information
needed to activate your Avid editing application.
10. Once you retrieve the license.bin file, return to the computer you want to
activate.
11. In the Avid License Control tool, click Browse and navigate to the
license.bin file on your system, then click Open.
The Activation tool confirms your system information. When the activation
is complete, a message informs you that your software has been successfully
activated and the button changes to Deactivate.
n Repeat the previous steps for each editing application or option you need to
activate.
12. If the Avid editing application is open, you should restart for any changes to
take effect.
Upgrading the Avid Editing Application 27
Page 28

To upgrade your Avid editing application with a dongle:
1. Make sure you have attached your dongle to your Avid editing system.
2. Navigate to the directory where DongleManager.exe is installed:
t (Windows) C:\Program Files\Avid\Utilities\DongleManager
t (Macintosh) Macintosh HD\Applications\Utilities\Avid
Utilities\DongleManager
3. Double-click the DongleManager.exe
The Dongle Manager window opens.
4. Click the Update tab.
5. Click Open, and navigate to the location of your dongle updater (.avd) file.
6. Select the updater file and click Open.
7. Click Update.
The DongleManager.exe application updates your dongle and displays a
“Verification Complete” message.
8. Start your Avid editing application.
The Welcome window opens.
9. Select “I want to use a dongle to activate my software.”
10. Click Continue.
The system confirms your information. When the activation is complete, a
message informs you that your software has been successfully activated.
28 Installation Guide for Avid Editing Applications
Page 29

To upgrade your Avid editing application using the Versioner.avd file
(Avid Support Contract customers only):
1. Download the Versioner.avd file for your editing application.
2. Place the Versioner.avd file in the editing application folder:
(Windows) [drive]:/Program Files/Avid/[Avid editing application]
(Macintosh) Macintosh HD/Applications/[Avid editing application]
3. Start your Avid editing application.
The Avid License Control tool opens.
4. Click Activate next to the Avid editing application.
5. Do one of the following:
t Select “I am connected to the Internet and will use this computer.”
t Select “I am not connected to the Internet and will be using another
computer that is connected to the Internet.”
6. Click Continue.
The Avid Activation dialog box opens. The system auto-populates your
System ID and the Activation ID.
n If you use a dongle, the System ID and Activation ID will only populate if you
have your dongle attached.
7. Continue with the upgrade license activation procedure described in this
section for the license option you selected in step 5.
Upgrading the Avid Editing Application 29
Page 30

Running the 30-Day Trial
Before you purchase the Avid editing application, PhraseFind or ScriptSync, you
can try it out for a 30-day period. If you run the 30-day trial of the Avid editing
application, you also get a 30-day trial of PhraseFind and ScriptSync. Your 30-day
trial of PhraseFind also includes access to all available languages during the trial.
You do not need to activate any additional language packs at this time. However,
you need to select your language from the Select a Language menu in the
PhraseFind window.
If you already own an Avid editing application, you can run a 30-day trial of
PhraseFind or ScriptSync.
After the 30 days, if you do not purchase the Avid editing application, PhraseFind
or ScriptSync, you will no longer have access to the product and feature. The
system keeps you informed of how many days you have left before the trial period
ends.
n Any bins or projects created during the 30-day trial will only be usable when you
activate a full editing license.
To use your Avid editing application for a 30-day trial period:
1. Start your Avid editing application.
The Welcome window opens.
2. Select “I want to run a fully-featured, trial version of the Avid editing
application for 30 days.”
30 Installation Guide for Avid Editing Applications
Page 31

3. Click Continue.
Your software has been successfully activated. At any time during the
30-day trial period, you can choose to purchase a copy of your Avid editing
application. If you choose not to purchase the software, your Avid editing
application is deactivated when the 30-day trial expires.
To run PhraseFind for a 30-day trial period:
1. Open your Avid editing application and an Avid project.
2. Press Ctrl+F or Command+F or select Edit > Find.
The Find window opens.
3. Type a word or phrase in the text box, then click the PhraseFind button.
The system checks to see if you have PhraseFind on your system and then a
dialog box opens.
4. Click Run Trial.
The system restarts your Avid editing application and you then have access
to PhraseFind.
Your 30-day trial of PhraseFind also includes access to all available
languages during the trial. You do not need to activate any additional
language packs at this time. However, you need to select your language from
the Select a Language menu in the PhraseFind window.
5. In the PhraseFind window, select your language from the Select a Language
menu and wait for the PhraseFind Index to turn solid green.
Running the 30-Day Trial 31
Page 32

To run ScriptSync for a 30-day trial period:
1. Open your Avid editing application and an Avid project.
2. Create a script, File > New Script.
3. Browse to your script then click Open.
4. In the script, click the section where you want to place the clip (take).
The section highlights.
5. From a bin, drag the clip to the selected section in the script.
The box below the clip in the script, should highlight black. This indicates
that the clip is selected in the script.
6. Select Script > ScriptSync.
The system checks to see if you have ScriptSync on your system and then a
dialog box opens.
7. Click Run Trial.
You have immediate access to the ScriptSync window.
To purchase the Avid editing application during your 30-day trial
period:
t Go to the Avid web store: http://shop.avid.com/store/ to purchase your Avid
editing application.
32 Installation Guide for Avid Editing Applications
Page 33

To purchase PhraseFind or ScriptSync during your 30-day trial
period:
1. Open your Avid editing application and an Avid project.
2. For ScriptSync, follow steps 1 through 5 under “To run ScriptSync for a
30-day trial period:” on page 32, then select Script > ScriptSync.
3. For PhraseFind, press Ctrl+F or Command+F or select Edit > Find.
The Find window opens.
4. For PhraseFind, type a word or phrase in the text box, then click the
PhraseFind button.
The system informs you of how many days you have left on your 30-day
trial.
5. Click Buy.
n If the Buy button does not appear, close the Find window and relaunch your Avid
editing application. Repeat the steps above.
The system opens the Avid web store, allowing you to purchase PhraseFind
or ScriptSync. Once you purchase and obtain your Activation ID, you can
activate PhraseFind or ScriptSync.
A dialog box opens informing you that activation will quit your Avid editing
application and launch the Avid License Control tool.
6. Click Continue.
The Avid License Control tool opens.
To activate, see “Activating the Avid Editing Application using Electronic
Activation” on page 12 to continue.
Running the 30-Day Trial 33
Page 34

Activating Options and Features
In addition to activating the Avid editing application, there are several editing
options or features that can be activated through the Avid License Control Tool.
To activate these features, follow the steps in “Activating the Avid Editing
Application using Electronic Activation” on page 12 or see the appropriate guide
listed below.
• PhraseFind
The PhraseFind option (phonetic find) searches and finds audio dialogue
throughout bins in a single project. PhraseFind is purchased separately and
includes a free language pack of your choice. For more information, see
“Purchasing and Activating PhraseFind” in the Avid editing Help or in the
Getting Started with PhraseFind guide.
• ScriptSync
ScriptSync uses phonetic-indexing technology to analyze the audio portion
of a clip and match it to lines of the script text. ScriptSync is purchased
separately. For more information, see “Purchasing and Activating
ScriptSync” in the Avid editing Help or in the Getting Started with
ScriptSync guide.
• PhraseFind Language Pack
Additional language packs are purchased to be used with PhraseFind.
Language packs are purchased separately. For more information, see
“Activating Additional Regional Language Packs” in the Avid editing Help
or in the Getting Started with PhraseFind guide.
34 Installation Guide for Avid Editing Applications
Page 35

• AVCHD Dolby AC-3 import or link to AMA
This feature is used to import or AMA link to AVCHD transport stream
(.mts) files. If you are not connected to the Internet the first time you import
or AMA link to .mts files, the system opens a dialog box and then the Avid
License Control tool. Follow the onscreen instructions to activate this
feature. If you are connected to the Internet, activation is automatic.
n The AVCHD Dolby AC-3 feature only appears if you use this format. You will not
normally see this option in the Avid License Control tool.
Deactivating the Avid Editing Application and Options
If you need to move your Avid editing application to a different computer,
deactivate the Avid editing application and options before you uninstall the Avid
editing application.
Deactivate PhraseFind and ScriptSync first, then deactivate the Avid editing
application.
n You must have an Internet Connection to deactivate the software and its options.
n You do not need to deactivate a Trial version.
Deactivating the Avid editing application and options:
1. From your Avid editing application, select Special > Deactivate Software
License.
2. A message appears informing you that the Avid editing application will
close and the Avid License Control tool will open, click Continue.
3. A dialog box opens and asks if you want to leave the Avid editing
applications, click Leave.
Deactivating the Avid Editing Application and Options 35
Page 36

4. Or go to the following location to open the Avid License Control tool:
(Windows) Start/All Programs/Avid/Utilities/License Control
(Macintosh) Applications/Utilities/Avid Utilities/License Control
The Avid License Control tool opens.
5. Next to the Avid editing application, PhraseFind or ScriptSync, click
Deactivate.
If you are deactivating PhraseFind, a message appears informing you that the
language packs associated with PhraseFind will also be deactivated.
6. Click Yes.
The system deactivates the selected item and the button changes to Activate.
7. Click Quit to close the window.
Uninstalling the Avid Editing Application
Prior to installing the editing application, you should uninstall Digi Drivers using
Programs and Features from the Control Panel. Reboot the system and then install
the new editing application. If you do not remove the Digi Drivers, the AudioSuite
plug-ins do not load and you might receive either the error message “This
software requires installation of device driver TPkd and a reboot before running”
or a “DAE Interface NOT Available” error message. If you see these errors on a
clean installation on a brand new system, install Hot fix KB926255 from
Windows Update to fix the problem.
For all Avid editing applications, log in and initially start the application as a user
with administrative privileges. If you are working in a shared storage
environment, mount your workspaces. You may then subsequently run the Avid
editing application as a regular User.
36 Installation Guide for Avid Editing Applications
Page 37

If you use any Pro Tools audio devices — for example, any of the Avid Mbox
family of devices or the Avid Pro Tools|HD Native hardware — you must install
the device drivers separately. Avid audio device drivers are located in the
following directory:
• (Windows)
Program Files\Avid\Utilities\
AudioDriverInstallers
• (Macintosh)
Applications\Utilities\Avid Utilities\Avid
Audio Drivers
(Windows) To uninstall the Avid editing application software do one
of the following:
1. Quit all active applications.
2. Access the Control Panel and select Programs and Features. Then select the
editing application and click Uninstall.
(Macintosh) To uninstall the Avid editing application software:
1. Quit all active applications.
2. Go to Applications/Avid_Uninstaller/AvidEditingApplication.
3. Double-click the AvidEditingApplication uninstaller.
4. Follow the on-screen prompts.
Uninstalling the Avid Editing Application 37
Page 38

Firmware Update Note
When you first start your editing application after installing, you might receive a
dialog box requiring you to update the Avid hardware firmware. Choose to
Update. During the update process, do not access any other applications or move
any of the active windows. Accessing another application might result in the
update completion dialog box being hidden. If this happens, you will see the
update progress stay at 100% but have no option to proceed. The hidden window
which states the update is complete and prompts you to shut down your system
cannot be brought to the foreground. If this happens, you must shut down — not
just restart — the system and then power it up again.
38 Installation Guide for Avid Editing Applications
Page 39

2 Guide d'installation des applications de montage
Avid
Les informations les plus récentes concernant votre application de montage Avid
sont disponibles dans la version en ligne du document Lisez-moi (ReadMe).
Recherchez systématiquement sur notre site Web les dernières notes de version ou
le document Lisez-moi le plus récent. La documentation en ligne est mise à jour
chaque fois que de nouvelles informations sont disponibles. Pour consulter les
versions en ligne, sélectionnez ReadMe dans le menu d'aide de votre application
de montage Avid ou visitez la Base de connaissances en ligne à l'adresse
www.avid.com/readme.
Pour installer l'application de montage Avid directement depuis le DVD
d'installation Avid, votre système doit pouvoir lire les DVD double couche. Si
votre système ne dispose pas de lecteur DVD de ce type, vous pouvez télécharger
l'application de montage depuis le centre de téléchargement Avid sur la page
www.avid.com/fr/support/downloads.
Une fois l'application de montage Avid installée, vous devrez activer le logiciel à
l'aide de l'outil Avid License Control. Cet outil active également les options de
montage. Pour plus d'informations sur les options de montage, reportez-vous à la
section « Activation des options et fonctionnalités », page 69.
n Si vous possédez un contrat de support Avid valide, une mise à niveau de votre
logiciel peut vous être proposée. Pour en savoir plus, reportez-vous aux
procédures de mise à niveau accessibles depuis le Centre de téléchargement Avid
ou consultez les instructions accompagnant votre kit de mise à niveau.
Page 40

c Si vous modifiez la configuration de votre système (remplacement du disque
dur, d'un adaptateur réseau ou mise à niveau de votre système d'exploitation,
par exemple), vous devez d'abord désactiver votre logiciel Avid. Pour plus
d'informations sur la désactivation, reportez-vous à la section
« Désactivation de l'application de montage Avid et de ses options », page 70.
Avant l'installation de l'application de montage Avid
Lisez les procédures suivantes avant d'installer l'application de montage. Elles
sont destinées aux nouveaux utilisateurs, ainsi qu'aux personnes effectuant une
mise à niveau. Sélectionnez la procédure appropriée pour votre installation.
Nouveaux utilisateurs
Si vous êtes un nouvel utilisateur et n'avez jamais installé l'application de montage
sur votre système, suivez les instructions de la page 41 à la page 53. Commencez
par la section « Installation de l'application de montage Avid », page 41.
Anciens utilisateurs
Si vous procédez à la mise à niveau d'une version antérieure de l'application de
montage, désinstallez la version antérieure avant d'installer et d'activer le nouveau
logiciel.
n Avant de désinstaller votre application de montage Avid, notez votre ID système.
Votre ancien ID système
sera nécessaire pour activer votre nouveau logiciel.
Suivez les instruction de la page 54 à la page 64. Commencez par la section
« Mise à niveau de l'application de montage Avid », page 54.
40 Guide d'installation des applications de montage Avid
Page 41

Installation de l'application de montage Avid
Pour toutes les applications de montage Avid, connectez-vous à votre ordinateur
en tant qu'administrateur, installez l'application, puis lancez-la pour la première
fois en tant qu'administrateur. Si vous travaillez dans un environnement de
stockage partagé, montez vos workspaces. Vous pourrez ensuite exécuter
l'application de montage Avid en tant qu'utilisateur normal.
n L'installation du logiciel de l'application de montage peut être longue. Celle de la
seule application de montage peut durer de 5 à 15 minutes. L'installation de la
suite de montage dans son intégralité peut prendre jusqu'à 35 minutes.
(Windows) Pour installer le logiciel de l'application de montage Avid :
1. Quittez toutes les applications en cours d'exécution.
2. Insérez le DVD de l'application de montage.
3. Sélectionnez l'option Avid Editor Suite (suite de montage Avid) ou
Individual Product (produit unique) et suivez les instructions à l'écran.
n Si la boîte de dialogue FilesInUse (Fichiers en cours d'utilisation) s'ouvre,
sélectionnez Ignore (Ignorer) et continuez.
n Si des alertes d'accès utilisateur s'affichent à l'écran au cours de l'installation,
sélectionnez Continue Anyway (Continuer) pour poursuivre l'installation.
4. À l'invite, sélectionnez Yes, restart my computer (Oui, redémarrer
l'ordinateur).
5. Passez ensuite à la section « Démarrage de l'application de montage Avid »,
page 42.
Installation de l'application de montage Avid 41
Page 42

(Macintosh) Pour installer le logiciel de l'application de montage Avid :
1. Quittez toutes les applications.
2. Insérez le DVD de l'application de montage.
3. Double-cliquez sur le fichier NomApplicationMontage.pkg.
4. Sélectionnez l'option Avid Editor Suite (suite de montage Avid) ou
Individual Product (produit unique) et suivez les instructions à l'écran.
5. À l'invite, sélectionnez Yes, restart my computer (Oui, redémarrer
l'ordinateur).
6. Passez ensuite à la section « Démarrage de l'application de montage Avid »,
page 42.
Démarrage de l'application de montage Avid
La procédure d'installation ajoute une icône sur le bureau ou sur le Dock, ainsi
qu'un raccourci vers l'application de montage Avid dans le menu Démarrer.
Si l' application Avid est installée sur un ordinateur portable, il est possible qu'une
boîte de dialogue affiche un message signalant une incompatibilité de modes de
gestion de l'alimentation. Avid recommande d'utiliser l'option d'alimentation
Hautes performances sous Windows 7 lorsque vous utilisez les applications de
montage Avid. L'utilisation d'autres modes de gestion de l'alimentation risque
d'altérer les performances des fonctions de montage (par exemple pour la capture
ou les reports sur bande).
Une fois le logiciel de l'application de montage Avid installé et l'application
démarrée pour la première fois, vous devez activer votre copie de l'application.
42 Guide d'installation des applications de montage Avid
Page 43

(Windows) Pour exécuter l'application Avid, effectuez l'une des
actions suivantes :
t Cliquez sur Démarrer > Tous les programmes > Avid > Application de
montage Avid.
t Double-cliquez sur l'icône du bureau de l'application de montage Avid.
La fenêtre d'accueil s'affiche.
(Macintosh) Pour exécuter l'application Avid, effectuez l'une des
actions suivantes :
1. Cliquez sur l'icône d'alias de l'application de montage Avid sur le Dock.
2. Ou sélectionnez Aller à > Applications, puis double-cliquez sur le dossier de
l'application de montage Avid. Ensuite, double-cliquez sur le fichier de
l'application de montage Avid.
Démarrage de l'application de montage Avid 43
Page 44

La fenêtre d'accueil s'affiche.
3. Sélectionnez l'une des options pour activer votre logiciel.
t Pour procéder à l'activation électronique, sélectionnez I want to activate
my software using the Internet, another computer, or a volume license
server (Je souhaite activer mon logiciel via Internet, un autre ordinateur
ou un serveur de licences en volume), puis cliquez sur Continue.
L'outil Avid License Control s'ouvre. Suivez la procédure indiquée
dans la section « Activation électronique de l'application de montage
Avid », page 47.
44 Guide d'installation des applications de montage Avid
Page 45

t Pour procéder à l'activation à l'aide d'une clé matérielle ou dongle,
sélectionnez I want to use a dongle to activate my software (Je souhaite
utiliser un dongle pour activer mon logiciel), connectez votre clé
autorisée, puis cliquez sur Continue.
Le système vérifie vos informations. Une fois l'activation terminée, un
message vous informe que votre logiciel a été activé avec succès.
t Pour utiliser la version d'évaluation, sélectionnez I want to run a
fully-featured trial version of the Avid editing application for 30 days
(Je souhaite utiliser une version d'évaluation complète de l'application
de montage Avid pendant 30 jours), puis cliquez sur Continue.
Votre logiciel a été activé avec succès.
Pour plus d'informations sur la version d'évaluation, reportez-vous à la
section « Utilisation de la version d'évaluation de 30 jours », page 65.
De quoi aurai-je besoin pour activer mon application de montage
Avid ?
Numéros
d'identification (ID) Où les trouver ?
ID d'activation
Sur la couverture intérieure de ce guide.
Si vous avez acheté votre produit sur la boutique en ligne
Avid, vous avez dû recevoir votre ID d'activation Avid par
e-mail.
De quoi aurai-je besoin pour activer mon application de montage Avid ? 45
Page 46

Numéros
d'identification (ID) Où les trouver ?
Si vous avez acheté votre produit sur la boutique en ligne Avid,
connectez-vous à votre compte sur la page
http://account.avid.com/.
ID système
Pour un nouvel utilisateur, sur la couverture intérieure de ce
guide. Pour un ancien utilisateur, vous aurez besoin de votre
ancien ID système.
Si vous avez acheté l'application en ligne, vous avez reçu votre
ID système par e-mail.
Sur l'écran de démarrage de l'application de montage Avid
(Help > About Avid editing application).
Sur la console de l'application de montage Avid (Tools >
Console, puis faites défiler jusqu'à System ID).
Si vouz avez acheté votre produit sur la boutique en ligne Avid,
vous pouvez consulter votre numéro d’ID système en vous
connectant à votre compte sur la page http://account.avid.com/.
46 Guide d'installation des applications de montage Avid
Page 47

Numéros
d'identification (ID) Où les trouver ?
ID système (suite)
Après activation, l'onglet License Profile (Profil Licence) de l'outil
Avid License Control affiche des informations sur votre système
Cliquez sur Copy pour copier ces informations dans le
presse-papiers. Vous pouvez ensuite les coller à partir du
presse-papiers dans un e-mail, ou créer un fichier texte. Vous
pouvez ainsi sauvegarder ces informations dans vos archives
personnelles ou les communiquer au support client Avid.
ID de périphérique
Uniquement nécessaire pour l'activation de votre logiciel sur un
système non connecté à Internet.
Il vous sera fourni via l'outil
Avid License Control au cours de l'activation.
Activation électronique de l'application de montage Avid
• Avec accès Internet : reportez-vous à la section « Activation électronique de
l'application de montage Avid avec une connexion Internet », page 48.
• Sans accès Internet : reportez-vous à la section « Activation électronique de
l'application de montage Avid sans connexion Internet », page 52.
• Via un serveur de licences en volume : reportez-vous à la section
« Activation de l'application de montage Avid via un serveur de licences en
volume », page 53.
Activation électronique de l'application de montage Avid 47
.
Page 48

Activation électronique de l'application de montage Avid avec
une connexion Internet
1. Lorsque l'outil Avid License Control est ouvert, cliquez sur Activate
(Activer) à côté de l'application de montage Avid.
48 Guide d'installation des applications de montage Avid
Page 49

La fenêtre suivante s'ouvre.
2. Sélectionnez I am connected to the Internet and will use this computer (Cet
ordinateur est connecté à Internet, je l'utiliserai pour l'activation), puis
cliquez sur Continue.
Activation électronique de l'application de montage Avid avec une connexion Internet 49
Page 50

Une fenêtre vous permettant de saisir les informations système et
d'enregistrer votre produit s'ouvre.
3. Saisissez votre numéro d'ID système dans la zone System ID. Pour trouver
votre ID système, reportez-vous à la section « De quoi aurai-je besoin pour
activer mon application de montage Avid ? », page 45.
4. Saisissez le numéro d'identification d'activation dans la zone Activation ID.
Pour trouver votre ID d'activation, reportez-vous à la section « De quoi
aurai-je besoin pour activer mon application de montage Avid ? », page 45.
5. Si vous souhaitez consulter la politique de confidentialité d'Avid, cliquez sur
le bouton Read Privacy Policy.
50 Guide d'installation des applications de montage Avid
Page 51

6. Effectuez l'une des opérations suivantes :
t Sélectionnez Register your software (Enregistrer votre logiciel), puis
cliquez sur Continue.
Une boîte de dialogue d'enregistrement s'affiche. L'enregistrement en
ligne sur le site Avid vous permet de recevoir d'importantes mises à
jour et informations de maintenance.
t Sélectionnez Don’t register your software (Ne pas enregistrer votre
logiciel), puis cliquez sur Activate (Activer).
L'outil Avid License Control vérifie vos informations système. Une fois
l'activation terminée, un message vous informe que votre logiciel a été
activé avec succès.
n Si vous préférez remettre l'enregistrement de votre produit à plus tard, vous
pourrez le faire à tout moment en sélectionnant Special > Register dans votre
application de montage Avid.
7. Si vous choisissez d'enregistrer votre produit, procédez comme suit :
a. Depuis la boîte de dialogue d'enregistrement, renseignez vos nom,
adresse et coordonnées dans les zones appropriées. Les astérisques (*)
désignent les champs obligatoires.
b. Cliquez sur Next.
Une boîte de dialogue d'enregistrement s'affiche.
c. Saisissez les informations appropriées (produit et client).
d. Cliquez sur Activate and Register (Activer et enregistrer).
8. Si l'application de montage Avid est ouverte, redémarrez-la afin d'appliquer
les modifications.
Activation électronique de l'application de montage Avid avec une connexion Internet 51
Page 52

Activation électronique de l'application de montage Avid sans
connexion Internet
1. Lorsque l'outil Avid License Control est ouvert, cliquez sur Activate
(Activer) à côté de l'application de montage Avid.
La fenêtre Activation s'ouvre.
2. Sélectionnez I am not connected to the Internet and will be using another
computer that is connected to the Internet (Cet ordinateur n'est pas connecté
à Internet, j'en utiliserai un autre pour l'activation), puis cliquez sur
Continue.
3. Saisissez votre numéro d'ID système dans la zone System ID. Pour trouver
votre ID système, reportez-vous à la section « De quoi aurai-je besoin pour
activer mon application de montage Avid ? », page 45.
n Votre ID de périphérique s'affiche en bas de la page d'activation, notez-le pour
l'utiliser plus tard.
4. Saisissez le numéro d'identification d'activation dans la zone Activation ID.
Pour trouver votre ID d'activation, reportez-vous à la section « De quoi
aurai-je besoin pour activer mon application de montage Avid ? », page 45.
5. Cliquez sur Next.
6. Suivez les instructions de l'outil Avid License Control, puis cliquez sur Next.
7. Ouvrez un navigateur Web sur un ordinateur connecté à Internet, puis
rendez-vous à l'adresse http://avid.com/license.
52 Guide d'installation des applications de montage Avid
Page 53

8. Suivez les instructions affichées sur la page Web.
Le site Web génère un fichier license.bin. Ce fichier contient les
informations de licence nécessaires à l'activation de votre application de
montage Avid.
9. Après avoir récupéré ce fichier license.bin, retournez sur l'ordinateur sur
lequel vous souhaitez activer votre logiciel.
10. Dans l'outil Avid License Control, cliquez sur Browse (Parcourir) et accédez
au fichier license.bin copié sur votre système, puis cliquez sur Open.
L'outil Activation vérifie les informations du système. Une fois l'activation
terminée, un message vous informe que le logiciel a été activé avec succès,
et l'intitulé du bouton se change en Deactivate (Désactiver).
n Répétez l'étape précédente pour toutes les applications de montage ou options à
activer.
11. Si l'application de montage Avid est ouverte, redémarrez-la afin d'appliquer
les modifications.
Activation de l'application de montage Avid via un serveur de
licences en volume
Vous pouvez activer et gérer plusieurs clients de montage via un serveur de
licences en volume. Pour plus d'informations, reportez-vous au guide FlexNet
Device Manager for Avid dans la Base de connaissances.
Activation de l'application de montage Avid via un serveur de licences en volume 53
Page 54

Mise à niveau de l'application de montage Avid
Vous pouvez mettre à niveau l'application de montage Avid depuis une licence
logicielle existante ou depuis une licence sur dongle. Si vous procédez à la mise à
niveau depuis une version de licence sur dongle et changez de modèle de produit,
votre kit de mise à niveau inclut une carte de mise à jour du dongle, un code de
mise à niveau ainsi qu'un code d'activation du logiciel. Reportez-vous aux
instructions de votre kit de mise à niveau pour mettre à jour votre logiciel.
Si vous avez acheté PhraseFind, des modules de prise en charge linguistique pour
PhraseFind ou ScriptSync auparavant, votre activation de licence devrait se mettre
à jour automatiquement. Si vous achetez de nouvelles options, vous obtiendrez un
nouvel ID d'activation.
n La mise à niveau d'une licence sur dongle vers une licence logicielle désactive
votre dongle. Une fois la licence logicielle activée, vous n'aurez pas besoin du
dongle et ne pourrez l'utiliser pour exécuter votre application de montage Avid.
Si vous mettez à niveau votre licence et disposez d'un contrat de support Avid en
cours de validité, reportez-vous aux procédures accessibles depuis le Centre de
téléchargement Avid ou consultez les instructions qui accompagnent votre kit de
mise à niveau avant d'effectuer la mise à niveau. Tous les clients disposant d'un
contrat de support Avid doivent utiliser le fichier Versioner.avd pour mettre à
niveau leur logiciel, comme décrit dans la dernière procédure de cette section.
Pour en savoir plus, consultez l'article Software Licensing Upgrade Process for
Support Customers (Procédure de mise à niveau de licence logicielle pour les
souscripteurs d'un contrat de support) dans la Base de connaissances Avid
(www.avid.com/fr/support).
Vous trouverez ci-dessous les étapes avancées à suivre si vous mettez à niveau
votre système de montage Avid, les options PhraseFind ou ScriptSync.
54 Guide d'installation des applications de montage Avid
Page 55

Procédure de mise à niveau
1. Désinstallez votre application de montage Avid actuelle.
Reportez-vous à la section « Désinstallation de l'application de montage
Avid », page 72.
PhraseFind et ScriptSync se désinstallent avec votre application de montage
Avi d.
n Avant de désinstaller votre application de montage Avid, notez votre ID système.
Votre ancien ID système sera nécessaire pour activer votre nouveau logiciel.
2. Installez votre nouvelle application de montage Avid.
Reportez-vous à la section « Installation de l'application de montage Avid »,
page 41.
PhraseFind et ScriptSync s'installent avec votre application de montage
Avid. Si vous avez acheté PhraseFind, des modules de prise en charge
linguistique pour PhraseFind ou ScriptSync auparavant, votre activation de
licence devrait se mettre à jour automatiquement. Si vous achetez de
nouvelles options, vous obtiendrez un nouvel ID d'activation.
3. Activez votre application de montage Avid.
Selon votre configuration, reportez-vous aux étapes de mise à niveau
suivantes.
Pour en savoir plus sur l'outil Avid License Control, reportez-vous à la
section « Activation électronique de l'application de montage Avid »,
page 47.
4. Activez PhraseFind, le module de prise en charge linguistique PhraseFind ou
ScriptSync.
Reportez-vous à la section « Activation électronique de l'application de
montage Avid », page 47.
Mise à niveau de l'application de montage Avid 55
Page 56

Mise à niveau de votre application de montage Avid avec une
connexion Internet à partir d'une licence logicielle existante.
1. Naviguez jusqu'à l'emplacement suivant :
(Windows) Démarrer/Tous les programmes/Avid/Utilities/License Control
(Macintosh) Applications/Utilitaires/Avid Utilities/License Control
L'outil Avid License Control s'ouvre.
2. Cliquez sur Activate à côté de l'application de montage Avid.
La fenêtre Activation s'ouvre.
3. Sélectionnez I am connected to the Internet and will use this computer (Cet
ordinateur est connecté à Internet, je l'utiliserai pour l'activation), puis
cliquez sur Continue.
Une fenêtre vous permettant de saisir les informations système et
d'enregistrer votre produit s'ouvre.
4. Si votre ID système ne s'affiche pas, saisissez votre numéro d'identification
système dans la zone System ID. Pour les anciens utilisateurs, saisissez votre
ancien ID système.
Pour trouver votre ID système s'il ne s'affiche pas, reportez-vous à la section
« De quoi aurai-je besoin pour activer mon application de montage Avid ? »,
page 45.
n Si votre ancien système de montage incluait des options payantes telles que
PhraseFind ou ScriptSync, elles seront activées automatiquement en même temps
que votre mise à niveau.
5. Saisissez le numéro d'identification d'activation dans la zone Activation ID.
Utilisez le numéro d'ID d'activation de votre nouvelle version du logiciel.
56 Guide d'installation des applications de montage Avid
Page 57

6. Effectuez l'une des opérations suivantes :
t Si vous n'avez jamais enregistré votre produit, sélectionnez Register
your product with Avid Technology, Inc. now. Si vous souhaitez
consulter la politique de confidentialité Avid, cliquez sur Read Privacy
Policy. Cliquez ensuite sur Next.
Une boîte de dialogue d'enregistrement s'affiche. L'enregistrement en
ligne sur le site Avid vous permet de recevoir d'importantes mises à
jour et informations de maintenance.
t Sélectionnez Don’t register at this time puis cliquez sur Activate.
L'outil Activation vérifie les informations du système. Une fois
l'activation terminée, un message vous informe que votre logiciel a été
activé avec succès.
n Si vous préférez remettre l'enregistrement de votre produit à plus tard, vous
pourrez le faire à tout moment en sélectionnant Special > Register dans votre
application de montage Avid.
7. Si vous avez choisi d'enregistrer votre logiciel à l'étape 6, procédez comme
suit :
a. Depuis la boîte de dialogue d'enregistrement, renseignez vos nom,
adresse et coordonnées dans les zones appropriées. Les astérisques (*)
désignent les champs obligatoires.
b. Cliquez sur Next.
Une boîte de dialogue d'enregistrement s'affiche.
c. Saisissez les informations appropriées (produit et client).
Mise à niveau de l'application de montage Avid 57
Page 58

d. Cliquez sur Activate and Register (Activer et enregistrer).
L'outil Activation vérifie les informations du système. Une fois
l'activation terminée, un message vous informe que le logiciel a été
activé avec succès, et l'intitulé du bouton se change en Deactivate
(Désactiver).
8. Cliquez sur OK.
Mise à niveau de votre application de montage Avid avec une
connexion Internet d'une licence sur dongle vers une licence
logicielle :
1. Connectez votre dongle à votre système de montage Avid.
2. Naviguez jusqu'à l'emplacement suivant :
(Windows) Démarrer/Tous les programmes/Avid/Utilities/License Control
(Macintosh) Applications/Utilitaires/Avid Utilities/License Control
L'outil Avid License Control s'ouvre.
3. Cliquez sur Activate à côté de l'application de montage Avid.
La boîte de dialogue Activation s'affiche.
4. Sélectionnez I am connected to the Internet and will use this computer (Cet
ordinateur est connecté à Internet, je l'utiliserai pour l'activation), puis
cliquez sur Continue.
Une fenêtre vous permettant de saisir les informations système et
d'enregistrer votre produit s'ouvre.
5. Si votre ID système ne s'affiche pas, saisissez votre numéro d'identification
système dans la zone System ID. Pour les anciens utilisateurs, saisissez votre
ancien ID système.
58 Guide d'installation des applications de montage Avid
Page 59

Pour trouver votre ID système s'il ne s'affiche pas, reportez-vous à la section
« De quoi aurai-je besoin pour activer mon application de montage Avid ? »,
page 45.
n Si votre ancien système de montage incluait des options payantes telles que
PhraseFind ou ScriptSync, elles seront activées automatiquement en même temps
que votre mise à niveau.
6. Saisissez le numéro d'identification d'activation dans la zone Activation ID.
Pour trouver votre ID d'activation, reportez-vous à la section « De quoi
aurai-je besoin pour activer mon application de montage Avid ? », page 45.
7. Effectuez l'une des opérations suivantes :
t Si vous n'avez jamais enregistré votre produit, sélectionnez Register
your product with Avid Technology, Inc. now. Si vous souhaitez
consulter la politique de confidentialité Avid, cliquez sur Read Privacy
Policy. Cliquez ensuite sur Next.
Une boîte de dialogue d'enregistrement s'affiche. L'enregistrement en
ligne sur le site Avid vous permet de recevoir d'importantes mises à
jour et informations de maintenance.
t Sélectionnez Don’t register at this time puis cliquez sur Activate.
L'outil Activation vérifie les informations du système. Une fois
l'activation terminée, un message vous informe que votre logiciel a été
activé avec succès.
n Si vous préférez remettre l'enregistrement de votre produit à plus tard, vous
pourrez le faire à tout moment en sélectionnant Special > Register dans votre
application de montage Avid.
Mise à niveau de l'application de montage Avid 59
Page 60

8. Si vous avez choisi d'enregistrer votre logiciel à l'étape 7, procédez comme
suit :
a. Depuis la boîte de dialogue d'enregistrement, renseignez vos nom,
adresse et coordonnées dans les zones appropriées. Les astérisques (*)
désignent les champs obligatoires.
b. Cliquez sur Next.
Une boîte de dialogue d'enregistrement s'affiche.
c. Saisissez les informations appropriées (produit et client).
d. Cliquez sur Activate (Activer).
9. Le système vous demande si vous êtes sûr de vouloir désactiver votre
dongle. Cliquez sur OK.
L'outil Activation vérifie les informations du système. Une fois l'activation
terminée, un message vous informe que votre logiciel a été activé avec
succès.
10. Cliquez sur OK.
Mise à niveau de votre application de montage Avid sans connexion
Internet vers une licence logicielle :
1. Naviguez jusqu'à l'emplacement suivant :
(Windows) Démarrer/Tous les programmes/Avid/Utilities/License Control
(Macintosh) Applications/Utilitaires/Avid Utilities/License Control
L'outil Avid License Control s'ouvre.
2. Cliquez sur Activate à côté de l'application de montage Avid.
La fenêtre Activation s'ouvre.
60 Guide d'installation des applications de montage Avid
Page 61

3. Sélectionnez I am not connected to the Internet and will be using another
computer that is connected to the Internet (Cet ordinateur n'est pas connecté
à Internet, j'en utiliserai un autre pour l'activation), puis cliquez sur
Continue.
Une fenêtre vous permettant de saisir les informations système et
d'enregistrer votre produit s'ouvre.
4. Si votre ID système ne s'affiche pas, saisissez votre numéro d'identification
système dans la zone System ID. Pour les anciens utilisateurs, saisissez votre
ancien ID système.
Pour trouver votre ID système s'il ne s'affiche pas, reportez-vous à la section
« De quoi aurai-je besoin pour activer mon application de montage Avid ? »,
page 45.
n Si votre ancien système de montage incluait des options payantes telles que
PhraseFind ou ScriptSync, elles seront activées automatiquement en même temps
que votre mise à niveau.
n Votre ID de périphérique s'affiche en bas de la page d'activation, notez-le pour
l'utiliser plus tard.
5. Saisissez le numéro d'identification d'activation dans la zone Activation ID.
Pour trouver votre ID d'activation, reportez-vous à la section « De quoi
aurai-je besoin pour activer mon application de montage Avid ? », page 45.
n Laissez l'outil Avid License Control ouvert sur le système à activer. Vous devrez
saisir des informations supplémentaires.
6. Cliquez sur Next.
7. Suivez les instructions de l'outil Avid License Control, puis cliquez sur Next.
Mise à niveau de l'application de montage Avid 61
Page 62

8. Ouvrez un navigateur Web sur un ordinateur connecté à Internet, puis
rendez-vous à l'adresse http://avid.com/license.
9. Suivez les instructions affichées sur la page Web.
Le site Web génère un fichier license.bin. Ce fichier contient les
informations de licence nécessaires à l'activation de votre application de
montage Avid.
10. Après avoir récupéré ce fichier license.bin, retournez sur l'ordinateur sur
lequel vous souhaitez activer votre logiciel.
11.
Dans l'outil Avid License Control, cliquez sur Browse (Parcourir) et accédez
au fichier license.bin copié sur votre système, puis cliquez sur Open.
L'outil Activation vérifie les informations du système. Une fois l'activation
terminée, un message vous informe que le logiciel a été activé avec succès,
et l'intitulé du bouton se change en Deactivate (Désactiver).
n Répétez l'étape précédente pour toutes les applications de montage ou options à
activer.
12. Si l'application de montage Avid est ouverte, redémarrez-la afin d'appliquer
les modifications.
62 Guide d'installation des applications de montage Avid
Page 63

Pour mettre à niveau votre application de montage Avid à l'aide d'un
dongle :
1. Vérifiez que vous avez connecté votre dongle au système de montage Avid.
2. Accédez au répertoire d'installation du fichier DongleManager.exe :
t (Windows) C:\Programmes\Avid\Utilities\DongleManager
t (Macintosh) Macintosh HD\Applications\Utilitaires\Avid
Utilities\DongleManager
3. Double-cliquez sur DongleManager.exe.
La fenêtre de l'application DongleManager s'ouvre.
4. Cliquez sur l'onglet Update (Mettre à jour).
5. Cliquez sur Open, puis naviguez jusqu'à l'emplacement du fichier de mise à
jour (.avd) du dongle.
6. Sélectionnez le fichier de mise à jour puis cliquez sur Open.
7. Cliquez sur Update.
L'application DongleManager.exe met à jour votre dongle puis affiche le
message Verification Complete (Vérification terminée).
8. Démarrez votre application de montage Avid.
La fenêtre d'accueil s'affiche.
9. Sélectionnez I want to use a dongle to activate my software (Je souhaite
utiliser un dongle pour activer mon logiciel).
10. Cliquez sur Continue.
Le système vérifie vos informations. Une fois l'activation terminée, un
message vous informe que votre logiciel a été activé avec succès.
Mise à niveau de l'application de montage Avid 63
Page 64

Pour mettre à niveau votre application de montage Avid à l'aide du
fichier Versioner.avd (réservé aux souscripteurs d'un contrat de
support Avid) :
1. Téléchargez le fichier Versioner.avd correspondant à votre application de
montage.
2. Déplacez le fichier Versioner.avd dans le dossier de l'application de
montage :
(Windows) [lecteur]:/Programmes/Avid/[Application de montage Avid]
(Macintosh) Macintosh HD/Applications/[Application de montage Avid]
3. Démarrez votre application de montage Avid.
L'outil Avid License Control s'ouvre.
4. Cliquez sur Activate à côté de l'application de montage Avid.
5. Effectuez l'une des opérations suivantes :
t Sélectionnez I am connected to the Internet and will use this computer
(Cet ordinateur est connecté à Internet, je l'utiliserai pour l'activation).
t Sélectionnez I am not connected to the Internet and will be using
another computer that is connected to the Internet (Cet ordinateur n'est
pas connecté à Internet, j'en utiliserai un autre pour l'activation).
6. Cliquez sur Continue.
La boîte de dialogue Avid Activation s'affiche. Le système remplit
automatiquement l'ID système et l'ID d'activation.
n Si vous utilisez un dongle, l'ID système et l'ID d'activation seront uniquement
indiqués si le dongle est connecté.
64 Guide d'installation des applications de montage Avid
Page 65

7. Poursuivez la procédure de mise à niveau de licence décrite dans cette
section, selon l'option de licence sélectionnée à l'étape 5.
Utilisation de la version d'évaluation de 30 jours
Avant d'acheter l'application de montage Avid, PhraseFind ou ScriptSync, vous
pouvez l'essayer pendant une période de 30 jours. Si vous exécutez la version
d'évaluation de 30 jours de l'application de montage Avid, vous disposez aussi d'une
version d'évaluation de 30 jours de PhraseFind et ScriptSync. Votre version
d'évaluation de 30 jours de PhraseFind inclut également l'accès à toutes les langues
disponibles pendant cette période. Il n'est donc pas nécessaire d'activer de modules
de prise en charge linguistique supplémentaires. Cependant, vous devez sélectionner
votre langue dans le menu Select a Language de la fenêtre PhraseFind.
Si vous possédez déjà une application de montage Avid, vous pouvez exécuter une
version d'évaluation de 30 jours de PhraseFind ou ScriptSync.
Une fois les 30 jours écoulés, si vous n'achetez pas l'application de montage Avid,
PhraseFind ou ScriptSync, vous n'aurez plus accès au produit ni à ses
fonctionnalités. Le système vous tient informé du nombre de jours restants avant
la fin de la période d'évaluation.
n Tous les chutiers ou projets créés pendant la période d'évaluation de 30 jours
pourront uniquement être utilisés lorsque vous aurez activé une licence de
montage complète.
Utilisation de la version d'évaluation de 30 jours 65
Page 66

Pour utiliser la période d'évaluation de 30 jours de votre application
de montage Avid :
1. Démarrez votre application de montage Avid.
La fenêtre d'accueil s'affiche.
2. Sélectionnez I want to run a fully-featured, trial version of
application
for 30 days (Je souhaite exécuter une version d'évaluation
the Avid editing
entièrement fonctionnelle de l'application de montage Avid pendant 30 jours).
3. Cliquez sur Continue.
Votre logiciel a été activé avec succès. Vous pouvez, à tout moment au cours
de la période d'évaluation de 30 jours, choisir d'acheter une copie de
l'application de montage Avid. Si vous choisissez de ne pas acheter le
logiciel, votre application sera désactivée à la fin de la période d'évaluation
de 30 jours.
Pour utiliser la période d'évaluation de 30 jours de PhraseFind :
1. Ouvrez votre application de montage Avid et un projet Avid.
2. AAppuyez sur Ctrl+F ou Commande+F, ou sélectionnez Edit > Find.
La fenêtre Find (Rechercher) s'affiche.
3. Saisissez un mot ou une phrase dans la zone de texte, puis cliquez sur le
bouton PhraseFind.
Le système vérifie si PhraseFind est installé sur votre système, puis une boîte
de dialogue s'ouvre.
4. Cliquez sur Run Trial (Exécuter la version d'essai).
Le système redémarre votre application de montage Avid. Vous avez dès lors
accès à PhraseFind.
66 Guide d'installation des applications de montage Avid
Page 67

Votre version d'évaluation de 30 jours de PhraseFind inclut également l'accès
à toutes les langues disponibles pendant cette période. Il n'est donc pas
nécessaire d'activer de modules de prise en charge linguistique
supplémentaires. Cependant, vous devez sélectionner votre langue dans le
menu Select a Language de la fenêtre PhraseFind.
5. Dans la fenêtre PhraseFind, sélectionnez votre langue dans le menu Select a
Language, puis attendez que l'index PhraseFind s'affiche en vert fixe.
Pour utiliser la période d'évaluation de 30 jours de ScriptSync :
1. Ouvrez votre application de montage Avid et un projet Avid.
2. Créez un script, File > New Script.
3. Accédez à votre script, puis cliquez sur Open.
4. Dans le script, cliquez sur la section dans laquelle vous souhaitez placer le
clip (prise).
La section est mise en surbrillance.
5. À partir d'un chutier, faites glisser le clip vers la section sélectionnée dans le
script.
La boîte en dessous du clip dans le script devrait être surlignée en noir pour
indiquer que le clip est sélectionné dans le script.
6. Sélectionnez Script > ScriptSync.
Le système vérifie si ScriptSync est installé sur votre système, puis une boîte
de dialogue s'ouvre.
7. Cliquez sur Run Trial (Exécuter la version d'essai).
Vous accédez immédiatement à la fenêtre ScriptSync.
Utilisation de la version d'évaluation de 30 jours 67
Page 68

Pour acheter l'application de montage Avid au cours de la période
d'évaluation de 30 jours :
t Accédez à la boutique en ligne Avid : http://shop.avid.com/store/ pour
acheter votre application de montage Avid.
Pour acheter PhraseFind ou ScriptSync au cours de la période
d'évaluation de 30 jours :
1. Ouvrez votre application de montage Avid et un projet Avid.
2. Pour ScriptSync, suivez les étapes 1 à 5 de la section « Pour utiliser la
période d'évaluation de 30 jours de ScriptSync : », page 67, puis
sélectionnez Script > ScriptSync.
3. Appuyez sur Ctrl+F ou Commande+F, ou sélectionnez Edit > Find.
La fenêtre Find s'affiche.
4. Pour PhraseFind, saisissez un mot ou une phrase dans la zone de texte, puis
cliquez sur le bouton PhraseFind.
Le système vous informe du nombre de jours restants pour votre période
d'évaluation de 30 jours.
5. Cliquez sur Buy (Acheter).
n Si le bouton Buy n'apparaît pas, fermez la fenêtre Find et relancez votre
application de montage Avid. Répétez les étapes ci-dessus.
Le système ouvre la boutique en ligne Avid, où vous pouvez acheter
PhraseFind ou ScriptSync. Une fois le produit acheté et votre ID d'activation
reçu, vous pouvez activer PhraseFind ou ScriptSync.
Une boîte de dialogue s'ouvre pour vous indiquer que le processus d'activation
fermera votre application de montage Avid et lancera l'outil Avid License
Control.
68 Guide d'installation des applications de montage Avid
Page 69

6. Cliquez sur Continue.
L'outil Avid License Control s'ouvre.
Pour procéder à l'activation, reportez-vous à la section « Activation
électronique de l'application de montage Avid », page 47 pour continuer.
Activation des options et fonctionnalités
En plus de l'activation de l'application de montage Avid, plusieurs fonctionnalités
et options de montage peuvent être activées via l'outil Avid License Control.
Pour ce faire, suivez les étapes de la section « Activation électronique de
l'application de montage Avid », page 47 ou reportez-vous au guide approprié
répertorié ci-dessous.
• PhraseFind
L'option PhraseFind (recherche phonétique) recherche des dialogues audio
dans les chutiers d'un projet unique. PhraseFind est vendu séparément et
inclut un module de prise en charge linguistique gratuit de votre choix. Pour
plus d'informations, reportez-vous à la section Purchasing and Activating
PhraseFind (Achat et activation de PhraseFind) de l'aide de l'application de
montage Avid ou au guide Getting Started with PhraseFind (Guide de
démarrage de PhraseFind).
• ScriptSync
ScriptSync utilise une technologie d'indexation phonétique pour analyser la
section audio d'un clip et la synchroniser avec les lignes d'un script.
ScriptSync est vendu séparément. Pour plus d'informations, reportez-vous à
la section Purchasing and Activating ScriptSync (Achat et activation de
ScriptSync) de l'aide de l'application de montage Avid ou au guide Getting
Started with ScriptSync (Guide de démarrage de ScriptSync).
Activation des options et fonctionnalités 69
Page 70

• Module de prise en charge linguistique PhraseFind
Des modules de prise en charge linguistique supplémentaires à utiliser avec
PhraseFind sont disponibles. Ces modules sont vendus séparément. Pour plus
d'informations, reportez-vous à la section Activating Additional Regional
Language Packs (Activation de modules de prise en charge linguistique
supplémentaires) de l'aide de l'application de montage Avid ou au guide
Getting Started with PhraseFind
• Importation AVCHD Dolby AC-3 ou liaison AMA
Cette fonctionnalité permet d'importer ou d'établir une liaison AMA avec
des fichiers de flux de transport AVCHD (.mts). Si vous n'êtes pas connecté
à Internet la première fois que vous importez ou établissez une liaison AMA
vers des fichiers .mts, le système ouvre une boîte de dialogue, puis l'outil
Avid License Control. Suivez les instructions à l'écran pour activer cette
fonctionnalité. Si vous êtes connecté à Internet, l'activation est automatique.
(Guide de démarrage de PhraseFind).
n La fonctionnalité AVCHD Dolby AC-3 s'affiche uniquement si vous utilisez ce
format. Elle n'est généralement pas affichée dans l'outil Avid License Control.
Désactivation de l'application de montage Avid et de ses options
Si vous devez installer l'application de montage Avid sur un autre ordinateur,
désactivez l'application de montage Avid et ses options avant de désinstaller
l'application.
Désactivez d'abord PhraseFind et ScriptSync, puis l'application de montage Avid.
n Vous devez être connecté à Internet pour désactiver le logiciel et ses options.
n Il n'est pas nécessaire de désactiver une version d'évaluation.
70 Guide d'installation des applications de montage Avid
Page 71

Désactivation de l'application de montage Avid et de ses options :
1. Dans votre application de montage Avid, sélectionnez Special > Deactivate
Software License (Spécial > Désactiver la licence logicielle).
2. Un message indiquant que l'application de montage Avid sera fermée et
l'outil Avid License Control ouvert s'affiche ; cliquez sur Continue.
3. Une boîte de dialogue vous demandant si vous souhaitez fermer les
applications de montage Avid s'ouvre ; cliquez sur Leave (Quitter).
4. Ou accédez à l'emplacement suivant pour ouvrir l'outil Avid License
Control :
(Windows) Démarrer/Tous les programmes/Avid/Utilities/License Control
(Macintosh) Applications/Utilitaires/Avid Utilities/License Control
L'outil Avid License Control s'ouvre.
5. Cliquez sur Deactivate (Désactiver), à côté de l'application de montage Avid,
PhraseFind ou ScriptSync.
Si vous désactivez PhraseFind, un message indiquant que les modules de
prise en charge linguistique associés seront également désactivés s'affiche.
6. Cliquez sur Yes.
Le système désactive l'élément sélectionné, et l'intitulé du bouton change en
Activate (Activer).
7. Cliquez sur Quit pour fermer la fenêtre.
Désactivation de l'application de montage Avid et de ses options 71
Page 72

Désinstallation de l'application de montage Avid
Avant d'installer l'application de montage, désinstallez également les pilotes Digi
à l'aide de l'option Programmes et fonctionnalités du Panneau de configuration.
Redémarrez le système puis installez la nouvelle application de montage. Si vous
ne supprimez pas les pilotes Digidesign, le chargement des plug-ins AudioSuite
sera impossible et vous risquez d'obtenir le message d'erreur This software
requires installation of device driver TPkd and a reboot before running (Ce
logiciel nécessite l'installation du pilote de périphérique TPkd, suivie d'un
redémarrage) ou DAE Interface NOT Available (Interface DAE NON disponible).
Si ces erreurs s'affichent sur une version nouvellement installée effectuée sur un
système lui aussi récemment installé, installez le hot fix KB926255 à partir de
Windows Update pour résoudre le problème.
Pour toutes les applications de montage Avid, connectez-vous et lancez
l'application pour la première fois en tant qu'utilisateur disposant des droits
d'administration. Si vous travaillez dans un environnement de stockage partagé,
montez vos workspaces. Vous pourrez ensuite exécuter l'application de montage
Avid en tant qu'utilisateur normal.
Si vous utilisez des périphériques audio Pro Tools (par exemple, l'un des
périphériques de la famille Avid Mbox ou du matériel Avid Pro Tools|HD Native),
vous devez installer séparément les pilotes des périphériques. Les pilotes des
périphériques audio Avid se trouvent dans le répertoire suivant :
• (Windows)
AudioDriverInstallers
• (Macintosh)
Avid Audio Drivers
Programmes\Avid\Utilities\
Applications\Utilitaires\Avid Utilities\
72 Guide d'installation des applications de montage Avid
Page 73

(Windows) Pour désinstaller le logiciel de l'application de montage
Avid, effectuez l'une des opérations suivantes :
1. Quittez toutes les applications en cours d'exécution.
2. Accédez au Panneau de configuration, puis sélectionnez Programmes et
Fonctionnalités. Sélectionnez ensuite l'application de montage et cliquez sur
Uninstall (Désinstaller).
(Macintosh) Pour désinstaller le logiciel de l'application de montage
Avid :
1. Quittez toutes les applications en cours d'exécution.
2. Accédez à Applications/Avid_Uninstaller/ApplicationMontageAvid.
3. Double-cliquez sur le programme de désinstallation
4. Suivez les instructions à l'écran.
Note de mise à jour du firmware
Lorsque vous exécutez pour la première fois l'application de montage que vous
venez d'installer, une boîte de dialogue vous invitera peut-être à mettre à jour le
firmware du matériel Avid. Choisissez l'option Update (Mettre à jour). Lors de la
procédure de mise à jour, n'ouvrez aucune autre application et ne déplacez aucune
des fenêtres actives. Accéder à une autre application risque de masquer la boîte de
dialogue signalant la fin de la procédure de mise à jour. Le cas échéant, la
progression de la mise à jour restera figée à 100 % mais vous ne disposerez
d'aucune option pour finaliser la procédure. La fenêtre masquée qui vous signale
la fin de la mise à jour et vous invite à éteindre votre système ne peut pas être
rappelée au premier plan. Vous devrez dans ce cas éteindre votre système, et non
pas seulement le redémarrer, puis le remettre sous tension.
ApplicationMontageAvid
.
Note de mise à jour du firmware 73
Page 74

74 Guide d'installation des applications de montage Avid
Page 75

3 Installationshandbuch für Avid-Editing-Anwen-
dungen
Die aktuellsten Informationen zu Ihrer Avid-Editing-Anwendung finden Sie in
der Online-Version der Readme-Datei. Sie sollten immer online nach den
neuesten Versionshinweisen oder Readme-Dateien suchen, da die OnlineVersionen aktualisiert werden, sobald neue Informationen verfügbar sind. Um
diese Online-Versionen zu finden, können Sie entweder die Readme-Option aus
dem Hilfemenü Ihrer Avid-Editing-Anwendung wählen oder die Knowledge Base
unter www.avid.com/readme besuchen.
Für die Installation der Avid-Editing-Anwendung direkt von der Avid-InstallationsDVD aus muss Ihr System Dual-Layer-DVDs unterstützen. Wenn Ihr System kein
Dual-Layer-DVDs unterstützendes DVD-Laufwerk besitzt, können Sie die
Avid-Editing-Anwendung direkt im Avid-Download-Center unter
www.avid.com/support/downloads herunterladen.
Sobald Sie Ihre Avid-Editing-Anwendung installieren, aktivieren Sie die Software
mit dem Avid License Control-Tool. Das Avid License Control-Tool aktiviert
ebenfalls Editing-Erweiterungsoptionen. Informationen über die EditingErweiterungen finden Sie unter „Aktivieren von Erweiterungen und Funktionen“
auf Seite 104.
n Wenn Sie über einen laufenden Avid-Supportvertrag verfügen, haben Sie eventuell
die Möglichkeit, ein Software-Upgrade durchzuführen. Weitere Informationen
können Sie den Anweisungen zu Ihrem Upgrade entnehmen, die Sie entweder im
Avid-Download-Center oder in Ihrem Upgrade-Kit finden.
Page 76

c Falls Sie Ihre Systemkonfiguration ändern möchten – indem Sie
beispielsweise die Festplatte oder einen Netzwerk-Adapter austauschen oder
das Betriebssystem aktualisieren –, müssen Sie zuvor Ihre Avid-Software
deaktivieren. Informationen zur Deaktivierung finden Sie unter
„Deaktivieren von Avid-Editing-Anwendung und -Erweiterungen“ auf
Seite 106.
Vor dem Installieren der Avid-Editing-Anwendung
Lesen Sie die folgenden Anleitungen durch, bevor Sie die Editing-Anwendung
installieren. Dieses Handbuch enthält Anleitungen sowohl für Upgrade-Kunden
als auch für neue Anwender. Wählen Sie die für Ihre Installation relevante
Anleitung:
Neue Anwender
Wenn Sie ein neuer Anwender sind und noch nie die betreffende Editingauf Ihrem System installiert haben, folgen Sie den Anweisungen von Seite 77 bis
Seite 89. Beginnen Sie mit „Installieren der Avid-Editing-Anwendung“ auf
Seite 77.
Registrierte Anwender
Bei einem Upgrade von einer früheren Version der Editing-Anwendung müssen
Sie die vorherige Version deinstallieren, um die neue Software installieren und
aktivieren zu können.
n Notieren Sie sich Ihre System-ID, bevor Sie Ihre Avid-Editing-Anwendung
deinstallieren. Sie benötigen Ihre alte System-ID, um Ihre neue Software zu
aktivieren.
Folgen Sie den Anweisungen von Seite 90 bis Seite 99. Beginnen Sie mit
„Durchführen von Upgrades der Avid-Editing-Anwendung“ auf Seite 90.
Anwendung
76 Installationshandbuch für Avid-Editing-Anwendungen
Page 77

Installieren der Avid-Editing-Anwendung
Loggen Sie sich für alle Avid-Editing-Anwendungen als Benutzer mit
Administratorrechten ein, installieren Sie die Anwendung und führen Sie den
ersten Start als Benutzer mit Administratorrechten aus. Falls Sie in einer
Zentralspeicher-Umgebung arbeiten, müssen Sie Ihre Arbeitsbereiche mounten.
Anschließend können Sie die Avid-Editing-Anwendung als normaler Benutzer
ausführen.
n Das Installieren der Editing-Anwendung kann einige Zeit in Anspruch nehmen.
Für eine einzelne Editing-Anwendung dauert die Installation in der Regel 5 bis
15 Minuten. Die Installation des gesamten Editing-Systems kann bis zu
35 Minuten dauern.
(Windows) So installieren Sie die Avid-Editing-Anwendung:
1. Beenden Sie alle aktiven Anwendungen.
2. Legen Sie die DVD der Editing-Anwendung ein.
3. Wählen Sie, ob Sie das Editing-System von Avid oder das einzelne Produkt
installieren möchten, und folgen Sie den Anweisungen auf dem Bildschirm.
n Falls die Meldung angezeigt wird, dass Dateien verwendet werden, können Sie
problemlos auf „Ignorieren“ (Ignore) klicken und fortfahren.
n Sollten während der Installation Warnmeldungen der Benutzerzugriffsverwaltung
angezeigt werden, klicken Sie auf „Trotzdem fortfahren“ (Continue Anyway), um
die Installation fortzusetzen.
4. Wenn Sie dazu aufgefordert werden, wählen Sie die Option zum sofortigen
Neustart des Computers.
5. Fahren Sie fort mit „Starten der Avid-Editing-Anwendung“ auf Seite 78.
Installieren der Avid-Editing-Anwendung 77
Page 78

(Mac) So installieren Sie die Avid-Editing-Anwendung:
1. Beenden Sie alle Anwendungen.
2. Legen Sie die DVD der Editing-Anwendung ein.
3. Doppelklicken Sie auf die Datei Name der Editing-Anwendung.pkg.
4. Wählen Sie, ob Sie das Editing-System von Avid oder das einzelne Produkt
installieren möchten, und folgen Sie den Anweisungen auf dem Bildschirm.
5. Wenn Sie dazu aufgefordert werden, wählen Sie die Option zum sofortigen
Neustart des Computers.
6. Fahren Sie fort mit „Starten der Avid-Editing-Anwendung“ auf Seite 78.
Starten der Avid-Editing-Anwendung
Während des Installationsprozesses werden für Ihre Avid-Editing-Anwendung ein
Desktop- oder Dock-Symbol und ein Eintrag im Startmenü erstellt.
Wenn Sie Ihre Avid-Editing-Anwendung auf einem Laptop installieren, wird
möglicherweise eine Meldung bezüglich inkompatibler Energieverwaltungseinstellungen angezeigt. Für die Arbeit mit den Avid-Editing-Anwendungen ist es
empfehlenswert, die Einstellung „Höchstleistung“ (High Performance) für
Windows 7 zu wählen. Andere Energieverwaltungseinstellungen könnten die
Leistungsfähigkeit bestimmter Editing-Funktionen beeinträchtigen (z. B.
Einspielen und digitales Schneiden).
Nachdem Sie die Software für Ihre Avid-Editing-Anwendung installiert haben
und die Anwendung zum ersten Mal gestartet haben, müssen Sie Ihre Kopie
aktivieren.
78 Installationshandbuch für Avid-Editing-Anwendungen
Page 79

(Windows) Sie haben folgende Möglichkeiten, Ihre Avid-EditingAnwendung zu starten:
t Klicken Sie auf „Start > Alle Programme > Avid >
Avid-Editing-Anwendung“.
t Doppelklicken Sie auf das Desktop-Symbol der Avid-Editing-Anwendung.
Das Willkommen-Fenster öffnet sich.
(Mac) Sie haben folgende Möglichkeiten, Ihre Avid-EditingAnwendung zu starten:
1. Klicken Sie auf dem Dock auf das Alias-Symbol für Ihre Avid-EditingAnwendung.
2. Oder wählen Sie „Start > Programme“ und doppelklicken Sie anschließend
auf den Ordner der Avid-Editing-Anwendung. Doppelklicken Sie danach auf
die Programmdatei der Avid-Editing-Anwendung.
Starten der Avid-Editing-Anwendung 79
Page 80

Das Willkommen-Fenster öffnet sich.
80 Installationshandbuch für Avid-Editing-Anwendungen
Page 81

3. Wählen Sie eine der Optionen, um Ihre Software zu aktivieren.
t
Um die Aktivierung elektronisch durchzuführen, wählen Sie „I want to
activate my software using the Internet, another computer, or a volume
license server“ und klicken Sie auf „Continue“.
Das Avid License Control-Tool öffnet sich. Folgen Sie den Anweisungen
unter „Elektronische Aktivierung der Avid-Editing-Anwendung“ auf
Seite 83.
t
Um die Aktivierung mit einem Hardware-Schlüssel oder Dongle
durchzuführen, wählen Sie „I want to use a dongle to activate my
software“, schließen Sie den Dongle an und klicken Sie auf „Continue“.
Das System bestätigt Ihre Daten. Nach Abschluss der Aktivierung wird
durch eine Meldung bestätigt, dass Ihre Software erfolgreich aktiviert
wurde.
t
Um die Anwendung im Testmodus auszuführen, klicken Sie auf „I want to
run a fully-featured trial version of [die Avid-Editing-Anwendung] for 30
days“ und klicken Sie auf „Continue“.
Die Aktivierung Ihrer Software war erfolgreich.
Weitere Informationen zum Testmodus finden Sie unter „Verwenden der
30-Tage-Testversion“ auf Seite 100.
Was benötige ich, um meine Avid-Editing-Anwendungen zu
aktivieren?
IdentifikationsNummern (IDs): Diese finden Sie hier:
Aktivierungs-ID
Auf der Umschlaginnenseite dieses Handbuchs.
Was benötige ich, um meine Avid-Editing-Anwendungen zu aktivieren? 81
Page 82

IdentifikationsNummern (IDs): Diese finden Sie hier:
Wenn Sie die Anwendung im Avid Store gekauft haben,
sendet Ihnen Avid Ihre Aktivierungs-ID per E-Mail.
Wenn Sie die Anwendung im Avid Store gekauft haben,
loggen Sie sich in Ihren Store-Account ein unter
http://account.avid.com/.
System-ID
Neue Anwender finden die ID auf der Umschlaginnenseite
dieses Handbuchs.
Bereits registrierte Anwender benötigen ihre alte
System-ID.
Wenn Sie Ihre Avid-Software online gekauft haben, wurde
Ihnen die System-ID von Avid per E-Mail zugeschickt.
Auf dem Splash Screen der Avid-Software (Hilfe >
Informationen zur Avid-Editing-Anwendung).
Auf der Konsole der Avid-Editing-Anwendung (Tools >
Konsole, dann herunterscrollen zur System-ID).
Wenn Sie die Anwendung im Avid Store gekauft haben,
können Sie Ihre System-ID in Ihrem Store-Account
einsehen unter http://account.avid.com/.
82 Installationshandbuch für Avid-Editing-Anwendungen
Page 83

IdentifikationsNummern (IDs): Diese finden Sie hier:
System-ID (Fortsetzung) Sobald die Aktivierung abgeschlossen ist, zeigt Ihnen im
Avid License Control-Tool die „Licence
Profile“-Registerkarte Informationen zu Ihrem System an.
Klicken Sie auf „Copy“, um die Informationen in die
Zwischenablage zu kopieren. Anschließend können Sie die
Informationen in eine E-Mail oder eine Textdatei einfügen.
Dies kann dann nützlich sein, wenn Sie diese Informationen
sicher aufbewahren wollen oder Systeminformationen an den
Avid-Kundensupport senden müssen.
Device-ID (Gerätekennung) Nur erforderlich, wenn Sie Ihre Software auf einem Computer
aktivieren, der keine Verbindung mit dem Internet hat. Die
Device-ID erhalten Sie über das Avid License Control-Tool
während der Aktivierung.
Elektronische Aktivierung der Avid-Editing-Anwendung
• Mit Internetzugang – siehe „Elektronische Aktivierung mit Internetzugang“
auf Seite 84.
• Ohne Internetzugang – siehe „Elektronische Aktivierung ohne
Internetverbindung“ auf Seite 88.
• Über einen Volumenlizenz-Server – siehe „Aktivieren der
Avid-Editing-Anwendung über einen Volumenlizenz-Server“ auf Seite 89.
Elektronische Aktivierung der Avid-Editing-Anwendung 83
Page 84

Elektronische Aktivierung mit Internetzugang
1. Öffnen Sie das Avid License Control-Tool und klicken Sie neben der
Avid-Editing-Anwendung auf „Activate“.
84 Installationshandbuch für Avid-Editing-Anwendungen
Page 85

Das folgende Fenster wird geöffnet:
2. Wählen Sie „I am connected to the Internet and will use this computer“ und
klicken Sie auf „Continue“.
Elektronische Aktivierung mit Internetzugang 85
Page 86

Ein Fenster wird geöffnet, in dem Sie Systeminformationen eingeben und
Ihr Produkt registrieren können.
3. Geben Sie Ihre System-ID in das entsprechende Textfeld ein. Wie Sie Ihre
System-ID finden, erfahren Sie unter „Was benötige ich, um meine
Avid-Editing-Anwendungen zu aktivieren?“ auf Seite 81.
4. Geben Sie Ihre Aktivierungs-ID in das entsprechende Textfeld ein. Wie Sie
Ihre Aktivierungs-ID finden, erfahren Sie unter „Was benötige ich, um
meine Avid-Editing-Anwendungen zu aktivieren?“ auf Seite 81.
5. Wenn Sie die Datenschutzerklärung von Avid lesen möchten, klicken Sie auf
„Read Privacy Policy“.
86 Installationshandbuch für Avid-Editing-Anwendungen
Page 87

6. Sie haben folgende Möglichkeiten:
t Wählen Sie „Register your software“ und klicken Sie dann auf
„Continue“.
Ein Registrierungs-Dialogfeld wird geöffnet. Wenn Sie sich online bei
Avid registrieren, erhalten Sie wichtige Updates und Wartungsinformationen.
t Wählen Sie „Don’t register your software“ und klicken Sie
anschließend auf „Activate“.
Das Avid License Control-Tool bestätigt Ihre Systeminformationen.
Nach Abschluss der Aktivierung wird durch eine Meldung bestätigt,
dass Ihre Software erfolgreich aktiviert wurde.
n Falls Sie Ihre Software zu diesem Zeitpunkt nicht registrieren möchten, können Sie
dies auch später jederzeit tun, indem Sie in Ihrer Avid-Editing-Anwendung auf
„Special > Register“ klicken.
7. Wenn Sie die Software registrieren möchten, gehen Sie folgendermaßen vor:
a. Geben Sie im Registrierungs-Dialogfeld Ihren Namen, Ihre Adresse
und Ihre Kontaktinformationen in die entsprechenden Textfelder ein.
Pflichtfelder sind mit einem Sternchen (*) gekennzeichnet.
b. Klicken Sie auf „Next“.
Ein Registrierungs-Dialogfeld wird geöffnet.
c. Geben Sie die entsprechenden Produkt- und Kundeninformationen ein.
d. Klicken Sie auf „Activate and Register“.
8. Falls die Avid-Editing-Anwendung geöffnet ist, starten Sie sie bitte erneut,
damit die Änderungen wirksam werden.
Elektronische Aktivierung mit Internetzugang 87
Page 88

Elektronische Aktivierung ohne Internetverbindung
1. Öffnen Sie das Avid License Control-Tool und klicken Sie neben der
Avid-Editing-Anwendung auf „Activate“.
Das Aktivierungstool wird geöffnet.
2. Wählen Sie „I am not connected to the Internet and will be using another
computer that is connected to the Internet“ und klicken Sie auf „Continue“.
3. Geben Sie Ihre System-ID in das entsprechende Textfeld ein. Wie Sie Ihre
System-ID finden, erfahren Sie unter „Was benötige ich, um meine
Avid-Editing-Anwendungen zu aktivieren?“ auf Seite 81.
n Ihre Device-ID wird am unteren Ende der Aktivierungs-Seite angezeigt. Notieren
Sie sie für später.
4. Geben Sie Ihre Aktivierungs-ID in das entsprechende Textfeld ein. Wie Sie
Ihre Aktivierungs-ID finden, erfahren Sie unter „Was benötige ich, um
meine Avid-Editing-Anwendungen zu aktivieren?“ auf Seite 81.
5. Klicken Sie auf „Next“.
6. Folgen Sie den Anweisungen im Avid License Control-Tool und klicken Sie
auf „Next“.
7. Öffnen Sie auf einem Computer mit Internetverbindung einen Webbrowser
und navigieren Sie zu http://avid.com/license.
8. Folgen Sie den Anweisungen auf der Website.
Die Website erstellt eine license.bin-Datei. Diese Datei enthält
Lizenzinformationen, die für das Aktivieren Ihrer Avid-Editing-Anwendung
benötigt werden.
88 Installationshandbuch für Avid-Editing-Anwendungen
Page 89

9. Sobald Sie die license.bin-Datei erhalten, fahren Sie an dem Computer fort,
auf dem Sie die Avid-Editing-Anwendung aktivieren möchten.
10. Öffnen Sie das Avid License Control-Tool, klicken Sie auf „Browse“,
wählen Sie die auf Ihrem System abgelegte license.bin-Datei aus und
klicken Sie dann auf „Open“.
Das Aktivierungstool bestätigt Ihre Systeminformationen. Nach Abschluss der
Aktivierung wird durch eine Meldung bestätigt, dass Ihre Software erfolgreich
aktiviert wurde, und die Schaltfläche verändert sich zu „Deactivate“.
n Wiederholen Sie diese Schritte für alle Editing-Anwendungen oder
-Erweiterungen, die Sie aktivieren möchten.
11. Falls die Avid-Editing-Anwendung geöffnet ist, starten Sie diese neu, damit
die Änderungen wirksam werden.
Aktivieren der Avid-Editing-Anwendung über einen
Volumenlizenz-Server
Über einen Volumenlizenz-Server können Sie mehrere Editing-Clients aktivieren
und verwalten. Weitere Informationen entnehmen Sie der Anleitung FlexNet
Device Manager for Avid in der Knowledge Base.
Aktivieren der Avid-Editing-Anwendung über einen Volumenlizenz-Server 89
Page 90

Durchführen von Upgrades der Avid-Editing-Anwendung
Upgrades Ihrer Avid-Editing-Anwendung können entweder auf der Grundlage
einer vorhandenen Softwarelizenz oder einer Dongle-Lizenz durchgeführt
werden. Falls Sie das Upgrade auf der Grundlage einer Dongle-Lizenz
durchführen und das Produktmodell wechseln, enthält Ihr Upgrade-Kit eine
Dongle-Aktualisierungskarte, einen Upgrade-Code und einen SoftwareAktivierungscode. Anweisungen zu dem Software-Upgrade finden Sie in Ihrem
Upgrade-Kit.
Wenn Sie zuvor bereits PhraseFind, PhraseFind-Sprachpakete oder ScriptSync
erworben haben, sollte das Update Ihrer Lizenz automatisch erfolgen. Wenn Sie
neue Erweiterungen erwerben, wird eine neue Aktivierungs-ID an Sie vergeben.
n Durch ein Upgrade Ihrer Dongle-Lizenz auf eine Softwarelizenz wird Ihr Dongle
deaktiviert. Sobald Sie Ihre Softwarelizenz aktiviert haben, benötigen Sie den
Dongle nicht länger zum Ausführen Ihrer Avid-Editing-Anwendung und können
ihn auch nicht wieder verwenden.
Wenn Sie ein Upgrade Ihrer vorhandenen Lizenz durchführen und über einen
laufenden Avid-Supportvertrag verfügen, können Sie weitere Informationen den
Anweisungen zu Ihrem Upgrade entnehmen, die Sie entweder im Avid-DownloadCenter oder in Ihrem Upgrade-Kit finden. Alle Avid-Support-Vertragskunden müssen
die Datei Versioner.avd verwenden, um Upgrades ihrer Software durchführen zu
können. Eine Beschreibung hierzu finden Sie am Ende dieses Kapitels. Weitere
Informationen finden Sie unter „Software Licensing Upgrade Process for Support
Customers“ in der Avid Knowledge Base (www.avid.com/US/support).
Folgen Sie den nachstehenden wichtigen Anweisungen, wenn Sie ein Upgrade
Ihres Avid-Editing-Systems, der PhraseFind- oder der ScriptSync-Erweiterung
durchführen.
90 Installationshandbuch für Avid-Editing-Anwendungen
Page 91

Upgrade-Workflow
1. Deinstallieren Sie Ihre bestehende Avid-Editing-Anwendung.
Siehe „Deinstallieren der Avid-Editing-Anwendung“ auf Seite 107.
PhraseFind und ScriptSync werden zusammen mit Ihrer Avid-Editing-
Anwendung deinstalliert.
n
Notieren Sie Ihre System-ID, bevor Sie Ihre Avid-Editing-Anwendung deinstallieren.
Sie benötigen Ihre alte System-ID, um Ihre neue Software zu aktivieren.
2. Installieren Sie Ihre neue Avid-Editing-Anwendung.
Siehe „Installieren der Avid-Editing-Anwendung“ auf Seite 77.
PhraseFind und ScriptSync werden zusammen mit Ihrer Avid-Editing-
Anwendung installiert. Wenn Sie zuvor bereits PhraseFind, PhraseFindSprachpakete oder ScriptSync erworben haben, sollte das Update Ihrer
Lizenz automatisch erfolgen. Wenn Sie neue Erweiterungen erwerben,
wird eine neue Aktivierungs-ID an Sie vergeben.
3. Aktivieren Sie Ihre Avid-Editing-Anwendung.
Folgen Sie den folgenden Anweisungen zum Durchführen von Upgrades.
Weitere Informationen zum Avid License Control-Tool finden Sie unter
„Elektronische Aktivierung der Avid-Editing-Anwendung“ auf Seite 83.
4. Aktivieren Sie PhraseFind, ein PhraseFind-Sprachpaket oder ScriptSync.
Siehe „Elektronische Aktivierung der Avid-Editing-Anwendung“ auf Seite 83.
Durchführen von Upgrades der Avid-Editing-Anwendung 91
Page 92

So aktualisieren Sie Ihre Avid-Editing-Anwendung online auf der
Grundlage einer vorhandenen Softwarelizenz:
1. Rufen Sie das folgende Verzeichnis auf:
(Windows) Start\Alle Programme\Avid\Utilities\License Control
(Mac) Programme/Dienstprogramme/Avid Utilities/License Control
Das Avid License Control-Tool öffnet sich.
2. Klicken Sie auf „Activate“ neben der Avid-Editing-Anwendung.
Das Aktivierungstool wird geöffnet.
3. Wählen Sie „I am connected to the Internet and will use this computer“ und
klicken Sie auf „Continue“.
Ein Fenster wird geöffnet, in dem Sie Systeminformationen eingeben und
Ihr Produkt registrieren können.
4. Wenn Ihre System-ID nicht angezeigt wird, geben Sie sie in das entsprechende
Textfeld ein. Anwender, die bereits Kunden sind, nutzen ihre alte System-ID.
Wie Sie Ihre System-ID finden, wenn sie nicht angezeigt wird, erfahren Sie
unter „Was benötige ich, um meine Avid-Editing-Anwendungen zu
aktivieren?“ auf Seite 81.
n Wenn zu Ihrer bisherigen Editing-Anwendung erworbene Erweiterungen wie
PhraseFind oder ScriptSync gehörten, werden diese mit dem Upgrade
automatisch aktiviert.
5. Geben Sie Ihre Aktivierungs-ID in das entsprechende Textfeld ein.
Verwenden Sie die Aktivierungs-ID für die neue Version Ihrer Software.
92 Installationshandbuch für Avid-Editing-Anwendungen
Page 93

6. Sie haben folgende Möglichkeiten:
t Sollten Sie Ihr Produkt noch nicht registriert haben, wählen Sie
„Register your product with Avid Technology, Inc. now“. Wenn Sie die
Datenschutzerklärung von Avid lesen möchten, klicken Sie auf „Read
Privacy Policy“. Klicken Sie anschließend auf „Next“.
Ein Registrierungs-Dialogfeld wird geöffnet. Wenn Sie sich online bei
Avid registrieren, erhalten Sie wichtige Updates und Wartungsinformationen.
t Wählen Sie „Don’t register at this time“ und klicken Sie anschließend
auf „Activate“.
Das Aktivierungstool bestätigt Ihre Systeminformationen. Nach
Abschluss der Aktivierung wird durch eine Meldung bestätigt, dass
Ihre Software erfolgreich aktiviert wurde.
n Falls Sie Ihre Software zu diesem Zeitpunkt nicht registrieren möchten, können Sie
dies auch später jederzeit tun, indem Sie in Ihrer Avid-Editing-Anwendung auf
„Special > Register“ klicken.
7. Wenn Sie sich in Schritt 6 für die Registrierung der Software entschieden
haben, gehen Sie folgendermaßen vor:
a. Geben Sie im Registrierungs-Dialogfeld Ihren Namen, Ihre Adresse
und Ihre Kontaktinformationen in die entsprechenden Textfelder ein.
Pflichtfelder sind mit einem Sternchen (*) gekennzeichnet.
b. Klicken Sie auf „Next“.
Ein Registrierungs-Dialogfeld wird geöffnet.
c. Geben Sie die entsprechenden Produkt- und Kundeninformationen ein.
Durchführen von Upgrades der Avid-Editing-Anwendung 93
Page 94

d. Klicken Sie auf „Activate and Register“.
Das Aktivierungstool bestätigt Ihre Systeminformationen. Nach
Abschluss der Aktivierung wird durch eine Meldung bestätigt, dass
Ihre Software erfolgreich aktiviert wurde, und die Schaltfläche
verändert sich zu „Deactivate“.
8. Klicken Sie auf „OK“.
So aktualisieren Sie Ihre Avid-Editing-Anwendung online von einer
Dongle-Lizenz auf eine Softwarelizenz:
1. Schließen Sie den Dongle an Ihr Avid-Editing-System an.
2. Rufen Sie das folgende Verzeichnis auf:
(Windows) Start\Alle Programme\Avid\Utilities\License Control
(Mac) Programme/Dienstprogramme/Avid Utilities/License Control
Das Avid License Control-Tool öffnet sich.
3. Klicken Sie auf „Activate“ neben der Avid-Editing-Anwendung.
Das Aktivierungs-Dialogfeld wird geöffnet.
4. Wählen Sie „I am connected to the Internet and will use this computer“ und
klicken Sie auf „Continue“.
Ein Fenster wird geöffnet, in dem Sie Systeminformationen eingeben und
Ihr Produkt registrieren können.
5. Wenn Ihre System-ID nicht angezeigt wird, geben Sie sie in das entsprechende
Textfeld ein. Anwender, die bereits Kunden sind, nutzen ihre alte System-ID.
Wie Sie Ihre System-ID finden, wenn sie nicht angezeigt wird, erfahren Sie
unter „Was benötige ich, um meine Avid-Editing-Anwendungen zu
aktivieren?“ auf Seite 81.
94 Installationshandbuch für Avid-Editing-Anwendungen
Page 95

n Wenn zu Ihrer bisherigen Editing-Anwendung erworbene Erweiterungen wie
PhraseFind oder ScriptSync gehörten, werden diese mit dem Upgrade
automatisch aktiviert.
6. Geben Sie Ihre Aktivierungs-ID in das entsprechende Textfeld ein. Wie Sie
Ihre Aktivierungs-ID finden, erfahren Sie unter „Was benötige ich, um
meine Avid-Editing-Anwendungen zu aktivieren?“ auf Seite 81.
7. Sie haben folgende Möglichkeiten:
t Sollten Sie Ihr Produkt noch nicht registriert haben, wählen Sie
„Register your product with Avid Technology, Inc. now“. Wenn Sie die
Datenschutzerklärung von Avid lesen möchten, klicken Sie auf „Read
Privacy Policy“. Klicken Sie anschließend auf „Next“.
Ein Registrierungs-Dialogfeld wird geöffnet. Wenn Sie sich online bei
Avid registrieren, erhalten Sie wichtige Updates und Wartungsinformationen.
t Wählen Sie „Don’t register at this time“ und klicken Sie anschließend
auf „Activate“.
Das Aktivierungstool bestätigt Ihre Systeminformationen. Nach
Abschluss der Aktivierung wird durch eine Meldung bestätigt, dass
Ihre Software erfolgreich aktiviert wurde.
n Falls Sie Ihre Software zu diesem Zeitpunkt nicht registrieren möchten, können Sie
dies auch später jederzeit tun, indem Sie in Ihrer Avid-Editing-Anwendung auf
„Special > Register“ klicken.
Durchführen von Upgrades der Avid-Editing-Anwendung 95
Page 96

8. Wenn Sie sich in Schritt 7 für die Registrierung der Software entschieden
haben, gehen Sie folgendermaßen vor:
a. Geben Sie im Registrierungs-Dialogfeld Ihren Namen, Ihre Adresse
und Ihre Kontaktinformationen in die entsprechenden Textfelder ein.
Pflichtfelder sind mit einem Sternchen (*) gekennzeichnet.
b. Klicken Sie auf „Next“.
Ein Registrierungs-Dialogfeld wird geöffnet.
c. Geben Sie die entsprechenden Produkt- und Kundeninformationen ein.
d. Klicken Sie auf „Activate“.
9. Sie werden durch eine Warnung des Systems aufgefordert, die Deaktivierung
Ihres Dongles zu bestätigen. Klicken Sie auf „OK“.
Das Aktivierungstool bestätigt Ihre Systeminformationen. Nach Abschluss
der Aktivierung wird durch eine Meldung bestätigt, dass Ihre Software
erfolgreich aktiviert wurde.
10. Klicken Sie auf „OK“.
So aktualisieren Sie Ihre Avid-Editing-Anwendung offline auf eine
Softwarelizenz:
1. Rufen Sie das folgende Verzeichnis auf:
(Windows) Start\Alle Programme\Avid\Utilities\License Control
(Mac) Programme/Dienstprogramme/Avid Utilities/License Control
Das Avid License Control-Tool öffnet sich.
2. Klicken Sie auf „Activate“ neben der Avid-Editing-Anwendung.
Das Aktivierungsfenster wird geöffnet.
96 Installationshandbuch für Avid-Editing-Anwendungen
Page 97

3. Wählen Sie „I am not connected to the Internet and will be using another
computer that is connected to the Internet“ und klicken Sie auf „Continue“.
Ein Fenster wird geöffnet, in dem Sie Systeminformationen eingeben und
Ihr Produkt registrieren können.
4. Wenn Ihre System-ID nicht angezeigt wird, geben Sie sie in das entsprechende
Textfeld ein. Anwender, die bereits Kunden sind, nutzen ihre alte System-ID.
Wie Sie Ihre System-ID finden, wenn sie nicht angezeigt wird, erfahren Sie
unter „Was benötige ich, um meine Avid-Editing-Anwendungen zu
aktivieren?“ auf Seite 81.
n Wenn zu Ihrer bisherigen Editing-Anwendung erworbene Erweiterungen wie
PhraseFind oder ScriptSync gehörten, werden diese mit dem Upgrade
automatisch aktiviert.
n Ihre Device-ID wird am unteren Ende der Aktivierungs-Seite angezeigt. Notieren
Sie sie für später.
5. Geben Sie Ihre Aktivierungs-ID in das entsprechende Textfeld ein. Wie Sie
Ihre Aktivierungs-ID finden, erfahren Sie unter „Was benötige ich, um
meine Avid-Editing-Anwendungen zu aktivieren?“ auf Seite 81.
n Lassen Sie das Avid License Control-Tool auf dem System geöffnet, das Sie
aktivieren möchten. Sie werden aufgefordert, zusätzliche Informationen
einzugeben.
6. Klicken Sie auf „Next“.
7. Folgen Sie den Anweisungen im Avid License Control-Tool und klicken Sie
auf „Next“.
8. Öffnen Sie auf einem Computer mit Internetverbindung einen Webbrowser
und navigieren Sie zu http://avid.com/license.
Durchführen von Upgrades der Avid-Editing-Anwendung 97
Page 98

9. Folgen Sie den Anweisungen auf der Website.
Die Website erstellt eine license.bin-Datei. Diese Datei enthält
Lizenzinformationen, die für das Aktivieren Ihrer Avid-Editing-Anwendung
benötigt werden.
10. Sobald Sie die license.bin-Datei erhalten, fahren Sie an dem Computer fort,
auf dem Sie die Avid-Editing-Anwendung aktivieren möchten.
11. Öffnen Sie das Avid License Control-Tool, klicken Sie auf „Browse“,
wählen Sie die auf Ihrem System abgelegte license.bin-Datei aus und
klicken Sie dann auf „Open“.
Das Aktivierungstool bestätigt Ihre Systeminformationen. Nach Abschluss
der Aktivierung wird durch eine Meldung bestätigt, dass Ihre Software
erfolgreich aktiviert wurde, und die Schaltfläche verändert sich zu
„Deactivate“.
n Wiederholen Sie diese Schritte für alle Editing-Anwendungen oder
-Erweiterungen, die Sie aktivieren möchten.
12. Falls die Avid-Editing-Anwendung geöffnet ist, starten Sie diese neu, damit
die Änderungen wirksam werden.
So aktualisieren Sie Ihre Avid-Editing-Anwendung mit einem Dongle:
1. Vergewissern Sie sich, dass der Dongle an Ihr Avid-Editing-System
angeschlossen ist.
2. Gehen Sie in das Verzeichnis, in dem die Datei „DongleManager.exe“ zu
finden ist:
t (Windows) C:\Programme\Avid\Utilities\DongleManager
t (Mac) Macintosh HD/Programme/Dienstprogramme/Avid
Utilities/DongleManager
98 Installationshandbuch für Avid-Editing-Anwendungen
Page 99

3. Doppelklicken Sie auf die Datei „DongleManager.exe“.
Das Dongle Manager-Fenster wird geöffnet.
4. Klicken Sie auf die „Update“-Registerkarte.
5. Klicken Sie auf „Open“ und navigieren Sie zum Speicherort Ihrer
Dongle-Aktualisierungsdatei (.avd).
6. Wählen Sie die Aktualisierungsdatei aus und klicken Sie auf „Open“.
7. Klicken Sie auf „Update“.
Die Anwendung „DongleManager.exe“ aktualisiert Ihren Dongle und zeigt
eine Meldung an, wenn die Verifizierung abgeschlossen ist.
8. Starten Sie Ihre Avid-Editing-Anwendung.
Das Willkommen-Fenster öffnet sich.
9. Wählen Sie „I want to use a dongle to activate my software“.
10. Klicken Sie auf „Continue“.
Das System bestätigt Ihre Daten. Nach Abschluss der Aktivierung wird
durch eine Meldung bestätigt, dass Ihre Software erfolgreich aktiviert
wurde.
So aktualisieren Sie Ihre Avid-Editing-Anwendung mit Hilfe der Datei
„Versioner.avd“ (nur für Kunden mit Avid-Supportverträgen):
1. Laden Sie die zu Ihrer Editing-Anwendung gehörende Datei „Versioner.avd“
herunter.
2. Speichern Sie die Datei „Versioner.avd“ im Ordner der Editing-Anwendung:
(Windows) C:\Programme\Avid\[Avid-Editing-Anwendung]
(Mac) Macintosh HD/Programme/[Avid-Editing-Anwendung]
Durchführen von Upgrades der Avid-Editing-Anwendung 99
Page 100

3. Starten Sie Ihre Avid-Editing-Anwendung.
Das Avid License Control-Tool öffnet sich.
4. Klicken Sie auf „Activate“ neben der Avid-Editing-Anwendung.
5. Sie haben folgende Möglichkeiten:
t Wählen Sie „I am connected to the Internet and will use this computer“.
t Wählen Sie „I am not connected to the Internet and will be using
another computer that is connected to the Internet“.
6. Klicken Sie auf „Continue“.
Das Avid-Aktivierungs-Dialogfeld wird geöffnet. Die Eingabefelder für Ihre
System-ID und Aktivierungs-ID werden automatisch vom System
ausgefüllt.
n Falls Sie einen Dongle verwenden, werden diese Felder nur dann automatisch
ausgefüllt, wenn Sie Ihren Dongle angeschlossen haben.
7. Fahren Sie mit der Upgrade-Lizenzaktivierung fort wie in diesem Abschnitt
beschrieben (je nachdem, welche Lizenzoption Sie in Schritt 5 gewählt
haben).
Verwenden der 30-Tage-Testversion
Bevor Sie die Avid-Editing-Anwendung, PhraseFind oder ScriptSync erwerben,
können Sie diese Programme im Rahmen einer 30-Tage-Testversion ausprobieren.
Wenn Sie die 30-Tage-Testversion der Avid-Editing-Anwendung nutzen, bekommen
Sie auch eine 30-Tage-Testlizenz für PhraseFind und ScriptSync. Ihre 30-TageTestversion von PhraseFind umfasst außerdem Zugang zu allen verfügbaren
100 Installationshandbuch für Avid-Editing-Anwendungen
 Loading...