

Page 1

™
Avid® DS Nitris
Getting Started Guide
Version 7.5
make manage move | media
™
Avid
®
Page 2

Copyright and Disclaimer
Product specifications are subject to change without notice and do not represent a commitment on the part
of Avid Technology, Inc. The software described in this document is furnished under a license agreement.
You can obtain a copy of that license by visiting Avid's Web site at www.avid.com. The terms of that license
are also available in the product in the same directory as the software. The software may not be reverse
assembled and may be used or copied only in accordance with the terms of the license agreement. It is
against the law to copy the software on any medium except as specifically allowed in the license
agreement.
No part of this document may be reproduced or transmitted in any form or by any means, electronic or
mechanical, including photocopying and recording, for any purpose without the express written permission
of Avid Technology, Inc.
Copyright © 2003–2004 Avid Technology, Inc. and its licensors. All rights reserved. Printed in
USA.
The Avid DS and Avid DS Nitris application uses JScript and Visual Basic Scripting Edition from Microsoft
Corporation.
Attn. Government User(s). Restricted Rights Legend
U.S. GOVERNMENT RESTRICTED RIGHTS. This Software and its documentation are “commercial
computer software” or “commercial computer software documentation.” In the event that such Software or
documentation is acquired by or on behalf of a unit or agency of the U.S. Government, all rights with
respect to this Software and documentation are subject to the terms of the License Agreement, pursuant to
FAR §12.212(a) and/or DFARS §227.7202-1(a), as applicable.
Trademarks
888 I/O, Adrenaline, AirPlay, AirSPACE, AirSPACE HD, AniMatte, AudioSuite, AudioVision, AutoSync, Avid,
Avid DNA, Avid DNxHD, AVIDdrive, AVIDdrive Towers, AvidNet, AvidNetwork, AVIDstripe, Avid Mojo, Avid
Unity, Avid Xpress, AVoption, AVX, CamCutter, ChromaCurve, ChromaWheel, DAE, D-Fi, D-fx, Digidesign,
Digidesign Audio Engine, Digidesign Intelligent Noise Reduction, DigiDrive, Digital Nonlinear Accelerator,
DigiTranslator, DINR, D-Verb, Equinox, ExpertRender, FieldPak, Film Composer, FilmScribe, FluidMotion,
HIIP, HyperSPACE, HyperSPACE HDCAM, IllusionFX, Image Independence, Intraframe, iS9, iS18, iS23,
iS36, Lo-Fi, Magic Mask, make manage move | media, Marquee, Matador, Maxim, MCXpress,
Media Composer, MediaDock, MediaDock Shuttle, Media Fusion, Media Illusion, MediaLog, Media Reader,
Media Recorder, MEDIArray, MediaShare, Meridien, MetaSync, NaturalMatch, Nearchive, NetReview,
NewsCutter, Nitris, OMF, OMF Interchange, OMM, Open Media Framework, Open Media Management,
ProEncode, Pro Tools, QuietDrive, Recti-Fi, RetroLoop, rS9, rS18, Sci-Fi, Softimage, Sound Designer II,
SPACE, SPACEShift, Symphony, the Avid DS logo, Trilligent, UnityRAID, Vari-Fi, Video Slave Driver,
VideoSPACE, Xdeck, and XSI are either registered trademarks or trademarks of Avid Technology, Inc. in
the United States and/or other countries.
All other trademarks contained herein are the property of their respective owners.
Footage
Saturn “Calvin Egg” — Courtesy of Cossette Communications.
GOT FOOTAGE?
Editors — Filmmakers — Special Effects Artists — Game Developers — Animators — Educators —
Broadcasters — Content creators of every genre — Just finished an incredible project and want to
share it with the world?
Send us your reels and we may use your footage in our show reel or demo!*
For a copy of our release and Avid’s mailing address, go to www.avid.com/footage.
*Note: Avid cannot guarantee the use of materials submitted.
Avid DS Nitris Getting Started Guide • 0130-05573-02. August 2004.
2
Page 3

Contents
Getting Started . . . . . . . . . . . . . . . . . . . . . . . . . . . . . . . . . . . . . . . . . 9
Prerequisites . . . . . . . . . . . . . . . . . . . . . . . . . . . . . . . . . . . . . . . . . . . . . 10
Using the Avid DS Training Station . . . . . . . . . . . . . . . . . . . . . . . . . . . . 10
Accessing the Media . . . . . . . . . . . . . . . . . . . . . . . . . . . . . . . . . . . . . . . 11
Logging on to Your Workstation. . . . . . . . . . . . . . . . . . . . . . . . . . . . . . . 11
If You Need Help. . . . . . . . . . . . . . . . . . . . . . . . . . . . . . . . . . . . . . . . . . . . . . 13
Avid DS Customer Support . . . . . . . . . . . . . . . . . . . . . . . . . . . . . . . . . . . . . . 13
E-mail Support . . . . . . . . . . . . . . . . . . . . . . . . . . . . . . . . . . . . . . . . . . . . 13
Web Support . . . . . . . . . . . . . . . . . . . . . . . . . . . . . . . . . . . . . . . . . . . . . 13
Upload Utility . . . . . . . . . . . . . . . . . . . . . . . . . . . . . . . . . . . . . . . . . . . . . 14
Avid Community Forum . . . . . . . . . . . . . . . . . . . . . . . . . . . . . . . . . . . . . 14
Accessing the Online Library . . . . . . . . . . . . . . . . . . . . . . . . . . . . . . . . . . . . 15
How to Order Documentation . . . . . . . . . . . . . . . . . . . . . . . . . . . . . . . . . . . . 15
Avid Educational Services. . . . . . . . . . . . . . . . . . . . . . . . . . . . . . . . . . . . . . . 15
Chapter 1 Starting a Project. . . . . . . . . . . . . . . . . . . . . . . . . . . . . . . . . . . . . . . 17
The Digital Post-Production Process . . . . . . . . . . . . . . . . . . . . . . . . . . . . . . 18
Working with Project Files and Media . . . . . . . . . . . . . . . . . . . . . . . . . . . . . . 20
What is a Project? . . . . . . . . . . . . . . . . . . . . . . . . . . . . . . . . . . . . . . . . . 21
Creating a New Project . . . . . . . . . . . . . . . . . . . . . . . . . . . . . . . . . . . . . . . . . 22
Chapter 2 Working on the Desktop . . . . . . . . . . . . . . . . . . . . . . . . . . . . . . . . . 25
Restoring the Default Layout. . . . . . . . . . . . . . . . . . . . . . . . . . . . . . . . . . . . . 26
Title Bar. . . . . . . . . . . . . . . . . . . . . . . . . . . . . . . . . . . . . . . . . . . . . . . . . . . . . 27
Layouts . . . . . . . . . . . . . . . . . . . . . . . . . . . . . . . . . . . . . . . . . . . . . . . . . . . . . 28
Accessing the Default Layouts . . . . . . . . . . . . . . . . . . . . . . . . . . . . . . . . 30
Using the Menus . . . . . . . . . . . . . . . . . . . . . . . . . . . . . . . . . . . . . . . . . . . . . . 31
Page 4

Status Bar. . . . . . . . . . . . . . . . . . . . . . . . . . . . . . . . . . . . . . . . . . . . . . . . . . . 32
Accessing the Views . . . . . . . . . . . . . . . . . . . . . . . . . . . . . . . . . . . . . . . . . . 33
Combo Views . . . . . . . . . . . . . . . . . . . . . . . . . . . . . . . . . . . . . . . . . . . . 34
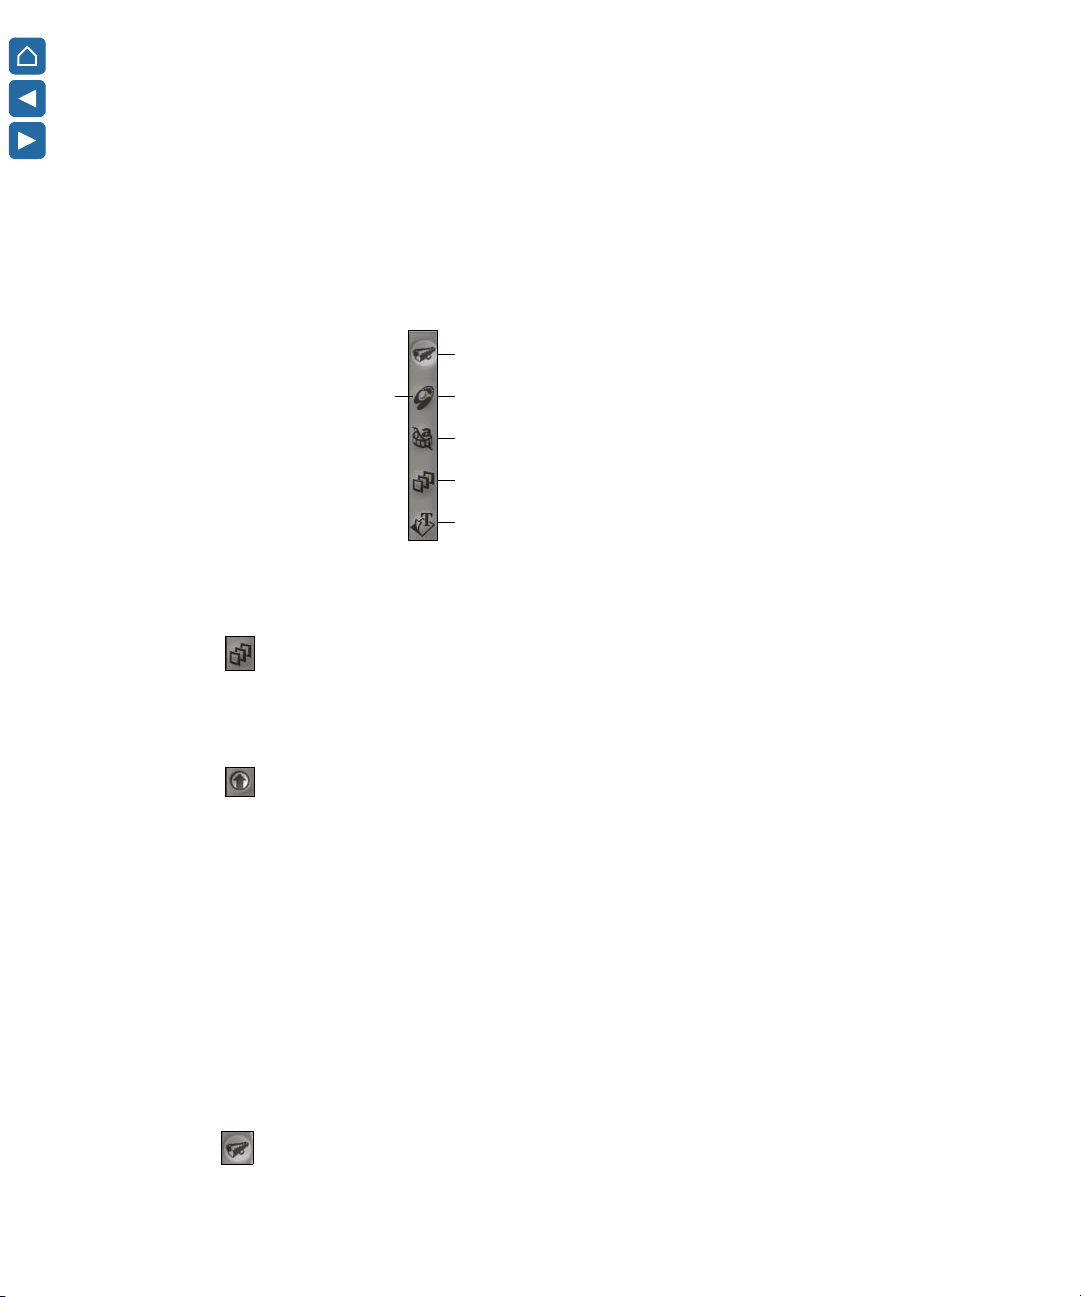
Using the Toolbars . . . . . . . . . . . . . . . . . . . . . . . . . . . . . . . . . . . . . . . . . . . . 35
Dialog Boxes . . . . . . . . . . . . . . . . . . . . . . . . . . . . . . . . . . . . . . . . . . . . . . . . 36
Entering Values . . . . . . . . . . . . . . . . . . . . . . . . . . . . . . . . . . . . . . . . . . . . . . 37
Chapter 3 Capturing Material . . . . . . . . . . . . . . . . . . . . . . . . . . . . . . . . . . . . . . 39
Capturing Source Material . . . . . . . . . . . . . . . . . . . . . . . . . . . . . . . . . . . . . . 40
The Avid Explorer . . . . . . . . . . . . . . . . . . . . . . . . . . . . . . . . . . . . . . . . . 40
Organizing your Project Files . . . . . . . . . . . . . . . . . . . . . . . . . . . . . . . . 42
Changing the View Mode . . . . . . . . . . . . . . . . . . . . . . . . . . . . . . . . . . . 43
Identifying File Types in a Bin . . . . . . . . . . . . . . . . . . . . . . . . . . . . . . . . 43
Configuring the External Device. . . . . . . . . . . . . . . . . . . . . . . . . . . . . . . . . . 44
Capturing from Tape . . . . . . . . . . . . . . . . . . . . . . . . . . . . . . . . . . . . . . . . . . 46
Capturing from File. . . . . . . . . . . . . . . . . . . . . . . . . . . . . . . . . . . . . . . . . . . . 48
Chapter 4 Getting Ready to Edit . . . . . . . . . . . . . . . . . . . . . . . . . . . . . . . . . . . 53
Editing Layout. . . . . . . . . . . . . . . . . . . . . . . . . . . . . . . . . . . . . . . . . . . . . . . . 54
Previewing Clips. . . . . . . . . . . . . . . . . . . . . . . . . . . . . . . . . . . . . . . . . . . . . . 56
Using J-K-L Keys for Three-Button Play . . . . . . . . . . . . . . . . . . . . . . . . 57
Marking In and Out-Points in the Source Viewer. . . . . . . . . . . . . . . . . . 58
Creating Subclips . . . . . . . . . . . . . . . . . . . . . . . . . . . . . . . . . . . . . . . . . 59
Changing the Thumbnail of a Clip . . . . . . . . . . . . . . . . . . . . . . . . . . . . . 60
Chapter 5 Creating a First Cut . . . . . . . . . . . . . . . . . . . . . . . . . . . . . . . . . . . . . 61
The Timeline. . . . . . . . . . . . . . . . . . . . . . . . . . . . . . . . . . . . . . . . . . . . . . . . . 62
Working with Tracks. . . . . . . . . . . . . . . . . . . . . . . . . . . . . . . . . . . . . . . . . . . 63
Selecting Tracks and Regions of Tracks. . . . . . . . . . . . . . . . . . . . . . . . 64
Adding, Reordering and Deleting Tracks. . . . . . . . . . . . . . . . . . . . . . . . 64
Setting the Track Height . . . . . . . . . . . . . . . . . . . . . . . . . . . . . . . . . . . . 65
Muting Audio and Video Tracks. . . . . . . . . . . . . . . . . . . . . . . . . . . . . . . 66
4
Page 5

Setting Tracks to Solo . . . . . . . . . . . . . . . . . . . . . . . . . . . . . . . . . . . . . . 66
Navigating the Timeline. . . . . . . . . . . . . . . . . . . . . . . . . . . . . . . . . . . . . . . . . 67
Using the Scale and Scroll Bars. . . . . . . . . . . . . . . . . . . . . . . . . . . . . . . 67
Selecting Objects on the Timeline. . . . . . . . . . . . . . . . . . . . . . . . . . . . . . . . . 68
Placing Clips on the Timeline . . . . . . . . . . . . . . . . . . . . . . . . . . . . . . . . . . . . 68
Dragging and Dropping Clips . . . . . . . . . . . . . . . . . . . . . . . . . . . . . . . . . 68
Inserting Clips. . . . . . . . . . . . . . . . . . . . . . . . . . . . . . . . . . . . . . . . . . . . . 70
Overwriting Clips . . . . . . . . . . . . . . . . . . . . . . . . . . . . . . . . . . . . . . . . . . 71
Replacing Clips . . . . . . . . . . . . . . . . . . . . . . . . . . . . . . . . . . . . . . . . . . . 71
Chapter 6 Refining the Edit . . . . . . . . . . . . . . . . . . . . . . . . . . . . . . . . . . . . . . . 73
Rearranging Clips . . . . . . . . . . . . . . . . . . . . . . . . . . . . . . . . . . . . . . . . . . . . . 74
Copying Clips . . . . . . . . . . . . . . . . . . . . . . . . . . . . . . . . . . . . . . . . . . . . . 75
Removing Clips from the Timeline . . . . . . . . . . . . . . . . . . . . . . . . . . . . . 75
Trimming Clips . . . . . . . . . . . . . . . . . . . . . . . . . . . . . . . . . . . . . . . . . . . . . . . 76
Using the Trim Mode . . . . . . . . . . . . . . . . . . . . . . . . . . . . . . . . . . . . . . . 77
Using Ripple Mode When Trimming Clips . . . . . . . . . . . . . . . . . . . . . . . 78
Chapter 7 Applying Effects . . . . . . . . . . . . . . . . . . . . . . . . . . . . . . . . . . . . . . . 81
The Effects Library . . . . . . . . . . . . . . . . . . . . . . . . . . . . . . . . . . . . . . . . . . . . 82
Effect Bar Colors . . . . . . . . . . . . . . . . . . . . . . . . . . . . . . . . . . . . . . . . . . 83
Applying Effects . . . . . . . . . . . . . . . . . . . . . . . . . . . . . . . . . . . . . . . . . . . . . . 84
Applying Effects to Clips. . . . . . . . . . . . . . . . . . . . . . . . . . . . . . . . . . . . . 85
Using the Property Editors . . . . . . . . . . . . . . . . . . . . . . . . . . . . . . . . . . . 86
Applying Effects to Tracks . . . . . . . . . . . . . . . . . . . . . . . . . . . . . . . . . . . 87
Applying Transition Effects. . . . . . . . . . . . . . . . . . . . . . . . . . . . . . . . . . . 92
Applying Audio Effects . . . . . . . . . . . . . . . . . . . . . . . . . . . . . . . . . . . . . . 94
Creating a Stack of Effects. . . . . . . . . . . . . . . . . . . . . . . . . . . . . . . . . . . 97
The Effects Layout . . . . . . . . . . . . . . . . . . . . . . . . . . . . . . . . . . . . . . . . . . . . 98
Using the Viewers . . . . . . . . . . . . . . . . . . . . . . . . . . . . . . . . . . . . . . . . 101
5
Page 6

Chapter 8 Working with Effects . . . . . . . . . . . . . . . . . . . . . . . . . . . . . . . . . . . 103
Editing Effects . . . . . . . . . . . . . . . . . . . . . . . . . . . . . . . . . . . . . . . . . . . . . . 104
Opening an Effect’s Property Editor . . . . . . . . . . . . . . . . . . . . . . . . . . 104
Bypassing Effects . . . . . . . . . . . . . . . . . . . . . . . . . . . . . . . . . . . . . . . . 106
Saving Effects . . . . . . . . . . . . . . . . . . . . . . . . . . . . . . . . . . . . . . . . . . . 107
Substituting Effects . . . . . . . . . . . . . . . . . . . . . . . . . . . . . . . . . . . . . . . 111
Animating Effects . . . . . . . . . . . . . . . . . . . . . . . . . . . . . . . . . . . . . . . . . . . . 111
Chapter 9 Processing . . . . . . . . . . . . . . . . . . . . . . . . . . . . . . . . . . . . . . . . . . . 113
Processing Effects . . . . . . . . . . . . . . . . . . . . . . . . . . . . . . . . . . . . . . . . . . . 114
How Do I Process?. . . . . . . . . . . . . . . . . . . . . . . . . . . . . . . . . . . . . . . . . . . 116
Chapter 10 Adding Graphics and 2D Titles . . . . . . . . . . . . . . . . . . . . . . . . . . 119
Starting a Graphics Session. . . . . . . . . . . . . . . . . . . . . . . . . . . . . . . . . . . . 120
The Graphics Combo View . . . . . . . . . . . . . . . . . . . . . . . . . . . . . . . . . . . . 121
The Graphics Layout . . . . . . . . . . . . . . . . . . . . . . . . . . . . . . . . . . . . . . . . . 122
Displaying the Safe/Action Title Guides . . . . . . . . . . . . . . . . . . . . . . . . . . . 124
Using the Graphics Property Tree . . . . . . . . . . . . . . . . . . . . . . . . . . . . . . . 125
Setting the Drawing Tool Properties. . . . . . . . . . . . . . . . . . . . . . . . . . . . . . 126
Defining Color. . . . . . . . . . . . . . . . . . . . . . . . . . . . . . . . . . . . . . . . . . . . . . . 127
Creating Graphics and Titles . . . . . . . . . . . . . . . . . . . . . . . . . . . . . . . . . . . 128
Using the Graphics Object View (GOV) . . . . . . . . . . . . . . . . . . . . . . . 129
Changing the Properties of Objects. . . . . . . . . . . . . . . . . . . . . . . . . . . 130
Finishing a Graphics Session. . . . . . . . . . . . . . . . . . . . . . . . . . . . . . . . . . . 131
Chapter 11 Compositing. . . . . . . . . . . . . . . . . . . . . . . . . . . . . . . . . . . . . . . . . . 133
About Compositing. . . . . . . . . . . . . . . . . . . . . . . . . . . . . . . . . . . . . . . . . . . 135
Compositing Methods. . . . . . . . . . . . . . . . . . . . . . . . . . . . . . . . . . . . . . . . . 136
Creating a Basic Matte. . . . . . . . . . . . . . . . . . . . . . . . . . . . . . . . . . . . . . . . 138
Viewing the Alpha Channel . . . . . . . . . . . . . . . . . . . . . . . . . . . . . . . . . 138
Keying out the Blue Background . . . . . . . . . . . . . . . . . . . . . . . . . . . . . 139
Simple Track Compositing . . . . . . . . . . . . . . . . . . . . . . . . . . . . . . . . . . . . . 142
6
Page 7

Using Composite Container Clips . . . . . . . . . . . . . . . . . . . . . . . . . . . . . . . . 144
The Layers View. . . . . . . . . . . . . . . . . . . . . . . . . . . . . . . . . . . . . . . . . . 147
Applying Effects to Layers . . . . . . . . . . . . . . . . . . . . . . . . . . . . . . . . . . 148
Viewing the Results of Composited Layers . . . . . . . . . . . . . . . . . . . . . 150
Chapter 12 Outputting a Sequence. . . . . . . . . . . . . . . . . . . . . . . . . . . . . . . . . 153
Outputting to Tape . . . . . . . . . . . . . . . . . . . . . . . . . . . . . . . . . . . . . . . . . . . 154
Outputting to File. . . . . . . . . . . . . . . . . . . . . . . . . . . . . . . . . . . . . . . . . . . . . 155
Chapter 13 Conforming . . . . . . . . . . . . . . . . . . . . . . . . . . . . . . . . . . . . . . . . . . 157
Methods for Conforming . . . . . . . . . . . . . . . . . . . . . . . . . . . . . . . . . . . . . . . 158
Conforming a Project . . . . . . . . . . . . . . . . . . . . . . . . . . . . . . . . . . . . . . . . . 159
Defining Your Storages . . . . . . . . . . . . . . . . . . . . . . . . . . . . . . . . . . . . 159
Conforming the Sequence . . . . . . . . . . . . . . . . . . . . . . . . . . . . . . . . . . 165
Index . . . . . . . . . . . . . . . . . . . . . . . . . . . . . . . . . . . . . . . . . . . . . . . . 169
7
Page 8

8
Page 9

Getting Started
The Avid DS Nitris system lets you create broadcast-quality output,
incorporating every possible production element—from full-speed,
high-resolution footage, to multimedia artwork and animation, to
computer-generated effects and titling.
n
The documentation describes the features and hardware of all models.
Therefore, your system might not contain certain features and hardware that
are covered in the documentation.
The Getting Started Guide consists of 13 chapters of the basic information
you’ll need to get working in Avid DS Nitris. The following table lists the
approximate amount of time needed to complete each chapter.
Chapter Time to complete
Chapter 1: Starting a Project 15 minutes
Chapter 2: Working on the Desktop 30 minutes
Chapter 3: Capturing Material 60 minutes
Chapter 4: Getting Ready to Edit 30 minutes
Chapter 5: Creating a First Cut 45 minutes
Chapter 6: Refining the Edit 30 minutes
Chapter 7: Applying Effects 90 minutes
Chapter 8: Working with Effects 30 minutes
Chapter 9: Processing 30 minutes
Chapter 10: Adding Graphics and 2D Titles 30 minutes
Chapter 11: Compositing 60 minutes
Page 10

Getting Started
Prerequisites
Chapter Time to complete
Chapter 12: Outputting a Sequence 20 minutes
Chapter 13: Conforming 45 minutes
Before using the Avid DS Nitris Getting Started Guide, your Avid DS Nitris
system should be properly configured with the appropriate hardware.
You should also have a working knowledge of your computer and its operating
system. You must know how to use the mouse or pen, standard menus and
commands, as well as how to open, save, and close files. If you need to review
these techniques, refer to Windows online help.
Installing the DivX Codec and QuickTime
Before you can view or capture the media files for this guide, you will need to
install the DivX codec and Apple QuickTime (if you do not already have them).
• DivX codec: Install the free standard codec from: www.divx.com/divx/
• QuickTime: Install the latest version of QuickTime from
www.apple.com/quicktime/
Using the Avid DS Training Station
If you are using the software-only Avid DS Training Station, you should know
that although it functions just like the software running on Avid DS Nitris
systems, there are some notable exceptions:
• A license or hardware key (dongle) is not needed to run the Avid DS
Training Station.
• You won’t be able to output to tape or file, nor export OMF
or AAF files.
• There are no indexing services.
• Any archives created on an Avid DS Training Station can only be used
on other Avid DS Nitris Training Stations.
10
®
, EDL,
Page 11

• Archiving is limited to project data (media cannot be included).
• Remote processing is not available.
• Captured and processed media, sequences, clips, and presets use
a different format than the standard Avid DS Nitris software.
Accessing the Media
The media files that you’ll be using in this guide were installed along with the
Avid DS software. You can find the media in the C:\Program
Files\Avid\DS_v7.5\Media_GetStarted folder. In addition, you’ll need
a videotape with some material on it to practice capturing material from tape
and outputting to tape.
Logging on to Your Workstation
Before you start Avid DS Nitris, you must log on to your workstation with
your Windows user name and password. Since many users can work on the
same workstation at different times, Windows gives you security and a unique
user profile, so as not to conflict with the settings of other users.
When you run Avid DS Nitris, you are accessing an environment that can be
customized. If you set any personal or project preferences while logged on,
Avid DS Nitris saves them to your user profile. The next time you log on
to that workstation, it recalls your previous settings.
To log on to your workstation:
1. When the Welcome to Windows dialog box is displayed, press
Ctrl+Alt+Delete.
2. In the Log On to Windows dialog box, enter your user name and password.
3. Click OK.
Once you have logged on to Windows, you can access your applications
and files.
11
Page 12

Getting Started
To start Avid DS Nitris, do one of the following:
t Double-click the Avid DS v7.5 icon on the Windows desktop.
t Select Start > Programs > Avid Products > Avid DS v7.5 > Avid DS v7.5.
The Avid DS Nitris Release Notes window displays. After you close the
Release Notes, the Open Project dialog box displays.
Later on, when you have created a project, here’s how you can exit
Avid DS Nitris. For now, do not exit Avid DS Nitris.
To exit Avid DS Nitris, do one of the following:
t Select File > Exit.
t Click the X (close) button at the top-right corner of the title bar.
t Press Alt+F4.
When you exit Avid DS Nitris, any changes that you made to the desktop
layout or user preferences are saved with your user profile and recalled the
next time you log on to the workstation.
12
Page 13

If You Need Help
If you are having trouble using Avid DS Nitris:
1. Retry the action, carefully following the instructions given for that task in
this guide. It is especially important to check each step of your workflow.
2. Check for the latest information that might have become available after
the documentation was published in one of two locations:
- If release notes are available, they ship with your application.
- If ReadMe files are available, they are supplied in your Avid
application folder. ReadMe files are also available from Help.
3. Check the documentation that came with your Avid application or your
hardware for maintenance or hardware-related issues.
4. See “Avid DS Customer Support” below.
5. For Technical Support, please call 800-800-AVID (800-800-2843).
Avid DS Customer Support
If You Need Help
E-mail Support
n
Web Support
The following sections describe various Avid DS Customer Support options.
The e-mail address for Avid DS Customer Support is: dssupport@avid.com.
You can use it for sending bug reports, usability questions, and avidds.cab
audit reports for system analysis. All e-mails are logged in the support
database and assigned a case number. Send one support request per e-mail.
It is mandatory that you include your SID number in the body of your e-mail
message for verification of your maintenance contract and case logging.
Otherwise, response will be delayed.
The Avid DS Support Center at http://www.softimage.com/avidds provides
quick access to a wide range of resources from the Avid DS teams and user
community. Downloads, including presets, drivers, and Quick Fix Engineering
(QFE), provide the latest solutions for use with your Avid DS system.
13
Page 14

Getting Started
Upload Utility
Online documentation, tutorials, and Knowledge Base articles ensure that you
get the most out of your work with Avid DS. It's like having a dedicated Avid
DS Customer Support engineer sitting at your desk!
For troubleshooting purposes, you can upload your files for Avid DS
Customer Support to examine. You can upload a project's archive, media files,
or other necessary data. Simply zip the files that you need to upload and use
a short name (for easy retrieval), such as archive.zip or Case274877.zip.
To upload your files:
1. Go to the Avid web site at http://www.softimage.com/avidds.
2. Select Contact > Upload Tool.
3. Once the file upload is complete, send an e-mail to dssupport@avid.com
to inform Avid DS Customer Support as there is no automatic notification
when a file is uploaded on the FTP server. Please provide the complete
and exact file name (case sensitive) to retrieve.
Avid Community Forum
Although the Avid DS community forum is frequently monitored by Avid
employees, it is not part of the official support channels. You are invited
to send your support requests to any of the above channels when required.
If you have an e-mail account, you can join the worldwide network of Avid DS
users exchanging ideas. The mailing list has proven to be quite useful for
users, and there is a constant stream of new subscribers.
To subscribe, send an e-mail to majordomo@softimage.com with the
following text in the body of your message: subscribe ds. You can get further
information on using the automated list server by e-mailing
majordomo@softimage.com with “help” as your message.
You can also join other Avid forums on the Avid web site at:
http://www.avid.com. Select Support > Forums.
14
Page 15

Accessing the Online Library
The Online Library contains all the Avid DS Nitris documentation in PDF
format. If it was installed on your system, you can access it from the Help
menu in Avid DS Nitris.
Accessing the Online Library
n
You will need Adobe® Acrobat® Reader® to view the documentation online.
To access the Online Library:
Do one of the following:
t In Avid DS Nitris, select Help > Online Library,
t Insert the Software CD into the CD-ROM drive, and select Online
Library from the main menu.
To install Adobe Acrobat Reader:
1. If Acrobat Reader is not installed on your system, insert the Drivers CD
into the CD-ROM drive.
2. Under the Various section, select Utilities.
How to Order Documentation
To order additional copies of this documentation from within the
United States, call Avid Sales at 800-949-AVID (800-949-2843). If you are
placing an order from outside the United States, contact your local
Avid representative.
Avid Educational Services
For information on courses/schedules, training centers, certifications,
courseware, and books, please visit www.avid.com/training or call Avid Sales
at 800-949-AVID (800-949-2843).
15
Page 16

Getting Started
16
Page 17

Chapter 1
Starting a Project
This chapter introduces you to the Avid DS Nitris post-production process.
You will learn how to create a project in Avid DS Nitris.
This chapter takes approximately 15 minutes to complete.
Page 18

Chapter 1 Starting a Project
The Digital Post-Production Process
The Avid DS Nitris system is a digital post-production environment. Once
you’ve acquired your footage in a digital format and put it on a storage device,
Avid DS Nitris gives you complete, random access to the media with instant
retrieval of clips and sequences. You also have quick, nonlinear access to any
part of your sequence, as well as the ability to apply a wide variety of digital
effects at any stage of your production.
Because each post-production facility and its projects are unique, you can use
the different tools and techniques available in Avid DS Nitris to complete
them. You can import sequences “offlined” on other systems and proceed with
your finishing tasks in Avid DS Nitris, or you can build a production from start
to finish directly in Avid DS Nitris.
After a project is complete, you can archive the media and files, making space
for your next project. If you need to go back and re-edit a project, you can
restore it at any time.
The following illustration gives you an overview of the Avid DS Nitris
production cycle.
18
Page 19
2
“Offline” edit
Create a rough cut of clips and
decide on timing of cuts and
transitions.
If offlined externally, load *AAF, AFE,
OMF files or EDLs, and digitize
material from file, tape, or audio.
The Digital Post-Production Process
Redigitize source
material in full,
uncompressed
resolution from file
or tape.
1
Capture material
Digitize source material at
low resolution directly from
file or tape.
7
Archive the project
- Archive project and/or media to tape.
- Project and media can be restored at
any time.
6
Output media
Output sequence to tape or
file, such as .avi.
3
Fine-tune edit
Fine-tune timing of cuts,
transitions, and other effects.
4
Apply effects
- Create composites.
- Add 2D and 3D effects.
- Mix and sweeten audio.
- Add titles and graphics.
- Perform dust/scratch
removal and color correction.
Repeat if necessary
5
Process
Process all effects applied to
clips and create new media
files (source media remains
untouched).
*AAF: Advanced Authoring Format, AFE: Avid File Exchange,
OMF: Open Media Framework, and EDL: Edit Decision List.
19
Page 20
Chapter 1 Starting a Project
Working with Project Files and Media
It is important to understand how Avid DS Nitris handles your data, so that you
can work efficiently when using large sizes of digitized video and audio files.
When you capture material, the digitized media is placed on an external
storage device, and the project files representing this media are stored in the
DS Projects folder on your workstation’s local disk drive. The project files
point Avid DS Nitris to the location of the corresponding digitized media
on the storage device.
Source material
20
Captured video and/or audio
are represented as master clips
in Avid DS Nitris.
Clips refer to media
on storage device.
Actual digitized material
(media)
is on storage device.
Page 21
What is a Project?
A project contains all the clips and sequences required for your work in
Avid DS Nitris. In the Avid Explorer, which is a file browser similar to
Windows Explorer, a project is represented as a folder that can contain many
subfolders to organize all the elements related to your project.
Projects contain
master clips,
sequences, and any
special presets and/or
scripts you create.
Sequence files
contain information
about the edit
decisions, composites,
and effects you’ve
applied to your clips.
Working with Project Files and Media
Master clips are
representations of the
digitized media stored
on a storage device.
Master clips can be
shared between
sequences in the
same project.
A project also links and tracks master clips and sequences with their
associated media, making file management easier.
When you place clips on the timeline to build your sequence, they maintain
pointers to the source media on the storage device. Any edits or effects that
you apply to the clips are noted in the sequence when you save it. Clips,
sequences, and presets (a customized set of properties saved for reuse on other
projects) are all considered project files, and must be stored in the project
folder. That way, you can easily archive, restore, and/or purge all files related
to a project.
When you archive a project, a copy of the media is saved to tape or disk and
the project files are saved in the DS Archives folder on your local workstation.
With the archived project files and associated media, you can reconstruct
everything in your project when necessary.
21
Page 22
Chapter 1 Starting a Project
Creating a New Project
As soon as you start Avid DS Nitris, you are prompted to open or create a
project and sequence. When you create a project, you define the format for
each sequence that you create in that particular project.
n
You can change the video and audio quality settings during the course of your
work according to the amount of storage space available. For example, if you
want to conserve disk space, do a rough cut on material captured at low
resolution or in compressed form. When the sequence is ready for finishing,
redigitize the material you need, so you can work at the quality at which you
will be outputting.
To create a project:
When you start Avid DS Nitris, the Open Project dialog box displays.
1
Select the Local Projects Only option at the bottom-left.
Click the New Project button.
2
22
Page 23
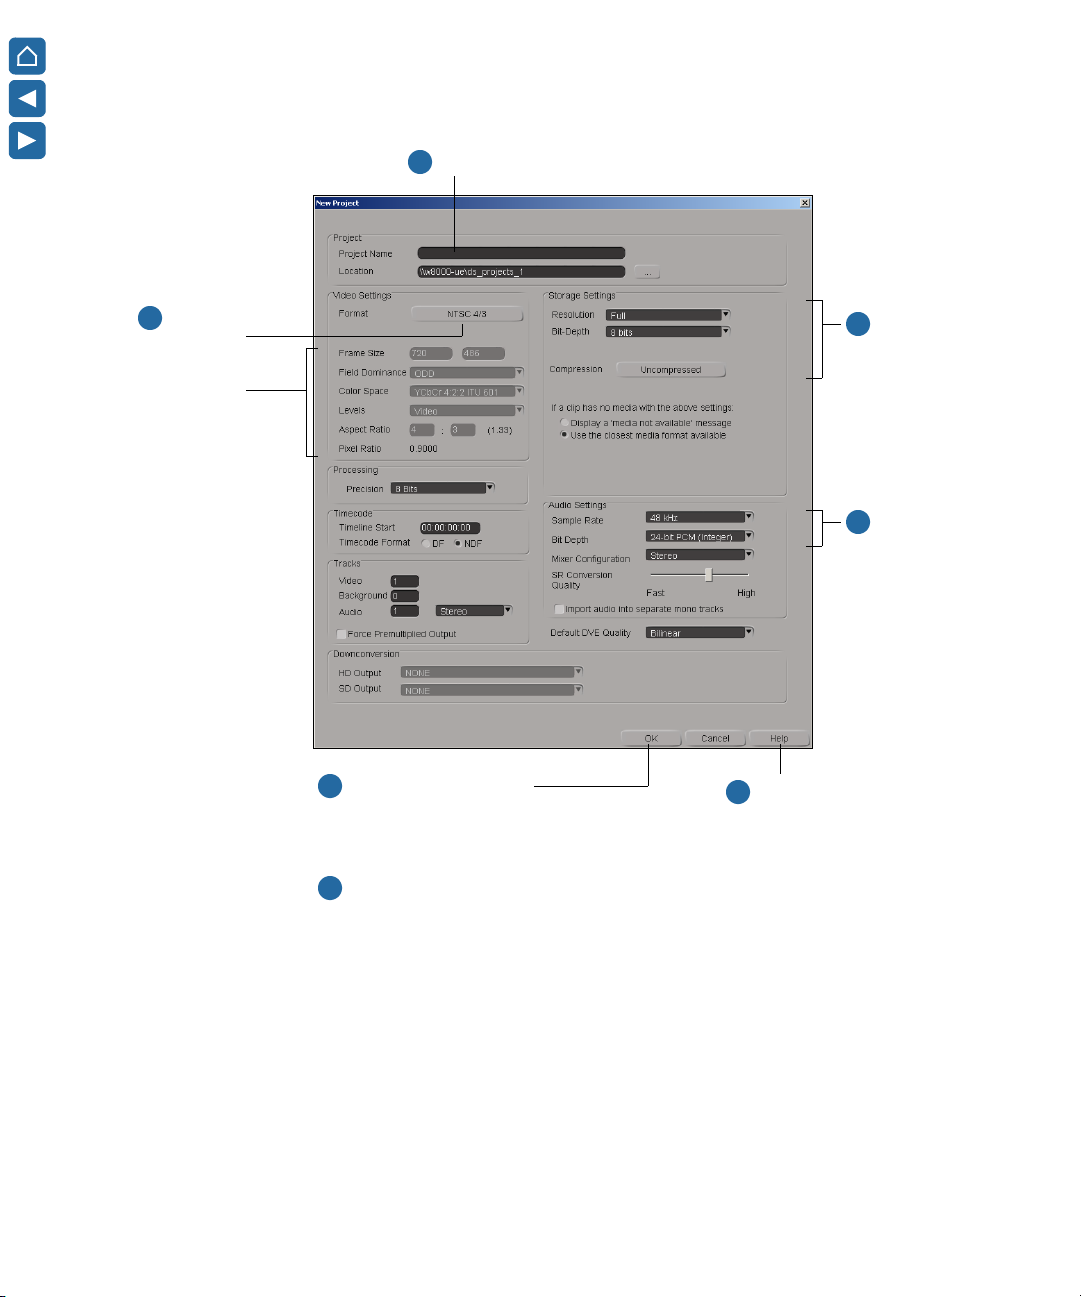
Give your project a name. We named ours My First Project.
2
Creating a New Project
Select the
3
NTSC 4/3
video format.
The frame
details are
usually set
automatically.
7
Save project preferences.
A new sequence is opened and the Editing layout is
displayed for you to start building a sequence.
Select File > Save. In the Save Sequence dialog
8
box, name it Sequence1 and click OK.
Set the
4
resolution,
bit depth, and
compression for
capturing the
video media.
Set the sample
5
rate and bit
depth for the
audio media.
Get more information on each
6
setting in this dialog box.
23
Page 24

Chapter 1 Starting a Project
24
Page 25

Chapter 2
Working on the Desktop
In this section, you will be familiarizing yourself with some of the basic elements
in Avid DS Nitris, such as the layouts, toolbars, dialog boxes, and menus.
This chapter takes approximately 30 minutes to complete.
Page 26
Chapter 2 Working on the Desktop
Restoring the Default Layout
Note that you might not be viewing the default Editing layout if your system
was previously in use by a different user. Before you start exploring the
Avid DS Nitris desktop, you should restore the layout to its defaults.
To restore the layout:
1. Select Layout > Restore Default Layout.
A message window displays.
2. Click OK.
3. Close and restart Avid DS Nitris.
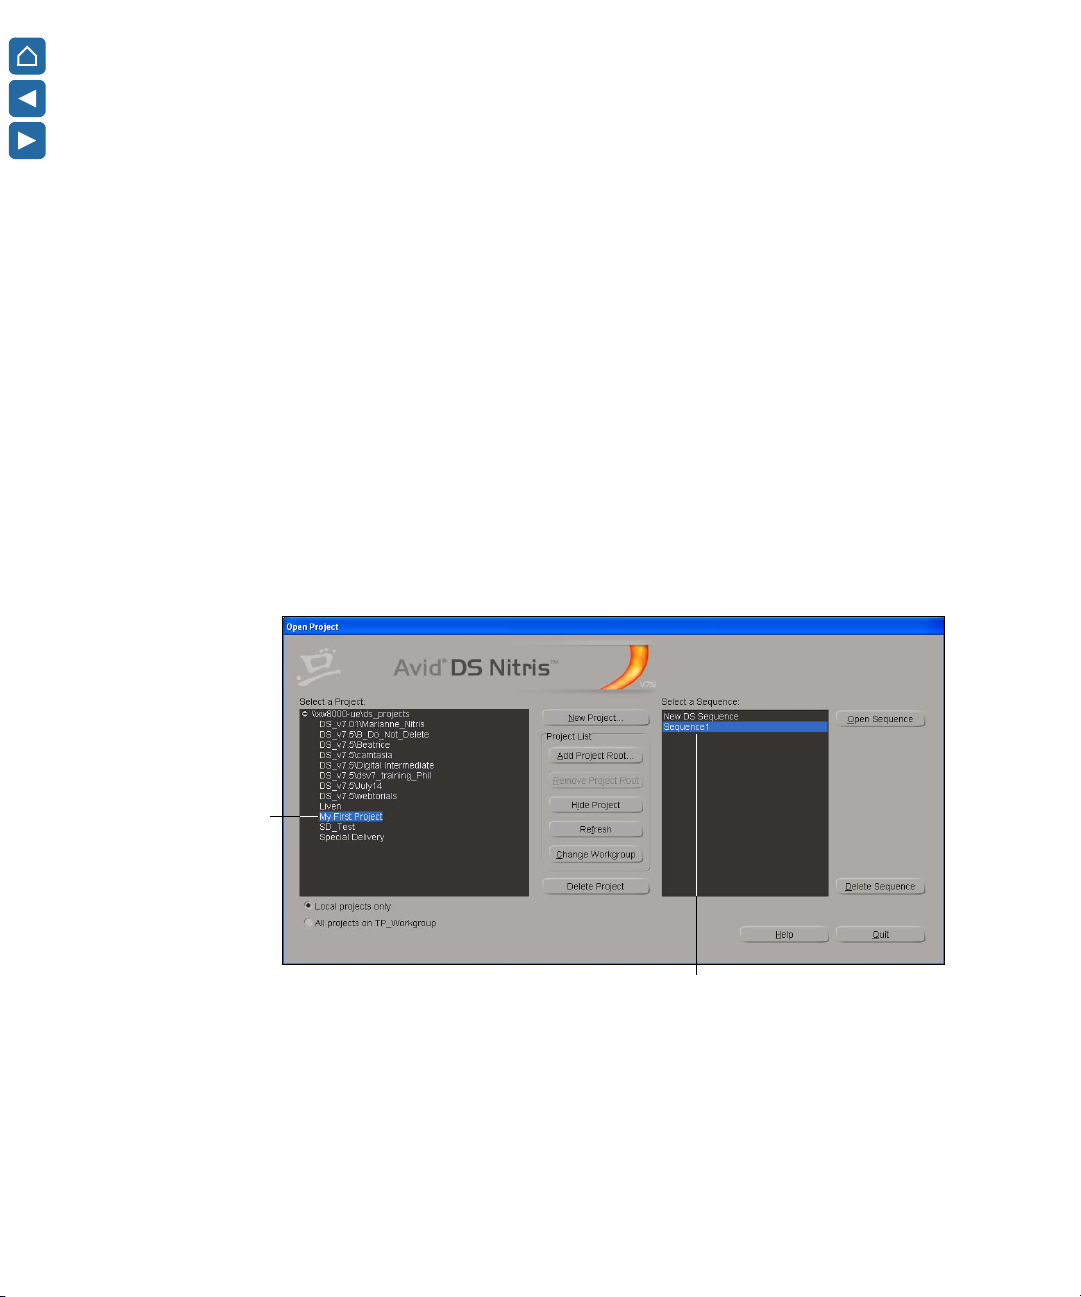
In the Open Project dialog box, the name of your project is already
highlighted.
4. Select Sequence1 and click the Open Sequence button on the right side
of the dialog box.
Name of last-opened
project is highlighted.
26
Sequences available
in this project.
The layout is restored to its default settings. Turn to “Layouts” on page 28
to see how the Editing layout should appear.
Page 27

Title Bar
Title Bar
The title bar at the top of the Avid DS Nitris window displays the name of the
project and sequence, sequence video format, and buttons for minimizing,
maximizing and closing the application window.
Project name
Sequence name
Sequence video format
Close/exit window
Minimize window
Maximize window
27
Page 28
Chapter 2 Working on the Desktop
Layouts
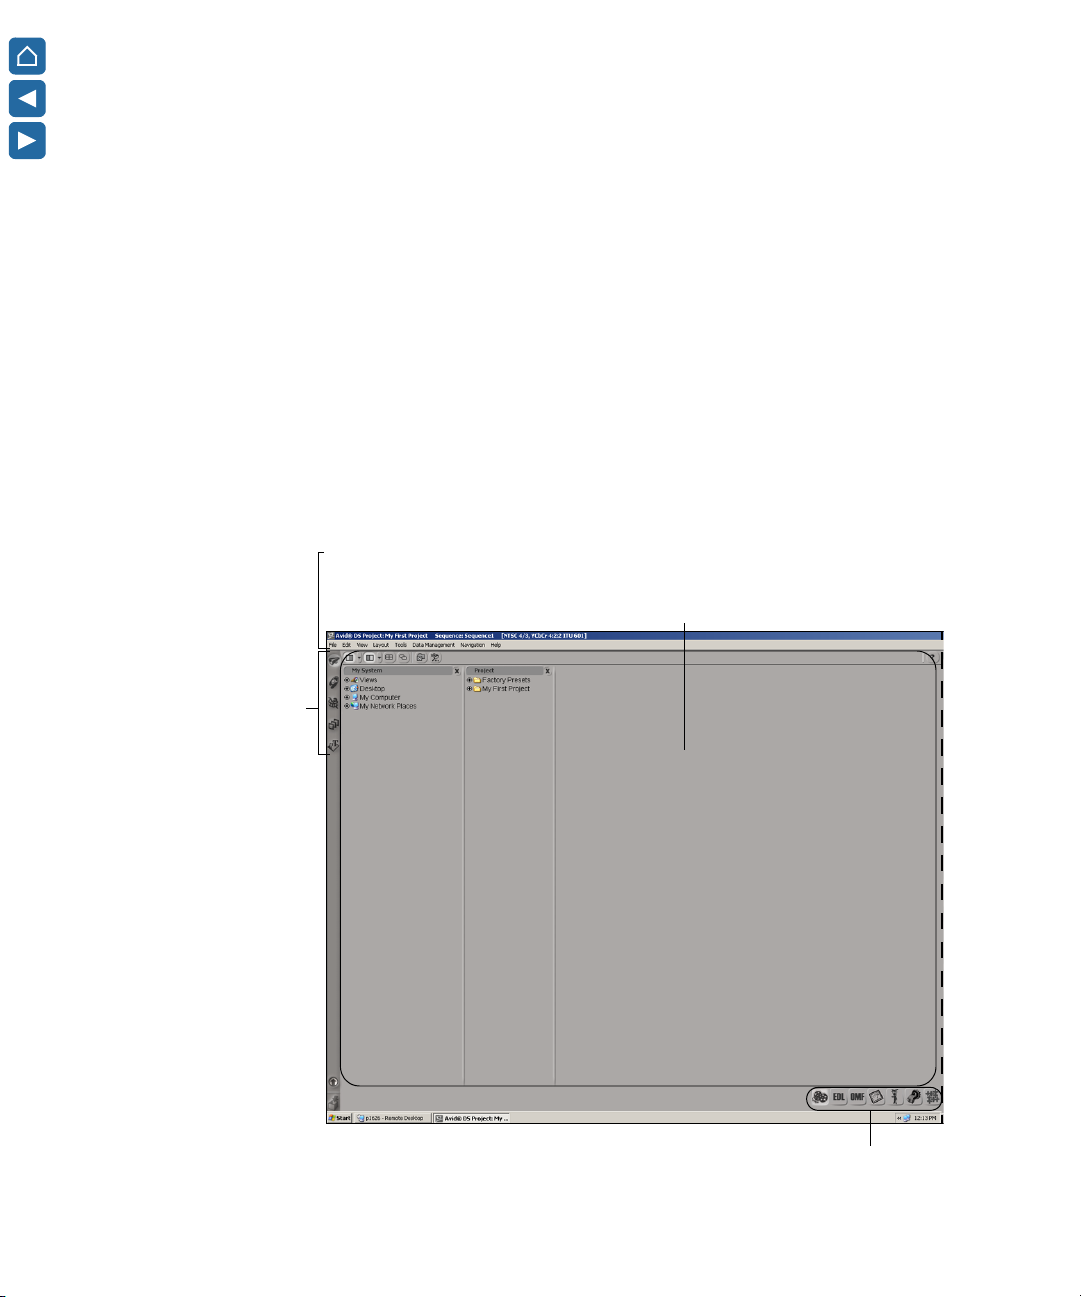
A layout contains tools for performing specialized tasks. Whether you’re
digitizing media, editing, compositing, painting, or titling, there’s a
corresponding layout for the job. The default layouts in Avid DS Nitris
include: Editing, Effects, Graphics, Compositing, and 3D DVE.
n
Taskbar is a navigational aid
for moving between layouts:
Editing, Effects, Graphics,
Compositing, and 3D DVE.
The 3D DVE and Compositing layouts are not available in the Avid DS Nitris
Editor product.
View is an area that contains a group of
tools that are specific to the tasks you’ll
Menu bar contains commands, such
as opening and saving projects and
sequences, editing layouts, and
accessing online help.
perform in a layout. The Editing layout
below shows the Avid Explorer view, a file
management tool that is useful when
handling files and editing.
28
View switcher lets you access different
views within a particular layout.
Page 29
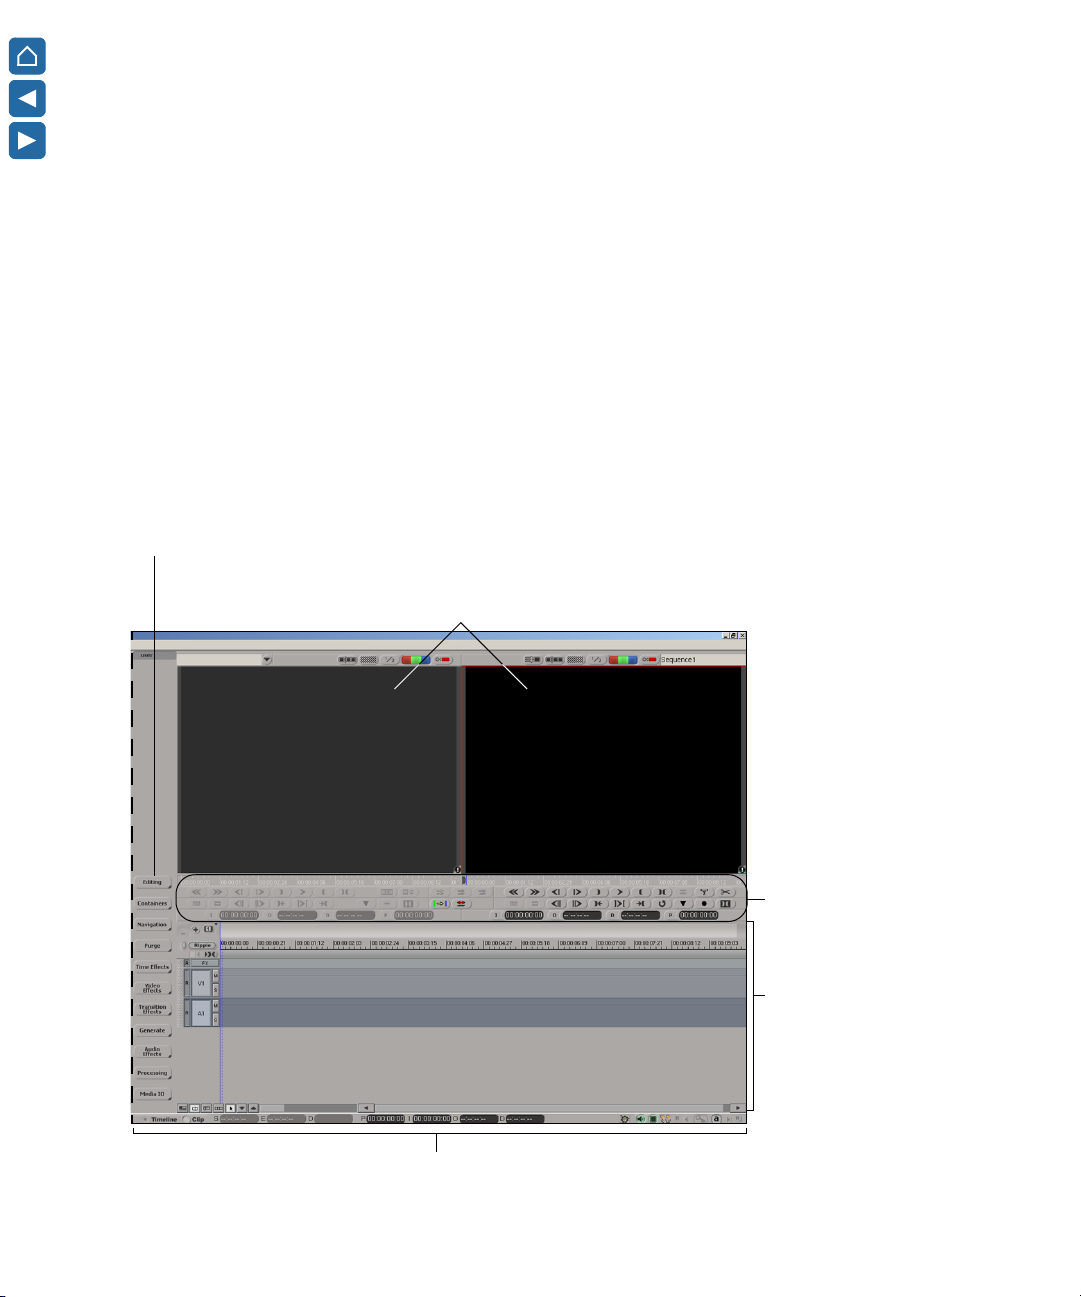
Too lbar contains commonly used commands grouped
together to make certain tasks quicker and easier.
All toolbars can be customized.
Viewers display the output of your sequence.
During a graphics session, it serves as an area to
create and arrange titles and graphics objects.
Layouts
Status bar displays the timecodes of selected objects on the timeline, and shows toolbar,
warning, error, and active command information, as well as the global animation controls.
Transport controls let you
preview media in the viewer
or play sequences that
have been edited on the
timeline.
Timeline is where you place
and edit clips to build a
sequence. It graphically
displays the position of video
and audio clips, transitions,
and effects over time.
29
Page 30
Chapter 2 Working on the Desktop
Accessing the Default Layouts
Switching between the different layouts lets you access tools for particular
tasks, such as editing, creating effects and graphics, compositing, and adding
3D DVE elements. When you click one of these buttons in the taskbar, its
corresponding layout, views, and tools are displayed.
Editing layout
n
Taskbar
To switch layouts:
1. In the taskbar, click the Compositing button.
The Compositing layout displays. Notice that the timeline and view have
changed. You are now in a nested clip called a composite container clip.
You’ll learn more about this later in “Compositing” on page 133.
2. Return to the main timeline by clicking the Go to Top Timeline button
at the lower end of the taskbar.
Tip: If you hover over active buttons on the desktop, such as the taskbar or
transport controls, tooltips will appear to help you identify icons and provide
keyboard shortcuts.
A clip called Composite is created on the B1 background track on the
timeline. This clip was automatically created when you switched to the
Compositing layout. Background tracks are usually used for compositing.
Effects layout
Graphics layout
Compositing layout
3D DVE layout
30
n
3. Click any of the other layout buttons to explore the other layouts.
Some of the layouts can’t be accessed unless a clip is selected on the timeline.
4. Switch back to the Editing layout when you’re done.
Page 31

If you viewed each layout, there will be a red horizontal bar, as well as a
purple one on the Composite clip on the timeline. The bars represent what
you have applied to the clip so far. You’ll learn more about this in
“Applying Effects” on page 81.
Using the Menus
Menus appear in different places to make it easy for you to access commands.
• The menu bar is displayed across the top of the desktop directly below
the title bar. The commands in the menu bar include general operations
related to opening and saving projects, as well as setting project
preferences, customizing layouts, and accessing Help.
Using the Menus
n
When you open a menu, you will notice keyboard shortcuts to the right of some
commands. Instead of opening a menu, you can use the keyboard shortcut.
For example, to save a sequence, press Ctrl+S on the keyboard.
Arrows indicate that additional
commands are available.
Keyboard shortcut
• Pop-up menus are displayed by right-clicking individual elements or
specific areas of the interface, such as the timeline, viewers, or tracks.
These menus provide commands that are specific to the particular
interface element you’ve chosen.
Right-click an area of the desktop,
such as the timeline. A pop-up menu
displays with a list of commands that
are related to that area.
Click the Help button for detailed
information on each command.
31
Page 32

Chapter 2 Working on the Desktop
Status Bar
The status bar at the bottom-right of the desktop displays the timecodes of
selected objects on the timeline and provides status, warning, error, toolbar,
and active command information, as well as the global animation controls.
Selection Mode
button
Timecode boxes display the timecodes of
selected objects on the timeline.
Avid DS Nitris Workgroup
Status indicator shows the
workgroup to which your
workstation belongs.
Audio Scrubbing
button turns audio
output on/off while
scrubbing timeline.
Hardware Sync Status
indicator shows when
external video and audio
devices are synced.
Global
button
turns
viewer
on/off.
animation
controls for
recording
keyframes
and
navigating
between
keyframes.
Viewer
To view the timecode of a clip:
1. To select items on the timeline, you must be in Selection mode.
Click the Selection Mode button just above the status bar.
2. Drag the Composite clip towards the right on the timeline. Let go of the clip.
The Start and End timecodes boxes on the status bar update.
End
Position indicator
Out timecode
32
Start
Duration
In timecode
Duration between
in and out
Page 33

3. Right-click the Track button of the background track (B1) and select
Delete Track.
Track button
Accessing the Views
Views contain groups of tools for creating, managing, and editing media.
Clicking a button on the view switcher at the bottom-center of the desktop
lets you switch to the different toolsets within a layout. In the Editing layout,
the Avid Explorer is the main view displayed on the left side of the desktop.
Accessing the Views
View switcher
To switch views:
1. Click any of the buttons in the view switcher to see each view.
2. Switch back to the Avid Explorer view when you’re done.
To split a view:
1. Select Layout > Edit Layout.
2. In the area that you want to split (boundaries are highlighted in red), rightclick and select one of the following:
- Split Horizontally
- Split Vertically
- Split Both Ways
3. Select Layout > Edit Layout to exit the Edit Layout mode.
33
Page 34

Chapter 2 Working on the Desktop
Combo Views
A combo view contains a group of tools for a particular task, such as the
Graphics combo view. Unlike the fixed layouts, you can move the combo
views around on the desktop.
To open a combo view:
1. Select View > Default Combo Views > Graphics from the menu bar
at the top of the application.
The Graphics combo view displays.
This may be different
than what you see in
your version of
Avid DS Nitris.
It depends on what was
last displayed.
34
2. Some of the tools in the Graphics combo view are dimmed for the
moment. For now, move the combo view around on the desktop by
dragging it by the title bar.
3. Close the combo view by clicking the close (X) button at the top-right
corner. You’ll learn more about the tools in this view later on in “Adding
Graphics and 2D Titles” on page 119.
Page 35

Using the Toolbars
The toolbars contain commonly used tools and effects. The buttons on the
toolbar let you activate tools or commands, and apply effects.
Using the Toolbars
NLE Tools toolbar
Click a button to see
additional commands.
35
Page 36

Chapter 2 Working on the Desktop
Dialog Boxes
A dialog box lets you set options and parameters. Selecting a command often
opens a dialog box, requiring you to provide input before a command can be
executed. You cannot proceed with further operations while a dialog box is open.
To open a dialog box:
1. Select File > User Preferences.
To exit without applying
changes, select the
Cancel button or the
close (X) button, or
press the Esc or Alt+F4
keys.
The changes you made
are cancelled and the
dialog box is closed.
36
To apply any changes you made
in this dialog box, click OK.
2. Keep the dialog box open for the next section on entering values.
Page 37

Entering Values
Text boxes let you enter values for parameters. They are located beside or
below a property name in a dialog box or property editor. You’ll learn more
about property editor’s later on in “Working with Effects” on page 103.
To enter values in a text box:
1. In the User Preferences dialog box (General property page), click in the
Number of Undo Levels text box.
The contents of the text box is highlighted in blue.
2. Type in a new value for the number of times you can undo a task in
Avid DS Nitris. The default is 50 and the maximum is 1000.
3. In the Autosave box, enter a new length of time to automatically save your
sequence at regular intervals.
4. Click the Help button for detailed information on each parameter. You’ll
find Help buttons or Help icons on all dialog boxes and property editors.
Entering Values
5. Click OK to apply the values and close the User Preferences dialog box.
37
Page 38

Chapter 2 Working on the Desktop
38
Page 39

Chapter 3
Capturing Material
Capturing material is the process of creating media files from video or audio
source material. This chapter describes how to capture material from different
sources, such as videotape and file.
This chapter takes approximately 60 minutes to complete.
Page 40

Chapter 3 Capturing Material
Capturing Source Material
Source material is the original, unaltered material from videotapes or digital
recordings. This source material comes from a variety of sources, such as
video, audio, animated sequences, graphics, and still images. When you
capture material with Avid DS Nitris, you are digitally transferring
audio or video material from an external device to a storage disk on
your workstation.
During capture, Avid DS Nitris creates media files (in the form of master
clips) based on the parameters you’ve set, such as in-points, out-points, and
compression. Master clips contain information about the location of the media
on your storage disk, the source data’s tape name, and the original in and out
timecodes. With this information, you can recapture the material at any time.
Master clips also include information about the video format, resolution,
compression, audio format, and so on.
The Avid Explorer
The Avid Explorer displays the hierarchical structure of files, folders, and
drives on your workstation. When you select a project folder in the Avid
Explorer, it displays the related project files (clips, sequences, effects) in a
window. This window is similar to the bin view in other Avid products like
Media Composer
®
and Film Composer®.
40
From this project window (also known as a bin), you can capture clips, as well
as organize sequences, clips and effects within your project.
To access a bin:
1. Use the view switcher to switch to the Avid Explorer if you are in a
different view.
2. In the Project panel, double-click your project folder named My First
Project. The contents of the folder are displayed on the right in a bin.
Page 41

Panels display the
contents of your
system in a tree
structure. Each panel
can display one of
three views: My
System, Project, or
Shortcuts.
Avid Explorer tools let you control the
content and arrangement of the folders
and windows, and perform tasks.
Capturing Source Material
Windows display the contents of
folders. You can display multiple
windows. When a project is selected,
this window is known as a bin.
It displays master clips, sequences,
and other project files.
View Modes include large icons, list,
details, thumbnail, and script views.
View switcher lets you access
different toolsets or views within
a particular layout.
Folders usually contain source clips and other objects for use in your
sequence. At the moment, the folders are empty because nothing has been
captured. The Avid Explorer tools let you navigate through and manage the
contents of folders.
The tools at the top of the Avid Explorer let you navigate to different folders
and change the display of information in a window.
41
Page 42

Chapter 3 Capturing Material
Avid Explorer tools at the top of the view.
Show/Hide
Panel 1
Cascade
Capture Settings
For more information about the Avid Explorer, click the Help button.
Organizing your Project Files
Before capturing any material, you will create additional folders in your
project folder to hold master clips. You may want to create separate folders
for your video clips, audio clips, still images, and even one for custom presets.
By organizing your project with a system of folders, you can locate files
quickly and easily.
To create a folder:
1. In the Project panel of Avid Explorer, double-click your project folder
named My First Project.
The contents of the folder are displayed on the right in a bin.
2. Right-click an empty area of the bin and select New > Folder.
A new folder is created in the bin.
3. Type in a new name and press Enter. We created a folder called Master
Clips for storing the master clips!
Panel 2
Tile
HelpPathShow/Hide
42
4. Continue adding as many folders as you need. You can create additional
folders inside the new folders.
Although it’s not necessary right now, here’s how you can delete any extra
folders that are not needed.
To delete a folder:
t Right-click a folder and select Delete.
Page 43

Changing the View Mode
p
In a window, there are several views to help you locate clips for a sequence.
The tools at the bottom of the window let you change the way the contents of
the window are displayed. Go ahead and click any of the icons to see the
various views.
Large Icons view displays clips as large icons.
List view displays clips as a list without details.
Details view displays
clips as a list with details.
For more information, see “Working with Bins” in the Help.
Identifying File Types in a Bin
Script view displays both pictorial
icons and clip information.
Thumbnail view displays clips
with
ictorial icons.
Capturing Source Material
List lets you select a
customized view.
Avid DS Nitris media files have their own icons, which appear on or beside
clips in a bin. When an icon is highlighted in red, it means that Avid DS Nitris
could not find any media associated with a clip. This clip must be recaptured
before you can work with it.
Icon File type Icon File type
Audio clip Background or composite
container clip
Video clip Sequence
Combined audio and video clip Still image
Audio container clip Linked still image
43
Page 44

Chapter 3 Capturing Material
To see file name extensions on your system:
1. Open Windows Explorer.
2. Select Tools > Folder Options.
3. Select the View tab.
Deselect this option.
4. Deselect the Hide extensions for known file types option and click OK.
Configuring the External Device
You’ll probably capture material from videotape or audiotape most of time.
First, you’ll need to configure the device from which you will be capturing.
To specify the settings for an external device, such as a videotape recorder
(VTR) or deck, you’ll be using the Deck Configuration view.
Avid DS Nitris includes templates for many different types of devices. You
can use the settings in the templates, or adjust them to suit your own
requirements.
You can also save the settings for your device as a preset, so that you don’t
have to reconfigure the device each time you use it for capture or output.
A preset is a customized set of properties that you save for reuse later on or
for other projects.
n
44
For the following procedure, you will need access to material on videotape.
Page 45

To configure your tape deck:
Open the Deck Configuration view by selecting
1
View > Multi-Instance Views > Deck Configuration.
Configuring the External Device
Click the Fast
2
Menu button and
select Add New
Deck Preset.
Give the new
preset a name.
Set the options
5 8
for your device.
Select the
3
Thumbnails view.
Double-click the preset you created.
4
A green checkmark indicates that
it’s active.
Click the Help button
6
for details on each
parameter.
Click the Check
7
Machine button.
Click the Save button to
save your deck preset.
Close the Deck
9
Configuration view.
For more information, see “Configuring the External Device” in the Help.
45
Page 46

Chapter 3 Capturing Material
Capturing from Tape
Although there are several ways to capture from tape, you’ll be using the
Capture Tool to log and capture clips, so that you can later recapture using
frame-accurate timecode.
To log and capture clips:
1 Open the Capture view by selecting View > Single-Instance Views > Capture Tool.
2
Click the Tap e button.
Select your deck
4
preset and click
the Check button.
Select a tape or
5
name a new one.
Click the Target
6
button and select a
folder to hold the
captured clips. If you
created a folder for
master clips, set this
as the target folder.
Click the Capture Settings button.
10
Set the Log/Capture button to Capture.
3
Enter number of extra
7
frames to record before
the in-point and after the
out-point.
Select the channels you
8
want to capture.
Enter a base clip
9
name to prefix all
captured clips.
46
The capture settings are displayed. Set the options that are relevant
to your system. Now do the same for the other four settings:
Input
Monitor
Audio
Input
Video
Input
Sync
Source
Page 47

Capturing from Tape
On the transport controls in the Capture Tool, click the Play button to play the source material.
11
Mark In
In timecode
Click the Mark In button at the point at which you want to start the capture.
12
The timecode of the in-point you selected is displayed in the In timecode box.
Use the transport controls in the Capture Tool view to play or shuttle the tape to advance to the
13
point at which you want to end the capture and click the Mark Out button.
Tip: If you already know the in and out timecodes, you can type them in the In or Out timecode
boxes. You can also enter a value for the duration and Avid DS Nitris will calculate the
out-point.
The out-point is displayed in the Out timecode box. The Duration timecode box displays
the length of material to be captured.
Click the Start Capture button in the upper-right corner of the Capture Tool.
14
The clip appears in the folder you specified, according to the in and out times you set.
Continue to capture clips.
In the Project panel of Avid Explorer, double-click your project name. A bin opens and displays
15
its contents.
Double-click a clip in the bin. Click the Play button under the Source viewer (left side).
16
Out timecode
Duration
timecode
Play
Mark Out
Position indicator
timecode
The clip plays in the viewer, but is not loaded on the timeline.
Close the Capture Tool.
17
For more information, see “Logging and Capturing Material” and “Capture
Tool” in the Help.
47
Page 48

Chapter 3 Capturing Material
Capturing from File
Avid DS Nitris lets you capture various file formats. Besides video, you can
capture still graphics files, animated graphics files, and audio files. To capture
from file, you will be using the Avid Explorer in Avid DS Nitris.
Logging and capturing from file is like capturing material from tape. That is,
you can log the material without capturing, or log and capture at the same
time. Logging creates information about the source material and in/out
timecodes in a clip, so that you can perform a batch capture later on. Before
you capture the files, you’ll need to specify the capture settings.
48
Page 49

To log and capture from file:
At the top of the Avid Explorer, click the Capture Settings button.
1
Set the video quality at
2
which you want to
capture material. You
can choose a lower
resolution, or use
compression to save
space on your storage
device while you do a
rough cut.
Capturing from File
Click the Help button for
3
more information on each
parameter.
Select the storage folder for
4
the media.
Keep the default setting for
5
the audio quality.
Select the storage folder for
6
the audio media.
Click the browse button
7
(it has three dots) to select a
folder to hold the master
clips. We selected the
Master Clips folder we
created earlier.
Keep the default conversion
8
settings.
Keep the default settings for
9
the source files.
Close the Capture Settings
10
view.
49
Page 50

Chapter 3 Capturing Material
Now you will use the Avid Explorer to capture the files.
Click both Show/Hide Panel buttons to make sure the two panels are
11
displayed. Both buttons should be highlighted.
Click the arrow next to
12
the first Show/Hide Panel
button and select My
System.
The panel updates to
display the folders on
your system.
13
Set the second panel to Project.
The Project panel updates to display the folders for the factory presets
and the project folder.
Type the following in the Address line: C:\Program Files\Avid\DS_v7.5\Media_GetStarted.
14
Make sure to type in the exact path.
The contents of the folder is displayed.
Click the Details button to see the details of the files.
15
Press Ctrl and select these file types: PICT images (.pic files), QuickTime movies (.mov files),
16
and TIFF image (.tif files). Do not select the MXF folder or the Avid File Exchange (.afe) file.
50
Page 51

Right-click one of the selected files and select Capture.
17
A progress bar appears to show you the file being captured. Captured
files are placed in the folder you specified in the Capture Settings view.
Repeat step 16 and capture the .wav file.
18
In the Project panel, click the name of your project: My First Project. Then click
19
the folder that you created for the master clips.
The clips you captured are displayed in the bin.
Capturing from File
51
Page 52

Chapter 3 Capturing Material
52
Page 53

Chapter 4
Getting Ready to Edit
Before starting an editing session, it’s important to understand how to organize
and manipulate your clips.
This chapter takes approximately 30 minutes to complete.
Page 54

Chapter 4 Getting Ready to Edit
Editing Layout
The Editing layout is where you perform most editing tasks. Once you place
clips on the timeline, you can apply transitions and effects, trim, move, slide,
slip, and synchronize clips.
The Editing layout consists of the Source and Record viewers, transport
controls, timeline, NLE Tools toolbar, and timeline navigation bar. The
buttons in the view switcher let you access the Avid Explorer and several other
views that are handy in the Editing layout.
To access the Editing layout:
t If you are not in the Editing layout, click the Editing button in the taskbar.
Avid Explorer is a
management tool that
lets you explore and
sequences, and custom
54
organize clips,
effects.
View switcher lets you access
different toolsets or views within
a particular layout.
Page 55

NLE Tools toolbar lets you perform general editing tasks, apply transitions and
effects, find and add locators, navigate the timeline, work with container clips and
reference clips, and process and purge material from the timeline.
Source Viewer displays
the current source clip.
Record Viewer displays the
frame of the sequence at the
current location of the position
indicator.
Editing Layout
Status bar displays the timecode of selected objects on the
timeline and provides status, warning, error, toolbar, and active
command information, as well as the global animation controls.
Transport controls let you
mark in/out-points, add
locators, and control playback
of sequences.
Timeline lets you build and
edit a sequence.
Timeline navigation bar lets
Timeline navigation bar lets
you pan the timeline, zoom in
you pan the timeline, zoom in
and out on the timeline, step
and out on the timeline, step
into and out of container clips,
into and out of container clips,
switch between the Source
switch between the Source
and Record timelines, select
and Record timelines, select
modes (Source/Record, Color
modes (Source/Record, Color
Correction, Trim, or Slip/Slide).
Correction, Trim, or Slip/Slide).
55
Page 56

Chapter 4 Getting Ready to Edit
Previewing Clips
The Source viewer lets you view and mark source clips before including them
in your sequence. With a clip loaded in the Source viewer, you can review the
clip to find and mark the footage you want to use in your sequence. You can
move through the clip using the navigation keys on the keyboard or using the
transport controls below the Source viewer.
To preview clips:
1. Drag the Man_Front clip from the bin to the Source viewer (left).
2. Drag the green position indicator under the Source viewer back and forth
to preview the clip.
56
n
Position indicator
3. Press Enter to begin playing the clip.
4. Press Enter again to stop playback.
Tip: Go to the start of the clip or sequence by pressing the Home key.
Page 57

Previewing Clips
You can use the Home, End, and arrow keys on the keyboard to move through
footage when a clip is loaded in a viewer.
Press this key To
Home Go the beginning of a clip or sequence.
End Go to the end of a sequence.
Left Arrow Move the footage one frame backward.
Right Arrow Move the footage one frame forward.
Use the Step buttons under the viewer to play the clip backward or forward in
1-frame or 10-frame increments.
1 frame backward 1 frame forward
10 frames backward 10 frames forward
For more information, see “Transport Controls” in the Help.
Using J-K-L Keys for Three-Button Play
The J-K-L keys on the keyboard let you play, step, and shuttle through footage
at varying speeds. This feature, also referred to as three-button or
variable-speed play, lets you use three fingers to manipulate the speed of
playback for greater control.
To shuttle through footage using the J-K-L keys:
1. Use the following keys to shuttle at varying speeds:
- Press the L key to move forward through the footage at normal speed.
Press the L
key
2 times 2x normal speed 60 fps 50 fps 48 fps
3 times 3x normal speed 90 fps 75 fps 72 fps
4 times 5x normal speed 150 fps 125 fps 120 fps
5 times 8x normal speed 240 fps 200 fps 192 fps
To play footage at NTSC rate PAL rate 24p rate
57
Page 58

Chapter 4 Getting Ready to Edit
- Press the J key to move backward at the same shuttle speed
increments.
- Hold down the K+L keys for slow forward.
- Hold down the J+K keys for slow backward.
2. To pause the shuttling, press the space bar.
Marking In and Out-Points in the Source Viewer
Marking the in and out-points of clips in the Source viewer gives you several
advantages:
• You can play back and mark clips in the bin before loading a single clip,
saving several steps.
• You can quickly build a sequence by splicing the marked clips into place
one after another.
• You can use the process of rough-cut or storyboard editing, which allows
you to instantly splice several prepared clips into a sequence.
Even if your marks are not accurate now, you can later trim the edit points and
fine-tune the sequence on the timeline.
58
Use the transport controls under the Source viewer to mark your clips:
Position bar Mark Out
In-point
Out-point
In
timecode
Mark In
Out
timecode
Duration
timecode
Position indicator (green)
Position
timecode
Page 59

Creating Subclips
Previewing Clips
To mark a clip for use in your sequence:
1. Move the green position indicator under the Source viewer to the desired
in-point.
2. Click the Mark In button.
3. An alternate method to move the position indicator to the desired outpoint is by entering the timecode in the P (position) timecode box.
4. Click the Mark Out button.
An in-point and out-point appear in the position bar. If you need to adjust
these points, simply drag them to a new location.
Subclips break up longer master clips into smaller segments of selected
footage. When you mark footage with in and out-points, you can either save
over the existing clip along with the new marks, or you can create new
subclips between the in and out-points that you set. The master clip maintains
its original in and out-points.
Unlike master clips, subclips do not directly reference the original media.
Subclips remain linked to the master clips from which they were created, and
the master clips, in turn, reference the digitized media files located on your
storage devices. As a result, none of the original footage is lost.
Instead of placing the marked clip on the timeline, you can first create a
subclip from it. This leaves the original length of the master clip untouched,
while a copy of the original clip with new in and out-points is saved.
Update Thumbnail
Create Subclip
59
Page 60

Chapter 4 Getting Ready to Edit
To create a subclip:
1. After you’ve previewed a clip in the Source viewer and marked the in and
out-points, click the Create Subclip button.
2. In the Create Subclip dialog box, type a name for the subclip.
n
You can use the default name, which is the original clip name appended with a
number, such as Man_Front - 001.
3. Click OK.
The new clip is created and saved in the same folder as the original clip.
For more information, see “Media Capture Settings” in the Help.
Changing the Thumbnail of a Clip
It is easier to identify clips in the Avid Explorer if you set the thumbnail to
display a particular frame in that clip.
To change a clip’s thumbnail frame in the bin:
1. At the bottom of the bin in Avid Explorer, click the Thumbnails button to
display your files as thumbnails.
2. Move the green position indicator to the frame you want to display as the
thumbnail frame.
3. Under the Source viewer, click the Update Thumbnail button to change
the thumbnail frame of the clip.
60
The thumbnail view updates accordingly.
4. Save your sequence. Select File > Save.
Page 61

Chapter 5
Creating a First Cut
There are several ways to build a sequence. This chapter describes how to
place clips on the timeline to create a sequence.
This chapter takes approximately 45 minutes to complete.
Page 62

Chapter 5 Creating a First Cut
The Timeline
The timeline is where you place and edit clips to build your sequence. The
timeline displays all the elements that make up your sequence, such as video
and audio clips, transitions, and effects. For more information, see “The
Timeline” in the Help.
Timeline ribbon
displays locators,
in/out-points, and
loop markers.
Tracks contain the
components of the
sequence.
In-point indicates the
starting point when adding
clips to a sequence.
Timeline navigation bar lets you pan the timeline, zoom in
and out on the timeline, step into and out of container clips,
switch between the Source and Record timelines, and select
modes (Source/Record, Color Correction, Trim, or Slip/Slide).
Clip indicates the
location of a clip in the
sequence.
Out-point indicates the
ending point when adding
clips to a sequence.
Activeness bar
indicates the
sections of the clip
that will be used in
the final sequence.
Edit point lets you
trim the clip.
Position indicator
(blue) shows your
place in the sequence.
62
Page 63

Working with Tracks
There are three types of tracks on the timeline:
• Audio tracks contain the audio clips and audio container clips of a sequence.
• Video tracks contain the video clips and container clips that are
composited over clips on the video and background tracks.
• Background tracks contain the video clips and background/composite
container clips of a sequence.
While working with multiple tracks, you can use the Track selector to select,
manipulate, delete, ripple, and patch tracks, as well as scroll and adjust the
heights of tracks. You can use multiple tracks to layer audio effects and sound,
or to add video titles and other effects.
You can change track properties, such as the track name or the level of detail
at which the clips are displayed on a track. By default, tracks are numbered
sequentially (V1, V2, A1, A2, and so on) as they are created on the timeline.
Working with Tracks
Tr ac k
selector
Tr ac k
button
Timeline controls
Audio track
Background track
Overview area: The white bar (called visible time
span) can be shortened, lengthened, or moved.
Ruler
Timeline ribbon
Timeline effect track
Video track
63
Page 64

Chapter 5 Creating a First Cut
To show or hide the Track selector:
t Right-click the overview area and select/deselect Display > Display
Control Area.
For more information, see “Track Selector” in the Help.
Selecting Tracks and Regions of Tracks
You can select one or more tracks at the same time. When you select a track,
you can perform editing operations on the entire track.
To select a track:
t Click the Track button of a track.
Track button
The Track button for the selected track is highlighted.
To deselect a track:
t Click the Track button of a selected track.
To select a region on a single track:
t On a video or audio track, drag right or left to select a region.
Selected region is highlighted
Adding, Reordering and Deleting Tracks
You can add any number of audio, video, or background tracks to the timeline.
Video tracks are grouped at the top of the timeline, and audio tracks are
grouped at the bottom of the timeline. Background tracks are inserted between
the audio and video tracks.
You can change the order of the video, audio, and background tracks. You
cannot, however, place a video track below a background track. Also, you can
delete any tracks that are no longer required in the sequence.
64
Page 65

Working with Tracks
To insert a track on the timeline:
t Right-click the overview area and select Create Video Track, Create
Background Track, or Create Audio Track.
An empty track is added to the timeline.
n
Track button
Tip: You can automatically insert a track when dragging a clip from the viewer
or Avid Explorer to the timeline. Simply drag the clip to the timeline ribbon.
To reorder tracks:
t Drag the Track button up or down to reorder the tracks.
To remove a track from the timeline:
t Right-click an empty area of a track and select Delete Track.
The selected track is deleted from the timeline.
Setting the Track Height
You can enlarge or reduce the height of the tracks to improve visibility and
display more information within the tracks. You can reduce the track height
if you need more space on the timeline to view other tracks.
n
Reducing the track height may hide any effects you have applied on the timeline.
To enlarge or reduce the height of tracks:
t Press Ctrl and drag the bottom of a Track button to change the height
of the track.
n
Place pointer here
Tip: Increasing the height of the video tracks lets you see larger thumbnails
of your clips.
65
Page 66

Chapter 5 Creating a First Cut
Muting Audio and Video Tracks
If there are several tracks on the timeline and you need to exclude clips from
the preview, you can turn off the audio on selected audio tracks or turn off the
video on a selected video track. When the sequence is played, any video or
audio on the tracks that are ‘muted’ are not displayed or heard.
n
Mute
button
Muted tracks do not contribute to the final sequence.
To mute a track:
t Click the Mute button on an audio track to turn off the audio.
t Click the Mute button on a video track to turn off the video.
The Mute button turns red.
Setting Tracks to Solo
When you solo a track, it plays the contents of that track during the preview.
Both active and inactive video clips are displayed in the viewer. With video,
you can only solo one track at a time. With audio, however, you can solo more
than one track. Any tracks that do not have the Solo button activated are not
displayed or heard.
To solo a track:
Solo
button
n
t Click the Solo button of the tracks that you want to preview.
The Solo button turns green.
The settings of the Mute and Solo buttons on each audio track are saved along
with the sequence.
66
Page 67

Navigating the Timeline
The timeline has various controls to quickly move through a sequence and
adjust your view of the tracks while editing. The position indicator (the
vertical blue line) in the timeline shows your place in the sequence. Also,
the Record viewer displays the frame of the sequence on which the position
indicator is parked.
Using the Scale and Scroll Bars
Depending on the length of your sequence, you might not be able to see the entire
sequence on your timeline. Using the scale and scroll bars at the bottom of the
timeline, you can pan the timeline, or zoom in and out to view the entire timeline.
To scale or scroll the timeline:
Navigating the Timeline
Drag the scale bar to zoom in and
1 2
out around the position indicator on
the timeline.
Click the arrows or drag the timeline scroll bar to
pan back and forth along the timeline.
67
Page 68

Chapter 5 Creating a First Cut
Selecting Objects on the Timeline
By selecting objects on the timeline, you can move clips to different tracks, view
the properties of a clip, and select a region of a track. The objects you can select
include: clips, effect bars, edit points, regions, markers, and more. But before
you can select anything from the timeline, you must be in Selection mode.
To turn on the Selection mode:
t Click the Selection Mode button on the timeline navigation bar.
The button is highlighted to indicate that you’re in Selection mode.
Placing Clips on the Timeline
You can build a rough cut of your sequence by dragging, inserting,
overwriting, and replacing clips on the timeline. You can only place video
clips on video or background tracks, and audio clips on audio tracks.
Dragging and Dropping Clips
An easy way to place create a rough cut of your sequence is to simply drag
clips from the Source viewer and drop them on a track in the timeline. When
you drag and drop clips on the timeline, they overwrite any existing clips that
are present on the timeline.
68
Page 69

Placing Clips on the Timeline
To drag and drop a clip to the timeline:
From the Avid Explorer, select the Basket clip and drag it to the Source viewer
1
for previewing.
Mark appropriate in-point and out-points on the clip.
2
Drag the Basket clip from the Source viewer to the V1 video track on the timeline,
3
and drop it at the beginning of the timeline.
Name of clip
Edit pointActiveness bar
Repeat steps 1 to 3 using the Smell clip. Place the Smell clip beside the Basket
4
clip on the timeline.
From the Most Recently Used Items list in the upper-left corner of the Source viewer,
5
select the Man_Front clip. The clip is displayed in the Source viewer. Mark the in and
out-points and then place the clip on the timeline.
Most Recently Used Items list
Recent clips
Visible time span (white area)
Drag the right edge of the visible time span
6
towards the right to contract the view of the
clips on the timeline.
69
Page 70

Chapter 5 Creating a First Cut
Inserting Clips
You can also insert clips on the timeline between other clips. When you insert
clips, it pushes forward any existing clips on the timeline.
To insert a clip:
1. Make sure that none of the clips are selected. If one or more clips are
selected, a red border surrounds each clip. Click an empty area of the
track to deselect clips on the video track.
2. Drag the Wake-Up clip to the Source viewer.
3. On the timeline, place the pointer over the ruler and drag the position
indicator over the Smell clip.
4. Using the transport controls under the Record viewer (right), click the
Mark In button or press I to set an in-point.
An in-point maker is displayed on the timeline ribbon.
5. On the transport controls, click the yellow Insert Clip button.
The Wake_Up clip is inserted on the timeline at the location of the
in-point marker.
70
n
n
Tip: Adjust the visible time span or use the scale and scroll bars at the bottom
of the desktop to adjust your view of the clips on the video track.
Inserted clip In-point
Tip: To undo an insert or any other operation on the timeline, press Ctrl+Z.
Page 71

Overwriting Clips
Placing Clips on the Timeline
You can place a clip on the timeline and overwrite a portion of an existing clip
on the timeline using the Overwrite Clip button. This method is more precise
than simply dragging and dropping clip on the timeline.
To overwrite a clip on the timeline:
1. On the timeline, drag the in-point marker to the middle of the Man_Front clip.
2. Click the red Overwrite Clip button to place the clip at the in-point and
overwrite any existing clips over the section that it covers.
A section of the Man_Front clip is overwritten by the Wake-Up clip.
In-point
Wake-Up clip
overwrites a portion of
the Man_Front clip.
Replacing Clips
Replacing is a way to place a clip on the timeline and delete a selected clip at
the same time.
To replace a clip on the timeline:
1. Drag the Clouds clip to the Source viewer.
2. On the timeline, select the first Wake- Up clip.
A red border surrounds the clip.
3. Click the blue Replace Clip button to overwrite the selected clip with the
one that is currently in the Source viewer.
71
Page 72

Chapter 5 Creating a First Cut
Clouds clip replaces Wake-Up clip.
4. Delete the Wake- Up clip as it is not needed.
5. Select File > Save to save your sequence.
A gap is left because the Clouds clip is
shorter than the clip it replaced.
72
Page 73

Chapter 6
Refining the Edit
After you create a rough sequence on the timeline, you can refine your edits
to sharpen the look and improve the relationship between pictures and sound.
This chapter describes how to rearrange, overwrite, and remove material in
a sequence. You can also trim the edit points between clips to fine-tune
transitions.
This chapter takes approximately 30 minutes to complete.
Page 74

Chapter 6 Refining the Edit
Rearranging Clips
After selecting one or more clips, you can rearrange them on the timeline by
moving them along the same track or to a different track. When you move a
clip to a new location, blank space or silence remains in the previous position.
To rearrange clips on the same track:
1. Open Sequence1 if it is not already open.
2. Select the Clouds clip on the timeline. Drag it below the other clips on the
timeline and drop it into its new position between the two Man_Front
clips. You should see a gray shadow representing the clip as you move it.
The Clouds clip is moved
further in time on the
same track.
74
3. To close the gap between the clips, select the second Smell clip, and drag
left until the gap is closed. Do the same for the remaining clips.
4. Save your sequence.
Page 75

Copying Clips
Rearranging Clips
You can easily make copies of clips on the timeline. When you copy a clip,
you do not duplicate the media on the storage device. Both clips refer to the
original media.
To copy a clip:
1. Select one or more clips to copy.
2. Right-click one of the selected clips and select Copy Clip.
3. On the same track, move the position indicator to where you want to paste
the clips. Right-click the track and select Paste.
A copy of the clip appears at the location of the position indicator. The
name of the copy is prefixed by “Copy of...”.
4. To paste the clips on a different track, right-click the desired track and
select Paste.
5. To rename the clip, right-click the clip and select Properties.
A property editor displays the properties of the clip.
6. In the Name text box, enter a new name for the clip and close the property
editor by clicking the Close (X) button at the top-right corner.
n
You can use the standard cut (Ctrl+X), copy (Ctrl+C), and paste (Ctrl+V)
shortcuts in Avid DS Nitris.
Removing Clips from the Timeline
You can remove any clip on the timeline. The master clip in the Avid Explorer
and its media are not deleted.
To remove a clip:
t Select one or more clips and press Delete.
The clip(s) are removed from the timeline.
75
Page 76

Chapter 6 Refining the Edit
Trimming Clips
Trimming is the process of fine-tuning the move from one clip to another.
Each clip has elements that you can select and edit: the trim handles and the
edit points. Edit points are located at the ends of the activeness bar of a clip,
or where it transitions to another clip.
There are two ways to trim clips: by directly manipulating the clips on the
timeline or by using the Trim mode.
Trim-out handle
Changes the outgoing
frame on clip A
Edit points
Changes edit time without moving clips
To trim a clip on the timeline:
Trim-in handle
Changes the incoming
frame on clip B
Activeness bar
1. Select the edit point between two clips on the timeline.
2. Select a trim handle and drag left or right.
The clip is trimmed.
3. Select and then drag an edit point left or right to see the difference
between showing the trim handle versus its edit point.
76
Page 77

Using the Trim Mode
The Trim mode provides a close-up view of a clip, so that you can trim the clip
on a frame-by-frame basis. The results are the same as if you were dragging
the clip’s trim handles or edit points on the timeline, except that there are more
tools to work with in the Trim mode.
To enter Trim mode:
t On the timeline navigation bar at the bottom of the timeline, click the
Outgoing frame Incoming frame
Trimming Clips
Trim Mode button.
The Source/Record viewers are replaced with the Outgoing and Incoming
viewers and trim controls. If an edit point was not selected before entering
Trim mode, the edit point that is closest to the position indicator is
selected for trimming.
Transition buttonsTrim Nudge buttons Transport controls
Frame Offset countersTransition buttons
Transition Duration timecode boxTransition Alignment button
77
Page 78

Chapter 6 Refining the Edit
To trim the edit point of a clip:
1. Select the edit point between two clips on the timeline.
2. Use the trim nudge buttons to move the edit point forward or backward,
and trim frames at the selected edit point. As you trim the edit point, the
frames of the clip are hidden or revealed to reflect the new incoming or
outgoing frame.
Nudge left 10 frames
These buttons appear dimmed when there are no more frames available at
the head or tail of the clip.
To review the most recent trim edit:
t Click the Play Preview button below the Outgoing frame.
A playback loop begins playing in the Incoming viewer. The loop begins
several frames before the transition and ends several frames after, pausing
briefly before beginning playback again.
3. Click the Play Preview button again to stop playing.
To exit the Trim mode:
t Click the Trim Mode button again.
For more information, see “Understanding Trim Mode” in the Help.
Using Ripple Mode When Trimming Clips
The Ripple mode lets you preserve the integrity of previous edits on the
timeline as you continue making other edits. As you trim clips on the timeline,
the Ripple mode allows clips that follow the edit point to move to
accommodate the change.
Nudge right 10 frames
Nudge right 1 frame Nudge left 1 frame
78
The following illustrations show how clips are affected when you trim an
in-point with and without the Ripple mode.
Page 79

Trimming an in-point to the left
Before
Trimming to the left
Ripple mode off
After
Ripple mode on
To enter the Ripple mode:
Trimming Clips
Edit point remains
fixed on timeline
The following clip(s)
ripple
Edit point moves
1
Click the Ripple button to activate the Ripple mode.
The main Ripple button and the Ripple buttons for each track are
activated. You can deactivate the Ripple mode on individual
tracks that you do not want to be affected.
Select an edit point to trim.
2
For more information, see “Rippling Clips” and “Trimming with the Trim
Handles” in the Help.
Drag the trim handle to the right
3
or left to trim the clip.
The trim handle can only be moved
as far as there is extra material
available on the clip.
Turn the Ripple mode off.
Turn the Ripple mode off.
4
Do NOT save this sequence.
5
79
Page 80

Chapter 6 Refining the Edit
80
Page 81

Chapter 7
Applying Effects
Avid DS Nitris offers a wide variety of effects that you can apply to media.
This chapter describes the effects library, the different ways to apply effects,
the Effects layout, and property editors.
This chapter takes approximately 90 minutes to complete.
Page 82

Chapter 7 Applying Effects
The Effects Library
The term effect refers to a range of filters, DVEs, keyers, and transitions. Each
effect has several properties that allow for unlimited variations. You can save
custom property settings and use them on other projects.
n
The 3D DVE layout and tree effects are not available in Avid DS Nitris Editor.
The effects are grouped into these categories:
Effect categories Description
3D DVE Effects that let you create 2D/3D titles, as well as 3D
DVEs. You can apply these effects to clips, or tracks.
Audio Effects that let you adjust the output signal of your
audio clip. You can apply these effects to audio clips,
tracks, or mixer strips in the Mixer view.
DVE Effects that are either a transition from one clip to
another clip or a 3D transformation between layers
in a composite. You can apply these effects to clips,
tracks, or layers.
Image filter Effects with single inputs that encompass a wide
variety of effects that you can apply to video clips,
tracks, and layers. These include blur, fade-in, fadeout, and noise, to name a few.
Image transition Effects with two inputs that let you transition from
one clip to another, such as the dissolve, wipe, fade,
DVE, or crossfade effects. You can apply these
effects between two clips.
82
Source generator Effects that create a clip for you, such as solid or
gradient colors, 3D Warp effects, or patterns. This new
clip is useful as the background for a compositing
session or to create a fade-to-color transition.
Page 83

Effect Bar Colors
The Effects Library
When you apply an effect, an effect bar appears on the timeline in various
colors depending on the type of effect. This makes it easy to identify the
different types of effects on the timeline.
These are the colors you’ll see on the effect bars:
Color Effect
Blue Keyer
Gray Color Correction Classic
Green Edge and Blur
Light blue Fade
Light green Color Correction
Orange AVX Host
Purple Graphics
Red Image and audio
Yellow DVE and Picture-in-Picture
83
Page 84

Chapter 7 Applying Effects
Applying Effects
There are basically two ways to apply effects:
• On the Timeline: All effects applied on the timeline are based on what
you’ve currently selected, including clips, tracks, or portions of the
timeline (called regions), transitions between clips, as well as the layers
in the Compositing layout.
• In the Effects Layout: By switching to the Effects layout, you can begin
an effects session with all the tools available in this layout. Although this
layout is optimized for color correction, you can use it for all kinds of
video effects.
The following illustration shows the timeline with different effects on clips:
Process button Track effects
After applying or creating effects, you might have to process an effect to play
it in real time. When the Process button on the timeline turns red, it means that
one or more effects on a section of the timeline require processing. The region
that requires processing is highlighted on the timeline ribbon. For more
information, see “Processing Effects” on page 114.
Clip effect
Generated effectTransition effect
84
Page 85

Applying Effects to Clips
Effects applied to individual clips are called clip effects. They are useful when
you want to apply an effect only to one clip on the timeline. Clip effects are
attached to the clip, so when you move or edit it, the effects travel with it.
You can apply an unlimited number of clip effects to a clip; this is called a
stack of effects. You can build complex effects by editing and stacking simple
effects. As effects are added, effect bars are placed on top of one another on
the timeline. The effect at the bottom is processed first, followed by each
effect directly above it.
To apply a clip effect:
1. Open Sequence1.
2. Select the first Man_Front clip on the timeline.
3. On the timeline navigation bar, click the Selection Mode button to allow
you to select objects on the timeline.
4. From the NLE Tools toolbar beside the timeline, click Video Effects > Wipe.
Applying Effects
The Wipe effect is applied to the clip you selected, an effect bar appears
over the entire length of the clip, and property editor displays.
85
Page 86

Chapter 7 Applying Effects
Global controls
Property pages contain
additional properties.
Dimmed options
are not available.
Animate a specific
parameter.
List of options.
Click to turn an option on.
If the box is already
checked, click to turn it off.
Click to display the
calculator.
Drag the scroll bars to view
additional parameters on
the property page.
Text b ox
Using the Property Editors
Whenever you use effects, you’ll encounter their property editors. Property
editors display the properties of a selected object or tool, and can have one
or more pages of properties. You can adjust these properties to achieve a
desired effect using the text boxes, lists, options, and sliders. Any values that
you change are immediately applied.
There are also global controls for loading, saving, and viewing presets,
processing, animating properties, and previewing clips. Different property
editors have different global controls.
Slider area
86
Page 87

Applying Effects
To edit the effect:
1. To see how the Wipe effect looks on your clip, drag the position indicator
slowly back and forth (scrub) on the timeline.
2. In the property editor, adjust the values of the effect by doing any of the
following:
t Click anywhere in the slider area and drag to the right to increase
values, or to the left to decrease them.
t Press Shift and drag the slider to adjust values slowly.
t Press Ctrl and drag the slider to adjust values quickly.
t Click in a numerical text box and circle clockwise with your mouse
to increase values or circle counterclockwise to decrease values.
Drag clockwise or counterclockwise to
increase or decrease values.
3. Click the calculator next to a slider to make calculations.
4. Go ahead and adjust any of the parameters. Click the Help button for
detailed information on each parameter. When you’re done, close the
property editor to save the settings.
5. Save your sequence.
For more information, see “Property Editors” in the Help.
Applying Effects to Tracks
Effects applied to tracks on the timeline, such as the video and audio tracks,
are known as track effects. Track effects are useful when you want to apply the
same effect to several clips on the same track.
You can apply effects to one or more tracks, or to a specific area of a track
called a region. The region of the track that you select can be empty or it can
contain one or more clips.
Like clip effects, you can apply an unlimited number of track effects to a track or
build a stack of effects one on top of another to create more complex effects.
87
Page 88

Chapter 7 Applying Effects
To apply an effect to a track:
1. Right-click the upper area of the V1 video track.
2. Select Add Track Effect from the menu.
3. Select any effect, such as Blur, and click OK.
The entire track is highlighted.
Upper area of track
The Load Preset dialog box displays the effects in the \Image Effects folder.
The Blur effect is applied to all the clips on the track and its property
editor displays.
88
Track effect
4. Close the property editor.
To apply an effect to a portion (region) of a track:
1. Hold down the left mouse button and drag towards the right to select the
region of the V1 track on which you want the effect to be placed.
Selected region
Page 89

2. Do one of the following:
t From the NLE Tools toolbar beside the timeline, click Video Effects
> any effect.
t Right-click the white selected region and select Add Track Effect.
In the Load Preset dialog box, select an effect and click OK.
An effect bar is applied to the region and its property editor displays.
Effect applied to region
3. Close the property editor and save your sequence.
Applying Effects to the Timeline Effect Track
The timeline effect track is a track that appears above all the other tracks
on the timeline; this track can only accept track effects. When you apply an
effect to the timeline effect track, it modifies the clips on all the tracks
below it. This lets you, for example, place a graphics effect (such as a title)
on the timeline effect track, so that it will be displayed over the resulting
video sequence. You can apply effects to the timeline effect track in the
same way that you apply track effects.
Applying Effects
Track effects
Timeline effect track
89
Page 90

Chapter 7 Applying Effects
Creating Clips with Source Generator Effects
You can create new clips based on a selected region of a track. When you
create a new clip, you can choose from a list of effects (called source
generator effects), such as the Solid Color or Wood Grain effect. These types
of clips are useful as the background for a compositing session or to create
a fade-to-color transition.
To create a clip with effects:
1. Add a new video track to the timeline by right-clicking the overview area
(directly above the ruler) and selecting Create Video Track.
Overview area
90
A new track, labeled V2, appears above the V1 track.
2. On the new track, drag to select a region at the end of the sequence.
Selected region
Page 91

Applying Effects
3. From the NLE Tools toolbar, click Generate > Source Generator Clip.
The Load Preset dialog box displays the available source generator effects.
4. Select an effect. We chose the Marble effect for our example.
A clip is created on the track and given the name of the effect, which is
appended with the term “Generated”. The effect’s property editor displays.
A clip created with
the Marble effect.
5. Close the property editor.
6. Save your sequence.
91
Page 92

Chapter 7 Applying Effects
Applying Transition Effects
Transition effects include dissolves, wipes, fades, DVEs, or cuts that you can
apply to or between clips on the timeline. You can apply transitions to the
beginning or end of a single clip, or between two clips. For more information,
see “Applying Transitions” in the Help.
n
n
Transitions on the timeline can be created only when there is extra material
available on one of the clips to accommodate the transition.
To apply a transition effect between two clips:
1. Start a new sequence by selecting File > New Sequence.
2. Drag the Basket and Clouds clips to the video track on the timeline.
Leave some space between the clips.
Tip: Use the overview area at the top of the timeline and the scroll bar at the
bottom of the timeline to adjust the view of your clips.
Edit point
3. Select the edit point at the end of the Basket clip.
Trim-out handle
92
4. Select the trim-out handle and drag left to trim in by a few frames.
Now you’ll have extra material for the transition.
5. Move the Clouds clip beside the Basket clip.
Page 93

Applying Effects
6. Select the edit point between the two clips.
Edit point
7. From the NLE Tools toolbar, select Transition Effects > effect. We chose
the Wipe effect.
The transition’s property editor displays. The transition is represented as
a gradient below the clip.
Transition
8. Close the property editor.
9. Drag the position indicator back and forth (scrub) on the timeline
to preview the transition you created.
93
Page 94

Chapter 7 Applying Effects
Applying Audio Effects
There is a range of audio effects that you can apply to clips or tracks on the
timeline, as well as on the mixer input strips in the Mixer view.
To apply an audio effect on the timeline:
1. Place the FinalMix clip on the audio track.
2. From the NLE Tools toolbar, click Audio Effects > effect. The Dynamics
effect is a good one to try.
3. To view the effect’s waveform, place the pointer at the bottom of the Track
button and press Ctrl. The pointer should now look like a double-pointed
arrow. Drag downwards. The farther you drag, the larger the waveform
becomes. It will take a second or two for Avid DS Nitris to generate the
waveform.
n
Tip: You can also do this on the video tracks to see thumbnails of your clips.
Place pointer here
The clip’s waveform
4. Scrub the timeline or click the Play button to hear the result.
5. Close the property editor.
94
Page 95

Applying Audio Effects in the Mixer
The mixer combines the audio signals coming from the audio tracks and routes
them to the mixer output strips. You can assign the channels of an audio track
to a specific output strip. When you add an effect to a mixer input strip, the
effect is applied to an entire audio track. For more information, see “Mixer” in
the Help.
Applying Effects
Mixer input strips
control volume
from audio tracks.
Mixer output strips
control volume of
sound being output.
Master Mute button
Solo indicator
Routing View button
Standard View button
Mixer Configuration
Animation controls
To access the mixer:
t From the view switcher, click the Mixer button.
95
Page 96

Chapter 7 Applying Effects
To add an effect to a mixer input strip:
1. Right-click the effects box of a mixer input strip and select Add Effect.
2. Select an effect from the \Audio Effects folder, such as the Reverb effect.
The Load Preset dialog box displays.
Effects box
The effect is applied to the input strip and its property editor displays.
96
3. Experiment with the properties in the property editor. Play the clip to hear
the result. You can also add more audio effects. Click the Help button for
details on all the parameters.
4. Close the property editor when you’re done.
5. Switch back to the Avid Explorer view by clicking its button on the view
switcher.
6. Save your sequence as Sequence2.
Page 97

Creating a Stack of Effects
A stack of effects is simply one effect piled on top of another, which altogether
creates a more complex effect. You can apply an unlimited number of effects to
individual clips, the timeline effect track, and regions on the timeline. Simply
keep adding effects and experimenting with them until you’re satisfied. In the
example below, there are stacks of effects on the video clip and audio clip, as
well as on the timeline effect track and on regions of the video track.
Stacks of effects on:
Video and audio clips
Regions of timeline
Audio track
Applying Effects
Timeline effect track
97
Page 98

Chapter 7 Applying Effects
The Effects Layout
The Effects layout provides an efficient way of working with video effects.
This layout is optimized for color correction and will automatically load the
Color Correction effect when you first switch to the layout. You can easily
change the Color Correction effect for another effect.
Avid Explorer lets you explore and
organize clips, sequences, and custom
effects within a hierarchy of folders.
98
View switcher lets you access different
toolsets and views.
Page 99

Viewers display three consecutive clips on the timeline
at the location of the position indicator.
The Effects Layout
Large property editor lets you adjust the
properties of the selected effect.
Timeline is where you place,
edit, and apply effects.
99
Page 100

Chapter 7 Applying Effects
To access the Effects layout:
1. Start a new sequence.
2. Place the following clips side-by-side on the video track on the timeline:
Smell, Wake_Up, Clouds, and Basket.
n
n
Tip: Adjust the overview area so that all the clips are visible on the timeline.
3. Place the position indicator over the Wake_ Up clip.
4. From the taskbar, select the Effects button.
By default, the Color Correction effect, with its large property editor, is
displayed. A gray effect bar above the Wake-Up clip on the timeline
indicates that the Color Correction effect is loaded, but inactive. When
you edit the values on the property editor, the effect bar changes to light
green (active).
Tip: If there was already video effect on the timeline that you wanted to edit,
simply select the effect bar before switching to the Effects layout. Instead of
the default Color Correction effect, the Effects layout will display the property
editor of the effect you selected.
5. Place the position indicator over the next clip, so you can view sequential
clips in the viewers.
6. Save your sequence as Sequence3.
7. Now is a good time to restore the layout to ensure that you’re using the
default settings—see “Restoring the Default Layout” on page 26.
8. Restart Avid DS Nitris and open Sequence3.
100
9. Double-click the green effects bar to switch to the Effects layout.
 Loading...