

Page 1

™
Avid® DS Nitris
Version 7.0
Capture and Output Guide
make manage move | media
™
Avid
®
Page 2

Copyright and Disclaimer
Product specifications are subject to change without notice and do not represent a commitment on the part
of Avid Technology, Inc.
The software described in this document is furnished under a license agreement. You can obtain a copy of
that license by visiting Avid's Web site at www.avid.com. The terms of that license are also available in the
product in the same directory as the software. The software may not be reverse assembled and may be
used or copied only in accordance with the terms of the license agreement. It is against the law to copy the
software on any medium except as specifically allowed in the license agreement.
No part of this document may be reproduced or transmitted in any form or by any means, electronic or
mechanical, including photocopying and recording, for any purpose without the express written permission
of Avid Technology, Inc.
Copyright © 2003 Avid Technology, Inc. and its licensors. All rights reserved. Printed in U.S.A.
The Avid DS Nitris application uses JScript and Visual Basic Scripting Edition from Microsoft Corporation.
Attn. Government User(s). Restricted Rights Legend
U.S. GOVERNMENT RESTRICTED RIGHTS. This Software and its documentation are “commercial
computer software” or “commercial computer software documentation.” In the event that such Software or
documentation is acquired by or on behalf of a unit or agency of the U.S. Government, all rights with
respect to this Software and documentation are subject to the terms of the License Agreement, pursuant to
FAR §12.212(a) and/or DFARS §227.7202-1(a), as applicable.
Trademarks
888 I/O, Adrenaline, AirPlay, AirSPACE, AirSPACE HD, AniMatte, AudioSuite, AudioVision, AutoSync, Avid,
Avid DNA, AVIDdrive, AVIDdrive Towers, AvidNet, AvidNetwork, AVIDstripe, Avid Mojo, Avid Unity, Avid
Xpress, AVoption, AVX, CamCutter, ChromaCurve, ChromaWheel, DAE, D-Fi, D-fx, Digidesign, Digidesign
Audio Engine, Digidesign Intelligent Noise Reduction, DigiDrive, Digital Nonlinear Accelerator,
DigiTranslator, DINR, D-Verb, Equinox, ExpertRender, FieldPak, Film Composer, FilmScribe, FluidMotion,
HIIP, HyperSPACE, HyperSPACE HDCAM, IllusionFX, Image Independence, Intraframe, iS9, iS18, iS23,
iS36, Lo-Fi, Magic Mask, make manage move | media, Marquee, Matador, Maxim, MCXpress, Media
Composer, MediaDock, MediaDock Shuttle, Media Fusion, Media Illusion, MediaLog, Media Reader, Media
Recorder, MEDIArray, MediaShare, Meridien, MetaSync, NaturalMatch, Nearchive, NetReview,
NewsCutter, Nitris, OMF, OMF Interchange, OMM, Open Media Framework, Open Media Management,
ProEncode, Pro Tools, QuietDrive, Recti-Fi, RetroLoop, rS9, rS18, Sci-Fi, Softimage, Sound Designer II,
SPACE, SPACEShift, Symphony, the Avid|DS logo, Trilligent, UnityRAID, Vari-Fi, Video Slave Driver,
VideoSPACE, Xdeck, and XSI are either registered trademarks or trademarks of Avid Technology, Inc. in
the United States and/or other countries.
All other trademarks contained herein are the property of their respective owners.
GOT FOOTAGE?
Editors — Filmmakers — Special Effects Artists — Game Developers — Animators — Educators —
Broadcasters — Content creators of every genre — Just finished an incredible project and want to
share it with the world?
Send us your reels and we may use your footage in our show reel or demo!*
For a copy of our release and Avid’s mailing address, go to www.avid.com/footage.
*Note: Avid cannot guarantee the use of materials submitted.
Avid DS Nitris Capture and Output Guide • 0130-05574-01 • September 2003
2
Page 3

Contents
Using This Guide . . . . . . . . . . . . . . . . . . . . . . . . . . . . . . . . . . . . . 7
Who Should Use This Guide . . . . . . . . . . . . . . . . . . . . . . . . . . . . . . . . . . 7
Symbols and Conventions . . . . . . . . . . . . . . . . . . . . . . . . . . . . . . . . . . . . 8
Using the Mouse, Pen, and Keyboard . . . . . . . . . . . . . . . . . . . . . . . . 9
Customizing the Pen or Mouse . . . . . . . . . . . . . . . . . . . . . . . . . . . . 10
If You Need Help . . . . . . . . . . . . . . . . . . . . . . . . . . . . . . . . . . . . . . . . . . 10
Accessing the Online Documentation . . . . . . . . . . . . . . . . . . . . . . . 10
If You Have Documentation Comments. . . . . . . . . . . . . . . . . . . . . . 11
How to Order Documentation . . . . . . . . . . . . . . . . . . . . . . . . . . . . . 11
Avid Educational Services . . . . . . . . . . . . . . . . . . . . . . . . . . . . . . . . 11
Avid DS Customer Support . . . . . . . . . . . . . . . . . . . . . . . . . . . . . . . . . . 12
E-mail Support . . . . . . . . . . . . . . . . . . . . . . . . . . . . . . . . . . . . . . . . . 12
Web Support . . . . . . . . . . . . . . . . . . . . . . . . . . . . . . . . . . . . . . . . . . 12
FTP Support. . . . . . . . . . . . . . . . . . . . . . . . . . . . . . . . . . . . . . . . . . . 12
Mailing List . . . . . . . . . . . . . . . . . . . . . . . . . . . . . . . . . . . . . . . . . . . . 13
Chapter 1 Capturing Material . . . . . . . . . . . . . . . . . . . . . . . . . . . . . . . . . . . 15
Workflow: Capturing Material . . . . . . . . . . . . . . . . . . . . . . . . . . . . . . . . . 15
Preparing to Capture Material . . . . . . . . . . . . . . . . . . . . . . . . . . . . . . . . 17
Configuring the External Device . . . . . . . . . . . . . . . . . . . . . . . . . . . 18
Opening the Capture Tool . . . . . . . . . . . . . . . . . . . . . . . . . . . . . . . . 24
Selecting the Capture Mode . . . . . . . . . . . . . . . . . . . . . . . . . . . . . . 25
Selecting the Capture Target . . . . . . . . . . . . . . . . . . . . . . . . . . . . . . 26
Specifying the Capture Quality . . . . . . . . . . . . . . . . . . . . . . . . . . . . 26
Specifying Audio Input Settings . . . . . . . . . . . . . . . . . . . . . . . . . . . . 30
Specifying Video Input Settings . . . . . . . . . . . . . . . . . . . . . . . . . . . . 31
Previewing Material . . . . . . . . . . . . . . . . . . . . . . . . . . . . . . . . . . . . . 33
Monitoring Audio Input . . . . . . . . . . . . . . . . . . . . . . . . . . . . . . . . . . . 33
Logging and Capturing Material . . . . . . . . . . . . . . . . . . . . . . . . . . . . . . . 35
Performing a Live Capture . . . . . . . . . . . . . . . . . . . . . . . . . . . . . . . . 36
3
Page 4

Logging and Capturing Clips from Tape. . . . . . . . . . . . . . . . . . . . . . 37
Capturing Clips On-the-Fly . . . . . . . . . . . . . . . . . . . . . . . . . . . . . . . . 41
Capturing Material from File . . . . . . . . . . . . . . . . . . . . . . . . . . . . . . . . . . 43
Capturing from File by Dragging to a Bin . . . . . . . . . . . . . . . . . . . . . 49
Capturing from Layered Adobe Photoshop Files . . . . . . . . . . . . . . . 49
Capturing from DPX Files . . . . . . . . . . . . . . . . . . . . . . . . . . . . . . . . . 52
Importing Encapsulated PostScript (EPS) Files . . . . . . . . . . . . . . . . 55
Creating Linked Clips . . . . . . . . . . . . . . . . . . . . . . . . . . . . . . . . . . . . . . . 56
Relinking a Clip. . . . . . . . . . . . . . . . . . . . . . . . . . . . . . . . . . . . . . . . . 58
Batch Capturing . . . . . . . . . . . . . . . . . . . . . . . . . . . . . . . . . . . . . . . . . . . 59
Recapturing at a Different Quality . . . . . . . . . . . . . . . . . . . . . . . . . . 59
Capturing Clips from the Avid Explorer. . . . . . . . . . . . . . . . . . . . . . . 60
Capturing Clips from the Timeline . . . . . . . . . . . . . . . . . . . . . . . . . . 64
Creating a Batch Capture List . . . . . . . . . . . . . . . . . . . . . . . . . . . . . 67
Batch Capturing Without Interaction. . . . . . . . . . . . . . . . . . . . . . . . . 69
Using Scripts to Capture Media . . . . . . . . . . . . . . . . . . . . . . . . . . . . . . . 70
Creating a Script for Capturing Media . . . . . . . . . . . . . . . . . . . . . . . 71
Running a Script for Capturing Media. . . . . . . . . . . . . . . . . . . . . . . . 72
Importing from SOFTIMAGE|XSI . . . . . . . . . . . . . . . . . . . . . . . . . . . . . . 75
Importing .gen Files . . . . . . . . . . . . . . . . . . . . . . . . . . . . . . . . . . . . . 75
Importing a Composite Tree through AAF . . . . . . . . . . . . . . . . . . . . 76
Managing Tapes . . . . . . . . . . . . . . . . . . . . . . . . . . . . . . . . . . . . . . . . . . . 77
Adding a New Tape . . . . . . . . . . . . . . . . . . . . . . . . . . . . . . . . . . . . . 78
Renaming a Tape and Changing the Comment . . . . . . . . . . . . . . . . 79
Purging Media from Tape . . . . . . . . . . . . . . . . . . . . . . . . . . . . . . . . . 79
Recapturing from Tape . . . . . . . . . . . . . . . . . . . . . . . . . . . . . . . . . . . 80
Deleting a Tape . . . . . . . . . . . . . . . . . . . . . . . . . . . . . . . . . . . . . . . . 80
Chapter 2 Conforming AAF and AFE Files . . . . . . . . . . . . . . . . . . . . . . . . 81
Workflow: Conforming AAF and AFE Files . . . . . . . . . . . . . . . . . . . . . . . 82
Conforming AAF and AFE Files . . . . . . . . . . . . . . . . . . . . . . . . . . . . . . . 83
Before You Begin . . . . . . . . . . . . . . . . . . . . . . . . . . . . . . . . . . . . . . . 83
Exporting AAF Files . . . . . . . . . . . . . . . . . . . . . . . . . . . . . . . . . . . . . 88
Exporting AFE Files . . . . . . . . . . . . . . . . . . . . . . . . . . . . . . . . . . . . . 89
Transferring Media . . . . . . . . . . . . . . . . . . . . . . . . . . . . . . . . . . . . . . 93
4
Page 5

Importing AAF and AFE Files . . . . . . . . . . . . . . . . . . . . . . . . . . . . . 93
Creating a Sequence and Master Clips . . . . . . . . . . . . . . . . . . . . . . 95
Recapturing Media. . . . . . . . . . . . . . . . . . . . . . . . . . . . . . . . . . . . . . 98
Transferring Audio Media. . . . . . . . . . . . . . . . . . . . . . . . . . . . . . . . . 98
Completing the Conformed Sequence. . . . . . . . . . . . . . . . . . . . . . 101
Creating Real-Time Graphics from Conformed Titles . . . . . . . . . . 101
Conforming AAF Sequences with MediaManager . . . . . . . . . . . . . . . . 102
Setting Up MediaManager . . . . . . . . . . . . . . . . . . . . . . . . . . . . . . . 103
Checking a Sequence into MediaManager . . . . . . . . . . . . . . . . . . 105
Conforming a Sequence with MediaManager . . . . . . . . . . . . . . . . 106
Chapter 3 Conforming OMF, EDL, and ALE Files. . . . . . . . . . . . . . . . . . 109
Workflow: Conforming OMF, EDL, and ALE Files . . . . . . . . . . . . . . . . 110
Conforming OMF Compositions . . . . . . . . . . . . . . . . . . . . . . . . . . . . . . 111
Opening an OMF File. . . . . . . . . . . . . . . . . . . . . . . . . . . . . . . . . . . 111
Conforming an OMF File . . . . . . . . . . . . . . . . . . . . . . . . . . . . . . . . 112
Exporting an OMF File . . . . . . . . . . . . . . . . . . . . . . . . . . . . . . . . . . 118
Conforming EDLs . . . . . . . . . . . . . . . . . . . . . . . . . . . . . . . . . . . . . . . . . 120
Avid EDL Manager. . . . . . . . . . . . . . . . . . . . . . . . . . . . . . . . . . . . . 121
Opening an EDL File . . . . . . . . . . . . . . . . . . . . . . . . . . . . . . . . . . . 121
Setting EDL Properties . . . . . . . . . . . . . . . . . . . . . . . . . . . . . . . . . 123
Conforming an EDL File. . . . . . . . . . . . . . . . . . . . . . . . . . . . . . . . . 124
Modifying an EDL File . . . . . . . . . . . . . . . . . . . . . . . . . . . . . . . . . . 128
Exporting an EDL File . . . . . . . . . . . . . . . . . . . . . . . . . . . . . . . . . . 130
Printing an EDL File . . . . . . . . . . . . . . . . . . . . . . . . . . . . . . . . . . . . 131
Proofing . . . . . . . . . . . . . . . . . . . . . . . . . . . . . . . . . . . . . . . . . . . . . 132
Conforming ALE Files. . . . . . . . . . . . . . . . . . . . . . . . . . . . . . . . . . . . . . 132
Importing an ALE File . . . . . . . . . . . . . . . . . . . . . . . . . . . . . . . . . . 133
Logging Clips from an ALE File . . . . . . . . . . . . . . . . . . . . . . . . . . . 134
Chapter 4 Outputting Media . . . . . . . . . . . . . . . . . . . . . . . . . . . . . . . . . . . 137
Workflow: Outputting Media . . . . . . . . . . . . . . . . . . . . . . . . . . . . . . . . . 138
Preparing for Output . . . . . . . . . . . . . . . . . . . . . . . . . . . . . . . . . . . . . . . 139
Processing Effects . . . . . . . . . . . . . . . . . . . . . . . . . . . . . . . . . . . . . 139
Selecting an Area to Output . . . . . . . . . . . . . . . . . . . . . . . . . . . . . . 139
5
Page 6

Monitoring Audio Output . . . . . . . . . . . . . . . . . . . . . . . . . . . . . . . . . 141
Configuring the External Device for Output . . . . . . . . . . . . . . . . . . 141
Calibrating Video Output . . . . . . . . . . . . . . . . . . . . . . . . . . . . . . . . 142
Specifying Downconvert Formats . . . . . . . . . . . . . . . . . . . . . . . . . . 144
Specifying the Sync Source . . . . . . . . . . . . . . . . . . . . . . . . . . . . . . 145
Outputting Material . . . . . . . . . . . . . . . . . . . . . . . . . . . . . . . . . . . . . . . . 146
Outputting to Tape . . . . . . . . . . . . . . . . . . . . . . . . . . . . . . . . . . . . . 146
Outputting to File . . . . . . . . . . . . . . . . . . . . . . . . . . . . . . . . . . . . . . 148
Exporting AVI or QuickTime Reference Movies . . . . . . . . . . . . . . . 153
Exporting Reference Movies to ProEncode . . . . . . . . . . . . . . . . . . 154
Index . . . . . . . . . . . . . . . . . . . . . . . . . . . . . . . . . . . . . . . . . . . . . 157
6
Page 7

Using This Guide
Congratulations on your purchase of an Avid DS Nitris system. You can
use your system to create broadcast-quality output incorporating every
possible production element from full-speed, high-resolution footage, to
multimedia artwork and animation, to computer-generated effects and
titling.
n
The documentation describes the features and hardware of all models.
Therefore, your system might not contain certain features and hardware
that are covered in the documentation.
Who Should Use This Guide
This guide is intended for all Avid DS Nitris users, from beginning to
advanced, who need to capture, conform, or output material. It provides
comprehensive, task-oriented instructions for:
• Capturing material from external devices and files
• Conforming projects transferred from other systems through AFE,
AAF, OMF
• Outputting material to external devices and files
®
, EDL, and ALE files
Page 8

Using This Guide
Symbols and Conventions
Unless noted otherwise, the material in this document applies to the
Windows XP operating system.
Avid DS Nitris documentation uses the following symbols and
conventions:
Symbol or
Convention
Meaning or Action
n
c
w
> This symbol indicates menu commands (and subcommands)
t
Margin tips In the margin, you will find tips that help you perform tasks
Italic font Italic font is used to emphasize certain words and to indicate
Courier Bold
font
A note provides important related information, reminders,
recommendations, and strong suggestions.
A caution means that a specific action you take could cause
harm to your computer or cause you to lose data.
A warning describes an action that could cause you physical
harm. Follow the guidelines in this document or on the unit
itself when handling electrical equipment.
in the order you select them. For example, File > Import
means to open the File menu and then select the Import
command.
This symbol indicates a single-step procedure. Multiple
arrows in a list indicate that you perform one of the actions
listed.
more easily and efficiently.
variables.
Courier Bold font identifies text that you type.
Bold font Bold indicates a user interaction.
8
Page 9

Using the Mouse, Pen, and Keyboard
In Avid DS Nitris, you can use a two-button mouse (with wheel) or a pen
and tablet. The left and right mouse buttons perform different operations.
Unless otherwise stated, use the left mouse button.
The mouse and pen operate slightly differently. All the procedures in this
guide are documented for the mouse. You can, however, easily use a pen or
the keyboard. The following table shows the terms relating to the mouse,
pen, and keyboard.
This Term Means This with a Mouse Means This with a Pen
Symbols and Conventions
Click Quickly click and release the
left mouse button. Always use
the left mouse button unless
otherwise stated.
Double-click Click the left mouse button
twice rapidly.
Right-click Quickly click and release the
right mouse button.
Drag Click and hold the left mouse
button or the wheel while you
move the mouse.
Alt+key,
Ctrl+key,
Shift+key,
etc.
Press and hold the first key while you press the second key. For
example, “Press Alt+F1” means to press and hold the Alt key
while you press the F1 key.
Tap the tablet once with the tip of
the pen, or touch the pen to the
tablet with enough pressure to
click.
Quickly tap the tablet twice in the
same screen pixel or press the F5
key to go from single to doubleclick.
Press the top portion of the switch
on the side of the pen or press the
F6 key to go from left to rightclick.
Press the pen to the tablet while
moving the pen.
9
Page 10

Using This Guide
Customizing the Pen or Mouse
By customizing the pen, you can adjust the click pressure, switch
functions, and other features. For information on customizing the pen,
refer to the documentation provided with your Avid DS Nitris system.
You can also customize the mouse. For example, you can select lefthanded configuration or change the double-click speed. For information on
customizing the mouse, refer to the Windows online Help.
If You Need Help
If you are having trouble using Avid DS Nitris:
1. Retry the action, carefully following the instructions given for that task
in this guide. It is especially important to check each step of your
workflow.
2. Check for the latest information that might have become available
after the documentation was published in one of two locations:
- If release notes are available, they ship with your application.
- If ReadMe files are available, they are supplied in your Avid
application folder. ReadMe files are also available from Help.
3. Check the documentation that came with your Avid application or your
hardware for maintenance or hardware-related issues.
4. See “Avid DS Customer Support” on page 12.
5. For Technical Support, please call 800-800-AVID (800-800-2843).
For international enquiries and support services, contact your local
Avid Reseller. Support offerings may vary per location.
Accessing the Online Documentation
The online library contains all the Avid DS Nitris documentation in PDF
format. If it was installed on your workstation, you can access it from the
Help menu in Avid DS Nitris.
10
Page 11

If You Need Help
n
You will need Adobe® Acrobat® Reader® installed to view the
documentation online.
To access the online library, do one of the following:
t In Avid DS Nitris, select Help > Online Library.
t Insert the Drivers CD-ROM into your CD-ROM drive, and select
Online Library from the main menu.
To install Adobe Acrobat Reader:
1. Insert the Drivers CD-ROM into your CD-ROM drive.
2. Select the appropriate workstation and select Utilities.
If You Have Documentation Comments
We’d appreciate any comments or suggestions you may have about the
Avid DS Nitris documentation.
Please e-mail your documentation comments to:
dsdocs@avid.com
Include the title of the document, its part number, and the specific section
you are commenting on in all correspondence.
How to Order Documentation
To order additional copies of this documentation from within the
United States, call Avid Sales at 800-949-AVID (800-949-2843). If you are
placing an order from outside the United States, contact your local
Avid representative.
Avid Educational Services
For information on courses/schedules, training centers, certifications,
courseware, and books, please visit www.avid.com/training or call
Avid Sales at 800-949-AVID (800-949-2843).
11
Page 12

Using This Guide
Avid DS Customer Support
The following sections describe various Avid DS Customer Support
options.
E-mail Support
The e-mail address for Avid DS Customer Support is:
dssupport@avid.com.
You can use it for sending bug reports, usability questions, and avidds.cab
audit reports for system analysis. All e-mails are logged in the support
database and assigned a case number. Send one support request per e-mail.
n
Web Support
FTP Support
It is mandatory that you include your SID number in the body of your
e-mail message for verification of your maintenance contract and case
logging, otherwise, response will be delayed.
The Avid DS Customer Support and Download sections at
http://www.softimage.com/avidds provide quick access to a wide range
of resources from the Avid DS teams and user community. Downloads,
including presets, drivers, and Quick Fix Engineering (QFE), provide the
latest solutions for use with your Avid DS Nitris system. Online
documentation, tutorials, and Knowledge Base articles ensure that you get
the most out of your work with Avid DS Nitris. It's like having a dedicated
Avid DS Customer Support engineer sitting at your desk!
For troubleshooting purposes, an FTP server is available for uploading
large files for Avid DS Customer Support personnel to examine. You can
upload a project's archive, media files, or other large piece of data. Simply
zip the files to upload and use a short name for easy retrieval, such as
archive.zip or Case274877.zip. You can use a Windows Command Prompt
or an FTP application to upload files to our server.
12
Page 13

Avid DS Customer Support
Command Prompt Commands
Command Description
Site access ftp ftp.softimage.com [Enter]
Folder access cd incoming [Enter]
User name anonymous [Enter]
Password “your e-mail address” [Enter]
Transfer mode bin [Enter]
Upload command Put “path:\file name” [Enter]
Once the file upload is complete, send an e-mail to dssupport@avid.com
to inform Avid DS Customer Support as there is no automatic notification
when a file is uploaded on the FTP server. Please provide the complete and
exact file name (case sensitive) to retrieve.
Mailing List
Although the Avid DS mailing list is frequently monitored by Avid
employees, it is not part of the official support channels. You are invited to
send your support requests to any of the above channels when required.
If you have an e-mail account, you can join the worldwide network of Avid
DS users exchanging ideas. The mailing list has proven to be quite useful
for users, with a constant stream of new subscribers.
To subscribe, send an e-mail to majordomo@softimage.com with the
following text in the body of your message: subscribe ds. You can get
further information on using the automated list server by e-mailing
majordomo@softimage.com with “help” as your message.
You can also go to http://www.avid.com/support/forms.html, which is a
great source of information, available on the Avid web site for Avid DS.
13
Page 14

Using This Guide
14
Page 15

Chapter 1
Capturing Material
This chapter describes how to prepare to capture material, specify the
capture quality, and capture and log material so that you can edit it in
Avid DS Nitris. This chapter includes the following topics:
• Workflow: Capturing Material
• Preparing to Capture Material
• Logging and Capturing Material
• Capturing Material from File
• Creating Linked Clips
• Batch Capturing
• Using Scripts to Capture Media
• Importing from SOFTIMAGE|XSI
• Managing Tapes
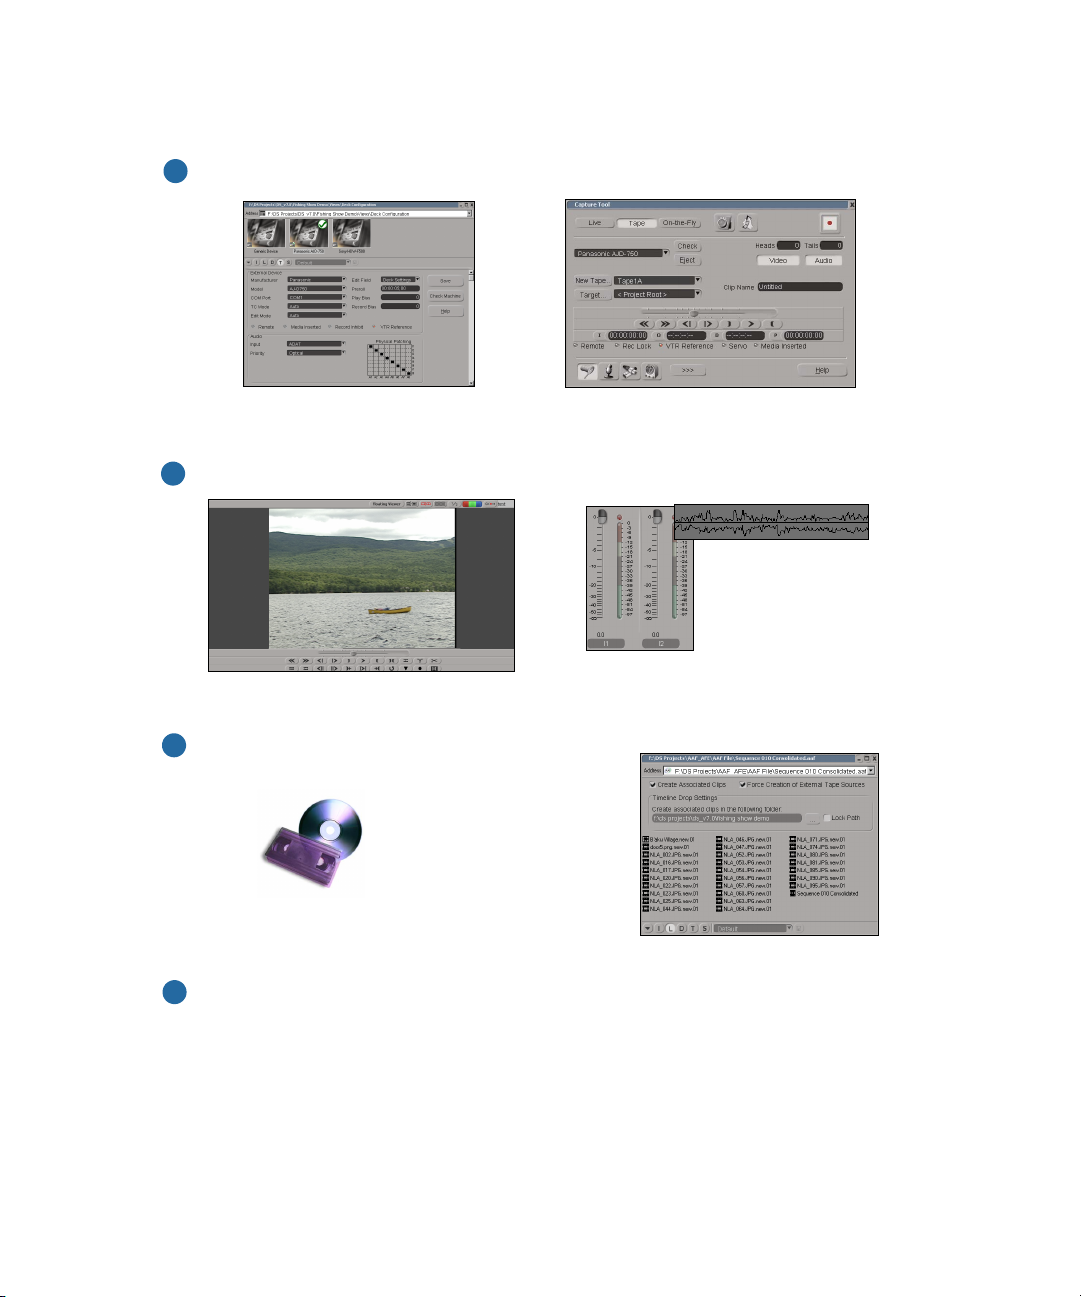
Workflow: Capturing Material
You can capture material for your project from different sources, such as
tape or file. The following illustration shows you the process of capturing
material:
Page 16
Chapter 1 Capturing Material
Configure inputs and quality settings.
1
Configure the VTR or other external device.
Preview material.
2
Preview video material.
Log or capture material from...
3
File
Tape
If required, batch capture from the timeline or Avid Explorer.
4
AFE, AAF, OMF
®
, EDL, or ALE file.
Select video/audio input, quality, and storage.
Adjust level of incoming audio signal.
16
Page 17

Preparing to Capture Material
Before capturing media, you must configure settings for your workstation.
Configuration includes specifying the external device and the input signals
coming from the external device, selecting the capture quality, storage
location for the captured media, and other settings, and monitoring audio
levels.
Use this checklist to help you prepare to capture.
Preparing to capture
❏ Configure the external device
❏ Select the capture mode
❏ Select the capture target
❏ Specify the capture quality
Preparing to Capture Material
c
n
❏ Specify audio input settings
❏ Specify video input settings
❏ Preview material
These tasks are described in the following sections.
Avid DS Nitris requires that the deck and the Avid Nitris DNA be
genlocked to the same timing source when capturing. If you’re
capturing a format that allows either tri-level or black burst sync
(such as 1080i 59.94), you can use either sync source, so long as it is
supported by the deck.
If you are capturing material from file, configure the capture settings in
advance through the Capture Settings view and capture through the Avid
Explorer. For more information, see “Capturing Material from File” on
page 43.
17
Page 18

Chapter 1 Capturing Material
Configuring the External Device
Before capturing from an external device, such as a deck, you need to set
options for the device.The first time you work with a new device, you need
to set parameters in the Deck Configuration view. The Deck Configuration
view lets you save your settings as a preset. You can then select the preset
in the Deck Configuration view or select it from the Device pop-up menu
in the Capture Tool.
To configure an external device:
1. Connect the external device to your Avid DS system, as described in
the setup guide for your system.
2. Open the Deck Configuration view by doing one of the following:
t Select View > Multi-Instance Views > Deck Configuration.
t In an Avid Explorer panel, open the Views folder and click Deck
Configuration.
The Deck Configuration view opens.
18
Page 19
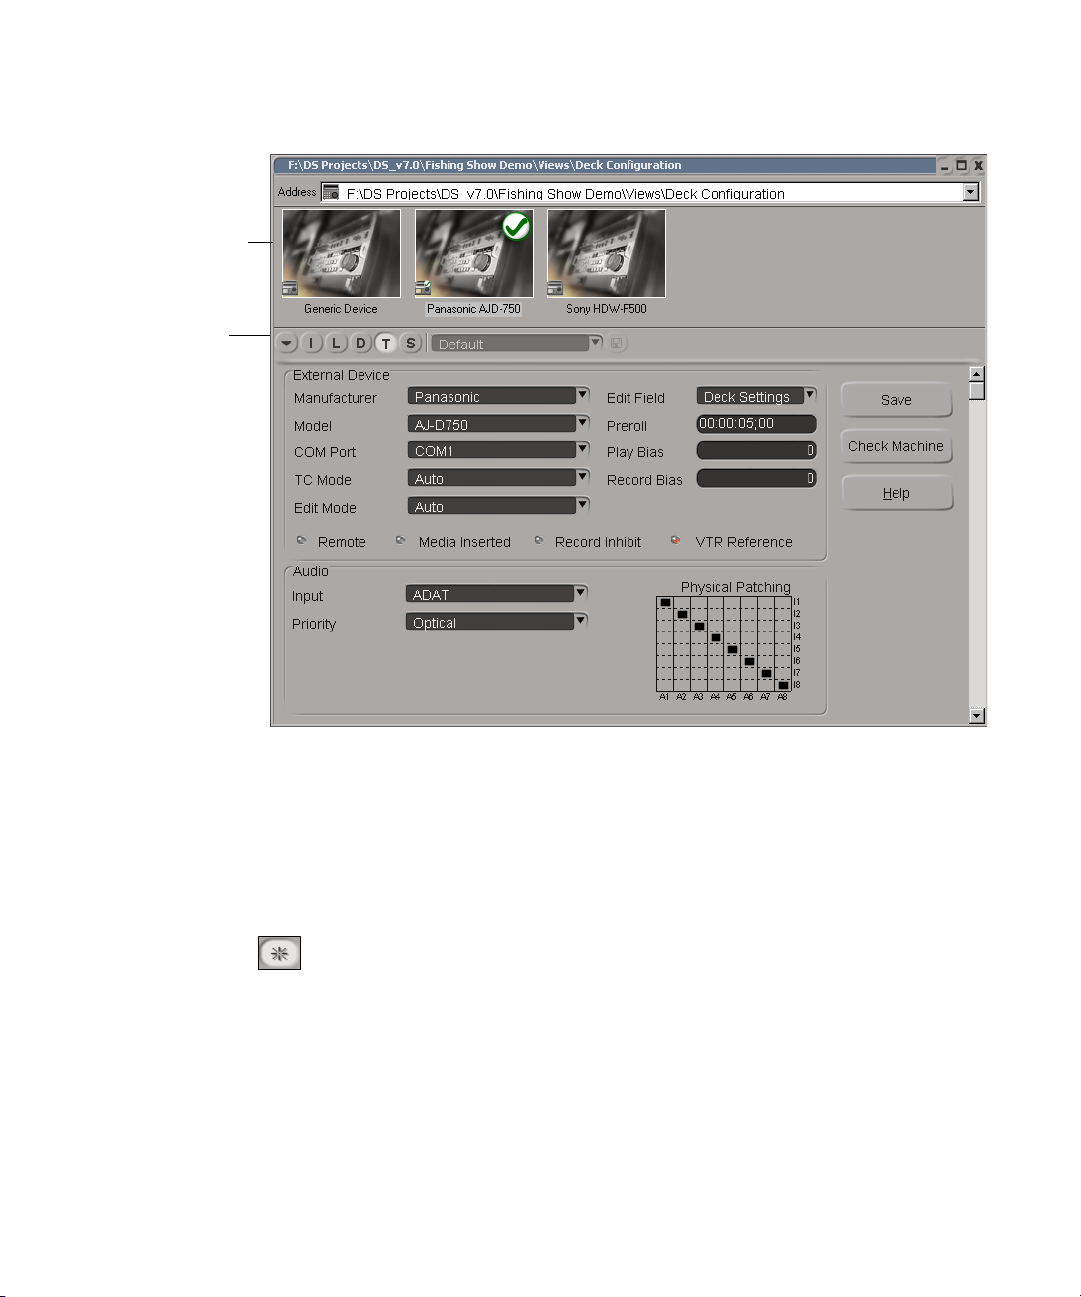
Deck presets
list
Fast Menu
button
Preparing to Capture Material
For information about options in the Deck Configuration view, click
the Help button in the Avid Explorer toolbar.
3. Do one of the following:
t In the Deck Configuration view, click the Fast Menu button and
select Add New Deck Preset.
t In the Avid Explorer toolbar, click the New button.
An icon named Deck Preset is added to the Deck Presets list. The
name is selected and ready to be renamed.
4. Type a name for the preset.
5. From the Manufacturer list, select the name of the manufacturer of the
external device.
6. From the Model list, select the model number.
19
Page 20

Chapter 1 Capturing Material
7. From the COM Port list, select the COM port that connects the serial
8. From the TC Mode list, select the type of timecode you want to use for
Some models include a frame rate (23, 24, and so on). Make sure the
template matches the playback rate of your deck.
cable from the external device to your system.
The serial cable should be connected to either COM1 or COM2.
input: Auto, LT C, or VITC.
Auto lets the external device determine which timecode to read.
n
n
If your external device cannot find a timecode when previewing material,
your TC Mode setting may be incorrect.
9. When outputting to tape, you must specify the edit mode by selecting
Auto or Assemble from the Edit Mode list.
10. From the Edit Field list, select the field on which the output starts.
Deck Settings uses the Edit Field setting that is set on the external
device.
11. In the Preroll text box, enter the amount of time that you want the
external device to play before Avid DS Nitris starts to capture or
output.
12. If you’re experiencing an offset between the external device and your
system, you can compensate by adding or subtracting frames in the
Play Bias and Record Bias text boxes. The Play Bias option offsets the
timeline whereas the Record Bias option offsets the VCR timecode
entry point.
When you first connect the external device to your system, you should
perform several capture and output tests to verify that the timecodes are
accurate.
20
13. Make a selection from the Input and Priority lists.
The input you select will depend on the audio hardware connected to
your system.
14. Use the Audio Physical Patching matrix to assign the audio outputs
from the external device to the audio inputs on your workstation—see
“Using the Physical Patching Matrix” on page 22.
Page 21

Preparing to Capture Material
n
n
The Input, Priority, and Audio Physical Patching settings are all saved
with the device preset.
15. Click the Check button.
If the communication between the external device and your system is
operating properly, nothing happens. If there is a problem, a message
box appears, stating the possible cause of the problem.
You can also verify that the external device is operating within normal
parameters by checking the five items in the External Device
Status area, located beneath the transport controls.
16. Right-click the new preset and select Save or click the Save button.
17. (Optional) Select the preset as the currently active external
device—see “Activating a Device Preset” on page 23.
If you’re using a deck that can be addressed in a format different from its
recording speed, four bin columns provide you with a quick way to find
your clips on the source tape:
• Avid DS Nitris Physical In
• Avid DS Nitris Physical Out
n
• Avid DS Nitris Physical Start
• Avid DS Nitris Physical Stop
These columns show timecodes in the same format as the deck faceplate.
Templates for output devices are located by default in the following folder:
C:\Program Files\Avid\DS_v7.0\Edm\Supporting
Files\Machine_Templates.
The Supporting Files folder also contains the Backup_Machine_Templates
folder, which holds older templates. To access additional templates in the
Deck Configuration view, copy template files to the Machine_Templates
folder.
21
Page 22
Chapter 1 Capturing Material
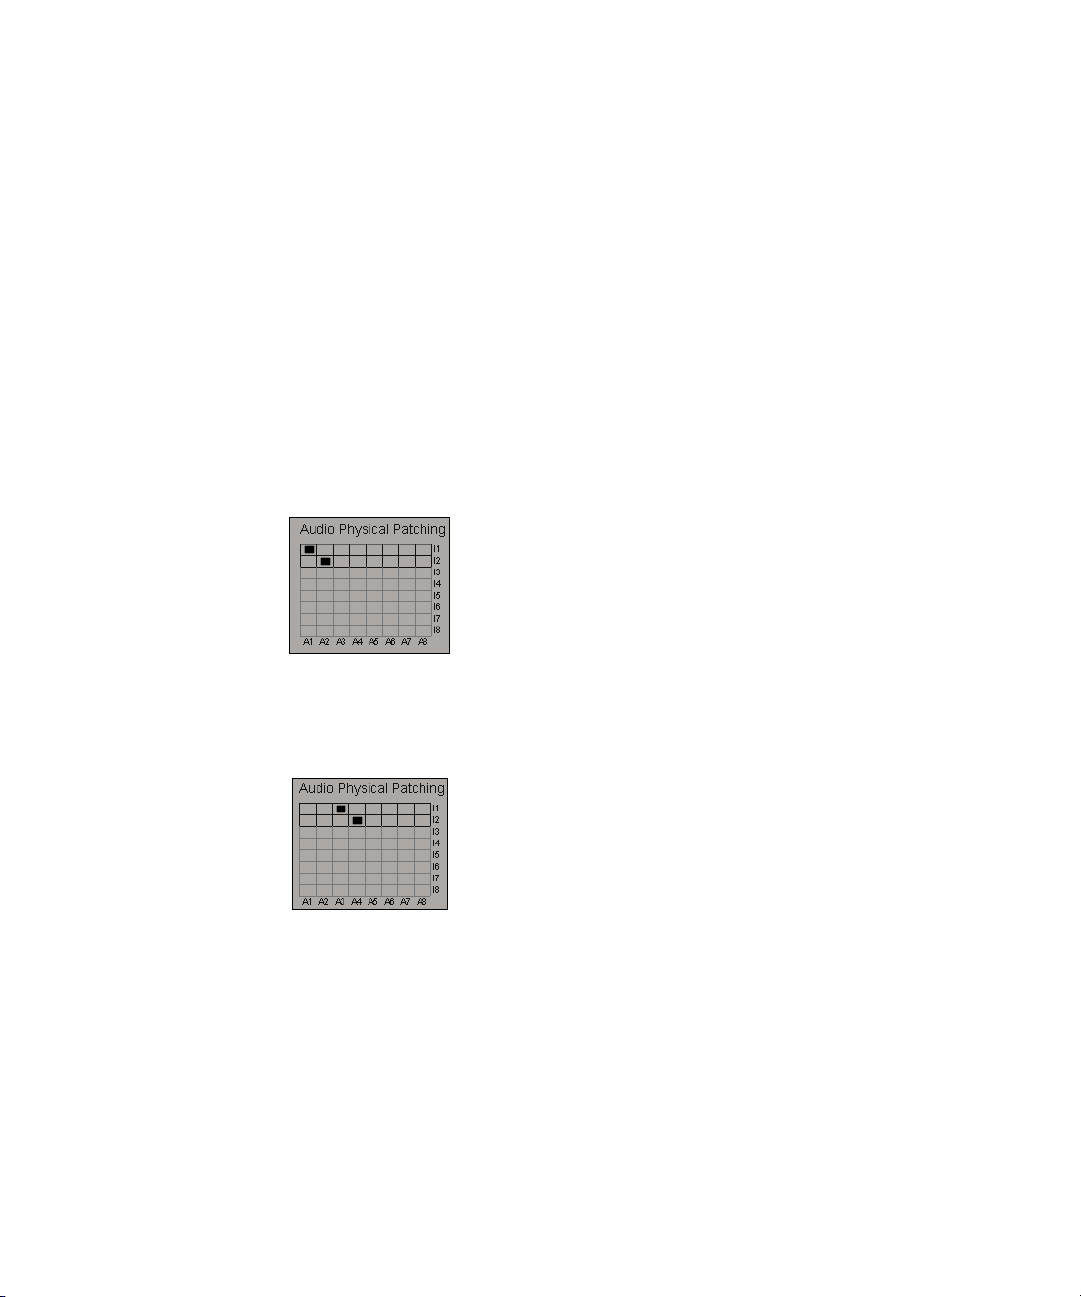
Using the Physical Patching Matrix
The Physical Patching matrix lets you assign the audio outputs from the
external device to the audio inputs on your workstation.
If the material you want to capture has more audio tracks than the number
of physical inputs on your workstation, you can capture the audio tracks in
different passes. For each pass, you can re-assign the audio physical
patching to capture the tracks you need.
For example, assume you only have two physical inputs (I1 and I2), but
have four tracks of audio to capture (A1, A2, A3, and A4). On the first
pass, you can capture tracks A1 and A2.
22
On the second pass, you can change the audio physical patching to A3 and
A4, which lets you capture audio tracks 3 and 4.
You can also use the patching to:
• Rearrange the track destination
• Import specific tracks from a device
• Remove unwanted tracks
Since the Audio Physical Patching is saved with the device preset, each
device can have its own specific audio patching.
Page 23

Editing and Deleting External Device Presets
You can save the settings for your external device as a preset, so that you
don’t have to reconfigure the device each time you use it for capture or
output.
To edit a preset:
1. Right-click the preset.
2. Select the options you want to change.
3. Click the Save button.
To delete a preset from the device list, do one of the following:
t Right-click the preset and select Delete.
t In the Avid Explorer toolbar, click the Delete button.
Preparing to Capture Material
n
Activating a Device Preset
n
You cannot delete the active preset.
You can select one of your presets as the currently active external device.
The device you choose will be the default device for capture, recapture,
and output.
You can choose a different device preset in the Capture Tool and Output
view.
To activate a device preset, do one of the following:
t In the top part of the Deck Configuration view, right-click the preset
and select Activate.
t Double-click the preset.
A green check mark appears on the preset’s icon.
23
Page 24

Chapter 1 Capturing Material
Exporting and Importing Device Presets
You can share presets with other Avid DS Nitris systems by exporting and
importing deck presets.
To export deck presets:
1. In the Bin tools section of the Deck Configuration view, click the Fast
Menu button and select Export Deck Presets.
The Select Deck Presets Export Folder dialog box opens.
2. Select the folder into which you want to export the presets.
3. Click the Select button.
All presets are exported to the folder you selected.
To import deck presets:
1. In the Bin tools section of the Deck Configuration view, click the Fast
Menu button and select Import Deck Presets.
The Select Deck Presets Import Folder dialog box opens.
2. Select the folder from which you want to import the presets.
3. Click the Select button.
All presets in the selected folder are imported to your system.
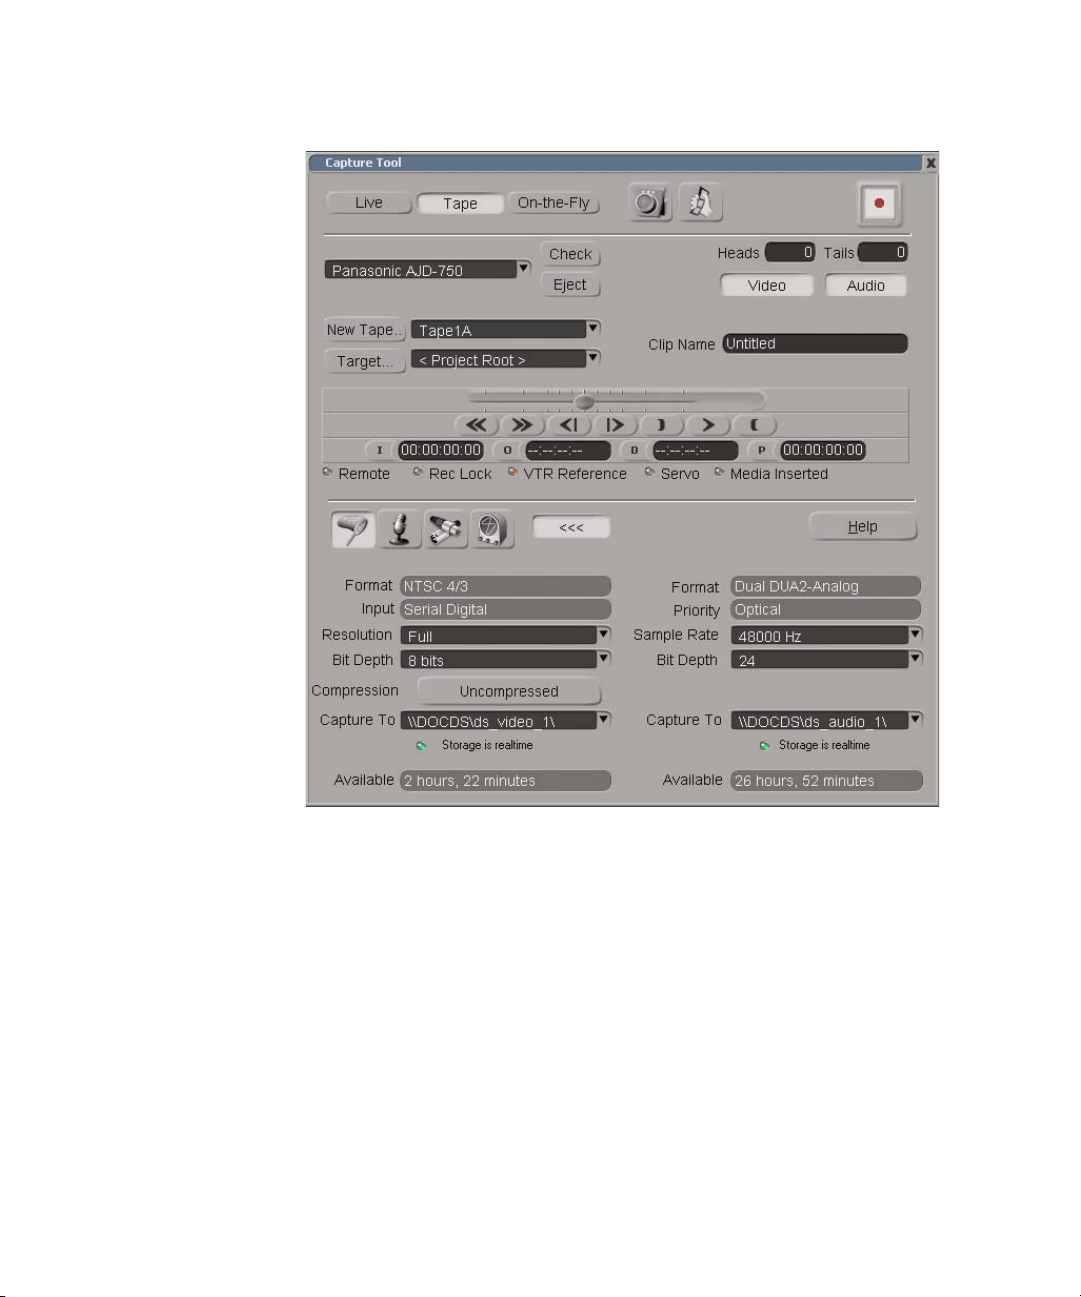
Opening the Capture Tool
The Capture Tool lets you configure the settings you need to capture media
from an external device and perform the capture.
To open the Capture Tool:
t Select View > Single-Instance Views > Capture Tool.
24
Page 25
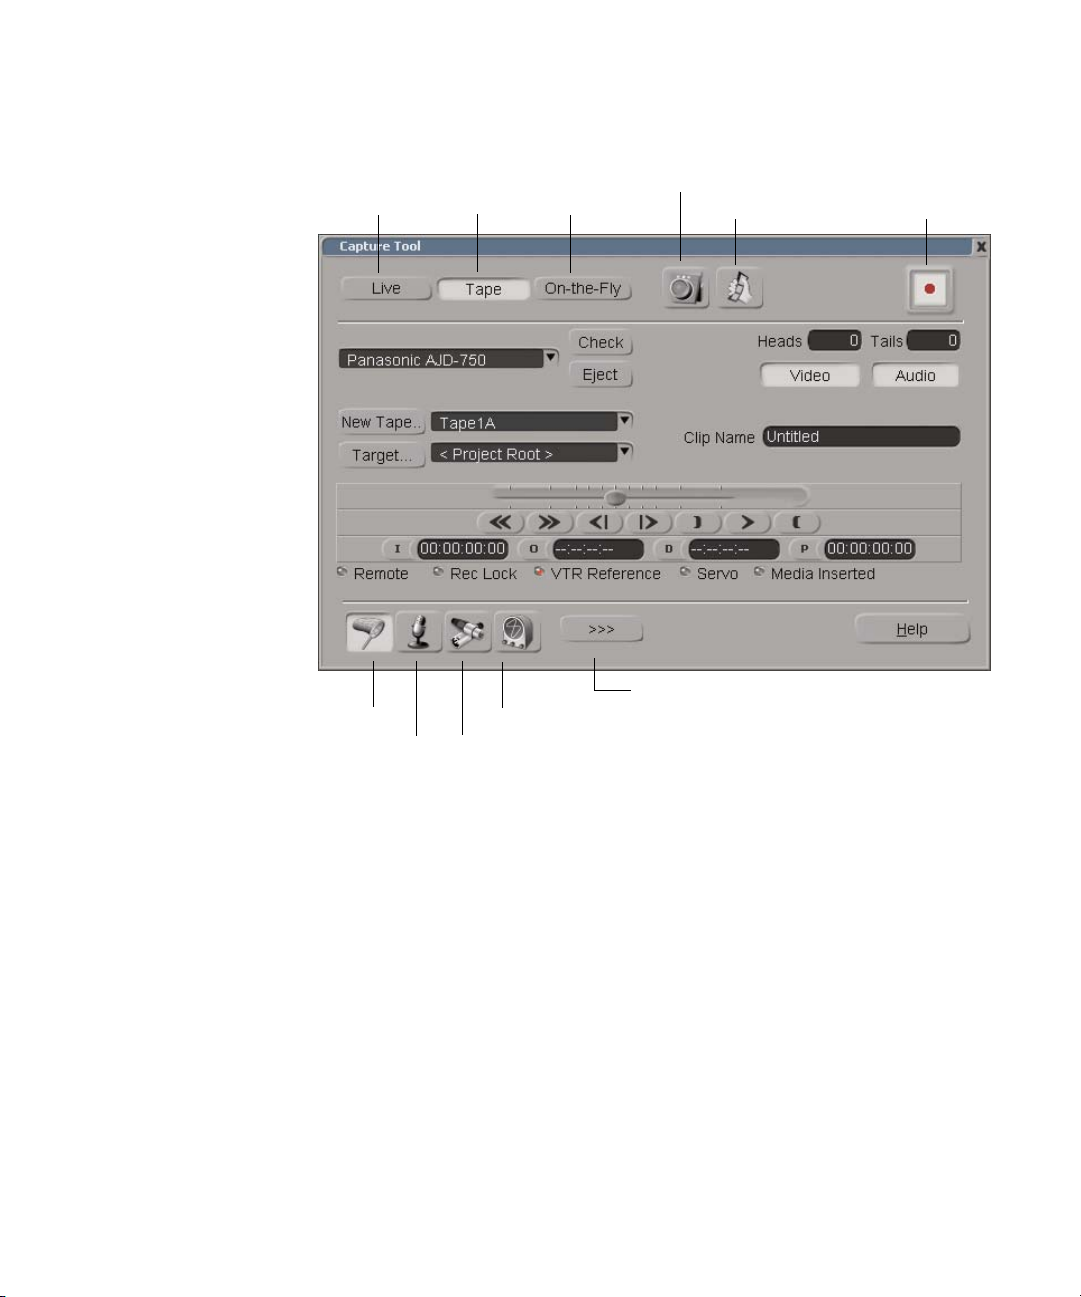
Live
Tape
On-the-Fly
Timeline/Deck Control
Log/Capture Mode
Preparing to Capture Material
Start Capture
Video/Audio
Capture Settings
Input Monitor
Deck Configuration Audio Parameters
Selecting the Capture Mode
You can choose one of three different capture modes in the Capture Tool:
• Live: Lets you specify settings for capturing material by simply
starting and stopping the capture—see “Performing a Live Capture” on
page 36.
• Ta pe : Lets you specify settings for capturing material between in and
out-points or for logging empty master clips—see “Logging and
Capturing Clips from Tape” on page 37.
• On-the-fly: Lets you specify settings for capturing material between in
and out-points that you set as the tape plays—see “Capturing Clips
On-the-Fly” on page 41.
Expand/Collapse
Video Input Parameters
25
Page 26

Chapter 1 Capturing Material
Selecting the Capture Target
You can choose one of several capture targets in the Capture Tool.
To select a capture target, do one of the following:
t Click the Target list button and select:
- Project Root: Creates master clips in the folder with the project
name (the project folder).
- Auto-Source: Creates master clips in a folder with the same name
as the tape name.
- Main Explorer Location: Creates master clips in a bin you
selected in the Avid Explorer.
The most recently activated bin within the project root becomes
the capture target. An icon in the title bar marks a bin as the
capture target.
t Click the Target button. Avid DS Nitris creates master clips in a folder
you select.
You cannot create master clips outside the current project, so
Avid DS Nitris checks the path to make sure the folder is within the
project folder.
Specifying the Capture Quality
You set the video and audio capture quality when you create your project
or sequence. You can keep these default settings or adjust them for the
material you are going to capture or recapture.
For your video material, you can change the resolution, bit depth,
compression, and storage device. For your audio material, you can change
the sample rate, bit depth, and storage device.
Specifying the Video Capture Quality
Video capture settings let you define the resolution, bit depth, and
compression ratio at which images are captured.
26
Page 27

Preparing to Capture Material
You can save space on your disk array by capturing video material in
compressed format. Typically, compressed material is used for a rough cut,
where you capture large amounts of material at a lower quality. After that,
you can recapture the edited material uncompressed before proceeding
with a more detailed edit.
n
You can also set the video capture quality in the Capture Settings view. For
more information, see “Capturing Material from File” on page 43.
To specify video capture quality:
1. Select View > Single-Instance Views > Capture Tool.
2. Click the Video/Audio Capture Settings button.
The video and audio capture settings are displayed.
27
Page 28
Chapter 1 Capturing Material
28
For information about video capture options, click the Help button.
3. In the Video panel, select a resolution from the Resolution list.
Options depend on your hardware.
4. From the Bit Depth list, select a bit depth: 8-bit or 10-bit, depending on
your hardware.
5. From the Compression list, select a compression or Uncompressed.
6. From the Capture To list, select the storage device on which your video
media will be stored.
Page 29

The status of the storage device you selected is displayed. If the
storage device is accessible in real time, the status marker is green. If
the storage device is not accessible in real time, the status marker is
red.
The Time Available box indicates how much video material you can
successfully capture based on your quality settings. If you have
insufficient storage space, consider deleting any unused media on your
disk array. For more information, see “Purging Media” on page 443.
Specifying the Audio Capture Quality
The audio capture settings let you define the quality at which your audio
material is captured. These settings depend on the audio hardware
connected to your workstation.
When you’re capturing material from a digital input, the audio input
sample rate and protocol settings are set according to the input signal
detected by your hardware.
Preparing to Capture Material
n
With digital input, such as AES/EBU or S/PDIF, the sample rate is
determined and set by the external device (CD player, DAT, etc.). If the
digital input cannot be detected (for example, the external device is turned
off), the default sampling rate is set to 48 kHz.
You can also set the audio capture quality in the Capture Settings view. See
“Capturing Material from File” on page 43.
To specify audio capture quality:
1. Select View > Single-Instance Views > Capture Tool.
2. Click the Video/Audio Capture Settings button.
For information about audio capture options, click the Help button.
3. In the Audio panel, select a sample rate from the Sample Rate list.
The higher the sample rate, the more accurate the capture process will
be.
4. From the Bit Depth list, select a bit depth. The higher the value, the
more precise the audio will be.
29
Page 30

Chapter 1 Capturing Material
5. From the Capture To list, select the disk array on which your audio
material will be stored.
The status of the storage device you select is displayed. If the storage
device is accessible in real time, the status marker is green. If the
storage device is not accessible in real time, the status marker is red.
The Time Available box indicates how much audio material you can
successfully capture based on your quality settings. If you have
insufficient storage space, consider deleting any unused media on your
disk array. For more information, see “Purging Media” on page 443.
Specifying Audio Input Settings
You can specify two types of audio input settings in the Capture Tool:
• Settings for the external device
• Audio format and channel routing
Setting the Audio Format
30
n
Your choices for audio format and available channels depend on the
installed audio hardware.
To set the audio format and assign audio channels:
1. In the Capture Tool, click the Input Monitor button.
2. Select the audio format from the Audio Format list.
For information about audio formats, click the Help button.
3. Use the channel routing matrix to assign the incoming audio tracks to
the desired audio channels of the clip.
Click in the appropriate boxes to make the assignments. The number of
available channels depends on the installed audio hardware and the
selected audio format. You should know, in advance, to which tracks
the audio has been recorded on the tape.
If you click on a square in the matrix and an empty circle appears, that
particular assignment is not available due to limitations of the audio
hardware.
Page 31

Preparing to Capture Material
For example, to switch the settings for track A1 and A2 so that track
A1 is assigned to Right (R) and track A2 is assigned to Left (L), click
the R square in column A1 and the L square in column A2. Notice that
you can have only one track assigned to one audio channel.
Old assignment
Specifying Audio Settings for the External Device
Settings for the external device are determined by the selection you make
from the device list. This list includes presets that you create in the Deck
Configuration view. For more information, see “Configuring the External
Device” on page 18. You can change the audio settings for the preset in the
Capture Tool, but they are not saved with the preset.
To specify audio parameters for the external device:
1. In the Capture Tool, click the Deck Configuration Audio Parameters
button.
2. Select the type of audio input from the Input list.
3. Select the priority for the audio input from the Priority list.
4. Specify the audio output assignments in the physical patching
matrix—see “Using the Physical Patching Matrix” on page 22.
Specifying Video Input Settings
New assignment
n
If your system includes an Avid Nitris DNA, you must select the type of
video input signal: Serial Digital, component, composite, or S-Video
(Serial Digital is required for HD). For component, composite, and
S-Video, you can calibrate video input by adjusting the video parameters.
You cannot adjust input parameters for Serial Digital.
31
Page 32

Chapter 1 Capturing Material
To select video input:
1. In the Capture Tool, click the Video Input Parameters button.
2. Select the input source from the Input Selection list.
32
To adjust video input parameters:
1. Connect a waveform monitor, vectorscope, or other equipment for
calibrating video input, depending on your production environment.
2. In the Capture Tool, click the Video Input Parameters button.
3. Select the input source from the Input Selection list.
4. Select Professional or Consumer, depending on the type of deck that
is connected.
5. Using color bars or a test pattern, adjust one or more video parameters
by dragging the slider or by clicking the minus (-) or plus (+) button.
For information about video parameters, click the Help button.
6. To save your settings, click the Save Parameters button.
You can save one set of parameters for each type of video input.
7. To restore the default settings for all video inputs, click the Factory
Settings button.
Page 33

Previewing Material
Before capturing video or audio material from a tape or live capture
session, you can preview it to decide how much pre-roll or post-roll to add,
or to monitor the audio levels (see “Specifying Video Input Settings” on
page 31). When you preview audio material, you can use the Audio Input
monitor to set incoming audio levels, depending on your hardware.
To preview video or audio material:
1. In the Capture Tool, click either the Live button, the Ta pe button, or
the On-the-Fly button.
2. Click the Play button on the transport controls.
Preparing to Capture Material
Play button
Monitoring Audio Input
You can monitor your incoming audio in a panel in the Capture Tool or in
the Audio Input Monitor view.
Each input strip in the input monitor corresponds to channels that are
recorded from the source device. You can use the fader on the input strip to
lower the incoming signal (depending on your system’s hardware). Once
you set the audio levels on the input monitor, they’re saved with the audio
clip.
33
Page 34

Chapter 1 Capturing Material
Input monitor
with mono tracks
Fader
Peak
indicator
Strip
name
Input strips
Level meter
When you later recapture this material, Avid DS Nitris uses the levels that
you set when you originally captured the material.
To adjust the audio input levels:
1. In the Capture Tool, click the Live button, Tape button, or On-the-Fly
button.
2. Open the audio monitor in one of the following ways:
34
n
t In the Capture Tool, click the Input Monitor button.
t Select View > Multi-Instance Views > Audio Input Monitor.
3. Set the audio format and assign the incoming audio tracks to the
desired audio channels of your clip—see “Setting the Audio Format”
on page 30.
4. On the transport controls, click the Play button.
5. If necessary, drag the fader controls to adjust the gain while the audio
is playing.
You cannot boost the signal through the Audio Input Monitor, but you can
lower it. Use your external device to boost the incoming signal.
The ability to adjust volume depends on your Avid DS Nitris system
hardware.
Page 35

Logging and Capturing Material
Depending on the source from which you are capturing material, you can:
• Log the material and batch capture it later
• Log and capture the material at the same time
• Log a clip that is linked to material on a network
If you’re capturing material from a tape or other external device, you can
log the clips needed for your sequence and then batch capture them later.
Logging lets you specify the in and out-points for material on tape without
actually capturing the material.
After you log or capture your material, master clips are created in a bin in
the Avid Explorer. These clips contain information about the original
media on tape or file, as well as the source in and source out timecodes.
Logging and Capturing Material
n
n
The source timecodes are not available for material that was recorded
from file.
You can also create logged clips from the following sources:
• AAF files (Advanced Authoring Format)
• AFE files (Avid Log Exchange)
• OMF files (Open Media Framework
• EDLs (Edit Decision Lists)
• ALEs (Avid Log Exchange)
For more information on logging clips from these sources, see
“Conforming AAF and AFE Files” on page 81 and “Conforming OMF,
EDL, and ALE Files” on page 109.
®
)
35
Page 36

Chapter 1 Capturing Material
Performing a Live Capture
You can perform a live capture of audio and video material as the tape is
playing from a variety of external devices.
A live capture is essentially the same as a capture from tape except that you
control the capture as the tape or other device is playing (without any preroll). If there is a proper SMPTE or AES/EBU timecode signal, the
material is assigned the incoming timecode. If no timecode signal is
present, Avid DS Nitris assigns an arbitrary timecode to the clip, starting at
00:00:00:00. Even if the material is assigned its appropriate timecode, the
timecode may not be completely accurate.
n
Material captured using this option is considered live material and cannot
be recaptured at a later time.
To perform a live capture:
1. Select View > Single-Instance Views > Capture Tool.
2. Configure the external device, specify the capture quality, and perform
other tasks listed in “Preparing to Capture Material” on page 17.
3. Click the Live button.
4. From the device list, select a deck preset.
5. Click the Check button.
If the communication between the external device and your system is
operating properly, nothing happens. If there is a problem, a message
box appears, stating the possible cause of the problem.
You can also verify that the external device is operating within normal
parameters by checking the five items in the External Device
Status area, located beneath the transport controls.
6. Make sure the Timeline/Deck Control button is set for Deck.
7. Make sure the Log/Capture Mode button is set for Capture.
36
8. In the Clip Name text box, enter a name to prefix all captured clips.
Page 37

Logging and Capturing Material
9. From the source name list, select the tape’s name.
If the tape is new, click the New Tape button and enter a name for the
tape.
c
n
It is very important to assign a unique name to every tape because
Avid DS Nitris uses it to identify the captured media.
10. From the Target list, select a location to hold the clips—see “Selecting
the Capture Target” on page 26.
11. Click the Video button to capture the video channel of the material.
12. Click the Audio button to capture one or more audio channels of the
material.
13. Click the Start Capture button.
The capture begins and the progress bar displays the number of
seconds of material captured. This value updates while the capture is in
progress.
If you encounter problems capturing material from tape, you should
deactivate the viewer using the Viewer button in the status bar and try
capturing again. When capturing full resolution HD material at 29.97 and
30 frames per second, the viewer is automatically deactivated.
14. When you want to stop capturing, click the Stop button on the progress
bar.
The captured material is represented by a clip in the folder you
selected. Click Capture again to resume capturing.
Logging and Capturing Clips from Tape
When capturing material from tape, you can capture the media between
selected in and out-points or log empty master clips.
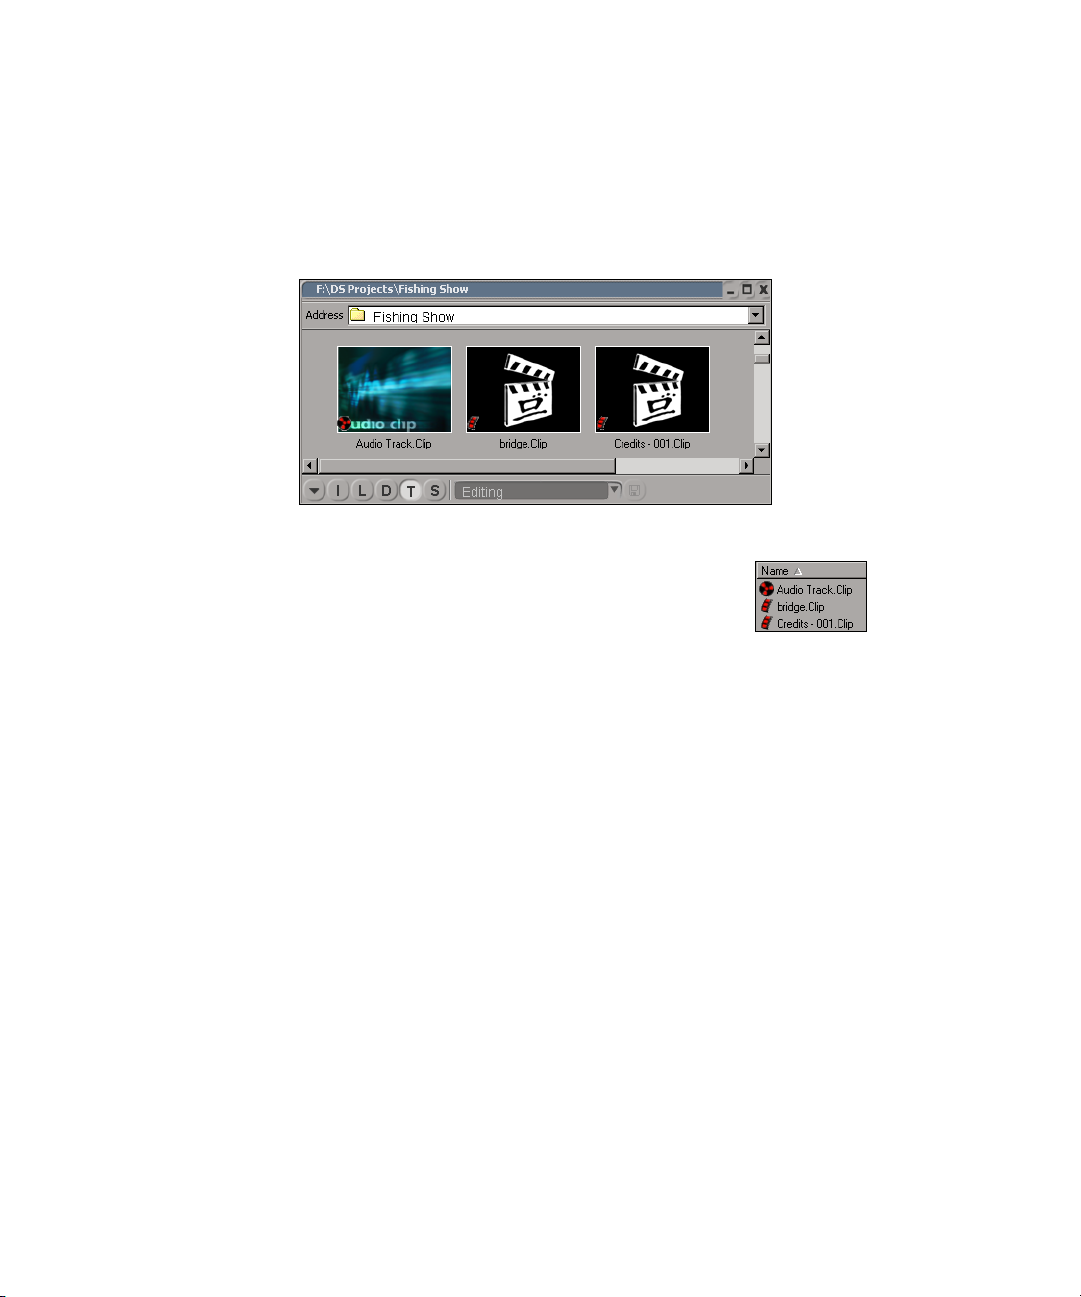
The captured clips are displayed in a bin. Logged video clips display the
Avid DS Nitris clapboard icon in the Thumbnails and Script view. Icons
for the audio and video clips without media are red.
37
Page 38
Chapter 1 Capturing Material
You can place logged clips on the timeline to create a sequence and then
edit them like any other master clip, even though they do not include
media. Later, you can capture the media at any time directly from the
timeline.
In the Thumbnails view of a bin, video and audio clips
without media are displayed with red icons.
In the Details view of a bin, video and audio clips
without media are preceded by a red icon.
38
To log and capture clips from a tape:
1. Select View > Single-Instance Views > Capture Tool.
2. Configure the external device, specify the capture quality, and other
perform other tasks listed in “Preparing to Capture Material” on
page 17.
3. Click the Ta pe button.
4. From the device list, select a deck preset.
5. Click the Check button.
If the communication between the external device and your system is
operating properly, nothing happens. If there is a problem, a message
box appears, stating the possible cause of the problem.
You can also verify that the external device is operating within normal
parameters by checking the five items in the External Device
Status area, located beneath the transport controls.
6. Make sure the Timeline/Deck Control button is set for Deck.
7. Click the Log/Capture Mode button to either capture or log material.
Page 39

Logging and Capturing Material
8. In the Clip Name text box, enter a name to prefix all captured clips.
9. From the source name list, select the tape’s name.
If the tape is new, click the New Tape button and enter a name for the
tape. The tape name is added to the Tape Library—see “Managing
Tapes” on page 77.
n
Tip: It is very important to assign a unique name to every tape because
Avid DS Nitris uses it to identify the captured media.
10. From the Target list, select a location to hold the clips—see “Selecting
the Capture Target” on page 26.
11. Click the Video button to capture the video channel of the material.
12. Click the Audio button to capture one or more audio channels of the
material.
13. To record additional material before the in-point and after the outpoint, type the appropriate number of frames in the Heads and Tails
text boxes.
14. On the transport controls, click the Play button to play the source
material.
15. While the clip is playing, click the Mark In button at the point where
you want to start the capture.
The timecode of the in-point you selected is displayed in the In
timecode box.
Mark In
Mark Out
In timecode box
Out timecode box
16. Play or shuttle the tape to advance to the point where you want to end
the capture and click the Mark Out button.
The out-point is displayed in the Out timecode box. The Duration
timecode box displays the length of material to be captured.
39
Page 40

Chapter 1 Capturing Material
n
n
Tip: If you already know the in and out timecodes, you can type them
directly in the In or Out timecode boxes. You can also enter a value for the
duration and Avid DS Nitris will calculate the out-point.
You can use the numeric keypad to enter in-points and out-points. Begin
typing the timecode and an entry box is displayed. When you finish typing,
press the I key to set an in-point or the O key to set an out-point. You can
also type a duration and press the D key.
17. Click the Start Capture button.
As the material is logged, or logged and captured, clips appear in the
Avid Explorer according to the in and out points that you specified.
If Avid DS Nitris is unable to capture the material on the first attempt, it
will try again. If it fails again, Avid DS Nitris will attempt the capture a
third time with an additional pre-roll of five seconds. If the capture fails
again, an error message is displayed with a possible explanation for the
problem.
If you encounter problems capturing material from tape, you should
deactivate the viewer using the Viewer button in the status bar and try
capturing again. When capturing full resolution HD material at 29.97 and
30 frames per second, the viewer is automatically deactivated.
40
c
Logged video clips appear with an image of the Avid DS Nitris
clapboard icon, since they do not have any media. Both video and
audio clip icons are also red to show that no media has been captured.
You can later capture these clips in one batch directly from the Avid
Explorer.
If any frames are skipped during the capture, the capture stops, and
an error message is displayed. Clips are created for the material that
was captured up to the point at which frames were dropped.
If Avid DS Nitris detects any problems during capture, the Capture
Error Log is displayed. The Capture Error Log dialog box displays the
clip that could not be captured, including tape source name, in, and
out-point. It also gives you a brief description of the type of error that
occurred.
Page 41

Logging and Capturing Material
a. To save this log as an .html file, click the Save As button.
b. In the Save As dialog box, navigate to an appropriate folder, type a
name for the log and click the Save button.
The log is saved as an .html file and can be viewed in any HTML
browser.
n
Avid DS Nitris stops a capture session if it detects any timecode breaks on
the source tape. It creates a master clip from the in-point to the timecode
break. The capture session may stop a frame or two after the actual
timecode break. If this happens, you may have to cut or trim some of the
unusable frames from your clip.
To resume capture, enter new in and out-points in the In/Out timecode
boxes and click Capture.
If there is insufficient material for the deck to pre-roll before capturing, you
will not be able to capture the material. In this case, use the Live capture
option to capture the material.
Capturing Clips On-the-Fly
You can capture material from tape as it plays. All you have to do is start
the tape, and then set in and out-points for the material you want to
capture.
Once the tape finishes, clips are created in the Avid Explorer based on the
various in and out-points you set during playback.
Unlike the Live capture option, the On-the-fly option records the accurate
timecode of the source material, letting you recapture the material at any
time. This option also lets you create several clips by setting multiple in
and out-points without having to start and stop playback.
To log and capture clips on-the-fly:
1. Select View > Single-Instance Views > Capture Tool.
2. Configure the external device, specify the capture quality, and other
perform other tasks listed in “Preparing to Capture Material” on
page 17.
41
Page 42

Chapter 1 Capturing Material
3. Click the On-the-Fly button.
4. From the device list, select a deck preset.
5. Click the Check button.
6. Make sure the Timeline/Deck Control button is set for Deck.
7. Make sure the Log/Capture Mode button to set to Capture.
8. In the Clip Name text box, enter a name to prefix all captured clips.
9. From the source name list, select the tape’s name.
If the communication between the external device and your system is
operating properly, nothing happens. If there is a problem, a message
box appears, stating the possible cause of the problem.
You can also verify that the external device is operating within normal
parameters by checking the five items in the External Device
Status area, located beneath the transport controls.
If the tape is new, click the New Tape button and enter a name for the
tape. The tape name is added to the Tape Library—see “Managing
Tapes” on page 77.
42
c
Tip: It is very important to assign a unique name to every tape because
Avid DS Nitris uses it to identify the captured media.
10. From the Target list, select a location to hold the clips—see “Selecting
the Capture Target” on page 26.
11. Click the Video button to capture the video channel of the material.
12. Click the Audio button to capture one or more audio channels of the
material.
13. Click the Start Capture button.
The tape begins playback.
14. Click in the viewer to set an in-point, and then right-click in the viewer
to set an out-point.
A clip is created for each of the in and out-points that you set.
Continue to set in and out-points on the material you want to capture.
15. To finish the capture session, click the Cancel button in the progress
bar.
Page 43

Capturing Material from File
Clips appear in the folder you selected for each of the in and out-points
that you set. The clips are named as follows: BaseClipName,
BaseClipName-001, and so on. Each clip’s timecode matches that on
the tape, making it possible for you to recapture the material at a
different compression rate or resolution.
n
If you encounter problems capturing material from tape, you should turn
off the viewer by deselecting the Viewer button in the status bar and try
capturing again. When capturing full resolution HD material at 29.97 and
30 frames per second, the viewer is automatically deactivated.
Capturing Material from File
When capturing material from file, you can do any of the following:
• Capture media from selected files
• Log the selection as clips without capturing the media
• Create linked clips, which act as pointers to source media located on a
local disk or anywhere on the network
You can capture material from video, audio, and image files. For a list of
supported file types, see “Capture File Formats” in the Help.
When you capture material from file, it’s important to select the correct
media conversion mode, pixel ratio, and premultiplication setting. The
media conversion modes let you determine how media of differing formats
are converted when captured into Avid DS Nitris. Files coming from
different formats, such as NTSC, PAL, and computer graphics, all have
different file pixel ratios. If the pixel ratio of the source file is different than
that of the current sequence, then the file’s pixels are scaled to match those
of the current sequence. When you select the correct premultiplication
setting, you can avoid incorrect compositing results.
If you’re capturing still images, you can specify their duration on the
Editing property page of the User Preferences dialog box. By default, the
duration of captured still images is set to 30 frames.
43
Page 44

Chapter 1 Capturing Material
n
Show/Hide Panel
You can capture from a single file or a series of files at the same time.
To log and capture clips from file:
1. In the Avid Explorer, click one of the Show/Hide Panel buttons to
display a panel. Then click the arrow next to the button and select My
System.
2. In the tree, click My Computer or My Network Places and navigate
to the folder where the files that you want to capture are located.
The files are displayed in a bin.
44
n
3. In the bin, select the file or files that you want to capture.
To select a series of files, click the first file, hold down the Shift key,
and click the last file. To select multiple files, hold down the Ctrl key
and click each file name.
If you select a sequential list of still files of the same type, such as all .jpg
or all .bmp, during capture you are given the choice of combining the files
into one master clip or creating individual clips.
Page 45

4. Right-click a file and select Capture Settings.
The Capture Settings dialog box opens.
Capturing Material from File
Help button
For information about options in the Capture Settings dialog box, click
the Help button.
45
Page 46

Chapter 1 Capturing Material
5. In the Media Capture panel of the Capture Settings dialog box, select a
6. From the Media Conversion list, select one of the following modes:
Mode To
location to hold the clips—see “Selecting the Capture Target” on
page 26. If you select Auto-Source, master clips are created in a folder
named File Source.
Center, Keep Original
Size
Scale to Fit Scale the media in both the X and Y axes to fit the
Scale, Keep Aspect
Ratio
Keep Original Size and
Position
Center the media in the viewer along both the X and Y
axes. Any portion of the image falling outside the
viewer is cropped. This option does not modify the
original size of the media.
sequence settings. This option may reduce image
clarity.
Scale the media in both the X and Y axes to fit the
image settings, but retain the ratio between width and
height.
Display the media in the viewer without modifying its
original size or position.
The following illustrations show a 540x304 image captured using various
media conversion modes.
46
Page 47

Capturing Material from File
Center, Keep Original Size Scale to Fit
Keep Original Size and PositionScale, Keep Aspect Ratio
n
7. If the source image contains an alpha channel that you want to capture
with the clip, select the Keep Alpha option. Only image formats that
support alpha channels are applicable. For example, .bmp images do
not support alpha channels.
8. Depending on whether your source file was premultiplied, select or
deselect the Premultiplied Alpha option.
9. If you want to convert the frame rate of the file you are capturing to the
same frame rate used by the sequence, select the Convert Video
Frame Rate option.
This option does not apply to still images or audio files.
When you capture from an audio file with a sample rate different from
than that currently set in the Audio Sample Rate list, a message box
opens, asking you if you want to convert the audio file to the selected
rate.
10. If you want to adjust the colors of the captured file to remove banding,
select Auto-Dither.
47
Page 48

Chapter 1 Capturing Material
11. To set the File Pixel Ratio, select one of the following options:
12. From the Field Dominance box, select the field dominance.
13. From the Input Levels box, select one of the following options:
14. Close the Capture Settings dialog box to save your settings.
15. Right-click on the selected files and select one of the following:
Option Description
- Standard to capture from a file that has a standard file pixel ratio.
- Custom to capture from a file that has a non-standard file pixel
ratio.
- Graphics for most images that were created in a graphics
program.
- Video for images that include superblack or superwhite values.
- Auto to import at the level used by the sequence.
48
Capture Creates master clips and captures the media. This
option takes substantially longer because the
media must be digitized.
Log Creates master clips without capturing the media.
Logged clips appear with the message
n
“Media Not Available” when they are
placed in the viewer or timeline. You can
later capture these clips in one batch
directly from the Avid Explorer or the
timeline.
Link Creates linked clips, which act as pointers to
source media located on a local disk or anywhere
on the network—see “Creating Linked Clips” on
page 56.
As the material is logged or captured, clips appear in the target bin.
Page 49

Capturing Material from File
n
You can cancel the capture session at any time by clicking Cancel in the
progress bar. A message box opens, asking you if you want to keep the
material that was captured so far. If you click Yes, clips are created for the
material that was captured until you clicked Cancel.
Capturing from File by Dragging to a Bin
You can capture media from file by right-clicking the source file and
dragging it to the bin where you in which to create the master clip.
To capture from file by dragging to a bin:
1. Check the Capture Settings view to make sure your settings are
correct—see “Capturing Material from File” on page 43.
You don’t need to specify the capture target.
2. Right-click the file or files you want to capture.
3. Drag the files to the bin in which you want to create the master clips.
4. Release the mouse button, and select Capture Here.
As the files are captured, master clips appear in the target bin.
You can also use the menu to open the Capture Settings view, create a
linked clip, or create a logged clip. Other options let you copy or move
files and create shortcuts.
Capturing from Layered Adobe Photoshop Files
There are two ways to capture from Adobe Photoshop files into
Avid DS Nitris:
• Select the file or files in a bin, right-click and select Capture.
• On the Editing toolbar, click Generate > Import Photoshop.
The first option captures only the flattened Photoshop image as a still. If
you want to preserve all the layer information, you should use the second
option.
49
Page 50

Chapter 1 Capturing Material
When you capture from a layered Photoshop image into Avid DS Nitris
using the Import Photoshop command, a Targa image file is created for
each Photoshop layer. A sequence with one composite container clip is
created in a new bin in the Avid Explorer, along with a master clip for each
layer. These master clips are linked to the Targa files. Each layer in the
Photoshop file is recreated in the composite container clip as a layer and
corresponding clip on a composite track. Each layer is composited in the
same order as the original Photoshop file.
DVEs are applied to each clip to position them appropriately, and the
opacity of each layer is adjusted to match the opacity levels in the original
Photoshop file. An additional folder is created called Linked layers, which
contains the source Targa files to which the master clips are linked. Having
access to these source files makes it easier for you to delete them, if
needed.
The Photoshop images must be 8 bit RGBA or grayscale files. Only normal
blending information is supported, and text and shape information are
rasterized when captured.
50
Example
Every time you capture from a layered Photoshop file, a new bin is created
in the Avid Explorer. The bin is named after the Photoshop file you
captured. The sequence, master clips, and Linked layers folder are all
stored in this new folder. The master clips are named after the layer they
represent followed by the name of the Photoshop file in parentheses.
For example, if you capture from a Photoshop file called Poster.psd that
contains the following layers:
•Sky
•Sea
•Boat
Page 51

Capturing Material from File
A new bin called “Poster” is created in the Avid Explorer. Within that bin,
a new sequence called “Poster” is created, a folder called “Linked layers”
is created, as well as the following master clips:
• Sky (Poster)
• Sea (Poster)
• Boat (Poster)
The \Linked layers folder contains the following files:
• Sky (Poster).tga
• Sea (Poster).tga
• Boat (Poster).tga
To capture from layered Photoshop files:
1. In the Avid Explorer, select the folder in which you want the new
folder to be created.
2. In the Editing toolbar, click Generate > Import Photoshop.
The Import Adobe Photoshop dialog box opens.
3. Select the Photoshop file and click OK.
A message is displayed telling you that the clip was successfully
saved.
4. Click OK.
A new folder is created in the Avid Explorer and named after the
Photoshop file. Within that folder, a folder called Linked layers is
created that contains the source Targa files. A sequence file with one
composite container clip is also created, along with a master clip for
each layer. In the composite container clip, each layer in the Photoshop
file is recreated as a layer and corresponding clip on a composite track.
The lower-left corner of the final composited image is placed in the
lower-left corner of the viewer.
51
Page 52

Chapter 1 Capturing Material
Linked layers folder
contains Targa files.
New file created in Avid Explorer.
A sequence file is created along
with a master clip for each layer.
Since the master clips are linked to the Targa files, the images maintain
their original size. To view images that are larger than the sequence
resolution, right-click in the result area of the layer view to turn off the
Output Frame Size option.
The lower-left corner of the final
composited image is place in the
lower-left corner of the viewer.
All layers are visible. DVE applied to each clip.
For more information, see “Working with Layered Photoshop Images” on
page 59 of the Avid DS Nitris Compositing and Graphics Guide.
Capturing from DPX Files
DPX (Digital Picture eXchange) is an industry-standard, SMPTE file
format that is used to transfer film-originated images to a series of digital
files (also called scanned image files). This format is sometimes referred to
as 2K because the pixel size of a file is typically 2048 x 1556. The Cineon
image file format is a subset of the DPX format. Avid DS Nitris provides
the same options and controls for both formats to convert pixel values from
a log-based to a linear representation and vice-versa.
52
Page 53

Capturing Material from File
Before you import or export the files, you need to determine what look-up
table (LUT) should be used to convert the pixel values from a log to a
linear representation. You can import an LUT specific to the files or use a
standard LUT. If you use a standard LUT, you can choose either a linear
representation or a log-to-linear representation.
The Linear option preserves the log-based representation during import.
Within Avid DS Nitris these log-based images can be used for many
actions where linearizing (conversion from log to linear) may not be
important, such as cuts-only editing or some basic effects. For applying
complicated effects and combining the media with other non-log
representation images, Avid recommends linearizing the pixel values by
applying one of the following:
• an LUT created by the Log>Linear option
• an LUT modified by the controls in the DPX Import dialog box
• an LUT imported from file
You can export DPX or Cineon files through similar controls. When
exporting, you can convert from linear to log or invert the file used for
import. For more information, click the Help button in the DPX Export
dialog box.
To capture from Cineon or DPX files:
1. Use the standard procedure for capturing from file (see “Capturing
Material from File” on page 43) or linking to file (see “Creating
Linked Clips” on page 56). The scanned image files, which are
consecutively numbered, should be included by default in one or more
Avid DS Nitris Group folders.
2. After you select Capture, the DPX Import dialog box appears.
The first file (first frame of the transfer) is displayed in the viewer.
53
Page 54

Chapter 1 Capturing Material
54
3. Indicate the type of look-up table the capture requires.
- If the capture requires a file, select LUT from file. A dialog box
opens. Select the .lut file, and click Open. The name of the file
appears in the box beneath the LUT from file option. To change
the file, click the filename.
- If the transfer uses a standard look-up table, select Standard LUT.
Then select Linear (to preserve log values) or Log > Linear (to
convert from log to linear) from the LUT list.
4. If you are using a standard look-up table, you can adjust the color
values.
a. By default, R, G, and B values are equivalent, even if you adjust
one. If you want to adjust an individual R, G, or B value, clear the
box in the Lock column for the parameter.
b. Type the new values or use the sliders. The result of the new values
are shown in the viewer and the waveform display.
Page 55

For a linear LUT, you can adjust only the White Point and the Black
Point. For a log LUT converted to linear, you can also adjust Gamma,
Film Gamma, and Softclip.
To return to the default values, click the Reset button.
To save your values in a file, click the Export LUT button. A dialog
box opens for you to name and save your file.
5. When you are satisfied with your settings, click OK.
A message box asks if you want to combine multiple files into a single
master clip. Click Ye s.
The files are captured as master clips in the bin.
Importing Encapsulated PostScript (EPS) Files
You can import EPS files into Avid DS Nitris, but they are treated
differently than other file imports. EPS files are imported from within the
Graphics layout and no master clips are created for the EPS file. Instead,
the EPS information is imported directly into your current graphics
session.
in the EPS file is a separate stroke in Avid DS Nitris.
The color information in the EPS files is retained and each shape
Capturing Material from File
n
You can import solid colors, but not gradients.
Avid DS Nitris can import files created with Adobe Illustrator 8.0 or
earlier versions. To work with Illustrator 9.0 files, save it as a version 8.0
file.
You can also import EPS files as brush strokes. For more information, see
“Creating Custom Brushes” on page 268 of the Avid DS Nitris
Compositing and Graphics Guide.
To import an EPS file:
1. With the position indicator over a clip in the timeline, switch to the
Graphics layout.
2. From the Tools toolbar, click Import > EPS File.
The Open dialog box opens.
55
Page 56

Chapter 1 Capturing Material
3. Select an EPS file and click the Open button.
The EPS file is imported into your graphics session.
Creating Linked Clips
By creating links to media files that are not stored on your disk array, you
can work with media files without having to capture them to your disk.
These files, called linked clips, can reside on a local disk or anywhere on
the network until you’re ready to output your sequence.
Some projects may require you to work with images at varying resolutions.
When you capture these files, you must convert the material to the working
resolution of the current sequence. By linking to the material instead, you
can keep the material at its original resolution regardless of the sequence’s
frame size. Once you’ve completed your edits, you can process the linked
material, which creates a cache file of the image area that is visible in the
viewer.
56
n
Linking clips can also be useful when more than one person needs access
to the same file. You can capture the file as a linked clip, drop it into your
sequence, and continue to use it as a reference while another person
continues to work on the source media file. Changes made to the original
file automatically appear in the linked clip, both in the Avid Explorer and
on the timeline.
If another person tries to modify a file that’s linked to a clip in an open
project, they will not be able to save that file due to a sharing violation.
You must close the project that contains the linked clip for them to be able
to save the original file.
Once you’re ready to output the sequence, you can either capture the
source file or simply process the clip on the timeline. If you process the
material, a cache file is created. Once a cache is created, Avid DS Nitris no
longer refers to the source media file, but uses this cache file during
playback. Any further changes to the source file do not appear in the linked
clip on the timeline. Like any other cache however, the cache for the linked
Page 57

Creating Linked Clips
clip can be purged, which relinks the clip to the source file. For more
information, see “Purging Caches” on page 446 of the Avid DS Nitris
Editing Guide.
Linked clips appear in the Avid Explorer as regular clips, but their file type
icons are underlined in red, indicating that no actual media has been
captured. As a result, you cannot play them back in real time until you have
processed them.
If the “Media Not Found” message appears in the viewer when using
linked clips, it’s possible that Avid DS Nitris has lost the connection to the
linked file. All you have to do is re-establish the link. For more
information, see “Relinking a Clip” on page 58.
To create a linked clip:
1. In the Avid Explorer, open a bin and select the file (s) that you want to
capture as linked clips. To select a series of files, click the first file,
hold down the Shift key, and click the last file. To select multiple files,
hold down the Ctrl key and click each file name.
n
n
If you select a sequential list of still files of the same type (such as all .jpg
or all .bmp), you are given the choice of combining the files into one
master clip or capturing individual clips.
2. Right-click a file and select Capture Settings.
The Capture Settings dialog box opens.
3. Select the settings that apply to the files that you want to capture—see
“Capturing Material from File” on page 43.
Since linked files are brought into Avid DS Nitris at their original
resolutions, there is no need to convert them to the current sequence’s
resolution. As a result, the Media Conversion modes are not applicable
when the Link option is selected.
4. Close the Capture Parameters dialog box.
5. Right-click the selected files and select Link.
57
Page 58

Chapter 1 Capturing Material
Relinking a Clip
If you move the media of a linked clip to a new location, you need to reestablish the link. Avid DS Nitris lets you relink more than one clip at a
time.
To relink a clip through the Media Properties dialog box:
1. Right-click the linked clip in a bin and select Properties.
2. Select the File Info tab.
3. Click the Relink File button.
As the material is linked, clips appear in the selected bin. The clip
icons are underlined in red to indicate that no media has actually been
captured.
The Clip Properties dialog box opens.
In the Status text box, the following message is displayed: “File is
missing from expected location”.
58
n
4. In the Relink File dialog box, navigate to the new location of the media
file, select it, and click OK.
5. Close the Clip Properties dialog box by clicking OK.
The link is re-established.
If you go back into the Clip Properties dialog box, you will see that the
status of the linked file has changed to “File is Present.”
To relink one or more clips through the Avid Explorer:
1. Right-click one or more linked clips and select Relink.
Avid DS Nitris tries to relink by using the most recent path used in a
relink operation. If the media file is not found in that path, the Relink
dialog box opens.
2. In the Relink dialog box, navigate to the location of the media file,
select it, and click OK.
The link is re-established. If multiple clips are linked to media files in
the same folder, all links are re-established.
Page 59

Batch Capturing
In an offline/online workflow, you first create an offline sequence by using
logged clips or compressed media. To create the final, online sequence,
you need to capture media for the logged clips or recapture compressed
media in uncompressed format. You can efficiently capture a group of clips
from the Avid Explorer or timeline in one pass. This is called batch
capturing.
Recapturing at a Different Quality
If you have already captured clips with media, you can recapture media at
a different quality. You can initially capture clips at a lower quality to save
disk space and increase processing time, and then recapture at a higher
quality for the final output. You can also recapture media for clips that have
been partially or completely purged.
If you recapture media at a different quality, Avid DS Nitris lets you keep
the original media. In this case, the master clip represents two (or more)
media files of different qualities.
Batch Capturing
n
To see if a clip has more than one capture quality, right-click the clip in a
bin and select Properties. In the property dialog box, select the Media
property page.
When you place the clip in a sequence, Avid DS Nitris automatically uses
the media which has the same resolution as the sequence.You can set a
preference to display media that doesn’t exactly match the sequence
settings. For more information, see “Understanding Video Quality
Matching” on page 76 of the Avid DS Nitris Editing Guide.
You can purge the original media at any time. For more information, see
“Purging Media” on page 443.
59
Page 60

Chapter 1 Capturing Material
Capturing Clips from the Avid Explorer
When you log material, empty master clips (without media) are created in
a bin in the Avid Explorer. You can then capture source material from tape
or file. The master clips hold information about the in and out-points of
material from tape or about the location of an original file.
n
Avid DS Nitris stops the deck, rewinds and then pre-rolls before capturing
material. If, however, it detects two or more clips on the same tape and they
are separated by less than 5 seconds, it will skip the pre-roll and capture
both pieces of media in one pass. This feature, known as streaming
capture, can reduce the time to recapture media especially if your clips are
lined up one right after the other on a single tape.
To capture clips from Avid Explorer:
1. (Optional) If you want to view a list of clips to be captured, set a user
preference—see “Creating a Batch Capture List” on page 67.
2. Select View > Multi-Instance Views > Deck Configuration and
activate the deck preset for the connected deck.
3. In a bin, select the master clips that you want to recapture.
4. (Optional) To delete media associated with the clips, right-click the
selected clips and select Purge Media—see “Purging Media” on
page 443 of the Avid DS Nitris Editing Guide.
5. Right-click the selected clips and select Capture Settings to specify
the video quality and audio quality settings.
6. Right-click the selected clips and select one of the following:
- Recapture with Options to open a dialog box that lets you select
the video and audio tracks you want to recapture.You can choose
not to recapture tracks that you originally captured, but you cannot
capture new tracks. For example, if you created a clip by capturing
video only, you cannot recapture the clip with video and audio.
60
- Recapture to begin the recapture process, using the settings
specified in the Recapture with Options dialog box.
7. If you selected Recapture with Options, the Explorer Recapture
Options dialog box opens.
Page 61

Batch Capturing
a. Click the Video button to recapture the video portion of your
media.
b. Click the Audio button to recapture the audio portion of your
media.
c. Click the audio tracks (A1, A2, and so on) that you want to
recapture.
d. If you want the capture to begin immediately, leave the Time
Delay option deselected. If you want to capture certain files at a
specific time in the future, select the Time Delay option.
n
For more information about options in the Explorer Recapture
Options dialog box, click the Help button.
e. Click the Recapture button.
8. If you selected the Display Capture List option, the Batch Capture list
is displayed. If you are satisfied with the list, click OK.
If you’re capturing from a tape that is currently in the VTR, then
capture starts automatically. As the clips are captured, the progress bar
updates.
If Avid DS Nitris is unable to capture the material on the first attempt, it
will try again. If it fails again, Avid DS Nitris will attempt the capture a
third time with an additional pre-roll of five seconds. If the capture fails
again, the error is displayed in the Capture Error Log, with the possible
cause of the problem.
61
Page 62

Chapter 1 Capturing Material
If you encounter problems recapturing material from tape, you should
deactivate the viewer using the Viewer button in the status bar and try
capturing again. When recapturing full resolution HD material at 29.97
and 30 frames per second, the viewer is automatically deactivated.
9. If the tape is not in the VTR, the Insert Tape dialog box opens.
62
Page 63

Batch Capturing
For information about options in the Insert Tape dialog box, click the
Help button.
a. Insert the specified tape. Click the Skip Tape button to bypass
capturing all the clips with this tape’s source name.
b. (Optional) Change the external device by selecting a deck preset
from the device list.
To create a deck preset, see “Configuring the External Device” on
page 18.
c. Use the transport controls in the dialog box to cue the tape, if
necessary. For example, in the case of repeated timecode, cue the
tape so that the recapture starts at the correct position.
d. Click OK.
The capture begins.
If you selected the Time Delay option, the Start Capture At dialog
box opens. Enter the date and time at which you want the capture
to begin and click OK. The progress bar appears with the current
date and time, as well as the capture start date and time you
specified.
10. If any problems are detected during recapture, the Capture Error Log
dialog box is displayed.
The Capture Error Log dialog box lists all the clips, including tape
source name, in, and out-points, that could not be recaptured. It also
gives you a brief description of the type of error that occurred.
63
Page 64

Chapter 1 Capturing Material
11. To save this log as an .html file, click the Save As button.
12. In the Save As dialog box, navigate to an appropriate folder, enter a
name for the log, and click the Save button.
The log is saved as an .html file and can be viewed in any Web
browser.
Capturing Clips from the Timeline
When you log clips from a tape or file, or conform using an ALE file, AAF
file, OMF file, ALE file, or EDL, master clips without media are created in
a bin, in the timeline, or in both. You can edit these clips into the timeline,
and edit their in and out-points before capturing the media.
You can also capture media from clips on the timeline when the clips have
media and you want to use a different audio or video quality.
When you capture clips from the timeline, the new clips retain the audio
and video tracks used in the original clip.
64
n
n
When you capture from the timeline, all the frames in a clip are recaptured
unless otherwise specified.
Avid DS Nitris stops the deck, rewinds and then pre-rolls before capturing
material. If, however, it detects two or more clips on the same tape and they
are separated by less than 5 seconds, it will skip the pre-roll and capture
both pieces of media in one pass. This feature, known as streaming
capture, can reduce the time to recapture media especially if your clips are
lined up one right after the other on a single tape.
To recapture clips from the timeline:
1. (Optional) To view a list of clips to be captured, you need to set a user
preference—see “Creating a Batch Capture List” on page 67.
2. Select View > Multi-Instance Views > Deck Configuration and
activate the deck preset for the connected deck.
3. Select View > Multi-Instance Views > Capture Settings and specify
the video quality and audio quality settings.
Page 65
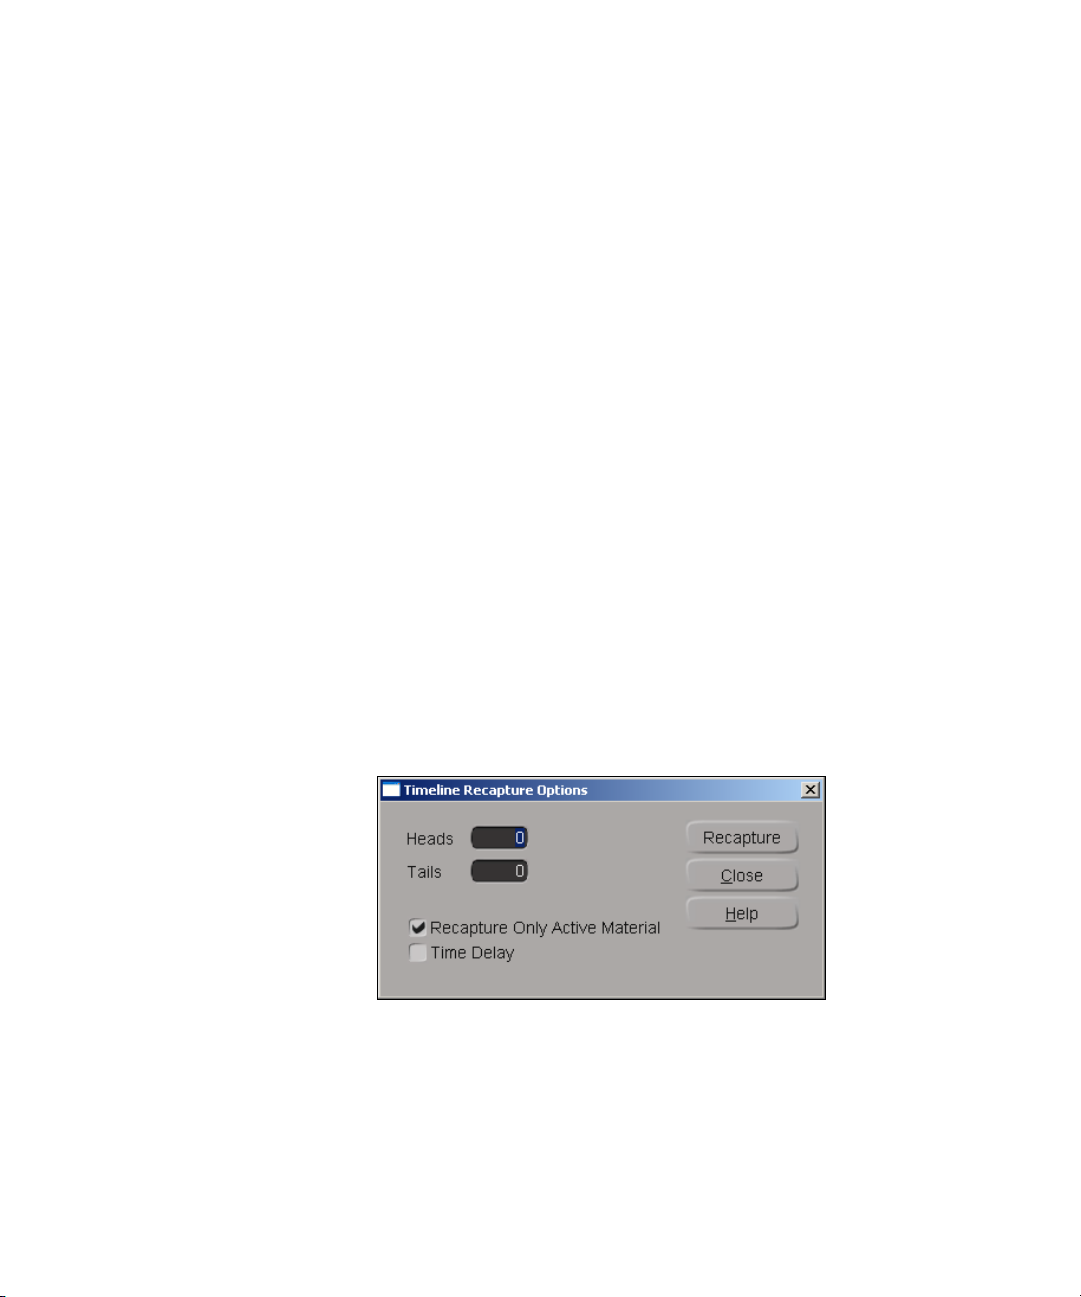
Batch Capturing
4. (Optional) To delete media associated with the sequence, select Data
Management > Purge Media—see “Purging Media” on page 443 of
the Avid DS Nitris Editing Guide.
5. If you do not want to recapture the entire sequence, select the tracks,
clips, or time span that you want to recapture.
6. On the Editing toolbar, click the Media I/O button and select one of
the following:
- Recapture Entire Timeline with Options to open a dialog box
that lets you change the heads and tails of the clip (handles) and set
other options.
- Recapture Entire Timeline to begin the recapture process, using
the settings specified in the Recapture Entire Timeline with
Options dialog box.
- Recapture Selection with Options to open a dialog box that lets
you set options.
- Recapture Selection to begin the recapture process, using the
settings specified in the Recapture Selection with Options dialog
box.
7. If your selection lets you set options, Timeline Recapture Options
dialog box opens.
a. To record additional material before the in-point and after the out-
point, enter the appropriate number of frames in the Heads and
Tails text boxes.
65
Page 66

Chapter 1 Capturing Material
n
n
You can only add heads and tails to the clip on the timeline up to the length
of the original master clip. You cannot extend the clip beyond what was
originally captured.
b. To capture only the active frames of clips on the timeline, select
the Recapture Only Active Material option.
When you select this option, clips with time effects (Timewarp, Interlace,
Deinterlace, 3:2 Expand, or 3:2 Contract) are recaptured in their entirety
regardless of the active areas. For all other types of container clips, only
the active portions of the container clips are recaptured.
c. If you want the capture to begin immediately, leave the Time
Delay option deselected. If you want to capture certain files at a
specific time in the future, select the Time Delay option.
For more information about options in the Explorer Recapture
Options dialog box, click the Help button.
d. Click the Recapture button.
8. If you selected the Display Capture List option, the Batch Capture list
is displayed. If you are satisfied with the list, click OK.
If you’re capturing from a tape that is currently in the VTR, then
capture starts automatically. As the clips are captured, the progress bar
updates.
66
n
If Avid DS Nitris is unable to capture the material on the first attempt, it
tries again. If it fails again, Avid DS Nitris will attempt the capture a third
time with an additional pre-roll of five seconds. If the capture fails again,
the error is displayed in the Capture Error Log, with the possible cause of
the problem.
If you encounter problems recapturing material from tape, you should
deactivate the viewer using the Viewer button in the status bar and try
capturing again. When recapturing full resolution HD material at 29.97
and 30 frames per second, the viewer is automatically deactivated.
9. If the tape is not in the VTR, the Insert Tape dialog box opens.
a. Insert the specified tape. Click the Skip Tape button to bypass
capturing all the clips with this tape’s source name.
Page 67

Batch Capturing
b. (Optional) Change the external device by selecting a deck preset
from the device list. To create a deck preset, see “Configuring the
External Device” on page 18.
c. Use the transport controls in the dialog box to cue the tape, if
necessary. For example, in the case of repeated timecode, cue the
tape so that the recapture starts at the correct position.
d. Click OK.
The capture begins.
If you selected the Time Delay option, the Start Capture At dialog
box opens. Enter the date and time at which you want the capture
to begin and click OK. The progress bar appears with the current
date and time, as well as the capture start date and time you
specified.
For information about options in the Insert Tape dialog box, click the
Help button.
10. If any problems are detected during recapture, the Capture Error Log is
displayed.
The Capture Error Log dialog box lists all the clips, including tape
source name, in, and out-points, that could not be recaptured. It also
gives you a brief description of the type of error that occurred.
a. To save this log as an .html file, click the Save As button.
b. In the Save As dialog box, navigate to an appropriate folder, enter
a name for the log, and click the Save button.
The log is saved as an .html file and can be viewed in any Web
browser.
Creating a Batch Capture List
When you have many clips to recapture, you might want to generate a list
to review what you’re recapturing. The capture list in Avid DS Nitris not
only lets you review what you’re capturing, but also lets you prioritize
items, as well as remove items from the list.
67
Page 68

Chapter 1 Capturing Material
To create a batch capture list:
1. Select File > User Preferences.
2. Select the Capture tab.
3. Select Display recapture list.
4. Follow the recapture process described in “Capturing Clips from the
Avid Explorer” on page 60 or “Capturing Clips from the Timeline” on
page 64. Before the recapture process begins, the Capture List dialog
box opens.
Clips with check
marks beside
them are part of
the list and will be
recaptured
68
5. Double-click an entry in the list to remove it from the list of clips to be
recaptured. Double-click it again to add it back to the list.
6. Use the Move Up and Move Down buttons to prioritize the capture
list. Clips at the top of the list are captured first.
7. Click the Source Name or Clips column heading to sort the list
according to the source name or the clip name.
Page 69

8. Click OK to begin capturing.
If you are capturing from a tape that is currently in the VTR, then
capture starts automatically. As the clips are captured, the progress bar
updates.
If the tape is not in the VTR, the Insert Tape dialog box opens. For
more information, see “Capturing Clips from the Avid Explorer” on
page 60 or “Capturing Clips from the Timeline” on page 64.
Batch Capturing Without Interaction
You can set your user preferences so that a batch capture proceeds without
your needing to interact with the application for each tape.
To perform a batch capture without interacting with the application:
1. Select File > User Preferences and select the Capture tab.
2. Select the following options:
- Eject the tape after digitize
Batch Capturing
- No interaction when inserting new tape
- Display recapture list.
3. Click OK.
4. When you are ready to start the batch capture, follow the recapture
process described in “Capturing Clips from the Avid Explorer” on
page 60 or “Capturing Clips from the Timeline” on page 64. Before
the recapture process begins, the Capture List dialog box opens.
5. Note the order of the recapture, and arrange the physical tapes in the
same order.
6. Click OK to begin recapturing.
The Insert Tape dialog box opens and asks for the first tape.
7. Insert the first tape in the capture list.
When all clips have been recaptured from the tape, the deck ejects it.
8. Insert the next tape.
69
Page 70

Chapter 1 Capturing Material
c
Avid DS Nitris cannot distinguish between tapes so make sure you
insert them in the same order that is used in the capture list.
Using Scripts to Capture Media
Avid DS Nitris lets you create scripts to automate the capture process.
Instead of defining the capture properties each time you capture media,
you can do it once, create a script based on what you did, and then run that
script the next time you capture. Creating a script can be as simple as
copying the contents of the History pane to the Editing pane of the Script
Editor and then saving it.
n
You can use scripts to capture media from file only.
A script is a set of commands that can be executed in sequence as if they
were a single command. Simple scripts are a set of native Avid DS Nitris
commands. More advanced scripts use a third-party scripting language as
the glue that holds the commands together. With a scripting language, your
scripts can use variables, constants, conditional statements, loops, and
procedures. You can change the default scripting language in the User
Preferences dialog box (Scripting/Logging property page). For more
information, see “Choosing a Scripting Language” on page 27 of the
Avid DS Nitris Editing Guide.
70
n
Tip: When using a script to capture media, make sure that the Start
Capture command appears only once at the end of your script. If your
script contains more than one Start Capture command, it will not work.
Page 71

Creating a Script for Capturing Media
To create a script for capturing media:
1. Select View > Single-Instance Views > Script Editor.
The Script Editor view opens.
Menu bar
History pane
Editing pane
Using Scripts to Capture Media
2. Select View > Multi-Instance Views > Capture Settings.
3. Configure the video and audio input.
Each command that you set is logged in the History pane of the
Script Editor.
4. In the Avid Explorer, select a file, right-click, and select Capture,
Log, or Link.
5. Once the capture is complete, select the contents of the History pane in
the Script Editor.
6. From the menu bar, click Copy or press Ctrl+C.
7. Click in the Editing pane and then click Paste or press Ctrl+V.
The contents of the History pane are displayed in the Editing pane.
71
Page 72

Chapter 1 Capturing Material
Copy contents from
History pane to Editing
pane to create a script.
8. Click the Save button.
The Save As dialog box opens.
9. Type a name for your script in the File name text box and click the
Save button.
By default, all scripts are saved in the DSScripts folder.
Running a Script for Capturing Media
To run a script for capturing media:
1. From the Script Editor, select File > Open.
The Open dialog box opens.
2. Browse through the folders to locate the script you want to run. Select
the file and click the Open button.
The contents of the script appear in the Editing pane of the Script
Editor.
3. If you want to make changes to the script, you can modify the contents
of the script by cutting, copying, or typing directly into the Editing
pane.
72
Page 73
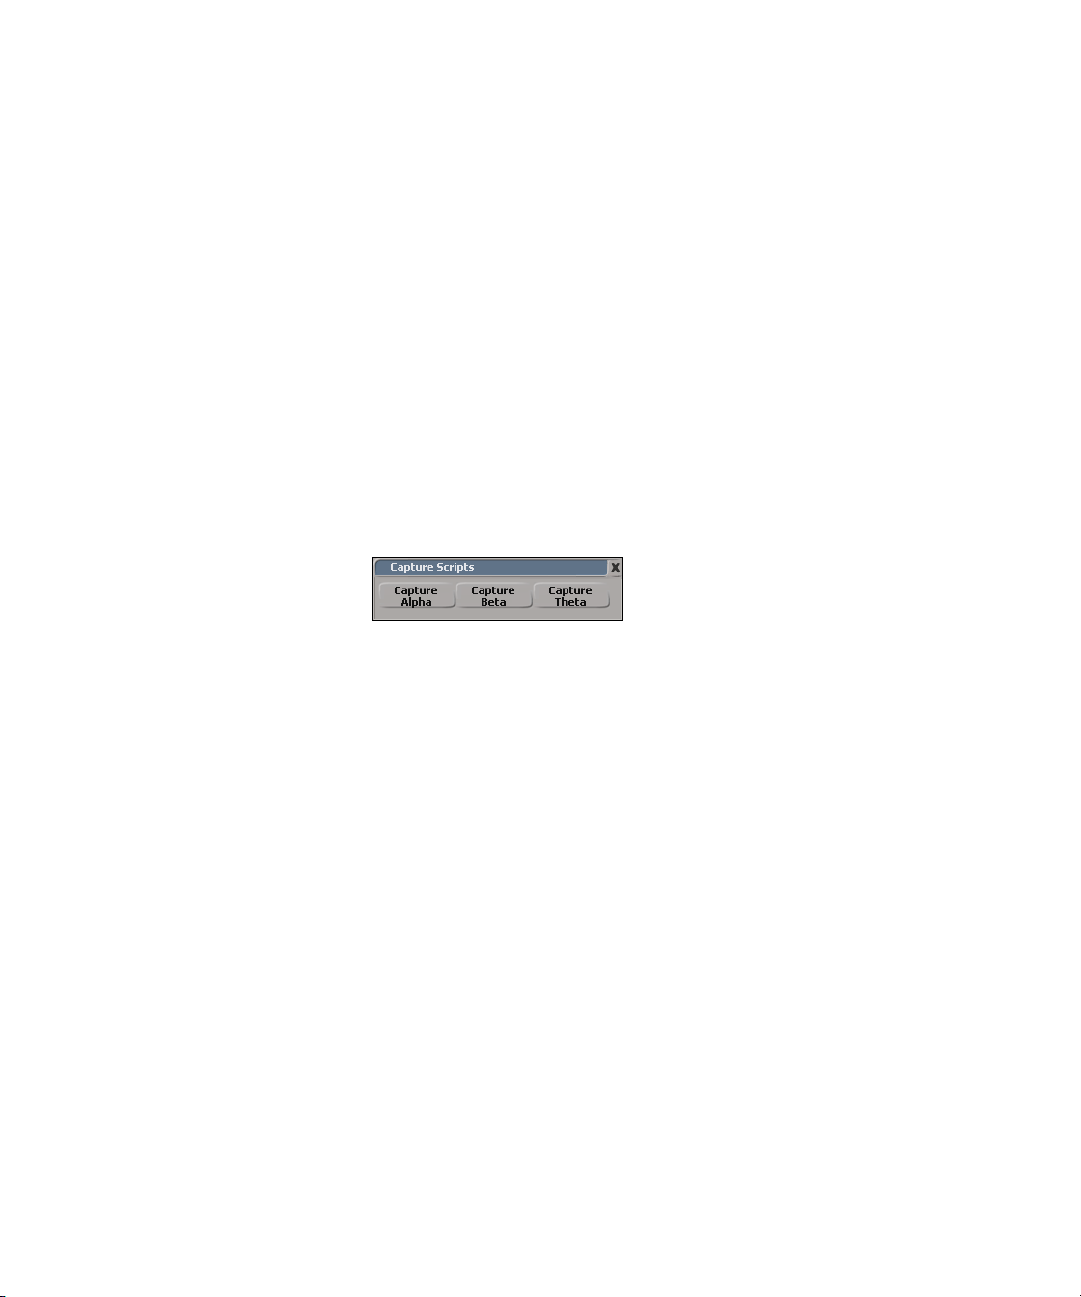
Using Scripts to Capture Media
4. Click the Run button.
The script runs through each line and performs the associated
commands.
c
n
Once a script is running, the only way to terminate it is to exit
Avid DS Nitris. Never test your script by running it on valuable
unsaved data.
To create a toolbar button for a script file:
1. Create a media input script and save it in the \DSScripts folder.
2. In the Avid Explorer, open the \DSScripts folder.
3. Select the script file you created, hold down the Ctrl key, and drag the
file to a toolbar.
The Add Script Command dialog box opens.
You can also create a toolbar button from one or more lines in the History
or Editing pane of the Script Editor. Select the contents of the script and
then drag them onto a toolbar. A toolbar button is created with the name
Scriptnumber.
4. In the Command Name text box, enter a name for the toolbar button.
By default, the Command Name is the name of the saved script file.
5. Specify a Command Name for Scripting. This is the name that is
logged to the command history when you click the toolbar button. You
can also use this name to invoke this script from within another script.
The command name for scripting cannot use spaces or punctuation.
6. If necessary, select the scripting language from the Language list. The
list contains the supported languages that are installed on your
computer.
If you dragged lines from the Script Editor onto the toolbar, then the
default language is the one specified in your preferences—see
“Scripting/Logging Property Page” in the Help.
73
Page 74

Chapter 1 Capturing Material
Scripting language File extension
JScript .js
PerlScript .pls
Python Active X Scripting Engine .pys
VB Script Language .vbs
7. Do one of the following:
If you dragged a saved file, the default language is based on the file
name extension:
t If your script does not contain any procedures, there is nothing
more to do. Click OK to close the Add Script Command dialog
box and add the button to your toolbar.
74
c
c
t If your script does contain procedures, continue with the
following:
8. Click the Parse Script button.
The script is parsed and the procedures and arguments are “found”.
Parsing a script may execute global code, that is, any code that is not
within a defined procedure. In such cases, it will also run procedures
that are called from global code.
9. If your script contains procedures, you can specify which one to
execute when the button is clicked. Select a procedure from the Script
Procedure box. If you do not specify a procedure, only global code will
be executed, as well as any procedures that are called from global
code.
Even when a procedure is specified, global code may be executed
before the procedure is called. This is a side-effect of parsing the script
with some scripting engines. To be certain that your script behaves
predictably in all situations, do not mix global code and procedures.
Page 75

Importing from SOFTIMAGE|XSI
10. If the selected procedure contains arguments, they are listed under
Parameters. For each argument, specify the value to use when the
script is run by doing one of the following:
t Enter a value in the corresponding Value box. This value will be
used whenever you click the button to run the script.
t Click twice in the Value box, and select Prompt On Run from the
list. With this option, when you click the button to run the script, a
dialog box prompts you to enter a value.
11. Click OK.
The Add Script Command dialog box closes and the new button is
added to the toolbar.
n
If you want to go back and edit the script, right-click on the toolbar button
and select Edit Script. A dialog box opens and you are prompted to save
your script. Click No. The contents of your script are displayed in the
Editing pane of the Script Editor and are ready for editing.
Importing from SOFTIMAGE|XSI
If you work with 3D elements produced in SOFTIMAGE®|XSI®, you can
import information in two ways:
• You can import a sequence of rendered images as a .gen file
• You can import a simple composite tree using the AAF utility
Importing .gen Files
You can preview render passes in Avid DS Nitris. From a .gen file rendered
in SOFTIMAGE|XSI, you can create a master clip in Avid DS Nitris and
then play it back in real time.
For information on how to render a .gen file, see the SOFTIMAGE|XSI
documentation.
75
Page 76

Chapter 1 Capturing Material
To create a master clip from a rendered .gen file:
1. In the Avid Explorer, browse to the location of the .gen file.
2. Right-click the file and click Link.
A new master clip appears in a bin.
n
n
The .gen files should be in a valid VideoStorage directory.
The name of the master clip created will be the same as the name of the
selected .gen file. You can now drag the clip to the timeline. For the clip to
be real-time playable, the project and .gen file types must match (either
RGB or YUV). If not, you must first process the clip to convert the type.
Tip: Once the master clip has been created, you can re-render your scene
and then play it back in Avid DS Nitris without having to create another
master clip or recapture your media.
Importing a Composite Tree through AAF
You can import a composite tree that includes render passes from
SOFTIMAGE|XSI directly into Avid DS Nitris. First, export and convert
your XSI file through the AAF utility, then open it in Avid DS Nitris. Any
render passes that are present in the Fx tree (as FileInput nodes) become
master clips in Avid DS Nitris.
In addition, XSI media can be stored on a shared media storage so that any
change made to the XSI media is available in real-time within your
Avid DS Nitris sequence.
76
This utility is offered as a plug-in for SOFTIMAGE|XSI. Refer to the
Softimage website www.softimage.com for details on availability.
Page 77

Managing Tapes
The Tape Library view lets you add tapes to a project and manage the tapes
associated with a project.
To access the Tape Library view:
t In an Avid Explorer panel, open the Views folder and click Ta pe
Library.
Tapes list
Bin tools
Managing Tapes
Clips and
sequences list
Bin tools
The Tape Library view consists of two sections. The top section lists the
tapes in your project, and the bottom section lists the master clips and
sequences that are associated with one or more selected tapes.
If you import clips or sequences from another project, the associated tape
is added to the Tape Library. The name of the original project appears in
parentheses.
You can use Bin tools to change how tapes or clips and sequences are
displayed. You can right-click on a tape, clip, or sequence to perform
various tasks.
77
Page 78

Chapter 1 Capturing Material
Adding a New Tape
You can use the Tape Library view to add a new tape.
To add a new tape:
1. Do one of the following:
t In the Bin tools section of the Tapes list, click the Fast Menu
button.
t In the Avid Explorer toolbar, click the New button.
The Add New Tape dialog box opens.
78
n
You can also add a new tape by clicking the New Tape button in the
Capture Tool.
2. Enter a name for the tape.
A tape name must be less than 32 characters and cannot contain the
following characters: / \ : ; * ? “ < > | . ^ #
3. (Optional) Enter a comment.
To display a comment, select the Details or Script view.
4. If the tape from which you are capturing material contains timecode
that appears more than once, select the Manual Reel option.
This option deactivates the streaming capture functionality, and allows
you to manually cue the tape to the appropriate timecode. You can use
this option for any type of problem that requires user interaction, such
as short timecode breaks or other problem sections in a tape. You can
also select or deselect this option by right-clicking a tape icon.
Page 79

Managing Tapes
c
If you have flagged a tape with the Manual Reel option during
capture, don’t deactivate it during recapture because it may cause
recapture errors.
5. Click OK.
The new tape appears in the top section of the Tape Library view.
Renaming a Tape and Changing the Comment
After adding a tape to a project, you can rename it or change the comment.
n
If you rename a tape that is shared between projects, the name is changed
only in the current project.
To rename a tape:
1. Right-click a tape and select Rename.
The Set Tape Name dialog box opens.
2. Enter a new name.
A tape name must be less than 32 characters and cannot contain the
following characters: / \ : ; * ? “ < > | . ^ #
3. Click OK.
To change a comment:
1. Right-click the tape and select Change Comment.
The Set Tape Comment dialog box opens.
2. Enter a new comment.
3. Click OK.
Purging Media from Tape
You can purge media associated with a selected tape or tapes. Purging
media retains the master clips and sequences, so that you can later
recapture the media.
79
Page 80

Chapter 1 Capturing Material
To purge media from tape:
t Select a tape or tapes, right-click, and select Purge.
Recapturing from Tape
If you have purged media for a tape, you can use the Tape Library view to
recapture all master clips associated with the tape.
To recapture all master clips associated with a tape:
t Select a tape or tapes, right-click, and select Recapture.
You can also recapture master clips from the Clips and Sequences List
section of the Tape Library view. You cannot recapture sequences by
selecting a tape. You must recapture from the bottom section of the Tape
Library view, from a bin, or from the timeline. For more information, see
“Batch Capturing” on page 59.
Deleting a Tape
80
c
You can delete one or more tapes from the Tape Library view.
Deleting a tape will delete all media, master clips, and sequences
associated with that tape.
Master clips and sequences shared with other projects are preserved, but
their media is deleted.
To delete a tape and its associated media, clips, and sequences:
1. Select one or more tapes, right-click, and select Delete.
A dialog box displays the media, clips, and sequences to be deleted
and asks for conformation.
2. Click OK.
Page 81

Chapter 2
Conforming AAF and AFE Files
Conforming is the process of bringing a project from an offline
environment into Avid DS Nitris, so you can continue the editing process.
This chapter describes how to load an Avid File Exchange (AFE) or
Advanced Authoring Format (AAF) file into Avid DS Nitris and recreate a
sequence on which you can apply further edits and effects.
This chapter includes the following topics:
• Workflow: Conforming AAF and AFE Files
• Conforming AAF and AFE Files
• Conforming AAF Sequences with MediaManager
Page 82

Chapter 2 Conforming AAF and AFE Files
Workflow: Conforming AAF and AFE Files
The following illustration shows the basic steps in the conform process
using AAF or AFE files.
Export the AAF or AFE file.
1
Open the AAF or
2
AFE file in an Avid
Explorer bin.
Create a sequence
3
and master clips.
Link to or recapture
4
media.
Export an AAF file
directly from the Avid
editing system.
or
Export an AFE file from
the Avid editing system or
through Avid MediaLog.
82
Link to a removable
drive or Avid
MediaNetwork.
Recapture media
or
from tape or file.
Page 83

Conforming AAF and AFE Files
Conforming AAF and AFE Files
Avid DS Nitris cannot directly open bins or projects from Media
Composer
sequence must first be converted to an intermediate format that
Avid DS Nitris can read. Two different file formats are available: AAF
(Advanced Authoring Format) and AFE (Avid File Exchange).
AAF and AFE files are both efficient ways to transfer project information
from an Avid editing system to an Avid DS Nitris system. Both file
formats are part of a similar workflow. AAF files can contain information
about only a single clip or sequence; AFE files can contain information
about all bins, master clips, and sequences in a project.
Before You Begin
Before you begin the conform process, review the following information.
Conforming Effects
• For the latest information on the conform process, such as which
®
or other Avid editing systems. The bin, project, or final
versions of Avid editing products are supported and the level of
support for effects and titles, refer to the Help or the Avid DS Nitris
Conform Guide. This guide is available on the Avid DS Nitris
Customer Support website or the Avid Knowledge Center. Also, refer
to the Avid DS Nitris release notes.
• Be aware that not every effect in the original sequence will be
completely conformed. For specific information, refer to the Help or
the Avid DS Nitris Conform Guide. Also, during the conform process,
you can view a log which lists any effects and parameters that are not
supported.
• Place titles in the sequence before you create the AFE file. You cannot
drag a title from an AFE bin to a sequence in the timeline.
• If the offline sequence includes graphics that use video levels (ITU-R
601 levels, which include “superblack” and “superwhite”),
Avid DS Nitris preserves information about the video levels when
83
Page 84

Chapter 2 Conforming AAF and AFE Files
creating master clips (conforming AAF or AFE files only). When you
recapture the graphics, Avid DS Nitris automatically recaptures them
at the original levels.
• Layered Photoshop graphics that have been imported as layers in the
original sequence are not conformed correctly. You need to import the
original layered graphic into Avid DS Nitris using the Generate >
Import Photoshop command.
• Sequential file formats with alpha channels that have been imported
into the original sequence do not conform. You need to import the files
into Avid DS Nitris and re-edit them into the sequence.
• QuickTime movies with alpha do not conform correctly. You need to
manually invert the alpha channel in Avid DS Nitris.
• Audio pan, Audio EQ, and AudioSuite plug-ins do not conform. In the
original sequence, you can mix down the areas that contain these
adjustments or effects and then output an audio mix—see
“Transferring Audio Media” on page 98.
Sharing and Transferring Files
84
• If you need to share AVX® plug-ins, make sure the same plug-ins are
installed on both systems. On the Avid DS Nitris system, the default
path is drive:\Program Files\Avid\AVX_Plug-ins. Avid DS Nitris
currently supports only AVX 1.0 plug-ins.
• To make it easier to move files between products and across platforms,
use the following guidelines when naming files:
- Do not use the following characters in project, bin, or other file
names: / \ : * ? ” < > |
The Windows system does not recognize these characters in file
names and will substitute other characters, possibly making the
file name unrecognizable or causing other problems.
- Do not add spaces at the beginning or end of a file name. The
Windows system will display such files, but might be unable to
open them.
- Do not use a period at the end of a file name. The windows system
will display such files, but might be unable to open them.
Page 85

Conforming AAF and AFE Files
- On Avid Macintosh systems, you can enable a setting that prevents
you from using Windows restricted characters in file names and
automatically adds the correct file name extensions to files for
your project. When you select the Use Windows Compatible File
Names setting, the file name extension .avp is added to project
files and .avb is added to bin files when they are saved. These file
name extensions are attached to existing files as well.
• If the project includes titles and you are moving between Macintosh
and Windows systems, make sure you have the same font with exactly
the same name (preferably from the same manufacturer) on both the
Macintosh and Windows systems. Check the font carefully because
the same font can have slightly different names. For example, Times
New Roman on the Macintosh system is named Times New Roman
Regular on the Windows system.
For best results, use TrueType or PostScript fonts. Bitmap fonts can
cause scaling problems.
• If you are copying project files from a CD-ROM, the files will be
marked as read-only and cannot be edited. After you have copied the
files, right-click the file icon, select Properties, and clear the Readonly attribute.
Conforming HD Projects
To conform an HDTV (high-definition TV) project that was offlined on an
Avid editing system, it is critical that the offline sequence be edited at the
proper frame rate. The following table lists the required Avid editing
project types for different HD frame rates.
85
Page 86

Chapter 2 Conforming AAF and AFE Files
HD format/Frame rate Avid editing project type
1080i or 1080PsF/30 fps or 29.97 fps 30i NTSC
1080i or 1080PsF/25 fps 25i PAL
1080PsF/24 fps 24p NSTSC or 24p PAL
1080PsF/23.97 fps 24p NTSC
720p/60 fps or 59.94 fps 30i NTSC
a. Requires Symphony 4.5 or later, Media Composer or
Film Composer 11.5 or later, or Avid Xpress 5.5 or later.
For information on working with audio, see “Using Audio from an Avid
Editing System” on page 99.
23.976p NTSC
a
86
To conform an HD project, follow this basic workflow:
1. Downconvert the HD source tapes to SDTV (standard-definition TV)
tapes, using the 16x9 anamorphic aspect ratio.
™
2. Create a Symphony
®
Avid X pres s
, or Avid Xpress DV project with the proper frame rate.
, Media Composer, Film Composer®,
3. Digitize the SDTV source tapes into the Avid editing system using an
offline resolution.
4. Edit the sequence.
5. Export an AFE or AAF file to recreate the project or sequence on the
Avid DS Nitris system. For AFE files, export directly from an Avid
editing system or export through MediaLog
™
, depending on the
version of your Avid editing application.
6. Recapture the HD media on the Avid DS Nitris system.
7. Finish and output the project.
Page 87

Sharing Compressed and Uncompressed Media
Conforming AAF and AFE Files
n
Avid DS Nitris can share compressed and uncompressed OMFI media with
Symphony, Media Composer, and Avid Xpress (Meridien
can share media by using Avid Unity
™
MediaNetwork shared storage or by
™
) systems. You
transferring media files.
You must process compressed media before you can play it in real time.
Avid DS Nitris does not relink to OMFI media files of the following
resolutions, created by other Avid editing products: NTSC 24p, PAL 25p,
DV, MPEG (IMX) or AVR.
To share compressed or uncompressed media:
1. Do one of the following, depending on how you are sharing media:
t If you are sharing media on a MediaNetwork (formerly known as
MediaNet) workspace, make sure that both the offline and the
online systems have access to the workspace.
t If you are transferring files on a removable drive, make sure that
you can correctly transfer the drive. For information on connecting
and disconnecting an external media drive, refer to your system
setup guide.
t If you are copying files to a local drive (one already attached to
your Avid DS Nitris system) or a drive you can access through the
Media Indexer, locate or create a folder named OMFI MediaFiles
on the drive.
This folder name must use the correct uppercase and lowercase letters
and include a space between OMFI and MediaFiles.
2. Configure media storage for Avid OMFI files, as described in “Main
Topics: Managing Your Storage Areas” in the Avid DS Nitris
Installation and Administration Guide. If you are transferring files on a
removable drive, you need to configure media storage after you have
connected the drive to the Avid DS Nitris system.
87
Page 88

Chapter 2 Conforming AAF and AFE Files
Exporting AAF Files
AAF (Advanced Authoring Format) is a cross-platform, multimedia file
format that allows interchange of media and composition information
between AAF-compliant applications.
There are two general types of data that can be included in an AAF file:
• Composition information, which provides the instructions needed to
combine and modify the media portions of the AAF file. Composition
information consists of either a sequence and its associated master
clips or a single master clip.
• Audio and video media.
If you are transferring information from an offline Avid editing system to
Avid DS Nitris, export an AAF file as composition only.
n
n
You cannot export an AAF file from Avid DS Nitris.
To export an AAF file:
1. On the Avid editing system, select the sequence you want to conform
and export it as an AAF file.
The exact steps for exporting an AAF file vary, depending on the Avid
editing product and its version. For any product or version, create a
composition with linked media. Do not create a composition with
embedded media.
Avid editing systems give you the option of consolidating or copying media
to a selected media drive at the same time you create an AAF file.
2. Transfer the AAF file to a location that you can access from the
Avid DS Nitris workstation.
You can use removable media, a network server, or an Avid Unity
shared storage system.
88
Page 89

Exporting AFE Files
AFE files are based on AAF technology. AFE files, however, are designed
for sharing project information among Avid applications. AFE files let you
transfer one or more bins, their contents, and information about the
contents, including master clips, subclips, titles, and sequences.
You can create AFE files from the following products:
• Symphony 4.5 or later (Windows version only)
• Media Composer 11.5 or later (Windows version only)
• Avid Xpress 5.5 or later (Windows version only)
• Avid MediaLog11.1 or later (Windows version only). You can use
MediaLog on either the Avid editing system or the Avid DS Nitris
system.
To create an AFE file from an Avid editing product running on a
Macintosh system, copy the project folder from the Macintosh system to
the Avid DS Nitris system. Then use MediaLog on the Avid DS Nitris
system to create the AFE file.
Conforming AAF and AFE Files
n
Exporting AFE Files from an Avid Editing System
MediaLog is shipped with your Avid DS Nitris system. For complete
information about MediaLog, see the MediaLog Help or the Avid
MediaLog User’s Guide (available in Adobe Acrobat format on the
MediaLog CD). MediaLog is also available on the Avid DS Nitris
Customer Support web site.
To export an AFE file from an Avid editing system:
1. Open a project.
2. Do one of the following:
t To create a file that includes all bins in a project, click the project
window and select File > Export. The Export Project As dialog
box opens. Select a location, name the file, and click the Save
button.
89
Page 90

Chapter 2 Conforming AAF and AFE Files
t To create a file that includes the contents of a single bin, open the
bin, click the bin, and select File > Export. The Export Bin As
dialog box appears. Select Avid File Exchange (*.afe) from the
“Export Bin As” list. Choose a location, name the file, and click
the Save button.
90
n
AFE export to a network drive takes much longer than export to a local
drive. Avid recommends that you export to a local drive and then copy the
exported file to a network location.
Page 91

3. Transfer the AFE file to a location that you can access from the
Avid DS Nitris workstation.
You can use removable media, a network server, or an Avid Unity
shared storage system.
Exporting AFE Files from MediaLog
To export an AFE file from MediaLog:
1. If you are running MediaLog on an Avid editing system, close the
Avid editing application.
2. If you plan to run MediaLog on an Avid DS Nitris system, transfer the
Avid editing project folder to the \MediaLog\Avid Projects folder on
the Avid DS Nitris workstation or use Avid Unity shared storage.
3. Open MediaLog.
The Select Project and User dialog box opens.
Conforming AAF and AFE Files
Directory list
c
4. Create a new user by clicking the New User button.
Do not share user settings between MediaLog and the Avid
editing system. The settings might become corrupted.
5. Use the Directory list to navigate to the project you want to transfer.
Select the project and click OK.
The project opens.
91
Page 92

Chapter 2 Conforming AAF and AFE Files
Project window
6. Do one of the following:
- (MediaLog 11.1) To create a file that includes all bins in a project,
click the project window and select File > Save Project Copy As.
The Save Project Copy As dialog box opens. Select a location,
name the file, and click the Save button.
- (MediaLog 11.5 or later) To create a file that includes all bins in a
project, click the project window and select File > Export. The
Export Project As dialog box opens. Select a location, name the
file, and click the Save button.
- (MediaLog 11.1) To create a file that includes the contents of a
single bin, open the bin, select the bin, and select File > Save Bin
Copy As. The Save bin name As dialog box opens. Select Av id
File Exchange (*.afe) from the Save as type file list. Select a
location, name the file, and click the Save button.
Bins
92
- (MediaLog 11.5 or later) To create a file that includes the contents
of a single bin, open the bin, click the bin, and select File >
Export. The Export Bin As dialog box appears. Select Avid File
Exchange (*.afe) from the “Export Bin As” list. Choose a
location, name the file, and click the Save button.
MediaLog creates an AFE file.
Page 93

Conforming AAF and AFE Files
c
n
n
Make sure to close MediaLog before opening Avid DS Nitris. If
MediaLog and Avid DS Nitris are open at the same time,
Avid DS Nitris performance is seriously affected.
AFE export to a network drive takes much longer than export to a local
drive. Avid recommends that you export to a local drive and then copy the
exported file to a network location.
7. If you are running MediaLog on an Avid editing system, make sure the
If you open a project in an Avid editing system after you have created an
AFE file from the project, the following message might appear: An
incompatible (or damaged) setting has been skipped. The original project
should not be affected.
Transferring Media
AFE file is in a location that you can access from the Avid DS Nitris
workstation.
You can use removable media, a network server, or an Avid Unity
shared storage system.
If you are using a removable drive to share media, disconnect the drive
from the offline system and connect it to the Avid DS Nitris system. For
information on connecting and disconnecting an external media drive,
refer to your system setup guide and “Sharing Compressed and
Uncompressed Media” on page 87.
Importing AAF and AFE Files
After you have determined the location of the transferred file, you can
import it into Avid DS Nitris.
To import an AAF or AFE file:
1. Use the Avid Explorer to select the folder that holds the AAF or
AFE file.
The file opens in a bin.
93
Page 94

Chapter 2 Conforming AAF and AFE Files
2. Double-click the file.
For AAF files, the sequence and its associated master clips appear in
the bin. For AFE files, the imported bins appear. The same settings
appear for either type of file.
AAF/AFE settings
AAF sequence
and master clips
94
Imported bins
3. For AFE files, double-click an imported bin to display its contents.
The contents can include master clips, subclips, titles, and sequences.
Page 95

Conforming AAF and AFE Files
Bin and sequence information from the Avid editing system is
transferred to the Avid DS Nitris system. For bins transferred through
AFE files, the columns initially displayed match the columns
displayed when the AFE file was created. You can show additional
columns or hide selected columns, as described in “Customizing the
Details and Script Views” on page 410 of the Avid DS Nitris Editing
Guide.
n
Columns and information from AAF and AFE files are not associated with
new Avid DS Nitris master clips.
For more information about options in the AAF/AFE View, click the Help
button in the Avid Explorer toolbar.
Creating a Sequence and Master Clips
After you have imported the AAF or AFE file, you can drag a sequence
onto the timeline and create master clips that are associated with the
sequence. You can also create master clips by dragging an imported clip or
sequence to a bin.
95
Page 96

Chapter 2 Conforming AAF and AFE Files
To create a sequence and master clips:
1. In the bin, select the Create Associated Clips option.
Select this option if you want to create master clips by dragging an
imported clip or sequence to the timeline or by dragging an imported
clip or sequence to a bin.
Deselect this option if you have already created master clips and you
want to avoid creating a duplicate set. Duplicate clips are marked by
the addition of the word “new”.
2. To append the AAF or AFE project name to the master clip source
names, select the Force Creation of External Tape Sources option.
This option distinguishes between clips that are created from tapes
associated with the conform and clips that are not.
3. Specify the path for the folder in which you want to create the master
clips after you drag a clip or sequence to the timeline. Click the browse
(...) button to navigate to the folder.
Avid DS Nitris checks the path to make sure the folder is within the
project folder.
96
4. To keep the same folder for any new master clips you create, select the
Lock Path option. Deselect this option to create master clips in folders
that match the names of the imported bins (AFE files only).
Deselecting this option keeps the original project structure when you
conform with AFE files.
5. Open a new sequence in your project.
Page 97

Conforming AAF and AFE Files
6. Drag the sequence from the bin onto the timeline. To match the
timecode of the imported sequence to the timecode of the sequence in
the timeline, hold down the U key while you drag the sequence to the
timeline.
The conform process begins. Depending on the length of the sequence,
a progress bar is displayed.
When the conform is complete, the sequence, its clips, titles, and
supported effects are recreated on the timeline. Associated master clips
are created in the location you specified.
If you are sharing media, the clips are automatically linked.
If you are recapturing media, empty master clips are created in the
folder that you have specified. When you open the folder in a bin, the
clip icons are red since no media has been captured yet.
A message box displays a summary of the information contained in the
AAF/AFE Conform Log and asks if you want to view the log.
7. To view the AAF/AFE Conform Log, click Yes .
The AAF/AFE Conform Log window displays information about how
the effects and parameters were supported. Use this information to
finish the final sequence.
97
Page 98

Chapter 2 Conforming AAF and AFE Files
8. To save the log as an .html file, click the Save button.
The Save As dialog box opens.
9. Navigate to an appropriate folder, type in a name for the log, and click
the Save button. Click OK to close the log window.
10. Save the sequence.
Recapturing Media
If you are not sharing media, you need to recapture media for the empty
master clips. For more information, see “Batch Capturing” on page 59.
Transferring Audio Media
Instead of recapturing and editing audio media, you can capture or import
an audio mix.
Possible workflows are:
• Recapturing audio media, exporting audio media from Avid DS Nitris
to Pro Tools
“Conforming OMF Compositions” on page 111.
• Creating a digital cut of the final audio mix in Media Composer (or
other Avid editing system) and capturing the audio in Avid DS Nitris.
• Exporting an OMF file with embedded audio media from an Avid
editing system and importing it into Avid DS Nitris.
98
®
, and importing it back after it has been processed—see
Page 99

• Exporting an OMF file with embedded audio media from an Avid
editing system to Pro Tools, and then importing it to Avid DS Nitris.
Using Audio from an Avid Editing System
If you want to use audio from Media Composer (or another Avid editing
system) in the final sequence, make sure the frame rates match the frame
rates on the Avid DS Nitris system. To transfer the audio, you can perform
a digital cut and capture audio from tape or, in most cases, you can use
OMF. Refer to the following table for more specific information:
Avid editor
project
Digital cut
output format
OK to
use
OMF?
Conforming AAF and AFE Files
Avid DS Nitris
format
30i NTSC (29.97
Standard NTSC Yes NTSC (29.97 fps)
fps frame rate)
25i PAL (25 fps
Standard PAL Yes PAL (25 fps)
frame rate)
24p NTSC (24 fps
frame rate)
24 (NTSC)
Destination TC
Yes 1080 PsF, 24 fps
rate depends on
output device.
24p NTSC (24 fps
23.976 (NTSC) No
a
1080 PsF, 23.97 fps
frame rate)
b
23.976p NTSC
23.976 (NTSC) Yes 1080 PsF, 23.97
24p PAL 24 (PAL) Yes 1080 PsF, 24 fps
a. See the article “How to Reduce the Audio Play Rate from 24 fps to
23.976 fps” in the Avid DS Nitris Customer Support Knowledge Base.
b. Requires Symphony 4.5 or later, Media Composer or
Film Composer 11.5 or later, or Avid Xpress 5.5 or later.
99
Page 100

Chapter 2 Conforming AAF and AFE Files
Exporting and Importing OMF Audio
The following procedure outlines the workflow for exporting audio as an
OMF file from an offline Avid editing system, transferring the audio to
Avid DS Nitris or Pro Tools, and importing the audio to Avid DS Nitris.
To export and import audio as an OMF file:
1. Make sure the project frame rates match—see “Using Audio from an
Avid Editing System” on page 99.
2. On Media Composer or another Avid editing system:
t Export the sequence as an AAF file or export a project and bins as
an AFE file
t Export the audio track as an OMF file (composition and audio
media)
n
If you are transferring the audio to
media and export it as OMF 2.0.
If you are transferring the audio to Pro Tools, embed the audio media
and export the file as OMF 2.0. Depending on the version of your Avid
editing system, you can link to consolidated media.
Use Link to Consolidated Media only for audio you are exporting to
Pro Tools. Avid DS Nitris does not support this type of OMF file.
For more information on creating an OMF file, see the Help or the
documentation for the Avid editing system.
3. Do one of the following:
t Transfer the OMF file to the Pro Tools workstation, sweeten the
audio, export from the ProTools workstation, and import into
Avid DS Nitris.
t Transfer the OMF file to the Avid DS Nitris workstation and
import.
For more information, see “Conforming an OMF File” on page 112.
4. Create a new sequence and conform the OMF file.
Avid DS Nitris, embed the audio
100
 Loading...