

Page 1

Avid® DS Nitris
Editing Guide
Version 7.0
™
make manage move | media
™
Avid
®
Page 2

Copyright and Disclaimer
Product specifications are subject to change without notice and do not represent a commitment on the part
of Avid Technology, Inc.
The software described in this document is furnished under a license agreement. You can obtain a copy of
that license by visiting Avid's Web site at www.avid.com. The terms of that license are also available in the
product in the same directory as the software. The software may not be reverse assembled and may be
used or copied only in accordance with the terms of the license agreement. It is against the law to copy the
software on any medium except as specifically allowed in the license agreement.
No part of this document may be reproduced or transmitted in any form or by any means, electronic or
mechanical, including photocopying and recording, for any purpose without the express written permission
of Avid Technology, Inc.
Copyright © 2003 Avid Technology, Inc. and its licensors. All rights reserved.
The Avid DS and Avid DS Nitris application uses JScript and Visual Basic Scripting Edition from Microsoft
Corporation.
Attn. Government User(s). Restricted Rights Legend
U.S. GOVERNMENT RESTRICTED RIGHTS. This Software and its documentation are “commercial
computer software” or “commercial computer software documentation.” In the event that such Software or
documentation is acquired by or on behalf of a unit or agency of the U.S. Government, all rights with
respect to this Software and documentation are subject to the terms of the License Agreement, pursuant to
FAR §12.212(a) and/or DFARS §227.7202-1(a), as applicable.
Trademarks
888 I/O, Adrenaline, AirPlay, AirSPACE, AirSPACE HD, AniMatte, AudioSuite, AudioVision, AutoSync,
Avid, Avid DNA, AVIDdrive, AVIDdrive Towers, AvidNet, AvidNetwork, AVIDstripe, Avid Mojo, Avid Unity,
Avid Xpress, AVoption, AVX, CamCutter, ChromaCurve, ChromaWheel, DAE, D-Fi, D-fx, Digidesign,
Digidesign Audio Engine, Digidesign Intelligent Noise Reduction, DigiDrive, Digital Nonlinear Accelerator,
DigiTranslator, DINR, D-Verb, Equinox, ExpertRender, FieldPak, Film Composer, FilmScribe, FluidMotion,
HIIP, HyperSPACE, HyperSPACE HDCAM, IllusionFX, Image Independence, Intraframe, iS9, iS18, iS23,
iS36, Lo-Fi, Magic Mask, make manage move | media, Marquee, Matador, Maxim, MCXpress, Media
Composer, MediaDock, MediaDock Shuttle, Media Fusion, Media Illusion, MediaLog, Media Reader,
Media Recorder, MEDIArray, MediaShare, Meridien, MetaSync, NaturalMatch, Nearchive, NetReview,
NewsCutter, Nitris, OMF, OMF Interchange, OMM, Open Media Framework, Open Media Management,
ProEncode, Pro Tools, QuietDrive, Recti-Fi, RetroLoop, rS9, rS18, Sci-Fi, Softimage, Sound Designer II,
SPACE, SPACEShift, Symphony, the Avid|DS logo, Trilligent, UnityRAID, Vari-Fi, Video Slave Driver,
VideoSPACE, Xdeck, and XSI are either registered trademarks or trademarks of Avid Technology, Inc. in
the United States and/or other countries.
Adobe, Acrobat, and Acrobat Reader are either registered trademarks or trademarks of Adobe Systems
Incorporated in the United States and/or other countries. Microsoft, Windows, and Windows XP are
registered trademarks of Microsoft Corporation. All other trademarks contained herein are the property of
their respective owners.
GOT FOOTAGE?
Editors — Filmmakers — Special Effects Artists — Game Developers — Animators — Educators —
Broadcasters — Content creators of every genre — Just finished an incredible project and want to
share it with the world?
Send us your reels and we may use your footage in our show reel or demo!*
For a copy of our release and Avid’s mailing address, go to www.avid.com/footage.
*Note: Avid cannot guarantee the use of materials submitted.
Avid DS Nitris Editing Guide • 0130-05575-01 • September 2003
2
Page 3

Contents
Using This Guide . . . . . . . . . . . . . . . . . . . . . . . . . . . . . . . . . . . . 13
Who Should Use This Guide . . . . . . . . . . . . . . . . . . . . . . . . . . . . . . . . . 13
Symbols and Conventions . . . . . . . . . . . . . . . . . . . . . . . . . . . . . . . . . . . 14
Using the Mouse, Pen, and Keyboard . . . . . . . . . . . . . . . . . . . . . . . 15
Customizing the Pen or Mouse . . . . . . . . . . . . . . . . . . . . . . . . . . . . 16
If You Need Help . . . . . . . . . . . . . . . . . . . . . . . . . . . . . . . . . . . . . . . . . . 16
Accessing the Online Documentation . . . . . . . . . . . . . . . . . . . . . . . 16
If You Have Documentation Comments. . . . . . . . . . . . . . . . . . . . . . 17
How to Order Documentation . . . . . . . . . . . . . . . . . . . . . . . . . . . . . 17
Avid Educational Services . . . . . . . . . . . . . . . . . . . . . . . . . . . . . . . . 17
Avid DS Customer Support . . . . . . . . . . . . . . . . . . . . . . . . . . . . . . . . . . 18
E-mail Support . . . . . . . . . . . . . . . . . . . . . . . . . . . . . . . . . . . . . . . . . 18
Web Support . . . . . . . . . . . . . . . . . . . . . . . . . . . . . . . . . . . . . . . . . . 18
FTP Support. . . . . . . . . . . . . . . . . . . . . . . . . . . . . . . . . . . . . . . . . . . 18
Mailing List . . . . . . . . . . . . . . . . . . . . . . . . . . . . . . . . . . . . . . . . . . . . 19
Chapter 1 Working with Projects . . . . . . . . . . . . . . . . . . . . . . . . . . . . . . . . 21
Starting a Work Session . . . . . . . . . . . . . . . . . . . . . . . . . . . . . . . . . . . . . 22
Creating a New Project . . . . . . . . . . . . . . . . . . . . . . . . . . . . . . . . . . 23
Opening an Existing Project. . . . . . . . . . . . . . . . . . . . . . . . . . . . . . . 25
Setting User Preferences. . . . . . . . . . . . . . . . . . . . . . . . . . . . . . . . . 26
Managing Files and Folders . . . . . . . . . . . . . . . . . . . . . . . . . . . . . . . . . . 29
Working with Avid Explorer . . . . . . . . . . . . . . . . . . . . . . . . . . . . . . . 29
Organizing Your Project Folder . . . . . . . . . . . . . . . . . . . . . . . . . . . . 33
Working with Bins. . . . . . . . . . . . . . . . . . . . . . . . . . . . . . . . . . . . . . . . . . 39
Changing the Bin View. . . . . . . . . . . . . . . . . . . . . . . . . . . . . . . . . . . 41
Changing the Frame in Thumbnail and Script View. . . . . . . . . . . . . 42
Identifying File Types . . . . . . . . . . . . . . . . . . . . . . . . . . . . . . . . . . . . 42
Displaying File Properties . . . . . . . . . . . . . . . . . . . . . . . . . . . . . . . . 43
Customizing the Details and Script Views . . . . . . . . . . . . . . . . . . . . 44
3
Page 4

Saving or Deleting a Bin View . . . . . . . . . . . . . . . . . . . . . . . . . . . . . 46
Sorting Files . . . . . . . . . . . . . . . . . . . . . . . . . . . . . . . . . . . . . . . . . . . 47
Sifting Files . . . . . . . . . . . . . . . . . . . . . . . . . . . . . . . . . . . . . . . . . . . . 49
Viewing Events . . . . . . . . . . . . . . . . . . . . . . . . . . . . . . . . . . . . . . . . . . . . 52
Viewing the Avid Event Log . . . . . . . . . . . . . . . . . . . . . . . . . . . . . . . 53
Sorting Columns and Events . . . . . . . . . . . . . . . . . . . . . . . . . . . . . . 55
Chapter 2 Working with Sequences . . . . . . . . . . . . . . . . . . . . . . . . . . . . . 57
Workflow: Working with Sequences . . . . . . . . . . . . . . . . . . . . . . . . . . . . 58
Opening Sequences . . . . . . . . . . . . . . . . . . . . . . . . . . . . . . . . . . . . . . . . 59
Creating a New Sequence . . . . . . . . . . . . . . . . . . . . . . . . . . . . . . . . 60
Opening an Existing Sequence . . . . . . . . . . . . . . . . . . . . . . . . . . . . 62
Importing Sequences and Master Clips from Another Project . . . . . 63
Setting Sequence Preferences . . . . . . . . . . . . . . . . . . . . . . . . . . . . . . . . 65
Working with Different Qualities of Media . . . . . . . . . . . . . . . . . . . . . . . . 69
Understanding Video Settings . . . . . . . . . . . . . . . . . . . . . . . . . . . . . 72
Understanding Video Quality Matching . . . . . . . . . . . . . . . . . . . . . . 76
Understanding Audio Quality Matching . . . . . . . . . . . . . . . . . . . . . . 81
Understanding the Processing Settings . . . . . . . . . . . . . . . . . . . . . . 82
Understanding the Working Conversion Mode. . . . . . . . . . . . . . . . . 83
Saving Sequences . . . . . . . . . . . . . . . . . . . . . . . . . . . . . . . . . . . . . . . . . 88
Creating a Copy of a Sequence . . . . . . . . . . . . . . . . . . . . . . . . . . . . 89
Searching for Sequences . . . . . . . . . . . . . . . . . . . . . . . . . . . . . . . . . . . . 90
Deleting Sequences . . . . . . . . . . . . . . . . . . . . . . . . . . . . . . . . . . . . . . . . 92
Chapter 3 Building a Rough Cut . . . . . . . . . . . . . . . . . . . . . . . . . . . . . . . . 93
Workflow: Editing Audio and Video . . . . . . . . . . . . . . . . . . . . . . . . . . . . . 94
Creating Sequences . . . . . . . . . . . . . . . . . . . . . . . . . . . . . . . . . . . . . . . . 96
Preparing Source Clips for Editing . . . . . . . . . . . . . . . . . . . . . . . . . . 97
Editing Source Clips . . . . . . . . . . . . . . . . . . . . . . . . . . . . . . . . . . . . . 99
Placing Clips on the Timeline . . . . . . . . . . . . . . . . . . . . . . . . . . . . . 101
Working on the Tracks . . . . . . . . . . . . . . . . . . . . . . . . . . . . . . . . . . 116
Marking In and Out-points on the Timeline . . . . . . . . . . . . . . . . . . . . . . 122
Using the Mark Buttons to Set In and Out-points . . . . . . . . . . . . . . 122
Using Timecode to Set In and Out-points. . . . . . . . . . . . . . . . . . . . 123
4
Page 5

Displaying Timecodes . . . . . . . . . . . . . . . . . . . . . . . . . . . . . . . . . . . . . 124
Displaying the Source Timecodes of a Clip . . . . . . . . . . . . . . . . . . 125
Displaying the Sequence Timecodes of a Clip . . . . . . . . . . . . . . . 126
Moving or Trimming Objects Using the Timecode Boxes . . . . . . . 126
Adjusting the Timeline . . . . . . . . . . . . . . . . . . . . . . . . . . . . . . . . . . 128
Panning and Zooming the Timeline . . . . . . . . . . . . . . . . . . . . . . . . 129
Changing the Ruler Display . . . . . . . . . . . . . . . . . . . . . . . . . . . . . . 131
Viewing a Sequence as a Hieracharical Tree Structure. . . . . . . . . . . . 133
Playing Sequences. . . . . . . . . . . . . . . . . . . . . . . . . . . . . . . . . . . . . . . . 134
Varying the Playback Speed . . . . . . . . . . . . . . . . . . . . . . . . . . . . . 137
Moving to Points on the Timeline . . . . . . . . . . . . . . . . . . . . . . . . . . 138
Moving to Edit Points on the Timeline . . . . . . . . . . . . . . . . . . . . . . 139
Looping Clips . . . . . . . . . . . . . . . . . . . . . . . . . . . . . . . . . . . . . . . . . 139
Viewing Unprocessed Frames . . . . . . . . . . . . . . . . . . . . . . . . . . . . 140
Using the Position Bar . . . . . . . . . . . . . . . . . . . . . . . . . . . . . . . . . . 141
Switching Viewers . . . . . . . . . . . . . . . . . . . . . . . . . . . . . . . . . . . . . 142
Setting True Video Display . . . . . . . . . . . . . . . . . . . . . . . . . . . . . . 143
Zooming or Panning the Viewers. . . . . . . . . . . . . . . . . . . . . . . . . . 143
Displaying Overlays . . . . . . . . . . . . . . . . . . . . . . . . . . . . . . . . . . . . 145
Manipulating Clips . . . . . . . . . . . . . . . . . . . . . . . . . . . . . . . . . . . . . . . . 145
Selecting Clips . . . . . . . . . . . . . . . . . . . . . . . . . . . . . . . . . . . . . . . . 146
Moving Clips . . . . . . . . . . . . . . . . . . . . . . . . . . . . . . . . . . . . . . . . . 147
Renaming and Adding Comments to Clips . . . . . . . . . . . . . . . . . . 151
Cutting Clips. . . . . . . . . . . . . . . . . . . . . . . . . . . . . . . . . . . . . . . . . . 152
Copying Clips. . . . . . . . . . . . . . . . . . . . . . . . . . . . . . . . . . . . . . . . . 152
Deleting Clips from the Timeline . . . . . . . . . . . . . . . . . . . . . . . . . . 153
Lifting Material . . . . . . . . . . . . . . . . . . . . . . . . . . . . . . . . . . . . . . . . 154
Extracting Material . . . . . . . . . . . . . . . . . . . . . . . . . . . . . . . . . . . . . 154
Revealing Unused Material on Clips . . . . . . . . . . . . . . . . . . . . . . . 155
Changing the Activeness of Clips . . . . . . . . . . . . . . . . . . . . . . . . . 156
Using Locators . . . . . . . . . . . . . . . . . . . . . . . . . . . . . . . . . . . . . . . . . . . 160
Displaying Locator Information . . . . . . . . . . . . . . . . . . . . . . . . . . . 161
Setting Reference Locators . . . . . . . . . . . . . . . . . . . . . . . . . . . . . . 163
Placing Locators on Clips . . . . . . . . . . . . . . . . . . . . . . . . . . . . . . . 164
Moving Locators. . . . . . . . . . . . . . . . . . . . . . . . . . . . . . . . . . . . . . . 165
5
Page 6

Deleting Locators . . . . . . . . . . . . . . . . . . . . . . . . . . . . . . . . . . . . . . 167
Moving to Locators . . . . . . . . . . . . . . . . . . . . . . . . . . . . . . . . . . . . . 167
Annotating Locators . . . . . . . . . . . . . . . . . . . . . . . . . . . . . . . . . . . . 168
Changing the Color of Locators . . . . . . . . . . . . . . . . . . . . . . . . . . . 169
Finding Frames, Clips, and Bins . . . . . . . . . . . . . . . . . . . . . . . . . . . . . . 169
Matching a Frame in a Master Clip or Subclip . . . . . . . . . . . . . . . . 169
Performing a Reverse Match Frame. . . . . . . . . . . . . . . . . . . . . . . . 171
Finding the Bin for a Clip or Subclip . . . . . . . . . . . . . . . . . . . . . . . . 172
Extracting Parts of a Sequence. . . . . . . . . . . . . . . . . . . . . . . . . . . . . . . 173
Converting a Timeline Region or Object. . . . . . . . . . . . . . . . . . . . . 174
Creating Multiple Clips . . . . . . . . . . . . . . . . . . . . . . . . . . . . . . . . . . 175
Replacing Timeline Material . . . . . . . . . . . . . . . . . . . . . . . . . . . . . . 176
Grabbing Frames . . . . . . . . . . . . . . . . . . . . . . . . . . . . . . . . . . . . . . . . . 176
Creating a Master Clip from a Snapshot. . . . . . . . . . . . . . . . . . . . . 177
Creating an Image File from a Snapshot . . . . . . . . . . . . . . . . . . . . 177
Rippling Clips . . . . . . . . . . . . . . . . . . . . . . . . . . . . . . . . . . . . . . . . . . . . 178
Inserting Clips in Ripple Mode . . . . . . . . . . . . . . . . . . . . . . . . . . . . 181
Editing Clips in Ripple Mode. . . . . . . . . . . . . . . . . . . . . . . . . . . . . . 182
Synchronizing Clips. . . . . . . . . . . . . . . . . . . . . . . . . . . . . . . . . . . . . . . . 183
Aligning Clips for Synchronization . . . . . . . . . . . . . . . . . . . . . . . . . 183
Creating a Sync Group . . . . . . . . . . . . . . . . . . . . . . . . . . . . . . . . . . 185
Manipulating Synchronized Clips . . . . . . . . . . . . . . . . . . . . . . . . . . 188
Editing Synchronized Clips. . . . . . . . . . . . . . . . . . . . . . . . . . . . . . . 189
Resyncing Clips . . . . . . . . . . . . . . . . . . . . . . . . . . . . . . . . . . . . . . . 190
Deleting Synchronized Clips. . . . . . . . . . . . . . . . . . . . . . . . . . . . . . 190
Referencing Sequences . . . . . . . . . . . . . . . . . . . . . . . . . . . . . . . . . . . . 191
Creating Reference Clips . . . . . . . . . . . . . . . . . . . . . . . . . . . . . . . . 192
Converting a Container Clip to a Reference Clip . . . . . . . . . . . . . . 192
Processing Reference Clips . . . . . . . . . . . . . . . . . . . . . . . . . . . . . . 193
Chapter 4 Trimming Clips. . . . . . . . . . . . . . . . . . . . . . . . . . . . . . . . . . . . . 195
Workflow: Trimming Clips . . . . . . . . . . . . . . . . . . . . . . . . . . . . . . . . . . . 196
Understanding Trimming. . . . . . . . . . . . . . . . . . . . . . . . . . . . . . . . . . . . 197
Methods of Trimming . . . . . . . . . . . . . . . . . . . . . . . . . . . . . . . . . . . . . . 198
Understanding Trim Mode. . . . . . . . . . . . . . . . . . . . . . . . . . . . . . . . . . . 199
6
Page 7

Entering and Exiting Trim Mode. . . . . . . . . . . . . . . . . . . . . . . . . . . 200
Trimming Clips in Trim Mode . . . . . . . . . . . . . . . . . . . . . . . . . . . . . 201
Reviewing a Trim Edit or Transition in Trim Mode. . . . . . . . . . . . . 202
Selecting and Breaking Edit Points . . . . . . . . . . . . . . . . . . . . . . . . . . . 203
Selecting Trim Sides . . . . . . . . . . . . . . . . . . . . . . . . . . . . . . . . . . . 203
Breaking and Relinking Edit Points . . . . . . . . . . . . . . . . . . . . . . . . 206
Performing a Basic Trim . . . . . . . . . . . . . . . . . . . . . . . . . . . . . . . . . . . . 207
Trimming the Edit Point . . . . . . . . . . . . . . . . . . . . . . . . . . . . . . . . . 209
Trimming with the Trim Handles . . . . . . . . . . . . . . . . . . . . . . . . . . 211
Trimming Audio Clips. . . . . . . . . . . . . . . . . . . . . . . . . . . . . . . . . . . 215
Backtiming . . . . . . . . . . . . . . . . . . . . . . . . . . . . . . . . . . . . . . . . . . . 216
Snapping Edit Points . . . . . . . . . . . . . . . . . . . . . . . . . . . . . . . . . . . 216
Trimming On-the-Fly . . . . . . . . . . . . . . . . . . . . . . . . . . . . . . . . . . . 217
Creating Overlap Edits . . . . . . . . . . . . . . . . . . . . . . . . . . . . . . . . . . . . . 218
Trimming Container Clips . . . . . . . . . . . . . . . . . . . . . . . . . . . . . . . . . . . 219
Trimming Transition Effects . . . . . . . . . . . . . . . . . . . . . . . . . . . . . . . . . 219
Understanding Slipping or Sliding Clips . . . . . . . . . . . . . . . . . . . . . . . . 221
Slipping Clips . . . . . . . . . . . . . . . . . . . . . . . . . . . . . . . . . . . . . . . . . 222
Sliding Clips . . . . . . . . . . . . . . . . . . . . . . . . . . . . . . . . . . . . . . . . . . 224
Entering Slip/Slide Mode . . . . . . . . . . . . . . . . . . . . . . . . . . . . . . . . 224
Performing a Slip or Slide Trim . . . . . . . . . . . . . . . . . . . . . . . . . . . 225
Reviewing a Slip or Slide Trim . . . . . . . . . . . . . . . . . . . . . . . . . . . . 227
Maintaining Sync While Trimming . . . . . . . . . . . . . . . . . . . . . . . . . . . . 227
Creating a Gap When Trimming . . . . . . . . . . . . . . . . . . . . . . . . . . 228
Chapter 5 Working with Effects and Transitions . . . . . . . . . . . . . . . . . . 229
Displaying Guides. . . . . . . . . . . . . . . . . . . . . . . . . . . . . . . . . . . . . . . . . 230
Applying Effects on the Timeline . . . . . . . . . . . . . . . . . . . . . . . . . . . . . 230
Applying Transitions . . . . . . . . . . . . . . . . . . . . . . . . . . . . . . . . . . . . . . . 231
Cutting to a Clip . . . . . . . . . . . . . . . . . . . . . . . . . . . . . . . . . . . . . . . 231
Creating One-Sided Transitions. . . . . . . . . . . . . . . . . . . . . . . . . . . 233
Creating Transitions Between Clips. . . . . . . . . . . . . . . . . . . . . . . . 233
Editing Transition Properties . . . . . . . . . . . . . . . . . . . . . . . . . . . . . 235
Aligning Transitions . . . . . . . . . . . . . . . . . . . . . . . . . . . . . . . . . . . . 236
7
Page 8

Removing Transitions . . . . . . . . . . . . . . . . . . . . . . . . . . . . . . . . . . . 237
Using the Comparison Buffer . . . . . . . . . . . . . . . . . . . . . . . . . . . . . 237
Nesting Clips. . . . . . . . . . . . . . . . . . . . . . . . . . . . . . . . . . . . . . . . . . . . . 239
Creating Nested Clips. . . . . . . . . . . . . . . . . . . . . . . . . . . . . . . . . . . 240
Navigating within Nested Clips . . . . . . . . . . . . . . . . . . . . . . . . . . . . 245
Deleting Nested Clips . . . . . . . . . . . . . . . . . . . . . . . . . . . . . . . . . . . 248
Displaying Effects in a Viewer. . . . . . . . . . . . . . . . . . . . . . . . . . . . . . . . 248
Opening a Floating Viewer . . . . . . . . . . . . . . . . . . . . . . . . . . . . . . . 248
Changing the Image Displayed in a Viewer . . . . . . . . . . . . . . . . . . 250
Viewing Image Components. . . . . . . . . . . . . . . . . . . . . . . . . . . . . . 251
Processing Sequences . . . . . . . . . . . . . . . . . . . . . . . . . . . . . . . . . . . . . 252
Chapter 6 Processing Effects . . . . . . . . . . . . . . . . . . . . . . . . . . . . . . . . . 255
Understanding Processing . . . . . . . . . . . . . . . . . . . . . . . . . . . . . . . . . . 256
When is Processing Needed? . . . . . . . . . . . . . . . . . . . . . . . . . . . . 257
Workflow: Processing . . . . . . . . . . . . . . . . . . . . . . . . . . . . . . . . . . . . . . 259
Processing Areas of the Timeline . . . . . . . . . . . . . . . . . . . . . . . . . . . . . 260
Processing a Single Effect . . . . . . . . . . . . . . . . . . . . . . . . . . . . . . . . . . 262
Processing a Region of a Frame . . . . . . . . . . . . . . . . . . . . . . . . . . 264
Previewing Effects without Processing. . . . . . . . . . . . . . . . . . . . . . 264
Setting the Processing Options. . . . . . . . . . . . . . . . . . . . . . . . . . . . . . . 265
Processing Media at Different Qualities . . . . . . . . . . . . . . . . . . . . . 269
Creating Caches at Any Level . . . . . . . . . . . . . . . . . . . . . . . . . . . . 270
Understanding Processing Modes . . . . . . . . . . . . . . . . . . . . . . . . . . . . 275
Minimal Processing . . . . . . . . . . . . . . . . . . . . . . . . . . . . . . . . . . . . 275
Complete Processing . . . . . . . . . . . . . . . . . . . . . . . . . . . . . . . . . . . 275
Example: Minimal versus Complete Processing. . . . . . . . . . . . . . . 276
Working with Real-Time Effects . . . . . . . . . . . . . . . . . . . . . . . . . . . . . . 280
Playing Real-Time Effects . . . . . . . . . . . . . . . . . . . . . . . . . . . . . . . 282
Outputting Real-time Effects. . . . . . . . . . . . . . . . . . . . . . . . . . . . . . 284
Remote Processing. . . . . . . . . . . . . . . . . . . . . . . . . . . . . . . . . . . . . . . . 285
Monitoring Remote Processing Jobs with the Avid DMS Broker . . 286
8
Page 9

Chapter 7 Applying Image Transition Effects. . . . . . . . . . . . . . . . . . . . . 287
Understanding Image Transition Effects . . . . . . . . . . . . . . . . . . . . . . . 287
Applying a Dissolve Effect to a Transition . . . . . . . . . . . . . . . . . . . . . . 288
Applying a DVE Effect to a Transition . . . . . . . . . . . . . . . . . . . . . . . . . 290
Understanding the Morph Effect. . . . . . . . . . . . . . . . . . . . . . . . . . . . . . 292
Applying a Morph Transition Effect . . . . . . . . . . . . . . . . . . . . . . . . 294
Creating Shapes . . . . . . . . . . . . . . . . . . . . . . . . . . . . . . . . . . . . . . 295
Joining Shapes . . . . . . . . . . . . . . . . . . . . . . . . . . . . . . . . . . . . . . . 298
Creating Barrier Shapes . . . . . . . . . . . . . . . . . . . . . . . . . . . . . . . . 302
Warping the Morph . . . . . . . . . . . . . . . . . . . . . . . . . . . . . . . . . . . . 303
Animating Shapes . . . . . . . . . . . . . . . . . . . . . . . . . . . . . . . . . . . . . 303
Tracking Morphed Shapes . . . . . . . . . . . . . . . . . . . . . . . . . . . . . . . 305
Setting the Rendering Options. . . . . . . . . . . . . . . . . . . . . . . . . . . . 306
Applying a Picture-in-Picture Effect . . . . . . . . . . . . . . . . . . . . . . . . . . . 309
Applying Wipe Effects. . . . . . . . . . . . . . . . . . . . . . . . . . . . . . . . . . . . . . 313
Chapter 8 Working with Time Effects . . . . . . . . . . . . . . . . . . . . . . . . . . . 315
Understanding the Time Effects . . . . . . . . . . . . . . . . . . . . . . . . . . . . . . 315
Applying a 3:2 Contract Effect . . . . . . . . . . . . . . . . . . . . . . . . . . . . . . . 316
Applying a 3:2 Expand Effect . . . . . . . . . . . . . . . . . . . . . . . . . . . . . . . . 318
Applying a Deinterlace Effect . . . . . . . . . . . . . . . . . . . . . . . . . . . . . . . . 318
Applying an Interlace Effect . . . . . . . . . . . . . . . . . . . . . . . . . . . . . . . . . 321
Understanding the Timewarp Effects . . . . . . . . . . . . . . . . . . . . . . . . . . 322
Applying an Audio Timewarp Effect. . . . . . . . . . . . . . . . . . . . . . . . 322
Applying a Video Timewarp Effect . . . . . . . . . . . . . . . . . . . . . . . . . 326
Chapter 9 Animating Objects . . . . . . . . . . . . . . . . . . . . . . . . . . . . . . . . . . 339
Workflow: Animating Properties . . . . . . . . . . . . . . . . . . . . . . . . . . . . . . 340
Creating Animation . . . . . . . . . . . . . . . . . . . . . . . . . . . . . . . . . . . . . . . . 341
Setting Keyframes Automatically . . . . . . . . . . . . . . . . . . . . . . . . . . 342
Setting Keyframes Manually . . . . . . . . . . . . . . . . . . . . . . . . . . . . . 343
Understanding the Animation Editor. . . . . . . . . . . . . . . . . . . . . . . . . . . 346
Using the Animation Tree . . . . . . . . . . . . . . . . . . . . . . . . . . . . . . . 347
Working with the Animation Graph . . . . . . . . . . . . . . . . . . . . . . . . 350
9
Page 10

Editing Animation . . . . . . . . . . . . . . . . . . . . . . . . . . . . . . . . . . . . . . . . . 353
Editing Keyframes Manually . . . . . . . . . . . . . . . . . . . . . . . . . . . . . . 354
Editing Animation on the Animation Graph. . . . . . . . . . . . . . . . . . . 356
Offsetting Animation . . . . . . . . . . . . . . . . . . . . . . . . . . . . . . . . . . . . 371
Copying Animation . . . . . . . . . . . . . . . . . . . . . . . . . . . . . . . . . . . . . 371
Repeating Animation . . . . . . . . . . . . . . . . . . . . . . . . . . . . . . . . . . . 376
Trimming Animation . . . . . . . . . . . . . . . . . . . . . . . . . . . . . . . . . . . . 379
Removing Animation . . . . . . . . . . . . . . . . . . . . . . . . . . . . . . . . . . . 379
Processing Animation . . . . . . . . . . . . . . . . . . . . . . . . . . . . . . . . . . . . . . 381
Chapter 10 Mixing Audio . . . . . . . . . . . . . . . . . . . . . . . . . . . . . . . . . . . . . . 383
Workflow: Mixing Audio. . . . . . . . . . . . . . . . . . . . . . . . . . . . . . . . . . . . . 384
Working in Audio Container Clips . . . . . . . . . . . . . . . . . . . . . . . . . . . . . 385
Audio Clips and Tracks . . . . . . . . . . . . . . . . . . . . . . . . . . . . . . . . . . . . . 386
Understanding the Mixer . . . . . . . . . . . . . . . . . . . . . . . . . . . . . . . . . . . . 388
Changing the Mixer Configuration . . . . . . . . . . . . . . . . . . . . . . . . . 389
Using the Input Strips . . . . . . . . . . . . . . . . . . . . . . . . . . . . . . . . . . . 389
Using the Output Strips . . . . . . . . . . . . . . . . . . . . . . . . . . . . . . . . . 397
Using an External Controller . . . . . . . . . . . . . . . . . . . . . . . . . . . . . . . . . 398
Mapping External Controls to Avid DS Nitris Commands. . . . . . . . 399
Creating a Command Mapping Set . . . . . . . . . . . . . . . . . . . . . . . . 401
Loading a Command Mapping Set. . . . . . . . . . . . . . . . . . . . . . . . . 401
Building an Audio Mix . . . . . . . . . . . . . . . . . . . . . . . . . . . . . . . . . . . . . . 401
Creating Audio Tracks . . . . . . . . . . . . . . . . . . . . . . . . . . . . . . . . . . 403
Using the Surround Panner . . . . . . . . . . . . . . . . . . . . . . . . . . . . . . 405
Mixing Clips . . . . . . . . . . . . . . . . . . . . . . . . . . . . . . . . . . . . . . . . . . 406
Fine-tuning the Mix . . . . . . . . . . . . . . . . . . . . . . . . . . . . . . . . . . . . . . . . 409
Adjusting the Mixer Inputs . . . . . . . . . . . . . . . . . . . . . . . . . . . . . . . 410
Adjusting the Mixer Outputs . . . . . . . . . . . . . . . . . . . . . . . . . . . . . . 412
Animating the Audio Mix . . . . . . . . . . . . . . . . . . . . . . . . . . . . . . . . . . . . 412
Animating the Input Strip Controls . . . . . . . . . . . . . . . . . . . . . . . . . 413
Bypassing the Animation . . . . . . . . . . . . . . . . . . . . . . . . . . . . . . . . 415
Editing the Animation . . . . . . . . . . . . . . . . . . . . . . . . . . . . . . . . . . . 416
Deleting Animation . . . . . . . . . . . . . . . . . . . . . . . . . . . . . . . . . . . . . 416
10
Page 11

Converting the Sample Rate . . . . . . . . . . . . . . . . . . . . . . . . . . . . . . . . 417
Converting Sequence Sample Rates. . . . . . . . . . . . . . . . . . . . . . . 417
Converting Clip Sample Rates . . . . . . . . . . . . . . . . . . . . . . . . . . . . 417
Processing the Mix . . . . . . . . . . . . . . . . . . . . . . . . . . . . . . . . . . . . . . . . 420
Processing Clip-based Audio Effects. . . . . . . . . . . . . . . . . . . . . . . 422
Chapter 11 Working with Audio Effects . . . . . . . . . . . . . . . . . . . . . . . . . . 423
Understanding Audio Effects . . . . . . . . . . . . . . . . . . . . . . . . . . . . . . . . 424
Applying Crossfade Effects . . . . . . . . . . . . . . . . . . . . . . . . . . . . . . . . . 424
Applying Dynamics Effects . . . . . . . . . . . . . . . . . . . . . . . . . . . . . . . . . . 425
Working with Equalizer (EQ) Effects . . . . . . . . . . . . . . . . . . . . . . . . . . 426
Applying the 3 Band Tone Control Effect. . . . . . . . . . . . . . . . . . . . 426
Applying the 4 Band Parametric EQ Effect . . . . . . . . . . . . . . . . . . 427
Applying the 10 Band Graphic EQ Effect. . . . . . . . . . . . . . . . . . . . 427
Applying Fade Effects. . . . . . . . . . . . . . . . . . . . . . . . . . . . . . . . . . . . . . 428
Applying a Gain Effect . . . . . . . . . . . . . . . . . . . . . . . . . . . . . . . . . . . . . 428
Applying Reverb Effect . . . . . . . . . . . . . . . . . . . . . . . . . . . . . . . . . . . . . 429
Applying a VST Host Effect . . . . . . . . . . . . . . . . . . . . . . . . . . . . . . . . . 429
Chapter 12 Media Management . . . . . . . . . . . . . . . . . . . . . . . . . . . . . . . . . 431
Understanding Media . . . . . . . . . . . . . . . . . . . . . . . . . . . . . . . . . . . . . . 431
Managing Media . . . . . . . . . . . . . . . . . . . . . . . . . . . . . . . . . . . . . . . . . . 434
Using the Media Tool . . . . . . . . . . . . . . . . . . . . . . . . . . . . . . . . . . . 434
Defragmenting Media. . . . . . . . . . . . . . . . . . . . . . . . . . . . . . . . . . . 440
Verifying Media . . . . . . . . . . . . . . . . . . . . . . . . . . . . . . . . . . . . . . . 440
Copying Media . . . . . . . . . . . . . . . . . . . . . . . . . . . . . . . . . . . . . . . . 441
Moving Media. . . . . . . . . . . . . . . . . . . . . . . . . . . . . . . . . . . . . . . . . 441
Deleting Media . . . . . . . . . . . . . . . . . . . . . . . . . . . . . . . . . . . . . . . . 442
Purging Media . . . . . . . . . . . . . . . . . . . . . . . . . . . . . . . . . . . . . . . . 443
Example: Purging versus Deleting Media . . . . . . . . . . . . . . . . . . . 448
Archiving Projects. . . . . . . . . . . . . . . . . . . . . . . . . . . . . . . . . . . . . . . . . 449
Creating a Device Preset Before Archiving . . . . . . . . . . . . . . . . . . 450
Creating a Single Archive for a Project . . . . . . . . . . . . . . . . . . . . . 450
Creating Multiple Archives of the Same Project. . . . . . . . . . . . . . . 454
11
Page 12

Restoring Projects. . . . . . . . . . . . . . . . . . . . . . . . . . . . . . . . . . . . . . . . . 456
Restoring a Complete Project. . . . . . . . . . . . . . . . . . . . . . . . . . . . . 457
Restoring Parts of a Project Archive. . . . . . . . . . . . . . . . . . . . . . . . 460
Restoring a Project Archived on Multiple Tapes. . . . . . . . . . . . . . . 462
Moving Projects to Another Workstation. . . . . . . . . . . . . . . . . . . . . . . . 463
Deleting Projects . . . . . . . . . . . . . . . . . . . . . . . . . . . . . . . . . . . . . . . . . . 463
Deleting Clips . . . . . . . . . . . . . . . . . . . . . . . . . . . . . . . . . . . . . . . . . . . . 465
Viewing Information about Storage Devices . . . . . . . . . . . . . . . . . . . . . 466
Index . . . . . . . . . . . . . . . . . . . . . . . . . . . . . . . . . . . . . . . . . . . . . 467
12
Page 13

Using This Guide
Congratulations on your purchase of an Avid DS Nitris system. You can
use your system to create broadcast-quality output incorporating every
possible production element from full-speed, high-resolution footage, to
multimedia artwork and animation, to computer-generated effects and
titling.
n
The documentation describes the features and hardware of all models.
Therefore, your system might not contain certain features and hardware
that are covered in the documentation.
Who Should Use This Guide
This guide is intended for all Avid DS Nitris users, from beginning to
advanced who are interested in learning essential skills for assembling
programs of any length in the Avid nonlinear environment and finishing
high-end uncompressed, quality television programs and commercials.
This guide and the Help will be your primary learning tools for editing
procedures as you progress through early projects, and will remain your
principal source for procedures in the future.
This guide provides information on:
• Setting project configurations
• Setting sequence preferences
• Using the editing tools
• Managing your media files
Page 14

Using This Guide
Symbols and Conventions
Unless noted otherwise, the material in this document applies to the
Windows XP operating system. Avid DS Nitris documentation uses the
following symbols and conventions:
Symbol or
Convention
Meaning or Action
n
c
w
> This symbol indicates menu commands (and subcommands)
t
Margin tips In the margin, you will find tips that help you perform tasks
Italic font Italic font is used to emphasize certain words and to indicate
Courier Bold
font
A note provides important related information, reminders,
recommendations, and strong suggestions.
A caution means that a specific action you take could cause
harm to your computer or cause you to lose data.
A warning describes an action that could cause you physical
harm. Follow the guidelines in this document or on the unit
itself when handling electrical equipment.
in the order you select them. For example, File > Import
means to open the File menu and then select the Import
command.
This symbol indicates a single-step procedure. Multiple
arrows in a list indicate that you perform one of the actions
listed.
more easily and efficiently.
variables.
Courier Bold font identifies text that you type.
14
Bold font Bold indicates a user interaction.
Page 15

Using the Mouse, Pen, and Keyboard
In Avid DS Nitris, you can use a two-button mouse (with wheel) or a pen
and tablet. The left and right mouse buttons perform different operations.
Unless otherwise stated, use the left mouse button.
The mouse and pen operate slightly differently. All the procedures in this
guide are documented for the mouse. You can, however, easily use a pen
or the keyboard. The following table shows the terms relating to the
mouse, pen, and keyboard.
This Term Means This with a Mouse Means This with a Pen
Symbols and Conventions
Click Quickly click and release the
left mouse button. Always
use the left mouse button
unless otherwise stated.
Double-click Click the left mouse button
twice rapidly.
Right-click Quickly click and release the
right mouse button.
Drag Click and hold the left mouse
button or the wheel while you
move the mouse.
Alt+key,
Ctrl+key,
Shift+key,
etc.
Press and hold the first key while you press the second key. For
example, “Press Alt+F1” means to press and hold the Alt key
while you press the F1 key.
Tap the tablet once with the tip of
the pen, or touch the pen to the
tablet with enough pressure to
click.
Quickly tap the tablet twice in the
same screen pixel or press the F5
key to go from single to doubleclick.
Press the top portion of the switch
on the side of the pen or press the
F6 key to go from left to rightclick.
Press the pen to the tablet while
moving the pen.
15
Page 16

Using This Guide
Customizing the Pen or Mouse
By customizing the pen, you can adjust the click pressure, switch
functions, and other features. For information on customizing the pen,
refer to the documentation provided with your Avid DS Nitris system.
You can also customize the mouse. For example, you can select
left-handed configuration or change the double-click speed. For
information on customizing the mouse, refer to the Windows online Help.
If You Need Help
If you are having trouble using Avid DS Nitris:
1. Retry the action, carefully following the instructions given for that task
in this guide. It is especially important to check each step of your
workflow.
2. Check for the latest information that might have become available
after the documentation was published in one of two locations:
- If release notes are available, they ship with your application.
- If ReadMe files are available, they are supplied in your Avid
application folder. ReadMe files are also available from Help.
3. Check the documentation that came with your Avid application or
your hardware for maintenance or hardware-related issues.
4. See “Avid DS Customer Support” on page 18.
5. For Technical Support, please call 800-800-AVID (800-800-2843).
For international enquiries and support services, contact your Avid
Reseller. Support offerings may vary per location.
Accessing the Online Documentation
The online library contains all the Avid DS Nitris documentation in PDF
format. If it was installed on your workstation, you can access it from the
Help menu in Avid DS Nitris.
n
16
You will need Adobe® Acrobat® Reader® installed to view the
documentation online.
Page 17

To access the online library, do one of the following:
t In Avid DS Nitris, select Help > Online Library.
t Insert the Drivers CD-ROM into your CD-ROM drive, and select
Online Library from the main menu.
To install Adobe Acrobat Reader:
1. Insert the Drivers CD-ROM into your CD-ROM drive.
2. Select the appropriate workstation and select Utilities.
If You Have Documentation Comments
We’d appreciate any comments or suggestions you may have about the
Avid DS Nitris documentation.
Please e-mail your documentation comments to:
dsdocs@avid.com
If You Need Help
Include the title of the document, its part number, and the specific section
you are commenting on in all correspondence.
How to Order Documentation
To order additional copies of this documentation from within the
United States, call Avid Sales at 800-949-AVID (800-949-2843). If you
are placing an order from outside the United States, contact your local
Avid representative.
Avid Educational Services
For information on courses/schedules, training centers, certifications,
courseware, and books, please visit www.avid.com/training or call
Avid Sales at 800-949-AVID (800-949-2843).
17
Page 18

Using This Guide
Avid DS Customer Support
The following sections describe various Avid DS Customer Support
options.
E-mail Support
The e-mail address for Avid DS Customer Support is:
dssupport@avid.com.
You can use it for sending bug reports, usability questions, and avidds.cab
audit reports for system analysis. All e-mails are logged in the support
database and assigned a case number. Send one support request per e-mail.
n
Web Support
FTP Support
It is mandatory that you include your SID number in the body of your
e-mail message for verification of your maintenance contract and case
logging, otherwise, response will be delayed.
The Avid DS Customer Support and Download sections at
http://www.softimage.com/avidds provide quick access to a wide range of
resources from the Avid DS teams and user community. Downloads,
including presets, drivers, and Quick Fix Engineering (QFE), provide the
latest solutions for use with your Avid DS Nitris system. Online
documentation, tutorials, and Knowledge Base articles ensure that you get
the most out of your work with Avid DS Nitris. It's like having a dedicated
Avid DS Customer Support engineer sitting at your desk!
For troubleshooting purposes, an FTP server is available for uploading
large files for Avid DS Customer Support personnel to examine. You can
upload a project's archive, media files, or other large piece of data. Simply
zip the files to upload and use a short name for easy retrieval, such as
archive.zip or Case274877.zip. You can use a Windows Command Prompt
or an FTP application to upload files to our server.
18
Page 19

Avid DS Customer Support
Command Prompt Commands
Command Description
Site access ftp ftp.softimage.com [Enter]
Folder access cd incoming [Enter]
User name anonymous [Enter]
Password “your e-mail address” [Enter]
Transfer mode bin [Enter]
Upload command Put “path:\file name” [Enter]
Once the file upload is complete, send an e-mail to dssupport@avid.com
to inform Avid DS Customer Support as there is no automatic notification
when a file is uploaded on the FTP server. Please provide the complete and
exact file name (case sensitive) to retrieve.
Mailing List
Although the Avid DS mailing list is frequently monitored by Avid
employees, it is not part of the official support channels. You are invited to
send your support requests to any of the above channels when required.
If you have an e-mail account, you can join the worldwide network of
Avid DS users exchanging ideas. The mailing list has proven to be quite
useful for users, with a constant stream of new subscribers.
To subscribe, send an e-mail to majordomo@softimage.com with the
following text in the body of your message: subscribe ds. You can get
further information on using the automated list server by e-mailing
majordomo@softimage.com with “help” as your message.
You can also go to http://www.avid.com/support/forums.html, which is a
great source of information available on the Avid web site for Avid DS.
19
Page 20

Using This Guide
20
Page 21

Chapter 1
Working with Projects
This chapter describes how your project files and media are handled in
Avid DS Nitris. Since project organization plays a key part in the editing
process, you will learn how to create projects, and use the Avid Explorer to
organize your media into folders.
The following sections describe how to work with projects and media:
• Starting a Work Session
• Managing Files and Folders
• Working with Bins
• Viewing Events
Page 22
Chapter 1 Working with Projects
Starting a Work Session
When you start Avid DS Nitris, the Open Project dialog box is displayed,
so that you can view and manage all projects anywhere on the network.
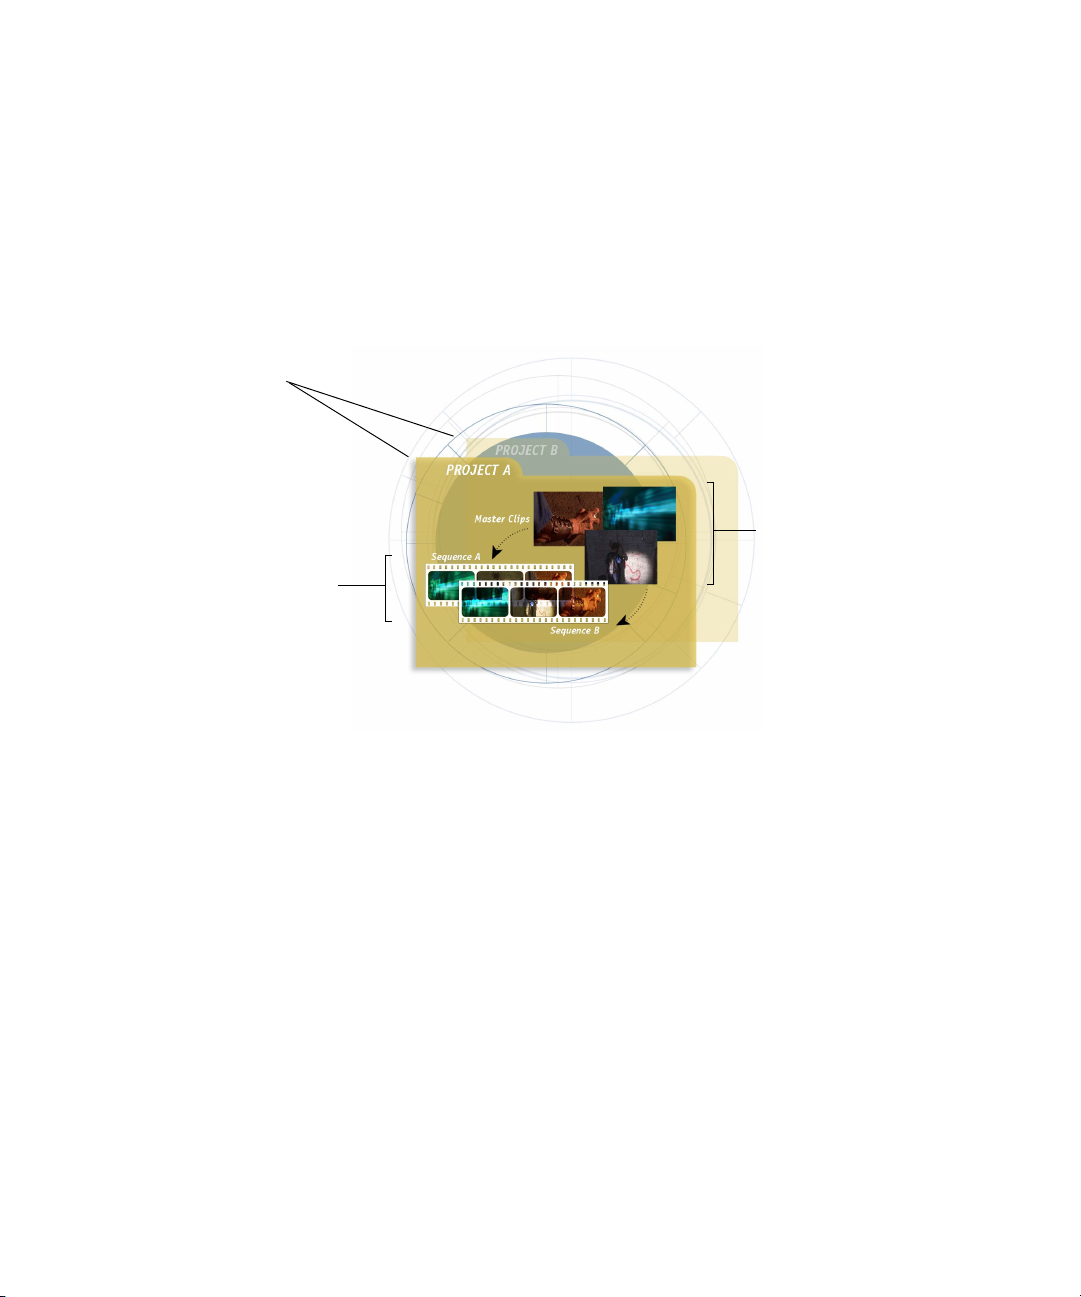
Each project has its own associated sequences. When you open a sequence,
you have access to all the master clips and custom presets in the project.
Projects contain
master clips,
sequences, and
any special presets
and/or scripts you
create.
Sequence files
contain information
about your edit
decisions, composites,
and any effects you’ve
applied to your clips.
Master clips are
representations of the
digitized media stored
on your disk array.
Master clips can be
shared between
sequences within the
same project.
22
n
By default, all projects created with Avid DS Nitris are stored in their own
folder under the DS Projects folder. It’s important that you keep all the files
related to a project inside the project folder, so that they can be archived,
restored, and/or purged.
If you’re running more than one version of Avid DS Nitris on your
workstation, new projects will be classified by version, and will be stored
in a subfolder of the \DS Projects folder. You can use the Scan Disk option
to change the project path folder, so that only the projects in a particular
version folder are displayed.
Page 23

Starting a Work Session
To start Avid DS Nitris, do one of the following:
t Double-click the Avid DS Nitris icon on the Windows desktop.
t Click Start > Programs > Avi d P ro d uc t s > Avid DS Nitris v7.0 >
Avid DS Nitris v7.0.
n
Tip: If you selected the Load Last Sequence at Startup option in the User
Preferences dialog box and want to bypass this option, press Shift and
double-click the Avid DS Nitris shortcut on the desktop. This starts the
application and displays the Open Project dialog box from which you can
select a different project.
The Open Project dialog box is displayed.
You can now create or open an existing project or sequence.
Creating a New Project
When you first start Avid DS Nitris or when you want to start a new
project, you are prompted to name your project, designate a location for it,
and set the project’s preferences. Once you’ve done this, a project folder is
created at the specified location. By default, all sequences associated with
this project are saved in this folder.
23
Page 24
Chapter 1 Working with Projects
To open a new project:
1. Do one of the following:
t From the Open Project dialog box, click the New Project button.
t Select File > New > Project.
Browse button
24
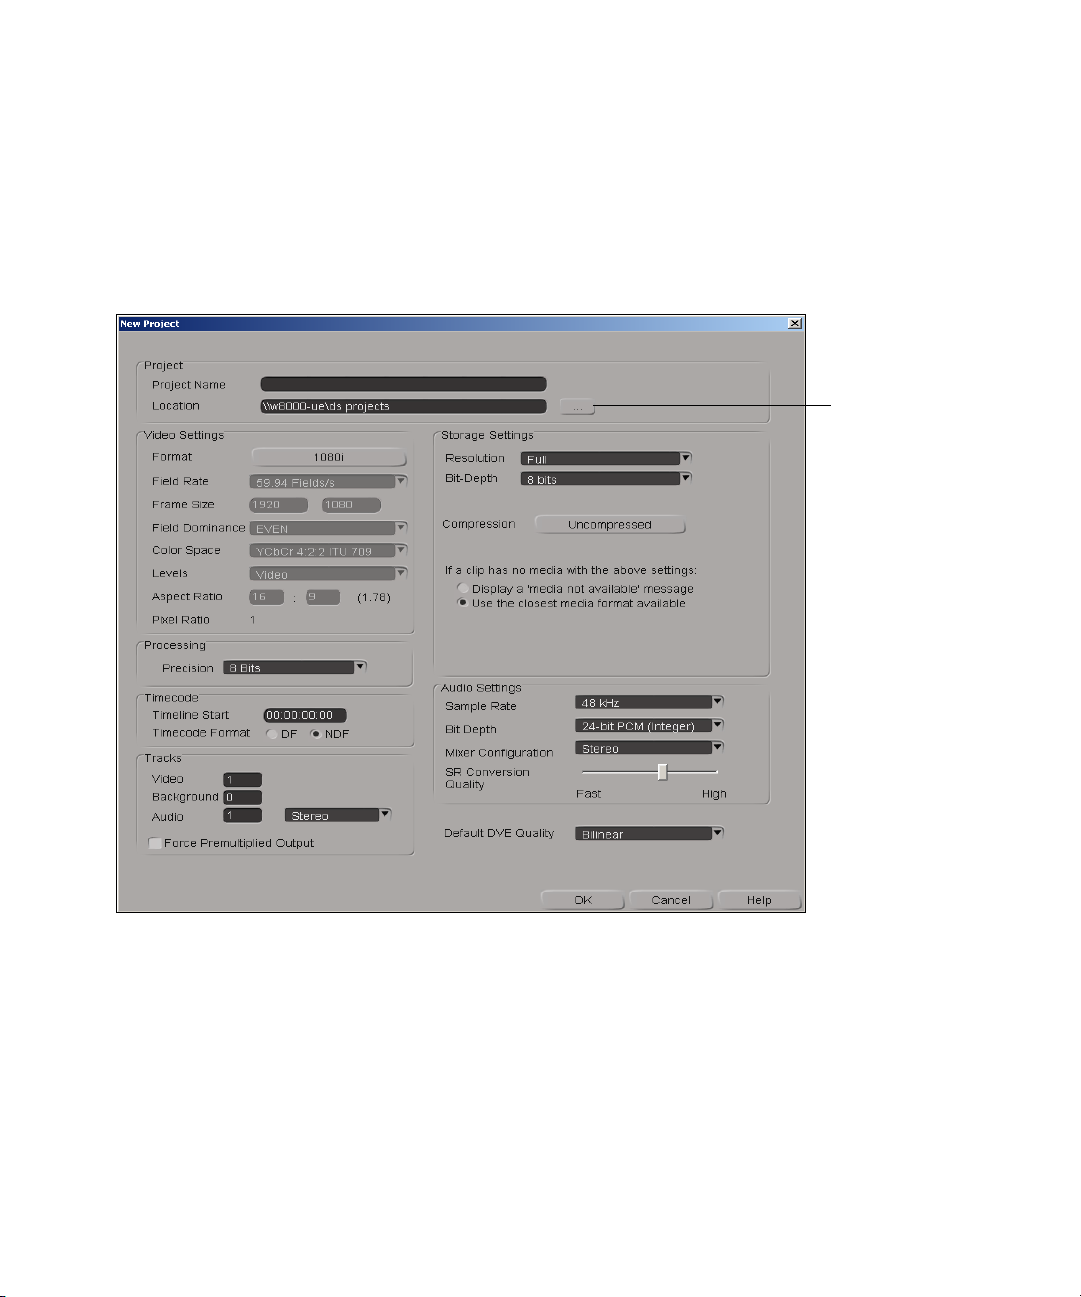
2. In the New Project dialog box, enter a unique name for your project in
the Project Name text box.
3. In the Location text box, type the path where you would like the
project files to reside. You can also use the browse (...) button to locate
the folder in which you want to save your project.
Page 25

4. Set the appropriate preferences for your project.
Project preferences define the way your material is captured,
processed, and output by Avid DS Nitris. Once you set the project
preferences, they become the default settings for the sequences that
you create in this project.
For detailed information on setting these preferences, click the Help
button.
5. Click OK to save the project preferences.
The Editing layout is displayed for you to start building your sequence,
and the Avid Explorer displays your project as the favorite.
Opening an Existing Project
Once you’ve created a project, it is available to all other users in your
workgroup. Opening any sequence in the project gives you access to all
master clips and presets used in that project.
Starting a Work Session
To open an existing project on your workstation:
1. Select File > Open > Project.
The Open Project dialog box is displayed.
2. From the Select a Project list, select a project name.
3. From the Select a Sequence list, do one of the following:
t Click New DS Sequence and then click New Sequence.
t Double-click an existing sequence name.
t Select a sequence and click Open.
If you created a new sequence, the New Sequence dialog box is
displayed for you to set the sequence preferences—see “Setting
Sequence Preferences” on page 65.
A new or existing sequence is opened.
To open an existing project on another workstation:
1. Select File > Open > Project.
The Open Project dialog box is displayed.
25
Page 26

Chapter 1 Working with Projects
2. From the Project List box, click Scan Disk.
The Scan Subdirectories for Projects dialog box is displayed.
3. Locate the \DS Projects folder on the network that contains the project
you want to open and click Select.
Avid DS Nitris searches through the selected folder and creates a
project list. You can now open any one of these projects and/or
sequences.
Setting User Preferences
You can work more efficiently by setting some personal preferences, such
as automatic saves, number of undo levels, animation preferences, and the
number of type of tracks to display when you open a new sequence. You
can also set editing preferences, such as pre-roll and post-roll frames.
After setting the preferences, they become part of your user profile under
your user name. The next time you start Avid DS Nitris, these preferences
are used.
26
c
Do not customize the fonts, windows scheme, or taskbar properties on
the Windows desktop or Avid DS Nitris may not function properly.
Page 27

To open the User Preferences dialog box:
t Select File > User Preferences.
Starting a Work Session
For information about the User Preferences options, click the Help button.
Choosing a Scripting Language
Avid DS Nitris supports several popular scripting languages. To use a
scripting language with Avid DS Nitris, you must first install the scripting
engine for that language.
Although Avid DS Nitris logs commands in its History pane using
VBScript syntax, you can write and run scripts using any language that is
ActiveX-compliant. ActiveX is a technology for sharing data between
programs. Some ActiveX-compliant scripting languages include:
• ActivePerl
•JScript
• Python ActiveX Scripting
• VBScript (default)
27
Page 28

Chapter 1 Working with Projects
To set a preferred scripting language:
1. From the User Preferences dialog box, select the Scripting/Logging
tab.
2. From the Scripting Language list, select your preferred scripting
language.
n
Setting Up the Command Log
No matter what language you’ve specified in your preferences,
Avid DS Nitris logs commands using the VBScript syntax.
The Scripting Language list contains the ActiveX scripting languages
whose engines are installed on your workstation. If you just installed an
engine and it’s not listed, restart Avid DS Nitris. If it still isn’t listed,
restart your computer.
Avid DS Nitris not only creates a command log in the History pane of the
Script Editor, but can also create a separate log file that is saved to disk for
each Avid DS Nitris session.
You have the option of setting a limit to the number of commands logged
in the History pane. You can also save a log file to disk, containing all
commands used in each Avid DS Nitris session.
To set the command log size:
1. From the User Preferences dialog box, select the Scripting/Logging
property page.
2. The number of commands kept in the History pane of the Script Editor
by default is 200. To modify this number, click in the Lines text box
and type a new number. To set no limit to the number, select the
Unlimited option.
28
To activate the log file:
1. On the Scripting/Logging property page, select the Log Commands to
File option to create a command log file.
A log file will be created the next time you start Avid DS Nitris.
Page 29

Managing Files and Folders
2. To specify a location for the log file, type a path in the File Name
text box.
n
Avid DS Nitris overwrites the existing command log file each time you start
a new session. If you want to keep the log file, make sure you rename it
before starting Avid DS Nitris.
You can only use the logging and scripting tools to capture media.
Managing Files and Folders
After you start a project, you can organize your project files to suit your
project’s needs. When you work with files, folders, and the windows that
contain them, you are working in the Avid Explorer view.
Working with Avid Explorer
The Avid Explorer is a view that opens by default when you start a project.
By using the Avid Explorer, you can
• Navigate and view the entire contents of your workstation
• Organize a project’s clips, sequences, and effects in a tree structure of
folders.
• Capture from file and import clips from other projects
Any files or applications that you can open on your Windows desktop you
can also open in the Avid Explorer. For example, imagine that you are
working on a commercial and the producer sends you a Microsoft
document that lists the latest changes. You can open the document within
the Avid Explorer and refer to it while you are editing, without needing to
switch back and forth between application windows. You can also open
files associated with your Web browser through the Avid DS Nitris Web
viewer.
When you select a folder, the folder’s contents are displayed in a bin.
®
Word
29
Page 30

Chapter 1 Working with Projects
To access the Avid Explorer:
t From the view switcher, click the Avid Explorer (Main) button.
Avid Explorer tools
Panel 1
Panel 2
Bins
30
n
You can include the Avid Explorer as a single-instance view or a multiinstance view in any views that you create.
Page 31

Using the Avid Explorer Views
The left side of the Avid Explorer includes two panels. Each panel can
contain one of three views: My System, Shortcuts, or Project.
Managing Files and Folders
The My System view shows the
contents of your workstation in a
hierarchical tree structure.
The Shortcuts view shows
shortcuts to files, folders, or
applications.
The Project view shows the
folders for the current project.
To show or hide a panel:
t Click the Show/Hide Panel button.
Show/Hide Panel buttons
The Show/Hide Panel button is highlighted for the panel that is
displayed.
31
Page 32

Chapter 1 Working with Projects
To choose a view to display in a panel:
t Click the pop-up menu next to a Show/Hide Panel button and select
My System, Shortcuts, or Project.
A check mark indicates which view is displayed.
Using the Shortcuts View
The Shortcuts view lets you create and access shortcuts that suit your work
requirements. For example, you can create a shortcut to a folder with your
favorite presets or to a graphics application. Any shortcuts you can create
in Windows can be created in the Shortcuts view.
The Shortcuts view is divided into two tabs: System and Project.
• Shortcuts that you create on the System tab are available in all
projects.
• Shortcuts that you create on the Project tab are available only when
the project in which you created them is open.
32
System tab
Project tab
To switch between tabs:
t Click the System tab or the Project tab.
To create a shortcut, do one of the following, depending on what is
displayed in a bin:
t Drag a folder or file from a bin to either tab in the Shortcuts view.
t Drag the folder icon from a bin’s address bar to either tab in the
Shortcuts view.
Page 33

Managing Files and Folders
t In either tab of the Shortcuts view, right-click an empty area and select
New Shortcut. The Windows Shortcut Wizard is displayed. Follow
the instructions to create a shortcut in the Shortcuts view.
To delete a shortcut, do one of the following:
t Right-click the shortcut and select Delete.
t Select a shortcut and press Delete on the keyboard.
To access the Shortcuts context menus:
t Right-click the background. Use this context menu to change the way
shortcuts are displayed (large icons, list, thumbnail) and how they are
sorted and arranged.
t Right-click a shortcut. Use this context menu to cut, copy, paste,
delete, and other system functions.
n
The Create Shortcut command, which is displayed when you right-click an
object, does not create a shortcut in the My System view or Project view.
Organizing Your Project Folder
Before you start capturing material and editing sequences, create
subfolders in your project folder to hold master clips, sequences, and
custom presets. You’ll find that creating subfolders helps organize your
project, so that you can locate files quickly and easily.
Also, when Avid DS Nitris archives a project, it gathers and archives all
the files in the project folder. Therefore, it is important that you keep all the
project files within the project folder.
When you create a new project in Avid DS Nitris, a project folder is
automatically created and displayed in the Avid Explorer. It also creates
subfolders for DSPresets and scripts. This default structure can be
customized, so that all projects you create are already organized. For more
information, see “Creating a Standard Folder Structure” on page 36.
33
Page 34

Chapter 1 Working with Projects
There are ways to set up your folders that make tasks, such as recapturing,
much easier. Here is an example of a simple but effective folder setup:
Show/Hide Panel
Project folder
Subfolders
n
When capturing clips, you can select the AutoSource option. This
automatically creates a folder for your master clips with the same name as
the tape from which you are capturing material.
Creating or Deleting Folders
To create a folder:
1. In the Project view, select your project folder.
Project view
Bin
34
The contents of the folder are displayed on the right in a bin.
2. Right-click an empty area of the bin and select New > Folder.
The new folder is displayed in the bin with the name New Folder
highlighted.
3. Type in a new name and press Enter.
4. Continue adding as many folders as you need. You can create
subfolders under your new folders. Simply click the new folder in the
Project view and then right-click the bin to add a new folder.
Page 35

To delete a folder:
t In the Project view or bin, right-click a folder and select Delete from
the Windows section of the menu.
Moving Files between Folders
You can rearrange the files in your project folders by dragging them to a
new folder.
To move a file to another folder:
t Drag a file from a bin to a folder in the Project view or to another bin.
The No Entry icon changes to a Move icon when you place the pointer
over a folder in the Project view.
Managing Files and Folders
n
Renaming Project Files
n
You cannot move clips or sequences between projects, but you can import
sequences and master clips into another project. For more information, see
“Importing Sequences and Master Clips from Another Project” on
page 63.
To make a copy of a file:
t Select the clip or sequence that you want to copy, press Ctrl and drag
You can rename a master clip, sequence, or folder in your project.
You cannot change the name of a clip or sequence if it is open or when
previewing it in the Source viewer.
the clip to an empty area in the current folder, or to another folder in
the tree.
35
Page 36

Chapter 1 Working with Projects
To rename a clip, sequence, or folder:
1. In a bin, click the name of a clip, sequence, or folder.
2. Type in a new name and press Enter.
n
Creating a Standard Folder Structure
When you rename a clip, sequence, or other Avid DS Nitris file, make sure
to keep the file extension (.Clip, .Segment, and so on). Avid DS Nitris
cannot manage the file properly without the extension.
A file name can contain up to 255 characters and include spaces. It cannot
contain any of the following characters: \ / : * ? " < > |
If you want Avid DS Nitris to create a standard folder structure for new
projects, you can create an .ini file that will specify the folders that will
appear in the Avid Explorer when a new project is created. The .ini file
must be called folder.ini and must be stored in the \Preferences\username
folder. You can have different .ini files for each Avid DS Nitris user.
To create a standard folder structure for new projects:
1. Open a text file using a text editor.
2. On the first line of the file, type the following in uppercase letters:
[FOLDERS]
3. Type in the names of the folders you want to appear in the
Avid Explorer. For example:
.
36
n
-Graphics
- Master Clips
-Sequences
-Trash
The order of the folders is not important, as they will be sorted in
alphabetical order or according to the sorting method used in the Avid
Explorer.
Page 37

Managing Files and Folders
4. Save the file as folder.ini and save it in the following location:
C:\Program Files\Avid\DS_v7.0\Preferences\username
Any new projects that are created will contain the folders specified in
the .ini file.
n
Avid DS Nitris Group Folders
The DSPresets, Scripts, and Views folders are created by default.
As part of a project’s workflow, you might need to work with groups of
sequential files, such as a series of scanned image files or files from a
graphics program. Typically these files share a file name that increments
by a single digit, such as beach001.jpg, beach002.jpg, and so on. The
Avid Explorer automatically combines these files into a special kind of
folder, called an Avid DS Nitris Group folder, or virtual folder. You can
then capture and manage the sequential files more easily.
37
Page 38

Chapter 1 Working with Projects
The following illustration shows a list of Avid DS Nitris Group folders.
The folder is identified with the following syntax:
filename[first..last:#files].extension
For example, a folder that contains 88 files, named CatchFish1.pic through
CatchFish88.pic, is labeled:
CatchFish[1..88:88].pic
38
n
n
To view the individual files:
t Double-click the Avid DS Nitris Group folder.
If a group does not include a complete series of numbers, a yellow circle
and exclamation point is displayed over the icon. The folder name displays
the total number of files, indicating that one or more files are missing. For
example, if CatchFish30.pic is missing, the folder is labeled:
CatchFish[1..88:87].pic
Sequential Avid DS Nitris files (*.Clip, *.Segment, *.Preset) are not
grouped in a folder.
When a folder contains a file that does not conform to the pattern of the
group, Avid DS Nitris isolates the file and the part of the group that is
affected. To combine the files into a single folder again, remove or rename
the non-conforming file.
Page 39

Grouping Files as Frames or Fields
By default, Avid DS Nitris groups files as a series of frames. If, however,
the file names of a group include field numbers (Frame01.1.jpg,
Frame01.2.jpg, Frame02.1.jpg, and so on), you should deselect the default
option. The folder name then includes the total number of files followed by
the letter F (field). For example,
Frame[01..06:12;F].jpg
To group files as frames or fields:
1. Select File > User Preferences.
2. Select the Avi d Exp lorer property page.
3. Select or deselect the Group files as frame option.
Working with Bins
A bin is a window that displays the contents of a folder or other object.
Bins appear within the Avid Explorer view. You can minimize, maximize,
resize, and close bins using standard Windows control methods. You can
also cascade and tile bins.
Working with Bins
The following illustration shows three bins within the Avid Explorer view.
Each bin displays its contents in a different view.
39
Page 40

Chapter 1 Working with Projects
Storyboard view
Thumbnail view
Details view
40
To open a bin:
t Select a folder or other object in the tree.
If a folder in the tree is already selected, double-click it.
To open additional bins, do one of the following:
t Press Shift and click a folder or other object in the tree.
If a folder in the tree is already selected, press Shift and double-click it.
t Press Shift and double-click a folder in a bin.
Page 41

Working with Bins
n
You can open one or more Avid Explorer windows that are not docked in
the Avid Explorer view. From the View menu, select Multi-Instance Views
> Avid Explorer. These windows include only bin tools. You can include
this Avid Explorer window as a multi-instance view in any views that you
create.
Changing the Bin View
You can display a bin in one of five different views:
• Large icons: Displays files with large icons
• List: Displays files with small icons in list format
• Details: Displays files as a list with details, using columns. You can
choose and save which columns to display—see “Customizing the
Details and Script Views” on page 44.
• Thumbnail: Displays the files as pictorial icons. This view is
especially useful for media files. You can rearrange the thumbnails in
any order within the bin by clicking and dragging.
• Script: Displays the files as pictorial icons with an area for comments.
Clip information is displayed above the text box.
To change the bin view:
t Click a button at the bottom of the bin.
Large Icons
List
Details
Thumbnail
Script
41
Page 42

Chapter 1 Working with Projects
Changing the Frame in Thumbnail and Script View
By default the first frame of a clip is displayed in Thumbnail or Script
view. Avid DS Nitris lets you select a different frame to display.
To change the frame displayed in the Thumbnail or Script view:
1. Open the clip in the Source viewer.
2. Go to the frame you want to display.
3. Click the Update Thumbnail button, located below the Source
viewer.
Identifying File Types
Each file in a bin is identified by an icon. Because a bin displays the same
files as your workstation, you see the same icons that appear in your
Windows Explorer.
n
Files that are specific to Avid DS Nitris display a generic icon when viewed
in the Windows Explorer.
Avid DS Nitris media files have their own icons, which appear on or beside
clips in a bin. When an icon is highlighted in red, it means that
Avid DS Nitris could not find any media associated with a clip. This clip
must be recaptured before you can work with it.
Icon File Type Icon File Type
Audio clip Background or composite
container clip
Video clip Sequence
Combined audio and video clip Still image
Audio container clip Linked still image
42
Page 43
Displaying File Properties
Each master clip or sequence contains information about its location on the
disk array, the name of the project to which it belongs, the start, end, and
duration of the clip, as well as your own comments.
In addition, master clips contain information on the clip type, quality,
resolution, dominance, color space, bit depth, coverage, and location. For a
description of these properties, click the Help button.
To view master clip properties:
1. In a bin, right-click a master clip, and in the Avid DS Nitris section
select Properties.
The Properties dialog box is displayed.
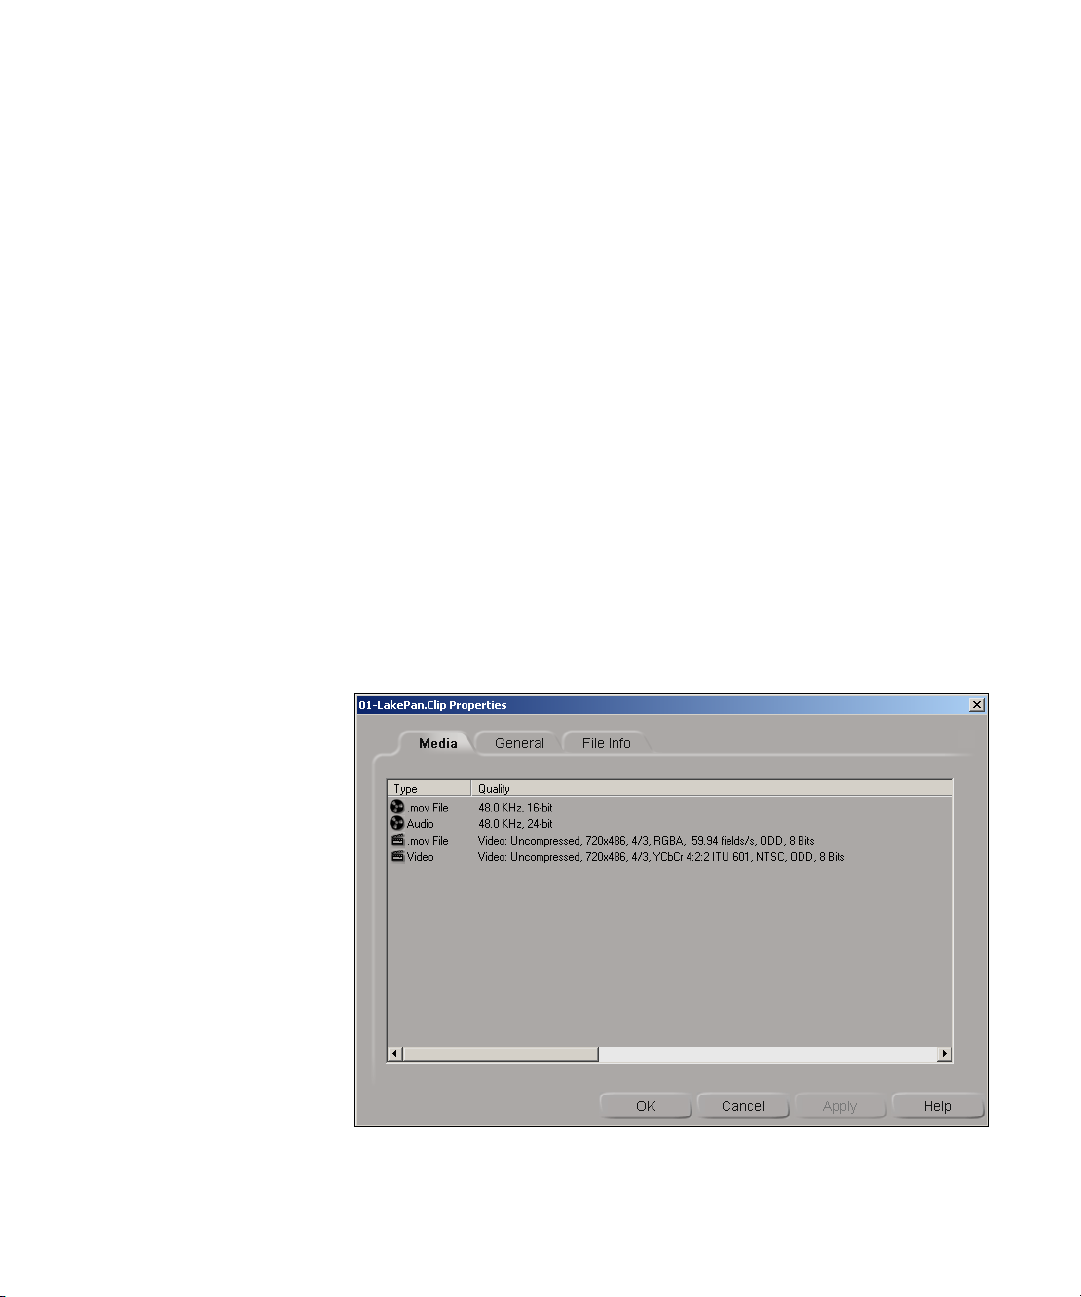
2. Select the Media tab to view information about the media associated
with the master clip.
The Media property page displays information about the selected clip.
Audio and video media files are listed separately.
Working with Bins
43
Page 44

Chapter 1 Working with Projects
n
The Media property page displays the types of media associated with the
clip you selected in the Avid Explorer. Purged media is indicated by a red
dot on the icon. It is possible to have one type of media indicated as purged
and another not.
3. Select the General tab to view the file properties.
The location of this file, its in and out times, and duration are
displayed. You cannot edit these properties, but you can add notes for
the file in the Comments text box.
4. Select the File Info tab to view information about how the original file
was captured.
The original file location, resolution, capture settings, and file status
are displayed. This information is read-only and cannot be modified,
except to re-establish a link for a linked file that has been moved from
its original location.
5. Select the Track Patching tab to view information about the audio
format (such as mono or stereo) and the audio input assignment for
master clips that were captured from tape.
You can use this property page to reassign hardware inputs to different
audio channels if necessary when recapturing audio media.
To view sequence properties:
t In a bin, right-click a sequence, and in the Avid DS Nitris section
select Properties.
The Properties dialog box is displayed. These properties are read-only.
Customizing the Details and Script Views
Avid DS Nitris lets you customize the columns of information in Details
and Scripts views by displaying and hiding file parameters.You can choose
from Avid DS Nitris parameters, parameters from the Windows operating
system, or parameters that have been added to your Windows system from
other applications. You can also rearrange the order of columns, adjust the
size of columns, and save the arrangement.
44
Page 45

Working with Bins
To create a more compact display, Avid DS Nitris parameters do not
include the product name in the column heading. Column headings for
these parameters use a darker shading.
To hide or display bin columns:
1. Do one of the following:
t In the bin tools, click the Settings button.
t Click the Fast Menu button and select Settings > Add/Remove
Columns.
A dialog box is displayed, either within the bin or separately. The
currently displayed column headings are marked by colored bands.
For a description of the bin columns, click the Help button.
2. Do one or more of the following:
t Select the columns that you want to display.
Selected columns are highlighted by a colored band.
t Deselect highlighted columns that you do not want to display.
t Click the All/None button to select all columns.
t Click the All/None button again to deselect all columns
45
Page 46

Chapter 1 Working with Projects
3. Click the Apply button to apply your changes.
4. Click the Close button to close the dialog box.
To rearrange columns:
1. Click the heading of the column that you want to move.
The entire column is selected.
2. Drag the column to the desired position.
The column is displayed in the new position.
To change the width of a column:
t Drag the border of a column heading.
n
If you’re using a deck that can be addressed in a format different from its
recording speed, four bin columns provide you with a quick way to find
your clips on the source tape:
• Avid DS Nitris Physical In
• Avid DS Nitris Physical Out
• Avid DS Nitris Physical Start
• Avid DS Nitris Physical Stop
These columns show timecodes in the same format as the deck faceplate.
Saving or Deleting a Bin View
If you change the bin view by adding columns, changing the order of
columns, or other customization, an asterisk is displayed at the end of the
bin view name. Avid DS Nitris lets you save and display this customized
bin view.
You can also display a preset bin view, such as Editing, Audio
Management, Video Management, or Presets.
46
Page 47

Working with Bins
To save a bin view:
1. Click the Save Current Column Setting button.
The Save As dialog box is displayed.
2. Accept the current name or type a new one, and click OK.
The Bin View list includes the new bin view.
To display a bin view:
t From the Bin View list, select the view you want to display.
To delete a bin view:
1. From the Bin View list, select the view you want to delete.
2. With the Bin View list displayed, press the Delete key.
A confirmation box is displayed.
3. Click Ye s .
Sorting Files
By default, clips in Details view are sorted by name, in ascending
alphabetical order (from A to Z). You can change the way clips are sorted,
using the information in any column or combination of columns.
You can change the sorting for any files that you view through the Avid
Explorer.
To change the way clips are sorted:
1. In Details view, click the column that you want to act as the primary
sorting criterion.
The clips are sorted according to the information in that column. The
number zero (0) is displayed in the title bar of the column indicating
the primary sorting status. An upward or downward pointing arrow is
also displayed, specifying the direction in which the information is
sorted (ascending or descending).
47
Page 48

Chapter 1 Working with Projects
2. Press Ctrl and click a new column to act as the secondary sorting
criterion.
Any clips with the same criterion in the primary sort are now sorted
according to the information in the second column. The number one
(1) is displayed in the title bar of the column, indicating the secondary
sorting status. An upward or downward pointing arrow is also
displayed, specifying the direction in which the information is sorted.
3. Continue pressing Ctrl and clicking the columns to further refine your
column sorting.
n
When performing a single-column sort, click the column a second time to
change the direction in which the column is sorted. Click again to remove
the sorting.
When performing multi-column sort, press Ctrl and click a column a
second time to change the sorting direction. Press Ctrl and click again to
remove the sorting.
Example
In this example, clips are first sorted by channel. Notice that all video clips
are grouped together. Since they are all the same, you can sort them further
using another criterion. In this example, they are sorted further by duration.
48
Page 49

Working with Bins
Clips sorted by
channel in
alphabetical order.
(primary sort)
Each channel type,
such as Video, is
further sorted
according to
duration (secondary
sort).
Sifting Files
n
By sifting files, you can customize any window that you view through the
Avid Explorer so that it displays only those files that meet a specific set of
criteria.
For example, in a bin that contains master clips, you can create a custom
sift to display only clips from a particular tape or only clips with a name
that contains the letters CU (for close-up). Sifting is not limited to clips;
you can use it with any files that you view through the Avid Explorer. You
can also use it to modify the files displayed in the Media Tool (see “Using
the Media Tool” on page 434).
The Custom Sift dialog box provides ten types of criteria (such as Equals
or Contains) and lets you set up to six sets of criteria.
Tip: To view bin columns, click the D (Details) button in the bottom bar of
the bin. To change the visible bin columns, click the Settings button in the
Avid Explorer toolbar.
49
Page 50

Chapter 1 Working with Projects
To sift clips or sequences:
1. In an open bin, click the Fast Menu button and select Custom Sift.
The Custom Sift dialog box is displayed.
50
2. From the Column list, select an Avid DS Nitris column heading to
which you want to apply the criterion.
t To view all column headings on your system, select the Show All
Columns option.
t To clear the Column entry, select None from the Column list.
3. From the Criterion list, select one of the sifting options.
4. In the Value text box, and type the text that you want to use as a sift
criterion.
Type the text exactly as it is displayed in the column. For example, to
view clips with a duration of more than 5 seconds, select Greater
Than as the criterion and type 00:00:05:00.
An exception is size. For example, to view clips greater than 54 KB,
select Greater Than as the criterion and type 54000.
5. Repeat these steps to add additional sift criteria (up to six sets).
Page 51

6. To clear all data, click the Clear button.
7. To preview the results of your selections, click the Apply button.
8. To save your view:
a. Click the Save button.
The Save As dialog box is displayed.
b. Type a name for the sifted view and click OK.
9. In the Custom Sift dialog box, click OK.
Only the clips or sequences that meet your criteria are displayed in the
bin.
Displaying a Sifted or an Unsifted View
After you have sifted the clips in a bin, you can switch between the
unsifted view and the currently selected sifted view.
To switch between a sifted and an unsifted view, do one of the
following:
Working with Bins
t In a bin, click the Fast Menu button and select Show Sifted.
t In the Avid Explorer toolbar, click the Sifting button.
Loading and Deleting a Sifted View
You can load or delete a saved set of criteria.
To load a sifted view, do one of the following:
t In the Custom Sift dialog box, select the view that you want to load
from the Load/Save list, and click Apply or OK.
t Click the Fast Menu button, select Load Sift, and select the view you
want to load.
To delete a sifted view:
1. Select the view that you want to delete from the Load/Save list.
2. Keep the menu open and press the Delete key on your keyboard.
3. In the dialog box, click Ye s.
51
Page 52

Chapter 1 Working with Projects
Viewing Events
While working with Avid DS Nitris, you can track important processes,
such as the start up and shut down of Avid DS Nitris applications,
Avid DS Nitris RP processing messages, or errors when a folder cannot be
accessed. This is done using the event logging service in Avid DS Nitris.
The event-logging service stores events from various sources in a single
collection called an event log. Notifications of events include informative
messages, errors, and warnings.
The event log records important software and hardware events to help you
determine the conditions that caused the error and the context in which it
occurred. By periodically viewing the event log, you may be able to
identify problems before they cause damage.
The event logging service does not replace direct messages that are
displayed when an action is necessary. The event log simply lets you to
view the results of any actions.
52
A reasonable amount of disk space is reserved for the event log. When the
log is full, older events are erased to make room for new ones.
The following Avid applications log events in the event log:
• Avid DS Nitris
• Avid Media Indexer
• Avid Project Indexer
Page 53
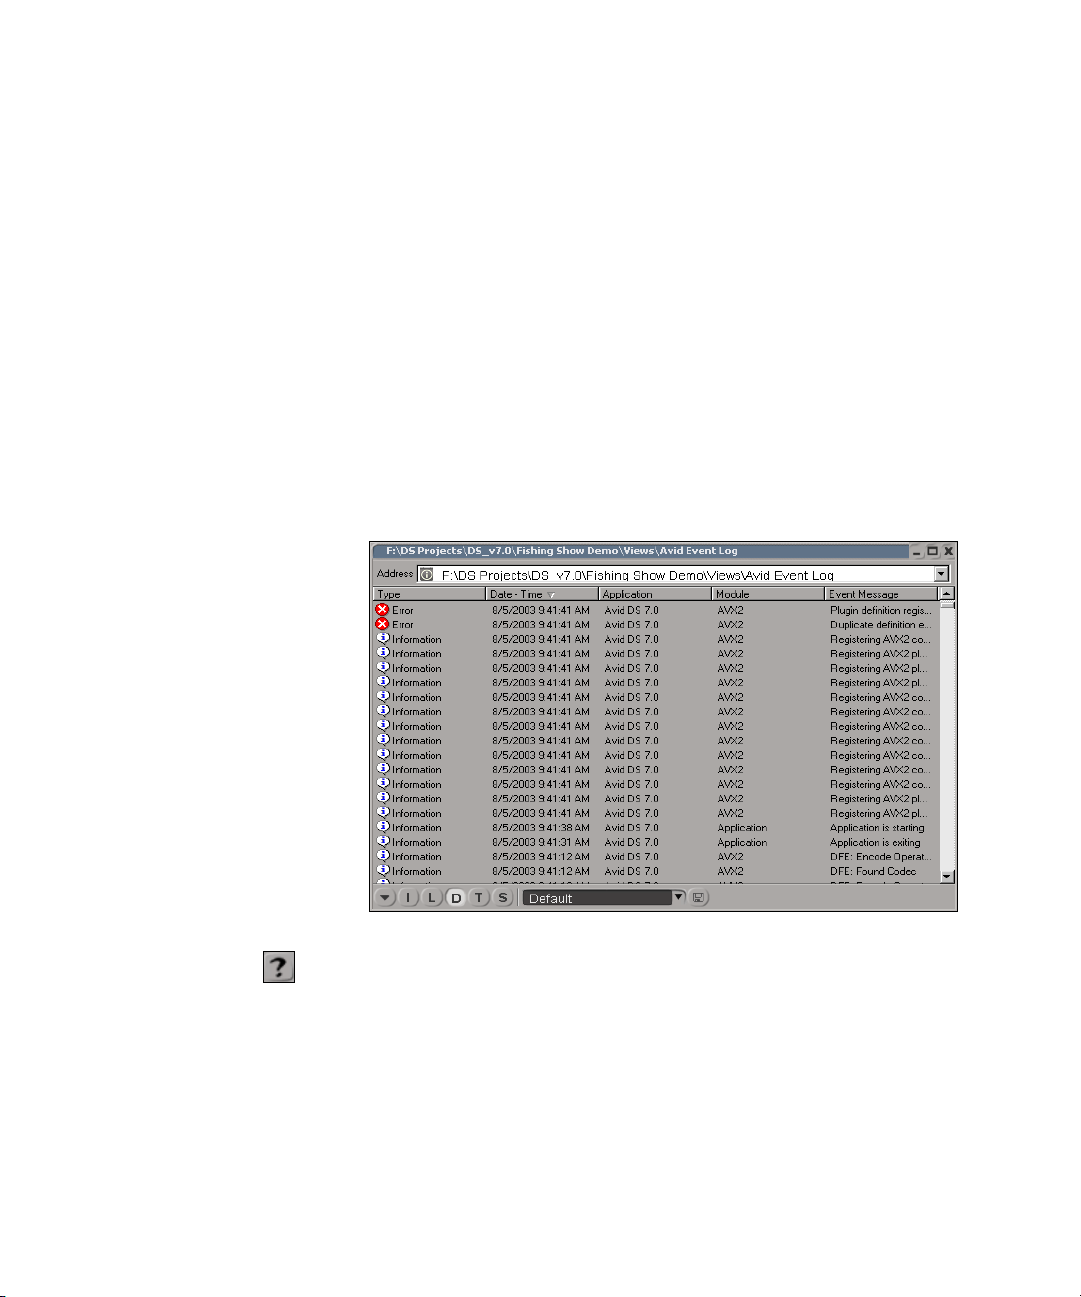
Viewing the Avid Event Log
The event logging system consists of two parts, the viewer and the event
log file. The Avid Event Log is a list of all previously logged events.
To view the Avid event log,
1. Do one of the following:
t Select View > Multi-Instance Views > Avid Event Log.
t In an Avid Explorer panel, select Avid Event Log in the Views
folder.
The Avid Event Log view is displayed in a bin, along with a list of
software and hardware events that have occurred.
Viewing Events
For detailed information on the Avid Event Log, click the Avid
Explorer Help button.
53
Page 54

Chapter 1 Working with Projects
2. Double-click an event log entry to display additional information.
Viewing the Windows Event Log
54
If you cannot start Avid DS Nitris due to a fatal error, Windows also has an
Event Viewer so that you can browse through the event logs. In the
Windows Event Viewer, events from all open applications, the operating
system, and other system services are logged.
To view the Windows event log:
1. On the Windows desktop, right-click the My Computer icon and select
Manage.
2. Click System Tools > Event Viewer.
An event log is displayed for the different Windows applications.
Page 55

Viewing Events
3. Double-click the Avid Event Log to view the Avid DS Nitris events.
Sorting Columns and Events
You can reorder the columns and events that are displayed.
To set the column order:
t Click on a column heading and drag it left or right to a new position.
To sort the list of events:
t Click on the column heading to sort the contents below the column in
ascending or descending order.
n
You can perform secondary sorts on multiple columns for better grouping
of events. For instance if you want to sort the events by type and then by
time, click the Type column heading, press Ctrl and click the Date - Time
heading. A (0) and a (1) appear in the respective columns.
You can also sort the columns in the reverse order by pressing Ctrl and
clicking the column heading again. An up or down arrow appears in the
column heading to indicate the direction of the sort.
55
Page 56

Chapter 1 Working with Projects
56
Page 57

Chapter 2
Working with Sequences
This chapter describes how to work with sequences, search for sequences,
and set your video and audio preferences.
• Workflow: Working with Sequences
• Opening Sequences
• Setting Sequence Preferences
• Working with Different Qualities of Media
• Saving Sequences
• Searching for Sequences
• Deleting Sequences
Page 58

Chapter 2 Working with Sequences
Workflow: Working with Sequences
Before you open a sequence, you must first select the project to which it
belongs. The following illustration shows a simple editing scenario in
Avid DS Nitris.
Open project and sequence.
1
Select project Select sequence
Set sequence preferences.
2
58
Construct sequence.
3
Sequence preferences can be
changed during the course of a
project to work with media at
different qualities.
Page 59

Opening Sequences
You can easily create, open, and manage the sequences in your project
using the Open Project dialog box. A sequence is an arrangement of clips
on the timeline; it contains information about edit decisions, applied
graphics and effects, animation settings, and working preferences.
When you open a sequence in the timeline, you can immediately begin
audio/video editing, compositing, painting, titling, or audio mixing.
Because the Avid DS Nitris environment is nonlinear, these tasks can be
performed in any order, changed at any time, and moved to any location.
Avid DS Nitris also gives you the flexibility to work with different media
qualities within your sequence. For example, working with media at a
higher resolution increases processing time, so initially, you may want to
process your clips at lower resolution to obtain quicker results. When
you’re ready to output the final sequence, you can recapture the media at a
higher resolution, and reprocess the effects.
Opening Sequences
Sequence
Overview area
Video tracks
Audio track
Sequences always belong to a particular project. To access your sequences,
you must first select the project to which it belongs. To get a quick view of
all the projects on any workstation on the network, use the Open Project
dialog box.
59
Page 60

Chapter 2 Working with Sequences
To access the list of projects and sequences:
t Select File > Open > Project.
The Open Project dialog box is displayed.
Projects
Sequences within the selected project
Click the Help button for detailed information on the Open Project
dialog box.
Creating a New Sequence
You must create sequences from within a project. You can either select a
project from the Open Project dialog box and then create a new sequence,
or if your project is already open, you can create a new sequence directly
from the File menu.
To create a sequence:
1. Select File > Open > Project.
The Open Project dialog box is displayed.
2. From the Select a Project box, select the project to which your
sequence will belong.
The Select a Sequence box opens any other sequences that belong to
this project.
60
Page 61

Opening Sequences
3. From the Select a Sequence box, select New DS Sequence from the
list.
4. Click the New Sequence button.
The New Sequence dialog box displays the sequence preferences.
By default, the sequence preferences are inherited from the settings
established when the project was created. These settings can be changed.
For more information, see “Setting Sequence Preferences” on page 65.
n
n
Avid DS Nitris requires at least 10% of your system memory (RAM) to be
free at all times. If not, you may not be able to create sequences with
custom formats that have resolutions much greater than the standard video
resolution, such as 2000×1500.
5. Click OK to accept the settings.
A new sequence is opened and the Editing layout is displayed.
To create a new sequence within the current project:
1. Select File > New Sequence.
If the sequence you’re currently working on has not been saved, you
are prompted to do so.
2. Click Ye s to save the sequence.
A new sequence is opened in your current project with the same
preferences as those of the project.
If you want to create a new sequence with preferences that are different
from the project, select File > New > DS Sequence.
For detailed information on these sequence preferences, click the Help
button.
61
Page 62

Chapter 2 Working with Sequences
Opening an Existing Sequence
You can open a sequence in one of three ways:
• From the File menu (if you want to open a sequence from the current
project)
• From the Open Project dialog box (if you want to open a sequence
from another project)
• By double-clicking the sequence in the Avid Explorer
n
Each time you start Avid DS Nitris, you can automatically load the last
sequence on which you were working by selecting the Load Last Sequence
at Startup option in the User Preferences dialog box. For more
information, see “Setting User Preferences” on page 26.
To open a sequence from the File menu:
1. Select File > Open > Sequence.
If the sequence you are currently working on has not been saved, you
are prompted to do so.
2. Click Ye s to save the current sequence.
The Load Sequence dialog box is displayed.
3. Browse through the folders and select a sequence. (All sequences are
indicated by the sequence icon.)
4. Click OK or double-click the sequence to open it.
To open a sequence from the Open Project dialog box:
1. Select File > Open > Project.
If the sequence you are currently working on has not been saved, you
are prompted to do so.
62
2. Click Ye s to save the current sequence.
The Open Project dialog box is displayed.
Page 63

Opening Sequences
3. From the Select a Project box, select the project to which your
sequence will belong.
The Select a Sequence box displays all sequences that belong to
this project.
4. From the Select a Sequence box, select a sequence and click the Open
Sequence button.
To open a sequence from the Avid Explorer:
1. Locate the sequence in the Avid Explorer.
2. Double-click the sequence.
If the sequence you are currently working on has not been saved, you
are prompted to do so.
3. Click Ye s to save the current sequence.
The sequence is opened.
Importing Sequences and Master Clips from Another Project
n
Depending on how you set up your sequences and projects, you may want
to use the same sequence or master clips in more than one project. When
you import sequences or master clips to another project, you have the
option of linking to the existing media or creating copies of the media.
By creating a link to the media, the media is shared between the two
projects, which saves space on your disk array.
Shared storage devices can be any storage area on your local machine or
anywhere on the network. The limitation with media sharing is that, unless
you are connected to an Avid Unity
have sufficient bandwidth to provide real-time access to the media for more
than one user at a time. However, if the storage device has sufficient
bandwidth, real-time playback is possible.
If you are not getting real-time playback on effects, you can either
reprocess your effects or copy the media from the shared storage to your
local storage. For more information, see “Copying Media” on page 441.
™
system, the storage device may not
63
Page 64

Chapter 2 Working with Sequences
To import a sequence or master clips from another project:
1. In the Avid Explorer, locate and open the folder that contains the
sequence or master clips you want to import.
n
n
If you want to import a sequence or master clips that are on another
workstation on the network, you must share the project folder and the
folder containing the media at the Windows level.
2. Right-click the sequence or master clips and select Import to
Current Project.
If you archive a project with media that is shared between projects, the
media will be archived with both projects. When it is restored,
Avid DS Nitris checks to see if the media is still in its original location. If it
is, the link is recreated. If not, the media is restored to its original location.
The Sequence and Master Clip Import dialog box is displayed.
64
Page 65

3. Select an option:
- Link to original media links the new sequence or master clips to
the original media
- Make new copies of media creates copies of the media at the
locations you specify for the new video and audio media.
4. Click OK.
A new folder is displayed in the current project folder, entitled
“Imported from project projectname.”
Setting Sequence Preferences
Sequence preferences define the format and quality of the audio and video
clips in your sequence. By default, the sequence preferences are inherited
from the settings you created for the current project.
During the course of building your sequence, you can switch your
sequence preferences to work with video at a lower resolution, or with
compression. Working at a lower resolution is useful when producing a
rough cut of your sequence, because your clips are processed at a much
faster rate. Working with compressed media lets you save storage space on
your disk array. For more information, see “Working with Different
Qualities of Media” on page 69.
Setting Sequence Preferences
65
Page 66

Chapter 2 Working with Sequences
66
c
For descriptions of all the options in this dialog box, click the Help button.
To set the sequence preferences:
1. In the Video Settings box, select a video format from the Format list.
When you select a video format other than Custom, Avid DS Nitris
automatically sets the aspect ratio, color space, frame rate, frame size,
field dominance, and pixel ratio based on the format you chose—see
“Understanding Video Settings” on page 72.
These settings cannot be changed after you save your sequence
preferences.
Page 67

Setting Sequence Preferences
2. Set the Precision at which you want to process the effects in this
sequence—see “About Bit Depth” on page 82.
n
n
n
The processing settings apply to all effects in the sequence but can be
changed when you process effects individually.
3. Set the Timecode Start if other than 00:00:00:00.
If you select a drop-frame video format, such as NTSC, you have the option
of displaying timecode as either drop frame or non-drop frame. This option
only affects the timecode display and not the sequence frame rate. For
more information, see “About Video Format” on page 72.
4. Set the number of Video, Background, and Audio tracks you will
require in your sequence.
5. In the Storage Settings box, make a selection from the Resolution list.
Setting it at Full resolution results in large, high-quality media and
cache files. Setting it at Quarter resolution results in smaller, lowerquality media and cache files—see “About Video Quality” on page 75.
On some workstations where the processing power and bandwidth does not
allow you to work with HD media at full resolution, you can work in
quarter resolution mode to play your effects in real-time. On these
workstations, there will be additional options for Quarter Resolution
working mode.
n
6. Set the Bit Depth to be used when capturing your media.
7. Select one of the following options:
- Uncompressed to work with media that is not compressed.
- Compressed to work with compressed media. From the Preferred
Ratio list, select a compression ratio that best suits your needs.
When you are in passthrough mode, all compressions (codecs) may not be
available.
67
Page 68

Chapter 2 Working with Sequences
Since Avid DS Nitris supports multiple qualities for your video
material, you can select the version of the captured media that you
want to use. For more information, see “Understanding Video Quality
Matching” on page 76.
8. Select one of the following options:
- Use the closest media format available if it is not crucial that you
have an exact video media match with your sequence preferences.
If Avid DS Nitris cannot find an exact match, it finds and displays
the closest alternative.
- Display a “media not available” message if you only want to
work with video media of a specific quality.
Avid DS Nitris uses only the media that matches the selected
resolution and compression settings. If it cannot find an exact
match for both, a “Media Not Available” message is displayed in
the viewer as you playback your clips. This serves as a good
indicator when you’ve captured video that does not conform to
your sequence preferences.
9. Select a Sample Rate for your sequence. The higher the sampling rate,
the more accurate the audio—see “Understanding Audio Quality
Matching” on page 81.
68
n
Audio quality defines the sample rate and bit depth at which an audio
signal is captured. You can set the sample rate conversion quality, so
that Avid DS Nitris can convert audio material that has a different
sample rate than the current sequence. The higher the sample rate, the
more accurate the digital representation of the signal. A higher sample
rate, however, does use more disk space.
When you place audio clips on the timeline that contain different sampling
rates than the current sequence, you are prompted to convert the clip to
match the current sequence sampling rate. If you do not convert the clip,
you will not have access to the audio media unless you change the
sequence preferences.
10. Select a Bit Depth value from the list. The higher the value, the more
precise the audio will be.
Page 69

Working with Different Qualities of Media
11. Drag the SR Conversion Quality slider in the direction of one of
the following:
- Fast to convert the sample rate quickly, but at a low quality.
- High to preserve quality, but this setting takes longer to convert the
sample rates.
12. Click OK to save your settings.
n
When working with sequences of custom formats with resolutions that are
much greater than the standard video resolution, such as 2000×1500, a
minimal amount of system memory (RAM) must be kept available at all
times. Otherwise, you may notice significant slowdown when working on
your system.
Working with Different Qualities of Media
You can work at full, half, or quarter resolution (HD only), and with
compressed media at different ratios. This multi-quality feature lets you
balance image quality and system performance during the different phases
of your work. The working video settings (compression and resolution)
determine the quality at which your media is displayed in the viewer, as
well as the quality at which it is processed by Avid DS Nitris. You can
change the video settings at any time if you want to display or process
media at a different quality.
n
The video format cannot be changed once you create the sequence.
The quality you choose to work with at any given time depends on the task
at hand. Media can use up large amounts of disk space, and the higher the
quality of the media, the more disk space is consumed.
If you want to conserve disk space, you can do your rough cut on material
captured at low resolution or in compressed form. When your sequence is
ready for finishing, you can redigitize a specific clip, so that you can work
at the quality at which you will be outputting.
69
Page 70

Chapter 2 Working with Sequences
When you’re ready to output the entire sequence, you only need to
redigitize the portions of the master clips actually used in the sequence at
full, uncompressed resolution before you output to tape.
If you’re working with only compressed media, you can mix different
compression ratios within a sequence. If you’re working with both
compressed and uncompressed media, you may encounter circumstances
where both cannot be used at the same time within the same sequence.
To change the sequence preferences:
1. Select File > Sequence Preferences.
The settings that you chose for this sequence are displayed.
70
For descriptions of all the options in this dialog box, click the Help
button.
2. In the Processing box, select the Type of processing.
This selection depends on the type of source material that you
have—see “Processing in Fields versus Frames” on page 83.
Page 71

Working with Different Qualities of Media
3. Set the Precision at which you will process the video effects.
4. From the Conversion Mode box, select a mode for Presets and Media.
From now on, when you place clips or sequences on the timeline, they
will be converted using the mode you selected—see “Understanding
the Working Conversion Mode” on page 83.
n
You can still change the conversion mode for an individual clip on the
timeline by right-clicking the clip and selecting Properties.
5. Set the video resolution, bit depth, and compression at which you will
be capturing your media—see “About Video Quality” on page 75.
6. To change the audio settings, select the Audio tab.
7. From the Sample Rate Conversion box, select the Conversion on
Drop option if you want to convert all sample rates imported into your
sequence to the sample rate of the current sequence.
71
Page 72

Chapter 2 Working with Sequences
8. Drag the SR Conversion Quality slider in the direction of one of
the following:
- Fast to convert the sample rate quickly, but at a low quality.
- High to preserve quality, but this setting takes longer to convert the
sample rates.
9. Click OK to save the new settings.
Understanding Video Settings
Although Avid DS Nitris automatically sets the industry-standard video
size and frame settings for the video format you choose, you may want to
read about the various video settings, especially if you intend to work on a
custom format.
About Video Format
Video format refers to the size or aspect ratio of a picture frame.
Depending on your hardware configuration, you can work in a variety of
video formats, such as PAL D1, NTSC D1, 720p, 1080i, 1080p, or other
custom formats. When you select a video format (other than Custom),
Avid DS Nitris automatically sets the industry-standard video size and
frame settings.
72
Drop Frame versus Non-Drop Frame
Some formats such as NTSC (the standard North American video format),
may require a timecode adjustment if you are making a video that has to
fill an exact time slot.
NTSC video runs at 29.97 frames per second, and since timecode counts at
30 frames per second, it means that the timecode will gain on actual time at
a rate of about 3.6 seconds per hour.
Using non-drop timecode (which runs at 30 frames per second), will
gradually differ from actual time. If you use drop frame timecode,
however, it will make slight adjustments by skipping frame numbers
periodically to keep the timecode synchronized with real time. Depending
on your purpose, you may either keep the timecode synced with real time
Page 73

About Frame Size
Working with Different Qualities of Media
or count the frames exactly. It is important to understand that no frames in
the video are actually dropped when you choose drop frame. The video is
identical in both cases with only the timecode counter being modified.
The frame size is the dimensions of a picture frame in Avid DS Nitris.
These measurements are based on pixels.
About Pixel Ratio
720
486
An NTSC D1 4:3 image by default
has a frame size of 720×486
pixels.
A PAL D1 4:3 image, however,
has a default frame size of
720×576 pixels.
A 16:9 HD image can have a
variety of frame sizes, such as
1920×1080 pixels or 1280×720
pixels.
Aspect ratio is the numerical ratio of picture width to height. The standard
aspect ratio for NTSC and PAL video and television is 4:3. For material
shot on film or HD, 16:9 is the standard aspect ratio. You can also create
non-standard aspect ratios.
Pixel ratio refers to the shape of one pixel. Different video standards have
different pixel ratios. NTSC and PAL pixels have ratios of 0.9 and 1.07
respectively, while computer-generated image, typically have square pixels
with a ratio of 1.0.
Avid DS Nitris can compensate for different pixel ratios so that a captured
image does not appear distorted. When you capture material from file, you
must set the file’s pixel ratio, which tells Avid DS Nitris the original state
of the material. For example, if you are importing a computer-generated
image, set the pixel ratio to 1.0.
73
Page 74

Chapter 2 Working with Sequences
About Field Dominance
Video images are displayed half a frame at a time, where each half,
referred to as a field, is comprised of alternate lines of video information
(odd and even). The two fields are combined (interlaced) to form one
frame.
Even fields
Two fields are
interlaced to form
one frame
Odd fields
Frames
The order in which odd and even fields occur over time is referred to as
field order or field dominance. With even field dominance, even fields
come first. In odd field dominance, odd fields come first. With NTSC, the
first field contains all the odd numbered scan lines and the second field
contains all the even. PAL is the opposite of NTSC in terms of field
dominance. That is, field 1 contains all the even-numbered scan lines and
field 2 contains all the odd lines.
NTSC, PAL, and HD video material can either be interlaced or
progressive, such as 1080i or 1080p. Interlaced video contains two fields,
which make up every frame. Progressive video, however, creates full
frames by scanning each line sequentially. As a result, field dominance is
not an issue. For more information, see “Interlacing versus Progressive
Scanning” on page 7 of the Avid DS Nitris Compositing and
Graphics Guide.
74
When you need to invert your fields, you can deinterlace your material,
then reinterlace and invert the field dominance. You can also deinterlace a
clip to display the odd and even fields as separate frames. This is useful
Page 75

About Color Space
Working with Different Qualities of Media
when retouching clips or creating paint animation and field-based
rotoscopy. For more information, see “Applying a Deinterlace Effect” on
page 318 and “Applying an Interlace Effect” on page 321.
Color space determines how the color components of the video signal are
stored in Avid DS Nitris. There are three pixel formats available in
Avid DS Nitris: YCbCr 4:2:2 (601), YCbCr 4:2:2 (709), and RGBA.
Avid DS Nitris converts all imported material to the color space of the
sequence. All material imported in RGBA color space uses 32 bits per
pixel, even if you did not import the alpha channel. YCbCr 4:2:2 uses 16
bits/pixel and YCbCrA (YCbCr with alpha) 4:2:2 uses 24 bits/pixel.
Cache media, created from processed effects, transitions, or composites, is
treated the same way as source media. Some effects, however, require an
internal conversion to RGBA. As a result, some banding may occur when
you’re working with a YCbCr sequence with these effects. To solve this
problem, you can apply the RGB-YCbCr Dither effect. For more
information, see “Color Space Adjustment Effect” on page 508 of the
Avid DS Nitris Compositing and Graphics Guide.
About Video Quality
Video media quality is determined by three factors:
• Resolution, which is the amount and degree of detail in a video image,
• Compression, which is a technique used to reduce the amount of space
necessary to store video data, and
• Bit depth, which is the number of bits used to store information about
each pixel of an image.
The resolution you set affects the size of the captured or processed media.
The higher the resolution, the better the quality of your media, and the
larger the size of the media. Similarly, the higher the bit depth, the more
tones (grayscale or color) that are available for storage, and more accurate
color representation in the digital image. Higher bit depth also increases
file size.
75
Page 76

Chapter 2 Working with Sequences
When you’re performing a rough cut, you can increase throughput and
limit storage requirements by working at low resolution. Later on in the
editing process, you can use high-resolution media to obtain better results.
Compression is a technique used to reduce the amount of space necessary
to store video information. You can compress material at capture time to
reduce the size of the media file. High compression is useful when you
capture media for your initial edit. This lets you store large amounts of
material using the least amount of storage space. Compressed data usually
suffers some loss or degradation from the original source. After you’ve
done a rough cut, you can purge the compressed media, and recapture the
edited material with less or no compression. For more information, see
“Working with Different Qualities of Media” on page 69.
Understanding Video Quality Matching
When you set your video storage sequence preferences, such as the
working resolution, bit depth, compression, or sample rate, you defined the
quality at which clips are previewed and processed. If a video clip was
captured at a different quality than the option set in your sequence
preferences, Avid DS Nitris can either:
• Display no media, or
• Use the media which best approximates the resolution, compression
ratio, bit depth, or audio sample rate.
n
Working with Exact Media Matches
76
Quality matching is different for audio than it is for video—see
“Understanding Audio Quality Matching” on page 81.
If you choose to display only the media that matches your sequence
preferences, Avid DS Nitris looks for an exact match when the position
indicator passes over the clip on the timeline.
1. Resolution: Checks if there is media captured or processed at the
specified resolution.
2. Precision: For caches only. Checks if there are two caches processed
with the same precision as the sequence settings.
Page 77

Working with Different Qualities of Media
3. Aspect ratio: Checks if the aspect ratio matches that of the current
sequence.
4. Frame rates: Verifies that the frame rates are identical.
5. Compression ratio: Checks if there is media captured or processed at
the specified compression. For the purposes of quality matching,
uncompressed media has a compression ratio of 1.0.
6. Field dominance: Checks if the field dominances are compatible. For
this criteria, the match does not have to be exact, since some media
files, such as stills, can be tagged as having a field dominance of None.
The matching criteria works as follows:
Media Quality
Field Dominance
Sequence preference
None Even Odd
None
Even
Odd
Ye s N o N o
Ye s Ye s No
Ye s N o Ye s
7. Image formats: Verifies if the following are identical:
-Color space
-Frame size
- Pixel ratio
- Bits per Channel (Number of bits used to encode a channel)
8. Compatible Resolution: Checks if the current hardware settings
support real-time effects in this resolution.
9. Compression type and ratio: Checks if there is media captured with
the same cache and at the same ratio than the sequence settings.
77
Page 78

Chapter 2 Working with Sequences
10. Only caches generated in Exact match mode are accepted in exact
match (This restriction does not apply to media).
The checks are done sequentially. If it finds video media that meets all the
criteria, then the media is displayed in the viewer. If any one of the criteria
fails, then the “Media Not Available” message is displayed in the viewer.
Working with Closest Media Matches
If you choose to display media that is closest to your sequence preferences,
Avid DS Nitris first verifies that you have media that matches your
frame rate.
n
In HD sequences, compression is not supported for HD media.
1. Frame rate: Verifies if the frame rate is identical, except for linked
clips.
If, after this search, no candidates are found, the “Media Not
Available” message is displayed in the viewer.
If more than one candidate is found, Avid DS Nitris uses the following
criteria to determine which media file is a closer match and will be
displayed:
2. Captured versus linked media: Captured media is considered a
closer match than linked media.
3. Conversion needs: Media with an image format, size, resolution,
compression, bit depth, or field dominance that does not need to be
converted to match the preferences of the current sequence is a closer
match than media that needs to be converted.
4. Compression: If the compression type or ratio of the two qualities are
different, then a quality match will be based on criteria in the following
order:
- its codec type and ratio exactly matches those of the sequence.
78
- its codec type is the same as the sequence but not its ratio.
- its codec type can be read in real-time by the hardware.
Page 79

Working with Different Qualities of Media
5. Resolution width: If none of the candidates match the resolution
width of the current sequence, then the media with the greater
resolution width is the closest match.
6. Resolution height: If none of the candidates match the resolution
height of the current sequence, then the media with the greater
resolution height is the closest match.
7. Image format: Uses the exact or closest match.
8. Aspect ratio: Uses the closest match.
- Width in square pixels: If none of the candidates have the same
width as the current sequence, then the media with the greater
width is determined to be a closer match.
- Height in square pixels: If none of the candidates have the same
height as the current sequence, then the media with the greater
height is determined to be a closer match.
9. Bit depth: If none of the candidates has the same bit depth as the
current sequence, then the one with the greatest bit depth is the closest
match.
10. Processing precision: For caches only. If none of the candidates has
the same precision as the current sequence, then the one with the
higher precision is preferred.
Once it finds the candidate that is the closest match, Avid DS Nitris
determines if it needs to convert the media to fit into the current sequence.
The conversion method is based on the following properties:
1. Image format: If the image format is different than the current
sequence, it will need to be converted.
2. Image size: If the image size is different than the current sequence
size, it will need to be converted.
3. Resolution: If the resolution is different than the current sequence, it
will need to be converted.
79
Page 80

Chapter 2 Working with Sequences
4. Field Dominance: If the field dominance is set to None, then no
conversion is needed. Odd and even are incompatible, so a field
conversion is required. The following table shows where conversion is
required:
Field Dominance
Sequence preference
Media Quality
None Even Odd
None
Even
Odd
No No No
No No Yes
No Yes No
5. Compression: If the compression type is not hardware real-time
playable, a conversion is needed.
Quality Matching Example
Here’s an example of video quality matching. Your sequence preferences
have been set to:
• 4:3 aspect ratio
• Half-resolution
• 4:1 compression
• Use the closest media format available
You have the following media available on disk:
80
• Quality 1 – 4:3 aspect ratio, half-resolution, uncompressed
• Quality 2 – 4:3 aspect ratio, half-resolution, 2:1 compression
• Quality 3 – 4:3 aspect ratio, half-resolution, 3:1 compression
• Quality 4 – 16:9 aspect ratio, half-resolution, 3:1 compression
Page 81

Working with Different Qualities of Media
Using the quality matching formula in Avid DS Nitris:
Step Discards Reason
Step 1 None All media segments are at the same resolution.
Step 2 None No match for compression ratio. Keeps all but notes
that the smallest compression ratio will be the closest.
Step 3 Quality 4 Does not match the aspect ratio.
Between Quality 1, 2 and 3, Quality 1 is chosen because it is the least
compressed of the three.
n
Processed media (caches) are also created based on the video resolution
and compression settings. The same quality matching method is used to
select the quality of the cache during playback.
Understanding Audio Quality Matching
An audio clip can have media at multiple sample rates, just like a video
clip can have media at multiple resolutions, compression ratios, or aspect
ratios.
With audio, Avid DS Nitris first tries to play media that matches the
sample rate set in your audio sequence preferences. If it doesn’t find such
media, the audio tracks turn red and you’re prompted to convert the audio
media to the sample rate of the current sequence.
If an exact audio media match is found, then that audio media is used. If
more than one candidate meets this match, then Avid DS Nitris looks at the
following criteria:
1. Captured versus linked media: Captured media is considered a
closer match than linked media.
2. Bit Depth: If none of the candidates match the bit depth, media with a
greater bit depth is the closest match.
81
Page 82

Chapter 2 Working with Sequences
Understanding the Processing Settings
The media resolution, bit depth, compression, or sample rate that you set in
your Sequence preferences define the quality at which clips are captured.
During processing, you can use these same settings, or you can change
them to process the captured media at a different resolution, bit depth, or
compression. This is useful if you want to process your effects at a lower
quality for preview purposes, and save on processing time. When your
sequence is ready for finishing, you can change the settings back to a
higher quality and reprocess the effects.
About Bit Depth
Bit depth is used to describe the number of bits used to store information
about each pixel of an image. The higher the depth, the more colors that
are available for storage and more accurate color representation in the
digital image.
In Avid DS Nitris, this is known as the Storage format bit depth, and is
used when storing captured media and processed media (caches).
82
c
Avid DS Nitris supports 8 or 10-bit storage bit depth for non-Custom
sequences, and up to 16 and 32-bit for custom sequences.
Setting the Processing Bit Depth
Effects can be processed at 16 or 32-bit depth. This is known as Precision.
Avid DS Nitris supports 8, 10, 16 or 32-bit media and caches. This
Precision can be set for the individual effects that support these levels, or it
can be set in your sequence preferences and applied globally to all effects
that support these levels. For a list of 16 bit/32 bit float effects, see “Effects
Supporting 16 or 32 Bits (Float) Processing” in the Help.
Although Avid DS Nitris can support higher bit depths during
processing, the storage of the caches (for non-Custom sequences) is
still done at either 8 or 10-bit depth. Note that, using a higher
precision bit depth generates smoother effects during processing, and
still produces better quality output even though some quality is lost
when storing the cache at the lower bit depth.
Page 83

Working with Different Qualities of Media
Processing in Fields versus Frames
When applying effects, you must decide whether to apply the effect to each
frame or each field. This will usually depend on the type of source material
you’re using. Knowing how your source material was created will play a
role in determining how to process your effects. If processed incorrectly,
you may notice unwanted jittering or unusual artifacts.
• Field to convert the image to fields, which processes each field of your
effects and graphics separately (using different property values if there
is animation), and then reconverts the video information to frames to
display the results. This option is better for animated effects, such as
dissolves, fades, and motion paths.
• Frame processes the entire frame (both fields together) using the same
property values. Use this option with frame-based source material.
Static graphics images, 30 fps film, and 30 fps CGI (computergenerated images) are some examples of frame-based material.
Understanding the Working Conversion Mode
Since Avid DS Nitris is resolution independent, you can work with media
and sequences with different size and resolutions, all within the same
sequence. When dealing with media of different formats, you can specify
how Avid DS Nitris should handle the conversion.
There are different situations in which media is converted:
• When media is imported
• When linking to media from within a sequence
• When using media of different formats than the current sequence
When you digitize or import media, it is digitized according to the video
sequence preferences or capture settings—see “Understanding Video
Settings” on page 72.
Since the scale/pan settings applied to the media are fixed, you cannot
change these settings when you recapture the media.
83
Page 84

Chapter 2 Working with Sequences
In the second and third cases, you’re dealing with how clips are converted
when they’re placed on the timeline. The conversion mode you select
determines how clips and sequences of different resolutions are displayed
when they’re placed on the timeline.
You can set the conversion mode in the Sequence Preferences dialog box.
n
n
The clips that are already on the timeline will not be affected. Only clips
placed on the timeline after the sequence preferences are changed will be
converted.
You can also set the conversion mode for each clip individually using the
conversion mode settings in the Clip Properties property page. This
overrides the conversion mode in the Sequence Preferences dialog box.
As previously explained, when you place a clip on the timeline which has a
different resolution than the current sequence, the image will be converted
using the method you set in the Sequence Preferences dialog box.
However, when you place a sequence on the timeline, the conversion
becomes a little more complicated, since you may be dealing with various
resolutions within that sequence. Avid DS Nitris treats the clips within that
sequence as a single unit in order to preserve the relationship between the
clips. By doing so, Avid DS Nitris ensures that the ratio between each clip
remains the same. Once the clips are grouped together, Avid DS Nitris uses
the conversion mode you set in the Sequence Preferences dialog box to
convert all the clips as a single unit.
If your clip is converted more than once, it can’t be assigned one of the
defined conversion modes. Instead, a separate conversion mode called
“Multiple Conversions” is used to specify that the clip has been converted
multiple times.
84
When you insert a sequence within another sequence, you can always
override the current sequence preference conversion mode by modifying
each clip’s conversion mode individually in the Clip Properties property
editor. Only the clip whose conversion mode you modified will be affected.
All other clips will remain as they are.
Page 85

Working with Different Qualities of Media
n
If you use a sequence that has processed effects within another sequence,
the caches will remain valid as long as both sequences have the same
settings. If, however, you change the conversion mode, you must process
the effects again.
The following table summarizes how each item is converted in
Avid DS Nitris:
Items Media conversion treatment
Captured clip Frame size, at the time of capture, is scaled and panned to the
current sequence size
Linked clip Image size is scaled and panned to the current sequence size
Sequence Sequence size is scaled and panned to the current sequence
size
Example
The following is an example of how a sequence, which contains linked
images of various resolutions, is converted when inserted into a sequence
that has a different resolution.
Sequence A is an NTSC D1 sequence at 720 × 486 resolution. It contains
the following images:
85
Page 86

Chapter 2 Working with Sequences
Image 1: 1440×972 linked
image set to Scale to Fit.
Sequence B is a custom sequence at 360 × 243 resolution. The conversion
mode in the Sequence Preferences dialog box is set to Center, Keep
Original Size. When you place sequence A into sequence B, the following
occurs (the original frame size of sequence A is outlined in white):
The clips are grouped together and
treated as a single unit. Since image
1 was centered in the original
sequence, it will remain centered in
the new sequence. Since sequence
B has a smaller resolution, the image
just fills up more of the viewer. This
clip has been converted in both
sequences, so its conversion mode
will be set to Multiple Conversions.
Image 2: 300×300 linked
image set to Keep Original
Size and Position.
Image 2 was not centered in
the original sequence, so in this
sequence, the star gets cut out
of the viewer. Since the original
linked clip was set to Keep
Original Size and Position, it
has only been converted once
and its conversion mode will be
set to that of the current
sequence.
Image 3: 1000×1000 linked
image set to Center, Keep
Original Size.
Since image 3 was centered in
the original sequence, it
remains centered. Because the
circle is so large, it fills the
entire viewer. This clip has
been converted in both
sequences, so its conversion
mode will be set to Multiple
Conversions.
86
Page 87

Working with Different Qualities of Media
If you change the conversion mode in the Sequence Preferences dialog box
to Scale to Fit, and place sequence A into sequence B again, the following
occurs:
If you compare these images with the images in the original sequence, they will be exactly the same, except
smaller. Since the images are grouped together as a sequence, the individual images are not scaled to fit the
resolution of the current sequence. Instead, the whole sequence is scaled down to fit the new sequence
resolution, which, in this case, produces a smaller version of the original sequence.
You can then go into the Clip Properties property page and change the
conversion mode for each clip individually.
When applying a conversion mode to a clip
individually, the original sequence settings
are ignored and Avid DS Nitris refers back to
the original image.
For example, the conversion mode for image 1
was set to Keep Original Size and Position.
Notice how the displayed image is the
1440×972 clip. If Avid DS Nitris had referred
back to the original sequence, then the clip
would have been displayed at 720×486
resolution.
After changing the conversion mode of an individual clip, you can always
change it back to its original setting.
87
Page 88

Chapter 2 Working with Sequences
Saving Sequences
When you save a sequence, you are saving the contents of the timeline.
Any clips, container clips, transitions, caches, effects, and edit markers are
saved with the sequence.
It is good practice to save your sequences at regular intervals, or when you
have completed an important part of your work. The first time you save a
sequence, all information related to the sequence is saved. However, the
next time you save the sequence, only the modifications to the sequence
are saved, so it takes less time.
n
You can also create a crash recovery file for your current sequence at
regular intervals. This lets you recover the latest work on your sequence in
the event of a system failure. For more information, see “User Preferences
Dialog Box” in the Help.
To save a sequence for the first time:
1. Select File > Save.
The Save Sequence dialog box is displayed.
2. Use the Avid Explorer tools to navigate to the folder in which you want
to save the sequence.
3. Type in a name for your sequence in the File Name text box and click
OK.
The sequence is saved and a sequence icon with the sequence name is
displayed in the Avid Explorer. You can now continue editing or close
the current sequence, and begin work on a new sequence or project.
To save an existing sequence:
t Select File > Save.
The existing sequence is overwritten.
88
The sequence is saved and a sequence icon with the sequence name is
displayed in the Avid Explorer. You can now continue editing or close
the current sequence, and begin work on a new sequence or project.
Page 89

Creating a Copy of a Sequence
You can save different versions of a sequence in a project folder. If, for
example, you’ve been hired to create a series of spots for a client, you
create a project that is completely contained in a single folder. Inside that
folder, you create a number of subfolders to store elements, such as master
clips, presets, mattes, and backgrounds.
Inside that project, you create a sequence for the first spot by dragging
clips to the timeline, and saving the sequence in your project folder. For the
second spot, make a copy of the sequence calling it “Scene 2 (Take 2)”,
and make the necessary adjustments. Continue to do the same for each of
the spots.
Saving Sequences
n
To save a copy of a sequence:
1. Select File > Save As.
2. Type a new name for the sequence.
The sequence is saved. You can now make the necessary edits to
this sequence.
Another way to create versions of your sequence is by selecting the
sequence in the Avid Explorer, pressing the Ctrl key, and dragging the file
to an empty area of the folder. Copying the sequence in the Avid Explorer
takes less time than creating a copy with the Save As command.
89
Page 90

Chapter 2 Working with Sequences
Searching for Sequences
Large projects can contain many sequences and even more master clips.
Although you can use the Avid Explorer to find a particular sequence or
clip, it can be more efficient to search for sequences and master clips using
the Clip Search tool.
The Clip Search tool lets you search for master clips or sequences within
your current project. You can do searches by source, file name, or file
properties. All clips found in the search appear in the clip tray.
To search for sequences or master clips:
1. Select View > Single-Instance Views > Clip Search.
The Clip Search dialog box is displayed.
90
2. Select the Master Clips and/or Sequences option(s) to search for one,
the other, or both.
Page 91

Searching for Sequences
3. To search by:
- Source: Select a tape source name or file from the Referencing the
Following Source list and click Go.
- File name: Type the file name in the With Name Containing text
box and click Go.
- File property: Select an attribute from the list, either Contains or
Equals, type the text you are searching for in the text box, and
click Go.
The clips and/or sequences found in your search are displayed in the
clip tray.
n
You can only perform a clip or sequence search using one filter option at a
time.
Click Help for detailed information on the Clip Search dialog box.
91
Page 92

Chapter 2 Working with Sequences
Deleting Sequences
If you no longer require a sequence, you can create an archive of the
project in which it resides (see “Archiving Projects” on page 449) or delete
the sequence from the project. Be careful when you delete a sequence,
because deleting a sequence can also delete media, depending on the
option that you choose.
To delete a sequence:
1. In an Avid Explorer bin, right-click a sequence that is not currently
open and select one of the following:
- Delete Clip & Unused Media: Deletes the selected sequence and
its associated media if the media is not used by a master clip or
another sequence. This option deletes cache media that is used
only by the sequence.
-Delete Clip & All Media: Deletes the selected sequence and its
associated media even if the media is used elsewhere. Although
this is a quick way to create more disk space on your drive, it can
be risky. You should only do this when you’re absolutely sure that
you no longer need the sequence’s cache media and master clips.
92
n
Selecting the Delete option under the Windows section of the menu or
pressing the Delete key deletes the selected sequence but does not delete
the associated media.
2. Click Ye s to delete the sequence.
Page 93

Chapter 3
Building a Rough Cut
This chapter describes how to perform basic editing tasks, such as
preparing source clips, arranging clips on the timeline, and synchronizing
clips to create a rough cut.
• Workflow: Editing Audio and Video
• Creating Sequences
• Marking In and Out-points on the Timeline
• Displaying Timecodes
• Viewing a Sequence as a Hieracharical Tree Structure
• Playing Sequences
• Manipulating Clips
• Using Locators
• Finding Frames, Clips, and Bins
• Extracting Parts of a Sequence
• Grabbing Frames
• Rippling Clips
• Synchronizing Clips
• Referencing Sequences
Page 94

Chapter 3 Building a Rough Cut
Workflow: Editing Audio and Video
Editing is the process of assembling audio and video clips on the timeline,
creating transitions between these clips, and synchronizing the sound with
the images. Because the timeline is an integral part of the editing process,
it is found in many of the layouts. The tasks in this chapter focus on the
timeline and how to use it with other tools to edit your media.
All editing tasks are based on what you select. Each time you make a
selection on the timeline, the Record viewer, timecode boxes, and tool
panels are updated to give you information on the selected object.
94
Page 95

Workflow: Editing Audio and Video
The following illustration shows how you can build and edit a sequence in
Avid DS Nitris.
Locate and prepare media for editing.
Preview and trim your source media in
21
the Source viewer.
Place clips on the timeline.
3
Create a rough cut of your
sequence by dragging clips to
the timeline.
Manipulate clips.
4
Move, trim, slip, slide, and
nest clips on the timeline.
Apply transitions.
5
Create cuts, wipes, dissolves,
crossfades, and DVE-type
transitions.
95
Page 96

Chapter 3 Building a Rough Cut
Synchronize audio with video.
6
Synchronize video or audio
events by using locators.
Process the sequence.
7
Process all transitions
and container clips in the
sequence to play the
results in real time.
Click Process button.
Creating Sequences
A sequence is an arrangement of clips on the timeline. It contains
information about edit decisions, applied graphics and effects, animation
settings, and working preferences.
Before constructing your sequence, it’s important to realize that the edits
you make to clips are non-destructive. That is, you’re not actually editing
the source media. The clips that you see in the bin and on the timeline are
simply references to the media on the disk array.
96
Page 97

Creating Sequences
Setting up your sequence involves previewing and editing source clips, and
then placing them on the timeline. The quickest way to create your rough
cut is to place clips directly on the timeline. You can, however, preview
your source clips to set new in and out-points before placing them on the
timeline.
You may also want to bring in a project from an offline environment into
Avid DS Nitris. You can import an AFE, AAF, Open Media Framework
®
(OMF
), or Edit Decision List (EDL) file into the Avid Explorer as logged
clips, or onto the timeline as a sequence. For more information, see
“Conforming AAF and AFE Files” and “Conforming OMF, EDL, and
ALE Files” in the Avid DS Nitris Capture and Output Guide.
Preparing Source Clips for Editing
Before you place a clip on the timeline, you can prepare it in the Source
viewer. If a single viewer is displayed, and you drag a clip to the viewer, it
changes into a dual viewer that displays the Source and Record viewers.
The Source viewer lets you view and edit source clips.
To move a clip to the Source viewer:
t Drag a clip from a bin to the Source viewer.
Bin Source viewer
®
Clip
97
Page 98

Chapter 3 Building a Rough Cut
The source clip is displayed in the Source viewer. The Record viewer
displays the frame (if any) at the current location of the position indicator
on the timeline. This lets you compare a source clip with the clip on the
timeline where it will be inserted.
For more information, see “Source and Record Viewers” in the Help.
Transport controls
Source viewer: Frame at position of
position indicator on source clip.
Record viewer: Frame at position of
position indicator on timeline.
Each viewer has its own set of controls for manipulating the source clips,
timeline clips, or material on an external device. The controls under the
Source viewer help you prepare source clips before inserting them on the
timeline. You can continuously cue and mark your source material without
affecting the sequence.
For an overview of all the controls in the Source viewer, see “Transport
Controls” in the Help.
98
After marking the appropriate in and out-points on the source clip, use the
Record viewer to locate the frame (in your sequence) on which the new
clip is to be inserted. You can also decide whether or not to use all the
channels of the source clip, and on which track you want to place the clip.
For more information, see “Patching Tracks” on page 108.
After the clip has been placed on the timeline, you can continue working in
dual viewer mode or use a single viewer to display only the clips on
the timeline.
Page 99

Editing Source Clips
You can place master clips, container clips, or sequences in the Source
viewer for previewing. This lets you cue or mark new in and out-points on
the source clip, and then insert, overwrite, replace, or fit-to-fill clips on the
timeline with it.
Creating Sequences
Position bar
Timecode box
In-point Position indicator
Mark In-point Mark Out-point
To edit a clip for use in your sequence:
Play
Out-point
1. Click Play below the Source viewer to play the source clip.
2. Click one of the following:
t Mark In button when the position indicator reaches the desired in-
point.
t Mark Out button at the desired out-point.
t Type a timecode in the I (in) or O (out) timecode box and click the
I or O button.
An in-point or out-point is displayed in the position bar. If you need to
adjust these points, drag them to a new location.
3. Click Play again to stop playing the clip.
4. You can now place the clip directly on the timeline—see “Placing Pre-
edited Clips on the Timeline” on page 105.
99
Page 100

Chapter 3 Building a Rough Cut
Creating Subclips
Instead of placing the marked clip on the timeline, you can first create a
subclip from it. This leaves the original clip untouched while a copy of the
original clip with new in and out-points is saved in a bin. The Capture
Target option of the Capture Settings dialog box specifies the location for
the new subclip, see “Media Capture Settings” in the Help.
Unlike master clips, subclips do not directly reference the original media.
Subclips remain linked to the master clips from which they were created,
and the master clips in turn reference the digitized media files located on
your storage drives. As a result, none of the original footage is lost.
To create a subclip:
1. Verify the target location for the subclip, by doing the following:
a. In the Avid Explorer toolbar, click the Capture Settings button.
b. In the Media Capture panel, verify the Capture Target settings
The Capture Settings dialog box is displayed.
and modify if needed.
100
n
n
2. Load a clip in the Source viewer.
3. On the position bar below the Source viewer, reposition the in and/or
out-points of a clip.
4. Place the position indicator on the frame you want to display in the
bin.
5. Click the Create Subclip button.
6. In the Create Subclip dialog box, type a name for the subclip.
You can use the default name, which is the parent clip name appended with
a number, such as RealClip - 001.
7. Click OK.
The new clip is created and saved in the target bin.
The source clip maintains its original in and out-points.
 Loading...