

Page 1

Avid® DS Nitris
™
Installation and Administration Guide
Version 7.0
make manage move | media
™
Avid
®
Page 2

Copyright and Disclaimer
Product specifications are subject to change without notice and do not represent a commitment on the part
of Avid Technology, Inc. The software described in this document is furnished under a license agreement.
You can obtain a copy of that license by visiting Avid's Web site at www.avid.com. The terms of that license
are also available in the product in the same directory as the software. The software may not be reverse
assembled and may be used or copied only in accordance with the terms of the license agreement. It is
against the law to copy the software on any medium except as specifically allowed in the license
agreement.
No part of this document may be reproduced or transmitted in any form or by any means, electronic or
mechanical, including photocopying and recording, for any purpose without the express written permission
of Avid Technology, Inc.
Copyright © 2003 Avid Technology, Inc. and its licensors. All rights reserved. Printed in USA.
The Avid DS and Avid DS Nitris application uses JScript and Visual Basic Scripting Edition from Microsoft
Corporation.
Attn. Government User(s). Restricted Rights Legend
U.S. GOVERNMENT RESTRICTED RIGHTS. This Software and its documentation are “commercial
computer software” or “commercial computer software documentation.” In the event that such Software or
documentation is acquired by or on behalf of a unit or agency of the U.S. Government, all rights with
respect to this Software and documentation are subject to the terms of the License Agreement, pursuant to
FAR §12.212(a) and/or DFARS §227.7202-1(a), as applicable.
Trademarks
888 I/O, Adrenaline, AirPlay, AirSPACE, AirSPACE HD, AniMatte, AudioSuite, AudioVision, AutoSync, Avid,
Avid DNA, AVIDdrive, AVIDdrive Towers, AvidNet, AvidNetwork, AVIDstripe, Avid Mojo, Avid Unity,
Avid Xpress, AVoption, AVX, CamCutter, ChromaCurve, ChromaWheel, DAE, D-Fi, D-fx, Digidesign,
Digidesign Audio Engine, Digidesign Intelligent Noise Reduction, DigiDrive, Digital Nonlinear Accelerator,
DigiTranslator, DINR, D-Verb, Equinox, ExpertRender, FieldPak, Film Composer, FilmScribe, FluidMotion,
HIIP, HyperSPACE, HyperSPACE HDCAM, IllusionFX, Image Independence, Intraframe, iS9, iS18, iS23,
iS36, Lo-Fi, Magic Mask, make manage move | media, Marquee, Matador, Maxim, MCXpress,
Media Composer, MediaDock, MediaDock Shuttle, Media Fusion, Media Illusion, MediaLog, Media Reader,
Media Recorder, MEDIArray, MediaShare, Meridien, MetaSync, NaturalMatch, Nearchive, NetReview,
NewsCutter, Nitris, OMF, OMF Interchange, OMM, Open Media Framework, Open Media Management,
ProEncode, Pro Tools, QuietDrive, Recti-Fi, RetroLoop, rS9, rS18, Sci-Fi, Softimage, Sound Designer II,
SPACE, SPACEShift, Symphony, the Avid DS Nitris logo, Trilligent, UnityRAID, Vari-Fi, Video Slave Driver,
VideoSPACE, Xdeck, and XSI are either registered trademarks or trademarks of Avid Technology, Inc. in
the United States and/or other countries.
All other trademarks contained herein are the property of their respective owners.
GOT FOOTAGE?
Editors — Filmmakers — Special Effects Artists — Game Developers — Animators — Educators —
Broadcasters — Content creators of every genre — Just finished an incredible project and want to
share it with the world?
Send us your reels and we may use your footage in our show reel or demo!*
For a copy of our release and Avid’s mailing address, go to www.avid.com/footage.
*Note: Avid cannot guarantee the use of materials submitted.
Avid DS Nitris Installation and Administration Guide • 0130-05572-01 • September 2003
Page 3

Contents
Using This Guide . . . . . . . . . . . . . . . . . . . . . . . . . . . . . . . . . . . . . 7
Who Should Use This Guide . . . . . . . . . . . . . . . . . . . . . . . . . . . . . . . . . . 7
Symbols and Conventions . . . . . . . . . . . . . . . . . . . . . . . . . . . . . . . . . . . . 8
Using the Mouse, Pen, and Keyboard . . . . . . . . . . . . . . . . . . . . . . . . 9
Customizing the Pen or Mouse . . . . . . . . . . . . . . . . . . . . . . . . . . . . 10
If You Need Help . . . . . . . . . . . . . . . . . . . . . . . . . . . . . . . . . . . . . . . . . . 10
Accessing the Online Documentation . . . . . . . . . . . . . . . . . . . . . . . 10
If You Have Documentation Comments. . . . . . . . . . . . . . . . . . . . . . 11
How to Order Documentation . . . . . . . . . . . . . . . . . . . . . . . . . . . . . 11
Avid Educational Services . . . . . . . . . . . . . . . . . . . . . . . . . . . . . . . . 11
Avid DS Customer Support . . . . . . . . . . . . . . . . . . . . . . . . . . . . . . . . . . 12
E-mail Support . . . . . . . . . . . . . . . . . . . . . . . . . . . . . . . . . . . . . . . . . 12
Web Support . . . . . . . . . . . . . . . . . . . . . . . . . . . . . . . . . . . . . . . . . . 12
FTP Support. . . . . . . . . . . . . . . . . . . . . . . . . . . . . . . . . . . . . . . . . . . 12
Mailing List . . . . . . . . . . . . . . . . . . . . . . . . . . . . . . . . . . . . . . . . . . . . 13
Chapter 1 Installing Avid DS . . . . . . . . . . . . . . . . . . . . . . . . . . . . . . . . . . . 15
Determining your Avid DS Environment Setup. . . . . . . . . . . . . . . . . . . . 16
Avid DS Installation Scenarios . . . . . . . . . . . . . . . . . . . . . . . . . . . . . 17
Avid DS Software and Services . . . . . . . . . . . . . . . . . . . . . . . . . . . . 21
Checklist for Installing the Software . . . . . . . . . . . . . . . . . . . . . . . . . . . . 23
Setting Up an Avid DS Workgroup . . . . . . . . . . . . . . . . . . . . . . . . . . . . . 24
Installing Avid DS . . . . . . . . . . . . . . . . . . . . . . . . . . . . . . . . . . . . . . . . . . 26
Installing the DMS Broker. . . . . . . . . . . . . . . . . . . . . . . . . . . . . . . . . . . . 38
Attaching the Application Key . . . . . . . . . . . . . . . . . . . . . . . . . . . . . 38
Loading Plug-Ins. . . . . . . . . . . . . . . . . . . . . . . . . . . . . . . . . . . . . . . . . . . 39
Installing and Removing Fonts . . . . . . . . . . . . . . . . . . . . . . . . . . . . . . . . 40
Installing and Removing Type 1 Fonts. . . . . . . . . . . . . . . . . . . . . . . 40
Installing and Removing TrueType Fonts . . . . . . . . . . . . . . . . . . . . 40
Installing Non-European Fonts . . . . . . . . . . . . . . . . . . . . . . . . . . . . 42
3
Page 4

Chapter 2 Upgrading your Avid DS v6.x Workstation . . . . . . . . . . . . . . . 45
Upgrading your Workstation from the Recovery CD. . . . . . . . . . . . . . . . 46
Installing the Recovery CD . . . . . . . . . . . . . . . . . . . . . . . . . . . . . . . . . . . 49
Uninstalling Avid DS . . . . . . . . . . . . . . . . . . . . . . . . . . . . . . . . . . . . . . . . 49
Removing Avid DS . . . . . . . . . . . . . . . . . . . . . . . . . . . . . . . . . . . . . . 50
Chapter 3 Installing the Remote Processing Software . . . . . . . . . . . . . . 51
An Introduction to Avid DS Remote Processing . . . . . . . . . . . . . . . . . . . 52
Remote Processing Concepts . . . . . . . . . . . . . . . . . . . . . . . . . . . . . 53
Avid DS RP Workstation Requirements . . . . . . . . . . . . . . . . . . . . . . . . . 54
Network Hardware and Remote Processing Performance. . . . . . . . 55
Checklist for Installing the Avid DS RP Software . . . . . . . . . . . . . . . . . . 56
CPU Usage on Avid DS RP Workstations . . . . . . . . . . . . . . . . . . . . . . . 57
Installing Avid DS RP . . . . . . . . . . . . . . . . . . . . . . . . . . . . . . . . . . . . . . . 58
Installing Avid Throttle Manager . . . . . . . . . . . . . . . . . . . . . . . . . . . . . . . 59
Troubleshooting Avid DS RP . . . . . . . . . . . . . . . . . . . . . . . . . . . . . . . . . 60
Chapter 4 Licensing Avid DS and Avid DS RP . . . . . . . . . . . . . . . . . . . . . 67
Requesting a License File. . . . . . . . . . . . . . . . . . . . . . . . . . . . . . . . . . . . 68
Softimage Licensing Program . . . . . . . . . . . . . . . . . . . . . . . . . . . . . . . . . 69
Creating a Valid License File . . . . . . . . . . . . . . . . . . . . . . . . . . . . . . . . . 69
Solving Licensing Problems . . . . . . . . . . . . . . . . . . . . . . . . . . . . . . . . . . 72
Chapter 5 Managing Your Workstations . . . . . . . . . . . . . . . . . . . . . . . . . . 75
Managing User Accounts . . . . . . . . . . . . . . . . . . . . . . . . . . . . . . . . . . . . 76
Account Setup for Standalone Avid DS . . . . . . . . . . . . . . . . . . . . . . 76
Account Management of Windows Domains . . . . . . . . . . . . . . . . . . 77
Account Management of Windows Workgroups. . . . . . . . . . . . . . . . 78
Configuring the Network Connection . . . . . . . . . . . . . . . . . . . . . . . . 80
Sharing Folders and Setting Permissions. . . . . . . . . . . . . . . . . . . . . 83
Creating User Accounts . . . . . . . . . . . . . . . . . . . . . . . . . . . . . . . . . . 86
Creating a User Group . . . . . . . . . . . . . . . . . . . . . . . . . . . . . . . . . . . 89
Adding Users to User Groups. . . . . . . . . . . . . . . . . . . . . . . . . . . . . . 89
Managing the Avid Services . . . . . . . . . . . . . . . . . . . . . . . . . . . . . . . . . . 91
Restarting a Workgroup . . . . . . . . . . . . . . . . . . . . . . . . . . . . . . . . . . 92
4
Page 5

Creating a New Workgroup . . . . . . . . . . . . . . . . . . . . . . . . . . . . . . . 92
Turning an Existing Client Workstation into a Controller . . . . . . . . . 93
Connecting Other Workstations in the Workgroup to the Controller 94
Chapter 6 Managing Your Storage Areas . . . . . . . . . . . . . . . . . . . . . . . . . 95
About your Local Storage Area . . . . . . . . . . . . . . . . . . . . . . . . . . . . . . . 96
Planning your Storage Locations . . . . . . . . . . . . . . . . . . . . . . . . . . . . . 100
Avid DS Workgroup Storage Scenarios . . . . . . . . . . . . . . . . . . . . . 101
The Avid Indexing Services . . . . . . . . . . . . . . . . . . . . . . . . . . . . . . 104
Configuring your Storage Locations . . . . . . . . . . . . . . . . . . . . . . . . . . . 105
Configuring Media Storages in a Media Indexing Service . . . . . . . 105
Adding a Media Indexing Service . . . . . . . . . . . . . . . . . . . . . . . . . 113
Maintaining your Storage Areas . . . . . . . . . . . . . . . . . . . . . . . . . . . . . . 114
Defragmenting your Drives . . . . . . . . . . . . . . . . . . . . . . . . . . . . . . 115
About Striping. . . . . . . . . . . . . . . . . . . . . . . . . . . . . . . . . . . . . . . . . . . . 116
Creating a Stripe Volume. . . . . . . . . . . . . . . . . . . . . . . . . . . . . . . . 116
Striping the Drives . . . . . . . . . . . . . . . . . . . . . . . . . . . . . . . . . . . . . 117
Importing Foreign Disks . . . . . . . . . . . . . . . . . . . . . . . . . . . . . . . . . . . . 119
Creating an Emergency Repair Disk . . . . . . . . . . . . . . . . . . . . . . . . . . 119
Chapter 7 Using the Recovery CD . . . . . . . . . . . . . . . . . . . . . . . . . . . . . . 121
Installing the Recovery CD. . . . . . . . . . . . . . . . . . . . . . . . . . . . . . . . . . 122
Completely Rebuilding the System. . . . . . . . . . . . . . . . . . . . . . . . . . . . 124
Index . . . . . . . . . . . . . . . . . . . . . . . . . . . . . . . . . . . . . . . . . . . . . 127
5
Page 6

6
Page 7

Using This Guide
Congratulations on your purchase of an Avid DS system. You can use your
system to create broadcast-quality output incorporating every possible
production element from full-speed, high-resolution footage, to
multimedia artwork and animation, to computer-generated effects and
titling.
n
The documentation describes the features and hardware of all models.
Therefore, your system might not contain certain features and hardware
that are covered in the documentation.
Who Should Use This Guide
This guide is intended for all Avid DS users, who need to install and
license any of the Avid DS software components. There are also some
useful guidelines on the daily maintenance of your system.
This guide provides information on:
• Different environment setups of your Avid DS workstation(s) and
storage.
• Installation of the Avid DS software components
• Licensing of the Avid DS software components
• Management of your Avid DS workstation
Page 8

Using This Guide
Symbols and Conventions
Avid DS Nitris documentation uses the following symbols and
conventions:
Symbol or Convention Meaning or Action
n
c
w
> This symbol indicates menu commands (and
t
Margin tips In the margin, you will find tips that help you perform
Italic font Italic font is used to emphasize certain words and to
A note provides important related information,
reminders, recommendations, and strong suggestions.
A caution means that a specific action you take could
cause harm to your computer or cause you to lose
data.
A warning describes an action that could cause you
physical harm. Follow the guidelines in this
document or on the unit itself when handling
electrical equipment.
subcommands) in the order you select them. For
example, File > Import means to open the File menu
and then select the Import command.
This symbol indicates a single-step procedure.
Multiple arrows in a list indicate that you perform
one of the actions listed.
tasks more easily and efficiently.
indicate variables.
Courier Bold font
Bold font Bold indicates a user interaction.
8
Courier Bold font identifies text that you type.
Page 9

Using the Mouse, Pen, and Keyboard
In Avid DS Nitris, you can use a two-button mouse (with wheel) or a pen
and tablet. The left and right mouse buttons perform different operations.
Unless otherwise stated, use the left mouse button.
The mouse and pen operate slightly differently. All the procedures in this
guide are documented for the mouse. You can, however, easily use a pen or
the keyboard. The following table shows the terms relating to the mouse,
pen, and keyboard.
This Term Means This with a Mouse Means This with a Pen
Symbols and Conventions
Click Quickly click and release the
left mouse button. Always use
the left mouse button unless
otherwise stated.
Double-click Click the left mouse button
twice rapidly.
Right-click Quickly click and release the
right mouse button.
Drag Click and hold the left mouse
button or the wheel while you
move the mouse.
Alt+key,
Ctrl+key,
Shift+key,
etc.
Press and hold the first key while you press the second key. For
example, “Press Alt+F1” means to press and hold the Alt key
while you press the F1 key.
Tap the tablet once with the tip of
the pen, or touch the pen to the
tablet with enough pressure to
click.
Quickly tap the tablet twice in the
same screen pixel or press the F5
key to go from single to doubleclick.
Press the top portion of the switch
on the side of the pen or press the
F6 key to go from left to rightclick.
Press the pen to the tablet while
moving the pen.
9
Page 10

Using This Guide
Customizing the Pen or Mouse
By customizing the pen, you can adjust the click pressure, switch
functions, and other features. For information on customizing the pen,
refer to the documentation provided with your Avid DS system.
You can also customize the mouse. For example, you can select lefthanded configuration or change the double-click speed. For information on
customizing the mouse, refer to the Windows online Help.
If You Need Help
If you are having trouble using Avid DS:
1. Retry the action, carefully following the instructions given for that task
in this guide. It is especially important to check each step of your
workflow.
2. Check for the latest information that might have become available
after the documentation was published in one of two locations:
- If release notes are available, they ship with your application.
- If ReadMe files are available, they are supplied in your Avid
application folder. ReadMe files are also available from Help.
3. Check the documentation that came with your Avid application or your
hardware for maintenance or hardware-related issues.
4. See “Avid DS Customer Support” on page 12.
5. For Technical Support, please call 800-800-AVID (800-800-2843).
For international enquiries and support services, contact your local
Avid Reseller. Support offerings may vary per location.
Accessing the Online Documentation
The online library contains all the Avid DS documentation in PDF format.
If it was installed on your workstation, you can access it from the Help
menu in Avid DS.
10
Page 11

If You Need Help
n
You will need to install Adobe® Acrobat® Reader® to view the online
documentation.
To access the online library, do one of the following:
t In Avid DS, select Help > Online Library.
t Insert the Software CD or the Drivers CD into your CD-ROM drive,
and select Online Library from the main menu.
To install Adobe Acrobat Reader:
1. Insert the Drivers CD into your CD-ROM drive.
2. Select the required workstation and choose Utilities.
If You Have Documentation Comments
We’d appreciate any comments or suggestions you may have about the
Avid DS documentation.
Please e-mail your documentation comments to:
dsdocs@avid.com
Include the title of the document, its part number, and the specific section
you are commenting on in all correspondence.
How to Order Documentation
To order additional copies of this documentation from within the
United States, call Avid Sales at 800-949-AVID (800-949-2843). If you are
placing an order from outside the United States, contact your local
Avid representative.
Avid Educational Services
For information on courses/schedules, training centers, certifications,
courseware, and books, please visit www.avid.com/training or call
Avid Sales at 800-949-AVID (800-949-2843).
11
Page 12

Using This Guide
Avid DS Customer Support
The following sections describe various Avid DS Customer Support
options.
E-mail Support
The e-mail address for Avid DS Customer Support is:
dssupport@avid.com.
You can use it for sending bug reports, usability questions, and avidds.cab
audit reports for system analysis. All e-mails are logged in the support
database and assigned a case number. Send one support request per e-mail.
n
Web Support
FTP Support
It is mandatory that you include your SID number in the body of your
e-mail message for verification of your maintenance contract and case
logging, otherwise, response will be delayed.
The Avid DS Customer Support and Download sections at
http://www.softimage.com/avidds provide quick access to a wide range
of resources from the Avid DS teams and user community. Downloads,
including presets, drivers, and Quick Fix Engineering (QFE), provide the
latest solutions for use with your Avid DS system. Online documentation,
tutorials, and Knowledge Base articles ensure that you get the most out of
your work with Avid DS. It's like having a dedicated Avid DS Customer
Support engineer sitting at your desk!
For troubleshooting purposes, an FTP server is available for uploading
large files for Avid DS Customer Support personnel to examine. You can
upload a project's archive, media files, or other large piece of data. Simply
zip the files to upload and use a short name for easy retrieval, such as
archive.zip or Case274877.zip. You can use a Windows Command Prompt
or an FTP application to upload files to our server.
12
Page 13

Avid DS Customer Support
Command Prompt Commands
Command Description
Site access ftp ftp.softimage.com [Enter]
Folder access cd incoming [Enter]
User name anonymous [Enter]
Password “your e-mail address” [Enter]
Transfer mode bin [Enter]
Upload command Put “path:\file name” [Enter]
Once the file upload is complete, send an e-mail to dssupport@avid.com
to inform Avid DS Customer Support as there is no automatic notification
when a file is uploaded on the FTP server. Please provide the complete and
exact file name (case sensitive) to retrieve.
Mailing List
Although the Avid DS mailing list is frequently monitored by Avid
employees, it is not part of the official support channels. You are invited to
send your support requests to any of the above channels when required.
If you have an e-mail account, you can join the worldwide network of Avid
DS users exchanging ideas. The mailing list has proven to be quite useful
for users, with a constant stream of new subscribers.
To subscribe, send an e-mail to majordomo@softimage.com with the
following text in the body of your message: subscribe ds. You can get
further information on using the automated list server by e-mailing
majordomo@softimage.com with “help” as your message.
You can also go to http://www.avid.com/support/forums.html, which is
another great source of info on the Avid web site for Avid DS.
13
Page 14

Using This Guide
14
Page 15

Chapter 1
Installing Avid DS
This chapter describes how to install Avid DS software and services.
If you purchased the new Avid DS Nitris system, the drivers and firmware
needed to run Avid DS Nitris are already installed on the system disk.
However, you must install version 7.x of the Avid DS software.
If you need to reinstall any hardware component drivers or system
firmware, the instructions are available on the Avid DS Nitris Drivers CD.
If you are upgrading from a previous version of Avid DS, see “Upgrading
your Avid DS v6.x Workstation” on page 45.
Page 16

Chapter 1 Installing Avid DS
Determining your Avid DS Environment Setup
Before installing Avid DS on your workstation(s), you must decide how all
the workstations in your environment can be used to their best potential. If
you have one Avid DS workstation, then the configuration is simple. All
software components are installed on that workstation.
When you have two or more Avid DS workstations connected to each
other, then it is possible to have an Avid DS workgroup. In a workgroup,
you can offload the media management and processing services to a
dedicated workstation such as an Avid DS RP (Remote Processing)
workstation. This leaves the Avid DS workstations free for creative editing
tasks.
The station that runs the media management and processing services is
known as the controller. If you have more than one Avid DS workstation,
then one of them must be designated as the controller and the others
connected as clients. Naturally, if you have only one Avid DS workstation,
then it will be the controller.
16
n
The following section shows the different setups that you can choose from,
and, in each case, where each of the various Avid DS software components
or services would be installed.
A valid network connection is required for your Avid DS workstation(s)
whether they are connected or running standalone. If you don’t have a
valid network connection, you can simulate one by creating a loopback
connection. For more information, refer to the Avid DS Customer Support
Web site.
You will also need to set up the appropriate user accounts on each
workstation, depending on whether you are in a standalone, Windows
workgroup, or Windows domain environment. For more information, see
“Checklist for Installing the Software” on page 23.
Page 17

Avid DS Installation Scenarios
There are many different ways that you can set up your Avid DS
environment. This section shows four setup possibilities, and recommends
where each of the various Avid DS software components or services
should be installed. For a complete description of each component, see
“Avid DS Software and Services” on page 21.
You may also want to refer to “Planning your Storage Locations” on
page 100, to see the different ways that your project and media storage can
be configured. If you are using Avid Unity
storage, you may use it in any one of these configurations.
Determining your Avid DS Environment Setup
™
MediaNetwork as your
n
Installing a Standalone Avid DS Workstation
You cannot install the Avid DS software components directly on Unity, but
you can configure the indexing services on any workstation to index the
storage area on Unity.
If you have a single Avid DS workstation, you will need the following
components installed:
• Avid DS—see “Installing Avid DS” on page 26.
• Avid Project Indexer (automatically installed by Avid DS setup)
• Avid Media Indexer (automatically installed by Avid DS setup)
17
Page 18

Chapter 1 Installing Avid DS
Installing Workstation(s) with no Remote Processing Workstation
18
If you have more than one Avid DS workstation connected in a workgroup,
you must designate one of them as a controller. The Avid DS workstation
that will serve as the controller will need the following components
installed on it:
• Avid DS—see “Installing Avid DS” on page 26.
• Avid Project Indexer (automatically installed by Avid DS setup)
• Avid Media Indexer (automatically installed by Avid DS setup)
Any other Avid DS workstations (clients) will need the following
components installed:
• Avid DS—see “Installing Avid DS” on page 26.
• Avid Media Indexer (automatically installed by Avid DS setup)
Page 19

Determining your Avid DS Environment Setup
Installing Workstation(s) and Remote Processing Workstation
When you have one or more Avid DS workstations connected to an
Avid DS RP workstation, the RP workstation would best serve as the
controller. This allows it to do all your media processing and indexing, and
leave your Avid DS workstations free for the creative editing tasks.
n
Since you can’t run Avid DS RP and Avid DS simultaneously on a
workstation, it is more practical to use the Avid DS RP workstation as the
controller.
If you designate the RP workstation as the controller, you will need the
following components installed on it:
• Avid Distributed Media Services—see “Installing the DMS Broker” on
page 38.
•AvidDSRP—see “Installing Avid DS RP” on page 58.
19
Page 20

Chapter 1 Installing Avid DS
• Avid Throttle Manager—see “Installing Avid Throttle Manager” on
• Avid Project Indexer (automatically installed by Avid DS setup)
Any connected Avid DS workstations (clients), will need the following
components installed:
• Avid DS—see “Installing Avid DS” on page 26.
• Avid Media Indexer (automatically installed by Avid DS setup)
page 59.
n
Installing a non-Avid DS Workstation as the Workgroup Controller
Any additional RP workstations that are connected will need the
Avid DS RP software and Avid Media Indexer installed.
You can connect a non-Avid DS workstation to your workgroup and
designate it as the controller. In this case, you would only need to install
the Avid Project Indexer on it. This workstation must have the same
specifications as required for an RP workstation.
20
Page 21

Avid DS Software and Services
These are the different software components available in Avid DS:
Component Function
Avid DS This is the Avid DS software (Avid DS or Avid DS Editor).
Avid DS RP This software is installed on a workstation that will handle
remote processing requests. The Avid DS RP workstation
processes effects from another client or controller workstation
within the Avid DS workgroup and returns the results to the
workstation when completed.
You cannot run Avid DS RP and Avid DS simultaneously on a
workstation, therefore, in a workgroup environment, it would
be best to set up the Avid DS RP workstation as the controller.
Determining your Avid DS Environment Setup
Avid Project
Indexer
Avid Media
Indexer
Avid Distributed
Media Services
(DMS) Broker
This service indexes storage locations that contain Avid DS
projects. The Avid Project Indexer can only be installed on one
workstation (the controller) per workgroup. The Project
Indexer indexes projects for all Avid DS workstations within
the workgroup and keeps a single index table on the controller
workstation.
The Avid Media Indexer is installed on each workstation in the
Avid DS workgroup that’s running Avid DS or Avid DS RP. It
indexes storage locations that contain audio and video media
files to optimize searches of those files. Each workstation
keeps its own index table of any connected storage.
The Avid DMS Broker manages the remote processing
requests sent from any Avid DS workstation in the workgroup
to an RP workstation(s). The DMS Broker is installed on only
one workstation (preferably the controller) per workgroup.
21
Page 22

Chapter 1 Installing Avid DS
Component Function
Avid Throttle
Manager
Licensing
Software
Online Library The Avid DS documentation can be installed with Avid DS, so
The Avid Throttle Manager manages the bandwidth to shared
storage locations for each workstation in the Avid DS
workgroup.
For example, since an Avid DS client workstation and an RP
workstation can share the same storage, the Throttle Manager
manages access to shared storages, so that the RP workstation
doesn’t interfere with the client workstation during critical
times such as playback, capture, and output to tape—see
“Installing Avid Throttle Manager” on page 59.
The Throttle Manager can only be installed on an RP
workstation. If you have more than one RP workstation, then
you must install it on only one of those RP workstations.
This software is needed to validate the Avid DS software. If
you’re a new customer, you must request a license file for each
Avid DS workstation. When you receive the license, install it
on the client workstation.
Although a separate license is also needed for the RP
n
workstation, you can store that license on the Avid DS
client workstation and point to it from the RP
workstation.
that you can access it directly from the Avid DS Help menu.
22
Page 23

Checklist for Installing the Software
Once you have decided on your installation scenario, you need to carry out
the installation in the following order:
Step Refer to
!
Checklist for Installing the Software
Request a license for each workstation on
"
which you are going to install the Avid DS
and Avid DS RP software.
" Set up your Windows Workgroup or Domain
accounts.
" Install the Avid DMS Broker software on the
workstation that will be the controller of the
Avid DS workgroup.
" Start the DMS Broker.
" Install the necessary Avid DS components on
the workstation that will be the controller of
the Avid DS workgroup.
" After the controller has been completely
installed, install the necessary Avid DS
components on the remaining workstations in
the Avid DS workgroup and configure them
as clients.
" Install Avid DS RP on the workstation(s) you
want to use for remote processing.
“Requesting a License File”
on page 68.
“Setting Up an Avid DS
Workgroup” on page 24.
“Installing the DMS Broker”
on page 38.
“Installing Avid DS” on
page 26.
“Installing Avid DS” on
page 26.
“Installing the Remote
Processing Software” on
page 51.
" Install the Avid Throttle Manager software on
one, and only one, RP workstation.
“Installing Avid Throttle
Manager” on page 59.
" Install the license files for all workstations. “Softimage Licensing
Program” on page 69.
more...
23
Page 24

Chapter 1 Installing Avid DS
!
Step Refer to
" By default, the Media Indexer sets any new
storage areas to automatically have full
read/write access by any user on the network.
To restrict access to your media, you can
change the share permissions through
Windows.
" Install any plug-in software that you require
on the Avid DS workstations.
" Install fonts that you may require for titling
and graphics work on your Avid DS
workstation.
Setting Up an Avid DS Workgroup
If you are going to set up an environment where multiple Avid DS
workstations can access each other’s projects and media, you will need to
create an Avid DS workgroup and designate the controller and client
workstations.
n
If you only have one Avid DS, it is designated as the controller of its own
workgroup.
“Managing User Accounts”
on page 76.
“Loading Plug-Ins” on
page 39.
“Installing and Removing
Fonts” on page 40.
24
The Avid DS workgroup emulates a Windows network workgroup, but has
its own regulations:
• You can connect as many Avid DS workstations to a single Avid DS
workgroup as you want.
• An Avid DS workgroup can have any name, as long as you avoid
illegal Windows characters.
• You can share project's data and media between different workstations
within the same Avid DS workgroup.
Page 25

Setting Up an Avid DS Workgroup
n
n
To properly configure an Avid DS workgroup, you should have a basic
understanding of Windows user account management. As a rule, all Avid
DS workstations should belong to the same Windows domain or
workgroup. This way, they are all connected together over a network and
can access each other’s storage and other resources.
To set up an Avid DS workgroup:
1. Determine the workstations that will be in the Avid DS workgroup
before you start installing the Avid DS software.
Important: If you would like to keep one or more workstations running
Avid DS v6.x or earlier, then you must create a separate Avid DS
workgroup for any Avid DS v7 workstations, and designate a new
controller for this workgroup.
2. If you are setting up more than one Avid DS workstation, make sure
that these workstations are in the same Windows domain or
workgroup—see “Account Management of Windows Domains” on
page 77 or “Account Management of Windows Workgroups” on
page 78.
3. If you are setting up an Avid DS workstation to run standalone, then
make sure its IP address is set correctly—see “Account Setup for
Standalone Avid DS” on page 76.
4. Some type of network timing software should be used to maintain
synchronization between the workstations within a workgroup.
25
Page 26

Chapter 1 Installing Avid DS
Installing Avid DS
To install Avid DS, you must log on with an account that has
Administrator privileges.
n
If you have one or more RP workstations in your workgroup, you must
install the Avid DMS Broker before installing Avid DS. For more
information, see “Installing the DMS Broker” on page 38.
To install Avid DS:
1. Put the Avid DS Software CD in the CD-ROM drive.
2. From the main menu, click the Avid DS Installation button.
26
3. When the Avid DS Installation Wizard is displayed, click the Next
button.
4. In the License Agreement dialog box, read the End User License
Agreement and click the Ye s button to accept the terms of the
agreement and continue the installation.
Page 27

Installing Avid DS
5. In the Customer Information dialog box, enter your name and
company name, and click the Next button.
6. In the Reseller or Dealer Information dialog box, enter the requested
information and click the Next button.
The Workgroup Configuration dialog box is displayed.
n
The following choices are presented:
- Keep existing DS Workgroup Configuration — Select this only if
you are upgrading to Avid DS v7 and want to keep a previous Avid
DS v6.x workgroup configuration.
This option does not apply if you are upgrading from a version prior to
Avid DS v6.0.
- Create or join a different DS workgroup — This option lets you
configure your workstation as part of an Avid DS workgroup.
27
Page 28

Chapter 1 Installing Avid DS
If you choose to Create or Join a different DS workgroup, then the
following choices are displayed:
- Allow this workstation to share, exchange, and collaborate with
those other workstations? — Joins your workstations to a selected
DS workgroup.
If you are connected to other Avid DS workstations, and there is
already another Avid DS Nitris workstation designated as the
controller.
From the list that is displayed, select the Avid DS workgroup that
you want to join. Your workstation will join the workgroup as a
“client”.
n
n
If the controller does not automatically appear in this list, consult
Customer Services and review your network configuration for a potential
access permission problem.
Standalone workstations also appear as controllers in the pulldown menu.
Do not choose a standalone workstation as the controller unless you plan
on connecting it to your other Avid DS workstations.
- Create a new DS workgroup for sharing, exchanging, and
collaborating? — Allows you to specify a new workgroup name to
which this workstation will belong.
If you select this option, the current workstation will be set up as
the controller.
- Have this workstation work separately from all the others? — Sets
up your workstation in its own workgroup (in standalone mode).
You will still need to specify a unique workgroup name.
28
Page 29

Installing Avid DS
n
Important: If you would like to keep one or more workstations running
Avid DS v6.x or earlier, then you must create a separate Avid DS
workgroup for any Avid DS v7 workstations, and designate a new
controller for this workgroup.
7. Click the Next button to save the Workgroup Configuration.
8. When the Service Configuration window is displayed, select one of the
following:
t Local System Account — Uses the login profile of the user that is
currently logged in.
The account must be a member of the local administrators group
and have a password.
t This account — Allows you to designate the user that will manage
the Avid services. Avid recommend that you select this option.
n
9. If you select the This account option, enter the login information of
the user account that will run the Avid Media Indexer and Project
Indexer services.
If your workstation is part of a Windows domain, then you need to specify
the domain name before the user id (example: domain_name\userid). The
local administrator account cannot be used to configure the services.
29
Page 30
Chapter 1 Installing Avid DS
10. Click the Next button.
The second Service Configuration window is displayed.
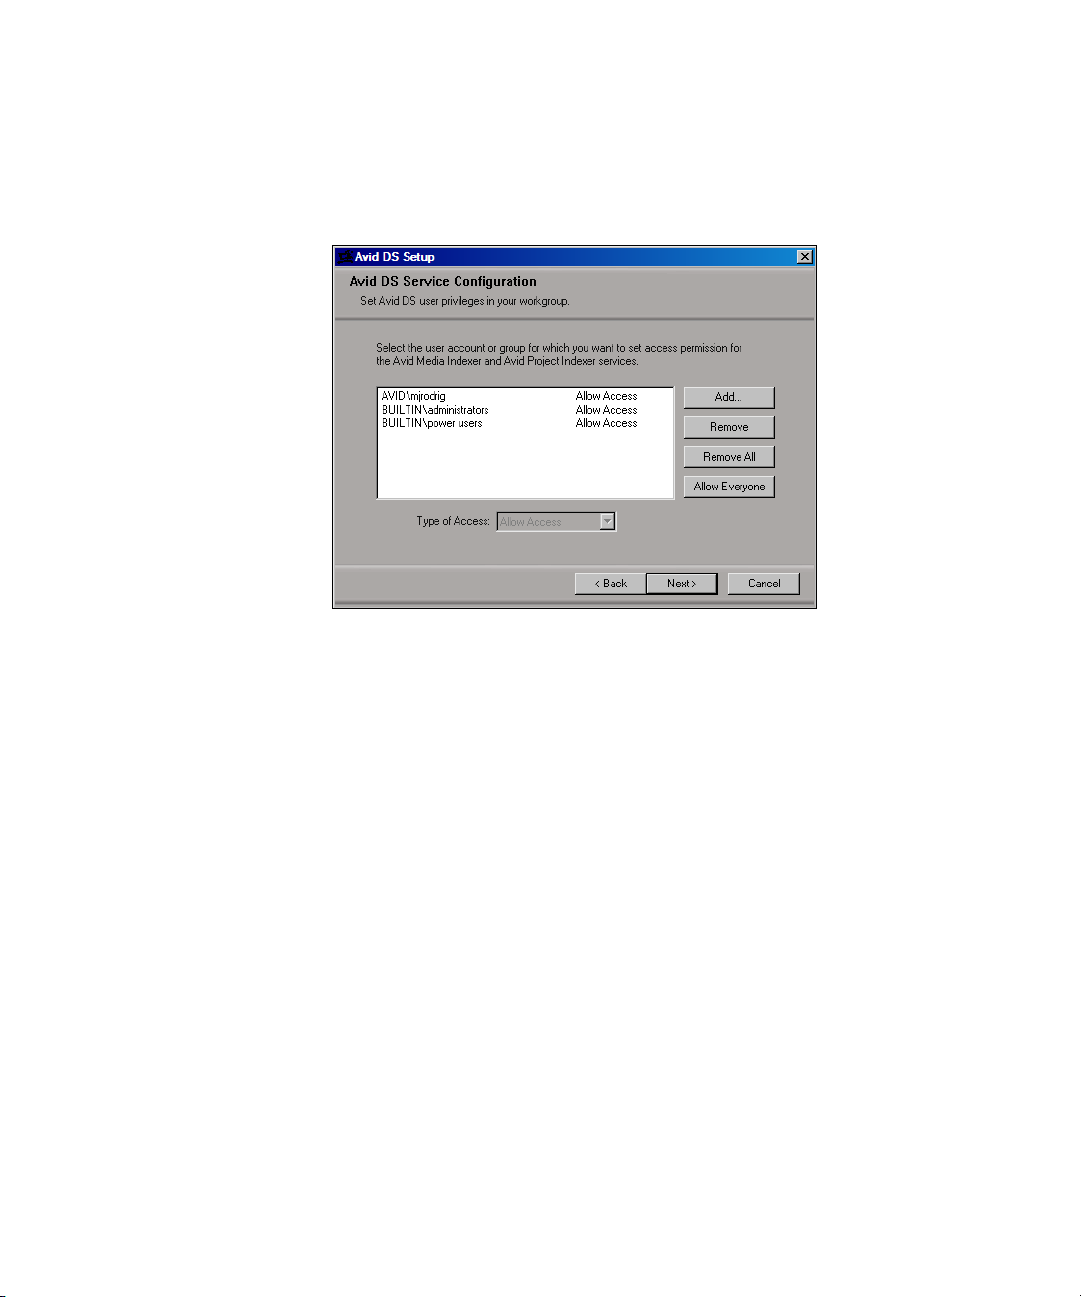
30
n
During installation everyone in the Administrator Group of the local
system is automatically allowed access to the Avid DS services. Avid
recommends that all users who need access to Avid DS services within
the Avid DS Workgroup have accounts in the Administrators or Power
Users group on each workstation in the workgroup.
If you are part of a Windows workgroup, then you only need the
Administrator in this list.
If you are part of a Windows domain, then all user names must be
configured with the domain name (example: domain_name\userid). If these
user accounts are not configured correctly, then the services will not work.
For more information on domain versus workgroup accounts, see
“Managing User Accounts” on page 76.
Page 31

Installing Avid DS
11. Select the users or group that you want to Allow Access to the Avid
DS workgroup.
- If you want to add new users or a new group, click the Add button.
- If you want to add a new users to a group, select the group from
the list, and click the Add button.
- If you want to remove a user or group, select a name from the list,
and click the Remove button.
- If you want to change user or group privileges, select a name from
the list, and select Allow Access or Deny Access from the dropdown list.
12. Click the Next button.
If you are installing the controller, the DMS Broker Configuration
dialog box is displayed.
31
Page 32

Chapter 1 Installing Avid DS
13. If you have an RP workstation in your workgroup, enter the name of
the workstation running the DMS Broker, and click the Next button.
If you do not have a DMS Broker installed, leave the field blank.
The SMTP Server dialog box is displayed.
32
14. Enter the name or IP address of your SMTP server and click the Next
button.
You may leave this field blank if you do not know your SMTP server
address.
15. Click the Next button.
The Choose Destination Location dialog box is displayed.
Page 33

Installing Avid DS
16. Do one of the following:
- Click the Next button to accept the default folder. (Avid
recommends that you keep the suggested default path).
- Click the Change button to specify a folder in which to install
Avid DS and click the Next button.
The Select Components dialog box is displayed.
17. Select the components that you want to install.
Component Description
Avid DS Installs Avid DS on your workstation. This option is
only enabled if the supported hardware is detected.
Avid DS RP Installs Avid DS RP on your workstation. Install this
component if you want to use this workstation for
remote processing.
You cannot run the Avid DS and Avid DS RP
n
software simultaneously on a workstation,
therefore, in a workgroup environment, it would
be best to set up the RP workstation as the
controller.
33
Page 34

Chapter 1 Installing Avid DS
Component Description
Online Library Installs the Avid DS documentation. The online library
Avid DS Services The Avid DS Services are required to index media on
Extras There are other components that you may need to install
has the most up-to-date description of all features in
Avid DS.
your storage devices as well as share, exchange, and
collaborate with other workstations in the workgroup.
Media Indexer Installs the Media Indexer on all workstations in the
workgroup.
Project Indexer Installs the Project Indexer on only one workstation
(usually on the designated controller workstation).
Throttle Manager Installs the Throttle Manager. Install this component on
one, and only one, RP workstation.
with Avid DS or Avid DS RP.
34
Fonts Installs fonts that you may require for titling and
graphics work in Avid DS.
Avid DS Mouse
Cursor Scheme
Avid DS Color
Scheme for
Installs the Avid DS mouse cursors on your
workstation.
Installs the Avid DS color scheme that is optimized for
Avid DS.
Windows
Support for JL
Enables the use of the JL Cooper within Avid DS.
Cooper
Page 35

18. Click the Next button.
The Hardware Setup dialog box is displayed.
Installing Avid DS
19. Verify that the hardware matches your workstation’s configuration:
Workstation Video devices Audio devices Accessories
Compaq Workstation
w8000
HP Workstation xw8000 Avid Equinox video
Avid Nitris DNA Nitris Video Subsystem Nitris Audio board Supported OpenGL
Avid Equinox
subsystem
subsystem
™
video
Mykerinos audio
card
Mykerinos audio
card
Supported OpenGL
graphics card
Supported OpenGL
graphics card
graphics card
If the hardware options don’t match your workstation’s configuration,
click the Manual Settings button, and select the correct hardware
options.
35
Page 36

Chapter 1 Installing Avid DS
20. Click the Next button.
The Storage Setup dialog box is displayed.
36
n
- Video Storage: Select the actual drive letter for your video media.
- Audio Storage: Select the actual drive letter for your audio media.
- Projects Storage: Select the actual drive letter for your projects
and presets storage area (F:\)
- Archives Storage: Select the actual drive letter for your archives
storage area (F:\)
- Interactive Cache: Select the actual drive letter for your
interactive cache storage area. The interactive cache location must
be either one of the local video storage drives, or a drive partition
other than the system partition (D:\)
If you are connected to Unity, do not select the Unity storage. You should
only use the Unity for your media storage.
Page 37

Installing Avid DS
21. Change the storage locations if necessary, and click the Next button.
The Licensing Information dialog box is displayed.
22. When installing Avid DS, select the Local License File option, enter
the following in the text box:
C:\Softimage\flexlm\Licenses\Softimage.lic and click the Next
button.
n
23. When the Start Copying Files dialog box is displayed, review your
installation settings and if you’re satisfied, click the Next button.
If you need to change options, use the Back button to go as far back as you
need to change the options.
A progress indicator is displayed as the Avid DS files are copied to
your system.
After the files are copied, you will be asked if you need to install
Adobe Acrobat Reader. This program is required to read the Avid DS
online documentation.
24. Click the Finish button.
25. Close the Avid DS Setup window by clicking the close (X) button in
the top-right corner.
26. Remove the CD and restart your workstation.
37
Page 38

Chapter 1 Installing Avid DS
Installing the DMS Broker
If you have one or more RP workstations in your workgroup, you must
install the Avid DMS Broker. This service handles all remote processing
requests within an Avid DS workgroup.
The DMS Broker should be installed on a non-Avid DS workstation
(preferrably an RP station that is configured as the controller). This
workstation must be running Windows 2000 or Windows XP. It also
requires Internet Explorer 5.5 or later. For more information, see the Avid
ProEncode
Attaching the Application Key
The application key, commonly referred to as a dongle, allows the DMS
software to run on your system. It also lets you access only the number of
encoders for which you have purchased licenses.
™
Release Notes.
w
DMS Automatic USB Dongle Detection and Licensing
38
Do not connect the application key to a USB port until you install the
DMS Broker.
To install the DMS Broker:
1. Put the Avid DS Software CD in the CD-ROM drive.
2. From the menu, select Avid DMS Broker.
3. Follow the instructions in the installation program.
4. When the installation is complete, click Exit.
To attach the application key:
1. On the workstation that will run the DMS Broker, locate an available
USB port.
2. Connect the USB dongle to the USB port.
3. Windows automatically detects a "USB dongle SuperPro" device.
The "Found New Hardware Wizard" opens.
Page 39

Loading Plug-Ins
4. Keep the Install the software automatically (Recommended) option,
and click Next.
“Rainbow USB SuperPro” is detected and installed by Windows.
5. When the Completing the Found New Hardware Wizard dialog
appears, click Finish.
w
n
Do not lose the application key. Your ProEncode software does not
function without it. If you lose your application key, you must
purchase another key from Avid.
After the DMS Broker is installed, refer to the Avid ProEncode Setup and
User’s Guide for instructions on how to configure the DMS Broker and set
up the DMS Administration Tool.
The installation process automatically creates an Administrator account.
You do not need to add any users as these will automatically be created
when a user sends a processing request.
Loading Plug-Ins
Avid provides some plug-ins for use with Avid DS Nitris v7.x.
To load these plug-ins:
1. Insert the Avid DS Nitris Software CD into your CD-ROM drive and
click Plug-ins from the main menu.
2. A window opens to display the folders that contain the plug-ins.
n
3. For each plug-in you want to use:
t Open the folder.
t Open the Readme.txt for that plug-in, and
t Follow the instructions to load the program.
Important: Any plug-ins that you install on your client workstations,
should also be installed on the RP workstation to ensure compatibility. The
same applies to any third-party plug-ins.
39
Page 40

Chapter 1 Installing Avid DS
Installing and Removing Fonts
Avid DS Nitris supports the following typeface formats:
•Type1
• TrueType (PC-formatted)
Avid DS Nitris does not require any additional software to access
TrueType fonts, but does require Adobe Type Manager (ATM) software to
access Type 1 fonts.
Included in the \Fonts folder of the Avid DS Nitris CD are 500 fonts from
the Bitstream typeface library.
n
n
Installing too many fonts on your workstation can noticeably degrade
computing performance. Keep the number of fonts installed on your
workstation to the minimum necessary to complete your projects.
Important: Any fonts that you install on a client workstation should also
be installed on the RP workstation to ensure consistency between
processed results in titles and graphics.
Installing and Removing Type 1 Fonts
Type 1 font support in Avid DS Nitris is available only if you have the
Adobe Type Manager or Adobe Type Manager Deluxe software (version
4.0 or later) installed and active. Consult the documentation that came with
the Adobe Type Manager or Adobe Type Manager Deluxe software for
instructions on how to install and remove Type 1 fonts.
Installing and Removing TrueType Fonts
TrueType font support in Avid DS Nitris does not require any additional
software.
40
Page 41

Installing and Removing Fonts
To install TrueType fonts:
1. Click the Start button and select Settings > Control Panel > Fonts.
The Fonts window is displayed.
2. From the File menu, select Install New Font.
The Add Fonts dialog box is displayed.
Use the Folders and Drives lists to navigate to the folder that contains
the TrueType fonts you want to install. On the Avid DS Nitris CD,
they’re in the \Fonts folder.
The available TrueType fonts in the selected folder appear in the List
of Fonts list.
3. Select the fonts to install from the List of Fonts list, as follows:
- To select a single font, click the name of the font.
- To select a range of fonts, click the name of the first font. Then
Shift-click the last font in the range.
- To select all fonts in the directory, click Select All.
- To switch the selection of a font, press the Ctrl key and click a font
name.
4. (Optional) You can use the selected fonts from their current folder by
deselecting the Copy fonts to Fonts folder option. This will save disk
space on your local workstation.
By default, fonts will be added to your workstation’s local disk space.
If you are adding several fonts, consider using the fonts from their
current locations to save local disk space.
5. Click OK.
The selected fonts are installed on your system.
6. If Avid DS Nitris is currently running, restart it to access the newly
installed fonts.
To remove TrueType fonts:
1. Click the Start button and select Settings > Control Panel > Fonts.
The Fonts window is displayed.
2. Select the fonts to remove.
41
Page 42

Chapter 1 Installing Avid DS
3. Press Delete.
You are prompted to confirm the deletion of the selected fonts.
4. Click Ye s .
5. Close the Fonts and Control Panel windows.
6. If Avid DS Nitris is currently running, restart it to update the list of
available fonts.
Installing Non-European Fonts
If you are working with a non-European, customized Windows operating
system, such as Windows XP Japanese, you can use the DSFontSetting.exe
application, which is distributed with Avid DS Nitris v7. You can use this
application to change the default font used in Avid DS Nitris dialog boxes
or reset it to default.
The new font is used only in dialog boxes; menus and toolbar buttons are
not affected by this new information. You can customize the menu font size
through the Windows Appearance tab of the Desktop Properties.
42
For non-European languages, Avid DS Nitris selects a font (by default)
that comprises the European character set and is part of the character set of
the foreign Windows system, such as Windows XP Japanese. However, the
chosen font is very small and does not appear properly, especially in dialog
boxes. For regular systems, the default font for dialog boxes is Arial 11.
This application does not ensure that the font will fit properly in the dialog
box. Whenever the new selected font is too large for the various text
contents of the dialog box, a smaller default font will be used as in
previous versions. You must be careful to choose a font that still contains a
European character set, since the displayed text is still English. this new
feature is not restricted only to Asian systems; any customer of any country
can change the Avid DS Nitris default font. However, layouts work best
with the actual default font (Arial 11). Each time a new font is set or reset,
you must restart Avid DS Nitris before it takes effect.
Page 43

Installing and Removing Fonts
To install non-European fonts
1. Browse to the C:\Program Files\Avid\DS_7 folder.
2. Double-click the DSFontsettings.exe file.
3. From the Settings menu, you can select one of two options:
- Reset Font to reset the fonts to their default setting.
- Set DS Font to choose the Font and size you want to use in the
dialog click. Click OK.
Some tips!
• For best results, use a font size between 8 and 14 points.
• If the font selected is a little too big to be displayed in its designated
area, it will be substituted by the default font size.
• If the font size is really too big, the layout will not appear correctly,
and you may need to refresh the screen.
43
Page 44

Chapter 1 Installing Avid DS
44
Page 45

Chapter 2
Upgrading your Avid DS v6.x Workstation
This chapter describes how to upgrade Avid DS v6.x on the Compaq EVO
W8000, or the HP xw8000 to Avid DS v7.
If you have an HP xw8000, and would like to upgrade your hardware to an
Avid Nitris DNA
on changing your hardware boards. You must do the hardware upgrade
before installing the Avid DS v7 software.
™
system, refer to the Avid DS web site for instructions
Page 46

Chapter 2 Upgrading your Avid DS v6.x Workstation
Upgrading your Workstation from the Recovery CD
You will need to use the Recovery CD to upgrade your Avid DS software
to version 7. Note that there are still some critical steps involved, so please
follow the instructions in this section very carefully.
To prepare your workstation for the upgrade:
Step Refer to
!
Read the release notes that came with your
"
system or software upgrade package to see if
there are any changes to this document.
Request a license for each workstation on
"
which you are going to install the Avid DS
software.
" Archive your existing projects and media.
Avid DS v7 uses a different media format
than previous releases. Therefore, you must
archive all your project information and
media files with your current version of Avid
DS to tape.
You may also place your archived files
n
on a CD. If you choose to do this, make
sure you “zip” your files before
burning them onto a CD.
After you upgrade to Avid DS v7, you can
restore the archive and recapture your media.
Just Released document.
“Requesting a License File”
on page 68.
Avid DS Nitris Capture and
Output Guide
46
Page 47

Upgrading your Workstation from the Recovery CD
To upgrade to Windows XP:
Step Refer to
!
" Have your Windows XP license number on
hand as you will be prompted to enter it.
" Use the Recovery CD for your specific
workstation, to upgrade all your client
workstations with the Windows XP operating
system, and Service Pack 1.
" Set up your Windows Workgroup or Domain
accounts.
" Install and configure the necessary software
on the workstation that will be the controller
of the Avid DS workgroup.
" After the controller has been completely
installed, install the Avid DS software on the
remaining workstations in the Avid DS
workgroup and configure them as clients.
" Install Avid DS RP on the workstation(s) you
want to use for remote processing.
" Install the Avid Throttle Manager software on
one, and only one, RP workstation per Avid
DS Workgroup.
" Install the Avid DMS Broker software on one,
and only one, RP workstation per Avid DS
Workgroup.
“Installing the Recovery
CD” on page 49
“Setting Up an Avid DS
Workgroup” on page 24
“Installing Avid DS” on
page 26
“Installing Avid DS” on
page 26
“Installing the Remote
Processing Software” on
page 51
“Installing Avid Throttle
Manager” on page 59
" Install the license files for all workstations. “Softimage Licensing
Program” on page 69
47
Page 48

Chapter 2 Upgrading your Avid DS v6.x Workstation
Step Refer to
!
" By default, the Media Indexer sets any new
storage areas to automatically have full
read/write access by any user on the network.
To restrict access to your media, you can
change the share permissions through
Windows.
" Check all third-party plug-ins for
compatibility with Avid DS 7.
Avid DS v7 supports AVX
Avid DS plug-ins. You will need to update
any plug-ins that you currently have installed
on your client and RP workstations. Contact
the vendor directly for details.
All other AVX-based plug-ins do not need to
be updated.
Avid also supports VST audio plug-ins.
n
For details contact Customer Services.
™
1.0 and native
" Install fonts that you may require for titling
and graphics work on your client and RP
workstations.
“Managing User Accounts”
on page 76
“Loading Plug-Ins” on
page 39
“Installing and Removing
Fonts” on page 40
48
Page 49

Installing the Recovery CD
Refer to “Installing the Recovery CD” on page 122 and “Completely
Rebuilding the System” on page 124 for further instructions.
Uninstalling Avid DS
Before removing the Avid DS software, you MUST first remove any
plug-ins or codecs that were installed on your system.
Installing the Recovery CD
w
n
If you uninstall Avid DS before uninstalling the plug-ins, the uninstall
procedure will fail.
To remove the Avid DS plug-ins:
1. Click the Start button and choose Settings > Control Panel >
Add/Remove Programs.
2. In the Currently Installed Programs list, check for any installed
plug-ins—see http://www.avid.com/partners/avx/displayPartners.html.
3. Select the plug-ins installed on your system (one at a time) and click
the Change/Remove button. Repeat this step until they’re all removed.
4. Remove all Avid DS native plug-ins such as:
t Audio Channel Switcher
t Tone Generator
If you cannot uninstall some plug-ins, continue with the next one until
completion, and then manually delete the \Plug-In folder. Use the Windows
Find utility to help you locate any \Plug-In folders.
49
Page 50

Chapter 2 Upgrading your Avid DS v6.x Workstation
Removing Avid DS
Once you’ve removed the plug-ins, you can uninstall the Avid DS
software.
To remove Avid DS:
1. Click the Start button and select Settings > Control Panel >
Add/Remove Programs.
2. In the Currently Installed Programs list, select the Avid DS software
that you want to remove.
The Avid DS setup program starts.
3. Select the Remove option and click the Next button.
The Confirm File Deletion dialog box is displayed.
4. Click the Ye s button.
The Avid DS files are removed from your system, and the Maintenance
Complete dialog box is displayed.
50
n
5. Click the Finish button.
If you’re prompted to restart the workstation, do so immediately to
properly unregister the software from the operating system.
Page 51

Chapter 3
Installing the Remote Processing Software
This chapter describes how to use and install software for an Avid DS
Remote Processing workstation.
Page 52

Chapter 3 Installing the Remote Processing Software
An Introduction to Avid DS Remote Processing
Processing, or rendering, is a normal and necessary part of the Avid DS
workflow, as with any system that handles complex compositing and
effects. Unfortunately for editors, artists, and their clients, processing takes
up time and resources on the workstation being used, and can present
frequent and lengthy interruptions to the creative process.
Instead of waiting for Avid DS to process your effects, you can send a
processing job to a remote workstation that is running Avid DS RP and
continue working on your sequence.
You can install the remote processing software on any number of
workstations in your workgroup. The DMS Broker will automatically
route your processing jobs to the first available RP workstation.
Avid DS RP processes the effects, returns the cache media to the Avid DS
client storages, and notifies the client workstation when the job is
complete. When installing Avid DS on your workstations, you can specify
where the caches will be stored, either on a shared storage device or on
your local workstation.
52
n
Version 7 of Avid DS RP cannot accept requests from earlier versions of
Avid DS.
Avid DS v7 uses the DMS Broker and a mail-type system to communicate
with the remote processing station. An Outbox contains all the jobs that
you sent out for processing, and an Inbox contains all the jobs that have
returned.
You can set up your Avid DS workstation, so that when a job returns from
the remote processing station, you receive an email informing you that the
job is complete. The caches generated from the processing are
automatically linked back to your current project.
Page 53

Remote Processing Concepts
Before you begin configuring your workstations for remote processing,
there are a few terms you need to understand:
Client Workstation: This is the workstation on which Avid DS is
installed. The client workstation is where the processing request is
initiated. The request is sent to the remote processing workstation, and the
result is eventually returned to the client.
Remote Processing Workstation: This is the workstation where
Avid DS RP is installed. The RP workstation handles requests from client
workstation(s) and updates the clients’ timeline as each request is
processed. RP workstations support both the Windows XP Professional
operating system and the Windows 2000 operating system.
Floating License: The license for the RP workstation is located on one of
the client workstations and not on the RP workstation itself. This license
information is appended to the dongle-based (or “nodelock”) information
in the Softimage.lic file. In this context, the client workstation is
designated as a “license server” for the RP workstation.
An Introduction to Avid DS Remote Processing
About Avid Throttle Manager
Avid DS workstations share their storages with RP workstations during
remote processing. The Avid Throttle Manager (installed separately from
the RP software and installed only on one RP workstation) manages access
to such shared storages, so that the remote processing doesn't interfere with
the Avid DS workstation at critical times, such as during playback, capture,
and output to tape.
On startup, Avid DS and Avid DS RP indicate to the Throttle Manager
which shared storages they are using. The Throttle Manager then monitors
how your Avid DS workstation and RP workstation are using the shared
storage, such as for playback, capture, output, or processing.
On an Avid DS workstation, playback, capture and output to tape are the
critical operations which require a guaranteed bandwidth between the
workstation and its storage. During these operations, the Throttle Manager
will pause any RP workstations using the same storage for processing in
53
Page 54

Chapter 3 Installing the Remote Processing Software
order to maintain that bandwidth. Once the playback, capture, or output to
tape operation is complete, the Throttle Manager restarts the processing on
the RP workstations.
n
If you are not using the Throttle Manager to manage your shared storage,
do not try to perform intensive tasks like playback, capture, and output to
tape on the client workstation while processing on the RP workstation.
Avid DS RP Workstation Requirements
The remote processing workstation must meet the following requirements:
• Supports Windows XP Professional and Windows 2000 operating
system.
• Intel Pentium III up (single or dual CPU; MMX enabled) or
Intel Pentium 4.
n
Intel Celeron and AMD processors are not supported.
• 1.5 GB RAM
• 1 GB of hard drive space
• SVGA monitor with a recommended resolution of 1280
• OpenGL for 3D DVE: In Avid DS Nitris, only the 3D DVE layout
uses OpenGL. An Avid DS RP workstation does not require an
OpenGL card to process OpenGL effects. However, these effects will
process significantly faster if the RP workstation has an OpenGL card.
×1024
54
n
It is recommended that you use the same type of OpenGL card in both the
RP workstation and the client workstation.
• Network card (100 Mbps minimum recommended)
• Network protocol: All of the workstations being used for your
workgroup must reside on a network that uses the TCP/IP protocol.
Each workstation must be able to see the others over the network.
Page 55

Avid DS RP Workstation Requirements
Network Hardware and Remote Processing Performance
To optimize your network hardware and the performance of remote
processing:
• The recommended minimum speed of your network card is 100 Mbps
full duplex as this speed matches that of the client workstation. Gigabit
Ethernet is better, but you would need to upgrade the client
workstation as well.
• A network switch is the best way to isolate the remote processing
traffic from the rest of a corporate network. We recommend a
minimum bandwidth of 100 Mbps and full duplex capability, however,
a gigabit switch is preferable. For the highest quality components,
purchase brand name products, such as 3Com, Cisco, etc.
n
Hubs are not recommended.
• Use 24AGW gauge network cable (category 5 and up). Connectors
must be assembled properly, with a minimal length of unshielded wire
on both ends.
55
Page 56

Chapter 3 Installing the Remote Processing Software
Checklist for Installing the Avid DS RP Software
Before you set up a remote processing workstation you must:
• Make sure you have at least one client workstation configured as a
controller—see “Avid DS Installation Scenarios” on page 17.
• Make sure that the license server software is installed and running on a
client workstation within the workgroup.
• Make sure that the floating license is appended to the Avid DS Nitris
license file on one of the client workstations in the workgroup.
Follow these general steps when setting up your RP workstation:
Step Refer to
!
n
" Install Avid DS RP on each workstation you
want to use for remote processing.
" Install the Avid Throttle Manager software on
one, and only one, RP workstation.
“Installing the Remote
Processing Software” on
page 51.
“Installing Avid Throttle
Manager” on page 59.
" Install the Avid DMS Broker software on one,
and only one, RP workstation.
" To process effects involving third-party plug-
ins, the plug-ins must be installed on all RP
workstations.
" All Windows fonts used on the client
workstations must also be installed on the
remote processing workstation to prevent
processing errors with titles.
Third-party plug-in vendors handle the licensing for remote processing of
third-party plug-ins.
“Loading Plug-Ins” on
page 39.
“Installing and Removing
Fonts” on page 40.
56
Page 57

CPU Usage on Avid DS RP Workstations
CPU Usage on Avid DS RP Workstations
In some cases, you may find that the CPU usage on the RP workstation or
the client workstation during processing is low. This may be more obvious
when the RP workstation is a faster machine, and in some cases the CPU
usage may be lower on the RP workstation than on the client workstation.
This is a normal occurrence however.
CPU usage is an indicator of processor activity. The faster the processor,
the faster it completes its job (processing the current frame). If the CPU
has to wait for the next frame read from disk to start processing the frame,
the CPU usage is lowered.
This is normal, and it depends on the effect being processed. For simple
light effects, such as color correction, the processing is fast enough that the
CPU is actually idling most of the time. This appears as a low CPU usage
value. These effects are said to be “I/O-bound”, meaning that the
Read/Write operations involved for each processed frame are more
significant than the actual processing. Because Avid DS is fully multithreaded, the processing itself and the I/O operations are done in parallel.
However, if the CPU is idling most of the time, a low CPU Usage value is
to be expected.
n
Most native Avid DS effects support multi-threading and, in addition to
this, processing jobs can be divided among the CPUs available in the
workstation. For example, on a dual-CPU workstation, when a blur effect
is processed, half the frame is processed on one CPU while the other half is
processed on the other. This dramatically improves the overall processing
time.
Some third party effects (such as all AVX effects) do not support multithreading. In these cases, because only one of the CPUs is being used, the
CPU usage never goes above 50%.
To verify if an effect is single or multi-threaded:
1. Click the Start button and select Run.
2. In the Run window, type perfmon to run the Performance Monitor.
3. Add one counter for each CPU Time.
57
Page 58

Chapter 3 Installing the Remote Processing Software
For multi-threaded effects, the two curves move together while processing.
In single-threaded effects, they move in opposite directions.
CPU usage can be affected by the RP license (single or dual). An RP
license for one processor will force the RP workstation into single-thread
mode, and the CPU usage will never exceed 50%.
CPU usage usually appears higher on the client workstation (if it has the
same processor type as the RP). This is because the read/write operations
are faster on the client (local storage). As a result, the processor spends less
time waiting for input frames before processing them.
n
Workstations connected by fibre-optic cable to an Avid Unity will actually
process very fast due to the direct connection.
Installing Avid DS RP
To install Avid DS RP on an RP workstation:
1. Select the Avid DS RP Only option and click Next.
2. Click the Next button.
The Storage Setup dialog box is displayed. If the RP workstation does
not have the standard Avid DS drive partitions, simply install it on the
available drives. If only one drive is available, make sure you have
sufficient space for the software, expected projects, and temporary
media files generated from the Avid DS client processing requests.
• Projects Storage: Select the actual drive letter for your projects and
presets storage area. This is the only option that applies on an RP
workstation.
n
If you are connected to Unity, do not select the Unity storage to store your
projects. You should only use the Unity for your media storage.
58
3. Change the storage locations if necessary, and click the Next button.
The Licensing Information dialog box is displayed.
Page 59

4. Since you’re installing Avid DS RP only, select the License Server
option, and type the following in the text box: 744@machine_name
(machine_name is the network name of the workstation that has the RP
license—see “Licensing Avid DS and Avid DS RP” on page 67).
Installing Avid Throttle Manager
The Avid Throttle Manager allows for more efficient bandwidth
management between your workstation, storage areas, and an Avid DS RP
workstation.
For instance, if you want to play back your sequence on the timeline, the
Avid Throttle Manager temporarily suspends any processing requests to an
RP workstation, or capture or output from/to a deck to allow for the full
bandwidth to be used for real-time playback. Once the sequence playback
is complete, the Avid Throttle Manager resumes the other processes.
The Avid Throttle Manager must be installed on only one RP workstation
on the same network as your Avid DS workgroup.
Installing Avid Throttle Manager
n
Do not install the Avid Throttle Manager on the client running the Avid DS
software.
To install the Avid Throttle Manager:
1. Put the Avid DS Nitris Software CD into your CD-ROM drive.
2. From the Select Components dialog box of the Avid DS setup, select
Avid Throttle Manager and follow the onscreen instructions to
complete the installation.
To uninstall the Avid Throttle Manager:
• Click the Start button and select Programs > Avid Products >
Services > Avid Throttle Manager Service, select Uninstall
Throttle Manager Service and follow the onscreen instructions to
remove the Avid Throttle Manager.
59
Page 60

Chapter 3 Installing the Remote Processing Software
Troubleshooting Avid DS RP
You might encounter some questions when using Remote Processing.
Some of the questions and answers are shown below.
There’s a licensing error when I start Avid DS RP.
First, you should read the error message. FLEXlm errors are sometimes
easy to fix and good indications are inserted in the error message. Consult
the GLOBEtrotter web document for error code explanation.
C:\Softimage\FLEXLM\Flexuser\chap10.htm.
Avid DS RP starts, but an error in the interface points to licensing.
Although Avid DS RP starts, it can fail to properly check out the license
file if one of the following occurs:
• The license increment that starts the application is proper but the
usability increment contains an error.
60
• The Softimage License Server daemon was running when Avid DS RP
was started, but the Daemon is halted shortly after, causing the
licensing error.
To verify if there are any errors in the usability increment of the
license file:
1. Click the Start button and choose Programs > Softimage Products >
Licensing and choose LicTools.
2. Open the Existing License file and click Validate.
3. Look for highlighted text in the RP license increment. If any, correct
the error or request a replacement to the license text from Softimage
Licensing.
To verify if the license server daemon was halted:
1. Right-click the Windows taskbar and choose Task Manager.
2. Select the Processes tab.
Page 61

Troubleshooting Avid DS RP
3. Locate the lmgrd.exe and Softimage.exe processes. If only lmgrd.exe
is shown without the accompanying Softimage.exe process, then the
the daemon is down. The solution is in the next question.
I’ve checked the networking connection, the license server, and the
license, and I still get an error on the Avid DS RP.
Problems with the Hosts file on the client workstation may prevent the
network from matching the names of the systems with their network IP
addresses. This can be confusing as the network may appear to be
functioning properly since you can link to the Audio and Video Storages
without problems.
1. Browse to the C:\WINNT\system32\driver\etc folder and locate the
Hosts file.
2. Right-click the Hosts file, select Open with > Notepad.
This is what you will see as default:
# Copyright (c) 1993-1995 Microsoft Corp.
#
# This is a sample HOSTS file used by Microsoft TCP/IP for Windows NT.
#
# This file contains the mappings of IP addresses to host names. Each
# entry should be kept on an individual line. The IP address should
# be placed in the first column followed by the corresponding host name.
# The IP address and the host name should be separated by at least one
# space.
#
# Additionally, comments (such as these) may be inserted on individual
# lines or following the machine name denoted by a '#' symbol.
#
# For example:
#
# 102.54.94.97 rhino.acme.com # source server
# 38.25.63.10 x.acme.com # x client host
127.0.0.1 localhost
3. On the client workstation, add a line with the IP Address and DNS
name of the RP station as shown below (rpstation being the DNS name
of the RP station).
127.0.0.1 localhost
100.100.100.10 rpstation
61
Page 62

Chapter 3 Installing the Remote Processing Software
4. On the RP station, add a line with the IP address and DNS name of the
client workstation.
n
You can be more specific by including a domain if the system is on one. For
example:
100.100.100.10 rpstation.dsland.com
What can cause the Softimage License Server daemon to stop?
The vendor daemon will be stopped if the network configuration IP
Address used is not of a valid class. Private or test classes may cause the
vendor daemon to automatically stop. This prevents Avid DS RP from
validating the license text on the Avid DS workstation. Verify with your
system administrator or Internet service provider that your network address
is valid.
Example: Although 10.10.10.01 is valid for a private workgroup of
computers, the Softimage License Server will reject this IP Address and
shut down the daemon.
Avid DS Nitris RP reports that it cannot find some files.
The needed files are linked to the project in a local folder on the Avid DS
workstation and are not accessible from the Avid DS RP station.
62
• Make sure the linked files can be shared identically from both the Avid
DS workstation and RP system (example:
\\computername\Files\files_to_use), or copy the linked files into your
project folder.
• The expected files are irrelevant to the project you’re working on. If
this occurs, look seriously for a potential virus infection of the system
because Avid DS RP uses VB scripting and can be affected by virus
infections.
Page 63

Troubleshooting Avid DS RP
Processing is very slow on the Avid DS RP station.
• If you are processing 3D DVE effects and the Avid DS RP is not
equipped with a supported OpenGL card, the processing is done in
software mode and is much slower. Also note that the result may differ
from the processing done on the Avid DS workstation.
• The network connection should be at least 100 Mbps.
• The use of a network hub with multiple computers and traffic will
affect media access and slow down processing. It is recommended to
use a network switch to program and isolate the Avid DS systems from
the network group.
• The Avid DS workstation is being used extensively for capture and
playback. With or without the Avid Throttle Manager installed, the
media access to the Avid DS RP workstation is greatly impacted. Do
not use remote processing if you must do intensive media playback
tasks with the Avid DS workstation.
• The Avid DS RP workstation is being heavily accessed at the same
time by other applications.
The Avid DS RP application is frozen or processing is interrupted
with an error. What could cause this?
• The Avid DS workstation was rebooted. This cuts off access to the
media located on the workstation pointed to by the Media Indexer
running on your workstation.
• There is an internal error in the sequence that causes the processing to
fail. Try to process on the Avid DS Nitris workstation to verify if the
error is replicated locally as well.
• The system is running low on memory.
• Verify that all plug-ins are installed and properly licensed on the
Avid DS RP workstation.
63
Page 64

Chapter 3 Installing the Remote Processing Software
What can I do to test the network access between my Avid DS
workstation and RP workstation?
Using Command Prompt (DOS window):
•Type PING followed by the IP Address of the other computer and
press Enter. If you can communicate with it, it will return the
following:
C:\>ping 192.100.10.01
Pinging 192.100.10.01 with 32 bytes of data:
Reply from 152.165.50.251: bytes=32 time<10ms
TTL=128
Reply from 152.165.50.251: bytes=32 time<10ms
TTL=128
Reply from 152.165.50.251: bytes=32 time<10ms
TTL=128
Reply from 152.165.50.251: bytes=32 time<10ms
TTL=128
64
Ping statistics for 152.165.50.251:
Packets: Sent = 4, Received = 4, Lost = 0 (0%
loss),
Approximate round trip times in milli-seconds:
Minimum = 0ms, Maximum = 0ms, Average = 0ms
Otherwise the ping command will return “timed out” error lines if the
computer is not available or “Unknown host” if the host does not exist.
•Type NET SHARE and press Enter to display all shared locations,
including the required Avid DS Nitris shared folders.
•Type IPCONFIG and press Enter to display the current network
configuration.
Page 65

Troubleshooting Avid DS RP
Avid DS RP displays this error message when started: Failed to
create project BasicProject: f:\DS Projects could not be found.
Make sure the DS Project path exists on the Avid DS RP workstation,
otherwise you must either reinstall the software and carefully choose the
project location or access the operating system Registry Editor and modify
the Avid DS Nitris MainRoot key (contact Avid DS Customer Service for
help with registry modifications).
When starting Avid DS RP, the hourglass icon appears for a brief
moment, then nothing.
Although extremely rare, this can occur after a software crash where a
process in still running in the background and preventing a new process
from being opened, since you can run only one instance of Avid DS at a
time on any system.
To resolve this problem:
1. Open Task Manager.
2. Select the Processes tab.
3. Locate any occurrence of a running ds.exe process. If any, click End
Process and confirm its termination.
Avid DS RP should now start properly.
I have two Avid DS RP licences and I am trying to process to two
remote processing stations, but the second station refuses to
process.
Avid DS RP licensing is processor based, not workstation-based. If the
Avid DS RP workstations are dual processor, then both RP licenses are
taken by the first RP workstation to be started and none are available for
the second RP workstation.
65
Page 66

Chapter 3 Installing the Remote Processing Software
66
Page 67

Chapter 4
Licensing Avid DS and Avid DS RP
This chapter describes how to request, install, and troubleshoot the license
file on an Avid DS workstation.
Page 68

Chapter 4 Licensing Avid DS and Avid DS RP
Requesting a License File
Avid DS and Avid DS RP v7.x require a new license file to validate the
software. This license is provided to all valid Avid DS customers and
replaces the existing license file. To run Avid DS, you must have a license
file, as well as a software protection key (Flexid dongle) connected to your
parallel port.
To request a license file:
t Open your Internet browser and go to
http://www.softimage.com/licenserequest to submit a license
request.
n
You must provide all the information requested in order to obtain your
license in a timely manner.
Avid DS Customer Service does not generate permanent licenses. However,
if your license is incorrect or if you haven’t received it within 72 hours of
your request, Customer Service can generate a limited one-week license.
Your reseller must validate the request.
68
Page 69

Softimage Licensing Program
Before licensing the Avid DS v7.x software, you must verify the version of
the Softimage Licensing program.
Creating a Valid License File
Once you have received your licensing key from Avid DS, you can create a
valid license file on your client workstation.
Softimage Licensing Program
n
To use Remote Processing, your license file must also include a floating
license. This license must be installed as a License Server on a client
workstation, not an RP workstation.
To create and validate a license file:
1. Click the Start button and choose Programs > SOFTIMAGE
Products > Licensing > LicTools.
69
Page 70

Chapter 4 Licensing Avid DS and Avid DS RP
2. Do one of the following:
- If you are creating a new license file, click the New License
button.
- If you have an existing license file and need to add the floating
license for remote processing, click the Existing License button.
3. You will normally click the Existing License button, since you want to
replace the old license with the new one you received from Avid DS.
The License File Window opens showing the existing license file
name.
4. Select SoftImage(.lic) and click the Open button.
The FLEXlm License File dialog box is displayed.
5. If your file doesn’t look similar to the one below (DS key on top,
Existing server lines and then RP key), edit it to make sure you place
the keys in the positions shown in the following file.
70
Page 71

Node-lock
license text
Existing
server lines
Floating
license text
Creating a Valid License File
6. Copy and paste the node-lock license text (the new license you
received from Avid for the client workstation) from the licensing email before the existing SERVER lines.
7. Copy and paste the floating license (RP licenses if you have ordered
them) text after the SERVER lines.
71
Page 72

Chapter 4 Licensing Avid DS and Avid DS RP
8. Click the Validate button and check the Log Information dialog box:
- If no error is reported, save and close the license file.
- If there are reported errors, check the FLEXlm License File
window for typos in the license text. If you cannot locate the
source of the problem, contact Avid DS Customer Service.
Solving Licensing Problems
Before you can start Avid DS, your system needs a software protection key
(dongle) and a license file. If the dongle identification number matches the
information in the license file, Avid DS will start.
If the licensing components are not properly set up, Avid DS will not start
and an error message is displayed. If this occurs, try the following
troubleshooting steps or refer to the Troubleshooting section of the
Avid DS Nitris Drivers CD. If startup problems persist, contact your
reseller.
72
To verify that the dongle is properly installed on a Windows XP
workstation:
1. Make sure that the dongle is attached to the base unit's parallel port
(LPT1) and secured with the locking screws—see the Avid DS Nitris
DNA Setup Guide.
2. Click the Start button, and select Programs > Accessories > System
tools > System information.
The System Information window is displayed.
Page 73

Solving Licensing Problems
3. Use the tree (left) to navigate to the System Tools > System
Information > Software Environment > Drivers folder.
4. Scroll down the list until you find the Parallel, DS1410D, and
Sentinel devices, and verify the following for each device:
- State: Running
- Status: OK
To verify the environment setting for the license file:
1. Click the Start button and select Settings > Control Panel.
2. Double-click System.
The System Properties dialog box is displayed.
3. Select the Advanced tab and click the Environment Variables button.
The Environment Variables dialog box is displayed.
4. From the System Variables list, select LM_LICENSE_FILE.
Its value should be: C:\Softimage\Flexlm\Licenses\Softimage.lic.
5. If it is not, click Edit.
The Edit System Variable dialog box is displayed.
73
Page 74

Chapter 4 Licensing Avid DS and Avid DS RP
6. Enter the following path in the Variable Value text box:
Avid DS: C:\Softimage\Flexlm\Licenses\Softimage.lic.
Avid DS RP: 744@”[enter license_server_name or IP address]”
7. Click OK.
8. In the Environment Variable dialog box, click OK.
9. In the System Properties dialog box, click OK to finish.
74
Page 75

Chapter 5
Managing Your Workstations
This chapter describes your Avid DS workstation and provides general
guidelines on its maintenance and administration with the Windows XP
operating system.
If you need to uninstall Avid DS or any of its components, see
“Uninstalling Avid DS” on page 49.
Page 76

Chapter 5 Managing Your Workstations
Managing User Accounts
Avid DS makes full use of the Windows XP operating system. This
includes multiple user accounts with your Avid DS presets, layouts, and
preferences preserved on an individual basis.
When you log on to a Windows XP workstation, you are accessing an
environment associated with your user name. When you set any personal
or project preferences while logged on, Avid DS saves them to your user
profile. For example, when you customize the Avid DS desktop, the
layouts that you create are saved with your user name. The next time you
log on to that workstation, it recalls your previous settings.
When you first receive your Avid DS system, the Windows XP operating
system is already installed, and an administrator account is set up with a
blank password.
You can change your password, and create and modify user accounts by
accessing the Windows XP Computer Management console, which lets
you define security features, such as permissions, rights, accounts, user
groups, and audit policies.
Important: It is critical that you correctly identify your network
configuration prior to configuring your Avid DS services. The
configuration is slightly different between a Windows workgroup or
domain network.
Account Setup for Standalone Avid DS
Your Avid DS may belong to a network even though you want to operate it
as a standalone system. Before creating user accounts, you must determine
if your workstation belongs to a Windows domain or a Windows
workgroup. Depending on what your configuration necessitates, see
“Account Management of Windows Domains” on page 77 or “Account
Management of Windows Workgroups” on page 78.
76
Page 77

If you are not connected to a network, then you simply have to log in as the
Administrator to create accounts for other users that will use Avid DS on
this workstation. You will also have to install the Microsoft Loopback
Adapter as directed below.
Account Management of Windows Domains
A domain configuration is usually most appropriate for larger facilities
where the Avid DS workstations are part of an existing corporate network.
In a domain, the Windows account management is centralized and
simplifies security configuration of all the Avid DS software components.
When an Avid DS workgroup operates within a Windows domain, do the
following:
• When setting up accounts, log on with a valid domain and user account
with local administrative privileges. i.e. <domain_name>\userid
• Each person that will use an Avid DS must be given a separate
Windows user account within the domain. For example, if the Avid DS
workgroup belongs to a domain called POST, and if Alice, Bob, and
Charlie are Avid DS Nitris operators, then the following accounts must
be created:
Managing User Accounts
POST\Alice
POST\Bob
POST\Charlie
For information on creating Windows user accounts, see “Creating
User Accounts” on page 86.
• Make sure there is a proper network connection on each workstation.
Your network administrator should perform this step.
• Create a Windows user account called DS Service within the domain
for running the Avid services. This account should be used only as an
identity for the services, and not to log into a workstation to run Avid
DS.
• Create a Windows group account called DS Users within the domain.
When choosing which users are allowed access to the services during
Setup, allow access only to DS Users—see “Creating a User Group”
on page 89.
77
Page 78

Chapter 5 Managing Your Workstations
•Add the DS Service user account to the Administrators group of all
the workstations in the Avid DS workgroup—see “Adding Users to
User Groups” on page 89.
•Add the DS Users group account to the Power Users group (or
alternatively, the Administrators group), of all workstations in the
Avid DS workgroup—see “Adding Users to User Groups” on page 89.
Once these accounts are properly configured, it becomes quite easy to add
and remove new users from the workgroup. If a new Avid DS user,
Mikayla, needs to be given access to the workgroup, then simply create a
new account (POST\Mikayla) and add this account to the DS Users group.
If an existing user, Bob, must be removed from the Avid DS workgroup,
then simply remove POST\Bob from the DS Users group.
Account Management of Windows Workgroups
A workgroup configuration is usually most appropriate for smaller
facilities. The only difference is that the Windows account management is
decentralized and therefore requires more complicated security
configurations for the Avid DS software components.
78
n
When an Avid DS workgroup operates within a Windows workgroup, do
the following:
• When setting up accounts, log on with the local administrator account.
For example: administrator or <computer_name>\administrator
The administrator account must have a password.
• A user account must be created for each person on each Avid DS
workstation. Each account must have the same username and password
on all workstations. For example, if the Avid DS workgroup belongs to
a Windows workgroup called POST, and if Alice, Bob, and Charlie are
Avid DS operators, then the following accounts must be created:
Alice
Bob
Charlie
Page 79

Managing User Accounts
For information on creating Windows user accounts, see “Creating
User Accounts” on page 86.
• Enter a unique name for each workstation in the workgroup—see
“Naming your Workstation” on page 80.
• Configure the network connection on each workstation—see
“Configuring the Network Connection” on page 80.
• Create a Windows user account called DS Service on each
workstation within the Avid DS workgroup for running the Avid
services. This account must have the same password on all
workstations. This account should be used only as an identity for the
services, and not to log into a workstation to run Avid DS.
• Create a Windows group account called DS Users on each
workstation within the Avid DS workgroup. When choosing which
users are allowed access to the services during Setup, allow access
only to DS Users—see “Creating a User Group” on page 89.
•Add the DS Service user account to the Administrators group on
each of the workstations in the Avid DS workgroup—see “Adding
Users to User Groups” on page 89.
•Add the DS Users group account to the Power Users group (or
alternatively, the Administrators group), on each of the workstations
in the Avid DS workgroup—see “Adding Users to User Groups” on
page 89.
If a new Avid DS user, Mikayla, needs to be given access to the
workgroup, then simply create a new account (Mikayla) on each
workstation, and add this account to the DS Users group on each
workstation.
If an existing user, Bob, must be removed from the Avid DS workgroup,
then remove Bob from the DS Users group on each workstation.
79
Page 80

Chapter 5 Managing Your Workstations
Naming your Workstation
If your workstations are members of a Windows workgroup, each
workstation should be given a unique name.
Also, it is better to give different names to the workstation, the Windows
workgroup, and the Avid DS workgroup to avoid confusion.
To set your workstation name on Windows XP:
1. Click the Start button and select Settings > Control Panel.
2. Double-click the System icon.
3. Select the Network Identification tab.
4. Click the Properties button.
5. Under Computer Name, type in a unique name for this workstation.
6. Select Member of: Workgro up.
7. For the workgroup name, type Workgro up or the name of your
company.
n
The workgroup name must be the same on all workstations.
8. Click Ok.
Configuring the Network Connection
If you are part of a Windows workgroup where there is no network cable
connected to the machine, then follow these steps to set up network
connections on each of the workstations.
n
80
If you running a standalone Avid DS Nitris workstation (that is, it is not
connected to a network) then ignore this section.
Page 81

Managing User Accounts
To configure the network connection on Windows XP:
1. On the Windows desktop, right-click the My Network Places icon and
select Properties.
The following window is displayed.
2. Right-click the Local Area Connection icon and select Properties.
n
A dialog box similar to the following is displayed.
The TCP/IP network protocol must always appear at the top of the list of
protocols.
81
Page 82

Chapter 5 Managing Your Workstations
3. Double-click the TCP/IP protocol.
4. Select Use the following IP address.
5. On a private network, do one of the following:
t Enter a valid IP address from your Internet Service Provider, such
as: 100 100 100 x (where x is a unique number for each
workstation in the Windows workgroup).
t Press the Tab key.
Important: Pressing the Tab key gives the correct Subnet Mask for the
type of IP address you are using.
6. Enter the Gateway address.
7. Click OK.
8. Repeat these steps for all workstations in the Windows workgroup.
To confirm that all workstations are part of the workgroup:
1. On the Windows desktop, right-click the My Network Places icon.
2. Click Computers Near Me.
You should see all the workstations that you just configured to be part
of the workgroup.
If not, restart the workstation to reinitialize the network adapter card.
Using Two Network Cards
If any of the workstations are configured with two active network cards,
the Avid indexing services require small modifications, so that they can
work properly.
1. Open file C:\Winnt\slp.conf with the Windows Notepad application.
2. Locate this line at the bottom of the file:
;net.slp.isBroadcastOnly = true
3. Remove the semicolon (;) character.
4. Save the file and restart the workstation to reset the indexing services.
82
Page 83

Managing User Accounts
If the Avid DS RP workstation chooses the slower network adapter for
processing, you can force Windows to use the fastest network adapter by
doing the following:
1. Open the C:\winnt\system32\drivers\etc\hosts file with the Windows
Notepad application.
2. At the bottom of the file, under the default 127.0.0.1 localhost line,
declare the fast network adapter IP Address and computer name
(example: 200.200.200.1 DS1).
3. Save the file and restart the workstation.
If that does not resolve the problem, open a Command Prompt
window, type ROUTE PRINT and press Enter.
The result should display your two network adapters’ IP addresses. If
you see only one address returned, you have a networking conflict to
resolve.
Do not use the same Subnet mask for both adapters. For example, the
following is not valid:
100.100.100.1
100.100.100.2
The following is valid:
100.100.100.1
200.200.200.1
Sharing Folders and Setting Permissions
The Avid DS Setup program will create folders to hold both project data
and media files. By default, these folders will inherit security permissions
from their parent folder. In a default installation, these folders are
automatically shared, and the default permissions give full access to
everyone.
83
Page 84

Chapter 5 Managing Your Workstations
These permissions may be changed as needed:
Shared folder Shared path Description
DS_Projects F:\DS Projects\DS_v7.0 Avid DS Nitris project folder
ds_video D:\VideoStorage Avid DS Nitris video media
storage
ds_audio F:\AudioStorage
Avid DS Nitris audio media
storage
If a user creates new media folders or stores project data in other folders,
then Avid DS automatically shares those folders. The share permissions
and security of these folders should also be verified.
For media and project folders, if permissions are not set properly on the
share or the folder, you will get an error message.
To share folders and set permissions on a computer that is part of a
Windows domain:
1. In Windows Explorer, right-click the folder and select Sharing and
Security.
2. In the Sharing tab, click the Permissions button.
3. Add the user that runs the Project Indexer and allow full control.
To share folders and set permission on a computer that is part of a
Windows workgroup:
1. Right-click the folder and select Properties.
84
2. In the Network sharing and security box, select the Share this folder on
the network option.
3. Enter the Share name.
4. Select the Allow network users to change my files option.
5. Click Apply and OK.
Page 85

Managing User Accounts
w
Do not store or create projects outside of an existing DS Projects
folder. e.g.
F:\DS Projects\projects is valid
F:\DS Projects\DS_v7.0\projects is valid (this is the default)
F:\projects is not valid
Additionally, the Avid Project Indexer does not allow a shared project
folder to reside within another shared project folder. You will get an
error message from the indexer if you do so.
85
Page 86

Chapter 5 Managing Your Workstations
Creating User Accounts
When creating user accounts, make note of whether your workstation is
part of a Windows workgroup or domain network.
• If it is part of a Windows workgroup, log on with the local
administrator account. For example:
administrator or computer_name\administrator
n
The administrator account must have a password.
• If it is part of a Windows domain, log on with a valid domain and user
account with local administrative privileges. For example:
domain_name\userid
To create a user account:
1. On the Windows desktop, right-click the My Computer icon and
select Manage.
86
Page 87

Managing User Accounts
2. Use the tree (left) to navigate to System Tools > Local Users and
Groups > Users.
3. From the Action menu, select New User.
4. Enter the new user information and click the Create button.
5. Repeat step 4 until you’re finished adding new users and click the
Close button.
The new user accounts are displayed in the Computer Management
console.
87
Page 88

Chapter 5 Managing Your Workstations
To modify an account:
1. In the Computer Management console, navigate to System Tools >
Local Users and Groups > Users.
2. Double-click the user account you want to edit.
The Properties dialog box for this user account is displayed.
88
n
3. Select the General tab to specify password options.
4. Select the Member Of tab to add the user to groups.
All Avid DS users must be members of the Administrators group.
5. Select the Profile tab to specify and edit user profiles and logon
scripts.
6. Click OK when you’re finished.
Page 89

Creating a User Group
To create a user group:
1. On the Windows desktop, right-click the My Computer icon and select
Manage.
2. Use the tree (left) to navigate to System Tools > Local Users and
Groups.
3. Right-click the Groups folder and select New Group.
4. Enter the new group information and click the Create button.
5. Click the Close button.
Adding Users to User Groups
To add a user to a group:
1. From the <username> Properties dialog box, select the Member Of
tab.
Managing User Accounts
The following is displayed.
89
Page 90

Chapter 5 Managing Your Workstations
2. Click the Add button.
The Select Groups dialog box is displayed.
3. In the upper pane, select the group to which you want to add the user
and click the Add button.
90
- All users must be set up as Administrators in Windows XP, so that
they can use Avid DS.
-The DS Service user account must also be added to the
Administrators group on each of the workstations in the Avid DS
workgroup.
4. Click OK.
5. In the <username> Properties dialog box, click OK.
To delete an account:
1. In the Computer Management console, navigate to System Tools >
Local Users and Groups > Users.
2. Right-click an account and select Delete.
Page 91

Managing the Avid Services
If you need to change the controller workstation in your Avid workgroup,
or start or stop the services on any of the workstations, you can easily
manage this from the services’ configuration utilities.
To check if the Avid services are enabled:
1. Right-click the My Computer icon on your desktop, and select
Manage.
2. In the Computer Management console, expand the Services and
Applications branch in the tree, and select Services.
All your system services are displayed on the right.
Managing the Avid Services
3. Verify that the Status column shows “Started” for the service in
question.
If the field is empty, the service is not enabled.
To start a service:
t Right-click the Status field and select Start.
To stop a service:
t Right-click the Status field and select Stop.
91
Page 92

Chapter 5 Managing Your Workstations
Restarting a Workgroup
When restarting workstations in an Avid DS workgroup, it is always good
practice to start the controller workstation first. Once it is running, then
others may be started.
If the controller workstation is restarted, then one or more of the other
client workstations may not remain connected to the Avid DS workgroup,
and as a result, may cause access errors to occur. If this happens, restart the
workstation in question.
Creating a New Workgroup
When you create an Avid DS workgroup, you also need to create a new
controller.
To make a new controller workstation:
1. Install the necessary components on the workstation—see “Installing
Avid DS” on page 26.
92
2. During the Avid DS Workgroup Configuration, select Create a new
Avid DS workgrou p , and enter a new workgroup name.
3. Select Enable/Disable this workstation as the controller of the
Avid DS workgrou p .
4. Continue with the setup as directed.
You now have a new controller and workgroup. All other workstations
that will be using this controller will now have to connect to it. For
more information, see “Connecting Other Workstations in the
Workgroup to the Controller” on page 94.
Page 93

Managing the Avid Services
Turning an Existing Client Workstation into a Controller
To turn a client into a controller:
1. From current controller workstation go to the Start menu, choose All
Programs > Avid Products > Avid DS 7.0 > Configure DS
Workg roup.
2. Select Create or join a different workgroup.
3. Select have this workstation work separately from others.
4. Click the Next button.
5. Enter a temporary name (example: Workgroup_Temp1) and click
Next.
6. Enter your user account and password and click Next.
7. Click the Next button.
8. From the client workstation, follow step 1 to step 7.
n
n
For step 5, use a different temporary name (example: Workgroup_Temp2)
Wait for 2 minutes for the service location protocol to be refreshed.
9. From the client workstation, follow step 1 and 2.
10. Select create a new DS workgroup for sharing, exchanging and
collaborating and click Next.
11. Enter the original workgroup name.
12. Enter your user account and password and click Next.
13. Click the Next button.
14. From the previous controller workstation, follow step 1 and 2.
15. Select allow this workstation to share, exchange, and collaborate
with those other workstations and click Next.
93
Page 94

Chapter 5 Managing Your Workstations
16. Select your DS workgroup.
17. Enter your user account and password and click Next.
You now have a new controller and workgroup. All other workstations
that will be using this controller will now have to connect to it. For
more information, see “Connecting Other Workstations in the
Workgroup to the Controller” on page 94.
Connecting Other Workstations in the Workgroup to the Controller
To connect other workstations in the workgroup to the controller:
1. Click the Start button and select Programs > Avid Products > Avid
7.0 > Configure DS Workgroup.
2. Select Configure workgroup.
3. Select Create or join a different DS Workgroup.
4. Click the Next button.
94
5. Select allow this workstation to share, exchange, and collaborate
with those other workstations.
6. Click the Next button.
7. Join an existing workgroup and click Next to continue.
8. Do this for all workstations in the workgroup.
Page 95

Chapter 6
Managing Your Storage Areas
This chapter contains information on the storage connected to your Avid
DS workstation and/or workgroup. It provides guidelines on the
configuration and maintenance of your storage areas.
Page 96

Chapter 6 Managing Your Storage Areas
About your Local Storage Area
Your Avid DS workstation includes a tower base unit and a disk array. All
software, projects, and audio media are stored on the disk drive in the base
unit, while the video media is stored on the drives in the disk array.
Base unit Disk array
C: and F:
drives
Depending on the storage choices that were made when your workstation
was installed, several folders were created to hold various system files,
project files, as well as media and cache files.
D: drive
96
Folder Description Location
\DS_v7.x Contains the files required to
run Avid DS 7.x
\DS Archives Contains information on
archived projects
\DS Projects Contains the projects,
sequences, and clips that you
create in Avid DS
\VideoStorage Contains the video media and
cache files that you capture
and bring into Avid DS
\AudioStorage Contains the audio media and
cache files that you capture
and bring into Avid DS
C:\Program Files\Avid\DS_v7.x
F:\Projects\Audio\DS Archives
F:\Projects\Audio\DS
Projects\DS_v7.x
D:\VideoStorage
F:\Projects\Audio\AudioStorage
Page 97

The DS_v7.x Folder
About your Local Storage Area
The Avid DS executable and the various .DLL files required by the
application are in the C:\Program files\Avid\DS_v7.x folder.
w
Do not move or modify any of the folders in the \DS_v7.x folder.
The \DS_v7.x folder contains the following folders:
Folder Description
\Command
Maps
\DSPresets Contains customized effects that you can use in Avid DS when
\Help Contains all the files required to use the online help, which
\Online Library Contains Adobe Acrobat PDF files of all the Avid DS books.
\Preferences Contains the user preferences and customized layouts,
\DSSystem Contains system files
Contains the command maps for the different views and
layouts in Avid DS
creating graphics, transitions, compositing, etc.
provides task and reference information on Avid DS functions
This library is updated with every new version of Avid DS and
may be more up-to-date than the printed books.
toolbars, and key maps
The DS Archives Folder
The \DS Archives folder is used by Avid DS to keep track of
archived projects. When you archive a project, an archive log file is saved
in this folder, so that you can later restore your media. The archive log file
also contains the Avid DS version number, so you know which version you
were using when the archive was created.
Video media is always archived to tape, but alpha material of any video
media in the project is archived in the \DS Archives folder.
97
Page 98

Chapter 6 Managing Your Storage Areas
Archived audio media or archived audio cached media is stored in this
folder. Under each project archive folder, the audio (.wav) media files are
stored in a folder called Archive Media Files\audio, which contains each
audio storage ID, labelled #1, #2, and so on.
When the project is restored, these folders are copied to their
corresponding audio storages and then deleted right after.
The DS Projects Folder
The \DS Projects folder contains the projects that you create with Avid DS.
Each time you create a new project, you are prompted to select a location
for the project folder. Although you may store project folders anywhere,
it’s easier to manage projects if they’re all stored in the \DS Projects folder.
98
n
The project folder contains the clips and sequences associated with a
project. Each project folder also contains the \System folder.
Do not move, delete, or modify the contents of the \System folder.
Never manually move a project between Avid DS workstations. Use the
Archive/Restore feature of Avid DS Nitris instead.
The \System folder contains the following information:
Source models: These data structures allow Avid DS to manage the
relationship between clips, sequences, and their media. Each time you
capture media from a new source, Avid DS creates a corresponding source
model, which tracks the time span, quality, and location of the different
media files captured from that source. When you play back a clip from that
source, Avid DS consults the appropriate source model to locate the media.
Page 99

Dsprojectinfo: This file contains information about the project format and
other project preference settings. For more information on project
preferences, see “Creating a New Project” in the Avid DS Nitris Editing
Guide.
The DSPresets Folder
The \DSPresets folder contains presets, which you can use to define
effects, transitions, graphics tools, and so on. The presets that are shipped
with Avid DS are stored in this folder by default.
Avid DS also creates a \DSPresets folder in each project folder. This lets
you store user presets that are specific to a particular project with that
project. You can also specify, as part of your user preferences, locations for
your own and shared workgroup presets.
The VideoStorage Folder
The \VideoStorage folder contains individual folders for each project. Each
folder contains the video media and cache files for that project. Each
folder's name is generated by the software and is based on a unique
identification string (called a GUID) that identifies each project.
About your Local Storage Area
The AudioStorage Folder
The \AudioStorage folder contains individual folders for each project.
Each folder contains the audio media files for that project.
n
Do not delete audio or video media files or folders using Windows XP
Explorer. If you want to delete a media file, use the Purge or Delete
command in Avid DS. For more information on deleting clips and/or
purging media, see “Managing Media” on page 434 of the Avid DS Nitris
Editing Guide.
99
Page 100

Chapter 6 Managing Your Storage Areas
The DSSystem Folder
The C:\Program Files\Avid\DS_v7.x\DSSystem folder contains system
files and several folders used by Avid DS.
Folder Description
\DSSystem Contains the autosave files, viewer and test pattern
bitmaps, some critical Avid DS system files, and the
crash log. Before modifying anything in this folder,
contact Avid DS Customer Service.
\Rsrc A resource folder for the 3D database
\SoftDB Contains the 3D database used by the 3D Warp effect
Planning your Storage Locations
100
n
You can share media located on your own workstation, on other
workstations on your network, or on Avid Unity. Sharing media saves you
time and disk space as you only have to capture the media once. If other
users in your workgroup want to use the media, they can import the
sequence into their project. The controller clips will then link directly to
the associated media.
Avid DS can also share compressed and uncompressed media with
Symphony
information, see the Avid DS Nitris Conform Guide.
The limitation with sharing media is that, if the storage area is connected
across a network, there may not be sufficient bandwidth to provide realtime access to the media. However, if there is sufficient bandwidth, as with
a fibre optic cable to the Unity storage, real-time playback is possible.
In a workgroup environment, the location of your media and projects can
make quite a difference to your performance and processing times. For
instance, if you are working in isolation on a project, then having the media
on your local workstation makes for better playback of the sequences.
™
, Media Composer® and Avid Xpress® systems. For more
 Loading...