

Page 1
?
5.0 Quick Reference Card
Editing Tips
Editing Objects on the Timeline
You can directly select and edit clips,
markers, effects/activeness bars on the
timeline. Each of these give different
results when they’re manipulated. Also,
the different Ripple settings can have a
large impact on your editing.
When manipulating objects on the
timeline, the magnetism of the object
you’re dragging is attracted to other
objects in close proximity, helping you
align clips with other clips/markers. To
temporarily deactivate magnetism, press Shift as you drag an object. To completely deactivate magnetism,
click Timeline Magnetism on the NLE Tools toolbar.
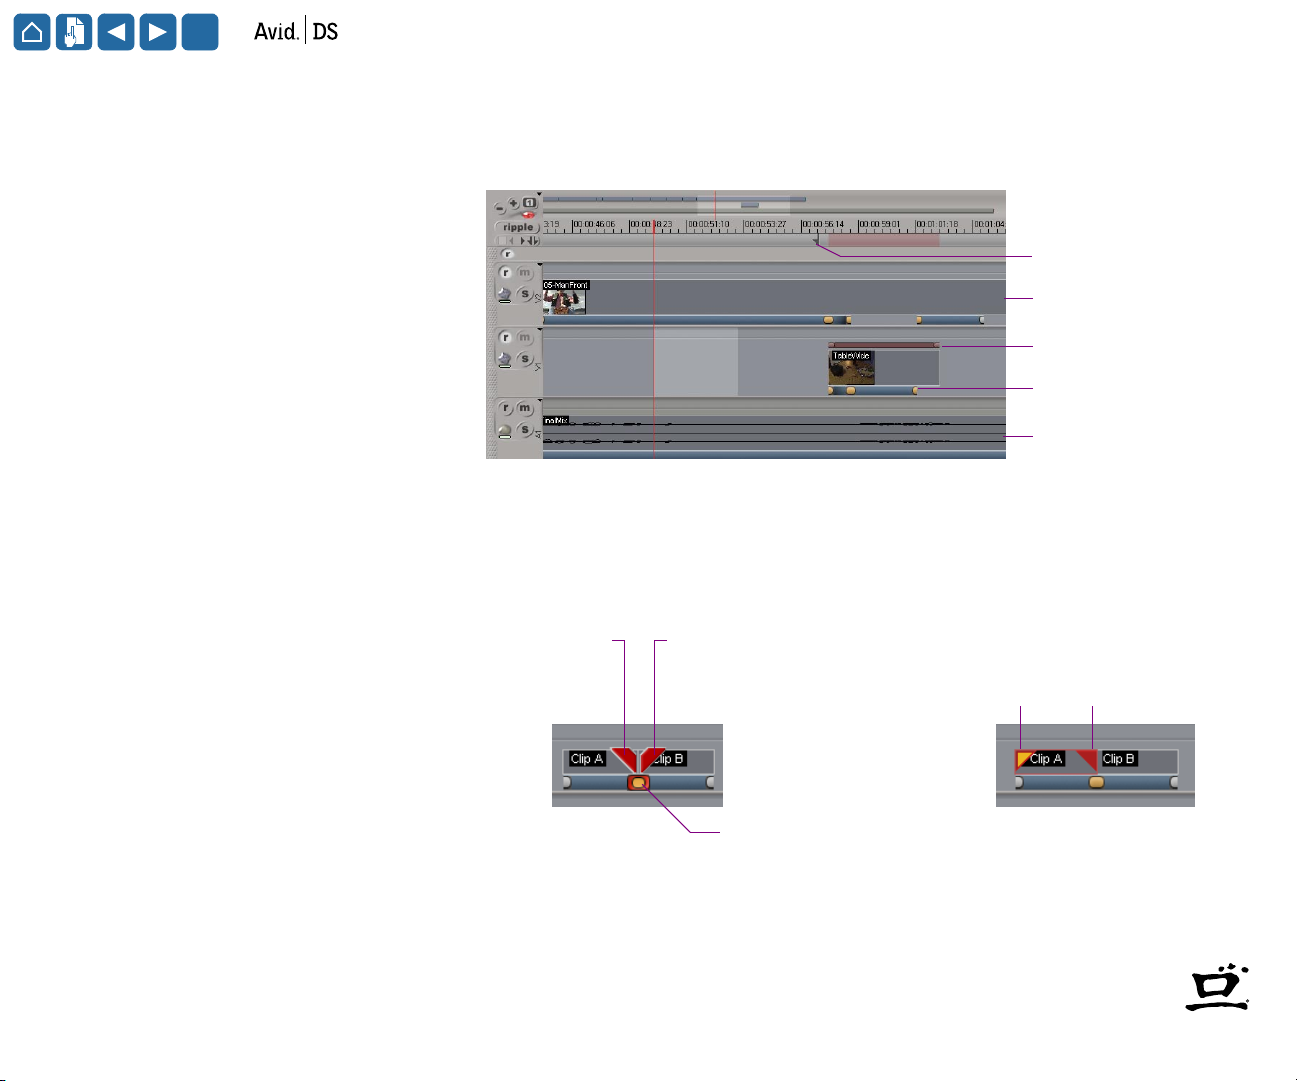
Editing Clips
Marker
Video clip
Effect bar
Activeness bar
Audio clip
Editing Tips
Each clip has elements that you
can select and edit. The trim and
edit handles let you change the
incoming or outgoing frames
and/or the recording timecodes.
Revealing Extra Material
The reveal handles let you show
extra material at the head or tail
of a clip. By default, a clip’s
unused frames are not shown.
Trim-out handle
changes the outgoing
frame on clip A
Trim-in handle
changes the incoming
frame on clip B
Edit point changes edit
time without moving clips
Reveal-in handle
shows extra frames
at head of clip A
Reveal-out handle
shows extra frames
at tail of clip A
1 of 8
Page 2
?
5.0 Quick Reference Card
Editing Tips
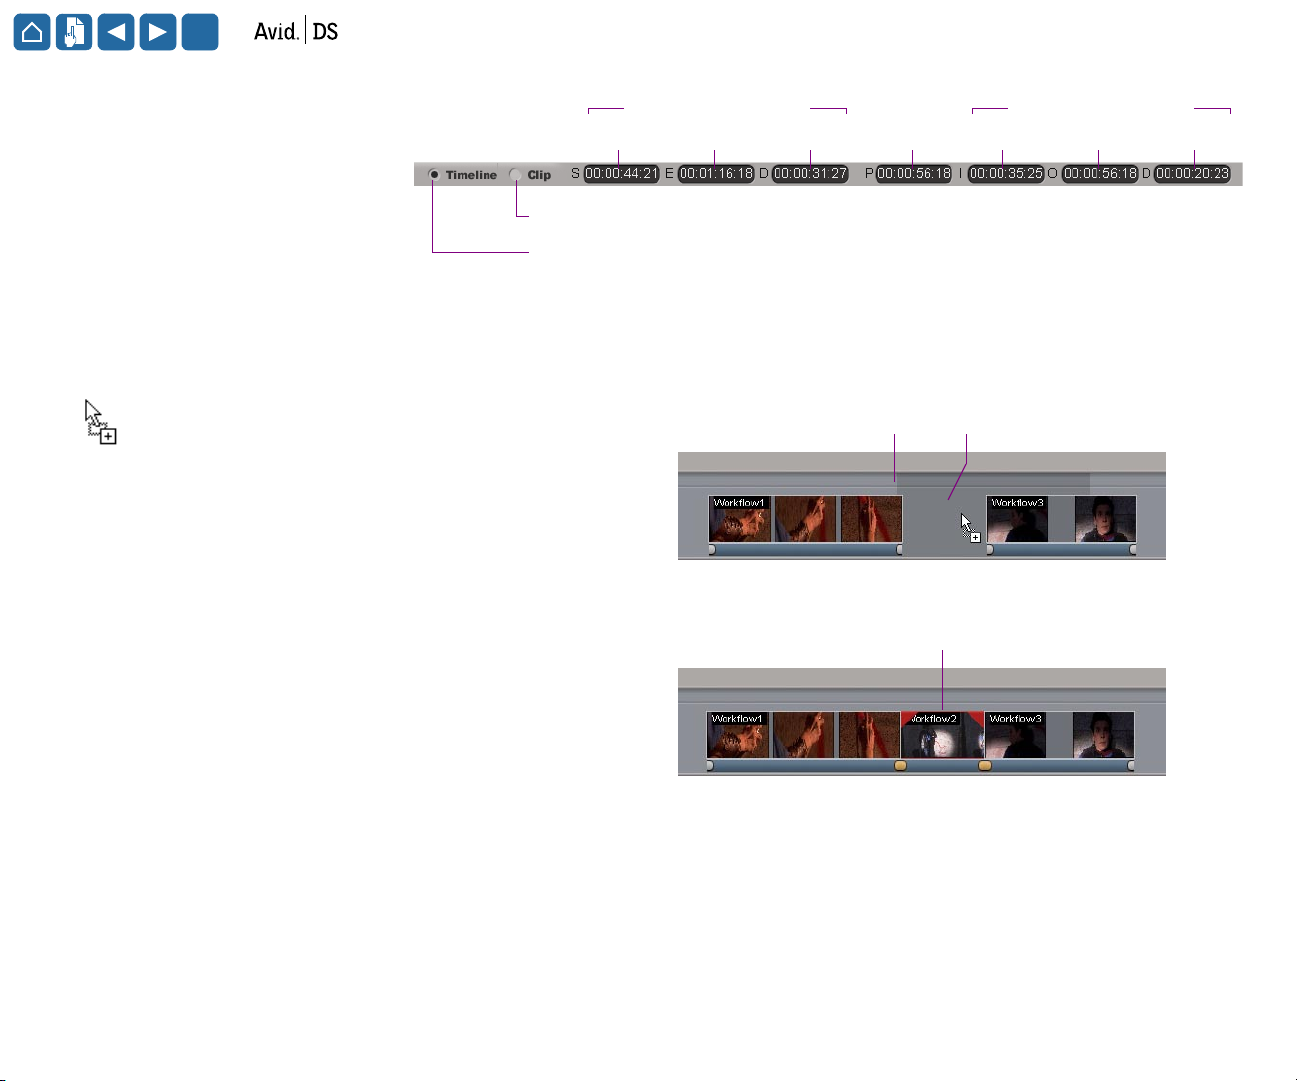
Editing Clips More Precisely
All of the above objects can be
moved by dragging them on the
timeline. You can also move/edit
them by entering values in the
timecode boxes in the status bar
Displays source timecodes of selected clip
Displays master timecodes of selected object
at the bottom of the desktop.
Placing Clips on the Tracks
Drag and drop
1. Drag a clip to the timeline.
2. Position the clip’s shadow where you want to
insert the clip.
3. Release the clip.
To place a clip on a specific track, right-click on a clip
in the browser, and drag it to the timeline. When the
Track Router dialog box is displayed, you can select
the different channels in a clip and the tracks on
which you want to place them.
For selected object Play cursor
Start
Before
After
End Duration
Insertion point Shadow of new clip
New clip fits within empty space relative to where it was positioned
Position
For in/out markers
In
Out Duration
Note: If you position the clip’s shadow over the
marker ribbon, the clip will be placed on a new track.
2 of 8
Page 3
?
5.0 Quick Reference Card
Editing Tips
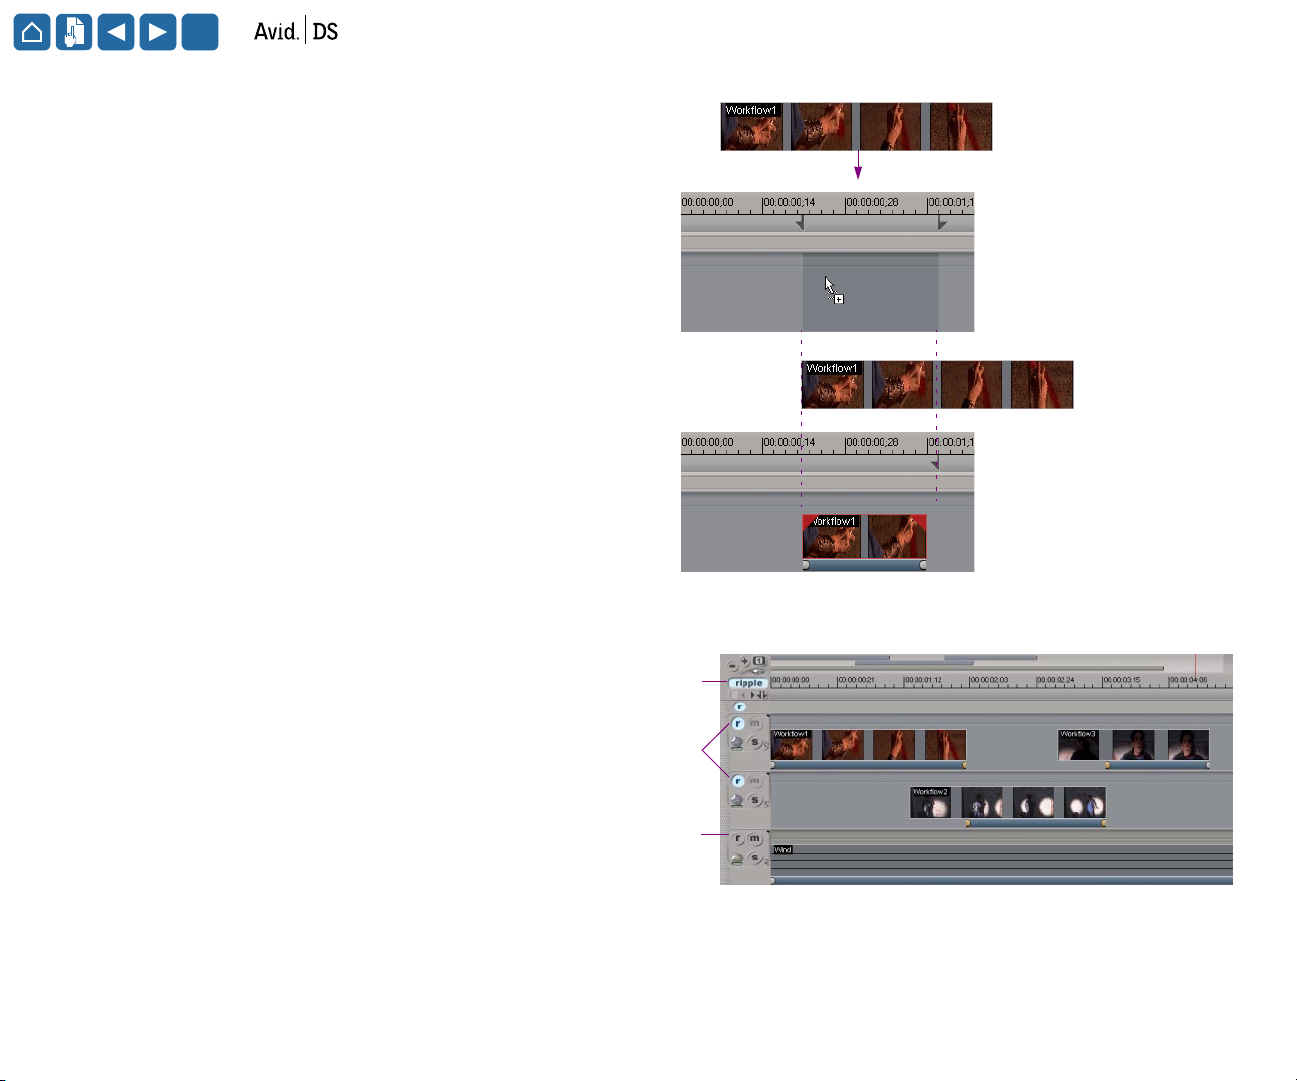
Placing Clips between Marked Points
1. Mark in and out-points on the marker ribbon.
2. Drag a clip to the timeline.
3. Position the clip’s shadow on the track, where
you want to insert the clip.
4. Release the clip.
The clip automatically becomes active between
these marked points.
Rippling
1. Click the main Ripple button in the
timeline controls, so that the clips ripple
when you place them on the timeline and
move them around.
Main Ripple button
Before
After
Track rip p le on
Actual length of
clip to be inserted
New clip is trimmed to fit
within the marked points
2. Click the Ripple buttons of the tracks that
you want to ripple.
Track ripple off
3 of 8
Page 4

?
Moving Clips
5.0 Quick Reference Card
Editing Tips
Move clip
1. Decide if you want to turn on the Ripple mode.
2. Click a clip to select it.
The selected clip is highlighted in red.
3. Drag it right or left.
As you move the clip, it loses its activeness in areas,
where it collides with existing clips on the timeline.
Moving Clips while Preserving Their In and Out-points
Move clip with its activeness
1. Decide if you want to turn on the Ripple mode.
2. Press Shift and click a clip to select it.
Before
After
(ripple on)
After
(ripple off)
Before
Drag right
Edit point is broken
Drag right
Selected clip
Following clips
are rippled
Activeness not
affected
Clip’s activeness
is trimmed
Selected clip
Following clip(s)
are rippled
The selected clip is highlighted in blue.
3. Drag it right or left.
As you move the clip, the clips that it collides with
lose their activeness. The clip that is highlighted in
blue overwrite the activeness of other clips.
After
(ripple on)
After
(ripple off)
Edit point is broken
Activeness not
affected
The following clip’s
activeness is trimmed
Activeness not
affected
4 of 8
Page 5

?
5.0 Quick Reference Card
Moving Effects
Move effect
• Drag an effect bar to the right or left.
Before
Editing Tips
Drag right
Selecting an Edit Point
When you select a clip’s edit point, you are selecting
its in or out-point. With video clips, an edit point is
shared when one clip intersects another.
When you select an edit or trim handle, the frame at
that point is displayed in the viewer. Then, you can
watch the viewer as you drag the handle in search of
the appropriate frame.
Select all edit points regardless of media type
• Shift-click an edit point.
All edit points at that same timecode are selected
regardless of media type.
Deselecting an Edit Point
When an edit point is selected, you can turn it on or
off. This is especially useful if you want to break an
edit point, so that you can trim clips independently of
each other.
After
Shift-click to select
all edit points
Edit point
remains selected
Ctrl-click to deselect
an edit point
Effect requires reprocessing after it is moved
New position for effect
Select an
edit point
Both edit points on
connected clips
become selected
Video clips
Audio
clips
Select or deselect an edit point
• Ctrl-click an edit point to deselect or reselect it.
5 of 8
Page 6

?
Trimming Clips
5.0 Quick Reference Card
Trimming Clips
Revealing Extra Material
When trimming clips, it’s helpful to know how much material is
available at the head or tail of a clip. You can see any extra frames by
using the Display Unused Material mode.
1. Right-click on the marker ribbon and choose
Display > Display Unused Material.
2. Drag the reveal handles of a clip to view any extra material.
Trimming Edit Points
An edit point is the time at which a cut or transition
occurs. When you trim the edit point, you are changing
the in or out recording time for the clip.
Note: It does not matter if the Ripple mode is on or off.
1. Click an edit point to display its edit handles.
2. Drag the edit point left or right to add or remove
framesatthatpoint.
Trimming Intersecting Edit Points
When you trim the intersecting edit point between two
clips, it reveals more frames on one clip and hides frames
on the other.
Before
After
More frames are being used at the beginning of the clip
Before
Trimming intersecting edit point to the right
After
Select and drag a reveal handle
Actual clip length
Frames that are currently being used (active)
Trimming edit point to the left
1. Click an intersecting edit point to display its edit handles.
2. Drag the edit point left or right to adjust the time of the edit.
6 of 8
Page 7

?
5.0 Quick Reference Card
Trimming the In-point
Trim i n -po i nt
1. Decide if you want to activate the Ripple mode.
2. Select the trim-in handle and drag left or right.
(Ripple on) Subsequent clips on the timeline
ripple accordingly.
(Ripple off) All subsequent edit points are
preserved.
Before
After
(Ripple on)
Trimming Clips
Trim left or right
Trim left—Outgoing frame of first clip is kept
Trim right—All subsequent clip(s) ripple
Trim left
After
(Ripple off)
Trim right
When trimming right or left, the edit point
remains fixed on timeline.
7 of 8
Page 8

?
5.0 Quick Reference Card
Trimming the Out-point
Trim out-point
1. Decide if you want to activate the Ripple mode.
2. Select the trim-out handle and drag left or right.
(Ripple on) Frames are added or removed at the
out-point and subsequent clips are rippled
accordingly.
(Ripple off) Frames are added or removed at the
out-point and subsequent edit points are
preserved.
Before
After
(Ripple on)
Trimming Clips
Trim left or right
Trim left—Following clip(s) ripple backward
Trim right—Following clip(s) ripple forward
Trim left—Second clip extends as long as there is more
material available
© 1997–2001 Avid Technology, Inc. All rights reserved.
Avid and the Avid|DS Logo are registered trademarks of Avid Technology, Inc.
All other trademarks contained herein are the property of their respective owners.
Product specifications are subject to change without notice.
After
(Ripple off)
Incoming frame of second clip is kept
Trim right
When trimming left or left, the edit point
remains fixed on timeline.
8 of 8
 Loading...