

Page 1

Avid® DS v10.3
Install Guide
Page 2

Legal Notices
Product specifications are subject to change without notice and do not represent a commitment on the part of Avid Technology,
Inc.
The software described in this document is furnished under a license agreement. You can obtain a copy of that license by
visiting Avid's Web site at www.avid.com. The terms of that license are also available in the product in the same directory as
the software. The software may not be reverse assembled and may be used or copied only in accordance with the terms of the
license agreement. It is against the law to copy the software on any medium except as specifically allowed in the license
agreement.
This document is protected under copyright law. An authorized licensee of Avid DS may reproduce this publication for the
licensee’s own use in learning how to use the software. This document may not be reproduced or distributed, in whole or in
part, for commercial purposes, such as selling copies of this document or providing support or educational services to others.
This document is supplied as a guide for [product name]. Reasonable care has been taken in preparing the information it
contains. However, this document may contain omissions, technical inaccuracies, or typographical errors. Avid Technology,
Inc. does not accept responsibility of any kind for customers’ losses due to the use of this document. Product specifications
are subject to change without notice.
Copyright © 2010 Avid Technology, Inc. and its licensors. All rights reserved.
The following disclaimer is required by Paradigm Matrix:
Portions of this software licensed from Paradigm Matrix.
The following disclaimer is required by Ray Sauers Associates, Inc.:
“Install-It” is licensed from Ray Sauers Associates, Inc. End-User is prohibited from taking any action to derive a source code
equivalent of “Install-It,” including by reverse assembly or reverse compilation, Ray Sauers Associates, Inc. shall in no event be
liable for any damages resulting from reseller’s failure to perform reseller’s obligation; or any damages arising from use or
operation of reseller’s products or the software; or any other damages, including but not limited to, incidental, direct, indirect,
special or consequential Damages including lost profits, or damages resulting from loss of use or inability to use reseller’s
products or the software for any reason including copyright or patent infringement, or lost data, even if Ray Sauers Associates
has been advised, knew or should have known of the possibility of such damages.
The following disclaimer is required by Videomedia, Inc.:
“Videomedia, Inc. makes no warranties whatsoever, either express or implied, regarding this product, including warranties with
respect to its merchantability or its fitness for any particular purpose.”
“This software contains V-LAN ver. 3.0 Command Protocols which communicate with V-LAN ver. 3.0 products developed by
Videomedia, Inc. and V-LAN ver. 3.0 compatible products developed by third parties under license from Videomedia, Inc. Use
of this software will allow “frame accurate” editing control of applicable videotape recorder decks, videodisc recorders/players
and the like.”
The following disclaimer is required by Altura Software, Inc. for the use of its Mac2Win software and Sample
Source Code:
©1993–1998 Altura Software, Inc.
The following disclaimer is required by Interplay Entertainment Corp.:
The “Interplay” name is used with the permission of Interplay Entertainment Corp., which bears no responsibility for Avid
products.
This product includes portions of the Alloy Look & Feel software from Incors GmbH.
This product includes software developed by the Apache Software Foundation (http://www.apache.org/).
© DevelopMentor
This product may include the JCifs library, for which the following notice applies:
JCifs © Copyright 2004, The JCIFS Project, is licensed under LGPL (http://jcifs.samba.org/). See the LGPL.txt file in the Third
Party Software directory on the installation CD.
Avid Interplay contains components licensed from LavanTech. These components may only be used as part of and in
connection with Avid Interplay.
2
Page 3

Legal Notices
Attn. Government User(s). Restricted Rights Legend
U.S. GOVERNMENT RESTRICTED RIGHTS. This Software and its documentation are “commercial computer software” or
“commercial computer software documentation.” In the event that such Software or documentation is acquired by or on behalf
of a unit or agency of the U.S. Government, all rights with respect to this Software and documentation are subject to the terms
of the License Agreement, pursuant to FAR §12.212(a) and/or DFARS §227.7202-1(a), as applicable.
Trademarks
003, 192 Digital I/O, 192XD I/O, 888 I/O, AirPlay, AirSPACE, AirSPACE HD, AirSpeed, ALEX, Alienbrain, AniMatte,
AudioMarket, AudioPages, AudioSuite, AudioVision, AutoSync, Avid, Avid Advanced Response, Avid DNA, Avid DNxcel,
Avid DNxHD, AVIDdrive, Avid DS Assist Station, Avid EditStar, Avid Learning Excellerator, Avid Liquid,
Avid Liquid Chrome Xe, Avid MEDIArray, Avid Mojo, AvidNet, AvidNetwork, Avid NewStar, Avid Remote Response,
AVIDstripe, Avid Unity, Avid Unity ISIS, Avid VideoRAID, Avid Xpress, AVoption, AVX, Beauty Without The Bandwidth, Boom,
C|24, CaptureManager, ChromaCurve, ChromaWheel, Command|24, Conectiv, CountDown, DAE, Dazzle,
Dazzle Digital Video Creator, Deko, DekoCast, D-Fi, D-fx, DigiDelivery, Digidesign, Digidesign Audio Engine,
Digidesign Intelligent Noise Reduction, DigiDrive, DigiLink, DigiMeter, DigiSerial, DigiStudio, DigiStudio Control,
Digital Nonlinear Accelerator, DigiTranslator, DINR, DNxchange, do more, DVD Complete, D-Verb, Eleven, Equinox,
EveryPhase, ExpertRender, Fastbreak, Fast Track, FieldPak, Film Composer, FilmScribe, Flexevent, FluidMotion, FXDeko,
G7, G-Rack, HD Core, HD Process, HDPack, HYBRID, HyperControl, HyperSPACE, HyperSPACE HDCAM, IllusionFX,
Image Independence, iNEWS, iNEWS Assign, iNEWS ControlAir, Instantwrite, Instinct,
Intelli-sat Broadcasting Recording Manager, Intelli-Sat, InterFX, Interplay, inTONE, Intraframe, iS9, iS18, iS23, iS36, ISIS,
IsoSync, KeyRig, KeyStudio, LaunchPad, LeaderPlus, Lightning, ListSync, Lo-Fi, Magic Mask, Make Anything Hollywood,
make manage move | media, Marquee, M-Audio, M-Audio Micro, Maxim, Mbox, MCXpress, Media Browse, Media Composer,
MediaDock, MediaDock Shuttle, Media Fusion, Media Illusion, MediaLog, Media Reader, Media Recorder, MEDIArray,
MediaShare, MediaStream, Media Suite, Meridien, MetaFuze, MetaSync, MicroTrack, Midiman, MissionControl, Mix Rack,
MixLab, Moviebox, Moviestar, NaturalMatch, Nearchive, NetReview, NewsCutter, Nitris, NRV-10 interFX, Octane, OMF,
OMF Interchange, OMM, OnDVD, Open Media Framework, Open Media Management, Palladium, Pinnacle,
Pinnacle DistanTV, Pinnacle Geniebox, Pinnacle HomeMusic, Pinnacle MediaSuite, Pinnacle Mobile Media, Pinnacle Studio,
Pinnacle Studio MovieBoard, Pinnacle Systems, ProEncode, ProServices, ProSessions, Pro Tools, QuietDrive, Recti-Fi,
Reel Tape Delay, Reel Tape Flanger, Reel Tape Saturation, RetroLoop, rS9, rS18, Salesview, Sci-Fi, Scorch, Scorefitter,
ScriptSync, SecureProductionEnvironment, Session, Show Center, Sibelius, SIDON, Soft SampleCell, Soft-Clip Limiter,
Sound Designer II, SPACE, SPACEShift, SpectraGraph, SpectraMatte, Sputnik, Starplay, SteadyGlide, Streamfactory,
Streamgenie, StreamRAID, Strike, Structure, Studiophile, SubCap, Sundance Digital, Sundance, Symphony, SYNC HD,
SynchroScience, SynchroScope, Syntax, TDM FlexCable, Thunder, Titan, Titansync, TL Aggro, TL AutoPan, TL Drum Rehab,
TL Everyphase, TL Fauxlder, TL In Tune, TL MasterMeter, TL Metro, TL Space, TL Utilities, Torq, Torq Xponent, Transfuser,
Trigger Finger, Trillium Lane Labs, TruTouch, UnityRAID, Vari-Fi, Velvet, Venom, VideoRAID, Video Slave Driver, VideoSPACE,
VideoSpin, Vortx, Xdeck, X-Form, Xmon, Xponent, and X-Session are either registered trademarks or trademarks of Avid
Technology, Inc. in the United States and/or other countries.
Adobe and Photoshop are either registered trademarks or trademarks of Adobe Systems Incorporated in the United States
and/or other countries. Apple and Macintosh are trademarks of Apple Computer, Inc., registered in the U.S. and other
countries. Windows is either a registered trademark or trademark of Microsoft Corporation in the United States and/or other
countries. All other trademarks contained herein are the property of their respective owners.
GOT FOOTAGE?
Editors — Filmmakers — Special Effects Artists — Game Developers — Animators — Educators — Broadcasters — Content
creators of every genre — Just finished an incredible project and want to share it with the world?
Send us your reels and we may use your footage in our show reel or demo!*
For a copy of our release and Avid’s mailing address, go to www.avid.com/footage.
*Note: Avid cannot guarantee the use of materials submitted.
Avid DS Install Guide • 0130-30043-02 Rev A • January 2010
3
Page 4

4
Page 5

Using This Guide
Congratulations on your purchase of an Avid® DS system. You can use your system to create
broadcast-quality output incorporating every possible production element from full-speed,
high-resolution footage, multimedia artwork and animation, to computer-generated effects
and titling.
This guide is intended for system administrators who are involved in installing and
configuring Avid DS.
The material in this document applies to the Windows
The documentation describes the features and hardware of all models. Therefore, your
n
system might not contain certain features and hardware that are covered in the
documentation.
Symbols and Conventions
Avid documentation uses the following symbols and conventions:
Symbol or Convention Meaning or Action
®
operating system.
n
c
> This symbol indicates menu commands (and subcommands) in the
Bold font Bold font is primarily used in task instructions to identify user interface
Italic font Italic font is used to emphasize certain words and to indicate variables.
A note provides important related information, reminders,
recommendations, and strong suggestions.
A caution means that a specific action you take could cause harm to
your computer or cause you to lose data.
order you select them. For example, File > Import means to open the
File menu and then select the Import command.
This symbol indicates a single-step procedure. Multiple arrows in a list
indicate that you perform one of the actions listed.
items and keyboard sequences.
Page 6

Symbol or Convention Meaning or Action
Courier Bold font
Ctrl+key or mouse action Press and hold the first key while you press the last key or perform the
If You Need Help
If you are having trouble using Avid DS:
1. Retry the action carefully following the instructions given for that task in this guide. It is
especially important to check each step of your workflow.
2. Check the latest information that might have become available after the documentation
was published:
t If release notes are available, they ship with the application.
t If ReadMe files are available, they are supplied on your Avid DS installation DVD,
the Avid DS application folder, or online.
Always check online for the most up-to-date release notes or ReadMe because the
online version is updated whenever new information becomes available. To vi ew
these online versions go to www.avid.com/readme.
3. Check the documentation that came with your Avid application or your hardware for
maintenance or hardware-related issues.
Courier Bold font identifies text that you type.
mouse action. For example, Command+Option+C or Ctrl+drag.
4. Visit the online Knowledge Base at www.avid.com/onlinesupport. Online services are
available 24 hours per day, 7 days per week. Search this online Knowledge Base to find
answers, to view error messages, to access troubleshooting tips, to download updates,
and to read or join online message-board discussions.
Avid Training Services
Avid makes lifelong learning, career advancement, and personal development easy and
convenient. Avid understands that the knowledge you need to differentiate yourself is always
changing, and Avid continually updates course content and offers new training delivery
methods that accommodate your pressured and competitive work environment.
To learn about Avid's new online learning environment, Avid Learning Excellerator™
(ALEX), visit learn.avid.com.
6
Page 7

Avid Training Services
For information on courses/schedules, training centers, certifications, courseware, and
books, please visit www.avid.com/training or call Avid Sales at 800-949-AVID
(800-949-2843).
7
Page 8

8
Page 9

Contents
Legal Notices . . . . . . . . . . . . . . . . . . . . . . . . . . . . . . . . . . . . . . . . . . . . . . . . . . . . . . . 2
Using This Guide . . . . . . . . . . . . . . . . . . . . . . . . . . . . . . . . . . . . . . . . . . . . . 5
Symbols and Conventions . . . . . . . . . . . . . . . . . . . . . . . . . . . . . . . . . . . . . . . . . . . . . 5
If You Need Help. . . . . . . . . . . . . . . . . . . . . . . . . . . . . . . . . . . . . . . . . . . . . . . . . . . . . 6
Avid Training Services . . . . . . . . . . . . . . . . . . . . . . . . . . . . . . . . . . . . . . . . . . . . . . . . 6
Chapter 1 Installing your Avid DS Environment. . . . . . . . . . . . . . . . . . . . . . . . . . . . 15
Installing Avid DS Workstations . . . . . . . . . . . . . . . . . . . . . . . . . . . . . . . . . . . . . . . . 15
Installing a Standalone Avid DS Workstation . . . . . . . . . . . . . . . . . . . . . . . . . . . 16
Installing Multiple Workstations in an Avid DS Workgroup. . . . . . . . . . . . . . . . . 16
Checklist: Preparing a New Avid DS Workstation. . . . . . . . . . . . . . . . . . . . . . . . . . . 18
Checklist: Installing a Standalone Workstation . . . . . . . . . . . . . . . . . . . . . . . . . . . . . 20
Checklist: Installing Multiple Workstations . . . . . . . . . . . . . . . . . . . . . . . . . . . . . . . . 22
Checklist: Installing the Controller . . . . . . . . . . . . . . . . . . . . . . . . . . . . . . . . . . . 22
Checklist: Installing Avid DS on the Appropriate Workstations . . . . . . . . . . . . . 22
Checklist: Installing Avid DS RP on the Appropriate Workstations . . . . . . . . . . 24
Upgrading Existing Avid DS Workstations . . . . . . . . . . . . . . . . . . . . . . . . . . . . . . . . 25
Checklist: Preparing your Workstation for an Upgrade . . . . . . . . . . . . . . . . . . . 25
Checklist: Upgrading a Standalone Avid DS Workstation . . . . . . . . . . . . . . . . . 26
Checklist: Upgrading a Workgroup with Multiple Avid DS Workstations . . . . . . 27
Checklist: Removing Avid DS . . . . . . . . . . . . . . . . . . . . . . . . . . . . . . . . . . . . . . . . . . 29
Managing a Workgroup. . . . . . . . . . . . . . . . . . . . . . . . . . . . . . . . . . . . . . . . . . . . . . . 30
Adding a Workstation to a Standalone Avid DS Workstation . . . . . . . . . . . . . . . 30
Connecting Other Workstations in the Workgroup to the Controller . . . . . . . . . 31
Designating a New Controller for the Workgroup. . . . . . . . . . . . . . . . . . . . . . . . 31
Separating a Workstation from the Workgroup . . . . . . . . . . . . . . . . . . . . . . . . . 32
Starting up and Shutting down a Workgroup . . . . . . . . . . . . . . . . . . . . . . . . . . . 32
Restarting a Workgroup . . . . . . . . . . . . . . . . . . . . . . . . . . . . . . . . . . . . . . . . . . . 32
Recovering the Avid DS System . . . . . . . . . . . . . . . . . . . . . . . . . . . . . . . . . . . . . . . . 32
Running Avid DS. . . . . . . . . . . . . . . . . . . . . . . . . . . . . . . . . . . . . . . . . . . . . . . . . . . . 33
Chapter 2 Configuring Avid DS on Avid Unity . . . . . . . . . . . . . . . . . . . . . . . . . . . . . 35
9
Page 10

Configuration and Hardware Requirements. . . . . . . . . . . . . . . . . . . . . . . . . . . . . . . 35
Common Installation Scenarios for Avid DS on Avid Unity . . . . . . . . . . . . . . . . . . . 36
Installing Avid DS with Avid Unity. . . . . . . . . . . . . . . . . . . . . . . . . . . . . . . . . . . . . . . 38
Checklist: Installing Avid DS with Avid Unity . . . . . . . . . . . . . . . . . . . . . . . . . . . 38
Configuring the Avid DS Media Storage on Avid Unity MediaNetwork . . . . . . . . . . 39
Preparing to Configure Avid DS Storage . . . . . . . . . . . . . . . . . . . . . . . . . . . . . . . . . 40
Connecting an Avid DS Workstation to a Remote Avid Unity Storage . . . . . . . 41
Chapter 3 Conforming Projects in an Avid Interplay Environment. . . . . . . . . . . . . 43
Avid DS and the Avid Interplay Environment . . . . . . . . . . . . . . . . . . . . . . . . . . . . . . 43
Checklist: Setting up Avid DS in an Interplay Environment . . . . . . . . . . . . . . . . . . . 45
Configuring the Interplay Adapter. . . . . . . . . . . . . . . . . . . . . . . . . . . . . . . . . . . . . . . 46
Exporting the Finished Sequence to Avid DS via Interplay . . . . . . . . . . . . . . . . . . . 47
Importing and Opening the Sequence in Avid DS . . . . . . . . . . . . . . . . . . . . . . . . . . 47
Chapter 4 Configuring Windows XP . . . . . . . . . . . . . . . . . . . . . . . . . . . . . . . . . . . . . 51
Configuring the Network Connection . . . . . . . . . . . . . . . . . . . . . . . . . . . . . . . . . . . . 51
Using Two Network Cards. . . . . . . . . . . . . . . . . . . . . . . . . . . . . . . . . . . . . . . . . 53
Installing the Microsoft Loopback Adapter on a Standalone Station . . . . . . . . . . . . 53
Managing Microsoft Windows Workgroup Accounts . . . . . . . . . . . . . . . . . . . . . . . . 54
Naming a Workstation . . . . . . . . . . . . . . . . . . . . . . . . . . . . . . . . . . . . . . . . . . . . 55
Managing Microsoft Windows Domain Accounts . . . . . . . . . . . . . . . . . . . . . . . . . . . 56
Sharing Folders and Setting Permissions . . . . . . . . . . . . . . . . . . . . . . . . . . . . . . . . 57
Sharing Folders in a Windows Workgroup . . . . . . . . . . . . . . . . . . . . . . . . . . . . 57
Storing Projects . . . . . . . . . . . . . . . . . . . . . . . . . . . . . . . . . . . . . . . . . . . . . . . . . 58
Sharing Folders in a Windows Domain . . . . . . . . . . . . . . . . . . . . . . . . . . . . . . . 58
Creating User Accounts . . . . . . . . . . . . . . . . . . . . . . . . . . . . . . . . . . . . . . . . . . 59
Chapter 5 Installing Avid DS Software and Services . . . . . . . . . . . . . . . . . . . . . . . . 63
Installing Avid DS Software Components. . . . . . . . . . . . . . . . . . . . . . . . . . . . . . . . . 64
Uninstalling Avid DS . . . . . . . . . . . . . . . . . . . . . . . . . . . . . . . . . . . . . . . . . . . . . 64
Installing Avid DS Software on a Standalone Workstation . . . . . . . . . . . . . . . . 65
Installing Avid DS in a Workgroup. . . . . . . . . . . . . . . . . . . . . . . . . . . . . . . . . . . 69
Installing the Avid DS Workgroup Controller . . . . . . . . . . . . . . . . . . . . . . . . . . . 73
The Avid DS Support Console . . . . . . . . . . . . . . . . . . . . . . . . . . . . . . . . . . . . . . . . . 78
Installing Avid Interplay Media Services and Related Applications . . . . . . . . . . . . . 79
10
Page 11

Uninstalling Avid DMS Broker v2.1 . . . . . . . . . . . . . . . . . . . . . . . . . . . . . . . . . . 80
Uninstalling DMS Broker v5.0 . . . . . . . . . . . . . . . . . . . . . . . . . . . . . . . . . . . . . . 80
Installing Internet Information Services . . . . . . . . . . . . . . . . . . . . . . . . . . . . . . . . . . . 81
Installing Microsoft .Net Framework 1.1 . . . . . . . . . . . . . . . . . . . . . . . . . . . . . . . . . . 81
Installing Java Runtime Environment . . . . . . . . . . . . . . . . . . . . . . . . . . . . . . . . . . . . 82
Installing Microsoft SQL Server. . . . . . . . . . . . . . . . . . . . . . . . . . . . . . . . . . . . . . . . . 82
Installing Avid Interplay Media Service . . . . . . . . . . . . . . . . . . . . . . . . . . . . . . . . . . . 85
Installing Avid Interplay Media Service and Transfer Status. . . . . . . . . . . . . . . . . . . 86
Installing the Sentinel Driver . . . . . . . . . . . . . . . . . . . . . . . . . . . . . . . . . . . . . . . . . . . 87
Installing Avid MetaFuze . . . . . . . . . . . . . . . . . . . . . . . . . . . . . . . . . . . . . . . . . . . . . . 87
Installing Drivers . . . . . . . . . . . . . . . . . . . . . . . . . . . . . . . . . . . . . . . . . . . . . . . . . . . . 88
Installing and Removing the AVI Reference Codec . . . . . . . . . . . . . . . . . . . . . . . . . 89
Reinstalling Plug-Ins . . . . . . . . . . . . . . . . . . . . . . . . . . . . . . . . . . . . . . . . . . . . . . . . . 90
Installing and Removing Fonts . . . . . . . . . . . . . . . . . . . . . . . . . . . . . . . . . . . . . . . . . 91
Installing and Removing Type 1 Fonts . . . . . . . . . . . . . . . . . . . . . . . . . . . . . . . . 91
Installing and Removing TrueType Fonts. . . . . . . . . . . . . . . . . . . . . . . . . . . . . . 91
Installing Non-European Fonts . . . . . . . . . . . . . . . . . . . . . . . . . . . . . . . . . . . . . 92
Saving Avid DS System Settings . . . . . . . . . . . . . . . . . . . . . . . . . . . . . . . . . . . . . . . 94
Exporting your Preferences . . . . . . . . . . . . . . . . . . . . . . . . . . . . . . . . . . . . . . . . 94
Importing your Preferences . . . . . . . . . . . . . . . . . . . . . . . . . . . . . . . . . . . . . . . . 94
Saving your Avid DS Deck Presets . . . . . . . . . . . . . . . . . . . . . . . . . . . . . . . . . . 95
Chapter 6 Installing the Remote Processing Software . . . . . . . . . . . . . . . . . . . . . . 97
Remote Processing Concepts. . . . . . . . . . . . . . . . . . . . . . . . . . . . . . . . . . . . . . . . . . 97
Minimal Requirements for Avid DS RP Workstation . . . . . . . . . . . . . . . . . . . . . . . . 98
Optimizing Network and Remote Processing Performance . . . . . . . . . . . . . . . . 99
Optimizing CPU Usage on Avid DS RP Workstations . . . . . . . . . . . . . . . . . . . . 99
Installing Avid DS RP . . . . . . . . . . . . . . . . . . . . . . . . . . . . . . . . . . . . . . . . . . . . 100
Chapter 7 Licensing Avid DS Software . . . . . . . . . . . . . . . . . . . . . . . . . . . . . . . . . . 105
Requesting a License File. . . . . . . . . . . . . . . . . . . . . . . . . . . . . . . . . . . . . . . . . . . . 105
Installing the Registered License File . . . . . . . . . . . . . . . . . . . . . . . . . . . . . . . . . . . 105
Chapter 8 Managing Your Storage Areas . . . . . . . . . . . . . . . . . . . . . . . . . . . . . . . . 107
Planning your Storage Locations . . . . . . . . . . . . . . . . . . . . . . . . . . . . . . . . . . . . . . 107
The Avid Indexing Services . . . . . . . . . . . . . . . . . . . . . . . . . . . . . . . . . . . . . . . 107
11
Page 12

Workgroup with Private Projects and Centralized Storage . . . . . . . . . . . . . . . 108
Workgroup with Shared Projects and Storage . . . . . . . . . . . . . . . . . . . . . . . . 110
Workgroup with Shared Storage in an Avid Interplay Environment. . . . . . . . . 112
Sharing Media . . . . . . . . . . . . . . . . . . . . . . . . . . . . . . . . . . . . . . . . . . . . . . . . . . . . 115
Sharing MXF Media. . . . . . . . . . . . . . . . . . . . . . . . . . . . . . . . . . . . . . . . . . . . . 116
Sharing OMFI Media . . . . . . . . . . . . . . . . . . . . . . . . . . . . . . . . . . . . . . . . . . . . 117
Placing High-Resolution Media on the Storage Device . . . . . . . . . . . . . . . . . . . . . 118
Linking Back to MXF Media on the Avid Offline Editing System . . . . . . . . . . . . . . 118
Configuring your Storage Locations. . . . . . . . . . . . . . . . . . . . . . . . . . . . . . . . . . . . 121
Opening the Media Storage Configuration Tool outside Avid DS . . . . . . . . . . 121
Defining your Storage Areas within the Media Indexing Service. . . . . . . . . . . 122
Accessing Storage on another Workstation . . . . . . . . . . . . . . . . . . . . . . . . . . 127
Accessing Storage on Workstations in an Avid Interplay Environment. . . . . . 129
Stopping and Starting your Avid Indexing Services. . . . . . . . . . . . . . . . . . . . . 132
About your Local Storage Area . . . . . . . . . . . . . . . . . . . . . . . . . . . . . . . . . . . . . . . 133
The DS Archives Folder . . . . . . . . . . . . . . . . . . . . . . . . . . . . . . . . . . . . . . . . . 134
The DS Projects Folder . . . . . . . . . . . . . . . . . . . . . . . . . . . . . . . . . . . . . . . . . . 134
The DSPresets Folder. . . . . . . . . . . . . . . . . . . . . . . . . . . . . . . . . . . . . . . . . . . 135
The VideoStorage and AudioStorage Folders. . . . . . . . . . . . . . . . . . . . . . . . . 135
The DSSystem Folder . . . . . . . . . . . . . . . . . . . . . . . . . . . . . . . . . . . . . . . . . . . 136
Chapter 9 Understanding the Avid Interplay Media Services System . . . . . . . . . 137
Media Services Software Components . . . . . . . . . . . . . . . . . . . . . . . . . . . . . . . . . 137
Understanding the Media Services Engine Software . . . . . . . . . . . . . . . . . . . 137
Understanding the Avid Interplay Media Services and Transfer Status Tool . 139
Understanding the Standalone Media Services and Transfer Status Tool . . . 140
Starting the Interplay Media Services Engine . . . . . . . . . . . . . . . . . . . . . . . . . . . . 140
Chapter 10 Interplay Media Services Configuration . . . . . . . . . . . . . . . . . . . . . . . . . 143
Configuring the Media Services Engine . . . . . . . . . . . . . . . . . . . . . . . . . . . . . . . . . 143
Chapter 11 Using the Media Services and Transfer Status Tool. . . . . . . . . . . . . . . 145
Opening the Media Services and Transfer Status Tool . . . . . . . . . . . . . . . . . . . . . 145
Media Services and Transfer Status Tool User Interface. . . . . . . . . . . . . . . . . . . . 147
Using the Jobs Page . . . . . . . . . . . . . . . . . . . . . . . . . . . . . . . . . . . . . . . . . . . . . . . 148
Jobs Page Information . . . . . . . . . . . . . . . . . . . . . . . . . . . . . . . . . . . . . . . . . . 148
12
Page 13

Customizing the Jobs Page Columns . . . . . . . . . . . . . . . . . . . . . . . . . . . . . . . 149
Filtering the Jobs List . . . . . . . . . . . . . . . . . . . . . . . . . . . . . . . . . . . . . . . . . . . . 150
Viewing Details About a Job. . . . . . . . . . . . . . . . . . . . . . . . . . . . . . . . . . . . . . . 151
Job Details Window . . . . . . . . . . . . . . . . . . . . . . . . . . . . . . . . . . . . . . . . . . . . . 152
Purging the Jobs List . . . . . . . . . . . . . . . . . . . . . . . . . . . . . . . . . . . . . . . . . . . . 152
Prioritizing a Job. . . . . . . . . . . . . . . . . . . . . . . . . . . . . . . . . . . . . . . . . . . . . . . . 153
Canceling a Job . . . . . . . . . . . . . . . . . . . . . . . . . . . . . . . . . . . . . . . . . . . . . . . . 154
Deleting a Job . . . . . . . . . . . . . . . . . . . . . . . . . . . . . . . . . . . . . . . . . . . . . . . . . 155
Retrying a Job . . . . . . . . . . . . . . . . . . . . . . . . . . . . . . . . . . . . . . . . . . . . . . . . . 155
Exporting the Jobs List . . . . . . . . . . . . . . . . . . . . . . . . . . . . . . . . . . . . . . . . . . . 155
Understanding the Providers Page . . . . . . . . . . . . . . . . . . . . . . . . . . . . . . . . . . . . . 156
Opening the Providers Page . . . . . . . . . . . . . . . . . . . . . . . . . . . . . . . . . . . . . . 156
Customizing the Providers Display. . . . . . . . . . . . . . . . . . . . . . . . . . . . . . . . . . 157
Viewing Details About a Provider . . . . . . . . . . . . . . . . . . . . . . . . . . . . . . . . . . . 157
Deleting Providers . . . . . . . . . . . . . . . . . . . . . . . . . . . . . . . . . . . . . . . . . . . . . . 158
Understanding the Services Page. . . . . . . . . . . . . . . . . . . . . . . . . . . . . . . . . . . . . . 158
Opening the Services Page . . . . . . . . . . . . . . . . . . . . . . . . . . . . . . . . . . . . . . . 159
Displaying Details About a Service . . . . . . . . . . . . . . . . . . . . . . . . . . . . . . . . . 159
Deleting a Media Services Service. . . . . . . . . . . . . . . . . . . . . . . . . . . . . . . . . . 160
Understanding the Users Page . . . . . . . . . . . . . . . . . . . . . . . . . . . . . . . . . . . . . . . . 161
Opening the Users Page . . . . . . . . . . . . . . . . . . . . . . . . . . . . . . . . . . . . . . . . . 161
Setting Up User Accounts . . . . . . . . . . . . . . . . . . . . . . . . . . . . . . . . . . . . . . . . 162
Reassigning Passwords . . . . . . . . . . . . . . . . . . . . . . . . . . . . . . . . . . . . . . . . . . 162
Deleting User Accounts . . . . . . . . . . . . . . . . . . . . . . . . . . . . . . . . . . . . . . . . . . 163
Chapter 12 Installing Services and Registering Providers . . . . . . . . . . . . . . . . . . . 165
Registering the Provider . . . . . . . . . . . . . . . . . . . . . . . . . . . . . . . . . . . . . . . . . . . . . 165
Verifying a Service is Connected . . . . . . . . . . . . . . . . . . . . . . . . . . . . . . . . . . . . . . 167
Index . . . . . . . . . . . . . . . . . . . . . . . . . . . . . . . . . . . . . . . . . . . . . . . . . . . . . 169
13
Page 14

14
Page 15

1 Installing your Avid DS Environment
This section describes how to set up a post-production environment with Avid DS.
Whether this is a new system installation, or an upgrade from an existing system, the
workstation(s) must be prepared with the proper operating system, drivers, and network and
storage connections.
The Avid DS Support Center web site at www.avid.com/ds/support, has all the most recent
software updates, hardware component and firmware drivers.
The Avid DS Support Center also contains many of the instructions and procedures found
here. In many cases, the versions found in the support center have added details and are
presented in a different manner. Users are encouraged to explore the support center and use
whichever resource they find most helpful.
Installing Avid DS Workstations
Due to the various types of hardware platforms and Avid DS workgroup configurations,
there are different installation checklists for upgrading your Avid DS workstation software.
These checklists have specific steps that must be followed in the correct order. Each step will
point you to an appropriate section with more detailed instructions. Return to the checklist
each time that you complete a step.
This section covers the installation of Avid DS on a standalone workstation or as part of an
Avid DS workgroup. In each case, a description of how the various Avid DS software
components or services should be installed.
Avid DS Components
Avid DS Avid DS is the editing, compositing, graphics and finishing
application.
Avid DS Controller The Workgroup Controller is a workstation in a Workgroup
that hosts the Avid Project Indexer service (only applicable in
an Avid DS Workgroup environment).
Page 16
1 Installing your Avid DS Environment
Avid DS Workstation
Avid DS
Avid Project Indexer
Avid Media Indexer
Avid DS
MEDIA
PROJECT
DATA
Avid DS Components
Avid DS RP Avid DS RP is the remote processing application used to
Avid Media Indexer Avid Media Indexer is an application that gathers media file
Avid Project Indexer Avid Project Indexer defines the DS Workgroup Controller.
generate real-time, playable, cached media in the Avid DS
storages.
information and the location of all the stored Avid DS audio
and video files. The media files can be stored on a Unity
workspace or a local storage device. In a workgroup, each
Avid DS workstation has a Media Indexer installed.
The service gathers projects, sequences, and clip information
and the location of all the defined Avid DS project roots. There
is only one service per DS Workgroup.
Installing a Standalone Avid DS Workstation
Installing Multiple Workstations in an Avid DS Workgroup
Avid Interplay Media Services
Engine
A provider is a software program that can perform a particular
service for Avid editing application. Avid Interplay Media
Services Engine uses the concept of service providers to match
jobs to suitable providers.
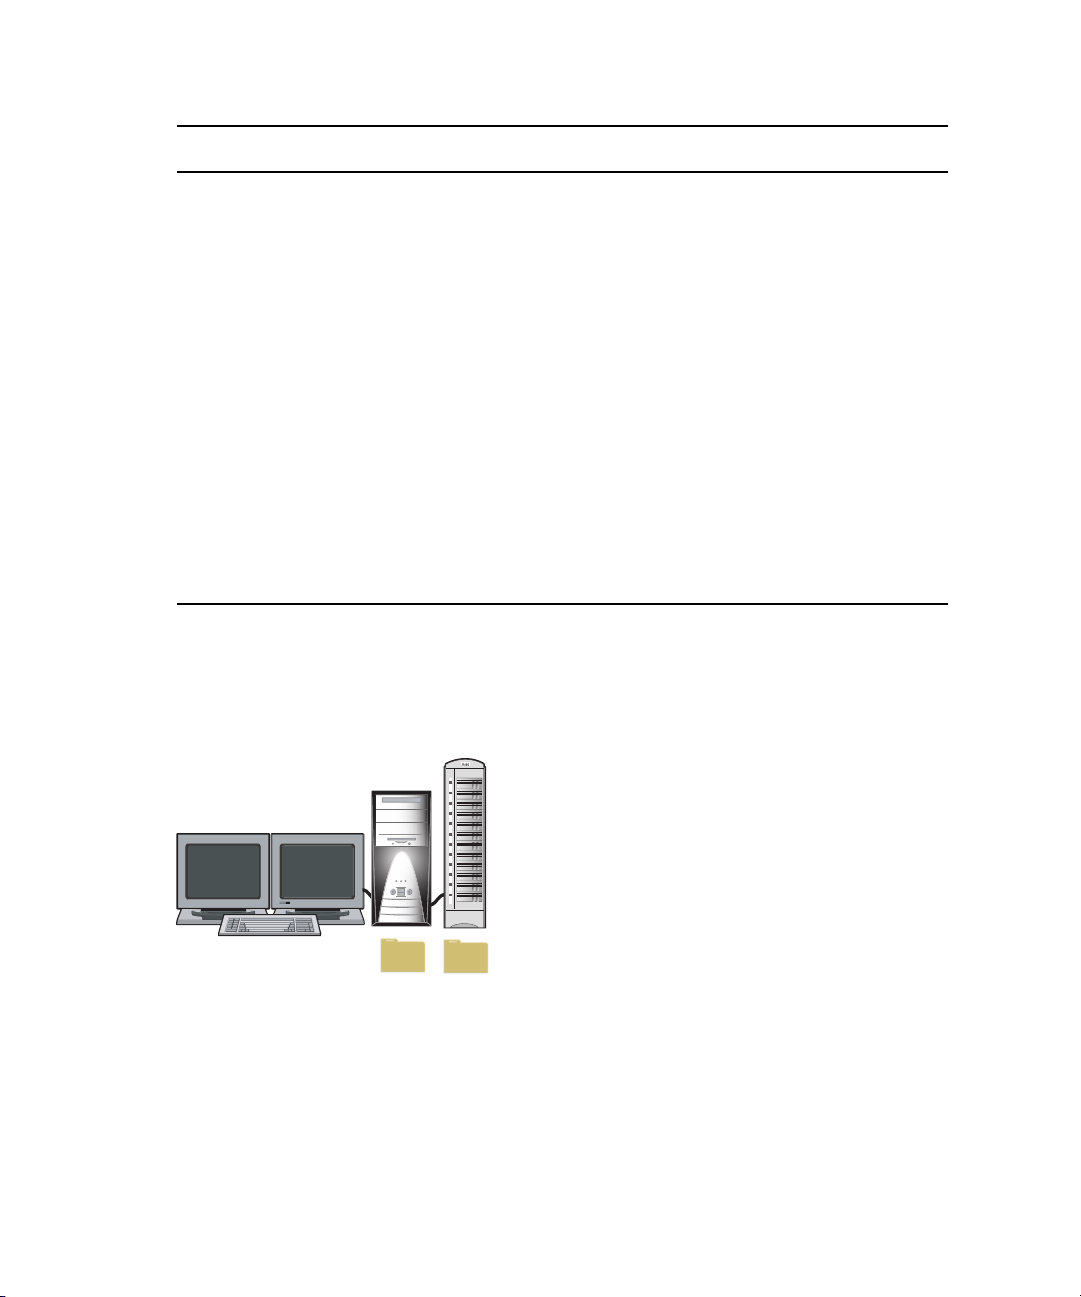
A single standalone Avid DS workstation requires only the installation of the Avid DS
software. The single workstation functions as both controller and media indexing service.
Two or more Avid DS workstations (including an Avid DS RP workstation), can be
connected as an Avid DS workgroup, enabling the sharing of projects and media between
workstations or the offloading of media management and processing services to a dedicated
workstation.
16
Page 17
Installing Avid DS Workstations
CONTROLLER
CLIENT
Avid DS Workstation
- Avid Throttle Manager
- Avid DS RP
- Avid Interplay Media Services
Could run any one of the following:
To optimize the operation of a workgroup, we recommend connecting an ordinary
workstation (i.e. a non-Avid DS workstation) to the workgroup and designating it as the
controller. The controller manages all indexing and remote processing services, so that the
Avid DS workstations can be dedicated to editing tasks.
This workstation would have the same system requirements as an Avid DS RP—see
n
“Minimal Requirements for Avid DS RP Workstation” on page 98.
In a more elaborate environment, more than one RP workstation may be providing services
to several Avid DS workstations. (You can’t run Avid DS RP and Avid DS simultaneously
on a workstation.)
Running:
- Avid DS RP
- Avid Interplay Media Services
- Avid Throttle Manager
CLIENT 1
Avid DS Workstation
Running Avid DS
Each Avid DS workstation added to
the workgroup should be configured
the same as this one.
CONTROLLER
LOCAL AREA NETWORK
CLIENT 2
Avid DS Workstation
ADDITIONAL RP WORKSTATION
Running Avid DS RP
Each RP workstation added to the
workgroup should be configured
the same as this one.
Avid DS Workstation
CLIENT 3
Running Avid DS
17
Page 18

1 Installing your Avid DS Environment
To properly configure an Avid DS workgroup, you should have a basic understanding of
Windows user account management. All workstations should be connected to the same
network so that they can access each other’s project files and media when necessary.
Refer also to “Planning your Storage Locations” on page 107 for the various media storage
configurations. If you are using Avid Unity MediaNetwork as storage, you may use it in any
of these workgroup scenarios.
Checklist: Preparing a New Avid DS Workstation
Before installing the Avid DS software, prepare your workstation(s) with the proper
operating system, drivers, and network and storage connections.
This checklist applies only to workstations on which you are installing Avid DS. It is not
n
required if you are only installing Avid DS RP on a workstation—see “Checklist: Installing
Avid DS RP on the Appropriate Workstations” on page 24.
Follow these steps in the order that they are listed. Each time you link to another topic within
a step, make sure you return to the checklist after you have completed that procedure.
Step Refer to
Read the latest ReadMe and Known Limitations
document on the Avid DS Support Center web site.
Request an Avid DS license for each workstation on
which you are going to install Avid DS.
Make sure the workstation is properly connected to
any necessary peripheral and storage devices.
Start the workstation.
Go to www.avid.com/ds/support and select
Documentation > Online Library.
“Requesting a License File” on page 105
Avid DS-HP Z800 Configuration Guidelines
(or Avid DS Configuration Guidelines for your PC)
18
Page 19

Checklist: Preparing a New Avid DS Workstation
Step Refer to
On new Avid DS systems, the Windows XP
operating system is already installed, but the
Windows XP product ID may be required for license
confirmation.
You will be asked to create a user account (other than
Administrator).
After setting up a user account, switch to the
administrator account to install Avid DS.
• Press Ctrl+Atl+Del twice to get the Windows
login dialog.
• Type administrator for the User ID and leave the
Password field blank.
• After you log in as administrator, add a password
for the administrator, so that the Avid DS
indexing services function properly.
On 64-bit systems, make sure that Windows Media
Encoder 9 Series is installed. This is needed to allow
the output and capture of WMV files.
The workstation MUST have a unique IP address.
Make sure that you have a valid network connection
for your Avid DS workstation whether it is
connected to a network or is standalone.
“Creating User Accounts” on page 59
Microsoft Windows online help.
Click Start > Help and Support.
Go to the Microsoft Download Center at
http://www.microsoft.com/downloads/.
“Configuring the Network Connection” on page 51
If you are running a standalone workstation, and don’t have a valid network connection, you need to
n
simulate one by creating a loopback connection—see “Installing the Microsoft Loopback Adapter on
a Standalone Station” on page 53.
Create a user account for each workstation user.
• If you are part of a Windows Workgroup... “Managing Microsoft Windows Workgroup
Accounts” on page 54
• If you are part of a Windows Domain... “Managing Microsoft Windows Domain Accounts”
on page 56
Name the workstation to uniquely identify. “Naming a Workstation” on page 55
19
Page 20

1 Installing your Avid DS Environment
Step Refer to
Turn off Simple File Sharing, so that other Avid DS
software components can access the shared folders
for data and media.
From Windows Explorer (My Computer), select
Tools > Folder Options... > View.
Under Advanced settings, deselect the Use simple
file sharing (Recommended) check box.
Use a network timing software to maintain
synchronization between the workstations
within a workgroup.
Install the necessary drivers for the workstation.
When installing the drivers, reboot the workstation
each time you are asked to do so.
If you purchased a new Avid DS system, the
n
drivers and firmware needed to run Avid DS
are already installed on your system.
If you are adding an external monitor to the
n
workstation, refer to the NVIDIA Drivers
section on the DVD or the Support Center for
configuration instructions.
If the workstation has a local storage device, make
sure the stripe volume has been created.
You are now ready to install Avid DS on the
workstation(s).
Use the appropriate checklist for installing:
• a single standalone Avid DS workstation “Checklist: Installing a Standalone Workstation” on
• multiple connected Avid DS and/or Avid DS RP
workstation(s).
Use the Avid DS Software & Drivers DVD, or
download the latest drivers from the Avid DS Support
Center web site: www.avid.com/ds/support.
Avid DS v10.x System Setup Guide in the Online
Library on the Avid DS Support Site
page 20
“Checklist: Installing Multiple Workstations” on page
22
Checklist: Installing a Standalone Workstation
For a standalone Avid DS workstation, you only need to install Avid DS.
Follow these steps in the order that they are listed. Each time you link to another topic within
a step, make sure you return to the checklist after you have completed that procedure.
20
Page 21

Checklist: Installing a Standalone Workstation
Step Refer to
Ensure that the workstation has been fully prepared
for the install.
Log on to the workstation.
Install Avid DS. “Installing Avid DS Software Components” on
Download and Install the latest Avid DS upgrades
and/or fixes (if any).
Create the license file for the workstation. “Installing the Registered License File” on page
Any new storage areas automatically have full
read/write access by any user on the network. To
restrict access to the media, change the share
permissions through Windows.
Configure the media storage areas on each Avid DS
workstation.
By default, the Avid DS installation configures one
audio and one video storage on each workstation.
Check the storage device configuration to set the Disk
Controller Type and Disk Storage Type correctly.
“Checklist: Preparing a New Avid DS Workstation”
on page 18
page 64
Use the Avid DS Software & Drivers DVD, or
download the software from the Avid Download
Center www.avid.com/ds/support.
Online instructions to install software updates.
(Then reboot the workstation.)
105.
“Sharing Folders and Setting Permissions” on page
57
“Configuring your Storage Locations” on page 121.
Set the path to the projects folder. Establishing the Project Folder in the Help.
Test Avid DS by starting it and creating a new project.
If you receive a Project Indexer message when
n
you create a new sequence, contact Avid DS
Support Center immediately to resolve the
problem.
Repeat these steps for each Avid DS workstation and
continue on to Checklist: Installing Avid DS RP on
the Appropriate Workstations if you want to install
Avid DS RP on a workstation.
Creating a Project in the Help.
Establishing the Project Folder in the Help.
21
Page 22

1 Installing your Avid DS Environment
Checklist: Installing Multiple Workstations
To upgrade an existing Avid DS workgroup, follow the instructions in this section. The order
in which you install the Avid DS software and services is critical, especially when
configuring RP workstations. In order to install Avid DS on multiple workstations, the
following three checklists must be completed.
• Checklist: Installing the Controller
• Checklist: Installing Avid DS on the Appropriate Workstations
• Checklist: Installing Avid DS RP on the Appropriate Workstations
Checklist: Installing the Controller
Follow these steps in the order that they are listed. Each time you link to another topic within
a step, make sure you return to the checklist after you have completed that procedure.
Step Refer to
Determine the appropriate workgroup configuration. “Installing Avid DS Workstations” on page 15
In a workgroup, first install the controller. “Installing the Avid DS Workgroup Controller” on
page 73
Use the Avid DS Software & Drivers DVD, or
download the software from the Avid Download
Center www.avid.com/ds/support.
After the controller has been installed, install and
connect other workstations in the workgroup.
“Checklist: Installing Avid DS on the Appropriate
Workstations” on page 22
Checklist: Installing Avid DS on the Appropriate Workstations
Follow these steps in the order that they are listed. Each time you link to another topic within
a step, make sure you return to the checklist after you have completed that procedure.
Step Refer to
Ensure that each Avid DS workstation has been
fully prepared for the install.
Log on to the workstation.
22
“Checklist: Preparing a New Avid DS Workstation” on
page 18.
Page 23

Step Refer to
Checklist: Installing Multiple Workstations
Install Avid DS.
In a workgroup environment, the
n
controller must be installed before you
install Avid DS on the workstations.
Install the latest Avid DS updates and/or fixes (if
any).
Follow the online instructions to install these
software updates, then reboot the workstation.
Install Avid Interplay Media Services “Installing Avid Interplay Media Services and Related
Create the license file on each workstation where
Avid DS is installed.
Any new storage areas automatically have full
read/write access by any user on the network. To
restrict access to the media, change the share
permissions through Windows.
Configure the media storage areas on each
Avid DS workstation.
By default, the Avid DS installation configures
one audio and one video storage on each
workstation. Check the storage device
configuration to set the Disk Controller Type and
Disk Storage Type correctly.
“Installing Avid DS Software Components” on page 64.
Use the Avid DS Software & Drivers DVD, or download
the software from the Avid Download Center
www.avid.com/ds/support.
Download the latest upgrades and/or fixes.
Applications” on page 79
“Installing the Registered License File” on page 105.
“Sharing Folders and Setting Permissions” on page 57
“Configuring your Storage Locations” on page 121
Set the path to the projects folder. Establishing the Project Folder in the Help
If you are using Avid Unity as your storage,
install the Avid Unity MediaNetwork software
on each client workstation.
If you are using Avid DS in an Interplay
enviroment.
Test Avid DS by starting it and creating a new
project.
If you receive a Project Indexer message
n
when you create a new sequence, contact
Avid DS Customer Service immediately to
resolve the problem.
“Checklist: Installing Avid DS with Avid Unity” on page
38
“Installing Avid Interplay Media Services and Related
Applications” on page 79
Creating a Project in the Help
23
Page 24

1 Installing your Avid DS Environment
Checklist: Installing Avid DS RP on the Appropriate Workstations
After the controller and the Avid DS workstations have been installed, install Avid DS RP on
the workstations that will serve as remote processing workstations.
Follow these steps in the order that they are listed. Each time you link to another topic within
a step, make sure you return to the checklist after you have completed that procedure.
Step Refer to
Install Avid DS RP. “Installing Avid DS RP” on page 100.
Use the Avid DS Software & Drivers DVD, or
download the software from the Avid Download Center
www.avid.com/ds/support.
Test remote processing on the newly installed
RP workstation.
• Start Avid DS RP and check that no error
messages are displayed.
• Start Avid DS on any workstation in the
workgroup.
Test remote processing on an Avid DS RP
workstation (if used by the workgroup).
• Start Avid DS RP on the controller, and
check that no error messages are displayed.
• Start Avid DS on any workstation in the
workgroup.
• Create a sequence, apply an effect on a
short clip, then send the job to be processed
remotely. After processing is complete,
verify that the processed effect plays back
correctly on the timeline.
If you have more than one RP
n
workstation in your workgroup, Avid DS
will direct your request to the first
available RP workstation. You can test
individual RP workstations by closing
Avid DS RP on the other RP
workstations.
24
Understanding Processing in the Help
Select the Process Remotely option in the
n
Processing dialog box.
Page 25

Upgrading Existing Avid DS Workstations
Upgrading Existing Avid DS Workstations
This section describes how to perform a software upgrade on your workstations.
If you only need to reinstall hardware component drivers or system firmware, refer to the
Avid DS Support Center web site at www.avid.com/ds/support for the most recent updates.
If you are upgrading from an earlier version than v7.5, refer to the Avid DS Support Center
n
web site for detailed instructions.
Checklist: Preparing your Workstation for an Upgrade
Before upgrading the software, it is very important to archive your existing projects and save
your Avid DS user preferences. You can then update your system drivers and firmware, and
lastly, upgrade your software.
Follow these steps in the order that they are listed. Each time you link to another topic within
a step, make sure you return to the checklist after you have completed that procedure.
Step Refer to
Read the online release notes and Readme instructions
on the Avid DS Support Center web site.
Request an Avid DS license for each workstation on
which you are going to install Avid DS.
Archive your existing projects.
Do NOT directly open projects created using previous
versions of Avid DS without first archiving them. Once
a sequence is opened in a newer version of Avid DS, it
cannot be opened using a previous version. Therefore,
it’s best to archive your projects before upgrading.
Save your current Avid DS layouts and preferences. “Saving Avid DS System Settings” on page 94
Uninstall the previous version of Avid DS as well as
any plug-ins.
Ensure that all workstations are upgraded to Windows
XP Service Pack 2, or Windows Professional x64
Edition and Service Pack 1.
Install the latest Windows XP hot fixes from the
Microsoft web site.
Go to www.avid.com/ds/support and select
Documentation > Online Library.
“Requesting a License File” on page 105
Archiving Projects in the Help
“Checklist: Removing Avid DS” on page 29
www.avid.com/ds/support
v4.windowsupdate.microsoft.com/en/default.asp
25
Page 26

1 Installing your Avid DS Environment
Step Refer to
Download the latest drivers and firmware files for the
workstations.
Install these files as instructed on the web site.
After the operating system and necessary hardware
drivers have been updated, use the appropriate
checklist to install the software:
• on a single standalone Avid DS workstation “Checklist: Upgrading a Standalone Avid DS
• on more than one Avid DS and/or Avid DS RP
workstation(s) connected together
Avid Download Center: www.avid.com/ds/support
Workstation” on page 26
“Checklist: Upgrading a Workgroup with Multiple
Avid DS Workstations” on page 27
Checklist: Upgrading a Standalone Avid DS Workstation
For a standalone Avid DS workstation, you need to install only Avid DS. The Project
Indexer and Media Indexer are installed automatically.
Follow these steps in the order that they are listed. Each time you link to another topic within
a step, make sure you return to the checklist after you have completed that procedure.
Step Refer to
Ensure that the workstation has been fully prepared
for the install.
“Checklist: Preparing your Workstation for an
Upgrade” on page 25
Install Avid DS. “Installing Avid DS Software Components” on page
64
Use the Avid DS Software & Drivers DVD, or
download the software from the Avid Download
Center www.avid.com/ds/support.
Install the necessary Avid DS components on this
workstation.
If there are any fixes for this version, install them as
well.
Install the license file for the workstation. “Installing the Registered License File” on page 105
26
Page 27

Step Refer to
Upgrading Existing Avid DS Workstations
Test Avid DS by starting it and creating a new project.
If you receive a Project Indexer message when you
create a new sequence, contact Avid DS Support
Center immediately to resolve the problem.
Configure the Media Storage.
By default, the Avid DS installation configures one
audio and one video storage on each workstation. If
you had existing storage, your storage areas are now
shared using ds_media names (e.g. ds_media,
ds_media_1, ds_media_2).
Determine the physical storage devices/drives to
which these correspond, and check that you are
capturing media to the correct location. Also check
the storage device configuration to set the Disk
Controller Type and Disk Storage Type correctly.
Restore the Avid DS layouts and preferences saved
from the previous version.
Creating a Project in the Help
“Configuring your Storage Locations” on page 121
“Saving Avid DS System Settings” on page 94
Checklist: Upgrading a Workgroup with Multiple Avid DS Workstations
To upgrade an existing Avid DS workgroup, follow the instructions in this section. The order
in which you install the Avid DS software and services is critical, especially when
configuring RP workstations.
This checklist assumes no changes to the existing workgroup configuration. To change the
n
workgroup configuration, (for instance, to designate a different workstation as controller),
see “Managing a Workgroup” on page 30.
If you want to keep one or more workstations running earlier versions of Avid DS, then you
n
must create a separate workgroup for these workstations.
Use these steps to upgrade each workstation. Follow these steps in the order that they are
listed. Each time you link to another topic within a step, make sure you return to the
checklist after you have completed that procedure.
Step Refer to
Make sure that each workstation has been fully
prepared for the install.
“Checklist: Preparing your Workstation for an
Upgrade” on page 25
27
Page 28

1 Installing your Avid DS Environment
Step Refer to
Insert the Avid DS Software and Drivers DVD into
your drive,
OR
Download the latest Avid DS software and updates
from the web.
Install the Controller.
First, install the necessary Avid DS components on
the controller.
If there are any fixes for this version, install them as
well.
Install Avid Interplay Media Services. “Installing Avid Interplay Media Services and
Install Avid DS and/or related software on each
workstation.
Create the license file for each workstation. .
Test Avid DS by starting it and creating a new project.
If you receive a Project Indexer message when you
create a new sequence, contact Avid DS Support
Center immediately to resolve the problem.
Configure the media storage areas on each Avid DS
workstation.
By default, the Avid DS installation configures one
audio and one video storage on each workstation.
Check your storage device configuration to set the
Disk Controller Type and Disk Storage Type correctly.
Avid Download Center: www.avid.com/ds/support
“Installing the Avid DS Workgroup Controller” on
page 73
Related Applications” on page 79
Refer to corresponding checklists for desired
software installations.
Creating a Project in the Help
“Configuring your Storage Locations” on page 121
If you are using Avid Unity as your storage, install the
Avid Unity MediaNetwork software on each client
workstation.
If you want to use Avid DS RP on a workstation(s),
install Avid DS RP on these workstations.
28
“Installing Avid DS with Avid Unity” on page 38
“Checklist: Installing Avid DS RP on the
Appropriate Workstations” on page 24
Page 29

Step Refer to
Test remote processing on an Avid DS RP workstation
(if you have one in your workgroup).
• Start Avid DS RP on the controller, and check the
messages in the interface to make sure that no
error is displayed.
• Start Avid DS on any workstation in the
workgroup.
Checklist: Removing Avid DS
• Create a sequence, apply an effect on a short clip
and send the job to be processed remotely. After
processing is complete, verify that the processed
effect plays back correctly on the timeline.
If you have more than one RP workstation in your workgroup, Avid DS will direct your request to the
n
first available RP workstation. You can test individual RP workstations by closing Avid DS RP on the
other RP workstations.
Restore your Avid DS layouts and preferences that
you saved from your previous version.
Understanding Processing in the Help.
Select the Process Remotely option in the
Processing dialog box.
“Saving Avid DS System Settings” on page 94
Checklist: Removing Avid DS
If you need to uninstall the Avid DS software, you MUST first remove any plug-ins or
codecs that were installed on your system.
c
If you uninstall Avid DS before uninstalling the plug-ins, the uninstall procedure will
fail.
Follow these steps in the order that they are listed. Each time you link to another topic within
a step, make sure you return to the checklist after you have completed that procedure.
Step
Save existing Avid DS layouts, presets, preferences, toolbars, and key command maps.
Refer to “Saving Avid DS System Settings” on page 94
29
Page 30

1 Installing your Avid DS Environment
Step
Remove all the Avid DS plug-ins or codecs.
• Click the Start button, and select Settings > Control Panel > Add/Remove Programs.
• In the Currently Installed Programs list, check for any installed plugs-ins.
• Select the plug-ins one at a time, and click the Change/Remove button. Repeat this step until they are
all removed.
If you cannot remove some plug-ins, continue with the next one until completion, and then manually
n
delete the \Plug-in folder.
If the Avid DS 32-bit version is installed, uninstall it before uninstalling the other Avid DS components.
Remove the installed drivers and firmware via Settings > Control Panel > Add/Remove Programs.
Remove Avid DS.
• Click the Start button, and select Settings > Control Panel > Add/Remove Programs.
• In the Currently Installed Programs list, select the Avid DS software that you want to remove.
• When the setup program starts, select the Remove option, then click Next.
• Select Ye s to remove all components.
• When all components are removed, click Yes to restart the workstation.
Managing a Workgroup
This section describes how to Manage an Avid DS Workgroup, including how to connect
more workstations to a workgroup, change the controller of a workgroup, and create a new
workgroup.
For issues related to Media Indexing Services, please refer to the online support page related
n
to Troubleshooting indexing services.
Adding a Workstation to a Standalone Avid DS Workstation
To connect a new workstation (either Avid DS or Avid DS RP) to a standalone workstation,
you need to first set up an Avid DS workgroup. In a workgroup, at least one workstation
must be designated as the controller.
If you are connecting an RP workstation, we strongly recommend that you make your RP
workstation the controller of the workgroup. This offloads the project indexing tasks from
the Avid DS workstation onto a dedicated RP workstation.
Follow the instructions in “Checklist: Installing Multiple Workstations” on page 22.
30
Page 31

Managing a Workgroup
Connecting Other Workstations in the Workgroup to the Controller
To connect a new workstation to a workgroup where the controller is already installed,
follow the checklist for “Checklist: Installing Avid DS on the Appropriate Workstations” on
page 22.
To connect a workstation with the necessary Avid DS components installed, follow the
instructions below.
To connect a standalone workstation to a workgroup:
1. On the workstation that you want to connect to the workgroup, click the Start then select
All Programs > Avid > Avid DS v10.x > Configure DS Workgroup.
2. Click Join workgroup.
3. Select Join a different DS Workgroup, then click Next.
4. In the left pane, select the name of the workgroup on the network, then click Next.
5. Validate the User Account and Password to authenticate the Avid indexing services
(These must match the Controller User Account and Password entries). Click Next.
6. Repeat these steps for any other workstation that you want to connect to the workgroup.
Designating a New Controller for the Workgroup
To designate a different workstation in the workgroup as the controller, first separate the
existing controller from the workgroup.
To designate a new controller:
1. Separate the existing controller from the workgroup by following the instructions for
“Separating a Workstation from the Workgroup” on page 32.
2. On the workstation that will be the new controller, click the Start then select All
Programs > Avid > Avid DS v10.x > Configure DS Workgroup.
3. Select Install Avid DS Workgroup Controller.
Depending on the type of workgroup you are configuring, you may need to select other
n
options in this setup—see “Installing Avid DS Workstations” on page 15.
4. Enter the name of the workgroup.
When the installation is complete, this workstation will be the new controller of the
workgroup.
5. You can now connect the other workstations to this workgroup—see “Connecting Other
Workstations in the Workgroup to the Controller” on page 31.
31
Page 32

1 Installing your Avid DS Environment
Separating a Workstation from the Workgroup
You can separate a workstation from a workgroup to have it work as standalone.
To separate a workstation from the workgroup:
1. On the workstation to be separated, click Start then select All Programs > Avid >
Avid DS v10.x > Configure DS Workgroup.
2. Click Work standalone then click Next.
Starting up and Shutting down a Workgroup
The workgroup controller should always be the last workstation to be shut down and first
workstation to be booted up. You can quit or run the Interplay Media Services at any time.
The workgroup controller will reconnect to it as soon as it is online. The order you shut
down workstations running Avid DS or Avid DS RP does not matter.
Restarting a Workgroup
When restarting all workstations in a workgroup, always start the controller workstation
first. Once it is running, then others may be started.
If the controller is the only workstation to be restarted, then one or more of the other client
workstations may not remain connected to the workgroup, resulting in access errors. If this
happens, restart the client workstation.
Recovering the Avid DS System
The HP platform for Avid DS includes a recovery feature that enables you to restore the
system state. The recovery feature restores the operating system (Windows XP x64/SP2) and
all required drivers that are installed at Avid’s initial shipping configuration.
The first user to log on to the HP workstation will be prompted to create the necessary
recovery DVDs and a recovery point, known as the Initial Recovery Point. This Point
enables you to perform the recovery at the initial state when the system was built by Avid.
All necessary applications, tools, and drivers will be loaded on the DVD, with the exception
of the Avid DS software and license.
The Avid DS Support Center web site provides details on the recovery process for your
particular system.
32
Page 33

Running Avid DS
To run Avid DS double-click on the Avid DS or Avid DS (Dual-Link) icon on your desktop.
If you want to use Avid DS in the Graphics-Link mode, refer to “Viewing High-Resolution
Sequences” on page 53.
In order for Avid DS to run correctly in the Graphics-Link (GL) mode, a second monitor
n
needs to be attached to your workstation and configured correctly. For details on the
required configuration for a dual-monitor set up, refer to the NVIDIA Drivers page on the
Avid DS Support Center site.
Running Avid DS
33
Page 34

1 Installing your Avid DS Environment
34
Page 35

2 Configuring Avid DS on Avid Unity
This section describes how to install and configure Avid DS on Avid Unity™ for storage
purposes.
c
Do not install any Avid DS software components (such as the indexing services) directly
on Avid Unity.
Configuration and Hardware Requirements
On Avid Unity MediaNetwork and ISIS, the Avid Media Indexing Service does not retain its
media list content if the workstation hosting this service is rebooted. This is a known
limitation.
When an Avid DS workstation connected to Avid Unity is rebooted, the Avid Media
Indexing Service automatically scans and indexes all of the Avid DS-defined Unity storages.
The indexing will take as much time as it needs to validate the many files, the Allocation
group and Workspaces used for the DS audio and video media files.
The media remains online but the actual media verification occurs in the background to
n
validate the media table. This allows the editor to work but it still prevents basic media
management that depends on the Avid Media Indexing Service, such as purging and
archiving.
The recommended solution to this limitation is to add an additional Unity Client system and
install a standalone Avid Media Indexer. The Indexer will scan the Unity storage and relay
the index table to the Avid DS client. The service can easily be configured from any Avid DS
workstation. Whenever the Avid DS workstation is rebooted, the index remains ready on the
Unity Client system.
Page 36

2 Configuring Avid DS on Avid Unity
Avid DS Workstation
Avid Unity MediaNetwork/ISIS
Unity Client with Avid Media Indexing
Common Installation Scenarios for Avid DS on Avid Unity
The following are the scenarios of the most common configurations:
• Scenario 1: One Avid DS Workstation on Avid Unity MediaNetwork/ISIS
• Scenario 2: One Avid DS Workstation and One Avid DS RP Workstation on Avid Unity
MediaNetwork/ISIS
• Scenario 3: One Avid DS Workstation or One Workstation with Avid DS Only on Avid
Unity MediaNetwork/ISIS
• “Scenario 4: Multiple Avid DS and Avid DS RP Workstations on Avid Unity
MediaNetwork/ISIS”
Scenario 1: One Avid DS Workstation on Avid Unity MediaNetwork/ISIS
In this configuration, the Avid Project Indexer can be set up either on the Avid DS
workstation or the Unity client.
36
Scenario 2: One Avid DS Workstation and One Avid DS RP Workstation on Avid Unity MediaNetwork/ISIS
In this configuration, the Avid DS workstation and Avid DS RP are connected as Unity
clients. Avid Media Indexer is used to index the media files and table contents.
Avid Interplay Media Indexer are installed on the Avid DS RP workstation. Avid Interplay
Media Indexer must be installed on a system running preferably Windows XP Professional
x64, but will also support Windows XP Professional x86.
Page 37

Common Installation Scenarios for Avid DS on Avid Unity
Avid Unity MediaNetwork/ISIS
RP Workstation
Avid DS Workstation
Scenario 3: One Avid DS Workstation or One Workstation with Avid DS Only on Avid Unity MediaNetwork/ISIS
In this configuration, the Avid Media Indexing Service of both the Avid DS workstation and
the workstation running Avid DS are reading the Unity Client system.
The Avid Project Indexer should be installed on the Unity Client system.
Avid DS Workstation
- OR -
Workstation with Avid DS
Avid Unity MediaNetwork/ISIS Unity Client with Avid Media Indexing
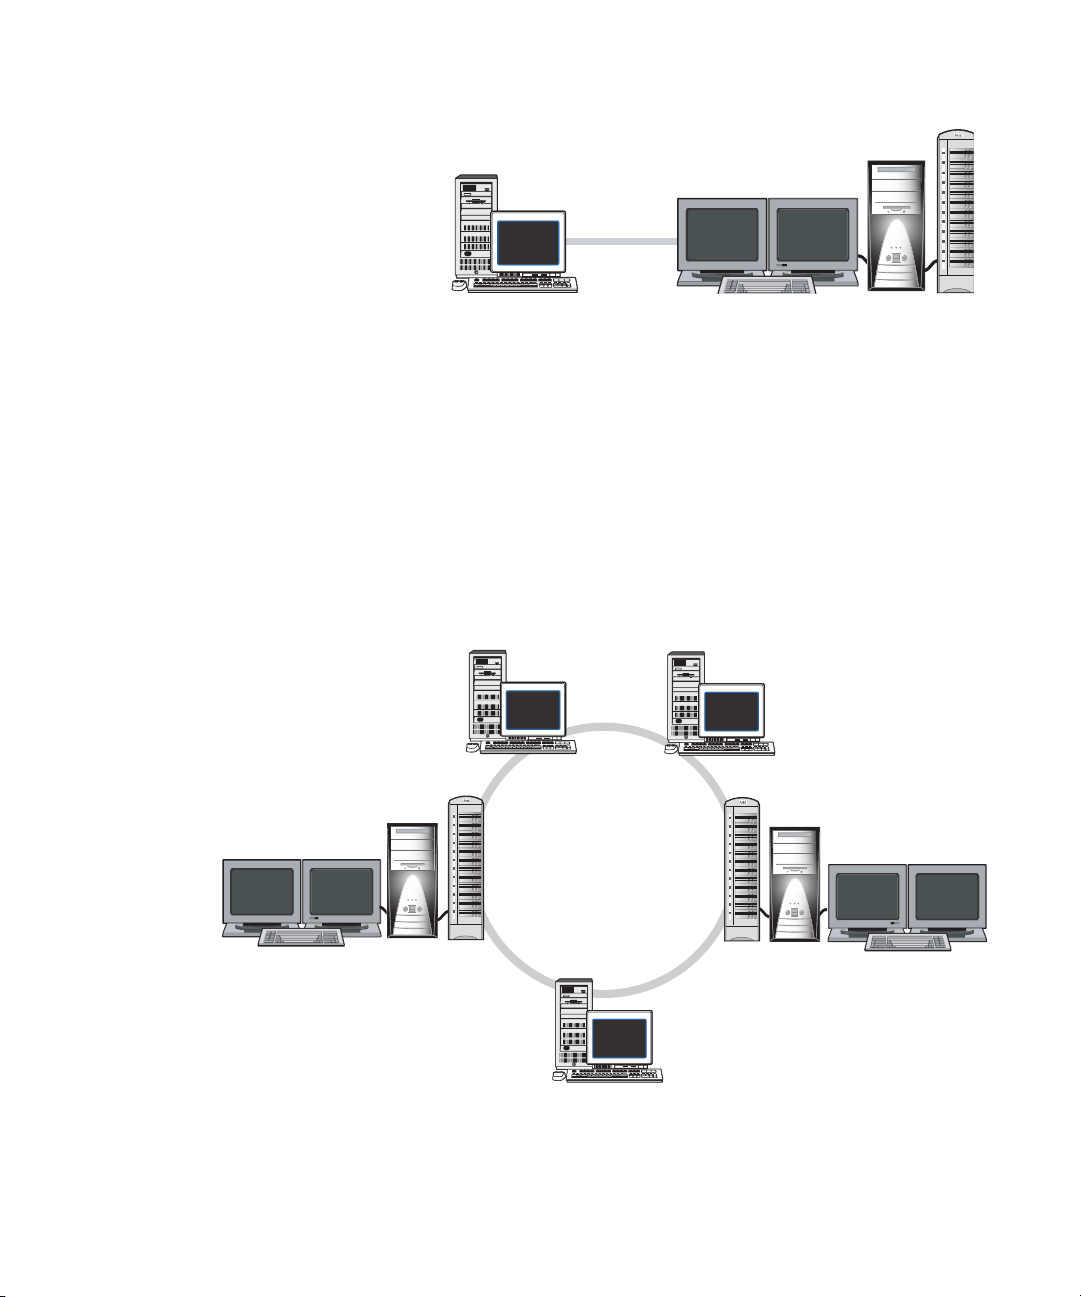
Scenario 4: Multiple Avid DS and Avid DS RP Workstations on Avid Unity MediaNetwork/ISIS
In this configuration, the Avid Media Indexing Service of both Avid DS workstations read
the Avid Media Indexing Service media table content from the Unity Client system.
The Avid DS RP accesses the media table content via the Avid DS workstations. Avid DS
RP gets the media table content by reading the imported sequence data from the Avid DS
workstation that issued the remote processing request and finds the media using the Avid
37
Page 38

2 Configuring Avid DS on Avid Unity
Avid Unity MediaNetwork/ISIS
Avid DS Workstation Avid DS Workstation
RP Workstation
RP Workstation
Unity Client with Avid Media Indexing
Unity Client with Avid Project Indexer,
Avid Interplay Media Indexer, and
Avid Media Indexing (Optional Backup)
Media Indexing Service list on the Avid DS workstation. The Avid DS workstation reads the
master Avid Media Indexing Service from the Unity Client, and in turn the Avid DS RP uses
this information to find the stored audio and video.
One of the Unity Client systems is used by the Avid Media Indexing Service to index the
Unity storage. The second Unity client system hosts the Avid Project Indexer and Avid
Interplay Media Indexer.
Installing Avid DS with Avid Unity
Each Avid DS workstation connected to Avid Unity MediaNetwork™ requires its own
workspace. This workspace is then added to the storage configuration in each Avid DS
workstation. For more information on configuring the workspaces and setting permissions
on the Avid Unity, refer to your Avid Unity MediaNetwork® documentation.
Checklist: Installing Avid DS with Avid Unity
Step Refer to
Install all Avid DS client workstations. “Installing your Avid DS Environment” on page 15.
38
Page 39

Configuring the Avid DS Media Storage on Avid Unity MediaNetwork
Step Refer to
Install Avid Unity MediaNetwork client software on
each Avid DS workstation that is connected to Avid
Unity.
Install the latest updates for the Avid Unity
MediaNetwork software (if any).
Follow the online instructions to install this software
update, then reboot your workstation.
On the Avid Unity, create a video workspace and an
audio workspace for each Avid DS workstation
(the RP workstation does not need a workspace).
Use the Administration Tool to assign the
permissions on each workspace. If some
workstations need to share media, you can assign
permissions for these workstations on the
appropriate workspaces. (You should also give the
RP workstations permission to each workspace).
In Avid DS, use the Storage Configuration tool to
add a Unity storage connection to your local
indexing service.
Important: Do NOT use a drive letter or mapped
driver letter, instead browse the network to the Avid
Unity server, using only a UNC path to access your
media folder on Avid Unity.
Avid Unity MediaNetwork documentation.
Avid Download Center
www.avid.com/support/downloadcenter/index.asp
Avid Unity MediaNetwork documentation.
Avid Unity MediaNetwork documentation.
“Managing Your Storage Areas” on page 107
Configuring the Avid DS Media Storage on Avid
Unity MediaNetwork
The Connection Manager should be left active on the Avid Unity Client workstations. The
utility will automatically map letters (or UNC paths in recent releases) and authenticate the
specific user accounts listed in the Avid Unity Engine.
Although you should leave the Connection Manager running for account authentication, the
letter mapping should not be used as a way to mount Avid DS storages. You must continue
to set these storages from the Avid DS Data Management > Configure Storages... setup
dialog. In Avid DS, the Avid Media Indexing Service will refer to the computer name
hosting the Avid Media Indexer, thus offloading the Avid DS workstation from the media
indexing task.
39
Page 40

2 Configuring Avid DS on Avid Unity
You cannot leave the Avid DS local Media Indexing Service list empty, otherwise Avid DS
n
will report missing audio and video storages every time you start the application. Set audio
and video storages in the local Avid Media Indexing Service and tag them clearly to avoid
accidental local capture or processing.
Preparing to Configure Avid DS Storage
To configure the Avid Unity MediaNetwork storage:
1. Under Data Management, select Configure Storage.
2. Select the Avid Media Indexing Service and click Change.
3. Select the computer name hosting the remote Avid Media Indexer and click Change.
4. In Media Storage Configuration, click Add.
5. In Available Storages Types, select Avid Media Storage.
6. Enter the full UNC path name, or use the browse (...) button to find it.
UNC is a network path, such as \\Unity\Allocation\Workspace\Video.
n
7. Browse to the allocation and workspace.
If Avid DS media folders do not exist for audio and video, create them from the Avid Unity
n
MediaNetwork File Manager. If you set the Avid DS storages at the root of the Avid Unity
workspace, the storage will not perform as realtime
8. Repeat these steps for all required Avid DS storage.
9. When finished, close all configuration dialog boxes.
The Avid Media Indexer will immediately start indexing existing material on the
storages. In an empty storage, this operation is quick but on storages with existing media
files, the process can take several minutes.
The following figure shows the storage configuration for Unity media workspaces.
The Name column displays the UNC path (computer name-folder).
The Status column displays the storage status and Connection Manager mapping.
The Avid Unity MediaNetwork Connection Manager and ISIS Client Manager can now
n
mount the workspace as UNC paths instead of drive letters. This option is recommended for
Avid DS.
40
Page 41

Preparing to Configure Avid DS Storage
Connecting an Avid DS Workstation to a Remote Avid Unity Storage
This section describes the procedure for connecting a local Avid DS Media Indexer to a
remote Avid Unity dedicated Media Indexing Service on all Avid DS workstations (except
those running Avid DS RP).
To connect a local Media Indexer to a remote Avid Unity Media Indexing Service:
1. In Avid DS, select Data Management then select Configure Storages.
2. Select the listed Avid Media Indexing Service, then click Change.
3. In the Installed Media Storages window, click Add.
4. Exit all dialog boxes.
5. In the Available Storage Types window, select Avid Media Indexing Service.
6. From the drop-down list, select the Avid Media Indexing Service of your choice.
7. Exit all windows.
41
Page 42

2 Configuring Avid DS on Avid Unity
42
Page 43

3 Conforming Projects in an Avid
Interplay Environment
Integrating a workgroup containing different Avid hardware and software into the Avid
Interplay environment provides improved media management. Avid Interplay facilitates
typical tasks such as conforming projects, importing and exporting sequences, and accessing
media and other assets from the storage.
For more information on Avid Interplay, see the following documents:
• Avid Interplay Best Practices
• Avid Interplay Access User Guide
• Avid Interplay Engine and Avid Interplay Archive Engine Administration Guide
• Avid Interplay Framework User’s Guide
• Avid Interplay Transfer Setup and User’s Guide
Avid DS and the Avid Interplay Environment
The Avid Interplay environment helps to manage and store media when you bring in
sequences from an Avid editing system, such as Avid Media Composer, to Avid DS for
conforming. With Avid storage solutions, you can import the sequence with its media
already in final resolution for finishing, such as adding special effects or color correction.
The following illustration shows a typical example of a basic workflow for storing,
transferring, and conforming media in an Avid Interplay environment.
Page 44

3 Conforming Projects in an Avid Interplay Environment
Avid Airspeed
7
Media files
1
workstation
Avid DS workstation
4
Media files are captured
and stored on Avid Unity ISIS
Avid DS Media Indexer
indexes media in the
dedicated DS workspace
Avid Unity ISIS
Interplay Media Indexer
indexes
Media Composer workspaces
Avid Media Composer
6
AAF File
Completed
5
Sequence (AAF
Interplay
Access
3
AAF File
1. Capture or ingest media files from Avid Airspeed to an Avid editing system such as
Avid Medi a Comp oser.
2
44
2. Build a rough sequence on the Media Composer timeline and check it in to the Interplay
database as an AAF file using Avid Interplay Access.
Avid Interplay Access manages, searches, and browses assets such as sequences and
files in a shared storage environment.
3. Check out The AAF file from the Interplay database and import it for conforming on
Avid DS.
4. Conform the sequence, and then finish it on Avid DS.
5. Export the completed sequence by sending the “Timeline to MC,” and then check the
file back into the Interplay database.
Page 45

Checklist: Setting up Avid DS in an Interplay Environment
6. Check out the file on Avid Media Composer.
7. Send the final sequence to Avid Airspeed for broadcast or playback.
Checklist: Setting up Avid DS in an Interplay
Environment
The checklist below provides a basic workflow for transferring and conforming media when
Avid DS participates in an Avid Interplay workgroup environment. The administrator
configuring the hardware and software components in the Interplay environment must
follow the steps in the order listed to ensure that these components function successfully.
Each time you link to a topic within a step, make sure you return to the checklist after you
have completed that procedure.
Step Refer to
Before you begin, refer to specific information
about workgroups in the Interplay environment.
Install and configure the required hardware and
software components:
• Avid Unity ISIS Client Manager
• Avid Interplay Access
Install Avid Interplay Access on each Avid DS workstation participating in the Interplay environment.
Using the Avid Unity ISIS Client Manager:
Create and mount dedicated Avid DS workspaces. Avid Unity MediaNetwork documentation
On the Avid DS system in the Interplay
environment:
Create necessary folders on your storage. “Sharing MXF Media” on page 116
Configure the media storage. “Defining your Storage Areas within the Media
Configure access to the media storage indexed by
the Avid Interplay Media Indexer.
Configure the Interplay Adapter. “Configuring the Interplay Adapter” on page 46
On the Avid editing system:
“Workgroup with Shared Storage in an Avid
Interplay Environment” on page 112
• Checklist: Installing Avid DS with Avid Unity
• Avid Interplay Installation Guide
Indexing Service” on page 122
“Accessing Storage on Workstations in an Avid
Interplay Environment” on page 129
45
Page 46

3 Conforming Projects in an Avid Interplay Environment
Step Refer to
Configure the Avid Interplay Media Indexer. Avid Interplay Framework documentation
Build the sequence and prepare it for export. “Packing Up Projects on your Offline System” on
page 3
Export the sequence to Avid DS by checking it into
Interplay Access.
On the Avid DS system:
Check out the sequence file from Interplay Access
and drag and drop it to Avid DS.
Finish the production. Refer to the appropriate sections in the Avid DS
Export or output the sequence to an Avid editing
application by using the Timeline to MC feature.
“Exporting the Finished Sequence to Avid DS via
Interplay” on page 47
“Importing and Opening the Sequence in Avid DS”
on page 47
Help.
“Using Timeline to MC to Output a Sequence to
Avid Media Composer” on page 15
Configuring the Interplay Adapter
You must configure the Interplay Adapter to establish a connection between each Avid DS
workstation and the Interplay database. You will only need to do this once.
To configure the Interplay Adapter:
46
1. In Avid DS, select File > User Preferences.
2. In the User Preferences dialog box, click the Interplay Access property page.
3. In the Interplay Connection box, enter the following:
t The name of the server where the Interplay database is located.
t The name of the Interplay database you are connecting to.
t The username and password.
You must have permission to log onto the Interplay database. Usernames, passwords,
and permissions are issued by the system administrator.
4. Click Connect.
In the Current Check In Directory box, all projects on the database that you have
permissions to access are listed.
Page 47

5. Click OK.
Exporting the Finished Sequence to Avid DS via Interplay
Exporting the Finished Sequence to Avid DS via
Interplay
Avid DS cannot directly open projects from the Avid editing system. Therefore, you must
export the finished sequence in an intermediate file format using the Avid Interplay Window
in the Avid editing system.
The Interplay Window is a built-in lighter version of Avid Interplay Access that allows you
to work with clips and sequences in a shared storage environment.
For information on how to check file assets in and out of the Interplay database using the
Interplay window, see the Avid Media Composer documentation.
Importing and Opening the Sequence in Avid DS
The offline sequence from the Avid editing system must be checked in, using Avid Interplay
Access or the integrated Interplay window, to a location that can be accessed by Avid DS.
47
Page 48

3 Conforming Projects in an Avid Interplay Environment
To import the offline sequence:
1. On the Avid DS workstation, launch Avid Interplay Access.
2. Navigate to the location of the sequence.
3. Drag and drop the sequence to the Avid DS Explorer.
4. In the DS Explorer, double-click the AAF to open the bin.
48
5. Double-click the bin to display its contents.
Page 49

Importing and Opening the Sequence in Avid DS
Master clips
Sequence
The contents will include master clips, subclips, and sequences.
For a description of Avid editing system icons—see AAF/AFE List in the Help.
6. Drag the sequence to the first track of the timeline.
Avid DS creates master clips in your project folder, and the sequence automatically
links to the media on your storage device. All cuts, edits, and effects applied in the Avid
editing system are visible on the timeline.
7. You can now finish the sequence in Avid DS.
49
Page 50

3 Conforming Projects in an Avid Interplay Environment
50
Page 51

4 Configuring Windows XP
Avid DS is supported on both Windows XP Professional and Windows Professional x64
Edition. Before installing Avid DS, there is some basic Window configuration that must take
place.
Configuring the Network Connection
• For a standalone Avid DS workstation with no network connection—see “Installing the
Microsoft Loopback Adapter on a Standalone Station” on page 53. This simulates an
active network connection.
• For a Microsoft Windows domain: Perform the following steps 1 to 5 to set up network
connections on each of the workstations.
• For a Microsoft Windows workgroup: Perform all the following steps to set up network
connections on each of the workstations.
The Avid Project Indexer will not operate correctly if the network adapter or connection is
n
not set properly.
To configure the network connection on Windows XP:
1. On the Windows desktop, right-click the My Network Places icon and select Properties.
The following window displays.
2. Right-click the Local Area Connection icon, then click Properties.
Page 52

4 Configuring Windows XP
The Local Area Connection Properties dialog box displays.
The TCP/IP network protocol must always appear in the list of protocols.
n
3. Double-click Internet Protocol (TCP/IP) to display the Internet Protocol (TCP/IP)
Properties dialog box.
4. Do one of the following:
Windows workgroup Select the Use the following IP address option, enter the IP
address, Subnet mask, and if required, the Default gateway
address.
Windows domain Select the Obtain an IP address automatically option.
5. Click OK.
6. Repeat steps 1 to 5 for each workstation in the workgroup.
To confirm that all workstations are part of the workgroup:
1. On the Windows desktop, double-click the My Network Places icon.
2. Click View Workgroup Computers.
All the workstations in the workgroup should be listed. If not, restart the workstation to
reinitialize the network adapter card.
52
Page 53

Using Two Network Cards
If any of the workstations in a workgroup are configured with two active network cards, the
Avid indexing services require small modifications to work properly.
To configure the network cards:
1. Open Windows Notepad, then open the file C:\WINDOWS\slp.conf.
Depending on the system setup, the drive may not be C:
2. Locate this line at the bottom of the file:
net.slp.isBroadcastOnly = false
3. Change ‘false’ to ‘true’.
4. Save the file and restart the workstation to reset the indexing services.
If the Avid DS RP workstation chooses the slower network adapter for processing, you
can force Windows to use the fastest network adapter by doing the following:
5. Open Windows Notepad, then open the file
C:\WINDOWS\system32\drivers\ETC\HOSTS.
6. Locate this default line at the bottom of the file.
127.0.0.1 localhost
Installing the Microsoft Loopback Adapter on a Standalone Station
7. Under the default line, declare the fast network adapter IP Address and computer name
(example: 200.200.200.1 DS1).
8. Save the file and restart the workstation.
If that does not resolve the problem, open a Command Prompt window, type ROUTE
PRINT and press Enter.
The result should display your two network adapters’ IP addresses. If you see only one
address returned, you have a networking conflict to resolve.
Do not use the same IP class for both adapters. For example, the following is not valid:
100.100.100.1 and 100.100.100.2
The following is valid:
100.100.100.1 and 200.200.200.1
Installing the Microsoft Loopback Adapter on a
Standalone Station
If an Avid DS workstation will not be operating on a network, the Microsoft Loopback
adapter must be installed and configured with a static IP address.
53
Page 54

4 Configuring Windows XP
Before you begin, make sure that your workstation is disconnected from any network:
• the Local Area connection must be disabled (click Network Connections desktop icon),
• the network cable must be disconnected.
To install the Microsoft Loopback adapter:
1. Go to the Control Panel and double-click the Add Hardware icon.
The Welcome to the Add Hardware Wizard displays.
2. Click Next.
The wizard searches for installed components.
3. Select the Yes, I have already connected the hardware option then click Next.
4. In the Installed hardware list box, select Add a new hardware device then click Next.
5. Select Install the hardware that I manually select from a list (Advanced) then click Next.
6. In the Common hardware types list box, select Network Adapters then click Next.
7. In the Manufacturers list box, select Microsoft, then in the Network Adapter list box
select Microsoft Loopback Adapter, then click Next.
8. Click the Next button again, then click Finish.
To test the Microsoft LoopBack adapter:
t In a Command Prompt window, type
the name of the workstation).
The result should be:
Reply from 127.0.0.1: bytes=32 time<1ms TTL=128
127.0.0.1 is the standard IP address used for a loopback network connection.
n
PING "computername"
(where computername is
Managing Microsoft Windows Workgroup Accounts
A workgroup configuration is usually most appropriate for smaller facilities. The only
difference is between a workgroup and a domain is that the Windows account management
for a workgroup is decentralized and requires more complicated security configurations for
the Avid DS software components.
An Avid DS Workgroup can be setup on either a Windows Workgroup or a Windows Domain.
n
54
Page 55

Managing Microsoft Windows Workgroup Accounts
To setup the Avid DS workgroup operating within a Windows workgroup:
1. When setting up accounts, log on with the local administrator account. For example:
administrator or <computer_name>\administrator
After you log on for the first time, you must set a password for the administrator account.
n
2. Create a user account for each user on each Avid DS workstation. Each account must
have the same username and password on all workstations.
For example:
If the Windows workgroup is called POST, and if Alice, Bob, and Charlie are Avid DS
operators, the following accounts must be created on every workstation in the
workgroup:
Alice
Bob
Charlie
3. Add each user account to the Administrators group, on each workstations in the
workgroup.
For example:
To add a new user to the workgroup, create a new user account on each workstation, and
add this account to the Administrators group on each workstation.
To remove an existing user from the workgroup, remove the user from the
Administrators group on each workstation and disable the user account.
4. Enter a unique name for each workstation in the workgroup—see “Naming a
Workstation” on page 55.
5. Configure the network connection on each workstation—see “Configuring the Network
Connection” on page 51.
Naming a Workstation
If a workstation belongs to a Windows workgroup, it should be given a unique name.
Likewise, the workstation, the Windows workgroup, and the Avid DS workgroup should
each have a unique name.
To set a workstation name on Windows XP:
1. Click the Start button then select Settings > Control Panel.
2. Double-click the System icon.
If the system icon is not available, click on “switch to classic view” on the left hand side.
n
55
Page 56

4 Configuring Windows XP
3. Under the Computer Name tab, click on the “Change...” button.
4. Under Computer Name, type in a unique name.
5. Select Member of: Workgroup.
6. For the workgroup name, type Workgroup or a unique name.
In order to share files on a group of workstations, the workgroup name must be the same on
n
all workstations.
c
If you are on a system that is part of a Windows Domain, changing it to a Windows
Workgroup can cause you to loose the ability to login to your workstation.
Managing Microsoft Windows Domain Accounts
A domain configuration is most appropriate for facilities where the Avid DS workstations
are part of a corporate network. In a domain, the Windows account management is
centralized and simplifies security configuration of all the Avid DS software components.
An Avid DS Workgroup can be setup on either a Windows Workgroup or a Windows Domain.
n
To setup an Avid DS workgroup operating within a Windows domain:
1. When setting up accounts, log on with a valid domain and user account with local
administrative privileges (<domain_name>\userid).
2. Create a user account for each user within the domain.
For example:
If the workgroup belongs to a domain called POST, and if Alice, Bob, and Charlie are
Avid DS operators, then the following accounts must be created:
POST\Alice
POST\Bob
POST\Charlie
56
Domain accounts must be set up by network administration personnel. Avid does not
provide nor support domain networking issues, as network environments differ from one
company to the next.
3. Add each user account to the Administrators group on each workstation in the domain.
The administrators group is the local administrator of the workstation, not the Domain
administrator. The Avid DS services and hardware require administrative privileges to
run on Windows.
4. Add new users and remove existing users from the workgroup
For example:
Page 57

Sharing Folders and Setting Permissions
To give a new user, Karen, access to the workgroup, create a new account POST\Karen
and add this account to the Administrators group on each workstation in the domain.
To remove a user, Bob, from the workgroup, remove POST\Bob from the
Administrators group and disable the account.
5. Ensure there is a proper network connection on each workstation. The network
administrator should perform this step.
Sharing Folders and Setting Permissions
The Avid DS Setup program creates folders for project data and media files. By default,
these folders inherit security permissions from the parent folder. In a default installation,
these folders are shared, and the default permissions give full access to everyone.
These permissions may be changed as needed:
Shared folder name Shared path Description
\DS_Projects F:\DS Projects\DS_v10.x Avid DS project folder
\ds_media D:\VideoStorage Avid DS media storage
\ds_media_1 F:\AudioStorage Avid DS media storage
If a user creates new media folders or stores project data in other folders, then Avid DS
automatically shares those folders. The share permissions and security of these folders
should also be verified.
For media and project folders, if permissions are not set properly on the share or the folder,
you will get an error message.
Sharing Folders in a Windows Workgroup
To disable simple file sharing:
1. Open an Explorer window and select Tools from the menu.
2. Select Folder Options.
3. Select the View tab.
4. Under Advanced Settings, deselect Use simple file sharing (Recommended).
5. Click Apply, and then OK to exit.
Now you can share folders over the network.
57
Page 58

4 Configuring Windows XP
To set folder permissions:
1. Right-click the folder and select Properties.
2. In the Sharing tab, select the Share this folder option.
3. Enter the Share name.
4. Enter a comment: ‘Avid DS project for shared projects; DS Media storage for shared
media’.
5. Click Permissions.
6. Select the Full Control check box, then click Apply and OK.
Storing Projects
c
Do not store or create projects outside an existing DS Projects folder.
n
F:\projectname is not valid
Projects must be stored in a valid location, within an existing DS Projects folder.
• Valid storage locations:
-F:\DS Projects\projectname (where F:\DS Projects is shared)
- F:\DS Projects\DS_v10.x\projectname (where F:\DS Projects\DS_v10.x is shared)
Invalid storage locations:
-F:\projectname is invalid. A project cannot be located at the root of a drive.
The Avid Project Indexer does not allow a shared project folder to reside within another
shared project folder. An error message from the indexer will appear if this is done.
Sharing Folders in a Windows Domain
To share folders and set permissions on a computer that is part of a Windows domain:
1. In Windows Explorer, right-click the folder and select Sharing and Security.
2. Select Share this folder, and click the Permissions button.
3. Select Full Control, then click Apply and OK.
4. Add the user that runs the Project Indexer and allow full control.
58
Page 59

Creating User Accounts
You can change your password, and create and modify user accounts by accessing the
Windows XP Computer Management console, which lets you define security features, such
as permissions, rights, accounts, user groups, and audit policies.
Avid recommends that all users within an Avid DS workgroup have accounts in the
Administrators group on each workstation in the workgroup.
When creating a user account, note whether the workstation is part of a Windows workgroup
or a domain network.
• If it is part of a Windows workgroup, log on with the local administrator account.
For example: administrator or computer_name\administrator
The administrator account must have a password.
n
• If it is part of a Windows domain, log on with a valid domain and user account with
local administrative privileges.
For example: domain_name\userid\userid
To create a user account:
Sharing Folders and Setting Permissions
1. On the Windows desktop, right-click the My Computer icon and select Manage.
The Computer Management dialog box displays.
2. In the left pane use the tree to navigate to System Tools > Local Users and
Groups > Users.
3. Right-click Users the select New User.
59
Page 60

4 Configuring Windows XP
The New User dialog box displays.
4. Enter the new user information, then click Create.
5. Repeat step 4 for each new user to be added. When done, click Close.
The new user accounts display in the Computer Management console.
To modify an account:
1. In the Computer Management console, navigate to System Tools > Local Users and
Groups > Users.
2. Double-click the user account you want to edit.
The Properties dialog box for this user account displays.
60
Page 61

3. Select the General tab to specify password options.
4. Select the Member Of tab to add the user to groups.
All Avid DS users must be members of the Administrators group.
n
5. When done, click OK.
Sharing Folders and Setting Permissions
61
Page 62

4 Configuring Windows XP
62
Page 63

5 Installing Avid DS Software and
Services
The Avid DS Software & Drivers DVD contains the following:
Software • Avid DS 64-bit
• Avid DS 32-bit
• Avid Metafuze
Drivers • HP Z800 - Dual-Link
• HP xw8600 - Dual-Link
• HP xw8400 - Nitris and Dual-Link
• HP xw9300 - Nitris and Dual-Link
• HP xw8200 - Nitris
• Software/RP workstation only
Services Avid Interplay Media Services
Codec AVI Reference Codec
n
w
Documentation • ReadMe
• Avid DS-HP Z800 Configuration Guidelines
• Avid DS Install Guide
• Avid DS High-Resolution Workflow and Color Guide
You will need Adobe® Reader® to view the PDF documentation online. You can download
the latest version from the Adobe web site at www.adobe.com.
Before you begin installing Avid DS, all the operating system updates, required device
drivers, and the stripe volume (for local storage), must be configured correctly—see
“Installing your Avid DS Environment” on page 15.
Page 64

5 Installing Avid DS Software and Services
Installing Avid DS Software Components
To install Avid DS, you must log on with an account that has Administrator privileges.
If a previous version of Avid DS is installed, it must be removed before the latest version can
be installed.
Before installing Avid DS, determine if the workstation will run as a standalone machine or
be connected to other Avid DS workstations in a workgroup.
• For standalone workstation installation refer to “Installing Avid DS Software on a
Standalone Workstation” on page 65.
• For installations in a workgroup refer to “Installing Avid DS in a Workgroup” on
page 69
Important note for an Avid DS Workgroup installation:
n
It is suggested that you first install all Avid DS workstations as standalone units. This will
allow you to test and then put these machines in service with very low downtime for your
facility.
When all Avid DS workstations are up-and-running, you can now carefully prepare the
Avid DS Workgroup that will host its clients, including potential standalone services such as
Avid Media and Project Indexers, Avid DS Software and Avid DS RP clients. When the Avid
DS Workgroup is fully configured, you simply join the Avid DS workstations as clients to
complete the setup.
You should clearly plan your Avid DS Workgroup. Evaluate the equipment at your disposal
and what you might need to add to realize this project. A standalone indexer may force you
to buy an additional PC to host the service. If you keep the Avid DS Workgroup small, you
can host all Avid DS Indexing Services on one computer, or use separate machines to better
distribute the workload.
Uninstalling Avid DS
The Uninstall program removes the original Avid DS application files, but leaves some
residual files such as your deck templates and user preferences. If you want to reuse any of
these remaining files, you should copy them to the updated version folder(s) after the latest
version has been installed.
64
Page 65

Installing Avid DS Software Components
To uninstall Avid DS:
1. Click Start and select Settings > Control Panel > Add or Remove Programs.
2. In the Currently installed programs list, select the Avid DS software version you want to
remove, then click Remove.
3. In the Avid DS Setup dialog box, select the Remove option, then click Next.
A Confirm Uninstall dialog box displays.
4. Click Yes to continue with the uninstall.
5. When the uninstall is done, click Finish.
Refer to Avid DS online Support Center if further instructions are required.
n
Installing Avid DS Software on a Standalone Workstation
Follow this procedure to install the Avid DS software on a standalone workstation. This
procedure applies to both 32-bit- and 64-bit-systems. Before you start the installation, refer
to the ReadMe.
When the installation starts, the program detects the configuration of the workstation (32- or
64-bit). You can install only the appropriate version of the software.
For a standalone Avid DS workstation you only need to install the Avid DS software. The
n
workstation functions as its own controller and media indexing service.
During the installation, you can use the Back button to return to previous dialog boxes.
To install Avid DS software on a standalone workstation:
1. Use the Avid DS Software & Drivers DVD, or download the Avid DS software from the
Avid Download Center at www.avid.com/support/downloadcenter/index.asp.
2. Double-click the Start.exe file.
The Main Menu displays.
3. Click Software Installation.
4. Click Install Avid DS 10.2 (64-bit) or Install Avid DS 10.2 (32-bit).
The Avid DS Setup Wizard displays.
65
Page 66

5 Installing Avid DS Software and Services
5. Click Next.
The Select Main Components dialog box displays. The Avid DS check box is selected
by default. If this is a software-only installation, the Avid DS (software-only) check box
is selected.
66
6. Click Next.
7. In the License Agreement dialog box, read the End User License Agreement, accept the
terms of the agreement, then click Next.
8. In the Customer Information dialog box, enter a user name and your company name,
then click Next. This information is required.
Page 67

Installing Avid DS Software Components
9. In the Reseller or Dealer Information dialog box, enter the requested information, if
applicable, then click Next. This information is optional.
10. In the Choose Destination Location dialog box, click Next to install the software in the
default destination folder.
You can change the default installation location, but doing so could cause shortcuts in the
n
Support Console to no longer be valid.
11. In the Avid DS Workgroup Configuration dialog box, click Work standalone, then click
Next.
12. In the Avid DS Service Configuration dialog box, enter the login profile of the user
account that will run the Avid DS services on this workstation, then click Next.
You must specify the computer name before the user id (e.g., computer_name\userid).
If your workstation is part of a Windows domain, specify the domain name before the user id
n
(domain_name\userid).
13. The Storage Setup dialog box will display. The correct storage locations must be
selected to ensure that Avid DS operates correctly.
To change the storage locations, use the drop-down lists, then click Next.
- Video Storage: Select the drive letter for your video media.
- Audio Storage: Select the drive letter for your audio media.
- Projects Storage: Select the drive letter for your projects and presets storage area.
- Archives Storage: Select the drive letter for your archives storage area.
- Interactive Cache: Select the drive letter for your interactive cache storage area. The
interactive cache location must be either one of the local video storage drives, or a
drive partition other than your local system partition (An RP workstation will also
return processed media to this location).
67
Page 68

5 Installing Avid DS Software and Services
If you are connected to Avid Unity, select None even if it is available in this list. It will be
n
added later via the Storage Configuration dialog in Avid DS (using the full UNC path name).
Both the Video Storage location and the Interactive Cache should be set to the same
n
location.
68
The storage location configuration will need to be finalized the first time you run Avid DS.
n
The hardware setup dialog box will display the hardware setup options, if supported
hardware is detected. If no supported hardware is installed, the select additional
components dialog box will be displayed and step 14 does not apply.
14. By default Avid DS will detect which hardware is installed on your system. Click Next
to continue.
Page 69

Installing Avid DS Software Components
If you are setting up an Avid DS RP station, you may need to use the manual setting to force
n
Avid DS to use Software Video and Wave Audio.
The Select Additional Components dialog box displays to show additional components
you can install.
If more than one network adapter is present on the machine, you will get a dialog box asking
n
you to select all adapters which will be used by the workgroup.
15. When the Start Copying Files dialog box displays, review your installation settings, then
click Next.
A progress indicator displays while the Avid DS files are copied to your system.
16. When the InstallShield Wizard Complete displays, click Finish and allow your
workstation to restart.
If this is not a new installation, ensure that your drivers are up to date before restarting.
n
Refer to “Installing Drivers” on page 88 for driver installation instructions.
Installing Avid DS in a Workgroup
Follow this procedure to install Avid DS on a workstation in a workgroup. Before you start
the installation, see the ReadMe.
69
Page 70

5 Installing Avid DS Software and Services
Here, the term Workgroup describes an Avid DS workgroup and not a Windows Workgroup.
n
An Avid DS workgroup can be setup in both a Windows workgroup and in a Windows
domain environment.
The Avid DS Controller needs to be set up before setting up an Avid DS workstation.
During the installation, you can use the Back button to return to previous dialog boxes.
To add a workstation to a workgroup:
1. Use the Avid DS Software & Drivers DVD, or download the Avid DS software from the
Avid Download Center at www.avid.com/support/downloadcenter/index.asp.
2. Double-click the Start.exe file.
The Main Menu displays.
3. Click Software Installation.
4. Click Install Avid DS 10.2 (64-bit) or Install Avid DS 10.2 (32-bit).
The Avid DS Setup Wizard displays.
70
5. Click Next.
The Select Main Components dialog box displays. The Avid DS check box is selected.
Page 71

Installing Avid DS Software Components
6. In the License Agreement dialog box, read the End User License Agreement, accept the
terms of the agreement, then click Next.
7. In the Customer Information dialog box, enter a user name and your company name,
then click Next. This information is required.
8. In the Reseller or Dealer Information dialog box, enter the requested information, if
applicable, then click Next. This information is optional.
9. In the Choose Destination Location dialog box, click Next to install the software in the
default destination folder.
You can change the default installation location, but doing so could cause shortcuts in the
n
Support Console to no longer be valid.
10. In the Avid DS Workgroup Configuration dialog box, click Join workgroup, then click
Next.
The Avid DS Workgroup Configuration dialog box displays. Existing workgroups are
shown in the left pane. When you select a workgroup, the workstations in the selected
workgroup are shown in the right pane.
71
Page 72

5 Installing Avid DS Software and Services
11. In the left pane, select a workgroup to join, then click Next.
12. In the Avid DS Service Configuration dialog box, enter the login profile of the user
account that will run the Avid DS services on this workstation, then click Next.
You must specify the computer name before the user id (that is, computer_name\userid).
72
If your workstation is part of a Windows domain, specify the domain name before the user id
n
(domain_name\userid).
13. Specify the desired storage locations by using the drop-down lists, then click Next.
The hardware setup dialog box will display the hardware setup options, if supported
hardware is detected. If no supported hardware is installed, the select additional
components dialog box will be displayed and step 14 does not apply.
14. By default Avid DS will detect which hardware to use. To make changes to the hardware
setup, click on the Manual Settings button. Then select the desired video and audio
devices by checking the box next to the desired devices. Click Next to continue.
Page 73

Installing Avid DS Software Components
The Select Additional Components dialog box displays to show additional components
you can install.
If more than one network adapter is present on the machine, you will get a dialog box asking
n
you to select all adapters which will be used by the workgroup.
15. When the Start Copying Files dialog box displays, review your installation settings, then
click Next.
A progress indicator displays while the Avid DS files are copied to your system.
16. When the Maintenance Complete dialog box displays, click Finish.
17. Close the Avid DS Setup window by clicking the close button in the top-right corner.
18. Restart the workstation if prompted.
If this is a first-time installation of the Avid DS application on a hardware-based workstation
n
(Avid DS Dual-Link, Avid DS Nitris + Dual-Link or Avid DS Nitris only), DO NOT
RESTART the workstation. Select "No, I will restart my computer later.", click Finish and
immediately proceed with the “Installing Drivers” on page 88.
Installing the Avid DS Workgroup Controller
Follow this procedure to install the Avid DS workgroup controller. To install the controller,
you must log on with an account that has Administrator privileges.
If Avid DS is installed on the workstation where the workgroup controller will be installed, it
n
must be removed before the controller is installed. See “Uninstalling Avid DS” on page 64.
73
Page 74

5 Installing Avid DS Software and Services
To install the workgroup controller:
1. Use the Avid DS Software & Drivers DVD, or download the Avid DS software from the
Avid Download Center at www.avid.com/support/downloadcenter/index.asp.
2. Double-click the Start.exe file and from the Main Menu, click Software Installation
3. Click Install Avid DS 10.2 (64-bit) or Install Avid DS 10.2 (32-bit)
4. In the Welcome dialog box, click Next.
The Select Main Components dialog box displays.
74
5. In the Workgroup Components tree, select the Avid Workgroup Controller check box.
The other software components that can be installed on the controller are:
- Avid DS RP—see “Installing Avid DS RP” on page 100.
- Avid Media Indexer
6. When done, click Next.
7. In the License Agreement dialog box, read the End User License Agreement and accept
the terms of the agreement. Click Next to continue the installation.
8. In the Customer Information dialog box, enter your name and company name, then click
Next. This information is required.
9. In the Reseller or Dealer Information dialog box, enter the requested information then
click Next. This information is optional.
10. Click Next to choose the default destination location to install any Avid DS software or
change the path to install to a different location; then click Next.
Page 75

Installing Avid DS Software Components
The Avid DS Workgroup Configuration dialog box displays. If this is the first time that
the controller software has been installed on this workstation, enter a workgroup name.
We suggest a name without space or illegal characters to avoid problems later.
n
11. Click Next.
The Avid Interplay Media Service dialog box displays.
75
Page 76

5 Installing Avid DS Software and Services
The Install and Configure Avid Interplay Media Service window will not show the option to
n
Use local Avid Interplay Media Service unless it is already installed on the system. For
installation instructions refer to “Installing Avid Interplay Media Services and Related
Applications” on page 79.
12. Select an option:
If you want to use Avid Interplay Media Service:
a. Click Use remote Avid Interplay Media Service to use the Avid Interplay Media
Service installed on another workstation in the workgroup, then click Next. The
Avid Interplay Media Service Configuration dialog box displays.
b. Enter the required details in the text box, or leave the text box blank if you will
configure it later, then click Next.
If you do not want to use Avid Interplay Media Service:
a. Click Do not use Avid Interplay Media Service, then click Next.
The Avid DS Service Configuration dialog box displays.
13. Enter the login profile (computer name_user id) of the user account that will run the
Avid DS services on this workstation, then click Next.
If the workstation is part of a Windows domain, specify the domain name before the user id
n
(domain_name\userid).
76
By default the current user id is placed in the user account field.
14. In the next Avid DS Service Configuration dialog box, determine the users or groups
that will have access to the Avid DS services.
If you want to... Do this
Add a new user or group Click Add. In the Add Users and Groups dialog box,
enter the user ID(s)/group names, select the access type,
then click OK.
Remove a user or group Select from the list, then click Remove, or Remove All.
Change user or group privileges Select from the list, then select from the Type of Access
drop-down list.
15. Click Next.
16. In the Storage Setup dialog box, the default storage locations are selected.
Page 77

Installing Avid DS Software Components
If you are connected to Avid Unity, select None even if it is available in this list. It will be
n
added later via the Storage Configuration dialog in Avid DS (using the full UNC path name).
17. To change the storage locations, use the drop-down lists, then click Next.
The hardware setup dialog box will display the hardware setup options, if supported
hardware is detected. If no supported hardware is installed, the select additional
components dialog box will be displayed and step18 should be ignored.
18. By default Avid DS will detect which hardware to use. To make changes to the hardware
setup, click on the Manual Settings button. Then select the desired video and audio
devices by checking the box next to the desired devices. Click Next to continue.
If more than one network adapter is present on the machine, you will get a dialog box asking
n
you to select all adapters which will be used by the workgroup.
77
Page 78

5 Installing Avid DS Software and Services
The Select Additional Components dialog box displays to show additional components
you can install.
19. In the Select Additional Components dialog box, select any additional components that
you need to install, then click Next.
20. When the Start Copying Files dialog box displays, review your installation settings, then
click Next.
A progress indicator displays while the Avid DS files are copied to your system.
21. When the InstallShield Wizard Complete displays, click Finish.
The Avid DS Support Console
When Avid DS v10.2 is installed, up to four shortcuts are placed on the desktop: one for the
Avid DS application, one for the Avid DS Graphics-Link (if supported hardware is
available), one for Avid DS RP (if installed) and one for the Avid DS Support Console.
The Support Console provides quick links to the various Avid support functions and tools.
78
Page 79

Installing Avid Interplay Media Services and Related Applications
There are four tabs in the Avid DS Support Console window:
Tab Features
Avid Support
Information
Windows XP Utilities Contains links to the most frequently used Windows XP utilities.
Avid DS Tools Contains links to a variety of Avid DS tools.
Workstations Contains links to the HP support sites for the workstations supported
Contains links to the Avid Technologies web site, Avid Customer
Support, and the Avid Community.
by Avid DS.
Installing Avid Interplay Media Services and
Related Applications
The Avid DMS Broker application has been replaced by Avid Interplay Media Services.
Before installing the Avid Interplay Media Services, several preparatory procedures have to
be performed.
It is important that these preparatory procedures be performed in the correct order, and that
none of the procedures be omitted, otherwise the install will fail.
79
Page 80

5 Installing Avid DS Software and Services
If DMS Broker is not installed on your system, start with “Installing Internet Information
n
Services” on page 81.
If Avid Interplay Media Services and related applications were installed previously during
an installation of Avid DS 10.x, they do not need to be reinstalled and are still valid for this
release.
You cannot install the Media Composer Software on an Avid DS workstation if this system is
n
part of an Interplay Workgroup.
Uninstalling Avid DMS Broker v2.1
If Avid DMS Broker v2.1 is installed on the workstation where Avid Interplay Media
Service will be installed, it must be removed before you proceed with the new installation.
Java v1.2.2 should also be removed from the Control Panel, as Avid DS uses Java v1.5.
To uninstall DMS Broker v.2.1:
1. Click Start and select Settings > Control Panel > Add or Remove Programs.
2. In the Currently installed programs list, select Avid DMS Broker, then click
Change/Remove.
3. In the Avid DS Setup dialog box, select the Remove option, then click Next.
A Confirm Uninstall dialog box displays.
4. Click Yes to continue with the uninstall.
5. When the uninstall is done, click Finish, then restart the workstation.
To remove Java v1.2.2:
t Open Control Panel and delete the Java folder.
To remove residual Avid DS files:
1. Browse to the C:\Program Files\Avid folder.
2. Delete the ProEncode folder.
Uninstalling DMS Broker v5.0
If DMS Broker v5.0 is installed on the workstation where Avid Interplay Media Service will
be installed, it must be removed before you proceed with the new installation. As well, the
Java RunTime Environment SE v1.4.2_08, Microsoft SQL Server Desktop Engine, and
residual Avid DS files have to be removed
80
Page 81

Installing Internet Information Services
To uninstall DMS Broker v5.0:
1. Click Start and select Settings > Control Panel > Add or Remove Programs.
2. In the Currently installed programs list, select Avid DMS Broker, then click
Change/Remove.
3. In the Avid DS Setup dialog box, select the Remove option, then click Next.
A Confirm Uninstall dialog box displays.
4. Click Yes to continue with the uninstall.
5. Repeat steps 2 to 4 for Java 2 Runtime Environment SE V1.4.2_08.
6. When the uninstall is done, click Finish, then restart the workstation.
To remove residual Avid DS files:
1. Browse to the C:\Program Files\Avid folder and delete the DMS folder.
2. Browse to C:\Program Files\ and delete the Microsoft SQL Server folder.
Installing Internet Information Services
To install Internet Information Services (IIS):
1. Click Start and select Settings > Control Panel > Add or Remove Programs.
2. Click Add/Remove Windows Components.
3. In the Windows Components dialog box, select the Internet Information Services (IIS)
check box, then click Next.
If prompted for the Windows XP installation disk, browse to C:\amd64 (64-bit) or C:\i386
n
(32-bit) to find and install the requested DLL file or insert the appropriate Windows
installation disk.
4. When the installation is complete, click Finish.
Installing Microsoft .Net Framework 1.1
To install Microsoft .Net Framework 1.1:
1. On the Avid DS Software & Drivers DVD, open the folder
\Applications\DMS\Setup\1_Framework, and double-click the 1-dotnetfx.exe file.
Install this file even if the Microsoft .NET Framework 1.1 is already installed on your
n
system. This version includes specific files required for this installation.
81
Page 82

5 Installing Avid DS Software and Services
2. In the Microsoft .NET Framework 1.1 Setup dialog box, click Yes.
The installer installs without further dialog boxes.
3. In the 1_Framework folder, double-click the 2-framework_script.bat file.
A command prompt dialog box displays.
4. Press any key to continue, then press any key again to complete the installation.
5. Close the 1_Framework window.
Installing Java Runtime Environment
To install Java Runtime Environment:
1. In the \Applications\DMS\Setup\2_jre_1.5 b folder, double-click the
2_jre_1.5_0_12-windows-i586-p.exe file.
2. When the License Agreement dialog box displays, read the End User License
Agreement, then click Accept to start a typical setup.
The installation starts and runs without further dialog boxes.
3. When the installation is complete, click Finish.
Installing Microsoft SQL Server
This install procedure consists of five separate steps, which must be done in the proper order,
otherwise the install will fail.
• Installing Microsoft.NET Framework 2.0
• Installing Microsoft SQL Server components
• Installing the SQL Toolkit
• Configuring the SQL Server Configuration Manager
• Configuring the SQL Server Management Studio Express
Step 1: To install Microsoft.NET Framework 2.0:
1. Click Start and select Settings > Control Panel > Add or Remove Programs.
2. In the Currently installed programs list, check to see if Microsoft NET.Framework 2.0 is
installed.
If it is installed, skip the rest of this install procedure and continue with Step 2.
3. In the \Applications\DMS\Setup\3_SQL2005Express folder, double-click one of these
versions:
82
Page 83

Installing Microsoft SQL Server
t 32-bit system: 1-NetFx32.exe
t 64-bit system: 1-NetFx64.exe
A Confirm Uninstall dialog box displays.
4. When the installation is complete, click Finish.
Step 2: To install the Microsoft SQL Server components:
1. In the \Applications\DMS\Setup\3_SQL2005Express folder, double-click the
2-SQLEXPR.EXE file.
2. When the License Agreement dialog box displays, read the End User License
Agreement, accept the terms of the agreement, then click Next.
3. In the Installing Prerequisites dialog box, click Install to install SQL components.
4. Click Next.
The SQL Setup scans your system configuration.
5. In the Welcome to the Microsoft SQL Server Installation wizard, click Next.
The System Configuration Check should display Success for all items in the Status
column.
6. Click Next to continue.
7. In the Registration Information dialog box, enter the name and company information but
deselect Hide advanced configuration options. Click Next.
8. In the Feature Selection dialog box, keep all the default options and click Next.
9. In the Instance Name dialog box, select Default instance, then click Next.
10. In the Service Account dialog box, click Next.
11. In the Authentication Mode dialog box, select Mixed Mode ...(Windows Authentication
and SQL Server Authentication.
12. Under Specify the sa logon password below: enter !avid1234 in the Enter and Confirm
password boxes.
13. In the Collation Settings dialog box, click Next.
14. In the User Instances dialog box, click Next.
15. In the Error and Usage Report Settings dialog box, do not select any options, then click
Next.
16. In the Ready to Install dialog box, click Install.
The Microsoft SQL Server 2005 Setup installs the system files and configures the
components. This takes a few minutes to complete.
17. In the Status column lists Setup finished for all components, click Next.
83
Page 84

5 Installing Avid DS Software and Services
18. In the Completing Microsoft SQL Server 2005 Setup dialog box, click Finish.
Step 3: To install the SQL Toolkit:
1. In the \Applications\DMS\Setup\3_SQL2005Express folder, double-click the
3-SQLEXPR_TOOLKIT.EXE file.
2. When the License Agreement dialog box displays, read the End User License
Agreement, accept the terms of the agreement, then click Next.
3. In the Installing Prerequisites dialog box, click Install.
The SQL Setup scans your system configuration.
4. In the Welcome to the Microsoft SQL Server Installation wizard, click Next.
The System Configuration Check should display Success for all items in the Status
column.
5. Click Next.
6. In the Registration Information dialog box, click Next.
7. In the Feature Selection dialog box, click the X icon next to Management Studio
Express, and select Will be installed on local hard drive.
DO NOT select any other items.
8. Click Next.
9. In the Error and Usage Report Settings dialog box, click Next.
10. In the Ready to Install dialog box, click Install.
The Microsoft SQL Server 2005 Setup installs the system files and configures the
components. This takes a few minutes to complete.
11. In the Status column lists Setup finished for all components, click Next.
12. In the Completing Microsoft SQL Server 2005 Setup dialog box, click Finish.
Step 4: To configure SQL Server Configuration Manager:
1. Click Start and select All Programs > Microsoft SQL Server 2005 > Configuration
Tools > SQL Server Configuration Manager.
2. Select SQL Server 2005 Services.
3. Verify in the right pane that the SQL Server (MSSQLSERVER) is Running and
Automatic. The SQL Server Browser is Stopped and this is normal.
4. In the left pane, expand SQL Server 200 Network Configuration (32-bit).
5. Select Protocols for MSSQLSERVER.
6. In the right pane, right-click TCP/IP and select Enable.
84
Page 85

Installing Avid Interplay Media Service
7. Any changes made will be saved; however, they will not take effect until the service is
stopped and restarted. Click OK.
8. In the left pane, select SQL Server 2005 Services.
9. In the right pane, right-click SQL Server (MSSQLSERVER) and select Restart.
The service is stopped, then restarted.
10. Close the SQL Server Configuration Manager.
Step 5: To configure the SQL Server Management Studio Express:
1. Click Start and select All Programs > Microsoft SQL Server 2005 > SQL Server
Management Studio Express.
2. Change the Authentication box to SQL Server Authentication. For the login name, enter
sa. For the Password, enter !avid1234.
3. When the application opens, expand Security.
4. Right-click Logins, then select New Login....
5. Select General (if another option has been selected).
6. Select Windows authentication (if not already selected) and enter the Avid DS
workgroup user account name (the name authenticating the Avid DS Services).
If your workstation is part of a Windows domain, specify the domain name before the user id
n
(domain_name\userid).
7. Select Server Roles.
8. Select the sysadmin box, then click OK.
The Avid DS Workgroup account name is added to the list of logins.
9. Exit the SQL Server application.
This completes the preparatory procedures for installing Avid Interplay Media Service.
Installing Avid Interplay Media Service
Before installing the application, make sure that all the preparatory procedures have been
completed.
To install Avid Interplay Media Service:
1. On the Avid DS Software & Drivers DVD, open the folder
\Applications\DMS\Setup\4_DMS_Broker, and double-click the Setup.exe file.
The Avid Interplay Media Service 1.2.1 installer starts.
85
Page 86

5 Installing Avid DS Software and Services
2. In the Welcome dialog box, click Next.
3. In the Country Selection for License Agreement, do not make any selection, just click
Next.
4. In the License Agreement dialog box, click Yes.
5. In the Choose Destination Location dialog box, click Next to install in the default
location, or click Browse to select a different location.
If an error message reporting a missing security driver appears, click OK. The
installation continues and validates the existing components. If the Interplay database
screen appears, select Overwrite Current database.
6. When the InstallShield Wizard Complete dialog box appears, select Yes, I want to
restart my computer now and click Finish.
After the computer has restarted, continue with the next procedure to complete the
installation.
Installing Avid Interplay Media Service and Transfer Status
To install Avid Interplay Media Service and Transfer Status:
1. On the Avid DS Software & Drivers DVD, open the folder
\Applications\DMS\Setup\TM_DMS_Status, and double-click the Setup.exe file.
The Avid Interplay Media Service and Transfer Status 1.2.1 installer starts.
2. In the Welcome dialog box, click Next.
3. In the Country Selection for License Agreement, do not make any selection, just click
Next.
4. In the License Agreement dialog box, click Yes.
5. In the Choose Destination Location dialog box, click Next to install in the default
location, or click Browse to select a different location.
6. When the InstallShield Wizard Complete dialog box appears, select Yes, I want to
restart my computer now and click Finish.
After the computer has restarted, continue with the next procedure to complete the
installation.
You may install Avid Interplay Media Service and Transfer Status on any or all workstations
n
in the workgroup to monitor the Avid Interplay Media Service.
86
Page 87

Installing the Sentinel Driver
If a previous version of the Sentinel driver is installed, uninstall it before installing this
version.
To uninstall a previous version of the Sentinel driver:
1. Click Start and select Settings > Control Panel > Add or Remove Programs.
2. In the Currently installed programs list, select the Sentinel driver, then click
Change/Remove.
To install the Sentinel Driver:
1. On the Avid DS Software & Drivers DVD, open the folder
\Applications\DMS\Setup\5_SentinelUSB and double-click the Sentinel Protection
Installer 7.4.0.exe file.
2. In the Welcome to the InstallShield Wizard for the Sentinel Protection Installer 7.4.0
dialog box, click Next.
3. In the License Agreement dialog box, read the License Grant/Warranty for Software,
accept the terms of the agreement, then click Next.
4. In the Setup Type dialog box, select the Complete option, then click Next.
Installing the Sentinel Driver
5. In the Ready to Install the Program dialog box, click Install.
The Sentinel Protection driver installs.
6. In the InstallShield Wizard Completed dialog box, click Finish.
Installing Avid MetaFuze
Read the Avid MetaFuze ReadMe and then follow this procedure to install the Avid
MetaFuze option.
To install Avid MetaFuze:
1. Use the Avid DS Software & Drivers DVD, or download the Avid DS software from the
Avid Download Center at www.avid.com/support/downloadcenter/index.asp.
2. Double-click the Start.exe file and from the Main Menu click Software Installation.
3. Click Install Avid MetaFuze.
The InstallShield Wizard requires that the VC redistribution file be installed.
87
Page 88

5 Installing Avid DS Software and Services
4. Click Install to continue.
5. In the Welcome dialog box, click Next.
6. Select “I accept the terms in the license agreement” then click Next.
7. In the Destination Folder dialog box, click Next to accept the destination folder, or click
Change... to select a different folder.
8. Click Install to begin the installation.
9. When the installation is complete, click Finish.
Installing Drivers
Follow this procedure to install any of the various drivers that are required, depending on
your system configuration.
To install a driver:
1. Use the Avid DS Software & Drivers DVD, or download the Avid DS software from the
Avid Download Center at www.avid.com/support/downloadcenter/index.asp.
2. Double-click the Start.exe file and in the Main Menu, click Drivers Installation.
The Avid DS Support Center window appears. The list of supported systems is in the
upper menu bar, and the list of available drivers is in the left pane.
88
Page 89

Installing and Removing the AVI Reference Codec
3. Click the system model in the main menu, select the link for the appropriate driver in the
left pane, then follow the instructions for installing the driver.
Installing and Removing the AVI Reference Codec
Follow this procedure to install the AVI Reference Codec on a remote computer that will use
the shared Avid DC media for encoding purposes.
To install the AVI Reference Codec:
1. Use the Avid DS Software & Drivers DVD, or download the Avid DS software from the
Avid Download Center at www.avid.com/support/downloadcenter/index.asp.
2. Double-click the Start.exe file.
3. In the Avid DS Software and Drivers dialog box, click Software Installation, then click
on Install AVI Reference Codec.
89
Page 90

5 Installing Avid DS Software and Services
The InstallShield Wizard will start installing the AVI Reference Codec.
4. When the installation is complete, click Finish.
To remove the AVI Reference Codec:
1. Click Start and select Settings > Control Panel > Add or Remove Programs, select
Softimage AVI Reference Codec, then click Remove.
A Confirm Uninstall dialog box appears.
2. To confirm the uninstall, click OK.
3. When the Uninstall Complete dialog box displays, click Finish.
Reinstalling Plug-Ins
Avid provides some plug-ins for use with Avid DS. These plug-ins are automatically
installed whenever Avid DS is installed on your workstations.
Avid DS supports AVX 2.0 and native Avid DS plug-ins. For a list of compatible third-party
plug-ins, refer to the Avid DS Support Center web site. Contact the vendor directly for
compatibility with this version of Avid DS.
90
Avid DS also supports VST audio plug-ins. For details contact Avid DS Customer Service.
If the plug-ins were removed, reinstall them by following the instructions below.
To reinstall plug-ins:
1. Use the Avid DS Software & Drivers DVD, or download the Avid DS software from the
Avid Download Center.
2. Double-click the Start.exe file, then from the Main Menu, click Software Installation.
3. Click Install Avid DS 32-bit or Install Avid DS 64-bit.
4. In the Welcome dialog box, select the Modify option, then click Next.
5. In the Select Main Components dialog box, select the Avid DS check box, then click
Next.
6. Follow the online instructions until the Select Additional Components dialog box
displays. Select the Plugins check box, then click Next.
7. Complete the installation.
Important: Any plug-ins that you install on your client workstation should also be installed
n
on the RP workstation to ensure compatibility. The same applies to any third-party plug-ins.
Page 91

Installing and Removing Fonts
Avid DS includes 500 fonts from the Bitstream typeface library in the \Fonts folder of the
Avid DS Software and Drivers DVD.
Avid DS supports both Type 1 and TrueType (PC-formatted) typeface formats.
Avid DS does not require any additional software to access TrueType fonts, but does require
Adobe Type Manager (ATM) software to access Type 1 fonts.
• For best results, use a font size between 8 and 14 points.
• If the font selected is a little too big to be displayed in its designated area, it will be
substituted by the default font size.
• If the font size is really too big, the layout will not appear correctly, and you may need to
refresh the screen.
Installing too many fonts on a workstation can noticeably degrade computing performance.
n
Keep the number of fonts installed on your workstation at the minimum amount required for
your projects.
Important: Any fonts installed on an Avid DS workstation should also be installed on the RP
workstation to ensure consistency between processed results in titles and graphics.
Installing and Removing Fonts
Installing and Removing Type 1 Fonts
Type 1 font support in Avid DS is available only if you have the Adobe Type Manager or
Adobe Type Manager Deluxe software (version 4.0 or later) installed and active. Consult the
documentation that came with the Adobe Type Manager or Adobe Type Manager Deluxe
software for instructions on how to install and remove Type 1 fonts.
Installing and Removing TrueType Fonts
TrueType font support in Avid DS does not require any additional software.
To install TrueType fonts:
1. Click Start and select Settings > Control Panel > Fonts.
The Fonts window displays.
2. From the File menu, select Install New Font.
3. In the Add Fonts dialog box, use the Folders and Drives lists to navigate to the folder
that contains the TrueType fonts you want to install. On the Avid DS CD, they’re in the
\Fonts folder.
91
Page 92

5 Installing Avid DS Software and Services
The available TrueType fonts in the selected folder display in the List of Fonts list.
4. Select the fonts to install from the List of Fonts list, as follows:
- To select a single font, click the name of the font.
- To select a range of fonts, click the name of the first font. Then Shift-click the last
font in the range.
- To select all fonts in the directory, click Select All.
- To switch the selection of a font, press the Ctrl key and click a font name.
5. (Optional) You can use the selected fonts from their current folder by deselecting the
Copy fonts to Fonts folder option. This will save disk space on your local workstation.
By default, fonts will be added to your workstation’s local disk space. If you are adding
several fonts, consider using the fonts from their current locations to save local disk
space.
The selected fonts are installed on your system.
6. If Avid DS is currently running on this workstation, restart it to access the newly
installed fonts.
To remove TrueType fonts:
1. Click Start and select Settings > Control Panel > Fonts.
The Fonts window displays.
2. Select the fonts to remove.
3. Press Delete.
You are prompted to confirm the deletion of the selected fonts.
4. Click Yes.
5. Close the Fonts and Control Panel windows.
6. If Avid DS is currently running, restart it to update the list of available fonts.
Installing Non-European Fonts
If you are working with a non-European, customized Windows operating system, such as
Windows XP Japanese, you can use the DSFontSetting.exe application, which is distributed
with Avid DS. You can use this application to change the default font used in Avid DS dialog
boxes or reset it to default.
The new font is used only in dialog boxes; menus and toolbar buttons are not affected by this
new information. You can customize the menu font size through the Windows Appearance
tab of the Desktop Properties.
92
Page 93

Installing and Removing Fonts
For non-European languages, Avid DS selects a font (by default) that comprises the
European character set and is part of the character set of the foreign Windows system, such
as Windows XP Japanese. However, the chosen font is very small and does not display
properly, especially in dialog boxes. For regular systems, the default font for dialog boxes is
Arial 11.
This application does not ensure that the font will fit properly in the dialog box. Whenever
the new selected font is too large for the various text contents of the dialog box, a smaller
default font will be used as in previous versions. You must be careful to choose a font that
still contains a European character set, since the displayed text is still English. This new
feature is not restricted only to Asian systems; any customer of any country can change the
Avid DS default font. However, layouts work best with the default font (Arial 11). Each time
a new font is set or reset, you must restart Avid DS before it takes effect.
To install non-European fonts:
1. Browse to the C:\Program Files\Avid\DS_10.x folder.
2. Double-click the DSFontsettings.exe file.
3. From the Settings menu, select one of these options:
Setting Description
Reset Font Resets the fonts to their default setting.
Set DS Font Lets you choose the font and size you want to use in the Font dialog.
93
Page 94

5 Installing Avid DS Software and Services
Saving Avid DS System Settings
Before uninstalling a previous version of Avid DS, save your preferences and presets by
exporting them to a folder. After the upgrade, you can import the presets into the new
version of Avid DS.
A preference set is a collection of Avid DS layouts, toolbars, combo views, and/or key maps.
Importing and exporting preference sets lets you share customized controls with other users.
Use the Preference Management dialog box in Avid DS to import and export preference sets.
Do not save your preferences to a network folder.
n
When you import or export a preference set, its internal hierarchy is preserved. For example,
if you export an entire layout, any toolbars in the layout are exported with it.
Preference sets with the same name are appended with a number to differentiate them.
n
Exporting your Preferences
When you export a preference set, you can only include the layouts and keymaps that you
customized. You can export any toolbar.
To export a preference set:
1. Select Layout > Import/Export Preferences.
2. In the Preference Management dialog box, select the Export Preferences tab.
3. Select the individual controls that you want to export (or Select All). Use the Type list to
switch between the layouts, toolbars, and keymaps in the preference sets.
4. Click Export to export the selected controls.
5. Do one of the following:
t In the File Name text box, enter the path to the folder in which you want to save the
preference sets.
t Click Paths to select a default or project path.
t Use the Avid Explorer to navigate to the folder in which you want to save the
preference sets.
6. Enter a name for the preference set in the File Name text box, then click OK.
Importing your Preferences
When you import a preference set, you can import all of the controls in the set, or you can
select only the controls that you need.
94
Page 95

Saving Avid DS System Settings
When you import an entire layout from an existing preference set, its components are
n
automatically imported as well. Some types of layouts are unsupported and cannot be
imported.
You cannot import preferences from a network drive.
To import a preference set:
1. Select Layout > Import/Export Preferences.
2. In the Preference Management dialog box, select the Import Preferences tab.
3. Do one of the following:
t In the File Name text box, enter the name and location of the preference sets that
you want to import.
t Click Browse.
The Import Preferences dialog box displays.
4. Locate the preference sets that you want to import then click OK.
5. Select the controls that you want to import. Use the Type list to switch between the
layouts, toolbars, combo views, and keymaps preference sets.
6. Click Select All button to select all controls.
7. Click Import to import the selected controls.
You will be prompted to restart Avid DS when the import is complete.
If you imported a layout, additional layout buttons appear in the taskbar.
Saving your Avid DS Deck Presets
To export deck presets:
1. In the top panel of the Deck Configuration view, right-click and select Export Deck
Presets.
2. Select the folder into which you want to export the presets.
3. Click Select to begin the export.
95
Page 96

5 Installing Avid DS Software and Services
96
Page 97

6 Installing the Remote Processing
Software
This section describes how to install Avid DS v10.x software on an Avid DS Remote
Processing (RP) workstation.
Processing, or rendering, which is a normal and necessary part of the Avid DS workflow,
both takes time and uses resources on the workstation being used, which in turn interrupts
the creative process. The solution is to use a remote workstation running Avid DS RP to do
the processing.
The Avid DS RP software can be installed on as many workstations in a workgroup as
required. When a job is sent to be processed remotely, it is routed by the Avid Interplay
Media Services (Avid DMS Broker) to the first available RP workstation. Avid DS RP
processes the effects, returns the cache media to the Avid DS client storage, and notifies the
client workstation when the job is complete.
By default, both the hardware and software versions of Avid DS as licensed to be used as a
n
RP workstation. Therefore, if an Avid DS workstation is not being used, you can stop the
Avid DS application and start the Avid DS RP option to increase processing capacity.
This version of Avid DS RP cannot accept processing requests from earlier versions of
Avid DS.
Remote Processing Concepts
Client Workstation: This is the workstation on which Avid DS is installed. The client
workstation is where the processing request is initiated. The request is sent to the remote
processing workstation, and the result is eventually returned to the client.
Remote Processing Workstation: This is the workstation where Avid DS RP is installed.
The RP workstation handles requests from client workstation(s) and updates the clients’
timeline as each request is processed.
Each RP workstation keeps a log of the jobs that have been processed on that station. The
log provides full details on each job sent to that station for processing. A shortcut to access
this log (ds_server_log.txt) is available on the RP workstation desktop.
Page 98

6 Installing the Remote Processing Software
Minimal Requirements for Avid DS RP Workstation
The remote processing workstation must meet the following requirements:
• Supports Windows XP Professional and Windows XP Profession x64 Edition operating
system
• Intel Pentium 4 (MMX enabled) or Intel Core type CPU;
(Multi-core processors greatly increase the efficiency of Avid DS)
AMD processors are now supported.
n
• 1.5 GB RAM (x86) and 4 GB RAM (x64 Edition)
• 1 GB of hard drive space
• SVGA monitor with a recommended resolution of 1280×1024
• Network card with a minimum of Gigabit Ethernet (1000 Mbps)
• Network protocol: All of the workstations being used for your workgroup must reside
on a network that uses the TCP/IP protocol. Each workstation must be able to see the
others over the network.
• OpenGL for 3D DVE: In Avid DS, only the 3D DVE layout uses OpenGL. An Avid DS
RP workstation does not require an OpenGL card to process OpenGL effects. However,
these effects will process significantly faster if the RP workstation has an OpenGL card.
98
It is recommended that you use the same type of OpenGL card in both the RP workstation
n
and the client workstation.
Page 99

Minimal Requirements for Avid DS RP Workstation
Optimizing Network and Remote Processing Performance
To optimize the network hardware and the performance of remote processing:
• The recommended minimum speed of the network card is Gigabit Ethernet and full
duplex capability as this speed matches that of the client workstation.
The HP workstation uses an on-board Gigabit Ethernet adapter.
n
• A network switch is the best way to isolate the remote processing traffic from a
corporate network. We recommend a minimum bandwidth of Gigabit Ethernet and full
duplex capability, however, a gigabit switch is preferable. For the highest quality
components, purchase brand name products, such as 3Com, Cisco, etc.
Hubs are not recommended.
n
• Use 24AGW gauge network cable (category 5 and up). Connectors must be assembled
properly, with a minimal length of unshielded wire on both ends.
Optimizing CPU Usage on Avid DS RP Workstations
In some cases, the CPU usage on the RP workstation or the client workstation may be low
during processing. This may be more obvious when the RP workstation is a faster machine,
and in some cases the CPU usage may be lower on the RP workstation than on the client
workstation. This is a normal occurrence.
CPU usage is an indicator of processor activity. The faster the processor, the faster it
completes its job (processing the current frame). If the CPU has to wait for the next frame
read from disk to start processing the frame, the CPU usage is lowered. This is normal, and
depends on the effect being processed.
For simple light effects, such as color correction, the processing is fast enough that the CPU
is actually idling most of the time. This appears as a low CPU usage value. These effects are
said to be “I/O-bound”, meaning that the read/write operations for each processed frame are
more significant than the actual processing. Because Avid DS is fully multi-threaded, the
processing itself and the I/O operations are done in parallel. However, if the CPU is idling
most of the time, a low CPU usage value is to be expected.
Most native Avid DS effects support multi-threading and, in addition to this, processing jobs
can be divided among the CPUs available in the workstation. For example, when a blur
effect is processed on a dual-CPU workstation, half the frame is processed on one CPU
while the other half is processed on the other. This dramatically improves the overall
processing time.
99
Page 100

6 Installing the Remote Processing Software
Some third party effects (such as all AVX effects) do not support multi-threading. In these
n
cases, because only one of the CPUs is being used, the CPU usage will be lower.
To verify if an effect is single- or multi-threaded:
1. Click the Start button and select Run.
2. In the Run window, type perfmon to run the Performance Monitor.
3. Add one counter for each CPU Time.
For multi-threaded effects, the two curves move together while processing. In
single-threaded effects, they move in opposite directions.
Avid DS RP licenses no longer come in a dual or signal format. Avid DS RP will now always
n
use all the available processors and cores to process the work in parallel and accomplish the
task as quickly as possible.
CPU usage usually appears higher on the client workstation (if it has the same processor
type as the RP). This is because the read/write operations are faster on the client (local
storage). As a result, the processor spends less time waiting for input frames before
processing them.
Installing Avid DS RP
100
c
To install Avid DS RP, you must log on with an account that has Administrator privileges.
If you have one or more RP workstations in your workgroup, you must install and start
the Avid Interplay Media Services before installing Avid DS—see “Installing Avid
Interplay Media Service and Transfer Status” on page 86.
To install Avid DS RP:
1. Use the Avid DS Software & Drivers DVD, or download the Avid DS software from the
Avid Download Center.
2. Double-click the Start.exe file and from the main menu, click Software Installation.
3. Click Install Avid DS 32-bit or Install Avid DS 64-bit.
4. When the Avid DS Setup Wizard displays, click Next.
The Select Main Components dialog box displays.
 Loading...