

Page 1

Avid
High-Resolution and Color
Workflow Guide
®
Page 2

Legal Notices
Product specifications are subject to change without notice and do not represent a commitment on the part of Avid Technology,
Inc.
This product is subject to the terms and conditions of a software license agreement provided with the software. The product
may only be used in accordance with the license agreement.
Avid products or portions thereof are protected by one or more of the following United States Patents: 5,077,604; 5,267,351;
5,309,528; 5,355,450; 5,396,594; 5,440,348; 5,467,288; 5,513,375; 5,528,310; 5,557,423; 5,568,275; 5,577,190; 5,584,006;
5,634,020; 5,640,601; 5,644,364; 5,654,737; 5,724,605; 5,726,717; 5,745,637; 5,752,029; 5,754,180; 5,754,851; 5,799,150;
5,812,216; 5,828,678; 5,842,014; 5,852,435; 5,905,841; 5,929,836; 5,930,445; 5,946,445; 5,986,584; 5,987,501; 6,016,152;
6,018,337; 6,023,531; 6,058,236; 6,061,758; 6,091,778; 6,105,083; 6,118,444; 6,130,676; 6,134,607; 6,141,691; 6,198,477;
6,201,531; 6,223,211; 6,249,280; 6,269,195; 6,330,369; 6,353,862; 6,404,435; 6,407,775; 6,426,778; 6,477,271; 6,489,969;
6,512,522; 6,532,043; 6,546,190; 6,552,731; 6,553,142; 6,570,624; 6,571,255; 6,583,824; 6,618,547; 6,636,869; 6,665,450;
6,678,461; 6,687,407; 6,704,445; 6,747,705; 6,763,134; 6,766,063; 6,791,556; 6,810,157; 6,813,622; 6,847,373; 6,871,003;
6,871,161; 6,901,211; 6,907,191; 6,928,187; 7,043,058; 7,081,900; 7,103,231; 7,266,241; 7,280,117; RE40,107; 7,403,561;
7,433,519; 7,512,885; 7,545,957; 7,671,871; 7,684,096; D352,278; D392,267; D392,268; D392,269; D395,291; D396,853;
D398,912. Other patents are pending.
Avid products or portions thereof are protected by one or more of the following European Patents: 0506870; 0635188;
0674414; 0752174; 0857293; 0976108; 0988756; 1068734; 1111910; 1173850; 1629675. Other patents are pending.
Avid products or portions thereof are protected by one or more of the following United States Patents: 5,267,351; 5,309,528;
5,355,450; 5,396,594; 5,440,348; 5,467,288; 5,513,375; 5,528,310; 5,557,423; 5,577,190; 5,584,006; 5,640,601; 5,644,364;
5,654,737; 5,724,605; 5,726,717; 5,745,637; 5,752,029; 5,754,851; 5,799,150; 5,812,216; 5,828,678; 5,842,014; 5,852,435;
5,986,584; 5,999,406; 6,038,573; 6,061,758; 6,069,668; 6,141,007; 6,211,869; 6,532,043; 6,546,190; 6,596,031; 6,636,869;
6,747,705; 6,763,523; 6,766,357; 6,813,622; 6,847,373; 7,081,900; RE40,107; 7,403,561; 7,433,519; 7,671,871; 7,684,096;
D352,278; D372,478; D373,778; D392,267; D392,268; D392,269; D395,291; D396,853; D398,912.
Other patents are pending.
Avid products or portions thereof are protected by one or more of the following European Patents: 0506870; 0635188;
0674414; 0752174; 1111910; 1629675. Other patents are pending.
This document is protected under copyright law. An authorized licensee of Avid Media ComposerNewsCutterAvid Symphony
Nitris may reproduce this publication for the licensee’s own use in learning how to use the software. This document may not be
reproduced or distributed, in whole or in part, for commercial purposes, such as selling copies of this document or providing
support or educational services to others. This document is supplied as a guide for Avid Media ComposerNewsCutter and
NewsCutter XPAvid Symphony Nitris. Reasonable care has been taken in preparing the information it contains. However, this
document may contain omissions, technical inaccuracies, or typographical errors. Avid Technology, Inc. does not accept
responsibility of any kind for customers’ losses due to the use of this document. Product specifications are subject to change
without notice.
Copyright © 2010 Avid Technology, Inc. and its licensors. All rights reserved.
The following disclaimer is required by Apple Computer, Inc.:
APPLE COMPUTER, INC. MAKES NO WARRANTIES WHATSOEVER, EITHER EXPRESS OR IMPLIED, REGARDING
THIS PRODUCT, INCLUDING WARRANTIES WITH RESPECT TO ITS MERCHANTABILITY OR ITS FITNESS FOR ANY
PARTICULAR PURPOSE. THE EXCLUSION OF IMPLIED WARRANTIES IS NOT PERMITTED BY SOME STATES. THE
ABOVE EXCLUSION MAY NOT APPLY TO YOU. THIS WARRANTY PROVIDES YOU WITH SPECIFIC LEGAL RIGHTS.
THERE MAY BE OTHER RIGHTS THAT YOU MAY HAVE WHICH VARY FROM STATE TO STATE.
The following disclaimer is required by Sam Leffler and Silicon Graphics, Inc. for the use of their TIFF library:
Copyright © 1988–1997 Sam Leffler
Copyright © 1991–1997 Silicon Graphics, Inc.
Permission to use, copy, modify, distribute, and sell this software [i.e., the TIFF library] and its documentation for any purpose
is hereby granted without fee, provided that (i) the above copyright notices and this permission notice appear in all copies of
the software and related documentation, and (ii) the names of Sam Leffler and Silicon Graphics may not be used in any
advertising or publicity relating to the software without the specific, prior written permission of Sam Leffler and Silicon
Graphics.
THE SOFTWARE IS PROVIDED “AS-IS” AND WITHOUT WARRANTY OF ANY KIND, EXPRESS, IMPLIED OR
OTHERWISE, INCLUDING WITHOUT LIMITATION, ANY WARRANTY OF MERCHANTABILITY OR FITNESS FOR A
PARTICULAR PURPOSE.
2
Page 3

IN NO EVENT SHALL SAM LEFFLER OR SILICON GRAPHICS BE LIABLE FOR ANY SPECIAL, INCIDENTAL, INDIRECT
OR CONSEQUENTIAL DAMAGES OF ANY KIND, OR ANY DAMAGES WHATSOEVER RESULTING FROM LOSS OF USE,
DATA OR PROFITS, WHETHER OR NOT ADVISED OF THE POSSIBILITY OF DAMAGE, AND ON ANY THEORY OF
LIABILITY, ARISING OUT OF OR IN CONNECTION WITH THE USE OR PERFORMANCE OF THIS SOFTWARE.
The following disclaimer is required by the Independent JPEG Group:
This software is based in part on the work of the Independent JPEG Group.
This Software may contain components licensed under the following conditions:
Copyright (c) 1989 The Regents of the University of California. All rights reserved.
Redistribution and use in source and binary forms are permitted provided that the above copyright notice and this paragraph
are duplicated in all such forms and that any documentation, advertising materials, and other materials related to such
distribution and use acknowledge that the software was developed by the University of California, Berkeley. The name of the
University may not be used to endorse or promote products derived from this software without specific prior written
permission. THIS SOFTWARE IS PROVIDED ``AS IS'' AND WITHOUT ANY EXPRESS OR IMPLIED WARRANTIES,
INCLUDING, WITHOUT LIMITATION, THE IMPLIED WARRANTIES OF MERCHANTABILITY AND FITNESS FOR A
PARTICULAR PURPOSE.
Copyright (C) 1989, 1991 by Jef Poskanzer.
Permission to use, copy, modify, and distribute this software and its documentation for any purpose and without fee is hereby
granted, provided that the above copyright notice appear in all copies and that both that copyright notice and this permission
notice appear in supporting documentation. This software is provided "as is" without express or implied warranty.
Copyright 1995, Trinity College Computing Center. Written by David Chappell.
Permission to use, copy, modify, and distribute this software and its documentation for any purpose and without fee is hereby
granted, provided that the above copyright notice appear in all copies and that both that copyright notice and this permission
notice appear in supporting documentation. This software is provided "as is" without express or implied warranty.
Copyright 1996 Daniel Dardailler.
Permission to use, copy, modify, distribute, and sell this software for any purpose is hereby granted without fee, provided that
the above copyright notice appear in all copies and that both that copyright notice and this permission notice appear in
supporting documentation, and that the name of Daniel Dardailler not be used in advertising or publicity pertaining to
distribution of the software without specific, written prior permission. Daniel Dardailler makes no representations about the
suitability of this software for any purpose. It is provided "as is" without express or implied warranty.
Modifications Copyright 1999 Matt Koss, under the same license as above.
Copyright (c) 1991 by AT&T.
Permission to use, copy, modify, and distribute this software for any purpose without fee is hereby granted, provided that this
entire notice is included in all copies of any software which is or includes a copy or modification of this software and in all
copies of the supporting documentation for such software.
THIS SOFTWARE IS BEING PROVIDED "AS IS", WITHOUT ANY EXPRESS OR IMPLIED WARRANTY. IN PARTICULAR,
NEITHER THE AUTHOR NOR AT&T MAKES ANY REPRESENTATION OR WARRANTY OF ANY KIND CONCERNING THE
MERCHANTABILITY OF THIS SOFTWARE OR ITS FITNESS FOR ANY PARTICULAR PURPOSE.
This product includes software developed by the University of California, Berkeley and its contributors.
The following disclaimer is required by Nexidia Inc.:
© 2006 Nexidia. All rights reserved.
Manufactured under license from the Georgia Tech Research Corporation, U.S.A. Patent Pending.
The following disclaimer is required by Paradigm Matrix:
Portions of this software licensed from Paradigm Matrix.
3
Page 4

The following disclaimer is required by Ray Sauers Associates, Inc.:
“Install-It” is licensed from Ray Sauers Associates, Inc. End-User is prohibited from taking any action to derive a source code
equivalent of “Install-It,” including by reverse assembly or reverse compilation, Ray Sauers Associates, Inc. shall in no event be
liable for any damages resulting from reseller’s failure to perform reseller’s obligation; or any damages arising from use or
operation of reseller’s products or the software; or any other damages, including but not limited to, incidental, direct, indirect,
special or consequential Damages including lost profits, or damages resulting from loss of use or inability to use reseller’s
products or the software for any reason including copyright or patent infringement, or lost data, even if Ray Sauers Associates
has been advised, knew or should have known of the possibility of such damages.
The following disclaimer is required by Videomedia, Inc.:
“Videomedia, Inc. makes no warranties whatsoever, either express or implied, regarding this product, including warranties with
respect to its merchantability or its fitness for any particular purpose.”
“This software contains V-LAN ver. 3.0 Command Protocols which communicate with V-LAN ver. 3.0 products developed by
Videomedia, Inc. and V-LAN ver. 3.0 compatible products developed by third parties under license from Videomedia, Inc. Use
of this software will allow “frame accurate” editing control of applicable videotape recorder decks, videodisc recorders/players
and the like.”
The following disclaimer is required by Altura Software, Inc. for the use of its Mac2Win software and Sample
Source Code:
©1993–1998 Altura Software, Inc.
The following disclaimer is required by Ultimatte Corporation:
Certain real-time compositing capabilities are provided under a license of such technology from Ultimatte Corporation and are
subject to copyright protection.
The following disclaimer is required by 3Prong.com Inc.:
Certain waveform and vector monitoring capabilities are provided under a license from 3Prong.com Inc.
The following disclaimer is required by Interplay Entertainment Corp.:
The “Interplay” name is used with the permission of Interplay Entertainment Corp., which bears no responsibility for Avid
products.
This product includes portions of the Alloy Look & Feel software from Incors GmbH.
This product includes software developed by the Apache Software Foundation (http://www.apache.org/).
© DevelopMentor
This product may include the JCifs library, for which the following notice applies:
JCifs © Copyright 2004, The JCIFS Project, is licensed under LGPL (http://jcifs.samba.org/). See the LGPL.txt file in the Third
Party Software directory on the installation CD.
Avid Interplay contains components licensed from LavanTech. These components may only be used as part of and in
connection with Avid Interplay.
Attn. Government User(s). Restricted Rights Legend
U.S. GOVERNMENT RESTRICTED RIGHTS. This Software and its documentation are “commercial computer software” or
“commercial computer software documentation.” In the event that such Software or documentation is acquired by or on behalf
of a unit or agency of the U.S. Government, all rights with respect to this Software and documentation are subject to the terms
of the License Agreement, pursuant to FAR §12.212(a) and/or DFARS §227.7202-1(a), as applicable.
Trademarks
003, 192 Digital I/O, 192 I/O, 96 I/O, 96i I/O, Adrenaline, AirSpeed, ALEX, Alienbrain, AME, AniMatte, Archive, Archive II,
Assistant Station, AudioPages, AudioStation, AutoLoop, AutoSync, Avid, Avid Active, Avid Advanced Response, Avid DNA,
Avid DNxcel, Avid DNxHD, Avid DS Assist Station, Avid Liquid, Avid Media Engine, Avid Media Processor, Avid MEDIArray,
Avid Mojo, Avid Remote Response, Avid Unity, Avid Unity ISIS, Avid VideoRAID, AvidRAID, AvidShare, AVIDstripe, AVX,
Axiom, Beat Detective, Beauty Without The Bandwidth, Beyond Reality, BF Essentials, Bomb Factory, Boom, Bruno, C|24,
CaptureManager, ChromaCurve, ChromaWheel, Cineractive Engine, Cineractive Player, Cineractive Viewer, Color Conductor,
Command|24, Command|8, Conectiv, Control|24, Cosmonaut Voice, CountDown, d2, d3, DAE, Dazzle,
Dazzle Digital Video Creator, D-Command, D-Control, Deko, DekoCast, D-Fi, D-fx, Digi 003, DigiBase, DigiDelivery,
Digidesign, Digidesign Audio Engine, Digidesign Development Partners, Digidesign Intelligent Noise Reduction,
Digidesign TDM Bus, DigiLink, DigiMeter, DigiPanner, DigiProNet, DigiRack, DigiSerial, DigiSnake, DigiSystem,
Digital Choreography, Digital Nonlinear Accelerator, DigiTest, DigiTranslator, DigiWear, DINR, DNxchange, DPP-1, D-Show,
4
Page 5

DSP Manager, DS-StorageCalc, DV Toolkit, DVD Complete, D-Verb, Eleven, EM, EveryPhase, Expander, ExpertRender,
Fader Pack, Fairchild, Fastbreak, Fast Track, Film Cutter, FilmScribe, Flexevent, FluidMotion, Frame Chase, FXDeko,
HD Core, HD Process, HDPack, Home-to-Hollywood, HYBRID, HyperControl, HyperSPACE, HyperSPACE HDCAM,
iKnowledge, Image Independence, Impact, Improv, iNEWS, iNEWS Assign, iNEWS ControlAir, Instantwrite, Instinct,
Intelligent Content Management, Intelligent Digital Actor Technology, IntelliRender, Intelli-Sat,
Intelli-sat Broadcasting Recording Manager, InterFX, Interplay, inTONE, Intraframe, iS Expander, ISIS, IsoSync, iS9, iS18,
iS23, iS36, ISIS, IsoSync, KeyRig, KeyStudio, LaunchPad, LeaderPlus, LFX, Lightning, Link & Sync, ListSync, LKT-200, Lo-Fi,
Luna, MachineControl, Magic Mask, Make Anything Hollywood, make manage move | media, Marquee, MassivePack,
Massive Pack Pro, M-Audio, M-Audio Micro, Maxim, Mbox, Media Composer, MediaDock, MediaDock Shuttle, MediaFlow,
MediaLog, MediaMatch, MediaMix, Media Reader, Media Recorder, MEDIArray, MediaServer, MediaShare, MetaFuze,
MetaSync, MicroTrack, MIDI I/O, Midiman, Mix Rack, MixLab, Moviebox, Moviestar, MultiShell, NaturalMatch, NewsCutter,
NewsView, Nitris, NL3D, NLP, Nova, NRV-10 interFX, NSDOS, NSWIN, Octane, OMF, OMF Interchange, OMM, OnDVD,
Open Media Framework, Open Media Management, Ozone, Ozonic, Painterly Effects, Palladium, Personal Q, PET, Pinnacle,
Pinnacle DistanTV, Pinnacle GenieBox, Pinnacle HomeMusic, Pinnacle MediaSuite, Pinnacle Mobile Media,
Pinnacle Scorefitter, Pinnacle Studio, Pinnacle Studio MovieBoard, Pinnacle Systems, Pinnacle VideoSpin, Podcast Factory,
PowerSwap, PRE, ProControl, ProEncode, Profiler, Pro Tools|HD, Pro Tools LE, Pro Tools M-Powered, Pro Transfer, Pro Tools,
QuickPunch, QuietDrive, Realtime Motion Synthesis, Recti-Fi, Reel Tape Delay, Reel Tape Flanger, Reel Tape Saturation,
Reprise, Res Rocket Surfer, Reso, RetroLoop, Reverb One, ReVibe, Revolution, rS9, rS18, RTAS, Salesview, Sci-Fi, Scorch,
Scorefitter, ScriptSync, SecureProductionEnvironment, Serv|LT, Serv|GT, Session, Shape-to-Shape, ShuttleCase, Sibelius,
SIDON, SimulPlay, SimulRecord, Slightly Rude Compressor, Smack!, Soft SampleCell, Soft-Clip Limiter, Solaris,
SoundReplacer, SPACE, SPACEShift, SpectraGraph, SpectraMatte, SteadyGlide, Streamfactory, Streamgenie, StreamRAID,
Strike, Structure, Studiophile, SubCap, Sundance Digital, Sundance, SurroundScope, Symphony, SYNC HD, Synchronic,
SynchroScope, SYNC I/O, Syntax, TDM FlexCable, TechFlix, Tel-Ray, Thunder, Titansync, Titan, TL Aggro, TL AutoPan,
TL Drum Rehab, TL Everyphase, TL Fauxlder, TL In Tune, TL MasterMeter, TL Metro, TL Space, TL Utilities,
tools for storytellers, Torq, Torq Xponent, Transfuser, Transit, TransJammer, Trigger Finger, Trillium Lane Labs, TruTouch,
UnityRAID, Vari-Fi, Velvet, Video the Web Way, VideoRAID, VideoSPACE, VideoSpin, VTEM, Work-N-Play, Xdeck, X-Form,
Xmon, XPAND!, Xponent, X-Session, and X-Session Pro are either registered trademarks or trademarks of Avid Technology,
Inc. in the United States and/or other countries.
Adobe and Photoshop are either registered trademarks or trademarks of Adobe Systems Incorporated in the United States
and/or other countries. Apple and Macintosh are trademarks of Apple Computer, Inc., registered in the U.S. and other
countries. Windows is either a registered trademark or trademark of Microsoft Corporation in the United States and/or other
countries. All other trademarks contained herein are the property of their respective owners.
Footage
Arri — Courtesy of Arri/Fauer — John Fauer, Inc.
Bell South “Anticipation” — Courtesy of Two Headed Monster — Tucker/Wayne Atlanta/GMS.
Canyonlands — Courtesy of the National Park Service/Department of the Interior.
Eco Challenge British Columbia — Courtesy of Eco Challenge Lifestyles, Inc., All Rights Reserved.
Eco Challenge Morocco — Courtesy of Discovery Communications, Inc.
It’s Shuttletime — Courtesy of BCP & Canadian Airlines.
Nestlé Coffee Crisp — Courtesy of MacLaren McCann Canada.
Saturn “Calvin Egg” — Courtesy of Cossette Communications.
“Tigers: Tracking a Legend” — Courtesy of www.wildlifeworlds.com, Carol Amore, Executive Producer.
"The Big Swell" — Courtesy of Swell Pictures, Inc.
Windhorse — Courtesy of Paul Wagner Productions.
Arizona Images — KNTV Production — Courtesy of Granite Broadcasting, Inc.,
Editor/Producer Bryan Foote.
Canyonlands — Courtesy of the National Park Service/Department of the Interior.
Ice Island — Courtesy of Kurtis Productions, Ltd.
Tornados + Belle Isle footage — Courtesy of KWTV News 9.
WCAU Fire Story — Courtesy of NBC-10, Philadelphia, PA.
Women in Sports – Paragliding — Courtesy of Legendary Entertainment, Inc.
Avid High-Resolution Workflow and Color Guide • June 2010
5
Page 6

6
Page 7

Contents
Chapter 1 Digital FilmMaking . . . . . . . . . . . . . . . . . . . . . . . . . . . . . . . . . . . . . . . . . . . 11
Chapter 2 Film Workflows. . . . . . . . . . . . . . . . . . . . . . . . . . . . . . . . . . . . . . . . . . . . . . 15
Film Workflows: Editing Footage from Film Reel . . . . . . . . . . . . . . . . . . . . . . . . . . . 15
Checklist: Editing Film Reel Footage in Media Composer . . . . . . . . . . . . . . . . . . . . 17
Checklist: Editing and Finishing Film Reel Footage in Avid DS . . . . . . . . . . . . . . . . 20
Film Workflows: Editing Footage from Digital Files. . . . . . . . . . . . . . . . . . . . . . . . . . 21
Checklist: Editing Digital Film Footage in Media Composer . . . . . . . . . . . . . . . . . . . 23
Checklist: Editing and Finishing Digital Film Footage in Avid DS . . . . . . . . . . . . . . . 25
Transferring Film to Tape . . . . . . . . . . . . . . . . . . . . . . . . . . . . . . . . . . . . . . . . . . . . . 27
Creating a Film-Based Project . . . . . . . . . . . . . . . . . . . . . . . . . . . . . . . . . . . . . . . . . 37
Editing with High-Resolution Media . . . . . . . . . . . . . . . . . . . . . . . . . . . . . . . . . . . . . 41
Modifying the Reformat Attribute for a Clip . . . . . . . . . . . . . . . . . . . . . . . . . . . . . . . . 47
Working with RED Media . . . . . . . . . . . . . . . . . . . . . . . . . . . . . . . . . . . . . . . . . . . . . 48
Known Limitations for Linking RED Files via AMA . . . . . . . . . . . . . . . . . . . . . . . . . . 49
Copying RED Files to a FireWire or Network Drive . . . . . . . . . . . . . . . . . . . . . . . . . 50
Linking Media with AMA . . . . . . . . . . . . . . . . . . . . . . . . . . . . . . . . . . . . . . . . . . . . . . 50
Editing with Low-Res RED Media . . . . . . . . . . . . . . . . . . . . . . . . . . . . . . . . . . . . . . . 53
Color Management with RED Media. . . . . . . . . . . . . . . . . . . . . . . . . . . . . . . . . . . . . 56
Adjusting RED Source Settings . . . . . . . . . . . . . . . . . . . . . . . . . . . . . . . . . . . . . . . . 56
Applying a Source Setting. . . . . . . . . . . . . . . . . . . . . . . . . . . . . . . . . . . . . . . . . . . . . 60
Adjusting the Source Settings Histogram . . . . . . . . . . . . . . . . . . . . . . . . . . . . . . . . . 61
Preparing your RED Clip for Transcode, Mixdown, or Render . . . . . . . . . . . . . . . . . 62
Linking Back to MXF Media on the Avid Offline Editing System . . . . . . . . . . . . . . . . 63
Exporting the AFE File to Avid DS . . . . . . . . . . . . . . . . . . . . . . . . . . . . . . . . . . . . . . 64
Chapter 3 Managing Shared Storage for Avid Editors. . . . . . . . . . . . . . . . . . . . . . . 65
Setting up a Workgroup with Shared Projects and Storage . . . . . . . . . . . . . . . . . . . 65
Working with Bins and Projects in an Avid Unity Environment . . . . . . . . . . . . . . . . . 67
Creating New Workspaces . . . . . . . . . . . . . . . . . . . . . . . . . . . . . . . . . . . . . . . . . . . . 74
Mounting and Unmounting Workspaces . . . . . . . . . . . . . . . . . . . . . . . . . . . . . . . . . . 75
7
Page 8

Chapter 4 Setting up Storage and Media for High-Res Projects on Avid DS. . . . . 79
Checklist: Configuring Avid DS on Avid Unity . . . . . . . . . . . . . . . . . . . . . . . . . . . . . 79
Placing High-Resolution Media on the Storage Device . . . . . . . . . . . . . . . . . . . . . . 82
Installing and Configuring the ARRI Plug-in. . . . . . . . . . . . . . . . . . . . . . . . . . . . . . . 82
Opening the Media Storage Configuration Tool outside Avid DS . . . . . . . . . . . . . . 83
Defining your Storage Areas within the Media Indexing Service . . . . . . . . . . . . . . . 83
Chapter 5 Editing Film-based Projects in Avid DS . . . . . . . . . . . . . . . . . . . . . . . . . . 89
Opening a Film-based Project in Avid DS . . . . . . . . . . . . . . . . . . . . . . . . . . . . . . . . 89
Conforming a Film Sequence using an AFE . . . . . . . . . . . . . . . . . . . . . . . . . . . . . . 92
Conforming a Film Sequence using an EDL . . . . . . . . . . . . . . . . . . . . . . . . . . . . . . 94
Linking to High-Resolution Files. . . . . . . . . . . . . . . . . . . . . . . . . . . . . . . . . . . . . . . . 96
Capturing High Resolution Media from Tape . . . . . . . . . . . . . . . . . . . . . . . . . . . . . 103
Capturing Film-based Media from File . . . . . . . . . . . . . . . . . . . . . . . . . . . . . . . . . . 109
Viewing High-Resolution Sequences . . . . . . . . . . . . . . . . . . . . . . . . . . . . . . . . . . . 110
Film Proxy Mode . . . . . . . . . . . . . . . . . . . . . . . . . . . . . . . . . . . . . . . . . . . . . . . . . . 112
Outputting Film Sequences . . . . . . . . . . . . . . . . . . . . . . . . . . . . . . . . . . . . . . . . . . 114
Chapter 6 Color Management in Avid DS . . . . . . . . . . . . . . . . . . . . . . . . . . . . . . . . 121
Lookup Tables (LUTs) . . . . . . . . . . . . . . . . . . . . . . . . . . . . . . . . . . . . . . . . . . . . . . 121
The Avid DS Color Management Pipeline . . . . . . . . . . . . . . . . . . . . . . . . . . . . . . . 126
Chapter 7 Using Lookup Tables . . . . . . . . . . . . . . . . . . . . . . . . . . . . . . . . . . . . . . . . 131
Customizing LUTs . . . . . . . . . . . . . . . . . . . . . . . . . . . . . . . . . . . . . . . . . . . . . . . . . 131
Importing External LUTs. . . . . . . . . . . . . . . . . . . . . . . . . . . . . . . . . . . . . . . . . . . . . 132
Saving and Exporting a LUT File . . . . . . . . . . . . . . . . . . . . . . . . . . . . . . . . . . . . . . 133
Enabling a LUT to the Avid DS Viewer. . . . . . . . . . . . . . . . . . . . . . . . . . . . . . . . . . 134
Applying a LUT Effect. . . . . . . . . . . . . . . . . . . . . . . . . . . . . . . . . . . . . . . . . . . . . . . 134
Generating 3D LUTs . . . . . . . . . . . . . . . . . . . . . . . . . . . . . . . . . . . . . . . . . . . . . . . 136
Chapter 8 Using Avid MetaFuze . . . . . . . . . . . . . . . . . . . . . . . . . . . . . . . . . . . . . . . . 139
Film and High-Resolution Workflows using MetaFuze. . . . . . . . . . . . . . . . . . . . . . 139
Opening a Project in MetaFuze . . . . . . . . . . . . . . . . . . . . . . . . . . . . . . . . . . . . . . . 141
Customizing the MetaFuze Window. . . . . . . . . . . . . . . . . . . . . . . . . . . . . . . . . . . . 142
Scanning your Folders . . . . . . . . . . . . . . . . . . . . . . . . . . . . . . . . . . . . . . . . . . . . . . 143
Transcoding your Files. . . . . . . . . . . . . . . . . . . . . . . . . . . . . . . . . . . . . . . . . . . . . . 145
Configuring the MetaFuze Transcoder. . . . . . . . . . . . . . . . . . . . . . . . . . . . . . . . . . 152
8
Page 9

Using LUTs in MetaFuze. . . . . . . . . . . . . . . . . . . . . . . . . . . . . . . . . . . . . . . . . . . . . 153
Transcoding your Files in a Batch. . . . . . . . . . . . . . . . . . . . . . . . . . . . . . . . . . . . . . 156
Exporting an ALE from MetaFuze . . . . . . . . . . . . . . . . . . . . . . . . . . . . . . . . . . . . . . 161
Importing MXF Files into Avid Media Composer. . . . . . . . . . . . . . . . . . . . . . . . . . . 162
Chapter 9 Avid MetaFuze Reference . . . . . . . . . . . . . . . . . . . . . . . . . . . . . . . . . . . . 165
Scan Folders Dialog Box. . . . . . . . . . . . . . . . . . . . . . . . . . . . . . . . . . . . . . . . . . . . . 165
Group View . . . . . . . . . . . . . . . . . . . . . . . . . . . . . . . . . . . . . . . . . . . . . . . . . . . . . . . 167
Detail View . . . . . . . . . . . . . . . . . . . . . . . . . . . . . . . . . . . . . . . . . . . . . . . . . . . . . . . 171
Details of a group... . . . . . . . . . . . . . . . . . . . . . . . . . . . . . . . . . . . . . . . . . . . . . . . . . 172
Details of a file... . . . . . . . . . . . . . . . . . . . . . . . . . . . . . . . . . . . . . . . . . . . . . . . . . . . 174
Details of a transcode job.... . . . . . . . . . . . . . . . . . . . . . . . . . . . . . . . . . . . . . . . . . . 174
Details of a stereoscopic group or transcode job... . . . . . . . . . . . . . . . . . . . . . . . . . 176
Details of R3D groups or transcode jobs... . . . . . . . . . . . . . . . . . . . . . . . . . . . . . . . 177
Create XML Batch Dialog Box . . . . . . . . . . . . . . . . . . . . . . . . . . . . . . . . . . . . . . . . 177
Burn-in Editor Dialog Box . . . . . . . . . . . . . . . . . . . . . . . . . . . . . . . . . . . . . . . . . . . . 178
Transcode Configuration Options . . . . . . . . . . . . . . . . . . . . . . . . . . . . . . . . . . . . . . 179
9
Page 10

10
Page 11
1 Digital FilmMaking
Avid DS
TELECINE
SCANNER
HD 4:4:4
3 4
1
ACQUISITION HIGH-RES EFFECTS
& FINISHING
OUTPUT &
DISTRIBUTION
DPX
2K+
FILM
DELIVERABLES
VIDEO
DELIVERABLES
(HD, SD, DVD, BLU-RAY)
CG
AFE
Avid Media Composer
EDITING
2
Avid
MetaFuze
(optional)
MXF
Link to R3D files
TIF
Avid Unity
The oldest, most common, worldwide format in the industry—24-fps film, has been the
highest resolution master for film production. During the post production process, this film
reel footage can be scanned to DPX files to preserve the 2K or 4K film resolution, or
transferred to tape in HD 4:4:4 format.
Modern advances in cinematography, like the digital film cameras from RED
are starting to have an impact on the film-creation industry. They allow you to bypass the
film lab conversion process, and load your footage directly onto your online editing system.
As a result, films can now be produced digitally from start to end using an all-digital format.
Avid provides an easy and cost-effective way to manipulate high-resolution digital motion
picture images during the finishing and mastering stages of post production. You can capture
and edit material directly from file, or perform the offline editing as film-to-tape. Using the
original high-res media, you can then finish as file-based for the mastering and delivery
requirements to film (2K+), HD or SD formats.
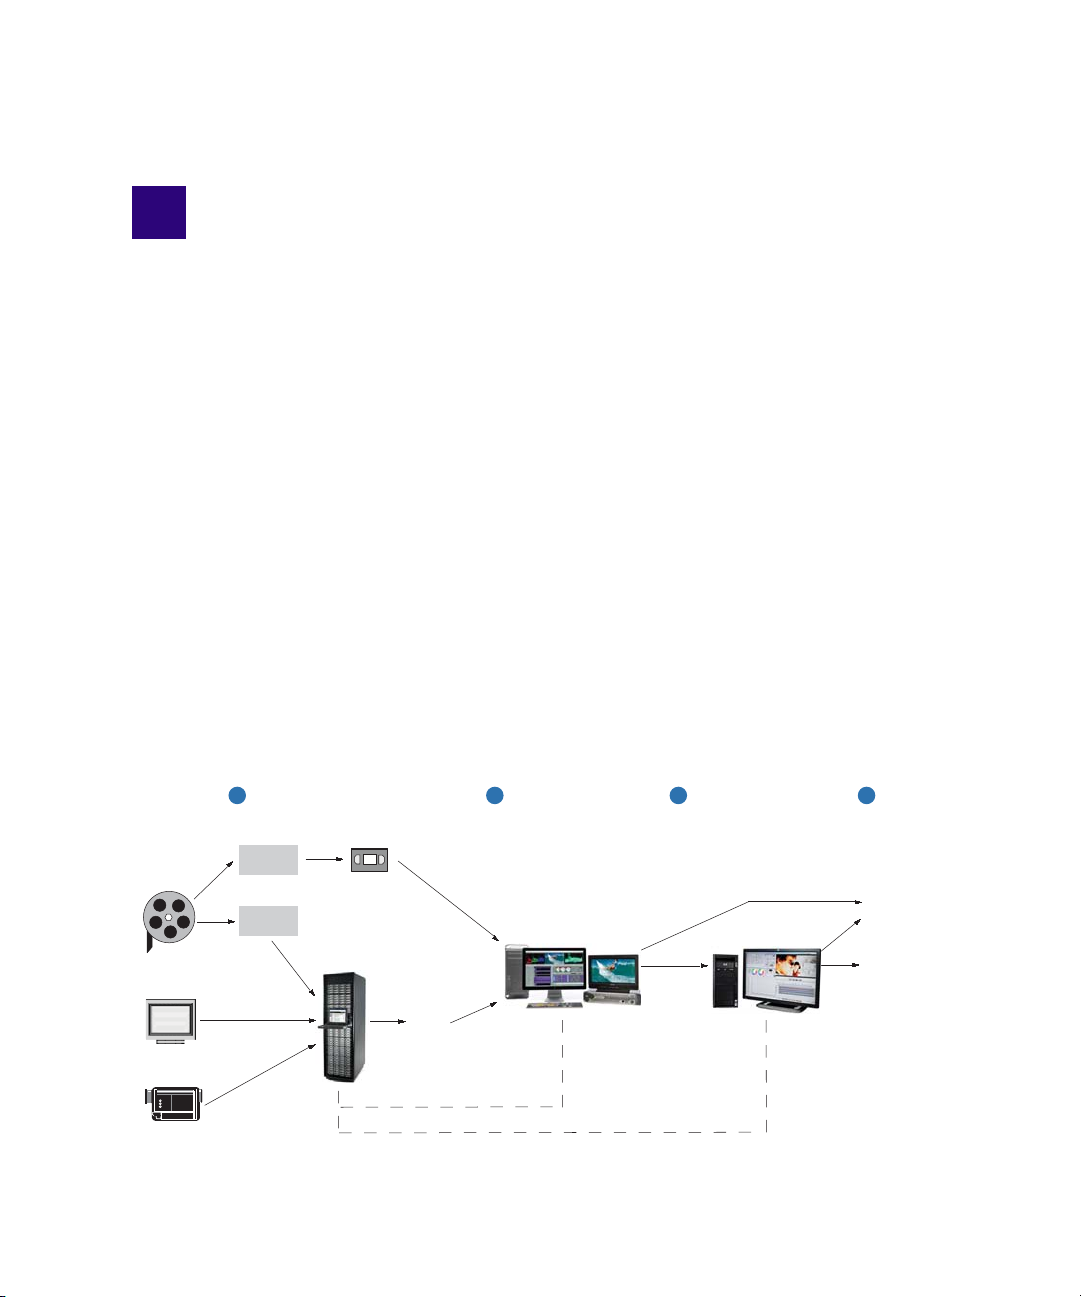
The following illustration shows the key steps for editing and finishing footage that
originates either from digital files or from a film reel.
®
and Arri® ,
Page 12

1 Digital FilmMaking
Step 1: Acquisition
If the footage comes from a traditional film reel, it needs to be scanned to DPX files, or
transferred through Telecine onto tape in a digital HD format. If the footage is already in
digital file format (originating from digital video cameras, film scanning processes, or CGI
applications e.g. R3D, ARI, DPX, TIF), the media can be accessed directly by the editing
system. All source material in digitized form can either be in 2K, 4K, or HD-RGB 4:4:4
format, which all provide superior image quality.
This document refers to DPX (Digital Picture eXchange) as it is a common file format used
n
to store a single motion picture frame to a file. Other formats such as Cineon are also
supported.
Step 2: Editing in HD
If you need to work with high-res file formats that cannot be read by Media Composer (such
as DPX/ARI), start by using Avid MetaFuze to transcode these files into MXF files with an
HD resolution. MetaFuze merges consecutive single-frame files (with metadata contained as
part of the format) into an MXF file that can be read by Avid Media Composer
Media Composer can link to and output RED footage in HD RGB 4:2:2 or 4:4:4. However,
if you need to output at a higher resolution, then you should transcode the RED files using
MetaFuze and do the offline edit using MXF files. When you conform your Media
Composer sequence in Avid DS, you will be able to link to the original RED footage to do
the finishing and output.
®
.
12
Step 3: High-Resolution Effects & Finishing
The effects and finishing workflow for high-resolution files can be conducted in either of the
following ways:
• Doing the offline edit using HD or lower resolution MXF proxies in Avid Media
Composer, and conforming to Avid DS for finishing and output at high-resolution
(2K+). To conform in Avid DS, simply import the AFE and connect to the original
DPX/R3D/TIF files.
or
• Doing all the editing and finishing of the project directly in Avid DS by linking to the
high-resolution media.
When working with high-resolution media, Avid DS handles the complicated task of
preserving color settings during the transfer and storage of the media. This is known as color
management and it is achieved by applying lookup table files (LUTs). For more information
see “Color Management in Avid DS” on page 121.
Page 13

Step 4: Output and Distribution
Universal Mastering in Avid editing applications give you the ability to output the
film-based sequence to any SD or HD format. In cases where you need a film out, you can
™
use Avid DS to easily output to a series of DPX or Cineon
images (with an appropriate
LUT) for recording to film.
13
Page 14

1 Digital FilmMaking
14
Page 15

2 Film Workflows
When using Avid applications, there are two main ways in which you can work with
high-resolution media.
• If you are editing footage that originated on film reel and was transferred to HD tape for
editing, then refer to “Film Workflows: Editing Footage from Film Reel” on page 15.
• If you are editing high-resolution files generated from digital cameras, film-scanning
facilities, or CGI applications (e.g. R3D, ARI, DPX, TIF), then refer to “Film
Workflows: Editing Footage from Digital Files” on page 21.
In addition, you may also want to share media and projects between Avid editing
applications. If so, make sure that you set up your storage and workstations accordingly.
• If your workstations are sharing projects and media on an Avid Unity, see “Managing
Shared Storage for Avid Editors” on page 65.
• If your workstations are sharing projects and media in an Avid Interplay environment
using Avid Unity, then refer to the Avid Editors on Interplay Workflow Guide.
Film Workflows: Editing Footage from Film Reel
When footage is shot on film, it can be digitized in one of two ways. It can be scanned to
DPX files to preserve the 2K or 4K film resolution, or it can be transferred to tape in HD
4:4:4 format. Through a telecine transfer to HD digital videotape, Avid editing applications
capture and store film frames as 24-fps progressive media, or 24p. An important aspect of
the 24p format is that it lets you output either HD, NTSC or PAL video from the same
project. Also, since the footage is transferred to videotape, you can retain all the advantages
of shooting and editing film without incurring the costs of transferring to 2K scans until the
final finishing and delivery stages.
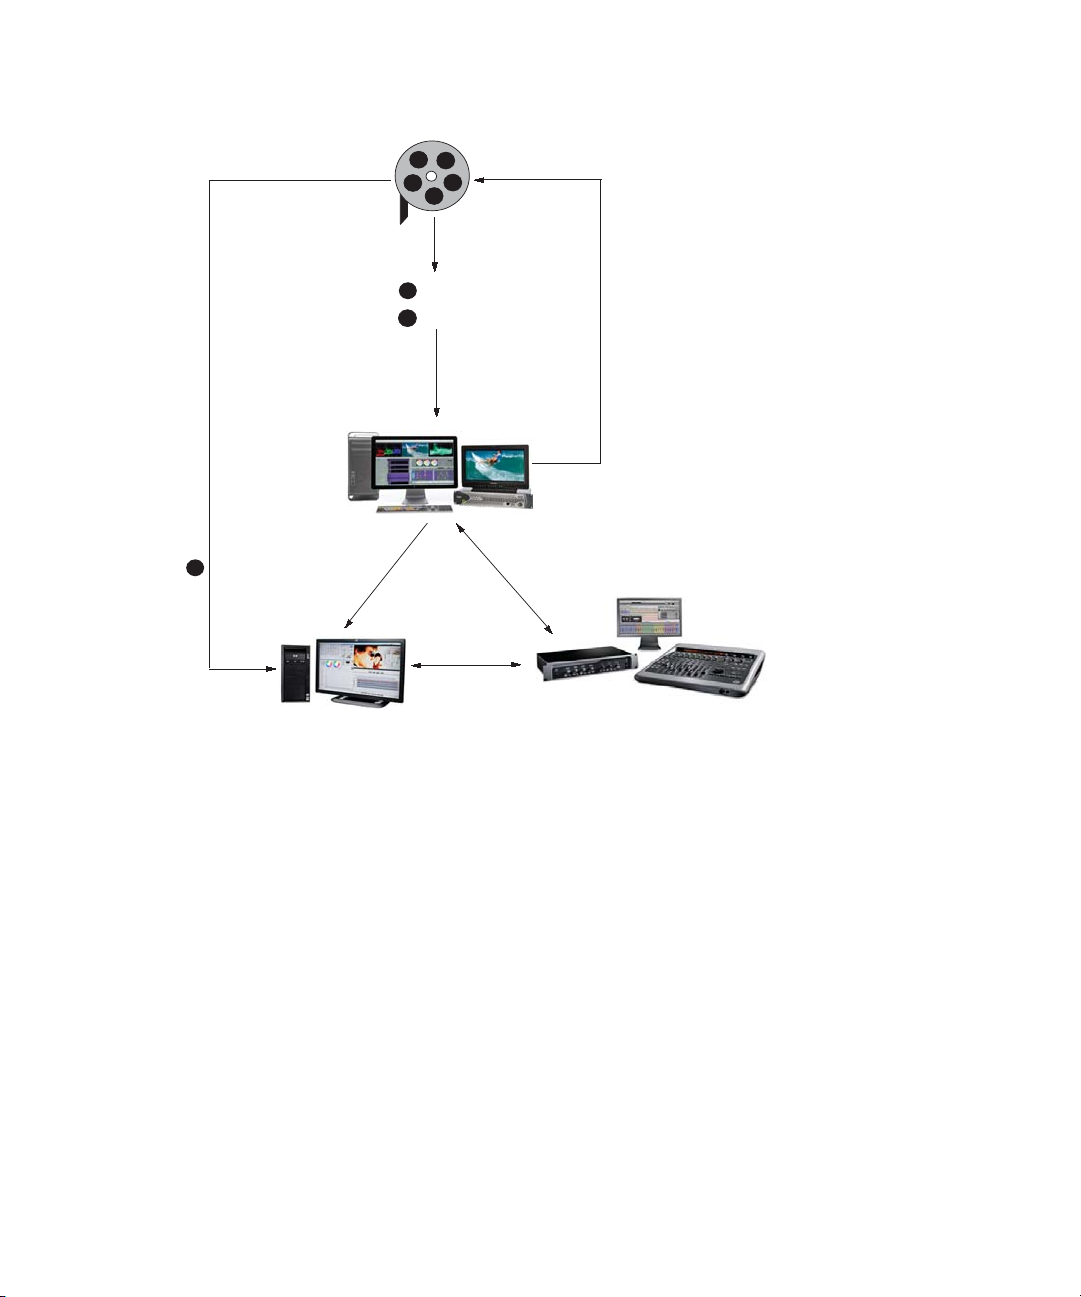
The scenario below describes how to edit your film projects as efficiently as possible for
multiple delivery formats.
Page 16
2 Film Workflows
Avid
Media
Composer
SD/HD/BWF
1
2
HD RGB 4:4:4
ALE
33
2K +
AFE/ALE
Avid DS
OMFI/AAF
OMFI/AAF
Avid Pro Tools
Step 1: Transfer of film to video
The telecine process is the most common practice used for transferring the film dailies to
videotape. For the offline editing, you may transfer to either SD or HD format. If your final
delivery is intended for HD or film, it is best to transfer the dailies as 16:9 anamorphic so
that the conform process will not only be frame-accurate, but also pixel-accurate in the sense
that the effects will match the same aspect ratio (titles, shapes, etc.).
During the telecine process, you can take the original sound recordings from the audio tape,
and synchronize the transfer of both to videotape. For more details on the telecine transfer
process, see “Transferring Film to Tape” on page 27.
The next phase of the process is to import the film transfer files (FLEx, Evertz, Aaton, ALE)
into Media Composer project bins and batch capture the footage from the dailies. If the
audio was not transferred during the telecine process, it can be captured directly from the
BWF file-based recorder, and synced during the editing process.
16
Page 17

Checklist: Editing Film Reel Footage in Media Composer
Step 2: Retransfer of film to HD video
Once the editing process is complete, you can easily generate a pull list with handles using
Avid FilmScribe. The pull list provides a concise list of footage to be transferred or scanned,
thus allowing for an efficient final conform process that minimizes costs in the telecine or
scanner room. If you are editing on an Avid Media Composer or Symphony, the original
footage can be transferred to HD format in 4:4:2 YCrCB or RGB 4:4:4. The source
timecodes and tape name are easily matched using the common denominator which is the
KeyKode information of the original camera negative. Once the bins are relinked, the
sequence will point to the newly transferred sources, tape, timecode, etc. From here, the
video master can easily be output to SD or HD.
Step 3: Retransfer of film to 2K+ files
If you are conforming and finishing on an Avid DS system for HD or film delivery, you can
scan or telecine the final footage to HD or higher-resolution (2K +) files, and conform the
offlined sequence into Avid DS using the AFE.
If you are linking to DPX files, necessary information such as KeyKode (key number) and
timecode is inserted as metadata into each DPX file during the scanning process. If the DPX
files do not contain the timecode information, an ALE is required in order to make the
necessary correspondence to the associated DPX files. The ALE is usually supplied by the
film-scanning facility or output by MetaFuze or Media Composer.
Final output can be SD, HD or in the case of film out, you can output a series of DPX or
Cineon images with the proper LUT (look-up table) for the film recorder.
Checklist: Editing Film Reel Footage in Media
Composer
A 24p or 25p project is one that uses 24p or 25p media, which is created and stored in your
Avid editing application. In most cases, the source footage is film shot at 23.976 fps, 24 fps
(for 24p) or 25 fps (for 25p), however new technology is introducing 24p and 25p videotape
formats, both for cameras and VTRs.
Progressive media is composed of single frames, each of which is vertically scanned as one
pass. Avid editing applications create 24p media by combining (deinterlacing) two video
fields into a single full, reconstructed frame. For NTSC film-to-tape transfers, Avid editing
applications create 24p media by removing the extra fields inserted by the 2:3 pulldown
process and by creating progressive frames.
17
Page 18

2 Film Workflows
The 25p format is primarily for use in countries where PAL video is standard. When you
transfer 25-fps film footage to 25-fps PAL video, no modifications are necessary due to
matching frame rates.
This section outlines the workflows for 24/25-fps film source. Certain steps will have
differences based on the project format and source footage you are using. Follow these steps
in the order that they are listed, and return to this checklist each time you complete a step.
Step Refer to this section
The telecine process syncs picture and sound to create
the videotape. The process also creates a shot log that
will be used during the capture process.
Transfer the 24-fps film to NTSC or PAL.
Convert the shot log file with Avid Log Exchange
(ALE), then import the shot log file into
Media Composer to create a bin or bins.
Open a project with the appropriate settings.
If you are outputting for NTSC HDTV
n
broadcast, create a 23.976p SD project.
Use the ALE to batch capture the footage in an offline
resolution.
Use the low-res media to edit at 24/25/23.976 fps. “Viewing Video Dailies” on page 35.
If a retransfer is needed, use Avid FilmScribe to
create an OCN (original camera negative) pull list for
another telecine process, of the footage used in the
final edit.
Perform the offline edit to produce the final sequence. “Editing with High-Resolution Media”
“Transferring Film to Tape” on page 27.
“Creating a Film-Based Project” on
page 37.
“Selecting a Project Format during
Capture” on page 39.
“Displaying 24p and 25p Media” on
page 41.
on page 41.
18
(Option) Export an OMFI or AAF file to a Pro Tools
digital audio workstation to create a final audio mix.
The telecine process uses the pull list and full
color-corrected transfer to create HD, NTSC or PAL
videotape with selects from the original negative
(picture only). The process also creates a new shot log
file. Convert the new shot log with ALE and import it
into the online system.
“Transferring Audio Files” in the Help
for the Media Composer family.
Page 19

Checklist: Editing Film Reel Footage in Media Composer
Step Refer to this section
Pack the project information for transfer to the Avid
Symphony or Avid DS online system.
If you will be finishing on an Avid DS system,
then export an AFE of your final project or
sequence from Media Composer. (You should
first make a copy of the sequence, decompose
it, and then export the bin.)
Finishing on Avid Symphony:
Transfer the project information to the Symphony
system.
If you are using an Avid Unity shared storage system,
the project links to the existing media. If you are not
using Avid Unity, transfer the media for reference.
(Option) For HD projects being output at 1080p, you
should open the 24p project and change its format to
1080p/23.976.
Review the offline sequence, then modify the format
of the sequence to create a new 1080p/23.976
sequence.
Batch capture in the desired resolution, based on the
new ALE shot log file.
“Exporting the AFE File to Avid DS” on
page 64.
“Changing the Project Format” on
page 43.
“Changing the Sequence Format” on
page 44.
Relink by KeyKode: relink the sequence and clips by
key numbers (FTFT) and complete any other
finishing. If necessary, batch capture clips as HD
media, using an HD resolution.
Complete any other finishing, using the original
offline sequence for reference.
(Option) Import the final audio mix.
Generate multiple formats. “Selecting a Project Format during
Output” on page 40.
19
Page 20

2 Film Workflows
Checklist: Editing and Finishing Film Reel Footage in Avid DS
The following checklist guides you through the process of editing and finishing
high-resolution footage from film reels. Follow these steps in the order that they are listed,
and return to this checklist each time you complete a step.
Step Refer to this section
Learn how to set up your workgroup so that you can
share media between workstations.
If you are working with high-resolution media, make
sure the files reside on a high-capacity storage.
Make sure that your storage has been configured to have
read/write access for your high-resolution files.
Open a new film or HD project. “Creating a Film-Based Project”
If you are conforming a sequence from Avid Media
Composer, then open the AFE or EDL, and link to the
original high-resolution files.
If you are using DPX files and they do not contain
n
the timecode information, then you will also need
the ALE (either from the film house, MetaFuze or
Avid Media Composer) to make the necessary
correspondence to the associated DPX files.
If you are starting your project directly in Avid DS, then
link to your clips and start building your sequence.
“Sharing Media” in the Help for
Avid DS.
“Placing High-Resolution Media
on the Storage Device” on
page 82.
“Opening the Media Storage
Configuration Tool outside Avid
DS” on page 83.
on page 37.
“Conforming a Film Sequence
using an AFE” on page 92, or
“Conforming a Film Sequence
using an EDL” on page 94.
“Linking to High-Resolution
Files during the Conform
Session” on page 98.
“Linking to High-Resolution
Files” on page 96.
20
or
If you are working with media from tape, capture your
HD 4:4:4 footage into Avid DS.
Perform the necessary editing of your sequence using
low-res proxies of your media.
Add special effects and do the necessary color correction. Refer to the appropriate sections
“Capturing High Resolution
Media from Tape” on page 103.
“Film Proxy Mode” on
page 112.
in the Avid DS Help.
Page 21
Film Workflows: Editing Footage from Digital Files
Avid Media Composer
3
2
Avid DS
AFE
Avid MetaFuze
1
4
R3D
HD 4:4:4
HD 4:2:2
NTSC
PAL
QuickTime
DPX
CINEON
(2K, 4K)
TIF
CG
DPX
MXF
4
ARI
Step Refer to this section
Process your sequence. Refer to the Processing section
in the Avid DS Help.
Output your final sequence to tape or file. “Outputting Film Sequences” on
page 114.
Film Workflows: Editing Footage from Digital Files
High-resolution media files could originate from digital film cameras, film-scanning
facilities, or CGI applications. The files include R3D, ARI, DPX, or TIF. The following
workflow shows you how to edit and finish projects with footage that is already in digital file
format.
If you will be delivering the final master in HD format, you can do all your work in Avid
Media Composer/Symphony. If you need to output to film, you can do your offline editing in
Avid Media Composer using HD resolution, and then do the finishing at high-resolution
with Avid DS.
Step 1: Offline editing with low-res media
If you need to work with high-res file formats that cannot be read by Media Composer (such
as DPX/ARI), start by using Avid MetaFuze to transcode these files to a lower SD or HD
resolution. MetaFuze merges consecutive single-frame files into an MXF file that can be
read by Avid Media Composer
included; or for non-metadata formats like TIF, metadata can be added.)
®
. (Any metadata originally contained in the file will also be
21
Page 22

2 Film Workflows
Media Composer can link to and output RED footage in HD RGB 4:2:2 or 4:4:4. However,
if you need to output at a higher resolution than HD, you should transcode the RED files
using MetaFuze and do the offline edit using MXF files. When you conform your Media
Composer sequence in Avid DS, you will be able to link to the original RED footage to do
the finishing and output.
MetaFuze also reads other file types supported third-party parsers.
n
Step 2: Edit sequence by linking to HD or high-res media
Link directly to your source media (such as RED) to edit your sequence on an Avid Media
Composer. From here, you can output directly to HD or SD. If you are doing the offline in
Media Composer and need to finish in Symphony or Avid DS, export the sequence as an
AFE.
Step 3: Conform AFE for high-res finishing in Avid DS
On Avid DS, you can conform the AFE and connect to the original DPX/R3D/TIF files.
In the case of DPX files, necessary information such as KeyKode
timecode is inserted as metadata into the DPX file during the scanning process. If the DPX
files do not contain the timecode information, an ALE is required to make the necessary
correspondence to the associated DPX files. The ALE is usually supplied by the
film-scanning facility or output by Avid MetaFuze.
™
(key number) and
22
The transcoded MXF file used in Media Composer is not required for the finishing process
n
but it could be imported onto a separate video track in Avid DS and used as part of the
conform check process.
Depending on your system configuration, many high-resolution formats are playable in real
time—for a specific list of these formats, see the Avid DS support web at www.avid.com.
When editing high-resolution projects where real-time playback is not achievable, you can
use the proxy mode to apply effects and view the results in HD 4:2:2 or HD 4:4:4.
Step 4: Output to tape or file
In Media Composer, you can output any SD or HD formats as required.
In Avid DS, for a film out, you can output the final sequence to master as a series of DPX or
Cineon
™
images (with an appropriate LUT) for recording to film.
Page 23

Checklist: Editing Digital Film Footage in Media Composer
Checklist: Editing Digital Film Footage in Media
Composer
The following checklist explains how to link and edit high-resolution RED media in Media
Composer. Follow these steps in the order that they are listed, and return to this checklist
each time you complete a step.
Step Refer to this section
Create a project. “Creating a Film-Based Project” on
page 37.
Begin editing your sequence. “Editing with High-Resolution Media”
on page 41
If you are working with media of varying frame sizes
in your project, then you need to set the formatting
options on each clip that is of a different frame size
than the project.
If you are editing with RED media, you can link to the
files via Avid AMA.
Connect your RED drive to your system.
(Optional) Place your RED media on a shared
storage device such as Avid Unity.
To get realtime playback of this media
n
from your shared storage, you will
require a 10GB ethernet connection.
For a list of performance expectations
refer to the Readme document for your
Avid editing application.
“Modifying the Reformat Attribute for a
Clip” on page 47.
“Working with RED Media” on page 48.
This guide contains general procedures
on editing RED media. For the full set of
documentation on using AMA, refer to
the Help for the Media Composer family.
“Copying RED Files to a FireWire or
Network Drive” on page 50.
Link to the source files. “Linking Media with AMA” on page 50.
Linking to RED files via AMA is both
processor and storage intensive. If you require
better performance, you may want to
transcode your RED media and work with
low-res proxies.
“Editing with Low-Res RED Media” on
page 53.
23
Page 24

2 Film Workflows
Step Refer to this section
You may need to change the color values
(color balance, exposure, and contrast) on
your RED media.
If you need to finish your sequence in another editing
system such as Symphony or Avid DS, export an AFE
of your final project or sequence from Media
Composer.
If your high-resolution media is on a shared storage
device where Avid DS also has access, Avid DS
automatically relinks to the files.
AMA-linked RED clips are not yet supported
n
for the conform and relinking process. Refer to
the checklist below for an alternate workflow.
You should first make a copy of the sequence,
move it to its own bin, decompose it (with
handles as desired), select ALL master clips,
and export as ALE with appropriate columns
visible in the bin.
If you are working with high-res files,
n
do not use the option to extend handles
beyond the master clip edges.
“Color Management with RED Media”
on page 56.
“Adjusting RED Source Settings” on
page 56.
“Adjusting the Source Settings
Histogram” on page 61.
“Exporting the AFE File to Avid DS” on
page 64.
24
Render the effects in your final sequence. “Step 9: Render Effects as Needed” in
the Help for the Media Composer family.
If you are using RED media, you should render all
your clips to the final HD quality that you require for
output.
Output the final sequence. “Selecting a Project Format during
“Preparing your RED Clip for
Transcode, Mixdown, or Render” on
page 62.
Output” on page 40.
The following checklist explains how to edit high-resolution files that cannot be read
directly by Media Composer.
Page 25

Checklist: Editing and Finishing Digital Film Footage in Avid DS
Step Refer to this section
Install and use Avid MetaFuze to transcode your
high-resolution media into MXF files.
If you are working with ARRI media, you must
n
install the ARRI plug-in on the same system
where MetaFuze is installed.
Open Avid MetaFuze, scan your folders, and
set the necessary options for transcoding the
files.
If you have multiple MXF files, export an edit
list of all these clips via an ALE.
Import the MXF file(s) into Avid Media
Composer.
Edit the sequence. “Editing with High-Resolution Media”
If you need to finish your sequence in another editing
system such as Symphony or Avid DS, export an AFE
of your final project or sequence from Media
Composer.
If your high-resolution media is on a shared storage
device where Avid DS also has access, Avid DS
automatically relinks to the files.
Refer to the Avid website for more
information.
“Scanning your Folders” on page 143
and “Transcoding your Files” on
page 145.
“Exporting an ALE from MetaFuze” on
page 161.
“Importing MXF Files into Avid Media
Composer” on page 162.
on page 41.
“Exporting the AFE File to Avid DS” on
page 64.
For the workflow on finishing
high-resolution files in Avid DS, see
“Checklist: Editing and Finishing Digital
Film Footage in Avid DS” on page 25.
You should first make a copy of the sequence,
move it to its own bin, decompose it (with
handles as desired), select ALL master clips,
and export as ALE with appropriate columns
visible in the bin.
Checklist: Editing and Finishing Digital Film
Footage in Avid DS
The following checklist details all the steps required to edit digital film files in Avid DS.
Follow these steps in the order that they are listed, and return to this checklist each time you
complete a step.
25
Page 26

2 Film Workflows
Step Refer to this section
Learn how to set up your workgroup so that you
can share media between workstations.
If the footage originated on a film reel, the film
transfer facility will use the film pull list to scan
the necessary footage to DPX files.
Make sure all the high-resolution files reside on
a high-capacity storage.
If you are working with different types of high-resolution media (e.g. R3D, ARI,
n
DPX, TIF), make sure that they are each placed in different folders.
If you are using ARRI media, you must install
the ARRI plug-in.
Make sure that your storage has been configured
to have read/write access for your
high-resolution files.
Open a new project for film or HD. “Opening a Film-based Project in Avid
If you are starting your project directly in
Avid DS, build your sequence by linking to your
clips.
or
“Defining your Storage Areas within the
Media Indexing Service” on page 83.
“Placing High-Resolution Media on the
Storage Device” on page 82.
“Installing and Configuring the ARRI
Plug-in” on page 82.
“Opening the Media Storage
Configuration Tool outside Avid DS” on
page 83.
DS” on page 89.
“Linking to High-Resolution Files” on
page 96.
26
If you are conforming a sequence from Avid
Media Composer, then open the AFE or EDL.
If you are linking to DPX files and they do not contain the timecode information,
n
then you will also need the ALE (either from the film house, MetaFuze or Avid
Media Composer) to make the necessary correspondence to the associated DPX
files.
Perform the necessary editing of your sequence
using low-res proxies of your media.
Add special effects and do the necessary color
correction.
Process your sequence. Refer to the Processing section in the
“Conforming a Film Sequence using an
AFE” on page 92, or
“Conforming a Film Sequence using an
EDL” on page 94.
“Film Proxy Mode” on page 112.
Refer to the appropriate sections in the
Avid DS Help.
Avid DS Help.
Page 27

Transferring Film to Tape
Step Refer to this section
Output your sequence to tape or file. “Outputting Film Sequences” on
page 114.
Transferring Film to Tape
You have your film rolls from the day’s shooting, and you’re ready to edit on your Avid
system. To capture that footage into the system, you first need to transfer the film to
videotape. This process uses a special film projector called a telecine, which is usually part
of a production system that includes audiotape recorders, a controller, and other equipment.
The steps in the process will differ, depending on whether you include audio and whether the
transfer produces NTSC or PAL videotapes.
This section provides some guidelines to ensure that the film shoot and transfer process is
well-planned for the Avid editing session.
Film Shoot Specifications
Use the guidelines in the following table to help you plan for film shoots that will be edited
on an Avid.
Element Supported Formats Notes
Film type 16mm Use Standard 16mm or Super 16mm.
Super 16’s aspect ratio closely matches 16:9.
35mm: 2, 3, 4, 8, and 12 perf
65mm: 5, 8, 10, and 15 perf
Film wind B-wind Always use camera rolls with key numbers in
Audio media BWF file-based recorders Use to record digital audio.
Audio timecodes 30-fps drop-frame or non-drop-frame Use for NTSC transfer projects, and for generating
25-fps timecode Use for PAL transfer projects, and for generating
16mm, 35mm 4 perf, and 35mm 3 perf are
supported as projects in the Avid system. The
remaining formats are supported through ink
numbers and auxiliary ink numbers. For more
information, see “Film and 24P Settings” in the
Help for the Media Composer family.
ascending order.
audio EDLs.
audio EDLs in the PAL format.
27
Page 28

2 Film Workflows
Element Supported Formats Notes
Sync methods Clapsticks Use for manual syncing of sound with
picture.
Electronic slate (smart slate) Use for semiautomatic syncing.
In-camera timecode, with audio sync Use for automatic, “slateless” syncing in the
telecine.
Slate information Camera roll, scene and take, shoot
date, sound-roll ID
Sound-roll cues Sound-roll ID, date, start and end
time-of-day timecode
Film-to-Tape Transfer Guidelines
Observe the following general guidelines when transferring film to tape:
• Instruct the telecine facility to record timecode on the address track.
• Instruct the facility to use only a telecine transfer process when transferring to NTSC
videotape. Do not use a film chain or any other transfer device.
• PAL transfers do not require pulldown, so you can use either a telecine or a film chain.
However, quality is much better on a telecine.
• Transfer all of the project’s source film footage to disk or tape by using either the NTSC
or PAL method.
- For NTSC projects, you can mix footage transferred at 24 fps (23.976 fps) or 30 fps
(29.97 fps), and mix sound transferred at 1.0 or 0.99. Do not mix 24-fps and 30-fps
transfers on the same transfer tape.
- For PAL projects, you cannot mix audio that has been transferred at 4.1 percent
speedup (PAL Method 1) with audio that has not been sped up (PAL Method 2).
Mark sound-roll ID as a backup.
Include verbal time-of-day cues as a backup.
28
PAL film-to-tape transfers that use pulldown are not currently supported in Avid editing
n
applications.
Project
Format Source footage During the telecine process
SD 24 fps To create ITU-R 601 video, the telecine process adds 2:3
pulldown to film footage to create an NTSC videotape, or uses
4.1% speedup for PAL videotape.
Page 29

Transferring Film to Tape
Project
Format Source footage During the telecine process
25 fps The telecine process transfers 25-fps film footage at 1:1 (no
pulldown).
The sound recording can be synchronized as part of the telecine
transfer.
For NTSC output, this method slows the audio by 4
n
percent. If you plan to output to both NTSC and PAL, you
might want to shoot at 24 fps and use 24p instead of 25p.
23.976 fps The telecine process syncs audio and transfers film footage at 1:1
(no pulldown).
HD 24 fps The telecine process transfers 24-fps film footage at 1:1 (no
pulldown).
It can also transfer the footage at HD 1080p/23.976 video at 1:1.
This lets you create the project at 24p and later change it to 1080p
without having to create a new project and sequence. In addition,
you can keep both offline SD material and online HD material
available in the same project.
23.976 fps The telecine process syncs audio and transfers film footage at HD
1080p/23.976 video at 1:1 (no pulldown).
25 fps For PAL broadcast, transfer film at 1080p/25, edit offline in a 25p
PAL project, and edit online in a 1080p/25 project.
Film-to-Tape Transfer Quality Options and Production Aids
The quality of the film-to-tape transfers depends upon several options for the telecine
transfer. The following table describes common transfer-quality options available from a
telecine facility:
Option Description
One-light This transfer involves a single setting of color correction values, resulting in the
simplest, fastest, and least-costly type of transfer. One-light transfers are often
used during offline stages of editing.
Best-light This transfer involves optimum settings of the color-grade controls, but without
scene-by-scene color correction. Best-light transfers are an intermediate level in
terms of both quality and cost.
29
Page 30

2 Film Workflows
Option Description
Timed
(scene-by-scene)
This transfer involves color correcting each scene or shot during transfer. Timed
transfers are the most expensive and time consuming. This option sets up the
proper black and white levels so that you can perform a tape-to-tape color
correction from the source tapes, if needed.
You can use the film-tape-film-tape feature to perform two separate telecine processes for a
project:
• Perform a one-light or best-light transfer to obtain the most material for the initial edits.
• After editing is complete, perform a timed, fully color-corrected transfer of the clips that
will be used in the final cut.
For more information on the film-tape-film option, see “Relinking Clips by Key Number” in
n
the Help for the Media Composer family.
After you perform the final telecine operation, you can capture at a finishing resolution, such
as 1:1 (uncompressed).
The transfer facility might have available one or more of the production aids described in the
following table, which you can include in your film-to-tape transfer:
Aid Description
Automatic logging Whenever possible, you should instruct the facility to log tracking information directly
into a computer database program. Logs generated automatically are more accurate
than manual logs and can be imported easily into the Avid editing system. A log file
typically indicates the relative timecode, key numbers, and pullin (“A” frames) for
each clip that will be captured.
A keypunch at the head
of each camera roll
Burn-in code If the transfer facility is equipped with a timecode or film-code character generator,
30
Ask the lab or transfer house to keypunch the head of each camera roll at the zero
frame and give you a list of the corresponding key numbers. After you have captured,
you can match this list with your captured material to check for potential transfer
errors.
you can instruct the facility to display or “burn-in” tracking codes on the videotape
transfer. Burn-in code provides visual feedback for logging and tracking footage.
Burn-in code cannot be removed from the image and should be used only
c
for the offline stage of a project.
Page 31

Transferring Film to Tape
Aid Description
16:9 wide screen format Your Avid editing application supports the 16:9 wide-screen display format. You can
either shoot your footage by using a 16:9 lens, or transfer the footage anamorphically
to display a larger area of the film aspect ratio during offline and online editing. Also,
this aspect ratio lets you create media that takes advantage of 16:9 monitors that
conform to SDTV and HDTV standards.
Transfer of 24-fps Film to NTSC Video
For an NTSC transfer, the telecine converts your film footage into video running at
29.97 fps. The video can then be captured and edited at 24 fps in the Avid editing system.
This approach ensures that all your edits correspond to true film frames so you see an
accurate representation of the finished film.
If you transfer sound along with picture, your Avid editing application captures audio at the
slowed-down speed. Then during editing and playback, your Avid editing application speeds
up the play rate by 0.1 percent to play in sync with the 24-fps video. Audio plays at
44100 Hz (44.1 kHz) or 48000 Hz (48 kHz).
Transferring Film to Video
Film runs at 24 fps, and NTSC video runs at 30 fps. The difference in frame rates between
film and video prevents a direct frame-to-frame transfer. To compensate, the telecine process
creates an extra six frames every second (the difference between 24 and 30). This method of
creating extra frames is known as pulldown.
At the same time, the telecine slightly reduces the film’s running speed to 23.976 fps. NTSC
video, the broadcast standard used in the United States, Japan, and other countries, plays at
an actual rate of 29.97 fps, although it is usually referred to as 30 fps. An accurate
conversion requires exact adherence to the 4:5 ratio, but this ratio breaks down when you
compare 24 fps to 29.97 fps. To achieve a true 4:5 ratio, the film frame rate is slowed down
to 23.976 fps. The telecine process makes this correction automatically, slowing NTSC
video 0.1 percent from the original film speed, so that the video plays at 99.9 percent of its
original speed.
The following table describes the film to video ratio:
Film Video
24 fps 30 fps
4 frames 5 frames (10 fields)
31
Page 32

2 Film Workflows
Film Video
23.976 fps (0.999 x 24) 29.97 fps (0.999 x 30)
During the capture process, your Avid editing application reverses the pulldown procedure
to capture the film footage at 24 fps. It removes the extra fields added by the pulldown
process to create full-frame, 24p media. The capture process captures video and audio at the
slowed-down speed (0.999).
Maintaining Synchronized Sound
In most cases, the sound for your production has been recorded on a digital audio system,
such as a BWF file-based recorder. You need to synchronize the sound with the picture and
make sure they are in sync in your Avid editing application. You can take one of three basic
paths:
• Transfer the original sound recording to mag track, sync the mag track to the film work
print, and transfer both to videotape through a telecine process.
• Sync the original sound recordings to picture during the telecine process, and transfer
both to videotape.
• Transfer only the picture through the telecine process, capture picture and sound
separately, and sync them in your Avid editing application.
If the telecine transfers sound along with picture (one of the first two paths), the sound
intended to be slowed down for telecine is usually recorded at 48.048 kHz, so that it ends up
being 48 kHz.
Transfer of 24-fps Film to PAL Video
If you use a PAL transfer, the film-to-video process takes place in two stages:
• Transfer the film to videotape by speeding up the film rate during the telecine process.
• Capture the transferred videotape into the Avid system at the sped-up rate.
There are two approaches to synchronizing sound, which are often referred to as PAL
Method 1 and PAL Method 2.
PAL Method 1
With PAL Method 1, you synchronize sound with picture during the telecine process.
32
Page 33

Transferring Film to Tape
As with an NTSC film-to-tape transfer, the telecine process creates two video fields for each
film frame. However, because the film rate of 24 fps is close to the PAL video rate of 25 fps,
most PAL film-to-tape transfers involve simply speeding up the frame rate. This speedup
changes the frame rate from 24 to 25 (an increase of 4.1 percent). There is no pulldown that
creates extra fields.
Some PAL film-to-tape transfers use pulldown. This method is not currently supported in
n
Avid editing applications.
With PAL Method 1, there are two ways to sync sound with picture in the telecine process:
• Transfer the original sound recording to mag track, sync the mag track to the film work
print, and transfer both to videotape through a telecine process.
• Sync the original sound recordings to picture during the telecine process, and transfer
both to videotape.
In either case, the telecine process speeds up sound at the same rate as picture: 4.1 percent.
After you receive the PAL transfer tapes, the next step is capturing the footage in a 24p PAL
project. During the capturing process, your Avid editing application captures the material at
the PAL rate of 25 fps, capturing every picture frame. It stores the two video fields as a
single progressive frame, which you edit at 24 fps.
You must capture audio along with video at the PAL rate of 25 fps if you want to use audio
n
that was transferred along with picture during the telecine process. You set the Audio
Transfer rate as Video Rate (100+%) in the New Project dialog box. For more information,
see “Audio Transfer Options for 24p PAL Projects” on page 34.
You have the option of playing back the footage at 24 fps or 25 fps. If you select 24 fps, the
system slows both the picture and the sound by 4.1 percent for playback. This approach lets
you edit at the original film rate, but the slowdown creates a limitation for audio. Because
you capture the audio at a rate faster than playback, some audio samples are duplicated
during playback, and sound quality is compromised.
Select the Edit Play Rate option in the Film and 24p Settings dialog box. For more
n
information, see “Film and 24P Settings” in the Help for the Media Composer family.
If you select 25 fps, there is a different limitation with audio. Because you are playing back
at the sped-up rate (4.1 percent), the audio pitch rises slightly. This is usually acceptable for
broadcast, so PAL Method 1 is primarily used for PAL television broadcast.
33
Page 34

2 Film Workflows
PAL Method 2
With PAL Method 2, you capture sound and picture separately using the same telecine
process for picture (create a video frame of two fields for each film frame, speed up rate by
4.1 percent). The difference is that you do not synchronize sound as part of the telecine
process..
Some PAL film-to-tape transfers use pulldown. This method is not currently supported in
n
Avid editing applications.
Here’s an example where you have your picture-only videotapes (at the rate of 25 fps) and
your source recording tapes. To capture at 24 fps, you need to follow a two-step process:
1. Capture the picture to create 24p media.
2. Capture the sound at the film rate of 24 fps.
When you created the project, you set the Audio Transfer rate as Film Rate (100%) in the
n
New Project dialog box. For more information, see “Audio Transfer Options for 24p PAL
Projects” on page 34.
In most cases, you will choose to edit at 24 fps. The sound maintains source quality
(44.1 kHz and 48 kHz) and plays in sync with 24-fps video.
34
Audio Transfer Options for 24p PAL Projects
When you create a 24p PAL project, you must specify the appropriate audio transfer rate for
the project. (This is not necessary for a 25p PAL project because there is no film speedup
during the transfer.) The New Project dialog box provides Audio Transfer options that lets
you select either Film Rate or Video Rate. This value is project specific and should not be
changed after you create the project unless you have a specific element that you need to
transfer at a different rate.
The Audio Transfer options are also located in the Film and 24p Settings dialog box and can
n
be changed after the project is created.
The Info tab in the Project window lets you view the audio transfer rate you selected when
n
you created the project. The actual audio transfer rate might be different from the display if
you used the Film and 24p Settings dialog box to change the audio transfer rate.
The following table describes the Audio Transfer options:
Page 35

Option Description
Film Rate (100%) Select this option when your 24-fps film footage has been transferred
Video Rate (100%+) Select this option when your 24-fps film footage has been transferred to
Viewing Video Dailies
The video dailies method relies on videotape transfers from negative for screening,
transferring, and creating conformed cuts during editing.
The advantage of working with video dailies and film negative is that you can avoid the cost
of work print until the finishing stages, or altogether. The disadvantage is you are limited to
the aspect ratio, resolution, and contrast range of video previews. For this reason, video
dailies are preferred for television projects, but you can also use this method to economize
on a feature film production.
Transferring Film to Tape
MOS (roughly translated as “without sound”) to 25 fps by speeding up the
film, and the audio comes in separately at 100 percent of the actual speed
(PAL Method 2).
25 fps by speeding up the film, and the audio is synchronized to the video
picture. This means that the audio speed is increased by 4.1 percent (PAL
Method 1).
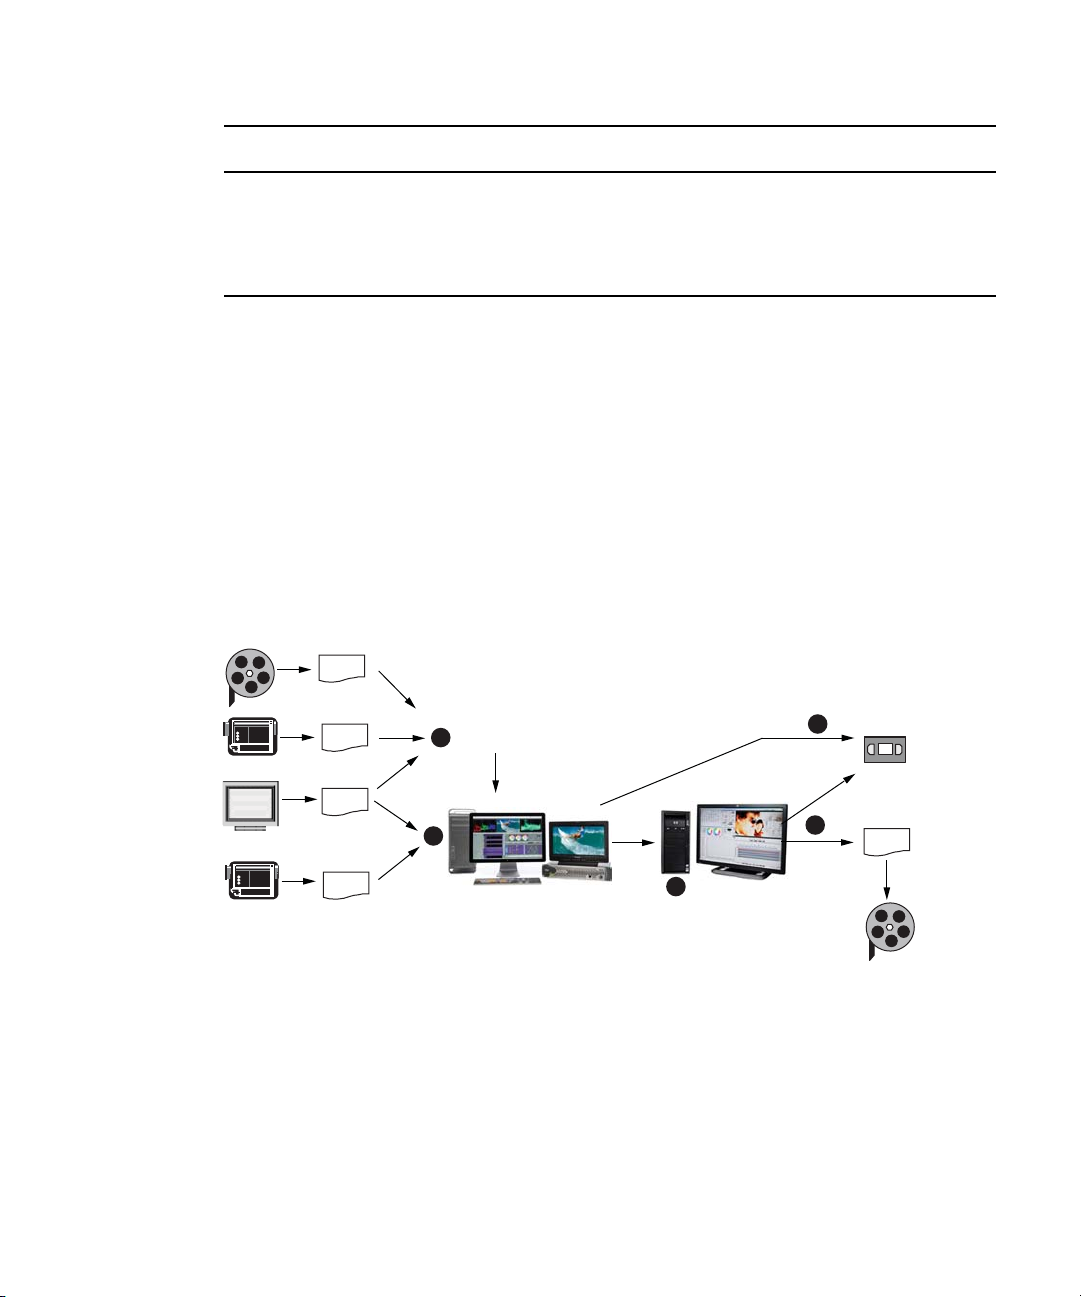
The illustration below describes the video dailies method:
35
Page 36

2 Film Workflows
....................
....................
1
2
33
4
36
5
6
EDL
Description
1 Prepare film negative for the circled (selected) takes.
2 Transfer reels of negative synced to audio in telecine. Generate a simultaneous online transfer, or
create the online transfer from selects after editing the sequence.
3 Screen the videotape dailies before telecine transfer.
4 Import existing key numbers and timecode information into the Avid system, then capture.
You can manually add or change key numbers in the KN Start bin column and manually add
timecodes in the Aux TC and Sound TC bin columns.
5 Edit using the Avid system.
Page 37

Description (Continued)
6 Record a digital cut to preview the sequence with effects, or generate EDLs for editing the
videotape transfers. Alternatively, generate a matchback list of selects for printing selects and
conforming negative.
Creating a Film-Based Project
When you create a project that uses footage coming either from film reel or high-resolution
digital files (2K+), the options that you choose for your project should be determined by:
• The acquisition format (high-res digital files, 16mm or 35 mm film, HD video)
• The audio rate (film speed of 48 kHz, or video speed of 48.048 kHz)
• The finishing and output requirements of the project
To create a new film-based project:
1. Start your Avid editing application.
2. In the Select Project dialog box, select the folder in which you want to create the
project: Private, Shared, or External.
Creating a Film-Based Project
3. Click New Project.
4. Type the name of your new project in the text box.
5. Click the Format menu and select the most appropriate project type. The format you
choose must take into consideration both the frame rate at which the film was shot, as
well as the final delivery format for the production.
Format Source Output
24p NTSC Film-based or other 24-fps footage transferred to Standard
Definition NTSC videotape.
23.976 NTSC Film transferred at 23.976 or footage shot at 23.976. Audio
remains synchronized with video throughout with no
conversion required.
In addition, chose this option if the production was shot with
a DV (digital video) camera.
24p PAL Film-based or other 24-fps footage transferred to PAL
videotape. Ideal for a dual system production.
Film,
HD Broadcast,
Video
HD Broadcast,
NTSC Video
Film,
HD Broadcast,
PAL Broadcast,
PAL Video
37
Page 38

2 Film Workflows
Format Source Output
25p PAL Film-based material or other 25-fps footage shot at 25 fps
transferred to PAL video.
1080p/23.976 High-resolution files coming from digital film cameras such
as RED, film transferred to HD videotape at 23.976 fps, or
HD-originated 23.976-fps footage. This is the most
commonly used HD project in NTSC-based countries.
1080p/24 High-resolution files coming from digital film cameras such
as RED, or HD-video originated production (shot at 24 fps).
This format is also used if you’re working on older Avid
systems that do not support the 23.976 frame rate.
1080p/25 High-resolution files coming from digital film cameras such
as RED, or HD-video originated production (shot at 25 fps).
This is the most commonly used HD project in PAL-based
countries.
1080i/59.94 High-resolution interlaced files (shot at 59.94 fps). HD Broadcast,
1080i/50 High-resolution interlaced files (shot at 50 fps). HD Broadcast,
Film,
HD Broadcast
PAL Broadcast,
PAL Video
Film,
HD Broadcast,
NTSC Broadcast
Film,
HD Broadcast
Film,
HD Broadcast,
PAL Broadcast
NTSC Broadcast
PAL Broadcast
Further options might change depending on the format that you chose.
38
6. Select Film if your source material originated on film reel.
This will give you access to film options such as Perf Slip and Film and 24p settings.
7. Set the following additional option(s), where applicable:
Option SD (NTSC/PAL) HD and Film
Aspect Ratio Select either 4:3 or 16:9 Only uses the 16:9 aspect ratio.
The project uses the aspect ratio setting to determine the display setting in the
monitors, and as a factor in determining whether material requires resizing or
repositioning in sequences.
Raster
Dimension
Color Space N/A Select RGB 709 to retain the best color quality
N/A The Raster Dimension menu appears only for
HD projects on a supported system.
from the film shoot.
Page 39

Creating a Film-Based Project
Option SD (NTSC/PAL) HD and Film
Film Gauge Available for 23.976p, 24p, 25p, 720p, and
1080p film projects. If you are using source
material originating on film reel, click the Film
button and select a format for film gauge
tracking from the Default Film Type menu.
Audio
Transfer Rate
Matchback Available for 25i PAL, 30i NTSC, 720p, and 1080i Matchback projects only. If you
are using source material from film reel, select Matchback, then click the Film button
and select a format for film gauge tracking from the Default Film Type menu. The
Matchback item appears only if your Avid editing application includes the Matchback
option
Available for 24p PAL projects where material
originated from tape.
8. Click OK.
Your Avid editing application creates the new project files and folder, and then returns to
the Select Project dialog box. The project name is highlighted in the Projects list.
9. Double-click the project name in the Projects list to open the project or click OK with
the project name highlighted.
The Project window, the Composer window, and the Timeline open with the User
settings loaded. The Project window, the Source/Record monitor, and the Timeline open
with the User settings loaded. The title bar of the Project window contains the project
name and the user profile selected in the Select Project dialog box.
10. (Option) If your project uses a film project type, set film preferences immediately after
you create the project.
For more information, see “Film and 24P Settings” in the Help for the Media Composer
family.
Before you capture or output film reel footage, refer to the following topics—“Selecting
a Project Format during Capture” and “Selecting a Project Format during Output” in the
Help for the Media Composer family.
Selecting a Project Format during Capture
Before you capture film reel footage into your editing system, make sure you select the
correct project format. The following table explains how the Avid system creates the
digitized media from your source footage.
39
Page 40

2 Film Workflows
Project
Format
SD 24 fps The Avid system removes the 2:3 pulldown and creates 24p media.
HD All HD footage is captured in its native format. If you need to
Source
footage During the capture process
25 fps Use a 25p deck if you need to downconvert HDTV to ITU-R 601 video.
The deck does not need to add pulldown or speed up the audio since the
footage will remain at 25 fps. The Avid system creates 25p media.
23.976 fps Use a 24p deck if you need to downconvert HDTV to ITU-R 601 SD
video. The deck adds 2:3 pulldown for video but maintains audio at 48
kHz. The Avid system removes both normal (2:3:2:3) and advanced
(2:3:3:2) pulldown types. It maintains audio at 48 kHz, and creates
23.976p media.
downconvert HD media to an SD format, then refer to the appropriate
SD rows above.
Selecting a Project Format during Output
Before you output your sequences, make sure you select the correct project format. The
following table explains how the Avid system handles the digitized media during the output
process.
40
Project
Format
SD 24 fps For NTSC and PAL, the system reinserts the pulldown or re-creates
HD 24 fps Creates a 24p EDL for use in an online suite.
Source
footage During the output process
the speedup.
25 fps For NTSC, the system inserts 2:3 pulldown and slows down the
audio by 4%. No adjustment is needed for PAL.
23.976 fps For NTSC video, the Symphony system reinserts pulldown.
25 fps Creates a 25p EDL for use in an online suite.
23.976 fps Creates a 24p EDL for use in an online suite.
Use the Digital Cut tool to output a 1080p/23.976 master tape. Then
convert the master tape to 720p/59.94 or 1080i/59.94 for broadcast.
Optionally, use your Avid editing application to crossconvert to
720p/59.94 or 1080i/59.94 for preview or reference. The HD VTR
can also create 1080i/50 for PAL broadcast.
Page 41

Editing with High-Resolution Media
Project
Format
Film 24 fps For conforming film, it creates a 24p cut list.
Source
footage During the output process
25 fps For film, it creates a 25p cut list.
23.976 fps For conforming film, it creates a 24p cut list.
Editing with High-Resolution Media
Your Avid editing system can work directly with film footage that is already in digital file
format, such as files from digital video cameras or film scanning processes. In fact, media
from the RED camera can be linked through your Avid editing application to avoid capturing
these high-resolution files. Audio is included in the RED files, and will display as .wav files
in the bin.
If you need to work with other high-res file formats that cannot be read by Media Composer
n
(e.g. DPX/ARI), start by using Avid MetaFuze to convert the files into MXF files at an HD
resolution, and then import this MXF into your Avid editing application for offline editing.
If you need to conform and finish your sequence on another system, then note that
AMA-linked RED files are not yet supported for the AFE conform. You should first transcode
the RED files using Avid MetaFuze and do the offline edit with the MXF media.
When film reel footage is transferred from tape, you can capture it at any SD or HD
resolution. The resolution at which you capture depends on the hardware capabilities of your
system and the amount of storage space that you have available for the media. Some Avid
editing applications let you capture HD-RGB 4:4:4 format, which provides superior quality
for editing and applying effects. Use the resolution that is optimal for your system, and that
lets you edit your sequences efficiently during the offline process.
To increase your performance when working with high-res media, you can do the offline edit
with low-res proxy media. If you are working with RED via AMA, see “Editing with
Low-Res RED Media” on page 53.
If you are in an Avid Interplay environment, you can edit with compressed media and
recapture the clips at high resolution for final finishing and output. This can be accomplished
using the Dynamic Relinking feature. For more information, refer to the Avid Ed itors on
Interplay Workflow Guide.
Displaying 24p and 25p Media
This section applies to you only if you are working with Standard Definition (SD) formats.
41
Page 42

2 Film Workflows
When your Avid editing application captures video that has been transferred from film (or
video shot at 24 fps), it creates 24p media. It creates this media by capturing the video fields,
by dropping extra pulldown fields (NTSC transfers only), by combining (deinterlacing) two
fields for each film frame (A1+A2, B1+B2, and so on), and by storing the fields together as
a full frame. The system always stores media as a fully reconstructed, progressive frame. It
is the construction of this full frame that gives you the flexibility to create multiformat
output.
You typically use 25p media when capturing film or video shot at 25 fps. In this case, the
system also stores the media as a fully reconstructed, progressive frame. The difference is
that there is no need for pulldown fields because there is a 1:1 correspondence between the
source tape and the captured frames.
Displaying Media While Editing
When you click the Play button while editing a clip or a sequence (sometimes referred to as
Edit Play), the system separates (interlaces) the progressive frames into fields and does the
following:
• On the Source, Record, Playback, or pop-up monitor, your Avid editing application
displays the footage at 23.976 fps, 24 fps, or 25 fps, depending on your project and
editing preference.
42
Choose your preference for playback in the Film and 24p Settings dialog box. For more
n
information, see “Filtering the Settings List” in the Help for the Media Composer family.
• On an NTSC monitor, the system does one of two things:
- If playing at 23.976 fps (audio pulldown ON), the system performs a 2:3 pulldown
that replicates the telecine pulldown, and displays the interlaced media at 29.97 fps.
- If playing at 24 fps (audio pulldown OFF), the system performs a 2:3 pulldown,
drops every 1000th frame in the Client monitor, and displays the interlaced media at
29.97 fps.
• On a PAL monitor, the system does one of two things:
- If playing at 24 fps, the system duplicates two fields per second to display the
interlaced media at 25 fps.
- If playing at 25 fps, the system performs a 4.1 percent speedup, maintains 1:1
transfer of film frames to video frames, and displays the interlaced media at 25 fps.
For 25p projects, 25 fps is the only playback rate. The playback rate is 1:1 with no speed
change.
Page 43

Displaying Media During a Digital Cut
The Digital Cut tool lets you output multiple formats at various play rates, all from 24p and
25p media. When you click the Play Digital Cut button, the system displays the sequence as
described in “Displaying Media While Editing” above, depending on your selection in the
Digital Cut tool.
For more information, see “Selecting Output and Timecode Formats for 23.976p, 24p, and
25p Projects” in the Help for the Media Composer family.
Changing the Project Format
Changing formats is especially useful if you are working with downconverted HD material
in an offline-to-online workflow. Each HD format has an equivalent SD format that you can
use for offline editing.
For details, see “Offline Formats for HD” in the Help for the Media Composer family.
The Format tab in the Project window lets you change the format of the project to another
format that shares the same frame rate. On systems with supported Avid input/output
hardware, you can also change the raster dimension to improve performance as you edit HD
projects.
Editing with High-Resolution Media
43
Page 44

2 Film Workflows
When you change the project format, the following changes take place:
• The hardware changes to support input and output for the new project.
• The available resolutions and, for some configurations, raster dimensions change to
those of the new project.
• Any new sequences you create use the format of the new project.
If necessary, you can then modify the format of an existing sequence, see “Changing the
Sequence Format” on page 44.
To change the project format:
1. Click the Format tab on the Project window.
2. Select the corresponding format for your workflow.
You can select only projects with the same edit rate.
n
3. If available, click the Raster Dimension menu and select a raster size.
For information on raster types and raster sizes, see “Raster Dimensions” in the Help for
the Media Composer family.
Changing the Sequence Format
When your Avid editing application creates a sequence, it uses the format of the current
project.
You may not always need to change the edit rate of the sequence. For example, you can
change an NTSC 30i sequence to 1080i/59.94 or to 720p/59.94. In other cases, you do
change the edit rate, and the modified sequence uses motion adapter effects and contains
other adjustments necessary to allow the sequence to play at the new edit rate.
There are special workflows for converting a 23.976p NTSC sequences. See “Converting a
n
24p NTSC Sequence to 1080p/23.976” on page 45 and “Converting a 23.976p NTSC
Sequence to 720p/23.976” on page 46.
To modify the format of a sequence:
1. (Option) Duplicate the sequence.
2. Select the sequence you want to modify.
3. Select Clip > Modify.
4. Select Set Format from the top list.
5. Select the format to which you want to convert from the Format menu.
6. Click OK.
44
Page 45

Editing with High-Resolution Media
A message box tells you whether the sequence has been duplicated or modified.
Your Avid editing application changes the format of the sequence. In cases where
timecode needs to be converted, your Avid editing application creates a new sequence
and unlinks the media. No media is converted. For more information, see
“Understanding Options for Modifying the Sequence Format” in the Help for the Media
Composer family.
You can check the format of the sequence in the Format column of the bin. This column
displays the format of a clip or sequence as determined by the project type, such as 30i
NTSC or 1080i/59.94. This is especially useful if you have both SD and HD clips in the
same bin.
Format column in the bin
Converting a 24p NTSC Sequence to 1080p/23.976
The most efficient offline format for a project that needs to be delivered as 1080p/23.976 is
23.976p (NTSC). In some cases, however, you might need to edit the offline sequence at
24 fps — for example, if the offline system does not support 23.976p NTSC projects. To
convert a 24p NTSC sequence to 1080p/23.976p, you need to take an intermediate step and
first convert it to 23.976p NTSC.
Several limitations apply to this conversion:
• Audio captured without pulldown (60 Hz) needs to be recaptured with pulldown (NTSC
reference at 59.94 Hz).
• Media for the new 23.976p sequences and clips is offline. Sequences and clips cannot be
linked to the original 24p media.
• You need to batch capture and import media. In most cases, you would do this after
converting the sequence to 1080p/23.976.
The last two limitations also apply to other sequence conversions that create new sequences.
45
Page 46

2 Film Workflows
To convert a 24p NTSC sequence to 1080p/23.976:
1. On the HD online system, open a 1080p/23.976p project or create a new one.
2. Switch the project format to 23.976p NTSC.
3. Open the bin that contains the original 24p sequence and select the sequence.
4. Select Clip > Modify.
5. Select Set Format from the top list and select 23.976 NTSC from the Format menu.
6. Click OK.
Your Avid editing application creates a new sequence labeled with the extension
23.976 fps.
7. Switch the project format back to 1080p/23.976p project.
8. Select the new 23.976p sequence.
9. Select Clip > Modify.
10. Select Set Format from the top list and select 1080p/23.976 from the Format menu.
11. Click OK.
12. Batch capture, import graphics, and finish the sequence.
Converting a 23.976p NTSC Sequence to 720p/23.976
Because the source edit rates are different for these formats, you cannot simply change the
project and sequence format. The following sequence is based on source material shot or
transferred to 720p/23.976 and edited offline in a 23.976p NTSC project.
To convert a 23.976p NTSC sequence to 720p/23.976:
1. In the 23.976p NTSC project, duplicate the final sequence and move it to a new bin.
2. Decompose the sequence.
3. Select the master clips and export them as a shot log file.
4. Create a 720p/23.976p HD project.
5. Import the shot log file into a bin.
6. Batch capture the clips.
7. Open the SD bin containing the duplicated sequence.
8. Relink the SD sequence to the new HD clips.
46
Page 47

Editing at 60 fps
The project type 720p/59.94 uses a screen resolution of 1280 x 720 at a frame rate of
60 frames per second. Editing at 60 fps is similar to editing at 24 fps because both
resolutions are progressive — they use full frames instead of interlaced fields. Note the
following:
• Single-frame step commands move at 1/60th of a second. Single-field step commands
are deactivated; if you click a button, your Avid editing application beeps.
• Draft Quality plays back at 30 fps. Full Quality plays back at 60 fps.
• You can mark IN and OUT points at 1/60th of a second increments.
• You can trim at 1/60th of a second increments.
• Transition effects default to one-second duration (60 frames).
• Deck control for capture and digital cut is limited to 30 fps. A message box warns you if
you try to mark an odd timecode value (such as 01:00:00:03).
1080i/50 and 1080i/59.94 are interlaced resolutions that you edit at 25 frames per second
n
and 30 frames per second.
Modifying the Reformat Attribute for a Clip
Modifying the Reformat Attribute for a Clip
Your Avid editing application uses the Reformat attribute of a clip to resize and reposition
the clip so that it conforms to the current frame size and aspect ratio specified in the Project
Settings. When you create a clip or subclip, the Reformat attribute is automatically set to
Stretch. If you are using AMA to link to clips, then the default is set to Center Keep Size.
For a list of these options, see “Reformatting Options Reference” in the Help for the Media
Composer family.
If you are working in an Interplay environment, do not change the Reformat attribute from
n
the Stretch setting. If you use a different setting, and you then use Interplay Transcode or
Send to Playback, the results might not be what you expect.
The illustration shows the Reformat bin column and the menu that lets you choose a
Reformatting Option.
47
Page 48

2 Film Workflows
Changes you make to the Reformat attribute apply only to the selected clip in the bin. You
can have several subclips derived from the same master clip, and set different Reformatting
Options on each of them.
When you change the Reformat attribute of a clip, it updates if it is loaded in a Source or
pop-up monitor, and new edits into a sequence using this clip use the new Reformatting
Option. However, previous edits using this clip continue to use the old value. If you want to
update a sequence so that all versions of this clip in a sequence use the current Reformat
attribute, refresh the Reformatting Options for the sequence. For more information, see
Refreshing Sequences to Use Current Clip Attributes in the Help for the Media Composer
family.
To set the Reformat value for an individual clip or subclip:
1. Open the bin containing the clip or subclip you want to modify.
For more information, see Opening and Closing Bins in the Help for the Media
Composer family.
2. Click the Text tab.
3. (Option) If it is not already visible, display the Reformat bin heading.
For more information, see Using Text View in the Help for the Media Composer family.
4. Click the Reformat field for the clip or sub-clip, and select an option.
Options apply only to clips that do not match the frame size and aspect ratio of the
project.
For more information, see Reformatting Options Reference in the Help for the Media
Composer family.
Working with RED Media
Avid Media Access (AMA) is a plug-in architecture that allows you to link directly to clips
on a storage device without importing the media directly on your system. AMA allows you
to be more productive by browsing and editing directly from the storage device or volume.
48
Page 49

Known Limitations for Linking RED Files via AMA
To link to RED media, you need the RED AMA plug-in installed on your system. You must
also configure the necessary AMA settings as outlined in “The Avid Media Access (AMA)”
in the Help.
When you link to RED files, the images are scaled to the frame size of the sequence.
Assuming that you are working in HD sequences, the images will be scaled to HD frame
size with a choice of color precision as high as RGB 4:4:4. In addition, you have access to all
the metadata and color values in the raw RED files as well as any other “look” files
associated with this media (e.g. RLX, RSX, RMD).
Finally, all rendering or transcoding can be done at full HD-RGB quality. Note that linking
to RED files via AMA is both processor and storage intensive. Refer to “Feature
Performance” in the Avid Editing Readme for technical requirements on RED editing via
AMA.
You may begin editing with the linked RED source material immediately. If the project is
short, the media management needs of the project are not great, the project does not require
several streams of video and effect to play concurrently, and the CPU and storage is up to the
task, the offline process can continue using linked media. Otherwise, it’s best to transcode
the RED files to a format optimized for the offline workflow such as DNxHD 36. See
“Editing with Low-Res RED Media” on page 53.
Important: If you intend to finish on Avid DS at higher-than-HD resolution, then note that
n
AMA-linked RED files are not yet supported during the AFE conform. You should first
transcode the RED files using Avid MetaFuze and do the offline edit using MXF files. When
you conform your Media Composer sequence in Avid DS via AFE, you will be able to link to
the original RED footage to do the finishing and output.
Known Limitations for Linking RED Files via AMA
• Dailies that were created in Avid MetaFuze and REDCINE-X will not relink or conform
to R3D files via Avid AMA.
• Sequences that were edited and moved to and from REDCINE-X and Avid AMA will
not relink or conform.
• AFE, EDL or XML files generated for conform of sequences with Avid DS and other
third-party applications, will not relink on files edited via Avid AMA.
• Refer to the “RED AMA Plug-in” document on the Avid web site for other
late-breaking information.
49
Page 50

2 Film Workflows
Copying RED Files to a FireWire or Network Drive
After you attach the RED drive or insert a REDFlash card, you can copy the RED media to a
FireWire drive or a network drive and then disconnect the drive. You might find it
convenient to copy several cards to other drives so you can reuse the cards quickly.
You can connect a FireWire drive, for example, and store the contents of several cards on it
so you can keep using the cards in the camera.
To copy the REDFlash cards to another drive:
1. On the drive, set up a folder for each card or drive you want to copy.
Avid recommends that you do not place the media folder at the top level of the drive.
2. Give each folder a unique name that identifies the card or drive.
The name does not have to be the same as the actual drive or card name.
3. Navigate to the actual drive or card and select the contents of the folder.
You can select the top directory of several RDC folders (containing an R3D file and a
color metadata file such as RSX or RMD).
4. Do one of the following:
t Copy and paste the contents of the folder to the folder on the other drive.
t Click the drive or card folder and drag it to the folder on the other drive.
5. Remove the drive.
Linking Media with AMA
If you link to media which originates on a volume (RED, P2, XDCAM EX, XDCAM, or
GFCAM), use the File > Link to AMA Volume(s) option. If you link directly to the media
file clip (QuickTime or MXF), use the File > Link to AMA File(s) option.
For optimum viewing and playing, Avid recommends a single clip length should not exceed
n
more than 12 hours.
The decompose option from the Clip menu is not available with AMA. You do not need to
n
decompose clips when you use the AMA method.
To automatically link clips on a volume using AMA:
1. Connect the drive, or card reader through a USB or FireWire port on your computer.
The system scans the device and links the clips into a bin (based on the AMA settings).
These clips are highlighted in yellow.
50
Page 51

Linking Media with AMA
To manually link clips from another volume using AMA:
1. Select File > Link to AMA Volumes.
The Browse For Folder dialog box opens.
2. Navigate to the P2, XDCAM, RED or GFCAM clips, and then click OK.
For P2, navigate one level above the Contents folder. For XDCAM disks, navigate to
one level above the Clip folder. For XDCAM EX, navigate to one level above the BPAV
folder. For RED, navigate to the root directory of the RED card. For GFCAM, navigate
to the root directory of the GFPAK.
Depending if you are using an existing bin or creating a new bin, the Bin Selection
dialog box opens.
3. Select Bin Selection options.
Option Description
Single Bin Based On Selected Folder Places all linked clips into one default bin.
Single Bin Named Lets you create a new bin and type in a new bin name.
Places all linked clips into that bin.
Bin(s) Based on Current AMA
Setting
Bin(s) Based on Subfolders Places the clips in bin(s) based on their subfolders.
Top Bin Window Places the clips in the active bin.
If you relink a sequence and the bin that stores the AMA referenced clips is closed, the media
n
does not relink. Before you relink, open the bin of the referenced clips.
Places the clips in the bin(s) you set up in the AMA
Settings Bins tab.
51
Page 52

2 Film Workflows
4. Click OK.
The clips appear in the bin or bins depending on the options you selected, they highlight
in yellow.
To manually link clips from a file with AMA:
1. Select File > Link to AMA File(s).
You can also right-click a bin and select Link to AMA File(s).
The system ignores the settings you have selected in the AMA Volume Mounting settings.
n
2. If there is no active bin, a dialog box appears asking you to select a bin.
The Select file(s) for AMA linking dialog box opens.
3. From the AMA Plugin Filter menu, select the type of file.
Option Description
All AMA Plugins Files Searches and displays all files.
QuickTime Searches and displays only QuickTime files.
MXF Searches and displays only MXF files.
52
RED R3D Searches and displays only RED files.
4. Select the file(s) you want to link. Ctrl+click or Shift+click to select multiple files.
5. Click Open.
The clips appear in the active bin, they highlight in yellow.
If the system cannot link a file, an error message displays informing you to open the
Console window for more information about the file(s) in error.
If you move the clip from the original drive to another drive on your system, the clip
displays as offline in your bin.
If you move a source file from one location to another and then back to the original location,
n
you might need to refresh the bin to redisplay the clip. Close and reopen the bin to refresh
the bin.
Page 53

Editing with Low-Res RED Media
AMA offers the advantage of allowing you to transcode material to a lower resolution at any
stage of the process. At a logical break in the process, such as at the end of the work day, or
after the rough cut is complete, you simply select AMA-linked clips in the bin and choose
the ones that need transcoding.
Transcoding to DNxHD 36 is an acceptable quality for editing your sequences. However, if
you plan on doing finishing work to your sequence, it's advisable to transcode your final
sequence to DNxHD 145, DNxHD 220, or DNxHD 220x.
To transcode your RED Media:
1. Create a rough cut of your sequence by linking to the RED clips via AMA.
2. When you are ready to transcode, you can speed up the transcode process by setting a
lower R3D Source Quality Setting. Select Tools > Media Creation.
3. Select the Mixdown & Transcode tab of the Media Creation setting.
4. Set the video playback quality from the R3D Source Quality (Debayer) menu to Quarter
or Eighth. For many offline workflows this is an acceptable quality when transcoding to
DNxHD 36.
Editing with Low-Res RED Media
5. Click OK.
6. Transcode your clip or sequence as required.
For more details, see “Using the Transcode Command” in the Help.
7. After the transcode process is complete, new master clips are created in the bin that
point to the transcoded media.
If you transcoded a clip from within a sequence, the new master clip is automatically
used in your sequence.
If you transcoded an entire sequence, you have the option of creating a new sequence
which will use the newly created master clips. If you do not choose to create a new
sequence, then the existing clips in your sequence will be replaced with the new master
clips.
At this point, you can take your original media offline by unmounting the AMA folder
n
containing the source RED media. Select File > Unmount.
53
Page 54

2 Film Workflows
To relink to the original media:
1. After the editing process is complete and you are ready to relink to the original media,
make sure that your original RED media is online. If you un-mounted your RED
volume, remount it.
2. In the bin, select the completed offline sequence, and all the original RED master clips.
The master clips need to be selected so that the original linked path can be restablished.
To alleviate space on your storage, you may delete previously-transcoded media. If you
do this, then you do not need to also select the original RED master clips. If the relink
mechanism does not find any other media online, it will automatically revert to the
originally-linked media.
3. Select Relink from the clip menu, and set the following settings in the Relink window.
a. Choose Relink selected items to: Selected items in ALL open bins.
b. Select Allow relinking of Imported/AMA clips by Source File Name.
c. Select Version Separator, and set the separator to a period (.) .
This may differ depending on how the version is appended to your transcoded clips.
54
Page 55

Editing with Low-Res RED Media
4. Set any other options as necessary.
5. If you would like to change the any Source Settings to achieve the look or quality to you
want, you can do so at the clip level, and refresh the sequence to apply the changes at the
sequence level.
6. When you are ready for final output, right-click the sequence and transcode to the online
resolution including handles. This will transcode only the required media.
55
Page 56

2 Film Workflows
Color Management with RED Media
Avid's RED workflow allows you to work with RED .rsx files and .rlx files to manage a
clip's color. You may also make non-destructive, custom color adjustments to the R3D clip.
These adjustments can be made at any stage of the process—see “Adjusting RED Source
Settings” on page 56.
Color adjustments made after editing has begun will not be automatically applied to
instances of the source media that have been previously edited into sequences, unless you
refresh the sequence. For procedures on how to refresh your sequence, see “Refreshing
Sequences to Use Current Clip Attributes” in the Help.
Once you start working with offline low-res proxies, any color adjustments you make to the
n
transcoded media will not be saved if you decide to link back to the original RED media.
Adjusting RED Source Settings
When you link to R3D (RED) files, the Avid editing system reads each REDCODE RAW
file directly. You can then change the clip’s color values: color balance, exposure, and
contrast in the Source Settings window. This color value information is encoded with the
R3D file through an RLX, RSX or RMD file. These files hold the camera’s original color
values of your clip.
56
The RLX, RSX or RMD files might be created if you set the color values outside of the Avid
n
editing application. These files can be loaded and applied to the associated RED clip
through the Source Settings window.
When a RED clip displays in the bin, the system displays the metadata columns of the clip’s
color values. For example: Color Space, Gamma Space, Kelvin, Tint. You can export this
information to ALE (Avid Log Exchange) and XML (through Avid FilmScribe) for
downstream use in your workflow.
The Source Settings window also has three color spaces to choose from: REDSpace, Camera
RGB, and REC.709. You can set up different color options (or presets) in each of these color
spaces and then apply their color values to multiple clips.
To change the RED source settings:
1. Link the RED clip through the AMA Link to Volume option.
2. Right-click the RED clip in the bin and select Set Source Settings.
The Source Settings dialog box opens. The clip displays in the video area.
Page 57

Adjusting RED Source Settings
You can choose from the Settings menu to select a camera metadata setting or an RSX,
RLX or RMD setting (template), or adjust your own custom parameters. This procedure
details the custom parameters.
3. Drag the video slider to the frame you want to view.
The new frame displays and the histogram updates.
The histogram is a tool that helps you more precisely adjust Source Settings. For more
information about the histogram, see “Understanding the Source Settings Histogram” in
the Help for the Media Composer family.
4. Set the appropriate options:
Option Description
Color Space Choose from:
Camera RGB: as close to RAW
REC.709: SMPTE standard color space for HD
REDcolor: newest, more accurate color science from RED
REDSpace (default): based on the camera’s RGB but more saturated
57
Page 58

2 Film Workflows
Option Description
Gamma Curve Lets you override the gamma curve. Choose from:
Kelvin Adjusts the RGB color to compensate for red - blue tinting of the
Tint Adjusts the RGB color to compensate for yellow - green tinting of
ISO Allows the ISO level to change from 50 to 2000. Default is 320.
FLUT
REC.709: a REC.709 gamma curve with a linear portion at black and
a gamma at 2.2 curve
REDLog: maps the 12-bit sensor data on to a 10-bit curve with
minimal loss
REDSpace: (default) based on REC.709 but with more contrast
REDGamma: gamma curve from RED with a smoother highlight
rolloff
scene at different color temperatures of the ambient light while you
shoot. Common values are 3200 (tungsten) and 5600 (daylight).
Click and drag the slider from 1700 to 9400. Default is 5600.
the scene at different color temperatures of the ambient light while
you shoot. This is valuable when the ambient light source contains a
significant amount of yellow or green, such as fluorescent. Click and
drag the slider from -100 to 100. Default is 0.00.
™
The latest color science developed by RED. Allows you to balance
your mid-grays in the center of the histogram without pushing
highlight details over the edge.
58
Shadow Adjusts the overall black level of the image without affecting the
white level. Click and drag the slider from 0.00 to 1.00. Default is
0.00.
DRX Lets you recover potentially lost dynamic range by extending and
balancing highlights, taking into account the rendering intent of the
desired Klevin and Tint white balance. Click and drag the slider from
0.00 to 1.00. Default is 0.00.
Debayer Detail Choose from High (default), Medium, or Low.
Chroma Denoise Choose from Off (default), Minimum, Milder, Mild, Strong, or
Maximum.
OLPF Controls the optical low-pass filter. Choose from Off (default), Low,
Medium, or High.
Exposure Allows adjustment to the clip exposure. Click and drag the slider
from -7.00 to 7.00. Default is 0.00.
Page 59

Adjusting RED Source Settings
Option Description
Brightness Adjusts the overall brightness of the image. Lifts blacks without
affecting the white level. Click and drag the slider from -10.00 to
10.00. Default is 0.00.
Contrast Adjusts the tonal range of the image, which usually improves
sharpness and detail. When you increase the Contrast, it increases
tonal separation between adjacent gray levels but decreases the total
number of discreet gray levels in the image.
Click and drag the slider from -1.00 to 1.00. Default is 0.00.
Saturation Affects the intensity of the red, green and blue channels. As the value
increases color saturation increases. As the value decreases, so does
the color decrease. If the value is set to high, colors might clip. If the
level is set to 0.00, a monochromatic image with only gray tones
appear.
Click and drag the slider from 0.00 to 4.00. Default is 1.00
Red Increases or decreases the camera’s sensitivity to red light by
amplifying the R channel digital video signal received from the
sensor. A 0 (zero) no Red is visible, the image has a strong cyan cast.
Click and drag the slider from 0.00 to 10.00. Default is 1.00.
Green Increases or decreases the camera’s sensitivity to green light by
amplifying the G channel digital video signal received from the
sensor. At 0 (zero), no green is visible, the image has a strong
magenta cast. Click and drag the slider from 0.00 to 10.00. Default is
1.00.
Blue Increases or decreases the camera’s sensitivity to blue light by
amplifying the B channel digital video signal received from the
sensor. At 0 (zero), no blue light is visible, the image has a strong
yellow cast. Click and drag the slider from 0.00 to 10.00. Default is
1.00.
5. Click Apply.
The changes apply to your clip. You can continue to make additional changes.
If the clip is in the Source viewer, the changes are reflected in the Source viewer and in
the Client monitor (if you have one attached).
If you click Cancel after you click Apply, the Set Source Settings window closes with
the changes you made.
6. Click OK to save your change and close the window.
The system updates the bin column metadata with the new parameters.
59
Page 60

2 Film Workflows
If you make changes in the Source Settings window and then relink the clip through AMA
n
again, you still keep all the parameters that you set.
Applying a Source Setting
To apply a source setting to a RED clip:
1. Right-click a RED clip in the bin (or Shift-click multiple clips), then choose Set Source
Settings.
The Set Source Settings window opens and your clip displays in the viewer.
2. Select a setting (template) from the Source Settings menu.
Source Settings vary depending on the files or templates loaded on your system.
Setting Origin
Camera Metadata Settings Default
Default Settings Default
Grade (RSX) Settings RED Alert!
filename RLX Setting RED Alert!
Grade (RMD) Setting REDCINE-X
Custom User created in Avid
3. Click Apply.
The settings apply to the clip and if the clip is loaded in the Timeline, the video updates
and displays in a Client monitor (if one is attached) and the Source monitor.
4. Click OK to save your settings and close the window.
The system updates the bin column RED metadata with the parameters.
If you make additional changes after you select a setting, the system creates a Custom
setting and Custom appears in the Settings list. You cannot make changes to a system
generated setting, however you can use a system setting and make changes to create
your own Custom setting.
To import additional source settings:
1. From the Source Settings window, click the Load button.
The Load External Settings window opens.
2. Browse to the Settings file.
60
Page 61

Adjusting the Source Settings Histogram
3. Change the filter to display RSX, RLX or RMD files.
4. Select your setting and click OK.
The new source setting appears in the Source Settings menu, and is immediately applied
to the clip.
Adjusting the Source Settings Histogram
You can adjust the Source Settings Histogram in two ways. You can toggle drawing a
histogram for an individual color, and you can zoom the vertical axis.
To adjust the Source Settings Histogram:
t Right-click anywhere inside the histogram graph, and then select one of the following
options.
Option Result
Red
Green
Blue
Zoom In Zooms in on the lower half of the vertical axis.
Zoom Out Zooms out of the vertical axis by a factor of two.
Reset Zoom Resets the zoom so that the vertical axis boundary is equal to the maximum value
Enables or disables the histogram display for the selected color. A check mark
indicates that the histogram for that particular color displays.
Changes the scaling of the vertical axis so that the height is half that of the
maximum value in the plot. You can zoom in indefinitely to display, for example,
1/4, 1/8, or 1/16 of the maximum value.
Changes the scaling of the vertical axis to be twice that of the maximum value in
the plot. You can zoom out indefinitely to display, for example, 4, 8, or 16 times
the height of the maximum value.
in the plot.
61
Page 62

2 Film Workflows
Preparing your RED Clip for Transcode, Mixdown, or Render
If you want to take a RED clip and offline it to another application, you can create a different
resolution RED file, depending on your requirements. This changes the speed and quality of
the clip, which could affect the playback performance. The higher the video quality the
slower the process (transcode, mixdown, render). The lower the video quality the faster the
process. Before you transcode, mixdown or render your clip or sequence, set the appropriate
quality in the Media Creation dialog box.
62
If you apply any Reformat options (stretch, letterbox, etc.) to your clip, when you perform a
n
transcode, the reformatting options will apply.
To prepare your RED clip for transcoding, mixdown or rendering:
1. Before you transcode, mixdown or render, select Tools > Media Creation.
2. Click the Mixdown & Transcode tab or click the Render tab.
3. Select the playback quality from the R3D Source Quality (Debayer) menu.
t Full
t Half (Best Quality)
t Half (Good Quality)
t Quarter
t Eighth
t Sixteenth
4. Click OK.
5. Transcode, mixdown or render your clip or sequence as required.
Page 63

Linking Back to MXF Media on the Avid Offline Editing System
Linking Back to MXF Media on the Avid Offline
Editing System
You can share MXF master clips captured or generated on Avid DS with other Avid editing
systems. For HD media, you can share MXF DNxHD media only with other Avid systems
that support it. To make this media available for use by Avid offline editing systems, you
need to set up your storage areas accordingly.
To share MXF master clips created on Avid DS, follow this basic workflow:
1. Make sure any storage devices or Avid Unity workspaces are configured correctly.
2. On the Avid DS system:
a. Create a project. In the New Sequence dialog box, select the proper capture settings:
MXF storages (one for audio and one for video), desired compression, and so on.
MXF storage can be shared (in an Avid Unity environment) or local (and later
transferred).
If you are going to capture audio from a multi-stream file, make sure to select the option
n
“Import audio into separate audio tracks” in the New Sequence dialog box.
b. Capture and edit the media.
c. Export an AAF file—see “Outputting a Sequence to Avid Media Composer” in the
Help for Avid DS.
3. If your media is not on a shared Unity storage, you will need to transfer media to the
Avid editing system. Do one of the following:
- If you are transferring media over a network, copy the MXF audio storage and the
MXF video storage to the local drive.
- If you are transferring media on a removable drive, connect the drive.
4. On the Avid editing system, open a project with a matching frame rate.
5. Import one or more AAF files.
The Avid editing system creates a master clip for each AAF file.
6. Select the new master clips and select Clip > Relink.
The Relink dialog box opens.
7. Deselect the option Relink only to media from the current project, accept the other
defaults, and click OK.
The master clips are relinked with the MXF media.
63
Page 64

2 Film Workflows
You can use the Media Tool to create master clips, but this method does not always work, for
n
example, when a clip from Avid DS includes alpha.
Media Composer Macintosh systems, and other Macintosh-based Avid editors, cannot use
MXF media created by Avid DS, due to a 31-character file name limit. This situation occurs
when an Avid DS system creates a storage on a Unity volume to share with other Avid
editing systems. This problem does not affect Windows systems.
Exporting the AFE File to Avid DS
Once the edits are completed in the Avid Media Composer, export the sequence as an AFE
to Avid DS for finishing.
You can import an AFE file into Avid DS v6.0 or later only.
If you are editing an offline sequence that you want to finish on Avid DS, make sure to
n
consult the conform information in the Avid DS documentation, which contains important
information about the most efficient way of preparing a sequence for the conform process.
To export an AFE from Avid Media Composer to Avid DS:
1. Right-click the sequence and select Send To > Avid DS.
The Send To: Avid DS dialog box opens with the default export template.
2. Optional: Change the file name.
3. Click Set to browse to the driver and folder to which you want to export the sequence,
and click OK.
4. Select Export Settings 1.
All current settings are displayed in the summary panel below.
5. Click the button after the Export Settings 1, and select Avid DS from the drop-down list.
6. Click the Options button.
The Export Settings - Avid DS dialog box opens.
7. Select AFE from the Export As drop-down list and click Save.
8. In the Send To: Avid DS dialog box, click OK.
64
Page 65

3 Managing Shared Storage for Avid
Editors
Before you begin working on your projects, you must plan out your storage solutions
carefully so that you can share media between Avid applications. The topics here provide
useful information for working with shared bins and projects in Avid Media Composer and
Symphony.
Avid DS clients require additional configuration of the shared storage and media indexing
services—see “Setting up Storage and Media for High-Res Projects on Avid DS” on
page 79.
For information about sharing bins and projects within an Avid Interplay environment, refer
n
to the Avid Editors on Interplay Workflow Guide.
Setting up a Workgroup with Shared Projects and Storage
In cases where there is a large need to share projects and media between workstations, the
media storage can be centralized on an Avid Unity storage. Set up your environment as
illustrated in the following figure, so that Avid editing systems workstations can access
media stored on an Avid Unity.
Page 66

3 Managing Shared Storage for Avid Editors
Avid Media Composer
3
2
Avid DS
1
Avid DS
Avid DS
Controller
Avid Symphony
Avid Unity
4
The Avid Unity storage needs to have a workspace for each editing client. Within the
workspace, set up separate folders for video and audio, and set the necessary permissions.
Refer to the documentation that came with the Unity storage.
66
Element
1 Avid Media Composer has its own workspace on the Unity.
2 Avid Symphony has its own workspace on the Unity.
3 Each Avid DS client has a workspace on the Unity. The Avid DS Controller indexes
all DS project and media in an Avid DS workgroup.
4 If Media Composer/Symphony needs to share files with Avid DS, then additional
workspaces are required for the shared media. The Avid DS Controller indexes these
workspaces as well.
Page 67

Working with Bins and Projects in an Avid Unity Environment
Working with Bins and Projects in an Avid Unity
Environment
Avid Unity MediaNetwork and Avid Unity ISIS let you share bins and projects across the
network. When you place your bins and projects on Avid Unity workspaces (drive volumes),
several users can work on the same project at the same time.
For example, an editor creates sequences in one bin while an assistant recaptures media in
another bin. At the same time, other users add audio effects or titles to other bins in the
project.
Each user performs tasks from their own computer. Your Avid editing application provides a
locking mechanism to help you keep track of who is currently working in a bin. The method
allows one user to write to a bin; multiple users can read the files in that bin.
c
n
The lock does not prevent you from deleting the media in a locked bin if you have write
access to the workspace. It ensures only that you do not overwrite changes to the bin.
In an Avid Unity environment, your Avid editing application creates and stores projects and
bins on the client’s internal drive. If you move or save these projects and bins to the
workspace, only one client can work on the project at a time. If two or more users work
simultaneously on the same project, only one user can update the files. Other users can open
and play sequences but cannot make any changes to them.
For information on managing workspaces, see the clients’ Quick Start cards. For details on
Avid Unity, see the Avid Unity MediaNetwork Management Guide or the Avid Unity ISIS
Administration Guide.
You can also use an asset manager such as Avid Interplay to collaborate on projects. For
more details, refer to Working with Avid Interplay from an Avid Editing System in the Help
for the Media Composer family.
67
Page 68

3 Managing Shared Storage for Avid Editors
Sharing Bins and Projects in Avid Unity
Sharing Only Bins
If you share only bins, you store the project on your local system and store bins and media
files on the shared workspace. This method allows users in a shared environment to share
only selected bins with other users. The system identifies the shared bins as follows:
• Stores the bin in a Unity Bins folder in the Project window. This folder is similar to the
Other Bins folder.
• Displays a second column of information for the bin that identifies the computer that
currently has the bin locked.
• Uses bold text to identify bins that are locked by another user.
Sharing Both Bins and Projects
If you share bins and projects, you create and store the project folder and bins on the shared
workspace (or copy an existing project, bins, and the related media files). Your Avid editing
application identifies information from each computer using the shared workspace as
follows:
• Creates a project folder for each computer that accesses the project. Your Avid editing
application adds the computer’s name to the folder name to create a unique name and
stores any project-specific information in the folder. This prevents users from
overwriting the project-specific data for other users.
68
• Displays an extra column in the Project window that identifies the computer that has the
bin locked.
• Uses bold text to identify bins that are locked by other users.
• Creates a folder at the top level of the shared workspace called Unity Attic. This folder
contains backup files for each project on the shared volume.
Depending on the number of users sharing a workspace, you might want to increase the
n
number of files that your Avid editing application stores in the Unity Attic folder.
The following illustration shows the Project window for a shared project.
Page 69

Bins tab in the Project window, showing a bin that is locked for editing (bold text, top left), the name of the
computer that currently has the bin locked (top right), and folders for each computer that accesses the
project (bottom)
Opening a Shared Project
To open an existing project on the shared volume:
1. Start your Avid editing application.
2. In the Select Project dialog box, navigate to the project on Avid Unity.
Working with Bins and Projects in an Avid Unity Environment
3. Double-click a Bin icon to open one of the bins.
The bin appears with a Bin Lock Status button. You can click the red (locked) or green
(unlocked) Bin Lock Status button to view a history file that shows which computers
and users have modified the bin and the date and time of the modifications.
The Bin Lock Status button. When the button is green (top), the bin is unlocked. When the button is red
(bottom) the bin is locked.
69
Page 70

3 Managing Shared Storage for Avid Editors
When a bin is unlocked, you have permission to make changes. You should not make
changes to a locked bin. See “Considerations for Working with Shared Bins and
Projects” on page 71.
The Bin Lock Status button does not appear if the bin is not on Avid Unity.
n
Working with Locks and Shared Bins
Your Avid editing application uses a locking mechanism to help you keep track of who is
currently working in a shared bin. Only one user can write to the bin, but multiple users can
read the files in the bin.
The user who opens the bin first controls the lock and obtains write access to the bin. Bold
text in the Project window also identifies bins that are locked by another user. When the
person who controls the lock closes the bin, it becomes available for another user to open
and control the lock.
If one user has the lock and another user has the same bin open, when the first user closes the
bin, the second user must close and reopen the bin to control the lock.
You can instruct your Avid editing application to keep a bin locked even after you close it.
You can click the red or green Bin Lock Status button in the bin to view a history file that
shows which computers and users have modified the bin.
To open a bin without controlling the lock:
t Alt+double-click (Windows) or Option+double-click (Macintosh) the bin in the Project
window.
To permanently lock a bin:
1. Select one or more bins in the Project window.
2. Right-click the Bin icon, and select Lock Project Bin.
An asterisk (Windows) or diamond (Macintosh) appears next to the user name in the
Project window. In this case, the bin remains locked even after you close it.
To unlock the bin:
t Right-click the bin in the Project window, and select Unlock Project Bin.
The Lock Project Bin and Unlock Project Bin commands are also available from the Clip
n
menu.
70
Page 71

Working with Bins and Projects in an Avid Unity Environment
Considerations for Working with Shared Bins and Projects
Suggestions for Improving Performance When Working with Shared Bins
The following information is provided to improve performance when working with shared
bins in an Avid Unity environment.
• Do not use the same name for your editing system machine name and your user name.
Do not use the same name for security objects such as machine names, user names,
group names, and domain names. If any two security objects have the same name,
Windows might become confused and sharing might not work properly.
• Do not use the same prefix for machine names in a shared environment. No full name
can be a prefix of another name. If one of the systems has a machine name that is the full
name, and others in the environment have the prefix as part of their machine name,
problems can occur. For example, if an editing system has a machine name ABC and
additional editing systems in the shared environment have machine names ABCnn,
ABCxx, the following problems could occur:
- When the system with the machine name ABC is writing to a directory, the systems
whose machine names have the same prefix (ABCnn and ABCxx) might not be able
to access the directory.
- When the system with the machine name ABC is rendering, systems whose
machine names have the same prefix (ABCnn and ABCxx) might be unable to
launch.
Avid recommends that you do not use a common prefix for machine names. If you
must use a common prefix, make sure all the names are the same length (ABC01,
ABC02, ABC03, etc.).
• Do not use Windows Explorer to examine, copy, or manipulate shared bin files or shared
project folders or their contents when you use those files or folders. If you do, when you
attempt to access those shared bins or projects you might experience delays
accompanied by a progress dialog that says, “Filesystem busy, retrying (MESSAGE).”
If the busy condition persists, a failure message appears. Make sure that you are not
using Windows Explorer for the shared bins you are trying to access, and then try the
operation again.
• When you have an environment where more than five users are sharing bins on Avid
Unity, Avid recommends using an Avid Interplay server in the workgroup environment.
• When an Avid Interplay server is available in an Avid Unity system in the workgroup
environment, Avid does not recommend sharing bins or projects. Use the Avid Interplay
server and the Interplay Window to share media. All editing systems in a workgroup
environment that includes an Avid Interplay server must have the Avid Unity client
software installed. The Media Tool might become unreliable if an editor in the Avid
Unity workgroup environment does not have the Avid Unity client software installed.
71
Page 72

3 Managing Shared Storage for Avid Editors
Limitations When Working with Shared Bins and Projects
If an editor other than the creator deletes a media file, other editors cannot see that media file
go offline immediately. If an editor tries to play that file, a “media file not found” message
might appear in a monitor window, and an access violation error might occur.
Each editing application maintains a PMR file in its machine name folder inside the OMFI
MediaFiles folder or the Avid MediaFiles folder. The PMR file lists all the online media
files. Every editing application consults all the PMR files in all the machine name folders to
find out which media files are online. Whenever a media file is created, its name is
immediately added to the creating editor application's PMR file, and whenever a media file
is deleted by its creator, its name is immediately removed from the PMR file.
However, if an editing application other than the creator deletes a media file, the PMR file
that contains the deleted file is NOT updated immediately. Once the creating editor
encounters an event that causes its PMR to be updated, then all editing systems know that
the deleted media file has gone offline.
There are several ways to force an editing application to update its PMR. The simplest is to
switch to the desktop and back.
Avid recommends that you institute policies where media files are deleted by the editor who
created them, or if necessary, the deleting editors notify the editor who created the media
files that a deletion has occurred. This editor can then switch to the desktop and back, and all
other editors can see the deleted file go offline.
72
Restrictions and Limitations for Locked Bins
The following restrictions apply to bins that are locked by another user:
• You cannot select a locked bin for operations such as capture, title creation, and import.
This helps to minimize the problems of modifying a locked bin.
• You cannot drag an item to a locked bin.
• If you drag an item from a locked bin to a writable bin, the Avid system creates a
duplicate (not a copy) of the selection in the writable bin. The original item is not
removed from the locked bin. This operation is the equivalent of duplicating a selection
and then drag the duplicate to another bin.
• You cannot move a bin that is locked by another user.
• If you modify a locked bin, your Avid editing application does not let you save the bin to
the same name, but it lets you save the bin to another name. However, this causes
duplicate bin IDs and might cause system-level conflicts with the contents of the two
bins. Your Avid editing application sees the duplicate contents of these bins and resolves
the conflicts by newest modifications.
Page 73

Working with Bins and Projects in an Avid Unity Environment
Avoid creating duplicate bins when you modify a locked bin. If you do create a
duplicate bin, you should manually merge the changes into the original bin and delete
the duplicate bin.
c
The lock does not prevent you from deleting the media in a locked bin if you have write
access to the workspace. It ensures only that you don’t overwrite changes to the bin.
Limitation When Using the Shared Bin Lock Icon
Occasionally, when two editors attempt to open a shared bin at the same time, both editors
get the green lock icon. However, only one editor really has the lock, and that editor's
machine name appears beside the bin name in both Project windows.
Both editors can modify their copies of the bin, but only the editor that controls the lock, as
indicated in the Project window, can save that bin. The other editor is warned that the bin is
locked but is allowed to save a copy of the changed bin.
Avid recommends that you use the “Save Bin Copy As...” button and continue working.
Drive Filtering in Networked Workflows
The Drive Filtering and Indexing tab of the Media Creation Settings dialog box includes
three options:
• Filter by Resolution
• Filter by System Drive
• Filter by Launch Drive
Depending on the version of your Avid editing system, the drive filtering options could be on
or off by default. Avid recommends that all drive filtering options should be on by default.
Any project brought into a networked workflow that was created with any of the filtering
n
selections off might have problems with networked media creation, such as “Audio and/or
Video Mixdown” and “SendToPlayback,” because their Media Creation Settings are still
configured for standalone usage.
There are several ways to work around this issue. First, adjust the drive filtering settings
when you switch environments. You can open the Media Creation Setting and switch the
drive filtering settings or create multiple Media Creation Settings and switch the active
setting whenever you shift environments. If you always work in an environment that differs
from the defaults, you can create a Media Creation setting that fits your workflow and add it
to your Site Settings so you create new projects with the desired defaults.
73
Page 74

3 Managing Shared Storage for Avid Editors
Creating New Workspaces
Workspaces are locations to store and segregate data. You can allow users to access some or
all of the Workspaces, and you can assign permissions for how each user can access the data
in a Workspace.
If you have created Storage Groups but you have not created any Workspaces, the Create
n
Workspace dialog box opens by default when you select the Workspaces list.
To create a new Workspace:
1. From the Management Console home page, do one of the following:
t Click Workspaces in the ISIS Setup icon, located in the System section.
t Click Workspaces in the pop up navigation menu.
The Workspaces tool opens.
2. Click the New button.
The Create Workspace dialog box opens.
3. In the Name text box, type a name for the Workspace.
For more information about entering text in name fields, see “Entering Text” in the Help for
n
Avid Unity.
If there is already a Workspace with the name entered in the Name text box, an error
message tells you to type a new name.
4. (Option) Click the Protection menu and select the available Workspace protection
option.
The protection type available for the Workspace depends upon the protection type specified
n
for the Storage Group it is assigned to. For more information on types of protection, see
“Storage Group Protection” in the Help for Avid Unity.
5. Click the Storage Group menu, and select the Storage Group in which you want to
create the Workspace.
The Storage Group name appears in the Storage Group text box.
6. Type a size for the Workspace in the Capacity text box. The minimum size (1.0) is listed
in the Capacity text box, and the maximum size is listed next to the Capacity text box.
If all storage in the Storage Group is allocated to existing Workspaces, you can make an
existing Workspace smaller.
7. (Option) In the Warning Event Trigger text box, do one of the following:
74
Page 75

Mounting and Unmounting Workspaces
t To set a warning event trigger based on percentage of used storage, type in a
percentage value and select ‘%’.
t To set a warning event trigger based on gigabytes (GB) of unused storage, type in a
gigabyte value and select ‘GB’.
8. (Option) In the Error Event Trigger text box, do one of the following:
t To set an error event trigger based on percentage of used storage, type in a
percentage value and select ‘%’.
t To set an error event trigger based on gigabytes (GB) of unused storage, type in a
gigabyte value and select ‘GB’.
9. In the User Access area, set the User and User Group access privileges.
10. Click the Apply button to create a new Workspace containing the selected Storage
Group and users.
The new Workspace appears in the Workspace dialog box, and the Create Workspace
dialog box refreshes to allow you to create a new Workspace.
11. (Option) Repeat steps 3–10 to create new Workspaces.
12. Click the Close button to close the Create Workspace dialog box to return to the
Workspaces tool.
The new Workspace appears in the Workspaces list.
Mounting and Unmounting Workspaces
Your Avid Unity user account must have access to at least one workspace. For information
on workspace access, see “Creating Client Accounts for Users” in the Avid Unity ISIS
Administration Guide.
When you have one or more workspaces mounted and the connection to the System Director
is subsequently lost, a message in the taskbar (for Windows systems) or the dock (for
Macintosh systems) indicates the workspace is unavailable.
The Client Manager then automatically attempts to reestablish the connection with the
System Director. When the connection is successfully reestablished, a message in the
taskbar or dock informs you of the connection state.
To mount an Avid Unity ISIS workspace on your system:
1. Open the Client Manager.
The Workspaces list opens. The Online field displays a green ball for workspaces that
are already mounted. You can filter the Workspaces list by Workspace name.
2. Do one of the following:
75
Page 76

3 Managing Shared Storage for Avid Editors
t Click (mount) in the Online column for the selected workspace.
t Click to select a workspace, then right-click, and select Mount.
t (Option) Right-click, and select “Mount to drive” from the menu.
Selecting this option will override the current drive mapping option settings for the selected
n
workspace. For more information on drive letter assignments, see “Configuring Workspace
Drive Letter Assignments” on page 77.
The Client Manager mounts the selected workspace on your client and the Online icon
for the mounted workspace changes to green. The Workspaces list displays the drive the
workspace is mounted to. If you use letterless drive mappings, the Workspaces list
displays “UNC path” next to the Online icon.
3. (Option) If you want the selected workspace remounted the next time you log in, do one
of the following:
t Click (enable) in the Auto column for the mounted workspace.
t Right-click, and select “Enable auto mount.”
The next time you log in to your client system, the Client Manager automatically
mounts the selected workspace.
To mount multiple Avid Unity ISIS workspaces on your system:
1. Open the Client Manager.
The Workspaces list opens. The Online field displays a green ball for workspaces that
are already mounted. You can filter the Workspaces list by Workspace name.
2. Do one of the following:
t Select multiple non-contiguous workspaces with Control+click.
t Select a range of contiguous workspaces by clicking on the first workspace row in
the range, then Shift+clicking on the last.
t Select all workspaces by right-clicking in the Workspaces list and selecting “Select
all”.
t Select all workspaces by pressing Control+A.
3. Right-click, and select Mount.
The Client Manager mounts the selected workspaces on your client and the Online icons
for the mounted workspaces change to green. The Workspaces list displays the drives
the workspaces are mounted to. If you use letterless drive mappings, the Workspaces list
displays “UNC path” next to the Online icons.
4. (Option) If you want the selected workspaces remounted the next time you log in,
right-click, and select “Enable auto mount”.
76
Page 77

Mounting and Unmounting Workspaces
The next time you log in to your client system, the Client Manager will automatically
mount the selected workspaces.
To unmount an Avid Unity ISIS workspace on your system:
1. Make sure your Avid application is not running.
2. Open the Client Manager.
The Workspaces list opens. The Online field displays a green ball for workspaces that
are already mounted. You can filter the Workspaces list by Workspace name.
3. Do one of the following:
t Click the green icon in the Workspaces list to unmount the selected workspace.
t Click to select a workspace, then right-click, and select Unmount.
The Client Manager unmounts the workspace from your client, and the green icon is
removed from the Online field for this workspace.
To unmount multiple Avid Unity ISIS workspaces on your system:
1. Make sure your Avid application is not running.
2. Open the Client Manager.
The Workspaces list opens. The Online field displays a green ball for workspaces that
are already mounted. You can filter the Workspaces list by Workspace name.
3. Do one of the following:
t Select multiple non-contiguous workspaces with Control+click.
t Select a range of contiguous workspaces by clicking on the first workspace row in
the range, then Shift+clicking on the last.
t Select all workspaces by right-clicking in the Workspaces list and selecting “Select
all”.
t Select all workspaces by pressing Control+A.
4. Right-click, and select Unmount.
The Client Manager unmounts the workspaces from your client, and the green icons are
removed from the Online field for those workspaces.
Configuring Workspace Drive Letter Assignments
The Client Manager allows you to configure the drive letter used when mounting Avid Unity
ISIS workspaces. This allows you to prevent workspaces from being assigned drive letters
you want reserved for other uses.
The Client Manager skips fixed drives and drive letters that are already in use.
n
77
Page 78

3 Managing Shared Storage for Avid Editors
If your system requires using Universal Naming Convention (UNC) paths for all mounted
workspaces rather than drive letters, you can use Client Manager to set this as the default
mapping for workspaces.
To configure the drive letter for mounting workspaces:
1. Open the Client Manager.
The Client Manager opens.
2. Select a workspace from the Workspace list.
3. Right-click the selected workspace, and select “Mount to drive” from the menu.
The Mount To dialog box opens.
4. Click the Choose drive letter menu, and select the drive letter you want to use for
mounting workspaces.
78
Option Description
UNC (Letterless) Uses a Universal Naming Convention (UNC) path for the
mounted workspace instead of a drive letter.
Any drive Mounts the workspace to the next available drive letter, working
backward from drive Z:
Specific drive Mounts the workspace to the selected available drive letter.
5. Click OK.
Page 79

4 Setting up Storage and Media for
High-Res Projects on Avid DS
Since film-based media is large, it requires high bandwidth and fast disk access. You must
ensure that you have storage that is large and fast enough for high throughput so that you can
play your sequence in realtime. (Typically, 2K data takes up over 1 TB per hour of footage.)
The Avid DS Support Center web site provides a complete list of storages supported for
n
film-based media, and indicates which types of storage provide realtime capability.
If you need to transfer or share projects and media for offline-to-online production between
Avid systems, you can set up shared storage with Avid Media Composer. MXF sequences
offlined on an HD-capable Avid Media Composer can be previewed directly in Avid DS
using the real-time proxy resolution (film proxy mode).
Before you begin working on your projects, you must plan out your storage solutions
carefully so that you can share media between Avid applications—see “Sharing Media” in
the Avid DS Help.
Checklist: Configuring Avid DS on Avid Unity
Each Avid DS workstation connected to Avid Unity MediaNetwork™ or ISIS requires its
own workspace. This workspace is then added to the storage configuration in each Avid DS
workstation. For more information on configuring the workspaces and setting permissions
on the Avid Unity, refer to your Avid Unity documentation.
A different configuration is required if you are working within an Avid Interplay
n
environment—refer to the Avid Editors on Interplay Workflow Guide.
Step Refer to
Determine the best configuration for your workgroup. “Planning your Storage Locations” in
the Help for Avid DS.
Page 80

4 Setting up Storage and Media for High-Res Projects on Avid DS
Step Refer to
Install all Avid DS client workstations.
Do not install any Avid DS software components (such
c
as the indexing services) directly on Avid Unity.
Install Avid Unity client software on each Avid DS workstation
that is connected to Avid Unity.
Install the latest updates for the Avid Unity software (if any).
Follow the online instructions to install this software update, then
reboot your workstation.
On the Avid Unity, create a video workspace and an audio
workspace for each Avid DS workstation
(the RP workstation does not need a workspace).
Create a workspace for the video storage \\server_name\workspace_name\video
Create a workspace for the audio storage \\server_name\workspace_name\audio
If you need to share media with other Avid editing systems
(Media Composer, Symphony), create additional workspaces
where they can place media that will be shared with Avid DS
(audio and video can be stored in the same folder).
These folders should only contain media that needs to be
n
conformed and used by Avid DS, as there is no need to
index all the offline media on an Avid editing system.
“Installing your Avid DS
Environment” in the Help for Avid DS.
Avid Unity documentation.
Avid Download Center
www.avid.com/support/downloadcente
r/index.asp
Avid Unity documentation.
To share MXF media, create the workspace using the following
convention:
\\server_name\workspace_name\Avid MediaFiles\MXF\
80
Page 81

Checklist: Configuring Avid DS on Avid Unity
Step Refer to
To share OMFI media, create the workspace using the following
convention:
\\server_name\workspace_name\OMFI
MediaFiles\VideoStorage
\\server_name\workspace_name\OMFI
MediaFiles\AudioStorage
Make sure to use the correct syntax:
• Include a space between OMFI and MediaFiles
• Don’t include a space for MediaFiles, VideoStorage, and
AudioStorage
• Use the correct uppercase and lowercase letters.
Use the Administration Tool to assign the permissions on each
workspace. If some workstations need to share media, you can
assign permissions for these workstations on the appropriate
workspaces. (You should also give the RP workstations
permission to each workspace).
Set up the Avid Unity Connection Manager on each Avid DS
workstation to auto-launch.
The Connection Manager should always be left active on the
Avid DS workstations. This utility will automatically map letters
(or UNC paths in recent releases) and authenticate the specific
user accounts listed in the Avid Unity Engine.
Each client workstation needs to mount the required workspaces. “Mounting and Unmounting
In Avid DS, use the Storage Configuration tool to add a Unity
storage connection to your local indexing service.
Important: Do NOT use a drive letter or mapped drive letter,
instead browse the network to the Avid Unity server, using only a
UNC path to access your media folder on Avid Unity.
Place your media in the designated workspaces. “Placing High-Resolution Media on
Avid Unity documentation.
Workspaces” on page 75.
“Defining your Storage Areas within
the Media Indexing Service” on
page 83.
the Storage Device” on page 82.
81
Page 82

4 Setting up Storage and Media for High-Res Projects on Avid DS
Placing High-Resolution Media on the Storage Device
High-resolution digital footage that comes either from digital video cameras, film scanning
processes or CGI applications (e.g. R3D, ARI, DPX, TIF), should be placed onto a fast,
high-capacity storage device connected to your workstation. This allows you to link to these
source files and still get real-time playback in Avid DS.
If this media is being shared with other Avid systems, you can place these master files on a
shared storage, such as Avid Unity and link to it.
For a list of storages that support real-time playback, refer to the Avid DS Support Center.
n
You can also place your media on a shared storage and link to it, but you may not get
real-time playback unless you process the media.
If you are working with different types of high-resolution media (e.g. R3D, ARI, DPX, TIF),
make sure that they are each placed in different folders.
t For lo c al s to r age. Place your high-resolution files in an appropriate folder under the
\VideoStorage folder on the storage device. For example,
\\workstation_name\VideoStorage\DPX\Casino\...
t For shared storage. Place the high-resolution files on a workspace on Avid Unity. For
example,
\\UnityServer_name\workspace_name\Avid MediaFiles\DPX\Casino\...
Installing and Configuring the ARRI Plug-in
Download the plug-in from the ARRI web site, and install it on your Avid DS workstation.
To enable grouping of the ARRI file type in Avid DS:
1. Start Avid DS.
2. Select File > User Preferences.
3. Select the Avid Explorer tab.
4. In the File Grouping, Available list, select ARI, and click the Add button to move it to
the Selected list.
5. Click OK.
82
Page 83

Opening the Media Storage Configuration Tool outside Avid DS
Opening the Media Storage Configuration Tool
outside Avid DS
Before you begin working on any projects, you must set up your storage. The Media Storage
Configuration tool can be accessed inside or outside Avid DS.
To open the media storage configuration tool outside Avid DS:
1. On your desktop, select Start > All Programs > Avid > Avid DS v10.x > Tools > Avid
DS Support Console.
The support console and all the various tools are displayed.
2. Double-click UMMDTest.exe.
3. Select File > Open Service.
A dialog box displays for you to enter the workstation whose storage you want to
configure.
4. If you are on the proper workstation then leave the machine name blank and click OK.
If you need to configure the storage for another workstation in this workgroup, then
enter the name of that workstation.
Warn in g: There is no security when configuring another workstation’s storage in this way.
n
Therefore, make sure that no one else is using that workstation or they will automatically be
disconnected when you log in.
5. Select File > Configure.
The Media Storage Configuration - Current Project dialog box displays the media
indexing services that were automatically configured for your workstation when
Avid DS was installed.
Defining your Storage Areas within the Media Indexing Service
You must define all storage areas that you need to access inside a configuration called a
media indexing service. The Avid DS media indexer scans all storages defined for each
workstation and indexes the media for quick and efficient access.
You cannot leave the Avid DS local media indexing service list empty, otherwise Avid DS
will report missing audio and video storages every time you start the application. Configure
both audio and video storages and name them clearly.
83
Page 84

4 Setting up Storage and Media for High-Res Projects on Avid DS
Your workstation’s
media indexing
service is
indicated by the
computer name
If you are configuring the media indexing service on the controller, see “Accessing Storage
n
on another Workstation” in the Avid DS Help. The procedure describes how to include
storage areas on other Avid DS workstations in the workgroup, so that workstations can
access each other’s media.
To define your storage areas in the media indexing service:
1. In Avid DS, select Data Management > Configure Storages.
If you are not running Avid DS, see “Opening the Media Storage Configuration Tool outside
n
Avid DS” on page 83.
The Media Storage Configuration - Current Project dialog box displays the media
indexing services that were automatically configured for your workstation when
Avid DS was installed.
84
2. Select your workstation’s media indexing service, and click the Change button.
The Media Indexing Service dialog box displays.
Page 85

Defining your Storage Areas within the Media Indexing Service
Actual path to storage
Avid DS shared
storage name
3. Leave the workstation name as it is and click the Change button.
The list of storage areas that have already been defined in this indexing service displays.
Each storage area is uniquely identified by the workstation name and folder where the
media resides.
4. To add a new storage, click the Add button.
5. The Available Storage Types dialog box, select Avid Media Storage and click OK.
6. Enter the full Windows path name (\\workstation_name\folder_name) where the storage
area is located, or use the browse (...) button to find it. For example,
\\DSStorage4\Video.
If you are connecting to a folder on an Avid Unity, then click the browse (...) button and
locate the Avid Unity workspace folder. For example,
\\UnityServer_name\workspace\folder_name.
Do NOT use a drive letter.
85
Page 86

4 Setting up Storage and Media for High-Res Projects on Avid DS
7. If this storage is for sharing MXF media with another Avid editing system such as
Media Composer, then select Prevent purge of media on this storage. This makes the
storage “read-only”.
86
8. Select the media type that you will store in this folder:
If there are different media types in your storage, you must add a storage configuration for
n
each different type (e.g. generic audio, generic video, MXF audio, MXF video, etc.)
For this storage folder Select this option(s)
Video media imported or generated media by
Avid DS (read/write).
Audio media imported or generated media by
Avid DS (read/write).
Media that is going to be read-only, but not
overwritten. e.g. OMFI media that will be used by
other Avid editing systems.
For MXF media: Folders that contain MXF media must be defined separately within your
media indexing service.
You need to set up separate MXF folders for Avid DS and any other Avid editing
n
systems— see “Sharing MXF Media” in the Avid DS Help.
generic video (.gen)
generic audio (.wav)
None
Page 87

Defining your Storage Areas within the Media Indexing Service
Storage areas will
be listed here as
they get added
Avid DS shared
storage name
For this storage folder Select this option(s)
MXF audio (purgeable) — Read Only MXF audio files (.mxf)
MXF video (purgeable) — Read Only MXF video files (.mxf)
MXF audio (non-purgeable) • MXF audio files (.mxf)
• Prevent purge of media on this storage
MXF video (non-purgeable) • MXF video files (.mxf)
• Prevent purge of media on this storage
9. From the Disk Controller Type list, select the card that is installed in your workstation.
10. From the Disk Storage Type list, select the storage type that you are using.
The disk options set the appropriate bandwidth for Avid DS to use when transferring
data to the storage. Choose the appropriate options for your storage device to obtain the
best performance for real-time effects.
If your storage device does not appear in the list, it may be because it was installed after
n
Avid DS was installed. To make sure that it appears in the list, restart Avid DS so that the
software detects the device.
11. Click OK.
The storage area is added to the Media Storage Configuration list.
12. Continue to add storage areas for all folders to which you need access.
87
Page 88

4 Setting up Storage and Media for High-Res Projects on Avid DS
Avid DS shared
storage name
If there are different media types in your storage, you must add a storage configuration
for each different type (e.g. generic audio, generic video, MXF audio, MXF video, etc.)
13. Storages are accessed and indexed in the order in which they are listed. Use the Move
Up or Move Down buttons to change the order of priority.
88
14. Click Close and then OK to return to the Media Storage Configuration - Workstation
dialog box.
15. Click Close and then OK to return to the Media Storage Configuration - Workstation
dialog box.
16. Click the Close button to save the configuration for the media indexing service.
By default, the media indexer sets any new storage areas to automatically have full
n
read/write access by any user on the network. To restrict access to your media, you can
change the share permissions through Windows—see “Sharing Folders and Setting
Permissions” in the Avid DS Help.
The first time that you configure your storage, the media indexer will need to index the
media on your storage device. This may take a while depending on the amount of media
on your storage.
17. Once your storages have been indexed, you should stop and restart the media
indexer—see “Stopping and Starting your Avid Indexing Services” in the Avid DS Help.
Page 89

5 Editing Film-based Projects in Avid DS
As there are a number of different ways to work with film-based projects, it is recommended
that you first read “Film Workflows” on page 15 and follow the workflow that best meets
your project requirements. You should also read the material in “Color Management in Avid
DS” on page 121 to better understand how and where LUTs are applied.
Depending on your system configuration, many high-resolution formats are playable in real
time—for a specific list of these formats, see the Avid DS support web at www.avid.com.
When editing high-resolution projects where real-time playback is not achievable, you can
use the proxy mode to apply effects and view the results in HD 4:2:2 or HD 4:4:4.
Opening a Film-based Project in Avid DS
Avid DS can work with HD and 2K/4K files, including a large number of sequence formats
for various film resolutions and aspect ratios.
To set your project settings accurately when you open a project in Avid DS, you must gather
the following information from either the film-scanning facility, the camera operator, or the
production director:
• The original film format of your media (e.g. 1080, RED, Full Aperture, DPX, Cineon).
• The quality at which your film master was scanned or transferred. The most popular is
the 10-bit format and the most frequently used resolution is 2K.
• The frame rate (fps) at which your film master was scanned or transferred.
• The format required for final delivery.
• A corresponding LUT for your footage. This will be required when you import your
media into Avid DS.
To create a film-based project:
1. In the Open Project dialog box that displays when you start Avid DS, click the New
Project button.
The New Project dialog box displays. You can click the Help button at any time to get a
full description of all the parameters in this dialog box.
2. Enter a Project Name.
Page 90

5 Editing Film-based Projects in Avid DS
3. Keep the default project Location as this is where all your Avid DS projects reside.
4. There are a number of film resolutions and apertures for HD or film that you can choose
from.
Select the specific film Format at which your material was acquired. The menu options
are as follows—Media Format > Resolution > Frame rate.
For example:
FILM > RED > 2:1 (2K) > 23.97 frames/s
HD RGB 4:4:4 > 1080i > 59.94 fields/s
If you are going to output your project at a different resolution then what it was
originally shot at, then you can set the project with the new output format. Note
however, that if your media format is not the same as your sequence format, your media
will not be playable in realtime in Avid DS until you process your sequence.
There are some third-party applications available on the Internet that can read the
n
properties of high-resolution files (i.e. DPX, R3D, TIF) to give you the exact dimensions.
5. When you select the format, the frame details are set automatically.
Verify that the Frame Size is showing the correct dimensions. If not, you will need to
choose another Format.
90
Page 91

Opening a Film-based Project in Avid DS
6. Select the LUT depending on the delivery format of this sequence.
For example, if the material you are editing and finishing is for HD Television, then the
Sequence LUT will be ITU 601/709.
If you are working with media from only one source and been provided a specific LUT
file for this media, you can import it now—see “Importing External LUTs” on page 132.
If you will be using media from different sources, then we recommend that you select
the LUT that is most appropriate for the final output.
7. For the Storage Settings:
t Set the Resolution for capturing/linking video media to Full.
t Set the Color Space to RGB 4:4:4.
91
Page 92

5 Editing Film-based Projects in Avid DS
t Set the Bit Depth to 10-bits. This is typically the format at which film is scanned.
8. Select Use the closest media available, to allow Avid DS to display media of mixed
resolutions and frame rates in your sequence.
9. Set the Processing Precision to a bit-depth that will give you the best quality for your
processed effects. To preserve the quality of the bit-depth of 10-bit material, choose
16-bits. For more information on bit depth, see “Bit Depth” in the Avid DS Help.
If you selected the ITU 601/709 LUT, then select the 32 Bits float option for Processing.
This ensures that the LUT can be reversed transparently so that you can view your
media without your LUT if necessary.
c
Although Avid DS can support higher bit depths during processing, the caches may be
stored at a lower bit depth depending on your resolution and color space settings. Note
that, using a higher precision bit depth generates smoother effects during processing,
and still produces better quality output for lower bit depth outputs. Optionally, you
could set the Precision bit depth to the same setting as the Storage bit-depth. Then, if
you want to process a specific effect at a higher-quality bit depth, you can change the
Precision bit depth within the Processing dialog box, or in the Options property page of
the effect.
10. For the Audio Settings, set the Sample Rate and Bit Depth at which you will output your
audio media.
11. Leave the conversion settings at default.
12. Click OK to save project preferences.
Avid DS displays the timeline where you can now begin working on a sequence.
A project folder is created under the location specified earlier. This is where all your
sequences will reside.
Conforming a Film Sequence using an AFE
AFE (Avid File Exchange) files are an efficient way to transfer projects and bins from an
offline to an Avid DS online finishing system. AFE files let you transfer one or more bins,
their contents, and information about the contents, including master clips, subclips, titles,
and sequences.
92
To load the AFE:
1. From your offline editing system, take the AFE and other project files that you may
require (e.g. EDL, ALE) for the sequence that you are conforming, and copy them to the
local project folder that was established when you created your project in Avid DS.
e.g. C:\DS Projects\DS v.x\Casino\...
Page 93

Conforming a Film Sequence using an AFE
2. Open a new project in Avid DS in the format in which you intend to output your final
sequence.
3. Navigate to the folder where you placed offline files, and double-click the AFE.
The loaded bin displays in the lower area of the screen.
4. When conforming R3D files, it is recommended that you log them by deselecting Create
Linked Clips for File Sources. You can then capture the R3D media either from the Avid
Explorer or from the Timeline.
5. Double-click the bin that contains the sequence that you want to conform.
The contents of the bin are displayed.
6. Select Create Associated clips and Use Alternate Video Sources, and then click
Configure.
The Choose Alternate Video Sources dialog opens so that you can select your DPX,
R3D or other high-resolution files.
7. Proceed to “Linking to High-Resolution Files during the Conform Session” on page 98.
93
Page 94

5 Editing Film-based Projects in Avid DS
Conforming a Film Sequence using an EDL
An edit decision list (EDL) is a detailed list of the edits contained in a sequence, including
all the timecode and supported effects information required to re-create the sequence in an
online videotape suite. Avid DS accommodates EDLs from many different systems.
In a tape-based workflow, you can log the events in the Avid Explorer, and/or recreate the
list of events on the timeline. You can then capture the media from either the Avid Explorer
or the timeline—see “Batch Capturing” in the Help.
Before conforming your EDL, check if there are any layers to be composited. Offline editors
often create multiple EDLs since the EDL format does not support more than one video
track.
During the conform process, you can set up the appropriate heads and tails values for each
clip. This is important if you need additional material at the beginning and end of each clip
to do minor changes during the final stage of the edit. You can also configure the audio
channel patching for each tape.
If the proofing session is successful, you can then remove the video track you added and
continue to add effects and finishing touches to the original sequence.
94
To open an EDL:
1. From your offline editing system, take the AFE and other project files that you may
require (e.g. EDL, ALE) for the sequence that you are conforming, and copy them to the
local project folder that was established when you created your project in Avid DS.
e.g. C:\DS Projects\DS v.x\Casino\...
2. Open a new project in Avid DS in the format in which you intend to output your final
sequence.
3. Select View > Single-instance Views > EDL.
4. In the EDL view, click the Load EDL button to load a new EDL.
5. In the Open dialog box, browse to the folder where you placed the offline files, and
select the EDL.
If you know the system from which the EDL was generated, select the appropriate File
Type.
Page 95

Conforming a Film Sequence using an EDL
Record in-point
Conform EDL
6. Click the Open button.
The selected EDL is displayed in the EDL view. The EDL view lets you import an EDL
file produced on any external system, and capture material based on the edits in that
EDL. For more information about the EDL view, click the Help button.
If you selected the wrong file type, you are prompted to convert the file to the
appropriate type.
7. Click the Conform EDL button.
95
Page 96

5 Editing Film-based Projects in Avid DS
8. In the EDL Conform dialog box, select whether you want to create Logs and/or
Timeline Clips.
9. If your digital master is in DPX, R3D, or ARI file format, select Use Alternate Video
Sources and click Configure.
Proceed to “Linking to High-Resolution Files during the Conform Session” on page 98.
Linking to High-Resolution Files
By creating links to media files that are not stored on a remote storage device, you can work
with media files without having to capture them to your local storage. These files, called
linked clips, can reside anywhere on the network until you’re ready to output your sequence.
Some projects may require you to work with images at varying resolutions (sizes). When
you capture these files, you must convert the material to the working resolution of the
current sequence. By linking to the material instead, you can keep the material at its original
resolution regardless of the sequence’s frame size. Once you have completed your edits, you
can process the linked material, which creates a cache file of the image area that is visible in
the viewer.
96
Page 97

Linking to High-Resolution Files
Linking clips is also useful when more than one person needs access to the same file. You
can capture the file as a linked clip, drop it into your sequence, and continue to use it as a
reference while another person continues to work on the source media file. Changes made to
the original file automatically appear in the linked clip, both in the Avid Explorer and on the
timeline. You can also use the Copy-Link function to make a copy of the original media and
then link to it—see “Copying and Linking Media” in the Help for Avid DS.
If another person tries to modify a file that is linked to a clip in an open project, they will not
n
be able to save that file due to a sharing violation. You must close the project that contains
the linked clip for them to be able to save the original file.
Once you are ready to output the sequence, simply process the clip on the timeline. If you
process the material, a cache file is created. Once a cache is created, Avid DS no longer
refers to the source media file, but uses this cache file during playback. Any further changes
to the source file do not appear in the linked clip on the timeline. Like any other cache
however, the cache for the linked clip can be purged, which relinks the clip to the source file.
If the original file is removed from its location, you will receive a “Media not available”
n
message when you playback the portion of the sequence that uses that clip.
• If you are conforming a sequence—see “Linking to High-Resolution Files during the
Conform Session” on page 98.
• If you are building a new sequence in Avid DS—see “Creating Linked Clips” on
page 97.
Creating Linked Clips
When you link to media on your storage, linked clips will appear in the Avid Explorer
similar to master clips. Since no actual media has been captured, their file type icons will be
underlined in red.
Depending on the type of media you are linking to, your system hardware, or the storage
where your media resides, some linked clips do not require processing and can be played
back in real time (such as .gen, .omfi, .mxf, .dpx, or .cin files). If you cannot view your
media in realtime when they are placed on the timeline, you will need to process. Processing
the clips will create media caches on your storage which will be used instead of the original
linked media.
If the Media Not Found message appears in the viewer when using linked clips, it is possible
that the file has been moved or that Avid DS has lost the connection to the linked file. To
re-establish the link, see “Relinking a Clip” in the Help for Avid DS.
97
Page 98

5 Editing Film-based Projects in Avid DS
To create a linked clip:
1. In the Avid Explorer, open a bin and select the file (s) you want to capture as linked
clips. To select a series of files, click the first file, hold down the Shift key, and click the
last file. To select multiple files, hold down the Ctrl key and click each file name.
If you select a sequential list of still files of the same type (such as all .DPX or all .TIF), you
n
will be asked if you want to combine the files into one master clip or capture individual clips.
Working with one master clip makes editing much easier.
2. Right-click a file and select Capture Settings.
The Capture Settings dialog box opens.
3. Select the settings that apply to the files that you want to capture. See “Capturing
Material from File” in the Help for Avid DS.
Since linked files are brought into Avid DS at their original resolutions, there is no need to
n
convert them to the current sequence’s resolution. As a result, the Media Conversion modes
are not applicable when the Link option is selected.
4. Close the Capture Settings dialog box.
5. Right-click the selected files and select Link.
An Import dialog box opens and the first file (first frame of the transfer) is displayed in
the viewer. For more information on the options in this dialog box, click Help.
6. Optional. If you are working with film-based material, make sure you select the
appropriate LUT for your footage. By default, Avid DS selects an appropriate LUT for
the file type you are working with. However, if you have a LUT that was provided
together with your footage, then you should use this LUT instead.
7. Click Ok to begin the import.
As the material is linked, clips appear in the selected bin. The clip icons are underlined
in red to indicate that they are linked clips. Although no media has actually been
captured, when they are placed on the timeline, the media will still be referenced.
You can view additional information about the linked clip by right-clicking on the clip, and
n
selecting Clip properties. On the Format Specific tab, click the File Info button.
Linking to High-Resolution Files during the Conform Session
Once you have opened your AFE or EDL, you can select the DPX or R3D files that you need
to use for the sequence you are conforming.
If you have a folder containing different media types, Avid DS will ask you which type of
media you want to use for the current conform.
98
Page 99

Linking to High-Resolution Files
If your sequence contains several types of media, you will have to conform it once per type
n
of media, and replace them manually on the final sequence.
To find the DPX or R3D files:
1. In the Choose Alternate Video Sources dialog, select Quick browse.
2. Click Select Root Folder and browse to the folder where the files are located on your
video storage.
3. Select the folder that needs to be scanned and click Select.
All subfolders under your selected folder will also be scanned.
When you scan your files, Avid DS retrieves the metadata in the files (i.e. timecode,
KeyKode, tapename) and does the following:
If... Then...
The DPX files contain the tape source
information (i.e. tape name and
timecode)
The DPX files only contain timecodes The folder in which the file is located is used
The DPX files only contain film source
info (i.e. KeyKode), or you want to
KeyKode rather than the timecode
A direct association is made between the file’s
timecodes/tapenames, and the edited
sequence’s timecodes/tapenames.
as the EDL/AFE “tape name”.
In this case, you must also specify an ALE file
to allow Avid DS to create the association
between the scanned file’s KeyKode, and the
edited sequence’s timecodes/tapenames. (The
ALE can come from the film house,
MetaFuze or Avid Media Composer).
99
Page 100

5 Editing Film-based Projects in Avid DS
100
4. (Optional) If you want to use an ALE to make the relationship between the
corresponding AFE/EDL timecode/KeyKode edits, click the option for Select ALE File,
and browse to the folder where the ALE file is located.
5. (Optional) If you are using RED or ARRI media that has an associated “look” file
holding additional color information (e.g. .RLX, .XML), then select the Look options:
Use Look from AAF/AFE/ALE.
Media type File Location
RED If you have an RLX file, then place it in the RLX folder
under your project folder.
If you have an RSX file, then place it in the same folder
as your RED files.
ARRI XML files are located in the LUT or XML folder in the
path where Avid DS is installed. (This folder was created
when the ARRI plug-in was installed.)
6. Click Scan.
 Loading...