

Page 1

Avid® Deko® Select
Installation and User’s Guide
make manage move | media
™
Avid
®
Page 2

Copyright and Disclaimer
Product specifications are subject to change without notice and do not represent a commitment on the part of
Avid Technology, Inc.
The software described in this document is furnished under a license agreement. You can obtain a copy of that license by
visiting Avid's Web site at www.avid.com. The terms of that license are also available in the product in the same directory as
the software. The software might not be reverse assembled and might be used or copied only in accordance with the terms of
the license agreement. It is against the law to copy the software on any medium except as specifically allowed in the license
agreement.
Avid products or portions thereof are protected by one or more of the following United States Patents: 4,746,994; 4,970,663;
5,045,940; 5,267,351; 5,309,528; 5,355,450; 5,396,594; 5,440,348; 5,452,378; 5,467,288; 5,513,375; 5,528,310; 5,557,423;
5,577,190; 5,583,496; 5,584,006; 5,627,765; 5,640,601; 5,644,364; 5,654,737; 5,715,018; 5,719,570; 5,724,605; 5,726,717;
5,729,673; 5,745,637; 5,752,029; 5,754,851; 5,799,150; 5,812,216; 5,828,678; 5,842,014; 5,852,435; 5,999,406; 6,038,573;
6,061,758; 6,141,007; 6,211,869; 6,532,043; 6,546,190; 6,596,031; 6,636,869; 6,747,705; 6,763,523; 6,766,357; 6,813,622;
6,847,373; 7,081,900; D352,278; D372,478; D373,778; D392,267; D392,268; D392,269; D395,291; D396,853; D398,912.
Other patents are pending.
This document is protected under copyright law. An authorized licensee of Deko Select might reproduce this publication for
the licensee’s own use in learning how to use the software. This document might not be reproduced or distributed, in whole or
in part, for commercial purposes, such as selling copies of this document or providing support or educational services to
others. This document is supplied as a guide for Deko Select. Reasonable care has been taken in preparing the information it
contains. However, this document might contain omissions, technical inaccuracies, or typographical errors. Avid Technology,
Inc. does not accept responsibility of any kind for customers’ losses due to the use of this document. Product specifications
are subject to change without notice.
Copyright © 2007 Avid Technology, Inc. and its licensors. All rights reserved.
Attn. Government User(s). Restricted Rights Legend
U.S. GOVERNMENT RESTRICTED RIGHTS. This Software and its documentation are “commercial computer software” or
“commercial computer software documentation.” In the event that such Software or documentation is acquired by or on behalf
of a unit or agency of the U.S. Government, all rights with respect to this Software and documentation are subject to the terms
of the License Agreement, pursuant to FAR §12.212(a) and/or DFARS §227.7202-1(a), as applicable.
Trademarks
888 I/O, Adrenaline, AirPlay, AirSPACE, AirSPACE HD, AirSpeed, AniMatte, AudioSuite, AudioVision, AutoSync, Avid,
Avid DNA, Avid DNxcel, Avid DNxHD, AVIDdrive, AVIDdrive Towers, Avid DS Assist Station, Avid ISIS,
Avid Learning Excellerator, Avid Liquid, Avid Mojo, AvidNet, AvidNetwork, Avid Remote Response, AVIDstripe, Avid Unity,
Avid Unity ISIS, Avid Xpress, AVoption, AVX, CamCutter, ChromaCurve, ChromaWheel, DAE, Dazzle, Deko, DekoCast, D-Fi,
D-fx, DigiDelivery, Digidesign, Digidesign Audio Engine, Digidesign Intelligent Noise Reduction, DigiDrive,
Digital Nonlinear Accelerator, DigiTranslator, DINR, DNxchange, do more, D-Verb, Equinox, ExpertRender, Face Robot,
FieldPak, Film Composer, FilmScribe, FluidMotion, FXDeko, HIIP, HyperSPACE, HyperSPACE HDCAM, IllusionFX,
Image Independence, iNEWS, iNEWS ControlAir, Instinct, Interplay, Intraframe, iS9, iS18, iS23, iS36, LaunchPad, Lightning,
Lo-Fi, Magic Mask, make manage move | media, Marquee, Matador, Maxim, MCXpress, Media Browse, Media Composer,
MediaDock, MediaDock Shuttle, Media Fusion, Media Illusion, MediaLog, Media Reader, Media Recorder, MEDIArray,
MediaShare, MediaStream, Meridien, MetaSync, MissionControl, NaturalMatch, Nearchive, NetReview, NewsCutter, Nitris,
OMF, OMF Interchange, OMM, Open Media Framework, Open Media Management, PCTV, Pinnacle MediaSuite,
Pinnacle Studio, Pinnacle Systems, ProEncode, Pro Tools, QuietDrive, Recti-Fi, RetroLoop, rS9, rS18, Sci-Fi, ScriptSync,
SecureProductionEnvironment, Show Center, Softimage, Sound Designer II, SPACE, SPACEShift, SpectraGraph,
SpectraMatte, SteadyGlide, Symphony, TARGA, Thunder, Trilligent, UnityRAID, Vari-Fi, Video RAID, Video Slave Driver,
VideoSPACE, and Xdeck are either registered trademarks or trademarks of Avid Technology, Inc. in the United States and/or
other countries.
Adobe and Photoshop are either registered trademarks or trademarks of Adobe Systems Incorporated in the United States
and/or other countries. Apple and Macintosh are trademarks of Apple Computer, Inc., registered in the U.S. and other
countries. Windows is either a registered trademark or trademark of Microsoft Corporation in the United States and/or other
countries. All other trademarks contained herein are the property of their respective owners.
2
Page 3

GOT FOOTAGE?
Editors — Filmmakers — Special Effects Artists — Game Developers — Animators — Educators — Broadcasters — Content
creators of every genre — Just finished an incredible project and want to share it with the world?
Send us your reels and we might use your footage in our show reel or demo!*
For a copy of our release and Avid’s mailing address, go to www.avid.com/footage.
*Note: Avid cannot guarantee the use of materials submitted.
Avid Deko Select Installation and User’s Guide • 0130-07832-01 • March 2007
3
Page 4

4
Page 5

Contents
Using This Guide . . . . . . . . . . . . . . . . . . . . . . . . . . . . . . . . . . . . . . . . . . . . 11
Symbols and Conventions . . . . . . . . . . . . . . . . . . . . . . . . . . . . . . . . . . . . . . . . . . . . 12
If You Need Help. . . . . . . . . . . . . . . . . . . . . . . . . . . . . . . . . . . . . . . . . . . . . . . . . . . . 12
How to Order Documentation . . . . . . . . . . . . . . . . . . . . . . . . . . . . . . . . . . . . . . . . . . 13
Avid Training Services . . . . . . . . . . . . . . . . . . . . . . . . . . . . . . . . . . . . . . . . . . . . . . . 13
Chapter 1 Welcome to Deko Select . . . . . . . . . . . . . . . . . . . . . . . . . . . . . . . . . . . . . . 15
How Deko Select Enhances Newsroom Efficiency . . . . . . . . . . . . . . . . . . . . . . . . . . 16
Traditional Methods for Supporting Stories with Graphics . . . . . . . . . . . . . . . . . 16
Using Deko Select to Support Stories with Graphics . . . . . . . . . . . . . . . . . . . . . 17
Understanding Deko Select . . . . . . . . . . . . . . . . . . . . . . . . . . . . . . . . . . . . . . . . . . . 17
Deko Select and the Newsroom Environment . . . . . . . . . . . . . . . . . . . . . . . . . . . . . 17
Architecture and Workflow . . . . . . . . . . . . . . . . . . . . . . . . . . . . . . . . . . . . . . . . . 18
Deko Select Browser . . . . . . . . . . . . . . . . . . . . . . . . . . . . . . . . . . . . . . . . . . . . . 20
DekoMOS Gateway . . . . . . . . . . . . . . . . . . . . . . . . . . . . . . . . . . . . . . . . . . . . . . 22
DekoMOS Macro Server . . . . . . . . . . . . . . . . . . . . . . . . . . . . . . . . . . . . . . . . . . 23
Chapter 2 Installation and Setup . . . . . . . . . . . . . . . . . . . . . . . . . . . . . . . . . . . . . . . . 25
Before You Install Deko Select . . . . . . . . . . . . . . . . . . . . . . . . . . . . . . . . . . . . . . . . . 26
Verifying Deko Select Option Contents . . . . . . . . . . . . . . . . . . . . . . . . . . . . . . . 26
Gathering Information. . . . . . . . . . . . . . . . . . . . . . . . . . . . . . . . . . . . . . . . . . . . . 26
Preparing Your System . . . . . . . . . . . . . . . . . . . . . . . . . . . . . . . . . . . . . . . . . . . 27
File Storage Structure . . . . . . . . . . . . . . . . . . . . . . . . . . . . . . . . . . . . . . . . . 27
An Important Word about Fonts . . . . . . . . . . . . . . . . . . . . . . . . . . . . . . . . . 27
About Using Deko Select in a Non-Latin Language Environment. . . . . . . . 27
Compatibility with Components in Previous Versions of Deko Select
(DekoMOS) . . . . . . . . . . . . . . . . . . . . . . . . . . . . . . . . . . . . . . . . . . . . . . . 28
Configuring ENPS MOS Settings Before Installing on an ENPS NCS. . . . . . . . 28
Connecting the Net HASP Dongle and Printer. . . . . . . . . . . . . . . . . . . . . . . . . . 32
Page 6

Confirming that the NetHASP License Manager is Running and Properly
Configured . . . . . . . . . . . . . . . . . . . . . . . . . . . . . . . . . . . . . . . . . . . . . . . . . . . 32
Installing Software Components . . . . . . . . . . . . . . . . . . . . . . . . . . . . . . . . . . . . 33
Installing and Configuring the DekoMOS Gateway . . . . . . . . . . . . . . . . . . . . . . . . . 33
Installing the DekoMOS Gateway . . . . . . . . . . . . . . . . . . . . . . . . . . . . . . . . . . . 34
Accessing the DekoMOS Gateway Configuration Window . . . . . . . . . . . . . . . . 34
Configuring General Settings . . . . . . . . . . . . . . . . . . . . . . . . . . . . . . . . . . . . . . 36
Configuring Connections . . . . . . . . . . . . . . . . . . . . . . . . . . . . . . . . . . . . . . . . . . 39
Configuring Browser and Editor Settings. . . . . . . . . . . . . . . . . . . . . . . . . . . . . . 42
Configuring Editor Macros. . . . . . . . . . . . . . . . . . . . . . . . . . . . . . . . . . . . . . . . . 43
Assigning Macros to a Single Key for Quick Access . . . . . . . . . . . . . . . . . 44
Configuring Deko Select to Access Images and Clips from Other
Browsers . . . . . . . . . . . . . . . . . . . . . . . . . . . . . . . . . . . . . . . . . . . . . . . . 46
Editing Graphic or Clip Browsers . . . . . . . . . . . . . . . . . . . . . . . . . . . . . . . . 47
Deleting Graphic or Clip Browsers . . . . . . . . . . . . . . . . . . . . . . . . . . . . . . . 48
Selecting a Graphic or Clip Browser as the Default Browser . . . . . . . . . . . 49
Enabling Deko Select to Use Manual Entry . . . . . . . . . . . . . . . . . . . . . . . . 49
Configuring Client Style Settings. . . . . . . . . . . . . . . . . . . . . . . . . . . . . . . . . . . . 50
Adding Control Rooms . . . . . . . . . . . . . . . . . . . . . . . . . . . . . . . . . . . . . . . . . . . 54
Viewing Options Enabled on the Net HASP. . . . . . . . . . . . . . . . . . . . . . . . . . . . . . . 54
Installing DekoMOS Macro Server on the Deko System . . . . . . . . . . . . . . . . . . . . . 56
Creating Macros to Automatically Start the DekoMOS Macro Server When
Deko Starts . . . . . . . . . . . . . . . . . . . . . . . . . . . . . . . . . . . . . . . . . . . . . . . . . . 57
Configuring the DekoMOS Macro Server . . . . . . . . . . . . . . . . . . . . . . . . . . . . . 57
Configuring Styles and Corresponding Local Paths . . . . . . . . . . . . . . . . . . . . . 59
Installing and Configuring Deko Select Software . . . . . . . . . . . . . . . . . . . . . . . . . . . 61
Installing Avid Deko Select . . . . . . . . . . . . . . . . . . . . . . . . . . . . . . . . . . . . . . . . 61
Configuring Deko Select . . . . . . . . . . . . . . . . . . . . . . . . . . . . . . . . . . . . . . . . . . 62
Configuring User Preferences on a Client Computer . . . . . . . . . . . . . . . . . . . . 63
Configuring Gateway Settings on a Client Computer . . . . . . . . . . . . . . . . . . . . 64
Configuring Gateway Settings on Additional Clients from an .ini File. . . . . 64
Configuring the Spell Checker . . . . . . . . . . . . . . . . . . . . . . . . . . . . . . . . . . 65
Creating Toolbar Buttons and Shortcuts to Access the Browser from iNEWS . 67
Creating a Deko Select Toolbar Button in iNEWS . . . . . . . . . . . . . . . . . . . 67
6
Page 7

Creating Shortcuts to the Deko Select Editor in iNEWS . . . . . . . . . . . . . . . 69
Locations of Installed Components. . . . . . . . . . . . . . . . . . . . . . . . . . . . . . . . . . . . . . 69
Chapter 3 Preparing to Use Deko Select . . . . . . . . . . . . . . . . . . . . . . . . . . . . . . . . . . 71
Creating Templates. . . . . . . . . . . . . . . . . . . . . . . . . . . . . . . . . . . . . . . . . . . . . . . . . . 71
Creating Replaceable Layers in a Deko Graphic . . . . . . . . . . . . . . . . . . . . . . . . 72
Creating a Replaceable Text Layer. . . . . . . . . . . . . . . . . . . . . . . . . . . . . . . 75
Creating a Replaceable Still or Image Layer. . . . . . . . . . . . . . . . . . . . . . . . 78
Creating a Replaceable Clip Layer . . . . . . . . . . . . . . . . . . . . . . . . . . . . . . . 80
Troubleshooting Graphics . . . . . . . . . . . . . . . . . . . . . . . . . . . . . . . . . . . . . . . . . 81
Creating Static Design Elements for your Templates. . . . . . . . . . . . . . . . . . . . . 82
Preparing Clips to Use with Templates . . . . . . . . . . . . . . . . . . . . . . . . . . . . . . . 83
Storage Structure for Graphic Components . . . . . . . . . . . . . . . . . . . . . . . . . . . . . . . 83
Storing Files . . . . . . . . . . . . . . . . . . . . . . . . . . . . . . . . . . . . . . . . . . . . . . . . . . . . 83
Creating a Storage Structure . . . . . . . . . . . . . . . . . . . . . . . . . . . . . . . . . . . . . . . 84
Using Other Products . . . . . . . . . . . . . . . . . . . . . . . . . . . . . . . . . . . . . . . . . . . . . . . . 85
Chapter 4 Building Stories with Graphics. . . . . . . . . . . . . . . . . . . . . . . . . . . . . . . . . 87
Opening Deko Select . . . . . . . . . . . . . . . . . . . . . . . . . . . . . . . . . . . . . . . . . . . . . . . . 87
Opening Deko Select at an iNEWS Workstation . . . . . . . . . . . . . . . . . . . . . . . . 88
Opening Deko Select at an ENPS Workstation . . . . . . . . . . . . . . . . . . . . . . . . . 89
Understanding the Deko Select Browser and Editor. . . . . . . . . . . . . . . . . . . . . . . . . 90
Toolbar Buttons . . . . . . . . . . . . . . . . . . . . . . . . . . . . . . . . . . . . . . . . . . . . . . . . . 93
Changing the Deko Select Display . . . . . . . . . . . . . . . . . . . . . . . . . . . . . . . . . . . . . . 93
Configuring User Preferences . . . . . . . . . . . . . . . . . . . . . . . . . . . . . . . . . . . . . . 93
Configuring Editor Options . . . . . . . . . . . . . . . . . . . . . . . . . . . . . . . . . . . . . . . . . 96
Changing the Display . . . . . . . . . . . . . . . . . . . . . . . . . . . . . . . . . . . . . . . . . . . . . 96
Switching Between Template File Names or Template Picons in the
Browser . . . . . . . . . . . . . . . . . . . . . . . . . . . . . . . . . . . . . . . . . . . . . . . . . . 97
Showing or Hiding the Editor. . . . . . . . . . . . . . . . . . . . . . . . . . . . . . . . . . . . 97
Showing or Hiding the Favorite Templates List. . . . . . . . . . . . . . . . . . . . . . 97
Viewing the Contents of a Folder in the Browser . . . . . . . . . . . . . . . . . . . . 97
Closing a Folder and returning to the Previous Level in the Browser . . . . . 98
Enabling and Disabling In-Line Spell Checking in the Editor. . . . . . . . . . . . 98
Simplifying Access to Template Files. . . . . . . . . . . . . . . . . . . . . . . . . . . . . . . . 100
7
Page 8

Placing a File in the Favorites List . . . . . . . . . . . . . . . . . . . . . . . . . . . . . . 100
Removing a File from the Favorites List . . . . . . . . . . . . . . . . . . . . . . . . . . 100
Assigning a File to a Hot Key for Easy Keyboard Access . . . . . . . . . . . . 100
Adding Graphics to a Story . . . . . . . . . . . . . . . . . . . . . . . . . . . . . . . . . . . . . . . . . . 101
Inserting Deko Select Events into iNEWS Stories. . . . . . . . . . . . . . . . . . . . . . 101
Editing Replaceable Fields of a Deko Select Event in an iNEWS Story. . 104
Inserting Deko Select Events into ENPS Stories. . . . . . . . . . . . . . . . . . . . . . . 104
Tabbing Through Text Boxes in the Editor . . . . . . . . . . . . . . . . . . . . . . . . 109
Entering Often Used Text or Graphics into a Replaceable Text Box . . . . 110
Editing Text Boxes in a Graphic in an ENPS Story . . . . . . . . . . . . . . . . . 110
Changing Deko Select Graphic Templates but Preserving the Contents of
Replaceable Text Boxes . . . . . . . . . . . . . . . . . . . . . . . . . . . . . . . . . . . . 111
Adding Breaks to a Rundown. . . . . . . . . . . . . . . . . . . . . . . . . . . . . . . . . . . . . . . . . 111
Adding Breaks to a Rundown in iNEWS . . . . . . . . . . . . . . . . . . . . . . . . . . . . . 111
Adding Breaks to a Rundown in ENPS . . . . . . . . . . . . . . . . . . . . . . . . . . . . . . 112
Chapter 5 Support and Troubleshooting. . . . . . . . . . . . . . . . . . . . . . . . . . . . . . . . . 113
Using the Gateway for Problem Solving. . . . . . . . . . . . . . . . . . . . . . . . . . . . . . . . . 114
Viewing Deko Select Logs. . . . . . . . . . . . . . . . . . . . . . . . . . . . . . . . . . . . . . . . 114
Configuring the Level of Information Displayed by the Log. . . . . . . . . . . . . . . 115
Clearing the Log . . . . . . . . . . . . . . . . . . . . . . . . . . . . . . . . . . . . . . . . . . . . . . . 116
Saving Logged Information . . . . . . . . . . . . . . . . . . . . . . . . . . . . . . . . . . . . . . . 117
Testing Communication with the NCS. . . . . . . . . . . . . . . . . . . . . . . . . . . . . . . 117
Troubleshooting from the DekoMOS Macro Server . . . . . . . . . . . . . . . . . . . . . . . . 117
Troubleshooting from the Deko Select Client Browser. . . . . . . . . . . . . . . . . . . . . . 117
Common Problems and Solutions . . . . . . . . . . . . . . . . . . . . . . . . . . . . . . . . . . . . . 118
Before You Contact Avid Technical Support . . . . . . . . . . . . . . . . . . . . . . . . . . . . . 120
Appendix A Using the Spell Check Utility. . . . . . . . . . . . . . . . . . . . . . . . . . . . . . . . . . 123
Check-Spelling Dialog Box. . . . . . . . . . . . . . . . . . . . . . . . . . . . . . . . . . . . . . . . . . . 123
Dictionaries Dialog Box . . . . . . . . . . . . . . . . . . . . . . . . . . . . . . . . . . . . . . . . . . . . . 125
Action List . . . . . . . . . . . . . . . . . . . . . . . . . . . . . . . . . . . . . . . . . . . . . . . . . . . . 125
Options Dialog Box. . . . . . . . . . . . . . . . . . . . . . . . . . . . . . . . . . . . . . . . . . . . . . . . . 128
New Dictionary Dialog Box. . . . . . . . . . . . . . . . . . . . . . . . . . . . . . . . . . . . . . . . . . . 129
8
Page 9

Appendix B Displaying Languages. . . . . . . . . . . . . . . . . . . . . . . . . . . . . . . . . . . . . . . 131
Selecting a Language for Your Deko Product. . . . . . . . . . . . . . . . . . . . . . . . . . . . . 132
Determining the Operating System of Your Deko Product. . . . . . . . . . . . . . . . 132
Configuring Windows 2000 Based Products to Display Non-Latin
Character Sets . . . . . . . . . . . . . . . . . . . . . . . . . . . . . . . . . . . . . . . . . . . . . . . 133
Configuring Windows XP Based Products to Display Non-Latin
Character Sets . . . . . . . . . . . . . . . . . . . . . . . . . . . . . . . . . . . . . . . . . . . . . . . 137
Glossary . . . . . . . . . . . . . . . . . . . . . . . . . . . . . . . . . . . . . . . . . . . . . . . . . . 141
Index . . . . . . . . . . . . . . . . . . . . . . . . . . . . . . . . . . . . . . . . . . . . . . . . . . . . . 145
9
Page 10

10
Page 11

Using This Guide
n
The Avid® Deko Select Installation and User’s Guide is an instructional manual for
installing and learning to use Avid Deko Select
operation. This guide offers step-by-step instructions and general information.
If you are responsible for installing Deko Select, carefully follow the instructions in the
installation chapter. If you are responsible for installation or for creating Deko templates, see
the chapter Preparing to Use Deko Select. If you are responsible for placing graphics in
stories or for playout, you can find specific chapters for those tasks. However, you might
want to read or skim all chapters to better understand how Deko Select works and what to do
if you have difficulty.
References to the Newsroom Computer System, or NCS, apply to iNEWS
Technology and to ENPS
are made only where there is a difference.
The documentation describes the features and hardware of all models. Therefore, your
system might not contain certain features and hardware that are covered in the
documentation.
®
from Associated Press. Specific references to ENPS or iNEWS
™
as well as a reference for day-to-day
®
from Avid
Page 12

Using This Guide
Symbols and Conventions
Avid documentation uses the following symbols and conventions:
Symbol or Convention Meaning or Action
n
c
w
> This symbol indicates menu commands (and subcommands) in the
t
Italic font Italic font is used to emphasize certain words and to indicate variables.
Courier Bold font
Ctrl+key or mouse action Press and hold the first key while you perform the mouse action. For
If You Need Help
A note provides important related information, reminders,
recommendations, and strong suggestions.
A caution means that a specific action you take could cause harm to
your computer or cause you to lose data.
A warning describes an action that could cause you physical harm.
Follow the guidelines in this document or on the unit itself when
handling electrical equipment.
order you select them. For example, File > Import means to open the
File menu and then select the Import command.
This symbol indicates a single-step procedure. Multiple arrows in a
list indicate that you perform one of the actions listed.
Courier Bold font identifies text that you type.
example, Ctrl+drag.
12
If you are having trouble using Deko Select:
1. Retry the action, carefully following the instructions given for that task in this guide. It
is especially important to check each step of your workflow.
2. Check for the latest information that might have become available after the
documentation was published:
- If the latest information for your Avid product is provided as printed release notes,
they ship with your application and are also available online.
Page 13

- If the latest information for your Avid product is provided as a ReadMe file, it is
supplied on your Avid installation CD or DVD as a PDF document
(README_DekoSelect.pdf) and is also available online.
You should always check online for the most up-to-date release notes or ReadMe
because the online version is updated whenever new information becomes
available. To view these online versions, select ReadMe from the Help menu. or visit
the Knowledge Base at www.avid.com/readme.
3. Check the documentation that came with your Avid application or your hardware for
maintenance or hardware-related issues.
4. Visit the online Knowledge Base at www.avid.com/onlinesupport. Online services are
available 24 hours per day, 7 days per week. Search this online Knowledge Base to find
answers, to view error messages, to access troubleshooting tips, to download updates,
and to read or join online message-board discussions.
How to Order Documentation
To order additional copies of this documentation from within the United States, call Avid
Sales at 800-949-AVID (800-949-2843). If you are placing an order from outside the United
States, contact your local Avid representative.
How to Order Documentation
Avid Training Services
Avid makes lifelong learning, career advancement, and personal development easy and
convenient. Avid understands that the knowledge you need to differentiate yourself is always
changing, and Avid continually updates course content and offers new training delivery
methods that accommodate your pressured and competitive work environment.
To learn about Avid's new online learning environment, Avid Learning Excellerator
(ALEX), visit http://learn.avid.com.
For information on courses/schedules, training centers, certifications, courseware, and
books, please visit www.avid.com/training or call Avid Sales at 800-949-AVID
(800-949-2843).
™
13
Page 14

Using This Guide
14
Page 15

Chapter 1
Welcome to Deko Select
Deko Select is a plug-in for a newsroom computer system’s interface that allows a user, such
as a reporter, to drag and drop graphic templates directly into the story, as well as alter
replaceable text or graphics in the selected template. Deko Select tightly integrates the Avid
Deko line of character generators with your Newsroom Computer System (NCS).
Any Deko graphic can be used as a template for Deko Select if the following conditions
are met:
• Appropriate layers are designated as replaceable.
• Replaceable layers are properly identified, ordered, and named.
• Default playout channel is designated.
During script creation, you can preview and select graphics from the Deko Select Browser
within the NCS. You can also add text, stills, or clips to a graphic template and preview
exactly how each graphic will air.
In the control room, the iNews Command controls up to nine channels of Deko. Effects and
clips are embedded in Deko templates so that the graphics air just as the art department
intended. With Deko Select, you can easily manage multiple graphic looks to support
different shows or channel branding.
The following topics describe Deko Select and the Newsroom:
• How Deko Select Enhances Newsroom Efficiency
• Understanding Deko Select
• Deko Select and the Newsroom Environment
Page 16

Chapter 1 Welcome to Deko Select
How Deko Select Enhances Newsroom Efficiency
The following topics contain information on how Deko Select enhances newsroom
efficiency.
Traditional Methods for Supporting Stories with Graphics
The process of capturing a newsworthy event on camera, creating and editing a story about
the event, and then presenting the story on-air involves several people and several media
devices. After the initial shooting, the piece is edited and then stored either on a tape device
or digitally on a video server. A reporter enters the story text into a NCS. The story is
displayed on a teleprompter for the anchor to read and graphic elements are applied from
other devices to identify and support the story.
Depending on the size of the news department, there might be one or any number of
reporters contributing to a single news program. Several media devices might be used in the
process including, but not limited to:
• Video tape recorders, for playing a taped video recording of a story
• Video servers, for playing a digital video recording of a story
• Still stores, for accessing topical graphics, typically presented as over-the-shoulder
graphics, to introduce a story
16
• Character generators, for creating lower third, over-the-shoulder, full screen, or other
graphics to identify and support story topics
• Teleprompters, to display the story script for the anchor to read
The stories created by reporters are managed by the producer, who places them in an
appropriate order for broadcast. This order is called a rundown. The rundown is entered as a
list into the NCS, printed, and used as a guide for individuals operating the various media
devices. The NCS can sort media, obtain newswire feeds and archive the stories of each
reporter.
The process of creating stories with graphics and placing them in a rundown must be
repeated for each news program that airs. Each rundown is completely dynamic. During a
news program, stories are added, dropped, and reordered, sometimes just before the story is
intended to air. Traditionally, this forced individuals, sometimes in different locations, to
scramble with their printed rundowns and reorder their tasks. If one person is not
synchronized, there is a chance that the incorrect media will air.
Page 17

Using Deko Select to Support Stories with Graphics
Deko Select (formerly DekoMOS, where MOS stood for Media Object Server) is a
communications protocol for management of media devices by newsroom computer
systems. Deko Select facilitates and coordinates the use of various media devices in news
presentation. Quick changes can be made more easily with less chance of error. Deko Select
is used to control the Deko product line of character generators from Avid. Deko Select
creates an active network link between each media device and the active rundown in the
NCS. Through Deko Select, items for broadcast can be easily and quickly added, deleted, or
reordered within a rundown.
Understanding Deko Select
Deko Select changes the workflow of newsroom operations by allowing the journalist,
operator, or producer to:
• See all available graphic templates
• Access those templates
• Add text, stills, or clips to graphics with replaceable text boxes
• Preview the completed graphic
Understanding Deko Select
• Insert the completed graphic into a story
• Control playback of stories with a dynamic rundown
Deko Select is currently available for the following newsroom computer systems:
• ENPS by Associated Press
• iNEWS by Avid Technology
Deko Select and the Newsroom Environment
Deko Select consists of several components working together, installed on different
computers. Deko Select gathers information from other applications and distributes
information to other applications. Understanding the relationship of Deko Select to other
aspects of the newsroom environment is helpful.
Your NCS, or server, organizes the newsroom. There is two-way communication between
the server and other computers with the NCS client software. Each NCS client has the Deko
Select Browser as a plug-in, functioning as part of the client software. The Deko Select
Browser communicates with the DekoMOS Gateway.
17
Page 18

Chapter 1 Welcome to Deko Select
The DekoMOS Gateway manages configuration information. It also is the communication
link between the NCS and iNews Command to create and modify news rundowns.
iNews Command controls playback of graphics on Deko systems, and can drive up to nine
channels of Deko, across multiple systems, from a single user interface.
The DekoMOS Macro Server, installed on all Deko systems used for playout, allows iNews
Command to communicate with the Dekos.
All Deko Select components should be installed and configured as specified in this guide;
see “Installation and Setup” on page 25 and relevant NCS documentation.
n
n
In this explanation, the term Deko refers to any one of these products: Deko 3000, Deko
3000 Hybrid, Deko 3000 HD, FXDeko II, Deko 2200, Deko 1000, Deko 1000 Hybrid, Deko
1000 HD, and Deko 550. Older versions of Deko Select (formerly known as DekoMOS)
might not be compatible with all Deko models listed here. See the ReadMe for your
application for minimum system requirements.
NCS stands for Newsroom Computer System and might refer to iNEWS from Avid
Technology or ENPS from Associated Press.
Architecture and Workflow
Avid iNEWS Command is scalable and can adapt to work in traditional newsroom-based
playlist creation to production-centric workflows where running orders are created inside the
iNEWS Command playback application. All of the components can run on a single
computer, or they can be spread out across multiple computers with redundant services
configured to take control if the primary services should become unavailable.
18
Page 19
Deko Select and the Newsroom Environment
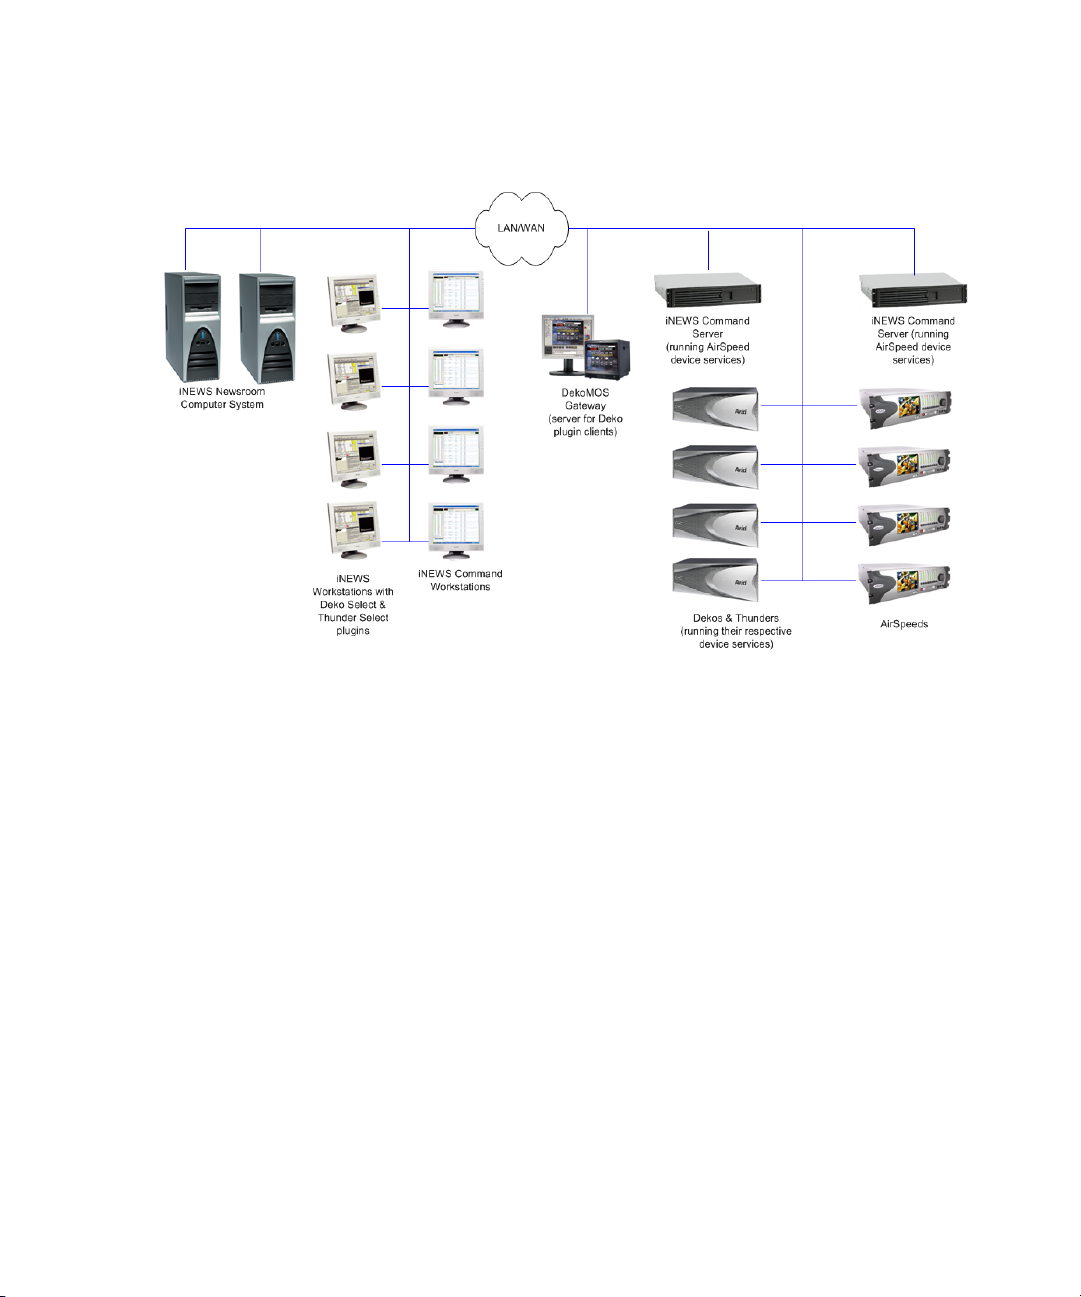
An example of a basic Command system architecture is shown in the following illustration:
In the most common news workflow, playlists are created using the iNEWS newsroom
computer system and the video and graphic assets are referenced in stories using their IDs or
by dragging and dropping them from an Active-X plugin.
Playlists can be saved to use later, stand-alone playlists can be created, and multiple playlists
can be embedded in a single running order. You can set assets within a playlist to playback at
a specified time, or you can set groups of assets to play in follow-on mode.
19
Page 20
Chapter 1 Welcome to Deko Select
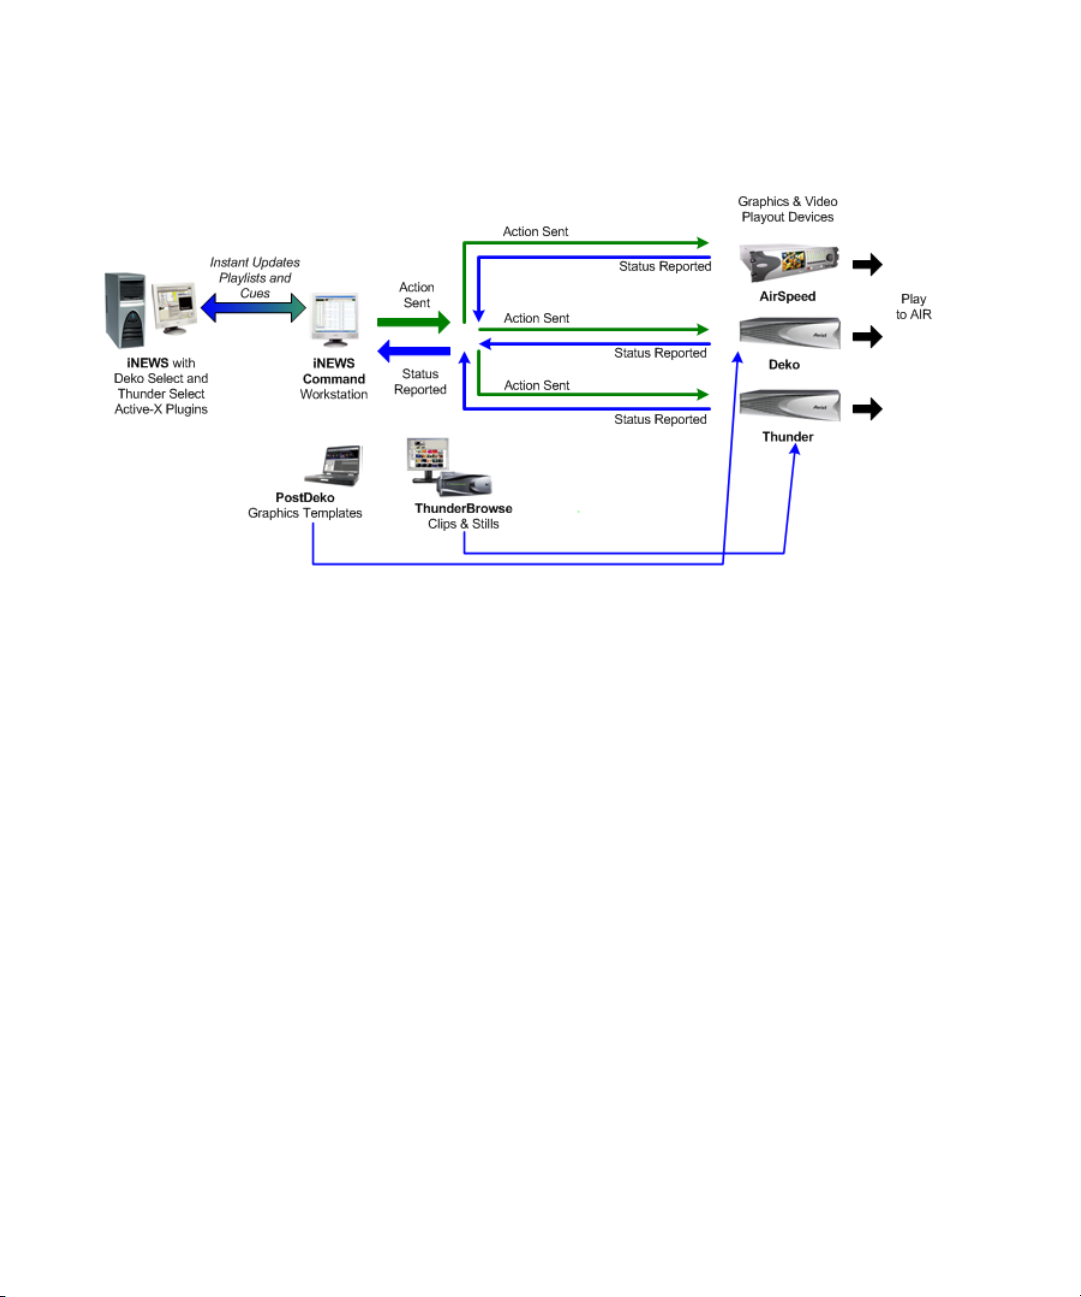
A basic workflow is shown in the following illustration.
Deko Select Browser
20
Each client workstation displays an interface for creating stories. The Deko Select Browser
is a plug-in for this interface that allows the reporter to drag and drop graphics templates into
the story and alter replaceable text or graphics in the selected template. This interface is
covered in detail in “Building Stories with Graphics” on page 87.
Page 21
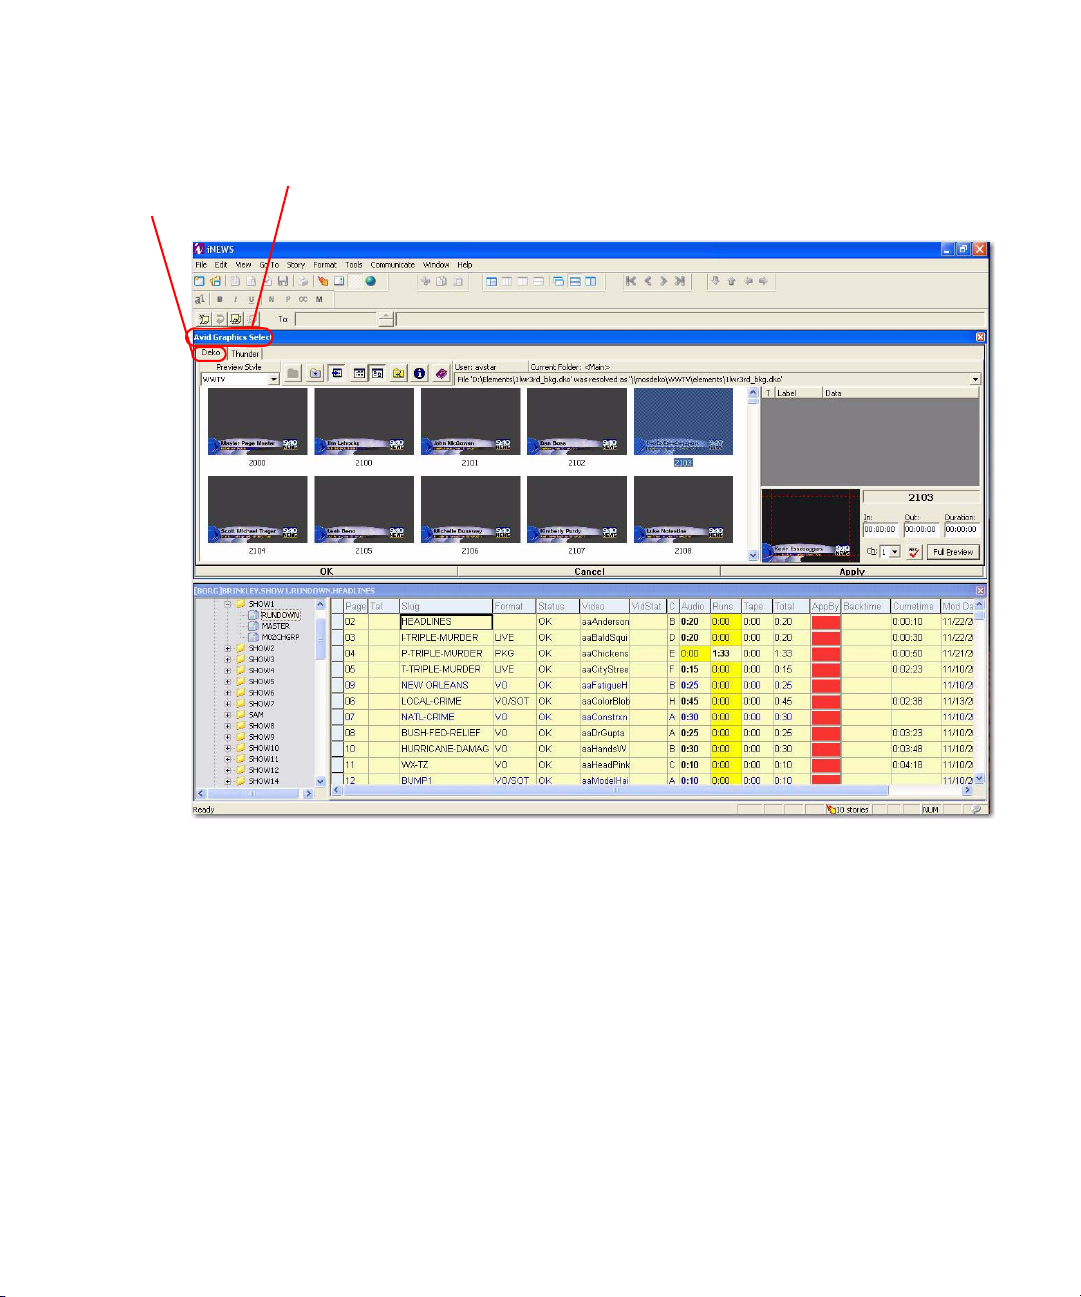
Deko Select within the iNEWS client workstation interface
Deko Select tab
Deko Select and the Newsroom Environment
Avid Graphics Select indicates that both Deko Select and Thunder
Select are installed on this workstation. Notice the tabs for each plug-in.
21
Page 22
Chapter 1 Welcome to Deko Select
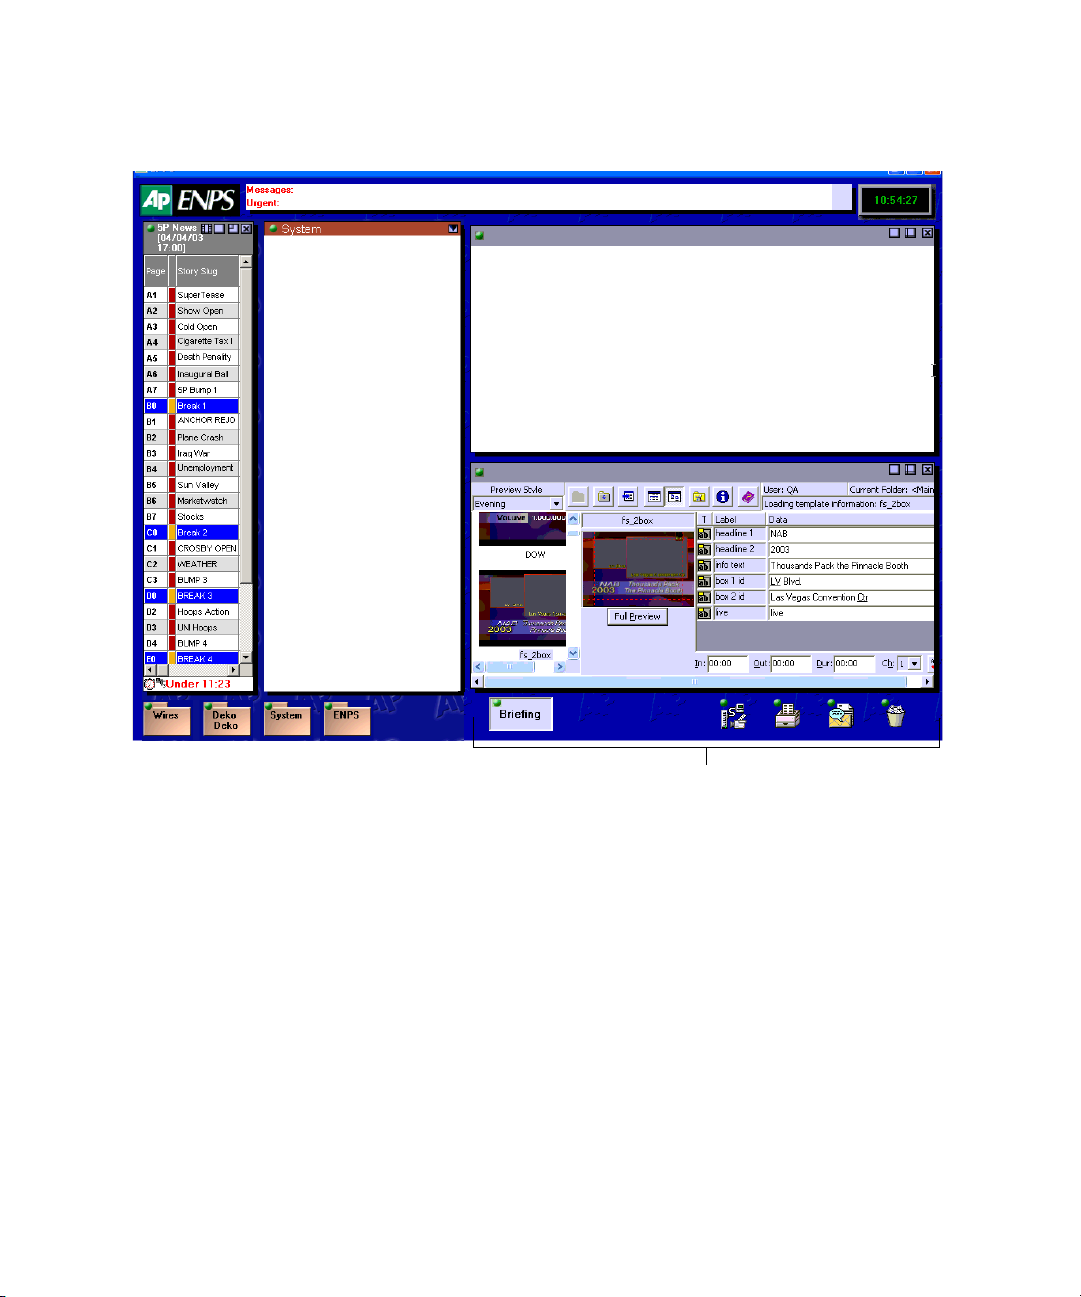
Deko Select within the ENPS client workstation interface
DekoMOS Gateway
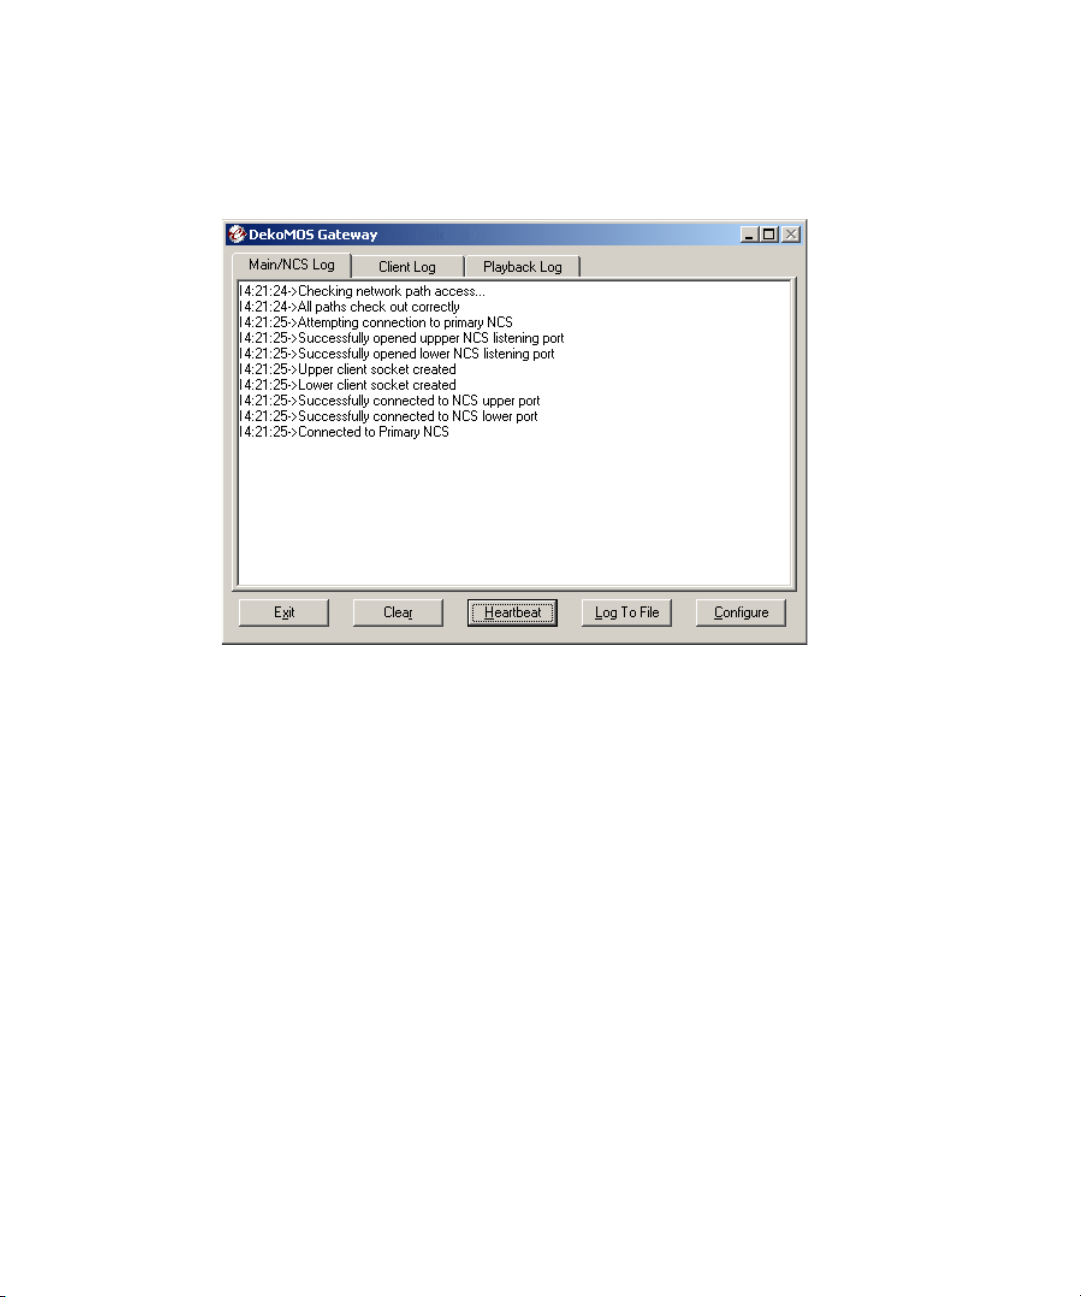
The DekoMOS Gateway is the essential interface for communication between the NCS and
all Deko Select components. Important configuration information allowing all Deko Select
components to effectively communicate is stored here. The DekoMOS Gateway presents
logs of DekoMOS activity and connections. For more information about installing and
configuring the DekoMOS Gateway, see “Installing and Configuring the DekoMOS
Gateway” on page 33.
22
Deko Select
Page 23
Deko Select and the Newsroom Environment
DekoMOS Gateway Interface
The following is an example of the DekoMOS Gateway interface.
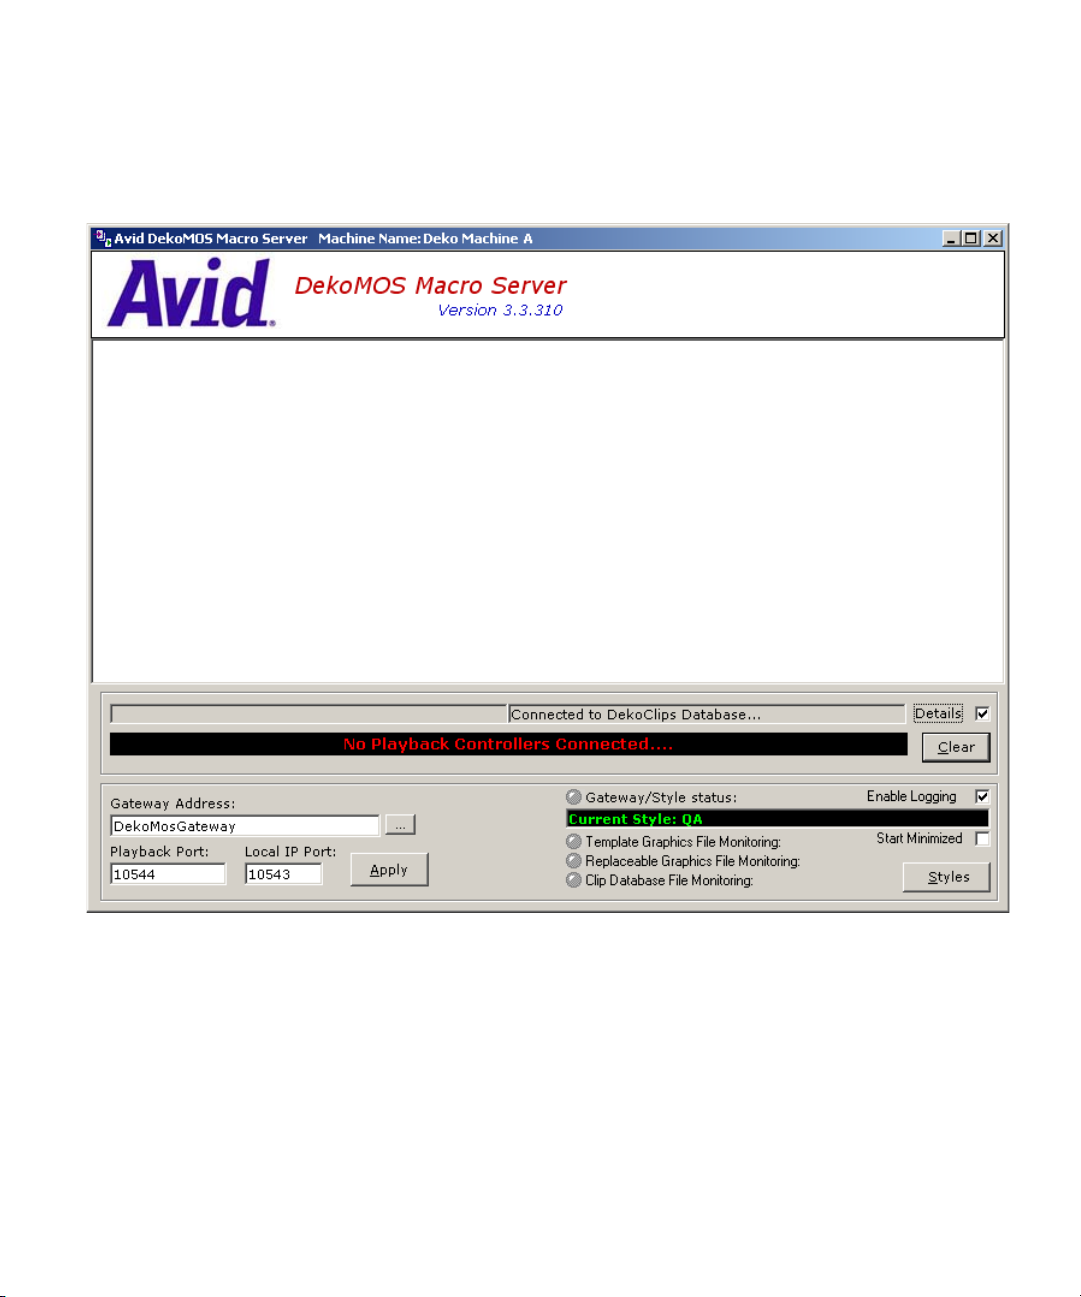
DekoMOS Macro Server
The DekoMOS Macro Server is the communication link between the Playback Controller,
the Gateway, and the Deko system. This component is installed on each Deko used for
playout to air. For information about installing and configuring the DekoMOS Macro Server,
see “Installing DekoMOS Macro Server on the Deko System” on page 56.
23
Page 24
Chapter 1 Welcome to Deko Select
DekoMOS Macro Server Interface
The following is an example of the DekoMOS Macro Server interface.
24
Page 25

Chapter 2
Installation and Setup
Before you can use Deko Select effectively, you must properly install and configure the
Deko Select components.
This chapter includes the following:
• What information to gather before installing
• How and where to install Deko Select components
• How to configure Deko Select components
The following topics describe how to install and setup the components of your Deko Select
system:
• Before You Install Deko Select
• Installing and Configuring the DekoMOS Gateway
• Viewing Options Enabled on the Net HASP
• Installing DekoMOS Macro Server on the Deko System
• Installing and Configuring Deko Select Software
• Locations of Installed Components
Page 26

Chapter 2 Installation and Setup
Before You Install Deko Select
Before you install Deko Select, you must open the box and make sure you have the Deko
Select Option contents, including the Net HASP enabling dongle (Application key), and
software installation CD. Once you have verified that, there is additional information you
must gather and preparations that you must make before installing and configuring
Deko Select.
These functions are described in the following topics:
• Verifying Deko Select Option Contents
• Gathering Information
• Preparing Your System
• Configuring ENPS MOS Settings Before Installing on an ENPS NCS
• Connecting the Net HASP Dongle and Printer
• Confirming that the NetHASP License Manager is Running and Properly Configured
• Installing Software Components
Verifying Deko Select Option Contents
Verify that your Deko Select Option includes the following:
• A Net HASP enabling dongle
• An Installation CD with all Deko Select software components
• Deko Select Installation and User’s Guide (this guide) in .PDF format
n
If you are configuring a system to integrate with iNEWS Command, see Chapter 6 of the
Avid iNEWS Command Installation Guide.
Gathering Information
Before you begin the software installation, gather the following information regarding the
systems on your site:
• The IP address of the NCS (the ENPS server or the iNEWS Command Gateway).
• The IP address of the fail-over NCS (needed for ENPS workstations only).
• The NCS ID (needed for iNEWS and ENPS workstations).
• The Gateway ID that you have decided upon and defined in the NCS. In iNEWS, this is
defined in the system.mos-map.
26
Page 27

• The path name to the location where clients can access updates. This is optional is you
enable Auto-updates on your system.
• The IP address of the computer with the Net HASP installed, typically the same
computer as the DekoMOS Gateway.
For the following, recommended defaults are displayed in the Configuration dialog box, but
settings can be changed at your own risk:
• The default port number for the clients to communicate with the DekoMOS Gateway
is 10542.
• The default port numbers for the DekoMOS Gateway to communicate with the ENPS
server, if applicable, are 10540 for Media Objects and 10541 for Running Order.
• The port number for the Net HASP, default is 475.
Preparing Your System
The following topics contain information regarding preparing your system:
• File Storage Structure
• An Important Word about Fonts
• About Using Deko Select in a Non-Latin Language Environment
Before You Install Deko Select
File Storage Structure
Deko Select components must be able to locate the Deko graphic template files and their
components. Graphics for playout are stored on the Deko used for playout. Copies are stored
on the DekoMOS Gateway for access by the Deko Select Browser from the NCS clients.
Information about the file storage structure is entered and displayed in various configuration
windows. For more about appropriate storage structure, see “Storage Structure for Graphic
Components” on page 97.
An Important Word about Fonts
Any fonts used in templates intended for use with Deko Select must be installed on all
computers, including Deko playout systems and NCS clients that access and display the
templates. To install fonts, see the appropriate Windows documentation.
About Using Deko Select in a Non-Latin Language Environment
English and other Latin-based languages use a certain character set. Other languages use
other characters. The language or languages that you can display depend upon system
settings. For more information, see the appendix beginning on “Displaying Languages” on
page 195, or the appropriate Windows documentation.
27
Page 28

Chapter 2 Installation and Setup
Deko Select currently uses single-byte characters to recall the appropriate glyph to display a
character. When a byte is sent to Deko, Deko converts it to Unicode according to the current
code page. The information is then maintained internally in Deko in Unicode. Most
Truetype fonts have more than one lookup table. If they have more than 256 glyphs, then
they must be able to find those glyphs, usually with a Unicode lookup table. Before Unicode,
many non-English applications supplied their own fonts where all the glyphs are in the first
256 positions. The applications had their own tables to know where the glyphs were stored.
These fonts, possibly found in older graphics, do not work properly with more modern
applications such as Deko Select.
iNEWS Command can be set to display fonts appropriate for languages other than English.
See “Displaying Languages” on page 195.
Compatibility with Components in Previous Versions of Deko Select (DekoMOS)
Components of different versions of Deko Select (formerly DekoMOS) are compatible as
indicated below. Many of the new features might not be available when connecting Deko
Select to older components.
3.0 Gateway
• 2.1 Client, no 3.0 Client features
• 2.1 Macro Server
2.1 Gateway
• 3.0 Client, no global default graphic duration
• 3.0 Macro Server
Configuring ENPS MOS Settings Before Installing on an ENPS NCS
You need to configure the ENPS MOS settings before you install on an ENPS NCS.
You must be an ENPS Administrator to complete this process.
To configure the ENPS MOS settings:
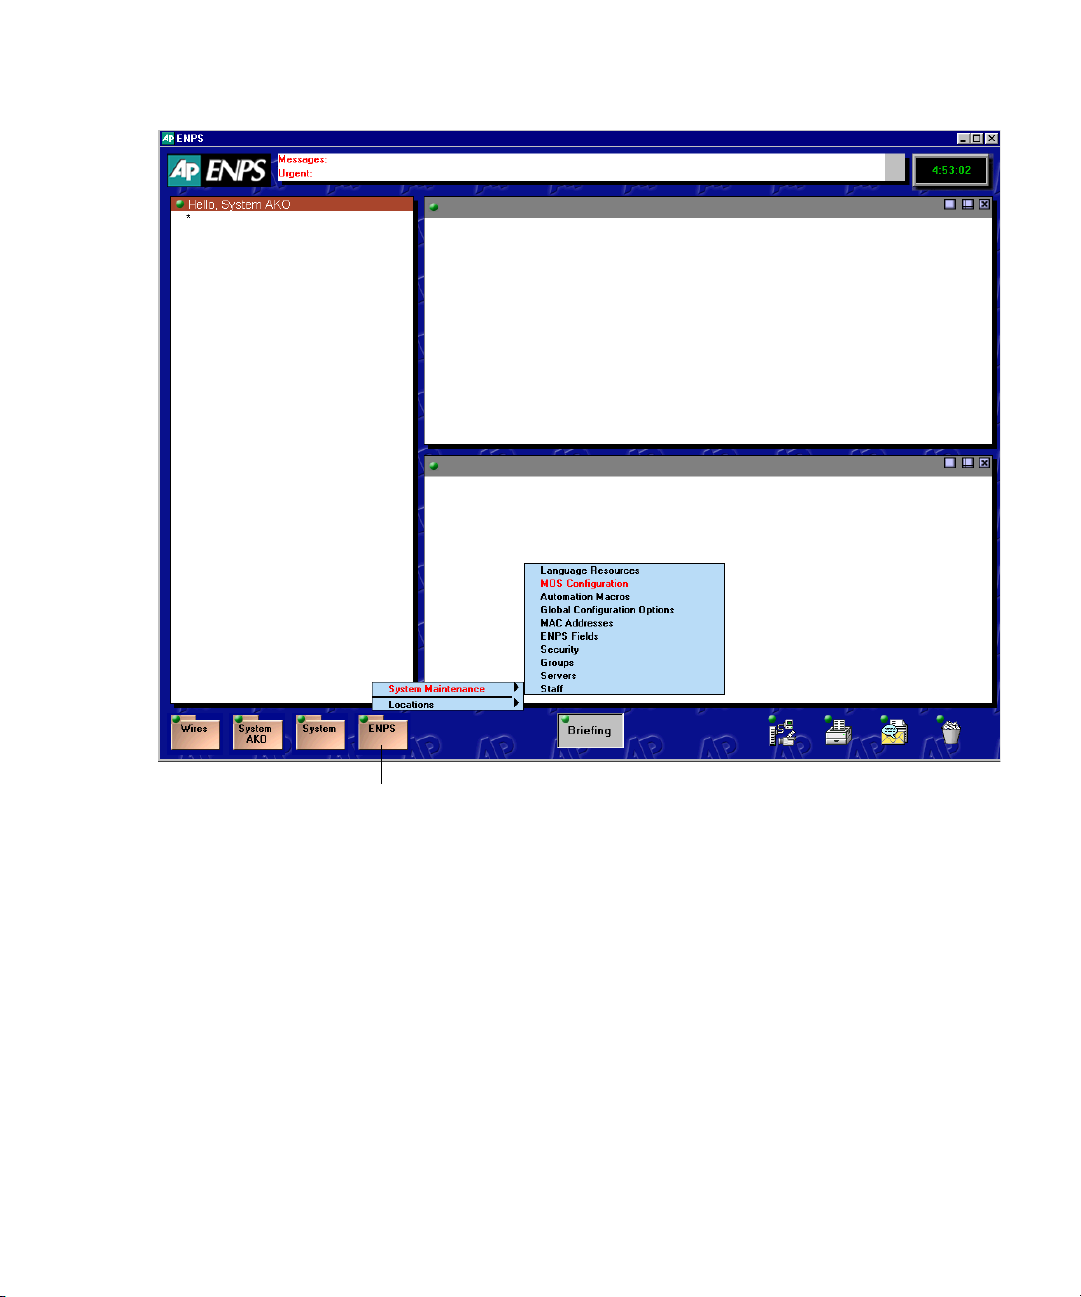
1. Open the ENPS client interface.
2. Click the green Rover button on the Corporate folder at the bottom of your screen,
fourth from the left. This folder is typically labeled with your station call letters or
corporate name. By default, it is labeled ENPS.
28
Page 29
Before You Install Deko Select
Green Rover button
29
Page 30
Chapter 2 Installation and Setup
3. Select System Maintenance > MOS Configuration.
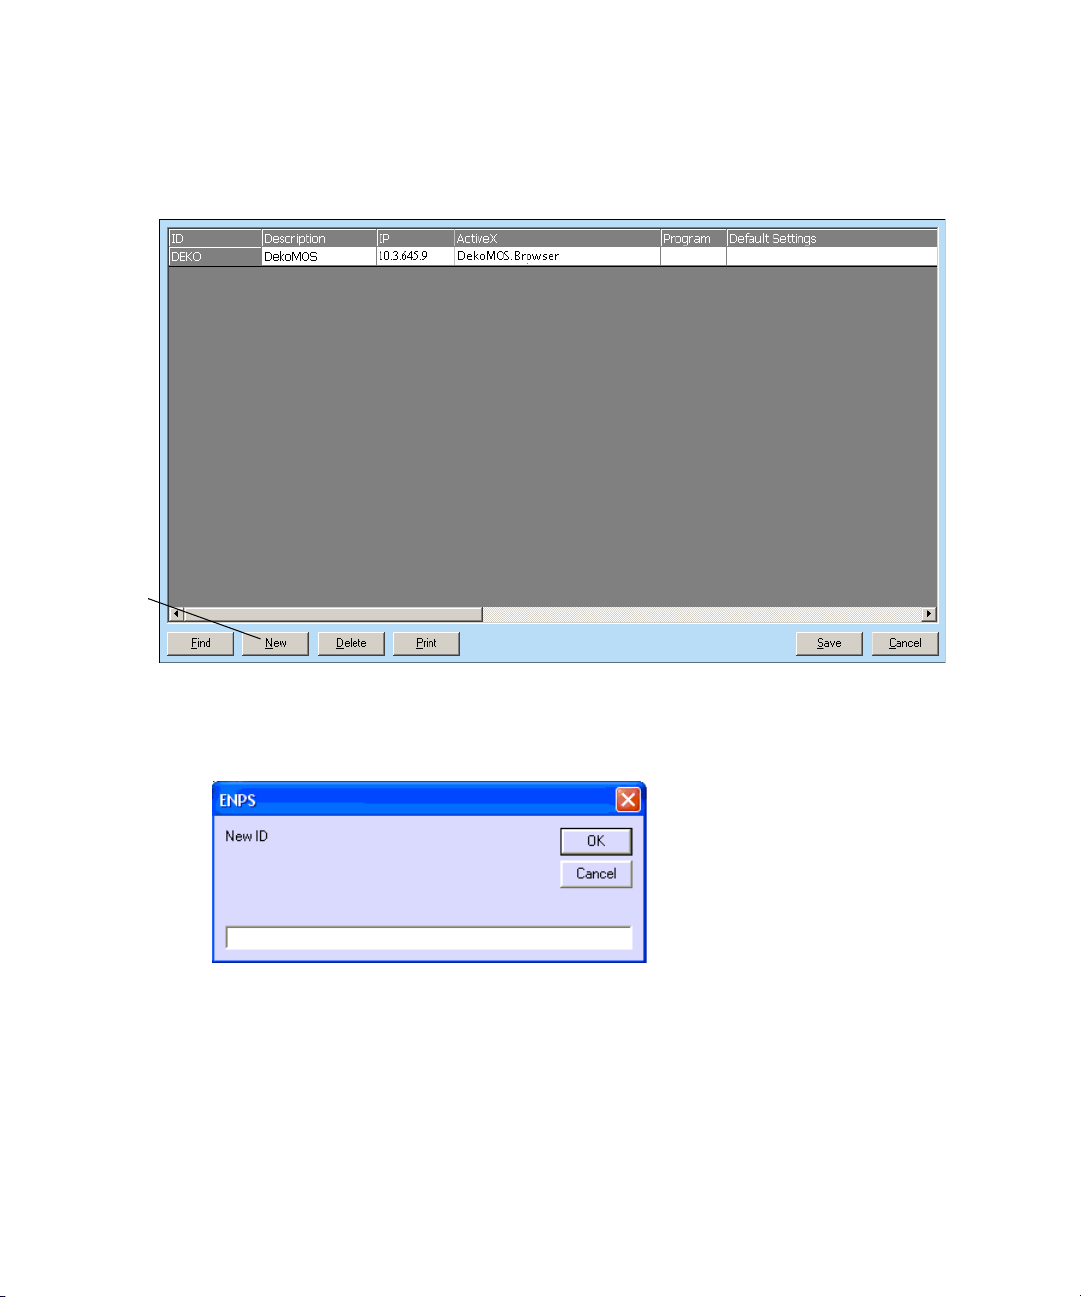
A dialog box with a list of configured MOS plug-ins opens.
Click
New
button
30
4. Click the New button.
The ENPS dialog box opens.
5. Type the same MOS ID that you will type in the DekoMOS Gateway configuration in
the Gateway ID text box.
6. Click OK.
A new row appears in the table.
Page 31

7. Double-click the row.
The MOS Configuration dialog box opens.
Before You Install Deko Select
8. Complete the text boxes as shown in the following table:
MOS Configuration dialog box
Text Box Name Type
Description The name that identifies this plug-in
for users.
IP The IP address of the DekoMOS
Gateway
ActiveX The ActiveX Application ID of the
DekoMOS.Browser
Modal UI ActiveX The ActiveX Application ID of the
DekoMOS.Browser
9. Select the Auto Create text box.
10. Click OK.
11. Click Save.
31
Page 32

Chapter 2 Installation and Setup
Connecting the Net HASP Dongle and Printer
The Net HASP dongle included with your Deko Select system should be connected to the
machine where you will install the DekoMOS Gateway.
To connect the New HASP Dongle, do the following:
t Connect the dongle to either the parallel port or one of the USB ports on the back of
the machine.
To connect a printer to this computer, do the following:
t Connect the printer with a cable to the dongle just as you would directly to the port. The
Net HASP dongle enables the Deko Select Option for the NCS clients.
The Net HASP License Manager, the driver for the Net HASP, installs automatically with
the DekoMOS Gateway. Avid recommends selecting Service as the installation option for
the Net HASP License Manager. After installing, you should confirm that the Net HASP
License Manager is running and that it is configured to use TCP/IP.
Confirming that the NetHASP License Manager is Running and Properly Configured
32
To confirm that the NetHASP License Manager is running and properly configured:
1. Right-click the NetHASP License Manager Icon in the task tray at the bottom of your
screen and select Show.
The Net HASP License Manager window opens. You should see the words Server is
listening to TCP/IP: Loaded and Net HASP License Manager is now - Active.
Page 33

Installing Software Components
The Deko Select Option requires installation and configuration of four software
components:
• Install the core components of the Avid Interplay Framework on the Deko. For more
information, see Chapter 2 of the Avid iNEWS Command Installation Guide.
• Install DekoMOS Gateway on a PC with a network connection to the actual Deko
device. The requires a USB dongle supplied by Avid. For more information, see
“Installing and Configuring the DekoMOS Gateway” on page 33.
• Install DekoMOS Macro Server (on each playout Deko system). For more information,
see “Installing DekoMOS Macro Server on the Deko System” on page 56.
• If your Deko is going to be integrated with Avid iNEWS Command, you must install the
Avid iNEWS Command Server and Client software. For more information, see the
iNEWS Command Installation Guide.
• Deko Select software (on all NCS client workstations). The Deko Select software
includes the Browser and Editor. For more information, see “Installing and Configuring
Deko Select Software” on page 61
Install each component as described on the following pages. The DekoMOS Gateway should
be installed before the other components.
Installing and Configuring the DekoMOS Gateway
n
n
Make sure Internet Explorer version 5.0 or higher is installed on all machines before
installing Deko Select software components.
When updating Deko Select from previous versions (formerly called DekoMOS), Avid
recommends that you update all four components. Mixed versions might not be compatible
or might have limited feature functionality.
Installing and Configuring the DekoMOS Gateway
This topic contains information on installing and configuring the DekoMOS Gateway.
The DekoMOS Gateway can not be installed on the iNEWS Gateway or ENPS Server. We
recommend installing the DekoMOS Gateway on it’s own dedicated computer.
®
The DekoMOS Gateway should be installed on a Windows
Server or a Windows 2003 Server Operating System. Otherwise, because of Windows
limitations, the number of clients allowed to connect simultaneously is limited to ten.
NT Server, a Windows 2000
33
Page 34

Chapter 2 Installation and Setup
These functions are described in the following topics:
• “Installing the DekoMOS Gateway” on page 34
• “Accessing the DekoMOS Gateway Configuration Window” on page 34
• “Configuring General Settings” on page 36
• “Configuring Connections” on page 39
• “Configuring Browser and Editor Settings” on page 42
• “Configuring Editor Macros” on page 43
• “Configuring Client Style Settings” on page 50
• “Adding Control Rooms” on page 54
Installing the DekoMOS Gateway
To install the DekoMOS Gateway:
1. Insert the Deko Select Installation CD into the CD drive of the DekoMOS Gateway
machine.
2. On the CD, navigate to DekoMOSGateway.exe.
3. Click OK and follow the instructions on the screen to install the software.
Accessing the DekoMOS Gateway Configuration Window
To access the DekoMOS Gateway configuration window:
1. Determine if the DekoMOS Gateway is running. If the DekoMOS Gateway is
- Not running, click Start > Programs > Avid Systems > DekoMOS > DekoMOS
Gateway to run the DekoMOS Gateway application.
- Running, right-click on the icon in the system tray on the taskbar to maximize
the window.
DekoMOS Gateway icon
If you have not previously configured the Gateway, or if it is missing any required
information, the DekoMOS Gateway Configuration window will automatically open.
34
Page 35

Installing and Configuring the DekoMOS Gateway
2. If it does not appear, do one of the following:
t Click the Configure button.
t Press Alt+C.
Configure
button
The DekoMOS Gateway Configuration window opens.
Once the DekoMOS Gateway is installed, you need to configure the following:
• General settings, including
- Enabling spell checking and spell check preferences
• Connection information, including:
- Confirming or adding enabled options and the number of enabled users
• Browser and Editor settings, including:
- Configuring Editor macros
- Configuring third-party graphic or clip browsers
- Configuring a safe title area for graphics
• Client Styles settings
• Control Room settings
35
Page 36

Chapter 2 Installation and Setup
From the DekoMOS Gateway configuration window, you can also do the following:
• Configure General Settings. See “Configuring General Settings” on page 36
• Configure Connections. See “Configuring Connections” on page 39
• Configure Browser and Editor Settings. See “Configuring Browser and Editor Settings”
on page 42
• Configure Editor Macros. See “Configuring Editor Macros” on page 43
• Configure Client Style Settings. See “Configuring Client Style Settings” on page 50
• Add Control Rooms. See “Adding Control Rooms” on page 54
Configuring General Settings
To configure general settings:
1. From the DekoMOS Gateway Configuration window, select the General tab.
36
Paths
area
Log Settings
area
2. In the Paths area, type settings as follows:
t In the XML Storage Folder text box, type or browse to the pathname of the folder
for storing active rundowns. If you type a folder name that does not exist, when you
click OK you see a message asking if you would like the system to create this
folder. This path is for the use of the Gateway and should therefore be local to this
machine, beginning with a drive, C:, for example.
Page 37

Installing and Configuring the DekoMOS Gateway
t In the User Settings Storage Folder text box, type or browse to the pathname of the
folder for storing individual user client settings. If you type a folder name that does
not exist, when you click OK you see a message asking if you would like the system
to create this folder. This path is for the use of the Gateway and should therefore be
local to this machine, beginning with a drive, C:, for example.
t Select (recommended except when using languages without lexicons) or deselect
Enable Spell Checking. In the Spell-Check Dictionary Folder text box, type the
UNC name of the folder containing the lexicon files. It is important to use the full
UNC name, beginning with \\, because this path is provided to the Deko Select
browsers on the NCS client machines. By default, Deko Select installs the lexicon
files to c:\program files\Avid\dekomos\lex. After installation, the administrator
must share that folder so clients can read the lexicon files. The folder might be
shared as Lex, so the pathname entered in the text box in the General tab would be
\\Gateway\Lex, substituting the word Gateway with the name of the machine where
the DekoMOS Gateway is installed.
n
n
For more information about file sharing, see your Windows documentation.
t Select Enable Auto-Updates. Once selected, Force Auto-Updates becomes enabled.
The full UNC name, including file name, of the latest client installer should appear
in the DekoMOS Client Installer text box. Using the full UNC name, beginning
with \\ is important because this path is provided to the Deko Select browsers on the
NCS client machines. Enabling auto-updates allows the system to automatically
receive and install Deko Select software updates. Additionally, selecting Force
Auto-Updates allows updates to install without offering you an option to decline
updating. Updating requires restarting the NCS client machine.
You can create a folder in the Gateway machine for the DekoMOS Client Installer. To do
this, name the folder C:\Updates. Copy the latest DekoMOSClient.exe installer into the
folder and share the folder as Updates. The DekoMOS Client Installer text box in the
General tab would then read \\(Gateway name)\Updates\DekoMOSClient.exe.
t Click the Auto-Update Password button to display a prompt for entering the name,
domain, and password of a local administrative account. Type the information. This
information is encrypted in auto-update files, allowing individual clients without
administrative privileges to install auto-updates. Click OK.
37
Page 38

Chapter 2 Installation and Setup
3. In the Log Settings area, select options as follows:
t For Log Detail Level, select High to show XML data in the Log of system activity.
Select Medium for normal log activity. Select Low to show errors only. This setting
is recommended unless you are troubleshooting.
t Leave Max Lines at the default setting.
t Select Display time in log lines (recommended) if you want the log to display the
time, according to the system clock, when activity occurs.
38
t Select or deselect Hide Heartbeats. A heartbeat is a signal sent from one computer
to another, requesting a return signal to confirm their connection. If selected, you
see only the results of heartbeats you manually send, but not the ones the NCS
initiates, or the ones the Gateway automatically sends.
4. In the Startup Settings area, make the following selections
t Select (recommended) or deselect Start Minimized according to your preference.
t Select Automatically Start on Boot-Up (recommended) to start the Gateway
whenever you log on to this PC.
5. Click OK.
Page 39

Configuring Connections
To configure connections:
1. Access the DekoMOS Gateway Configuration window if it is not already open, and
click the Connections tab.
Installing and Configuring the DekoMOS Gateway
2. In the Primary NCS area, type these settings:
t In the Address text box, type the IP address for the iNEWS Gateway or
ENPS server
t For the Lower Port, Avid recommends keeping the default setting of 10540 unless
you receive an error message.
t For the Upper Port, Avid recommends keeping the default setting of 10541 unless
you receive an error message.
3. Select or deselect Automatic Fail-over. If the Gateway loses connection to the NCS, the
Gateway automatically tries to reconnect. If it cannot reconnect, and Automatic Failover is enabled, the Gateway tries to connect to the fail-over NCS. If the Gateway
cannot connect to the fail-over NCS, it continues to alternate connection attempts to the
NCS and the fail-over NCS until it connects to one. If you enable Automatic Fail-over,
type information in the Fail-over NCS area:
t In the Address text box, type the IP address for the fail-over iNEWS Gateway or
ENPS server
t For the Lower Port, type 10540.
39
Page 40

Chapter 2 Installation and Setup
t For the Upper Port, type 10541
4. In the MOS IDs area, select one of the following buttons to configure your system for a
single MOS ID or Multiple MOS IDs (Command systems only).
t If you select the Single MOS ID button, then, in the Gateway ID text box, type the
MOS ID name that you have decided upon and defined in the NCS.
n
n
This unique MOS ID string enables every template that is dragged and dropped into a story
to use the specified MOS ID.
t If you are using Command, you can select the MOS ID per Ch button (as shown in
the following example) if you want the ability to drag and drop templates into
specific channels. Once you select this button, the screen changes to reveal the
Assign Channel IDs button.
With the MOS ID per Ch button selected, the MOS ID of the templates that are dragged and
dropped into a story will vary depending on the channel the template was dropped with.
40
- If you select the MOS ID per Ch button, click the Assign Channel IDs button. The
Configure Channel IDs dialog box opens.
Page 41

Installing and Configuring the DekoMOS Gateway
- For each Channel group listed in the Ch column (that is, 1, 2, 3, 4...), in the Gateway
ID column, type in a corresponding MOS ID for the channels you want to use. Click
OK to return to the DekoMOS Gateway Configuration dialog box.
5. In the NCS ID text box, type the NCS ID assigned by your System Administrator.
6. Select the “Reject items with incorrect Gateway ID” check box unless you are using
Deko Select with an ENPS system and MOS Redirection.
7. In the Listening Ports area:
n
t Client Port default setting is 10542. Avid recommends keeping this setting.
t PBC Port default setting is 10544. Avid recommends keeping this setting.
8. In the Net HASP Settings area:
t Type the IP address of the computer with the Net HASP installed if it is not already
entered. The IP address text box automatically defaults to the address of the
current machine.
t Keep the default setting of 475 in the Port field to indicate the Port number where
the Net HASP checks for connections. This can be changed if you receive an
error message.
9. Click OK.
Using the Enabled Options button is described in “Viewing Options Enabled on the Net
HASP” on page 54.
41
Page 42

Chapter 2 Installation and Setup
Configuring Browser and Editor Settings
To configure the browser and editor settings:
1. Access the DekoMOS Gateway Configuration window if it is not already open. Click
the Browser/Editor tab.
42
2. In the Time Code area, select Use Time Code to enable clients to enter a time code when
a graphic is added to a story. Make a selection from the list to specify the format of the
time code.
Default Graphic Duration allows graphics to play for the specified number of seconds
from a specified in time without entering a duration or an out time when you place
graphics in a rundown. You can override this setting later.
3. Select the appropriate Frame Rate setting, NTSC or PAL for your facility.
Page 43

Installing and Configuring the DekoMOS Gateway
4. Click the Configure Safe Title Area Button.
The Safe Title Area dialog box opens.
5. Select “Show safe title area” to display a red dotted border around the area of a template
that one could safely assume would appear onscreen. Because the edges of an image
might be clipped by an overscanning monitor, text placed outside the safe title area
could appear off screen. In a broadcast environment, you should probably keep the
recommended default settings of ten percent from the Top, Left, Right, and Bottom
edges. In a different environment, with monitors of varying dimensions, you might want
to adjust percentages. When you are finished, click OK.
6. In the Graphic Browsers and Clip Browsers areas, add, delete, or edit graphic or clip
browsers. For more information, see “Configuring Deko Select to Access Images and
Clips from Other Browsers” on page 46.
7. To configure Editor Macros, see “Configuring Editor Macros” on page 43.
8. Click OK.
Configuring Editor Macros
If there is a text string or special character that you know you frequently use in replaceable
text boxes of the Deko templates, you can create a macro to type the text or character and
then assign the macro to a keyboard shortcut for quick access.
Examples of text you might want to enter with an editor macro would be an often used
anchor name or a name that is difficult to spell. Editor macros are also useful for entering
frequently used symbols such as an Up or Down arrow indicating the price change of stocks.
Editor macros are defined from the DekoMOS Gateway.
43
Page 44

Chapter 2 Installation and Setup
These functions are described in the following topics:
• “Assigning Macros to a Single Key for Quick Access” on page 44
• “Configuring Deko Select to Access Images and Clips from Other Browsers” on
page 46
• “Editing Graphic or Clip Browsers” on page 47
• “Deleting Graphic or Clip Browsers” on page 48
• “Selecting a Graphic or Clip Browser as the Default Browser” on page 49
• “Enabling Deko Select to Use Manual Entry” on page 49
Assigning Macros to a Single Key for Quick Access
To assign a macro to a single key for quick access:
1. Access the DekoMOS Gateway window.
2. Click the Configure button.
The DekoMOS Gateway Configuration window opens.
44
3. Click the Browser/Editor tab.
Page 45

4. Click the Configure Editor Macros button.
The Editor Macros dialog box opens.
Installing and Configuring the DekoMOS Gateway
5. Click a letter in the left column to select the Key to which you want to assign a macro.
45
Page 46

Chapter 2 Installation and Setup
6. Click the Add button.
The Add Editor Macro dialog box opens.
7. To assign a macro to a letter key, type the name of the macro in the Description text box.
Then do one of the following:
t To create a macro for entering text, simply type that text in the Macro text box and
then select Show macro contents when inserted.
t To create a macro for entering a symbol, picture, or for assigning a Deko preset
style, in the Macro text box, type a “\” as an escape character, then type in a macro
using commands found in the Shortcuts and Commands section of the Avid Deko
Help. Uncheck Show macro contents when inserted.
8. Click OK and then click OK again.
Configuring Deko Select to Access Images and Clips from Other Browsers
Deko Select has the ability to access stills and clips to place in the editable text boxes of your
templates. Access to the Deko Select browser or a third-party storage system must be
configured from the DekoMOS Gateway. At this time, Xenotrack and Artbox from
®
Proximity
To configure Deko Select for access to graphic or clip browsers:
is compatible. For more information, see “Using Other Products” on page 99.
1. Click the DekoMOS Gateway icon on the task bar to see the DekoMOS
Gateway window.
2. Click the Configure button.
The DekoMOS Gateway Configuration window opens.
46
Page 47

Installing and Configuring the DekoMOS Gateway
3. Click the Browser/Editor tab.
4. To add a graphic browser or a clip browser, click Add in the appropriate area.
The Add Graphic Browser dialog box opens.
5. See the manufacturer’s instructions for the software application ID of the plug-in and
type it in the AppID text box.
6. In the Alias text box, type the name you would like to appear in the Deko Select
Browser interface.
n
n
Editing Graphic or Clip Browsers
If you want the ability to manually type in replaceable graphic names or numbers, see
“Enabling Deko Select to Use Manual Entry” on page 49.
7. Click OK.
If you want to delete Graphic or Clip browsers, see “Deleting Graphic or Clip Browsers” on
page 48.
To edit a graphic or clip browser:
1. Highlight the browser in the list.
2. Click Edit.
The Add Graphic Browser dialog box opens with the AppID and the Alias for the
selected browser.
3. Make changes as desired.
4. Click OK.
47
Page 48

Chapter 2 Installation and Setup
Deleting Graphic or Clip Browsers
To delete a graphic or clip browser:
1. Select the browser in the list.
48
Browser name selected in list
2. Click the Delete button.
Page 49

Installing and Configuring the DekoMOS Gateway
Selecting a Graphic or Clip Browser as the Default Browser
To select a graphic or clip browser as the default browser:
1. From the DekoMOS Gateway, select Configure > Browser/Editor.
2. Select the graphic or clip browser in the list.
Select from the list
Enabling Deko Select to Use Manual Entry
If you want the ability to manually type in replaceable graphic names or numbers, you must
enable Deko Select to use manual entry functionality.
To enable Deko Select to use Manual entry:
1. Click Add in the Graphic Browsers area.
2. Type
3. Type
<manual>
<manual>
in the Alias area.
in the AppID area.
49
Page 50

Chapter 2 Installation and Setup
4. Click OK.
Configuring Client Style Settings
Deko Select can easily manage and organize graphic templates to ensure the correct look or
style of your broadcasts. For each programming entity, such as a station or a single show,
that uses a distinct style, you can create a style name. You then assign paths to that style for
the templates, graphics, and custom typefaces utilized for that look. You can reference this
style from the client interface for easy access to the graphics appropriate for the station
or show.
n
50
All graphics in a single rundown must be from the same style. Adding graphics to a story is
described in “Building Stories with Graphics” on page 87.
In the examples that follow, each template has the same name and the same number and
types of layers. The background, the Dow Jones Industrials banner, and the Change, Close,
and Volume Headings are all fixed layers. The Up or Down change indicators and the
numeric values are all in replaceable text boxes filled in by a reporter or via automation. The
Current Style determines which look appears by defining the paths to templates, fixed
graphics, and replaceable graphics. Once a template is selected and the replaceable text
boxes are filled, changing the Current Style changes the appearance of the graphic, but the
information or graphics in replaceable text boxes remains.
Page 51

Installing and Configuring the DekoMOS Gateway
An example of how a graphic might look, rendered in a certain style.
The same graphic, rendered in a different style.
51
Page 52

Chapter 2 Installation and Setup
To add a style and define paths:
1. Access the DekoMOS Gateway Configuration window if it is not already open. Click
the Client Styles tab.
n
52
2. Click the Add button. The Add Style dialog box opens.
3. Type a style name in the Style Name text box. Click OK to accept the name and return to
the Configuration dialog box. This is the name that will appear in the Deko Select
plug-in on the client computers and in the iNews Command Inventory.
The Deko style is also referenced in the iNEWS system.map story for each rundown using the
Deko with iNEWS Command.
4. If the style name you just added is not displayed in the Style Name text box, click the
Down arrow beside the text box to display a list of style names. Click the Style Name to
select it.
Page 53

Installing and Configuring the DekoMOS Gateway
5. In each of the four Folder text boxes, type the path that the style should reference or
press the browse button to the right of the text box to navigate to the appropriate folder.
All clients will locate the elements for display in these folders. Avid recommends that
they reside on the system where the DekoMOS Gateway is installed.
The path you type must be a UNC path and not a drive letter path. The format for a UNC
path is \\server\volume\directory\file and is not case-sensitive. For example:
\\Shared1_svr\Shared1\WGroups\Network\Orders.xls
n
n
All folders should be shared for Read Only access. This ensures that the graphics remain as
they were created while allowing access to those graphics. For best performance, files for
playout are stored on the Deko. Duplicate files stored on the Gateway are accessed by the
Deko Select Browser.
See the recommended file structure for graphics described in “Storage Structure for Graphic
Components” on page 83.
The path you type
must be a UNC
path, and not a
drive letter path.
6. Click OK.
To change a style name:
1. Click the DekoMOS Gateway icon on the taskbar to see the DekoMOS
Gateway window.
2. Select Configure > Client Styles.
3. Select the style to modify from the Style Name list.
53
Page 54

Chapter 2 Installation and Setup
4. Click the Modify button, then change the style name.
5. Click OK.
To change the appearance of a style:
1. Click the DekoMOS Gateway icon on the taskbar to see the DekoMOS
Gateway window.
2. Select Configure > Client Styles.
3. Select the style to modify from the Style Name list.
4. To change the style's reference locations for the clients, in each of the four Folder text
boxes, type the path that the style should reference, or press the Browse button to the
right of the text box to navigate to the appropriate folder.
To delete a style:
1. Click the DekoMOS Gateway icon on the taskbar to see the DekoMOS
Gateway window.
2. Select Configure > Client Styles.
3. Select the style to delete from the Style Name list.
4. Click the Delete button.
5. Click OK.
Adding Control Rooms
If you are using Command, you do not need to add or configure a Control Room.
Viewing Options Enabled on the Net HASP
From the machine with the DekoMOS Gateway software installed, you can see a list of
options and users enabled for Deko Select. Additional options or user licenses can be
purchased from Avid, and must be enabled from the DekoMOS Gateway interface.
To see options and number of users enabled for Deko Select:
1. Click the DekoMOS Gateway icon on the taskbar.
DekoMOS Gateway icon
The DekoMOS Gateway window opens.
54
Page 55

Viewing Options Enabled on the Net HASP
2. Click the Configure button, then click the Connections tab.
3. Click the Enabled Options button.
The HASP Options dialog box opens. A check mark appears beside enabled options.
n
If you purchase additional options from Avid, you receive a SetOpt.mcr file with the enabling
code for those options. If you purchase additional user licenses, the enabling code is sent to
you in a SetLimit.mcr file.
To enable additional options or more users:
1. Start the DekoMOS Gateway.
2. Click the DekoMOS Gateway icon on the taskbar to see the DekoMOS
Gateway window.
DekoMOS Gateway icon
The DekoMOS Gateway window opens.
3. Click the Configure button, then click the Connections tab.
4. Click the Enabled Options button.
The HASP Options dialog box opens.
55
Page 56

Chapter 2 Installation and Setup
5. Click the Enable Options button on the HASP Options dialog box.
The Enable Options dialog box opens.
6. Do one of the following:
t Select Use .mcr file. Then, type in the name of the SetOpt.mcr or SetLimit.mcr file
or locate it with the browse button.
t Select Manually enter enabling codes. Then, type the four multi-digit numbers of
your purchased code in the four Enabling Code text boxes.
7. Click OK.
Installing DekoMOS Macro Server on the Deko System
The DekoMOS Macro Server is the communication connection with the iNEWS Command
Playback Controller. Once installed on the Deko system, the Macro Server receives and
processes macro commands. The DekoMOS Macro Server also acts as a client to the
DekoMOS Gateway to retrieve a list of defined Styles from the Gateway. Once a style is
defined in the DekoMOS Gateway and selected from the iNEWS Command Playback
Controller, the Deko paths will be set according to the values configured in the DekoMOS
Macro Server.
To install the DekoMOS Macro Server on the Deko:
1. Insert the Deko Select Option Installation CD in the Deko machine’s CD-ROM drive.
2. On the CD, navigate to the DekoMOSMacroServer.exe file, then click OK or
press Enter.
3. Follow the on-screen prompts to complete the installation.
56
Page 57

Installing DekoMOS Macro Server on the Deko System
Once you have installed the Deko MOS Macro Server on the Deko, you can do the
following:
• Create macros to automatically start the DekoMOS Macro Server when Deko Starts.
See “Creating Macros to Automatically Start the DekoMOS Macro Server When Deko
Starts” on page 57.
• Configure the DekoMOS Macro Server. See “Configuring the DekoMOS Macro
Server” on page 57.
• Configure styles and local paths. See “Configuring Styles and Corresponding Local
Paths” on page 59.
Creating Macros to Automatically Start the DekoMOS Macro Server When Deko Starts
To create a macro to automatically start the DekoMOS Macro Server when Deko starts:
1. Select Start > Programs > Accessories > Notepad.
2. In the Notepad text window, type the following, with no line breaks:
shell open name="c:\Program
Files\Avid\DekoMOS\DekoMosMacroServer.exe"
3. Select File > Save File As.
The Save File As dialog box opens.
4. Type the name init.mcr and save the file in Deko’s bin folder that matches the Deko
model you are using (for example, C:\Deko1000\bin).
Configuring the DekoMOS Macro Server
To configure the DekoMOS Macro Server:
1. Do one of the following:
t If the DekoMOS Macro Server is not running, access the configuration window by
clicking Start > Programs > Avid > DekoMOS > DekoMOS Macro Server.
t Double-click the desktop icon.
t If the DekoMOS Macro Server is running and is visible in the system tray, click the
DekoMOS symbol in the system tray to maximize the application.
The DekoMOS Macro Server window appears. The top portion of the window displays
a log of DekoMOS Macro Server activity.
57
Page 58

Chapter 2 Installation and Setup
2. To specify that this log shows data communication in full xml view, select Details, near
the bottom right of the window. Or, deselect Details to show a simple one line view. To
clear the information displayed here, click the Clear button.
n
58
3. In the Gateway Address text box, type the IP address of the machine running the
DekoMOS Gateway. The Playback Port text box and the Local IP Port text box are
10544 and 10543, respectively, by default.
Do not change these port numbers unless you receive an error message. The Playback Port
number must be the same number you typed during DekoMOS Gateway configuration as the
Playback Port.
4. Click the Apply button below the Gateway Address text box.
5. Click Enable Logging if you want all logged information about Macro Server activity to
be automatically sent to the folder Avid\DekoMOS\Logs.
Page 59

Installing DekoMOS Macro Server on the Deko System
6. Click Start Minimized to specify that upon starting the DekoMOS Macro Server will not
display this window, but will appear in the system tray.
You can verify that the Macro Server is communicating with the Gateway. When the Macro
Server is first started and correctly communicating with the DekoMOS Gateway, the LED
light next to Gateway/Styles status turns green for a few seconds, then appears grayed out. If
there is no communication, the light turns red, indicating that there is a problem talking to
the Gateway.
You can verify that the Macro Server can confirm the existence of scheduled graphics,
graphic assets, and clips. The LED lights next Template Graphics File Monitoring, and
Replacement Graphic File Monitoring should be green. The Macro server must be able to
monitor these files to communicate information to the Playback Controller.
Configuring Styles and Corresponding Local Paths
To configure styles and corresponding local paths:
n
The same style names, but with local paths, must be typed in the configuration of the Macro
Server as were typed during Gateway configuration. For best performance, files for playout
are stored on the Deko. Duplicate files stored on the Gateway are accessed by the Deko
Select Browser.
1. Access the configuration window by selecting Start > Programs > Avid > DekoMOS >
DekoMOS Macro Server. If the Macro Server is already running, click the icon in the
system tray.
59
Page 60

Chapter 2 Installation and Setup
2. Click the Styles button.
The Deko Style Settings dialog box opens.
60
3. To configure styles defined in the DekoMOS Gateway, select the Style Name from the
list and then set the appropriate paths that this style will use. When the Playback
Controller sets a style, Deko uses the paths defined by the style.
Although you should use the same paths as set in the DekoMOS Gateway for that style,
paths should be local to this machine for best performance.
4. In the Additional Macro Commands text box, type additional commands to send to
Deko when the style is selected. This is useful for opening any show-specific presets or
other files.
5. Click Apply to apply settings for a style.
Page 61

Installing and Configuring Deko Select Software
6. Click OK when you have finished configuring styles.
To retrieve styles recently configured in DekoMOS Gateway and add them to the list of
styles in the Deko Style Settings window:
t Click the Refresh Styles List button in the Deko Style Settings window.
Installing and Configuring Deko Select Software
Deko Select software must be installed on each client computer.
After installation, you must configure Deko Select to communicate with the DekoMOS
Gateway. Once Deko Select is installed and configured on one computer, the configuration
files it produces (DekoMos.ini and NetHASP.ini) can be copied to the System32 folder on
that computer. Then, both of those files can be copied to additional Deko Select clients that
need to be configured
You can also configure individual user settings. The browser displays its contents and
executes spell checking according to the preferences of each individual user.
These functions are described in the following topics:
• “Installing Avid Deko Select” on page 61
• “Configuring Deko Select” on page 62
• “Configuring User Preferences on a Client Computer” on page 63
• “Configuring Gateway Settings on a Client Computer” on page 64
• “Creating Toolbar Buttons and Shortcuts to Access the Browser from iNEWS” on
page 67
Installing Avid Deko Select
The Deko Select plug-in allows iNEWS users to create CG items directly at the iNEWS
Workstation, including changing background graphics, editing replaceable text, and setting
In and Out points.
To install Avid Deko Select:
1. Ensure that the iNEWS client software is not running.
2. At the iNEWS Workstation, run the Deko Select installation program called
DekoSelectClient.exe
3. Log in to iNEWS.
4. Select Tools > Plugins > Avid Deko Select
.
61
Page 62

Chapter 2 Installation and Setup
n
n
n
If Thunder Select is also installed on the same workstation, the menu option will be Tools >
Plugins > Avid Graphics Select.
5. In the Configuration dialog box, on the Gateway Configuration tab, enter the host name
or IP address for the computer that is running the DekoMOS Gateway software.
6. Click OK.
Templates exist on both the Deko MOS Gateway and the Deko device. The Deko MOS
Gateway is then used to supply thumbnail graphics and handle file requests from plug-ins at
multiple workstations, thus relieving such burden from the actual device that might be busy
during playout. Duplication of assets on the gateway and device is not automatic; therefore,
it must be maintain manually.
To allow all clients to automatically access updates on one client, see “Installing and
Configuring the DekoMOS Gateway” on page 33.
Configuring Deko Select
To configure Deko Select:
1. Open Deko Select in either the iNEWS or ENPS Client interface. If Deko Select has not
been configured on this system before, the Configuration dialog box opens. Go to
Step 4.
2. Click the Configure button on the Deko Select toolbar. If this is the first time opening
Deko Select after installation, an error message appears stating that Deko Select is not
configured.
62
3. Click OK.
The Configuration dialog box opens.
Page 63

Installing and Configuring Deko Select Software
4. Type the DekoMOS Gateway machine name in the Gateway Address field, and
click OK.
Configuring User Preferences on a Client Computer
To configure User Preferences on a client computer:
1. Click the Configure button on the toolbar of Deko Select.
2. Click the User Preferences tab.
3. Select options to indicate what you want Deko Select to display.
4. Click OK.
63
Page 64

Chapter 2 Installation and Setup
Configuring Gateway Settings on a Client Computer
To configure Gateway settings on a client computer:
1. Click the Configure button on the toolbar of the Deko Select Browser.
2. Click the Gateway Configuration tab.
3. Type the IP address of the computer where the DekoMOS Gateway is installed in the
text box or browse to it.
The Gateway Browser Port is set to 10542. Do not change this default setting unless you
have changed it in the DekoMOS Gateway configuration.
4. Click OK.
Once you have configured the Gateway Settings on the first client computer, you can install
them on additional clients from an .ini file. For more information, see “Configuring Gateway
Settings on Additional Clients from an .ini File” on page 64.
In addition, you can also configure the spell checker. For more information, see
“Configuring the Spell Checker” on page 65.
Configuring Gateway Settings on Additional Clients from an .ini File
Gateway Settings, as configured above, are stored in a file called DekoMOS.ini in
C:\WinNT\System32 or C\WINDOWS\system32. After installing and configuring
Gateway settings on one client computer, you can copy this DekoMos.ini file onto any
other machines rather than actually repeating the configuration procedure.
64
Page 65

Configuring the Spell Checker
To configure the Spell Checker:
1. Click the Configure button on the toolbar, then click the Editor Options tab.
2. Click the Configure Spell Checker button.
The Spelling Options dialog box opens.
Installing and Configuring Deko Select Software
3. Select options as desired. for more information, see “Options Dialog Box” on page 128.
65
Page 66

Chapter 2 Installation and Setup
4. Select a Main Dictionary language.
5. In the Suggestions area, select the option indicating the desired degree of accuracy.
6. Click OK.
To edit your Personal Dictionary:
1. Click the Configure button on the toolbar, then click the Editor Options tab.
2. Click the Edit Personal Dictionary button. The Spelling Dictionaries dialog box opens.
n
66
3. Use the controls to add a word to your personal dictionary and associate another word
and an action with that word. You can also delete words or import all of the words in a
text file. For a detailed description of the controls in this window, see “Check-Spelling
Dialog Box” on page 123.
4. Click Close.
To have spelling errors underlined as you type text in the Editor:
1. Click the Configure button on the toolbar, then click the Editor Options tab.
2. Select Enable In-line Spell Checking.
3. Click OK.
The underline displays in the editor, not in the graphic output.
To edit the Default Graphic Duration, for automatically setting the Out Time of graphic
playout when you assign a graphic to a story:
1. Click the Configure button on the toolbar, then click the Editor Options tab.
2. Type a duration, in seconds, in the Default Graphic Duration text box.
3. Click OK.
Page 67

Installing and Configuring Deko Select Software
Creating Toolbar Buttons and Shortcuts to Access the Browser from iNEWS
The iNEWS Newsroom Computer System allows you to create toolbar buttons to access the
Deko Select client. The iNEWS System Administrator can also create keyboard shortcuts
giving the user direct access to Deko Select directly from the keyboard.
For more information, see the following topics:
• Creating a Deko Select Toolbar Button in iNEWS
• Creating Shortcuts to the Deko Select Editor in iNEWS
Creating a Deko Select Toolbar Button in iNEWS
To create a Deko Select toolbar button in the iNEWS interface:
1. Right-click one of the existing iNEWS tool bars and select Customize.
The Toolbars dialog box opens.
2. Click the New button.
3. Type a name for the new toolbar and then click OK.
67
Page 68

Chapter 2 Installation and Setup
4. Click Add to add a new button.
The Customize Toolbar button dialog box opens.
68
5. Type a name for the new button in the Name text box.
6. If desired, type descriptive text in the Tooltip Text text box.
7. Click the Macro radio button.
8. In the Macro window type
{alt TU}a.
9. Click OK to close the Customize Toolbar Button window.
10. In the Customize Toolbar window, click Text labels to show the button name under the
toolbar button.
11. Click OK to close the Customize Toolbar window.
12. Click Yes to show the newly created toolbar. The toolbar is now floating on top of the
iNEWS user interface.
13. Click and drag to position as desired.
Page 69

Creating Shortcuts to the Deko Select Editor in iNEWS
A keyboard shortcut can be set up by the System Administrator. The iNEWS keyboard
shortcuts are configured in the folder System.Keyboard. The example below assigns Deko
Select to the function key Alt+F12
; ALT/F12DekoMOS
@{alt{f12}}~{alt TU}a
After the System Administrator has set up the new keyboard shortcut, you must reload
the keyboard.
To reload the keyboard, do one of the following:
t Log off iNEWS and log on again.
t In iNEWS, select Tools > Options > Preferences. In the Preferences window that opens,
click the Session tab, click Reload, then click OK.
Locations of Installed Components
Locations of Installed Components
All components are installed into subfolders in
C:\ProgramFiles\PinnacleSystems\DekoMOS.
All components store their settings in C:\windows\system32\DekoMOS.ini.
Shortcuts are created in: Windows Start menu\Programs\Avid\DekoMOS.
The DekoMOS Gateway creates an additional configuration file in the System32 folder
named DekoMOSConfig.xml.
69
Page 70

Chapter 2 Installation and Setup
70
Page 71

Chapter 3
Preparing to Use Deko Select
In this chapter you will learn:
• How to create Deko templates with replaceable text boxes for use with Deko Select
• How to structure paths and folders for storing graphic components
• Important information about using third-party components with Deko Select
The following topics describe how to prepare and use Deko Select:
• Creating Templates
• Storage Structure for Graphic Components
• Using Other Products
Creating Templates
Deko Select users have the convenience of selecting a graphic template for a story and filling
in replaceable layers of the template with appropriate text, stills, or clips. Templates are not
created with the Deko Select option itself. Templates for Deko Select are created on Deko
character generators, such as Deko3000 or FXDekoII, or with PostDeko, the software only,
offline creation tool. Any Deko graphic can be used as a template if the appropriate layers
are replaceable.
These functions are described in the following topics:
• “Creating Replaceable Layers in a Deko Graphic” on page 72
• “Troubleshooting Graphics” on page 81
• “Creating Static Design Elements for your Templates” on page 82
Page 72

Chapter 3 Preparing to Use Deko Select
• “Preparing Clips to Use with Templates” on page 83
Creating Replaceable Layers in a Deko Graphic
When creating replaceable layers in a Deko graphic, the procedure varies slightly depending
on the type of replaceable layer you want to create.
n
n
These instructions apply to the Deko interface, not the Deko Select interface. For more
information, see the Avid Deko Products User’s Guide.
To create replaceable layers in a Deko graphic:
1. In Deko, select a graphic to use as a template. Any graphic can serve as a template if you
select a layer, then specify Replace, ID, Name, and Channel.
2. Select the layer for the graphic. Make sure you have selected the layer, not the text
within the layer. A selected layer displays grey handles on each side and corner of
the layer.
If your cursor sits inside the layer on the first character typed, with the Move tool selected,
press the Page Up key to select the layer.
72
Wrong: Cursor is in the layer. The layer is not
selected.
Correct: The layer is selected, as indicated by
the handles displayed on each side and corner,
shown above and in the close-up below.
Page 73

3. Access the Style window Layer tab.
Creating Templates
n
n
n
n
The Style window sometimes appears as the Text or Rectangle window, depending upon your
most recent task and the layer selected.
4. Use the controls in the Style window, Layer tab, to do the following:
- Select Replace.
Replace allows the currently selected layer to accept external data.
- Specify a consecutive ID number.
The ID number indicates the order in which layers accept external data. Each layer with an
assigned ID number must have its own unique consecutive ID. Set the ID numbers in the
order you want them to appear in the Deko Select Editor that opens with the Deko Select
Browser within the newsroom client interface. If you do not specify layer ID numbers, Deko
uses the layer orders as IDs. It places layer 1 text in the first replaceable layer it finds, layer
2 in the next, and so on.
- Type a name for the layer in the Name field.
The name you assign to the layer should identify the type of information or image required
for the reporter or producer. This name appears in the Deko Select Browser in the newsroom
client interface.
Layer Name assigned in
Deko template creation
appears in Deko Select
Editor.
73
Page 74

Chapter 3 Preparing to Use Deko Select
5. Save the layer. Make sure you give the template a name identifiable by Deko Select
users, for example lower3 or 1line. You might also want to use a naming protocol to
indicate clips or effects embedded in graphics, such as 1line_x to indicate an effect or 1
line_c to indicate a clip.
• In the Save Graphic As dialog box, use the graphics comment text box to designate the
channel to which the graphic should play. Only the first character in the text box
specifies a channel, and other comments can follow, for example, 2-Simple Lower
Third. It is possible to override this channel later.
n
74
Indicates that graphic will play to channel 2
For more information about creating graphics with Deko, see the Avid Deko Products
User’s Guide.
These functions are described in the following topics:
• “Creating a Replaceable Text Layer” on page 75
• “Creating a Replaceable Still or Image Layer” on page 78
• “Creating a Replaceable Clip Layer” on page 80
Page 75

Creating a Replaceable Text Layer
To create a replaceable text layer:
1. Do one of the following:
t Select File > Open and navigate to the graphic file you want to use as a template.
Open the file into the Program window.
t Clear the Program window and create a new graphic with one or more text layers.
For more information, see the Avid Deko Products User’s Guide.
2. Select a text layer that you want to be replaceable. Remember, a solid box with handles
on each side and corner of the layer box indicates a selected layer.
3. In the Style window, currently labeled as the Text window, click the Layer tab.
4. In the Auto-Update area, click Replace to accept external data into the currently selected
layer. If you do not see these controls, click More.
Layer tab
Creating Templates
Replace
button
75
Page 76

Chapter 3 Preparing to Use Deko Select
5. Continuing near the bottom of the same window, the ID, by default, is Off. Off means
that the layer number will indicate the order in which external data will be entered into
the layers. Click the Up arrow to specify an ID number. This number indicates the order
in which the data, defined in the Deko Select client plug-in, will populate layers. Layer
IDs should be unique and consecutive.
n
76
Layer ID
Duplicate layer IDs cause undesirable results.
6. Click the More button on the Style window to reveal additional controls, including the
Name text box.
Page 77

Name
text box
Creating Templates
7. Type a name in the Name text box to identify the type of text required for the
Reporter/Producer. This name will appear in the Deko Select Newsroom
Client interface.
8. Click in the Program window displaying the graphic to activate it.
9. Do one of the following:
t Select File > Save Graphic As
t Press F12
t Press Save File (FAK).
The Save Graphic As dialog box opens.
10. Give the template a name identifiable by Deko Select users, for example lower3
or 1line.
77
Page 78

Chapter 3 Preparing to Use Deko Select
11. Use the graphics comment text box to designate the channel to which the graphic should
play. Only the first character in the text box specifies a channel, and other comments can
follow, for example, 2-Simple Lower Third. If no comment is added, the graphic
defaults to Channel 1.
n
It is possible to override the channel later.
12. Click OK to save your graphic.
Designate a
playout
channel
before saving
the template.
Creating a Replaceable Still or Image Layer
To create a replaceable still or image layer:
78
1. Open a new or existing Deko graphic. Create a rectangle layer with a face as the only
detail. Use a texture for the face shader. For further instructions, see the Avid Deko
Products User’s Guide.
2. Make sure that the layer is selected.
3. In the Face Shader window, Texture tab, choose a default texture and check the Auto
Replace box. From the AutoScale list, choose Fit, Crop, or Preserve, depending upon
the shape of the rectangle and the graphics that can be used for this layer.
Page 79

Creating Templates
4. In the Style window, currently titled Rectangle window, click the Layer tab. For Auto
Update choose Replace. Designate a Layer ID. If you do not see these controls on the
layer tab, click More.
5. Click More. Click to place cursor in the Name text box and type a name for the layer.
6. Remember to designate a channel with the first character in the Comment text box when
you save.
79
Page 80

Chapter 3 Preparing to Use Deko Select
When using the template, reporters can designate a still to populate the layer.
Creating a Replaceable Clip Layer
To create a replaceable clip layer:
1. Open a new or existing Deko graphic.
80
2. Create a rectangle layer with a single face.
For further instructions, see the Avid Deko Products User’s Guide.
Rectangle layer with
single face.
Page 81

3. In the Style window, currently titled Rectangle, click the Layer tab, for Auto Update
choose Replace. Designate a unique, consecutive layer ID. If you do not see these
controls on the Layer tab, click More.
4. For Associated, choose a default clip name from the list of available clips.
5. Click More.
6. Type a name for the layer in the Name text box.
7. Remember to designate a channel with the first character in the comment text box when
you save.
8. So that reporters can see a picon representation of the clip in the Deko Select Browser,
create a bitmap from the embedded background of the clip. Save it to the
Elements_fixed folder with the same name as the clip.
Troubleshooting Graphics
Despite a well-conceived design effort, some templates might not appear as intended when
text or graphics are placed in the replaceable text boxes. Following is a check list for
troubleshooting graphics problems within the Deko interface.
• Follow the four standard rules of Deko Select template creation:
- Replace on
Creating Templates
-ID on
- Layer Name, appropriate for the layer
- Channel designation
• Turn Word wrap on or off, as appropriate.
• Turn Shrink to fit on as appropriate.
• Make sure layers are properly justified. For example, center justify for lottery numbers.
• Use unique, consecutive layer replacement ID numbers.
• Texture layers must be set to replace in both the layer properties and in the shader.
• Use correct layer names.
• Use correct layer order.
• Layer font style properties should be the same as the text in them. Deko Select
automation only sees those layer properties.
• Check for duplicate layers. For example, a duplicate bullet layer in a full screen
template, one right on top of the other is only noticed when you scroll through
the layers.
81
Page 82

Chapter 3 Preparing to Use Deko Select
• Verify the correct font style before finalizing template. Problems can occur due to
misinterpretation of how to obtain the desired effect. For example, Swiss Bold is
obtained by using SwissBT and the BOLD feature.
• Use correct opacity settings for shaders.
• Turn on or off details, such as shadows, as appropriate.
• Check that embedded effects and embedded clips work for the graphic.
• Position layers carefully to match with background elements as appropriate.
• Stay within the safe title area.
• Make sure all correct fonts are installed on client and playout systems.
Creating Static Design Elements for your Templates
Following are recommended guidelines for creating design elements for your graphic
templates and importing images into Deko. These elements are commonly created in a paint
application, such as Adobe Photoshop
frames, logos, headshots, full-frame backgrounds and other items used to convey a show's
distinct look.
Aspect Ratio
®
, and imported into Deko. These can include banners,
n
82
To ensure appropriate aspect ratio while in other square pixel graphic applications, such as
Microsoft Paint, always work in 720 X 540 for NTSC and 768 X 576 for PAL.
If texture images originate from AP Graphics Bank, they were probably downloaded as 768
X 576. If they are for use in an NTSC environment, a conversion can be done in
Adobe Photoshop.
Textures
To ensure Deko's best handling of an imported image as a texture, always position textures
center screen. Save texture images as TARGA files (.tga). This stores an alpha channel for
keyable elements.
Scaling
To ensure that sizing and scaling of images in the template are consistent, always save in full
resolution with the same center line and eye line.
Find scaling options in the File Open dialog box. See your Avid Deko Products User’s Guide
for file import instructions appropriate for your Deko model and version.
Page 83

Storage Structure for Graphic Components
Preparing Clips to Use with Templates
Moving video, commonly called clips, can come from a variety of sources. For more
information, see the Avid Deko Products User’s Guide.
Because a Deko Select template preview within the client application is a static image, clips
cannot be previewed. However, you can create a bitmap to represent a clip in a
template preview.
To create a representation of a clip for template preview:
1. When you create the clips for your templates, create a bitmap of a single frame (one that
you want to be the representative frame).
2. Save this bitmap with the same name as the clip. For example, if the clip file is named
background.dv, save its bitmap representation as background.bmp. Save the bitmap file
in the “Elements_Fixed” folder (on the central graphics storage system, usually the
DekoMOS Gateway system).
The thumbnails in the Deko Select Browser do not show the clip, but the Preview
displays the representative frame.
Storage Structure for Graphic Components
Because Deko Select uses several software components installed on several hardware
components, a viable and consistent directory structure for graphics is very important. The
following sections include information about setting up directories for Deko Select systems
shared by reporters for browsing, editing, and preview of on-air templates.
These functions are described in the following topics:
• “Storing Files” on page 83
• “Creating a Storage Structure” on page 84
Storing Files
Files that must be stored include the following:
• Templates
The template is an entire graphic used for on-air display. Save templates separately from
design elements that are part of the graphic. A design element is one part of the graphic,
and can be fixed or replaceable. Saving the templates separately allows the DekoMOS
browser to access only the templates, rather than populating with templates and
individual elements. Within the template folder, you can have subfolders for better
organization.
83
Page 84

Chapter 3 Preparing to Use Deko Select
• Static Elements
These design elements are not meant to be modified or replaced by the DekoMOS user.
An example of a fixed element might be the station logo, or a permanent banner design.
This type of design element should be stored separately from the templates and from
replaceable elements. This folder can not have subfolders.
• Replaceable Elements
These design elements exist as dynamic components of graphics, and are meant to be
altered or replaced frequently. An example of a replaceable element might be the topical
image for an over the shoulder template. This type of design element should be stored
separately from the templates and from fixed or static elements. This folder can not have
subfolders.
Creating a Storage Structure
A storage structure is recommended for systems intended for template design, and for shared
storage for NCS client access to graphics (usually stored on the DekoMOS
Gateway system).
To create a storage structure for DekoMOS graphic components:
1. Create the following folders in the directory titled DekoMOS_COMPONENTS, in the
root of your system drive:
n
n
n
84
It is important to include the underscore (_) symbol in place of spaces in all folder names.
This facilitates technical support assistance.
Sometimes a single facility has several control rooms or broadcast stations and therefore
broadcasts multiple styles. In this situation, name the parent folders
DekoMOS_Components_name of station or DekoMOS_Components_name of style.
The Templates directory can contain subfolders to better organize graphics for the
DekoMOS user. Those subfolders appear in the DekoMOS Browser interface. Other folders
can not have subfolders.
Page 85

2. On the DekoMOS Gateway, using Windows Explorer, assign permissions to the folders
as follows:
t Elements_Static: Read Only for everyone; Read/Write for specific users who save
or move graphics to this location.
t Templates: Read Only for everyone; Read/Write for specific users who save or
move graphics to this location.
t Elements_Replace: Read Only; When using graphics from a third-party, images
transfer via FTP.
To ensure that client computers can see new or modified templates:
t Copy any templates modified or created on Deko to the Gateway.
Using Other Products
Deko Select templates can include replaceable text boxes for still images or clips.
Stills and clips can enhance a story in a variety of ways. One example is a topical image
introducing a story segment called an over-the-shoulder, or OTS, because the image is
positioned just above and to the right or left of the anchor. Traditionally, OTS images are
applied from a still-store device that sorts and manages large volumes of images.
Using Other Products
Often, artists enhance these images to better relay the story. Rather than just show a picture
of a fire (left), an artist might combine partial graphics into one (right), and store this in a
still-store media device for use the next time a story calls for a similar graphic.
To manage these topical images, you can use third-party software to create and use a central
database allowing the reporter to quickly order and insert OTS elements in their written story
even as the story develops.
85
Page 86

Chapter 3 Preparing to Use Deko Select
86
Page 87

Chapter 4
Building Stories with Graphics
This chapter describes information on:
• Opening the Deko Select interface from your client computer (iNEWS or ENPS)
• Using the Browser to access graphics templates and place them in a story
• How to replace text, stills, or clips in the templates
The following topics describe how to build stories with graphics:
• Opening Deko Select
• Understanding the Deko Select Browser and Editor
• Changing the Deko Select Display
• Adding Graphics to a Story
• Adding Breaks to a Rundown
Opening Deko Select
There are two ways to open Deko Select, based on your Newsroom Computer system.
These functions are described in the following topics:
• “Opening Deko Select at an iNEWS Workstation” on page 88
• “Opening Deko Select at an ENPS Workstation” on page 89
• “Understanding the Deko Select Browser and Editor” on page 90
Page 88

Chapter 4 Building Stories with Graphics
Opening Deko Select at an iNEWS Workstation
To open Deko Select at an iNEWS Workstation:
1. Log in to iNEWS.
2. Select Tools > Plugins > Avid Deko Select.
The plug-in will open in a new workspace within the iNEWS window. It might appear at
the top (as shown) or bottom, depending on the user’s preferences.
Plug-in Tabs
Browser Area
(showing thumbnails)
Replaceable Fields
Preview Graphic
n
88
Another plug-in available from Avid is Thunder Select. If both the Deko Select and Thunder
Select plug-ins are installed, the name that will appear in the Tools > Plugins menu will be
Avid Graphics Select. When chosen, both plug-ins will open in the workspace, with each
plug-in available via tabs (shown) in the upper left corner of the workspace.
Page 89

Opening Deko Select at an ENPS Workstation
t If you are using ENPS, click the rover (green dot) on the ENPS Media Control Icon
and then select Deko Select, or the name entered during configuration.
The browser appears within the ENPS client workstation interface.
Opening Deko Select
89
Page 90

Chapter 4 Building Stories with Graphics
Understanding the Deko Select Browser and Editor
Initially, the Deko Select Browser displays a list of available graphic template files.
90
After you double-click a file to select it, the Deko Select Browser also displays an Editor,
including a thumbnail of that graphic and a form for filling in the graphic's replaceable
text boxes.
List of available templates Mini-preview Replaceable Fields Editor
Page 91

Understanding the Deko Select Browser and Editor
The areas and functions of the browser are described in the following table.
Areas and Functions of the Browser
Area Description
Preview Style List The list includes the styles configured on the DekoMOS Gateway. They
must also be configured in the DekoMOS Macro Server for correct
playout. Your selection determines the paths the browser searches to
find graphics and templates specified by the files in the browser, and
therefore the template file names displayed in the browser.
If there is only one configured Preview style, the Preview Style
n
list does not appear.
Toolbar buttons For more information, see “Toolbar Buttons” on page 93.
User This is the name that you use to log onto the system. The browser uses
your preferences, including Preview Style and browser display options.
Current Folder This displays the name of the main folder specified in the Gateway
under Styles as the Templates path, or the currently selected subfolder
of that main folder. Subfolders can be used to organize your graphic
templates. Examples of subfolders you might want to use include
Sports, Full Screens, and OTS.
List of Available
Templates and Folder
Mini-Preview When a template is selected, this displays the template's appearance as
Deko Select Editor This editor displays a cell for each replaceable text box in the selected
This list displays all folders and template files in the current folder. This
can either be in text view or picon view.
created and saved, if all path settings are correct. After specifying text,
stills, or clips in the Replaceable Fields Editor, this display updates
automatically.
template. To the left of the cells, icons indicate whether the text box is a
text box, still graphic text box, or clip text box.
91
Page 92

Chapter 4 Building Stories with Graphics
Areas and Functions of the Browser (Continued)
Area Description
In Time, Out Time,
Duration
In these text boxes, type specifications about when the graphic should
appear relative to the start of the show. Whether the editor includes a
text box for Out Time or for Duration is determined by Gateway
Settings. The information entered in these text boxes does not cause an
action, but is displayed in the Playback Controller. An entry in one text
box causes the other text boxes to change as follows:
• If the In Time is changed, Out Time automatically adjusts per the
Duration. If no duration is entered, Out Times and Duration are
adjusted per the default duration.
• If the Out Time is changed, the Duration automatically adjusts per
the In Time.
• If the Duration is changed, the Out Time automatically adjusts per
the In time.
Channel Selection The selected template displays its default channel assignment. To assign
it to a different channel, select it from the list.
Full Preview Button Use the Full Preview button, or double click on the Mini Preview, to
open a larger preview of the currently selected template with the text
and graphics specified in the Replaceable Fields Editor.
Spell Check Click the Spell Check button to check spelling of all text typed in the
editor for insertion in the replaceable text boxes.
If In-line spell checking is enabled, you see spelling errors underlined
as you type in the editor. The underline does not display in the graphic
output.
For more information about configuring the Spell Checker, see
“Configuring the Spell Checker” on page 65.
92
Favorites List The Browser can display a special section at the bottom of the window
listing those template files designated as favorites. The Favorites list,
described in “Simplifying Access to Template Files” on page 100,
allows you to easily look for commonly used graphics without scanning
the entire list in the browser. The Favorites list is specific to the current
user, not the physical system.
Page 93

Toolbar Buttons
The toolbar buttons on Deko Select are shown in the following illustration:
Changing the Deko Select Display
Toggle On/Off Editor
Close Folder
Toggle On/Off
Favorites List
View Template
Picons
View Template
Filenames
Information about this
version of Deko Select
Configure
Browser
Access Deko Select Help
Changing the Deko Select Display
This topic contains information on how to configure the Deko Select user preferences,
change the Browser and Editor display for your environment or workflow. In addition, it
describes how to create an easier way to locate template files.
These functions are described in the following topics:
• “Configuring User Preferences” on page 93.
• “Configuring Editor Options” on page 96
• “Changing the Display” on page 96
• “Simplifying Access to Template Files” on page 100
Configuring User Preferences
To configure user preferences on a client computer:
1. To access the Configuration dialog box, do one of the following:
t Click the Configure button on the Deko Select toolbar.
t Press Alt + C.
The Configuration dialog box opens.
93
Page 94

Chapter 4 Building Stories with Graphics
2. Click the User Preferences tab to configure individual user preferences. Settings are
applied to the name used to log on to the system and are specific to that user, not
the workstation.
3. In the Startup Options area, you can define what is included in the browser window at
startup. Select the startup display option you want to see upon starting the application.
94
Showing
Picons
Page 95

Showing
Editor with
file names
Showing
Favorites
Changing the Deko Select Display
n
4. In the Startup Folder section, select a style from the Preview Style list. To set the style as
the default, click the Set as Default button. The Style you use defines the paths the
browser uses to find templates and graphics.
In the Deko Select toolbar, the Preview Style section appears only if there is more than one
Preview style defined.
5. Select the folder initially displayed in the browser. User defined is the default setting.
6. Click OK.
95
Page 96

Chapter 4 Building Stories with Graphics
Configuring Editor Options
When configuring Editor options, you can configure spell checking preferences and default
graphic duration. The following topics provide you with information on how to get started in
configuring Editor options, and provide references for more information.
To configure Editor Options, including spell checking and Default Graphic Duration:
1. To access the Configuration dialog box, do one of the following:
t Click the Configure button on the Deko Select toolbar.
t Press Alt + C.
2. Click the Editor Options tab. For details, see instructions beginning on “Configuring
Editor Macros” on page 43.
To configure Gateway settings:
1. To access the Configuration dialog box, do one of the following:
t Click the Configure button on the Deko Select toolbar.
t Press Alt + C.
2. Click the Gateway Configuration tab. For details, see instructions beginning on
“Installing and Configuring the DekoMOS Gateway” on page 33.
Changing the Display
Once you have Deko Select up and running, you can change the display to match your
preferences.
These functions are described in the following topics:
• “Switching Between Template File Names or Template Picons in the Browser” on
page 97
• “Showing or Hiding the Editor” on page 97
• “Showing or Hiding the Favorite Templates List” on page 97
• “Viewing the Contents of a Folder in the Browser” on page 97
• “Closing a Folder and returning to the Previous Level in the Browser” on page 98
• “Enabling and Disabling In-Line Spell Checking in the Editor” on page 98
96
Page 97

Changing the Deko Select Display
Switching Between Template File Names or Template Picons in the Browser
To switch between template filenames or template picons in the Browser:
t Do one of the following:
-Press Alt+T.
- Click one of the toolbar buttons.
Display template file names button
Display template picons button
Showing or Hiding the Editor
To show or hide the Editor:
t Do one of the following:
-Press Alt+E.
- Click the toolbar button.
The Deko Select Editor opens automatically when you double-click a file in
the Browser.
Showing or Hiding the Favorite Templates List
To show or hide the Favorite Templates list:
t Do one of the following:
-Press Alt+F.
- Click the toolbar button.
Viewing the Contents of a Folder in the Browser
To view the contents of a folder in the Browser:
t Double-click on the folder to Select and Open it.
The folder name appears in the Current Folder text box of the Browser. File names or
picons of templates in that folder appear in the Browser.
97
Page 98

Chapter 4 Building Stories with Graphics
Closing a Folder and returning to the Previous Level in the Browser
To close a folder and return to the previous level in the Browser:
t Click the Folder icon at the left of the Toolbar.
Enabling and Disabling In-Line Spell Checking in the Editor
Deko Select provides you with the ability to turn on and off in-line spell checking. When
turned on, in-line spell checking underlines possible spelling errors as you type in the Editor.
For more information, see the following topics:
• “Enabling In-Line Spell Checking” on page 98
• “Disabling In-Line Spell Checking” on page 99
Enabling In-Line Spell Checking
To enable in-line spell checking in the Editor:
1. Do one of the following:
t Click the Configure button on the Deko Select toolbar.
98
t Press Alt + C.
The Configuration dialog box opens.
2. Click the Editor Options tab.
Page 99

Changing the Deko Select Display
3. Select Enable In-line Spell Checking.
With In-Line Spell Checking enabled, possible spelling errors appear underlined as you
type in the editor to fill the text boxes of a graphic. Whether or not you choose to change
the spelling of the word or words, the underline does not appear in the graphic itself
during preview or playout.
4. Click OK.
Disabling In-Line Spell Checking
To disable in-line spell checking in the Editor:
1. Do one of the following:
t Click the Configure button on the Deko Select toolbar.
t Press Alt + C.
The Configuration dialog box opens.
2. Click the Editor Options tab.
3. Deselect Enable In-line Spell Checking.
4. Click OK.
99
Page 100

Chapter 4 Building Stories with Graphics
Simplifying Access to Template Files
This topic provides information on ways to get easier access to your template files.
For more information, see the following topics:
• “Placing a File in the Favorites List” on page 100
• “Removing a File from the Favorites List” on page 100
• “Assigning a File to a Hot Key for Easy Keyboard Access” on page 100
Placing a File in the Favorites List
To place a file in the Favorites list:
t Right-click on a template in the main browse and select Add to Favorites.
n
Removing a File from the Favorites List
Assigning a File to a Hot Key for Easy Keyboard Access
This procedure works whether or not the Favorites list is currently displayed.
To remove a file from the Favorites list:
1. Right-click the file in the Favorites list.
2. Select Remove From Favorites.
To assign a file to a hotkey for easy keyboard access:
1. Right-click a template in the main browser.
2. Select Assign to Hotkey.
The Assign to Hotkey dialog box opens.
100
3. Assign the file to a hotkey with a modifier key. Note that some keys are already used by
the NCS.
 Loading...