

Page 1

Avid® Deko® Products
User’s Guide
Page 2

Legal Notices
Product specifications are subject to change without notice and do not represent a commitment on the part of Avid Technology,
Inc.
This product is subject to the terms and conditions of a software license agreement provided with the software. The product
may only be used in accordance with the license agreement.
Avid products or portions thereof are protected by one or more of the following United States Patents: 5,267,351; 5,309,528;
5,355,450; 5,396,594; 5,440,348; 5,467,288; 5,513,375; 5,528,310; 5,557,423; 5,577,190; 5,584,006; 5,640,601; 5,644,364;
5,654,737; 5,724,605; 5,726,717; 5,745,637; 5,752,029; 5,754,851; 5,799,150; 5,812,216; 5,828,678; 5,842,014; 5,852,435;
5,986,584; 5,999,406; 6,038,573; 6,061,758; 6,069,668; 6,141,007; 6,211,869; 6,532,043; 6,546,190; 6,596,031; 6,636,869;
6,747,705; 6,763,523; 6,766,357; 6,813,622; 6,847,373; 7,081,900; RE40,107; 7,403,561; 7,433,519; 7,671,871; D352,278;
D372,478; D373,778; D392,267; D392,268; D392,269; D395,291; D396,853; D398,912. Other patents are pending.
Avid products or portions thereof are protected by one or more of the following European Patents: 0506870; 0635188;
0674414; 0752174; 1111910; 1629675. Other patents are pending.
This document is protected under copyright law. An authorized licensee of Deko may reproduce this publication for the
licensee’s own use in learning how to use the software. This document may not be reproduced or distributed, in whole or in
part, for commercial purposes, such as selling copies of this document or providing support or educational services to others.
This document is supplied as a guide for Deko. Reasonable care has been taken in preparing the information it contains.
However, this document may contain omissions, technical inaccuracies, or typographical errors. Avid Technology, Inc. does not
accept responsibility of any kind for customers’ losses due to the use of this document. Product specifications are subject to
change without notice.
Copyright © 2010 Avid Technology, Inc. and its licensors. All rights reserved.
The following disclaimer is required by Apple Computer, Inc.:
APPLE COMPUTER, INC. MAKES NO WARRANTIES WHATSOEVER, EITHER EXPRESS OR IMPLIED, REGARDING
THIS PRODUCT, INCLUDING WARRANTIES WITH RESPECT TO ITS MERCHANTABILITY OR ITS FITNESS FOR ANY
PARTICULAR PURPOSE. THE EXCLUSION OF IMPLIED WARRANTIES IS NOT PERMITTED BY SOME STATES. THE
ABOVE EXCLUSION MAY NOT APPLY TO YOU. THIS WARRANTY PROVIDES YOU WITH SPECIFIC LEGAL RIGHTS.
THERE MAY BE OTHER RIGHTS THAT YOU MAY HAVE WHICH VARY FROM STATE TO STATE.
The following disclaimer is required by Sam Leffler and Silicon Graphics, Inc. for the use of their TIFF library:
Copyright © 1988–1997 Sam Leffler
Copyright © 1991–1997 Silicon Graphics, Inc.
Permission to use, copy, modify, distribute, and sell this software [i.e., the TIFF library] and its documentation for any purpose
is hereby granted without fee, provided that (i) the above copyright notices and this permission notice appear in all copies of
the software and related documentation, and (ii) the names of Sam Leffler and Silicon Graphics may not be used in any
advertising or publicity relating to the software without the specific, prior written permission of Sam Leffler and Silicon
Graphics.
THE SOFTWARE IS PROVIDED “AS-IS” AND WITHOUT WARRANTY OF ANY KIND, EXPRESS, IMPLIED OR
OTHERWISE, INCLUDING WITHOUT LIMITATION, ANY WARRANTY OF MERCHANTABILITY OR FITNESS FOR A
PARTICULAR PURPOSE.
IN NO EVENT SHALL SAM LEFFLER OR SILICON GRAPHICS BE LIABLE FOR ANY SPECIAL, INCIDENTAL, INDIRECT
OR CONSEQUENTIAL DAMAGES OF ANY KIND, OR ANY DAMAGES WHATSOEVER RESULTING FROM LOSS OF USE,
DATA OR PROFITS, WHETHER OR NOT ADVISED OF THE POSSIBILITY OF DAMAGE, AND ON ANY THEORY OF
LIABILITY, ARISING OUT OF OR IN CONNECTION WITH THE USE OR PERFORMANCE OF THIS SOFTWARE.
The following disclaimer is required by the Independent JPEG Group:
This software is based in part on the work of the Independent JPEG Group.
The following disclaimer is required by Paradigm Matrix:
Portions of this software licensed from Paradigm Matrix.
2
Page 3

The following disclaimer is required by Ray Sauers Associates, Inc.:
“Install-It” is licensed from Ray Sauers Associates, Inc. End-User is prohibited from taking any action to derive a source code
equivalent of “Install-It,” including by reverse assembly or reverse compilation, Ray Sauers Associates, Inc. shall in no event be
liable for any damages resulting from reseller’s failure to perform reseller’s obligation; or any damages arising from use or
operation of reseller’s products or the software; or any other damages, including but not limited to, incidental, direct, indirect,
special or consequential Damages including lost profits, or damages resulting from loss of use or inability to use reseller’s
products or the software for any reason including copyright or patent infringement, or lost data, even if Ray Sauers Associates
has been advised, knew or should have known of the possibility of such damages.
The following disclaimer is required by Videomedia, Inc.:
“Videomedia, Inc. makes no warranties whatsoever, either express or implied, regarding this product, including warranties with
respect to its merchantability or its fitness for any particular purpose.”
“This software contains V-LAN ver. 3.0 Command Protocols which communicate with V-LAN ver. 3.0 products developed by
Videomedia, Inc. and V-LAN ver. 3.0 compatible products developed by third parties under license from Videomedia, Inc. Use
of this software will allow “frame accurate” editing control of applicable videotape recorder decks, videodisc recorders/players
and the like.”
The following disclaimer is required by Altura Software, Inc. for the use of its Mac2Win software and Sample
Source Code:
©1993–1998 Altura Software, Inc.
The following disclaimer is required by Ultimatte Corporation:
Certain real-time compositing capabilities are provided under a license of such technology from Ultimatte Corporation and are
subject to copyright protection.
The following disclaimer is required by 3Prong.com Inc.:
Certain waveform and vector monitoring capabilities are provided under a license from 3Prong.com Inc.
Attn. Government User(s). Restricted Rights Legend
U.S. GOVERNMENT RESTRICTED RIGHTS. This Software and its documentation are “commercial computer software” or
“commercial computer software documentation.” In the event that such Software or documentation is acquired by or on behalf
of a unit or agency of the U.S. Government, all rights with respect to this Software and documentation are subject to the terms
of the License Agreement, pursuant to FAR §12.212(a) and/or DFARS §227.7202-1(a), as applicable.
Trademarks
003, 192 Digital I/O, 192XD I/O, 888 I/O, AirPlay, AirSPACE, AirSPACE HD, AirSpeed, ALEX, Alienbrain, AniMatte,
AudioMarket, AudioPages, AudioSuite, AudioVision, AutoSync, Avid, Avid Advanced Response, Avid DNA, Avid DNxcel,
Avid DNxHD, AVIDdrive, Avid DS Assist Station, Avid EditStar, Avid Learning Excellerator, Avid Liquid,
Avid Liquid Chrome Xe, Avid MEDIArray, Avid Mojo, AvidNet, AvidNetwork, Avid NewStar, Avid Remote Response,
AVIDstripe, Avid Unity, Avid Unity ISIS, Avid VideoRAID, Avid Xpress, AVoption, AVX, Beauty Without The Bandwidth, Boom,
C|24, CaptureManager, ChromaCurve, ChromaWheel, Command|24, Conectiv, CountDown, DAE, Dazzle,
Dazzle Digital Video Creator, Deko, DekoCast, D-Fi, D-fx, DigiDelivery, Digidesign, Digidesign Audio Engine,
Digidesign Intelligent Noise Reduction, DigiDrive, DigiLink, DigiMeter, DigiSerial, DigiStudio, DigiStudio Control,
Digital Nonlinear Accelerator, DigiTranslator, DINR, DNxchange, do more, DVD Complete, D-Verb, Eleven, Equinox,
EveryPhase, ExpertRender, Fastbreak, Fast Track, FieldPak, Film Composer, FilmScribe, Flexevent, FluidMotion, FXDeko,
G7, G-Rack, HD Core, HD Process, HDPack, HYBRID, HyperControl, HyperSPACE, HyperSPACE HDCAM, IllusionFX,
Image Independence, iNEWS, iNEWS Assign, iNEWS ControlAir, Instantwrite, Instinct,
Intelli-sat Broadcasting Recording Manager, Intelli-Sat, InterFX, Interplay, inTONE, Intraframe, iS9, iS18, iS23, iS36, ISIS,
IsoSync, KeyRig, KeyStudio, LaunchPad, LeaderPlus, Lightning, ListSync, Lo-Fi, Magic Mask, Make Anything Hollywood,
make manage move | media, Marquee, M-Audio, M-Audio Micro, Maxim, Mbox, MCXpress, Media Browse, Media Composer,
MediaDock, MediaDock Shuttle, Media Fusion, Media Illusion, MediaLog, Media Reader, Media Recorder, MEDIArray,
MediaShare, MediaStream, Media Suite, Meridien, MetaFuze, MetaSync, MicroTrack, Midiman, MissionControl, Mix Rack,
MixLab, Moviebox, Moviestar, NaturalMatch, Nearchive, NetReview, NewsCutter, Nitris, NRV-10 interFX, Octane, OMF,
OMF Interchange, OMM, OnDVD, Open Media Framework, Open Media Management, Palladium, Pinnacle,
Pinnacle DistanTV, Pinnacle Geniebox, Pinnacle HomeMusic, Pinnacle MediaSuite, Pinnacle Mobile Media, Pinnacle Studio,
Pinnacle Studio MovieBoard, Pinnacle Systems, ProEncode, ProServices, ProSessions, Pro Tools, QuietDrive, Recti-Fi,
Reel Tape Delay, Reel Tape Flanger, Reel Tape Saturation, RetroLoop, rS9, rS18, Salesview, Sci-Fi, Scorch, Scorefitter,
ScriptSync, SecureProductionEnvironment, Session, Show Center, Sibelius, SIDON, Soft SampleCell, Soft-Clip Limiter,
Sound Designer II, SPACE, SPACEShift, SpectraGraph, SpectraMatte, Sputnik, Starplay, SteadyGlide, Streamfactory,
Streamgenie, StreamRAID, Strike, Structure, Studiophile, SubCap, Sundance Digital, Sundance, Symphony, SYNC HD,
3
Page 4

SynchroScience, SynchroScope, Syntax, TDM FlexCable, Thunder, Titan, Titansync, TL Aggro, TL AutoPan, TL Drum Rehab,
TL Everyphase, TL Fauxlder, TL In Tune, TL MasterMeter, TL Metro, TL Space, TL Utilities, Torq, Torq Xponent, Transfuser,
Trigger Finger, Trillium Lane Labs, TruTouch, UnityRAID, Vari-Fi, Velvet, Venom, VideoRAID, Video Slave Driver, VideoSPACE,
VideoSpin, Vortx, Xdeck, X-Form, Xmon, Xponent, and X-Session are either registered trademarks or trademarks of Avid
Technology, Inc. in the United States and/or other countries.
Adobe and Photoshop are either registered trademarks or trademarks of Adobe Systems Incorporated in the United States
and/or other countries. Apple and Macintosh are trademarks of Apple Computer, Inc., registered in the U.S. and other
countries. Windows is either a registered trademark or trademark of Microsoft Corporation in the United States and/or other
countries.
iNEWS, iNEWS ControlAir, and Media Browse are either registered trademarks or trademarks of iNews, LLC.
All other trademarks contained herein are the property of their respective owners.
Footage
Arri — Courtesy of Arri/Fauer — John Fauer, Inc.
Bell South “Anticipation” — Courtesy of Two Headed Monster — Tucker/Wayne Atlanta/GMS.
Canyonlands — Courtesy of the National Park Service/Department of the Interior.
Eco Challenge British Columbia — Courtesy of Eco Challenge Lifestyles, Inc., All Rights Reserved.
Eco Challenge Morocco — Courtesy of Discovery Communications, Inc.
It’s Shuttletime — Courtesy of BCP & Canadian Airlines.
Nestlé Coffee Crisp — Courtesy of MacLaren McCann Canada.
Saturn “Calvin Egg” — Courtesy of Cossette Communications.
“Tigers: Tracking a Legend” — Courtesy of www.wildlifeworlds.com, Carol Amore, Executive Producer.
"The Big Swell" — Courtesy of Swell Pictures, Inc.
Windhorse — Courtesy of Paul Wagner Productions.
Arizona Images — KNTV Production — Courtesy of Granite Broadcasting, Inc.,
Editor/Producer Bryan Foote.
Canyonlands — Courtesy of the National Park Service/Department of the Interior.
Ice Island — Courtesy of Kurtis Productions, Ltd.
Tornados + Belle Isle footage — Courtesy of KWTV News 9.
WCAU Fire Story — Courtesy of NBC-10, Philadelphia, PA.
Women in Sports – Paragliding — Courtesy of Legendary Entertainment, Inc.
News material provided by WFTV Television Inc.
GOT FOOTAGE?
Editors — Filmmakers — Special Effects Artists — Game Developers — Animators — Educators — Broadcasters — Content
creators of every genre — Just finished an incredible project and want to share it with the world?
Send us your reels and we may use your footage in our show reel or demo!*
For a copy of our release and Avid’s mailing address, go to www.avid.com/footage.
*Note: Avid cannot guarantee the use of materials submitted.
Avid Deko Products User’s Guide • 0130-07482-01 Rev D • July 2010
This document is distributed by Avid in online (electronic) form only, and is not available for purchase in printed
form.
4
Page 5

Contents
About this Guide . . . . . . . . . . . . . . . . . . . . . . . . . . . . . . . . . . . . . . . . . . . . . . . . . . . . 31
Keyboard Abbreviations . . . . . . . . . . . . . . . . . . . . . . . . . . . . . . . . . . . . . . . . . . . 32
Symbols and Conventions . . . . . . . . . . . . . . . . . . . . . . . . . . . . . . . . . . . . . . . . . . . . 32
If You Need Help. . . . . . . . . . . . . . . . . . . . . . . . . . . . . . . . . . . . . . . . . . . . . . . . . . . . 33
How to Order Documentation . . . . . . . . . . . . . . . . . . . . . . . . . . . . . . . . . . . . . . . . . . 33
Avid Training Services . . . . . . . . . . . . . . . . . . . . . . . . . . . . . . . . . . . . . . . . . . . . . . . 33
Getting Started with Deko . . . . . . . . . . . . . . . . . . . . . . . . . . . . . . . . . . . . . 35
Welcome to Our Product. . . . . . . . . . . . . . . . . . . . . . . . . . . . . . . . . . . . . . . . . . . . . . 36
Verifying Your Equipment . . . . . . . . . . . . . . . . . . . . . . . . . . . . . . . . . . . . . . . . . . . . . 37
About Deko Options . . . . . . . . . . . . . . . . . . . . . . . . . . . . . . . . . . . . . . . . . . . . . . . . . 37
Automation . . . . . . . . . . . . . . . . . . . . . . . . . . . . . . . . . . . . . . . . . . . . . . . . . . . . . 37
ClipDeko. . . . . . . . . . . . . . . . . . . . . . . . . . . . . . . . . . . . . . . . . . . . . . . . . . . . . . . 37
DekoObjex . . . . . . . . . . . . . . . . . . . . . . . . . . . . . . . . . . . . . . . . . . . . . . . . . . . . . 38
DVE Effects Group 2 . . . . . . . . . . . . . . . . . . . . . . . . . . . . . . . . . . . . . . . . . . . . . 38
Make DekoMovie . . . . . . . . . . . . . . . . . . . . . . . . . . . . . . . . . . . . . . . . . . . . . . . . 38
SportsWare . . . . . . . . . . . . . . . . . . . . . . . . . . . . . . . . . . . . . . . . . . . . . . . . . . . . 38
StillDeko . . . . . . . . . . . . . . . . . . . . . . . . . . . . . . . . . . . . . . . . . . . . . . . . . . . . . . . 38
Timeline . . . . . . . . . . . . . . . . . . . . . . . . . . . . . . . . . . . . . . . . . . . . . . . . . . . . . . . 38
Aston Import. . . . . . . . . . . . . . . . . . . . . . . . . . . . . . . . . . . . . . . . . . . . . . . . . . . . 39
Chyron Import. . . . . . . . . . . . . . . . . . . . . . . . . . . . . . . . . . . . . . . . . . . . . . . . . . . 39
Determining Enabled Options for Your Model. . . . . . . . . . . . . . . . . . . . . . . . . . . . . . 39
Switching Between SD and HD with Deko Hybrid Products . . . . . . . . . . . . . . . . . . . 40
Availability of Features . . . . . . . . . . . . . . . . . . . . . . . . . . . . . . . . . . . . . . . . . . . . . . . 40
Starting Your Software . . . . . . . . . . . . . . . . . . . . . . . . . . . . . . . . . . . . . . . . . . . . . . . 40
Starting Windows . . . . . . . . . . . . . . . . . . . . . . . . . . . . . . . . . . . . . . . . . . . . . . . . 41
Starting Deko . . . . . . . . . . . . . . . . . . . . . . . . . . . . . . . . . . . . . . . . . . . . . . . . . . . 41
Adding a Deko Icon to your Desktop . . . . . . . . . . . . . . . . . . . . . . . . . . . . . . . . . 41
Checking Your Desktop Settings . . . . . . . . . . . . . . . . . . . . . . . . . . . . . . . . . . . . 41
Starting Deko Automatically . . . . . . . . . . . . . . . . . . . . . . . . . . . . . . . . . . . . . . . . 42
5
Page 6

Locating the Deko Application. . . . . . . . . . . . . . . . . . . . . . . . . . . . . . . . . . . . . . 42
Once you Start Deko . . . . . . . . . . . . . . . . . . . . . . . . . . . . . . . . . . . . . . . . . . . . . 43
Hiding the Windows Taskbar . . . . . . . . . . . . . . . . . . . . . . . . . . . . . . . . . . . 43
Initial Deko Desktop Appearance . . . . . . . . . . . . . . . . . . . . . . . . . . . . . . . . 44
Using Your Keyboard . . . . . . . . . . . . . . . . . . . . . . . . . . . . . . . . . . . . . . . . . . . . . . . . 45
About the Enhanced Keypad Feature . . . . . . . . . . . . . . . . . . . . . . . . . . . . . . . . 45
Enabling or Disabling the Enhanced Keypad . . . . . . . . . . . . . . . . . . . . . . . . . . 46
About the Optional FastAction Keyboard . . . . . . . . . . . . . . . . . . . . . . . . . . . . . 46
Enabling and Disabling the FastAction Keyboard . . . . . . . . . . . . . . . . . . . 47
Enabling and Disabling FastAction Lights . . . . . . . . . . . . . . . . . . . . . . . . . 47
Setting your Save Preferences. . . . . . . . . . . . . . . . . . . . . . . . . . . . . . . . . . . . . . . . . 48
Using Other Applications without Exiting Deko . . . . . . . . . . . . . . . . . . . . . . . . . . . . 48
Exiting Deko . . . . . . . . . . . . . . . . . . . . . . . . . . . . . . . . . . . . . . . . . . . . . . . . . . . . . . . 48
Deko Overview . . . . . . . . . . . . . . . . . . . . . . . . . . . . . . . . . . . . . . . . . . . . . . 51
Desktop Appearance . . . . . . . . . . . . . . . . . . . . . . . . . . . . . . . . . . . . . . . . . . . . . . . . 51
Style Edit Layout . . . . . . . . . . . . . . . . . . . . . . . . . . . . . . . . . . . . . . . . . . . . . . . . 52
Using Other Layouts for Other Tasks . . . . . . . . . . . . . . . . . . . . . . . . . . . . . . . . 53
Sequence Playback Layout . . . . . . . . . . . . . . . . . . . . . . . . . . . . . . . . . . . . 53
Effect Playback Layout . . . . . . . . . . . . . . . . . . . . . . . . . . . . . . . . . . . . . . . . 54
Motion Compose Layout. . . . . . . . . . . . . . . . . . . . . . . . . . . . . . . . . . . . . . . 55
More Layouts . . . . . . . . . . . . . . . . . . . . . . . . . . . . . . . . . . . . . . . . . . . . . . . 55
Navigating the Deko Desktop . . . . . . . . . . . . . . . . . . . . . . . . . . . . . . . . . . . . . . 56
Accessing Functions with the Menu Bar and the Mouse . . . . . . . . . . . . . . 56
Accessing Functions with the Menu Bar and Alt Key . . . . . . . . . . . . . . . . . 57
Accessing Functions with Keyboard Shortcuts. . . . . . . . . . . . . . . . . . . . . . 58
Accessing Functions by Pressing Alt and Another Key . . . . . . . . . . . . . . . 58
Accessing Windows and Layouts . . . . . . . . . . . . . . . . . . . . . . . . . . . . . . . . 59
Setting Preferences . . . . . . . . . . . . . . . . . . . . . . . . . . . . . . . . . . . . . . . . . . . . . . . . . 59
Determining the Look and Behavior of your Cursor . . . . . . . . . . . . . . . . . . . . . 60
Fixing Mistakes. . . . . . . . . . . . . . . . . . . . . . . . . . . . . . . . . . . . . . . . . . . . . . . . . . . . . 64
Undoing Previous Actions . . . . . . . . . . . . . . . . . . . . . . . . . . . . . . . . . . . . . . . . . 64
Redoing Undone Actions. . . . . . . . . . . . . . . . . . . . . . . . . . . . . . . . . . . . . . . . . . 65
Deleting Text . . . . . . . . . . . . . . . . . . . . . . . . . . . . . . . . . . . . . . . . . . . . . . . . . . . 65
6
Page 7

Clearing the Program Window . . . . . . . . . . . . . . . . . . . . . . . . . . . . . . . . . . . . . . 65
Typing Text . . . . . . . . . . . . . . . . . . . . . . . . . . . . . . . . . . . . . . . . . . . . . . . . . . . . . . . . 66
Confirming you are Using the Style Edit Layout. . . . . . . . . . . . . . . . . . . . . . . . . 67
Enabling or Disabling Word Wrap . . . . . . . . . . . . . . . . . . . . . . . . . . . . . . . . . . . 67
Selecting a Style for Your Text. . . . . . . . . . . . . . . . . . . . . . . . . . . . . . . . . . . . . . 67
Adjusting Text Size. . . . . . . . . . . . . . . . . . . . . . . . . . . . . . . . . . . . . . . . . . . . . . . 68
Typing Text. . . . . . . . . . . . . . . . . . . . . . . . . . . . . . . . . . . . . . . . . . . . . . . . . . . . . 68
Remembering Cursor Position . . . . . . . . . . . . . . . . . . . . . . . . . . . . . . . . . . . . . . 68
Changing the Home Position of the Cursor . . . . . . . . . . . . . . . . . . . . . . . . . . . . 69
Positioning the Cursor to Edit Text. . . . . . . . . . . . . . . . . . . . . . . . . . . . . . . . . . . 69
Using an International Character Set . . . . . . . . . . . . . . . . . . . . . . . . . . . . . . . . . . . . 69
Changing the Keyboard Layout . . . . . . . . . . . . . . . . . . . . . . . . . . . . . . . . . . . . . 71
Creating Graphics . . . . . . . . . . . . . . . . . . . . . . . . . . . . . . . . . . . . . . . . . . . . . . . . . . . 71
Saving Deko Graphics . . . . . . . . . . . . . . . . . . . . . . . . . . . . . . . . . . . . . . . . . . . . . . . 73
Designing and Applying Styles . . . . . . . . . . . . . . . . . . . . . . . . . . . . . . . . 77
Styles for New or Existing Text . . . . . . . . . . . . . . . . . . . . . . . . . . . . . . . . . . . . . . . . . 78
Style Edit Layout Windows and Tools . . . . . . . . . . . . . . . . . . . . . . . . . . . . . . . . 79
Menu Bar. . . . . . . . . . . . . . . . . . . . . . . . . . . . . . . . . . . . . . . . . . . . . . . . . . . 80
Text Bar. . . . . . . . . . . . . . . . . . . . . . . . . . . . . . . . . . . . . . . . . . . . . . . . . . . . 80
Style Window. . . . . . . . . . . . . . . . . . . . . . . . . . . . . . . . . . . . . . . . . . . . . . . . 81
Program Window. . . . . . . . . . . . . . . . . . . . . . . . . . . . . . . . . . . . . . . . . . . . . 81
Tools Window . . . . . . . . . . . . . . . . . . . . . . . . . . . . . . . . . . . . . . . . . . . . . . . 81
Shader Window . . . . . . . . . . . . . . . . . . . . . . . . . . . . . . . . . . . . . . . . . . . . . . 81
Command Bar . . . . . . . . . . . . . . . . . . . . . . . . . . . . . . . . . . . . . . . . . . . . . . 82
Status Bar . . . . . . . . . . . . . . . . . . . . . . . . . . . . . . . . . . . . . . . . . . . . . . . . . . 82
Preset Style Window . . . . . . . . . . . . . . . . . . . . . . . . . . . . . . . . . . . . . . . . . . 82
Current Style Window . . . . . . . . . . . . . . . . . . . . . . . . . . . . . . . . . . . . . . . . . 82
Defining the Current Style for Typing Text . . . . . . . . . . . . . . . . . . . . . . . . . . . . . . . . 83
Moving the Current Style Window . . . . . . . . . . . . . . . . . . . . . . . . . . . . . . . . . . . 83
Resizing the Current Style Window . . . . . . . . . . . . . . . . . . . . . . . . . . . . . . . . . . 84
Changing the Letter Used as Sample Text in the Current Style Window. . . . . . 84
Using a Preset Style . . . . . . . . . . . . . . . . . . . . . . . . . . . . . . . . . . . . . . . . . . . . . . . . . 85
Using a Modified Version of a Preset Style . . . . . . . . . . . . . . . . . . . . . . . . . . . . 85
7
Page 8

Creating Styles. . . . . . . . . . . . . . . . . . . . . . . . . . . . . . . . . . . . . . . . . . . . . . . . . . . . . 86
Selecting and Adjusting a Typeface . . . . . . . . . . . . . . . . . . . . . . . . . . . . . . . . . 87
Installing Additional Fonts. . . . . . . . . . . . . . . . . . . . . . . . . . . . . . . . . . . . . . 89
Adjusting Size, Bold, Italic, and Justification Rules to the Current Style . . . . . . 89
Applying Rotate, Skew, Kerning and Leading to the Current Style . . . . . . . . . . 90
Adjusting the Display of Capitalization, Quotes and Spacing . . . . . . . . . . . . . . 90
Typing in a Language other than English . . . . . . . . . . . . . . . . . . . . . . . . . . . . . 90
Controlling the Typeface in the Style Window. . . . . . . . . . . . . . . . . . . . . . . . . . 91
Restoring a Numeric Parameter to Its Default Value . . . . . . . . . . . . . . . . . 92
Adjusting the Sharpness of a Font . . . . . . . . . . . . . . . . . . . . . . . . . . . . . . . . . . 93
Adding Details to a Font . . . . . . . . . . . . . . . . . . . . . . . . . . . . . . . . . . . . . . . . . . 93
Displaying the Look Tab in the Style Window . . . . . . . . . . . . . . . . . . . . . . 94
Adding a Face, Edge, Frame, Shadow, or Underline to the
Current Look . . . . . . . . . . . . . . . . . . . . . . . . . . . . . . . . . . . . . . . . . . . . . . 95
Removing a Face, Edge, Frame, Shadow or Underline from the
Current Look . . . . . . . . . . . . . . . . . . . . . . . . . . . . . . . . . . . . . . . . . . . . . . 96
Adjusting Details . . . . . . . . . . . . . . . . . . . . . . . . . . . . . . . . . . . . . . . . . . . . . . . . 97
Adjusting Face Detail Attributes . . . . . . . . . . . . . . . . . . . . . . . . . . . . . . . . . 98
Adjusting Edge Detail Attributes . . . . . . . . . . . . . . . . . . . . . . . . . . . . . . . . . 99
Adjusting Shadow Detail Attributes . . . . . . . . . . . . . . . . . . . . . . . . . . . . . 101
Adjusting Underline Detail Attributes . . . . . . . . . . . . . . . . . . . . . . . . . . . . 103
Adjusting Frame Detail Attributes . . . . . . . . . . . . . . . . . . . . . . . . . . . . . . . 105
Applying Color, Ramp, Texture, CAP, or Keyhole to a Style Detail. . . . . . . . . 106
Activating a Shader Window for the Current Look’s First Detail. . . . . . . . 108
Activating the Shader for Any Detail in the Current Style . . . . . . . . . . . . . 109
Applying or Changing the Color of a Detail . . . . . . . . . . . . . . . . . . . . . . . 109
Selecting Colors using the Color Picker . . . . . . . . . . . . . . . . . . . . . . . . . . 111
Selecting a Color Using the Eyedropper . . . . . . . . . . . . . . . . . . . . . . . . . 112
Creating Color Gradients Using the Ramp Shader . . . . . . . . . . . . . . . . . 113
Applying a Ramp to a Detail . . . . . . . . . . . . . . . . . . . . . . . . . . . . . . . . . . . 113
Applying Highlighting to a Ramp . . . . . . . . . . . . . . . . . . . . . . . . . . . . . . . 116
Previewing a Ramp . . . . . . . . . . . . . . . . . . . . . . . . . . . . . . . . . . . . . . . . . 117
About the Texture Shader . . . . . . . . . . . . . . . . . . . . . . . . . . . . . . . . . . . . 118
Specifying a Default Texture . . . . . . . . . . . . . . . . . . . . . . . . . . . . . . . . . . 119
8
Page 9

Using Associated Files in the Texture Shader Dialog Box . . . . . . . . . . . . 121
Changing the Pixel Aspect of the Source Graphic (for Non-Deko Texture Files)
125
Changing the Auto Scale Parameters . . . . . . . . . . . . . . . . . . . . . . . . . . . . 125
Filling a Detail with Keyed Video . . . . . . . . . . . . . . . . . . . . . . . . . . . . . . . . 126
Creating Texture Shadows . . . . . . . . . . . . . . . . . . . . . . . . . . . . . . . . . . . . 127
Using the CAP Shader Option. . . . . . . . . . . . . . . . . . . . . . . . . . . . . . . . . . 129
Playing a Cel Animation . . . . . . . . . . . . . . . . . . . . . . . . . . . . . . . . . . . . . . 134
Using Preset Shaders . . . . . . . . . . . . . . . . . . . . . . . . . . . . . . . . . . . . . . . . . . . 134
Opening a Preset Shader File . . . . . . . . . . . . . . . . . . . . . . . . . . . . . . . . . . 135
Applying a Preset Shader to a Detail. . . . . . . . . . . . . . . . . . . . . . . . . . . . . 135
Assigning the Current Shader to a Preset Shader Button. . . . . . . . . . . . . 135
Saving the Current Preset Shaders. . . . . . . . . . . . . . . . . . . . . . . . . . . . . . 135
Resetting the Preset Shader Factory Defaults . . . . . . . . . . . . . . . . . . . . . 136
Saving and Reusing the Styles You Create . . . . . . . . . . . . . . . . . . . . . . . . . . . . . . 136
Assigning the Current Style to a Preset Style Button. . . . . . . . . . . . . . . . . . . . 137
Saving Styles . . . . . . . . . . . . . . . . . . . . . . . . . . . . . . . . . . . . . . . . . . . . . . . . . . 138
Saving Modified Preset Styles. . . . . . . . . . . . . . . . . . . . . . . . . . . . . . . . . . 138
Saving the Eight Preset Styles in a new Presets File . . . . . . . . . . . . . . . . 138
Saving or Renaming a Style . . . . . . . . . . . . . . . . . . . . . . . . . . . . . . . . . . . 139
Saving a Modified Style. . . . . . . . . . . . . . . . . . . . . . . . . . . . . . . . . . . . . . . 139
Saving the Current Style as a Prerendered Style . . . . . . . . . . . . . . . . . . . 139
Retrieving Styles . . . . . . . . . . . . . . . . . . . . . . . . . . . . . . . . . . . . . . . . . . . . . . . 140
Working with Text and Styles . . . . . . . . . . . . . . . . . . . . . . . . . . . . . . . . . . . . . . . . . 141
Selecting Text. . . . . . . . . . . . . . . . . . . . . . . . . . . . . . . . . . . . . . . . . . . . . . . . . . 141
Selecting a Block of Text. . . . . . . . . . . . . . . . . . . . . . . . . . . . . . . . . . . . . . 141
Selecting Multiple Blocks of Text. . . . . . . . . . . . . . . . . . . . . . . . . . . . . . . . 142
Selecting a Word . . . . . . . . . . . . . . . . . . . . . . . . . . . . . . . . . . . . . . . . . . . . 142
Selecting all Text in a Row . . . . . . . . . . . . . . . . . . . . . . . . . . . . . . . . . . . . 142
Selecting all Text in a Text Layer . . . . . . . . . . . . . . . . . . . . . . . . . . . . . . . 142
Selecting all Text Characters in a Graphic . . . . . . . . . . . . . . . . . . . . . . . . 143
Selecting all Text Characters in the Current Style. . . . . . . . . . . . . . . . . . . 143
Deselecting Text. . . . . . . . . . . . . . . . . . . . . . . . . . . . . . . . . . . . . . . . . . . . . . . . 143
9
Page 10

Modifying Selected Text . . . . . . . . . . . . . . . . . . . . . . . . . . . . . . . . . . . . . . . . . 143
Applying a Font to a Typeface . . . . . . . . . . . . . . . . . . . . . . . . . . . . . . . . . 144
Changing Normal Text to Bold . . . . . . . . . . . . . . . . . . . . . . . . . . . . . . . . . 144
Changing Normal Text to Italic . . . . . . . . . . . . . . . . . . . . . . . . . . . . . . . . . 145
Underlining Text . . . . . . . . . . . . . . . . . . . . . . . . . . . . . . . . . . . . . . . . . . . . 145
Changing how Selected Text displays the Case of Typed Characters. . . 145
Deleting and Clearing Text or Program Window . . . . . . . . . . . . . . . . . . . . . . . 146
Deleting Text . . . . . . . . . . . . . . . . . . . . . . . . . . . . . . . . . . . . . . . . . . . . . . 146
Clearing the Program Window . . . . . . . . . . . . . . . . . . . . . . . . . . . . . . . . . 146
Cutting, Copying, and Pasting Details and Styles . . . . . . . . . . . . . . . . . . . . . . 147
Cutting or Copying a Detail. . . . . . . . . . . . . . . . . . . . . . . . . . . . . . . . . . . . 147
Pasting a Detail into the Details Look. . . . . . . . . . . . . . . . . . . . . . . . . . . . 147
Copying and Pasting a Look. . . . . . . . . . . . . . . . . . . . . . . . . . . . . . . . . . . 148
Copying and Pasting a Font . . . . . . . . . . . . . . . . . . . . . . . . . . . . . . . . . . . 148
Copying and Pasting a Style . . . . . . . . . . . . . . . . . . . . . . . . . . . . . . . . . . 148
Selecting a Style from a Graphic and Assigning it a Preset Style
Button . . . . . . . . . . . . . . . . . . . . . . . . . . . . . . . . . . . . . . . . . . . . . . . . . . 148
Selecting Multiple Styles from a Graphic and Assigning them to Preset
Style Buttons. . . . . . . . . . . . . . . . . . . . . . . . . . . . . . . . . . . . . . . . . . . . . 149
Selecting a Typeface from a Graphic . . . . . . . . . . . . . . . . . . . . . . . . . . . . 149
10
Building Graphics with Layers . . . . . . . . . . . . . . . . . . . . . . . . . . . . . . . . 151
Understanding Layers and Backgrounds . . . . . . . . . . . . . . . . . . . . . . . . . . . . . . . . 151
Working with Backgrounds. . . . . . . . . . . . . . . . . . . . . . . . . . . . . . . . . . . . . . . . . . . 156
Turning the Background On or Off . . . . . . . . . . . . . . . . . . . . . . . . . . . . . . . . . 156
Applying a Color, Ramp or Texture to the Background. . . . . . . . . . . . . . . . . . 156
Opening a Graphic Directly into the Background . . . . . . . . . . . . . . . . . . . . . . 157
Opening a Graphic into the Background Using a Browser . . . . . . . . . . . . . . . 158
Turning the Background into a Layer . . . . . . . . . . . . . . . . . . . . . . . . . . . . . . . 158
Replacing the Background with Luminance from a Graphic File. . . . . . . . . . . 158
Adding Layers . . . . . . . . . . . . . . . . . . . . . . . . . . . . . . . . . . . . . . . . . . . . . . . . . . . . 159
Adding a Text Layer to a Graphic . . . . . . . . . . . . . . . . . . . . . . . . . . . . . . . . . . 159
Typing Text in a Newly Added Text Layer. . . . . . . . . . . . . . . . . . . . . . . . . . . . 160
Creating New Layers for Selected Text. . . . . . . . . . . . . . . . . . . . . . . . . . . . . . 160
Adding a Rectangle to a Graphic . . . . . . . . . . . . . . . . . . . . . . . . . . . . . . . . . . 162
Page 11

Adding an Ellipse to a Graphic. . . . . . . . . . . . . . . . . . . . . . . . . . . . . . . . . . . . . 165
Using Layers to Display Other Files . . . . . . . . . . . . . . . . . . . . . . . . . . . . . . . . . . . . 165
Creating a Layer with a “Sticky” Texture . . . . . . . . . . . . . . . . . . . . . . . . . . . . . 166
Creating Clip Filled Layers . . . . . . . . . . . . . . . . . . . . . . . . . . . . . . . . . . . . . . . . 169
Playing a Motion on a Graphic with a Clip Filled Layer . . . . . . . . . . . . . . . 170
Associating a Clip with an Entire Graphic . . . . . . . . . . . . . . . . . . . . . . . . . 170
Modifying Layers and Text . . . . . . . . . . . . . . . . . . . . . . . . . . . . . . . . . . . . . . . . . . . 170
Selecting Layers. . . . . . . . . . . . . . . . . . . . . . . . . . . . . . . . . . . . . . . . . . . . . . . . 171
Determining Which Layers are Selected . . . . . . . . . . . . . . . . . . . . . . . . . . 172
Selecting a Layer in the Active Graphic. . . . . . . . . . . . . . . . . . . . . . . . . . . 174
Selecting a Layer in Front of the Current Layer. . . . . . . . . . . . . . . . . . . . . 174
Selecting the Layer Behind the Currently Selected Layer. . . . . . . . . . . . . 174
Selecting All Layers in the Active Graphic. . . . . . . . . . . . . . . . . . . . . . . . . 174
Selecting Multiple Layers in the Active Graphic . . . . . . . . . . . . . . . . . . . . 174
Deselecting All Selected Layers . . . . . . . . . . . . . . . . . . . . . . . . . . . . . . . . 175
Specifying Layer Properties . . . . . . . . . . . . . . . . . . . . . . . . . . . . . . . . . . . . . . . 175
Moving the Layer Using the Keyboard . . . . . . . . . . . . . . . . . . . . . . . . . . . 179
Moving the Layer Using the Mouse. . . . . . . . . . . . . . . . . . . . . . . . . . . . . . 179
Using the Layer Browser. . . . . . . . . . . . . . . . . . . . . . . . . . . . . . . . . . . . . . . . . . . . . 180
Opening the Layer Browser . . . . . . . . . . . . . . . . . . . . . . . . . . . . . . . . . . . . . . . 180
Locating a Thumbnail Image in the Browser . . . . . . . . . . . . . . . . . . . . . . . . . . 181
Selecting a Layer Using the Layer Browser . . . . . . . . . . . . . . . . . . . . . . . . . . . 181
Using Layer Browser Tools to Facilitate Your Work. . . . . . . . . . . . . . . . . . . . . 182
Viewing or Hiding a Layer . . . . . . . . . . . . . . . . . . . . . . . . . . . . . . . . . . . . . 182
Locking or Unlocking a Layer . . . . . . . . . . . . . . . . . . . . . . . . . . . . . . . . . . 182
Zooming In and Out on a Layer. . . . . . . . . . . . . . . . . . . . . . . . . . . . . . . . . 182
Naming Layers . . . . . . . . . . . . . . . . . . . . . . . . . . . . . . . . . . . . . . . . . . . . . . . . . 183
Naming a Layer in the Style Window. . . . . . . . . . . . . . . . . . . . . . . . . . . . . 183
Naming or Renaming a Layer in the Layer Browser . . . . . . . . . . . . . . . . . 183
Reordering Layers . . . . . . . . . . . . . . . . . . . . . . . . . . . . . . . . . . . . . . . . . . . . . . 184
Appending a Graphic to a Second Graphic . . . . . . . . . . . . . . . . . . . . . . . . . . . 185
Pasting Layers to the Background . . . . . . . . . . . . . . . . . . . . . . . . . . . . . . . . . . . . . 187
Loading and Clearing Associated Clips . . . . . . . . . . . . . . . . . . . . . . . . . . . . . . . . . 188
11
Page 12

Editing Text and Layers. . . . . . . . . . . . . . . . . . . . . . . . . . . . . . . . . . . . . . 191
Modifying Text . . . . . . . . . . . . . . . . . . . . . . . . . . . . . . . . . . . . . . . . . . . . . . . . . . . . 191
Changing Text Case . . . . . . . . . . . . . . . . . . . . . . . . . . . . . . . . . . . . . . . . . . . . 192
Changing Character Spacing (Kerning) . . . . . . . . . . . . . . . . . . . . . . . . . . . . . 195
Changing Row Spacing (Leading). . . . . . . . . . . . . . . . . . . . . . . . . . . . . . . . . . 196
Changing Character Width . . . . . . . . . . . . . . . . . . . . . . . . . . . . . . . . . . . . . . . 197
Finding and Replacing Text. . . . . . . . . . . . . . . . . . . . . . . . . . . . . . . . . . . . . . . 199
Checking Text Spelling . . . . . . . . . . . . . . . . . . . . . . . . . . . . . . . . . . . . . . . . . . 201
Manipulating Text or Layers. . . . . . . . . . . . . . . . . . . . . . . . . . . . . . . . . . . . . . . . . . 203
Rotating Text or Layers . . . . . . . . . . . . . . . . . . . . . . . . . . . . . . . . . . . . . . . . . . 204
Skewing Text or Layers. . . . . . . . . . . . . . . . . . . . . . . . . . . . . . . . . . . . . . . . . . 208
Specifying a Numerical Value for Skewing Text. . . . . . . . . . . . . . . . . . . . 210
Specifying a Numerical Value for Skewing a Layer . . . . . . . . . . . . . . . . . 210
Scaling Text or Layers. . . . . . . . . . . . . . . . . . . . . . . . . . . . . . . . . . . . . . . . . . . 211
Limiting Text Renderings to a Fixed Number of Characters. . . . . . . . . . . 213
Limiting Text Layer Renderings to the Layer Boundary . . . . . . . . . . . . . . 214
Changing the Size of a Layer without Changing the Text Size . . . . . . . . 214
Scaling Selected Text or Layers Using the Keyboard . . . . . . . . . . . . . . . 216
Scaling Selected Text Using the Mouse. . . . . . . . . . . . . . . . . . . . . . . . . . 217
Specifying Numerical Values for Font Size . . . . . . . . . . . . . . . . . . . . . . . 218
Specifying Numerical Values for Layer Scaling . . . . . . . . . . . . . . . . . . . . 218
Moving Text and Layers . . . . . . . . . . . . . . . . . . . . . . . . . . . . . . . . . . . . . . . . . 219
Moving a Layer Using the Mouse . . . . . . . . . . . . . . . . . . . . . . . . . . . . . . . 222
Positioning Layers by Specifying Numerical Values. . . . . . . . . . . . . . . . . 222
Moving Text Using the Keyboard . . . . . . . . . . . . . . . . . . . . . . . . . . . . . . . 223
Moving Text Using the Mouse . . . . . . . . . . . . . . . . . . . . . . . . . . . . . . . . . 224
Justifying Text and Layers. . . . . . . . . . . . . . . . . . . . . . . . . . . . . . . . . . . . . . . . 224
Justifying Text Using the Mouse. . . . . . . . . . . . . . . . . . . . . . . . . . . . . . . . 224
Justifying Text Using the Keyboard . . . . . . . . . . . . . . . . . . . . . . . . . . . . . 227
Justifying a Rectangle, Ellipse, or Text Layer. . . . . . . . . . . . . . . . . . . . . . 227
Deleting Text and Layers . . . . . . . . . . . . . . . . . . . . . . . . . . . . . . . . . . . . . . . . 228
Deleting Text . . . . . . . . . . . . . . . . . . . . . . . . . . . . . . . . . . . . . . . . . . . . . . 228
Deleting All Text Within a Layer Without Deleting the Layer . . . . . . . . . . 229
12
Page 13

Deleting One or More Layers . . . . . . . . . . . . . . . . . . . . . . . . . . . . . . . . . . 229
Deleting All Layers (but not the Background) . . . . . . . . . . . . . . . . . . . . . . 229
Clearing the Background from the Active Graphic . . . . . . . . . . . . . . . . . . 229
Clearing the Layers and the Background from the Active Graphic . . . . . . 229
Having Deko Prompt You to Save Modified Files before Clearing
Them . . . . . . . . . . . . . . . . . . . . . . . . . . . . . . . . . . . . . . . . . . . . . . . . . . . 230
Cutting and Pasting Text or Layers. . . . . . . . . . . . . . . . . . . . . . . . . . . . . . . . . . . . . 230
Cutting or Copying Text or a Layer . . . . . . . . . . . . . . . . . . . . . . . . . . . . . . . . . 230
Pasting Text . . . . . . . . . . . . . . . . . . . . . . . . . . . . . . . . . . . . . . . . . . . . . . . . . . . 230
Pasting a Layer . . . . . . . . . . . . . . . . . . . . . . . . . . . . . . . . . . . . . . . . . . . . . . . . 231
Typing on a Curve. . . . . . . . . . . . . . . . . . . . . . . . . . . . . . . . . . . . . . . . . . . . . . . . . . 231
Controlling the Placement of Text Within a Graphic. . . . . . . . . . . . . . . . . . . . . 233
Creating a Baseline . . . . . . . . . . . . . . . . . . . . . . . . . . . . . . . . . . . . . . . . . . . . . 233
Creating a Curve, an Ellipse, or a Rectangle Baseline . . . . . . . . . . . . . . . 234
Drawing a Line-Segment Baseline . . . . . . . . . . . . . . . . . . . . . . . . . . . . . . 236
Editing a Baseline. . . . . . . . . . . . . . . . . . . . . . . . . . . . . . . . . . . . . . . . . . . . . . . 237
Deleting or Inserting a Point on a Baseline . . . . . . . . . . . . . . . . . . . . . . . . 237
Reversing the Direction of the Baseline . . . . . . . . . . . . . . . . . . . . . . . . . . 239
Changing the Type of Point on the Baseline . . . . . . . . . . . . . . . . . . . . . . . 240
Adjusting the Continuity Between Two Bézier Curves . . . . . . . . . . . . . . . 242
Reshaping a Baseline by Moving the Points . . . . . . . . . . . . . . . . . . . . . . . 242
Cancelling Changes to a Baseline. . . . . . . . . . . . . . . . . . . . . . . . . . . . . . . 243
Using Tab Stops . . . . . . . . . . . . . . . . . . . . . . . . . . . . . . . . . . . . . . . . . . . . . . . . . . . 243
Setting Tab Stops. . . . . . . . . . . . . . . . . . . . . . . . . . . . . . . . . . . . . . . . . . . . . . . 244
Clearing Tab Stops. . . . . . . . . . . . . . . . . . . . . . . . . . . . . . . . . . . . . . . . . . . . . . 244
Finding Tab Stops . . . . . . . . . . . . . . . . . . . . . . . . . . . . . . . . . . . . . . . . . . . . . . 244
Moving Tab Stops . . . . . . . . . . . . . . . . . . . . . . . . . . . . . . . . . . . . . . . . . . . . . . 245
Cutting or Copying Tab Stops . . . . . . . . . . . . . . . . . . . . . . . . . . . . . . . . . . . . . 245
Pasting Tab Stops . . . . . . . . . . . . . . . . . . . . . . . . . . . . . . . . . . . . . . . . . . . . . . 245
Changing the Decimal Tab Character . . . . . . . . . . . . . . . . . . . . . . . . . . . . . . . 245
Displaying or Hiding Tab Markers . . . . . . . . . . . . . . . . . . . . . . . . . . . . . . . . . . 246
Working with Charts and Graphs . . . . . . . . . . . . . . . . . . . . . . . . . . . . . . 247
Accessing the Chart Designer. . . . . . . . . . . . . . . . . . . . . . . . . . . . . . . . . . . . . . . . . 247
13
Page 14

Basic Procedure for Creating Charts . . . . . . . . . . . . . . . . . . . . . . . . . . . . . . . . . . . 248
Creating a Series. . . . . . . . . . . . . . . . . . . . . . . . . . . . . . . . . . . . . . . . . . . . . . . 249
Configuring Chart Settings . . . . . . . . . . . . . . . . . . . . . . . . . . . . . . . . . . . . . . . 250
(Optional) Assigning Interactivity for the Mouse . . . . . . . . . . . . . . . . . . . . . . . 252
Assigning Data to a Series . . . . . . . . . . . . . . . . . . . . . . . . . . . . . . . . . . . . . . . 253
Working with Advanced Controls . . . . . . . . . . . . . . . . . . . . . . . . . . . . . . . . . . . . . . 255
Using Series Controls . . . . . . . . . . . . . . . . . . . . . . . . . . . . . . . . . . . . . . . . . . . 255
Setting the Series Attributes . . . . . . . . . . . . . . . . . . . . . . . . . . . . . . . . . . . 256
Setting the Series Data Labels . . . . . . . . . . . . . . . . . . . . . . . . . . . . . . . . . 259
Setting the Series Data Points . . . . . . . . . . . . . . . . . . . . . . . . . . . . . . . . . 262
Setting the Series Legend . . . . . . . . . . . . . . . . . . . . . . . . . . . . . . . . . . . . 263
Setting the Series Markers . . . . . . . . . . . . . . . . . . . . . . . . . . . . . . . . . . . . 264
Modifying the Series List . . . . . . . . . . . . . . . . . . . . . . . . . . . . . . . . . . . . . 265
Using Axes Controls . . . . . . . . . . . . . . . . . . . . . . . . . . . . . . . . . . . . . . . . . . . . 266
Setting the Axes Appearance . . . . . . . . . . . . . . . . . . . . . . . . . . . . . . . . . . 267
Setting the Axes ConstLines . . . . . . . . . . . . . . . . . . . . . . . . . . . . . . . . . . 268
Setting the Axes Gridlines . . . . . . . . . . . . . . . . . . . . . . . . . . . . . . . . . . . . 270
Setting the Axes Labels . . . . . . . . . . . . . . . . . . . . . . . . . . . . . . . . . . . . . . 271
Setting the Axes Paging . . . . . . . . . . . . . . . . . . . . . . . . . . . . . . . . . . . . . . 272
Setting the Axes Position . . . . . . . . . . . . . . . . . . . . . . . . . . . . . . . . . . . . . 274
Setting the Axes Stripes . . . . . . . . . . . . . . . . . . . . . . . . . . . . . . . . . . . . . . 275
Setting the Axes Ticks . . . . . . . . . . . . . . . . . . . . . . . . . . . . . . . . . . . . . . . 277
Setting the Axes Title . . . . . . . . . . . . . . . . . . . . . . . . . . . . . . . . . . . . . . . . 278
Using Background Controls. . . . . . . . . . . . . . . . . . . . . . . . . . . . . . . . . . . . . . . 280
Setting the Background Appearance . . . . . . . . . . . . . . . . . . . . . . . . . . . . 280
Setting the Basic Frame Background. . . . . . . . . . . . . . . . . . . . . . . . . . . . 281
Setting the Image Frame Background . . . . . . . . . . . . . . . . . . . . . . . . . . . 283
Using Labels Controls . . . . . . . . . . . . . . . . . . . . . . . . . . . . . . . . . . . . . . . . . . . 286
Setting the Label Appearance . . . . . . . . . . . . . . . . . . . . . . . . . . . . . . . . . 286
Setting the Label Format . . . . . . . . . . . . . . . . . . . . . . . . . . . . . . . . . . . . . 288
Setting the Label Position. . . . . . . . . . . . . . . . . . . . . . . . . . . . . . . . . . . . . 289
Creating the Label List . . . . . . . . . . . . . . . . . . . . . . . . . . . . . . . . . . . . . . . 291
Using Legend Controls . . . . . . . . . . . . . . . . . . . . . . . . . . . . . . . . . . . . . . . . . . 292
14
Page 15

Setting the Legend Appearance . . . . . . . . . . . . . . . . . . . . . . . . . . . . . . . . 292
Setting the Legend Layout. . . . . . . . . . . . . . . . . . . . . . . . . . . . . . . . . . . . . 293
Setting the Legend Marks . . . . . . . . . . . . . . . . . . . . . . . . . . . . . . . . . . . . . 295
Setting the Legend Position. . . . . . . . . . . . . . . . . . . . . . . . . . . . . . . . . . . . 296
Setting the Legend Titles. . . . . . . . . . . . . . . . . . . . . . . . . . . . . . . . . . . . . . 298
Using Walls Controls . . . . . . . . . . . . . . . . . . . . . . . . . . . . . . . . . . . . . . . . . . . . 299
Setting the Wall Appearance. . . . . . . . . . . . . . . . . . . . . . . . . . . . . . . . . . . 299
Setting the Wall Size . . . . . . . . . . . . . . . . . . . . . . . . . . . . . . . . . . . . . . . . . 301
Using Watermarks Controls . . . . . . . . . . . . . . . . . . . . . . . . . . . . . . . . . . . . . . . 302
Setting the Watermark Appearance . . . . . . . . . . . . . . . . . . . . . . . . . . . . . 302
Setting the Basic Frame Watermarks . . . . . . . . . . . . . . . . . . . . . . . . . . . . 304
Setting the Watermark Position. . . . . . . . . . . . . . . . . . . . . . . . . . . . . . . . . 305
Creating the Watermark List . . . . . . . . . . . . . . . . . . . . . . . . . . . . . . . . . . . 307
Using Lighting Controls . . . . . . . . . . . . . . . . . . . . . . . . . . . . . . . . . . . . . . . . . . 308
Setting the Lighting Appearance . . . . . . . . . . . . . . . . . . . . . . . . . . . . . . . . 308
Setting the Lighting Attenuation. . . . . . . . . . . . . . . . . . . . . . . . . . . . . . . . . 310
Setting the Lighting Attributes . . . . . . . . . . . . . . . . . . . . . . . . . . . . . . . . . . 311
Setting the Lighting Direction. . . . . . . . . . . . . . . . . . . . . . . . . . . . . . . . . . . 312
Setting the Lighting Position . . . . . . . . . . . . . . . . . . . . . . . . . . . . . . . . . . . 313
Creating the Lighting Source List . . . . . . . . . . . . . . . . . . . . . . . . . . . . . . . 314
Using View Controls. . . . . . . . . . . . . . . . . . . . . . . . . . . . . . . . . . . . . . . . . . . . . 315
Setting the Global Setup View. . . . . . . . . . . . . . . . . . . . . . . . . . . . . . . . . . 315
Setting the View Margins. . . . . . . . . . . . . . . . . . . . . . . . . . . . . . . . . . . . . . 317
Setting the View Projection . . . . . . . . . . . . . . . . . . . . . . . . . . . . . . . . . . . . 318
Setting the View Size. . . . . . . . . . . . . . . . . . . . . . . . . . . . . . . . . . . . . . . . . 319
Setting the Text Size . . . . . . . . . . . . . . . . . . . . . . . . . . . . . . . . . . . . . . . . . 320
Template Configuration Controls . . . . . . . . . . . . . . . . . . . . . . . . . . . . . . . . . . . 321
Configuring Your Templates . . . . . . . . . . . . . . . . . . . . . . . . . . . . . . . . . . . 321
Creating Custom Typefaces . . . . . . . . . . . . . . . . . . . . . . . . . . . . . . . . . . 323
Creating a Custom Typeface . . . . . . . . . . . . . . . . . . . . . . . . . . . . . . . . . . . . . . . . . 323
Opening a Custom Typeface Window . . . . . . . . . . . . . . . . . . . . . . . . . . . . . . . 324
Importing an Active Graphic as a Character into a Custom Typeface . . . . . . . 324
Importing a Graphic from a File as a Character into a Custom Typeface . . . . 325
15
Page 16

Changing Pin Location and Set Width of a Character. . . . . . . . . . . . . . . . . . . 327
Specifying Custom Typeface Properties . . . . . . . . . . . . . . . . . . . . . . . . . . . . . 328
Saving a Custom Typeface . . . . . . . . . . . . . . . . . . . . . . . . . . . . . . . . . . . . . . . 329
Accessing Graphics Assigned to a Custom Typeface with a Single Keystroke . . . 331
Creating Useful Graphics . . . . . . . . . . . . . . . . . . . . . . . . . . . . . . . . . . . . 333
Creating and Using Lower Thirds. . . . . . . . . . . . . . . . . . . . . . . . . . . . . . . . . . . . . . 334
Building Lower Thirds . . . . . . . . . . . . . . . . . . . . . . . . . . . . . . . . . . . . . . . . . . . 334
Building a Simple Lower Third Template . . . . . . . . . . . . . . . . . . . . . . . . . 334
Custom Designing a Lower Third . . . . . . . . . . . . . . . . . . . . . . . . . . . . . . . 338
Building a Lower Third Template with a Background . . . . . . . . . . . . . . . . 345
Creating Graphics from a Template . . . . . . . . . . . . . . . . . . . . . . . . . . . . . 349
Using an Existing Graphic as a Template for a Similar Graphic. . . . . . . . 350
Creating Graphics for Multiple Formats . . . . . . . . . . . . . . . . . . . . . . . . . . . . . . . . . 352
Setting Up for Creating Multiple Format Graphics. . . . . . . . . . . . . . . . . . . . . . 352
Creating and Saving an Alternate View Layout. . . . . . . . . . . . . . . . . . . . . . . . 353
Creating Multiple Format Graphics . . . . . . . . . . . . . . . . . . . . . . . . . . . . . . . . . 354
Playing Back Multiple Format Graphics. . . . . . . . . . . . . . . . . . . . . . . . . . . . . . 355
Applying Fancy Frames for Your Text . . . . . . . . . . . . . . . . . . . . . . . . . . . . . . . . . . 356
Selecting and Using a Preset Style with a Fancy Frame. . . . . . . . . . . . . . . . . 357
Creating Styles with Fancy Frames. . . . . . . . . . . . . . . . . . . . . . . . . . . . . . . . . 358
Creating a Graphic to Use as a Shader for a Fancy Frame . . . . . . . . . . . 360
Creating and Using Real-Time Clocks . . . . . . . . . . . . . . . . . . . . . . . . . . . . . . . . . . 361
Defining a New Clock or Editing an Existing Clock . . . . . . . . . . . . . . . . . . . . . 361
Displaying a Clock in the Current Graphic. . . . . . . . . . . . . . . . . . . . . . . . . . . . 364
Starting the Countdown or Countup Timer . . . . . . . . . . . . . . . . . . . . . . . . . . . 365
Resetting the Countdown or Countup Timer . . . . . . . . . . . . . . . . . . . . . . . . . . 365
Preventing Digits from Shifting as the Clock Advances. . . . . . . . . . . . . . . . . . 366
Starting, Pausing, Resuming or Resetting a Clock from the
Command Bar . . . . . . . . . . . . . . . . . . . . . . . . . . . . . . . . . . . . . . . . . . . . . . . 366
Creating and Using a Leaderboard . . . . . . . . . . . . . . . . . . . . . . . . . . . . . . . . . . . . 366
Creating Leaderboards . . . . . . . . . . . . . . . . . . . . . . . . . . . . . . . . . . . . . . . . . . 367
Changing Information on a Leaderboard. . . . . . . . . . . . . . . . . . . . . . . . . . . . . 371
Moving a Row Up or Down the List . . . . . . . . . . . . . . . . . . . . . . . . . . . . . 372
16
Page 17

Changing the Font or Look of a Column . . . . . . . . . . . . . . . . . . . . . . . . . . 373
Creating and Using a Full Screen Bulleted List. . . . . . . . . . . . . . . . . . . . . . . . . . . . 373
Creating a Bulleted List . . . . . . . . . . . . . . . . . . . . . . . . . . . . . . . . . . . . . . . . . . 374
Designing a Background for Your Bulleted List . . . . . . . . . . . . . . . . . . . . . . . . 380
Saving your Bulleted List . . . . . . . . . . . . . . . . . . . . . . . . . . . . . . . . . . . . . . . . . 381
Creating a Template for Interfaced Data Applications such as DekoMOS . . . . . . . 381
Creating a Replaceable Text Layer . . . . . . . . . . . . . . . . . . . . . . . . . . . . . . . . . 381
Creating a Replaceable Still Layer. . . . . . . . . . . . . . . . . . . . . . . . . . . . . . . . . . 382
Creating a Replaceable Clip Layer. . . . . . . . . . . . . . . . . . . . . . . . . . . . . . . . . . 383
Creating and Using Partial Graphics with the SportsWare Option . . . . . . . . . . . . . 384
About Pops. . . . . . . . . . . . . . . . . . . . . . . . . . . . . . . . . . . . . . . . . . . . . . . . . . . . 384
Creating Pops. . . . . . . . . . . . . . . . . . . . . . . . . . . . . . . . . . . . . . . . . . . . . . . . . . 385
Creating a Text Pop. . . . . . . . . . . . . . . . . . . . . . . . . . . . . . . . . . . . . . . . . . 385
Creating a Style Pop . . . . . . . . . . . . . . . . . . . . . . . . . . . . . . . . . . . . . . . . . 386
Creating a Place Pop. . . . . . . . . . . . . . . . . . . . . . . . . . . . . . . . . . . . . . . . . 386
Using Pops in Graphics . . . . . . . . . . . . . . . . . . . . . . . . . . . . . . . . . . . . . . . . . . 387
Managing Files . . . . . . . . . . . . . . . . . . . . . . . . . . . . . . . . . . . . . . . . . . . . . 389
Organizing Files . . . . . . . . . . . . . . . . . . . . . . . . . . . . . . . . . . . . . . . . . . . . . . . . . . . 389
Creating File Directories (Folders) . . . . . . . . . . . . . . . . . . . . . . . . . . . . . . . . . . 390
Best Practice for Storing Custom Typefaces. . . . . . . . . . . . . . . . . . . . . . . 390
Best Practice for Storing Design Elements . . . . . . . . . . . . . . . . . . . . . . . . 391
Best Practice for Organizing News Graphics . . . . . . . . . . . . . . . . . . . . . . 391
Best Practice for Organizing Sports Graphics. . . . . . . . . . . . . . . . . . . . . . 391
Best Practice for Organizing Postproduction Graphics . . . . . . . . . . . . . . . 392
Telling your Deko Where to Save and Find Files. . . . . . . . . . . . . . . . . . . . . . . 392
Opening Files Using the Open Dialog Box . . . . . . . . . . . . . . . . . . . . . . . . . . . . . . . 393
Opening a Graphic File . . . . . . . . . . . . . . . . . . . . . . . . . . . . . . . . . . . . . . . . . . 395
Opening a File From a Browser . . . . . . . . . . . . . . . . . . . . . . . . . . . . . . . . . . . . 396
Opening a New Window. . . . . . . . . . . . . . . . . . . . . . . . . . . . . . . . . . . . . . . . . . 396
Viewing Thumbnails of your Graphics in Windows Explorer . . . . . . . . . . . . . . 397
Viewing a Preview of Your Image . . . . . . . . . . . . . . . . . . . . . . . . . . . . . . . . . . 399
Viewing a Key Signal or Alpha Channel of an Image. . . . . . . . . . . . . . . . . . . . 399
Viewing Image Properties . . . . . . . . . . . . . . . . . . . . . . . . . . . . . . . . . . . . . . . . 400
17
Page 18

Opening Non-Deko Files . . . . . . . . . . . . . . . . . . . . . . . . . . . . . . . . . . . . . . . . . . . . 401
Opening Files in Windows Explorer . . . . . . . . . . . . . . . . . . . . . . . . . . . . . . . . . . . . 402
Saving Files . . . . . . . . . . . . . . . . . . . . . . . . . . . . . . . . . . . . . . . . . . . . . . . . . . . . . . 403
Saving an Untitled File or Saving a File Under a New Name . . . . . . . . . . . . . 403
Creating a New Directory for Saving Files. . . . . . . . . . . . . . . . . . . . . . . . . . . . 404
Saving an Existing File . . . . . . . . . . . . . . . . . . . . . . . . . . . . . . . . . . . . . . . . . . 404
Saving a Graphic in a Different Video Standard . . . . . . . . . . . . . . . . . . . . . . . 404
Specifying Whether to Save Character Glyphs . . . . . . . . . . . . . . . . . . . . . . . . 405
Saving a Fully Rendered Bitmap with a Graphic File . . . . . . . . . . . . . . . . . . . 405
Saving a Graphic with an Automatic Comment. . . . . . . . . . . . . . . . . . . . . . . . 406
Adding File Properties to a Graphic . . . . . . . . . . . . . . . . . . . . . . . . . . . . . . . . . . . . 406
Viewing File Information for Associated Clips and Macros . . . . . . . . . . . . . . . . . . 407
Closing Files and Exiting Deko. . . . . . . . . . . . . . . . . . . . . . . . . . . . . . . . . . . . . . . . 408
Closing a File in the Active Window . . . . . . . . . . . . . . . . . . . . . . . . . . . . . . . . 408
Closing all Open Files and Exiting Deko . . . . . . . . . . . . . . . . . . . . . . . . . . . . . 408
Having Deko Prompt You to Save Modified Files Before Closing Them. . . . . 409
Having Deko Prompt You to Save Before Exiting . . . . . . . . . . . . . . . . . . . . . . 409
Moving or Renaming Multiple Files . . . . . . . . . . . . . . . . . . . . . . . . . . . . . . . . . . . . 409
Deleting Files . . . . . . . . . . . . . . . . . . . . . . . . . . . . . . . . . . . . . . . . . . . . . . . . . . . . . 411
18
Importing Still Images and Clips. . . . . . . . . . . . . . . . . . . . . . . . . . . . . . . 413
Understanding Computer Graphics . . . . . . . . . . . . . . . . . . . . . . . . . . . . . . . . . . . . 414
File Formats . . . . . . . . . . . . . . . . . . . . . . . . . . . . . . . . . . . . . . . . . . . . . . . . . . 414
About Key Channels . . . . . . . . . . . . . . . . . . . . . . . . . . . . . . . . . . . . . . . . . . . . 415
Saving PICT, TIFF, and TARGA Files with Alpha Channel Within Deko . 416
Saving TIFF and TARGA Files with File Compression. . . . . . . . . . . . . . . 416
Creating Graphics in Other Applications and Importing to Deko . . . . . . . . . . . . . . 417
Importing Deko and Non-Deko Graphics. . . . . . . . . . . . . . . . . . . . . . . . . . . . . 417
Pixel Shape, Aspect Ratio, and Graphic Size . . . . . . . . . . . . . . . . . . . . . . . . . 419
Recommendation for Images that are not Full Screen . . . . . . . . . . . . . . . 420
Recommendation for Full Screen Images . . . . . . . . . . . . . . . . . . . . . . . . 420
Traditional Method of Adjusting Pixel Shape for Square to Rectangle. . . 420
Creating and Importing Full Screen PhotoShop Images into Deko. . . . . . . . . 422
Creating and Importing Images Created in an Old Version of Photoshop 422
Page 19

Creating and Importing Images Created in Photoshop Using Square Pixels .
424
Creating and Importing Images Created in Photoshop CS2 or Later . . . . 425
When to use Pixel Aspect Source Set to NTSC, NTSC Wide, PAL, or PAL
Wide. . . . . . . . . . . . . . . . . . . . . . . . . . . . . . . . . . . . . . . . . . . . . . . . . . . . 426
Auto-Scaling Options Override Pixel Aspect Source. . . . . . . . . . . . . . . . . 426
Using Photographs or Continuous Tone Graphics. . . . . . . . . . . . . . . . . . . . . . 426
Importing Adobe Photoshop Layers as a Deko Graphic. . . . . . . . . . . . . . . . . . . . . 427
Importing Graphics from Legacy Systems . . . . . . . . . . . . . . . . . . . . . . . . . . . . . . . 429
Transferring GF/Halo/Kseries/Presto Images to Deko. . . . . . . . . . . . . . . . . . . 429
Aston Import Option . . . . . . . . . . . . . . . . . . . . . . . . . . . . . . . . . . . . . . . . . . . . . 429
Chyron Import Option. . . . . . . . . . . . . . . . . . . . . . . . . . . . . . . . . . . . . . . . . . . . 430
Managing Stills with StillDeko, and Thunder. . . . . . . . . . . . . . . . . . . . . . . . . . . . . . 432
Connecting to an Existing Remote Database. . . . . . . . . . . . . . . . . . . . . . . . . . 433
Setting Up a Database on Deko. . . . . . . . . . . . . . . . . . . . . . . . . . . . . . . . . . . . 433
Using Thunder Browse with StillDeko . . . . . . . . . . . . . . . . . . . . . . . . . . . . . . . 434
Opening a Still Image from Deko. . . . . . . . . . . . . . . . . . . . . . . . . . . . . . . . 435
Browsing for Images in Thunder Browse. . . . . . . . . . . . . . . . . . . . . . . . . . 435
Opening a Still Image in Thunder Browse and Editing it in Deko . . . . . . . 435
Saving a Deko Graphic in a Thunder Database . . . . . . . . . . . . . . . . . . . . 436
Using the ClipDeko Option . . . . . . . . . . . . . . . . . . . . . . . . . . . . . . . . . . . . . . . . . . . 436
About the Clip Edit Window . . . . . . . . . . . . . . . . . . . . . . . . . . . . . . . . . . . . . . . 437
Accessing the Clip Edit Window. . . . . . . . . . . . . . . . . . . . . . . . . . . . . . . . . . . . 438
Creating and Opening Clips Databases. . . . . . . . . . . . . . . . . . . . . . . . . . . . . . 439
Recording Clips Using the Clip Record Interface . . . . . . . . . . . . . . . . . . . . . . . . . . 440
Accessing the Record Clip Window . . . . . . . . . . . . . . . . . . . . . . . . . . . . . . . . . 440
Setting Up Your Clip Record Parameters. . . . . . . . . . . . . . . . . . . . . . . . . . . . . 441
Recording Your Clip . . . . . . . . . . . . . . . . . . . . . . . . . . . . . . . . . . . . . . . . . . . . . 441
Importing Clips . . . . . . . . . . . . . . . . . . . . . . . . . . . . . . . . . . . . . . . . . . . . . . . . . . . . 442
Importing Clips to the Browser Database. . . . . . . . . . . . . . . . . . . . . . . . . . . . . 442
Renaming Clips . . . . . . . . . . . . . . . . . . . . . . . . . . . . . . . . . . . . . . . . . . . . . . . . 445
Deleting Clips From the Browser Database . . . . . . . . . . . . . . . . . . . . . . . . . . . 445
Using Clips with Key . . . . . . . . . . . . . . . . . . . . . . . . . . . . . . . . . . . . . . . . . . . . 446
Importing a Fill Clip and Its Associated Key . . . . . . . . . . . . . . . . . . . . . . . 446
19
Page 20

Assigning a Key Clip to a Fill Clip. . . . . . . . . . . . . . . . . . . . . . . . . . . . . . . 446
Removing the Key Assignment From the Current Clip. . . . . . . . . . . . . . . 447
Aligning a Key Clip with a Fill Clip . . . . . . . . . . . . . . . . . . . . . . . . . . . . . . 447
Importing MPEG-2 (MXF) Clips into Deko. . . . . . . . . . . . . . . . . . . . . . . . . . . . 447
MPEG-2 Compression Format . . . . . . . . . . . . . . . . . . . . . . . . . . . . . . . . . 448
MXF File Compatibility with Liquid Editing Products. . . . . . . . . . . . . . . . . 448
Clip Formats and QuickTime. . . . . . . . . . . . . . . . . . . . . . . . . . . . . . . . . . . . . . 449
Converting Clips Using QuickTime Pro . . . . . . . . . . . . . . . . . . . . . . . . . . 450
Importing .MOV Files into Deko. . . . . . . . . . . . . . . . . . . . . . . . . . . . . . . . . . . . 453
Using Static Mattes . . . . . . . . . . . . . . . . . . . . . . . . . . . . . . . . . . . . . . . . . . . . . . . . 456
Using ClipAutoUpdate . . . . . . . . . . . . . . . . . . . . . . . . . . . . . . . . . . . . . . . . . . . . . . 457
Configuring ClipAutoUpdate . . . . . . . . . . . . . . . . . . . . . . . . . . . . . . . . . . . . . . 458
Preparing to Play a Clip . . . . . . . . . . . . . . . . . . . . . . . . . . . . . . . . . . . . . . . . . . . . . 459
Specifying the Genlock Source . . . . . . . . . . . . . . . . . . . . . . . . . . . . . . . . . . . . 460
Previewing a Clip. . . . . . . . . . . . . . . . . . . . . . . . . . . . . . . . . . . . . . . . . . . . . . . 461
Trimming the Beginning or Ending of a Clip . . . . . . . . . . . . . . . . . . . . . . . . . . 461
Finding the Nearest Point in the Clip. . . . . . . . . . . . . . . . . . . . . . . . . . . . . . . . 462
Looping Clip Playback. . . . . . . . . . . . . . . . . . . . . . . . . . . . . . . . . . . . . . . . . . . 462
Implementing Three Point Looping of a Clip . . . . . . . . . . . . . . . . . . . . . . . . . . 462
Synchronizing Clip Playback with Effect Playback . . . . . . . . . . . . . . . . . . . . . 463
Adjusting the Volume of Embedded Audio . . . . . . . . . . . . . . . . . . . . . . . . . . . 463
Playing a Clip . . . . . . . . . . . . . . . . . . . . . . . . . . . . . . . . . . . . . . . . . . . . . . . . . . . . . 464
Stopping Clip Playback . . . . . . . . . . . . . . . . . . . . . . . . . . . . . . . . . . . . . . . . . . . . . 464
Clearing or Hiding a Clip Loaded in the Clip Player . . . . . . . . . . . . . . . . . . . . 465
Automatically Displaying Clips with Deko Graphics . . . . . . . . . . . . . . . . . . . . 465
Associating a Clip with a Graphic . . . . . . . . . . . . . . . . . . . . . . . . . . . . . . . 466
Breaking a Link Between a Clip and a Graphic . . . . . . . . . . . . . . . . . . . . 466
Creating a Graphic with a Clip Filled Layer . . . . . . . . . . . . . . . . . . . . . . . 466
Using Levels and Keys to Adjust Shaped or Unshaped Clips. . . . . . . . . . . . . 467
Creating Clip Transitions . . . . . . . . . . . . . . . . . . . . . . . . . . . . . . . . . . . . . . . . . 468
Creating and Playing “Background” Clips with Default Transition . . . . . . 469
Creating and Playing “Background” Clips with Motion . . . . . . . . . . . . . . . 471
Creating Clip Layers . . . . . . . . . . . . . . . . . . . . . . . . . . . . . . . . . . . . . . . . . 472
20
Page 21

Selecting a Frame (Frame Grab) from a Clip . . . . . . . . . . . . . . . . . . . . . . . . . . 473
Using Power Clips (Deko 3000 SD/HD/HY only) . . . . . . . . . . . . . . . . . . . . . . . . . . 473
Creating Power Clips in QuickTime Pro. . . . . . . . . . . . . . . . . . . . . . . . . . . . . . 474
Creating a Power Clips Database in Deko. . . . . . . . . . . . . . . . . . . . . . . . . . . . 480
Importing .mov Files into Deko as Power Clips . . . . . . . . . . . . . . . . . . . . . . . . 481
Creating Graphics Using Power Clips . . . . . . . . . . . . . . . . . . . . . . . . . . . . . . . 484
Power Clip Playback During Effects. . . . . . . . . . . . . . . . . . . . . . . . . . . . . . . . . 485
Composing for Power Clip Playback in Motion Edit . . . . . . . . . . . . . . . . . . . . . 486
Playing a Thunder Sequence from Deko . . . . . . . . . . . . . . . . . . . . . . . . . . . . . . . . 487
Configuring Thunder - ThunderNet Protocol . . . . . . . . . . . . . . . . . . . . . . . . . . 487
Configuring Thunder - GPI Triggers. . . . . . . . . . . . . . . . . . . . . . . . . . . . . . . . . 488
Configuring Deko - ThunderNET Protocol . . . . . . . . . . . . . . . . . . . . . . . . . . . . 490
Configuring Deko - GPI Triggers . . . . . . . . . . . . . . . . . . . . . . . . . . . . . . . . . . . 492
Playing a Thunder Sequence Directly from Deko . . . . . . . . . . . . . . . . . . . . . . 493
Associating a Thunder Clip with a Deko Graphic (for Use in a Deko). . . . 494
Using Effects and Sequences. . . . . . . . . . . . . . . . . . . . . . . . . . . . . . . . . 495
Layouts for Working with Effects and Sequences. . . . . . . . . . . . . . . . . . . . . . . . . . 495
Effect Playback Layout. . . . . . . . . . . . . . . . . . . . . . . . . . . . . . . . . . . . . . . . . . . 496
Sequence Playback Layout . . . . . . . . . . . . . . . . . . . . . . . . . . . . . . . . . . . . . . . 497
Program and Preview Windows . . . . . . . . . . . . . . . . . . . . . . . . . . . . . . . . . . . . 497
Switching Preview and Program Graphics . . . . . . . . . . . . . . . . . . . . . . . . 498
Copying a Graphic from Preview to Program . . . . . . . . . . . . . . . . . . . . . . 498
Copying a Graphic from Program to Preview . . . . . . . . . . . . . . . . . . . . . . 498
Using Deko Effects . . . . . . . . . . . . . . . . . . . . . . . . . . . . . . . . . . . . . . . . . . . . . . . . . 498
Transitional Effects. . . . . . . . . . . . . . . . . . . . . . . . . . . . . . . . . . . . . . . . . . . . . . 499
DVE Effects . . . . . . . . . . . . . . . . . . . . . . . . . . . . . . . . . . . . . . . . . . . . . . . . . . . 499
Control Effects . . . . . . . . . . . . . . . . . . . . . . . . . . . . . . . . . . . . . . . . . . . . . . . . . 500
Text Effects . . . . . . . . . . . . . . . . . . . . . . . . . . . . . . . . . . . . . . . . . . . . . . . . . . . 500
Motion Effects. . . . . . . . . . . . . . . . . . . . . . . . . . . . . . . . . . . . . . . . . . . . . . . . . . 501
Playing a Single Effect . . . . . . . . . . . . . . . . . . . . . . . . . . . . . . . . . . . . . . . . . . . . . . 501
Opening the Effect Layout . . . . . . . . . . . . . . . . . . . . . . . . . . . . . . . . . . . . . . . . 501
Playing a Single Effect on the Current Graphic . . . . . . . . . . . . . . . . . . . . . . . . 502
Associating an Effect with a Graphic . . . . . . . . . . . . . . . . . . . . . . . . . . . . . . . . 503
21
Page 22

Making Sure Associated Effects Play Automatically . . . . . . . . . . . . . . . . . . . . 503
Playing an Associated Effect without Reloading the Graphic . . . . . . . . . . . . . 504
Creating Sequences. . . . . . . . . . . . . . . . . . . . . . . . . . . . . . . . . . . . . . . . . . . . . . . . 504
Opening a Sequence. . . . . . . . . . . . . . . . . . . . . . . . . . . . . . . . . . . . . . . . . . . . 504
Creating a Sequence. . . . . . . . . . . . . . . . . . . . . . . . . . . . . . . . . . . . . . . . . . . . 505
Adding a Sequence . . . . . . . . . . . . . . . . . . . . . . . . . . . . . . . . . . . . . . . . . . . . . 507
Saving a Sequence . . . . . . . . . . . . . . . . . . . . . . . . . . . . . . . . . . . . . . . . . . . . . 507
Appending a Sequence to the Active Sequence . . . . . . . . . . . . . . . . . . . . . . . 508
Controlling Sequences Using Timecode Control. . . . . . . . . . . . . . . . . . . . . . . 508
Specifying Timecodes to Begin and End an Effect. . . . . . . . . . . . . . . . . . 509
Setting Intime to Outtime . . . . . . . . . . . . . . . . . . . . . . . . . . . . . . . . . . . . . 509
Setting Outtime to Intime . . . . . . . . . . . . . . . . . . . . . . . . . . . . . . . . . . . . . 509
Offsetting In and Out Times . . . . . . . . . . . . . . . . . . . . . . . . . . . . . . . . . . . 510
Finding the Event Closest to the Current Output Timecode . . . . . . . . . . . 510
Specifying Timecode Settings . . . . . . . . . . . . . . . . . . . . . . . . . . . . . . . . . 510
Using Rolls and Crawls in Your Sequence . . . . . . . . . . . . . . . . . . . . . . . . . . . 511
Using Command Event to Include Macros in Your Sequence. . . . . . . . . . . . . 511
Editing a Sequence . . . . . . . . . . . . . . . . . . . . . . . . . . . . . . . . . . . . . . . . . . . . . . . . 511
Selecting Events . . . . . . . . . . . . . . . . . . . . . . . . . . . . . . . . . . . . . . . . . . . . . . . 512
Cutting, Copying, and Pasting Events. . . . . . . . . . . . . . . . . . . . . . . . . . . . . . . 513
Inserting and Deleting Events . . . . . . . . . . . . . . . . . . . . . . . . . . . . . . . . . . . . . 513
Playing a Sequence . . . . . . . . . . . . . . . . . . . . . . . . . . . . . . . . . . . . . . . . . . . . . . . . 514
Pausing Sequence Playback . . . . . . . . . . . . . . . . . . . . . . . . . . . . . . . . . . . . . . . . . 515
Using a GPI Trigger. . . . . . . . . . . . . . . . . . . . . . . . . . . . . . . . . . . . . . . . . . . . . 516
Stopping Sequence Playback . . . . . . . . . . . . . . . . . . . . . . . . . . . . . . . . . . . . . . . . 517
Playing Sequences as Clips with Make DekoMovie. . . . . . . . . . . . . . . . . . . . . . . . 517
22
Creating Custom Motions . . . . . . . . . . . . . . . . . . . . . . . . . . . . . . . . . . . . 521
Tools for Creating Motions . . . . . . . . . . . . . . . . . . . . . . . . . . . . . . . . . . . . . . . . . . . 521
Using the Motion Edit Window. . . . . . . . . . . . . . . . . . . . . . . . . . . . . . . . . . . . . 523
Using the Motion Timeline Editor to Create Motions . . . . . . . . . . . . . . . . . . . . . . . 525
Building a Motion Script. . . . . . . . . . . . . . . . . . . . . . . . . . . . . . . . . . . . . . . . . . 525
Using the Basic Timeline Editor to Create Basic Motions . . . . . . . . . . . . . . . . . . . 529
About the Basic Timeline Editor . . . . . . . . . . . . . . . . . . . . . . . . . . . . . . . . . . . 529
Page 23

Basic Timeline Editor Compared to Motion Timeline Editor . . . . . . . . . . . 530
Creating Motions Using the Basic Motion Editor . . . . . . . . . . . . . . . . . . . . . . . 530
Creating an Action for the Veil Layer. . . . . . . . . . . . . . . . . . . . . . . . . . . . . 531
Creating an Action for the Captions Layers. . . . . . . . . . . . . . . . . . . . . . . . 533
Creating an Action for the Picture Layers . . . . . . . . . . . . . . . . . . . . . . . . . 534
Adjusting Your Motion Script . . . . . . . . . . . . . . . . . . . . . . . . . . . . . . . . . . . . . . 535
Adjusting Timing of an Action . . . . . . . . . . . . . . . . . . . . . . . . . . . . . . . . . . 535
Allowing Time at the Beginning or End of a Motion. . . . . . . . . . . . . . . . . . 536
Adjusting Motion Parameters Using the Basic Timeline Editor . . . . . . . . . 537
Editing Motions. . . . . . . . . . . . . . . . . . . . . . . . . . . . . . . . . . . . . . . . . . . . . . . . . 539
Deleting Selected Actions . . . . . . . . . . . . . . . . . . . . . . . . . . . . . . . . . . . . . 539
Appending a Motion to the Active Motion . . . . . . . . . . . . . . . . . . . . . . . . . 539
Saving a New Motion Script . . . . . . . . . . . . . . . . . . . . . . . . . . . . . . . . . . . 540
Opening a Motion File . . . . . . . . . . . . . . . . . . . . . . . . . . . . . . . . . . . . . . . . 540
Creating a Motion to Play a Cel Animation . . . . . . . . . . . . . . . . . . . . . . . . 540
Adjusting Motion Parameters with the Timeline Option . . . . . . . . . . . . . . . . . . 541
Position (X Position, Y Position, and Z Position). . . . . . . . . . . . . . . . . . . . 544
Scale . . . . . . . . . . . . . . . . . . . . . . . . . . . . . . . . . . . . . . . . . . . . . . . . . . . . . 547
Rotate . . . . . . . . . . . . . . . . . . . . . . . . . . . . . . . . . . . . . . . . . . . . . . . . . . . . 548
Skew . . . . . . . . . . . . . . . . . . . . . . . . . . . . . . . . . . . . . . . . . . . . . . . . . . . . . 548
Kern. . . . . . . . . . . . . . . . . . . . . . . . . . . . . . . . . . . . . . . . . . . . . . . . . . . . . . 548
Opacity . . . . . . . . . . . . . . . . . . . . . . . . . . . . . . . . . . . . . . . . . . . . . . . . . . . 548
Blur Face . . . . . . . . . . . . . . . . . . . . . . . . . . . . . . . . . . . . . . . . . . . . . . . . . . 549
Origin. . . . . . . . . . . . . . . . . . . . . . . . . . . . . . . . . . . . . . . . . . . . . . . . . . . . . 549
Editing an Action with the Timeline . . . . . . . . . . . . . . . . . . . . . . . . . . . . . . 549
Using Motion Behaviors . . . . . . . . . . . . . . . . . . . . . . . . . . . . . . . . . . . . . . . . . . . . . 552
Adding a Local Behavior . . . . . . . . . . . . . . . . . . . . . . . . . . . . . . . . . . . . . . . . . 553
Adding a Targeted Behavior. . . . . . . . . . . . . . . . . . . . . . . . . . . . . . . . . . . . . . . 559
Playing Motions. . . . . . . . . . . . . . . . . . . . . . . . . . . . . . . . . . . . . . . . . . . . . . . . . . . . 563
How Deko Determines Which Motion or Effect to Use. . . . . . . . . . . . . . . . . . . 563
Ability to Handle Motions Created on More Capable Deko Models . . . . . . . . . 564
Playing Motions in the Motion Edit Window . . . . . . . . . . . . . . . . . . . . . . . . . . . 565
Manually Playing the Motion . . . . . . . . . . . . . . . . . . . . . . . . . . . . . . . . . . . 565
23
Page 24

Specifying the Playback Rates of Motions . . . . . . . . . . . . . . . . . . . . . . . . 565
Pausing Motions . . . . . . . . . . . . . . . . . . . . . . . . . . . . . . . . . . . . . . . . . . . . 566
Playing Selected Motions . . . . . . . . . . . . . . . . . . . . . . . . . . . . . . . . . . . . . 566
Pausing and Resuming Motions During Playback . . . . . . . . . . . . . . . . . . 566
Stopping Motions During Playback. . . . . . . . . . . . . . . . . . . . . . . . . . . . . . 566
Playing Motions Using the Scrub Bar . . . . . . . . . . . . . . . . . . . . . . . . . . . . 567
Synchronizing a Clip with a Motion Scrub . . . . . . . . . . . . . . . . . . . . . . . . 567
Playing Clips Associated with a Graphic and Linked to a Motion or
Effect. . . . . . . . . . . . . . . . . . . . . . . . . . . . . . . . . . . . . . . . . . . . . . . . . . . 567
Pausing and Holding Effects (at Start) . . . . . . . . . . . . . . . . . . . . . . . . . . . 568
Playing a Motion within a Sequence . . . . . . . . . . . . . . . . . . . . . . . . . . . . . . . . 569
Playing a Motion as a Single Effect. . . . . . . . . . . . . . . . . . . . . . . . . . . . . . . . . 569
Associating a Motion with a Graphic . . . . . . . . . . . . . . . . . . . . . . . . . . . . . . . . 569
Creating 3D Animated Objects Using Depth Rotation . . . . . . . . . . . . . . . . . . . . . . 570
Creating a Cube-like Motion with a Graphic on Two Sides . . . . . . . . . . . . . . . 571
Creating Motions on Large Images for Real-time Playback (Pan & Scan) . . . 574
Making a Zoom Motion. . . . . . . . . . . . . . . . . . . . . . . . . . . . . . . . . . . . . . . . . . . . . . 576
Defining the Motion Origin Point . . . . . . . . . . . . . . . . . . . . . . . . . . . . . . . . . . . 578
Using Differential Motions . . . . . . . . . . . . . . . . . . . . . . . . . . . . . . . . . . . . . . . . 581
Using Auto-Motions . . . . . . . . . . . . . . . . . . . . . . . . . . . . . . . . . . . . . . . . . . . . . . . . 584
Understanding Motion Playback Compared with Auto-Motions . . . . . . . . . . . 585
Motion and Auto-Motion Terminology . . . . . . . . . . . . . . . . . . . . . . . . . . . . . . . 585
Triggering Associated Effect Playback . . . . . . . . . . . . . . . . . . . . . . . . . . . . . . 586
Determining the Associated Effect . . . . . . . . . . . . . . . . . . . . . . . . . . . . . . . . . 586
Determining if Auto-Motion Is Available. . . . . . . . . . . . . . . . . . . . . . . . . . . . . . 587
Determining Which Auto-Motion Is Used. . . . . . . . . . . . . . . . . . . . . . . . . . . . . 587
Adding a Graphic Class. . . . . . . . . . . . . . . . . . . . . . . . . . . . . . . . . . . . . . . . . . 587
Viewing Selected Motions and Graphics for a Graphic Class . . . . . . . . . . . . . 590
Checking Auto-Motion Files. . . . . . . . . . . . . . . . . . . . . . . . . . . . . . . . . . . . . . . 591
Checking Auto-Motions . . . . . . . . . . . . . . . . . . . . . . . . . . . . . . . . . . . . . . . . . . 591
Saving an Auto-Motion File with a New Name . . . . . . . . . . . . . . . . . . . . . . . . 591
Saving an Auto-Motion File . . . . . . . . . . . . . . . . . . . . . . . . . . . . . . . . . . . . . . . 591
Opening an Auto-Motion File. . . . . . . . . . . . . . . . . . . . . . . . . . . . . . . . . . . . . . 592
24
Page 25

Editing a Graphic Class . . . . . . . . . . . . . . . . . . . . . . . . . . . . . . . . . . . . . . . . . . 592
Deleting a Graphic Class . . . . . . . . . . . . . . . . . . . . . . . . . . . . . . . . . . . . . . . . . 593
Setting a Graphic’s Class in a Graphic. . . . . . . . . . . . . . . . . . . . . . . . . . . . . . . 593
Effect Playback and Auto-Motions . . . . . . . . . . . . . . . . . . . . . . . . . . . . . . . . . . 594
Play-On and Play-Off Motions . . . . . . . . . . . . . . . . . . . . . . . . . . . . . . . . . . . . . 595
Using Motion-in-Motion . . . . . . . . . . . . . . . . . . . . . . . . . . . . . . . . . . . . . . . . . . . . . . 596
Specifying Parent Motion Actions. . . . . . . . . . . . . . . . . . . . . . . . . . . . . . . . . . . 596
Using Differential Motion with the Motion-in-Motion Feature . . . . . . . . . . . . . . 597
Assigning Content-Independent Sound Effects to Deko Motions . . . . . . . . . . . . . . 598
Applying Sound Effects to Motions Exercise . . . . . . . . . . . . . . . . . . . . . . . . . . 599
Creating Animated Graphics. . . . . . . . . . . . . . . . . . . . . . . . . . . . . . . . . . 601
Animating Layers in a Graphic . . . . . . . . . . . . . . . . . . . . . . . . . . . . . . . . . . . . . . . . 602
Adding Motion to Your Bulleted List . . . . . . . . . . . . . . . . . . . . . . . . . . . . . . . . . 602
Naming the Layers of the Bulleted List . . . . . . . . . . . . . . . . . . . . . . . . . . . 602
Adding Motion to the Bulleted List. . . . . . . . . . . . . . . . . . . . . . . . . . . . . . . 604
Creating Rolls and Crawls. . . . . . . . . . . . . . . . . . . . . . . . . . . . . . . . . . . . . . . . . . . . 608
Creating and Playing Rolls. . . . . . . . . . . . . . . . . . . . . . . . . . . . . . . . . . . . . . . . 609
Composing a Graphic for a Roll Effect . . . . . . . . . . . . . . . . . . . . . . . . . . . 609
Running a Roll Effect. . . . . . . . . . . . . . . . . . . . . . . . . . . . . . . . . . . . . . . . . 610
Rolling Text within a Layer . . . . . . . . . . . . . . . . . . . . . . . . . . . . . . . . . . . . 610
Adjusting Duration or Spacing for Smooth Roll Playback . . . . . . . . . . . . . 611
Importing a Text File for a Roll . . . . . . . . . . . . . . . . . . . . . . . . . . . . . . . . . 611
Changing Speed During Roll Playback . . . . . . . . . . . . . . . . . . . . . . . . . . . 612
Embedding Speed Changes in a Roll Graphic . . . . . . . . . . . . . . . . . . . . . 612
Creating and Playing Crawls . . . . . . . . . . . . . . . . . . . . . . . . . . . . . . . . . . . . . . 613
Composing a Graphic with Crawling Text . . . . . . . . . . . . . . . . . . . . . . . . . 613
Running a Crawl Effect:. . . . . . . . . . . . . . . . . . . . . . . . . . . . . . . . . . . . . . . 614
Crawling Text Within a Layer. . . . . . . . . . . . . . . . . . . . . . . . . . . . . . . . . . . 614
Crawling Text Across a Specific Row . . . . . . . . . . . . . . . . . . . . . . . . . . . . 614
Crawling Entire CG Pages. . . . . . . . . . . . . . . . . . . . . . . . . . . . . . . . . . . . . 615
Running a Continuous Crawl. . . . . . . . . . . . . . . . . . . . . . . . . . . . . . . . . . . 615
Changing Speed During Crawl Playback . . . . . . . . . . . . . . . . . . . . . . . . . 616
Embedding Speed Changes in a Crawl Graphic. . . . . . . . . . . . . . . . . . . . 616
25
Page 26

Creating Glows and Blurs. . . . . . . . . . . . . . . . . . . . . . . . . . . . . . . . . . . . . . . . . . . . 617
Using the Deko3D Feature. . . . . . . . . . . . . . . . . . . . . . . . . . . . . . . . . . . . . . . . . . . 622
Deko Compatibility Requirements for 3D Applications . . . . . . . . . . . . . . . . . . 623
Deko3D Limitations . . . . . . . . . . . . . . . . . . . . . . . . . . . . . . . . . . . . . . . . . . . . . 623
Installing and Using the Deko3D Converter . . . . . . . . . . . . . . . . . . . . . . . . . . 624
Configuring the Deko3D Converter . . . . . . . . . . . . . . . . . . . . . . . . . . . . . 626
Using the Deko3D Converter . . . . . . . . . . . . . . . . . . . . . . . . . . . . . . . . . . 628
Building a 3D Studio MAX Scene . . . . . . . . . . . . . . . . . . . . . . . . . . . . . . . . . . 629
Guidelines for Creating 3D Models for Use in Deko . . . . . . . . . . . . . . . . . . . . 637
Exporting the Scene From 3D Studio MAX to D3D File Format . . . . . . . . . . . 638
3D Scene Checklist Before Exporting to FBX File Format . . . . . . . . . . . . . . . 639
Exporting the Scene From 3D Studio MAX to FBX File Format . . . . . . . . . . . 639
Exporting the Scene From XSI to FBX File Format. . . . . . . . . . . . . . . . . . . . . 640
3D Scene Checklist Before Exporting to COLLADA File Format . . . . . . . . . . 643
Exporting the Scene From 3D Studio MAX to COLLADA File Format . . . . . . 643
Exporting the Scene From XSI to COLLADA File Format. . . . . . . . . . . . . . . . 646
Importing the 3D Scene File into Deko . . . . . . . . . . . . . . . . . . . . . . . . . . . . . . 649
About the Deko 3D Layer Mapping Table . . . . . . . . . . . . . . . . . . . . . . . . . . . . 651
Using the Deko3D Layer Mapping Table. . . . . . . . . . . . . . . . . . . . . . . . . . . . . 653
Creating the Play-On Motion . . . . . . . . . . . . . . . . . . . . . . . . . . . . . . . . . . 655
Creating the Update Motion . . . . . . . . . . . . . . . . . . . . . . . . . . . . . . . . . . . 657
Creating the Play-Off Motion . . . . . . . . . . . . . . . . . . . . . . . . . . . . . . . . . . 660
Creating a Deko Graphic for Use with a Deko3D Motion . . . . . . . . . . . . . . . . 663
Setting Up the Auto-Motion Table for Deko3D . . . . . . . . . . . . . . . . . . . . . . . . 664
Playing a Deko Graphic with a Deko3D Motion Using Auto-Motion . . . . . . . . 665
26
Working with User Preferences . . . . . . . . . . . . . . . . . . . . . . . . . . . . . . . 667
Arranging the Desktop . . . . . . . . . . . . . . . . . . . . . . . . . . . . . . . . . . . . . . . . . . . . . . 668
Graphic Compose Layout . . . . . . . . . . . . . . . . . . . . . . . . . . . . . . . . . . . . . . . . 669
Style Edit Layout . . . . . . . . . . . . . . . . . . . . . . . . . . . . . . . . . . . . . . . . . . . . . . . 670
Effect Playback Layout . . . . . . . . . . . . . . . . . . . . . . . . . . . . . . . . . . . . . . . . . . 671
Sequence Playback Layout. . . . . . . . . . . . . . . . . . . . . . . . . . . . . . . . . . . . . . . 672
Macro Edit Layout . . . . . . . . . . . . . . . . . . . . . . . . . . . . . . . . . . . . . . . . . . . . . . 673
Macro Record Layout . . . . . . . . . . . . . . . . . . . . . . . . . . . . . . . . . . . . . . . . . . . 674
Page 27

Motion Compose Layout . . . . . . . . . . . . . . . . . . . . . . . . . . . . . . . . . . . . . . . . . 675
Typeface Edit Layout . . . . . . . . . . . . . . . . . . . . . . . . . . . . . . . . . . . . . . . . . . . . 676
Customizing Your Deko Desktop . . . . . . . . . . . . . . . . . . . . . . . . . . . . . . . . . . . . . . 677
Changing from One Standard Layout to Another. . . . . . . . . . . . . . . . . . . . . . . 677
Showing or Hiding Desktop Objects. . . . . . . . . . . . . . . . . . . . . . . . . . . . . . . . . 678
Closing, Resizing or Repositioning Deko Windows . . . . . . . . . . . . . . . . . . . . . 678
Creating Custom Layouts. . . . . . . . . . . . . . . . . . . . . . . . . . . . . . . . . . . . . . . . . 678
Saving a Layout as the Starting Layout . . . . . . . . . . . . . . . . . . . . . . . . . . . . . . 680
Resetting Windows in the Current Layout to Default Positions . . . . . . . . . . . . 680
Freezing Windows . . . . . . . . . . . . . . . . . . . . . . . . . . . . . . . . . . . . . . . . . . . . . . 680
Changing the Video Standard or the Aspect Ratio . . . . . . . . . . . . . . . . . . . . . . . . . 680
Changing the Current Aspect Ratio . . . . . . . . . . . . . . . . . . . . . . . . . . . . . . . . . 681
Changing the Current Video Standard . . . . . . . . . . . . . . . . . . . . . . . . . . . . . . . 681
Specifying User Preferences. . . . . . . . . . . . . . . . . . . . . . . . . . . . . . . . . . . . . . . . . . 681
Specifying Common Preferences. . . . . . . . . . . . . . . . . . . . . . . . . . . . . . . . . . . 682
Specifying Prompts Preferences . . . . . . . . . . . . . . . . . . . . . . . . . . . . . . . . . . . 685
Specifying Paths Preferences . . . . . . . . . . . . . . . . . . . . . . . . . . . . . . . . . . . . . 687
Specifying Cursor Preferences. . . . . . . . . . . . . . . . . . . . . . . . . . . . . . . . . . . . . 688
Specifying Marker Preferences . . . . . . . . . . . . . . . . . . . . . . . . . . . . . . . . . . . . 690
Specifying Advanced Preferences . . . . . . . . . . . . . . . . . . . . . . . . . . . . . . . . . . 692
Specifying Alt Compose Preferences. . . . . . . . . . . . . . . . . . . . . . . . . . . . . . . . 694
Saving or Resetting Preferences . . . . . . . . . . . . . . . . . . . . . . . . . . . . . . . . . . . . . . 697
Saving Current Preferences. . . . . . . . . . . . . . . . . . . . . . . . . . . . . . . . . . . . . . . 697
Automatically Saving Current Preferences Upon Exiting Deko . . . . . . . . . . . . 697
Resetting Preferences to Factory Defaults. . . . . . . . . . . . . . . . . . . . . . . . . . . . 697
Resetting All Preferences, Hardware and Software Settings. . . . . . . . . . . . . . 698
Working with Video Input and Output . . . . . . . . . . . . . . . . . . . . . . . . . . 699
Directing Signal Paths. . . . . . . . . . . . . . . . . . . . . . . . . . . . . . . . . . . . . . . . . . . . . . . 700
About Keying and Routing . . . . . . . . . . . . . . . . . . . . . . . . . . . . . . . . . . . . . . . . 700
Specifying Output Channels. . . . . . . . . . . . . . . . . . . . . . . . . . . . . . . . . . . . . . . 700
Configuring Hardware Settings . . . . . . . . . . . . . . . . . . . . . . . . . . . . . . . . . . . . . . . . 701
Using the Hardware Settings Dialog Box . . . . . . . . . . . . . . . . . . . . . . . . . . . . . 701
Switching Between Video Standards . . . . . . . . . . . . . . . . . . . . . . . . . . . . . . . . 705
27
Page 28

Determining Output View Priority . . . . . . . . . . . . . . . . . . . . . . . . . . . . . . . . . . . . . . 705
Viewing the Status of a DekoObjex Scene, a Clip, or Video Input . . . . . . . . . 706
Turning On or Off a DekoObjex Scene, a Clip, or Video Input . . . . . . . . . . . . 708
Determining the Name of a DekoObjex Scene or an Open Clip . . . . . . . . . . . 708
Reordering Output View Priority . . . . . . . . . . . . . . . . . . . . . . . . . . . . . . . . . . . 708
Displaying a Test Pattern . . . . . . . . . . . . . . . . . . . . . . . . . . . . . . . . . . . . . . . . . . . . 708
Working in Dual Channel Output Mode . . . . . . . . . . . . . . . . . . . . . . . . . . . . . . . . . 709
Using Frame Grabbing. . . . . . . . . . . . . . . . . . . . . . . . . . . . . . . . . . . . . . . . . . . . . . 710
Setting Grab Options. . . . . . . . . . . . . . . . . . . . . . . . . . . . . . . . . . . . . . . . . . . . 710
Grabbing a Frame of Video . . . . . . . . . . . . . . . . . . . . . . . . . . . . . . . . . . . . . . . 710
Applying Motion Suppression . . . . . . . . . . . . . . . . . . . . . . . . . . . . . . . . . . . . . 711
Applying Motion Suppression When Frame Grabbing . . . . . . . . . . . . . . . 711
Applying Motion Suppression to the Current Background . . . . . . . . . . . . 711
Specifying Motion Suppression Options. . . . . . . . . . . . . . . . . . . . . . . . . . 711
Streamlining Your Work with Macros. . . . . . . . . . . . . . . . . . . . . . . . . . . 713
Introduction to Macros . . . . . . . . . . . . . . . . . . . . . . . . . . . . . . . . . . . . . . . . . . . . . . 714
A Simple Macro Example . . . . . . . . . . . . . . . . . . . . . . . . . . . . . . . . . . . . . . . . 715
Recording Macros . . . . . . . . . . . . . . . . . . . . . . . . . . . . . . . . . . . . . . . . . . . . . . . . . 716
Playing Macros. . . . . . . . . . . . . . . . . . . . . . . . . . . . . . . . . . . . . . . . . . . . . . . . . . . . 717
Playing Macros Using the Play Button . . . . . . . . . . . . . . . . . . . . . . . . . . . . . . 717
Recalling and Playing Macros with a Single Keystroke (FAK only). . . . . . . . . 718
Using Macro Autoplay with the SportsWare Option . . . . . . . . . . . . . . . . . . . . 719
Pausing, Advancing, and Stopping Macro Playback. . . . . . . . . . . . . . . . . . . . 719
Converting a Graphic, Sequence or Motion into a Macro . . . . . . . . . . . . . . . . . . . 720
Writing and Editing Macros . . . . . . . . . . . . . . . . . . . . . . . . . . . . . . . . . . . . . . . . . . 721
About the Deko Macro Programming Language . . . . . . . . . . . . . . . . . . . . . . . 722
Commands . . . . . . . . . . . . . . . . . . . . . . . . . . . . . . . . . . . . . . . . . . . . . . . . 723
Parameters . . . . . . . . . . . . . . . . . . . . . . . . . . . . . . . . . . . . . . . . . . . . . . . . 724
Variables. . . . . . . . . . . . . . . . . . . . . . . . . . . . . . . . . . . . . . . . . . . . . . . . . . 728
Operators . . . . . . . . . . . . . . . . . . . . . . . . . . . . . . . . . . . . . . . . . . . . . . . . . 730
Comments . . . . . . . . . . . . . . . . . . . . . . . . . . . . . . . . . . . . . . . . . . . . . . . . 734
Conditional Commands and Loops . . . . . . . . . . . . . . . . . . . . . . . . . . . . . 734
Subroutines . . . . . . . . . . . . . . . . . . . . . . . . . . . . . . . . . . . . . . . . . . . . . . . 738
28
Page 29

Return Values . . . . . . . . . . . . . . . . . . . . . . . . . . . . . . . . . . . . . . . . . . . . . . 739
Objects . . . . . . . . . . . . . . . . . . . . . . . . . . . . . . . . . . . . . . . . . . . . . . . . . . . 740
Data Type Conversions. . . . . . . . . . . . . . . . . . . . . . . . . . . . . . . . . . . . . . . 741
Editing Macros . . . . . . . . . . . . . . . . . . . . . . . . . . . . . . . . . . . . . . . . . . . . . . . . . 742
Editing a Macro (.mcr) File . . . . . . . . . . . . . . . . . . . . . . . . . . . . . . . . . . . . 742
Editing a Macro Using the Replace Dialog Box. . . . . . . . . . . . . . . . . . . . . 743
Editing Macro Parameters. . . . . . . . . . . . . . . . . . . . . . . . . . . . . . . . . . . . . 743
Saving Macros . . . . . . . . . . . . . . . . . . . . . . . . . . . . . . . . . . . . . . . . . . . . . . . . . . . . 744
Saving a Macro with a New Name . . . . . . . . . . . . . . . . . . . . . . . . . . . . . . . . . . 744
Saving a Modified Macro with the Same Name . . . . . . . . . . . . . . . . . . . . . . . . 744
Appending a Macro to the Active Macro . . . . . . . . . . . . . . . . . . . . . . . . . . . . . 745
Executing Deko Macros in External Applications . . . . . . . . . . . . . . . . . . . . . . . . . . 745
Setting Up Your Macro Server Connection . . . . . . . . . . . . . . . . . . . . . . . . . . . 746
Sending Macros to the Macro Server. . . . . . . . . . . . . . . . . . . . . . . . . . . . . . . . 747
Macro Command Format . . . . . . . . . . . . . . . . . . . . . . . . . . . . . . . . . . . . . . . . . 747
Macro Command Formats for Version 1.0 . . . . . . . . . . . . . . . . . . . . . . . . 747
Macro Command Formats for Version 2.0 . . . . . . . . . . . . . . . . . . . . . . . . 748
Macro Command Examples: . . . . . . . . . . . . . . . . . . . . . . . . . . . . . . . . . . . 748
Macro Server Commands . . . . . . . . . . . . . . . . . . . . . . . . . . . . . . . . . . . . . . . . 750
Using Automation . . . . . . . . . . . . . . . . . . . . . . . . . . . . . . . . . . . . . . . . . . 753
About Automation . . . . . . . . . . . . . . . . . . . . . . . . . . . . . . . . . . . . . . . . . . . . . . . . . . 753
How Automation Works . . . . . . . . . . . . . . . . . . . . . . . . . . . . . . . . . . . . . . . . . . 754
Example of Newsroom Automation . . . . . . . . . . . . . . . . . . . . . . . . . . . . . . 755
Customizing Deko Using Automation. . . . . . . . . . . . . . . . . . . . . . . . . . . . . . . . 756
About the I.I.I. Protocol . . . . . . . . . . . . . . . . . . . . . . . . . . . . . . . . . . . . . . . 757
Accessing the Automation Interface in Deko . . . . . . . . . . . . . . . . . . . . . . . . . . 757
Starting Automation Immediately Every Time You Start Deko . . . . . . . . . 758
Using Deko Graphics with Automation . . . . . . . . . . . . . . . . . . . . . . . . . . . . . . . . . . 759
Defining a Layer for Automation. . . . . . . . . . . . . . . . . . . . . . . . . . . . . . . . . . . . 759
Creating Template Files for Automation. . . . . . . . . . . . . . . . . . . . . . . . . . . . . . 760
Creating a Template File to be Filled in by Your Automation Interface . . . 760
Reassigning Order for Template Layers to Replace . . . . . . . . . . . . . . . . . 762
Using a Template to Verify a Successful Connection . . . . . . . . . . . . . . . . . . . 762
29
Page 30

Example of a Successful Connection . . . . . . . . . . . . . . . . . . . . . . . . . . . . 763
Enabling Your FastAction Keyboard to Read Automation Files . . . . . . . . . . . 764
Querying a Database from Deko . . . . . . . . . . . . . . . . . . . . . . . . . . . . . . . . . . . . . . 764
Viewing Installed ODBC Drivers . . . . . . . . . . . . . . . . . . . . . . . . . . . . . . . . . . . 765
Specifying a DSN . . . . . . . . . . . . . . . . . . . . . . . . . . . . . . . . . . . . . . . . . . . . . . 765
Setting Up Layers to Query a Database . . . . . . . . . . . . . . . . . . . . . . . . . . . . . 766
Using a Variable Field Value . . . . . . . . . . . . . . . . . . . . . . . . . . . . . . . . . . . . . . 767
Setting and Using Global Field Values . . . . . . . . . . . . . . . . . . . . . . . . . . . . . . 767
Accessing Optional Interfaces . . . . . . . . . . . . . . . . . . . . . . . . . . . . . . . . 769
About DekoObjex . . . . . . . . . . . . . . . . . . . . . . . . . . . . . . . . . . . . . . . . . . . . . . . . . . 769
FastAction Keyboard Commands and Keys. . . . . . . . . . . . . . . . . . . . . . . . . . . . . . 774
FastAction Keyboard (FAK) Callout Descriptions . . . . . . . . . . . . . . . . . . . . . . 775
FastAction Keyboard Function Key Descriptions . . . . . . . . . . . . . . . . . . . . . . 777
FastAction Keyboard Tips . . . . . . . . . . . . . . . . . . . . . . . . . . . . . . . . . . . . . . . . . . . 780
Using the FAK to Get Random Graphics to Air . . . . . . . . . . . . . . . . . . . . . . . . 780
Using the FAK to Get Sequential Graphics to Air . . . . . . . . . . . . . . . . . . . . . . 780
Using the FAK to Call Up Files with Numerical Filenames . . . . . . . . . . . . . . . 781
Using the FAK to Read in Any Filename. . . . . . . . . . . . . . . . . . . . . . . . . . . . . 781
Using the FAK to Enable Reading Automation Files. . . . . . . . . . . . . . . . . . . . 781
Performing FastAction Keyboard Functions Using a Standard Keyboard . . . . . . . 782
Using a Standard Keyboard (SK) to Perform Formatting Commands. . . . . . . 783
Using a Standard Keyboard (SK) to Perform Command Functions . . . . . . . . 784
Shaped vs. Unshaped Compositing. . . . . . . . . . . . . . . . . . . . . . . . . . . . . . . . . . . . 787
Shaped . . . . . . . . . . . . . . . . . . . . . . . . . . . . . . . . . . . . . . . . . . . . . . . . . . . . . . 788
Unshaped . . . . . . . . . . . . . . . . . . . . . . . . . . . . . . . . . . . . . . . . . . . . . . . . . . . . 789
Mathematical Equations . . . . . . . . . . . . . . . . . . . . . . . . . . . . . . . . . . . . . . . . . 790
Comparison Matrix . . . . . . . . . . . . . . . . . . . . . . . . . . . . . . . . . . . . . . . . . . . . . 791
30
Index . . . . . . . . . . . . . . . . . . . . . . . . . . . . . . . . . . . . . . . . . . . . . . . . . . . . . 793
Page 31

Using This Guide
Congratulations on your Deko® purchase. Deko is an award-winning product line of
full-color video character generators. Almost any graphic you can imagine for television can
be created with a Deko. Deko is used worldwide for news and sports broadcasting by art
directors, designers, and on-air operators.
This guide contains all the task-oriented instructions, conc
material you need to use the effects and titling features of your Deko application.
This guide is intended for all users, from beginning to advanced.
Unless noted otherwise, the material in this doc
system.
The documentation describes the features and hardware of all models. Therefore, your
n
system might not contain certain features and hardware that are covered in the
documentation.
About this Guide
The Deko Products User's Guide is designed to be a learning tool for those new to Deko, as
well as a handy reference for experienced operators. This user's guide offers step-by-step
instructions and general information.
Experienced operators might not want to read the
or index for specific information. We are constantly improving the Deko family, so you
might find some changes since you last used Deko.
If you are new to Deko products, especially if you
your best bet is to read this manual in order and familiarize yourself with all of the tasks
presented. An investment of time now might save a lot of time later. Once you reach the
“Create Useful Graphics on the Job” and “Create Useful Animated Graphics” chapters, you
will be well prepared to create the graphics you need.
eptual information, and reference
ument ap
entire manual, b
plies to the Windows® operating
are new to
ut can refer to the contents
using a character generator,
Page 32

If you’re familiar with other Windows applications, we think you’ll find using Deko easy
and natural. If you’re new to Windows, we suggest that you pick up a book on the subject to
familiarize yourself with basic Windows concepts. This user’s guide assumes a working
knowledge of Windows.
Keyboard Abbreviations
Using one, two, or three keystrokes instead of using the mouse pointer to interact with the
user interface is called a shortcut. Shortcuts for standard keyboards are marked SK.
Shortcuts for the FastAction Keyboard are marked FAK.
Symbols and Conventions
Avid documentation uses the following symbols and conventions:
Symbol or Convention Meaning or Action
n
c
w
> This symbol indicates menu commands (and subcommands) in the
(Windows), (Windows
only), (Macintosh), or
(Macintosh only)
Bold font Bold font is primarily used in task instructions to identify user interface
Italic font Italic font is used to emphasize certain words and to indicate variables.
Courier Bold font
A note provides important related information, reminders,
recommendations, and strong suggestions.
A caution means that a specific action you take could cause harm to
your computer or cause you to lose data.
A warning describes an action that could cause you physical harm.
Follow the guidelines in this document or on the unit itself when
handling electrical equipment.
order you select them. For example, File > Import means to open the
File menu and then select the Import command.
This symbol indicates a single-step procedure. Multiple arrows in a list
indicate that you perform one of the actions listed.
This text indicates that the information applies only to the specified
operating system, either Windows or Macintosh OS X.
items and keyboard sequences.
Courier Bold font identifies text that you type.
32
Ctrl+key or mouse action Press and hold the first key while you press the last key or perform the
mouse action. For example, Command+Option+C or Ctrl+drag.
Page 33

If You Need Help
If you are having trouble using your Avid product:
If You Need Help
1. Retry the action, carefully following the instructions given
is especially important to check each step of your workflow.
2. Check the latest information that might hav
was published:
- If the latest information for yo
they ship with your application and are also available online.
If the latest information for your Avid product
supplied on your Avid installation CD or DVD as a PDF document
(README_product.pdf) and is also available online.
You should always check online for the most up-to-date release notes or ReadMe
cause t
be
available. To view these online versions, select ReadMe from the Help menu, or visit
the Knowledge Base at www.avid.com/readme.
3. Check the documentation that came with your Avid application or your hardware for
maintenance
4. Visit the online Knowledge Base at www.avid.com/onlinesupport. Online services are
available 24 hours per day, 7 days per week. Search this online Knowledge Base to find
swers,
an
and to read or join online message-board discussions.
he online version is updated whenever new information becomes
or hardware-related issues.
to view error messages, to access troubleshooting tips, to download updates,
ur Av
e become av
id product is provided as printed release notes,
is provided as a
for that task in this guide. It
ailable after the documentation
ReadMe file, it is
How to Order Documentation
To order additional copies of this documentation from within the United States, call Avid
Sales at 800-949-AVID (800-949-2843). If you are placing an order from outside the United
States, contact your local Avid representative.
Avid Training Services
Avid makes lifelong learning, career advancement, and personal development easy and
convenient. Avid understands that the knowledge you need to differentiate yourself is always
changing, and Avid continually updates course content and offers new training delivery
methods that accommodate your pressured and competitive work environment.
To learn about Avid's new online learning environment, Avid Learning Excellerator™
LEX), visit http://learn.avid.com.
(A
33
Page 34

For information on courses/schedules, training centers, certifications, courseware, and
books, please visit www.avid.com/training or call Avid Sales at 800-949-AVID
(800-949-2843).
34
Page 35

1 Getting Started with Deko
Once your Deko workstation has been set up and configured for your site, you need to learn
how to get started with using the Deko software. In order to do so, you must understand the
basics of what Deko has to offer, the options that may be available for your model, how to
switch between SD and HD with Deko Hybrid models, and how to start and exit your
software. In addition, you need to know how to use your keyboard, and set your save
preferences.
The following topics describe how to get started with Deko:
elcome to Our Product
• W
• Verify
• About Deko Options
• Determining Enabled Optio
• Switching Between SD and HD with Deko Hybrid Products
• Availability of Features
• Starting Your Software
• Using Your Keyboard
• Setting your Save Preferences
• Using Other Applications without Exiting Deko
• Exi
ing Your Equipment
ns for Your Model
ting Deko
Page 36

1 Getting Started with Deko
Welcome to Our Product
Congratulations on your Deko purchase. Deko is an award-winning product line of full-color
video character generators. Almost any graphic you can imagine for television can be
created with a Deko. Deko is used worldwide for news and sports broadcasting by art
directors, designers, and on-air operators.
Deko offers many capabilities:
• Like a word processor, Deko offers a variety o
fonts and styles.
• Like a page layout program, Deko allows total
full-color graphic elements on the screen.
• Like a presentation program, Deko plays back
range of real-time effects.
• Deko provides up to three output channels and a powerful Motion Editor, for the most
ariety a
v
• Graphics and sequences that you create on a De
to other Deko products.
• Graphics created on other products can be
Deko environment.
• Deko graphics can easily incorporate other graphics, motions, and effects, saving time
and al
Based on the Windows operating system, Deko of
broadcast-quality character generator, including:
• The highest picture quality currently available for television graphics
The
•
PostDeko Lite is a full-color video-charact
for DekoCast. Although PostDeko Lite does not support motions such as a cel animation
player, it does have all of the power of Deko 3000 for building text and graphic layers.
Graphic files built in PostDeko Lite (.dko files) can be used seamlessly in other Deko
products.
vailable in creating and playing motions.
lowing co
ease of use and the networking capabilities of Windows
nvenient, multiple uses of your graphics library.
er generator provided as a graphics creation tool
f tools for ty
flexi
a series of grap
ko
can easily be exported for playback
easily
imported for use in the
fers unprecedented performance in a
ping text and for selecting
bility in positioning text and
hic pages using a wide
36
PostDeko Lite controls the default directories for the Dek
o graphics files used by DekoCast.
Page 37

Verifying Your Equipment
Your Deko turnkey system includes:
Verifying Your Equipment
• A computer, consisting of internal hardware co
installed.
• A mouse, to select or click items in the Deko interface.
• Either a standard keyboard or a FastAction Keyboard (optional). The FastAction
eyboard (FAK) is specially designed for Deko to promote speed and ease of use. For
K
more information on the FAK, see “About the Optional FastAction Keyboard” on
page 46. For information on using the FastAction Keyboard, see “Using FastAction
Keyboard Functionality” on page 773.
About Deko Options
Deko options can provide additional functionality to your Deko system. The following
topics contain more information on some of the available Deko options:
• “Automation” on page 37
• “DekoObje
• “DVE Effects Group 2” on page 38
• “Make DekoMovie” on page 38
• “SportsWare” on page 38
• “StillDeko” on page 38
x” on page 38
mponents, with the Deko software
• “Timeline” on page 38
• “Aston Import” on page 39
• “Ch
Automation
The Automation option includes I.I.I. protocol for reading non-Deko files, both serial and
network; Timecode Control, allowing control of sequences via SMPTE timecode; and
Database Connection. For more information, see “Using Automation” on page 753.
ClipDeko
Import and play video clips with your Deko. For more information, see “Using the ClipDeko
Option” on page 436.
yron Import” on page 39
37
Page 38

1 Getting Started with Deko
DekoObjex
DekoObjex gives the ability to define and playback individual objects (or groups of objects)
with actions independent of any other element or effect on the screen. Examples include
video squeezeback or persistent objects like clocks or crawls. Author these objects in an
easy-to-use environment that does not require programming skills. For more information,
see “About DekoObjex” on page 769, and your Deko Objex User’s Guide.
DVE Effects Group 2
DVE Effects Group 2 offers additional motion effects, accessed just as other effects,
including Page Scroll, Cylinder, Magic Carpet, Accordion, and 3D Ripple. For more
information, see “DVE Effects” on page 499.
Make DekoMovie
The Make DekoMovie option makes it possible for the Deko Sequencer to render Deko
effects to create AVI files or TARGA
Editor, use them in Cel Animations, or play them on other devices. For more information,
see “Playing Sequences as Clips with Make Dek
SportsWare
The SportsWare option includes two powerful features to quickly modify graphics, Pops,
and Macro Autoplay. With Pops, create and “pop” a text selection onto an open graphic.
With Macro Autoplay, enable macros to play automatically when opened. For more
information, see “Creating and Using Partial Graphics with t
page 384.
StillDeko
Access and title stills in a Thunder Database. For more information, see “Managing Stills
with StillDeko, and Thunder” on page 432.
Timeline
Timeline allows you customize motions in Deko’s Motion Edit window. Define changes
over time to a graphic element’s position, size, rotation, or opacity. The resulting effect is
similar to DVE keyframing. For more information, see “Adjusting Motion Parameters with
the Timeline Option” on page 541.
®
files. You can then import these files into the Clip
oMovie” on page 517.
he Sport
sWare Option” on
38
Page 39

Determining Enabled Options for Your Model
Aston Import
Import files created in the Aston environment and use them with your Deko. For more
information, see “Aston Import Option” on page 429.
Chyron Import
Import files created in the Chyron® environment and use them with your Deko. For more
information, see “Chyron Import Option” on page 430.
Determining Enabled Options for Your Model
Your Deko came with some options that were enabled on it. There might also be options that
are available for your Deko model, but were not enabled. And, there might be options that
are not available for your Deko model.
To see if an option is available for your system:
t See the Features and Options Matrix located on the Avid Knowledge Base at
www.avid.com/onlinesupport.
To see which options are enabled on your system:
1. Select Options > Enabled Options.
A dialog box opens. A check mark next to an option in
system.
2. Click OK to close the dialog box.
To use an enabled option:
t For options that are integrated into the Deko, but offer separate interfaces (for example,
Rocket and DekoObjex), see the appropriate User Guide.
These options are introduced in this User’s Guide, but each is covered in detail in its own
n
Guide.
To add an option not currently enabled on your system:
t Contact Avid Sales at 800-949-AVID (800-949-2843).
dicates that it is enabled on your
39
Page 40

1 Getting Started with Deko
Switching Between SD and HD with Deko Hybrid Products
The purpose of the Deko1000 and Deko3000 Hybrid products is to enable you to switch
between native high-definition (HD) and native standard definition (SD) operating modes.
Using these new Deko Hybrid products, broadcasters can support both SD and HD
production needs using a single system and user interface, minimizing equipment,
installation, retraining and production costs while expanding HD services.
Deko 1000/Hybrid and Deko 3000/Hybrid support a wide variety of live sports,
entertainment
video and deliver output for native NTSC / PAL SD resolutions and native 720 / 1080 HD
resolutions.
and newsroom environments. Both hybrid products generate graphics, process
In an SD/HD world, broadcasters must contend wi
assets. Deko 1000/Hybrid and Deko 3000/Hybrid dramatically improve management with
tools to simplify the process of working with 4:3 and 16:9 aspect ratio elements and layouts.
Both hybrid models deliver the
example, Deko 3000/Hybrid delivers the feature set of Deko 3000 when in SD mode and the
feature set of Deko 3000 HD when in HD mode.
full functionalit
Availability of Features
Most features and functions presented in this guide are available on all Deko models.
However, some features are available only on certain models, or optionally at an additional
cost.
Starting Your Software
This topic contains information on how to get started with using your Deko.
• “Starting Windows” on page 41
• “Starting Deko
• “Adding a Deko Icon to your Desktop” on page 41
” on page 41
th multiple versions of their graphics
y of their single format counterparts. For
40
• “Starting Deko Automatically” on page 42
• “Locating the Deko Application” on page 42
• “Once
you Start Deko” on page 43
Page 41

Starting Windows
To start Windows:
1. Turn on the power to the Deko system.
Starting Your Software
The VGA monitor shows a series of diagnostic screens, then displays the Wi
startup screen.
2. Press Ctrl+Alt+Delete to log on.
3. Type your user name and password, and then press Enter. If you don’t have a user name,
log on
password.
Once you log on, you see the Windows desktop, from which you can launch any application
n
program, including Deko. You might need to be privileged as a Power User to run Deko.
Check with your system administrator for details. For more information about Windows,
refer to the Windows documentation.
Starting Deko
To start Deko, do one of the following:
t Double-click the Deko program icon.
t Click the Start button, and then select Programs > the name of your Deko application
(such as, Deko3000, PostDeko, and so on.)
If you do not see the Windows desktop with various program icons, it might be because
n
another program is running. Close or minimize any open program.
as user “Deko.” This user na
ndows
me is factory installed and does not require a
Adding a Deko Icon to your Desktop
To place the Deko icon (shortcut to Deko) on the Windows desktop if it is not there:
1. Right-click the icon and select Create Shortcut.
A copy of the application appears with (2) appended to it.
2. Drag the copy to the desktop.
Checking Your Desktop Settings
In order to operate sufficiently, Deko requires particular desktop settings.
To check or change desktop settings:
1. Right-click on the desktop and select Properties.
The Display Properties dialog box opens.
41
Page 42

1 Getting Started with Deko
2. Click the Appearance tab, and make sure the Font size is set to Normal.
3. Click the Settings tab, and make sure the sett
- Color quality: Highest (32 bit)
- Screen
resolution: 1024 by 768 pixels
Starting Deko Automatically
To start Deko automatically, every time you log on:
1. From the Windows taskbar at the bottom of your screen, click the Start button and select
Settings > Taskbar and Start Menu.
The Taskbar and start menu dialog box opens.
2. In the window that appears, select the Advanced tab
3. Click Add, and then click Browse.
4. Locate your Deko program, and then double-click it.
5. Click Next, and then double-click the StartUp folder.
The name of your Deko program should appear in the field.
6. Click Finish.
7. If Windows prompts you to select an icon, click one, and then click Finish.
Locating the Deko Application
ings are set as follows:
.
42
To find Deko if you do not see it on the desktop or in the Program list:
1. Click the Start button and select Search > For Files or Folders.
2. Click All Files and Folders.
3. Type the name of your Deko (for example, Deko1000, Deko3000 HD, or PostDeko) in
“All
the
or part of the filename” text box.
4. Click Search.
A description of the Deko filename along with a
path that indic
5. Click the file name in the list and drag it to the deskto
p.
ates its location appears.
This creates a shortcut so you can start Deko from the desktop.
n the li
6. To start Deko, double-click on the filename i
st or on your new desktop shortcut.
Page 43

Once you Start Deko
As Deko starts, you might be prompted to hide the Windows taskbar so the Deko windows
display properly.
Hiding the Windows Taskbar
To hide the Windows taskbar:
1. Right-click the taskbar at the bottom of your screen.
A menu opens.
Make sure that you do not click on any buttons on the taskbar.
n
2. Click Properties.
A dialog box opens.
3. Click Auto-hide the taskbar.
Starting Your Software
After closing Deko, you may click this choice
again to turn of
f the auto-hide option.
43
Page 44

1 Getting Started with Deko
Initial Deko Desktop Appearance
Once you start Deko, you see the Deko desktop. The appearance of
depending on the layout selected. Unless you have changed settings, as discussed later in
this guide, the desktop initially displays the Style Edit layout.
the desktop varies,
44
The Deko interface is discussed further in subsequent chapters.
n
Page 45

Using Your Keyboard
Your Deko is equipped with either a standard keyboard or the optional FastAction Keyboard.
Throughout this manual, keyboard shortcuts for performing tasks in Deko are labeled SK for
standard keyboards and FAK for FastAction keyboards.
The following topics contain more information about using your keyboard:
About the Enhanced Keypad Feature” on page 45
• “
• “Enabling or Disabling the Enhanced Keypad” on page 46
About the Optional FastAction Keyboard” on page 46
• “
About the Enhanced Keypad Feature
The Enhanced Keypad feature is available even without the FastAction Keyboard option.
With this feature, the numeric keypad can provide quick access to reading files. Just be sure
the NumLock key is enabled on the keypad. Otherwise, the next sequential file just reads.
For example, with NumLock off, if you type
sequential file 166 airs). However, with Numlock on, you can type
166
(and 170 airs), and
(and 166 airs).
165
(and 165 airs), then type
Using Your Keyboard
170
(and the next
165
(and 165 airs)
170
To call up graphics with numerical file names:
1. Type the file name on the numeric keypad.
2. Do one of the following:
ress Read.
t P
t Pres
It is recommended to leave NumLock on and use the keys at the top of the main keyboard
n
for numerals.
Deko displays a text box on the menu bar. The alphanumeric display in the text box
shows t
To use this feature, you need to enable the enhanced keypad. For more information, see
“Enabling or Disabling the Enhanced Keypad” on page 46.
To use your numeric keys for other purposes, you may decide to disable this feature. But,
n
make sure if you turn it off, you notify other operator that may be using this Deko. If not, they
may think the enhanced keypad is broken.
s Enter.
he file name as it is being typed, then advances to display the next sequential file.
45
Page 46

1 Getting Started with Deko
Enabling or Disabling the Enhanced Keypad
To enable or disable the enhanced keypad:
1. Select Options > Preferences.
The Preferences dialog box opens.
2. Click the Common tab.
3. In the Keyboard area, select or deselect Enhanced Keypad.
4. If you are enabling the Enhanced Keypad, press the NumLock key on the keyboard to
turn it on.
5. Click O
K.
About the Optional FastAction Keyboard
The FastAction Keyboard (FAK) enables you to perform common Deko tasks with a single
keystroke. It is designed for use in real-time on-air environments, where speed is critical.
The FAK is based on a standard keyboard and functions as such when using applications
other than Dek
• The standard PC 101 keyboard layout
• Function keys (F1-F12)
• A numeric keypad
46
o. Like a standard keyboard, the FAK provides:
Page 47

Using Your Keyboard
The FAK also provides:
• Additional keys for single-keystroke access to many of Deko’s functions
• An alphanumeric display so you can enter or view the filename of the next graphic to be
ad
re
• Addi
tional functionality of the F1-F12 keys
You can enable the function keys to access the fun
F9=Bold, F12=Spellcheck, and so on). When enabled, the function keys mirror the text bar
functions on the Deko desktop. When disabled, you can use them as you would on a
standard keyboard for important command functions. It is recommended that you enable
your keyboard for FAK and disable it for SK. For more information, see “Enabling and
Disabling the FastAction Keyboard” on page 47.
You can also enable FastAction Lights, allowing use of the dedicated Style and Color keys.
ore information, see “Enabling or Disabling the Enhanced Keypad” on page 46.
or m
F
FastAction Keyboard shortcuts are found throughout this guide and are designated FAK.
The FastActi
on Keyboard is described in detail in “FastAction Keyboard Commands and
Keys” on page 774.
Enabling and Disabling the FastAction Keyboard
To enable or disable FastAction function keys (F1 - F12):
1. Select Options > Preferences.
The Preferences dialog box opens to the Common tab.
2. In the Keyboard area, click FastAction Funct
option is enabled.
ctions en
ion Ke
graved on the keycap (such as,
ys. A check mark appears when the
3. Click OK.
For a complete list of tasks performed by the function keys when enabled, see “Using a
ard Keyboard (SK) to Perform Formatting Commands” on page 783.
Stand
Enabling and Disabling FastAction Lights
To enable or disable FastAction Lights:
1. Select Options > Preferences.
The Preferences dialog box opens to the Common tab.
2. In the Keyboard area, click FastAction Lights. A
enabled.
3. Click OK.
check mark appear
s when the option is
47
Page 48

1 Getting Started with Deko
Setting your Save Preferences
To have Deko remind you to save your work before exiting:
1. Select Options > Preferences.
The Preferences dialog box opens.
2. Click the Prompts tab.
3. Select either or both of the following:
rompt to save before closing a window (This ch
t P
on-air situations where speed is critical.)
t Prompt before exiting Deko.
4. Click OK.
oice is NOT recommended for
Using Other Applications without Exiting Deko
To use other applications without exiting Deko, do one of the following:
t Click the minimize icon at the right end of the Deko application title bar.
t Move the mouse pointer to the bottom of your screen to reveal the Windows taskbar. On
the taskbar, click the Deko button.
t Hold Alt down and press Tab repeatedly to switch to other open applications.
When you are ready to return to Deko, move the mouse pointer to the bottom of your screen
n
to reveal the Windows taskbar. On the taskbar, click the Deko icon on the Windows desktop.
Exiting Deko
To exit Deko, do one of the following:
t Click the close button at the right end of the Deko title bar.
48
t Select File > Exit.
t Press Alt+F4 (SK).
After you exit Deko, files on your Deko may still be accessed from other networked
n
workstations as long as the system is on, even if your Deko is logged off of Windows.
To shut down the Deko system:
1. Exit the Deko software as described above.
2. Do one of the following:
Page 49

Exiting Deko
t Press Ctrl+Alt+Delete, and then select Shut Down.
t Click the Start button, and then click Shut Down.
A dialog box opens.
3. Select Shut down, and then click OK. Don’t turn off the power to your system. It turns
f automati
of
cally or displays a message on the screen when it is OK to do so. Once shut
down, the system must be restarted before you or another user can log back on. While
the system is shut down, files stored on your Deko are not accessible from other
networked workstations.
49
Page 50

1 Getting Started with Deko
50
Page 51

2 Deko Overview
In order to begin to feel comfortable using Deko, you need to learn how to adjust the
appearance and function of your desktop. This involves learning how to select a layout,
navigate, adjust Preferences to suit your work style, fix mistakes, type and select text, and
create and save a graphic.
The following topics provide an overview of Deko:
• Desktop Appearance
• Setting Preferences
xing Mistakes
• Fi
• Typing Text
• Using an International Character Set
• Creating Graphics
aving Deko Graphics
• S
Desktop Appearance
When your Deko is running, the screen of your VGA monitor is called the desktop. The
appearance of the desktop depends on:
• The current layout, as selected from the Window menu or created by opening windows
from the Vi
specific tasks. All standard layouts include a Menu Bar, a Status Bar, and a
Command Bar.
• The currently active window. Items displayed on the menu bar, the associated menus,
and controls displayed in other windows might change according to the tasks associated
with the active window.
The following topics contain more i
• “Style Edit Layout” on page 52
• “Using Other Layo
• “Na
vigating the Deko Desktop” on page 56
ew menu. Each layout includes some of Deko's windows and is suitable for
nformation on desktop a
uts for Other Tasks” on page 53
ppearance:
Page 52
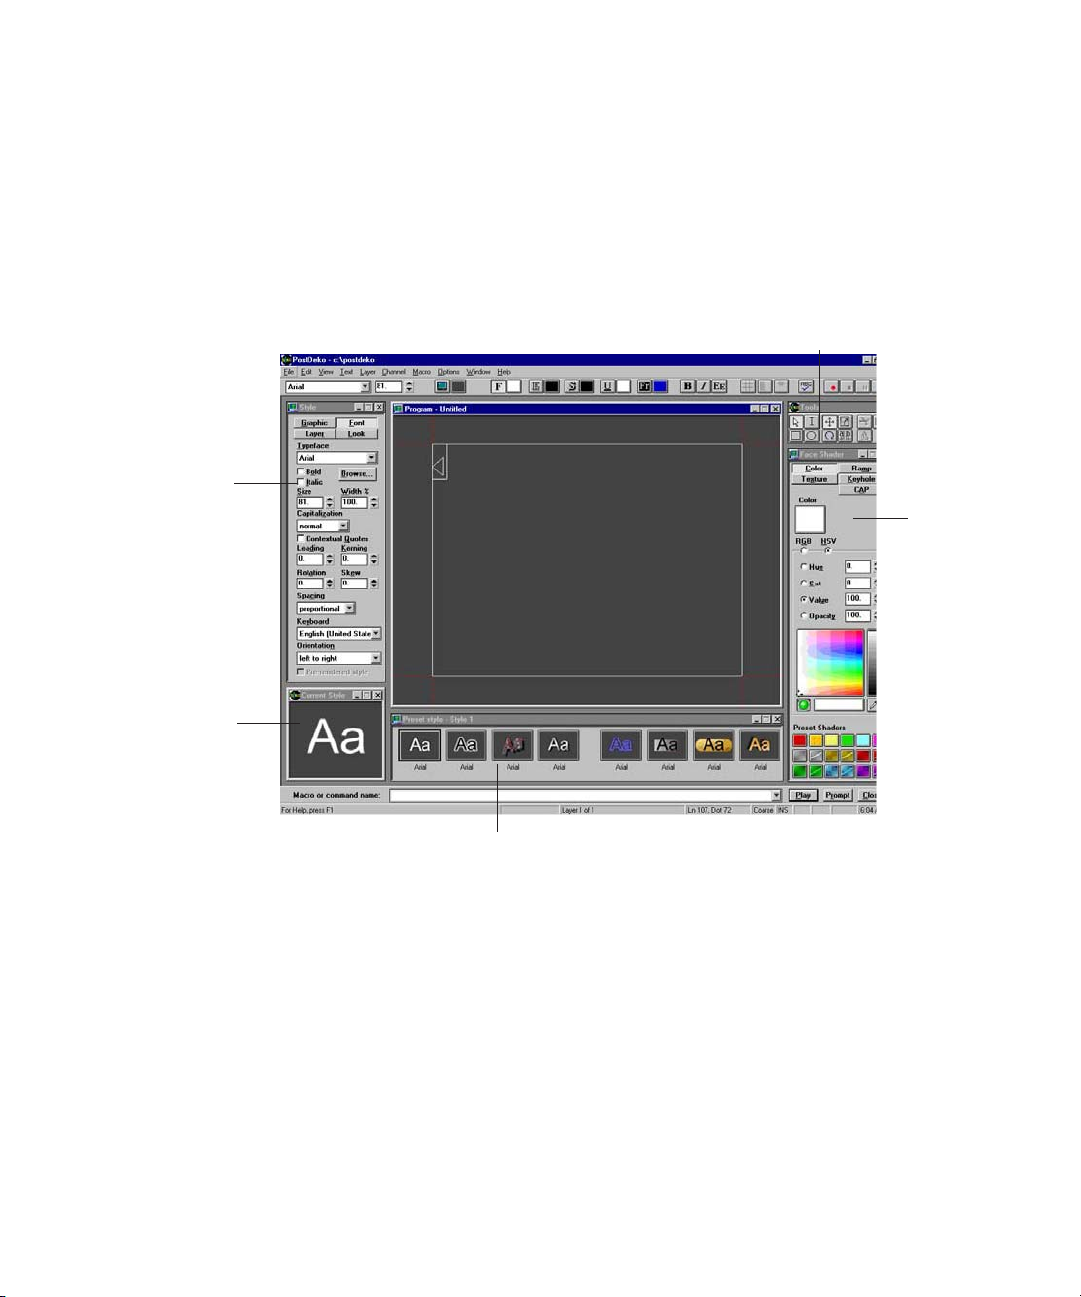
2 Deko Overview
Tools window
Style
window
Shader
window
Current Style
window
Preset Style window
Style Edit Layout
Initially, you should see the Style Edit layout. This is the preferred view for graphic creation
and the most important one to learn first. The Style Edit layout is discussed fully in
“Designing and Applying Styles” on page 77. The Style Edit layout includes the Program
window, surrounded by (counterclockwise, from left) the Style wind
window, Preset Style window, Shader window, and Tools window.
ow, Cu
rrent Style
52
To open the Style Edit layout if you do not see it:
t Do one of the following:
- Select Window > Select Layout > Style Edit.
- Press Alt+F11 (SK).
Page 53

Using Other Layouts for Other Tasks
Deko offers several standard layouts, each with the appropriate windows for different tasks.
The three most frequently used layouts other than the Style Edit layout include the Sequence
Playback, Effect Playback, and Motion Compose layouts.
To see other layouts:
1. Select Window > Select Layout.
A list of all layouts opens.
2. Select a layout.
Sequence Playback Layout
To create a playback sequence of graphics:
t Use the Sequence Playback layout by doing one of the following:
- Press F11 on the SK.
- Press Seq Edit on the FAK.
Desktop Appearance
This layout includes the Preview windo
Sequence window.
w, the Program window, and the
53
Page 54

2 Deko Overview
Effect Playback Layout
To set up and play back single effects
t Use the Effect Playback layout by doing one of the following
- Press Shift+F11 on the SK.
- Press Effect on the FAK.
This layout includes the Preview window, the Program windo
window.
w, and the Effect Playback
54
Page 55

Motion Compose Layout
To create a variety of complex on-screen moves and 3D effects:
t Use the Motion Compose layout by pressing Shift+Ctrl+M.
Desktop Appearance
You can apply these effects to any elements of a graphic, pro
viding very sophisticated
and exciting on-screen moves. This layout includes the Preview window, the Program
window, Timeline, Current Style window, and Tools window.
More Layouts
Other standard layouts are available. The standard
edit, and play graphics and macros. You can also design and save custom layouts to suit your
work style. For information about customizing layouts, see “Creating Custom Layouts” on
page 678.
layouts provide tools you need to create,
55
Page 56

2 Deko Overview
Navigating the Deko Desktop
You can create and play Deko graphics using the mouse and keyboard to interact with the
various controls, menus, and windows on Deko’s desktop. Deko's menus work like those in
other interfaces on Windows systems. Accessing files and functions with the mouse or
keyboard is called navigating.
The following topics contain more information on navigating the Deko desktop:
Accessing Functions with the Menu Bar and the Mouse” on page 56
• “
• “Accessin
g Functions with the Menu Bar and Alt Key” on page 57
• “Accessing Functions with Keyboard Shortcuts” on page 58
• “Accessing Functions by Pressing Alt and Another Key” on page 58
Accessing Windows and Layouts” on page 59
• “
Accessing Functions with the Menu
To access functions with the menu bar and the mouse:
1. Click any menu heading on the Deko menu bar to reveal a menu of more selections.
2. Click an item in the menu to open a dialog box or act
3. To cancel the view of a menu, click an
Bar and the Mouse
ivate a function.
ywhere outside the menu.
56
Page 57

4. To close a dialog box, click the Close button.
Close button
Desktop Appearance
For example, selecting File on the menu bar reveals the File menu. Selecting File >
Open, opens the Open dialog box that allows you to open a file.
Accessing Functions with the Menu Bar
To access functions with the menu bar and the Alt key:
1. Press Alt to turn on this function.
On the menu bar, File appears as a raised button.
2. Use the Right and Left arrow keys to move across the menu bar and select a
ffe
rent menu.
di
That menu button then appears raised.
3. Use the Down arrow to open a selected me
4. Press Enter to activate a selection.
and Alt Ke
nu and scroll down its list of items.
y
57
Page 58

2 Deko Overview
Shortcut for Open function
5. Press Esc or Alt to switch off this selection process.
Accessing Functions with Keyboard Shortcuts
Many functions available through the menu bar can also be accessed by one, two or three
simple keystro
found in this documentation as well as in each menu.
kes, called shortcuts. Learning shortcuts can save time. Shortcuts can be
In the preceding example, F9 is the keyboard shortcut to open a file. Instead of selecting File
n, yo
> Ope
Function keys are disabled. For the FAK, you can press Clear, Read, Ctrl+O, or Alt+F+O.
Some function keys on your FAK are not available for standard use if you have activated
n
them as FAK special function keys by selecting Options > Preferences, and then on the
Common tab of the Preferences dialog box, selecting FastAction Function Keys.
Accessing Functions by Pressing Alt and Another Key
To access functions by pressing Alt and another key:
1. Look at the menu bar.
2. Press and hold down the Alt key, and notice which lett
3. Press the key of the underlined letter in the item you would like to select from the menu.
58
u could press F9 to open the Open dialog box with the SK if the FastAction
heading for the menu you wish to open. Then, press and release the key of the
underlined letter. Do not release Alt.
er is underlined in the menu
Page 59

Accessing Windows and Layouts
Setting Preferences
The View Menu (Alt+V) provides access to all of the tools av
switches it into view (indicated by a check mark) or out of view.
The Window Menu (Alt+W) provides access to the va
Setting Preferences
With Preferences settings, Deko allows you to select how the user interface works. For more
information, see “Specifying User Preferences” on page 681.
determine a starting layout, the look and behavior of your cursor, and the color for
transparent areas of your
You can work with either an I-beam or a box cursor. An I-b
the space where a typed character appears. A box cursor appears around the space where a
typed character appears.
You can also define how the cursor behaves when you press the Home or the End keys.
Home and
in conventional character generators.
End key cursor behavior might be either as in typical Windows applications or as
graphic.
ailable. Selecting an item
rious layouts.
Initially, you might want to
eam cursor appears to the left of
59
Page 60

2 Deko Overview
Dark gray default background
Dark green background
Some users want to adjust Color used where graphic is transparent. With the default setting,
dark gray might make it difficult to tell if you are looking at a keyed transparent background
or a black background. Choosing a color, such as dark green, helps clarify what is
transparent in the background. The color is not displayed on the video output.
For more information, see “Determining the Look and Behavior of your Cursor” on page 60.
Determining the Look and Behavior of your Cursor
To determine the look and behavior of your cursor:
1. Select Options > Preferences.
The Preferences dialog box opens.
60
Page 61

2. Click the Cursor tab.
3. In the Text cursor style area, select I-beam or Box.
Setting Preferences
If you are accustomed to working in a Windows environment, you might prefer an I-beam
n
cursor. If you are accustomed to other character generators, you might prefer a Box cursor.
4. In the Home and End key behavior area. Do one of the following:
t Click Windo
- Home moves the cursor to the beginning of a line.
- End moves the cursor to the end of the line.
- Ctrl + Home moves the cursor to the beginning of a text field.
- Ctrl + End moves the cursor to the end of a text field.
t Click Character generator to specify that:
- Home moves the cursor to the beginning of a text field.
- End moves the cursor to the end of a text field.
- Ctrl + Home moves the cursor to the beginning of a line.
- Ctrl + End moves the cursor to the end of a line.
5. Click OK.
6. Click Options on the menu bar.
ws to specify that:
61
Page 62

2 Deko Overview
7. Deselect Save Settings On Exit in the Options menu.
Generally, this option should be off to prevent unwanted saving. Deliberate saving, by
checki
ng Save Settings Now in the Options menu is a better practice.
8. To save your settings, select Options > Sa
To specify Starting layout and other Common Preferences:
ve Settings Now.
1. Select Options > Preferences.
2. Click the Common tab.
62
3. Select a layout from the Starting layout menu. Style Edit is a good starting choice.
Page 63

Setting Preferences
4. Click the color button under Color used where graphic is transparent. A color picker
opens.
5. Click the desired color or use the panel to create a custom color. A medium green is a
good choice.
6. Click OK.
7. Depending on what type of keyboard you are using, do one of the following:
f you’re using a FastAction Keyboard (FAK), enable Enhanced Keypad,
t I
FastAc
tion Function keys and FastAction lights and enable Numlock on the keypad.
t If you’re using a Standard Keyboard (SK), enable Enhanced keypad, enable
NumLock on the keypad, and disable FastAction Function keys. FastAction Lights
become unavailable.
If Enhanced Keypad and FastAction Function Keys are unavailable and cannot be selected,
n
you might need to install the appropriate drivers. For more information on how to do this,
contact Technical Support.
Some function keys on your FAK are not available for standard use if you have activated
them as FAK special function keys by selecting Options > Preferences. On the Preferences
dialog box, select the Common tab and select FastAction Function Keys.
63
Page 64

2 Deko Overview
8. You might want to select the following:
t Use ‘explorer’ style file open if you want to v
Explorer
t If you have ClipDeko, the second selection is Display clip representative frame.
When selected, if you have a clip in the background or layer, a representative frame
appears in the Program and Preview windows.
t Automatically play macros when opened if you would like commands in a macro to
be executed when you open the macro. For more information on Macros, see
“Streamlining Your Work with Macros” on page 713.
t Automatically play associated effects to automatically play motion effects that you
have associated with a graphic when you open that graphic. For more information
on Associated effects, see “Motion Effects” on page 501.
9. Click OK.
10. To save your settings, select Options > Save Settings Now.
Fixing Mistakes
Deko allows you to undo actions one by one, beginning with the most recent. Enabling the
Undo function allows you to undo actions, but requires more memory. Current systems,
however, have sufficient memory to use Undo without compromising performance.
The following topics contain more informati
on on fi
iew you graphics in a Windows
xing mistakes:
• “Undoing Previous Actions” on page 64
• “Deleting Te
• “Deleting Text” on page 65
• “Clearing
xt” on page 65
the Program Window” on page 65
Undoing Previous Actions
To enable or disable Undo:
t Select Edit > Enable Undoer.
Enable Undoer is disabled as the Factory default. So, if you want the ability to use the Undo
n
function, it’s a good idea to enable it.
So, they might not realize they have undo.
64
Page 65

To Undo the previous action(s):
1. Do one of the following:
2. With Undo enabled, select Edit > Undo.
3. Press Ctrl+Z.
4. Press Undo (FAK).
5. Repeat for each action that you want to undo.
You can only undo actions performed since Deko was launched with Undo enabled.
n
Redoing Undone Actions
To redo undone actions:
t With Undo enabled, select Edit > Redo (Ctrl + Y). Repeat for each action that you want
to redo.
Deko also allows you to select and delete text or layers, or clear an entire Program or
n
Preview window.
Deleting Text
Fixing Mistakes
To delete text:
t Select the text, and then press the Delete key.
Clearing the Program Window
To clear the Program window:
t Do one of the following:
-Alt+F8 (SK).
- Press F8 twice.
- Press Clear Program (FAK).
This clears the currently active Program or Preview window. If no Program or Preview
n
window is active, this clears the most recently used Program or Preview window.
65
Page 66

2 Deko Overview
Typing Text
You can type text in a Program window or a Preview window. When Deko is launched, the
Preview window is underneath the Program window. Move the window slightly so you can
see it.
To open either a Program or Preview window
t Do one of the following:
- Press F5 on SK (if Function keys are disabled in Preferences).
- Press the Program key (FAK).
- Press the Preview key (FAK).
You can open and edit an existing text file.
Typically, the Style Edit layout is preferred for ty
appears in the current style, indicated in the Current Style window. The current style
includes the typeface, size, color, details, and other qualities of the text.
Changing the current style does not change previously typed text. However, you can select
xt to apply
te
77.
All typed text appears in a text layer, sometimes called a text field. By default, a new Deko
raphi
g
properties, see “Building Graphics with Layers” on page 151.
The following topics contain more information on typing text:
• “Con
• “Enabling or Disabling Word Wrap” on page 67
• “Selecting a Style for Your Text” on page 67
• “Adjusting Text Size” on page 68
• “Typing Text” on page 68
• “Remembering Cursor Position” on page 68
• “Changing the Home Position of the Cursor” on page 69
• “Posit
changes. For more information, see “Designing and Applying Styles” on
c has one text layer. For information on adding text layers and specifying text layer
firming you are Using the Style Edit Layout” on page 67
ioning the Cursor to Edit Text” on page 69
ping an
d editing text. As text is typed, it
page
66
Page 67
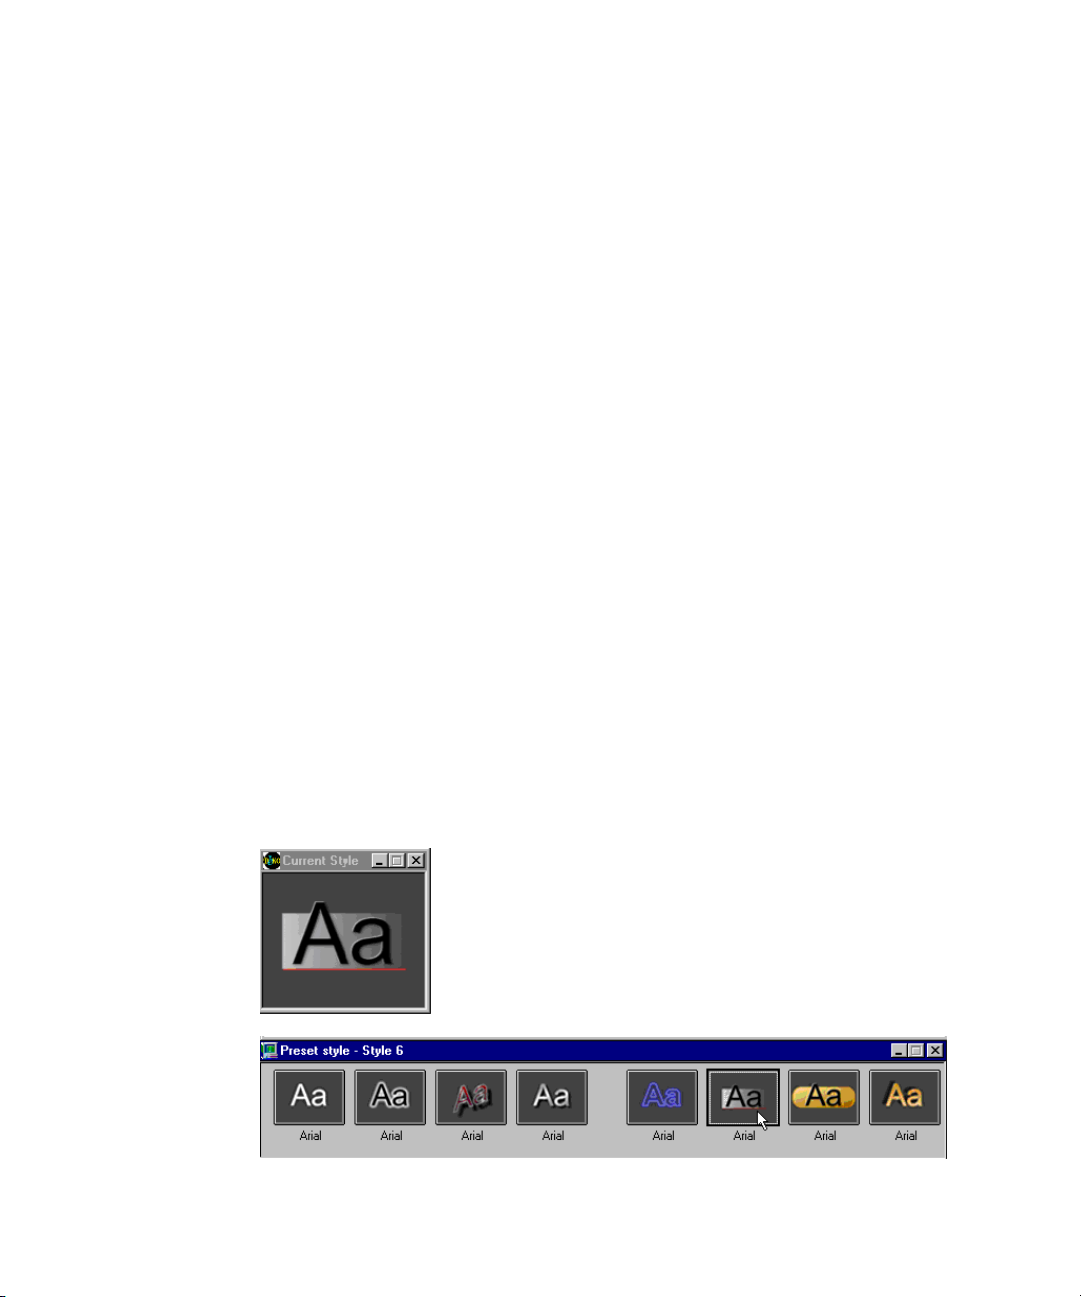
Confirming you are Using the Style Edit Layout
To confirm that you are using the Style Edit layout:
1. Select Window > Select Layout.
2. Select Style Edit.
Enabling or Disabling Word Wrap
There might be instances where you want to have word wrap enabled or disabled.
To enable/disable word wrap:
1. Click Text on the menu bar.
2. Click Word Wrap. Word wrap keeps your text in the appropriate area with automatic
returns.
The default is that Word Wrap is automatically enabled in Preferences so every text layer
n
has word wrap. You can disable Word Wrap in Preferences by selecting Options >
Preferences > Advanced.
Selecting a Style for Your Text
Typing Text
To select a style for your text:
t Click one of the preset buttons in the Preset Style window, or do nothing to use the style
displayed in the Current Style window.
For more information about determining the appearance of your text, see “Designi
and Appl
ying Styles” on page 77. You can create an infinite variety of styles.
ng
67
Page 68

2 Deko Overview
Adjusting Text Size
To adjust text size:
t Do one of the following:
- On the text bar, double-click the Size text box. With the FastAction Function (FAK)
keys enabled, press F2. Then, type the new size, and press Enter.
- Click the Up and Down arrows to incrementally increase or decrease the size.
- Click and hold the Up arrow or the Down arrow to continuously increase or
decrease the size. Release the mouse button when the size you want is displayed.
- Triple-click the size text box to return to the default setting.
Typing Text
The cursor appears where you click in the window. However, clicking anywhere in the
window can cause unwanted rows or spaces in your graphic. The best practice is to click the
Title bar or press the Program key (or press F5 on a SK) and immediately begin typing, so
the cursor appears in the home position. You can also enable “Remember cursor position” in
the Preferences dialog box, so the cursor appears in the Home position for new graphics.
Home is the starting place for text to begin in the layer, typically at the top left.
To type text:
1. Activate a Program or Preview window by doing one of the following:
t Click a Program window or a Preview window.
t Press F5 (SK).
t Press Program or
2. Click the Layer tab in the Style window and verify that Word wrap is selected. If not,
select it.
3. Begin typing as with any Windows-based program.
Preview (FAK).
Remembering Cursor Position
To have the cursor appear in its most recent position, or in the home position for new
graphics:
1. Select Options > Preferences.
The Preferences dialog box opens.
2. Select the Cursor tab, and select Remember cursor position.
3. Click OK.
68
Page 69
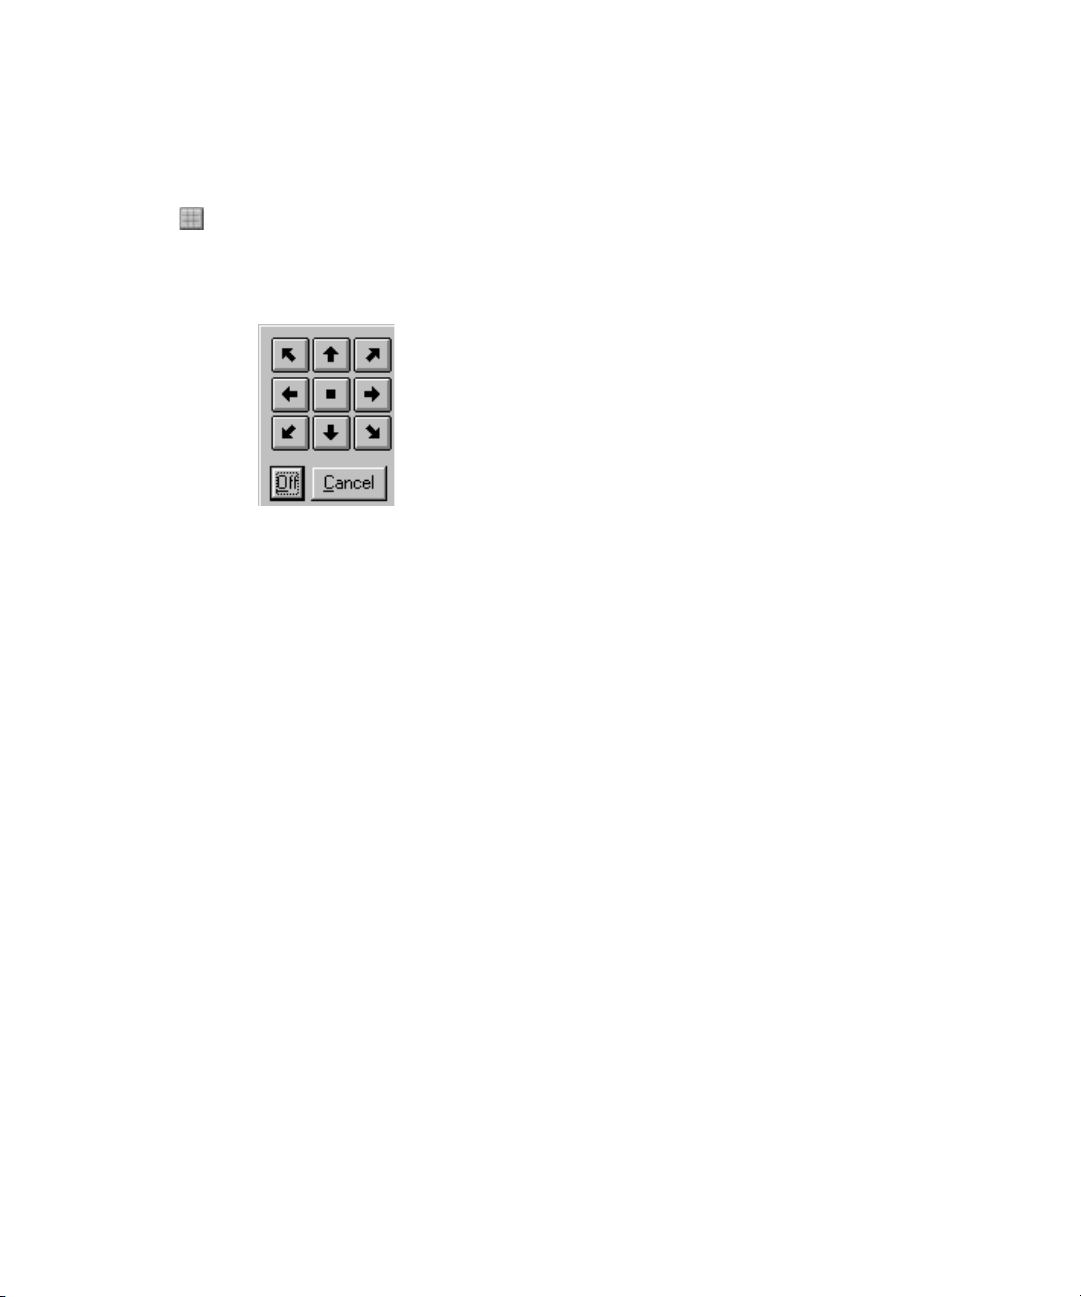
Changing the Home Position of the Cursor
To change the home position of the cursor:
1. Click the Justify Text button on the toolbar.
A dialog box opens.
2. Select the arrow indicating how you want
text to
Positioning the Cursor to Edit Text
To position the cursor to edit text:
t Do one of the following:
Using an International Character Set
be justified, and click OK.
- Position the mouse pointer to the desired place and click.
- Press the Left Arrow key or the Right Arrow key to move the cursor one space at a
time.
- Press the Up Arrow key or the Down Arrow key to move the cursor one row at a
time.
- Press Ctrl+Left or Ctrl+Right to move the cursor one word at a time.
Using an International Character Set
Because some languages require characters not used in other languages, you might need to
specify a character set when typing in a language other than English. A character set is a set
of 256 characters in a TrueType
characters, but Windows can access only 256 at a time. By choosing a character set, you are
choosing which 256 characters you wish to use. Not all character sets are supported by every
font. A character set can be used for storing unique symbols that are not on your keyboard,
such as Copyright, trademark, Euro, and so on A character set can also be used to store
common language symbols like the Spanish tilde. Even if you are working in English, some
Spanish symbols might be necessary from time to time.
®
or PostScript® font. A font might contain more than 256
69
Page 70

2 Deko Overview
To type a character from an international character set:
1. Select View > International.
The International window opens.
2. Click the Character Set menu, then selec
t a charact
er set from the menu.
70
3. In the Program window, position the insertion point where you wish to insert
the character.
4. Click the desired character in the International window.
Not all TrueType fonts include every character in every character set. The International
n
window displays a small box in place of any character that is not available in the
current font.
Chang
For more information, see “
ing the Keyboard Layout” on page 71.
Page 71

Changing the Keyboard Layout
To change the current keyboard layout:
1. Select View > Style.
2. In the Style window, select Font, then click the Keyboard menu.
3. Type or scroll to the new keyboard layout.
Creating Graphics
Deko automatically picks up the keyboard layo
Any keyboard layout installed in Windows is automatically available in Deko. On the
n
Windows desktop, click the Start button, then select Settings > Control Panel > Regional
Settings. For more detailed information, see the Windows documentation.
Deko supports most alphabet-based languages as well as several ideographic languages.
or the f
F
language: Arabic, Chinese, Hebrew, Japanese, Korean, and Thai.
ollowing languages, you must install a version of Windows that supports the
Creating Graphics
The main function of Deko is the creation and display of graphic files. You create a Deko
graphic, including text and background elements, in either a Preview or Program window.
Once created, a graphic can be saved on disk in a graphic file. For more information, see
“Managing Files” on page 389.
A graphic consists of one or more layers and a
geometric shape—a rectangle or an ellipse. You can edit selected text or entire layers. Deko
provides a variety of tools for typing, justifying, positioning, sizing and otherwise editing
text and shapes. For more information, see “Editing Text and Layers” on page 191.
Each character of text is rendered in a particula
Each geometric shape is rendered in a particular look. For more information, see “Designing
and Applying Styles” on page 77.
ut used to create the open graphic.
background. Each layer can be text or a
r style, which specifies its font and look.
pply
You can also animate your graphics, by either a
motions. For more information, see “Creating Animated Graphics” on page 601.
You can recall Graphic files from disk individually
opening a file. You can play back a series of graphic files by entering them into a sequence.
For more information, see “Using Effects and Sequences” on page 495.
ing Deko effects or creating your own
. In Wi
ndows terminology, this is called
71
Page 72
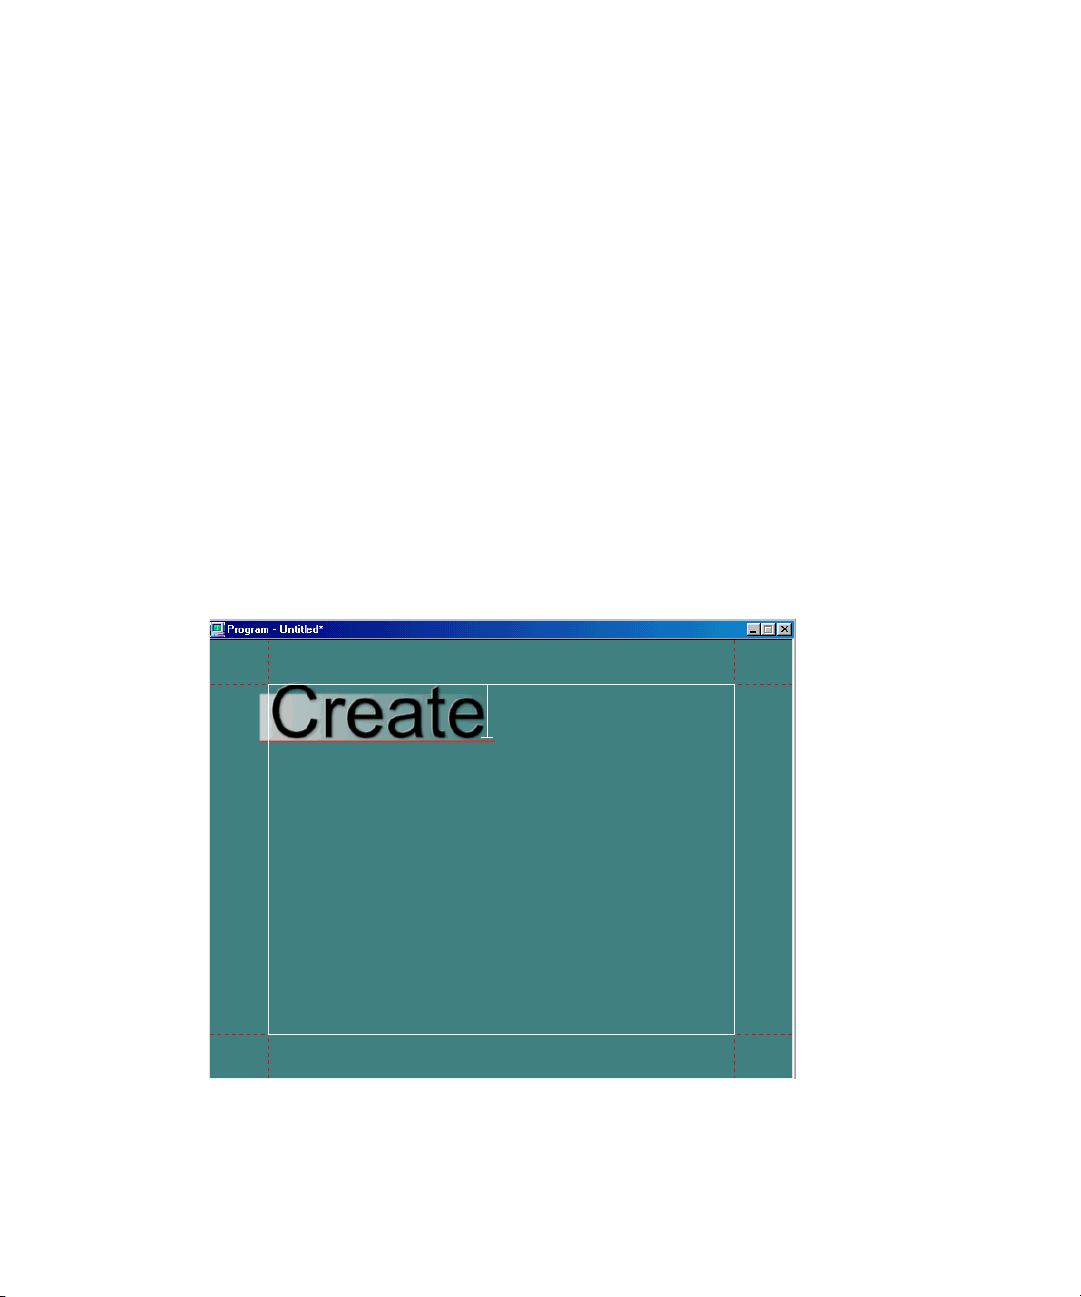
2 Deko Overview
Following are brief, introductory instructions for creating and saving graphics. If you have
some experience with Windows, Character Generators, or both, and want to get going
quickly, you might find these instructions useful. If you need more detail, everything in this
section is covered more thoroughly in other chapters.
To create a Deko graphic:
1. Activate a Program or Preview window by clicking on the title bar. If desired, clear any
previous graphic by doing one of the following:
t Press F8 (SK with FastAction Function
keys disabled) once to clear all layers but
not the background.
t Press F8 twice or press Alt+F8 to clear the layers and the background. (SK).
t Press Clear Program or Clear Preview (FAK).
The cursor should be in the Home position.
2. Type any desired text.
3. Select the text by pressing Ctrl+Shift+A.
The text appears in the style displayed in the c
urrent style
window.
72
4. Use any of Deko’s compositional tools to select fonts and styles, add geometric shapes
or text layers, position layers, and so on.
5. Save the graphic by doing one of the following:
Page 73

t Select File > Save Graphic As.
t Press F12 (SK).
t Press Save File (FAK).
Saving Deko Graphics
Every Deko system hard drive is partitioned into two drives: C and D. The C:\ drive is
labeled as the C:\SYSTEM drive since it is meant to store all programs that are installed on
the system. The D:\GRAPHICS drive is larger and the best place in which to store all
Graphic directories. Use the D:\ drive for creating new file directories is recommended.
To save a graphic under a new name:
1. Activate the graphic window by doing one of the following:
t Click on the title bar of the window.
Saving Deko Graphics
t Pres
t Press Program or Preview (FAK) to indicate where the graphic is currently
2. Do one of the following:
t S
t Pres
t Press Save File (FAK).
The Save Graphic As dialog box opens.
s F5 (SK).
displayed.
elect File > Save Graphic As.
s F12 (SK).
73
Page 74

2 Deko Overview
3. Navigate to the drive and directory where you want to store the file. Typically, you want
to use the following drives for the following types of media:
- C: drive is for applications.
- D: dri
- E: drive is for clips and audio files.
Select Preferences > Paths for the default directory settings.
n
ve is for graphics and static elements (.tif, .tga, .psd, and so on.).
74
4. Type a new file name in the File Name text box, then click OK.
Deko automatically attaches “. dko” to the file name. Do not type a different extension.
n
Page 75

To save a modified graphic:
1. Activate the Graphic window.
Saving Deko Graphics
2. To replace the previous version of the .dko
t Select File > Save Graphic.
t Pres
s Ctrl+S or Alt+F12 (SK).
t Press Alt+Save File (FAK).
file, do one of the following:
75
Page 76

2 Deko Overview
76
Page 77

3 Designing and Applying Styles
Deko offers numerous ways to control and enhance the appearance of your text, including:
• Specifying a particular font.
• Adding details to your font
• Filling in those details with color, ramp, texture,
shaders.
• Saving and using preset styles, includ
• Selecting and modifying existing text.
• Copying and pasting style elements.
The following topics describe how to design and apply styles:
yles for New or Existing Text
• St
• Defin
• Using a Preset Style
• Creating Styles
• Saving and Reusing the Styles You Create
• W
ing the Current Style for Typing Text
orking with Text and Styles
to create a
unique look.
cel animation player, or keyhole
ing styles with fancy frames.
Page 78

3 Designing and Applying Styles
Styles for New or Existing Text
A style is created by doing the following:
1. Choosing a font, comprised of a typeface and its size
2. Composing a unique look for the font by doing the following:
a. Adding
b. Filling in those details with shaders, which might be colors, textures, or animations,
or keyholes (cutouts that allow live video or other fill to show through).
Usually you define a style, labeled as the Current Style, before typing text. An
example of the
style is applied to any text that you subsequently type. You might, however, select
existing text and alter its style.
When creating styles, Avid
To confirm that you are using the Style Edit layout:
t Do one of the following:
- Press Alt+F11 to select the Style Edit layout.
- Select Window > Select Layout. Select a Style Edit menu item to enable it.
For more information about styles for new or existing text, see “S
and Tools” on page 79.
details, including frames, underlines, edges, faces, or shadows.
current style is displayed in the Current Style window. The current
recommends that you use the Style Edit layout.
and other specifications.
tyle Ed
it Layout Windows
78
Page 79

Style Edit Layout Windows and Tools
Style window
Menu bar
Text bar
Program
window
Tools window
Current Style
window
Preset Style window
Status
bar
Command
bar
Shader
window
The following illustration is an example of the windows and tools available in the Style Edit
Layout.
Styles for New or Existing Text
79
Page 80

3 Designing and Applying Styles
The following topics provide more information about Style Edit layout windows and tools:
• “Menu Bar” on page 80
Menu Bar
Text Bar
• “Tex
t Bar” on page 80
• “Style Window” on page 81
• “Program Window” on page 81
• “Tools Window” on page 81
• “Shader Window” on page 81
• “Command Bar” on page 82
• “Status Bar” on page 82
• “Preset Style Window” on page 82
• “Cur
rent Style Window” on page 82
The Menu bar opens in all layouts and is useful for finding available functions. Menu
selections v
The Text bar is available in all layo
ary depending on the currently active window.
uts. The T
ext bar allows you to:
•Select text
• Size text
80
•Format text
•Justify text
• Access shaders
• Activate shaders
For more information on Shaders, see “Using Preset
right side of the text bar are for recording macros.
Your Work with Macros” on page 713.
Shaders” on page
134. Tools on the
For more information, see “Streamlining
Page 81

Style Window
Style attributes of text and graphic elements are defined in the Style window. Pressing each
of the four tabs at the top of the window accesses different controls. The tabs are as follows:
Styles for New or Existing Text
• Font - Provides font formatting including si
• Look - Allows the addition of details suc
and a frame.
• Layer - Sets layer attributes including word wrap,
Initially, there is one layer for typing text in the Program window, but you can create
additional layers. For more information, see “Editing Text and Layers” on page 191.
• Graphic - Allows you to link effects files and clips (with the ClipDeko option) to
associated gra
389.
Program Window
Graphics created or opened in the Program window are simu
video monitor. For more information about the display on your video monitor, see “Working
with Video Input and Output” on page 699. The Program window displays the cursor, the
safe area, carriage returns, and tab stops. These markers help you place text and other
cs appropriatel
graphi
output.
Tools Window
The Tools window contains a palet
text layers and graphic elements. Many of the tools have shortcut keys that you can
memorize so you can work faster.
ze, width, kerning and leading.
h as a face, an edge, a shadow, an underline,
scaling, and l
ayer justification.
phics. For more information on using files, see “Managing Files” on page
ltaneously displayed on the
y; they do not appear on the video monitor and are not part of the video
te of tools for creating, moving, and altering the shape of
Shader Window
Use the Shader window to shade, or f
window. The appropriate Shader window for the currently highlighted detail opens.
Depending on the detail selected, you see one of the following titles displayed on the Shader
window title bar:
• Face Shader
• Edge Shader
• Shadow Shader
• Underline Shader
ill in, a detail specified with the Look tab of the Style
81
Page 82

3 Designing and Applying Styles
• Frame Shader
• Background Shader
Shading Details
The Shader window provides a choice of five sources for shading details:
• Color - Presents a color picker for choosing a soli
• Ramp - Presents a gradient that uses different co
• Texture - Accesses a graphic file to use as a texture fill
• Keyhole - Presents a key cutout for external fill
• CAP - Allows fill from sequential animation files
mand Bar
Com
The Command Bar is for playing macro files. Fo
Work with Macros” on page 713.
Status Bar
The Status Bar provides useful information about the graphic in current view, including
cursor screen
insert/overwrite mode status, number lock status, file size, and time.
Preset Style Window
The Preset Style window displays samples of eight styles that you can quickly select and
use. You are not limited to these styles only. You can create any style combination you wish.
You can assign your own styles to the Preset Style palettes and save them as .pst files. Only
one Preset Style window may be active at one time. The FAK Style keys refer to the active
Preset Style window. Using the Preset Style window is discussed in “Using a Preset Style”
on page 85.
position, layer
d color fill
lors of your choice
r more information, see “Streamlining Your
selected, layer position, positioning mode status,
Current Style Window
The Current Style window provides a sample of the c
current cursor position. As text is typed, it appears in this style. In the default mode, the style
is presented with an upper and a lower case “Aa,” but you can alter this.
82
urrent style se
lection or the style at the
Page 83

Defining the Current Style for Typing Text
Defining the Current Style for Typing Text
The quickest way to define a style is to select a preset style from the Preset Style window.
You can also use controls in the Style window and the Shader window to create a style. Any
text you subsequently type is rendered in the current style, is shown in the Current Style
window.
This window shows sample text in the current font and lo
appear if typed in the Program window. If you are creating a style with a very large font, you
can enlarge the window to accommodate the larger sample characters.
By default, Deko displays samples as upper and
what sample text is displayed.
The following topics provide more information about defining the current style for
typing te
• “M
• “Resizing the Curren
• “Ch
xt:
oving the Current Style Window” on page 83
t Style Window” on page 84
anging the Letter Used as Sample Text in the Current Style Window” on page 84
Moving the Current Style Window
The Current Style window can be moved anywhere on the desktop.
To move the Current Style window:
1. In the Window menu, make sure Freeze is not selected.
2. Move the mouse pointer over the window’s title bar.
3. Click the window and drag it anywhere on the desktop.
ok, in the actual size it would
lowe
r case letters “Aa.” You can change
83
Page 84

3 Designing and Applying Styles
Resizing the Current Style Window
The Current Style window can be resized to meet your needs.
To resize the Current Style window:
1. In the Window menu, make sure Freeze is not selected.
2. Move the mouse pointer anywhere over the border of the window.
The pointer becomes a sizing tool.
3. Drag a sizing tool on the border to change the window’s size.
To return the Current Style window to its original position:
1. Move the mouse pointer over the window’s title bar.
2. Drag the window offscreen left.
The window pops back to its origina
l spot in the l
ower left corner.
Changing the Letter Used as Sample Text in the Current Style Window
Deko enables you to change the letter used as sample text in the Current Style window.
To change the letter used as sample text in the Current Style window:
1. Click to activate the Style window.
2. Click the Font tab.
ypef
3. Click the Browse button to open the T
4. Select File > Select Sample Text.
A dialog box opens.
5. Type new sample text.
6. Click OK or press Enter.
The Typeface Browser, the Current Style windo
first two characters that you typed.
ace Browser window.
w, an
d Preset Style windows display the
84
Page 85

Using a Preset Style
Preset styles are displayed in the Preset Style window. Although you can create any style
you wish, using a Preset style automatically specifies the typeface, details, and all aspects of
the Current Style, and the keyboard layout for the Style 1-8 keycaps. Once selected, a Preset
style can be modified. If you create a new style, you can save it as a Preset style.
To select a Preset style for typing:
1. Activate the Preset Style window (Alt+F7).
2. Do one of the following:
Using a Preset Style
t Cli
t Pres
t Press Shift+F1-F8 (SK).
That style is now the current style and appears in the Current Style window.
For more information about using a preset style, see “Using
Preset Style” on page 85.
ck one of the eight preset styles.
s Style 1-8 (FAK).
Using a Modified Version of a Preset Style
To use a modified version of a Preset style:
1. Press Ctrl+Shift+A to select all of the text and the endmarker you want to apply the
Preset Style to.
Ctrl + Shift selects all text across all layers (not usually what you want).
n
2. To change the font size of the style, do any of the following:
t Click on the Style window to activate it.
t Click the Font tab.
t Click the Up or Down arrows by the Size field to adjust the height of the font.
a Modi
fied Version of a
85
Page 86
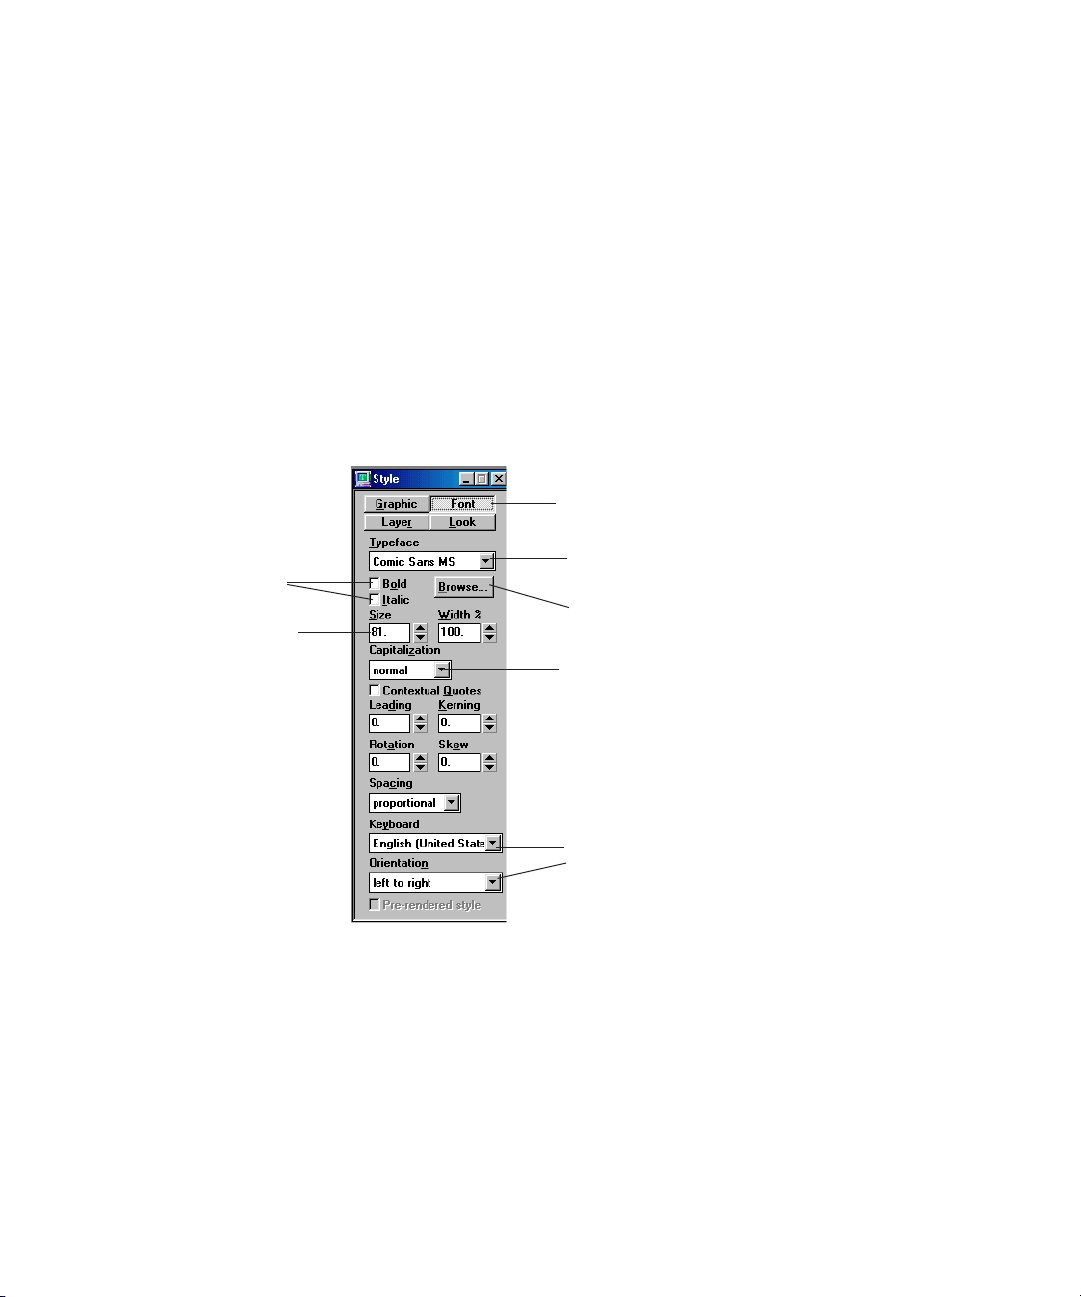
3 Designing and Applying Styles
Font tab
Click down arrow to reveal
list of typefaces
Click to reveal typeface browser, displaying
samples of available typefaces
Click to turn on/off
Bold or Italic
Adjust font size
Choices for typing in other
languages
Click down arrow to reveal
choices for automatic
capitalization
3. Change any other attribute of the style. For more information, see “Creating Styles” on
page 86.
Style attributes can be altered at any time, in any order.
n
4. To replace the original preset style with your modified ve
style you want to replace. Otherwise, skip this step to keep the original preset style.
Creating Styles
Instead of using a preset style, you can create a style. Creating a style is a multi-step process
using the Style dialog box.
rsion, right-click the preset
86
To create a style:
1. Highlight the text by pressing Ctrl+Shift+A.
2. Adjust size, justification, bold, and italic specif
3. Add details to your typeface, such as a face, e
ications for your typeface.
dge, shadow, underline, or frame.
4. Fill in each detail with a color, a ramp, a texture, a c
shader.
el animation player, or a keyhole
Page 87

The style you create defines the current style and appears in the Current Style window.
Text that you subsequently type appears in this style. You can save this style or apply it
to one of the Preset Style buttons to use later.
You cannot name the eight styles in the Preset Style window. However, if you modify a style,
n
name it, and then assign it to a Preset Style file, the Preset Style appears with the Style name
under it.
Creating Styles
The following topics provide more i
• “Selecting and Adjusting a Typeface” on page 87
• “Adj
• “Applying Rotate, Skew, Kerning and Leadin
• “Adjusting the Display of Capitalization, Quotes and Spacing” on page 90
• “Typing in a Language other than English” on page 90
• “Controlling the Typeface in the Style Window” on page 91
• “Adjusting the Sharpness of a Font” on page 93
• “Adding Details to a Font” on page 93
• “Adjusting Details” on page 97
• “Applying Color, Ramp, Texture, CAP, or Keyhole to a Style Detail” on page 106
• “Using Preset
usting Size, Bold, Italic, and Justification Rules to the Current Style” on page 89
Shaders” on page
134
Selecting and Adjusting a Typeface
You can select and adjust a typeface for your text.
To select a new typeface for your text:
1. Select the text by pressing Ctrl+Shift+A.
nformation a
g to the Current Style” on
bout creating styles:
page 90
87
Page 88

3 Designing and Applying Styles
2. Do one of the following:
t Use the menu on the text bar.
88
t From the Style wi
ndow, select the Font tab, and click the Typeface box to call up a
list of available typefaces.
t From the Style window, select the Font tab, click Browse or Press Typeface
Browser (FAK) to open the Typeface Browser window, and type the first one or two
letters of the typeface name to jump to that typeface or use the scroll bar.
3. Double-click a typeface sample to select it.
The typeface appears in the
Current Style wi
ndow.
Page 89

Creating Styles
Font size
Turn on Bold
or Italic
Menu for typeface
selection
Display lower case
as small caps
Justification
Face
Edge
Shadow
Underline
Frame
For more information about selecting and adjusting a typeface, see “Installing Additional
Fonts” on page 89.
Installing Additional Fonts
Your Deko software includes a variety of standard and specialty fonts. You can install
onal fonts at any time.
additi
To install fonts:
t Select Start > Control Panel > Open Fonts > File > Install New Fonts.
Adjusting Size, Bold, Italic, and Justification Rules to the Current Style
To adjust size, bold, italic, and justification rules of the current style:
1. Select the text by pressing Ctrl+Shift+A.
2. Do one of the following:
t Use
t Use the Style windo
The Face, Edge, Shadow, Underline and Frame buttons are switches. If a Style does not have
n
a Face, clicking the Face button adds one. If a Style has a Face, clicking the Face button
the text bar to select size, bold, italic and justification rules.
w (Font tab), to control all aspects of the current font.
deletes it.
Justifying text as you define a style determines how the text is justified within its layer.
However, entire layers can also be justified. For more information, see “Moving Text and
Layers” on page 219.
89
Page 90

3 Designing and Applying Styles
Applying Rotate, Skew, Kerning and Leading to the Current Style
You can make adjustments to the Current Style using controls in the Style window, Font tab.
To rotate, skew, or apply kerning and leading to the current style:
1. Select the text by pressing Ctrl+Shift+A.
2. In the Style window, Font tab, change the values
and/or Skew fields to change your current style as desired. For more information, see
“Controlling the Typeface in the Style Window” on page 91.
Please note that style characteristics can be applied to an entire text layer. The result of
n
applying these characteristics to the current style, or text, might be very different than
applying them to a layer. To fully understand how to achieve the result you want, see
“Editing Text and Layers” on page 191.
in the Leading, Kerning, Rotation,
Adjusting the Display of Capitalization, Quotes and Spacing
To adjust the display of capitalization, contextual quotes, and spacing:
1. Select the text by pressing Ctrl+Shift+A.
2. Use the appropriate controls in the Style window, F
“Controlling the Typeface in the Style Window” on page 91.
Please note that style characteristics can be applied to an entire text layer. The result of
n
applying these characteristics to the current style, or text, might be very different than
applying them to a layer. To fully understand how to achieve the result you want, see
“Editing Text and Layers” on page 191.
ont tab. For more information, see
Typing in a Language other than English
90
To type in a language other than English:
1. From the Style dialog box, Font tab, select a language from the Keyboard menu.
2. Select the appropriate Orientation (left to right, to
p to bottom, and so on.).
Page 91

Controlling the Typeface in the Style Window
The Style window Font tab provides the controls typeface information.
Style Window
Font Tab Option Description
Typeface Names the current typeface. Select a typeface from this menu. The list
includes TrueType and Postscript fonts and Deko Custom Typefaces. The
latter are indicated by the word “(Deko)” after the typeface name.
Browse Opens the Typeface Browser window, showing a sample of each available
typeface. Type the first one or two letters of the typeface name to jump to
that typeface. Double-click a typeface sample to select it.
Bold Selects a bold version of the current typeface. If no bold version is
available, this item is dimmed. Select or deselect to turn on or off.
Italic Selects an italic version of the current typeface. If no italic version is
available, this item is dimmed. Select or deselect to turn on or off.
Size Shows the height of the current font, in screen units. Click the Up and
Down arrows or type a number in the text box. For more information, see
“Working with User Preferences” on page 667.
Creating Styles
Width Shows percent of normal width. Type a percent less than 100 to condense
the font, or greater than 100 to expand it. Click the Up and Down arrows
or type a number in the field.
Capitalization Displays a menu for changing the way Deko displays the case of typed
characters:
• Normal - Deko displays the case of all characters as typed.
• Smallcaps - Deko displays lower case characters as small capital
characters.
• Allcaps - Deko displays all characters as capital characters.
• Allsmalls - Deko displays all characters as lower case characters.
• Words - Deko displays the first character of each word as a capital
character (title case).
Contextual Quotes Displays typed quotation marks as “true” opening and closing quotes
based on this style.
Leading Determines row spacing by the leading value of the style applied to the
new line character. A value of zero produces the default row spacing.
Values greater than zero increase the space between rows; values less than
zero decrease it.
91
Page 92

3 Designing and Applying Styles
Style Window
Font Tab Option Description (Continued)
Kerning Controls the spacing between characters. A value of zero produces the
Rotation Controls the angle of the baseline, in degrees.
Skew Controls the amount of skew, or slant, applied to the characters. This is
Filter Controls blurring of the font. Select Hard, Medium, Soft, or Very Soft to
Spacing Selects the type of character spacing for the font:
default kerning. Values greater than zero increase the space between
characters; values less than zero decrease it.
independent of the italic setting.
blur the font, diminishing jagged lines caused by aliasing.
Medium is the default setting. Soft makes the font blurrier. Hard makes it
less blurry.
• Proportional - characters are spaced according to their widths.
• Monospace - all characters are forced to have the same widths.
• Digits - the digits 0-9 are monospace, but all other characters are
proportional.
Keyboard Selects the language. Keystrokes on the keyboard correspond to
characters in this language.
Orientation Determines field orientation, that is, left-to-right, right-to-left (for Arabic
and Hebrew) or top-to-bottom (for Eastern Asian languages).
Some orientations might not be available in all languages.
n
Prerendered style Indicates that this style was previously rendered and saved so it can be
rendered more quickly.
For many typefaces, there is no difference between “proportional” and “digits” spacing
n
because the fonts were designed with monospaced digits.
For more information about controlling the t
Numeric Parameter to Its Default Value” o
Restoring a Numeric Parameter to Its Default Value
To restore any numeric parameter in the Style window to its default value:
t In the Style window, triple-click the parameter you want to restore to its default value.
This is true of many controls in Deko.
n
92
ypeface
n page 92.
in the Style window, see “Restoring a
Page 93

Adjusting the Sharpness of a Font
Like any television or computer graphic created with pixels, some text might display
unwanted jagged edges, or artifacts called “jaggies.” You might want to adjust the sharpness
of your text, blurring it slightly to avoid the appearance of jaggies. Jaggies might be more
noticeable with some fonts than others. They are more likely to be prominent with the color
red and with smaller text.
To adjust sharpness or blurring of a font:
1. Select one of the following:
t Text
Creating Styles
t A layer, t
o change all text in the layer
t Nothing, to change the current style.
2. In the Style window, click the Font tab.
3. In the Filter menu, select a Filter opti
Filter Option Description
Hard Hard makes the font less blurry, but might allow some effects of
aliasing to appear.
Medium Medium is the default setting.
Soft Soft makes the font blurrier, diminishing jagged lines.
Adding Details to a Font
Once you have defined a font for the current style, you can add details to the font to create a
unique look. A detail can be a face, an edge, a frame, a shadow, or an underline. You can
adjust the size, shape, and blurring of each detail. Each detail has a shader, defining how it is
filled. Add, remove, or prioritize details using the Look tab in the Style window. A style can
have an unlimited number and combination of details.
The following topics provide more information about adding details to a font:
on. See the following t
able.
• “Displaying
the Look
Tab in the Style Window” on page 94
• “Adding a Face, Edge, Frame, Shadow, or Underline to the Current Look” on page 95
• “Re
moving a Face, Edge, Frame, Shadow or Under
line from the Current Look” on page
96
93
Page 94
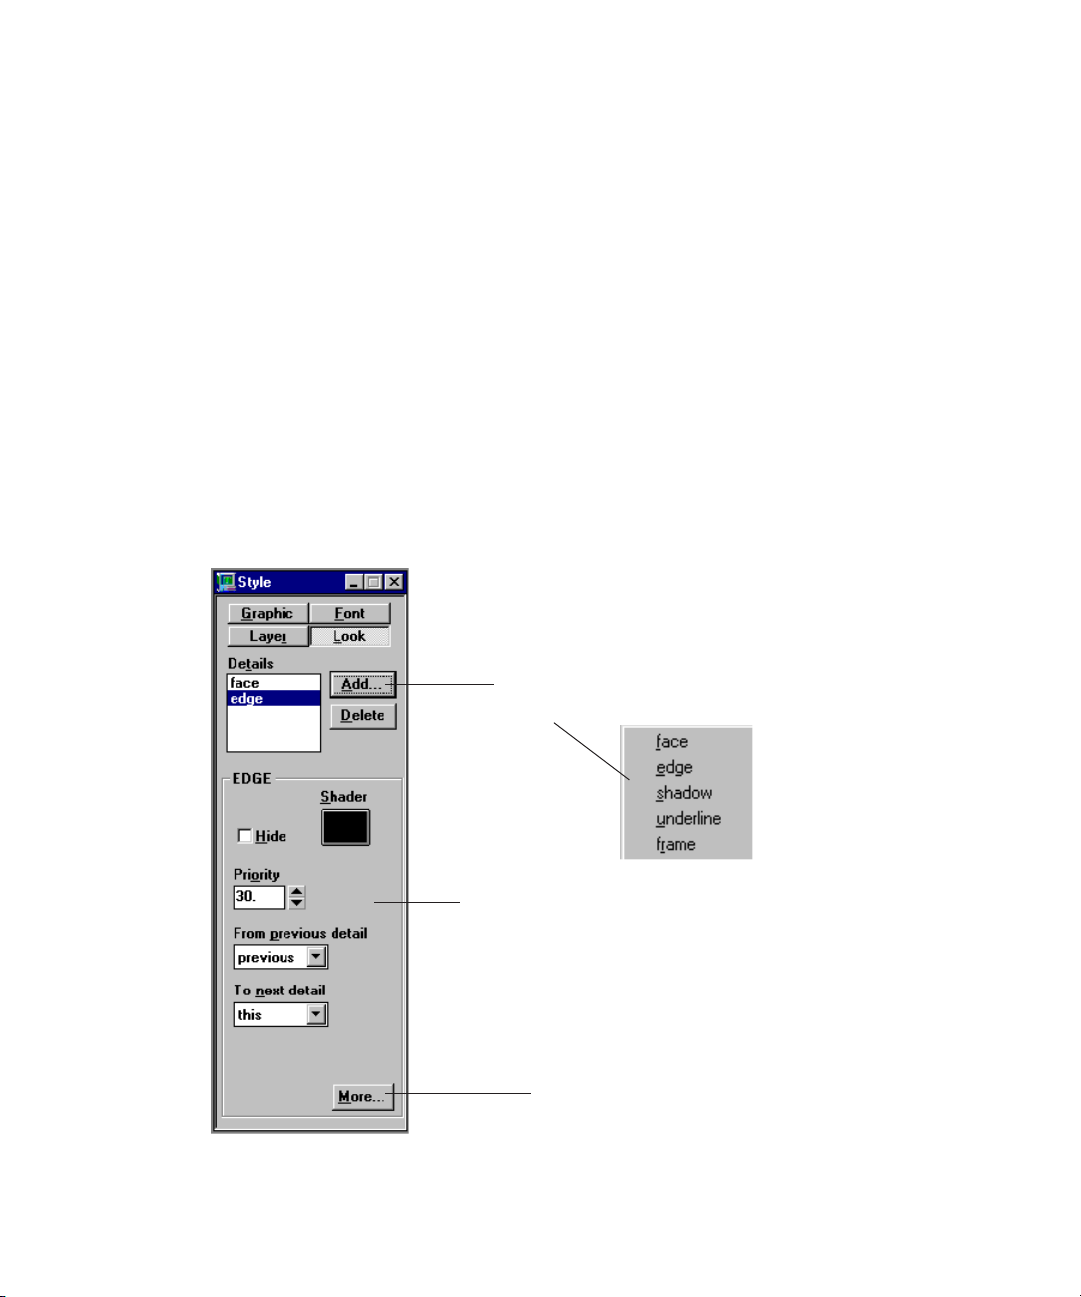
3 Designing and Applying Styles
Click the Add
button to reveal a
list of details
Bottom area of window
varies depending on detail
selected in Details list
Click the More button to
reveal additional controls
Displaying the Look Tab in the Style Window
To display the Style window, Look tab:
1. Access the Style Window by doing one of the following:
t Select > Style.
t Press F6 (SK).
t Press Look k
ey (FAK).
2. From the Style window, display the Look tab by doing one of the following:
t Cli
t Press Alt+L (SK)
ck the Look button.
.
t Press Look (FAK).
To restore any numeric parameter in the Style window to its default value, triple-click
n
the parameter.
94
Page 95

Creating Styles
Style Window
Look Tab Control Description
Details The list of details for the current look. The selected detail is highlighted, and its
attributes are displayed in the lower half of the window. Types of details include:
• Face -the face of the characters. Most looks have only a single face, usually
the first detail in the list of details.
• Edge - an edge around each character. The edge is based on details preceding
it in the list of details, or a selected detail.
• Shadow - a shadow of each character. The shadow is based on details
preceding it in the list of details, or a selected detail.
• Underline - an underline following the characters.
• Frame - a frame behind the characters.
Add Adds a new detail to the current look. A menu lets you select which kind of
detail to add. The new detail is added after the selected detail.
Delete Deletes the selected detail.
Controls in the bottom half
of the window
Controls vary, depending on the type of detail selected in the Detail list. Use the
controls to modify the selected detail.
Adding a Face, Edge, Frame, Shadow, or Underline to the Current Look
To add a face, an edge, a frame, a shadow, or an underline to the current look:
1. Select the text (Ctrl+Shift+A).
2. Do one of the following:
t Use
the text bar detail buttons to add the first f
ace, edge, shadow, underline, and
frame of a look. This method can only be used to add one of each type of detail.
Clicking any detail buttons after the first time removes that detail.
t From the Style window:
a. Click the Look button.
b. Click the Add button. A menu opens, enabling you to select which kind of detail to
add (face, edge, shadow, underline, frame).
95
Page 96

3 Designing and Applying Styles
c. Select the new detail from the list. The new detail is added to the bottom of the
Details list or after the detail in the list that is selected. You can use this method to
add as many of each kind of detail as you like.
t With the FastAction function keys enabled, press any of the following:
- F4 to add a Face
- F5 to add an Edge
- F6 to add a Shadow
- F7 to add an Underline
- F8 to add a Frame
You can use this method to add one of each type of detail. Pressing any detail
buttons after the first time removes that detail.
Removing a Face, Edge, Frame, Shadow or Underline from the Current Look
To remove a face, an edge, a frame, a shadow, or an underline from the current look:
1. Select the text (Ctrl+Shift+A).
2. Do one of the following:
96
t Use
the text bar Detail buttons to remove the first face, edge, shadow, underline, and
frame, of a
look. You can use this method only to remove one of each type of detail.
Clicking any detail buttons removing that detail applies the detail again.
t From the Style window, click the Look button. In the Details list, click a detail to
select it, then click Delete. You can use this method to delete as many of each kind
of detail as you like.
t With the FastAction function keys enabled, press any of the following:
- F4 to delete a Face
- F5 to delete an Edge
- F6 to delete a Shadow
- F7 to delete an Underline
- F8 to delete a Frame
one of
You can use this method only to delete
each type of detail. Pressing any
detail buttons after deleting the detail adds that detail.
Page 97

Adjusting Details
To adjust the dimension, shape, definition, or priority of a detail:
1. Click on the Style window to activate.
2. Select the text (Ctrl+Shift+A).
3. Do one of the following:
Creating Styles
t Cli
ck the Look tab at the top of the Style window.
t Press Alt+L (SK).
t Press Look (FAK).
4. In the Details list, click the Detail you want
to adjust to select it. Deko displays
attributes associated with the detail in the lower half of the Style window. You can use
the associated controls, described in the following sections to adjust the detail you
select.
The following topics provide more information about adjusting details:
Adjusting Face Detail Attributes” on page 98
• “
• “Adj
usting Edge Detail Attributes” on page 99
• “Adjusting Shadow Detail Attributes” on page 101
• “Adjusting Underline Detail Attributes” on page 103
Adjusting Frame Detail Attributes” on page 105
• “
97
Page 98
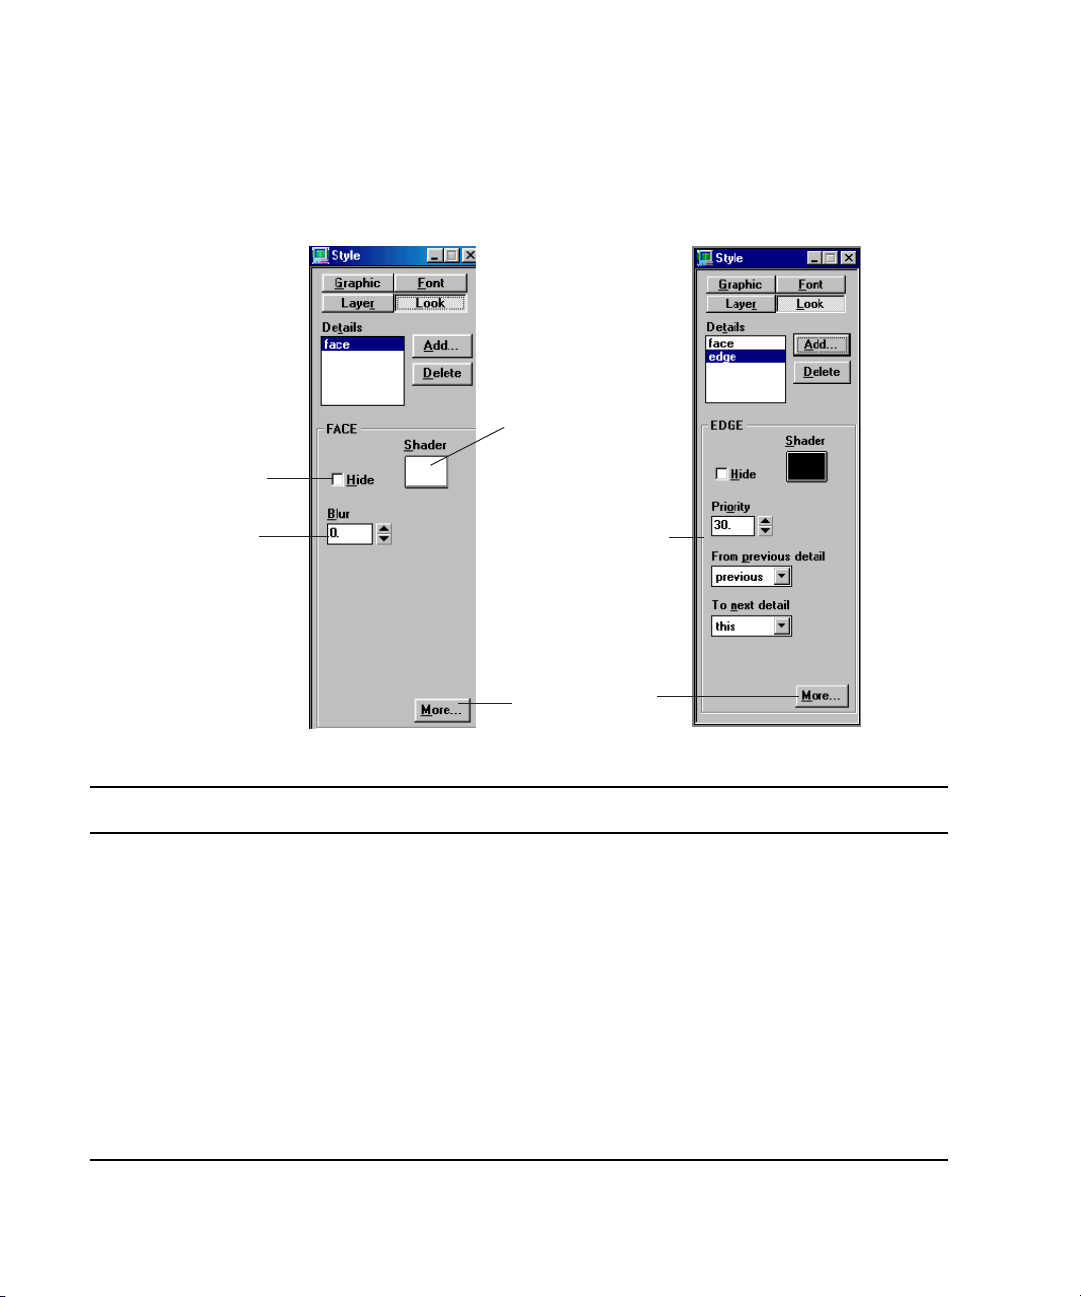
3 Designing and Applying Styles
Hide face
Adjust blur
Opens face shader
window/see sample
Click More to reveal
additional controls
Controls to position
detail relative to other
details
Adjusting Face Detail Attributes
To adjust Face detail attributes, use the controls in th
e lower half of the Style window, Look
tab. Face Detail attributes are only available when Face is selected in the Details List.
Face Detail Attribute Description
Hide Select this option to hide the face. A hidden face can still affect other details, based
on its Priority and the “From previous detail” settings of other details.
Shader Opens the Face Shader window. Use the Face Shader to apply a color, ramp or
texture to the face. For more information, see “Shader Window” on page 81.
Blur Controls the amount of blur, from 0 (no blur) to 100.
Priority
(click More to display)
Determines whether the face appears in front of or behind other details. By default,
Deko assigns a priority to the details so that they render from front to back, in the
order in which they appear in the Details list. Use Priority to change the rendering
order. Priority ranges from 0 (closest to viewer) to 1000 (farthest from viewer).
Priority also controls the rendering order of overlapping details from
different styles.
98
Page 99
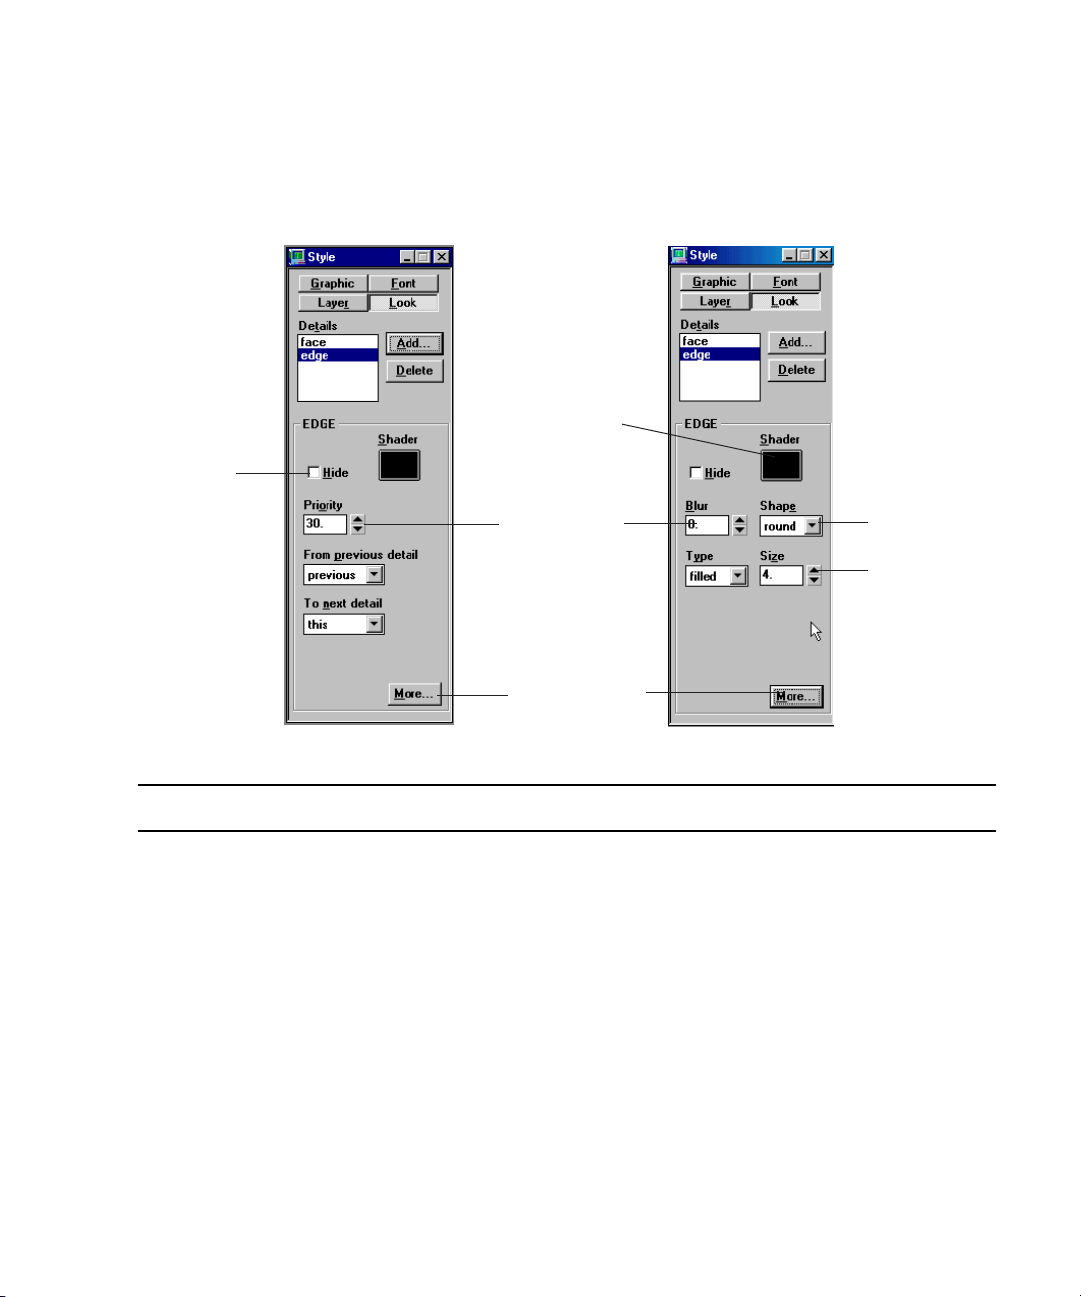
Adjusting Edge Detail Attributes
Adjust priority
among other details
Click More to turn
to additional
controls
Specify round or
square edge
Adjust thickness
of the edge
Open the Edge
shader window/
see sample
Hide
edge
Creating Styles
To adjust Edge detail attributes, use the controls in the
lower half of the Style window, Look
tab. Edge Detail attributes are available only when Edge is selected in the Details List.
Edge Detail Attribute Description
Hide Hides the edge. A hidden edge can still affect other details, based on its Priority
and “To next detail” settings.
Shader Opens the Edge Shader window. Use the Edge Shader to apply a color, ramp or
texture to the edge. For more information, see “Shader Window” on page 81.
Blur Controls the amount of blur, from 0 (no blur) to 100.
Shape Specifies the shape of the edge:
• Round - creates a rounded edge.
• Square - creates a rectangular edge.
99
Page 100

3 Designing and Applying Styles
Outer
Inner
Border
Filled
Edge Detail Attribute Description (Continued)
Type Specifies the type of edge:
• Outer - creates an edge that extends outward from the outer border of the
edged detail.
• Inner - creates an edge that extends inward from the outer border of the edged
detail.
• Border - creates an edge that extends both outward and inward from the outer
border of the edged detail.
• Filled - creates an edge that extends outward from the outer border of the
edged detail; the inside is filled with the edge color.
Size Controls the size of the edge, from 0 (no edge) to 100 (very large edge).
Priority
(click More to display)
Determines whether the edge appears in front of or behind other details. By
default, Deko assigns a priority to the details so that they render from front to
back, in the order they appear in the Details list. Use Priority to change the
rendering order. Priority ranges from 0 (closest to viewer) to 1000 (farthest from
viewer).
Priority also controls the rendering order of overlapping details from different
styles.
From previous detail Specifies which other details in the look provide the shape on which this edge is
based:
• Face - produces an edge based only on the face detail.
• Frame - produces an edge around the first frame detail preceding the edge in
the Details list.
• Previous - produces an edge based on the “To next detail” setting of the detail
immediately preceding the edge in the Details list.
• Underline - produces an edge around the first underline preceding the edge in
the Details list.
100
 Loading...