

Page 1

Avid® CaptureManager
User’s Guide
™
make manage move | media
™
Avid
®
Page 2

Copyright and Disclaimer
Product specifications are subject to change without notice and do not represent a commitment on the part of Avid Technology,
Inc.
The software described in this document is furnished under a license agreement. You can obtain a copy of that license by
visiting Avid's Web site at www.avid.com. The terms of that license are also available in the product in the same directory as
the software. The software may not be reverse assembled and may be used or copied only in accordance with the terms of the
license agreement. It is against the law to copy the software on any medium except as specifically allowed in the license
agreement.
Avid products or portions thereof are protected by one or more of the following United States Patents: 4,746,994; 4,970,663;
5,045,940; 5,267,351; 5,309,528; 5,355,450; 5,396,594; 5,440,348; 5,452,378; 5,467,288; 5,513,375; 5,528,310; 5,557,423;
5,577,190; 5,583,496; 5,584,006; 5,627,765; 5,640,601; 5,644,364; 5,654,737; 5,715,018; 5,719,570; 5,724,605; 5,726,717;
5,729,673; 5,745,637; 5,752,029; 5,754,851; 5,799,150; 5,812,216; 5,828,678; 5,842,014; 5,852,435; 5,999,406; 6,038,573;
6,061,758; 6,141,007; 6,211,869; 6,532,043; 6,546,190; 6,596,031; 6,636,869; 6,747,705; 6,763,523; 6,766,357; 6,813,622;
6,847,373; D352,278; D372,478; D373,778; D392,267; D392,268; D392,269; D395,291; D396,853; D398,912.
Other patents are pending.
This document is protected under copyright law. An authorized licensee of CaptureManager may reproduce this publication
for the licensee’s own use in learning how to use the software. This document may not be reproduced or distributed, in whole
or in part, for commercial purposes, such as selling copies of this document or providing support or educational services to
others. This document is supplied as a guide for CaptureManager. Reasonable care has been taken in preparing the
information it contains. However, this document may contain omissions, technical inaccuracies, or typographical errors. Avid
Technology, Inc. does not accept responsibility of any kind for customers’ losses due to the use of this document. Product
specifications are subject to change without notice.
Copyright © 2006 Avid Technology, Inc. and its licensors. All rights reserved.
The following disclaimer is required by Sam Leffler and Silicon Graphics, Inc. for the use of their TIFF library:
Copyright © 1988–1997 Sam Leffler
Copyright © 1991–1997 Silicon Graphics, Inc.
Permission to use, copy, modify, distribute, and sell this software [i.e., the TIFF library] and its documentation for any purpose
is hereby granted without fee, provided that (i) the above copyright notices and this permission notice appear in all copies of
the software and related documentation, and (ii) the names of Sam Leffler and Silicon Graphics may not be used in any
advertising or publicity relating to the software without the specific, prior written permission of Sam Leffler and Silicon
Graphics.
THE SOFTWARE IS PROVIDED “AS-IS” AND WITHOUT WARRANTY OF ANY KIND, EXPRESS, IMPLIED OR
OTHERWISE, INCLUDING WITHOUT LIMITATION, ANY WARRANTY OF MERCHANTABILITY OR FITNESS FOR A
PARTICULAR PURPOSE.
IN NO EVENT SHALL SAM LEFFLER OR SILICON GRAPHICS BE LIABLE FOR ANY SPECIAL, INCIDENTAL, INDIRECT
OR CONSEQUENTIAL DAMAGES OF ANY KIND, OR ANY DAMAGES WHATSOEVER RESULTING FROM LOSS OF USE,
DATA OR PROFITS, WHETHER OR NOT ADVISED OF THE POSSIBILITY OF DAMAGE, AND ON ANY THEORY OF
LIABILITY, ARISING OUT OF OR IN CONNECTION WITH THE USE OR PERFORMANCE OF THIS SOFTWARE.
The following disclaimer is required by the Independent JPEG Group:
Portions of this software are based on the work of the Independent JPEG Group.
This Software may contain components licensed under the following conditions:
Copyright © 1989 The Regents of the University of California. All rights reserved.
Redistribution and use in source and binary forms are permitted provided that the above copyright notice and this paragraph
are duplicated in all such forms and that any documentation, advertising materials, and other materials related to such
distribution and use acknowledge that the software was developed by the University of California, Berkeley. The name of the
University may not be used to endorse or promote products derived from this software without specific prior written
permission. THIS SOFTWARE IS PROVIDED ``AS IS'' AND WITHOUT ANY EXPRESS OR IMPLIED WARRANTIES,
INCLUDING, WITHOUT LIMITATION, THE IMPLIED WARRANTIES OF MERCHANTABILITY AND FITNESS FOR A
PARTICULAR PURPOSE.
Copyright © 1989, 1991 by Jef Poskanzer.
Permission to use, copy, modify, and distribute this software and its documentation for any purpose and without fee is hereby
granted, provided that the above copyright notice appear in all copies and that both that copyright notice and this permission
notice appear in supporting documentation. This software is provided "as is" without express or implied warranty.
2
Page 3

Copyright 1995, Trinity College Computing Center. Written by David Chappell.
Permission to use, copy, modify, and distribute this software and its documentation for any purpose and without fee is hereby
granted, provided that the above copyright notice appear in all copies and that both that copyright notice and this permission
notice appear in supporting documentation. This software is provided "as is" without express or implied warranty.
Copyright 1996 Daniel Dardailler.
Permission to use, copy, modify, distribute, and sell this software for any purpose is hereby granted without fee, provided that
the above copyright notice appear in all copies and that both that copyright notice and this permission notice appear in
supporting documentation, and that the name of Daniel Dardailler not be used in advertising or publicity pertaining to
distribution of the software without specific, written prior permission. Daniel Dardailler makes no representations about the
suitability of this software for any purpose. It is provided "as is" without express or implied warranty.
Modifications Copyright 1999 Matt Koss, under the same license as above.
Copyright © 1991 by AT&T.
Permission to use, copy, modify, and distribute this software for any purpose without fee is hereby granted, provided that this
entire notice is included in all copies of any software which is or includes a copy or modification of this software and in all
copies of the supporting documentation for such software.
THIS SOFTWARE IS BEING PROVIDED "AS IS", WITHOUT ANY EXPRESS OR IMPLIED WARRANTY. IN PARTICULAR,
NEITHER THE AUTHOR NOR AT&T MAKES ANY REPRESENTATION OR WARRANTY OF ANY KIND CONCERNING THE
MERCHANTABILITY OF THIS SOFTWARE OR ITS FITNESS FOR ANY PARTICULAR PURPOSE.
This product includes software developed by the University of California, Berkeley and its contributors.
The following disclaimer is required by Paradigm Matrix:
Portions of this software licensed from Paradigm Matrix.
The following disclaimer is required by Ray Sauers Associates, Inc.:
“Install-It” is licensed from Ray Sauers Associates, Inc. End-User is prohibited from taking any action to derive a source code
equivalent of “Install-It,” including by reverse assembly or reverse compilation, Ray Sauers Associates, Inc. shall in no event be
liable for any damages resulting from reseller’s failure to perform reseller’s obligation; or any damages arising from use or
operation of reseller’s products or the software; or any other damages, including but not limited to, incidental, direct, indirect,
special or consequential Damages including lost profits, or damages resulting from loss of use or inability to use reseller’s
products or the software for any reason including copyright or patent infringement, or lost data, even if Ray Sauers Associates
has been advised, knew or should have known of the possibility of such damages.
The following disclaimer is required by Videomedia, Inc.:
“Videomedia, Inc. makes no warranties whatsoever, either express or implied, regarding this product, including warranties with
respect to its merchantability or its fitness for any particular purpose.”
“This software contains V-LAN ver. 3.0 Command Protocols which communicate with V-LAN ver. 3.0 products developed by
Videomedia, Inc. and V-LAN ver. 3.0 compatible products developed by third parties under license from Videomedia, Inc. Use
of this software will allow “frame accurate” editing control of applicable videotape recorder decks, videodisc recorders/players
and the like.”
The following disclaimer is required by Altura Software, Inc. for the use of its Mac2Win software and Sample
Source Code:
©1993–1998 Altura Software, Inc.
The following disclaimer is required by 3Prong.com Inc.:
Certain waveform and vector monitoring capabilities are provided under a license from 3Prong.com Inc.
The following disclaimer is required by Interplay Entertainment Corp.:
The “Interplay” name is used with the permission of Interplay Entertainment Corp., which bears no responsibility for Avid
products.
This product includes portions of the Alloy Look & Feel software from Incors GmbH.
This product includes software developed by the Apache Software Foundation (http://www.apache.org/
© DevelopMentor
).
3
Page 4

This product may include the JCifs library, for which the following notice applies:
JCifs © Copyright 2004, The JCIFS Project, is licensed under LGPL (http://jcifs.samba.org/). See the LGPL.txt file in the Third
Party Software directory on the installation CD.
Avid Interplay contains components licensed from LavanTech. These components may only be used as part of and in
connection with Avid Interplay.Attn. Government User(s). Restricted Rights Legend
U.S. GOVERNMENT RESTRICTED RIGHTS. This Software and its documentation are “commercial computer software” or
“commercial computer software documentation.” In the event that such Software or documentation is acquired by or on behalf
of a unit or agency of the U.S. Government, all rights with respect to this Software and documentation are subject to the terms
of the License Agreement, pursuant to FAR §12.212(a) and/or DFARS §227.7202-1(a), as applicable.
Trademarks
888 I/O, Adrenaline, AirPlay, AirSPACE, AirSPACE HD, AirSpeed, AniMatte, AudioSuite, AudioVision, AutoSync, Avid,
Avid DNA, Avid DNxcel, Avid DNxHD, AVIDdrive, AVIDdrive Towers, Avid DS Assist Station, Avid ISIS,
Avid Learning Excellerator, Avid Liquid, Avid Mojo, AvidNet, AvidNetwork, Avid Remote Response, AVIDstripe, Avid Unity,
Avid Unity ISIS, Avid Xpress, AVoption, AVX, CamCutter, ChromaCurve, ChromaWheel, DAE, Dazzle, Deko, DekoCast, D-Fi,
D-fx, DigiDelivery, Digidesign, Digidesign Audio Engine, Digidesign Intelligent Noise Reduction, DigiDrive,
Digital Nonlinear Accelerator, DigiTranslator, DINR, DNxchange, do more, D-Verb, Equinox, ExpertRender, Face Robot,
FieldPak, Film Composer, FilmScribe, FluidMotion, HIIP, HyperSPACE, HyperSPACE HDCAM, IllusionFX,
Image Independence, iNEWS, iNEWS ControlAir, Instinct, Interplay, Intraframe, iS9, iS18, iS23, iS36, LaunchPad, Lightning,
Lo-Fi, Magic Mask, make manage move | media, Marquee, Matador, Maxim, MCXpress, Media Browse, Media Composer,
MediaDock, MediaDock Shuttle, Media Fusion, Media Illusion, MediaLog, Media Reader, Media Recorder, MEDIArray,
MediaShare, MediaStream, Meridien, MetaSync, MissionControl, NaturalMatch, Nearchive, NetReview, NewsCutter, Nitris,
OMF, OMF Interchange, OMM, Open Media Framework, Open Media Management, PCTV, Pinnacle MediaSuite,
Pinnacle Studio, Pinnacle Systems, ProEncode, Pro Tools, QuietDrive, Recti-Fi, RetroLoop, rS9, rS18, Sci-Fi, ScriptSync,
SecureProductionEnvironment, Show Center, Softimage, Sound Designer II, SPACE, SPACEShift, SpectraGraph,
SpectraMatte, SteadyGlide, Symphony, TARGA, Thunder, Trilligent, UnityRAID, Vari-Fi, Video RAID, Video Slave Driver,
VideoSPACE, and Xdeck are either registered trademarks or trademarks of Avid Technology, Inc. in the United States and/or
other countries.
Adobe and Photoshop are either registered trademarks or trademarks of Adobe Systems Incorporated in the United States
and/or other countries. Windows is either a registered trademark or trademark of Microsoft Corporation in the United States
and/or other countries. All other trademarks contained herein are the property of their respective owners.
Footage
Windhorse — Courtesy of Paul Wagner Productions.
Arizona Images — KNTV Production — Courtesy of Granite Broadcasting, Inc.,
Editor/Producer Bryan Foote.
Canyonlands — Courtesy of the National Park Service/Department of the Interior.
News material provided by WFTV Television Inc.
Tornados + Belle Isle footage — Courtesy of KWTV News 9.
WCAU Fire Story — Courtesy of NBC-10, Philadelphia, PA.
Women in Sports – Paragliding — Courtesy of Legendary Entertainment, Inc.
GOT FOOTAGE?
Editors — Filmmakers — Special Effects Artists — Game Developers — Animators — Educators — Broadcasters — Content
creators of every genre — Just finished an incredible project and want to share it with the world?
Send us your reels and we may use your footage in our show reel or demo!*
For a copy of our release and Avid’s mailing address, go to www.avid.com/footage.
*Note: Avid cannot guarantee the use of materials submitted.
Avid CaptureManager User’s Guide • 0130-07638-01 Rev. A • August 2006
4
Page 5

Contents
Using This Guide. . . . . . . . . . . . . . . . . . . . . . . . . . . . . . . . . . . . . . . . 7
Who Should Use This Guide. . . . . . . . . . . . . . . . . . . . . . . . . . . . . . . . . . . . . . 7
About This Guide . . . . . . . . . . . . . . . . . . . . . . . . . . . . . . . . . . . . . . . . . . . . . . 7
Symbols and Conventions . . . . . . . . . . . . . . . . . . . . . . . . . . . . . . . . . . . . 8
If You Need Help. . . . . . . . . . . . . . . . . . . . . . . . . . . . . . . . . . . . . . . . . . . . . . . 9
Related Documentation . . . . . . . . . . . . . . . . . . . . . . . . . . . . . . . . . . . . . . 9
How to Order Documentation. . . . . . . . . . . . . . . . . . . . . . . . . . . . . . . . . 10
Avid Educational Services . . . . . . . . . . . . . . . . . . . . . . . . . . . . . . . . . . . 10
Chapter 1 System Overview. . . . . . . . . . . . . . . . . . . . . . . . . . . . . . . . . . . . . . . 11
Workflow . . . . . . . . . . . . . . . . . . . . . . . . . . . . . . . . . . . . . . . . . . . . . . . . . . . . 12
Logging In . . . . . . . . . . . . . . . . . . . . . . . . . . . . . . . . . . . . . . . . . . . . . . . . . . . 13
Workspace . . . . . . . . . . . . . . . . . . . . . . . . . . . . . . . . . . . . . . . . . . . . . . . . . . 15
Chapter 2 Assets Tab . . . . . . . . . . . . . . . . . . . . . . . . . . . . . . . . . . . . . . . . . . . . 17
Overview . . . . . . . . . . . . . . . . . . . . . . . . . . . . . . . . . . . . . . . . . . . . . . . . . . . . 18
Types of Media Assets . . . . . . . . . . . . . . . . . . . . . . . . . . . . . . . . . . . . . . . . . 19
Viewing and Printing Metadata. . . . . . . . . . . . . . . . . . . . . . . . . . . . . . . . 20
Information. . . . . . . . . . . . . . . . . . . . . . . . . . . . . . . . . . . . . . . . . . . . 20
Comments . . . . . . . . . . . . . . . . . . . . . . . . . . . . . . . . . . . . . . . . . . . . 22
Related Assets . . . . . . . . . . . . . . . . . . . . . . . . . . . . . . . . . . . . . . . . 23
Record Information . . . . . . . . . . . . . . . . . . . . . . . . . . . . . . . . . . . . . 24
Chapter 3 Feed Capture Tab . . . . . . . . . . . . . . . . . . . . . . . . . . . . . . . . . . . . . . 27
Overview . . . . . . . . . . . . . . . . . . . . . . . . . . . . . . . . . . . . . . . . . . . . . . . . . . . . 28
Schedule Date . . . . . . . . . . . . . . . . . . . . . . . . . . . . . . . . . . . . . . . . . . . . 28
Legend . . . . . . . . . . . . . . . . . . . . . . . . . . . . . . . . . . . . . . . . . . . . . . . . . . 29
Scheduling Grid . . . . . . . . . . . . . . . . . . . . . . . . . . . . . . . . . . . . . . . . . . . 30
5
Page 6

Customizing the Grid . . . . . . . . . . . . . . . . . . . . . . . . . . . . . . . . . . . . . . . . . . 31
Adding a Channel on the Grid . . . . . . . . . . . . . . . . . . . . . . . . . . . . . . . . 32
Viewing Channels on the Grid. . . . . . . . . . . . . . . . . . . . . . . . . . . . . . . . 37
Viewing Metadata from the Grid . . . . . . . . . . . . . . . . . . . . . . . . . . . . . . 38
Chapter 4 Device Capture Tab . . . . . . . . . . . . . . . . . . . . . . . . . . . . . . . . . . . . . 39
Tabbed Workspace . . . . . . . . . . . . . . . . . . . . . . . . . . . . . . . . . . . . . . . . . . . 40
Chapter 5 Messages Tab . . . . . . . . . . . . . . . . . . . . . . . . . . . . . . . . . . . . . . . . . 41
Displaying Messages . . . . . . . . . . . . . . . . . . . . . . . . . . . . . . . . . . . . . . . . . . 41
Chapter 6 ActiveX Add-In Tab . . . . . . . . . . . . . . . . . . . . . . . . . . . . . . . . . . . . . 43
Viewing Web-based Applications. . . . . . . . . . . . . . . . . . . . . . . . . . . . . . . . . 43
Chapter 7 Working with Recordings . . . . . . . . . . . . . . . . . . . . . . . . . . . . . . . . 45
Scheduling a Recording . . . . . . . . . . . . . . . . . . . . . . . . . . . . . . . . . . . . . . . . 46
Content Information. . . . . . . . . . . . . . . . . . . . . . . . . . . . . . . . . . . . . . . . 49
Initiating an Instant Recording . . . . . . . . . . . . . . . . . . . . . . . . . . . . . . . . . . . 50
Recording from a VTR Device . . . . . . . . . . . . . . . . . . . . . . . . . . . . . . . . . . . 53
Chapter 8 Searching . . . . . . . . . . . . . . . . . . . . . . . . . . . . . . . . . . . . . . . . . . . . . 57
Opening the Find Dialog Box . . . . . . . . . . . . . . . . . . . . . . . . . . . . . . . . . . . . 58
Searching by Text . . . . . . . . . . . . . . . . . . . . . . . . . . . . . . . . . . . . . . . . . . . . 59
Searching by Date . . . . . . . . . . . . . . . . . . . . . . . . . . . . . . . . . . . . . . . . . . . . 60
Searching by Type . . . . . . . . . . . . . . . . . . . . . . . . . . . . . . . . . . . . . . . . . . . . 61
Index . . . . . . . . . . . . . . . . . . . . . . . . . . . . . . . . . . . . . . . . . . . . . . . . . 63
6
Page 7

Using This Guide
Congratulations on your purchase of your Avid CaptureManager system.
Avid CaptureManager offers a considerable amount of functionality for the state-of-the-art
newsroom, including feed management, newsroom system integration, and asset
management. With CaptureManager, newsroom personnel can easily coordinate all video
feeds, schedule feed captures in advance, or record late-breaking events instantly—even
control the router. CaptureManager provides a consolidated interface for high-resolution
material coming in to multiple feed room devices, reducing the chance for human error.
This publication provides information on how to use the CaptureManager system.
n
The documentation describes the standard features of a basic system configuration.
Therefore, your system might contain certain features and hardware that are not covered in
the documentation.
Who Should Use This Guide
This guide is written for journalists, producers, directors, writers, and various technical
personnel responsible for using the CaptureManager system in a broadcast newsroom. This
guide is intended for all users, from beginning to advanced.
It is strongly recommended that system users have prior experience in or classroom
knowledge of Windows-based operating systems.
About This Guide
This guide leads you through even the most complex procedures with task-oriented
instructions, illustrated for a more realistic presentation of the actual icons and images you
encounter. The information provides basic user procedures, while adding a complete
explanation of all the tools and techniques required to create, apply, and adjust various
settings, including useful tips, shortcuts, and custom options.
The Contents lists all topics included in the book. They are presented with the following
overall structure:
Page 8

Using This Guide
• The Introduction helps you get oriented with beginning concepts and general workflow
and provides valuable pointers to keep in the back of your mind as you proceed.
• The main body of the guide follows the natural flow of your work, with clear and
comprehensive step-by-step procedures.
• Finally, a detailed Index helps you quickly locate specific topics.
This guide provides instruction for your system in the following areas:
• An overview of system architecture and workflow
• The CaptureManager Workspace
• Various procedures and uses for CaptureManager
Use this guide for help in using your system after you have installed all components
according to requirements and specifications. Before installing any equipment, the site must
already have a configured network.
Symbols and Conventions
Avid documentation uses the following symbols and conventions:
Symbol or Convention Meaning or Action
n
c
w
> This symbol indicates menu commands (and subcommands) in the
t
Italic font Italic font is used to emphasize certain words and to indicate variables.
Courier Bold font
8
A note provides important related information, reminders,
recommendations, and strong suggestions.
A caution means that a specific action you take could cause harm to
your computer or cause you to lose data.
A warning describes an action that could cause you physical harm.
Follow the guidelines in this document or on the unit itself when
handling electrical equipment.
order you select them. For example, File > Import means to open the
File menu and then select the Import command.
This symbol indicates a single-step procedure. Multiple arrows in a
list indicate that you perform one of the actions listed.
Courier Bold font identifies text that you type.
Page 9

Symbol or Convention Meaning or Action
Ctrl+key or mouse action Press and hold the first key while you press the last key or perform the
If You Need Help
If you are having trouble using the Avid CaptureManager system:
1. Retry the action, carefully following the instructions given for that task in this guide. It
is especially important to check each step of your workflow.
2. Check for the latest information in one of two locations:
- If release notes are available, they ship with your application.
- If ReadMe files are available, they are supplied in your Avid application folder.
If You Need Help
mouse action. For example, Ctrl+drag or Ctrl+S. This also applies to
Alt and Shift keys.
n
Release notes and ReadMe files are also available on the Avid Knowledge Base.
3. Check any printed documentation that came with your Avid application or your
hardware for maintenance or hardware-related issues.
4. Visit the online Knowledge Base at www.avid.com/onlinesupport. Online services are
available 24 hours per day, 7 days per week. Search this online Knowledge Base to find
answers, to view error messages, to access troubleshooting tips, to download updates,
and to read/join online message-board discussions.
5. For Technical Support, call 800-800-AVID (800-800-2843).
For Broadcast On-Air Sites and Call Letter Stations, call
800-NEWSDNG (800-639-7364).
Related Documentation
The following documents provide more information about CaptureManager:
• Avid CaptureManager Installation and Administration Guide
• Avid CaptureManager ReadMe files (located on the installation CD)
The Online Library that ships with most Avid editing applications includes a Master
Glossary of all specialized terminology used in the documentation for Avid products.
n
For the latest product information, see the Avid Knowledge Base:
www.avid.com/support
9
Page 10

Using This Guide
How to Order Documentation
To order additional copies of any Avid documentation from within the United States, call
Avid Sales at 800-949-AVID (800-949-2843). If you are placing an order from outside the
United States, contact your local Avid representative.
Avid Educational Services
For information on courses/schedules, training centers, certifications, courseware, and
books, visit www.avid.com/training or call Avid Sales at 800-949-AVID (800-949-2843).
10
Page 11

Chapter 1
System Overview
This chapter provides instructions on how to log in to CaptureManager as well as an
overview of the system, its workflow and user interface.
This chapter contains the following main sections:
• Workflow
• Logging In
• Workspace
Page 12
Chapter 1 System Overview
Workflow
The Avid nonlinear broadcast news workflow starts with the ability to control the capture of
feeds from any source, such as satellite downlinks, microwave relays, field tapes, and studio
input. CaptureManager interfaces with a wide range of industry standard components,
allowing for easy simultaneous control of routers, VTRs and video servers.
CaptureManager’s feed-scheduling ability enables users to create recording schedules in
advance, based on a variety of criteria. Users can also perform instant frame-accurate
recordings—by ensuring the synchronous start of multiple ingest devices—for late-breaking
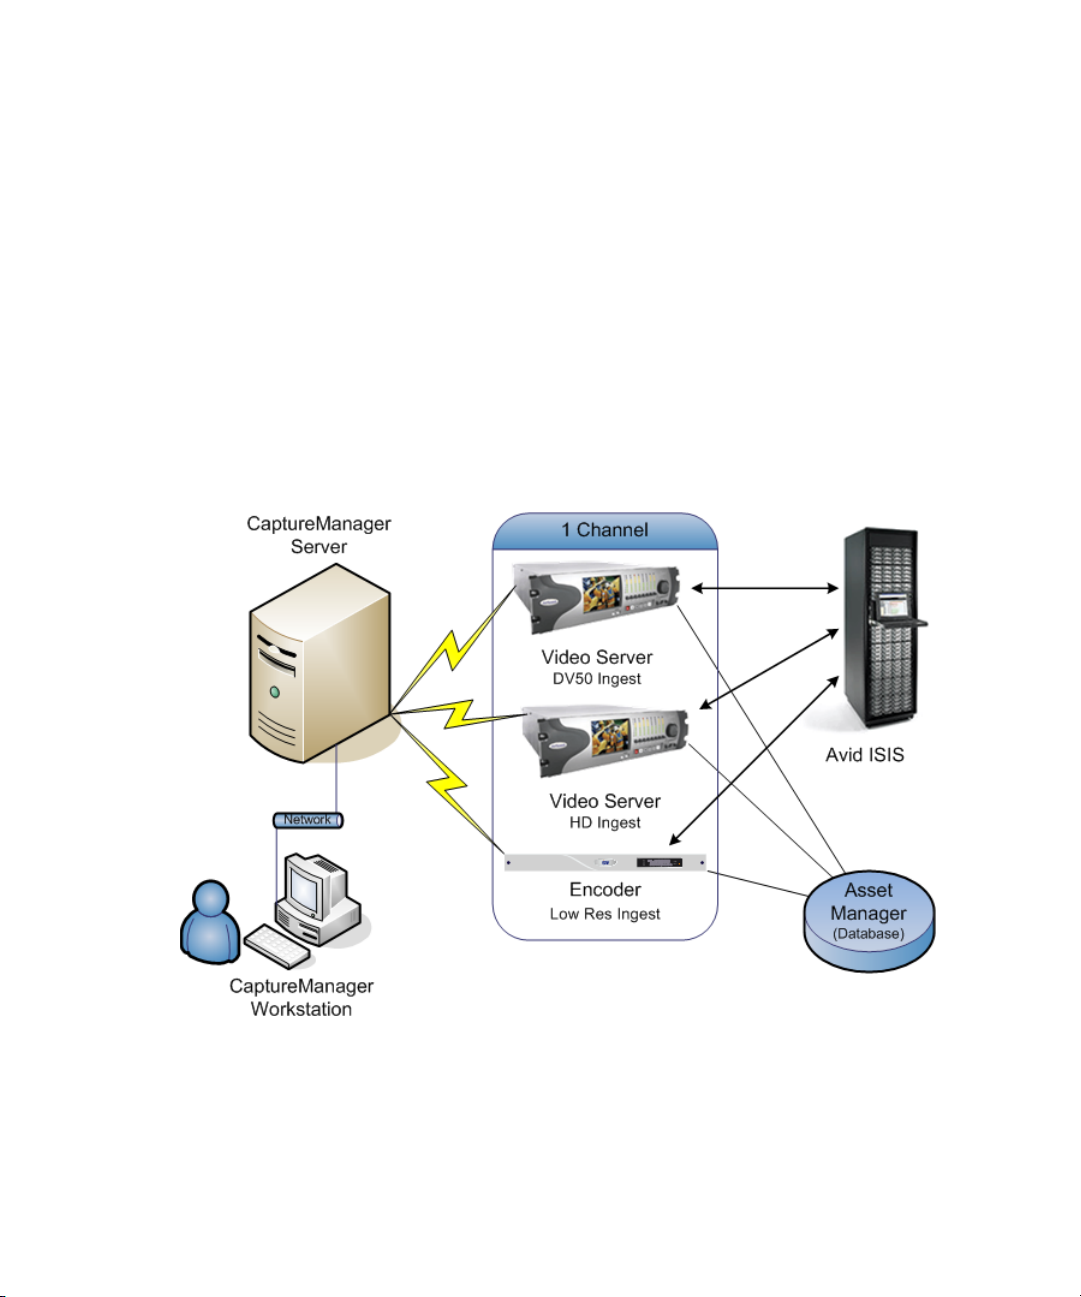
news events. For example, CaptureManager can control up to twelve simultaneous encoding
streams—that is, twelve channels, with each channel controlling multiple devices, such as a
low resolution encoder and two video servers (one for DV50 and the other for HD) as shown
in the following graphic.
12
The unique ID associated with a recording is shared among the devices and stored in the
asset management database for immediate access throughout the newsroom. Since
CaptureManager users can enter descriptive metadata during the recording process, which is
instantly available over the network, searching for media and feeds is easy.
Page 13

Logging In
The CaptureManager system is comprised of:
• A Windows-based workstation running the CaptureManager client software
• A Windows-based server running the CaptureManager utility programs, known as
services. In a basic configuration, all of the following services run on the same
computer; however, some are optional and might not be used at your site at all:
- System service
- Mapper service
- License service
- Data service
- Capture service
- Software Distribution service (optional)
- User Profile service
- VTR Control service (optional)
- Route service (optional)
- <hi-res> service (optional—for high-resolution video)
n
The <hi-res> option in the service name can be one of several product names for highresolution video servers, such as AirSpeed
For more information about installing and configuring CaptureManager to work with
encoders and video servers, such as the Avid Interplay low resolution encoder and an
AirSpeed high resolution video server, see the Avid CaptureManager Installation and
Configuration Guide.
Logging In
After the CaptureManager client software is installed on a Windows-based computer, a
shortcut icon will appear on the desktop, allowing users at that workstation to log in.
To log in to CaptureManager:
1. Do one of the following:
t Click the Start button and select Programs > Avid > CaptureManager >
CaptureManager.
®
, Unity™, or AirSPACE™.
13
Page 14
Chapter 1 System Overview
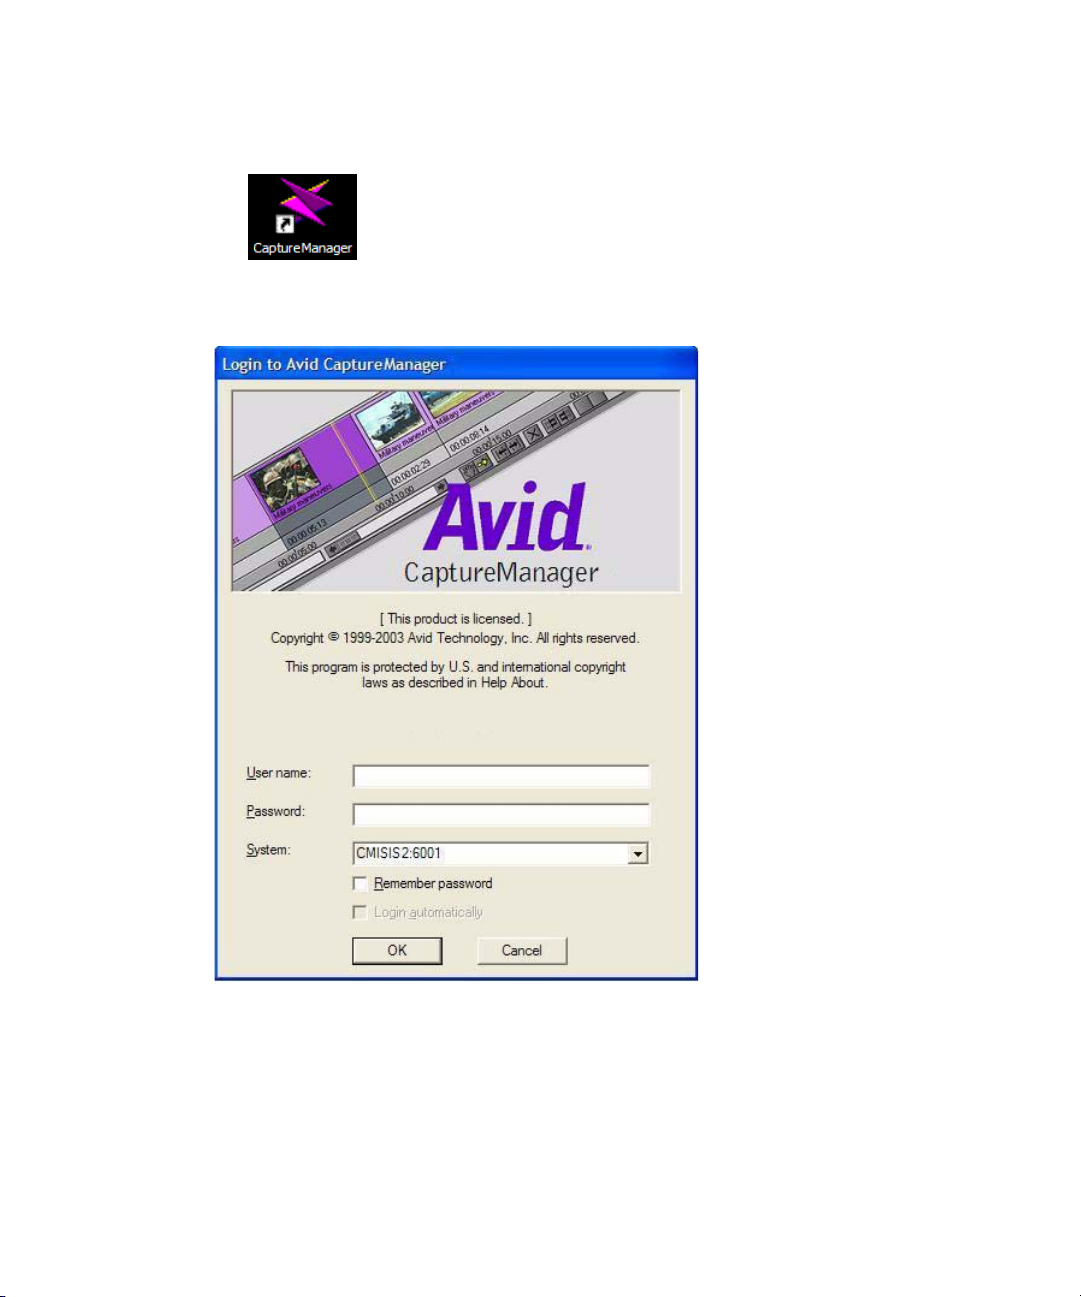
t Double click the CaptureManager shortcut on the desktop, as shown below:
2. Enter your user name and password in the Login to Avid CaptureManager dialog box.
14
3. Select the appropriate server from the System list (if necessary).
4. (Optional) Select whether you want the computer to remember your password and log
you in without prompting you for a user name and password.
5. Click OK.
The Avid CaptureManager window appears, displaying the program’s workspace.
Page 15
Workspace
CaptureManager’s simple tabbed workspace is both informative and easy to navigate.
Workspace
At the top is a menu with the following options: File and Help. The File menu allows users
to print asset information, log off, and exit the program. The Help menu is a link to the
system’s comprehensive task-oriented reference tool known as the Avid Help system.
The primary tabs located across the top are:
• Assets Tab (See page 17.)
• Feed Capture Tab (See page 27.)
• Device Capture Tab (See page 39.)
• Messages Tab (See page 41.)
• ActiveX Add-In Tab (Not shown - See page 43.)
15
Page 16

Chapter 1 System Overview
16
Page 17

Chapter 2
Assets Tab
The Assets tab—shown on page 15—displays available media.
This chapter contains the following main sections:
• Overview
• Types of Media Assets
Page 18
Chapter 2 Assets Tab
Overview
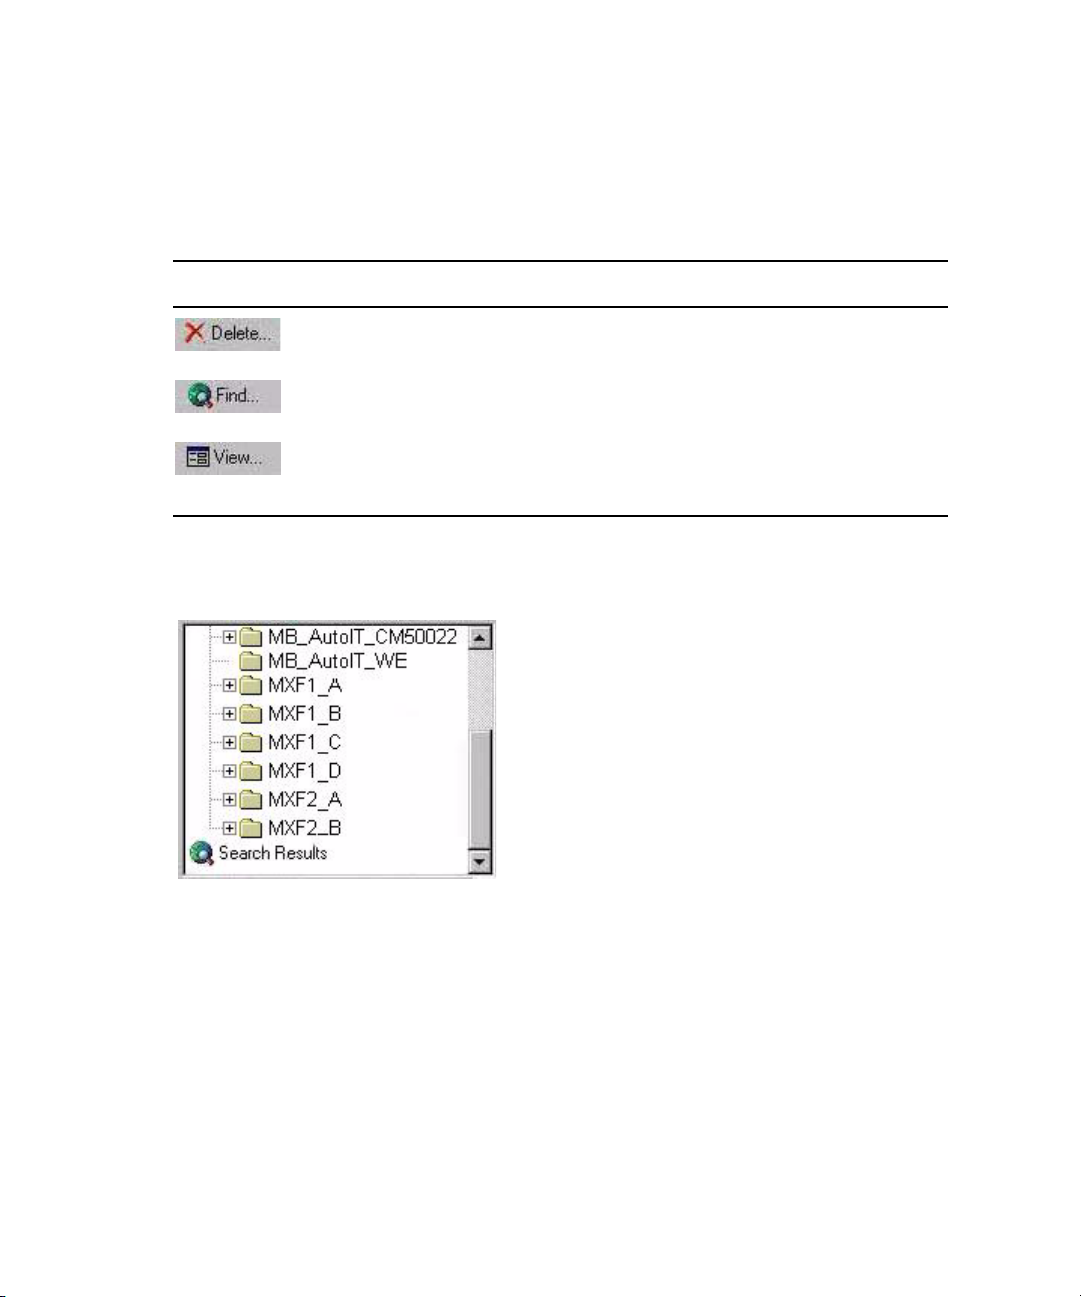
At the top of the Assets tab is the Assets toolbar that contains buttons described in the
following table.
Button Description
Below the toolbar, on the left side, is the Directory panel containing a tree-style list of
directories (also known as folders) on the network.
Use this button to delete a media asset from the directory.
Use this button to search for assets. See “Searching” on page 57 for more
information.
Use this button to filter what appears in the Queue panel. For more
information, see “Types of Media Assets” on page 19. It can also be used to
toggle the display of the Metadata tabs, located at the bottom of the Assets tab.
18
To navigate in the Directory panel:
1. Expand the directory that contains the folder (subdirectory) you want to view by
clicking the plus sign (+). Clicking a minus sign (-) collapses an expanded directory.
2. Select a folder in the Directory panel to open it and view its contents in the Queue panel.
The Queue panel on the right side of the Assets tab displays media assets in a configurable
listing that includes other information, such as name, type, creation and modification dates,
and so forth.
Page 19
Types of Media Assets
A user can reorder the list by clicking the header buttons at the top of each column, such as
Name or Type. Also, what types of media assets appear is determined by using the View
button in the Assets toolbar. See “Types of Media Assets” on page 19 for more information.
At the bottom of the Assets tab are the Metadata tabs—Information, Comments, Related
Assets, and Record Information, which are explained on page 20. Whether some of these
tabs appear depends on the type of media asset selected. Also, these tabs may be hidden,
using the View button.
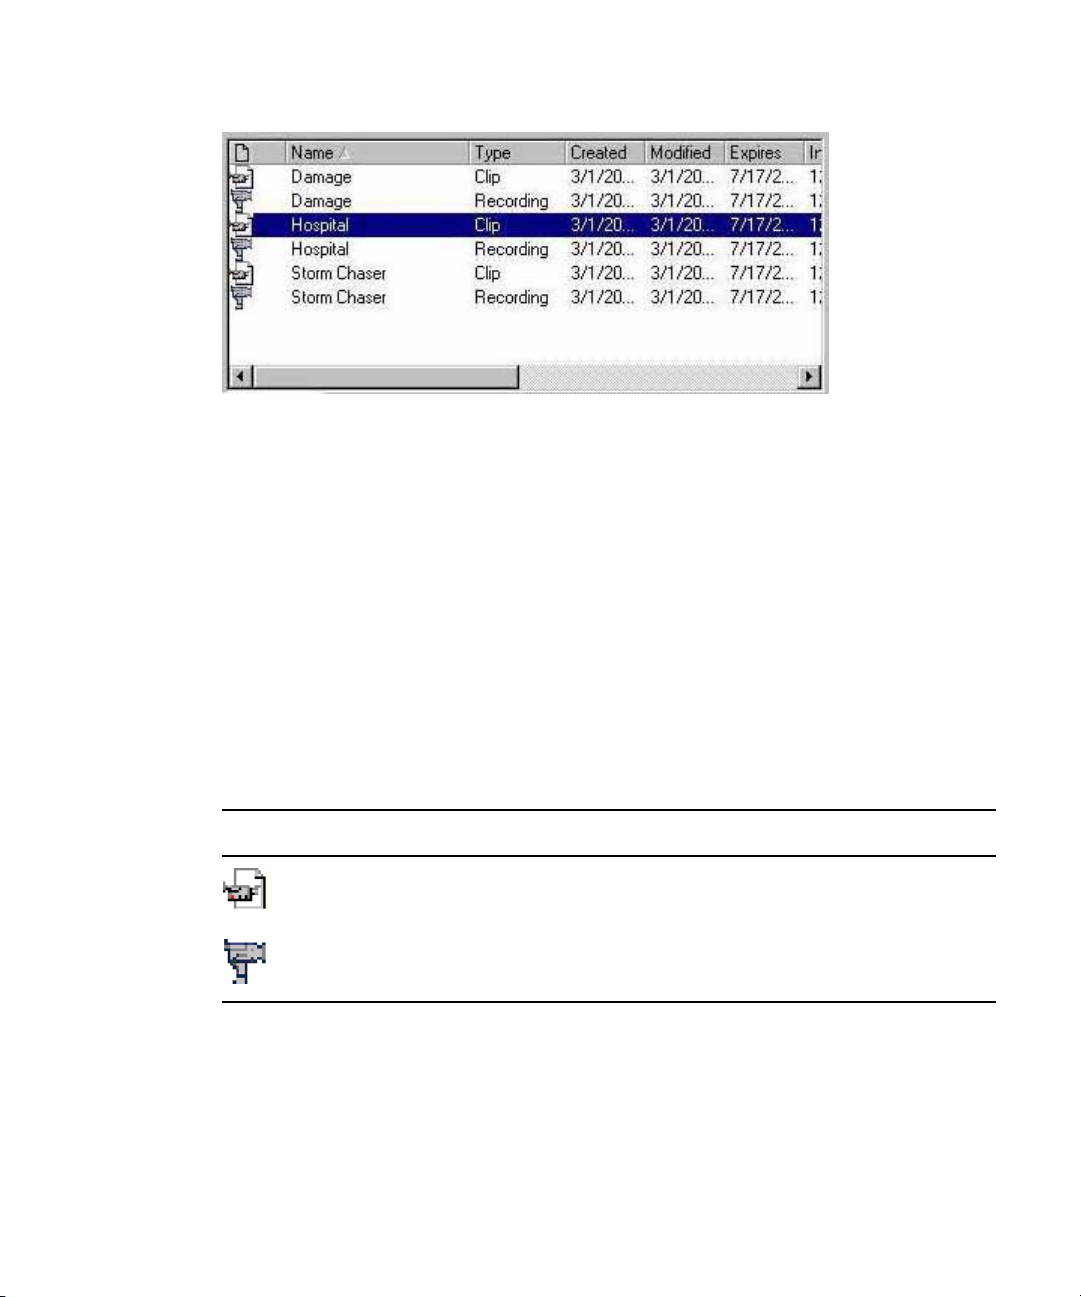
Types of Media Assets
When a directory is open, its contents appear in the Queue panel on the right side of the
Assets tab. Icons are visual indicators for the various types of media assets.
Icons Description
Video clip – a segment of video recorded (digitized) into Media Browse. There is
no minimum or maximum length for a video clip.
A Recording is made using the Feed Capture tab or Device Capture tab. It is the
event (containing metadata) that triggers the creation of a clip.
By default, all media asset types are displayed; however, a user can choose to not display
one or more types.
To show or hide media assets:
1. Click the View button on the Assets toolbar.
2. Select which item, Clips or Recordings, you want to show or hide from the display. A
check mark appears if displayed.
19
Page 20

Chapter 2 Assets Tab
n
The View MetaData option toggles the display of metadata on the tabs at the bottom of the
screen, such as Information and Comments.
Viewing and Printing Metadata
Metadata is another term for media asset information. Enhanced metadata enables users to
more easily find the media within an asset database. Metadata varies depending on the type
of asset and is located on the Metadata tabs at the bottom of the Assets tab.
Display of the Metadata tabs can be turned on or off.
To view the Metadata tabs:
t Click the View button and select View Metadata.
All asset types display metadata on the tabs called Information, Comments, and Related
Assets. Selected recordings display some metadata on the Record Information tab.
To view met adata:
1. Select the media asset in the Queue panel.
2. Select each Metadata tab to view the information displayed there.
To print metadata:
Information
While some of the data on the Information tab is read-only, some fields allow users to enter
metadata when scheduling a recording, while video recording is underway, or after it is
complete.
20
1. Select the media asset in the Queue panel.
2. Select File > Print Asset Information.
The Print Preview window appears.
3. Click the Magnifier button to increase or decrease the size of the preview.
4. Click the Arrow buttons to scroll if there are multiple-pages in the preview.
5. Click the Printer button when you are ready to print the page(s).
The Print dialog box appears.
6. Click the Print button.
Page 21
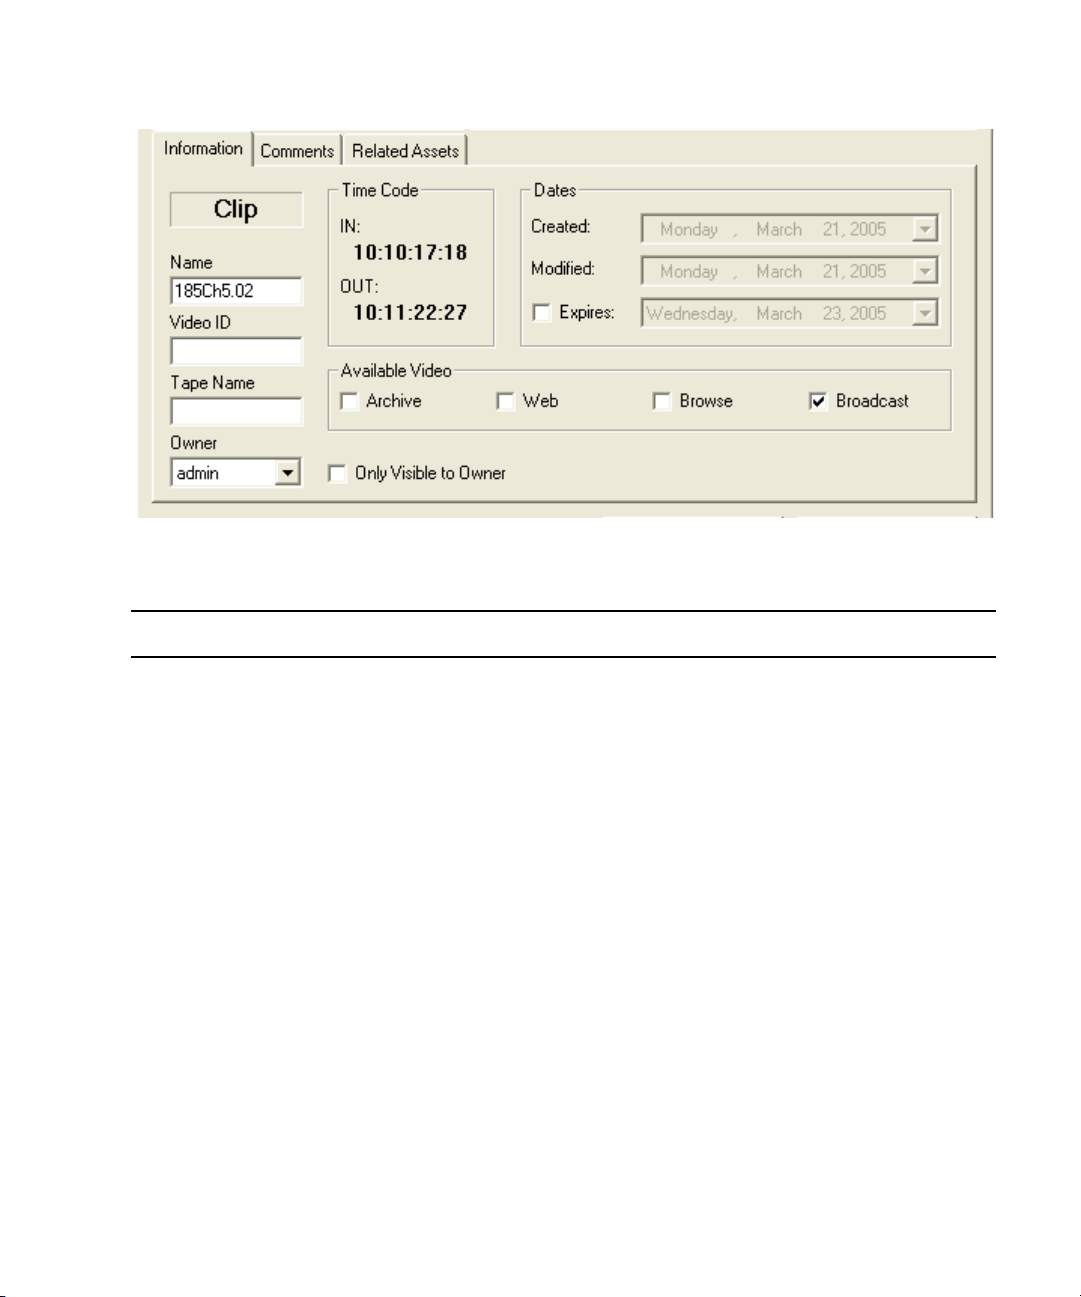
The Information tab contains metadata as described in the following table:
Metadata Description
Types of Media Assets
Type of media asset The words Clip (for video) or Recording appear in bold at the top left of the tab,
depending on the type of media asset. This field is read-only.
Name The name of the asset, as it appears on the Assets tab.
Video ID The assigned ID to a clip referenced from on-air playback.
Tape Name The name of the source tape, or the feed, where the video originated. This name must
match the label on the actual tape for reference purposes.
Owner Shows the User ID of the person who created the asset or who has taken posession of
the asset.
Only Visible to Owner If selected, this makes an asset private, which prevents viewing on the Assets tab,
playing, editing, deleting, or stopping the recording of an asset by anyone other than
the owner or those given permission by the system administrator to view other users’
private media assets.
IN The IN point of the clip, taken from the timecode if recorded from tape, or the time of
day if recorded from a feed. This field is a read-only.
OUT The OUT point of the clip, taken from the timecode if recorded from tape, or the time
of day if recorded from a feed. This field is a read-only.
Created The date the clip was digitized. This field is read-only.
21
Page 22

Chapter 2 Assets Tab
Metadata Description
Modified The date the asset information was last changed. This field is read-only.
Expires The date the system will automatically delete the asset.
Archive This read-only check box indicates that an archived high-resolution video asset exists,
such as for Nearchive. To view more information about the asset, click the Related
Assets tab.
Web This check box is reserved for future development.
Browse This check box is not enabled.
Broadcast This read-only check box indicates that video exists on a high-resolution video server.
To view more information about the video, click the Related Assets tab.
To edit metadata for a recorded clip on the Information tab:
1. Type the information in any of the editable fields on the tab.
2. Click Save Changes.
n
If you load another clip before saving changes to information on the current clip, the system
prompts you to save the metadata or revert to the old information.
For more information on entering metadata before or during the recording, see “Feed
Capture Tab” on page 27 and “Device Capture Tab” on page 39.
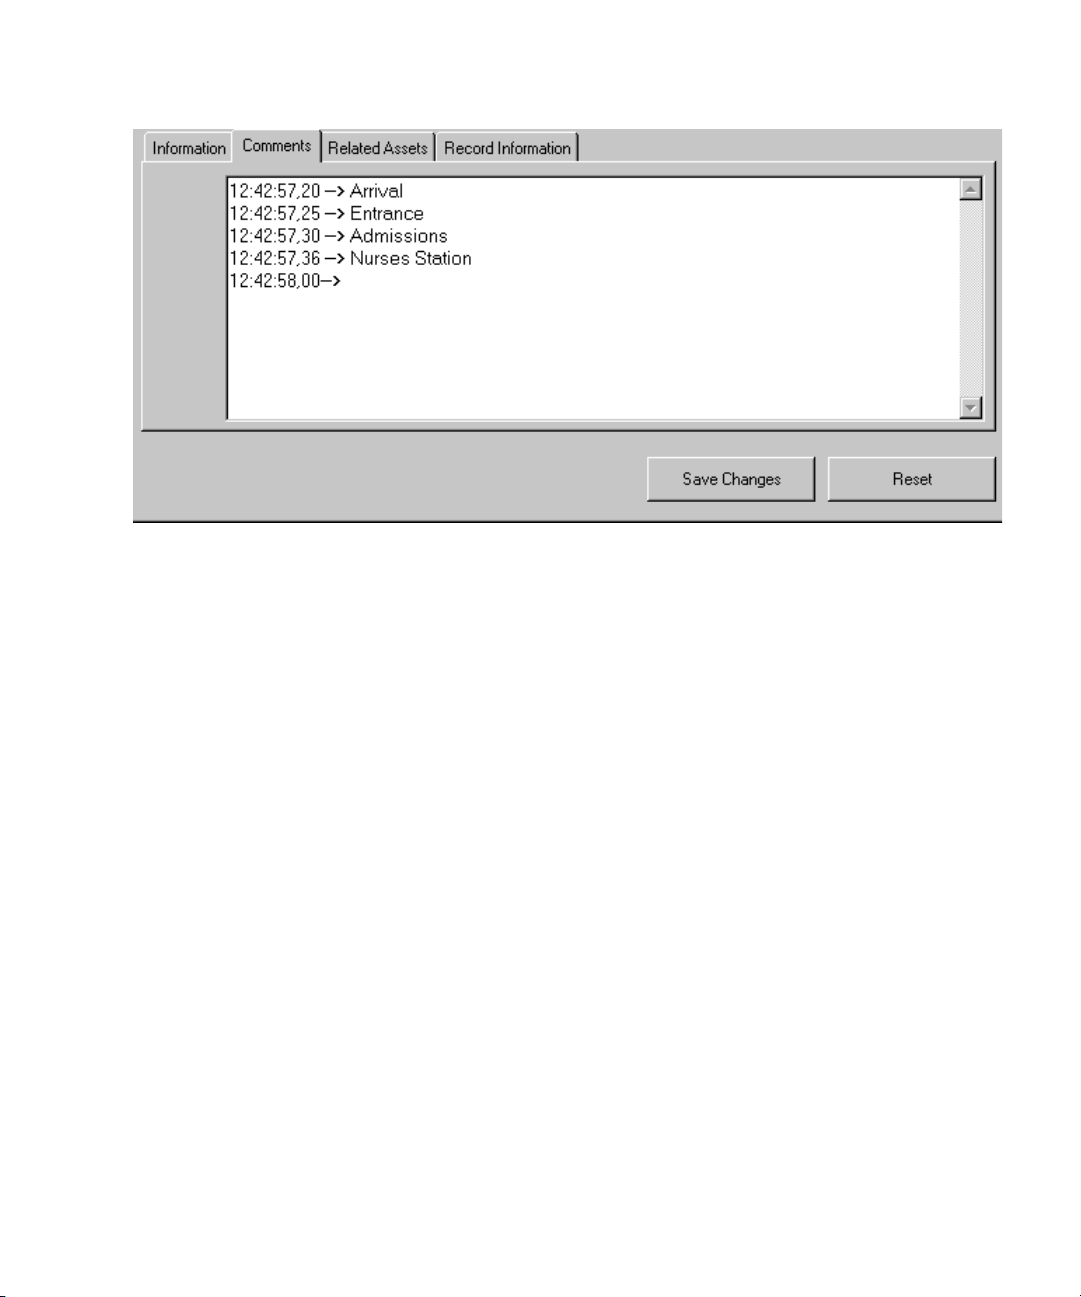
Comments
The Comments tab enables users to enter pertinent information that can help identify the
media.
22
Page 23
Types of Media Assets
For example, a user could add the script associated with the clip, names of individuals or
places on the video, as well as any copyright or payment terms for the clip if used on-air.
All comments become part of the searchable database of metadata, which can be used to
help locate the media later through the Find button on the Assets toolbar.
To enter comments:
1. Type comments in the text box on the Comments tab.
2. Click Save Changes when done.
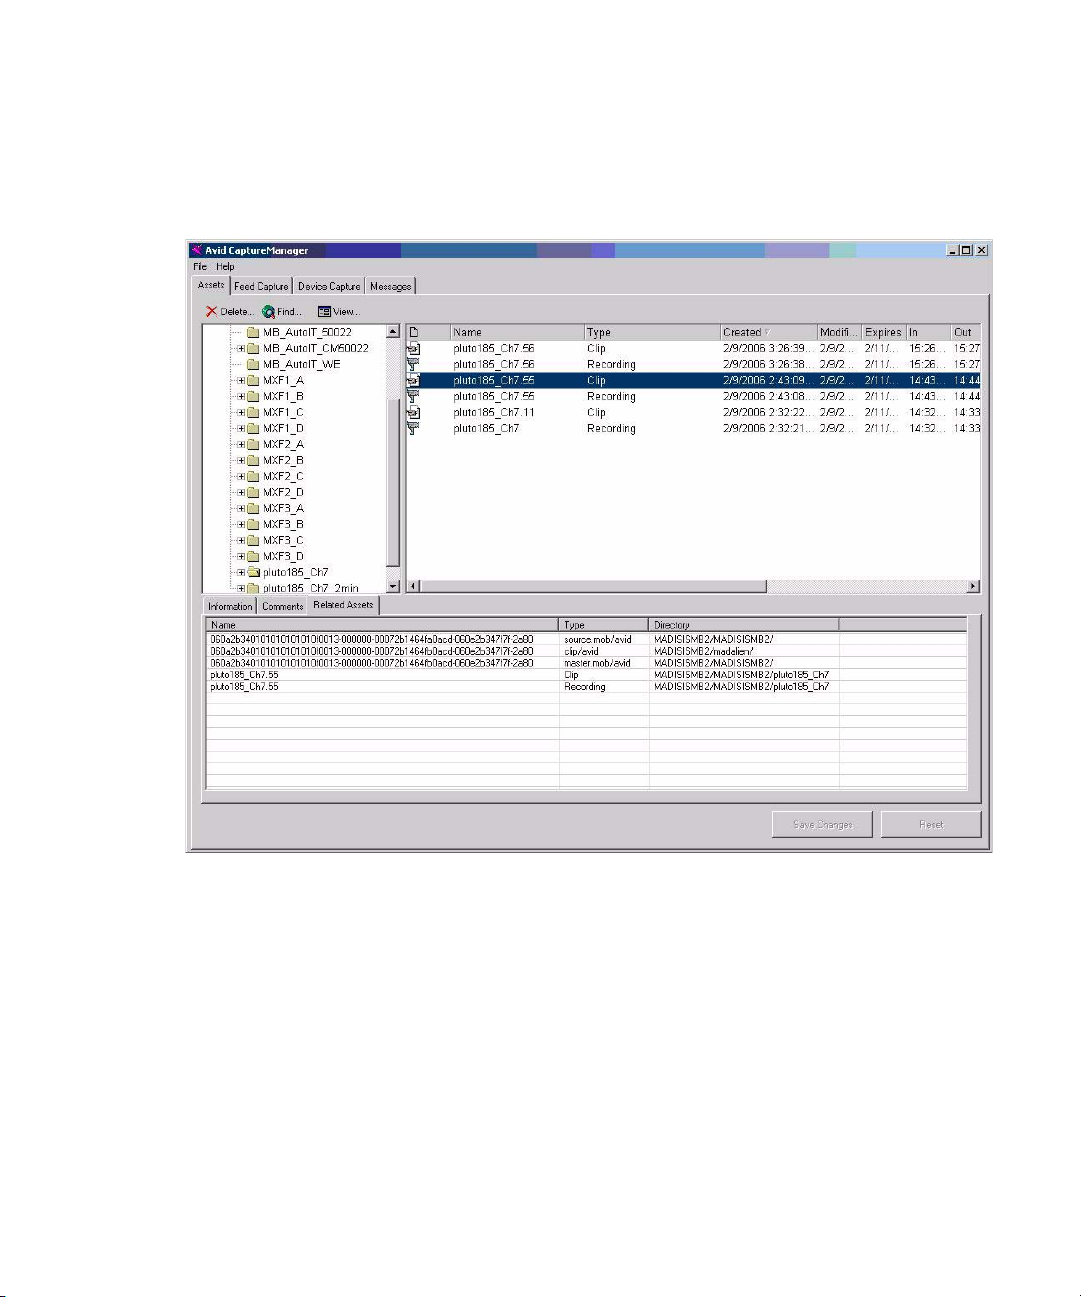
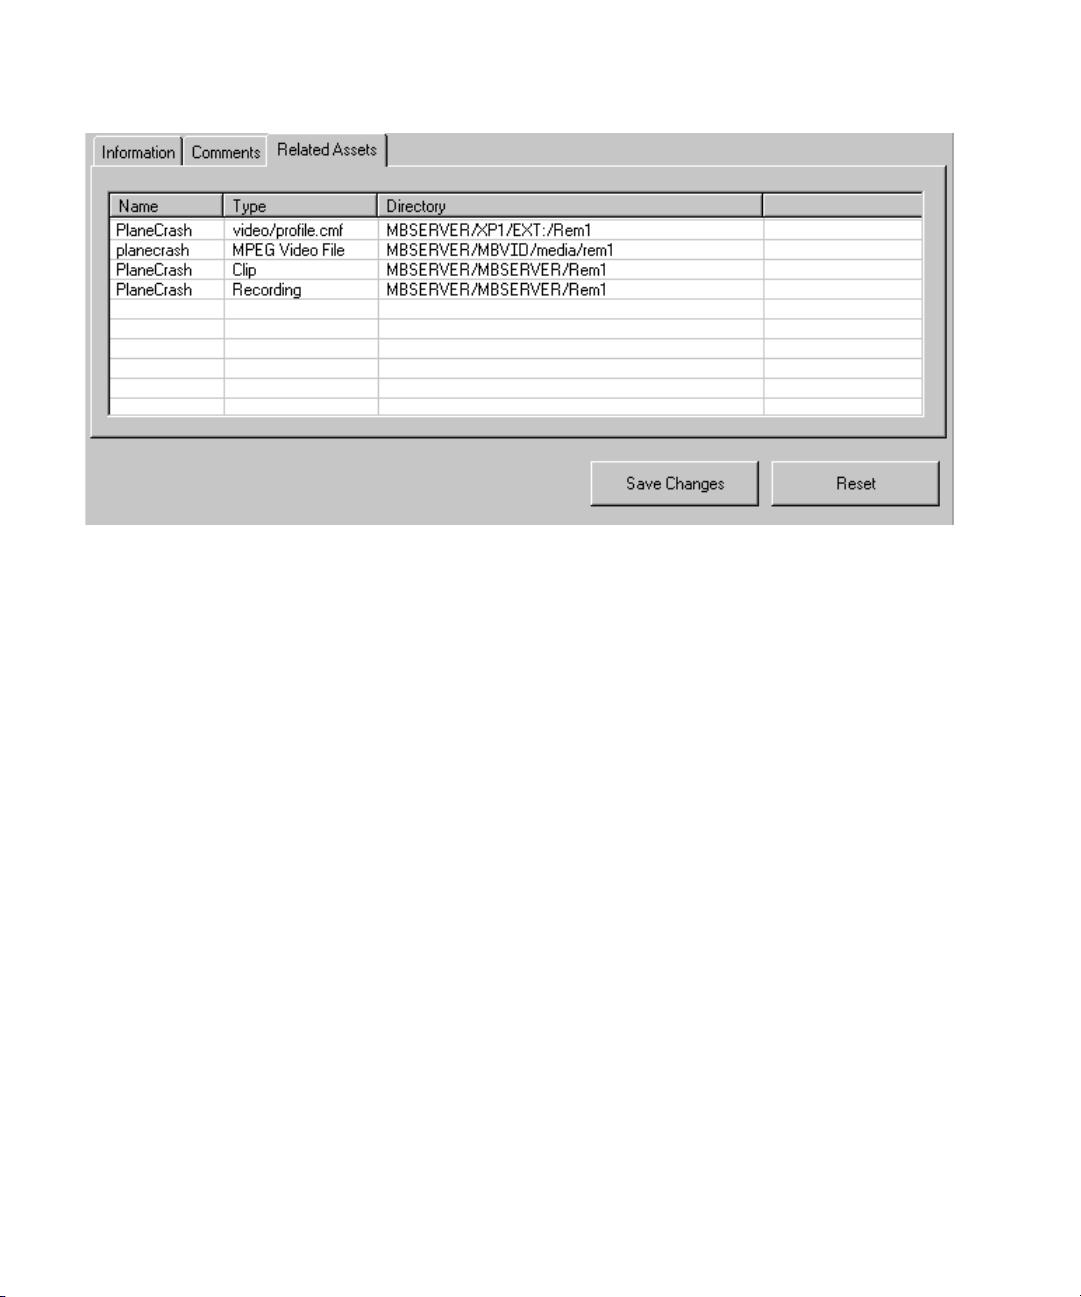
Related Assets
The Related Assets tab provides a list of all assets associated with a selected clip or
recording.
23
Page 24
Chapter 2 Assets Tab
For example, the preceding graphic shows all assets associated with a clip called Plane
Crash, including:
• High-resolution video on a Profile video server
• The clip itself
• A recording
n
Record Information
24
If an archived asset, browse clip, or broadcast-quality video is available as a related asset,
this information is also indicated in the Available Video section of the Information tab.
All recordings have metadata that is displayed on the Record Information tab. Unlike the
other three Metadata tabs, the Record Information tab does not appear for selected clips.
Page 25

Types of Media Assets
Except for Record Notes and Prevent Auto Archive, the information on this tab is read-only.
• Record Date—The date the recording is scheduled to occur or the first time a recurring
recording will occur.
• Recurrence—Description of how often a recurring recording will occur.
• Record Status—Current state of the recording, such as Record Scheduled, Record
Pending, Record Complete, Record Error, or Recording.
• Record Status Message—Additional information about the state of the recording.
• Record Notes—Comments can be entered before, during, or after the recording is
scheduled.
• Prevent Auto Archive—Select when you do not want recorded media to be archived
automatically.
To enter comments on the Record Information tab:
1. Type your remarks in the Record Notes text box.
2. Click Save Changes.
25
Page 26

Chapter 2 Assets Tab
26
Page 27

Chapter 3
Feed Capture Tab
Use the Feed Capture tab—also known as the Feed Scheduler—to set up video recordings
instantly or on a schedule, which might or might not recur. For information on setting up
recordings, see Chapter 7.
This chapter contains the following main sections:
• Overview
- Schedule Date
- Legend
- Scheduling Grid
• Customizing the Grid
- Adding a Channel on the Grid
- Viewing Metadata from the Grid
Page 28

Chapter 3 Feed Capture Tab
Overview
The Feed Capture tab is divided into the following sections:
• Schedule Date
• Legend
• Scheduling Grid
The scheduling grid is the table containing time elements, channels, and various feed
resource names located at the bottom of the Feed Capture tab. By default, the grid displays
feeds for the selected date and time associated with the server running the Data service
shown in the CaptureManager Server list box.
To display feeds for a different server:
t Select a different server from the CaptureManager Server list box.
Schedule Date
28
The Schedule Date section provides the option to change the default display from the current
date to another date.
Page 29
Overview
To view feeds for a specific date:
1. Click the Down Arrow button to the right of the displayed date. A calendar appears,
displaying the current date by default.
2. Select a new date.
To view the live recording schedule only:
t Select the Show live schedule radio button.
n
Legend
When the live schedule is displayed, the scheduling grid’s scroll bar is disabled so only the
live schedule is visible at all times. For example, the current time indicator, shown as a
yellow horizontal bar, remains static as the scheduling grid automatically scrolls
underneath.
To view the current schedule:
t Click the Now button.
This restores the scheduling grid’s display to current date and time, but still allows the
user the ability to scroll through the rest of the day’s schedule.
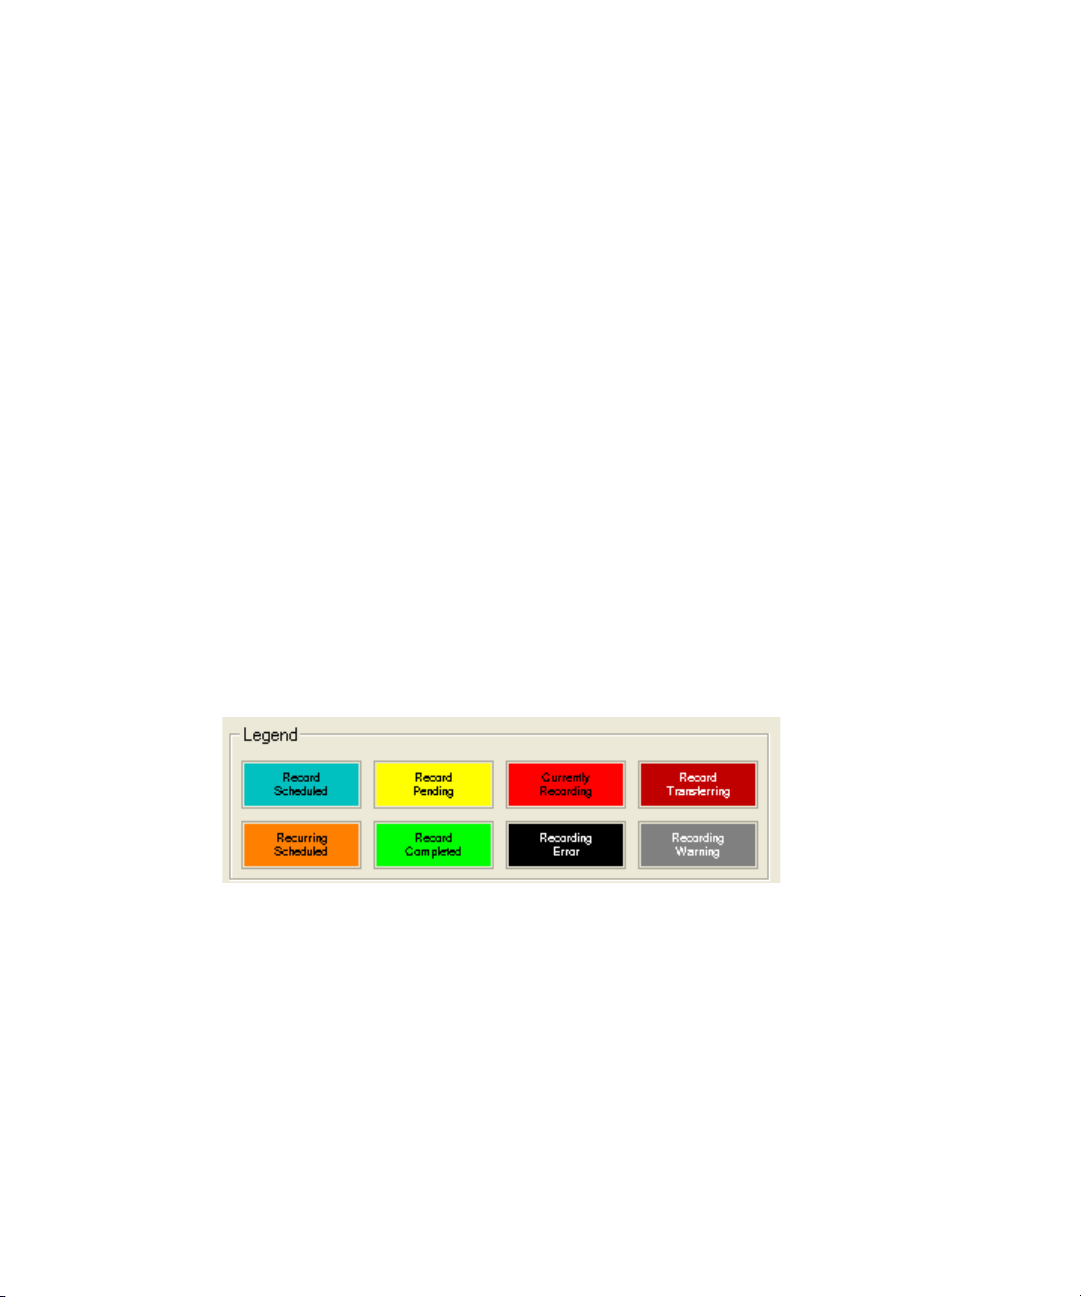
The legend is a color-coded key for the Feed boxes that appear on the scheduling grid.
n
The color-coded legend is also used for indicating the status of recordings from devices,
such as VTRs, so it appears on the Device Capture tab.
29
Page 30

Chapter 3 Feed Capture Tab
Users may customize the color settings by right-clicking the Legend. For more information,
see “Customizing the Grid” on page 31. By default, the colors are as described in the
following table:
Record State Default Color Description
Record Scheduled Aqua Indicates the feed is scheduled for a future date and
time, but has not yet initiated.
Record Pending Yellow Indicates the scheduled feed is about to begin.
Currently Recording Red Indicates recording of the feed is underway. The box
on the grid remains this color until recording is
complete.
Recurring Scheduled Orange Indicates the feed is set to recur, such as daily, weekly,
or monthly.
Record Complete Green Indicates the feed was recorded.
Recording Error Black Indicates a problem with the recording.
Record Transferring Burgundy Indicates transferring of video is underway. The box
on the grid remains this color until transfer is
complete.
Recording Warning Gray Indicates a warning was issued while the recording
was in progress.
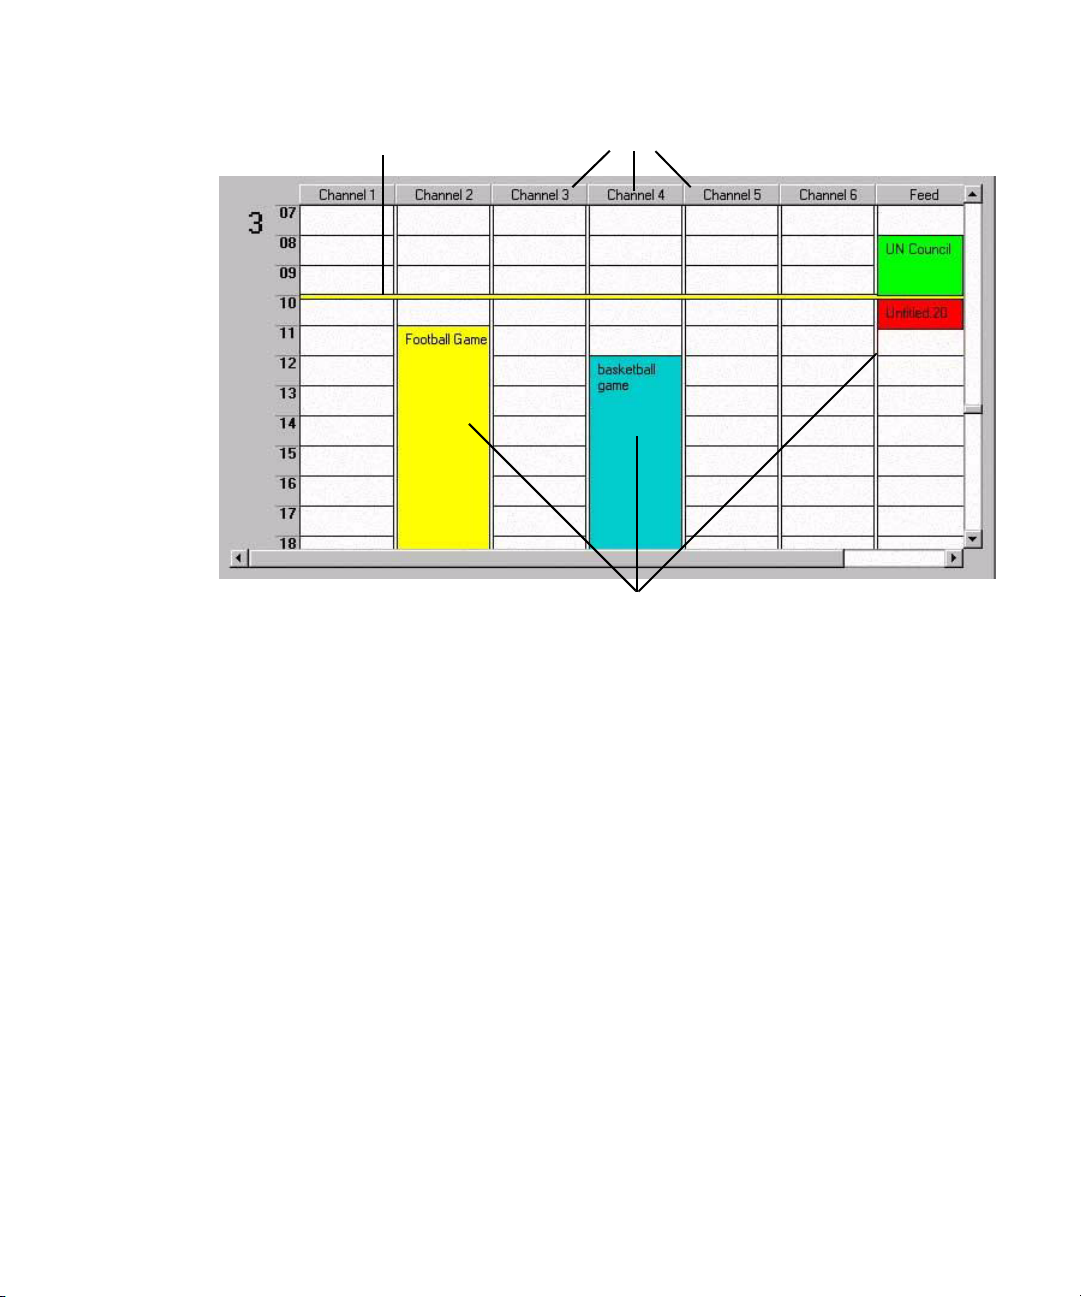
Scheduling Grid
The scheduling grid is a visual display of feeds by date, time, and channel, as configured on
the system.
30
Page 31
Customizing the Grid
Current Time Indicator
By default the times appear vertically down the left side of the grid. The available channels
appear across the top. Some users can add channels or limit which channels are shown. For
more information, see “Adding a Channel on the Grid” on page 32.
Channel Header Buttons
Colored Feed Boxes
Feeds show up on the grid in colored boxes—also known as Feed boxes—with the colors
indicating the status of the feed. A yellow horizontal line is also shown to indicate the
current time.
Customizing the Grid
Users can customize the layout, font, and colors associated with the scheduling grid.
However, the color of the yellow time indicator is not configurable.
To customize the Feed box colors:
1. Right click on the Legend.
2. Select Schedule options > Change colors.
Options include: Background color, Foreground color, and Reset colors to default.
n
The menu also provides an option for users to customize the font used in the scheduling grid.
31
Page 32

Chapter 3 Feed Capture Tab
To customize the layout:
1. Right click on any white space in the scheduling grid.
2. Do any or all of the following:
t Select Schedule options > Schedule layout to position the increments of time on the
grid. Options include: Time across or Time down.
t Select Schedule options > Schedule time format to set the timing convention used
on the grid. Options include: the standard 12-hour or 24-hour military timing
conventions.
t Select Schedule options > Schedule time increment to set the minute-by-minute
increments for the grid. Options include: 1-6 minutes, 10, 12, 15, 20, 30, and 60
minutes.
3. (Optional) Select Reset Schedule to restore the default settings for the scheduling grid.
Adding a Channel on the Grid
Adding and configuring channels on the Feed Capture tab is a user privilege determined by
the system administrator. Not all users will have this capability.
To add a channel to the scheduling grid’s display:
n
32
1. Right-click on any channel’s header button or on any white space in the grid.
Right-clicking on the row labels (displaying increments of time) is another option.
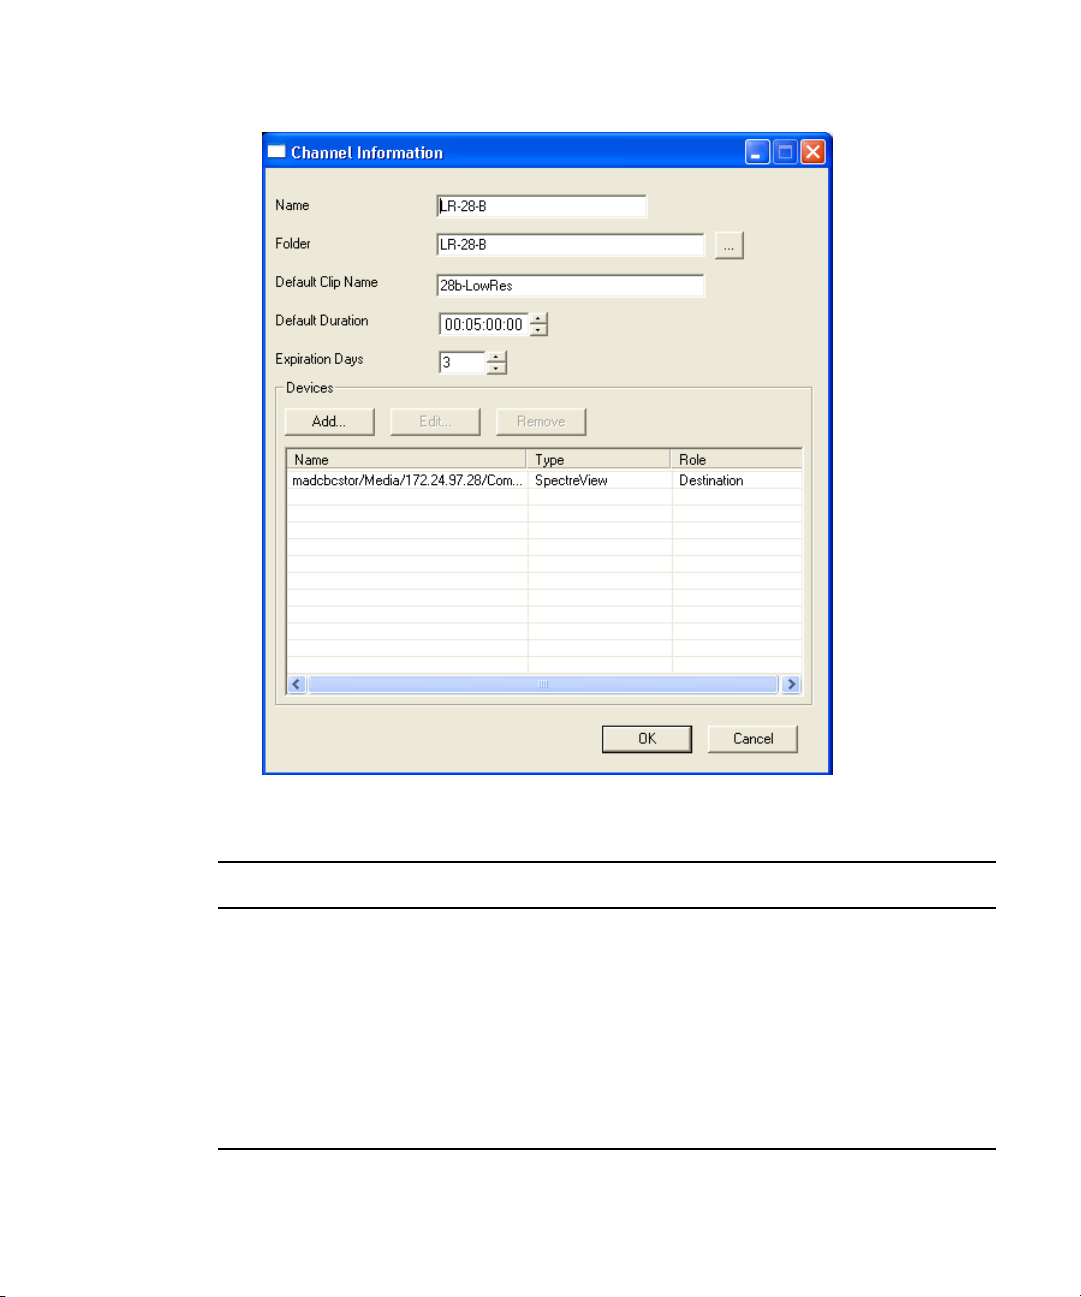
2. Select Add channel.
The Channel Information dialog box appears.
Page 33
Customizing the Grid
3. Fill in the text fields accordingly.
Field Description
Name Name of the channel. This is the name that will appear on the channel’s
header button in the scheduling grid.
Folder Folder where video from the channel is stored in the database. If one already
exists, use the Ellipses button to browse for and select the folder.
Default Clip Name Provides a default name for clips when the user doesn’t provide one.
Default Duration Provides a default duration for the length of a recording.
Expiration Days Sets the amount of days a video recording remains available.
4. Add the device:
33
Page 34
Chapter 3 Feed Capture Tab
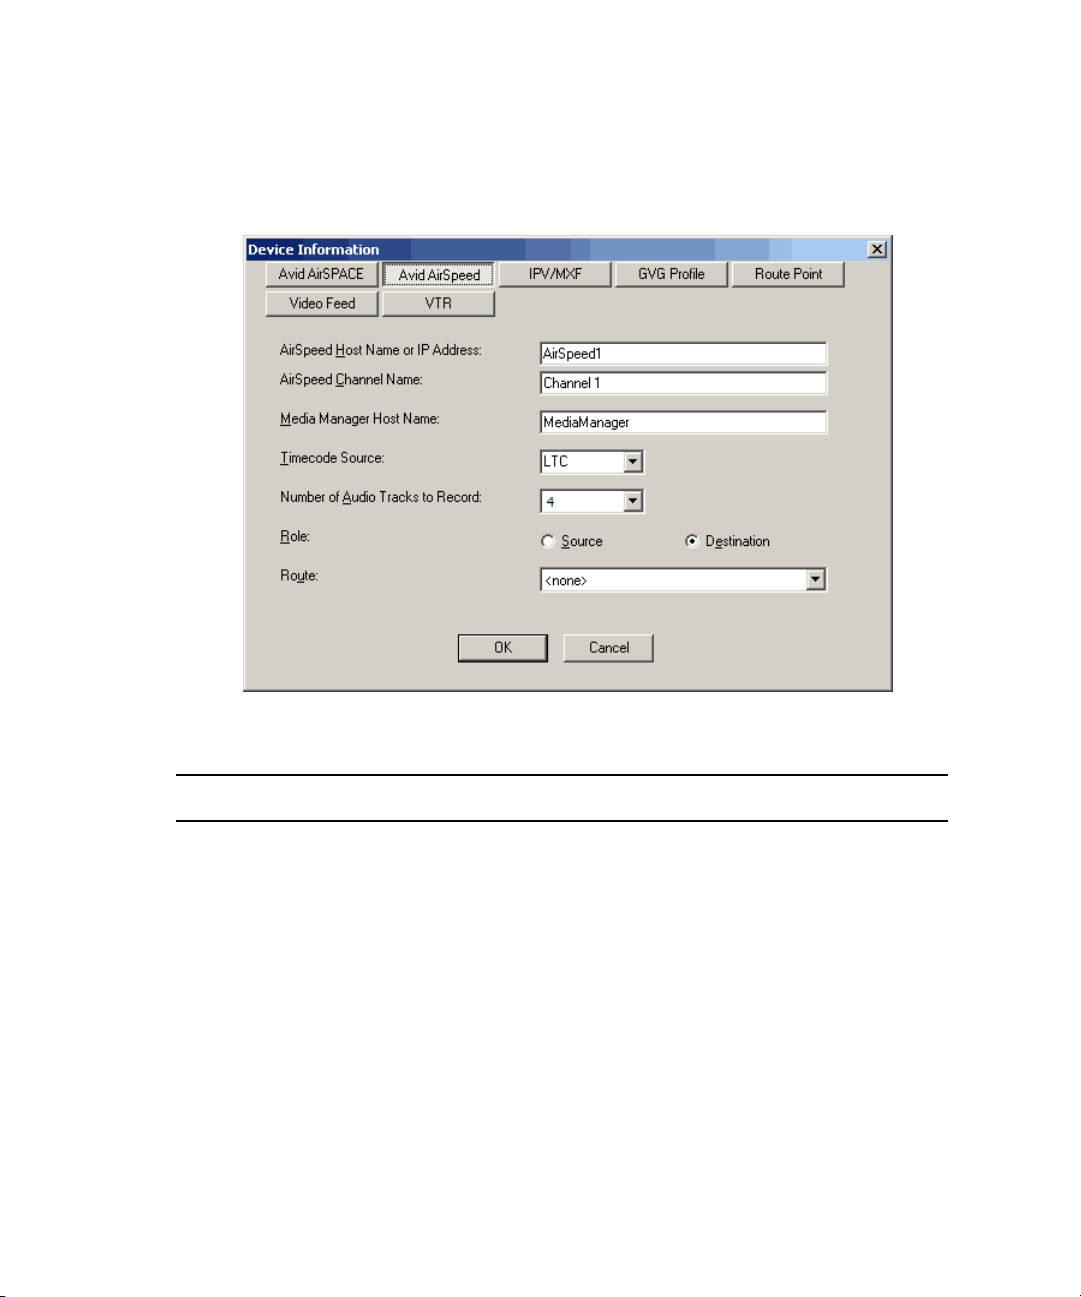
a. Click the Add button.
b. Select the appropriate device from those available in the Device Information dialog
box.
34
c. Fill in the information required for the selected device accordingly.
Device Field Description
AirSPACE: Server Name The name here must be network resolvable.
Channel Name Must match the channel name on the AirSPACE device.
This setting is case-sensitive.
Transfer to Unity Check only if ingested media should be automatically
transferred to Avid Unity.
Role Select whether device is a source of video or a
destination for storing ingested media. This is usually set
to destination.
Route When a Route service is installed and running, then a
route associated with this device might be indicated. This
is usually set to <none>.
Page 35

Device Field Description
Customizing the Grid
AirSpeed: Host Name or IP
Address
If a name, it must be network resolvable. If an IP
address, it must be the static address of the AirSpeed
device.
Channel Name Always set to Channel 1.
Media Manager Host
Name
This should be either the host name for the Media
Manager or the Avid Interplay Engine.
Timecode Source This source should be the same for both AirSpeed and
the Avid Interplay encoder. Options include: LTC,
VITC, or Internal. That latter allows CaptureManager to
determine the starting timecode; however, frame
accuracy is not guaranteed with the Internal option.
Number of Audio
Tracks to Record
Configure to 4 if using the Avid Interplay low resolution
encoder.
Role Select whether device is a source of video or a
destination for storing ingested media. This is usually set
to destination.
Route When a Route service is installed and running, then a
route associated with this device might be indicated. This
is usually set to <none>.
IPV/MXF: Encoder Name The name of the Avid Interplay low resolution encoder.
Channel Specify the channel used to initiate recordings.
Checkin Master Clips Specify whether master clips should be checked in to the
Avid Interplay database.
Route When a Route service is installed and running, then a
route associated with this device might be indicated. This
is usually set to <none>.
GVG Profile: Server Name The name here must be network resolvable.
Channel Name Must match the channel name on the Profile.
Disk Array Name Must match drive volume designated in the Profile
Media Manager. Usually set to one of three names:
EXT:
INT:
V:
35
Page 36

Chapter 3 Feed Capture Tab
Device Field Description
Route Point Name A label that is user configurable.
Video Feed Name A label that is user configurable.
Role Select whether device is a source of video or a
destination for storing ingested media. This is usually set
to destination.
Route When a Route service is installed and running, then a
route associated with this device might be indicated. This
is usually set to <none>.
Role Select whether it is used as a source or a destination.
When set to source, it provides a default source route for
a channel when scheduling a feed. When set to
destination, it provides the router destination for the
particular device(s) configured in the channel.
Route When a Route service is installed and running, and
depending on the Role selected (above), this might be
either the source route or router destination.
Route When a Route service is installed and running, then a
default source route for other devices might be indicated.
36
VTR Server Name This is the host name of the computer running the VTR
Control service.
Com Port The number of the communication port on the VTR
Server that CaptureManager must use.
If a Digiboard is used, the first port is usually
n
identified as Com Port 3, not 1.
Device Type Always set to Sony BVW Compatible
Start New Recording
on Timecode Break
Role Select whether device is a source of video or a
Route When a Route service is installed and running, then a
This check box is only enabled if Role is set to Source.
Check it only if CaptureManager should begin a new
recording each time there is a break in timecode on the
source video tape.
destination for storing ingested media. This is usually set
to source.
route associated with this device might be indicated. This
is usually set to <none>.
Page 37
5. Click OK. The Device Information dialog box will close.
6. (Optional) To remove a device, select it in the Channel Information dialog box and click
Remove. To edit or choose a different device, select the device shown and click Edit.
7. Click OK again. The channel appears on the Feed Capture’s scheduling grid.
Viewing Channels on the Grid
To hide or show channels on the scheduling grid:
1. Right-click any channel’s header button.
2. Select Customize channels.
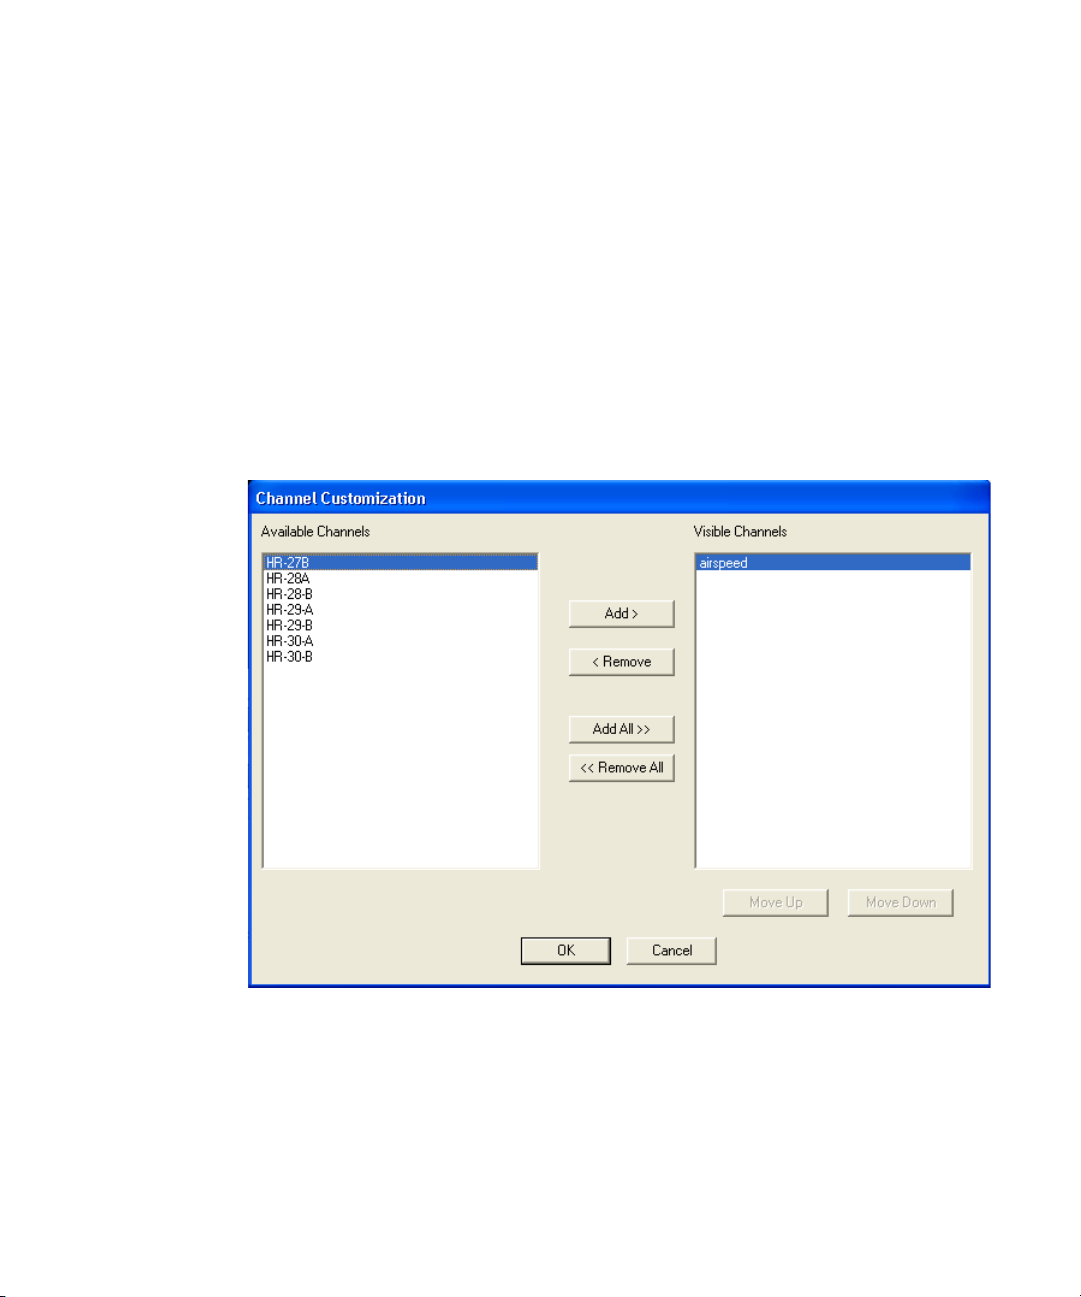
The Channel Customization dialog box appears.
Customizing the Grid
3. Select the channels you want to display, using the Add button to move them from the
Available Channels list to Visible Channels list.
4. Click the Remove button to remove selected channels from being visible. Click the Add
All or Remove All buttons to move all channels from one side to the other.
By default, when no specific channel is selected as visible, all available channels appear
on the grid, with names appearing in numeric then alphabetic order.
37
Page 38

Chapter 3 Feed Capture Tab
5. (Optional) Click the Move Up and Move Down buttons to adjust the order of the
channels. Listing channels from top to bottom equates to positioning channels on the
grid from left to right.
6. Click OK.
Viewing Metadata from the Grid
Positioning the mouse pointer over a Feed box causes a tooltip to appear with some
metadata information.
n
38
To view all metadata information associated with a feed:
1. Right-click a Feed box.
2. Select Show metadata.
The Metadata Viewer dialog box opens, showing the Metadata tabs.
The Metadata tabs are also displayed on the Assets tab. For more information, see “Viewing
and Printing Metadata” on page 20.
Page 39
Chapter 4
Device Capture Tab
Use the Device Capture tab to manage video and recordings from video tape recorder
devices. For more information on procedures for setting up recordings, see Chapter 7.
Page 40

Chapter 4 Device Capture Tab
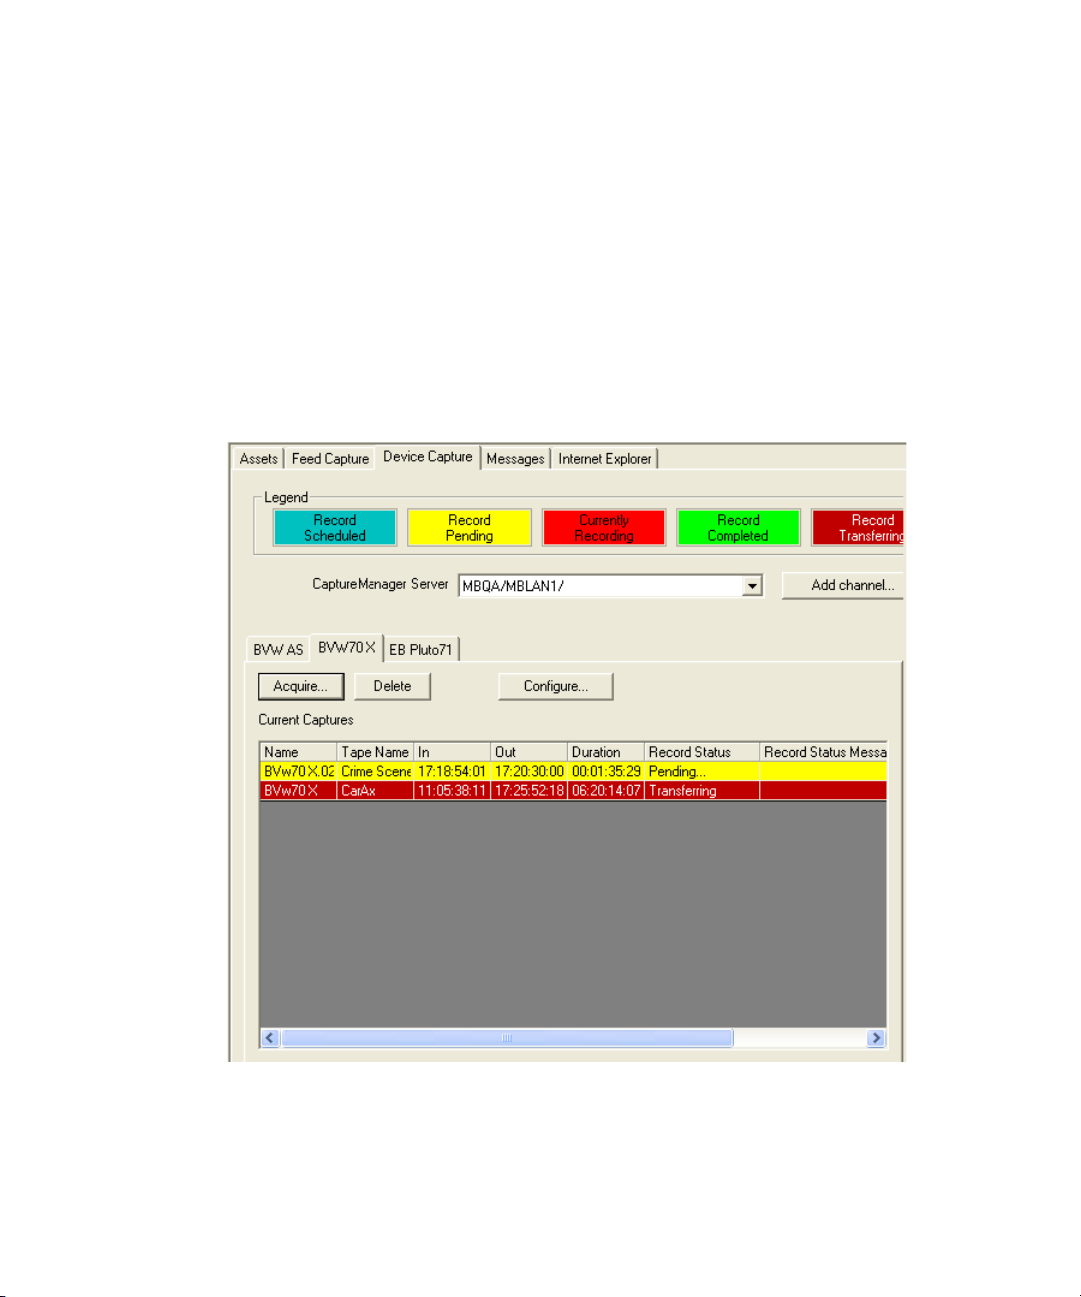
The Device Capture tab is divided into the following sections:
• Legend
• Tabbed Workspace
Tabbed Workspace
The tabbed workspace on the Device Capture tab displays recording information for any
video tape recorder (also known as VTR) associated with the server shown in the
CaptureManager Server list box.
To display devices for a different server:
t Select a different server from the CaptureManager Server list box.
n
n
System administrators or any user with permission to manage acquisition channels can
configure the VTRs that show up on the Device Capture tab.
A color-coded legend is provided to indicate the status of current recordings. The
information—which includes any data on current recordings in progress or others that have
recently taken place—is duplicated in the Record Status column on the tab. For more
information, see “Legend” on page 29.
Use the Acquire button to open the VTR Record dialog box, which enables users to acquire
control of a VTR to record video. Only one user can control a VTR device at a time. For
more information, see “Recording from a VTR Device” on page 53.
The Delete button is used to delete a selected recording in the Current Captures area.
The Configure button is used to add, delete, or configure channels on a VTR; however, its
appearance only applies to users whose profiles allow them to manage acquisition channels.
System administrators set this user privilege.
40
Page 41
Chapter 5
Messages Tab
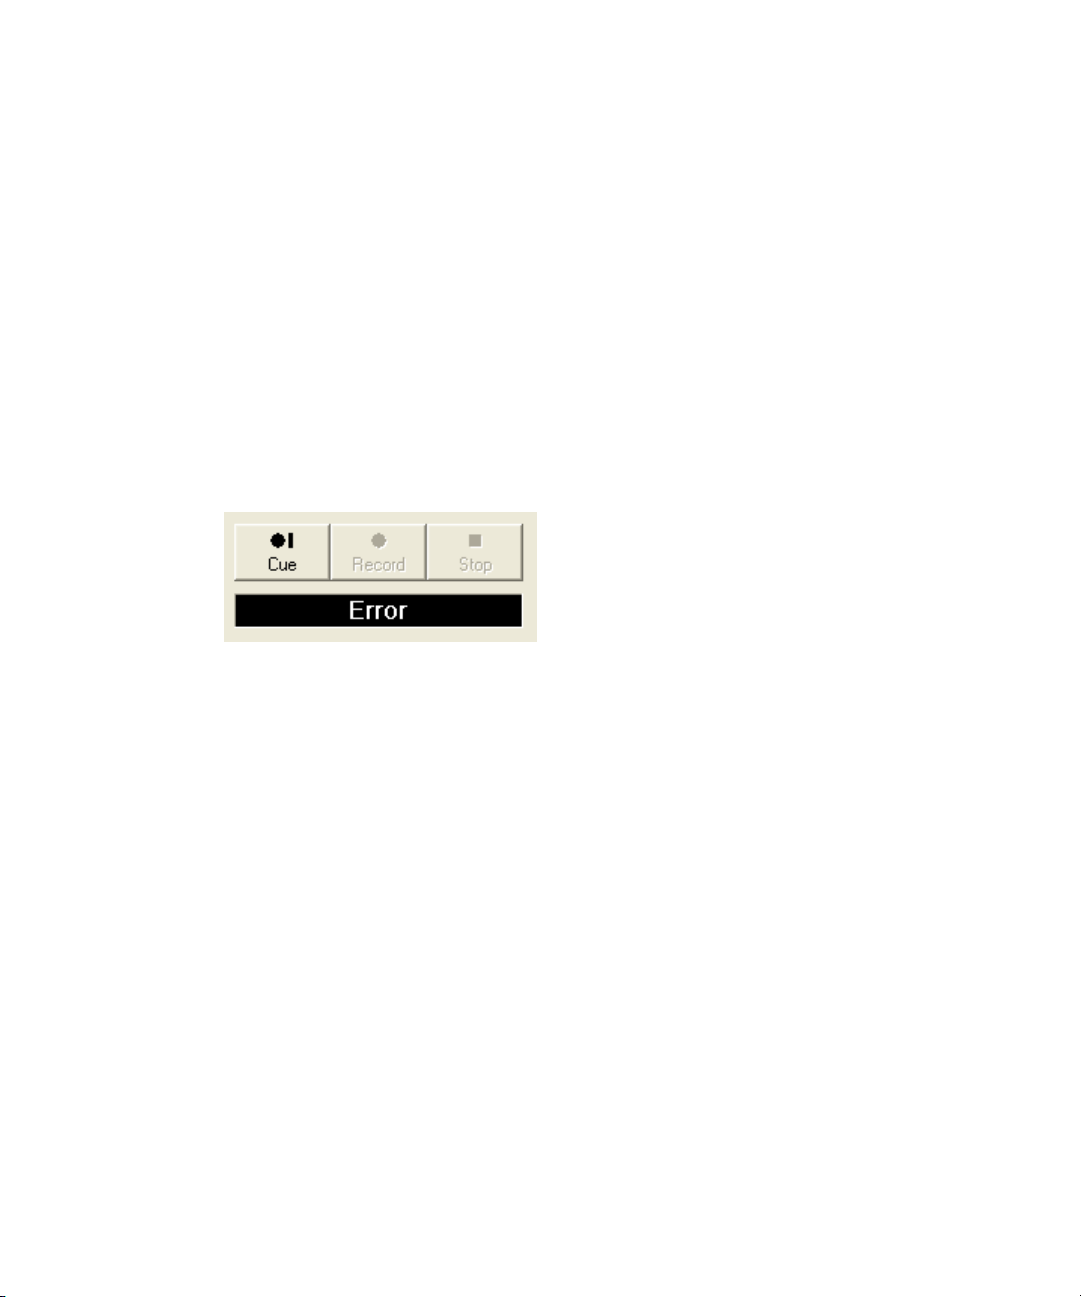
The Messages tab provides feedback regarding the success or failure of a recording or
transfer.
When a problem occurs while instant recording is underway, the system indicates an error in
the Instant Record dialog box, as shown in the following graphic:
Displaying Messages
Users can then view more information about what generated the error by clicking the
Messages tab in CaptureManager.
n
The Messages tab is optional and therefore might not appear in the workspace. Its
appearance is determined by a setting in the User Profile Configuration tool, as configured
by the system administrator.
There are two options for displaying messages:
• Display a message box when an error is reported
• Only show messages for me
Page 42

Chapter 5 Messages Tab
42
To view more information about a specific message:
t Select the message and click the Details button.
Page 43

Chapter 6
ActiveX Add-In Tab
CaptureManager provides a customizable tab that, by default, is called the ActiveX Add-In
tab. Since the tab is optional, it does not appear in the workspace unless configured by the
system administrator. If it appears, use it to display an ActiveX add-in, such as Internet
Explorer.
n
The system administrator can rename the ActiveX Add-In tab by editing the settings under
Visible Components with the User Profile Configuration Tool. Only one ActiveX Add-In tab
is permitted per client.
Viewing Web-based Applications
This tab expands the system’s capabilities to view Web-based applications. For instance,
when this tab is configured for Internet Explorer, a user is able to sign in to Avid Unity
MediaManager—as shown in the following graphic—without having to launch Internet
Explorer separately.
Page 44

Chapter 6 ActiveX Add-In Tab
44
Signing in to MediaManager using this ActiveX Add-In tab allows users to check the status
of transfers into Avid Unity, from the AirSpeed and AirSPACE video servers.
Page 45

Chapter 7
Working with Recordings
Video recordings can be started instantly or set up in advance on a recurring or
non-recurring basis. Video can be recorded from live video feeds or digitized from a video
tape recorder device, known as a VTR.
This chapter contains the following main sections:
• Scheduling a Recording
• Initiating an Instant Recording
• Recording from a VTR Device
Page 46

7 Working with Recordings
Scheduling a Recording
CaptureManager users can schedule multiple recordings—simultaneously capturing high
resolution video with audio—in advance from a variety of sources.
When setting up a scheduled recording, users can also state whether the system should
repeat the process at regular intervals, eliminating the risk of missing a satellite feed that
occurs on a daily or weekly basis.
To schedule a video recording:
1. Determine the channel and time of day of the feed you want to record.
2. Double-click the blank field corresponding with that channel and time frame in the
scheduling grid at the bottom of the Feed Capture tab.
The Scheduled Record dialog box appears, displaying the selected channel in the title
bar and Source field.
46
Page 47

Scheduling a Recording
3. Type any pertinent data in the Content Information section. For more information, see
“Content Information” on page 49.
4. Set the time period for the recording. Select the Start Time check box and either the End
Time or Duration check box. (When one is selected, the other appears dimmed.)
A default might appear for duration, as configured by your system administrator. You
can adjust the duration manually if the default is not enough or too long.
47
Page 48
7 Working with Recordings
5. Set the expiration date for the recording by selecting Delete after and setting the number
of days the recording is to remain available in the database.
If no expiration date is set, the recorded video must be deleted from the database
manually.
6. (Optional) Determine whether the recorded video is a private asset.
If private, select Only Visible to Owner. The asset’s ownership belongs to the user
whose ID appears in the Owner field.
n
Making an asset private prevents viewing (on the Assets tab), playing, editing, deleting, or
stopping the recording of the asset by users other than the owner and those given permission
by the system administrator to view other users’ private assets.
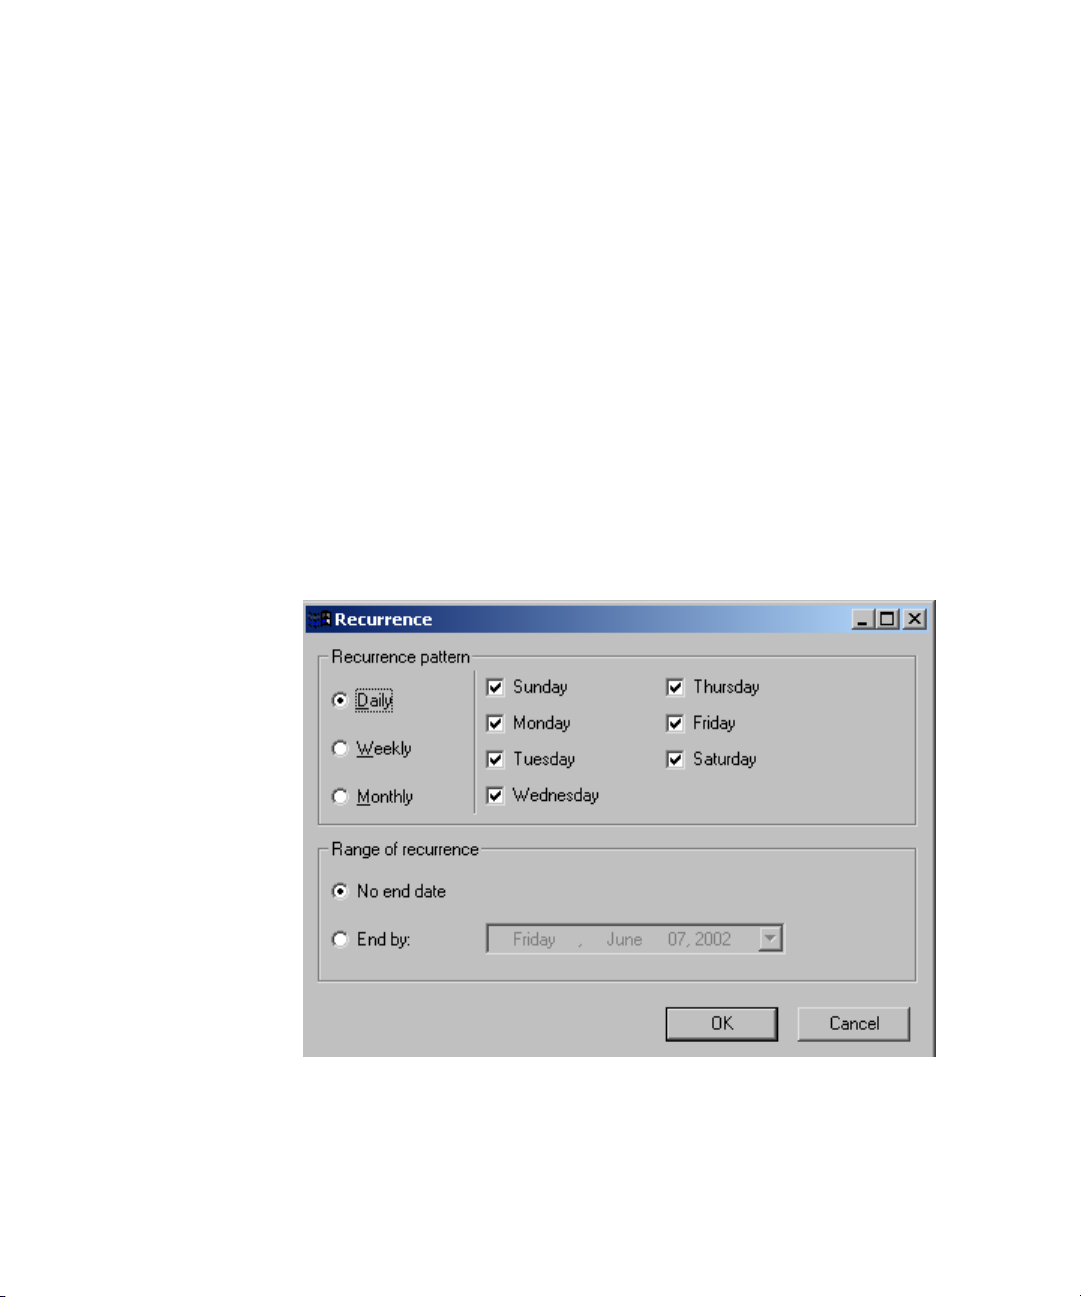
7. In the Recurrence section, do one of the following:
t Select One-Time Feed and specify a date.
t Select Recurring Feed and click the Change button to set the recurrence pattern and
range with the Recurrence dialog box—shown in the following graphic:
48
8. Select Prevent Auto Archive in the Options section if you do not want the recorded
media to be archived automatically.
9. Click OK.
Page 49

Content Information
The Content Information section appears in several dialog boxes, such as:
• Scheduled Record
• Instant Record
• VTR Record
Scheduling a Recording
In each case, the information available to the user is explained in the following table:
Field Description
Source The name of the source from which the video is recorded. (The field is read-only. The
name here also appears in the title bar of the dialog box.)
Source Route Routable items for router control. The router server is a list of real aliases of router cross
points.
Folder The database folder where the clip will be stored. Type the name in the text box or use
the Ellipses button to browse for the folder.
Name The name of the clip. A default may be set in the channel configuration for each
individual channel. (This field does not appear in the Content Information section of the
VTR Record dialog box.)
Tape Name The name of the tape. Type the name in the text box, which must match exactly what
appears on the tape’s label to eliminate confusion.
Video ID The ID assigned to the clip for direct to air playback through the newsroom computer
system and playback device. It can be numbers, letters, or a combination of the two.
49
Page 50

7 Working with Recordings
Field (Continued) Description
Notes Other technical information in reference to the recording. Type the information in the
text box. This data appears in the Record Notes text field on the Metadata tab named
Record Information.
Comments Text that appears on the Metadata tab named Comments. Type any comments in the text
box.
See “Viewing and Printing Metadata” on page 30 for more information.
n
Initiating an Instant Recording
Users might need to record video from a feed that was not previously scheduled. This is
called an instant recording.
To initiate an instant recording:
1. Do one of the following:
t Click the channel’s header button on the scheduling grid at the bottom of the Feed
Capture tab.
n
50
t Right-click any white space in the scheduling grid and select Instant record.
The Instant Record dialog box appears.
Selecting Instant Record ASAP from the right-click menu opens the Instant Record dialog
box, then immediately cues and starts the recording process without further user input.
Page 51

Initiating an Instant Recording
2. Type of select any pertinent data in the Content Information section. For more
information, see “Content Information” on page 49.
3. In the Time Period section, the Start Time is already set to On Demand and the Duration
is set to the default, as configured by your system administrator. You can adjust the
duration manually if the default is not enough or too long.
51
Page 52

7 Working with Recordings
4. (Optional) In an Avid Unity/AirSPACE environment, select Transfer to Unity—shown
below—if you want the clip transferred to Unity and therefore made available to Avid
NewsCutters.
The Transfer to Unity check box only appears in the Options section when
CaptureManager is part of an Avid Unity/AirSPACE environment.
5. Set the expiration date for the recording, by selecting the Delete after check box and
setting the number of days the recording is to remain available in the database. If no
expiration date is set, the recorded video must be deleted from the database manually.
6. (Optional) Determine whether the recorded video is a private asset. If private, then
select Only Visible to Owner. The asset’s ownership belongs to the user whose ID
appears in the Owner field.
n
Making an asset private prevents viewing (on the Assets tab), playing, editing, deleting, or
stopping the recording of the asset by users other than the owner and those given permission
by the system administrator to view other users’ private media assets.
7. Select Prevent Auto Archive in the Options section if you do not want the recorded
media to be archived automatically.
8. Click the Cue button to prepare the capture system to record on demand.
The gray bar below the button turns yellow and the word Cueing appears. When the
system is cued, the bar turns green, the word Ready appears, and the Record button is
activated.
9. Click the Record button to begin recording media.
The bar below the button appears red, and the word Recording appears. Click the Apply
button to apply edits to the content information, even while recording is in progress.
10. (Optional) If you want to stop the recording prior to reaching the specified duration,
click the Stop button.
The status of the recording appears in the Feed Capture tab’s scheduling grid. The
Messages tab provides more detailed feedback on the success or failure of the recording.
If a problem occurs, contact your system administrator.
52
Page 53

Recording from a VTR Device
To record video from a VTR device:
1. On the Device Capture tab, select the tab for the VTR you want to use.
2. Click the Acquire button.
The VTR Record dialog box appears.
Recording from a VTR Device
VTR Control buttons
3. Type of select any pertinent data in the Content Information section. For more
information, see “Content Information” on page 49.
4. Type the name in the Segment Name text box.
53
Page 54
7 Working with Recordings
n
A default name might appear, as configured for each individual channel by the system
administrator. Users can override the default. Also, users can change a name later by
selecting the existing segment in the Time Code Segments section and using the Change
button.
5. Set the IN and OUT points for the recording by doing one of the following:
t Use the IN and OUT spin boxes to select the timecodes.
t Type the actual timecodes.
t Use the VTR Control buttons in the Preview section of the VTR Record dialog box
to locate the initial frame of video and its timecode, then click the Mark IN button.
Navigate to the final frame of video and click the Mark OUT button.
Users can use the Preview button to toggle the display of the Preview section in the VTR
Record dialog box.
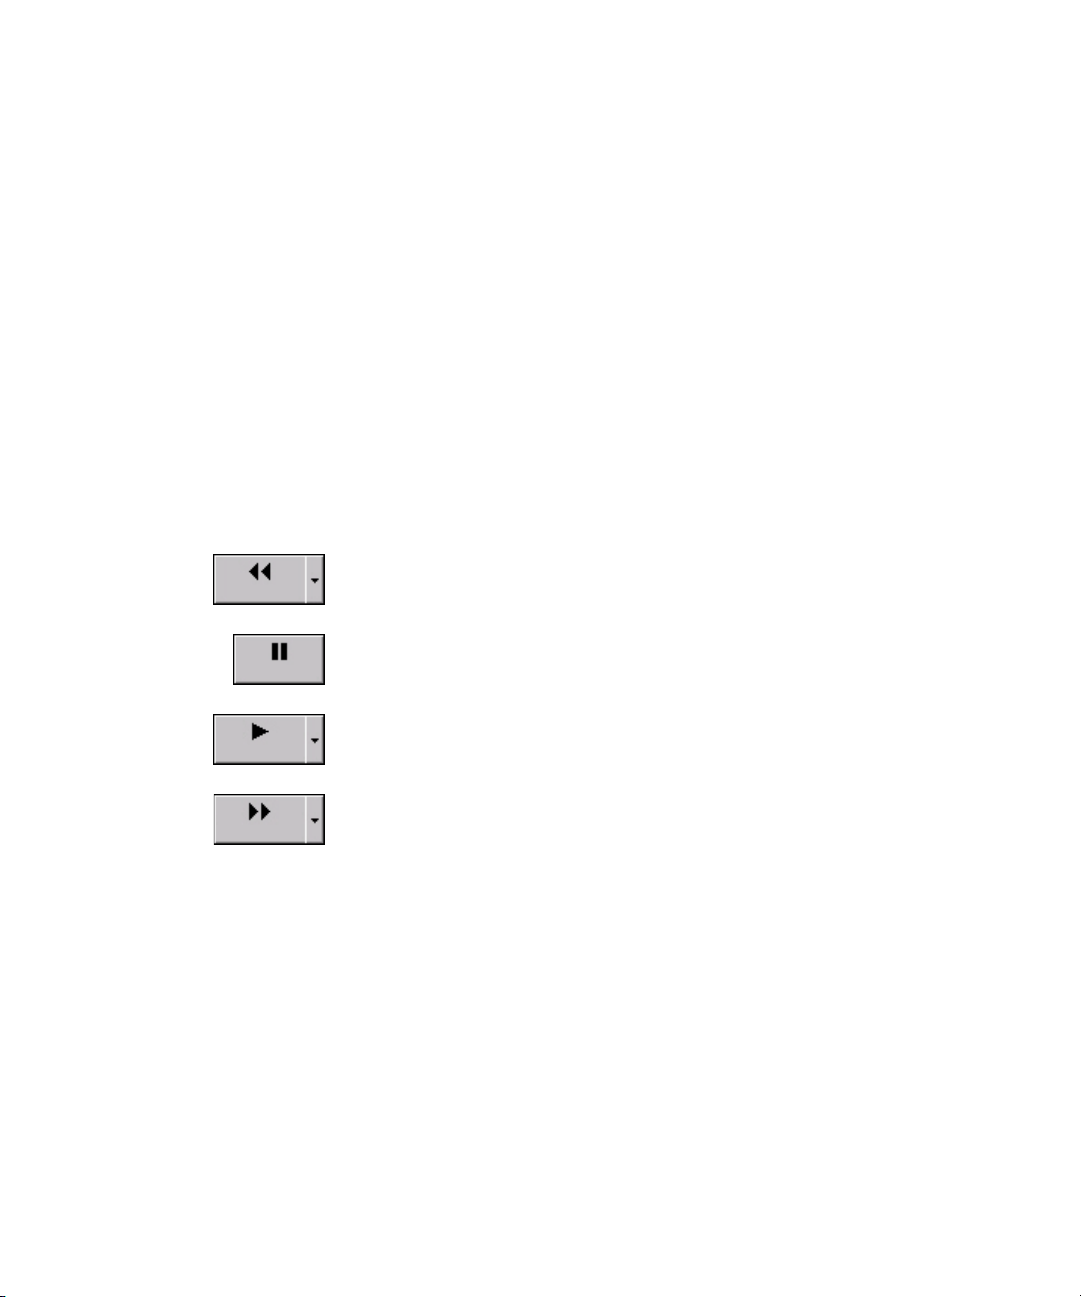
The VTR Control buttons are:
The Rewind button rewinds video on the VTR. Clicking the drop-down arrow
allows users to cue the video back 10 seconds, 30 seconds, 1, 5, or 15 minutes.
The Pause button pauses the video on the VTR.
n
n
54
The Play button plays video on the VTR at normal speed. Clicking the dropdown arrow allows users to play video at 0.25x, 0.5x, 2x, 5x, or 10x speed.
The Fast Forward button rewinds video on the VTR. Clicking the drop-down
arrow allows users to cue the video forward 10 seconds, 30 seconds, 1, 5, or 15
minutes.
Only one user can control a VTR device at a time. If the device is in use, the VTR Control
buttons appear gray.
6. The Video and Audio check boxes in the Preview section are selected by default. They
control the Preview stream only, not the actual recording. Deselect either to remove
video or audio from the Preview.
The Volume slider controls the volume of the preview audio, but it has no effect on the
audio level of the recording.
If the Preview section is not visible as part of the dialog box, click the Preview button to
switch the display. To view video tape content while selecting segments, an external monitor
connected to the VTR must be used.
Page 55

Recording from a VTR Device
7. In a Avid Unity/AirSPACE environment, select the Transfer to Unity check box if you
want the clip transferred to Unity and therefore made available as an online
MediaManager clip.
8. Click the Add button to add the marked video to the list located in the Time Code
Segments section of the VTR Record dialog box.
This step is unnecessary if the Add on Mark OUT check box is selected, in which case
the marked video is added to the list when you set the Mark OUT point.
9. (Optional) To record multiple segments of the same tape, repeat steps 5 and 8. The
additional segments also appears in the list on the VTR Record dialog box.
10. (Optional) Click the Change button to alter the IN or OUT points and names of
segments already added to the list.
11. (Optional) Click the Delete button to remove a segment from the list.
12. Set the expiration date for the recording by selecting the Delete after check box and
setting the number of days the recording is to remain available in the database. If no
expiration date is set, the recorded video must be deleted from the database manually.
13. (Optional) Determine whether the recorded video is a private asset. If private, then
select the Only Visible to Owner check box. The asset’s ownership belongs to the user
whose ID appears in the Owner field.
n
Making an asset private prevents viewing (on the Assets tab), playing, editing, deleting, or
stopping the recording of the asset by users other than the owner and those given permission
by the system administrator to view other users’ private media assets.
14. Click OK to digitally record the segments.
The status of the recording appears in the Device Capture tab. The Messages tab
provides more detailed feedback on the success or failure of the recording. If a problem
occurs, contact your system administrator.
55
Page 56

7 Working with Recordings
56
Page 57

Chapter 8
Searching
Metadata information makes it easy to find clips while a searchable asset database helps
make media and feeds easy to find and view. Users can search for word strings, video clips,
dates, or by other criteria.
This chapter contains the following main sections:
• Opening the Find Dialog Box
• Searching by Text
• Searching by Date
• Searching by Type
Page 58
8 Searching
Opening the Find Dialog Box
The search functionality is located on the Assets tab.
To search the assets database:
t Click the Find button on the Assets toolbar.
The Find dialog box contains:
• The Search Name text box where the user may specify a name for the search
• Text, Dates, and Types tabs for refining the search criteria
• Find Now and Cancel buttons
58
Page 59
Searching by Text
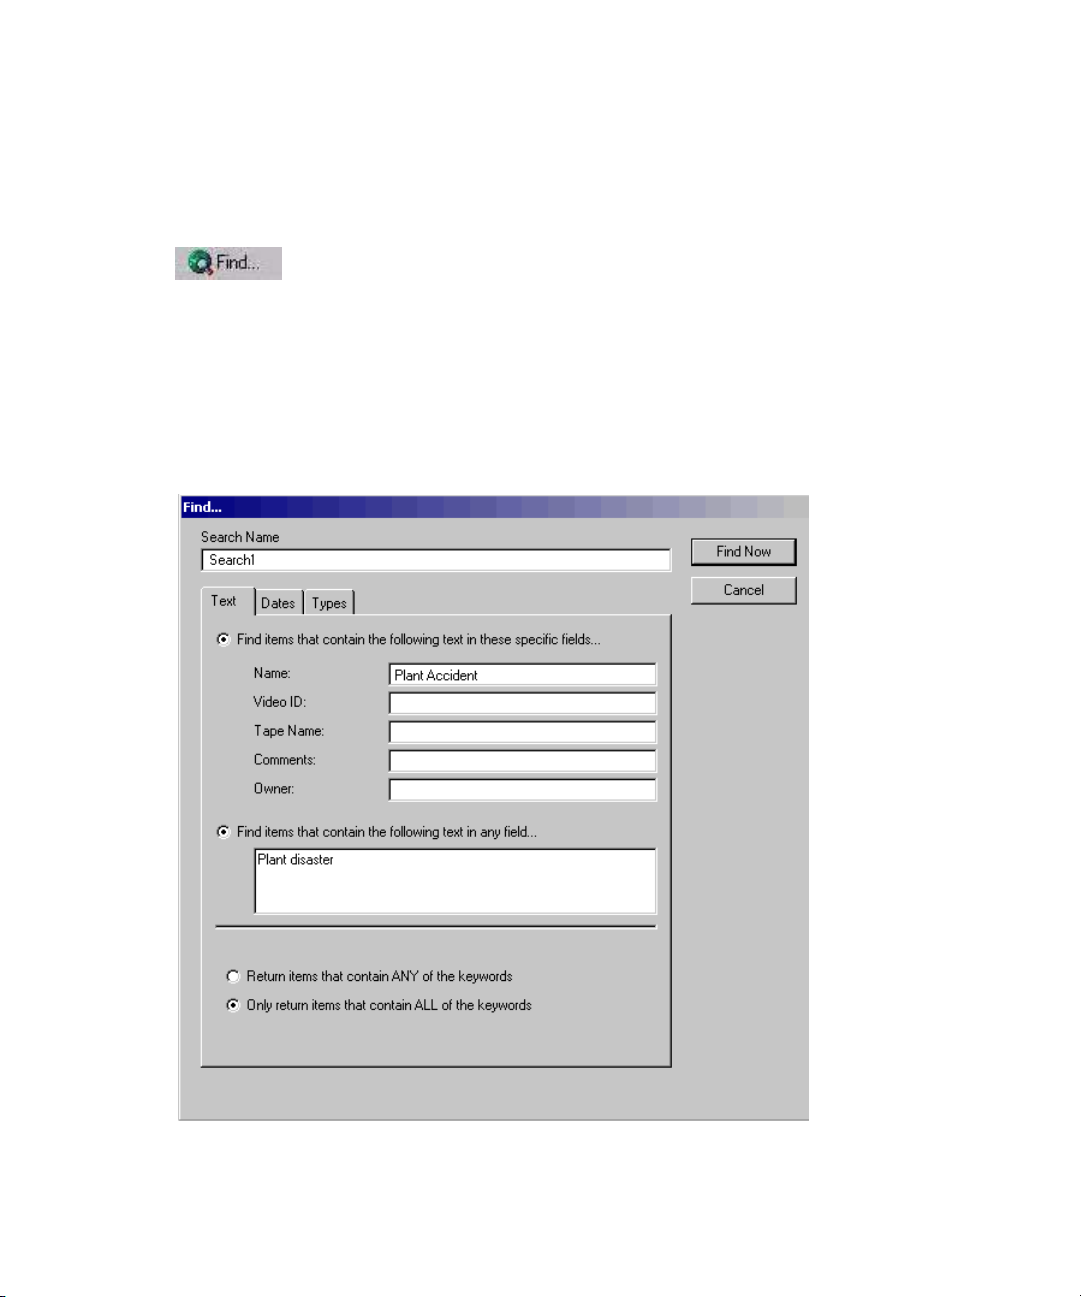
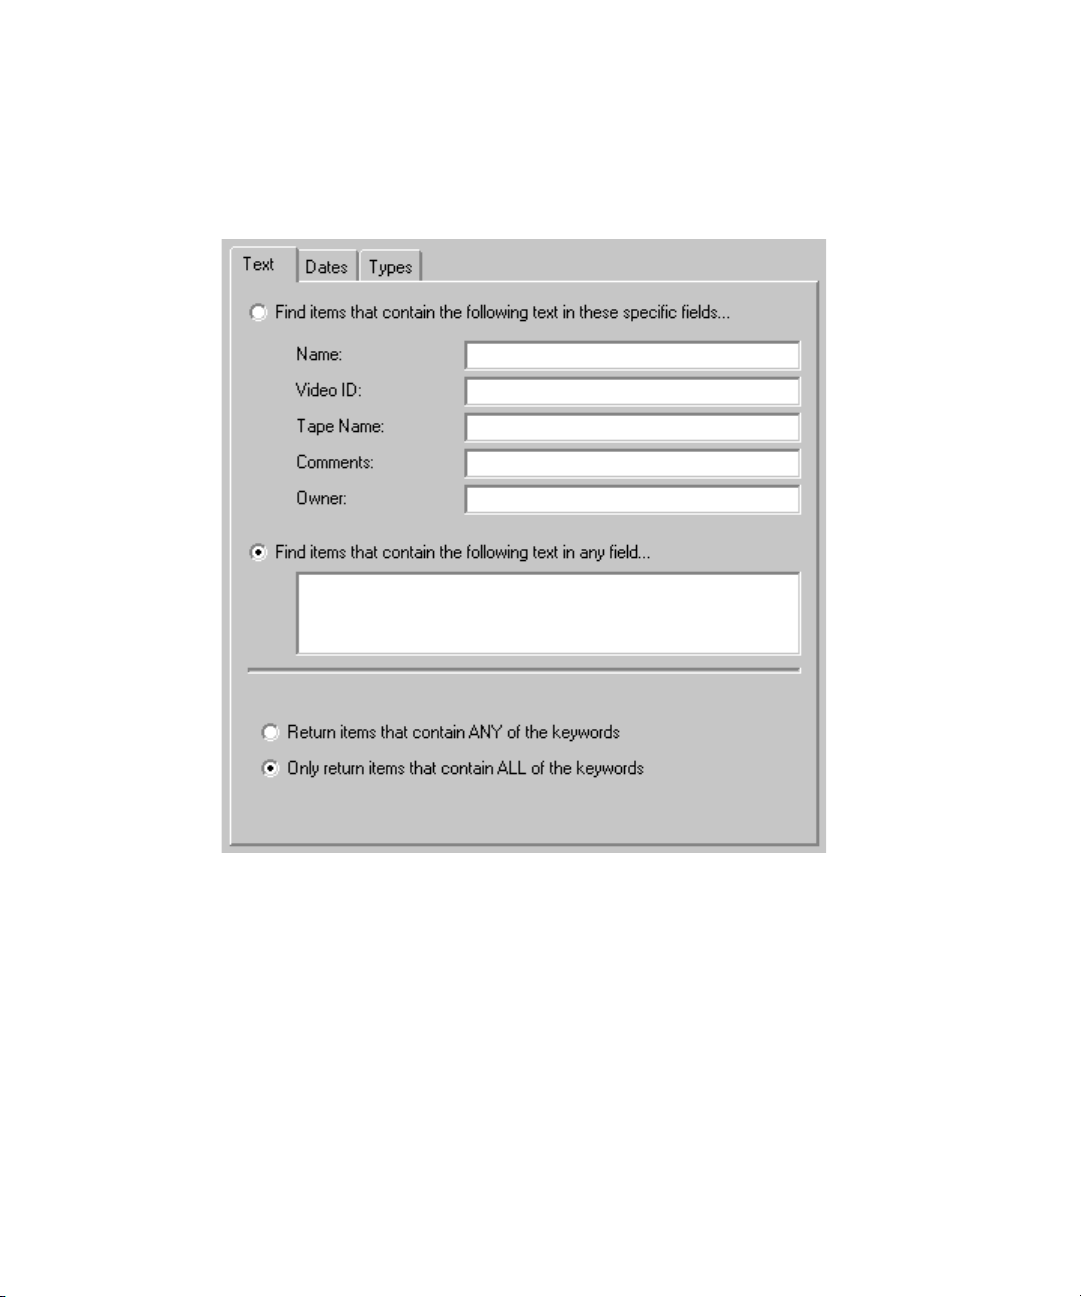
The following graphic shows the Text tab search options.
Searching by Text
Searching by text allows you to find items by entering text and searching a specified field or
all fields in the metadata database. You can also select to see all items that contain any of the
keyword text or those that contain all of the keyword text.
To search by text:
1. Click the Find button located on the toolbar.
The Find dialog box appears.
2. (Optional) Change the default Search Name.
3. In the upper section of the Text tab, select whether you want to specify text for each
metadata field, and then type that text in the corresponding text boxes.
59
Page 60

8 Searching
4. In the lower section of the Text tab, select whether the system should return items that
contain ANY or ALL of the keywords you entered.
5. Click Find Now.
The system conducts the search, navigates to Search Results in the Directory panel, and
places the results in a directory that is given the name chosen in step 2.
Searching by Date
The following graphic shows the Dates tab search options.
60
Searching by date allows you to find items by creation, modification, or expiration dates.
To search by date:
1. Click the Find button located on the toolbar.
The Find dialog box appears.
Page 61

2. (Optional) Change the default Search Name.
3. Click the Dates tab.
4. Select one or more of the check boxes to define the type of files to search. This action
activates the radio buttons with which dates may be specified.
5. Select a radio button to refine the dates of the files to search.
6. Click Find Now.
The system conducts the search, navigates to Search Results in the Directory panel and
places the results in a directory that is given the name chosen in step 2.
Searching by Type
The following graphic shows the Types tab search options.
Searching by Type
Searching by type allows you to find items by selecting one or more types of items.
61
Page 62

8 Searching
To search by type:
1. Click the Find button located on the toolbar.
2. (Optional) Change the default Search Name.
3. Click the Types tab.
4. Do one of the following:
5. (Optional) Click the Unselect All button to clear all check marks.
6. Click Find Now.
The Find dialog box appears.
t Select one or more check boxes to define the type of file(s) to search for.
t Click the Select All button to select all file types.
The system conducts the search, navigates to Search Results in the Directory panel and
places the results in a directory that is given the name chosen in step 2.
62
Page 63

Index
A B C D E F G H I J K L M N O P Q R S T U V W X Y Z Index
A
Acquire button 53
ActiveX Add-In tab
Adding channels
Adding comments 25
AirSPACE
AirSpeed
Archive, preventing auto
Assets
Assets tab
Avid
Avid Interplay
Avid Unity
44, 52
35, 44
making private
searching the database
19
types of
17
educational services
Knowledge Base
database
low resolution encoder
35
44
MediaManager
transferring to
43
32
48
9
35
43
52
B
Buttons
Acquire
Change
Configure
Find
Preview
VTR Control 54
40
55
40
58
54
C
10
25
58
13
workflow
workspace
Channels
add to scheduling grid
customize
Comments tab
Content Information section
Customizing
the channels
the feed box colors
the grid layout
12
15
32
37
22
49
37
31
32
D
Dates tab 60
Device Capture tab
Devices
information
Dialog boxes
Channel Customization
Channel Information
Content Information section
Device Information
58
Find
Instant Record
Login to CaptureManager 14
Scheduled Record
VTR Record
Digiboard
Directory panel
36
39
34
37
32
34
50
46
53
18
E
Encoder 12, 13, 35
Error reporting in Messages tab
49
41
CaptureManager
components
logging in
13
13
F
Feed boxes 31
63
Page 64

Index A B C D E F G H I J K L M N O P Q R S T U V W X Y Z
Feed Capture tab 27
Feed Scheduler
Feeds
instant recordings
recurring
scheduled recordings 46
File menu
27
50
48
15
G
GVG Profile 35
H
Help menu 15
I
iNEWS
documentation
training
Information tab
Instant Record ASAP option
Instant recording
Internet Explorer
IPV/MXF
35
9
10
20
50
43
K
Knowledge Base 9
L
Legend 29
13
Log in
Low resolution encoder
12, 35
M
Media assets
show or hide
types of 19
MediaManager
Messages tab
Messages, displaying 41
19
43
41
50
Metadata
on Information tab
searching
view and print
Metadata tabs
viewing 20
57
19, 38
21
20
O
Online support 9
P
Preview button 54
Procedures
add channel to scheduling grid
customize channels on scheduling grid
customize layout of scheduling grid
customizing the scheduling grid
display different server devices
display different server feeds
edit metadata for recorded information
enter comment information
enter Record comments
initiate instant recording
logging in
navigate the Directory panel
print metadata
record video from VTR
schedule video recording
search assets database
search by date
search by text
search by type
showing or hiding media assests
view a feed’s metadata 38
view current schedule
view feeds by specified date
view live recording schedule
view message details
view metadata
viewing Metadata tabs 20
13
20
60
59
62
42
20
28
23
25
50
18
53
46
58
29
29
29
32
37
32
31
40
22
19
64
Page 65

A B C D E F G H I J K L M N O P Q R S T U V W X Y Z Index
Q
Queue panel 18
R
Record Information tab 24
Record Notes
Recording, defined
Recordings
instant
scheduling
types of
Recurrence
Related Assets tab
25
19
50
46
45
48
23
S
Schedules, viewing 29
Scheduling grid
add channels
customize channels
customize layout
customizing colors
default colors explained
explained
Scheduling recordings
Search Results
Searching
Services
13
32
37
32
31
30
46
62
57–62
30
Related Assets
Text (Search)
Types (Search)
Text tab
Toolbars, Assets tab
Training, ordering courses 10
Transferring to Unity
Troubleshooting
Types tab
59
61
23
59
61
18
52
9
U
Unity, transferring to 52
User Profile Configuration Tool
V
Video clip, defined 19
VTR Control service
VTR, recording video
36
53
W
Web-based applications 43
Workspace
15
41, 43
T
Tabs
ActiveX Add-In 43
17
Assets
Comments
customizable
Dates (Search)
Device Capture
Feed Capture 27
Information
Messages
Metadata
Record Information
41
19
22
43
60
39
20
24
65
Page 66

Index A B C D E F G H I J K L M N O P Q R S T U V W X Y Z
66
 Loading...