

Page 1

AirSpeed™ CountDown
User’s Guide
™
make manage move | media
™
Avid
®
Page 2

Copyright and Disclaimer
Product specifications are subject to change without notice and do not represent a commitment on the part
of Avid Technology, Inc.
The software described in this document is furnished under a license agreement. You can obtain a copy of
that license by visiting Avid's Web site at www.avid.com. The terms of that license are also available in the
product in the same directory as the software. The software may not be reverse assembled and may be
used or copied only in accordance with the terms of the license agreement. It is against the law to copy the
software on any medium except as specifically allowed in the license agreement.
Avid products or portions thereof are protected by one or more of the following United States Patents:
4,746,994; 4,970,663; 5,045,940; 5,267,351; 5,309,528; 5,355,450; 5,396,594; 5,440,348; 5,452,378;
5,467,288; 5,513,375; 5,528,310; 5,557,423; 5,577,190; 5,583,496; 5,584,006; 5,627,765; 5,640,601;
5,644,364; 5,654,737; 5,715,018; 5,719,570; 5,724,605; 5,726,717; 5,729,673; 5,745,637; 5,752,029;
5,754,851; 5,799,150; 5,812,216; 5,828,678; 5,842,014; 5,852,435; 5,999,406; 6,038,573; 6,061,758;
6,141,007; 6,211,869; 6,532,043; 6,546,190; 6,596,031; 6,636,869; 6,747,705; 6,763,523; 6,766,357;
6,813,622; D352,278; D372,478; D373,778; D392,267; D392,268; D392,269; D395,291; D396,853;
D398,912. Other patents are pending.
No part of this document may be reproduced or transmitted in any form or by any means, electronic or
mechanical, including photocopying and recording, for any purpose without the express written permission
of Avid Technology, Inc.
Copyright © 2004 Avid Technology, Inc. and its licensors. All rights reserved
The following disclaimer is required by Sam Leffler and Silicon Graphics, Inc. for the use of
their TIFF library:
Copyright © 1988–1997 Sam Leffler
Copyright © 1991–1997 Silicon Graphics, Inc.
Permission to use, copy, modify, distribute, and sell this software [i.e., the TIFF library] and its
documentation for any purpose is hereby granted without fee, provided that (i) the above copyright notices
and this permission notice appear in all copies of the software and related documentation, and (ii) the
names of Sam Leffler and Silicon Graphics may not be used in any advertising or publicity relating to the
software without the specific, prior written permission of Sam Leffler and Silicon Graphics.
THE SOFTWARE IS PROVIDED “AS-IS” AND WITHOUT WARRANTY OF ANY KIND, EXPRESS,
IMPLIED OR OTHERWISE, INCLUDING WITHOUT LIMITATION, ANY WARRANTY OF
MERCHANTABILITY OR FITNESS FOR A PARTICULAR PURPOSE.
IN NO EVENT SHALL SAM LEFFLER OR SILICON GRAPHICS BE LIABLE FOR ANY SPECIAL,
INCIDENTAL, INDIRECT OR CONSEQUENTIAL DAMAGES OF ANY KIND, OR ANY DAMAGES
WHATSOEVER RESULTING FROM LOSS OF USE, DATA OR PROFITS, WHETHER OR NOT ADVISED
OF THE POSSIBILITY OF DAMAGE, AND ON ANY THEORY OF LIABILITY, ARISING OUT OF OR IN
CONNECTION WITH THE USE OR PERFORMANCE OF THIS SOFTWARE.
The following disclaimer is required by the Independent JPEG Group:
Portions of this software are based on work of the Independent JPEG Group.
The following disclaimer is required by Paradigm Matrix:
Portions of this software licensed from Paradigm Matrix.
The following disclaimer is required by Ray Sauers Associates, Inc.:
“Install-It” is licensed from Ray Sauers Associates, Inc. End-User is prohibited from taking any action to
derive a source code equivalent of “Install-It,” including by reverse assembly or reverse compilation, Ray
Sauers Associates, Inc. shall in no event be liable for any damages resulting from reseller’s failure to
perform reseller’s obligation; or any damages arising from use or operation of reseller’s products or the
software; or any other damages, including but not limited to, incidental, direct, indirect, special or
consequential Damages including lost profits, or damages resulting from loss of use or inability to use
reseller’s products or the software for any reason including copyright or patent infringement, or lost data,
even if Ray Sauers Associates has been advised, knew or should have known of the possibility of such
damages.
2
Page 3

The following disclaimer is required by Videomedia, Inc.:
“Videomedia, Inc. makes no warranties whatsoever, either express or implied, regarding this product,
including warranties with respect to its merchantability or its fitness for any particular purpose.”
“This software contains V-LAN ver. 3.0 Command Protocols which communicate with V-LAN ver. 3.0
products developed by Videomedia, Inc. and V-LAN ver. 3.0 compatible products developed by third parties
under license from Videomedia, Inc. Use of this software will allow “frame accurate” editing control of
applicable videotape recorder decks, videodisc recorders/players and the like.”
The following disclaimer is required by Altura Software, Inc. for the use of its Mac2Win
software and Sample Source Code:
©1993–1998 Altura Software, Inc.
The following disclaimer is required by 3Prong.com Inc.:
Certain waveform and vector monitoring capabilities are provided under a license from 3Prong.com Inc.
Attn. Government User(s). Restricted Rights Legend
U.S. GOVERNMENT RESTRICTED RIGHTS. This Software and its documentation are “commercial
computer software” or “commercial computer software documentation.” In the event that such Software or
documentation is acquired by or on behalf of a unit or agency of the U.S. Government, all rights with
respect to this Software and documentation are subject to the terms of the License Agreement, pursuant to
FAR §12.212(a) and/or DFARS §227.7202-1(a), as applicable.
Trademarks
888 I/O, Adrenaline, AirPlay, AirSPACE, AirSPACE HD, AirSpeed, AniMatte, AudioSuite, AudioVision,
AutoSync, Avid, Avid DNA, Avid DNxHD, AVIDdrive, AVIDdrive Towers, Avid Mojo, AvidNet, AvidNetwork,
AVIDstripe, Avid Unity, Avid Xpress, AVoption, AVX, CamCutter, ChromaCurve, ChromaWheel,
CountDown, DAE, D-Fi, D-fx, Digidesign, Digidesign Audio Engine, Digidesign Intelligent Noise Reduction,
DigiDrive, Digital Nonlinear Accelerator, DigiTranslator, DINR, D-Verb, Equinox, ExpertRender, FieldPak,
Film Composer, FilmScribe, FluidMotion, HIIP, HyperSPACE, HyperSPACE HDCAM, IllusionFX,
Image Independence, Intraframe, iS9, iS18, iS23, iS36, Lo-Fi, Magic Mask, make manage move | media,
Marquee, Matador, Maxim, MCXpress, Media Composer, MediaDock, MediaDock Shuttle, Media Fusion,
Media Illusion, MediaLog, Media Reader, Media Recorder, MEDIArray, MediaShare, Meridien, MetaSync,
NaturalMatch, Nearchive, NetReview, NewsCutter, Nitris, OMF, OMF Interchange, OMM,
Open Media Framework, Open Media Management, ProEncode, Pro Tools, QuietDrive, Recti-Fi,
RetroLoop, rS9, rS18, Sci-Fi, Softimage, Sound Designer II, SPACE, SPACEShift, Symphony, the Avid|DS
logo, Trilligent, UnityRAID, Vari-Fi, Video Slave Driver, VideoSPACE, and Xdeck are either registered
trademarks or trademarks of Avid Technology, Inc. in the United States and/or other countries.
iNEWS, iNEWS ControlAir, and Media Browse are trademarks of iNews, LLC.
All other trademarks contained herein are the property of their respective owners.
GOT FOOTAGE?
Editors — Filmmakers — Special Effects Artists — Game Developers — Animators — Educators —
Broadcasters — Content creators of every genre — Just finished an incredible project and want to
share it with the world?
Send us your reels and we may use your footage in our show reel or demo!*
For a copy of our release and Avid’s mailing address, go to www.avid.com/footage.
*Note: Avid cannot guarantee the use of materials submitted.
AirSpeed CountDown User’s Guide • 0130-06046-01 Rev A • December 2004
3
Page 4

4
Page 5

Contents
Using This Guide. . . . . . . . . . . . . . . . . . . . . . . . . . . . . . . . . . . . . . . 13
Symbols and Conventions . . . . . . . . . . . . . . . . . . . . . . . . . . . . . . . . . . . . . . 14
If You Need Help. . . . . . . . . . . . . . . . . . . . . . . . . . . . . . . . . . . . . . . . . . . . . . 15
How to Order Documentation . . . . . . . . . . . . . . . . . . . . . . . . . . . . . . . . . . . . 16
Avid Educational Services. . . . . . . . . . . . . . . . . . . . . . . . . . . . . . . . . . . . . . . 16
Chapter 1 Getting Started . . . . . . . . . . . . . . . . . . . . . . . . . . . . . . . . . . . . . . . . 17
Operating System and Hardware Requirements . . . . . . . . . . . . . . . . . . . . . 18
Installing Optional Hardware . . . . . . . . . . . . . . . . . . . . . . . . . . . . . . . . . . . . . 19
Installing an Input/Output Card. . . . . . . . . . . . . . . . . . . . . . . . . . . . . . . . 19
Installing a Programmable Keypad . . . . . . . . . . . . . . . . . . . . . . . . . . . . 19
Connecting the Application Key . . . . . . . . . . . . . . . . . . . . . . . . . . . . . . . . . . 20
Setting Up Server Connections. . . . . . . . . . . . . . . . . . . . . . . . . . . . . . . . . . . 20
Connecting to a Single Server . . . . . . . . . . . . . . . . . . . . . . . . . . . . . . . . 21
Connecting to Multiple AirSpeed Servers. . . . . . . . . . . . . . . . . . . . . . . . 22
Installing CountDown . . . . . . . . . . . . . . . . . . . . . . . . . . . . . . . . . . . . . . . . . . 23
Starting CountDown . . . . . . . . . . . . . . . . . . . . . . . . . . . . . . . . . . . . . . . . . . . 23
Getting Information about CountDown . . . . . . . . . . . . . . . . . . . . . . . . . . . . . 23
Chapter 2 Setting Up CountDown . . . . . . . . . . . . . . . . . . . . . . . . . . . . . . . . . . 25
Establishing Communication Between CountDown and AirSpeed . . . . . . . . 26
Before You Begin . . . . . . . . . . . . . . . . . . . . . . . . . . . . . . . . . . . . . . . . . . 26
Communication Information. . . . . . . . . . . . . . . . . . . . . . . . . . . . . . . 26
Server Functions . . . . . . . . . . . . . . . . . . . . . . . . . . . . . . . . . . . . . . . 27
Configuration Example . . . . . . . . . . . . . . . . . . . . . . . . . . . . . . . . . . 28
Configuring the Servers and Channels . . . . . . . . . . . . . . . . . . . . . . . . . 28
Automatic Server Changeover . . . . . . . . . . . . . . . . . . . . . . . . . . . . . . . . 30
5
Page 6

Manually Performing a Server Changeover . . . . . . . . . . . . . . . . . . . . . 30
Performing Emergency Channel Assignment . . . . . . . . . . . . . . . . . . . . 31
Viewing the Configuration . . . . . . . . . . . . . . . . . . . . . . . . . . . . . . . . . . . 32
Configuring User Preferences . . . . . . . . . . . . . . . . . . . . . . . . . . . . . . . . . . . 33
Configuring Playlist/Shotbox Preferences . . . . . . . . . . . . . . . . . . . . . . . 33
Configuring the Appearance of a Playlist . . . . . . . . . . . . . . . . . . . . . . . 38
Configuring Server Preferences . . . . . . . . . . . . . . . . . . . . . . . . . . . . . . 40
Configuring External Control . . . . . . . . . . . . . . . . . . . . . . . . . . . . . . . . . . . . 43
Configuring External Control Preferences. . . . . . . . . . . . . . . . . . . . . . . 43
Customizing External Control Functions . . . . . . . . . . . . . . . . . . . . . . . . 45
Viewing Customizations . . . . . . . . . . . . . . . . . . . . . . . . . . . . . . . . . . . . 47
Printing Customizations. . . . . . . . . . . . . . . . . . . . . . . . . . . . . . . . . . . . . 48
Enabling and Disabling the External Device . . . . . . . . . . . . . . . . . . . . . 48
Configuring Logging and Security Features. . . . . . . . . . . . . . . . . . . . . . . . . 48
Understanding the Status Displays . . . . . . . . . . . . . . . . . . . . . . . . . . . . . . . 51
Determining Network Status . . . . . . . . . . . . . . . . . . . . . . . . . . . . . . . . . 51
Determining Server Status . . . . . . . . . . . . . . . . . . . . . . . . . . . . . . . . . . 51
Determining Serial Port Status . . . . . . . . . . . . . . . . . . . . . . . . . . . . . . . 52
Determining Emergency Channel Assignment Status. . . . . . . . . . . . . . 53
Determining External Device Status . . . . . . . . . . . . . . . . . . . . . . . . . . . 53
Chapter 3 Managing Media Events . . . . . . . . . . . . . . . . . . . . . . . . . . . . . . . . . 55
Displaying the Media List . . . . . . . . . . . . . . . . . . . . . . . . . . . . . . . . . . . . . . . 55
Network Status Lights . . . . . . . . . . . . . . . . . . . . . . . . . . . . . . . . . . . . . . 56
Media Availability. . . . . . . . . . . . . . . . . . . . . . . . . . . . . . . . . . . . . . . . . . 57
Sorting the Media List . . . . . . . . . . . . . . . . . . . . . . . . . . . . . . . . . . . . . . 57
Resizing Media List Columns . . . . . . . . . . . . . . . . . . . . . . . . . . . . . . . . 58
Rearranging Media List Columns . . . . . . . . . . . . . . . . . . . . . . . . . . . . . 58
Restoring Media List Column Layout. . . . . . . . . . . . . . . . . . . . . . . . . . . 58
Displaying Media Event Details . . . . . . . . . . . . . . . . . . . . . . . . . . . . . . . . . . 58
6
Page 7

Modifying Media Event IDs and Titles. . . . . . . . . . . . . . . . . . . . . . . . . . . . . . 59
Changing a Media Event ID . . . . . . . . . . . . . . . . . . . . . . . . . . . . . . . . . . 59
Changing a Media Event Title . . . . . . . . . . . . . . . . . . . . . . . . . . . . . . . . 60
Searching for Media Events . . . . . . . . . . . . . . . . . . . . . . . . . . . . . . . . . . . . . 61
Using the Find Media Dialog Box . . . . . . . . . . . . . . . . . . . . . . . . . . . . . . 61
Searching Using the Find Media Dialog Box . . . . . . . . . . . . . . . . . . 62
Refining a Search . . . . . . . . . . . . . . . . . . . . . . . . . . . . . . . . . . . . . . 63
Starting a New Search. . . . . . . . . . . . . . . . . . . . . . . . . . . . . . . . . . . 64
Canceling a Search . . . . . . . . . . . . . . . . . . . . . . . . . . . . . . . . . . . . . 64
Updating the Media Information . . . . . . . . . . . . . . . . . . . . . . . . . . . . . . . . . . 64
Deleting Media Events from AirSpeed . . . . . . . . . . . . . . . . . . . . . . . . . . . . . 64
Protecting Events from Deletion . . . . . . . . . . . . . . . . . . . . . . . . . . . . . . . . . . 65
Browsing Media Events. . . . . . . . . . . . . . . . . . . . . . . . . . . . . . . . . . . . . . . . . 66
Showing Storage Availability. . . . . . . . . . . . . . . . . . . . . . . . . . . . . . . . . . . . . 67
Chapter 4 Managing Playlists . . . . . . . . . . . . . . . . . . . . . . . . . . . . . . . . . . . . . 69
Understanding Playlists. . . . . . . . . . . . . . . . . . . . . . . . . . . . . . . . . . . . . . . . . 70
Understanding Columns and Icons for Playlist Events. . . . . . . . . . . . . . 71
Event Number . . . . . . . . . . . . . . . . . . . . . . . . . . . . . . . . . . . . . . . . . 72
Event Playout Channel . . . . . . . . . . . . . . . . . . . . . . . . . . . . . . . . . . 72
Event Playout Mode . . . . . . . . . . . . . . . . . . . . . . . . . . . . . . . . . . . . 73
Event ID. . . . . . . . . . . . . . . . . . . . . . . . . . . . . . . . . . . . . . . . . . . . . . 73
Event Title . . . . . . . . . . . . . . . . . . . . . . . . . . . . . . . . . . . . . . . . . . . . 74
Event Duration. . . . . . . . . . . . . . . . . . . . . . . . . . . . . . . . . . . . . . . . . 74
Event Start Time and Day . . . . . . . . . . . . . . . . . . . . . . . . . . . . . . . . 74
Event Modification Date. . . . . . . . . . . . . . . . . . . . . . . . . . . . . . . . . . 75
GPI Outputs. . . . . . . . . . . . . . . . . . . . . . . . . . . . . . . . . . . . . . . . . . . 75
Building a Playlist . . . . . . . . . . . . . . . . . . . . . . . . . . . . . . . . . . . . . . . . . . . . . 75
Creating a New Playlist . . . . . . . . . . . . . . . . . . . . . . . . . . . . . . . . . . . . . 75
7
Page 8

Adding Media Events. . . . . . . . . . . . . . . . . . . . . . . . . . . . . . . . . . . . . . . 76
Adding a Single Event . . . . . . . . . . . . . . . . . . . . . . . . . . . . . . . . . . 76
Adding Multiple Events . . . . . . . . . . . . . . . . . . . . . . . . . . . . . . . . . . 77
Assigning a Playout Channel . . . . . . . . . . . . . . . . . . . . . . . . . . . . . 77
Automatically Reversing the Default Playout Mode . . . . . . . . . . . . 78
Including the Events from Another Playlist . . . . . . . . . . . . . . . . . . . 78
Using the Insert Playlist Command. . . . . . . . . . . . . . . . . . . . . . . . . 78
Using Drag and Drop . . . . . . . . . . . . . . . . . . . . . . . . . . . . . . . . . . . 79
Manually Expanding a Referenced Playlist . . . . . . . . . . . . . . . . . . 80
Using a Playlist Reference to Loop the Playlist . . . . . . . . . . . . . . . 80
Adding Comments and Break Events . . . . . . . . . . . . . . . . . . . . . . . . . . 81
Adding Comments . . . . . . . . . . . . . . . . . . . . . . . . . . . . . . . . . . . . . 81
Editing an Existing Comment . . . . . . . . . . . . . . . . . . . . . . . . . . . . . 81
Adding Break Events . . . . . . . . . . . . . . . . . . . . . . . . . . . . . . . . . . . 82
Editing an Existing Break Event . . . . . . . . . . . . . . . . . . . . . . . . . . . 82
Changing Comment Events to Break Events . . . . . . . . . . . . . . . . . 83
Rearranging Events in a Playlist . . . . . . . . . . . . . . . . . . . . . . . . . . . . . . 83
Relocating Events. . . . . . . . . . . . . . . . . . . . . . . . . . . . . . . . . . . . . . 83
Duplicating Events . . . . . . . . . . . . . . . . . . . . . . . . . . . . . . . . . . . . . 84
Using Placeholders . . . . . . . . . . . . . . . . . . . . . . . . . . . . . . . . . . . . . . . . 84
Understanding the Deferred Ready Function . . . . . . . . . . . . . . . . . 84
Adding Placeholders. . . . . . . . . . . . . . . . . . . . . . . . . . . . . . . . . . . . 85
Converting an Existing Event to a Placeholder. . . . . . . . . . . . . . . . 86
Replicating Media Events . . . . . . . . . . . . . . . . . . . . . . . . . . . . . . . . . . . 86
Undoing Changes . . . . . . . . . . . . . . . . . . . . . . . . . . . . . . . . . . . . . . . . . 87
Reverting to the Last Saved Playlist . . . . . . . . . . . . . . . . . . . . . . . . . . . 87
Saving a Playlist . . . . . . . . . . . . . . . . . . . . . . . . . . . . . . . . . . . . . . . . . . 87
Saving Part of a Playlist. . . . . . . . . . . . . . . . . . . . . . . . . . . . . . . . . . . . . 87
Opening an Existing Playlist. . . . . . . . . . . . . . . . . . . . . . . . . . . . . . . . . . . . . 88
Optimizing the Positions of CountDown Windows . . . . . . . . . . . . . . . . . . . . 89
8
Page 9

Modifying Events in the Playlist. . . . . . . . . . . . . . . . . . . . . . . . . . . . . . . . . . . 89
Changing the Channel for Event Playout . . . . . . . . . . . . . . . . . . . . . . . . 90
Locking the Channel Assignment. . . . . . . . . . . . . . . . . . . . . . . . . . . . . . 90
Assigning Event Playout Mode. . . . . . . . . . . . . . . . . . . . . . . . . . . . . . . . 91
Setting an Event to be Manual . . . . . . . . . . . . . . . . . . . . . . . . . . . . 91
Setting an Event to be Follow-On . . . . . . . . . . . . . . . . . . . . . . . . . . 92
Setting an Event to Time-of-Day . . . . . . . . . . . . . . . . . . . . . . . . . . . 92
Adjusting the Play-Out Time of Time-of-Day Events . . . . . . . . . . . . 93
Looping Media Events. . . . . . . . . . . . . . . . . . . . . . . . . . . . . . . . . . . 94
Adding Events to a Loop . . . . . . . . . . . . . . . . . . . . . . . . . . . . . . . . . 96
Assigning GPI Output Triggers to Events. . . . . . . . . . . . . . . . . . . . . . . . 96
Editing Events . . . . . . . . . . . . . . . . . . . . . . . . . . . . . . . . . . . . . . . . . . . . 97
Understanding the Clip Editor . . . . . . . . . . . . . . . . . . . . . . . . . . . . . 97
Using the Clip Editor . . . . . . . . . . . . . . . . . . . . . . . . . . . . . . . . . . . . 99
Locking Items Against Updates . . . . . . . . . . . . . . . . . . . . . . . . . . . 101
Changing the Title of Events . . . . . . . . . . . . . . . . . . . . . . . . . . . . . 101
Modifying Events While Playing a Playlist to Air . . . . . . . . . . . . . . 102
Restoring Event Properties . . . . . . . . . . . . . . . . . . . . . . . . . . . . . . . . . 102
Playing a List to Air . . . . . . . . . . . . . . . . . . . . . . . . . . . . . . . . . . . . . . . . . . . 103
Going On-Air . . . . . . . . . . . . . . . . . . . . . . . . . . . . . . . . . . . . . . . . . . . . 103
Playing a List in Single Channel Mode . . . . . . . . . . . . . . . . . . . . . 104
Playing a List in All Channels Mode . . . . . . . . . . . . . . . . . . . . . . . 105
Playing a List in Dual Channel Mode. . . . . . . . . . . . . . . . . . . . . . . 105
Playing Events . . . . . . . . . . . . . . . . . . . . . . . . . . . . . . . . . . . . . . . . . . . 105
Rearranging Media Events in the List While On-Air . . . . . . . . . . . . . . . 107
Selecting the Event to Play Next . . . . . . . . . . . . . . . . . . . . . . . . . . 107
Editing the Playlist . . . . . . . . . . . . . . . . . . . . . . . . . . . . . . . . . . . . . 107
Controlling the On-Air Event. . . . . . . . . . . . . . . . . . . . . . . . . . . . . . . . . 109
Pausing an Event . . . . . . . . . . . . . . . . . . . . . . . . . . . . . . . . . . . . . 109
Aborting an Event . . . . . . . . . . . . . . . . . . . . . . . . . . . . . . . . . . . . . 109
9
Page 10

Grouping and Ungrouping Events . . . . . . . . . . . . . . . . . . . . . . . . 109
Playing Out Multiple Playlists . . . . . . . . . . . . . . . . . . . . . . . . . . . . 110
Going Off-Air. . . . . . . . . . . . . . . . . . . . . . . . . . . . . . . . . . . . . . . . . 111
Previewing a Playlist . . . . . . . . . . . . . . . . . . . . . . . . . . . . . . . . . . . . . . . . . 111
Importing a Playlist. . . . . . . . . . . . . . . . . . . . . . . . . . . . . . . . . . . . . . . . . . . 112
Exporting a Playlist. . . . . . . . . . . . . . . . . . . . . . . . . . . . . . . . . . . . . . . . . . . 112
Printing a Playlist . . . . . . . . . . . . . . . . . . . . . . . . . . . . . . . . . . . . . . . . . . . . 113
Deleting a Playlist. . . . . . . . . . . . . . . . . . . . . . . . . . . . . . . . . . . . . . . . . . . . 114
Previewing a Transition . . . . . . . . . . . . . . . . . . . . . . . . . . . . . . . . . . . . . . . 114
Breaking Out of Referenced Playlist Loops . . . . . . . . . . . . . . . . . . . . . . . . 114
Chapter 5 Working with the MOS Protocol. . . . . . . . . . . . . . . . . . . . . . . . . . 117
Using MOS. . . . . . . . . . . . . . . . . . . . . . . . . . . . . . . . . . . . . . . . . . . . . . . . . 117
Configuring CountDown to Use MOS. . . . . . . . . . . . . . . . . . . . . . . . . . . . . 118
Managing Playlists . . . . . . . . . . . . . . . . . . . . . . . . . . . . . . . . . . . . . . . . . . . 123
Playlist Restrictions . . . . . . . . . . . . . . . . . . . . . . . . . . . . . . . . . . . . . . . 123
Item Auto-Cue . . . . . . . . . . . . . . . . . . . . . . . . . . . . . . . . . . . . . . . . . . . 124
Enabling Channel Auto-Assignment . . . . . . . . . . . . . . . . . . . . . . . . . . 124
10
Displaying MOS Rundowns. . . . . . . . . . . . . . . . . . . . . . . . . . . . . . . . . 126
Displaying MOS Item Details. . . . . . . . . . . . . . . . . . . . . . . . . . . . . . . . 126
Updating Details . . . . . . . . . . . . . . . . . . . . . . . . . . . . . . . . . . . . . . . . . 126
Resyncing MOS Runorders. . . . . . . . . . . . . . . . . . . . . . . . . . . . . . . . . 127
Manual Assignment of Channels. . . . . . . . . . . . . . . . . . . . . . . . . . . . . 127
Channel Locking . . . . . . . . . . . . . . . . . . . . . . . . . . . . . . . . . . . . . . . . . 127
Changing Item Type . . . . . . . . . . . . . . . . . . . . . . . . . . . . . . . . . . . . . . 128
Ready for Air Indication . . . . . . . . . . . . . . . . . . . . . . . . . . . . . . . . . . . . 128
Air Status Cleardown. . . . . . . . . . . . . . . . . . . . . . . . . . . . . . . . . . . . . . 128
Managing Placeholder Creation. . . . . . . . . . . . . . . . . . . . . . . . . . . . . . . . . 128
Creating and Replacing Placeholders . . . . . . . . . . . . . . . . . . . . . . . . . 128
Page 11

Placeholder Management . . . . . . . . . . . . . . . . . . . . . . . . . . . . . . . . . . 131
Placeholder Format . . . . . . . . . . . . . . . . . . . . . . . . . . . . . . . . . . . . 131
Copying a Placeholder ID . . . . . . . . . . . . . . . . . . . . . . . . . . . . . . . 131
Viewing and Deleting Placeholders. . . . . . . . . . . . . . . . . . . . . . . . 131
Manually Setting the Next ID . . . . . . . . . . . . . . . . . . . . . . . . . . . . . 133
Viewing the Event Log . . . . . . . . . . . . . . . . . . . . . . . . . . . . . . . . . . . . . . . . 133
Chapter 6 Using Shotboxes. . . . . . . . . . . . . . . . . . . . . . . . . . . . . . . . . . . . . . 135
Understanding Shotboxes. . . . . . . . . . . . . . . . . . . . . . . . . . . . . . . . . . . . . . 135
Customizing Shotbox Buttons . . . . . . . . . . . . . . . . . . . . . . . . . . . . . . . . . . . 136
Building a Shotbox . . . . . . . . . . . . . . . . . . . . . . . . . . . . . . . . . . . . . . . . . . . 137
Creating a New Shotbox . . . . . . . . . . . . . . . . . . . . . . . . . . . . . . . . . . . 137
Assigning Media to Buttons . . . . . . . . . . . . . . . . . . . . . . . . . . . . . . . . . 137
Using Placeholders . . . . . . . . . . . . . . . . . . . . . . . . . . . . . . . . . . . . . . . 137
Assigning a Placeholder to a Button . . . . . . . . . . . . . . . . . . . . . . . 138
Converting an Existing Event to a Placeholder . . . . . . . . . . . . . . . 139
Undoing Changes. . . . . . . . . . . . . . . . . . . . . . . . . . . . . . . . . . . . . . . . . 139
Reverting to the Last Saved Shotbox. . . . . . . . . . . . . . . . . . . . . . . . . . 139
Saving a Shotbox . . . . . . . . . . . . . . . . . . . . . . . . . . . . . . . . . . . . . . . . . 140
Opening an Existing Shotbox . . . . . . . . . . . . . . . . . . . . . . . . . . . . . . . . . . . 140
The Open Command . . . . . . . . . . . . . . . . . . . . . . . . . . . . . . . . . . . . . . 140
The Drag and Drop Method . . . . . . . . . . . . . . . . . . . . . . . . . . . . . . . . . 141
Optimizing the Positions of CountDown Windows . . . . . . . . . . . . . . . . . . . 141
Modifying Events in the Shotbox. . . . . . . . . . . . . . . . . . . . . . . . . . . . . . . . . 142
Modifying Shotbox Events Using AirSpeed . . . . . . . . . . . . . . . . . . . . . 142
Modifying Shotbox Events Using the Clip Editor . . . . . . . . . . . . . . . . . 142
Modifying Events While Playing a Shotbox to Air . . . . . . . . . . . . . . . . . . . . 144
Restoring Event Properties . . . . . . . . . . . . . . . . . . . . . . . . . . . . . . . . . . . . . 144
Playing a Shotbox to Air . . . . . . . . . . . . . . . . . . . . . . . . . . . . . . . . . . . . . . . 145
Going On-Air . . . . . . . . . . . . . . . . . . . . . . . . . . . . . . . . . . . . . . . . . . . . 146
Cuing Events . . . . . . . . . . . . . . . . . . . . . . . . . . . . . . . . . . . . . . . . . . . . 146
11
Page 12

Playing Events. . . . . . . . . . . . . . . . . . . . . . . . . . . . . . . . . . . . . . . . . . . 147
Enabling One Shot Operation . . . . . . . . . . . . . . . . . . . . . . . . . . . . . . . 147
Controlling an On-Air Shotbox. . . . . . . . . . . . . . . . . . . . . . . . . . . . . . . 148
Pausing a Shotbox Event . . . . . . . . . . . . . . . . . . . . . . . . . . . . . . . 148
Aborting a Shotbox Event. . . . . . . . . . . . . . . . . . . . . . . . . . . . . . . 148
Deleting a Shotbox. . . . . . . . . . . . . . . . . . . . . . . . . . . . . . . . . . . . . . . . . . . 149
Index . . . . . . . . . . . . . . . . . . . . . . . . . . . . . . . . . . . . . . . . . . . . . . . . 151
12
Page 13

Using This Guide
This guide provides comprehensive installation, configuration, and operation
instructions for the AirSpeed CountDown application. It is intended for all
broadcast personnel who need to use CountDown as part of a configuration
that includes one or more AirSpeed servers.
n
The documentation describes the features and hardware of all models.
Therefore, your system might not contain certain features and hardware that
are covered in the documentation.
Page 14

Using This Guide
Symbols and Conventions
Avid documentation uses the following symbols and conventions:
Symbol or Convention Meaning or Action
n
c
w
> This symbol indicates menu commands (and
t
Margin tips
Italic font Italic font is used to emphasize certain words and to
Courier Bold font
A note provides important related information,
reminders, recommendations, and strong suggestions.
A caution means that a specific action you take could
cause harm to your computer or cause you to lose data.
A warning describes an action that could cause you
physical harm. Follow the guidelines in this document
or on the unit itself when handling electrical
equipment.
subcommands) in the order you select them. For
example, File > Import means to open the File menu
and then select the Import command.
This symbol indicates a single-step procedure.
Multiple arrows in a list indicate that you perform one
of the actions listed.
In the margin, you will find tips that help you perform
tasks more easily and efficiently.
indicate variables.
Courier Bold font identifies text that you type.
14
Page 15

If You Need Help
If you are having trouble using CountDown:
1. Retry the action, carefully following the instructions given for that task in
this guide. It is especially important to check each step of your workflow.
2. Check for the latest information that might have become available after
the documentation was published in one of two locations:
- If release notes are available, they ship with your application.
- If ReadMe files are available, they are supplied in your Avid
If You Need Help
application folder. ReadMe files are also available from Help.
n
Release notes and ReadMe files are also available on the Avid Knowledge
Base.
3. Check the documentation that came with your Avid application or your
hardware for maintenance or hardware-related issues.
4. Visit the online Knowledge Base at www.avid.com/support. Online
services are available 24 hours per day, 7 days per week. Search this
online Knowledge Base to find answers, to view error messages, to access
troubleshooting tips, to download updates, and to read/join online
message-board discussions.
5. For Technical Support, please call 800-800-AVID (800-800-2843).
For Broadcast On-Air Sites and Call Letter Stations, call
800-NEWSDNG (800-639-7364).
15
Page 16

Using This Guide
How to Order Documentation
To order additional copies of this documentation from within the
United States, call Avid Sales at 800-949-AVID (800-949-2843). If you are
placing an order from outside the United States, contact your local
Avid representative.
Avid Educational Services
For information on courses/schedules, training centers, certifications,
courseware, and books, please visit www.avid.com/training or call Avid Sales
at 800-949-AVID (800-949-2843).
16
Page 17

Chapter 1
Getting Started
CountDown is an application that gives you the ability to control playout from
AirSpeed servers. You can control up to eight VDCP channels on four
AirSpeed servers, and keep a fifth server for browsing or emergency
changeover. You can also use CountDown to view, manage, and edit playlists
on the server or group of servers.
This chapter provides information to help you get started using CountDown. It
includes the following sections:
• Operating System and Hardware Requirements
• Installing Optional Hardware
• Connecting the Application Key
• Setting Up Server Connections
• Installing CountDown
• Starting CountDown
• Getting Information about CountDown
Page 18

Chapter 1 Getting Started
Operating System and Hardware Requirements
Operating system and hardware requirements are listed in the AirSpeed
CountDown Release Notes. For the latest information on requirements, visit
http://www.avid.com/products.
A serial ports expansion card adds RS-422 serial ports to a PC and is required
to connect the PC to one or more AirSpeed servers. This version of
CountDown supports the Digi multiport 422 card, manufactured by Digi
International, Inc. (www.digi.com). For specific model numbers, see the
CountDown release notes. Follow the manufacturer’s instructions for
installing the card in the PC.
To configure the PC to use the expansion card, make sure the VDCP Flow
Control option is selected. See “Configuring Server Preferences” on page 40.
18
Page 19

Installing Optional Hardware
Optional hardware includes a digital input/output card and a programmable
keypad.
Installing an Input/Output Card
If you want to use GPI controls with CountDown, you need to install a digital
input/output card. This version of CountDown supports cards manufactured by
ACCES I/O Products, Inc. (www.accesio.com). For specific model numbers,
see the CountDown release notes. Follow the manufacturer’s instructions for
installing the card in the PC.
For instructions on configuring CountDown for GPI control, see “Configuring
External Control” on page 43.
Installing a Programmable Keypad
This version of CountDown supports the X-keys™ programmable keypad,
manufactured by P.I. Engineering, Inc. (www.xkeys.com). For specific model
numbers, see the CountDown release notes.
Installing Optional Hardware
To install the X-keys keypad, plug it into a USB port.
For instructions on configuring CountDown to use the keypad, see
“Configuring External Control” on page 43.
19
Page 20

Chapter 1 Getting Started
Connecting the Application Key
The application key, commonly referred to as a dongle, allows CountDown to
run on your system. You need to connect the application key before you can
run the application. If your system has USB ports in the front and in the rear,
Avid recommends that you connect the application key to a USB port at the
rear of the system.
Setting Up Server Connections
20
This section describes basic configurations for using CountDown with one to
five AirSpeed servers.
Page 21
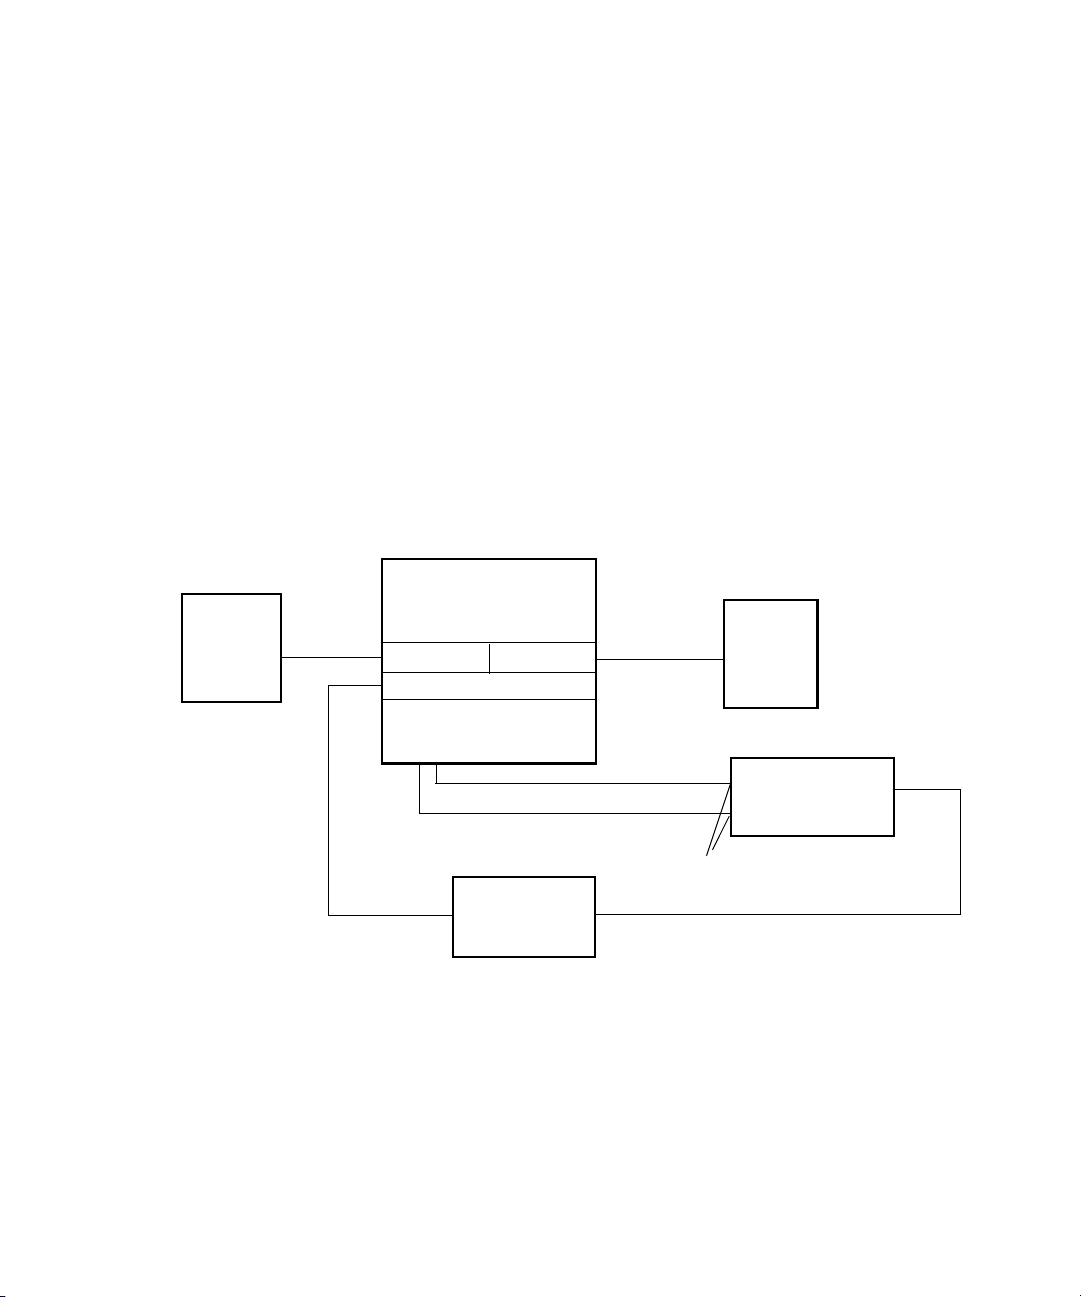
Connecting to a Single Server
In this basic two-channel configuration, the CountDown PC controls two
channels on a single server. The PC has three connections to the server: two
remote control connections and a network connection. The remote control
connections require two COM ports on the CountDown PC.
PC COM ports use RS-232 standards, and the Remote serial ports on the
server use RS-422 standards. To enable commu8nication between the PC and
the server, the CountDown PC requires a serial ports expansion card and serial
cables (see “Operating System and Hardware Requirements” on page 18).
This configuration includes an optional GPI device and an optional X-keys
keypad. The GPI device connects to an ACCES I/O card. The X-keys keypad
connects to a USB port.
Setting Up Server Connections
GPI device
(optional)
CountDown PC
USBDigital I/O
Ethernet Connector
Serial Ports Expansion
Card (RS-422)
Ethernet Switch
X-keys
keypad
(optional)
AirSpeed Server
RS-422 ports
(labeled Remote)
21
Page 22
Chapter 1 Getting Started
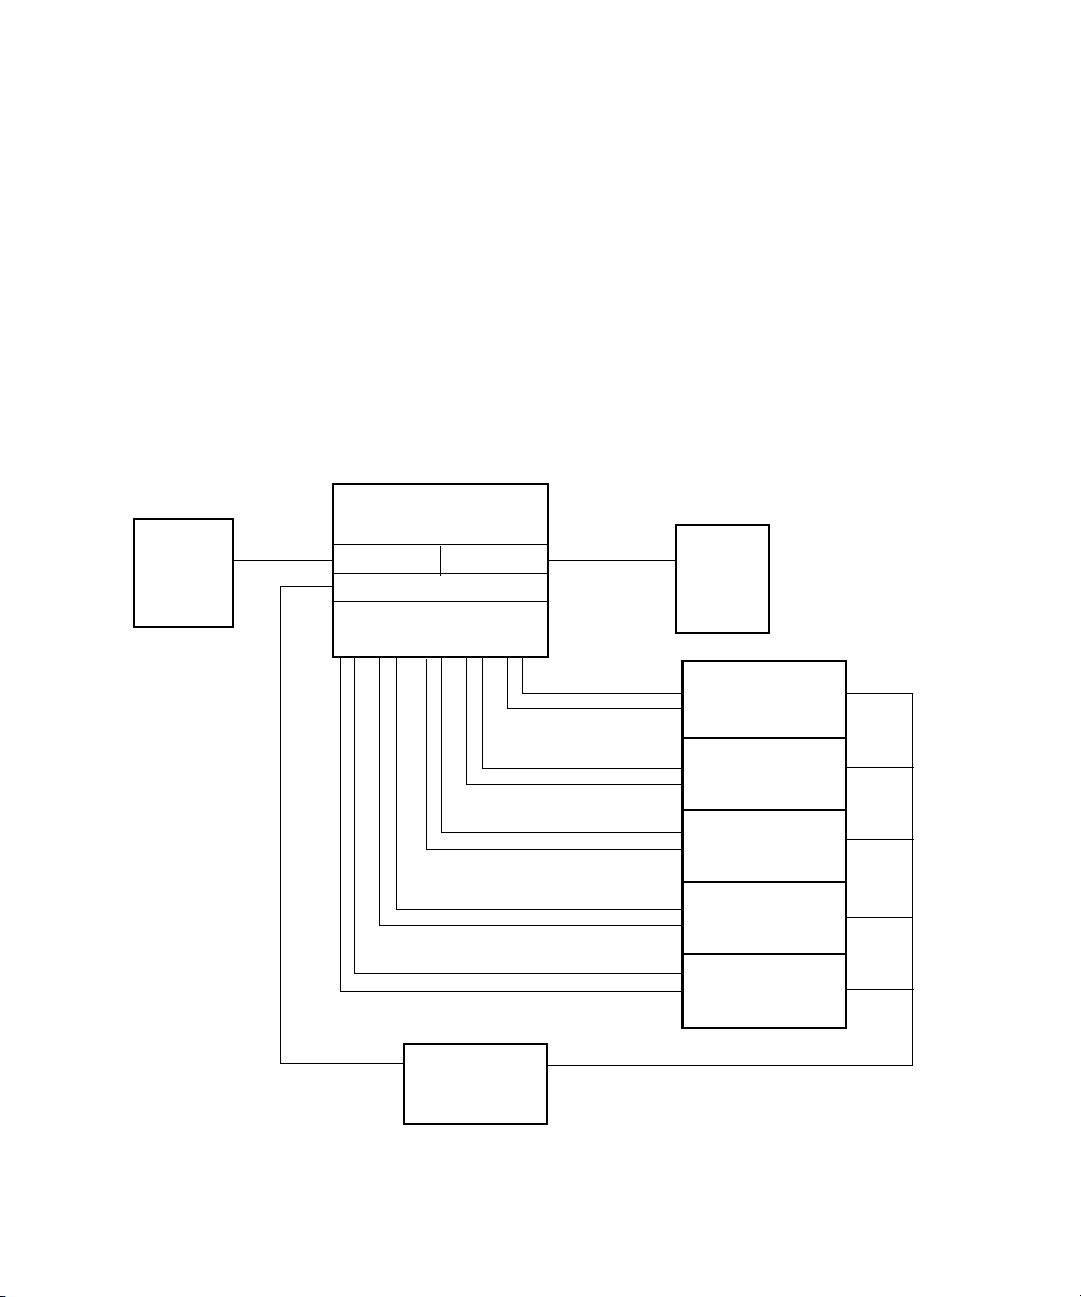
Connecting to Multiple AirSpeed Servers
In this configuration, the CountDown PC uses up to ten channels to
communicate with a maximum of five AirSpeed servers. The PC has two
remote control connections to each server and a network connection. Because
each remote control connection uses a COM port, this configuration requires a
serial ports expansion card and serial cables (see “Operating System and
Hardware Requirements” on page 18).
This configuration includes an optional GPI device and an optional X-keys
keypad. The GPI device connects to an ACCES I/O card. The X-keys keypad
connects to a USB port.
GPI device
(optional)
CountDown PC
USBDigital I/O
Ethernet Connector
Serial Ports Expansion
Card (RS-422)
Ethernet Switch
X-keys
keypad
(optional)
AirSpeed
Server 1
AirSpeed
Server 2
AirSpeed
Server 3
AirSpeed
Server 4
AirSpeed
Server 5
22
Page 23
Installing CountDown
To install the AirSpeed CountDown software, locate and run the CountDown
installer application on the CountDown CD-ROM.
Starting CountDown
To start CountDown, do one of the following:
t Select Start > All Programs > Avid > AirSpeed > AirSpeed CountDown.
t Double-click the CountDown shortcut on the desktop.
After you have created a playlist or shotbox file, you can also start
CountDown by double-clicking the file in any directory window (such as from
the Windows Explorer) or on the desktop.
Getting Information about CountDown
Installing CountDown
To get information about your CountDown installation:
t Select Help > About AirSpeed CountDown
The screen shows you the license number and other information.
CountDown includes a Help system with all the information contained in this
user’s guide. The hypertext Help system includes a full-text search, as well as
a table of contents and index.
To access CountDown Help:
t Select Help > AirSpeed CountDown Help.
For more information about using Help, select the Using Help topic in the
Help Contents.
23
Page 24

Chapter 1 Getting Started
24
Page 25

Chapter 2
Setting Up CountDown
This chapter provides instructions for configuring CountDown software. It
contains the following sections:
• Establishing Communication Between CountDown and AirSpeed
• Configuring User Preferences
• Configuring External Control
• Configuring Logging and Security Features
• Understanding the Status Displays
Page 26

Chapter 2 Setting Up CountDown
Establishing Communication Between CountDown and AirSpeed
This section describes how to set up CountDown to communicate to one or
more AirSpeed servers.
Before You Begin
You can configure CountDown for up to ten channels: two channels for each
of five servers. You can configure these channels to suit your requirements by
assigning the following functions:
• Channels A, B, C, and D can be used for playback or browsing.
• Channels E, F, G, and H can be used for playback, browsing, or mirroring.
• Channels I and J cannot be used for playback or mirroring but can be used
for browsing or emergency channel assignment.
For each unit in the studio, you need to establish both IP (network) and
RS-422 (serial) communication. CountDown uses the network for media
inventory management, browsing, and editing of events. It uses RS-422
communication for playout control.
Communication Information
Before you configure CountDown software, make sure you have the following
information:
• The IP address or hostname for each server to be controlled. You can get
this information from the AirSpeed by clicking Setup > Network.
• (Optional) A display name for each server, which will appear in the user
interface.
• The VDCP port numbers for each server.
VDCP (Video Disk Communication Protocol) is an industry standard for
controlling video file servers. Each Remote serial port on the server is
assigned a VDCP port number. Currently Play 1 is assigned VDCP Port 2
and Play 2 is assigned VDCP Port 3.
You can set the VDCP port to 0, which grays out the COM port. This
setting prevents you from using the channel for playout, but with the
network connection set, you can use the channel to browse or edit.
26
Page 27

Server Functions
Establishing Communication Between CountDown and AirSpeed
• For each channel, the COM (serial) port number on the PC and the
corresponding VDCP port number on the server.
You specify this information in the Studio Configuration dialog box.
You can assign one of the following functions to an AirSpeed server:
• Not Used: CountDown is not connected (default setting).
• Playback: Provides one or two channels of normal transmission playback.
• Browser: Provides dedicated network control for browsing and editing
clips, using a video monitor connected to an AirSpeed server. This feature
does not require an RS-422 connection.
• Mirroring: Provides a means to switch playout from a primary server to a
standby server. CountDown. Mirroring is available only on the AirSpeed 3
and AirSpeed 4 tabs in the Studio Configuration dialog box. Mirroring is
limited to the following configuration:
- Channels A and B (AirSpeed 1) are mirrored by Channels E and F
(AirSpeed 3)
- Channels C and D (AirSpeed 2) are mirrored by Channels G and H
(AirSpeed 4)
In this case, AirSpeed 1 and AirSpeed 2 function as main or primary
servers, and AirSpeed 3 and AirSpeed 4 function as standby servers.
If you have two AirSpeed servers in a configuration, and you want to
mirror channels, you would set Channels A and B for playout, set
Channels C and D as unused, and set Channels E and F for mirroring.
For more information, see “Automatic Server Changeover” on page 30.
• Emergency Channel Assignment: If you have two or more AirSpeed
servers in a configuration, you can assign two channels for manual
changeover or “hot swapping.” This function can be assigned only to
Channels I and J. To assign this function, select the AirSpeed 5 tab in the
Studio Configuration dialog box, select Playback, and select the Enable
Automatic Channel Failover Protection option.
For more information, see “Performing Emergency Channel Assignment”
on page 31.
27
Page 28

Chapter 2 Setting Up CountDown
Configuration Example
The following table shows a typical configuration:
Display
Hostname
studio001 AirSpeed 1 Playout A 2 COM 1
studio002 AirSpeed 2 Playout C 2 COM 3
studio003 AirSpeed 3 Mirroring E 2 COM 5
studio004 AirSpeed 4 Mirroring G 2 COM 7
studio005 AirSpeed 5 Browsing I 2 COM 9
Name Usage Channel VDCP Port COM Port
B3 COM 2
D3 COM 4
F3 COM 6
H3 COM 8
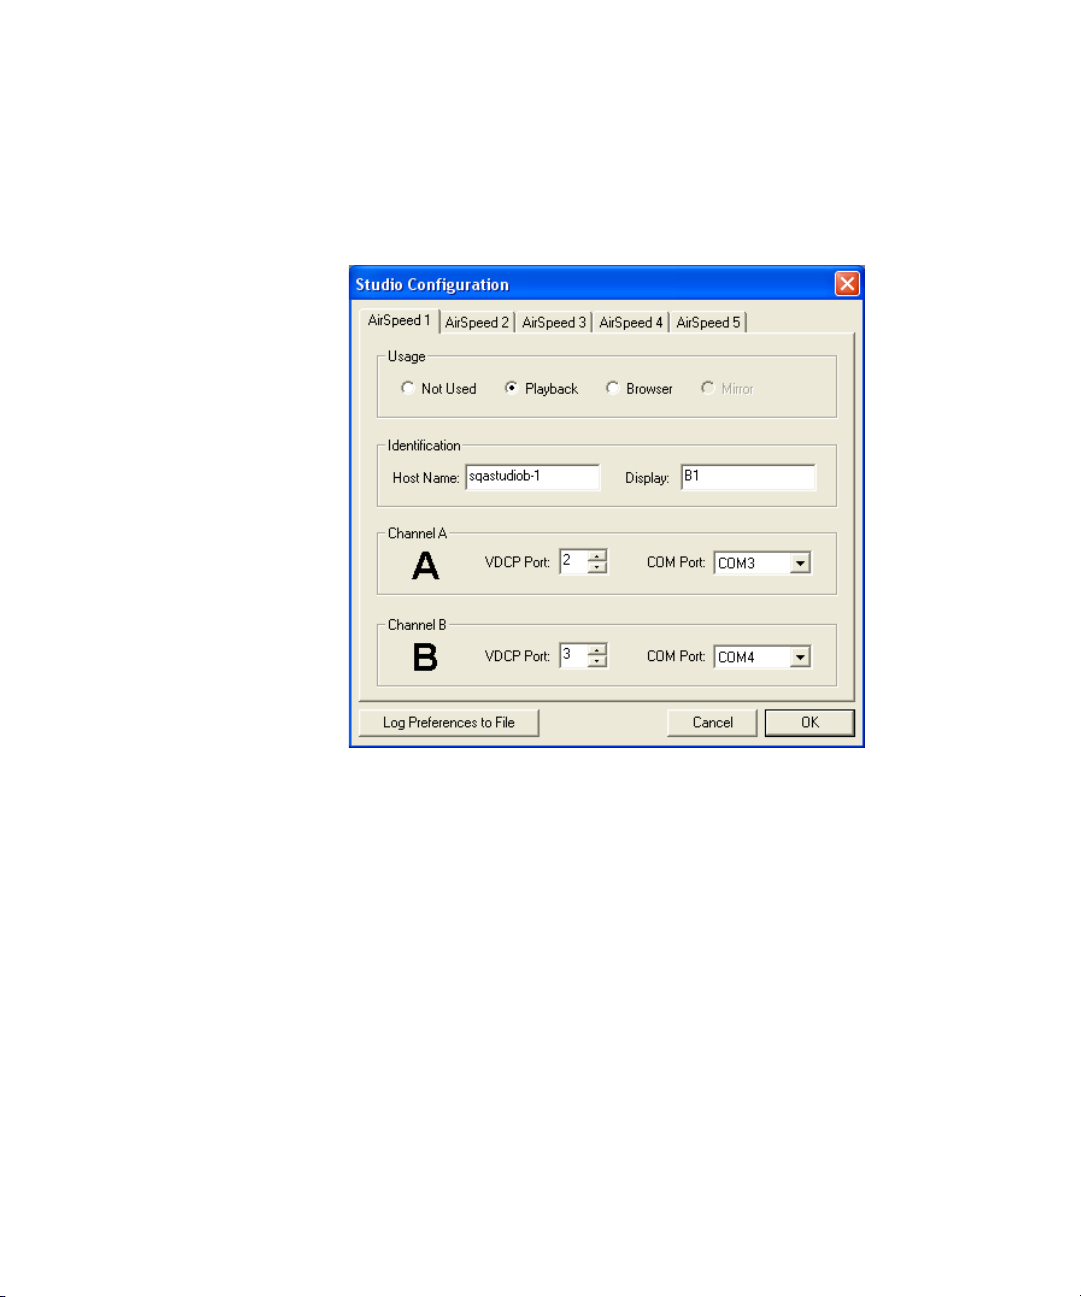
Configuring the Servers and Channels
You use the Studio Configuration dialog box to provide information and
assign functions to each server. Each server is assigned a tab. Tabs crosscommunicate to make sure there are no conflicts between COM ports, which
need to be uniquely assigned. However, you are allowed to specify the same
VDCP port numbers on different tabs, because currently each AirSpeed server
uses the same hard-coded VDCP connections.
See “Before You Begin” on page 26 for information you need for configuring
the servers and channels.
28
J3 COM 10
Page 29
Establishing Communication Between CountDown and AirSpeed
To configure servers and channels:
1. Select Tools > Studio Configuration.
The Studio Configuration dialog box opens.
2. Click the AirSpeed 1 tab.
3. In the Usage box, select the function for this server.
4. Enter the host name or IP address for the server.
5. (Optional) Enter the display name for the server. If you leave this field
blank, CountDown displays the host name or IP address.
6. Enter the VDCP port and COM port.
7. Configure the remaining AirSpeed servers.
8. Click OK.
A dialog box warns you that the application will shut down.
9. Click Yes.
10. Restart the application.
29
Page 30

Chapter 2 Setting Up CountDown
Automatic Server Changeover
If CountDown detects a problem with a channel on a primary AirSpeed server,
it automatically switches control of that channel to the mirroring channel on
the standby server (called a server changeover). It also displays a warning
message alerting you of the changeover and changes the indicator lights in the
status bar (see “Understanding the Status Displays” on page 51). The channels
listed in the playlist do not change.
n
CountDown will not reassign the original server as the primary server after
that server becomes fully functional again. You must make the reassignment
manually by selecting Studio > Changeover.
CountDown checks if the media is available on both servers. If the media is
available on the primary server but not on the standby server, CountDown
displays the Playout mode icon in the playlist window as half green and half
red.
Manually Performing a Server Changeover
CountDown allows manual switching of playout from a primary AirSpeed
server to the standby AirSpeed server and from the standby server to the
primary server.
To perform a server changeover:
1. Select Studio > Changeover.
When the channels on the primary server are in use, checkmarks appear in
front of the menu items.
2. Select the channel on the primary server that you want to switch. For
example, select Channel A Main to switch the playout of channel A to the
corresponding channel (Channel E) on the standby AirSpeed server.
30
No checkmark appears in front of the channel that has been switched. In
the status bar, the main server indicator changes to red and reads STBY.
The mirrored server changes to green, yellow, or red (depending on the
network and VDCP status) and reads MAIN.
Page 31

Establishing Communication Between CountDown and AirSpeed
The channels listed in the playlist do not change. CountDown checks if the
media is available on both servers. If the media is available on the primary
server but not on the standby server, CountDown displays the Playout mode
icon in the playlist window as half green and half red.
Performing Emergency Channel Assignment
If your configuration includes two or more AirSpeed servers, you can
configure channels I and J for emergency channel assignments (see “Server
Functions” on page 27).
To perform an emergency channel assignment:
1. Select Studio > Emergency Channel Assignment.
The Emergency Server Assignment dialog box opens.
2. Select the channel for which you want to reassign playout. You can
reassign playout for either one or two failed channels. For example, you
can reassign playout from failed channel A to channel I.
3. Click OK.
Playout is reassigned to the channels you selected. In the status bar, the failed
channel turns red and displays the channel that replaces it. For example, if
channel I takes the place of failed channel A, the Port A indicator turns red and
displays the characters I > A.
31
Page 32

Chapter 2 Setting Up CountDown
Viewing the Configuration
CountDown provides you with a visual representation of your configuration.
You can use this as an aid to troubleshooting, by determining which COM port
is assigned to which channel.
To view the configuration:
t Select Tools > Show Configuration.
32
Page 33

Configuring User Preferences
User preferences include setting defaults and enabling functionality for
playlists, shotboxes, and media events on an AirSpeed server.
This section provides instructions for the following:
• Configuring Playlist/Shotbox Preferences
• Configuring the Appearance of a Playlist
• Configuring Server Preferences
For information about configuring the MOS Interface, see “Configuring
CountDown to Use MOS” on page 118.
Configuring User Preferences
n
CountDown does not allow access to the Preferences dialog box while a
playlist or shotbox is on air.
Configuring Playlist/Shotbox Preferences
You configure preferences for Playlist and Shotbox functionality on the
Playlist tab in the General Preferences dialog box.
To configure Playlist or Shotbox preferences:
1. Select Tools > General Preferences.
The General Preferences dialog box is displayed.
2. Click the Playlist tab.
33
Page 34

Chapter 2 Setting Up CountDown
3. Select the options you want, as described in the following table.
4. Click OK.
Playlist/Shotbox Options
Option Description
Allow Playlist/Shotbox Editing Enables editing of playlists and shotboxes. (Not selected by default)
Follow-on As Default Sets CountDown to automatically assign the Follow on Playout mode to
events you drag into a playlist. For more information, see “Assigning
Event Playout Mode” on page 91. If this option is not checked,
CountDown automatically assigns the Manual Playout Mode.
34
Page 35

Configuring User Preferences
Playlist/Shotbox Options (Continued)
Option Description
Automatically Assign Channels Sets CountDown to automatically re-assign channels when changes are
made to the playlist. If you enable this option, the Ellipsis button next to
it is enabled. Click this button to select the channels to be used in the
playlist. The first channel in the playlist is always the first channel
selected in the channel assignment. Each time the playlist is modified,
the channel assignment is adjusted accordingly.
This option also applies to changes downloaded to the playlist by an
NRCS (Newsroom Computer System). For more information, see
“Enabling Channel Auto-Assignment” on page 124.
Display Count Up Time The CountDown playlist window features two time displays (rundown
clocks). See “Going On-Air” on page 103 for more information.
The left display always shows time remaining for the item currently
playing on-air.
The right display shows either time remaining for the entire playlist (the
default) or the time elapsed for the item currently playing on-air.
To have the right display show elapsed time for the current item, select
the Display Count Up time check box.
Return Key Enabled Lets you press the Return key to select the next event to play when a
playlist is on air.
Spacebar Enabled Lets you press the spacebar to select the next event to play when a
playlist is on air.
ABCD... Enabled Lets you press a channel-specific key to select the next event to play
when a playlist is on air. Use this option if you have multiple playlists,
each of which is assigned to a specific channel. Pressing A will play the
next event on the A playlist, pressing B will play the next event on the B
playlist, and so on CountDown lets you play out on channels A through
H. This option does not apply to multichannel playlists.
Double-click Opens Clip Editor Sets double-click to open an item in the Clip Editor at any time, both
on-air and off-air. By default, when a playlist is on-air, double-clicking
cues the item clicked.
Holding down the Alt key when double-clicking in an on-air playlist
will reverse the selected action. For example, if the default setting is
used, double-clicking will cue the item and Alt+double-clicking will
display the clip editor.
35
Page 36

Chapter 2 Setting Up CountDown
Playlist/Shotbox Options (Continued)
Option Description
Autoscroll On-Air List When a playlist contains more media events than the playlist window
can display, ensures that the event currently playing and, when possible,
the cued event are always visible.
Delete Items After Playout By default, CountDown retains an event in a playlist after it has been
played to air. To set CountDown to delete events after playing them to
air, select this option. Deleting items from the playlist does not delete
items from the server.
If this option is selected, it is not possible to include looping events in a
playlist.
Re-cue on Move or Insert By default, if you drag or paste a media event into the playlist, even if
you place it directly after the event that is currently on-air, CountDown
adds the event to the list but does not cue the event. Select this option if
you want to enable automatic cuing of such an event.
By default, when a placeholder immediately follows a playing event in
a playlist, CountDown does not cue the placeholder. This is because
there is no corresponding media on the AirSpeed server so it is not yet
playable. If, while the preceding event is playing, the placeholder’s ID
is created and media is recorded before the preceding event is within
one second of finishing playout, CountDown cancels the event’s
placeholder status and cues it, allowing it to be played out next. Select
this option to enable automatic cueing of placeholders.
Auto-Activate Clock Event Lists Enables CountDown to put a list containing time-of-day events on-air
five seconds before the scheduled playout time of the first time-of-day
event. It also cues it and plays it at the scheduled time. CountDown
plays activated lists on only a single channel—the channel the first
time-of-day event is assigned to.
See “Setting an Event to Time-of-Day” on page 92.
Played items cannot be re-cued Specifies that items that have already played to air (shown as a darker
grey highlight) cannot be cued again for playout. You can override this
setting by holding down the Alt key when cueing the item.
Interactive Locator enabled Enables the Interactive Locator in the Playlist Clip Editor. This control
allows users to scrub through a media event quickly, providing nearinstant access to any part of the event. For more information, see
“Editing Events” on page 97.
36
Page 37

Configuring User Preferences
Playlist/Shotbox Options (Continued)
Option Description
Skip Items not Available on Server Passes over items in the playlist that are not available on the server.
These items include placeholders that have not been updated and events
that are not online. Events not online are indicated by a red icon in the
playlist.
Shift + ESC terminate playout Enables pressing Shift + Esc to end playout of the playlist.
Automatic Played Item Eject Sets a delay that determines how long the last frame of a clip is held on
the channel before the next item is cued. When using clips that are less
than 10 seconds in duration, specify a value that is less than the duration
of the events in the playlist. For example, when using clips that are five
seconds in duration, specify the value to any positive integer less than
five. Using the smallest value (1 second) seems to have the best results
when using short-duration clips.
Eject Previous Events Stops an item that continues to play after a new item is sent to air. For
example, a two-minute clip is playing in channel A, and after one
minute you play the next item to air on channel B. The clip on channel
A would continue to play for the remaining minute, unless you
manually stop it. If you set the Eject Previous Item time greater than
zero, any events that continue to play after you play the next item to air
are stopped automatically after the selected time interval has elapsed.
Placeholder Updating Determines how quickly placeholders are checked against the server.
Select the Immediate button (the button furthest left) unless a playlist
has more than 100 placeholders.
Log Preferences to File Click this button to name and save a preferences file. This log is for
support only; you can send it to customer support when reporting an
error or verifying the configuration.
37
Page 38

Chapter 2 Setting Up CountDown
Configuring the Appearance of a Playlist
You configure preferences for the appearance of a playlist on the Appearance
tab in the General Preferences dialog box.
To configure the appearance of a playlist:
1. Select Tools > General Preferences.
The General Preferences dialog box is displayed.
2. Click the Appearance tab.
38
3. Select the options you want, as described in the following table.
4. Click OK.
Page 39

Configuring User Preferences
Playlist Appearance Options
Option Description
Highlight Colors Lets you set the preferred color to indicate the status of the media
events in on-air playlists. By default, playing events are red, cued
events are green, and events that fail to play are yellow.
To change the status indication color:
1. Click the status color box to be changed.
The Windows color pallet appears.
2. Select the color by clicking the appropriate colored box.
3. Click OK.
Playlist Lets you set the appearance of the playlist text. A playlist can show
icons indicating the type and status of events (standard mode) or
simple text-based displays (text-only mode). The text-based display
allows more events to be shown in the playlist window than when
using the icons. If you increase the font size, you can use this mode
to view a playlist from across a room.
To change the playlist appearance:
1. Click the desired Playlist Mode radio button: Standard or Text
Only
If you select Text Only, the text characteristics are displayed in
the Font, Style and Size status areas. To change any aspect of the
text click the Change button.
2. Click OK.
A dialog box asks if you want to quit CountDown so that your
changes will take effect.
3. Click Yes to proceed.
4. Restart CountDown.
Select Emphasize Offline Items if you want details for offline events
to be displayed in red. Events might be offline if they do not exist on
the server or VDCP communication with the channel has been lost.
Server Lets you set the appearance of the media list text. Click the Change
button. To change the media list text display, click the Change
button.
39
Page 40

Chapter 2 Setting Up CountDown
Playlist Appearance Options (Continued)
Option Description
Printing Lets you set the font of a printed playlist or media inventory. To
change the printing font, click the Change button.
Auto-Arrange Windows Enables automatic arrangement of CountDownwindows whenever
you open or close a window. You can still arrange windows
manually at any time. You can also select Window > Arrange
Windows to set the default arrangement.
Log Preferences to File Click this button to name and save a preferences file. This log is for
support only; you can send it to customer support when reporting an
error or verifying the configuration.
Configuring Server Preferences
Server preferences include media-related functionality that affects the display
and handling of media events stored on an AirSpeed server. You configure
media-related functionality on the Server tab in the General Preferences dialog
box.
40
To configure media-related functionality:
1. Select Tools > General Preferences.
The General Preferences dialog box is displayed.
2. Click the Server tab.
Page 41

Configuring User Preferences
3. Select the options you want, as described in the following table.
4. Click OK.
Server Options
Option Description
Allow Media Deletion Lets you delete events from AirSpeed Studio.
Alert When Server Changes Enables an audible alert whenever AirSpeed server content
changes, such as when a media event is added, modified, or
deleted by direct recording, network transfer, or other user
activity.
Deleted Items Convert Playlist Entries to
Placeholders
By default, CountDown retains an event in a Playlist or Shotbox
even if the media for the event no longer exists on the AirSpeed
server. A red icon identifies such items as not available.
Select this option to convert the status of a deleted item to that of
a placeholder. Then, if the deleted item is subsequently restored,
possibly in a modified form, CountDown updates the details (title
and duration) of the item in the playlist at the same time as it
restores the item’s online status.
41
Page 42

Chapter 2 Setting Up CountDown
Server Options (Continued)
Option Description
Automatically Update Playlist Entries if
Server Changes
By default, when media on the AirSpeed server changes, a
corresponding media event in a Playlist or Shotbox does not
reflect the change.
Select this option to enable automatic updating of media events
for AirSpeed media changes.
Sort Order is Case Sensitive By default, CountDown sorts the events in the media list
regardless of case.
Select this option to set CountDown to sort the events by upper
case first and lower case last.
Automatically Show Media List Enables CountDown to automatically display the media list after
establishing a network connection.
Automatically Sort Media List Enables CountDown to automatically re-sort the media list when
items are added or updated.
VDCP Flow Control Select this option when using a serial ports expansion card.
Deselect this option if you have problems getting non-standard
serial connections to operate.
Log Preferences to File Click this button to name and save a preferences file. This log is
for support only; you can send it to customer support when
reporting an error or verifying the configuration.
42
Page 43

Configuring External Control
You can set up CountDown to work with the following external controls:.
• GPI input and output: You can configure CountDown to perform
functions triggered by GPI inputs and trigger other devices to perform
certain functions using GPI outputs. GPI control requires installation of
the ACCES I/O card. See “Installing an Input/Output Card” on page 19.
• X-keys keypad: You can configure CountDown to perform functions
through the X-keys keypad. See “Installing a Programmable Keypad” on
page 19.
You can also assign CountDown functions to the keyboard’s function keys and
the numeric keypad.
To set up a GPI device or keypad, follow these general steps:
1. Install and connect the required hardware and software (see “Installing
Optional Hardware” on page 19).
2. Start CountDown. The external device must be connected before you start
the CountDown application.
Configuring External Control
3. Configure External Control functions (see “Configuring External Control
Preferences” on page 43).
4. Customize the device (see “Customizing External Control Functions” on
page 45).
5. Enable the device (see “Enabling and Disabling the External Device” on
page 48).
6. For GPI, assign GPI triggers to events (see “Assigning GPI Output
Triggers to Events” on page 96).
Configuring External Control Preferences
You configure preferences on the External Controls tab in the General
Preferences dialog box.
To configure external control preferences:
1. Select Tools > General Preferences.
The General Preferences dialog box is displayed.
43
Page 44

Chapter 2 Setting Up CountDown
2. Click the External Control tab.
3. Select the options you want, as described in the following table.
4. Click OK.
5. For changes to take effect, restart CountDown.
External Control Preferences
Option Description
I/O card identification Provides the name of the installed I/O card.
GPI Input Configuration - Automatic Playlist
Updating
GPI Output Configuration Settings for a GPI device (X-keys keypad)
Pulse Duration Sets the pulse duration (in milliseconds) for GPI outputs,
44
Not currently implemented.
Page 45

Configuring External Control
External Control Preferences (Continued)
Option Description
Playlist Colors Determines the color applied to playlist events to indicate the
status set by the GPI.
Turn On Turn Off Toggle Pulse
X-keys Debounce Determines the length of the delay between valid button
presses on the X-keys keypad. Increase this setting (up to 1
second) to avoid inadvertent key presses.
Log Preferences to File Click this button to name and save a preferences file. This
log is for support only; you can send it to customer support
when reporting an error or verifying the configuration.
Customizing External Control Functions
After you have installed and configured preferences for the external device,
you need to customize how you are going to use it.
To customize external control functions:
1. Select Tools > Customize External Controls.
The AirSpeed CountDown Customization dialog box is displayed.
45
Page 46

Chapter 2 Setting Up CountDown
2. Select the options you want, as described in the following table.
3. Click Clear All to remove all settings.
4. Click Restore Defaults to restore the default settings.
5. When you are done, click OK.
External Control Customization Settings
Option Description
Function Select the function for the external device
Play Next Event Starts playing the event that is currently in a cued state. This
function has the same effect as clicking the Next button in the
playlist.
Play Next Event if Idle Starts playing the event that is currently in a cued state. In this
case, no action occurs unless the current event has finished
playing. This function has an effect similar to clicking the Next
button in the playlist.
Pause Current Event If there is an event playing, pauses the event. If the event is
already paused, playout continues.This has the same effect as
clicking the Freeze button in the playlist.
Eject Current Event Immediately ends playout of the current event. This has the same
effect as clicking the Eject button in the playlist.
Recue Current Event Cues the event that is currently playing as the next event. Playout
of the event is not affected and will continue normally.
Recue Current Event Immediately Stops the currently playing event and cues it as the next event.
Cue Next Event If an event is in a cued state, cues the event that follows it.
Cue Previous Event Cues the item immediately prior to the event that is currently
cued. If the event that is currently cued is the one below the
transmission bar, then the event currently playing is the event that
is cued.
Cue Previous Event and Cue First Event will have no effect
n
if the Delete Items After Playout option is selected as there
will be no items prior to the current event. For more
information, see “Configuring Playlist/Shotbox
Preferences” on page 33.
Cue First Event Cues the first event in the playlist.
46
Page 47

Configuring External Control
External Control Customization Settings (Continued)
Option Description
Move Cursor Up Moves the cursor up one item in the playlist.
Move Cursor Down Moves the cursor down one item in the playlist.
Cue Selected Event Cues the event on which the cursor is resting.
command (Channel Specific) For dedicated channel-specific playlists. If you select one of these
commands, click the Channels button, and the Assign Channels
dialog box opens. Select the channel to which you want to assign
the command and click OK. The channels you selected appear on
the button.
Shotbox Items 1-10 Has the same effect as clicking one of the shotbox buttons. Plays
the item if one-shot play is selected (see “Enabling One Shot
Operation” on page 147.
Tally Input Changes the Playlist control bar to red when CountDown receives
an external tally signal, for example, from a vision switcher, and
sets the playlist in the On-Air state (similar to a tally light).
Online Control Not currently implemented.
Keystroke Assigns a key on the keyboard to the selected function.
Keystrokes include function keys F1 - F12, shifted function keys,
and numbers on the numeric keypad.
Xkey Assigns the selected function to a button on the X-keys keypad
(1–20).
GPI Assigns the selected function to a GPI input (1–8).
Viewing Customizations
To view a graphical representation of the external controls:
1. Select Tools > View Customization.
2. Select the external controls you want to view: Function Keys, Numeric
Keypad, GPI, or X-keys.
A graphical representation of your customization is displayed.
3. To close the window, click the Close button.
47
Page 48

Chapter 2 Setting Up CountDown
Printing Customizations
To print a graphical representation of the external controls:
1. Select Tools > View Customization and select the external controls you
want to print.
2. Click the window.
3. Select File > Print selected_controls.
Enabling and Disabling the External Device
To enable or disable an external device:
1. Select Playlist > External Control.
2. Select GPI Inputs or External Keypad.
If a check appears before the device, the device is enabled. To disable the
device, select it again so that the check disappears.
You can also click the appropriate toolbar button.
GPIs Keypad
You can check the status of the external device by looking at the status display
at the bottom of the screen (see “Determining External Device Status” on
page 53).
Configuring Logging and Security Features
You configure preferences for logging and security features on the Logging
and Security tab in the General Preferences dialog box.
To configure logging and security features:
1. Select Tools > General Preferences.
The General Preferences dialog box is displayed.
2. Click the Logging and Security tab.
48
Page 49

Configuring Logging and Security Features
3. Select the options you want, as described in the following table.
4. Click OK.
Logging and Security Options
Option Description
Set Password Click this button to set password protection for the General
Preferences and Studio Configuration dialog boxes. If you
specify a password, and then select Tools > General
Preferences, a dialog box requires you to enter a password.
To disable password protection, click the Set Password button
and clear Enter Password and Confirm Password fields.
49
Page 50

Chapter 2 Setting Up CountDown
Logging and Security Options (Continued)
Option Description
Logging Specifies if you want CountDown to create a log file and
where you want to save it.
The log file name is autogenerated. For traffic logging, the file
name reflects the day and time the playlist was aired
For diagnostic logging, the file name reflects the day and time
the file was created. For example, a file titled Wed121725
was created on a Wednesday at 12:17:25.
You need to set the location where the log file will be created
and restart CountDown for changes to take effect.
Traffic Traffic logging provides a record of all events that CountDown
has attempted to play to air. Each log entry indicates the
following:
• The channel on which CountDown attempted to play the
event
• The time of day at which CountDown attempted to play
the event
• Whether the playout was successful
You can select to print the log as Formatted Text, Tab
Separated, or Comma Separated. Tab Separated or Comma
Separated logs are formatted for import into a spreadsheet.
Diagnostic Diagnostic logging provides a detailed log of internal
CountDown operations. This log file can assist Avid support
staff in diagnosing playout and communication problems
between CountDown and an AirSpeed server.
Do not enable diagnostic logging unless a member of
c
Avid’s support staff has advised you to do so.
Auto Recovery Enables CountDown to recover following an abnormal
termination.With Auto Recovery activated, essential Playout
information is saved at regular intervals and can be used to
recreate the on-air state prior to any abnormal termination
Enter the desired automatic save interval (in seconds) in the
Interval box, or use the UP and DOWN arrows to select a
value.
50
.
Page 51

Understanding the Status Displays
When CountDown runs, it also monitors the state of the network and serial
connections to the AirSpeed server. CountDown establishes network and serial
port connections as it starts up and, unless a problem with either the network
or any serial ports occurs, it remains connected until shut down.
Determining Network Status
CountDown checks the network status of the servers at frequent and regular
intervals. If a problem is detected, CountDown closes the network connection
and attempts to reopen it. CountDown displays the status of the network on the
status bar at the top of the Media Summary list.
Understanding the Status Displays
CountDown uses the following colors to indicate the status of the network
connection:
• Green— Good connection. Bright green indicates a server configured for
playback and pale green indicates a server configured for browsing. A
browser channel turns bright green when in use.
• Yellow—The network connection is lost.
Determining Server Status
The status of the four controlled servers is displayed on the status bar at the
bottom of the CountDown window. CountDown uses four colors to indicate
the status:
• Green—The server is connected through both the network and VDCP
ports. The servers are labeled MAIN or, in a mirrored configuration,
STBY.
• Red—The VDCP connection for either channel of the server is lost.
51
Page 52

Chapter 2 Setting Up CountDown
• Yellow—The network connection for the server is lost.
• Gray—No corresponding AirSpeed server is configured.
In a mirrored configuration, after a server changeover, the main server
indicator changes to red and is labeled STBY. The mirrored server changes to
green, yellow, or red (depending on the network and VDCP status) and is
labeled MAIN.
For more information, see “Automatic Server Changeover” on page 30.
Determining Serial Port Status
The status of the serial connections is displayed on the status bar at the bottom
of the CountDown window.
52
n
CountDown uses four colors to indicate four types of status for serial ports:
• Green—Good connection.
• Red—CountDown has tried to establish a VDCP connection with the
AirSpeed server but failed. Make sure that the AirSpeed server has the
remote control protocol for each play channel set to VDCP or that a cable
is not disconnected.
If a serial port fails to open, an error dialog box appears.
If a Failed to Open Port message is displayed, make certain another
application is not already using the port.
Page 53

Understanding the Status Displays
• Yellow—Port has opened correctly but CountDown has made no attempt
to communicate with the AirSpeed server.
n
Yellow is seen when an offline CountDown PC is switched online. Yellow
remains only briefly.
• Gray—The port is not in use by CountDown.
If communication on any of the connections fails and is restored, CountDown
reopens the port and establishes communication.
Determining Emergency Channel Assignment Status
In case of an emergency channel assignment, the failed channel turns red and
displays the channel that replaces it. For example, if channel I takes the place
of failed channel A, the Port A indicator turns red and displays the characters
I>A.
Determining External Device Status
If external control devices are connected, CountDown displays their status in
the status bar at the bottom of the CountDown window.
CountDown uses three colors to indicate three types of status for the external
control devices:
• Green—The device is connected and enabled.
• Red—The device is connected but not enabled.
• Gray—The device is not connected
53
Page 54

Chapter 2 Setting Up CountDown
54
Page 55

Chapter 3
Managing Media Events
This chapter describes how to manage media events on an AirSpeed server. It
contains the following sections:
• Displaying the Media List
• Displaying Media Event Details
• Modifying Media Event IDs and Titles
• Searching for Media Events
• Updating the Media Information
• Deleting Media Events from AirSpeed
• Protecting Events from Deletion
• Browsing Media Events
• Showing Storage Availability
Displaying the Media List
You can display the media list whenever you need it, or display it
automatically whenever you start CountDown.
To display the media list, do one of the following:
t Select Studio > List Media.
t Click the List Media button on the CountDown toolbar.
t Type CTRL-L.
The list of media events on the AirSpeed is displayed in the Media Summary
window.
Page 56

Chapter 3 Managing Media Events
To display the media list automatically:
1. Select Tools > General Preferences.
2. Click the Server tab.
3. Select Automatically Show Media List.
4. Click OK.
Network Status Lights
CountDown uses status lights at the top of the media list to indicate the state of
the network connection. There is one light per server. The name displayed on
the light is the name you set when establishing communication with the server
(see “Configuring the Servers and Channels” on page 28). For more
information about the network status, see “Determining Network Status” on
page 51.
Even if the network is down, you can still work with a playlist, but without a
network you cannot keep track of new items as they arrive on the server.
56
Page 57

Media Availability
Displaying the Media List
The AV (Availability) column shows the availability of a single piece of media
on the server. There can be up to five columns of indicator lights, depending
on the number of servers in your configuration.The order of the lights matches
the order of the servers listed in the network status area. CountDown uses
three colors to indicate the availability of media events on the server:
• Green: The event is available on the specific server
• Blue: The event is available and protected from deletion
• Red: The event is not available on the specific server
If you use Avid Unity shared storage, you might see events automatically
made available (indicator lights will change from red to green). An event
becomes available when at least the first 10 seconds of the clip reside on the
server.
If media is removed from one server, CountDown changes the indicator light
for that server to red. If media is removed from all servers, CountDown drops
the event from the list.
n
If the AirSpeed server is configured for 8-characters IDs and media events
have IDs longer than 8 characters, their titles are shown in red. Events with
more than 31 characters are also shown in red. You cannot add these events to
playlists or shotboxes because they cannot be played on the AirSpeed using
VDCP protocol.
Sorting the Media List
CountDown lets you sort the media list by column data and in ascending or
descending order.
n
The way a media list is sorted depends on having case-sensitive sorting
enabled on the Server tab of the General Preferences dialog box. See
“Configuring Server Preferences” on page 40.
To select the criteria for sorting the media list:
t Click the column heading for the criteria you want to use for sorting.
CountDown highlights the selected column (sort field).
57
Page 58

Chapter 3 Managing Media Events
To toggle the sort order, ascending or descending:
t Click the column heading again.
Resizing Media List Columns
To resize a media list column:
t Click the bar between two column headings and drag the pointer right to
enlarge the column and left to shrink the column.
Rearranging Media List Columns
To rearrange the six columns in the media list:
t Click on the column heading and drag it to the desired location.
Restoring Media List Column Layout
To restore media list column layout to the default setting:
t Select Studio > Reset Columns.
Displaying Media Event Details
To show details about a media event:
1. Select the event in the media list.
2. Select Studio > Show Media Summary.
The Studio Summary dialog box opens.
The following illustration shows an event that is stored on all five
configured servers.
58
Page 59

Modifying Media Event IDs and Titles
Modifying Media Event IDs and Titles
You can change a media event ID (Video ID) or title associated with a media
event. These actions change the ID and title listed on the AirSpeed server.
Changing a Media Event ID
To change the ID of a single media event:
1. Select the item in the media list.
2. Do one of the following:
t Select Studio > Rename Media ID.
t Right-click and select Rename Media ID.
The Change Media Item ID dialog box appears.
59
Page 60

Chapter 3 Managing Media Events
3. Modify the ID in the Item ID text box.
4. Click OK to update the media event on the server.
A warning dialog box opens.
5. Click Yes to proceed with renaming the media item.
Changing a Media Event Title
To change the title of a single media event:
1. Select the item in the Media List.
60
2. Do one of the following:
t Select Studio > Rename Media Title.
t Right-click and select Rename Media Title.
The Change Media Item Title dialog box appears.
3. Modify the title in the Title text box.
4. Click OK to update the media event on the server.
Page 61

Searching for Media Events
To search for events in the media list, do one of the following:
t Use the Find Media dialog box.
See “Using the Find Media Dialog Box” on page 61 for more information.
t Click the Title column heading and type the first few letters of the title.
CountDown selects the first event whose title begins with those letters.
t Click the ID column heading and type the first few numbers or letters of
the ID.
CountDown selects the first event whose ID begins with those numbers or
letters.
Searching for Media Events
n
The speed at which you type letters for the keyword affects the search. If you
type consecutive letters with intervals of less than one second, CountDown
interprets the input as a single key word. If you type letters with longer than
one second intervals between keystrokes, CountDown interprets the following
letters as the beginning of a new keyword.
CountDown also displays the results of the search in the media list status bar
located at the bottom of the media list. The display shows the total items that
meet the criteria, the total items that do not meet the criteria (and are thus
hidden in the media list), and the ID of the selected clip.
Using the Find Media Dialog Box
The Find Media dialog box allows you to search for media events in the list
using several criteria.
To access the Find Media dialog box, do one of the following:
t Select Studio > Find.
t Click the Find Media button on the CountDown toolbar.
61
Page 62

Chapter 3 Managing Media Events
Searching Using the Find Media Dialog Box
You can search the media list by event ID, title, duration, or modification date.
You can search events using a single criterion or a combination of up to three
criteria. For instance, you can search for only events whose IDs start with
Event or search for events whose IDs start with Event, whose titles do not
include Test, and whose durations are less than 15 seconds.
To conduct a search:
1. Select ID, Title, Duration, or Modification Date from the first list box in
the Find Media dialog box.
2. Select the search parameter from the second drop-down list box. such as
contains, does not contain, is less than.
3. For ID, Title, and Duration criteria, type the character string that applies to
the search parameter needed to find the event.
For the Modification Date criteria, enter the date and time each in
appropriate text box.
62
Page 63

Searching for Media Events
4. To incorporate a second criterion in the search, do the following:
a. Select AND or OR. CountDown activates the second search level.
b. Repeat steps 1–3 for the second search level.
If AND is selected, CountDown searches for events that satisfy both
criterion. If OR is selected, CountDown searches for events that
satisfy either criterion.
5. To incorporate a third criterion in the search, do the following:
a. Select AND or OR for the second search level. CountDown activates
the third search level.
b. Repeat steps 1–3 for the third search level.
If AND is selected, CountDown searches for events that satisfy the
third criteria and the combination of the first two criterion. If OR is
selected, CountDown searches for events satisfying either the third
criterion or the combination of the first two criterion.
6. To make the search case-sensitive, uncheck the Ignore Case checkbox. To
make the search case-insensitive, check the Ignore Case checkbox.
7. Click OK.
n
Refining a Search
CountDown updates the media list with the events that match the criteria
specified. If no events match the specified criteria, CountDown lists no
media in the media list.
When using the modification date criteria ensure that the time zone and
Greenwich Mean Time is properly set on the AirSpeed Studio.
You can refine the search by searching the results of an initial search.
To refine a search:
t In the Find Media dialog box, repeat the steps you performed in the initial
search using different criterion, as described in “Searching Using the Find
Media Dialog Box” on page 62.
CountDown searches only in the list generated by the initial search.
63
Page 64

Chapter 3 Managing Media Events
Starting a New Search
To start a new search:
1. Select the New Search option in the Find Media dialog box.
2. Perform the search, as described in “Searching Using the Find Media
Dialog Box” on page 62
n
Canceling a Search
The New Search option is the default option if a media list contains no items.
To cancel the result of a search and restore the full media list, do one of
the following:
t Select Studio > Find All.
t Click the Find All Media button on the CountDown toolbar.
Updating the Media Information
AirSpeed continually informs CountDown of changes that occur to its media
database. You can also update media information manually.
To manually update the media information:
t Select Studio > Refresh Details from Studio.
Deleting Media Events from AirSpeed
Before deleting media, make sure you have enabled media deletion on the
Server tab in the General Preferences dialog box. See “Configuring Server
Preferences” on page 40 for more information.
64
For information about protecting media from deletion, see “Protecting Events
from Deletion” on page 65.
Page 65

Protecting Events from Deletion
To delete media from the server:
1. From the Media list, select the event or group of events to be deleted.
2. Do one of the following:
t Select Studio > Delete Media.
t Click the Delete Media button on the CountDown toolbar.
t Right-click and select Delete Media.
A dialog box opens, requiring confirmation of the deletion.
3. Click Yes to confirm each individual deletion or click Yes To All to
confirm the deletion of the entire selection.
CountDown deletes the selected media events from the server.
c
n
There is no undo for deletions.
If the event is in use, it will not be deleted and a dialog is displayed to alert the
user.
Protecting Events from Deletion
You can prevent media events from being deleted by a setting on the AirSpeed
server. You can also use CountDown to protect event from deletion. These
events are marked in the Media List by a blue indicator light.
To protect events from deletion:
1. In the Media List, select the clip or clips you want to protect from
deletion.
2. Do one of the following:
t Select Studio > Delete Protect Media.
t Right-click and select Delete Protect Media.
65
Page 66

Chapter 3 Managing Media Events
Browsing Media Events
You can use CountDown to browse AirSpeed media events through the
network connection and a video monitor connected to AirSpeed. Network
browsing requires a different AirSpeed channel from those used for playout
control (See “Before You Begin” on page 26).
To browse the media events on AirSpeed:
1. If necessary, show the media list by selecting Studio > List Media.
2. Open the Browser Control dialog box by doing one of the following:
t Double-click the event to browse.
t Select the event to browse and select Studio > Browse Item.
t Select the event to browse and click the Browse Item button on the
CountDown toolbar.
t Right-click the event and select Browse Item.
The Browser Control dialog box appears.
66
The title bar shows the AirSpeed server name, followed by the event title.
3. Use the Browser Control Dialog Box to cue, jog, fast-forward, rewind, or
play the event.
The controls on the Browser Control dialog box are similar to those in the Clip
Editor. For more information, see “Understanding the Clip Editor” on page 97.
Page 67

Showing Storage Availability
To display the amount of space available on the configured AirSpeed
servers:
t Select Studio > Show Storage Availability.
The Studio Storage Availability dialog box opens and shows the percentage of
storage space used and how much is available. The following illustration
shows storage availability for a configuration in which servers B3 and B4
mirror servers B1 and B2.
Showing Storage Availability
67
Page 68

Chapter 3 Managing Media Events
68
Page 69

Chapter 4
Managing Playlists
This chapter provides instructions for building, modifying, and playing
playlists. It includes the following topics:
• Understanding Playlists
• Building a Playlist
• Opening an Existing Playlist
• Optimizing the Positions of CountDown Windows
• Modifying Events in the Playlist
• Playing a List to Air
• Previewing a Playlist
• Importing a Playlist
• Exporting a Playlist
• Printing a Playlist
• Deleting a Playlist
• Previewing a Transition
• Breaking Out of Referenced Playlist Loops
Page 70

Chapter 4 Managing Playlists
Understanding Playlists
A playlist allows rapid assembly, modification, and playing out sequences of
media events. The following figure shows a typical playlist window.
For information about
shotboxes, see “Using
Shotboxes” on
page 135.
70
By default, CountDown prevents editing of playlists and shotboxes.
To enable playlist and shotbox editing, check the Allow Playlist and Shotbox
Editing check box on the Playlist tab of the General Preferences dialog box
(see “Configuring Playlist/Shotbox Preferences” on page 33).
Page 71

Understanding Playlists
When the Allow Playlist and Shotbox Editing check box is checked, you can
use the Playlist/Shotbox section of the CountDown toolbar, shown in the
following figure.
Manual
Event
Follow-On
Event
Looping
Event
Time of Day
Event
Playout Channels
Clip Edit
GPI Setup
Replicate
Item
Insert
Break
Understanding Columns and Icons for Playlist Events
Information about each event entry in a playlist is displayed by columns. The
column headings are as follows:
• Event Number
• Event Playout Channel
• Event Playout Mode
• Event ID
• Event Title
Placeholder
Insert
Comment
Insert
Change
Title
Group
Items
Ungroup
Items
• Event Duration
• Event Start Time and Day
• Event Modification Date
• GPI Outputs
71
Page 72

Chapter 4 Managing Playlists
Event Number
The event number indicates the item’s position in the playlist. If the item is
part of a loop the event number column is shaded.
Event number
If the playlist item has been locked against automatic updating, a padlock icon
is displayed in the event number column (see “Locking Items Against
Updates” on page 101).
Event playout channel
Event playout mode
Event Playout Channel
The event playout channel (Port) column displays the letter of the playout
channel assigned to this event, followed by an icon that indicates the Playout
mode. For more information, see “Changing the Channel for Event Playout”
on page 90.
72
Page 73

Event Playout Mode
Understanding Playlists
The Port column displays the following icons, located next to the event
playout channel letter, to indicate the event Playout mode.
Follow-On Event
Manual Event
Loop Event
Time-of-Day Event
Reference List Event - Follow-On
Reference List Event - Manual
Reference List Event - Time of Day
Grouped Event
Event ID
n
For an explanation of these modes, see “Assigning Event Playout Mode” on
page 91.
When the playlist is configured for text only display, the icons are replaced by
a simple text label, indicating the icon type. See “Configuring the Appearance
of a Playlist” on page 38 for more information.
The ID column displays the Video ID assigned to this event. CountDown takes
the Video ID from the AirSpeed database; you cannot edit the ID column. You
can modify the ID on the AirSpeed server. See “Changing a Media Event ID”
on page 59.
73
Page 74

Chapter 4 Managing Playlists
Event Title
The Title column displays the title assigned to this event. You can modify the
title in two ways:
• On the AirSpeed server (see “Changing a Media Event Title” on page 60)
• In the Playlist only (see “Changing the Title of Events” on page 101)
Event Duration
The event duration column displays the duration assigned to this event.
Initially, CountDown takes the duration from the AirSpeed server database.
The duration could change if you edit the event, and CountDown uses the
adjusted duration in that case. See “Editing Events” on page 97.
Event durations displayed in red indicate that there is not enough time to
complete playout before a subsequent time of day event is scheduled to
playout.
Event Start Time and Day
For more information
see “Setting an Event to
Time-of-Day” on
page 92.
n
74
CountDown calculates the time each event starts based on the cumulative
duration of the previous events.
Event times displayed in black indicate that times are absolute, meaning the
event is a Time-of-Day event. All other times are displayed in gray indicating
that the times are derived from the previous event.
Event times displayed in red indicate that there is not enough time to begin
playout. This event will not play to air because a subsequent Time-of-Day
event will go on air before the clock has reached the play time of the event
whose time is displayed in red.
CountDown updates event times in a playlist as it plays each event to air. This
enables you to determine the time at which an event is likely to go on air.
Calculated times for events following a Manual event are irrelevant until the
Manual event is played to air.
Page 75

Event Modification Date
The Last Modified column shows when the event was last modified on the
AirSpeed server.
GPI Outputs
The GPI Outputs column shows what, if any, GPI output function the event
will trigger. A blank in the column indicates that no GPI output is associated
with this event. For information about configuring output functions, see
“Assigning GPI Output Triggers to Events” on page 96.
Building a Playlist
To build a playlist, follow these procedures:
• Creating a New Playlist
• Adding Media Events
• Adding Comments and Break Events
Building a Playlist
• Rearranging Events in a Playlist
• Using Placeholders
• Replicating Media Events
• Looping Media Events
• Undoing Changes
• Reverting to the Last Saved Playlist
• Saving a Playlist
• Saving Part of a Playlist
Creating a New Playlist
To create a new playlist, do one of the following:
t Select File > New Playlist.
t Click the New icon on the CountDown toolbar.
75
Page 76

Chapter 4 Managing Playlists
CountDown opens a new playlist titled “Untitled Playlist n.” The n
represents the number of the new playlists that have been created during a
CountDown session.
Adding Media Events
You can add events to a playlist one at a time or in groups of events. You can
also add events from another playlist to the playlist being built. When you add
events one at a time or in groups, CountDown assigns the playout channel and
mode.
Adding a Single Event
When there is a large number of media events on the AirSpeed
server, you
might need to perform a search to locate the events you want to add. See
“Searching for Media Events” on page 61.
To add a single event to a playlist by dragging and dropping:
1. Select the desired event in the media list or in an open playlist.
2. Drag and drop it to the playlist.
- To add the event before another in the middle of the list, drop it over
that event.
- To add the event to the end of the list, drop it below the last event in
the playlist. CountDown scrolls the playlist to find new events placed
beyond the boundaries of the playlist window.
To add a single event using the Copy and Paste commands:
1. Select Copy from the Edit drop-down menu or click the Copy button on
the CountDown toolbar.
2. Click the location to put the event. If no location is selected, events are
pasted at the end of the playlist.
3. Select Paste from the Edit drop-down menu or click the Paste button on
the CountDown toolbar.
76
Page 77

Adding Multiple Events
To add multiple events to a playlist by dragging and dropping:
To add multiple events by using the Copy and Paste commands:
Building a Playlist
1. Select the desired events in the media list or in an open playlist by doing
one of the following:
- Hold down the Ctrl key and click to select random events.
- Hold down the Shift key and click to select consecutive events.
2. Drag and drop the selected events to the playlist.
- To add the event before another in the middle of the list, drag and
drop it over that event.
- To add the event to the end of the list, drag and drop it below the last
event in the playlist. CountDown scrolls the playlist to find new
events placed beyond the boundaries of the playlist window.
1. Select the desired events in a media list or in an open playlist.
2. Select Copy from the Edit drop-down menu or click the Copy button on
the CountDown toolbar.
3. Click the location to put the event. If no location is selected, events are
pasted at the end of the playlist.
4. Select Paste from the Edit drop-down menu or click the Paste button on
the CountDown toolbar.
Assigning a Playout Channel
To assign a playout channel to events when adding them to a playlist:
t Hold down a letter key (A through H) while dragging the selection to the
playlist.
If you do not hold down a letter key, CountDown assigns channel A by default,
unless you have selected the Automatically Assign Channels option. For more
information, see “Configuring Playlist/Shotbox Preferences” on page 33.
77
Page 78

Chapter 4 Managing Playlists
Automatically Reversing the Default Playout Mode
You set the default Playout mode with the Follow-on As Default setting on the
Playlist tab of the General Preferences dialog box (see “Configuring
Playlist/Shotbox Preferences” on page 33). The default setting is either
Follow-on (if the option is selected) or Manual (if the option is not selected).
You can reverse the default setting when adding events to a playlist using drag
and drop.
To reverse the default Playout mode setting:
t Hold down the Alt key while dragging the selection to the playlist.
For example, if the default mode is set to Manual, holding down the Alt key
while dragging a selection sets the events as Follow-on.
Including the Events from Another Playlist
You can include events from another playlist by listing each event from the
other playlist in the new playlist or by adding a reference to the other playlist.
If a playlist is referenced to itself, the playlist will loop.
You can add events from another playlist in the following ways:
• Using the Insert Playlist Command
• Using Drag and Drop
• Manually Expanding a Referenced Playlist
• Using a Playlist Reference to Loop the Playlist
Using the Insert Playlist Command
To include events from another playlist using the Insert Playlist
command:
1. Open or create a playlist.
2. Select File > Insert Playlist.
The Select Playlist dialog box opens and displays the available playlists.
78
Page 79

Building a Playlist
3. Click Open.
If the Insert as Reference option is not selected, CountDown adds each
event from the other playlist and lists them separately.
n
Using Drag and Drop
If the Insert as Reference option is selected, CountDown adds the file path
of the playlist as the title for the event. The channel and ID reflect those of
the first event in the referenced playlist. The duration indicates the
duration of the entire referenced playlist, and the Playout Mode icon
indicates that it is a referenced playlist.
CountDown expands the referenced list upon playout when the preceding
event is cued. To manually expand the list before the preceding event is
cued, see “Editing Events” on page 97.
The pathname length of the referenced playlist may not exceed 71 characters.
If you attempt to reference a pathname exceeding 71 characters, CountDown
prompts you to move the playlist file further up the file hierarchy.
To include events from another playlist using drag and drop:
1. Open or create a playlist.
2. Locate the Playlist file to use. The file may be on the Desktop, listed in
Windows Explorer, or listed in any directory window.
79
Page 80

Chapter 4 Managing Playlists
3. Drag the file from its location and drop it into the playlist at the location
before which you want to add it.
CountDown adds the file path of the playlist as the title for the event. The
channel and ID reflect those of the first event in the referenced playlist.
The duration indicates the duration of the entire referenced playlist, and
the Playout Mode icon indicates that it is a referenced playlist.
CountDown expands the referenced list on playout when the preceding
event is cued. See “Manually Expanding a Referenced Playlist” on
page 80 to manually expand the list before the preceding event is cued.
Manually Expanding a Referenced Playlist
To expand a referenced playlist:
1. Select the playlist reference in the playlist.
2. Select Playlist > Expand Reference List.
CountDown replaces the reference with the list of its events.
Using a Playlist Reference to Loop the Playlist
80
n
To set a playlist to loop:
1. Insert a reference to the playlist itself as the last item in the playlist by
selecting Add Loop List Reference from the Playlist menu.
Using the Add Loop List Reference command does not store a file path
reference; instead it instructs CountDown to reload the current file. This
means that playlist looping will still function correctly if the file is
subsequently moved to a different location. It may be easier to use a Looping
Event instead of a reference playlist to create the loop. For more information,
see “Looping Media Events” on page 94.
2. Ensure all events in the playlist are in Follow-On mode. For more
information, see “Assigning Event Playout Mode” on page 91.
3. Save the playlist because the reference refers to the saved version of the
playlist.
When you play the playlist it will loop until you end playout.
Page 81

Adding Comments and Break Events
You can add comments and break events to playlists.
Adding Comments
You can use comments to annotate the playlist and to flag commercial blocks.
Building a Playlist
n
n
Editing an Existing Comment
CountDown ignores comments on playout. They are for user reference only.
To add a comment:
1. Select the line in the playlist before the spot the comment will be placed.
2. Click the Insert Comment button on the CountDown toolbar or select
Playlist > Insert Comment.
The Playlist Comment dialog box opens.
3. Type comments in the text box.
4. Click OK.
CountDown adds the comment to the playlist and indicates that it is a
comment with the Notebook icon.
CountDown accepts comments up to 107 characters in length.
To edit an existing comment:
1. Do one of the following:
t Double-click the comment.
t Select the comment and click the Insert Comment button on the
CountDown toolbar.
t Select the comment and select File > Insert Comment.
The Playlist Comment dialog box appears with the existing comment
displayed in the text box.
2. Edit the comment in the text box.
3. Click OK.
CountDown replaces the comment with the new comment.
81
Page 82

Chapter 4 Managing Playlists
Adding Break Events
See “Assigning Event
Playout Mode” on
page 91.
n
n
Editing an Existing Break Event
Use a break event to cause a Follow-On event to act like a Manual event.
Playout will stop at that event until CountDown receives a command to play
out the event. See “Playing Events” on page 105 for more information.
Break events have no effect when placed before Manual media events.
To add a break event:
1. Select the Follow-On event in the playlist before the break event will
appear.
2. Click the Insert Break button on the CountDown toolbar or select Playlist
> Insert Break.
The Playlist Break dialog box opens.
3. Type a label for the break in the text box and click OK.
CountDown adds the break to the playlist and indicates that it is a break
with the stop icon.
Upon playout, CountDown will wait to play out the event following the
break until it receives a command to play the event.
CountDown accepts break labels up to 107 characters in length.
82
To edit the label for an existing break event:
1. Do one of the following:
t Double-click the break event.
t Select the break event and click the Insert Break button on the
CountDown toolbar.
t Select the break event and select File > Insert Break.
The Insert Break dialog box opens with the existing label displayed in
the text box.
2. Edit the label in the text box.
3. Click OK.
CountDown changes the break label.
Page 83

Changing Comment Events to Break Events
To change an existing comment event to a break event:
1. Select the comment item in the playlist.
2. Do one of the following:
a. Select Playlist > Insert Break.
b. Click the Insert Break button on the CountDown toolbar.
To change an existing break event to a comment event:
1. Select the break item in the playlist.
2. Do one of the following:
a. Select Playlist > Insert Comment.
b. Click the Insert Comment button on the CountDown toolbar.
Rearranging Events in a Playlist
After a playlist is assembled, you can change the order of the items.
Building a Playlist
Relocating Events
n
To relocate events, select the event or group of events and do one of the
following:
t Drag the selection to the desired location.
t Use the Cut and Paste commands:
a. Select Edit > Cut or click the Cut button on the CountDown toolbar.
b. Click the location to put the event. If no location is selected, events
are pasted at the end of the playlist.
c. Select Edit > Paste or click the Paste button on the CountDown
toolbar.
The events are pasted in the playlist.
When the playlist is on air, only single events may be selected and moved.
83
Page 84

Chapter 4 Managing Playlists
Duplicating Events
To duplicate events in the playlist, select the event or group of events to
duplicate and do one of the following:
t Hold down the CTRL key and drag the selection to the desired location.
t Use the Copy and Paste commands:
a. Select Edit > Copy or click the Copy button on the CountDown
b. Click the location to put the event. If no location is selected, events
c. Select Edit > Paste or click the Paste button on the CountDown
The events are pasted in the playlist.
Using Placeholders
Placeholders allow creation of events in a playlist for media events that are not
yet present on the AirSpeed server.
toolbar.
are pasted at the end of the playlist.
toolbar.
n
Understanding the Deferred Ready Function
n
84
For information on using the MOS protocol to create placeholders, see
“Managing Placeholder Creation” on page 128.
When a placeholder follows a playing event in a playlist there is no
corresponding media on the AirSpeed server. The placeholder is not cued
because it is not playable.
If while the event is playing, you create the placeholder’s ID and its media is
recorded before the event is within one second of finishing playout, the
placeholder is cued, allowing it to be played out next. This process is called
the deferred ready function.
For CountDown to cue and play an event that was previously a placeholder,
the Re-cue on Move or Insert option must be selected on the Playlist tab in the
General Preferences dialog box. See “Configuring Playlist/Shotbox
Preferences” on page 33 for more information.
Page 85

Adding Placeholders
Building a Playlist
To add a placeholder:
1. Select the location in the playlist before the placeholder is to be inserted.
2. Select Playlist > Insert Placeholder or click the Insert Placeholder button
on the CountDown toolbar.
The Insert Placeholder dialog box appears.
n
3. Enter the ID, title, and an estimated duration for the event.
CountDown will update the title and duration after the media and the ID
appear on the AirSpeed server.
The Video ID used when creating the media event on the AirSpeed server must
correspond to the placeholder ID.
4. Select the Playout mode: Manual or Follow-On radio button. See “Editing
Events” on page 97 for more information.
5. Click OK.
The placeholder is added to the playlist. The event details are displayed in
purple to indicate that it is a placeholder and not a playable event. When
CountDown detects a match between a placeholder ID and the ID of an
event on the AirSpeed server, the playlist entry details are updated to
match those of the event on the AirSpeed server. The placeholder status is
cancelled and details of the event are displayed in black to indicate it is a
playable media event.
85
Page 86

Chapter 4 Managing Playlists
n
Converting an Existing Event to a Placeholder
n
If the event already exists when you are creating a placeholder for it, you can
fill in the title and duration fields by pressing the Tab key.
To convert an existing event or group of events to placeholders:
1. Select the event or group of events you want to convert to placeholders.
2. Select Playlist > Convert to Placeholder.
CountDown converts the event or group of events to placeholders,
showing the details in purple to indicate that they are placeholders and not
yet playable media events.
When items referenced in a playlist are deleted from the server, it is possible to
convert them to placeholders automatically. Select “Deleted Items Convert
Playlist Entries to Placeholders” on the Server tab of the General Preferences
dialog box. For more information, see “Configuring Server Preferences” on
page 40.
Replicating Media Events
CountDown can be set to repeat an event by replicating that event in the
playlist.
86
To replicate an event:
1. In the playlist, select the event to be replicated.
2. Select Playlist > Replicate Item or click the Replicate button on the
CountDown toolbar.
The Replicate Item dialog box appears.
3. Type or select the number of repetitions in the Repeat Count text field.
4. Click OK.
CountDown adds the specified number of duplicate entries to the playlist.
Page 87

Undoing Changes
Building a Playlist
To undo the last change made to a playlist:
t Select Edit > Undo.
n
CountDown has a single level of the undo function only. For more than one
level of undo, revert to the previous playlist.
Reverting to the Last Saved Playlist
During the process of editing a playlist, you can cancel all changes made since
the playlist was last saved by starting over from the last saved version.
To revert to the last saved playlist:
t Select File > Revert Playlist.
Saving a Playlist
To save a playlist:
1. Click the playlist to ensure it has focus
2. Do one of the following:
t Select File > Save
t Click the Save button on the CountDown toolbar.
If the playlist has never been saved before, the Save Playlist As dialog box
appears.
3. In the File Name text box, enter the name for the playlist.
4. Click Save.
Saving Part of a Playlist
To save part of a playlist:
1. In the playlist, select the event or group of events to save.
2. Select File > Save Playlist Selection.
The Save Playlist As dialog box appears.
3. In the File Name text box, enter the name to use for the playlist.
87
Page 88

Chapter 4 Managing Playlists
4. To remove the selected events from the existing playlist and replace them
with a reference to the new playlist being created, select the “Replace
saved items with reference list” option.
5. Click Save.
CountDown saves the selected events in the new playlist. If you selected
“Replace saved items with reference list,” CountDown removes the events
from the existing playlist and replaces them with a reference to the playlist
file just created.
n
The pathname length of the referenced playlist may not exceed 71 characters.
If you attempt to reference a pathname exceeding 71 characters, CountDown
prompts you to move the playlist file further up the file hierarchy.
Opening an Existing Playlist
There are three different ways to open an existing playlist:
• Using the Open command
• Using the recent files list
• Using drag and drop
To open an existing playlist using the Open command:
1. Do one of the following:
t Click the Open button on the CountDown toolbar.
t Select File > Open.
The Open Playlist or Shotbox dialog box opens.
2. Select Playlist Files from the Files of type list.
A list of existing playlists is displayed.
88
3. Select the playlist to open.
4. Click OK.
To open an existing playlist using the recent files list:
t Click the File menu and select the playlist from the list of recent files.
Page 89

Optimizing the Positions of CountDown Windows
To open an existing playlist using drag and drop:
1. Locate the playlist file to open. The file may be on the Desktop, listed in
Windows Explorer, or listed in any directory window.
2. Drag the file from its location and drop it into the CountDown window.
n
Do not drop the file into a Playlist window or the list will be inserted as a
reference playlist rather than being opened as a playlist.
Optimizing the Positions of CountDown Windows
To optimize the positions of the playlist, shotbox, and media list
windows, do one of the following:
t Select Window > Arrange Windows or click the Arrange Windows button
on the CountDown toolbar.
When no more than three Playlist or Shotbox windows are open, the
Arrange Windows command tiles them. If more than three Playlist or
Shotbox windows are open, the Arrange Windows command cascades
them.
t Select Window > Tile Horizontally or Window > Tile Vertically.
The Tile commands allow viewing of all open Playlist and Shotbox
windows when more than three are open.
Modifying Events in the Playlist
After you have created a playlist, you can modify it in the following ways:
• Changing the Channel for Event Playout
• Locking the Channel Assignment
• Assigning Event Playout Mode
• Assigning GPI Output Triggers to Events
• Editing Events
• Restoring Event Properties
89
Page 90

Chapter 4 Managing Playlists
Changing the Channel for Event Playout
To set the playout channel for events:
1. Select the event or group of events.
2. Do one of the following:
t Click the appropriate channel button on the CountDown toolbar.
t Select Playlist > Set Item Play Channel and select the desired channel
from the list that is displayed.
t Press Shift + the keyboard letter of the channel you want to assign.
This setting will only affect items selected, unless you hold down the Ctrl key,
in which case subsequent items will have their channels re-assigned to
maintain the correct sequence.
To assign alternative channels:
t Select Playlist > Alternate Channels.
This setting ripples the channel assignments in the playlist according to what
is set in the Auto Assign Channels preference. See “Configuring
Playlist/Shotbox Preferences” on page 33. If a list is off-air, this setting ripples
the entire playlist. If the list is on-air, this setting ripples either from the on-air
item or selection, whichever is later.
Locking the Channel Assignment
To lock the channel assignment:
t Right-click an event and select Lock Channel Assignment.
You cannot automatically override the channel assignment. A key appears on
the channel letter.
90
Page 91

Assigning Event Playout Mode
There are four different Playout modes that you can set in CountDown:
•Manual
•Follow-On
• Time-of-Day
•Loop
Setting an Event to be Manual
A Manual event requires user intervention to play the clip. CountDown cues
the clip and then waits for one of the following before playing the event:
• A click on the Next button.
• A Return, Spacebar or ABCD key press, provided it is enabled. See
“Configuring Playlist/Shotbox Preferences” on page 33.
• A GPI Next Event trigger.
To set the Playout mode of an event or group of events to Manual:
Modifying Events in the Playlist
1. Select the event or events in the playlist.
2. Do one of the following:
t Select Playlist > Set Item Type > Manual.
t Click the Manual Event button on the CountDown toolbar.
t Type Ctrl+1.
The Playout Mode icon changes to the hand icon.
91
Page 92

Chapter 4 Managing Playlists
Setting an Event to be Follow-On
A Follow-On event plays automatically when the previous event ends.
To set the Playout mode of an event or group of events to Follow-On:
1. Select the event or events in the Playlist.
2. Do one of the following:
t Select Playlist > Set Item Type >Follow On from the Playlist menu.
t Click the Follow On Event button on the CountDown toolbar
t Type Ctrl+2.
The Playout Mode icon changes to the arrow icon.
Setting an Event to Time-of-Day
A Time-of-Day event plays automatically at a specified time of day.
To set the Playout mode of an event to Time-of-Day:
92
1. Select the event in the playlist.
2. Do one of the following:
t Select Playlist > Set Item Type >Time of Day.
t Click the Time-of-Day Event button on the CountDown toolbar.
t Type Ctrl+3.
The Set Event Time dialog box is displayed.
Page 93

Modifying Events in the Playlist
3. In the Event Time text box, enter the time of day—in 24-hour
notation—for CountDown to play the event.
4. To play the event only once, use the Day list menu to select the day of the
week to play the event. To play the event at the same time every day, select
the Daily Event option.
5. When adjusting the playout time of an event that is already a Time-of-Day
event, and to adjust the playout times of any following Time-of-Day
events, select the Retime All Following Events option. See “Adjusting the
Play-Out Time of Time-of-Day Events” for more information.
6. Click OK.
A playlist may not contain two Time-of-Day events set to start at the same
time.
n
Adjusting the Play-Out Time of Time-of-Day Events
If CountDown attempts to set two Time-of-Day events to start at the same time,
an error message appears.
After creating a Time-of-Day event, you can adjust its playout time.
CountDown can also adjust the playout time of subsequent Time-of-Day
events by the difference between the event’s original playout time and the new
one. For example, if the original playout time for an event is 14:00:00 and you
change it to 14:05:00, CountDown can adjust the playout time of all the
subsequent Time-of-Day events to begin five minutes later.
To adjust the playout time of a Time-of-Day event:
1. Select the event in the playlist.
2. Do one of the following:
t Select Playlist > Set Item Type > Time of Day.
t Click the Time of Day button on the CountDown toolbar.
t Type Ctrl+3.
The Set Event Time dialog box appears.
3. In the Event Time text box, enter the new time—in 24-hour notation—for
CountDown to play the event.
4. For CountDown to adjust the playout times of any following Time-of-Day
events, select the Retime All Following Events option.
93
Page 94

Chapter 4 Managing Playlists
5. Click OK.
CountDown adjusts the playout time of the selected event and any subsequent
Time-of-Day events by the difference between original time and the new time.
Looping Media Events
You can set CountDown to loop either a single media event or a block of
events.
To create a looping event:
1. In the playlist, select the event that will control the loop; this will be the
last event in the block.
2. Do one of the following:
t Select Playlist > Set Item Type > Loop.
t Click the Loop Item button on the CountDown toolbar.
t Type Ctrl+4.
The Set Playlist Loop dialog box opens.
94
3. In the Set Loop Type section, click the radio button for the option
required:
t Check the Loop To Self radio button to create an event that loops only
the selected item
t Check the Loop To Item radio button to create an event that loops a
contiguous block of events. Use spin box control to select the first
item in the block.
Page 95

Modifying Events in the Playlist
n
n
n
n
When Loop To Item is selected, CountDown highlights all items currently
selected in the loop.
4. In the Loop Condition section, do one of the following:
t Select the Loop Until option to create an event that will continue
looping until a specific time. Use the time entry text box and Day
menu to set the specific time.
The time entered is not necessarily the time the item following the loop event
will play to air. It is used as a test condition. If the time set has not been
reached when the looping event starts to play, the loop is repeated. If the time
has been passed, playout continues with the following item.
t Select the Loop For option to create an event that will loop for a pre-
determined number of repetitions. Use the spin box control to set the
repetition count.
Setting the number of loops to zero (0) will create an endless loop. A
subsequent item must be cued manually in order to break out of the loop, or
you can create and insert a time-of-day event.
When a single item is looping, the media event is in both the playing and cued
states at the same time. CountDown does not distinguish this special case, and
because the cued status is updated after the playing status, a looping item will
be highlighted only with the cued color.
n
n
5. Click OK.
Items are only configured as looping events if CountDown is not configured to
delete items after playout. See “Configuring Playlist/Shotbox Preferences” on
page 33 for more information.
Constraints are applied when items are configured to loop. It is not possible to
cut or delete either the first or last item in the loop. Loops may not be nested
or overlap. Attempting to drag, cut, or copy an item within the loop will drag,
cut, or copy the loop as a whole.
95
Page 96

Chapter 4 Managing Playlists
Adding Events to a Loop
You can add events to a loop that you have created. Use the same procedures
for adding events to a playlist (see “Adding Media Events” on page 76). If you
drag an item to the top of the loop, CountDown displays a message that asks if
you want to include it in the loop.
Assigning GPI Output Triggers to Events
CountDown enables you to configure events to trigger any or all of the GPI
outputs. All assigned outputs are triggered simultaneously.
You can assign triggers even though no card is present. This feature is useful
when you build a list offline.
To assign triggers to an event:
1. Select the event in the playlist.
2. Do one of the following:
t Select GPI Setup in the Playlist menu.
96
t Click the GPI Setup button on the CountDown toolbar.
The Set GPI Output Event dialog box appears.
Page 97

Modifying Events in the Playlist
3. Use the list boxes to select the operation for each of the eight outputs. The
four operations available in the list boxes are as follows:
• Turn On—sets the output to its ON state regardless of its previous
state.
• Turn Off—sets the output to its OFF state regardless of its previous
state.
• Toggle—reverses the state of the output—if it was ON before the
event, it goes OFF after the event and vice-versa.
• Pulse—sets the output to its ON state regardless of its previous
state. After the specified duration, sets the output to its OFF state.
See “Configuring External Control Preferences” on page 43.
4. In the Event Timing list box, select the reference point for the trigger to
start and enter the offset from that reference point in the Event Timing list
box. The reference point options include the following:
• After Clip Start
• Before Clip End
• Before Clip Start
n
Use Before Clip Start only when there is a preceding event in the playlist. For
example, if After Clip Start is selected, enter 00:00:00 in the text box,
CountDown will trigger the GPI outputs the instant it plays the event to air. If
Before Clip End is selected, enter 00:00:10, CountDown will trigger the GPI
outputs ten seconds before the end of the event.
5. Click OK.
Editing Events
You can modify events by using the Clip Editor. Use the Clip Editor to change
the duration of the event that CountDown plays to air.
Understanding the Clip Editor
The Clip Editor lets you play out media from the same event multiple times,
each with a different set of IN and OUT points. You use the Clip Editor to
modify the IN and OUT points of an event.
97
Page 98

Chapter 4 Managing Playlists
This section describes the Clip Editor’s controls and their functions.
n
When there is no channel —VDCP or Network—available for browsing, Clip
Editor functionality is restricted. The Transport Controls, Mark IN, Mark
OUT, and the Cue buttons are disabled. See “Configuring the Servers and
Channels” on page 28.
98
n
Transport Controls
The Clip Editor includes the following Transport Control buttons, which let
you move through a media event:
• Rewind button: For rewinding the media event.
• Play Reverse button: For playing the media event in reverse.
• Stop button: For stopping the media event.
• Play Forward button: For playing the media event forward.
• Fast Forward button: To fast forward through the media event.
You can also use the J-K-L keys play reverse, stop, and play forward.
The Timecode display is located next to the Transport Control buttons. This
display shows the time relative to the beginning of the clip.
Page 99

Modifying Events in the Playlist
Two sliders are located below the Transport Control buttons:
• Jog or Shuttle Slider: Select the Jog or Shuttle option located to the right
of the slider to assign that function to the slider. To use the slider, drag it
back and forth with the pointer or use the left and right keyboard cursor
keys to jog one frame at a time. You can also control play by using a
mouse wheel.
• Interactive Locator Slider: This slider allows access to any part of the
original media event—even parts beyond the IN and OUT points. You can
operate this slider manually. In addition, it updates its position when you
use any transport control to move within the clip.
Mark, Cue, and Clear Controls
Six buttons are located to the right of the In and Out text boxes:
The Mark IN button. Use the Mark IN button to mark the IN point of the clip.
The Mark OUT button. Use the Mark OUT button to mark the OUT point of
the clip
Using the Clip Editor
The Cue IN button. Use the Cue IN button to cue to the IN point of the clip.
The Cue OUT button. Use the Cue OUT button to cue to the last frame of the
clip
The Clear IN button. Use the Clear IN button to clear the IN point.
The Clear OUT button. Use the Clear OUT button to clear the OUT point.
Changes you make with the Clip Editor take affect only when the event is
actually playing. The changes do not affect the original media event on the
AirSpeed server.
99
Page 100

Chapter 4 Managing Playlists
To edit an event using the Clip Editor:
1. Open the Clip Editor dialog box by doing one of the following:
t Double-click the event.
t Select the event and select Playlist > Edit Clip.
t Select the event and click the Edit Clip button on the CountDown
t Select the event and type Ctrl+E.
The Clip Editor dialog box appears.
toolbar.
For information about
controls, see
“Understanding the
Clip Editor” on
page 97.
2. Use the Transport Controls to locate the IN point.
3. Click the Mark IN button. The IN time appears in the In text box.
4. Use the Transport Controls to find the OUT point.
5. Click the Mark OUT button. The OUT time appears in the Out text box.
After setting the IN and OUT points, you can cue the events using the Cue
buttons.
6. To clear the IN or OUT point of the event, click the Clear button
corresponding to the IN or OUT point.
7. To change the title of this instance of the event in the playlist, enter a new
title in the Title text box.
8. To apply the changes made to all instances of the event throughout all
open Playlists and Shotboxes, select the “Update all instances of this clip”
option.
CountDown checks all open playlists and shotboxes, including referenced
playlists, for instances of the event matching the Event ID and title and
updates all of them.
9. Click OK.
You can also set IN and OUT points by clicking in the appropriate text box,
typing the desired timecode value, and pressing the Enter key.
100
 Loading...