

Page 1

Avid® AirSpeed® 5000
Remote Console Operator’s Guide
Page 2

Legal Notices
Product specifications are subject to change without notice and do not represent a commitment on the part of Avid Technology, Inc.
This product is subject to the terms and conditions of a software license agreement provided with the software. The product may
only be used in accordance with the license agreement.
This product may be protected by one or more U.S. and non-U.S patents. Details are available at www.avid.com/patents.
This document is protected under copyright law. An authorized licensee of AirSpeed 5000 may reproduce this publication for the
licensee’s own use in learning how to use the software. This document may not be reproduced or distributed, in whole or in part, for
commercial purposes, such as selling copies of this document or providing support or educational services to others. This document
is supplied as a guide for AirSpeed 5000 Remote Console. Reasonable care has been taken in preparing the information it contains.
However, this document may contain omissions, technical inaccuracies, or typographical errors. Avid Technology, Inc. does not
accept responsibility of any kind for customers’ losses due to the use of this document. Product specifications are subject to change
without notice.
Copyright © 2013 Avid Technology, Inc. and its licensors. All rights reserved.
Copyright 2003-2007 of MOG Solutions
The following disclaimer is required by Apple Computer, Inc.:
APPLE COMPUTER, INC. MAKES NO WARRANTIES WHATSOEVER, EITHER EXPRESS OR IMPLIED, REGARDING THIS
PRODUCT, INCLUDING WARRANTIES WITH RESPECT TO ITS MERCHANTABILITY OR ITS FITNESS FOR ANY PARTICULAR
PURPOSE. THE EXCLUSION OF IMPLIED WARRANTIES IS NOT PERMITTED BY SOME STATES. THE ABOVE EXCLUSION
MAY NOT APPLY TO YOU. THIS WARRANTY PROVIDES YOU WITH SPECIFIC LEGAL RIGHTS. THERE MAY BE OTHER
RIGHTS THAT YOU MAY HAVE WHICH VARY FROM STATE TO STATE.
The following disclaimer is required by Sam Leffler and Silicon Graphics, Inc. for the use of their TIFF library:
Copyright © 1988–1997 Sam Leffler
Copyright © 1991–1997 Silicon Graphics, Inc.
Permission to use, copy, modify, distribute, and sell this software [i.e., the TIFF library] and its documentation for any purpose is
hereby granted without fee, provided that (i) the above copyright notices and this permission notice appear in all copies of the
software and related documentation, and (ii) the names of Sam Leffler and Silicon Graphics may not be used in any adver tising or
publicity relating to the software without the specific, prior written permission of Sam Leffler and Silicon Graphics.
THE SOFTWARE IS PROVIDED “AS-IS” AND WITHOUT WARRANTY OF ANY KIND, EXPRESS, IMPLIED OR OTHERWISE,
INCLUDING WITHOUT LIMITATION, ANY WARRANTY OF MERCHANTABILITY OR FITNESS FOR A PARTICULAR PURPOSE.
IN NO EVENT SHALL SAM LEFFLER OR SILICON GRAPHICS BE LIABLE FOR ANY SPECIAL, INCIDENTAL, INDIRECT OR
CONSEQUENTIAL DAMAGES OF ANY KIND, OR ANY DAMAGES WHATSOEVER RESULTING FROM LOSS OF USE, DATA OR
PROFITS, WHETHER OR NOT ADVISED OF THE POSSIBILITY OF DAMAGE, AND ON ANY THEORY OF LIABILITY, ARISING
OUT OF OR IN CONNECTION WITH THE USE OR PERFORMANCE OF THIS SOFTWARE.
The following disclaimer is required by the Independent JPEG Group:
This software is based in part on the work of the Independent JPEG Group.
This Software may contain components licensed under the following conditions:
Copyright (c) 1989 The Regents of the University of California. All rights reserved.
Redistribution and use in source and binary forms are permitted provided that the above copyright notice and this paragraph are
duplicated in all such forms and that any documentation, advertising materials, and other materials related to such distribution and
use acknowledge that the software was developed by the University of California, Berkeley. The name of the University may not be
used to endorse or promote products derived from this software without specific prior written permission. THIS SOFTWARE IS
PROVIDED ``AS IS'' AND WITHOUT ANY EXPRESS OR IMPLIED WARRANTIES, INCLUDING, WITHOUT LIMITATION, THE
IMPLIED WARRANTIES OF MERCHANTABILITY AND FITNESS FOR A PARTICULAR PURPOSE.
Copyright (C) 1989, 1991 by Jef Poskanzer.
Permission to use, copy, modify, and distribute this software and its documentation for any purpose and without fee is hereby
granted, provided that the above copyright notice appear in all copies and that both that copyright notice and this permission notice
appear in supporting documentation. This software is provided "as is" without express or implied warranty.
Copyright 1995, Trinity College Computing Center. Written by David Chappell.
2
Page 3

Permission to use, copy, modify, and distribute this software and its documentation for any purpose and without fee is hereby
granted, provided that the above copyright notice appear in all copies and that both that copyright notice and this permission notice
appear in supporting documentation. This software is provided "as is" without express or implied warranty.
Copyright 1996 Daniel Dardailler.
Permission to use, copy, modify, distribute, and sell this software for any purpose is hereby granted without fee, provided that the
above copyright notice appear in all copies and that both that copyright notice and this permission notice appear in supporting
documentation, and that the name of Daniel Dardailler not be used in advertising or publicity pertaining to distribution of the software
without specific, written prior permission. Daniel Dardailler makes no representations about the suitability of this software for any
purpose. It is provided "as is" without express or implied warranty.
Modifications Copyright 1999 Matt Koss, under the same license as above.
Copyright (c) 1991 by AT&T.
Permission to use, copy, modify, and distribute this software for any purpose without fee is hereby granted, provided that this entire
notice is included in all copies of any software which is or includes a copy or modification of this software and in all copies of the
supporting documentation for such software.
THIS SOFTWARE IS BEING PROVIDED "AS IS", WITHOUT ANY EXPRESS OR IMPLIED WARRANTY. IN PARTICULAR,
NEITHER THE AUTHOR NOR AT&T MAKES ANY REPRESENTATION OR WARRANTY OF ANY KIND CONCERNING THE
MERCHANTABILITY OF THIS SOFTWARE OR ITS FITNESS FOR ANY PARTICULAR PURPOSE.
This product includes software developed by the University of California, Berkeley and its contributors.
The following disclaimer is required by Nexidia Inc.:
© 2010 Nexidia Inc. All rights reserved, worldwide. Nexidia and the Nexidia logo are trademarks of Nexidia Inc. All other
trademarks are the property of their respective owners. All Nexidia materials regardless of form, including without limitation,
software applications, documentation and any other information relating to Nexidia Inc., and its products and services are the
exclusive property of Nexidia Inc. or its licensors. The Nexidia products and services described in these materials may be covered
by Nexidia's United States patents: 7,231,351; 7,263,484; 7,313,521; 7,324,939; 7,406,415, 7,475,065; 7,487,086 and/or other
patents pending and may be manufactured under license from the Georgia Tech Research Corporation USA.
The following disclaimer is required by Paradigm Matrix:
Portions of this software licensed from Paradigm Matrix.
The following disclaimer is required by Ray Sauers Associates, Inc.:
“Install-It” is licensed from Ray Sauers Associates, Inc. End-User is prohibited from taking any action to derive a source code
equivalent of “Install-It,” including by reverse assembly or reverse compilation, Ray Sauers Associates, Inc. shall in no event be liable
for any damages resulting from reseller’s failure to perform reseller’s obligation; or any damages arising from use or operation of
reseller’s products or the software; or any other damages, including but not limited to, incidental, direct, indirect, special or
consequential Damages including lost profits, or damages resulting from loss of use or inability to use reseller’s products or the
software for any reason including copyright or patent infringement, or lost data, even if Ray Sauers Associates has been advised,
knew or should have known of the possibility of such damages.
The following disclaimer is required by Videomedia, Inc.:
“Videomedia, Inc. makes no warranties whatsoever, either express or implied, regarding this product, including warranties with
respect to its merchantability or its fitness for any particular purpose.”
“This software contains V-LAN ver. 3.0 Command Protocols which communicate with V-LAN ver. 3.0 products developed by
Videomedia, Inc. and V-LAN ver. 3.0 compatible products developed by third parties under license from Videomedia, Inc. Use of this
software will allow “frame accurate” editing control of applicable videotape recorder decks, videodisc recorders/players and the like.”
The following disclaimer is required by Altura Software, Inc. for the use of its Mac2Win software and Sample Source
Code:
©1993–1998 Altura Software, Inc.
The following disclaimer is required by Ultimatte Corporation:
Certain real-time compositing capabilities are provided under a license of such technology from Ultimatte Corporation and are
subject to copyright protection.
The following disclaimer is required by 3Prong.com Inc.:
Certain waveform and vector monitoring capabilities are provided under a license from 3Prong.com Inc.
3
Page 4

The following disclaimer is required by Interplay Entertainment Corp.:
The “Interplay” name is used with the permission of Interplay Entertainment Corp., which bears no responsibility for Avid products.
This product includes portions of the Alloy Look & Feel software from Incors GmbH.
This product includes software developed by the Apache Software Foundation (http://www.apache.org/).
© DevelopMentor
This product may include the JCifs library, for which the following notice applies:
JCifs © Copyright 2004, The JCIFS Project, is licensed under LGPL (http://jcifs.samba.org/). See the LGPL.txt file in the Third Par ty
Software directory on the installation CD.
Avid Interplay contains components licensed from LavanTech. These components may only be used as part of and in connection
with Avid Interplay.
This product includes the Warlib library, for which the following notice applies:
Copyright Jarle (jgaa) Aase 2000 - 2009
COPYRIGHT file which is included in the distribution:
warlib is copyright Jarle (jgaa) Aase 2000 - 2009
The warlib C++ Library is free software; you can redistribute it and/or modify it under the terms of the GNU Lesser General Public
License as published by the Free Software Foundation; either version 3.0 of the License, or (at your option) any later version.
The warlib C++ Library is distributed in the hope that it will be useful, but WITHOUT ANY WARRANTY; without even the implied
warranty of MERCHANTABILITY or FITNESS FOR A PARTICULAR PURPOSE. See the GNU Lesser General Public License for
more details.
Portions copyright © 2012 Avid Technology, Inc.
Attn. Government User(s). Restricted Rights Legend
U.S. GOVERNMENT RESTRICTED RIGHTS. This Software and its documentation are “commercial computer software” or
“commercial computer software documentation.” In the event that such Software or documentation is acquired by or on behalf of a
unit or agency of the U.S. Government, all rights with respect to this Software and documentation are subject to the terms of the
License Agreement, pursuant to FAR §12.212(a) and/or DFARS §227.7202-1(a), as applicable.
Trademarks
003, 192 Digital I/O, 192 I/O, 96 I/O, 96i I/O, Adrenaline, AirSpeed, ALEX, Alienbrain, AME, AniMatte, Archive, Archive II, Assistant
Station, AudioPages, AudioStation, AutoLoop, AutoSync, Avid, Avid Active, Avid Advanced Response, Avid DNA, Avid DNxcel, Avid
DNxHD, Avid DS Assist Station, Avid Ignite, Avid Liquid, Avid Media Engine, Avid Media Processor, Avid MEDIArray, Avid Mojo, Avid
Remote Response, Avid Unity, Avid Unity ISIS, Avid VideoRAID, AvidRAID, AvidShare, AVIDstripe, AVX, Beat Detective, Beauty
Without The Bandwidth, Beyond Reality, BF Essentials, Bomb Factory, Bruno, C|24, CaptureManager, ChromaCurve,
ChromaWheel, Cineractive Engine, Cineractive Player, Cineractive Viewer, Color Conductor, Command|24, Command|8,
Control|24, Cosmonaut Voice, CountDown, d2, d3, DAE, D-Command, D-Control, Deko, DekoCast, D-Fi, D-fx, Digi 002, Digi 003,
DigiBase, Digidesign, Digidesign Audio Engine, Digidesign Development Partners, Digidesign Intelligent Noise Reduction,
Digidesign TDM Bus, DigiLink, DigiMeter, DigiPanner, DigiProNet, DigiRack, DigiSerial, DigiSnake, DigiSystem, Digital
Choreography, Digital Nonlinear Accelerator, DigiTest, DigiTranslator, DigiWear, DINR, DNxchange, Do More, DPP-1, D-Show, DSP
Manager, DS-StorageCalc, DV Toolkit, DVD Complete, D-Verb, Eleven, EM, Euphonix, EUCON, EveryPhase, Expander,
ExpertRender, Fader Pack, Fairchild, FastBreak, Fast Track, Film Cutter, FilmScribe, Flexevent, FluidMotion, Frame Chase, FXDeko,
HD Core, HD Process, HDpack, Home-to-Hollywood, HYBRID, HyperSPACE, HyperSPACE HDCAM, iKnowledge, Image
Independence, Impact, Improv, iNEWS, iNEWS Assign, iNEWS ControlAir, InGame, Instantwrite, Instinct, Intelligent Content
Management, Intelligent Digital Actor Technology, IntelliRender, Intelli-Sat, Intelli-sat Broadcasting Recording Manager, InterFX,
Interplay, inTONE, Intraframe, iS Expander, iS9, iS18, iS23, iS36, ISIS, IsoSync, LaunchPad, LeaderPlus, LFX, Lightning, Link &
Sync, ListSync, LKT-200, Lo-Fi, MachineControl, Magic Mask, Make Anything Hollywood, make manage move | media, Marquee,
MassivePack, Massive Pack Pro, Maxim, Mbox, Media Composer, MediaFlow, MediaLog, MediaMix, Media Reader, Media
Recorder, MEDIArray, MediaServer, MediaShare, MetaFuze, MetaSync, MIDI I/O, Mix Rack, Moviestar, MultiShell, NaturalMatch,
NewsCutter, NewsView, NewsVision, Nitris, NL3D, NLP, NSDOS, NSWIN, OMF, OMF Interchange, OMM, OnDVD, Open Media
Framework, Open Media Management, Painterly Effects, Palladium, Personal Q, PET, Podcast Factory, PowerSwap, PRE,
ProControl, ProEncode, Profiler, Pro Tools, Pro Tools|HD, Pro Tools LE, Pro Tools M-Powered, Pro Transfer, QuickPunch,
QuietDrive, Realtime Motion Synthesis, Recti-Fi, Reel Tape Delay, Reel Tape Flanger, Reel Tape Saturation, Reprise, Res Rocket
Surfer, Reso, RetroLoop, Reverb One, ReVibe, Revolution, rS9, rS18, RTAS, Salesview, Sci-Fi, Scorch, ScriptSync,
SecureProductionEnvironment, Serv|GT, Serv|LT, Shape-to-Shape, ShuttleCase, Sibelius, SimulPlay, SimulRecord, Slightly Rude
Compressor, Smack!, Soft SampleCell, Soft-Clip Limiter, SoundReplacer, SPACE, SPACEShift, SpectraGraph, SpectraMatte,
SteadyGlide, Streamfactory, Streamgenie, StreamRAID, SubCap, Sundance, Sundance Digital, SurroundScope, Symphony, SYNC
4
Page 5

HD, SYNC I/O, Synchronic, SynchroScope, Syntax, TDM FlexCable, TechFlix, Tel-Ray, Thunder, TimeLiner, Titansync, Titan, TL
Aggro, TL AutoPan, TL Drum Rehab, TL Everyphase, TL Fauxlder, TL In Tune, TL MasterMeter, TL Metro, TL Space, TL Utilities,
tools for storytellers, Transit, TransJammer, Trillium Lane Labs, TruTouch, UnityRAID, Vari-Fi, Video the Web Way, VideoRAID,
VideoSPACE, VTEM, Work-N-Play, Xdeck, X-Form, Xmon and XPAND! are either registered trademarks or trademarks of Avid
Technology, Inc. in the United States and/or other countries.
Footage
Arizona Images — KNTV Production — Courtesy of Granite Broadcasting, Inc.,
Editor/Producer Bryan Foote.
Canyonlands — Courtesy of the National Park Service/Department of the Interior.
Ice Island — Courtesy of Kurtis Productions, Ltd.
Tornados + Belle Isle footage — Courtesy of KWTV News 9.
WCAU Fire Story — Courtesy of NBC-10, Philadelphia, PA.
Women in Sports – Paragliding — Courtesy of Legendary Entertainment, Inc.
News material provided by WFTV Television Inc.
Avid AirSpeed 5000 Remote Console Operator’s Guide v2.5 • 9320-65103-00 Rev C • March 2013 (03/21/13)
This document is distributed by Avid in online (electronic) form only, and is not available for purchase in printed form.
5
Page 6

Contents
Using This Guide. . . . . . . . . . . . . . . . . . . . . . . . . . . . . . . . . . . . . . . . . . . . . . . 11
Symbols and Conventions . . . . . . . . . . . . . . . . . . . . . . . . . . . . . . . . . . . . . . . . . . . . . . . 12
If You Need Help. . . . . . . . . . . . . . . . . . . . . . . . . . . . . . . . . . . . . . . . . . . . . . . . . . . . . . . 13
Avid Training Services . . . . . . . . . . . . . . . . . . . . . . . . . . . . . . . . . . . . . . . . . . . . . . . 13
Chapter 1 Installing and Configuring the Remote Console . . . . . . . . . . . . . . . . . . . . . 14
Standalone Transfer Engine Overview . . . . . . . . . . . . . . . . . . . . . . . . . . . . . . . . . . . . . . 15
Configuration Requirements for AirSpeed 5000 Server . . . . . . . . . . . . . . . . . . . . . . 16
Standalone Software Requirements. . . . . . . . . . . . . . . . . . . . . . . . . . . . . . . . . . . . . 17
Software Requirements for the Avid Editing Client . . . . . . . . . . . . . . . . . . . . . . 17
AirSpeed 5000 Installation and Configuration Checklist . . . . . . . . . . . . . . . . . . . . . . . . . 18
Installing the AirSpeed 5000 Remote Console Application . . . . . . . . . . . . . . . . . . . 19
Installing the Interplay Transfer Engine on the Avid Editor (Standalone Mode). . . . 20
Connecting to AirSpeed 5000 Servers. . . . . . . . . . . . . . . . . . . . . . . . . . . . . . . . . . . 21
Configuring Transfers for AirSpeed 5000 Servers (Standalone Mode) . . . . . . . . . . 23
Manually Configuring the Interplay Transfer Engine for a Standalone Environment 24
Starting the Interplay Transfer Engine on the Avid Editor . . . . . . . . . . . . . . . . . . . . 31
Starting the AirSpeed 5000 Remote Console Application . . . . . . . . . . . . . . . . . . . . 31
Configuring the Standalone Settings for the Avid Editor . . . . . . . . . . . . . . . . . . . . . 33
Verifying your Remote Console is Configured Properly . . . . . . . . . . . . . . . . . . . . . . 34
Chapter 2 Getting Started with the Remote Console . . . . . . . . . . . . . . . . . . . . . . . . . . 35
User Interface . . . . . . . . . . . . . . . . . . . . . . . . . . . . . . . . . . . . . . . . . . . . . . . . . . . . . . . . . 36
Main Menu . . . . . . . . . . . . . . . . . . . . . . . . . . . . . . . . . . . . . . . . . . . . . . . . . . . . . . . . 37
File Menu. . . . . . . . . . . . . . . . . . . . . . . . . . . . . . . . . . . . . . . . . . . . . . . . . . . . . . 38
Options Menu . . . . . . . . . . . . . . . . . . . . . . . . . . . . . . . . . . . . . . . . . . . . . . . . . . 39
View Menu. . . . . . . . . . . . . . . . . . . . . . . . . . . . . . . . . . . . . . . . . . . . . . . . . . . . . 39
About Menu . . . . . . . . . . . . . . . . . . . . . . . . . . . . . . . . . . . . . . . . . . . . . . . . . . . . 40
Channels Pane. . . . . . . . . . . . . . . . . . . . . . . . . . . . . . . . . . . . . . . . . . . . . . . . . . . . . 41
Transport Buttons. . . . . . . . . . . . . . . . . . . . . . . . . . . . . . . . . . . . . . . . . . . . . . . . . . . 44
Inventory Pane . . . . . . . . . . . . . . . . . . . . . . . . . . . . . . . . . . . . . . . . . . . . . . . . . . . . . 45
6
Page 7

Headframes. . . . . . . . . . . . . . . . . . . . . . . . . . . . . . . . . . . . . . . . . . . . . . . . . . . . 47
Clip Properties Panel . . . . . . . . . . . . . . . . . . . . . . . . . . . . . . . . . . . . . . . . . . . . . . . . 48
Filter Controls . . . . . . . . . . . . . . . . . . . . . . . . . . . . . . . . . . . . . . . . . . . . . . . . . . . . . . 50
Status Bar. . . . . . . . . . . . . . . . . . . . . . . . . . . . . . . . . . . . . . . . . . . . . . . . . . . . . . . . . 51
View Playlists Mode . . . . . . . . . . . . . . . . . . . . . . . . . . . . . . . . . . . . . . . . . . . . . . . . . 52
Channel in Normal View. . . . . . . . . . . . . . . . . . . . . . . . . . . . . . . . . . . . . . . . . . . . . . 55
Channel in Advanced Transport View . . . . . . . . . . . . . . . . . . . . . . . . . . . . . . . . . . . 56
Channel Status Descriptions . . . . . . . . . . . . . . . . . . . . . . . . . . . . . . . . . . . . . . . 58
Timecode Displays . . . . . . . . . . . . . . . . . . . . . . . . . . . . . . . . . . . . . . . . . . . . . . 59
Media Timeline (scrub bar) . . . . . . . . . . . . . . . . . . . . . . . . . . . . . . . . . . . . . . . . 60
Media Timeline Context Menu. . . . . . . . . . . . . . . . . . . . . . . . . . . . . . . . . . . . . . 60
Timescale Bar . . . . . . . . . . . . . . . . . . . . . . . . . . . . . . . . . . . . . . . . . . . . . . . . . . 61
Timescale Bar Context Menu . . . . . . . . . . . . . . . . . . . . . . . . . . . . . . . . . . . . . . 61
Media Controls . . . . . . . . . . . . . . . . . . . . . . . . . . . . . . . . . . . . . . . . . . . . . . . . . 62
Subclip Controls . . . . . . . . . . . . . . . . . . . . . . . . . . . . . . . . . . . . . . . . . . . . . . . . 64
Channel in Mini-bar View . . . . . . . . . . . . . . . . . . . . . . . . . . . . . . . . . . . . . . . . . . . . . 65
Playlist Information Bar . . . . . . . . . . . . . . . . . . . . . . . . . . . . . . . . . . . . . . . . . . . . . . 67
Playlist . . . . . . . . . . . . . . . . . . . . . . . . . . . . . . . . . . . . . . . . . . . . . . . . . . . . . . . . . . . 68
Proxy Viewer . . . . . . . . . . . . . . . . . . . . . . . . . . . . . . . . . . . . . . . . . . . . . . . . . . . . . . 70
Right-Click Menus . . . . . . . . . . . . . . . . . . . . . . . . . . . . . . . . . . . . . . . . . . . . . . . . . . . . . . 73
Chapter 3 Working with the Remote Console . . . . . . . . . . . . . . . . . . . . . . . . . . . . . . . . 78
Working with Clips. . . . . . . . . . . . . . . . . . . . . . . . . . . . . . . . . . . . . . . . . . . . . . . . . . . . . . 79
Selecting Clips . . . . . . . . . . . . . . . . . . . . . . . . . . . . . . . . . . . . . . . . . . . . . . . . . . . . . 79
Changing the Sort Order of Clips . . . . . . . . . . . . . . . . . . . . . . . . . . . . . . . . . . . . . . . 80
Showing or Hiding Columns in the Inventory Pane . . . . . . . . . . . . . . . . . . . . . . . . . 81
Reordering Columns in the Inventory Pane . . . . . . . . . . . . . . . . . . . . . . . . . . . . . . . 83
Filtering on a Clip Name or Video ID . . . . . . . . . . . . . . . . . . . . . . . . . . . . . . . . . . . . 83
Viewing Clip Properties and Modifying Clip Behavior . . . . . . . . . . . . . . . . . . . . . . . 85
Playing Clips. . . . . . . . . . . . . . . . . . . . . . . . . . . . . . . . . . . . . . . . . . . . . . . . . . . . . . . 86
Cueing and Playing Clips Directly from the Current Video ID Field. . . . . . . . . . 86
Cueing and Taking Clips via the Next Video ID Field . . . . . . . . . . . . . . . . . . . . 87
Recording Clips . . . . . . . . . . . . . . . . . . . . . . . . . . . . . . . . . . . . . . . . . . . . . . . . . . . . 87
Crash Recording Clips. . . . . . . . . . . . . . . . . . . . . . . . . . . . . . . . . . . . . . . . . . . . 87
7
Page 8

Cueing Clips for Record . . . . . . . . . . . . . . . . . . . . . . . . . . . . . . . . . . . . . . . . . . 88
Recording Clips with Only a Video ID Specified (no Duration or Name) . . . . . . 88
Recording Clips with Both a Video ID and Duration Specified . . . . . . . . . . . . . 89
Recording Clips with Only a Name Specified (no Duration or Video ID) . . . . . . 89
Recording Clips with Only a Duration Specified (No Video ID or Name) . . . . . 89
Modifying In/Out Points for Clips in the Inventory Pane . . . . . . . . . . . . . . . . . . . . . . 90
Creating Subclips in Normal View . . . . . . . . . . . . . . . . . . . . . . . . . . . . . . . . . . . . . . 90
Working with Proxy Clips . . . . . . . . . . . . . . . . . . . . . . . . . . . . . . . . . . . . . . . . . . . . . 91
Manually Creating Proxy Clips . . . . . . . . . . . . . . . . . . . . . . . . . . . . . . . . . . . . . 91
Viewing Proxy Clips. . . . . . . . . . . . . . . . . . . . . . . . . . . . . . . . . . . . . . . . . . . . . . 92
Creating Subclips Using the Proxy Viewer . . . . . . . . . . . . . . . . . . . . . . . . . . . . 93
Editing the In and Out Points of a Clip in the Proxy Viewer. . . . . . . . . . . . . . . . 94
Deleting Clips . . . . . . . . . . . . . . . . . . . . . . . . . . . . . . . . . . . . . . . . . . . . . . . . . . . . . . 94
Protecting or Unprotecting Clips from Deletion . . . . . . . . . . . . . . . . . . . . . . . . . . . . 95
Transferring Clips . . . . . . . . . . . . . . . . . . . . . . . . . . . . . . . . . . . . . . . . . . . . . . . . . . . 96
Transferring Clips to Shared Storage (Interplay Production and Team Modes) 96
Transferring Clips to an Avid Editor (Standalone Mode) . . . . . . . . . . . . . . . . . . 96
Transferring Clips to an Avid Editor (Team Mode) . . . . . . . . . . . . . . . . . . . . . . 97
Performing an Edit While Capture (EWC) with Drag and Drop . . . . . . . . . . . . . 97
Performing an Edit While Capture (EWC) with Auto Transfer . . . . . . . . . . . . . . 99
Importing .AAF Files into the Avid Editor (Macintosh Team Mode). . . . . . . . . 102
Working with Playlists . . . . . . . . . . . . . . . . . . . . . . . . . . . . . . . . . . . . . . . . . . . . . . . . . . 104
Creating Playlists . . . . . . . . . . . . . . . . . . . . . . . . . . . . . . . . . . . . . . . . . . . . . . . . . . 105
Basic Playlist Operations . . . . . . . . . . . . . . . . . . . . . . . . . . . . . . . . . . . . . . . . . . . . 106
Opening Playlists. . . . . . . . . . . . . . . . . . . . . . . . . . . . . . . . . . . . . . . . . . . . . . . 106
Clearing Playlists. . . . . . . . . . . . . . . . . . . . . . . . . . . . . . . . . . . . . . . . . . . . . . . 107
Taking Control of a Playlist for a Channel . . . . . . . . . . . . . . . . . . . . . . . . . . . . 107
Setting Loop Behavior in the Playlist. . . . . . . . . . . . . . . . . . . . . . . . . . . . . . . . 108
Working with Clips in the Playlist . . . . . . . . . . . . . . . . . . . . . . . . . . . . . . . . . . . . . . 108
Reordering Clips within the Playlist . . . . . . . . . . . . . . . . . . . . . . . . . . . . . . . . . 108
Modifying In/ Out Points for Clips in the Playlist . . . . . . . . . . . . . . . . . . . . . . . 109
Setting the Follow Behavior for Clips in the Playlist . . . . . . . . . . . . . . . . . . . . 109
Deleting Clips from the Playlist . . . . . . . . . . . . . . . . . . . . . . . . . . . . . . . . . . . . 109
8
Page 9

Cueing a Playlist . . . . . . . . . . . . . . . . . . . . . . . . . . . . . . . . . . . . . . . . . . . . . . . 110
Cueing From a Specific Clip in the Playlist . . . . . . . . . . . . . . . . . . . . . . . . . . . 110
Playing Clips in the Playlist . . . . . . . . . . . . . . . . . . . . . . . . . . . . . . . . . . . . . . . 110
Pausing Clips in the Playlist . . . . . . . . . . . . . . . . . . . . . . . . . . . . . . . . . . . . . . 111
Stopping and Unloading Clips in the Playlist . . . . . . . . . . . . . . . . . . . . . . . . . . 111
Showing All Media in the Advanced Transport View. . . . . . . . . . . . . . . . . . . . 111
Working in the Advanced Transport View . . . . . . . . . . . . . . . . . . . . . . . . . . . . . . . . . . . 112
Selecting Channels . . . . . . . . . . . . . . . . . . . . . . . . . . . . . . . . . . . . . . . . . . . . . . . . 113
Playing Clips in the Advanced Transport View. . . . . . . . . . . . . . . . . . . . . . . . . . . . 114
Recording Clips in the Advanced Transport View . . . . . . . . . . . . . . . . . . . . . . . . . 115
Stepping Forward and Backward . . . . . . . . . . . . . . . . . . . . . . . . . . . . . . . . . . . . . . 116
Going to a Specific Position in a Clip . . . . . . . . . . . . . . . . . . . . . . . . . . . . . . . . . . . 117
Creating Subclips in the Advanced Transport View . . . . . . . . . . . . . . . . . . . . . . . . 118
Sub-clipping from Left or Right. . . . . . . . . . . . . . . . . . . . . . . . . . . . . . . . . . . . . . . . 119
Appendix A Keyboard Shortcuts . . . . . . . . . . . . . . . . . . . . . . . . . . . . . . . . . . . . . . . . . . . 120
Inventory Pane Keyboard Shortcuts . . . . . . . . . . . . . . . . . . . . . . . . . . . . . . . . . . . . . . . 121
Channel Keyboard Shortcuts . . . . . . . . . . . . . . . . . . . . . . . . . . . . . . . . . . . . . . . . . . . . 122
Proxy Viewer Keyboard Shortcuts . . . . . . . . . . . . . . . . . . . . . . . . . . . . . . . . . . . . . . . . 123
Playlist Keyboard Shortcuts . . . . . . . . . . . . . . . . . . . . . . . . . . . . . . . . . . . . . . . . . . . . . 124
Advanced Transport View Keyboard Shortcuts . . . . . . . . . . . . . . . . . . . . . . . . . . . . . . 124
9
Page 10

10
Page 11

1 Using This Guide
Congratulations on your purchase of an Avid AirSpeed 5000 Remote Console.
The AirSpeed 5000 Remote Console is an application that is installed on a PC on your network.
The AirSpeed 5000 Remote Console is able to connect to one or more AirSpeed 5000 or
AirSpeed Multi Stream servers on your network. Once connected, you can see the channels and
inventory on the server(s). Then you can use the AirSpeed 5000 Remote Console to do the
following:
• Cue and play clips
• Cue and record clips
• Retransfer clips
• Manage clip inventory
• Create playlists and play the clips out on their associated channels
• Create subclips
• Preview clips via proxy media
This guide contains all the installation, configuration, and task-oriented instructions, conceptual
information, and reference material you need to install, configure and use the Avid AirSpeed
5000 Remote Console.
This guide is intended for all users, from beginning to advanced.
The documentation describes the features and hardware of all models. Therefore, your system
n
might not contain certain features and hardware that are covered in the documentation.
11
Page 12

Symbols and Conventions
Avid documentation uses the following symbols and conventions:
Symbol or Convention Meaning or Action
Symbols and Conventions
n
c
w
> This symbol indicates menu commands (and subcommands) in the
(Windows), (Windows
only), (Macintosh), or
(Macintosh only)
Bold font Bold font is primarily used in task instructions to identify user interface
Italic font Italic font is used to emphasize certain words and to indicate variables.
Courier Bold font
A note provides important related information, reminders,
recommendations, and strong suggestions.
A caution means that a specific action you take could cause harm to
your computer or cause you to lose data.
A warning describes an action that could cause you physical harm.
Follow the guidelines in this document or on the unit itself when
handling electrical equipment.
order you select them. For example, File > Import means to open the
File menu and then select the Import command.
This symbol indicates a single-step procedure. Multiple arrows in a list
indicate that you perform one of the actions listed.
This text indicates that the information applies only to the specified
operating system, either Windows or Macintosh OS X.
items and keyboard sequences.
Courier Bold font identifies text that you type.
Ctrl+key or mouse action Press and hold the first key while you press the last key or perform the
mouse action. For example, Command+Option+C or Ctrl+drag.
12
Page 13

If You Need Help
If you are having trouble using your Avid product:
1. Retry the action, carefully following the instructions given for that task in this guide. It is
especially important to check each step of your workflow.
2. Check the latest information that might have become available after the documentation was
published:
- If the latest information for your Avid product is provided as printed release notes, they
ship with your application and are also available online.
If the latest information for your Avid product is provided as a ReadMe file, it is
supplied on your Avid installation CD or DVD as a PDF document
(README_product.pdf) and is also available online.
You should always check online for the most up-to-date release notes or ReadMe
because the online version is updated whenever new information becomes available. To
view these online versions, select ReadMe from the Help menu, or visit the Knowledge Base
at www.avid.com/readme.
3. Check the documentation that came with your Avid application or your hardware for
maintenance or hardware-related issues.
If You Need Help
4. Visit the online Knowledge Base at www.avid.com/onlinesupport. Online services are
available 24 hours per day, 7 days per week. Search this online Knowledge Base to find
answers, to view error messages, to access troubleshooting tips, to download updates, and to
read or join online message-board discussions.
Avid Training Services
Avid makes lifelong learning, career advancement, and personal development easy and
convenient. Avid understands that the knowledge you need to differentiate yourself is always
changing, and Avid continually updates course content and offers new training delivery methods
that accommodate your pressured and competitive work environment.
To learn about Avid's new online learning environment, Avid Learning Excellerator (ALEX),
visit http://learn.avid.com.
For information on courses/schedules, training centers, certifications, courseware, and books,
please visit www.avid.com/training or call Avid Sales at 800-949-AVID (800-949-2843).
13
Page 14

1 Installing and Configuring the Remote
Console
The AirSpeed 5000 Remote Console is an application that can be installed on a PC on your
network. Once on your network, a single instance of Remote Console from one PC can connect
to any combination of up to ten AirSpeed Multi Stream and AirSpeed 5000 servers per channel.
An AirSpeed Multi Stream or AirSpeed 5000 server can accept connections from up to ten
AMSAPI clients per channel. A connecting client will typically open one connection for each
channel. This could include Remote Console clients, as well as 3rd-party products that use
AMSAPI to communicate with the system.
FTP connections, Avid Interplay Capture, Avid Capture Manager and Avid iNEWS Command do
n
not count against the total connections to a single server.
There is a version of the AirSpeed 5000 Remote Console software included in the AirSpeed 5000
n
server installation. There is no need for additional installation of the AirSpeed 5000 Remote
Console software on the AirSpeed 5000 server.
In Interplay Production mode, we support up to five (5) devices in the same Studio.
n
Once configured and connected to an AirSpeed 5000 server (or servers), you can see the
channels and inventory on the server(s) you are connected to. Then, remotely from your PC, you
can use the AirSpeed 5000 Remote Console application to do the following:
• Cue and play clips
• Cue and record clips
• Retransfer clips
• Manage clip inventory
• Create Playlists and play the clips out on their associated channels
• Create subclips
• Preview clips via proxy media
Page 15

Standalone Transfer Engine Overview
This chapter describes how to install and configure the AirSpeed 5000 Remote Console for your
environment.
The following topics are included:
• Standalone Transfer Engine Overview
• AirSpeed 5000 Installation and Configuration Checklist
Standalone Transfer Engine Overview
When AirSpeed 5000 is configured with a standalone Transfer Engine it operates in
environments where you have local storage without Interplay. In a Standalone environment, the
Transfer Engine (TM) application uses FTP functionality to act as the transfer agent between the
Avid editors and the AirSpeed 5000 Remote Console application.
With a Standalone Transfer Engine configuration, AirSpeed 5000 uses only its own internal
storage or local Avid editor storage for storing clips and supports playing out to air via drag and
drop using the AirSpeed 5000 Remote Console.
In this configuration, clips are visible through the Remote Console inventory pane and can be
used to drag and drop files directly to the editor bin for editing. The standalone configuration
supports playout automation applications such as DNF controllers and other solutions using
VDCP or AMSAPI.
Interplay Transfer Engine does not support Studio playout.
n
15
Page 16

Standalone Transfer Engine Overview
Video servers configured with a Standalone Transfer Engine support the standard features of
your video server model (AirSpeed 5000) with the exception of the features listed below:
• Avid Studio Playout
• Interplay Capture
• CaptureManager
• Frame Chase™ Editing
• Edit While Capture (EWC) functionality with Avid Editor systems
• H.264 media transfers to the Editor (not for Standalone or Team)
For more information, see the following topic:
• Standalone Software Requirements
Configuration Requirements for AirSpeed 5000 Server
Before configuring the AirSpeed 5000 Remote Console for standalone environment, each
AirSpeed 5000 server that you want to connect to must have been configured with the following:
• Site-specific settings need to be applied for the AirSpeed 5000 to operate with a Standalone
Transfer Engine.
• A site-specific host name/domain name must have been created for the AirSpeed 5000,
including an IP address and mask for the network interface.
•The E: drive must be shared with at least Read Only privileges.
Once these requirements are met, and you have installed all of the necessary hardware and
software for your site, you can configure the AirSpeed 5000 Remote Console for a Standalone
environment. For more information on specific tasks involved when configuring your AirSpeed
5000 with a Standalone Transfer Engine, see “AirSpeed 5000 Installation and Configuration
Checklist” on page 18.
Prior to proceeding with AirSpeed 5000 configuration, ensure that your AirSpeed 5000 is
n
installed and connected as described in the AirSpeed 5000 Setup Guide, and in the AirSpeed
5000 Administrator’s Guide.
16
Page 17

Standalone Software Requirements
For the AirSpeed 5000 system to function properly in a Standalone environment, it is necessary
to configure a standalone Transfer Engine. Depending on the Editor software version of
NewsCutter, Media Composer, or Symphony you are using, you must have a compatible Avid®
Interplay™ Transfer Engine and Client software version.
The following table lists the minimum supported Editor and Interplay Transfer software
versions.
System Requirements
Editor Version Interplay Transfer Software
NewsCutter v9.0.4 or later Avid Interplay Transfer Engine v2.5 or later
Standalone Transfer Engine Overview
Media Composer v5.0.4 or
later
Symphony v5.0.4 or later Avid Interplay Transfer Engine v2.5 or later
Avid Interplay Transfer Engine v2.5 or later
To verify the latest supported software versions, search for the latest AirSpeed 5000 ReadMe on
the Avid Knowledge Base.
All of the documentation for configuration is available on the Avid Knowledge Base. This
documentation assists users in configuration of the Standalone Transfer Engine. The Avid
Interplay Transfer Setup and User’s Guide, and the Avid Interplay Transfer v1.0 Readme are
available at the top level of the Avid Interplay Transfer CD-ROM. For the latest versions of the
documentation, see the Knowledge Base.
Software Requirements for the Avid Editing Client
In order for the Standalone AirSpeed 5000 Remote Console to work in a Standalone
environment, each Avid Editing client must have the following software loaded:
• An Avid editing application (e.g., Media Composer, NewsCutter, or Symphony)
• A Standalone version of the AirSpeed 5000 Remote Console application
• Avid Interplay Transfer Engine
• Avid Interplay Transfer Client
17
Page 18

AirSpeed 5000 Installation and Configuration Checklist
AirSpeed 5000 Installation and Configuration
Checklist
The following table provides a checklist of tasks that must be performed on the Avid Editor
when configuring your Avid editing application in a Standalone Transfer Engine environment.
Depending on your site’s configuration, some tasks are optional.
Install the AirSpeed 5000 Remote Console application, as described in “Installing the
AirSpeed 5000 Remote Console Application” on page 19.
Install the Interplay Transfer Engine, as described in “Installing the Interplay Transfer
Engine on the Avid Editor (Standalone Mode)” on page 20.
Connect to an AirSpeed 5000 server, as described in “Connecting to AirSpeed 5000
Servers” on page 21.
For Team and Interplay Production modes, after you connect to a server, you can begin
using the Remote Console, as described in “Getting Started with the Remote Console” on
page 35
(Standalone only) There are two methods for configuring the AirSpeed 5000 and related
software when using a Standalone Transfer Engine (Interplay Transfer Engine). Select
one of the following methods:
• The AirSpeed 5000 Remote Console (File > Configure Transfer Engine) “Automatic
Configuration” method, as described in “Configuring Transfers for AirSpeed 5000
Servers (Standalone Mode)” on page 23.
• The “Manual Configuration” method to configure the Avid Interplay Transfer Engine
Configuration window for a Standalone Transfer Engine, as described in “Manually
Configuring the Interplay Transfer Engine for a Standalone Environment” on
page 24.
(Standalone only) Configure the Standalone settings for the Avid editor, as described in
“Configuring the Standalone Settings for the Avid Editor” on page 33.
(Standalone only) Start the Interplay Transfer Engine on the Avid editor, as described in
“Starting the Interplay Transfer Engine on the Avid Editor” on page 31.
(Standalone only) Start the Remote Console, as described in “Starting the AirSpeed 5000
Remote Console Application” on page 31.
Once started, verify that your Standalone configuration works by connecting to an
AirSpeed 5000 server. for more information, see “Connecting to AirSpeed 5000 Servers”
on page 21.
18
Page 19
AirSpeed 5000 Installation and Configuration Checklist
Installing the AirSpeed 5000 Remote Console Application
This topic contains information on how to install the AirSpeed 5000 Remote Console application
for your environment.
To install the AirSpeed 5000 Remote Console application:
1. On the Avid editor, locate the AvidAirSpeed5000RemoteConsole.zip file, and un-compress
it to your desktop.
2. Double-click Setup.exe to run the installer.
If you are upgrading your AirSpeed 5000 Remote Console from a previous version, the installer
n
will install the application for the same environment. If you want to change your environment,
you must uninstall via Add/Remove Programs, and then reinstall the Remote console
application.
3. Click Next when prompted.
The License Agreement dialog box opens.
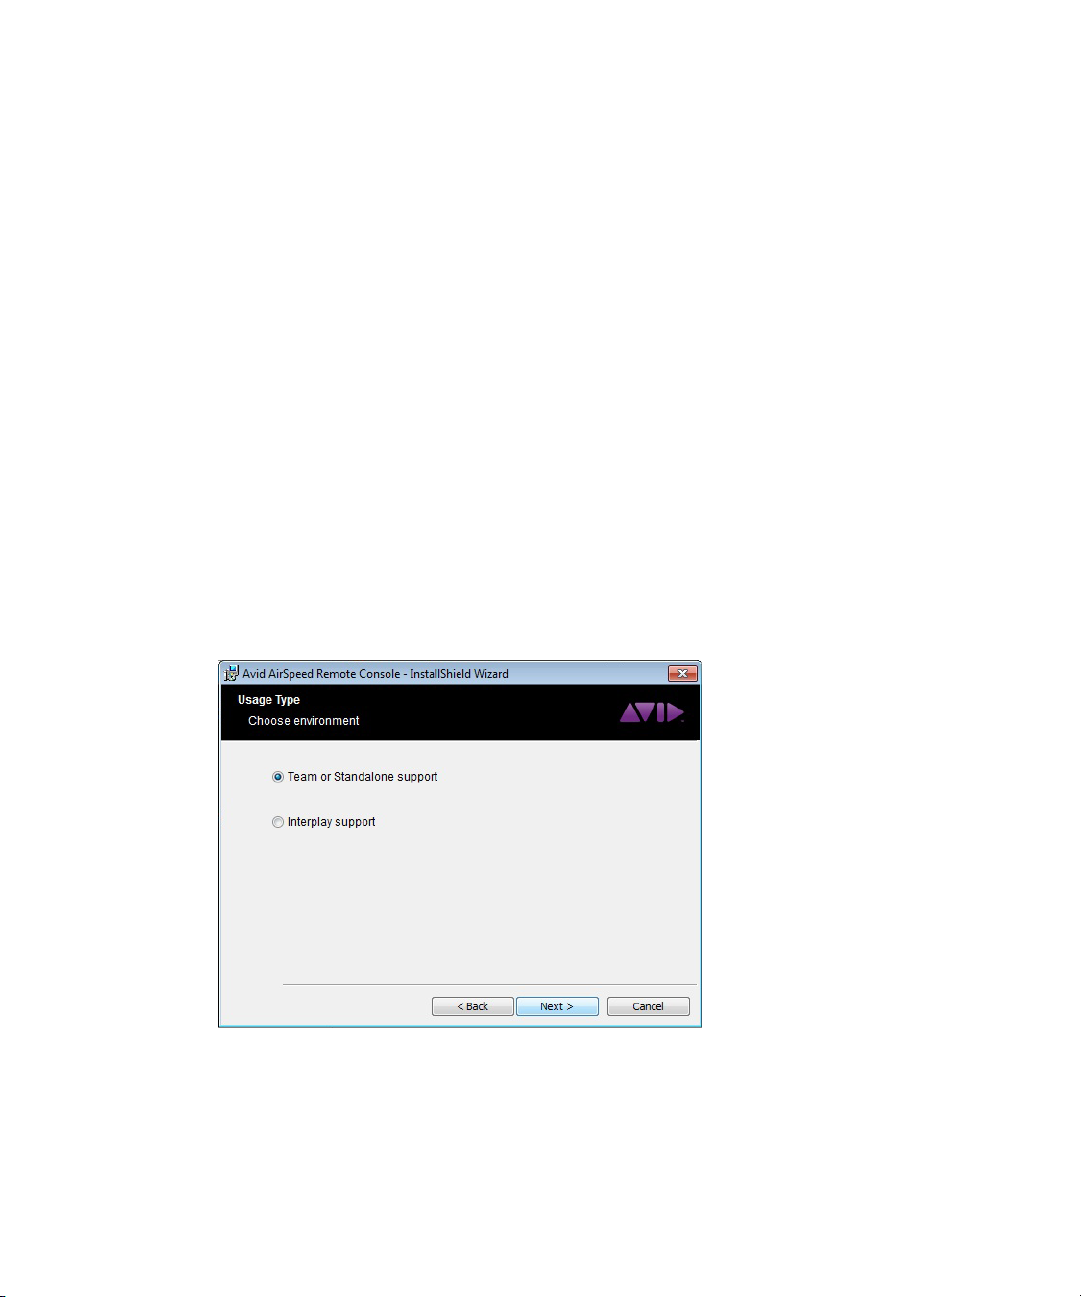
4. Accept the terms of the license agreement, and click Next.
The Usage Type dialog box opens.
5. Select the option for your environment, and click Next.
The Editor Support dialog box opens.
6. Select the appropriate Editor support option for your environment, and click Next.
19
Page 20

AirSpeed 5000 Installation and Configuration Checklist
7. Click Install.
The AirSpeed 5000 Remote Console application will automatically be installed on your
Avid editor.
8. Depending on the environment for your site, do one of the following:
t If your site is configured in an Interplay or Team environment, your next step is to
launch the AirSpeed 5000 Remote Console. For more information, see “Starting the
AirSpeed 5000 Remote Console Application” on page 31.
t If your site is configured in a Standalone environment, your next step is to install the
Interplay Transfer Engine on the Avid Editor. For more information, see “Installing the
Interplay Transfer Engine on the Avid Editor (Standalone Mode)” on page 20.
Installing the Interplay Transfer Engine on the Avid Editor (Standalone Mode)
If your site is configured in a Standalone mode, the next step is to install the Interplay Transfer
Engine on each Avid editor.
These instructions are only a subset of the instructions for installation and configuration of the
n
standalone Transfer Engine. See the Avid Interplay Transfer Setup and User’s Guide
documentation for complete installation and configuration instructions.
To install the Interplay Transfer Engine on the Avid editor:
1. Insert the Avid Interplay Transfer CD-ROM and double-click the Launch.exe file.
The Main Menu page opens.
2. Click Avid Transfer Server.
The Welcome window opens.
3. Click Next.
Make sure that the FTP services get installed with the Interplay Transfer Engine.
n
4. Click the applicable country, and click Next.
5. Click Yes to accept the license agreement.
If you do not accept the license agreement, the Interplay Transfer Engine installation ends
n
without completing.
20
Page 21

6. The next step is to start the AirSpeed 5000 Remote Console application, and connect to an
AirSpeed 5000 server. For more information, see “Starting the AirSpeed 5000 Remote
Console Application” on page 31.
It is recommended that the XferMgrServer.exe is launched prior to launching the Avid editor to
n
avoid having to reconnect the Avid editor to the Standalone Interplay Transfer Engine.
If the XferMgrServer.exe is launched following launch of the Avid editor application, the User
must select the “Transfer”, “Reconnect to server” menu option to reconnect the Avid editor to
the standalone Interplay Transfer Engine Server.
Connecting to AirSpeed 5000 Servers
This topic contains information on how to connect to AirSpeed 5000 or AirSpeed Multi Stream
servers from the AirSpeed 5000 Remote Console.
Depending on your environment (Standalone, Team, or Interplay Production), you will get
different “Connect” dialog boxes.
Once you are connected to a server, you should be able to view Channel and Inventory
information for that server.
AirSpeed 5000 Installation and Configuration Checklist
To connect to an AirSpeed 5000 server:
1. On the AirSpeed 5000 Remote Console, select File > Connect... Depending on your
AirSpeed 5000 environment, one of the following dialog boxes opens:
t For Standalone and Team environments, the Connect to Remote Server dialog box
opens. If you do not see a server, you must type the host name of the AirSpeed 5000
server that you want to connect to in the Server Host Name field, and click OK.
If you are configured in a Standalone mode, once you successfully connect to an AirSpeed 5000
n
server, its host name appears in the Server Host Name list. Therefore, if you ever want to connect
to that (or any other previously connected to) AirSpeed 5000 server, you can simply select it from
the list.
t For Interplay Production environments, the Select Servers dialog box opens. Select a
server and click OK.
21
Page 22

AirSpeed 5000 Installation and Configuration Checklist
In order for servers to populate in the dialog box, you must have your user configured properly
n
in the User’s Page of the AirSpeed Management Console, as well as in Interplay. Once
connected to a server, you can view Channel and Inventory information for that server.
If you are configured in an Interplay Production mode, the servers appearing in the Select
n
Servers list consist of the AirSpeed 5000 servers that are in the Interplay Workgroup that you are
connected to.
Once connected, Channel and Inventory information for that AirSpeed 5000 server is
loaded into the AirSpeed 5000 Remote Console with a Server tab just above the
Inventory panel, showing the host name of that AirSpeed 5000 server.
2. (Option) Repeat Step 1 to connect to additional AirSpeed 5000 servers.
Channel and Inventory information for additional AirSpeed 5000 servers can be accessed by
switching Server tabs.
A single instance of Remote Console from one PC can connect to any combination of up to ten
n
AirSpeed Multi Stream and AirSpeed 5000 servers.
An AirSpeed Multi Stream or AirSpeed 5000 server can accept connections from up to ten
AMSAPI clients per channel. A connecting client will typically open one connection for each
channel. This could include Remote Console clients, as well as 3rd-party products that use
AMSAPI to communicate with the system. FTP connections, Avid Interplay Capture, Avid
Capture Manager and Avid iNEWS Command do not count against the total connections to a
single server.
22
Page 23

AirSpeed 5000 Installation and Configuration Checklist
3. Your next step depends on what environment your site is configured for.
t For Standalone environments, your next step is to configure the Interplay Transfer
Engine for a Standalone environment. There are two methods for doing this:
- For information on configuring Standalone transfers using the AirSpeed 5000 Remote
Console application to automatically configure it for you, see “Configuring Transfers
for AirSpeed 5000 Servers (Standalone Mode)” on page 23.
- For information on configuring transfers manually using the Avid Interplay Transfer
Engine Configuration window, see “Manually Configuring the Interplay Transfer
Engine for a Standalone Environment” on page 24.
t For Interplay Production or Team environments, assuming you were able to connect to a
server, you are now ready to begin using the AirSpeed 5000 Remote Console
application.
For more information, see “Getting Started with the Remote Console” on page 35.
Configuring Transfers for AirSpeed 5000 Servers (Standalone Mode)
Once the AirSpeed 5000 Remote Console has been launched, and connected to AirSpeed 5000
server(s), you must configure transfers for the AirSpeed 5000 Remote Console on the Avid
editor to allow communication between it and the AirSpeed 5000 server.
For more information, see “Connecting to AirSpeed 5000 Servers” on page 21.
In the User’s Page of the Management Console, be sure that you defined the FTP password for
n
the user you plan on using on the Avid Editing client.
To configure transfers for AirSpeed 5000 servers in a Standalone environment:
1. After you have successfully connected your Remote Console to the AirSpeed 5000 server,
select File > Configure Transfer Engine.
The Configure Transfer Engine dialog box opens.
23
Page 24

AirSpeed 5000 Installation and Configuration Checklist
2. Select the AirSpeed 5000 server name that you want to configure from the Select Server list.
The Select Server list displays the servers that were most recently connected to.
3. Click Add to add the selected server to the Configured Servers list.
The Configured Servers list displays the AirSpeed 5000 servers that are configured for use
by the Standalone Transfer Engine.
4. (Optional) To remove a server from the Configured Servers list, select the server you want to
remove and click the Delete button.
5. (For MPEG-2 HD (XDCAM) capable systems) To enable Send to Playback (STP) of
MPEG-2 HD clips, select the compression format you want to use for your transfers from
the XDCAM STP Format list.
For all systems that are not capable of MPEG-2 HD (XDCAM) formats, you can leave this field
n
blank.
6. Click the Update button to save your changes.
You will be asked to restart the Transfer Engine. Click OK.
7. Manually stop and restart the Transfer Engine. For more information, see “Starting the
Interplay Transfer Engine on the Avid Editor” on page 31.
At this point, the server is configured for ingest and playback.
For MPEG-2 HD (XDCAM) servers, a profile is generated that allows you to send to
playback MPEG-2, 720p or 1080i media. This will be denoted by the
<AirSpeed5000servername>-HD in the Avid editor upon sending an MPEG-2 HD sequence
to playback.
8. Next, you must configure the Standalone setting on the Avid Editor. For more information,
see “Configuring the Standalone Settings for the Avid Editor” on page 33.
Manually Configuring the Interplay Transfer Engine for a Standalone Environment
After installing the Interplay Transfer Engine on the Avid editor, you can manually configure the
Interplay Transfer Engine to operate in a Standalone environment.
To manually configure the Interplay Transfer Engine for a Standalone Environment:
1. On your Avid editor, do one of the following:
t Select Start > All Programs > Avid > Interplay Transfer Configuration.
t Select the Interplay Transfer Engine desktop shortcut
The Avid Interplay Transfer Engine Configuration window opens.
24
Page 25
AirSpeed 5000 Installation and Configuration Checklist
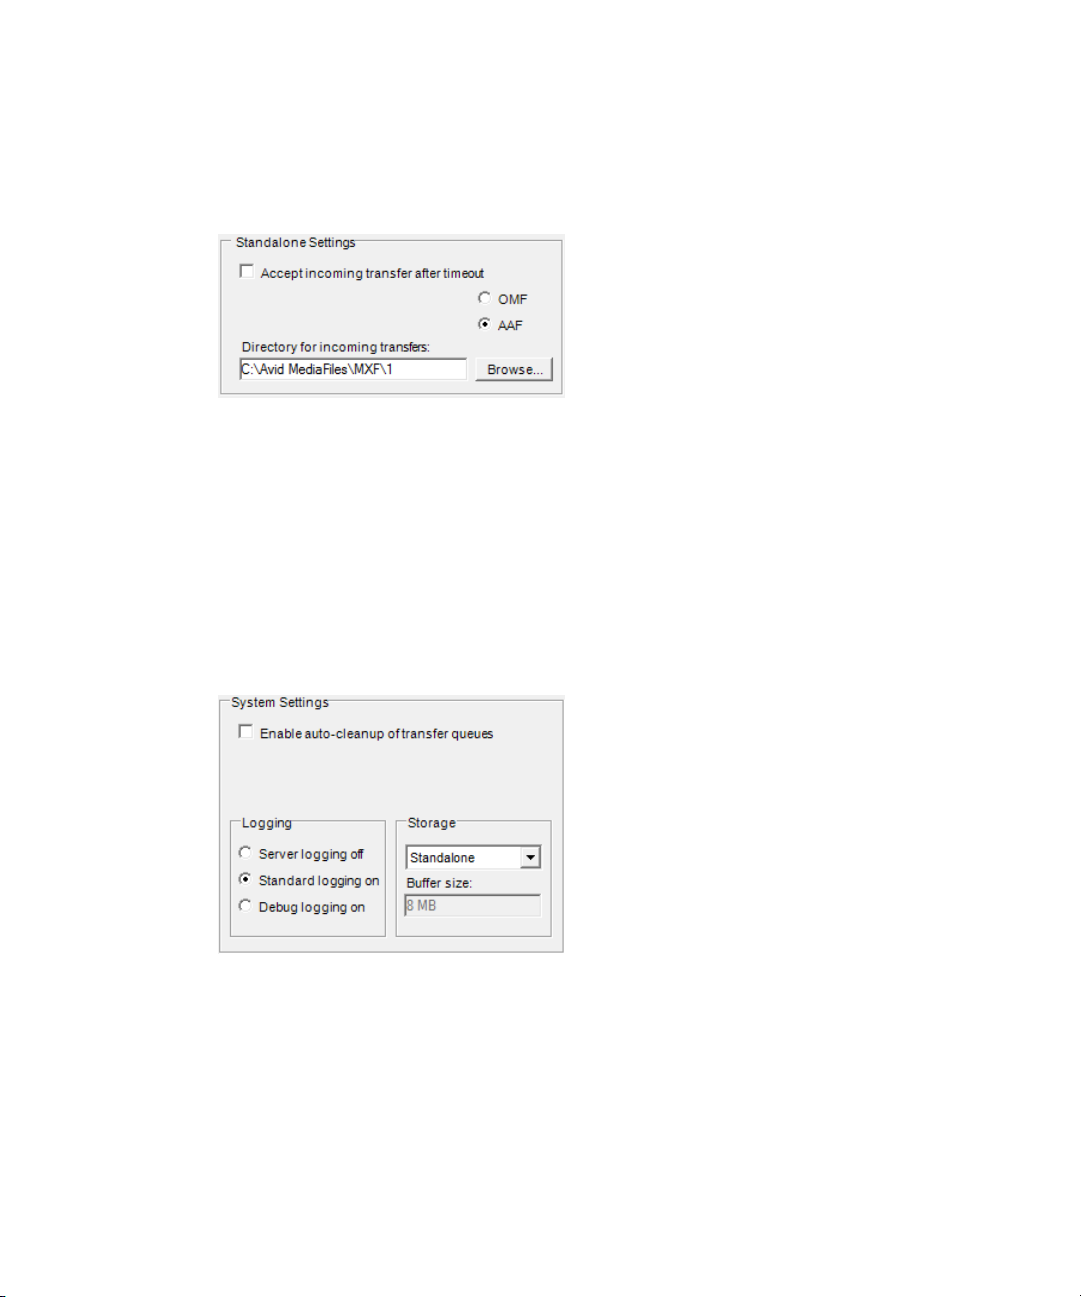
2. In the Standalone Settings section, ensure that the AAF option is selected.
For more information on the Standalone Settings area, refer to the Avid Unity
TransferManager Version 2.9.22 Release Notes.
3. Click the Browse button to navigate to the location on your local volume (e.g., C:\), in which
the media will be transferred to. For example: C:\Avid MediaFiles\MXF\1.
If this directory does not exist, import any supported file into the editor. The directory will
automatically be created, and then you can navigate to it, and copy and paste the path in the
“Directory of incoming transfers” field.
4. In the System Settings area, in the Storage list, ensure that Standalone is already selected. If
not, select it.
When Standalone is selected, it also sets the proper buffer size to 8MB.
n
25
Page 26
AirSpeed 5000 Installation and Configuration Checklist
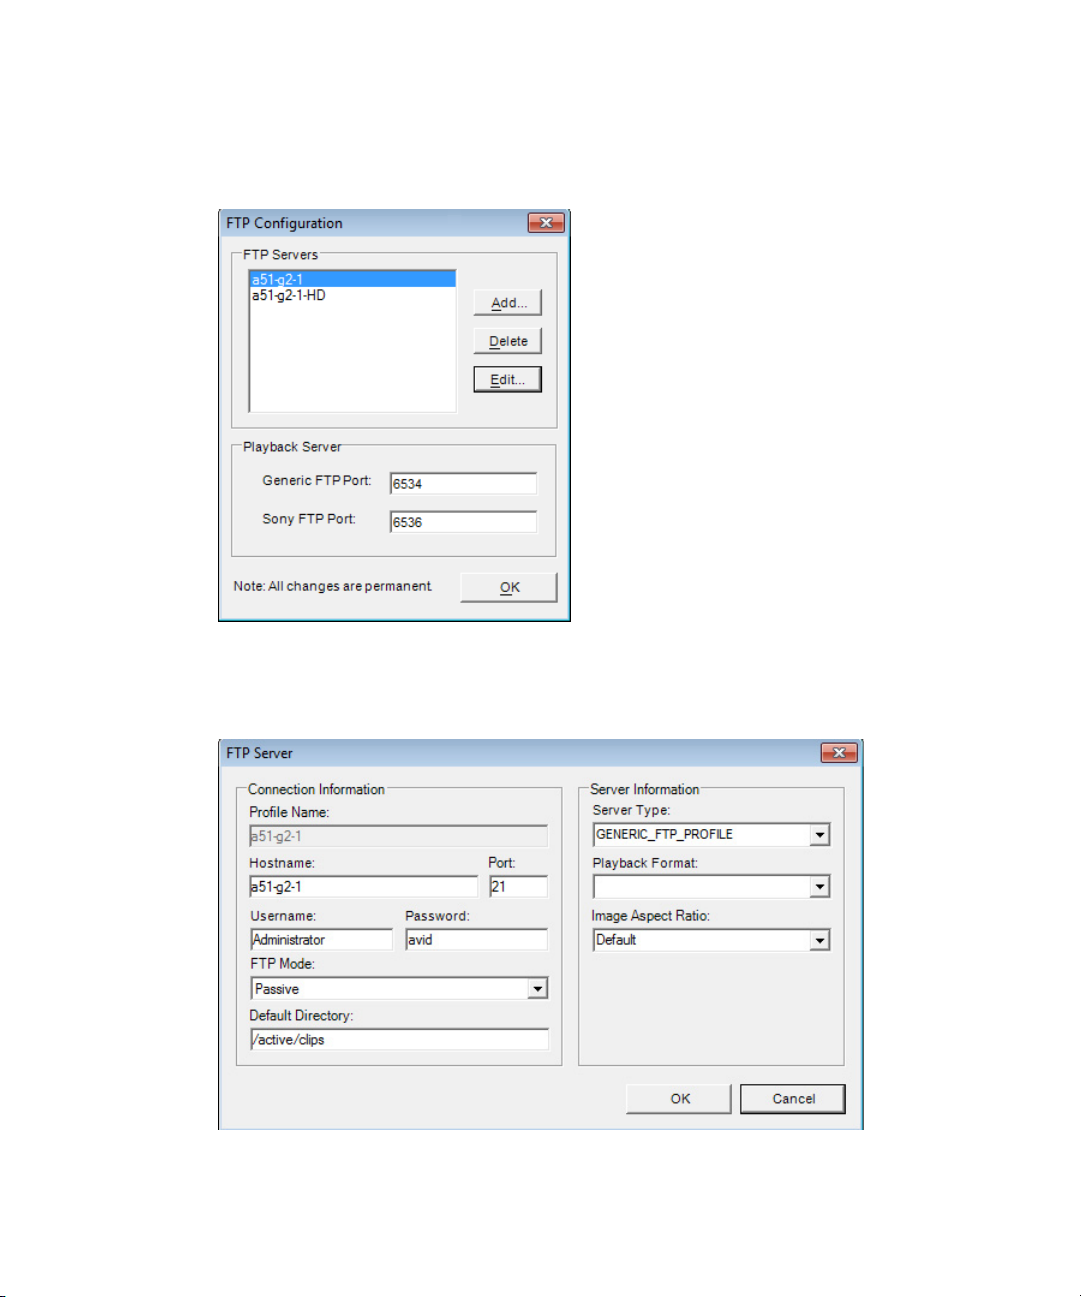
5. Select the Configure FTP Servers button.
The FTP Configuration dialog box opens.
6. Select the Add button.
The FTP Server dialog box opens.
26
Page 27
AirSpeed 5000 Installation and Configuration Checklist
7. Complete the following fields as instructed (leave the default in the remaining fields):
a. In the Hostname field, type the name of the AirSpeed 5000 server.
b. In the Username field, type the name of the user.
c. In the Password field, type the password for the user you entered in the Username field.
d. In the Default Directory field, type the path /active/clips.
e. In the Server Type field, verify that GENERIC_FTP_PROFILE is selected.
f. Click OK.
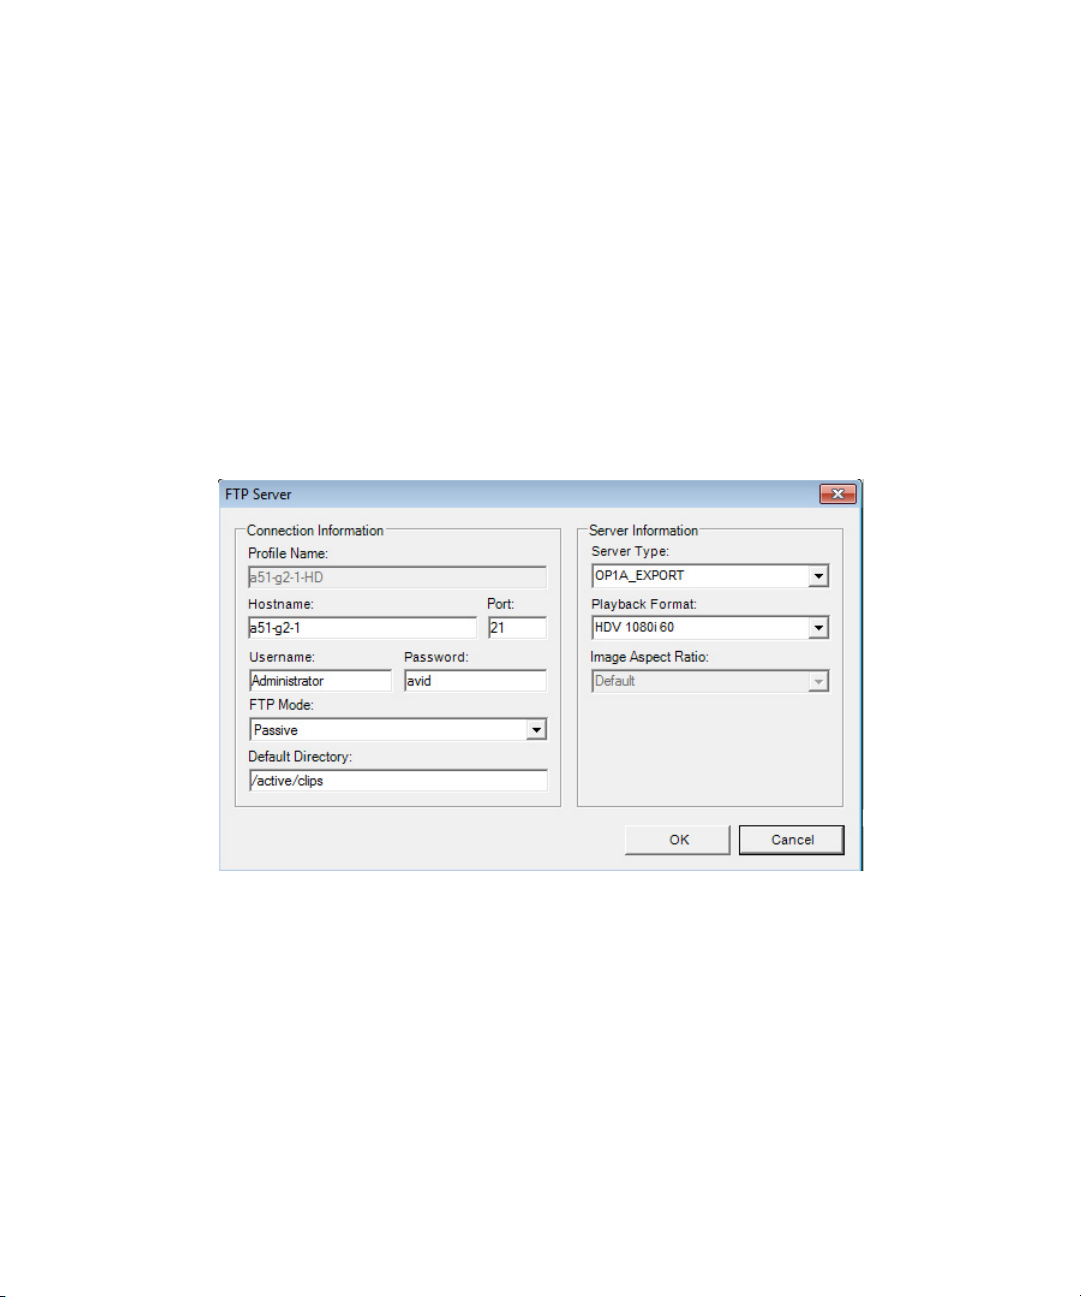
8. (Option) If you are transferring MPEG-2 HD (XDCAM) clips, click the Add button again to
create a second profile for XDCAM. Otherwise go to Step 10.
The FTP Server dialog box opens.
9. Complete the following fields for the MPEG-2 HD (XDCAM) profile as instructed (leave
the default in the remaining fields):
a. In the Hostname field, type the name of the AirSpeed 5000 server.
b. In the Username field, type the name of the user.
c. In the Password field, type the password for the user you entered in the Username field.
d. In the Default Directory field, type the path /active/clips.
e. In the Server Type list box, select OP1A_EXPORT.
f. In the Playback Format list box, select the MPEG-2 HD format that you want to transfer.
g. Click OK.
27
Page 28
AirSpeed 5000 Installation and Configuration Checklist
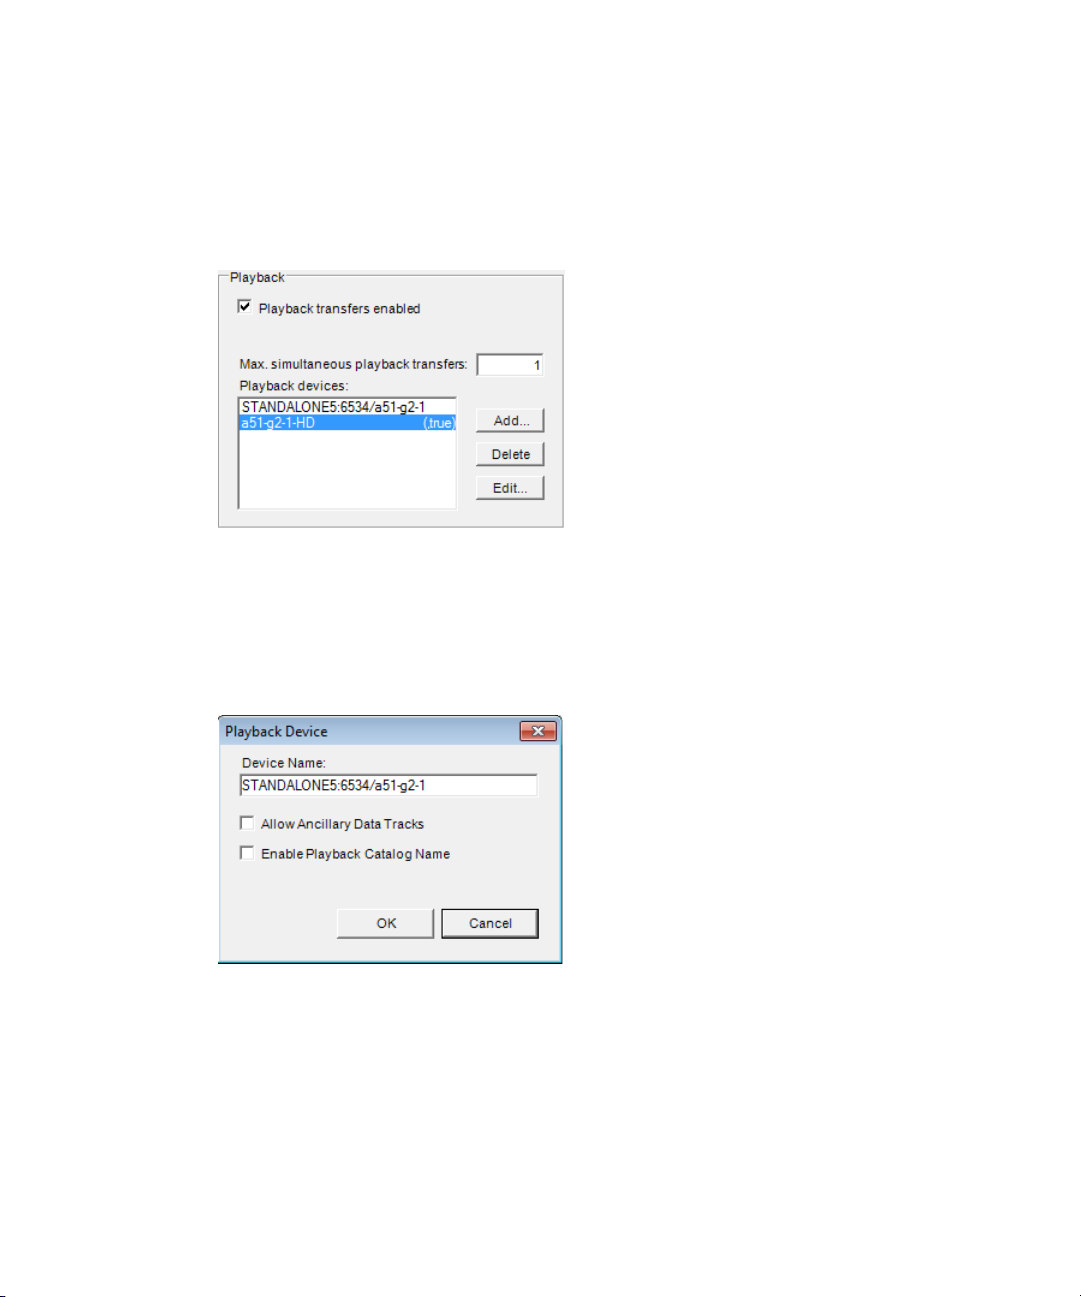
10. In the Playback area, add at least one Playback device for handling AVC-Intra, DNXHD,
and SD clip transfers.
If you are transferring MPEG-2 HD (XDCAM) clips, you must add an additional Playback
n
device for HD.
11. To add a Playback device, do the following:
a. Verify that the Playback transfers enabled check box is selected.
b. Click the Add button.
The Playback Device dialog box opens.
28
Page 29
AirSpeed 5000 Installation and Configuration Checklist
12. Do the following:
a. In the Device name field, type the name of the editor that you are using for FTP transfers
as follows:
- If you are transferring AVC-Intra, DNXHD, and SD formats, you must add a
Playback device name for these formats, by typing it as follows:
[Name of editor]:6534/[Name of AirSpeed 5000]
- If you are transferring MPEG-2 HD (XDCAM) formats, you must add a second
Playback device name for HD, by typing it as follows:
[Name of AirSpeed 5000]-HD
b. If you want to allow ancillary data tracks to be transferred, select the Allow Ancillary
Data Tracks check box.
c. Leave the Enable Playback Catalog Name check box deselected.
d. Click OK.
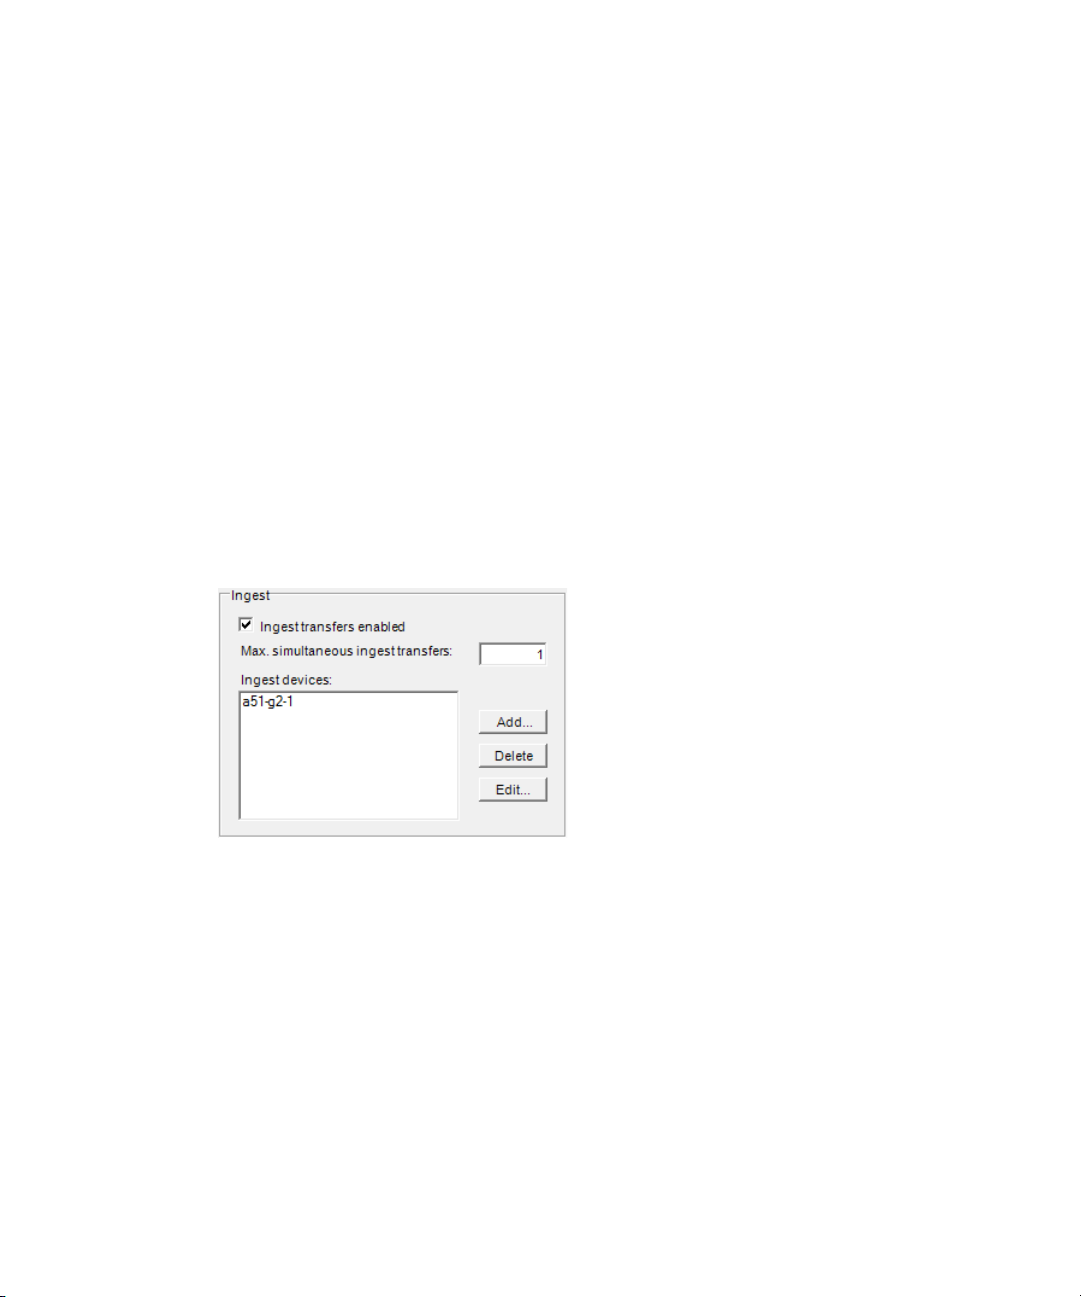
13. In the Ingest area, make sure that the Ingest Transfers enabled check box is selected.
29
Page 30
AirSpeed 5000 Installation and Configuration Checklist
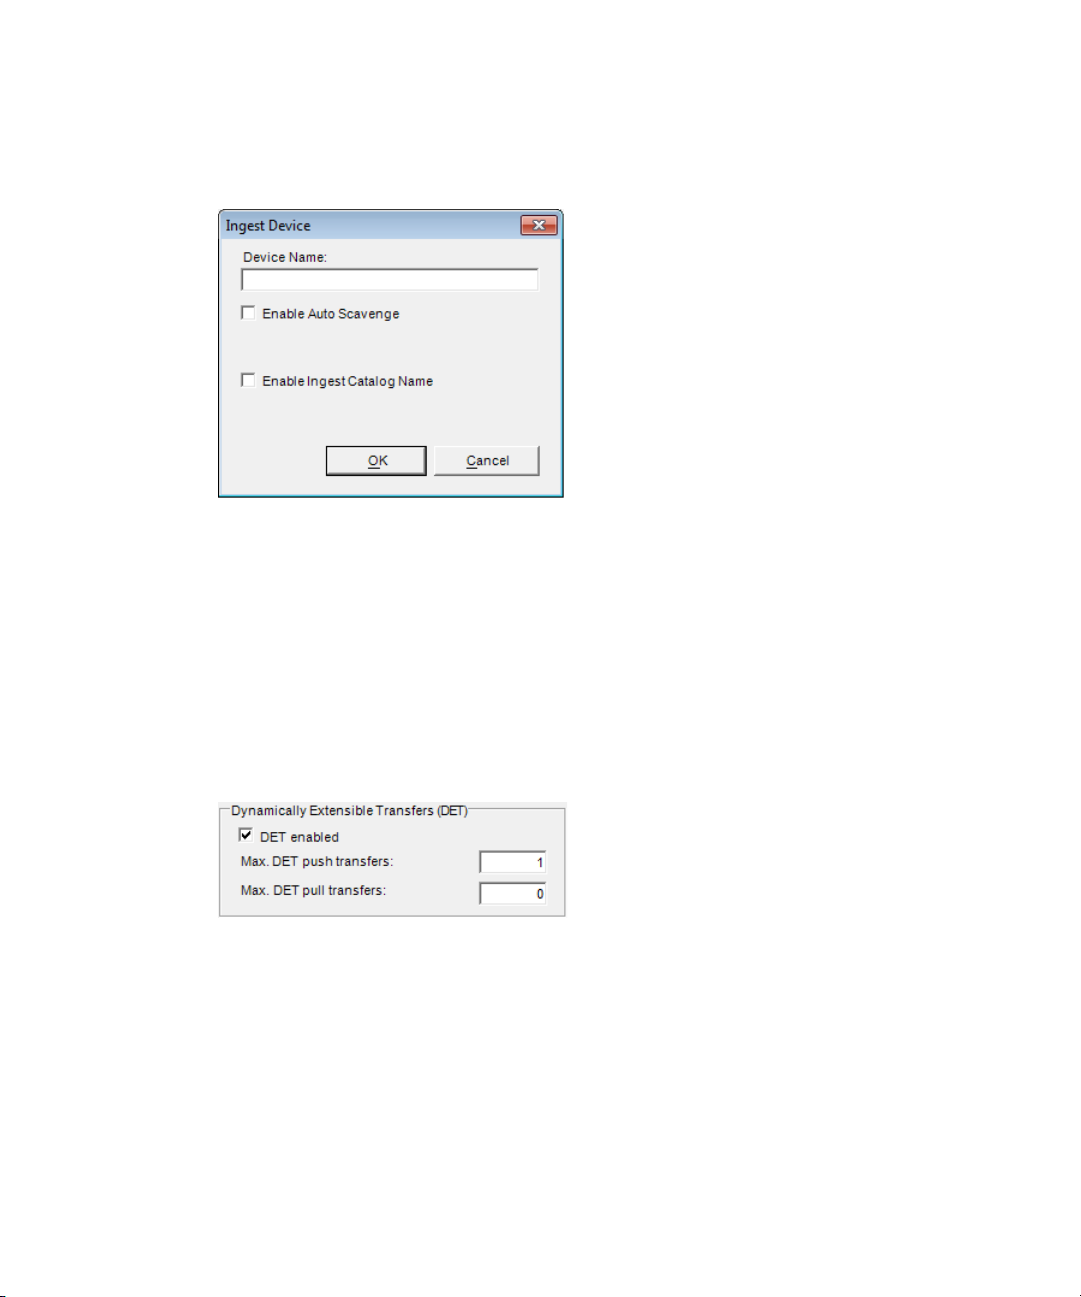
14. Click Add.
The Ingest Device dialog box opens.
15. In the Device Name field, type the name of the AirSpeed 5000 server that you are using to
ingest media, and click OK.
Leave all of the other fields blank.
n
16. In the Dynamically Extensible Transfers (DET) area, do the following:
a. Make sure the DET enabled check box is selected.
b. Make sure the Max. DET push transfers: field is set to 1.
c. Make sure the Max. DET pull transfers: field is set to 0.
17. Click OK to save your changes.
You will get a message saying that “changes will not take effect until the Transfer Engine is
restarted.”
18. Next, you should start the Interplay Transfer Engine on the Avid Editor.
For more information, see “Starting the Interplay Transfer Engine on the Avid Editor” on
page 31.
30
Page 31

AirSpeed 5000 Installation and Configuration Checklist
Starting the Interplay Transfer Engine on the Avid Editor
If you are configured in a Standalone environment, and the Interplay Transfer Engine is not
currently running on the Avid editor, you must start it.
To start the Interplay Transfer Engine on the Avid editor:
1. Select Start > All Programs > Avid > Interplay Transfer Engine.
The Interplay Transfer Engine application launches. The title bar should show the words
“Standalone Mode”.
2. Next, you must configure the Standalone settings for your Avid Editor.
For more information, see “Configuring the Standalone Settings for the Avid Editor” on
page 33.
Starting the AirSpeed 5000 Remote Console Application
During the installation process, a shortcut to AirSpeed 5000 Remote Console was installed on
your computer’s desktop.
Depending on your configuration, you might have different user requirements. Basically, every
n
time a new user is added, you must make sure that they are also added in the appropriate places
for your environment (Interplay, Shared storage, User’s Page of the AirSpeed 5000 Management
Console, OS login, Domain).
For more information on adding and managing users, see the Avid AirSpeed 5000
Administrator’s Guide, or the AirSpeed 5000 Management Console Online Help.
To start the AirSpeed 5000 Remote Console:
1. Launch the AirSpeed 5000 Remote Console in one of the following ways:
t For Interplay or Team configurations, click on the Avid AirSpeed 5000 Remote
Console icon on the desktop, or select Start > All Programs > Avid > Avid AirSpeed
5000 Remote Console.
t For Standalone configurations, click on the AirSpeed 5000 Remote Console
Standalone icon on the desktop, or select Start > All Programs > Avid > Avid
AirSpeed 5000 Remote Console Standalone.
For Interplay Production configurations, the AirSpeed 5000 Remote Console dialog box
opens for you to type in your user name and password for Interplay.
31
Page 32

AirSpeed 5000 Installation and Configuration Checklist
For Standalone and Team configurations, the AirSpeed 5000 Remote Console application
will automatically launch.
2. (Option) If you are connected via an Interplay Production configuration, do the following:
a. Select the Workgroup name from the Workgroup list box.
b. Type the name of the Interplay server that you want to connect to in the Interplay Server
field.
c. Type the name of the Interplay database in the Interplay Database field. The default
database is Av id WG .
d. Type your user name in the User field.
e. Type your password in the Password field.
f. Click the Login button.
The Avid AirSpeed 5000 Remote Console application will launch.
3. You must now File > Connect... to one or more (up to 10 at a time) AirSpeed 5000 or
AirSpeed Multi Stream servers.
For more information, see “Connecting to AirSpeed 5000 Servers” on page 21.
32
Page 33

AirSpeed 5000 Installation and Configuration Checklist
Configuring the Standalone Settings for the Avid Editor
Once all of the required software is installed, you must next configure the Standalone settings for
the Avid editor.
You should have already configured the Workgroup Properties on the AirSpeed 5000 server.
For more information, see the topic “Configuring the Avid Service Framework (for Standalone
or Team Mode)” in the AirSpeed 5000 Administrator’s Guide.
To configure the standalone settings for the Avid Editor:
1. In the Avid editor, do the following:
a. Open the Project Window
b. Click the Settings tab
c. Click Tr ansfer
The Transfer Settings - Current dialog box opens.
2. Select the TMClient.ini tab.
3. In the My Workgroup area, click Edit.
The Edit My Workgroup dialog box opens.
4. In the Server field, type the name of the Avid editor that has the Interplay Transfer engine
installed.
5. In the Workgroup field, type a name for your workgroup (e.g., “AvidWorkgroup”) that you
want the AirSpeed 5000 to be associated with, and click OK.
6. Click OK.
7. Next, you are ready to begin using the AirSpeed 5000 Remote Console application. For
more information, see “Getting Started with the Remote Console” on page 35.
33
Page 34

AirSpeed 5000 Installation and Configuration Checklist
Verifying your Remote Console is Configured Properly
Once you have configured your AirSpeed 5000 system, you should verify that it is configured
properly.
To verify your Remote Console is configured properly:
1. Record a clip and verify that the media files are copied to the destination workspace you
specified.
2. Depending on the mode you are configured as, do one of the following:
t For Standalone mode, from the AirSpeed 5000 Remote Console, select a clip, and drag
and drop it to your Editor bin. Launch the Transfer Status tool to make sure the clip is
transferred to the editor. When it is finished, verify that it plays.
t For Team mode, on the Editor, import the .aaf file and verify that it plays.
t For Interplay Production mode, navigate to the Interplay Transfer window, and drag the
clip from the Interplay Transfer window to the Editor bin. When it is finished, verify
that it plays.
3. Edit the clip and Send To Playback (STP) to the AirSpeed 5000 server to verify the full
round-trip workflow.
In the case of Standalone mode on ingest, and all three modes on Send-To-Playback (STP),
the Transfer Status window will provide error messages in the event transfers do not
complete.
34
Page 35

2 Getting Started with the Remote Console
The previous chapter described how to connect and configure your Remote Console application
to an AirSpeed Multi Stream or AirSpeed 5000 server or servers. Once connected, you can see
the channels and inventory on the server(s) you are connected to. Then, remotely from your PC,
you can use the AirSpeed 5000 Remote Console application to do the following:
• Cue and play clips
• Cue and record clips
• Retransfer clips
• Manage clip inventory
• Create Playlists and play the clips out on their associated channels
• Create subclips
• Preview clips via proxy
This chapter describes how to get started with the AirSpeed 5000 Remote Console.
The following topics are included:
• User Interface
• Right-Click Menus
Page 36

qq
rr
tt
ww
ee
User Interface
The AirSpeed 5000 Remote Console has a graphic user interface consisting of a Main menu, a
Channels pane containing either two (2) or four (4) channels when connected to an AirSpeed
5000, and an Inventory pane. The following illustration identifies the key elements of the
AirSpeed 5000 Remote Console user interface.
The function and use of these elements is discussed later.
n
User Interface
36
Page 37

User Interface
Channels Fields
Number Option Description
1 Main Menu Displays the Main menu items.
For more information, see “Main Menu” on page 37.
2 Channels Pane The Channels pane contains up to four (4) individual channels, six (6)
for AirSpeed Multi Stream servers. Each channel represents a channel
on the active AirSpeed 5000 server that you have connected to.
For more information, see “Channels Pane” on page 41.
3 Inventory Pane The Inventory pane is a list view of an AirSpeed 5000 server’s
inventory. You connect to an AirSpeed 5000 server using the File >
Connect command.
For more information, see “Inventory Pane” on page 45
4 Filter Controls Enables you to filter clips in a variety of ways.
You can also choose to display only subclips, or display all clips.
For more information, see “Filter Controls” on page 50.
5 Status Bar Enables you to view system status.
Main Menu
Located at the top of the application, the Main menu contains the following menus:
•File
•View
• Options
• About
For more information, see each of the menu topics.
• For information on the File menu, see File Menu
• For information on the View menu, see Vi ew Me nu
For more information, see “Status Bar” on page 51.
37
Page 38

File Menu
User Interface
• For information on the Options menu, see Options Menu
• For information on the About menu, see About Menu
The File menu contains the following submenus. Each is described in the following table:
File Submenus
Option Description
Connect Enables you to connect to an AirSpeed 5000 server to view Channels and
Inventory.
For more information, see “Connecting to AirSpeed 5000 Servers” on
page 21.
Configure Transfer
Engine
(Only available for
Standalone version of the
Remote Console)
Exit Closes the AirSpeed 5000 Remote Client application and exits to the
Enables you to select the AirSpeed 5000 server you want to configure.
For more information, see “Configuring Transfers for AirSpeed 5000
Servers (Standalone Mode)” on page 23.
Windows desktop.
38
Page 39

Options Menu
The Options menu contains the following submenus which are described in the following table:
Options Submenu
Option Description
Flashing Play/Rec The behavior of the Flashing Play/Rec menu option is as follows:
User Interface
• If checked, when playing, the Play and Channel Status buttons will
flash green. When recording, the Record and Channel Status buttons
will flash red (except when in Advanced Transport view).
• If unchecked, when playing, the Play and Channel Status buttons will
stay solid green. When recording, the Record and Channel Status
buttons will stay solid red (except when in Advanced Transport
view).
View Menu
The View menu enables you to select which available channels are visible in the user interface at
any given time. It also enables you to toggle on and off Playlist View.
For a 4-channel system, the View menu contains the following submenus.
39
Page 40

User Interface
Each is described in the following table.
View Submenus
Option Description
View Playlists The behavior of the View Playlists menu option is as follows:
• If selected, the application will be in Playlist View mode. The
Channel pane is vertically aligned along the left hand side of the
screen. Playlists (depending on whether you have created any
previously, some might be empty) appear to the right of each visible
channel.
• If deselected, the application will be in its normal state.
Show Channel 1-4 The behavior of the Show Channel menu option is as follows:
• If selected, the Channel will display in the Channel pane of the user
interface.
• If deselected, the channel will not display in the Channels pane of the
user interface.
There are four possible states for each channel:
•Hidden
• Minimized
• Normal View
• Advanced View
About Menu
The About menu contains the following submenus. Each is described in the following table:
About Submenus
Option Description
Version Selecting About > Version displays the copyright notice and software
version number.
40
Page 41

About Submenus
Option Description
Help Selecting About > Help brings up the Online Help.
Channels Pane
The Channels pane contains up to four individual channels for AirSpeed 5000 servers (up to six
for AirSpeed Multi Stream MPEG-2 HD models). Each channel represents a channel on the
active AirSpeed 5000 or AirSpeed Multi Stream server that you have connected to.
If your system is configured for DNxHD 185/220, for a 4-channel model server, you will only see
n
two (2) channels. For a 2-channel model server, you will only see one (1) channels.
You can click and drag a clip from the Inventory pane to a channel Precue area or Load area. If
n
you drag it to the Precue area, the clip gets precued to play. If you drag it to the Load area, the
clip is loaded and plays. For more information, see “Playing Clips” on page 86.
User Interface
41
Page 42
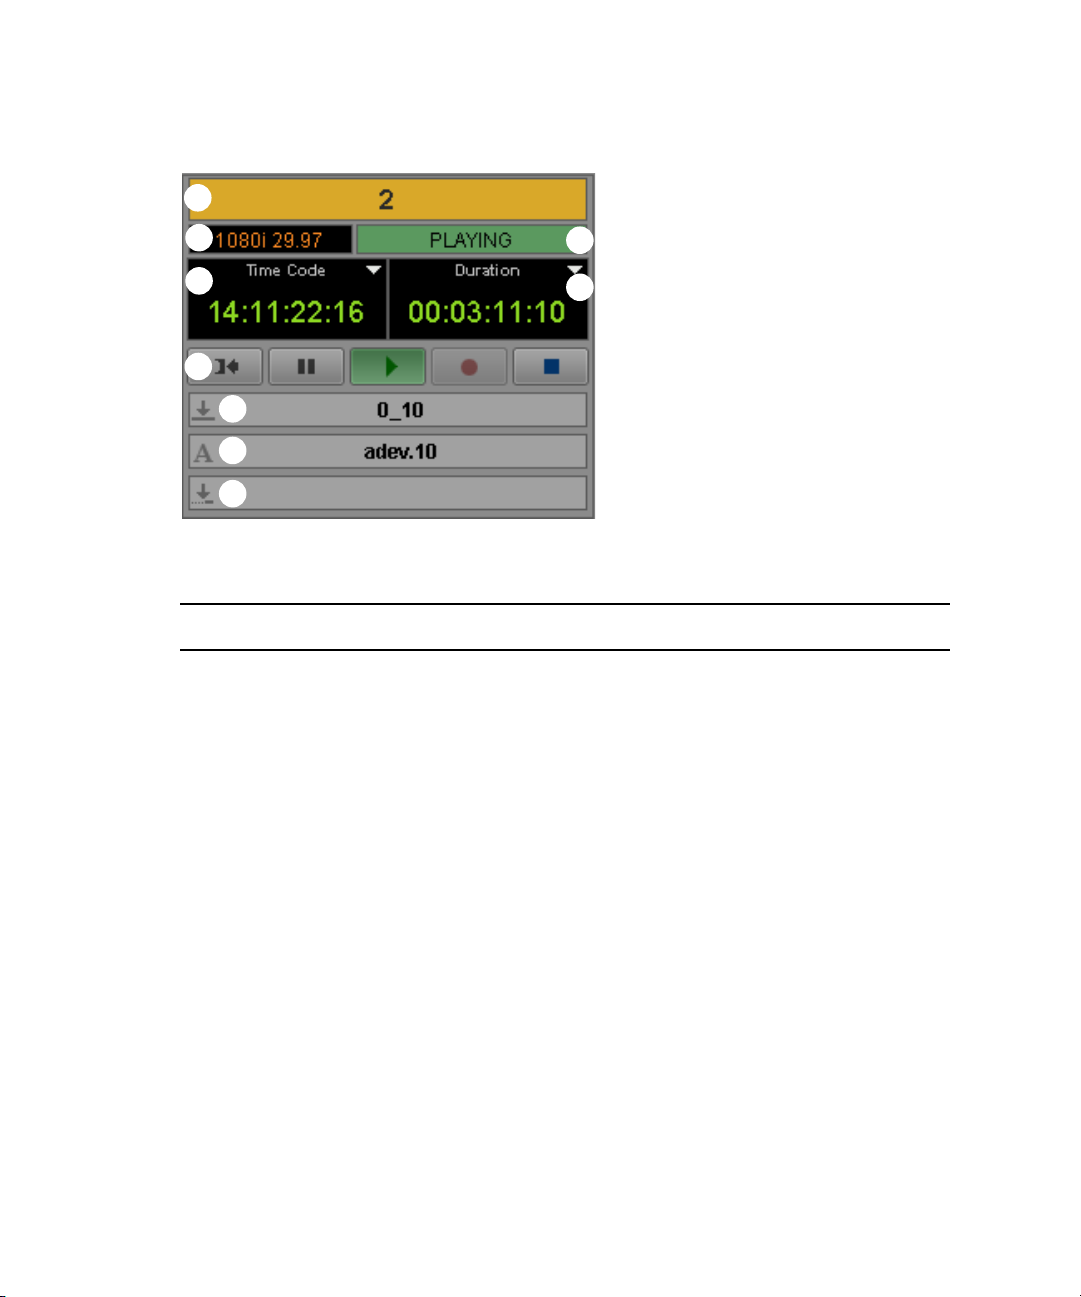
Each Channel has the components shown in the following figure.
o
i
u
y
t
r
e
w
q
Channels Fields
Number Option Description
User Interface
1 Channel ID Displays the channel number.
2 Channel Format The format for the channel.
3 Channel Status The following channel statuses are available:
• IDLE – There is no active clip.
• PAUSED – The active clip is paused.
• PLAYING – The active clip is playing.
• SHUTTLING – The active clip is shuttling.
• JOGGING – The active clip is jogging.
• VARIPLAY – The active clip is variable playing.
• RECORDING – The active clip is recording.
• CUED – The active clip is cued for Playback or Record.
• UPDATING – Indicates that you switched from one
server to another, and there is a delay in getting status
information for the new view.
• DONE – The active clip was played to the end.
• ERROR – The last cue operation failed (will stay in this
state until another cue is issued).
42
Page 43

User Interface
Channels Fields
Number Option Description
4 Time Code / Elapsed Displays the time code or elapsed time of the currently
loaded clip.
The default is Time Code.
To toggle (change) the field name display between Time
Code and Elapsed, click on the carat, and select the name
that you want to display from the menu.
5 Duration / Remaining Displays the duration or time remaining of the currently
loaded clip.
The default is Duration.
To toggle (change) the field name display between Duration
and Time Remaining, click on the carat, and select the name
that you want to display from the menu.
You can also change the duration or time remaining of a
currently recording clip by clicking in the field to enable
editing, then typing the duration directly in the field. If you
reduce the duration or time remaining to less than what has
already been recorded, the clip will stop recording.
6 Transport buttons The Transport buttons are used to manipulate the video.
Buttons included are the following:
•Recue
•Pause
•Play
• Record
•Stop
For more information on the Transport buttons, see
“Transport Buttons” on page 44.
7 Current Video ID Displays the video ID of the current clip. This field is also
where you can drag a clip to play it.
For more information, see “Cueing and Playing Clips
Directly from the Current Video ID Field” on page 86.
43
Page 44

Channels Fields
Number Option Description
8 Clip Name Displays the clip name of the actively playing or recording
9 Next Video ID The Video ID of the next (cued) clip.
Transport Buttons
User Interface
clip.
You can also change the name of a currently recording clip
by clicking the field to enable it for editing, and then typing
the name directly in the field.
Do not include these characters (* | “ : < > ? / . \ ) in
n
the Clip Name field.
If these characters (* | “ < > ?) are used in the Clip
n
Name field, they will be translated to (_). The ( / and \
) characters behave as folder level separators.
For more information on cueing clips, see “Cueing and
Taking Clips via the Next Video ID Field” on page 87.
The Transport buttons are the buttons towards the bottom of each Channel. They are used to play,
record, pause, eject, and recue the currently loaded clip.
Transport Buttons
Button Name Description
Recue Brings you back to the beginning of a clip that is playing in the Current Video
ID field.
Pause Pauses the currently playing clip.
Play Plays the clip that is loaded in the Current Video ID field.
Record Records a clip. The Recording clip uses the ID in Clip ID field if one is
specified.
44
Page 45

Transport Buttons (Continued)
Button Name Description
Inventory Pane
The Inventory pane, shown in the following illustration, is a list view of a server’s inventory. You
can connect to any AirSpeed 5000 server using the File > Connect command.
If you are connected to more than one server (AirSpeed 5000 or AirSpeed Multi Stream), you
can toggle between the active server, and another server that you are connected to by clicking on
the Server tab just above the Inventory pane for the server that you want to work with. The
currently active server’s inventory displays in the Inventory pane.
When you connect to multiple AirSpeed 5000 or AirSpeed Multi Stream servers, they appear as
n
additional tabs just above the Inventory pane.
The tab for the active Server (the one you are currently viewing inventory for) is highlighted.
n
User Interface
Stop Ejects a playing, recording, cued or paused clip from the channel.
Inventory Pane Fields
Option Description
Name The name of the clip.
Video ID The unique video ID of the clip.
45
Page 46

User Interface
Inventory Pane Fields (Continued)
Option Description
Duration The duration of the clip.
In The IN timecode of the clip.
Out The OUT timecode of the clip.
Creation Date The date the clip was created.
Protected An identifier denoting whether this clip is protected from deletion. For
information on protecting clips, see “Protecting or Unprotecting Clips from
Deletion” on page 95.
Format The format of the clip.
Transfer Status The transfer status of the clip. Options are:
• Transfer Done
• Transfer Error
• Transfer Paused
• Transferring Out
• Transferring In
• Transfer Request
• Ready to Transfer
• Recording
Head Frame Displays the head frame of the clip. For more information, see “Headframes”
on page 47.
Original For subclips, this field lists the Video ID of the masterclip from which the
subclip’s media is associated with.
Proxy Status Displays the status of the Proxy for this clip. Options include:
• No Proxy
• Requesting
• Recording
• Transcoding
• % Done
• Completed
Proxy File Displays the name of the proxy file for this clip.
46
Page 47

Inventory Pane Fields (Continued)
Option Description
Clip File Displays the name of the clip file for this clip.
If you want to change the order of fields in the Inventory window, click, see “Changing the Sort
Order of Clips” on page 80.
Headframes
The term “Headframe” refers to an identifying frame of video associated with each clip in the
database of an AirSpeed 5000 or AirSpeed Multi Stream server. Headframes might have
additional symbols on them to identify the kinds of files they represent.
Headframe Icon Descriptions
Icon Description
User Interface
Green film icon upper right corner: This clip is a masterclip.
Green film icon with shortcut arrow: This clip is a sub-clip of the original. It contains
instructions to play a portion of the original clip as edited.
Green film icon with curved arrow: This clip has been set for loop play (not available for
MPEG-2 HD clips).
A yellow rectangle in the lower left corner of the clip indicates a 16:9 1080i clip format.
A blue rectangle in the lower left corner of the clip indicates a 16:9 720p clip format.
A magenta rectangle in the lower left corner of the clip indicates an 16:9 SD clip.
47
Page 48

Clip Properties Panel
This topic contains information on the Clip Properties Panel in the Remote Console Inventory
View.
To access the Clip Properties Panel, right-click on a clip in the Inventory Panel, and select Clip
Properties from the menu.
The Clip Properties panel is only available when connected to an AirSpeed 5000 server.
n
Option Description
Clip ID Displays the Video ID of the clip.
Timecode Source Identifies the Timecode source for this clip. Options include:
User Interface
•BaseTC
• TOD (Time-of-Day)
•ATC/VITC
•LTC
Codec The compression method by which clips are stored. The values
listed in this field are set in the Record Templates page of the
AirSpeed 5000 Management Console. What displays in this field
varies depending on what was configured there.
Bitrate The data rate, in Mbit/s, at which clips are recorded. This data rate
depends on the codec type used.
The rate shown in the field applies to the clip.
Aspect Ratio Displays the video aspect ratio.
Base Timecode Displays the base timecode used by the clip for time calculations.
This field is editable.
For more information, see “Viewing Clip Properties and
Modifying Clip Behavior” on page 85.
Proxy Clip Displays the status of the Proxy clip (if available).
48
Page 49

User Interface
Option Description
Looping Displays the looping parameters for the clip. Options are:
• Don’t Loop
• Loop - If selected, you can select the number of times you
want it to loop in the times field.
• Loop forever - If selected, the clip will loop endlessly.
If Loop or Loop Forever are selected, you can also set a position in
the clip where looping starts using the Loop In field.
This functionality is available for SD , AVC-Intra, and
n
DNxHD clips only. You cannot loop MPEG-2 HD clips.
For more information, see “Viewing Clip Properties and
Modifying Clip Behavior” on page 85.
Loop In The position in the clip where looping starts. You can change this
position by typing directly in the field.
For more information, see “Viewing Clip Properties and
Modifying Clip Behavior” on page 85.
Audio A1-A8 Indicates the name of the audio stream. Streams 5-8 are for HD
only.
Below the name is the source type for the audio portion of the clip.
The options are:
• Discard - Passes the audio without compression. This option
will display a blank field.
• PCM-16 Bit
• PCM-24 Bit
•AC-3
• Dolby-E
You must have at least one stream selected (not discarded).
n
49
Page 50

Filter Controls
The Filter Controls area displays beneath the Inventory panel.
The fields in the Status bar example indicate the following:
Indicator Description
Filter Enables you to filter on a clip name or video ID.
Clip Source Enables you to filter clips based on if they were recorded from baseband (locally) or
User Interface
For more information, see “Filtering on a Clip Name or Video ID” on page 83.
Click this button to choose to display only subclips in your filter.
Click this button to choose to display all clips in your filter.
transferred from a Send to Playback sequence.
• If the Recorded check box is selected, the filter will only show clips that meet the
filter criteria and were recorded locally.
• If the Transferred check box is selected, the filter will only show clips that meet
the filter criteria and were transferred.
• If both (or neither) the Recorded and Transferred check boxes are selected, there
is no effect on the filter.
50
Page 51

Status Bar
The Status Bar displays across the bottom of the Remote Console application window.
The fields in the Status bar example indicate the following:
Indicator Description
Clip Count Displays the number of clips on the selected (active) AirSpeed 5000 or AirSpeed
Reference Status Displays the reference status. Options are:
User Interface
Multi Stream server.
• Ref OK - The reference signal is working properly.
• ! NO REFERENCE - The system cannot detect a reference signal.
• ! REFERENCE UNLOCKED - The reference is unlocked.
• ! WRONG REFERENCE TYPE - The system detected that you have the
wrong reference type.
This occurs when the incoming signal (Blackburst or Tri-level) does not
n
match the signal that is currently selected in the Reference Video Standard
field on the Server Mode page.
System Time
(11:32:36)
Free Space
(1,576,976 (% 82
Free))
Connection Status Displays the connection status. Options are:
Shows the current time.
The amount and percentage of free space on the AirSpeed 5000 or AirSpeed
Multi Stream server that holds this Inventory.
• CONNECTED - Indicates that the server is connected to the AirSpeed 5000
Remote Console.
• NOT CONNECTED - Indicates that the server is not connected to the
AirSpeed 5000 Remote Console.
51
Page 52

View Playlists Mode
qq
ww
ee
The View Playlists mode is a part of the AirSpeed 5000 user interface that shows Playlists for
each Playout channel you have on the selected AirSpeed 5000 or AirSpeed Multi Stream server.
The Remote Console Playlist enables you to easily create Playlists and execute some basic tasks
using these Playlists.
A Playlist can consist of 1000 clips or a 24 hour period of time.
n
User Interface
You can enable or disable the View Playlists mode at any time, by selecting View > View
Playlists.
Each individual channel can appear in one of four view modes as shown in the table below.
On first connection, by default, Channel 1 appears in Normal view, and the remaining available
n
channels appear in Mini-bar view. After the initial connection, the user interface appears as how
it was last viewed.
52
Page 53

Playlist Channel Views
Number View Description
1 Normal view This is the regular view for a channel in Playlist view.
The Advanced View button appears below the channel number icon
with a tooltip stating “Show the Advanced Transport”. Select this
button to change the channel to display in Advanced Transport view.
For more information, see “Channel in Normal View” on page 55.
User Interface
2 Advanced
Transport view
The Advanced Transport view includes everything that is in a Normal
view channel with the addition of a scrub bar with a time scaling bar
beneath it. For more information, see “Channel in Advanced Transport
View” on page 56.
An Advanced Transport View button appears below the channel
number icon with a tooltip stating “Hide the Advanced Transport”.
Select this button to change the channel to display in Normal view.
For more information, see “Channel in Advanced Transport View” on
page 56.
3 Mini-bar view Any channel that is in Normal view or Advanced Transport view can
be minimized to Mini-bar view by simply selecting the Minimize
button on the far right hand side of the channel panel. Once a channel
is minimized, the button changes to a Restore button that, when
selected, restores the previous view (Normal or Advanced Transport).
You can toggle minimization to Normal or Advanced Transport
channel view by double-clicking on the channel number icon.
The Mini-bar view has all the features of the Normal View, except:
• The Transport buttons are moved to the right of the timecode.
• The three text fields are merged into a single field above the
transport buttons with a drop down caret to select between them.
• The Playlist controls are unavailable, except for the display of the
Playlist Duration and Remaining fields.
• The row # of the currently playing (or cued) clip, and the number
of clips in the Playlist, appear in tiny boxes below the Playlist
duration field.
For more information, see “Channel in Mini-bar View” on page 65.
53
Page 54

Playlist Channel Views
Number View Description
Hidden view A channel that is in Hidden view is not shown in the Playlists view.
You may hide a channel in one of three ways:
• Click the per-channel Close (‘[x]’) button on the far right of the
channel panel.
• Select View > and deselect a checked channel to hide it.
• Right-click the channel number on the far left of the channel
panel. Then, select Select channels from the menu, uncheck one
or more channels, then click OK.
User Interface
54
Page 55

Channel in Normal View
qq
ww
ee
rr
tt
ty
tu
i
o
This topic contains information on a channel in Normal view in the Remote Console Playlist
View.
Display Description
User Interface
1 Channel Number The Channel number icon enables you to easily identify which channel is
selected, view the state of each channel.
The state of each channel is indicated as follows:
• A Yellow background shows which channel is currently selected.
• A light grey/black number indicates the channel is not selected.
For more information, see “Selecting Channels” on page 113.
2 Channel Status The Channel Status icon indicates the status of a channel. For more information
on possible statuses and their descriptions, see “Channel Status Descriptions”
on page 58.
3 Video Format Indicates the video format that the channel is set to.
4 Timecode Display Displays information and options regarding the timecode of the clip. For more
5 Timecode Duration/Remaining Displays information regarding the timecode duration, or remaining time of the
6 Media Controls Lets you pause, play, record, step through, play fast or slow, and mark In and
7 Video Name Displays Video name.
information, see “Timecode Displays” on page 59.
clip. For more information, see “Timecode Displays” on page 59.
Out points. For more information, see “Media Controls” on page 62.
55
Page 56

User Interface
qq
ww
ee
tu
rr
tt
ty
ri
o
t
1)
Display Description
Clip Name icon Distinguishes between the Load clip, Clip name, and Precue clip text fields.
9 Advanced Mode Transport
button
Channel in Advanced Transport View
This topic contains information on a channel in the Advanced Transport view. The Advanced
Transport view provides a number of controls to enable you to move around clips and create
subclips easier.
To access the Advanced Transport pane from a channel in Normal view, click the Advanced
Mode toggle button.
Following is an example of a channel in Advanced Transport view.
The Advanced Mode Transport button puts the channel into Advanced
Transport view.
For more information, see “Channel in Advanced Transport View” on page 56.
56
Page 57

User Interface
Display Description
1 Channel The Channel icon enables you to easily identify which channel is selected, view
the state of each channel.
The state of each channel is indicated as follows:
• A Yellow background shows which channel is currently selected.
• A light grey/black number indicates the channel is Idle.
Double-click to toggle to Advanced Transport view.
For more information, see “Selecting Channels” on page 113.
2 Channel Status The Channel Status indicates the status of a channel. For more information on
possible statuses and their descriptions, see “Channel Status Descriptions” on
page 58.
3 Timecode Display Displays information and options regarding the timecode of the clip. For more
information, see “Timecode Displays” on page 59.
4 Media Timeline (scrub bar) The Media Timeline (or scrub bar) is a graphical representation of the length
and time spans of a clip. It enables you to view the current position being
viewed in the clip, as well as scrub the clip. For more information, see “Media
Timeline (scrub bar)” on page 60.
It also contains a context menu which provides special scrubbing and
sub-clipping operations. For more information, see “Media Timeline (scrub
bar)” on page 60.
5 Timescale Bar The Timescale Bar shows you the relative position and size of the scrub bar
within the clip. For more information, see “Timescale Bar” on page 61.
6 Media Controls Lets you pause, play, record, step through, play fast or slow, and mark In and
Out points. For more information, see “Media Controls” on page 62.
7 Subclip Controls The Subclip controls enable you to create a new subclip based on the current
In/Out points, and then specify the name and ID to use for the new subclip.
For more information, see “Subclip Controls” on page 64.
8 Video Name Displays the Video name.
9 Video ID Displays Video ID.
10 Advanced Mode Transport
button
The Advanced Mode Transport button changes the state of the channel back to
Normal view.
57
Page 58

Channel Status Descriptions
The Channel Status indicates the status of a given channel.
The following channel statuses are available:
• UPDAT - Indicates a channel is updating.
• IDLE - Indicates the channel is idle.
• CUED - Indicates the channel is cued.
• PAUSE - Indicates the channel is paused.
• REC - Indicates the channel is recording.
• PLAY - Indicates the channel is playing.
• JOG - Indicates the channel is jogging.
• SHTL - Indicates the channel is shuttling.
• VARI - Indicates the channel is in Variplay mode.
• FF <N> - Indicates the channel is fast forwarding.
• RW <N> - Indicates the channel is fast rewinding.
• FW 1/N - Indicates the channel is forwarding at a slow speed
User Interface
• RV 1/N - Indicates the channel is playing in reverse at a slow speed.
• ERR - Indicates the channel is experiencing an error.
58
Page 59

Timecode Displays
ww
ee
rr
tt
ty
q
This topic contains information on the Timecode displays in the Advanced Transcode view.
Display Description
1 Channel Format Displays the following for the clip.
• The video resolution (e.g., 1080i or 720p)
• The frame rate (Advanced Transport only. e.g., 29.97 or 59.94)
• Whether there is a live signal on the channel. If there is a live signal, the
text appears in light green. If there is no signal, the text appears in reddish
orange.
User Interface
2 Master, Absolute, or Remain Master: Displays timecode for the selected frame that corresponds to the
original timecode for the clip.
Absolute: Displays timecode for the selected frame that is offset from the first
frame of the clip (time elapsed).
Remain: Displays timecode for the selected frame that is offset from the last
frame of the clip (time remaining).
3 Timecode display menu button Displays the options for displaying master, absolute, or remain timecode.
4 In point Displays timecode for the In point.
5 Out point Displays timecode for the Out point.
6 Duration Shows timecode for the duration from In point to Out point.
59
Page 60

Media Timeline (scrub bar)
qq
ww
ee
rr
The Media Timeline or scrub bar, is a graphical representation of the length and time spans of a
clip. It enables you to view the current position being viewed in the clip.
When the Timescale bar is maximized, the length of the Media Timeline represents the full length
n
of the clip.
1
In Point Out point Indicators for In point.
2
Position
Indicator
3
Out Point Indicators for Out point.
4
Timescale Bar The Timescale bar shows the relative position and size of the scrub bar within
User Interface
The position indicator functions as a playhead: It shows the current position
being viewed in the clip. Media for the frame marked by the position indicator
is displayed in the monitor. You can drag the position indicator to scrub through
a clip or sequence. You can click a location in the Media Timeline to move the
position indicator and display a specific frame.
the clip. For more information, see “Timescale Bar” on page 61.
Media Timeline Context Menu
The Media Timeline context menu provides special scrubbing and sub-clipping operations, some
of which are not available elsewhere. To activate the Media Timeline context menu, right-click
anywhere in the scrub bar, above the Timescale bar.
60
Page 61

For more information, see “Right-Click Menus” on page 73.
Timescale Bar
The timescale bar appears beneath the Media Timeline, and is used for change the time scale for
a clip.
Following is an example of the Timescale bar:
In the Timescale bar, you can click anywhere and release the mouse button without dragging, it
will move the window to that location. If the position marker is within the scrub bar window, the
window will follow the current time during playback fast forward, or rewind. You can also click
and drag left or right to change the time scale. Dragging left compresses time, decreasing
resolution, while dragging right expands time, increasing resolution to smaller values. The
dragging behavior is exponential.
You can drag all the way to the left and the scrub bar represents the entire clip, which is the
default when a clip is loaded. Drag all the way to the right and minor ticks represent individual
frames – but it will stop before those ticks spread apart much.
User Interface
Also, note the following:
Timescale Bar Context Menu
The Timescale Bar Context menu provides special zooming and scrolling operations. To activate
the context menu, right-click anywhere in the Timescale bar (at the bottom of the Media
Timeline or Scrub bar, below the tick marks). When hovering the cursor over the Timescale bar,
the cursor will appear as shown in the following screen example:
61
Page 62

For more information, see “Right-Click Menus” on page 73.
qq
ww ee
rr
tt
ty
tu
ti
to
t1)
t1! t1@
t1# t1$
t1%
t1^
t1&
t1*
t1(
t2)
t2!
Media Controls
The Media Controls allow you to do the following:
• Play the clip in normal speed.
• Play the clip at 1/2 or 1/3 speed.
• Record the clip.
• Shuttle forward or reverse at these faster speeds (2x, 4x, 8x, 16x).
• Navigate to different points in the clip, and set In and Out points in the clip.
• Step the clip forward or back at various speeds.
User Interface
The following table describes the function of the Media Controls buttons.
Media Controls
Name Function
1 Fast Reverse Shuttles the clip in reverse at speeds (2x, 4x, 8x, or 16x). Each click
2 1/2 Speed Plays the clip forward in slow motion at one half the speed of the
moves to the next speed.
original playing clip.
n
When clicked, the button toggles to a Pause button. When
clicked again, it pauses the clip, and returns to the 1/2 Speed
button.
62
Page 63

Media Controls (Continued)
Name Function
3 1/3 Speed Plays the clip forward in slow motion at a third of the speed of the
original playing clip.
When clicked, the button toggles to a Pause button. When
n
clicked again, it pauses the clip, and returns to the 1/3 Speed
button.
4 Play/Pause Plays the clip. Also, pauses the currently playing clip when playing
at normal, fast reverse, or fast forward speeds.
For more information, see “Playing Clips in the Advanced
Transport View” on page 114.
5 Record Records the clip.
For more information, see “Recording Clips in the Advanced
Transport View” on page 115.
6 Stop Stops the clip from Recording, or ejects a loaded clip.
7 Fast Forward Plays the clip forward at various speeds (2x, 4x, 8x, or 16x). Each
click moves to the next speed.
User Interface
8 Go to Start Moves you to the start of the clip.
9 Play In to Out Enables you to go to the In point of the clip and play it to the Out
point of the clip.
10 Go to Mark IN Moves you to the In point of the clip.
11 Set Mark IN Sets an In point at the current location of the clip.
12 Set Mark OUT Sets an Out point at the current location of the clip.
13 Go to Mark OUT Moves you to the Out point of the clip.
14 Play Last 3
Seconds before
Out
15 Go to End of
Media
16 Step Back 10
Seconds
17 Step Back one
Second
Plays the last three seconds before the Out point of the clip.
Moves you to the end of the clip.
Moves the clip back ten seconds.
Moves the clip back one second.
63
Page 64

Media Controls (Continued)
qq
ww
ee
rr
tt
Name Function
User Interface
18 Step back one
Frame
19 Step Forward one
Frame
20 Step forward one
Second
21 Step forward ten
Seconds
Subclip Controls
The Subclip controls enable you to create a new subclip based on the current In points and Out
points, and then specify the name and ID to use for the new subclip.
These only appear when a clip is loaded on the channel.
n
With the Subclip controls, you can do the following:
• Set an In point and Out point for the clip
• Specify a subclip name and ID
• Create a new subclip that will appear in the Inventory pane.
Moves the clip to the previous frame.
Advances the clip forward one frame.
Moves the clip forward one second.
Moves the clip forward ten seconds.
The In and Out points should match the In points and Out points specified on the original clip
when it was created.
64
Page 65

The following table describes the function of the Subclip area.
Subclip Controls Buttons and Fields
Name Function
User Interface
1 Create New
Subclip button
2 Subclip ID Type a Video ID for the subclip.
Creates a subclip based on the masterclip you are previewing. The
subclip will reflect the current In and Out points that have been set
for the clip.
For more information, see “Creating Subclips in the Advanced
Transport View” on page 118.
n
3 Subclip Name Type a name for the subclip.
n
4 Video Name Displays the Video name.
5 Video ID Displays Video ID.
Channel in Mini-bar View
This topic contains information on a channel in Mini-bar view in the Remote Console Playlist
View.
Any channel that is in Normal view or Playlist view can be minimized to what we call Mini-bar
view by simply selecting the Minimize button on the far right hand side of the channel panel.
Once a channel is minimized, the button changes to a Restore button that, when selected, restores
the previous view (Normal or Advanced Transport).
If there is no subclip ID provided in this field, the system will
generate a unique ID for the subclip.
If there is no subclip name provided in this field, the subclip
will use the name of the master clip.
You can also minimize a Normal or Advanced Transport channel by double-clicking on it.
The Mini-bar view has all the features of the Normal View, except:
• The Transport buttons are moved to the right of the timecode.
• The three text fields are merged into a single field above the transport buttons with a drop
down caret to select between them.
65
Page 66

User Interface
ee
rr
tt
ty
• The Playlist controls are unavailable, except for the display of the Playlist Duration and
Remaining fields.
• The row # of the currently playing (or cued) clip, and the number of clips in the Playlist,
appear in tiny boxes below the Playlist duration field.
Display Description
1 Channel The Channel icon enables you to easily identify which channel is currently
selected by displaying a Yellow background.
• A Yellow background indicates that the channel is currently selected.
• A light grey/black number indicates the channel is not selected.
Double-click the channel to toggle in and out of Mini-bar/ Normal view.
2 Channel Status The Channel Status indicates the status of a channel. For more information on
possible statuses and their descriptions, see “Channel Status Descriptions” on
page 58.
3 Timecode Display Displays information and options regarding the timecode of the clip. For more
information, see “Timecode Displays” on page 59.
4 Remaining Display Displays information and options regarding the remaining time of the clip. For
more information, see “Timecode Displays” on page 59.
5 Video ID Displays the Video ID.
6 Media Controls Lets you pause, play, record, stop, and go to the In point. For more information,
see “Media Controls” on page 62.
66
Page 67

Playlist Information Bar
This topic contains information on the Playlist Information bar in the Remote Console Playlist
View.
The Playlist Information bar is the same for both Normal view and Advanced Transport view
channels. Mini-bar view only shows the Duration and Remaining fields.
Option Description
User Interface
The Playlist name (gray box on the left) is used to type in a name
for the Playlist. The menu to the right of this gray editable field
contains the following items:
• Open - Loads an existing Playlist.
• Save - Saves the currently loaded Playlist.
• Clear - Clears the currently loaded Playlist.
• Take Control - Takes over control of a Playlist from another
user. For more information, see “Taking Control of a Playlist
for a Channel” on page 107.
The Lock icon indicates that this channel is locked, and in use by
someone at another AirSpeed 5000 Remote Console.
For more information, see “Taking Control of a Playlist for a
Channel” on page 107.
Select the Cue button to automatically cue the highlighted clip in
the Playlist. If no clip is highlighted, selecting the Cue button cues
the first clip in the Playlist.
For more information, see “Cueing a Playlist” on page 110.
To cue an individual clip, you can also highlight the clip you want
to start playing from, and right-click. Then, select Cue from the
menu.
For more information, see “Cueing From a Specific Clip in the
Playlist” on page 110.
67
Page 68

Playlist
n
User Interface
Option Description
Enables you to toggle the Playlist between Loop On and Loop Off.
• If the button is Green, it indicates Loop On.
• If the button is Grey, it indicates Loop Off.
For more information, see “Setting Loop Behavior in the Playlist”
on page 108.
Duration The Duration of the entire Playlist.
Remaining The remaining duration in the Playlist. The value in this field
indicates the time remaining to play from where a clip in the
Playlist is currently cued or playing.
This topic contains information on the Clip Information pane in the Remote Console Playlist
View.
All Playlist column headings can be reordered by clicking on a column heading and dragging
and dropping it to the desired location.
You can resize column headings by clicking on the edge of a heading and dragging it.
Option Description
Clip # Indicates the clip position of the clip in the current Playlist.
If you want to reorder a clip in the Playlist, you can drag and drop
a clip to the desired location in the Playlist.
For more information, see “Reordering Clips within the Playlist”
on page 108.
Name The name of the clip.
68
Page 69

User Interface
Option Description
Video ID The Video ID of the clip.
In Lists the In point timecode of the clip.
For more information, see “Modifying In/Out Points for Clips in
the Inventory Pane” on page 90.
Out Lists the Out point timecode of the clip.
For more information, see “Modifying In/Out Points for Clips in
the Inventory Pane” on page 90
Duration The total duration of the clip.
Follow • If the Follow check box is selected (Orange check mark) for
this clip, the clip will automatically play if it is the next clip
cued.
• If the Follow check box is not selected for this clip, the Playlist
will stop play when it gets to this clip. You need to manually
press the Play button, Spacebar, or F12 to continue playout on
the channel.
Status Describes the status of the clip. Options are:
• Online - A clip is considered to be “Online” when the media is
present in the Inventory pane, and the video standard is the
same as the associated channel.
• Offline - A clip is considered to be “Offline” when the media is
missing from the Inventory pane.
• Cued - The clip is cued to play. When a clip is cued, the row
appears highlighted yellow.
• Playing - The clip is playing. When a clip is playing the row
appears green.
• Unplayable - A clip is considered “Unplayable” when its
video standard is different than the associated channel, or, it is
in the wrong format. When a clip is un-playable, the row
appears grey and the text is bold.
Unplayable and offline clips will be skipped when the
n
previous clip has finished playing. The following clip will
play if Follow is selected.
69
Page 70

Proxy Viewer
This topic contains information on the Proxy Viewer. The Proxy Viewer is accessed by
right-clicking on a clip in the Inventory pane, and clicking View Proxy.
However, in order to generate Proxy clips, and view them in the AirSpeed 5000 Remote Console
Proxy Viewer, the following must be done:
• An H.264 Proxy Encode license must be activated on your server.
• The Proxy Enabled check box must be selected in the Record Templates page of the
AirSpeed 5000 Management Console.
The Proxy Viewer is only available when you are connected to an AirSpeed 5000 server. In
n
addition, the AirSpeed 5000 Remote Console application must be installed on a Windows 7
Operating System.
User Interface
70
Page 71

User Interface
Playback Controls allow you to preview the clip. The following table describes the function of
the Playback Control buttons.
Proxy Viewer Buttons
Button Name Function
Go to Start Moves the clips to the start.
Go to End Moves the clip to the end.
Pause Pauses the currently playing clip.
Play Plays the clip.
Step back one
Frame
Step Forward one
Frame
Set Mark IN Sets a Mark IN at the location where the clip is stopped.
Set Mark OUT Sets a Mark OUT at the location where the clip is stopped.
Create Subclip Creates a subclip based on the masterclip you are previewing. The
Create Head Frame Sets the Head Frame image to what is currently showing in the
Go to Mark IN Moves the clip to the In point.
Go to Mark OUT Moves the clip to the Out point.
Moves the clip to the previous frame.
Advances the clip forward one frame.
subclip will reflect the current In and Out points that have been set
for the clip. For more information, see “Viewing Proxy Clips” on
page 92.
Proxy Viewer monitor.
71
Page 72

User Interface
Proxy Viewer Buttons (Continued)
Button Name Function
Go to Headframe Moves the clip to the headframe set point.
The following table describes the field and options available on the Proxy Viewer.
Field/Option Description
Timeline Scrubber Moves the clip forward and backward through the full length of the
media.
Current Timecode Displays current clip position.
Video ID Displays the name of the clip.
Length Displays the full length of the media, regardless of In/Out points.
Audio AirSpeed 5000 records up to eight (8) stereo pairs of audio for HD
formats, and up to four (4) stereo pairs of audio for SD formats.
This allows you to record and play back two different sound tracks
for programs broadcast in two different languages. For the purpose
of editing a clip, use the menu to select the stereo pair.
Duration Displays the duration of the clip.
72
Page 73

Right-Click Menus
The following right-click menus are available in the AirSpeed 5000 Remote Console.
Right-Click Menu Description
Right-Click Menus
Right-clicking on a clip in the Inventory pane displays these menu options:
• Toggle Delete Protect - Protects this clip file from being deleted. See
“Protecting or Unprotecting Clips from Deletion” on page 95.
• Transfer to Shared Storage - Transfers this clip to storage and checks
it into Interplay. This option is only available in an Interplay Production
environment.See “Transferring Clips to Shared Storage (Interplay
Production and Team Modes)” on page 96.
• Create Subclip - Creates a subclip in a new row in the Inventory panel.
The subclip is based on the media in the masterclip. You can then set In
points and Out points based on the masterclip. See “Creating Subclips
in Normal View” on page 90.
• Create Proxy - (Only available if connected to an AirSpeed 5000 server
with an H.264 Proxy Encode license activated). Creates a proxy of the
clip. As the proxy is created, the status appears in the Proxy Status
column of the Inventory panel. See “Viewing Proxy Clips” on page 92.
• View Proxy - (Only available if connected to an AirSpeed 5000 server
with existing Proxy media available) Selecting this option, opens the
Proxy Viewer to view a proxy of the clip. You can then set In points and
Out points based on the masterclip. You can create a subclip based on
the media in the masterclip in a new row in the Inventory panel.
If this option is grayed out, it might be because the user/password on
n
the Remote Console client either does not exist, or does not match the
user/password that is on the AirSpeed 5000 server.
See “Viewing Proxy Clips” on page 92.
• Clip Properties - (Only available if connected to an AirSpeed 5000
server) Selecting this option displays the Clip Properties panel, allowing
you to view and modify some clip properties, including the ability to
modify Looping behavior.
For information on the Clip Properties panel description, see “Clip
Properties Panel” on page 48.
For information on viewing clips properties and modifying clip
behavior, see “Viewing Clip Properties and Modifying Clip Behavior”
on page 85.
73
Page 74

Right-Click Menu Description
Right-clicking on any column heading in the Inventory pane displays this
menu, allowing you to show or hide selected columns.
Clicking Hide This Column hides the column that you right-clicked on in
the Inventory pane.
If the option next to a column heading is selected, the column will appear in
the Inventory pane. If it is not selected, it will not appear in the Inventory
pane.
Click the More button to open a dialog box to select or deselect multiple
columns that you want to show or hide in the Inventory pane.
If you want to view the masterclip name from which a subclip’s media is
associated with, you must select the Original column.
For more information, see “Showing or Hiding Columns in the Inventory
Pane” on page 81.
Right-Click Menus
Right-clicking on a clip in the Playlist will display this menu.
• Cue - Selecting Cue automatically cues the highlighted clip. The row
for the cued clip appears highlighted yellow. See “Cueing From a
Specific Clip in the Playlist” on page 110.
• Remove Clip - Deletes the highlighted clip from the Playlist. See
“Deleting Clips from the Playlist” on page 109.
• Enable Follow - Highlighted clips will all be enabled to play next in the
Playlist.
• Disable Follow - Highlighted clips will all be disabled to automatically
play next in the Playlist.
for more information, see “Setting the Follow Behavior for Clips in the
Playlist” on page 109.
74
Page 75

Right-Click Menu Description
In Advanced Transport View, right-clicking anywhere in the Media
Timeline (scrub bar) displays a menu, allowing you to:
• Show all media - Changes the visible range of the Media timeline
(scrub bar) to include the entire media of the master clip (even outside
the master clip's In and Out locations). Normally, clips are cued to play
between their In and Out points. Selecting this option recues the clip on
the channel to allow playing or scrubbing outside the clip's current In
and Out points. Media outside this range will appear in dark gray. This
allows the In and Out points to be set outside this range.
This option is disabled when the playlist is locked.
n
• Reset in/out - Resets the soft In and Out markers to the actual In and
Out locations of the clip. This option clears the current In and Out
markers and restores them to their original points (similar to pressing
the g keyboard shortcut) without reloading the clip on the channel.
If you find that you cannot scrub in all locations of the clip, it is likely
an operation was performed that caused the visible range of the Media
Timeline to exceed the loaded range of the clip. To fix this, try reloading
the clip.
• Modify clip - Changes the actual In and Out locations of the clip in the
inventory. Normally, the In and Out markers in the Advanced Transport
are "soft", meaning that changing them does not affect either the range
of the clip itself, or the range that the clip was last loaded on the
channel. This option can be used to edit the In and Out locations of the
original clip, in the event they were not set correctly the first time and
need to be adjusted.
• Create new Subclip - This option is simply a shortcut to the
corresponding Subclip button near the bottom-left of the Advanced
Transport. Use it to create a new subclip with the range defined by the
current ("soft") In and Out marker locations. This allows you to create
new subclips without modifying the original clip.
See “Creating Subclips in the Advanced Transport View” on page 118.
Right-Click Menus
75
Page 76

Right-Click Menu Description
• Subclip from left - Creates a subclip between the In marker and the
Position bar, and then updates the In marker to the current time. This
option can be used to chop a master clip into any number of subclips
(from left to right) without touching the In and Out markers explicitly.
Just position the current time at the location of each desired cut, from
left to right, and select the Subclip from left option for each cut. As
usual, if you specify either a Video ID or Video Name for subclips, an
auto-incremented suffix will be appended to each clip to group them by
default, until you clear it or rename it.
The Subclip from left option is not available if the Position bar is not
n
positioned between a In and Out point.
See “Creating Subclips in the Advanced Transport View” on page 118.
• Subclip from right - Creates a subclip between the Position bar and the
Out marker, and then updates the Out marker to the current time. This is
similar to the Subclip from left option, except it allows you to chop a
clip into multiple subclips from right to left, instead of from left to right.
See “Creating Subclips in the Advanced Transport View” on page 118.
The Subclip from right option is not available if the Position bar is
n
not positioned between a In and Out point.
• Go to head frame - Moves the current time of the channel to the current
headframe set point.
• Set head frame - Changes the location of the headframe set point to the
current location (time) of the channel.
If the In point of the clip changes, the headframe will not change. So,
n
it is possible that in the event the In point gets moved past the
headframe, the headframe could be out side of the clip.
To reset the headframe to the In point, load the clip in the Advanced
n
Transport, make sure the current time is at the In point (or wherever
you desire), right-click in the Scrub Bar and select Set head frame.
.
Right-Click Menus
76
Page 77

Right-Click Menu Description
In Advanced Transport View, right-clicking anywhere in the Timescale bar
displays a menu, allowing you to:
• Zoom all in - Changes the time scale to the highest resolution (one
frame per tick). This option is a shortcut to clicking in the Timescale
Bar and dragging to the right as far as it will go.
• Zoom in - Zooms the time scale in to a higher time resolution by a
factor of two, for each “Zoom in”. Alternatively, you can hover the
cursor over the Timescale bar, and click and drag to zoom in.
See .“Timescale Bar” on page 61
• Zoom out - Zooms the time scale out to a lower time resolution by a
factor of two, for each “Zoom out”. Alternatively, you can hover the
cursor over the Timescale bar, and click and drag to zoom in.
• Zoom all out - Changes the time scale to the lowest resolution: to show
the full range of the loaded clip. This is a shortcut to clicking in the
Timescale Bar and dragging to the left as far as it will go.
This is the default when loading a clip.
n
• Scroll to now - Moves the Scrub Bar window so the current time is
centered in the window, as best as possible without changing the time
scale factor.
This is useful and effective only at high time resolutions (does
n
nothing when zoomed all out).
Right-Click Menus
77
Page 78

3 Working with the Remote Console
Once you have installed and configured your AirSpeed 5000 Remote Console, and connected to
one or more AirSpeed 5000 or AirSpeed Multi Stream servers, you are now ready to use the
Remote Console to do the following:
• Cue and play clips
• Cue and record clips
• Retransfer clips
• Manage clip inventory
• Create Playlists and play the clips out on their associated channels
• Create subclips
• Preview clips via proxy media
In Interplay Production mode, we support up to five (5) devices in the same Studio. It is
n
important to note that Studio is only supported with Interplay.
For more information on working with the Remote Console, see the following topics:
• “Working with Clips” on page 79
• “Working with Playlists” on page 104
• “Working in the Advanced Transport View” on page 112
• “Performing an Edit While Capture (EWC) with Drag and Drop” on page 97
• “Performing an Edit While Capture (EWC) with Auto Transfer” on page 99
• “Importing .AAF Files into the Avid Editor (Macintosh Team Mode)” on page 102
Page 79

Working with Clips
This topic contains information on how to work with clips in the AirSpeed 5000 Remote
Console.
The following topics are included:
• “Selecting Clips” on page 79
• “Changing the Sort Order of Clips” on page 80
• “Showing or Hiding Columns in the Inventory Pane” on page 81
• “Reordering Columns in the Inventory Pane” on page 83
• “Filtering on a Clip Name or Video ID” on page 83
• “Playing Clips” on page 86
• “Recording Clips” on page 87
• “Creating Subclips in Normal View” on page 90
• “Working with Proxy Clips” on page 91
• “Deleting Clips” on page 94
Working with Clips
• “Protecting or Unprotecting Clips from Deletion” on page 95
• “Transferring Clips” on page 96
Selecting Clips
You can select clips in the Inventory pane for playing, cueing, deleting, or transferring to
Interplay.
You can also select multiple clips for deletion or transfer to Interplay. There are two methods for
selecting multiple clips.
To select a single clip:
t Simply click on a clip you want to select.
To select individual non-consecutive clips
t Ctrl+click and select individual non-consecutive clips.
To select a series of clips
t Shift+click and select multiple consecutive clips.
79
Page 80

Changing the Sort Order of Clips
This topic contains information on changing the sort order of clips based on a single column of
data in the Inventory pane.
To change the sort order of clips:
1. To sort on a single column heading, click on the column heading to sort by at the top of the
Inventory pane (Name, Video ID, Transfer Status, and so on).
When a Name sort is active, items with no information in the Name field are moved to the top of
n
the window. Clips that contain a numerical entry in the first position of these fields are sorted
next, followed by all remaining clips sorted alphabetically by name.
2. Click on the column heading again to reverse sort the items in the column.
Working with Clips
80
Page 81

The following table describes how the columns are sorted.
Sort Category
Option Description
Name Clips are sorted alphabetically by name.
Video Id Clips are sorted alphabetically by a unique ID for the clip.
Duration Clips are sorted numerically by their length.
In Clips are sorted numerically by their In point.
Out Clips are sorted numerically by their Out point.
Creation Date Clips are sorted by the date they were recorded or transferred in.
Protected Clips are sorted alphabetically by those that are protected.
Format Clips are sorted alphabetically by format.
Transfer Status Clips are sorted alphabetically by their transfer status.
Proxy Status Clips are sorted alphabetically by their proxy status.
Working with Clips
Original Clips are sorted alphabetically by the name of the master clip they are
associated with.
Showing or Hiding Columns in the Inventory Pane
The Remote Console enables you to show or hide columns in the Inventory pane.
If you want to see the masterclip name associated with a subclip, you must show the Original
n
column.
81
Page 82

To show or hide columns in the Inventory pane:
1. In the Inventory pane, right-click on a column heading.
The following menu opens:
Working with Clips
2. Do the following to show or hide columns in the Inventory pane.
t To hide only the column pertaining to the column heading you right-clicked on, select
Hide This Column.
t To display a column, select the option next to the column heading you want to display. It
will appear in the Inventory pane.
t To hide a column, deselect the option next to the column heading you want to hide. It
will not appear in the Inventory pane.
3. To select or deselect multiple columns that you want to show or hide in the Inventory pane,
do the following:
a. Click the More button.
The Choose Columns to Display dialog box opens.
b. Select the columns you want to display (these will be checked) in the Inventory pane.
c. Click OK to save your changes.
82
Page 83

Reordering Columns in the Inventory Pane
This topic contains information on how to reorder columns within the Inventory pane.
To reorder columns in the Inventory pane:
t Click on a column heading and drag it horizontally to the desired location that you want it to
appear, then drop it into place.
Filtering on a Clip Name or Video ID
This topic contains information on filtering on a clip name or video ID.
To filter on a clip name or video ID:
1. Type a portion or the full clip name or video ID you want to filter on in the Filter field to run
the filter.
2. (Option) If you want to change the default filter settings, you can also right-click on the
Filter field to bring up the Filter menu controls as shown in the following illustration:
Working with Clips
83
Page 84

The following table describes the options available in the Filter menu.
Filter Options
Option Description
All This is the default. If selected, whatever you type in the Filter field
applies to both video IDs and clip names.
Video ID If selected, whatever you type in the Filter field applies to Video IDs
only.
Name If selected, whatever you type in the Filter field applies to clip names
only.
Case sensitive If selected, whatever you type in the Filter field must be case sensitive for
the filter to find a match.
For example, if you typed “Dog”, it would not find “dog”, and vice versa.
Case insensitive This is the default. If selected, whatever you type in the Filter field does
not need to be case sensitive for the filter to find a match.
For example, if you typed “Dog”, it would also find “dog”, and vice
versa.
Working with Clips
Use wild cards This is the default. If selected, you can type wildcards such as * in the
Filter field to find everything that contains the text after the wildcard.
This field is redundant if Match anywhere is selected. For example, if
you typed “*Do”, it would not find all names or Video IDs (or both) with
the letters “do”, assuming you have Case sensitive selected.
Match from start If selected, whatever you type in the Filter field must be found at the
beginning of the name or Video ID for the filter to find a match.
Match exactly If selected, whatever you type in the Filter field must be exactly the same
as the name or Video ID for the filter to find a match. In other words, the
whole name must be typed in exactly as it appears in the Inventory pane.
Match anywhere This is the default. If selected, whatever you type in the Filter field can be
anywhere in the name or Video ID, and can also be a partial name.
84
Page 85

3. (Option) If you want to filter clips based on whether they were recorded from baseband
(locally) or transferred from a Send to Playback or FTP sequence, do one of the following:
t If you want the filter to only show clips that were recorded locally, select the Recorded
option.
t If you want the filter to only show clips that were transferred from Send to Playback or
FTP, select the Tr ansfer red option.
If both or neither the Recorded and Transferred options are selected, there is no effect on the
n
filter.
Viewing Clip Properties and Modifying Clip Behavior
The Remote Console enables you to view clip properties and modify clip behavior.
To view and Modify Clip Properties:
1. In the Inventory pane, right-click on a clip.
The following menu opens:
Working with Clips
If the Create Proxy option does not appear in the menu, the H.264 Proxy Encode License is not
n
activated on the server. You must purchase and activate the license as described in the AirSpeed
5000 Administrator’s Guide.
2. Select the Clip Properties option.
The Clip Properties panel opens in the Inventory pane. For more information, see “Clip
Properties Panel” on page 48.
85
Page 86

3. View the properties for the selected clip. You can also do the following:
a. Edit the base timecode by typing directly in the Base Timecode field.
b. Select a Looping option for the clip. If you select Loop, you can also specify the number
c. Specify the Loop In time of the clip. This is the position in the clip where looping starts.
Looping functionality is available for SD, AVC-Intra, and DNxHD clips only. You cannot loop
n
MPEG-2 HD clips.
Playing Clips
This topic contains information on the methods on how to cue and play a clip on an AirSpeed
5000 server channel.
There are two methods for cueing and playing clips:
• Cue and Play directly from the Current Video ID field
• Cue and Take via the Next Video ID field
Working with Clips
of times you want to loop the clip by typing a number in the times field.
You can change this position by typing directly in the field.
Pre-cued clips get removed when another clip is dragged and dropped to the active window of
n
the same channel. When a clip is dragged or cued to in the active channel location of the Remote
Console user interface, it overrides any pre-cued clip and causes the pre-cued clips to be ejected.
Cueing and Playing Clips Directly from the Current Video ID Field
This topic contains information on how to cue and play a clip directly from the Current Video ID
field on an AirSpeed 5000 server channel.
To cue and play a clip from the Current Video ID field:
1. Do one of the following:
t Select a clip in the Inventory pane to highlight it, then click and drag and drop it into the
Current Video ID field.
The clip cues, but does not play.
t Type the Video ID of the clip in the Current Video ID field, and press Enter.
The clip cues, but does not play.
2. Click the Play button or press the Spacebar to begin playback.
86
Page 87

Cueing and Taking Clips via the Next Video ID Field
This topic contains information on how to cue and take (F12) a clip on an AirSpeed 5000 server
channel via the Next Video ID field.
To cue and take a clip via the Next Video ID field:
t Do one of the following:
- Select a clip you want to cue from the Inventory pane to highlight it, then click and drag
and drop it into the Next Video ID field.
Click the Take (F12 ) key to Take the clip to the Current Video ID field.
- Type the Video ID of the clip you want to cue in the Next Video ID field, and press
Enter.
Click the Take (F12 ) key to Take the clip to the Current Video ID field.
The clip will automatically begin to play.
Recording Clips
There are a few basic methods in which to record or capture clips. This topic contains
information on the methods used to record clips on an AirSpeed 5000 server channel including:
Working with Clips
• Crash Recording Clips
• Cueing Clips for Record
• Recording Clips with Only a Video ID Specified (no Duration or Name)
• Recording Clips with Both a Video ID and Duration Specified
• Recording Clips with Only a Name Specified (no Duration or Video ID)
• Recording Clips with Only a Duration Specified (No Video ID or Name)
Crash Recording Clips
A Crash record is the ability to start a recording and instantly capture to a predetermined
channel, without a predetermined end time. A Crash record uses the channel settings that were
configured from the Record and Destination templates.
Clip names and Tape names are not required when performing a Crash record.
n
To crash record a clip:
1. Click the Record button.
The clip will record to the location specified on the active AirSpeed 5000 server for that
channel.
87
Page 88

If you do not type a name or ID for the clip, one will be generated as specified in the Record and
n
Destination templates.
2. Click the Stop button when you want to stop the crash record of this clip.
Cueing Clips for Record
This topic contains information on how to cue a clip for record.
To cue a clip for record:
1. Select the channel you want to record to by clicking on it.
2. Do the following:
a. Click in one of the editable fields (Name, Video ID or Duration).
b. (Optional) Type a clip name, Video ID or duration for the clip.
If no video ID, clip name, or duration has been entered for the clip, the clip will be
assigned this information based on how the Default Template for the AirSpeed 5000
server you are recording to was configured.
c. Press Ctrl+Enter to cue the clip for record.
To cancel the Record Cue, click the Stop button.
n
3. Click the Record button to record the cued clip.
Working with Clips
The clip will stop recording at the set duration. However, you can also stop the record by
pressing the Stop button.
Recording Clips with Only a Video ID Specified (no Duration or Name)
This topic contains information on how to record a clip on an AirSpeed 5000 server channel with
a Video ID, but no duration or name specified.
To record a clip with a Video ID and no duration specified:
1. Select the channel you want to record to.
2. Type a name for the clip in the Current Video ID field, and press Enter.
3. Click the Record button.
4. Click the Stop button to stop the record at the desired duration.
88
Page 89

Recording Clips with Both a Video ID and Duration Specified
This topic contains information on how to record a clip on an AirSpeed 5000 server channel with
both a Video ID and duration specified.
To record a clip with both a Video ID and duration specified:
1. Select the channel you want to record to.
2. Type a name for the clip in the Current Video ID field.
3. Type a duration for the recording in the Duration field.
4. Click the Record button or press Enter.
Record will continue until the duration specified is met, and the clip will be unloaded from
the channel.
Recording Clips with Only a Name Specified (no Duration or Video ID)
This topic contains information on how to record a clip on an AirSpeed 5000 server channel with
a name, but no duration or video ID specified.
To record a clip with a name and no duration or video ID specified:
1. Select the channel you want to record to.
Working with Clips
2. Type a name for the clip in the Name field.
3. Click the Record button or press Enter.
4. Click the Stop button to stop the record at the desired duration.
Recording Clips with Only a Duration Specified (No Video ID or Name)
This topic contains information on how to record a clip on an AirSpeed 5000 server channel with
only a duration specified (no video ID or name).
To record a clip with only a duration specified (no video ID or name):
1. Select the channel that you want to record to:
2. Type a duration for the recording in the Duration field.
3. Click the Record button, or press Enter.
Record will continue until the duration specified is met, and when the recording stops, the
clip will be unloaded from the channel.
89
Page 90

Modifying In/Out Points for Clips in the Inventory Pane
This topic contains information on how to modify the In and/or Out points for clips in the
Inventory pane. This can also be done in the Playlist.
To modify the In or Out points for clips:
1. Click in the In or Out field for the clip you want to change the In or Out point for.
2. Type the new timecode in the field.
The new In or Out will reflect the timecode you entered in the field.
Creating Subclips in Normal View
This topic contains information on how to create subclips from a masterclip in Normal view.
You can also create subclips in multiple ways (e.g., Subclip from left, Subclip from right) in
Advanced Transport view. For more information, see “Creating Subclips in the Advanced
Transport View” on page 118.
To create subclips in Normal view:
1. Right-click on any masterclip in the Inventory pane, and select Create Subclip from the
menu.
Working with Clips
A new subclip is created in a new row in the Inventory pane.
2. (Optional) View the source masterclip from which the subclip was created. You must show
the Original column.
The Original column lists the name of the masterclip from which the subclip’s media was taken.
n
For more information, see “Showing or Hiding Columns in the Inventory Pane” on page 81.
3. Edit the In and Out points of the subclip. For more information, see “Editing the In and Out
Points of a Clip in the Proxy Viewer” on page 94.
90
Page 91

Working with Proxy Clips
This topic contains information on the method used to create proxy clips and view them in the
Proxy Viewer.
In order to generate Proxy clips, and subsequently view them in the Proxy Viewer, the following
must be done:
• An H.264 Proxy Encode license must be activated on your server. This activates the Proxy
feature, and enables the Proxy Viewer.
• Once the H.264 Proxy Encode feature is activated on your server, you must create the proxy
clips in one of the following ways:
- (Automatic) Select the Proxy Enabled check box in the Record Templates page of the
AirSpeed 5000 Management Console. This automatically creates proxy clips for all
ingested clips. For more information, see the AirSpeed 5000 Administrator’s Guide.
- (Manual) Right-click on a clip in the database, and select Create Proxy. This creates a
proxy version of the hi-res clip. If there already is a proxy, this re-creates a proxy. For
more information on creating proxy clips this way, see “Manually Creating Proxy Clips”
on page 91.
The Proxy Viewer is only available when you are connected to an AirSpeed 5000 server. In
n
addition, the Remote Console application must be installed on a Windows 7 Operating System.
Working with Clips
For more information, see the following topics:
• “Manually Creating Proxy Clips” on page 91
• “Viewing Proxy Clips” on page 92
• “Creating Subclips Using the Proxy Viewer” on page 93
• “Editing the In and Out Points of a Clip in the Proxy Viewer” on page 94
Manually Creating Proxy Clips
With the H.264 Proxy Encode License activated, you can create a proxy from any hi-res clip at
any time using the AirSpeed 5000 Remote Console.
This functionality is helpful in the following scenarios:
• You are just starting to create proxy versions of hi-res clips, and have old hi-res clips for
which you would like to create proxy versions.
• You want to manually create proxies for only certain hi-res clips (not all ingested clips).
91
Page 92

To manually create proxy clips:
1. Right-click on a clip in the database, and select Create Proxy.
The Confirm Create Proxy dialog box opens.
If the Create Proxy option does not appear in the menu, the H.264 Proxy Encode License is not
n
activated on the server. You must purchase and activate the license as described in the AirSpeed
5000 Administrator’s Guide.
2. Select Ye s to create the proxy.
The Proxy Status column will show the status (Requesting, Transcoding, % Done,
Complete) of the proxy clip as it’s being created. The status also appears in the Clip
Properties panel in the Proxy Clip field.
3. View the proxy clip by right-clicking the clip, and selecting View Proxy from the menu. For
more information, see “Viewing Proxy Clips” on page 92.
Viewing Proxy Clips
If you have the H.264 Proxy option activated, and have created proxy clips, you can use the
Proxy Viewer to view the proxy clips.
Working with Clips
To view proxy clips:
t Right-click on any masterclip with proxy in the Inventory pane, and select View Proxy from
the menu.
A clip with no proxy will have the View Proxy option grayed out.
n
92
Page 93

The Proxy Viewer opens.
Working with Clips
Creating Subclips Using the Proxy Viewer
This topic contains information on how to use the Proxy Viewer to create a subclip.
To create a subclip using the Proxy Viewer:
1. Edit the Mark In and Mark Out points of the clip as desired. For more information, see
“Editing the In and Out Points of a Clip in the Proxy Viewer” on page 94.
2. Once you have edited the In and Out points of a clip, and are satisfied with the results, click
the Create Subclip button.
A new subclip is created in a new row in the Inventory panel.
The Original column lists the name of the masterclip from which the subclip’s media was taken
n
from.
For more information, see “Showing or Hiding Columns in the Inventory Pane” on page 81.
93
Page 94

Editing the In and Out Points of a Clip in the Proxy Viewer
This topic contains information on how to edit the In and Out points of a clip in the Proxy
Viewer.
You can also change the Mark In and Mark Out points by typing them in the Inventory pane as
n
described in “Modifying In/Out Points for Clips in the Inventory Pane” on page 90.
To edit the In and Out points of a clip:
1. Open a clip’s proxy in the Proxy Viewer.
2. Use the Proxy Viewer buttons, keyboard shortcuts, or mouse scroll wheel to locate the spot
where you want to set the In or Out point of the clip.
The timecode will change to reflect the In or Out point of the clip.
3. When you are at the location you are looking for, do one of the following:
a. Click the Mark In button, or type I to mark the new In point of the clip.
b. Click the Mark Out button, or type O to mark the new Out point of the clip.
You will notice the duration of the clip changes in both the Duration field of the Proxy
Viewer, and the Duration field in the Inventory panel.
Working with Clips
If you changed the In point, the clip will play from the new In point, and cueing the clip will now
n
cue to the new In point. If you changed the Out point, the clip will stop playing at the new Out
point.
4. (Option) To modify the In point or Out point of the clip, repeat this procedure.
For Proxy clips, the new Mark In to Mark Out duration will be represented by the green portion
n
of the Proxy Viewer timeline.
Deleting Clips
This topic contains information on how to delete a clip. You can only delete unprotected clips,
and clips that are not being used.
For more information, see “Protecting or Unprotecting Clips from Deletion” on page 95.
To delete a clip:
1. In the Inventory pane, click on a clip you want to delete.
2. Press the Delete key.
A dialog box opens, asking if you are sure you want to delete this clip. Click Ye s to delete
the clip. The clip will be deleted from the AirSpeed 5000 server and will not appear in the
Inventory pane.
94
Page 95

You can also select multiple clips for deletion. There are two methods for selecting multiple
clips.
To delete individual non-consecutive clips:
t Ctrl+click and select individual non-consecutive clips, and press the Delete key.
To delete a series of clips:
t Shift+click and select multiple consecutive clips, and press the Delete key.
Protecting or Unprotecting Clips from Deletion
The Remote Console enables you to protect or unprotect clips from being deleted from the
AirSpeed 5000 server.
The Protected column toggles between Protected (box checked), to Unprotected (box
unchecked).
Working with Clips
To protect or unprotect clips from deletion:
1. In the Inventory pane, click on a clip you want to protect or unprotect from being deleted.
You c a n a l s o:
t Ctrl+click to select individual non-consecutive clips.
t Shift+click to select multiple consecutive clips.
2. Once your clip(s) are selected, right-click and select Toggle Delete Protect from the menu.
This changes the status of the clip in the Protected column. The clip will switch to the
opposite behavior that it had when you selected it. For instance, if it was protected from
deletion (box was checked), it will now be unprotected (box unchecked). If it was
unprotected (box was unchecked), it will now be protected (box checked).
You can also manually click the check box to toggle Delete Protect for individual clips.
n
95
Page 96

Transferring Clips
This topic contains information on how to use the Remote Console to transfer clips. the
following topics are included:
• “Transferring Clips to Shared Storage (Interplay Production and Team Modes)” on page 96
• “Transferring Clips to an Avid Editor (Standalone Mode)” on page 96
• “Transferring Clips to an Avid Editor (Team Mode)” on page 97
• “Performing an Edit While Capture (EWC) with Drag and Drop” on page 97
• “Performing an Edit While Capture (EWC) with Auto Transfer” on page 99
• “Importing .AAF Files into the Avid Editor (Macintosh Team Mode)” on page 102
Transferring Clips to Shared Storage (Interplay Production and Team Modes)
This topic contains information on how to transfer clips to Shared storage.
This option is only available if you are in an Interplay Production or Team environment.
n
To transfer clips to Shared storage:
1. In the Inventory pane, click on a clip you want to transfer to Shared storage. You can also
select multiple clips at once:
Working with Clips
t Press Ctrl+click and select individual non-consecutive clips.
t Press Shift+click and select multiple consecutive clips.
2. Once your clip(s) are selected, right-click and select Transfer to Interplay from the menu.
The selected clip(s) will be transferred to Shared storage, and checked into Interplay.
Transferring Clips to an Avid Editor (Standalone Mode)
If your site is configured in a Standalone mode, you can transfer clips directly to an Avid Editor.
The clips will also be transferred into the local storage location configured in the Interplay
Transfer Engine Configuration.
To transfer clips to an Avid Editor:
1. In the Inventory pane, click on a clip you want to transfer to an Avid Editor. To select
multiple clips do one of the following:
t Press Ctrl and then click to select individual non-consecutive clips.
t Press Shift and then click on the last clip of a group to select multiple consecutive clips.
All clips in between will be selected.
2. Drag the selected clip(s) to the Editor bin.
96
Page 97

You will be asked if you want to transfer Now or Later.
3. Select Now.
The Transfer Status will show the clip transferring to local storage.
Transferring Clips to an Avid Editor (Team Mode)
If your site is configured in a Team mode, you can transfer clips directly to an Avid Editor. The
clips will also be transferred into the Shared storage location configured in the AirSpeed 5000
Management Console.
To transfer clips to an Avid Editor:
1. In the Inventory pane, click on a clip you want to transfer to an Avid Editor. To select
multiple clips do one of the following:
t Press Ctrl and then click to select individual non-consecutive clips.
t Press Shift and then click on the last clip of a group to select multiple consecutive clips.
All clips in between will be selected.
2. Drag the selected clip(s) to the Editor bin.
You will be asked if you want to transfer Now or Later.
Working with Clips
3. Select Now.
The Transfer Status will show the clip transferring to Shared storage.
For more information on other various Team mode import workflows, see the following
topics:
- To perform an Edit while capture (EWC) with drag and drop in Team mode, see
“Performing an Edit While Capture (EWC) with Drag and Drop” on page 97.
- To perform an Edit while capture (EWC) with Auto Transfer in Team mode, see
“Performing an Edit While Capture (EWC) with Auto Transfer” on page 99.
- (For Macintosh in Team Mode only) To import .AAF Files into Avid Editor from a
Macintosh in Team Mode, see “Importing .AAF Files into the Avid Editor (Macintosh
Team Mode)” on page 102.
Performing an Edit While Capture (EWC) with Drag and Drop
If you are in a Team Configuration, you can use the Edit While Capture with Drag and Drop
workflow to edit in-progress clips as they are being recorded via the AirSpeed 5000 Remote
Console Standalone. The clips will also be transferred into the shared storage location
configured in the AirSpeed 5000 Management Console.
Before you can perform an Edit While Capture, your system must have been set up using a Team
Configuration (Shared storage and no Interplay).
97
Page 98

Working with Clips
To perform an Edit While Capture (EWC) with drag and drop:
1. From the AirSpeed 5000 Remote Console, start a Record. For more information, see
“Recording Clips” on page 87.
2. Once the recording has begun, drag and drop the in-progress recording from the AirSpeed
5000 Remote Console into an Editor bin.
You will be asked if you want to transfer Now or Later.
3. Select Now.
The media appears online about 45 seconds after the transfer is started, and you can start
editing the clip.
There is a possibility that the clip drag and dropped to your bin will remain in-progress well
n
after the clip has completed transferring. In this case, you should navigate to the location
specified on the Default Templates tab under the Master clip location drop down
(\\<SystemDirector>\<Workspace>\Avid Masterclips) and import the .AAF file of the clip being
transferred. This clip will most likely be noted as <VideoID>_1.aaf in the folder. Importing this
file will close out the in-progress clip in the bin.
This behavior might occur in the event that the editor is constantly playing while a transfer to the
n
bin is taking place. The editor consumes all necessary resources to achieve playback of all
frames, which may prevent the bin from being updated upon completion of playback.
Clips edited while in this in-progress state may encounter issues when being exported. It is
n
required that if you are editing with an in-progress clip, and plan to export the composition, that
you consolidate the clip before the export is performed.
98
Page 99

Performing an Edit While Capture (EWC) with Auto Transfer
If you are in a Team configuration, you can use the Edit While Capture with Auto Transfer
workflow to enable the AirSpeed 5000 server to capture directly to your shared storage
workspace location configured in the AirSpeed 5000 Management Console. The metadata for
these clips will also be transferred to the location defined in the Master clip location (Team) field
in the AirSpeed 5000 Management Console.
Before you can perform an EWC with Auto Transfer, make sure that your system has been set up
using the Team Configuration (No Interplay with Shared storage).
Also, on the Inventory page in the AirSpeed 5000 Management Console, make sure of the
following:
• In the “Default Ingest Destination” field, under the Inventory tab, make sure that the
Destination template that is selected includes the workspace that you want to transfer the
media to.
• In the Master Clip Location (Team) field, select the ISIS workspace for which you want the
.AAF file to be transferred to.
It is recommended that the location you select for the masterclip location matches the location
n
you selected in the Workspace field of the Default Ingest Destination field in the Inventory tab of
the AirSpeed 5000 Management Console.
Working with Clips
To perform an Edit While Capture (EWC) with auto transfer:
1. From the AirSpeed 5000 Remote Console, start a Record. For more information, see
“Recording Clips” on page 87.
99
Page 100

Working with Clips
2. Do one of the following to locate your clip:
t From Windows Explorer, locate the clip(s) you want to EWC, then drag/drop the .AAF
file into the Avid editor bin.
The clip will be imported and an in-progress clip will appear in the Avid editor bin. For
more information, see Step 4, then continue this procedure on Step 5.
t From the Avid Editor, select File > Import.
The Select Files to Import dialog box opens.
3. Navigate to the location that is specified in the Master Clip Location (Team) field in the
Inventory tab of the AirSpeed 5000 Management Console.
4. Do the following:
a. Highlight the .AAF file of the clip that you started to record.
b. Verify that the Video Resolution and Destination drive you are importing to is correct.
c. Click Open.
100
 Loading...