

Page 1

PCTV Deluxe
USER'S GUIDE
Page 2

PCTV Deluxe
User’s Guide
GB September 2002
© Pinnacle Systems GmbH 2002
All rights reserved.
No part of this manual may be reproduced or transferred to other media without explicit written
permission from Pinnacle Systems GmbH, Braunschweig, Germany.
All brand or product names are trademarks or registered trademarks of their respective holders.
This manual is printed on chlorine-free paper using environmentally safe ink.
Pinnacle Systems Inc. has written this manual to the best of its knowledge, but does not guarantee that the
programs/systems will fulfill the desires of the user.
No warranty is made as to the specifications of features.
Pinnacle Systems Inc. retains the right to make alterations to the content of the manual without the
obligation to inform third parties.
All tenders, sales, supply and manufacturing contracts from Pinnacle Systems Inc., including consultancy,
installation and other contractual performance are subject exclusively to the Gereral Sales and Delivery
Terms of Pinnacle Systems GmbH.
Page 3

Contents
CHAPTER 1: OVERVIEW 1
WHAT IS PCTV DELUXE? 1
WHAT DOES PCTV DELUXE OFFER? 2
CHAPTER 2: BEFORE YOU START 3
SYSTEM REQUIREMENTS 3
PACKAGE CONTENTS 6
CHAPTER 3: INSTALL PCTV DELUXE 8
SPECIFIC CHARACTERISTICS OF WINDOWS 2000 AND WINDOWS XP 9
INSTALLATION STEPS 9
THE PCTV ASSISTANT 11
CONNECTING OPTIONAL EQUIPMENT 13
CHAPTER 4: PCTV VISION 14
THE MAIN WINDOW OF PCTV VISION 14
UPPER WINDOW AREA 15
LOWER WINDOW AREA 17
THE CONTROL PANEL FOR RECORD, PLAY AND TIMESHIFT 20
SCHEDULER 25
GALLERY 27
THE VCD, SVCD AND DVD BURNING FUNCTIONS 29
SETTINGS MENU 34
CHAPTER 5: TIMESHIFT - PURE TV ENJOYMENT 47
WHAT IS TIMESHIFT? 47
WHAT DOES TIMESHIFT OFFER? 47
THE DIFFERENT FUNCTIONAL STATES 48
TIMESHIFT FUNCTIONS IN DETAIL 50
SETTINGS 52
“TIMESHIFT” WHENEVER YOU WANT! 53
CHAPTER 6: PCTV WEBTEXT 55
OVERVIEW 55
THE PCTV WEBTEXT MAIN WINDOW 57
NAVIGATION WITH PCTV WEBTEXT 61
OTHER TIME- AND WORK-SAVING FUNCTIONS 65
INTERNET BROWSER 66
User's Guide i
Page 4

APPENDIX A: TIPS & TRICKS I
HARDWARE REQUIREMENTS I
ENHANCED-IDE HARD DISKS II
HINTS FOR IMPROVING THE CAPTURE PERFORMANCE OF YOUR HARD DISK III
HARD DISK CAPTURING CAPACITY DATA V
SETTINGS IN WINDOWS ME VI
SETTINGS IN WINDOWS 2000 AND WINDOWS XP VII
REDUCING NONCAPTURE-RELATED MACHINE ACTIVITY VIII
LED SIGNALS OF THE PCTV DELUXE BOX IX
APPENDIX B: TECHNICAL DATA X
APPENDIX C: GLOSSARY XI
APPENDIX D: LICENCE AGREEMENT XVII
INDEX
ii PCTV Deluxe
Page 5

About the Users's Guide
This User’s Guide explains how to install and use the Pinnacle Systems
hardware and software.
Subheadings
In the margins are subheadings to help you quickly find your way through
this manual.
Important text passages are marked with the “notepad” and this format.
Numbers mark step by step instructions:
1. Start Windows.
Bullets mark instructions for optional steps the order of which is not
important.
Connect the board to the camcorder.
All keyboard commands appear in this font:
setup
Menus, commands, options or buttons which the user can select are written
in italics.
User's Guide iii
Page 6

Konformitätserklärung nach ISO/IEC Guide 22 neu!!
Declaration of conformity in accordance with
ISO/IEC Guide 22
Anbieter / Supplier : Pinnacle Systems GmbH
Anschrift / Address : Frankfurter Strasse 3c
38122 Braunschweig, Germany
Nr. / No 1.01
Produkt / Product : PCTV
Das oben beschriebene Produkt ist konform mit: / The product described above is in conformity with:
Dokument-Nr.
Document No.
EN 55022 : 1998
Class B
EN 55024 : 1999 Störfestigkeitseigenschaften für Einrichtungen der Informationstechnik - Grenzwerte und Prüfverfahren
EN 61000-4-2 : 1995
+ A1 : 1998
EN 61000-4-3 : 1996
+ A1 : 1998
EN 61000-4-4 : 1995 Störfestigkeit gegen schnelle transiente elektrische Störgrößen/BURST
EN 61000-4-6 : 1996 Störfestigkeit gegen leitungsgeführte Störgrößen, induziert durch hochfrequente Felder
ENV 50204 : 1995 Störfestigkeit gegen hochfrequente elektromagnetische Felder von digitalen Funktelefonen
EN 61000-3-2 : 1998
+ A14 : 2000
EN 61000-3-3 : 1996 Grenzwerte für Spannungsschwankungen und Flicker
EN 55013 : 1990
+ A14:1999
EN 55020 : 1994
+ A14:1999
EN 60950 : 2000 Sicherheit von Einrichtungen der Informationstechnik
Titel
Title
Grenzwerte und Messverfahren für Funkentstörungen von Einrichtungen der Informationstechnik
Limits and methods of measurement of radio interference characteristics of information technology equipment
Immunity characteristics for information technology equipment - limits and methods of measurement
Störfestigkeit gegen Entladung statischer Elektrizität
Electrostatic discharge immunity test
Störfestigkeit gegen hochfrequente elektromagnetische Felder
Radiated, radio-frequency, electromagnetic field immunity test
Electrical fast transient/burst immunity test
Immunity to conducted disturbances, induced by radio-frequency fields
Radiated electromagnetic field from digital radio telephones - Immunity test
Grenzwerte für Oberschwingungsströme
Limitations for harmonic currents
Limitations of voltage fluctuations and flicker
Funkstöreigenschaften von Rundfunkempfängern und verwandten Geräten der Unterhaltungselektronik
Limits and methods of measurement of radio disturbance characteristics of broadcast receivers and associated
equipment
Störfestigkeit von Rundfunkempfängern und verwandten Geräten der Unterhaltungselektronik
Electromagnetic immunity of broadcast receivers and associated equipment
Safety of information technology equipment
Dieser Erklärung liegt zugrunde: Prüfbericht(e) des EMV-Prüflabors
This certification is based on: Test report(s) generated by EMI-test laboratory
Braunschweig, 14. November 2001 / November 14th, 2001
......................................... ..............................................
Bernd Riemann Oliver Hellmold
Entwicklungsleiter Hardware Finanzdirektor / Director Finance
Engineering Manager Hardware (Rechtsverbindliche Unterschrift / Legally Binding)
Page 7

FCC Compliance Statement
FOR YOUR OWN SAFETY
NOTE: Shielded cables should be used for a composite interface. This is to ensure
continued protection against radio frequency interference.
FCC WARNING STATEMENT
NOTE: This equipment has been tested and found to comply with the limits for a Class B
digital device, pursuant to Part 15 of the FCC Rules. These limits are designed to provide
reasonable protection against harmful interference in a residential installation. This
equipment generates, uses and can radiate radio frequency energy and, if not installed and
used in accordance with the instructions, may cause harmful interference to radio
communications. However, there is no guarantee that interference will not occur in a
particular installation. If this equipment does cause harmful interference to radio or
television reception, which can be determined by turning the equipment off and on, the user
is encouraged to try to correct the interference by one or more of the following measures:
Reorient or relocate the receiving antenna.
Increase the separation between the equipment and receiver.
Connect the equipment into an outlet on a circuit different from that to which the
receiver is connected.
Consult the dealer or an experienced radio/TV technician for help.
CAUTION
Changes or modifications not expressly approved by the party responsible for compliance
could void the user's authority to operate the equipment.
Shielded interface cable must be used in order to comply with the emission limits.
LABEL WARNING
This device complies with Part 15 of the FCC Rules. Operation is subject to the following
two conditions: (1) this device may not cause harmful interference, and (2) this device must
accept any interference received, including interference that may cause undesired operation.
Pinnacle Systems PCTV Deluxe
Tested To Comply
With FCC Standards
FOR HOME OR OFFICE USE
Page 8

NOTES
Page 9

WHAT IS PCTV DELUXE?
PCTV Deluxe is an external MPEG encoder box with TV functionality
which can be connected to any computer using USB 2.0 or 1.1.
With PCTV Deluxe, your PC is converted into a television and at the same
time into a convenient video recorder.
PCTV Deluxe provides the highest video and audio quality in MPEG-1
and/or MPEG-2 format. Due to the efficient MPEG compression, TV
programs can be recorded to and played back from the PC’s hard disk at the
same time via a standard USB connection.
In addition to the pre-programmed TV, VCR and timeshift functions, the
remote control provided can also be freely programmed.
PCTV Deluxe is equipped with a Composite and an S-Video input to
which video recorders, DVD players, camcorders or a video camera can be
connected.
Chapter 1:
Overview
PCTV Deluxe is also equipped with a TV tuner which is compatible with
cable TV and allows you to receive any TV channel offered using a
common (terrestrial) TV antenna or via cable TV-net.
PCTV Deluxe includes a stereo and MTS audio decoder.
PCTV Deluxe offers you the following facilities:
Amongst other things you can
use your PC as a television
record video and audio sequences in MPEG-1 and MPEG-2 format
play back your video recordings later thanks to the Timeshift feature
pre-program your video recordings
connect an external video source (e.g. a DVD player or a camera)
Burn your captured videos as VCD, SVCD or DVD (CD-R, CD-RW,
DVD-R, DVD-RW, DVD+RW, DVD+R)
convert your multimedia files from one format to another, for
instance from a DV AVI format to an MPEG-1 format (VideoCD).
Chapter 1: Overview 1
Page 10

WHAT DOES PCTV DELUXE OFFER?
WDM drivers
PCTV Vision
PCTV WebText
WDM drivers are supplied for operating the hardware under
Windows Millennium Edition, Windows 2000 and Windows XP.
The TV application of PCTV Deluxe offers the following functions:
Watching TV on your PC
Automatic channel search with station name recognition
Pre-programmed transmitter list
Multi-channel preview
Recording and playback in the digital MPEG format
Timeshift - delayed recording and viewing of videos, which allows
functions as quick motion, live-pause and blanking out commercial
breaks.
Digitizing individual pictures.
burn VCD
burn SVCD
burn DVD
This application is not available in all countries and offers the following
functions:
Teletext reception
Unlimited cache memory, i.e. once received, every receivable page and
subpage is stored in the cache.
Received teletext pages can be stored as .TXT- or .HTM files.
PCTV WebText is displayed in your Internet browser allowing you to
navigate as if you were in the Internet including it's own search engine.
Support for the TOP text service.
PCTV Assistant
Twain Driver
TRex
2 PCTV Deluxe
The PCTV Assistant provides continual help during the functionality check
of your computer system in association with PCTV Deluxe. All the relevant
parameters for the smooth running, installation and functioning of your
system are checked and stored.
PCTV Deluxe offers full support of the TWAIN interface. Hereby you have
the possibility to capture still images in highest resolution directly from a
connected video source into an image processing program.
TRex is a program, which enables you to convert your multimedia files
from one format to another, for instance from a DV AVI format to an
MPEG-1 format (VideoCD).
Page 11

SYSTEM REQUIREMENTS
In order to install and use PCTV Deluxe successfully, your system must
satisfy the following requirements:
Hardware
Computer:
As a minimum, Pentium® III or Celeron® PC running at 700 MHz
(recommended 1 GHz or higher) or comparable AMD processor with
CD-ROM drive.
Memory:
At least 128 MBytes memory (recommended 256 MBytes).
For Windows 2000 and Windows XP at least 256 MBytes.
Chapter 2:
Before you start
Harddisk:
Enhanced-IDE harddisk with at least 5 GB free disk space
(second video hard disk running in DMA mode recommended).
Graphics board:
DirectX 8.1 compatible graphics board (AGP graphics board with
MPEG-1 and MPEG-2 decoding support recommended) with at least 8
bits color depth (256 colors).
DirectX Overlay surface capability.
DirectDraw support:
Before you start to work with the applications, a graphics board with a
complete DirectX 8.1 must be installed.
The installation program checks to see if DirectDraw has been installed. If
this is not the case, it will install DirectX 8.1 automatically.
Sound board:
DirectX 8.1 compatible sound board.
DVD burner (for DVD Authoring)
Chapter 2: Before you start 3
Page 12

Software
Windows Millennium Edition, Windows 2000 (with Service Pack 2
installed) or Windows XP.
If you want to use PCTV WebText (not available in all countries), the
Internet Explorer (4.0 or 5.X) has to be installed on your computer. The
Internet Explorer is contained on the supplied CD-ROM and can be
installed using the install program.
Antenna connections
Connect the PCTV Deluxe TV antenna input to the household antenna
(coaxial connection) or to a cable connection.
You will require the appropriate cable to make the antenna connections.
Please note that the quality of the cable has a considerable effect on the
quality of the reception.
4 PCTV Deluxe
a
enn
ant
TV
Power supply
PCTV Deluxe – Rear connections
B
US
Page 13
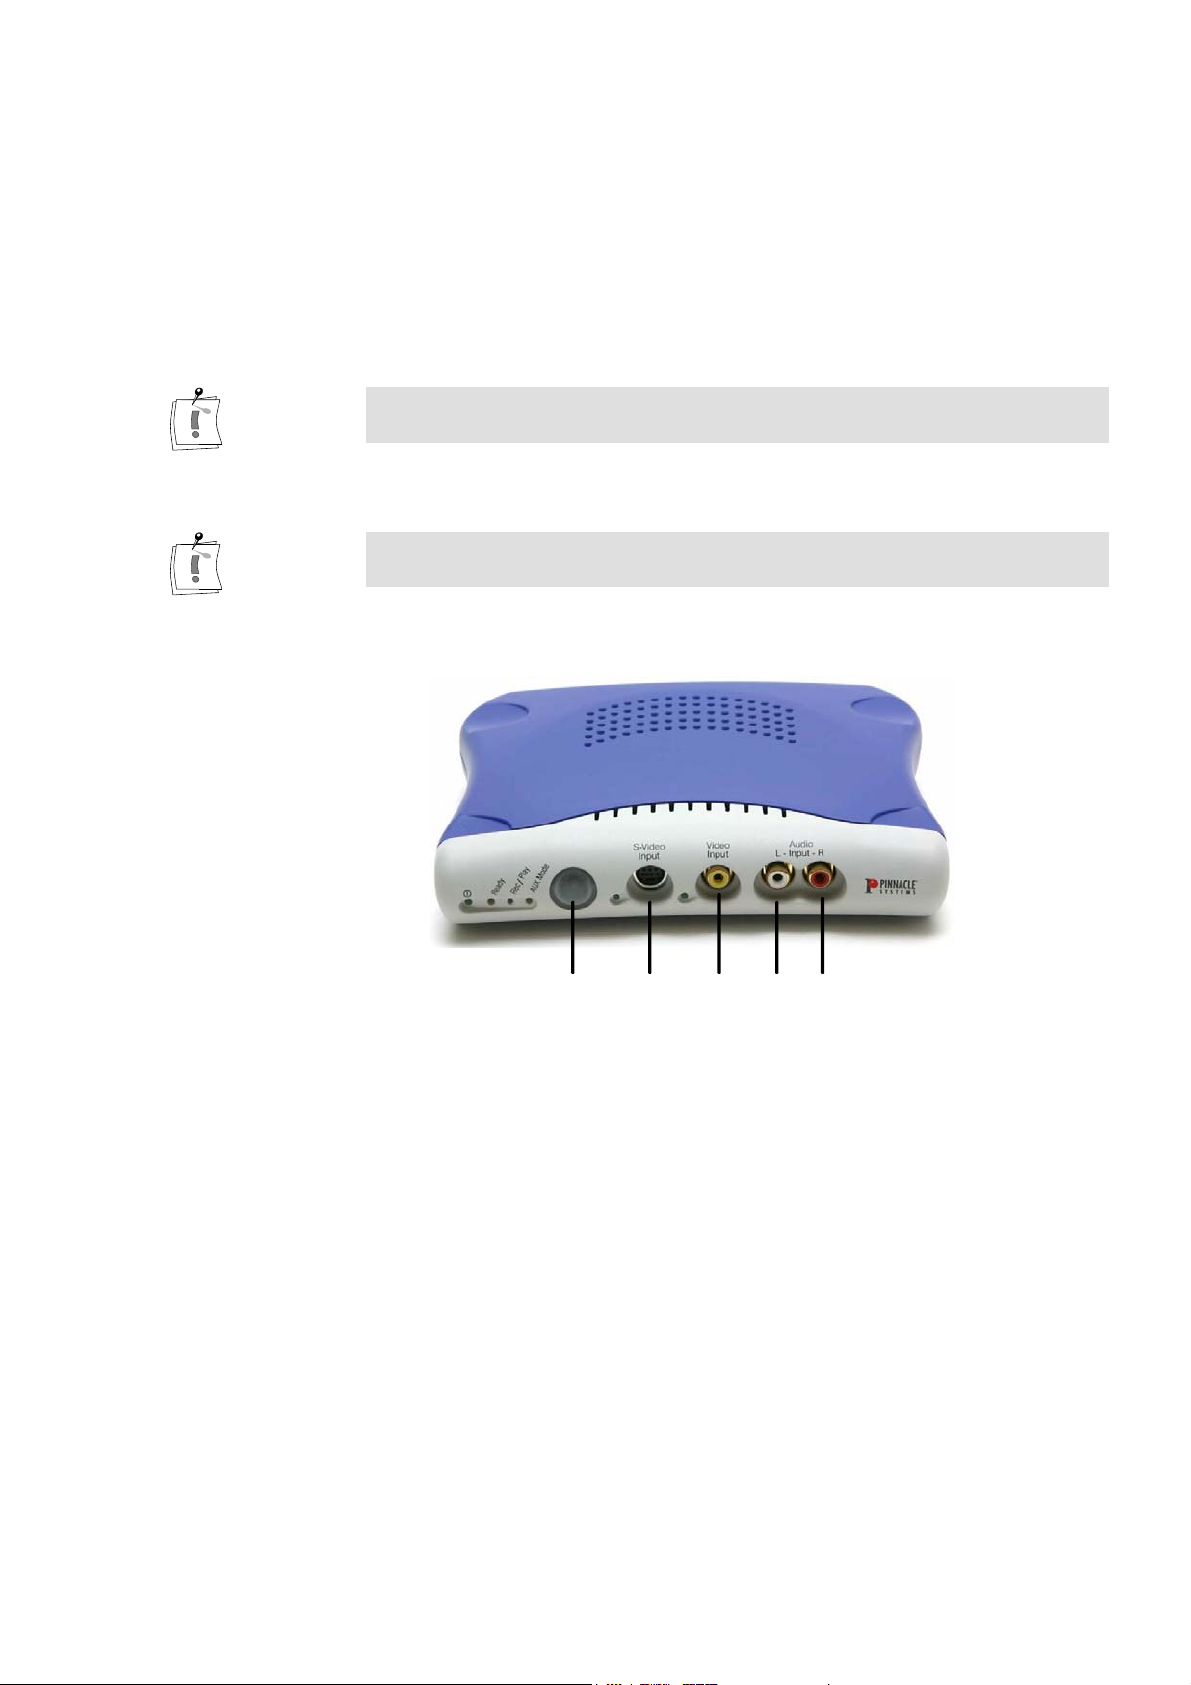
Video equipment
S-Video and Composite Video inputs:
You can connect any video device that provides an S-Video signal or a
Composite video signal in PAL, NTSC or SECAM to the PCTV Deluxe
video inputs, regardless of the video system used (e.g. VHS, S-VHS, Hi8,
Video 8), e.g. video recorders, camcorders, video cameras or DVD player.
Please note that not all video standards (PAL, NTSC or SECAM) are
available for all product variants.
If your video source has an S-Video output, for reasons of quality make
your connection to this and not to the composite video output.
r
e
v
i
e
e
fr
In
for the
c
re
d
re
re
a
mot
-Video in
S
ompos
C
Vide
te
i
PCTV Deluxe – Front connections
in
o
ud
A
L
/
in
o
i
Audio in / R
Chapter 2: Before you start 5
Page 14
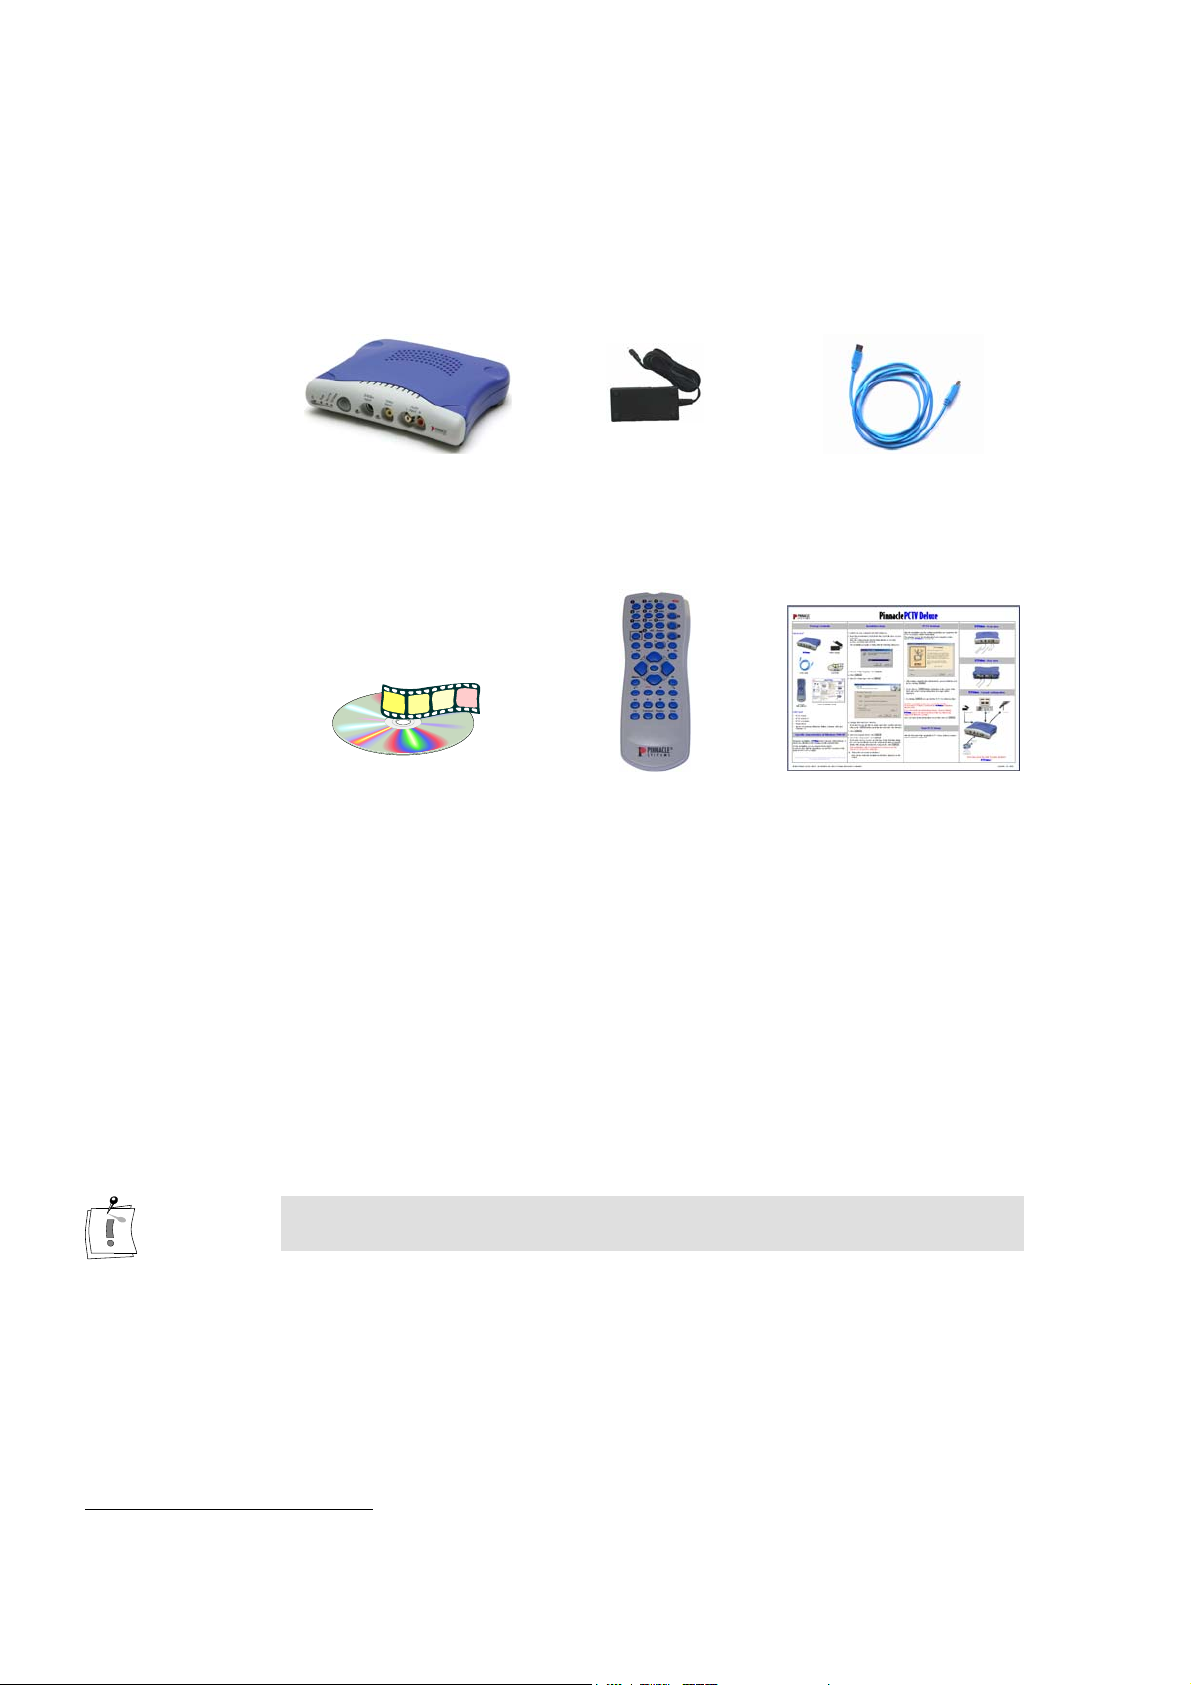
PACKAGE CONTENTS
Before beginning the installation of your device, please check to make sure
your package is complete1:
PCTV Deluxe
Power supply with
separate power cable
(no illustration)
USB-cable
Software
CD-ROM containing
drivers, applications, online
documentation
Remote
with batteries
Quick Installation Guide
If any parts are missing, please contact your dealer or retailer. You will find
the complete software and documentation on CD-ROM. Diskettes are not
included in the package contents.
The PCTV Deluxe package contents include the following software:
WDM drivers for Windows Millenium Edition, Windows 2000 and
Windows XP.
The operation systems Windows 95, Windows 98 and Windows NT 4 are
not supported by PCTV Deluxe!
The PCTV Assistant helps you to check the functionality our your
computer system together with PCTV Deluxe. All relevant parameters
for the correct installation and function of your system are checked and
saved.
1
Depending on the delivery scope, the actual package contents may be different from the package contents listed in
the manual.
6 PCTV Deluxe
Page 15

PCTV Vision is an application that allows you to use your PC monitor as
TV and VCR.
With the PCTV WebText application (not available in all countries) you
can make use of the teletext function offered by many TV stations and
save and print teletext pages.
PCTV Deluxe offers full support of the TWAIN interface. Hereby you
have the possibility to capture still images in highest resolution directly
from a connected video source into an image processing program.
TRex is a program, which enables you to convert your multimedia files
from one format to another, for instance from a DV AVI format to an
MPEG-1 format (VideoCD).
Chapter 2: Before you start 7
Page 16
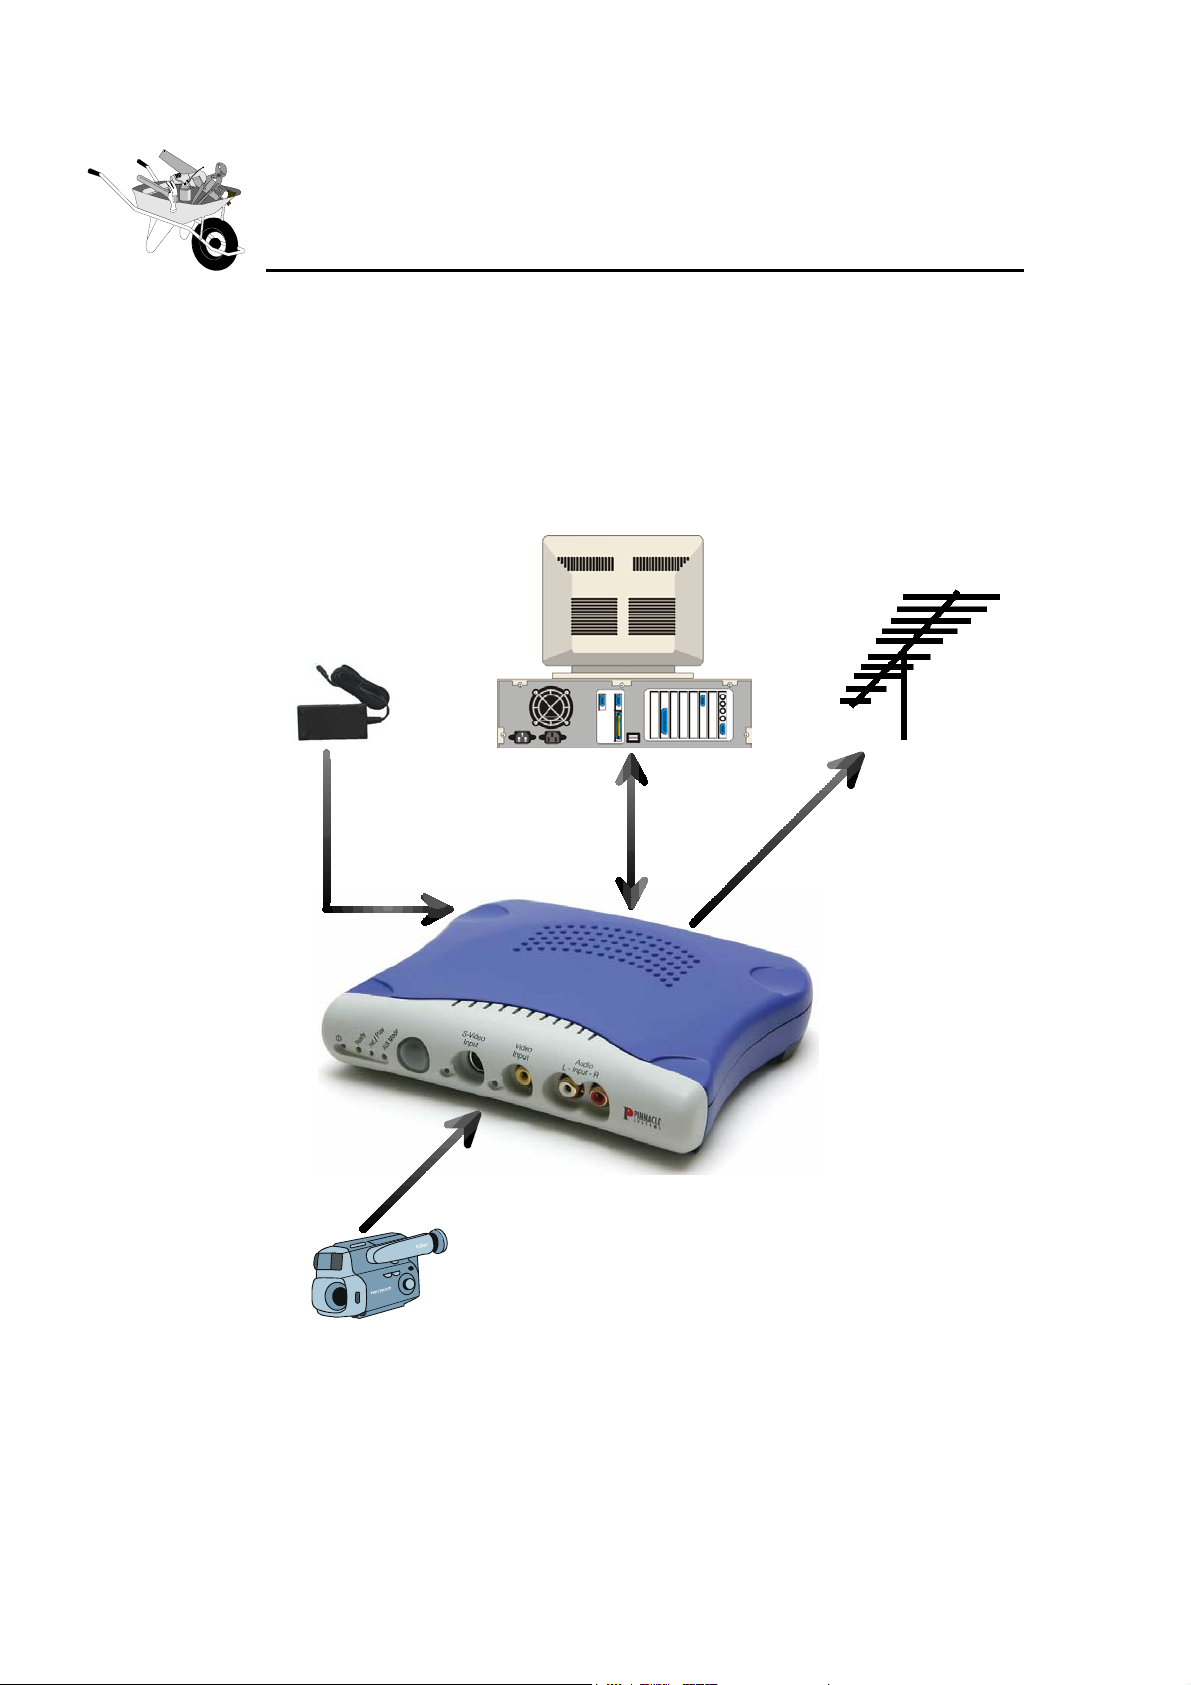
Chapter 3:
Install PCTV Deluxe
This section explains you how to install the PCTV Deluxe-hardware and software. During the installation, the PCTV Deluxe program group will be
created and the Windows drivers, the tools, and the applications will be
copied into this group.
The following illustration shows a sample configuration:
Power supply
optional:
Video source
e.g. camcorder
or DVD player
Audio- and
Video-in
USB
TV antenna
8 PCTV Deluxe
Page 17
SPECIFIC CHARACTERISTICS OF WINDOWS 2000 AND
WINDOWS XP
During the installation of PCTV Deluxe under Windows 2000/XP, please
pay attention to the following specific characteristics:
For the installation you need administrator rights.
In order to work with the applications you must be a member of the group
Power Users or higher.
INSTALLATION STEPS
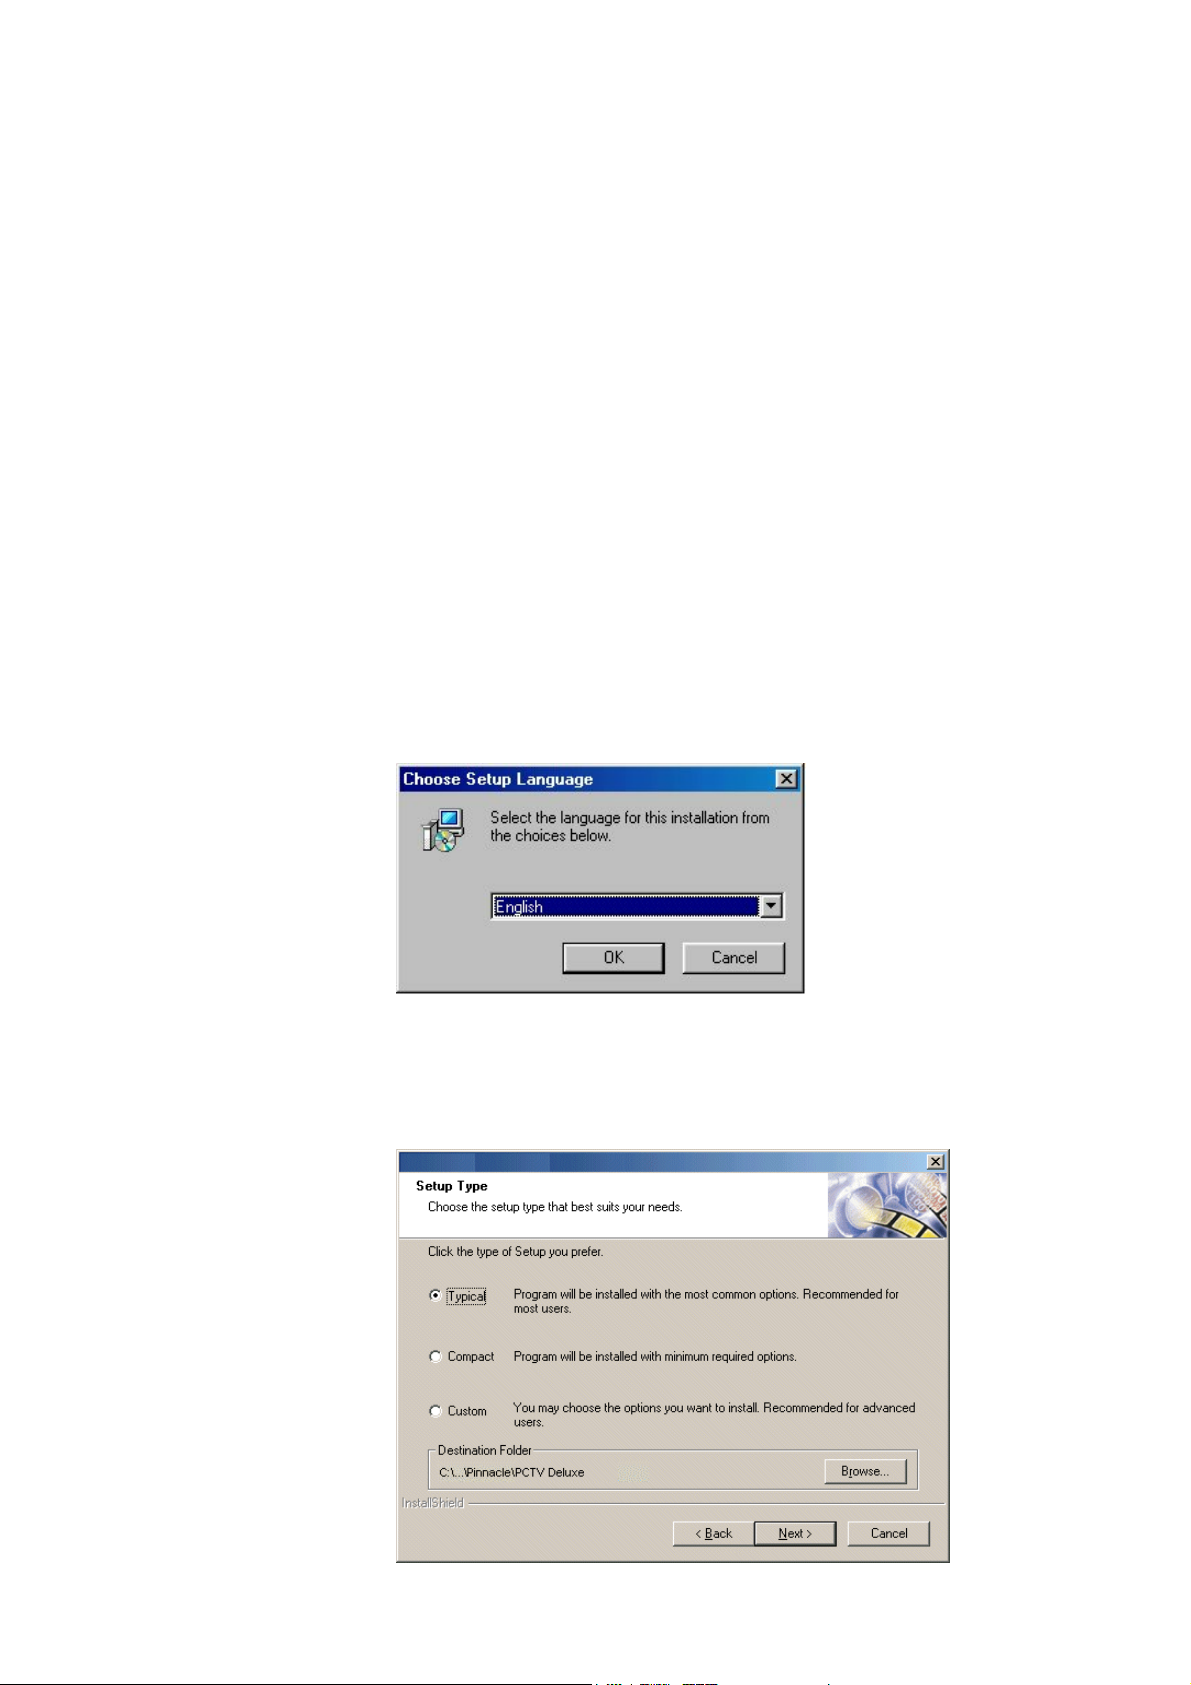
1. Switch on your computer and start Windows.
2. Insert the installation CD-ROM into the CD-ROM drive of your
computer.
Now, the setup program will start automatically or you start autorun.exe
from your CD-ROM.
The installation program is starting with the following dialog box:
3. Choose Setup language, click OK.
4. Click Next.
5. Select a Setup type.
Chapter 3: Install PCTV Deluxe 9
Page 18

6. Change the hard disk / directory.
If you wish to copy the files to a different hard disk / directory, click on
the Browse… button and define the hard disk / the directory.
7. Click Next.
8. Select a program folder, click Next.
9. Select the components, click Next.
If you have chosen Custom as setup type, in the following dialog box
you can specifically choose the components that you want to install.
After having determined the components, click Next.
This installation step is not required, if you have chosen Typical or Compact
as setup type.
10. Follow the on-screen instructions.
Now, please follow the installation instructions displayed on the screen.
10 PCTV Deluxe
Page 19
THE PCTV ASSISTANT
The PCTV Assistant helps you to check the functionality of your computer
system together with PCTV Deluxe.
All relevant parameters for the perfect installation and function of your
system are checked and saved.
If you encounter problems later when using PCTV Deluxe, you can use this
test application to localize the problems very quickly and find solutions for
them.
The program is subdivided into separate sections. To test the entire
functionality of your system, all available tests should be carried out in the
prescribed order. The tests can also be run later to test individual functions.
The Assistant will be started automatically after restarting the system or
after installing the software.
You can start the PCTV Assistant at other times using the PCTV Deluxe
program group located in the Tools folder of the Start menu.
When the PCTV Assistant has been started you can begin with the tests.
After having completed the individual tests, proceed with the next test by
clicking Continue.
If you click the button Details further information on the course of the tests
and on the corresponding failure messages will be displayed.
Chapter 3: Install PCTV Deluxe 11
Page 20

The display Test Progress is showing you, which part of the tests is already
finished.
All functional tests can be aborted by clicking Exit.
Checking the Software
The first test of the PCTV Assistant is checking whether all required drivers
have been installed correctly. If this is not the case, a corresponding failure
message will be displayed.
If the test has been finished successfully, you will also get a corresponding
message and you can proceed with the next text.
DirectX-Installation
For a perfect function of your system, DirectX has to be installed in the
version 8.1 (minimum) or higher. If the PCTV Assistant determines that this
is not the case, you can carry out this installation supplementary from the
enclosed CD-ROM.
DirectDraw Support
This test will check the DirectDraw compatibility of your graphics board. If
your board is not compatible a failure message will be displayed and you
can take corresponding measures.
Overlay-Test
At this point a test will check whether your graphics board in the current
mode (resolution, color depth, image refresh rate) is supporting a TV full
screen. If this is not the case, the possibilities of TV image display of
PCTV Deluxe cannot be used completely. Actually, the functionality is not
restricted by this.
PCTV Deluxe Resource Test
The last test of the PCTV Assistant will check the functionality of the
PCTV Deluxe Box.
Exit PCTV Assistant
Once you have tested all functions successfully, click on the button Exit.
12 PCTV Deluxe
Page 21

If you have problems...
All results produced by the Assistant are saved in the text file
ASSISTANT.TXT, which is created in the PCTV Deluxe/ASSI directory. If
you encounter unanticipated problems when installing PCTV Deluxe, please
forward a print out of this text file to the Support at Pinnacle Systems.
After you have finished the installation / configuration of PCTV Deluxe,
consider visiting the Pinnacle Web site at http://www.pinnaclesys.com to
look for the latest software updates.
CONNECTING OPTIONAL EQUIPMENT
Depending upon your individual requirements you can now connect other
equipment to the PCTV Deluxe-Box.
Connecting audio inputs and video input
Connect your video source (e.g. camcorder, videorecorder, DVD player) to
the PCTV Deluxe audio inputs and the appropriate video input (Composite
or S-Video).
Chapter 3: Install PCTV Deluxe 13
Page 22
w
THE MAIN WINDOW OF PCTV VISION
Chapter 4:
PCTV Vision
Pop-up-menu
Audio status,
record status/
Timeshift active
Settings
menu
Minimize Window
Window always on top
Maximize Windo
Exit
PCTV Vision
TV screen
Select
next/
previous
channel
Sound
on/off
14 PCTV Deluxe
Channel display
and
channel list
Start channel
preview
Open
control panel
Regulate
volume
Page 23
UPPER WINDOW AREA
Window settings
At the upper right edge of the PCTV Vision window there are four buttons
for making the following settings:
Always keep windows at top , minimize windows , maximize
windows and exit PCTV Vision .
Show and hide frame and buttons
By double-clicking with the left mouse button on the PCTV Vision window,
you can show and hide the frame and buttons of the window. A repeated
double click displays the frame and buttons again.
Pop-up menu
By clicking the button or clicking the right mouse button on the PCTV
Vision window, you go to the pop-up menu.
Here you have access to more settings.
Function keys or key combinations have been defined for some menu items.
You will find these on the right hand edge of the menu in each case.
Show frame and
buttons
Always on top
By selecting these options, frame and buttons can be hidden or shown again.
By activating this button, the PCTV Vision window is kept on top.
Chapter 4: PCTV Vision 15
Page 24

Gallery
With this option you can call up the gallery where your recorded videos,
audio files and grabbed single frames (snapshots) are listed.
Scheduler
Size
Aspect
Zoom In
Select this option to plan and program your video recordings in the
Scheduler.
Select here the size of the PCTV Vision window.
You can select between various set sizes and a full screen.
You can, however, customize the size by holding down the mouse button on
a corner and dragging the PCTV Vision window to make it bigger or
smaller. The page ratio remains the same (see “Aspect”).
Select here between the common picture format 4:3, the format 16:9 of a
movie theater screen, and a format you can size yourself.
This zooms in centrally on the TV picture. This can be repeated several
times. The zoom window can be moved using the arrow keys.
Furthermore, you can zoom in on any rectangular area of the TV picture. To
do this, press and hold the shift key and the left mouse button and drag the
rectangle to the required size.
Stop Zoom
mode
Enable
Cropping
Mode
Settings
Show tool tips
The TV picture is returned to its initial size of 100%.
Zooms in on the TV picture with a defined 1%. This suppresses possible
interference from some stations on the top and bottom edge of the picture.
Select here whether the Record, Play and Timeshift window should be
displayed or not.
You can also make this selection by clicking the button in the PCTV
Vision main window.
After selecting this option you advance to the Settings menu. (see also the
section “Settings Menu”).
You can also call up this menu by clicking the
key.
With this option you can show or hide the tool tips.
Help
Exit
16 PCTV Deluxe
With this option you can call up the online help.
With this option you can exit the PCTV Vision application.
Page 25

LOWER WINDOW AREA
In the lower area of the main window you can
call up the Settings menu
select a television channel and call up the channel list
select a television channel and call up the channel/group list
switch to Composite or S-VHS input via the channel list
change to your personalized group of transmitters
run a preview on all channels
regulate the volume or turn the sound on or off
open the control panel for Record, Play and Timeshift.
Channel display and channel list
Channel display
You can obtain the following information from the station display:
The currently selected station or video input (composite or S-Video) is
displayed.
You can choose the next or the previous station from the station list by
clicking the buttons.
The current audio status is displayed to the right of the station name.
Mono
Stereo
or Channel 1 or Channel 2
Channel 1 and Channel 2
If you have programmed recordings, an indicator appears below the
audio status symbol:
grey: timer has been programmed but is not yet running
red: programmed recording is running at the moment
this indicator shows that a manually started recording is running
at the moment
this indicator (green) shows that the Timeshift function is
currently activated
Chapter 4: PCTV Vision 17
Page 26
Channel list
By clicking on the Channel display, the channel list appears:
Here you can directly select the desired program via mouse click or arrow
key. Instead of using the TV tuner, you can also switch to S-VHS or
Composite input.
Channel list
Advanced
By clicking on the Advanced button, all the channel groups you personally
specified will appear (see the “Channel settings” section). You can select a
channel group, and only channels belonging to that group will be displayed
in the channel list.
18 PCTV Deluxe
By clicking in the PCTV Vision window or selecting a channel, the list
window will close.
Page 27

Channel matrix
By clicking on the button you will see a preview of all the available TV
channels of the current channel category in the same order they have in the
channel list. Each channel name is also displayed.
You can set the number of channels that are to be displayed on the Special
tab in the setup menu.
The preview is silent to avoid disturbing noises.
Select channel
Cancel channel
matrix
Sound on / off
Regulate
volume
By clicking on a channel, the preview ends and the channel is selected.
You can cancel the preview by using [Escape]. The previously selected
channel is displayed again.
Volume
By clicking the button you can turn the sound on and off.
To regulate the volume, you can move the slider with
depressed left mouse key.
Chapter 4: PCTV Vision 19
Page 28
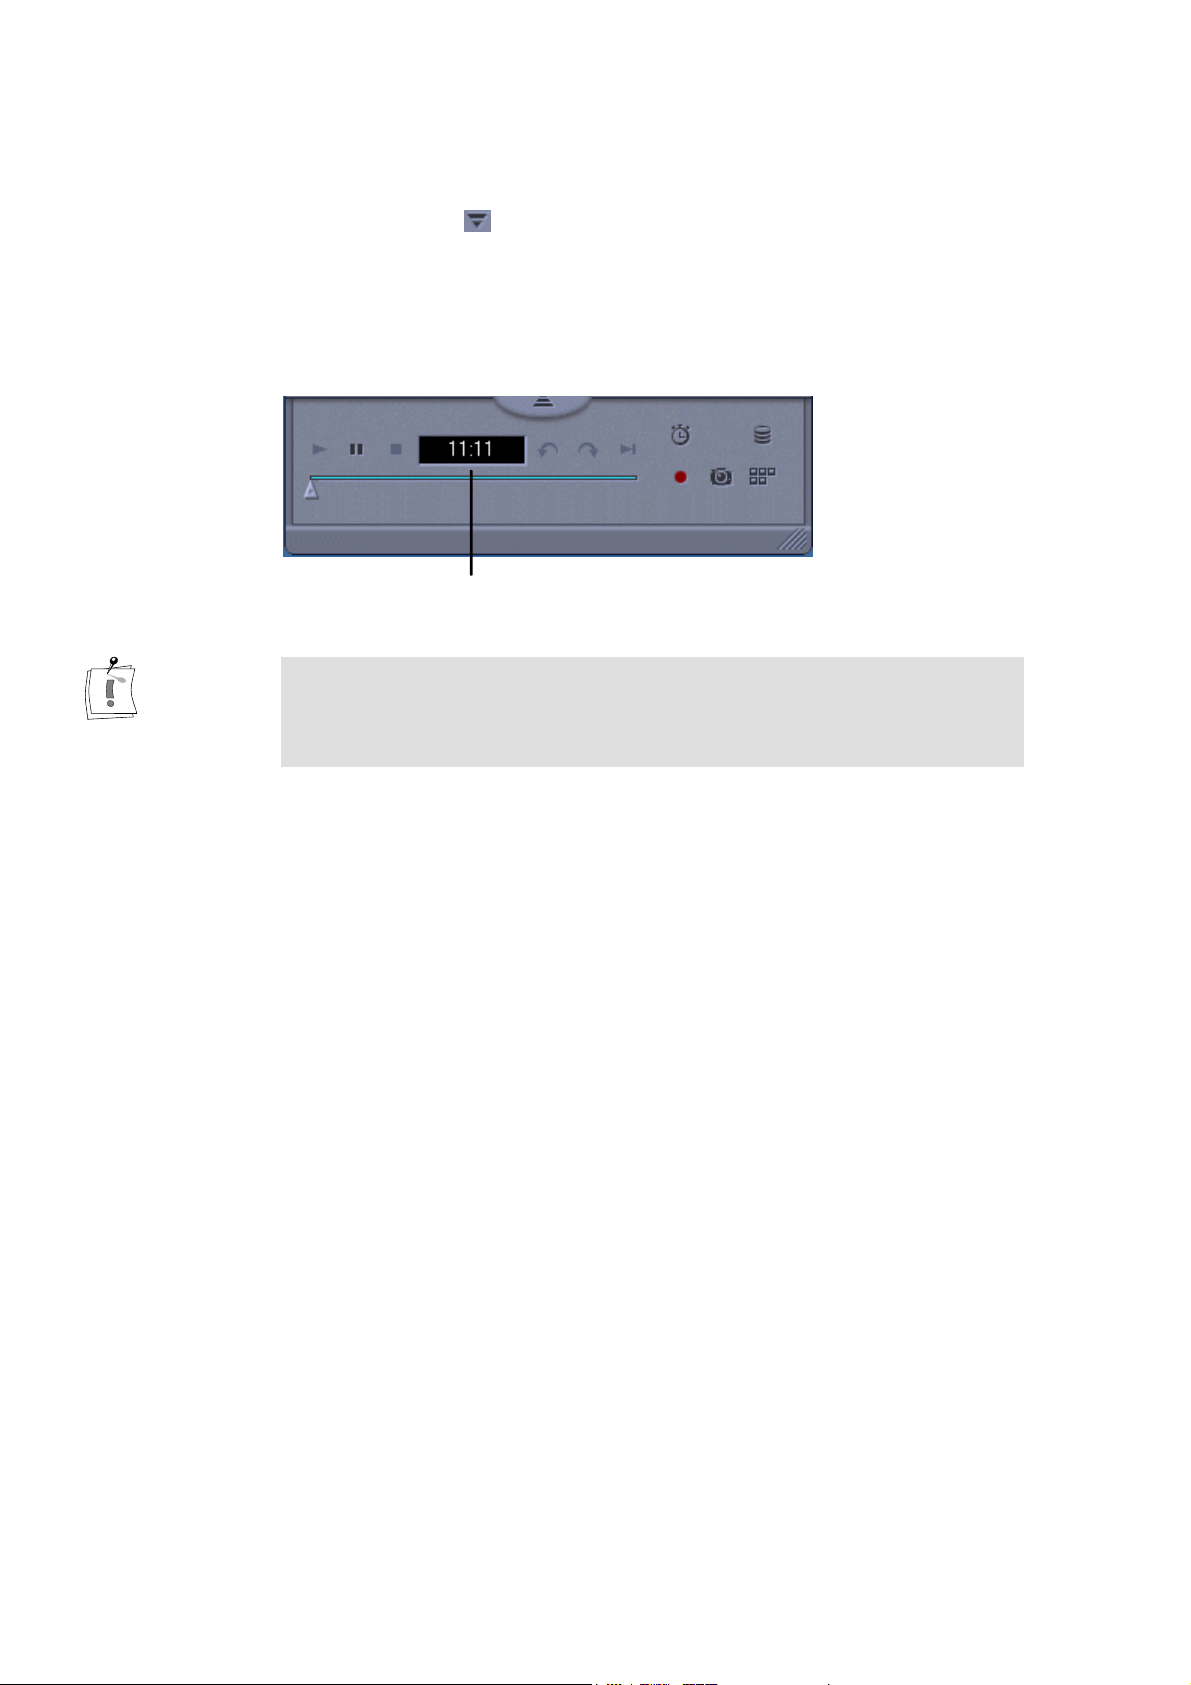
THE CONTROL PANEL FOR RECORD, PLAY AND TIMESHIFT
After clicking the button or by choosing the Mode option in the pop-up
menu, the control panel for Record, Play and Timeshift will open.
Here you will find all the functions for recording and playing back videos
and will be able to see a list of your recordings in the gallery.
You can also activate and deactivate the Timeshift function.
Time- and position display
With a mouse click on the time- and position display during a running
playback, you can switch between the display of the running time
(playback time up to now) and the display of the remaining time
(remaining playback time).
The different functional states
PCTV Vision offers four different functional states (also called “function
modes”).
In addition to the respective symbols shown in the control panel, you can
recognize the currently prioritized state by the color of the background of
the time and position display.
Here are the possible functional states and the associated background
colors:
Watch TV only
(black)
Record
(red)
Play
(blue)
Timeshift
(green)
20 PCTV Deluxe
The selected station/video input is being displayed in the viewing window.
A manually programmed or Timeshift recording is running.
A video file is being played.
The Timeshift function is active.
Page 29

Example:
A manual recording is running and the time and position display has a red
background (functional state: Record).
If a file that has now already been recorded is played back, the
background color of the time and position display changes to blue
(functional status: Play).
If the replay is stopped, the functional status changes back from Play to
Record and with it the background color from blue to red.
Combining the functional states
It is fundamentally possible to combine the four functional states, i.e. to use
several functions at once.
The following matrix gives an overview of the possibilities:
Priority
functional state
View TV only black
Record red
Play blue
Timeshift green
In the following example, you can see which actions can be active as a
maximum at the same time:
You start PCTV Vision and watch TV only:
The time and position display is black.
You activate the Timeshift function:
The time and position display is green.
You start a manual recording
The time and position display is red.
You start to replay a MPEG file
The time and position display is blue.
Background
color
Possible actions
Record Play Timeshift
yes yes yes
./. yes no
no ./. no
yes yes ./.
Functional state: Timeshift
You will find further information on the Timeshift function in Chapter 5 of
this manual.
Chapter 4: PCTV Vision 21
Page 30

Functional state: Record
(manual and programmed)
Stop
Stop
Start time
Position controller
Jump - Jump +
Live-TV
Time and
position
display
Current
Time
Scheduler
Gallery
Record snapschot
Start recording
The controls described below are active in the Record state. This applies
both to recordings that have been started manually and those that have been
programmed.
Stops the current recording. You return to the mode that was active before
the recording was commenced.
Jump - /
Jump +
/
Scheduler
Position
controller
Time and
position display
Jump backwards/forwards within the recorded file.
Opens the Record Assistant, which you can use to plan and program your
recordings.
Use the controller in order to get to a particular position within the recorded
file.
The background of the time and position display is red during the recording.
22 PCTV Deluxe
Page 31

Live-TV
The viewing window shows live TV, the recording continues to run.
Start / stop
recording
Record
snapshot
Gallery
Starts a manual recording and lights up red while the recording is running /
stops a running recording procedure.
Initiates a snapshot of the picture currently being displayed.
Opens/closes the gallery.
Functional state: Play
Start
Stop
Pause
Jump - Jump +
Scheduler
Time and
position display
Position
controller
Gallery
Record
snapshot
With a mouse click on the time- and position display during a running
playback, you can switch between the display of the running time
(playback time up to now) and the display of the remaining time
(remaining playback time).
The controls described below are active in the Play state.
Start
Restarts a playback that has been paused.
Chapter 4: PCTV Vision 23
Page 32

Pause
Pauses the playback.
Stop
Jump - /
Jump +
/
Scheduler
Position
controller
Time and
position display
Stops the current playback. You return to the mode that was active before
the recording was commenced.
Jump backwards/forwards within the file currently being played back.
Opens the Record Assistant, which you can use to plan and program your
recordings.
Use the controller in order to get to a particular position within the file
currently being played back.
The background of the time and position display is blue during playback.
Record
snapshot
Gallery
Initiates a snapshot of the picture currently being displayed.
Opens/closes the gallery.
24 PCTV Deluxe
Page 33

SCHEDULER
After clicking the button, the Scheduler settings dialog appears, where
you can plan and program your video recordings.
Scheduler settings dialog
Here you can plan all the programs you want to record.
List
Edit recording
list
The selected list gives you the following information about the programs
you want to record:
Active - here you can see whether the individual recording tasks are
activated or not.
Title
Recording Date
Duration
Frequency, i.e., how often the recording is repeated (e.g., once, daily or
weekly).
Channel Name
In the lower area of the window you can makes changes to the list. Use the
buttons
Add
Edit and
Delete
After clicking the Edit button you can change your existing entries.
By clicking the Delete button you can delete the highlighted entries.
Chapter 4: PCTV Vision 25
Page 34

Add Recording
Task
By clicking the Add button you come to the programming window, where
you can program a desired recording.
Schedule
Enter here the title, channel, recording date with start and stop time, and the
frequency (e.g., once, daily or weekly).
By using the Select… button you can select another channel.
When you have finished all the settings, confirm with OK.
The recording is now programmed and will take place according to the
information you have entered.
The check box Active allows you to deactivate the corresponding recording
task temporarily, without loosing the entered data, and to activate it again
later on. In the scheduler list you can see the state of the individual
recording tasks.
Please ensure that the PCTV Vision application is active at the time of
making the recording and that no other recordings are running. Otherwise
the recording that is required now cannot be made.
26 PCTV Deluxe
Page 35

GALLERY
By clicking the button you come to the gallery, where your recorded
videos, audio files and grabbed single frames are listed.
Video gallery
The Videos tab contains information about all the videos you have recorded.
Under View, you can select the information you want to see.
Context menu
View
Thumbnails
Please note, that you can carry out several actions by clicking with the right
mouse button on the corresponding file. The following context menu is
displayed:
Play: Start video playback
Stop: Stop video playback
Save…: Save the file in the desired directory
Rename the file
Delete the file
This view shows the first picture of each recorded video.
Burn/VCD/
SVCD/DVD
For details concerning these buttons, please refer to the section “The VCD,
SVCD and DVD burning functions”.
Chapter 4: PCTV Vision 27
Page 36

View Details
In this view, you see detailed information about the recorded videos:
File: Name and storage location of the video
Title of the video
Duration of the video
Recording Date
Channel Name.
Burn/VCD/
SVCD/DVD
Start playback
Stop playback
For details concerning these buttons, please refer to the section “The VCD,
SVCD and DVD burning functions”.
If you want to play one of the files, you have three options:
Double-click on the corresponding file, or
Click with the right mouse button on the corresponding file and select the
Play option from the pop-up menu.
Drag & Drop – drag the file into the Vision window keeping the left
mouse button pressed.
If you want to stop the playback, you also have three options:
Press the Esc key, or
Click with the right mouse button on the corresponding file and select the
Stop option from the pop-up menu.
Click on the Stop button in the open control panel.
28 PCTV Deluxe
Page 37

THE VCD, SVCD AND DVD BURNING FUNCTIONS
By using the buttons Burn / VCD, SVCD or DVD in the Video Gallery you
can open the following dialog. It contains a listbox as well as several
buttons and options for the burning process settings.
You can also use the context menu in the Video gallery to open this dialog.
Once the dialog is open, only files captured with appropriate capture format
will be selectable in the gallery (Thumbnails or Details view). All other files
are grayed out.
You can select/de-select the files via the left mouse button.
If you want to select all files, use CTRL-A, or the SHIFT- or CTRL-key in
combination with the left mouse button.
Selected files can be transferred from the gallery into the listbox by
Drag&Drop.
Chapter 4: PCTV Vision 29
Page 38

Files
(Listbox)
The listbox displays a filename for each file and the further details Size, file
duration and capture format.
The files appear in the order in which they have been transferred from the
gallery.
Select file(s)
You can select/de-select the files via the left mouse button.
If you want to select all files, use CTRL-A, or the SHIFT- or CTRL-key in
combination with the left mouse button.
Rearrange files
You can rearrange the order of the files in the listbox by Drag&Drop.
Delete listbox entry
A listbox entry can be deleted by selecting it via the left mouse button and
pressing the DEL key.
Volume
Progress
Burn
Close
Advanced
This bar displays the total size of all files in the listbox in MB units. Each
time a new file is transferred into the listbox, the bar will be adjusted to the
corresponding file size.
The maximum marker shows the maximum size of the chosen medium.
The Progress bar displays the status of a running burn process.
By clicking this button, the burning process is started.
The dialog and/or the burning process can be closed by using this button or
by using the
button in the upper right corner.
This button opens or closes the lower part of the dialog where you can
choose between several Options for the burning process settings:
Device
If you have several burning devices installed in your system, you can choose
from this list.
30 PCTV Deluxe
Disc size
Shows the capacity of the medium disc that you have inserted into the
burning device.
Speed
Here, you can select the burning speed for the planned process.
Page 39

Copies
Enter the number of copies you want to produce.
Stop preview
This checkbox is enabled by default as the burning process is carried out
more quickly without simultaneous preview.
If you disable the checkbox, you can preview the selected video source
during the burning process, but this procedure takes more time.
Path for temporary files
Here, you can specifiy the directory for saving intermediate files that are
produced during the burning process. If necessary, use the Browse button to
specify the correct path on your system.
Chapter 4: PCTV Vision 31
Page 40

Snapshots gallery
The Snapshots gallery contains information about all the snapshots you have
recorded. Under View you can change the display of the information.
Context menu
View
Thumbnails
Please note, that you can carry out several actions by clicking with the right
mouse button on the corresponding file. The following context menu is
displayed:
Open: View the snapshot
Save…: Save the file in the desired directory
Rename the file
Delete the file
This view shows the recorded snapshots as symbols.
View Details
32 PCTV Deluxe
In this view, you see detailed information about the recorded snapshots:
File: Name and storage location of the snapshot
Recording Date of the snapshot
Size of the picture
Name of the channel.
Page 41

View picture
By double-clicking on the highlighted picture, MS Paint, for example, or
another picture processing program installed in your system, will open.
Chapter 4: PCTV Vision 33
Page 42

SETTINGS MENU
After clicking the button or by using the Settings option in the pop-up
menu, you come to the Settings menu. Here you can make further settings
for the following functions:
Channels
Colors
Video
Audio
Capture
Timeshift
Special
Channel settings
Channel
position
34 PCTV Deluxe
In this menu you can search for new TV channels and edit or change the
channel list that already exists by adding new entries or deleting entries that
are already in the list. You can also specify new channel categories and
assign specific channels to them.
Edit channel list
You can change the position of a channel in the channel list. To do so, click
with the mouse on the corresponding channel and drag it with depressed left
mouse button to another position.
If you hold down the Ctrl key while you highlight with the mouse, you can
then move several channels at the same time.
Page 43

Sort list
The channel list can be sorted by columns (name, number) by clicking on
the respective column title.
You can also sort the channels by specific categories and thus combine your
individual channel lists.
Enter new channel categories (e.g., sports, entertainment, reporting) in the
left area of the window and drag the desired channels with depressed mouse
button into the folder. After selecting a certain category, the channel list
then appears with the channels that were assigned to it (see also the section
on “Channel Display and Channel List”).
Channel search
To run a complete search, click on the Autoscan button. The following
dialog appears:
Country/
Signal type
Video standard
Quick scan
In the window that appears, enter the country you are in and the signal type.
Choose the appropriate video standard (e.g. PAL, NTSC, SECAM). Please
note that not all standards are available for all product variants.
Use the option Quick scan to scan the air in larger intervals than normal. If
you have cable TV, the quick scan usually suffices to find all available
channels.
Chapter 4: PCTV Vision 35
Page 44

No duplicate
stations
If a station is broadcasting on more than one channel, you may get duplicate
entries in the channel list. To prevent this from happening, select the option
No duplicate stations: The auto-scan only picks out the channel with the
best reception. This function only works if the TV station is broadcasting
with a VPS signal.
After clicking the Start button, the search will start, and any channel list that
already exists will be overwritten.
Cancel search
Channel names
The search can be canceled at any time by clicking the Cancel button.
PCTV Vision recognizes the names of the individual TV channels
automatically as long as they broadcast the corresponding data. If this is not
the case, a default name is assigned with the respective channel designation.
Adding a channel
Click on the button Add in the settings menu to open a window where you
can enter the name of a new station and set a channel for reception in the
channel list. If necessary, you can use the fine-tune slider to optimize the
quality of reception.
36 PCTV Deluxe
If you click on the button Advanced, you can adjust the Country, the Signal
type (antenna or cable) and the Video standard for the new channel. Please
note that not all video standards are available for all product variants.
Note that these settings apply to the added station only!
Click on the OK button to add the new TV station with all the made settings
to the channel list.
Page 45

Changing the name of the TV station or channel
Click on the button Edit in the settings menu to open a window where you
can change the name of the TV station and/or select another channel from
the channel list.
In addition, you can use the fine-tune slider to improve the reception of a
station.
If you click on the button Advanced, you can adjust the Country, the Signal
type (antenna or cable) and the Video standard for the selected station.
Please note that not all video standards are available for all product variants.
Note that these settings apply to the selected station only!
Click on the OK button to transfer the data to the channel list.
Deleting a channel
Highlight the station you want to delete in the channel list and click on the
button Delete to remove the selected station from the list.
Chapter 4: PCTV Vision 37
Page 46

Color settings
These settings can only be made for analogous inputs (Composite or SVideo).
If the video picture of PCTV Vision is too bright, too dark, or if the colors
are incorrect, you can adjust the color display using the Brightness, Contrast,
Saturation and Sharpness regulators.
By clicking the Reset to defaults button, the respective default values will be
set automatically.
38 PCTV Deluxe
Page 47

Video settings
Video input
Video standard
Video settings
Here you can choose between TV, Composite and S-Video for the video
input.
In the Video standard field and dependent on the norm of the connected
video device (recorder, camera, etc.), you can select e.g., between the PAL,
SECAM and NTSC standards. Please note that not all standards are
available for all product variants.
Video display
Here you have the choice between:
2 fields interlaced
2 fields deinterlaced
1 field only
Noise filter
This function can be activated or deactivated depending on the noise on the
picture.
Chapter 4: PCTV Vision 39
Page 48

Audio settings
Audio mixer
Audio channels
When connecting an analogous device, the sound is recorded and played
back via the sound card. For this, the following settings must be made.
In the Audio mixer field, select the sound card used and enter which sound
card input will be used for Audio playback and recording.
Under Audio cannels you can choose between the usual settings Mono and
Stereo.
For a program with two language channels, for Stereo: (Channel 1+2) you
have the additional possibility to choose between Stereo: Channel 1 (for
example original sound) and Stereo: Channel 2 (for example your native
language).
40 PCTV Deluxe
Page 49

Capture settings
In this tab you can make all the settings required for making a video
recording.
Video Capture
Here, choose the quality that you want for your recording or the storage
medium that your video is to be finally suitable for.
Depending on the selection, the values for compression method, bit rate and
size/resolution are pre-defined.
Quality/
Storage medium
VCD
SVCD
DVD Longplay
DVD
Files with the ending ".MPG" are created in each case.
Compression
method
MPEG-1 1.15 Mbit
MPEG-2 2.5 Mbit
MPEG-2 3.5 Mbit
MPEG-2 6.0 Mbit
Bit rate Resolution
PAL/SECAM
352 x 288
480 x 576
352 x 576
720 x 576
Resolution
NTSC
352 x 240
480 x 480
352 x 480
720 x 480
Custom
When this option is chosen, the values in the following fields can also be
chosen:
Chapter 4: PCTV Vision 41
Page 50

Compression
Set the type of compression required here. You can choose between
MPEG-1 and MPEG-2.
Files with the ending ".MPG" are created in each case.
Bit rate
The higher the bit rate chosen, the better the picture quality of the recorded
material will be – but also the larger your video file will be.
The maximum possible bit rate depends on the USB version that you use
in your system:
USB 1.1: maximum bit rate 9,5 Mb/s
USB 2.0: maximum bit rate 15 Mb/s
Size
Choose the resolution for the recording.
Capture directory
This field is used to define the directory in your computer where manual and
programmed recordings are to be saved.
42 PCTV Deluxe
Page 51

Timeshift settings
The following settings can be made for recording video in Timeshift mode:
Max. Duration,
File size
Seek offsets
Directory
Here you can enter the maximum time for your recording or the maximum
memory available for Timeshifting. As these values are dependent upon
each other, entering one value will automatically change the other.
If your corresponding hard drive memory is in use or the specified time is
exceeded, the passages that were already recorded will be overwritten from
the beginning.
Here you can specify the passage you want to skip with the or
functions.
Here you can see in which directory on your computer the Timeshift files
have been stored.
As standard, this is the same directory in which the manual/programmed
recordings take place.
It is not possible to change the directory at this point. If necessary this must
be carried out under Capture settings.
Chapter 4: PCTV Vision 43
Page 52

Special settings
General configuration settings can be made in this tab.
Channel surf
matrix size
Priority
Disable screen
saver
Here, choose the number of stations that are to be displayed in the station
preview.
See also under “Channel Matrix”.
If you are a Windows 2000/XP user, you can set the priority here that is to
be granted to PCTV Vision by the CPU.
Please note that if the selection “High” is made, this can lead to a slowing
down of other programs when they are being used in parallel.
You can deactivate your screen saver using this check box. This is to be
recommended if you want to have the viewing window visible at all times.
44 PCTV Deluxe
Page 53

Using function keys
By using specific function keys on your keyboard you can execute the
following commands.
F1 Call up online help
F2 Open the pop-up menu
F3 Hide or show the frame and toolbar
F4 Snapshot: Storage of a single frame as picture file
F8 Display channel list
F9 Open menu
You can also execute the following commands by using the following keys
or shortcut keys:
Alt - F4 Exit Vision
Next channel from the channel list
Previous channel from the channel list
Ctrl - M Turn sound on/off
+ or
- or
Number
Increase volume
Decrease volume
Direct input of a channel
keys 0, 1, ...,
9
Ctrl - A Change video input (tuner, composite, S-Video)
Ctrl - F Full screen
Ctrl - P Start preview for all programs with already activated
channel matrix:
Exit channel matrix and use current channel.
Ctrl - L Go to previous channel.
Ctrl - I Display channel information
Ctrl - Z Zoom
Ctrl - R Switch between TV and recording mode
Alt –R Start recording
Chapter 4: PCTV Vision 45
Page 54

Following functions can be used only in the recording mode.
Alt -P Playback of the recorded file
Alt -
Alt -
Back
Forward
Alt - S Stop
The following keys are used for the Timeshifting functions:
Space bar Pause / Live-Pause (Timeshifting is started)
End Switch to live TV
Picture
Picture
Jump +
Jump – (instant replay)
46 PCTV Deluxe
Page 55

Timeshift - Pure TV Enjoyment
WHAT IS TIMESHIFT?
Timeshift is when:
you’re watching the first half while recording the second half.
the evening news takes a 5-minute break just for you.
you can say goodbye to all of those commercials.
WHAT DOES TIMESHIFT OFFER?
Timeshift lets you record the current TV program and view it later.
In addition to the normal functions of a video recorder, you have all new
options for designing your personal TV program.
Chapter 5:
Take a break if you feel like it!
These annoying harassments and interruptions are now a thing of the past.
By simply pressing a button, you can stop the live TV program and record
the rest of it automatically.
To continue seeing the rest of the program, all you have to do is press a
button again. The recording is now played. At the same time, the live
program continues to be recorded in the background and played back shifted
in time so that you do not miss a single minute of the program.
Pure TV enjoyment!
You can tell Timeshift to advance or replay in time-lapse while it is still
recording, to skip certain amounts of time, or to return to the live program.
Timeshift lets you play back at any time to repeat your favorite scene. The
live program is recorded continuously so that you don’t miss any of the rest
of the program.
Time-lapse viewing means you don’t get upset any more because of all the
commercial breaks. The jump key lets you simply skip annoying
commercials!
Watch without waiting – while recording!
If you would like to record a certain program, you can set the appropriate
time just like with a video recorder.
Chapter 5: Timeshift 47
Page 56

To view the recording, there’s no need to wait until the program or
recording ends. You can begin watching even while the recording is being
made. At the same time, the rest of the program continues to be recorded in
the background and played back shifted in time.
For details on programming the recording, please see the “PCTV Vision”
section of this user guide.
THE DIFFERENT FUNCTIONAL STATES
PCTV Vision offers four different functional states (also called “function
modes”).
In addition to the respective symbols shown in the control panel, you can
recognize the currently prioritized state by the color of the background of
the time and position display.
Watch TV only
(black)
Record
(red)
Play
(blue)
Timeshift
(green)
Time- and position display
Here are the possible functional states and the associated background
colors:
The selected station/video input is being displayed in the viewing window.
A manually programmed or Timeshift recording is running.
A video file is being played.
The Timeshift function is active.
48 PCTV Deluxe
Page 57

Example:
A manual recording is running and the time and position display has a red
background (functional state: Record).
If a file that has now already been recorded is played back, the
background color of the time and position display changes to blue
(functional status: Play).
If the replay is stopped, the functional status changes back from Play to
Record and with it the background color from blue to red.
Combining the functional states
It is fundamentally possible to combine the four functional states, i.e. to use
several functions at once.
The following matrix gives an overview of the possibilities:
Priority
functional state
View TV only black
Record red
Play blue
Timeshift green
In the following example, you can see which actions can be active as a
maximum at the same time:
You start PCTV Vision and watch TV only:
The time and position display is black.
You activate the Timeshift function:
The time and position display is green.
You start a manual recording
The time and position display is red.
You start to replay a MPEG file
The time and position display is blue.
Background
color
Possible actions
Record Play Timeshift
yes yes yes
./. yes no
no ./. no
yes yes ./.
Chapter 5: Timeshift 49
Page 58

TIMESHIFT FUNCTIONS IN DETAIL
Timeshift on/off
Pause
Time and
position
display
Jump - Jump +
Live-TV
Postition
controller
Timeshift
on/off
Start recording
Click on this button to turn Timeshift on or off.
The following functions become active when Timeshift is turned on:
Time and
position display
Time and
position display
Pause
The background of the time and position display is green when the
Timeshift function is activated. At the beginning, the display shows “live”.
As soon as the
or buttons or the position controller are
used, the display shows the difference between the Timeshift recording and
the “Live TV”.
Click on this button to pause the Timeshift function.
If you click on this button while you are watching TV only, the Timeshift
function will automatically be started.
Jump - / +
/
50 PCTV Deluxe
Using these buttons, you can jump forwards or backwards over a predefined time passage in the Timeshift recording (see section on “Settings”).
Page 59

Position-
controller
Use the controller to get to a particular position within the Timeshift
recording.
Live-TV
By clicking on this button, you can change to the live program. The
Timeshift recording of your chosen program will be continued.
Start
recording
With this button, you can start a manual recording from the current position
while the Timeshift function is active.
The control panel will now be in the Record state.
Clicking the button again will stop the recording and Timeshift will
become the priority function once more.
The functions, which you can also carry out using your remote control, are
described in our PDF manual on the remote control. You can find this in the
Pinnacle program group under
Start/Programs/.../Help/Remote control.
Chapter 5: Timeshift 51
Page 60

SETTINGS
You can get to the Timeshift tab via the PCTV Vision “Settings” menu (see
also the “PCTV Vision” section of this user guide).
Max. Duration,
File size
Seek offsets
Directory
Here you can enter the maximum time for your recording or the maximum
memory available for Timeshifting. As these values are dependent upon
each other, entering one value will automatically change the other.
If your corresponding hard drive memory is in use or the specified time is
exceeded, the passages that were already recorded will be overwritten from
the beginning.
Here you can specify the passage you want to skip with the or
functions.
Here you can see in which directory on your computer the Timeshift files
have been stored.
As standard, this is the same directory in which the manual/programmed
recordings take place.
It is not possible to change the directory at this point. If necessary this must
be carried out under Capture settings.
52 PCTV Deluxe
Page 61

“TIMESHIFT” WHENEVER YOU WANT!
Any day at 9:00 PM
You know you can’t make it back home tomorrow in time to see the
beginning of the soccer game, so you program the Scheduler.
You click on the button in PCTV Vision’s main window and enter all
the data in the Edit Recording Wizard:
Next day
8:15 PM
The recording of the game begins when you programmed it to do so.
9:15 PM
You return home during the second half and simply slide the position
control back to the required starting time. You can now watch the game
from the beginning while it is being recorded for you to the end.
With the various Timeshift functions you have complete freedom of
movement during the Timeshift recording.
Use
, if you need to take a break
or , if you want to skip parts of the recording or want to have
another look at an exciting part of the game
Chapter 5: Timeshift 53
Page 62

, whenever you want to switch to the live program
, to find a certain position in your recording.
10:00 PM
The Timeshift recording ends just like you programmed it the day before.
A new day
10:05 PM
While you’re watching the news, the telephone rings.
To avoid missing anything in the news, click the or symbol to turn
on the Timeshift function. All the news will now be recorded and you can
stay on the phone as long as you want.
10:10 PM
You’re done on the phone and click on , to continue watching the news
where you left off.
Use
, if you need to take another break
or , if you want to skip parts of the recording
, if you want to switch to the live program
, to find a certain position in your recording.
54 PCTV Deluxe
Page 63

OVERVIEW
Chapter 6:
PCTV WebText
Important: It is not possible to receive Teletext in all countries. Furthermore,
not all stations provide Teletext service.
The PCTV WebText application lets users view and edit the additional
information that is broadcast together with TV signals in Europe and in
many other countries of the world. This signal, which is known as Teletext
or Videotext, is a text-based transmission method.
The data is transmitted in the unused lines of the television picture at a rate
of approx. 8 pages per second.
Pinnacle's PCTV WebText Videotext browser has been optimized for use
with Microsoft Internet Explorer 4.0 and higher or Netscape Navigator 4.X.
Chapter 6: PCTV WebText 55
Page 64

PCTV WebText Highlights
View Teletext pages in your Internet browser (e.g., Microsoft Internet
Explorer or Netscape Navigator).
Convenient page navigation (convenient browsing) through direct entry
of via hotlinks.
Easy navigation via the TOP-Text Navigator or the smart keyword search.
TV tuner function.
Open mapped Internet addresses right in the Videotext window.
WebText as desktop wallpaper.
A multichannel cache (page memory) allows rapid and convenient access
to the teletext pages.
Moreover, using the standard browser functions, it is possible to define a
WebText page as home page, save and print WebText pages, configure
them as favorites or place them on the desktop as shortcuts.
System Requirements
The following requirements should be met to ensure proper functioning of
the WebText application:
Starting
PCTV WebText
In order to use WebText the TCT/IP Protocol has to be installed. The
TCP/IP Protocol is installed by default during an installation of Windows.
The easiest way to install the TCP/IP Protocol is to install a Dial-UpNetwork (select direct connection via serial port). A modem is not
required. It is not necessary to configure the TCT/IP Protocol.
Version 4.0 (or higher) of an Internet browser should be installed on your
system.
While Internet access is not absolutely necessary, it will expand your
possibilities when using the WebText application.
If a browser other than Internet Explorer is installed on your system, for
example, Netscape Navigator 4.X, then you can also use that browser with
the WebText application. In that case, however, operation may vary from
the description below.
To start PCTV WebText use the Pinnacle program group.
If the station to which you are tuned has Teletext service, that station's index
page (page 100) will appear automatically in the PCTV WebText main
window.
56 PCTV Deluxe
Page 65

THE PCTV WEBTEXT MAIN WINDOW
Your standard browser will be used to display Teletext information.
The WebText main window consists of the Teletext window (also called the
Videotext window), the navigation window, and the controls described
below.
WebText window
Navigation window
Teletext window
Chapter 6: PCTV WebText 57
Page 66

WebText Window: Toolbar
The user-friendly toolbar gives you immediate access to all frequently used
commands.
HOME
PAGE
SUBPAGES
RESET
CACHE
(Page memory)
HELP
Click on this button to return to the index page (Page 100) of current station,
in other words, the default Teletext setting.
Use these two buttons to view the previous or next Teletext page.
Important: These buttons are especially for navigation in the WebText
application. To navigate between other web pages, please use the Back and
Forward buttons of your Internet browser.
A Teletext page can lead to several subpages. Use these two buttons to
browse back and forth among the subpages.
If the selected, active page does not lead to any subpages, then these buttons
will be grayed out.
WebText makes use of an extensive page memory. This allows rapid and
convenient access to the teletext pages. When a particular page is requested,
the first resort is to the cache. If the page is available there, it can be
displayed immediately without any delay. If the page concerned is not yet in
the cache, it must first be loaded, i.e. the system “waits” for the page. The
cache is continuously updated whenever new teletext pages arrive.
You can delete the cache by clicking on this button.
If you need additional information about using the WebText application,
click on this button and select the desired topic.
58 PCTV Deluxe
Page 67

WebText Window: "Teletext Page Display
This field shows the number of the currently active Videotext page. Use
your keyboard to enter a new page number at any time. Please note that
page numbers always have three digits.
If links to other Videotext pages appear in the Videotext window (for
example, "News...110"), click on the three-digit number to jump directly to
the page in question.
WebText Window: Channel
Teletext content varies from station to station. To read Videotext
information from another station, switch to the desired station here.
All pages of a previously tuned station are buffered by the application in the
multichannel cache. In this way, the pages are immediately available
without any delay when the station is selected again.
Chapter 6: PCTV WebText 59
Page 68

WebText Window: Checkboxes
Show Hidden
Text
Show
Animation
Some Teletext pages contain hidden information, for example, solutions to
TV puzzles, VPS times, etc.. To view this information, activate the
checkbox Show Hidden Text.
If a Teletext page encompasses multiple subpages and the Teletext
Animation function is active, the display will spring forward to the next
page automatically each time a new subpage is received.
If no subpages are available, then the main page will be redisplayed
automatically each time it is refreshed by the active station.
This function is especially helpful when the active station frequently
refreshes its pages.
60 PCTV Deluxe
Page 69

NAVIGATION WITH PCTV WEBTEXT
TOP – The Smart Table of Contents
TOP ("Table of Pages") is an additional service that broadcasters provide to
Videotext users. Not all stations, however, support this service.
TOP is a type of table of contents in which all of the information offered on
various subject areas is summarized. It thus permits fast, user-friendly
orientation within the Videotext program offered even without knowledge
of the page numbers.
Click on the button in the WebText window to make the TOP
Navigator appear at the left edge of the window. The TOP Navigator shows
a list of topics offered by the station in question. Click the mouse on the
appropriate topic to go quickly to the desired information.
Close TOP
To close the TOP Navigator, click on the close box of the TOP window.
Chapter 6: PCTV WebText 61
Page 70

Keyword Searches with PCTV WebText
PCTV WebText makes it easy to search for even complex search strings
within all stored Teletext pages.
WebText
Database
PCTV WebText stores all Videotext pages received from the currently
active station in a database. This database is updated continually.
Please pay attention to the Pinnacle logo in the upper left-hand corner of the
WebText window. As long as the rotates, pages are still being
received and stored in the database.
Important: The search is conducted only in the Teletext pages that have
already been received and stored in the database!
62 PCTV Deluxe
Page 71

Conducting a
Search
1. To start searching, click the button in the WebText window.
The Navigation window will now appear on the left side:
2. Type your search string in the text box. This may be an entire sentence or
a single keyword.
3. Activate one of the following radio buttons, depending on the type of
search that you want to carry out:
Search for all words
Searches for all of the words entered, regardless of their order in the text.
This is known as an "AND-operation" ("conjunction").
Example: A search on "Weekend Concert" may lead to the result
"Concerts will be held on the weekend".
Search for any word
The text found contains at least one of the words specified. This is known
as an "OR-operation" ("disjunction").
Example: A search on "Weekend Concert" leads, for example, to the
result "The sun will shine on the weekend".
Search exact phrase
The text found will contain the exact phrase entered.
Example: "Weekend Concert" leads to the exact result "Weekend
Concert".
Chapter 6: PCTV WebText 63
Page 72

4. Now click on the Go button.
The search results will be displayed in the search window:
New Search
Exiting the
Search Function
Closing
PCTV WebText
You can jump directly to the individual hits, by clicking on them, in order to
obtain more detailed information.
Use the Next button to view the next group of hits. You can determine the
number of hits displayed via .
To start a new search, enter the new search string and click on Go.
To exit the search function, click on the close box of the search window or
on the button.
To close the PCTV WebText application, click on the close box of the
Internet browser, or via the Internet Explorer menu system with File, Exit.
64 PCTV Deluxe
Page 73

OTHER TIME- AND WORK-SAVING FUNCTIONS
Changing Font Sizes in WebText
To change the font size in the WebText window, select the desired setting in
under View, Font Size in the Internet Explorer menu bar.
Direct Internet Connection
You can jump directly to Internet addresses shown in the Videotext window
by clicking the mouse on them.
For this, of course, your system must be able to access the Internet.
Creating "Drag & Drop" Shortcuts on Your Desktop
To create desktop shortcuts for your favorite Videotext pages or Internet
addresses, proceed as follows:
In the Videotext window, mark the corresponding page number or Internet
address, then hold down the left mouse button and drag the page number/
Internet address to the desired position on your desktop.
Activate Active
Desktop
Now you can go straight to the specified page/address by double clicking on
the shortcut.
For this functionality the WebServer has to be activated. (see the
corresponding icon in your taskbar). If the server is not active yet, you can
activate it via the Pinnacle program group …/Tools/PCTVWebServer.
WebText as „Active Desktop“
You can configure the WebText application as an active desktop, so that
you are always able to access all functions from the desktop.
For this functionality the WebServer has to be activated. (see the
corresponding icon in your taskbar). If the server is not active yet, you can
activate it via the Pinnacle program group …/Tools/PCTVWebServer.
Proceed as follows:
1. Start WebText and click the right mouse button while pointing at your
desktop. Select the command Properties in the context menu.
2. In t he Display Properties dialog box, select the Web page. Mark the
checkbox Display Active Desktop as Web Page and then click on the
button New... .
3. Now the query New Active Desktop Object will appear. Answer No.
Chapter 6: PCTV WebText 65
Page 74

4. In the ensuing dialog box, New Active Desktop Object, enter the
information from the address bar of the Internet Explorer under Location:
for example, http://localhost:2558/cgi-bin/start.hps. Click on OK to
save your changes.
5. When the next dialog box, Add Element to Active Desktop(TM) appears,
you should respond by clicking OK.
6. You should also acknowledge the window Display Properties by clicking
OK.
7. Now the Telext window will appear on your desktop. You can resize it
up to full-screen at any time by dragging the sides of the window with
the mouse.
Hiding the
Active Desktop
To hide the image on your desktop, use the close box of the WebText
window, which appears whenever you move the mouse pointer to the top
edge of the window.
You can also open the context menu by clicking the right mouse button
while pointing at the desktop. In this menu, you should then deactivate the
option Display as Web Page.
You can also use this context menu to reactivate the Active Desktop
function!
INTERNET BROWSER
Using you Internet browser, you can configure WebText pages as Start Page,
save them, print them, add them to your favorites, or create shortcuts to
them on your desktop.
For detailed information, please start the onscreen help for your Internet
browser.
66 PCTV Deluxe
Page 75

This chapter gives you important hints as well as tips & tricks on the subject
video capturing.
HARDWARE REQUIREMENTS
Hard disk speed
If the hard disk works too slow, the PC cannot save the digitised images fast
enough and the drop-out rate increases. The drop-out rate is the number of
images which are not saved during capturing. This results in jerky playback.
Your hard disk should offer a transfer rate of 5 MBytes/sec under Windows.
To take advantage of the full transfer rate, the option "DMA" should be
checked in the Device Manager for your hard disk (see “Settings in
Windows Me” or “Settings in Windows 2000 and Windows XP”).
Appendix A:
Tips & Tricks
Memory
In general: The more memory available, the better.
Video source requirements
If you can choose between the Composite- and the S-Video input, for
quality reasons prefer the S-Video input.
Appendix A: Tips & Tricks I
Page 76

ENHANCED-IDE HARD DISKS
With some E-IDE hard disks, high data rates result in an unsmooth playback
when playing back video files, because the hard disk is recalibrated while a
file is read. This is not a malfunction of our product but is due to the
functionality of your hard disk and the other system components.
If you have received a disk with special busmaster drivers with your E-IDE
hard disk and/or motherboard, please install these drivers in your system,
because the disk performance will be improved considerably.
For accelerating the transmission of large amounts of data like in this case
the video data, activate the DMA (Direct Memory Access) for all hard disks
of your computer (see “Settings in Windows Me” or “Settings in
Windows 2000 and Windows XP”).
II PCTV Deluxe
Page 77

HINTS FOR IMPROVING THE CAPTURE PERFORMANCE OF YOUR
HARD DISK
General
During capturing of videos a large amount of data is transferred from the
capture board to the hard disk. You might find that your system cannot keep
up with the required amount of data transfer for the settings you have
chosen.
When capturing, your system might pause, the video might be jerky or jitter
(not smooth), and some of the frames might be dropped (not saved to disk).
Playback quality of such a video is typically unsatisfactory.
To avoid such problems, we herein have described a number of practices to
optimise your system.
Please, bear in mind that each system is reacting different. Something that
improves performance on one system might not be effective on another
system.
Installing hard disks
The Windows operating systems support 32-bit hard disk access. Please
check in Start/Settings/Control Panel/System/Device Manager whether your
hard disk drive or your SCSI controller has been detected by Windows
correctly (no yellow or red warnings in the Device Manager behind the
device groups). If not, the data transfer rate of your hard disk will not
suffice for a satisfying quality when recording and playing back video.
If possible, install a second hard disk for capturing and saving all of your
video clips. For recording and playing back video a SCSI hard disk with
SCSI controllers should be preferred.
You can save temporary files to your system hard disk or another partition.
The Windows operating systems access system files during recording and
playback. If these files are located on the same hard disk as the video clips,
the head has to be repositioned, which leads to one or more dropped frames
(unsmooth playback).
Appendix A: Tips & Tricks III
Page 78

Optimising the hard disk(s)
Because capturing of videos is a very hard-disk intensive procedure,
optimising the files on the hard disk that you will use for capturing is the
most important task in optimising capture performance. In the following you
will find some detailed suggestions for doing this.
Partitioning the hard disk
You can reserve a complete hard disk or a partition of the hard disk
exclusively for digitising video clips.
When you format such a hard disk/partition, please do not use the format
type Quick (erase) as this leaves old data on the disk. Format the hard
disk/partition with the option Full.
Defragmenting the hard disk(s)
Usually, the hard disk is searched for free spaces. If a hard disk is in use for
some time, the files are fragmented and saved in different segments of the
disk. During the video digitising process the hard disk tries to fill the free
gaps. This increases the access time and the drop-out rate. In this way some
images are missing and the video playback is jerky. After defragmentation
the images are saved on a contiguous segment, i.e. they are not separated
any more.
For this purpose, Windows offers a defragmenting tool.
If you have two hard drives - a system drive for the operating system and
the programs and a drive for the video data to be saved - you should
defragment both. The system drive is carrying out important tasks during
video editing and therefore should be optimised, too.
To reach an optimal performance, the capture drive should be defragmented
before each capture session and the drive containing your saved images
should be defragmented before each playback.
IV PCTV Deluxe
Page 79

HARD DISK CAPTURING CAPACITY DATA
The maximum amount of digital video and audio data that can be stored is
dependent upon the data rate at which the television stations transmit their
signals. This data rate is not the same for all stations.
Some stations use the static multiplex system, which means that the picture
information is only coded with the data rate that is actually necessary. Other
stations currently use constant data rates.
For this reason, it is not possible to give a fixed conversion formula here for
the relationship between the size of the hard disk and the possible capturing
capacity.
It is generally true to say that the better the picture quality and the higher the
data rate, the fewer programs will fit on the hard disk. One and the same
film captured from different stations can therefore take up different amounts
of space on the hard disk.
The following table gives you an indication of the possible capture durations
for different sizes of hard disk depending on the transmitted data rate:
Hard disk capacity Capture duration at a
constant data rate of 5
Mbit/s
10 GByte 4.5 h 7.5 h
15 GByte 6.8 h 11.3 h
20 GByte 9.1 h 15.1 h
30 GByte 13. 6 h 22.7 h
40 GByte 18.2 h 30.3 h
50 GByte 22.7 h 37.9 h
60 GByte 27.3 h 45.5 h
80 GByte 36. 4 h 60.6 h
100 GByte 45.5 h 75.8 h
Capture duration at a
constant data rate of 3
Mbit/s
Appendix A: Tips & Tricks V
Page 80

SETTINGS IN WINDOWS ME
The system applet of the Windows Me Control Panel contains several
options you can enable or disable for optimal capture performance. During
capturing the drive should write as much data as possible and not spend time
with software optimisations or checking for system changes.
To access these options in Windows, click the Start menu. Under Settings
click Control Panel, and double-click the System applet. In the window
System Properties you can make the desired settings.
Device Manager tab:
Click CD-ROM and select your CD-ROM drive. Click the Properties
button, select the Settings tab and clear the Auto insert notification check
box. Click OK.
Additionally, in the list under Disk Drives click on the available disk(s)
of your computer (one after the other). For each drive activate the
checkbox DMA under Properties in the Settings tab and confirm with OK.
Performance tab:
Click the File System button and drag the Read-ahead optimisation slider
to None ( the default is Full).
While still on the File System Properties dialog, select the
Troubleshooting tab and check Disable write-behind caching for all
drives. Confirm with OK.
You will have to restart your machine now for the new settings to take
effect.
VI PCTV Deluxe
Page 81

SETTINGS IN WINDOWS 2000 AND WINDOWS XP
The system applet of the Windows 2000/Windows XP Control Panel
contains several options you can enable or disable for optimal capture
performance. During capturing the drive should write as much data as
possible and not spend time with software optimisations or checking for
system changes.
To access these options in Windows, click the Start menu. Under Settings
click Control Panel, and double-click the System applet. In the window
System Properties you can make the desired settings.
Click on the Hardware tab, then on the Device Manager... button
under Device Manager:
In the list under IDE ATA/ATAPI Controller first click on Primary IDE
Channel using the right mouse button and choose Properties from the
context menu. Then go to the Further Settings tab.
If two devices are shown, carry out the following settings for both devices.
Pay attention to what appears in the Current transmission mode box at
the bottom. If Ultra DMA mode is displayed, the correct setting is already
active and you do not need to make any changes.
If this is not the case, choose the DMA, if available setting from the
Transmission mode list box. Ultra DMA mode will then appear after the
computer has been restarted.
Confirm with OK.
Now click on Secondary IDE channel in the list with the right mouse
button and carry out the same settings as for the primary IDE channel.
You will have to restart your machine now for the new settings to take
effect.
Appendix A: Tips & Tricks VII
Page 82

REDUCING NONCAPTURE-RELATED MACHINE ACTIVITY
Anything that interrupts the system or consumes CPU time for purposes
other than capture can potentially decrease capture performance. Consider
performing the following tasks to see if they affect performance on your
system.
Close all applications except the capture application
Turn off the screen saver
To do so, right-click the desktop, click Properties, select the Screen
Saver tab, choose (None) from the screen saver drop-down combo box
and confirm with OK.
Turn off TSR (Terminate and Stay Resident) programs
TSR programs are programs that perform certain operations after the
computer has been started and install a part of the program permanently
into the memory. The resident (still active) part is continuously
performing certain background operations now, for example virus scan
operations.
TSR programs displayed in the taskbar
If there are TSR programs displayed at the right bottom of your
taskbar, you can turn them off in the following way:
Right-click the corresponding symbol in the taskbar and select the
option Exit or Close from the context menu that appears now.
TSR programs not displayed in the taskbar
In this case start the Task Manager with the keyboard command
CTRL + ALT + DEL. Select the applications to be turned off one after
the other and click the button End Task.
The corresponding symbols disappear from the taskbar now or they are
indicated with a red "Warning" sign.
Turn off your printer
Disable your network card
If you have a network card in your computer, disable it. Sending and
receiving data over the network can interrupt the system, even if you are
not actively doing anything over the network.
VIII PCTV Deluxe
Page 83

LED SIGNALS OF THE PCTV DELUXE BOX
At the front of the PCTV Deluxe box there are 6 LEDs: 3 green, 2 yellow,
and 1 red. Depending on which of them are on/off/blinking, you can draw
conclusions about the functional state of the box and about error messages.
The following table is showing you the possible combinations with the
corresponding meanings:
LEDs green yellow red yellow green green
Combination
0
1
2
3
4
5
6
7
8
off off off off off off - Device off / no power
on blinks blinks blinks blinks blinks
on blinks off off off off
on on on on off off
on on off blinks off off
on on on off on off
on on off off blinks off
on on on off off on
on on off off off blinks
Functional state/
Error message
- Power on
- USB not connected
- Power on
- USB connected
- Drivers not initialized
- Power on
- USB connected
- Drivers initialized
- TV Tuner Input selected
- Signal on TV Tuner
- Power on
- USB connected
- Drivers initialized
- TV Tuner Input selected
- no signal on TV Tuner
- Power on
- USB connected
- Drivers initialized
- Signal on S-Video Input
- Power on
- USB connected
- Drivers initialized
- no signal on S-Video
Input
- Power on
- USB connected
- Drivers initialized
- Signal on Composite Input
- Power on
- USB connected
- Drivers initialized
- no signal on Composite
Input
Appendix A: Tips & Tricks IX
Page 84

Appendix B:
Technical data
Bus system
USB 2.0 (backwards compatible with USB 1.1)
Antenna input
75 ohms, F connector or IEC
Video and Audio Inputs
S-Video
Composite video
Audio left and right
TV Tuner
Depending on the delivery scope;
corresponds to tuner standards:
Example countries Tuner variant Frequency
D, A, CH, DK, NL, F PAL-/ SECAM-Tuner 48,25 - 855,25 MHz
US, Japan NTSC-Tuner 48,25 - 855,25 MHz
X PCTV Deluxe
Page 85

r
F
-
a
A
w
U
-
i
P
h
P
-
e
J
Appendix C:
Glossary
This glossary contains the most important concepts from the field of
computer hardware, software and video.
Cross-references are marked by this symbol .
Address
Active speakers
ASCII
AUTOEXEC.BAT
AVI
Batch file
All memory positions in a computer have numbers (addresses). Through
these addresses each memory position can be addressed. Some addresses are
reserved for certain hardware components and must not be used. If two
hardware components use the same address, there is an address conflict.
Active speakers have their own in-built amplifier and require their own
power supply. Active speakers are mainly used to amplify the output signal
of sound boards.
American Standards Committee of Information Interchange. ASCII
character set ( Font): standard character set used by IBM and compatible
computers. The ASCII character set consists of 256 characters, the first 128
of which are standardized.
A special DOS batch file which is processed automatically after the
computer has been started. The file contains among other things commands
which load the country-specific keyboard driver ( Driver) or load
programs automatically.
Abbreviation for Audio Video Interleaved, standard format for digital video
( Video for Windows).
A DOS file where a sequence of commands is processed one after the
other.
BIOS
Bit
Bus
Byte
Basic Input Output System. Number of basic input and output commands
stored in a ROM, PROM or EPROM. The operating system uses
these commands. The basic task of the BIOS is to control the data input and
output. After starting the system the ROM BIOS performs some tests
(checking the interfaces, the disk drives, etc.).
Binary Digit. Smallest information unit in a computer. One bit can take on
two states: “0” and “1”, two bits can take on 22=4 states and three bits 23=8,
etc. In a computer those states are realized by “0 V” (no current = 0) and “5
V” (current = 1). To display a character (letter, number etc.), 8 bits = 1
byte are required.
In a computer, the bus provides for the communication between the
processor and the installed hardware (hard disk, graphics board, etc.).
One byte consists of eight bits. One byte represents exactly one
character (letter, number etc.). The characters are binary-coded with “zero”
(0) and “one” (1). The character “E” has the ASCII code “01000101” or
“45h” (hexadecimal).
Appendix C: Glossary XI
Page 86

CD-ROM
CD-ROMs are mass storage media for digital data, such as digital video.
CD-ROMs can only be read.
Clock frequency
CLUT
CODEC
Color depth
Composite video
CONFIG.SYS
Data rate
Rate at which individual commands are processed in a processor. The
higher the clock frequency, the quicker the commands are processed.
Color Look Up Table. Color table which contains all indexed color values.
Acronym for Compressor/Decompressor, compresses (packs) and
decompresses (unpacks) image data.
Number of bits containing color information for each pixel. A color
depth of 1 bit displays only black and white (21=2 colors). At a color depth
of 8 bits 28=256 colors are available and at 24 bits 224=16,777,216
( TrueColor) colors are available.
Composite video encodes all image information in one signal.
A DOS configuration file which is processed automatically when the
system starts. The CONFIG.SYS file includes drivers which control the
output to the monitor and the keyboard and the mouse.
Data per second, e.g. amount of data which a mass storage medium (hard
disk or CD-ROM) saves/plays back per second or the amount of data of a
video sequence per second.
Digital video
DIP switch
DirectDraw
DirectX
Dithering
DMA
Digital video stores information bit by bit in a file (in contrast to analogous
storage media).
Dual Inline Package switch. A row of small switches designed to make
Software interface developed by Microsoft for Windows which enables
applications to access the graphics hardware.
Direct (X) Extensions is a collection of several system extensions developed
by Microsoft for Windows (among others DirectDraw, Direct3D), to
enable video and games acceleration.
Method to avoid extreme color contrasts, which occur with a reduced
number of colors.
English abbreviation for Direct Memory Access. When the DMA is
activated, large quantities of data, for instance video data can be transported
particularly quickly.
XII PCTV Deluxe
Page 87

DOS
Disk Operating System. The most common operating system for PCs
(Personal Computer). MS DOS is the Microsoft version of DOS.
Driver
DVD
Field
Font
Frame
Programs which integrate the hardware (e.g. driver for a CD-ROM drive) in
the computer and which adapt the software to the hardware (e.g. driver for a
graphical user interface, such as Microsoft Windows). The software then
uses the features of the graphics board.
Stands for Digital Versatile Disk.
An optical data carrier that uses special storage technology. Suitable for
storing data and for digital video with data rates up to 7 MB/s in brilliant
MPEG-2 quality.
All common TV systems (NTSC, PAL, SECAM) use the following trick to
avoid image flicker: Instead of creating a complete frame 30 (or 25 for
PAL) times per second, half the lines are displayed at 60 (50) times a second
and then the other half are woven in at 60 times per second in a process
called interlace scanning. First, all odd lines (lines 1,3,5 etc.), then, all even
lines (2,4,6 etc.) are drawn. The images consisting of either odd or even
lines are called fields.
Character set in a certain type, size and style, e.g. Times New Roman 11,
normal; Times New Roman 11, italics; Times New Roman 11, bold; Times
New Roman 11, bold, italics.
A single image in a video or animation sequence. If using full NTSC or
PAL resolution, one frame consists of two interlaced fields.
Frame Rate
Graphics board
Hardware
Interlaced
KB
Image rate measured in frames per second when capturing and recording
video clips.
Graphics boards are the “link” between the computer and the monitor.
Without a graphics board no image appears on the screen. Graphics boards
operate in two modes: the text mode and the graphics mode. In the text
mode only ASCII characters are displayed. The ASCII character set
includes some simple “graphical” characters to display simple graphics. The
graphics mode uses individual pixels. The more pixels available (the
higher the resolution) the more detailed characters and graphics can be
displayed.
The hardware includes all computer components which are “hard”, such as
the monitor, the hard disk, the keyboard, the mouse and the printer.
Image refreshing technique: the screen is subdivided into lines. When
refreshing the image first all even lines and then all odd lines are refreshed.
1 KB (Kilobyte) is equal to 1024 Bytes. Here “K” (kilo) is always equal
to “1024”.
MBytes
1 MBytes (Megabyte) equals 1024 KB.
Appendix C: Glossary XIII
Page 88

MPEG
Non-interlaced
NTSC
Operating
system
PAL
Abbreviation for Motion Pictures Experts Group. Standard for the
compression of moving images. A distinction is made between different
formats depending upon the type of compression (e.g. MPEG-1, MPEG-2).
Image refresh method, where the complete image is generated without
skipping lines. A non-interlaced image flickers much less than an
interlaced image.
Abbreviation for National Television System Committee.
Color TV standard spread in the USA using 525 lines and 60 image fields
per second.
The operating system provides for the communication between hardware,
software and the user. The tasks of the operating system are among
others the file and the program management.
Abbreviation for Phase Alternation Line. Color TV standard developed in
Germany using 625 lines and 50 image fields per seconds.
Parallel
interface
PIO
Pixel
Preview
RAM
Refresh rate
The parallel or Centronics interface transfers data through an 8-bit data line.
This means that 8 bits (1 byte) can be transferred at a time. The
transfer through the parallel interface is considerably faster than the transfer
through the serial interface, over long distances the parallel data transfer
is, however, more susceptible to interference. Parallel interfaces are
designated by LPT and a number (e.g. LPT1).
English abbreviation for Parallel Input Output. Denotes an integrated circuit
(IC) used for inputting and outputting data in parallel.
Picture element. Pixels are the smallest elements of a monitor image (
resolution).
The TV image appears on the monitor with the number of colors the
graphics board supplies and possibly not in full size. See also TV
overlay.
Random Access Memory.
A RAM is a read-write memory component from which data can be read
and to which data can be written any time. The computer memory is
equipped with RAM components. The memory is a so-called “volatile”
memory meaning that the memory contents are removed as soon as the
computer is switched off.
Also vertical scan rate. Number of image refreshes per second measured in
Hertz (Hz). The higher the vertical scan rate the less flicker.
Resolution
RGB
XIV PCTV Deluxe
Number of horizontal and vertical pixels. 1408 x 1024 means that 1408
pixels are displayed horizontally and 1024 pixels are displayed on the
monitor vertically. The higher the resolution the more details the monitor
can display.
Abbreviation for Red, Green and Blue, the basic colors of additive color
mixing. RGB describes the method used in computer technology where
image information is transferred by dividing it into the three basic colors.
Page 89

ROM
Read Only Memory. A ROM is a memory component which can only be
read but which cannot be modified. The ROM's contents remain in the
component also after the computer has been switched off. All functions
which have to be available immediately after switching the computer on, e.g.
the data for the system test, the character output on the screen, etc. are
stored in ROM components. There are also PROMs (Programmable ROM)
EPROMs (Erasable PROM) and EEPROMs (Electric EPROM).
Scaling
SECAM
Serial interface
Software
SVCD
S-VHS
Adaptation of an image to a different size.
Abbreviation for Séquentiel Couleur à Mémoire. Color television system
developed on the basis of the NTSC system operating with 625 lines and
50 image halves per second.
Also RS232. The serial interface transfers data through a data line bit by bit
(all bits of a byte one after the other). The serial data transfer is
considerably slower than the transfer through the parallel interface but it
is less susceptible to interference. Serial interfaces are designated by COM
and a number (e.g. COM1).
General term for all programs a computer can run (system programs,
application programs, drivers etc.) and files.
Stands for “Super Video Compact Disc”.
A CD that holds about 35 minutes of video material and sound compressed
in MPEG-2 format. The quality is dependent upon the compression rate
and at the highest permissible data rate is somewhat worse than a
DVD but better than that of VCDs or VHS.
Improved standard for home VCRs using S-Video signals to improve the
color reproduction ( Y/C).
S-Video
TrueColor
TSR
TV Overlay
With S-Video signals the brightness (luminance) and the color information
(chrominance) are transferred separately.
16.7 million colors can be displayed at a time ( color depth).
English abbreviation for Terminate and Stay Resident.
TSR programs are programs which perform certain operations after being
started and install a certain part of the program in the memory. The memory
resident part (which remains active) performs certain operations constantly
in the background, such as scanning for viruses.
Inserting the TV image into the image supplied by the graphics board: The
TV image is supplied via the PCI bus, inserted into the image supplied by
the graphics board, and displayed in a window. The playback will be
without jerks and will not depend on the number of colors supplied by the
graphics board. The quality of the TV overlay is better than the Preview.
Appendix C: Glossary XV
Page 90

Twain Driver
USB
VCD
VHS
Video-CD
TWAIN defines a standardized software interface for communication
between graphics and/or capture programs and devices that supply graphical
information. If the Twain Driver is installed, the capture function of the
respective program can be used to load images directly from your video
source into the graphics program.
The Twain Driver only supports 32-bit programs and capures images in 24bit mode.
Acronym for Universial Serial Bus. A bus which can support up to 127
peripheral devices in a daisy chain configuration including printers, digital
cameras, keyboards and mice, and storage devices.
Stands for “Video Compact Disc”.
A CD that holds up to 60 minutes of MPEG-1 compressed video
material and sound. It can be played on almost all DVD players and on all
computers with a DVD or CD drive. The quality is approximately the same
as VHS.
Abbreviation for Video Home System. System commonly used for home
VCRs to record and play back images and sound using ½“ tape. VH systems
use composite signals consisting of brightness and color information.
CD-ROM standard with MPEG compressed videos. Can be played back
using a suitable CD-ROM drive and MPEG decoder-card.
Video decoder
Video encoder
Video for
Windows
WDM
Y/C
YUV
Converts analogous signals into digital information.
Converts digital information into analogous signals.
Video for Windows is an extended system application for Microsoft
Windows, with which it is possible to record, to store and to play back
digital video sequences. WDM.
English abbreviation for Windows Driver Model. Replaces Video for
Windows and is available from Windows 98 onward.
Y/C is a signal consisting of two components: Y = Brightness information,
C = Color information.
Color model where Y delivers the brightness information and U and V the
color information.
XVI PCTV Deluxe
Page 91

Appendix D:
Licence Agreement
Pinnacle End User License Agreement
This End User License Agreement (“License”) is a legal agreement between
you and Pinnacle Systems (“Pinnacle”) regarding Pinnacle’s software and
the accompanying documentation (collectively, the “Software”).
CAREFULLY READ THE FOLLOWING LICENSE. USING THIS
SOFTWARE INDICATES YOUR ACCEPTANCE OF THIS LICENSE.
IF YOU DO NOT ACCEPT OR UNDERSTAND THE TERMS OF THIS
LICENSE, YOU SHOULD NOT INSTALL THE SOFTWARE AND
PROMPTLY RETURN THIS PRODUCT TO YOUR VALUE-ADDED
RESELLER.
1. License Grant. Subject to the restrictions set forth below, this License
grants you a non-exclusive, perpetual license to (a) install the Software on
only one computer; (b) use or authorize use of the Software on only one
computer; (c) make one copy of the Software, in machine-readable form,
solely for backup purposes; provided you include all copyright and other
proprietary rights notices on the copy and (d) transfer the Software and this
License to another party if the other party agrees to accept the terms and
conditions of this License. If you transfer the Software, you must at the
same time either transfer all copies to the same party or destroy any copies
not transferred. If you transfer possession of any copy of the Software to
another party, your License is automatically terminated.
2. License Restrictions. You may not, or allow any third party to, (a) rent,
lease, sell, loan or otherwise transfer the Software or any of your rights and
obligations under this License; (b) install the Software on a network for use
by multiple users, unless each user has purchased a license; (c) reverseengineer, decompile or disassemble the Software or hardware in whole or in
part; (d) remove or destroy any copyright notices or other proprietary
markings of the Software or any third-party software; (e) modify or adapt
the Software, merge the Software into another program or create derivative
works based on the Software; (f) make copies of or distribute, for profit or
otherwise, the Software, except as expressly provided above; (g) make any
alteration, modification, connection, disconnection, improvement or
adjustment of any kind to or use the Software except as explicitly
contemplated in the enclosed documentation and in this License and (h)
sublicense, transfer or assign this License or any of the rights and
obligations granted under this License, except as explicitly contemplated in
this License. Any purported transfer or assignment will be void.
3. Export Restrictions. The export and re-export of Pinnacle software
products are controlled by the United States Export Administration
Regulations and such software may not be exported or re-exported to any
country to which the United States embargoes goods. In addition, Pinnacle
software may not be distributed to persons on the Table of Denial Orders,
Appendix D: Licence Agreement XVII
Page 92

the Entity List, or the List of Specially Designated Nationals. By
downloading or using a Pinnacle software product you are certifying that
you are not a national of any country to which the United States embargoes
goods and that you are not a person on the Table of Denial Orders, the
Entity List, or the List of Specially Designated Nationals.
4. Ownership. The license granted hereunder does not constitute a transfer
or sale of ownership rights in or to the Software. Except for the license
rights granted above, Pinnacle retains all right title and interest in and to the
Software including all intellectual property rights therein. The Software is
protected by applicable intellectual property laws, including United States
copyright laws and international treaties.
5. Third Party Proprietary Property. This Software may contain the
proprietary property of others, which has been licensed to Pinnacle, your use
of the Software is expressly conditioned on your agreement not to remove
any copyright notices or other proprietary markings of the third party
software.
6. Security. You acknowledge and agree that in order to protect the
integrity of certain third party content, Pinnacle and/or its licensors may
provide for Software security related updates that will be automatically
downloaded and installed on your computer. Such security related updates
may impair the Software (and any other software on your computer which
specifically depends on the Software) including disabling your ability to
copy and/or play "secure" content, i.e. content protected by digital rights
management. In such an event, Pinnacle and/or its licensors shall use
reasonable efforts to promptly post notices on Pinnacle’s web site
explaining the security update and providing instructions to end-users for
obtaining new versions or further updates of the Software that restore access
to secure content and related features.
7. Term and Termination. This License shall be effective upon installation
of the Software and shall terminate upon the earlier of (a) your failure to
comply with any term of this License; (b) return, destruction or deletion of
all copies of the Software in your possession or (c) transfer of the Software
and this License to another party in accordance with Section 1(d).
Pinnacle’s rights and your obligations shall survive termination of this
License.
8. Limited Warranty. Pinnacle warrants to the original licensee that the
Software, as delivered, will perform in accordance with the accompanying
documentation for a period of 30 days from the date of the original purchase
(“Limited Warranty”). Pinnacle’s entire liability and your exclusive
remedy for breach of the preceding Limited Warranty shall be, at Pinnacle’s
sole option, repair or replacement of the Software that does not meet the
warranty set forth herein and that is returned to Pinnacle. This limited
warranty shall be void if failure of the Software has resulted from any
accident, abuse, misuse or misapplication by you. Any replacement
Software will be warranted for the remainder of the original warranty period
or 30 days, whichever is longer.
XVIII PCTV Deluxe
Page 93

9. NO OTHER WARRANTIES. EXCEPT AS SET FORTH ABOVE,
THE SOFTWARE IS PROVIDED ON AN “AS IS” BASIS. YOU
ASSUME ALL RESPONSIBILITIES FOR THE QUALITY AND
PERFORMANCE OF THE SOFTWARE. TO THE MAXIMUM
EXTENT PERMITTED BY APPLICABLE LAW, PINNACLE
DISCLAIMS ALL WARRANTIES, EITHER EXPRESS OR IMPLIED,
INCLUDING BUT NOT LIMITED TO IMPLIED WARRANTIES OF
MERCHANTABILITY, NONINFRINGEMENT, AND FITNESS FOR A
PARTICULAR PURPOSE. LICENSOR DOES NOT WARRANT THAT
THE FUNCTIONS CONTAINED IN THE SOFTWARE WILL MEET
YOUR REQUIREMENTS, BE UNINTERRUPTED OR ERROR FREE.
10. LIMITATION OF LIABILITY. YOU AGREE THAT IN NO EVENT
WILL PINNACLE BE LIABLE FOR ANY CONSEQUENTIAL,
SPECIAL, INDIRECT, INCIDENTAL OR PUNITIVE DAMAGES
WHATSOEVER, EVEN IF PINNACLE HAS BEEN ADVISED OF THE
POSSIBILITY OF SUCH DAMAGES. IN NO EVENT SHALL
PINNACLE’S LIABILITY EXCEED THE TOTAL AMOUNT OF THE
FEES PAID FOR THE SOFTWARE. Some states/jurisdictions do not allow
the limitation or exclusion of incidental or consequential damages in certain
circumstances, so the above limitations may not apply in some
circumstances.
11. General. This License is governed by the laws of the State of California
and by the federal laws of the United States, without reference to conflict of
laws principles. The federal and state courts within the County of Santa
Clara, California shall have excusive jurisdiction to adjudicate any dispute
arising out of this License and you hereby consent to the personal
jurisdiction of the federal and state courts within the County of Santa Clara,
California. This License is the entire agreement between you and Pinnacle
and supersedes any other communication with respect to the Software. No
modification of or amendment to this License will be effective unless in
writing signed by both parties. If any provision of this License is held
invalid or unenforceable, the remainder of this License will continue in full
force and effect.
Appendix D: Licence Agreement XIX
Page 94

NOTES
XX PCTV Deluxe
Page 95

A
Active speakers XI
Adding a channel 36
Address XI
Antenna connections 4
Antenna input X
ASCII XI
audio decoder 1
Audio Input X
Audio settings 40
AUTOEXEC.BAT XI
AVI XI
Index
Channel search 35
Channel settings 34
Checking the Software 12
Clock frequency XII
CLUT XII
CODEC XII
Color depth XII
Color settings 38
Composite video XII
compression method 41
Computer 3
CONFIG.SYS XII
Context menu 27, 32
B
Batch file XI
BIOS XI
Bit XI
bit rate 41
Burn 30
Burning functions 29
Bus XI
Bus system X
Byte XI
C
CACHE 58
Capture performance
improving III
Capture settings 41
CD-R 1
CD-ROM XII
CD-RW 1
Channel display 17
Channel list 18, 34
Channel matrix 19
D
Data rate XII
Deleting a channel 37
Digital video XII
DIP switch XII
DirectDraw 12
DirectDraw support 3
DirectX 12
Dithering XII
DMA XII
DOS XIII
Driver XIII
DVD 1, 2, 29, 41, XIII
DVD Longplay 41
DVD+R 1
DVD+RW 1
DVD-R 1
DVD-RW 1
Index A-D
Page 96

E
Edit a Channel 37
Enhanced-IDE hard disks II
F
Field XIII
Font XIII
Frame Rate XIII
Function keys 45
MPEG XIV
MPEG-1 1, 42
MPEG-2 1, 42
multichannel cache 56
N
Network card
disabling VIII
Non-interlaced XIV
NTSC 41, XIV
G
Gallery 27
Glossary XI
Graphics board 3, XIII
H
Hard disk
defragmenting IV
installing III
optimising IV
partinioning IV
Hard disk capturing capacity V
Hard disk speed I
Harddisk 3
Hardware 3, XIII
Hardware requirements I
I
If you have problems... 13
Installation steps 9
Interlaced XIII
K
KB XIII
L
LED signals IX
Licence Agreement XVII
M
Machine activity
reducing VIII
MBytes XIII
Memory 3, I
O
Operating system XIV
optional equipment 13
Overlay-Test 12
Overview 1
P
Package contents 6
page memory 56
Page memory 58
PAL 41, XIV
Parallel interface XIV
PCTV Assistant 2, 6, 11
PCTV Vision 2, 7, 14
control panel 20
Control panel 17
Functional states 20
Main Window 14
Settings Menu 34
PCTV WebText 2, 7, 55
PIO XIV
Pixel XIV
Play 23
Preview XIV
printer VIII
R
RAM XIV
Reception quality 4
Record 22
Refresh rate XIV
remote control 1
resolution 41
E-R PCTV Deluxe
Page 97

Resolution XIV
Resource Test 12
RGB XIV
ROM XV
U
USB XVI
USB 1.1. 1
USB 2.0 1
S
Scaling XV
Scheduler 25
screen saver VIII
SECAM 41, XV
Serial interface XV
Snapshots gallery 32
Software 4, 6, XV
Package Contents 6
Sound board 3
Special settings 44
storage medium 41
subheadings iii
SVCD 1, 2, 29, 41, XV
S-VHS XV
S-Video XV
System requirements 3
V
VCD 1, 2, 29, 41, XVI
VHS XVI
Video decoder XVI
Video encoder XVI
Video equipment 5
Video for Windows XVI
Video gallery 27
Video Input X
Video settings 39
video source 1
Video source
requirements I
Video-CD XVI
Vision
Settings Menu 34
Volume 19
T
Technical data X
Timeshift 1, 21, 47
Details 50
Timeshift settings 43
Timeshift Settings 52
Tips & Tricks I
TOP – The Smart Table of Contents 61
TRex 2, 7
TrueColor XV
TSR XV
TSR programs VIII
TV Overlay XV
TV tuner 1
TV Tuner X
Twain Driver 2, XVI
TWAIN interface 7
W
WDM XVI
WDM drivers 2, 6
WebText 55
Changing Font Sizes 65
Closing 64
Creating "Drag & Drop" Shortcuts 65
Database 62
Highlights 56
Keyword Searches 62
Main Window 57
Navigation 61
Overview 55
Starting 56
System Requirements 56
WebText as „Active Desktop 65
WebText Window
Channel 59
Checkboxes 60
Show Animation 60
Show Hidden Text 60
Teletext Page 59
Toolbar 58
Index S-W
Page 98

Windows 2000 4, 9
Settings VII
Windows Me
Settings VI
Windows Millennium Edition 4
Windows XP 4, 9
Settings VII
Y
Y/C XVI
YUV XVI
Y-Y PCTV Deluxe
 Loading...