

Page 1

Powered Subwoofer
Owner’s Manual
AC SubTM 100, MicroburstTM, Digital SubTM 100,
Digital SubTM 150 & PS SubTM 150
2004 PINNACLE LOUDSPEAKERS
Page 2

We congratulate and thank you for choosing a PINNACLE® subwoofer. Our subwoofers exemplify the
best in modern audio technology, and are designed to produce tremendous amounts of deep bass. Please
read this manual completely to ensure the best possible performance from your Home Theater or sound
system.
SOLID BRASS ISOLATION CONES:
If your subwoofer comes with solid brass isolation cones be sure to install them into the bottom of your
subwoofer cabinet. They are an important part of the performance of the product and will improve the bass
definition. AC SubTM 100 owners: You must install the solid brass isolation cones for the bottom vent to
operate properly.
With the cabinet on its side, simply screw the cones into their receptacles on the bottom of the
cabinet. Then, with the cabinet upright, adjust the cones individually as needed to level the cabinet. When the
cones have been adjusted to the proper height, screw each nut up the threaded shaft flush with the bottom of
the cabinet to secure the height setting. If you intend to place your subwoofer on wooden or vinyl floors, we
suggest placing a penny under each cone to prevent any indentations.
PLACEMENT:
Recommended Subwoofer Placement:
a) within a few inches of the room corner closest to your left or right front speaker (maximum low bass
output);
b) within a few inches of the wall between your left and right front speakers (strong low bass output with
optimal blending to front speakers);
c) near any other room corner or wall.
Other locations will provide varying degrees of low bass impact and blending with your front speakers.
We recommend listening to your system, with the subwoofer in different room positions, to obtain a location
with an optimum response.
A Special Note for MicroburstTM owners: Due to the bipole configuration of your subwoofer be
sure to leave at least an inch between the rear woofer and your wall.
If you must place your subwoofer near baseboard heaters or forced hot air vents try to leave at least
3” of clearance for proper ventilation. Do not place your subwoofer outdoors, or in any wet or excessively
damp environment.
Note: Because of your subwoofer’s powerful magnet(s), be sure to place your subwoofer far enough
away from your TV (approximately 2-3 feet) to avoid color distortion and any other anomalies in the picture. If
you experience picture distortion, simply move the subwoofer away from the TV until the picture becomes
distortion free.
1
Page 3
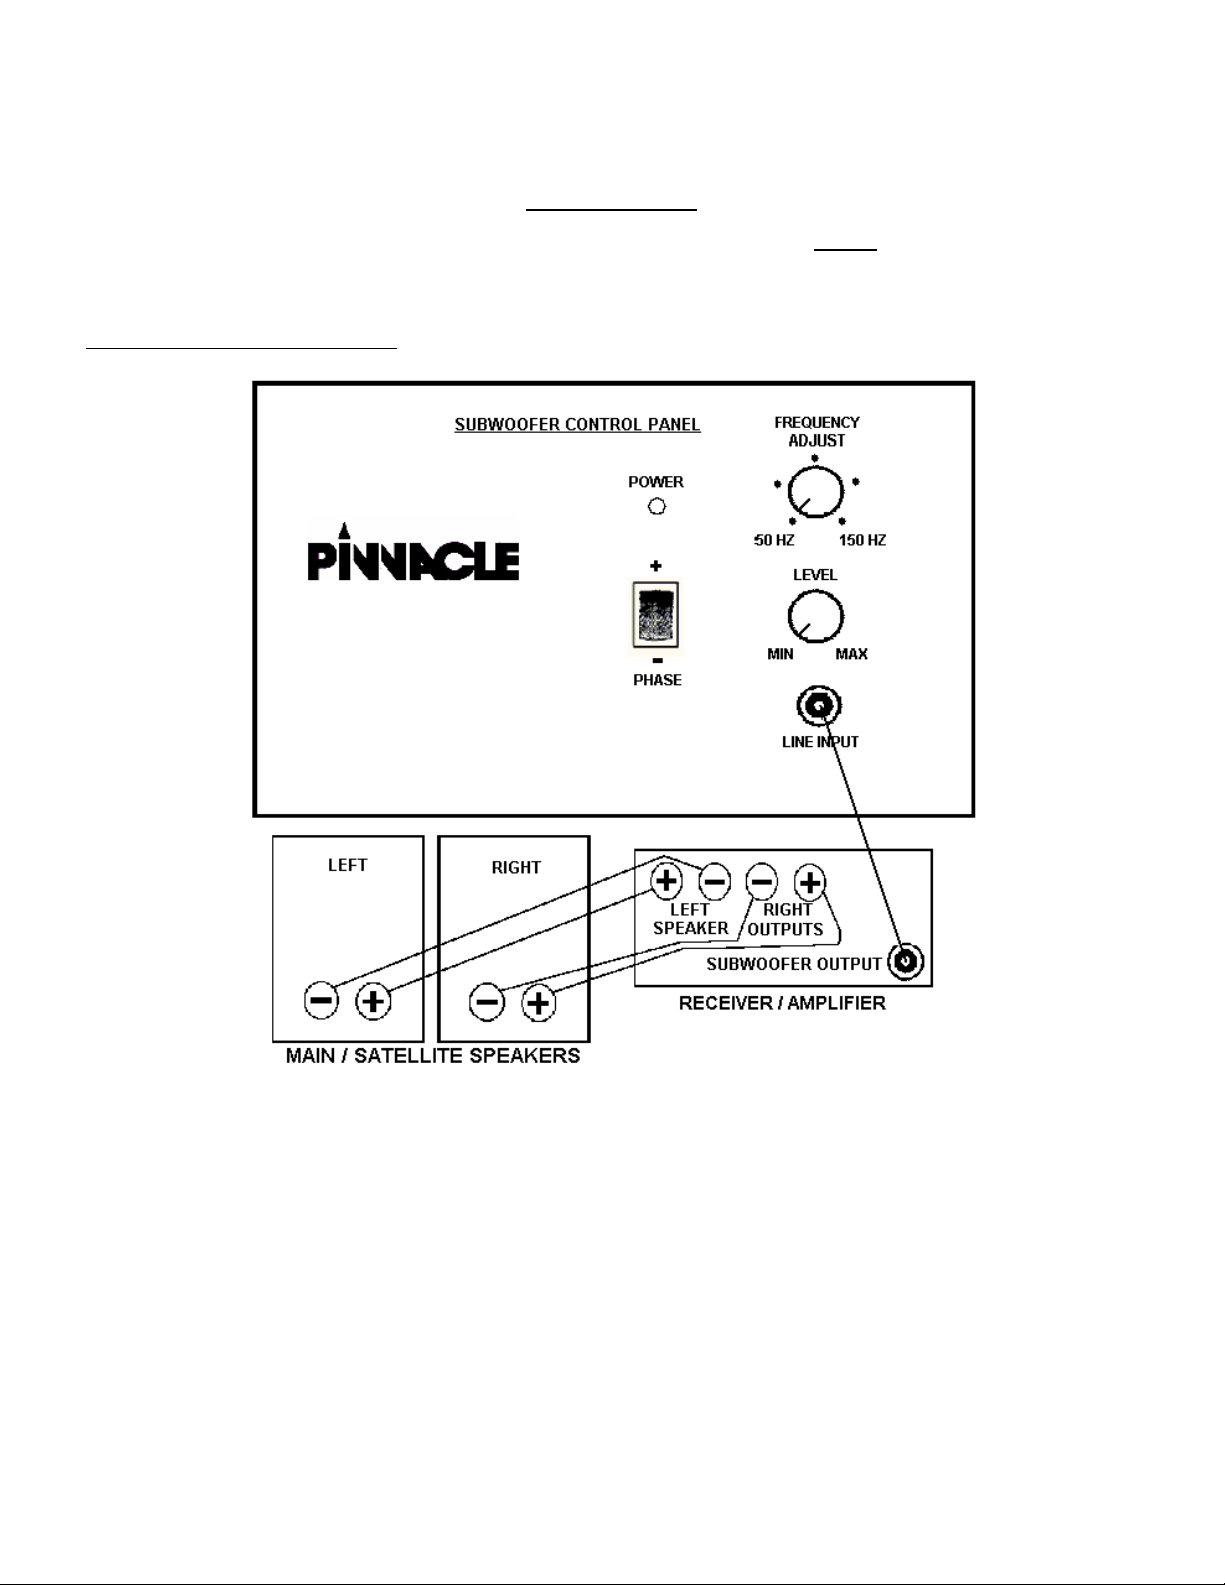
We also recommend keeping magnetic media such as audio/videotapes and computer disks at least 2
feet away from your subwoofer to prevent damaging them.
CONNECTIONS:
Complete all wire connections in your Home Theater/Sound system before plugging in your subwoofer
or turning on your receiver (amplifier).
Connecting Your Subwoofer:
To connect your subwoofer your receiver must have a dedicated phono (RCA) subwoofer output jack
(sometimes labeled LFE (Low Frequency Effects), Sub Out or Low Pass). Simply connect your subwoofer via
a standard phono cable (the same kind of audio cable used to connect your CD player, tape deck, etc.) from
your receiver’s phono subwoofer output to the input on the subwoofer. Then, wire your left and right front
speakers directly to your receiver’s speaker outputs. Please refer to the wiring diagram above for further
clarification. Do not connect the subwoofer to any receiver outputs intended for connection to tape decks or
Mini-Disc, DAT or VCRs recorders etc., as they will overdrive the subwoofer’s circuitry!
2
Page 4

POWER-UP AND TONE CONTROL ADJUSTMENTS:
• With the VOLUME control at minimum (fully counter-clockwise) plug your subwoofer’s power cord into any
ordinary wall outlet. The red power indicator LED will stay on as long as the subwoofer is plugged-in. If for
any reason you do not want your subwoofer on, simply unplug it.
• Please ensure that your receiver’s loudness control is off and that the bass tone control is in its middle
(flat or no boost) position. Now play some music with ample bass content. (The following setup routine is
best accomplished with one person seated in a normal listening position directing another to adjust the
controls for the best sound.)
• Adjust the VOLUME level on the subwoofer’s control panel so that the output level of the subwoofer is
satisfactory (relative to your front speakers). If either of your front speakers or subwoofer are not
functioning properly, please refer to the Troubleshooting section toward the end of this manual.
• Adjust the FREQUENCY ADJUST knob and determine what position sounds best. This feature controls
the output level of the mid and upper bass frequencies. Please note that if you have hooked up your
subwoofer to a Dolby Digital or DTS receiver via its LFE jack, due to the low pass filter already in the
receiver, the subwoofer's frequency adjust control would be best left at the highest frequency (fully
clockwise).
• Adjust the PHASE switch on the subwoofer’s control panel to determine which position sounds the most
natural and powerful. The difference should be most audible in the mid-bass. If you cannot detect a
difference, leave the PHASE switch in the + (in-phase) position.
• The best VOLUME level, FREQUENCY ADJUST and PHASE switch positions will mostly be determined
by your room acoustics, the mid and upper bass frequency response characteristics of your front
speakers, and your personal preferences. The source material will also play a significant role as its bass
level and qualities may vary considerably.
• After your initial adjustments you may want to go back and “tweak” these controls. Their effects are
acoustically interrelated. Re-adjusting them may be necessary to obtain optimal performance. Generally,
once you are satisfied with your subwoofer's settings, you can use your receiver’s tone, equalizer, volume
and subwoofer output level controls to optimize your whole system’s performance.
3
Page 5

VERY IMPORTANT!
• If you have a Dolby Pro-Logic Home Theater system, make sure that your receiver’s center
channel mode is in the NORMAL position. This will ensure that all low bass information is sent
to your subwoofer.
• If you have a Dolby Digital or DTS Home Theater system, make sure that you have correctly
configured your receiver's Bass Management System so that all of your speakers are properly
categorized as either SMALL or LARGE. This will ensure that all appropriate low bass
information is sent to your subwoofer. As a general rule, a speaker with an 8" or greater
diameter woofer may be considered LARGE. Conversely, a speaker with a woofer less than 8"
in diameter may be considered SMALL. Please note that the bass output of a dual woofer
speaker could be comparable to that of a larger single woofer speaker. Example: A dual 6.5"
woofer system would generally be considered LARGE since its woofer area approximates that
of a single 10" woofer system.
• With high volume levels of certain types of signals, your subwoofer may be audibly strained. If
you hear the subwoofer “breaking-up” or distorting, turn down the volume level.
• If you have any problems or questions, please contact your PINNACLE® dealer for further assistance.
TROUBLESHOOTING:
No Sound only from Subwoofer - Check the subwoofer's volume setting and all connections. If your receiver
has a subwoofer on/off or variable subwoofer output level control, ensure that the subwoofer option it is turned
on and that the output level is at maximum. Ensure that the center channel mode on the receiver is in the
NORMAL or SMALL position. Make sure that the subwoofer's RCA cable is connected to the receiver's
subwoofer output and not the subwoofer input jack. In the event that the problem persists, refer to the TO
OBTAIN SERVICE section of your warranty at the end of this manual.
No Sound only from Left and Right Front Speakers - Check all connections. Ensure that your receiver’s
speaker channel A or B is switched on.
Too Little Bass - Check: subwoofer volume/frequency/phase control positions; receiver tone controls;
program material; ensure that the center channel mode on the receiver is in the NORMAL or SMALL position.
If your receiver has a variable subwoofer output level control, ensure that the output level is at maximum. Try
moving the subwoofer further into a corner or towards the wall.
Too Much Bass - Check: subwoofer volume/frequency/phase control positions; receiver bass/loudness
controls; program material; move subwoofer further out of corner or away from wall.
4
Page 6

Hum: Check for faulty phono connecting cable. Try to separate phono cables from power cords (they can
induce hum into the system). If that doesn't work we recommend you turn off your subwoofer when it is not in
use. This is most easily accomplished by either connecting its powercord to a switched power outlet on the
back of your receiver (if it has them) or by using a Remote Controlled Switched Outlet like Radio Shack part
#61-2667.
AC SubTM 100, MicroburstTM, Digital SubTM 100, Digital SubTM 150 & PS SubTM 150 Specifications:
AC & Digital SubTM 100: (1) 10" heavyweight fibercone woofer with 1 1/2” voice coil and 26 ounce magnet
MicroburstTM: (2) 6.5" heavyweight fibercone woofers with 2" voice coils and 30 ounce magnets
Digital & PS SubTM 150: (1) 12" heavyweight polycone woofer with 1 1/2” voice coil and 20 ounce magnet
Low End Frequency Response: AC & Digital SubTM 100: - 3 dB @ 33 Hz
MicroburstTM: - 3 dB @ 32 Hz
Digital & PS SubTM 150: - 3 dB @ 30 Hz
Variable Subwoofer Low Pass Filter: Third Order from 50 - 150 Hz
System: AC SubTM 100 - 4th Order Bottom Vented
MicroburstTM - Bipole, Acoustic Suspension
Digital Sub 150TM - 4th Order Rear Vented
Digital Sub 100TM & PS SubTM 150 - Acoustic Suspension
Dimensions: AC & Digital SubTM 100: 13" wide x 13" high x 13" deep (without grill)
MicroburstTM: 9 1/2" wide x 9 1/16" high x 9 5/8" deep (without grills)
Digital & PS SubTM 150: 14 1/4" wide x 15" high x 15 1/8" deep (with grill)
Weight: AC & Digital Sub100TM - 22 lbs. / MicroburstTM - 25 lbs. / Digital & PS SubTM 150 - 36 lbs.
Amplifier Type: Class A/B amplifier
Power Requirements: AC 120 V, 60 Hz
Operating Temperature Range: 50° to 104° F (10° to 40° C)
5
Page 7

LIMITED WARRANTY:
What Is Covered
Your Pinnacle® subwoofer features a limited warranty as follows. The subwoofer driver and all
assembly and construction aspects are covered by this warranty for a period of seven (7) years from
the date of original purchase. Your subwoofer amplifier is covered by this warranty for a period of two
(2) year from the date of original purchase. The warranty covers all necessary parts and labor to
return the subwoofer to proper working order. Cabinet surfaces, grill assembly, and other exterior
parts subject to normal wear and tear are not covered except where an inherent structural defect
becomes evident.
Parts replacement and labor will be performed at the discretion of Pinnacle Loudspeakers and will be
provided free of charge unless (in the opinion of our service department, service representatives, or
engineering department) the system has failed due to abuse or negligent operation.
What Is Not Covered
This warranty will be void and no free services performed if we or any party acting as our agent
determines that the system has had any of its elements (amplifier, woofer, etc.) removed or tampered
with in any way whatsoever. Furthermore, if your subwoofer is not found to be defective a service
charge will be levied. In either case the minimum charge will be $30.00. An additional charge will be
applicable for same day service where possible and this charge will always be in effect even if the
actual parts and labor are covered by this warranty. Pinnacle Loudspeakers reserves the right to make
the final determination of whether or not the system has been damaged by abuse or negligent
operation.
To Obtain Service
To obtain service under this warranty, either contact your Pinnacle® dealer or us directly at (516) 5769052 or [email protected]. You may also write us at 1 Fairchild Court, Suite 140,
Plainview, NY 11803. If you ship your subwoofer you are responsible for packing and shipping
insurance. The freight must be prepaid. We will, however, pay return freight charges on any returned
subwoofer that qualifies for in-warranty service. Sorry, we cannot accept any collect freight charges.
You must include a note, attached to the unit, with your name, phone number or email address, and
return shipping address (no Post Office boxes), indicating the nature of the problem you are
experiencing. For warranty service you must also include a copy of your sales receipt. YOU MUST
FIRST CONTACT US FOR THE CUSTOMER SERVICE SHIPPING ADDRESS IN YOUR AREA IF
YOUR DEALER IS NOT EQUIPPED FOR THIS SERVICE. Please be sure to pack any items you ship
us carefully since we cannot be held responsible for damages incurred during shipping.
This warranty may be transferred to a subsequent owner.
SAVE YOUR ORIGINAL SHIPPING CARTON AND PACKING MATERIALS, AS WELL AS THIS
WARRANTY AND YOUR SALES RECEIPT. YOU WILL NEED THEM TO OBTAIN SERVICE UNDER
THE PROVISIONS OF THIS LIMITED WARRANTY.
6
Page 8

1 Fairchild Court Suite 140
Plainview, NY 11803
Tel. (516) 576 9052, Fax. (516) 576 0826
E-mail: [email protected]
Website: Http://www.pinnaclespeakers.com
PR MAN Q1 REV1004
7
 Loading...