

Page 1

Instant VideoAlbum
The fun and easy way to share your home
movies on CD or DVD
User guide
Page 2

Special thanks to Chris Zamara, Mike Iampietro, Brian Lane,
Charmine Tung, Keith Thompson, Louis Gentry, Bin Zhu, Christine
Wang, Jim Sugg, Sandra Thiel, Mark Van Bellingham, Don Oh, Ivan
Maltz, Brad Rudolph, Mike Funk, Darrel Chen, Kurt Gallant, Rich
Edgley, Michael Fleischhauer, William Chien, and Bill Loesch.
Documentation: Nick Sullivan, René White, Patrick Roscoe
Instant VideoAlbum, Pinnacle Systems, and the Pinnacle Systems
logo are registered trademarks of Pinnacle Systems, Inc.
All Rights Reserved. QDesign MPEG-2 Layer II Fast
Encoder/Decoder © 1996-2002 by QDesign Corporation. Windows
Media is a trademark of Microsoft Corporation. All other trademarks
are the property of their respective owners. You agree not to remove
any product identification or notices of the property restrictions from
Pinnacle Systems’ products or manuals.
All products mentioned in this manual are trademarks of their
respective owners.
Instant VideoAlbum User Guide copyright © 2003 by Pinnacle
Systems, Inc. All rights reserved.
No part of this manual may be copied or distributed, transmitted,
transcribed, stored in a retrieval system, or translated into any human
or computer language, in any form or by any means, electronic,
mechanical, magnetic, manual, or otherwise, without the express
written permission of Pinnacle Systems, Inc.
Pinnacle Systems, Inc.
280 North Bernardo Avenue
Mountain View, CA 94043
Printed in the USA.
ii Instant VideoAlbum
Page 3

Contents
CHAPTER 1: OVERVIEW.............................................. 1
Computer requirements.............................................................................2
Technical specifications .............................................................................2
Input formats ...........................................................................................3
Output formats......................................................................................... 3
Installing your software .............................................................................4
Obtaining software updates .....................................................................5
Connecting a digital camcorder ................................................................5
On-line help................................................................................................. 5
Abbreviations and conventions ................................................................. 6
Terminology ............................................................................................6
Dialogs and window names..................................................................... 8
Choosing menu commands...................................................................... 8
Keyboard conventions ............................................................................. 8
Mouse clicking ........................................................................................8
CHAPTER 2: IMPORT ................................................... 9
Importing ..................................................................................................10
Importing video from your camcorder...................................................10
Importing video from your PC ..............................................................12
Importing photos from your PC.............................................................12
Importing assets from Windows Explorer.............................................12
The Asset List ...........................................................................................13
Contents iii
Page 4

CHAPTER 3: DISC SETTINGS.................................... 15
Settings dialog........................................................................................... 15
Output format ........................................................................................16
Media..................................................................................................... 17
TV standard ...........................................................................................17
Video quality / disc usage...................................................................... 18
CHAPTER 4: MENU STYLES...................................... 21
The Style Chooser .................................................................................21
CHAPTER 5: PREVIEWING ........................................ 23
The Remote Control................................................................................. 23
Number pad ...........................................................................................24
DVD navigation buttons........................................................................ 24
Movie controls....................................................................................... 25
The TV screen........................................................................................... 25
Cursor navigation ..................................................................................26
CHAPTER 6: BURNING .............................................. 27
Burning the Disc....................................................................................... 28
Temporary files .....................................................................................28
File conversion ......................................................................................30
CHAPTER 7: CUSTOMIZING MENU STYLES............ 31
Backgrounds.......................................................................................... 32
Frames ...................................................................................................32
Layout.................................................................................................... 33
Type....................................................................................................... 33
Music ..................................................................................................... 34
iv Instant VideoAlbum
Page 5

CHAPTER 8: EDITING VIDEO AND PHOTOS............ 35
The Edit Video dialog...............................................................................35
The Asset List ...........................................................................................37
Renaming objects ..................................................................................37
Rearranging objects............................................................................... 38
Duplicating objects................................................................................ 38
Deleting objects ..................................................................................... 38
Opening and closing video chapters...................................................... 39
Opening and closing slideshows............................................................40
Importing images from Windows Explorer........................................... 40
The Preview Screen.................................................................................. 41
Editing tools and options .........................................................................42
Project options....................................................................................... 42
Chapter options...................................................................................... 43
Change thumbnail.................................................................................. 47
Enhance .................................................................................................48
Split .......................................................................................................51
Information Display Area........................................................................ 52
CHAPTER 9: MAKING LABELS AND INSERTS ........ 53
The Make Custom Labels dialog.............................................................53
Label type tabs....................................................................................... 54
The Edit toolbar..................................................................................... 55
The Edit Window ..................................................................................58
The text controls.................................................................................... 61
The Print Custom Labels dialog ............................................................ 62
APPENDIX A: TECHNICAL SUPPORT ...................... 65
APPENDIX B: LICENSE AGREEMENT ...................... 69
INDEX .......................................................................... 73
Contents v
Page 6

vi Instant VideoAlbum
Page 7

Chapter 1:
Overview
Pinnacle Instant VideoAlbum lets you use your
personal computer to turn your home movies into
DVDs and VideoCDs. Soon you’ll be able to send a
friend or family member movies that they can play in
their DVD player. There are four simple steps:
First, Pinnacle Instant VideoAlbum lets
you “capture video” — transfer the
video from your camcorder or VCR to
your PC’s hard drive. You can also add videos and
pictures you’ve already saved on your PC.
Next, select a menu style. This will
determine what the on-screen menu for
your finished disc will look like when
viewed on a television. You can also customize menu
styles for a more personal feel.
Now, preview your disc using the on-
screen remote control, or by clicking
directly on video and photo
“thumbnails” in the preview area. This screen also
allows you to arrange, edit, and enhance your videos
and / or photos. To save you time, Pinnacle Instant
VideoAlbum automatically breaks up your video into
scenes, and creates a scene menu for you!
Finally, burn your completed project
onto a DVD or CD using your disc
burner. Pinnacle Instant VideoAlbum
lets you create DVDs, VideoCDs, and Super VideoCDs.
Chapter 1: Overview 1
Page 8

COMPUTER REQUIREMENTS
In addition to your Instant VideoAlbum software, you
will need a PC-compatible computer with:
• Intel Pentium™ or AMD Athlon™ processor, 700
MHz or faster (1.5 GHz recommended)
• Windows
• Direct X compatible graphic and sound boards
• 256 MB of RAM (512 MB recommended)
• 100 MB of free hard disc space to install software
• Minimum 1GB needed for project and temp files
Your hard drive must be capable of sustained reading
and writing at 4 MB/sec. All SCSI and most UDMA
drives are capable of this. DV-format video
consumes 3.6 MB of hard disc space for every
second of video, so four minutes of DV video will
require almost 900 MB of hard disc space.
®
98/Me/XP/2000 (XP recommended)
• CD or DVD Burner
TECHNICAL SPECIFICATIONS
Instant VideoAlbum supports several types of digital
video and photo formats. The program recognizes
several common input formats for importing video
from your camcorder, or video and photo files from
your PC.
Instant VideoAlbum also enables you to burn your final
project to its destination disc in a number of standard
and custom playback formats.
2 Instant VideoAlbum
Page 9

Input formats
• Capture video from Digital (DV and Digital8)
camcorders (requires a PC with an OHCI-compliant
IEEE-1394 / FireWire port or interface card)
• Capture video from any camcorder with analog
(composite or S-Video) outputs (requires optional
Instant VideoAlbum Plus capture hardware)
• Video Import: AVI, DV, MPEG-1, MPEG-2
• Digital Image Import: BMP, JPG, PCD, PCT, TGA,
WMF, TIF (LZW compression not supported)
Output formats
• DVD: A DVD disc is the ultimate in video quality.
Instant VideoAlbum can burn up to 90 minutes of
high-quality video and audio (or up to 232 minutes at
decent quality) onto a DVD-R/RW or DVD+R/RW
disc.
• VideoCD (VCD): A VideoCD disc allows up to 70
minutes of VHS-quality video to be burned onto a
CD with any CD-Burner. This video format is
supported by a large number of DVD players.
• Super VideoCD (SVCD): Super-VideoCD is an
enhancement to the VCD format. An S-VCD disc
allows up to 39 minutes of near-DVD quality video
to be burned onto a CD. This video format is
supported by a number of DVD players.
Check the Pinnacle web site and VCDhelp.com
for a
list of compatible players.
Chapter 1: Overview 3
Page 10

INSTALLING YOUR SOFTWARE
To install your Instant VideoAlbum software:
1. Insert the Instant VideoAlbum CD-ROM into your
CD-ROM drive. If you have Autorun enabled for
your CD-ROM, Setup will run automatically.
2. If you do not have Autorun enabled, navigate to
your CD-ROM drive, and double-click on
Setup.exe.
3. Select the language of your choice.
4. Enter your serial number (found on the Instant
VideoAlbum CD or printed on its sleeve).
5. Agree to the Instant VideoAlbum software license
terms (click “I Agree”). If you do not accept or
understand the terms, you should promptly return
this product to your dealer.
6. Choose “Typical” installation (recommended).
Only advanced computer users should choose
“Custom.”
7. Click “Next” until the installation is completed.
8. Restart your computer.
9. Next, you will be given the opportunity to register
your copy of Instant VideoAlbum. You can quickly
and easily register using your Internet connection.
Registration is important for three reasons:
• Registration allows Pinnacle Systems to inform
you of free upgrades to the Instant VideoAlbum
software
• Registration makes you eligible for special offers
and promotions from Pinnacle Systems
• Registration is required to receive technical
support
4 Instant VideoAlbum
Page 11

Obtaining software updates
To check for Instant VideoAlbum software updates that
may be released from time to time to provide new
features or correct issues, choose the Help ¾ Software
Updates menu command. This uses your computer’s
Internet connection to check Pinnacle’s web-site for
new releases of the product.
CONNECTING A DIGITAL CAMCORDER
After the software installation is complete, connect the
DV IN/OUT port on your DV camcorder to the DV
IN/OUT port on your desktop PC using a 4-pin to 6-pin
1394 (FireWire/DV) cable. If you have a laptop
computer, you may require a 4-pin to 4-pin 1394
(FireWire/DV) cable. Make sure that your camcorder is
turned on and in VTR mode.
Note: To connect an analog camcorder or conventional
VCR using the optional Instant VideoAlbum Plus
capture hardware, please refer to the instructions in the
Instant VideoAlbum Plus Quick Install Guide.
ON-LINE HELP
On-line help is right where you need it, when you need
it, while you’re working in Instant VideoAlbum.
Standard on-line help: Click the Help menu in the
Instant VideoAlbum main menu bar, or press F1 to
display the Table of Contents page of the standard help
Chapter 1: Overview 5
Page 12

topics. Click Help ¾ Help Topics if you want to search
for a specific topic, or command.
Tool tips: To find out what a button or other Instant
VideoAlbum control does, pause your mouse pointer
over it and a Tool Tip appears explaining its function.
ABBREVIATIONS AND CONVENTIONS
This guide uses the following conventions to help
organize the material.
Terminology
Instant VideoAlbum refers to Pinnacle’s video
capture and disc authoring software.
DV refers to DV and Digital8 camcorders, DV VCRs,
and DV tapes.
1394 refers to OHCI-compliant IEEE-1394 FireWire,
DV, or iLink interfaces, ports and cables.
Analog refers to 8mm, Hi8, VHS, SVHS, VHS-C or
SVHS-C camcorders, VCRs and tapes, and to
Composite (RCA) and S-Video cables and connectors.
Assets are video, photo and audio files.
Video file refers to source video/audio from a DV
capture device, or analog video/audio that has been
digitized and saved to disc.
MPEG refers to a type of compressed video and audio
file that is burned onto a disc and which can also be
imported as an asset. MPEG-1 is used for VideoCD
and MPEG-2 is used for Super VideoCD and DVD.
Instant VideoAlbum can import most MPEG file types.
6 Instant VideoAlbum
Page 13

The exceptions are "elementary stream" files
(consisting of audio or video but not both), and MPEG2 "transport stream" files (as used in Sony's MicroMV
camcorders, for example).
AVI file (Audio Video Interleave) refers to a common
type of Windows video and audio file that is typically
compressed, but which may be uncompressed. The
video and audio file that is captured from a DV
camcorder in Instant VideoAlbum is called a Type-2
DV AVI file. In order to play an AVI file on a
Windows PC, a software CODEC (Compressor/
DECompressor) capable of handling the compression
method used by that AVI file must be installed on your
computer. As a result, you will find that Instant
VideoAlbum can import most AVI files, but may have
trouble with proprietary and uncompressed AVI files,
or AVI files that have been compressed with a CODEC
that has not yet been installed. If you are not sure about
the compatibility of a particular AVI file, try playing it
in Windows Media Player before importing into Instant
VideoAlbum.
Scene refers to sections of a video file that Instant
VideoAlbum has detected. A video file can also be
manually split into a number of scenes.
Menu page (or just menu) refers to a graphic
background for up to 12 interactive buttons that link to
videos and slideshows, and to the layouts, text styles,
and frame types comprising the menu page.
Thumbnail refers to miniature images of videos and
photos that appear on menu pages.
Chapter 1: Overview 7
Page 14

Dialogs and window names
Names of buttons, dialogs, windows and related items
are written in Italics so that you can find them in the
text quickly.
Example: Click the Rename button in the Asset List.
Choosing menu commands
The right angle bracket symbol (¾) denotes the path for
hierarchical menu items. For example, to create a new
file, the instruction would be:
Example: Select File ¾ New Project
Keyboard conventions
Key names are underlined. A plus (+) sign denotes a
key combination.
Example: Press Ctrl+A to select all the video scenes in
the List View.
Brackets denote keys that do not have names printed on
them.
Example: Press the [Spacebar] to pause the slideshow.
Mouse clicking
When a mouse click is required, the default is always a
left-click unless otherwise specified.
8 Instant VideoAlbum
Page 15
Chapter 2:
Import
Instant VideoAlbum lets you make a DVD, VideoCD,
or Super VideoCD in just four steps:
1. Import video/photos
2. Select a menu style
3. Preview and Edit your project
4. Burn your disc
These four steps are represented by the four buttons
atop the Instant VideoAlbum interface.
Importing is the process of adding assets (video and
photos) to your Instant VideoAlbum project. This may
involve transferring video from your camcorder to your
hard disc, or simply adding files from your PC.
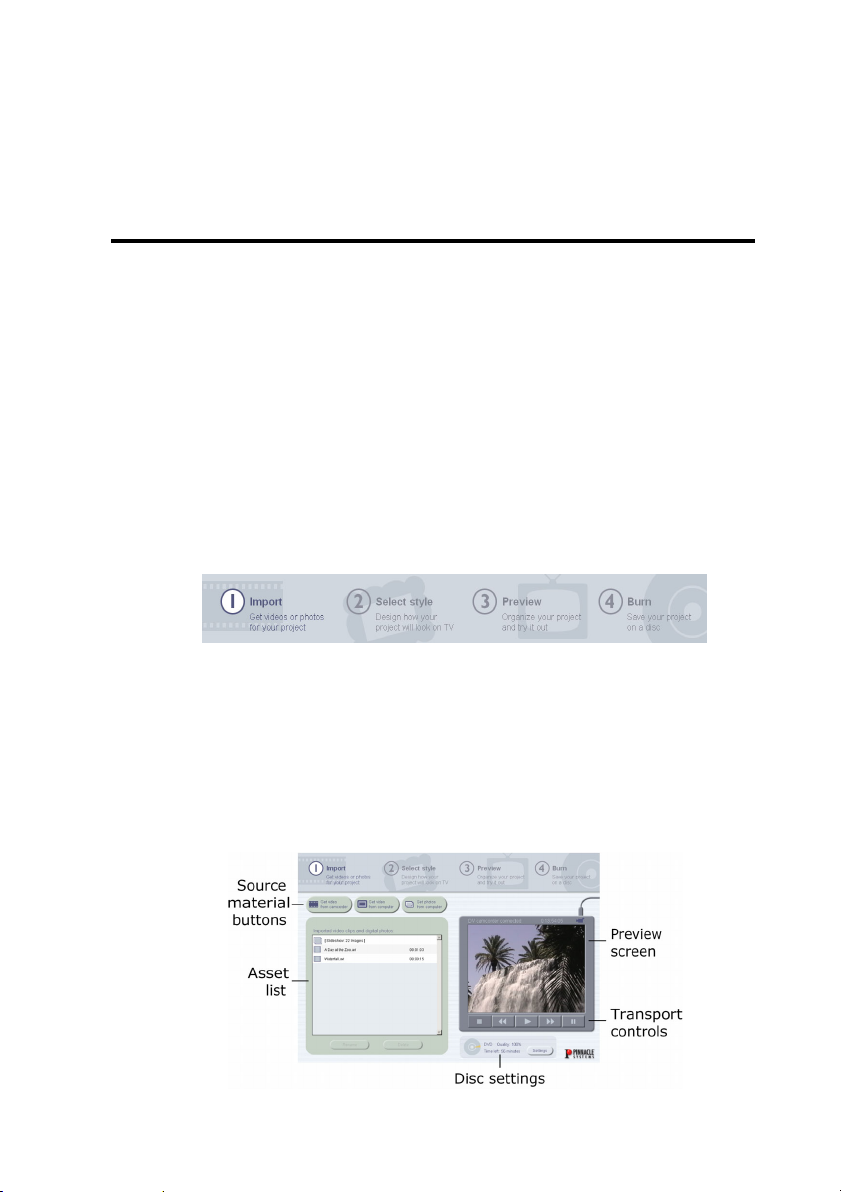
Your Import screen looks like this:
Chapter 2: Import 9
Page 16
IMPORTING
The three buttons above the Asset List allow you to
import video from a DV camcorder connected to your
computer via a 1394 (FireWire/DV) cable, import
video from an AVI or MPEG file, or import a digital
photo.
Importing video from your camcorder
Often you will want to start your project by importing
video from your camcorder. Instant VideoAlbum
supports digital camcorders using your PC’s 1394
(FireWire/DV) interface. Your DV camcorder is
connected to your PC as described in Chapter 1. You
may import an entire tape, or start and stop importing
video at any point in the tape.
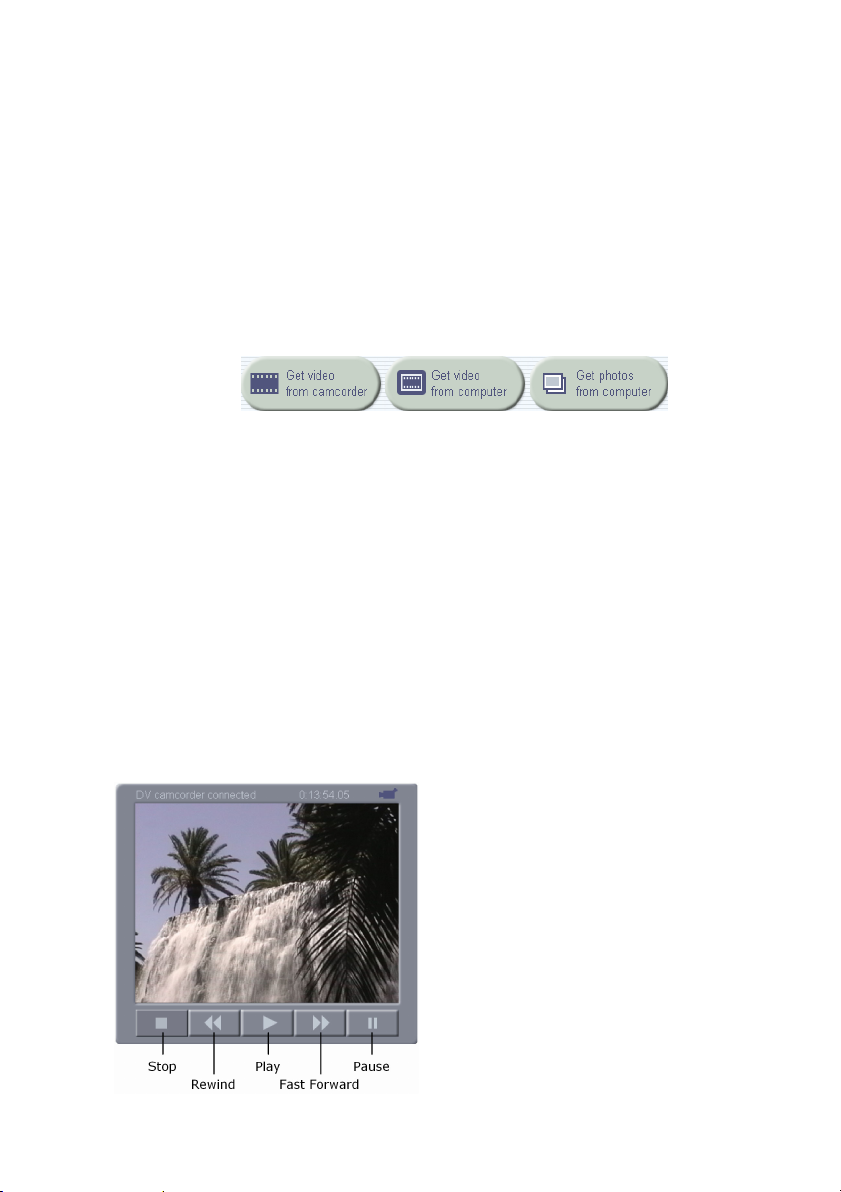
Transport controls
Use the Transport controls
beneath the TV Screen to
view your tape or seek to the
tape location at which
importing is to begin.
(If you are using the Instant
VideoAlbum Plus capture
hardware, the Transport controls will be disabled.)
10 Instant VideoAlbum
Page 17
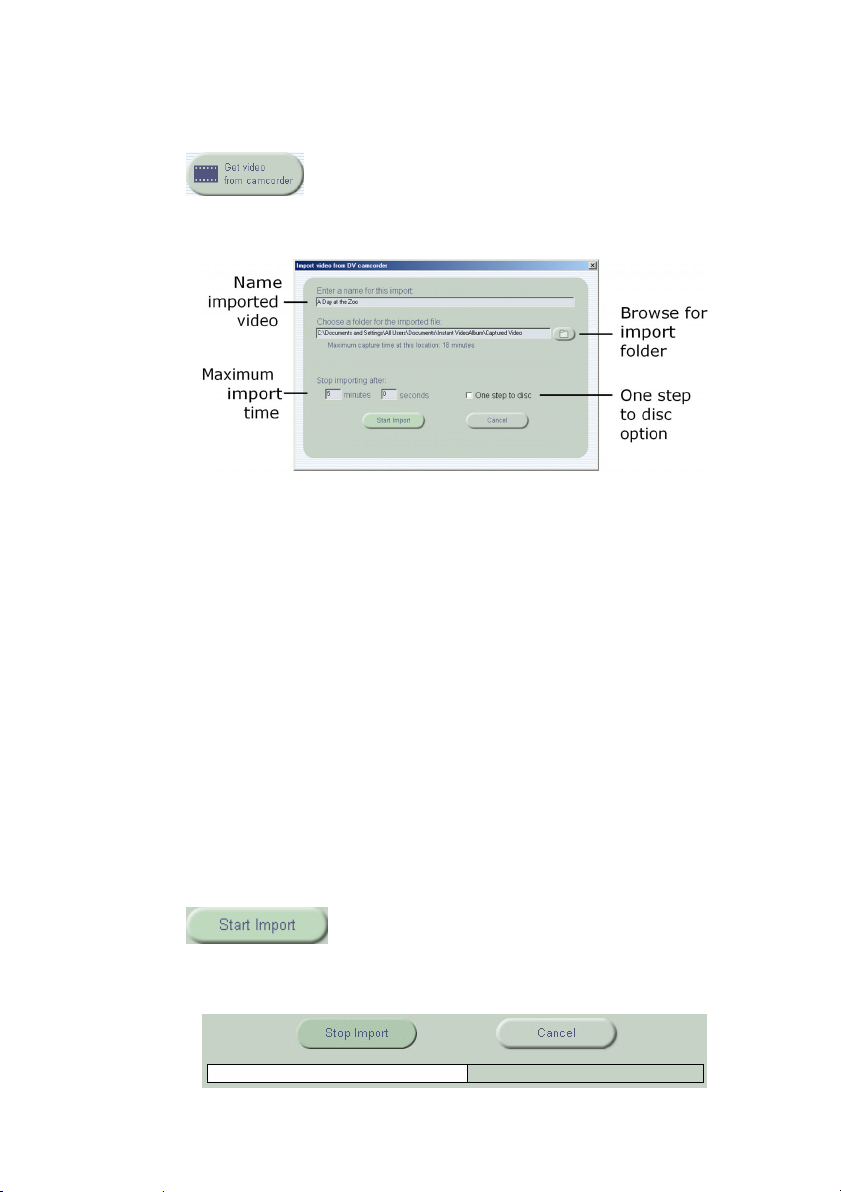
Get video from camcorder button
The Get video from camcorder button
begins the video import from camcorder
process by opening this dialog:
While this dialog is open, the TV Screen above the
Transport Controls continues to display incoming
video from your camcorder. When you choose a harddrive location to which you want the video to be
captured, Instant VideoAlbum calculates and displays
the maximum capture time, based on the empty space
available on that hard-drive.
If the One step to disc option is checked, Instant
VideoAlbum will skip the Preview and Edit stages and
capture the imported video directly to your destination
disc, by proceeding directly to the Burning screen.
Enter a name for your captured video file, and click the
Start Import button.
The Start Import button initiates the
transfer of DV video from your
camcorder to your hard drive.
Chapter 2: Import 11
Page 18

When Instant VideoAlbum is importing video, the Start
Import button turns into the Stop Import button, which
you can click at any time to stop video importing.
During importing, a progress bar appears that indicates
the portion of available hard drive space that has been
used so far.
Importing video from your PC
Instant VideoAlbum allows you to import
video files already on your PC’s hard
disc. If you wish to import an AVI or MPEG video file,
click the Get video from computer button to open a file
browser.
You can also import video (and digital photos) by
dragging files from Windows Explorer into the Asset
List (see page 12).
Importing photos from your PC
As with video files, you can import still
images from your PC’s hard disc. Click
the Get photos from computer button to open a file
browser.
You can also import digital photos (and video) by
dragging files from Windows Explorer into the Asset
List (see page 12).
All the digital photos and stills you import into the
Asset List will be grouped into a single slideshow.
Importing assets from Windows Explorer
Another way to import files is to select them in
Windows Explorer and drag them onto the Asset List.
You can instantly create a slideshow by dragging in a
folder of images in one operation!
12 Instant VideoAlbum
Page 19

THE ASSET LIST
As you import media, Instant VideoAlbum shows the
file name and type of each asset (the files you import)
in the Asset List. Digital photos and other stills are
grouped automatically into a slideshow.
Scene detection
Automatic Scene Detection is a key feature of Instant
VideoAlbum. It eliminates the drudgery of manually
marking the beginnings and ends of video scenes.
When Instant VideoAlbum imports video, it
automatically detects and marks natural breaks that
occur in the video.
Renaming and deleting video assets
To rename or delete
any video asset,
click on the object to select it then click the Rename or
Delete button at the bottom of the list.
Chapter 2: Import 13
Page 20

14 Instant VideoAlbum
Page 21
Chapter 3:
Disc Settings
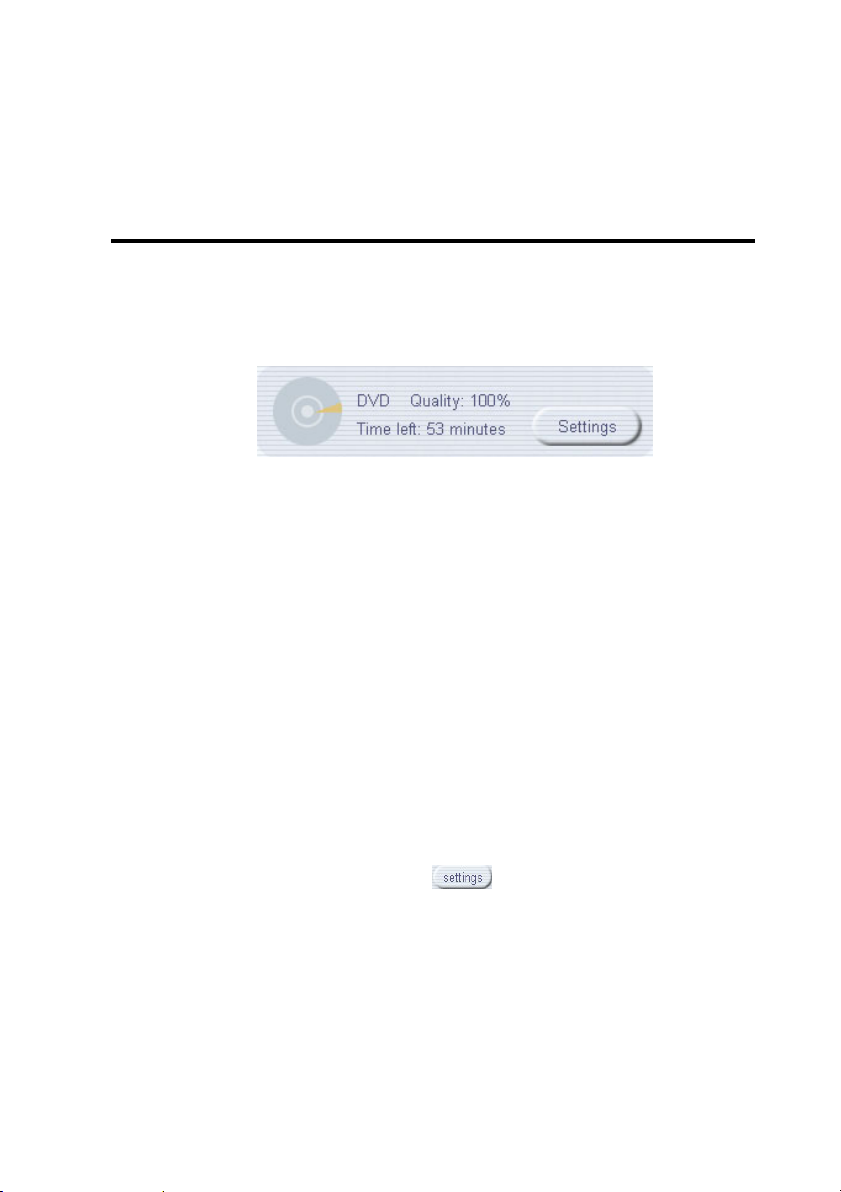
Disc Settings and information are a very important part
of Instant VideoAlbum and are available on all four
screens of the program.
This feature can be found in the bottom right of most
screens and gives you an at-a-glance summary of the
currently selected disc output format and the amount of
space on your target disc, expressed as the remaining
number of minutes of video that can be stored on it.
The amount of remaining space will depend upon the
size of your project, the disc format (DVD, VideoCD,
S-VCD), and the current quality setting.
SETTINGS DIALOG
Click the Settings button to open this dialog:
You can use this dialog to:
• Specify the type of disc you want to create
• Check the compatibility of the media you are using
• Set the TV standard
• Set the video quality of your presentation
Chapter 3: Disc Settings 15
Page 22
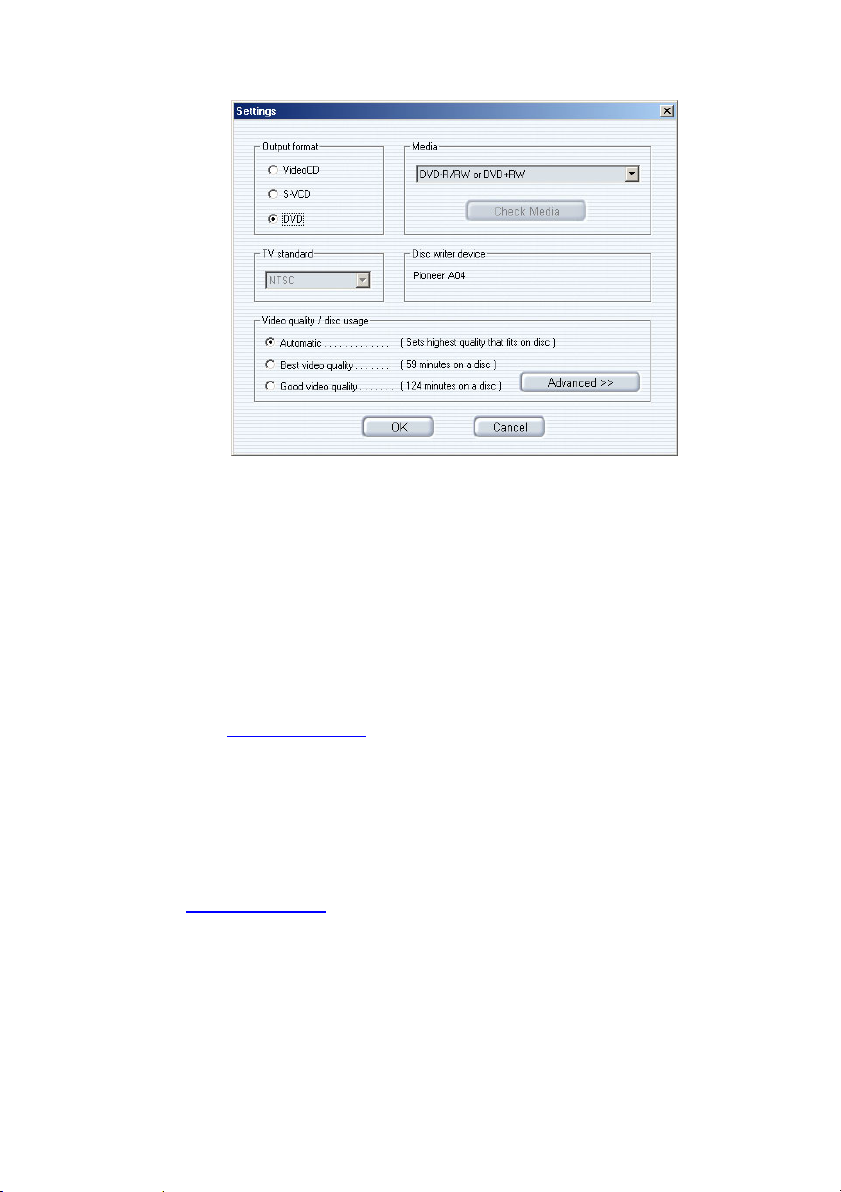
Output format
Select the type of disc you wish to create:
VCD (VideoCD): A VideoCD disc allows up to 70
minutes of VHS-quality video to be burned onto a CD
with any CD-Burner and is supported by a large
number of DVD players. Check the Pinnacle web site
and VCDhelp.com for a list of compatible players.
The Settings dialog box
S-VCD (Super-VideoCD): Super-VideoCD is an
enhancement to the VCD format. An S-VCD disc
allows up to 39 minutes of near-DVD quality video to
be burned onto a CD and is supported by a number of
DVD players. Check the Pinnacle web site and
VCDhelp.com for a list of compatible players.
DVD: A DVD disc is the ultimate in video quality.
Instant VideoAlbum can burn up to 90 minutes of highquality video and audio (or up to 232 minutes at decent
quality) onto a DVD-R/RW or DVD+R/RW disc. For a
list of compatible DVD burners, check the Pinnacle
web site.
16 Instant VideoAlbum
Page 23

Media
Based on the output format you choose, Instant
VideoAlbum will prompt you as to which type of
media is needed.
CD-R (and CD-RW): Use for VCD and S-VCD titles.
If you are using CD-RW, Instant VideoAlbum will
prompt you to erase the disc.
DVD-R/RW or DVD+R/RW: Instant VideoAlbum
supports General and Authoring DVD-R (write once),
DVD-RW (write many), DVD+R (write once), and
DVD+RW (write many) media. There are five basic
types of DVD burners – Authoring DVD-R (expensive,
for professional use), General DVD-R/RW, DVD+RW,
DVD+R/RW and DVD-RAM. Instant VideoAlbum
does not currently support DVD-RAM, as this format
cannot play in a standard DVD player. As newer DVD
players begin to support this format, check the Pinnacle
web site for updates.
Check Media button
Place the blank or erasable disc into your drive and
click the Check Media button. Instant VideoAlbum will
verify its usability.
TV standard
The discs you create will work properly with only one
of the NTSC and PAL television standards. If a choice
is offered, pick the one your target audience will be
using.
Chapter 3: Disc Settings 17
Page 24

Video quality / disc usage
The three main choices here are presets that control the
quality of the video that will be stored on your DVD or
S-VCD discs (no options are provided for VCD discs
because the standard dictates a single video quality
setting).
Because higher-quality video requires more
information for each second of playback, there is a
trade-off between quality and the amount of video that
will fit on a disc. While a short production may fit
comfortably on disc at the highest quality setting, as the
duration increases the quality may have to be reduced.
Quality is expressed in terms of bit-rate in kilobits per
second. The higher the bit-rate, the higher the quality of
your video. A very high quality setting of 8000 kilobits
per second will result in the best video image that your
DVD player can provide, though you will only be able
to fit up to 52 minutes of video into a DVD disc at this
bit-rate. Low settings, in the realm of 2000 kilobits per
second, are roughly equivalent to “VHS quality” – the
playback quality of an ordinary VCR.
Automatic: This is the default setting, and is
recommended for most users. It sets the highest
possible quality for your project based on the amount
of video and the number of stills you have included.
For example, if you have 68 minutes of video in your
DVD project, Instant VideoAlbum will use the full
capacity of the DVD disc by encoding your finished
video at the highest possible bit-rate (6000 kilobits per
second in this example). A longer project with almost 2
hours of video would be burned at a bit-rate of 3000
kbps.
18 Instant VideoAlbum
Page 25

Best video quality: This setting allows you to force the
highest possible bit-rate for your project, resulting in
the best possible quality. Keep in mind that in this
mode you will be able to get no more than 52 minutes
of video onto your DVD (31 minutes for S-VCD).
Good video quality: This setting allows up to 114
minutes of video on a DVD (39 minutes for S-VCD)
while still maintaining good quality.
Custom settings
These settings are recommended for advanced users
only.
Bit-rate: The pull-down list offers several bit-rate
settings, ranging from 3000-8000 kbps DVD and
2000-2500 kbps for S-VCD. Selecting a higher bit-rate
from the list causes the "minutes on a disc" display to
decrease accordingly, and vice versa.
You can also type in your own bit-rate setting (e.g.
6553 kbps) if you prefer. Instant VideoAlbum accepts
bit-rates as low as 2000 kbps.
After you close the Output Media Settings window,
you will notice that the Disc Meter icon changes to
reflect your selection. Check the icon after entering a
custom settings to make sure you have not gone over
the disc limit.
Chapter 3: Disc Settings 19
Page 26

“Draft” mode: This setting accelerates the encoding of
your project. Instant VideoAlbum will encode up to
three times faster when the box is checked, but the
quality of the video will not be as high.
MPEG Audio: This setting is for DVD output only.
MPEG Audio requires less disc space. While most
DVD players support MPEG audio, not all do. You
should therefore check this box only if you need to fit
more video on your disc and you are sure your DVD
player supports the format. The “minutes on a disc”
display will increase when this option is used.
20 Instant VideoAlbum
Page 27

Clicking on the Select Style button takes you
to the Select Style screen. This screen lets
you determine what the start up menu will look like on
your finished disc. The screen looks like this:
The Style Chooser
Chapter 4:
Menu Styles
The Style Chooser on the left of the screen is filled with
collections of pre-designed menu styles which feature a
variety of backgrounds (both still and animated), text
styles and frame styles. Click on any menu style
thumbnail in this list and you will see a preview of your
disc menu in the TV Screen on the right using that style.
The “No Menu” Item
You will notice that the very first item in the Style
Chooser is “No Menu”. Select this item if you want
your final disc to begin playing immediately when
placed in a DVD player with no initial menu screen.
Note that you will still be able to navigate through the
disc with your DVD player’s remote control.
Chapter 4: Menu Styles 21
Page 28

Creating a Custom Menu Style
In addition to the numerous pre-designed menu styles
included with Pinnacle Instant VideoAlbum, you can
also create your own customized menu styles by
clicking on the Create Style button at the bottom of the
Style Chooser.
See “Chapter 7: Customizing Menu Styles” for a full
discussion on creating your own menu styles.
22 Instant VideoAlbum
Page 29

Chapter 5:
Previewing
Clicking on the Preview button at the top of
the screen takes you to the Preview Screen,
where Instant VideoAlbum shows how your finished
project will look when played on a television. You can
use the Remote Control on the left of the screen to
navigate through your project.
In addition to previewing your project, this screen is
also where you rearrange, edit and enhance video and
photos using the Edit Video dialog box. You’ll learn
more about rearranging and editing in “Chapter 8:
Editing Video & Photos”.
THE REMOTE CONTROL
The Instant VideoAlbum Remote Control features all
of the functions needed to navigate through DVDs,
VideoCDs, and Super VideoCDs, and play back videos
and slideshows in any order.
Chapter 5: Previewing 23
Page 30

Note: Some navigation features of DVD differ from
VideoCD and Super VideoCD.
DVD discs let you navigate through a menu page to
select a button. With VCD and S-VCD discs, you must
use the number pad on the remote control to choose
which button to select in the menu.
To jump back to a menu with DVD, you can use the
Menu button. For VCD and S-VCD, however, you
must use the Return button.
Number pad
The 10 digit number pad allows direct access to any
video file or slideshow in your project. If you are not
already on a menu page, click the Menu button (for
DVDs) or the Return button (for VideoCDs or
Super VideoCDs) to return to a menu page, then key in
the number of the video or slideshow you wish to see
using the number pad. Instant VideoAlbum will play it
immediately.
DVD navigation buttons
These buttons provide navigation to
scenes within a menu. The four arrow
buttons take you up, down, left, and right
within a menu. When you have selected
the desired scene, click the Play button.
24 Instant VideoAlbum
Page 31

The two remaining buttons have dual functions:
When a scene is playing or paused, is Play
Previous Scene and is Play Next Scene.
When a menu page is displayed, is Show Previous
Menu Page, and is Show Next Menu Page.
Note: If you can’t navigate through DVD menu pages
with the arrow buttons, click the Settings button
beneath the TV Screen and verify that you’ve selected
DVD as your output format.
Movie controls
These are controls for the movie only, and do not affect
scenes or menu pages.
THE TV SCREEN
The TV Screen shows what you will see on your TV
when your final disc is played in a DVD or VideoCD
player. It displays menu pages as well as full-motion
video and still images from your project.
Chapter 5: Previewing 25
Page 32

You can use the Remote Control on the left of the
screen to navigate though your project, or click directly
on scene thumbnails and the Next and Previous arrow
buttons in the TV Screen preview.
Cursor navigation
If a project has more than one menu page, left and right
arrows will appear at the bottom of the page to indicate
previous or subsequent pages. You can click directly on
these arrows in the TV Screen to navigate though menu
pages.
26 Instant VideoAlbum
Page 33

Chapter 6:
Burning
The final step in creating your disc is to
burn your project onto a DVD or CD.
Clicking on the Burn button takes you to the Burn
screen.
Prior to burning, you will have already chosen the
output format and quality settings for your disc from
the Settings dialog. As a result, burning your final disc
is a simple, one step process: Just click on the Burn
button , and Instant VideoAlbum will do the
rest!
For more information, see “Settings Dialog” on page
15.
Chapter 6: Burning 27
Page 34

BURNING THE DISC
During the burning process, Instant VideoAlbum will
automatically convert all of your video and photos into
the appropriate video format (MPEG-2 for DVD and
Super VideoCD, MPEG-1 for VideoCD) and then write
these files to your blank disc.
The progress bar at the top of the screen tracks the
progress of the file conversion stage, and the progress
bar beneath it then tracks the disc writing stage.
When the burn has finished, your disc tray will pop
open with the completed DVD, VideoCD, or Super
VideoCD. If you have chosen to burn more than one
disc, you will be asked to load another blank disc.
Temporary files
When the Burn process is started, Instant VideoAlbum
converts the files used in your project into a set of files
of the appropriate format for your output device. This
involves the creation of a large number of temporary
files, and may require considerable space to be
available on your hard drive.
These files are not automatically deleted by Instant
VideoAlbum, so it is important to be aware of where
they are stored, and when you may need to delete them
manually.
28 Instant VideoAlbum
Page 35

Changing the temporary files folder
By default, the temporary files that Instant
VideoAlbum creates during the file conversion process
are placed in a temporary folder in the Instant
VideoAlbum folder. If you would like these temporary
files to be created somewhere else, click on the Burn
options button beneath the top progress bar and change
the destination folder in the Make Disc Options dialog.
The Make Disc Options dialog box.
Deleting temporary files
The temporary files created during the file conversion
stage of the disc burning process can be quite large
(depending on the size of your project). When you are
finished burning your disc, you can clean up these files
and restore available space to your hard drive if you
wish by clicking on the delete temporary files button.
The Clean up temporary files dialog will appear with
options for deleting all of the files for a particular
project, or all of the temporary files you have created
so far in all of your projects.
Chapter 6: Burning 29
Page 36

The Clean Up Temporary Files dialog box.
File conversion
In order to make the file conversion stage of burning as
fast and efficient as possible, Instant VideoAlbum will
avoid unnecessarily converting any MPEG-1 or
MPEG-2 video file that is already in the appropriate
target format.
MPEG files in the following formats will not require
any conversion during disc burning:
DVD: MPEG-2, 720 x 480, 2-8Mbps
VCD: MPEG-1, 352 x 240, 1.2Mbps
SVCD: MPEG-2, 480 x 480, 1-2.5 Mbps
Note: Video files in these formats may still need to be
converted during burning if the video has been edited
or modified in certain ways, or if they include audio
that is not in the correct format for the output disc.
30 Instant VideoAlbum
Page 37

Chapter 7:
Customizing Menu Styles
In addition to choosing pre-designed
menu styles for your projects, Instant
VideoAlbum also allows you to create
custom menu styles to help personalize your projects.
To create a custom menu style, click on the Create
Style button at the bottom of the Asset List
window. The Create Custom Menu dialog will appear.
This dialog gives you control over almost every aspect
of menu style design, including the font and text styles
used for the menu title and video / photo “thumbnails”,
the frame style for thumbnails, the positioning / layout
of thumbnails, the menu background, and the selection
of music that will play while the menu is being
displayed.
Chapter 7: Customizing Menu Styles 31
Page 38

Backgrounds
A menu background is an image or video file that is
used as the background layer of a menu page. Instant
VideoAlbum comes with a number of attractive still
and motion backgrounds and also allows you to import
your own graphics or video for use as a custom menu
background.
To select a background, click on the Background tab
and then scroll through the list of available
backgrounds, or click on the Import button to select
one of your own images or video files for use as a
menu background.
Note: If you use a video file for a menu background
(otherwise known as a motion menu), the video file
you choose will loop continuously as long as the menu
page is displayed. Video files should not be more than
40 seconds long, however. If you select a video that is
longer than 40 seconds, only the first forty seconds of
your video will play / loop.
Frames
A frame encloses each video or photo thumbnail. There
is a variety of border styles and colors to choose from
in Instant VideoAlbum.
32 Instant VideoAlbum
Page 39

Layout
In addition to providing a sense of style within a menu,
frames highlight to indicate which video or photo
thumbnail is currently selected when navigating
through a disc.
Note: Not all of the thumbnails that are displayed
using a particular menu style will use the same frame.
A “Layout” is a template that determines how the menu
title, video and photo thumbnails, and thumbnail titles
will be arranged on a menu page. In addition to
offering a variety of different sizes and positions for
these elements, some layouts offer more or fewer
thumbnails per menu page than others.
Note that the icon for each layout contains colored
rectangles representing three types of content:
• Turquoise: thumbnail frames
• Light purple: menu title (heading)
• Dark purple: scene numbers and titles (captions)
Type
Type refers to a text style that includes the selection of
fonts for both the menu title and the thumbnail titles as
well as a color and visual treatment, or “effect” (such
as a shadow, glow, etc.) for that text.
Chapter 7: Customizing Menu Styles 33
Page 40

You can also specify that a particular font be used for
your menu title or for thumbnail titles with the “Font
for headings” and “Font for captions” drop down
menus to the right of the preview screen.
Music
Music can be used as a menu page element. Instant
VideoAlbum comes with a selection of music and
sound effects that can be used in your projects. You can
also import your own music, sound effect, or narration
files using the Import button at the right of the dialog.
Audio Looping
Instant VideoAlbum sets a minimum duration for an
audio “loop” at 40 seconds, and the maximum duration
at 280 seconds. If your audio file is shorter than 40
seconds (or the length of the current looped video
background), silence will be inserted at the end of the
audio to fill in the remaining time. If the audio is longer
than 280 seconds (or the length of the current looped
video background), the audio will be cut off at 280
seconds or the length of the video loop and begin
playing again.
34 Instant VideoAlbum
Page 41

Chapter 8:
Editing Video and Photos
In addition to importing your video and photos,
creating attractive disc menus for your projects, and
burning your projects to disc, Instant VideoAlbum also
allows you to edit, organize, and enhance your video
clips and images with the Edit Video dialog.
The Edit Video dialog allows you to:
• Rearrange, rename, and trim video clips
• Create, edit, and rename photo slideshows
• Select thumbnail images for videos and slideshows
• Enhance your videos and photos
To launch the Edit Video Dialog, click the Edit button
on the Preview screen.
THE EDIT VIDEO DIALOG
The Edit Video dialog provides several areas that let
you fine-tune your production.
The Asset List
This is a slightly modified version of the Instant
VideoAlbum Asset List that displays all of the video
and photos used in your project. You can reorder,
rename, and delete videos and photos within the Asset
List, as well as mark and unmark chapter points for
your final disc.
Chapter 8: Editing Video and Photos 35
Page 42

The Preview Screen
Similar to the TV Screen used elsewhere in Instant
VideoAlbum, the Preview Screen works in conjunction
with the Asset List to allow you to preview and edit
your videos and slideshows.
The Edit Video dialog box.
Editing Tools and Options
The column of buttons between the Asset List and the
Preview Screen gives you access to a variety of tools
and options for modifying your video and photos and
controlling the appearance of your disc menu.
Information Display Area
Beneath the Preview Screen is a text summary of
important details about your current project, including
the currently selected output disc format, remaining
room on your disc, etc.
36 Instant VideoAlbum
Page 43

THE ASSET LIST
The two tabs at the top of the Asset List in the Video
Edit dialog allow you to view your videos and photos
in two different ways:
Icon View displays your media as an
ordered list of graphic thumbnails, each
accompanied by a file name and an editable text name.
Text View is a more compact, text-only
format that displays your media as a
simple list of ordered (editable) names.
Both views allow you to arrange and rename your
videos and photos, and you can switch freely between
the two views whenever you wish.
Renaming objects
Instant VideoAlbum gives each video and slideshow in
your project a default name, as well as a number that
reflects the position of that object in the current list.
The default names are displayed next to or beneath the
video and slideshow thumbnails on your disc menu.
If you would like to change the name of any video or
slideshow, click on that object in the Asset List and
then edit the name in the text edit field that appears.
Press Enter
Chapter 8: Editing Video and Photos 37
to complete the operation.
Page 44

Rearranging objects
You can sort videos, slideshows, and photos within a
slideshow into whatever order you wish. To move an
item, move your mouse over the object until the
"grabbing hand" pointer appears, then drag the
object to wherever you wish.
To move multiple objects at a time, click outside of the
first desired item and drag your mouse to highlight the
objects you want to move, release the mouse, then click
on the highlighted group and drag it wherever you wish.
You can also select multiple objects in the list that are
not next to each other using the Windows standard
Shift+Ctrl key combination to select each item.
Duplicating objects
You can duplicate and otherwise edit selected items
using the standard Windows keyboard shortcuts for Cut
(Ctrl+X), Copy (Ctrl+C), and Paste (Ctrl+V).
Deleting objects
To delete an object or group of objects,
select the desired object(s) and then click on
the Delete button at the bottom right of the Asset List.
38 Instant VideoAlbum
Page 45

Opening and closing video chapters
Instant VideoAlbum refers to individual video objects
in the Asset List as “Chapters”. Chapters appear in disc
menus as thumbnail images.
Instant VideoAlbum automatically divides video
chapters into “Scenes” by detecting natural breaks or
divisions that exist within the video.
You can view and manipulate the list of contained
Scenes for any video chapter by clicking on the + sign
to the left of the desired chapter, or hide it by clicking
on the - sign to the left of the desired chapter. If there is
no + or - sign next to a particular video chapter, it does
not contain multiple video scenes.
You can also convert a scene into a Chapter or a
chapter into a scene by selecting the desired video
object and then clicking on the Mark Chapter or
Unmark Chapter buttons. Converting a scene into a
Chapter will cause it to appear in your final disc menu
as a thumbnail button.
Chapter 8: Editing Video and Photos 39
Page 46

Opening and closing slideshows
Instant VideoAlbum refers to collections of photos
and/or other images as Slideshows.
As with Video Chapters that contain individual video
Scenes, Slideshows contain individual photos which
can be viewed and manipulated by clicking on the +
sign to the left of the desired slideshow.
The display of individual photos within a slideshow
can be collapsed back into a single Slideshow item in
the Asset List by clicking on the - sign to the left of a
Slideshow object.
You can also convert a range of photos within a
slideshow into a new slideshow by clicking on a photo
and then clicking the Mark Chapter button. All of the
photos from that point on in the slideshow will be
grouped into a new slideshow.
As with Video Chapters, you can collapse the new
slideshow back into the old one by clicking on it and
then clicking on the Unmark Chapter button.
Importing images from Windows Explorer
A quick way to build a slideshow in Instant
VideoAlbum is to drag images directly into the Asset
List from Windows Explorer. Image files imported in
this way will create a new slideshow at the beginning
of your production.
You can then re-order these images within the Asset
List by dragging them into place as described in
Rearranging Objects. on page 38.
If you drag in a folder of images, the new slideshow
will be given the name of that folder.
40 Instant VideoAlbum
Page 47

THE PREVIEW SCREEN
The buttons and controls within the Preview Screen let
you navigate through video chapters, video scenes, and
slideshows, and allow you to trim individual video
chapters and scenes.
Scrubber: The Scrubber is a position indicator that
shows you at a glance where you are within a video or
slideshow. You can grab the Scrubber with your cursor
to quickly move forward and backward within a
chapter, scene, or slideshow.
Go To Beginning: Moves the Scrubber to the
first frame of your scene.
Fast Reverse: Plays the scene in fast-reverse
mode at 10x normal playback speed.
Play/Pause: Starts or stops playback from the
current position.
Fast Forward: Plays the scene in fast-forward
mode at 10x normal playback speed.
Chapter 8: Editing Video and Photos 41
Page 48

Frame Forward: Advances the Scrubber by one
frame with each click.
Frame Reverse: Backs up the Scrubber by one
frame with each click.
Start Clip Marker: Shows the trimmed
beginning point of a selected scene (or a chapter which
does not contain multiple scenes).
To trim the start point of a video object, grab the Start
Clip Marker and move it to a particular video frame
where you would like the video to begin.
End Clip Marker: Shows the trimmed end point
of a selected scene (or a chapter which does not
contain multiple scenes).
To trim the end point of a video object, grab the End
Clip Marker and move it to a particular video frame
where you would like the video to end.
EDITING TOOLS AND OPTIONS
The Edit Video dialog gives you access to a number of
tools and options for modifying your videos and photos
and controlling how your final disc will look and
behave when played back on a DVD or VCD player.
Project options
Clicking on the Project Options button
launches the Edit Options dialog. This
dialog allows you to control the behavior of Chapters
and Slideshows on your final disc.
42 Instant VideoAlbum
Page 49

The Edit Options dialog box.
Show chapter names when playing: This displays the
chapter or slideshow title for 2 seconds at the beginning
of each chapter or slideshow.
Return to menu at end of chapter: This returns the
viewer to the menu page after each chapter or
slideshow. If this choice is not made, each subsequent
chapter or slideshow will play automatically without
user intervention.
Fade to black between chapters: This option places a
video cross-fade between all chapters and slideshows.
The cross-fade does not affect audio.
Chapter options
The Chapter Options button enables you to
adjust the way in which Instant VideoAlbum
treats your final video or slideshow presentation.
The options available are different, depending on
whether the chapter contains video or photo material.
Video options
If a video is selected in the Asset List, clicking on the
Chapter Options button launches the Chapter Options
dialog. This dialog can be used to automatically create
Chapter 8: Editing Video and Photos 43
Page 50

a music video with the currently selected video and a
music track of your own choice – or you can choose
from a variety of supplied musical styles.
The Chapter Options dialog box.
You can select the musical style you wish to use for
your new music video from the drop-down menu, or
import song or music track of your own by clicking on
the Import file button. Instant VideoAlbum will then
automatically create a music video for you, editing the
video in time to the music!
Slideshow options
If a slideshow is select in the Asset List, clicking on the
Chapter Options button launches the Slideshow
Options dialog. This dialog allows you to set options
for the currently selected slideshow in the Asset List.
High-resolution still-image mode: By default,
slideshows are recorded to disc as MPEG formatted
video. For VCD and S-VCD discs, you can choose an
alternate mode, in which your slideshow is saved as a
sequence of high quality, high resolution still images.
Slideshows saved in this format offer much better
image quality than the regular video mode, but
44 Instant VideoAlbum
Page 51

transitions (such as dissolves, wipes, etc.) between
images are not available in this mode.
The Slideshow Options dialog box.
High-resolution mode also allows you to give control
over the progress of slideshow directly to the user
(using the “next chapter” and “previous chapter”
buttons on the remote control); although it should be
noted that background audio is not available for usercontrolled slideshows.
Note: High-resolution still-image mode can be set for
slideshows output to VideoCD and Super VideoCD
discs only. It is not needed for DVD discs as DVD
resolution is already very high.
Image archive: Check this option if you would like to
store copies of the original image files that make up
your slideshow on your target disc. These additional
image files won’t be displayed along with regular
slideshows when the disc is played back, but they will
Chapter 8: Editing Video and Photos 45
Page 52

be accessible as image files if the disc is accessed with
a computer.
Note: The archived images will be unmodified by any
image enhancements you may have made within the
slideshow itself. The image files will be stored in a
subfolder named after the Slideshow.
Use audio soundtrack: Check this option to add a
musical background to your slideshow. You can select
from Instant VideoAlbum’s drop-down list of musical
pieces, or import your own by clicking on the Import
File button and browsing to the desired WAV or MP3
music file.
Show each slide indefinitely: This option is available
only when the high-resolution still-image mode is used
(see above). It leaves the pacing of the slideshow up to
the viewer, who can move from one image to the next
by using the next chapter and previous chapter buttons
on their remote control.
Note: Background audio is not available with this
option.
Show each slide for x seconds: This option sets a
fixed length for the display of each image. The
minimum duration is 1 second, and the maximum is
999 seconds. All images within a slideshow will have
the same duration.
Fit slideshow to length of audio: This setting is only
available when Use audio soundtrack option has been
selected. This option will automatically set the duration
of each image so that the entire slideshow will be
exactly as long as the selected audio soundtrack.
46 Instant VideoAlbum
Page 53

Automatic beat-detection: This option lends a more
dramatic mood to your slideshow by synchronizing the
changes from one image to the next with the beat of the
selected music.
Transitions between images: This drop-down list lets
you customize your slideshow with a variety of
transitions including wipes, slides, pushes and dissolve.
The selected transition will be used between every
image in the selected slideshow.
For some of the transitions, a direction can also be
specified using the neighboring Direction button.
Repeatedly clicking on this button will cycle through
all of the possible directions for the selected transition.
Note: Transitions are not available with slideshows
that use the high-resolution still-image mode discussed
above.
Change thumbnail
The Change Thumbnail button allows you to
choose a new thumbnail for a video chapter,
video scene, or slideshow that might be more
representative than the default first frame or image.
For video chapters and scenes, use the Transport
controls in the Preview Window to navigate to the
frame or image you want to use as a new thumbnail and
then click the Change Thumbnail button. You can use
the Frame Forward and Frame Reverse buttons to
choose the precise frame you wish to designate.
To change the thumbnail for a slideshow, expand the
slideshow with the + button, click on one of the images
within the slideshow, and then click on the Change
Thumbnail button.
Chapter 8: Editing Video and Photos 47
Page 54

Enhance
Instant VideoAlbum offers a variety of tools for
enhancing and cleaning up your video clips and photos.
Selecting a video or photo in the Asset List
and then clicking on the Enhance button will
open a panel of specialized enhancement tools beneath
the transport controls in the Preview Window.
Video enhancement tools
Auto-correct color option: Clicking on this option
turns on a filter that attempts to correct video that is too
dark or which features unnatural colors by restoring a
more natural brightness and color balance.
Stabilize motion option: Home videos are sometimes
difficult to watch if the footage is very shaky. Selecting
this option turns on a filter that attempts to remedy
shaky video footage by smoothing out the apparent
motion of the camera.
Cleanup option: This is a general purpose “fix up”
filter that will try to correct several common video
problems:
• Video shot in very low light that appears grainy
• Video that has been degraded substantially by being
copied many times
• Excessive wind noise in the audio track of video shot
outdoors
48 Instant VideoAlbum
Page 55

Note: Auto-color correction, Stabilize motion, and
Cleanup video noise will not correct problems in all
video footage. The effectiveness of these tools will
vary with the supplied video clips.
Adjust Brightness: Clicking on this option allows you
to adjust the overall brightness of your video clip with
the Brightness Slider beneath it.
Note: This slider will only affect your video when the
option is checked.
Apply: When you have finished making changes to
your video with the Enhance tools and options, click on
the Apply button.
Instant VideoAlbum will apply the enhancements that
you have chosen to your video.
Photo enhancement tools
Rotate left: Rotates the image 90 degrees
counterclockwise. If the rotated image doesn’t
fit exactly within the frame, the extra space will be
filled in with the current border color.
Rotate right: Rotate the image 90 degrees
clockwise. Blank areas are filled in with the
current border color.
Chapter 8: Editing Video and Photos 49
Page 56

Mirror image: The image is reversed
horizontally. Repeating the operation restores
the original appearance.
Crop/Zoom: Clicking on this button causes a
cropping frame to appear around your image.
You can drag this frame and its control points to
perfectly frame the portion of the image you are really
interested in.
When you are done, click the Crop/Zoom button again
and the newly marked region will expand to fill the
Preview Window, with any unused portion being filled
in with the current border color.
Note: If you want the cropped image to maintain the
same proportions as the original, only manipulate the
cropping frame with its corner control points and by
dragging it — don't use the mid-line control points.
Set border color: Many photos and images are
not the same proportion as a video image (4x3).
Because of this, blank areas will appear above and
below a wide photo, or to the left and right of tall
photos.
By default, Instant VideoAlbum will automatically fill
in these blank areas with whatever color appears in the
very top left corner of your image. This is called "Auto
color". While this often produces a pleasing result,
there may be times when you wish to change the border
color to something else. You can do this by clicking on
the Set border color button, and choosing one of the
four options in the menu that appears: Auto-color (the
default, as just described); black; white; and Choose
color, which will let you choose any border color from
a color picker dialog.
50 Instant VideoAlbum
Page 57

Full-size view: To see details in your image
that may not be visible in the small Preview
Window, click on the Full-size view button, and you
will see your image at full size in its own window.
Click anywhere in this new window to close it when
you are done.
Reset to original image: This button restores
the image to its original form, canceling the
effect of any changes or enhancements you have made.
Brightness slider: Increases or decreases the overall
brightness of the image. Use this to correct an overly
dark or light image.
Contrast slider: Increases or decreases the overall
contrast in the image. Adjustments to both contrast and
brightness may be needed to achieve the optimum
effect for many images.
Hue slider: Changes the overall color balance of the
image. This can be used to correct a strong color cast
affecting the entire image, or to create other worldly
color effects in many photos.
Color saturation slider: Increases or decreases the
overall amount of color in the image. Pushing the slider
all the way to the left will remove all color from your
image. Pushing the slider all the way to the right will
usually result in garish, oversaturated colors.
Split
The Split button may be used to split the
currently selected video chapter or scene into
two separate video clips at the currently displayed
frame.
Chapter 8: Editing Video and Photos 51
Page 58

INFORMATION DISPLAY AREA
The text display beneath the Preview Window shows
you critical information about your project at a glance,
including the total duration of all the video and menus,
number of chapters and menu pages, disc output format
and capacity, remaining space on your target disc, and
duration and type of the currently selected object.
52 Instant VideoAlbum
Page 59

Chapter 9:
Making labels and inserts
You’ve shot your video, you’ve put your production
together, and you’ve made your disc. Now what? Well,
why not make an attractive disc label or insert for your
video production?
Don’t worry; if designing a professional looking label
sounds like too much work, you’ll be pleased to
discover that Instant VideoAlbum makes it very easy
by using your menu styles and clip names to
automatically creating designs for each of the following
for you:
• a disc label
• a jewel case tray liner and booklet (for Video CDs
and Super Video CDs)
• a DVD cover.
Of course, you can choose to print only the elements
you require for each project, and you can print any of
the automatically generated designs as is or edit them
in the Make Custom Labels dialog.
THE MAKE CUSTOM LABELS DIALOG
Open the Make Custom Labels
dialog box by clicking on the
Print labels button on the bottom left of the Burn
screen, or by clicking the OK button in the dialog that
appears following disc burning.
Chapter 9: Making labels and inserts 53
Page 60

Label type tabs
The four tabs across the top of the dialog let you
specify which type of insert or label you want to work
on in the Edit Window below. The four types are:
CD/DVD label
ordinary audio CD), the same label design will work
with any output format.
This label goes on the disc itself. Since
DVD, VCD, and S-VCD discs are all
the same size (the same size as an
CD insert
This is a single folding sheet that forms
the outside front and inside front covers
of the VCD or S-VCD jewel case.
CD liner
This liner goes under the tray in a VCD
or S-VCD jewel case. Your text appears
on the back of the case, and along its
left and right edges.
54 Instant VideoAlbum
Page 61

DVD insert
spine, and back of the DVD cover.
The Edit toolbar
These six buttons access the main editing operations of
the Make Custom Label dialog. Detailed editing of text
and images is carried out using your mouse and
keyboard in the Edit Window below it.
Background
change this image by clicking on the Background
button. This opens a file browser that lets you select
any image on your system for use as a background. The
image you select will be stretched to fit the type of
label you are working on.
This is a single folding sheet that slips
into the clear plastic liner on the outside
of a DVD case and forms the front,
The default background used by Instant
VideoAlbum is the background you
selected for your disc menu. You can
Add picture
This button also opens a file browser for
selecting images from your system. These
images, however will be placed in front of
the background image. You can change the size, shape,
and position the image in the Edit Window.
Replace picture
This button is only available when a
foreground image is currently selected
within the Edit Window. (See “The Edit
Chapter 9: Making labels and inserts 55
Page 62

Window” on page 58 for more information.)A file
browser opens, allowing you to select a new image file,
and this image replaces the existing one while
preserving its size, shape, and position.
Add text
This button pops up a menu offering four
varieties of text that you can add to your
design. The four text types are:
• Simple text: This option creates a text box that
allows you to position, stretch and skew text
however you wish. Simple text does not, however,
support the outline and shadowing features provided
by the other text types.
• Curved text: Curved text has the same properties as
simple text but is drawn around the edge of an
ellipse instead of along a straight line – very handy
for disc labels!
• Angled text: This text box makes it particularly easy
to position your text at an angle. (To achieve a
similar effect with other types of text box, see
“Rotating an object” on page 61.)
• Stretchable text: For a dramatic perspective effect,
use stretchable text. This type of text can be warped
to create a perspective effect just by dragging the
corners with your mouse.
For information on the various ways of changing the
size, position, proportion and angle of text boxes, see
“The Edit Window” on page 58. To modify the text
itself, or its font, style and color, please refer to “The
text controls” on page 61.
56 Instant VideoAlbum
Page 63

Re-create
The first time you open the Make Custom
Labels Dialog from within a new Instant
VideoAlbum project, a set of default
designs for your labels and inserts is created
automatically. These are based on the particulars of
your production, including the menu style you have
chosen and the names of your clips and images.
If you would like your labels and inserts to reflect
changes and additions that you make to the project after
the default design has been generated, click on the
Match Project button. Your current label designs will
be replaced by an entirely new set, just as though you
were opening the Make Custom Labels editor for the
first time in this project.
When you click on the Match Project button, Instant
VideoAlbum will present you with a list of design
styles to choose from. Choose a style from among
those offered then click OK. You can try different
styles until you find the one that works best for your
project.
Note: Any customization that you have performed on
your labels and inserts after they were originally
created will be lost when you click on the Match
Project button. In some cases, you may prefer to
update individual design elements manually to reflect
minor changes to your project.
Print
To print out your labels and inserts, click
on the Print button. The Print Custom
Labels dialog box opens, allowing you to
specify what exactly is to be printed. For more
information, see “The Print Custom Labels dialog” on
page 62.
Chapter 9: Making labels and inserts 57
Page 64

The Edit Window
The Edit Window is the main work area for
customizing the appearance of labels and inserts in the
Make Custom Labels dialog. With your mouse and
keyboard you can quickly edit the size, shape and
orientation of the objects – images and text boxes – on
the current label.
Both the objects created for you by Instant
VideoAlbum and those you have added manually can
be edited.
Images vs. text
Editing the size, shape and angle of the objects works
the same way for both text and images.
To edit the other properties of a text box – the font, the
style and the text itself – see “The text controls” on
page 61.
58 Instant VideoAlbum
Page 65

Editing with guide lines and alignment lines
The Edit Window has rulers along the top and left edge
that are marked at regular intervals with light gray
guide-lines. Use these as a visual aid for positioning
and aligning objects.
You can also add alignment lines to the Edit Window
by double-clicking at the desired position on the
horizontal or vertical ruler. When the edge of a text box
or image is dragged into the vicinity of an alignment
line, the object will “snap” into place, making it easy to
achieve perfect alignment.
If you need to adjust the position of an alignment line
that you have created, move your mouse pointer along
the Edit Window ruler until you see a positioning cursor,
then click and drag the line as desired. To remove an
alignment line, double-click its position in the ruler.
Selecting an object
Clicking on an object selects
it. When you select an object,
a rectangular frame appears
around the object with
various control points that
you can click on and drag to manipulate the object.
Your mouse pointer will turn into a cross of arrows
whenever it is over an object or control point that can
be moved.
Editing with control points
Different types of object provide different numbers of
control points for accessing the object’s properties and
capabilities.
Chapter 9: Making labels and inserts 59
Page 66

To use a control point, click on it, drag the point to
wherever you wish to place it, and then release the
button. You will notice that the mouse pointer for a
control point is a smaller version of the crossed-arrow
“drag” pointer that appears when your mouse is over
the main object.
At first glance, the numerous control points that appear
when an object is selected may seem a little daunting.
A little experimentation, however, should quickly
reveal how to operate all of the points for a particular
object.
Change box dimensions: The side, top, bottom and
corner control points are used to resize an object. In the
case of text, these control points do not affect the size
of the text, but rather the size of the box in which text
appears, letting you determine exactly where lines of
text should wrap.
Skew text box: The four square skew control points
that appear outside the resizing control points can be
used to tilt the text box vertically or horizontally.
Stretch text: These two circular control points can be
used to resize the actual text size both vertically and
horizontally.
Image objects offer exactly the same set of control
points just described, with the exception of the two
“stretch text” points.
Scaling: resizing without distortion
If you simply want to change the size of a selected
object without changing its shape, hold down the Shift
key, then click and drag your mouse pointer. Moving
the mouse point up will enlarge the object, while
moving it down will shrink the object.
60 Instant VideoAlbum
Page 67

Rotating an object
To rotate an object, begin by double-clicking on it.
Your mouse pointer will change to a cross hair with a
circle to show that the object is now in rotation mode.
Click on or near the object and drag your mouse in a
circle. The object will rotate along with your mouse
pointer, using the point where you clicked as its center
of rotation. To complete rotation, simply release the
mouse.
Grouping objects
If you want to position or rotate more than one object at
the same time, begin with a left-click in any empty part
of the Edit Window (i.e. not on any object). Click and
drag to create a translucent group selection box. Any
objects partly or wholly within the box when you
release the mouse are now temporarily grouped, and
can be manipulated as a single object for positioning
and dragging. The grouping is indicated by faint blue
line that surrounding each of the objects as long as the
group is in effect. To cancel the grouping, click
anywhere in the Edit Window except on one of the
grouped objects.
The text controls
Below the Edit Window is a set of controls that affect
the appearance of text in the currently selected text box.
Click the bold or italic buttons to toggle these styles on
and off for the selected text object, or select a font from
the font drop-down list.
Chapter 9: Making labels and inserts 61
Page 68

The Font Color button to the right of
the font drop-down list opens a pop-up
menu with two sets of options. The first
three items allow you to choose colors
for the selected text, its outline, and its
shadow. The second set of menu items
lets you turn any of these three attributes on or off.
Switch off the Filling attribute, for instance, if you
would like to create text in which the background is
visible through the text face.
The Print Custom Labels dialog
This dialog box is accessed with the Print
button in the Make Custom Labels dialog.
The dialog is divided into three areas.
The Papers area
This leftmost area provides a list of label stationery
types. Choose the type of paper stock you are planning
to use, then move on to...
The Preview area
This area shows how your labels will appear on your
chosen stationery. Only those label and insert types that
can be used with the paper type will appear. If there are
multiple possibilities, you can cycle through them by
clicking the previewed labels with the mouse.
One of the possibilities you will be offered is that of
not printing a particular label. This option is useful on
“two-up” disc label paper: if exactly one label is
required, a second label on the sheet represents only
wasted ink. Clicking the second previewed label to
blank it will result in faster, more economical printing.
62 Instant VideoAlbum
Page 69

The Control area
This area contains two main groups of controls.
The first, Printer, lets you select the printer you want
use from a drop-down list of the printers available on
your system. The Settings button lets you access the
options available for the printer you have chosen. The
Calibrate button opens the Calibration Wizard, which
gives instructions on calibrating your printer to achieve
optimum results. You should only have to calibrate
your printer once prior to printing labels for the first
time. Only return to the Calibration Wizard if you
notice printing alignment problems
The second group of controls, Paper, offers the
Number of Copies control, where you can specify how
many copies of the label page should be printed. We
recommend that you always print a single test page to
confirm your settings and calibration before printing
out multiple copies. The Print button initiates printing
using the options you have chosen elsewhere in the
dialog box.
Printing tips
The first release of Instant VideoAlbum supports the
paper types manufactured by Neato. Choose your
particular label type from the list on the dialog box. It
is expected that other label types will be supported in
future versions of Instant VideoAlbum. For more
information, please refer to:
http://www.pinnaclesys.com/neato
When inserting blank labels into your printer, be sure
to follow any guide marks and other indications on the
paper. In general, the specialized paper stocks used for
label and insert printing will only work properly when
inserted exactly in accordance with the manufacturer’s
recommendations.
Chapter 9: Making labels and inserts 63
Page 70

64 Instant VideoAlbum
Page 71

Appendix A:
Technical support
Pinnacle Systems has free self-service troubleshooting
assistance, 24 hours a day, 7 days a week. To access a
technical support, go to:
http://www.pinnaclesys.com/support/expression
There you can access any of the technical support
options described below, and also download the latest
updates to your Instant VideoAlbum software.
FAQs (Frequently Asked Questions)
This is the best way to get your questions answered.
View scores of technical questions and their solutions
on a wide range of subjects. They are sorted with the
20 most commonly read questions listed. It is also easy
to modify the sort order with the Sort pull-down menu.
Ask a question, find an answer
Simply type your question into the space provided to
see a list of the most likely solutions. Using this natural
language search, you can type in your question or the
symptom of your problem, such as "I am having
problems outputting to tape" or "I get an error message
when I try to capture". If you do not get relevant
solutions, try rephrasing your question. For example,
instead of entering "I get an error", you might try "I get
an error that states that my data rate is below 4000 kbps
when I capture".
Another useful trick for locating the right solution is to
make a selection on the Category the pull-down list.
Appendix A: Technical support 65
Page 72

For example, if you have a question about installing the
hardware or software, choose the category "Setup,
Install and Configuration Issues" to see the top ten
installation questions. The categories follow the main
features of Instant VideoAlbum along with some other
general categories.
Discussion forum
Nearly 100,000 users have registered to use this free
service. Search Pinnacle Systems’ on-line discussion
forum to see if someone has already encountered your
question. Post your question on the forum and get help
from Pinnacle Systems and other users. The forum is
also searchable, so you can type in “dropping frames”,
for example, to display discussions with solutions on
that topic.
Once you post to the discussion forum, you can get an
email notification when someone has replied to your
question. To get email notification, after you post your
question, simply click on the Email button in the upper
right hand corner of the Discussion Forum browser
window, then click OK.
Email support
If you are unable to find answers to your questions
using our website, Pinnacle Systems also offers
troubleshooting and technical support by email. Email
is usually responded to within 48 hours (excluding
weekends and holidays). Use the “Ask a Question”
section of the support web site to submit an email.
Before the email is submitted, five suggested solutions
to your issue will be presented to you. Please review
them. Over 70% of customers find their answer in these
suggested solutions.
66 Instant VideoAlbum
Page 73

Additional support
If you are still not able to solve your problem, please
check the Pinnacle Service & Support Center that was
installed with your Instant VideoAlbum software.
Click Pinnacle Instant VideoAlbum/Pinnacle Service &
Support Center in your Windows Start/Programs menu
and select your country. Here you will find additional
support information including the phone number for
technical support in your country.
Appendix A: Technical support 67
Page 74

68 Instant VideoAlbum
Page 75

Appendix B:
License agreement
Pinnacle End User License Agreement
This End User License Agreement ("License") is a legal agreement
between you and Pinnacle Systems ("Pinnacle") regarding Pinnacle’s
software and the accompanying documentation (collectively, the
"Software"). CAREFULLY READ THE FOLLOWING LICENSE.
USING THIS SOFTWARE INDICATES YOUR ACCEPTANCE OF
THIS LICENSE. IF YOU DO NOT ACCEPT OR UNDERSTAND
THE TERMS OF THIS LICENSE, YOU SHOULD NOT INSTALL
THE SOFTWARE AND PROMPTLY RETURN THIS PRODUCT
TO YOUR VALUE-ADDED RESELLER.
1. License Grant. Subject to the restrictions set forth below, this
License grants you a non-exclusive, perpetual license to (a) install the
Software on only one computer; (b) use or authorize use of the
Software on only one computer; (c) make one copy of the Software, in
machine-readable form, solely for backup purposes; provided you
include all copyright and other proprietary rights notices on the copy
and (d) transfer the Software and this License to another party if the
other party agrees to accept the terms and conditions of this License.
If you transfer the Software, you must at the same time either transfer
all copies to the same party or destroy any copies not transferred. If
you transfer possession of any copy of the Software to another party,
your License is automatically terminated.
2. License Restrictions. You may not, or allow any third party to, (a)
rent, lease, sell, loan or otherwise transfer the Software or any of your
rights and obligations under this License; (b) install the Software on a
network for use by multiple users, unless each user has purchased a
license; (c) reverse-engineer, decompile or disassemble the Software
or hardware in whole or in part; (d) remove or destroy any copyright
notices or other proprietary markings of the Software or any thirdparty software; (e) modify or adapt the Software, merge the Software
into another program or create derivative works based on the Software;
(f) make copies of or distribute, for profit or otherwise, the Software,
except as expressly provided above; (g) make any alteration,
modification, connection, disconnection, improvement or adjustment
of any kind to or use the Software except as explicitly contemplated in
the enclosed documentation and in this License and (h) sublicense,
Appendix B: License agreement 69
Page 76

transfer or assign this License or any of the rights and obligations
granted under this License, except as explicitly contemplated in this
License. Any purported transfer or assignment will be void.
3. Export Restrictions. The export and re-export of Pinnacle software
products are controlled by the United States Export Administration
Regulations and such software may not be exported or re-exported to
any country to which the United States embargoes goods. In addition,
Pinnacle software may not be distributed to persons on the Table of
Denial Orders, the Entity List, or the List of Specially Designated
Nationals. By downloading or using a Pinnacle software product you
are certifying that you are not a national of any country to which the
United States embargoes goods and that you are not a person on the
Table of Denial Orders, the Entity List, or the List of Specially
Designated Nationals.
4. Ownership. The license granted hereunder does not constitute a
transfer or sale of ownership rights in or to the Software. Except for
the license rights granted above, Pinnacle retains all right title and
interest in and to the Software including all intellectual property rights
therein. The Software is protected by applicable intellectual property
laws, including United States copyright laws and international treaties.
5. Third Party Proprietary Property. This Software may contain the
proprietary property of others, which has been licensed to Pinnacle,
your use of the Software is expressly conditioned on your agreement
not to remove any copyright notices or other proprietary markings of
the third party software.
6. Security. You acknowledge and agree that in order to protect the
integrity of certain third party content, Pinnacle and/or its licensors
may provide for Software security related updates that will be
automatically downloaded and installed on your computer. Such
security related updates may impair the Software (and any other
software on your computer which specifically depends on the
Software) including disabling your ability to copy and/or play
"secure" content, i.e. content protected by digital rights management.
In such an event, Pinnacle and/or its licensors shall use reasonable
efforts to promptly post notices on Pinnacle’s web site explaining the
security update and providing instructions to end-users for obtaining
new versions or further updates of the Software that restore access to
secure content and related features.
7. Term and Termination. This License shall be effective upon
installation of the Software and shall terminate upon the earlier of (a)
your failure to comply with any term of this License; (b) return,
destruction or deletion of all copies of the Software in your possession
70 Instant VideoAlbum
Page 77

or (c) transfer of the Software and this License to another party in
accordance with Section 1(d). Pinnacle’s rights and your obligations
shall survive termination of this License.
8. Limited Warranty. Pinnacle warrants to the original licensee that
the Software, as delivered, will perform in accordance with the
accompanying documentation for a period of 30 days from the date of
the original purchase ("Limited Warranty"). Pinnacle’s entire liability
and your exclusive remedy for breach of the preceding Limited
Warranty shall be, at Pinnacle’s sole option, repair or replacement of
the Software that does not meet the warranty set forth herein and that
is returned to Pinnacle. This limited warranty shall be void if failure
of the Software has resulted from any accident, abuse, misuse or
misapplication by you. Any replacement Software will be warranted
for the remainder of the original warranty period or 30 days,
whichever is longer.
8. NO OTHER WARRANTIES. EXCEPT AS SET FORTH ABOVE,
THE SOFTWARE IS PROVIDED ON AN "AS IS" BASIS. YOU
ASSUME ALL RESPONSIBILITIES FOR THE QUALITY AND
PERFORMANCE OF THE SOFTWARE. TO THE MAXIMUM
EXTENT PERMITTED BY APPLICABLE LAW, PINNACLE
DISCLAIMS ALL WARRANTIES, EITHER EXPRESS OR
IMPLIED, INCLUDING BUT NOT LIMITED TO IMPLIED
WARRANTIES OF MERCHANTABILITY, NONINFRINGEMENT,
AND FITNESS FOR A PARTICULAR PURPOSE. LICENSOR
DOES NOT WARRANT THAT THE FUNCTIONS CONTAINED
IN THE SOFTWARE WILL MEET YOUR REQUIREMENTS, BE
UNINTERRUPTED OR ERROR FREE.
9. LIMITATION OF LIABILITY. YOU AGREE THAT IN NO
EVENT WILL PINNACLE BE LIABLE FOR ANY
CONSEQUENTIAL, SPECIAL, INDIRECT, INCIDENTAL OR
PUNITIVE DAMAGES WHATSOEVER, EVEN IF PINNACLE
HAS BEEN ADVISED OF THE POSSIBILITY OF SUCH
DAMAGES. IN NO EVENT SHALL PINNACLE’S LIABILITY
EXCEED THE TOTAL AMOUNT OF THE FEES PAID FOR THE
SOFTWARE. Some states/jurisdictions do not allow the limitation or
exclusion of incidental or consequential damages in certain
circumstances, so the above limitations may not apply in some
circumstances.
10. General. This License is governed by the laws of the State of
California and by the federal laws of the United States, without
reference to conflict of laws principles. The federal and state courts
within the County of Santa Clara, California shall have excusive
Appendix B: License agreement 71
Page 78

jurisdiction to adjudicate any dispute arising out of this License and
you hereby consent to the personal jurisdiction of the federal and state
courts within the County of Santa Clara, California. This License is
the entire agreement between you and Pinnacle and supersedes any
other communication with respect to the Software. No modification of
or amendment to this License will be effective unless in writing
signed by both parties. If any provision of this License is held invalid
or unenforceable, the remainder of this License will continue in full
force and effect.
72 Instant VideoAlbum
Page 79

Index
1
1394. See IEEE-1394
8
8mm
Video equipment, 6
A
Abbreviations and conventions, 6
Adjust brightness
Video, 49
Alignment lines (Label Editor), 59
Analog
Defined, 6
Asset List
Deleting objects, 38
Duplicating objects, 38
Edit Video dialog, 35, 37
Icon view, 37
Rearranging objects, 38
Renaming objects, 37
Slideshows, 40
Text view, 37
Video chapters, 39
Assets
Asset List, 13
Defined, 6
Deleting, 13
Renaming, 13
Audio
Automatic beat detection, 47
Looping, 34
Soundtrack, 46
Automatic installation, 4
B
Background
menu styles, 32
Bit-rate
Custom settings, 19
Burn progress bar, 28
Burning
Change temporary files folder, 29
Deleting temporary files, 29
File conversion, 30
Temporary files, 28
Burning screen, 27
Buttons
Check media, 17
DVD navigation, 24
Help, 5
Import video, 11
On menu pages, 7
Print labels, 53
Start Import, 11
Stop Import, 11
Tools tips for, 6
Transport control, 10
C
Cables and connectors
Analog, 6
Camcorder
Connecting, 5
Current mode, 10
Importing from, 10
Camcorders
DV, 6
Camera. See Camcorder
CD
Insert, 54
Label, 54
Liner, 54
Index 73
Page 80

CD-R, CD-RW, 17
Change Thumbnail button, 47
Changing temporary files folder,
29
Chapter Options
Chapter Options button, 43
Slideshow Options dialog, 44
Video Options dialog, 43
Chapters, 39
Change thumbnail, 47
Chapter options, 43
Fade to black, 43
Return to menu, 43
Show names when playing, 43
Slideshow options, 44
Splitting, 51
Video options, 43
Check Media button, 17
Cleanup video, 48
Color
Auto-correct, 48
Composite
Cables and connectors, 6
Computer
Minimum requirements for, 2
Connecting the camcorder, 5
Control Buttons (on transport
controls), 10
Control points (Label Editor), 59
Controls
Movie, 25
Tools tips for, 6
Conventions and abbreviations, 6
Converting File Formats, 30
Counter window, 10
Create Custom Menu dialog, 31
Creating a slideshow, 12
Creating DVDs and VideoCDs
Three-step process, 1
Cursor navigation, 26
Custom menu styles, 31
Audio looping, 34
Backgrounds, 32
Frames, 32
Layout, 33
Music, 34
Type, 33
Custom settings
Bit-rate, 19
Disc settings, 19
Draft mode, 20
MPEG audio, 20
D
Deleting
Assets, 13
objects, 38
Temporary files, 29
Dialog boxes. See Windows
Digital. See DV
Digital8
Included under ‘DV’, 6
DirectX
Graphics card, 2
Sound card, 2
Disc
Burning, 27
Previewing, 25
Disc Menu
Choosing a style, 21
Custom Style, 22
No menu, 21
Disc settings, 15
Check media, 17
Custom bit-rate, 19
Custom settings, 19
Disc usage, 18
Draft mode, 20
Media, 17
MPEG audio, 20
Output format, 16, 17
Settings dialog, 15
Video quality, 18
Disc space requirements, 2
Disc usage, 18
Discussion Forum, 66
Draft mode, 20
Duplicating objects, 38
DV
74 Instant VideoAlbum
Page 81

Defined, 6
Equipment installation, 5
DVD
Creation process, 1
Described, 16
Insert, 55
Label, 54
Media type selection, 17
MPEG audio, 20
Navigation buttons, 24
Select as output format, 16
Writable, 17
E
Introduction, 35
Preview screen, 36, 41
Editing with control points, 59
Email Technical Support, 66
End User License Agreement, 69
Enhance button, 48
Equipment
Video. See Video equipment
Equipment requirements, 2
Computer, 2
Hard disc, 2
EULA (End User License
Agreement), 69
Edit Options dialog, 42
Edit toolbar (of Custom Labeler),
55
Edit Video dialog, 35
Asset List, 35, 37
Editing tools and options, 36, 42
Enhance button, 48
Information display area, 36, 52
Photo enhancement tools, 49
Preview screen, 36, 41
Split button, 51
Video enhancement tools, 48
Editing Photos
Asset list, 35, 37
Edit Video dialog, 35
Editing tools and options, 36, 42
Information display area, 36, 52
Introduction, 35
Preview screen, 36, 41
Editing tools and options
Change thumnail, 47
Chapter options, 43
Edit Video dialog, 36, 42
Enhance, 48
Project options, 42
Split button, 51
Editing Video
Asset list, 35, 37
Edit Video dialog, 35
Editing tools and options, 36, 42
Information display area, 36, 52
F
Fade to black, 43
FAQs (Frequently Asked
Questions), 65
Files
Changing temporary files folder,
29
Conversion, 30
Converting, 30
Defined, 6
Deleting temporary files, 29
Imported, 13
Temporary Files, 28
FireWire. See IEEE-1394
Forum
Discussion, 66
Frames
menu styles, 32
G
Graphics card
DirectX-compatible, 2
Guide lines (Label Editor), 59
H
Hard disc
Performance test, 2
Requirements, 2
Index 75
Page 82

Transferring video to, 9
Help. See On-line help
Help menu, 5
Hi8
Video equipment, 6
I
IEEE-1394
DV cable, 5
With DV sources, 10
iLink. See IEEE-1394
Images
Adding to label or insert, 55
Archive, 45
Arranging, 1
Brightness, 51
Contrast, 51
Crop/Zoom, 50
Enhancement tools, 49
Enhancing, 48
Full-size view, 51
High resolution mode, 44
Hue, 51
Importing, 40
Mirror image, 50
Reset, 51
Rotate left, 49
Rotate right, 49
Saturation, 51
Set border color, 50
Import screen, 9
Import video
Button, 11
Dialog, 11
Source material options, 10
Imported Files window, 13
Importing, 9
Defined, 9
Files from Windows Explorer, 12
Video, 10
Importing Images
Windows Explorer, 40
Incoming video display, 11
Information display area, 52
Edit Video dialog, 36, 52
Input format, 3
Installation
Automatic (with Autorun), 4
Camcorder, 5
Manual (without Autorun), 4
Software, 4
Typical, 4
Instant VideoAlbum
Defined, 6
Introduction to, 1
Registration of, 4
Software installation, 4
Software license, 4
Software updates, 5
Technical support, 4
Technical Support, 65
Upgrades, 4
Italics, 8
K
Keyboard conventions, 8
L
Labels and inserts. See Make
custom labels
Add picture, 55
Add text, 56
Alignment lines, 59
Background, 55
Bold text, 61
CD insert, 54
CD liner, 54
CD/DVD label, 54
Control points, 59
Creating, 53
DVD insert, 55
Edit Window, 58
Editing, 55
Editing images, 58
Editing text, 58
Font color, 62
Grouping, 61
Guide lines, 59
Italic text, 61
76 Instant VideoAlbum
Page 83

Print, 57
Print custom labels, 62
Printing tips, 63
Re-create, 57
Replace picture, 55
Rotating, 61
Scaling, 60
Selecting objects, 59
tabs, 54
Text controls, 61
Language Selection, 4
Layout
menu styles, 33
License agreement, 69
License terms, 4
M
Make Custom Labels dialog, 53
Edit toolbar, 55
Manual installation, 4
Mark chapter
Slideshows, 40
Video chapters, 39
Media
Checking, 17
Choice of, 23
Format, 16
Settings, 15
Type, 17
Memory - minimum required, 2
Menu commands, 8
Menu page
Defined, 7
Menu pages
Editing, 23
Navigating, 23, 26
Menu Styles, 21, 31
Backgrounds, 32
Choosing a style, 21
Custom Style, 22
Customizing, 31
Design, 31
Fonts, 33
Frames, 32
Layout, 33
Music, 34
No menu, 21
Selecting, 1
Style chooser, 21
Type, 33
Mouse clicking, 8
Movie Controls, 25
MPEG audio
Custom settings, 20
Music
Audio looping, 34
menu styles, 34
N
Navigation
Cursor, 26
DVD, 24
In menu pages, 23, 26
Neato, 63
NTSC
Selecting format, 17
Number Pad, 24
O
Objects (Label Editor), 59
OHCI-compliant IEEE-1394. See
IEEE-1394
On-line help
Button, 5
How to use, 5
Types of, 5
Operating systems supported, 2
Options
For Import Video, 10
Output format, 3
Disc settings, 16
Output media
Checking, 17
Format, 16
Output Media Settings dialog box,
15
Overview, 1
Index 77
Page 84

P
PAL
Selecting format, 17
Photo enhancement tools, 49
Brightness, 51
Contrast, 51
Crop/Zoom, 50
Full-size video, 51
Hue, 51
Mirror image, 50
Reset, 51
Rotate left, 49
Rotate right, 49
Saturation, 51
Set border color, 50
Pinnacle Instant VideoAlbum. See
Instant VideoAlbum
Preview screen, 23
Cursor navigation, 26
DVD navigation buttons, 24
Edit Video dialog, 36, 41
Information display area, 52
Movie controls, 25
Number pad, 24
Remote contol, 23
Tools, 41
TV screen, 25
Preview window (video import),
11
Previewing
Cursor navigation, 26
Disc, 25
DVD navigation buttons, 24
Movie controls, 25
Navigation, 23
Number pad, 24
Project, 23
Remote control, 23
TV screen, 25
Print Custom Labels dialog, 62
Controls, 63
Number of copies, 63
Papers, 62
Preview, 62
Printing tips, 63
Select printer, 63
Settings, 63
Print labels button, 53
Printer
Calibration, 63
Settings, 63
Product names, 6
Project
Editing, 23
Previewing, 23, 25
Project Options button, 42
R
RAM. See Memory
RCA. See Composite
Rearranging objects, 38
Registration
And technical support, 4
Of Instant VideoAlbum, 4
Remote control, 23
Remote Control, 23
DVD Navigation, 24
Movie controls, 25
Number Pad, 24
Renaming
Assets, 13
Renaming objects, 37
Requirements
Equipment, 2
Return to menu, 43
S
Scene, 7
Scenes
Arranging, 1
Automatic scene detection, 13
Change thumbnail, 47
Defined, 7
Editing, 23
Navigation, 24
Playing back, 24
Splitting, 51
Screens
78 Instant VideoAlbum
Page 85

Burning, 27
Import, 9
Preview, 23
Scrubber, 41
Select Style, 21, See Styles
Button, 21
Screen, 21
Serial number, 4
Settings
Output media, 15
Settings dialog, 15
Setup. See Installation
Show chapter names when playing,
43
Slideshows, 40
Automatic beat detection, 47
Change thumbnail, 47
Chapter options, 44
Closing, 40
Converting, 40
creating, 12
Fit to audio, 46
Mark chapter, 40
Opening, 40
Show slide for x seconds, 46
Show slide indefinitely, 46
Transitions, 47
Unmark chapter, 40
Viewing scenes, 40
Software
Installing, 4
license terms, 4
Registration, 4
Updates, 5
Upgrades, 4
Sound card
DirectX-compatible, 2
Source material buttons, 10
Split button, 51
Stabilize motion, 48
Start Import button, 11
Startup Menu
Style, 21
Still images. See Images
Stop Import button, 11
Style Chooser, 21
Custom Menu Style, 22
No menu, 21
Styles. See Menu Styles
Super-VideoCD. See S-VCD
Support. See Technical Support
S-VCD
Described, 16
Select as output format, 16
SVHS, SVHS-C
Video equipment, 6
S-Video
Cables and connectors, 6
T
Tapes. See Videotapes
Technical specifications, 2
Input formats, 3
Output formats, 3
Technical support, 4, 65
Temporary files
Deleting, 29
Temporary Files, 28
Changing folder, 29
Text
Adding to label or insert, 56
Labels and inserts, 61
Three-step creation process, 1
Thumbnails
Change thumbnail, 47
Defined, 7
Tool tips, 6
Transport controls, 10
TV Screen, 9, 25
TV Standard, 17
Type
menu styles, 33
Typical installation, 4
U
Unmark chapter
Slideshows, 40
Index 79
Page 86

Video chapters, 39
Updates
obtaining, 5
Upgrades
Information about, 4
V
VCD
Creation process, 1
Described, 16
Media type selection, 17
Select as output format, 16
VCR
Current mode, 10
Importing from, 10
Installation, 5
VCRs
DV, 6
VHS, VHS-S
Video equipment, 6
Video
Adjust brightness, 49
Chapter options, 43
Cleanup, 48
Displayed during import, 11
Enhancement tools, 48
Enhancing, 48
Importing, 10
Quality, 18
Video capture
Hard disc requirements, 2
Video chapters, 39
Closing, 39
Converting, 39
Mark chapter, 39
Opening, 39
Unmark chapter, 39
Viewing scenes, 39
Video enhancement tools, 48
Adjust brightness, 49
Auto-correct color, 48
Cleanup, 48
Stabilize motion, 48
Video equipment
Analog, 6
Installation, 5
Video file, 6
Video import
Dialog, 11
Import video button, 11
Preview window, 11
Progress bar, 11
Starting, 11
Stopping, 11
Video quality, 18
Automatic, 18
Best video quality, 19
Bit rate, 18
Good video quality, 19
Selecting, 18
Video scenes. See Scenes
VideoCD. See VCD
Videotape
Current position, 10
Videotapes
DV, 6
W
Windows
Counter (on transport controls), 10
Import video dialog, 11
Imported Files, 13
Output Media Settings dialog box,
15
Windows (operating system)
Versions supported, 2
Windows Explorer, 12
Windows Explorer
Importing images, 40
80 Instant VideoAlbum
 Loading...