

Page 1

U
s
U
Pinnacle Systems, Inc.
280 N. Bernardo Ave
Mountain View, CA 94043
www.pinnaclesys.com
err’’
s
e
Revision A - English
s
s
G
G
uii
u
d
d
e
e
Page 2

Page 3

LLiicceennssee AAggrreeeemmeennt
This End User License Agreement (“License”) is a legal agreement between you and Pinnacle
Systems (“Pinnacle”) regarding Pinnacle’s software and the accompanying documentation
(collectively, the “Software”). CAREFULLY READ THE FOLLOWING LICENSE. USING THIS
SOFTWARE INDICATES YOUR ACCEPTANCE OF THIS LICENSE. IF YOU DO NOT ACCEPT OR
UNDERSTAND THE TERMS OF THIS LICENSE, YOU SHOULD NOT INSTALL THE SOFTWARE AND
PROMPTLY RETURN THIS PRODUCT TO YOUR VALUE-ADDED RESELLER.
1. License Grant. Subject to the restrictions set forth below, this License grants you a nonexclusive, perpetual license to (a) install the Software on only one computer; (b) use or authorize
use of the Software on only one computer; (c) make one copy of the Software, in machine-readable
form, solely for backup purposes; provided you include all copyright and other proprietary rights
notices on the copy and (d) transfer the Software and this License to another party if the other
party agrees to accept the terms and conditions of this License. If you transfer the Software, you
must at the same time either transfer all copies to the same party or destroy any copies not
transferred. If you transfer possession of any copy of the Software to another party, your License is
automatically terminated.
2. License Restrictions. You may not, or allow any third party to, (a) rent, lease, sell, loan
or otherwise transfer the Software or any of your rights and obligations under this
License; (b) install the Software on a network for use by multiple users, unless each
user has purchased a license; (c) reverse-engineer, decompile or disassemble the
Software or hardware in whole or in part; (d) remove or destroy any copyright notices
or other proprietary markings of the Software or any third-party software; (e) modify or
adapt the Software, merge the Software into another program or create derivative
works based on the Software; (f) make copies of or distribute, for profit or otherwise,
the Software, except as expressly provided above; (g) make any alteration,
modification, connection, disconnection, improvement or adjustment of any kind to or
use the Software except as explicitly contemplated in the enclosed documentation and
in this License and (h) sublicense, transfer or assign this License or any of the rights and
obligations granted under this License, except as explicitly contemplated in this License.
Any purported transfer or assignment will be void.
3. Export Restrictions. The export and re-export of Pinnacle software products are controlled
by the United States Export Administration Regulations and such software may not be exported or
re-exported to any country to which the United States embargoes goods. In addition, Pinnacle
software may not be distributed to persons on the Table of Denial Orders, the Entity List, or the List
of Specially Designated Nationals. By downloading or using a Pinnacle software product you are
certifying that you are not a national of any country to which the United States embargoes goods
and that you are not a person on the Table of Denial Orders, the Entity List, or the List of Specially
Designated Nationals.
4. Ownership. The license granted hereunder does not constitute a transfer or sale of ownership
rights in or to the Software. Except for the license rights granted above, Pinnacle retains all right
title and interest in and to the Software including all intellectual property rights therein. The
Software is protected by applicable intellectual property laws, including United States copyright laws
and international treaties.
5. Third Party Proprietary Property. This Software may contain the proprietary property of
others, which has been licensed to Pinnacle, your use of the Software is expressly conditioned on
your agreement not to remove any copyright notices or other proprietary markings of the third party
software.
6. Security. You acknowledge and agree that in order to protect the integrity of certain third party
content, Pinnacle and/or its licensors may provide for Software security related updates that will be
automatically downloaded and installed on your computer. Such security related updates may
t
Page 4

impair the Software (and any other software on your computer which specifically depends on the
Software) including disabling your ability to copy and/or play "secure" content, i.e. content protected
by digital rights management. In such an event, Pinnacle and/or its licensors shall use reasonable
efforts to promptly post notices on Pinnacle’s web site explaining the security update and providing
instructions to end-users for obtaining new versions or further updates of the Software that restore
access to secure content and related features.
7. Term and Termination. This License shall be effective upon installation of the Software
and shall terminate upon the earlier of (a) your failure to comply with any term of this
License; (b) return, destruction or deletion of all copies of the Software in your
possession or (c) transfer of the Software and this License to another party in
accordance with Section 1(d). Pinnacle’s rights and your obligations shall survive
termination of this License.
8. Limited Warranty. Pinnacle warrants to the original licensee that the Software, as
delivered, will perform in accordance with the accompanying documentation for a
period of 30 days from the date of the original purchase (“Limited Warranty”).
Pinnacle’s entire liability and your exclusive remedy for breach of the preceding Limited
Warranty shall be, at Pinnacle’s sole option, repair or replacement of the Software that
does not meet the warranty set forth herein and that is returned to Pinnacle. This
limited warranty shall be void if failure of the Software has resulted from any accident,
abuse, misuse or misapplication by you. Any replacement Software will be warranted
for the remainder of the original warranty period or 30 days, whichever is longer.
9. NO OTHER WARRANTIES. EXCEPT AS SET FORTH ABOVE, THE SOFTWARE IS PROVIDED
ON AN “AS IS” BASIS. YOU ASSUME ALL RESPONSIBILITIES FOR THE QUALITY AND
PERFORMANCE OF THE SOFTWARE. TO THE MAXIMUM EXTENT PERMITTED BY APPLICABLE LAW,
PINNACLE DISCLAIMS ALL WARRANTIES, EITHER EXPRESS OR IMPLIED, INCLUDING BUT NOT
LIMITED TO IMPLIED WARRANTIES OF MERCHANTABILITY, NONINFRINGEMENT, AND FITNESS
FOR A PARTICULAR PURPOSE. LICENSOR DOES NOT WARRANT THAT THE FUNCTIONS
CONTAINED IN THE SOFTWARE WILL MEET YOUR REQUIREMENTS, BE UNINTERRUPTED OR
ERROR FREE.
10. LIMITATION OF LIABILITY. YOU AGREE THAT IN NO EVENT WILL PINNACLE BE LIABLE
FOR ANY CONSEQUENTIAL, SPECIAL, INDIRECT, INCIDENTAL OR PUNITIVE DAMAGES
WHATSOEVER, EVEN IF PINNACLE HAS BEEN ADVISED OF THE POSSIBILITY OF SUCH DAMAGES.
IN NO EVENT SHALL PINNACLE’S LIABILITY EXCEED THE TOTAL AMOUNT OF THE FEES PAID FOR
THE SOFTWARE. Some states/jurisdictions do not allow the limitation or exclusion of incidental or
consequential damages in certain circumstances, so the above limitations may not apply in some
circumstances.
11. General. This License is governed by the laws of the State of California and by the federal
laws of the United States, without reference to conflict of laws principles. The federal and state
courts within the County of Santa Clara, California shall have excusive jurisdiction to adjudicate any
dispute arising out of this License and you hereby consent to the personal jurisdiction of the federal
and state courts within the County of Santa Clara, California. This License is the entire agreement
between you and Pinnacle and supersedes any other communication with respect to the Software.
No modification of or amendment to this License will be effective unless in writing signed by both
parties. If any provision of this License is held invalid or unenforceable, the remainder of this
License will continue in full force and effect.
Page 5

TTaabbllee OOff CCoonntteennttss
LICENSE AGREEMENT........................................................3
TABLE OF CONTENTS ........................................................5
INTRODUCTION..................................................................9
What is Hollywood FX?..................................................................9
Hollywood FX Levels...................................................................10
Before You Start..........................................................................11
Installing Hollywood FX...............................................................12
Licensing and Registration..........................................................13
Customer Support.......................................................................14
GETTING STARTED ..........................................................15
Pinnacle Studio...........................................................................16
Pinnacle Edition and Liquid .........................................................19
Adobe Premiere..........................................................................22
Avid AVX....................................................................................25
TUTORIALS .....................................................................29
Transitions & Options..................................................................29
Transition+.................................................................................33
MultiWindow FX..........................................................................35
PINNACLE ONLINE ...........................................................39
TROUBLESHOOTING ........................................................41
PERFORMANCE ............................................................... 43
CPU Speed, Bus Speed, and Memory ...........................................43
Graphic Card Drivers...................................................................43
Preview Performance ..................................................................43
Final Rendering Performance.......................................................44
ADVANCED TUTORIALS....................................................45
Keyframe Editing with Envelopes Plus PRO......................................45
Flight Path Editing Plus PRO ...........................................................49
Creating New FX from Existing FX PRO .........................................54
Warp Plugins PRO ........................................................................59
5
Page 6
HHoollllyywwoooodd FFXX UUsseerr’’ss GGuuiiddee
3D Text Generation PRO ............................................................... 62
REFERENCE GUIDE ..........................................................63
THE HOLLYWOOD FX DIALOG ...........................................65
The Hollywood FX Dialog............................................................ 65
The Control Panel....................................................................... 66
The Monitor Panel ...................................................................... 71
The Item Panel............................................................................ 73
The Envelope Editor Panel Plus PRO ............................................... 73
The Buttons Panel...................................................................... 73
THE FX CATALOG.............................................................75
Organizing FX ............................................................................ 75
BASIC OPTIONS ...............................................................77
Easy Flight Controls ................................................................... 77
Easy Lighting Controls ............................................................... 78
Easy Options Controls................................................................ 78
ADVANCED OPTIONS PLUS PRO .............................................81
Shadow Controls........................................................................ 81
Trail Count................................................................................. 82
Motion Blur Controls................................................................... 82
Hold Times................................................................................. 82
MEDIA OPTIONS ...............................................................85
Media Selection.......................................................................... 85
Preview and Trimming Plus PRO ..................................................... 86
Information ................................................................................ 86
Playback Control........................................................................ 86
Cropping Controls Plus PRO........................................................... 87
OBJECT OPTIONS PLUS PRO..................................................89
Object Hierarchies...................................................................... 89
Select File…............................................................................... 90
Positioning Controls................................................................... 90
Morph & Dissolve ....................................................................... 91
Parent Object............................................................................. 92
Object Flags............................................................................... 92
SURFACE OPTIONS PLUS PRO ...............................................93
6
Page 7
TTaabbllee OOff CCoonntteennttss
Texture Options..........................................................................93
Color Options .............................................................................94
THE ENVELOPE EDITOR PLUS PRO......................................... 97
The Single Value Envelope ..........................................................97
Multiple Value Envelope ..............................................................98
The Envelope Window.................................................................98
The Envelope Buttons .................................................................99
Key Type Controls.....................................................................100
Keyframe Controls ....................................................................100
Spline Controls.........................................................................104
PLUGINS PRO .................................................................. 105
Managing Plugins......................................................................105
Filter - Blur................................................................................107
Filter - Chroma Key ...................................................................108
Filter - Luma Key.......................................................................109
Filter - Directional Wipe.............................................................110
Filter – Edge Wipe.....................................................................111
Filter - Gradient Wipe.................................................................112
Warp – AlphaParticles...............................................................113
Warp – Displacement Map..........................................................115
Warp – Explode.........................................................................116
Warp – Peel...............................................................................118
Warp – PolyShrink .....................................................................120
Warp – Ripple ...........................................................................121
Warp – Swirl.............................................................................123
Warp - Twist ..............................................................................124
EXPORT HFZ PRO ............................................................ 125
IMPORT 3D PRO ............................................................... 127
3D TEXT PRO................................................................... 129
THE SETTINGS DIALOG .................................................. 131
Preview Settings .......................................................................131
Edit Settings.............................................................................132
Render Performance..................................................................133
7
Page 8

Page 9

IInnttrroodduuccttiioonn
Thank you for purchasing Hollywood FX. Hollywood FX gives you an incredible
collection of 3D transitions that you can quickly add to your video
productions, and customize completely for your needs. This chapter will
introduce you to Hollywood FX, provide instructions for installation and give
contact information for customer support.
This is a general guide to using Hollywood FX. If you received Hollywood FX
as part of a complete Pinnacle Systems’ solution, then you should first read
the Hollywood FX chapter in the guide that came with that solution.
WWhhaatt iiss HHoollllyywwoooodd FFXX??
Hollywood FX is an incredible collection of real 3D transitions and effects that
you can add to any video production. Hollywood FX works as an integrated
plugin to your video editing software (host application). Hollywood FX is:
• Real 3D. Hollywood FX uses OpenGL to provide hardware
accelerated, high quality 3D rendering.
• Easy To Use. Simply drag-and-drop Hollywood FX into your timeline
like any other transition. The Hollywood FX dialog will appear and
you can select a transition, change your options, or customize an
effect.
• Organized. Transitions are organized into convenient categories with
icons that let you find the transition you want quickly.
• Convenient. With every transition you can change the flight
direction, lighting, shadows, shine and antialiasing with the click of
your mouse.
• MultiWindow Excitement. Hollywood FX supports unlimited video
sources to create multi-layer 3D composites. Create cubes with
different video sources on each side, and much more.
• Expandable. Additional theme packs of 3D transitions are available
through Pinnacle Online at hollywoodfx.pinnaclesys.com, and
Hollywood FX PRO lets you share your own creations with other
users.
9
Page 10

HHoollllyywwoooodd FFXX UUsseerr’’ss GGuuiiddee
HHoollllyywwoooodd FFXX LLeevveellss
There are three levels of Hollywood FX:
• Basic. Includes 100 transitions and simple control over flight
direction, lighting, shadows shine, motion blur, trails, and antialiasing
(Basic for Pinnacle Studio includes 16 sample transitions and limited
control).
• Plus. Enables 188 additional transitions (288 total) plus advanced
control over lighting, light direction, shadows, shine, motion blur,
trails, antialiasing and more. Plus lets you customize any transition
with full keyframe editing of flight paths, object shape (morphing)
and transparency of objects.
• PRO. Enables 96 additional transitions (384 total) and gives you
complete control over all 3D rendering options. Pro provides a
complete suite of 3D tools to create your own 3D transitions and
effects:
o Complete keyframe editing of all object, surface, light and
camera attributes in a full 3D editing environment.
o Includes a suite of image filters including: Blurs, Directional
Wipe, Edge Wipe, Gradient Wipe and Luma and Chroma
key.
o Includes a powerful suite of 3D warp plugins including:
Alpha Particles, Displace, Explode, Peel, PolyShrink, Swirl
and Twirl.
o Adds an incredible 3D text generator that lets you create
amazing 3D text fly-ons.
o Import your own 3D objects (Lightwave 5 format) to create
completely unique 3D effects.
o Share your customized effects with others by exporting a
simple self-installing compressed file that contains the
effect and all objects and images needed for that effect.
You can easily and instantly upgrade between these levels over the
Internet at Pinnacle Online or purchased packaged upgrades from your
video reseller.
This is a complete guide for all levels of Hollywood FX. Sections and
features that are available in Plus and Pro are marked with Plus PRO and
features are only available in Pro are marked with PRO .
10
Page 11

IInnttrroodduuccttiioonn
BBeeffoorree YYoouu SSttaarrtt
Before getting started with Hollywood FX you should have a good working
knowledge of your Windows system. You should be able to use the mouse to
select menu options and should understand and be able to use the common
controls.
You should also be thoroughly familiar with your video editing software. You
should be able to use clips in the timeline and understand how to add and
modify transitions and filters.
Throughout this document we use the term FX to refer to the transitions and
effects in Hollywood FX. This term generically describes the following types
of transitions and effects:
• Transition. These are standard A-B transitions, where one video source
transitions into a second.
• Transition+. These are also A-B transitions; however, they may have
additional video channels that can be mapped with video. For example,
the FlipOver FX features the first video source flipping over like a card to
reveal the second video source. There is a third video source that is
visible in the background as the “card” flips over.
• MultiWindow. These effects are not transitions at all. Instead,
windows of video may fly on or off the screen into various positions while
playing your video.
11
Page 12

HHoollllyywwoooodd FFXX UUsseerr’’ss GGuuiiddee
IInnssttaalllliinngg HHoollllyywwoooodd FFXX
If Hollywood FX was included in a Pinnacle Systems’ solution, it will be
installed automatically with that product, and you can skip this section.
Before installing Hollywood FX, verify that you have the correct minimum
requirements:
• PC compatible computer with at least a 300 MHz (Intel
Celeron/Pentium II, or AMD Duron/Athlon class processor)
• Windows 98 Second Edition, Windows ME, Windows 2000, or
Windows XP.
• 64 MB RAM (more may be required by your video editing software).
For multi-window effects, 128 to 256 MB (or more) is recommended.
• At least 200 MB Hard Disk space.
• 16 or 24 bit display adapter. 3D OpenGL accelerator recommended.
··
TToo iinnssttaallll HHoollllyywwoooodd FFXX::
F Insert the Hollywood FX CD into your CD-ROM drive. The Main
Installation menu for your software will appear.
F Select Install Hollywood FX. The Language Selection dialog will
appear.
F Select your preferred language then click Ok. The Serial Number
dialog will appear.
F Enter the serial number that came with your software (it normally can
be found on the first page of this guide or on the CD-ROM sleeve).
Enter the serial number exactly as shown, including dashes, then click
Ok.
F Click Next to continue. The Setup Path dialog will appear.
F Normally you should accept the default path for installation. Do not
select your non-linear editor’s plug-in path for installation; the installer
will automatically install the files needed into your non-linear editor’s
folders. Click Next to continue. Hollywood FX will be installed on your
system.
F After installation, the LicenseTool dialog will appear. You have the
option to register online immediately (see Licensing and Registration).
F After installation, you may be required to restart your system.
12
Page 13
IInnttrroodduuccttiioonn
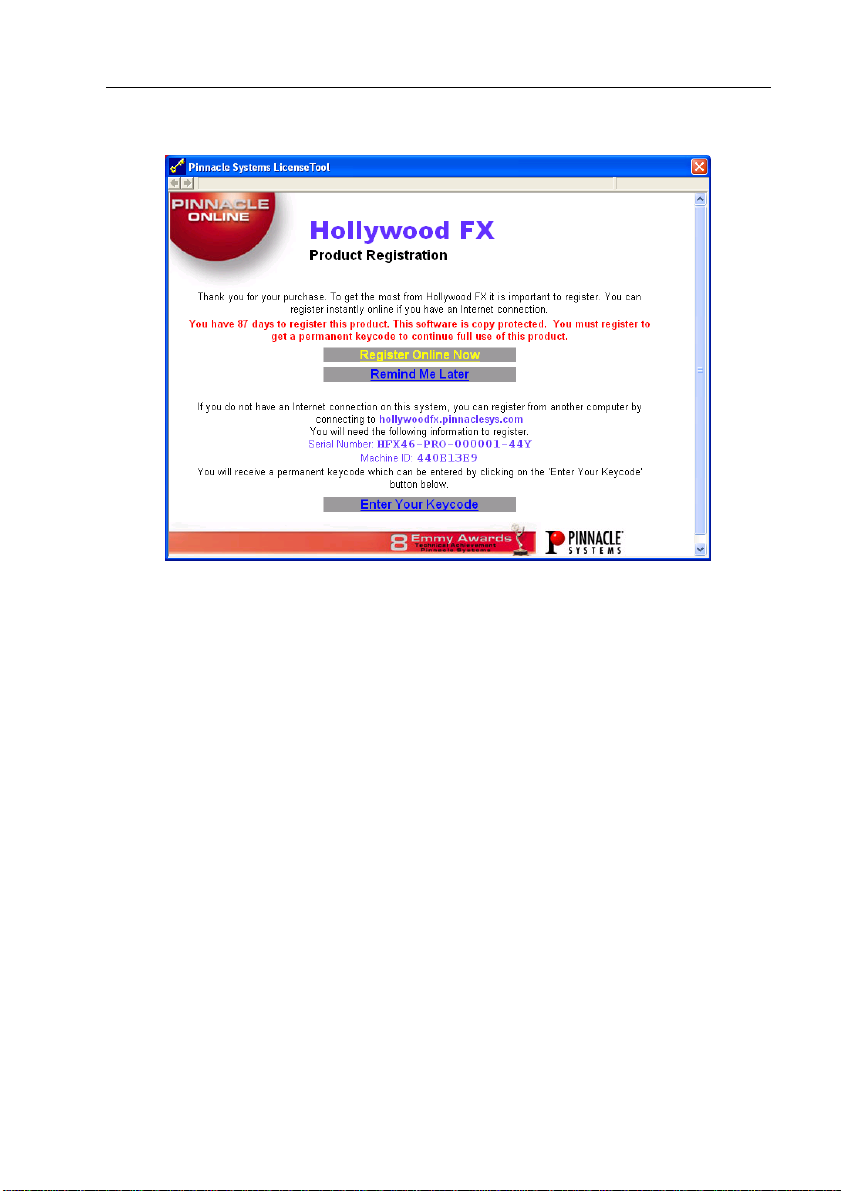
LLiicceennssiinngg aanndd RReeggiissttrraattiioonn
The License Tool
Registering your software gives you access to important benefits including
current updates, support, upgrade promotions, and information on exciting
new products from Pinnacle Systems.
Hollywood FX Basic and Plus do not require registration, but will continue to
remind you until you have registered your software.
Hollywood FX PRO is copy protected, and users must register within 90 days
to continue using the software.
When you register a Hollywood FX product, you will receive a permanent
keycode that fully enables Hollywood FX on a particular computer and stops
the registration reminders.
You can register from any Internet-enabled computer by connecting to
hollywoodfx.pinnaclesys.com. If you do not have your own Internetenabled computer, you can register from any computer that is connected to
the Internet (from a Library or Internet café for example).
If you reformat your system drive and reinstall the operating system or move
Hollywood FX to a new computer, you will need to get a new permanent
keycode, which you can do quickly at hollywoodfx.pinnaclesys.com.
13
Page 14

HHoollllyywwoooodd FFXX UUsseerr’’ss GGuuiiddee
CCuussttoommeerr SSuuppppoorrtt
Pinnacle Systems is dedicated to providing the best products and the best
customer support.
For fastest support, point your browser to
www.pinnaclesys.com/support.
Please note Pinnacle Systems cannot provide support for using your nonPinnacle video editing software. You should first make sure you fully
understand the operation of your other software before calling. You should
also look through the Readme file and the Troubleshooting section of this
guide before contacting customer support.
Instant Online Support: www.pinnaclesys.com/support
Phone (North & South America): 1-317-577-8788
Austria & Switzerland = +31-411-619-919
Belgium = 0902-88-101
France = 0836-687-512
Germany = 0190 510 083 or +31 411 619 577
Italy = 02 754 19 604
Netherlands = 0900 202 8 202
Scandinavia = +31 411 619 069
Spain = 91 375 4511
United Kingdom = 0640 701 111
14
Page 15

GGeettttiinngg SSttaarrtteedd
This chapter provides quick-start documentation for each video editor (host
application) that Hollywood FX plugs into. For each host application, the basic
procedure is described for adding and modifying Hollywood FX transitions and
filters, as well as hints and tips specific to that video editor. After reading the
section describing your video editor, you should continue to the tutorials in
the following chapter.
15
Page 16
HHoollllyywwoooodd FFXX UUsseerr’’ss GGuuiiddee
PPiinnnnaaccllee SSttuuddiioo
Hollywood FX transitions can be applied between video clips and titles within
Pinnacle Studio 7 and higher.
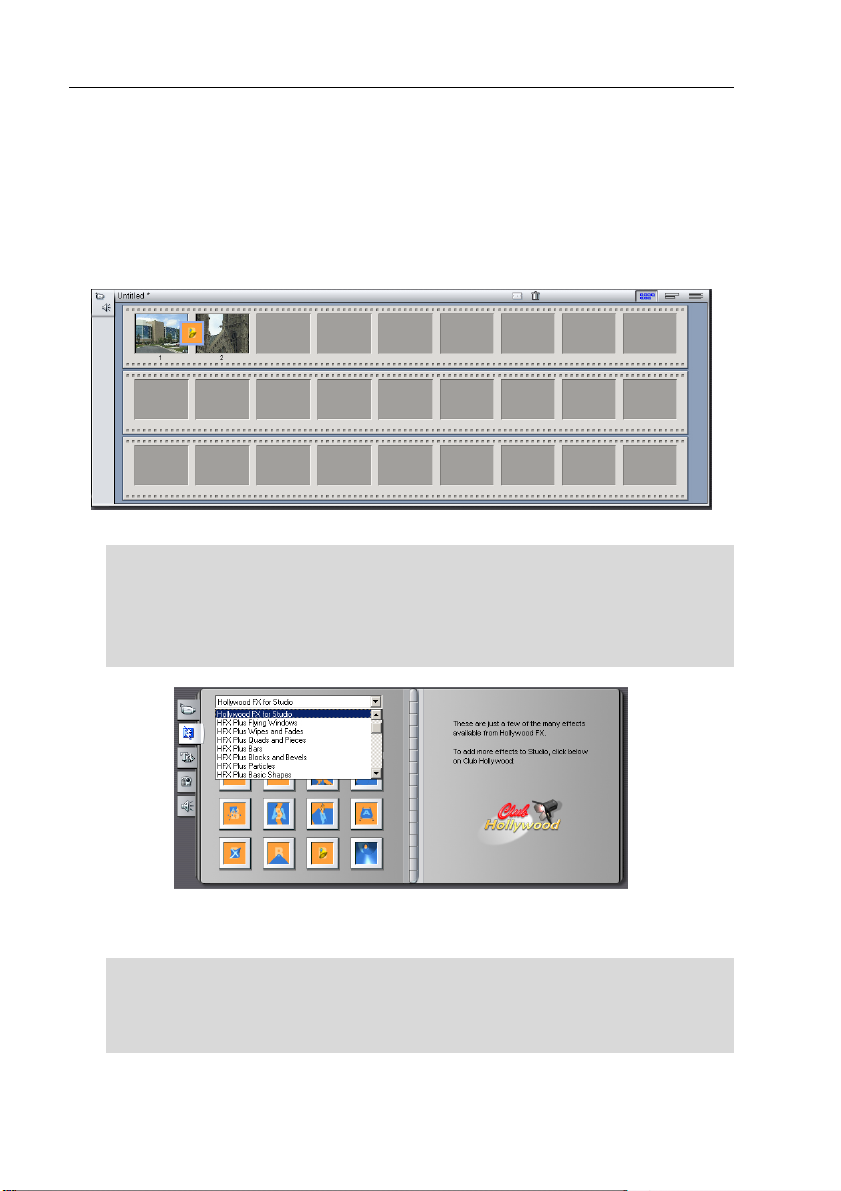
AAddddiinngg aa HHoollllyywwoooodd FFXX TTrraannssiittiioonn
To use Hollywood FX, first prepare two video sources into the storyboard.
Two video clips ready with a Hollywood FX transition in the storyboard
··
TToo aadddd aa ttrraannssiittiioonn ttoo tthhee ssttoorryybbooaarrdd oorr ttiimmeelliinnee::
F Make sure the Transitions tab in the Album is visible.
F Select the Hollywood FX For Studio group from the drop down menu.
F Drag the desired transition to the storyboard or timeline between the
two video clips.
The Hollywood FX for Studio transition group
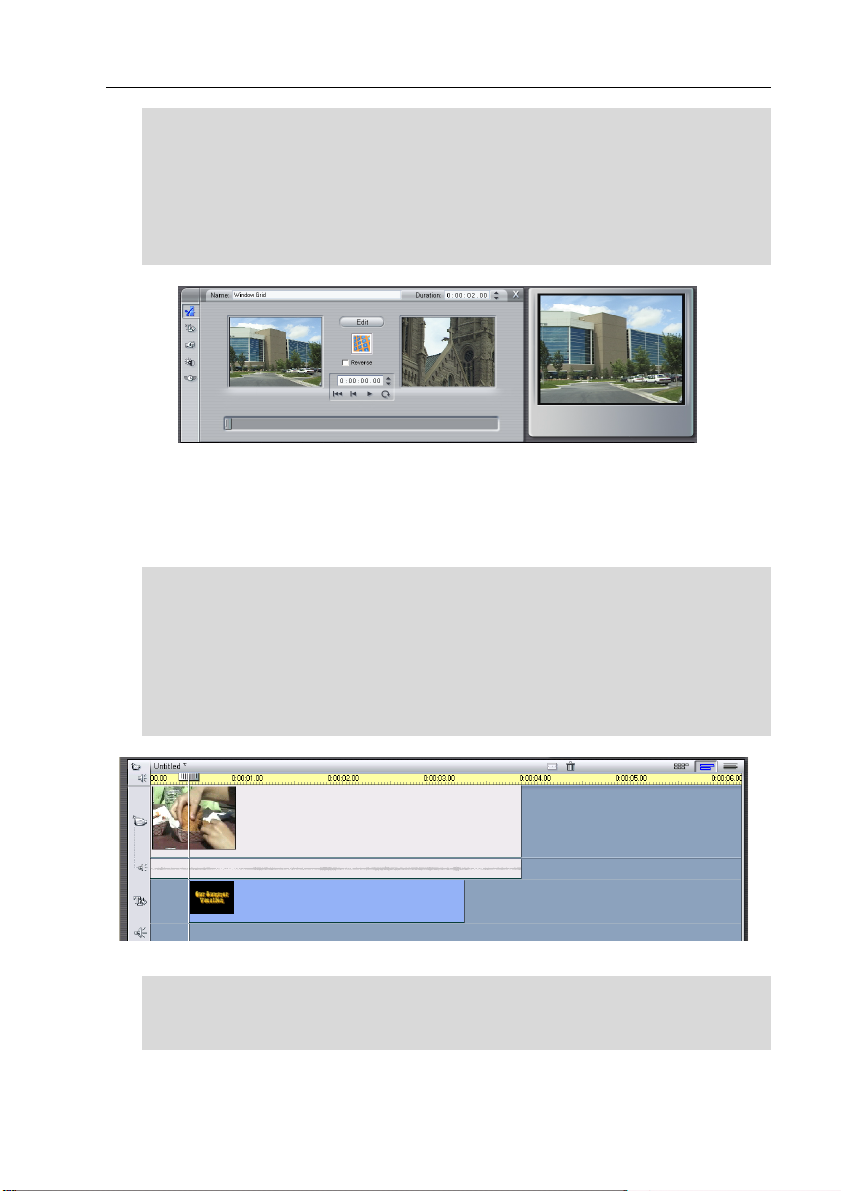
CChhaannggiinngg aa HHoollllyywwoooodd FFXX TTrraannssiittiioonn
··
TToo rreevveerrssee oorr eeddiitt aa ttrraannssiittiioonn::
F Go to the desired transition in the storyboard.
F Double-click on the transition block. The Transition Toolbox should
appear.
16
Page 17
GGeettttiinngg SSttaarrtteedd
F You can quickly reverse the direction by checking the Reverse check
box.
F You can also type in a specific duration for the effect.
F If you have Hollywood FX Plus or PRO, you will see the Edit button.
When you click the Edit button, the Hollywood FX dialog will appear,
letting you choose a specific transition, and change options for your
transition.
The Studio Transition Toolbox where you can edit your selection.
UUssiinngg HHoollllyywwoooodd FFXX WWiitthh TTiittlleess
You can use Hollywood FX to fly titles on and off over video and creating
incredible results.
··
TToo pprreeppaarree::
F Start a new project
F Switch to timeline view in Studio.
F Add a video clip to the Video track on the timeline.
F Now drag a title from the Album into the Title track, and adjust the start
and end time of the title so that it starts slightly after the video starts and
ends before the video ends.
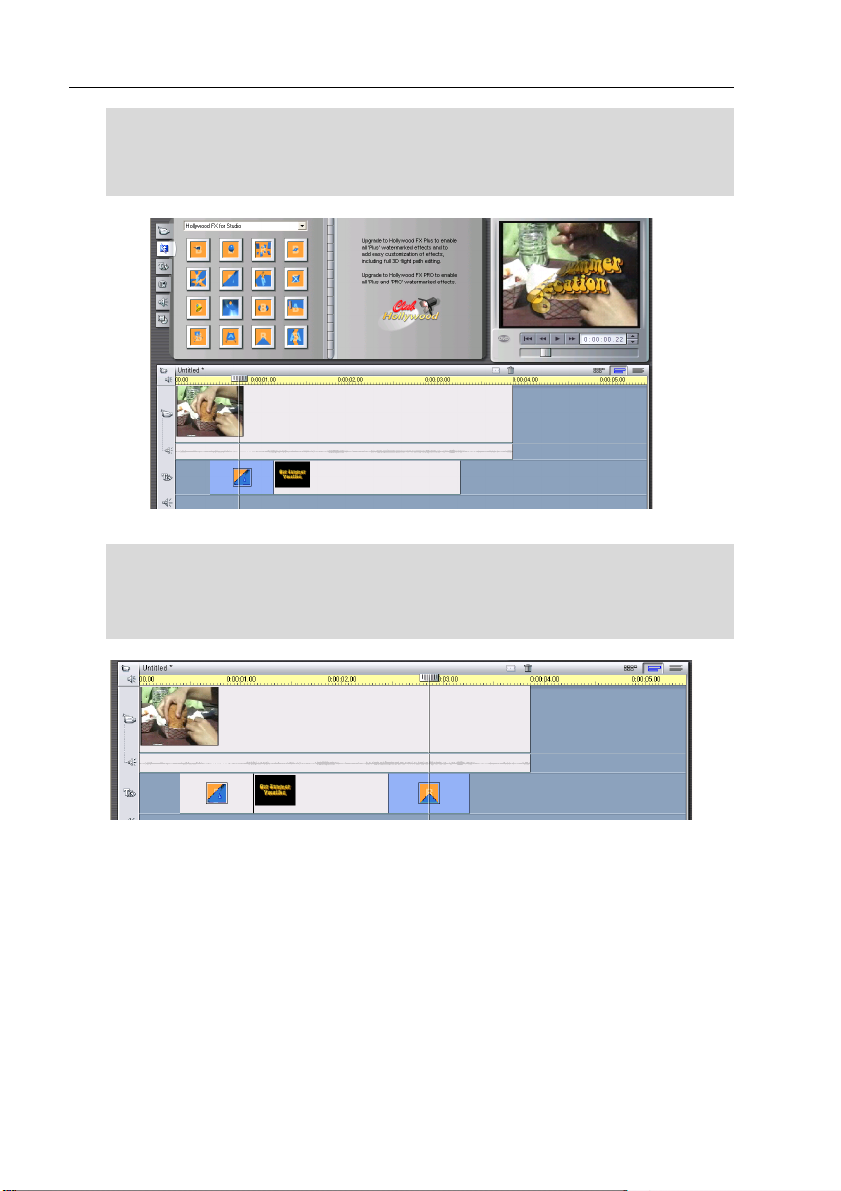
The title and video ready for Hollywood FX
··
MMaakkee tthhee ttiittllee FFllyy OOnn
F Make sure the Transitions tab in the Album is visible.
F Select the Hollywood FX For Studio group from the dropdown menu.
17
Page 18
HHoollllyywwoooodd FFXX UUsseerr’’ss GGuuiiddee
F Drag BAS-Page Peel from the album (when you stop the mouse
pointer over an icon, the effect name will appear) into the timeline at the
beginning of the title.
F Adjust the length of the transition as desired.
Hollywood FX flies the title on
··
MMaakkee tthhee ttiittllee FFllyy OOffff
F Close the toolbox if it is still open.
F From the Hollywood FX For Studio group in the Transition Album,
drag and drop PLS-Warp into the timeline at the end of the title.
NNootteess
Hollywood FX Basic for Studio includes the 16 effects in the Hollywood FX
For Studio effect group. The additional HFX effect groups contain effects
that are available by upgrading to Plus and Pro. You can try out these
effects, but each one is rendered with a watermark that indicates which level
of HFX is needed to fully use that effect. You can instantly upgrade to Plus or
Pro through Pinnacle Online at hollywoodfx.pinnaclesys.com. When you do
so, the watermarks will be removed.
Hollywood FX flies the title off
18
Page 19
GGeettttiinngg SSttaarrtteedd
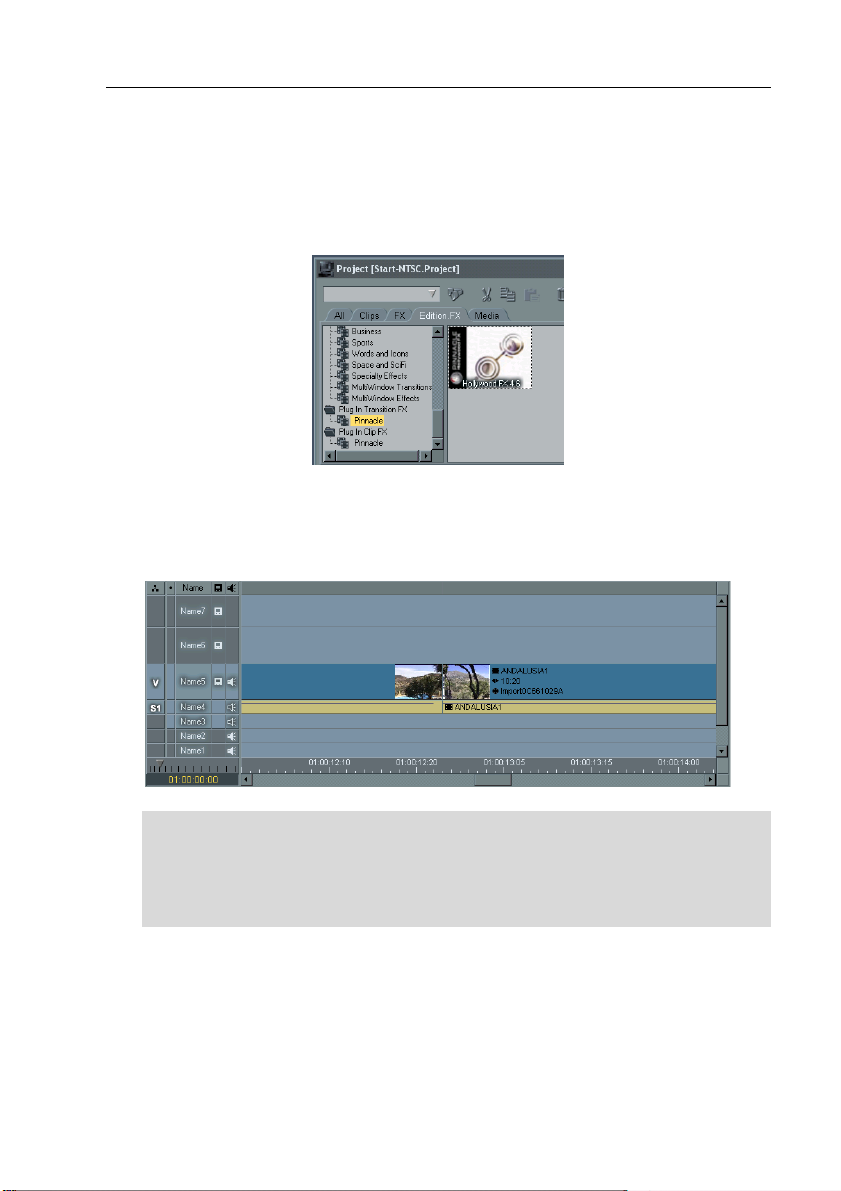
PPiinnnnaaccllee EEddiittiioonn aanndd LLiiqquuiidd
The Hollywood FX effects can be found under PlugIn Transition FX and Plugin
Clip Fx folders under the Edition.FX tab in the Project window.
AAddddiinngg aa HHoollllyywwoooodd TTrraannssiittiioonn
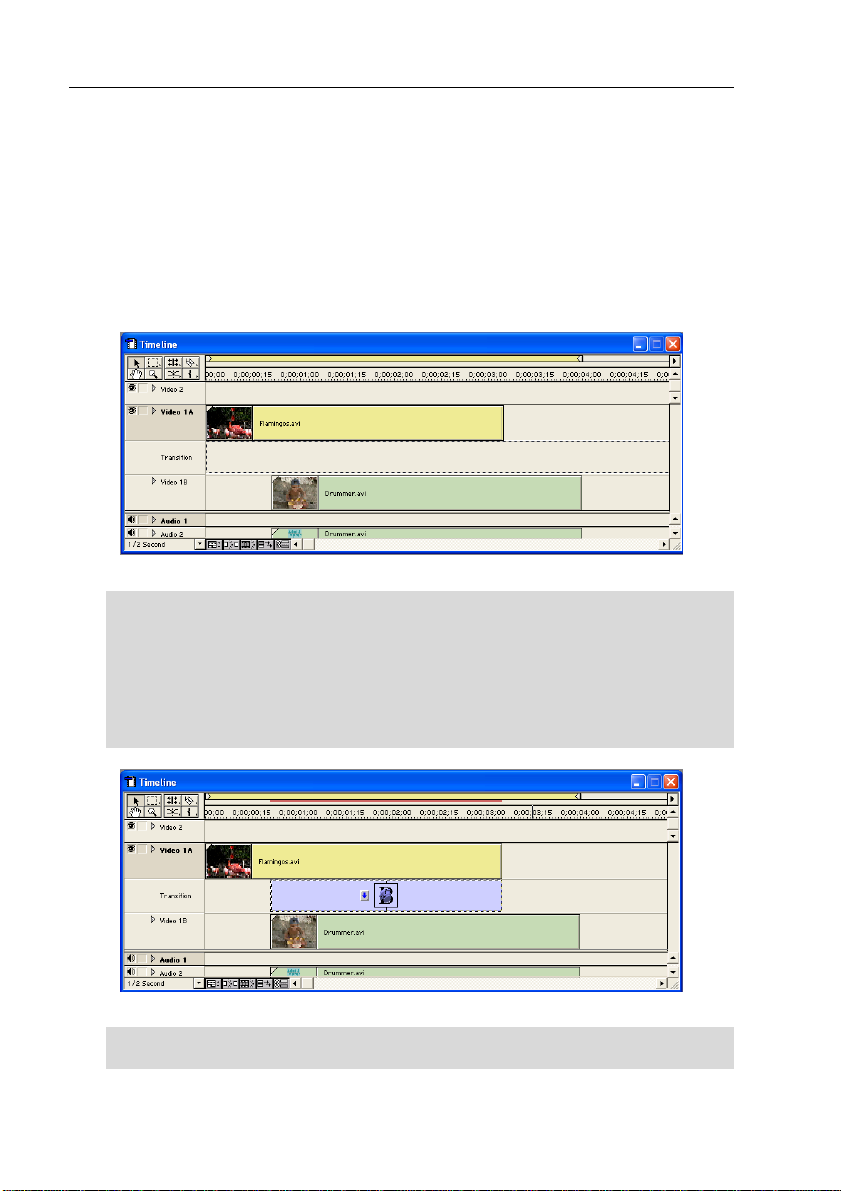
Before adding a Hollywood FX transition, prepare two video sources on the A
and B tracks of the timeline, so that there is some overlap between the two
video clips.
··
TToo aadddd aa ttrraannssiittiioonn ttoo tthhee ttiimmeelliinnee::
F Click on the Edition.FX tab in the Project window, then double-click on
the Plugin Transition FX folder, and the Pinnacle group.
F Drag Hollywood FX from the Project window into the timeline, between
the two video clips.
19
Page 20
HHoollllyywwoooodd FFXX UUsseerr’’ss GGuuiiddee
the title will fly on
A Hollywood FX Transition in the timeline
F Double-click on the transition block or Right-click on the transition and
choose the Edit... command from the popup menu.
F The Hollywood FX dialog will appear, letting you choose a specific
transition, and change options for your transition.
CChhaannggiinngg aann EExxiissttiinngg HHFFXX TTrraannssiittiioonn
You can modify a transition that is already in the timeline, changing the
selected effect or any options at any time.
··
TToo cchhaannggee aann eexxiissttiinngg ttrraannssiittiioonn iinn tthhee ttiimmeelliinnee::
F Double-click on the transition block or Right-click on the transition and
choose the Edit... command from the popup menu.
F The Hollywood FX dialog will appear, letting you choose a specific
transition, and change options for your transition.
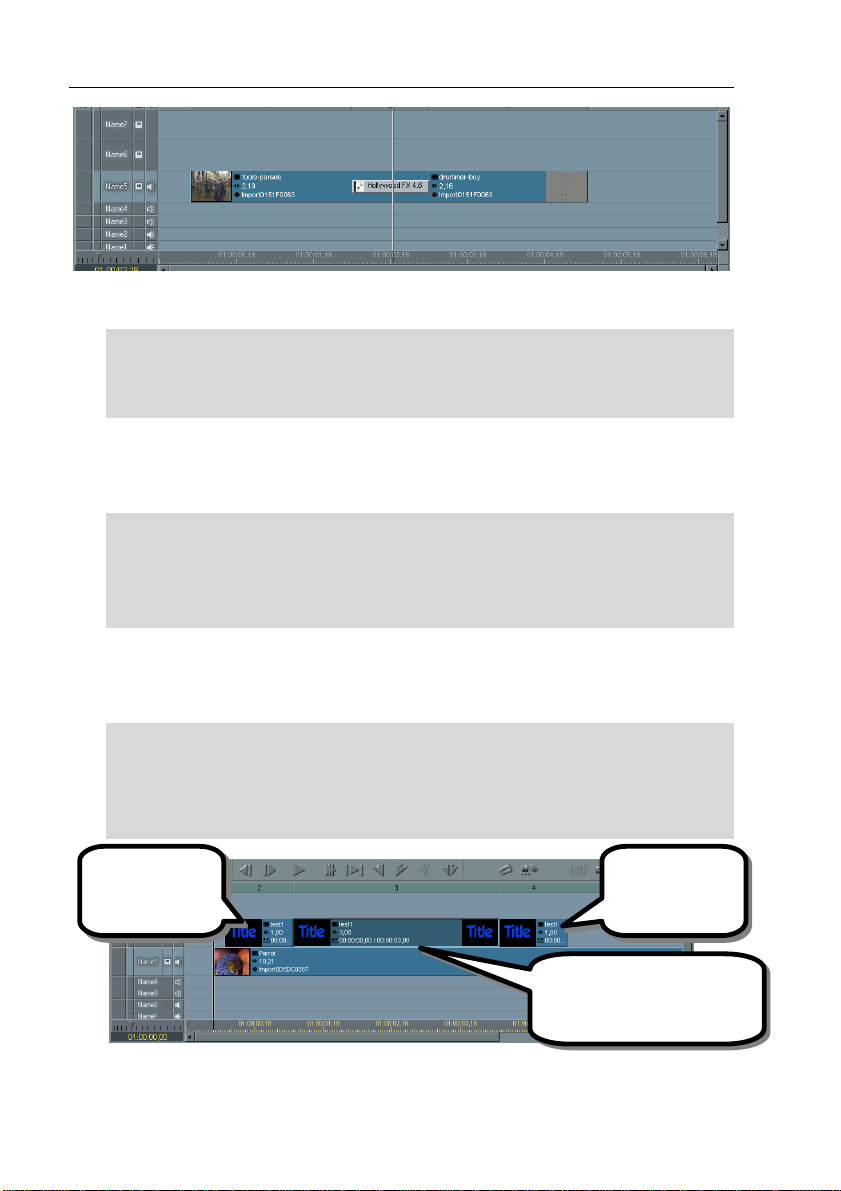
UUssiinngg HHoollllyywwoooodd FFXX AAss aa FFiilltteerr
Hollywood FX can also be used as a filter on a graphic, title, or video clip.
Hollywood FX is great for flying on or off titles over video.
··
PPrreeppaarree vviiddeeoo aanndd aa ggrraapphhiicc::
F Start a new sequence and drag a video clip into the first video track.
F Select a title, and drag that same title three (3) times into the timeline,
on the video track immediately above the video clip you dragged into
the first track.
The first copy of
over the video clip.
will simply be overlayed on the
The Timeline, ready for a Hollywood FX Filter
20
The last copy of
the title will fly
offscreen.
The second copy of the title
video clip.
Page 21
GGeettttiinngg SSttaarrtteedd
··
FFllyy oonn tthhee ttiittllee wwiitthh HHoollllyywwoooodd FFXX::
F In the Project window, click on the Edition.FX tab, then double-click on
the Plug In Clip Fx folder.
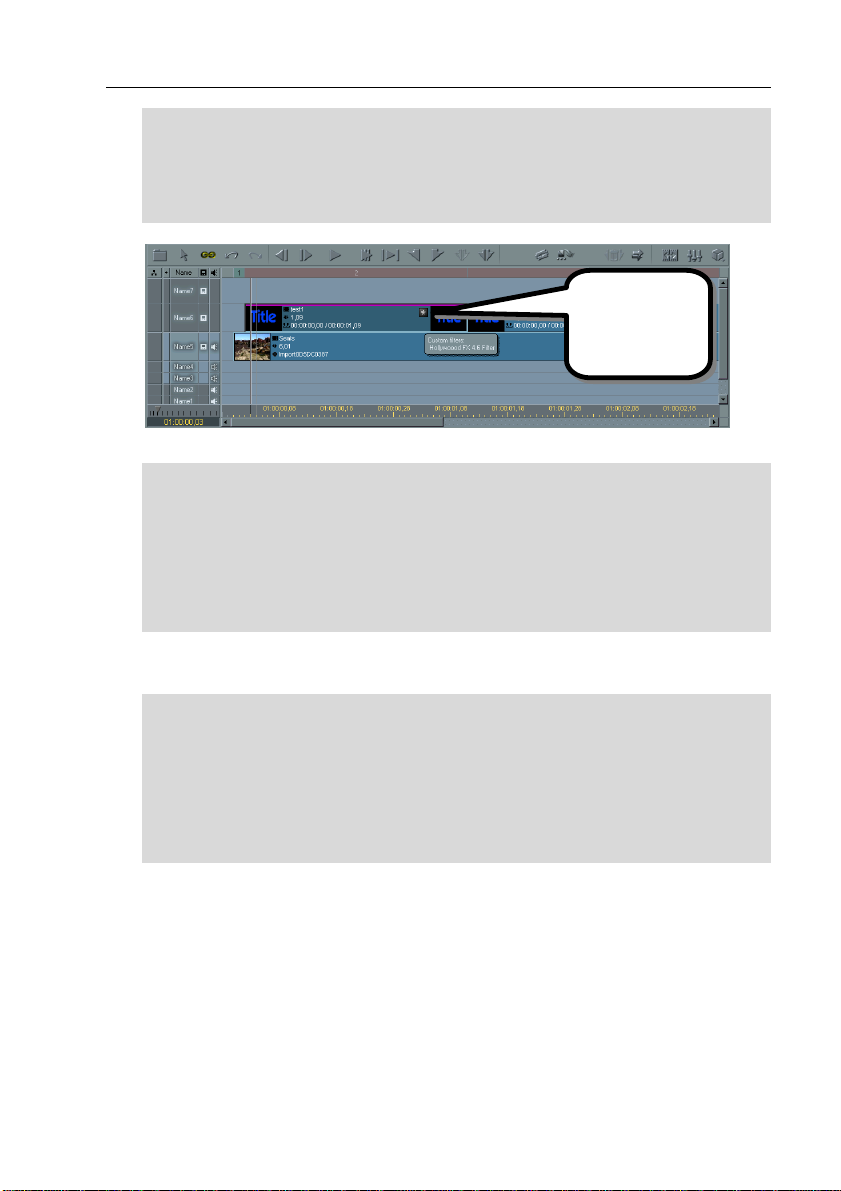
F Drag the Hollywood FX 4.6 Filter from the Project window into the
timeline on top of the first copy of the title.
Click on this icon
to display the
Hollywood FX
dialog.
Hollywood FX Filter added to first title clip
F Double-click on the asterisk (*) icon on the title clip to display the
Hollywood FX dialog.
F Click on the Domino effect in the first row of the FX Catalog.
F Click on Basic Options in the Control panel on the left.
F Check the Reverse Flight checkbox (this will make the effect fly on
instead of fly off).
F Click Ok to close the Hollywood FX dialog.
After background rendering is complete, you can playback the sequence and
see the title fly on with the effect selected.
··
FFllyy ooffff wwiitthh HHoollllyywwoooodd FFXX::
F Drag the Hollywood FX 4.6 Filter from the Project window into the
timeline on top of the last copy of the title.
F Double-click on the asterisk (*) icon on the title clip to display the
Hollywood FX dialog.
F Select the Dive Off effect from the first row of the FX Catalog.
F Click Ok to close the Hollywood FX dialog.
When background rendering is complete, you can playback the sequence, and
you will now see the title fly on, hold, then fly off.
21
Page 22
HHoollllyywwoooodd FFXX UUsseerr’’ss GGuuiiddee
AAddoobbee PPrreemmiieerree
Hollywood FX appears in the Pinnacle Folder in Adobe Premiere. If it does
not appear see Troubleshooting for more information.
AAddddiinngg aa NNeeww HHFFXX TTrraannssiittiioonn
Before adding a Hollywood FX transition, prepare two video sources on the A
and B tracks of the timeline, so that there is some overlap between the two
video clips.
Two video clips ready for a Hollywood FX transition
··
TToo aadddd aa ttrraannssiittiioonn ttoo tthhee ttiimmeelliinnee::
F Make sure the Transitions window is visible. If not, select Transitions
from the Windows menu.
F Drag Hollywood FX from the Transitions window into the Transition
track of the Construction window so that it is between the two video
clips (the transition should automatically snap to fill the time between
the two clips.
A Hollywood FX transition in the timeline
F Double-click on the transition block. The Hollywood FX dialog should
appear.
22
Page 23
GGeettttiinngg SSttaarrtteedd
The Hollywood FX dialog lets you choose a specific transition, and change
options for your transition (and will be described in full detail later).
F Click on Dive Off in the first row of icons in the FX Catalog.
F Click Ok to close the Hollywood FX dialog.
F Render that section of your project in Premiere to see the results.
CChhaannggiinngg aann EExxiissttiinngg TTrraannssiittiioonn
You can modify a transition that is already in the timeline, changing the
selected gradient or any options.
··
TToo cchhaannggee aa ttrraannssiittiioonn iinn tthhee ttiimmeelliinnee::
F Double-click on the representation of the transition in the Transition
track to display the Hollywood FX dialog.
F Make your changes in the Hollywood FX dialog then click Ok to close.
UUssiinngg HHoollllyywwoooodd FFXX AAss aa FFiilltteerr
Another way to use Hollywood FX is as a Filter. As a filter you can perform
multi-layer transitions within Premieres timeline. One great use of Hollywood
FX as a filter is to use it to fly titles around over video clips and other
transitions.
··
TToo pprreeppaarree ffoorr tthhee ttuuttoorriiaall::
F Start a new project.
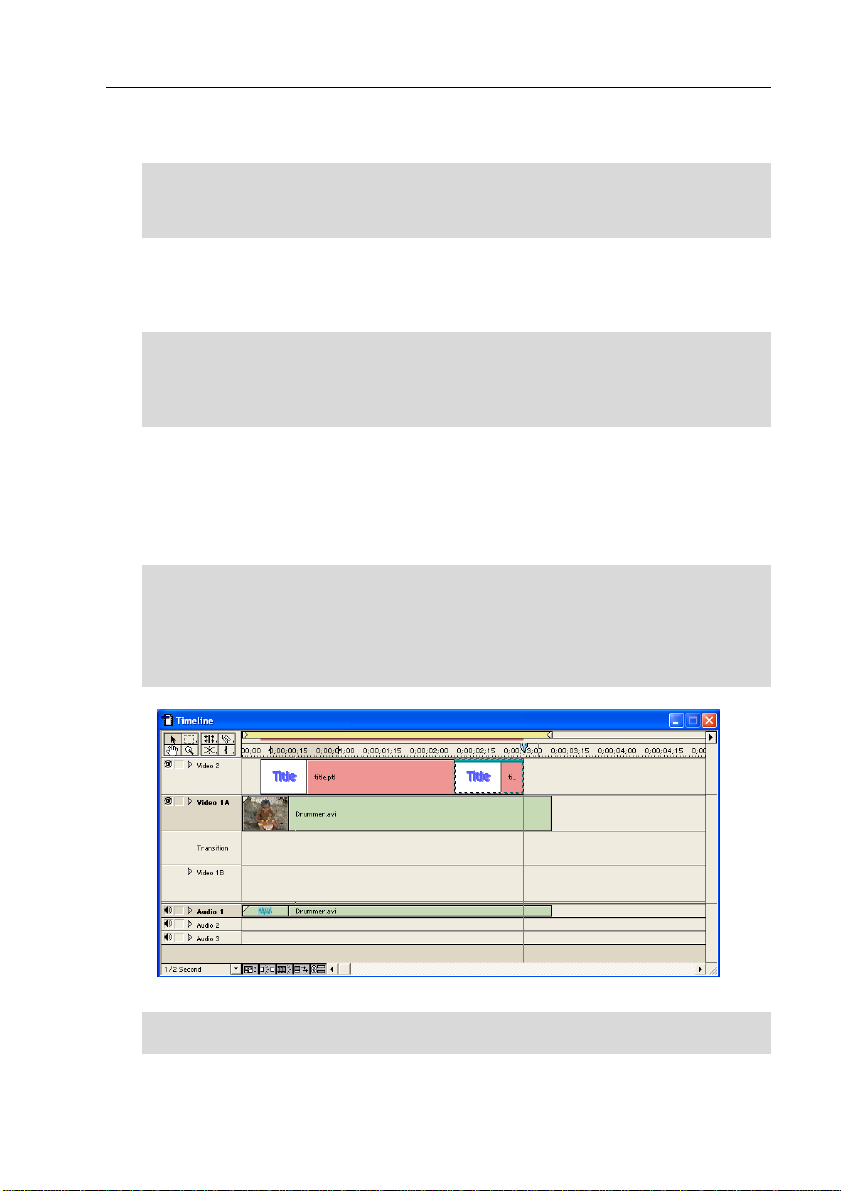
F Place a video clip on Video 1A
F Create a title and place two copies of it in Video 2 as shown in the
picture below.
Two copies of the title placed above the video clip
F Right-click on the second title in the timeline and select Video Options-
>Transparency from the popup menu.
23
Page 24
HHoollllyywwoooodd FFXX UUsseerr’’ss GGuuiiddee
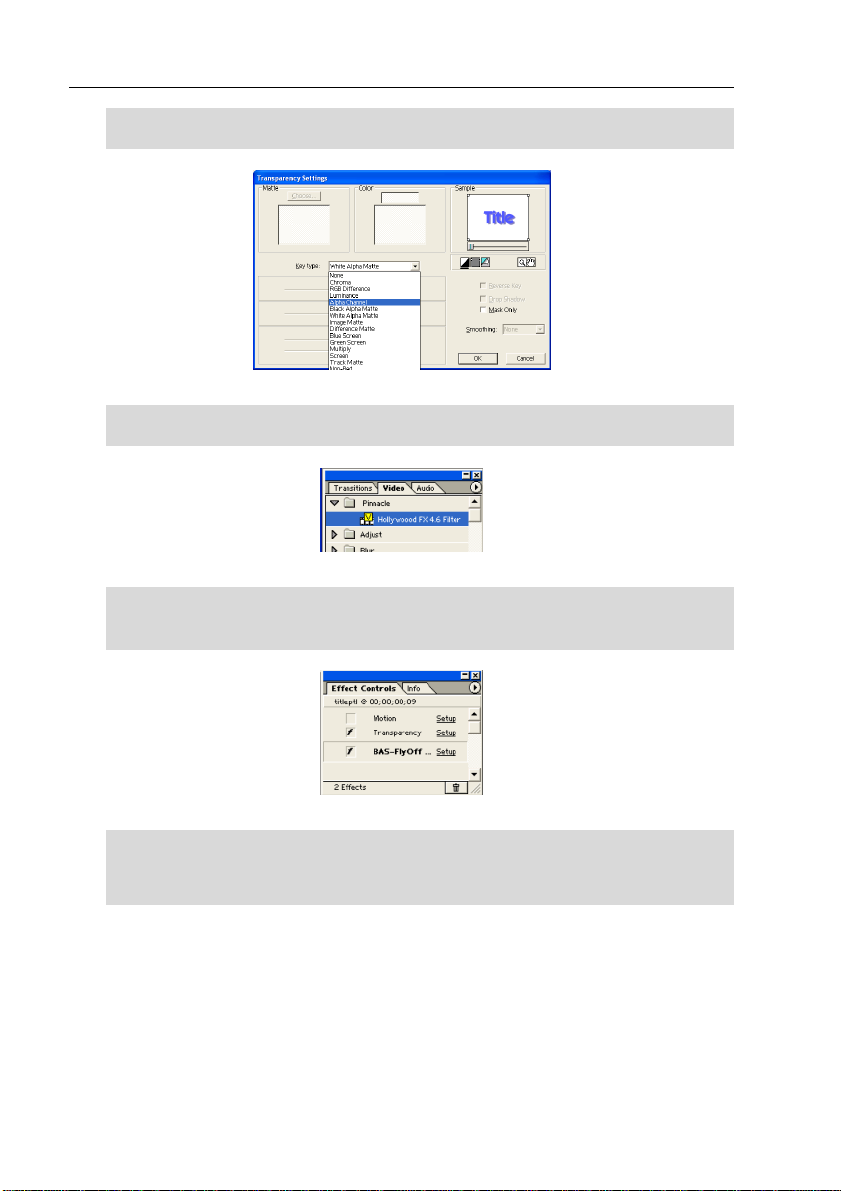
F In the Transparency Settings dialog change the key type to Alpha
Channel, click Ok.
Premiere’s Transparency Dialog
F From the Video Tab, drag and drop the Hollywood FX 4.6 filter onto
the second title.
The Hollywood FX 4.6 filter
F Now click the Setup button next to the Hollywood FX in the Effect
Control panel (the name of the specific effect selected will be listed); the
Hollywood FX dialog will appear.
Access to the Hollywood FX dialog from the Effect Controls palette
F Click on the Domino effect in the first row of icons in the FX Catalog.
F Click Ok to close Hollywood FX.
F Save and render the Premiere project to see the results.
24
Page 25
GGeettttiinngg SSttaarrtteedd
AAvviidd AAVVXX
Avid’s AVX plugin structure allows for flexibility with Hollywood FX. Hollywood
FX can be used as a single image filter, a transition, or for MultiWindow
effects directly within the timeline. The following sections describe the
process for using Hollywood FX in Avid AVX compatible products.
AAddddiinngg AA HHoollllyywwoooodd FFXX TTrraannssiittiioonn
To add a Hollywood FX transition to the Avid timeline, first add two video
sources that you want to transition between, and trim as necessary to create
time for the transition.
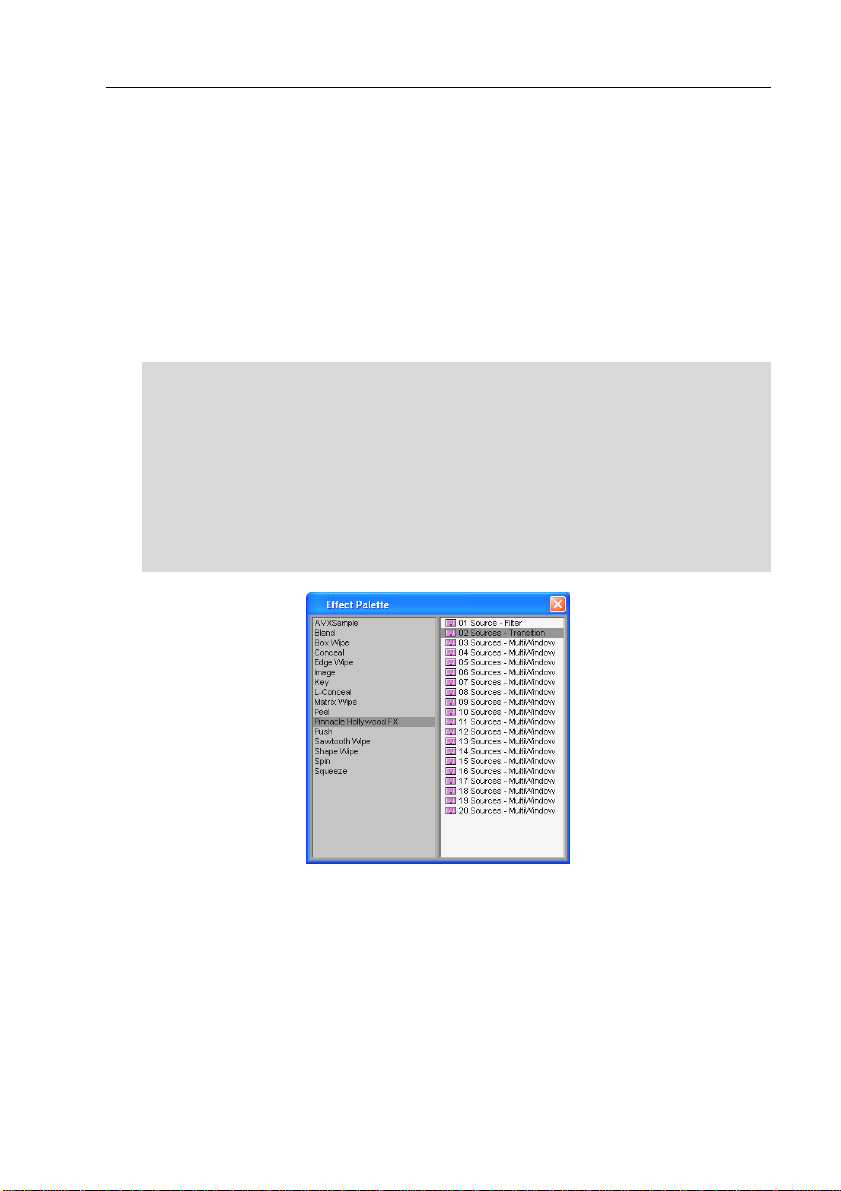
··
F Open the Effect Palette (Ctrl-8).
F Select the Pinnacle Hollywood FX group from the left side of the
F Drag 02 Sources – Transition from the right side of the Effect Palette
F Once dropped into the timeline, switch to Effect Mode (so that the Effect
TToo aadddd aa ttrraannssiittiioonn ttoo tthhee ttiimmeelliinnee::
Effect Palette.
into the timeline, between the two video clips.
Editor window is open, and click on the small button icon to the left of
02 Sources - Transition.
Hollywood FX in the Avid Effect Palette
The Hollywood FX dialog will appear, letting you choose a specific FX, and set
the options for rendering that FX.
CChhaannggiinngg aann EExxiissttiinngg TTrraannssiittiioonn
You can modify a transition that is already in the timeline, changing the
selected FX or any options.
25
Page 26

HHoollllyywwoooodd FFXX UUsseerr’’ss GGuuiiddee
Click here to display the
A Hollywood FX transition in the Avid Timeline
··
TToo cchhaannggee aa ttrraannssiittiioonn iinn tthhee ttiimmeelliinnee::
F Switch to Effect Mode.
F Click on the plugin icon in timeline.
F Click on the button to the left of 02 Sources - Transition in the Effect
Editor window.
F Make your changes in the Hollywood FX Selection dialog.
Hollywood FX dialog.
Hollywood FX in the Avid Effect Editor
AAddddiinngg AA HHoollllyywwoooodd FFXX FFiilltteerr
Hollywood FX can also be used as a filter for a single video source in Avid AVX
compatible products.
··
TToo aadddd aa ffiilltteerr ttoo tthhee ttiimmeelliinnee::
F Open the Effect Palette (Ctrl-8).
F Select the Pinnacle Hollywood FX group from the left side of the
Effect Palette.
F Drag 01 Source - Filter from the right side of the Effect Palette into the
timeline, on top of the video you wish to filter.
F Once dropped into the timeline, make sure the Effect Editor window is
open, and click on the small button icon to the left of 01 Source Filter.
The Hollywood FX dialog will appear, letting you choose a specific FX, and set
the options for rendering that FX.
CChhaannggiinngg aann EExxiissttiinngg FFiilltteerr
You can modify a filter that is already in the timeline, changing the selected
FX or any options.
··
TToo cchhaannggee aa ffiilltteerr iinn tthhee ttiimmeelliinnee::
F Switch to Effect Mode (opening the Effect Editor window).
F Click on the plug icon that represents the filter in the timeline.
26
Page 27
GGeettttiinngg SSttaarrtteedd
F Click on the button to the left of 01 Source - Filter in the Effect Editor
window.
F Make your changes in the Hollywood FX Selection dialog.
AAddddiinngg AA HHoollllyywwoooodd FFXX MMuullttiiWWiinnddooww EEffffeecctt
Avid’s nested track capability makes it simple to use Hollywood FX’s
MultiWindow effects in your projects.
··
TToo aadddd aa MMuullttiiWWiinnddooww ttoo tthhee ttiimmeelliinnee::
F Open the Effect Palette (Ctrl-8).
F Select the Pinnacle Hollywood FX group from the left side of the
Effect Palette.
F Drag XX Source - MultiWindow which matches the number of sources
in the effect you will use from the right side of the Effect Palette into the
timeline, on top of a piece of video in timeline which will serve as the
backdrop of the effect. For example, if you wanted to create the
Box6srce effect, you would drag the 07 Source effect onto your video
clip.
F Once dropped into the timeline, make sure the Effect Editor window is
open, and click on the small button icon to the left of XX Source MultiWindow.
F The Hollywood FX Selection dialog will appear. Select the effect you
wish to use and set any rendering options, then click Ok.
F Next, double-click on the plugin icon in the timeline to open up the
nested tracks.
F Switch to Source/Record mode or Trim mode, then drag additional
video clips into the nested tracks. The nested track number
corresponds to the Source number in HFX.
Hollywood FX in the Avid Effect Editor
27
Page 28

Page 29
TTuuttoorriiaallss
TTrraannssiittiioonnss && OOppttiioonnss
This tutorial will take you through the basics of selecting a Transition FX and
setting Effect Options.
··
TToo pprreeppaarree ffoorr tthhiiss ttuuttoorriiaall::
F Set up two video clips in your host application and add Hollywood FX
as described in Getting Started.
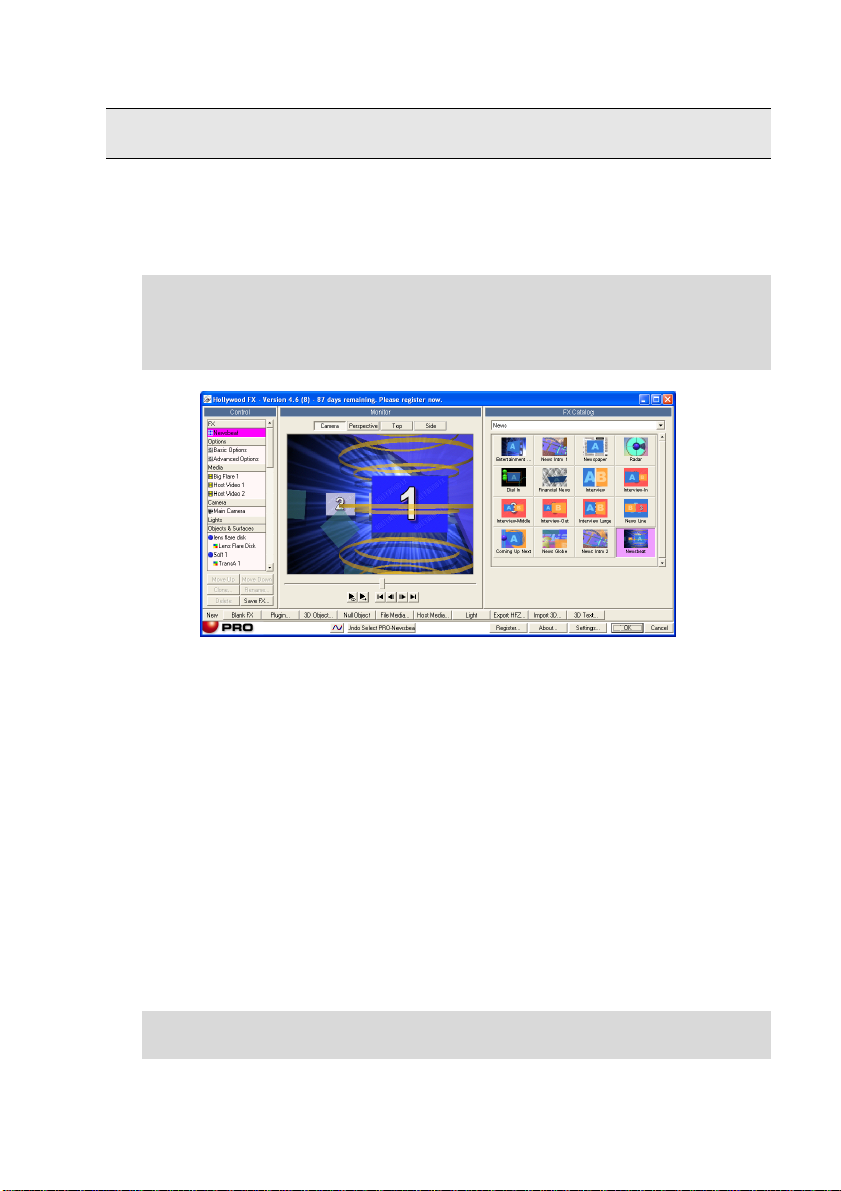
F When the Hollywood FX dialog appears, you are ready to begin.
The Hollywood FX dialog is organized into panels. The first panel is the
Control panel, which is the central control for working with FX. Selecting
items in the Control panel brings up different Item panels on the right side of
the dialog. The second panel is the Monitor panel that displays the preview of
the current FX. Finally, the Item panel changes to show different options for
the selected item in the Control panel.
The Hollywood FX dialog
SSeelleeccttiinngg AAnn FFXX
When the Hollywood FX dialog is displayed, you will immediately see the FX
Catalog (this is displayed when the current FX name is selected in the
Control panel). The FX Catalog has two major controls. The FX Group
popup list at the top of the page allows you to select one of the many groups
of FX. Below the FX Group list are the icons for each FX in the group. For
this tutorial you will select an interesting transition called Ball Split. This FX
is in the Basic Shape Transitions group.
··
TToo sseelleecctt tthhee BBaallll SSpplliitt FFXX::
F Select Basic Shapes from the FX Group popup list.
29
Page 30
HHoollllyywwoooodd FFXX UUsseerr’’ss GGuuiiddee
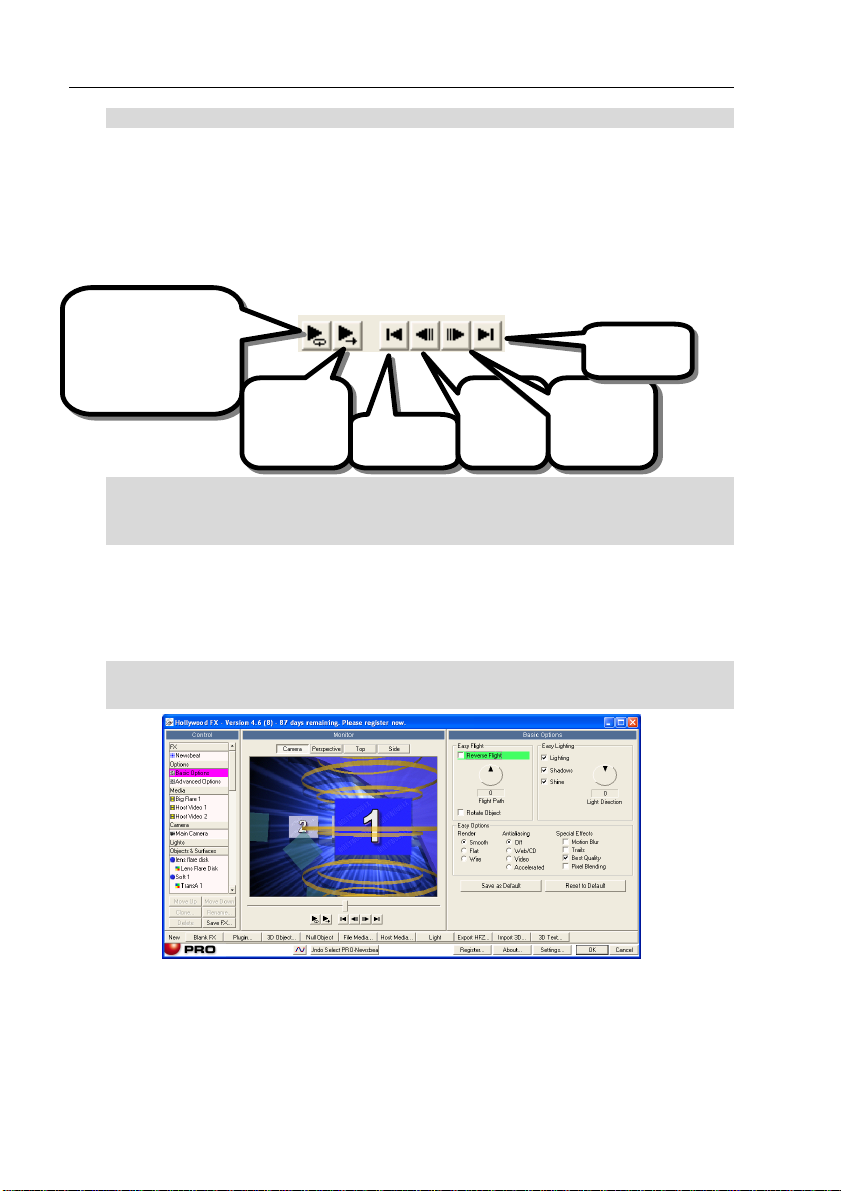
preview continuously as
Play entire FX
Jump to first
Step forward
F Click on the Ball Split FX icon.
When you select this FX, hints and tips for that effect appear at the bottom of
the FX Catalog panel.
TThhee MMoonniittoorr PPaanneell
Whenever you make changes in Hollywood FX, the preview window in the
Monitor panel is updated. Try dragging the slider directly below the preview
to view different frames of the preview.
Press loop play to
you work.
Press again to stop
preview.
··
TToo ttuurrnn oonn ccoonnttiinnuuoouuss ppllaayybbaacckk ooff tthhee pprreevviieeww::
F Click on the Loop Play button below the preview window in the Monitor
preview once.
frame.
Step
backward
one frame
Jump to the
last frame
one frame
panel.
BBaassiicc EEffffeecctt OOppttiioonnss
Hollywood FX gives you quick and easy control over many FX options. You
can create new and exciting results without having to re-keyframe the entire
FX.
··
TToo vviieeww tthhee BBaassiicc EEffffeecctt OOppttiioonnss::
F Click on the Basic Effect Options item in the Control panel.
EEaassyy FFlliigghhtt OOppttiioonnss
You can quickly change the flight path of an object in useful ways using the
Easy Flight controls.
The Effect Options panel selected
30
Page 31

TTuuttoorriiaallss
··
RReevveerrssee FFlliigghhtt::
F Click on the Reverse Flight checkbox. Watch the changes in the
preview.
F Click on the Reverse Flight checkbox to clear it.
Watch the preview now. You will see that instead of the first video source
flying off and revealing the second video source, the second video source will
fly on and cover the first video source.
··
FFlliigghhtt PPaatthh::
F Click-and-drag the Flight Path dial so that it reads 45. Watch the
preview.
F Click on the Rotate Object checkbox so it is checked. Watch the
preview.
F Click-and-drag the Flight Path dial so that it reads 90. Watch the
preview.
F Click-and-drag the Flight Path dial so that it reads 0. You can also use
the arrow keys to change the dial by one degree increments.
The Flight Path dial rotates the entire flight path of the 3D objects in the FX,
giving you a different result quickly and easily. When you change the Flight
Path, it does not rotate the object itself. Checking the Rotate Object
checkbox will cause the object itself to rotate and “follow” the new path.
NOTE: Some FX were not designed to be compatible with Easy Flight options.
So this feature may be disabled for those effects.
EEaassyy LLiigghhttiinngg
Lighting, shadows and shine add incredible 3D realism to an FX. By default
all of these features are turned on. Try turning them off to see the difference
it makes.
··
TToo ttuurrnn ooffff LLiigghhttiinngg,, SShhaaddoowwss,, aanndd SShhiinnee..
F Click on the Shine checkbox to clear it. Notice that the glossy shine
disappears.
F Click on the Shadows checkbox to clear it. Notice that the shadow
disappears.
F Click on the Lighting checkbox to clear it. Notice that the 3D ball is no
longer shaded.
F Click on Shine, Shadows, and Lighting to turn back on all of these
features.
In addition to being able to control which lighting features are used, you can
also control the light direction. By default, light comes from the top center of
the 3D “world”. When you adjust the light direction, it automatically adjusts
the shine and shadow position as well.
31
Page 32

HHoollllyywwoooodd FFXX UUsseerr’’ss GGuuiiddee
··
LLiigghhtt DDiirreeccttiioonn::
F Click-and-drag the Light Direction dial so that it reads 90. Watch the
PPlluuss PPRRO
O
preview.
F Click-and-drag the Light Direction dial so that it reads 180. Watch the
preview.
F Click-and-drag the Light Direction dial so that it reads 0. You can also
use the arrow keys to change the dial by one degree increments.
Changing the light direction to 180 degrees gives a very unique, almost
sinister appearance.
EEaassyy OOppttiioonnss
The Easy Options controls let you adjust special rendering features of the 3D
engine.
Render Type
Normally objects with curves are rendered with smooth surfaces. You can
use the Render Type to change to faceted or wire surfaces.
··
RReennddeerr TTyyppee::
F Click on the Flat radio button under Render. Notice that the object no
longer appears smooth.
F Click on the Wire radio button under Render. Notice that the object is
now rendered as a wireframe rather than a solid object.
F Click on the Smooth radio button under Render to return to smooth
solid rendering.
Antialiasing
Because of the low resolution of video, sharp edged 3D effects will often
exhibit blocky stairstepping along the edges of objects. Antialiasing
eliminates much of this problem. Hollywood FX includes three methods of
antialiasing (however the preview generally only displays edge antialiasing.
··
AAnnttiiaalliiaassiinngg::
F Click on Web/CD under Antialiasing and notice how the edges of the
3D ball are smoothed.
F Click on Video under Antialiasing to switch to scene antialiasing. This
generally will not change the preview, but during final rendering full
Scene antialiasing will be used.
The additional checkboxes and advanced shadow controls are described in
more detail in the Reference Chapter.
When you are ready, click Ok in the Hollywood FX dialog to exit, then render
your project to see the results.
32
Page 33

TTuuttoorriiaallss
TTrraannssiittiioonn++
In the previous tutorial you worked with a Transition FX which had only two
video sources. In this tutorial you will use a Transition+ FX that performs a
transition, but has additional video sources you can use.
NOTICE: Avid AVX users will want to follow the directions in the Host
Applications section for setting up Transition+, since Avid provides special
features for Transition+.
When you are finished with this tutorial, you will know:
• How to use a Transition+ FX with extra video sources.
• You will also learn some of the features on the Settings dialog.
··
TToo pprreeppaarree ffoorr tthhiiss ttuuttoorriiaall::
F Set up two video clips in your host application and add Hollywood FX
as described in Getting Started, creating a two second transition.
F When the Hollywood FX dialog appears, you are ready to begin.
SSeelleeccttiinngg tthhee TTrraannssiittiioonn++
··
TToo sseelleecctt tthhee ttrraannssiittiioonn::
F Select Wipes and Fades from the FX Group popup list at the top of the
page.
F Click on the FlipOver icon.
F Click the Play Once preview button on the Monitor.
Watch the preview. Notice that while the video is flipping over, you can see
black in the background. There is a backdrop that is currently not visible,
because no video source has been mapped to it. We will now map that 3rd
video source.
MMaappppiinngg AA VViiddeeoo CClliipp ttoo SSoouurrccee 33
Now add a video clip to Source 3 so that the background is no longer black.
··
TToo aadddd aa vviiddeeoo cclliipp ttoo SSoouurrccee 33::
F Click on the Host Video 3 media item in the Control panel.
F Click on the Select File button in the Media Options panel.
F Using the file requester, select a video clip to use for Source 3.
F Click on the Play Once button in the Monitor window.
33
Page 34

HHoollllyywwoooodd FFXX UUsseerr’’ss GGuuiiddee
You have selected a new video source and should be able to see it in the
background as Source 1 flips over to Source 2. You should also make sure
the field interpretation is correct for this video.
··
TToo cchhaannggee ffiieelldd IInntteerrpprreettaattiioonn::
F Click on the Interpret popup, and select the proper field interpretation
for your video. For most video capture cards you will select Interlaced
– Upper First or Interlaced – Lower First.
While correct interpretation is not important in the preview, it will be
important for final rendering. If interpretation is not set correctly, the video
in the background will playback incorrectly (it will jitter rather than playing
smoothly).
The Media Options panel selected, field interpret shown
From now on, when you select a video file, the Interpret value will be
defaulted to the last option selected. You will only need to change Interpret if
you select a single image file, or video captured using a different video card.
34
Page 35

TTuuttoorriiaallss
MMuullttiiWWiinnddooww FFXX
The final type of FX in Hollywood FX is the MultiWindow FX. MultiWindow FX
do not perform a transition from one video source to another. Instead, they
feature multiple video windows that fly on or off screen in various ways. For
this tutorial we will use the Flip 4 effect and we will reverse it, so that we
have four video windows that fly on, and play over a backdrop.
NOTICE: Avid AVX users will want to follow the directions in the Host
Applications section for setting up MultiWindow FX, since Avid provides special
features for MultiWindow FX.
When you are finished with this tutorial, you should know:
• How to select video sources for a MultiWindow FX.
• How to use Hold at Start and Hold at End.
PPrreeppaarree ffoorr tthhee TTuuttoorriiaall
MultiWindow FX are designed differently from Transitions. In a MultiWindow
FX, the Source A video from the host application is always used as the
backdrop video. This makes it easy to layout the timeline so that you can
have the backdrop video continue before or after the FX.
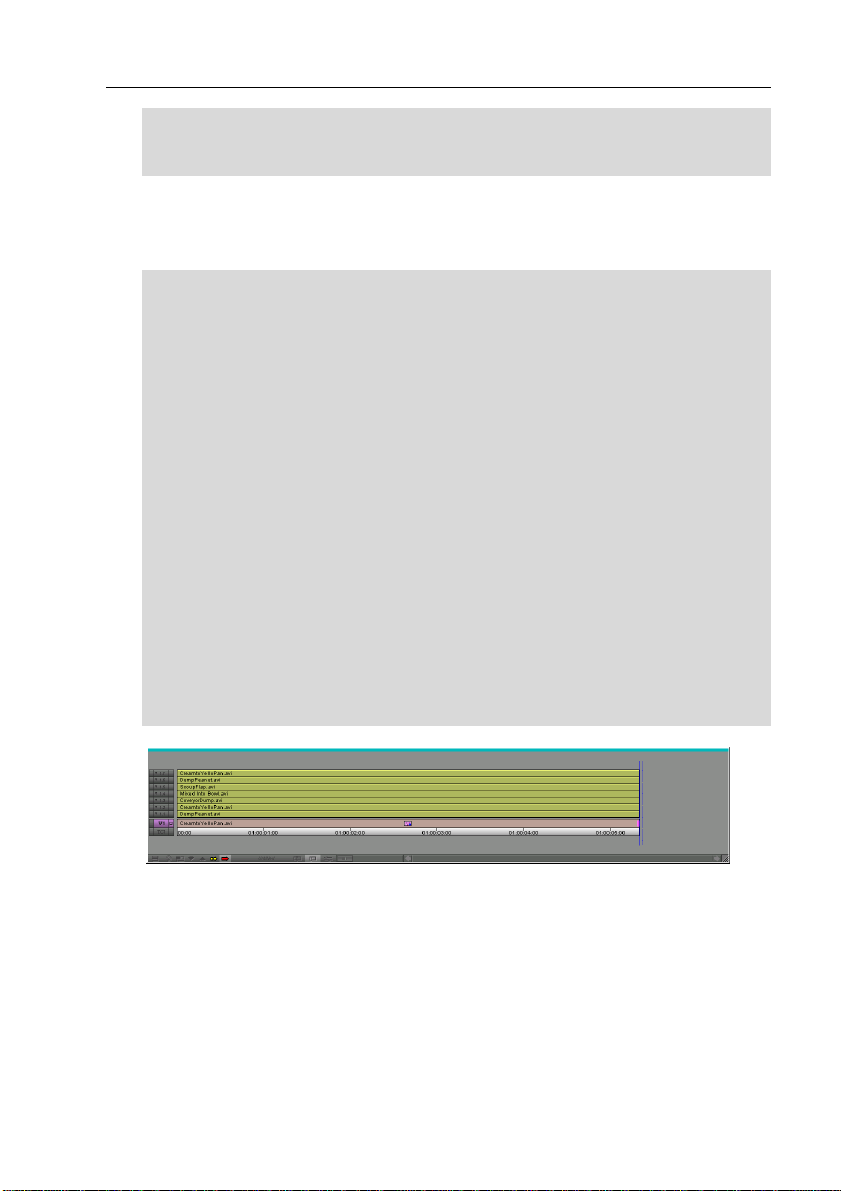
··
TToo pprreeppaarree ffoorr tthhee ttuuttoorriiaall::
F Start a new project.
F Place the video you want to use as the backdrop on you’re A video
track, so that it starts at the beginning of the project, and runs for about
five seconds.
F Place a second video source on the B video track, so that it starts about
one second into the project, and has a duration of about three seconds.
F Insert a Hollywood FX transition between the two clips so that the
transition is from A to B.
This video will be
the backdrop for
This video will be
mapped to the top
left video window.
The Hollywood FX transition in Premiere, ready for a MultiWindow FX
35
the FX.
Page 36

HHoollllyywwoooodd FFXX UUsseerr’’ss GGuuiiddee
SSeelleeccttiinngg tthhee FFXX aanndd SSeettttiinngg OOppttiioonnss
For this tutorial, you will select an effect called Flip 4, where four video
sources fly off over a backdrop video. We want the video sources to fly on, so
we will reverse the FX.
··
SSeelleeccttiinngg tthhee FFlliipp 44 FFXX aanndd sseettttiinngg ooppttiioonnss::
F Select Multiwindow Effects from the FX Group popup menu.
F Select Flip 4 from the FX icons.
F Click on the Effect Options item in the Control panel.
F Click on the Reverse checkbox.
F Click on the Play Once button in the Monitor panel.
Notice that the A video source plays in the background, and the B video
source is mapped to the top left video window. We will now select video clips
for the three remaining video windows.
··
TToo mmaapp tthhee aaddddiittiioonnaall vviiddeeoo ssoouurrcceess::
F Click on the Host Video 3 media item in the Control panel.
F Click on Select File in the Media Options panel.
F Select a video clip using the file requester.
F Click on the Play Once button to see the preview with the new video
source.
F Click on the Host Video 4 media item in the Control panel.
F Click on Select File in the Media Options panel.
F Select a video clip using the file requester.
F Click on the Host Video 5 media item in the Control panel.
F Select a video clip using the file requester.
F Click on the Play Once button in the Monitor panel to see the preview.
Because you set up the default Interpret value in the previous tutorial, you
should not have to change it for each video source you selected above.
O
UUssiinngg HHoolldd AAtt EEnndd
PPlluuss PPRRO
The way the FX is currently set up, the four video windows will fly on screen,
and as soon as the last one is on screen, the FX will end, and all of the video
windows will disappear. Instead of this, we would like the video windows to
remain on screen for a longer time while they play video. The Advanced
Options panel has two sliders, Hold at Start and Hold at End, that allow you to
quickly change the amount of time spent on the first and last frame of the FX.
This is exactly what we need.
36
Page 37

TTuuttoorriiaallss
Hold Time controls and how it affects the timeline
The last position will
hold for the final 30%
of the total time
··
TToo cchhaannggee tthhee HHoolldd aatt EEnndd::
F Click on the Advanced Options item in the Control panel.
F Drag the End slider (under Hold Times) to 30%.
F Click the Play Once button in the Monitor panel to see the preview.
Now all of the video windows will fly on during the first 70% of the total FX
time, and will hold at their final position for the last 30% of the total time.
Now exit the Hollywood FX dialog and render the FX to see the final results.
37
Page 38

Page 39

PPiinnnnaaccllee OOnnlliinnee
When you register Hollywood FX online to get your permanent keycode, you will
also receive a userid and password for Pinnacle Online, where you can purchase
and instantly download upgrades and add-on packs of FX.
To use Pinnacle Online you will need a web browser (like Microsoft Internet
Explorer 5.0 or higher), and a connection to the Internet. Simply connect to
http://hollywoodfx.pinnaclesys.com. Follow the instructions there to access
and use your Pinnacle Online account.
39
Page 40

Page 41

TTrroouubblleesshhoooottiinngg
This section provides a list of common problems and their solutions. If you
can’t find an answer to your problem in this list, or in the ReadMe file that is
created during setup, then contact Hollywood FX customer support for more
help.
Hollywood FX does not show up in my host application.
During installation Hollywood FX will attempt to find all compatible host
applications and install the proper plugin files for that application. If
Hollywood FX does not show up, try copying the files listed below from the
Host Plugins folder (in Hollywood FX) into the folder listed.
Host Application Plugin File Copy To Folder
Pinnacle Studio 8 Studio\Hfx4.dll Studio 8\Plugins
Pinnacle Edition/Liquid Edition\HfxEdt46.vfx
EditionFilter\FlHfxEdt46.vfx
Adobe Premiere 6.0 Premiere6\Fx-
HfxP646.prm
Premiere6Filter\FlHfxP646.prm
Avid AVX AVX\HfxAvx46.avx Symphony\AVX_Plug-Ins or
Edition\Plugins\Transitions
Edition\Plugins\Filter
Premiere 6.0\Plug-Ins\Pinnacle
Premiere 6.0\Plug-Ins\Pinnacle
Xpress\AVX_Plug-Ins etc.
My video editor crashes when I try to use Hollywood FX.
This usually indicates a conflict with your 3D graphics card. You should
download and install the very latest drivers for your graphics card.
I never get a rendered transition, I just get the Hollywood FX Logo.
This indicates that Hollywood FX was not able to use OpenGL to render the
effect. Check the following items to resolve this problem:
• Check to make sure the files Opengl32.dll and Glu32.dll are in
your Windows\System folder (Winnt\System32). If they are
not present, Windows 95 users should download the OpenGL
libraries from the Support area of the Hollywood FX website.
Windows 98, NT, and 2000 users should check their operating
system installation, and reinstall any service packs.
• Make sure you are using the very latest drivers for your graphic
display card.
41
Page 42

HHoollllyywwoooodd FFXX UUsseerr’’ss GGuuiiddee
• Click on the Settings button in the Hollywood FX dialog and try
changing the Render Type to OpenGL Software Engine. If it is
already set to OpenGL Software change it to Portable Software.
When I select video or images in the Media Options panel I get a
white object instead of video.
Generally this indicates you have run low on memory. If you are doing
MultiWindow effects with more than 3 video sources, you should have a
minimum of 128 MB of RAM (with at least 256 MB highly recommended). If
you are using images you scanned in, you should lower the resolution of
those scanned images.
I get color/brightness jumps at the start and end of my effect.
This is normally because the rendered effect is being recompressed while the
surrounding video is not. Many non-linear editors have an option to
Recompress Always or to turn off Smart Rendering. If your non-linear
editor does not have a Recompress Always option, you can usually solve
the shift by adding a Brightness/Contrast filter to both the incoming video
and outgoing video clips, but leave the Brightness/Contrast settings
unchanged. This will cause the video to be recompressed, but not changed.
42
Page 43

PPeerrffoorrmmaannccee
Hollywood FX uses OpenGL, which is the industry standard 3D graphics
language for high performance high quality rendering. Over the past few
years the 3D accelerators and their OpenGL graphics drivers have improved
dramatically, however there are still times that the graphics drivers cause
incompatibilities with Hollywood FX. For this reason, Hollywood FX defaults to
software-only rendering for the highest degree of compatibility, at the cost of
slower previews and rendering.
This section describes the steps you can take to improve 3D rendering
performance. You should only try these changes once you are familiar with
Hollywood FX and have successfully rendered some effects in your projects.
CCPPUU SSppeeeedd,, BBuuss SSppeeeedd,, aanndd MMeemmoorryy
Your system configuration can make a dramatic difference in performance.
By upgrading your CPU to a faster speed, upgrading to a new motherboard
that has a 133MHz (or faster) bus, and by increasing memory to 256MB or
more, you can dramatically improve the performance of Hollywood FX,
whether you have a 3D graphic accelerator or not.
GGrraapphhiicc CCaarrdd DDrriivveerrss
The most important aspect to 3D performance from your graphic accelerator
is the driver software you are using. You should regularly check your graphic
accelerator manufacturer’s website for updated drivers. Here are the website
addresses of the most popular graphic cards.
3D-Labs (Wildcat, Oxygen) – www.3dlabs.com
ATI (Radeon) – www.ati.com
Matrox (G450, Parahelia) – www.matrox.com/mga
Nvidia (GeForce, Quadro) – www.nvidia.com
PPrreevviieeww PPeerrffoorrmmaannccee
Almost any good 3D accelerator will dramatically improve the performance in
the Preview Monitor window. You must enable OpenGL Hardware in the
Preview Settings to benefit from your accelerator.
··
TToo eennaabbllee aacccceelleerraatteedd pprreevviieeww rreennddeerriinngg::
F Click on the Hollywood FX Settings button at the bottom of the
Hollywood FX window.
F In the Preview Settings area, select the OpenGL Hardware Engine
from the Preview Type dropdown menu.
43
Page 44

HHoollllyywwoooodd FFXX UUsseerr’’ss GGuuiiddee
F Click OK to return to the Hollywood FX window and try the new
settings.
If you encounter problems with the preview after enabling on-screen
rendering, you should immediately return to Hollywood FX Settings and select
the OpenGL Software or Portable Software Engine.
NOTICE: It is recommended to perform test these rendering changes using
the Easy FX editor that you can launch from the Start Menu.
Final Rendering Performance
FFiinnaall RReennddeerriinngg PPeerrffoorrmmaannccee
The most recent 3D accelerator cards (Radeon from ATI and GeForce from
Nvidia) have made dramatic improvements in texture loading performance,
which is critical to Hollywood FX rendering performance. If you have a recent
graphics card and the newest drivers, you may see anywhere from 2X to 5X
improvement in rendering times if you turn on acceleration for final rendering.
To enable acceleration for final rendering, you must change to Hardware
rendering.
··
TToo eennaabbllee aacccceelleerraatteedd FFiinnaall RReennddeerriinngg PPeerrffoorrmmaannccee::
F Click on the Hollywood FX Settings button at the bottom of the
Hollywood FX window.
F In the Render Performance area, select the OpenGL Hardware
Engine from the Render Type dropdown menu.
F Click OK to return to the Hollywood FX window and try the new
settings.
If, after making this change, your effects do not render properly, you should
immediately return to Settings and change the Render Type back to
OpenGL or Portable Software.
44
Page 45

AAddvvaanncceedd TTuuttoorriiaallss
Before following these tutorials, you should fully read and understand the
previous portion of this guide.
KKeeyyffrraammee EEddiittiinngg wwiitthh EEnnvveellooppeess
This tutorial demonstrates the way you can keyframe any option in Hollywood
FX to create advanced results.
Hollywood FX uses the term Envelope to describe a set of keyframes that
describe how an option’s value will change over time in Hollywood FX.
··
PPrreeppaarree ffoorr tthhee TTuuttoorriiaall aanndd SSeelleecctt tthhee FFXX::
F Create a new project in your host application.
F Add two video clips and create a two second transition between them.
F Add Hollywood FX as a transition between the two video clips.
F From the Hollywood FX dialog, select the Tumble 2 transition in the
Flying Windows group.
The Envelope Editor is normally hidden when you first begin using Hollywood
FX (to keep life simple).
··
TToo ddiissppllaayy tthhee EEnnvveellooppee EEddiittoorr::
F Click on the Envelope Editor button at the bottom of the Hollywood FX
dialog.
PPlluuss PPRRO
O
The Envelope Editor Button
The Envelope Editor will appear. We are going to modify the Tumble 2
transition by making the tumbling video dissolve as it tumbles into the
distance. We will do this by creating an envelope for the object’s Dissolve
option.
··
SSeelleecctt tthhee OObbjjeecctt aanndd OOppttiioonn::
F Click on the SoftFB 1 object in the Control panel.
F Click on the Dissolve slider in the Object Options panel so that it is
highlighted.
Notice that the word Dissolve under the slider is highlighted in green. This
is an indicator that it is the current option that can be modified in the
Envelope Editor. Whenever you select a control that can have an envelope in
Hollywood FX, it will be highlighted in green.
45
Page 46

HHoollllyywwoooodd FFXX UUsseerr’’ss GGuuiiddee
the keyframe at
Hollywood FX makes it extremely easy to create envelopes by simply clicking
and dragging in the envelope window. We want to create an envelope for
dissolve that makes the object disappear over the entire length of the
transition.
··
TToo ccrreeaattee aa ssiimmppllee eennvveellooppee::
F Click-and-drag in the envelope window at 100% in time, and 100% in
value. Drag the keyframe you create all the way to 100% value and
release the mouse.
Click here to
create your first
A second keyframe is
created automatically at
time 0%
The envelope after creating the first keyframe
keyframe.
Notice that there are two keyframes (indicated by blocks). The one at 100%
is the one you created. The keyframe at 0% is created automatically, since
all envelopes in Hollywood FX must at a minimum have keyframes at 0% and
100%.
Also notice that the preview and the current time slider at the top of the
envelope window both moved to 100%, and that the keyframe at 100% is
highlighted in red to indicate that it is the current keyframe.
The way the envelope is currently designed, the value of Dissolve will remain
100% for the entire effect. What we want is for the value to start at 0%, so
lets change the first keyframe.
··
TToo cchhaannggee tthhee ffiirrsstt kkeeyyffrraammee::
F Click-and-drag on the blue block that represents the keyframe at time
0%.
F Drag the blue block to the bottom of the envelope window (value 0%).
Notice the Dissolve slider (in the Object Options panel) while you are
dragging. Its value is “tied” to the current envelope.
F Release the mouse button.
Click and drag
time 0%.
The first keyframe is adjusted
46
Page 47

AAddvvaanncceedd TTuuttoorriiaallss
Now our envelope will work correctly, causing the object to dissolve over the
entire length of the transition. Try playing the preview to see the results.
Let’s add one more keyframe to this envelope, so that the object becomes
transparent more quickly. We will create this key in a different way.
··
TToo ccrreeaattee tthhee nneeww kkeeyyffrraammee::
F Drag the current time slider at the top of the envelope window until it is
at 50%.
F Now drag the Dissolve slider in the Object Options panel up to 90%.
After creating the new keyframe
The new keyframe is created automatically when you change the value of
Dissolve. This shows how the original value slider for Dissolve and the
Envelope Editor are tied together. This feature makes it extremely easy to
create keyframes for any value in Hollywood FX.
Before concluding this tutorial, lets play around with some of the other
envelope controls. First, let’s move quickly between the keyframes in this
envelope.
··
TToo mmoovvee bbeettwweeeenn kkeeyyffrraammeess::
F Click on the Prev button in the Envelope Editor. The current time slider
(and preview) will move to the keyframe at 0%.
F Click on the Next button in the Envelope Editor. The current time slider
will move to the keyframe at 50%.
F Click on the Next button. The current time slider will move to the
keyframe at 100%.
F Finally, click on the Prev button to return to the 50% keyframe.
Using the Prev and Next buttons can quickly get you to the keyframe you
need, especially when you have keyframes close together and one of them is
hard to select by clicking on it with the mouse.
Now, let’s save our current envelope to disk. If you create an interesting
envelope that you might want to use again, you can save it to disk.
··
TToo ssaavvee tthhee eennvveellooppee::
F Click on the Save… button in the Envelope Editor.
F Type tutorial for the filename in the file requester.
47
Page 48

HHoollllyywwoooodd FFXX UUsseerr’’ss GGuuiiddee
F Click Ok in the file requester to save the envelope.
Now let’s say we don’t really like having the keyframe at 50%, so we will get
rid of it.
··
TToo ddeelleettee tthhee ccuurrrreenntt kkeeyyffrraammee::
F Click on the Delete button in the Envelope Editor.
The keyframe at 50% disappears, and the envelope returns to a straight line
between 0% and 100%.
If we decide we don’t want the envelope at all (we want to return to a single
value for the entire duration of the FX), then we can remove the envelope.
··
TToo rreemmoovvee tthhee eennvveellooppee::
F Click on the Remove button at the top of the Envelope Editor.
The envelope will disappear, and the Dissolve slider now controls the dissolve
value for the entire duration of the FX.
For our final trick, let’s load back in the envelope we saved above.
··
TToo llooaadd aann eennvveellooppee::
F Click on the Load button in the Envelope Editor.
F Double-click the tutorial file in the file requester.
Our envelope is back. Exit the Hollywood FX dialog and try rendering the FX
with the dissolve envelope.
Remember, envelopes can be created for almost any value in Hollywood FX.
If a control is highlighted in green when you use it, that means you can
control that value with an envelope and create exciting results.
48
Page 49

AAddvvaanncceedd TTuuttoorriiaallss
O
FFlliigghhtt PPaatthh EEddiittiinngg
You can edit the paths of any 3D object to create unique results. A set of
tools on the Object Options panel along with the Envelope Editor give you
complete flexibility to create new flight paths for objects. In this tutorial we
will take the Ball Backup FX, and create a new path so that the ball bounces
up and down on the screen. We use the term path to mean the envelope for
an object’s position, rotation, and scale.
··
PPrreeppaarree ffoorr tthhee TTuuttoorriiaall aanndd SSeelleecctt tthhee FFXX::
F Create a new project in your host application.
F Add two video clips and create a two second transition between them.
F Add Hollywood FX as a transition between the two video clips.
F Select the Ball Backup transition in the Basic Shapes group.
F Click on the Sphere object in the Control panel.
The Positioning group should be highlighted in green, indicating that object
positioning is currently being edited in the Envelope Editor. In the case of
path editing, each keyframe of the envelope (or path) indicates the position,
rotation and scale of the object at that time in the FX. Hollywood FX then
automatically determines the positioning of the object between each
keyframe, so that the object moves smoothly from the position at one
keyframe to the position at the next keyframe. Let’s start by looking at the
keyframes in the Ball Backup FX.
PPlluuss PPRRO
49
Page 50

HHoollllyywwoooodd FFXX UUsseerr’’ss GGuuiiddee
The picture above shows each keyframe in the Ball Backup FX. For each
keyframe you can see the position, rotation and scale values, as well as a
camera preview and a perspective preview of the FX at that time. You can
follow along yourself by using the Next and Prev buttons in the Envelope
Editor, and using the View buttons in the Monitor panel to switch between
camera and perspective view.
At the first keyframe, the object is not morphed, and is positioned at
0, 0, 0 on the X, Y, and Z axis. It is not rotated at all
(0, 0, 0), and is scaled at 100% of normal size (1, 1, 1).
At the second keyframe, the object is moved down a small amount along the
Y axis (-0.123) and farther away from the camera (-0.37 along the Z axis).
The sphere object is also scaled smaller (0.39, 0.39, 0.39) in all directions.
The third keyframe continues the object’s movement away from the camera
(-1.36 on Z), and is smaller again (0.25, 0.25, 0.25 for scale).
In the fourth keyframe, notice that the sphere is rotated 118 degrees around
the X axis, and has moved offscreen.
In the last keyframe, the object has been scaled so small it is no longer
visible, and is far offscreen.
We are going to create a path where the sphere moves away from the
camera, then bounces up and down. We will begin by removing the current
path.
··
TToo rreemmoovvee tthhee ccuurrrreenntt ppaatthh::
F First make sure the current time slider is at time 0% (so that the first
keyframe is highlighted).
F Click on the Remove button to remove the path envelope.
By first making sure we are positioned at time 0%, the object will be left at its
fullscreen size and position when we remove the envelope this will make it
easy to start a new path.
Try playing the preview now. The object still morphs into a sphere, but it
doesn’t move anywhere. We are now ready to make it move the way we
want it to.
··
TToo ccrreeaattee aa nneeww ppaatthh::
F Click on the Create button in the Envelope Editor
Two keyframes get created, both with the object at the fullscreen position.
Hollywood FX must always have at least two keyframes (one at time 0% and
one at time 100%) in a path, so it creates the second keyframe automatically.
If you play the preview again, you will notice that nothing has changed.
Since our two keyframes are at the same position, the object still does not
50
Page 51

AAddvvaanncceedd TTuuttoorriiaallss
move. Let’s change the 100% keyframe so that the object will be in its final
position. You will actually move and adjust the sphere object by clicking and
dragging in the preview window, so read the following directions very
carefully.
··
TToo cchhaannggee tthhee llaasstt kkeeyyffrraammee::
F Click the Next button in the Envelope Editor, so that the 100% time
keyframe is selected.
F Click on the Scale tool button in the Object Options panel.
F Click-and-drag in the Monitor window to interactively scale the sphere
object. Drag to the left until the object is about one quarter its original
size (you can watch the scale values and stop scaling when the scale
values reach about 0.25).
F Click on the Move tool button in the Object Options panel.
F Click-and-drag in the preview window to interactively move the sphere.
Move the sphere towards the top of the preview until it is offscreen.
F Click on the Perspective button in the Monitor panel to switch to
perspective view.
F Right Click-and-drag in the preview window to move the sphere along
the Z axis. Move the mouse up until the object on the screen moves all
the way behind the backdrop video object, and the shadow is no longer
visible.
F Click the Camera button in the Monitor panel to return to camera view.
Now if you play the preview, you will see that the sphere simply shrinks and
disappears towards the top of the screen.
How your keyframes should look after modifying the last keyframe
51
Page 52

HHoollllyywwoooodd FFXX UUsseerr’’ss GGuuiiddee
new keyframe is created
Now we will create two more keyframes for the top and bottom of our bounce
(then we will use the Envelope Editor’s copy function to duplicate the
bounce). First let’s create the top of the bounce.
··
TToo ccrreeaattee aa nneeww kkeeyyffrraammee::
F Move the current time slider to time 10%.
F Click on the Scale tool button in the Object Options panel.
F Click-and-drag to the left in the preview until the object’s scale values
are around 0.25.
F Click on the Move tool button in the Object Options panel.
F Click-and-drag up in the preview until the object is at the very top of the
preview.
The
automatically at the current
time when you change the
positioning.
Notice that a new keyframe was automatically created for you as soon as you
began changing the object’s positioning. This eliminates the tedious process
of manually creating keyframes that some programs require. You simply
move the current time slider to the time you want, and begin editing. Now,
create the bottom of the bounce.
··
TToo ccrreeaattee tthhee bboottttoomm ooff tthhee bboouunnccee::
F Move the current time slider to 20%.
F The Move tool should already be selected in the Object Options tab, if
How things should look at the top of the bounce
not, click on it.
52
Page 53

AAddvvaanncceedd TTuuttoorriiaallss
F Click-and-drag down in the preview until the object is at the very bottom
of the preview.
Right now, at the bottom of the bounce, the keyframe is set to move
smoothly through that time, so it won’t look much like a bounce. Let’s
change that by making the spline curve to perform a bounce instead of a
smooth curve. We will use the Presets feature in Hollywood FX.
··
TToo mmaakkee tthhee ccuurrrreenntt kkeeyyffrraammee aa bboouunnccyy kkeeyyffrraammee::
F Click on the Presets dropdown in the Spline Control group at the
bottom of the Envelope Editor.
F Select Bounce from the list of presets. This will adjust the Tension,
Continuity and Spline values for the current keyframe to create a
bouncy motion.
Now we have a single bounce, but we would like the sphere to bounce again
and again. We will use the copy function to easily reproduce our bounce. We
will copy two keyframes that are at 10% and 20%, and paste them so that
we have a new bounce from 30% to 40%.
··
TToo ccooppyy aa sseett kkeeyyss::
F Click on the Copy button in the Envelope Editor.
F Type in 9 for Start and 21 for end (this makes sure we get the
keyframes even if they aren’t exactly at 10% and 20%).
F Type in 30 for paste.
F Click Ok.
The keys at 10% and 20% will now be duplicated, and you should have a
second bounce at 30% and 40%. Let’s make one more copy, this time of our
original bounce, and the first copy we made.
··
TToo ccooppyy tthhee kkeeyyss::
F Click on the Copy button in the Envelope Editor
F Type in 9 for Start and 45 for End.
F Type in 50 for Paste.
F Click Ok to make the copies.
Now you will have four bounces before the object flies off screen. Try playing
the preview to see the results.
Before leaving, you might want to save this path for future use.
··
TToo ssaavvee yyoouurr ppaatthh::
F Click on Save… in the Envelope Editor.
F Type the name bouncy as the filename in the file requester.
When you are finished try rendering your creation in your host application.
53
Page 54

HHoollllyywwoooodd FFXX UUsseerr’’ss GGuuiiddee
CCrreeaattiinngg NNeeww FFXX ffrroomm EExxiissttiinngg FFXX
The easiest way to create new FX is by changing an existing FX to meet your
needs rather than starting from scratch. In this example, we will take the
Flyoff FX and replace the flying window with a morphing shape, plus we will
use an image filter plugin to dissolve the shape in an exciting way.
··
PPrreeppaarree ffoorr tthhee TTuuttoorriiaall aanndd SSeelleecctt tthhee FFXX::
F Create a new project in your host application.
F Add two video clips and create a two second transition between them.
F Add Hollywood FX as a transition between the two video clips.
F The FlyOff transition should already be selected.
F Select the SoftFB 1 object in the Control panel.
The first thing we want to do is replace this simple flat window with a more
interesting shape. We will choose a Large Cylinder shape to replace the flat
window.
··
TToo rreeppllaaccee tthhee FFllaatt WWiinnddooww ((SSooffttFFBB 11))::
F Click on the Select File button in the Object Options panel. A file
requester will appear.
F In the file requester the Objects folder within Hollywood FX should be
the current folder (if it is not, make it so).
F Open on the 07 - Basic Shapes folder.
F Double-click on the Large Cylinder.hfo file.
O
PPRRO
The flat window has now been replaced with a large cylinder, but if you play
the preview, it looks like nothing has changed. That is because we have not
morphed the cylinder from its flat shape to its fully morphed cylinder shape.
To do this, we will create an envelope that will change its morph to 100%
during the first 10% of the FX duration.
··
TToo ccrreeaattee tthhee iinniittiiaall kkeeyyffrraammeess::
F Click-and-drag the Morph slider in the Object Options panel so that it is
highlighted and its value is 0.
F Click Create in the Envelope window to create a new envelope for the
Morph value.
F Click-and-drag in the Envelope window at 10% time and 0% value (see
picture below), then drag the new keyframe up to 100% in value and let
go of the mouse button.
54
Page 55

Click-and-drag up
from here.
AAddvvaanncceedd TTuuttoorriiaallss
Let go of the
mouse button here.
Creating the first keyframes.
··
AAddjjuusstt tthhee 110000%% ttiimmee kkeeyyffrraammee::
F Click-and-drag on the keyframe at 100% time.
F Drag it up to 100% value and let go of the mouse button.
F Click on the Linear checkbox in the Key Type group in the Envelope
Editor.
After adjusting the 100% time keyframe
We now have an envelope where the Morph starts at 0% and moves up to
100% during the first 10% of the duration of the FX. Then it stays at 100%
morphed for the remainder of the FX. If you play the preview you will see the
results.
55
Page 56

HHoollllyywwoooodd FFXX UUsseerr’’ss GGuuiiddee
Your new morphing cylinder effect
SSaavviinngg YYoouurr CCuussttoomm FFXX
In a moment we will make some more changes to this FX, but lets save it as a
new FX right now. If you are creating a custom FX for a specific project, you
don’t need to save it. All of your customizations will be saved as part of the
host application’s project file. However, if you want to use the customized FX
again and again you will want to save it to disk and add it to the FX Catalog.
··
TToo SSaavvee YYoouurr CCuussttoomm FFXX::
F Make sure the current time slider in the Envelope Editor window is at
10% time (the current preview frame will be used as the icon for the FX,
so we want a nice time for the icon).
F Click on the Save FX button in the Control panel. A save file requester
will appear.
F The current folder in the file requester should be Flying Windows.
F Click on the parent folder button to move up one folder to the Effects
folder.
F Click on the Create a New Folder button to create a new FX group.
Name the new folder Custom FX.
F Double-click on the Custom FX folder to open it.
F Change the filename to cylinder1 as the filename for the new FX and
click Ok.
After a few moments, the FX Catalog will appear with your new Custom FX
group and your cylinder1 FX icon visible.
Your new morphing cylinder effect saved in a custom group
56
Page 57

AAddvvaanncceedd TTuuttoorriiaallss
AAddddiinngg aa FFiilltteerr PPlluuggiinn
Now, let’s make our cylinder do a cool dissolve over time using the Gradient
Wipe plugin. Hollywood FX includes a number of plugins for filtering media
video and for warping 3D objects.
The Gradient Wipe plugin uses a grayscale gradient image to dissolve a Media
item using the “shape” of the gradient as the shape of the dissolve.
··
TToo aadddd tthhee GGrraaddiieenntt WWiippee PPlluuggiinn::
F Select the Host Video 1 Media item in the Control panel.
F Click on the Plugins… button in the Toolbar.
F Double-click on Gradient Wipe in the list of plugins that appears.
The new plugin will be added directly below (and indented) the Host Video 1
Media item, and the Item Options panel will change to show the Gradient
Wipe options.
The Gradient Wipe Options
We will now select a gradient image and set some options.
··
TToo sseett tthhee ooppttiioonnss ffoorr GGrraaddiieenntt WWiippee::
F Click on the Select Gradient… button. A file requester will appear.
F Change the current folder to the Hollywood FX\Images\gradients
folder (this should be the default).
F Double-click on the Clouds1.tga file.
F Make sure Tie transition amount to effect transition is checked.
F Change the Softness slider to 80.
F Change the Border Size slider to 30.
F Click on the Border Color button and select a yellow color from the
color requester.
Try playing the preview. Now the cylinder looks like its being eaten away by
acid as it flies off screen. Rather than tie the transition amount to the FX
duration, you could have keyframed your own transition amount to have the
57
Page 58

HHoollllyywwoooodd FFXX UUsseerr’’ss GGuuiiddee
object partially dissolve then reappear, and you could envelope softness,
border size, and color to create a more dynamic and interesting dissolve.
Same cylinder, now with gradient wipe
To conclude this tutorial, save your modified FX one more time.
··
TToo SSaavvee YYoouurr CCuussttoomm FFXX::
F Make sure the current time slider in the Envelope Editor window is at
40% time (for the icon).
F Click on the Save FX button in the Control panel. A save file requester
will appear.
F The current folder should already be Custom FX and the filename
should be cylinder1.
F Click Ok to replace the FX we saved earlier with our current changes.
When you are finished try rendering this FX in your host application to see the
final results.
As you can see, by modifying existing FX and using plugins you can create
dramatic and exciting new FX.
58
Page 59

AAddvvaanncceedd TTuuttoorriiaallss
O
WWaarrpp PPlluuggiinnss
Hollywood FX includes a number of 3D plugins called Warps. These Warps
mathematically change the shape of a 3D object and can be keyframed over
time. This tutorial will demonstrate the use of one of the most common Warp
plugins called Peel. Unlike more limited effect software, Hollywood FX allows
you to attach a Peel to any object (not just a flat plane) and allows you to
attach multiple peels to the same object.
··
PPrreeppaarree ffoorr tthhee TTuuttoorriiaall aanndd SSeelleecctt tthhee FFXX::
F Create a new project in your host application.
F Add two video clips and create a two second transition between them.
F Add Hollywood FX as a transition between the two video clips.
F Select the Specialty Effects group from the FX Catalog
F Select the Warp Template FX from the Specialty Effects group
The Warp Template FX contains a high-polygon object, ready for use with
Warp Plugins.
··
TToo aattttaacchh tthhee PPeeeell PPlluuggiinn::
F Click on the High Mesh 1 object in the Control panel.
F Click on the Plugins button in the Toolbar.
F Double-click on the Peel plugin in the Plugin Selection dialog that
appears.
You should immediately see that the object has peeled. By default, the Peel
time is keyed to the total transition time, and the direction of the Peel is tied
to the Flight Direction spinner (under Effect Options). This makes it simple to
quickly add a Peel to an effect. Most plugins work this same way, providing
default options that make it easy to quickly get the results you want.
PPRRO
Peel Options
Let’s try making some options changes to see what they do.
59
Page 60

HHoollllyywwoooodd FFXX UUsseerr’’ss GGuuiiddee
··
TToo mmooddiiffyy PPeerrcceenntt ooff ppeeeell ccoommpplleetteedd aanndd AAnnggllee ooff PPeeeell::
F Clear the Tie transition amount to effect transition checkbox.
F Clear the Tie peel direction to flight direction checkbox.
F Change the Angle of Peel spinner to –45 and the Percent of peel
completed slider to 50.
Angle of Peel of –45 and 180
The Percent of peel completed controls how far the peel has progressed.
This can simply be tied to the total transition time, or can be keyframed
individually to create interesting effects, like partial peels. Now let’s play with
the Peel Radius.
··
TToo mmooddiiffyy RRaaddiiuuss ooff tthhee PPeeeell::
F Move the Radius of Peel slider back and forth to see the result. When
finished, leave the Radius at approximately .25.
Radius of Peel of .10 and .50.
Finally, there is a checkbox that controls whether to perform a roll (which is
the default) or to actually peel without rolling.
··
TToo PPeeeell iinnsstteeaadd ooff RRoollll::
F Click on the Peel instead of roll checkbox.
60
Page 61

AAddvvaanncceedd TTuuttoorriiaallss
Roll and Peel
Now lets quickly create an interesting keyframed effect where the peel spins
around the object as it peels.
··
TToo ssttaarrtt kkeeyyffrraammiinngg tthhee AAnnggllee ooff PPeeeell::
F Clear the Peel instead of roll checkbox.
F Check the Tie Transition Amount to Effect Transition checkbox.
F Move the Angle of Peel spinner to 0.
F Move the current time slider in the envelope window to 0%.
F Click on the Create button in the Envelope Window to create a
keyframe at time 0% with the Angle of Peel currently at 0.
You have now created the first keyframe, with the angle starting at 0
degrees.
··
TToo ccoommpplleettee tthhee kkeeyyffrraammiinngg::
F Move the current time slider in the Envelope Window to 100%.
F Move the Angle of Peel spinner to 180 degrees.
You have now created the second keyframe, and if you play the preview you
will see the object peel as it flies off, and the peel rotates around the object.
Remember that plugins in Hollywood FX can be combined. You could attach
a Ripple at the same time the object is peeling, or even attach a second peel
to the same object.
Two Peels attached to the same object
61
Page 62

HHoollllyywwoooodd FFXX UUsseerr’’ss GGuuiiddee
O
33DD TTeexxtt GGeenneerraattiioonn
Hollywood FX includes an easy-to-use 3D text generator. This feature is best
used within the Filter format of Hollywood FX. It allows you to create text
that is extruded in 3D with bevels. You can assign different colors to the
sides, face and bevel edges of the text. You can also generate the text as a
single block or with each letter being it’s own separate object. This tutorial
will demonstrate the use of 3D text in its most common uses. Unlike more
limited effect software, Hollywood FX allows you to attach a warp plugin(described earlier) to 3D text, so you could even explode your text or have
it surface wipe away (see plug-ins tutorials).
··
PPrreeppaarree ffoorr tthhee TTuuttoorriiaall aanndd SSeelleecctt tthhee GGeenneerraattee TTeexxtt::
F Create a new project in your host application and put one clip in the
timeline so that it can have a filter attached to it (Video 2 in Premiere),
and make sure it is set for Alpha Channel transparency.
F Add Hollywood FX as a filter and bring up the Hollywood FX dialog for
the filter.
F Within Hollywood FX click the Blank FX button on the Toolbar. This
will start a new FX from scratch where we will add our 3D text.
F Click the 3D Text button in the Toolbar
F Choose a font you like by clicking Select Font, then type in WOW! In
the text box.
F Click Ok.
PPRRO
The Reference section contains a complete description of the controls in the
3D Text generator.
3D Text Interface and resulting text
62
Page 63

RReeffeerreennccee GGuuiidde
e
63
Page 64

Page 65

TThhee HHoollllyywwoooodd FFXX DDiiaalloogg
Item
panel changes to
Monitor
preview that lets you
Buttons
Control
Envelope Editor
envelopes for individual
The Hollywood FX dialog gives you quick and easy access to all of your 3D
transitions, and lets you quickly change rendering options and edit flight paths
and other attributes of FX. This chapter describes the Hollywood FX dialog
and all of its controls.
TThhee HHoollllyywwoooodd FFXX DDiiaalloogg
The Hollywood FX dialog is made up of a number of panels. These panels
group together the different features of Hollywood FX so that you can quickly
and easily select effects and make changes.
The
panel lets you select
items to be changed.
The
panel is where you work
with keyframes for
flight paths and
options.
panel
The
provides an instant
see changes
immediately.
panel
The
provide options for the
selected item in the
Control panel.
The
buttons to accept or cancel
changes, and to display the
Settings and About dialogs.
panel provides
Click here to
open or close
the Envelope
The Hollywood FX Dialog
Editor.
65
Page 66

HHoollllyywwoooodd FFXX UUsseerr’’ss GGuuiiddee
Click on the current FX
Catalog and select a new
Click on Effect Options to
change video sources in an
from
flight paths and rendering
options for each 3D object
change texture mapping or
sort media, and save a new
TThhee CCoonnttrrooll PPaanneell
The Control panel is the central control for the Hollywood FX dialog. It
contains items to select the current FX, set options for the FX, and edit
individual media items and objects. When you click on one of these items,
the Item Panel on the right side of the Hollywood FX dialog changes to show
the options for the selected item.
change options like
lighting, shadows, shine,
motion blur, and more.
Click on the Camera item
to edit Camera position,
FOV and Ambient Lighting
When additional Lights
have been added, select
this to edit them.
name to display the FX
If you have added a 2D
plug-in, select the plug-in
icon to edit it’s attributes.
Click on Media items to
FX. Media can come
the host application or
from video or still image
files.
FX.
Click on Object items to
change objects, alter
in an FX.
Use these buttons to
remove or clone items,
FX to disk.
The Control panel
66
Click on Surface items to
colored surfaces.
If you have added a 3D
plug-in, select the plug-in
icon to edit it’s attributes.
Page 67

TThhee HHoollllyywwoooodd FFXX DDiiaalloogg
O
MMoovvee UUpp//MMoovvee DDoowwnn……
Click either of these buttons to change the rendering order of objects. The
feature is particularly useful for effects you design that have a keyhole or
transparency need.
Examples of effects using this technique are: Spotlight and 00HFX in the
Video & Film group. In order to create the illusion of a disk keying through
source one, we need to have it rendering before source one.
Try turning off the effect by selecting the Simple Disk object within the
Spotlight effect, then click the Move Down button. When you click this
button, the disk will no longer cut a hole in the rendered video.
The unique nature of this feature would be to create some 3D text and set
the surface opacity on the face of the text to 0.001. Then have that text
sorted above Source 1 video in the objects list. This will cause the face of the
text as it passes by the screen to key out and show the background source 2.
Take a look at the “Wow” effect example in the ‘Words and Icons’ group.
PPlluuss PPRRO
Spotlight Effect: Showing keying style wipe resulting from sorting object layers
Keying Text example, a common broadcast effect
67
Page 68

HHoollllyywwoooodd FFXX UUsseerr’’ss GGuuiiddee
O
RReennaammee……
Click this button to rename an item in the Control panel (you cannot rename
the FX or the Effect Options items). When you click this button, the rename
dialog will appear, letting you type in a new name for the current item.
PPRRO
The Rename dialog
O
CClloonnee……
Click this button to copy the current item. Only Media, Object, and Plugin
items can currently be cloned. When you clone a Media or Plugin item, the
new cloned item is created immediately, and you can change its options.
When you a clone an Object, the Clone dialog appears, letting you create
multiple clones, and adjust the position and media for each new clone. See
the Advanced-Tutorials guide for a complete tutorial that shows how the
Clone tool can be used to create incredible effects quickly and easily. Within
the Clone dialog you will find the following controls.
• Clone Count. This is the number of clones of the current object
• Distance. Each clone can be offset a certain distance from the
• Rotation. Each clone can be rotated around any axis by entering a
• Scale. Each clone can be scaled as it is created by entering a scale
• Clone Surfaces and Media. When this is not checked, the clones
• Create New Media For Each Clone. When this option is selected
PPRRO
that will be created.
previous clone. You can enter values for the X, Y, and Z axis. This
makes it easy to create a set of clones that are all placed at different
positions from the original.
rotation amount for X, Y, or Z.
amount (between 0 and 1) for the X, Y, and Z axis.
will use the same surfaces and media as the original object. With
this option checked, clones for each surface and media will be
created for each object clone.
Hollywood FX will create a unique new Media item for each clone
created, using a different host track for each surface. Use the
68
Page 69

TThhee HHoollllyywwoooodd FFXX DDiiaalloogg
Starting Host Track control to set the first host track used by the
clones.
• Starting Host Track. When Create New Media For Each Clone is
selected, you can enter a starting track number to use for the
clones. The clone tool will begin by using the track number entered
here, then increment the track for each successive clone.
The Clone dialog
O
DDeelleettee
This button will delete the current item from the FX (only Media and Object
items can be deleted). Media items can only be deleted from an FX if they
are not used by any Surfaces (so you must first reassign the media for any
surfaces or delete any objects that use that media before deleting the media
itself).
SSaavvee FFXX……
Click on this button to save a new FX to disk and add its icon to the FX
Catalog. A file requester will appear letting you select a folder and type in a
name for the new FX. You must create the new FX within a subfolder of the
Effects folder for its icon to appear properly in a group within the FX Catalog
(see the FX Catalog chapter for more information on organizing FX). The
icon created for the FX will match exactly what is currently scene in the
preview, so set the preview slider appropriately to create a useful icon.
PPRRO
PPRRO
O
69
Page 70

TToooollbbaarr
PPRRO
HHoollllyywwoooodd FFXX UUsseerr’’ss GGuuiiddee
O
The Toolbar is an area of buttons allowing for incredible functionality. You
can create any of the following.
• Blank FX. Select this item to start a new FX from scratch. The new
FX will be named Untitled until you save it with a new name.
• Plugin. Click this to add a plugin to the current element. If a Media
item is currently selected, a list of Filters will be displayed. If a 3D
object is selected, then a list of Warps will be displayed. Doubleclick on the plugin you want to add. Individual Plugins are described
in detail below.
• 3D Object. Click this to add a new 3D object to the current FX. A
file requester will appear, letting you choose from the 3D objects
available to Hollywood FX. These are found within the Objects
folder within the Hollywood FX folder. All objects have a .hfo
extension.
• Null Object. Selecting this item creates a new Null Object in the
scene. Null objects are not rendered, but are used to create motion
hierarchies and as reference positions for certain plugins.
• File Media. Selecting this lets you create a new Media item and
select the image or video file immediately. A file requester will
appear letting you select a media file, then the new Media item will
be created, and you can modify its options.
• Host Media. This lets you create a new Media item using a video
track from the host application. A requester will appear with the
available host tracks.
• Light. This allows you to add a spoint, point or fill light to enhance a
composite.
• Export HFZ. This button allows you to package up your custom
effects for easy sharing with other users. This is described in full
detail below.
• Import 3D. This button allows you to import 3D objects from other
modeling programs. This is described in full detail below.
• 3D Text. This allows you to generate a 3D text object. You control
extrusion, beveling and surface attributes. This is described in full
detail below.
70
Page 71

TThhee HHoollllyywwoooodd FFXX DDiiaalloogg
move back and forth
of the preview.
Change camera views
TThhee MMoonniittoorr PPaanneell
Click this button to play
the entire preview one
time.
Click this button to start
and stop looping playback
of the preview.
The Monitor Panel provides a preview of your chosen FX and options. The
preview is generated on the fly as you make changes. A number of controls
are provided to adjust the preview itself.
LLooooppiinngg PPllaayybbaacckk BBuuttttoonn
The looping playback button starts and stops looping playback of the preview.
When the button is pressed in, the preview will playback continuously. You
can continue to change options or select a different transition while the
preview is playing.
while editing flight
paths.
Use this slider to
through the frames
Use Skip and Step
buttons to jump to
start or end of the
preview and single
frame step.
SSiinnggllee PPllaayybbaacckk BBuuttttoonn
SStteepp BBuuttttoonnss
SSkkiipp BBuuttttoonnss
Click the single playback button to play the entire transition one time. This is
useful when you’ve made some changes and want to see the entire effect
quickly.
Step forward one frame or step backward one frame.
Jump to the beginning frame of the effect or to the last frame in the effect.
71
Page 72

HHoollllyywwoooodd FFXX UUsseerr’’ss GGuuiiddee
TThhee PPrreevviieeww SSlliiddeerr
The preview slider lets you manually move to any frame of the preview.
Simply move the slider back and forth to see different frames of the preview.
If the preview is playing (either the looping playback is selected, or the single
playback was just pressed), you will not be able to use the preview slider.
VViieeww BBuuttttoonnss
Normally, the preview shows the view from the camera in the FX. The
camera view is what is used for rendering the actual FX. Sometimes,
particularly when editing an object’s flight path, you will want to change views
to see the FX from a different angle. These buttons allow you to quickly
change views.
72
Page 73

TThhee HHoollllyywwoooodd FFXX DDiiaalloogg
TThhee IItteemm PPaanneell
The Item Panel changes to display options for the current selection in the
Control panel. The different Item Panels are discussed in the following
chapters.
TThhee EEnnvveellooppee EEddiittoorr PPaanneell
The Envelope Editor is used for advanced keyframe editing of object flight
paths and option envelopes. This panel is discussed in detail in the chapter
titled The Envelope Editor.
TThhee BBuuttttoonnss PPaanneell
Along the bottom of the Hollywood FX dialog are buttons that provide a
number of functions.
RReeggiisstteerr//UUppggrraaddee
If you haven’t yet registered and entered your permanent keycode, you can
click on this button to display the registration information dialog, and register
online instantly, or enter a keycode your received after registering from
another system. If you have already registered, click on this button to find
out about upgrade options.
UUnnddoo
As you make changes, you will see an Undo button appear, letting you undo
the last action performed. You can press the Undo button again and again to
undo previous actions. The Undo button will change to show a description of
what action will be undone by pressing the button.
O
PPlluuss PPRRO
RReeddoo
SSeettttiinnggss
AAbboouutt
If you mistakenly Undo an action, you can redo it by clicking this button.
Each time you click Undo, the action that was undone is added to the Redo
list, letting you move back and forth through all of the changes you have
made since displaying the Hollywood FX dialog.
Click on the Settings button to display the Settings dialog, which contains a
number of global settings for Hollywood FX. These settings are described in
detail below.
Click on this button to display the About dialog. The About dialog displays the
version number, serial number, and machine id of your Hollywood FX. You
73
Page 74

HHoollllyywwoooodd FFXX UUsseerr’’ss GGuuiiddee
can also quickly connect to Pinnacle Online through the Internet from the
About dialog.
OOkk
Click Ok to save your changes and exit the Hollywood FX dialog. When you
click Ok you are returned to your host application. Clicking the close button
at the top right of the dialog has the same effect as clicking Ok.
CCaanncceell
If you wish to discard the changes you have made since the Hollywood FX
dialog was displayed, click Cancel. This will discard your current changes and
return to the host application.
74
Page 75

TThhee FFXX CCaattaalloogg
on to select that
When the Hollywood FX dialog is first displayed, and whenever you click on
the current FX name in the Control panel, the FX Catalog is displayed on the
right side of the Hollywood FX dialog.
Select from the
different groups of
FX using this
dropdown.
If you have HFX Basic or Plus, you will see some of the icons with a Plus or
Pro watermark to indicate that you need to upgrade to a particular level to
use that effect.
FX are organized into groups that make it easy to find the FX you want
quickly and easily.
··
TToo CChhaannggee TToo AA DDiiffffeerreenntt GGrroouupp
F Click on the Groups dropdown list above the FX icons.
F Use the dropdown list to select a new group. The FX icons for the
selected group will appear.
The icons for each FX in a group will help you find the effect you want.
··
TToo SSeelleecctt AAnn FFXX
F Left-click on the icon for the FX you wish to select. The selected effect
will be highlighted purple, and the preview will be updated.
The FX Catalog
Left-click on an
ic
FX. The current
selected FX is
highlighted in
purple.
OOrrggaanniizziinngg FFXX
You can create new FX (by using the Save FX button described in the
previous chapter), and you can reorganize existing FX into different groups by
simply reorganize the effect files (.hfx) themselves), using standard operating
system tools like Windows Explorer.
75
Page 76

HHoollllyywwoooodd FFXX UUsseerr’’ss GGuuiiddee
part of the Flying Window
A list of the current groups and FX within those groups is maintained in the
file effects.org within the Hollywood FX\Orgs folder. This list is updated
automatically when you use the Save FX button, but must be deleted if you
want to rebuild the list after reorganizing effect files.
Within the Effects folder in Hollywood FX you will find a set of folders that
are in fact the groups in the FX catalog. Within these folders you will find the
.hfx files that are the FX for that group. You can create new groups by
creating new folders within the Effects folder, and you can move or copy .hfx
files from one group folder to another. Hollywood FX only recognizes one
level of folders within the Effects folder.
Remember, after making any changes, you must delete the
Hollywood FX\Orgs\effects.org file so that the FX catalog will be rebuilt
the next time you use Hollywood FX.
The Flying Window
Transitions group.
The FX files that are a
Transitions group.
FX file organization
76
Page 77

BBaassiicc OOppttiioonnss
Once you have selected an FX from the FX Catalog, you can change rendering
options for that FX.
··
TToo DDiissppllaayy tthhee BBaassiicc OOppttiioonnss PPaanneell
F Click on the Basic Options item in the Control panel
The Basic Options Panel
Hollywood FX makes it easy to quickly customize an FX to your needs with a
series of simple controls.
EEaassyy FFlliigghhtt CCoonnttrroollss
RReevveerrssee FFlliigghhtt
In most transitions, the Source 1 (A) video flies off screen revealing the
Source 2 (B) video. By clicking on the Reverse Flight checkbox, Hollywood FX
will automatically adjust the FX so that the Source 2 (B) video flies on and
covers the Source 1 (A) video. If you have the Envelope Editor open, you will
be able to see how this reverses the transition percent values.
FFlliigghhtt PPaatthh
For most transitions, you can quickly change the direction in which the video
flies off (or on) using the Flight Path dial. Simply click and drag in the dial to
change the flight direction and create a very different result.
RRoottaattee OObbjjeecctt
When you use the Flight Path dial, you are changing the direction the object
flies, but the object itself stays oriented in its original direction. When you
77
Page 78

HHoollllyywwoooodd FFXX UUsseerr’’ss GGuuiiddee
check the Rotate Object checkbox, the object will rotate to follow the Flight
Direction, often giving a more interesting result.
EEaassyy LLiigghhttiinngg CCoonnttrroollss
LLiigghhttiinngg
Use this checkbox to turn on or off lighting in the FX. Turning off lighting will
eliminate the realistic shading, but will speed up rendering.
SShhaaddoowwss
Use this checkbox to turn on or off shadows in the FX. Turning off shadows
will speed up rendering. Having shadows on can add a sense of 3D realism to
an FX. Shadows can be controlled in more detail using the Shadow
Controls described below.
SShhiinnee
Many FX have a glossy shine on the 3D objects that fly on or off screen. This
checkbox controls shine. Clear this checkbox to turn off the glossy shine.
LLiigghhtt DDiirreeccttiioonn
Use the dial to change the direction of the light in the scene. You can create
interesting results by having light come from the bottom of the screen instead
of the top. Light Direction affects the shading, shine, and shadows of 3D
objects in an FX.
O
PPlluuss PPRRO
EEaassyy OOppttiioonnss CCoonnttrroollss
RReennddeerr
You can change the 3D rendering of the FX
• Smooth is the normal setting. Curved surfaces will have a realistic
smooth appearance.
• Flat will render all surfaces as flat polygons. Surfaces that are
normally smooth will have a faceted appearance.
• Wire will render all 3D objects as wireframes rather than solid
surfaces.
AAnnttiiaalliiaassiinngg
Some FX will exhibit aliasing (blocky stair stepping along the edge of a 3D
object). Turn on antialiasing to reduce aliasing.
• Off. No antialiasing is used. Fastest option.
• Web/CD. antialiasing is slower, but provides good results for all FX.
78
Page 79

BBaassiicc OOppttiioonnss
• Video. Highest level of antialiasing, slowest rendering.
MMoottiioonn BBlluurr
This checkbox will turn on realistic motion blur for an FX. Motion blur mimics
the blur that is seen when objects move quickly across a camera’s view.
Turning on this option will increase rendering time.
TTrraaiillss
Checking this will turn on trails. Any moving objects will leave trails behind
them as they move.
PPiixxeell BBlleennddiinngg
Turning on this feature will cause the rendering engine to perform advanced
pixel blending, smoothing out images in the FX. This feature is especially
useful when you “zoom” in on a piece of video. Pixel Blending will eliminate
the normal blockiness of the zoom.
79
Page 80

Page 81

AAddvvaanncceedd OOppttiioonnss
Once you have selected an FX from the FX Catalog, you can change rendering
options for that FX.
··
TToo DDiissppllaayy tthhee AAddvvaanncceedd OOppttiioonnss PPaanneell
F Click on the Advanced Options item in the Control panel
PPlluuss PPRRO
O
The Advanced Options Panel
SShhaaddooww CCoonnttrroollss
When shadows are turned on, they can be controlled with more precision
using the Shadow Controls.
SShhaaddooww TTyyppee
These radio buttons control the type of shadow that is generated.
• Cast. Cast shadows treat the backdrop image like a piece of paper
• Drop. When drop shadows are selected, shadows are always drawn
• Full. PRO Turn on full scene shadowing. With this option objects
that all other objects cast shadows onto. The closer an object is to
the backdrop, the closer its shadow is to the object.
at a specified distance from an object.
shadow themselves and each other for the most realistic look.
81
Page 82

HHoollllyywwoooodd FFXX UUsseerr’’ss GGuuiiddee
OOppaacciittyy
DDiissttaannccee
SSooffttnneessss
TTrraaiill CCoouunntt
MMoottiioonn BBlluurr CCoonnttrroollss
This slider controls the darkness of the shadows. The higher the value, the
darker and more opaque the shadows are. The lower the value, the more
transparent the shadows are. Generally a value from 30% to 50% produces
a very realistic shadow.
This slider controls the distance of shadows from their objects. The greater
the distance, the farther the shadow is drawn from the object. This slider is
particularly useful for Drop shadows. Remember, the direction of the shadow
is controlled by the Light Direction dial.
Hollywood FX lets you create soft-edged shadows. Simply increase the
softness value to create a softer shadow. Note however, that the higher the
softness value, the greater the rendering time.
Determines the number of trails that are drawn behind each object when
trails are turned on.
When motion blur is turned on, you can control the specific look of the blur
using the motion blur controls. Note: Motion blur can greatly increase
rendering time.
LLeennggtthh
CCoouunntt
HHoolldd TTiimmeess
This determines how far the blur “smears”. This value is the percent of the
total distance from frame to another in the FX. The higher the value, the
longer the smear. Hollywood FX always renders an accurate intraframe blur,
unlike other products which simply create a fixed distance blur.
This determines how many copies of the object are drawn to create the blur.
The higher the number the smoother the blur appears. Increasing this
number also greatly increases rendering time.
These controls let you hold at the start or end of an FX. This is useful on
certain MultiWindow FX where video windows fly on screen, and you might
want them to stay on screen for a certain time, playing video.
82
Page 83

AAddvvaanncceedd OOppttiioonnss
SSttaarrtt
This controls the hold time at the start of the FX. The value is a percentage
of the total time of the FX in your timeline. For example, if you were doing a
fly off transition, and set this value to 15%, then the “A” video source will
stay on screen for 15% of the total time, then will fly off during the last 85%
of the total time of the transition. If you have the Envelope Editor open, you
will be able to see the change in the transition percent values when you
adjust this slider.
EEnndd
This controls the hold time at the end of an FX. The value is a percentage of
the total time of the FX in your timeline. For example, if you reversed a
normal transition so that the “B” video source flies on and set this value to
15%, then the “B” video source will fly on during the first 85% of the total
transition time, and hold onscreen for the last 15% of the total time. If you
have the Envelope Editor open, you will be able to see the change in the
transition percent values when you adjust this slider.
83
Page 84

Page 85

MMeeddiiaa OOppttiioonnss
buttons to replace
host application, or
can have different
blanking or create
and Out buttons to trim
When you select a Media item in the Control panel, the Media Options will be
displayed in the Item panel. The Media Options panel gives you the ability to
map video and image files onto the 3D objects in an FX.
Usually, Source 1 and 2 come from the host application’s timeline and
normally you will not remap those. The Media items are most often used to
map additional video sources for MultiWindow FX, when the host application
does not provide that video.
Use the Select
any Media with
video from the
video/image files
field/frame
Different
orders.
from an image or
video file.
effects with
Use the slider and In
a video source.
MMeeddiiaa SSeelleeccttiioonn
SSeelleecctt TTrraacckk
The Media Options panel
Use cropping to
remove video
interesting results.
If you wish to select a video track from the host application, you can do so by
clicking this button. A list of available host video tracks will be displayed.
Using this button you could repeat Source 1 or Source 2 instead of having a
separate Source 3 in a MultiWindow transitions.
SSeelleecctt FFiillee
This button displays a file requester, letting you select a single image, a
sequence of images, or a video file. To select a sequence of images, simply
select the first image in the sequence (each file of the sequence must be
Create
interesting
playback
85
Page 86

HHoollllyywwoooodd FFXX UUsseerr’’ss GGuuiiddee
numbered sequentially). Hollywood FX currently supports targa, bitmap, and
png images, as well as Video for Windows and Quicktime video files.
O
PPrreevviieeww aanndd TTrriimmmmiinngg
The preview area lets you view any frame of a sequence or video file, and lets
you trim that file for use in Hollywood FX.
PPlluuss PPRRO
TThhee PPrreevviieeww SSlliiddeerr
Use this slider to move to any frame in the video sequence. Directly below
the slider is a time indicator that shows the current time of the preview frame
being displayed.
IInn
Click the In button to set the in-point of the video source. The current time
shown below the slider will be used as the first frame in the FX.
OOuutt
Click the Out button to set the out-point of the video source. The current
time shown below the slider will be used as the last frame in the FX.
IInnffoorrmmaattiioonn
Below the preview area you will find information about the resolution and
length in time of the video source selected.
PPllaayybbaacckk CCoonnttrrooll
These controls are only available when a media file is selected (for host
tracks, all playback is controlled by the host application).
IInntteerrpprreett
When you select a video file, you should also set the Interpretation for that
video file so that fields and frames are correctly rendered.
• Frames. If the video sequence consists of video frames that are not
interlaced fields, then you should select this option.
• Separate Fields. If the video sequence consists of individual fields
(not interlaced together into a full frame), then select this option.
• Interlaced – Upper First. This option is used when the video
source consists of interlaced frames (consisting of two fields), where
the upper field is rendered first in time.
86
Page 87

MMeeddiiaa OOppttiioonnss
• Interlaced – Lower First. This option is used when the video
source consists of interlaced frames (consisting of two fields), where
the lower field is rendered first in time.
• Single Image. Use this option when you are mapping an individual
image, or you only want to use a single image from a sequence of
images or video file.
For most video, one of the Interlaced interpretations will be used. Generally
this should be the same field order as you set in your host application.
Hollywood FX will remember the last Interpret setting for each type of media.
O
PPllaayybbaacckk RRaattee
Use this slider to speed up or slow down playback of the selected video. At
100% the video plays back at its normal rate. Below 100% the video plays
back slowly, and above 100% the video plays back more quickly than normal.
PPlluuss PPRRO
DDiirreeccttiioonn
You can create interesting results by switching the playback direction to
backwards. When set to backwards, the video begins playing from the last
frame and continues to play backwards until the first frame is reached.
EEnndd BBeehhaavviioorr
If the trimmed media is shorter in duration than the FX you can control what
happens when the last frame of the media is reached by changing the End
Behavior.
CCrrooppppiinngg CCoonnttrroollss
These controls adjust the number of pixels that are cropped on each side of
the video source. This is most often used to remove blanking information
from captured video, but may also be used to create some unique results
where you only display a small portion of a video source.
O
PPlluuss PPRRO
• Stop. This is the normal case. The playback simply stops and the
last frame continues to be shown until the end of the FX.
• Repeat. In this case, when the last frame is reached, then playback
starts over from the first frame.
• Ping-Pong. In this case, when the last frame is reached, playback
switches direction (going backwards). Playback continues switching
directions until the end of the FX.
PPlluuss PPRRO
O
87
Page 88

Page 89

OObbjjeecctt OOppttiioonnss
control whether
n object’s
transparency over
PPlluuss PPRRO
O
When an object is selected in the Control panel, the Object Options panel is
is displayed in the Item panel area. The Object Options panel gives you
controls to keyframe a new path for an object or to adjust its morphing or
dissolve level during an FX. Using the Object Options and the Envelope
Editor, you can completely customize any FX to create an entirely new and
unique result.
These buttons
the selected
tool will work
along each axis.
Replace the
current object
with any other
object file.
Select one of
these tools to
interactively
adjust position,
rotation and
size in the
Monitor window.
Types of Objects
Adjust a
shape and
time using these
sliders along with
the Envelope
Editor.
There are two types of objects in Hollywood FX. A null object is a special
object that is invisible and is used only to position and control other objects
(see Object Heierarchies below). A null object is represented in the preview
window by a white cross, and in the Control panel by a blue ball with a cross
in it.
A normal object is one that has rendered polygons and is usually visible in the
FX. This is represented by a blue ball icon in the Control panel.
OObbjjeecctt HHiieerraarrcchhiieess
Hollywood FX is a true 3D animation system and uses object hierarchies to
create complex multi-object movements. An object hierarchy is when one
object is the child of another object. When the parent object moves, the child
object moves with it. In the Control panel you will often see an object’s icon
indented directly below another object. This indicates that the indented
object is the child of the object above it. You can change the hierarchy by
changing the parent object for any object.
89
Page 90

HHoollllyywwoooodd FFXX UUsseerr’’ss GGuuiiddee
Scroll Parent Null
invisible null object that is used to
control the movement of all of the
(
Stick, Stick, and Scroll
).
The
pieces of the wooden scroll
An example of an object hierarchy in the Scroll2 FX
SSeelleecctt FFiillee……
Hollywood FX lets you replace an object in an FX with any other object on
disk. Click on Select File…, then select one of the object files (.hfo) within the
Objects folder in the Hollywood FX application folder. After replacing an
object, you may need to re-keyframe the Morph value for that object to get
proper morphing results from the object.
PPoossiittiioonniinngg CCoonnttrroollss
The positioning controls are used to quickly keyframe new flight paths for an
object in the FX. You can simply move the preview slider to a particular time
in the FX, then use these controls to move an object, and you will have
created a new path. For more advanced keyframing of paths, you will use
these controls together with the Envelope Editor.
TTooooll BBuuttttoonnss
These tool buttons let you select a tool to use in the Monitor panel. When
one of these tools is selected, you can click-and-drag in the Monitor panel to
interactively edit the position, rotation, size, and pivot point of the selected
object. These tools are also affected by the Axis buttons described below.
• Move. When the move tool is selected, clicking-and-dragging with
the left mouse button in the Monitor panel will let you move the
object along the X axis by moving left and right, and along the Y
axis by moving up and down. Using the right mouse button, you can
move the mouse back and forth along the Z axis by moving the
mouse up and down.
• Rotate. When the rotate tool is selected, clicking-and-dragging with
the left mouse button in the Monitor panel will let you rotate the
object around the Y axis by moving left and right and around the X
axis by moving the mouse up and down. Clicking-and-dragging with
the right mouse button will rotate the object around the Z axis.
• Scale. When the rotate tool is selected, clicking-and-dragging withi n
the Monitor panel will resize the object along all axis simultaneously.
If you want to scale the object along a single axis, hold the Shift
is an
90
Page 91

OObbjjeecctt OOppttiioonnss
key while clicking-and-dragging. The left button controls scaling
along the X and Y axis, while the right mouse button scales the
object along the Z axis.
• Pivot. The pivot tool lets you adjust the pivot point of an object.
The pivot point indicates the point in space that an object rotates
around. Moving the pivot point can create entirely new results when
rotating an object. The pivot point is indicated by a light blue X
shape for the selected object. Use the left mouse button to move
the pivot point along the X and Y axis. Use the right mouse button
to move the pivot point along the Z axis.
TThhee AAxxiiss BBuuttttoonnss
The buttons labeled X, Y, Z along the top of the Positioning controls are used
to limit a tool to specific axis. For example, if you only want to move an
object along the Z axis, then you can make sure that the X and Y buttons are
not pressed. Simply click on a button to change between pressed or not
pressed. The current tool will only affect an object along the axis whose
buttons are pressed.
TThhee EEddiitt FFiieellddss
For each tool, there are also text fields where you can enter a specific value
for each axis rather than using the interactive tools in the Monitor panel.
These fields will change to show the current values when you are using the
interactive tools.
SSiizzee TToo FFuullll
This button will resize the selected object so that it will exactly match the
original fullscreen video (without changing its position along the Z axis). You
should also set an object’s Morph percent to zero if you want the video to
show full screen properly.
PPoossiittiioonn TToo FFuullll
This button will move the selected object along the Z axis so that the object
will exactly match the original fullscreen video (without changing the size of
the object). You should also set an object’s Morph percent to zero if you
want the video to show full screen properly.
MMoorrpphh && DDiissssoollvvee
MMoorrpphh
Many of the 3D objects in Hollywood FX can change shape from the original
flat screen video to a unique 3D shape. This slider is used to control that
91
Page 92

HHoollllyywwoooodd FFXX UUsseerr’’ss GGuuiiddee
shape change. At 0% the object is not morphed at all (and usually will be
flat). At 100% the object is fully morphed into its final shape. Anywhere in
between, the object will be partially morphed between the original flat shape
and the final shape. Use this slider along with the Envelope Editor to create
interesting new shape changes. For example, with the Small Cylinder FX, you
could have the object morph back and forth between flat and cylinder to
create a flapping FX.
DDiissssoollvvee
This slider lets you adjust the transparency of an object. At 0% the object is
completely opaque. At 100% the object will be invisible. Use this slider with
the Envelope Editor to create interesting results like dissolves or fade-ins.
PPaarreenntt OObbjjeecctt
This dropdown lets you change the parent object of the current object. You
can create advanced object hierarchies by attaching objects to other objects.
This dropdown will list all other objects in the FX, as well as a <None>
option if you don’t wish to have this object attached to any other object.
When an object has a parent, then the object will always follow the parent’s
positioning. If the parent moves or rotates or resizes, then its children also
move, rotate or resize. The child can also have additional movements, but
they are always relative to the parent object. To better see how parenting
works, check out the Advanced-Tutorials guide.
OObbjjeecctt FFllaaggss
These flags control special capabilities of each object.
SShhaaddooww CCaasstt
If checked, this object will cast a shadow. If cleared, the object will not cast
a shadow.
SShhaaddooww RReecceeiivvee
This flag is intended for full-scene shadowing which is not currently
implemented.
TTrraannssiittiioonn OObbjjeecctt
If checked, the current object is considered to be a transition object. Only
transition objects change their flight path when the Flight Direction or
Rotate Object (Effect Options) is changed. When you create your own FX,
you will normally make sure that any objects that fly on or off the screen are
set to Transition Object, while the background object and any other objects
that remain still have their Transition Object flag cleared.
92
Page 93

SSuurrffaaccee OOppttiioonnss
Surfaces describe the color and texture properties of polygons in an object. A
surface can describe a simple color or can indicate that a Media item is to be
mapped on the object. An object may have multiple surfaces (for example
the stopwatch object in the Clockers FX has a surface for the gold colored
watch and a separate surface for the area that is mapped with video.
PPlluuss PPRRO
O
Use these tools to
interactively adjust
texture mapping in the
Monitor window.
Surface Options
TTeexxttuurree OOppttiioonnss
MMeeddiiaa
XX,, YY,, ZZ AAxxiiss BBuuttttoonnss
MMoovvee,, RRoottaattee,, SSccaallee
If a surface has video mapped onto it, then it is associated with a Media item.
This dropdown lets you change the current Media item used for the surface,
or select <none> so that no video is mapped on the surface and only the
color options are used.
These buttons determine which axes will be affected when one of the texture
adjustment tools is selected. If the button is pressed, that axis will be
affected, otherwise it will be locked and not changed by any interactive
editing in the Monitor window.
These texture adjustment tools let you create interesting effects by changing
how media is mapped onto the polygons of an object. Click on any of the tool
buttons to activate that tool, then click-and-drag in the Monitor window to
adjust the values for that tool. You can also manually enter values for
position, rotation or scale by entering values into the text fields.
• Move. When selected you can move the mouse up-and-down to
adjust the Y position of the texture and move the mouse right-and-
O
PPRRO
O
PPRRO
Select a Media
item to map to
this surface.
Control the
basic color
properties of
the surface
93
Page 94

HHoollllyywwoooodd FFXX UUsseerr’’ss GGuuiiddee
left to adjust the X position of the texture. You can create
interesting results by moving a texture across an object (keyframe
the position over time).
• Rotate. Use the left mouse button to rotate on the X and Y axes.
Use the right mouse button to rotate around the Z axis. Rotating a
texture can create some very unique results.
• Scale. When selected you can move the mouse up-and-down to
adjust the Y scale of the texture and move the mouse right-and-left
to adjust the X scale of the texture. Using Scale you can shrink or
grow the texture on the object. Use this along with Width Repeat
and Height Repeat to create interesting infinite zoom effects.
O
WWiiddtthh RReeppeeaatt,, HHeeiigghhtt RReeppeeaatt
These control whether a texture (media item) is repeated across an object
when the texture itself does not cover the entire object. You generally use
Width Repeat and Height Repeat together with Scale. Try turning on Width
Repeat and Height Repeat, then scale the texture so it is very small. You will
soon see multiple copies of the texture across the face of the object instead
of one copy.
PPRRO
RReesseett VVaalluueess
Click this button to return the Position, Rotation and Scale values for the
texture to their default values. This will quickly return the texture to its
normal, original mapping on the object.
CCoolloorr OOppttiioonnss
DDoouubbllee--SSiiddeedd
If checked, this surface is double-sided, and both the front and back of the
polygons in the object are visible. If cleared, only the front side of each
polygon is drawn. This option is used both for textured and color-only
surfaces.
SSmmooootthh
BBaassee CCoolloorr
If checked, the polygons of this surface are drawn with a smooth appearance.
When clear, the polygons are drawn flat and have a faceted appearance. This
option is used both for textured and color-only surfaces.
This RGBA value determines the base color of the surface. It is only used if
the Media item is set to <none> (a color-only surface). You can enter
individual vales for the Red, Green, Blue, and Alpha channels individually in
the edit fields (the values must be between 0 and 1), or you can click on the
94
Page 95

SSuurrffaaccee OOppttiioonnss
Base Color button to display a color requester and select a specific color.
Adjusting the Alpha channel below 1 will create a semi-transparent object.
OOppaacciittyy
SShhiinnee CCoolloorr
SShhiinnee SSppoott
This slider determines how transparent a surface is. The highest value of
1.000 is completely opaque, while the lowest value of 0.000 is completely
transparent. This will only make the surface transparent and not the entire
object, unless the entire object is a single surface. If your object has multiple
surfaces and you want the entire object to fade out, then use Dissolve in the
Object Options.
A surface can have a specular shine on it (a bright spot that makes it look
glossy). This value determines the color of that specular shine. It is used
along with the Shine Spot value which determines the size of the specular
shine spot. Normally, for a glossy appearance, this value should be set to 1,
1, 1, 1 (pure white), but you can use any color to create interesting results.
You can enter individual vales for the Red, Green, Blue, and Alpha channels
individually in the edit fields (the values must be between 0 and 1), or you
can click on the Base Color button to display a color requester and select a
specific color.
This slider along with the Shine color determines how glossy a surface looks.
The higher the value, the tighter the specular spot (and the glossier the
surface looks). With a smaller value the spot is spread out and the surface
looks less glossy. At 0, no Shine is drawn for the surface.
LLuummiinnoossiittyy
This RGBA value determines the luminous color of the surface. It is only used
if the Media item is set to <none> (a color-only surface). You can enter
individual vales for the Red, Green, Blue, and Alpha channels individually in
the edit fields (the values must be between 0 and 1), or you can click on the
Base Color button to display a color requester and select a specific color.
When a surface has a luminous color, it looks like it is emitting that color of
light. It will no longer be shaded based on light direction. This can be useful
to create effects like neon tubes.
95
Page 96

Page 97

TThhee EEnnvveellooppee EEddiittoorr
envelope window to create
The first ruler shows the total time of
The Envelope Editor is used for advanced keyframing of flight paths and
individual options in Hollywood FX. When you first use Hollywood FX, the
Envelope Editor is hidden to keep things simple. When you are ready to
begin using the Envelope Editor, open it by clicking on the envelope button at
the bottom of the Hollywood FX dialog.
The Envelope Editor is used to create keyframes for whatever control is
currently active in the Hollywood FX dialog. The current control’s name is
highlighted in green to indicate that it is the current control, and that the
Envelope Editor can be used to create keyframes for that control.
There are two basic types of envelopes.
PPlluuss PPRRO
O
TThhee SSiinnggllee VVaalluuee EEnnvveellooppee
When you are working with a single value in Hollywood FX (like Morph
percent), then the envelope editor will show that value over time, and will let
you edit the envelope by clicking and dragging in the envelope window.
Any key can have values
curve through it, go
straight, or jump
immediately from the
previous key’s value.
the FX, the second ruler shows the
Transition percent, which is affected
by the Reverse, Hold at Start, and
Hold at End options in Effect Options.
Use the current time
slider to move to a new
frame in the FX. This
works like the preview
slider, but is more
Adjust the spline curve
through a key using
these controls.
When you click and drag in the envelope window, it will at the same time
automatically adjust the current control. When you adjust the current control,
that will affect the envelope window.
Next and Previous
keyframe buttons.
Click and drag in the
and adjust keys.
accurate.
97
Page 98

HHoollllyywwoooodd FFXX UUsseerr’’ss GGuuiiddee
frames for the current
You can quickly save and
the current envelope.
MMuullttiippllee VVaalluuee EEnnvveellooppee
When you are editing the flight path of the object using the object tools, you
are actually adjusting keyframes for the position, rotation and scale
simultaneously for a keyframe. In this case, the envelope looks a little
different. Instead of showing the actual value, it simply indicates where
keyframes are in time. You edit the values for those keyframes using the
tools in the current Item panel.
load complete
envelopes, or remove
Create, Delete, Copy,
Shift and Scale individual
or ranges of keys.
TThhee EEnnvveellooppee WWiinnddooww
The Envelope Window displays the current envelope and lets you quickly click
and drag to create new keyframes for an envelope.
Key
path are shown as blocks
in the timeline.
TThhee CCuurrrreenntt TTiimmee SSlliiddeerr
At the top of the envelope window you will find the current time slider. Like
the preview slider, it lets you move back and forth to different times in the
FX. Left-click and drag the slider back and forth to move it. As you move it,
the preview slider in the Monitor window will move also. If you move the
time over a keyframe, that keyframe will be highlighted in red to indicate that
it is the current keyframe.
TThhee TTiimmee RRuulleerr
At the top of the window is the Time Ruler. The Time Ruler shows the total
time of the FX. This is controlled entirely by changing the duration of the FX
in your host application. The timecode used in this ruler can be adjusted in
the Settings dialog.
TThhee TTrraannssiittiioonn %% RRuulleerr
All keyframe information in Hollywood FX is stored as percent values of the
total transition. This allows Hollywood FX to handle true intraframe editing,
98
Page 99

TThhee EEnnvveellooppee EEddiittoorr
easily scale to any duration, be reversed and to control Hold at Start and Hold
at End quickly and easily.
Normally the values in this ruler run from 0% to 100% coinciding with the
Time Ruler above it. However, this can be affected by certain Effect Options
settings.
When the Reverse Effect checkbox is checked in Effect Options, the
transition % ruler is reversed also, running from 100% to 0%.
Adjusting the Hold values (Start and End), will adjust the starting and ending
point of the transition in relation to the total duration of the FX.
TThhee EEnnvveellooppee
The envelope is displayed in the envelope window. For single value
envelopes, the range of values is displayed to the left of the envelope
window. By clicking and dragging in the envelope window, you can create
and modify keyframes.
If you click on an existing keyframe, the current time slider will move to that
time and the keyframe will be selected. If you are editing a single value, then
you can drag up and down to immediately change the value at that keyframe.
If you click in the window where there is no keyframe, then a keyframe will
be created at that time. If you are editing a single value, you can drag the
keyframe’s value up and down. If you are editing a multiple value envelope,
then the key will be created using the current values.
TThhee EEnnvveellooppee BBuuttttoonnss
SSaavvee……
LLooaadd……
This button lets you save the current envelope to disk. When you press this
button, a file requester will appear and you can type in the name to save this
envelope as. Normally you should save all envelopes in the Envelopes folder
(the default) so that you can find them again easily. This is useful when you
might want to reuse a complex envelope in a different FX or for a different
value. For example, you might create a complex bouncing ball path that you
could save to disk and load later in an FX with a different shaped object.
Click this button to replace the current envelope with a previously saved
envelope. A file requester will appear letting you select a previously saved
envelope. Only envelopes that have the same range of values can replace an
existing envelope. So you could use an envelope you saved for an object’s
Morph as an envelope for an object’s Dissolve value since they both have a
range from 0 to 100. But you couldn’t use that Morph envelope for Flight
99
Page 100

HHoollllyywwoooodd FFXX UUsseerr’’ss GGuuiiddee
Direction, since Flight Direction requires an envelope that uses values from 0
to 360 degrees.
RReemmoovvee
This button will remove the current envelope. Once removed, changing the
current control will change it for the entire FX, rather than for the current
time’s keyframe.
KKeeyy TTyyppee CCoonnttrroollss
When the current time is on a keyframe (the keyframe block will be
highlighted red), you can use these radio buttons to control the type of
keyframe at that time.
SSpplliinnee CCuurrvvee
When Spline Curve is selected, the envelope will be a smooth curve through
the keyframe. You can adjust the curve through the keyframe using the
Spline Curve controls (described below).
LLiinneeaarr
The envelope will be a straight line to the current keyframe.
VVaalluuee JJuummpp
When this is selected, the value will remain at the previous keyframe’s value
until the exact moment of the current keyframe, then it will jump to the new
value. This is great when you want an object to disappear at a specific point
in time. You can set up an envelope for the object’s Dissolve value where
the first keyframe is 0%, and the second keyframe is a Value Jump keyframe
to 100%. This will guarantee that the object will disappear instantaneously
rather than fading out over time.
KKeeyyffrraammee CCoonnttrroollss
CCooppyy……
This button lets you copy a range of keyframes from one time to another.
When you click this button, the Copy Keys dialog appears.
The Copy Keys dialog
100
 Loading...