

Pinnacle A3623067 Owner's Manual

Powered Subwoofer
Owner’s Manual
2010 PINNACLE LOUDSPEAKERS


We congratulate and thank you for choosing a PINNACLE® subwoofer. Our subwoofers exemplify
the best in modern audio technology, and are designed to produce remarkable amounts of deep bass.
Please read this manual completely to ensure the best possible performance from your Home Theater or
sound system.
SOLID BRASS ISOLATION CONES:
If your subwoofer comes with Solid Brass Isolation Cones, please make sure to install them into the
bottom of your subwoofer cabinet. They are an important part of the performance of the product and will
improve the bass definition.
With the cabinet on its side, simply screw the cones into their receptacles on the bottom of the
cabinet. Then, with the cabinet upright, adjust the cones individually as needed to level the cabinet.
When the cones have been adjusted to the proper height, screw each nut up the threaded shaft flush with
the bottom of the cabinet to secure the height setting. If you intend to place your subwoofer on wooden or
vinyl floors, we suggest placing a penny under each cone to prevent any indentations.
PLACEMENT:
Recommended Subwoofer Placement:
a) Within a few inches of the room corner closest to your left or right front speaker (maximum low
bass output);
b) Against the wall between your left and right front speakers (strong low bass output with optimal
blending to front speakers);
c) Near any other room corner or wall.
Other locations will provide varying degrees of low bass impact and blending with your front
speakers. We recommend listening to your system, with the subwoofer in different room positions, to
obtain a location with an optimum response.
If your subwoofer has a woofer on both the front & rear of the cabinet, be sure to leave at least an
inch between the rear woofer and your wall.
If you must place your subwoofer near baseboard heaters or forced hot air vents try to leave at
least 4” of clearance for proper ventilation. Do not place your subwoofer outdoors, or in any wet or
excessively damp environment.
Note: If you have an older, non-flat screen TV, please place your subwoofer far enough away from
your TV (approximately 2-3 feet) to avoid any color distortion from being caused by your subwoofer’s
powerful magnet(s). If you experience picture distortion, simply move the subwoofer away from the TV
until the picture becomes distortion free. We also recommend keeping magnetic media such as
audio/videotapes and computer disks at least 2-3 feet away from your subwoofer to prevent damaging them.
2
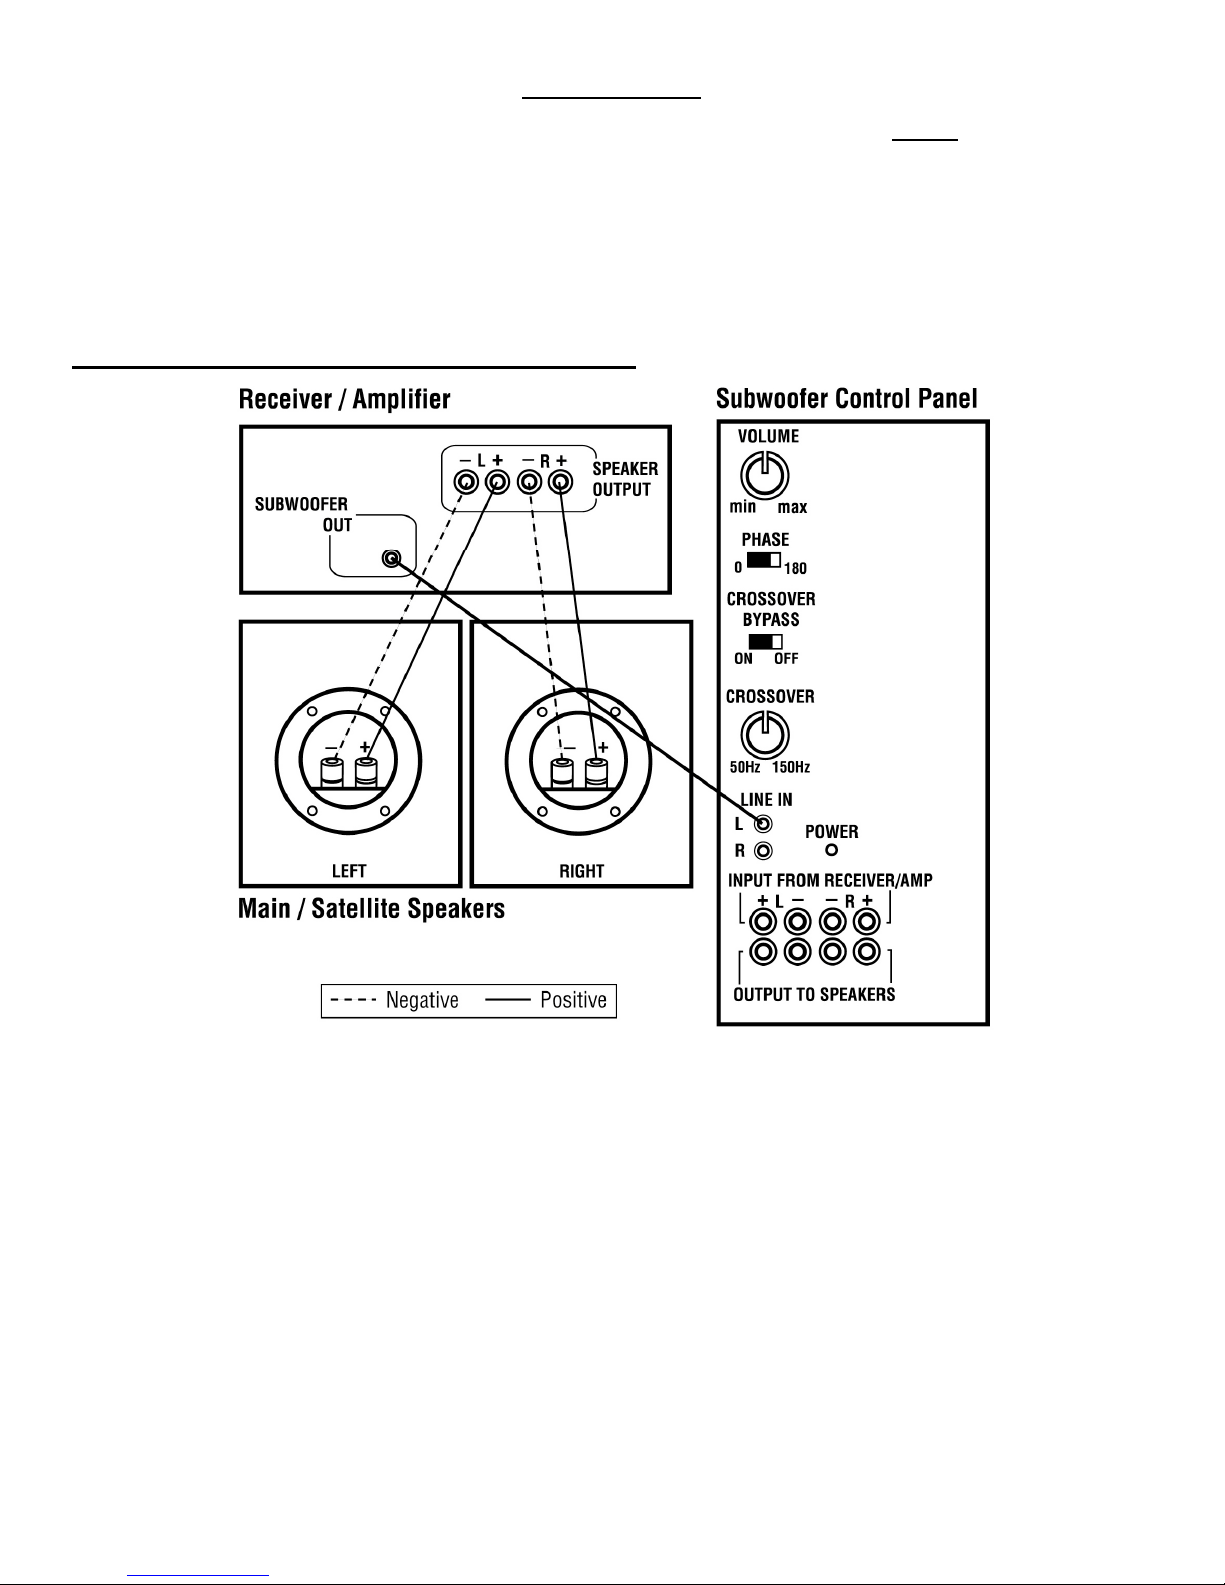
CONNECTIONS:
Complete all wire connections in your Home Theater / sound system before powering up your
subwoofer or your receiver (amplifier). Be sure to observe proper polarity for all speaker wire connections
(+ to +, - to -). To obtain the best performance, use only speaker wire of 12, 14, or 16 gauge (available
from your dealer). Lightweight speaker wire (18, 20, 22 gauge, etc.) will result in degraded performance;
16 gauge wire may be used for short runs of about 8 feet or less.
CONNECTION OPTION #1 - Using The Line Input(s):
To use the subwoofer’s LINE INPUT(s) your receiver must have a dedicated "subwoofer output" jack
(sometimes called Sub Out, Low Pass or LFE), or pre-amp left & right channel outputs. If your receiver
has these outputs you may connect your subwoofer using standard (coaxially shielded) RCA cable(s)
(the same kind of audio cable used to connect your CD, tape deck, etc.). This method is generally the
easiest to hook-up.
• If your receiver has a subwoofer output jack, simply connect your subwoofer, using the Mono / L Line
Input jack, to the subwoofer output jack on your receiver (refer to the Option #1 wiring diagram above).
3
 Loading...