

PI PIFOC QuickLock P-726.04, PIFOC QuickLock P-726.06, PIFOC QuickLock P-726.12, PIFOC QuickLock P-726.11, PIFOC QuickLock P-726.05 Technical Note
Page 1

Technical Note
Physik Instrumente (PI) GmbH & Co. KG, Auf der Roemerstrasse 1, 76228 Karlsruhe, Germany
Phone +49 721 4846
QuickLock adapter / item no.
Size of adapter aperture
Diameter of aperture
P-726.04
M28 x 0.75 mm
23 mm
P-726.05
M32 x 0.75 mm
27 mm
P-726.06
M26 x 1/36’’
21 mm
P-726.11
M25 x 0.75 mm
21 mm
P-726.12
W0.8 x 1/36’’
16 mm
P726T0001, valid for P-726
ECo/CBo, 4/3/2017
PIFOC® QuickLock Thread Option
Installation instructions
Introduction
This technical note describes the assembly/disassembly and installation/deinstallation of P-726
PIFOC® microscope objective nanofocussing positioners and scanners with the QuickLock
feature.
The QuickLock feature was developed to allow use of the same PIFOC® unit with any of the
supported microscope and objective thread types. Previous PIFOC®s could each be used only
with a single microscope thread size.
All QuickLock PIFOC®s can be installed without rotating the unit, eliminating inconvenient cable
windup.
Note that PIFOC
included with QuickLock adapters.
®
s and QuickLock adapters have to be ordered separately. Mounting tools are
Design
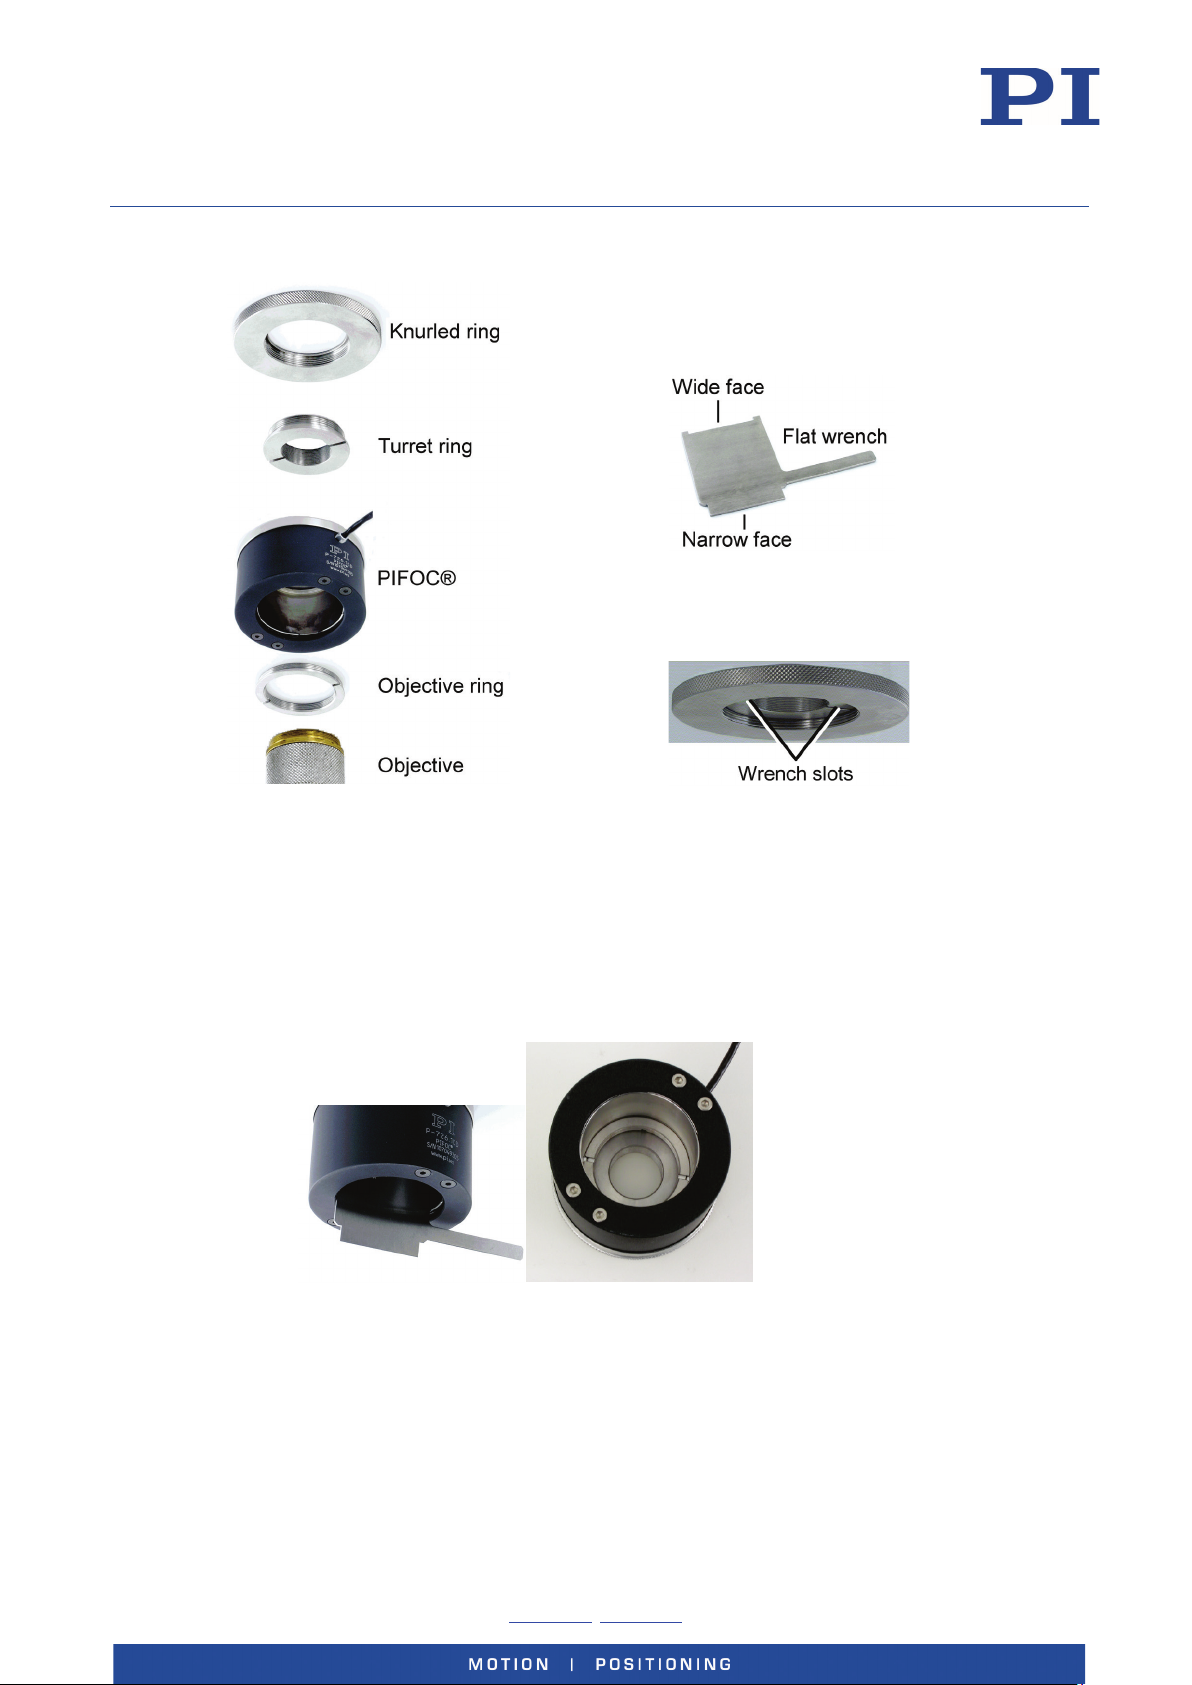
The QuickLock thread option provides interchangeable insert rings with matching threads for
the microscope and the objective. The objective ring accepts the microscope objective and is
screwed into the PIFOC® body (the required flat wrench is provided). The turret ring is screwed
into the microscope and is clamped to the PIFOC® body under the knurled ring.
NOTICE
Possible damage due to excessive torque!
Only moderate torque is necessary to secure the objective ring in the PIFOC® body.
Only use the included flat wrench for tightening the objective ring.
PIFOC® QuickLock Thread Option
The QuickLock adapters are available with apertures of different inner diameters:
Page 2
Technical Note
Physik Instrumente (PI) GmbH & Co. KG, Auf der Roemerstrasse 1, 76228 Karlsruhe, Germany Page 2 / 4
Phone +49 721 4846
Figure
P726T0001, valid for P-726
ECo/CBo, 4/3/2017
Overview of Parts
Figure 2: Included flat wrench
Assembly
1. Screw the objective ring into the PIFOC® using the included flat wrench. Use the wide
1: PIFOC® exploded view, as mounted on
non-inverted microscope
face of the flat wrench to engage the wrench slots in the ring. Grip the tool by hand
only.
Figure 4: Objective ring with wrench slots inside PIFOC® can be tightened with flat wrench
Figure 3: Turret ring wrench slots
-0, Fax +49 721 4846-1019, Email [email protected], www.pi.ws
Page 3
Technical Note
Physik Instrumente (PI) GmbH & Co. KG, Auf der Roemerstrasse 1, 76228 Karlsruhe, Germany Page 3 / 4
Phone +49 721 4846
P726T0001, valid for P-726
ECo/CBo, 4/3/2017
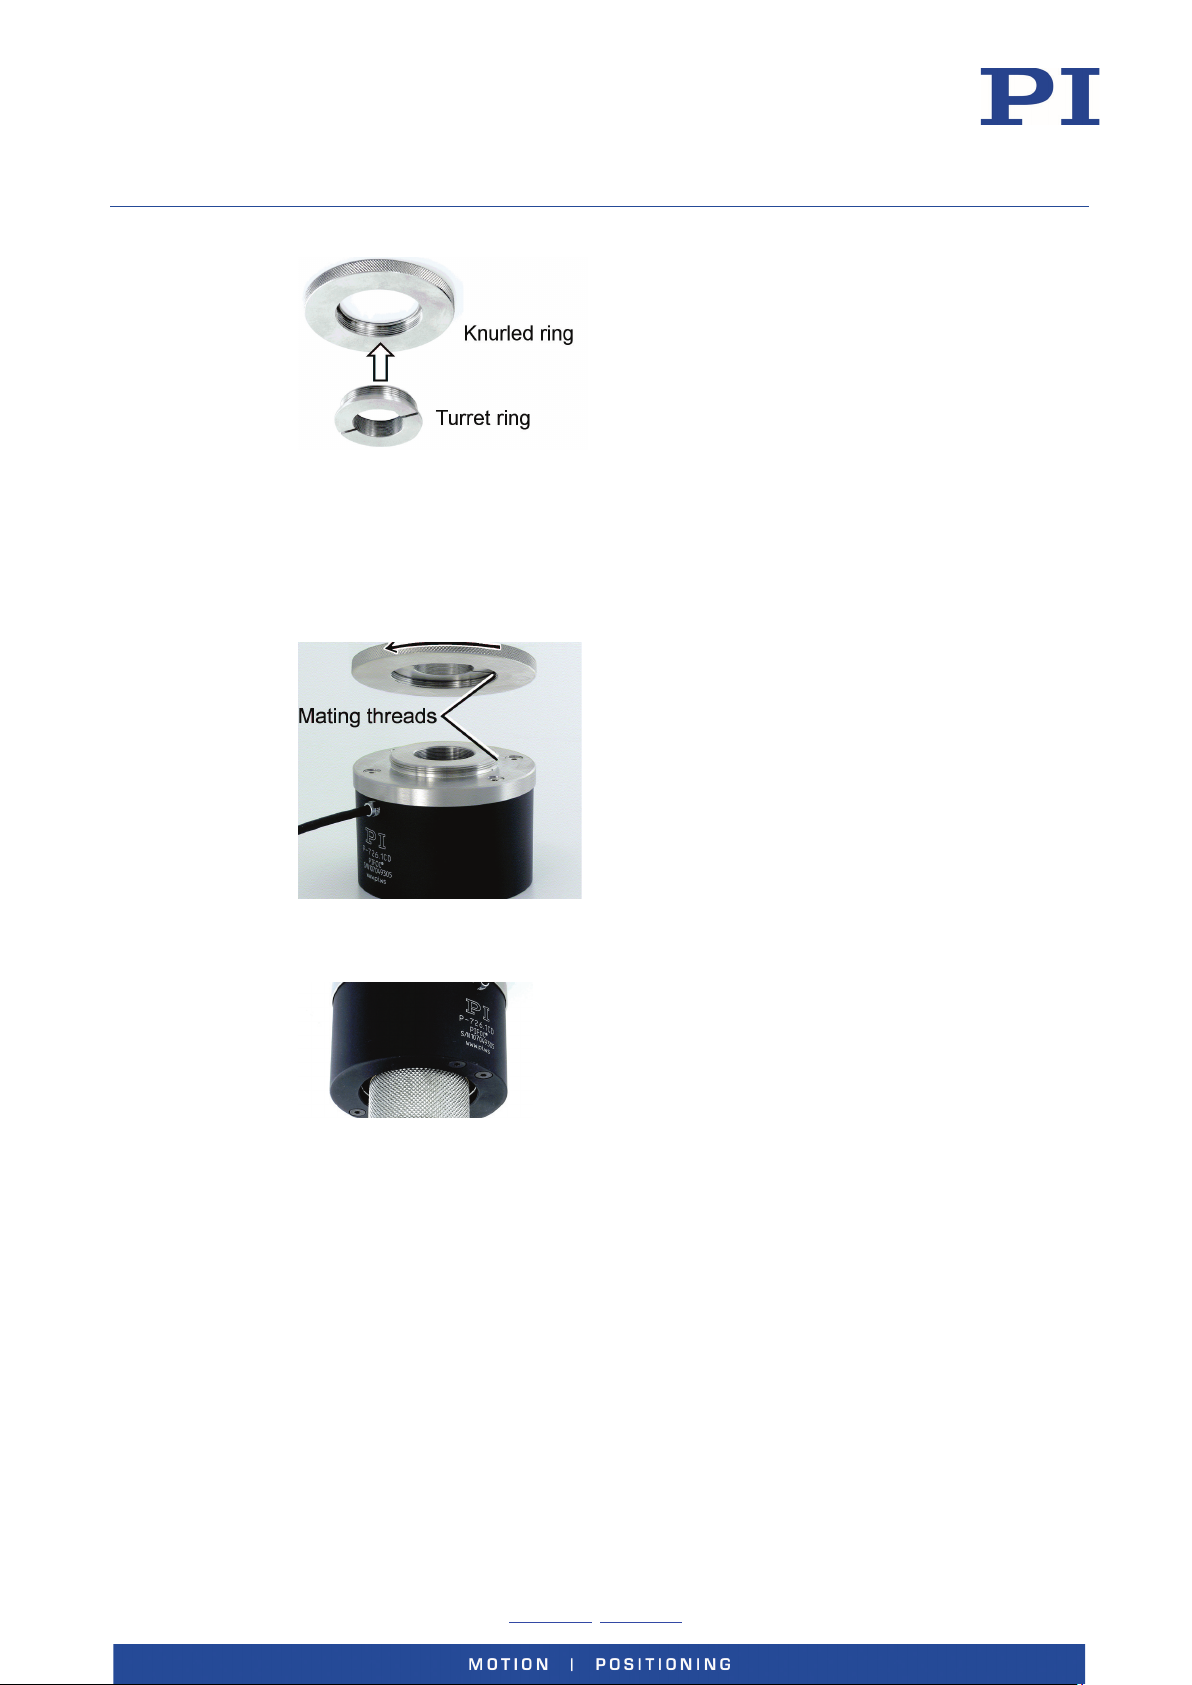
2. Insert the turret ring into the knurled ring.
Figure 5: Insertion of turret ring into knurled ring
Screw the turret ring together with the knurled ring clockwise into the microscope (not
3.
shown). Use the narrow face of the flat wrench to engage the wrench slots in the ring.
Grip the tool by hand only.
4. Affix the PIFOC® to the microscope: Align the PIFOC® with the knurled ring and screw
the knurled ring onto the PIFOC®.
Figure 6: Screwing the knurled ring onto the PIFOC®
Screw the objective into the objective ring of your PIFOC®.
5.
Figure 7: Objective installed in PIFOC®
-0, Fax +49 721 4846-1019, Email [email protected], www.pi.ws
Page 4
Technical Note
Physik Instrumente (PI) GmbH & Co. KG, Auf der Roemerstrasse 1, 76228 Karlsruhe, Germany Page 4 / 4
Phone +49 721 4846
P726T0001, valid for P-726
ECo/CBo, 4/3/2017
Disassembly
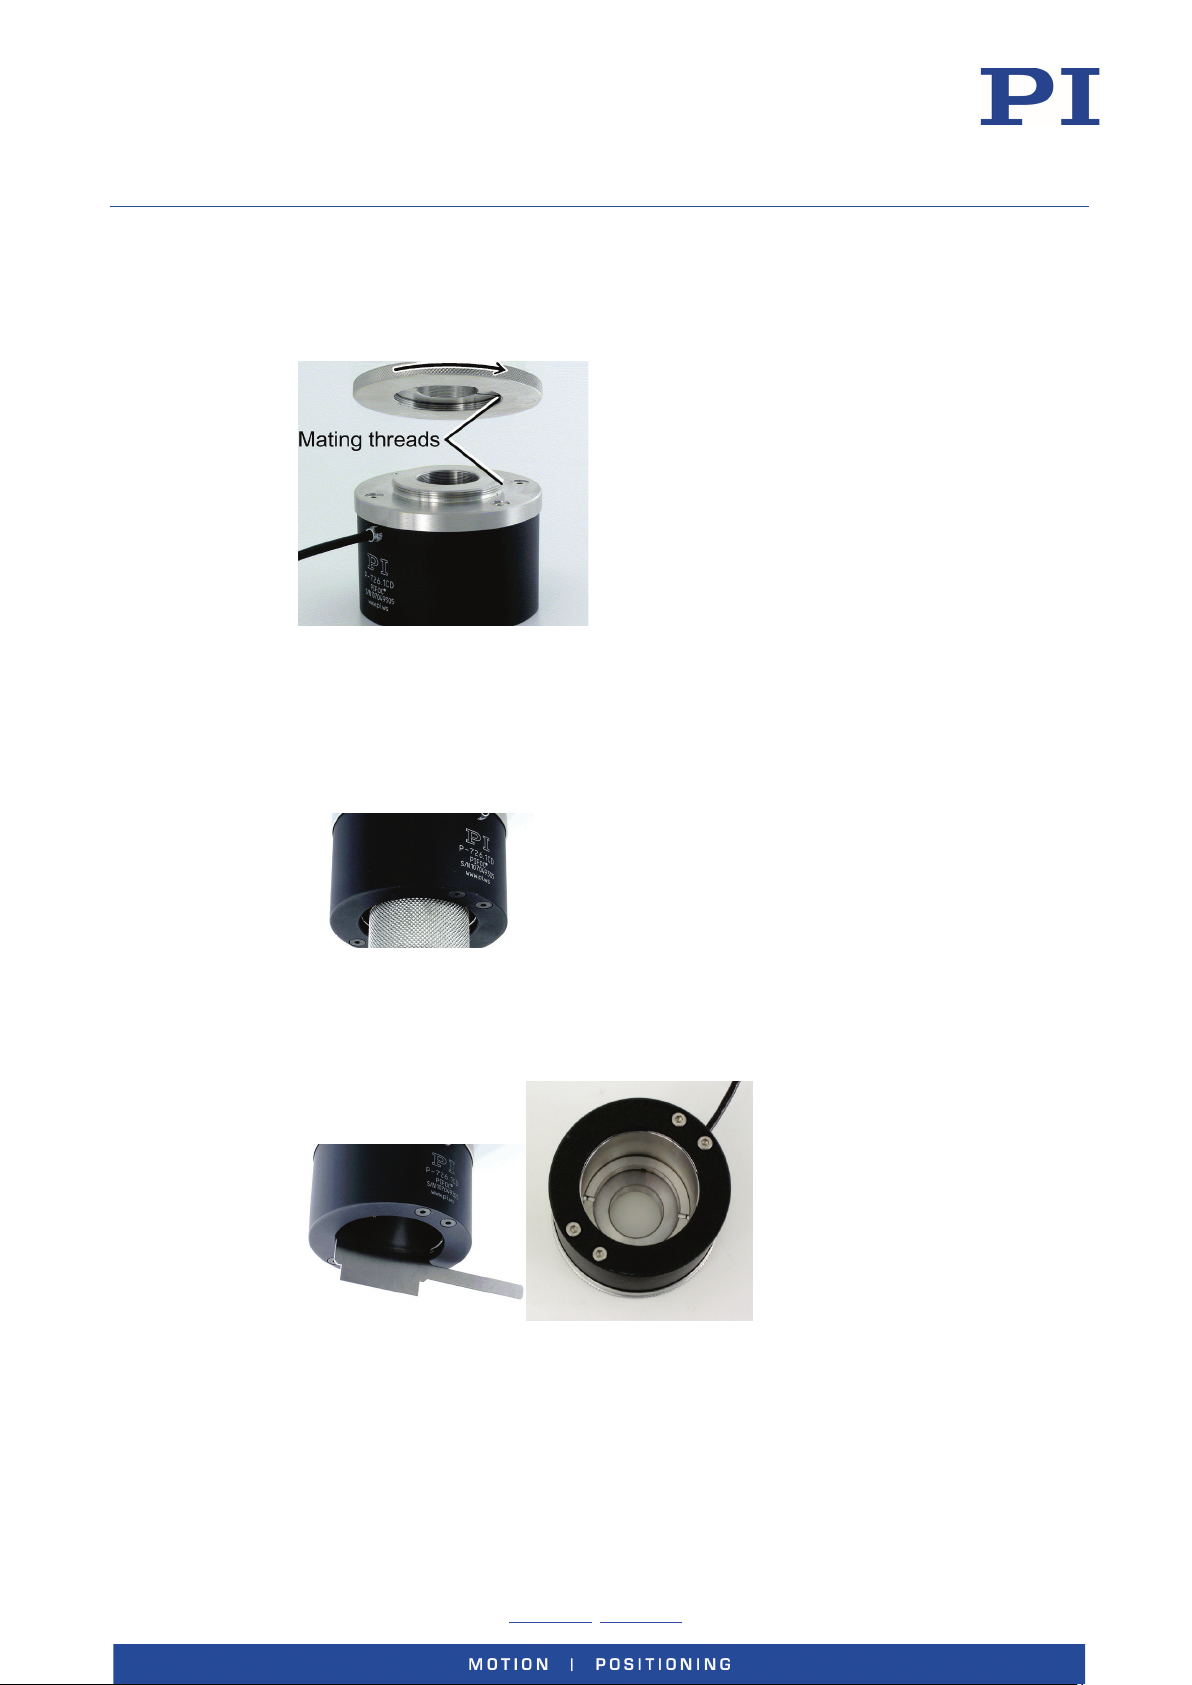
1. Remove the PIFOC® from the microscope (not shown): Hold the PIFOC® by the base
body with one hand and unscrew the knurled ring from the PIFOC® with the other hand
as shown in the figure below.
Figure 8: Unscrewing the knurled ring
If the turret ring needs to be removed from the microscope, use the narrow face of the
2.
flat wrench to unscrew the ring from the microscope (not shown). Grip the tool by hand
only.
3. If the objective needs to removed, unscrew it from the PIFOC® body. The objective ring
will probably remain in the PIFOC®.
Figure 9: Objective installed in PIFOC®
If the objective ring is still in the PIFOC® and needs to be removed, use the wide face of
4.
the included flat wrench to unscrew the ring from the PIFOC®. Grip the tool by hand
only.
Figure 10: Objective ring with wrench slots inside PIFOC® can be loosened with flat wrench
-0, Fax +49 721 4846-1019, Email [email protected], www.pi.ws
 Loading...