

Page 1

HealthEMS®
Monitor/Defibrillator User Guide for Mobile v4
Last updated: Apr 2016
Purpose
This user guide is designed to provide HealthEMS customers with instructions on how to import ECG
data into HealthEMS Mobile from a monitor/defibrillator. Please refer to the HealthEMS ECG/EKG
Guide for an up-to-date list of requirements and support materials.
This document provides links to vendor instructions on how to setup data transmission connections.
Instructions on how to program and configure the monitor/defibrillator for transmitting the case file are
not included in this document. Customers should consult with their monitor/defibrillator vendor and
complete the data transmission setup process prior to using this document for importing the data into
HealthEMS Mobile.
Philips HeartStart MRx Physio-Control LIFEPAK 15 ZOLL X-Series for EMS
©2016 Physio-Control, Inc. Redmond, WA 98052. All rights reserved. All names herein are trademarks or registered trademarks of their respective owners.
Page 2

Contents
Purpose ......................................................................................................................................................... 0
Philips ................................................................................................................................................... 2
Transferring Data via Bluetooth / Wireless Link .............................................................................................. 2
Importing Data into HealthEMS Mobile .......................................................................................................... 3
Physio ................................................................................................................................................... 8
Transferring Data via Bluetooth / Cable ......................................................................................................... 8
Installing CODE-STAT™ 9 SDK ...................................................................................................................... 9
Configuring LIFENET® System Device Communications.............................................................................. 12
Importing Data into HealthEMS Mobile ........................................................................................................ 17
ZOLL ................................................................................................................................................... 21
Transferring Data via WiFi............................................................................................................................ 21
Transferring Data via USB ........................................................................................................................... 27
Transferring Data via Bluetooth .................................................................................................................... 31
Importing Data into HealthEMS Mobile ........................................................................................................ 32
Page 1
Page 3

Philips
Transferring Data via Bluetooth / Wireless Link
Click HERE to open the PDF of Phillip’s instructions for the HeartStart MRx in your browser window.
Navigate to Chapter 19: Data Transmissions, page 250 of the PDF to find the instructions on how to
set up a Bluetooth connection.
Page 2
Page 4

Instructions
Screen View
1.
Select "EKG" for the attachment
type. (this choice may have been
set to automatically be selected)
Importing Data into HealthEMS Mobile
To upload an ECG file select the attachment icon while editing an ePCR.
Page 3
Page 5
Instructions
Screen View
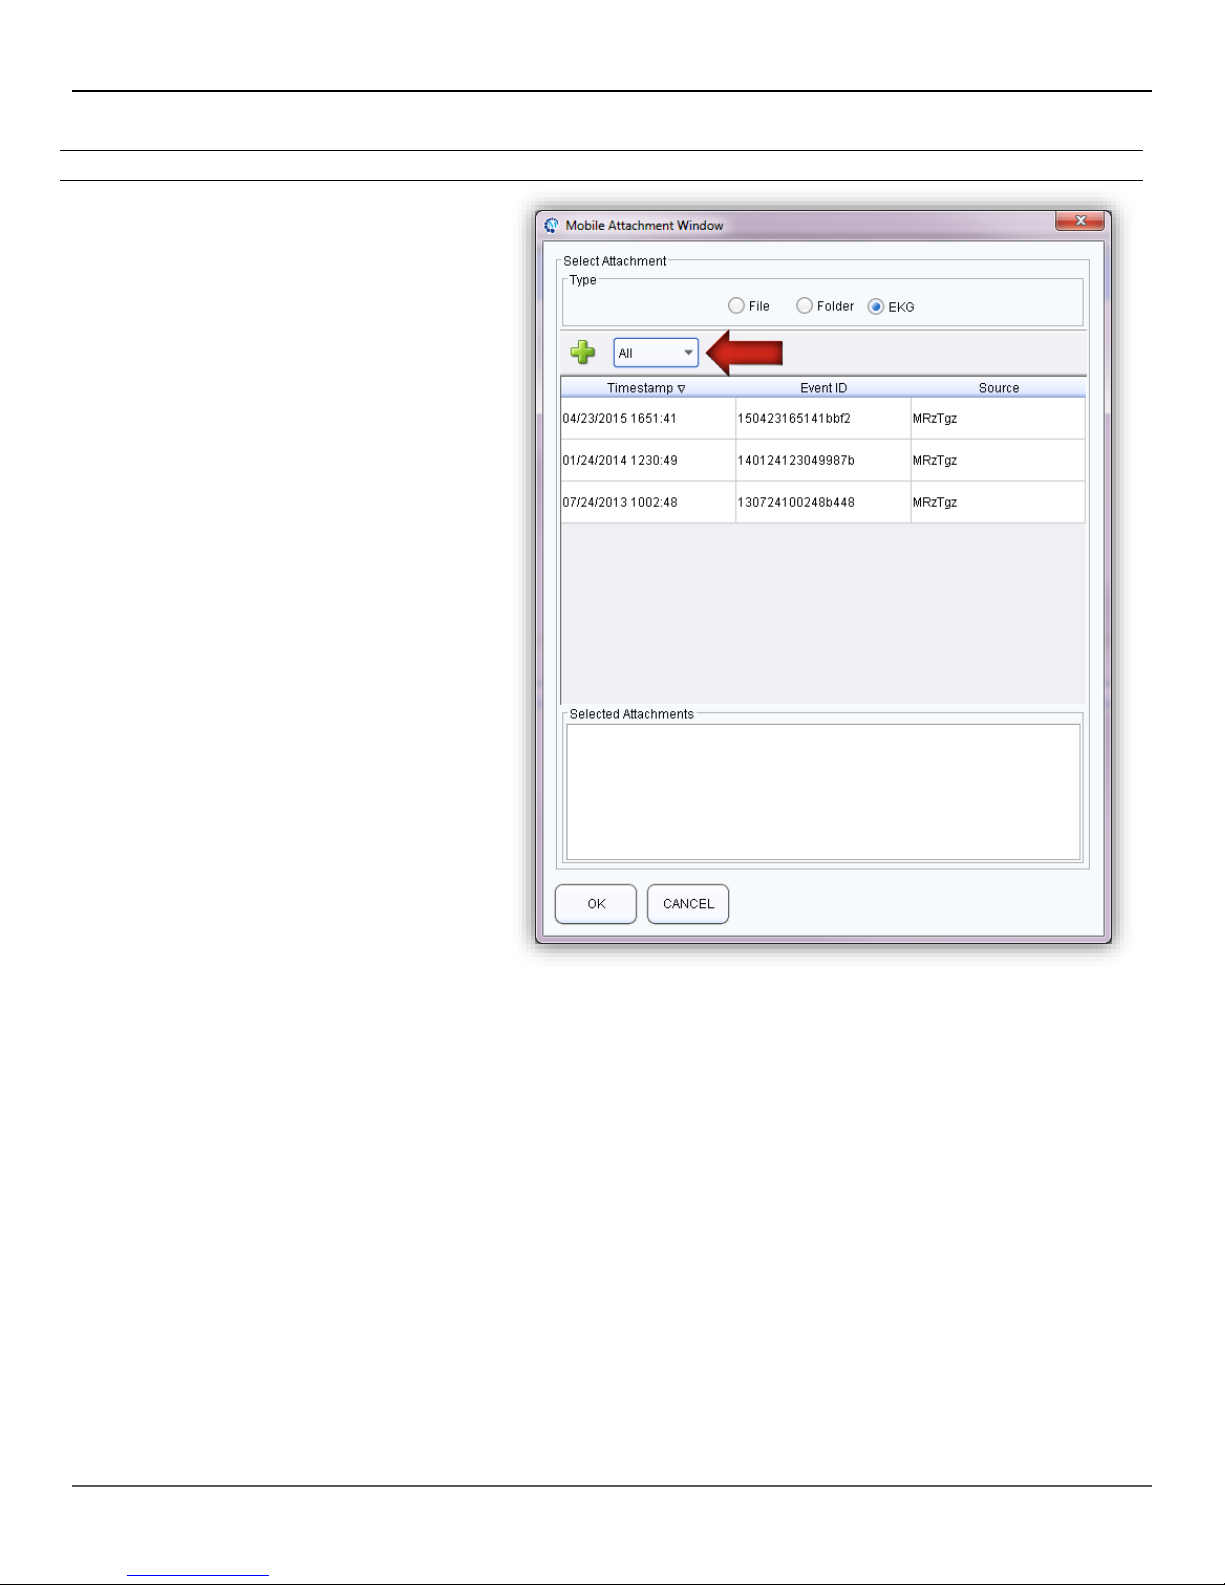
2.
The Mobile Attachment window
will default to showing all ECG
attachments from the last 3 hours.
Change this to the appropriate
setting to be able to see the ECG
data to be imported.
Page 4
Page 6
Instructions
Screen View
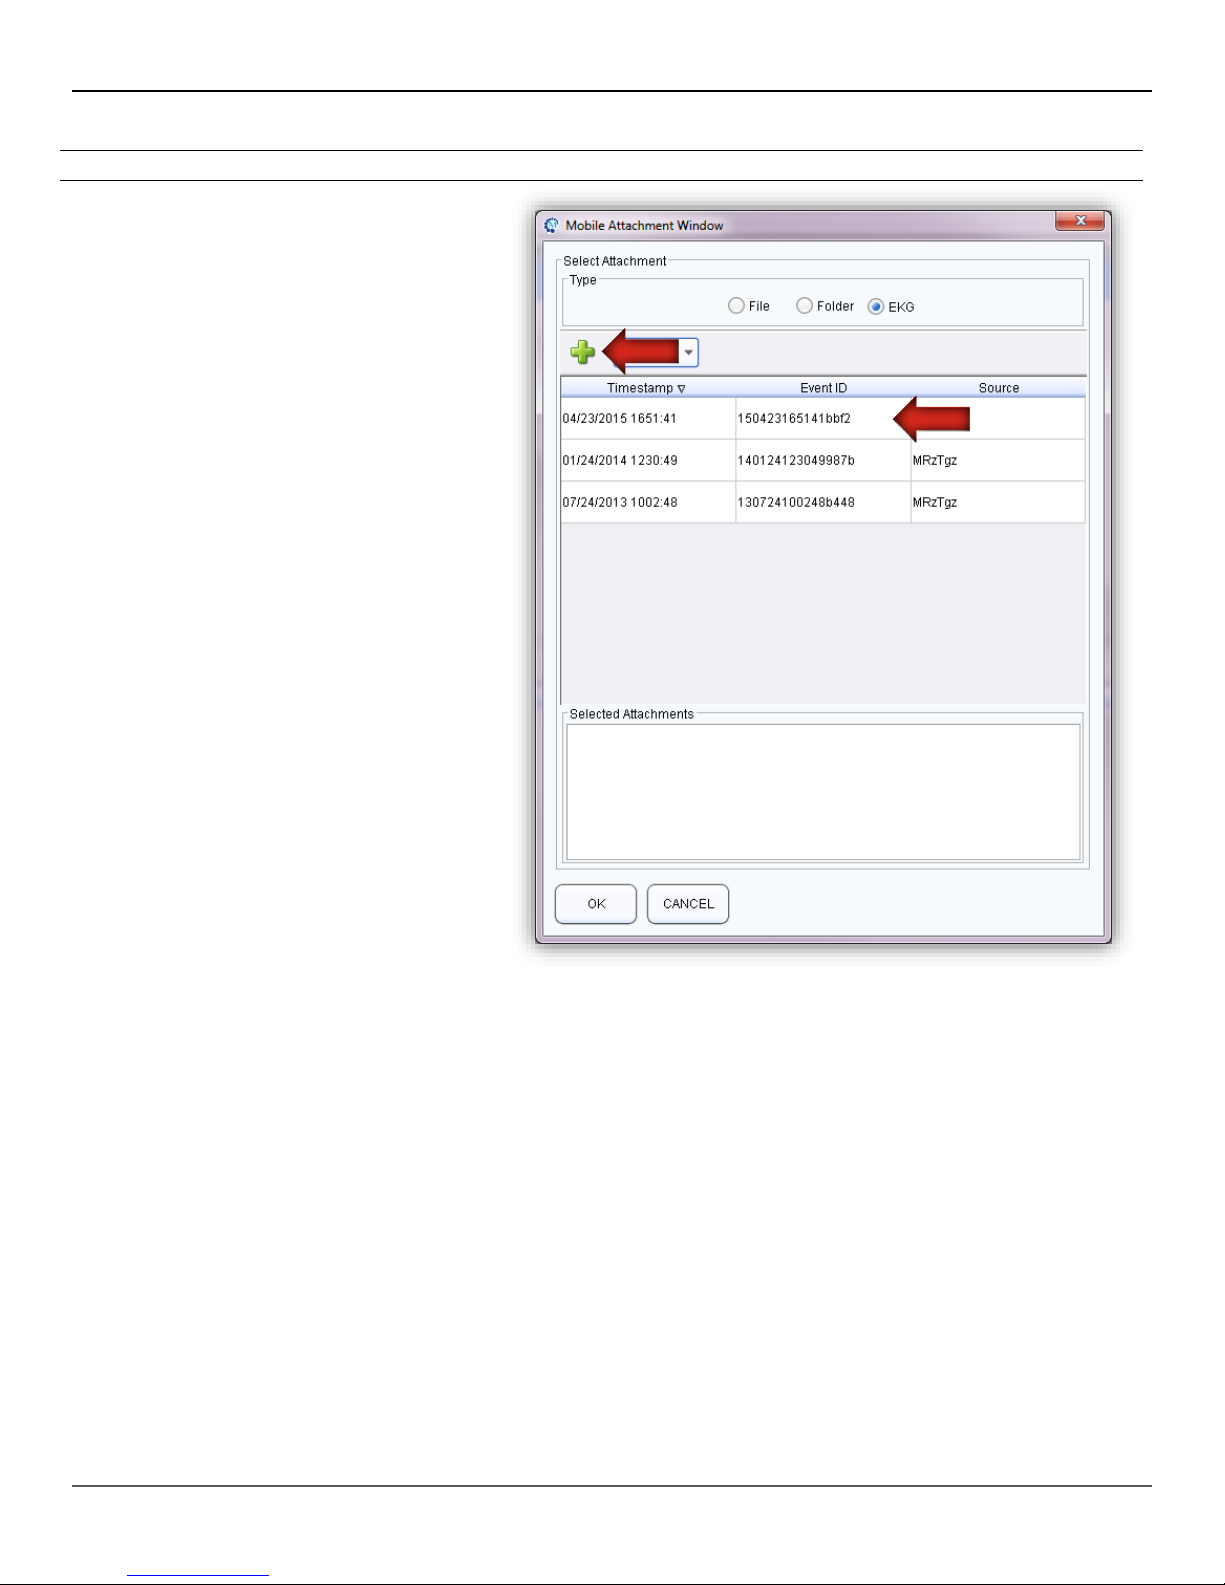
3.
Double click the desired ECG file
or select the row and click the
green plus icon.
Page 5
Page 7
Instructions
Screen View
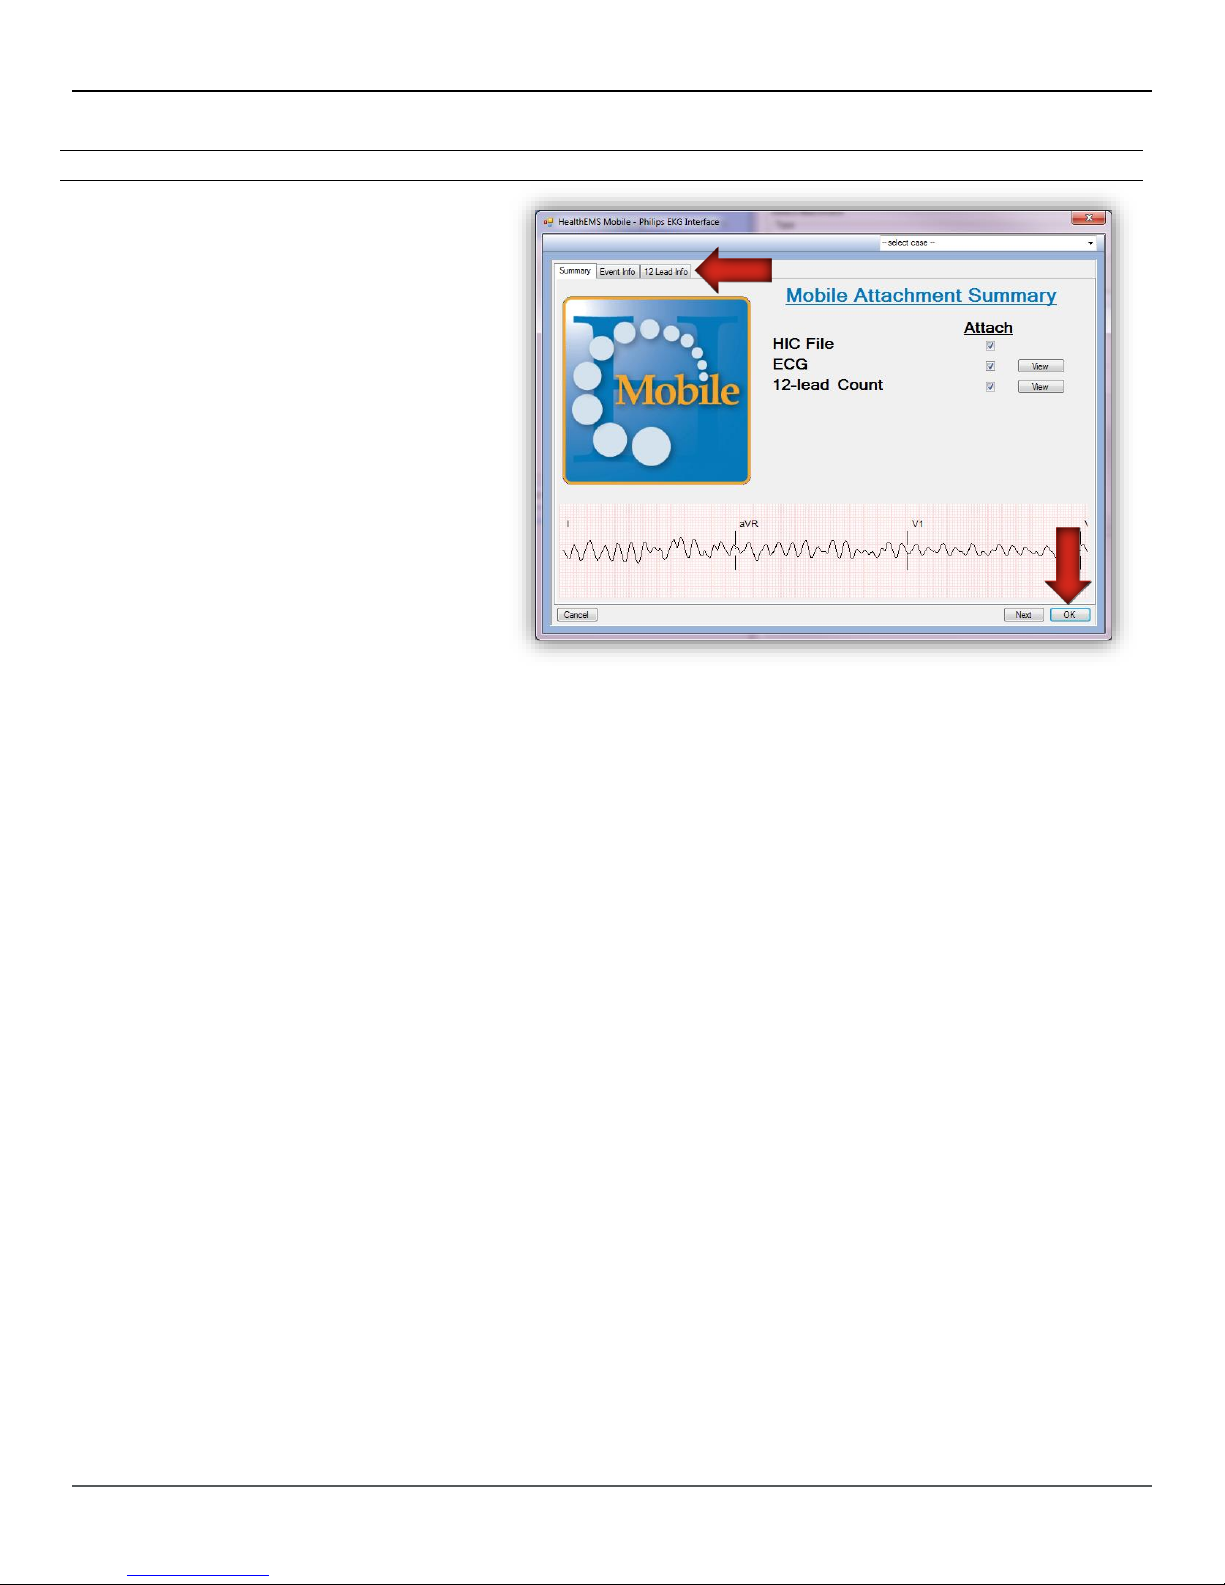
4.
Selecting the tabs across the top
will display details of the attached
ECG data file.
After reviewing, click “OK” to
continue.
Page 6
Page 8
Instructions
Screen View
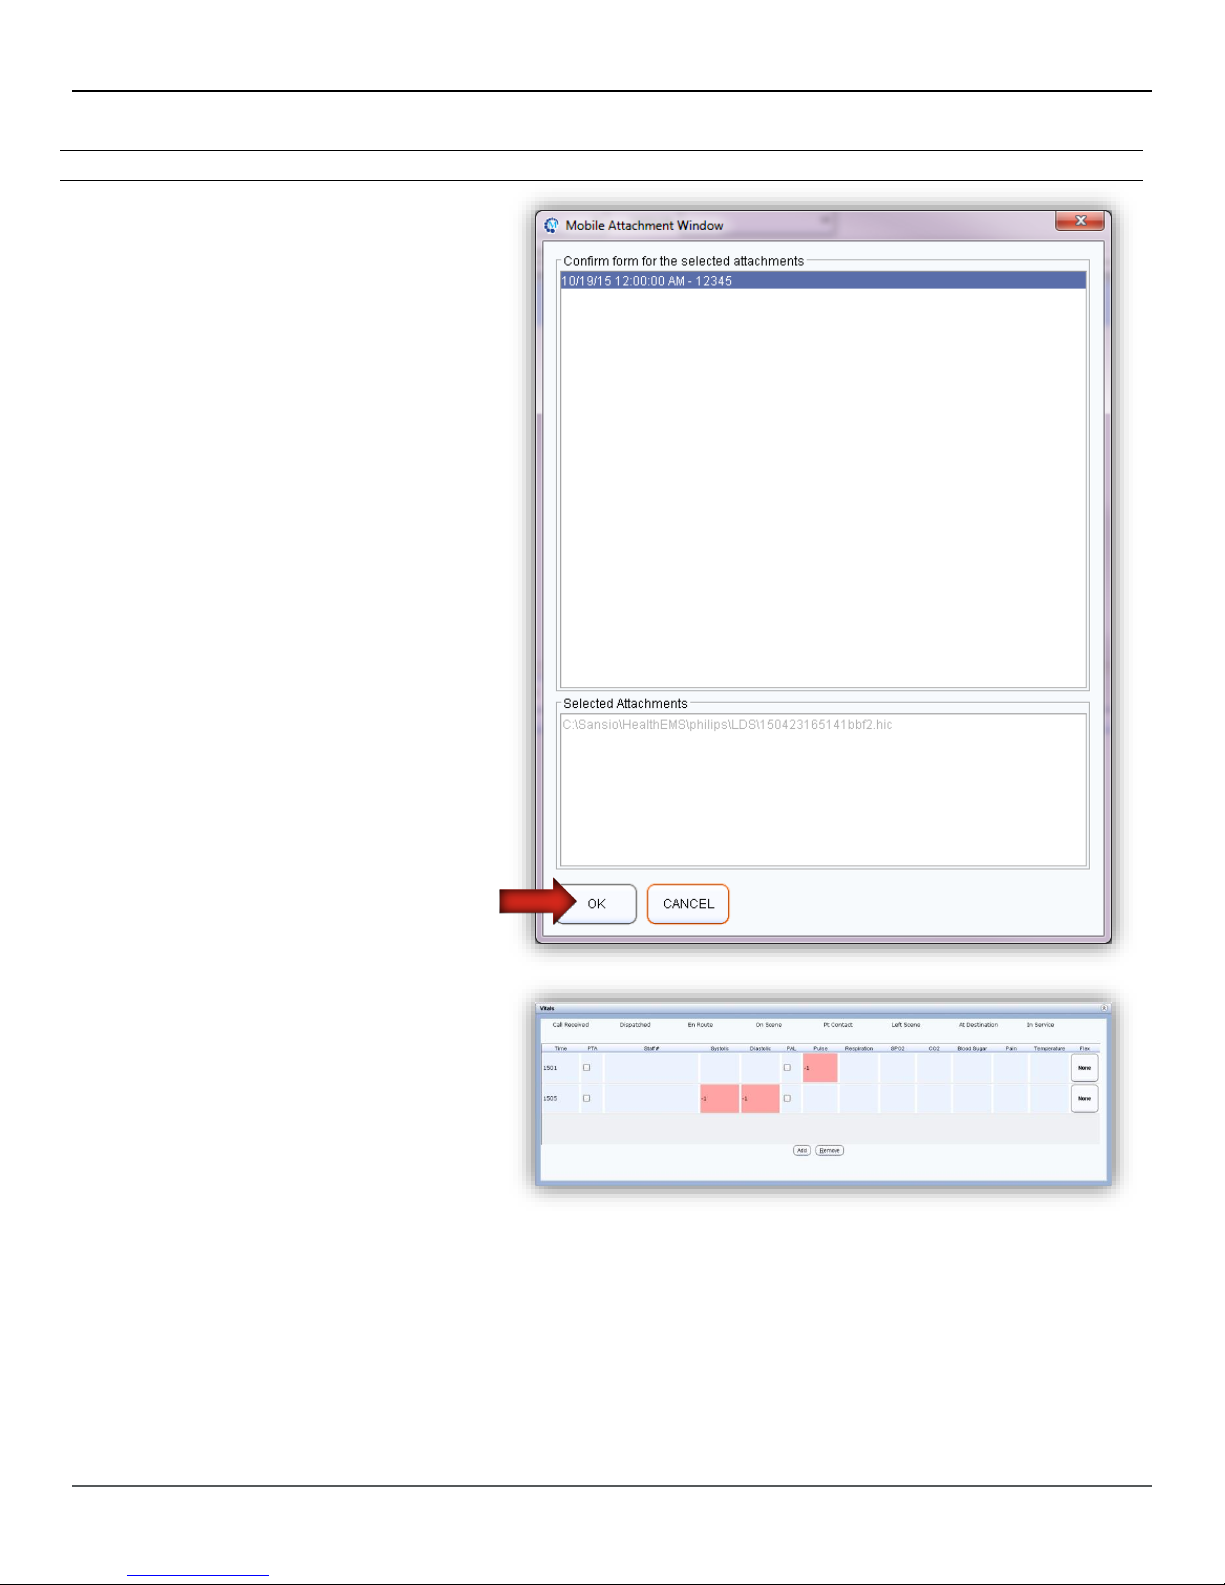
5.
The Mobile Attachment Window
will display your ECG data file
attachments.
Click “OK” to continue.
6.
The available data will populate
into the Vitals and Flowchart
sections.
Page 7
Page 9

Physio
Transferring Data via Bluetooth / Cable
For instructions on how to set up a Bluetooth connection between your device and LIFEPAK 15, as
well as instructions on how to use a direct connection (Ositech cable), proceed to section 8 page 165
of the instructions linked HERE.
Page 8
Page 10
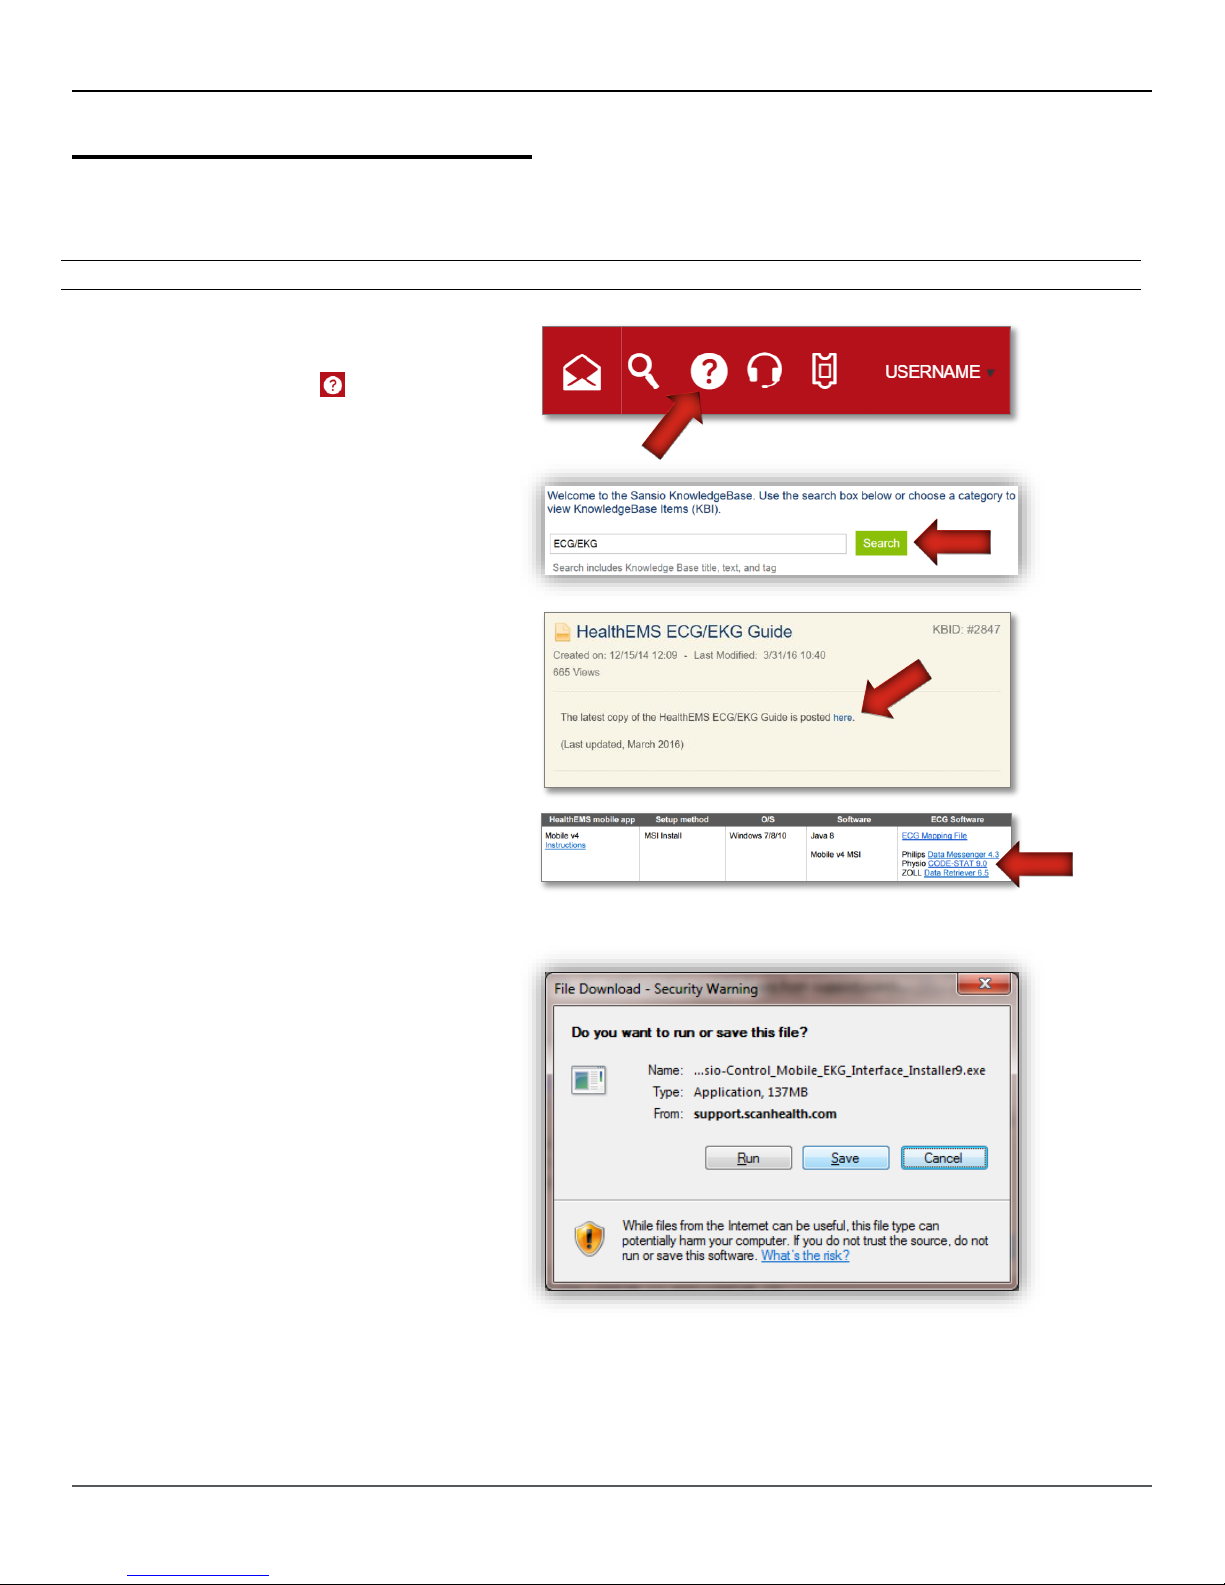
Instructions
Screen View
1.
Login to HealthEMS and
navigate to the
Knowledgebase by
clicking the icon
2.
Search for “ECG/EKG”
3.
Open the "HealthEMS
ECG/EKG Guide" under
the SUPPORT
INSTRUCTIONS section
and click on “
here
”
4.
Navigate to the Mobilev4
ECG Software section
and select "
CODE-STAT
9.0
"
5.
On the popup window
select "Save"
Installing CODE-STAT™ 9 SDK
This section will lay out the steps for installing the CODE-STAT™ 9 SDK on your device.
Page 9
Page 11

Instructions
Screen View
6.
Select the desired
destination to save the
file and click "Save"
7.
When the download
completes…
8.
Select "Run" on the
security warning popup
Page 10
Page 12

Instructions
Screen View
9.
Select "Install" on the
Mobile EKG Interface
Setup popup
10.
Once it is finished click
"Finish"
Page 11
Page 13

Instructions
Screen View
1.
Open LIFENET Device
Communications
2.
Open the LIFENET
System Configuration
Window by navigating to
Control → System
Configuration
3.
Select the "Device Data
Reception" tab to
configure the
communication ports
used to transfer data
from the
monitor/defibrillator
device
Click the "Modify…"
button
Configuring LIFENET® System Device Communications
This section will lay out the steps for configuring LIFENET® on your device.
Page 12
Page 14

Instructions
Screen View
4.
Select the appropriate
port(s) from the
"Available" section and
click the ">>" to move
them to the "Use"
section. The USB cable
connection will typically
use COM50 by default.
5.
Highlight LP15/LP12 and
click the "OK" button to
save this change
6.
The following message
will appear:
Click the "OK" button
Page 13
Page 15

Instructions
Screen View
7.
Then, go to the
LIFENET Device
Communications dialog
box and navigate to
Control → LIFENET
Communications and
select "Disable"
8.
The LIFENET
Communications will
then indicate that it is
disabled
9.
Navigate to Control →
LIFENET
Communications and
select "Enable"
Page 14
Page 16

Instructions
Screen View
10.
Once enabled, close the
LIFENET Device
Communications dialog
box by navigating to File
→ Exit. On the popup
window click "OK"
11.
Open LIFENET Case
View and click
"Configure…"
12.
*IMPORTANT: do not
change the Serial
Number or the Feature
Key on the Features tab*
Page 15
Page 17

Instructions
Screen View
13.
Select the "General" tab
and enter your agency's
name in the
Organization field and
then click the "OK"
button
14.
Click the "Exit" button to
finish. Congratulations!
The Physio-Control
Software has been
successfully installed
and configured for use
with HealthEMS®
Mobile.
Page 16
Page 18

Instructions
Screen View
1.
Select “EKG” for the
attachment type. (this
choice may have been
set to automatically be
selected)
Importing Data into HealthEMS Mobile
This section will lay out the steps for importing your ECG data into HealthEMS Mobile™.
Page 17
Page 19

Instructions
Screen View
2.
The Mobile Attachment
window will default to
showing all ECG
attachments from the
last 3 hours.
Change this to the
appropriate setting to be
able to see the ECG
data to be imported.
Page 18
Page 20

Instructions
Screen View
3.
Double click the desired
ECG file or select the
row and click the green
plus icon.
4.
Selecting the tabs
across the top will
display details of the
attached ECG data file.
After reviewing, click
“OK” to continue.
Page 19
Page 21

Instructions
Screen View
5.
The Mobile Attachment
Window will display your
ECG data file
attachments.
Click “OK” to continue.
6.
The available data will
populate into the Vitals
and Flowchart sections.
Page 20
Page 22

ZOLL
Click HERE to open ZOLL’s product webpage in your browser. Under the Product drop down list
select “X Series for EMS”; then, select your Language. Under Search Results click on the “X Series
Operators Guide” link to download the PDF file.
Once the file has been downloaded, open it and navigate to page 250 “Creating a Temporary Access
Point Profile” to view instructions on creating a temporary access point. To view instructions on how
to setup a WiFi Access Point, navigate to page 258 “Supervisor Communications Menu”.
Transferring Data via WiFi
The ZOLL X Series must be authenticated to a WiFi network which can either be a temporary
connection, or pre-configured.
After your WiFi Access Point has been set up, follow the instructions below to learn how to transfer
data from your unit to your device.
Page 21
Page 23

Instructions
Screen View
1.
Connect a Windows mobile
device that has HealthEMS
Mobile installed to the same WiFi
network.
2.
From the same device, open the
ZOLL Data Retriever software and
select “X Series Case Service”
from the drop down list.
Page 22
Page 24

Instructions
Screen View
3.
Then, open Options -> Data
Retriever.
4.
Enter:
C:\Sansio\HealthEMS\ZOLL\LDS
as the Destination Folder and
press “OK.”
Page 23
Page 25

Instructions
Screen View
5.
Then select Upload.
6.
Select Discover.
NOTE: If no device is found,
check the Wi-Fi network and
make certain both the X Series
and the Windows device are
connected.
Page 24
Page 26

Instructions
Screen View
7.
Select the ZOLL X Series monitor
that is connected to the Wi-Fi
network, and select “OK”.
8.
The data will then transmit. The
process should not take longer
than a minute or so, unless you
are downloading multiple
instances.
Page 25
Page 27

Instructions
Screen View
9.
Once the transfer is complete
select “OK.”
Finally, continue to “Importing Data
into HealthEMS Mobile”
instructions.
Page 26
Page 28

Instructions
Screen View
1.
Insert the same USB thumb drive
with the X Series case files into
the USB port of a Windows mobile
device that has HealthEMS
Mobile installed.
Open the ZOLL Data Retriever
software. Select USB Drive from
the drop down list.
2.
Then, open Options -> Data
Retriever.
Transferring Data via USB
An alternative method to transfer data is to use a thumb drive.
Click HERE to open ZOLL’s product webpage in your browser. Under the Product drop down list
select “X Series for EMS”; then, select your Language. Under Search Results click on the “X Series
Operators Guide” link to download the PDF file.
Once the file has been downloaded, open it and navigate to page 242 “Transferring Data to a USB
Device” to view further instructions.
After transferring your Data from the unit to your USB, follow the instructions below to learn how to
move the data from your USB to your device.
Page 27
Page 29

Instructions
Screen View
3.
Enter:
C:\Sansio\HealthEMS\ZOLL\LDS
as the Destination Folder and
press “OK.”
4.
Be sure that USB Drive has been
chosen and select Upload.
Page 28
Page 30

Instructions
Screen View
5.
Select the USB drive from the
drop down list and select “OK.”
6.
Once the transfer is complete
select “OK.”
Page 29
Page 31

Instructions
Screen View
7.
Select “Yes” to erase the case
files from the USB thumb drive.
Finally, continue to “Importing Data
into HealthEMS Mobile”
instructions.
Page 30
Page 32

Transferring Data via Bluetooth
Another alternative method to transfer data is to use a Bluetooth connection.
Click HERE to open ZOLL’s product webpage in your browser. Under the Product drop down list
select “X Series for EMS”; then, select your Language. Under Search Results click on the “X Series
Operators Guide” link to download the PDF file.
Once the file has been downloaded, open it and navigate to page 260 “Bluetooth Device Pairing” to
view further instructions.
Page 31
Page 33

Instructions
Screen View
1.
Select "EKG" for the attachment
type. (this choice may have been
set to automatically be selected)
Importing Data into HealthEMS Mobile
To upload an ECG file select the attachment icon while editing an ePCR.
Page 32
Page 34

Instructions
Screen View
2.
The Mobile Attachment window
will default to showing all ECG
attachments from the last 3 hours.
Change this to the appropriate
setting to be able to see the ECG
data to be imported.
Page 33
Page 35

Instructions
Screen View
3.
Double click the desired ECG file
or select the row and click the
green plus icon.
4.
Selecting the tabs across the top
will display details of the attached
ECG data file.
After reviewing, click “OK” to
continue.
Page 34
Page 36

Instructions
Screen View
5.
The Mobile Attachment Window
will display your ECG data file
attachments.
Click “OK” to continue.
6.
The available data will populate
into the Vitals and Flowchart
sections.
Page 35
 Loading...