

Page 1
MANUALE ISTRUZIONI • INSTRUCTIONS MANUAL
NOTICE DE MONTAGE ET D’EMPLOI • GEBRAUCHSANWEISUNGEN
MANUAL DE INSTRUCCIONES
VM 080
ENGLISH
ITALIANO
FRANÇAIS
DEUTSCH
ESPAÑOL
6,2” TFT/LCD
2 DIN NAVIGATION
DVD RECEIVER
SEAT LEON 11> - ALTEA 11>
SKODA FABIA 07> - ROOMSTER 07> - OCTAVIA 07>
VOLKSWAGEN GOLF V - GOLF VI - TIGUAN - TOURAN - PASSAT 05>
PASSAT CC 08> - SCIROCCO 08> - POLO 09> - SHARAN 10> - CADDY 10>
Page 2

INDICE - INDEX - INHALTSVERZEICHNIS
Connessioni / Connections .................................................................. 3-5
Funzioni / Functions ............................................................................. 6
Funzioni Telecomando / Remote-control functions ............................. 7
Menù / Menu ........................................................................................ 8
Impostazioni di sistema / System setup ............................................... 9-11
Radio .................................................................................................... 12
Equalizzatore / Equalizer ...................................................................... 13
Riproduzione / Reproduction DVD-CD-USB-SD CARD ..................... 14-15
Impostazioni Bluetooth / Bluetooth settings ........................................ 16
Funzioni Bluetooth / Bluetooth functions ............................................. 17
Caratteristiche tecniche / Specifications .............................................. 34
Connexions / Kabel-Verbindungen ...................................................... 19-21
Fonctions / Funktionen ......................................................................... 22
Fonctions télécommande / Fernbedienungs-tasten ............................ 23
Menu / Menü ........................................................................................ 24
Reglages de systeme / System-Einstellungen ..................................... 25-27
Radio .................................................................................................... 28
Egaliseur / Equalizer ............................................................................. 29
Reproduction / Wiedergabe DVD-CD-USB-SD ................................... 30-31
Reglages bluetooth / Bluetooth-Einstellungen ..................................... 32
Fonctions bluetooth / Bluetooth-funktionen ........................................ 33
Caracteristiques techniques / Technische daten ................................. 34
Conexiones .......................................................................................... 35-37
Funciones ............................................................................................ 38
Funciones mando a distancia .............................................................. 39
Menu ................................................................................................... 40
Adjuste del sistema .............................................................................. 41-43
Radio .................................................................................................... 44
IT-GB
E
FR-D
Equalizador ........................................................................................... 45
Reproduccion DVD-CD-USB-SD CARD .............................................. 46-47
Configuracion bluetooth ....................................................................... 48
Funciones bluetooth ............................................................................. 49
Caracteristicas tecnicas ....................................................................... 50
Page 3
3
IT/GB
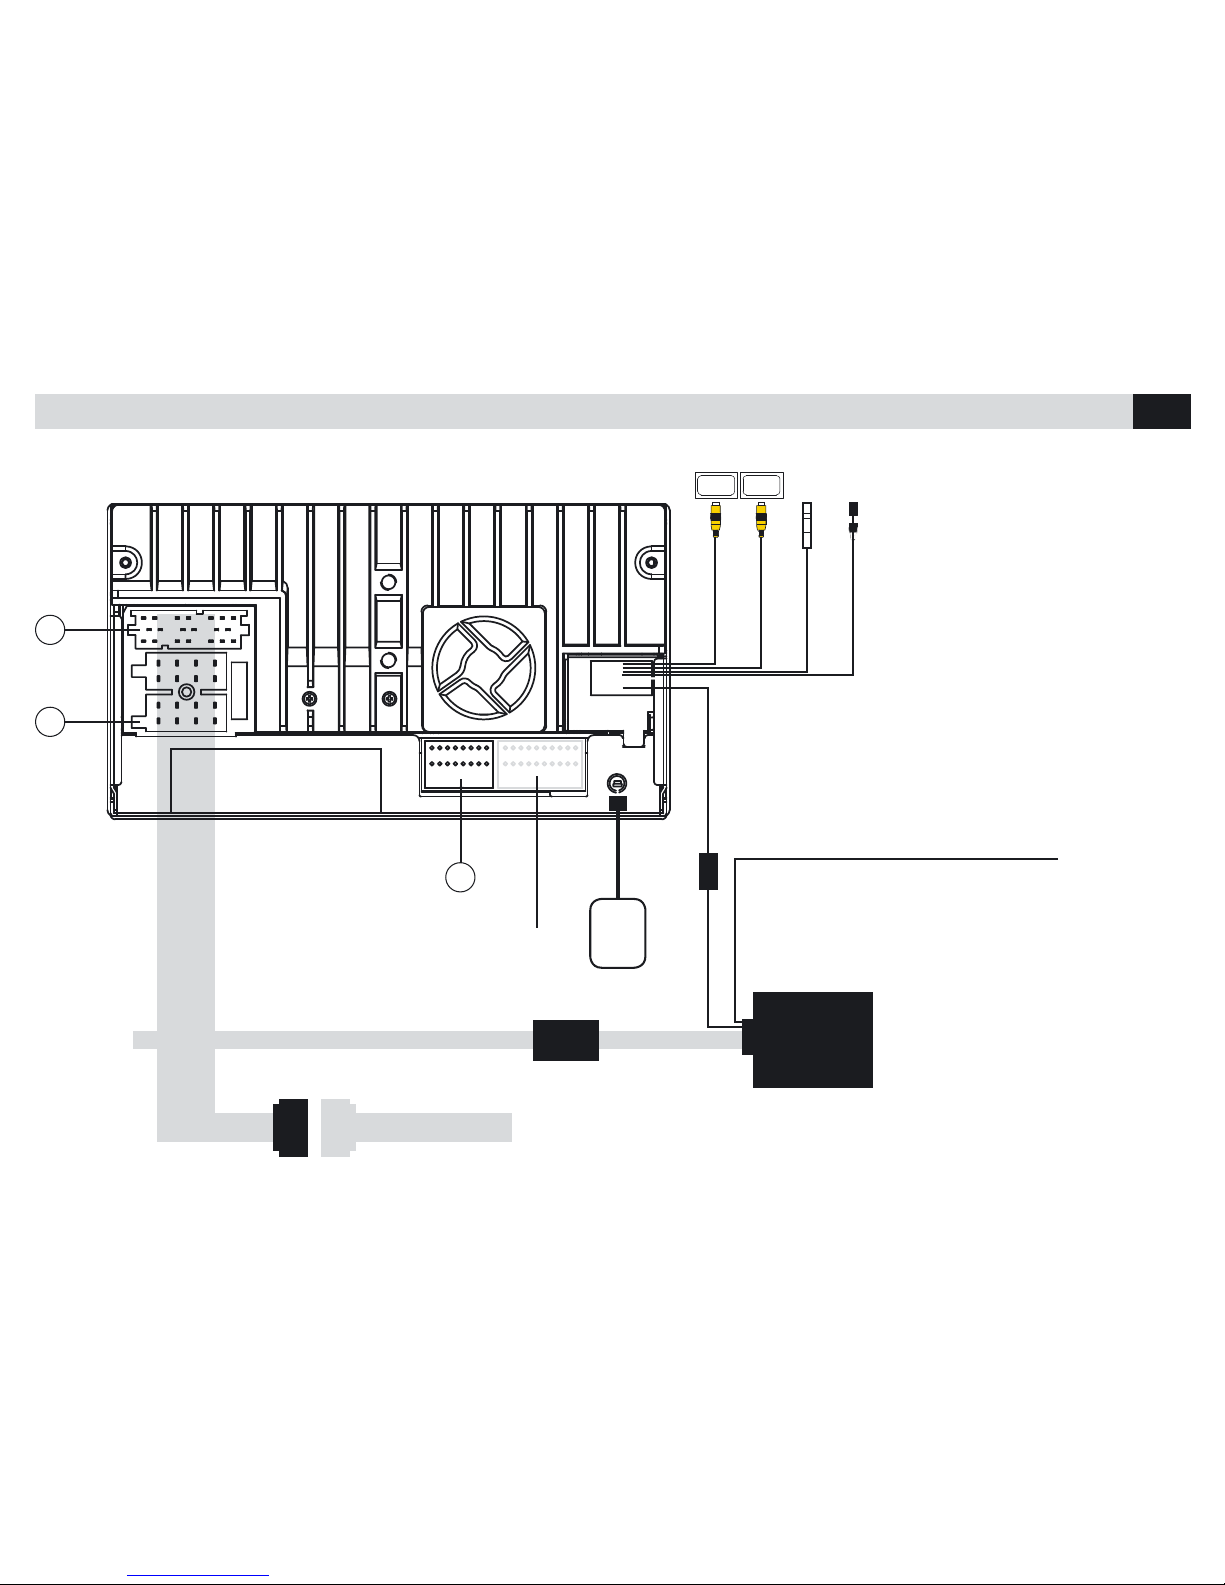
CONNESSIONI • CONNECTIONS
1
2
3
VIDEO 1
VIDEO 2
REAR
DISPLAY
REAR
DISPLAY
RADIO ANT
MICROFONO/MIC
VERDE / GREEN SWCMARRONE / BROWN
USCITA PER COMANDI AL VOLANTE
STEERING-WHEEL COMMANDS OUTPUT
Collegamento da effettuare solo in caso di comandi al volante presenti sull’auto.
Effect this connection only if car is equipped with steering-wheel commands.
NON DISPONIBILE
NOT AVAILABLE
GPS
ATTENZIONE / IMPORTANT:
Verificare che sulla vettura sia attiva la linea
CAN-BUS. A collegamenti avvenuti il led
della centralina effettua 3 lampeggi di colore
rosso. Quando il led è di colore verde la
centralina è programmata.
Se l’autoradio viene reinstallata la centralina
deve essere riprogrammata.
Please check and make sure that the CANBUS-line of your car is activated. When all
connections are complete, the Led of the
central-unit will flash 3 times in red colour.
When the Led turns green, the central-unit
is readily programmed.
If the car-radio is re-installed, the centralunit needs to be re-programmed.
ANTENNA
AERIAL
GPS
CAN BUS
INTERFACE
4/145
CONNETTORE ORIGINALE AUTO
ORIGINAL AUTO CONNECTOR
FAKRA
FAKRA
GRIGIO USCITA SEGNALE ODOMETRICO
GREY SPEED PULSE SIGNAL
Page 4
4
IT/GB
1
CONNESSIONI • CONNECTIONS
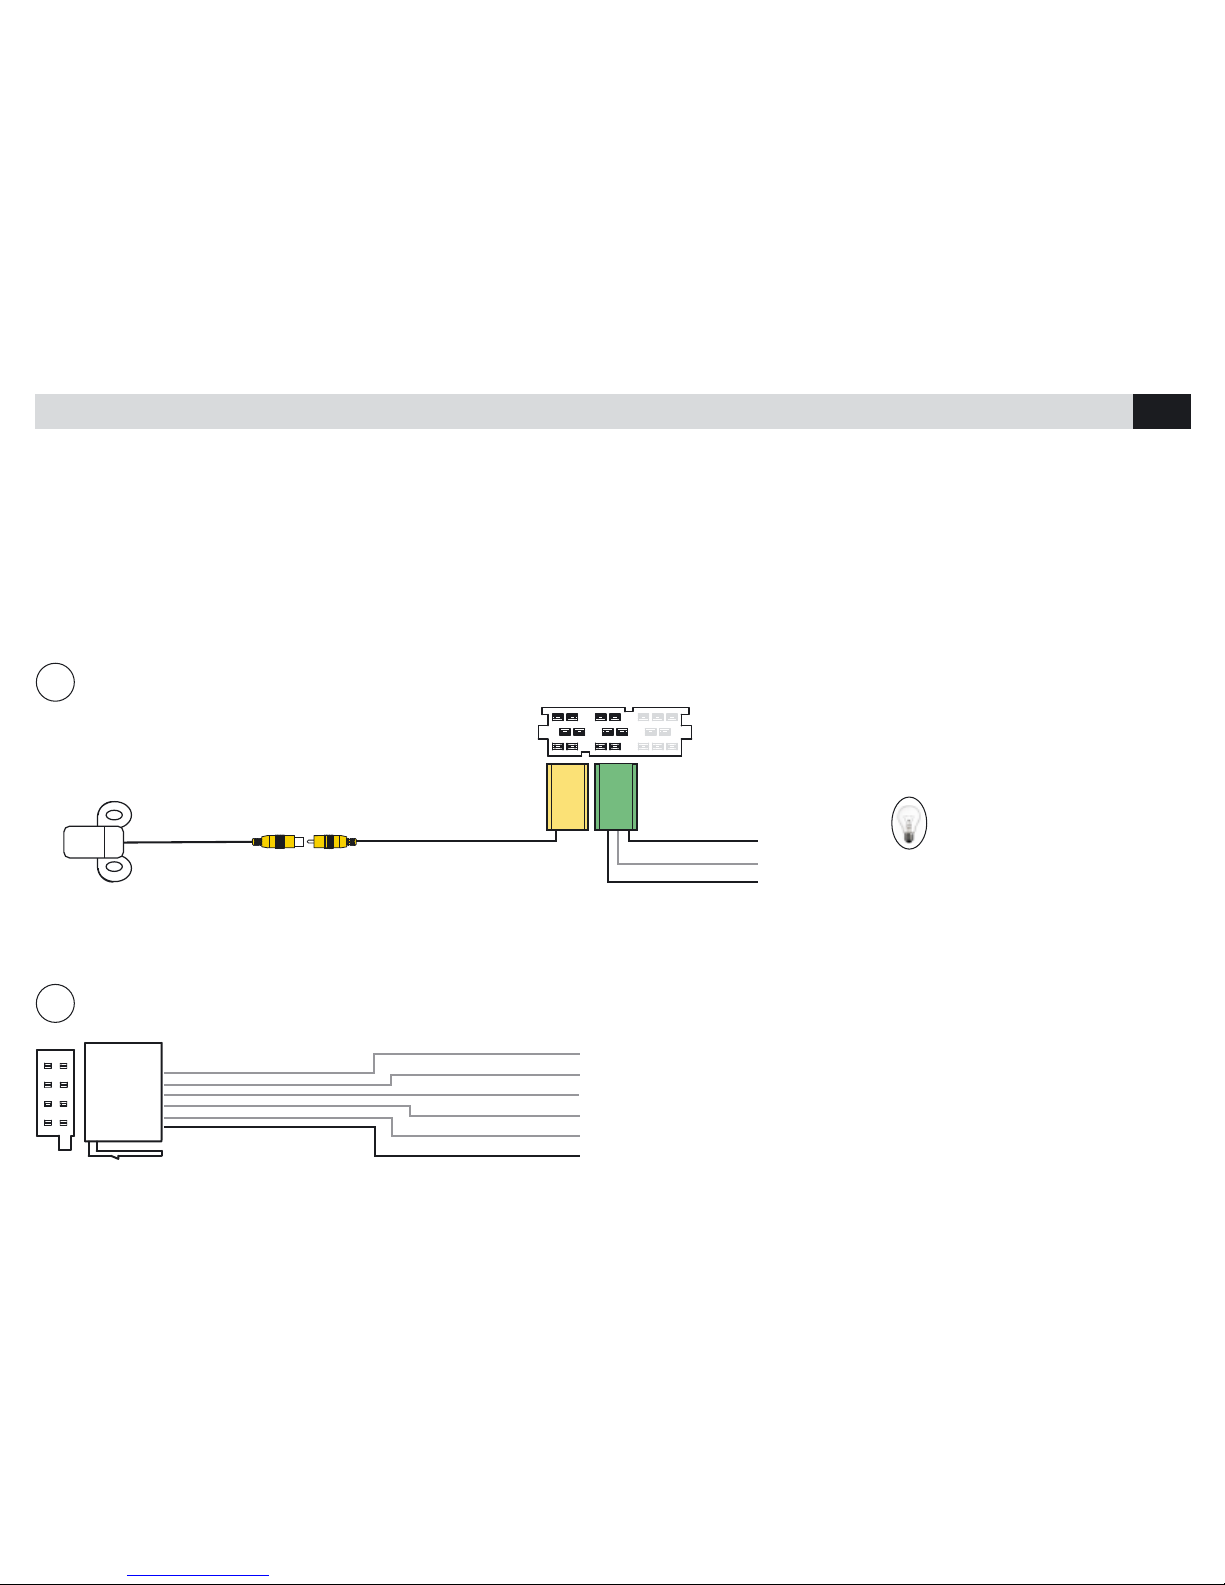
COLLEGAMENTI PER RETROCAMERA E AMPLIFICATORE / CONNECTIONS FOR REAR-CAMERA AND AMPLIFIER
2
NERO
BLACK
ROSA/PINK
Silenzia audio
Accensione amplificatore
SILENZIA AUDIO (MUTE) / MUTE
MUTE
Mute
Activation amplifier
CAMERA
REVERSE
BRAKE
P. REM
BLU/BLUE
BLU-NERO/BLUE-BLACK
GIALLO/YELLOW
VERDE
GREEN
GIALLO
YELLOW
Luci di retromarcia
Lights for Reverse-gear
+
Nel caso non sia presente la telecamera tagliare e isolare il cavo BLU presente nel connettore verde.
In the absence of a rear-camera, please cut and insulate the BLUE CABLE situated inside the green connector.
• Nel VM080 i collegamenti sono PLUG AND PLAY.
• La centralina CAN-BUS riconosce automaticamente il protocollo della vettura e fornisce i servizi necessari per il funzionamento.
• I seguenti schemi illustrano come effettuare collegamenti opzionali.
• The connections of VM080 are PLUG AND PLAY.
• The CAN-BUS central-unit automatically recognizes the car-protocol and consequently supplies all necessary working- functions.
• The following connection-schemes show how to effect additional connections.
Page 5
5
IT/GB
CONNESSIONI • CONNECTIONS
3
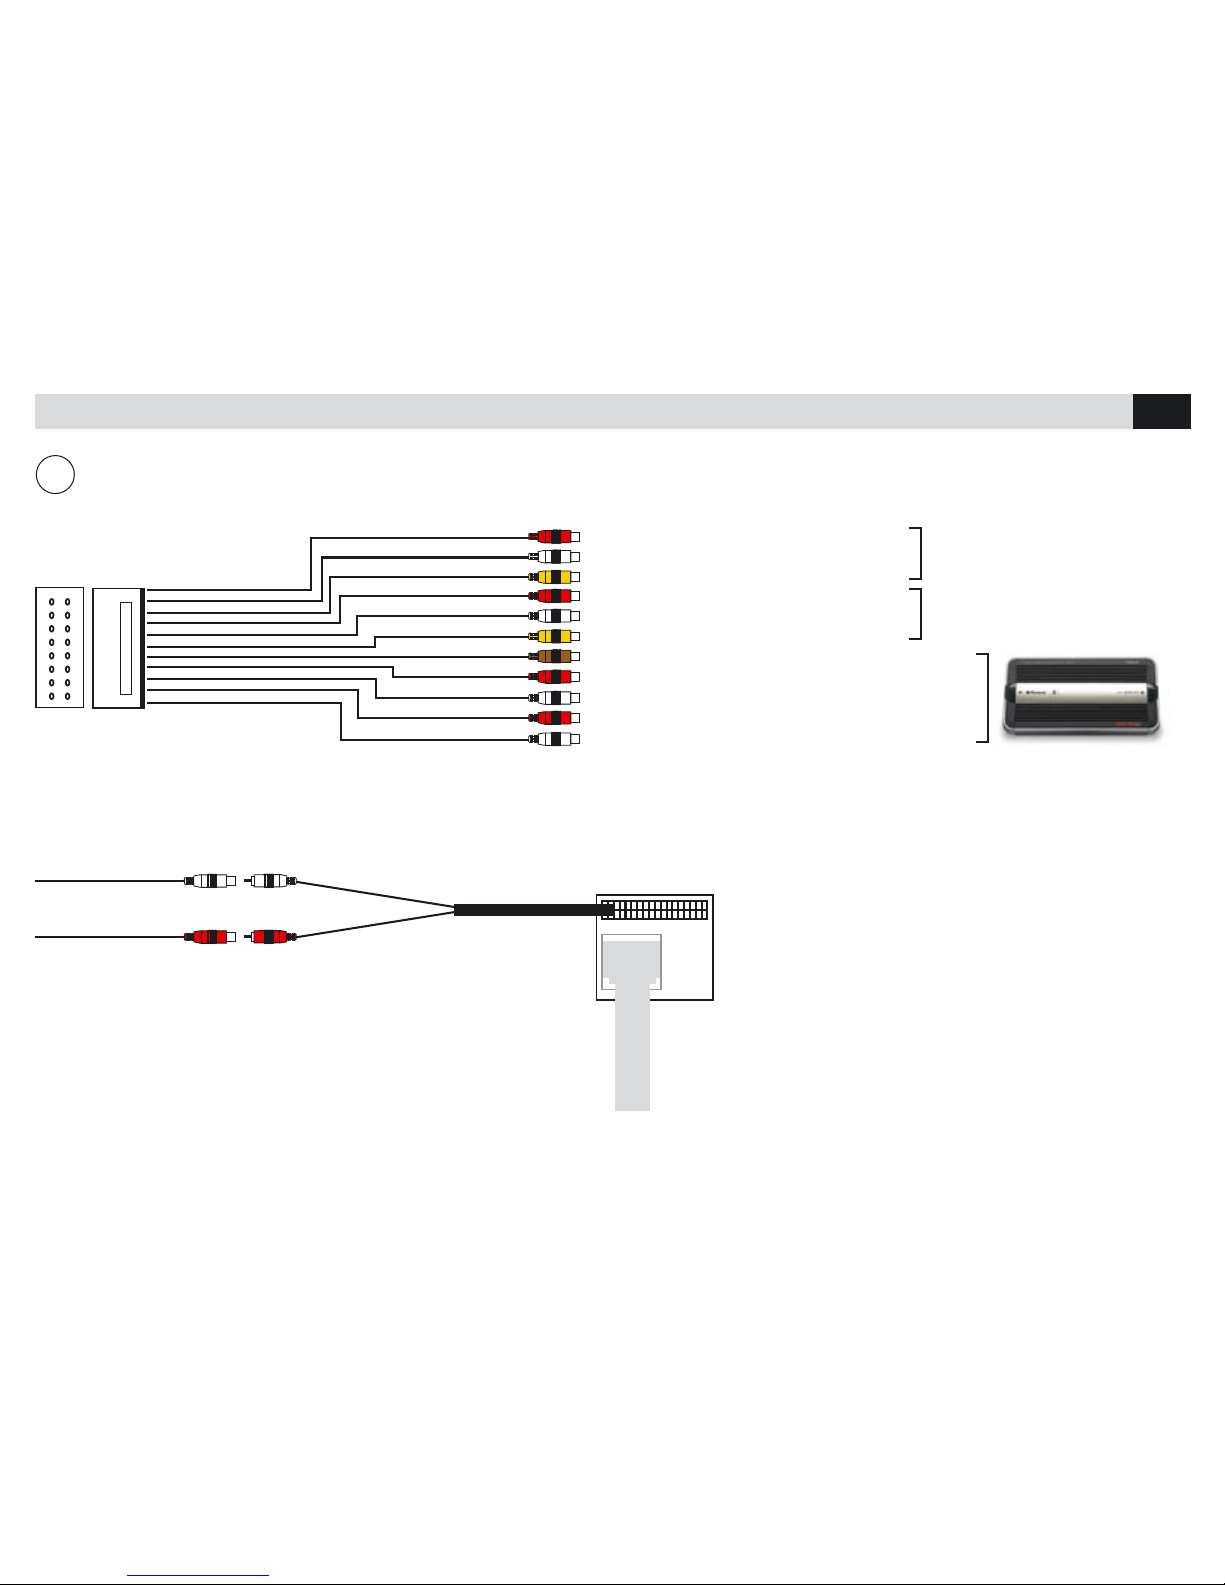
USCITE PRE-AMPLIFICATE / PRE-AMP OUTPUT
DESTRO / RIGHT 1
SINISTRA / LEFT 1
USCITA VIDEO 1 / VIDEO 1 OUTPUT
DESTRO / RIGHT 2
SINISTRA / LEFT 2
USCITA VIDEO 2 / VIDEO 2 OUTPUT
USCITA SUB WOOFER / SUB-WOOFER OUTPUT
ANTERIORE DESTRO / FRONT RIGHT
ANTERIORE SINISTRA / FRONT LEFT
POSTERIORE DESTRO / REAR RIGHT
POSTERIORE SINISTRA / REAR LEFT
Collegamenti da effettuare nel caso che nella
vettura sia presente un’ingresso AUX-IN.
Connections necessary when car is equipped
with an AUX-In-Input.
INGRESSO A/V 2
INPUT A/V 2
INGRESSO A/V 1
INPUT A/V 1
AUX IN R 1
AUX IN L 1
AUX VIDEO 1
AUX IN R 2
AUX IN L 2
AUX VIDEO 2
SUB WOOFER
FRONT R
FRONT L
REAR R
REAR L
AUX IN L 1
AUX IN R 1
FAKRA
Page 6
6
IT/GB
FUNZIONI • FUNCTIONS
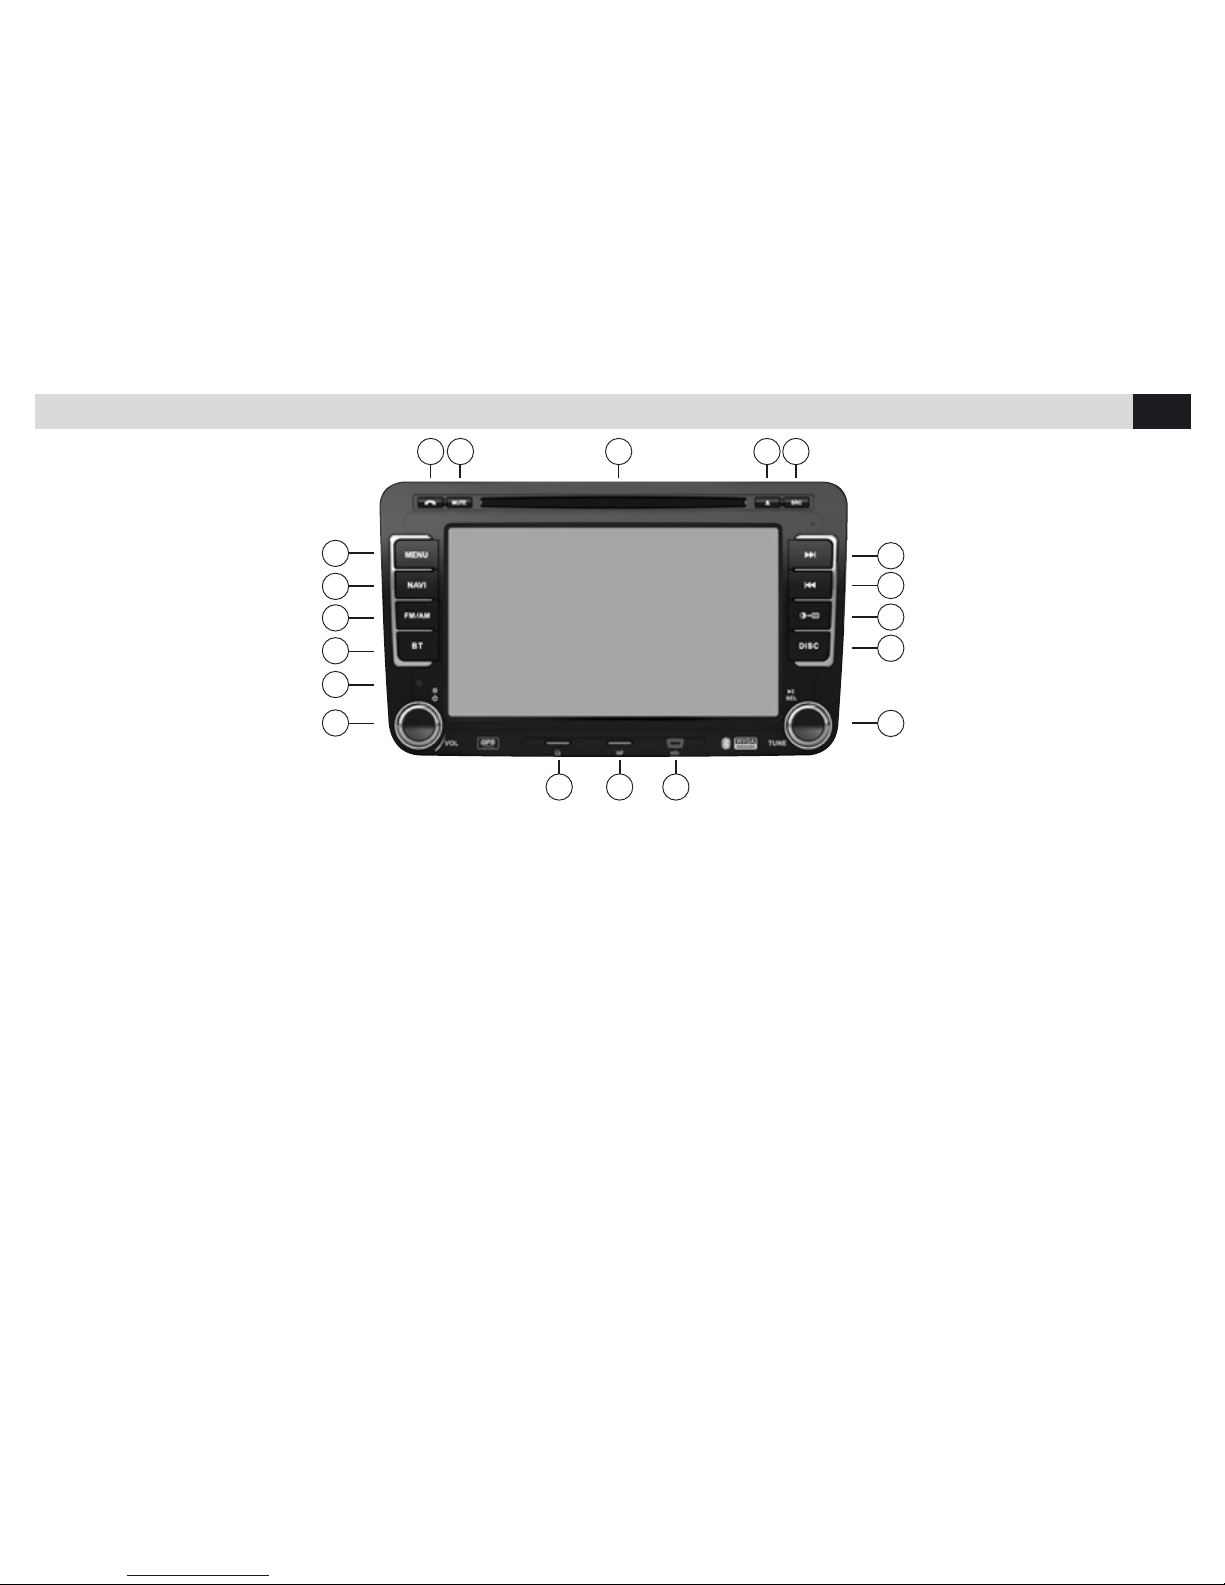
1. MENU - Torna al menu principale
2. Navigatore
3. Radio
4. Bluetooth
5. Sensore telecomando
6. Manopola accensione / volume
Per spegnere premere per 2 secondi
Per silenziare l’audio premere brevemente
7. Porta SD/SDHC/MMC Card
8. Porta Micro SD per navigazione
9. Porta Micro-USB
10. Manopola ricerca traccia/stazioni radio.
Avvia e interrompe riproduzione
11. Disco
12. Luminosità schermo
13-14. Traccia/Capitolo successivo-precedente
15. Cambia sorgente
16. Espulsione disco
17. Feritoia inserimento disco
18. Mute
19. Risponde/Termina/Invia chiamata
1. MENU – Return to Main Menu
2. Navigator
3. Radio
4. Bluetooth
5. Remote-Control Sensor
6. Knob for Switch-On / Volume
To switch-off, press for 2 seconds.
To mute Audio, press briefly.
7. Port SD/SDHC/MMC-Card
8. Port Micro-SD for Navigation
9. Port Micro-USB
10. Knob for Track/Radio-Station-Research
Start/Pause/Playback
11. Disc
12. Screen-Brightness
13-14. Track/Chapter next/before
15. Change Source
16. Eject Disc
17. Insert Disc
18. Mute
19. Answer/End/Start a Call
1
2
3
4
5
6
1516171819
7 8 9
10
11
12
13
14
Page 7
7
IT/GB
FUNZIONI
TELECOMANDO
• REMOTE-CONTROL FUNCTIONS
EJECT
ZOOM
DIM
SLOW
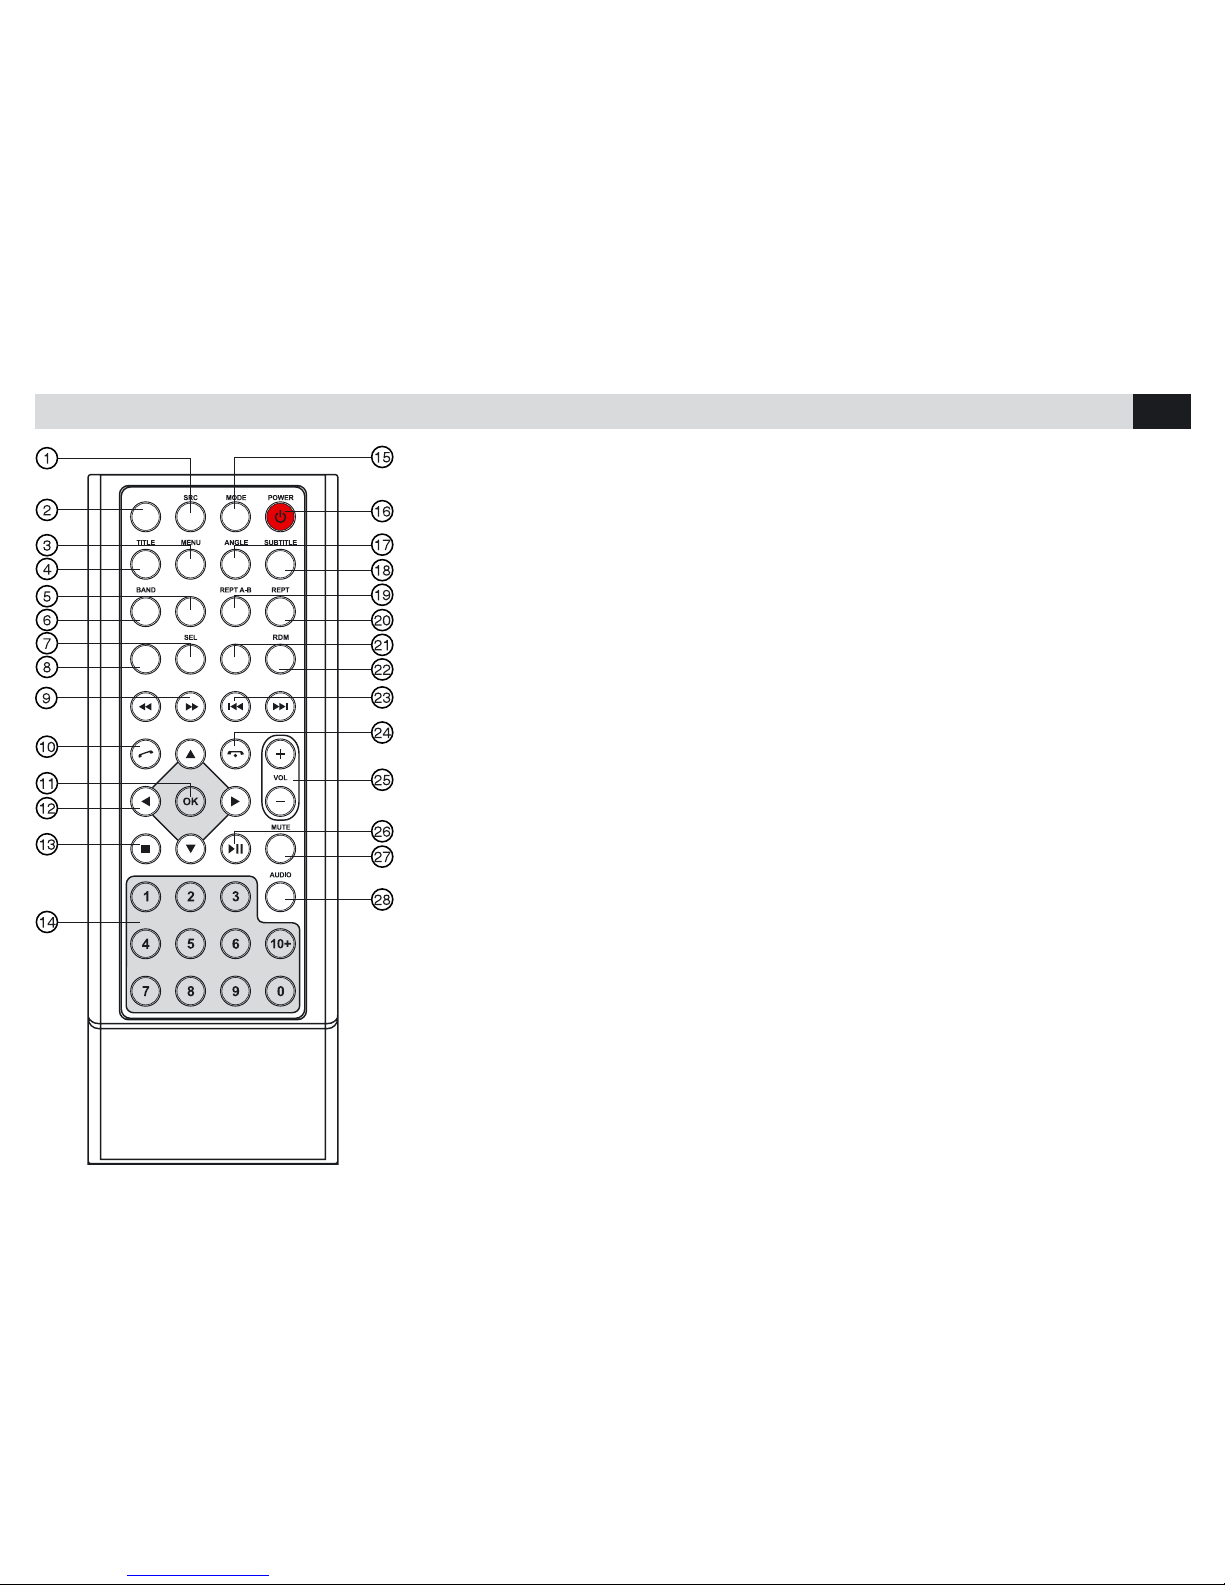
1. Seleziona sorgente
2. Espulsione disco
3. MENU’ DVD
4. Titolo DVD
5. Zoom
6. Banda radio
7. Impostazioni schermo/audio
8. Regolazione luminosità
9. Avanti/Indietro veloce
10. Invia/riceve chiamata
11. Invio
12. Menù cursore
13. Stop/Indietro
14. Tastiera numerica
15. Entra nel menù principale
16. Accensione/Spegnimento
17. Angolo DVD
18. Sottotitoli DVD
19. Ripetizione A-B
20. Ripetizione Traccia/Capitolo/Cartella
21. Menù su schermo
22. Riproduzione casuale
23. Traccia/Stazione precedente/successiva
24. Interrompe / Cancella chiamata
25. Volume
26. Avvia/Interrompe riproduzione
27. Silenziamento audio
28. Audio DVD/Audio VCD/L-R-ST
1. Select Source
2. Eject disc
3. DVD-Menu
4. DVD-Title
5. Zoom
6. Radio Frequency-Band
7. Setting Screen/Audio
8. Setting Brightness
9. Fast Forward/Backward
10. Dial / Receive calling
11. Confirm
12. Cursor-menu
13. Stop/Backward
14. Number-keys
15. Enter into the Main-Menu
16. Switch-ON / Switch-OFF
17. DVD-View-Angle
18. DVD-Subtitles
19. Repetition A-B
20. Repeat Track/Chapter/Folder
21. Menu on Screen
22. Random Repetition
23. Track/Station before/next
24. Stop / Delete calling
25. Volume
26. Start / Interrupt playback
27. Mute Audio
28. Audio DVD/Audio VCD/L-R-ST
Page 8
8
IT/GB
MENÙ • MENU
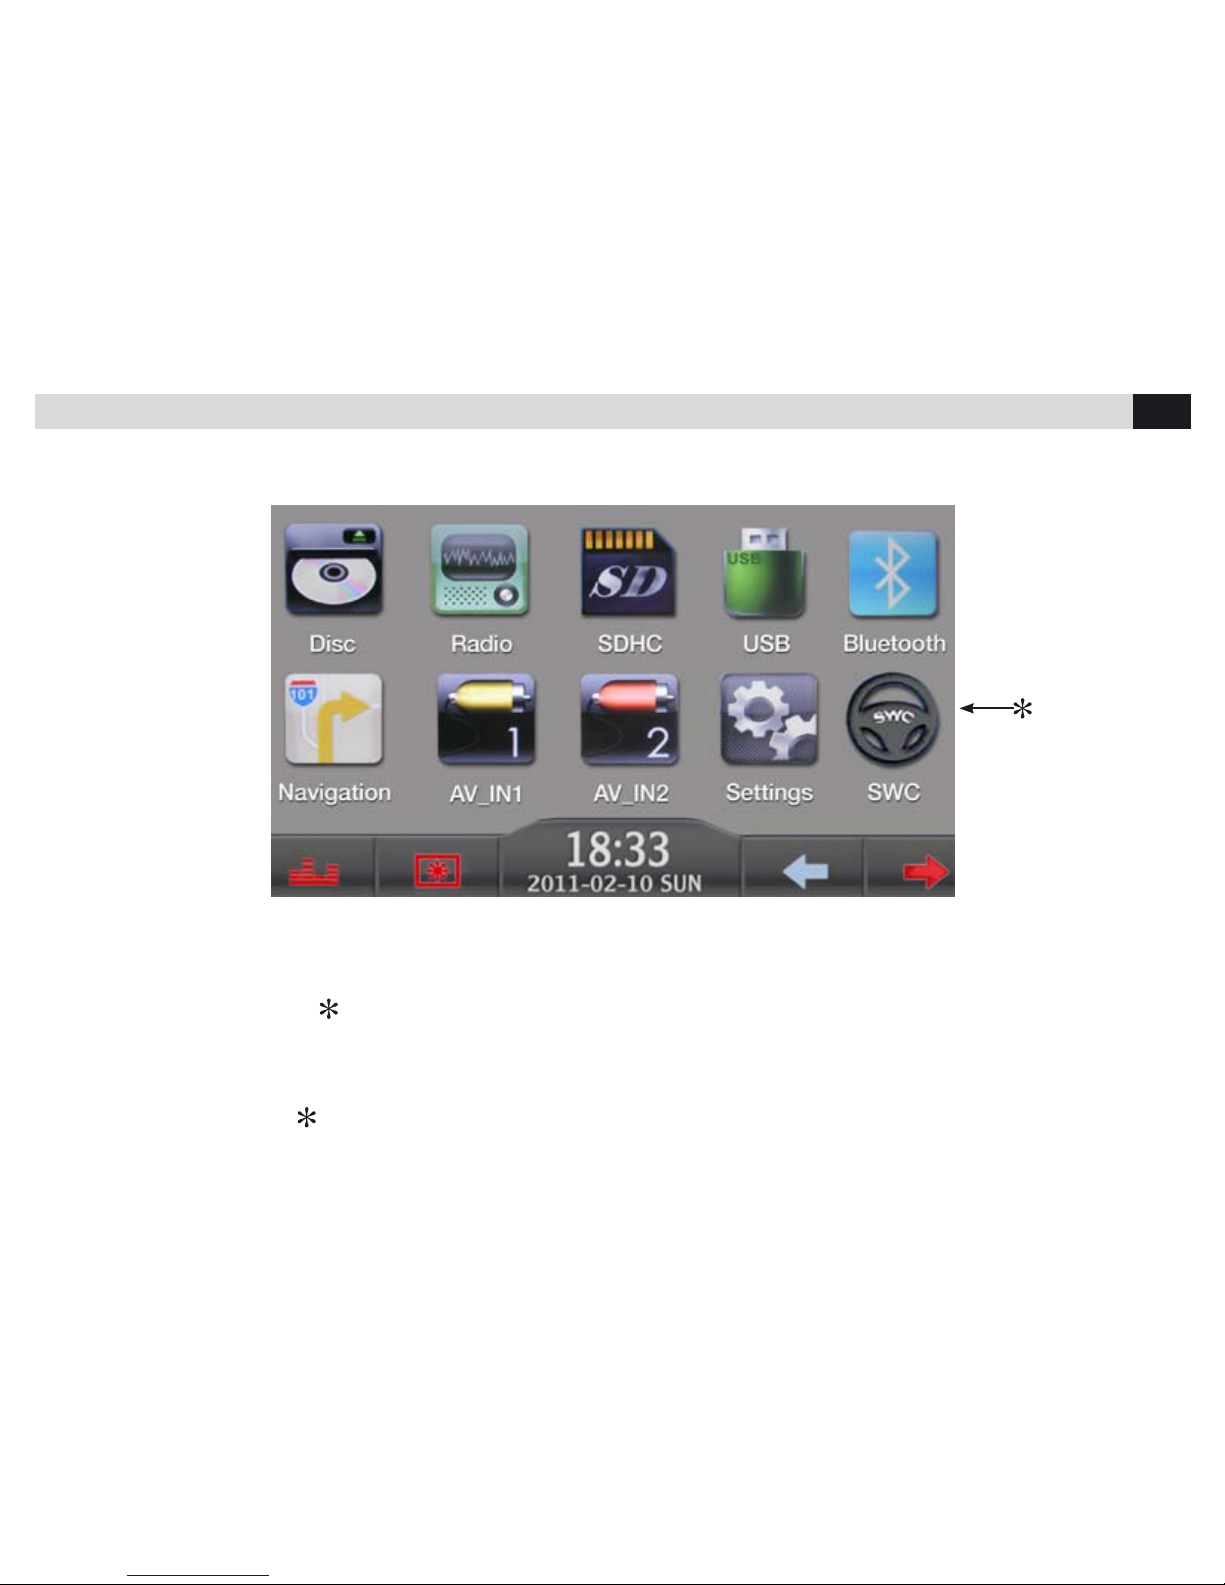
Per far apparire il menù principale premere il tasto MENU sul pannello frontale oppure premere l’angolo in alto a sinistra dello schermo.
Toccando le icone sullo schermo si seleziona la sorgente o la funzione desiderata.
To show the Main-Menu on the screen, press MENU-key on the front-panel or touch the upper left corner of the screen.
To choose Source and Functions, simply touch the related icon on the screen.
Funzione non attiva. I comandi al volante vengono rilevati automaticamente.
Function not activated. Steering-wheel-commands are automatically recognized.
Page 9
9
IT/GB
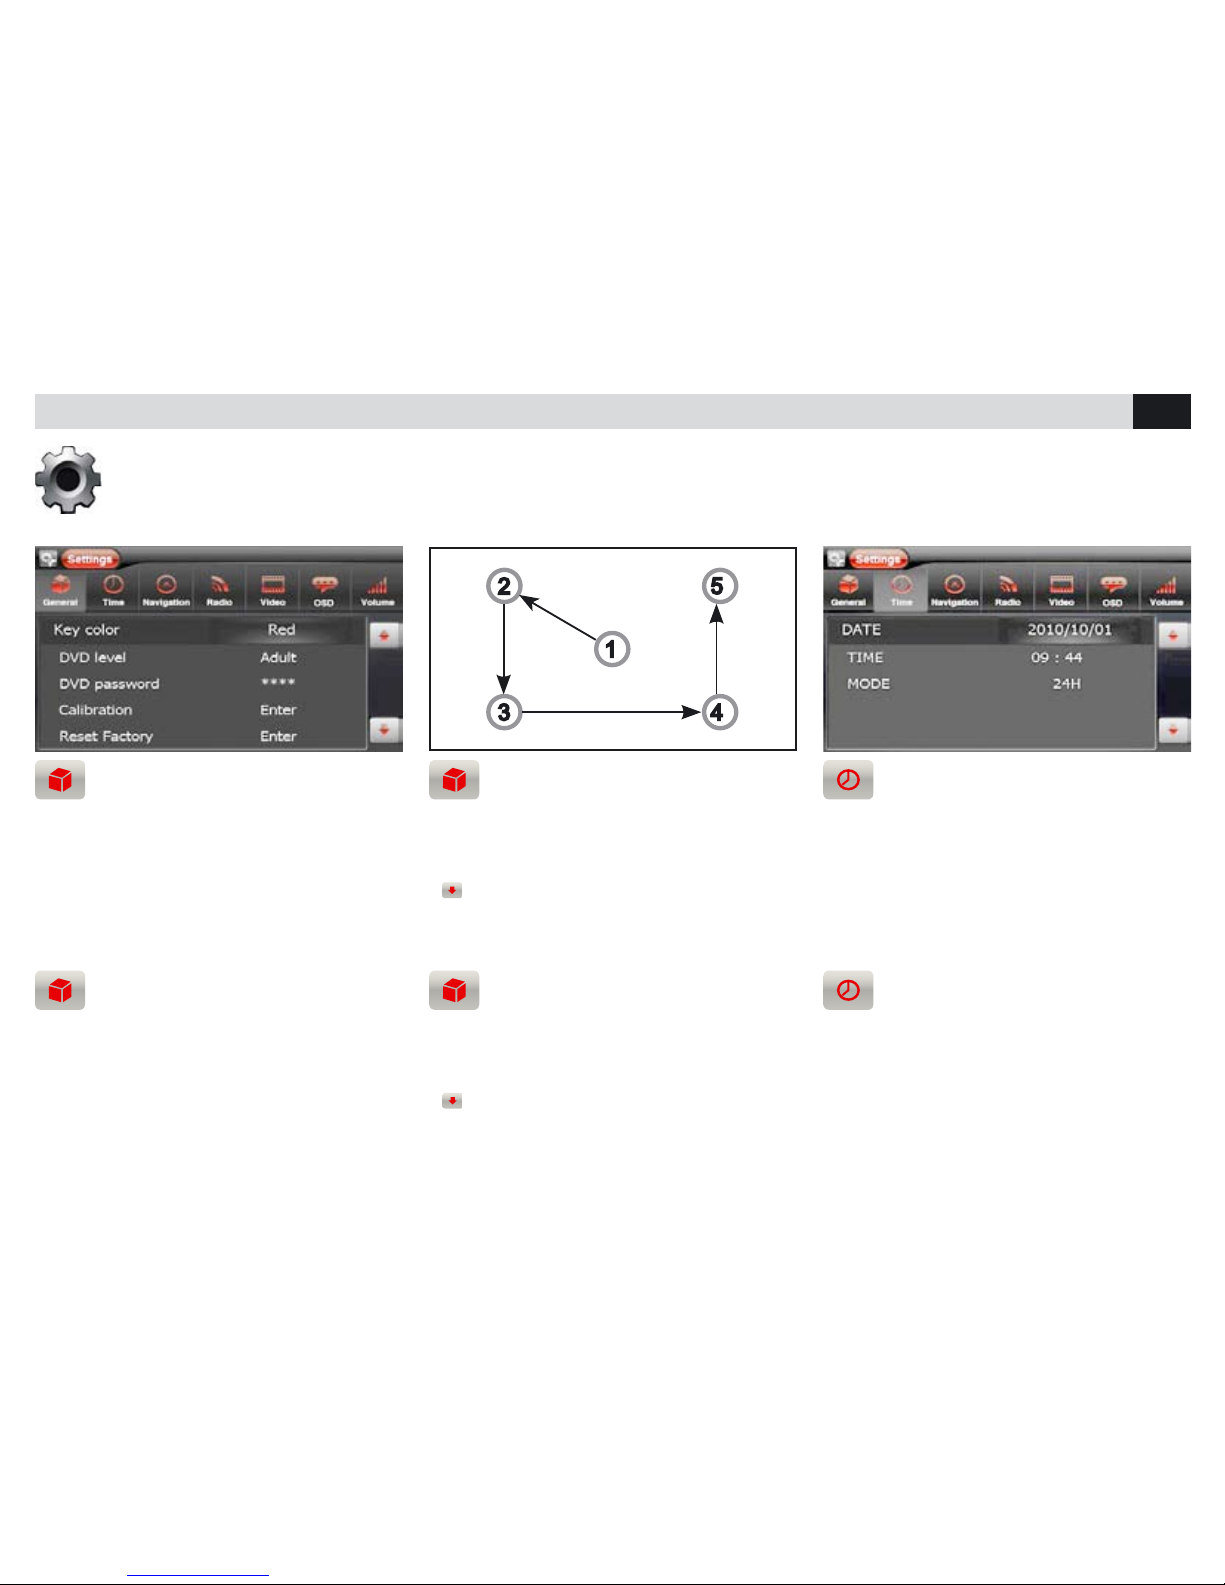
COLORE TASTI
LIVELLO DI PROTEZIONE DVD
• Per cambiare l’illuminazione dei tasti del pannello frontale premere COLORE TASTI.
• Impostando ADULTI non ci sarà nessuna restrizione nella visione.
• Memorizzando altri livelli impostare
la PASSWORD.
IMPOSTAZIONI DI SISTEMA • SYSTEM SETUP
CALIBRAZIONE TOUCH SCREEN
RESET DI FABBRICA - BEEP
• La calibrazione avviene toccando lo schermo
secondo la sequenza indicata.
• Reset, ripristina le impostazioni di fabbrica.
•
Beep, permette di attivare/disattivare il
suono ad ogni tocco del touch screen.
REGOLAZIONE DATA E ORA
• Posizionarsi sulla voce da modicare ed effettuare le modifiche.
Regolazioni: illuminazione tasti, livello di protezione DVD, calibrazione, reset, data e ora, navigazione, impostazioni radio, impostazioni video,
lingue, volume sorgenti, personalizzazione sfondo.
Settings: key-illumination, DVD CHILD protection-level, calibration, reset, date and time, navigation, radio-setting, Video-setting, languages,
Source-volume, personalized screen-background.
KEY-COLOR
DVD CHILDREN PROTECTION
• To change front-panel key-illumination, press
KEY COLOR.
• By choosing ADULT, DVD-viewing will be completely free from restrictions.
• Set password to choose different protection
levels.
CALIBRATION OF TOUCH SCREEN
FACTORY-RESET - BEEP
• Calibration starts by touching the screen and
following numbers sequence • Reset, restores
the factory-settings.
•
Beep, allows to activate/deactivate the
Sound, each time you touch the screen.
SETTING DATE AND TIME
• Touch the function required and change
values.
Page 10
10
IT/GB
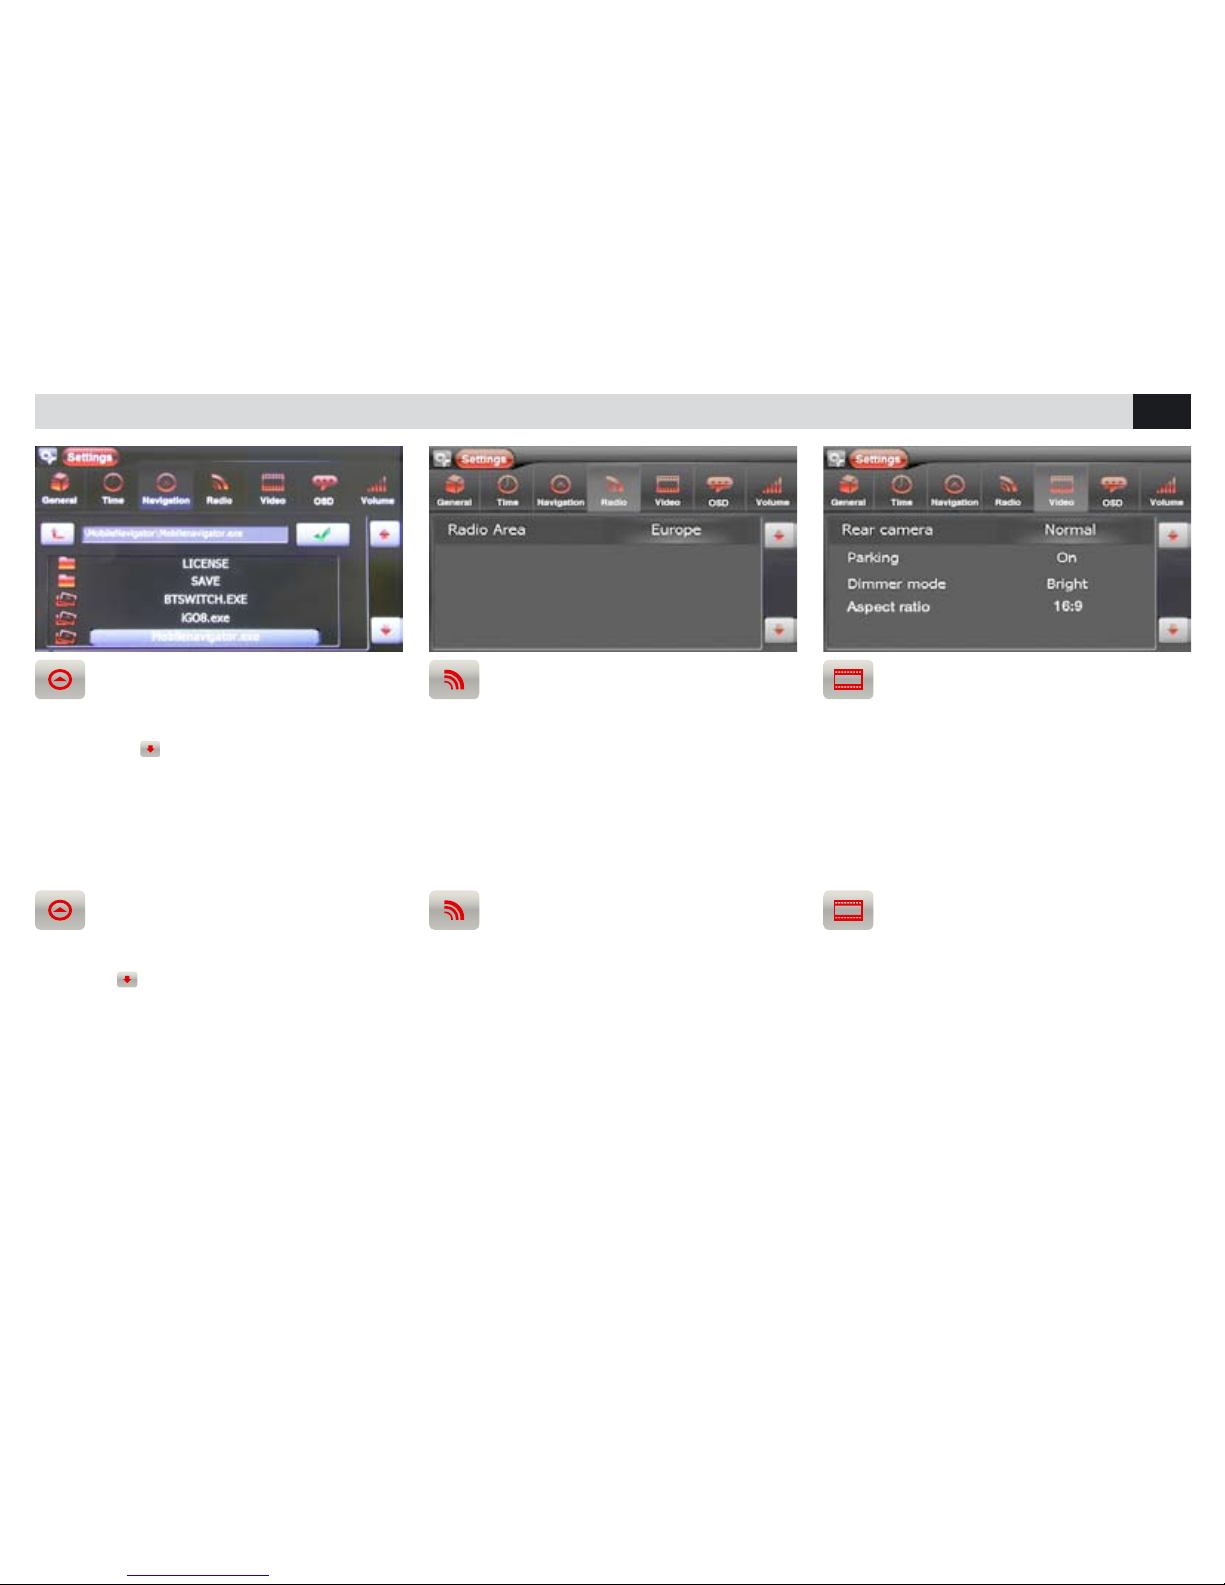
NAVIGAZIONE
• Inserire la MICRO SD di navigazione NV993.
Muoversi con
e selezionare il file esecutivo
Mobilenavigator.exe.
NOTA: Effettuare questa impostazione prima di
avviare la navigazione.
IMPOSTAZIONI RADIO
• Per la corretta banda radiofonica selezionare
l’area di appartenenza.
RETROCAMERA - ATTIVAZIONE VIDEO
LUMINOSITÁ - FORMATO VIDEO
• Selezionare RETROCAMERA per cambiare la
visualizzazione da normale a specchio.
• PARCHEGGIO per attivare/disattivare la visione
in movimento di filmati e immagini.
• LUMINOSITA’ per modicare l’intensità di luce
dello schermo.
IMPOSTAZIONI DI SISTEMA • SYSTEM SETUP
NAVIGATION
• Insert the navigation micro-SD art. NV993.
Move with
to Select the execution-file
Mobilenavigator.exe.
NOTE: To do before starting the navigation.
RADIO-SETTINGS
• In order to receive the correct radio frequency-
band, it is necessary to choose the Area you
belong to.
REAR-CAMERA - VIDEO-ACTIVATION
BRIGHTNESS - ASPECT RATIO
• Select REAR-CAMERA to switch from normal
to Mirror-Vision.
• Select PARKING to activate/deactivate visualization of films/pictures in movement.
• Select BRIGHT to modify the screen-brightness.
Page 11
11
IT/GB
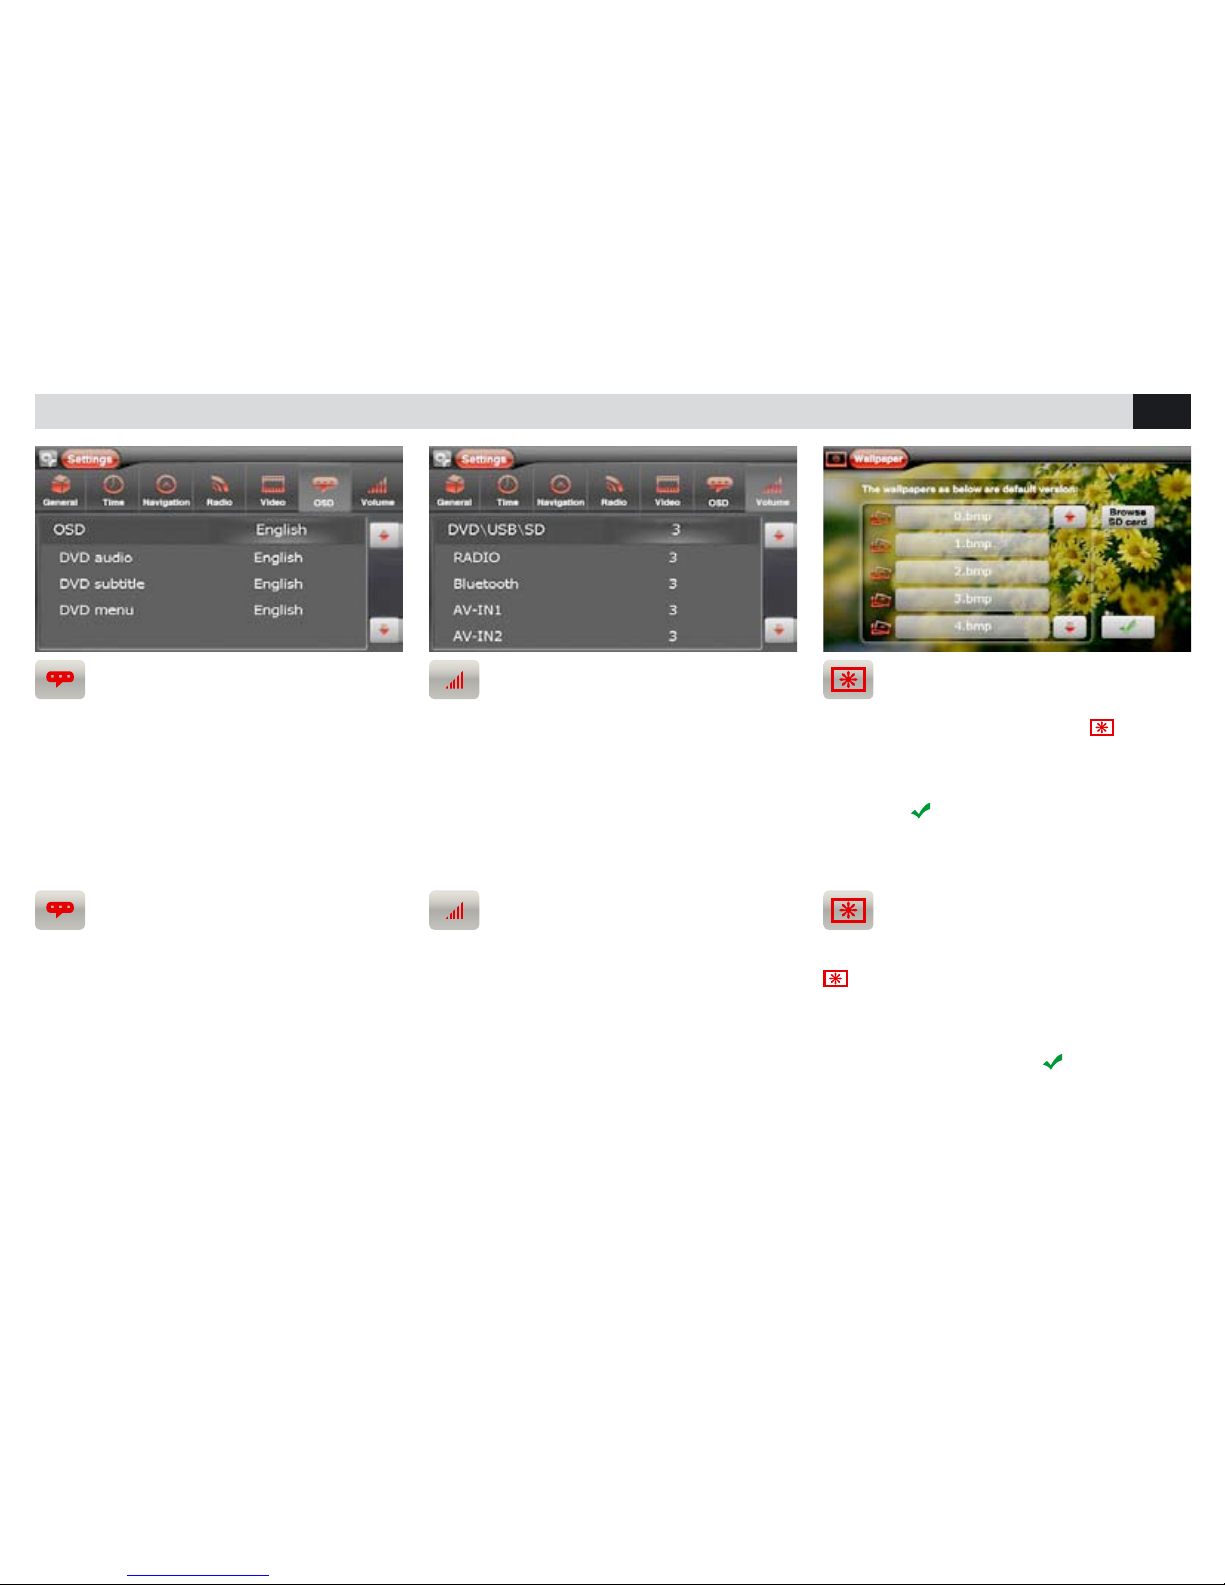
LINGUE
• E’ possibile scegliere la lingua dei menù,
dell’audio e dei sottotitoli del DVD.
LANGUAGES
• It is possible to choose the preferred Language
for the Menu, Audio and DVD-Subtitles.
VOLUME SORGENTI
• E’ possibile la regolazione del volume di ogni
sorgente per evitare di avere sbalzi d’intensità nel
passaggio tra una sorgente e un’altra.
SOURCES VOLUME
• Every single Source has its own VolumeSetting. This will exclude the disturbing impact
of intensity-differences when switching from one
Source to another.
IMPOSTAZIONI DI SISTEMA • SYSTEM SETUP
PERSONALIZZAZIONE SFONDO
Dal menù principale premere l’icona
per
accedere alla schermata gestione dello sfondo.
Per utilizzare le immagini presenti nella memoria,
premere il nome del le, selezionare l’anteprima e
confermare
. Per utilizzare immagini da MICROSD Card premere “LEGGI SD CARD”. Le immagini
devono essere in formato BMP 800x480.
BACKGROUND-PERSONALIZATION
Starting from the Main-Menu, press the icon
to enter the background-setting menu. You
can choose new background from pictures
list on the memory or upload from MICRO-SD
CARD pressing “BROWSE SD CARD”. Press
file name to see preview and
to select. The
pictures must be BMP file with 800x480 of
resolution.
Page 12
12
IT/GB
RADIO
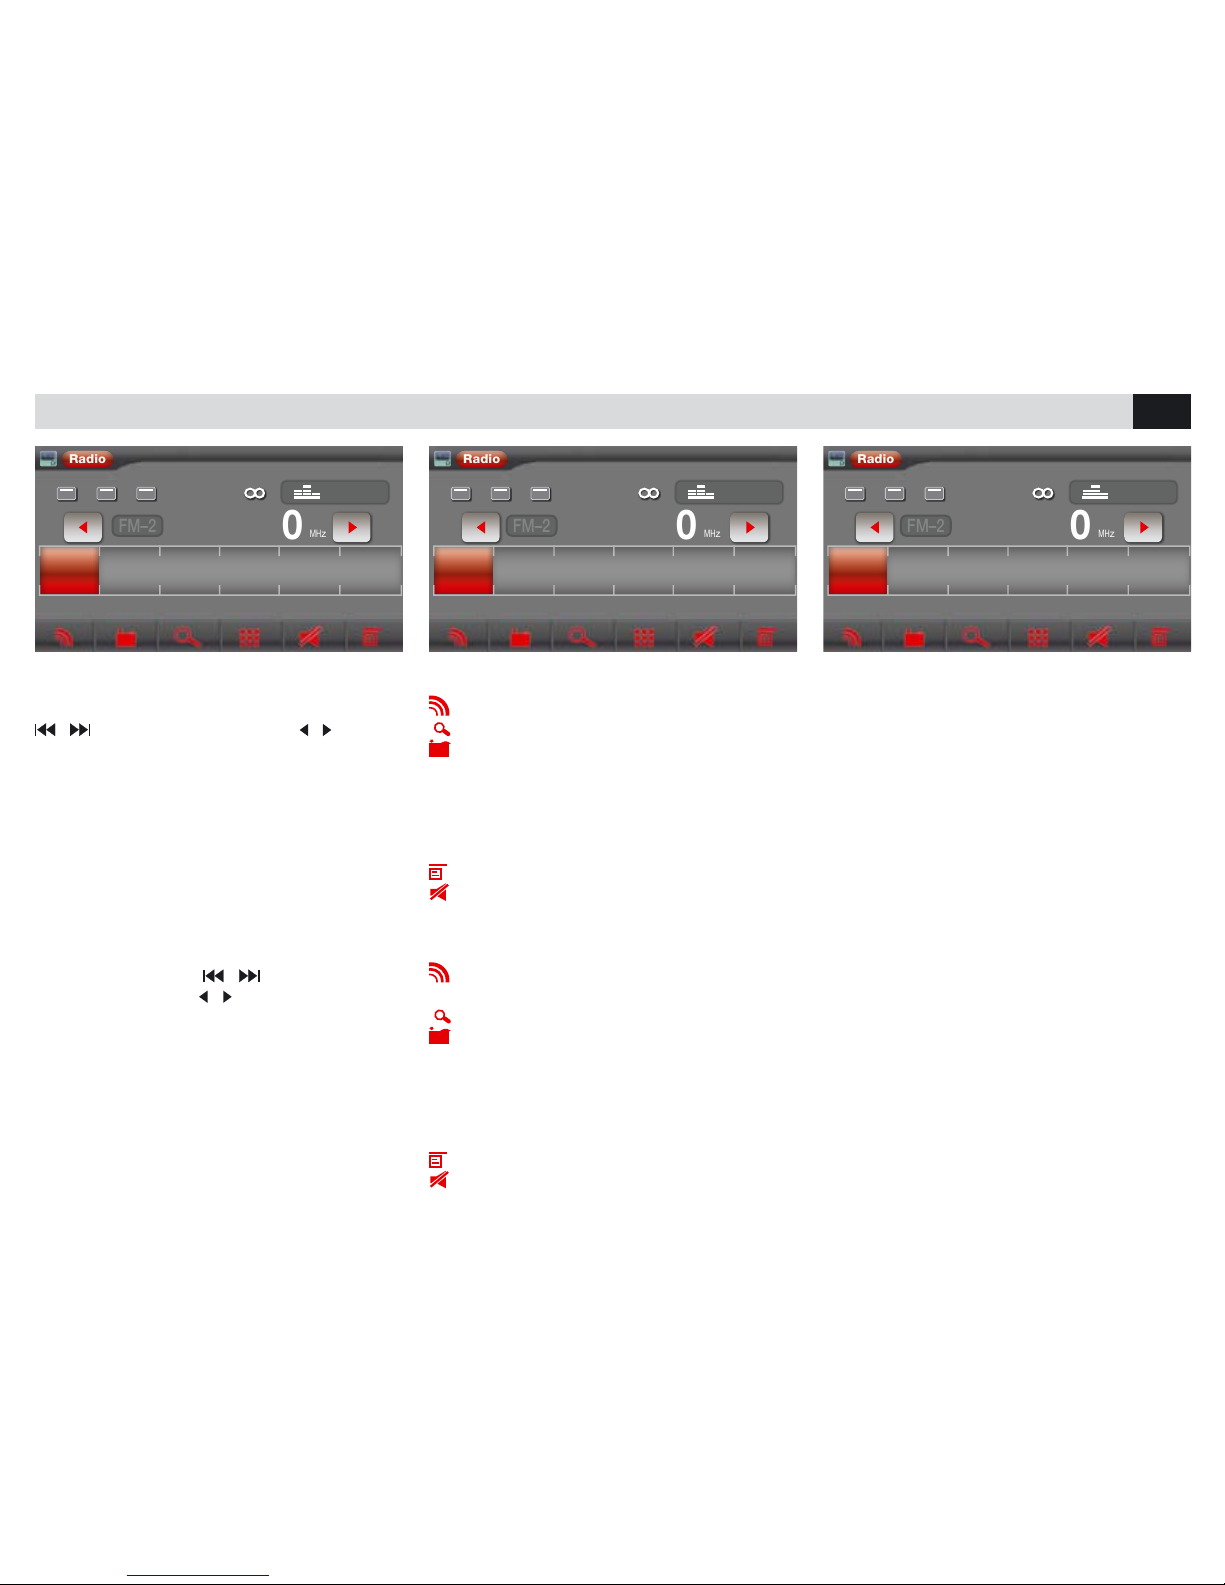
RICERCA STAZIONI
• Tenendo premuto per più di un secondo i tasti
/ sul telecomando o le icone / sullo
schermo, l’unità ricercherà automaticamente le
stazioni. Per la ricerca manuale premere brevemente.
FUNZIONI RADIO
BAND Seleziona Bande Radio 3 FM - 2 AM.
PS Scansione delle frequenze memorizzate.
STORE Memorizzazione di 6 stazioni disponi-
bili per ogni banda.
Per memorizzare premere STORE e scegliere la
posizione desiderata.
Per richiamare una stazione premere sulla fre-
quenza corrispondente, in basso sullo schermo.
PTY Seleziona tipo di programma musicale.
MUTE Silenzia l’audio.
FUNZIONI RADIO
• LOC Seleziona le stazioni vicine o lontane.
• AF Ricerca di una frequenza alternativa con
informazioni sullo schermo della stazione.
• TA Informazioni traffico.
STATIONS RESEARCH
• By keeping the keys
/ on the remote-
control, or the icones
/ on the screen,
pressed for more than 2 seconds, the unit will
automatically start searching stations. Press only
briefly, if you wish to research manually.
RADIO-FUNCTIONS
BAND Selects Radio Frequency-Bands
3 FM - 2 AM.
PS Scrolling all memorized frequencies.
STORE Memorizing 6 possible Stations per
Frequency-Band.
To memorize, press STORE and choose the
requested position.
To call a certain Station, press the corresponding
Frequency stated on the screen-bottom.
PTY Select Type of Musical Programme.
MUTE Shut Audio off.
RADIO-FUNCTIONS
• LOC Select near / remote Stations
• AF Research an alternative Frequency with
Programme-Details visible on screen.
• TA Traffic-Information
AF TA LOC
Radio
87 . 50
87.50 92.50
FM–2
106.50 98.70 105.00 103.50
MH
z
P1 P2 P3 P4 P5 P6
User
AF TA LOC
Radio
87 . 50
87.50 92.50
FM–2
106.50 98.70 105.00 103.50
MH
z
P1 P2 P3 P4 P5 P6
User
AF TA LOC
Radio
87 . 50
87.50 92.50
FM–2
106.50 98.70 105.00 103.50
MH
z
P1 P2 P3 P4 P5 P6
User
Page 13
13
IT/GB
EQUALIZZATORE • EQUALIZER
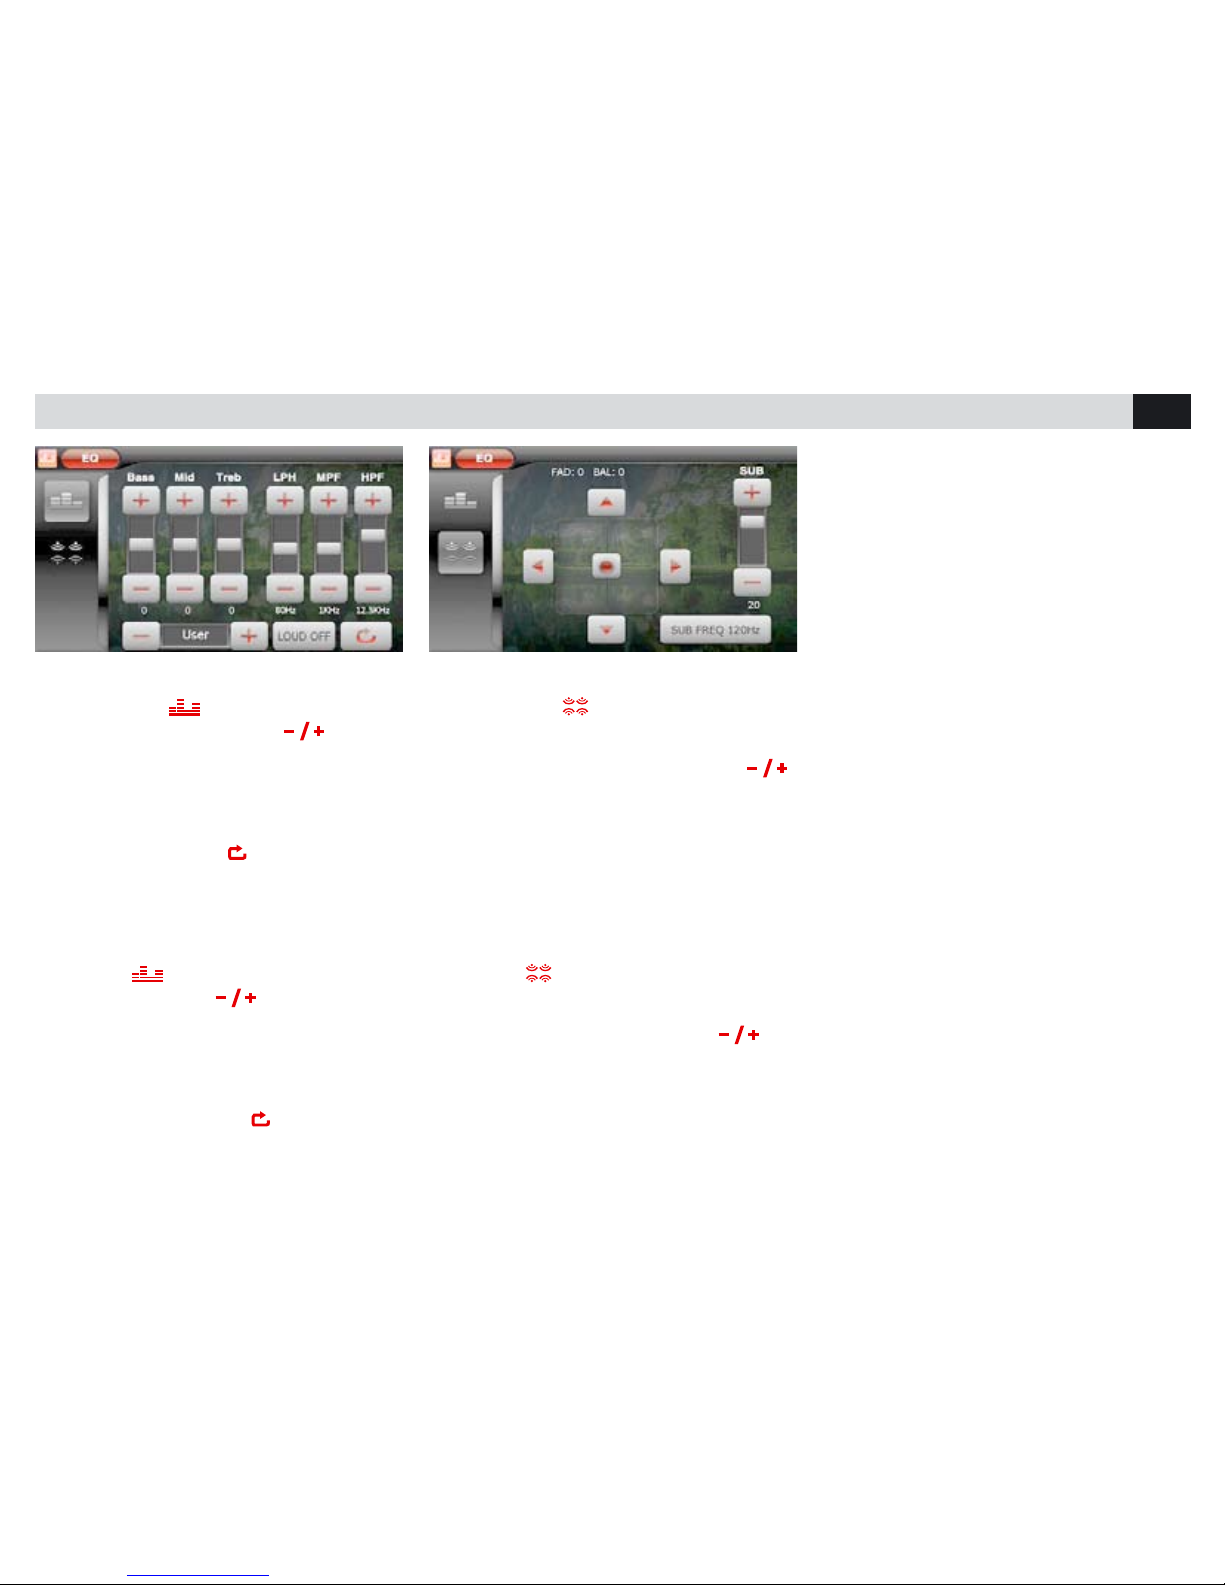
EQUALIZZATORE - LOUDNESS
• Premere l’icona per modificare le impostazioni di fabbrica. Tramite le icone
è possibile selezionare 8 diverse modalità di equalizzazione preimpostate: USER-FLAT-POP
ROCK-CLASSIC-JAZZ-TECHNO-OPTIMAL.
In modalità USER è possibile regolare i livelli di
alti, medio e bassi sulle frequenze desiderate.
LPF - MPF - HPF. L’icona
riporta in OPTIMAL.
• LOUD attiva l’esaltazione delle basse frequen-
ze.
FADER - BILANCIAMENTO - SUB WOOFER
• Premere l’icona per accedere alle regolazioni del FADER e del BILANCIAMENTO tramite
le frecce presenti sullo schermo.
Per regolare il volume del SUB W premere
Per regolare il crossover premere SUB W e posizionarsi sulla frequenza di taglio desiderata.
EQUALIZER - LOUDNESS
• Press icon
To modify the factory settings.
By means of the icones
it is possible to
choose 8 different predetermined equalization-
modes: USER-FLAT-POP-ROCK-CLASSICJAZZ-TECHNO-OPTIMAL.
The USER-mode allows to choose the wanted
Frequency for the High, Medium and Low-tones.
LPF - MPF - HPF. The icone
returns to OP-
TIMAL.
• LOUD Activates boosting-process of Low
Frequencies.
FADER - BALANCE – SUB-WOOFER
• Press icon
to enter the FADER-settings.
Use arrows on the screen, to effect the BALANCE-settings.
To set the SUB-Woofer-Volume, press
.
To set the crossover, press SUB-W and position
on the wanted Frequency-Cut.
Page 14
14
IT/GB
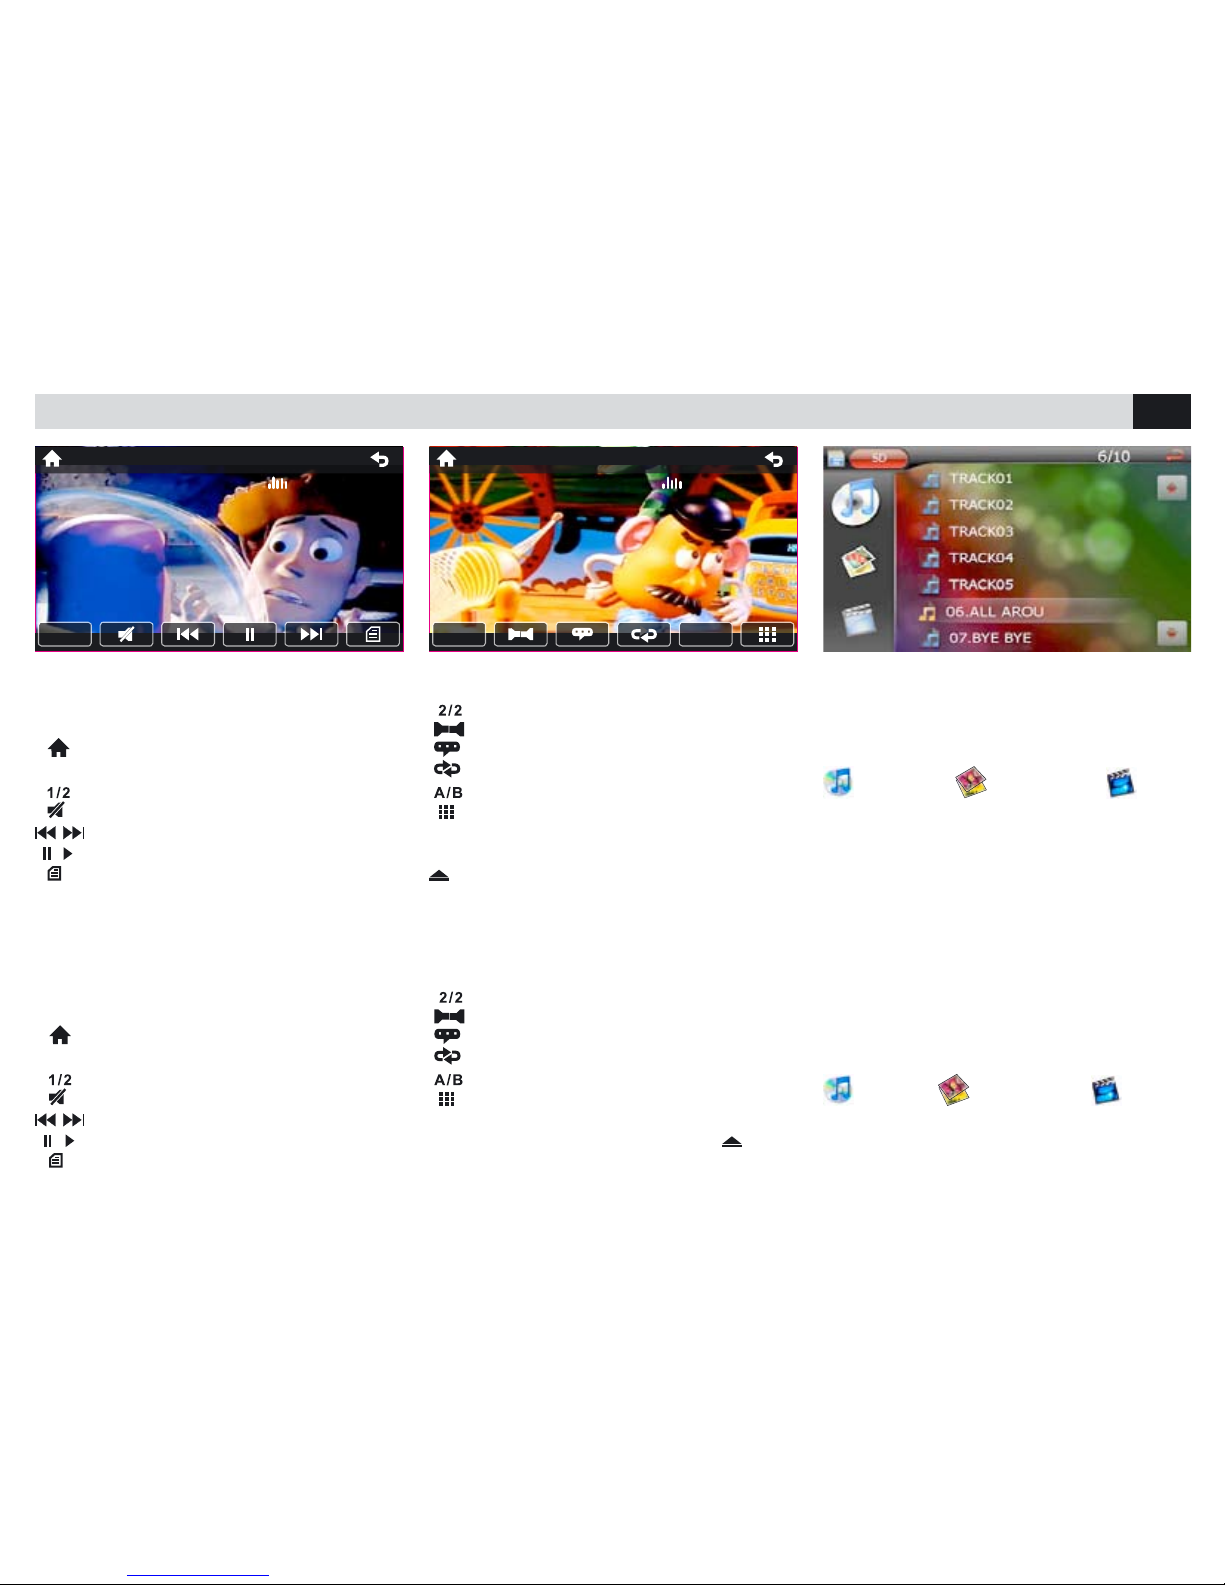
RIPRODUZIONE • PLAYBACK DVD-CD-USB-SD CARD
FUNZIONI USB/SDCARD
All’inserimento di USB/SD CARD il contenuto
verrà visualizzato automaticamente.
Selezionare il tipo di file tramite l’icona relativa.
MUSICA IMMAGINI VIDEO
FUNZIONI DVD
per tornare al primo menù DVD.
per cambiare la lingua audio.
per cambiare la lingua sottotitoli.
ripetizione traccia/capitolo/disco.
per la ripetizione dal punto A al punto B
per inserire il numero traccia/capitolo da
riprodurre.
L’ espulsione del disco avviene premendo il tasto
sul telecomando o sul pannello frontale.
FUNZIONI DVD
Con l’inserimento di un DVD appare il menù del
filmato.
per tornare al menù principale durante la
riproduzione.
per passare al secondo menù DVD.
per silenziare l’audio.
per traccia/capitolo precedente o successivo.
/ per avviare o interrompere la riproduzione.
per visualizzare il menù titoli DVD.
DVD-FUNCTIONS
As soon as a DVD is introduced, the Film-Menu
will appear.
To return to the Main Menu (during
playing DVD).
To procede to the second DVD-Menu.
To shut Audio off.
To get previous/next Track/Chapter.
/ To Start / Interrupt Reproduction.
To visualize Menu of DVD-Titles.
DVD-FUNCTIONS
To return to the first DVD-Menu.
To change to another Audio-Language.
To change to another Subtitle-Language.
Repeat Track / Chapter / CD.
To Repeat from A to B.
To digit number of Track / Chapter to be
reproduced.
The CD is ejected, by pressing the key
on the
remote-control unit or on the front panel.
USB/SD-FUNCTIONS
As soon as a USB/SD-support is introduced, its
related contents will automatically be visualized.
Select the requested file by pressing the related
icone.
MUSIC PICTURES VIDEOS
User
1/2
DVD T:1/20 C:3/51 00:00:30
User
2/2
DVD T:1/20 C:3/51 00:01:47
A/B
Page 15
15
IT/GB
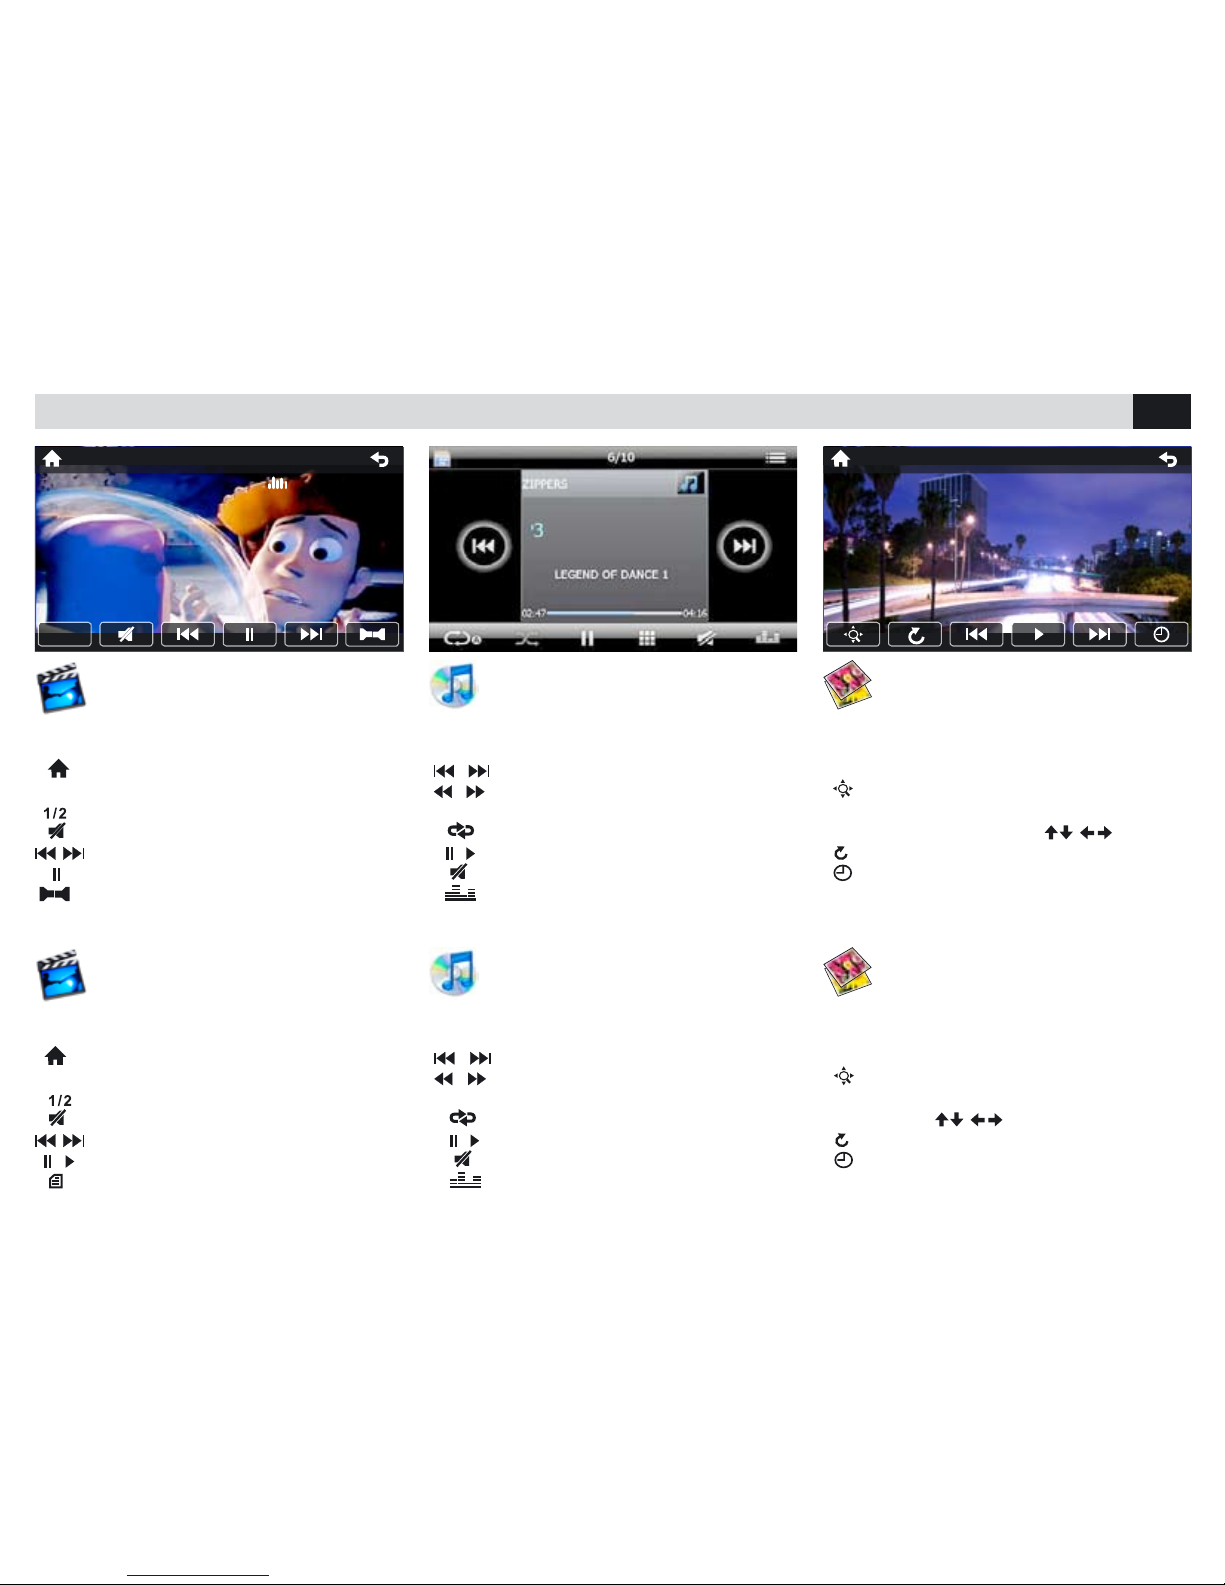
VIDEO-PLAYBACK
If you touch the screen while film is being
shown, the Menu will appear, allowing you:
To return to the Main Menu (during
playing).
To procede to the second-Menu.
To shut Audio off.
To get previous/next Track/Chapter.
/ To Start / Interrupt Reproduction.
To visualize Menu of Titles.
RIPRODUZIONE • PLAYBACK DVD-CD-USB-SD CARD
RIPRODUZIONE MUSICA
Selezionare la traccia desiderata per avviare la
riproduzione.
/ per cambiare la traccia.
/ premere ripetutamente per la riproduzio-
ne veloce avanti/indietro.
ripetizione traccia/cartella/disco.
/ per avviare o interrompere la ripr oduzione.
per silenziare l’audio.
Equalizzatore
RIPRODUZIONE IMMAGINI
Selezionare il file desiderato per visualizzare
l’immagine. Per far comparire il menù premere la
parte inferiore dello schermo.
per allargare l’immagine (zoom)
Per muovere l’immagine utilizzare le frecce che
compariranno sullo schermo (
).
per ruotare l’immagine.
per selezionare la durata della pausa tra un
immagine ed un’altra.
RIPRODUZIONE VIDEO
Toccare lo schermo per fare apparire il menù
quando il filmato è in riproduzione.
per tornare al menù principale durante la
riproduzione.
per passare al secondo menù.
per silenziare l’audio.
per traccia/capitolo precedente o successivo.
per avviare o interrompere la riproduzione.
per cambiare lingua audio.
SD 6/22
MUSICA PLAYBACK
Select the requested Track and start Reproduction.
/ to change to another Track.
/ press repeatedly, for fast Forward/Back-
ward reproduction of Track/Folder/Chapter.
Repeat Track / Folder / CD.
/ To Start / Interrupt Reproductio
To shut Audio off.
Equalizer
PICTURE-PLAYBACK
Select the requested file to visualize related
Picture. To get the Menu on the screen, touch
the bottom border of the screen.
To enlarge the Picture (zoom)
To move the Picture, use the arrows appearing
on the screen (
).
To rotate the Picture.
To select the duration of the pause between
one picture and another.
User
1/2
USB T:1/20 C:3/51 00:00:30
Page 16
16
IT/GB
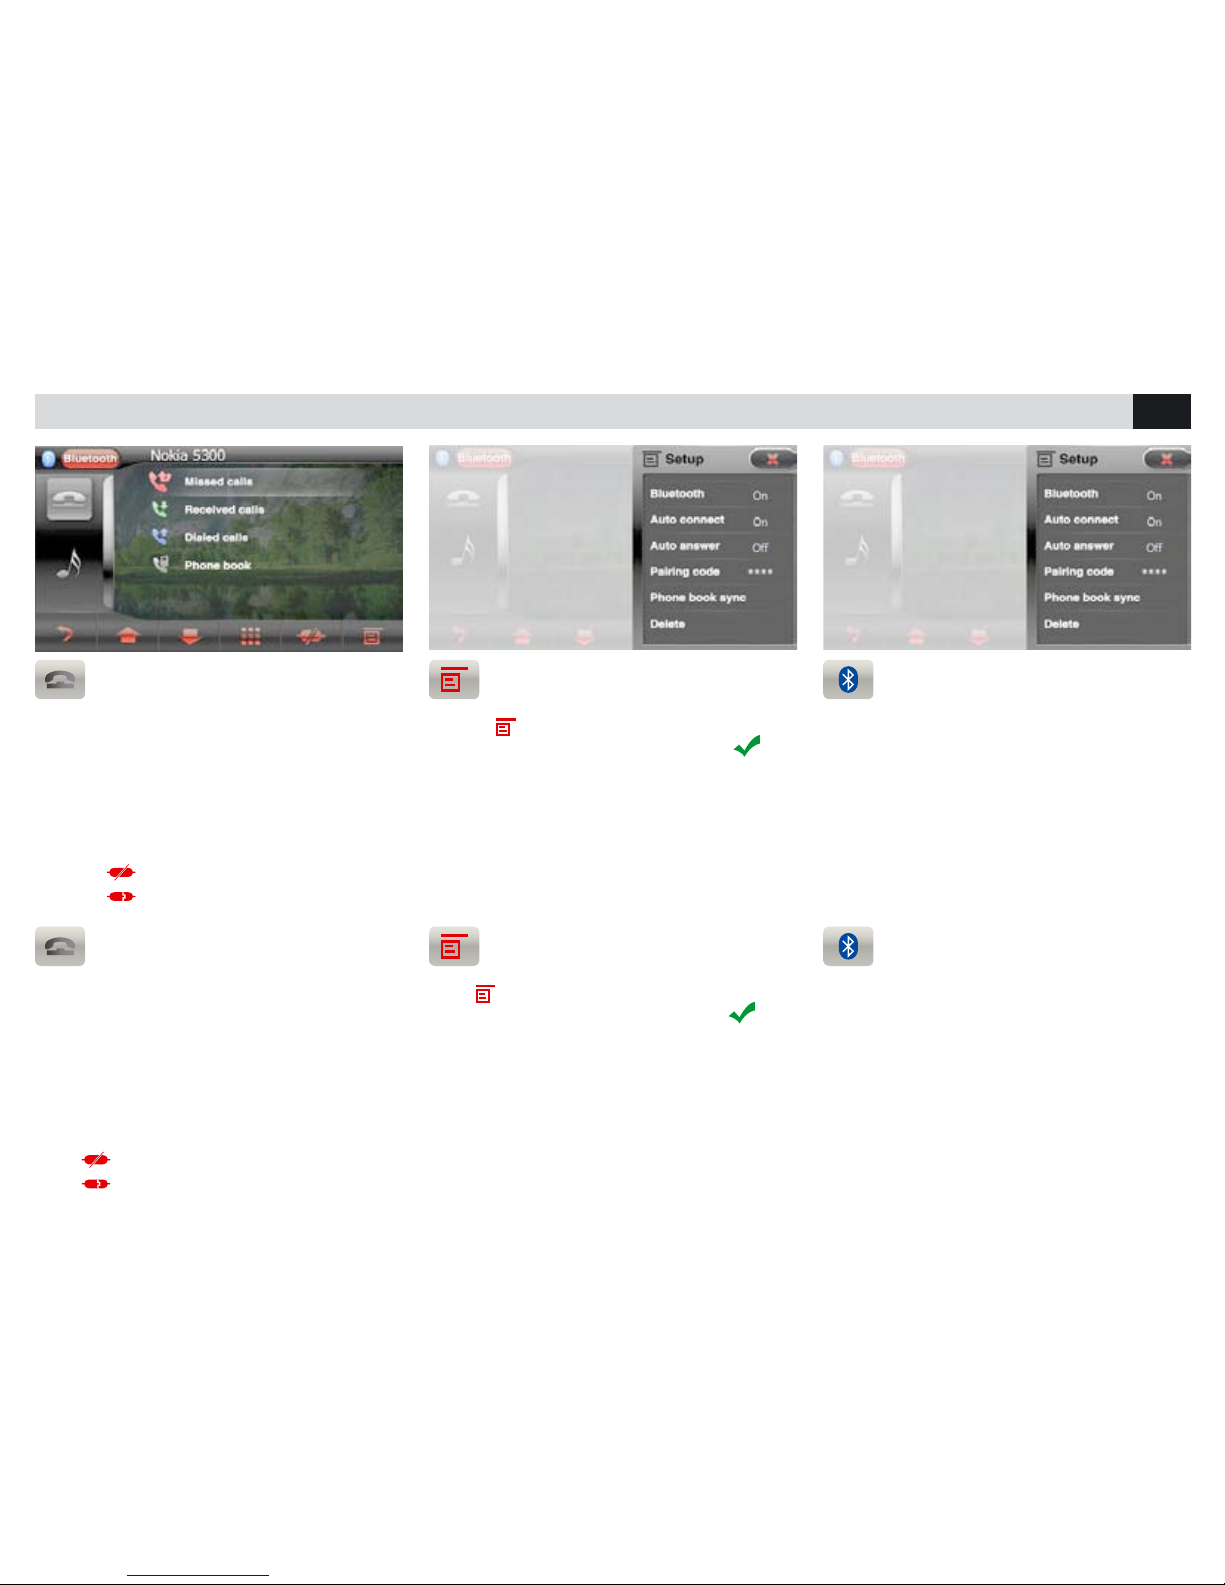
IMPOSTAZIONI BLUETOOTH • BLUETOOTH-SETTINGS
SINCRONIZZAZIONE RUBRICA
Premere
per accedere alle impostazioni.
Selezionare RUBRICA e confermare con
Automaticamente la rubrica del telefono verrà
scaricata nella memoria dell’autoradio. Il tempo
per l’operazione varia in base al numero dei
contatti.
OPZIONI BLUETOOTH
• AUTO-CONNESSIONE connette automaticamente il telefono.
• RISPOSTA AUTOMATICA risponde automaticamente alla chiamata.
• PIN cambia la password di accopiamento
• CANCELLA Elimina i dispositivi accoppiati.
ACCOPPIAMENTO TELEFONO
E’ possibile accoppiare fino a 5 telefoni.
• Attivare la funzione bluetooth sul telefono e
ricercare nuovi dispositivi.
• Selezionare PHONOCAR nella lista dispositivi,
inserire la password 0000 quando richiesta.
Ad accoppiamento avvenuto comparirà il nome
del telefono.
Premere
per disconnettere il telefono.
Premere
per riconnettere.
PHONE-PAIRING
Up to 5 phones can be coupled to the Device.
• Activate the Bluetooth-function on the phone
and search for new devices.
• Select PHONOCAR from the devices-list,
digit the password 0000, on request.
As soon as the coupling-process has been suc-
cessfully accomplished, the phone-name will be
shown.
Press
to disconnect the phone.
Press
to reconnect the phone.
PHONE-BOOK SYNCHRONIZATION
Press to enter the setting options.
Select PHONE-BOOK and confirm with
The phone-book of your telephone will automatically be downloaded into the car-radio’s memory.
The time required for this operation depends on
the number of contacts contained in the phonebook.
BLUETOOTH-OPTIONS
• AUTO-CONNECT provides for the automatic
phone-connection
• AUTO ANSWER answers automatically all in-
coming calls.
• PIN modifies the pairing code password.
• DELETE Cancels the coupled devices.
Page 17
17
IT/GB
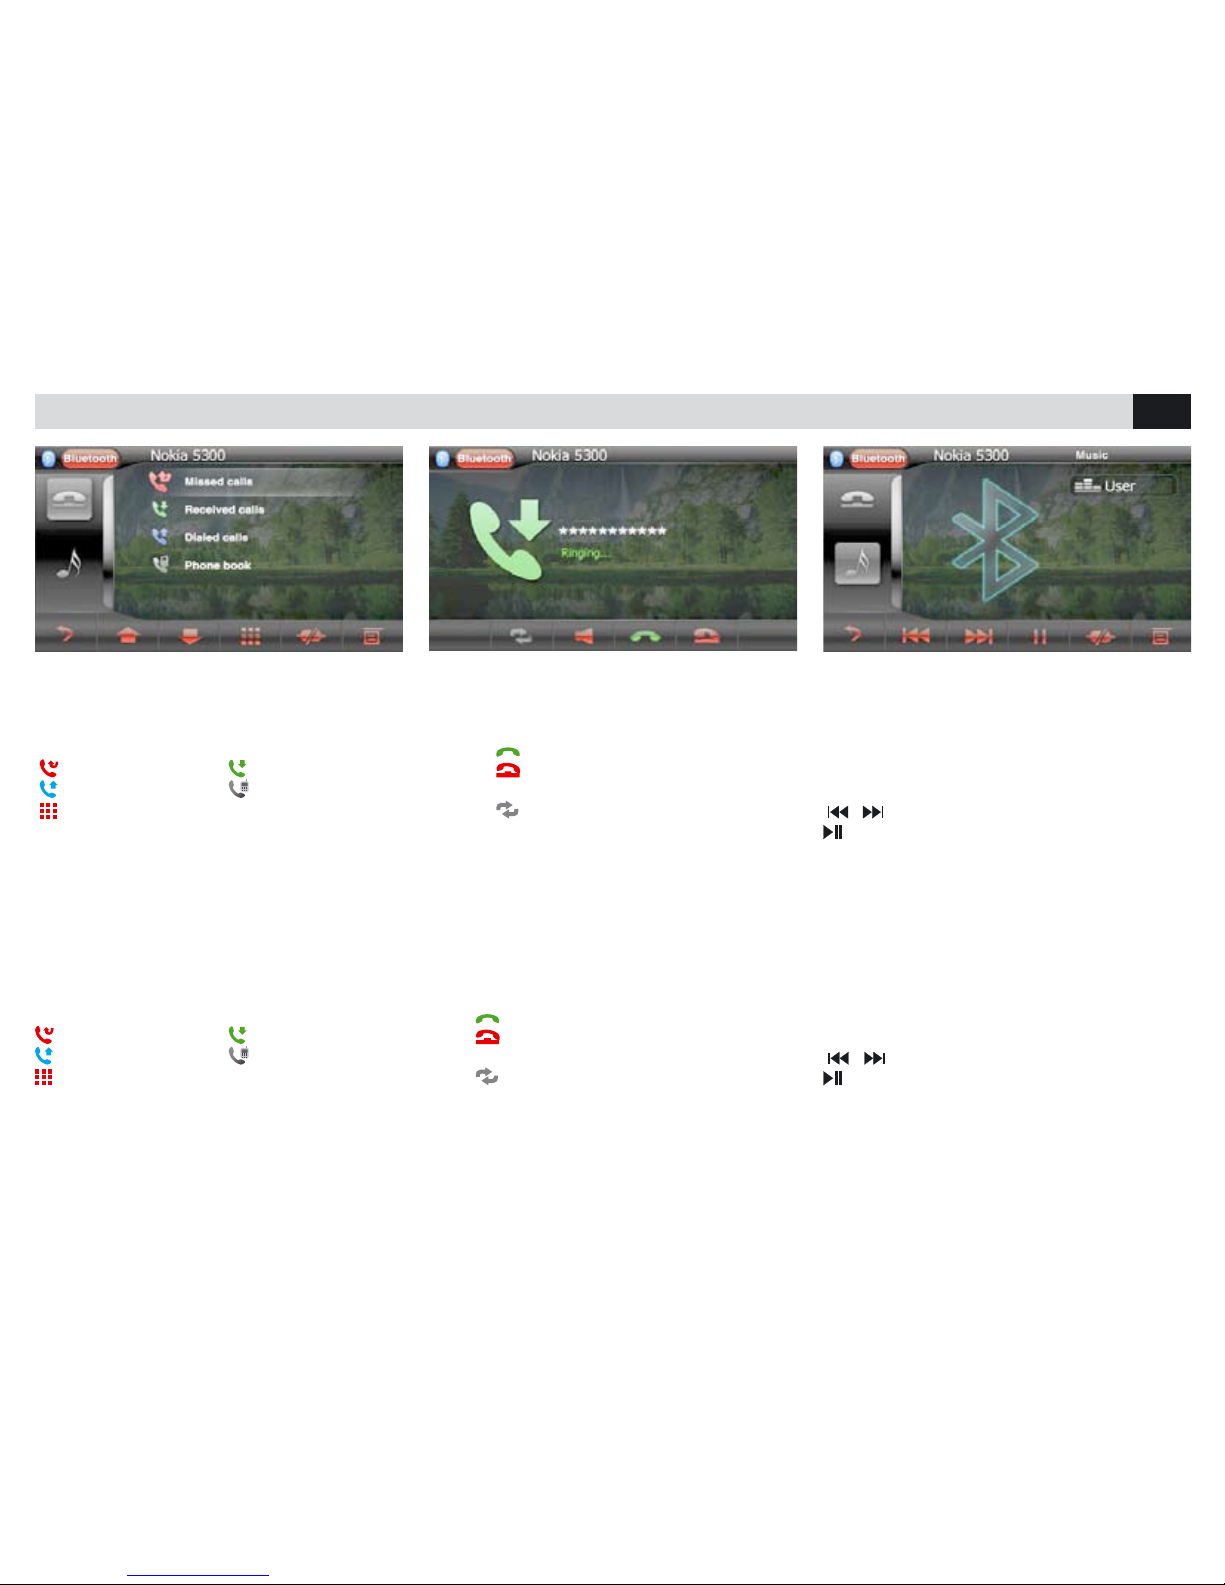
FUNZIONI BLUETOOTH • BLUETOOTH-FUNCTIONS
CHIAMARE DALLO SCHERMO
• Selezionare Bluetooth dal menù principale.
• Premere una delle icone presenti sullo schermo
per chiamare da uno degli elenchi.
chiamate perse chiamate ricevute
chiamate effettuate rubrica telefonica
chiamata dal tastierino numerico.
RICEVERE UNA CHIAMATA
Quando è in arrivo una chiamata, il VM080 passa
automaticamente in modalità bluetooth.
Premere
per rispondere.
Premere
per terminare la conversazione o per
rifiutare la chiamata in arrivo.
Premere
per escludere/attivare il vivavoce.
RIPRODUZIONE MUSICA BLUETOOTH
Se il telefono connesso supporta il profilo A2DP
è possibile ascoltare i brani musicali.
Se il dispositivo supporta AVRCP sarà possibile
controllare i brani musicali direttamente dal touch
screen.
/ brano precedente/successivo.
avvia/interrompe la riproduzione.
CALLING FROM THE SCREEN
• Select Bluetooth from the Main Menu.
• Press one of the icones available on the scre-
en, to call from one of the given phone-books.
missed calls received calls
dialed calls phone-book
calls effected through number-keys
RECEIVING A CALLING
When a phone-call arrives, the VM080 automatically switches to Bluetooth-mode.
Press
to answer the phone
Press
to end the conversation or refuse the
in-coming call.
Press
to deactivate/activate the hands-free
Device.
BLUETOOTH MUSIC PLAY
If the connected phone supports the A2DP-
Profile, you can listen to music.
If the device supports AVRCP, the musical tracks
can be handled on the touch-screen directly.
/ Previous/next Track.
Start/interrupt reproduction.
Page 18

SEA T LEON 11> - ALTEA 11>
SKODA F ABIA 07> - ROOMSTER 07> - OCTAVIA 07>
VOLKSWAGEN GOLF V - GOLF VI - TIGUAN - TOURAN - PASSA T 05>
P ASSAT CC 08> - SCIROCCO 08> - POLO 09> - SHARAN 10> - CADDY 10>
NOTICE DE MONTAGE ET D’EMPLOI
GEBRAUCHSANWEISUNGEN
MANUAL DE INSTRUCCIONES
VM 080
FRANÇAIS
DEUTSCH
ESPAÑOL
6,2” TFT/LCD
2 DIN NAVIGATION
DVD RECEIVER
Page 19
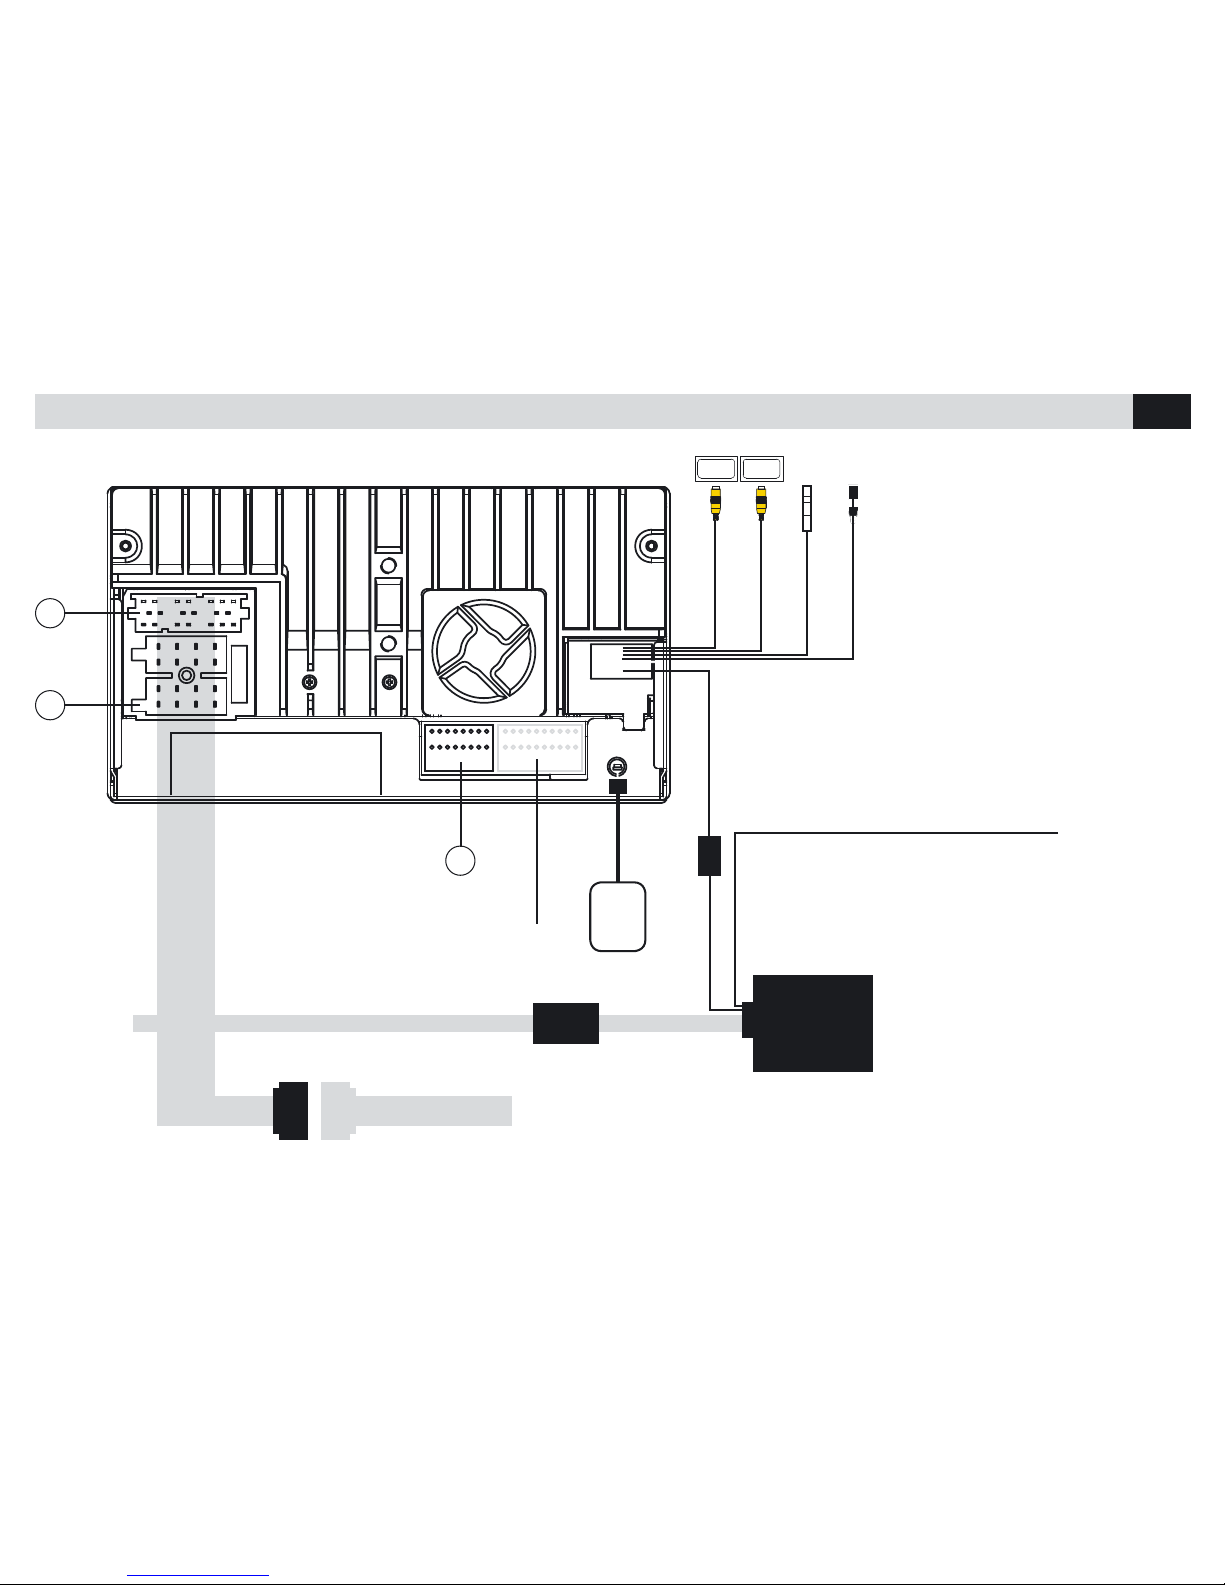
19
FR/D
CONNEXIONS • KABEL-VERBINDUNGEN
1
2
3
VIDEO 1
VIDEO 2
REAR
DISPLAY
REAR
DISPLAY
RADIO ANT
MICROFONO/MIC
VERT / GRÜN SWCMARRON / BRAUN
SORTIE POUR COMMANDES AU VOLANT
AUSGANG FÜR RESISTIVE LENKRAD-STEUERUNGEN BZW
Branchement à effectuer uniquement en cas de présence sur la voiture
des commandes au volant.
Verbindung nur dann herstellen, wenn der Wagen mit Lenkrad-Steuerungen ausgerüstet ist.
NON DISPONIBLE
NICHT VERFÜGBAR
GPS
ATTENTION / SEHR WICHTIG:
Vérifier que la ligne CAN-BUS soit active
sur la voiture. Une fois le branchement
effectué, le Led de la centrale effectue 3
clignotements de couleur rouge. Quand
le Led est de couleur verte, le boîtier est
programmé.
Si l’autoradio est réinstallé, le boîtier doit
être reprogrammé
Gut kontrollieren und dafür sorgen, dass
die CAN-BUS-Leitung des Wagens aktiviert
ist. Sobald alle Verbindungen hergestellt
sind, blinkt das Led der Zentral-Einheit 3
Mal rot. Die Programmierung der ZentralEinheit ist dann erfolgreich abgeschlossen,
wenn das Led auf Grün schaltet.
Wird das Autoradio erneut installiert, muss
die Zentral-Einheit neu programmiert
werden.
ANTENNE
ANTENNA
GPS
CAN BUS
INTERFACE
4/145
CONNECTEUR D’ORIGINE AUTO
KFZ-KABELBAUM
FAKRA
FAKRA
GRIS ODOMÈTRE SIGNAL DE SORTIE
GRAU AUSGANGSSIGNAL ODOMETER
Page 20
20
FR/D
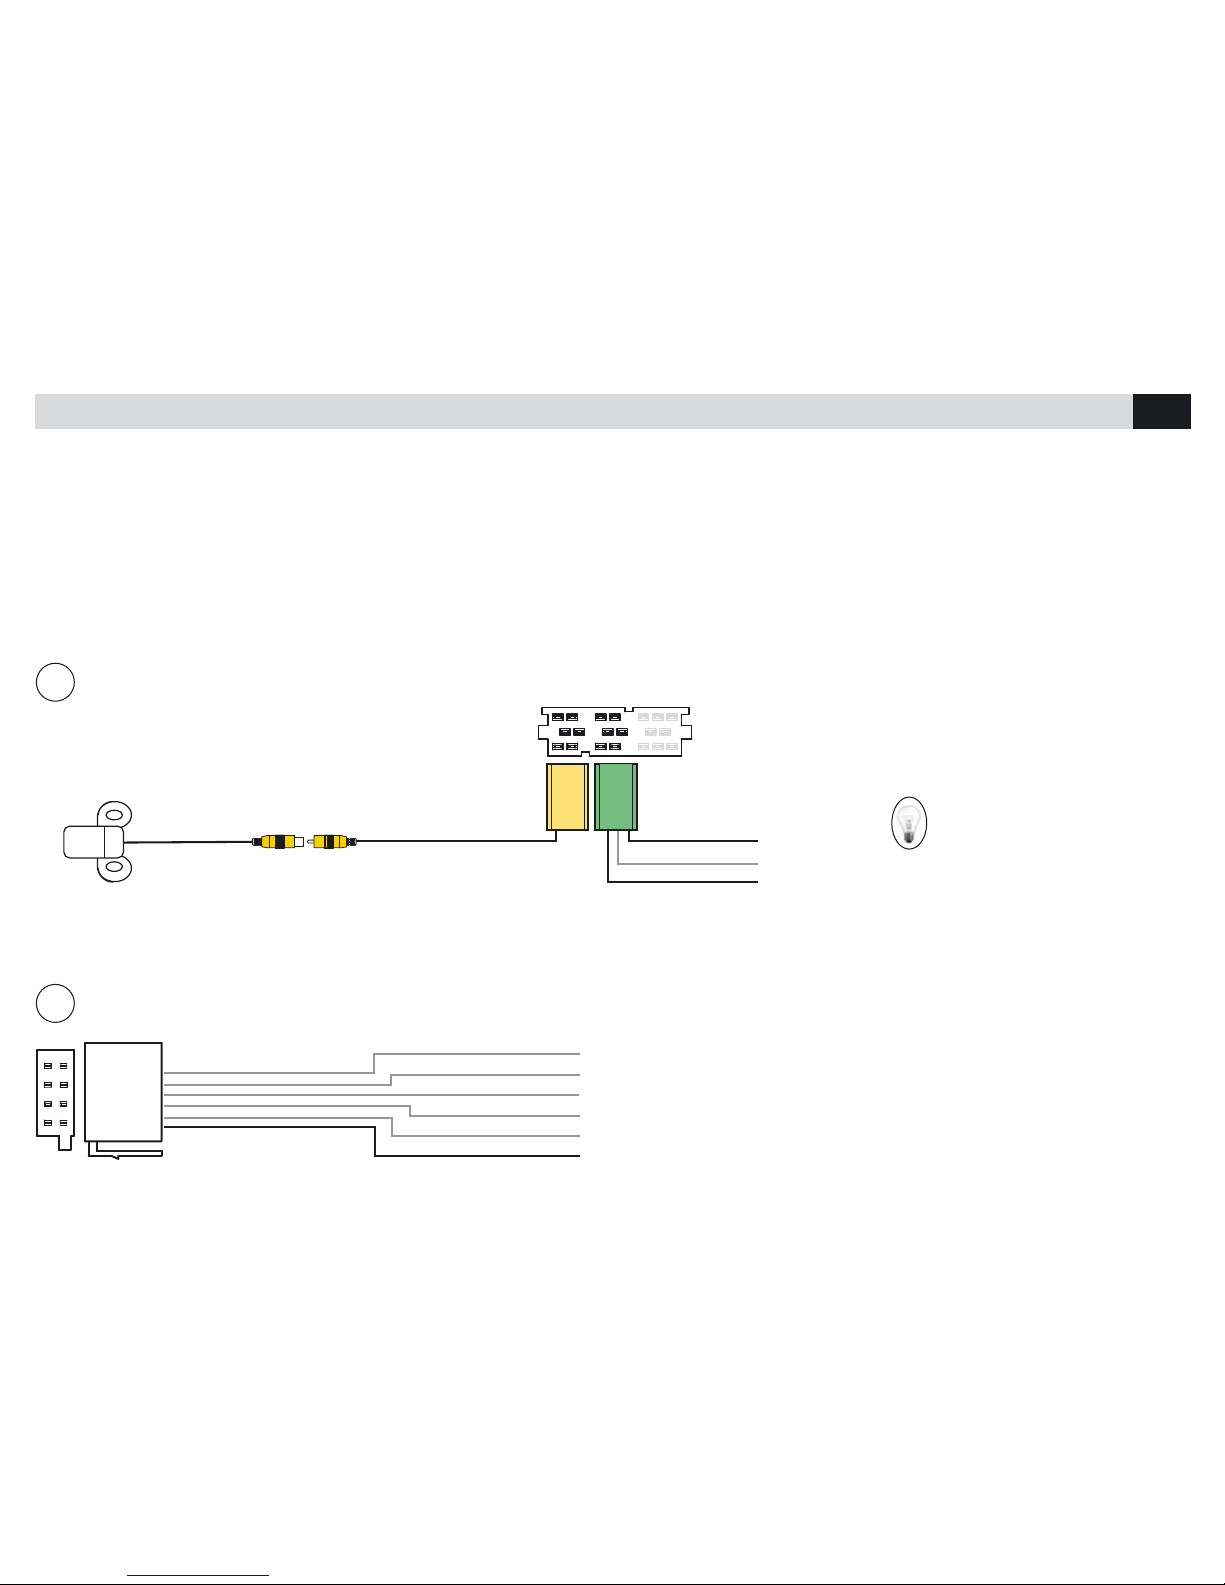
CONNEXIONS • KABEL-VERBINDUNGEN
1
BRANCHEMENTS POUR CAMÉRA DE RECUL ET AMPLIFICATEUR / ANSCHLÜSSE FÜR DIE RÜCKFAHR-KAMERA UND VERSTÄRKER
2
NERO
BLACK
ROSE/ROSA
Mute
Amplificateur d’allumage
MUTE
MUTE
Mute
Zündverstärker
CAMERA
REVERSE
BRAKE
P. REM
BLUE/BLAU
JAUNE/GELB
VERT
GRÜN
JAUNE
GELB
Lumière de marche arrière
Lichter bei Rückwärtsgang
+
En absence de caméra, couper et isoler le câble BLEU que vous trouver dans le connecteur vert.
Falls keine Rückfahr-Kamera verwendet wird, bitt das BLAUE KABEL, im grünen Stecker, abschneiden und isolieren.
• Dans le VM080 les branchements sont PLUG AND PLAY.
• La centrale CAN-BUS reconnaît automatiquement le protocole de la voiture et fournit les services nécessaires pour le fonctionnement.
• Les schémas suivants montrent comment effectuer les branchements optionnels.
• Die Verbindungen des VM080 sind vom Typ PLUG AND PLAY.
• Die Zentral-Einheit erkennt automatisch das betreffende Wagen-Protokoll and liefert konsequent alle notwendigen Betriebs-Funktionen.
• Die nachfolgenden Anschluss-Schemen geben Aufschluss über alle weiteren Verbindungsmöglichkeiten.
BLUE-NOIR/BLAU-SCHWARZ
Page 21
21
FR/D
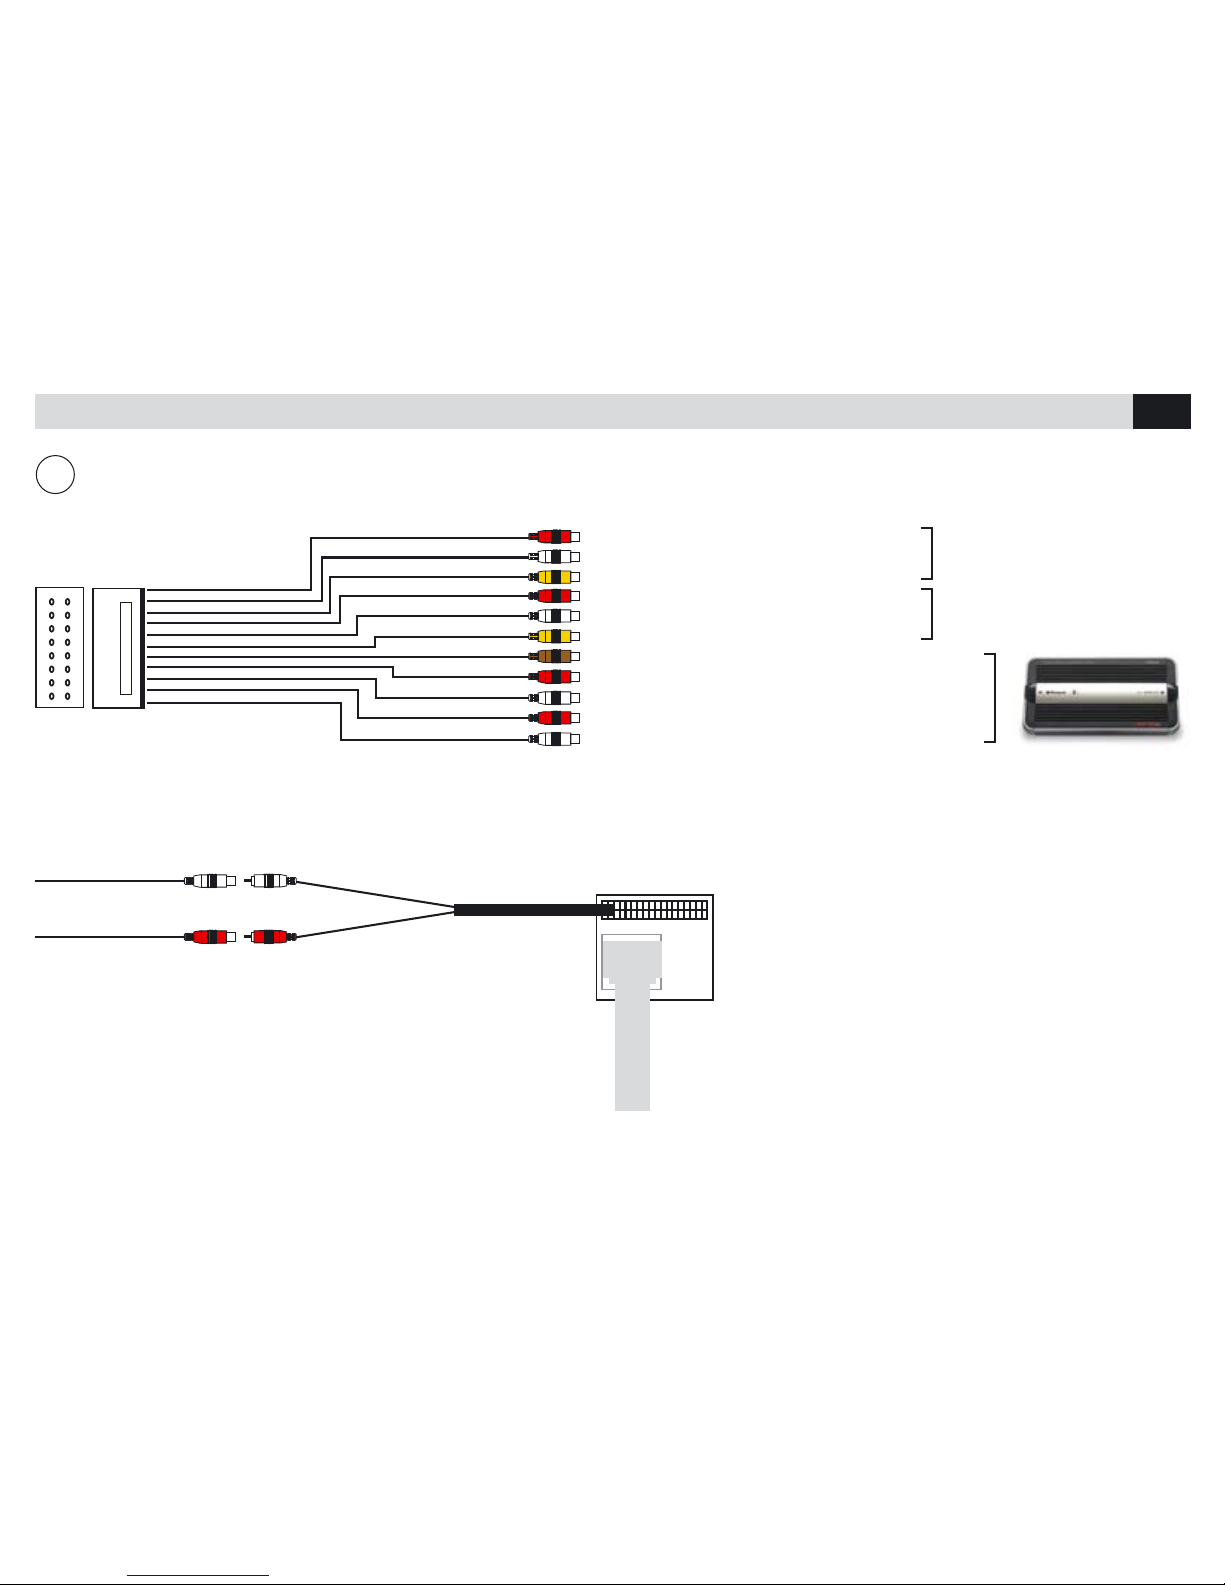
CONNEXIONS • KABEL-VERBINDUNGEN
3
SORTIES PRE – AMPLIFIEES / PRE-AMP-AUSGÄNGE
DROIT / RECHTS 1
GAUCHE / LINKS 1
SORTIE VIDÉO 1 / AUSGANG VIDEO 1
DROIT / RECHTS 2
GAUCHE / LINKS 2
SORTIE VIDÉO 1 / AUSGANG VIDEO 1
SORTIE SUBWOOFER / AUSGANG SUB-WOOFER
ANTÉRIEURE DROITE / FRONT RECHTS
ANTÉRIEURE GAUCHE / FRONT LINKS
POSTÉRIEURE DROITE / HECK RECHTS
POSTÉRIEURE GAUCHE / HECK LINKS
ENTRÉES AV 2 / EINGANG AV 2
ENTRÉES AV 1 / EINGANG AV 1
AUX IN R 1
AUX IN L 1
AUX VIDEO 1
AUX IN R 2
AUX IN L 2
AUX VIDEO 2
SUB WOOFER
FRONT R
FRONT L
REAR R
REAR L
Branchements à effectuer en cas de présence
dans la voiture d’une entrée AUX-IN.
Notwendige Verbindungen bei Wagen-Modellen
mit AUX-IN-Eingang.
AUX IN L 1
AUX IN R 1
FAKRA
Page 22
22
FR/D
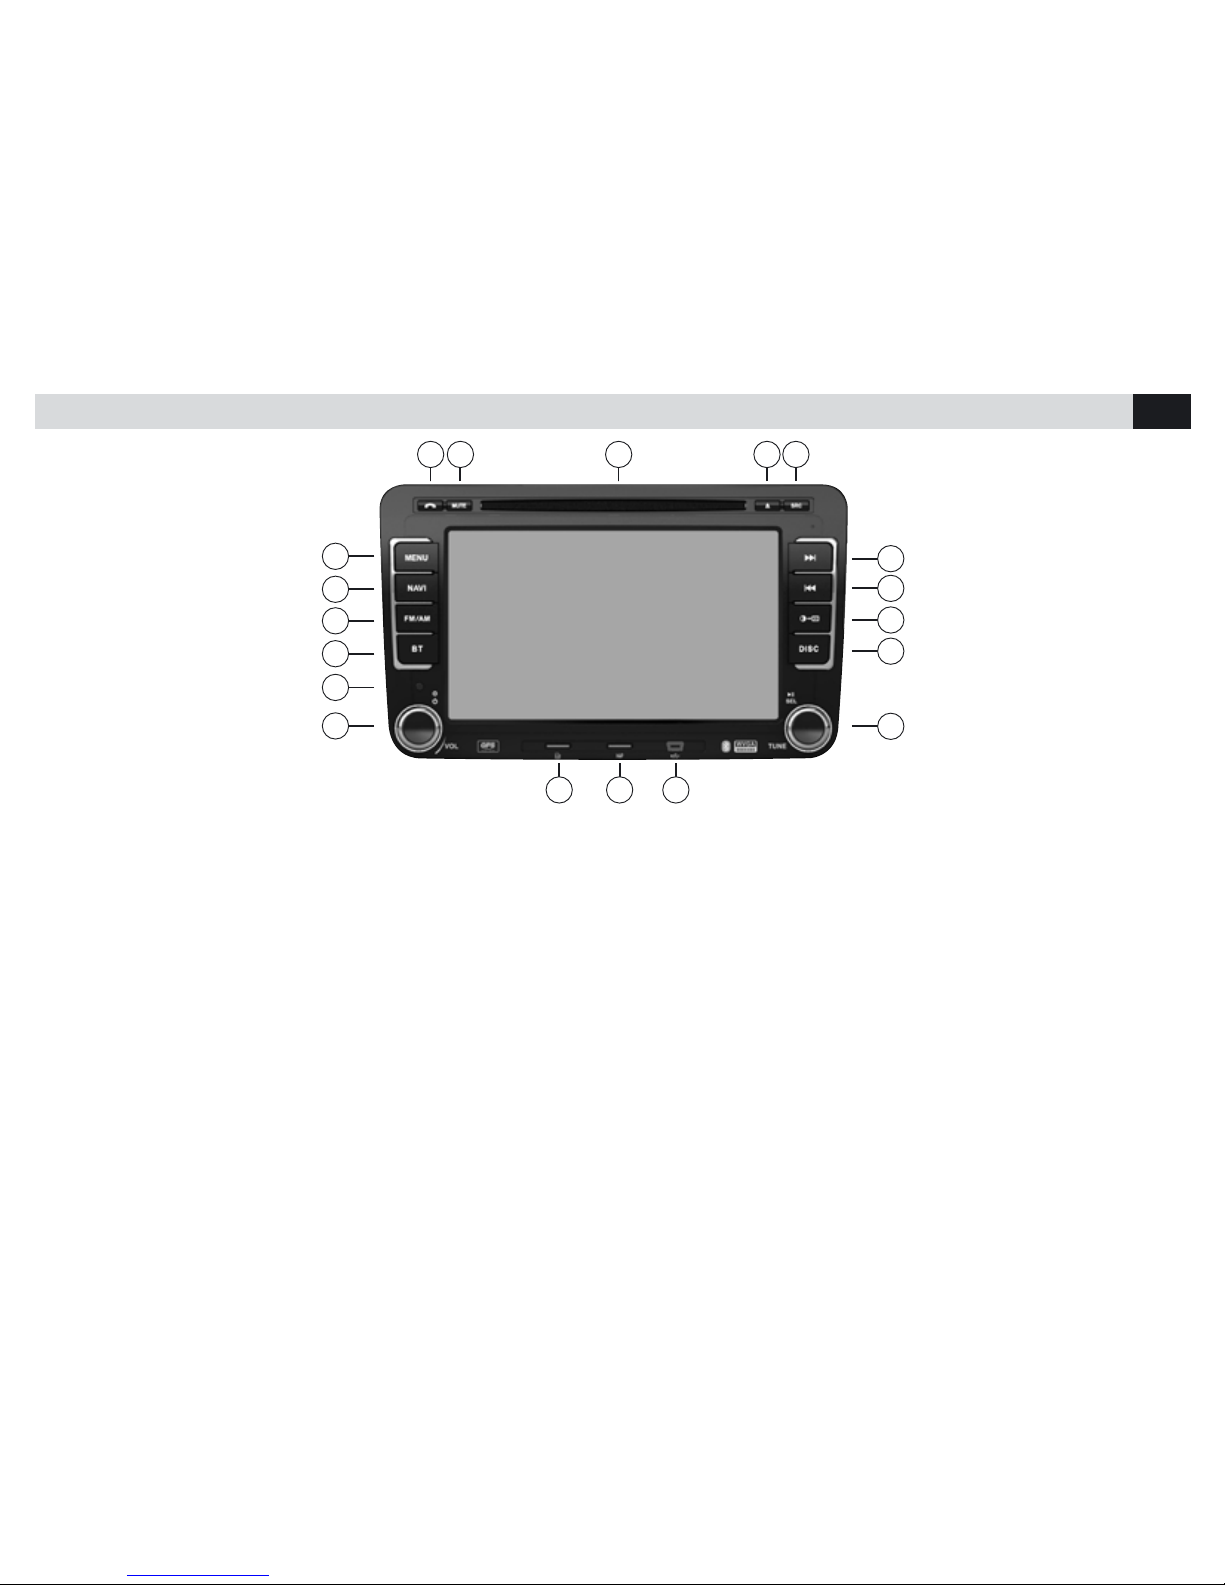
FONCTIONS • FUNKTIONEN
1. MENU – Retourne au Menu principal
2. Navigateur
3. Radio
4. Bluetooth
5. Senseur télécommande
6. Bouton allumage / volume
Pour éteindre appuyer pendant 2 secondes
Pour mette l’audio à zéro, appuyer brièvement
7. Porte Carte SD/SDHC/MMC
8. Porte Micro SD pour navigation
9. Porte Micro USB
10. Bouton recherche trace / stations radio.
Lance et interrompt la reproduction
11. CD
12. Luminosité écran
13-14. Trace/Chapitre successif - précédent
15. Change source
16. Expulsion CD
17. Fente insertion CD
18. Mute
19. Répond/Termine/Lance l’appel
1. MENU – zurück zum Haupt-Menü
2. Navigator
3. Radio
4. Bluetooth
5. Fernbedienungs-Sensor
6. Dreh-Knopf für Einschalten / Lautstärke
Ausschalten: 2 Sekunden drücken.
Stumm-Schalten: nur kurz drücken.
7. Öffnung für SD/SDHC/MMC-Karte
8. Öffnung für Navigations-Mikro-SD
9. Öffnung für Mikro-USB
10. Suche Musikstück / Radiosender
Wiedergabe Starten/Unterbrechen
11. CD
12. Bildschirm-Helligkeit
13-14. Musikstück/Kapitel davor/danach
15. Quelle wählen
16. CD-Auswurf
17. CD-Einwurf
18. Mute
19. Anruf beantworten/beenden/starten
1
2
3
4
5
6
1516171819
7 8 9
10
11
12
13
14
Page 23
23
FR/D
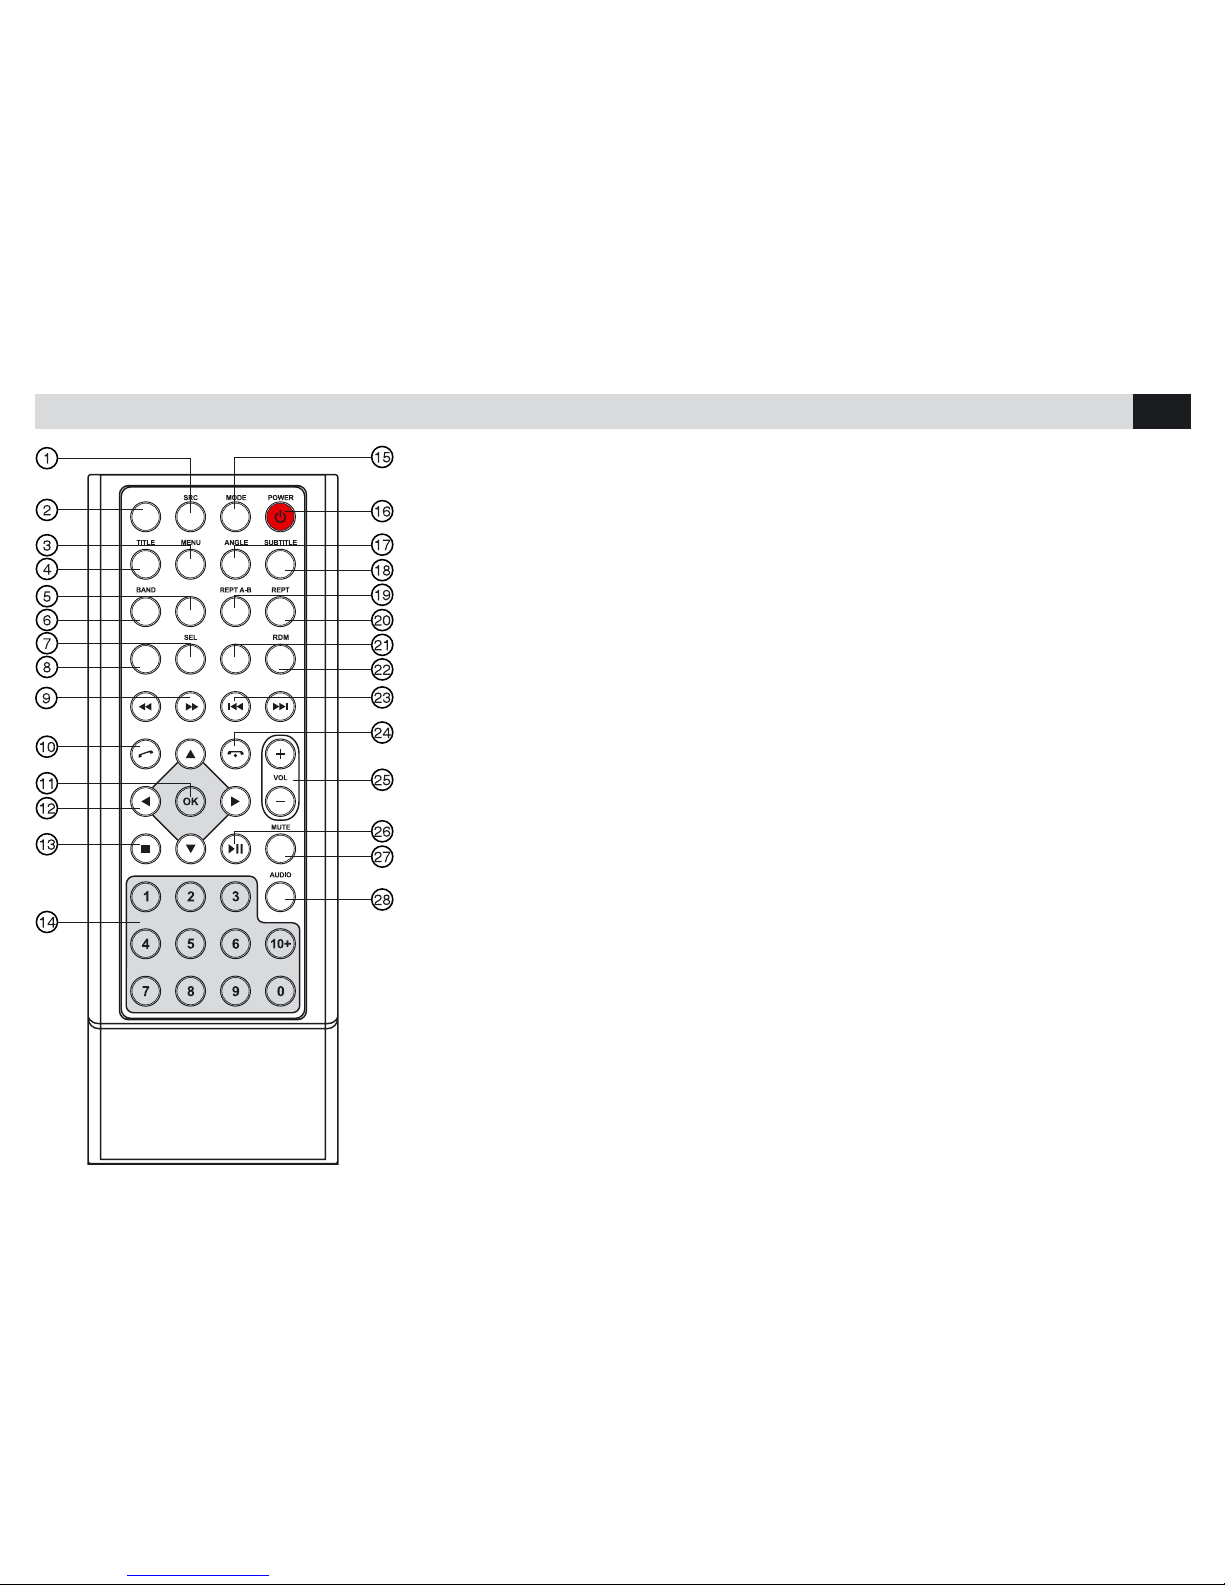
FONCTIONS TÉLÉCOMMANDE • FERNBEDIENUNGS-TASTEN
EJECT
ZOOM
DIM
SLOW
1. Sélectionne Source
2. Expulsion CD
3. MENU DVD
4. Titre DVD
5. Zoom
6. Bande Radio
7. Réglages écran / Audio
8. Réglage luminosité
9. Avance / Revient rapide
10. Effectue / Reçoit un appel
11. Valide
12. Menu curseur
13. Stop / Revient
14. Clavier numérique
15. Entre dans le menu principal
16. Allumage / extinction
17. Angle DVD
18. Sous-titres DVD
19. Répétition A-B
20. Répétition Trace / Chapitre / Dossier
21. Menu sur l’écran
22. Reproduction casuelle
23. Trace / Station: Précédente /
Suivante
24. Interrompt l’appel / Efface
25. Volume
26. Lance / Interrompt la reproduction
27. Réduit l’audio à zéro
28. Audio DVD / Audio VCD / L-R-ST
1. Wahl der Quelle
2. CD-Auswurf
3. DVD-MENÜ
4. DVD-Titel
5. Zoom
6. Radio-Frequenzband
7. Bildschirm/Audio-Einstellungen
8. Helligkeits-Einstellungen
9. Schnell Vorwärts / Rückwärts
10. Anruf starten / empfangen
11. Bestätigung
12. Läufer-Menü
13. Stop/Rückwärts
14. Nummern-Tasten
15. Haupt-Menü betreten
16. Einschalten / Ausschalten
17. DVD-Winkel
18. DVD-Untertitel
19. Wiederholung A-B
20. Wiederholung Stück/Kapitel/
Ordner
21. Menü auf Bildschirm ausweisen
22. Wahllose Wiedergabe
23. Stück/Sender davor/danach
24. Anruf Unterbrechen/Stornieren
25. Lautstärke
26. Wiedergabe Starten/Unterbrechen
27. Audio-Stummschalten
28. Audio DVD/Audio VCD/L-R-ST
Page 24
24
FR/D
MENU • MENÜ
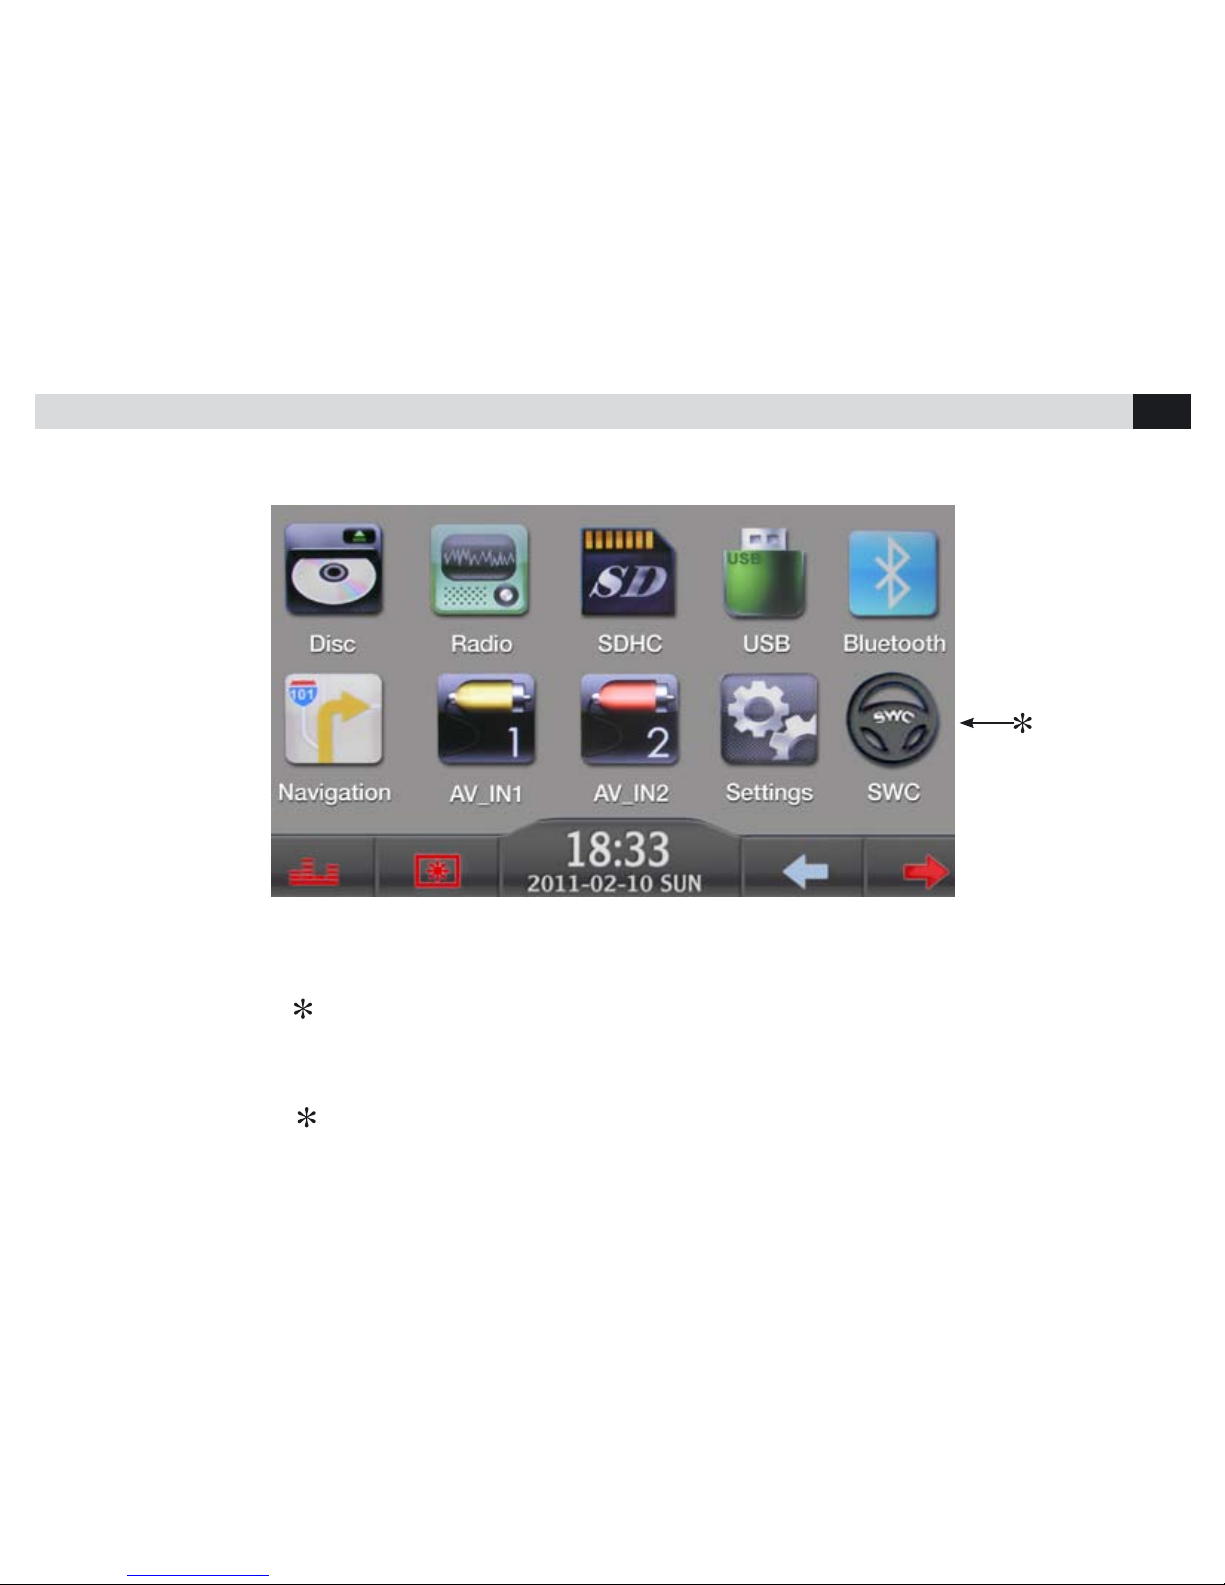
Pour faire apparaître le menu principal, appuyer la touche MENU sur la façade ou l’angle gauche en haut à de l’écran.
En touchant les icônes sur l’écran, on sélectionne la source ou la fonction désirée.
Um das Haupt-Menü einzublenden, entweder die MENÜ-Taste auf dem Bedienteil drücken, oder obere linke Bildschirm-Ecke antasten.
Durch das Antasten der Ikonen auf dem Bildschirm, lassen sich jeweils die Quelle und die verschiedenen Funktionen wählen.
Fonction pas active. Les commandes au volant sont reconnues automatiquement.
Funktion nicht aktiviert. Die Lenkrad-Steuerungen werden automatisch erkannt.
Page 25
25
FR/D
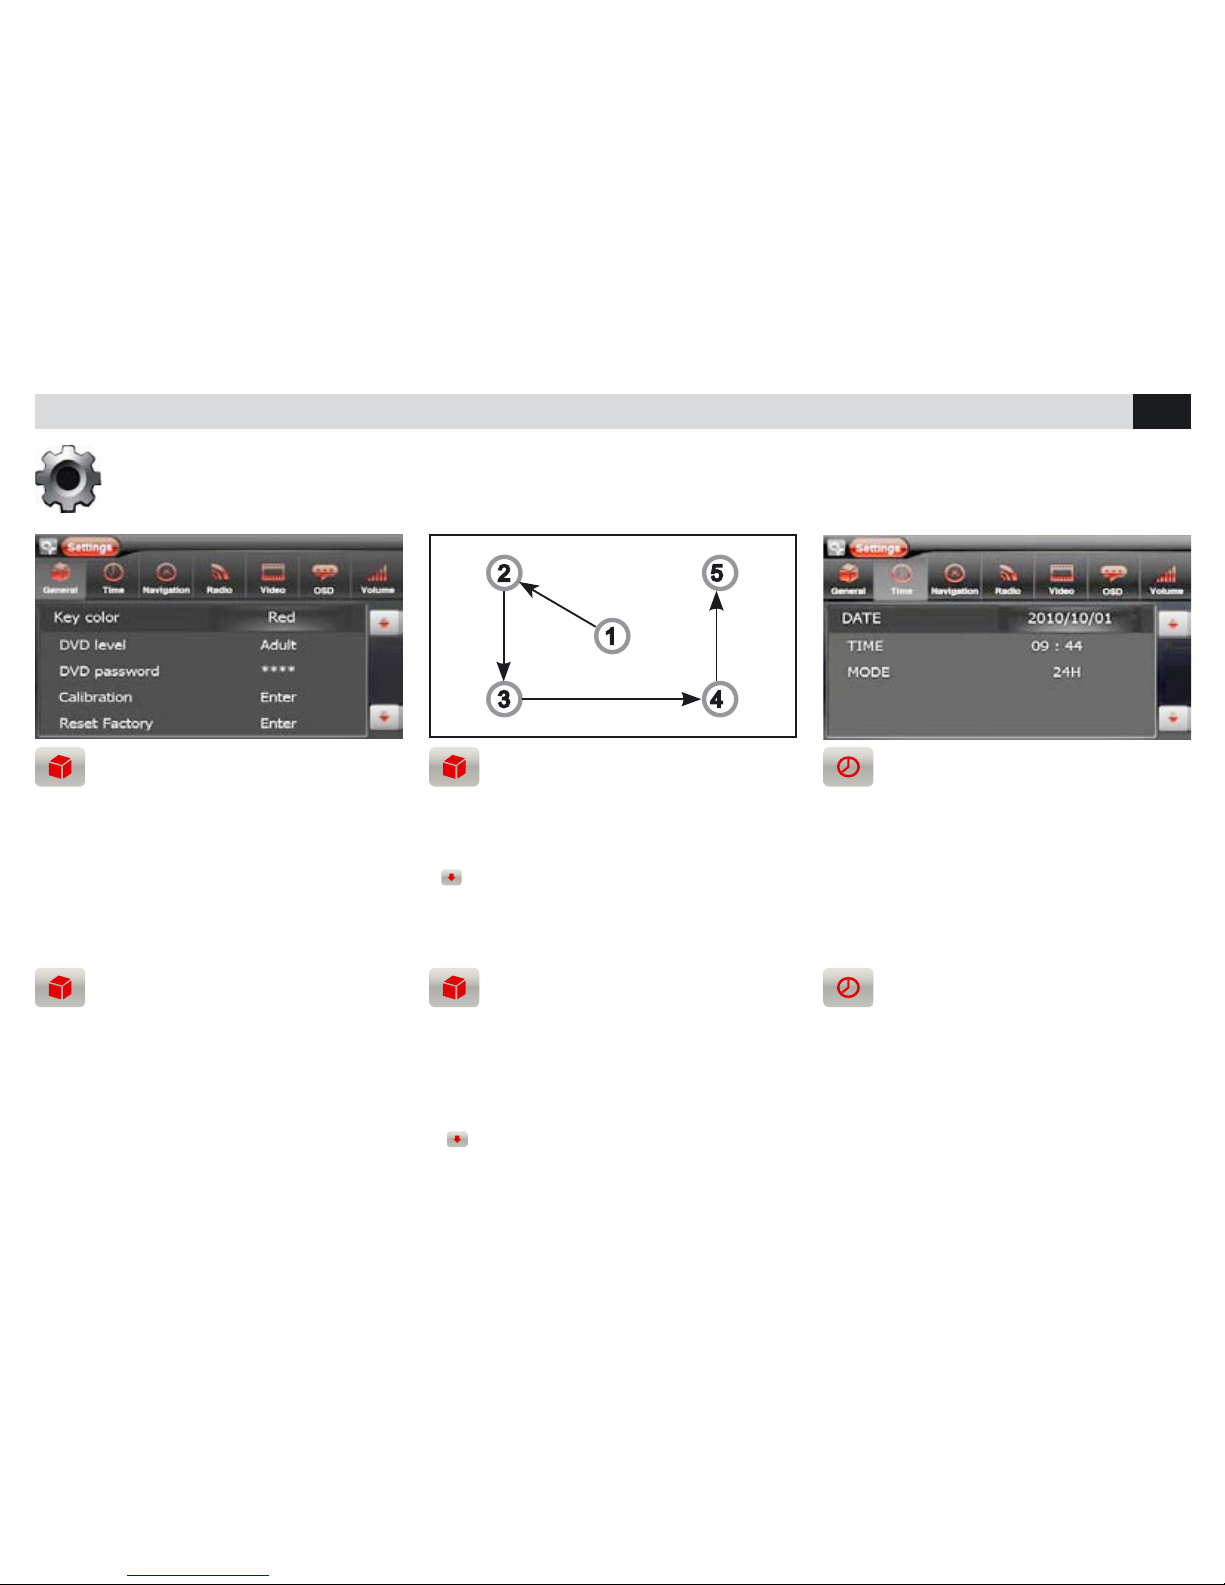
COULEUR DES TOUCHES
NIVEAU DE PROTECTION DVD
• Pour changer l’illumination des touches de la
façade, appuyer COULEUR TOUCHES.
• En réglant ADULTES, il n’y aura aucune restric-
tion pendant la vision
• En Mémorisant les autres niveaux, régler le
MOT DE PASSE.
TASTEN-BELEUCHTUNG
DVD-JUGENDSCHUTZ
• Um die Tasten-Beleuchtung des Bedienteils
zu ändern, Taste KEY-COLOR (Tasten-Farbe)
drücken.
• Unter der Funktion ADULT (Erwachsene) ist
keinerlei Jugendschutz vorgegeben.
• Bei der Festlegung einer bestimmten Jugendschutz-Stufe, muss das Passwort (PASSWORD)
eingegeben werden.
REGLAGES DE SYSTEME • SYSTEM-EINSTELLUNGEN
CALIBRAGE ECRAN TACTILE
RESET D’ORIGINE - BEEP
• Le calibrage se fait en touchant l’écran selon la
séquence indiquée.
• Reset, restaure les réglages d’origine.
•
Beep, permet d’activer / désactiver le son à
chaque fois qu’on touche l’écran tactile.
TOUCH SCREEN-KALIBRIERUNG
RESET DER FABRIK-EINSTELLUNGE - BIEP
• Die Kalibrierung erfolgt, in der angegebenen
Reihenfolge, durch einfaches Antasten des
Bildschirms.
• Reset, greift auf die Fabrik-Einstellungen
zurück.
•
Biep-Ton läßt sich durch Antasten des
Bildschirms aktivieren/deaktivieren.
REGLAGE DATE ET HEURE
• Se placer sur le paramètre à modifier et faire
les changements.
EINSTELLUNG VON DATUM / UHRZEIT
• Auf die gewünschte Position gehen und die
notwendigen Daten abändern.
Réglages: illuminations des touches, niveau de protection DVD, calibrage, reset, date et heure, navigation, réglages audio, réglages vidéo, Langues, volume sources, personnalisation fond d’écran.
Einstellungen: Tasten-Beleuchtung, DVD-Jugendschutz, Kalibrierung, Reset, Datum/Uhrzeit, Navigation, Radio-Einstellungen, Video-Einstellungen, Sprache, Quellen-Lautstärke, personalisierte Hintergrund-Kulisse.
Page 26
26
FR/D
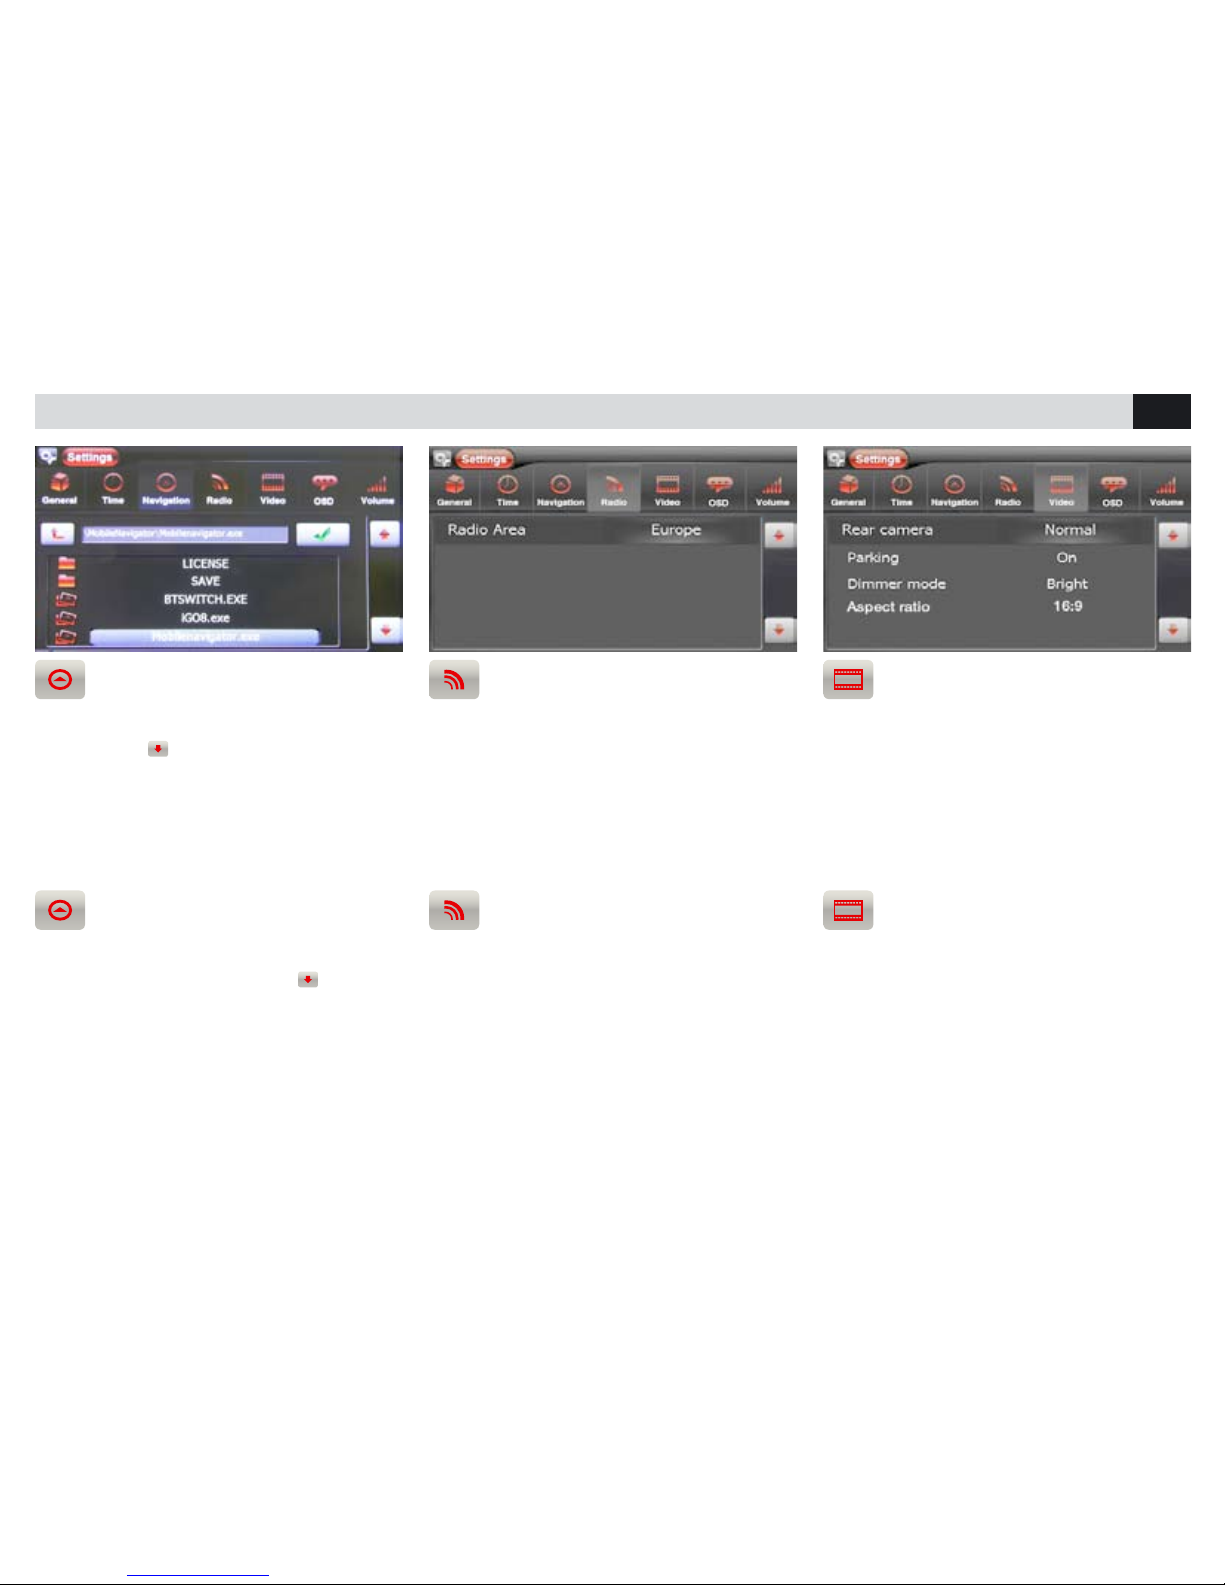
NAVIGATION
• Introduire la micro SD de navigation NV993.
Parcourir avec
pour sélectionner le fichier
Mobilenavigator.exe.
NOTE: Effectuer ce réglage avant de commencer la navigation.
NAVIGATION
• Die Mikro-Navigations-SD-Karte, Art. NV993
eingeben. Sich weiterbewegen mit
und die
exekutive Datei wählen:
Mobilenavigator.exe
WICHTIG: diese Einstellung unbedingt vor dem
Starten der Navigation durchführen.
REGLAGES RADIO
•Pour la correcte bande radiophonique, sélectionner la zone d’appartenance.
RADIO-EINSTELLUNGEN
• Der korrekte Frequenzgang kommt erst, nachdem man die Gebiets-Zugehörigkeit eingegeben
hat.
CAMERA DE RECUL - ACTIVATION
VIDEO - LUMINOSITE - ASPECT RATIO
• Sélectionner Camera de Recul pour changer la
visualisation; passer de normal à miroir.
• Stationnement pour activer / désactiver la vision
en mouvement des films et des images.
• Luminosité pour modifier l’intensité de lumière
de l’écran.
RÜCKFAHR-KAMERA
VIDEO-AKTIVIERUNG
HELLIGKEIT - ASPECT RATIO
• REAR-CAMERA (Rückfahr-Kamera) wählen, um
von Normal- auf Spiegel-Ansicht zu schalten.
• PARKING (Parken) wählen, um die Freischaltung (Filme, Fotos) zu aktivieren/deaktivieren.
• BRIGHT (Helligkeit) wählen, um die Licht-Intensität des Bildschirms zu regeln.
REGLAGES DE SYSTEME • SYSTEM-EINSTELLUNGEN
Page 27
27
FR/D
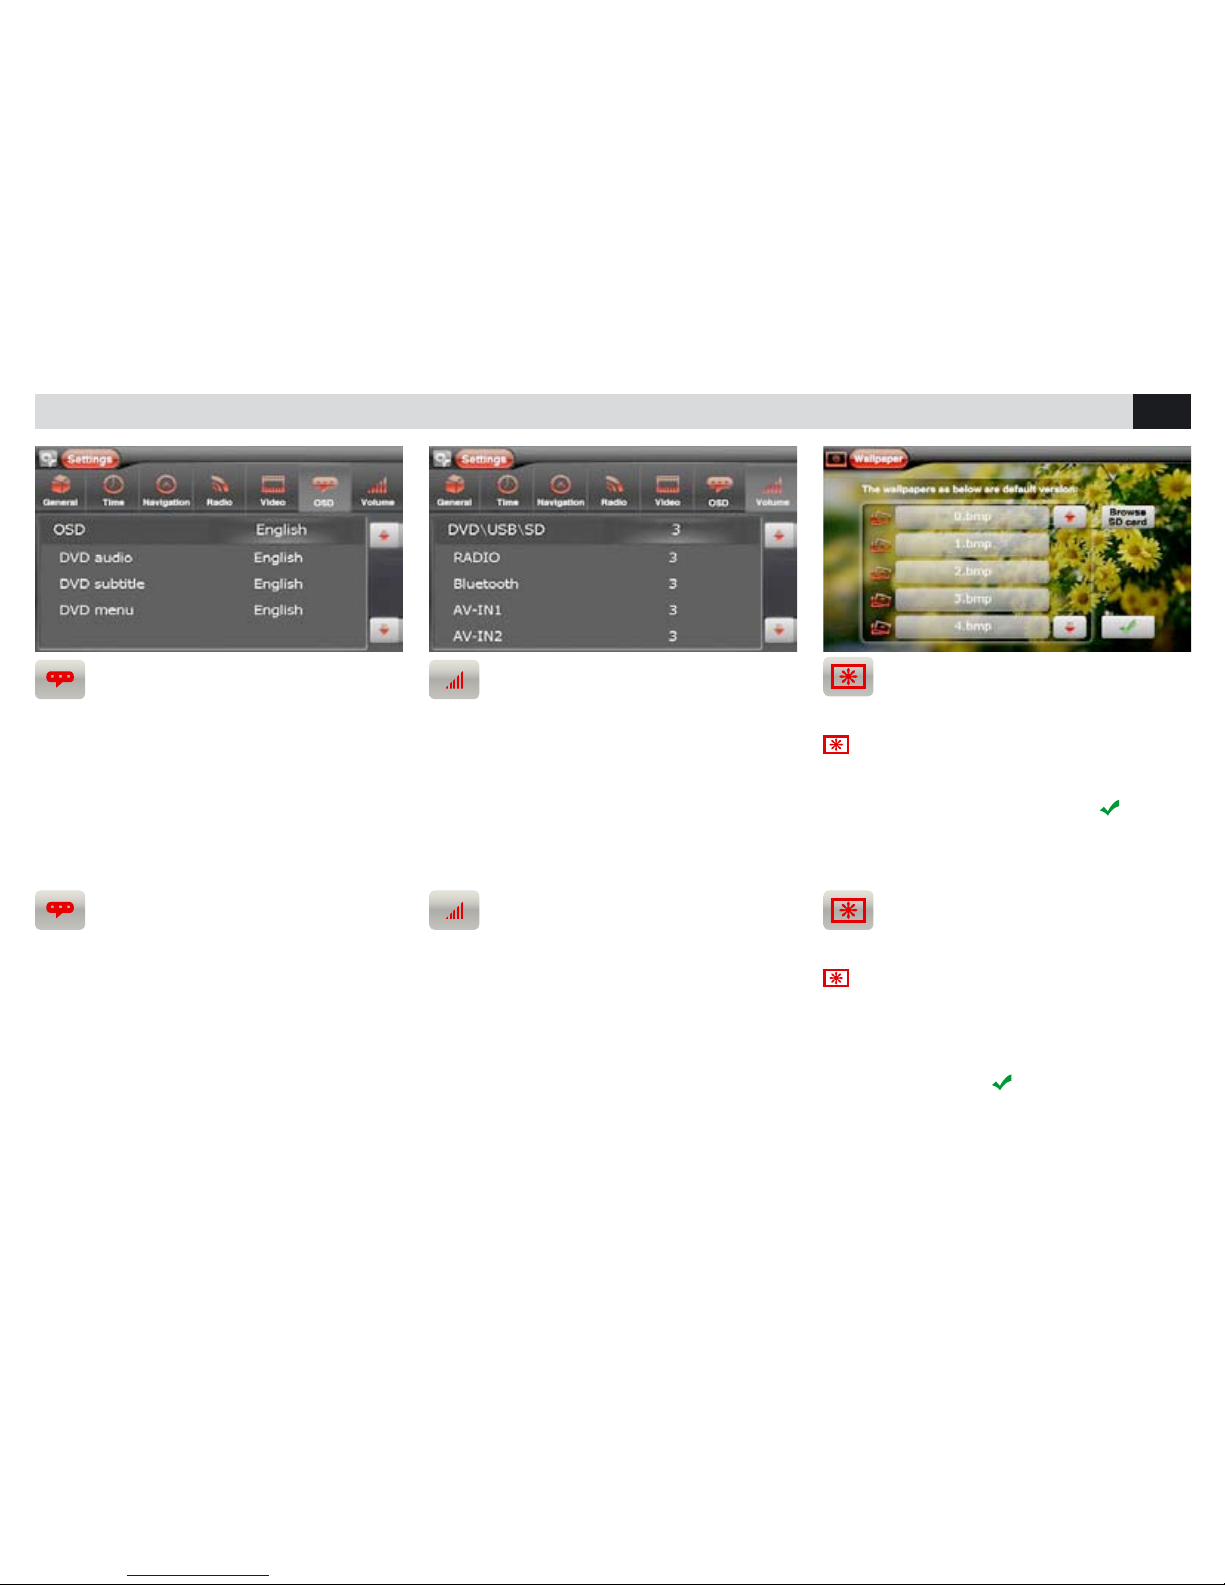
LANGUE
• C’est possible choisir la langue des menus, de
l’audio et des sous-titres du DVD.
SPRACHE
• Es besteht die Möglichkeit, bei den verschiedenen Menüs, sowie bei Audio und DVD-Untertitel,
eine bestimmte Sprache zu wählen.
VOLUME SOURCES
• On peut régler le volume de chaque source
afin d’éviter des écarts d’intensité durant le
passage d’une source à une autre.
QUELLEN-LAUTSTÄRKE
• Die Lautstärke-Regelung wird für jede einzelne
Quelle separat vorgenommen. Beim Umschalten
von einer Quelle auf die andere, kommt es somit
zu keinerlei Intensitäts-Unterschiede.
REGLAGES DE SYSTEME • SYSTEM-EINSTELLUNGEN
PERSONNALISATION FOND D’ECRAN
• A partir du menu principal, appuyer l’icône
pour accéder à la page de gestion du fond
d’écran. Pour utiliser les images qui se trouvent
dans la mémoire, choisir le nom du fichier, sélectionner l’avant première et confirmer
.
Pour utiliser les images (bmp res. 800x480) de la
Micro-Carte SD, appuyer « LIS LA CARD SD».
HINTERGRUND-PERSONALISIERUNG
• Vom Haupt-Menü ausgehend, auf die Ikone
drücken, um zur Funktion der HintergrundPersonalisierung zu gelangen. Die zur Wahl stehenden, eingespeicherten Hintergrund-Kulissen
lassen sich anhand des Datei-Namens wählen.
Nach der vorgenommenen Wahl, Vordruck beantragen und bestätigen
.
Um Hintergrund-Kulissen einer Micro-SD-Card
zu verwenden, einfach die Funktion “SD-KARTE
LESEN” wählen (bmp res. 800x480).
Page 28
28
FR/D
RADIO
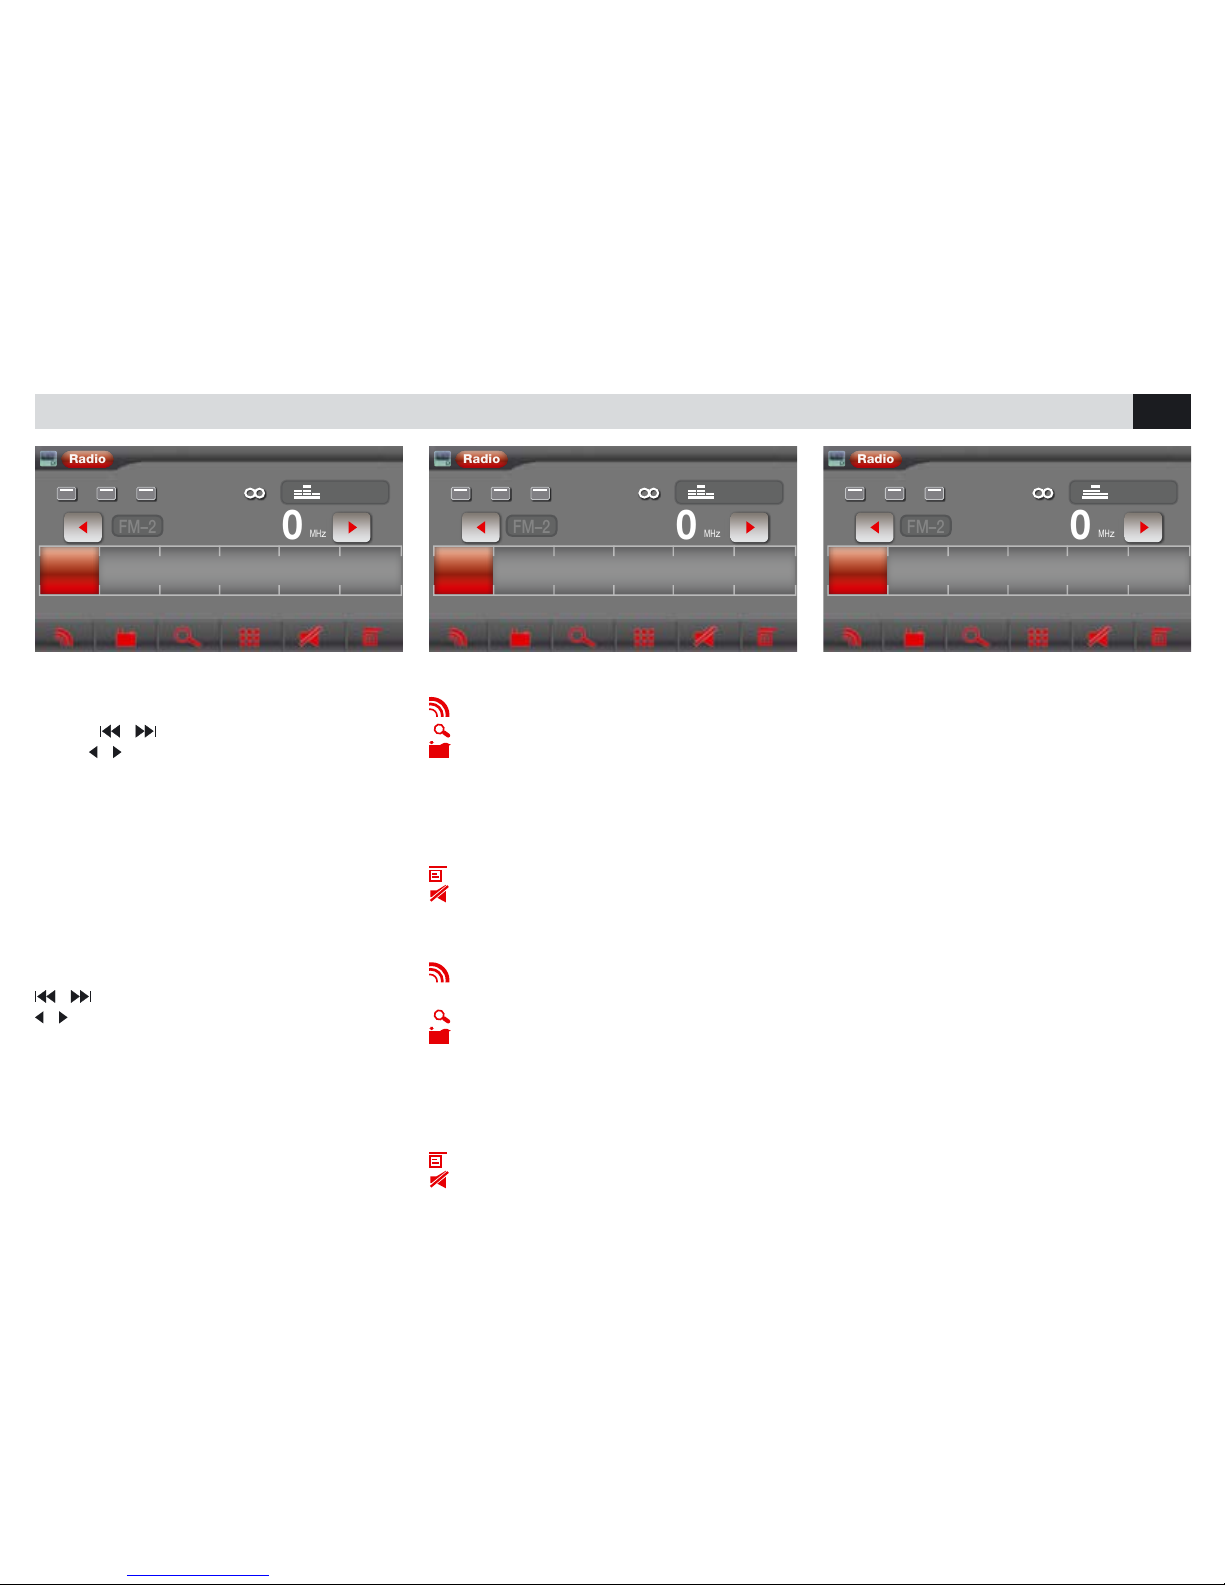
RECHERCHE DES STATIONS
• En appuyant pendant plus d’une seconde les
touches
/ sur la télécommande ou les
icônes
/ sur l’écran, l’appareil fera automa-
tiquement la recherche des stations. Pour la
recherche manuelle, appuyer brièvement.
FONCTION RADIO
BAND sélectionne les bandes radio 3 FM – 2 AM
PS Balayage des fréquences mémorisées
STORE Mémorisation de 6 stations disponibles
pour chaque bande.
Pour mémoriser appuyer STORE et choisir la position désirée.
Pour revenir sur une station, appuyer sur la fréquence correspondante en bas de l’écran.
PTYSélectionne le type de programme musical
MUTE Met l’audio à zéro.
FUNZIONI RADIO
• LOC. Sélectionne les stations voisines et
lointaines
• A F. Recherche d’une fréquence alternative avec
les informations de la station sur l’écran
• TA. Information sur la circulation
SENDER-WAHL
• drückt man länger als 1 Sekunde auf die Tasten
/ der Fernbedienung, bzw. auf die Ikonen
/ des Bildschirms, startet das Gerät automa-
tisch die Sender-Suche.
Will man eine manuelle Sender-Suche, nur kurz
auf die Tasten/Ikonen drücken.
RADIO-FUNKTIONEN
• LOC Wahl der nahen und ferngelegenen
Sender.
• AF Wahl einer Alternativ-Frequenz, mit Sender-
Infos auf dem Bildschirm.
• TA Verkehrs-Infos
RADIO-FUNKTIONEN
BAND Sucht Radio-Frequenzen zwischen 3
FM - 2 AM.
PS Auflistung der eingespeicherten Frequenzen.
STORE Einspeicherung von 6 möglichen
Sendern pro Frequenz-Band. Um einzuspeichern,
lang STORE drücken und die gewünschte Position
wählen. Um einen Sender heranzuholen, am unte-
ren Bildschirm-Rand, auf die betreffende Frequenz
drücken.
PTY Wahl der Musik-Programm-Art
MUTE Stummschaltung.
AF TA LOC
Radio
87 . 50
87.50 92.50
FM–2
106.50 98.70 105.00 103.50
MH
z
P1 P2 P3 P4 P5 P6
User
AF TA LOC
Radio
87 . 50
87.50 92.50
FM–2
106.50 98.70 105.00 103.50
MH
z
P1 P2 P3 P4 P5 P6
User
AF TA LOC
Radio
87 . 50
87.50 92.50
FM–2
106.50 98.70 105.00 103.50
MH
z
P1 P2 P3 P4 P5 P6
User
Page 29
29
FR/D
EGALISEUR • EQUALIZER
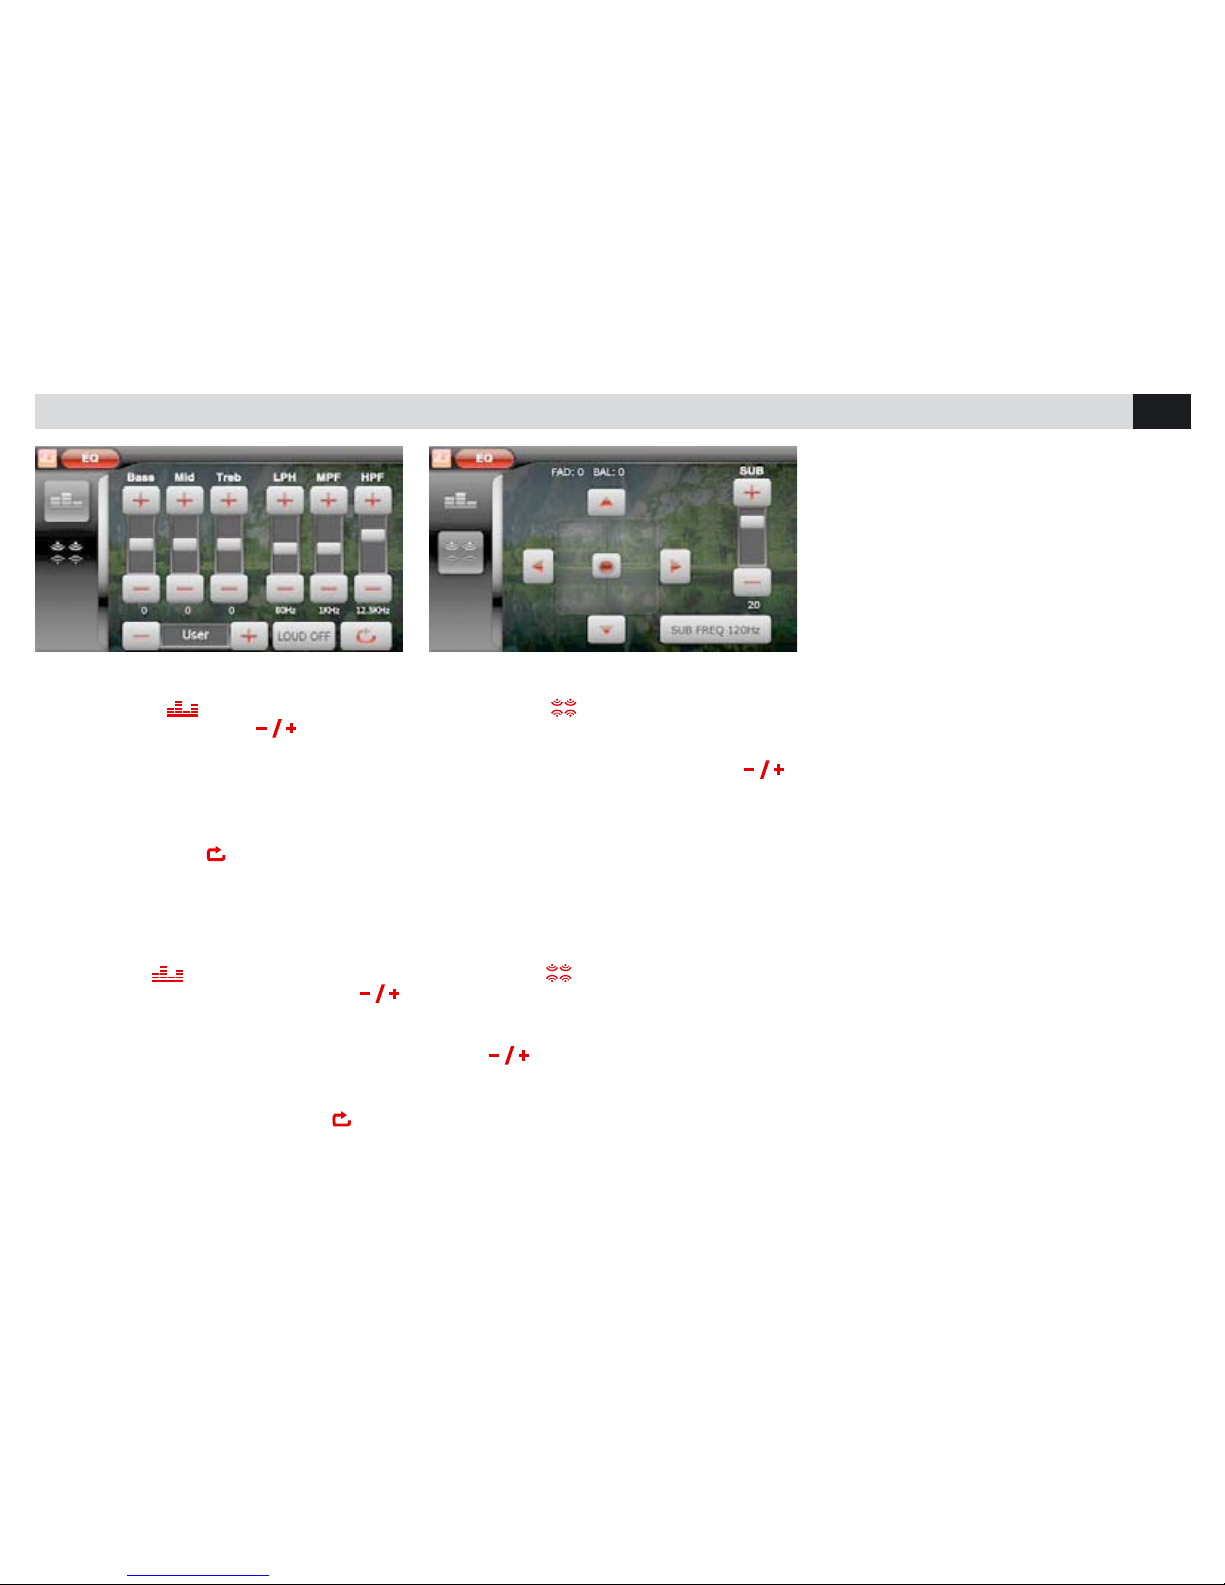
EGALISEUR - LOUDNESS
• Appuyer l’icône
pour modifier les réglages
d’origine. A travers les icônes
, on peut
sélectionner 8 modalités différentes d’équilibrage
préréglées: USER-FLAT-POP-ROCK-CLASSIC
JAZZ-TECHNO-OPTIMAL.
En modalité USER, on peut régler les niveaux des
hauts, medium et bas sur les fréquence désirées.
LPF-MPF-HPF. L’icône
reporte sur OPTIMAL
• LOUD: active l’exaltation des basses fréquences.
FADER - EQUILIBRAGE - SUBWOOFER
Appuyer l’icône
pour accéder aux réglages
du FADER et de l’ EQUILIBRAGE à travers les
flèches présentes sur l’écran.
Pour régler le volume du SUB W appuyer
Pour régler le crossover, appuyer SUB W et se
positionner sur la fréquence de coupure désirée.
EQUALIZER - LOUDNESS
• Auf die Ikone
drücken, um die Fabrik-Ein-
stellungen abzuändern. Anhand der Ikonen
lassen sich 8 verschiedene Equalizer-Modalitäten
wählen: USER-FLAT-POP-ROCK-CLASSIC-
JAZZ-TECHNO-OPTIMAL.
Im USER-Modus lassen sich Hoch-, Mittel- und
Tieftöne auf die gewünschten Frequenzen
einstellen. LPF - MPF - HPF. Die Ikone
führt
zurück zum OPTIMAL.
• LOUD Unterstreicht die Tief-Frequenzen.
FADER - BALANCE - SUB WOOFER
• Auf die Ikone
drücken. Dann, mittels
angezeigten Pfeilen, die FADER- und BALANCEEinstellungen vornehmen.
Um die Lautstärke des SUB-Woofers einzustellen, auf
drücken.
Um die Frequenzweiche zu regeln, die Taste
SUB-Woofer drücken und auf die gewünschte
Trennfrequenz gehen.
Page 30
30
FR/D
REPRODUCTION DVD-CD-USB-CARTE SD • DVD-CD-USB-SD-WIEDERGABE
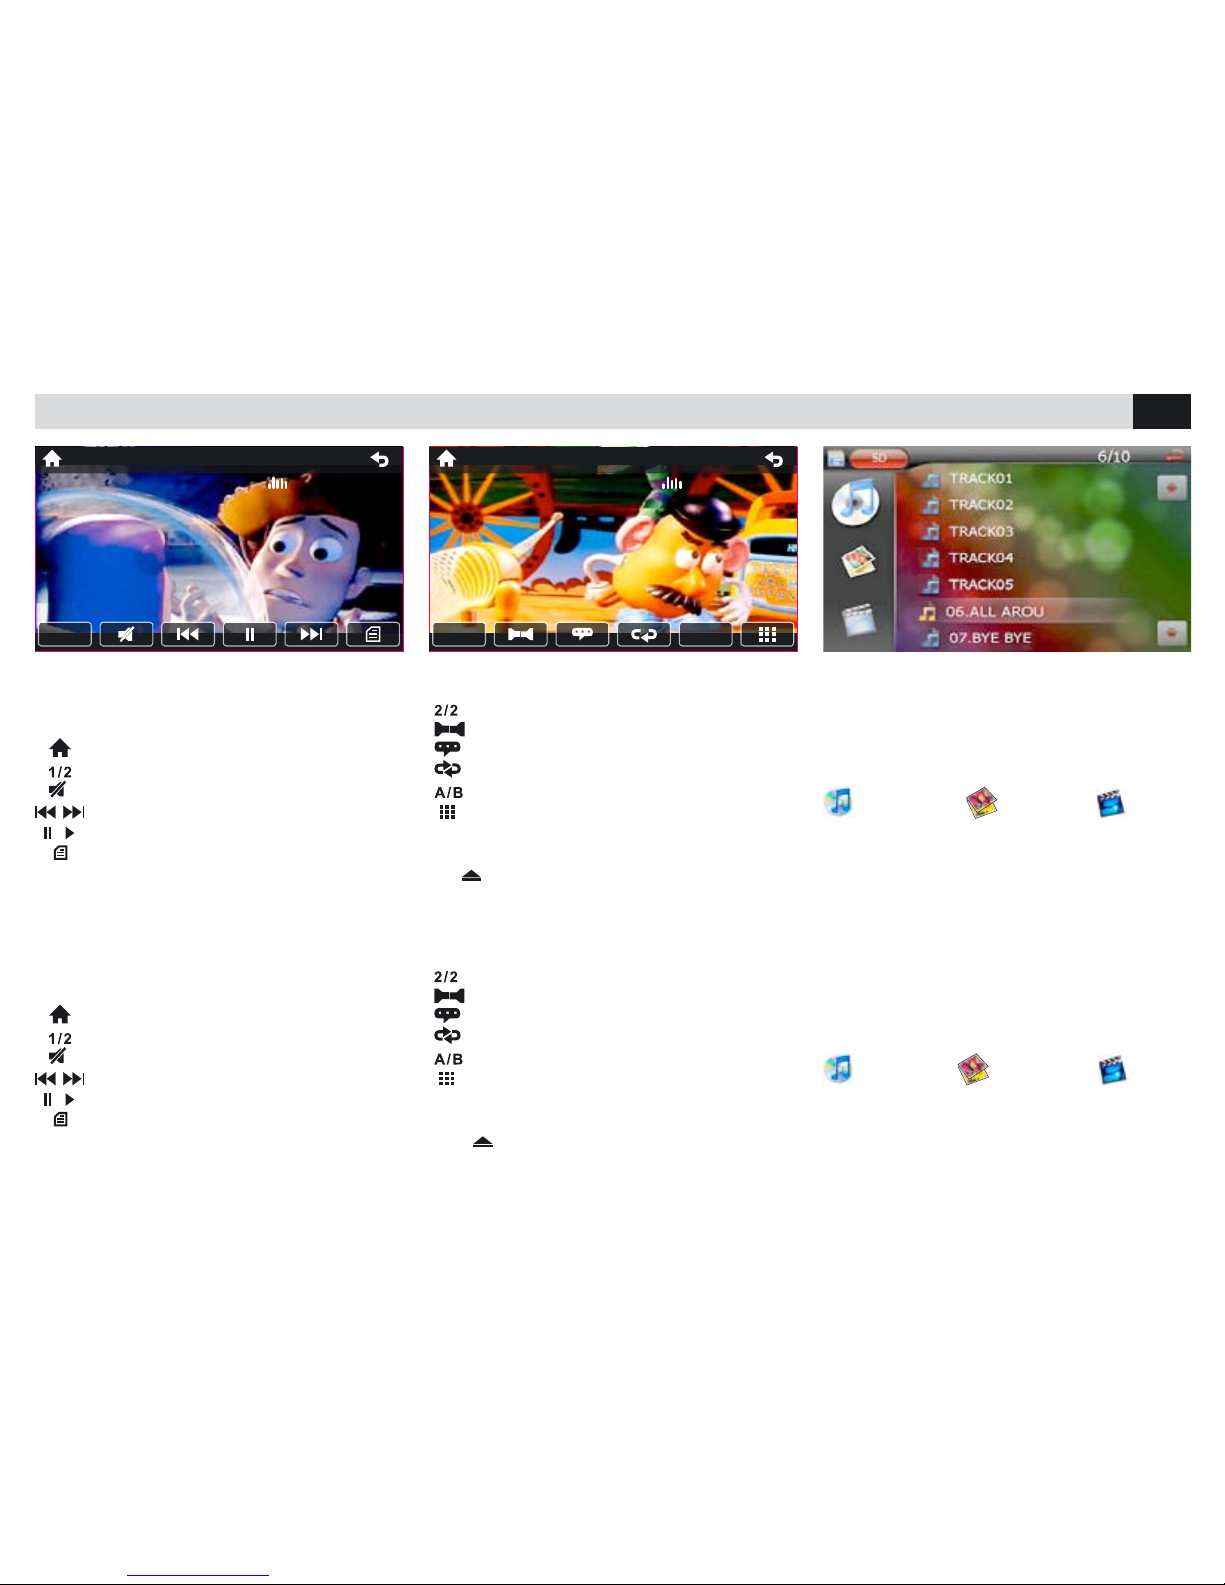
FONCTIONS USB / CARTE SD
A l’insertion d’une USB / CARTE SD, le contenu
est visualisé automatiquement
Sélectionner le type de fichier à travers l’icône
correspondante.
MUSIQUE IMAGES VIDEO
FONCTIONS DVD
Pour retourner au premier menu DVD
Pour changer la langue audio
Pour changer la langue des sous-titres
Répétition trace / chapitre / disque
Pour la répétition du point A au point B
Pour insérer le numéro de la trace /
chapitre à reproduire.
L’expulsion du disque se fait en appuyant la touche
sur la télécommande ou sur la façade.
FONCTIONS DVD
Avec l’insertion d’un DVD apparaît le menu du film.
Pour retourner au menu principal.
Pour passer au second menu DVD.
Pour mettre l’audio à zéro.
Pour trace / chapitre précédent ou successif.
/ Pour lancer ou interrompre la reproduction.
Pour visualiser le menu titres DVD.
DVD-FUNKTIONEN
Bei Eingabe einer DVD, erscheint das FilmMenü.
Zurück zum Haupt-Menü
Sprung zum 2. DVD-Menü
Audio-Einstellung
Stück/Kapitel davor/danach
/ Wiedergabe starten/unterbrechen
DVD-Menü ausweisen
DVD-FUNKTIONEN
Zurück zum 1. DVD-Menü
Audio-Sprache ändern
Untertitel-Sprache ändern
Stück / Kapitel / CD wiederholen
Wiederholung von A bis B
Eingabe der gewünschten Nummer des
Stücks oder Kapitels
Der CD-Auswurf wird getätigt, indem man die
Taste
auf der Fernbedienung oder auf dem
Bedienteil, drückt.
USB/SD-FUNKTIONEN
Sofort bei Eingabe einer USB/SD wird deren
Inhalt automatisch ausgewiesen.
Mit der entsprechenden Ikone, die gewünschte
Datei wählen.
MUSIK BILDER VIDEO
User
1/2
DVD T:1/20 C:3/51 00:00:30
User
2/2
DVD T:1/20 C:3/51 00:01:47
A/B
Page 31
31
FR/D
MUSIK-WIEDERGABE
Die Wiedergabe startet, sobald das gewünschte
Stück gewählt ist.
/ Ein anderes Stück wählen.
/ Wiederholt drücken, um schnell Vor-
wärts/Rückwärts zu gehen.
Stück / Ordner / Kapitel wiederholen.
/ Wiedergabe starten/unterbrechen.
Audio-Einstellung.
Equalizer
REPRODUCTION VIDÉO
Toucher l’écran pour faire apparaître le menu lorsque le film est en reproduction.
Pour retourner au menu principal.
Pour passer au second menu.
Pour mettre l’audio à zéro.
Pour trace / chapitre précédente ou suivant.
Pour lancer ou interrompre la reproduction.
Pour changer la langue audio.
REPRODUCTION DVD-CD-USB-CARTE SD • DVD-CD-USB-SD-WIEDERGABE
REPRODUCTION DES IMAGES
Sélectionner le fichier désiré pour visualiser
l’image. Pour faire apparaître le menu, appuyer
la partie inférieure de l’écran.
Pour agrandir l’image (Zoom)
Pour bouger l’image, utiliser les flèches qui
apparaîtront sur l’écran (
).
Pour tourner l’image.
Pour sélectionner la durée de la pause
entre une image et l’autre.
VIDEO-WIEDERGABE
Bildschirm antasten, wenn man, während der
Film-Wiedergabe, das Menü einblenden will.
Zurück zum Haupt-Menü
Das 2. Menü besichtigen
Das Audio ganz abzuschalten
Stück/Kapitel davor/danach
Wiedergabe starten / stoppen
Audio-Sprache ändern
REPRODUCTION MUSIQUE
Sélectionner la trace désirée pour commencer la
reproduction.
/ Pour changer la trace.
/ Appuyer consécutivement pour la repro-
duction rapide avance / revient.
Pour la répétition de trace / dossier chapitre.
/ Pour lancer ou interrompre la reproduction.
Pour mettre l’audio à zéro.
Egaliseur.
BILD-WIEDERGABE
Bild erscheint, nachdem die gewünschte Datei
gewählt wurde.
Den unteren Bildschirm-Rand antasten, um das
Menü erscheinen zu lassen.
Bild-Vergrößerung (Zoom)
Um das Bild zu verschieben, die Pfeil-Tasten auf
dem Bildschirm verwenden (
).
Bild drehen
Wahl der Pausezeit zwischen jedem
einzelnen Bild.
SD 6/22
User
1/2
USB T:1/20 C:3/51 00:00:30
Page 32
32
FR/D
REGLAGES BLUETOOTH • BLUETOOTH-EINSTELLUNGEN
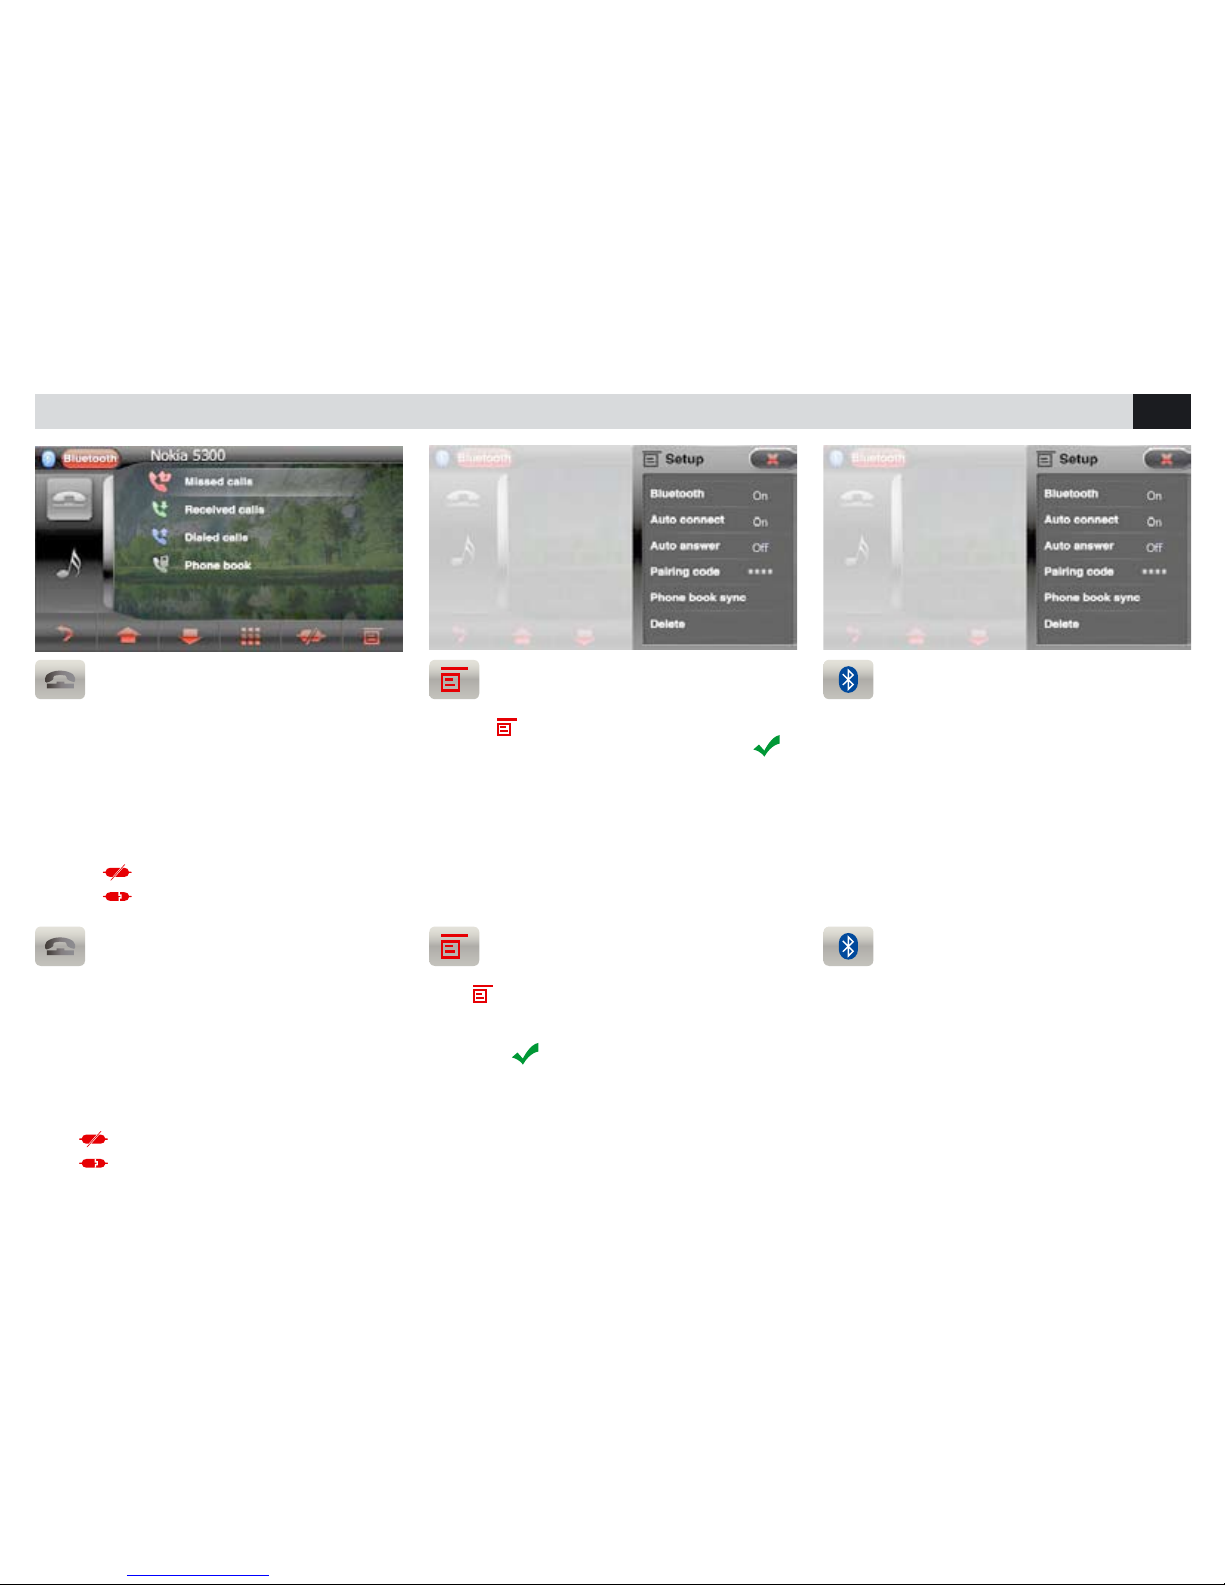
ÜBERNAHME DES TELEFON-REGISTERS
Taste drücken, um zu den Einstellungen zu
gelangen.
PHONEBOOK (Telefon-Register) wählen und
bestätigen
.
Das Telefon-Register wird somit automatisch
in das Autoradio eingespeichert. Die dazu in
Anspruch genommene Zeit richtet sich nach der
Anzahl der vorhandenen Telefon-Nummern.
OPTION BLUETOOTH
• CONNEXION AUTOMATIQUE: connecte automatiquement le téléphone
• RÉPONSE AUTOMATIQUE: répond automatiquement à l’appel
• CODE D’ACCOUPLEMENT: change le mot de
passe
• DELETE: élimine les dispositifs accouplés.
BLUETOOTH-MÖGLICHKEITEN
• AUTOMATISCHE KOPPLUNG: Telefon wird
automatisch angekoppelt
• AUTOMATISCHE BEANTWORTUNG: Anruf
wird automatisch in Empfang genommen
• KOPPLUNGS-CODE-NUMMER: Passwort
ändern
• DELETE: Stornierung der gekoppelten Telefon-
Geräte
ACCOUPLEMENT TELEPHONE
On peut accoupler jusqu’à 5 téléphones.
• Activer la fonction bluetooth sur le téléphone et
rechercher les nouveaux dispositifs.
• Sélectionner PHONOCAR dans la liste des
dispositifs, insérer le mot de passe 0000 quand
c’est nécessaire. Lorsque le couplage est réussi,
le nom du téléphone apparaît.
Appuyer
pour déconnecter le téléphone
Appuyer
pour le reconnecter.
TELEFON-KOPPELUNG
Es lassen sich bis zu 5 Telefongeräte anschließen.
• Bluetooth-Funktion auf dem Telefon aktivieren
und neue Geräte suchen.
• PHONOCAR aus der Geräte-Liste wählen. Auf
Verlangen, das Passwort 0000 eingeben.
Nach erfolgreich durchgeführter Koppelung,
erscheint der Name des Telefons.
Taste
drücken, um Telefon zu deaktivieren.
Taste
drücken, um Telefon wieder zu akti-
vieren.
SYNCHRONISATION DU REPERTOIRE
Appuyer
pour accéder aux réglages.
Sélectionner REPERTOIRE et valider avec
.
Le répertoire du téléphone sera automatiquement téléchargé dans la mémoire de l’autoradio.
Le temps de l’opération vari en fonction du
nombre des contacts.
Page 33
33
FR/D
FONCTIONS BLUETOOTH • BLUETOOTH-FUNKTIONEN
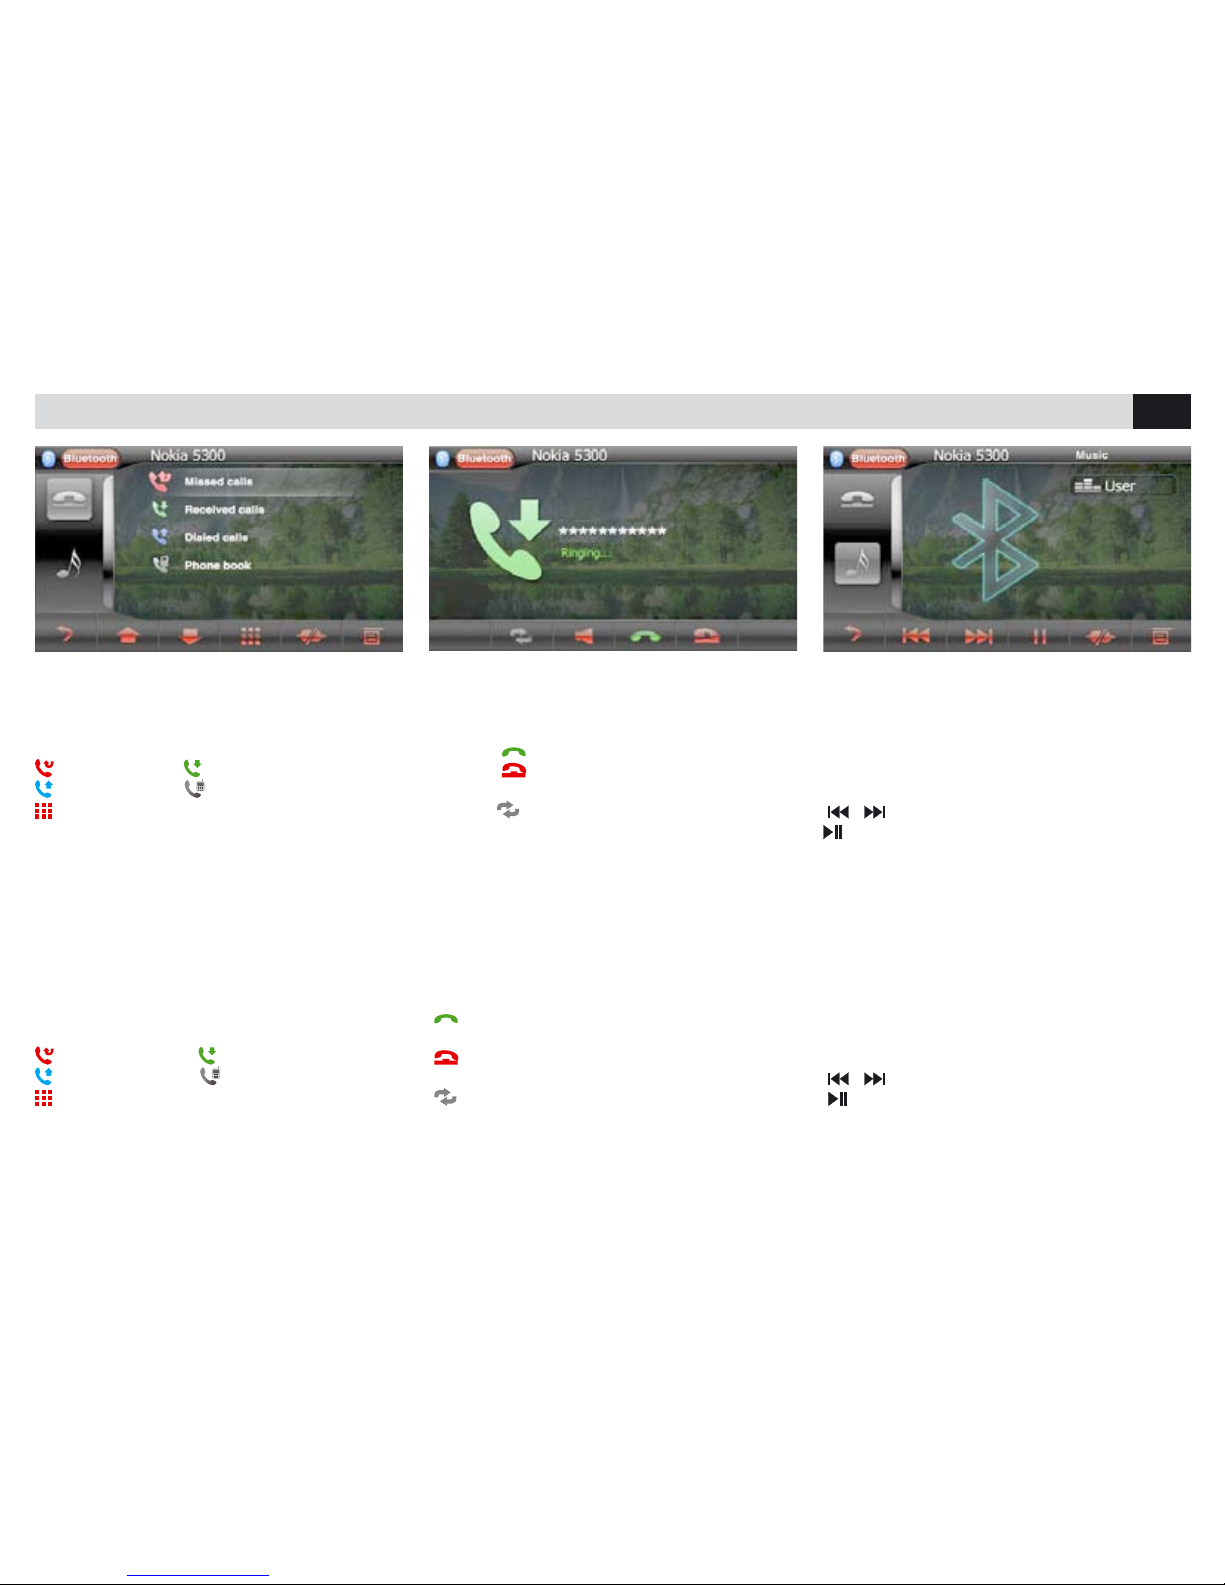
REPRODUCTION MUSIQUE BLUETOOTH
Si le téléphone branché supporte le profil AD2P,
c’est possible écouter les morceaux.
Si le dispositif supporte AVRCP, les morceaux
pourront être contrôlés directement à partir de
l’écran tactile.
/ Chanson précédente / suivante.
Lance / interrompe la reproduction.
APPELER À PARTIR DE L’ÉCRAN
• Sélectionner Bluetooth dans le Menu principal
• Appuyer un des icônes que vous trouvez sur
l’écran pour appeler à partir d’une des listes:
appel perdu; appel reçu;
appel effectué; répertoire téléphonique;
appel à partir du clavier numérique.
TELEFONAT VOM BILDSCHIRM STARTEN
• Bluetooth aus dem Haupt-Menü wählen.
• Eine der Ikonn auf dem Bildschirm antasten,
um Anruf aus der spezifischen Telefon-Liste zu
starten
Verlorene Anrufe Beantwortete Anrufe
Gestartete Anrufe Telefon-Register
Anruf durch Nummern-Tasten starten
RECEVOIR UN APPEL
Quand un appel est entrant, le VM080 passe
automatiquement en modalité bluetooth.
Appuyer
pour répondre.
Appuyer
pour terminer la conversation ou
refuser l’appel entrant.
Appuyer
pour exclure / activer la mains-li-
bres.
ANRUF IN EMPFANG NEHMEN
Sobald ein Anruf kommt, schaltet das Gerät
VM080 automatisch die Bluetooth-Funktion ein.
Taste drücken, um Gespräch in Empfang zu
nehmen.
Taste drücken, um Gespräch zu beenden
oder um eingehendes Telefonat zurückzuweisen.
Taste drücken, um Freisprech-Funktion zu
aktivieren/deaktivieren.
BLUETOOTH-MUSIK-WIEDERGABE
Soweit das gekoppelte Telefon AD2P-kompatibel
ist, läßt sich dadurch Musik hören.
Wenn es AVRCP-kompatibel ist, dann lassen
sich die einzelnen Musikstücke direkt auf dem
touch-Screen bedienen.
/ Stück davor / danach
Wiedergabe Starten / Stoppen
Page 34

34
IT/GB
CARATTERISTICHE TECNICHE • TECHNICAL FEATURES • CARACTERISTIQUES TECHNIQUES • TECHNISCHE DATEN
Reference Supply Voltage ...................................... 12V(DC)
Operating Voltage Range .......................... 10.5 - 15.8V(DC)
Max Operating Current ...................................................15A
FM
Signal Noise Ratio .................................................... ≥60dB
Residual Noise Sensitivity(S/N=30dB .................... 18dBμV
Frequency Response(±3dB ..........................40Hz~12.5KHz
Station Seeking Level ....................................... 20~28dBμV
Distortion .................................................................. ≤1.5%
Stereo Separation(1KHz ........................................... ≥25dB
Antenna Impedance ...................................................... 75Ω
AM
Residual Noise Sensitivity (S/N=20dB ................... 30dBμV
Selectivity (±9KHz .................................................... ≥50dB
LCD
Screen size .................................................. 6.2inches(16:9)
Display resolution ............................................800X480dots
Contrast radio .................................................................500
Brightness ........................................................... 300cd/m2
DVD Player
Signal / Noise Ratio ..................................................... 90dB
Dynamic Range ........................................................... 90dB
Distortion(line out ..................................................... ≤0.1%
Frequency Response(±3dB .............................20Hz~20KHz
Maximum Output Power .......................................... 4×45W
Load Impedance ............................................................. 4Ω
AUX IN
Distortion .................................................................. ≤0.5%
Frequency Response(±3dB .............................20Hz~20KHz
Audio Input Level ........................................................1Vrms
Audio
Audio Output Impedance ............................................ 100Ω
Audio Output Level ........................................... 4Vrms(Max)
Video
Normal Video Input Level(CVBS .............................1.0±0.2V
Video Input Impedance ................................................. 75Ω
Video Output Impedance ..............................................75Ω
Video Output Level .................................................1.0±0.2V
FORMATI SUPPORTATI
Formattazione USB/SD-CARD: FAT16 – FAT32 • Bit rate MP3 : 32-320 Kbps • WMA: V9 o successive
Numero di livelli massimo nella directory: 8 • Max album per cartella: 99 • Max tracce per cartella: 999
ID3TAG: V2 o successive • Nomi dei le in Unicode UTF8 (lunghezza massima 128 caratteri)
FORMATI NON SUPPORTATI
Un album o una cartella senza alcun file MP3/WMA non verrà visualizzato sul display.
I le non compatibili o non supportati saranno saltati, ignorati e non riprodotti (AAC, WMV, PCM / WMA con
protezione DRM e in formato LOSSLESS).
FORMATO DISCHI MP3 SUPPORTATI
ISO9660, Joliet • Numero massimo titoli : 512 • Numero massimo album: 255
Frequenza di campionamento supportata: 32Khz, 44.1Khz, 48Khz • Bit-rate supportati: 32-320Kbps.
SUPPORTED FORMATS
Formating USB/SD-CARD: FAT16 – FAT32 • Bit rate MP3 : 32-320 Kbps • WMA: V9 or successive
Maximum levels of Directory: 8 • Max albums per Folder: 99 • Max Tracks per Folder: 999
ID3TAG: V2 or successive • File-Names in Unicode UTF8 (max. length 128 digits)
NON-SUPPORTED FORMATS
An Album or a Folder lacking MP3/WMA-files at all, will NOT be visualized on the display.
The files which are not compatible or not supported, will be left behind, in other words ignored and not repro-
duced (AAC, WMV, PCM / WMA with DRM-protection and in LOSSLESS-format).
SUPPORTED MP3-FORMATS
ISO9660, Joliet • Max. number of Titles : 512 • Max. Album-quantity: 255
Supported sample-Frequency: 32Khz, 44.1Khz, 48Khz • Supported Bit-rates: 32-320Kbps.
FORMAT-KOMPATIBILITÄT
Formatierung USB/SD-CARD: FAT16 – FAT32 • Bit rate MP3 : 32-320 Kbps • WMA: V9 oder höher • Maximale
Register-Stufen: 8 • Max Album-Anzahl pro Ordner: 99 • Max Stücke pro Datei: 999 • ID3TAG: V2 oder höher
Datei-Namen in Unicode UTF8 (max. Länge 128 Buchstaben)
NICHT-KOMPATIBLE FORMATE
Ein Album oder ein Ordner, die ganz ohne MP3/WMA-Dateien sind, lassen sich nicht auf dem Display ausweisen.
Alle nicht-kompatiblen oder nicht lesbaren Dateien werden ganz einfach übersprungen bzw. ignoriert, d.h. nicht
abgespielt (AAC, WMV, PCM / WMA mit DRM-Schutz und in LOSSLESS-Format).
KOMPATIBLE MP3-FORMATE
ISO9660, Joliet • Max. Musikstück-Titel: 512 • Max. Album-Anzahl: 255
Kompatible Muster-Frequenz: 32Khz, 44.1Khz, 48Khz • Kompatible Bit-rate: 32-320Kbps.
FORMATS SUPPORTÉS
Formatage USB / CARTE SD: FAT 32. BIT rate MP: 32 -320 Kbps. WMA V9 ou successive
Nombre des niveaux maximum dans la directory: 8. Max album par dossier: 99. Max trace par dossier: 999
ID3TAG: V2 ou successive. Noms des fichiers en Unicode UTF8 (Longueur maximale 128 caractères)
FORMATS PAS SUPPORTÉS
Un album ou un dossier sans aucun fichier MP3 / WMA ne sera pas visualisé sur l’afficheur
Les fichiers pas compatibles ou pas supportés seront sautés, ignorés et pas reproduits (AAC, WMA, PCM /
WMA avec protection DRM et en format LOSSLESS)
FORMAT CD MP3 SUPPORTÉS
ISO09660, Joliet. Nombre maximum de titres: 512. Nombre Maximum d’album: 255
Fréquence d’essaie supportée: 32Khz, 44.1Khz, 48Khz. Bit –rate supportés: 32 – 320Kbps.
Page 35
35
E
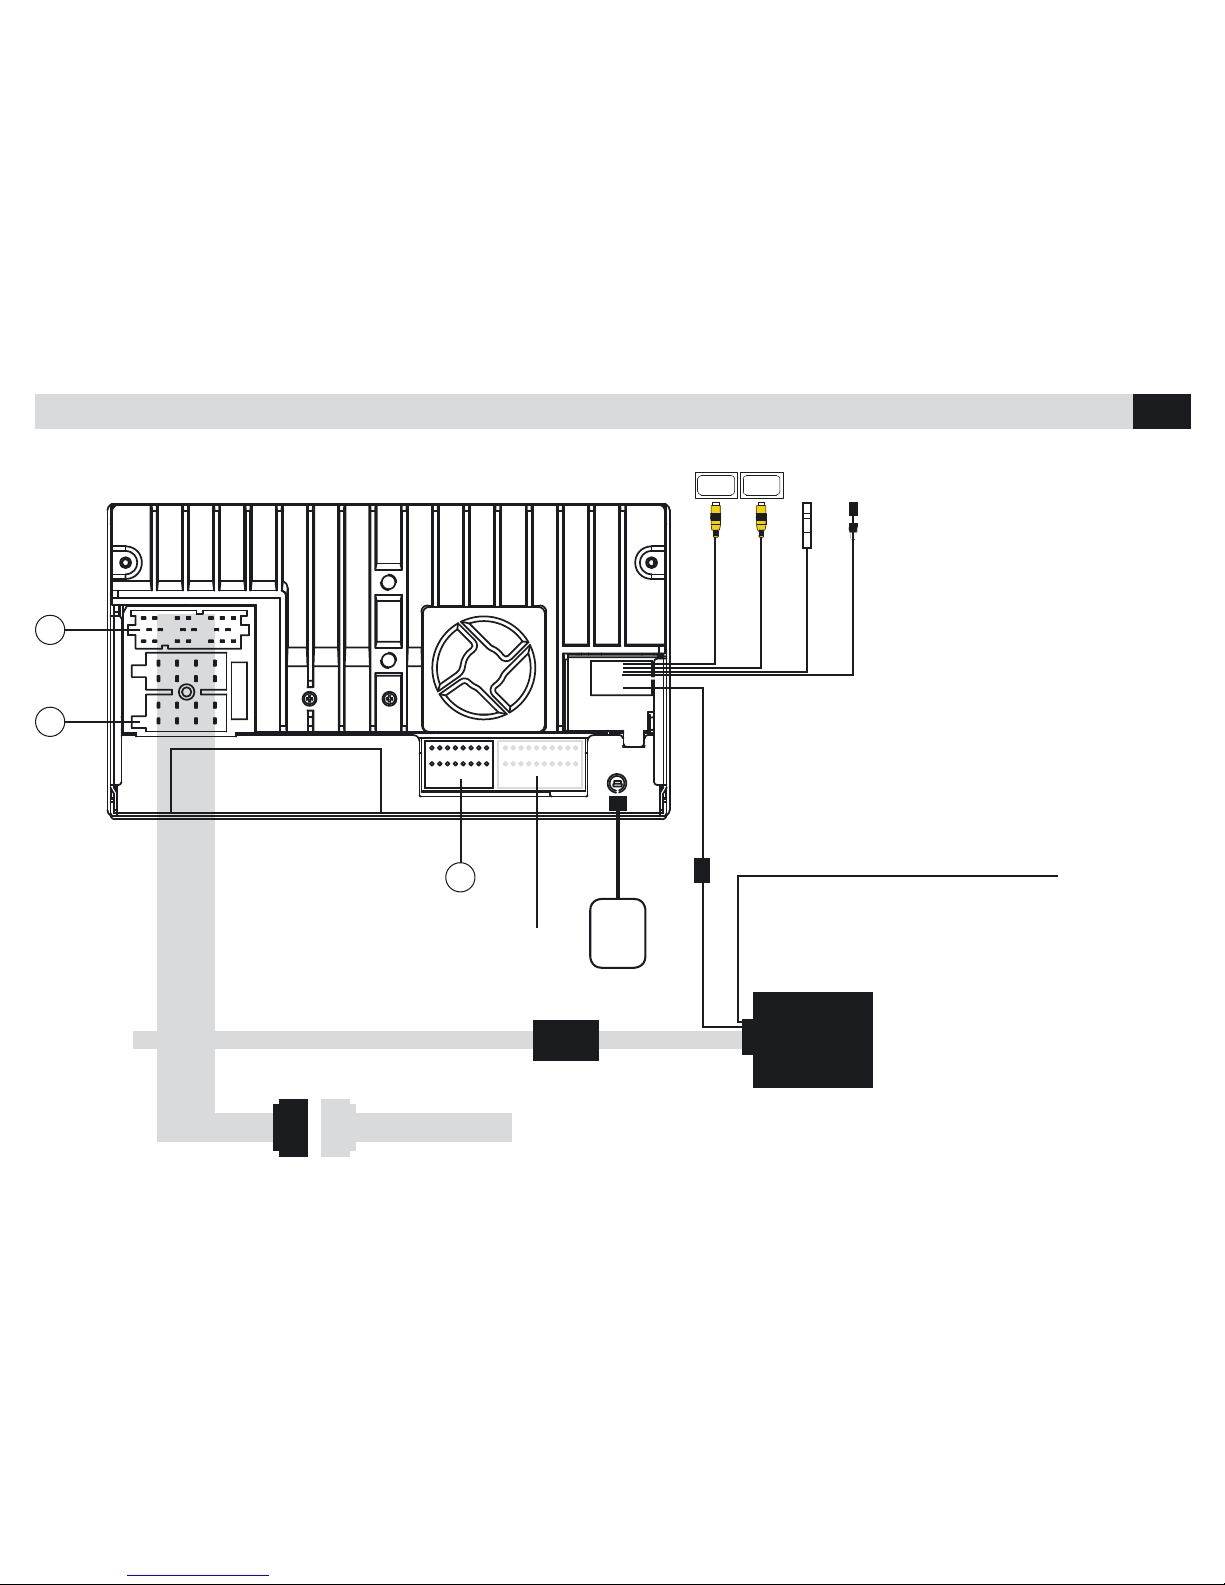
CONEXIONES
NO DISPONIBLE
1
2
3
VIDEO 1
VIDEO 2
REAR
DISPLAY
REAR
DISPLAY
RADIO ANT
MICROFONO/MIC
VERDE SWCMARRÓN
SALIDA MANDOS DE VOLANTE
Conexiones que se tienen que efectuar solo en el caso de que el
coche disponga de los mandos de volante.
GPS
ATENCIÓN
Verificar que el coche tenga activada la
línea CAN-BUS. Después de haber efectuado las conexiones, el Led de la centralita
efectúa 3 parpadeos de color rojo. Cuando
el Led se ponga de color verde la centralita
estará programada.
En el caso de que la radio sea re-instalada..
La centralita tiene que ser re-programada.
AERIAL
GPS
CAN BUS
INTERFACE
4/145
CONECTOR ORIGINAL DEL COCHE
FAKRA
FAKRA
GRIS SALIDA DE SEÑAL ODÓMETRO
Page 36
36
E
CONEXIONES
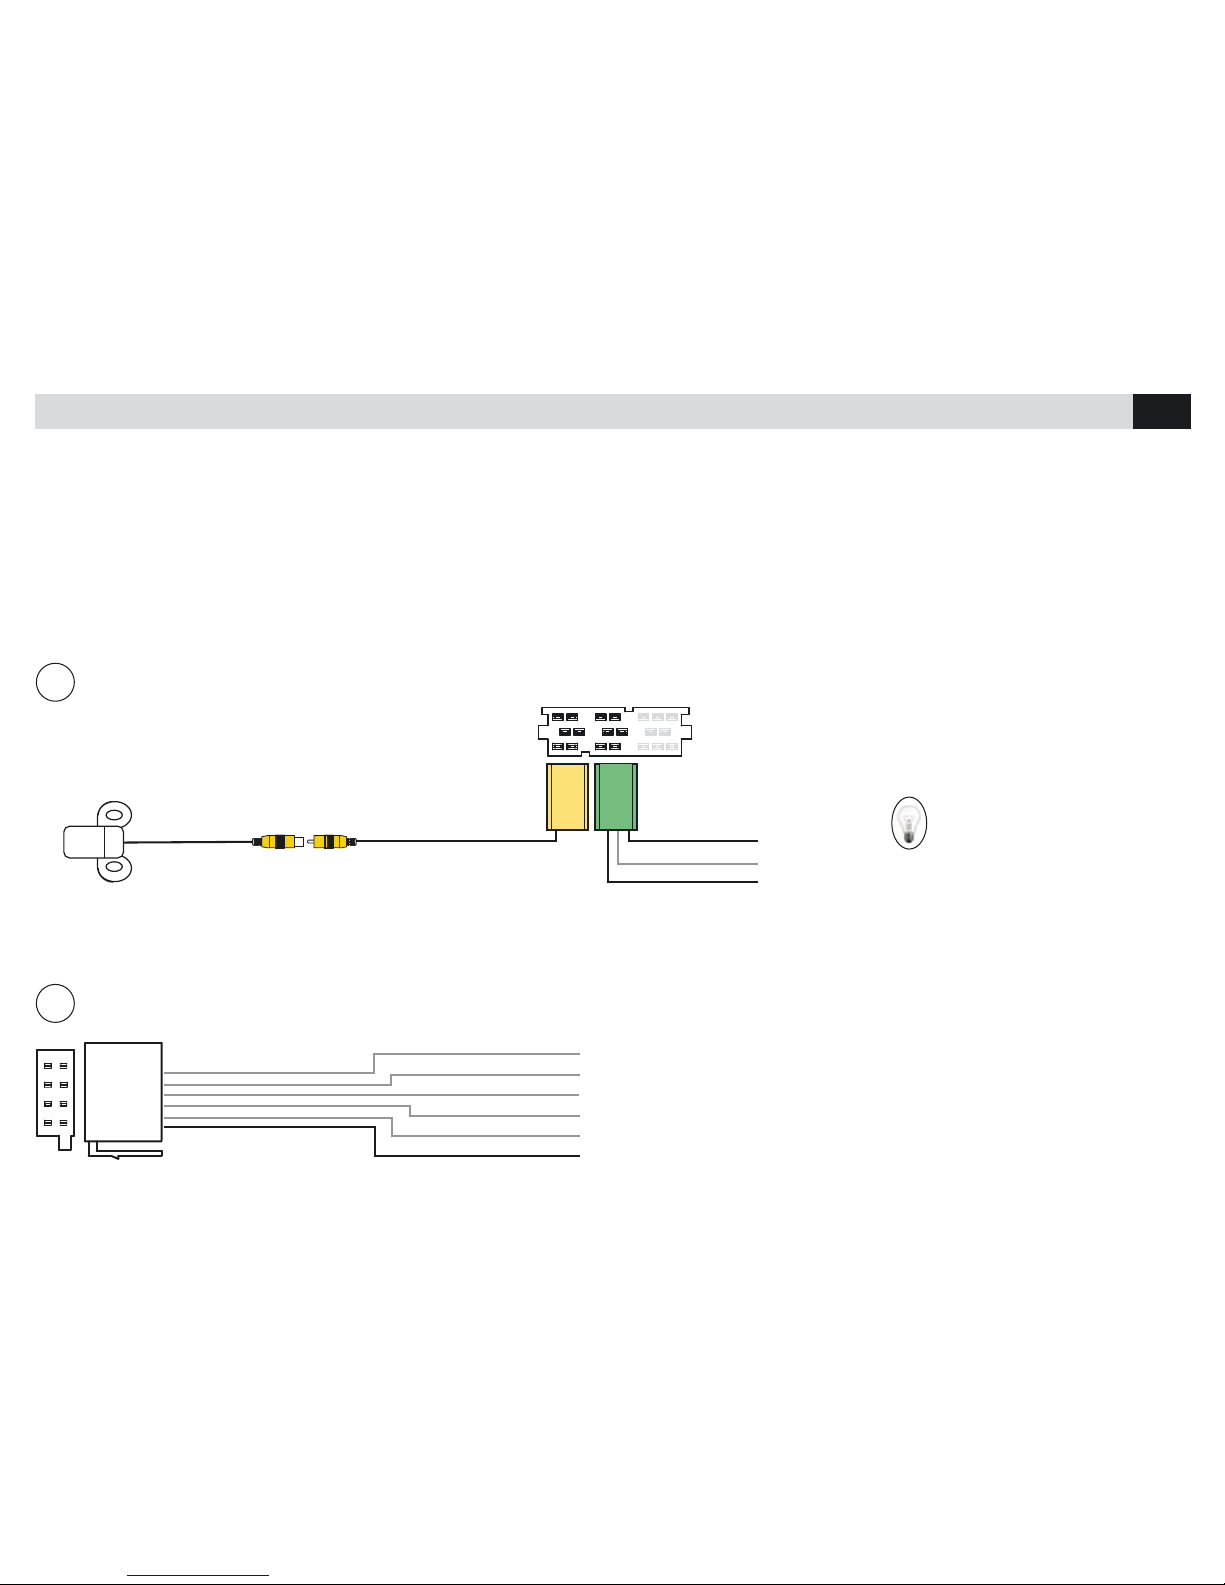
1
CONEXIONES PARA RETRO CAMARA Y AMPLIFICADOR
2
NEGRO
Mute
Encendido del amplificador
MUTE
MUTE
CAMERA
REVERSE
BRAKE
P. REM
AZUL
AZUL-NEGRO
AMARILLO
VERDE
AMARILLO
Luces de marcha atrás
+
En el caso de que no este presente la cámara trasera cortar y aislar el cable azul presente en el conector verde.
• En el VM080 las conexiones son PLUG AND PLAY.
• La centralita CAN-BUS reconoce automáticamente el protocolo del coche y proporciona los servicios necesarios para el funcionamiento.
• Los siguientes esquemas muestran como efectuar las conexiones opcionales.
ROSA
Page 37
37
E
CONEXIONES
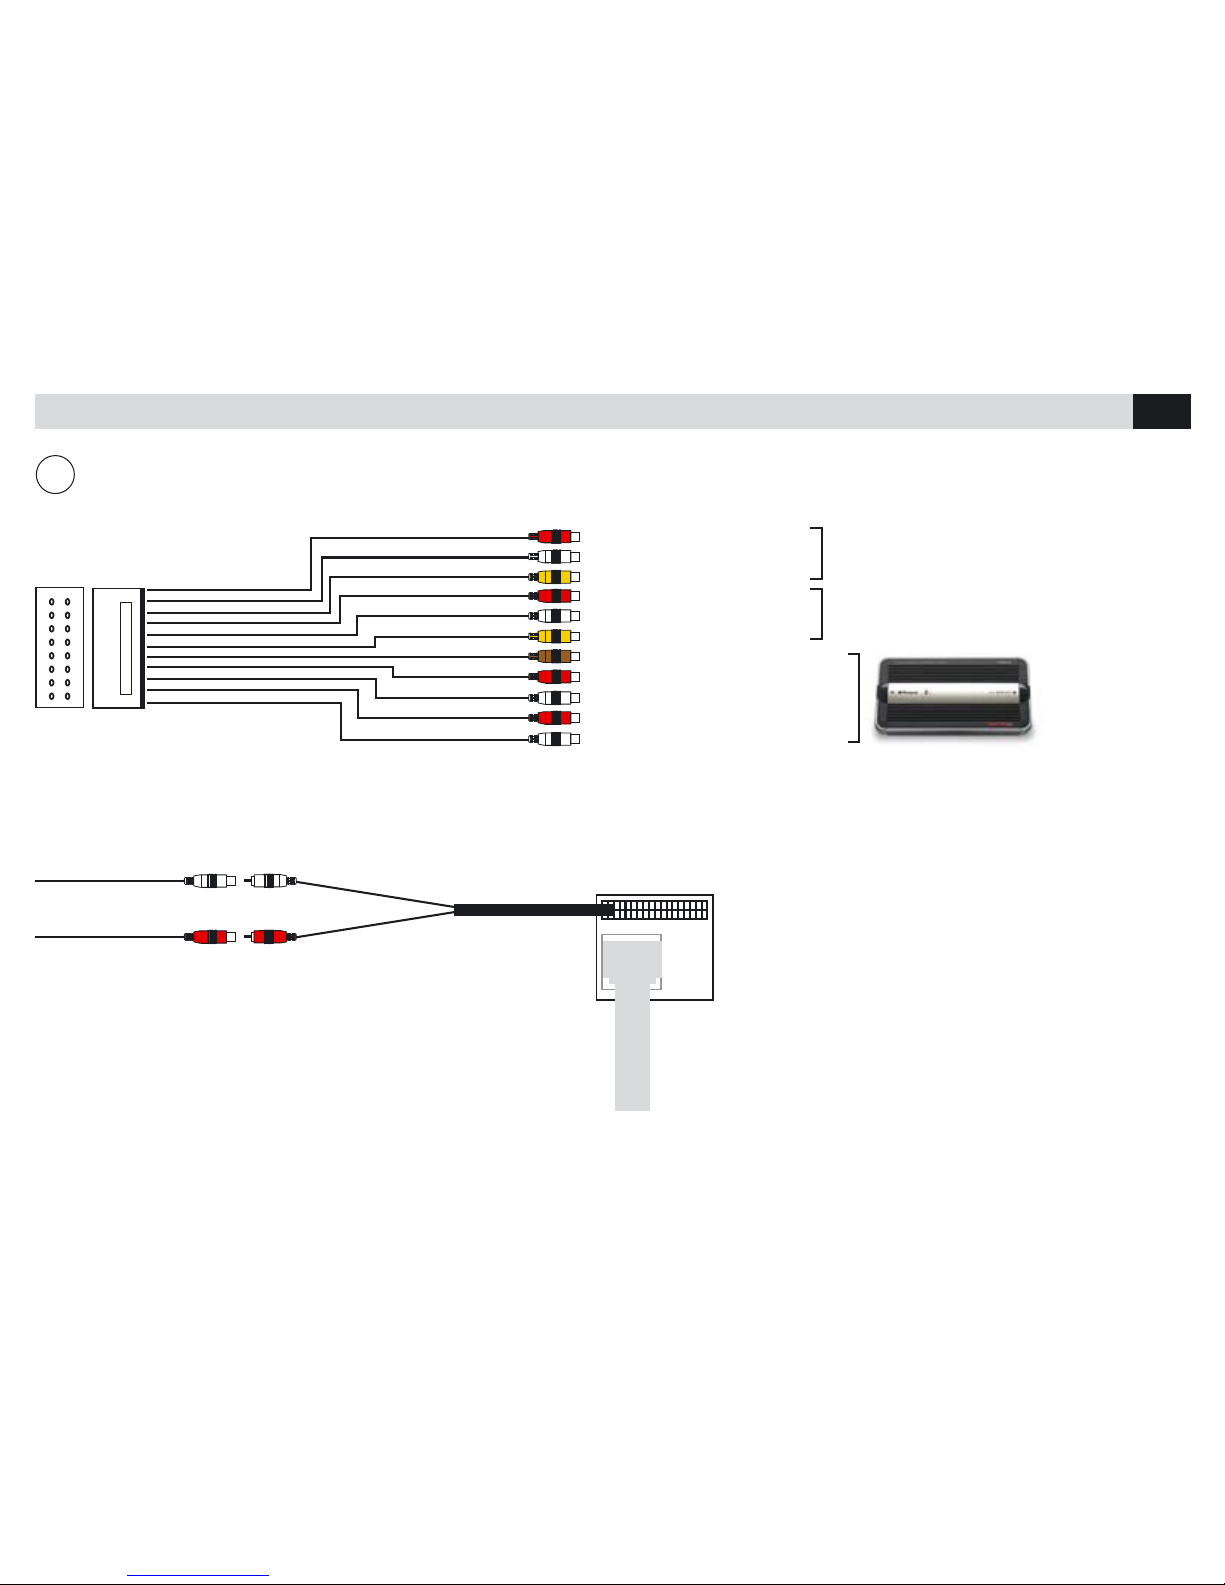
3
SALIDAS PRE-AMP
DERECHO 1
IZQUIERDO 1
SALIDA VIDEO 1
DERECHO 2
IZQUIERDO 2
SALIDA VIDEO 2
SALIDA SUB WOOFER
ANTERIOR DERECHO
ANTERIOR IZQUIERDO
POSTERIOR DERECHO
POSTERIOR IZQUIERDO
ENTRADA A/V 2
ENTRADA A/V 1
AUX IN R 1
AUX IN L 1
AUX VIDEO 1
AUX IN R 2
AUX IN L 2
AUX VIDEO 2
SUB WOOFER
FRONT R
FRONT L
REAR R
REAR L
Efectuar esta conexión, en el caso de que el coche
dispone de una entrada AUX-IN
AUX IN L 1
AUX IN R 1
FAKRA
Page 38
38
E
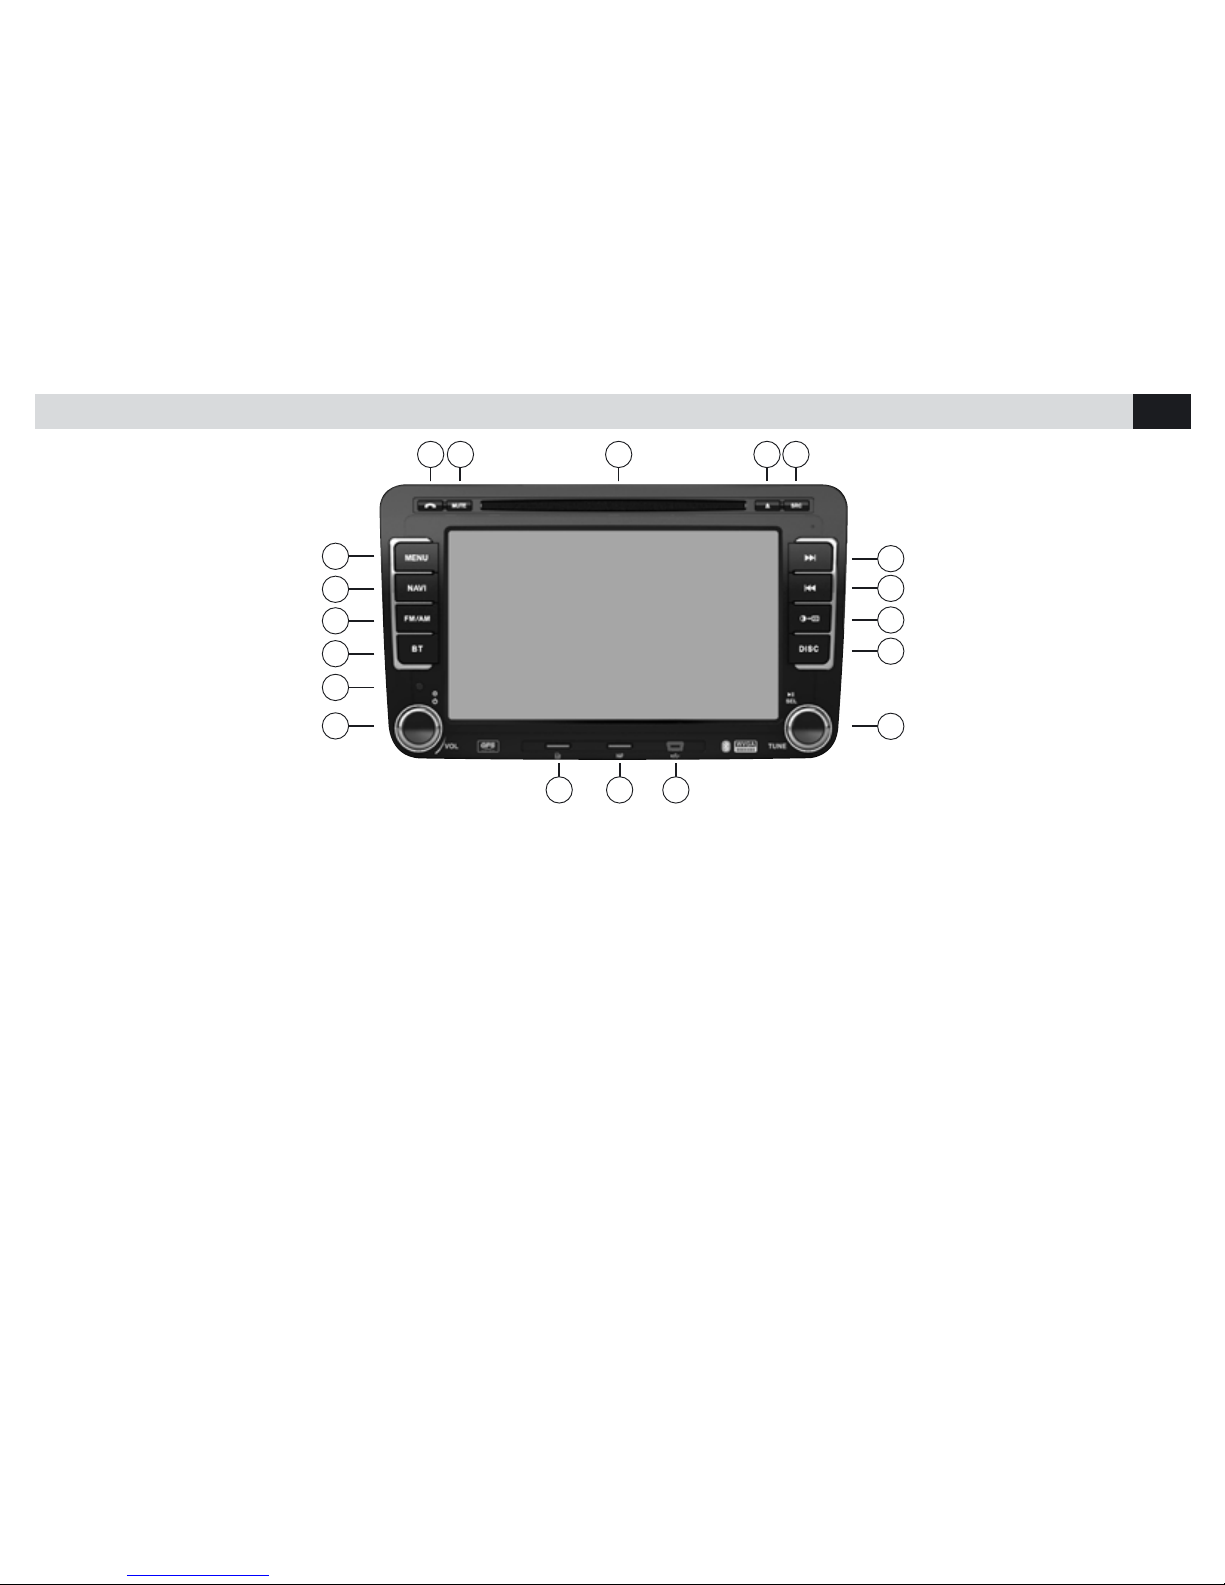
FUNCIONES
1
2
3
4
5
6
1516171819
7 8 9
10
11
12
13
14
1. MENU – Vuelve al menu principal
2. Navegador
3. Radio
4. Bluetooth
5. Sensor del mando a distancia
6. Comando encendido / volumen
Para apagar, presionar durante 2 segundos
Para silenciar el audio presionar brevemente
7. Ranura SD/SDHC/MMC Card
8. Ranura Micro SD para la navegación
9. Puerto Micro-USB
10. Mando búsqueda canción/emisora de radio.
Inicia e interrumpe la reproduccion
11. Disco
12. Brillo pantalla
13-14. Canción/Capitulo sucesivo-precedente
15. Cambia fuente
16. Expulsión del disco
17. Ranura CD / DVD
18. Mute
19. Contestar/Terminar/Realizar llamada
Page 39
39
E
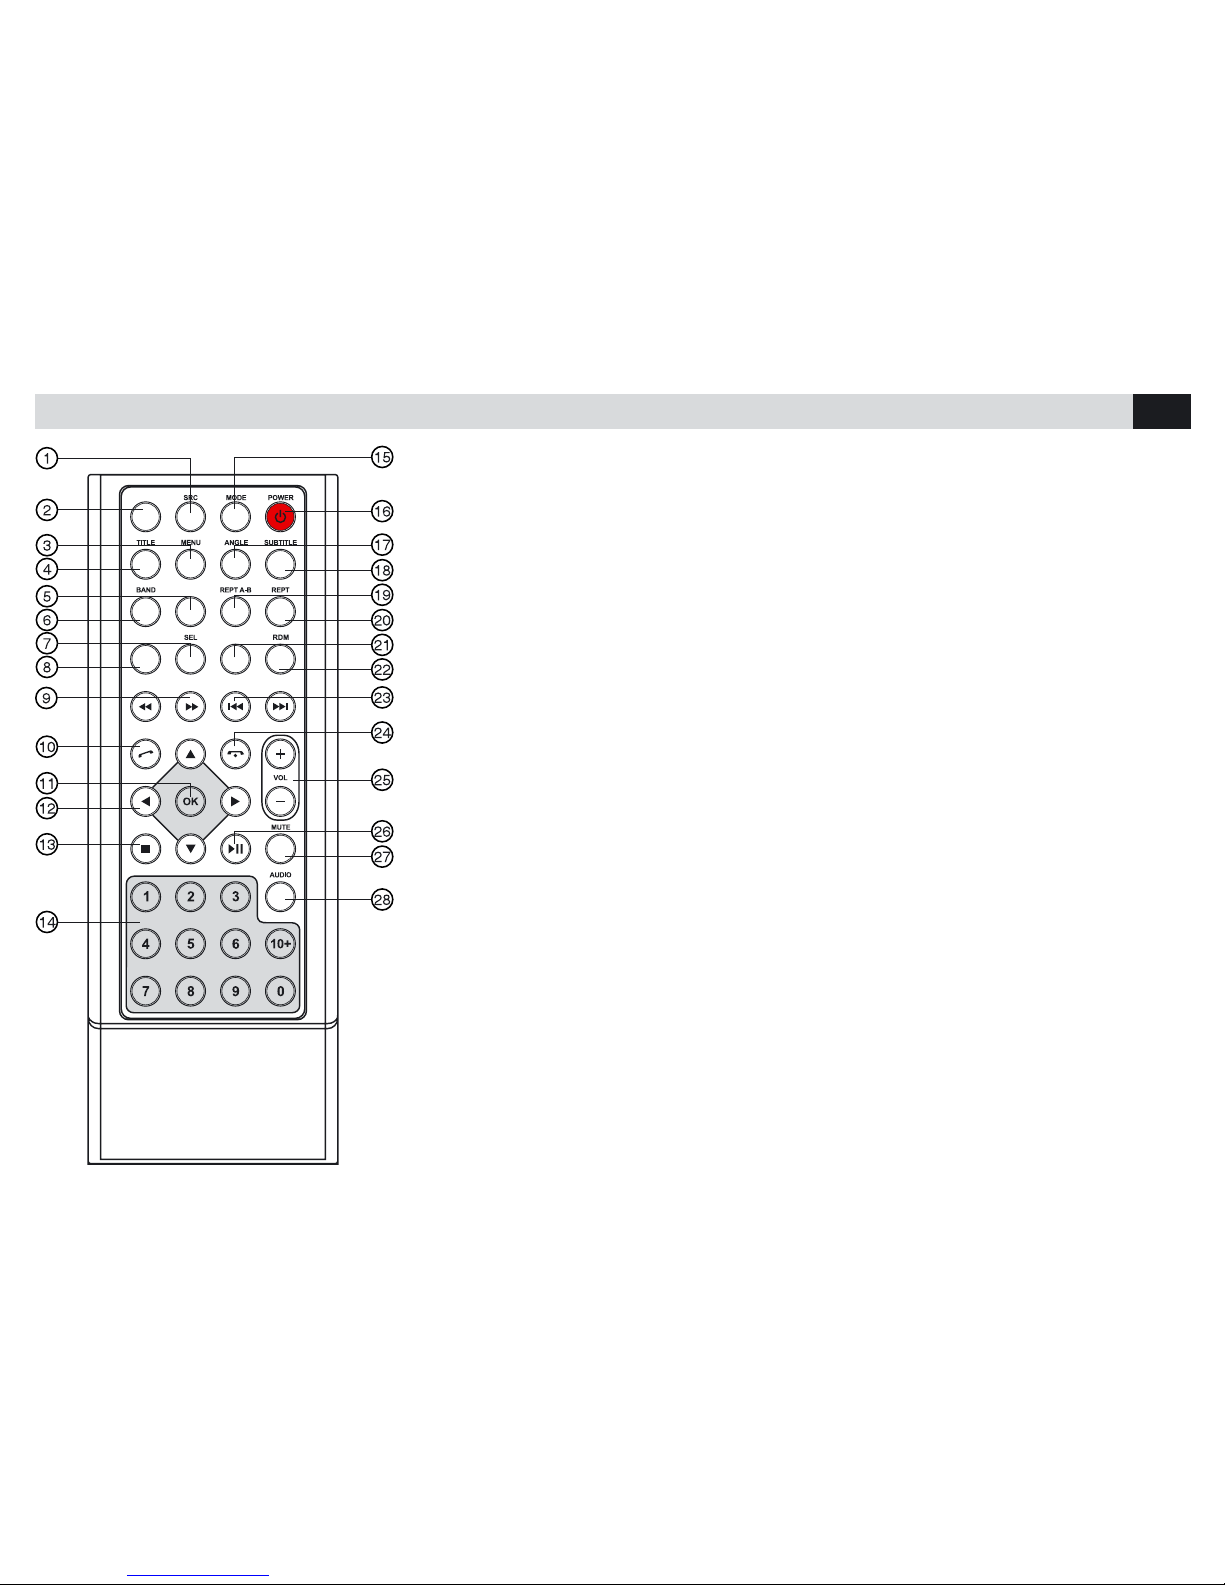
FUNCIONES MANDO A DISTANCIA
EJECT
ZOOM
DIM
SLOW
1. Selecciona fuente
2. Expulsión disco
3. MENU’ DVD
4. Titulo DVD
5. Zoom
6. Banda radio
7. Ajustes pantalla/audio
8. Ajuste brillo
9. Adelante/Atrás rápido
10. Realizar/Recibir llamada
11. Envía
12. Menú cursor
13. Stop/Atrás
14. Teclado numérico
15. Entra en el menú principal
16. Encendido/Apagado
17. Angulo DVD
18. Subtítulos DVD
19. Repetición A-B
20. Repetición Pista/Capitulo/Carpeta
21. Menú en la pantalla
22. Reproducción casual
23. Pista/Emisora precedente/siguiente
24. Interrumpe llamada/Cancela
25. Volumen
26. Inicia/Interrumpe reproducción
27. Silenciamiento audio
28. Audio DVD/Audio VCD/L-R-ST
Page 40
40
E
MENÙ
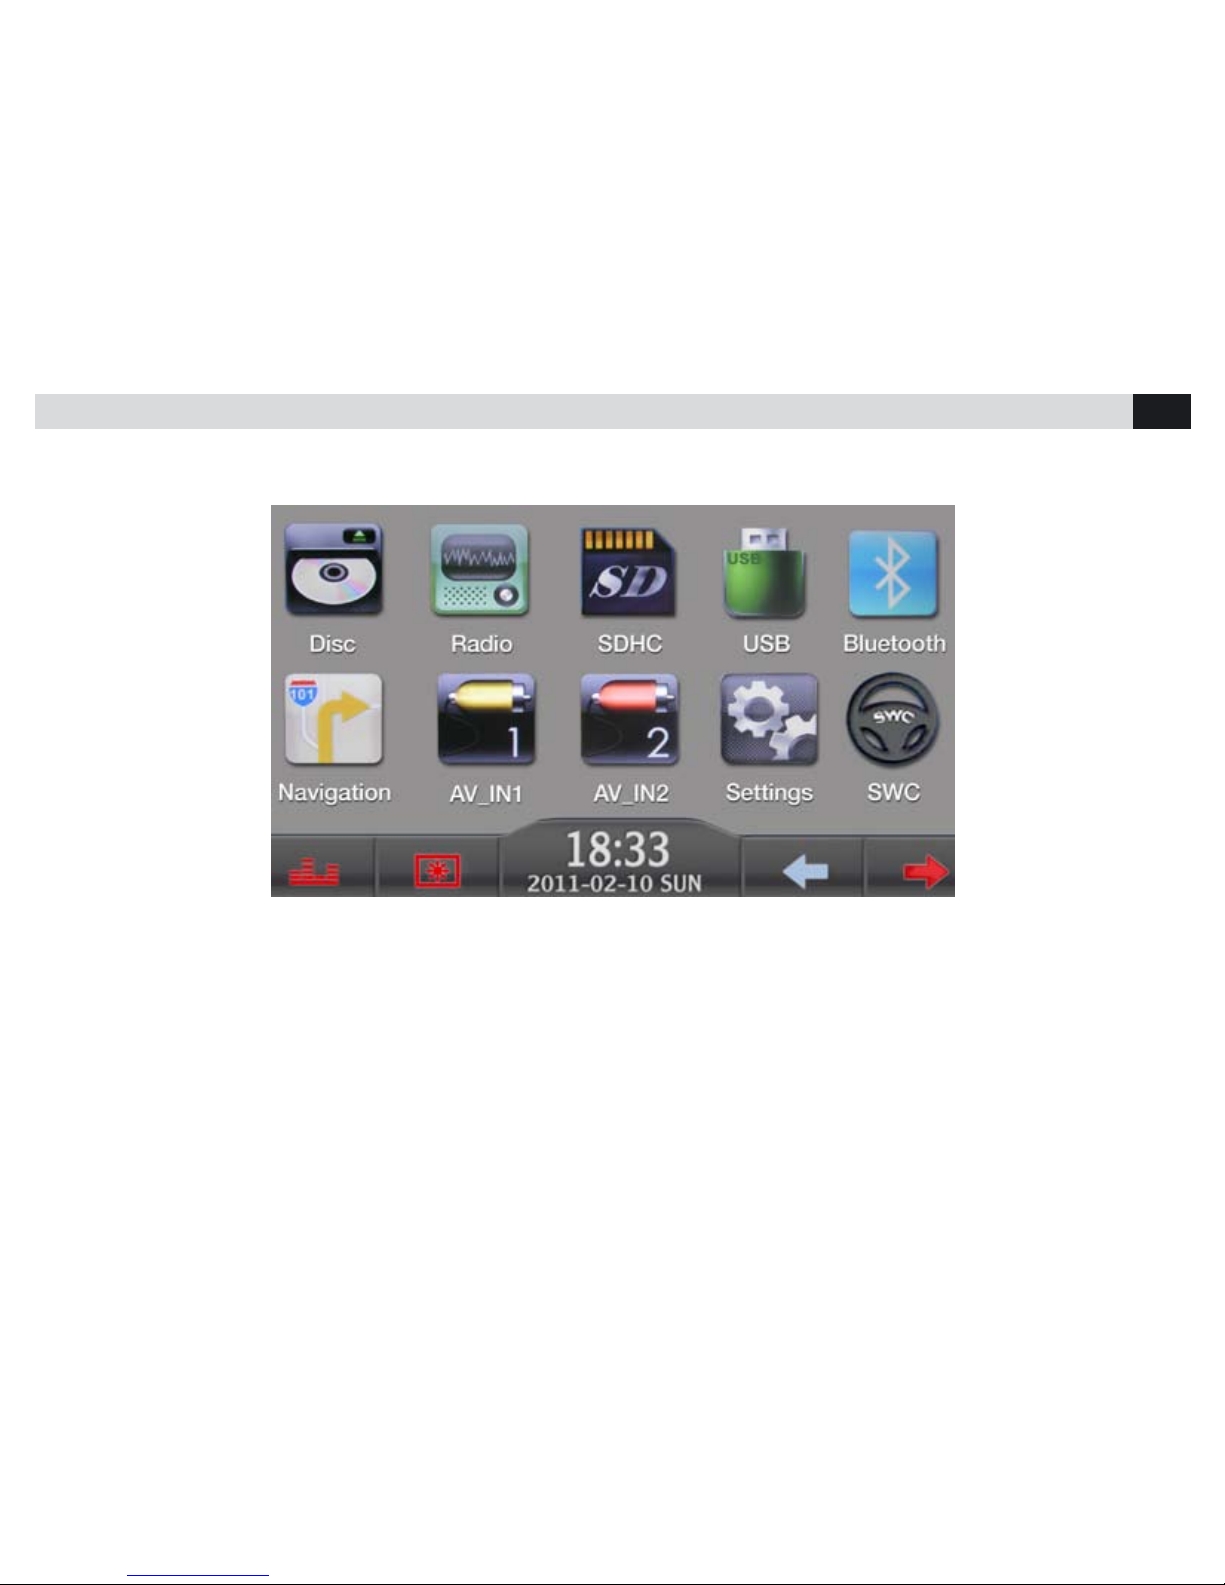
Para visualizar el menú principal presionar la tecla MENU en el panel frontal o bien presionar el ángulo en alto a la izquierda de la pantalla.
Tocando los iconos en la pantalla se selecciona la fuente o la función deseada.
Page 41
41
E
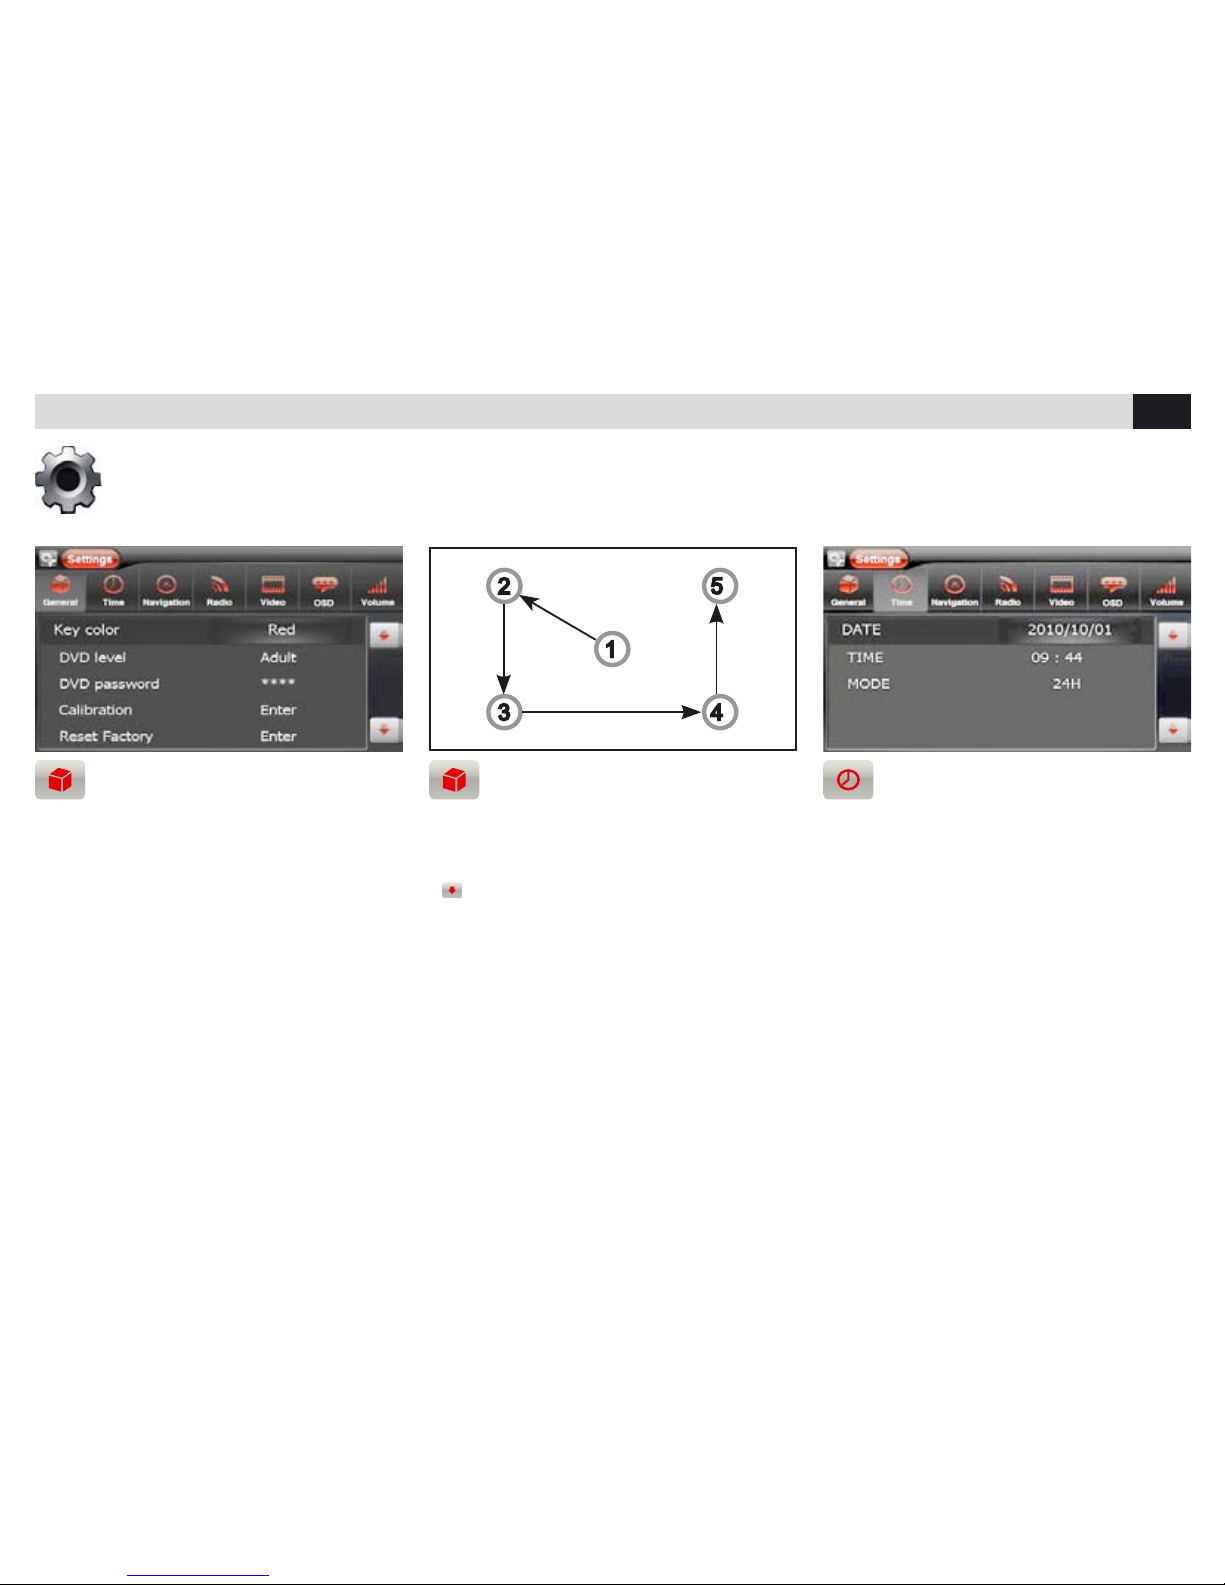
COLOR TECLADO
NIVEL DE PROTECION DVD
• Para cambiar la iluminación del teclado del
panel frontal presionar COLOR TECLADO.
• Congurando en ADULTOS no habrá
restricciones en la visión.
• Memorizando otros niveles ajustar la
PASSWORD.
AJUSTES DEL SISTEMA
CALIBRACION TOUCH SCREEN (pantalla
táctil) RESET DE FÁBRICA - BEEP
• La calibración se consigue tocando la pantalla
según la pauta que se marca.
• Reset, vuelve a los ajustes de fábrica.
•
Beep, permite activar/desactivar el sonido
cuando tocamos la pantalla táctil.
CONFIGURACION FECHA Y HORA
• Posicionarse y efectuar los ajustes.
Conguraciones: iluminación teclado, nivel de protección DVD, calibración, reset, fecha y hora, navegación, ajustes radio, ajustes video,
Idiomas, volumen fuentes, personalización fondo.
Page 42
42
E
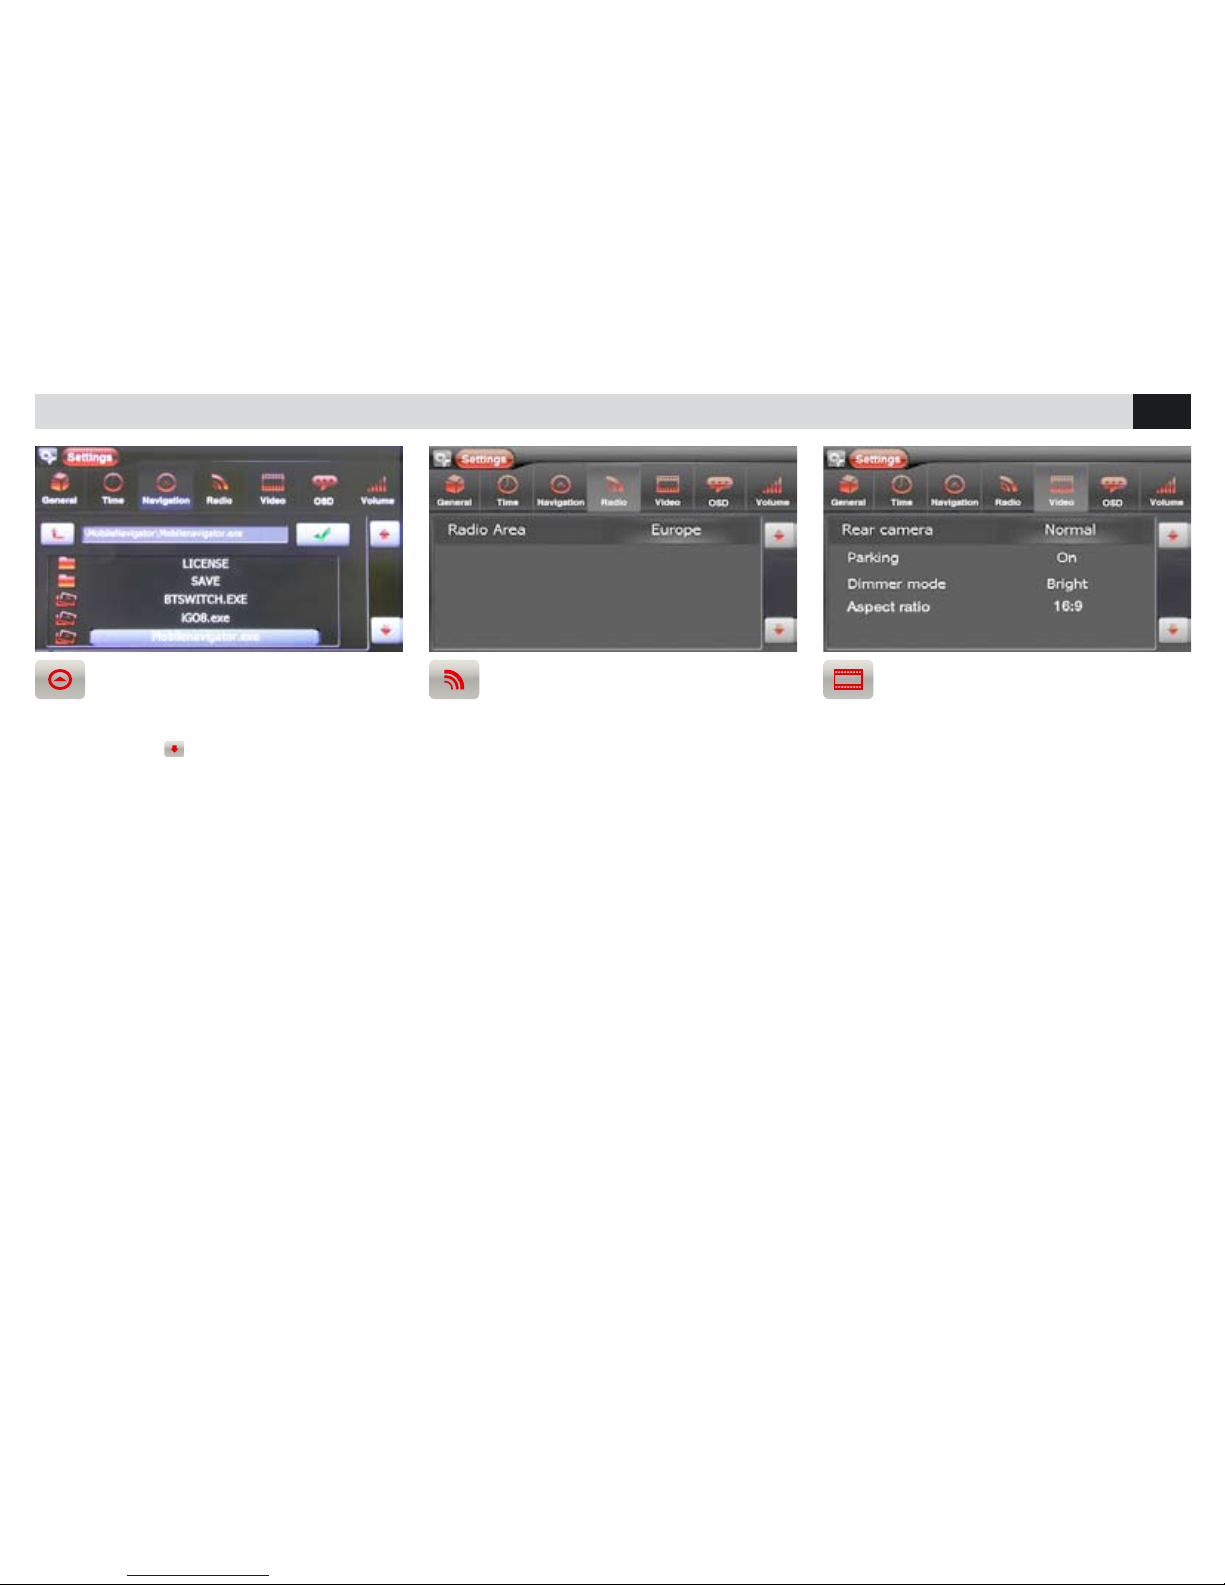
NAVEGACION
• Introducir la Micro SD de navegación NV993.
Desplazarse con
para seleccionar el archivo
ejecutable Mobilenavigator.exe.
NOTA:
Realice este ajuste antes de comenzar a navegar.
AJUSTES RADIO
• Para la correcta banda radiofónica seleccionar
el área de pertenencia.
RETRO CAMERA
ACTIVACION VIDEO BRILLO
• Seleccionar RETRO CAMARA para cambiar la
visualización de normal a espejo.
• PARKING para activar/desactivar la vision en
movimiento de las películas o imágenes.
• BRILLO para modicar la intensidad del brillo
de la pantalla.
AJUSTES DEL SISTEMA
Page 43
43
E
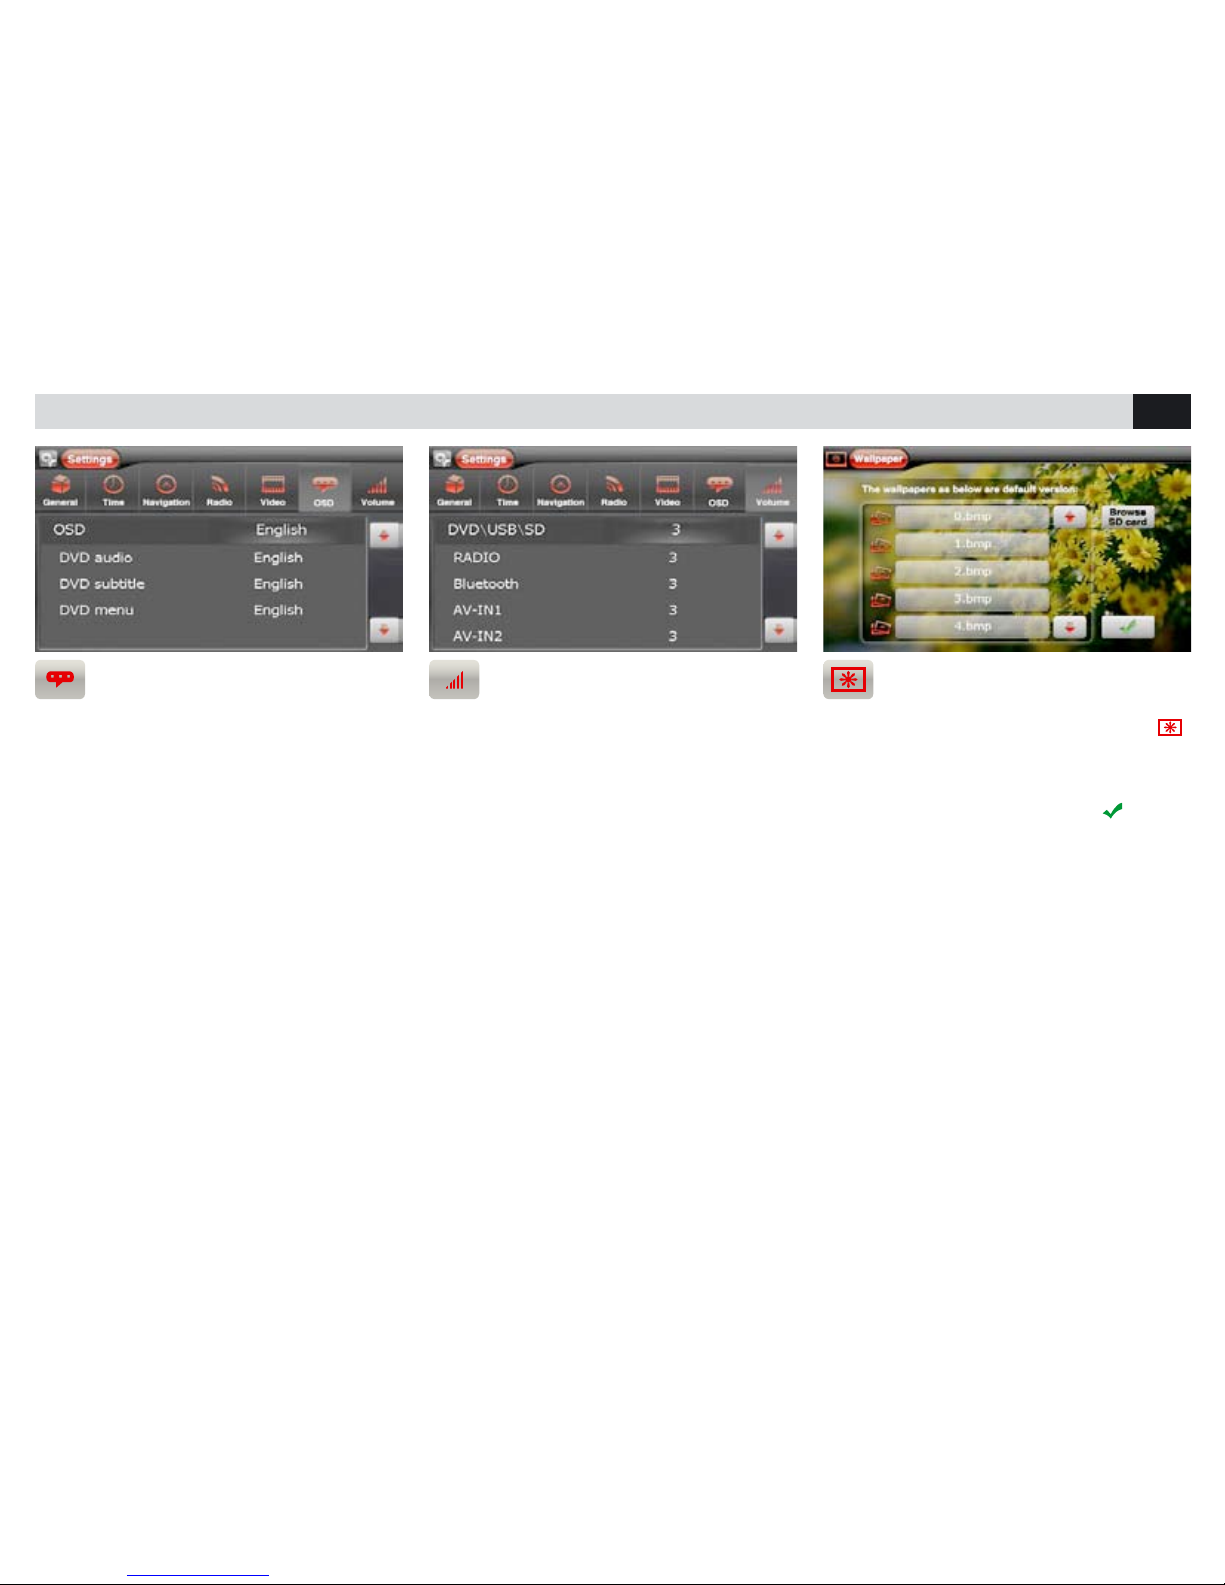
IDIOMAS
• Es posible elegir el idioma del menú, del audio
y de los subtítulos del DVD.
VOLUMEN FUENTES
• Es posible el ajuste del volumen de cada
fuente para evitar molestas subidas de
intensidad de volumen en el paso de una fuente
a otra.
AJUSTES DEL SISTEMA
PERSONALIZACION DEL FONDO
• Desde el menú principal presionar el icono
para acceder a la ventana gestión del fondo de
pantalla. Para utilizar las imágenes presentes
en la memoria, presionar el nombre del archivo,
seleccionar el ante prima y confirmar
.
Para utilizar imágenes desde una SD Card
presionar “BROWSE SD CARD”.
Page 44
44
E
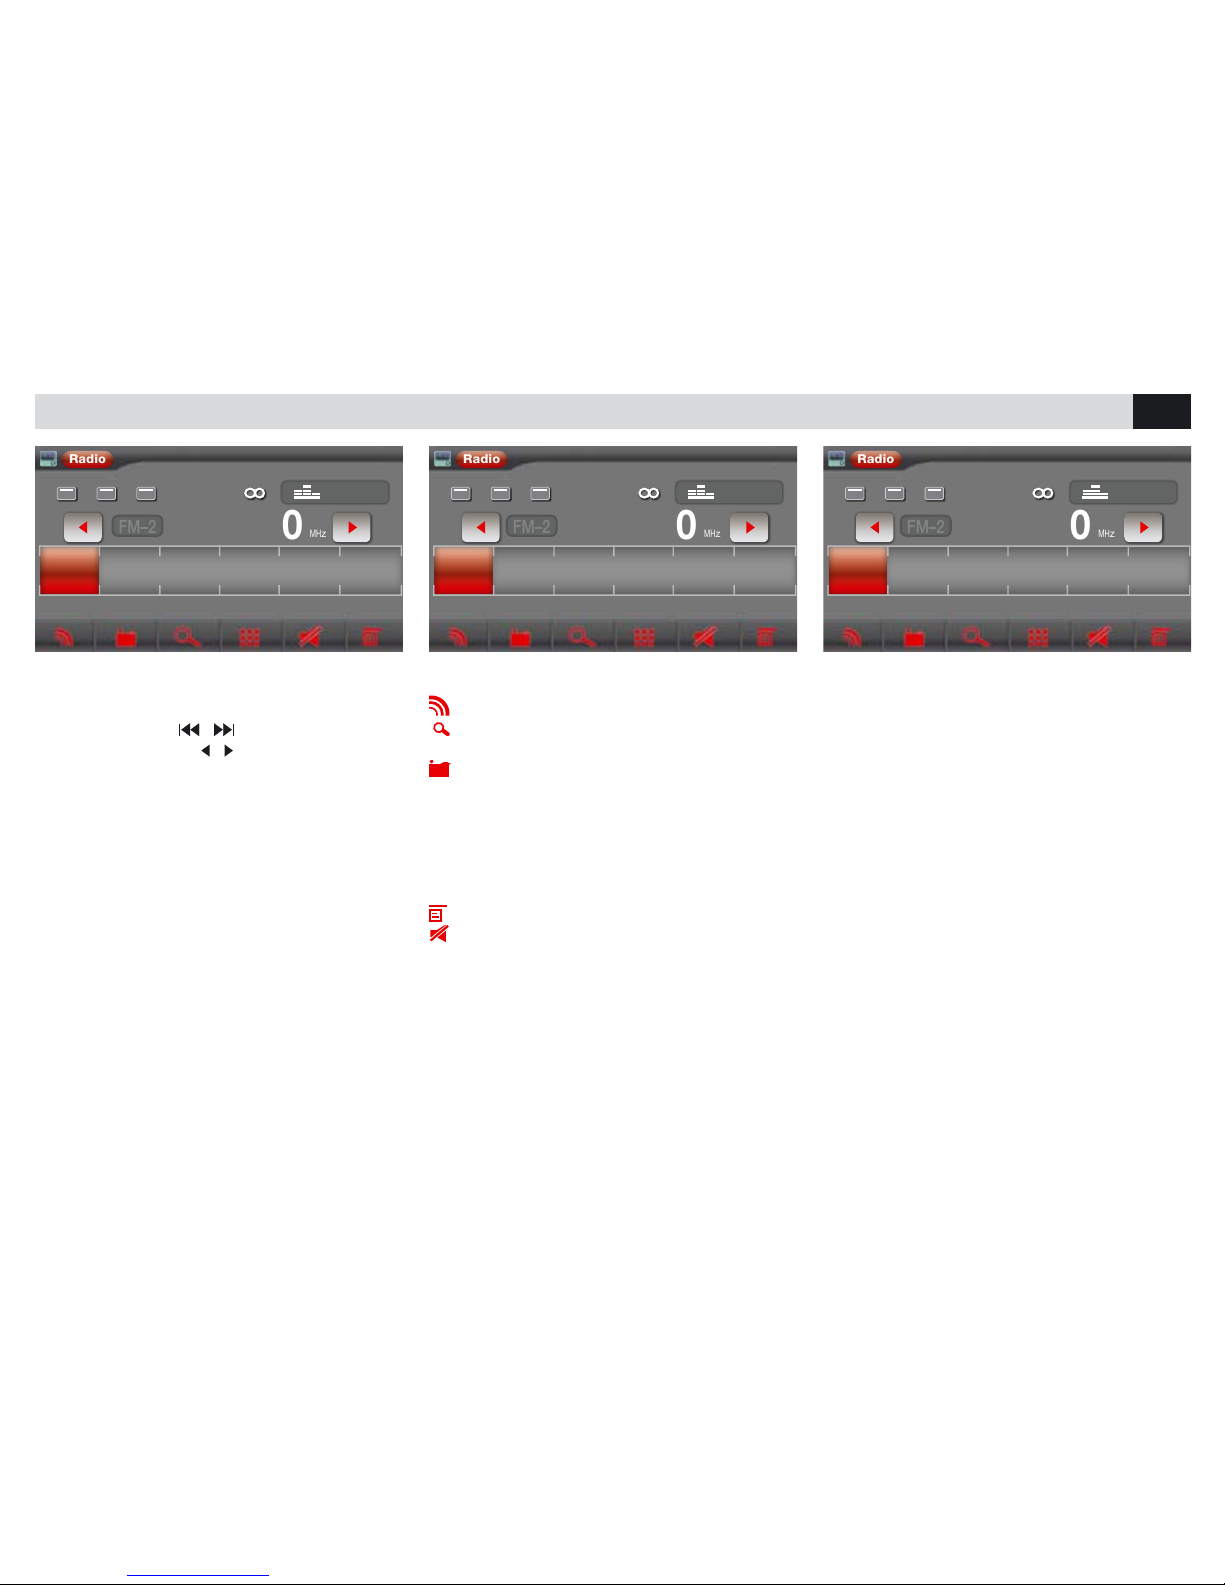
RADIO
BUSQUEDA EMISORAS
• Teniendo presionado durante más de 1
segundo las teclas
/ en el mando a
distancia o los iconos
/ en la pantalla, la
unidad buscará automáticamente las emisoras.
Para la búsqueda manual presionar brevemente.
FUNCIONES RADIO
BAND Selecciona Bandas Radio 3 FM - 2 AM.
PS Escansión de las frecuencias
memorizadas.
STORE Memorización de 6 emisoras
disponibles por cada banda.
Para memorizar presionar STORE y elegir la
posición deseada.
Para encontrar una emisora presionar en la
frecuencia correspondiente, en la parte inferior
de la pantalla.
PTY Selecciona el tipo de programa musical.
MUTE Silencia el audio.
FUNCIONES RADIO
• LOC Selecciona las emisoras cercana o
lejanas.
• AF Búsqueda de una frecuencia alternativa con
informaciones en la pantalla de la emisora.
• TA Informaciones de trafico.
AF TA LOC
Radio
87 . 50
87.50 92.50
FM–2
106.50 98.70 105.00 103.50
MH
z
P1 P2 P3 P4 P5 P6
User
AF TA LOC
Radio
87 . 50
87.50 92.50
FM–2
106.50 98.70 105.00 103.50
MH
z
P1 P2 P3 P4 P5 P6
User
AF TA LOC
Radio
87 . 50
87.50 92.50
FM–2
106.50 98.70 105.00 103.50
MH
z
P1 P2 P3 P4 P5 P6
User
Page 45
45
E
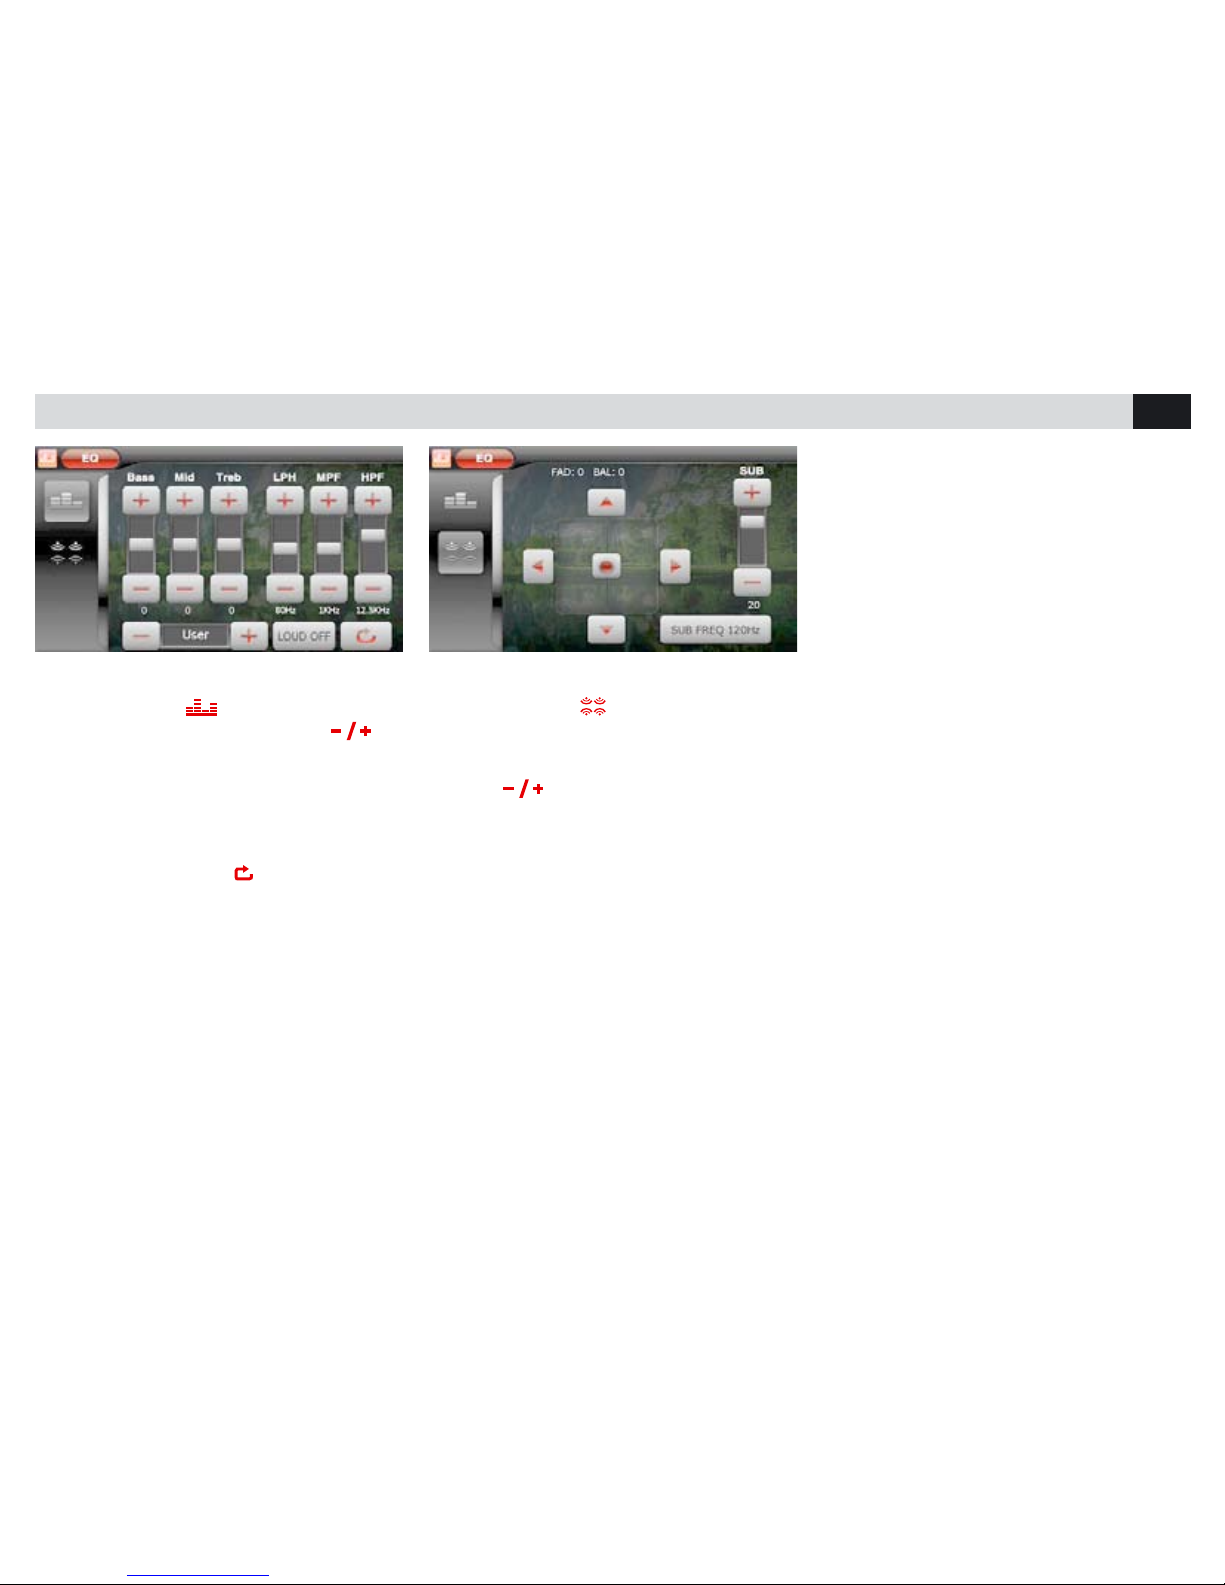
EQUALIZADOR
EQUALIZADOR - LOUDNESS
• Presionar el icono para modificar los
ajustes de fábrica. Mediante los iconos
es posible seleccionar 8 diferentes modos de
ecualización pre ajustados: USER-FLAT-POP
ROCK-CLASSIC-JAZZ-TECHNO-OPTIMAL.
En modo USER es posible ajustar los niveles de
los agudos, medios y graves en las frecuencias
deseadas.
LPF - MPF - HPF. El icono
se pone en
OPTIMAL.
• LOUD activa la exaltación de las bajas
frecuencias.
FADER - BALANCE - SUB WOOFER
• Presionar el icono para acceder a los
ajustes del FADER y del BALANCE mediante las
flechas presentes en la pantalla.
Para ajustar el volumen del SUB WOOFER
presionar
Para ajustar el crossover presionar SUB W y
posicionarse en las frecuencia de corte deseada.
Page 46
46
E
REPRODUCCION DVD-CD-USB-SD CARD
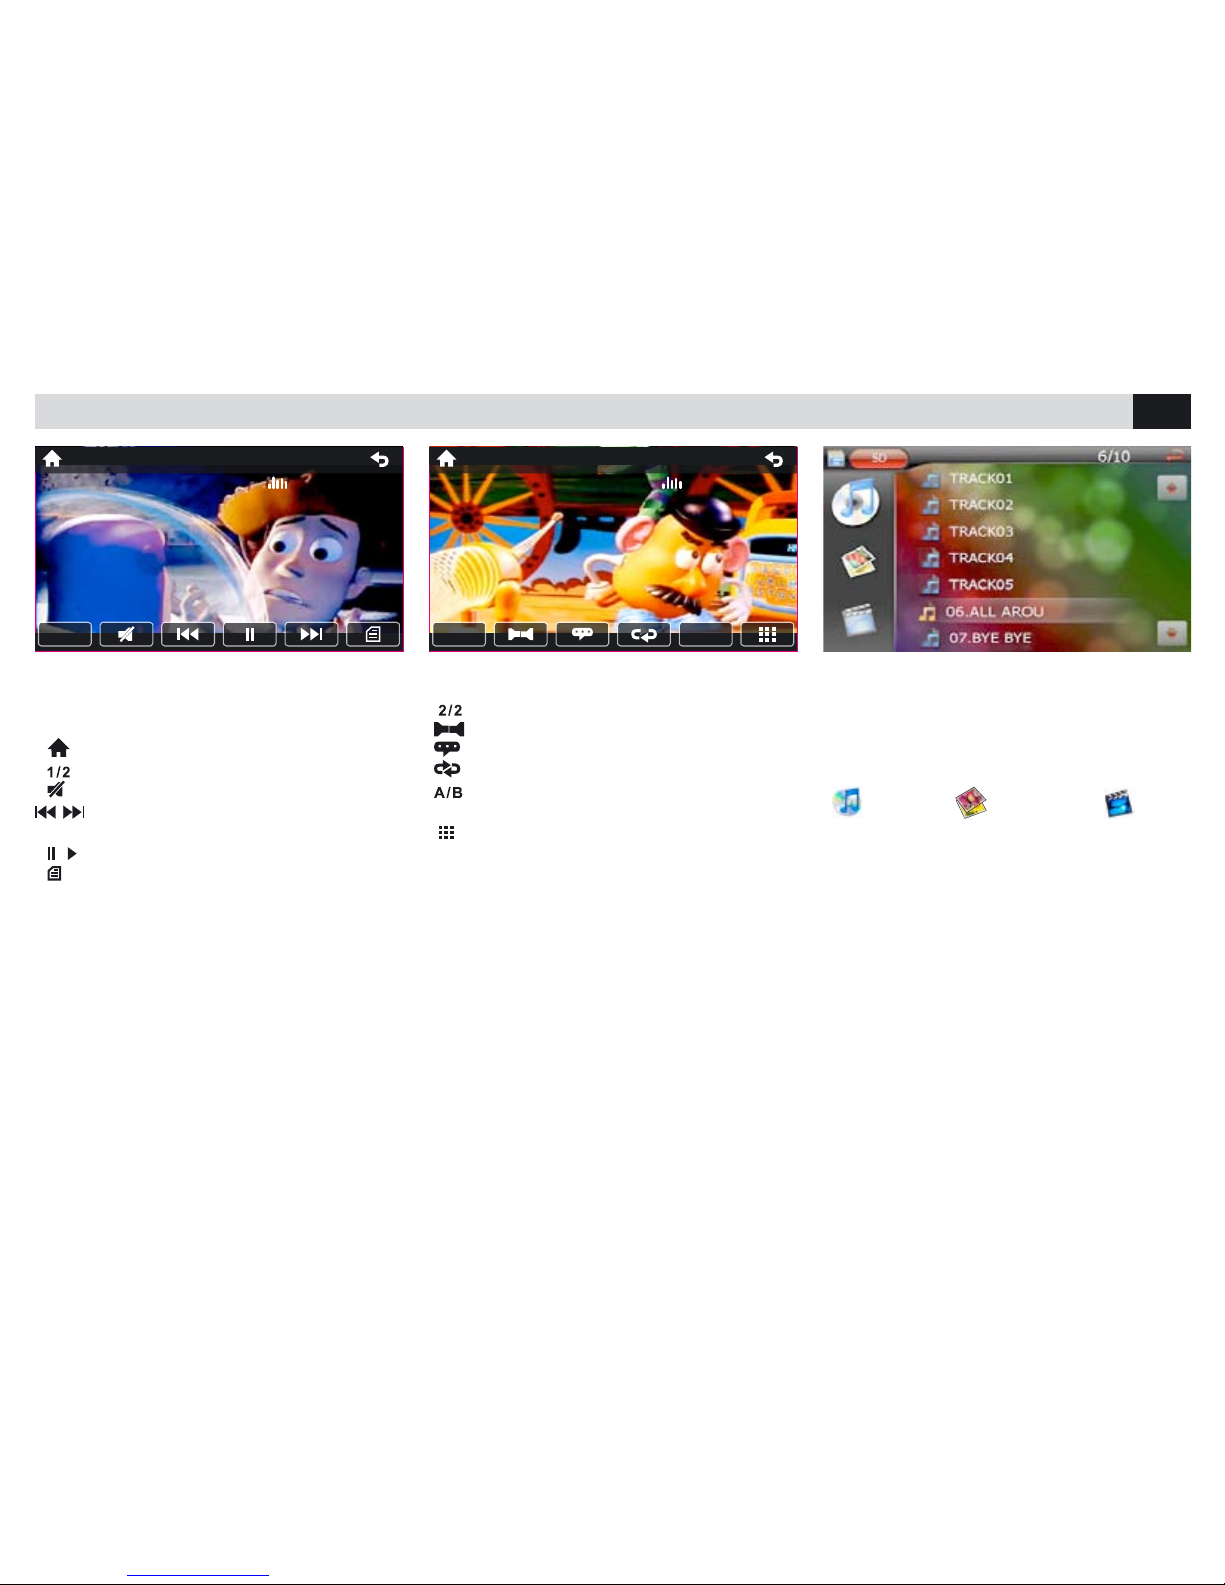
FUNCIONES USB/SDCARD
Introduciendo una USB/SD CARD el contenido
será visualizado automaticamente.
Seleccionar el tipo de archivo mediante el
relativo icono.
MUSICA IMAGENES VIDEO
FUNCIONES DVD
Para volver al primer menú DVD.
Para cambiar el idioma audio.
Para cambiar el idioma de los sub títulos.
Repetición pista/capitulo/disco.
Para la repetición desde el punto A al
punto B.
Para introducir el numero pista/capitulo
para reproducirlo.
La expulsión del disco se obtiene presionando
la tecla en el mando a distancia o en el panel
frontal.
FUNCIONES DVD
Introduciendo un DVD aparece el menú de la
película.
Para volver al menú principal.
Para pasar en el segundo menú DVD.
Para silenciar el audio.
Para pista/capitulo precedente o
siguiente.
/ Para iniciar o interrumpir la reproducción.
Para visualizar el menú títulos DVD.
User
1/2
DVD T:1/20 C:3/51 00:00:30
User
2/2
DVD T:1/20 C:3/51 00:01:47
A/B
Page 47
47
E
REPRODUCCION DVD-CD-USB-SD CARD
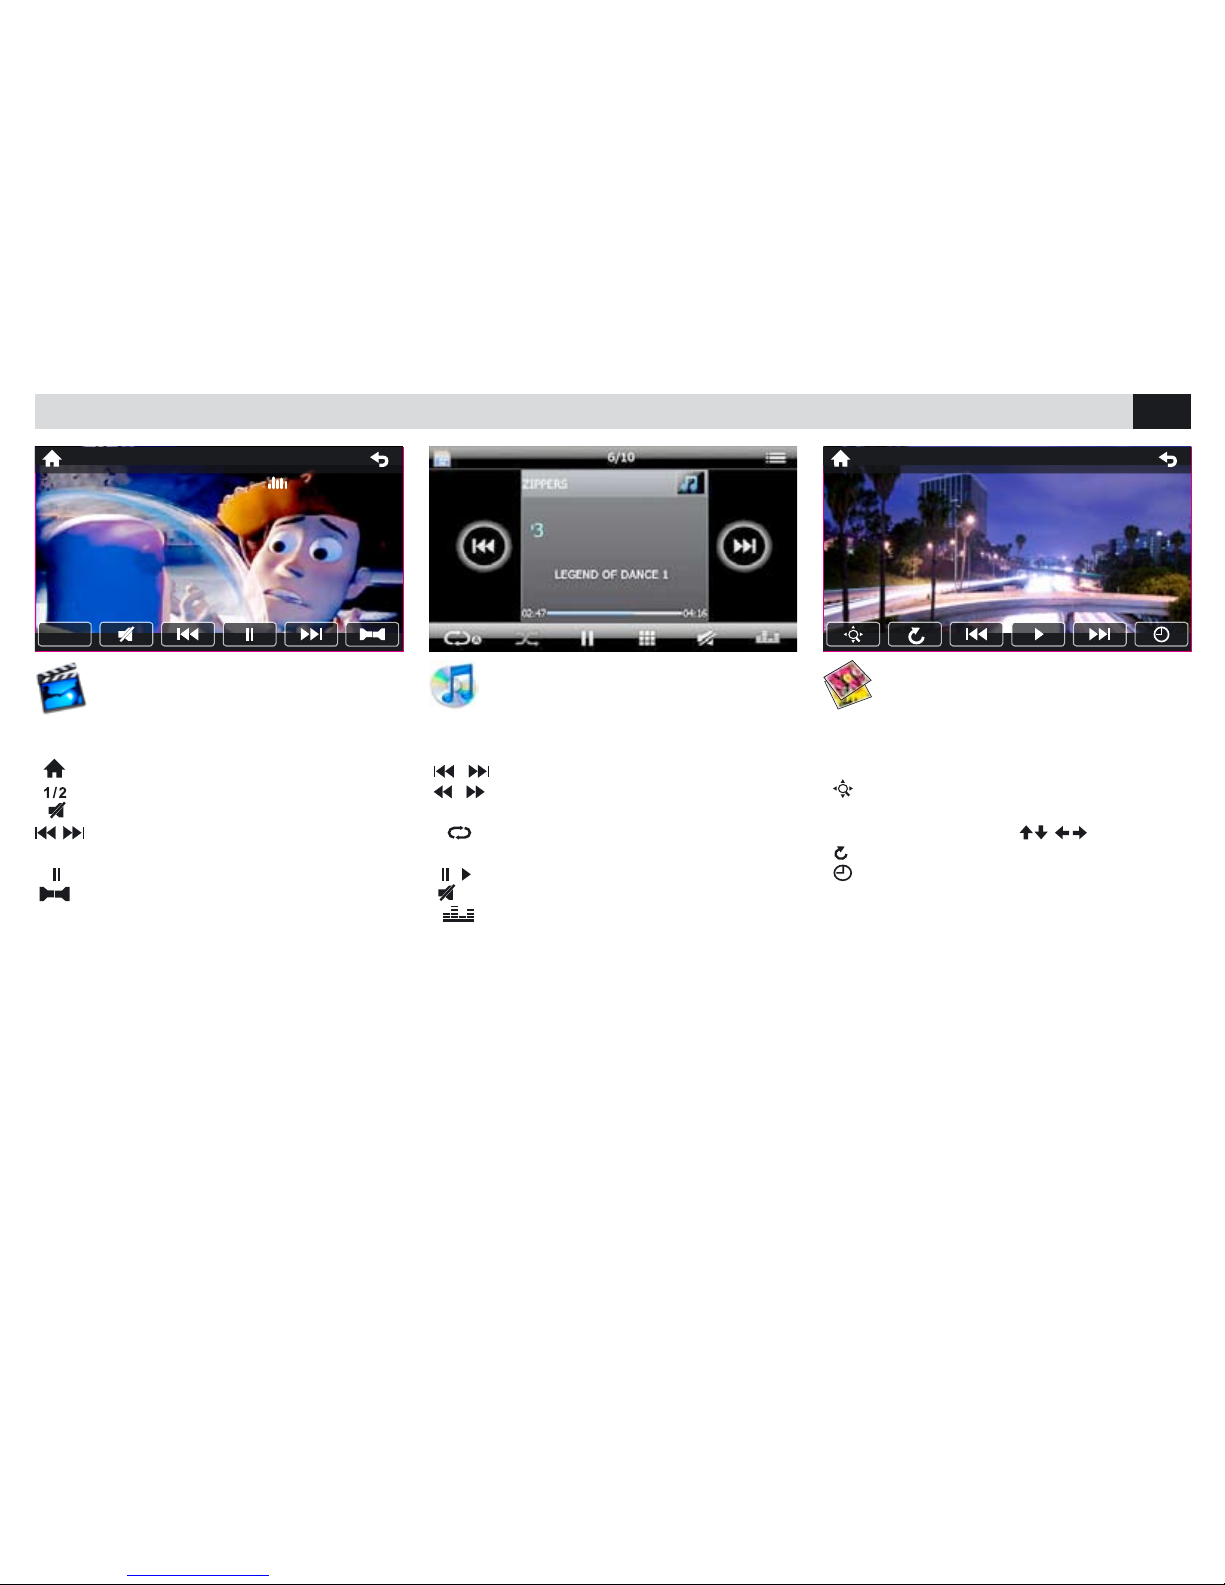
REPRODUCCION MUSICA
Seleccionar la pista deseada para iniciar la
reproducción.
/ Para cambiar la pista.
/ Presionar repetidamente para la
reproducción rápida adelante/atrás.
Para la repetición de pista /carpeta/
capitulo.
/ Para iniciar o interrumpir la reproducción.
Para silenciar el audio.
Equalizador.
REPRODUCCION IMAGENES
Seleccionar el archivo deseado para visualizar
la imagen. Para que aparezca el menú presionar
la parte inferior de la pantalla.
Para desanchar la imagen (zoom)
Para mover la imagen utilizar las flechas que
aparecerán en la pantalla (
).
Para girar la imagen.
Para seleccionar el tiempo de pausa entre
una imagen y otra.
REPRODUCCION VIDEO
Tocar la pantalla para que aparezca el menú
cuando la película se está reproduciendo.
Para volver al menú principal.
Para pasar al segundo menú.
Para silenciar el audio.
Para pista/capitulo precedente o
siguiente.
Para iniciar o interrumpir la reproducción.
Para cambiar el idioma audio.
SD 6/22
User
1/2
USB T:1/20 C:3/51 00:00:30
Page 48
48
E
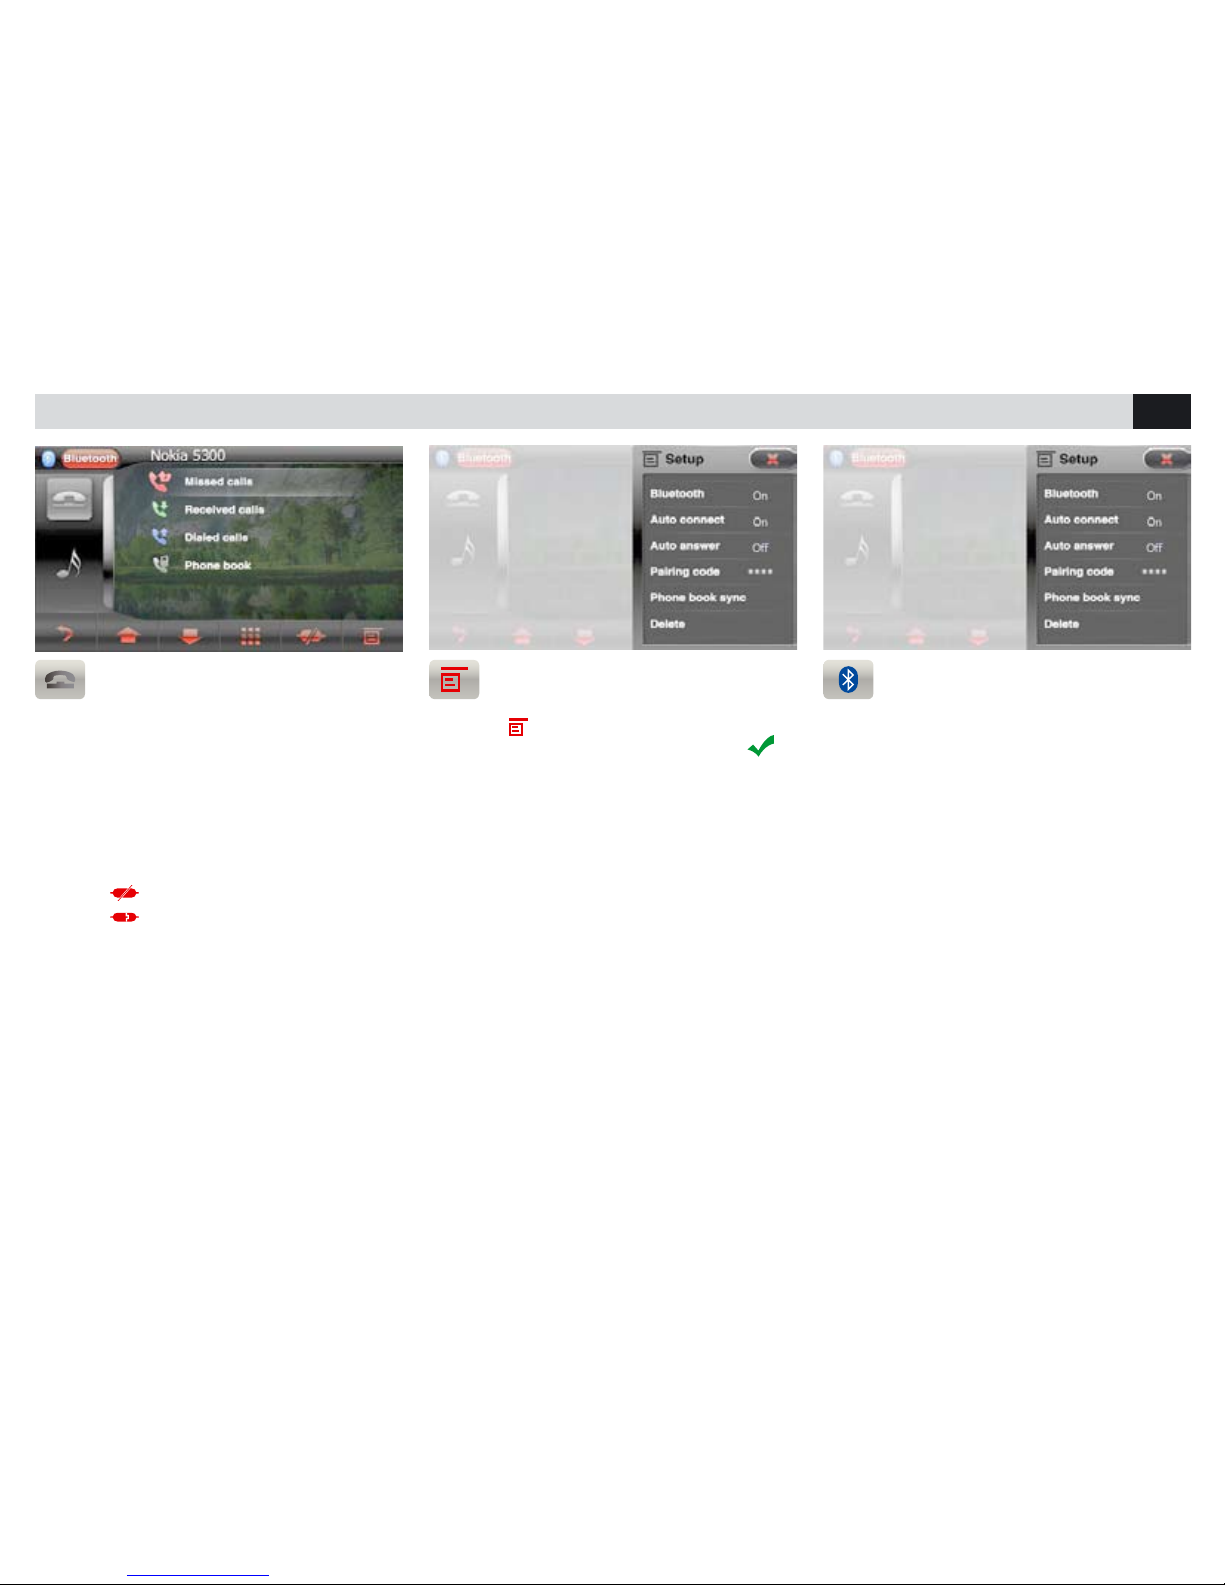
CONFIGURACION BLUETOOTH
SINCRONIZACION CONTACTOS
Presionar
para acceder a los ajustes.
Seleccionar CONTACTOS y confirmar con
Automáticamente los contactos del teléfono
serán descargados en la memoria del autorradio.
El tiempo necesario para esta operación varía en
base al número de contactos.
OPCIONES BLUETOOTH
• CONEXION AUTOMATICA conecta
automáticamente el teléfono.
• RESPUESTA AUTOMATICA contesta
automáticamente a la llamada.
• CODIGO DE EMPAREJAMIENTO cambia la
password.
• DELETE Elimina los dispositivos emparejados.
EMPAREJAMIENTO TELEFONO
Es posible emparejar hasta 5 teléfonos.
• Activar la función bluetooth en el teléfono y
buscar nuevos dispositivos.
• Seleccionar PHONOCAR en la lista
dispositivos,
Introducir la password 0000 cuando se indica.
Una vez emparejado aparecerá el nombre del
teléfono.
Presionar
para desconectar el teléfono.
Presionar
para reconectar.
Page 49
49
E
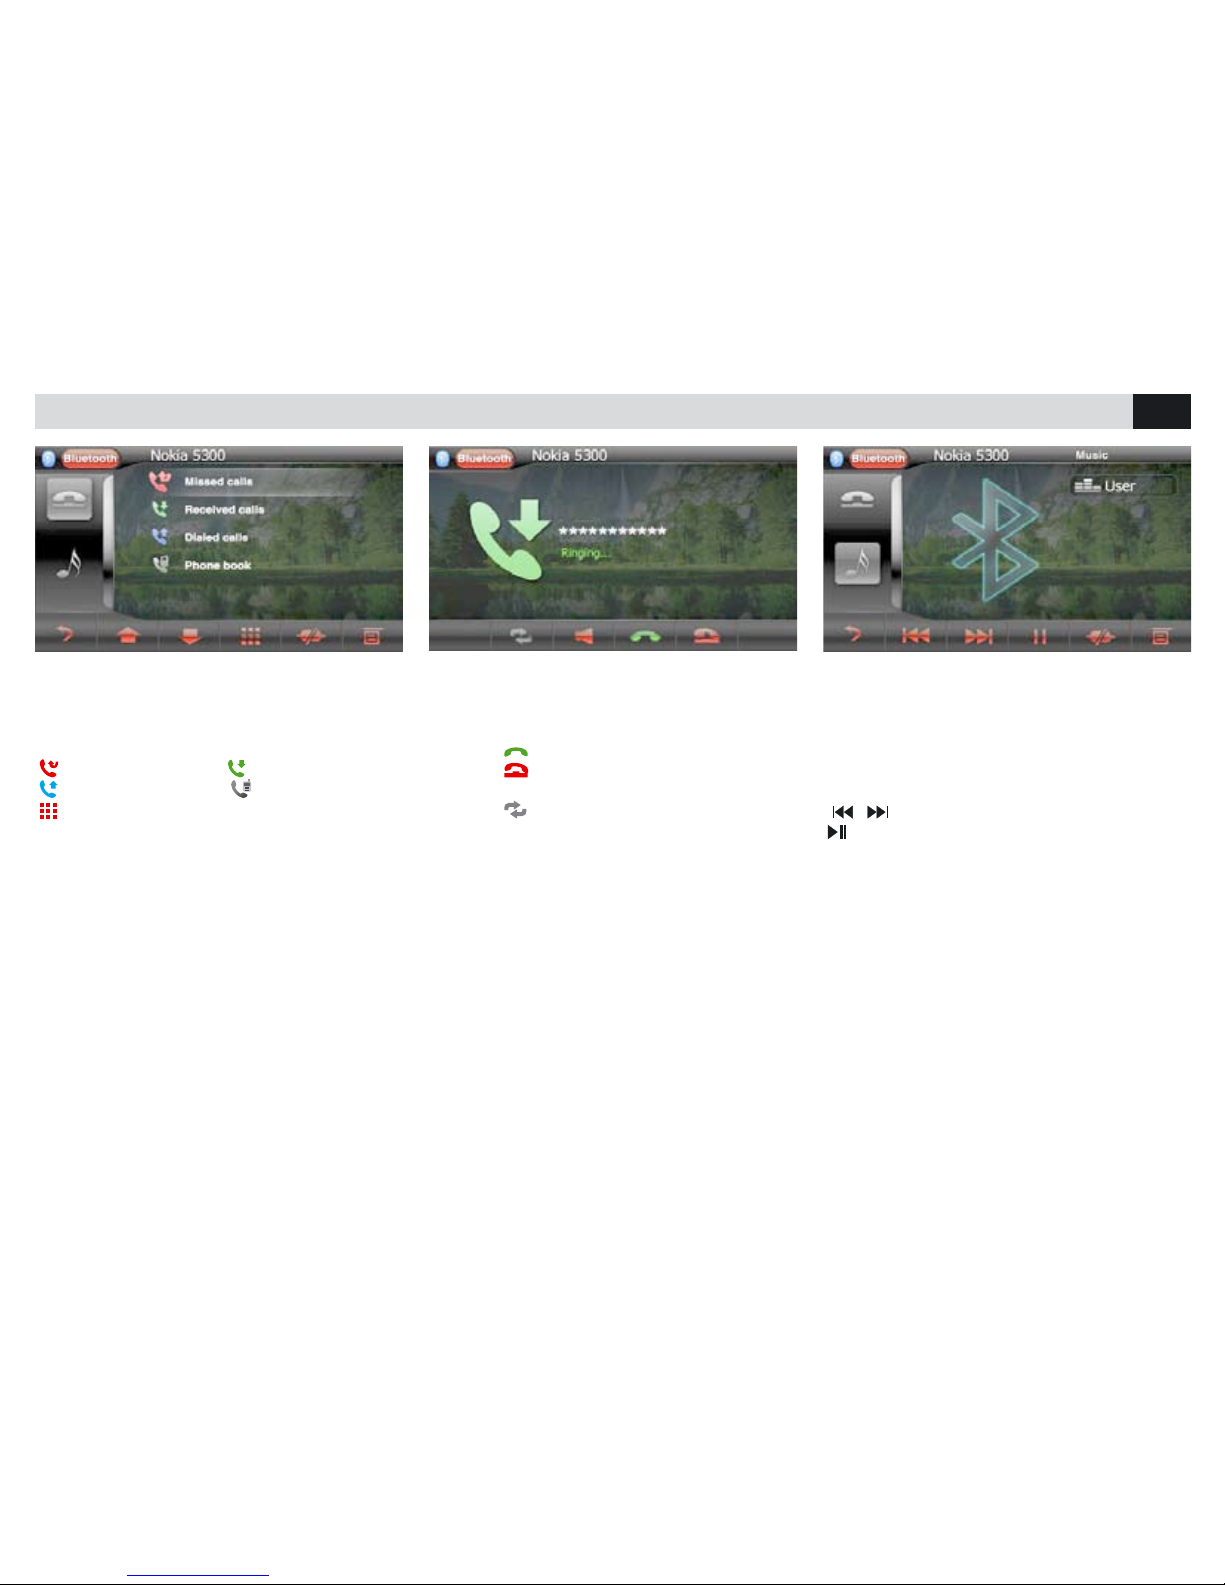
FUNCIONES BLUETOOTH
LLAMAR DESDE LA PANTALLA
• Seleccionar Bluetooth desde el menú principal.
• Presionar uno de los iconos presentes en la
pantalla para llamar desde unos listados.
Llamadas pérdidas llamadas recibidas
Llamadas efectuadas contactos telefónico,
llamadas desde el teclado numérico.
RECIBIR UNA LLAMADA
Cuando hay una llamada, el VM080 pasa
automáticamente en modo bluetooth.
Presionar
para contestar.
Presionar
para terminar la conversación o
para rechazar la llamada.
Presionar
para excluir /activar el manos
libres.
REPRODUCCION MUSICA BLUETOOTH
Si el teléfono conectado soporta el perfil AD2P
es posible escuchar los temas musicales.
Si el dispositivo soporta AVRCP será posible
controlar los temas musicales directamente
desde la pantalla táctil
/ Pista precedente/siguiente.
Inicia/interrumpe la reproducción.
Page 50

50
E
CARACTERISTICAS TECNICAS
Reference Supply Voltage ............................... 12V(DC)
Operating Voltage Range ....................10.5 - 15.8V(DC)
Max Operating Current ............................................ 15A
FM
Signal Noise Ratio .............................................. ≥60dB
Residual Noise Sensitivity(S/N=30dB .............. 18dBμV
Frequency Response(±3dB ................... 40Hz~12.5KHz
Station Seeking Level ................................. 20~28dBμV
Distortion ............................................................ ≤1.5%
Stereo Separation(1KHz ..................................... ≥25dB
Antenna Impedance ................................................75Ω
AM
Residual Noise Sensitivity (S/N=20dB ............. 30dBμV
Selectivity (±9KHz .............................................. ≥50dB
LCD
Screen size ........................................... 6.2inches(16:9)
Display resolution .....................................800X480dots
Contrast radio .......................................................... 500
Brightness .................................................... 300cd/m2
DVD Player
Signal / Noise Ratio ...............................................90dB
Dynamic Range .....................................................90dB
Distortion(line out ............................................... ≤0.1%
Frequency Response(±3dB ...................... 20Hz~20KHz
Maximum Output Power ....................................4×45W
Load Impedance .......................................................4Ω
AUX IN
Distortion ............................................................ ≤0.5%
Frequency Response(±3dB ...................... 20Hz~20KHz
Audio Input Level ................................................. 1Vrms
Audio
Audio Output Impedance ......................................100Ω
Audio Output Level ..................................... 4Vrms(Max)
Video
Normal Video Input Level(CVBS ......................1.0±0.2V
Video Input Impedance ...........................................75Ω
Video Output Impedance ........................................75Ω
Video Output Level .......................................... 1.0±0.2V
FORMATOR SOPORTADOS
• Formateado USB/SD-CARD: FAT16 – FAT32.
• Bit rate MP3 : 32-320 Kbps.
• WMA: V9 o siguientes.
• Numero de nivel máximo en la directory: 8.
• Max álbum por carpeta: 99.
• Max pistas por carpeta: 999.
• ID3TAG: V2 o siguientes.
• Nombres de los archivos en Unicode UTF8
(largo máximo 128 caracteres).
FORMATOS NO SOPORTADOS
Un álbum o una carpeta sin algún archivo MP3/WMA
no será visualizado en la pantalla. Los archivos no
compatibles o no soportados no serán tenidos en
consideración, y no se reproducirán. (AAC, WMV, PCM /
WMA con protección DRM y en formato LOSSLESS).
FORMATO DISCOS MP3 SOPORTADOS
• ISO9660, Joliet.
• Numero máximo de títulos: 512.
• Numero máximo de álbum: 255.
• Frecuencia de muestreo soportado:
32Khz, 44.1Khz, 48Khz.
• Bit-rate soportados: 32-320Kbps.
Page 51

Page 52

S.p.A. - Via F.lli Cervi, 167/C • 42124 Reggio Emilia (Italy) • Tel. ++39 0522 941621 • Fax ++39 0522 942452 • www.phonocar.com • e-mail:[email protected]
 Loading...