

Page 1

MANUALE ISTRUZIONI • INSTRUCTIONS MANUAL
NOTICE DE MONTAGE ET D’EMPLOI • GEBRAUCHSANWEISUNGEN
MANUAL DE INSTRUCCIONES
VM 043
ENGLISH
ITALIANO
FRANÇAIS
DEUTSCH
ESPAÑOL
7” TFT/LCD
1 DIN NAVIGATION
Page 2

INDICE - INDEX - INHALTSVERZEICHNIS
Connexions / Kabel-Verbindungen ...................................................... 23-25
Fonctions / Funktionen ......................................................................... 26-27
Fonctions télécommande / Fernbedienungs-tasten ............................ 28
Menu / Menü ........................................................................................ 29
Reglages de systeme / System-Einstellungen ..................................... 30-33
Paramètres GPS / GPS-Einstellungen ................................................. 32
Radio .................................................................................................... 34
Egaliseur / Equalizer ............................................................................. 35
Reproduction / Wiedergabe ................................................................. 36-37
Reglages bluetooth / Bluetooth-Einstellungen ..................................... 38
Fonctions bluetooth / Bluetooth-funktionen ........................................ 39
Commandes au Volant / Lenkrad-Steuerungen ................................... 40
Caracteristiques techniques / Technische daten ................................. 59
Conexiones .......................................................................................... 42-44
Funciones ............................................................................................ 45
Funciones mando a distancia .............................................................. 46
Menu ................................................................................................... 47
Adjuste del sistema .............................................................................. 48-51
Configuraciones GPS ........................................................................... 50
Radio .................................................................................................... 52
Equalizador ........................................................................................... 53
Reproduccion ....................................................................................... 54-55
Configuracion bluetooth ....................................................................... 56
Funciones bluetooth ............................................................................. 57
Mandos de volante ............................................................................... 58
Caracteristicas tecnicas ....................................................................... 59
IT-GB E
FR-D
Connessioni / Connections .................................................................. 3-5
Funzioni / Functions ............................................................................. 6-7
Funzioni Telecomando / Remote-control functions ............................. 8
Menù / Menu ........................................................................................ 9
Impostazioni di sistema / System setup ............................................... 10-13
Impostazioni GPS / GPS Setup ............................................................ 12
Radio .................................................................................................... 14
Equalizzatore / Equalizer ...................................................................... 15
Riproduzione / Playback ...................................................................... 16-17
Impostazioni Bluetooth / Bluetooth settings ........................................ 18
Funzioni Bluetooth / Bluetooth functions ............................................. 19
Comandi al Volante / Steering wheel commands ................................ 20
Caratteristiche tecniche / Technical specifications .............................. 21
Page 3
3
IT/GB
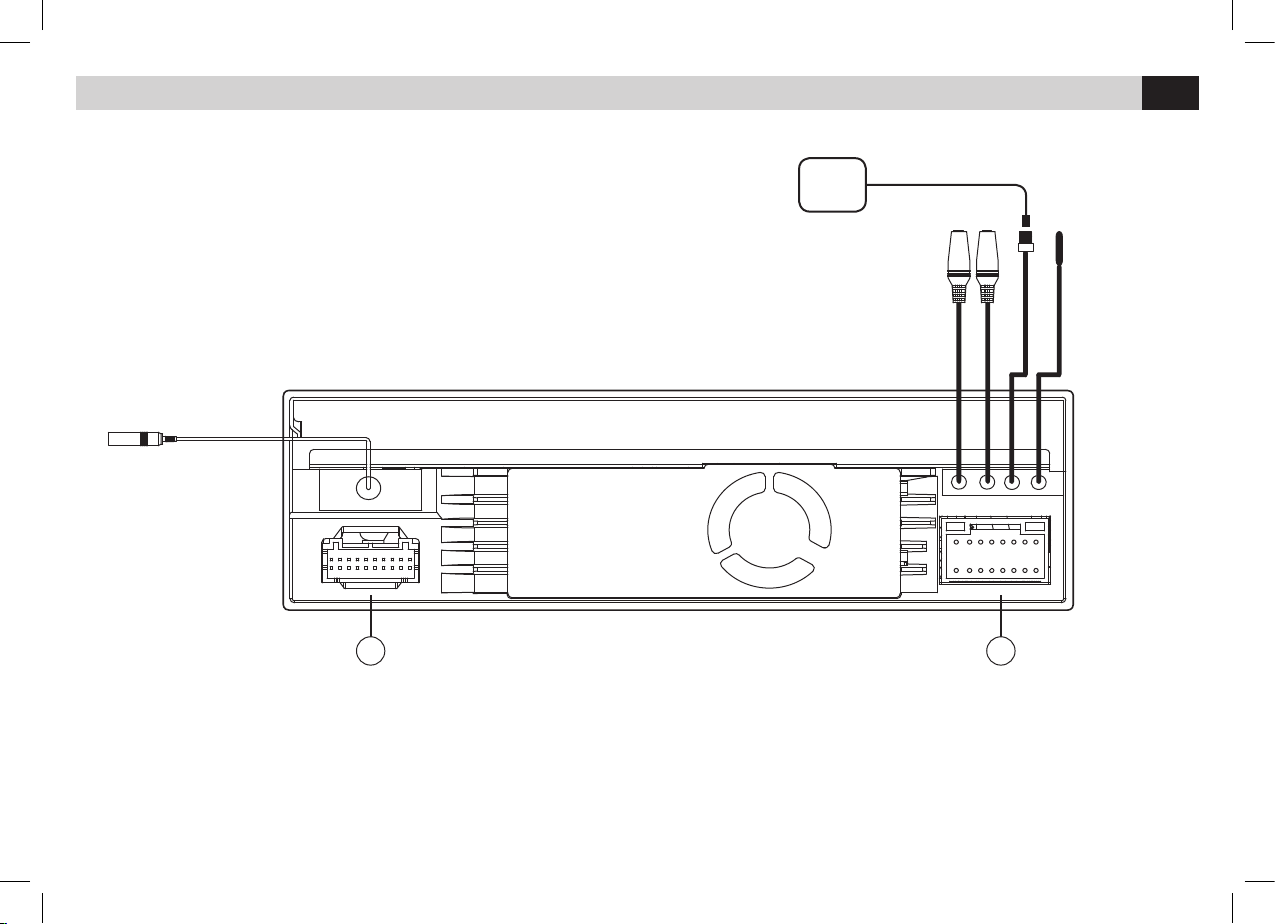
CONNESSIONI • CONNECTIONS
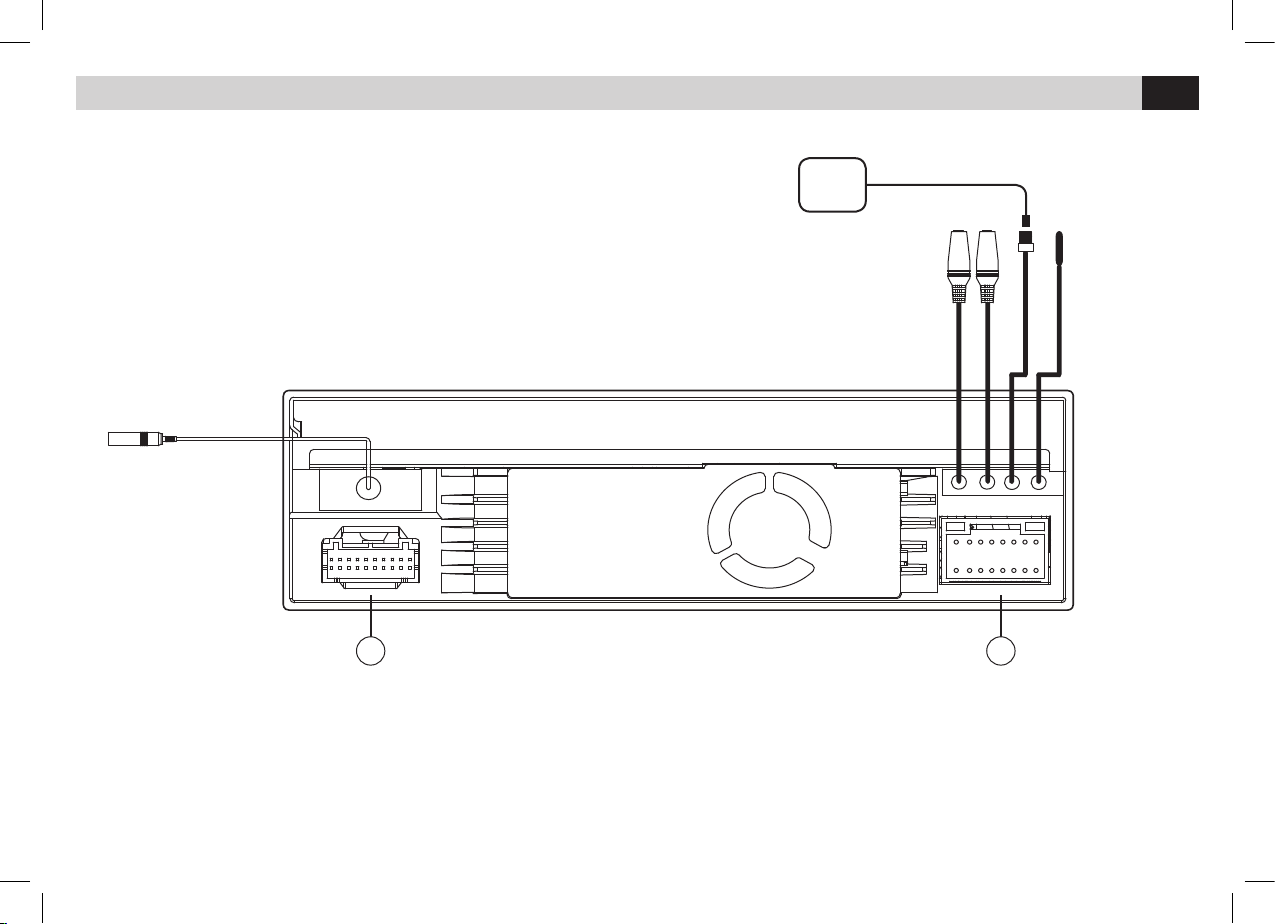
ANTENNA
AERIAL
GPS
SWC IR
RADIO ANT.
MIC
GPS ANT
SW Commands IR
2
1
Page 4
4
IT/GB
CONNESSIONI • CONNECTIONS
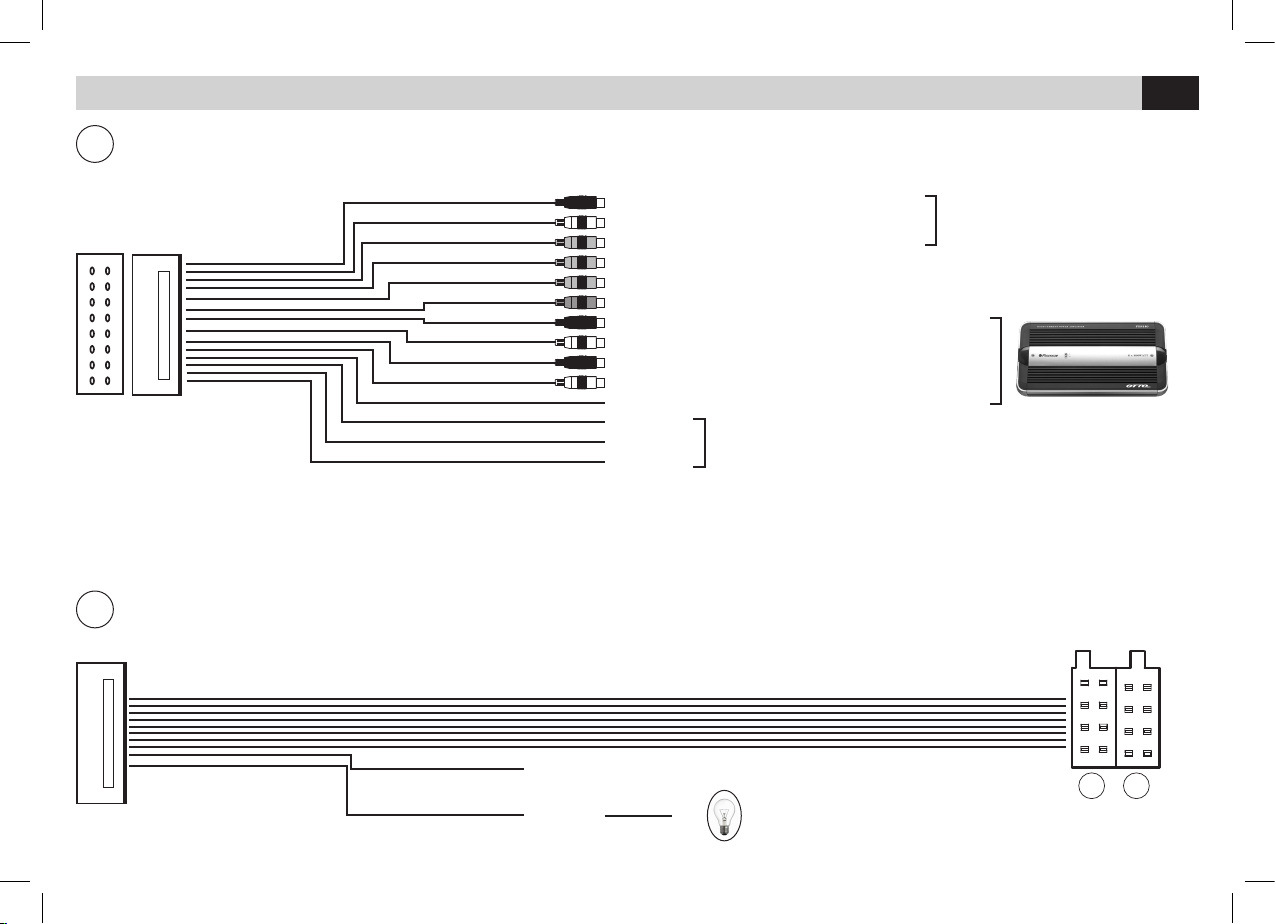
CAVO CON CONNETTORE ISO / CABLE WITH ISO CONNECTOR
P. CONT
+
Luci di retromarcia / Reverse-gear lights
Accensione amplificatore / Amplifier remote
LINEA A COMANDI AL VOLANTE / LINE A STEERING-WHEEL COMMANDS
LINEA B COMANDI AL VOLANTE / LINE B STEERING-WHEEL COMMANDS
MASSA COMANDI AL VOLANTE / GROUND FOR STEERING-WHEEL COMMANDS
ISO
BA
2
1
USCITE PRE-AMPLIFICATE / PRE-AMP OUTPUT
DESTRO / RIGHT 1
SINISTRA / LEFT 1
INGRESSO VIDEO 1 / VIDEO 1 INPUT
USCITA SUB WOOFER / SUB-WOOFER OUTPUT
ANTERIORE DESTRO / FRONT RIGHT
ANTERIORE SINISTRA / FRONT LEFT
POSTERIORE DESTRO / REAR RIGHT
POSTERIORE SINISTRA / REAR LEFT
FRENO A MANO / HAND-BRAKE
INGRESSO A/V 1
INPUT A/V 1
AUX IN R
AUX IN L
VIDEO IN
CAMERA IN
VIDEO OUT
SUB WOOFER
FRONT R
FRONT L
REAR R
REAR L
BRAKE
KEY A
KEY B
KEY GND
ROSA / PINK
BLU-BIANCO / BLUE-WHITE
ROSA / PINK
BLU / BLUE
VERDE / GREEN
NERO / BLACK
REVERSE
Page 5
5
IT/GB
ISO
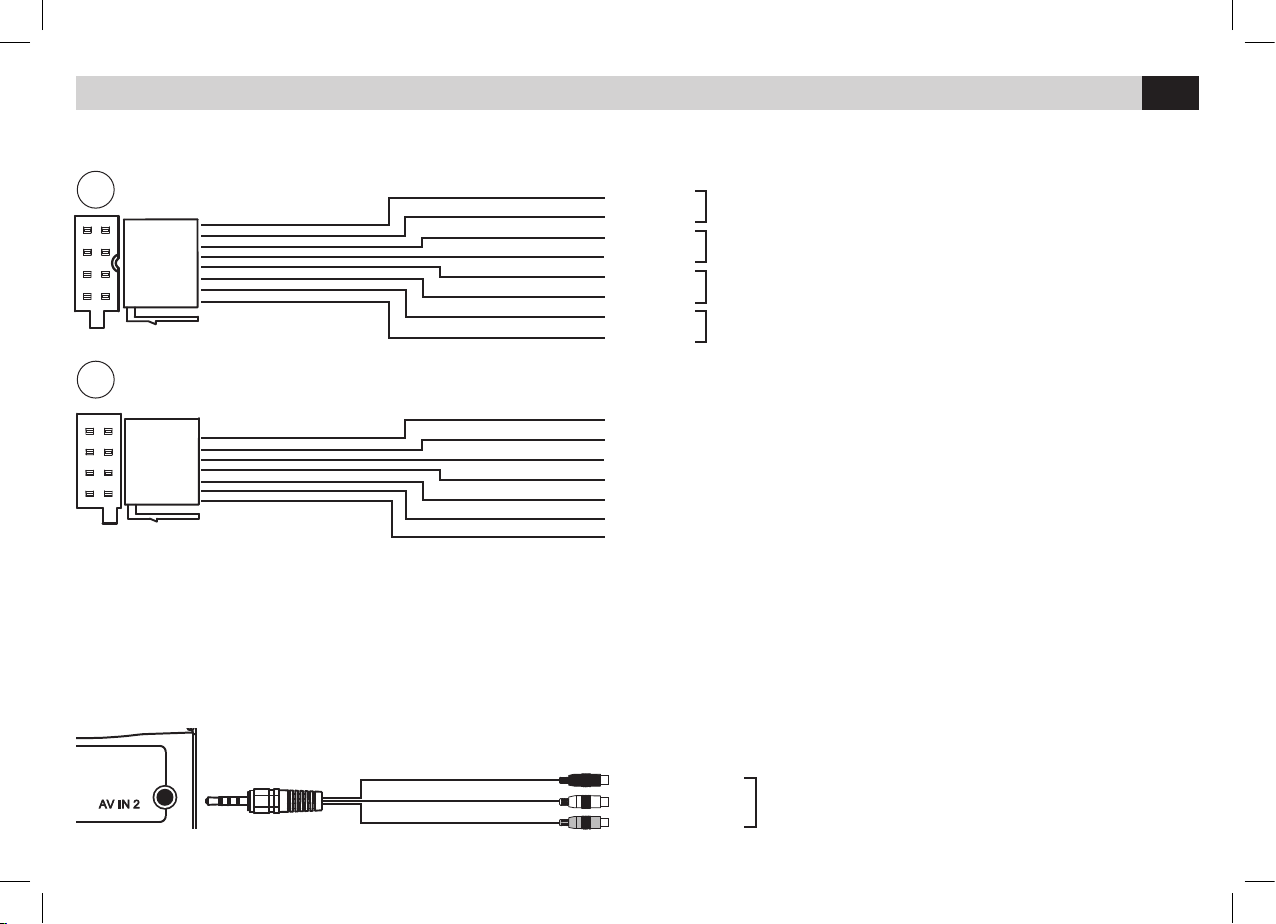
CONNESSIONI • CONNECTIONS
A
B
GRIGIO/GRAY
MARRONE
BROWN
NERO
BLACK
VERDE/GREEN
VERDE-NERO/GREEN-BLACK
BIANCO/WHITE
ROSSO/RED
BIANCO-NERO/WHITE-BLACK
NERO/BLACK
MARRONE/BROWN
ROSA/PINK
VIOLA/PURPLE
ARANCIONE/ORANGE
VIOLA-NERO/PURPLE-BLACK
BLU/BLUE
GRIGIO-NERO/GRAY-BLACK
GIALLO/YELLOW
+12V Positivo batteria
+12V Sottochiave
Massa
IIlluminazione / Dimmer
Accensione antenna elettrica
Silenzia audio
Luce retromarcia
ANTERIORE DESTRO
FRONT RIGHT
ANTERIORE SINISTRO
FRONT LEFT
POSTERIORE DESTRO
REAR RIGHT
POSTERIORE SINISTRO
REAR LEFT
FRONT R +
FRONT R FRONT L +
FRONT L REAR R +
REAR R REAR L +
REAR L -
USCITE ALTOPARLANTI
SPEAKERS OUTPUT
ALIMENTAZIONE
POWER-SUPPLY
BATT
ACC
GND
ILLUMI
ANT. CONT.
MUTE
REVERSE
Su alcuni veicoli durante l’avviamento il VM043 potrebbe spegnersi per poi riaccendersi. Per evitare questo inconveniente collegare lo stabilizzatore di
accensione 5/146.
On some car-models, the VM043 could turn-out and turn-on again, when the ignition-key gets activated. You can avoid such inconvenience, by connecting
the stabilizer 5/146.
+12V Battery-Positive
+12V Under-key
Ground
Illumination / Dimmer
Activation of Electric Aerial
Mute
Reverse gear lights
INGRESSO A/V 2
INPUT A/V 2
AUX IN 2 R
AUX IN 2 L
AUX IN 2 VIDEO
ROSSO/RED
BIANCO/WHITE
GIALLO/YELLOW
INGRESSO ANTERIORE A/V 2 • FRONT INPUT A/V 2
Page 6
6
IT/GB
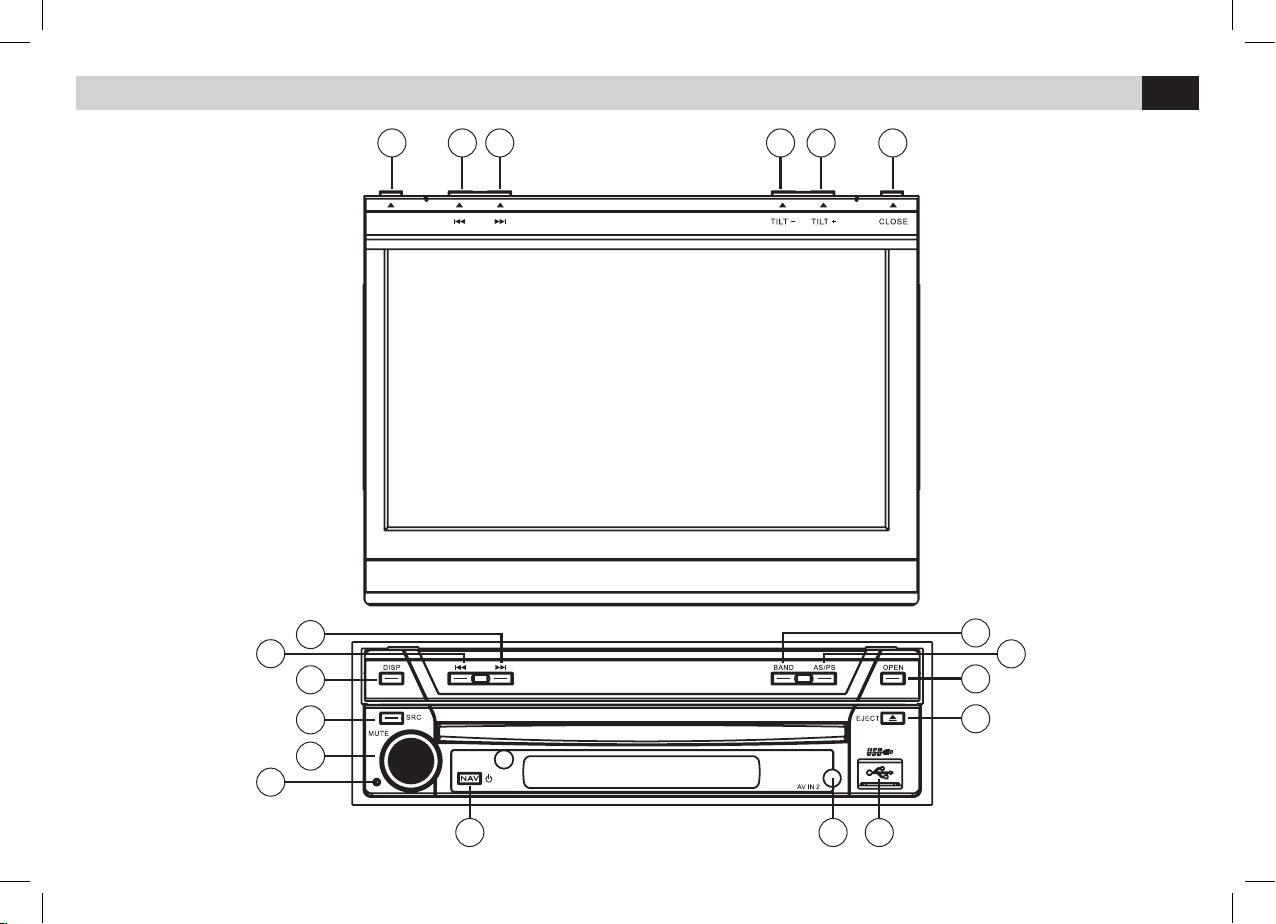
FUNZIONI • FUNCTIONS
DIM
123
11
1213
1
2
3
4
5
6
8 9
12
7
10
11
13
Page 7
7
IT/GB
FUNZIONI • FUNCTIONS
1 - Traccia/Stazione successiva
2 - Traccia/Stazione precedente
3 - Visualizza informazioni riproduzione sullo schermo
4 - Seleziona sorgente
5 - Regolazione volume / Silenziamento audio / Luminosità schermo
6 - Tasto reset
7 - Accensione / Spegnimento / Avvio navigazione
8 - Ingresso AUX IN 2
9 - Porta USB
10 - Espulsione disco
11 - Apre / Chiude monitor
12 - Auto memorizzazione stazioni / Scansione stazioni
Aumenta angolazione monitor
13 - Cambio banda radio / Decrementa angolazione monitor
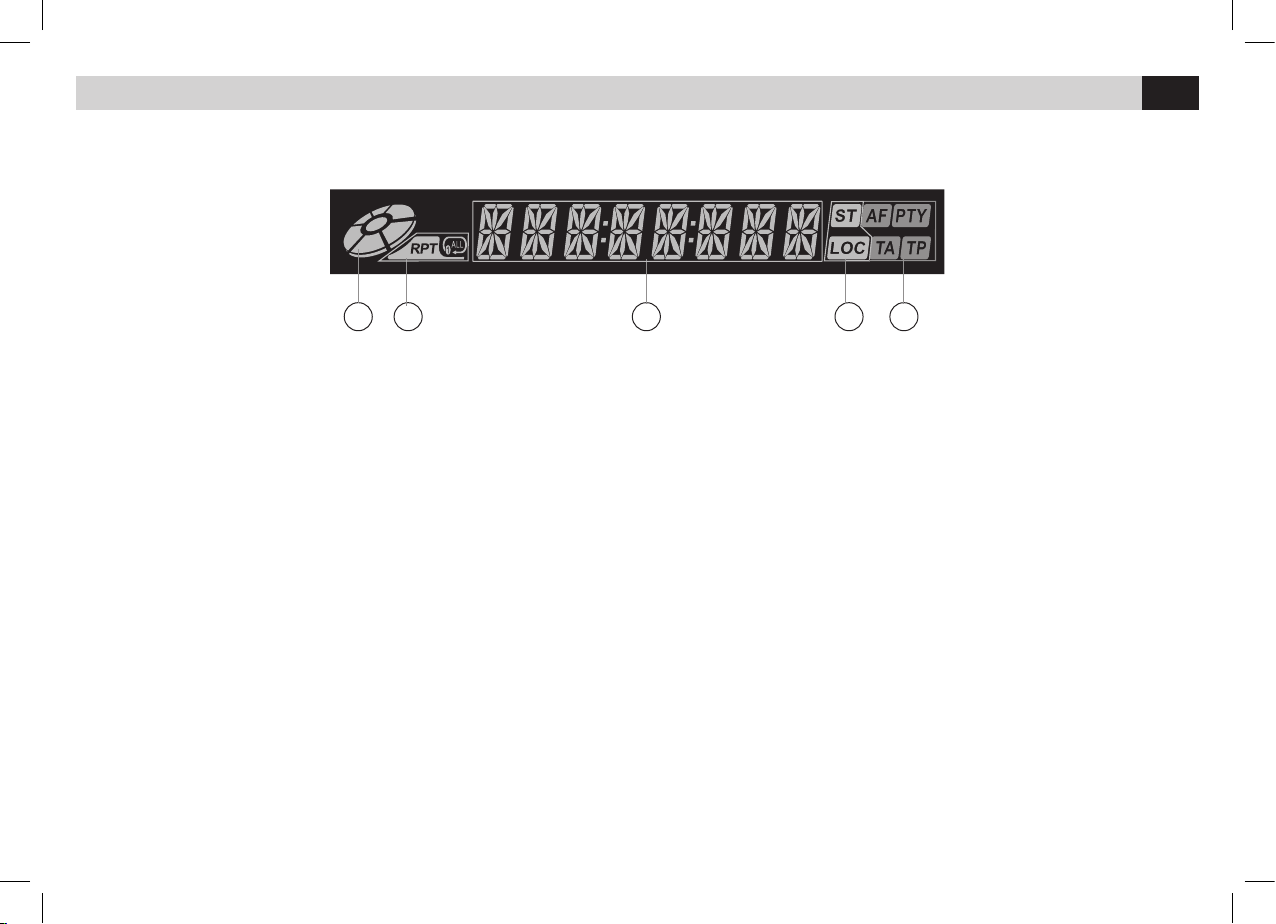
14 - Indicatore presenza disco
15 - Indicatore funzione ripetizione
16 - Informazioni di riproduzione
17 - Indicatore stato radio (LOC-DX)
18 - Indicatore funzioni RDS
1 - Next
2 - Previous
3 - Display information - Screen brightness adjustment - On/Off screen
4 - Select the sources
5 - Adjust volume Turn mute on or off Adjust screen brightness
6 - Reset the unit
7 - Unit power /Enter Nav mode
8 - AV IN2 jack
9 - USB Slot
10 - Eject disc
11 - Open / Close the TFT monitor
12 - Auto Save/Preview Scan/Increase display angle
13 - Change radio band/Decrease display angle
14 - Disc indicator
15 - Repeat mode indicator
16 - Main display area
17 - Radio status indicators
18 - RDS function indicators
14 15 16 17 18
Page 8
8
IT/GB
FUNZIONI
TELECOMANDO
• REMOTE-CONTROL FUNCTIONS
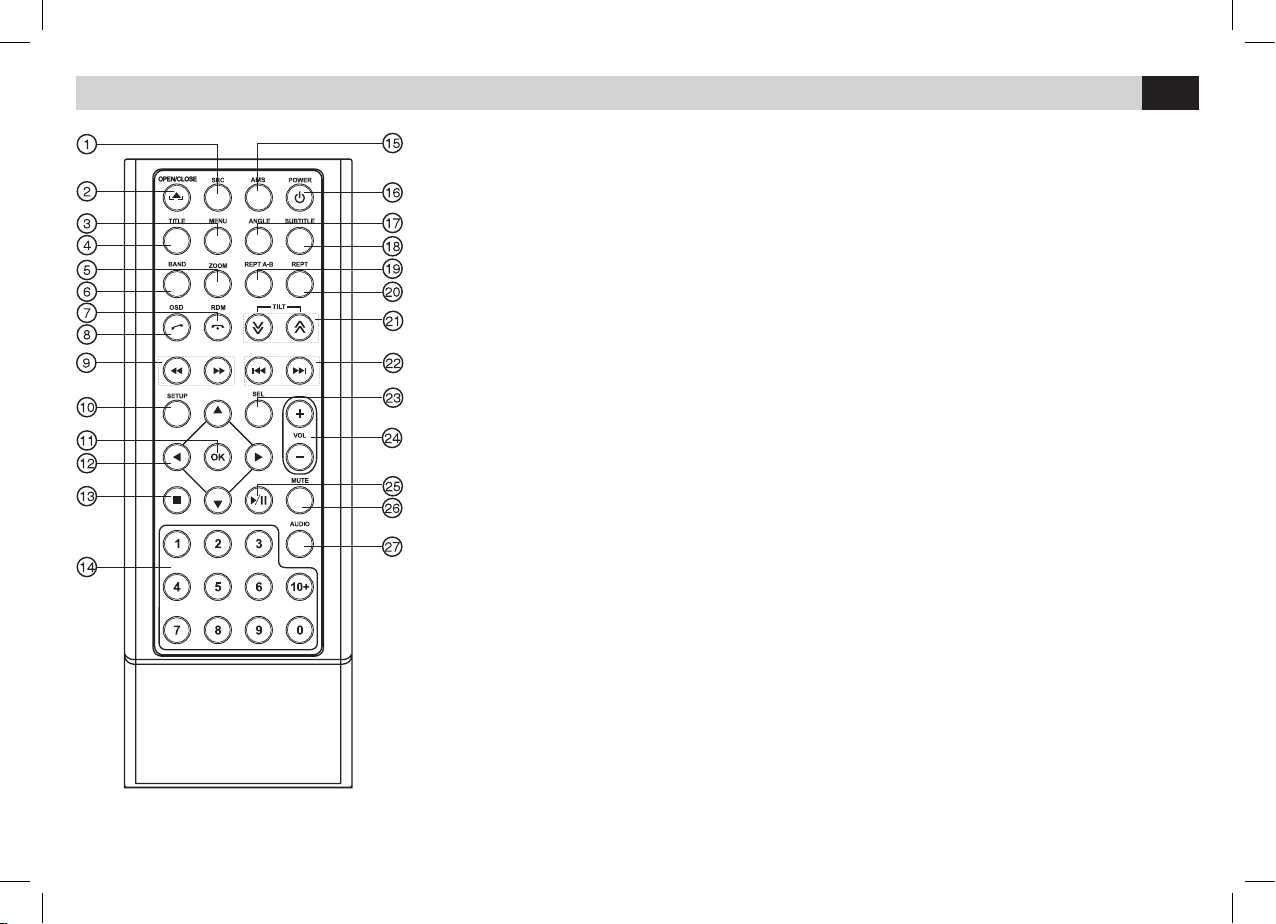
1 - Select playing source.
2 - Open / Close the TFT monitor.
3 - DVD MENU / PBC
4 - Title (DVD)
5 - Zoom (DVD/VCD)
6 - Radio band
7 - Random playback / Call Off-Cancel
8 - On screen display / Dial-Receive call
9 - Fast reverse / Forward playback
10 - Setup menu
11 - Enter
12 - Menu cursor
13 - Stop Playback
14 - Numeric keys
15 - Radio preset scan - Radio auto preset
16 - Power on/ off
17 - Angle (DVD)
18 - DVD subtitle
19 - A-B repeat
20 - Repeat
21 - Decrease display angle / Increase display angle
22 - Auto search / Previous / Auto search / Next
23 - EQ
24 - Adjust volume
25 - Play / Pause
26 - Turn mute on or off
27 - DVD audio / VCD audio selection
1 - Seleziona sorgente
2 - Apre / Chiude monitor
3 - Menù disco DVD - PCB
4 - Titolo DVD
5 - Zoom su DVD-VCD
6 - Cambio Banda Radio
7 - Riproduzione casuale / Termina chiamata
8 - Menu su schermo / Accetta chiamata
9 - Avanti / Indietro veloce
10 - Menù impostazioni
11 - Conferma selezione
12 - Spostamento nei menù
13 - Interrompe riproduzione
14 - Tastierino numerico
15 - Scansione stazioni radio memorizzate
Auto memorizzazione stazioni radio
16 - Accensione / Spegnimento
17 - Angolo visione DVD
18 - Sottotitoli DVD
19 - Ripetizione A-B
20 - Ripetizione Traccia / Capitolo / Cartella / Tutto
21 - Incrementa / Decrementa angolazione monitor
22 - Ricerca automatica
23 - Equalizzatore
24 - Regolazione volume
25 - Avvio / Pausa riproduzione
26 - Silenziamento audio
27 - Seleziona lingua audio DVD - VCD
Page 9
9
IT/GB
MENÙ • MENU
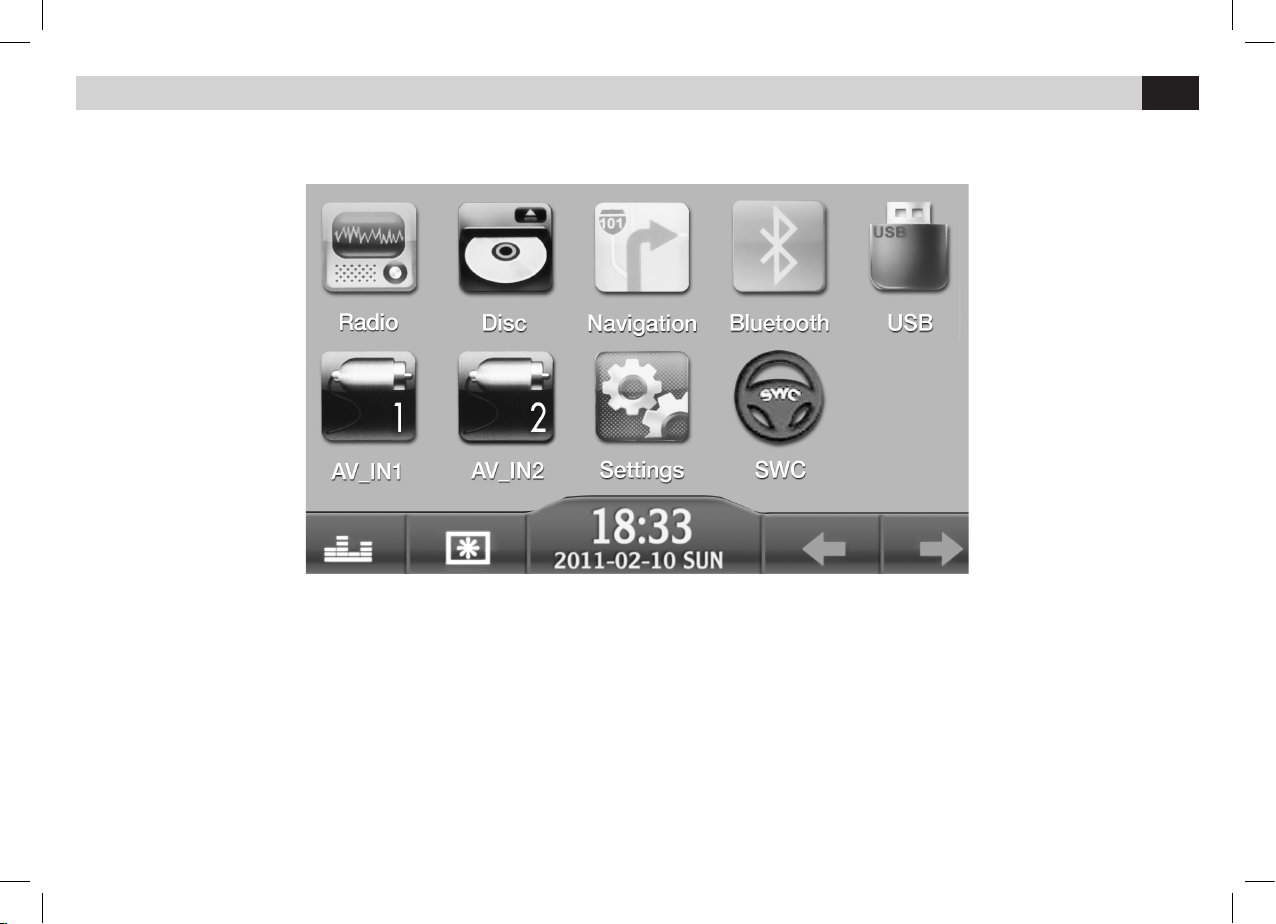
Per far apparire il menù principale premere il tasto MENU sul pannello frontale oppure premere l’angolo in alto a sinistra dello schermo.
Toccando le icone sullo schermo si seleziona la sorgente o la funzione desiderata.
To show the Main-Menu on the screen, press MENU-key on the front-panel or touch the upper left corner of the screen.
To choose Source and Functions, simply touch the related icon on the screen.
Page 10
10
IT/GB
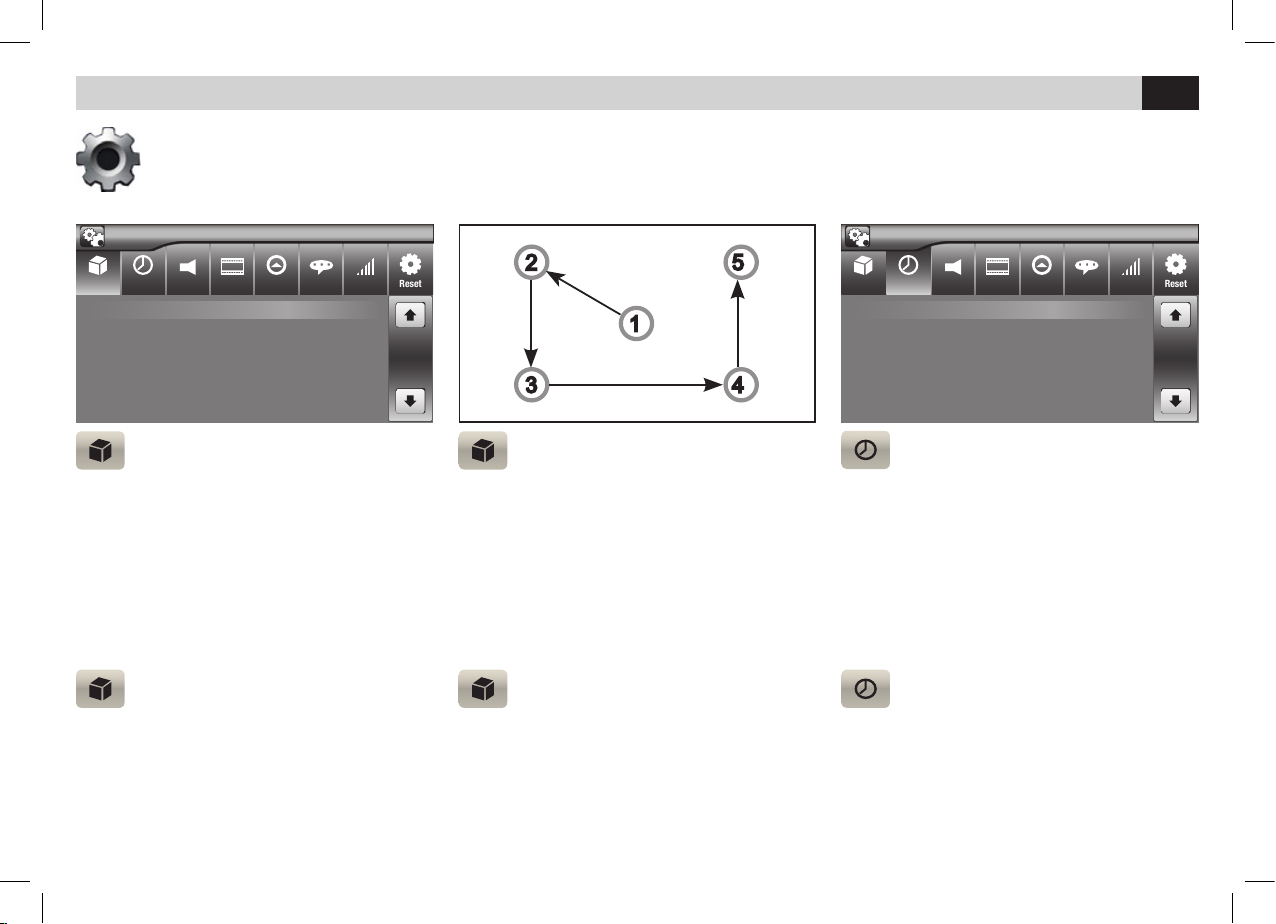
GENERAL SETTING
• RADIO REGION: To set the Area you belong
to (Europe-Australia-China-USA, etc.).
• BEEP: Activate/deactivate the Sound, each time
you touch the screen.
SETTING DATE AND TIME
• Touch the function required and change
values.
GENERAL SETTING
• CALIBRATION: Calibration starts by touching the
screen and following numbers sequence.
Keep pressed until the cursor starts moving.
SETTAGGI GENERALI
• RADIO REGION: Per impostare l’area di appartenenza (Europa-Australia-Cina-USA, ecc.).
• BEEP:
Attiva/Disattiva il suono ad ogni tocco
del touch screen.
IMPOSTAZIONI DI SISTEMA • SYSTEM SETUP
SETTAGGI GENERALI
• CALIBRATION: La calibrazione avviene toccan-
do lo schermo secondo la sequenza indicata.
Tenere premuto fino a quando il cursore si sposta.
Regolazioni: Calibrazione, reset, data e ora, navigazione, impostazioni radio, impostazioni video, lingue, volume sorgenti, personalizzazione sfondo.
Settings: Calibration, reset, date and time, navigation, radio-setting, Video-setting, languages, Source-volume, personalized screen-background.
REGOLAZIONE DATA E ORA
• Posizionarsi sulla voce da modicare ed effettuare le modifiche.
Sound Video GPS Language Volume Reset
Date 2012-11-11
Time mode 24 H
Time 00 : 42
Settings
General Time
Time Sound Video GPS Language Volume Reset
Radio region Europe
Beep On
Calibraton Enter
Settings
General
Page 11
11
IT/GB
VIDEO
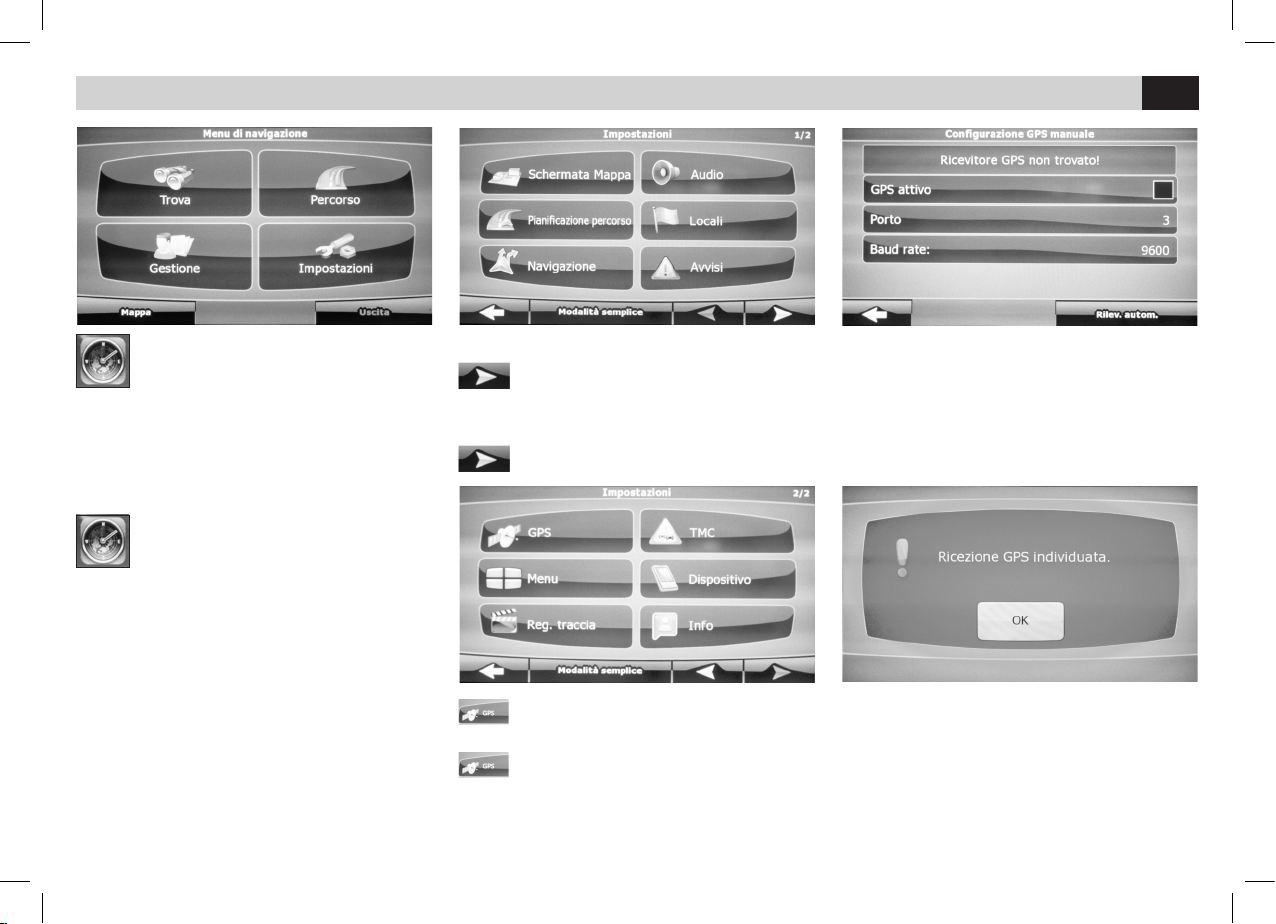
• REAR CAMERA: to switch from normal to
Mirror-Vision.
• DIMMER MODE: To set the screen brightness.
(NORMAL-BRIGHT-NIGHT-DUSK)
• PARKING: to activate/deactivate visualization
of films/pictures in movement.
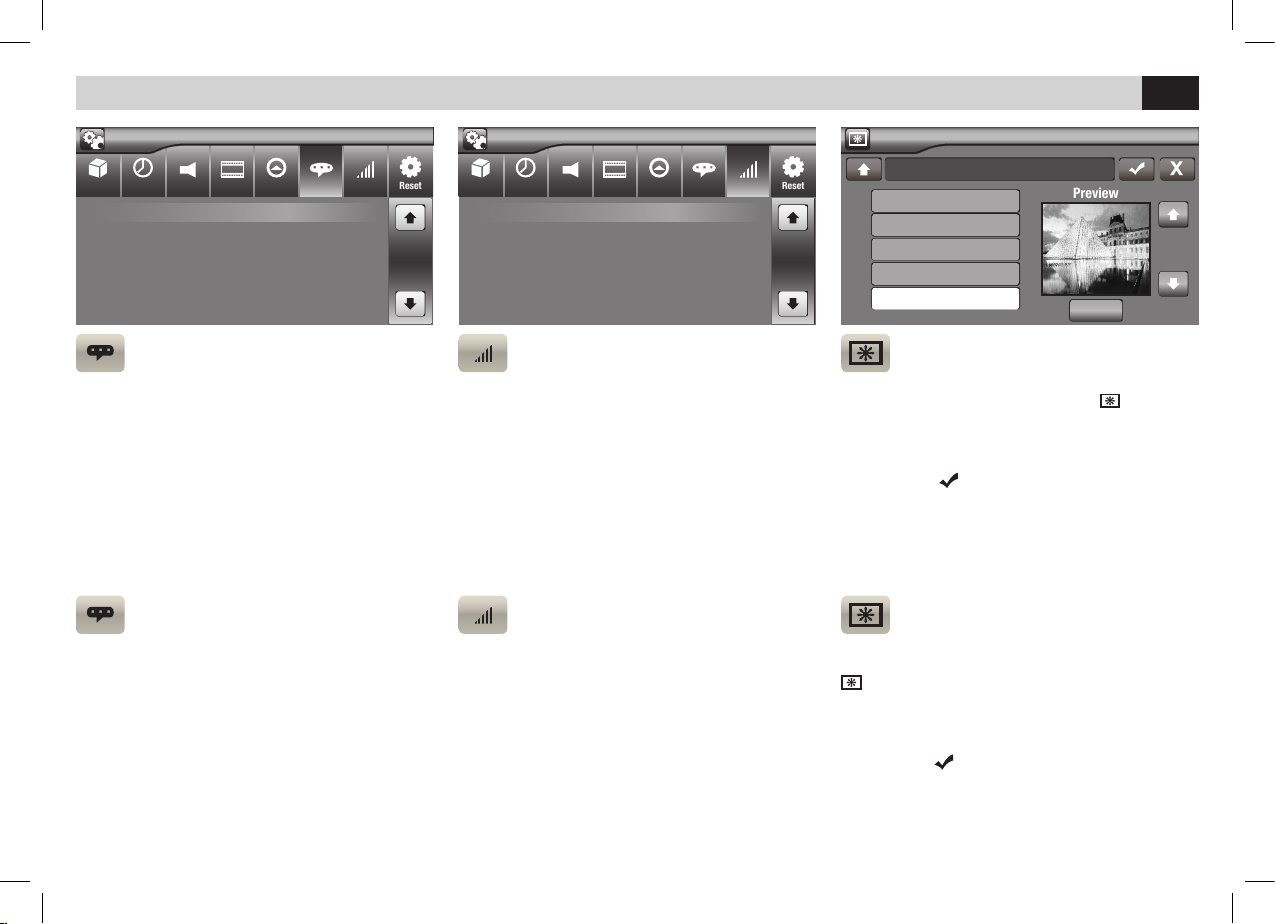
SETTAGGI GENERALI
• GPS SETUP: Inserire la MICRO SD di naviga-
zione NV995. Muoversi con
e selezionare il
file esecutivo
Mobilenavigator.exe.
NOTA: Effettuare questa impostazione prima di
avviare la navigazione.
GENERAL SETTING
• GPS SETUP: Insert the navigation micro-SD
art. NV995. Move with
to Select the execu-
tion-file Mobilenavigator.exe.
NOTE: To do before starting the navigation.
Sound Video GPS Language Volume Reset
Rear camera Normal
Dimmer mode Normal
Parking Off
Settings
General Time
Sound Video GPS Language Volume Reset
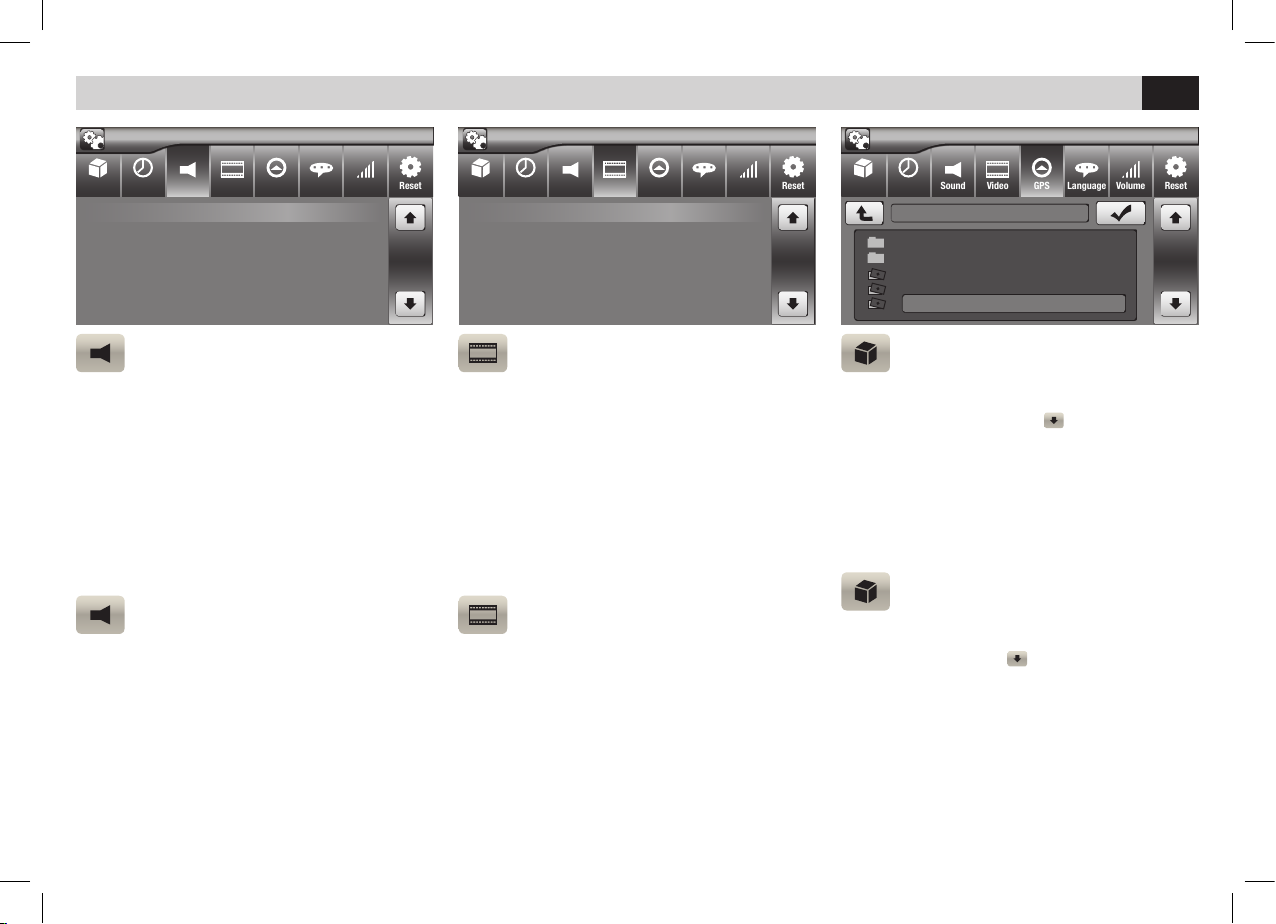
Sub woofer filter Off
LOUD On
Settings
General Time
IMPOSTAZIONI DI SISTEMA • SYSTEM SETUP
VIDEO
• REAR CAMERA: per cambiare la visualizzazio-
ne da normale a specchio.
• DIMMER MODE: Per impostare la luminosità
dello schermo. (NORMAL-BRIGHT-NIGHT-DUSK)
• PARKING: per attivare/disattivare la visione in
movimento di filmati e immagini.
IMPOSTAZIONI AUDIO
• SUB WOOFER FILTER: Per disattivare o impo-
stare i filtri del sub woofer.
• LOUD: Per attivare o disattivare l’esaltazione
delle bassa frequenze.
AUDIO-SETTINGS
• SUB WOOFER FILTER: Activation/Setting the
Subwoofer-Filters.
• LOUD Activates boosting-process of Low
Frequencies.
Sound Video GPS Language Volume Reset
Settings
General Time
\MobileNavigator\Mobilenavigator.exe
LICENSE
SAVE
BTSWITCH.EXE
IGO8.exe
Mobilenavigator.exe
Page 12
12
IT/GB
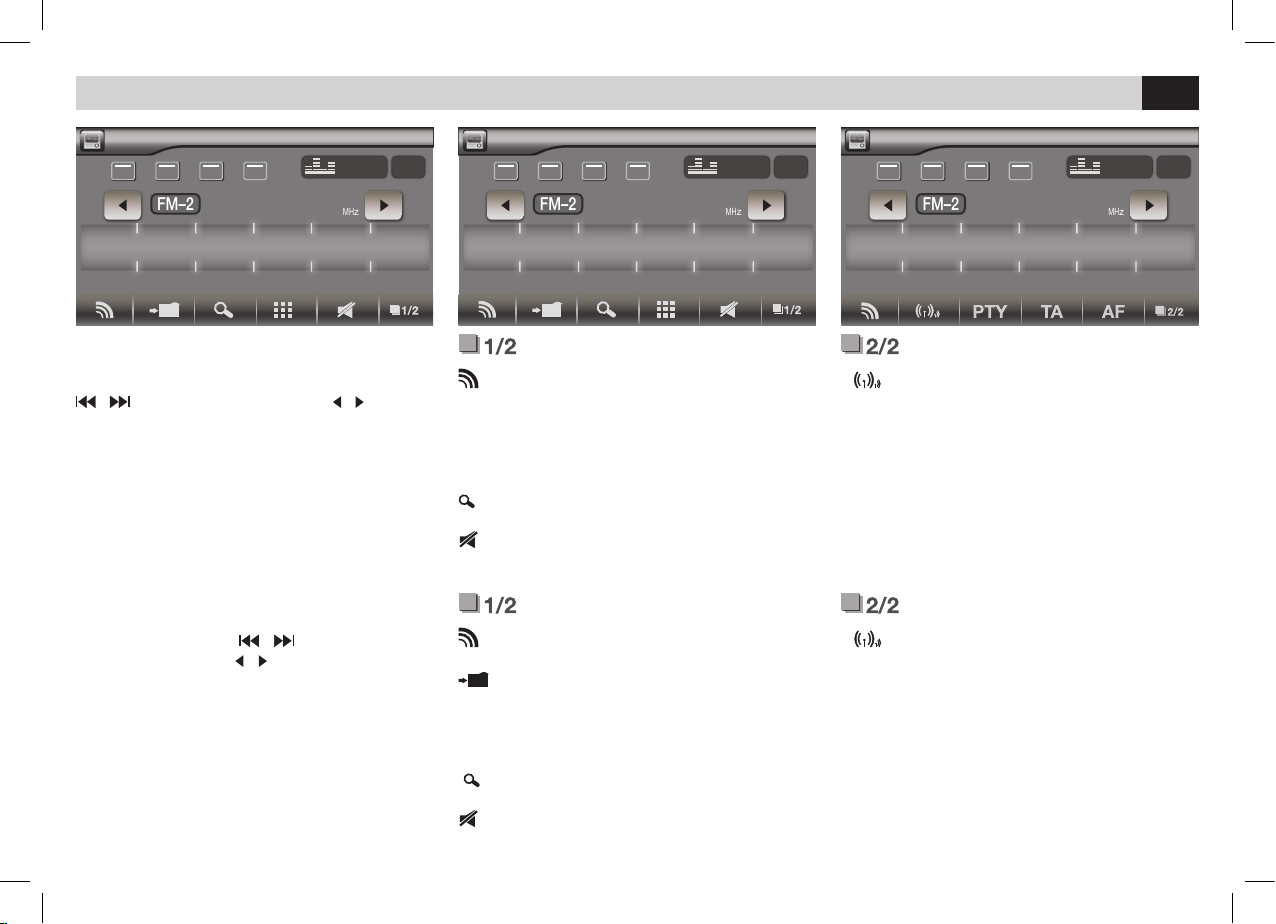
IMPOSTAZIONE MODULO GPS
• Passa alla seconda schermata
SETTING THE GPS-MODULE
• Go to the second panel
NAVIGAZIONE
Alla prima attivazione della mappa iGO (optional)
selezionare il file esecutivo mobilenavigator.exe
nei settaggi.
• Accedere al menu impostazioni del software.
NAVIGATION
When iGO-maps (Optional) are put into operation
for the first time, you have to select the executive
file mobilenavigator.exe and its settings.
• Enter the Software-Setup-Menu.
• Premere GPS.
• Press GPS.
IMPOSTAZIONI GPS • GPS SETUP
• Premere sulla spunta di GPS ATTIVO
poi su RILEVAMENTO AUTOMATICO.
• Press to tick GPS-ACTIVE then press
AUTOMATIC REVEALING.
• Attendere l’acquisizione dei dati e premere ok.
• Riferirsi al manuale iGO per le istruzioni sul
software di navigazione.
• Wait for Data-collection and press ok.
• Check iGO-Manual and follow the related
navigation-software instructions.
Page 13
13
IT/GB
LINGUE
• OSD: E’ possibile scegliere la lingua dei menù.
LANGUAGES
• OSD: It is possible to choose the preferred
Language for the Menu.
VOLUME SORGENTI-RESET
• E’ possibile la regolazione del volume di ogni
sorgente per evitare di avere sbalzi d’intensità nel
passaggio tra una sorgente e un’altra.
• RESET: Ripristina le impostazioni di fabbrica.
SOURCES VOLUME -RESET
• Every single Source has its own Volume-
Setting. This will exclude the disturbing impact
of intensity-differences when switching from one
Source to another.
• RESET: Restores the factory-settings.
IMPOSTAZIONI DI SISTEMA • SYSTEM SETUP
PERSONALIZZAZIONE SFONDO
Dal menù principale premere l’icona
per
accedere alla schermata gestione dello sfondo.
Per utilizzare le immagini presenti nella memoria,
premere il nome del file, selezionare l’anteprima
e confermare
. Per utilizzare immagini da SD
Card premere “SCAN SD”. Le immagini devono
essere in formato BMP 800x480.
BACKGROUND-PERSONALIZATION
Starting from the Main-Menu, press the icon
to enter the background-setting menu.
You can choose new background from pictures
list on the memory or upload from SD CARD
pressing “SCAN SD”. Press file name to see
preview and
to select. The pictures must be
BMP file with 800x480 of resolution.
Sound Video GPS Language Volume Reset
OSD English
Settings
General Time
Sound Video GPS Language Volume Reset
RADIO 7
BT 7
AUX 7
USB 7
Settings
General Time
Preview
Wallpaper
SCAN SD
6
7
8
9
Page 14
14
IT/GB
RADIO
RICERCA STAZIONI
• Tenendo premuto per più di un secondo i tasti
/ sul telecomando o le icone / sullo
schermo, l’unità ricercherà automaticamente le
stazioni. Per la ricerca manuale premere brevemente.
FUNZIONI RADIO
BAND Seleziona Bande Radio 3 FM - 2 AM.
STORE Memorizzazione di 6 stazioni disponibili
per ogni banda. Per memorizzare premere STORE e scegliere la posizione desiderata.
Per richiamare una stazione premere sulla frequenza corrispondente, in basso sullo schermo.
PS Scansione delle frequenze radio automati-
camente e memorizza le prime 6 più forti.
MUTE Silenzia l’audio.
FUNZIONI RADIO
•
LOC Seleziona le stazioni vicine o lontane.
• PTY Seleziona tipo di programma musicale.
• AF Ricerca di una frequenza alternativa con
informazioni sullo schermo della stazione.
• TA Informazioni traffico.
STATIONS RESEARCH
• By keeping the keys
/ on the remote-
control, or the icones
/ on the screen,
pressed for more than 2 seconds, the unit will
automatically start searching stations. Press only
briefly, if you wish to research manually.
RADIO-FUNCTIONS
BAND Selects Radio Frequency-Bands
3 FM - 2 AM.
STORE Memorizing 6 possible Stations per
Frequency-Band. To memorize, press STORE
and choose the requested position.
To call a certain Station, press the corresponding
Frequency stated on the screen-bottom.
PS Automatic scrolling of radio-frequencies
and memorization of the 6 most powerful.
MUTE Shut Audio off.
RADIO-FUNCTIONS
• LOC Select near / remote Stations
• PTY Select Type of Musical Programme.
• AF Research an alternative Frequency with
Programme-Details visible on screen.
• TA Traffic-Information
Radio
AFTA LOCST
87 . 50
87.50 92.50
FM–2
106.50 98.70 105.00 103.50
MH
z
P1 P2 P3 P4 P5 P6
EQ OFF
LOUD
Radio
AFTA LOCST
87 . 50
87.50 92.50
FM–2
106.50 98.70 105.00 103.50
MH
z
P1 P2 P3 P4 P5 P6
EQ OFF
LOUD
Radio
AFTA LOCST
87 . 50
87.50 92.50
FM–2
106.50 98.70 105.00 103.50
MH
z
P1 P2 P3 P4 P5 P6
EQ OFF
LOUD
Page 15
15
IT/GB
SUB
20
FAD: 0 BAL: 0
EQ
Bass Mid Treb LPH MPF HPF
0 0 0 80Hz 1KHz 12.5KHZ
EQ
USER
EQUALIZZATORE • EQUALIZER
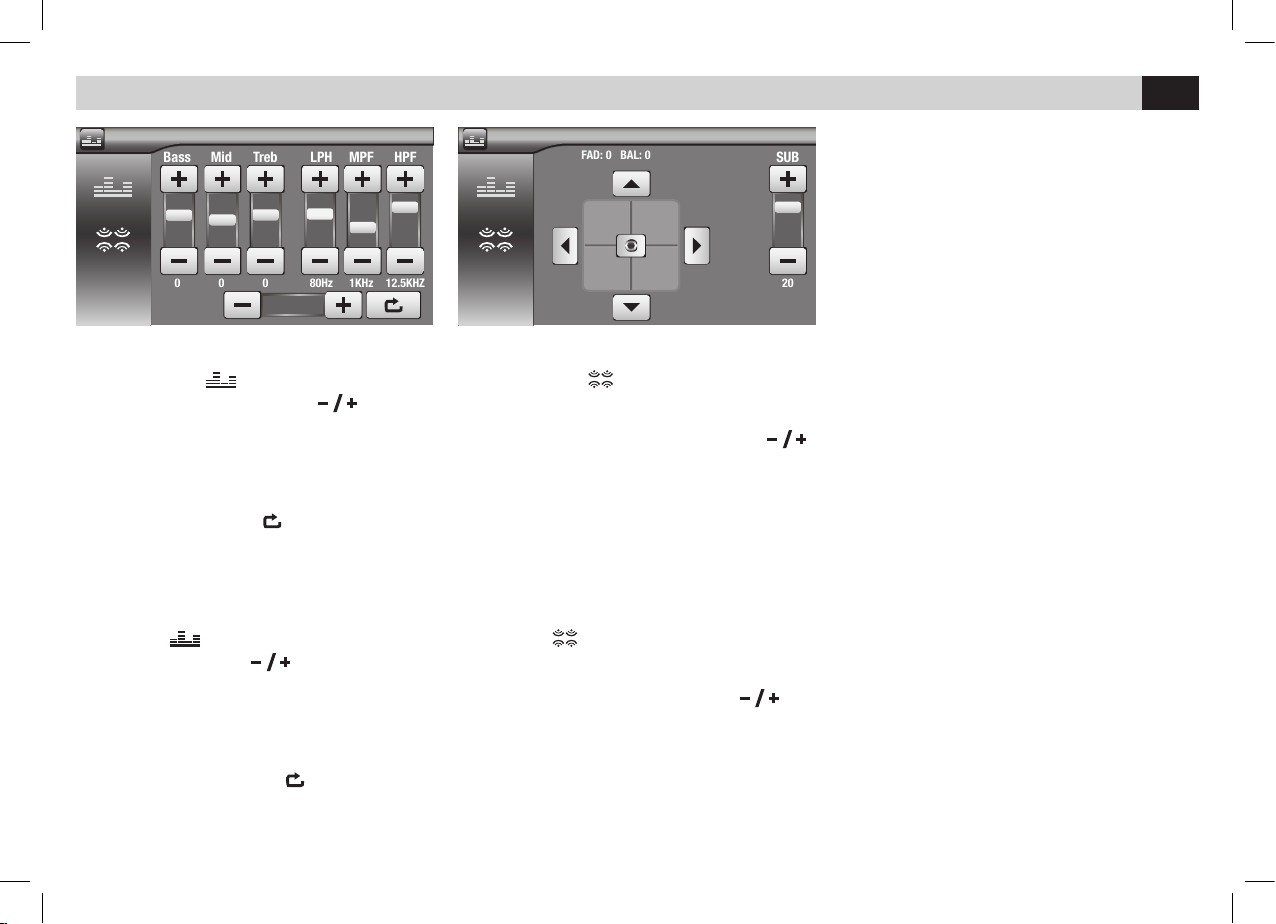
EQUALIZZATORE - LOUDNESS
• Premere l’icona per modificare le impostazioni di fabbrica. Tramite le icone
è possibile selezionare 8 diverse modalità di equalizzazione preimpostate: USER-FLAT-POP
ROCK-CLASSIC-JAZZ-TECHNO-OPTIMAL.
In modalità USER è possibile regolare i livelli di
alti, medio e bassi sulle frequenze desiderate.
LPF - MPF - HPF. L’icona
riporta in OPTIMAL.
FADER - BILANCIAMENTO - SUB WOOFER
• Premere l’icona per accedere alle regolazioni del FADER e del BILANCIAMENTO tramite
le frecce presenti sullo schermo.
Per regolare il volume del SUB W premere
Per regolare il crossover premere SUB W e posizionarsi sulla frequenza di taglio desiderata.
EQUALIZER - LOUDNESS
• Press icon
To modify the factory settings.
By means of the icones
it is possible to
choose 8 different predetermined equalizationmodes: USER-FLAT-POP-ROCK-CLASSICJAZZ-TECHNO-OPTIMAL.
The USER-mode allows to choose the wanted
Frequency for the High, Medium and Low-tones.
LPF - MPF - HPF. The icone
returns to OP-
TIMAL.
FADER - BALANCE – SUB-WOOFER
• Press icon
to enter the FADER-settings.
Use arrows on the screen, to effect the BALANCE-settings.
To set the SUB-Woofer-Volume, press
.
To set the crossover, press SUB-W and position
on the wanted Frequency-Cut.
Page 16
16
IT/GB
RIPRODUZIONE • PLAYBACK
RIPRODUZIONE MUSICA/FOTO/VIDEO
Selezionare: MUSICA - FOTO - VIDEO
KEY per visualizzare menù funzioni.
MUSIC/PICTURES/VIDEO PLAYBACK
Select: MUSIC - PICTURES - VIDEO
KEY Visualize Functions-Menu.
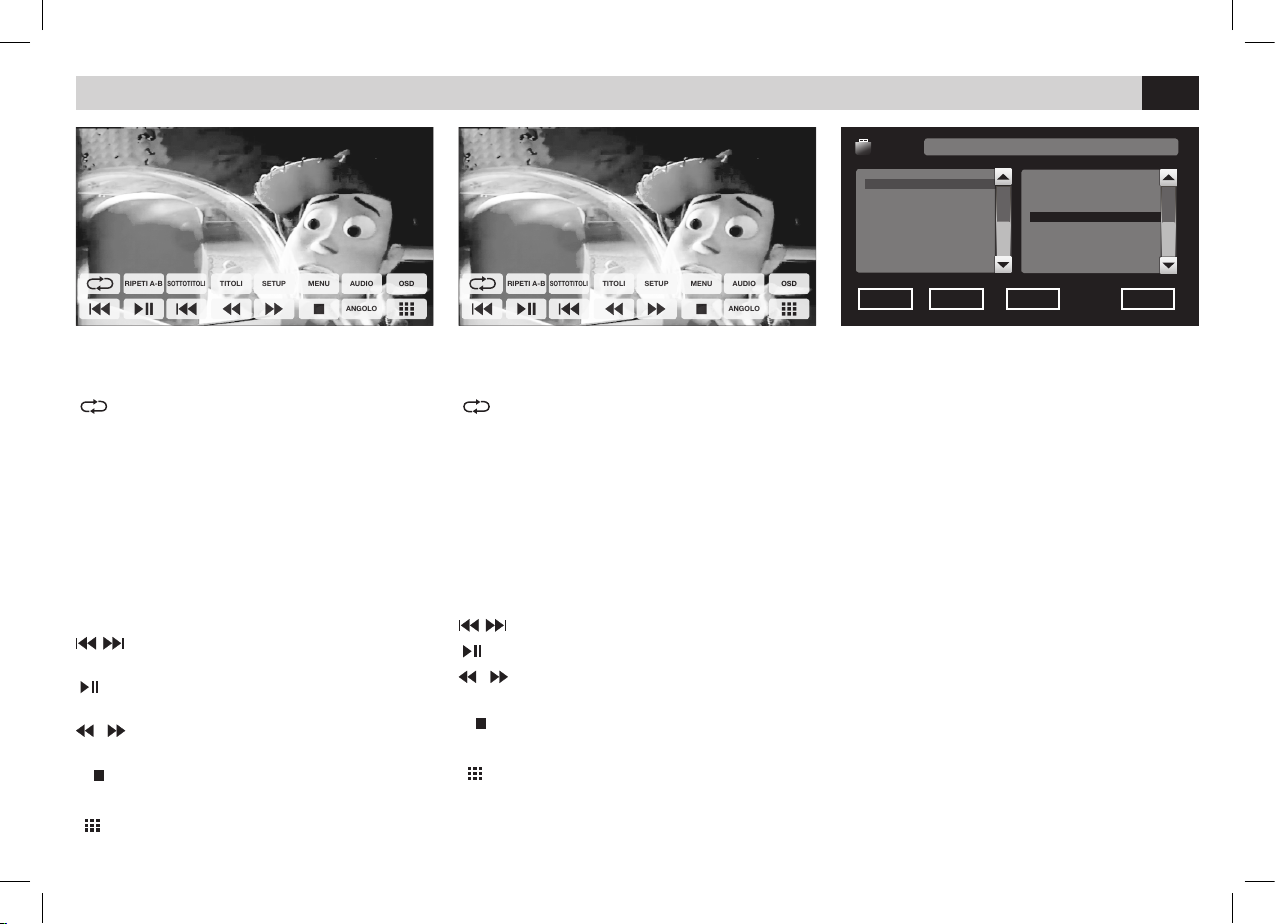
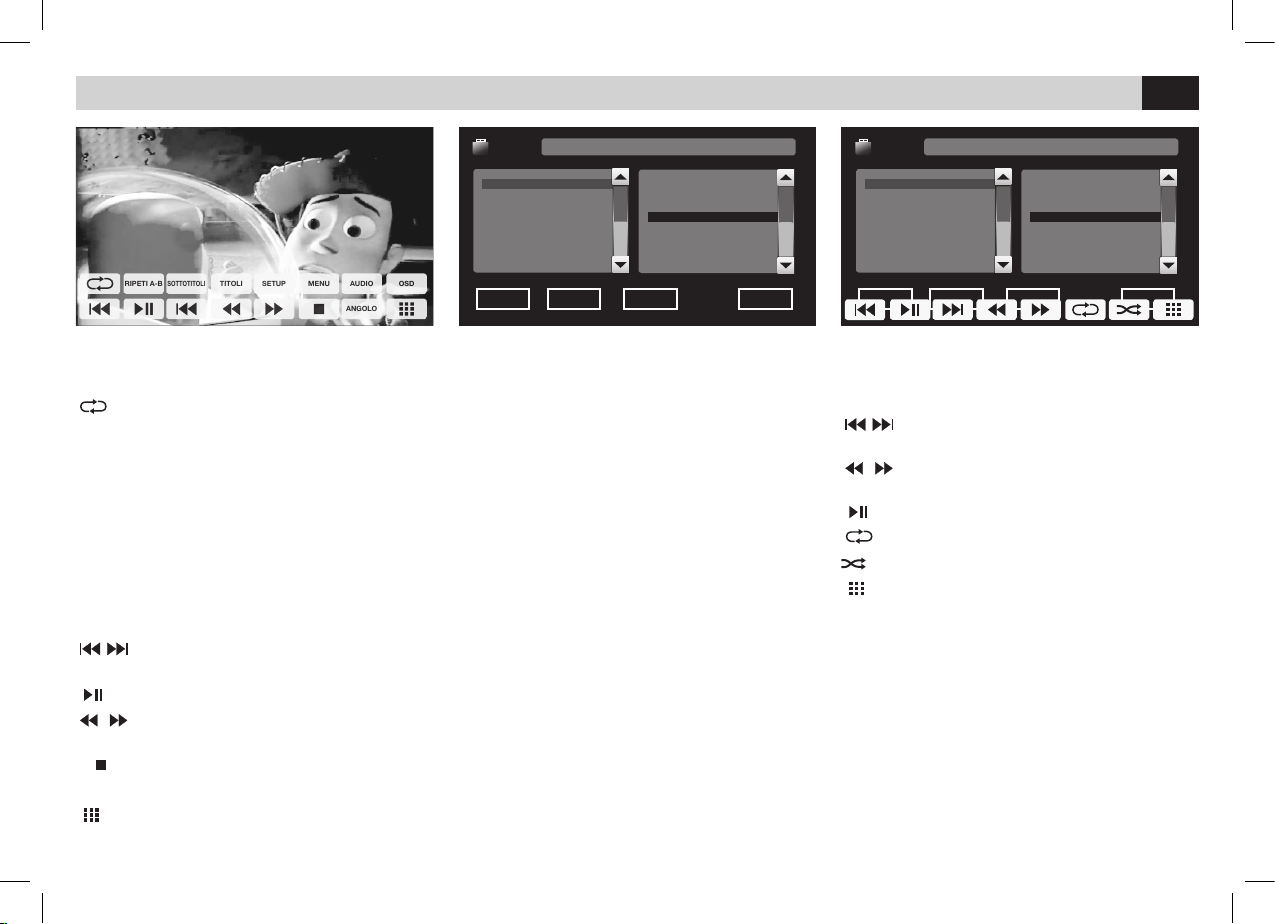
FUNZIONI DVD
Con l’inserimento del DVD appare il menù.
Ripetizione traccia/capitolo/disco.
RIPETI A-B Per la ripetizione dal punto A
al punto B.
SOTTOTITOLI Per cambiare la lingua sottotitoli.
TITOLI Funzione non disponibile.
SETUP Per impostazioni DVD.
MENU Per tornare al menù principale
durante la riproduzione.
AUDIO Per cambiare la lingua audio.
OSD Informazioni riproduzione.
Per traccia/capitolo precedente
o successivo.
Per avviare o interrompere
la riproduzione.
/ Tenere premuto per la riproduzione
veloce avanti/indietro.
Interrompe riproduzione.
ANGOLO Cambia angolo della riproduzione.
Per inserire il numero traccia/capitolo
da riprodurre.
DVD-FUNCTIONS
By introducing a DVD, MENU will appear.
Repeat Track/Chapter/Disc
RIPETI A-B Repeat from A to B.
SOTTOTITOLI Change Language of Subtitles.
TITOLI Function not available.
SETUP DVD-Settings.
MENU Back to Main Menu,
while reproduction is running.
AUDIO Change Audio-Language.
OSD Reproduction-Information.
Track/Chapter before/after.
Reproduction Start / Stop.
/ For fast Reproduction
forward/backward, keep pressed.
Reproduction Stop.
ANGOLO Change reproduction-angle.
Introduce number of Track/Chapter
for reproduction.
SOTTOTITOLI
RIPETI A-B TITOLI SETUP MENU AUDIO
ANGOLO
OSD
SOTTOTITOLI
RIPETI A-B TITOLI SETUP MENU AUDIO
ANGOLO
OSD
[¥]NI 21/04.2008/ARTIAT#ARTI
USB
MUSICA FOTO VIDEO KEY
01.¥
02.RECYCLED
01.N(5).MP3
02.N(6).MP3
03.N(7).MP3
04.N(8).MP3
05.N(9).MP3
Page 17
17
IT/GB
[¥]NI 21/04.2008/ARTIAT#ARTI
USB
MUSICA FOTO VIDEO KEY
01.¥
02.RECYCLED
01.N(5).MP3
02.N(6).MP3
03.N(7).MP3
04.N(8).MP3
05.N(9).MP3
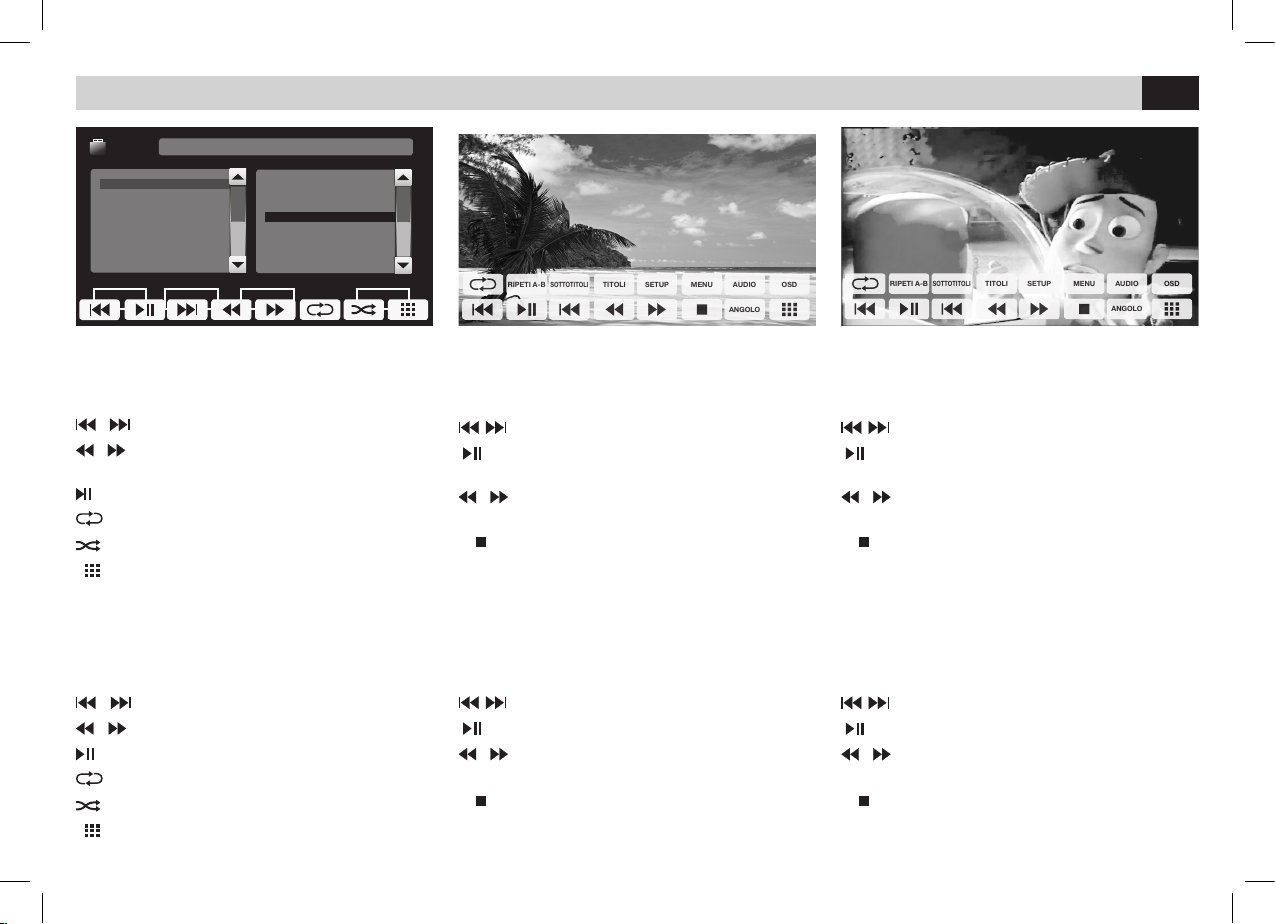
MENU MUSICA
Selezionare la traccia desiderata per avviare la
riproduzione.
/ Per traccia precedente o successivo.
/ Premere ripetutamente per la
riproduzione veloce avanti/indietro.
Pausa o riproduzione.
Ripetizione traccia / cartella / disco.
Riproduzione casuale
Per inserire il numero traccia
da riprodurre
MUSIC PLAYBACK
Select the requested Track and start playback
/ To change to another Track.
/ Press repeatedly, for fast Forward
Pause or playback
Repeat Track
Random playback
Introduce number of track for reproduction.
PICTURE-MENU
Select Photo for reproduction.
Photo before/after.
Reproduction Start / Stop.
/ For fast Reproduction
forward/backward, keep pressed.
Reproduction Stop.
VIDEO-MENU
Select Video for reproduction.
Video before/after.
Reproduction Start / Stop.
/ For fast Reproduction
forward/backward, keep pressed.
Reproduction Stop.
RIPRODUZIONE • PLAYBACK
MENU IMMAGINI
Selezionare la foto desiderata per avviare la
riproduzione.
Per foto precedente o successivo.
Per avviare o interrompere
la riproduzione.
/ Tenere premuto per la riproduzione
veloce avanti/indietro.
Interrompe riproduzione.
MENU VIDEO
Selezionare il video desiderato per avviare la
riproduzione.
Per video precedente o successivo.
Per avviare o interrompere
la riproduzione.
/ Tenere premuto per la riproduzione
veloce avanti/indietro.
Interrompe riproduzione.
SOTTOTITOLI
RIPETI A-B TITOLI SETUP MENU AUDIO
ANGOLO
OSD
SOTTOTITOLI
RIPETI A-B TITOLI SETUP MENU AUDIO
ANGOLO
OSD
Page 18
18
IT/GB
Missed calls
Received calls
Dialed calls
Phone book
Bluetooth
SAMSUNG GALAXY
IMPOSTAZIONI BLUETOOTH • BLUETOOTH-SETTINGS
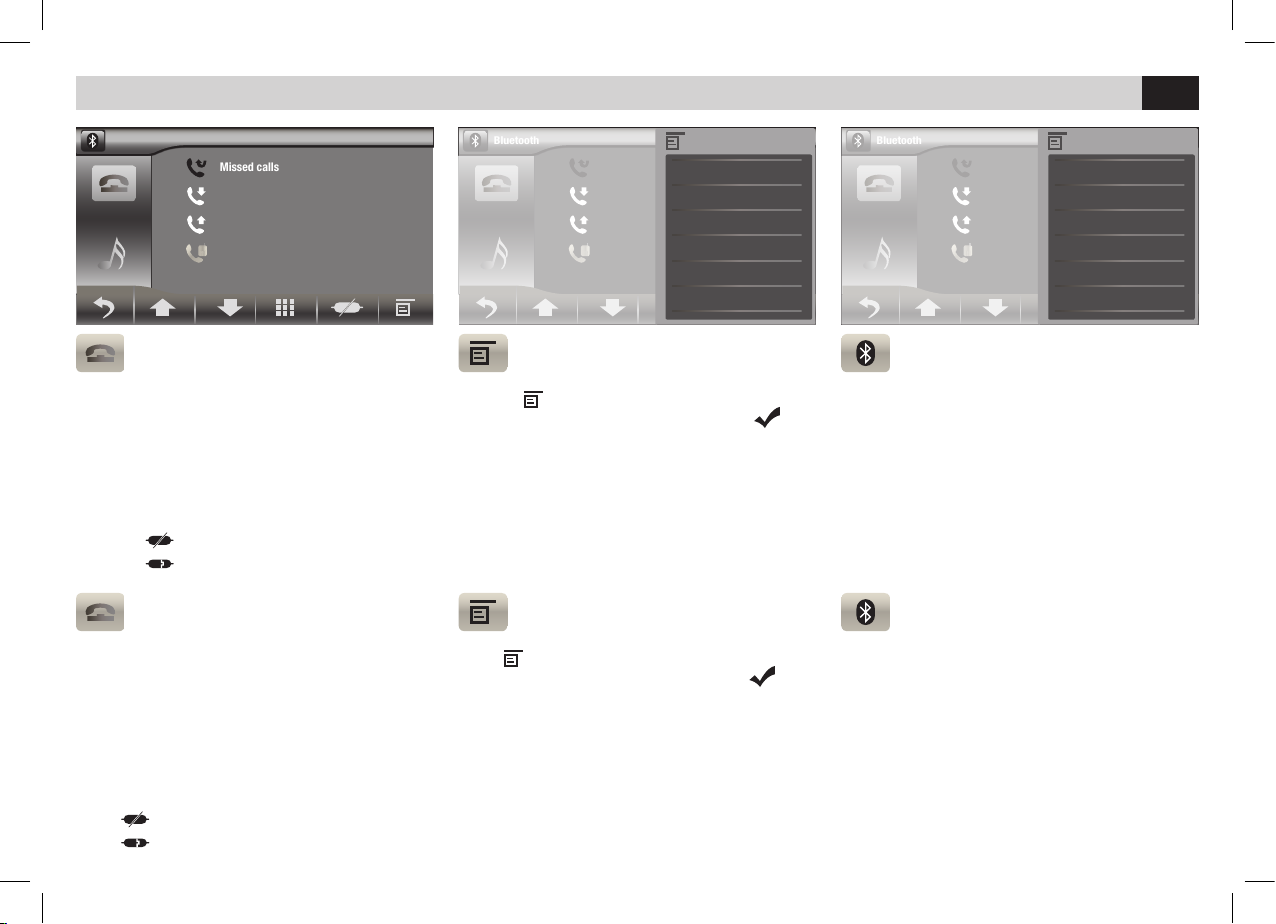
SINCRONIZZAZIONE RUBRICA
Premere
per accedere alle impostazioni.
Selezionare RUBRICA e confermare con
Automaticamente la rubrica del telefono verrà
scaricata nella memoria dell’autoradio. Il tempo
per l’operazione varia in base al numero dei
contatti.
OPZIONI BLUETOOTH
• AUTO-CONNESSIONE connette automaticamente il telefono.
• RISPOSTA AUTOMATICA risponde automaticamente alla chiamata.
• PIN cambia la password di accopiamento
• CANCELLA Elimina i dispositivi accoppiati.
ACCOPPIAMENTO TELEFONO
E’ possibile accoppiare fino a 5 telefoni.
• Attivare la funzione bluetooth sul telefono e
ricercare nuovi dispositivi.
• Selezionare PHONOCAR nella lista dispositivi,
inserire la password 0000 quando richiesta.
Ad accoppiamento avvenuto comparirà il nome
del telefono.
Premere
per disconnettere il telefono.
Premere
per riconnettere.
PHONE-PAIRING
Up to 5 phones can be coupled to the Device.
• Activate the Bluetooth-function on the phone
and search for new devices.
• Select PHONOCAR from the devices-list,
digit the password 0000, on request.
As soon as the coupling-process has been successfully accomplished, the phone-name will be
shown.
Press
to disconnect the phone.
Press
to reconnect the phone.
PHONE-BOOK SYNCHRONIZATION
Press to enter the setting options.
Select PHONE-BOOK and confirm with
The phone-book of your telephone will automatically be downloaded into the car-radio’s memory.
The time required for this operation depends on
the number of contacts contained in the phonebook.
BLUETOOTH-OPTIONS
• AUTO-CONNECT provides for the automatic
phone-connection
• AUTO ANSWER answers automatically all in-
coming calls.
• PIN modifies the pairing code password.
• DELETE Cancels the coupled devices.
Bluetooth
Setup
X
Bluetooth On
Auto connect On
Auto answers Off
Pairing code ****
Phone book sync
Delete
Bluetooth
Setup
X
Bluetooth On
Auto connect On
Auto answers Off
Pairing code ****
Phone book sync
Delete
Page 19
19
IT/GB
Bluetooth
SAMSUNG GALAXY
***************
Ringing...
Missed calls
Received calls
Dialed calls
Phone book
Bluetooth
SAMSUNG GALAXY
FUNZIONI BLUETOOTH • BLUETOOTH-FUNCTIONS
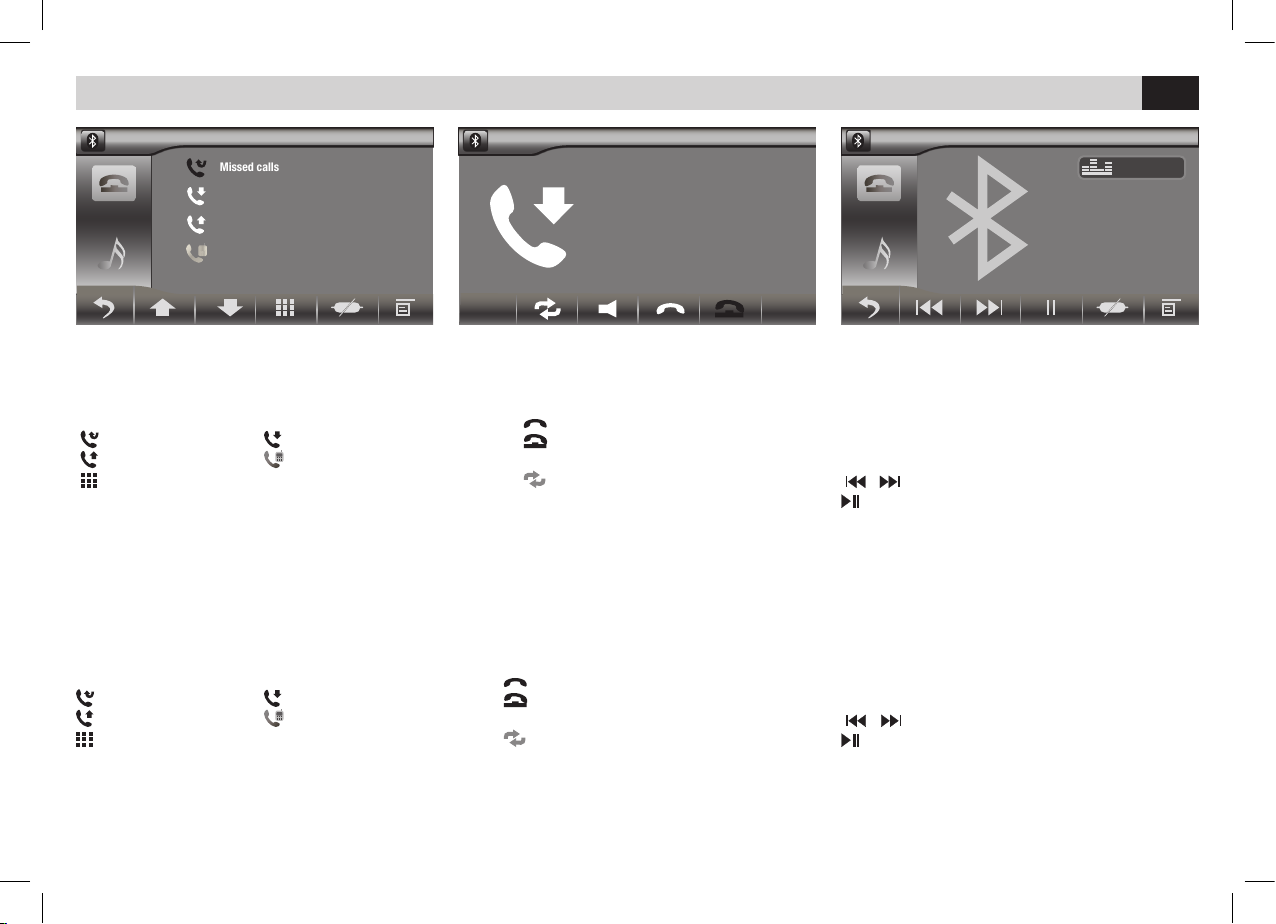
CHIAMARE DALLO SCHERMO
• Selezionare Bluetooth dal menù principale.
• Premere una delle icone presenti sullo schermo
per chiamare da uno degli elenchi.
chiamate perse chiamate ricevute
chiamate effettuate rubrica telefonica
chiamata dal tastierino numerico.
RICEVERE UNA CHIAMATA
Quando è in arrivo una chiamata, il VM066 passa
automaticamente in modalità bluetooth.
Premere
per rispondere.
Premere
per terminare la conversazione o per
rifiutare la chiamata in arrivo.
Premere
per escludere/attivare il vivavoce.
RIPRODUZIONE MUSICA BLUETOOTH
Se il telefono connesso supporta il profilo A2DP
è possibile ascoltare i brani musicali.
Se il dispositivo supporta AVRCP sarà possibile
controllare i brani musicali direttamente dal touch
screen.
/ brano precedente/successivo.
avvia/interrompe la riproduzione.
CALLING FROM THE SCREEN
• Select Bluetooth from the Main Menu.
• Press one of the icones available on the scre-
en, to call from one of the given phone-books.
missed calls received calls
dialed calls phone-book
calls effected through number-keys
RECEIVING A CALLING
When a phone-call arrives, the VM066 automatically switches to Bluetooth-mode.
Press
to answer the phone
Press
to end the conversation or refuse the
in-coming call.
Press
to deactivate/activate the hands-free
Device.
BLUETOOTH MUSIC PLAY
If the connected phone supports the A2DPProfile, you can listen to music.
If the device supports AVRCP, the musical tracks
can be handled on the touch-screen directly.
/ Previous/next Track.
Start/interrupt reproduction.
Bluetooth
SAMSUNG GALAXY
User
Page 20
20
IT/GB
VOL + SEEK+ POWER CH+ CALL
Enter
Reset
Assign
PLAY/
PAUSE
High
impedance
Low
impedance
MUTEVOL - SEEK- MODE CH- HANG
SWC
VOL + SEEK+ POWER CH+ CALL
Enter
Reset
Assign
PLAY/
PAUSE
High
impedance
Low
impedance
MUTEVOL - SEEK- MODE CH- HANG
SWC
COMANDI AL VOLANTE • STEERING-WHEEL COMMANDS
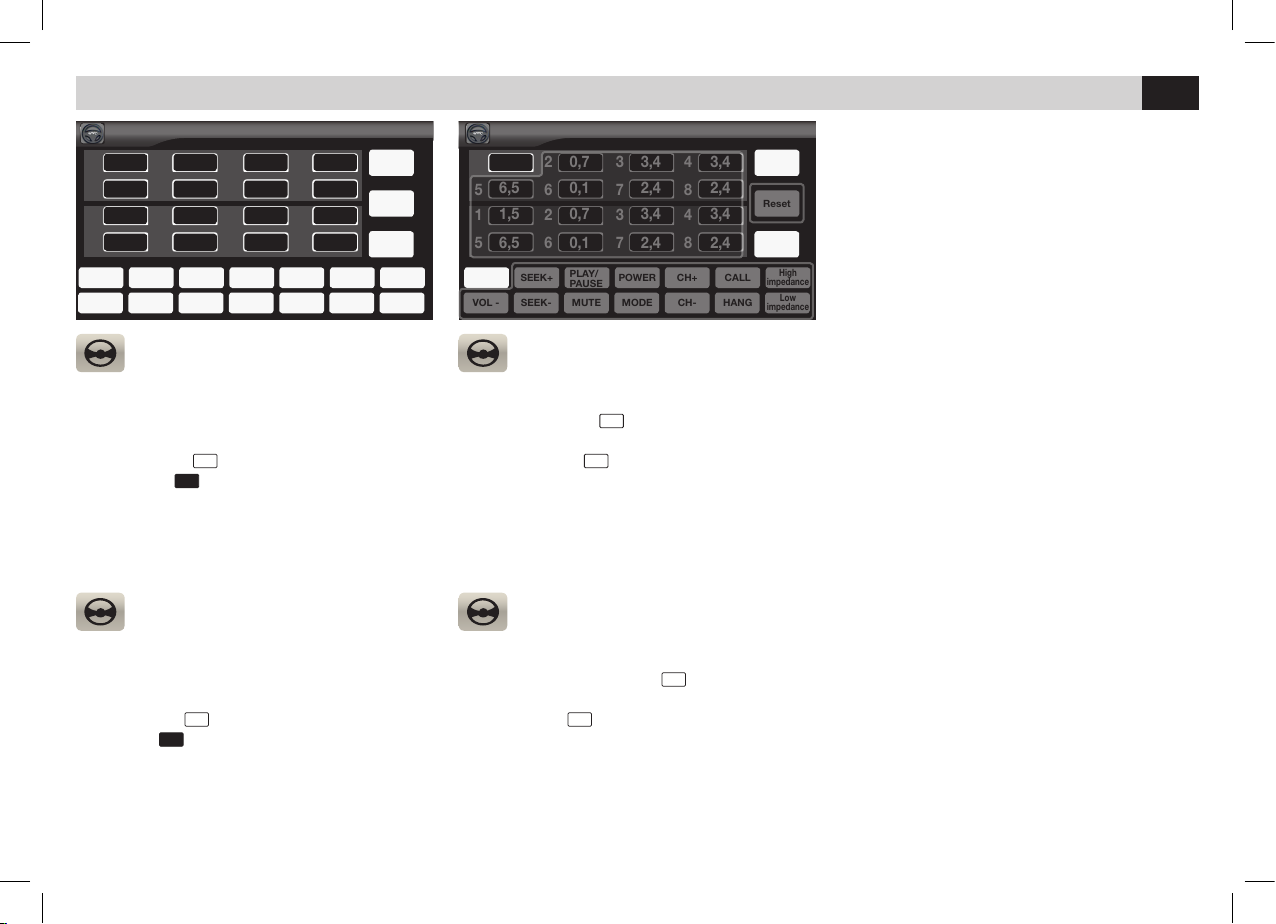
IMPOSTAZIONE COMANDI VOLANTE
Premere i tasti dei comandi al volante in sequenza. Sullo schermo si visualizzaranno i valori
resistivi per ogni singolo comando.
Premere l’icona
Assign
e selezionare il primo valore
resistivo (es.:
1,5
) l’icona si illuminerà.
IMPOSTAZIONE COMANDI VOLANTE
Premere l’icona della funzione relativa al comando al volante ( es.:
VOL+
).
Ripetere questa operazione per tutti i comandi e
alla fine premere
Enter
per memorizzare.
STEERING-WHEEL
COMMANDS SETTINGS
Press the steering-wheel command-keys in
sequence. The resistive values for every single
command will appear on the screen.
Press the icon
Assign
and select the first resistive
value (e.g.:
1,5
). The icon will switch-on.
STEERING-WHEEL
COMMANDS SETTINGS
Press the icon related to the steering-wheel
command in question (e.g.:
VOL+
)
Repeat these operations for all commands. At
the end, press
Enter
for memorization.
NOTA:
Il sistema accetta valori resistivi superiori
a 300 Ω differenti tra loro di almeno un 20-30%.
NOTE:
The system accepts resistive values of more than
300 Ohm, with a difference, from one another, of
at least 20-30%.
1,5 1,5
1
1
1 1
5
5
5 5
2
2
2 2
6
6
6 6
3
3
3 3
7
7
7 7
4
4
4 4
8
8
8 8
0,7 0,73,4 3,43,4 3,4
6,5 6,50,1 0,12,4 2,42,4 2,4
1,5 1,50,7 0,73,4 3,43,4 3,4
6,5 6,50,1 0,12,4 2,42,4 2,4
Page 21

21
IT/GB
CARATTERISTICHE TECNICHE • TECHNICAL FEATURES
• Monitor 7” TFT/LCD WIDE TOUCH SCREEN motorizzato / motorized
• Interfaccia grafica dinamica / Dynamic graphic interface
• Risoluzione / Resolution 800X480 pixel
• Illuminazione tasti colore verde / Green colour illumination keys
• Sistema colore / Colour System NTSC/PAL
• Importa immagini per salvaschermo o sfondo / Capture images to display as screen saver and background
• Volume ad encoder rotativo / Rotary volume encoder
• Funzioni visibili su schermo / On Screen Display functions (OSD)
• 1 Slot micro SD Card per navigazione / 1 micro SD Card slot for navigation
• 1 Porta USB frontale / 1 Front USB port
• Equalizzatore / Equalizer
• Sintonizzatore Radio / Tuner FM-AM-RDS-EON PLL
• 18 stazioni memorizzabili in FM e 12 in AM / Memory for 18 FM / 12 AM stations
• Memorizzazione dell’ultima posizione / Last position memory function
• Vivavoce Bluetooth nFore (Supporto iPhone 4, A2DP, Gestione Rubrica) / Handsfree (IPhone 4-A2DP Support-Phonebook Download)
• Microfono Esterno / External Microphone
• Tolleranza d’inclinazione ±30° / ±30° degrees inclination-tolerance
• Predisposizione Comandi Al Volante CAN-BUS / Steering Wheel Command ready
• Comandi Volante Resistivi Integrati / Resistive Steering Wheel Command Built In
• Controllo illuminazione / Dimmer control
• 4+1 Uscite audio Pre-Amplificate / 4.1 Channels Line-Out
• 2 ingressi AV, anteriore e posteriore / 2 Front and rear AV input
• Livelli subwoofer e filtro regolabili / Adjustable subwoofer and filter level
• Telecomando con tutte le funzioni / Remote Control with full Functions
Page 22

7” TFT/LCD
1 DIN NAVIGATION
NOTICE DE MONTAGE ET D’EMPLOI
GEBRAUCHSANWEISUNGEN
VM 043
FRANÇAIS
DEUTSCH
Page 23
23
FR/D
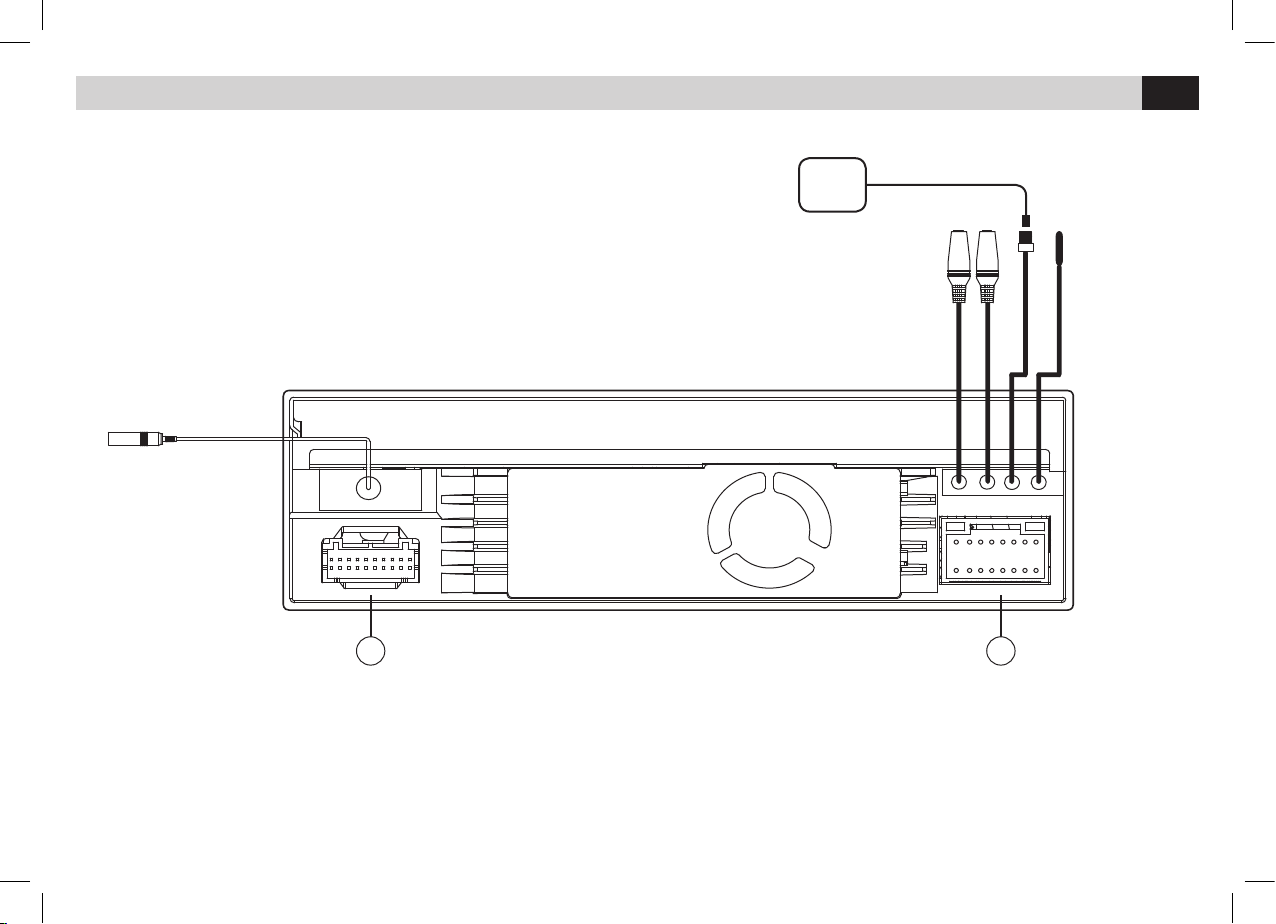
CONNEXIONS • KABEL-VERBINDUNGEN
ANTENNE
ANTENNA
GPS
SWC IR
RADIO ANT.
MIC
GPS ANT
SW Commands IR
2
1
Page 24
24
FR/D
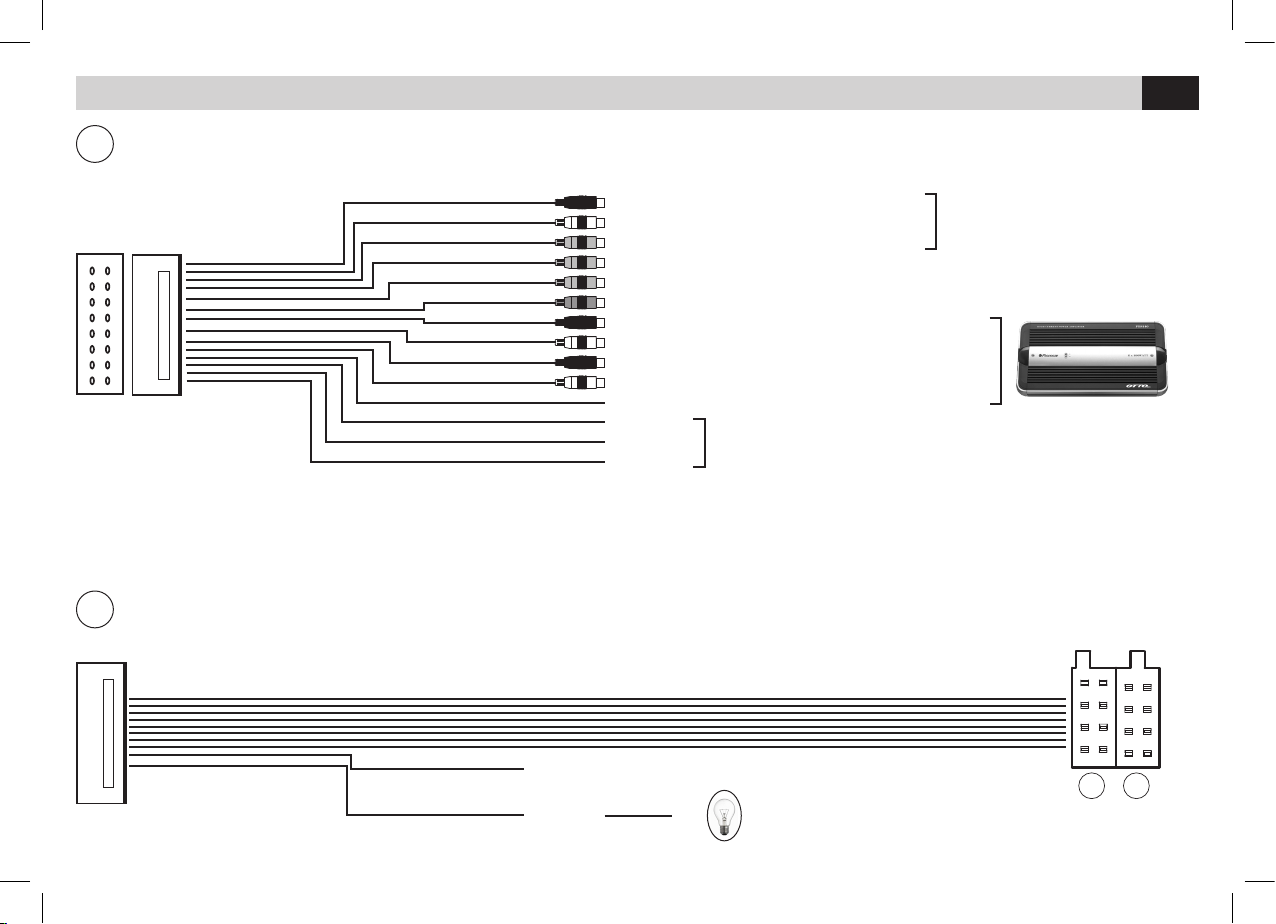
CONNEXIONS • KABEL-VERBINDUNGEN
KABEL MIT ISO STECKER / CÂBLE AVEC CONNECTEUR ISO
P. CONT
+
Lumière de marche arrière / Lichter bei Rückwärtsgang
LIGNE A COMMANDES AU VOLANT B-LEITUNG DER LENKRAD-STEUERUNGEN
LIGNE B COMMANDES AU VOLANT A-LEITUNG DER LENKRAD-STEUERUNGEN
MASSE COMMANDES AU VOLANT MASSE FÜR DIE LENKRAD-STEUERUNGEN
ISO
BA
2
1
SORTIES PRE – AMPLIFIEES / PRE-AMP-AUSGÄNGE
DROIT / RECHTS 1
GAUCHE / LINKS 1
SORTIE VIDÉO 1 / AUSGANG VIDEO 1
SORTIE SUBWOOFER / AUSGANG SUB-WOOFER
ANTÉRIEURE DROITE / FRONT RECHTS
ANTÉRIEURE GAUCHE / FRONT LINKS
POSTÉRIEURE DROITE / HECK RECHTS
POSTÉRIEURE GAUCHE / HECK LINKS
FREIN DE STATIONNEMENT / HANDBREMSE
ENTRÉES AV 1
EINGANG AV 1
AUX IN R
AUX IN L
VIDEO IN
CAMERA IN
VIDEO OUT
SUB WOOFER
FRONT R
FRONT L
REAR R
REAR L
BRAKE
KEY A
KEY B
KEY GND
ROSE / ROSA
BLUE-BLANC /BLAU-WEISS
ROSE / ROSA
BLUE/BLAU
VERTE/GRUN
NOIR/SCHWARZ
REVERSE
Amplificateur d’allumage / Zündverstärker
Page 25
25
FR/D
CONNEXIONS • KABEL-VERBINDUNGEN
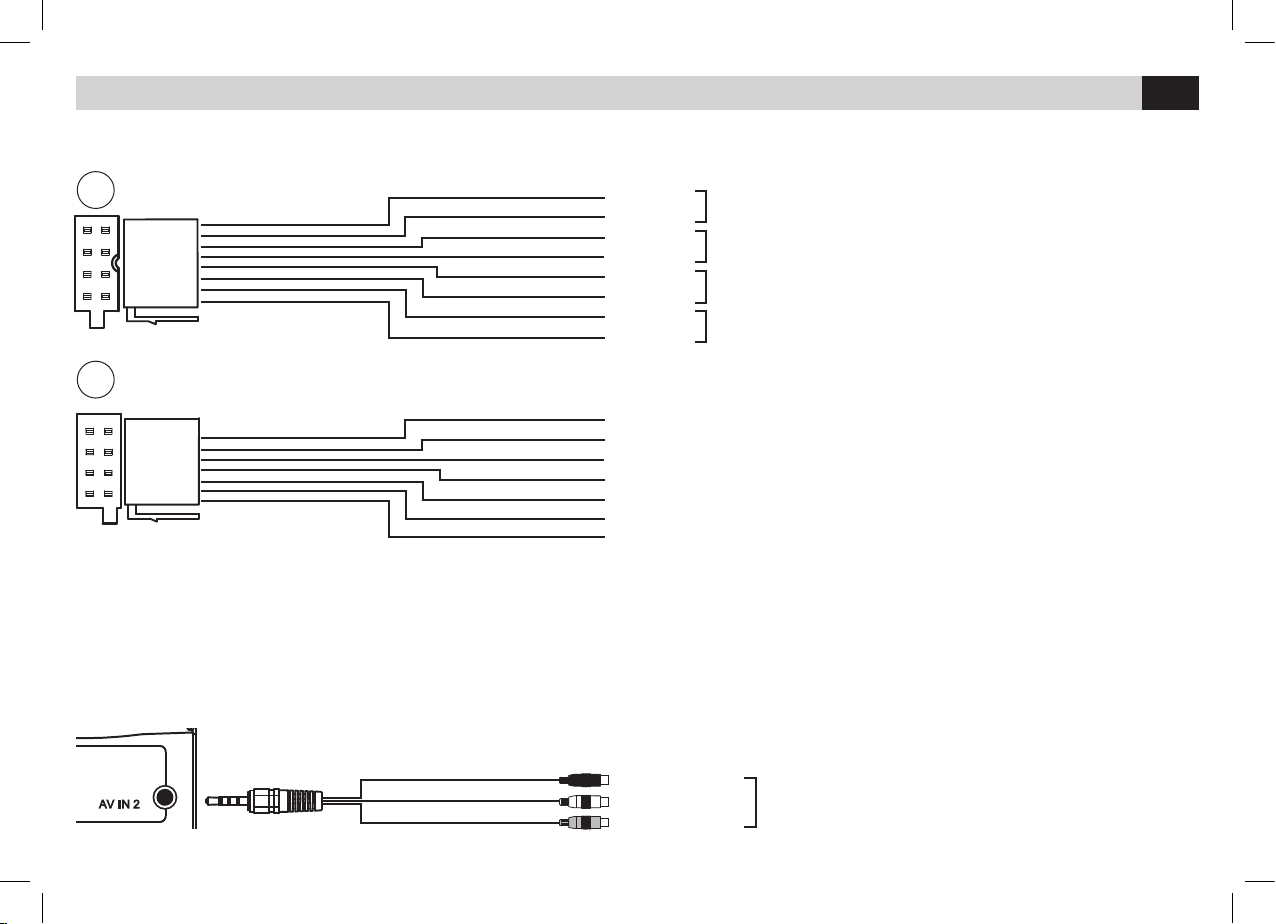
ANTÉRIEURE DROITE
FRONT RECHTS
ANTÉRIEURE GAUCHE
FRONT LINKS
POSTÉRIEURE DROITE
HECK RECHTS
POSTÉRIEURE GAUCHE
HECK LINKS
ISO
A
B
GRIS/GRAU
MARRON
BRAUN
NOIR
SCHWARZ
VERTE/GRUN
VERTE-NOIR/GRUN-
SCHWARZ
BLANC/WEISS
ROUGE/ROT
BLANC-NOIR/WEISS-SCHWARZ
NOIR/SCHWARZ
MARRON/BRAUN
ROSE/ROSA
VIOLET/PURPLE
ORANGE/ORANGE
VIOLET-NOIR/PURPLE-SCHWARZ
BLUE/BLAU
GRIS-NOIRE/GRAU-NOIR
JAUNE/GELB
+ 12V Positif batterie
+ 12V Après contact
Masse
Illumination / Dimmer
Allumage antenne électrique
Mute
Lumière de marche arrière
FRONT R +
FRONT R FRONT L +
FRONT L REAR R +
REAR R REAR L +
REAR L -
SORTIES HAUTS-PARLEURS
LAUTSPRECHER-AUSGÄNGE
ALIMENTATION
STROM-ZUFUHR
BATT
ACC
GND
ILLUMI
ANT. CONT.
MUTE
REVERSE
Sur certaines voitures, pendant l’allumage, le VM043 peut s’éteindre avant de se rallumer. Pour éviter cet inconvénient, brancher le temporisateur d’allumage 5/146.
Auf einigen Wagen-Modellen kann es vorkommen, dass beim Anlassen des Motors, der VM043 sich von selbst ausschaltet und dann wieder einschaltet.
Diesen Umstand kann man verhindern, indem man den Zeitgeber 5/146.
+12V Batterie-Plus
+12V Zündplus
Masse
Beleuchtung / Dimmer
Aktivierung der Elektro-Antenne
Mute
Lichter bei Rückwärtsgang
SORTIES A/V 2
AUSGÄNGE A/V 2
AUX IN 2 R
AUX IN 2 L
AUX IN 2 VIDEO
ROUGE/ROT
BLANC/WEISS
JAUNE/GELB
SORTIES ANTÉRIEURE A/V • FRONT AUSGÄNGE A/V
Page 26
26
FR/D
FONCTIONS • FUNKTIONEN
DIM
123
11
1213
1
2
3
4
5
6
8 9
12
7
10
11
13
Page 27
27
FR/D
FONCTIONS • FUNKTIONEN
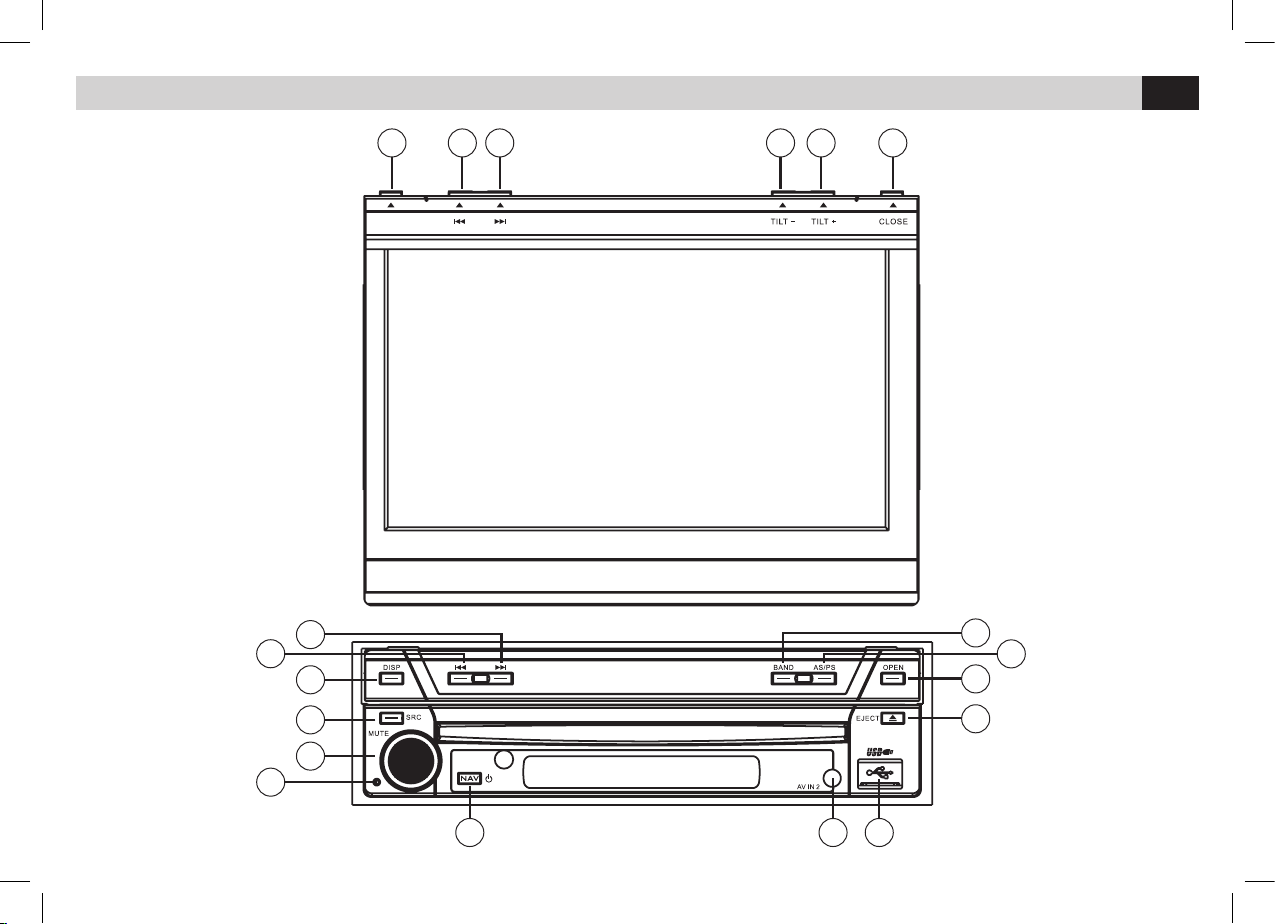
1 - Trace/Station successif
2 - Trace/Station précèdent
3 - Visualise informations reproduction sur l’écran
4 - Sélectionne source
5 - Régulation volume / Silencieux audio / Luminosité écran
6 - Touche reset
7 - Allumage / Extinction / Allumage navigation
8 - Entrée AUX IN 2
9 - Porte USB
10 - Expulsion disque
11 - Ouvre / Ferme écran
12 - Auto mémorisation stations / Balayage stations
Augmente angle écran
13 - Change bande radio / Diminue angle écran
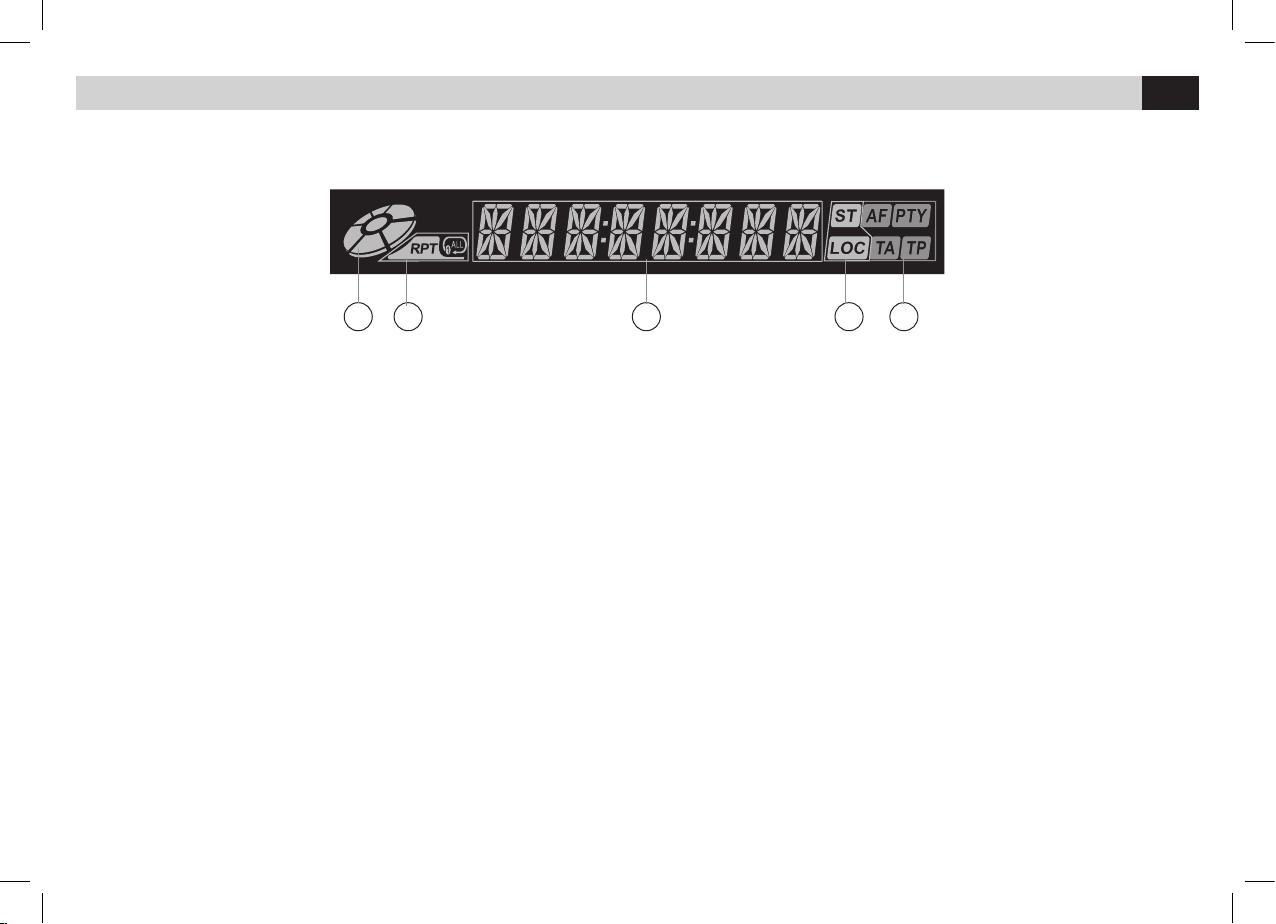
14 - Indicateur présence disque
15 - Indicateur fonction répétition
16 - Informations de reproduction
17 - Indicateur état radio (LOC-DX)
18 - Indicateur fonctions RDS
1 - Stück/Sender danach
2 - Stück/Sender davor
3 - Wiedergabe-Infos auf dem Monitor ausweisen
4 - Quelle wählen
5 - Lautstärke / Stummschaltung / Bildschirm-Helligkeit
6 - Reset-Taste
7 - Einschalten / Ausschalten / Navigation starten
8 - 2 AUX-IN-Eingänge
9 - USB-Öffnung
10 - CD-Auswurf
11 - Monitor ausfahren / einfahren
12 - Sender-Speicherautomatik / Sender-Scrolling
Monitor-Sichtwinkel vergrößern
13 - Radio-Frequenzband ändern / Monitor-Sichtwinkel verkleinern
14 - Anzeige bei CD-Anwesenheit
15 - Anzeige bei laufender Wiederholungsfunktion
16 - Wiedergabe-Infos
17 - Radio-Stand-Anzeige (LOC-DX)
18 - RDS-Anzeige
14 15 16 17 18
Page 28
28
FR/D
FONCTIONS TÉLÉCOMMANDE • FERNBEDIENUNGS-TASTEN
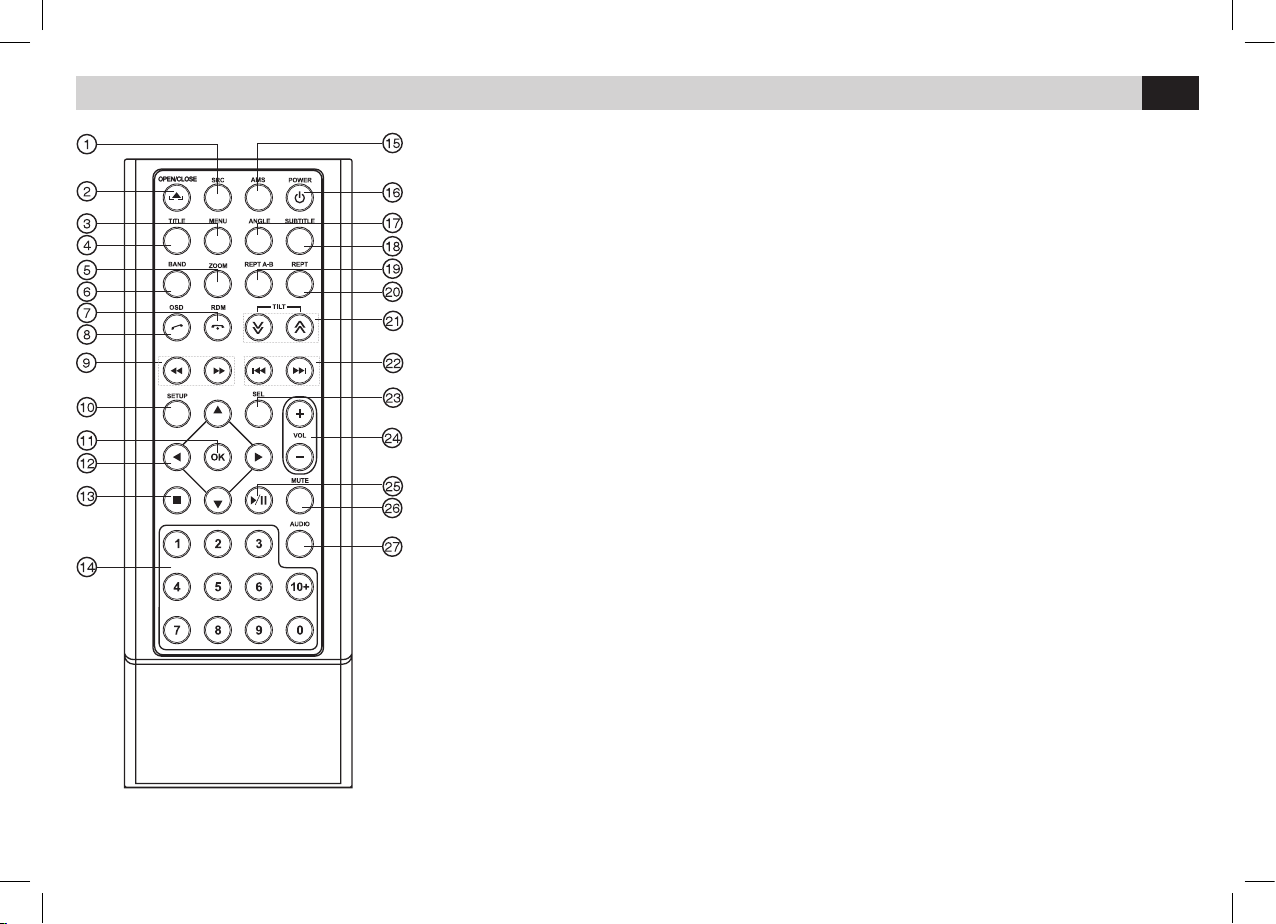
1 - Quelle wählen
2 - Monitor öffnen / schließen
3 - Menü DVD - PCB
4 - DVD-Titel
5 - Zoom bei DVD-VCD
6 - Radio-Frequenzband ändern
7 - Wahllose Wiedergabe / Telefongespräch beenden
8 - Menü auf Bildschirm / Anruf beantworten
9 - Schnell Vorwärts / Rückwärts
10 - Einstellungs-Menü
11 - Wahl bestätigen
12 - Menü handhaben
13 - Wiedergabe stoppen
14 - Nummern-Tasten
15 - Eingespeicherte Radio-Sender scrollen
Radio-Sender-Speicherautomatik
16 - Einschalten / Ausschalten
17 - DVD-Sichtwinkel
18 - DVD-Untertitel
19 - Wiederholung A-B
20 - Stück / Kapitel / Ordner / Alles wiederholen
21 - Monitor-Winkel vergrößern / verkleinern
22 - Such-Automatik
23 - Equalizer
24 - Lautstärke-Regler
25 - Wiedergabe Start / Pause
26 - Stummschaltung
27 - Audio-Sprache DVD - VCD wählen.
1 - Sélectionne source
2 - Ouvre / Ferme écran
3 - Menu disque DVD - PCB
4 - Titre DVD
5 - Zoom sur DVD-VCD
6 - Change Bande Radio
7 - Reproduction fortuit / Termine appel
8 - Menu sur écran / Accepte appel
9 - Avant / arrière rapide
10 - Menu réglages
11 - Confirme sélection
12 - Déplacement dans les menus
13 - Interrompe reproduction
14 - Clavier numérique
15 - Balayage stations radio mémorisés
Auto mémorisation stations radio
16 - Allumage / Extinction
17 - Angle vision DVD
18 - Sous-titres DVD
19 - Répétition A-B
20 - Répétition Trace / Chapitre / Fiche / Tout
21 - Augmente / Diminue angle écran
22 - Recherche automatique
23 - Egalisateur
24 - Régulation volume
25 - Allumage / Pause reproduction
26 - Silencieux audio
27 - Sélectionne langue audio DVD - VCD
Page 29
29
FR/D
MENU • MENÜ
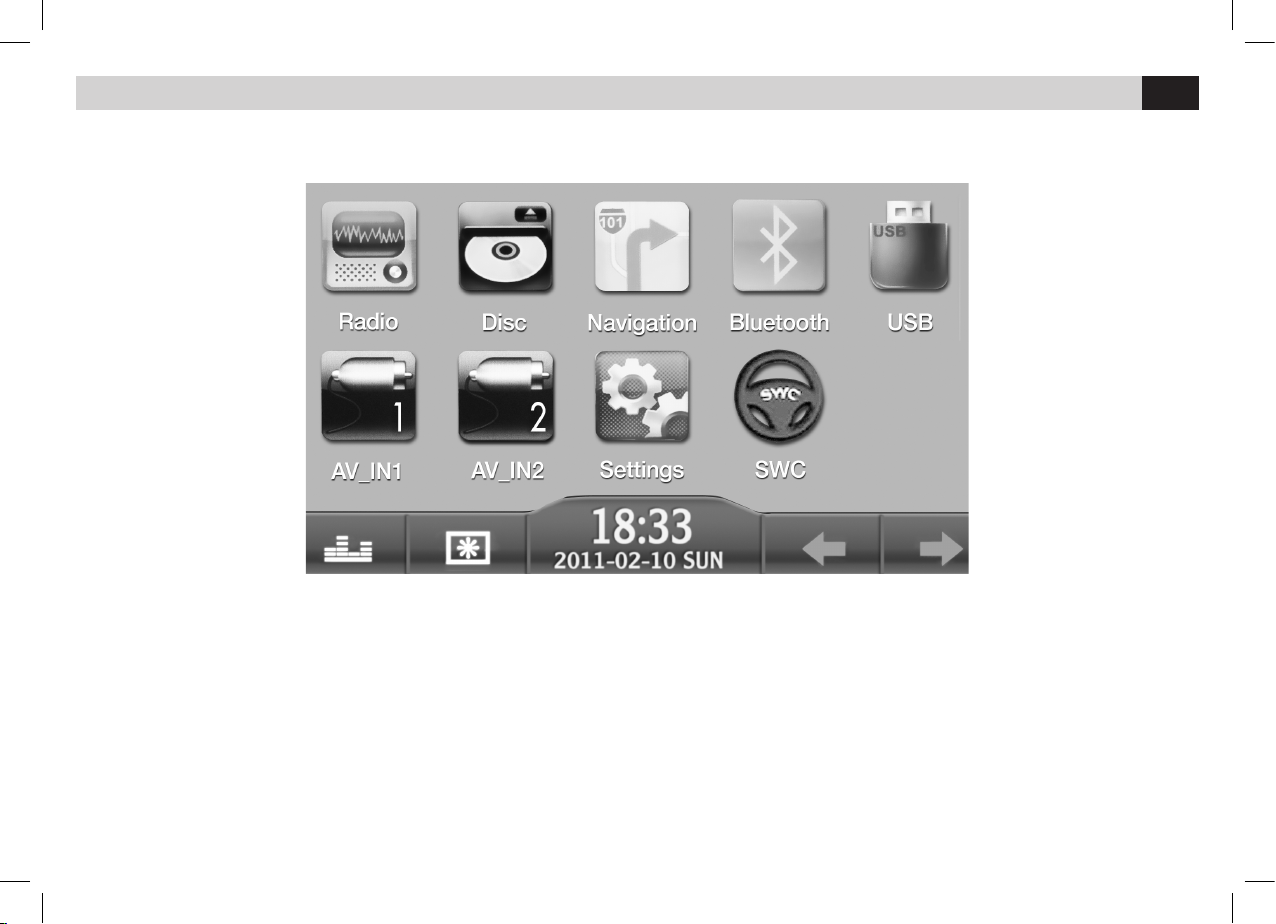
Pour faire apparaître le menu principal, appuyer la touche MENU sur la façade ou l’angle gauche en haut à de l’écran.
En touchant les icônes sur l’écran, on sélectionne la source ou la fonction désirée.
Um das Haupt-Menü einzublenden, entweder die MENÜ-Taste auf dem Bedienteil drücken, oder obere linke Bildschirm-Ecke antasten.
Durch das Antasten der Ikonen auf dem Bildschirm, lassen sich jeweils die Quelle und die verschiedenen Funktionen wählen.
Page 30
30
FR/D
REGLAGES DE SYSTEME • SYSTEM-EINSTELLUNGEN
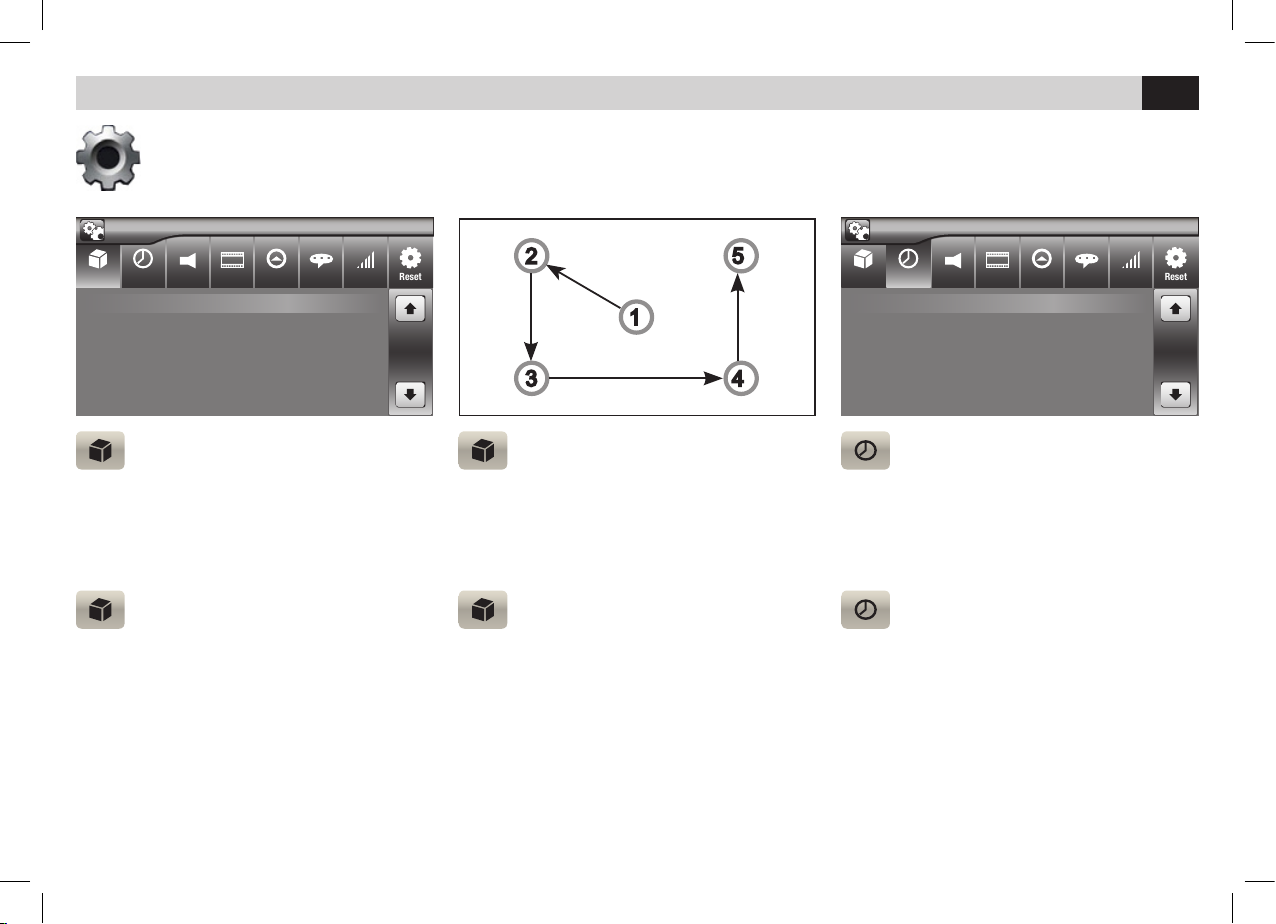
Réglages: Calibrage, reset, date et heure, navigation, réglages audio, réglages vidéo, Langues, volume sources, personnalisation fond d’écran.
Einstellungen: Kalibrierung, Reset, Datum/Uhrzeit, Navigation, Radio-Einstellungen, Video-Einstellungen, Sprache, Quellen-Lautstärke, personalisierte Hintergrund-Kulisse.
SETTAGGI GENERALI
• RADIO REGION: Per impostare l’area di appartenenza (Europa-Australia-Cina-USA, ecc.).
• BEEP: P
ermet d’activer / désactiver le son à
chaque fois qu’on touche l’écran tactile.
SETTAGGI GENERALI
• CALIBRATION: Le calibrage se fait en tou-
chant l’écran selon la séquence indiquée.
Faire pression jusqu’au déplacement du curseur
.
GENERAL SETTING
• RADIO REGION: To set the Area you belong
to (Europe-Australia-China-USA, etc.).
• BEEP: Biep-Ton läßt sich durch Antasten des
Bildschirms aktivieren/deaktivieren.
GENERAL SETTING
• CALIBRATION: Die Kalibrierung erfolgt, in der
angegebenen Reihenfolge, durch einfaches Antasten des Bildschirms.
Gedrückt halten, bis Läufer sich fortbewegt.
REGLAGE DATE ET HEURE
• Se placer sur le paramètre à modifier et faire
les changements.
EINSTELLUNG VON DATUM / UHRZEIT
• Auf die gewünschte Position gehen und die
notwendigen Daten abändern.
Sound Video GPS Language Volume Reset
Date 2012-11-11
Time mode 24 H
Time 00 : 42
Settings
General Time
Time Sound Video GPS Language Volume Reset
Radio region Europe
Beep On
Calibraton Enter
Settings
General
Page 31
31
FR/D
REGLAGES DE SYSTEME • SYSTEM-EINSTELLUNGEN
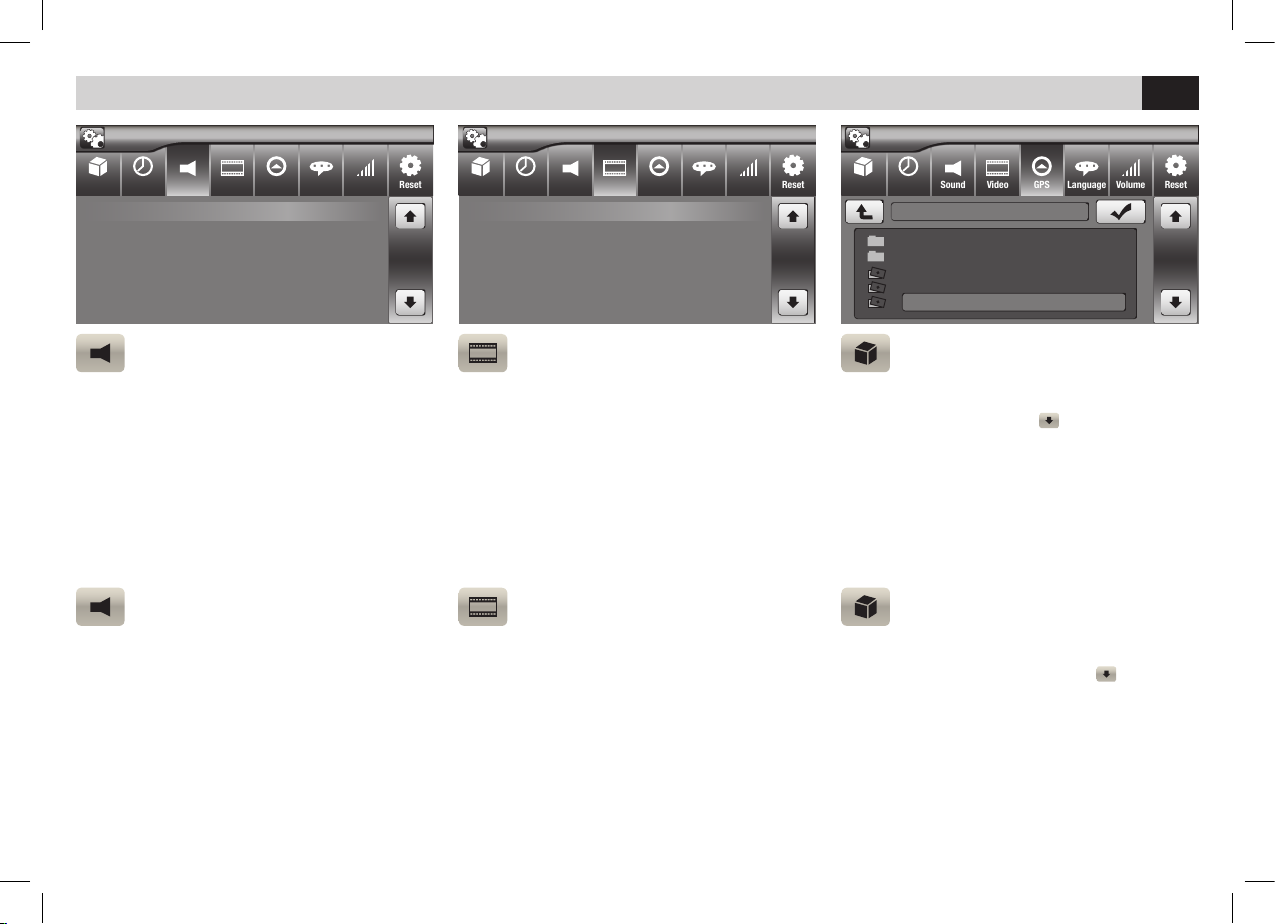
VIDEO
• REAR CAMERA: pour changer la visualisation;
passer de normal à miroir.
• DIMMER MODE: Pour modifier l’intensité de
lumière de l’écran. (NORMAL-BRIGHT-NIGHTDUSK)
• PARKING: Pour activer / désactiver la vision en
mouvement des films et des images.
RÉGLAGES AUDIO
• SUB WOOFER FILTER: Pour activer ou
désactiver les filtres du Sub woofer
• LOUD: active l’exaltation des basses fréquences.
AUDIO EINSTELLUNGEN
• SUB WOOFER FILTER: Aktivierung/Einstellung des Subwoofer-Filters.
• LOUD: Unterstreicht die Tief-Frequenzen.
VIDEO
• REAR CAMERA: (Rückfahr-Kamera) wählen,
um von Normal- auf Spiegel-Ansicht zu schalten.
• DIMMER MODE: wählen, um die LichtIntensität des Bildschirms zu regeln. (NORMAL-
BRIGHT-NIGHT-DUSK).
• PARKING: wählen, um die Freischaltung (Filme, Fotos) zu aktivieren/deaktivieren.
Sound Video GPS Language Volume Reset
Rear camera Normal
Dimmer mode Normal
Parking Off
Settings
General Time
Sound Video GPS Language Volume Reset
Sub woofer filter Off
LOUD On
Settings
General Time
Sound Video GPS Language Volume Reset
Settings
General Time
\MobileNavigator\Mobilenavigator.exe
LICENSE
SAVE
BTSWITCH.EXE
IGO8.exe
Mobilenavigator.exe
CONFIGURATION GENERALE
• GPS SETUP: Introduire la micro SD de naviga-
tion NV995. Parcourir avec
pour sélectionner
le fichier Mobilenavigator.exe.
NOTE: Effectuer ce réglage avant de commencer
la navigation.
ALLGEMEINE EINSTELLUNG
• Die Mikro-Navigations-SD-Karte, Art. NV995
eingeben. Sich weiterbewegen mit
und die
exekutive Datei wählen:
Mobilenavigator.exe
WICHTIG: diese Einstellung unbedingt vor dem
Starten der Navigation durchführen.
Page 32
32
FR/D
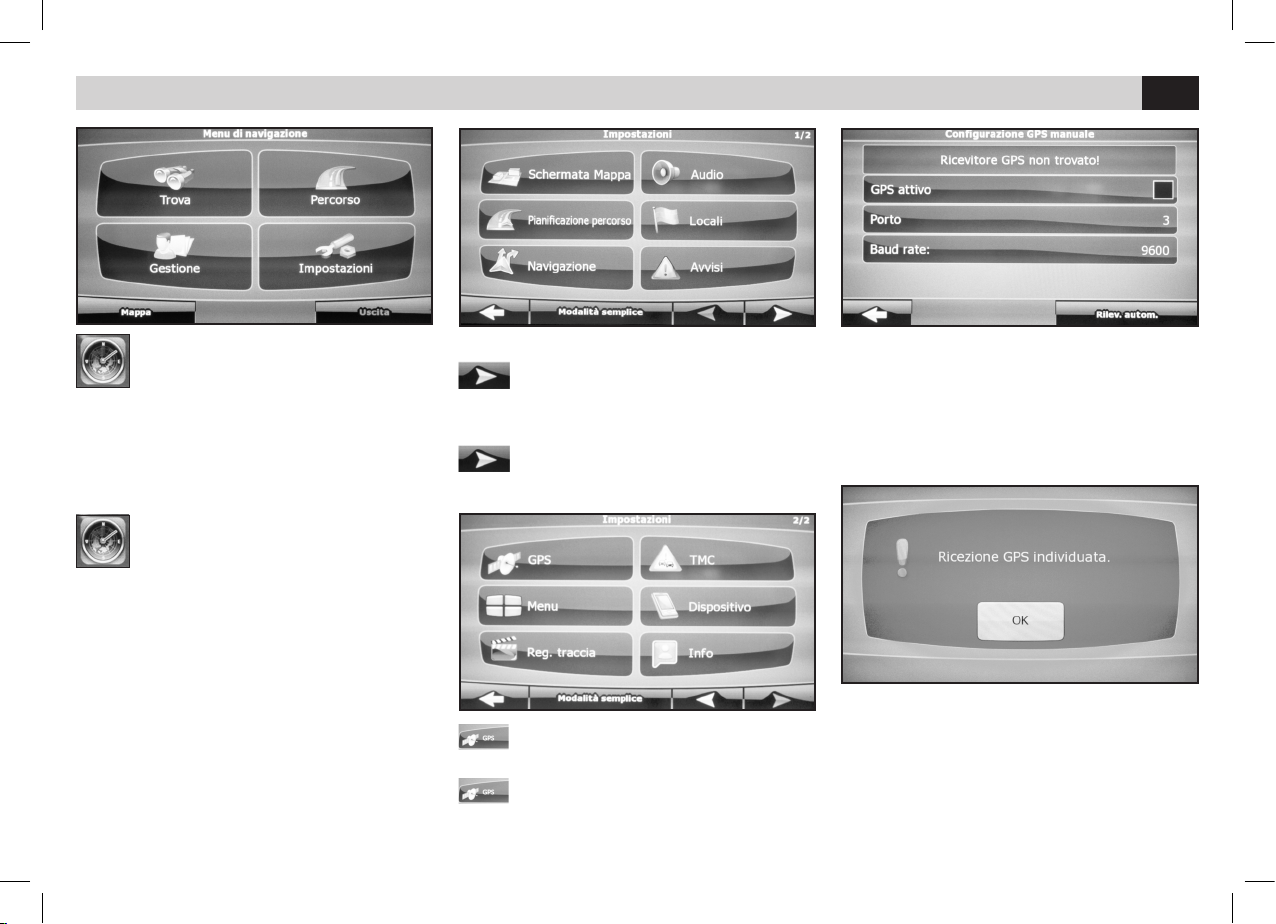
PARAMÈTRE MODULE GPS
• Passer au second écran.
EINSTELLUNG DES GPS-MODULS
• Auf die zweite Seite gehen.
NAVIGATION
Bei der Erst-Aktivierung der iGO-Mappen (Optional), die Betriebs-Datei mobilenavigator.exe
wählen und Einstellungen vornehmen.
• Das Software-Einstellungs-Menü betreten.
NAVIGATION
Quand on active pour la première fois la carte
iGo (optionnel), il faut sélectionner le fichier exécutif mobilenavigator.exe dans les réglages.
• Accéder au menu paramètre du software.
• Appuyer GPS.
• GPS drücken
PARAMÈTRES GPS • GPS-EINSTELLUNGEN
• GPS-AKTIV drücken bzw. abhaken.
Dann auf AUTOMATISCHE ERKENNUNG drücken.
• Appuyer sur le trait de GPS ACTIF,
Et après sur le RELÈVEMENT AUTOMATIQUE.
• Die Ermittlung der Daten abwarten und OK drücken.
• Die Anweisungen zur Navigations-Software sind dem
iGO-Handbuch zu entnehmen.
• Attendre l’acquisition des données et appuyer ok.
• Faire référence au manuel iGo pour les instruc-
tions sur le software de navigation.
Page 33
33
FR/D
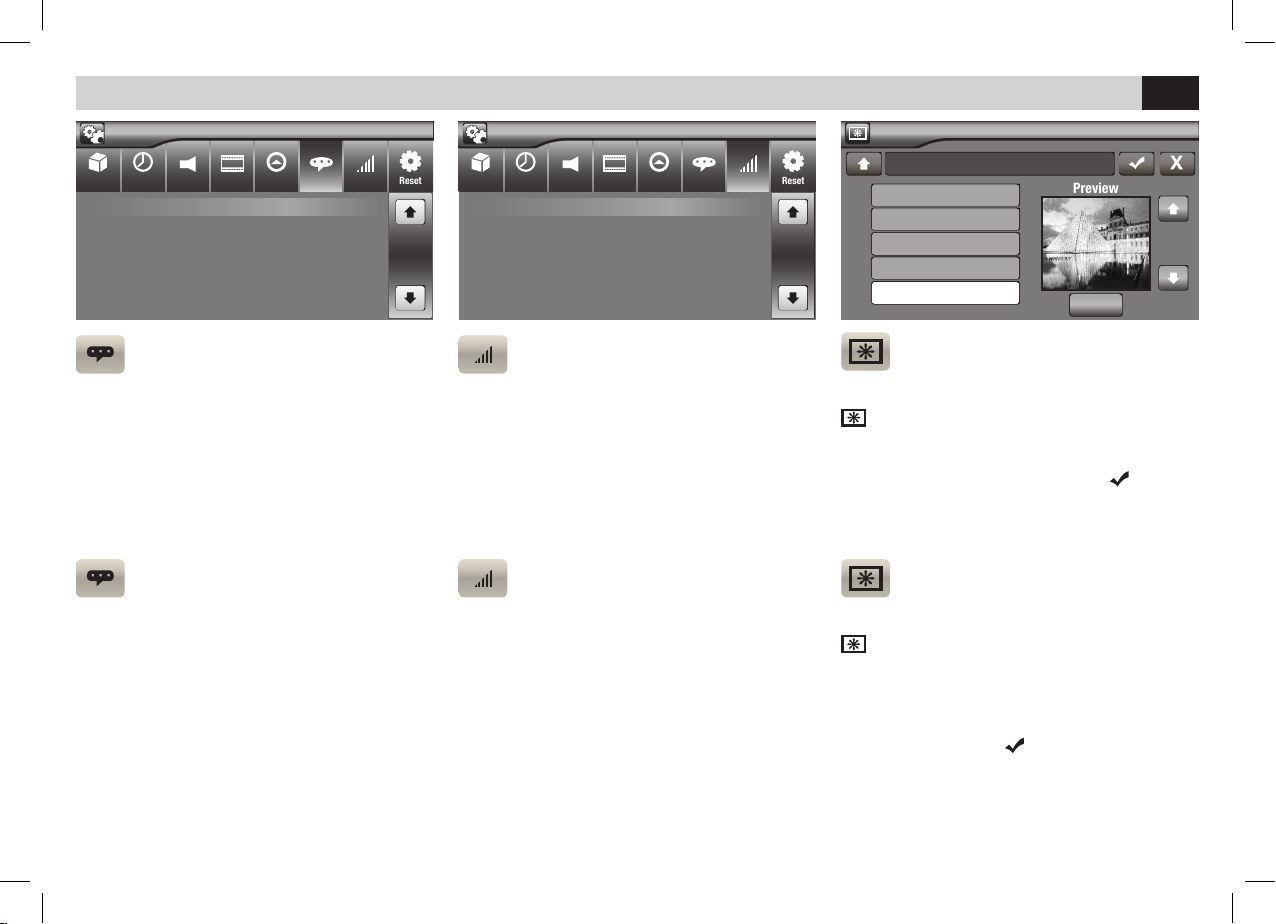
LANGUE
• OSD: C’est possible choisir la langue des me-
nus, de l’audio et des sous-titres du DVD.
SPRACHE
• OSD: Es besteht die Möglichkeit, bei den ver-
schiedenen Menüs, sowie bei Audio und DVDUntertitel, eine bestimmte Sprache zu wählen.
VOLUME SOURCES
• On peut régler le volume de chaque source
afin d’éviter des écarts d’intensité durant le
passage d’une source à une autre.
• RESET: restaure les réglages d’origin
QUELLEN-LAUTSTÄRKE
• Die Lautstärke-Regelung wird für jede einzelne
Quelle separat vorgenommen. Beim Umschalten
von einer Quelle auf die andere, kommt es somit
zu keinerlei Intensitäts-Unterschiede.
• RESET: Greift auf die Fabrik-Einstellungen
zurück.
REGLAGES DE SYSTEME • SYSTEM-EINSTELLUNGEN
PERSONNALISATION FOND D’ECRAN
• A partir du menu principal, appuyer l’icône
pour accéder à la page de gestion du fond
d’écran. Pour utiliser les images qui se trouvent
dans la mémoire, choisir le nom du fichier, sélectionner l’avant première et confirmer
.
Pour utiliser les images (bmp res. 800x480) de la
Carte SD, appuyer «SCAN SD».
HINTERGRUND-PERSONALISIERUNG
• Vom Haupt-Menü ausgehend, auf die Ikone
drücken, um zur Funktion der HintergrundPersonalisierung zu gelangen. Die zur Wahl stehenden, eingespeicherten Hintergrund-Kulissen
lassen sich anhand des Datei-Namens wählen.
Nach der vorgenommenen Wahl, Vordruck beantragen und bestätigen
.
Um Hintergrund-Kulissen einer SD-Card zu
verwenden, einfach die Funktion “SCAN SD”
wählen (bmp res. 800x480).
Sound Video GPS Language Volume Reset
OSD English
Settings
General Time
Sound Video GPS Language Volume Reset
RADIO 7
BT 7
AUX 7
USB 7
Settings
General Time
Preview
Wallpaper
SCAN SD
6
7
8
9
Page 34
34
FR/D
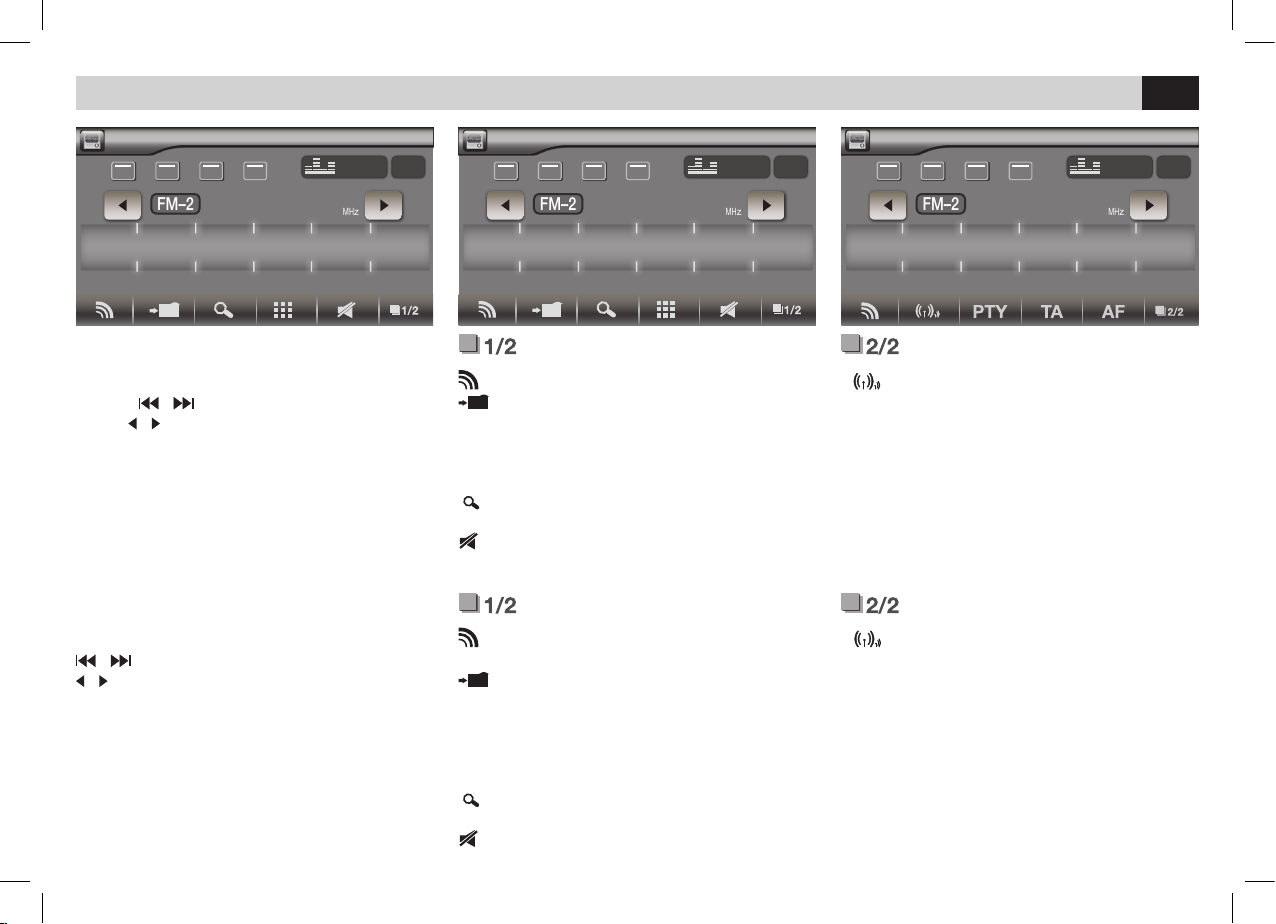
RADIO
RECHERCHE DES STATIONS
• En appuyant pendant plus d’une seconde les
touches
/ sur la télécommande ou les
icônes
/ sur l’écran, l’appareil fera automatiquement la recherche des stations. Pour la
recherche manuelle, appuyer brièvement.
FONCTION RADIO
BAND sélectionne les bandes radio 3 FM – 2 AM.
STORE Mémorisation de 6 stations disponi-
bles pour chaque bande. Pour mémoriser appuyer
STORE et choisir la position désirée. Pour revenir
sur une station, appuyer sur la fréquence correspondante en bas de l’écran.
PS Scanning automatique des fréquences ra-
dio et mémorisation des 6 premières plus fortes
MUTE Met l’audio à zéro.
FONCTION RADIO
•
LOC Sélectionne les stations voisines et
lointaines
• PTY Sélectionne le type de programme musical.
• AF Recherche d’une fréquence alternative avec
les informations de la station sur l’écran
• TA. Information sur la circulation
SENDER-WAHL
• drückt man länger als 1 Sekunde auf die Tasten
/ der Fernbedienung, bzw. auf die Ikonen
/ des Bildschirms, startet das Gerät automa-
tisch die Sender-Suche.
Will man eine manuelle Sender-Suche, nur kurz
auf die Tasten/Ikonen drücken.
RADIO-FUNKTIONEN
•
LOC Wahl der nahen und ferngelegenen
Sender.
• PTY Wahl der Musik-Programm-Art
• AF Wahl einer Alternativ-Frequenz, mit Sender-
Infos auf dem Bildschirm.
• TA Verkehrs-Infos
RADIO-FUNKTIONEN
BAND Sucht Radio-Frequenzen zwischen 3
FM - 2 AM.
STORE Einspeicherung von 6 möglichen
Sendern pro Frequenz-Band. Um einzuspeichern,
lang STORE drücken und die gewünschte Position
wählen. Um einen Sender heranzuholen, am unteren Bildschirm-Rand, auf die betreffende Frequenz
drücken.
PS Automatisches Scrolling der Radio-Fre-
quenzen und Einspeicherung der 6 stärksten.
MUTE Stummschaltung.
Radio
AFTA LOCST
87 . 50
87.50 92.50
FM–2
106.50 98.70 105.00 103.50
MH
z
P1 P2 P3 P4 P5 P6
EQ OFF
LOUD
Radio
AFTA LOCST
87 . 50
87.50 92.50
FM–2
106.50 98.70 105.00 103.50
MH
z
P1 P2 P3 P4 P5 P6
EQ OFF
LOUD
Radio
AFTA LOCST
87 . 50
87.50 92.50
FM–2
106.50 98.70 105.00 103.50
MH
z
P1 P2 P3 P4 P5 P6
EQ OFF
LOUD
Page 35
35
FR/D
EGALISEUR • EQUALIZER
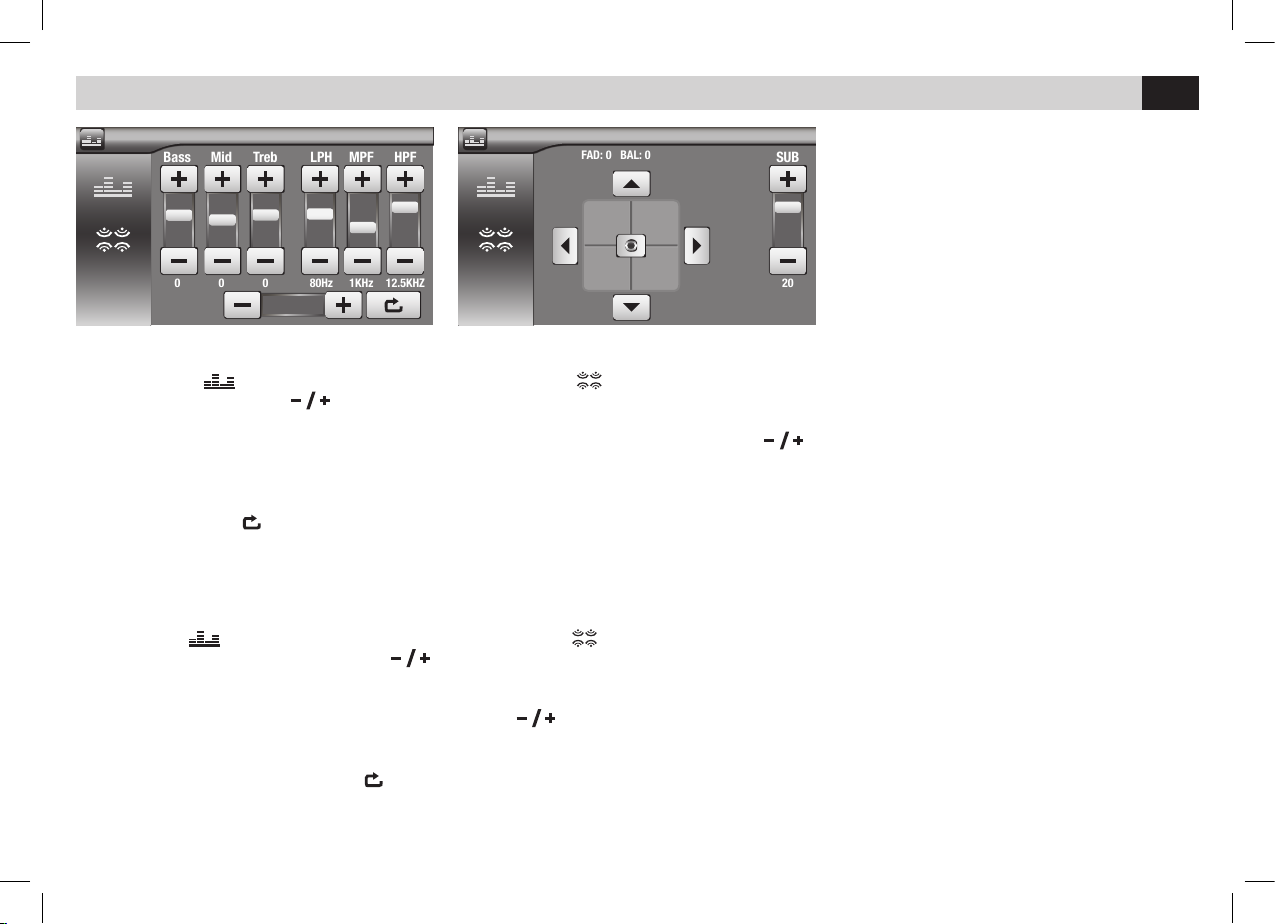
EGALISEUR - LOUDNESS
• Appuyer l’icône
pour modifier les réglages
d’origine. A travers les icônes
, on peut
sélectionner 8 modalités différentes d’équilibrage
préréglées: USER-FLAT-POP-ROCK-CLASSIC
JAZZ-TECHNO-OPTIMAL.
En modalité USER, on peut régler les niveaux des
hauts, medium et bas sur les fréquence désirées.
LPF-MPF-HPF. L’icône
reporte sur OPTIMAL
FADER - EQUILIBRAGE - SUBWOOFER
Appuyer l’icône
pour accéder aux réglages
du FADER et de l’ EQUILIBRAGE à travers les
flèches présentes sur l’écran.
Pour régler le volume du SUB W appuyer
Pour régler le crossover, appuyer SUB W et se
positionner sur la fréquence de coupure désirée.
EQUALIZER - LOUDNESS
• Auf die Ikone
drücken, um die Fabrik-Ein-
stellungen abzuändern. Anhand der Ikonen
lassen sich 8 verschiedene Equalizer-Modalitäten
wählen: USER-FLAT-POP-ROCK-CLASSICJAZZ-TECHNO-OPTIMAL.
Im USER-Modus lassen sich Hoch-, Mittel- und
Tieftöne auf die gewünschten Frequenzen
einstellen. LPF - MPF - HPF. Die Ikone
führt
zurück zum OPTIMAL.
FADER - BALANCE - SUB WOOFER
• Auf die Ikone
drücken. Dann, mittels
angezeigten Pfeilen, die FADER- und BALANCEEinstellungen vornehmen.
Um die Lautstärke des SUB-Woofers einzustellen, auf
drücken.
Um die Frequenzweiche zu regeln, die Taste
SUB-Woofer drücken und auf die gewünschte
Trennfrequenz gehen.
EQ
EQ
SUB
20
FAD: 0 BAL: 0
EQ
Bass Mid Treb LPH MPF HPF
0 0 0 80Hz 1KHz 12.5KHZ
EQ
USER
Page 36
36
FR/D
REPRODUCTION • WIEDERGABE
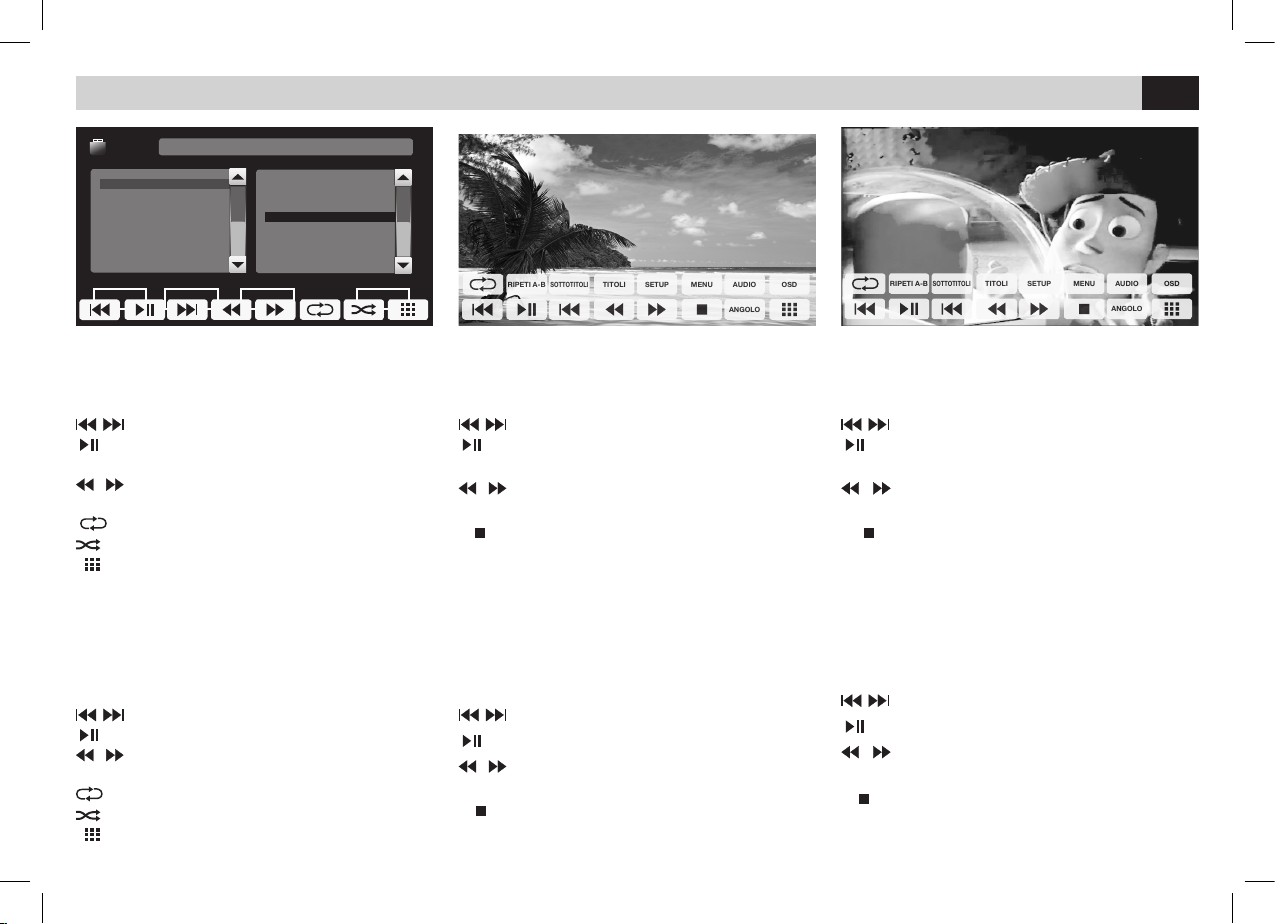
RIPRODUZIONE MUSICA/FOTO/VIDEO
Sélectionner: MUSIQUE - IMAGES - VIDEO
KEY Pour visualiser le menu fonctions.
MUSIC/PICTURES/VIDEO PLAYBACK
Die Wiedergabe startet: MUSIK - BILD - VIDEO
KEY Funktions-Menü ausweisen.
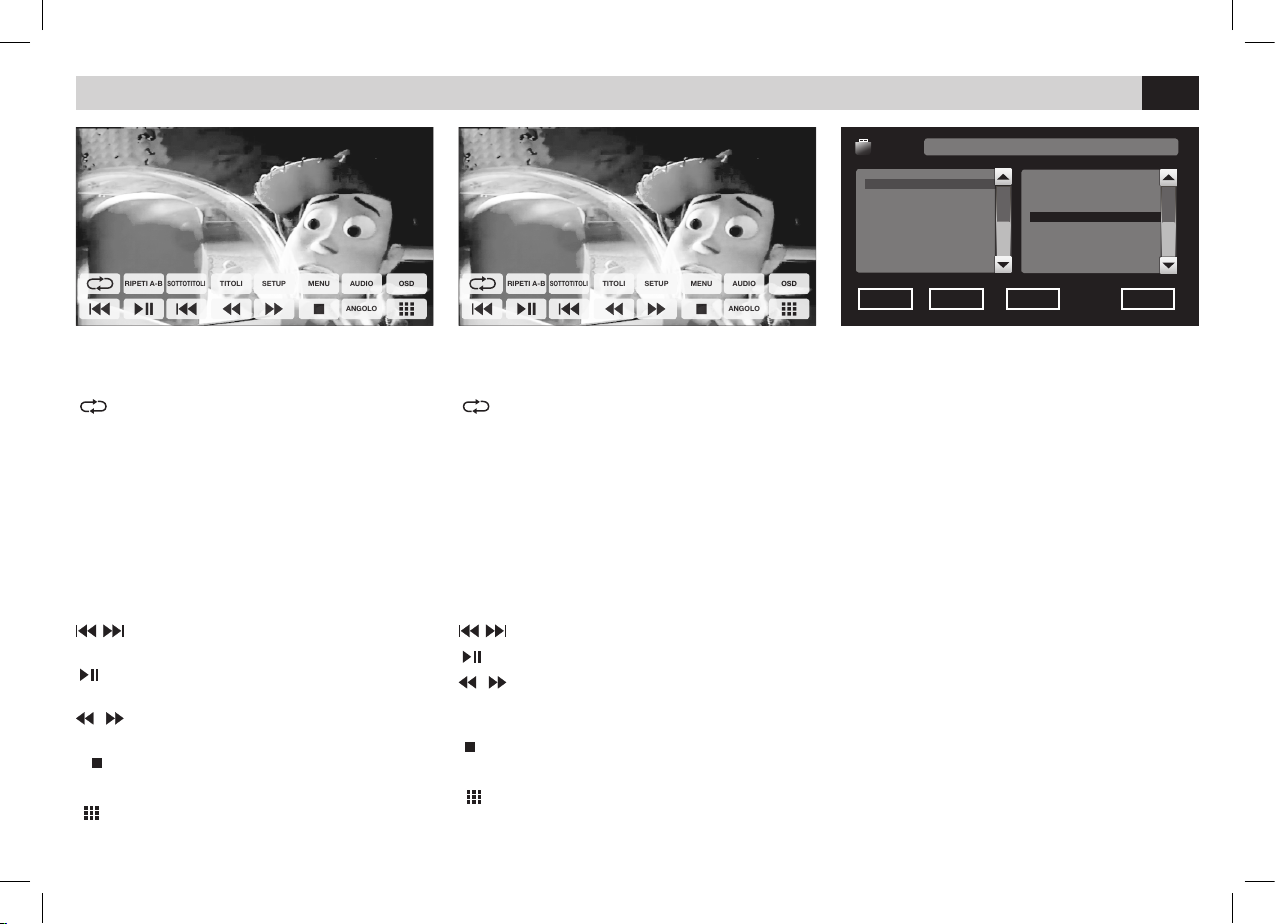
FONCTIONS DVD
Avec l’insertion du DVD le menu paraît.
Répétition trace/chapitre/disque.
RÉPÈTES A-B Pour la répétition du point A au point B
SOUS-TITRES Pour changer la langue des sous-titres.
TITRES Fonction pas disponible.
SETUP Pour le réglage DVD.
MENU Pour retourner au menu principale
pendant la reproduction.
AUDIO Pour changer la langue audio.
OSD Informations de reproduction.
Pour trace/chapitre précèdent ou
successif.
Pour engager ou interrompre
la reproduction.
/ Appuyer pour quelques seconds pour
la reproduction rapide avant/arrière.
Interrompre la reproduction.
ANGLE Change l’angle de la reproduction.
Pour insérer le numéro trace/chapitre
à reproduire.
DVD-FUNKTIONEN
Nach Eingabe einer DVD, erscheint sofort das Menü
Wiederhole Stück/Kapitel/CD.
WIEDERHOLE A-B. Wiederholung von A bis B.
UNTERTITEL. Untertitel-Sprache ändern.
TITEL. Funktion nicht vorhanden.
SETUP. DVD-Einstellungen vornehmen.
MENÜ. Während der Wiedergabe,
zurück zum Haupt-Menü.
AUDIO. Audio-Sprache ändern.
OSD. Wiedergabe-Infos.
Stück/Kapitel davor/danach.
Wiedergabe starten/stoppen.
/ Zur schnellen Wiedergabe
Vorwärts/Rückwärts,
gedrückt halten.
Wiedergabe stoppen.
WINKEL. Wiedergabe-Winkel ändern.
Stück-/Kapitel-Nummer zur
Wiedergabe eingeben.
SOTTOTITOLI
RIPETI A-B TITOLI SETUP MENU AUDIO
ANGOLO
OSD
SOTTOTITOLI
RIPETI A-B TITOLI SETUP MENU AUDIO
ANGOLO
OSD
[¥]NI 21/04.2008/ARTIAT#ARTI
USB
MUSICA FOTO VIDEO KEY
01.¥
02.RECYCLED
01.N(5).MP3
02.N(6).MP3
03.N(7).MP3
04.N(8).MP3
05.N(9).MP3
Page 37
37
FR/D
REPRODUCTION • WIEDERGABE
[¥]NI 21/04.2008/ARTIAT#ARTI
USB
MUSICA FOTO VIDEO KEY
01.¥
02.RECYCLED
01.N(5).MP3
02.N(6).MP3
03.N(7).MP3
04.N(8).MP3
05.N(9).MP3
MENU MUSIQUE
Sélectionner la trace désirée pour commencer la
reproduction.
Pour trace/chapitre précèdent ou successif.
Pour engager ou interrompre
la reproduction.
/ Appuyer pour quelques seconds pour
la reproduction rapide avant/arrière.
Répétition trace/chapitre/disque.
Reproduction aléatoire
Pour insérer le numéro trace à reproduire.
MUSIK-MENÜ
Die Wiedergabe startet, sobald das gewünschte
Stück gewählt ist.
Stück/Kapitel davor/danach.
Wiedergabe starten/stoppen.
/ Zur schnellen Wiedergabe
Vorwärts/Rückwärts, gedrückt halten.
Wiederhole Stück/Kapitel/CD.
Wahllose Wiedergabe
Stück-Nummer zur Wiedergabe eingeben.
BILDER-MENÜ
Gewünschtes Foto wählen und Wiedergabe
starten.
Foto davor/danach.
Wiedergabe starten/stoppen.
/ Zur schnellen Wiedergabe
Vorwärts/Rückwärts, gedrückt halten.
Wiedergabe stoppen.
VIDEO-MENÜ
Gewünschtes Video wählen und Wiedergabe
starten.
Video davor/danach
Wiedergabe starten / stoppen
/ For fast Reproduction
forward/backward, keep pressed.
Reproduction Stop.
MENU IMAGES
Sélectionner la photo désirée pour engager la
reproduction.
Pour photo précèdent ou successif.
Pour engager ou interrompre
la reproduction.
/ Appuyer pour quelques seconds pour
la reproduction rapide avant/arrière.
Interrompre la reproduction.
MENU VIDÉO
Sélectionner le vidéo désiré pour engager la
reproduction.
Pour video précédente ou suivant.
Pour lancer ou interrompre
la reproduction.
/ Appuyer consécutivement pour la
reproduction rapide avance / revient.
Interrompe riproduzione.
SOTTOTITOLI
RIPETI A-B TITOLI SETUP MENU AUDIO
ANGOLO
OSD
SOTTOTITOLI
RIPETI A-B TITOLI SETUP MENU AUDIO
ANGOLO
OSD
Page 38
38
FR/D
REGLAGES BLUETOOTH • BLUETOOTH-EINSTELLUNGEN
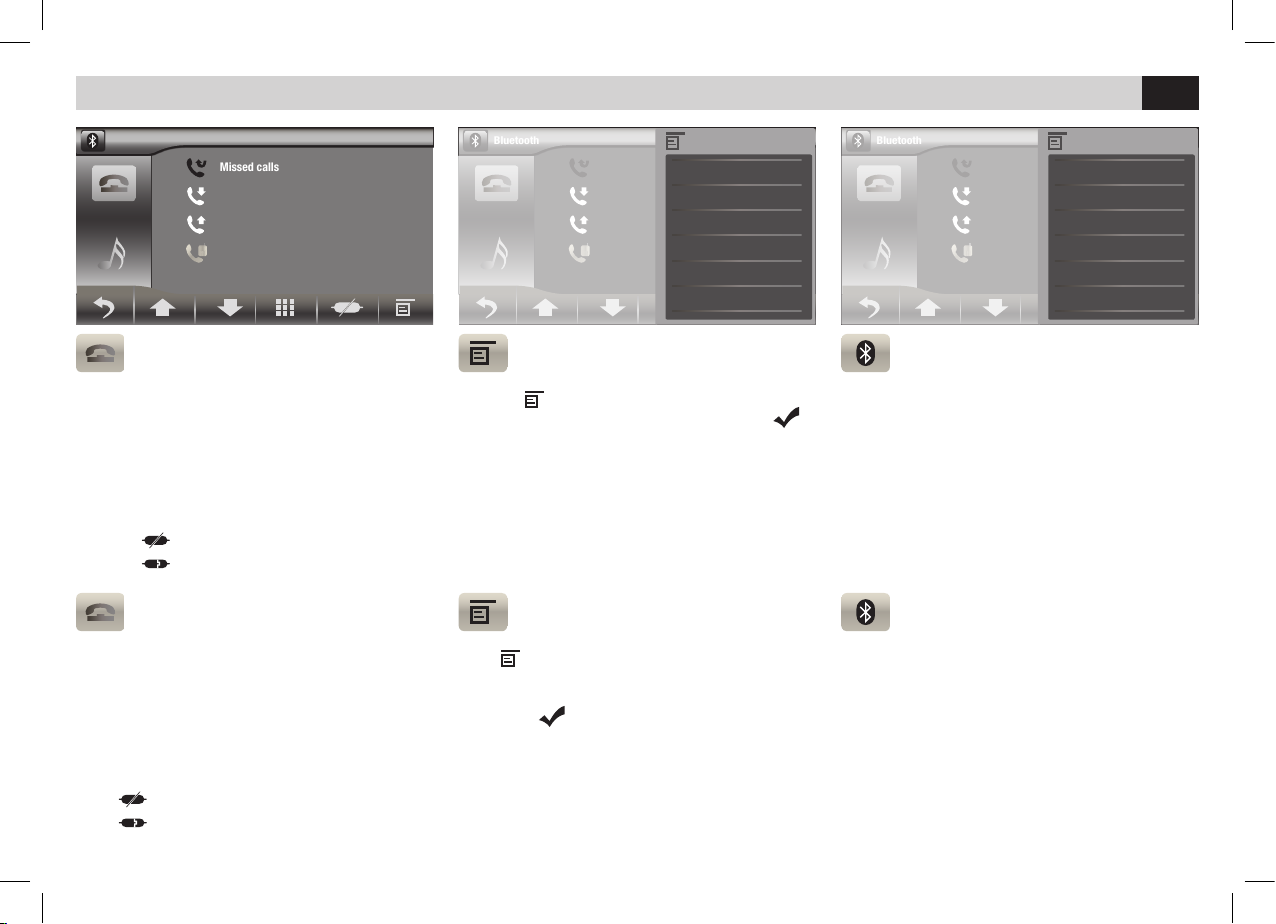
ÜBERNAHME DES TELEFON-REGISTERS
Taste drücken, um zu den Einstellungen zu
gelangen.
PHONEBOOK (Telefon-Register) wählen und
bestätigen
.
Das Telefon-Register wird somit automatisch
in das Autoradio eingespeichert. Die dazu in
Anspruch genommene Zeit richtet sich nach der
Anzahl der vorhandenen Telefon-Nummern.
OPTION BLUETOOTH
• CONNEXION AUTOMATIQUE: connecte automatiquement le téléphone
• RÉPONSE AUTOMATIQUE: répond automatiquement à l’appel
• CODE D’ACCOUPLEMENT: change le mot de
passe
• DELETE: élimine les dispositifs accouplés.
BLUETOOTH-MÖGLICHKEITEN
• AUTOMATISCHE KOPPLUNG: Telefon wird
automatisch angekoppelt
• AUTOMATISCHE BEANTWORTUNG: Anruf
wird automatisch in Empfang genommen
• KOPPLUNGS-CODE-NUMMER: Passwort
ändern
• DELETE: Stornierung der gekoppelten Telefon-
Geräte
ACCOUPLEMENT TELEPHONE
On peut accoupler jusqu’à 5 téléphones.
• Activer la fonction bluetooth sur le téléphone et
rechercher les nouveaux dispositifs.
• Sélectionner PHONOCAR dans la liste des
dispositifs, insérer le mot de passe 0000 quand
c’est nécessaire. Lorsque le couplage est réussi,
le nom du téléphone apparaît.
Appuyer
pour déconnecter le téléphone
Appuyer
pour le reconnecter.
TELEFON-KOPPELUNG
Es lassen sich bis zu 5 Telefongeräte anschließen.
• Bluetooth-Funktion auf dem Telefon aktivieren
und neue Geräte suchen.
• PHONOCAR aus der Geräte-Liste wählen. Auf
Verlangen, das Passwort 0000 eingeben.
Nach erfolgreich durchgeführter Koppelung,
erscheint der Name des Telefons.
Taste
drücken, um Telefon zu deaktivieren.
Taste
drücken, um Telefon wieder zu akti-
vieren.
SYNCHRONISATION DU REPERTOIRE
Appuyer
pour accéder aux réglages.
Sélectionner REPERTOIRE et valider avec
.
Le répertoire du téléphone sera automatiquement téléchargé dans la mémoire de l’autoradio.
Le temps de l’opération vari en fonction du
nombre des contacts.
Missed calls
Received calls
Dialed calls
Phone book
Bluetooth
SAMSUNG GALAXY
Bluetooth
Setup
X
Bluetooth On
Auto connect On
Auto answers Off
Pairing code ****
Phone book sync
Delete
Bluetooth
Setup
X
Bluetooth On
Auto connect On
Auto answers Off
Pairing code ****
Phone book sync
Delete
Page 39
39
FR/D
FONCTIONS BLUETOOTH • BLUETOOTH-FUNKTIONEN
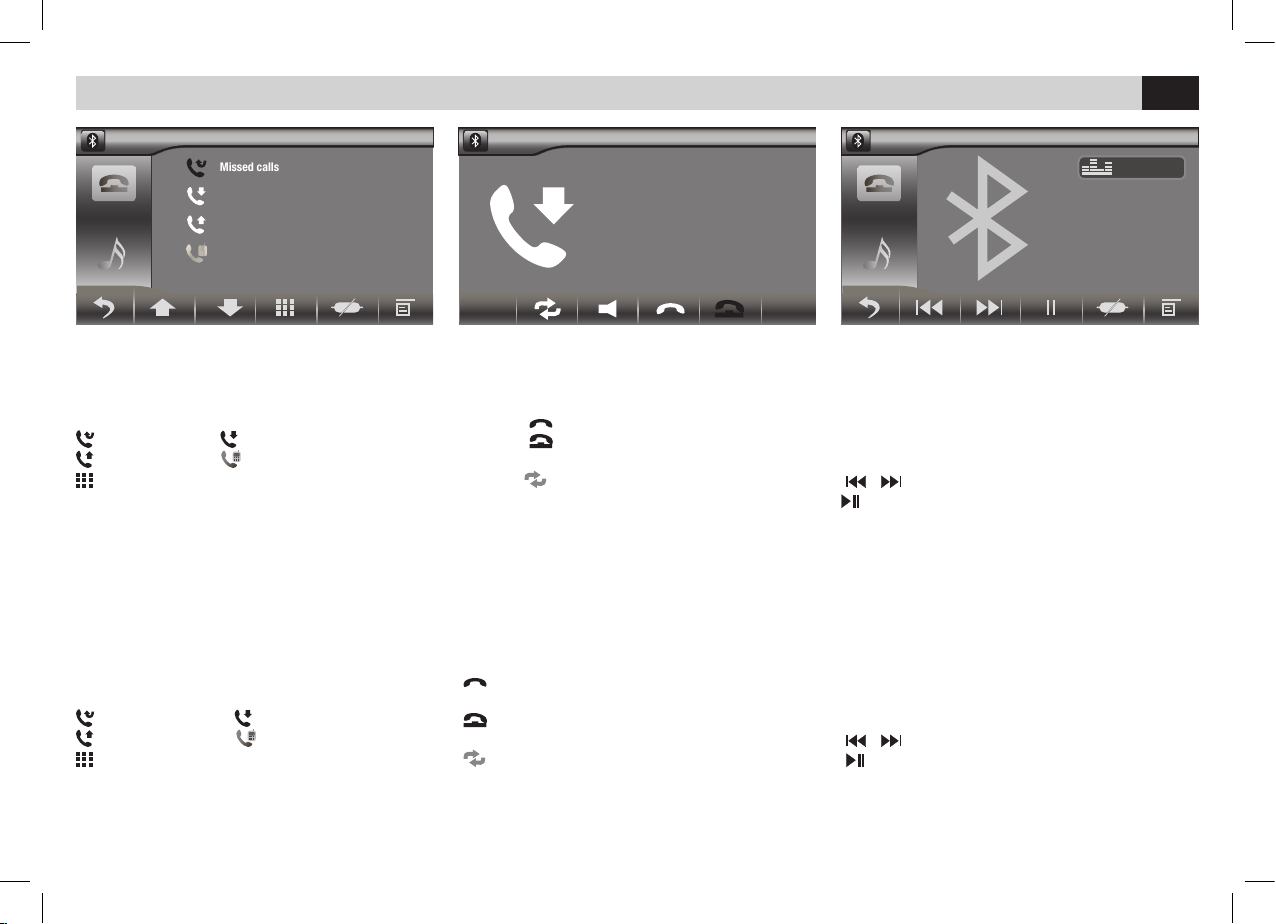
REPRODUCTION MUSIQUE BLUETOOTH
Si le téléphone branché supporte le profil AD2P,
c’est possible écouter les morceaux.
Si le dispositif supporte AVRCP, les morceaux
pourront être contrôlés directement à partir de
l’écran tactile.
/ Chanson précédente / suivante.
Lance / interrompe la reproduction.
APPELER À PARTIR DE L’ÉCRAN
• Sélectionner Bluetooth dans le Menu principal
• Appuyer un des icônes que vous trouvez sur
l’écran pour appeler à partir d’une des listes:
appel perdu; appel reçu;
appel effectué; répertoire téléphonique;
appel à partir du clavier numérique.
TELEFONAT VOM BILDSCHIRM STARTEN
• Bluetooth aus dem Haupt-Menü wählen.
• Eine der Ikonn auf dem Bildschirm antasten,
um Anruf aus der spezifischen Telefon-Liste zu
starten
Verlorene Anrufe Beantwortete Anrufe
Gestartete Anrufe Telefon-Register
Anruf durch Nummern-Tasten starten
RECEVOIR UN APPEL
Quand un appel est entrant, le VM066 passe
automatiquement en modalité bluetooth.
Appuyer
pour répondre.
Appuyer
pour terminer la conversation ou
refuser l’appel entrant.
Appuyer
pour exclure / activer la mains-li-
bres.
ANRUF IN EMPFANG NEHMEN
Sobald ein Anruf kommt, schaltet das Gerät
VM066 automatisch die Bluetooth-Funktion ein.
Taste drücken, um Gespräch in Empfang zu
nehmen.
Taste drücken, um Gespräch zu beenden
oder um eingehendes Telefonat zurückzuweisen.
Taste drücken, um Freisprech-Funktion zu
aktivieren/deaktivieren.
BLUETOOTH-MUSIK-WIEDERGABE
Soweit das gekoppelte Telefon AD2P-kompatibel
ist, läßt sich dadurch Musik hören.
Wenn es AVRCP-kompatibel ist, dann lassen
sich die einzelnen Musikstücke direkt auf dem
touch-Screen bedienen.
/ Stück davor / danach
Wiedergabe Starten / Stoppen
Bluetooth
SAMSUNG GALAXY
***************
Ringing...
Missed calls
Received calls
Dialed calls
Phone book
Bluetooth
SAMSUNG GALAXY
Bluetooth
SAMSUNG GALAXY
User
Page 40
40
FR/D
COMMANDES AU VOLANT • LENKRAD-STEUERUNGEN
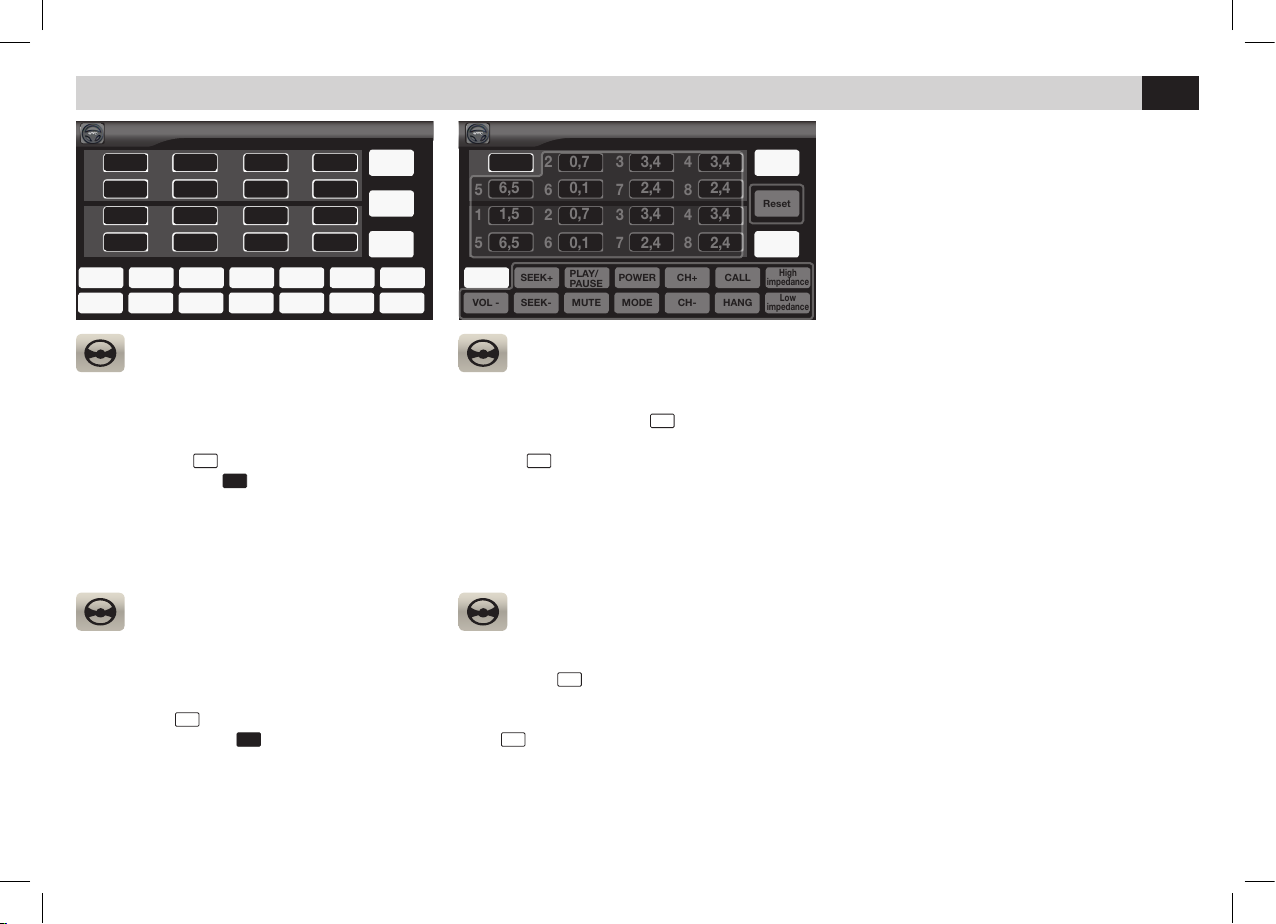
RÉGLAGE COMMANDES AU VOLANT
Appuyer les touches des commandes au volant
en séquence. Sur l’écran, se visualiseront les
valeurs résistives pour chaque commande.
Appuyer l’icône
Assign
et sélectionner la première
valeur résistive (ex.:
1,5
) l’icône s’illuminera.
RÉGLAGE COMMANDES AU VOLANT
Appuyer l’icône de la fonction relative à la
commande au volant (ex.:
VOL+
). Répéter cette
opération pour toutes les commandes et à la fin
appuyer
Enter
pour mémoriser.
EINSTELLUNG
DER LENKRAD-STEUERUNGEN
Der Reihe nach, alle Tasten der Lenkrad-Steuerungen drücken. Die Resistiv-Werte jeder einzelnen Funktion erscheinen auf dem Bildschirm.
Auf die Ikone
Assign
drücken und den ersten Resi-
stiv-Wert wählen (z.B.
1,5
). Die Ikone erlischt.
EINSTELLUNG
DER LENKRAD-STEUERUNGEN
Auf die Ikone der betroffenen Lenkrad-Funktion
drücken (z.B.
VOL+
).
Die beschriebenen Vorgänge für jede einzelne
Funktion wiederholen. Zuletzt, EinspeicherungsTaste
Enter
drücken.
NOTE: le système accepte les valeurs résistives
supérieures à 300 ohm se différenciant entre
elles d’au moins 20-30%.
BEMERKUNG: das System akzeptiert ResistivWerte von mehr als 300 Ohm, die sich,
untereinander, um mindestens 20-30%
differenzieren.
VOL + SEEK+ POWER CH+ CALL
Enter
Reset
Assign
PLAY/
PAUSE
High
impedance
Low
impedance
MUTEVOL - SEEK- MODE CH- HANG
SWC
VOL + SEEK+ POWER CH+ CALL
Enter
Reset
Assign
PLAY/
PAUSE
High
impedance
Low
impedance
MUTEVOL - SEEK- MODE CH- HANG
SWC
1,5 1,5
1
1
1 1
5
5
5 5
2
2
2 2
6
6
6 6
3
3
3 3
7
7
7 7
4
4
4 4
8
8
8 8
0,7 0,73,4 3,43,4 3,4
6,5 6,50,1 0,12,4 2,42,4 2,4
1,5 1,50,7 0,73,4 3,43,4 3,4
6,5 6,50,1 0,12,4 2,42,4 2,4
Page 41

7” TFT/LCD
1 DIN NAVIGATION
MANUAL DE INSTRUCCIONES
VM 043
ESPAÑOL
Page 42
42
E
ANTENA
GPS
SWC IR
RADIO ANT.
MIC
GPS ANT
SW Commands IR
2
1
CONEXIONES
Page 43
43
E
CONEXIONES
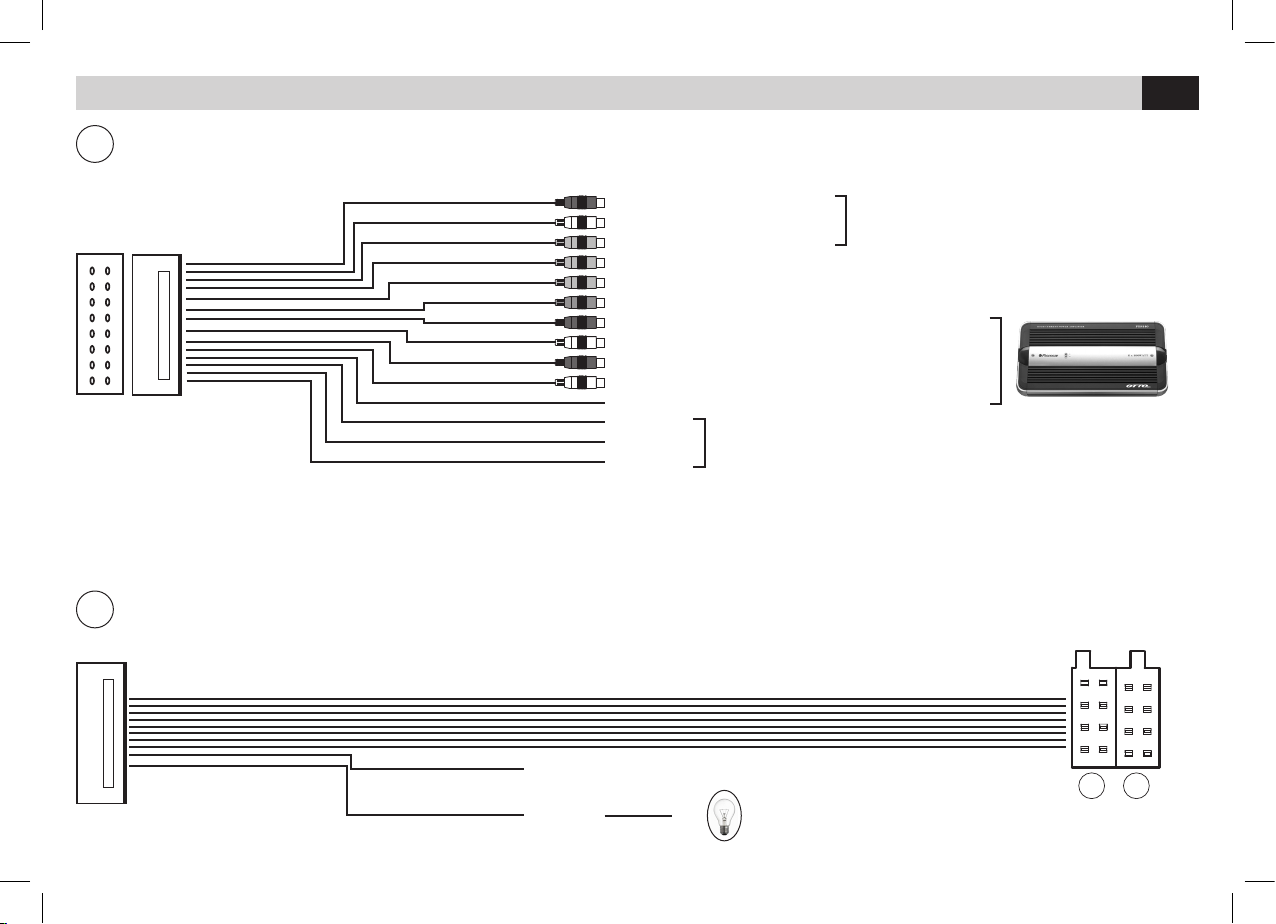
CABLE CON CONECTOR ISO
P. CONT
+
Luces de marcha atrás
Encendido del amplificador
LÍNEA A MANDOS DE VOLANTE
LÍNEA B MANDOS DE VOLANTE
MASA MANDOS DE VOLANTE
ISO
BA
2
1
SALIDAS PRE-AMP
DERECHO 1
IZQUIERDO 1
SALIDA VIDEO 1
SALIDA SUB WOOFER
ANTERIOR DERECHO
ANTERIOR IZQUIERDO
POSTERIOR DERECHO
POSTERIOR IZQUIERDO
FRENO DE MANO
ENTRADA A/V 1
AUX IN R
AUX IN L
VIDEO IN
CAMERA IN
VIDEO OUT
SUB WOOFER
FRONT R
FRONT L
REAR R
REAR L
BRAKE
KEY A
KEY B
KEY GND
ROSA / PINK
AZUL-BLANCO
ROSA / PINK
BLU / BLUE
VERDE / GREEN
NERO / BLACK
REVERSE
Page 44
44
E
CONEXIONES
ISO
A
B
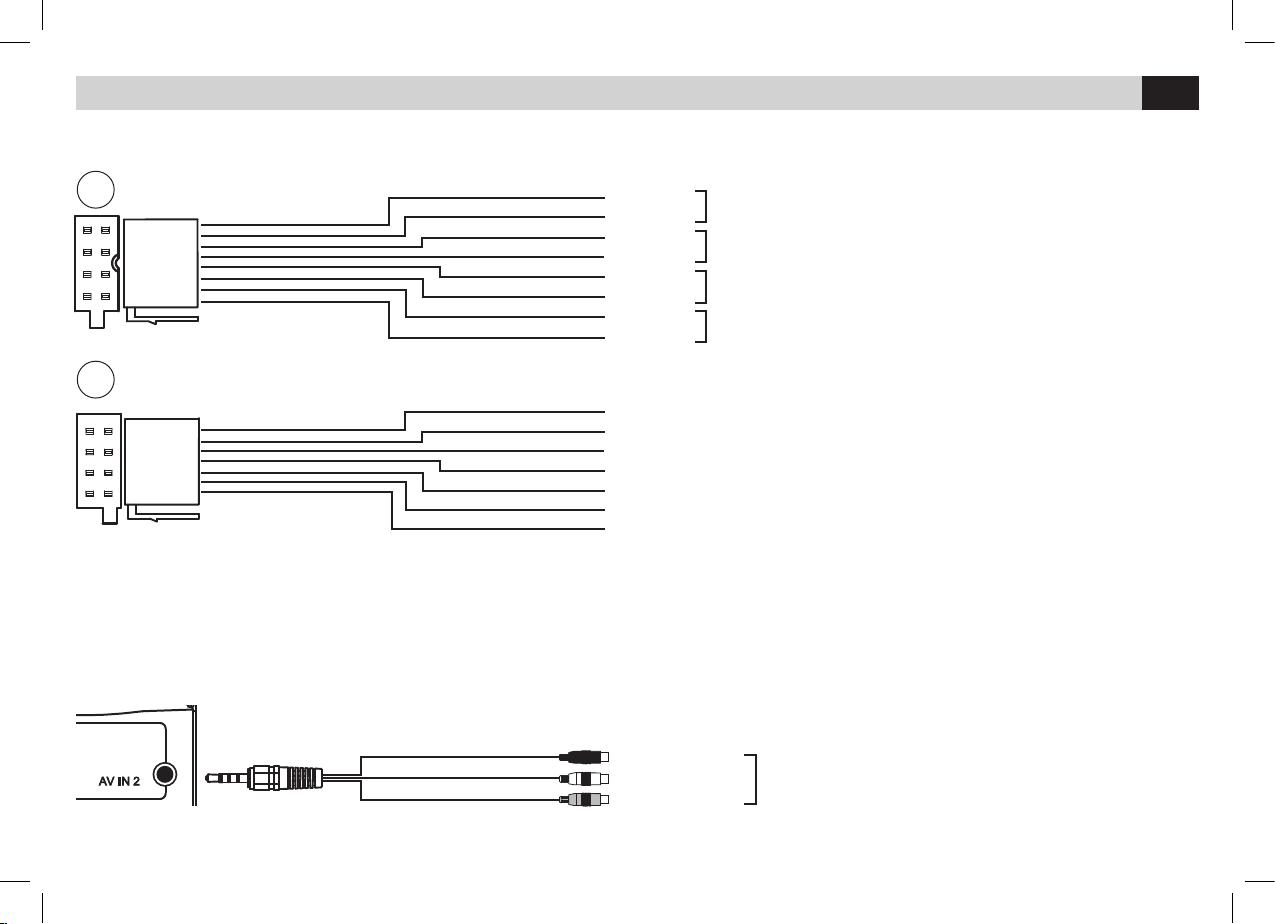
GRIS
MARRÓN
NEGRO
VERDE
VERDE-NEGRO
BLANCO
ROJO
BLANCO-NEGRO
NEGRO
ROSA
PURPURA
NARANJA
PURPURA-NEGRO
AZUL
GRIS-NEGRO
AMARILLO
+12V Positivo batería
+12V Bajo llave
Masa
Iluminación / Dimmer
Encendido antena eléctrica
Mute
Luces de marcha atrás
ANTERIOR DERECHO
ANTERIOR IZQUIERDO
POSTERIOR DERECHO
POSTERIOR IZQUIERDO
FRONT R +
FRONT R FRONT L +
FRONT L REAR R +
REAR R REAR L +
REAR L -
SALIDAS ALTAVOCES
ALIMENTACION
BATT
ACC
GND
ILLUMI
ANT. CONT.
MUTE
REVERSE
En algunos coches durante el arranque del motor el VM043 podría apagarse y después encenderse. Para evitar esta molestias conectar el temporizador
de encendido art. 5/146 en el cable rojo ACC.
ENTRADA A/V 2
AUX IN 2 R
AUX IN 2 L
AUX IN 2 VIDEO
ROJO
BLANCO
NARANJA
ENTRADA FRONTAL DE A/V
MARRON
Page 45
45
E
FUNCIONES
DIM
1
23
11
1213
1
2
3
4
5
6
8 9
12
7
10
11
13
14 15 16 17 18
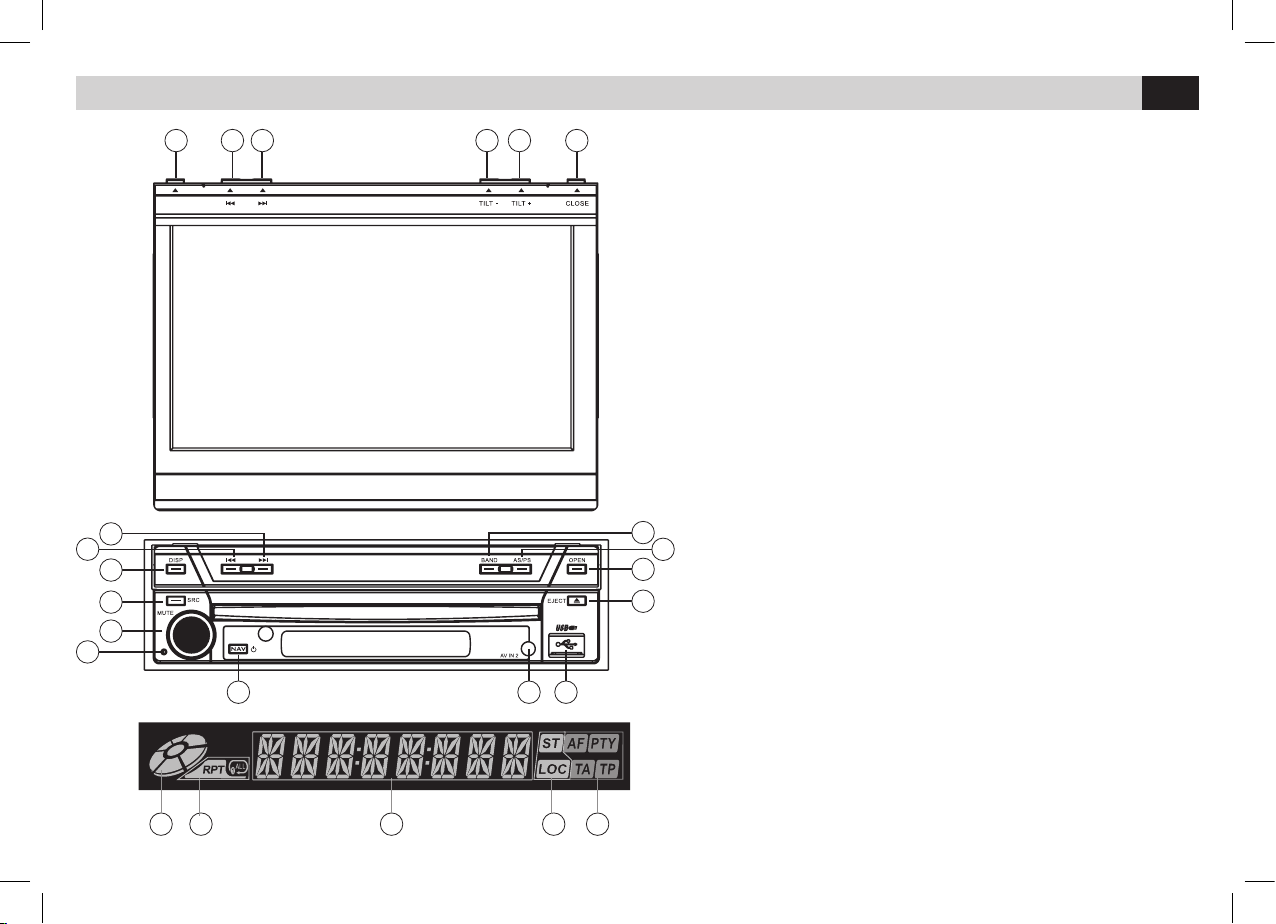
1 - Canción/ Emisora siguiente
2 - Canción/Emisora precedente
3 - Visualiza información reproducción en la pantalla
4 - Selecciona fuente
5 - Ajuste volumen /Mute audio / Brillo pantalla
6 - Tecla Reset
7 - Encendido / Apagado /Inicia navegación
8 - Entrada AUX IN 2
9 - Puerto USB
10 - Expulsión disco
11 - Abre / Cierra monitor
12 - Auto memorización emisoras de radio / Escansión emisoras
Aumenta ángulo monitor
13 - Cambio banda radio / Disminuye ángulo monitor
14 - Indicador presencia disco
15 - Indicador funciones repetición
16 - Informaciones de reproducción
17 - Indicador estado radio (LOC-DX)
18 - Indicador funciones RDS
Page 46
46
E
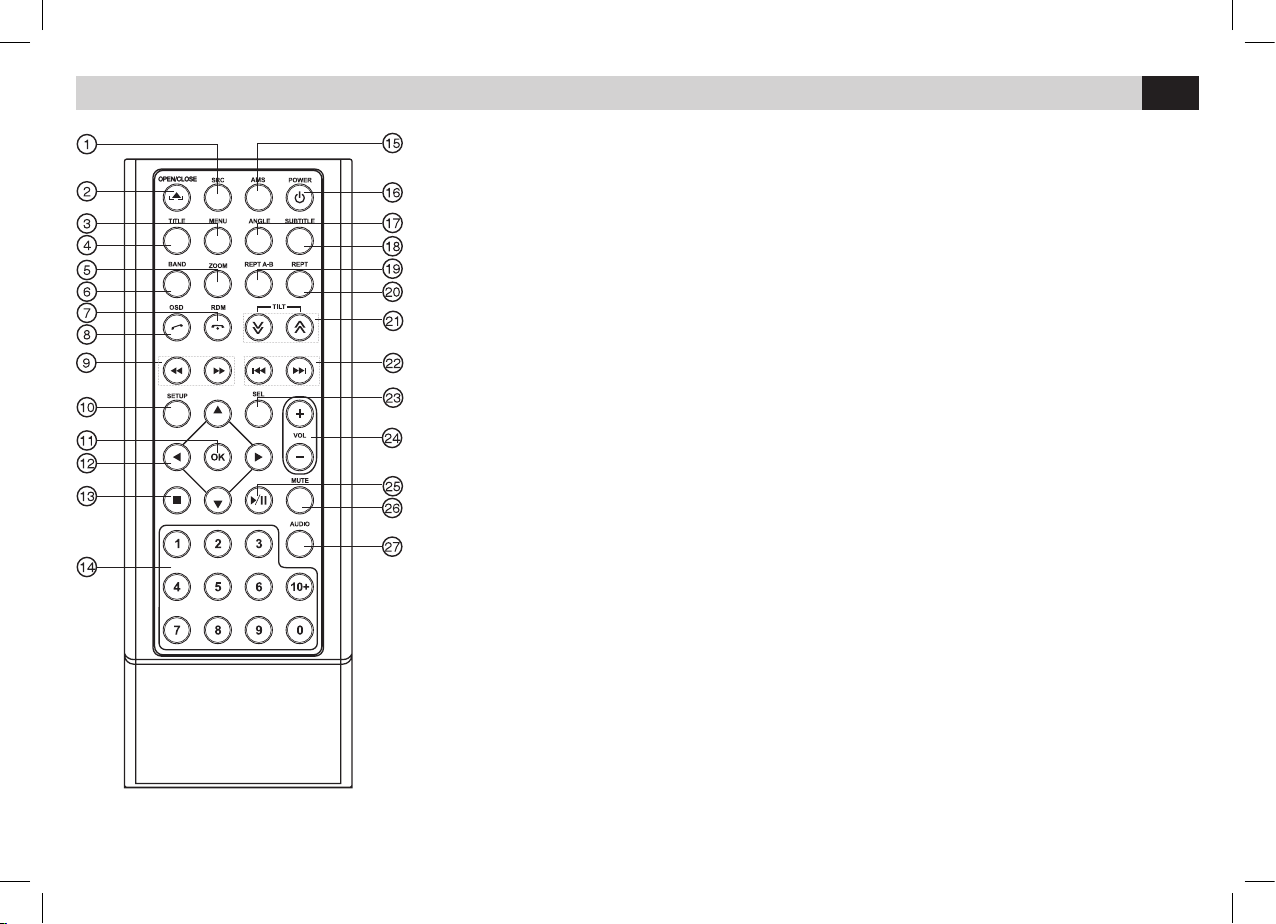
FUNCIONES MANDO A DISTANCIA
1 - Selecciona fuente
2 - Abre / Cierra monitor
3 - Menú disco DVD - PCB
4 - Titulo DVD
5 - Zoom en DVD-VCD
6 - Cambio Banda Radio
7 - Reproducción aleatoria / Terminar llamada
8 - Menú en la pantalla / Aceptar llamada
9 - Adelante / Atrás rápido
10 - Menú configuraciones
11 - Confirma selección
12 - Desplazarse en los menús
13 - Interrumpe reproducción
14 - Teclado numérico
15 - Escansión emisoras de radio memorizadas - Auto memorizaciones emisoras de radio
16 - Encendido /Apagado
17 - Angulo visión DVD
18 - Subtítulos DVD
19 - Repetición A-B
20 - Repetición Canción / Capitulo / Carpeta / Todo
21 - Incrementa / Disminuye ángulo monitor
22 - Búsqueda automática
23 - Ecualizador
24 - Ajuste volumen
25 - Inicio/ Pausa reproducción
26 - Mute audio
27 - Selecciona idioma audio DVD – VCD
Page 47
47
E
MENÙ
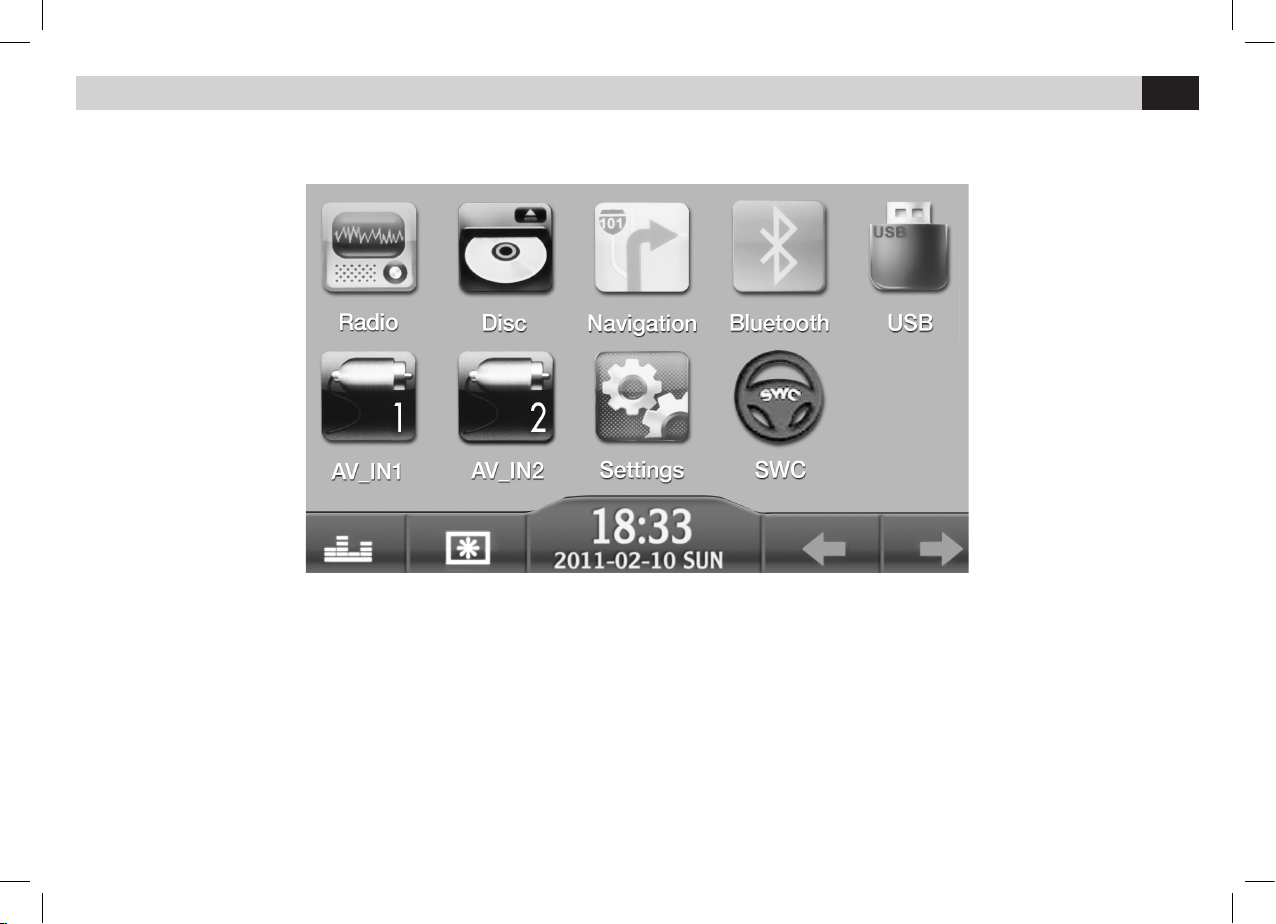
Para visualizar el menú principal presionar la tecla MENU en el panel frontal o bien presionar el ángulo en alto a la izquierda de la pantalla.
Tocando los iconos en la pantalla se selecciona la fuente o la función deseada.
Page 48
48
E
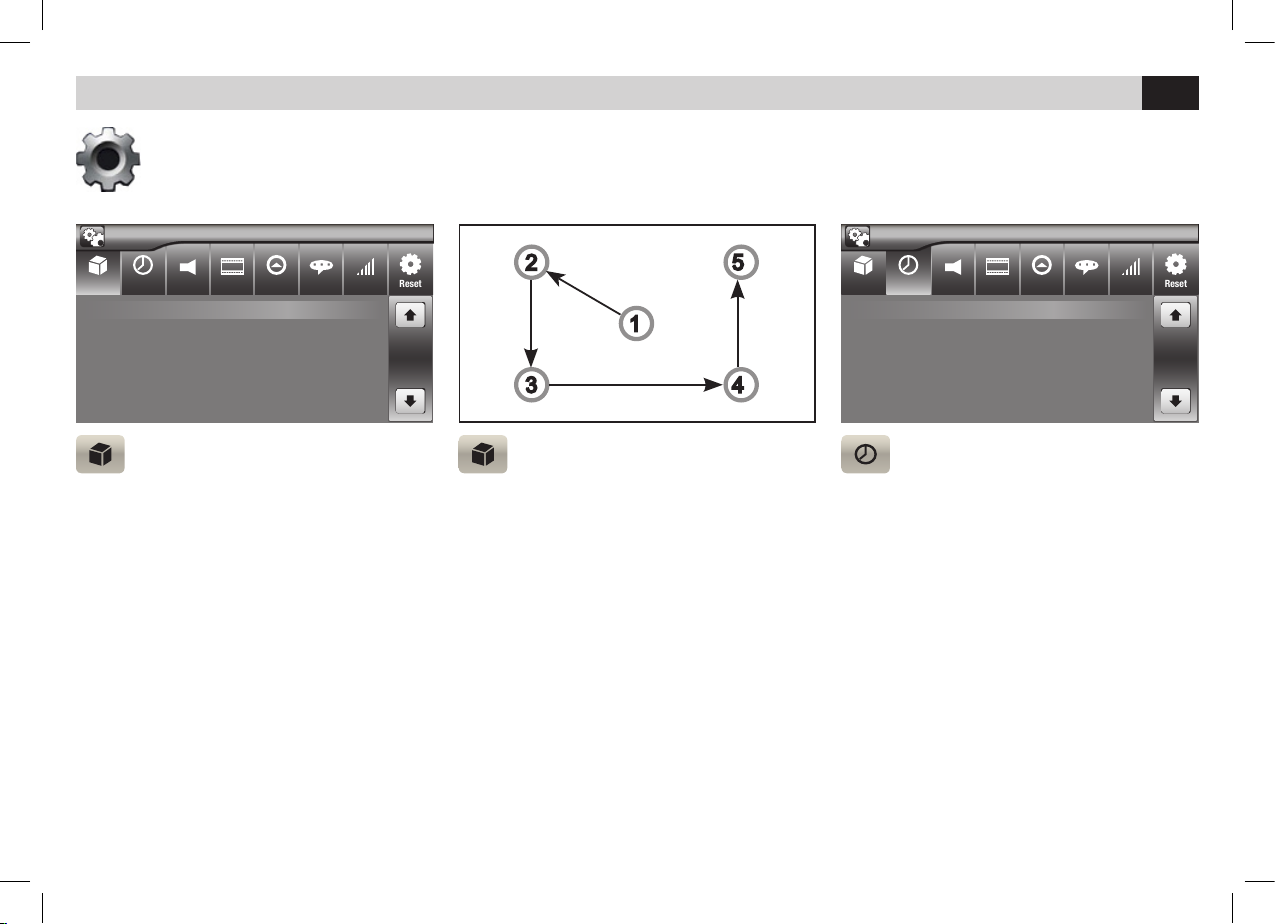
AJUSTES DEL SISTEMA
Configuraciones: iluminación teclado, nivel de protección DVD, calibración, reset, fecha y hora, navegación, ajustes radio, ajustes video,
Idiomas, volumen fuentes, personalización fondo.
CONFIGURACIÓN GENERAL
• RADIO REGION: Para la correcta banda
radiofónica seleccionar el área de pertenencia.
(Europa-Australia-Cina-USA).
• BEEP:
Permite activar/desactivar el sonido
cuando tocamos la pantalla táctil.
CONFIGURACIÓN GENERAL
• CALIBRATION: La calibración se consigue
tocando la pantalla según la pauta que se marca.
Tener presionado hasta cuando el cursor se
desplaza.
CONFIGURACION FECHA Y HORA
• Posicionarse y efectuar los ajustes.
Sound Video GPS Language Volume Reset
Date 2012-11-11
Time mode 24 H
Time 00 : 42
Settings
General Time
Time Sound Video GPS Language Volume Reset
Radio region Europe
Beep On
Calibraton Enter
Settings
General
Page 49
49
E
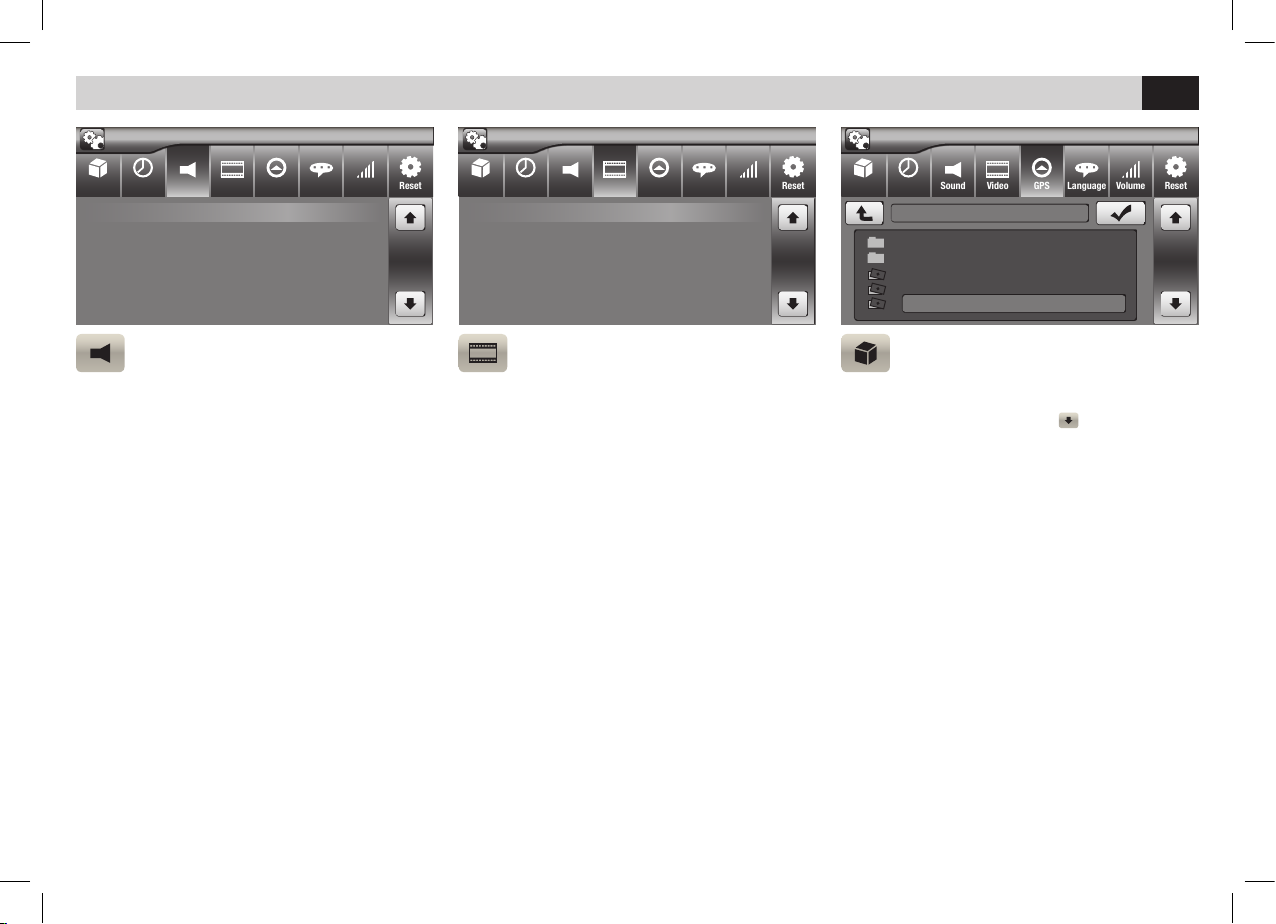
CONFIGURACIÓN GENERAL
• GPS SETUP: Introducir la Micro SD de navega-
ción NV995. Desplazarse con
para seleccio-
nar el archivo ejecutable Mobilenavigator.exe.
NOTA:
Realice este ajuste antes de comenzar a navegar.
AJUSTES DEL SISTEMA
AUDIO-SETTINGS
• SUB WOOFER FILTER: Para desactivar o
configurar los filtros del sub woofer.
• LOUD activa la exaltación de las bajas
frecuencias.
VIDEO
• REAR CAMERA: Para cambiar la visualización
de normal a espejo.
• DIMMER MODE: Para modificar la intensidad
del brillo de la pantalla. (NORMAL-BRIGHTNIGHT-DUSK)
• PARKING: Para activar/desactivar la vision en
movimiento de las películas o imágenes.
Sound Video GPS Language Volume Reset
Rear camera Normal
Dimmer mode Normal
Parking Off
Settings
General Time
Sound Video GPS Language Volume Reset
Sub woofer filter Off
LOUD On
Settings
General Time
Sound Video GPS Language Volume Reset
Settings
General Time
\MobileNavigator\Mobilenavigator.exe
LICENSE
SAVE
BTSWITCH.EXE
IGO8.exe
Mobilenavigator.exe
Page 50
50
E
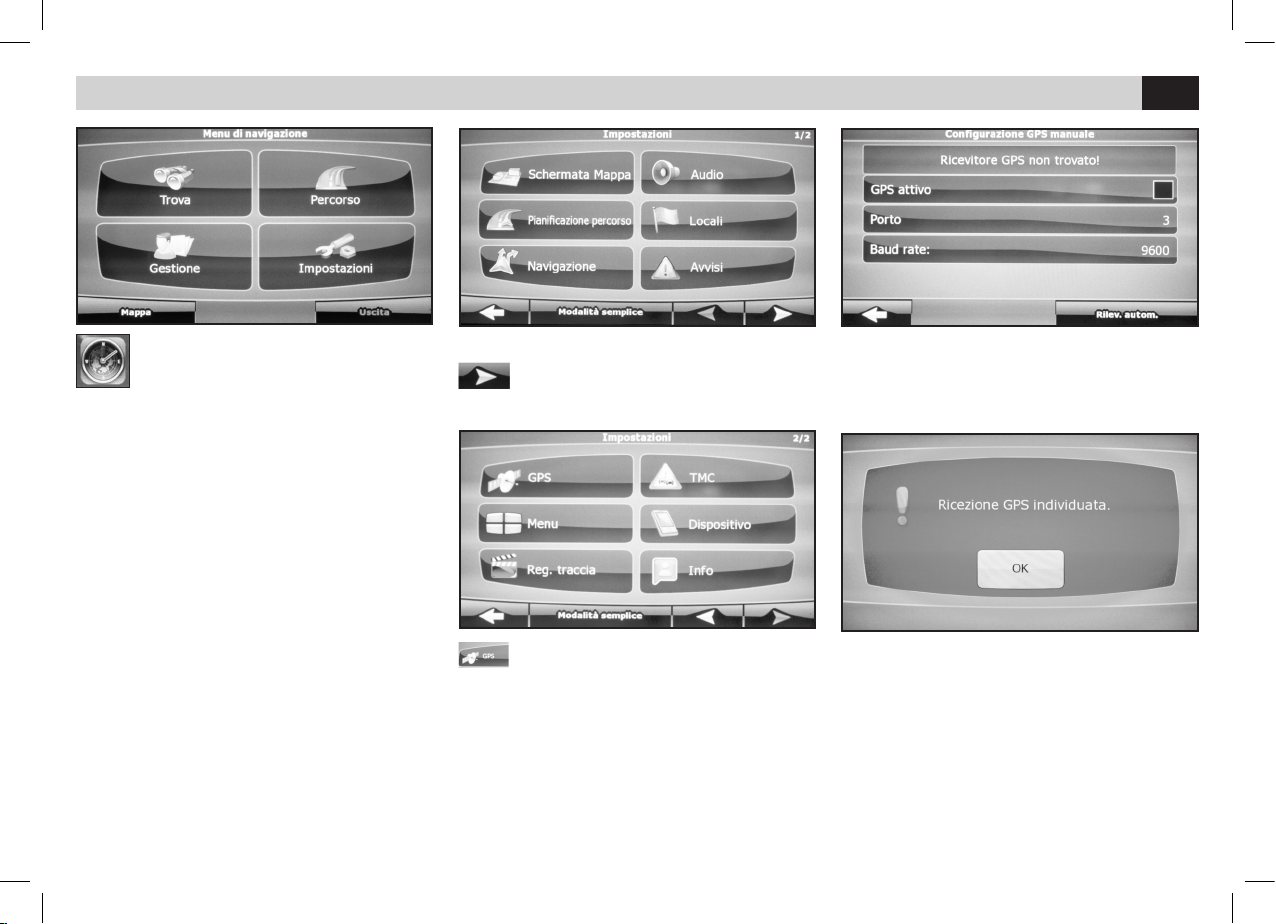
CONFIGURACION MODULO GPS
• Pasa a la segunda ventana
NAVEGACION
En la primera activación de la cartografía iGO
(opcional) seleccionar el archivo ejecutable
mobilenavigator.exe en los ajustes.
• Acceder al menú ajustes del software.
• Presionar GPS
• Presionar en la casilla de GPS ACTIVADO
A continuación en DETECCIÓN AUTOMATICA
• Esperar la adquisición de los datos y presionar ok.
• Tomar como punto de referencia el manual
iGO para las instrucciones sobre el software de
navegación.
CONFIGURACIONES GPS
Page 51
51
E
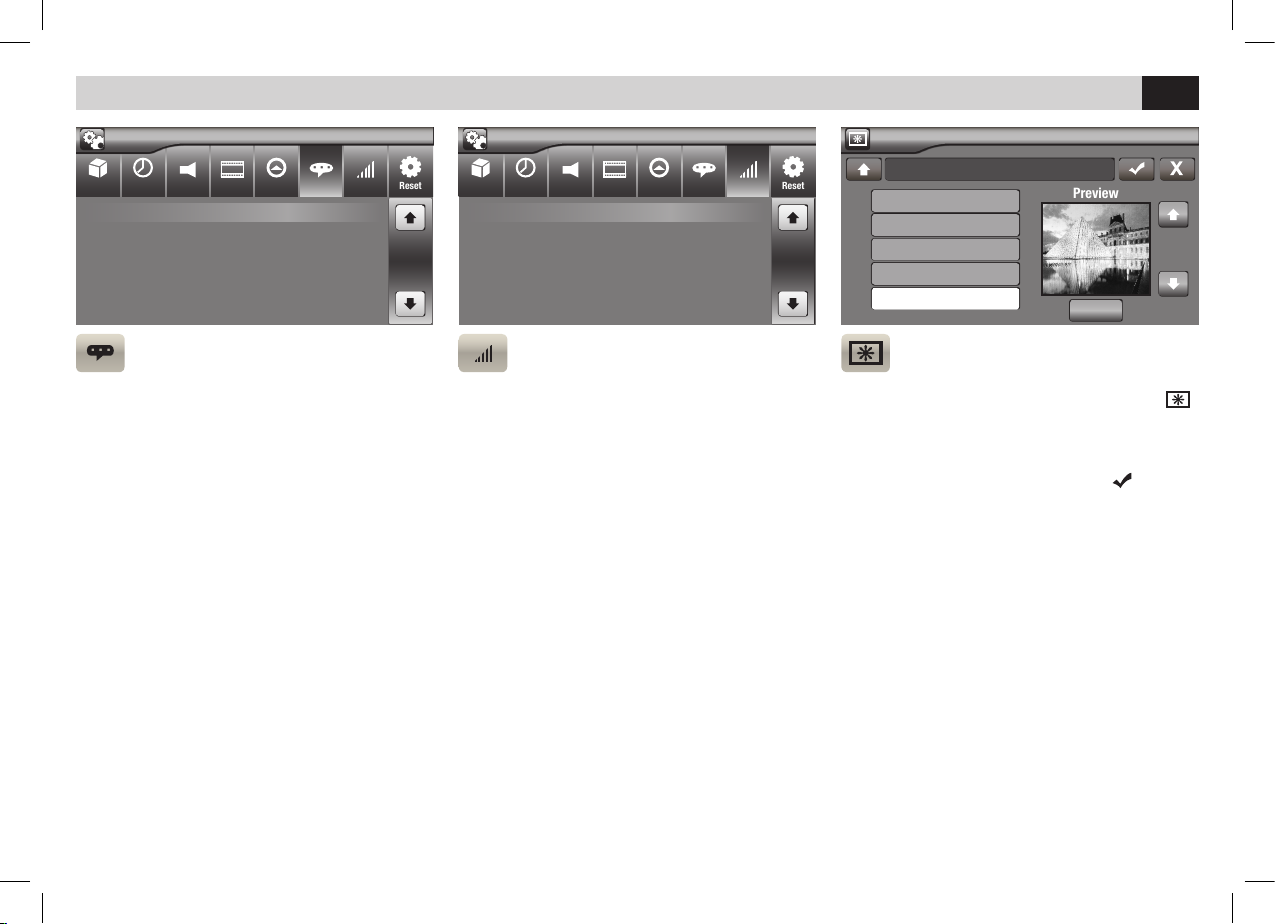
IDIOMAS
• OSD: Es posible elegir el idioma del menú.
VOLUMEN FUENTES
• Es posible el ajuste del volumen de cada
fuente para evitar molestas subidas de
intensidad de volumen en el paso de una fuente
a otra.
• RESET: vuelve a los ajustes de fábrica.
AJUSTES DEL SISTEMA
PERSONALIZACION DEL FONDO
• Desde el menú principal presionar el icono
para acceder a la ventana gestión del fondo de
pantalla. Para utilizar las imágenes presentes
en la memoria, presionar el nombre del archivo,
seleccionar el ante prima y confirmar
.
Para utilizar imágenes desde una SD Card
presionar “SCAN SD”.
Sound Video GPS Language Volume Reset
OSD English
Settings
General Time
Sound Video GPS Language Volume Reset
RADIO 7
BT 7
AUX 7
USB 7
Settings
General Time
Preview
Wallpaper
SCAN SD
6
7
8
9
Page 52
52
E
RADIO
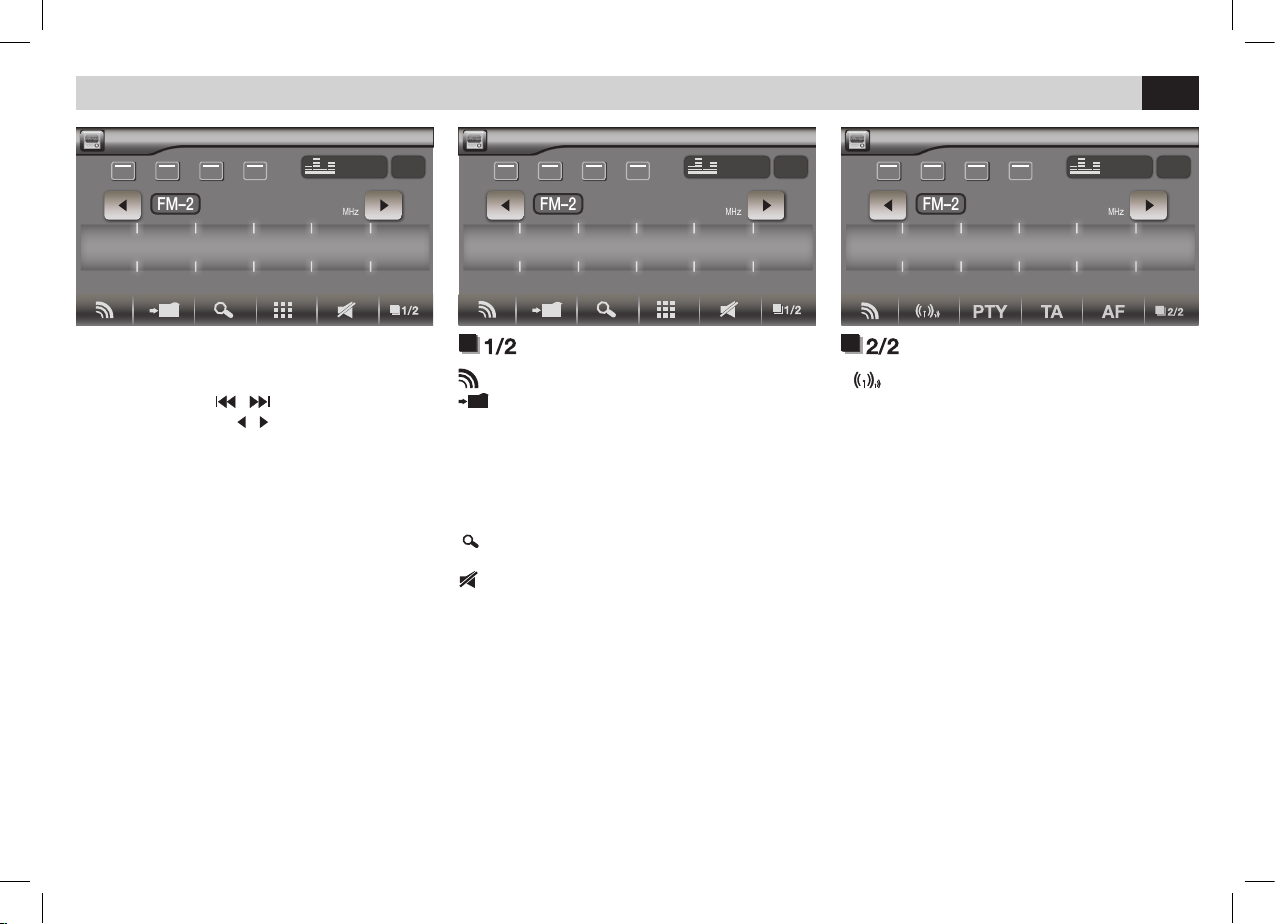
BUSQUEDA EMISORAS
• Teniendo presionado durante más de 1
segundo las teclas
/ en el mando a
distancia o los iconos
/ en la pantalla, la
unidad buscará automáticamente las emisoras.
Para la búsqueda manual presionar brevemente.
FUNCIONES RADIO
BAND Selecciona Bandas Radio 3 FM - 2 AM.
STORE Memorización de 6 emisoras
disponibles por cada banda.
Para memorizar presionar STORE y elegir la
posición deseada.
Para encontrar una emisora presionar en la
frecuencia correspondiente, en la parte inferior
de la pantalla.
PS Escansión automática de las frecuencias
radio y memoriza las 6 mejores emisoras.
MUTE Silencia el audio.
FUNCIONES RADIO
•
LOC Selecciona las emisoras cercana o
lejanas.
• PTY Selecciona el tipo de programa musical.
• AF Búsqueda de una frecuencia alternativa con
informaciones en la pantalla de la emisora.
• TA Informaciones de trafico.
Radio
AFTA LOCST
87 . 50
87.50 92.50
FM–2
106.50 98.70 105.00 103.50
MH
z
P1 P2 P3 P4 P5 P6
EQ OFF
LOUD
Radio
AFTA LOCST
87 . 50
87.50 92.50
FM–2
106.50 98.70 105.00 103.50
MH
z
P1 P2 P3 P4 P5 P6
EQ OFF
LOUD
Radio
AFTA LOCST
87 . 50
87.50 92.50
FM–2
106.50 98.70 105.00 103.50
MH
z
P1 P2 P3 P4 P5 P6
EQ OFF
LOUD
Page 53
53
E
EQUALIZADOR
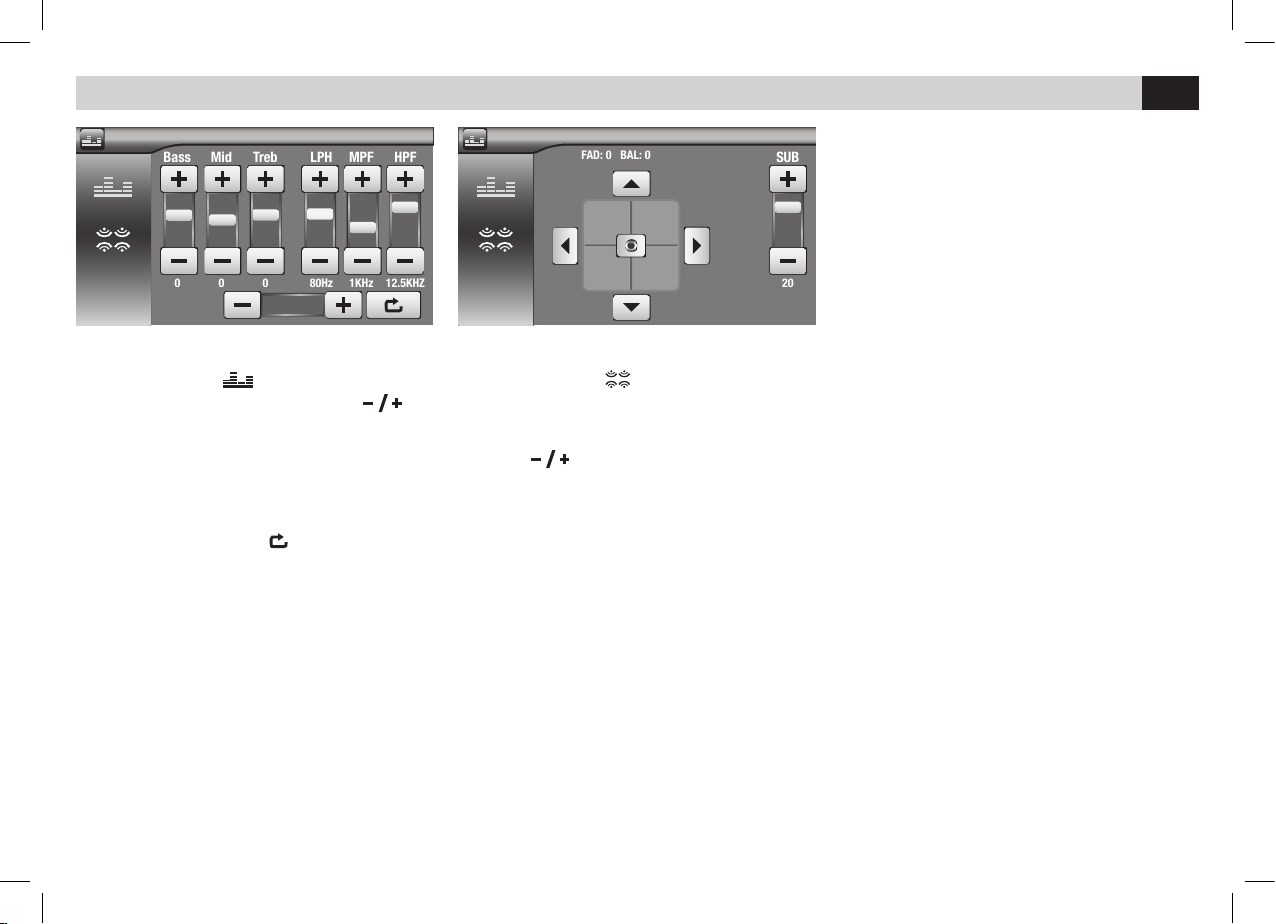
ECUALIZADOR - LOUDNESS
• Presionar el icono para modificar los
ajustes de fábrica. Mediante los iconos
es posible seleccionar 8 diferentes modos de
ecualización pre ajustados: USER-FLAT-POP
ROCK-CLASSIC-JAZZ-TECHNO-OPTIMAL.
En modo USER es posible ajustar los niveles de
los agudos, medios y graves en las frecuencias
deseadas.
LPF - MPF - HPF. El icono
se pone en
OPTIMAL.
FADER - BALANCE - SUB WOOFER
• Presionar el icono para acceder a los
ajustes del FADER y del BALANCE mediante las
flechas presentes en la pantalla.
Para ajustar el volumen del SUB WOOFER
presionar
Para ajustar el crossover presionar SUB W y
posicionarse en las frecuencia de corte deseada.
EQ
EQ
Bass Mid Treb LPH MPF HPF
0 0 0 80Hz 1KHz 12.5KHZ
EQ
USER
SUB
20
FAD: 0 BAL: 0
EQ
Page 54
54
E
REPRODUCCION
[¥]NI 21/04.2008/ARTIAT#ARTI
USB
MUSICA FOTO VIDEO KEY
01.¥
02.RECYCLED
01.N(5).MP3
02.N(6).MP3
03.N(7).MP3
04.N(8).MP3
05.N(9).MP3
REPRODUCCION MUSICA/IMAGENES/VIDEO
Seleccionar: MUSICA - FOTO - VIDEO
KEY para visualizar el menú funciones.
MENU MUSICA
Seleccionar la pista deseada para iniciar la
reproducción.
Para canción/capitulo precedente
o siguiente.
/ Tener presionado para la reproducción
rápida adelante / atrás.
Para iniciar o interrumpir la reproducción.
Repetición canción /capitulo/disco.
Reproducción Aleatoria
Para introducir el numero
canción/capitulo para reproducir.
FUNCIONES DVD
Después de introducir el DVD aparecerá el menú.
Repetición canción /capitulo/disco.
REPITE A-B Para la repetición desde el
punto A al punto B.
SUBTITULOS Parar cambiar el idioma de los subtítulos.
TITULOS Función no disponible.
SETUP Para configurar el DVD.
MENÚ Para volver al menú principal durante
la reproducción.
AUDIO Para cambiar el idioma audio.
OSD informaciones de la reproducción.
Para canción/capitulo precedente o
siguiente.
Para iniciar o interrumpir la reproducción.
/ Tener presionado para la reproducción
rápida adelante / atrás.
Interrumpe la reproducción.
ÁNGULO Cambia el ángulo de la reproducción.
Para introducir el numero
canción/capitulo para reproducir.
SOTTOTITOLI
RIPETI A-B TITOLI SETUP MENU AUDIO
ANGOLO
OSD
[¥]NI 21/04.2008/ARTIAT#ARTI
USB
MUSICA FOTO VIDEO KEY
01.¥
02.RECYCLED
01.N(5).MP3
02.N(6).MP3
03.N(7).MP3
04.N(8).MP3
05.N(9).MP3
Page 55
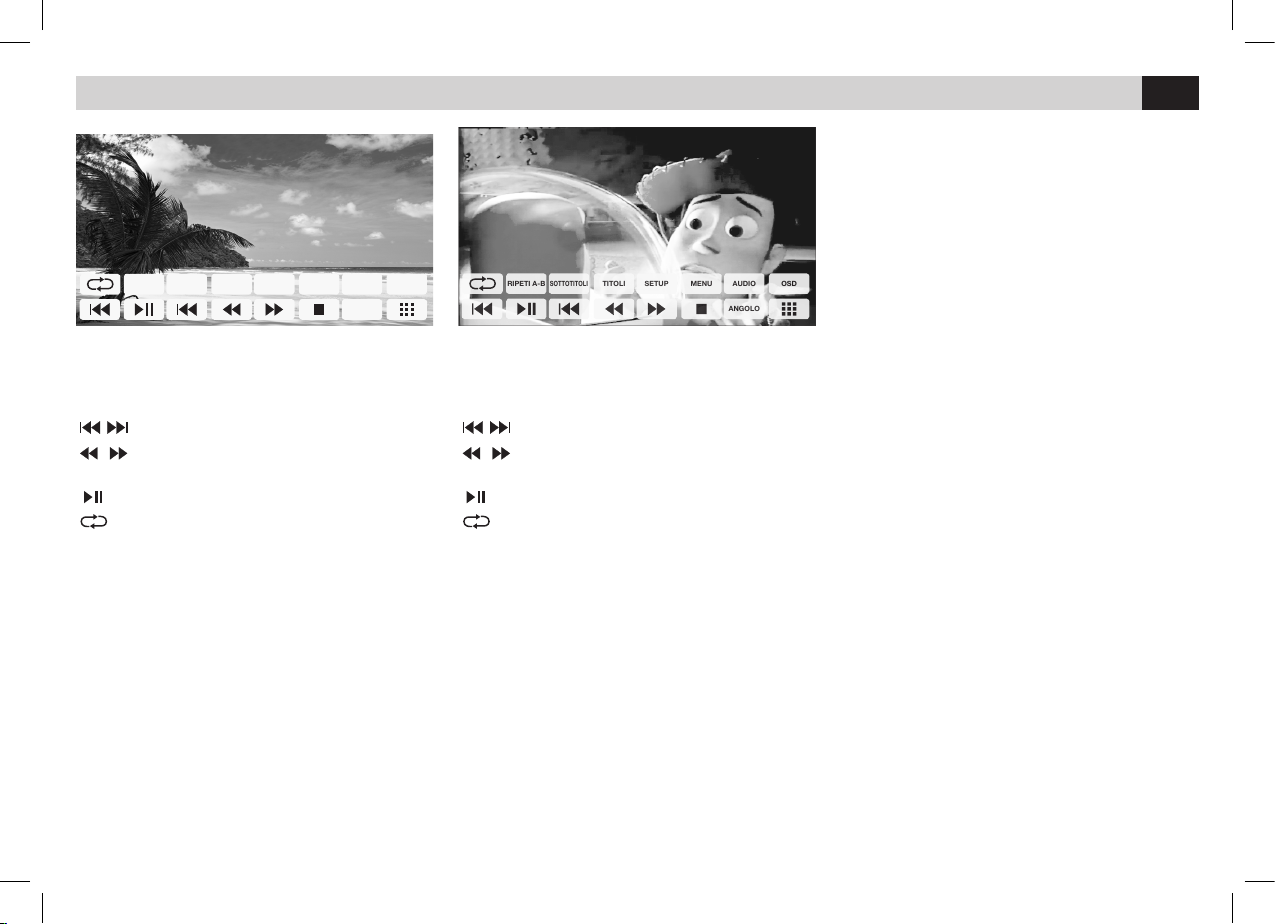
55
E
REPRODUCCION
MENU IMAGENES
Seleccionar la foto deseada para iniciar la
reproducción.
Para foto precedente o siguiente.
/ Tener presionado para la reproducción
rápida adelante / atrás.
Para iniciar o interrumpir la reproducción.
Repetición
MENU VIDEO
Seleccionar el menú del video deseado para
iniciar la reproducción.
Para video precedente o siguiente.
/ Tener presionado para la reproducción
rápida adelante / atrás.
Para iniciar o interrumpir la reproducción.
Repetición
SOTTOTITOLI
RIPETI A-B TITOLI SETUP MENU AUDIO
ANGOLO
OSD
SOTTOTITOLI
RIPETI A-B TITOLI SETUP MENU AUDIO
ANGOLO
OSD
Page 56
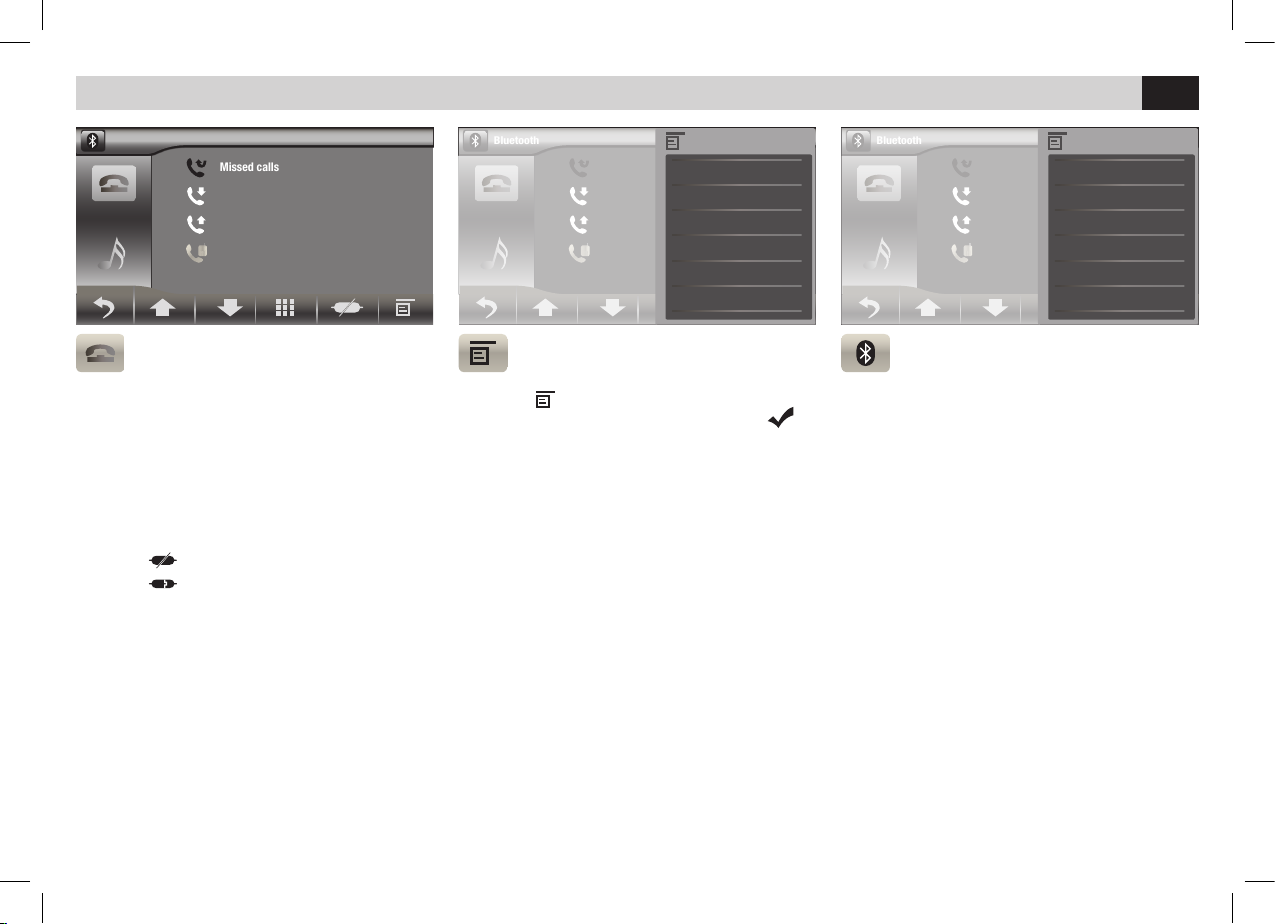
56
E
CONFIGURACION BLUETOOTH
SINCRONIZACION CONTACTOS
Presionar
para acceder a los ajustes.
Seleccionar CONTACTOS y confirmar con
Automáticamente los contactos del teléfono
serán descargados en la memoria del autorradio.
El tiempo necesario para esta operación varía en
base al número de contactos.
OPCIONES BLUETOOTH
• CONEXION AUTOMATICA conecta
automáticamente el teléfono.
• RESPUESTA AUTOMATICA contesta
automáticamente a la llamada.
• CODIGO DE EMPAREJAMIENTO cambia la
password.
• DELETE Elimina los dispositivos emparejados.
EMPAREJAMIENTO TELEFONO
Es posible emparejar hasta 5 teléfonos.
• Activar la función bluetooth en el teléfono y
buscar nuevos dispositivos.
• Seleccionar PHONOCAR en la lista
dispositivos,
Introducir la password 0000 cuando se indica.
Una vez emparejado aparecerá el nombre del
teléfono.
Presionar
para desconectar el teléfono.
Presionar
para reconectar.
Missed calls
Received calls
Dialed calls
Phone book
Bluetooth
SAMSUNG GALAXY
Bluetooth
Setup
X
Bluetooth On
Auto connect On
Auto answers Off
Pairing code ****
Phone book sync
Delete
Bluetooth
Setup
X
Bluetooth On
Auto connect On
Auto answers Off
Pairing code ****
Phone book sync
Delete
Page 57
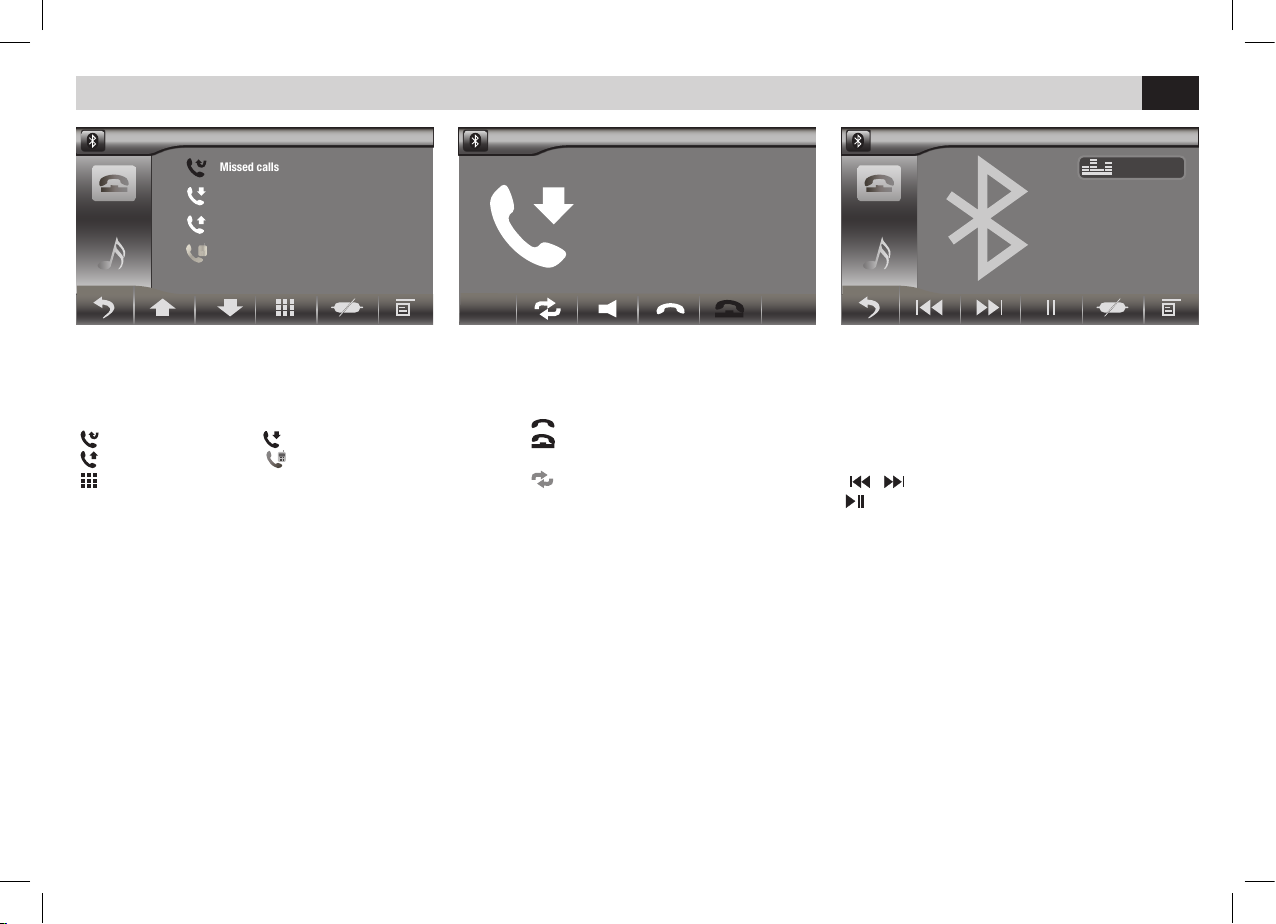
57
E
FUNCIONES BLUETOOTH
LLAMAR DESDE LA PANTALLA
• Seleccionar Bluetooth desde el menú principal.
• Presionar uno de los iconos presentes en la
pantalla para llamar desde unos listados.
Llamadas pérdidas llamadas recibidas
Llamadas efectuadas contactos telefónico,
llamadas desde el teclado numérico.
RECIBIR UNA LLAMADA
Cuando hay una llamada, el VM036 pasa
automáticamente en modo bluetooth.
Presionar
para contestar.
Presionar
para terminar la conversación o
para rechazar la llamada.
Presionar
para excluir /activar el manos
libres.
REPRODUCCION MUSICA BLUETOOTH
Si el teléfono conectado soporta el perfil AD2P
es posible escuchar los temas musicales.
Si el dispositivo soporta AVRCP será posible
controlar los temas musicales directamente
desde la pantalla táctil
/ Pista precedente/siguiente.
Inicia/interrumpe la reproducción.
Bluetooth
SAMSUNG GALAXY
***************
Ringing...
Missed calls
Received calls
Dialed calls
Phone book
Bluetooth
SAMSUNG GALAXY
Bluetooth
SAMSUNG GALAXY
User
Page 58
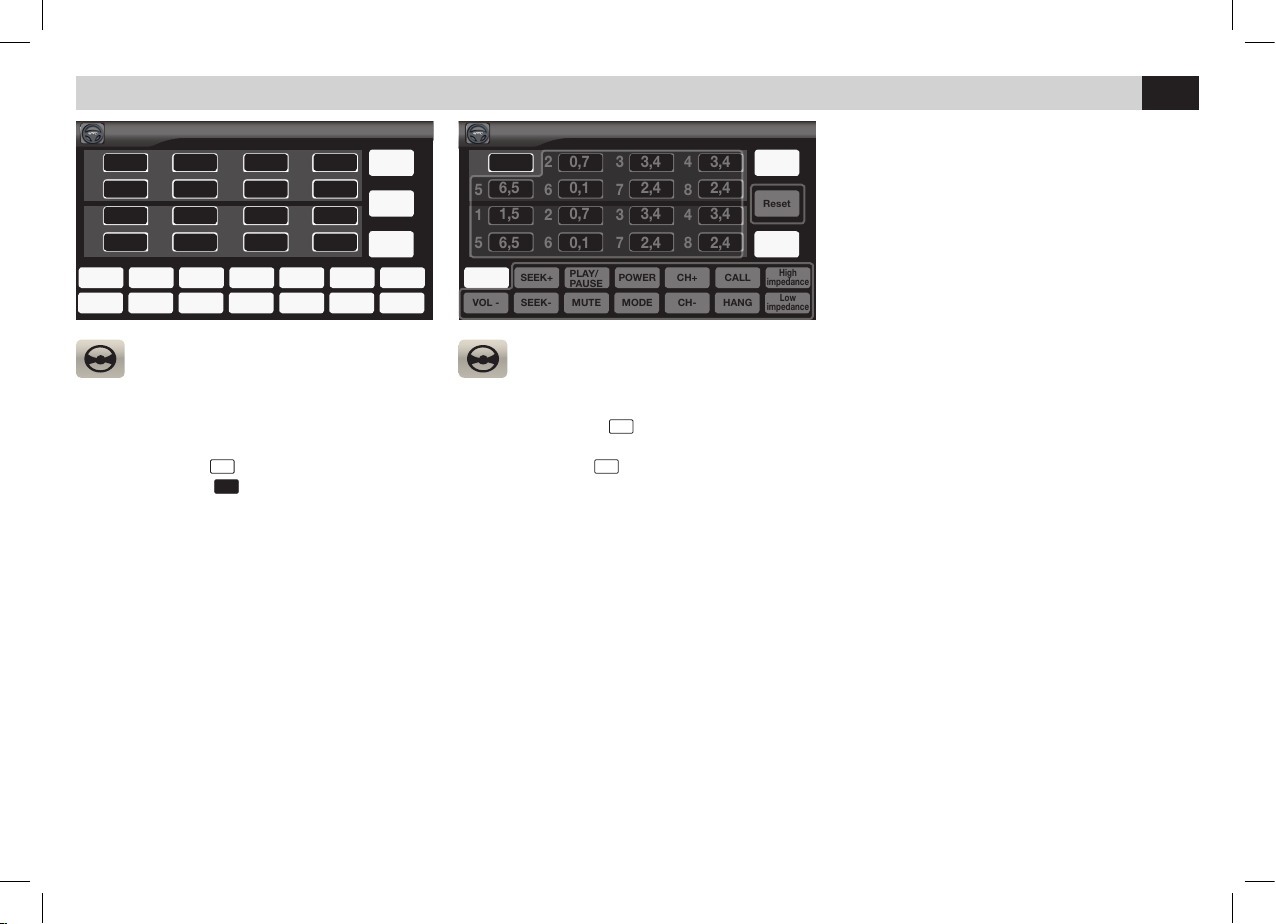
58
E
MANDOS DE VOLANTE
NOTA:
El sistema acepta valores resistivos superiores a
300 ohm diferentes entre ellos en un 20-30%.
CONFIGURACION DE LOS MANDOS
DE VOLANTE
Presionar las teclas de los mandos de volante
en secuencia. En la pantalla se visualizaran los
valores resistivos por cada comando.
Presionar el icono
Assign
y seleccionar el primer
valor resistivo (es.:
1,5
) el icono se iluminará.
CONFIGURACION DE LOS MANDOS
DE VOLANTE
Presionar el icono de la función relativa al mando del volante (es.:
VOL+
).
Repetir esta operación para todos los mandos
y al final presionar
Enter
para memorizar.
VOL + SEEK+ POWER CH+ CALL
Enter
Reset
Assign
PLAY/
PAUSE
High
impedance
Low
impedance
MUTEVOL - SEEK- MODE CH- HANG
SWC
VOL + SEEK+ POWER CH+ CALL
Enter
Reset
Assign
PLAY/
PAUSE
High
impedance
Low
impedance
MUTEVOL - SEEK- MODE CH- HANG
SWC
1,5 1,5
1
1
1 1
5
5
5 5
2
2
2 2
6
6
6 6
3
3
3 3
7
7
7 7
4
4
4 4
8
8
8 8
0,7 0,73,4 3,43,4 3,4
6,5 6,50,1 0,12,4 2,42,4 2,4
1,5 1,50,7 0,73,4 3,43,4 3,4
6,5 6,50,1 0,12,4 2,42,4 2,4
Page 59

59
CARACTERISTIQUES TECHNIQUES • TECHNISCHE DATEN •
CARACTERISTICAS TECNICAS
• Ecran 7” TFT/LCD WIDE TOUCH SCREEN motorized / motorisiert / motorizado
• Interface graphique dynamique / Dynamische Grak-Interface / Interfaz graco dinámico
• Résolution / Auösung / Resolución 800X480 pixel
• Illumination touches couleur vert / Grün beleuchtete Tasten / Teclas iluminadas color verde
• Système couleur / Farb-System / Sistema color NTSC/PAL
• Importe images pour fond d’écran / Bilder kopieren zwecks Bildschirm-Hintergrund bzw. –Schoner / Importa imágenes para salva pantalla o fondo de pantalla
• Volume avec encoder rotatif / Drehbarer Lautstärke-Encoder / Volumen con mando giratorio
• Fonctions visibles sur écran / Funktionen auf dem Bildschirm ersichtlich / Funciones visibles en la pantalla (OSD)
• 1 Slot micro SD Card pour navigation / 1 Öffnung für Navigations-Mikro-SD-Karte / 1 Ranura para SD Card - navegación
• 1 Porta USB frontale / 1 frontale USB-Öffnung / 1 Puerto USB frontal
• Egalisateur / Equalizer / Ecualizador
• Syntoniseur Radio / Radio-Tuner / Sintonizador Radio FM-AM-RDS-EON PLL
• 18 stations mémorisables en FM et 12 en AM / Speicher-Kapazität für 18 FM-Sender und 12 AM-Sender / 18 emisoras memorizables en FM 18 /12 en AM
• Mémorisation de la dernière position / Einspeicherung der letzten Position / Memorización de la ultima posición
• Mains-libres Bluetooth nFore / Freisprech-Funktion Bluetooth nFore / Manos libres Bluetooth nFore
(Support iPhone 4, A2DP, Gérance Carnet d’adresses) / (kompatibel mit iPhone 4, A2DP, mit Telefonregister-Handhabung) / (Soporte iPhone 4, A2DP, Gestión Agenda)
• Microphone Externe / Externes Mikrofon / Micrófono Externo
• Tolérance d’inclination ±30° / Neigungs-Toleranz ±30° / Tolerancia de inclinación ±30°
• Disposition Commandes Au Volant CAN-BUS / Vorbereitet auf CAN-BUS Lenkrad-Steuerungen / Predisposición para Mandos de Volante CAN-BUS
• Commandes Volant Résistifs Intégrés / Integrierte Resistiv-Lenkrad-Steuerungen / Mandos de Volante Resistivos Integrados
• Contrôle illumination / Beleuchtungs-Kontrolle / Control de brillo / Dimmer control
• 4+1 Sorties audio Pre-Ampliés / 4+1 vorverstärkte Audio-Ausgänge / 4+1 Salidas audio Pre-Amplicadas
• 2 entrées AV, antérieures et postérieure / 2 AV-Eingänge, frontal und rückwärtig / 2 Entradas AV, anterior y posterior
• Niveaux subwoofer et ltre réglable / Subwoofer- und Filter-Niveau einstellbar / Niveles subwoofer y ltro ajustables
• Télécommande avec toutes les fonctions / Fernbedienung mit allen Funktionen / Mando a distancia con todas las funciones
Page 60

S.p.A. - Via F.lli Cervi, 167/C • 42124 Reggio Emilia (Italy) • Tel. ++39 0522 941621 • Fax ++39 0522 942452 • www.phonocar.com • e-mail:[email protected]
 Loading...