

Page 1

Model 1108
User’s Manual
version 1.03
Phonetics, Inc.Phonetics, Inc.
Phonetics, Inc.
Phonetics, Inc.Phonetics, Inc.
Page 2

Sensaphone® Model 1108 User’s Manual
Every effort has been made to ensure that the information in this
document is complete, accurate and up-to-date. Phonetics, Inc.
assumes no responsibility for the results of errors beyond its control.
Phonetics, Inc. also cannot guarantee that changes in equipment
made by other manufacturers, and referred to in this manual, will not
affect the applicability of the information in this manual.
© 1998 by Phonetics, Inc.
Revised Edition, version 1.03, September, 2000
Written and produced by Phonetics, Inc. Please address all comments on this publication to:
Phonetics, Inc.
901 Tryens Road
Aston, PA 19014
www.sensaphone.com
Sensaphone® is a registered trademark of Phonetics, Inc.
Touch-Tone™ is a registered trademark of AT&T.
Page 3

IMPORTANT SAFETY INSTRUCTIONS
Your Model 1108 has been carefully designed to give you years
of safe, reliable performance. As with all electrical equipment,
however, there are a few basic precautions you should take to
avoid hurting yourself or damaging the unit:
• Read the installation and operating instructions in this
manual carefully. Be sure to save it for future reference.
• Read and follow all warning and instruction labels on
the product itself.
• To protect the Model 1108 from overheating, make sure
all openings on the unit are not blocked. Do not place on
or near a heat source, such as a radiator or heat register.
• Do not use your Model 1108 near water, or spill liquid
of any kind into it.
• Be certain that your power source matches the rating
listed on the AC power transformer. If you’re not sure of
the type of power supply to your facility, consult your
dealer or local power company.
• Do not allow anything to rest on the power cord. Do not
locate this product where the cord will be abused by
persons walking on it.
• Do not overload wall outlets and extension cords, as this
can result in the risk of fire or electric shock.
• Never push objects of any kind into this product through
ventilation holes as they may touch dangerous voltage
points or short out parts that could result in a risk of fire
or electric shock.
• To reduce the risk of electric shock, do not disassemble
this product, but return it to Phonetics Customer
Service, or other approved repair facility, when any
service or repair work is required. Opening or removing
covers may expose you to dangerous voltages or other
risks. Incorrect reassembly can cause electric shock
when the unit is subsequently used.
iii
Page 4

Sensaphone® Model 1108 User’s Manual
• If anything happens that indicates that your Model 1108
is not working properly or has been damaged, unplug it
immediately and follow the procedures in Appendix C
for having it serviced. Return the unit for servicing
under the following conditions:
1. The power cord or plug is frayed or damaged.
2. Liquid has been spilled into the product or it has been
exposed to water.
3. The unit has been dropped, or the cabinet is damaged.
4. The unit doesn’t function normally when you’re
following the operating instructions.
• Avoid using a telephone (other than a cordless type)
during an electrical storm. There may be a remote risk
of electric shock from lightning.
• Do not use the telephone to report a gas leak in the
vicinity of the leak.
CAUTION
To Reduce the Risk of Fire or Injury to Persons, Read and
Follow these Instructions:
1. Use only the following type and size batteries:
Alkaline, size D.
2. Do not dispose of the batteries in a fire. The cell may
explode. Check with local codes for possible special
disposal instructions.
3. Do not open or mutilate the batteries. Released electrolyte
is corrosive and may cause damage to the eyes or skin. It
may be toxic if swallowed.
4. Exercise care in handling batteries in order not to short
the battery with conducting materials such as rings,
bracelets, and keys. The battery or conductor may
overheat and cause burns.
5. Do not mix old and new batteries in this product.
iv
Page 5

FCC Requirements
Part 68: The Sensaphone® Model 1108 complies with Part 68
of the FCC rules. On the back of the unit there is a label that
contains, among other information, the FCC Registration
Number and the Ringer Equivalence Number (REN) for this
equipment. You must, upon request, provide this information to
your local telephone company.
The REN is useful to determine the quantity of devices that you
may connect to your telephone line and still have all of those
devices ring when your telephone number is called. In most,
but not all areas, the sum of the REN’s of all devices connected
to one line should not exceed five (5.0). To be certain of the
number of devices that you may connect to your line, you may
want to contact your local telephone company to determine the
maximum REN for your calling area.
This equipment may not be used on coin service provided by
the telephone company. Connection to party lines is subject to
state tariffs.
Should the Model 1108 cause harm to the telephone network,
the telephone company may discontinue your service temporarily. If possible, they will notify you in advance. But if
advance notice isn’t practical, the telephone company may
temporarily discontinue service without notice and you will be
notified as soon as possible. You will be informed of your right
to file a complaint with the FCC. The telephone company may
make changes in its facilities, equipment, operations, or
procedures where such action is reasonably required in the
operation of its business and is not inconsistent with the rules
and regulations of the FCC that could affect the proper functioning of your equipment. If they do, you will be notified in
advance to give you an opportunity to maintain uninterrupted
telephone service.
If you experience trouble with this equipment, or you need
information on obtaining service or repairs, please contact:
PHONETICS, INC.
901 Tryens Road, Aston, PA 19014
(610)558-2700 Fax: (610)558-0222
v
Page 6

Sensaphone® Model 1108 User’s Manual
The telephone company may ask that you disconnect this
equipment from the network until the problem has been
corrected or until you are sure that the equipment is not
malfunctioning.
Part 15: This equipment has been tested and found to comply
with the limits for a Class B digital device, pursuant to Part 15
of the FCC Rules. These limits a designed to provide reasonable protection against harmful interference in a residential
installation. This equipment generates, uses and can radiate
radio frequency energy and, if not installed and used in
accordance with the instructions, may cause harmful interference to radio communications. However, there is no guarantee
that interference will not occur in a particular installation. If
this equipment does cause harmful interference to radio or
television reception, which can be determined by turning the
equipment off and on, the user is encouraged to try to correct
the interference by one or more of the following measures:
• Reorient or relocate the receiving antenna.
• Increase the separation between the equipment and the
receiver.
• Connect the equipment into an outlet on a circuit
different from that to which the receiver is connected.
• Consult the dealer or an experienced radio/television
technician for help.
vi
Page 7

Canadian Department of Communications Statement
Notice: The Canadian Department of Communications label
identifies certified equipment. This certification means that the
equipment meets certain telecommunications network protective operational and safety requirements. The Department does
not guarantee the equipment will operate to the user’s satisfaction.
Before installing this equipment, users should ensure that it is
permissible to be connected to the facilities of the local
telecommunications company. The equipment must also be
installed using an acceptable method of connection. In some
cases, where the company’s inside wiring is associated with a
single line, individual service may be extended by means of a
certified connector assembly (telephone extension cord). The
customer should be aware that compliance with the above
conditions may not prevent degradation of service in some
situations.
Repairs to certified equipment should be made by an authorized Canadian maintenance facility designated by the supplier.
Any repairs or alterations made by the user to this equipment,
or equipment malfunctions, may give the telecommunications
company cause to request the user to disconnect the equipment.
Users should ensure for their own protection that the electrical
ground connections of the power utility telephone lines and
internal metallic water pipe system, if present, are connected
together. This precaution may be particularly important in rural
areas.
CAUTION: Users should not attempt to make such connections
themselves, but should contact the appropriate electric inspection authority, or electrician, as appropriate.
The Load Number (LN) assigned to each terminal device
denotes the percentage of the total load to be connected to a
telephone loop which is used by the device to prevent overloading. The termination on loop may consist of any combination of
devices subject only to the requirement that the total of the
Load Numbers of all the devices does not exceed 100. For the
Sensaphone® Model 1108, the Load Number is 8.
vii
Page 8

Sensaphone® Model 1108 User’s Manual
viii
Page 9

Chapter 1: Introduction
Model 1108
Table of Contents
version 1.03
Important Safety Instructions ..................................... iii
FCC Requirements .............................................................. v
Canadian Department of Communications Statement ......... vi
Chapter 1: Introduction................................................. 1
Technical Support.................................................... 2
Chapter 2: Installation................................................... 3
2.1 Operating Environment ........................................ 3
2.2 Mounting ................................................................ 3
2.3 Power Surge Protection ........................................ 4
2.4 Power Supply and Battery Backup ...................... 4
2.5 Starting the Model 1108 ........................................ 5
2.6 Run Mode and Standby Mode .............................. 5
2.7 Telephone Line ...................................................... 6
2.8 The Microphone..................................................... 7
2.9 Alert Inputs ............................................................ 8
2.10 Installing the Sensor ............................................. 9
2.11 Multiple Sensors ................................................. 11
2.12 Outdoor Wiring .................................................... 12
2.13 Disconnecting the Model 1108 for
Storage or Seasonal Use. ................................... 13
Chapter 3: Quick Start ................................................ 15
3.1 The Local Keypad................................................ 15
3.2 Preparation for Programming ............................ 16
3.3 Quick-Start Programming Steps ........................ 16
Step 1: Set Configuration of Inputs ...................... 16
Step 2: Set the ID Number ................................... 17
Step 3: Set Dial-Out Telephone Numbers ............ 18
Step 4: Set Temperature Limits ............................ 19
3.4 Summary of the Alarm Dial-Out Process .......... 21
ix
Page 10

Sensaphone® Model 1108 User’s Manual
Chapter 4: Communications Programming .............. 23
4.1 The Unit ID Number ............................................. 23
4.1.1 Programming the ID Number ................................ 24
4.1.2 Interrogating the ID Number .................................. 24
4.2 Dial-out Telephone Numbers .............................. 25
4.2.1 Programming Dial-out Telephone Numbers .......... 25
4.2.2 Interrogating a Dial-out Telephone Number .......... 26
4.2.3 Erasing a Telephone Number ................................ 26
4.3 Tone or Pulse Dialing .......................................... 27
4.4 Special Dialing ..................................................... 27
4.4.1 Special Dialing Keys ............................................. 28
4.4.2 Incorporating a Pause ........................................... 29
4.4.3 Incorporating a Pound (#) or Asterisk (*) ............... 30
4.4.4 Special Dialing to a Beeper or Pager .................... 31
4.5 Rings Until Answer ............................................. 33
4.5.1 Programming Rings Until Answer ......................... 33
4.5.2 Interrogating Rings Until Answer ........................... 34
4.6 TAD (Telephone Answering Device) ................. 34
4.6.1 TAD Enable/Disable .............................................. 35
4.6.2 Using the TAD feature ........................................... 35
4.6.3 No TAD In Use ...................................................... 36
4.7 Listen-in Time ...................................................... 37
4.7.1 Programming the Listen-in Time ........................... 37
4.7.2 Interrogating the Listen-in Time............................. 38
4.8 Call Delay ............................................................. 38
4.8.1 Programming the Call Delay ................................. 38
4.8.2 Interrogating Call Delay ......................................... 39
4.9 Local Voice Mute ................................................. 40
4.9.1 Enable/Disable Local Voice Mute.......................... 40
4.10 Voice Repetitions ................................................ 40
4.10.1 Programming Voice Repetitions ............................ 41
4.10.2 Interrogating Voice Repetitions ............................. 41
4.11 Intercall Time ....................................................... 42
4.11.1 Programming Intercall Time .................................. 42
4.11.2 Interrogating Intercall Time.................................... 43
x
Page 11

Chapter 1: Introduction
4.12 Maximum Number of Calls (Max Calls) ............. 43
4.12.1 Programming Max Calls ........................................ 44
4.12.2 Interrogating Max Calls ......................................... 45
4.13 The Clock ............................................................. 45
4.13.1 Setting the Clock ................................................... 45
4.13.2 Interrogating for the Current Time ......................... 46
4.14 The Security Code ............................................... 47
4.14.1 Locking the Keypad ............................................... 47
4.14.2 Unlocking the Keypad ........................................... 48
Chapter 5: Alarm Programming ................................. 49
5.1 Input Configuration ............................................. 49
5.1.1 Programming Input Configuration ......................... 50
5.1.2 Verifying Input Configuration ................................. 51
5.2 Enable/Disable Inputs ......................................... 51
5.2.1 Changing Enabled/Disabled Input Status ............. 52
5.2.2 Verifying Enabled/Disabled Input Status ............... 52
5.3 Input Recognition Time ....................................... 53
5.3.1 Programming Input Recognition Time ................... 53
5.3.2 Interrogating Input Recognition Time ................... 54
5.4 Establishing High and Low
Temperature Limits ............................................. 55
5.4.1 Programming Temperature Limits
for a Selected Input ............................................... 55
5.4.2 Disabling Alarm Response to High or
Low Temperature .................................................. 56
5.4.3 Interrogating High and Low Temperature Limits ... 57
5.5 Temperature Scale .............................................. 57
5.6 Temperature Calibration ..................................... 58
5.6.1 Programming Temperature Calibration ................. 58
5.6.2 Interrogating Temperature Calibration ................... 60
5.7 Obtaining Current Temperature ......................... 60
5.8 AC Power Monitoring Enable/Disable ............... 61
5.8.1 Enabling/Disabling the AC Power Alarm ............... 61
5.9 AC Power Failure Recognition Time .................. 61
5.9.1 Programming Power Failure Recognition Time..... 62
xi
Page 12

Sensaphone® Model 1108 User’s Manual
5.9.2 Interrogating Power Failure Recognition Time ...... 63
5.10 Sound Alarm Monitoring .................................... 63
5.10.1 Programming Sound Alarm Sensitivity .................. 64
5.10.2 Interrogating Sound Sensitivity ............................. 64
5.10.3 Programming High Sound Alarm
Recognition Time .................................................. 65
5.11 High Sound Alarm Enable/Disable .................... 66
5.11.1 Changing Enabled/Disabled High Sound Alarm.... 66
5.12 Exit Delay ............................................................. 66
Chapter 6: Acknowledgment, Status Report, and
Remote Access ................................................. 69
6.1 Alarm Acknowledgment ..................................... 69
6.1.1 Local Acknowledgment ......................................... 69
6.1.2 Touch-Tone™ Acknowledgment ............................ 69
6.1.3 Callback Acknowledgment .................................... 70
6.2 Status Report ....................................................... 71
6.2.1 Example: Status Report, No Alarms ..................... 72
6.2.2 Example: Status Report, Existing Alarms ............. 73
6.2.3 Example: Status Report, Disabled Inputs ............ 74
6.2.4 Battery Condition ................................................... 75
6.2.5 Remote Access by Touch-Tone™ Telephone ........ 75
Chapter 7: Operation .................................................. 79
7.1 Alarm Detection, Dial-out and
Acknowledgment................................................. 79
7.2 Example: A Dial-out Telephone Call .................. 84
Appendix A: Troubleshooting..................................... 85
Appendix B: Checking for Proper Operation............ 93
Appendix C: Accessories ........................................... 95
Appendix D: Returning the Unit for Repair ............... 97
Product Warranty......................................................... 98
xii
Page 13

Chapter 1: Introduction
The Sensaphone® Model 1108 is a fully-programmable,
environmental monitoring system that offers extensive on-site
and remote monitoring capability to small businesses, private
homes, farms, greenhouses, computer rooms, and remote
facilities. Designed for desktop or wall mounting, the
Model 1108 is simple to install, program and operate; no
changes to standard electrical or telephone service are required.
Connected to a telephone line, it will respond to an alarm by
dialing up to eight separate telephone numbers. When the call
is answered, an “Alert Condition” message is delivered in
digitized speech.
The Model 1108 features built-in sensors to monitor a variety
of conditions:
• High sound level
• AC electric power failure
• Battery backup
• Temperature*
Chapter 1: Introduction
*(Note: While technically not a “built-in” sensor,
temperature is factory installed on input 1, and if left
installed will limit your additional inputs as listed below
to 7.)
Equipped with 8 alert inputs, additional sensors* can be added
for extended monitoring:
• Intrusion or unauthorized entry
• Water leaks and seepage
• Temperature
• Humidity
• Equipment operation
• Many other conditions that may require unique
monitoring solutions
*Refer to Appendix B for information on additional sensors
(available separately from Phonetics) that are best suited to
your application.
1
Page 14

Sensaphone® Model 1108 User’s Manual
The status of each monitored condition is readily obtained at
the unit's installation site or remotely, by telephone. At the
close of every Status Report, time is provided for listening to
on-site sounds.
To ensure reliable operation, the Model 1108 features power
backup capability; in the event of AC power failure,
six D-cell batteries (not included) will continue to power the
unit for approximately 24 hours.
This manual comprises the instructions and commands for
installing and operating the Model 1108. The Quick Start
chapter is included to speed understanding of programming and
operation. Communication and Alarm Programming chapters
demonstrate step-by-step methods for utilizing the full range of
available features. The Troubleshooting chapter provides
assistance in the event that problems are encountered.
Technical Support
If any questions arise upon installation or operation of the
Model 1108, please contact Phonetics Technical Service
Department at the number shown below, and have the following information:
• Date of Purchase ____________________
• Serial Number of your Model 1108 ________________
Technical Support is available from 8:00 AM to 5:00 PM EST.
Phonetics, Inc.
901 Tryens Road
Aston, PA 19014
(610)558-2700
Fax: (610)558-0022
www.sensaphone.com
2
Page 15

Chapter 2: Installation
Correctly installing the Model 1108 will ensure proper
functioning of the unit. Please read the entire chapter before
starting the installation process.
Within the packaging will be a Warranty Registration Card.
Please take the time to fill this out and mail. The One Year
Limited Warranty is explained in the back of this manual.
2.1 Operating Environment
The Model 1108 should be installed and operated in an area
that provides space for wiring sensors to the screw terminals,
near an AC power source and telephone line. Operating
temperature ranges from 32° Fahrenheit (0° Celsius) to +120°
Fahrenheit (+49° Celsius).
NOTE
The Model 1108 is a sensitive electronic device.
Do not install the Model 1108 near strong
electrostatic, electromagnetic or radioactive
fields. Do not expose to fumes or corrosive
vapors.
Chapter 2: Installation
2.2 Mounting
Flat Mount: Place the Model 1108 on top of a desk or other
horizontal surface. Wall Mount: Mount on a wall with two
screws using the keyholes on the back panel of the unit. Place
the screws or bolts 313/16" apart at the desired height from the
floor. Hook the unit over the screws and toward the floor. Refer
to Figure 2-1.
3
Page 16

Sensaphone® Model 1108 User’s Manual
"
3 13/
16
Figure 2-1. Wall Mount
2.3 Power Surge Protection
The Model 1108 can be damaged by power surges and lightning through the telephone line and the 120 VAC power supply.
Although the Model 1108 has built-in surge protection, we
recommend that ad ditional pr otection be obtained f or the
unit and f or an y electr onic equipment that is attac hed to
your power supply and telephone lines. Power surge
protection is especiall y impor tant if y ou live in a lightningprone area. The ISOTEL Surge Protector Model IB-4 is
available through Phonetics. See Appendix B.
2.4 Power Supply and Battery Backup
The Model 1108 is provided with an AC power transformer
that will plug into any standard 120 VAC outlet and a battery
backup (batteries not included) that enables the unit to continue
functioning if AC power is removed (due to electric power
disruption or failure). The Model 1108 uses six, D-cell alkaline
batteries. Do not use rechargeable nicad batteries.
NOTE
Be sure that the AC transformer is plugged into
an outlet before installing batteries.
To install the batteries, open the battery compartment hatch
located underneath the unit, align batteries according to the
diagram shown in Figure 2-2, and replace the hatch.
4
Page 17

Chapter 2: Installation
---
+++
Figure 2-2. Battery Installation
2.5 Starting the Model 1108
When the AC power transformer is first plugged into the
electrical outlet, the Model 1108 automatically starts in RUN
mode. The red LED light will begin to glow. The unit will
respond with“Hello, this is Sensaphone® 1108.”
2.6 Run Mode and Standby Mode
Pressing the RUN/STANDBY key on the Model 1108 keypad
will alternately activate or deactivate the unit. If the unit is
activated and in RUN mode, the red LED (small red light on the
upper right of the unit's front panel) glows steadily. In
STANDBY mode, the red LED goes out, but will blink every
few seconds to indicate that power is still supplied to the unit.
+++
---
In RUN mode, the Model 1108 is able to receive incoming calls
and to automatically dial out in the event of an alarm on one of
the monitored conditions. To enter STANDBY mode, press
RUN/STANDBY.
As soon as the Model 1108 enters STANDBY mode, it
responds with “Have a good day.” The red light immediately
goes out and then resumes with a blink every few seconds.
While in STANDBY mode, all functions are disabled, but
programmed memory is preserved. Upon exiting STANDBY
mode, any currently existing alert conditions will be announced.
5
Page 18

Sensaphone® Model 1108 User’s Manual
NOTE
STANDBY mode is not equivalent to “power
off”—an electrical source, such as the 120 VAC,
or the battery backup, continues to provide full
power to the unit. If the unit is placed in
STANDBY mode, unplugged from the 120 VAC
outlet, and placed in storage, the batteries will
continue to power the Model 1108, discharging
until they fail. Consequently, batteries should
always be removed from the unit following
disconnection from any 120 VAC outlet, prior to
storage.
Press the RUN/STANDBY key again to return to RUN mode.
RUN
STANDBY
Figure 2-3. The RUN/STANDBY Key
2.7 Telephone Line
The Model 1108 will operate with all standard telephone
systems that accept pulse or tone dialing. The Model 1108
cannot be used on an extension line to dial its own telephone
number. Also, it may not be installed on a party line or pay
telephone line.
Certain private telephone systems and public switching
equipment may not accept the Model 1108 dialing or may
generate an unacceptable ring signal. In those cases, a dedicated line may be required. Consult the supplier of your
telephone system if you encounter problems.
If you do not have a modular telephone extension at the
Model 1108’s location, you must contact your local telephone
company to have one installed (there is a charge for this
service). If you have four-pin jacks, adapters are available to
convert them to the modular plugs. Contact your local
telephone company or electronics parts store.
6
Page 19
RJ11 Outlet
(for modular
telephone jack)
Chapter 2: Installation
CAUTION
Never install telephone wiring during a lightning
storm. Never install telephone jacks in wet
locations unless the jack is specifically designed
for wet locations. Never touch uninsulated
telephone wires or terminals unless the telephone
line has been disconnected at the network
interface. Use caution when installing or
modifying telephone lines.
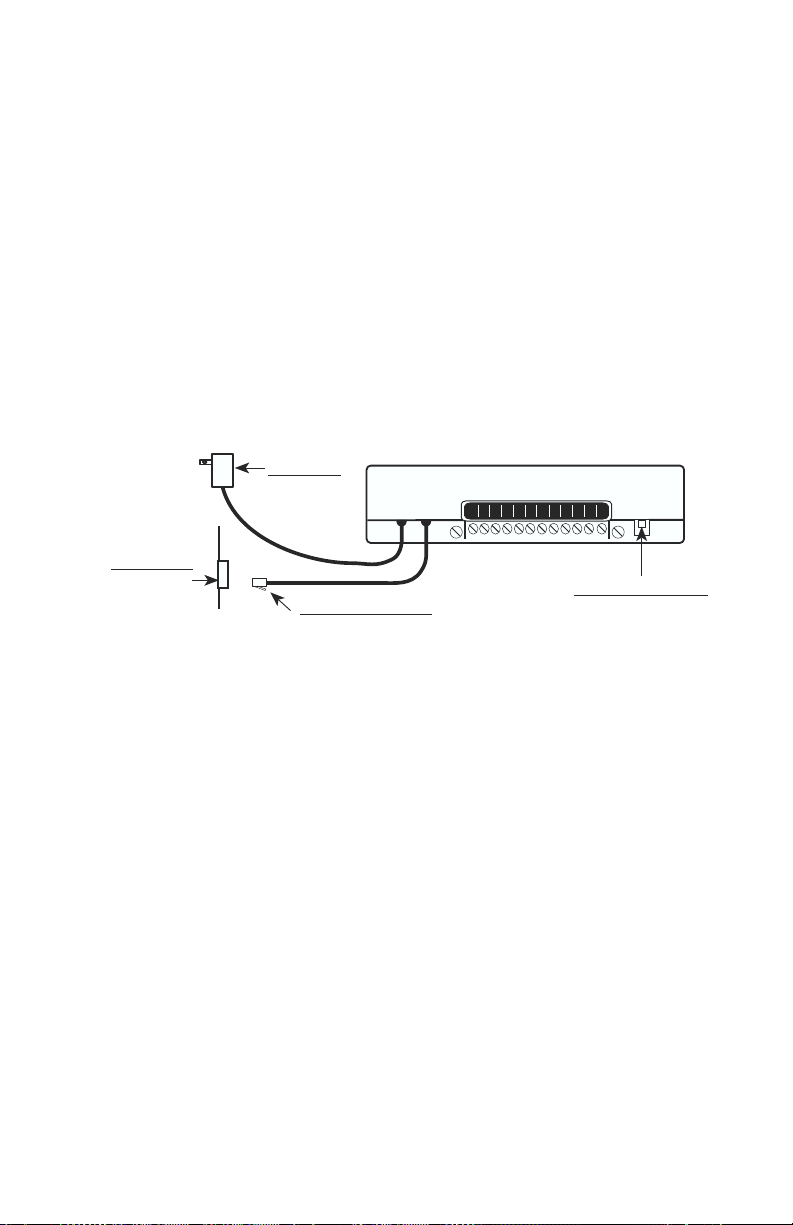
To install the telephone line, plug the modular telephone jack
provided into any standard RJ11 phone outlet. Refer to
Figure 2-4.
AC Power
Transformer
(plug into 110
VAC outlet)
Modular Telephone Jack
(plug into RJ11 outlet)
23456781
GND GND GNDGND
Female Telephone Jack
(connect telephone here)
Figure 2-4. Installing the Telephone Line
On the back of the Model 1108 is a female telephone jack.
This is provided so that a telephone or other answering device
may be used on the same line as the unit. It is not necessary to
hook up a telephone for the Model 1108 to operate.
2.8 The Microphone
The Model 1108 is provided with a built-in microphone which
is used to monitor high sound levels produced near the installation site. The sensitivity of the microphone is configurable and
will detect a continuous as well as a beeping alarm.
Other programming options that apply to the microphone
include setting the length of time before a high sound causes an
alarm.
If this sound level exists for 8 consecutive seconds (default) or
for the programmed length of time, the Model 1108 will dial
out with an alarm message.
7
Page 20
Sensaphone® Model 1108 User’s Manual
NOTE
The proximity of the audible alarm to the
microphone is extremely important.
Normally, the Model 1108 and the audible alarm
must be in the same room. The maximum
distance can vary considerably depending on the
alarm, the acoustics, and the size of the room.
During an alarm dial-out, the microphone allows four-second
intervals to listen-in to sounds at the Model 1108’s location.
When calling for a Status Report, the microphone permits
listening to on-site sounds for a programmed time interval.
2.9 Alert Inputs
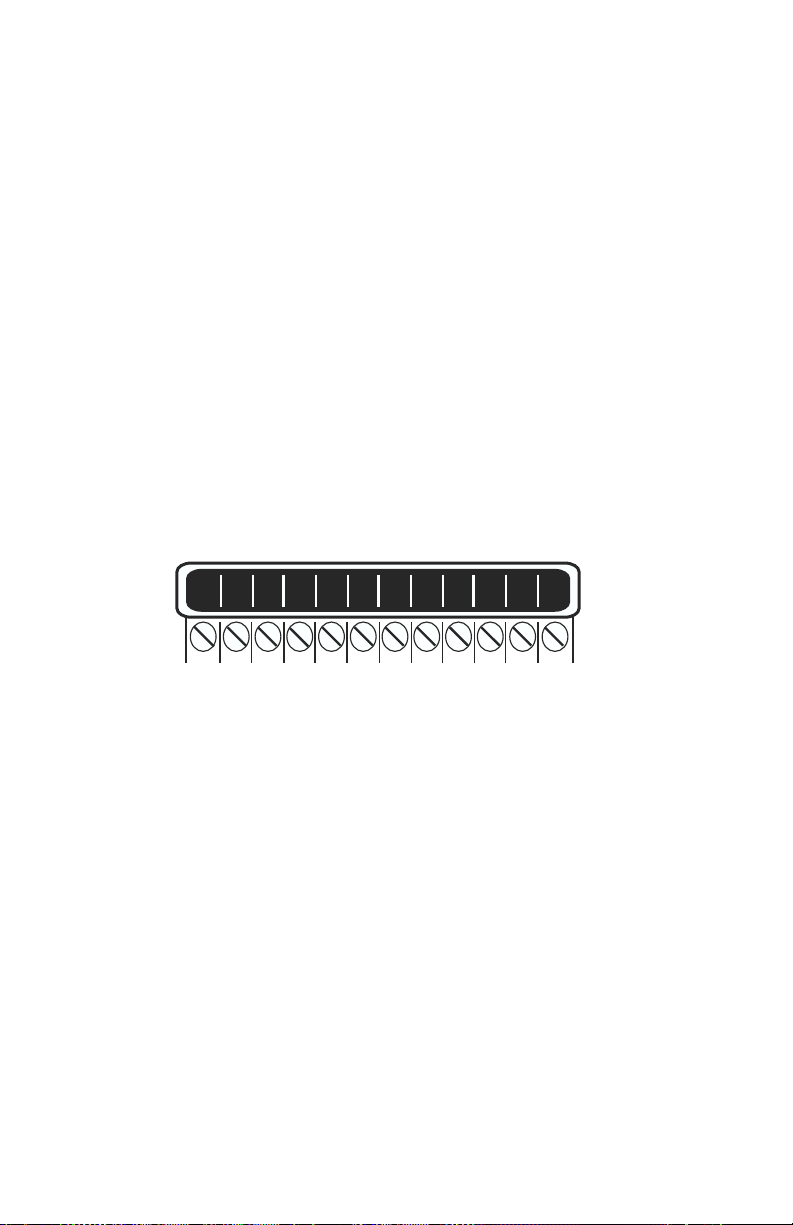
The Model 1108 can monitor up to 8 inputs (represented by the
numbered terminal screws shown in Figure 2-5, below). Two
input terminals share the same ground.
23456781
GND GND GNDGND
Figure 2-5. Alert Inputs
Inputs are configured as either dry contact or temperature.
An input configured as dry contact can be used with any
normally open (N.O.) or normally closed (N.C.) device.
“Open” refers to an opened circuit path; if conditions cause the
circuit to close, an alert condition occurs. “Closed” refers to a
continuous circuit path; if a closed circuit is opened, an alert
condition occurs. The Model 1108 determines the way inputs
are configured by the type of sensor connected to each alert
input (refer to Chapter 5, Section 5.1).
8
Page 21
An input configured as “temperature” is designed to evaluate a
range of settings. The Model 1108 will read the temperature at
the sensor’s location and compare that value to programmed
high and low temperature limits. Temperature inputs must be
used with Phonetics Remote Temperature Sensor.
NOTE
Before wiring, it is advisable to disable the
inputs to prevent accidentally tripping an alarm.
Refer to Chapter 5, Section 5.2.
2.10 Installing the Sensor
After you have selected the sensor, loosen the screw of the alert
input and its corresponding ground. Two wire leads are used to
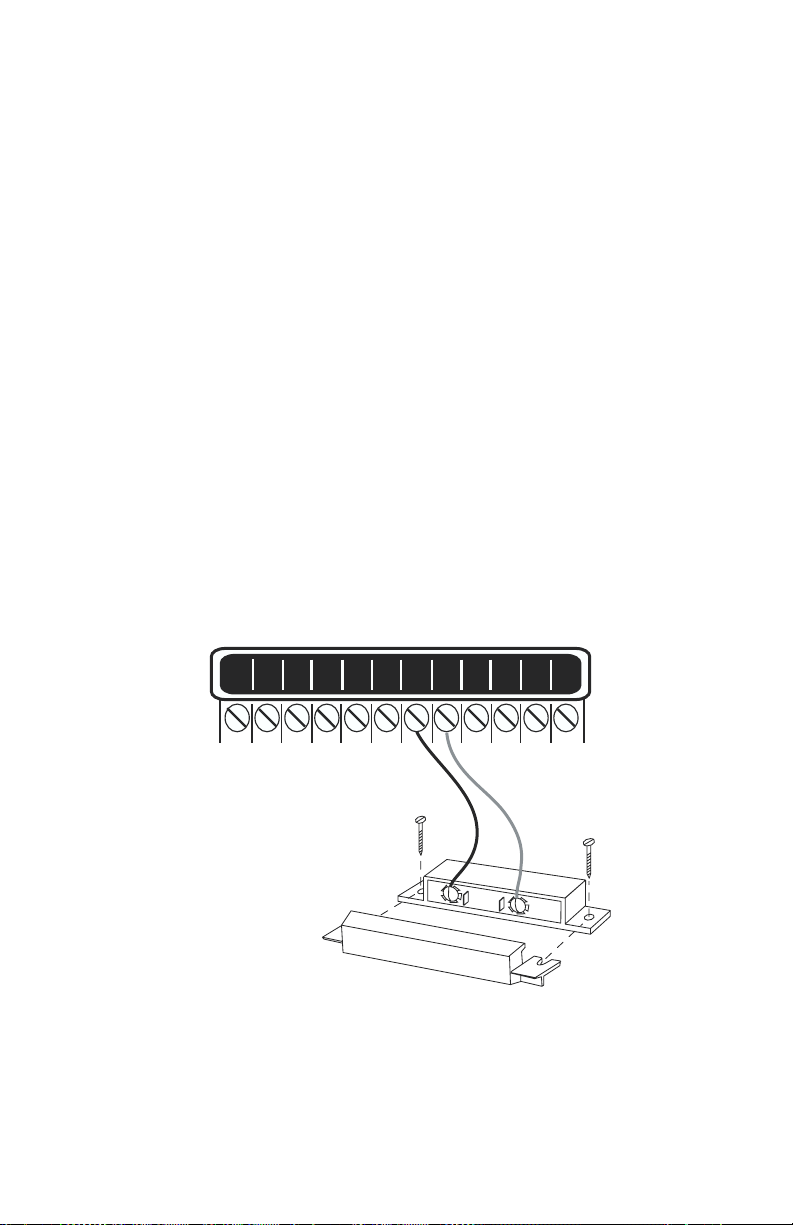
connect any monitoring sensor. Fasten one lead to the numbered screw and the other lead to GND. Tighten both screws. If
the input was not disabled, the Model 1108 may recite its
“Alert Condition Exists” message as you connect the sensor. If
it does, just press any key to stop. Re-enable the input after
wiring. Refer to Figures 2-6 and 2-7 for connecting a sensor to
an alert input.
Chapter 2: Installation
23456781
GND GND GNDGND
Sensor wired to
Alert Input 5
Figure 2-6. Sensor Connected to an Alert Input
9
Page 22
Sensaphone® Model 1108 User’s Manual
Any sensor can be attached to the Model 1108 using 22-gauge
wire. The sensor can be several hundred feet from the unit, as
long as the total resistance of the circuit is not greater than 50
ohms. Use wire appropriate for the application.
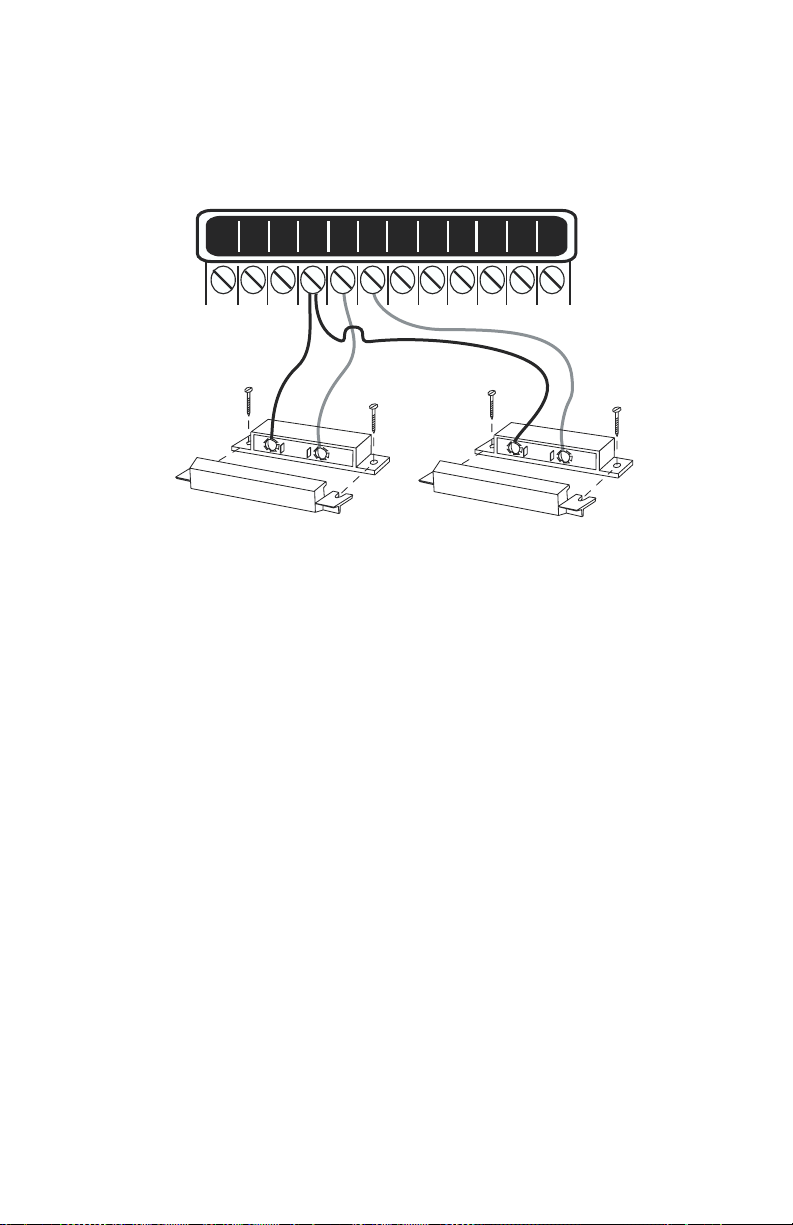
23456781
GND GND GNDGND
Sensor wired to
Alert Input 3
Figure 2-7. Two Sensors Wired to Adjacent Inputs
Share the Same Ground Terminal Screw
Sensor wired to
Alert Input 4
NOTE
Do not use sensors, switches, or relays that
supply any voltage or current to the Model 1108.
Be aware of proximity to other electrical wires or
components when placing wires that lead from
the sensors to the unit. Avoid running the wires
near electrical devices that use high voltage or
current, such as motors, heavy machinery, etc.
This voltage may be inductively coupled into the
sensor wiring and could result in damage to the
the Model 1108’s circuitry. Try to place wires at
least 6 inches from other electrical wiring or
devices.
10
Page 23
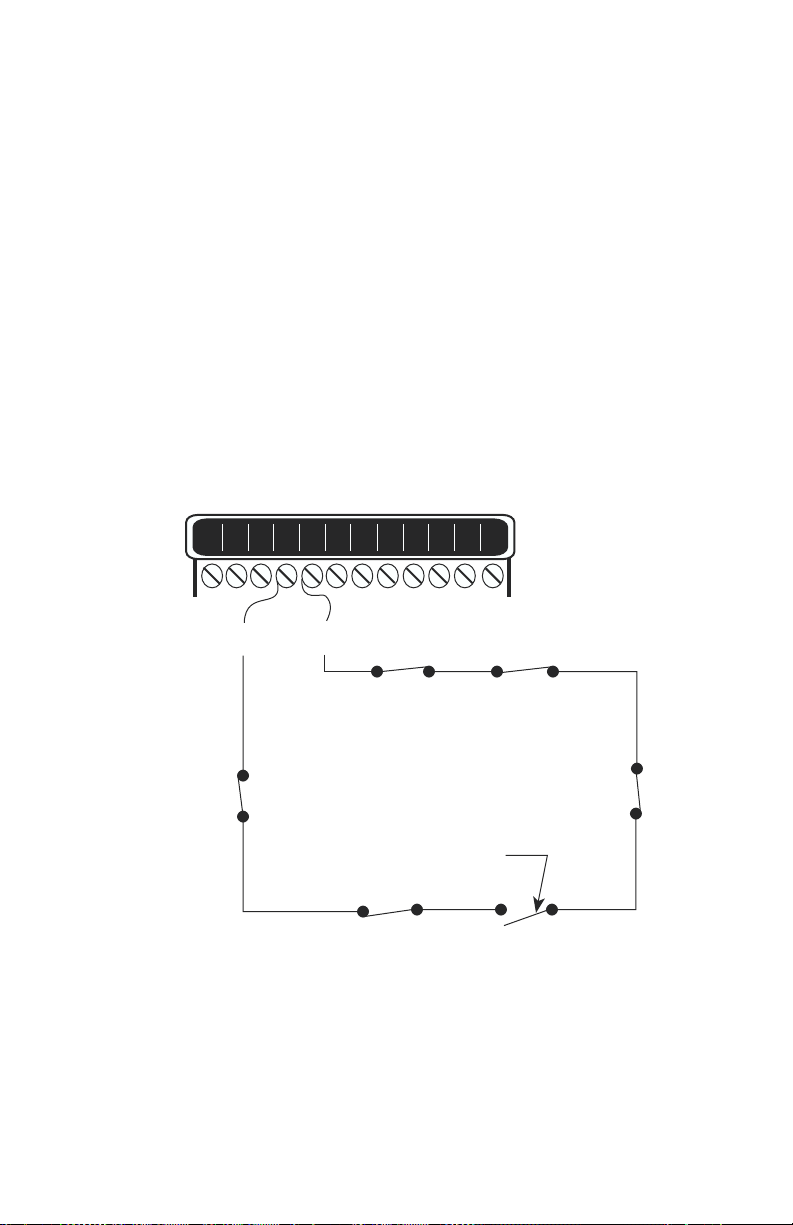
2.11 Multiple Sensors
The Model 1108 may have more than one sensor connected to
the same alert input, as long as the normal condition for each
sensor on the same alert input is identical (either all N.O. or all
N.C.). However, only one remote temperature sensor can be
used on each input.
When wiring several normally closed sensors on one input,
they must be connected in series. Connect one lead from the
first sensor to the numbered screw of the alert input. Next, take
the other lead from the first sensor and connect it to one lead
from the next sensor. Continue connecting sensors end-to-end
until you have connected all of your sensors. Take the second
lead from the last sensor and connect it to the ground screw on
the Model 1108. See Figure 2-8. Multiple N.C. sensors are
typically magnetic reed switches to monitor the security of
windows and doors.
23456781
GND GND GNDGND
Chapter 2: Installation
~
~
Figure 2-8. Multiple Normally Closed Sensors
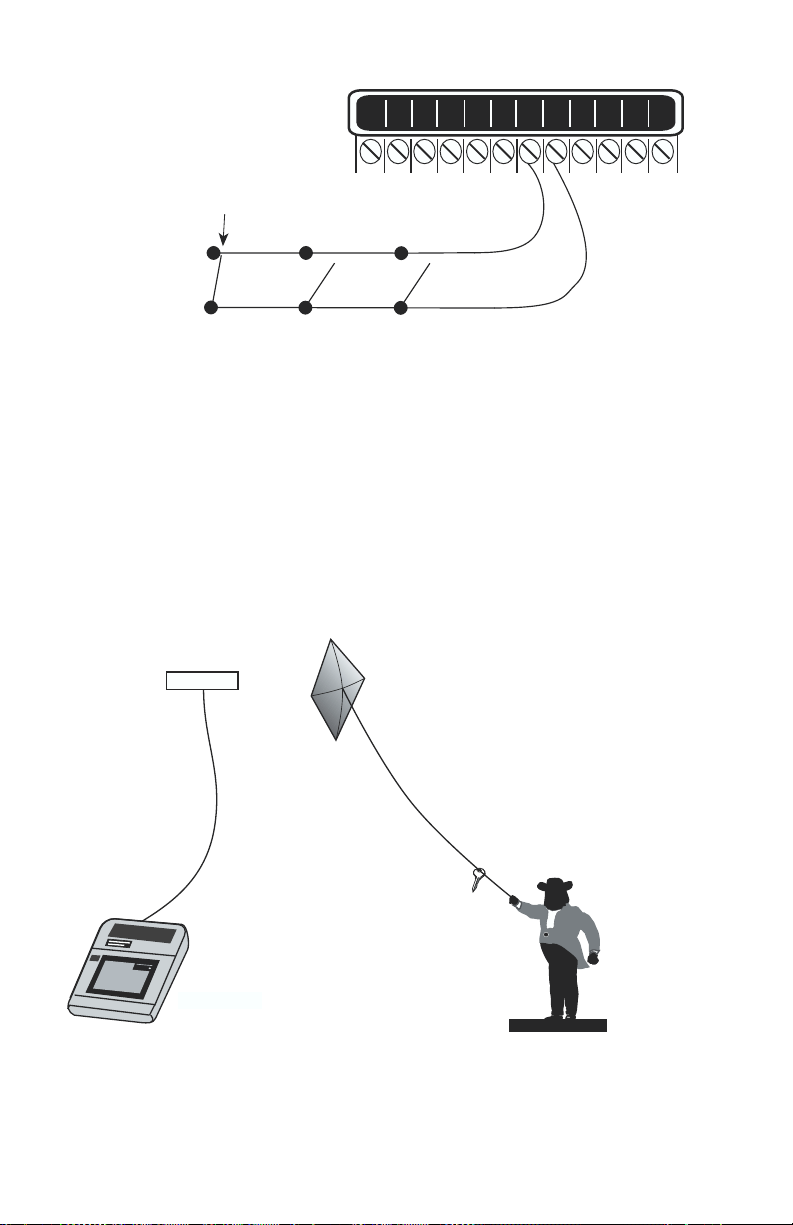
To wire several normally open sensors to one alert input,
connect them in parallel. To do this, take one lead from each
sensor and attach it to the numbered terminal. Then, take the
second lead from each sensor and attach each to the corresponding ground screw. Refer to Figure 2-9.
~
~
Multiple normally-closed
sensors wired in series.
(Example shown using Input 3.)
Alert condition
occurs when a
switch is opened.
11
Page 24
Sensaphone® Model 1108 User’s Manual
Example with multiple
sensors connected to
Input 5. Alert condition
occurs when a normally
open switch closes.
Figure 2-9. Multiple Normally Open Sensors
2.12 Outdoor Wiring
When wiring sensors outdoors, DO NOT allow exposed wires
to run freely in open air; under such conditions, the Model
1108 is susceptible to serious damage during a lightning storm.
Depending upon the distance outdoor wiring must travel,
consideration should be given to use of shielded wire inside a
metal conduit. Both shield and conduit should be connected to
earth ground. This prevents stray voltage from entering the
unit.
23456781
GND GND GNDGND
sensor
Model 1108
Figure 2-10. Potential Sensor Damage from Stray Electrical Noise
12
Page 25

Chapter 2: Installation
2.13 Disconnecting the Model 1108 for Storage or
Seasonal Use.
If you plan to employ the Model 1108 as a seasonal “watch-
dog” for a few months during the year, you m ust disconnect
all wires fr om the unit completel y to a void dama g e to the
circuitr y when the unit is not in use . If the unit is unplugged
but left in place with all the sensors still connected, the wires
act as antennae that draw in any stray “electrical noise” from
such devices as fans, blowers, microwaves, etc.
Additionally, it is important to remove the batteries, or they
will discharge until they fail.
Preserve your Model 1108 during the off-season, or
when not in use:
• Remove the sensor wires at the screw terminals
• Remove the batteries
• Unplug the unit and store in a safe place
13
Page 26

Sensaphone® Model 1108 User’s Manual
NOTES
14
Page 27
Chapter 3: Quick Start
This section presents a useful guide for first-time programming
of the Model 1108. Follow instructions for installation before
attempting to program the Model 1108. Refer to
Chapter 2: Installation.
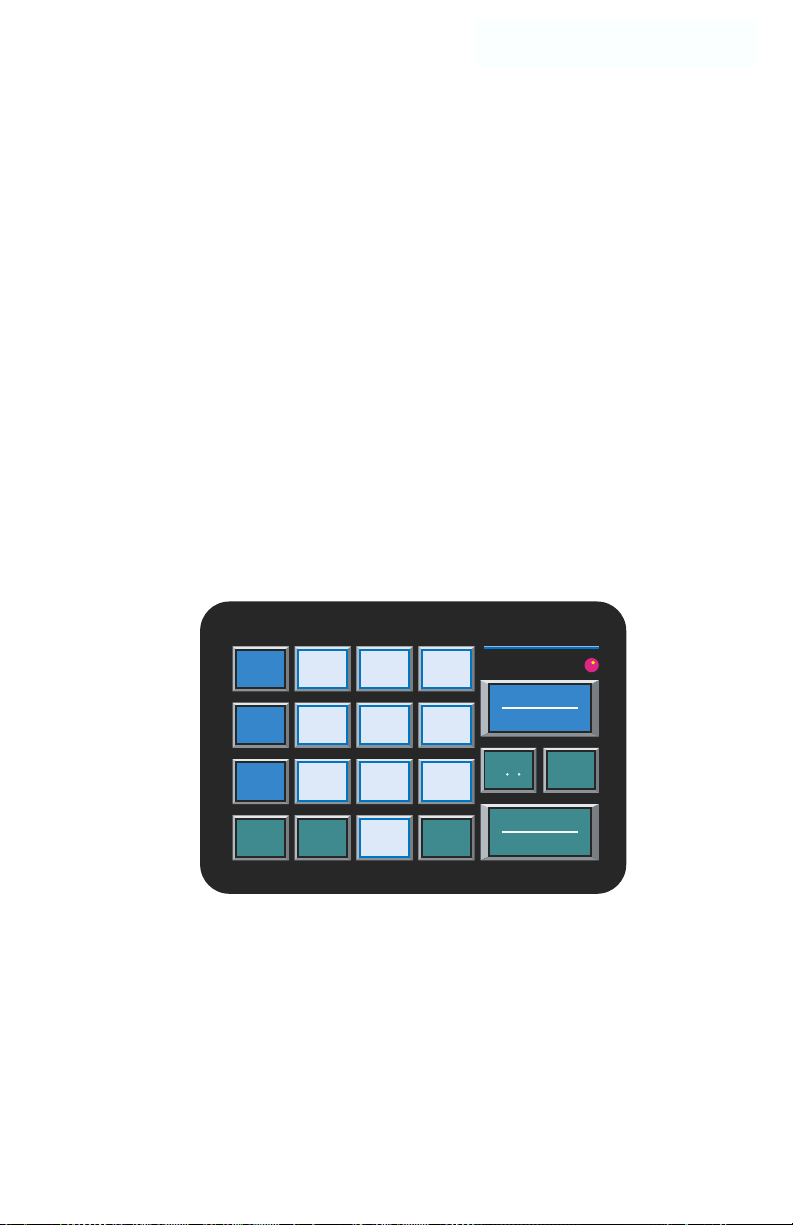
3.1 The Local Keypad
Programming is accomplished using the local keypad (shown
below, Figure 3-1). Notice that a single key has several
functions assigned to it; programming results are determined
by the order in which keys are pressed.
Individual keystrokes are illustrated to show programming
steps in the correct order. If you make a mistake by entering the
wrong key, do not press another key until you hear the message
“Error 1.” Then, start over with the first key in the
programming sequence.
Chapter 3: Quick Start
SET
#
WHAT
IS
*
SENSOR
ON/OFF
PHONE
NUMBER
1
CALL
DELAY
4
MAX CALLS
7
RECOGNITION
TIME
RING/TAD
PAUSE
AM
VOICE
REPS
5
TEMP LIMITS
CLOCK
0
ID NUMBER
POWER
3
2
INTERCALL
TIME
6
CALIBRATE
PM
TEMP
9
F /C
8
LISTEN TIME
SOUND
ENTER
TONE
Figure 3-1. The Model 1108 Keypad
RUN
STANDBY
CODE
MUTE
STATUS
CONFIGURE
15
Page 28

Sensaphone® Model 1108 User’s Manual
3.2 Preparation for Programming
Read complete instructions in Chapter 2: Installation, and make
sure to follow these steps first:
1. Plug the AC adaptor into the 120 VAC outlet.
2. Install the batteries.
3. Connect the Model 1108 to a telephone line.
When these steps are completed, the Model 1108 is fully
operational and able to monitor temperature, high sound,
AC power failure and battery backup condition; it can also be
called on the telephone for a Status Report or used for listening
to on-site sounds from any remote location. Now, the unit is
ready for programming.
3.3 Quick-Start Programming Steps
Step 1: Set Configuration of Inputs
The Model 1108 will scan the 8 external inputs and determine
if they are N.O. (normally open), N.C. (normally closed), or
Temperature. If external sensors are added, make sure they are
in their normal positions before proceeding—refer to
Chapter 5, Section 5.1.
16
1. Press STANDBY to place the Model 1108 in Standby
mode.
RUN
STANDBY
2. If you have external sensors available, wire the sensors to
the inputs on the back of the Model 1108 (see Chapter 2,
Section 2.10). Otherwise, skip this step and move to
step 3.
3. Press RUN. The red light glows when the Model 1108
returns to Run mode.
RUN
STANDBY
Page 29

4. Press SET.
SET
#
5. Press CONFIGURE.
STATUS
CONFIGURE
6. The Model 1108 will audibly recite the new configuration
for each of the eight inputs, responding with “OK,” if it
detects N.O. (normally open), “beep-OK,” if it detects
N.C (normally closed) or “Temperature,” if it detects
temperature (regardless of whether all the inputs have
attached sensors or not). If an input is unused, it is treated
as normally open.
Step 2: Set the ID Number
It is recommended that you set the ID number to reflect the
telephone number on which the Model 1108 is installed.
Chapter 3: Quick Start
1. Press SET.
SET
#
2. Press ID NUMBER.
0
ID NUMBER
POWER
3. Using the number keys, enter the digits (up to 16 are
permitted) for the ID number. The Model 1108 will recite
the digits as they are pressed.
1
2
VOICE
REPS
5
TEMP LIMITS
8
CLOCK
0
ID NUMBER
POWER
3
INTERCALL
TIME
6
CALIBRATE
9
LISTEN TIME
SOUND
CALL
DELAY
4
MAX CALLS
7
RECOGNITION
TIME
17
Page 30

Sensaphone® Model 1108 User’s Manual
4. Press ENTER. The 1108 will respond: “Enter.”
ENTER
TONE
PM
Step 3: Set Dial-Out Telephone Numbers
To program dial-out telephone numbers:
1. Press SET.
SET
#
2. Press PHONE NUMBER.
PHONE
NUMBER
3. Select which telephone number to program. Press any
unassigned number key (from 1 to 8) to represent the new
telephone number entry. Model 1108 will respond: “Enter
number.”
1
2
VOICE
REPS
5
TEMP LIMITS
8
CLOCK
3
INTERCALL
TIME
6
CALIBRATE
CALL
DELAY
4
MAX CALLS
7
RECOGNITION
TIME
18
4. Enter the complete telephone number using the number
keys. The Model 1108 will recite the digits as they are
pressed.
1
2
VOICE
REPS
5
TEMP LIMITS
8
CLOCK
0
ID NUMBER
POWER
3
INTERCALL
TIME
6
CALIBRATE
9
LISTEN TIME
SOUND
CALL
DELAY
4
MAX CALLS
7
RECOGNITION
TIME
5. Press ENTER. The unit will respond: “Enter.”
ENTER
TONE
PM
6. Repeat above procedure to program up to eight separate
telephone numbers.
Page 31

Step 4: Set Temperature Limits
High and low temperature limits can be separately programmed
for each input that is configured as temperature. Limits can
range from –20° to +150° Fahrenheit, or from –30
Celsius. Default settings are: 10
°
100
F for high temperature. Do not set temperature limits too
close to normal room temperature, since minor fluctuations
could result in frequent and unnecessary alarm dialouts.
1. Press SET.
SET
#
2. Press TEMP LIMITS.
5
TEMP LIMITS
3. From the number keys, press a number (from 1 to 8) that
corresponds to the temperature input being programmed.
1
2
VOICE
REPS
5
TEMP LIMITS
8
CLOCK
3
INTERCALL
TIME
6
CALIBRATE
CALL
DELAY
4
MAX CALLS
7
RECOGNITION
TIME
Chapter 3: Quick Start
°
°
F for low temperature and
to 65
°
The Model 1108 responds: “Enter low temperature
limit.”
4. Using the number keys, enter a value for low temperature
limit. The Model 1108 will recite the digits as they are
pressed. If a negative number is required, first press
PAUSE, then enter the number.
1
2
VOICE
REPS
5
TEMP LIMITS
8
CLOCK
0
ID NUMBER
POWER
3
INTERCALL
TIME
6
CALIBRATE
9
LISTEN TIME
SOUND
CALL
DELAY
4
MAX CALLS
7
RECOGNITION
TIME
5. Press ENTER.
ENTER
TONE
PM
19
Page 32

Sensaphone® Model 1108 User’s Manual
The Model 1108 responds: “Enter high temperature
limit.”
6. Using the number keys, enter the value for high
temperature limit. The Model 1108 will recite the digits as
they are pressed.
1
2
PM
VOICE
REPS
5
TEMP LIMITS
8
CLOCK
0
ID NUMBER
POWER
3
INTERCALL
TIME
6
CALIBRATE
9
LISTEN TIME
SOUND
CALL
DELAY
4
MAX CALLS
7
RECOGNITION
TIME
7. Press ENTER. The Model 1108 responds: “Enter.”
ENTER
TONE
This concludes minimum programming to achieve normal
operation of the Model 1108. In additon to the programming
just accomplished, default settings for many more features take
effect when the unit is first powered. You will be able to
reprogram most of these factory-set defaults to suit your
application.
20
For a complete explanation of each feature (with illustrations of
keystrokes), refer to Chapter 4: Communications Programming
and Chapter 5: Alarm Programming.
To gain a basic understanding of how the alarm dial-out feature
works, refer to this chapter, Section 3-4. For extended information regarding dial-out and related programmable parameters,
refer to Chapter 7: Operation.
Page 33

Chapter 3: Quick Start
3.4 Summary of the Alarm Dial-Out Process
Action—Response
1. THE Model 1108 DETECTS
AN ALERT CONDITION
An alert condition is not the same as a
valid alarm—the condition must
continue for the programmed time
period, or Recognition Time, before it is
recognized as a valid alarm.
2. A VALID ALARM IS CONFIRMED
An audible, on-site alarm message
begins and continues until the alarm is
acknowledged. (If the Mute feature is
turned on, there is no on-site message.)
Call Delay is activated.
3. DIAL-OUT BEGINS
Dial-out begins by calling telephone
number 1 to report an alarm.
If there is no acknowledgment, the
Model 1108 waits the programmed
Intercall Time before dialing subsequent telephone numbers. Dial-out
continues in this manner, cycling
through the remaining telephone
numbers, for the programmed Max
Calls.
4. THE ALARM IS
ACKNOWLEDGED
When the alarm is acknowledged, the
dial-out process is cancelled and the
audible, on-site alarm message stops.
Programmable Feature
• Recognition Time
This is the programmed
waiting period to determine if
an alert condition has persisted
long enough to be considered a
valid alarm. If the sensor
returns to normal within
recognition time, then no
alarm will occur.
• Call Delay
This is the programmed
waiting period, before the first
telephone number is called, to
report an alarm.
• Intercall Time
This is the programmed
waiting period, in between
sequential dialing of telephone
numbers, to report an alarm.
• Max Calls
This is the total number of
telephone calls that will be
dialed in response to any valid
alarm. Telephone numbers are
dialed sequentially, and
continue to cycle until the
maximum number of calls is
reached. If no acknowledgment occurs, then at the
completion of Max Calls, all
alarms are automatically
acknowledged.
21
Page 34

Sensaphone® Model 1108 User’s Manual
NOTES
22
Page 35

Chapter 4: Communications Programming
Chapter 4: Communications Programming
This chapter explains the keypad commands for
communications programming of the Model 1108,
including interrogation and resetting of the following:
• The Unit ID Number
• Dial-out Telephone Numbers
• Tone or Pulse Dialing
• Special Dialing with Pagers, Beepers and Access
Numbers.
• Rings Until Answer and Telephone Answering Device
Compatibility
• Listen-in Time
• Call Delay
• Local Voice Mute
• Voice Repetitions
• Intercall Time
• Maximum Number of Calls
• The Clock
• Security Code
4.1 The Unit ID Number
The Unit ID Number is the identification number of the
Model 1108. This number may be the same as the telephone
number where the unit is installed, or it may be designated
using any number that best suits your application.
The purpose of the Unit ID Number is to immediately provide
the source of any alarm, especially when using multiple
Model 1108 units in a complex monitoring system. When
the Model 1108 is called from a remote location, it always
begins its message with the identification number:
“Hello, this is telephone number (Unit ID Number).”
23
Page 36

Sensaphone® Model 1108 User’s Manual
4.1.1 Programming the ID Number
To program the ID Number:
1. Press SET.
SET
#
2. Press ID NUMBER.
0
ID NUMBER
POWER
3. Using the number keys, enter up to 16 digits for the ID
number. The Model 1108 will recite the digits as they are
pressed.
1
2
VOICE
REPS
5
TEMP LIMITS
8
CLOCK
0
ID NUMBER
POWER
3
INTERCALL
TIME
6
CALIBRATE
9
LISTEN TIME
SOUND
CALL
DELAY
4
MAX CALLS
7
RECOGNITION
TIME
4. Press ENTER. The Model 1108 will respond: “Enter.”
ENTER
TONE
PM
4.1.2 Interrogating the ID Number
To interrogate the ID numbers:
1. Press WHAT IS.
WHAT
IS
*
2. Press ID NUMBER. The Model 1108 will recite the Unit
ID Number programmed.
0
ID NUMBER
POWER
24
Page 37

Chapter 4: Communications Programming
4.2 Dial-out Telephone Numbers
The Model 1108 can store up to eight 32-digit phone numbers.
These are the numbers that will be called during dial-out.
In the event of an alarm, the numbers are dialed sequentially,
1 through 8. Begin programming the first telephone number by
assigning it to the key labeled with the number 1 on the
keypad, and continue to assign any other telephone numbers in
numerical order. A pause, pound or asterisk can be added to an
individual phone number to access different phone and beeper
systems. See Special Dialing, Section 4.4.
4.2.1 Programming Dial-out Telephone Numbers
To program dial-out telephone numbers:
1. Press SET.
SET
#
2. Press PHONE NUMBER.
PHONE
NUMBER
3. Select which telephone number to program. Press any
unassigned number key (from 1 to 8) to represent the new
telephone number entry. The Model 1108 will respond:
“Enter number.”
1
2
VOICE
REPS
5
TEMP LIMITS
8
CLOCK
3
INTERCALL
TIME
6
CALIBRATE
CALL
DELAY
4
MAX CALLS
7
RECOGNITION
TIME
4. Enter the complete telephone number using the number
keys.
1
2
VOICE
REPS
5
TEMP LIMITS
8
CLOCK
0
ID NUMBER
POWER
3
INTERCALL
TIME
6
CALIBRATE
9
LISTEN TIME
SOUND
CALL
DELAY
4
MAX CALLS
7
RECOGNITION
TIME
25
Page 38

Sensaphone® Model 1108 User’s Manual
5. Press ENTER. The unit will respond with “Enter.”
ENTER
TONE
PM
6. Repeat above procedure to program up to eight separate
telephone numbers.
4.2.2 Interrogating a Dial-out Telephone Number
To interrogate dial-out telephone numbers:
1. Press WHAT IS.
WHAT
IS
*
2. Press PHONE NUMBER.
PHONE
NUMBER
3. Press a number key (from 1 to 8).
1
2
VOICE
REPS
5
TEMP LIMITS
8
CLOCK
3
INTERCALL
TIME
6
CALIBRATE
CALL
DELAY
4
MAX CALLS
7
RECOGNITION
TIME
Model 1108 will recite the corresponding telephone
number. If there is no number programmed for a
particular key, the unit will respond: “No number.”
4.2.3 Erasing a Telephone Number
To erase a telephone number:
1. Press SET.
SET
#
2. Press PHONE NUMBER.
PHONE
NUMBER
26
Page 39

Chapter 4: Communications Programming
3. Press the number key (from 1 to 8) representing the
telephone number you want to erase.
1
2
VOICE
REPS
5
TEMP LIMITS
8
CLOCK
3
INTERCALL
TIME
6
CALIBRATE
CALL
DELAY
4
MAX CALLS
7
RECOGNITION
TIME
4. Press ENTER. The Model 1108 will say, “Enter.”
ENTER
TONE
PM
4.3 Tone or Pulse Dialing
The Model 1108 can dial out in pulse or Touch-Tone™. Select
the type of dialing, in either pulse or tone, depending upon the
type of service provided by your telephone company. The
default is tone.
To program for either pulse or tone:
1. Press the SENSOR ON/OFF key.
SENSOR
ON/ OFF
2. Press TONE.
ENTER
TONE
PM
The Model 1108 will respond: “Off” to indicate that tone
dialing is off and pulse is enabled, or “On” to indicate
that tone dialing is on and pulse is disabled.
3. Repeat key sequence to switch between settings.
4.4 Special Dialing
The Model 1108 has provisions for special dialing sequences.
Special dialing sequences allow:
• Dialing that requires an access number to connect with
an outside line.
27
Page 40

Sensaphone® Model 1108 User’s Manual
• Dialing that requires the pound (#) or asterisk (*).
• Dialing to a beeper or pager.
4.4.1 Special Dialing Keys
The following designated keys represent special functions
when used with PHONE NUMBER entries:
1. Pause
RING/TAD
PAUSE
AM
PAUSE represents a four second pause in dialing. It can
be used when an access number is required before dialing
to an outside line. (For example, in some cases a “9” or
other number, must be dialed first, in order to get a dial
tone for an outside line.) When interrogating telephone
numbers, PAUSE is audibly represented by a “beep.”
2. Pound (#)
SET
#
28
A pound may be required when calling some phone or
beeper systems. When interrogating telephone numbers,
pound (#) is audibly represented by the word “twelve.”
3. Asterisk (*)
WHAT
IS
*
An asterisk may be required when calling some phone or
beeper systems. When interrogating telephone numbers,
asterisk (*) is audibly represented by the word “eleven.”
4. Code
CODE
MUTE
CODE instructs the Model 1108 to wait until the call is
answered before continuing. When interrogating
telephone numbers, CODE is audibly represented by the
word “fourteen.”
Page 41

Chapter 4: Communications Programming
NOTE
Each time a pause, pound (#) or asterisk (*) is
incorporated in a programming sequence, it is
counted as one digit toward the total of 32 digits
allowed.
4.4.2 Incorporating a Pause
Incorporate PAUSE to access an outside telephone line:
1. Press SET.
SET
#
2. Press PHONE NUMBER.
PHONE
NUMBER
3. Press any unassigned number key (from 1 to 8) to
represent the new telephone number entry. Model 1108
will respond: “Enter number.”
1
2
VOICE
REPS
5
TEMP LIMITS
8
CLOCK
3
INTERCALL
TIME
6
CALIBRATE
CALL
DELAY
4
MAX CALLS
7
RECOGNITION
TIME
4. From the number keys, enter the access digit (i.e., 9).
The Model 1108 will recite the digit.
1
2
VOICE
REPS
5
TEMP LIMITS
8
CLOCK
0
ID NUMBER
POWER
3
INTERCALL
TIME
6
CALIBRATE
9
LISTEN TIME
SOUND
CALL
DELAY
4
MAX CALLS
7
RECOGNITION
TIME
5. Press PAUSE. The Model 1108 will beep.
RING/TAD
PAUSE
AM
29
Page 42

Sensaphone® Model 1108 User’s Manual
6. Enter the complete telephone number (1 + area code)
using the number keys. The Model 1108 will recite the
digits as they are pressed.
1
2
VOICE
REPS
5
TEMP LIMITS
8
CLOCK
0
ID NUMBER
POWER
3
INTERCALL
TIME
6
CALIBRATE
9
LISTEN TIME
SOUND
CALL
DELAY
4
MAX CALLS
7
RECOGNITION
TIME
7. Press ENTER. The Model 1108 will respond: “Enter.”
ENTER
TONE
PM
4.4.3 Incorporating a Pound (#) or Asterisk (*)
Incorporate a pound or asterisk if it is normally included in
telephone number:
1. Press SET.
SET
#
30
2. Press PHONE NUMBER.
PHONE
NUMBER
3. Press any unassigned number key (from 1 to 8) to
represent the new telephone number entry. Model 1108
will respond: “Enter number.”
1
2
VOICE
REPS
5
TEMP LIMITS
8
CLOCK
3
INTERCALL
TIME
6
CALIBRATE
CALL
DELAY
4
MAX CALLS
7
RECOGNITION
TIME
Page 43

Chapter 4: Communications Programming
4. Enter the telephone number using the number keys. The
Model 1108 will recite the digits as they are pressed.
1
2
VOICE
REPS
5
TEMP LIMITS
8
CLOCK
0
ID NUMBER
POWER
3
INTERCALL
TIME
6
CALIBRATE
9
LISTEN TIME
SOUND
CALL
DELAY
4
MAX CALLS
7
RECOGNITION
TIME
5. Position the pound (#) or asterisk (*) within the telephone
number where required by pressing SET (where the
pound is located) or WHAT IS (where the asterisk is
located). The Model 1108 will beep each time pound or
asterisk is pressed.
SET
#
–OR–
WHAT
IS
*
6. Enter any remaining digits of the telephone number.
7. Press ENTER. The Model 1108 will say “Enter.”
ENTER
TONE
PM
4.4.4 Special Dialing to a Beeper or Pager
The following example demonstrates just one solution to
programming the Model 1108 for dialing to a beeper or pager.
Many other key sequences will also work. Start with steps 1–3
below; next, enter special dialing keys where required for your
beeper or pager service.
To incorporate a pound or asterisk:
1. Press SET.
SET
#
2. Press PHONE NUMBER.
PHONE
NUMBER
31
Page 44

Sensaphone® Model 1108 User’s Manual
3. Press any unassigned number key (from 1 to 8) to
represent the new telephone number entry.
1
2
VOICE
REPS
5
TEMP LIMITS
8
CLOCK
2
VOICE
REPS
5
TEMP LIMITS
8
CLOCK
0
ID NUMBER
POWER
3
INTERCALL
TIME
6
CALIBRATE
3
INTERCALL
TIME
6
CALIBRATE
9
LISTEN TIME
SOUND
CALL
DELAY
4
MAX CALLS
7
RECOGNITION
TIME
4. Enter the complete telephone number using the number
keys. The Model 1108 will recite the digits as they are
pressed.
1
CALL
DELAY
4
MAX CALLS
7
RECOGNITION
TIME
5. Press CODE. This instructs the Model 1108 to wait for
the telephone call to be answered by the beeper or pager
service. (A voice message will not occur—only digital
tones are used.) Note that CODE may not work with
beepers where there is no ring before the beeper connects.
If that proves to be the case for your particular beeper,
skip the CODE step and proceed from Step 4 to Step 6.
32
CODE
MUTE
6. Now press PAUSE once to activate a four second delay.
This assumes the call is answered by a beeper/pager
service that immediately delivers a prerecorded voice
message. PAUSE may be pressed more than once to
program more time for the beeper/pager service to finish
its message. Each press of PAUSE allocates four additional seconds. The Model 1108 will beep with each
press.
RING/TAD
PAUSE
AM
Page 45

Chapter 4: Communications Programming
7. Enter a telephone number or custom code number that
will identify the Model 1108 as the caller to your beeper
or pager. A code may consist of any number(s) you
designate. Many users find it convenient to use the
telephone number to which the Model 1108 is connected.
1
2
VOICE
REPS
5
TEMP LIMITS
8
CLOCK
0
ID NUMBER
POWER
3
INTERCALL
TIME
6
CALIBRATE
9
LISTEN TIME
SOUND
CALL
DELAY
4
MAX CALLS
7
RECOGNITION
TIME
8. A pound or asterisk may be required in some dialing
situations. If required, position the pound (#) or asterisk
(*) within the telephone number where required by
pressing SET (where the pound is located) or WHAT IS
(where the asterisk is located). The Model 1108 will beep
each time pound or asterisk is pressed. Enter any remaining digits of the telephone number.
SET
–OR–
#
9. Press ENTER. The Model 1108 will say “Enter.”
ENTER
TONE
PM
4.5 Rings Until Answer
Rings Until Answer is the programmed number of times the
telephone rings before the Model 1108 will answer an incoming call. This can be set from 1 to 15 rings. The default value is
4.
4.5.1 Programming Rings Until Answer
To program Rings Until Answer:
1. Press SET.
WHAT
IS
*
33
Page 46

Sensaphone® Model 1108 User’s Manual
SET
#
2. Press RING/TAD. The Model 1108 will respond: “Enter
number.”
RING/TAD
PAUSE
AM
3. Using the number keys, enter a value.
1
2
PM
VOICE
REPS
5
TEMP LIMITS
8
CLOCK
0
ID NUMBER
POWER
3
INTERCALL
TIME
6
CALIBRATE
9
LISTEN TIME
SOUND
CALL
DELAY
4
MAX CALLS
7
RECOGNITION
TIME
4. Press ENTER. The Model 1108 will respond: “Enter.”
ENTER
TONE
4.5.2 Interrogating Rings Until Answer
To interrogate Rings Until Answer:
1. Press WHAT IS.
WHAT
IS
*
2. Press RING/TAD.
RING/TAD
PAUSE
AM
4.6 TAD (Telephone Answering Device)
The TAD feature is especially useful because it integrates the
operation of the Model 1108 with your telephone answering
device in a way that retains the full flexibility of each system.
This allows you to have on-demand telephone access to the
Model 1108, for obtaining a Status Report, or for issuing call-in
34
Page 47

Chapter 4: Communications Programming
commands, while your telephone answering device is set to
receive outside calls. Programming for use with a telephone
answering device (TAD) is always used in conjunction with
Rings Until Answer, detailed in section 4.5.
NOTE
The TAD feature only applies to answering
devices connected to the same telephone line as
the Model 1108.
4.6.1 TAD Enable/Disable
To enable/disable the TAD feature:
1. Press SENSOR ON/OFF.
SENSOR
ON/ OFF
2. Press RING/TAD.
RING/TAD
PAUSE
AM
The Model 1108 will respond: “On.” (If the Model 1108
says “Off,” repeat steps 1 and 2 to reactivate TAD.)
4.6.2 Using the TAD Feature
1. Make sure the TAD feature is enabled on the Model 1108.
(The default setting is disabled, so you must enable it
first.)
2. Determine the number of rings your telephone answering
device uses to answer the telephone. (Most answering
devices require 4 rings; others are selectable.)
3. On the Model 1108, program Rings Until Answer to a
greater number than the number of rings set on your
answering machine.
Example:
Telephone answering device, rings = 4
Model 1108, Rings Until Answer = 6
35
Page 48

Sensaphone® Model 1108 User’s Manual
Using the procedure just outlined, all incoming calls will be
answered by the telephone answering device, allowing it to
operate normally. With the programming just accomplished, the
Model 1108 can be accessed remotely, by telephone, to obtain
the Status Report.
1. Dial the telephone number of the Model 1108.
2. Let the telephone ring once and then hang up.
3. Wait approximately ten seconds
4. Call the Model 1108 back.
It will answer the telephone on the first ring.
Explanation: The pattern of one ring, followed by a second call
(within 30 seconds), signals the Model 1108 to answer your
incoming call, excluding the telephone answering device.
NOTE
Special Case: If the Model 1108 shares the same
line with a telephone answering device, and
during certain time periods, frequent, incoming
calls are expected on that line, then you may
want to temporarily disable the TAD feature. If
you leave the TAD enabled, it will not adversely
affect normal operation, but if two outside
telephone calls are received within the same
30-second time window, the Model 1108 will
interpret this pattern as a signal to answer the
telephone. If this occurs, press any key on the
Model 1108 to hang up.
4.6.3 No TAD In Use
If a telephone answering device is not used on the same
telephone line as the Model 1108, make sure that the
TAD feature is disabled, or turned off. Only Rings Until
Answer programming will determine how incoming calls
are answered. For example, if you program Rings Until
Answer to 3, incoming calls will be answered in 3 rings.
36
Page 49

Chapter 4: Communications Programming
4.7 Listen-in Time
The Listen-in Time is the amount of time you can listen to
sounds from the Model 1108’s built-in microphone at its
installation site. When you call in for a Status Report, the
Model 1108 announces Listen-in Time at the end of its first
round of status readings, saying, “Listen to the sound level for
(programmed time entered).” The programmable range is from
0 to 255 seconds (or up to 4.17 minutes). The default value is
15 seconds.
NOTE
The microphone is also used to monitor high
sound level. See Chapter 5, Section 5.10 through
Section 5.11.1.
4.7.1 Programming the Listen-in Time
To program the Listen-in Time:
1. Press SET.
SET
#
2. Press LISTEN TIME. The Model 1108 will respond:
“Enter seconds.”
9
LISTEN TIME
SOUND
3. Using the number keys, enter the seconds. The Model
1108 will recite the digits as they are pressed.
1
2
VOICE
REPS
5
TEMP LIMITS
8
CLOCK
0
ID NUMBER
POWER
3
INTERCALL
TIME
6
CALIBRATE
9
LISTEN TIME
SOUND
CALL
DELAY
4
MAX CALLS
7
RECOGNITION
TIME
4. Press ENTER. The Model 1108 will respond: “Enter.”
ENTER
TONE
PM
37
Page 50

Sensaphone® Model 1108 User’s Manual
4.7.2 Interrogating the Listen-in Time
To interrogate the Listen-in Time:
1. Press WHAT IS.
WHAT
IS
*
2. Press LISTEN TIME. The Model 1108 will recite the
listen time in seconds programmed.
9
LISTEN TIME
SOUND
4.8 Call Delay
Call Delay is the programmed length of time the Model 1108
waits, following detection of an alarm, before it begins the dialout sequence. This applies only to the first call. (Delay time
between calls is also programmable: refer to Intercall Time,
Section 4-11.)
The purpose for Call Delay is to allow time for personnel at the
Model 1108’s installation site to respond to and cancel an alarm
before dial-out begins. During this time, the Model 1108 will
audibly repeat its “alert condition” message (unless the Local
Voice Mute feature has been activated—refer to Section 4.9).
The default for Call Delay is 30 seconds. Call Delay can be
programmed from 0 seconds to 60 minutes (1 hour).
4.8.1 Programming the Call Delay
To program the Call Delay:
1. Press SET.
SET
#
2. Press CALL DELAY.
1
CALL
DELAY
The Model 1108 will respond: “Enter minutes.”
38
Page 51

Chapter 4: Communications Programming
3. Using the number keys, enter the minutes.
The Model 1108 recites the digits as they are pressed.
1
2
VOICE
REPS
5
TEMP LIMITS
8
CLOCK
0
ID NUMBER
POWER
2
VOICE
REPS
5
TEMP LIMITS
8
CLOCK
0
ID NUMBER
POWER
3
INTERCALL
TIME
6
CALIBRATE
9
LISTEN TIME
SOUND
3
INTERCALL
TIME
6
CALIBRATE
9
LISTEN TIME
SOUND
CALL
DELAY
4
MAX CALLS
7
RECOGNITION
TIME
4. Press ENTER. The Model 1108 responds: “Enter
seconds.”
ENTER
TONE
PM
5. Using the number keys, enter the seconds.
The Model 1108 recites the digits as you press them.
1
CALL
DELAY
4
MAX CALLS
7
RECOGNITION
TIME
6. Press ENTER. The Model 1108 responds: “Enter.”
ENTER
TONE
PM
4.8.2 Interrogating Call Delay
To interrogate Call Delay:
1. Press WHAT IS.
WHAT
IS
*
2. Press CALL DELAY.
1
CALL
DELAY
The Model 1108 will recite the programmed Call Delay.
39
Page 52

Sensaphone® Model 1108 User’s Manual
4.9 Local Voice Mute
When the Model 1108 dials out to report an alarm, it also
audibly recites the alarm message at its installation site. The
Local Voice Mute command allows you to turn off the voice at
the Model 1108’s site during alarm dialouts and status call-ins.
This feature is used to prevent intruders or unauthorized
persons from hearing the alarm dial-out message or from
hearing the Status Report during an off-site call.
4.9.1 Enable/Disable Local Voice Mute
To enable/disable Local Voice Mute:
1. Press SENSOR ON/OFF.
SENSOR
ON/ OFF
2. Press MUTE.
CODE
MUTE
The Model 1108 will say “On” to indicate that Local
Voice Mute is enabled, or“Off” to indicate that it is
disabled.
3. Repeat key sequence to switch between enabled or
disabled Local Voice Mute.
4.10 Voice Repetitions
The Voice Repetitions feature allows programming of the
number of times the alarm message is delivered per phone call
during alarm dial-out.
The maximum repetitions may be set to 10; the default is
3 repetitions.
40
Page 53

Chapter 4: Communications Programming
4.10.1 Programming Voice Repetitions
To program Voice Repetitions:
1. Press SET.
SET
#
2. Press VOICE REPS.
2
VOICE
REPS
The Model 1108 will respond:“Enter number.”
3. Using the number keys, enter a value from 0 to 10.
1
2
VOICE
REPS
5
TEMP LIMITS
8
CLOCK
0
ID NUMBER
POWER
3
INTERCALL
TIME
6
CALIBRATE
9
LISTEN TIME
SOUND
CALL
DELAY
4
MAX CALLS
7
RECOGNITION
TIME
4. Press ENTER. The Model 1108 will respond:“Enter.”
ENTER
TONE
PM
4.10.2 Interrogating Voice Repetitions
To interrogate Voice Repetitions:
1. Press WHAT IS.
WHAT
IS
*
2. Press VOICE REPS.
2
VOICE
REPS
The Model 1108 will recite the number programmed.
41
Page 54

Sensaphone® Model 1108 User’s Manual
4.11 Intercall Time
The Intercall Time is the programmable period of time the
Model 1108 waits in calling subsequent telephone numbers.
Intercall Time is activated only after alarm dial-out to the first
telephone number fails to be acknowledged. This period can
be programmed from 10 seconds to 60 minutes. The default
intercall time is 1 minute.
If an incoming telephone call is made to the Model 1108 during
Intercall Time (in between its dialing of subsequent telephone
numbers to report an alarm), it will answer the incoming call
and immediately report any existing alarms. The manner in
which the incoming call is answered depends upon whether or
not TAD is enabled or disabled:
• If TAD (Telephone Answering Device) is enabled,
Rings Until Answer will be 1.
• If TAD is disabled, Rings Until Answer will be 10.
Refer to Section 4.5, Rings Until Answer, and Section 4.6,
TAD (Telephone Answering Device).
4.11.1 Programming Intercall Time
To program Intercall Time:
1. Press SET.
SET
#
2. Press INTERCALL TIME.
3
INTERCALL
TIME
The Model 1108 will respond: “Enter minutes.”
3. Using the number keys, enter the minutes.
The Model 1108 recites the digits as you press them.
1
2
VOICE
REPS
5
TEMP LIMITS
8
CLOCK
0
ID NUMBER
POWER
3
INTERCALL
TIME
6
CALIBRATE
9
LISTEN TIME
SOUND
CALL
DELAY
4
MAX CALLS
7
RECOGNITION
TIME
42
Page 55

Chapter 4: Communications Programming
4. Press ENTER. The Model 1108 will respond: “Enter
seconds.”
ENTER
TONE
PM
6. Using the number keys, enter the seconds. The
Model 1108 recites the digits as you press them.
1
2
VOICE
REPS
5
TEMP LIMITS
8
CLOCK
0
ID NUMBER
POWER
3
INTERCALL
TIME
6
CALIBRATE
9
LISTEN TIME
SOUND
CALL
DELAY
4
MAX CALLS
7
RECOGNITION
TIME
7. Press ENTER. The Model 1108 responds: “Enter.”
ENTER
TONE
PM
4.11.2 Interrogating Intercall Time
To interrogate Intercall Time:
1. Press WHAT IS.
WHAT
IS
*
2. Press INTERCALL TIME.
3
INTERCALL
TIME
The Model 1108 will recite the programmed
Intercall Time.
4.12 Maximum Number of Calls (Max Calls)
The Max Calls feature controls the total number of repeated
calling attempts by the Model 1108 in the event of an alarm.
When an alarm occurs, the dial-out process begins, and
continues to cycle through your programmed telephone
43
Page 56

Sensaphone® Model 1108 User’s Manual
numbers until a maximum number of calls is reached. The Max
Calls setting regulates the number of calls that will be made as
a result of any alarms; if more than one alarm is detected at
once, or if a second alarm occurs during dial-out on the first
alarm, the Max Calls setting will start the calling process from
zero, until the programmed number of calling attempts are
completed.
The default setting for Max Calls is 100, but it may be programmed from 0 to 255 calls. Max Calls is cancelled when an
alarm is acknowledged. If the maximum number of calls is
completed and no alarm acknowledgement has occurred, the
Model 1108 will automatically acknowledge any alarm and
stop the dial-out.
NOTE
If only one telephone number is programmed,
the Model 1108 will dial out a maximum of 15
times to report an alarm.
4.12.1 Programming Max Calls
44
To program Max Calls:
1. Press SET.
SET
#
2. Press MAX CALLS.
4
MAX CALLS
The Model 1108 will respond:“Enter number.”
3. Using the number keys, enter a value. The Model 1108
will recite the digits as you press them.
1
2
VOICE
REPS
5
TEMP LIMITS
8
CLOCK
0
ID NUMBER
POWER
3
INTERCALL
TIME
6
CALIBRATE
9
LISTEN TIME
SOUND
CALL
DELAY
4
MAX CALLS
7
RECOGNITION
TIME
Page 57

Chapter 4: Communications Programming
5. Press ENTER. The Model 1108 responds: “Enter.”
ENTER
TONE
PM
4.12.2 Interrogating Max Calls
To interrogate Max Calls programmed:
1. Press WHAT IS.
WHAT
IS
*
2. Press MAX CALLS.
4
MAX CALLS
The Model 1108 will recite the value set for Max Calls.
4.13 The Clock
The Model 1108 has a built-in clock. The power-up time is 12
AM. The clock will keep time from 12 AM until you program
the current time. It will then keep time from your programmed
time. If the AC power fails, the clock will continue to keep time
until the battery back-up fails. It will then reset to 12 AM when
power is restored. An incorrect time is a good indication that
the power has failed and the batteries have been expended.
4.13.1 Setting the Clock
To set the clock:
1. Press SET.
SET
#
2. Press CLOCK.
8
CLOCK
45
Page 58

Sensaphone® Model 1108 User’s Manual
3. Using the number keys, enter the correct time. The
Model 1108 will recite the digits as they are pressed.
1
2
VOICE
REPS
5
TEMP LIMITS
8
CLOCK
0
ID NUMBER
POWER
AM
ENTER
TONE
PM
3
INTERCALL
TIME
6
CALIBRATE
9
LISTEN TIME
SOUND
CALL
DELAY
4
MAX CALLS
7
RECOGNITION
TIME
4. If the time is AM, press the AM key. The Model 1108 will
beep. (If the time is PM , there is no key to press—the
clock will be automatically set to PM if AM is not set.)
RING/TAD
PAUSE
5. Press ENTER. The Model 1108 will respond: “Enter.”
Example: You want to set the clock to 12:45 AM. Press the
following keys in the order shown:
SET…CLOCK…1…2…4…5…AM…ENTER.
4.13.2 Interrogating for the Current Time
To interrogate the Model 1108 for the current time:
1. Press WHAT IS.
WHAT
IS
*
2. Press CLOCK. The Model 1108 will recite the
programmed time.
8
CLOCK
46
Page 59

Chapter 4: Communications Programming
4.14 The Security Code
The Security Code is the last step after setting all other
programming parameters for the Model 1108. The code
consists of a 4-digit number you select and will effectively
prevent unauthorized changes to the Model 1108’s program-
ming. When the Security Code is activated, all keyboard
programming is inaccessible. The Model 1108 may be interrogated using the WHAT IS key, but the keyboard must be
unlocked, via the Security Code, before any additional programming is possible.
4.14.1 Locking the Keypad
To program the Security Code:
1. Press SET.
SET
#
2. Press CODE.
CODE
MUTE
The Model 1108 will respond: “Enter security code.”
3. Using the number keys, enter 4 digits. The Model 1108
says “OK.” The keyboard is now locked.
1
2
VOICE
REPS
5
TEMP LIMITS
8
CLOCK
0
ID NUMBER
POWER
3
INTERCALL
TIME
6
CALIBRATE
9
LISTEN TIME
SOUND
CALL
DELAY
4
MAX CALLS
7
RECOGNITION
TIME
If unauthorized persons attempt to set a parameter, an
error message, “Error 2,” is returned. Whenever any
operation except WHAT IS takes place without entering
the security code first, this error message occurs.
47
Page 60

Sensaphone® Model 1108 User’s Manual
4.14.2 Unlocking the Keypad
To unlock the keyboard:
1. Press WHAT IS.
WHAT
IS
*
2. Press CODE.
CODE
MUTE
The Model 1108 will respond: “Enter Security Code.”
3. Using the number keys, enter the digits for the code.
1
2
VOICE
REPS
5
TEMP LIMITS
8
CLOCK
0
ID NUMBER
POWER
3
INTERCALL
TIME
6
CALIBRATE
9
LISTEN TIME
SOUND
.
CALL
DELAY
4
MAX CALLS
7
RECOGNITION
TIME
48
If the correct code is entered, the Model 1108 will say
“OK.” If the wrong code is entered, the Model 1108 will
say “Error 2.”
Page 61

Chapter 5: Alarm Programming
Chapter 5: Alarm Programming
This chapter explains the alarm programming and monitoring
capabilities of the Model 1108, with specific instructions for
the following features:
• Configure inputs as dry contact or temperature
• Enable/disable inputs
• Program alarm Recognition Time for each input
• Program high and low temperature limits
• Disable alarm response to high or low temperature
• Program temperature in Fahrenheit or Celsius scale
• Calibrate temperature
• Obtain current temperature
• Program AC power-failure Recognition Time
• Enable/disable AC power monitoring
• Program sound level sensitivity
• Program high sound Recognition Time
• Disable alarm response to high sound
• Use Exit Delay via Status Report
5.1 Input Configuration
In preparing the Model 1108 to sense an alert condition, the
inputs must be configured as dry contact (either open or closed)
or as temperature inputs. The default setting for input 1 is
temperature; for inputs 2-8, the default is dry contact and open.
To configure input normality, sensors are first wired to the
terminal strip at the back of the unit. (Refer to Chapter 2,
Section 2.9–2.12, for an explanation on wiring inputs.)
The configuration process directs the Model 1108 to initialize
the 8 inputs and establish normal settings. Any change in the
status of an input (for example, from a normally open contact
to a suddenly closed contact) is recognized as an alert condi-
tion. In the case of a temperature input, an alert condition is
recognized when established temperature limits are exceeded.
49
Page 62

Sensaphone® Model 1108 User’s Manual
NOTE
Before starting keyboard commands to configure
input normality on the Model 1108, it is very
important to check that the sensors you have
wired to the unit are set in their normal, nonalarm positions. For example, if a magnetic reed
switch (a normally-closed sensor used to detect
unauthorized entry) has been wired to the
Model 1108, make sure that the door or window
to be monitored is shut before configuring the
input. If a motion-detector is wired to the unit, it
is advisable to block all sources of motion from
the sensor before and during configuration.
5.1.1 Programming Input Configuration
1. Press STANDBY to place the Model 1108 in
Standby mode.
RUN
STANDBY
50
2. Wire sensors to the inputs to the back of the Model 1108
(see Chapter 2, Section 2.10).
3. Press RUN. The red light glows when the Model 1108
returns to Run mode.
RUN
STANDBY
4. Press SET.
SET
#
5. Press CONFIGURE.
STATUS
CONFIGURE
Page 63

Chapter 5: Alarm Programming
6. The Model 1108 audibly recites the configuration for each
of the eight inputs:
• If the input is normally open, the Model 1108 recites the
number of the input and says“OK.”
• If the input is normally closed, the Model 1108 recites
the number of the input, followed by a beep and“OK.”
• If the input is configured as temperature, the
Model 1108 recites the number of the input, followed by
“Temperature.”
5.1.2 Verifying Input Configuration
Input configuration can be verified when interrogating the
Model 1108 for a complete Status Report. Refer to Chapter 6
for a more detailed description of the Status Report.
5.2 Enable/Disable Inputs
This function allows you to enable or disable an input’s
response to an alert condition. An enabled input will respond to
an alert condition and allow dial-out. A disabled input will
cause dial-out to be suppressed, but any existing alert conditions will be revealed during the Status Report. Enable/disable
programming is useful during wiring of inputs (see Chapter 2)
or when a condition needs to be monitored, but is not critical
enough to be programmed for dial-out reporting. It is important
to verify input status after performing any task that requires
disabling. The default setting for all inputs is enabled (ON).
If an alert condition exists when inputs are re-enabled,
Recognition Time will restart—refer to Section 5.3.
51
Page 64

Sensaphone® Model 1108 User’s Manual
5.2.1 Changing Enabled/Disabled Input Status
1. Press SENSOR ON/OFF.
SENSOR
ON/ OFF
2. Press the number (1 to 8) of the selected input to enable/
disable. The Model 1108 says “Off” to indicate disabled
or “On” to indicate enabled.
1
2
VOICE
REPS
5
TEMP LIMITS
8
CLOCK
3
INTERCALL
TIME
6
CALIBRATE
CALL
DELAY
4
MAX CALLS
7
RECOGNITION
TIME
5.2.2 Verifying Enabled/Disabled Input Status
1. Press WHAT IS.
WHAT
IS
*
2. Press STATUS.
52
STATUS
CONFIGURE
The Model 1108 audibly recites the current status of every
input. In a Status Report, each input is first identified by its
input number, followed by a report that specifies parameters
currently affecting that input. If an input is disabled, the word
“Off” immediately follows the number recited for that input.
For example, input 3 is configured as a normally open, dry
contact input. During the Status Report:
• If disabled, the Model 1108 recites:
“Number 3—Off—OK,” for input 3.
• If enabled, the Model 1108 recites:
“Number 3—OK,” for input 3.
Page 65

In another example, input 5 is configured as a temperature
input. The current temperature is 76 degrees. During a Status
Report:
• If disabled, the Model 1108 recites “Number 5—Off—
76 degrees—OK.”
• If enabled, the Model 1108 recites “Number 5—
76 degrees—OK.”
5.3 Input Recognition Time
The Input Recognition Time is the length of time an alert
condition must be present before a valid alarm exists and dialout is activated. This time period is programmable, from 0
minutes, 0 seconds (for immediate response) up to a period of
272 minutes, 0 seconds. If an alert condition begins and then
clears within the established Recognition Time, no dial-out will
occur. When an alert condition continues beyond the programmed Recognition Time, the Model 1108 initiates dial-out.
The default setting for Input Recognition Time is 0 minutes,
3 seconds.
Chapter 5: Alarm Programming
5.3.1 Programming Input Recognition Time
1. Press SET.
SET
#
2. Press RECOGNITION TIME.
7
RECOGNITION
TIME
3. Press the number (1 to 8) of the selected input to be
programmed.
1
2
VOICE
REPS
5
TEMP LIMITS
8
CLOCK
3
INTERCALL
TIME
6
CALIBRATE
CALL
DELAY
4
MAX CALLS
7
RECOGNITION
TIME
The Model 1108 responds: “Enter minutes.”
53
Page 66
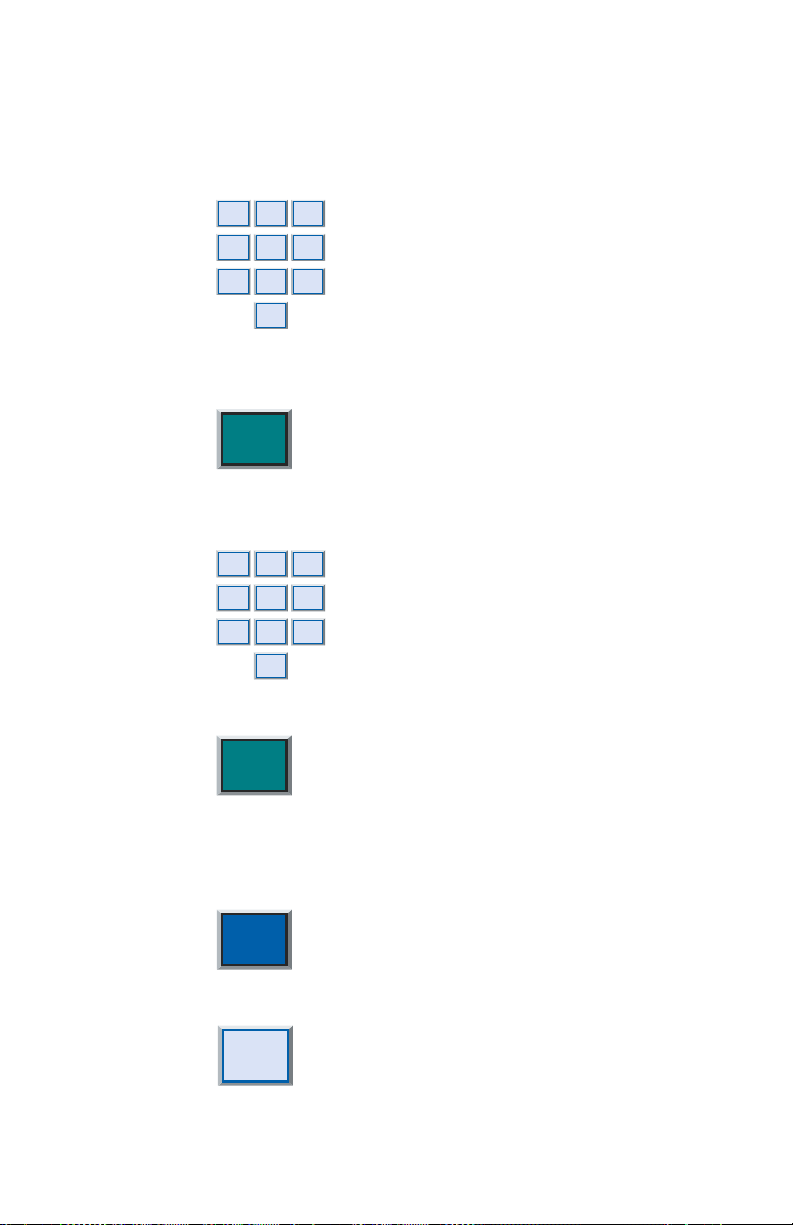
Sensaphone® Model 1108 User’s Manual
4. Using the number keys, enter the minutes. For example, to
set a Recognition Time of five minutes, simply press “5”
on the keypad. The Model 1108 recites the digits as they
are pressed.
1
2
PM
VOICE
REPS
5
TEMP LIMITS
8
CLOCK
0
ID NUMBER
POWER
2
VOICE
REPS
5
TEMP LIMITS
8
CLOCK
0
ID NUMBER
POWER
3
INTERCALL
TIME
6
CALIBRATE
9
LISTEN TIME
SOUND
3
INTERCALL
TIME
6
CALIBRATE
9
LISTEN TIME
SOUND
CALL
DELAY
4
MAX CALLS
7
RECOGNITION
TIME
5. Press ENTER. The Model 1108 responds: “Enter
seconds.”
ENTER
TONE
6. Using the number keys, enter the seconds. The
Model 1108 recites the digits as they are pressed.
1
CALL
DELAY
4
MAX CALLS
7
RECOGNITION
TIME
7. Press ENTER. The Model 1108 responds: “Enter.”
ENTER
TONE
PM
5.3.2 Interrogating Input Recognition Time
1. Press WHAT IS.
WHAT
IS
*
2. Press RECOGNITION TIME.
7
RECOGNITION
TIME
54
Page 67

Chapter 5: Alarm Programming
3. Press the corresponding input key (1 to 8).
1
2
VOICE
REPS
5
TEMP LIMITS
8
CLOCK
3
INTERCALL
TIME
6
CALIBRATE
CALL
DELAY
4
MAX CALLS
7
RECOGNITION
TIME
The Model 1108 recites the programmed Recognition
Time for that input.
5.4 Establishing High and Low Temperature Limits
High and low temperature limits can be separately programmed
for each input configured as temperature. Limits can range
from
–20° to +150° Fahrenheit, or from –30
When temperature limits exceed high or low settings, the
Model 1108 will dial out with an alarm message. Default
settings are: 10
°
F for low temperature and 100
temperature.
5.4.1 Programming Temperature Limits
for a Selected Input
°
to 65
°
Celsius.
°
F for high
1. Press SET.
SET
#
2. Press TEMP LIMITS.
5
TEMP LIMITS
3. From the number keys, press a number (from 1 to 8) that
corresponds to the temperature input being programmed.
1
2
VOICE
REPS
5
TEMP LIMITS
8
CLOCK
3
INTERCALL
TIME
6
CALIBRATE
CALL
DELAY
4
MAX CALLS
7
RECOGNITION
TIME
The Model 1108 responds: “Enter low temperature
limit.”
55
Page 68

Sensaphone® Model 1108 User’s Manual
4. Using the number keys, enter a value for low temperature
limit. The Model 1108 will recite the digits as they are
pressed. If a negative number is required, first press
PAUSE, then enter the number.
1
2
PM
PM
VOICE
REPS
5
TEMP LIMITS
8
CLOCK
0
ID NUMBER
POWER
2
VOICE
REPS
5
TEMP LIMITS
8
CLOCK
0
ID NUMBER
POWER
3
INTERCALL
TIME
6
CALIBRATE
9
LISTEN TIME
SOUND
3
INTERCALL
TIME
6
CALIBRATE
9
LISTEN TIME
SOUND
CALL
DELAY
4
MAX CALLS
7
RECOGNITION
TIME
5. Press ENTER.
ENTER
TONE
The Model 1108 responds: “Enter high temperature
limit.”
6. Using the number keys, enter the value for high temperature limit. The Model 1108 recites the digits as they are
pressed.
1
CALL
DELAY
4
MAX CALLS
7
RECOGNITION
TIME
7. Press ENTER. The Model 1108 responds: “Enter.”
ENTER
TONE
NOTE
Do not set temperature limits too close to normal
room temperature. Minor temperature fluctuations could result in frequent and unnecessary
alarm dialouts.
5.4.2 Disabling Alarm Response to High or
Low Temperature
To disable alarm response to either high or low temperature
settings exclusively, enter the maximum temperature limit
when programming the selected input. (The Model 1108 will
56
Page 69

Chapter 5: Alarm Programming
not respond to temperatures encountered at maximum settings
or beyond.) Begin by following the key sequence shown in
Section 5.4.1, and when prompted to enter the high or low
temperature value:
• Set high temperature to either +150o F or +65o C (high
temperature limit) to prevent the Model 1108 from
responding to a high temperature alarm.
• Set low temperature to either -20o F or -30o C to prevent
the Model 1108 from responding to a low temperature
alarm.
5.4.3 Interrogating High and Low Temperature Limits
1. Press WHAT IS.
WHAT
IS
*
2. Press TEMP LIMITS.
5
TEMP LIMITS
3. Press the number key corresponding to the selected
temperature input.
1
2
VOICE
REPS
5
TEMP LIMITS
8
CLOCK
3
INTERCALL
TIME
6
CALIBRATE
CALL
DELAY
4
MAX CALLS
7
RECOGNITION
TIME
5.5 Temperature Scale
Temperature inputs may be set in either Fahrenheit or Celsius
degrees. The default temperature scale is Fahrenheit. To change
to Celsius:
1. Press SENSOR ON/OFF.
SENSOR
ON/ OFF
57
Page 70

Sensaphone® Model 1108 User’s Manual
2. Press TEMP. The Model 1108 responds: “Off,” indicating
Celsius scale has replaced Fahrenheit scale.
TEMP
F / C
3. To return to Fahrenheit scale, repeat the key sequence.
The Model 1108 responds: “On,” indicating Fahrenheit
scale is in effect.
NOTE
When switching from Fahrenheit to Celsius, or
vice versa, the change applies to all inputs
configured to read temperature. When switching
temperature scales it is important to reset high
and low temperature limits on all temperature
inputs. Refer to Section 5.4.1 to reset
temperature limits.
5.6 Temperature Calibration
To compensate for minor variances in sensor accuracy, an offset
may be programmed for each temperature input. The amount of
offset is measured in degrees Fahrenheit or degrees Celsius.
Adjustments are possible within a range from -10 degrees to
+10 degrees. For example, if input 3 is sensing temperature and
is reading 1 degree too high, then the calibration for input 3 is
set at -1 to obtain an accurate reading.
5.6.1 Programming Temperature Calibration
1. Press SET.
SET
#
2. Press CALIBRATE.
6
CALIBRATE
58
Page 71

Chapter 5: Alarm Programming
3. Press the number (1 to 8) of the selected temperature
input to be calibrated.
1
2
VOICE
REPS
5
TEMP LIMITS
8
CLOCK
2
VOICE
REPS
5
TEMP LIMITS
8
CLOCK
0
ID NUMBER
POWER
3
INTERCALL
TIME
6
CALIBRATE
3
INTERCALL
TIME
6
CALIBRATE
9
LISTEN TIME
SOUND
CALL
DELAY
4
MAX CALLS
7
RECOGNITION
TIME
4. Enter the number required to offset the current tempera-
ture reading so a correct reading is obtained.
1
CALL
DELAY
4
MAX CALLS
7
RECOGNITION
TIME
• To program a positive offset number (up to +10
degrees), enter the number on the keypad. The Model
1108 recites the digits as they are pressed.
• To program a negative offset number (up to –10
degrees), first press PAUSE. The unit responds with a
“beep.” Next, enter the number on the keypad. The unit
recites the digits as they are pressed.
5. Press ENTER. The Model 1108 responds: “Enter.”
ENTER
TONE
PM
NOTE
If you find that your calibration offset exceeds
more than + 5 or – 5 degrees, other complicating
factors could be affecting normal operation of
the Model 1108. Call Phonetics for technical
assistance.
59
Page 72

Sensaphone® Model 1108 User’s Manual
5.6.2 Interrogating Temperature Calibration
1. Press WHAT IS.
WHAT
IS
*
2. Press CALIBRATE.
6
CALIBRATE
3. Press the number key corresponding to the selected
temperature input.
1
2
VOICE
REPS
5
TEMP LIMITS
8
CLOCK
3
INTERCALL
TIME
6
CALIBRATE
CALL
DELAY
4
MAX CALLS
7
RECOGNITION
TIME
If a “beep” precedes the number as it is recited, then a
negative offset is indicated.
5.7 Obtaining Current Temperature
Current temperature readings for each temperature input may
be accessed at any time. The Model 1108 recites the input
number, and the actual temperature detected by the attached
sensor, for all inputs configured as temperature. To obtain
current temperature:
1. Press WHAT IS.
WHAT
IS
*
2. Press TEMP.
TEMP
F / C
60
Page 73

Chapter 5: Alarm Programming
5.8 AC Power Monitoring Enable/Disable
The Model 1108 monitors AC power failure. This command
enables or disables the power failure detection feature. When
enabled, the Model 1108 will monitor power and dial out when
AC power failure exceeds a programmable span of time (refer
to AC Power Failure Recognition Time, Section 5.9).
The default setting for AC power monitoring is enabled (on).
When disabled, the Model 1108 will not dial-out to report
power failure.
5.8.1 Enabling/Disabling the AC Power Alarm
1. Press SENSOR ON/OFF.
SENSOR
ON/ OFF
2. Press POWER.
0
ID NUMBER
POWER
• The Model 1108 will say “Off” to indicate that the
power alarm is disabled, or
• The Model 1108 will say “On” to indicate that the
power alarm is enabled.
3. Repeat key sequence to change settings.
5.9 AC Power Failure Recognition Time
The AC Power Failure Recognition Time is the length of time
that AC electric power is off before a valid alarm is recognized
and dial-out begins. The default setting is 5 minutes, 0 seconds,
but is programmable from 0 seconds to a maximum of
272 minutes.
When AC power failure occurs, and throughout the programmed Recognition Time, the Model 1108 steadily repeats
the message “the electricity is off” at the unit’s installation site.
There is no Call Delay programming available for AC power
failure. Immediately following Recognition Time, the Model
1108 begins the dial-out process to report power failure.
61
Page 74

Sensaphone® Model 1108 User’s Manual
To cancel the power-failure message locally at the keypad
(during or after Recognition Time) press any key on the
Model 1108 keypad. This action also cancels the dial-out
process. The AC power failure alarm may also be cancelled
remotely, by telephone acknowledgment (see Chapter 6,
Section 6.1).
5.9.1 Programming Power Failure Recognition Time
1. Press SET.
SET
#
2. Press RECOGNITION TIME.
7
RECOGNITION
TIME
3. Press POWER. The Model 1108 responds: “Enter
minutes.”
0
ID NUMBER
POWER
62
4. Using the number keys, enter the number of minutes. The
Model 1108 will recite the digits as they are pressed.
1
2
VOICE
REPS
5
TEMP LIMITS
8
CLOCK
0
ID NUMBER
POWER
3
INTERCALL
TIME
6
CALIBRATE
9
LISTEN TIME
SOUND
CALL
DELAY
4
MAX CALLS
7
RECOGNITION
TIME
5. Press ENTER. The Model 1108 responds: “Enter
seconds.”
ENTER
TONE
PM
Page 75

Chapter 5: Alarm Programming
6. Using the number keys, enter the number of seconds. The
Model 1108 will recite the digits as they are pressed.
1
2
VOICE
REPS
5
TEMP LIMITS
8
CLOCK
0
ID NUMBER
POWER
3
INTERCALL
TIME
6
CALIBRATE
9
LISTEN TIME
SOUND
CALL
DELAY
4
MAX CALLS
7
RECOGNITION
TIME
7. Press ENTER. The Model 1108 responds:“OK.”
ENTER
TONE
PM
5.9.2 Interrogating Power Failure Recognition Time
1. Press WHAT IS.
WHAT
IS
*
2. Press RECOGNITION TIME.
7
RECOGNITION
TIME
3. Press POWER.
The Model 1108 will recite the power Recognition Time.
0
ID NUMBER
POWER
5.10 Sound Alarm Monitoring
This feature allows you to program the level and duration of
sound that will cause the Model 1108 to respond to an alarm
and dial-out. It may be useful to desensitize the Model 1108 to
sound if it is installed in an area with a relatively high noise
level, or where a loud noise occurs frequently but is not
associated with an alarm. In some applications, it may be
desirable to increase sound sensitivity to low sound levels.
63
Page 76

Sensaphone® Model 1108 User’s Manual
5.10.1 Programming Sound Alarm Sensitivity
The sensitivity setting for sound alarm monitoring ranges from
1 to 255. A value of 1 makes the microphone the MOST
sensitive to changes in sound. The value 255 makes the
microphone the LEAST sensitive to sound. The default value
is 32.
1. Press SET.
SET
#
2. Press CALIBRATE.
6
CALIBRATE
3. Press SOUND. The Model 1108 responds: “Enter
number.”
9
LISTEN TIME
SOUND
4. Using the number keys, enter a value for sound sensitivity.
The Model 1108 recites the digits as you press them.
1
2
VOICE
REPS
5
TEMP LIMITS
8
CLOCK
0
ID NUMBER
POWER
3
INTERCALL
TIME
6
CALIBRATE
9
LISTEN TIME
SOUND
CALL
DELAY
4
MAX CALLS
7
RECOGNITION
TIME
5. Press ENTER. The Model 1108 responds: “Enter.”
ENTER
TONE
PM
5.10.2 Interrogating Sound Sensitivity
1. Press WHAT IS.
WHAT
IS
*
64
Page 77

Chapter 5: Alarm Programming
2. Press CALIBRATE.
6
CALIBRATE
3. Press SOUND. The Model 1108 recites the programmed
sound sensitivity level.
9
LISTEN TIME
SOUND
5.10.3 Programming High Sound Alarm
Recognition Time
The Recognition Time for sound alarm monitoring ranges from
2 seconds to 59 seconds. The default value is 8 seconds.
1. Press SET.
SET
#
2. Press RECOGNITION TIME.
7
RECOGNITION
TIME
3. Press SOUND. The Model 1108 responds: “Enter
seconds.”
9
LISTEN TIME
SOUND
4. Using the number keys, enter the number of seconds. The
Model 1108 will recite the digits as they are pressed.
1
2
VOICE
REPS
5
TEMP LIMITS
8
CLOCK
0
ID NUMBER
POWER
3
INTERCALL
TIME
6
CALIBRATE
9
LISTEN TIME
SOUND
CALL
DELAY
4
MAX CALLS
7
RECOGNITION
TIME
65
Page 78

Sensaphone® Model 1108 User’s Manual
5. Press ENTER.
ENTER
TONE
PM
5.11 High Sound Alarm Enable/Disable
The Model 1108 monitors sound through the built-in
microphone. When the sound level suddenly exceeds the
programmed high sound limit, the Model 1108 will respond to
an alert condition. The increased sound level must continue
throughout the programmed recognition time. The default for
high sound alarm is enabled (on).
NOTE
The microphone is also used for listening to
on-site sounds. Refer to Chapter 4, Section 4.7.
Disabling the sound alarm does not affect
listen-in capability.
5.11.1 Changing Enabled/Disabled High Sound Alarm
1. Press SENSOR ON/OFF.
SENSOR
ON/ OFF
2. Press SOUND. The Model 1108 will say “Off” to
indicate disabled or “On” to indicate enabled.
LISTEN TIME
3. Repeat key sequence to change settings.
5.12 Exit Delay
When tripping an alarm is unavoidable, yet a true alert
condition has not actually occurred, the alarm response,
including dial-out, can be temporarily suppressed.
66
9
SOUND
Page 79

Chapter 5: Alarm Programming
The Model 1108 is able to suppress and then reset its dial-out
function automatically through use of the Status Report. This is
especially convenient when an alert condition is created upon
exiting a monitored door and there is no way to cancel from the
local keypad.
Example: You are planning to exit through a monitored door.
Prior to exiting, you initiate a Status Report recitation at the
Model 1108 keypad by pressing WHAT IS, followed by
STATUS, (key sequence shown below). You have approximately 30 seconds to exit without activating the Model 1108’s
programmed alarm response. At the conclusion of the Status
Report, normal alarm response is reactivated.
To use exit delay, initiate the Status Report.
1. Press WHAT IS.
WHAT
IS
*
2. Press STATUS. The Model 1108 recites the full Status
Report; during this time, you are able to exit the
monitored area without tripping an alarm.
STATUS
CONFIGURE
67
Page 80

Sensaphone® Model 1108 User’s Manual
NOTES
68
Page 81

Chapter 6: Acknowledgment, Status Report, and Remote Access
Chapter 6: Acknowledgment,
Status Report, and
Remote Access
In addition to communication and alarm monitoring
capabilities, the Model 1108 will also respond to your
instructions and provide you with access to information on
monitored conditions at all times.
By issuing commands to the unit, either at the installation site
or over standard telephone lines, the following features may be
activated:
• Acknowledgment of existing alarms
• The Status Report on all monitored conditions.
6.1 Alarm Acknowledgment
When the Model 1108 dials out with an alarm message, it will
request acknowledgment before hanging up. Acknowledgment
indicates to the unit that the alarm message has been received.
Upon acknowledgment, the Model 1108 will cancel the dial-out
sequence.
There are three ways* that an alarm is acknowledged directly:
• Local Acknowledgment
• Touch-Tone
• Callback Acknowledgment
* A fourth method of alarm acknowledgment is indirect. Refer
to Max Calls, Chapter 4, Section 4.12 for an example of
automatic alarm acknowledgment.
TM
Acknowledgment
6.1.1 Local Acknowledgment
To acknowledge an alarm locally (directly at the installation
site of the Model 1108), press any key.
6.1.2 Touch-Tone
This method of remote alarm acknowledgment works with a
Touch-ToneTM telephone.
TM
Acknowledgment
69
Page 82

Sensaphone® Model 1108 User’s Manual
Example: You receive a call from the Model 1108, reporting
that an alarm exists. The message concludes: “Indicate you
have received warning message.” Now, or at any time during
this call, you may acknowledge the alarm with the code “555”
if you are using a Touch-ToneTM telephone.
• To enter “555,” press the number (5) key on the Touch-
ToneTM phone keypad three times. The Model 1108 will
respond: * “Warning message received by telephone
number (last number dialed).” The Model 1108 will
hang up and the dial-out sequence, including any further
response to the alarm, will be cancelled.
• If you enter the wrong code or do not enter it within
10 seconds following the conclusion of the message, the
Model 1108 will respond: “Dial telephone number (the
programmed unit phone number) within (Intercall
Time).” Then, the Model 1108 will hang up. The alarm
is still not acknowledged until you call back. You have a
period equal to the programmed Intercall Time to call
the unit back in order to acknowledge the alarm. Refer
to Callback Acknowledgment, Section 6.1.3, below.
6.1.3 Callback Acknowledgment
This method of remote alarm acknowledgment works with any
telephone: pulse, rotary, or Touch-ToneTM.
Example: The Model 1108 calls you with an alarm message.
You answer the call with a rotary or pulse telephone, and do the
following:
• You listen to the message and hang up.
• Then you call the Model 1108 back on any telephone.
You must wait for 10 rings—this signals the Model
1108 to answer your telephone call. (Make sure to call
back within the programmed setting for Intercall
Time—refer to Chapter 4, Section 4.11.)
When the Model 1108 answers your return call, it gives a
Status Report (refer to Section 6.2). Then it says:“Warning
message received by ...” and recites the telephone number last
dialed. This indicates that the alarm has been acknowledged.
70
Page 83

Chapter 6: Acknowledgment, Status Report, and Remote Access
NOTE
If you have the TAD feature ( telephone
answering device) enabled, the Model 1108 will
answer the telephone on the first ring. If it is
disabled, the telephone must be allowed to ring
10 times. This serves as a precaution against a
random alarm acknowledgment. Refer to
Chapter 4, Section 4.6, for complete information
on using the TAD feature.
6.2 Status Report
The Status Report allows access to complete information on all
monitored conditions either locally, from the keypad, or by
telephone, from any location. The Model 1108 will answer an
incoming telephone call following the programmed Rings Until
Answer (refer to Chapter 4, Section 4.5). Included with the
Status Report are messages related to alarm conditions,
AC power, battery backup and sound level. It also provides an
opportunity for listening to on-site sounds (refer to Listen-in
Time, Chapter 4, Section 4.7).
To initiate the Status Report:
1. Press WHAT IS.
WHAT
IS
*
2. Press STATUS.
STATUS
CONFIGURE
Sections 6.2.1, 6.2.2, and 6.2.3 demonstrate two different
Status Report recitations. The Status Report starts with:
“Hello. This is telephone number 555-1234 (or the
programmed ID).”
“The time is 12:15 PM (or the current time).”
The Model 1108 proceeds with a separate report for each input.
Each input identifies itself by reciting the input number.
71
Page 84

Sensaphone® Model 1108 User’s Manual
6.2.1 Example: Status Report, No Alarms
Inputs 2, 3, 4, and 6 are configured as dry contact and inputs 1,
5, 7 and 8 are configured as temperature. No alarms exist. The
Status Report begins by saying, “Hello, this is telephone
number 555-1234; the time is 12:15 PM.” Following this
introduction, the report continues:
“Number 1, 74 degrees, OK.”
“Number 2, OK.”
“Number 3, OK.”
“Number 4, OK.”
“Number 5, 76 degrees, OK.”
“Number 6, OK.”
“Number 7, 86 degrees, OK.”
“Number 8, 70 degrees, OK.”
“The electricity is ON.” This refers to AC power.
72
“Battery condition, OK.” Other responses: “Battery condition
low” or “Replace batteries.” (Refer to Section 6.2.4 for
additional information regarding battery condition.)
“Sound level, OK.”
“Listen to the sound level for 10 seconds.” In this case, the
programmed Listen-in Time is set at 10 seconds. (This feature
is not available when obtaining the Status Report on-site,
directly at the keypad.)
The Status Report repeats once more and the Model 1108
concludes the call, saying: “Have a good day.” (The Status
Report will not repeat if obtained at the keypad; “Have a good
day,” is also not recited.)
The phrase “no number” at the end of a Status Report indicates
that no dial-out phone numbers have been programmed.
Page 85

Chapter 6: Acknowledgment, Status Report, and Remote Access
6.2.2 Example: Status Report, Existing Alarms
Inputs 2, 3, 4, and 6 are configured as dry contact and inputs 1,
5, 7 and 8 are configured as temperature. An emergency
situation is at hand: a fire in a greenhouse has tripped a smoke
alarm and electrical power has been disrupted. In addition to
high sound and AC power alarms, separate alarms exist on
inputs 5, 6, 7, and 8. You happen to call in for the Status
Report, which begins with, “Hello, this is telephone number
555-1234; the time is 12:15 PM.” Following this introduction,
the report continues:
“Number 1, 74 degrees, OK.”
“Number 2, OK.”
“Number 3, OK.”
“Number 4, OK.”
“Number 5, 105 degrees, HIGH.”
“Number 6, EXISTS.”
“Number 7, 110 degrees, HIGH.”
“Number 8, 98 degrees, HIGH.”
“The electricity is OFF.”
“Battery condition, OK.”
“Sound level, HIGH.”
“Listen to the sound level for 10 seconds.”
“Warning message received by ...(last telephone number
dialed*).”
The Status Report repeats once more and the Model 1108
concludes the call, saying: “Have a good day.”
* The “last telephone number dialed” refers to any one of the
programmed, dial-out telephone numbers through which the
Model 1108 was able to receive alarm acknowledgment, prior
to your call for a Status Report; this could also refer to the
Model 1108’s I.D. Number, if the alarms are acknowledged at
the keypad by someone present at the site.
73
Page 86

Sensaphone® Model 1108 User’s Manual
6.2.3 Example: Status Report, Disabled Inputs
If an input is disabled, the dial-out feature for that input is
deactivated, but all other programmed parameters remain in
effect. In the example below, all 8 inputs are disabled, although
inputs 5 and 6 are detecting alarms. AC power and Sound Level
are also disabled for dial-out. (Note that to indicate disabled
status, only AC power will return two audible beeps, rather
than the word, “OFF.”) When you call the Model 1108 for a
Status Report, you hear the following:
“Hello, this is telephone number 555-1234.
“The time is 12:15 PM.”
“Number 1, OFF, OK.”
“Number 2, OFF, 74 degrees, OK.”
“Number 3, OFF, OK.”
“Number 4, OFF, OK.”
“Number 5, OFF, 96 degrees, HIGH.”
“Number 6, OFF, EXISTS.”
74
“Number 7, OFF, 86 degrees, OK.”
“Number 8, OFF, 70 degrees, OK.”
“The electricity is (beep, beep), ON.” If the electricity is off,
or the AC adaptor is disconnected, you will hear:
“The electricity is (beep, beep), OFF.”
“Battery condition, OK.”
“Sound level, OFF, OK.” If the sound level is high you will
hear: “Sound level, OFF, HIGH.”
“Listen to the sound level for 10 seconds.”
The Status Report repeats once more and the Model 1108
concludes the call, saying: “Have a good day.”
Page 87

Chapter 6: Acknowledgment, Status Report, and Remote Access
6.2.4 Battery Condition
During a Status Report, you may hear one of three possible
messages regarding battery power. The Model 1108
determines the appropriate message by measuring battery
voltage. Depending upon the remaining voltage, it may
respond:
•“Battery Condition , OK,” if over 8.2 Volts.
•“Battery Condition , low,” if between 7.2 and 8.2 Volts.
•“Replace batteries,” if below 7.2 Volts.
6.2.5 Remote Access by Touch-Tone™ Telephone
Calling the Model 1108 for a Status Report provides the
opportunity to access other functions, using Touch Tone™ pushbutton commands. Remote telephone commands include:
• Disabling/enabling any input.
• Disabling/enabling High Sound Alarm monitoring.
• Disabling/enabling AC Power monitoring.
• Activation of Listen-In Time.
• Activation of the Status Report.
To issue commands by telephone, first dial the number of the
Model 1108 to access the Status Report. The Status Report will
be followed by the programmed Listen-In Time. If you remain
on the telephone, the Status Report will be repeated, followed
by a 10 second waiting period and hang-up. During this
10 second waiting period, or at any time during the call, other
commands may by accessed by pressing any push button on
the telephone.
If a Security Code is in effect, the Model 1108 will prompt you
with: “Enter Security Code.” If no Security Code is set, then it
will say “O.K.”
• Enter your Security Code (4 digits) with the telephone
push buttons. If the code you enter is correct, the
Model 1108 will respond: “OK.”
• If you enter the wrong Security Code, the Model 1108
says,“Error. Have a good day,” and hangs up.
75
Page 88

Sensaphone® Model 1108 User’s Manual
Disabling/enabling inputs – If an input is set to detect an alert
condition, it can be disabled to prevent the Model 1108 from
dialing out, or re-enabled at any time.
This feature allows the convenience of disabling an input, even
if you are away from the site of the Model 1108. One such
application may involve an input programmed to detect
unauthorized entry. You are in another locale, but must allow
someone else temporary access to the area monitored by the
Model 1108. Using a Touch-Tone
the appropriate input (thereby disabling any alarm dial-out
response). The input remains disabled until you issue the same
command, which effectively returns it to its former, enabled
state.
Press the following push-buttons on the Touch-ToneTM telephone to execute the desired command:
* (asterisk), 1
...equal to Sensor On/Off, for input 1. To re-enable the
input, repeat the same Touch-ToneTM button sequence
used for disabling.
* (asterisk), 2
TM
telephone, you can disable
76
...equal to Sensor On/Off for input 2, and so on, for
inputs up to 8. To re-enable the input, repeat the same
Touch-ToneTM button sequence used for disabling.
Disabling/enabling High Sound Monitoring –
* (asterisk), 9
...equal to SENSOR ON/OFF for High Sound Alarm
monitoring. To re-enable High Sound Alarm, repeat the
command.
Disabling/enabling AC Power –
* (asterisk), 0
...equal to Sensor On/Off for AC Power monitoring. To
re-enable AC Power monitoring , repeat the command.
Page 89

Chapter 6: Acknowledgment, Status Report, and Remote Access
Activating Listen-In Time –
# (pound), 1
...initiates Listen-In Time for listening to on-site sounds
for the programmed time available.
Activating Status Report –
# (pound), 2
...initiates a full recitation of the Status Report.
Exiting –
# (pound), # (pound)
...forces exit. The 1108 says, “Have a good day,” and
hangs up.
77
Page 90

Sensaphone® Model 1108 User’s Manual
NOTES
78
Page 91

Chapter 7: Operation
Chapter 7: Operation
After installation and programming is completed, the
Model 1108 is fully operational. This chapter explains the
sequence of events that occur during an alarm dialout to
illustrate how the Model 1108 operates.
7.1 Alarm Detection, Dial-out and Acknowledgment
Generally, an alarm event is structured in the following
manner:
I. The Model 1108 detects an alert condition due to
a change at the sensor.
II. A valid alarm is recognized.
III. Dial-out begins.
IV. The alarm is acknowledged.
Often, an alarm does not proceed through all stages: either an
alert condition does not persist long enough to be considered
valid, or a valid alarm is cancelled.
The table on the following page explains the alarm detection,
dial-out and acknowledgment features and lists important
variable factors affecting their operation.
79
Page 92

Sensaphone® Model 1108 User’s Manual
I. Model 1108 Detects a Change at the Sensor
• Model 1108 detects a change in the
monitored condition (from the sensor
wired to one of the inputs). This is
considered an alert condition, and does
not qualify as a valid alarm at this point.
• The condition continues throughout the
programmed Recognition Time. If the
condition (or sensor) reverts to its
normal state before the Recognition
Time is reached, no alarm will occur.
• The condition must persist long enough
to meet or exceed the programmed
Recognition Time. When Recognition
Time has expired, but the alert condition
continues, the Model 1108 will
determine that a valid alarm exists.
• When a valid alarm is determined, Call
Delay is activated, forcing the
Model 1108 to wait for a programmed
period of time before starting the dialout process. Call Delay applies to the
period just prior to dial-out, before the
first telephone call is made.
• Call Delay provides the opportunity to
cancel a valid alarm at the Model 1108’s
installation site, before dial-out occurs.
An audible voice message indicates
which of the inputs is in alarm. If on-site
personnel acknowledge the alarm within
the Call Delay time, the
Model 1108 will not dial out. (Local
Voice Mute is disabled, so that alarm
messages can be heard at the site.)
Variable Factors
Input Type: (1) An
open circuit closes,
(2) a closed circuit
opens, or
(3) temperature
limits are exceeded.
Recognition Time:
Activated
Variable FactorsII. A Valid Alarm Is Recognized
Recognition Time:
Expired
Valid Alarm:
Exists
Call Delay:
Activated
Alarm Message:
Audible, On-site
Activated
Local Voice Mute:
Disabled
80
Page 93

Chapter 7: Operation
III. Dial-out Begins Variable Factors
• The dial-out process is activated as soon
as the Call Delay time expires (if the
alarm has not been cancelled at the
Model 1108’s installation site.) The dialout begins with telephone number 1 and
proceeds sequentially, through the
remaining telephone numbers.
• If the alarm is not acknowledged with
the first dial-out telephone call, the
Model 1108 waits the duration of
Intercall Time before dialing the next
telephone number. Intercall Time is the
programmed waiting period in between
each dial-out telephone call.
• When the telephone is answered, the
programmed Voice Repetitions
determine the number of times per call
the Model 1108 recites the alarm
message.
• Call Progress, an automatic feature,
enables the Model 1108 to detect
whether or not the telephone call is
answered. After 8 rings, or if a busy
signal is encountered, the Model 1108
will hang up, wait the programmed
Intercall Time, and proceed to dial the
next telephone number.
• If no telephone calls are answered, the
Model 1108 dials out sequentially,
through the remaining telephone
numbers and continues to cycle until the
programmed Maximum Number of
Calls is reached.
• When the telephone is answered, the
Model 1108 will immediately begin
reciting a message that indicates which
of the inputs is in alarm. At the same
time, the alarm message is repeating at
the Model 1108’s installation site. The
Model 1108 will request acknowledgment, if it has not yet occurred.
Call Delay:
Expired
Intercall Time:
Activated
Voice Repetitions:
Activated
Call Progress:
Activated
Max Calls:
Activated
Alarm Messages:
By Telephone
and
On-site
81
Page 94

Sensaphone® Model 1108 User’s Manual
Variable FactorsIV. The Alarm is Acknowledged
• At any time after a valid alarm is
determined, the alarm may be acknowledged at the Model 1108’s installation
site, by pressing any key.
• When the Model 1108 dials out and the
call is answered via Touch-Tone
telephone, any alarm may be instantly
acknowledged by pressing “555.”
• If the alarm message repeats for the
number of programmed Voice Repetitions, and “555” has not been entered,
the Model 1108 will say:
“Indicate that you have received warning
message.”
The Model 1108 waits 10 seconds for
the Touch-Tone code “555” to be
entered. If the code is entered within 10
seconds, it responds:
“Warning message received by telephone
number...(the Unit ID Number).”
The alarm is considered acknowledged
and the dialout concludes.
• If the Model 1108 does not receive the
Touch-Tone code within 10 seconds, it
recites the following and then hangs up:
“Dial telephone number (gives the Unit ID Number)
within...(the programmed Intercall Time.)”
Local, On-site
Acknowledgment
Touch-Tone
Acknowledgment:
Fast Code 555
Touch-Tone
Acknowledgment:
Normal Code 555
Tone or Pulse
Callback
Acknowledgment:
Within Intercall Time
82
The recipient of this message must call
the Model 1108 back within the period
programmed for Intercall Time, in order
to acknowledge the alarm. If Local
Voice Mute is off, the unit will beep at
the installation site while waiting for
this call.
• Callback: The Model 1108 waits 10
rings before answering to guard against
random acknowledgment. If an
answering device is connected to the
Page 95

Chapter 7: Operation
IV. The Alarm is Acknowledged
same line as the Model 1108 (and TAD
is enabled), the Model 1108 will
answer on the first ring. First, it recites
the Status Report, followed by:
“Warning message received by telephone
number...(the number of your present location).”
“Have a good day.”
When the Model 1108 hangs up, the
alarm is acknowledged and dial-out
stops.
• If calls remain unanswered, or if they
are received by an answering machine
or FAX, the Model 1108 continues the
dialout sequence; it waits the Intercall
Time and proceeds to dial the next
telephone number. Telephone numbers
are dialed sequentially, and this cycle
continues for the number of Max Calls
programmed. If no acknowledgment
occurs, then at the completion of Max
Calls, the alarm is automatically
acknowledged and the dial-out process
is terminated.
Variable Factors
Tone or Pulse
Callback
Acknowledgment:
TAD Enabled
Max Calls
Acknowledgment
NOTE
Acknowledging the alarm does not correct the
situation! The alarm condition will still exist until
the sensor is restored to its normal state.
83
Page 96

Sensaphone® Model 1108 User’s Manual
7.2 Example: A Dial-out Telephone Call
The following parameters are selected for demonstration
purposes:
• Model 1108 Unit ID Number is set to 555-5674.
It is currently installed at your place of business.
• Dial-out Telephone Number 1 is programmed
to 555-1234, your home telephone number.
• Voice Repetitions are set to 4.
The Model 1108 is detecting an alarm on input 2.
The telephone rings at 555-1234, your home number.
You answer the telephone and hear the following message:
“Hello, this is telephone number 555-5674. The time is 8.30 p.m.
Alert condition two exists.”
(4-seconds to hear on-site sound from unit’s microphone.)
“Hello, this is telephone number 555-5674. The time is 8.30 p.m.
Alert condition two exists.”
(4-seconds to hear on-site sound from unit’s microphone.)
“Hello, this is telephone number 555-5674. The time is 8.30 p.m.
Alert condition two exists.”
(4-seconds to hear on-site sound from unit’s microphone.)
84
“Hello, this is telephone number 555-5674. The time is 8.30 p.m.
Alert condition two exists.”
(4-seconds to hear on-site sound from unit’s microphone.)
“Indicate you have received warning message.”
NOTE
It is important that your dial-out telephone
numbers be answered by you or other authorized
personnel in order to ensure adequate response to
an alarm.
Page 97

Appendix A: Troubleshooting
Appendix A: Troubleshooting
In the event that a problem is encountered, this section will assist
you in determining the cause, so you can return the unit to its usual
monitoring routine with minimal interruption.
Most problems with the Model 1108 are easy to identify and
quickly corrected, and are found under the following general
headings:
• Communications/dial-out functions
• Temperature monitoring
• Sound level monitoring
• Other monitoring functions
If you have tried the solutions outlined in this section and are not
satisfied with the results, call Customer Service, (610) 558-2700, or
follow the guidelines for shipping the Model 1108 to Phonetics for
repair (see Appendix C).
85
Page 98

Sensaphone® Model 1108 User’s Manual
Solution
Recheck programming steps, Refer to
Chapter 4, Section 4.2.1.
Switch from the current setting: from tone to
pulse, or from pulse to tone. Refer to
Chapter 4, Section 4.3.
Reprogram Recognition Time. Set the
Recognition Time to the minimum duration
Reprogram Max Calls. It is a good idea to
set your Max Calls to at least equal the
number of dial-out telephone numbers
required to create a valid alarm. If possible,
test the new setting by deliberately creating
an alert condition. Refer to Chapter 5,
Section 5.3.
programmed. Refer to Chapter 4,
Section 4.12.1.
method) is not compatible with the
incorrectly programmed.
a) The telephone number may be
Cause
Communications / Dial-out:
1. The Model 1108 fails to dial out.
Problem
telephone line on which the Model 1108
b) Tone or pulse (the current dialing
86
is installed.
c) Recognition Time is too long. An alert
condition does not remain in effect long
enough to become a valid alarm.
d) Max Calls is set to zero.
Page 99

Appendix A: Troubleshooting
s Rings Until Answer is set at
’
The Model 1108 must be connected to a
standard (2-wire analog) telephone line, not
a digital extension to a phone system. If the
unit will not dial out and the factors
previously listed have been ruled out, try
connecting the unit to a standard residential
telephone line.
incompatible telephone line.
e) The Model 1108 is connected to an
Recheck programming of Rings Until
Answer. Refer to Chapter 4, Section 4.5.1.
programmed.
a) Rings Until Answer is incorrectly
Some telephone systems will not allow the
telephone to ring beyond 4 rings. If your
Model 1108
more than 4 rings, you may not be able to
access the unit. Try setting the Rings Until
Answer to less than 4 rings. If this does not
correct the problem, it may indicate
telephone line incompatibility. In this case,
try connecting the Model 1108 to a standard,
residential telephone line.
incompatible telephone line.
b) The Model 1108 is connected to an
the telephone when called for a
Status Report or alarm
acknowledgment.
2. The Model 1108 will not answer
87
Page 100

Sensaphone® Model 1108 User’s Manual
Solution
Cause
When calling the Model 1108, and the TAD
You did not allow the telephone to ring
Deactivate local voice mute. Refer to the
is disabled, allow the telephone to ring 10
times. Refer to Chapter 6, Section 6.1.3,
and Chapter 4, Section 4.6.3.
10 times. Note: If the TAD (telephone
answering device) is disabled, the telephone
rings ten times before the Model 1108
answers. If the TAD is enabled, the
telephone rings once before the Model 1108
answers the call.
programming steps in Chapter 4,
Section 4.9.
The local voice mute feature is in effect.
Change the number of Rings Until Answer
for the Model 1108. Refer to Chapter 4,
Reprogram Voice Reps to 1 or greater.
Refer to Chapter 4, Section 4.10.
Voice Reps is set to zero.
Section 4.5.
s number of Rings Until
’
Answer is set to equal the number of rings
set for the telephone answering device.
The Model 1108
the telephone for Callback
Acknowledgement.
(Continued from previous page)
Communications / Dial-out:
Problem
3. The Model 1108 will not answer
88
message or Status Report over the
telephone, but is silent at the
installation site.
4. The Model 1108 recites the alarm
correctly but fails to audibly recite
its alarm message when you
answer the call.
5. The Model 1108 dials out
answering device (sharing the
same line) answer incoming calls
simultaneously.
6. The Model 1108 and telephone
 Loading...