

Philips Medical Systems North America M3813C Users Manual

Philips Telehealth Solutions
Patient Telemonitoring Set
Instructions for Use

Notice
Proprietary Information
Published by Philips Lifeline Systems, a division of Philips Electronics North America Corporation.
Philips Lifeline Systems reserves the right to make changes to both this Instructions for Use and to the
product it describes. Product specifications are subject to change without notice. Nothing contained within
this Instructions for Use is intended as any offer, warranty, promise or contractual condition, and must
not be taken as such.
© Koninklijke Philips Electronics N.V. 2011
All Rights are reserved. Reproduction in whole or in part in any form or by any means, electrical,
mechanical or otherwise, is prohibited without the written consent of the copyright holder.
Document number:
M3810-90096
Issue number 7, May 2011
Philips Lifeline Systems
111 Lawrence Street
Framingham, MA 01702
USA
Unauthorized copying of this publication is a copyright infringement and will reduce the ability of Philips
Lifeline Systems to provide accurate and up-to-date information to users. Non-Philips product names may
be trademarks of their respective owners.
Published in the United States of America

Printing History
New editions of this document will incorporate all material updated since the previous edition. Update
packages may be issued between editions and contain replacement and additional pages to be merged by a
revision date at the bottom of the page. Note that pages which are rearranged due to changes on a
previous page are not considered revised.
The documentation printing date and part number indicate its current edition. The printing date changes
when a new edition is printed. (Minor corrections and updates which are incorporated at reprint do not
cause the date to change.) The document part number changes when extensive technical changes are
incorporated.
All Editions and Updates of this manual and their publication dates are listed below.
First Edition . . . . . . . . . . . . . . . . . . . . . . . . . . . October 2002
Second Edition . . . . . . . . . . . . . . . . . . . . . . . . . . . . July 2006
Third Edition. . . . . . . . . . . . . . . . . . . . . . . . . . . . . . May 2007
Fourth Edition. . . . . . . . . . . . . . . . . . . . . . . . . . . . . May 2008
Fifth Edition . . . . . . . . . . . . . . . . . . . . . . . . . . . October 2008
Sixth Edition. . . . . . . . . . . . . . . . . . . . . . . . . . . . . . July 2009
Seventh Edition. . . . . . . . . . . . . . . . . . . . . . . . . . . . May 2011
Personal Health Information Security
Telehealth equipment collects personal information in the form of vital sign measurements and survey
responses that help your health care organization manage you health care effectively. These data are
stored and protected on a secure network and will not be disclosed for purposes other than for the
management of your healthcare. Any unintentional disclosure of your personal information will be
reported to your health care organization.
Trademarks
LifeScan OneTouch® Basic® and LifeScan OneTouch Profile® are all registered trademarks of
LifeScan, a Johnson&Johnson Company.
Lifeline® is a registered trademark of Philips LifeLine. Bayer Contour® is a registered trademark of
BAYER.

Content s
1. Introduction . . . . . . . . . . . . . . . . . . . . . . . . . . . . . . . . . . . . . . . . . . . . . . . . . . 1
Welcome . . . . . . . . . . . . . . . . . . . . . . . . . . . . . . . . . . . . . . . . . . . . . . . . . . . . . . . . . . . 1
How the System Works . . . . . . . . . . . . . . . . . . . . . . . . . . . . . . . . . . . . . . . . . . . . . 1
Keeping the System Working . . . . . . . . . . . . . . . . . . . . . . . . . . . . . . . . . . . . . . . . . 1
Philips Telemonitoring Services System . . . . . . . . . . . . . . . . . . . . . . . . . . . . . . . . . . . 1
Safety and Precautions . . . . . . . . . . . . . . . . . . . . . . . . . . . . . . . . . . . . . . . . . . . . . . . . 2
Follow Instructions . . . . . . . . . . . . . . . . . . . . . . . . . . . . . . . . . . . . . . . . . . . . . . . . . 2
Document Conventions . . . . . . . . . . . . . . . . . . . . . . . . . . . . . . . . . . . . . . . . . . . . . 2
Bold Typeface. . . . . . . . . . . . . . . . . . . . . . . . . . . . . . . . . . . . . . . . . . . . . . . . . . . . . 4
Display Symbols . . . . . . . . . . . . . . . . . . . . . . . . . . . . . . . . . . . . . . . . . . . . . . . . . . . . . 4
2. Philips Telemonitoring Set . . . . . . . . . . . . . . . . . . . . . . . . . . . . . . . . . . . . . . 7
Overview . . . . . . . . . . . . . . . . . . . . . . . . . . . . . . . . . . . . . . . . . . . . . . . . . . . . . . . . . . . 7
Device Description. . . . . . . . . . . . . . . . . . . . . . . . . . . . . . . . . . . . . . . . . . . . . . . . . . . . 7
TeleStation . . . . . . . . . . . . . . . . . . . . . . . . . . . . . . . . . . . . . . . . . . . . . . . . . . . . . . . 7
Scale. . . . . . . . . . . . . . . . . . . . . . . . . . . . . . . . . . . . . . . . . . . . . . . . . . . . . . . . . . . . 9
Blood Pressure Monitor . . . . . . . . . . . . . . . . . . . . . . . . . . . . . . . . . . . . . . . . . . . . 11
Rhythm Strip Recorde . . . . . . . . . . . . . . . . . . . . . . . . . . . . . . . . . . . . . . . . . . . . . 12
Pulse Oximeter. . . . . . . . . . . . . . . . . . . . . . . . . . . . . . . . . . . . . . . . . . . . . . . . . . . 13
Glucose Meter Cable . . . . . . . . . . . . . . . . . . . . . . . . . . . . . . . . . . . . . . . . . . . . . . 16
Device Usage . . . . . . . . . . . . . . . . . . . . . . . . . . . . . . . . . . . . . . . . . . . . . . . . . . . . . . 17
TeleStation . . . . . . . . . . . . . . . . . . . . . . . . . . . . . . . . . . . . . . . . . . . . . . . . . . . . . . 17
Scale. . . . . . . . . . . . . . . . . . . . . . . . . . . . . . . . . . . . . . . . . . . . . . . . . . . . . . . . . . . 20
Blood Pressure Monitor . . . . . . . . . . . . . . . . . . . . . . . . . . . . . . . . . . . . . . . . . . . . 26
Rhythm Strip Recorder. . . . . . . . . . . . . . . . . . . . . . . . . . . . . . . . . . . . . . . . . . . . . 31
Pulse Oximeter. . . . . . . . . . . . . . . . . . . . . . . . . . . . . . . . . . . . . . . . . . . . . . . . . . . 32
Glucose Meter . . . . . . . . . . . . . . . . . . . . . . . . . . . . . . . . . . . . . . . . . . . . . . . . . . . 36
3. Maintenance . . . . . . . . . . . . . . . . . . . . . . . . . . . . . . . . . . . . . . . . . . . . . . . . . 39
Overview . . . . . . . . . . . . . . . . . . . . . . . . . . . . . . . . . . . . . . . . . . . . . . . . . . . . . . . . . . 39
Cleaning Devices. . . . . . . . . . . . . . . . . . . . . . . . . . . . . . . . . . . . . . . . . . . . . . . . . . . . 39
Storing Devices . . . . . . . . . . . . . . . . . . . . . . . . . . . . . . . . . . . . . . . . . . . . . . . . . . . . . 39
Blood Pressure Monitor . . . . . . . . . . . . . . . . . . . . . . . . . . . . . . . . . . . . . . . . . . . . 40
Rhythm Strip Recorder. . . . . . . . . . . . . . . . . . . . . . . . . . . . . . . . . . . . . . . . . . . . . 40
Pulse Oximeter. . . . . . . . . . . . . . . . . . . . . . . . . . . . . . . . . . . . . . . . . . . . . . . . . . . 40
Replacing Batteries . . . . . . . . . . . . . . . . . . . . . . . . . . . . . . . . . . . . . . . . . . . . . . . . . . 40
Standard Scale and Steady Scale. . . . . . . . . . . . . . . . . . . . . . . . . . . . . . . . . . . . 40
Blood Pressure Monitor . . . . . . . . . . . . . . . . . . . . . . . . . . . . . . . . . . . . . . . . . . . . 42
Rhythm Strip Recorder. . . . . . . . . . . . . . . . . . . . . . . . . . . . . . . . . . . . . . . . . . . . . 44
Pulse Oximeter. . . . . . . . . . . . . . . . . . . . . . . . . . . . . . . . . . . . . . . . . . . . . . . . . . . 44
4. Troubleshooting. . . . . . . . . . . . . . . . . . . . . . . . . . . . . . . . . . . . . . . . . . . . . . 45
Overview . . . . . . . . . . . . . . . . . . . . . . . . . . . . . . . . . . . . . . . . . . . . . . . . . . . . . . . . . . 45
Radio Test . . . . . . . . . . . . . . . . . . . . . . . . . . . . . . . . . . . . . . . . . . . . . . . . . . . . . . 45
Contents I

Troubleshooting Tables. . . . . . . . . . . . . . . . . . . . . . . . . . . . . . . . . . . . . . . . . . . . . . . 46
TeleStation . . . . . . . . . . . . . . . . . . . . . . . . . . . . . . . . . . . . . . . . . . . . . . . . . . . . . . 46
Scale . . . . . . . . . . . . . . . . . . . . . . . . . . . . . . . . . . . . . . . . . . . . . . . . . . . . . . . . . . 49
Standard Scale. . . . . . . . . . . . . . . . . . . . . . . . . . . . . . . . . . . . . . . . . . . . . . . . . . . 49
Steady Scale . . . . . . . . . . . . . . . . . . . . . . . . . . . . . . . . . . . . . . . . . . . . . . . . . . . . 50
Rhythm Strip Recorder. . . . . . . . . . . . . . . . . . . . . . . . . . . . . . . . . . . . . . . . . . . . . 51
Blood Pressure Monitor . . . . . . . . . . . . . . . . . . . . . . . . . . . . . . . . . . . . . . . . . . . . 51
Pulse Oximeter. . . . . . . . . . . . . . . . . . . . . . . . . . . . . . . . . . . . . . . . . . . . . . . . . . . 53
5. Specifications and Regulatory . . . . . . . . . . . . . . . . . . . . . . . . . . . . . . . . . . 55
Overview. . . . . . . . . . . . . . . . . . . . . . . . . . . . . . . . . . . . . . . . . . . . . . . . . . . . . . . . . . 55
Indications for Use . . . . . . . . . . . . . . . . . . . . . . . . . . . . . . . . . . . . . . . . . . . . . . . . 55
Contra-indications. . . . . . . . . . . . . . . . . . . . . . . . . . . . . . . . . . . . . . . . . . . . . . . . . 55
Specifications . . . . . . . . . . . . . . . . . . . . . . . . . . . . . . . . . . . . . . . . . . . . . . . . . . . . . . 55
Description . . . . . . . . . . . . . . . . . . . . . . . . . . . . . . . . . . . . . . . . . . . . . . . . . . . . . . 55
Technical Specifications. . . . . . . . . . . . . . . . . . . . . . . . . . . . . . . . . . . . . . . . . . . . 59
Emissions and Immunity. . . . . . . . . . . . . . . . . . . . . . . . . . . . . . . . . . . . . . . . . . . . 62
Avoiding Electro-magnetic Interference . . . . . . . . . . . . . . . . . . . . . . . . . . . . . . . . 62
Emissions and Immunity. . . . . . . . . . . . . . . . . . . . . . . . . . . . . . . . . . . . . . . . . . . . 64
Regulatory Information . . . . . . . . . . . . . . . . . . . . . . . . . . . . . . . . . . . . . . . . . . . . . . . 68
FCC Regulations . . . . . . . . . . . . . . . . . . . . . . . . . . . . . . . . . . . . . . . . . . . . . . . . . 68
Telephone Regulatory Notice. . . . . . . . . . . . . . . . . . . . . . . . . . . . . . . . . . . . . . . . 69
Rights of the Telephone Company. . . . . . . . . . . . . . . . . . . . . . . . . . . . . . . . . . . . 69
Canadian Regulations . . . . . . . . . . . . . . . . . . . . . . . . . . . . . . . . . . . . . . . . . . . . . 70
6. Introducción. . . . . . . . . . . . . . . . . . . . . . . . . . . . . . . . . . . . . . . . . . . . . . . . . 73
Bienvenido . . . . . . . . . . . . . . . . . . . . . . . . . . . . . . . . . . . . . . . . . . . . . . . . . . . . . . . . 73
Cómo funciona el sistema . . . . . . . . . . . . . . . . . . . . . . . . . . . . . . . . . . . . . . . . . . 73
Funcionamiento continuo del sistema . . . . . . . . . . . . . . . . . . . . . . . . . . . . . . . . . 73
Sistema de servicios de telemonitorización Philips. . . . . . . . . . . . . . . . . . . . . . . . . . 73
Seguridad y precauciones. . . . . . . . . . . . . . . . . . . . . . . . . . . . . . . . . . . . . . . . . . . . . 74
Siga las instrucciones. . . . . . . . . . . . . . . . . . . . . . . . . . . . . . . . . . . . . . . . . . . . . . 74
Convenciones seguidas en este documento . . . . . . . . . . . . . . . . . . . . . . . . . . . . 74
En negrita. . . . . . . . . . . . . . . . . . . . . . . . . . . . . . . . . . . . . . . . . . . . . . . . . . . . . . . 76
Símbolos en pantalla. . . . . . . . . . . . . . . . . . . . . . . . . . . . . . . . . . . . . . . . . . . . . . . . . 76
7. Conjunto de dispositivos para telemonitorización Philips . . . . . . . . . . . 79
Generalidades. . . . . . . . . . . . . . . . . . . . . . . . . . . . . . . . . . . . . . . . . . . . . . . . . . . . . . 79
Descripción de los dispositivos. . . . . . . . . . . . . . . . . . . . . . . . . . . . . . . . . . . . . . . . . 79
TeleEstación. . . . . . . . . . . . . . . . . . . . . . . . . . . . . . . . . . . . . . . . . . . . . . . . . . . . . 79
Báscula. . . . . . . . . . . . . . . . . . . . . . . . . . . . . . . . . . . . . . . . . . . . . . . . . . . . . . . . . 81
Monitor de tensión arterial (MTA). . . . . . . . . . . . . . . . . . . . . . . . . . . . . . . . . . . . . 83
Registrador del ritmo en tiras (RRT). . . . . . . . . . . . . . . . . . . . . . . . . . . . . . . . . . . 84
Pulsioxímetro . . . . . . . . . . . . . . . . . . . . . . . . . . . . . . . . . . . . . . . . . . . . . . . . . . . . 85
Cable del glucómetro . . . . . . . . . . . . . . . . . . . . . . . . . . . . . . . . . . . . . . . . . . . . . . 88
Uso de los dispositivos . . . . . . . . . . . . . . . . . . . . . . . . . . . . . . . . . . . . . . . . . . . . . . . 89
TeleEstación. . . . . . . . . . . . . . . . . . . . . . . . . . . . . . . . . . . . . . . . . . . . . . . . . . . . . 89
II Contents

Báscula. . . . . . . . . . . . . . . . . . . . . . . . . . . . . . . . . . . . . . . . . . . . . . . . . . . . . . . . . 92
Monitor de tensión arterial (MTA). . . . . . . . . . . . . . . . . . . . . . . . . . . . . . . . . . . . . 98
Registrador del ritmo en tiras (RRT) . . . . . . . . . . . . . . . . . . . . . . . . . . . . . . . . . 104
Pulsioxímetro . . . . . . . . . . . . . . . . . . . . . . . . . . . . . . . . . . . . . . . . . . . . . . . . . . . 105
Glucómetro. . . . . . . . . . . . . . . . . . . . . . . . . . . . . . . . . . . . . . . . . . . . . . . . . . . . . 109
8. Mantenimiento. . . . . . . . . . . . . . . . . . . . . . . . . . . . . . . . . . . . . . . . . . . . . . 113
Generalidades. . . . . . . . . . . . . . . . . . . . . . . . . . . . . . . . . . . . . . . . . . . . . . . . . . . . . 113
Limpieza de dispositivos. . . . . . . . . . . . . . . . . . . . . . . . . . . . . . . . . . . . . . . . . . . . . 113
Almacenamiento . . . . . . . . . . . . . . . . . . . . . . . . . . . . . . . . . . . . . . . . . . . . . . . . . . . 114
Monitor de tensión arterial (MTA). . . . . . . . . . . . . . . . . . . . . . . . . . . . . . . . . . . . 114
Registrador del ritmo en tiras (RRT) . . . . . . . . . . . . . . . . . . . . . . . . . . . . . . . . . 114
Pulsioxímetro . . . . . . . . . . . . . . . . . . . . . . . . . . . . . . . . . . . . . . . . . . . . . . . . . . . 114
Sustitución de las baterías . . . . . . . . . . . . . . . . . . . . . . . . . . . . . . . . . . . . . . . . . . . 114
Báscula estándar y báscula fija . . . . . . . . . . . . . . . . . . . . . . . . . . . . . . . . . . . . . 115
Monitor de tensión arterial (MTA). . . . . . . . . . . . . . . . . . . . . . . . . . . . . . . . . . . . 116
Registrador del ritmo en tiras (RRT) . . . . . . . . . . . . . . . . . . . . . . . . . . . . . . . . . 118
Pulsioxímetro . . . . . . . . . . . . . . . . . . . . . . . . . . . . . . . . . . . . . . . . . . . . . . . . . . . 118
9. Solución de problemas. . . . . . . . . . . . . . . . . . . . . . . . . . . . . . . . . . . . . . . 121
Generalidades. . . . . . . . . . . . . . . . . . . . . . . . . . . . . . . . . . . . . . . . . . . . . . . . . . . . . 121
Prueba de radio . . . . . . . . . . . . . . . . . . . . . . . . . . . . . . . . . . . . . . . . . . . . . . . . . 121
Tablas de solución de problemas . . . . . . . . . . . . . . . . . . . . . . . . . . . . . . . . . . . . . . 122
TeleEstación. . . . . . . . . . . . . . . . . . . . . . . . . . . . . . . . . . . . . . . . . . . . . . . . . . . . 122
Báscula. . . . . . . . . . . . . . . . . . . . . . . . . . . . . . . . . . . . . . . . . . . . . . . . . . . . . . . . 126
Báscula estándar . . . . . . . . . . . . . . . . . . . . . . . . . . . . . . . . . . . . . . . . . . . . . . . . 126
Báscula fija. . . . . . . . . . . . . . . . . . . . . . . . . . . . . . . . . . . . . . . . . . . . . . . . . . . . . 127
Registrador del ritmo en tiras (RRT) . . . . . . . . . . . . . . . . . . . . . . . . . . . . . . . . . 127
Monitor de tensión arterial (MTA). . . . . . . . . . . . . . . . . . . . . . . . . . . . . . . . . . . . 128
Pulsioxímetro . . . . . . . . . . . . . . . . . . . . . . . . . . . . . . . . . . . . . . . . . . . . . . . . . . . 129
10. Especificaciones e información normativa . . . . . . . . . . . . . . . . . . . . . 131
Generalidades . . . . . . . . . . . . . . . . . . . . . . . . . . . . . . . . . . . . . . . . . . . . . . . . . . . . .131
Indicaciones . . . . . . . . . . . . . . . . . . . . . . . . . . . . . . . . . . . . . . . . . . . . . . . . . . . . 131
Contraindicaciones. . . . . . . . . . . . . . . . . . . . . . . . . . . . . . . . . . . . . . . . . . . . . . . 131
Especificaciones . . . . . . . . . . . . . . . . . . . . . . . . . . . . . . . . . . . . . . . . . . . . . . . . . . . 131
Descripción . . . . . . . . . . . . . . . . . . . . . . . . . . . . . . . . . . . . . . . . . . . . . . . . . . . . .132
Especificaciones técnicas . . . . . . . . . . . . . . . . . . . . . . . . . . . . . . . . . . . . . . . . . .136
Emisiones e inmunidad . . . . . . . . . . . . . . . . . . . . . . . . . . . . . . . . . . . . . . . . . . . .138
Cómo evitar interferencia electromagnética . . . . . . . . . . . . . . . . . . . . . . . . . . . .139
Emisiones e inmunidad . . . . . . . . . . . . . . . . . . . . . . . . . . . . . . . . . . . . . . . . . . . .141
Información normativa . . . . . . . . . . . . . . . . . . . . . . . . . . . . . . . . . . . . . . . . . . . . . . .145
Normativa de la FCC (Comisión Federal de Comunicaciones de Estados Unidos)
. . . . . . . . . . . . . . . . . . . . . . . . . . . . . . . . . . . . . . . . . . . . . . . . . . . . . . . . . . . . . . 145
Aviso de normativa telefónica . . . . . . . . . . . . . . . . . . . . . . . . . . . . . . . . . . . . . . 145
Derechos de la compañía telefónica . . . . . . . . . . . . . . . . . . . . . . . . . . . . . . . . . 146
Reglamentaciones canadienses . . . . . . . . . . . . . . . . . . . . . . . . . . . . . . . . . . . . 147
Contents III


Welcome
Welcome
1
Introduction
Welcome to Philips Telemonitoring Services.
When you use this product, you’ll take a few minutes every day to measure your
weight, vital signs, and/or glucose.
These measurements will help you and your healthcare provider make better
decisions about your care. You are providing information that can help improve
your quality of life.
How the System Works
Keeping the System Working
With this system, it’s easy to take your measurements from the comfort of your
home. The measurements are sent over your phone line or using the eDevice
Cellular Accessory to your healthcare provider’s computer.
If the TeleStation is connected to a landline telephone, feel free to talk on your
landline phone at any time -- the system is “smart” enough to know when the
phone line is open. It will wait and then send the information after you hang up.
If at any time you suspect something is wrong with any of the devices,
immediately contact your healthcare provider. Philips will replace any defective
device. You can also cross-check your results with another device if additional
measurement devices of the same type are available to you.
This
Instructions for Use contains easy-to-follow steps for taking your
measurements. It also shows you how to maintain the devices so that they will
continue to take accurate readings.
Thank you for taking an active role in your home healthcare plan! Philips and
your healthcare provider applaud your efforts to actively participate in your health
care plan.
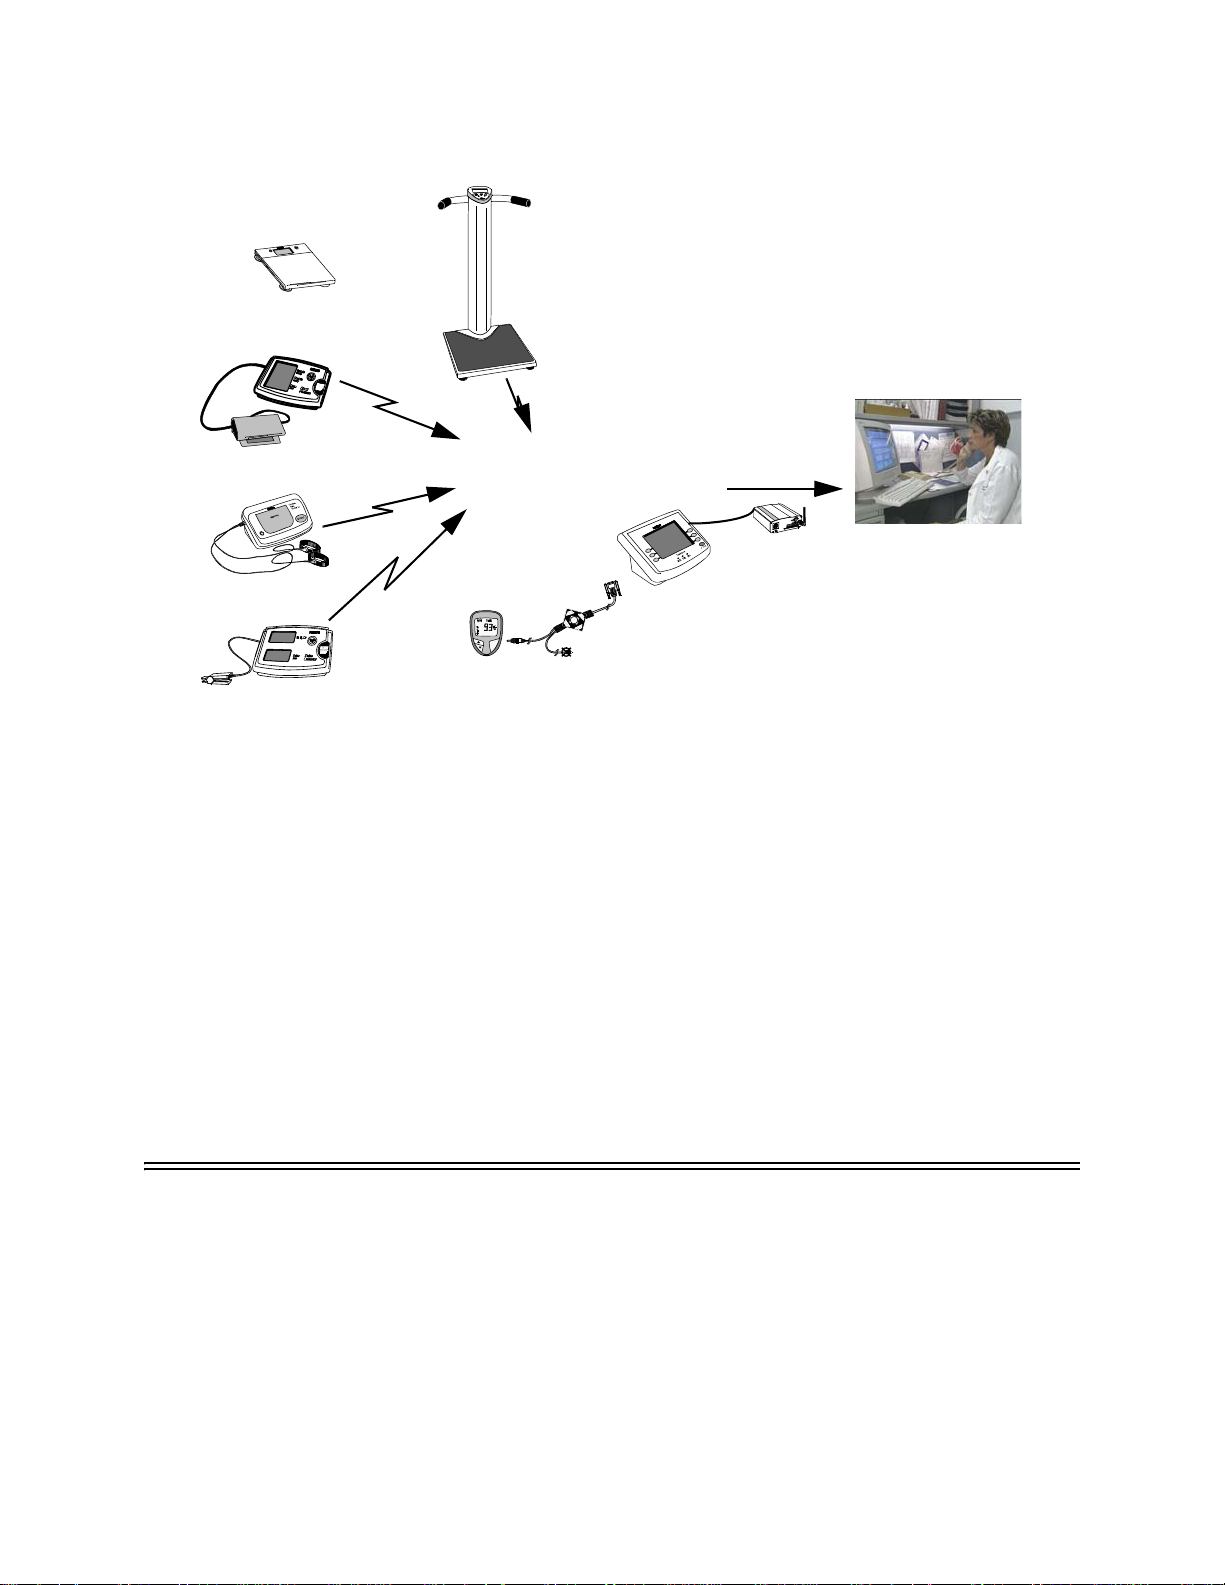
Philips Telemonitoring Services System
Your Philips Telemonitoring Services system includes a set of measurement
devices known as the
measurement -- such as weight, blood pressure, pulse rate, heart rhythm, blood
oxygen levels -- and then wirelessly sends that measurement to the TeleStation. A
patient’s glucose meter can also send glucose measurements to a TeleStation using
a special cable.
Patient Telemonitoring Set. Each device takes an important
Your healthcare provider decides whether you will use one or all of the
measurement devices below. The TeleStation is the "communications center." It
receives your measurements from the devices and sends them over your phone line
or using the eDevice Cellular Accessory to your healthcare provider’s computer.
The computer keeps a record of all of your vital sign measurements for review by
your healthcare provider.
Introduction 1
Safety and Precautions
Standard or
Steady
Radio
Transmission
TeleStation
Telephone or
Cellular
Transmission
Healthcare
Provider
Scale
Blood Pressure
Monitor
Rhythm Strip Recorder
Pulse Oximeter
Glucose Meter
Patient Telemonitoring Set
Safety and Precautions
Follow Instructions
Document Conventions
Warning • Do not let anyone else use these devices. They are provided for your use
Follow your doctor’s instructions about symptoms that require you to contact your
healthcare provider. Use of these devices is not intended to replace your existing
therapy or drug administration. Remember, only your healthcare provider is trained
to interpret the results. He or she will tell you when and how often to take your
vital signs. Please read all of the instructions in this guide before using the Philips
Telemonitoring System and follow the instructions carefully.
The following conventions will be used in this Instructions for Use to alert you to
special or important information in the text.
Warnings Warnings are information you should know to avoid a hazard that could result in
severe injury or death.
Observe the following Warnings with all devices of the Philips Telemonitoring
System.
only.
• Do not swap devices with a neighbor or family member who has the same or
similar system.
• These devices are not intended to be used to call for emergency medical
attention or response.
• Do not try to fix a device yourself. If there’s a problem, call your healthcare
provider.
2 Introduction

Safety and Precautions
• Do not use a device with the battery door removed.
• Avoid exposing the devices to extremes in temperature, humidity, direct
sunlight, shock, dust spill, or standing water.
• Do not let children use the device.
• Throw away packing materials and plastic bags right away. They are a
hazard for children.
• Be careful with small parts that can be removed from a device and
swallowed, such as the power adapter clip. They are hazards for children and
pets.
• To prevent shock, connect cables only as described in these Instructions for
Use.
• Do not connect anything to this system other than Philips Telemonitoring
Services devices or glucose meters approved by your healthcare provider.
• To prevent shock, do not use devices during a lightning storm.
• Call your healthcare provider if you are injured using any device.
• External cables present on some devices could pose a choking hazard. Keep
safely away from children and pets and exercise caution when storing
devices near your sleeping areas to avoid accidental entanglement.
Cautions Cautions are information you should know to avoid a hazard that could result in
personal injury or property damage.
Observe the following Cautions with all devices of the Philips Telemonitoring
System.
Cautions • Read these Instructions for Use carefully before using devices.
• Use these devices only as directed by your healthcare provider.
• Follow your physician’s instructions regarding symptoms that require direct
contact with your healthcare provider.
• Use of these device is not a substitute for medical care.
• To avoid electrical shock, if any device has damaged cables with exposed
wires do not use the device, do not remove the battery cover and contact your
healthcare provider to replace the device immediately.
• To avoid electrical shock, when replacing the batteries do not come in
contact with battery compartment terminals.
Notes Notes contain additional information on usage of the Patient Telemonitoring
System and its devices.
Note
Introduction 3
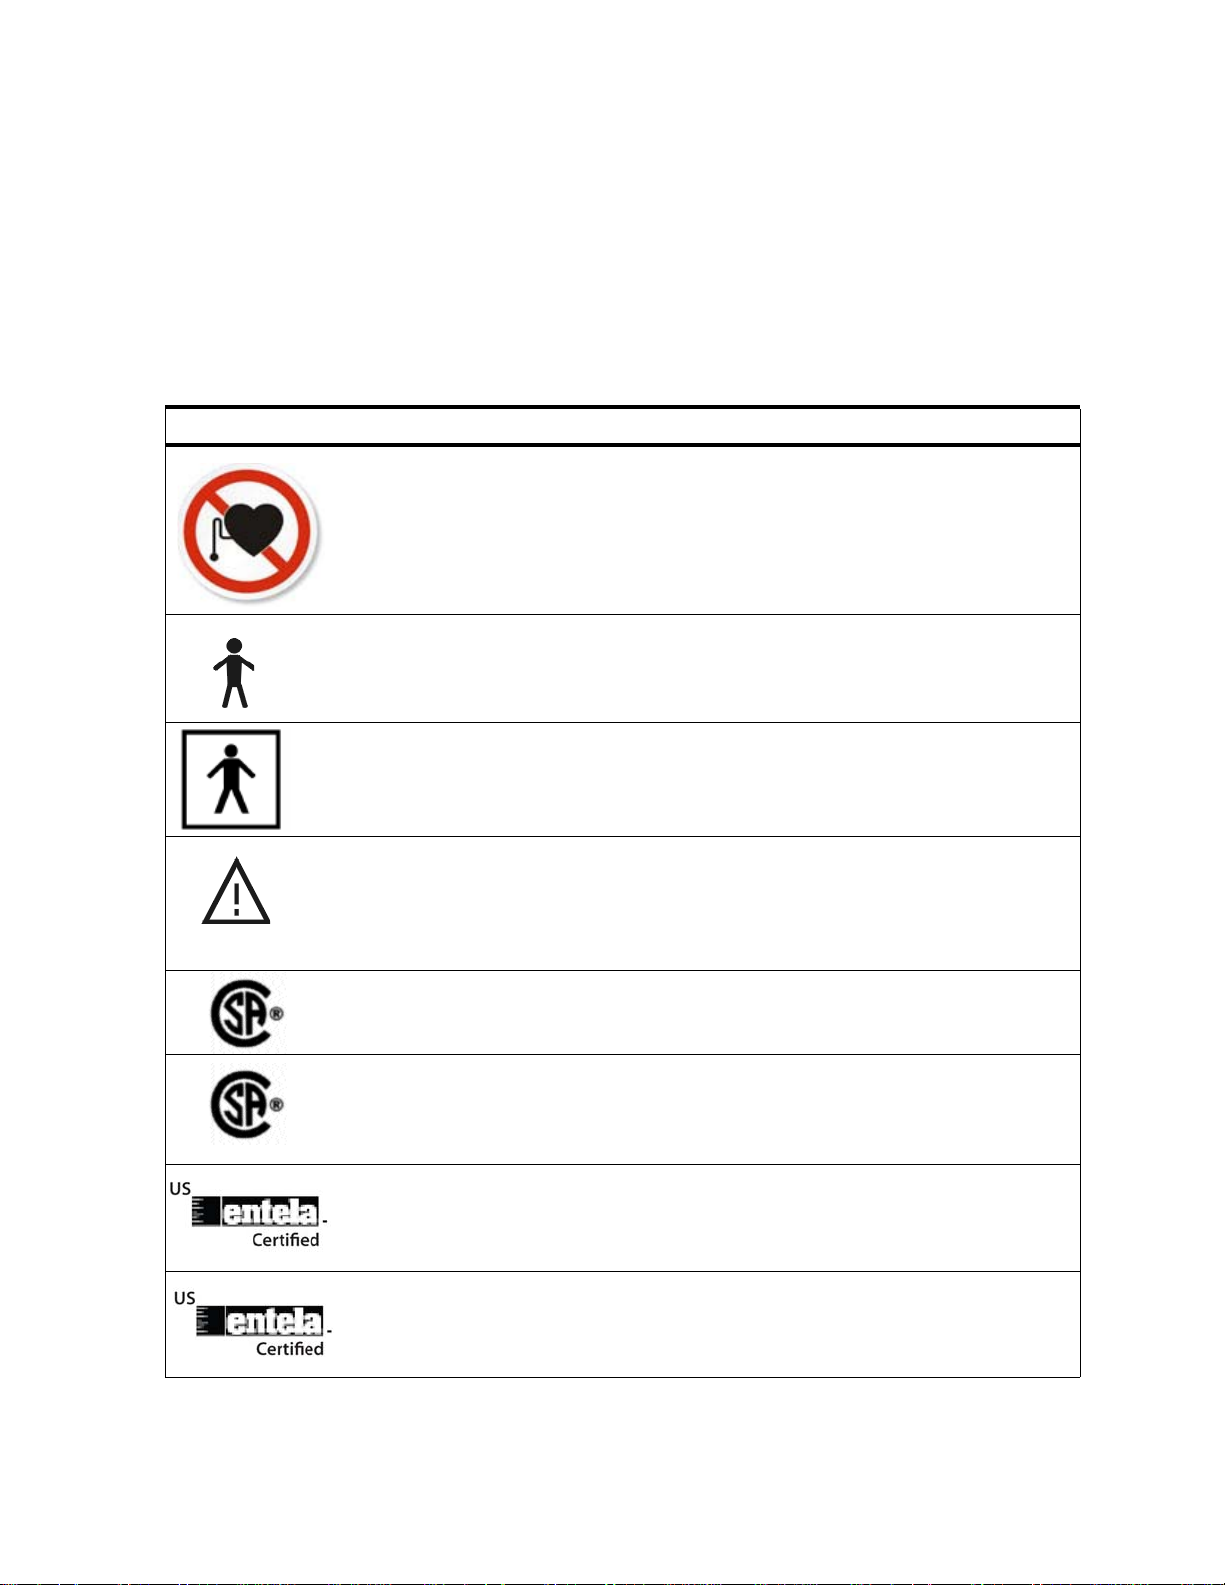
Display Symbols
US
US
C
C
C
Bold Typeface Objects of actions in procedures appear in bold typeface, as shown in the following
example:
Step 1. Select the Update button.
Display Symbols
A number of symbols are displayed on various devices or in documentation of the
Philips Telemonitoring System. Their meaning and the devices on which they may
appear are given in the following table.
Symbol Description Applicable Devices
ISO 7010-P007 - Pacemaker Prohibition Symbol.
When this symbol is present, people with pacemakers
should remain at least 28" away from the device with
the symbol.
Type B Patient Applied Parts as defined in
IEC 60601-1.
Not suitable for direct cardiac application.
Type BF Patient Applied Parts as defined in
IEC 60601-1.
Not suitable for direct cardiac application.
Attention: Consult accompanying documents.
Meets CSA 60601-1, UL 60601-1.
Meets standards CSA 60601-1, UL 60601-1.
M3812 Telestation eDevice
Cellular Accessory
Scale (M3813B, M3813C)
Blood Pressure Monitor
Rhythm Strip Recorder
Pulse Oximeter (M3814A)
Pulse Oximeter (M3814B)
TeleStation
Scale (M3813B, M3813C)
Blood Pressure Monitor
Rhythm Strip Recorder
Pulse Oximeter
Blood Pressure Monitor,
Scale, Pulse Oximeter
(A Models)
Blood Pressure Monitor,
Scale, Pulse Oximeter
(B Models)
Meets UL-1950, CSA-950, IEC-60950 standards. TeleStation
Meets standards CSA 60601-1, UL 60601-1. Pulse Oximeter (M3814A)
4 Introduction
Display Symbols
Symbol Description Applicable Devices
In TelePort serial data port for connection to Philips
TeleStation
devices only.
AC Power adapter connection (9.0VAC/500mA
TeleStation
Use Philips-supplied adapter only).
Telephone or telephone line. TeleStation
Meets Class B standards.
Meets Part 15 standards.
TeleStation
Standard Scale
Steady Scale
Blood Pressure Monitor
Rhythm Strip Recorder
Pulse Oximeter
Standard Scale
Steady Scale
Blood Pressure Monitor
Rhythm Strip Recorder
Pulse Oximeter
Meets Part 68 standards. TeleStation
Alarm Inhibit. Pulse Oximeter (M3814B)
Introduction 5


Overview
TeleStation
go back
TeleStation (M3812B/C)
on/survey
waiting
holding
results
using
phone
on/survey
waiting
holding
results
using
phone
Chapter 2 provides a detailed description of the devices of the Philips
Telemonitoring Set and how to use them
Device Description
The Philips Telemonitoring Set consists of a TeleStation, which serves as the
"communications center" of the system, and devices that measure important
healthcare vital signs -- Scale (weight), Blood Pressure Monitor (blood pressure),
Rhythm Strip Recorder (heart rhythm), Pulse Oximeter (blood oxygen levels, pulse
rate), and Glucose Meter Cable (glucose level).
Note: The PTS system provides only a cable for connecting the patient’s glucose
meter to the system.
Overview
2
Philips Telemonitoring Set
.
This section provides a brief description of each of these devices. More detailed
descriptions of how to use each device to take a measurement are given in the
sections that follow.
TeleStation After you take a measurement, such as weight, the TeleStation receives the result.
It then sends the result to your healthcare provider’s computer or over the cellular
telephone network using the eDevice Cellular Accessory.
If your TeleStation is connected to a landline, and you pick up your telephone
while the TeleStation is dialing or sending the result, you will not hear a dial tone.
Hang up the phone and wait for 5 seconds. Then make your call. The TeleStation
will send the result when the phone line is open.
Your healthcare provider will call you if your results are not received.
Indicators. The TeleStation has lights on the front that indicate what it is
currently doing.
The on or on/survey waiting light stays lit as long as the TeleStation is plugged
in.
Philips Telemonitoring Set 7

Device Description
If you have the TeleStation and the on/survey waiting light is flashing, you
have questions to answer. Your healthcare provider may activate the TeleStation to
beep every 60 seconds to alert you that a survey is waiting.
The data or holding results light comes on when the TeleStation receives your
measurement results and stays on until those results have been sent.
The using phone light comes on when the TeleStation is sending your results to
your healthcare provider, even if you have a TeleStation with an eDevice Cellular
Accessory (not connected to your phone phone line.)
Warning • When using the eDevice Cellular Accessory, people with Pacemakers should
remain at least 28 inches away from the eDevice Cellular Accessory
(attached to the back of the TeleStation.)
•Use only the P
– Do not plac
– Plu
g the adapter into an outlet near the TeleStation for easy access.
– Unplu
• Do not plac
hilips-supplied power adapter for the TeleStation.
e anything on top of the adapter.
g the adapter from the outlet to disconnect.
e the TeleStation where anyone, especially children, can step on,
trip over or get tangled in phone or power adapter cords.
• Do not p
lace the TeleStation near running water or where liquids (for
example, a cup of coffee or water in a vase of flowers) might spill onto it.
• Unplu
g the power and phone cords, and the eDevice Cellular Accessory (if
applicable) before cleaning the TeleStation and prior to an impending
lightning storm.
• Do not pu
• Do not overloa
• If you have a personal response service (exc
Lifeline
t lighted tobacco products or candles on the TeleStation.
d circuits where the TeleStation is installed.
ept for
Systems), it must be installed on its own phone line (not just a
separate telephone jack) or you must use an eDevice Cellular Accessory. If
you have a Lifeline
System personal response system or Lifeline System
Telephone, ensure that the TeleStation is plugged into the phone jack labeled
AUX or
• Do not to
on the back of the Lifeline unit.
uch, use, clean, or handle the TeleStation or your connected
glucose meter during a thunderstorm.
• If you are using the eDevice Cellular Accessory wit
h the TeleStation, the
second phone jack on the TeleStation cannot be used.
• Do not connect the
TeleStation to both an eDevice Cellular Accessory and a
land line telephone or any other device that uses a phone line.
Caution • Avoid placing the TeleStation on a metal surface or inside a metal enclosure
as it can interfere with the radio signal.
• Do not use
electronic devices, such as cordless and cellular phones and
computers, near the TeleStation
8 Philips Telemonitoring Set
Device Description
Display
Platform
• Avoid placing large appliances or metal furniture near the TeleStation as they
can block radio signals from the measurement devices.
• High temperatures can affect the LCD screen of your TeleStation.
– Choose a location away from direct sunlight.
– Operate the TeleStation at room temperature.
• Make sure that the TeleStation is plugged into its phone jack and electrical
outlet at all times, except when cleaning or prior to an impending lightning
storm.
• Make sure that a light switch or power strip does not turn off power to the
TeleStation.
• If using a land line connection, clear voice mail messages. Telephone
services that modify the dial tone, such as voice mail, can interfere with
transmissions made by the TeleStation.
• If you are using a glucose meter connected to your TeleStation:
– Follow the manufacturer’s instructions, including the action to take for error
conditions presented by the glucose meter itself.
– Follow any additional instructions from your healthcare provider.
– For LifeScan OneTouch Glucose Meters only, do not take glucose
measurements while your glucose meter is connected to your TeleStation.
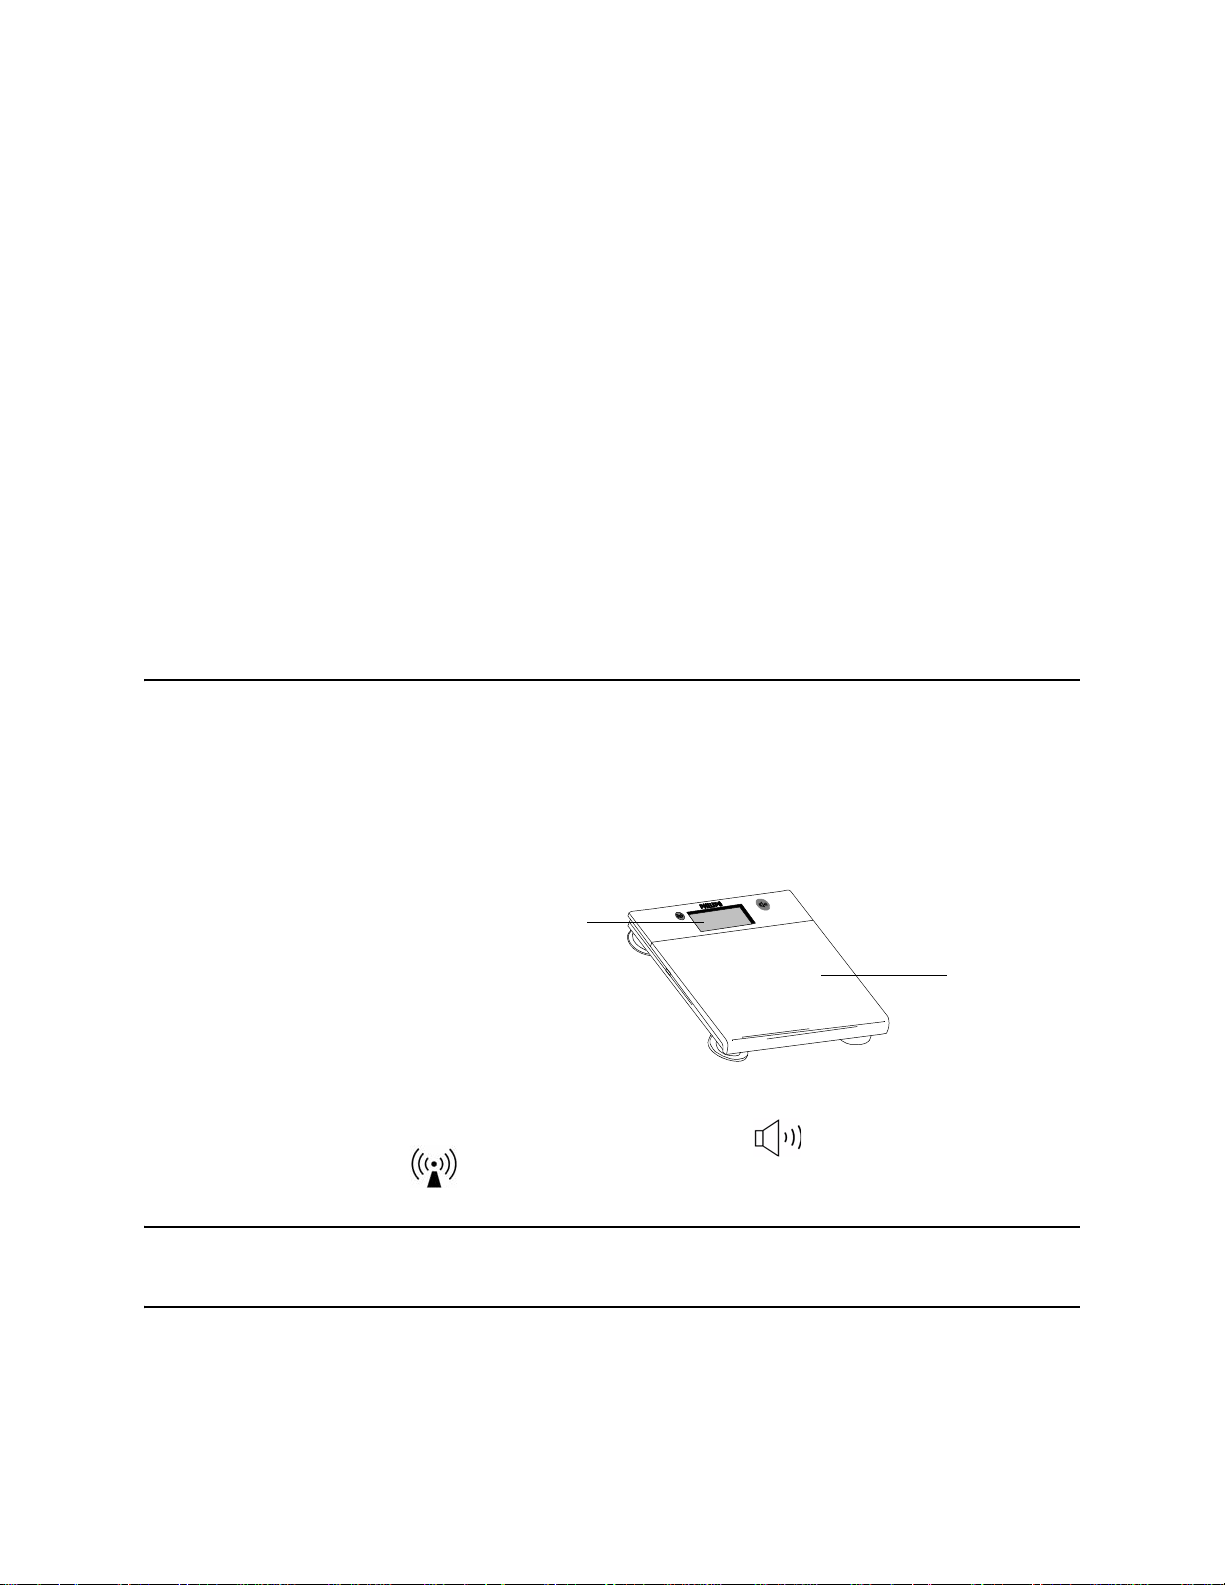
Scale You may have either a Standard Scale or a Steady Scale. Both scales speak your
weight.
Standard Scale. The Standard Scale (M3813B) is for people who can get on
and off the Scale without help. It has a maximum weight limit of 440 lbs (200
kgs).
The scale announces your weight (in English or Spanish).
The front panel has a Volume control button and a Radio Test
button .
Batteries are stored underneath the platform.
Note If you don’t feel comfortable taking your weight using the Standard Scale, contact
your healthcare provider .
Philips Telemonitoring Set 9
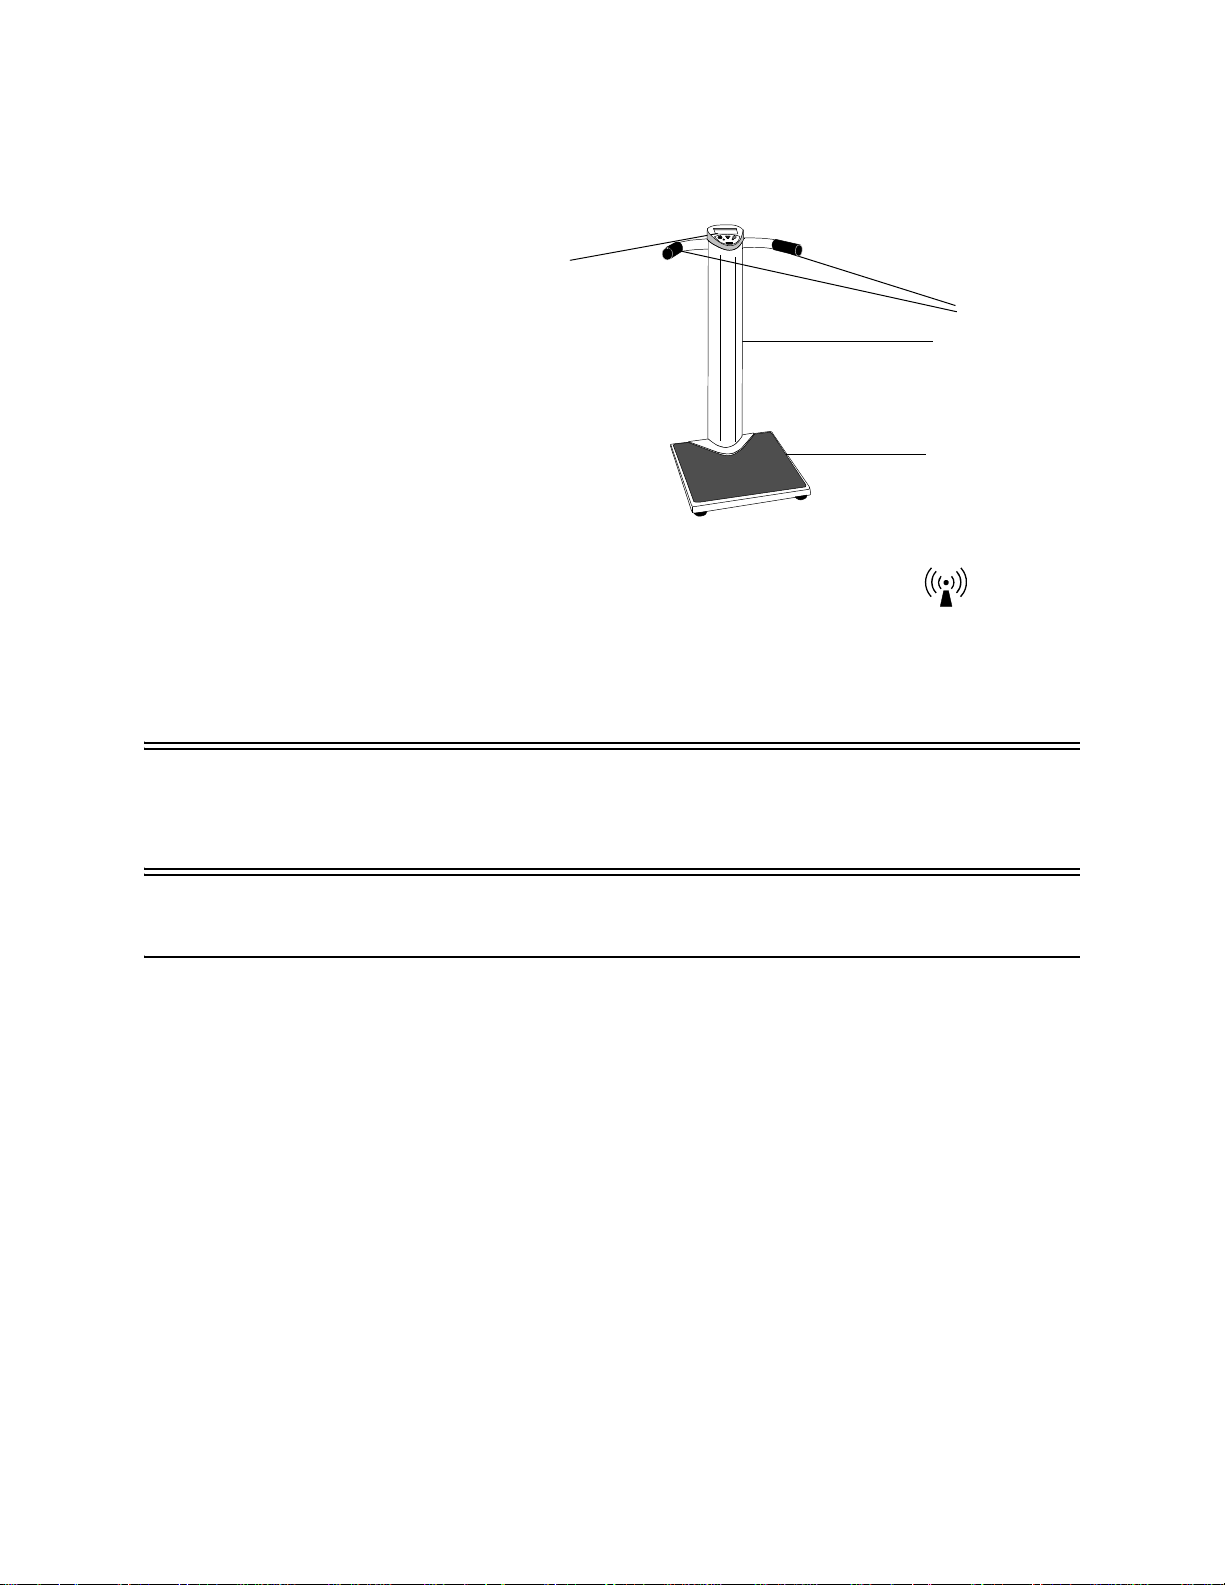
Device Description
Grab Bars
Column
Display
Platform
Steady Scale. The Steady Scale (M3813C) has a column with grab bars to help
people steady themselves (if they cannot stand unassisted) when using the Scale. It
has a maximum weight limit of 440 lbs (200 kgs).
The Steady Scale announces your weight in English or Spanish.
The front panel has a Volume control and a Radio Test button .
Batteries are stored underneath the base.
Warnings The following Warnings apply to use of both the Standard Scale and the Steady
Scale.
Warning • Do not use the Scale in standing water.
• Do not store the Scale where children or pets could get hurt by playing with
the grab bars and knocking the Scale over.
Cautions The following Cautions apply to use of the Scale.
Caution • The scale is accurate up to 440 pounds (200 kilograms). Contact your health
care provider for alternatives if this limitation is an issue.
• Keep the Scale in a dry, temperature controlled place, not in the bathroom.
• Position the Scale away from metal objects, such as a refrigerator, as they
can block transmission to your TeleStation.
• Place the Scale on the floor no more than 3 inches (7.5 cm) from a wall and if
you have a Steady Scale, with the colum facing the wall.
• Only one person should use the Scale.
• Do not use the Scale to measure anything other than yourself, such as a
package or pet, because all measurements are sent to your healthcare
provider.
• Do not drop or drag the Scale.
• When taking your weight, stand in the center of the scale. Do not step or
stand on the corners or edges.
• Traveling with the Scale is not recommended.
10 Philips Telemonitoring Set

Device Description
T
BP Display Window
Air Hose
Cuff
M3815A
M3815B
RADIO
TEST
button
RADIO
TEST
button
START/
STOP
button
START/
STOP
button
Note If you don’t feel comfortable standing unassisted while taking your weight using
the Standard Scale, contact your healthcare provider.
Blood
Pressure
You may have a Blood Pressure Monitor if your home healthcare plan includes
measuring your blood pressure and pulse.
Monitor
The Blood Pressure Monitor (also called a BP Monitor) is a plastic display case with a removable blood pressure cuff. The BP Monitor displays your blood pressure and pulse.
The BP Monitor has an air hose connector on the left side. The blood pressure cuff
has a metal D-ring (a metal bar that the cuff slides through and loops over), an air
hose, and an air connector. Batteries are stored underneath the display case.
Note Two models of BP Monitor are available (M3815A and M3815B) and are shown
below . Check your BP Monito r to determine which one you have. The part n umbers
are shown on the rear of the monitor.
BP Monitor Display Case. Both monitors have a display window that shows
the systolic and diastolic blood pressure and pulse rate, a START/STOP button
and a RADIO TEST button -- . (on M3815A) or (on M3815B).
Warnings The following Warnings apply to use of the BP Monitor.
Warning • Avoid storing the BP Monitor where children or pets can get at it. There is a
risk of injury if they get tangled in the air hose or if the cuff inflates.
Philips Telemonitoring Set 11

Device Description
T
Cautions The following Cautions apply to use of the BP Monitor.
Caution • If you get an error message when taking your blood pressure or think the
reading may be wrong, take it again.
• Do not store the BP Monitor inside a metal drawer or container, such as a file
cabinet. It will interfere with the radio signal to the
TeleStation.
• Do not store the BP Monitor with the cuff assembly twisted or folded tightly.
• Avoid tugging at the air hose or using it to carry the BP Monitor.
• Watch the display when taking your blood pressure.
– If the numbers go up to 330 mmHg,
press the START/STOP button immediately.
– If the numbers drop down to 15 mmHg and stay that way for more than 3
minutes,
press the START/STOP button again.
– If either of these conditions occur, contact your healthcare provider.
Rhythm Strip Recorder
Note The Rhythm Strip Recorder is not available in Canada.
You may have a Rhythm Strip Recorder if your healthcare plan includes recording
your heart rhythm.
The Rhythm Strip Recorder is a plastic display case with an attached dual cable
with snap-on connectors. Each of the two metal wristbands has a black plastic pad.
One side of the pad has a metal snap and the other side has a flat piece of metal.
Batteries are stored underneath the display case.
Rhythm Strip Recorder Display Case. The display case has a START
button, a RELAX light, and a RADIO TEST button .
12 Philips Telemonitoring Set
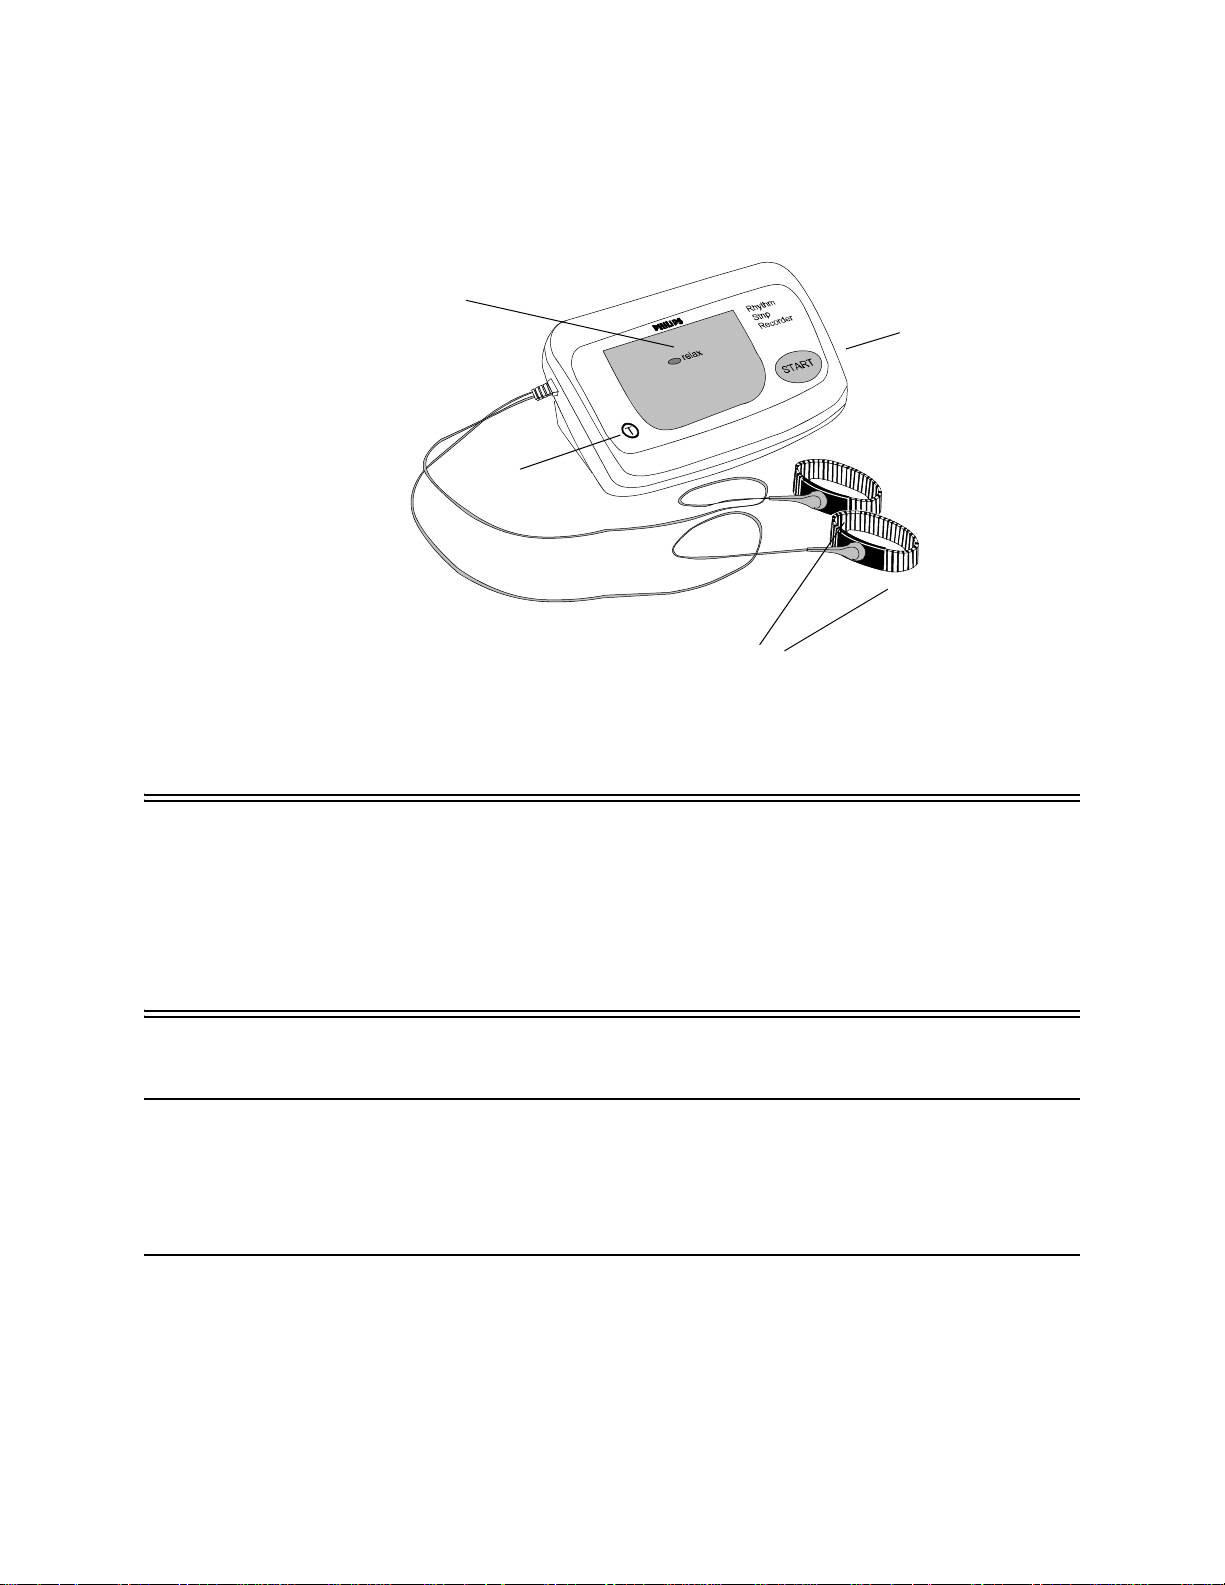
Device Description
Rhythm Strip Recorder Display Unit
Wristbands
Dual Cable
Relax
Light
ST ART
Button
RADIO
TEST
Button
Snap-on
Connectors
Warnings The following Warnings apply to use of the Rhythm Strip Recorder.
Warning • Do not store the Recorder where children or pets can get tangled in the
cables and the wristband.
• The wristbands may cause skin irritation, injury or an allergic reaction to
metal.
– Stop using the recorder if you have redness, rash, or other skin problems.
– Contact your healthcare provider.
Cautions The following Cautions apply to use of the Rhythm Strip Recorder.
Caution • Do not store the Recorder inside a metal drawer or container, such as a file
cabinet. It will interfere with the radio signal to the TeleStation.
Pulse Oximeter
• Store the Recorder so that the dual cable is not twisted or kinked.
• Avoid tugging at the dual cable or carrying the Recorder by the cable.
The Pulse Oximeter measures blo od oxygen level (%SpO2) and pulse rate. It has a
plastic display case with a finger-clip sensor attached to it. The front of the case is
shown in the figure below. The rear of the case has a compartment for batteries
that power the device.
Philips Telemonitoring Set 13

Device Description
T
M3814A M3814B
Radio Test
button
START
STOP
button
One
Display
Two
Displays
Finger-clip
Sensor
Radio Test
button
START
button
Note T w o models of Pulse Oximeter are available (M3814A and M3814B). Check your
Pulse Oximeter to determine which one you have. The part numbers are shown on
the rear of the device.
Pulse Oximeter Display Case. LED display windows show the blood oxygen
level (%SpO
finger.
) and pulse rate (in beats per minute) measured from the end of your
2
The M3814A has 1 display in which %SpO
and pulse (/min.) measurements
2
alternate. LEDs below the display light to indicate which measurement is being
displayed.
The M3814B has 2 displays, one each for %SpO
and pulse (/min.).
2
Pushing the START button causes the Pulse Oximeter to begin taking a
measurement.
The Radio Test button . on M3814A, on M3814B -- tests the
transmission of measurements from the Pulse Oximeter to the TeleStation.
The Finger-clip sensor is clipped on the end of one of your fingers and
measures your blood oxygen level and pulse rate.
Warnings The following Warnings apply to use of the Pulse Oximeter.
Warning • Do not use a damaged sensor.
• Do not let children use the device.
• Do not apply the finger sensor to a finger on the same arm where a Blood
Pressure cuff is present or has recently been used.
• Avoid excessive motion during measurements, this can lead to inaccurate
measurements.
14 Philips Telemonitoring Set
• Make sure the finger is not deeply pigmented with dark nail polish, artificial
nails, dye, or pigmented cream. This could cause inaccurate measurements.
• Cover the sensor with opaque material under conditions of strong or
excessive light (infrared lamps, photo therapy, etc.) Failure to do so can
result in inaccurate measurements.

• Avoid exposing the devices to extremes in temperature, humidity, direct
sunlight, shock, dust, spills, or standing water.
• The finger sensor can be comfortably clipped onto the finger (not thumb) of
patients weighing > 90 lb. If the sensor is too tight, it may result in inaccurate
measurements.
• The sensor may cause skin irritation, injury or an allergic reaction.
– Stop using the Pulse Oximeter if you have redness, rash, skin tear, or other
skin problems.
– Contact your healthcare provider.
• Do not use the device with the battery door removed.
• To prevent shock, do not use devices during a lightning storm.
Cautions The following Cautions apply to use of the Pulse Oximeter.
Caution • Read the procedures carefully before using this device.
• Use this device only as directed by your healthcare provider.
Device Description
• Follow your physician’s instructions regarding symptoms that require direct
contact with your healthcare provider.
• This device is not intended for continuous monitoring. The recommended
maximum time for the sensor to be attached to a finger is no more than 4
minutes (more than enough time for a measurement to be obtained). Do not
leave the finger sensor on the patients finger between measurements.
• This device may not work properly on all people. If you are unable to
achieve stable readings within 3 or 4 attempts, discontinue use and contact
your healthcare provider.
• Use of this device is not a substitute for medical care.
• If you have any questions regarding how to use your Pulse Oximeter, contact
your healthcare provider.
• Abnormal hemoglobin may affect accuracy.
• External cables could pose a choking hazard. Keep safely away from
children and pets and exercise caution when storing devices next to your
sleeping areas to avoid accidental entanglement.
• If the device has damaged cables with exposed wires do not use the device,
do not remove the battery cover and contact your healthcare provider to
replace the device immediately.
• When replacing the batteries, do not come in contact with battery
compartment terminals.
• Discontinue the use of the Pulse Oximeter if the finger sensor causes
irritation or is uncomfortably hot.
Philips Telemonitoring Set 15
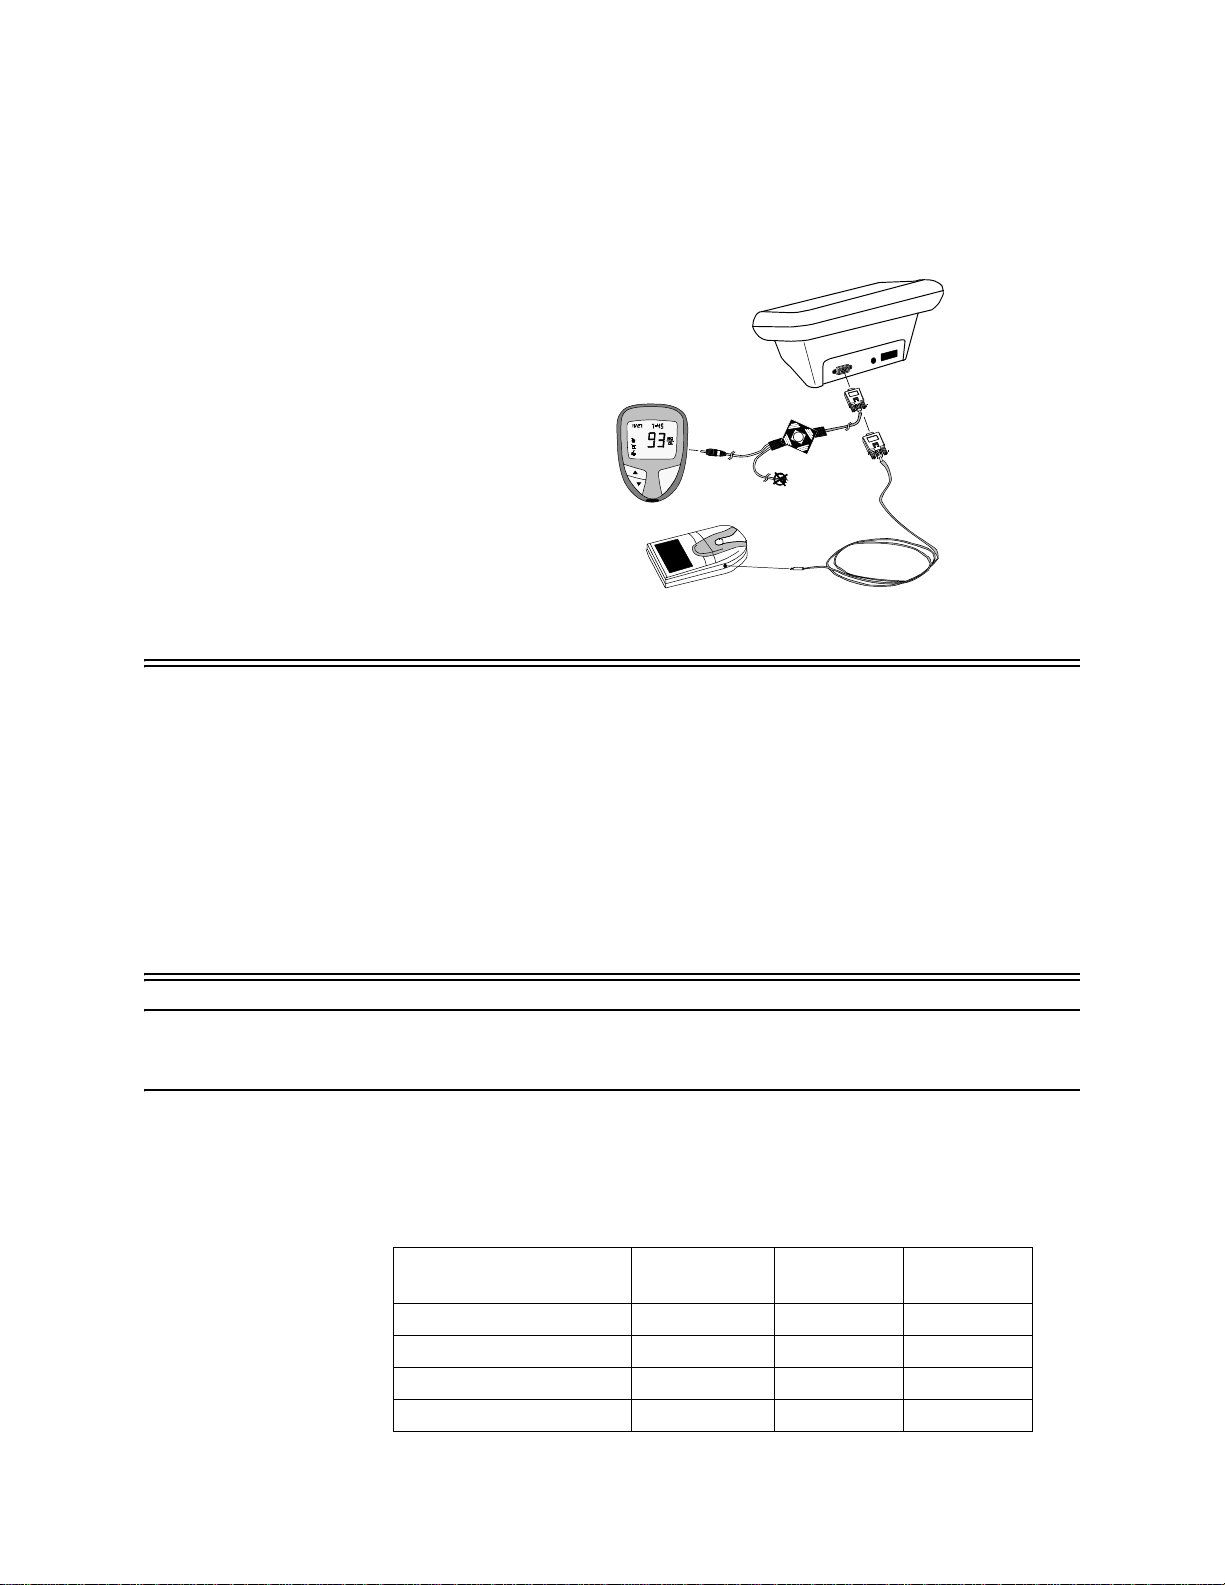
Device Description
Bayer
Contour
Glucose
Meter
OneT ouch
Basic & One
Touch Profile
Glucose Meters
Glucose
Meter
Cables
T eleStation
Glucose Meter Cable
The Patient Telemonitoring Set may also provide a Glucose Meter Cable for
connecting your Glucose Meter to a TeleStation to record your glucose
measurements. The Cable for the Bayer Contour
® glucose meters is different
from the Cable for the LifeScan OneTouch Basic and LifeScan OneTouch Profile
glucose meters..
Warnings The following Warnings apply to the use of a Glucose Meter Cable.
Warning Glucose Meter readings can only be transferred to a TeleStation. .
PTS System operates only with supported glucose meters (refer to the table on
the next page). Unsupported glucose meters should not be connected to the
TeleStation.
All Bayer Contour meters operate with TeleStations having serial numbers
SN:SG4921xxxx and higher. The serial number is on the label on the back of
the TeleStation under the Philips logo.
®
Note For procedures on how to measure your glucose with your Glucose Meter, refer to
16 Philips Telemonitoring Set
For OneTouch Glucose Meters only, do not measure your glucose while your
Glucose Meter is connected to the TeleStation.
Clean your finger of blood before using the TeleStation.
its Instructions for Use manual.
Supported Glucose Meters. The following table lists the Glucose Meters that
are able to transfer glucose measurements to the TeleStation via the cable that is
available with the TeleStation:
Brand Name Retail Meter #
LifeScan OneTouch
LifeScan OneTouch
Bayer Contour 7151B 9545B US
Bayer Contour 7151C 9545C US
Basic N/A N/A Not Available
Profile N/A N/A Not Available
Free Goods
Meter #
Commercial
Availability

Device Usage
Brand Name Retail Meter #
Bayer Contour 7151G/H N/A US
Bayer Contour 7182 9676 US
Bayer Contour 7183 9677 US
Bayer Contour 7184 9678 US
Bayer Contour 7190 9679 US
Bayer Contour 7191 9680 US
Bayer Contour 7152A N/A Canada
Bayer Contour 7152B N/A Canada
Bayer Contour 7186 N/A Canada
Bayer Contour 7187 N/A Canada
Bayer Contour 7188 N/A Canada
Free Goods
Meter #
Commercial
Availability
The cable for the supported Bayer meters is different from the cable for the
Johnson&Johnson LifeScan OneTouch Basic and OneTouch Profile meters. The
supported LifeScan meters can still be used and are supported by the TeleStation,
but you will not find them for sale. Philips can no longer provide the LifeScan
glucose meter cable.
Device Usage
This section describes how to use each of the devices of the Philips Telemonitoring
Set -- TeleStation, Scale, Blood Pressure Monitor, Rhythm Strip Recorder, Pulse
Oximeter, and the cable for your Glucose Meter.
TeleStation The TeleStation is the communications center for your Patient Telemonitoring Set.
Once the TeleStation is installed, it will send your measurements to your provide
either over your home phone line or using an eDevice Cellular Accessory (attached
to the back of the TeleStation.)
TeleStations also have the additional capability of asking you questions about
your health and sending your answers to your healthcare provider. Some
TeleStations also have the ability to let you enter your measurements manually and
to receive results from some Glucose Meters. Procedures for using these
TeleStation features are given in the following sections
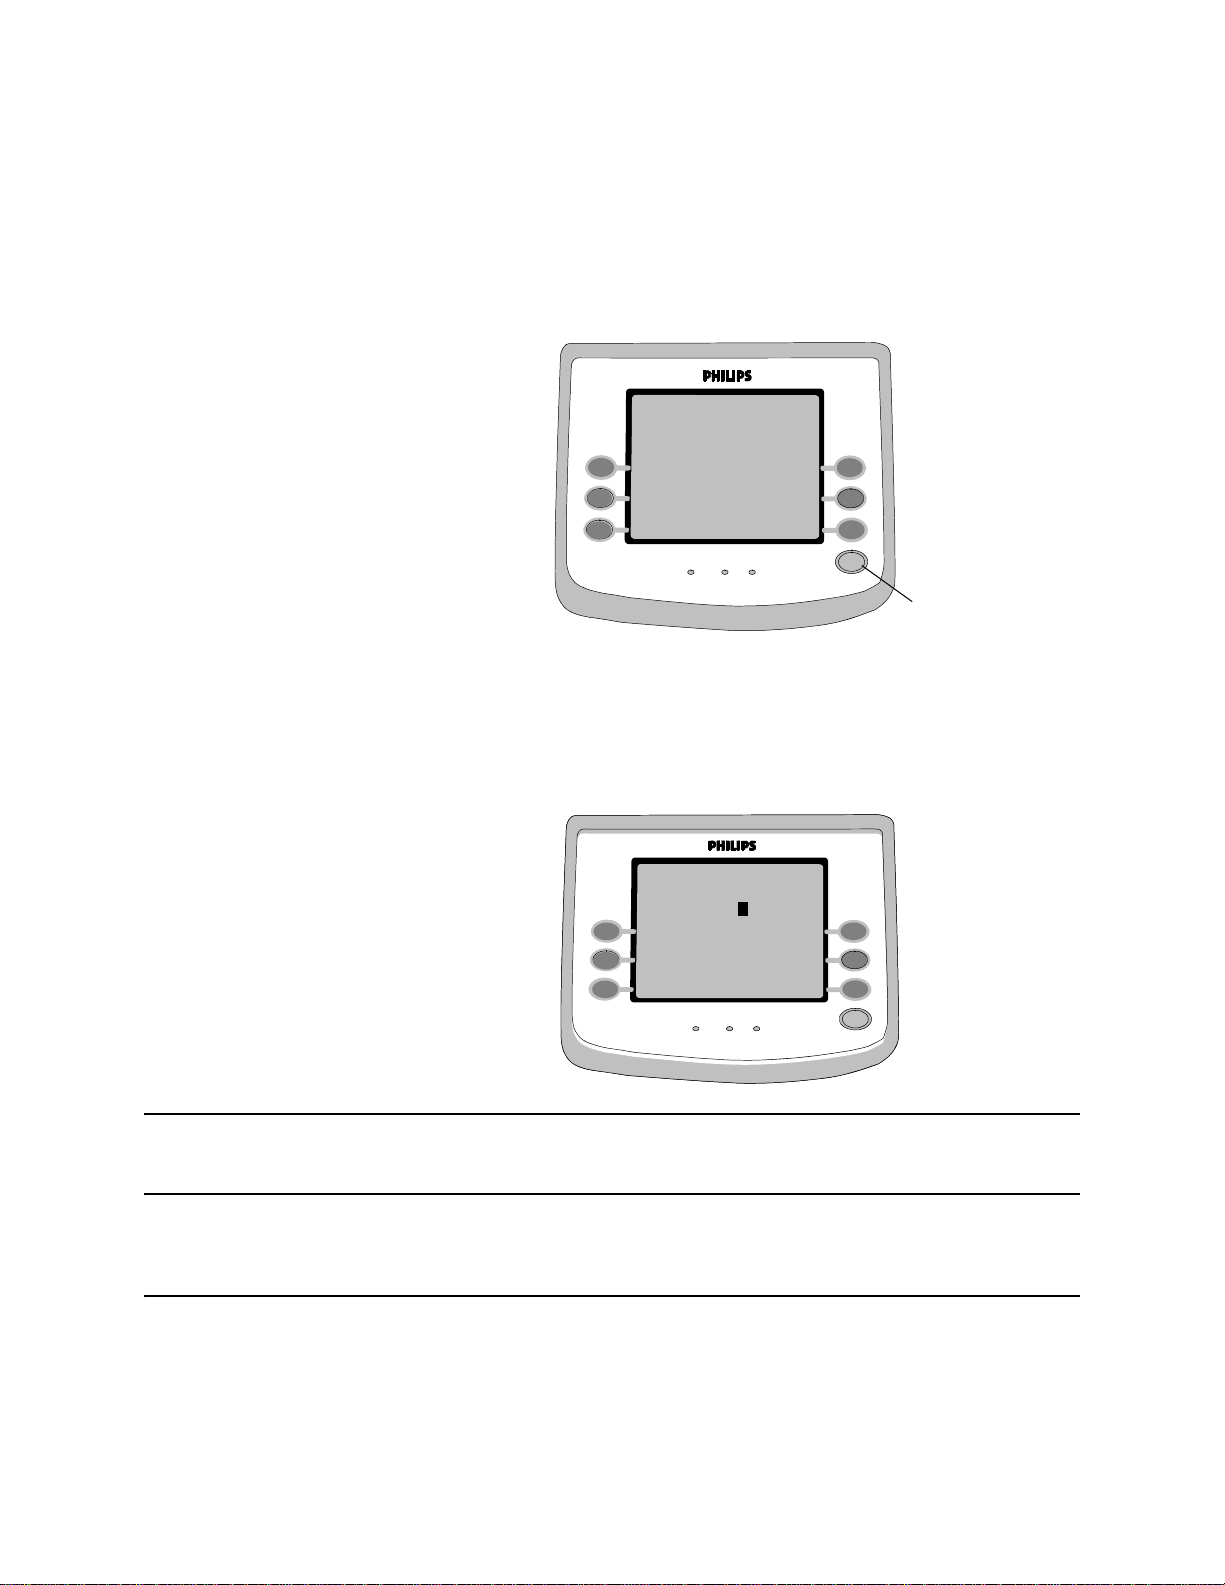
Answering
Survey
Questions
The front panel of the TeleStation has a number of buttons to assist you in
answering questions and lights to indicate when questions have been sent, as
shown in the following figure.
Philips Telemonitoring Set 17

Device Usage
TeleStation
go back
Continue
Hello! Welcome to Philips Auto mated
Interactions. To adjust the contrast
push the Go Back button. Push
Continue to go to the questions.
on/survey
waiting
holding
results
using
phone
on/survey
waiting light
holding
results light
using
phone light
go back
button
The on/survey waiting light flashes on the front of your TeleStation when there
are questions from your healthcare provider waiting to be answered.
Your healthcare provider may activate the TeleStation to beep every 60 seconds to
alert you that a survey is waiting.
To answer survey questions, use the following procedure
Step 1. Questions display on the screen with answer choices:
– Push the button next to the best answer.
– Choose only one. The answer will be highlighted.
If you make a mistake:
– Select the go back button and choose your answer again.
Step 2. After you select an answer, the next question is displayed.
– Answer it by pushing a button.
– Answer all of the questions.
Step 3. If you want to change your answer to an earlier question:
–Push the go back button until you see that question again.
– Then push the button next to the correct answer.
Note If you go back to change an answer to an earlier question, you will then need to
answer all of the questions that follow again. The last question will confirm that
your responses are complete.
Step 4. When you have finished the survey, the holding results light will come
on followed in a few minutes by the using phone light. This indicates that
your results are being sent to your healthcare provider’s computer.
18 Philips Telemonitoring Set
Device Usage
TeleStation
go back
Blood PressureWeight
Blood Sugar Temperature
Oxygen Level More
on/survey holdin using
do not
press go
back
Please select a
measurement to
TeleStation
on/survey
waiting
holding
results
using
phone
go back
Please enter your
More
All Finished
WT
167. LBS
Less
Next Number
WEIGHT
3
TeleStation
go back
More
All Finished
Less
Next Number
on/survey holdin using
Please enter your
WT 167.3 LBS
Entering
Measurements
Manually
Step 1. Take your measurements as directed by your healthcare provider and write
down the results.
Step 2. Press any button – except go back.
A menu screen appears showing the measurements that can be entered.
Step 3. Press the button next to the measurement you want to enter,
or
press the More button to see other measurements. Measurements display as
either US or metric values based on your country’s preference.
The measurement entry screen appears, for example WEIGHT as shown below.
Note If you make a mistake, press the go back button before you press the All Finished
button.
Step 4. Use the More and Less button to set the number on the screen to match
the measurement you wrote down earlier.
Note To make big changes to a number, press the Next Number button one or more
times, then use the More or Less buttons.
When entering Blood Pressure and Oxygen Level measurements, press Continue
to move to the next part of the entry.
Philips Telemonitoring Set 19

Device Usage
When you have finished entering your measurement:
Step 5. Press the All Finished button to store your measurement.
Step 6. Repeat Steps 3-5 to enter any other measurements.
Several minutes after you store your last measurement, the scree n will go blank
and the using phone light will turn on indicating that your measurements are
being sent to your healthcare provider’s computer.
Note If you get an invalid reading on your measurement device, do not enter it in the
TeleStation.
If you accidently turn on the measurement screen, do not press any buttons. After a
few minutes the screen will go blank.
Scale Two types of scale are available:
Standard Scale (M3813B) for people who can get on and off without help.
Steady Scale (M3813C) with a column and grab bar to help if you cannot stand
unassisted while taking your weight.
Notes If you have been given a Standard Scale and are having balance problems standing
on it, contact your healthcare provider. A Standard Scale can be replace with a
Steady Scale.
If you need the support of a walker, refer to the following section Measuring
Weight with a Walker.
Measuring
Weight
Notes You will not hear the voice prompt if the volume is set to 0.
Procedures for measuring your weight on both the Standard and Steady Scales are
as follows. Choose the procedure for your type of Scale.
Standard Scale
Step 1. Step on the Scale and stand on it without holding onto anything.
– Stand as much in the center of the platform as possible.
– Try not to step on the corners; you might damage the Scale.
Step 2. The Scale will say, “Please stand still”. Do not move.
Walking "-" will show on the display during the measurement.
After several seconds, the Scale will say “Please step off the Scale”.
Step 3. Step off the Scale.
20 Philips Telemonitoring Set

Device Usage
About 5 seconds after you step off the Scale, the Scale will say your final weight
(unless the volume is set to 0).
The Scale then turns off by itself.
Steady Scale
Step 1. Step on the Scale and stand on it holding the grab bars. You can continue
holding the grab bars whi
– Stand as much in the center of the platform as possible.
le taking your weight.
Notes
Step 2. The Scale will say, “ Pl
display during the measurement.
You will not hear the voice prompt if
After several seconds, the Scale will say “Please step off the Scale”, (unless the
volume is set to 0).
Step 3. Step off the Scale.
About 5 seconds after you step off the Scale, the
is set to 0) and display your final weight.
The Scale then turns off by itself.
If the batteries in the Scale are weak, the Scale’s display will flash Lo and batt
and announce "Please replace the scale batteries" for three measurements and then
the voice turns off.
If this message appears on the display or the voice is silent even though it is not set
to 0, change the Scale’s batteries following the Replacing Batteries procedure
on page “Replacing Batteries” on page 40.
ease stand still." Moving "-" will show on the
the volume is set to 0.
Scale will say (unless the volume
Measuring
Weight with a
Walker
If it is necessary to use a walker to steady yourself on the Scale, use the following
procedure for either the Standard Scale or Steady Scale.
Standard Scale
Step 1. Place the walker so its legs are on either
side of the Scale platform as shown opposite.
Step 1. Step on the Scale a
balance.
– Stand as much in the center of the platform as
possible.
– Try not to step on the corn
Scale.
Step 2. Remove your hands from the walker arms.
Philips Telemonitoring Set 21
nd use the walker arms for
ers; you might damage the
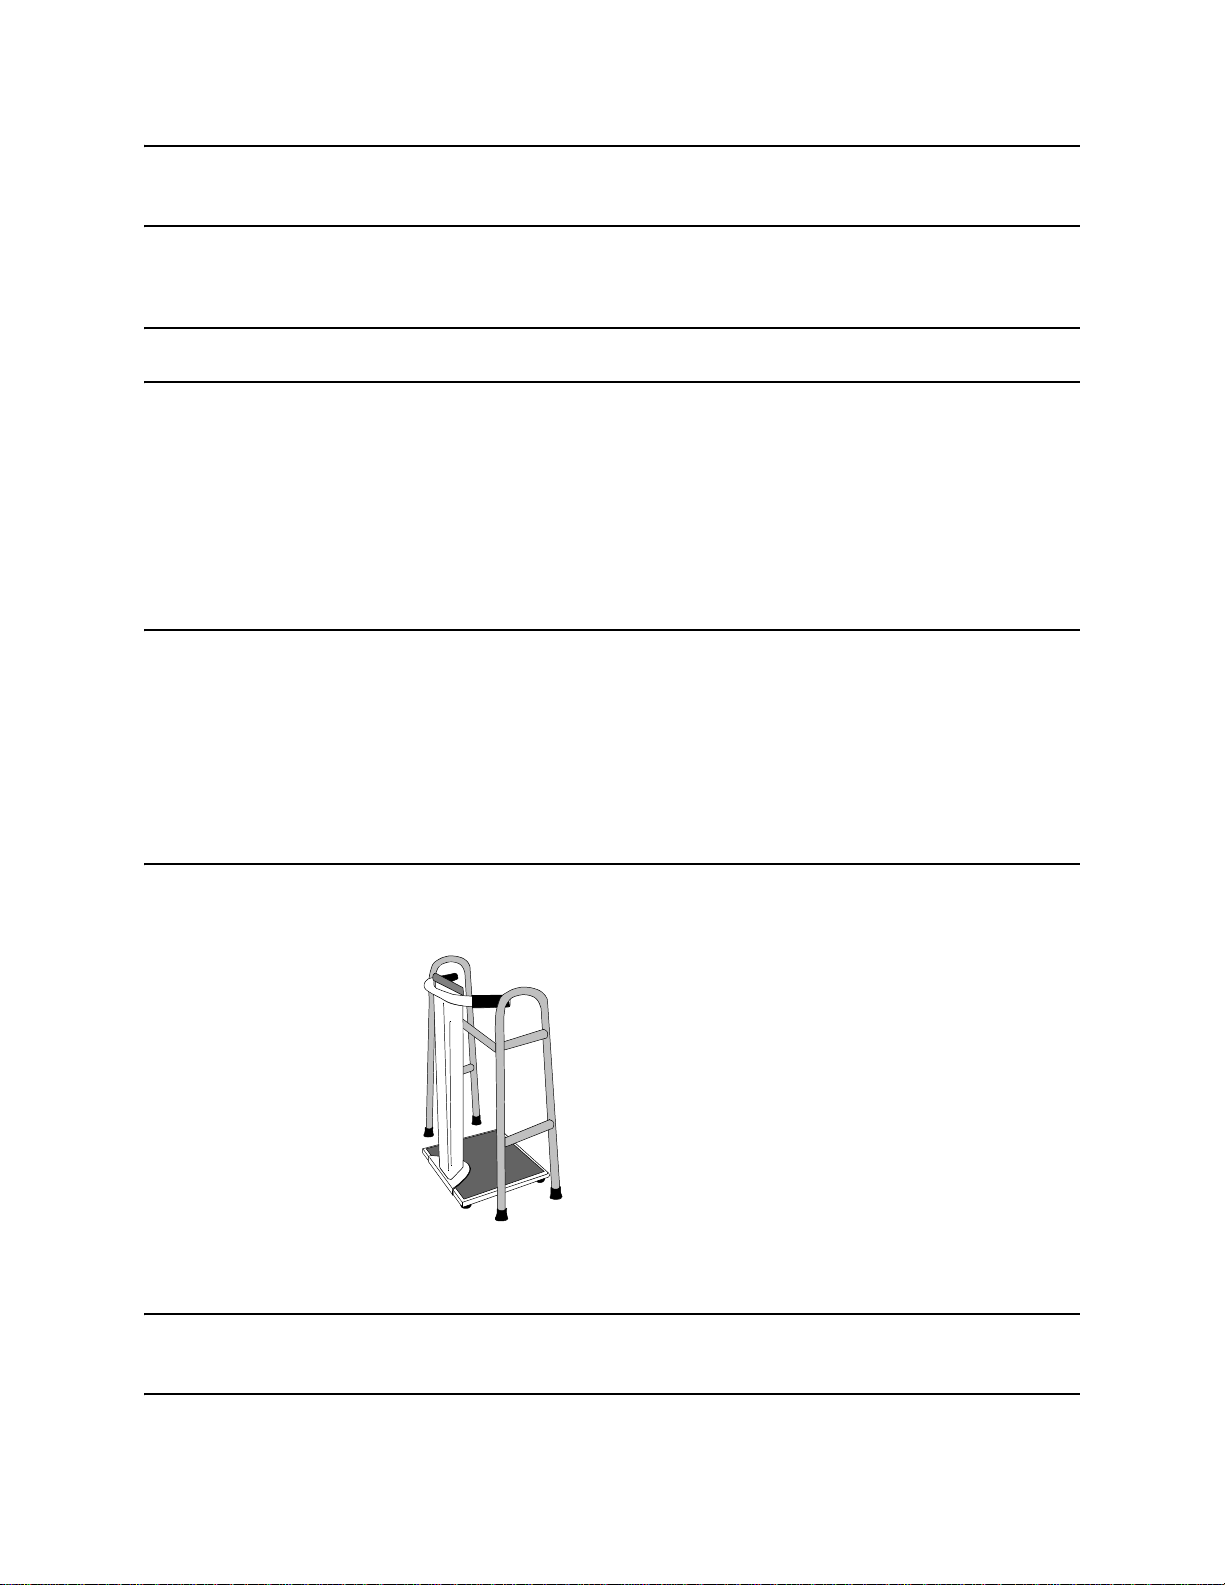
Device Usage
Note You must remove your hands from your wa lker for the Scale to take your true
weight.
Step 3. The Scale will say, “Please stand still”.
Moving "-" will
show on the display during the measurement.
Notes You will not hear the voice prompt if
After several seconds, the Scale will say “Please step off the Scale”.
Step 4. Grasp the walker arms.
Step 5. Step off the Scale.
About 5 seconds after you step off the Scale, the
(unless the volume is set to 0).
The Scale then turns off by itself.
Notes
If the batteries in the Scale are weak, the Scale’s display will flash Lo and batt
and announce "Please replace the scale batteries" for three measurements and then
the voice turns off.
If this message appears on the display or the voice is silent even though it is not set
to 0, change the Scale’s batteries following the Replacing Batteries procedure
on page -40. If you are unable to safely change the batteries in the scale, contact
your health care provider.
Steady Scale
Step 1. Place the walker so its legs are on either side
of the Scale platform as shown opposite.
the volume is set to 0.
Scale will say your final weight
Step 2. Step on the Scale
arms for balance.
–Stand as much in the center of the platform as
possible.
–Try not to step on the corners; you might damage
the Scale.
Step 3. Move your hands from the
Scale’s grab bars. You can continue to use the
Scale’s grab bars for balance while you are taking
your weight.
Note You must remove your hands from your wa lker for the Scale to take your true
weight.
22 Philips Telemonitoring Set
and stand using the walker
walker arms to the

Step 4. The Scale will say, “Please stand still."
Notes You will not hear the voice prompt if the volume is set to 0.
After several seconds, the Scale will say “Please step off the Scale”, (unless the
volume is set to 0) and the Step Off light will come on.
Step 5. Move your hands from Scale’s grab bars to the walker arms.
Step 6. Step off the Scale.
Device Usage
Notes
Changing
Voice Volume
About 5 seconds after you step off the Scale, the
is set to 0) and display your final weight.
The Scale then turns off by itself.
If the batteries in the Scale are weak, the Scale’s display will flash Lo and batt
and announce "Please replace the scale batteries" for three measurements and then
the voice turns off.
If this message appears on the display or the voice is silent even though it is not set
to 0, change the Scale’s batteries following the Replacing Batteries procedure
on page -40.
The Scale’s voice has 4 volume settings, as follows:
SettingVolume
0—Silent
1—Low
2—Medium
3—High
The volume of the Scale’s voice can be changed as follows:
Scale will say (unless the volume
Note The procedure for changing the volume is identical for both scales.
The only difference is
The S
tandard Scale has a speaker symbol .
teady Scale has the word Volume.
The S
Step 1. Step off the Scale when changing the volume.
Step 2. Firmly press and hold the Volume button. The volume will move to the
next setting. For example, the Scale may say “one” and display 1 for Low.
Step 3. Firmly press and hold the Volume button
next setting. In this example, the Scale will say “two” and display 2 for
Medium.
the label on the Volume button.
again. The volume moves to the
Philips Telemonitoring Set 23
 Loading...