


SCD870
Table of contents
 Loading...
Always here to help you
Register your product and get support at
www.philips.com/welcome
SCD870
1

ENGLISH 4
DEUTSCH 30
ESPAÑOL 57
FRANÇAIS 84
ITALIANO 112
NEDERLANDS 139
PORTUGUÊS 166
SCD860

4
ENGLISH
Table of contents
Introduction 4
Product overview 5
First-time setup 5
Mounting the baby monitor on the wall 7
Quick start guide 9
Viewing, hearing and monitoring your baby 12
Viewing your baby 12
Hearing your baby 13
How to get notied that your baby cries 14
Background monitoring 14
Notication options 15
Guest viewers and accounts 16
Inviting guests and a second admin 16
Giving and removing access 17
Account management 18
General app use 19
Video and audio quality optimisation 19
WiFi connection to the Internet 20
Using the baby monitor away from home 20
Using the app on several devices 21
Resetting the baby monitor 21
Firmware upgrades 22
WiFi status light signals 22
Security and privacy 24
Network security 24
Strong passwords 24
Safe use of the baby monitor app 24
Device compatibility 24
Ordering accessories 25
Guarantee and support 25
Frequently asked questions 25
Introduction
Congratulations on your purchase and welcome to Philips Avent! To benet
fully from the support that Philips Avent offers, register your product at
www.philips.com/welcome.
The uGrow Smart Baby Monitor uses new SafeConnect Technology to
work across networks. It automatically adjusts to the network conditions
to maintain a high-quality constant connection to your baby. It continuously
seeks to reconnect if connection drops. Bandwidth usage has been
optimised so that it does not drain the battery of your mobile device
unnecessarily. It even works when you use your phone for other things.
The uGrow Smart Baby Monitor requires Internet connection and
WiFi. A good Internet connection and WiFi are essential to get the best
performance of your uGrow Smart Baby Monitor. A lower quality Internet
connection and WiFi can reduce the quality of the connection between
the uGrow app and baby monitor. It is compatible with iOS 7 or higher,
or Android 4.1 or higher. It has all the support features you expect of a
baby monitor, including lullabies, multi-colour nightlight, and humidity and
temperature monitoring.
ENGLISH 5
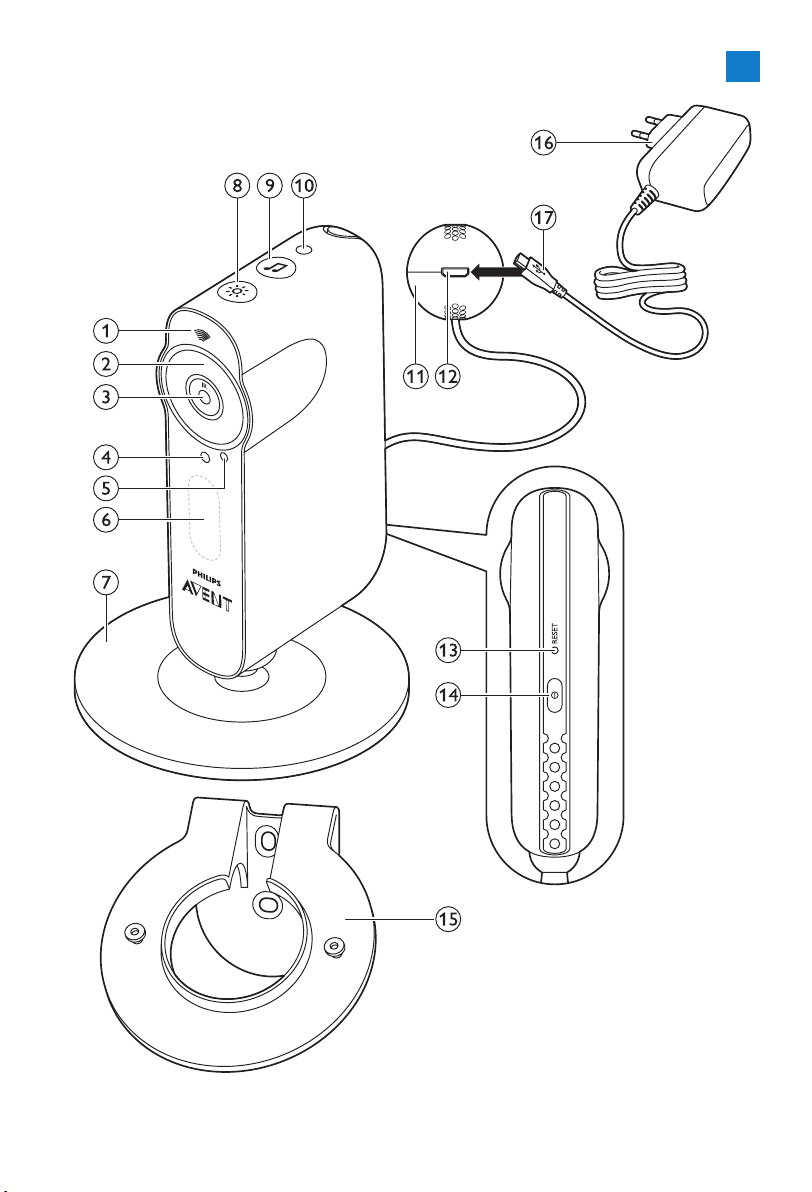
Product overview (Fig. 1)
1 WiFi status light
2 Infrared lights
3 Baby monitor lens
4 Microphone
5 Viewing indicator
6 Nightlight
7 Foot
8 Nightlight button
9 Lullaby play/pause button
10 Light sensor
11 Temperature and humidity sensor unit
12 Appliance plug socket
13 Reset button
14 On/off button
15 Wall mounting bracket
16 Adapter
17 Appliance plug
First-time setup
Before you start the set-up procedure, make sure:
- You have wireless Internet access (2.4 GHz WiFi).
- You are close enough to the WiFi router to have a good WiFi signal.
- If you use a WiFi repeater, make sure that your router and your WiFi
repeater have the same SSID (the network name) and that you use
the same password for the router and the repeater.
- You have the password of your WiFi network at hand. Always connect the
baby monitor to a secure network (see chapter ‘Security and privacy’).
- Make sure that your smart device runs on iOS 7 or higher, or
Android 4.1 or higher (for device compatibility, see chapter ‘Device
compatibility’).
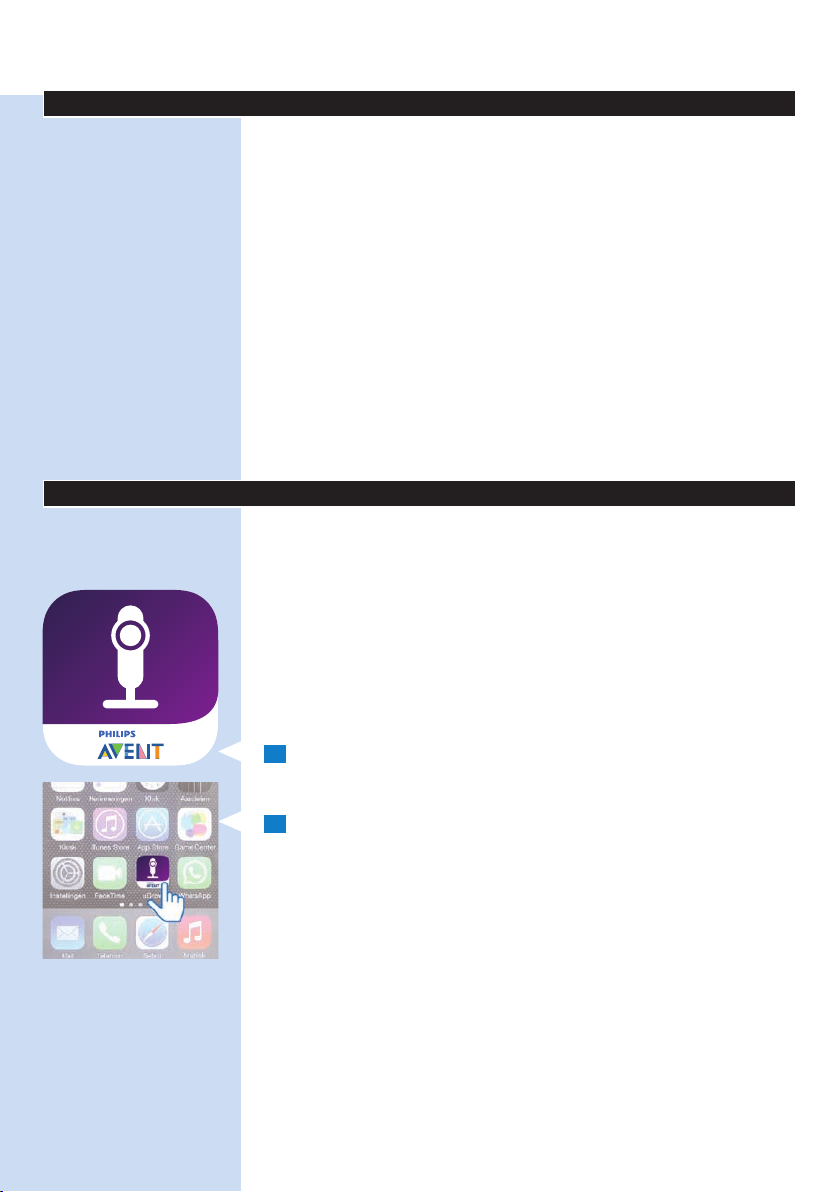
1 Download the Philips Avent uGrow Smart Baby Monitor app from
the App Store or Google Play. Use keywords ‘uGrow smart monitor’
or ‘Philips smart monitor’ to nd the app.
2 Launch the app.
ENGLISH6
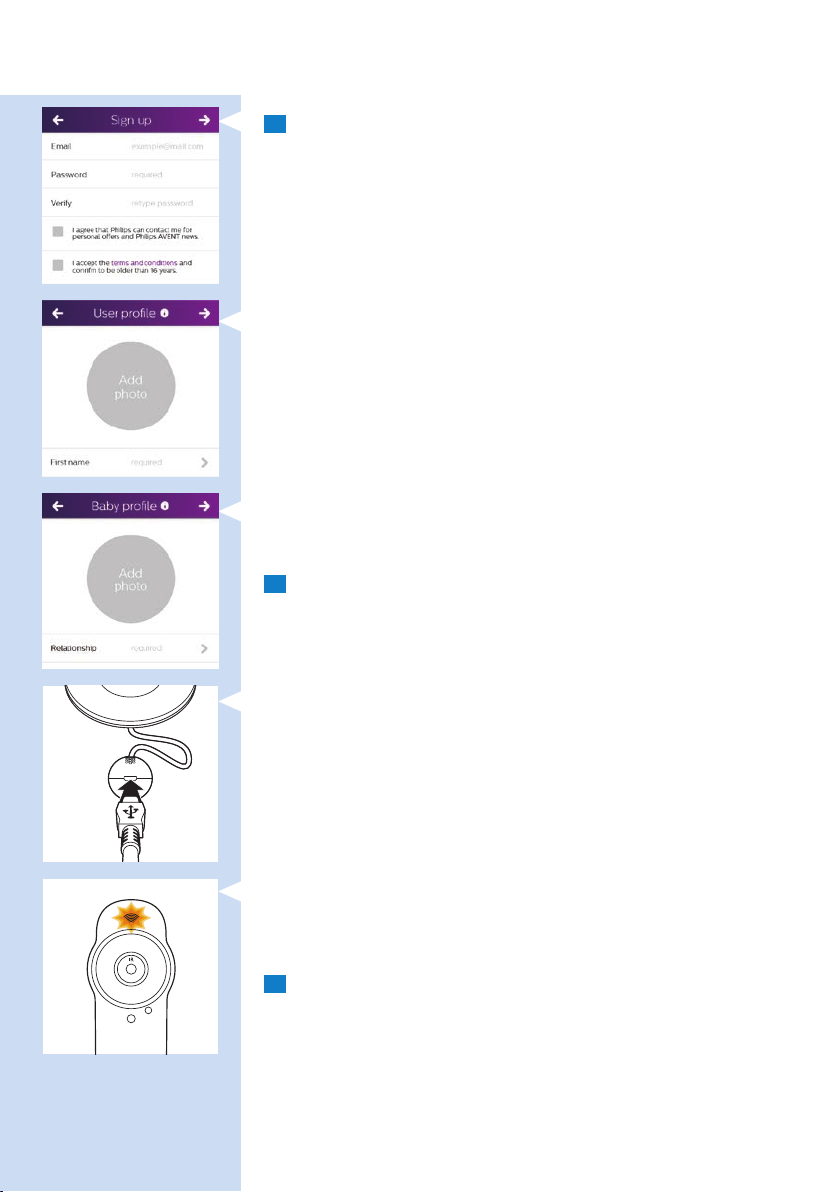
3 Follow the on-screen instructions to create a uGrow account.
1 Make sure that you use a working email address on which you can
always be reached.
2 Use a strong password (see ‘Security and privacy’).
3 When you receive the verication email, follow the instructions in this
email to continue setting up your uGrow Smart Baby Monitor.
4 Create your user prole.
A user prole is needed to identify yourself to invited guest users.
5 Create your baby’s prole.
A baby name is needed to identify your baby monitor in the app, especially
when multiple baby monitors are connected to your account.
4 Follow the on-screen instructions to connect the baby monitor to
the mains.
1 Insert the appliance plug into the appliance plug socket in the
temperature and humidity sensor unit and insert the adapter into
a wall socket.
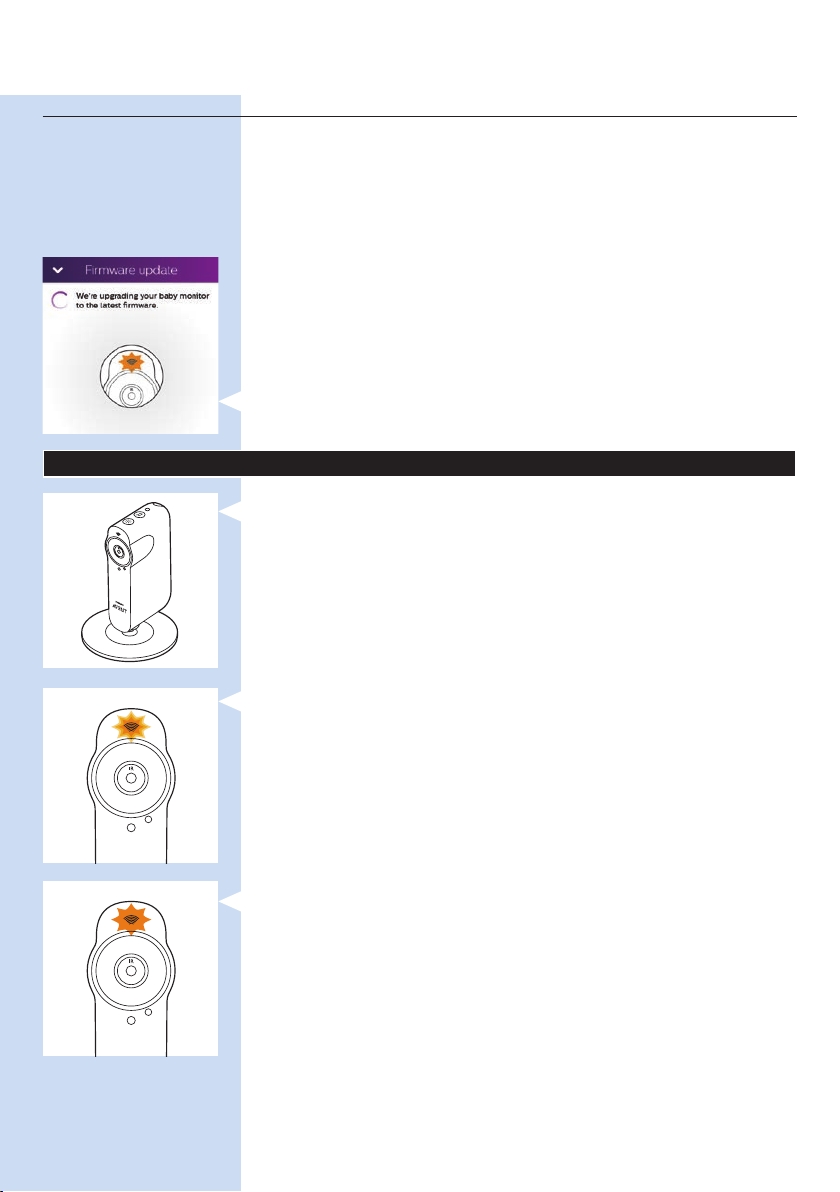
2 The Wi status light starts to ash orange when the baby monitor is
switched on. Wait until the WiFi status stops ashing. When the WiFi
status light is solid orange, the baby monitor is ready to read the WiFi
QR code.
5 Link the baby monitor to your smart device.
1 Select the WiFi network you want to use. Please note that the baby
monitor only works on a 2.4 GHz WiFi network.
2 Enter the WiFi password.
ENGLISH 7
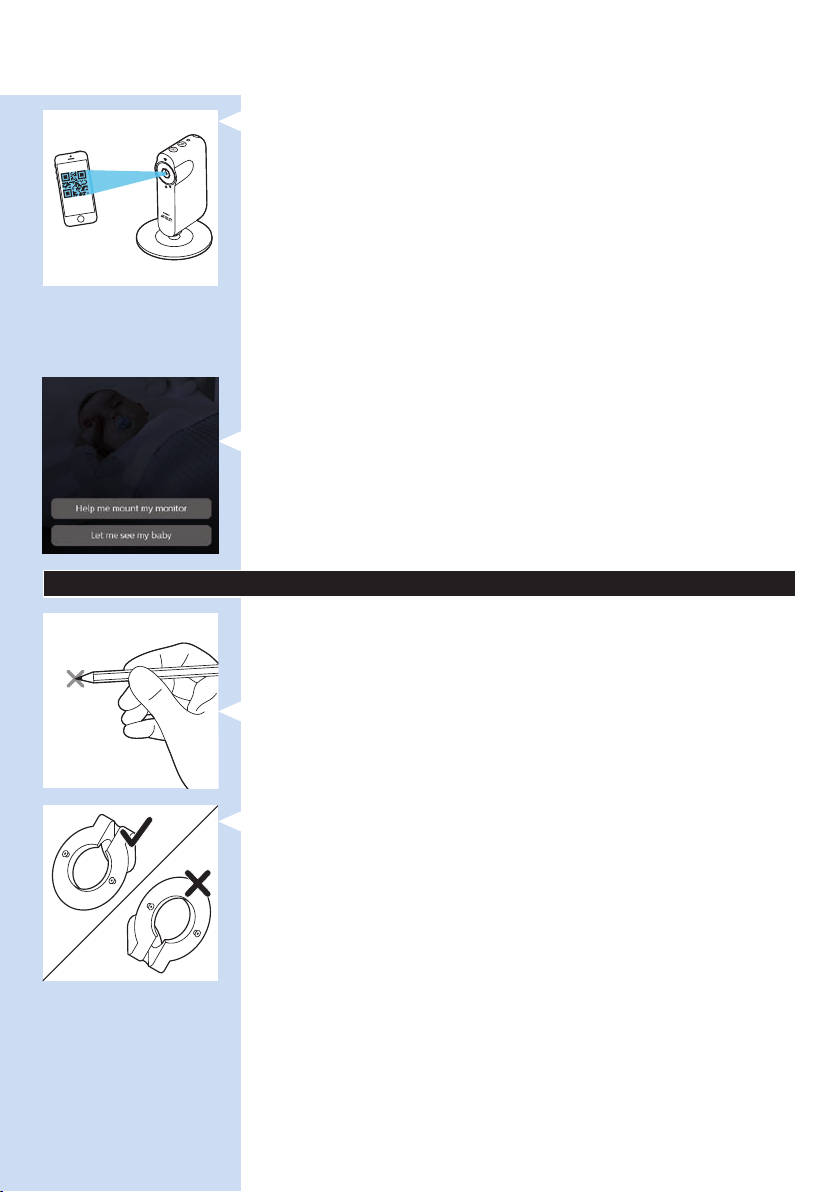
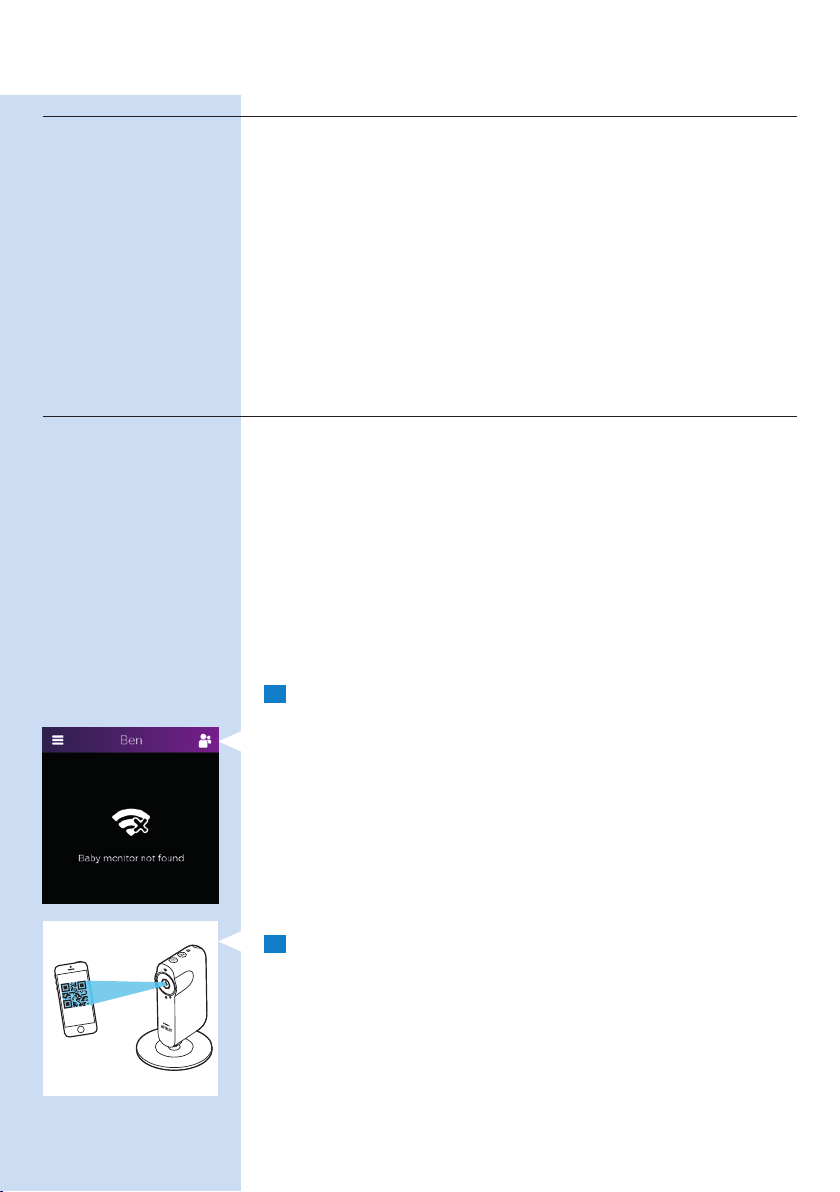
3 As instructed by the app, hold the WiFi QR code on the screen of
your smartphone or tablet at a distance of around 20 cm in front of
the baby monitor lens. Slowly move the smartphone or tablet closer
or further away from the lens to ensure the WiFi QR is read properly.
When the baby monitor has read the WiFi QR code, it plays a short
tune and the WiFi status light starts to ash green.
4 Follow the on-screen instructions to complete the setup procedure.
5 The WiFi status light turns solid green when the baby monitor is linked
to the WiFi network.
Note: If you are unable to complete the setup procedure and your baby monitor
is not linked to your smart device after you have completed the steps above,
check ‘Frequently asked questions’ in this user manual for a possible solution.
Tip: For more information on the WiFi status light, see chapter ‘WiFi status
light signals’.
6 Next you get an introductory tour through the app.
7 You can then choose between two options: ‘Help me mount the baby
monitor’ and ‘Let me see my baby’.
8 If you choose the rst option, you can follow the on-screen
instructions to mount the baby monitor on the wall (see chapter
‘Mounting the baby monitor on the wall’). At the end of the on-screen
instructions you can choose ‘Let me see my baby’.
Mounting the baby monitor on the wall
The baby monitor comes with a wall mounting bracket. Before you mount
the baby monitor on the wall, make sure there is a good WiFi signal at the
point where you want to mount the baby monitor. Follow the instructions
below to fasten the wall mounting bracket to the wall and to attach the
baby monitor onto the wall mounting bracket.
1 Use a pencil to put a cross on the wall at the place where you want to
mount the baby monitor.
2 Hold the wall mounting bracket to the wall. Make sure that one of the
holes is right over the cross that you put on the wall at step 1.
Note: Make sure that the ring of the wall mounting bracket slants downward
when you hold it to the wall. If the ring of the wall mounting bracket slants
upward, turn the wall mounting bracket the other way around so that it is in
the correct position.
ENGLISH8
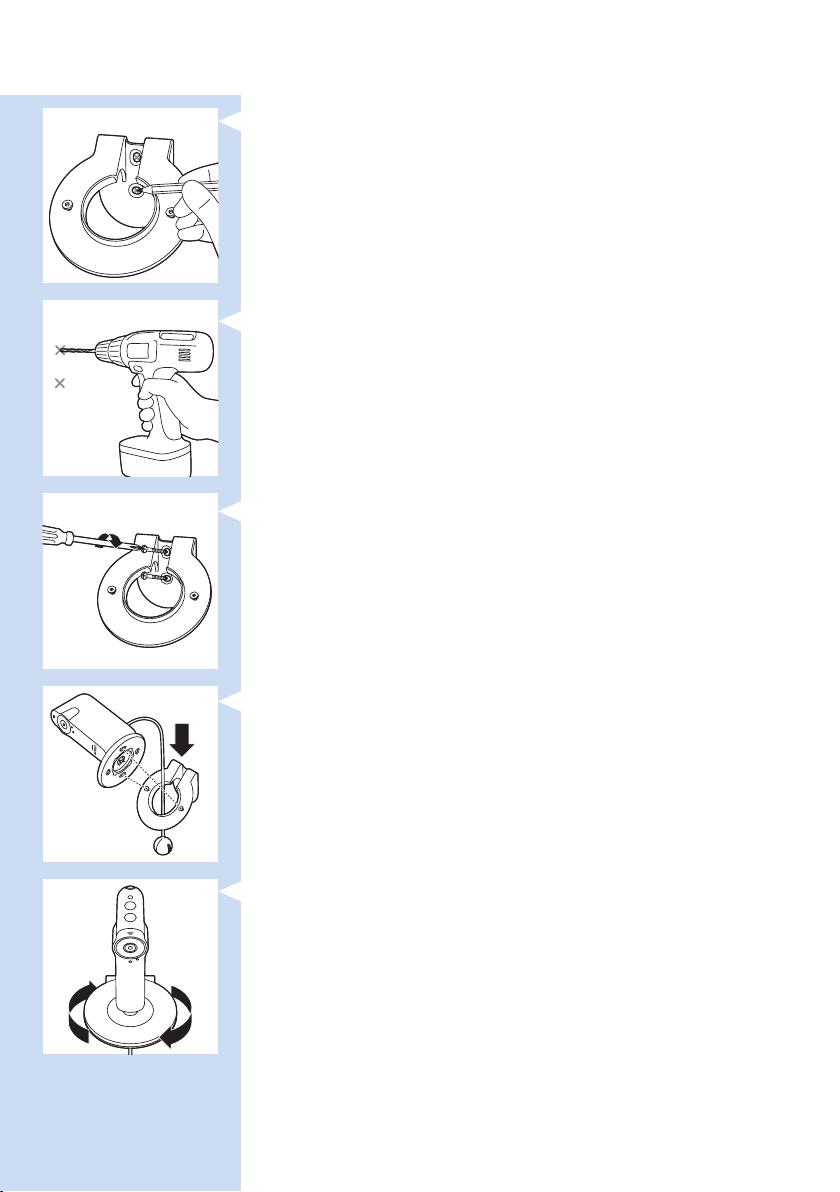
3 Use a pencil to mark the other screw hole on the wall.
4 Drill 2 holes in the wall at the marks.
5 Use 2 screws to fasten the wall mounting bracket to the wall.
Tighten the screws with a screwdriver.
6 Pass the humidity and temperature sensor unit through the hole in
the wall mounting bracket. Then align the slots in the foot of the baby
monitor with the projections on the ring. Fit the groove in the foot of
the baby monitor onto the raised edge on the inside of the ring.
7 Turn the foot of the baby monitor clockwise to position the baby
monitor.
ENGLISH 9
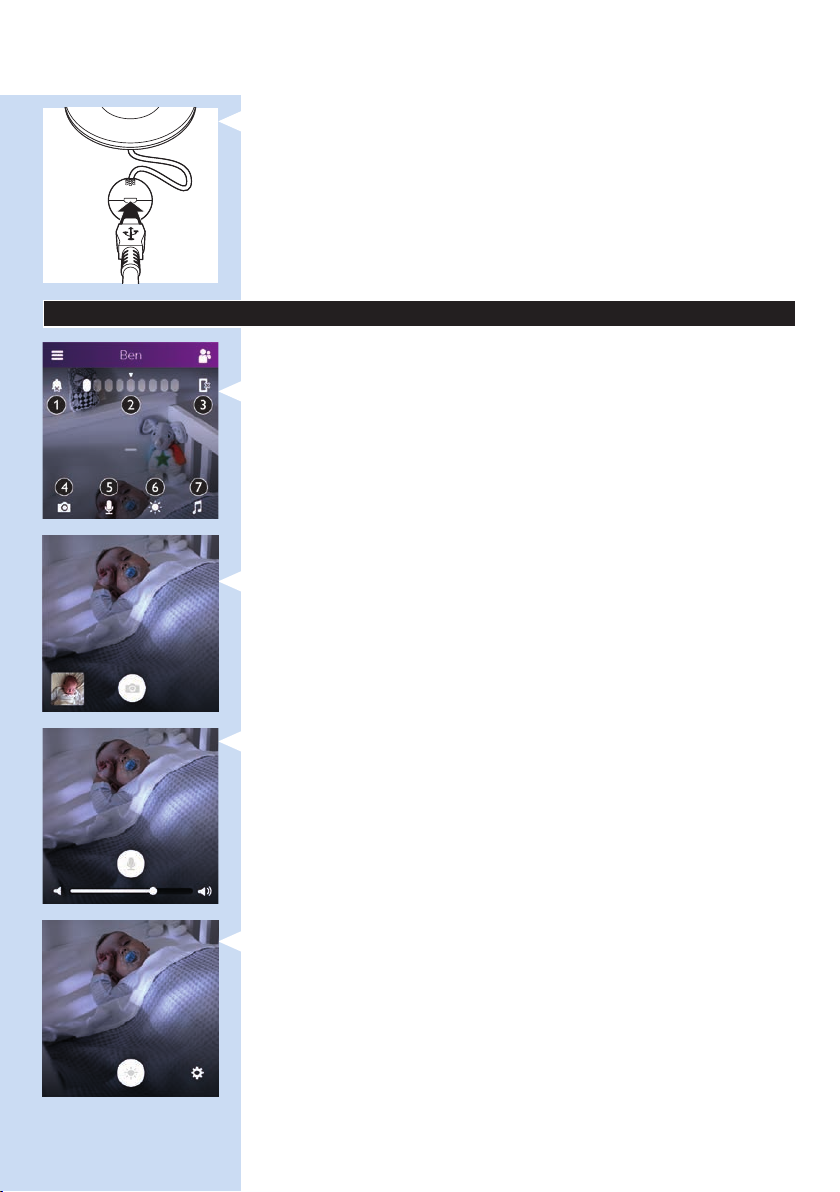
8 Insert the appliance plug into the appliance plug socket in the
temperature and humidity sensor unit and insert the adapter into
a wall socket. Now your baby monitor is ready for use.
Quick start guide
Main screen features
Top of screen:
1 All notications on/off
2 Sound level indication bar
3 Switch audio on/off
Bottom of screen:
4 Snap shot
5 Talk-back
6 Nightlight
7 Lullabies
Quick action buttons
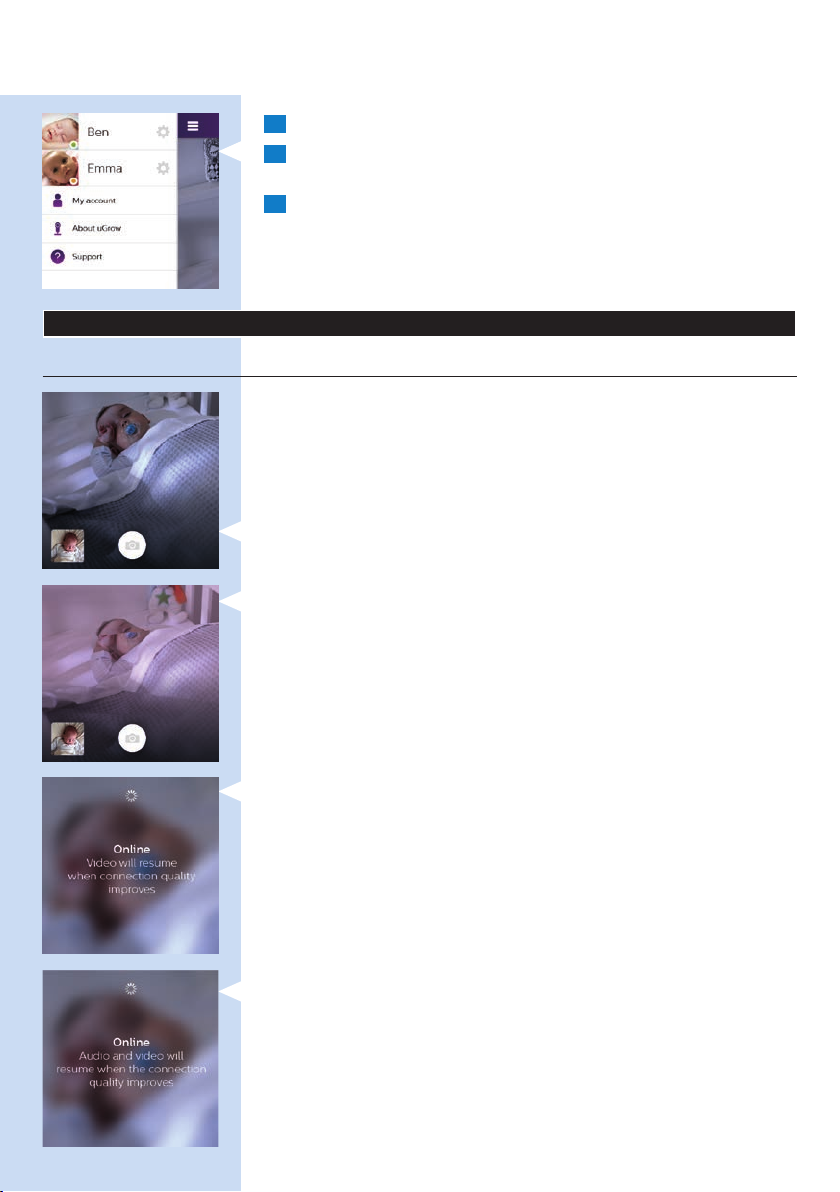
, Snap shot: tap this button to take a photo of your baby.
- When you take a photo of your baby, the photo will be stored in
the photo album on your smart device.
, Talk-back: tap this button to talk to your baby directly.
Options available:
- Talk back on or off
- Adjust talk-back volume
, Nightlight: tap this button to switch the nightlight on or off. Tap the
settings icon in the bottom right-hand corner to adjust the colour of
the nightlight or to set the nightlight timer. Options available:
- Nightlight on/off
- Set the nightlight timer or switch the nightlight on continuously
ENGLISH10
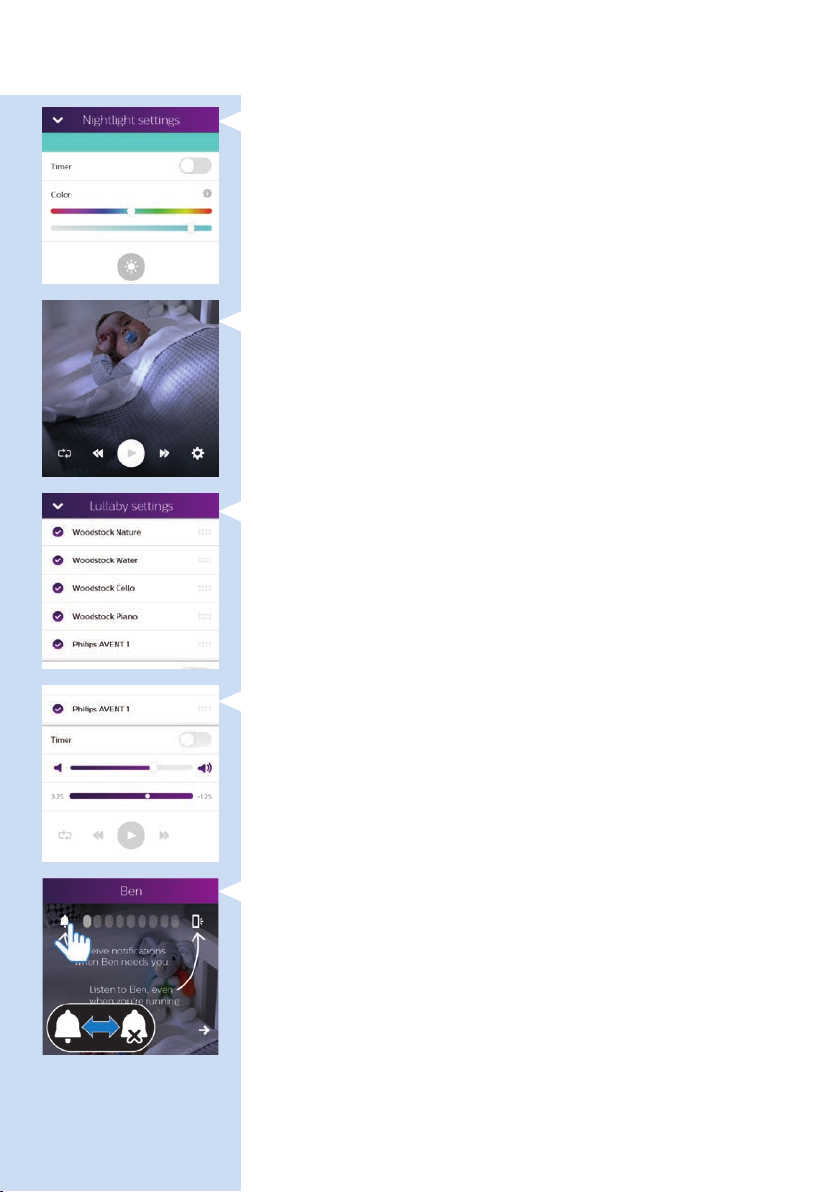
- Set the colour of the nightlight
, Lullabies: tap this button to switch lullaby playing on or off. Tap the
settings icon in the bottom right-hand corner to select the lullabies,
to set a timer and to adjust the volume. Options available:
- Select a lullaby from a list of lullabies
- Program a play list from the lullabies available
- Set the lullaby timer or choose play continuously
- Adjust the playback volume.
Background monitoring icons
- Bell icon: tap to switch notications on or off.
ENGLISH 11
- Mobile phone icon: tap to switch audio on or off.
Note: For more information about background monitoring, see chapter ‘Viewing,
hearing and monitoring your baby’.
Sound level indication bar
- The lights indicate the sound level in your baby’s room.
Note: For more information, see chapter ‘Viewing, hearing and monitoring
your baby’.
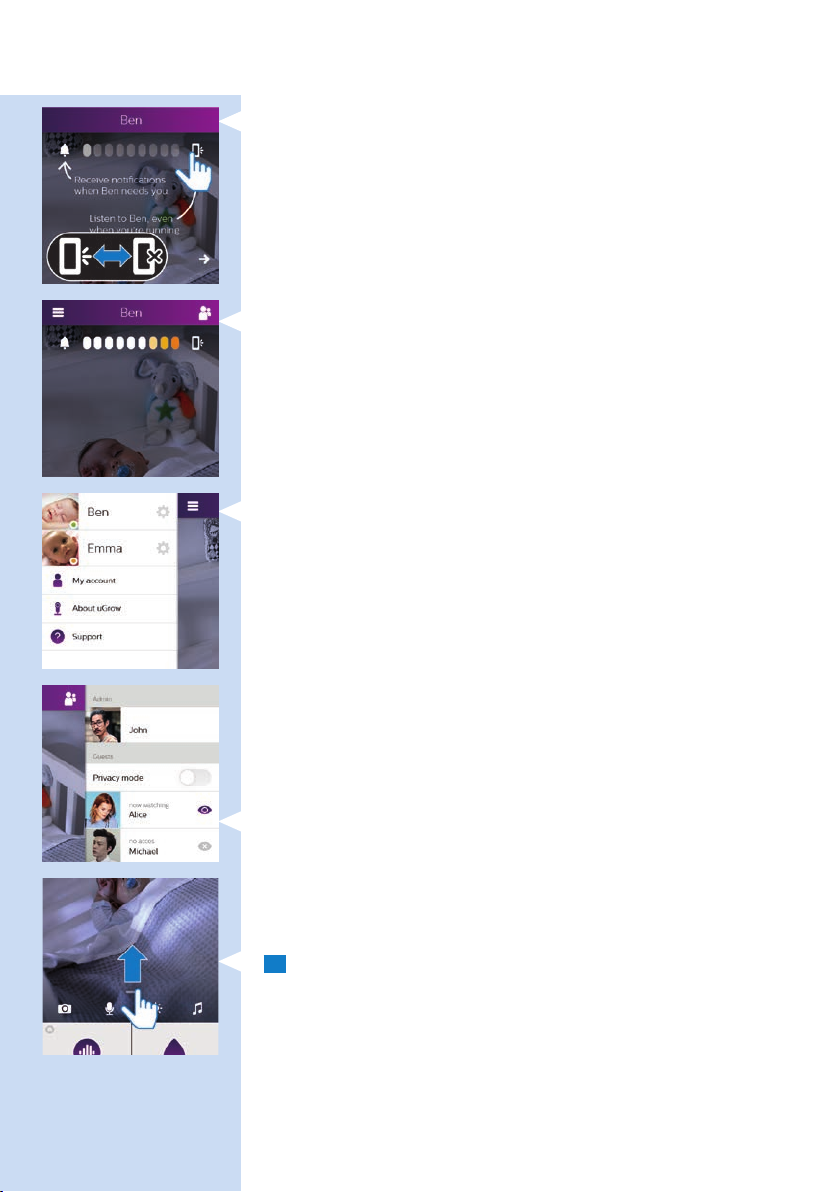
Left tray
- List of baby monitors linked to the app: tap the settings icon to set your
baby monitor preferences and to invite guest users to view your baby
- My account: tap this option to view and adjust your account
information, your prole and your baby’s prole, and to add or remove
a baby monitor
- About: tap this option for more information about the app, versions, etc.
- Support: tap this option to open the support menu
Note: For more information about the left tray, see chapter ‘General app use’.
Right tray
The right tray gives information on the users connected.
Note: The options in the right tray are only available to you if you are an admin
(for more information about the right tray, see chapter ‘General app use’).
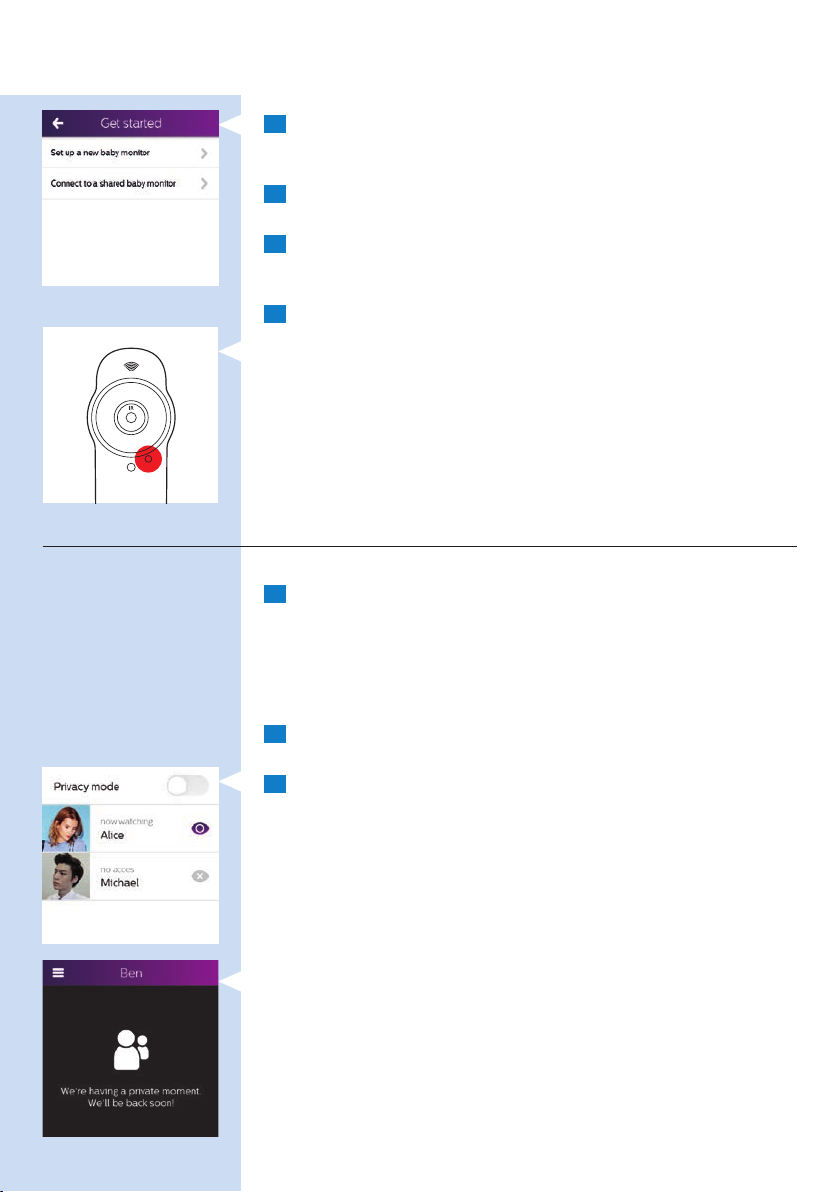
- It shows who is currently watching
- It shows who has access or has no access
The privacy mode button prevents all users from being able to watch
your baby
Dashboard
The app’s dashboard is in the bottom tray.
1 Put your nger on the horizontal line on the screen just above the
icons at the bottom of the screen. Pull this line towards the top of
the screen. The icons at the bottom of the screen also move up.

ENGLISH12
2 When you have pulled the line up, the dashboard in the bottom tray
is fully visible.
On the dashboard you have a number of notication options:
1 Sound
2 Temperature
3 Humidity
Note: For more information about the notication options on the dashboard,
see section ‘Notication options’ in chapter ‘Viewing, hearing and monitoring
your baby’ in this user manual.
Viewing, hearing and monitoring your baby
You can watch, hear and monitor your baby on your smartphone or tablet.
You can also comfort your child by talking to it.
Viewing your baby
Zooming and panning
Note: This feature is only available in portrait viewing mode.
1 When in full screen mode, double tap or pinch outwards to zoom in.
2 Double tap or pinch inwards to zoom out.
3 Drag to pan through a zoomed-in image.

ENGLISH 13
Portrait or landscape viewing
- Rotate your smartphone or tablet to view your baby in landscape
mode.
Night vision mode
When the light level in the room is low, the baby monitor switches to night
vision mode.
- In this mode, you see black and white images of your baby on your
smart device.
Hearing your baby
You hear your baby when it starts to cry.
- How loud you hear the baby, depends on the set volume level of your
smart device.
- The level of sound produced by the baby is also visible on the sound
level indication bar. The number of lights that light up indicates the
loudness of the sound in your baby’s room. The indication bar works
from left to right. The further to the right the lights light up, the louder
the sound is.
Note: The audio on/off button must be set to ‘on’ for you to hear your baby at all.
Tip: Connect your smart device to mains power when you want to use it for
overnight monitoring to prevent the battery from running out.
ENGLISH14
How to get notied that your baby cries
1 Push notication: you receive a push notication when your baby
starts to cry.
Note: If you want to receive a notication while you are performing other
activities on your smart device (e.g. texting, phoning, browsing the Internet),
make sure that you set the all notications toggle switch to ‘on ‘.
Tip: Switch on vibration in the ‘Settings’ of your smartphone if you want your
smartphone to vibrate to alert you when your baby cries, for instance when you
carry the smartphone in your pocket or because you are in a loud environment.
How to specify when you receive a notication
You can also specify in the dashboard when you want to receive a notication.
1 Receive a notication when the your baby’s sound passes the set level.
2 Receive a notication when the baby has been crying for a preset time.
Note: If you choose ‘no notication’, you don’t receive any notication that your
baby is crying (see section ‘Notication options’ in this chapter.
Switching notications on or off on your smart device
Notications are a setting on your smart device (outside the app). You can
select if and how you want to receive notications from the app.
1 Go to the notication centre on your device.
2 Select notication and click to set it on or off.
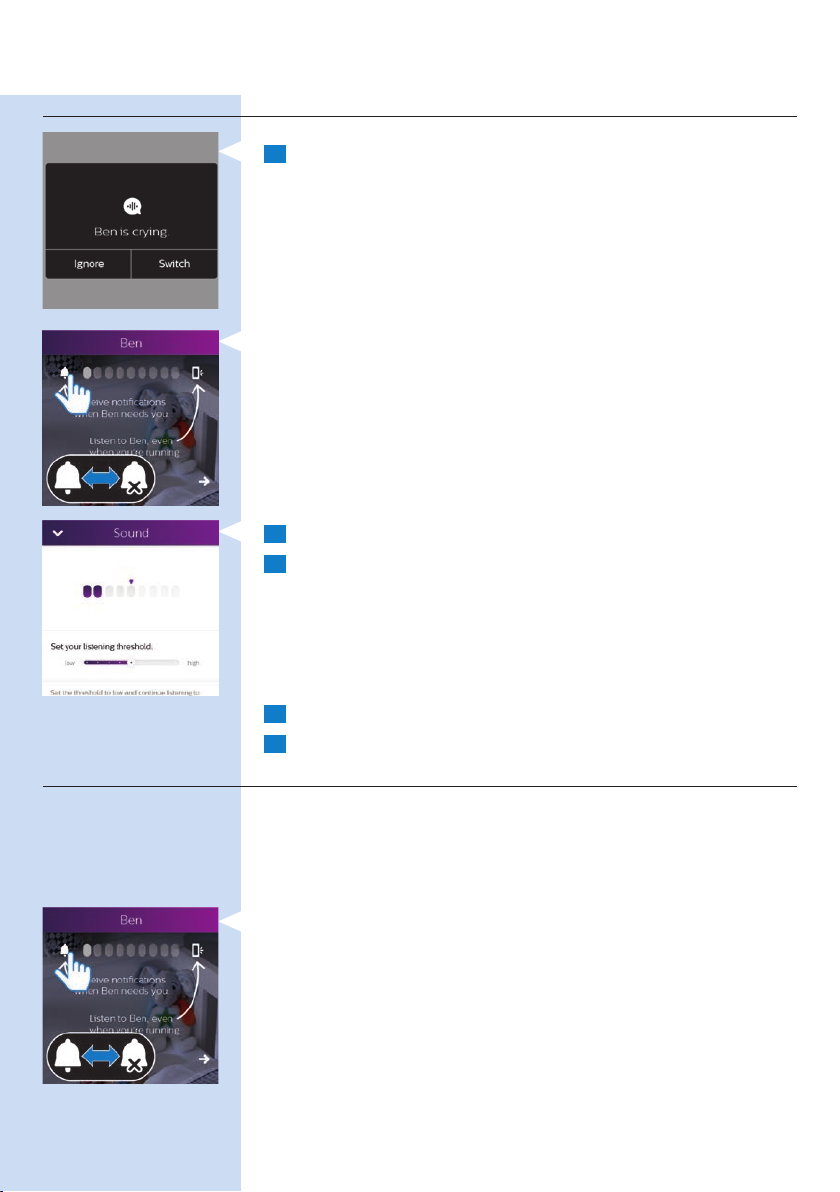
Background monitoring
Background monitoring is a feature in the app that ensures that you can
hear your baby and/or receive notications about your baby while you are
doing other things on your smart device. Background monitoring is on by
default, but you can switch it off.
Switching background monitoring off or on
- Tap the bell icon to switch all notications on or off. When the all
notications toggle switch is set to ‘on’, you receive a message on
your screen when the baby starts crying. You can set your notication
preference in the dashboard and/or monitor settings screen.
Note: Set the all notications toggle switch to ‘on’ to receive all notications
about your baby if the app is running in the background, for example when
you do something else on your smart device or the device is on standby with
its screen off. The all notications toggle switch has to be set to ‘on’ if you want
to adjust personalised notications on temperature, sound and humidity in the
dashboard.
ENGLISH 15
- Tap the mobile phone icon to switch audio on or off.
Note: If you mute the sound, you will not be able to hear your baby when you
switch to another function on your smart device (phoning, texting, etc.).
Note: When you make a mobile call or use a VoIP app (e.g. Skype, Viber or
FaceTime) to call someone, you will not hear your baby. As soon as the baby
starts to cry, however, you will receive a notication.
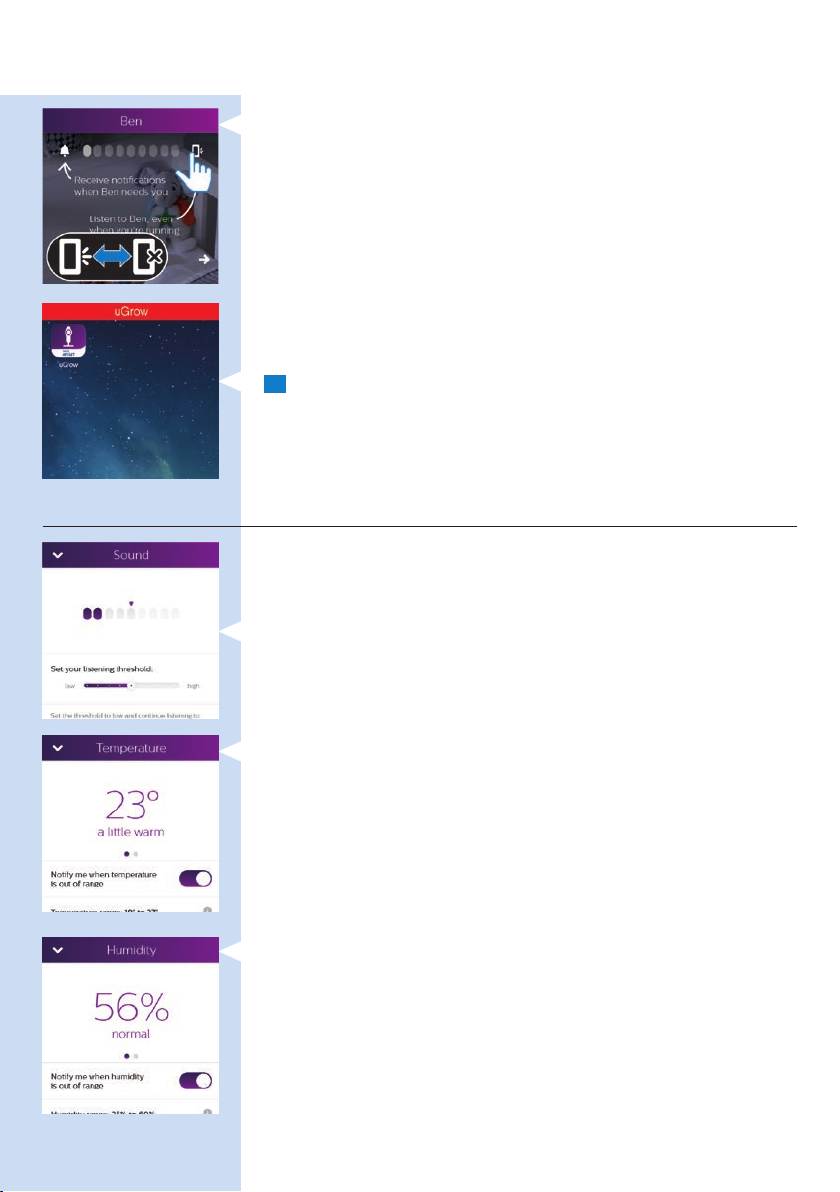
Switching from background monitoring to app main screen
The app remains active in the background, also when the device is on
standby. While background monitoring is active, there is a red bar at the
top of the screen of your smart device.
1 To switch from background monitoring to the app main screen,
tap the red bar at the top of the screen to bring the app to the
foreground.
Notication options
The app’s notication options are in the dashboard. The dashboard is
located in the tray at the bottom of the screen. Pull up the dashboard to
see the option menu. The menu contains the following options.
Sound
- Set the slider to a sound level above which you wish to be notied
Note: If the slider is set to ‘quiet’, you will hear your baby continuously when
you leave the app.
- Set the duration of the sound after which you wish to be notied
Temperature
- Set the temperature range above or below which you want to receive
a temperature notication
- Switch temperature notication on or off
- Display current temperature or history
Humidity
- Set the humidity range above or below which you want to receive a
humidity notication
- Switch humidity notication on or off
- Display current humidity or history
ENGLISH16
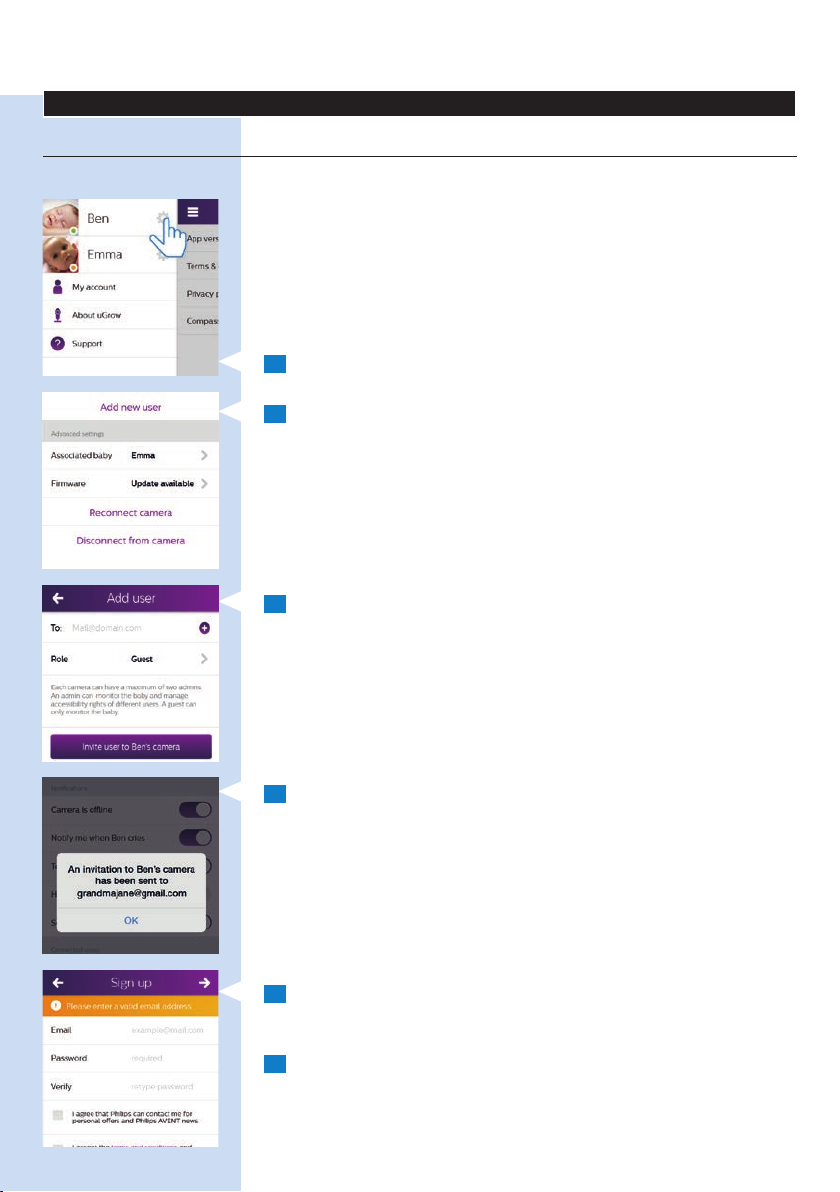
Guest viewers and accounts
Inviting guests and a second admin
You can invite up to nine relatives or friends as guests and allow them to
watch your baby on their smartphone or tablet. You can invite one of these
guests to act as second admin. A second admin has the same rights as the
rst admin. Guests only have viewing rights and these rights are controlled
by the admin(s). Just like a guest, an admin has viewing rights.
On top of that, the admin has the right to invite guests, to give them
access, to remove their access and to disconnect them. The admin can also
deactivate his or her account and thereby disassociate the guests from the
baby monitor.
1 In the left tray, tap on the settings icon next to the baby monitor.
2 Scroll down and tap ‘Add new user’.
3 Add a guest’s email address and his or her role (admin or guest).
4 The app sends an email to the person invited and you see a
notication pop up that an email has been sent.
5 The guest receives an email with an invitation code that is only valid
for a limited period. The email also contains a link to the App Store.
The guest can click this link to install the app.
6 After installing the app, the guest creates an account by following the
instructions in the app.
ENGLISH 17
7 The guest selects the ‘Connect to a shared baby monitor’ option
during the setup process. This opens the page on which the invitation
is validated.
8 The guest enters the invitation code, his email address and conrms.
The code and the email address are checked.
9 The admin receives an email that conrms that the guest has been
connected to the baby monitor and that the admin can now grant
the guest access.
10 When the admin has granted the guest access, the guest can view
the baby.
- When one or more people watch the baby, the red viewing indicator
lights up red.
Note: Although up to ten people (eight or nine guests and one or two admins)
have viewing rights to the same baby monitor, only three people can watch
the baby at the same time. If guests try to access the baby monitor while
three viewers are already watching, they will receive the message ‘Too many
connections’. Admins can always override the access of the guests if they want
to watch the baby.
Giving and removing access
Users with admin rights can determine who can watch the baby.
1 To remove access for a guest viewer, go to the right tray, tap the
guest whose access you want to remove and tap the eye icon next
to the guest’s name.
Tip: If there are already three people watching your baby and you want to give
someone, e.g. the babysitter, access to the baby monitor, you can remove access
for one of the current viewers and give someone else access instead.
2 To give a guest viewer access, go to the right tray, tap the guest you
want to give access and tap the eye icon next to the guest’s icon.
3 If you want to remove access for all viewers simultaneously, tap the
privacy mode button. This will deny everyone except yourself access
to the baby monitor until you tap the privacy mode button again.
Tip: You can use the privacy mode button to have a moment of privacy with
your baby, e.g. to breastfeed or bathe the baby or to change its nappy.
The guests who try to access the baby monitor receive an on-screen notication.

ENGLISH18
Account management
Disconnecting a guest
To disconnect guest users from the app permanently, you have to
remove them from the list of guests. A guest may also disconnect himself
permanently from the app.
Deactivating your user account
If there is only one admin and this admin deactivates his or her account,
all the accounts of guest users are disassociated from the baby monitor,
although the accounts continue to exist. If there are two admins, both
admins have to deactivate their accounts to disassociate all accounts. If only
one of the two admins deactivates his or her account, the guests remain
connected to the baby monitor.
If you want to transfer the baby monitor to someone else, if you lose the
baby monitor or if the baby monitor is stolen, we advise you to deactivate
the admin account or accounts. This is essential to protect you and your
baby’s privacy.
1 To deactivate your account, go to the left tray and tap on
‘My account’.
2 Tap on ‘Deactivate account’.
3 A pop-up window appears that asks you to conrm that you wish to
deactivate your account.
4 When you tap on ‘Deactivate’, a pop-up window conrms that your
account has been deactivated.
Adding or removing baby monitors
You can add up to ten baby monitors in the app. This allows you to
monitor more children or the same child in more rooms. You may, for
instance, want to install a monitor over the baby’s cot in the baby room
and over its playpen in the living room. You have to connect the baby
monitors to the app one by one.
ENGLISH 19
1 Go to ‘My account’ in the left tray.
2 You will see the list of baby monitors connected. Tap on ‘Add baby
monitor’.
3 Follow the instructions in chapter ‘First-time setup’ in this user
manual to connect the baby monitor to the app.
General app use
Video and audio quality optimisation
The quality of the video and audio on your smart device may change
over time, depending on the available bandwidth of your connection to
Internet. Using a WiFi connection typically gives the best results, while 4G
and 3G may offer less bandwidth and deliver reduced quality. The app will
automatically offer you the best possible experience, by matching the video
and audio quality to the bandwidth available.
Matching takes place in steps:
1 Large bandwidth: good video and audio quality, with text notications.
2 Reduced bandwidth (such as when using 3G): reduced video quality;
good audio quality, with text notications.
3 Small bandwidth (such as when using 2G): only an audio link will be
available, with text notications
4 Very small bandwidth: only text notications are available
ENGLISH20
WiFi connection to the Internet
You get the best results if you connect your smart device to the Internet
via WiFi. It will then automatically use the WiFi network to link to your baby
monitor. When there is no WiFi connection to the Internet, your smart
device switches to its 3G or 4G mobile data connection. Use of this data
connection may involve extra charges from your provider, depending on
your subscription. A video connection typically requires 0.1 to 0.25 MB of
data per second. An audio connection requires 0.01 MB of data per second.
If you want to prevent your smart device from connecting to the 3G or 4G
network, you have to switch off the mobile data connection of your device.
This will affect all other apps that may use the 3G or 4G mobile data
connection. Please note that, if you switch off the mobile data connection,
you will not be alerted that your baby is crying when you lose the WiFi
connection to the Internet.
Using the baby monitor away from home
You can use the monitor at any place where a 2.4 GHz WiFi network is
available, whether it as a friend’s or relative’s home or at a hotel or holiday
residence. If you have the WiFi network name and the WiFi password, you
can set up and use your baby monitor away from home. Follow the setup
instructions below to do so. Once you have set up connection with a WiFi
network, the settings are stored in the memory of your device and you
need not repeat the setup procedure as long as you use your app and
baby monitor at the same place.
Note: If the WiFi network connection requires an extra conrmation, e.g. to
agree to the terms of use, the baby monitor will not be able to connect to the
WiFi network. This may happen on hotel WiFi networks and other public WiFi
networks.
1 There are two options to connect the baby monitor to the WiFi
network.
- The rst option: When you switch on the baby monitor, you get the
message ‘Baby monitor not found’. Wait until the app offers the option
‘Reconnect the baby monitor’.
- The second option: Switch on the baby monitor. Open the left tray,
select the baby monitor and choose ‘Reconnect the baby monitor’.
2 When the app has generated a WiFi QR code, hold the screen of
your smartphone or tablet at a distance of around 20 cm in front
of the baby monitor lens. Slowly move the smartphone or tablet
closer or further away from the lens to ensure the WiFi QR is read
properly.
ENGLISH 21
3 Follow the rest of the on-screen instructions to complete setup.
The setup procedure is completed and the baby monitor is
connected to the WiFi network and ready for use, when the WiFi
status light on the front of the baby monitor turns solid green.
Note: When you return home, you have to follow the procedure above to
reconnect the baby monitor to your home WiFi network.
Using the app on several devices
You can use the uGrow Smart Baby Monitor app on more than one device
(e.g. on your iPhone and your iPad).
Note: When you log in with the same account on a device while the app is
active on another device, the device on which the app was active rst will
automatically log you out. You cannot use the app under the same account on
two different devices simultaneously.
Resetting the baby monitor
The baby monitor has a reset button on the back. When you press this
button the baby monitor is reset to its factory default settings. This means
that you disassociate all accounts from the baby monitor.
Note: Always reset the baby monitor by pressing the reset button before you
transfer the baby monitor to someone else. This is necessary to protect your
privacy. Also reset the baby monitor when you buy or receive it second-hand.
How to reset to factory default settings
Note: Make sure the baby monitor is switched on before you reset it.
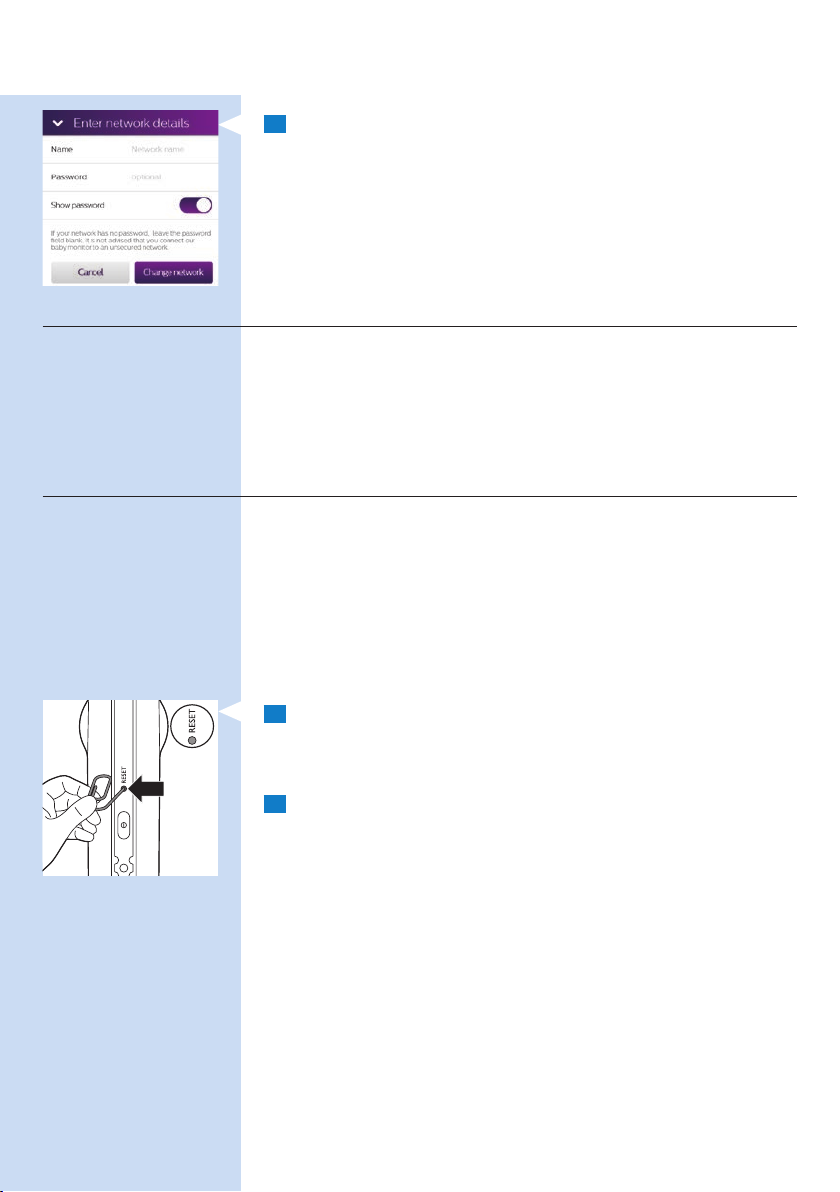
1 While the baby monitor is on, press the reset button on the back
of the baby monitor with a paperclip or another pointed object. It
is recommended to do this when the baby monitor is connected to
your WiFi network.
2 Keep the reset button pressed until the baby monitor beeps, then
you can release the button. When you release the button, the baby
monitor plays a short tune to conrm the reset.
What to do after a reset to factory default settings
After the baby monitor has been reset, the WiFi status light ashes orange
when you switch on the baby monitor to indicate that it is rebooting after
a reset. When the WiFi status light stops ashing, you can connect the baby
monitor to your WiFi network again. Follow the instructions in chapter
‘First-time setup’ in this user manual. If you invited other people to access
the baby monitor, you need to invite them again.
ENGLISH22
Firmware upgrades
Upgrading is essential to safeguard your privacy and the proper functioning
of the baby monitor and the app.
- Essential upgrades are mandatory. Mandatory app upgrades are
installed on your smart device automatically and do not require
conrmation.You will only receive a notication that a forced
mandatory upgrade is taking place.
- From time to time, you receive notications that upgrades are available
for your baby monitor’s rmware or for the app software.
The upgrades are installed when you conrm them.
- To look for rmware upgrades for your baby monitor, open the left
tray and tap the settings icon next to the baby monitor. Scroll down to
‘Firmware’ and tap on it to check for rmware upgrades. If an upgrade
is available, tap on it to install.
Note: When an upgrade is being installed, you are temporarily unable to view
and hear your baby.
WiFi status light signals
, Off
1 Off: The baby monitor is off
, Orange
1 Flashes orange fast: the baby monitor is starting up.
2 Flashes orange slowly: the baby monitor is upgrading its rmware.
Do not switch the baby monitor off during the rmware upgrade.
Note: The WiFi status light might switch off shortly during the rmware upgrade.
ENGLISH 23
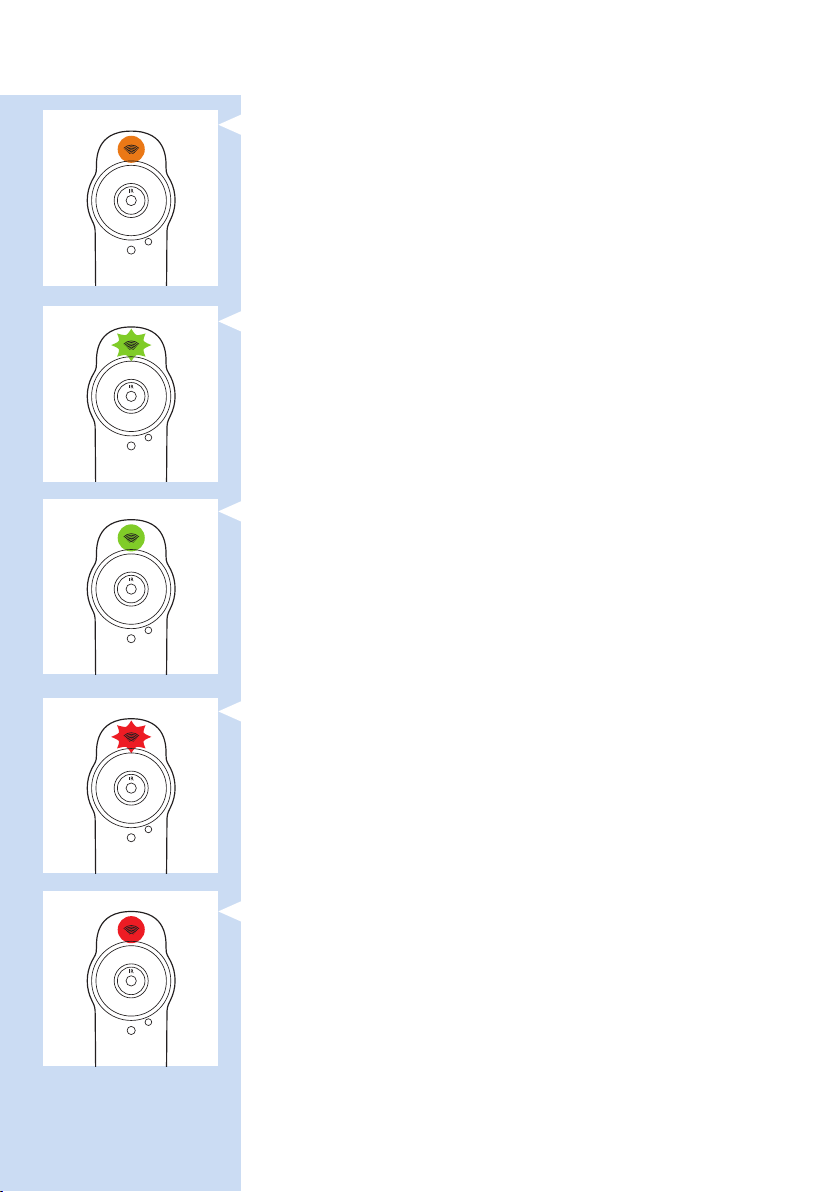
3 Solid orange: the camera of the baby monitor is ready to read the WiFi
QR code generated by your smartphone or tablet.
, Green
1 Flashes green: the WiFI QR code has been read successfully.
2 Solid green: the baby monitor is connected to the WiFi network.
, Red
1 Flashes red slowly: you entered the wrong WiFi password.
2 Solid red: the baby monitor fails to connect to the WiFi network.
ENGLISH24
Security and privacy
Network security
WiFi hotspots in public places, such as airpor ts and hotels, are convenient,
but they are often not secure.
We advise you to use the baby monitor only on a WiFi network protected
with WPA2 encryption. We advise you not to use the baby monitor on a
network that uses WEP encryption.
Note: WiFi networks that do not require a password are not secure.
Strong passwords
Passwords are essential to protect your WiFi network and your account
against unauthorised access. The stronger your password, the better
protected your WiFi network and your account is.
The rules for a strong password are:
1 A strong password has at least 8 characters.
2 A strong password does not contain your name, your baby’s name,
another real name or a brand name.
3 A strong password does not contain a complete word.
4 A strong password is very different from passwords that you have used
before.
5 A strong password contains characters from at least two of the
following categories:
- Letters: A, B, C or a, b, c
- Numbers: 0, 1, 2, 3, 4, 5, 6, 7, 8, 9
- Symbols: _ . @ $
Safe use of the baby monitor app
Only use the app on a secure network
Don’t use the app on an unsecured WiFi network. We advise you to use the
baby monitor only on a WiFi network protected with WPA2 encryption.
You can also use your phone’s data network (often referred to as 3G or 4G).
Always use the latest software and rmware
Always upgrade the app software and the baby monitor rmware when
you receive a notication that an upgrade is available. Upgrades are made
available when there are software improvements or to prevent a security
issue. If you fail to upgrade, your connection to the baby monitor via the
app may no longer be safe and private.
Device compatibility
, iPhone compatibility
- iPhone 4S and newer
, iPad compatibility
- iPad 2 and newer
, iPod Touch compatibility
- iPod Touch 5th gen and newer
, Android compatibility
- Android 4.1 or higher
Note: For the latest information on device compatibility, please visit
www.philips.com/ugrow.

Ordering accessories
To buy accessories or spare parts, visit www.shop.philips.com/service
or go to your Philips dealer. You can also contact the Philips Consumer
Care Centre in your country (see the worldwide guarantee leaet for
contact details).
Guarantee and support
If you need information or support, please visit the Philips website at
www.philips.com/support or read the separate worldwide guarantee
leaet.
Frequently asked questions
For more frequently asked questions about this baby monitor, see the
support page of this product on www.philips.com/support.
Question Answer
Troubleshooting
Why can’t I nd the
app in the App Store or
Google Play?
I cannot download and
install the app. What can
I do?
I cannot setup the baby
monitor. Each time I end
up in the connection
error screen. What is
the matter?
I have problems making
my baby monitor read
the QR code on my
smart device. What can
I do?
You can download the app from the Apple App Store or Google Play, by
searching for uGrow Smart Baby Monitor. If you do not see the app in the
App Store or Google Play, your phone may not have the required iOS or
Android version. This app is only compatible with iOS 7 or higher, or Android
4.1 or higher.
Please check if any of the following factors prevent a smooth download. Is
your WiFi signal stable and strong enough? Does your smart device run on
iOS 7 or higher, or Android 4.1 and higher? Do you have enough space left
on your smart device to save the app? Did you enter the correct password
for the App Store or Google Play?
If the WiFi status light is solid orange and ashed red while trying to connect,
the WiFi password entered is wrong. Restart the set up process. Re-enter the
WiFi password and make sure that the password is correct .
If the WiFi status light is solid orange and was solid red while trying to
connect, the baby monitor fails to connect to the WiFi network. First check
if your phone or tablet uses the same WiFi network you want to connect
the baby monitor to. Then check if you have Internet access to 2.4GHz WiFi.
If this does not solve the problem, make sure the router SSID (the network
name) does not contain special symbols. If it does, change the name of your
router SSID accordingly.
Make sure that you hold the WiFi QR code at approx. 20 cm/8 inch distance
from the lens. Try moving the smart device slightly up or down or left or right
to ensure the WiFi QR code is directly in front of the baby monitor. You can
also try moving the smart device closer to or further away from the baby
monitor lens to allow proper focussing. Make sure that there is enough light
in the room, but avoid too bright light. When the baby monitor has read
the WiFi QR code, you hear a conrmation sound and the WiFi status light
ashes green.
ENGLISH 25
ENGLISH26
Question Answer
Perhaps you did not remove the protective foil from the baby monitor lens.
Remove the foil.
Perhaps part of your hand covers the WiFi QR code. Hold your device in
such a way that your hand does not cover the WiFi QR code.
If the WiFi status light is solid orange, the baby monitor did not read the
QR code successfully. Go back using the arrow in the top left-hand corner of
the screen and follow the QR code instructions.
If the WiFi status light ashes orange, the camera is still booting. Wait until the
light is solid orange. Then go back using the arrow in the top left-hand corner
of the screen and follow the QR code instructions.
I cannot see my baby.
What is wrong?
Why does the app not
notify me that the baby
is crying?
Check if the WiFi signal is strong enough in the room where the baby
monitor is placed.
Check if the baby monitor is connected to a live power socket and switched
on.
The WiFi status light on the front of the baby monitor must be solid green
(see chapter ‘WiFi status light signals’).
If you use more than one baby monitor, check that the correct one is
selected. Go to the left tray and tap the baby monitor to see if it is active.
Perhaps there are already three people watching the baby. The app only
allows three people to watch simultaneously. If you have administrator rights,
you can remove access for one of the guests to be able to watch yourself.
Check if the baby monitor is connected to the WiFi network. The WiFi status
light on the front of the baby monitor must be solid green.
The baby monitor may be ofine. To receive a notication that the baby
monitor goes ofine, go to the left tray and switch on this notication under
‘Settings’.
The sound threshold for notication may have been set too high. In that
case, the app will only notify you when the baby produces a lot of sound.
Open the dashboard to lower the sound threshold to ensure that you will be
notied sooner when the baby starts crying.
You may have set the duration of the crying too long. Choose a shorter time
so that the app noties you sooner.
The volume of your phone may be off. Set the volume of your phone to
normal.
Perhaps talk-back is active. Tap the talk-back icon to switch off talk-back.
During talk-back you don’t hear any sounds from the baby.
Check if you have not received an email to notify that your account has been
removed. If you have viewing rights as a guest, the administrator may also
deny you access temporarily. Contact the administrator and ask him or her
do enable you or to reinvite you as a guest.

Question Answer
ENGLISH 27
I lose connection
frequently. What is the
matter?
After I changed my
router, I cannot see my
baby anymore. What is
wrong?
I have been invited as
a guest, but why don’t
I see anything when I
open the app?
Check if the WiFi signal in the room where the baby monitor is placed is
strong enough and stable. If this is not the case, you need a WiFi repeater to
get a strong and stable signal. If you use a WiFi repeater, make sure that your
router and your WiFi repeater have the same SSID and that you use the
same password for the router and the repeater.
If the WiFi status light on the front of the baby monitor is solid green and you
keep losing connection, there may be a problem with the Internet connection
of your smart device. Check the WiFi signal on your smart device or the 3G
or 4G speed by trying to watch a movie, e.g. one on YouTube.
First make sure that your smart device has a good WiFi signal from the
new router. There are two options to connect the baby monitor to the
WiFi network. The rst option is to switch on the baby monitor. The app
will give the message ‘Baby monitor not found’. Go to ‘Troubleshooting’ and
select ‘Reconnect baby monitor’. The second option is to open the left tray
when the app gives the message ‘Baby monitor not found’. Select the baby
monitor in the left tray and select ‘Reconnect baby monitor’. When the
app has generated a WiFi QR code, hold the screen of your smart device
at a distance of 20cm in front of the baby monitor’s lens. Next, follow the
on-screen instructions to complete setup. The setup procedure has been
completed successfully when the WiFi status light on the front of the baby
monitor turns solid green.
Check if you have not received an email to notify that your account has been
removed. If you have viewing rights as a guest, the administrator may also
deny you access temporarily. Contact the administrator and ask him or her
do enable you or to reinvite you as a guest.
Check if your smart device is connected to the Internet.
The baby monitor may be ofine. To receive a notication that the baby
monitor goes ofine, go to the left tray and switch on this notication under
‘Settings’.
The sound threshold for notication may have been set too high. In that
case, the app will only notify you when the baby produces a lot of sound.
Open the dashboard to lower the sound threshold to ensure that you will be
notied sooner when the baby starts crying.
You may have set the duration of the crying too long. Choose a shorter time
so that the app noties you sooner.
The volume of your phone may be off. Set the volume of your phone to
normal.
ENGLISH28
Question Answer
Tips and tricks
Do I have to keep
the app on screen to
monitor my baby?
Why do I get black and
white images instead of
colour ones?
If my device is locked or
I am using another app
or making a phone call,
can I still hear my baby?
Use and learn
Do I need an extra
account if I have more
baby monitors?
Can I use more baby
monitors in the same
app?
Why does it take a
long time for the app
to load?
Is the baby monitor
hacker-proof?
No, the app can monitor in the background while you do other things on
your smartphone or tablet. Tap the mobile phone icon. Now you hear your
baby and also hear when it starts to cry. When the all notications toggle
switch is set to on, you will also receive an on-screen notication that the
baby is crying, while the app runs in the background.
The baby monitor has switched to night vision mode. The room where the
baby monitor is placed is dark.
If there is enough light in the room, the light sensor on top of the baby
monitor may be covered or dirty. Make sure that this sensor is fully exposed
to the light in the room.
Yes, you can choose to continue monitoring your baby in the background.
Please note that if you use your phone to make a call, you will only hear a
ringtone when the baby starts crying. You will not hear your baby. Tap the
mobile phone symbol to switch on background audio. When background
audio is on, you hear your baby while you are engaged in other activities. You
can also choose to receive a notication when your baby is crying. Tap the
bell symbol on the main screen to switch all notications on or off. When all
notications is set to on, you will receive a message on your screen when the
baby is crying.
No, you do not need an extra account if you use more baby monitors. You
can add a baby monitor to your uGrow Smart Baby Monitor app. Go to ‘My
account’ in the left tray. Here you see a list of the baby monitors connected
to the app. Tap on ‘Add baby monitor’. Follow the instructions in chapter
‘First-time setup’ to connect the baby monitor to the app.
You can connect up to ten baby monitors to the app, but you can only view
the video from one baby monitor at the time. You will receive notications
from the other baby monitors connected. If you receive a notication and tap
on it, the app will take you directly to that baby monitor. You can also select
the baby monitor you want to view in the left tray.
The Internet connection of your smart device or the WiFi connection of the
baby monitor may be slow. Please check the connection of your smart device
and of the baby monitor. The app needs a stable network connection.
We do everything we can to prevent hacking and issue frequent updates.
Please make sure that you always use the latest app software and the latest
baby monitor rmware. If you lose your smart device, reset the baby monitor
to remove any connections to it. You can also log in on the app from another
smart device and delete your account. If you are the only administrator, all
guest users will be disconnected from the baby monitor too.

Question Answer
ENGLISH 29
I have lost my
smartphone. How can I
prevent strangers from
viewing my baby?
Will I be notied of
upgrades of the app
or the baby monitor
software?
My phone or tablet
becomes warm when
I use the app. Is this
normal?
Log in on the app from another smart device and delete your account. If
you are the only administrator, this will disconnect all guest users of the app
from the baby monitor tool. You can also reset the baby monitor to disable all
connections to the device you lost. You nd the reset button on the back of
the baby monitor.
Yes, you will receive a notication on your phone to upgrade via the App
Store. This will happen periodically. Upgrade notications for the rmware of
the baby monitor will appear in the app along with instructions on how to
upgrade.
Your device needs the power to provide high-quality video. This does not
harm your device. To prevent this, we advise you to update your device to the
latest iOS and uGrow app version. Your device does not warm up when you
run the app in the background.

30
DEUTSCH
Inhaltsangabe
Einführung 30
Produktübersicht 31
Ersteinrichtung 31
Anbringen des Babyphones an der Wand 33
Kurzanleitung 35
Sehen, Hören und Überwachen Ihres Babys 38
Ansehen Ihres Babys 38
Hören Ihres Babys 39
So werden Sie benachrichtigt, dass Ihr Baby weint 40
Hintergrundüberwachung 40
Benachrichtigungsoptionen 41
Gastbenutzer und Konten 42
Einladen von Gästen und einem zweiten Administrator 42
Erteilen und Entziehen von Zugriffsrechten 44
Kontoverwaltung 44
Allgemeine App-Nutzung 46
Optimierung der Video- und Audioqualität 46
WiFi-Verbindung zum Internet 46
Verwenden des Babyphones unterwegs 47
Verwenden der App auf mehreren Geräten 48
Zurücksetzen des Babyphones 48
Firmware-Aktualisierungen 48
WiFi-Statusanzeigen 49
Sicherheit und Datenschutz 50
Netzwerksicherheit 50
Starke Passwörter 51
Sichere Verwendung der Babyphone-App 51
Gerätekompatibilität 51
Zubehör bestellen 51
Garantie und Support 52
Häug gestellte Fragen 52
Einführung
Herzlichen Glückwunsch zu Ihrem Kauf und willkommen bei Philips Avent!
Um den Support von Philips Avent optimal zu nutzen, registrieren Sie Ihr
Produkt bitte unter www.philips.com/welcome.
Das uGrow Smart-Babyphone nutzt die neue SafeConnect Technology
und funktioniert so in allen Netzwerken. Es passt sich automatisch
an die Netzwerkbedingungen an, sodass jederzeit eine hochwertige,
kontinuierliche Verbindung zu Ihrem Baby gewährleistet wird. Sollte
die Verbindung doch einmal abbrechen, wird diese vom Babyphone
automatisch wiederhergestellt. Die Bandbreitennutzung wurde so optimiert,
dass der Akku Ihres mobilen Geräts geschont wird. Es funktionier t sogar,
wenn Sie Ihr Telefon für andere Zwecke verwenden.
Für das uGrow Smart-Babyphone ist eine Internetverbindung sowie WiFi
erforderlich. Eine gute Internetverbindung und WiFi sind Voraussetzung, damit
Ihr uGrow Smart-Babyphone optimal funktionieren kann. Eine niedrigere
Qualität von Internetverbindung und WiFi kann die Verbindung zwischen der
uGrow App und dem Babyphone beeinträchtigen. Es ist mit iOS7 und höher
Loading...