

Philips Zoom! Instructions For Use Manual

WhiteSpeed
Light-Accelerated
Tooth Whitening
Procedure Kit
WhiteSpeed
Light-Accelerated
Tooth Whitening
Procedure Kit
Instructions for use


English 6
Deutsch 19
Français 37
Hrvatski 59
Italiano 75
Română 89
Suomi 104
Български 120
4 English
Manufacturing information
Manufacturer:
Discus Dental, LLC
1700A South Baker Avenue
Ontario, CA 91761 USA
philipsoralhealthcare.com
EMERGO EUROPE
Prinsessegracht 20
2514 AP The Hague
The Netherlands
VITA is a registered trademark of the VITA
ZAHNFABRIK, H. Rauter GmbH & KG,
Bad Saeckingen, Germany.
Symbols
Consult instructions for use
Reference to enclosed or attached information
Caution
Keep away from sunlight, keep away from heat
Temperature limits
Conformity European
Manufacturer
2
Use by date
Batch code
Catalogue number
Authorized in the European Community
Do not re-use. This product is intended for use
on a single patient during a single procedure.
5English
REFRIGERATE
Keep refrigerated
Important information
Read and understand the information in these
instructions for use and in the instructions
for use provided with the Philips Zoom!
Whitespeed Light-Accelerated Tooth Whitening
Gel (whitening gel) prior to initiating whitening
treatment.
The whitening gel must be removed from
refrigeration and warmed to room temperature
so it will thicken before it is applied to the
patient's teeth. Either:
- Remove the syringe from refrigeration at
least 6 hours before use (preferably the night
before) or
- If removed just prior to use, place the syringe
in a cup of hot water (49 °C) for 10 minutes.
Remove the syringe from the water and wait
5 minutes before extruding gel.

6 English
Conditions of use
This product is to be distributed to and used by
dental professionals exclusively. This product is
intended for use on healthy patients aged
18 years and older who have no underlying oral
health issues, are not perio-involved and do not
exhibit failing restorations.
Contents
Philips Zoom! WhiteSpeed Light-Accelerated
Whitening Procedure Kits (Light-Accelerated
procedure kits) include:
- Sheets .040 EVA tray material (2), (not included
in all Light-Accelerated procedure kits)
- Light guide (2)
- IsoPrep retractor (2)
Procedure tray (2) includes:
- Face bib (2)
- Gauze squares (6)
- Liquidam Soft Tissue Isolation Syringe, 2.9 g (1)
- Liquidam needle point tip (1)
- Liquidam black tip (1)
- Cotton rolls (2)
- Surgical suction tip (1)
- Application brush (1)
Post care and maintenance kits (not included
in all Light-Accelerated procedure kits)
include:
- NiteWhite/DayWhite Whitening Gel
instructions for use (1)
- Relief ACP oral care gel instructions for use (1)
- Relief ACP oral care gel syringe, 2.4 ml (1)
- Whitening gel (1)
- Tray case (1)

Packaged separately:
- Philips Zoom! WhiteSpeed Light-Accelerated
Tooth Whitening Gel
- Instructions for use (1)
- 25 % Hydrogen Peroxide Whitening Gel
syringe, 4.6 g (1)
- Mixing tip (1)
Product description
Philips Zoom! WhiteSpeed Light-Accelerated
Tooth Whitening Procedure Kits are professional
level (in-oce) Light-Accelertated procedure
kits and are for single patient use only.
Indications for use - candidate
qualication
A screening exam is recommended to ensure
the patient has no underlying oral health issues.
You may want to treat existing issues before
recommending this whitening treatment and
disqualify any patient who is perio-involved,
exhibits failing restorations or is otherwise in an
unhealthy oral state.
Patient's expectations
Set realistic expectations about potential
results based on the oral exam and explain the
following:
- Results vary by patient.
- Most patients will experience a change of
up to 6-8 shades on value-ordered VITA®
Classical Shade Guide.
- Anatomy, calcications, age, tooth condition,
hygiene and starting shade aect the results.
- Teeth with yellow and brown stains will
achieve the most noticeable results.
- Teeth with gray shading from tetracycline
or other medications may experience less
noticeable results but should improve.
7English

8 English
- Teeth with multiple colorations, bands,
splotches or spots due to tetracycline use
or uorosis do not whiten as well, may
whiten unevenly, and may require additional
whitening treatments.
- Previous orthodontic treatments may
cause teeth to whiten unevenly either due
to residual resin remaining on the teeth or
overpolishing upon removal.
- Crowns and other tooth-colored restorations
will not whiten.
- Tooth-colored restorations may require
replacement following whitening to maintain
a uniform color.
Pre-treatment for reducing tooth
sensitivity
It is recommended to prescribe the following
prior to the treatment:
- Treat with a desensitizing toothpaste with
5 % KNO3 twice a day for 14 days before the
procedure
- NSAID adhering to the respective drug’s
instructions for use 1 hour before the
procedure
Warnings
- Do not place a composite/bonded
restoration within seven days after whitening
treatment to ensure color stability of the
composite/bonded restoration and bond
strength to enamel and dentin.
- Do not use tooth whitening gel on
anesthetized teeth.
- Tooth whitening is not recommended when
there are previous injuries in the gingival
tissues.
- Avoid contact of whitening gel with eyes and
soft tissue. If contact with eyes occurs, rinse
eyes immediately with plenty of water and
seek medical advice.

Intended use
Philips Zoom! Light-Accelerated WhiteSpeed
Kits are for use with Zoom! WhiteSpeed LightAccelerated Tooth Whitening Gel. The LightAccelerated procedure kit contents are intended
to be used as follows.
Kit contents Intended use
Lip retractor Moves the lips and cheeks away from
the teeth, protecting the lips, cheeks and
tongue from coming into contact with
the whitening gel.
Face bib Help protect the patient's face from the
light source.
9English
Liquidam (gingival
barrier material)
Cotton rolls Separate the upper and lower vestibule
Gauze squares Help isolate the patient's lip from the
Saliva suction tip Remove excess liquid/saliva that may
Whitening gel
applicator brush
Light guide An accessory to the LED Accelerator
Relief ACP oral care gel Relieve discomfort from dentin sensitivity.
Used as an isolation material to prevent
the whitening gel from contacting
gingival tissues.
during the procedure and help isolate
the patient's lips from the teeth.
teeth and provide additional separation
between the upper and lower vestibule.
accumulate during the procedure.
Apply whitening gel to the patient's
teeth.
used to help align the head to a
specied distance between the LED
Accelerator and the patient.

10 English
Contraindications
Philips Zoom! WhiteSpeed Light-Accelerated
Tooth Whitening Gel is not for use on or by:
- Pregnant or lactating women.
- Patients currently being treated for a
serious illness or disorder, e.g. immune
compromised, AIDS, etc.
- Patients under 18 years of age.
Possible side eects
- Teeth sensitivity or hypersensitivity.
- Gingival irritation or burn if Liquidam soft
tissue isolation is not placed in accordance
with the instructions in the Light-Accelerated
procedure kit.
Frequency of use
Philips Zoom! WhiteSpeed Light-Accelerated
Tooth Whitening Gel is intended for a single
patient treatment. A single treatment typically
consists of three to four 15-minute applications.
A patient may be treated more than once at the
discretion of the dental professional, allowing
seven days between treatments.
Safety
- Dental professional and patient need
suitable protective covering and Zoom!
protective eyewear.
- Avoid whitening gel contact with soft tissue
and eyes.
First aid instructions
- Contact a Poison Information Center or
medical doctor immediately if a large
quantity (over 25 % of the syringe) is
swallowed. Provide the ingredient label
if possible. Do not induce vomiting.
Immediately give a glass of water.

Precautions
11English
- If whitening gel gets into the eyes, hold the
eyelids apart and ush the eyes continuously
with running water for at least 15 minutes.
- If improper isolation leaves a patient’s
soft tissue exposed to light, administer
a nonsteroidal anti-inammatory drug
(NSAIDs) adhering to the respective drug's
instructions for use.
The whitening gel must be removed from
refrigeration and warmed to room temperature
so it will thicken before it is applied to the
patient's teeth. Either:
- Remove the syringe from refrigeration at
least 6 hours before use (preferably the night
before) or
- If removed just prior to use, place the syringe
in a cup of hot water (49 °C) for 10 minutes.
Remove the syringe from the water and wait
5 minutes before extruding gel.
Note: Improper soft tissue isolation may result
in irritation or burning of gingiva or swollen lips
due to WhiteSpeed Accelerator light coming
into contact with tissue. Improper soft tissue
isolation may also results in chemical burn due
to whitening gel coming into contact with tissue.
Note: Wait one week after whitening to place
restorations. Patients with porcelain fused
to metal crowns, amalgams, lingual bars or
implants will feel excessive heat.
In-oce whitening treatment
Before the in-oce whitening treatment
Complete diagnosis of patient, treat for
sensitivity (see 'Pre-treatment for reducing
tooth sensitivity') and fabricate trays prior to
whitening treatment (see EVA tray material
instructions for use if provided).
12 English
In-oce whitening treatment
1 Pumice teeth just prior to whitening.
2 Remove the light guide from the packaging
and place it on the LED Accelerator.
3 Switch on the LED Accelerator using
the power button located on the side of
the power pack. When the light guide
is attached, the display reads 'Guide
Status–Guide Attached' followed by 'X of X
Sessions'.
4 Place the surgical suction tip on the high
vacuum suction.
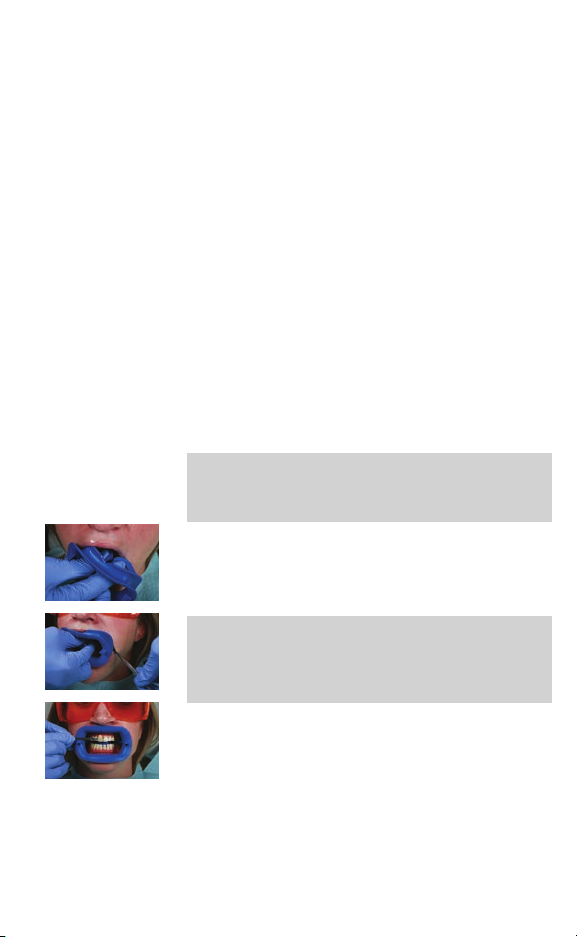
5 Place the Zoom! protective eyewear on the
patient.
Note: The retractor provided is necessary
to ensure proper positioning of the LED
Accelerator head and additional protection
from light.
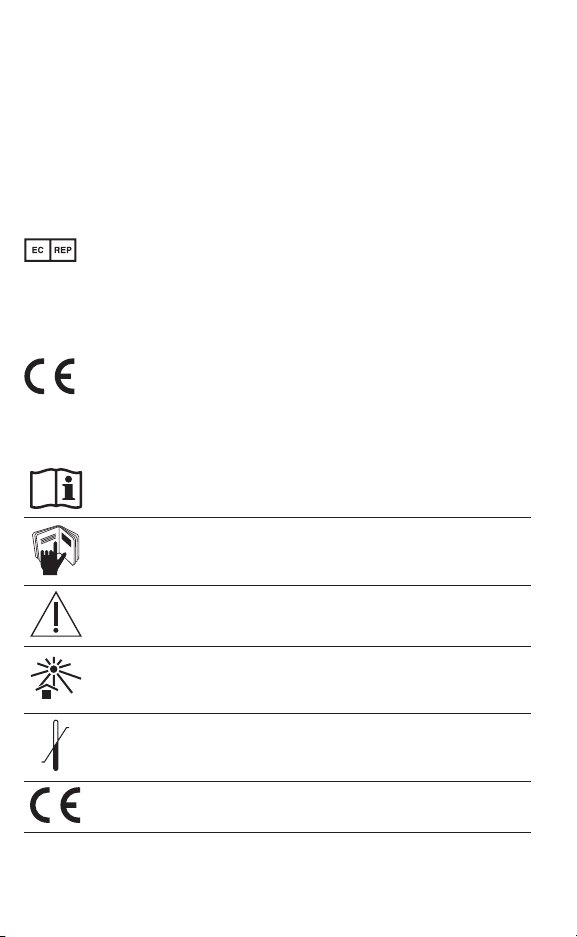
6 Insert the retractor at an angle, retracting
one side at a time using a dental mirror to
assist in placement.
Note: The retractor has been specically
engineered to work with the Philips Zoom!
WhiteSpeed Light-Accelerated Whitening
System. Do not substitute.
7 Take a retracted 'before' photo using a
matched shade tab.
8 Fully recline the patient.
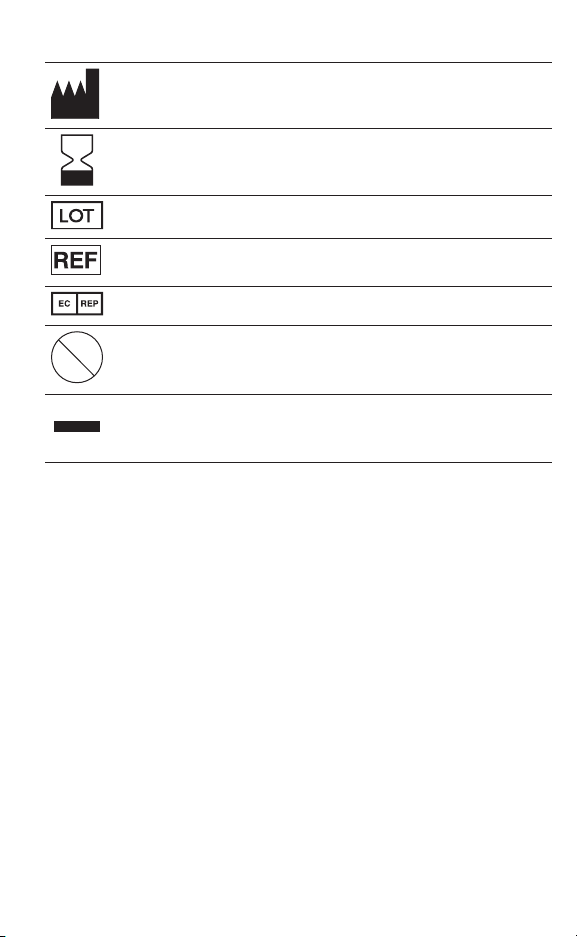
9 Place cotton rolls in the center of the upper
and lower vestibules. If the cotton rolls are
too large, unfold the gauze and twist it like a
cotton roll.
Note: Do not substitute gauze. The gauze
provided has been tested and proven to
provide superior protection.
10 Fully open the gauze squares and fold them
into triangles. Place the apex of the triangle
into the posterior cheek, tuck the balance
of material into the cheek, tucking the ends
between the cotton rolls and the retractor.
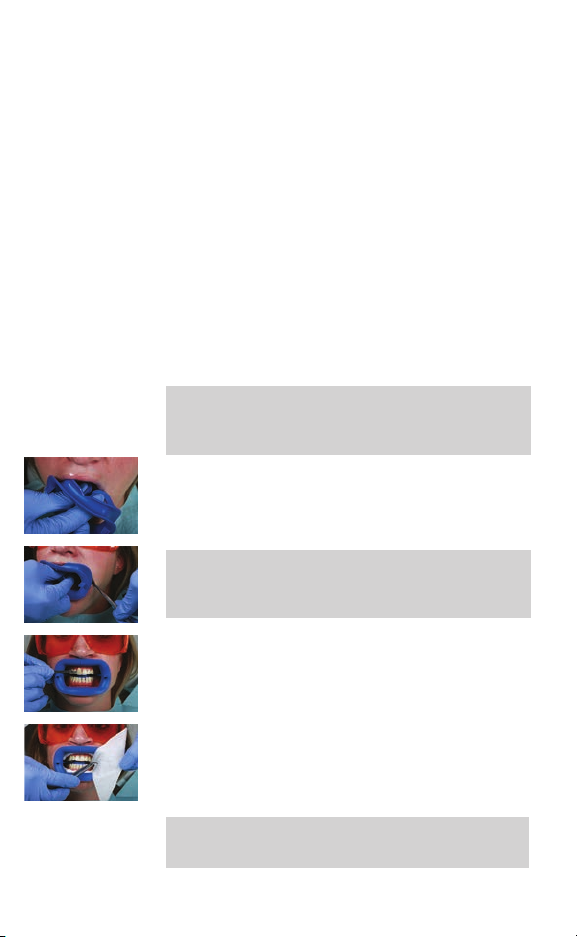
11 Carefully place one face bib around
the retractor, one side at a time. Add an
additional bib for heavy salivators.
12 Remove the Liquidam syringe from the
packaging, twist to remove the cap and
attach the metal tip.
Note: Exposed dentin and tissue should be
covered by barrier material. Use the 'no pink'
rule.
13 Dry soft tissue (failure to do so may create
imperfect seal and allow whitening gel
to migrate onto soft tissue) and begin by
scalloping barrier material to CEJ area
(gingival margins) on the upper teeth slightly
overlapping enamel and interproximal
spaces to form enamel seal.
13English

14 English
14 Cure the application of Liquidam using a
curing light.
Note: Liquidam can become warm upon
curing. Move the light back and forth across
the arch using a sweeping motion for about
10 seconds.
15 Change to the plastic tip. Fill in from the
cotton roll to just formed line of Liquidam
and cure. Be sure to cover all interproximal
areas leaving no soft tissue exposed.
On the lower arch, apply Liquidam using the
same method.
Use the tip of the syringe to press lightly on
the application to ensure that it is completely
cured. The material should be solid and have
no give.
If necessary, cure the arch again for an
additional 5 seconds.
The application should extend distal at least
one tooth beyond the area receiving the
whitening gel and should be 2 mm thick.

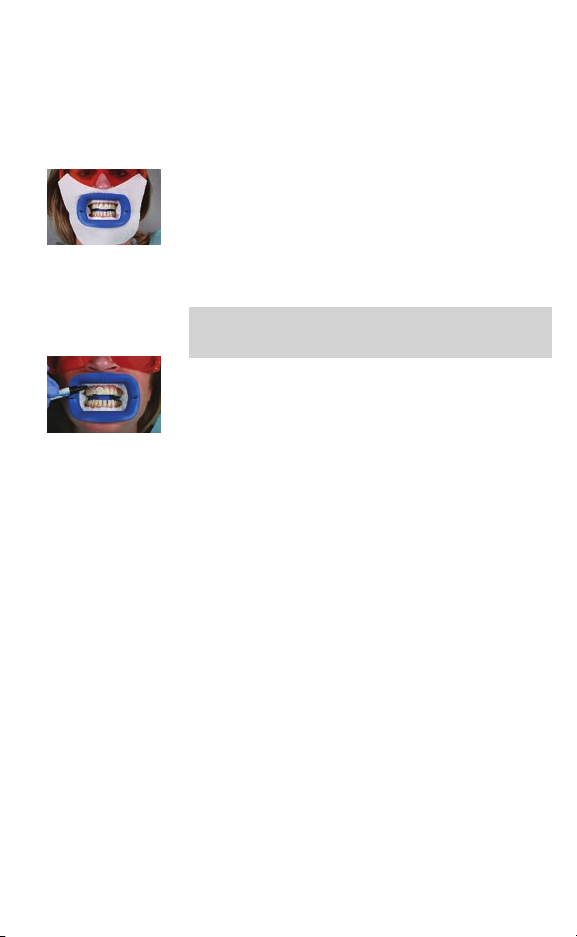
16 Remove the cap from the room temperature
whitening gel syringe. Attach the mixing tip
by aligning the marking and secure it by
turning it one quarter turn clockwise. Using
the blue brush provided, apply whitening gel
to the patient's teeth (1 - 2 mm thick).
Use caution not to disturb the barrier
material. Gingival irritation can occur with
prolonged exposure to the whitening gel.
Note: A small air gap or bubbles in the
syringe due to degassing of the whitening
gel is normal. If the air gap is near the front
of the syringe, purge until both sides of the
barrel extrude gel.
Note: A slight yellow or pink coloring of
the whitening gel is a normal occurrence
from the manufacturing process. There is
no impact on the peroxide content, other
chemical properties, or performance of the
whitening gel. It will not discolor the patient’s
teeth.
17 Once the whitening gel application is
complete, raise the back of the chair so
the patient is in a slightly reclined position
(-45 degree angle) and able to swallow
comfortably while maintaining light pressure
on the bite block.
Note: The light guide is designed to ensure
proper distance and alignment to maintain
correct light exposure on the smile zone.
15English

16 English
18 Slide the LED Accelerator into place next to
the patient. The arm of the LED accelerator
should be movable, but stable. Position the
LED Accelerator head by aligning the slots
on the light guide with the retractor.
19 Follow the prompts on the display panel to
switch on the light and to activate the timer.
Once the light is on, a countdown is
displayed. Light emits from where the arrow
points. Light emits from the LED accelerator
head to shine on the patient's teeth.
It is normal for the light to icker for the rst
few seconds.
The LED Accelerator beeps once when three
minutes of the session are remaining and
beeps three times in the nal three seconds
of the 15-minute session.
When the session is nished, the light goes
out and you hear a long beep.
Note: If a session must be interrupted, press
the 'Pause' button. The remaining session
time ashes on the display. To reactivate
the session, press either the 'Pause' or 'Start'
button.
20 Inform the patient that the progress of each
session are tracked by four white lights on
top of the LED Accelerator head. Each light
indicates one quarter of a session.
Note: During each 15-minute session,
make sure the patient has a means of
communication (e.g. a bell) or do not leave
the patient unattended.
21 After each session, gently pull the LED
Accelerator away from the patient, taking
care not to dislodge isolation materials.
Note: At the end of each 15-minute session,
the display indicates the number of remaining
sessions left on the light guide. Press ‚Start‘ to
activate the light for the next session.

22 Carefully remove the whitening gel with the
surgical suction tip and/or wipe the surface
of enamel clean with damp gauze. Do not
irrigate as the force of the water may pull the
dam loose and saturate isolation materials.
23 Check the isolation materials to make sure
'no pink' tissue is visible. Replace or add
isolation if needed.
24 Follow the same instructions as above for
the remaining sessions.
25 When all sessions on a light guide are
nished, the display reads 'Sessions
Complete' for three seconds, followed by
'Guide Status – Replace Guide. Detach the
light guide from the IsoPrep retractor and
pull the LED Accelerator away from the
patient.
Note: For sensitive patients, lower the
intensity of the LED Accelerator. However,
please note this could result in a fourth
15-minute session.
Tip: If the patient notes tooth sensitivity,
place Relief ACP (found in the procedure kit
or in the patient’s Post Care & Maintenance
kit) on the lingual surface(s) for the remaining
sessions. After the last session is complete,
detach the light guide from the retractor
and pull the LED Accelerator away from the
patient. Suction or wipe the whitening gel
from the teeth. Moisten gauze and cotton
rolls and remove the isolation materials.
If barrier material remains interproximally,
remove it with oss.
17English
26 Reinsert the retractor and take a retracted
'after' photo with the lighter shade tab
in place. Measure the shade change by
counting the shade shift according to the
value-ordered shade guide.

18 English
Maximizing results
Advise the patient not to consume coee, tea,
red wine and tobacco for two hours after the
whitening treatment, until the salivary pellicle
reforms on the teeth.
All tooth whitening requires maintenance.
The patient may choose to have the whitening
treatment again or to use a maintenance
product 1-3 nights every 4-6 months,
depending on their habits.
At home post care and maintenance
Sensitivity relief
Philips Relief ACP oral gel has been shown
to decrease tooth sensitivity. Place Relief
ACP oral care gel into the take-home trays
and set on patient. Normal wear time is
10–30 minutes once per day. If the tray is not
available, brush the product on the teeth. Do
not spit for approximately 3 minutes. For the
best results, do not drink or eat for 30 minutes
after application. See the Relief ACP oral gel
instructions for use for complete instructions.
At home whitening maintenance
24 hours after the whitening treatment, the
patient may use NiteWhite or DayWhite
Whitening Gel to maintain or further enhance
their results. See the Zoom! NiteWhite/
DayWhite patient instructions for use for
complete instructions.
Storage instructions
Whitening gel should be stored at 2 °C - 10 °C.
Storage temperature above 10 °C will result in
reduced shelf life.
Herstellungsinformationen
Hersteller:
Discus Dental, LLC
1700A South Baker Avenue
Ontario, CA 91761 USA
philipsoralhealthcare.com
EMERGO EUROPE
Prinsessegracht 20
2514 AP Den Haag
Niederlande
VITA ist ein eingetragenes Warenzeichen der
VITA ZAHNFABRIK, H. Rauter GmbH & KG,
Bad Säckingen, Deutschland.
Symbole
Konsultieren Sie die Gebrauchsanweisungen
Verweis auf beiliegende oder angehängte
Informationen
Achtung
19Deutsch
Kühl und vor Licht geschützt aufbewahren
Temperaturbereich
Europäische Konformität
2
20 Deutsch
Hersteller
Haltbar bis
Chargennummer
Katalognummer
Zugelassen in der Europäischen Gemeinschaft
Verwenden Sie das Produkt nicht mehrmals. Dieses
Produkt ist zur Verwendung für einen einzigen
Patienten während einer Sitzung vorgesehen.
REFRIGERATE
Kühl aufbewahren
Wichtige Informationen
Lesen Sie die Informationen in dieser
Gebrauchsanweisung sowie in der
Gebrauchsanweisung von Philips Zoom! und
stellen Sie sicher, dass Sie sie verstehen.
Light-Accelerated Tooth Whitening Gel
(Zahnaufhellungsgel) vor dem Beginn der
Aufhellungsbehandlung.
Das Aufhellungsgel muss vor dem Auftragen auf
die Zähne des Patienten aus dem Kühlschrank
genommen und auf Raumtemperatur erwärmt
werden, damit es verdickt wird. Entweder:
- Nehmen Sie die Spritze mindestens 6 Stunden
vor der Anwendung (vorzugsweise am Abend
vor der Behandlung) aus dem Kühlschrank.

- Falls das Gel erst unmittelbar vor der
Behandlung aus dem Kühlschrank
genommen wird, legen Sie die Spritze
10 Minuten lang in eine Tasse mit 49 °C
heißem Leitungswasser. Nehmen Sie die
Spritze aus dem Wasser, und warten Sie
5 Minuten, bevor Sie das Gel auftragen.
Nutzungsbedingungen
Dieses Produkt darf ausschließlich an Zahnärzte
vertrieben und von Zahnärzten verwendet
werden. Dieses Produkt ist für den Gebrauch
bei gesunden Patienten ab 18 Jahren ohne
akute Gesundheitsprobleme im Mundbereich,
Parodontalerkrankungen und fehlerhafte
Restaurationen vorgesehen.
Inhalt
Philips Zoom! WhiteSpeed Light-Accelerated
Whitening Behandlungskits (lichtaktivierte
Behandlungskits) enthalten:
- Blätter 0,040 EVA für die Zahnschienen (2),
(nicht in allen lichtaktivierten
Behandlungskits enthalten)
- Lichtleiter (2)
- IsoPrep Retraktor (2)
2 Behandlungsablagen mit:
- Gesichtsschutz (2) (2)
- Gaze-Kompressen (6)
- Spritze mit Liquidam zur Isolation des
Weichgewebes 2,9 g (1)
- Liquidam Nadelspitze (1)
- Liquidam schwarze Spitze (1)
- Watterollen (2)
- Chirurgischer Sauger (1)
- Applikationsbürste (1)
21Deutsch

22 Deutsch
Nachbehandlungs- und Wartungskits (nicht
in allen lichtaktivierten Behandlungskits
enthalten) bestehen aus:
- NiteWhite/DayWhite Whitening Gel
Gebrauchsanweisung (1)
- Relief ACP Oral Care Gel
Gebrauchsanweisung (1)
- Relief ACP Oral Care Gel Spritze, 2,4 ml (1)
- Aufhellungsgel (1)
- Aufbewahrungsdose für Zahnschienen (1)
Separat verpackt:
- Philips Zoom! WhiteSpeed Light-Accelerated
Tooth Whitening Gel
- Gebrauchsanleitung (1)
- 25 % Wasserstoperoxid-
Zahnaufhellungsgel Spritze, 4,6 g (1)
- Mischspitze (1)
Produktbeschreibung
Philips Zoom! WhiteSpeed LightAccelerated Teeth Whitening Procedure
Kits sind professionelle lichtbeschleunigte
Behandlungskits für den Praxiseinsatz. Sie sind
jeweils nur zur Anwendung bei einem einzelnen
Patienten vorgesehen.
Anwendungsgebiete Kandidatenqualikation
Es wird eine (zahn)ärztliche Untersuchung
empfohlen, um zu gewährleisten, dass keine
akuten Gesundheitsprobleme im Mundbereich
vorhanden sind. Es wird empfohlen, bestehende
Probleme zu behandeln, bevor Sie die
Zahnaufhellung empfehlen oder durchführen.
Bei Patienten bei parodontal vorgeschädigten
Zähnen, fehlerhaften Restaurationen oder mit
sonstigen Erkrankungen im Mundbereich ist von
einer Aufhellung abzusehen.

Erwartungen des Patienten
Setzen Sie realistische Erwartungen hinsichtlich
der möglichen Ergebnisse anhand der
intraoralen Untersuchung, und erläutern Sie die
nachfolgenden Punkte:
- Die Ergebnisse sind je nach Patient
unterschiedlich.
- Bei den meisten Patienten lässt sich eine
Aufhellung um 6 bis 8 Farbnuancen auf dem
VITA® Classical Shade Guide erreichen.
- Anatomie, Verkalkungen, Alter, Zustand der
Zähne, Hygiene und Ausgangsfarbton wirken
sich auf das Ergebnis aus:
- Bei Zähnen mit gelben und braunen Flecken
sind die Ergebnisse besonders deutlich.
- Wenn Zähne aufgrund einer Behandlung
mit Tetracyclin oder anderen Medikamenten
grau verfärbt sind, sollte ebenfalls eine
Verbesserung zu verzeichnen sein, die
jedoch möglicherweise weniger deutlich ist.
- Zähne, die aufgrund der Einnahme von
Tetracyclin oder aufgrund von Fluorose
verschiedenartige Verfärbungen,
Streifen oder Flecken aufweisen, werden
möglicherweise weniger gut oder
ungleichmäßig aufgehellt oder erfordern
zusätzliche Aufhellungsbehandlungen.
- Vorherige kieferorthopädische
Behandlungen können dazu führen,
dass die Zähne aufgrund verbleibender
Bondingüberschüsse oder übermäßig
starkem Polieren bei der Entfernung
ungleichmäßig aufgehellt werden.
- Kronen sowie andere zahnfarbene
Restaurationen werden nicht aufgehellt.
- Um eine einheitliche Zahnfarbe zu erhalten,
müssen zahnfarbene Restaurationen nach
dem Aufhellen gegebenenfalls ausgetauscht
werden.
23Deutsch

24 Deutsch
Vorbehandlung zur Reduzierung der
Zahnempndlichkeit
Folgendes Vorgehen wird vor der Behandlung
empfohlen:
- Behandeln Sie die Zähne in einem Zeitraum
von 14 Tagen vor der Behandlung zweimal
täglich mit einer desensibilisierenden
Zahnpasta, die 5 % KNO3 enthält.
- Geben Sie dem Patienten 1 Stunde vor dem
Eingri ein Schmerzmittel (NASR). Beachten
Sie die in der Packungsbeilage angegebene
Dosierung.
Warnhinweise
- Composit- oder gebundene Restaurationen
dürfen frühestens sieben Tage nach der
Aufhellungsbehandlung eingesetzt werden,
um die Farbstabilität der Restauration sowie
deren Haftfestigkeit am Zahnschmelz und
Dentin zu gewährleisten.
- Verwenden Sie kein Zahnaufhellungs-Gel
bei anästhesierten Zähnen.
- Bei vorbestehenden gingivalen Verletzungen
wird von Zahnaufhellungen abgeraten.
- Vermeiden Sie den Kontakt von Whitening
Gel mit Augen und Weichgewebe. Spülen Sie
bei Augenkontakt die Augen sofort gründlich
mit Wasser aus und konsultieren Sie einen
Arzt.
Vorgesehener Verwendungszweck
Philips Zoom! Light-Accelerated WhiteSpeed
Kits sind für den Einsatz mit Zoom! WhiteSpeed
Light-Accelerated Tooth Whitening Gel. Der
Inhalt des lichtaktivierten Behandlungskits
ist für die unten beschriebene Verwendung
vorgesehen.

Paketinhalt Vorgesehener Verwendungszweck
Lippenretraktor Wird verwendet, um Lippen, Wangen
und die Zunge vor Kontakt mit dem
Zahnaufhellungsgel zu schützen, indem
die Lippen und die Wangen von den
Zähnen weggehalten werden.
Gesichtsschutz (2) Schützt das Gesicht des Patienten vor der
Lichtquelle.
25Deutsch
Liquidam (GingivaIsolationsmaterial)
Watterollen Dienen dazu, den vestibulären Bereich
Gaze-Kompressen Tragen dazu bei, die Lippen des
Speichelsauger Dient zum Entfernen von Flüssigkeits-/
ApplikatorPinsel für das
Zahnaufhellungsgel
Lichtleiter
Relief ACP Oral
Care Gel
Dient als Isolationsmaterial für das
Zahneischgewebe zum Schutz gegen das
Zahnaufhellungsgel.
des Ober- und Unterkiefers während der
Behandlung abzuhalten und verhindern,
dass die Lippen des Patienten mit den
Zähnen in Kontakt kommen.
Patienten von den Zähnen abzuhalten
und sorgen für die zusätzliche Trennung
des vestibulären Bereichs des Ober- und
Unterkiefers.
Speichelüberschuss, der sich während der
Behandlung ansammeln kann.
Dient zum Auftragen des
Zahnaufhellungsgels auf die Zähne des
Patienten.
Unterstützt als Zubehör zum LEDBeschleuniger die Ausrichtung des Kopfes in
einem festgelegten Abstand zwischen dem
LED-Beschleuniger und dem Patienten.
Dient zur Linderung von Schmerzen bei
empndlichen Zähnen.

26 Deutsch
Gegenanzeigen
Philips Zoom! WhiteSpeed Light-Accelerated
Tooth Whitening Gel ist nicht für die folgenden
Anwendung bei oder durch folgende Personen
vorgesehen:
- Schwangere oder stillende Frauen
- Patienten, die derzeitig wegen einer
schweren Erkrankung oder Störung wie
beispielsweise einem geschwächten
Immunsystem, AIDS usw. behandelt werden
- Patienten unter 18 Jahren
Mögliche Nebenwirkungen
- Zahnempndlichkeit oder
Überempndlichkeit.
- Zahneischirritationen oder -verbrennungen,
wenn die Liquidam-Weichgewebeisolation
nicht ordnungsgemäß in Übereinstimmung
mit dem lichtaktivierten Behandlungskit
verwendet wird.
Häugkeit des Gebrauchs
Philips Zoom! WhiteSpeed Light-Accelerated
Tooth Whitening Gel ist für die Behandlung
eines einzelnen Patienten gedacht. Eine
einzelne Behandlung besteht typischerweise
aus drei bis vier 15-minütigen Anwendungen.
Ein Patient kann mehr als einmal behandelt
werden, wenn der behandelnde Zahnarzt es für
richtig erachtet.
Zwischen den Behandlungen müssen sieben
Tage liegen.

Sicherheit
- Zahnarzt und Patient müssen eine geeignete
Schutzabdeckung und einen Zoom!
Augenschutz tragen.
- Das Aufhellungsgel sollte nicht mit dem
Weichgewebe oder den Augen in Berührung
kommen.
Anweisungen zur Ersten Hilfe
- Kontaktieren Sie umgehend ein
Giftinformationszentrum oder einen Arzt,
wenn Sie eine große Menge (mehr als 25 %
der Spritze) verschlucken.Bringen Sie dazu
möglichst die Liste der Inhaltsstoe mit.
Führen Sie kein Erbrechen herbei.Reichen
Sie sofort ein Glas Wasser.
- Wenn Aufhellungsgel ins Auge gerät, halten
Sie die Augenlider auseinander, und spülen
Sie die Augen für mindestens 15 Minuten mit
ießendem Wasser aus.
- Falls die Schleimhaut des Patienten
aufgrund von unsachgemäßer Isolation
dem Licht ausgesetzt wird, geben Sie
dem Patienten einen nichtsteroidales
entzündungshemmendes Schmerzmittel
(NASR). Beachten Sie die in der
Packungsbeilage angegebene Dosierung.
27Deutsch
Vorsichtsmaßnahmen
Das Aufhellungsgel muss vor dem Auftragen auf
die Zähne des Patienten aus dem Kühlschrank
genommen und auf Raumtemperatur erwärmt
werden, damit es verdickt wird. Entweder:
- Nehmen Sie die Spritze mindestens 6 Stunden
vor der Anwendung (vorzugsweise am Abend
vor der Behandlung) aus dem Kühlschrank.

28 Deutsch
- Falls das Gel erst unmittelbar vor der
Behandlung aus dem Kühlschrank
genommen wird, legen Sie die Spritze
10 Minuten lang in eine Tasse mit 49 °C
heißem Leitungswasser. Nehmen Sie die
Spritze aus dem Wasser, und warten Sie
5 Minuten, bevor Sie das Gel auftragen.
Hinweis: Eine unsachgemäße
Weichgewebeisolation kann auch zu einer
gereizten oder brennenden Gingiva oder
geschwollenen Lippen führen, wenn das
WhiteSpeed Accelerator-Licht mit dem Gewebe
in Berührung kommt. Eine unsachgemäße
Weichgewebeisolation kann auch zu
chemischer Verbrennung führen, da das
Aufhellungsgel in Kontakt mit Gewebe tritt.
Hinweis:Warten Sie eine Woche nach dem
Aufhellen, bevor Zahnersatz eingesetzt wird.
Patienten mit Porzellan-Zahnersatz auf
Metallkronen, Amalgamen, Spangen oder
Implantaten fühlen übermäßige Hitze.
Vorgehen beim In-Oce Bleaching
Vor der Behandlung in der Praxis
Die Diagnose, die Behandlung des Patienten
wegen Empndlichkeit (siehe 'Vorbehandlung
zur Reduzierung der Zahnempndlichkeit')
und die Herstellung der Schienen müssen vor
der Zahnaufhellung abgeschlossen sein (siehe
Anweisungen für EVA-Zahnschienen, falls
vorhanden).
Zahnaufhellungsbehandlung in der Praxis
1 Reinigen Sie die Zähne unmittelbar vor der
Aufhellung mit grobkörniger Polierpaste
(Bimsstein).
2 Nehmen Sie den Lichtleiter aus der
Verpackung, und setzen Sie ihn auf den
LED-Beschleuniger auf.
3 Schalten Sie den LED-Beschleuniger mit
dem Netzschalter ein, der sich auf der Seite
des Netzteils bendet. Wenn der Lichtleiter
angebracht ist, erscheint zuerst "Guide
Status–Guide Attached", gefolgt von "X of
X Sessions" auf dem Display.
4 Schließen Sie den chirurgischen Sauger an
die Hochvakuum-Absaugung an.
5 Bringen Sie den Zoom! Augenschutz für den
Patienten an.
Hinweis: Der Retraktor ist notwendig, um
eine korrekte Positionierung des LEDBeschleunigerkopfes und einen zusätzlichen
Schutz vor Licht zu gewährleisten.
6 Setzen Sie den Retraktor in einem Winkel
ein, wobei er jeweils eine Seite gleichzeitig
zurückzieht. Ein Zahnspiegel kann bei der
Platzierung helfen.
Hinweis: Der Retraktor wurde speziell für die
Arbeit mit dem Philips Zoom! WhiteSpeed
Light-Accelerated Whitening System
entwickelt. Verwenden Sie ausschließlich
diesen Retraktor.
7 Machen Sie vor der Behandlung ein Foto
("Vorher-Foto") und halten Sie dabei ein zur
Zahnfarbe passendes Farbmuster vor die
Zähne.
8 Lehnen Sie den Behandlungsstuhl, auf dem
der Patient sitzt, vollständig zurück.
29Deutsch

30 Deutsch
9 Platzieren Sie die Watterollen mittig im
vestibulären Bereich des Ober- und
Unterkiefers. Wenn die Watterollen zu groß
sind, entfalten Sie die Gaze, und drehen Sie
sie wie eine Watterolle zusammen.
Hinweis: Verwenden Sie kein anderes Material.
Die mitgelieferte Gaze wurden getestet und
bietet nachweislich optimalen Schutz
10 Önen Sie die Gaze-Kompressen und falten
Sie sie zu Dreiecken. Legen Sie die Spitze
des Dreiecks in die hintere Wange, stecken
Sie das Material in die Wange, und platzieren
Sie die Enden zwischen Watterollen und
Retraktor.
11 Platzieren Sie einen Gesichtsschutz sorgfältig
um den Retraktor. Bringen Sie dabei eine
Seite nach der anderen in Position. Fügen
Sie einen zusätzlichen Schutz für Patienten
mit starkem Speicheluss hinzu.
12 Entnehmen Sie die Liquidam-Spritze aus der
Verpackung, drehen Sie die Kappe ab, und
bringen Sie die Metallspitze an.
Hinweis: Freiliegendes Dentin und Gewebe
müssen durch Schutzmaterial abgedeckt
werden. Verwenden Sie die Regel "kein Rosa".
.
13 Trocknen Sie das Weichgewebe (wenn Sie
dies nicht tun, ist die Abdichtung eventuell
undicht, und das Aufhellungs-Gel kann auf
das Weichgewebe gelangen) und beginnen
Sie, indem Sie das Schutzmaterial an die
Zahnschmelzzementgrenze (Gingivaränder)
auf den oberen Zähnen aufbringen und
dabei Zahnschmelz und Interproximalbereich
leicht überlappen, um eine Schmelzdichtung
zu erzielen.
 Loading...