

Philips TU7370, TU7370/SS211P, TU7370/SS001P, TU7370/SS951P, Zenia 300 Vox User Manual
...

Conformity, Environment & Safety
Safety information : This equipment is not designed to make emergency calls when power
fails.An alternative should be made available for access to emercgency calls.
Conformity : See page 9.A copy of the original certificate can be obtained on request to the
customer care centre.
Power requirements : This product requires an electrical supply of 220-240 volts, alternating
monophased current, excluding IT installations defined in standard EN 60-950.
WARNING ! The electrical network is classified as dangerous according to criteria in the
standard EN 60-950. The only way to power down this product is to unplug the power supply
from the electrical outlet. Ensure the electrical outlet is located close to the apparatus and is
always easily accessible.
Telephone connection : The voltage on the network is classified as TNV-3 (Telecommunication
Network Voltage as defined in the standard EN 60-950)
Safety precautions : Do not allow the handset to come into contact with water. Do not open
the handset.You could be exposed to high voltages. Do not allow charging contacts or batteries
to come into contact with conductive materials.
Environmental care : Please remember to observe the local regulations regarding the disposal
of your packaging materials, exhausted batteries and old phone and where possible promote
their recycling.
English
Using GAP standard compliance
The GAP standard guarantees that all DECTTMGAP handsets and base stations comply with a
minimum operating standard irrespective of their make.Your handset is GAP compliant, which
means the minimum guaranteed functions are : take the line, receive a call and dial.
Using Philips base stations
If you register the additional handset to a Philips Zenia 300 Vox base station, the handset will
have all the features described in the corresponding complete set user guide.
If you register the additional handset to a Philips Onis 200 or Zenia base station, only a limited
number of menus will be available. Please refer to the corresponding complete set user guides.
Using a non-Philips GAP base station
To register the Philips additional handset to a non-Philips base station, follow the base station
instructions described by the other manufacturer.Then follow the instructions on page 4 to
register the Philips additional handset.There will be only a few menus availble.
Philips has marked the battery and packaging with standard symbols designed to promote the
recycling and appropriate disposal of your eventual waste.
The labelled packaging material is recyclable.
A financial contribution has been paid to the associated national recovery & recycling system.
DECTTMis a trade mark of ETSI registered for the benefit of the implementers of the DECT technology
Conformity, Environment & Safety
1
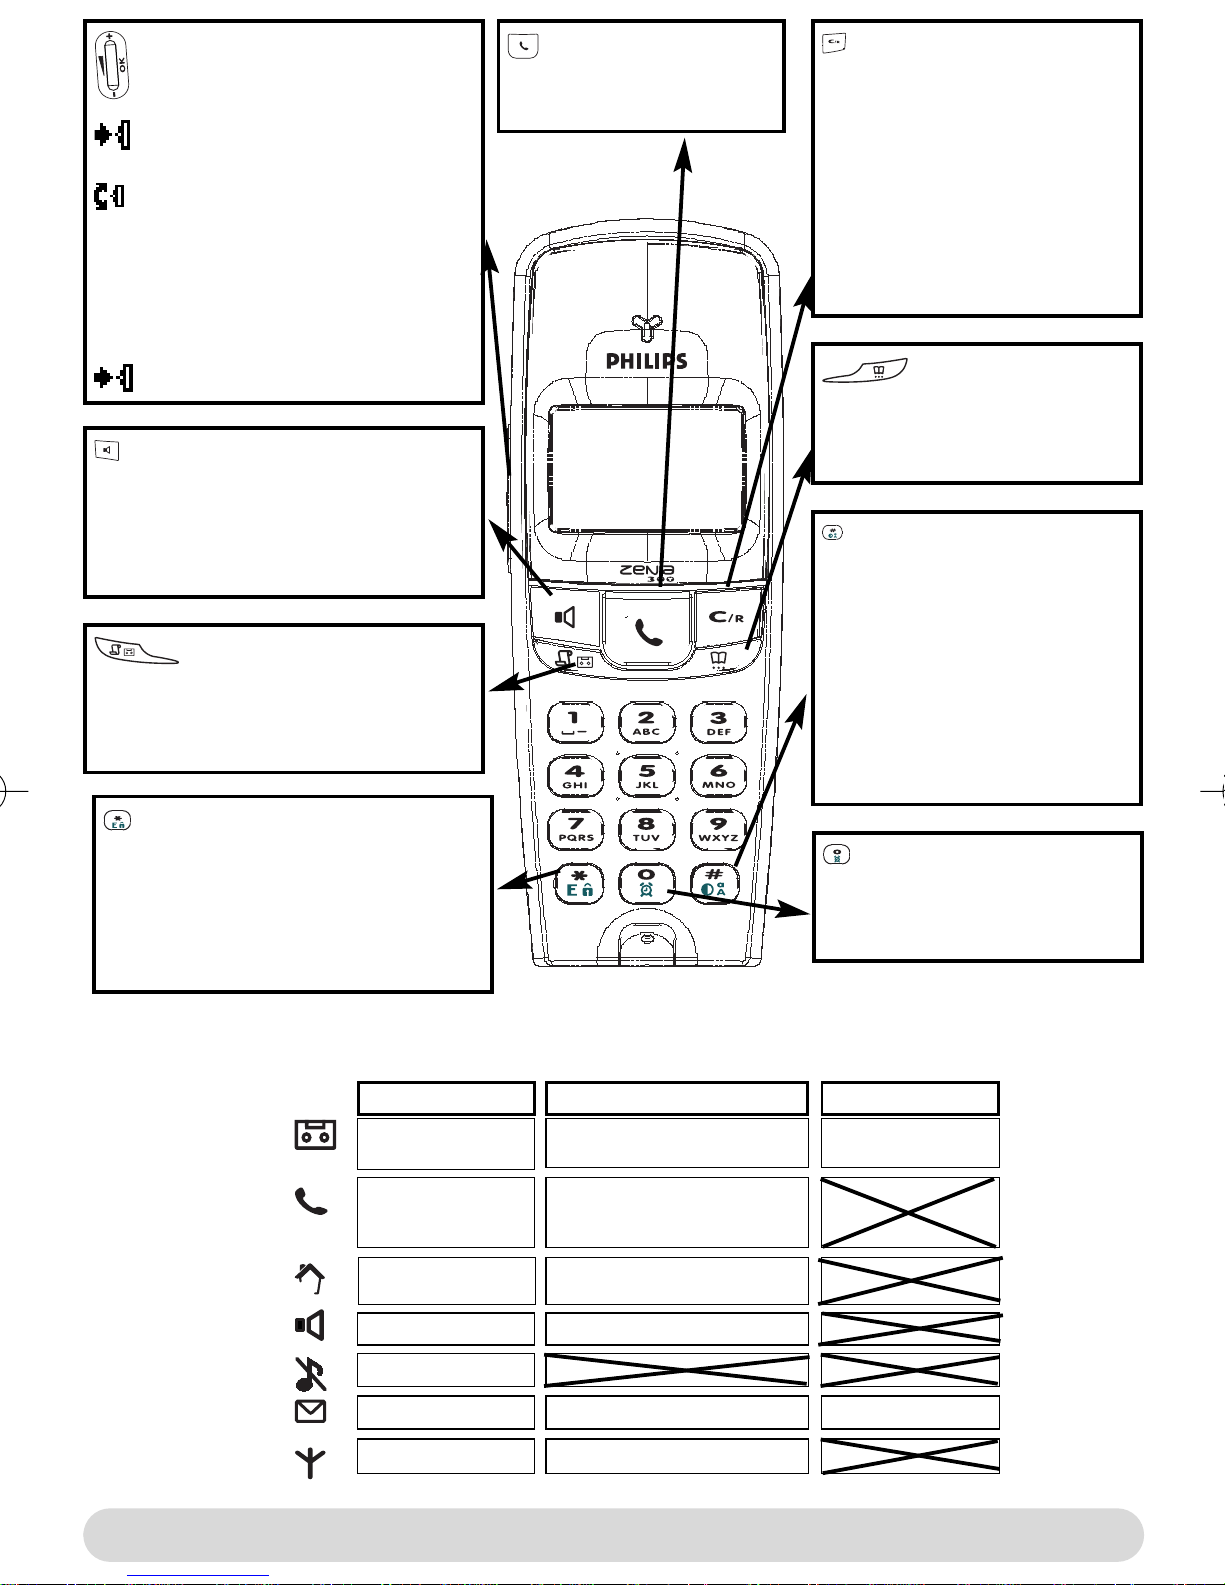
Pilot key
Press to enter the carousel or
validate a menu or an option
Scroll to navigate in the menus &
options or move the cursor
Scroll up to reach Intercom from
idle mode
Scroll down to reach Cheapest
rates prefix from idle mode
Press to unlock the keypad
Loudpeaker
- Press to take the line or activate the
handset loudspeaker during a call
- A long press to activate the base
lloudspeaker
Call log
- A short press to access the call log
- A long press to directly access the
messages list
Line key
- Press to take the line,
answer a call or hang up.
Earpiece
Correct key
- To correct a digit when
predialling or a character when
editing
- A short press to go back one
menu
- A long press to return to idle
mode when navigating
- To insert R for operator
services when on line
Phonebook
- A short press to access the
phonebook
- A long press to add a new entry
Do Not Disturb & case
mode
- A short press to insert # when
dialling.
- A long press to activate the Do
Not Disturb mode
- A long press to insert a pause
(P) when dialling
- Press to switch case mode
when editing
Keypad lock & Edition
- A short press to insert *
- A long press to lock/unlock the keypad
- A long press to insert (R) when dialling
- Press to enter multitap mode or
®
Eatoni
editor when editing
Icons
Answer machine ON
External call in
progress
Internal call in
progress
Loudspeaker ON
Ringer OFF
Microphone
Zenia 300 Vox Handset
Blinking
New message on answering.
machine or voice mail
Incoming external call in
progress
Line is already busy
Internal incoming call
Base loudspeaker ON
Alarm clock
- A short press to dial 0
- A long press to activate/
deactivate the alarm clock
Fast blinkingSteady ON
Answerphone full
SMS function ON
Registered & in range
2
New SMS
Not registered
The handset
SMS memory full
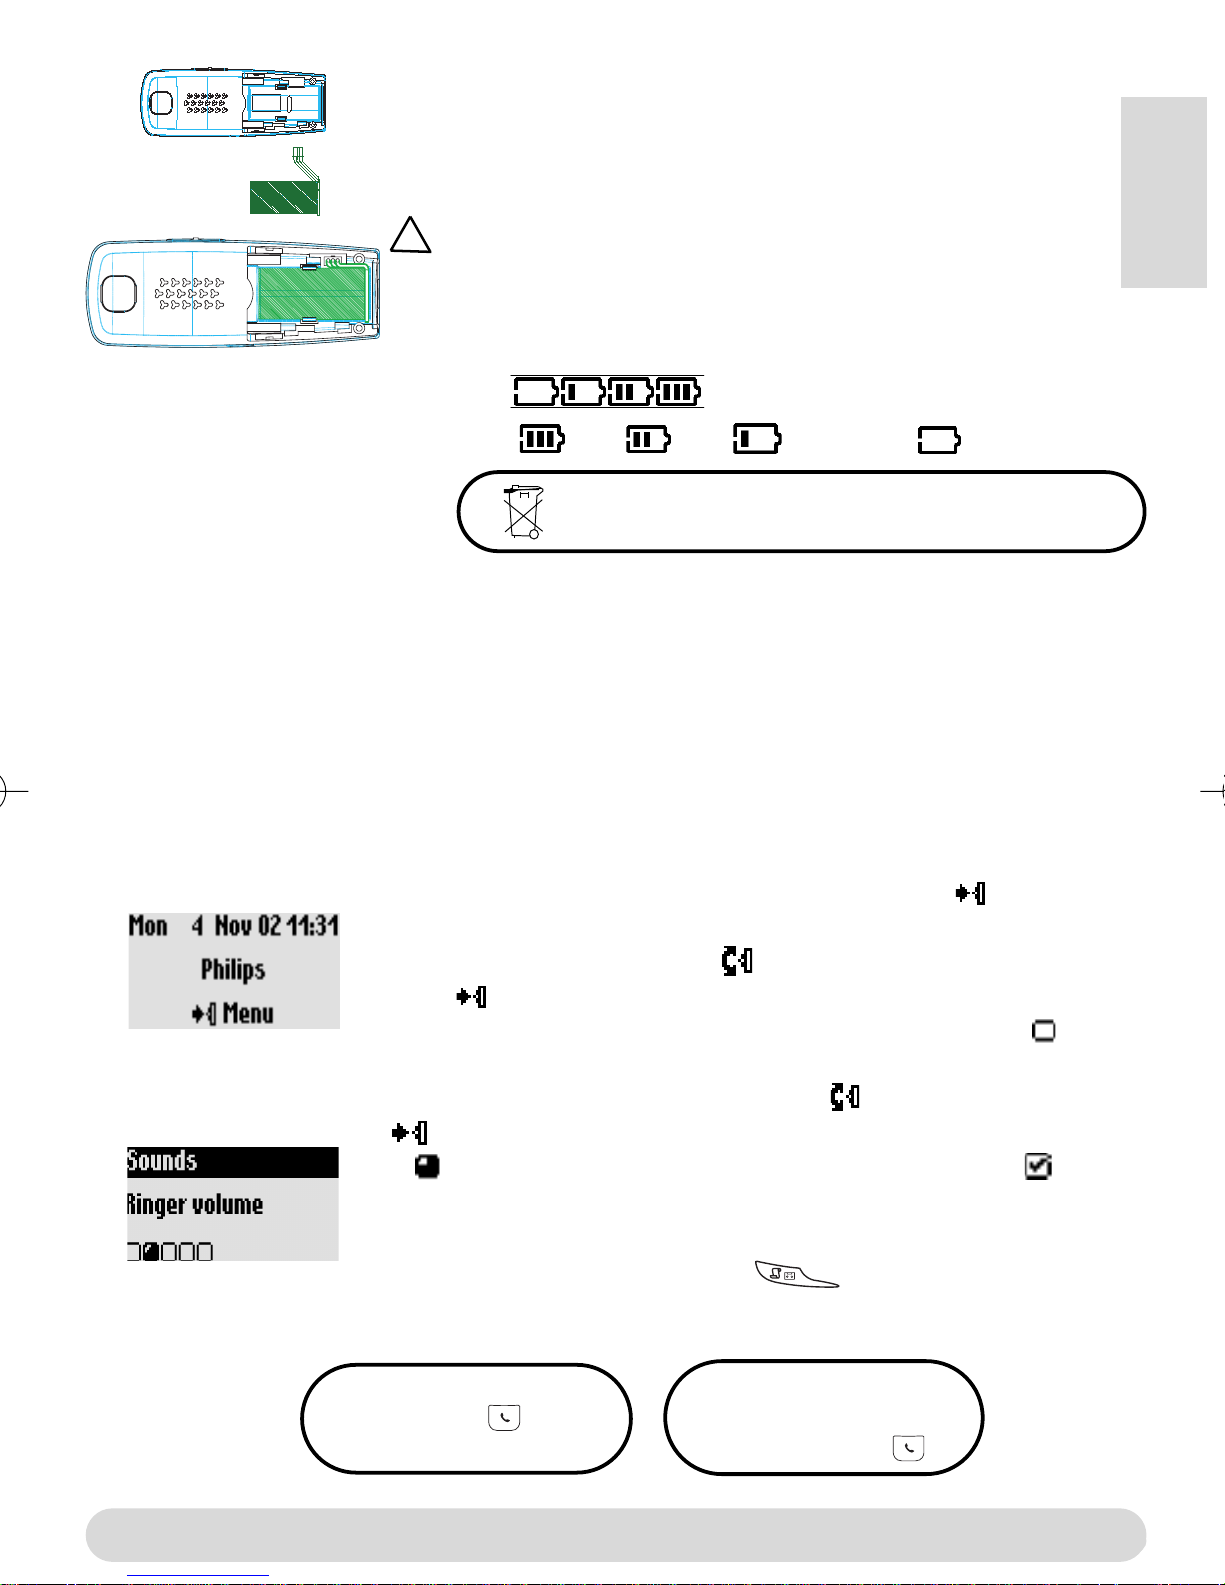
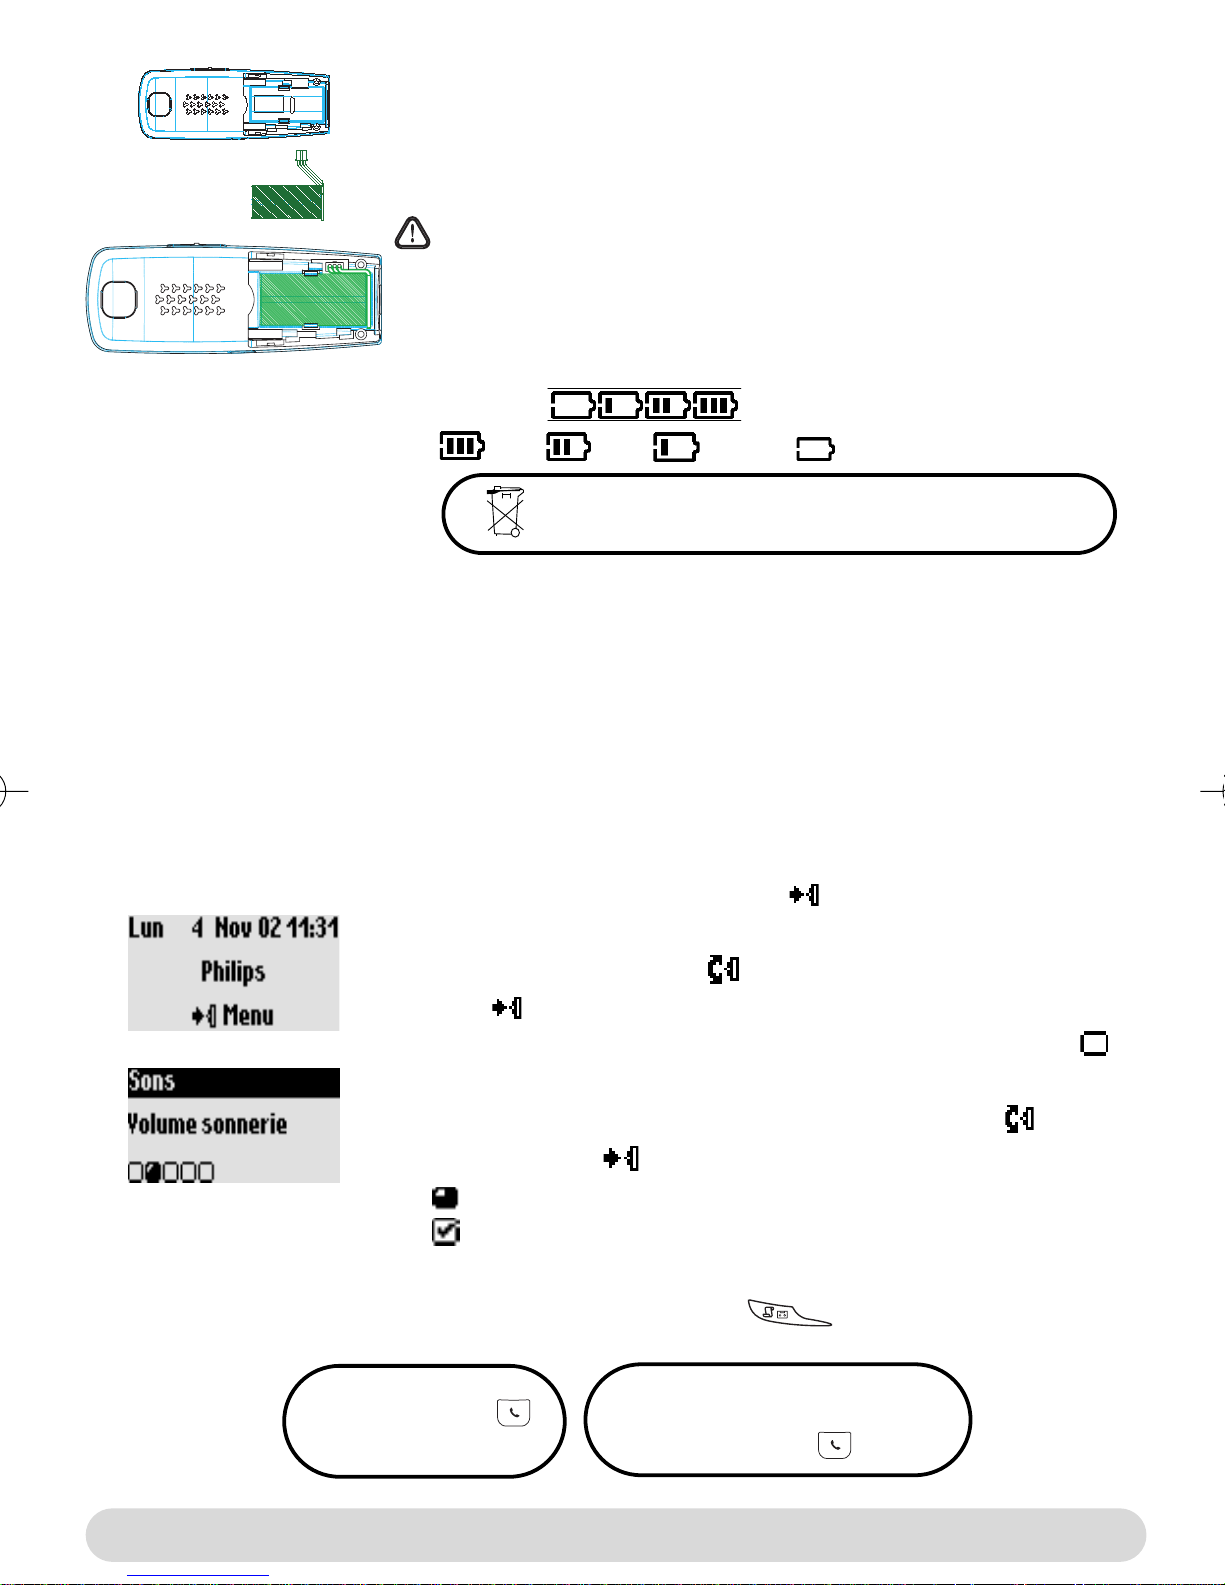
Installing and replacing the batteries
To insert the battery pack, open the battery door on the handset
by sliding it down. Connect the battery pack to the connector
inside the handset. Place the battery with sticker face up and wires
along the left side of the battery pack.
!
When replacing the batteries, only use NiMh.
The battery bars scroll when charging .When charged the icon changes
according to the remaining charge : full , 2/3 , 1/3 and empty .
The batteries should not be disposed of with general household waste.
Battery life and range
The battery life is about 250 hours in stand by time (when the handset is in idle mode & ready
to receive a call) and around 16 hours in communication. A battery low alert will inform you that
the handset has to be recharged, if this is during a call, it will end shortly after the alert.
Optimal battery life is reached after 3 cycles of full charge/discharge.
Under ideal conditions, the range is up to 50 m indoors and 300 m outdoors.When reaching the
range limit, the conversation will become crackly, get closer to the base station otherwise you
will be cut off.To reach optimal range place the base station far from electrical appliances.
English
Understanding the menu system
From idle screen, to access the carousel menu press
The carousel represents a loop of icons that gives access to the first
menu level. Scroll up or down to reach the desired menu.
Press to validate and enter the menu.
The sub menus are listed and represented by little squares at the
bottom of the display.
To reach one particular sub menu scroll and validate your choice
A shows the sub-menu or option you are browsing. A shows
the selected sub-menu or option.
Note : Certain menus are directly accessible via a dedicated key on
the keypad (example the Call log )
Direct dialling
1- Take the line
2- Dial on the keypad
Predialling
1- Dial on the keyad
2- Take the line
The menu system
3
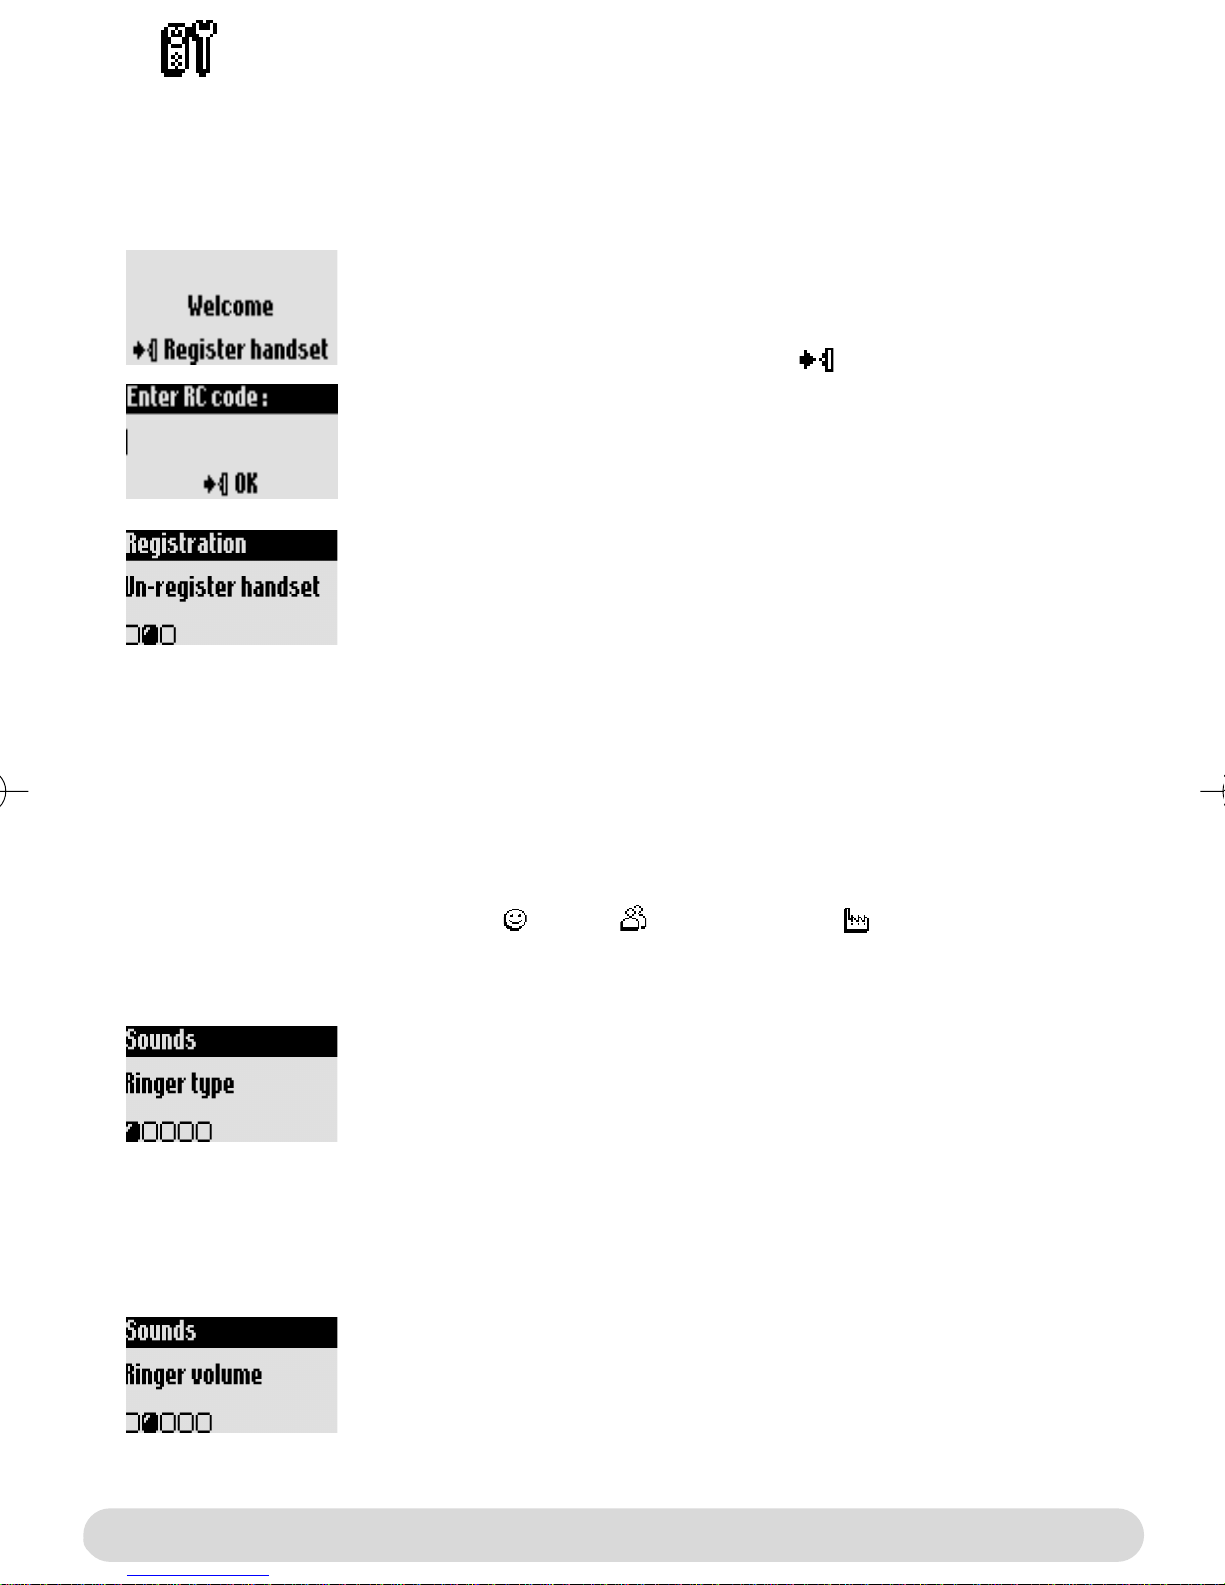
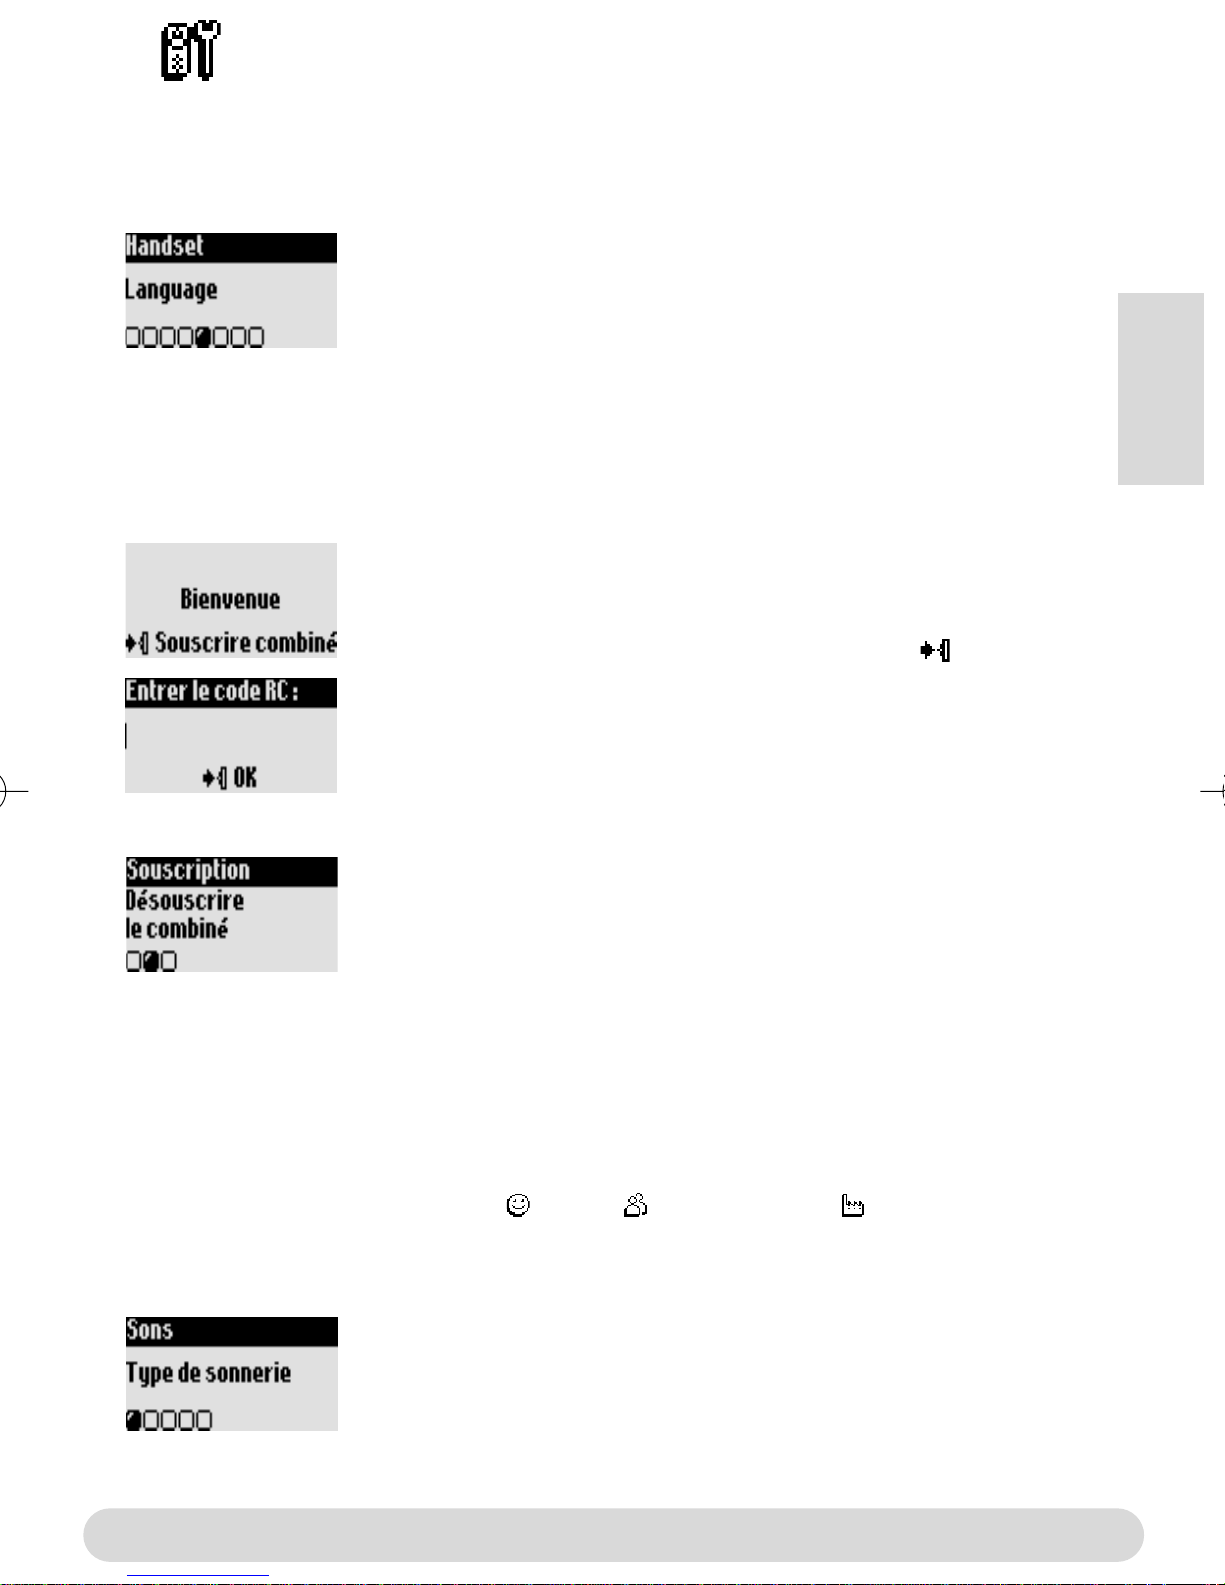
Handset
Registering/un-registering an additional handset
The additional handset will get full capability when it is registered to the base station*.You can
register up to 8 handsets to the Zenia 300 Vox base station.
To register an additional handset
Place the base station in Registration mode as follows :
1- Unplug and plug back in the mains lead
2- With the additional handset press to start the registration
3- Enter the 4-digit RC code written on the sticker placed under
the base station.
To un-register the handset
1- Go to Handset, validate
2- Scroll to Registration, validate
3- Scroll to Un-register handset, validate
4- Choose from the list the handset to un-register, validate
5- Enter the RC code (4-digit code) and validate
* See page 1
Setting the handset sounds
The ringers can be set for :
- The external standard ringer for callers whose number is not stored in the phonebook or
stored with no VIP settings.
- The internal ringer for the intercom (if there are at least 2 handsets).
To set the 3 VIP ringer types : Friends , Family and Professional : see manual Zenia 300.
Subscription to the Caller Line Identification service (CLI) needed.
To set the ringer type
1- Go to Handset, validate
2- Select Sounds, validate
3- Select Ringer type, validate
4- Choose External Std ringer/Internal ringer, validate
5- Select the ringer from the list and validate
To set the ringer volume on the handset
There are 5 ringer volume levels plus the vibration call alert.
1- Go to Handset, validate
2- Select Sounds, validate
3- Select Ringer volume, validate
4- Choose the appropriate volume level and validate
Note :You can activate the vibration call alert. In this case the ringer
will be in silence mode
4
Handset
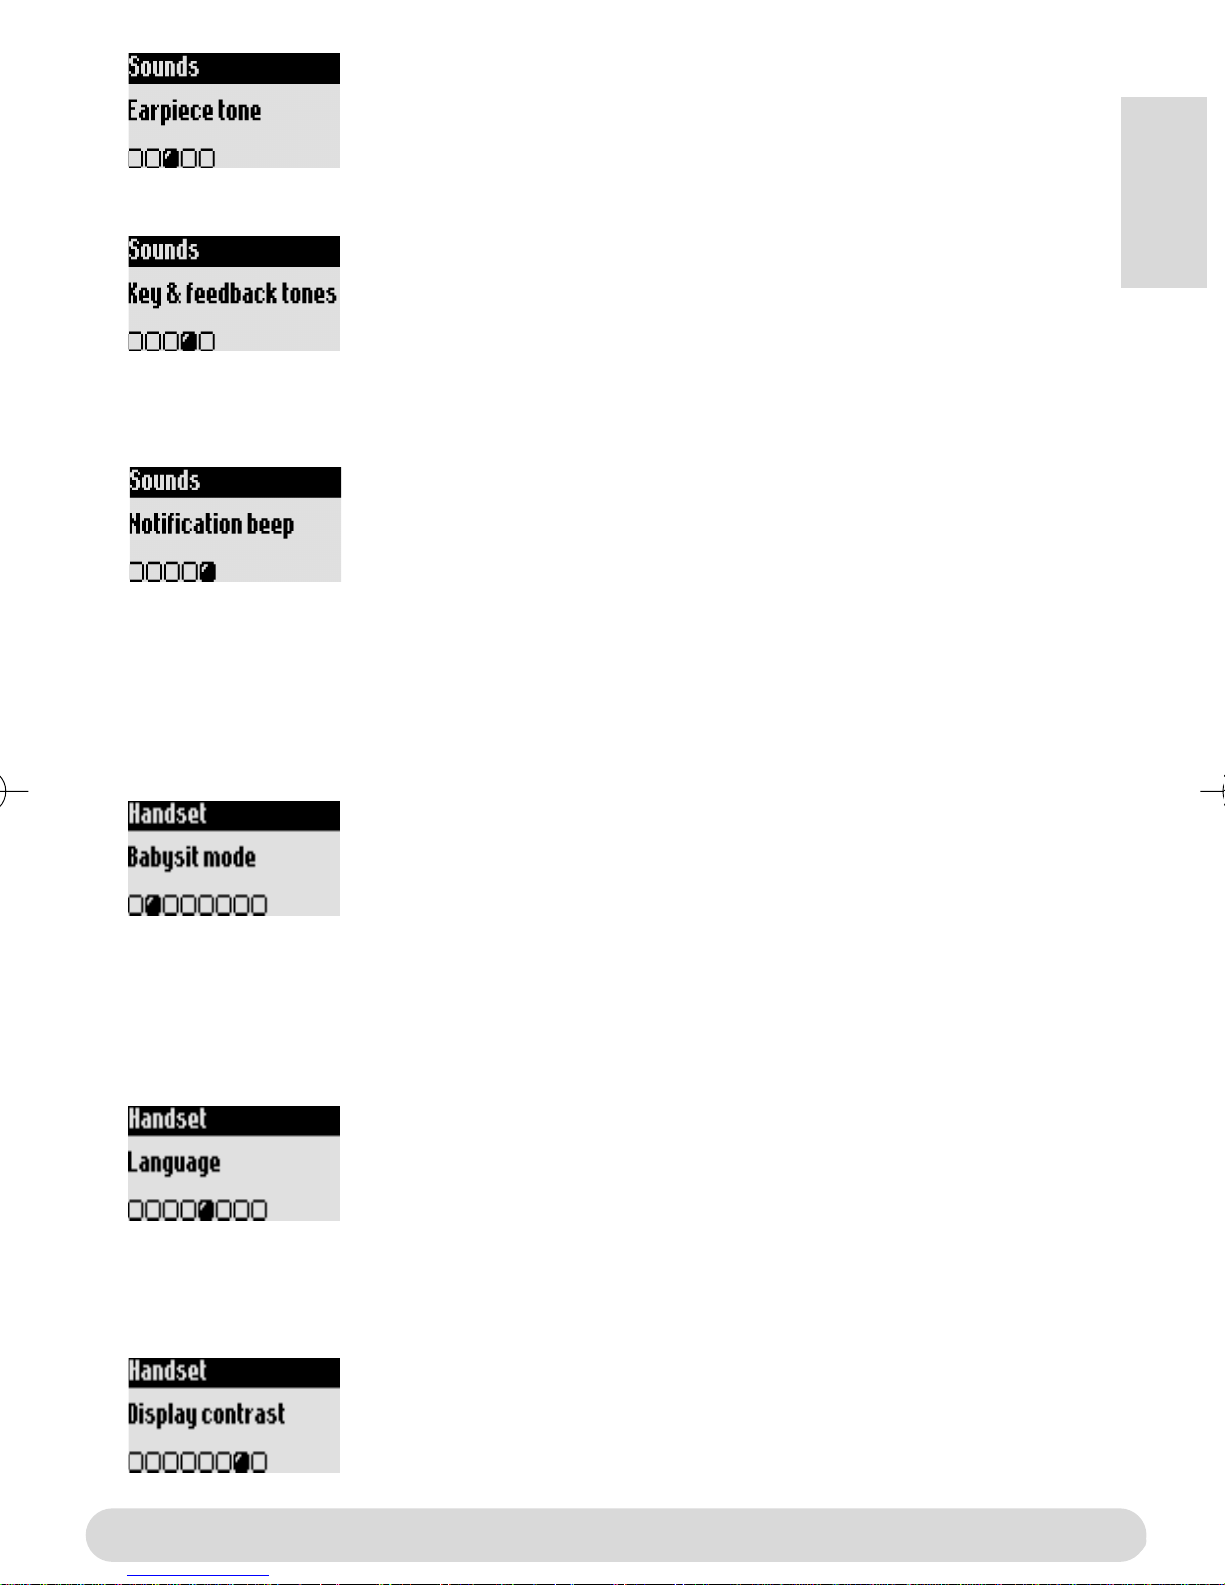
To set the earpiece tone
1- Go to Handset, validate
2- Select Sounds, validate
3- Scroll to Earpiece tone, validate
4- Select Standard, Trebble or bass and validate
To set the key tones & feedback tones
Audio feedback heard when pressing the keys & validating a
setting
Resume from step 1-2 above
3- Scroll to Key and feedback tones, validate
4- Select ON/OFF and validate
To set the notification beep
Audio indicators heard when there is new SMS or a new message
Resume from step 1-2 above
3- Scroll to Notification beep, validate
4- Select ON/OFF and validate
The babysit mode
This feature allows to monitor the babys room. Place the handset in the room to be monitored
and you will hear the noise on the additional handset.
To activate/deactivate the babysit mode
English
1- Go to Handset, validate
2- Scroll to Babysit mode, validate
3- Select ON/OFF and validate
Note : An intercom is necessary to monitor the room (see page 6).
Changing the language
The additional handset default language is English.
To change the language
1- Go to Handset, validate
2- Scroll to Language, validate
3- Select the language and validate
Warning : Changing the language will not alter the voice prompts of the
answer machine (Zenia 300 Vox or non-Philips base stations).
Setting the display contrast
To set the contrast
1- Go to Handset, validate
2- Scroll to Display contrast, validate
3- Select the appropriate level and validate
Handset
5

Setting the backlight
To set the backlight
1- Go to Handset, validate
2- Scroll to Backlight, validate
3- Select 10 sec, 20 sec or OFF, validate
6
Handset
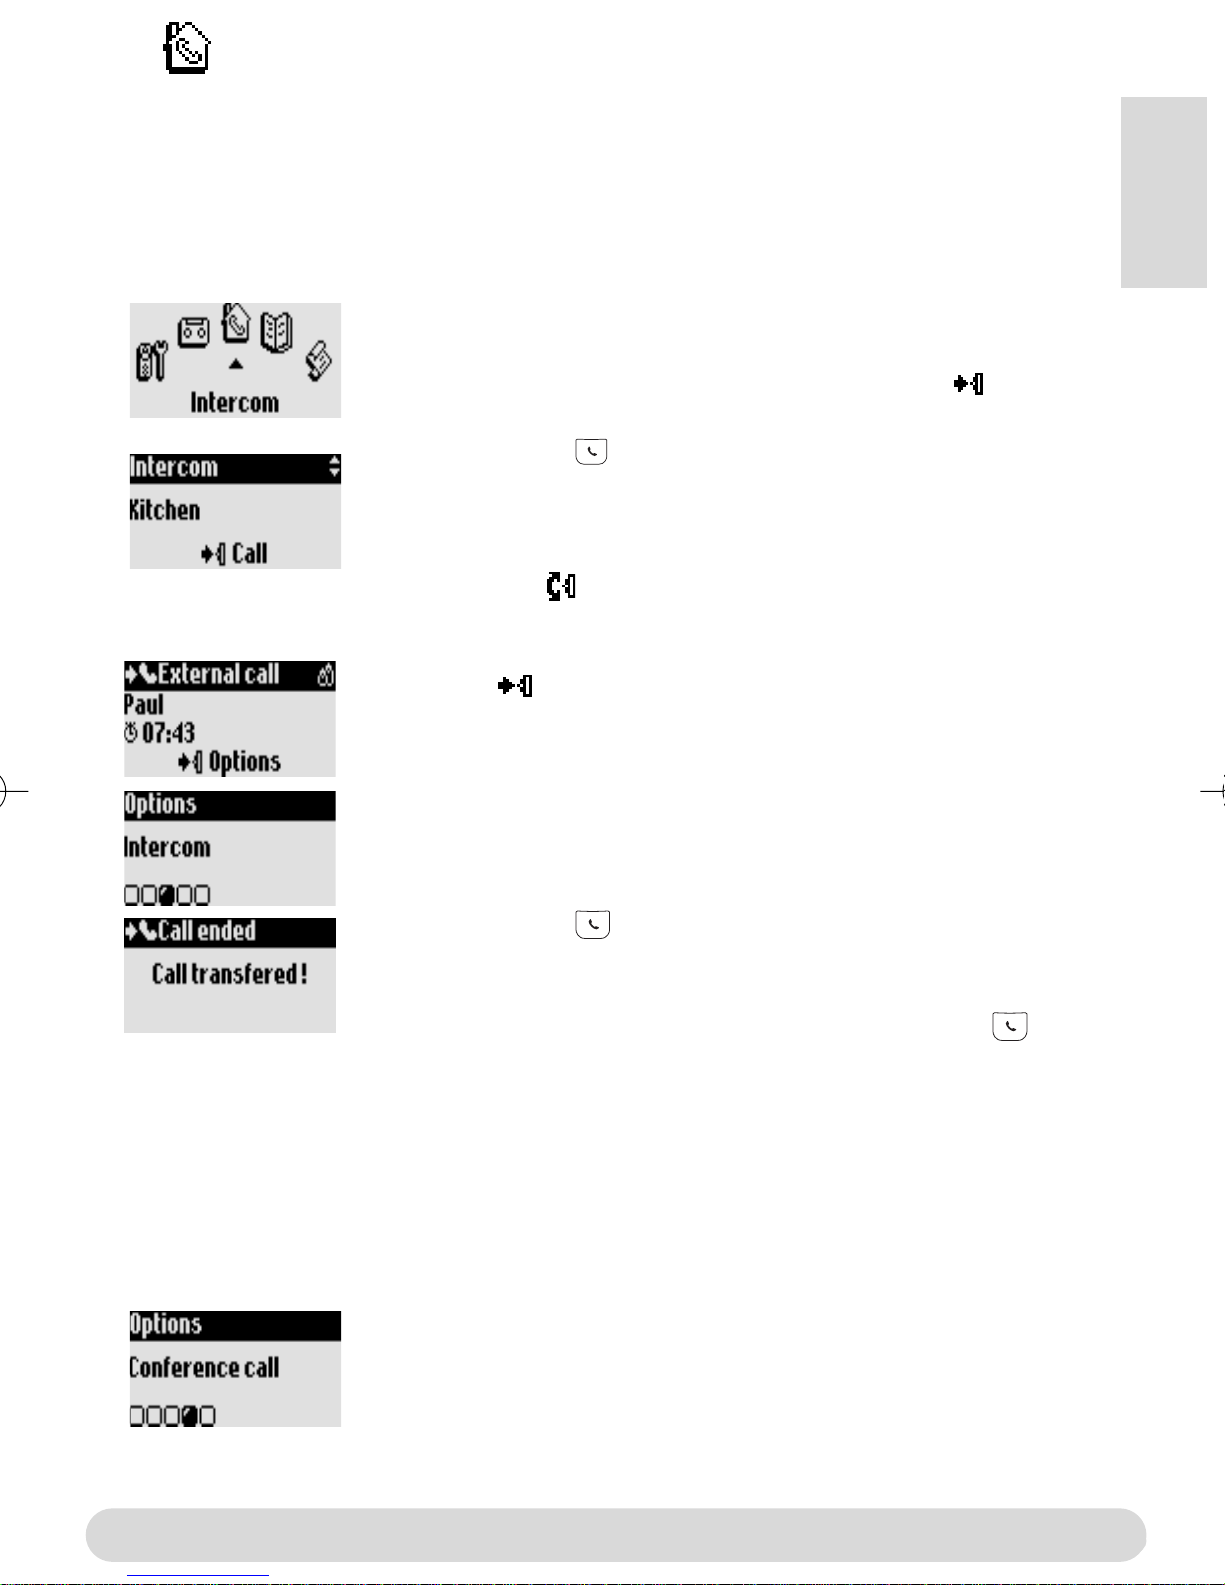
Intercom
Using the intercom (if there are at least 2 handsets)
This feature allows to make internal calls, activate babysit or transfer external calls from one
handset to the other.The intercom is possible with handsets registered to the same base
station.
Internal call or room monitoring activation
1- Go to Intercom, validate
2- If there is only one handset it rings automatically. Otherwise select
from the list the handset/base you want to call and Call
The called handset/base rings
3- Take the line on the called handset/base.
The intercom conversation or the babys room monitoring can start.
Mute is also available.
Note :You can access the Intercom with the pilot key.
In idle mode scroll up.
English
During an external call you can transfer the call to another handset
1- Press to enter the options
2- Scroll to Intercom, validate
3- If there is only one handset it rings automatically. Otherwise select
from the list the handset/base you want to call
The called handset/base rings.The external call is put on hold.
If there is no answer from the second handset you can resume the
call on the first handset. Use the End Intercom option.
4- Take the line on the other handset/base
Both internal callers can talk together.
5- Use the Transfer option.The call is ended on the first handset.
Note : You can also hang up on the first handset with .
While the call is put on hold the correspondant hears the music (if
music on hold is activated) or beeps.
Switch (between call 1 & 2) and Mute (microphone) are other
options available in the contextual menu.
To share a conference call
Conference call allows one external call to be shared with 2
handsets (in intercom).The 3 people can share the conversation
(no operator subscription is needed).
Resume from step 1-4 above
5- Select Conference call, validate
Intercom
7
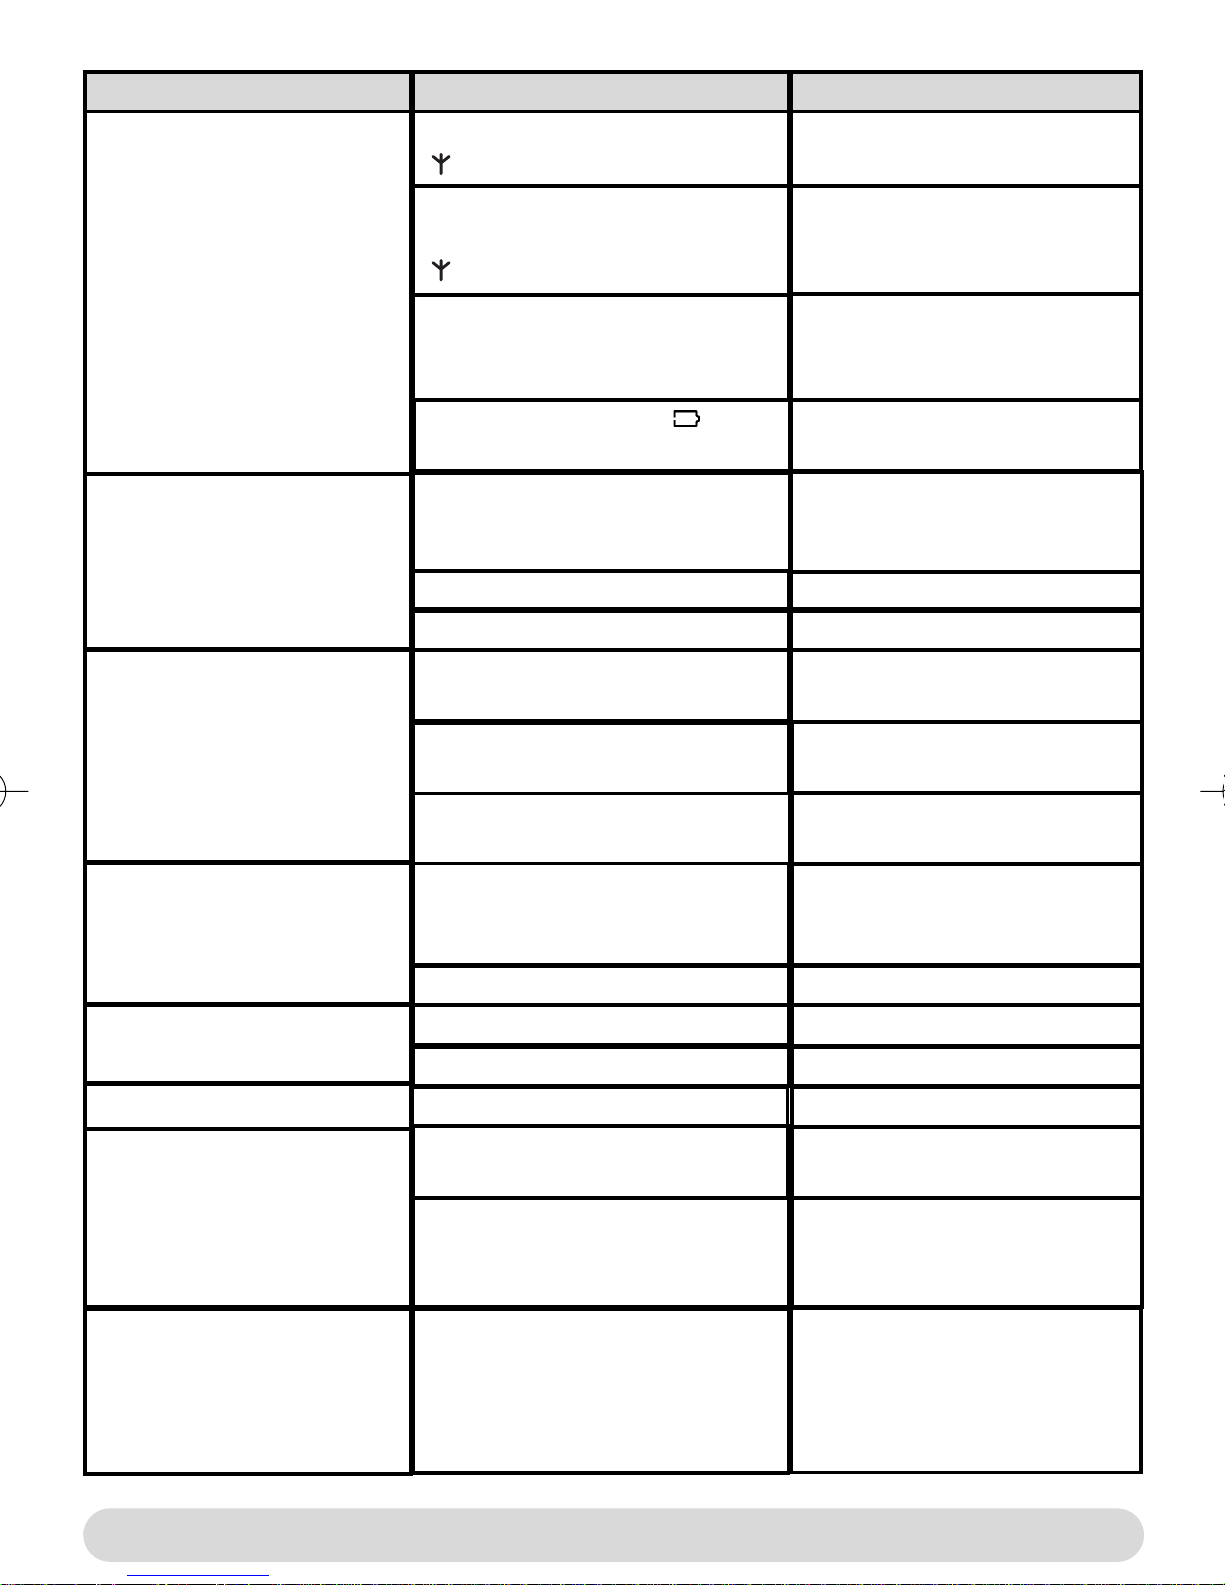
Troubleshooting
Problem
No dial tone.
When the handset is placed
on the charging unit, no
beep is heard.
The batteries remain low
although they have charged
for 12 hours.
Cause Solution
The handset is out of range,
( is not displayed).
The handset has not been
registered to the base station
Move closer to the base
station and try again
Register the handset to the
base station (page 4)
( is not displayed).
The base station is not
Check the connections
properly connected to the mains
or the telephone line.
The batteries are low ( is
Charge batteries (page 3)
displayed).
The charging unit is not properly
connected to the mains.
Charging contacts are dirty.
Key tones are deactivated.
The charging unit is not properly
Check the connection between
charging unit and mains.
Clean with a clean & dry cloth.
Activate them (page 5)
Check the connection
connected to the mains.
Handset not registered to base
Register handset to base (page
4)
An error beep is heard from
the handset when trying to
make a call.
An error beep is heard
during a call.
There is no ringer.
When adding a handset to
the base station, a failure
message is displayed.
Interference during call.
The batteries are defective or
too old.
Another call is already in
progress from another handset
or the base station.
The base is being consulted
The handset is out of range.
The handset batteries are low
The ringer is deactivated
The procedure has failed
The maximum number of
handset has been reached.
You are too far from the base.
The base station is too close to
electrical appliances, reinforced
concrete walls or metal door
frames
Contact your dealer.
Purchase new batteries
Retry when the current call is
finished.
Wait until it is available
Move closer to the base
Charge the batteries.
Activate it (page 5).
Try again the procedure again
(page 4).
Un-register a handset (page 4)
Get closer to the base station.
Move the base station to find a
better place (the higher the
better).
8
Troubleshooting

DECLARATION OF CONFORMITY
We,
PHILIPS Consumer, Electronics
DECT & Home Telephony
Route d’Angers
72081 Le Mans Cedex 9
France
Declare that the products Zenia 300, Zenia 300 additional handset and all bundle
combinations are in compliance with ANNEX III of the R&TTE-Directive 1999/5/EC
and then with the following essential requirements :
Article 3.1.a : (protection of the health & the safety of the user) : EN 60950 (2000)
English
Article 3.1.b : (protection requirements with respect to electromagnetic
compatibility) ETSI EN 301 489-6 V1.1.1 (09/2000) & ETSI EN 301 489-1 V1.3.1
(09/2001)
Article 3.2 : (effective use of the radio spectrum) : EN 301 406 (2001)
The presumption of conformity with the essential requirements regarding Council
Directive 1999/5/EC is ensured.
Date : 16/07/2003 Le Mans
Vice President & General Manager
DECT & Home Telephony
Declaration of conformity
9

Conformité, Sécurité et Environnement
Sécurité : Cet équipement na pas été conçu pour passer des appels durgence en cas de panne
dalimentation secteur.Vous devez donc disposer dune alternative dans ce cas.
Conformité : Par la présente, Philips déclare que lappareil Zenia 300 Vox est conforme aux
exigences essentilelles et aux autres dispositions pertinentes de la directive 1999/5/CE. En cas de
besoin une copie du certificat original peut être demandée auprès du service consommateurs.
Raccordement électrique : Alimentation sur réseau 230 volts, courant alternatif monophasé, à
lexclusion des installations à schéma IT définies dans la norme EN 60-950.
ATTENTION : Lalimentation secteur est classifiée au niveau sécurité Tension dangereuse, tel
que défini par la norme EN 60-950. Cet appareil ne peut être mis complètement hors tension
quen débranchant le bloc dalimentation secteur de la prise murale. La prise doit être située à
proximité de lappareil et facilement accessible.
Connection du téléphone : La tension du réseau est classée TRT-3 (Tension de Réseau de
Télecommunication), comme définie dans la norme EN 60-950.
Précautions dutilisation : Ne pas mettre le combiné au contact de leau. Ne pas ouvrir le
combiné ni la base.Vous risquez de vous exposer à des tensions élevées.Toujours contacter
votre service après-vente pour des réparations. Eviter de mettre en contact les plots de
chargements ou les batteries avec des objets conducteurs.
Protection de lenvironnement : Veuillez vous conformez aux réglementations locales
lorsque vous jetez les emballages, les batteries usagées ou votre ancien téléphone. Dans la
mesure du possible, tentez de promouvoir le recyclage.
Utiliser la norme GAP
La norme GAP garantit un fonctionnement minimum à tout combiné et à toute base DECT
GAP de marques différentes déclarés ensemble. Le combiné est GAP. Les fonctions minimales
garanties sont : prendre la ligne, recevoir un appel et numéroter.
TM
Utiliser des bases Philips*
Si vous associez le combiné supplémentaire à la base Philips Zenia 300 Vox, le combiné
bénéficiera de toutes les fonctions (décrites dans le manuel Zenia 300).
Si vous souscrivez le combiné supplémentaire à la base Philips Onis 200 ou Zenia, certains menus
seront manquants. Référez-vous aux manuels de ces produits.
Utiliser une base GAP non-Philips
Pour souscrire le combiné supplémentaire Philips à une base non Philips, suivez les instructions
dans le manuel du constructeur de la base. Puis suivez les instructions page 4 (depuis létape 4)
pour associer le combiné supplémentaire Philips. Seuls certains menus seront disponibles.
Philips a marqué de symboles standards les batteries et lemballage. Ces symboles sont conçus pour promouvoir
leur recyclage.
Lemballage et le manuel sont recyclables.
Une contribution financière a été payée pour favoriser le recyclage du manuel et de lemballage.
1
Conformité, Sécurité et Environnement

Touche de navigation
Appuyez pour entrer dans le
carousel ou valider un menu/option
- Défilez pour se déplacer dans les
menus & options, ou déplacer le curseur
- Vers le haut pour accéder à
Intercom depuis le mode veille
- Vers le bas pour accéder à
Moindre coût depuis le mode veille
Appuyez pour débloquer le clavier
Haut-parleur
- Appuyez pour prendre la ligne ou
activer le haut-parleur combiné
- Un appui long pour activer le hautparleur de la base
Journal des appels
- Un appui court pour accéder au journal
des appels
- Un appui long pour accéder
directement à la liste des messages
Blocage clavier & Edition
- Un appui court pour insérer *
- Un appui court pour entrer le mode
multitap ou léditeur Eatoni
®
- Un appui long pour bloquer/débloquer
le clavier
- Un appui long pour insérer (R) en
numérotant
Touche de ligne
- Appui court pour prendre
la ligne, ou raccrocher
Ecouteur
Microphone
Combiné Zenia 300 Vox
Touche de correction
- Pour corriger un chiffre en prenumérotation ou une lettre en
mode édition
- Un appui long/court pour
retourner au mode veille ou
remonter dun niveau de menu
- Pour insérer R dans lutilisation
des services opérateur en cours
dappel
Répertoire
- Un appui court pour accéder
au répertoire
- Un appui long pour ajouter un
nouveau nom
Le mode Do Not Disturb
& le mode dédition
- Un appui court pour insérer # en
composant
- Un appui long pour activer le
mode Do Not Disturb
- Un appui long pour insérer une
pause (P) en composant
- Pour changer le mode
majuscule/minuscule
Réveil
- Un appui court pour composer 0
- Un appui long pour
activer/désactiver le réveil
Français
Les icones
Répondeur allumé
Appel externe en
cours
cours
Haut-parleur activé
Sonnerie désactivée
Fonction SMS activée
Souscrit & à portée
de la base
Clignotante
Nouveau message sur
répondeur ou boîte vocale
- Appel entrant en cours.
- La ligne est occupée
Appel interne entrant Appel interne en
Haut-parleur base activé
Nouveau SMS
Non souscrit
Le combiné
Clignote viteAllumée
Répondeur plein
Mémoire SMS pleine
2
Installer et remplacer les batteries
Pour insérer le pack batteries, ouvrez la trappe sur le combiné en la
faisant glisser vers le bas. Connectez le pack batteries au connecteur
à lintérieur du combiné. Placez le pack avec létiquette face à vous et
les fils le long du côté gauche du pack batteries.
Quand vous remplacez les batteries, utilisez uniquement des
NiMh.
Licône batterie défile en cours de charge . En se déchargeant, la batterie
montre différents états : pleine , 2/3 , 1/3 et vide .
Autonomie et portée
Les batteries doivent être jetées dans les containers prévus à cet effet.
Lautonomie est denviron 250
heures en mode veille (quand le combiné est prêt à recevoir/émettre un appel) et denviron 16
heures en communication. Un signal dalerte vous informe que le combiné doit être chargé, si
cela arrive en communication, elle sera bientôt coupée. Lautonomie maximale est atteinte
après 3 cycles de charge/décharge des batteries.
Dans les conditions idéales, la portée peut atteindre 50 m à lintérieur et 300 m à lextérieur.
Quand vous atteignez la limite de portée, la conversation devient hachée, rapprochez-vous de la
base sinon la communication sera coupée. Pour obtenir une portée maximale éloignez la base
dappareils électriques.
Comprendre le système des menus
Depuis lécran de veille, appuyez sur pour accéder au caroussel
Le carrousel est une boucle dicônes qui donne accès aux menus du
premier niveau. Faîtes défiler pour atteindre le menu désiré.
Appuyez pour valider et entrer dans le menu.
Les sous menus sont listés et représentés par des petits carrés
en bas de lécran.
Pour atteindre un sous-menu en particulier faîtes défiler et
validez votre choix .
Un montre le menu où vous êtes.
Un montre le sous-menu ou loption choisi.
NB : certains menus sont accessibles directement par un appui
touche (ex. le journal des appels )
Appel direct
1- Prenez la ligne
2- Numérotez
3
Appel pré-numéroté
1- Numérotez
2- Prenez la ligne
Le système des menus
Combiné
Changer la langue
La langue du combiné supplémentaire est par défaut lAnglais.
Pour changer la langue
1- Allez à Handset, validez
2- Sélectionnez Language, validez
3- Sélectionnez la langue désirée et validez
Attention : Changer la langue ne modifie pas la langue de laide
vocale du répondeur (Zenia 300 Vox ou autre base non-Philips).
Souscrire/dé-souscrire un combiné supplémentaire à la base
Le combiné supplémentaire doit être associé à la base afin de pouvoir fonctionner
correctement*.Vous pouvez associer jusquà 8 combinés à la base Zenia 300 Vox.
Pour souscrire un combiné supplémentaire
1- Mettez la base en mode souscription en débranchant/rebranchant
sa prise électrique
2- Avec le combiné supplémentaire appuyez sur
3- Entrez le code RC à 4 chiffres inscrit sous la base, validez
* voir page 1
Pour dé-souscrire un combiné
1- Allez à Combiné, validez
2- Sélectionnez Souscription, validez
3- Choisissez Désouscrire le combiné, validez
4- choisissez un combiné dans la liste, validez
5- Entrez le code RC (code à 4 chiffres inscrit sous la base)et validez
Français
Régler les sons du combiné
Régler les sonneries pour :
- Appel externe standard, pour les correspondants inconnus au répertoire ou sans réglages VIP.
- Appel interne, pour linterphonie (sil y a au moins deux combinés)
Pour les régler les sonneries VIP (Ami , famille et Professionnel ) voir le manuel du
Zenia 300 Vox. Abonnement au service de présentation du numéro (CLI) nécessaire.
Pour choisir la sonnerie
1- Allez à Combiné, validez
2- Sélectionnez Sons, validez
3- Sélectionnez Type de sonnerie, validez
4- Sélectionnez Sonnerie externe Std/Sonnerie interne, validez
5- Choisissez une sonnerie dans la liste et validez
Combiné
4
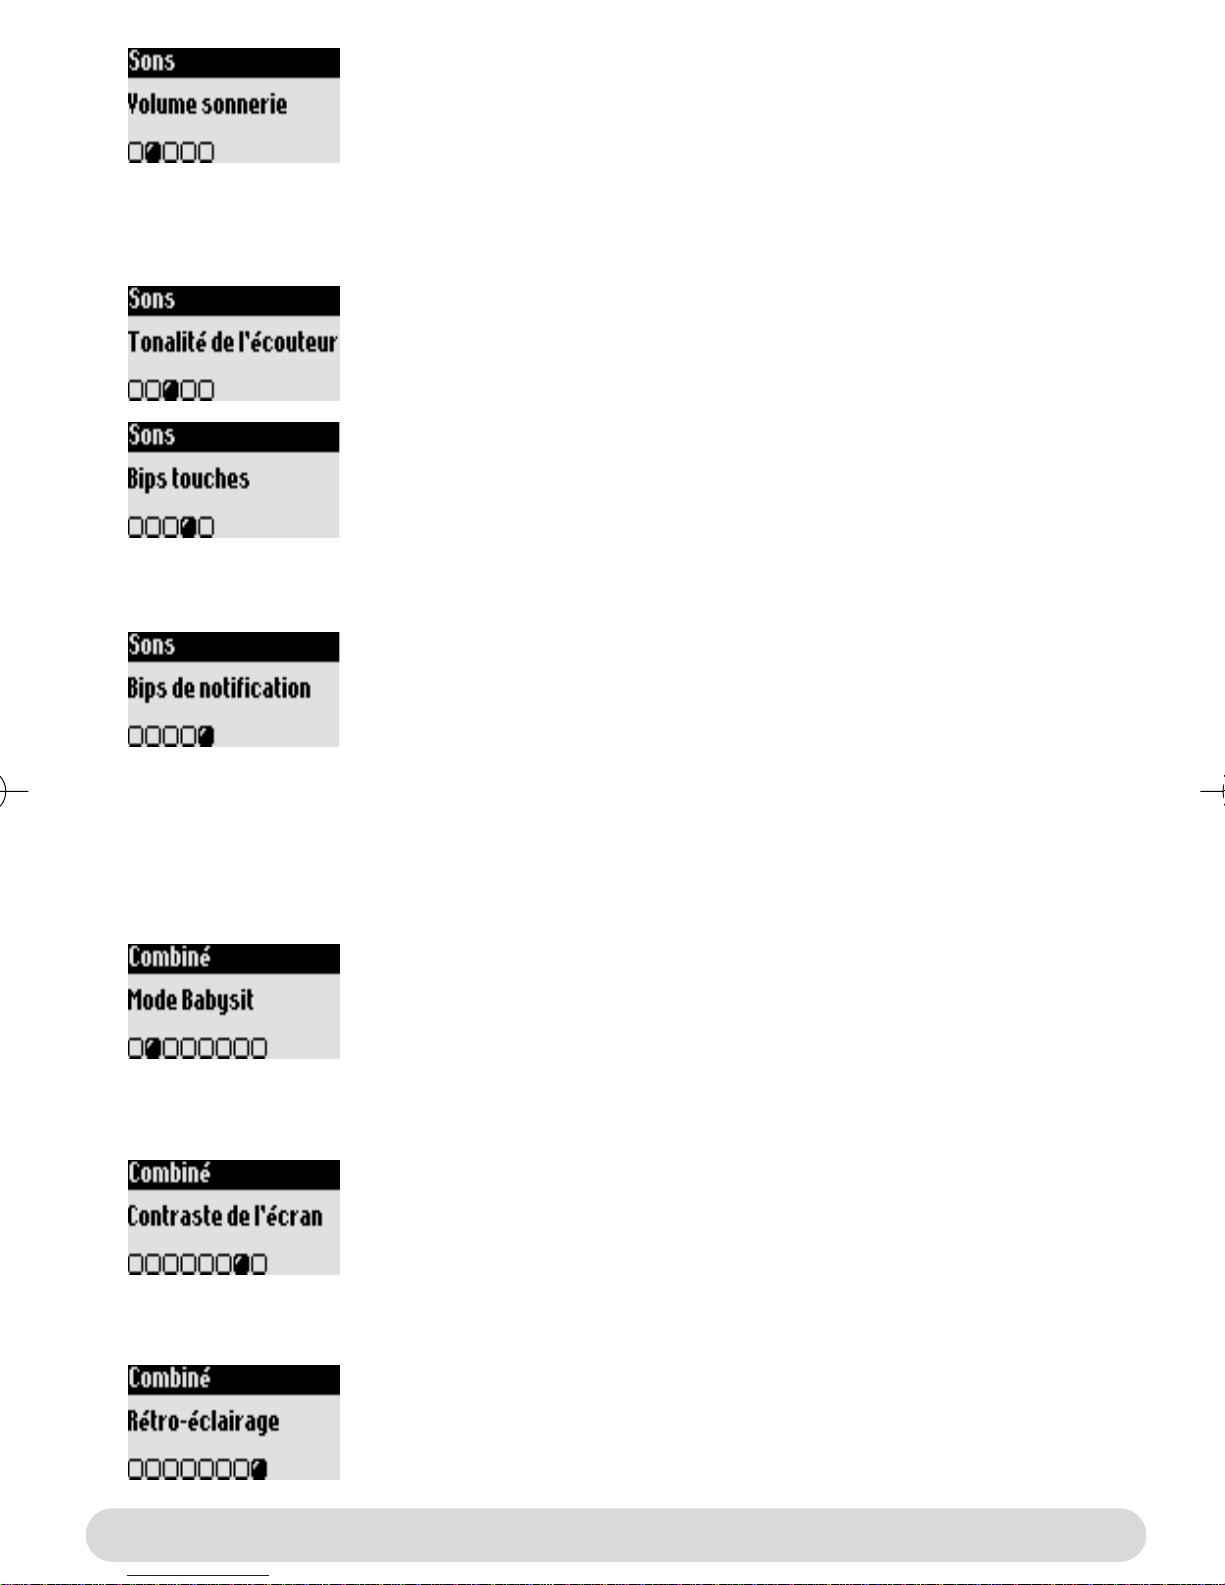
Pour choisir le volume de la sonnerie
5 niveaux de sonnerie sont disponibles plus le mode vibreur.
Reprenez les étapes1&2 précédentes
3- Sélectionnez Volume sonnerie, validez
4- Choisissez le volume approprié et validez
NB : vous pouvez également activer le mode vibreur. Dans ce cas, la
sonnerie sera en mode silencieux.
Pour choisir la tonalité de lécouteur.
Reprenez les étapes 1&2 précédentes
3- Sélectionnez Tonalité de lécouteur, validez
4- Choisissez Normal, Aigu ou Grave et validez
Pour activer/désactiver les bips touches
Indications sonores de réglages effectués et dappui touches.
Reprenez les étapes 1&2 précédentes
3- Sélectionnez Bips touches, validez
4- Sélectionnez Activer/Désactiver et validez
Pour activer/désactiver les bips de notification
Indications sonores de nouveaux SMS et message sur boîte vocale
Reprenez les étapes 1&2 précédentes
3- Sélectionnez Bips de notification, validez
4- Sélectionnez Activer/Désactiver et validez
Le mode babysit
Cette fonction permet de surveiller la chambre denfant. Placez le combiné dans la pièce à
surveiller et vous entendrez les bruits sur le combiné supplémentaire. Un appel interne est
nécessaire pour surveiller la pièce.
Pour activer/désactiver le mode babysit
1- Allez à Combiné, validez
2- Sélectionnez Mode Babysit, validez
3- Sélectionnez Activer/Désactiver
Régler le contraste de lécran
Pour régler le contraste
1- Allez à Combiné, validez
2- Sélectionnez Contraste de lécran, validez
3- Sélectionnez le niveau approprié et validez
Régler le rétro-éclairage
Pour régler le rétro-éclairage
1- Allez à Combiné, validez
2- Sélectionnez Rétro-éclairage, validez
3- Sélectionnez 10 sec, 20 sec, Désactiver, validez
5
Combiné
 Loading...