

Page 1
A
B
C
Connect/Setup
Enjoy
FAQ
Quick start guide
Read Me First!
GB
Wireless Music Center + Station
WACS700
Page 2
Mute
Menu
Program
RDS/News
Incr.Sur r. Like Artist Like Genre DB B
Music Match-genr e
Follows MeFollows Me
0
1
Repeat
Dim
Sleep
View
Scroll
VOL
OK
Server
Tuner
/Aux
3
def
4
ghi
jkl
mno
pqrs
8
tuv
9
6
A
l
l
r
i
g
h
t
s
r
e
s
e
r
v
e
d
.
U
n
a
u
t
h
o
r
i
z
e
d
c
o
p
y
i
n
g
,
r
e
p
r
o
d
u
c
t
i
o
n
,
h
i
r
i
n
g
,
l
e
n
d
i
n
g
,
p
u
b
l
i
c
p
e
r
f
o
r
m
a
n
c
e
a
n
d
b
r
o
a
d
c
a
s
t
i
n
g
p
r
o
h
i
b
i
t
e
d
.
©
2
0
0
4
R
o
y
a
l
P
h
i
l
i
p
s
E
l
e
c
t
r
o
n
i
c
s
w
w
w
.
p
h
i
l
i
p
s
.
c
o
m
/
w
w
w
.
p
h
i
l
i
p
s
.
c
o
m
\
s
u
p
p
o
r
t
.
1
2
N
C
3
1
4
1
0
7
8
7
0
0
7
1
.
W
i
n
d
o
w
s
a
n
d
P
e
n
t
i
u
m
a
r
e
t
r
a
d
e
m
a
r
k
s
o
f
M
i
c
r
o
s
o
f
t
C
o
r
p
.
A
l
l
o
t
h
e
r
t
r
a
d
e
m
a
r
k
s
b
e
l
o
n
g
t
o
t
h
e
i
r
r
e
s
p
e
c
t
i
v
e
o
w
n
e
r
s
.
System requirements:
• Windows 98 (SE) / ME / 2000 / XP
(Home and Professional)
• Pentium Class 300MHz processor or h igher
• CD-ROM drive
• Ethernet port
• Free hard disk space 500MB
for the software
CD contains:
• Digital Media Manager
• Network Setup
• Manual & FAQs
• Registration & Upgrades
Wireless Music Center
PC installer
WA
CS700
Wireless Music
Center + Station
User manual
Manuel d'utilisation
Manual del usuario
Benutzerhandücher
2
metsyS cisuM sseleriW
AW
007SC
CP ruoy ot tcennoC
? DC rellatsnI CP ruoy htiw od nac uoy tahW
– ruoy tcennoC AWC007 retuor deriw aiv,yltcerid krowten emoh ro CP ruoy ot retneC
tniop ssecca sseleriw aiv ro
– aiv noitcelloc cisum ruoy eganaM )MMD( reganaM aideM latigiD ,:gnidulcni
• selif cisum refsnart dna noitamrofni kcart tide,skcart/stsilyalp emaner dna etaerC
ot CP morf AW
C
007 retneC
• P noitamrofni csid tsetal eht rof ecivres noitingocer cisum ®etonecarG etadpu ot shta
• Psedargpu erawmrif s’007SCAW dna erawtfos MMD rof knil gnitroppus dna shta
sedargpu rof noitartsiger tcudorP –
stnemeriuqer metsys CP
–)lanoisseforP ro emoH( PX/0002/EM/ES89 swodniW
P–rehgih ro rossecorp zHM003 III muitne
–retpada krowten tenrehtE
–evirdMOR–DC
erawtfos eht rof BM001:ecaps ksid drah eerF –
? deen ll'uoy esle tahW
–)elbac thgiarts( elbac tenrehtE deilppuS
– DC rellatsnI CP deilppuS
3
A
l
l
r
i
g
h
t
s
r
e
s
e
r
v
e
d
.
U
n
a
u
t
h
o
r
i
z
e
d
c
o
p
y
i
n
g
,
r
e
p
r
o
d
u
c
t
i
o
n
,
h
i
r
i
n
g
,
l
e
n
d
i
n
g
,
p
u
b
l
i
c
p
e
r
f
o
r
m
a
n
c
e
a
n
d
b
r
o
a
d
c
a
s
t
i
n
g
p
r
o
h
i
b
i
t
e
d
.
©
2
0
0
4
R
o
y
a
l
P
h
i
l
i
p
s
E
l
e
c
t
r
o
n
i
c
s
w
w
w
.
p
h
i
l
i
p
s
.
c
o
m
/
w
w
w
.
p
h
i
l
i
p
s
.
c
o
m
\
s
u
p
p
o
r
t
.
1
2
N
C
3
1
4
1
0
7
8
7
0
0
7
1
.
W
i
n
d
o
w
s
a
n
d
P
e
n
t
i
u
m
a
r
e
t
r
a
d
e
m
a
r
k
s
o
f
M
i
c
r
o
s
o
f
t
C
o
r
p
.
A
l
l
o
t
h
e
r
t
r
a
d
e
m
a
r
k
s
b
e
l
o
n
g
t
o
t
h
e
i
r
r
e
s
p
e
c
t
i
v
e
o
w
n
e
r
s
.
:st
neme
riuqer metsy
S
PX / 0002 / EM / )ES( 89 swodniW •
rP dna emoH(issefo)lano
rehgih ro rossecorp zHM003 ssalC muitneP •
DC •-evird MOR
trop tenrehtE •
BM005 ecaps ksid drah eerF •
erawtfos eht rof
:sniatnoc DC
reganaM aideM latigiD •
puteS krowteN •
sQAF & launaM •
sedargpU & noitartsigeR •
retneC cisuM sseleriW
rellatsni CP
A
B
C
puteS/tcennoC
yojnE
snoitseuQ deksA yltneuqerF
metsyS cisuM sseleriW
007SCaw
ediug trats kciuQ
1
!tsriF eM daeR
1
3
2
Wireless music center WAC 700
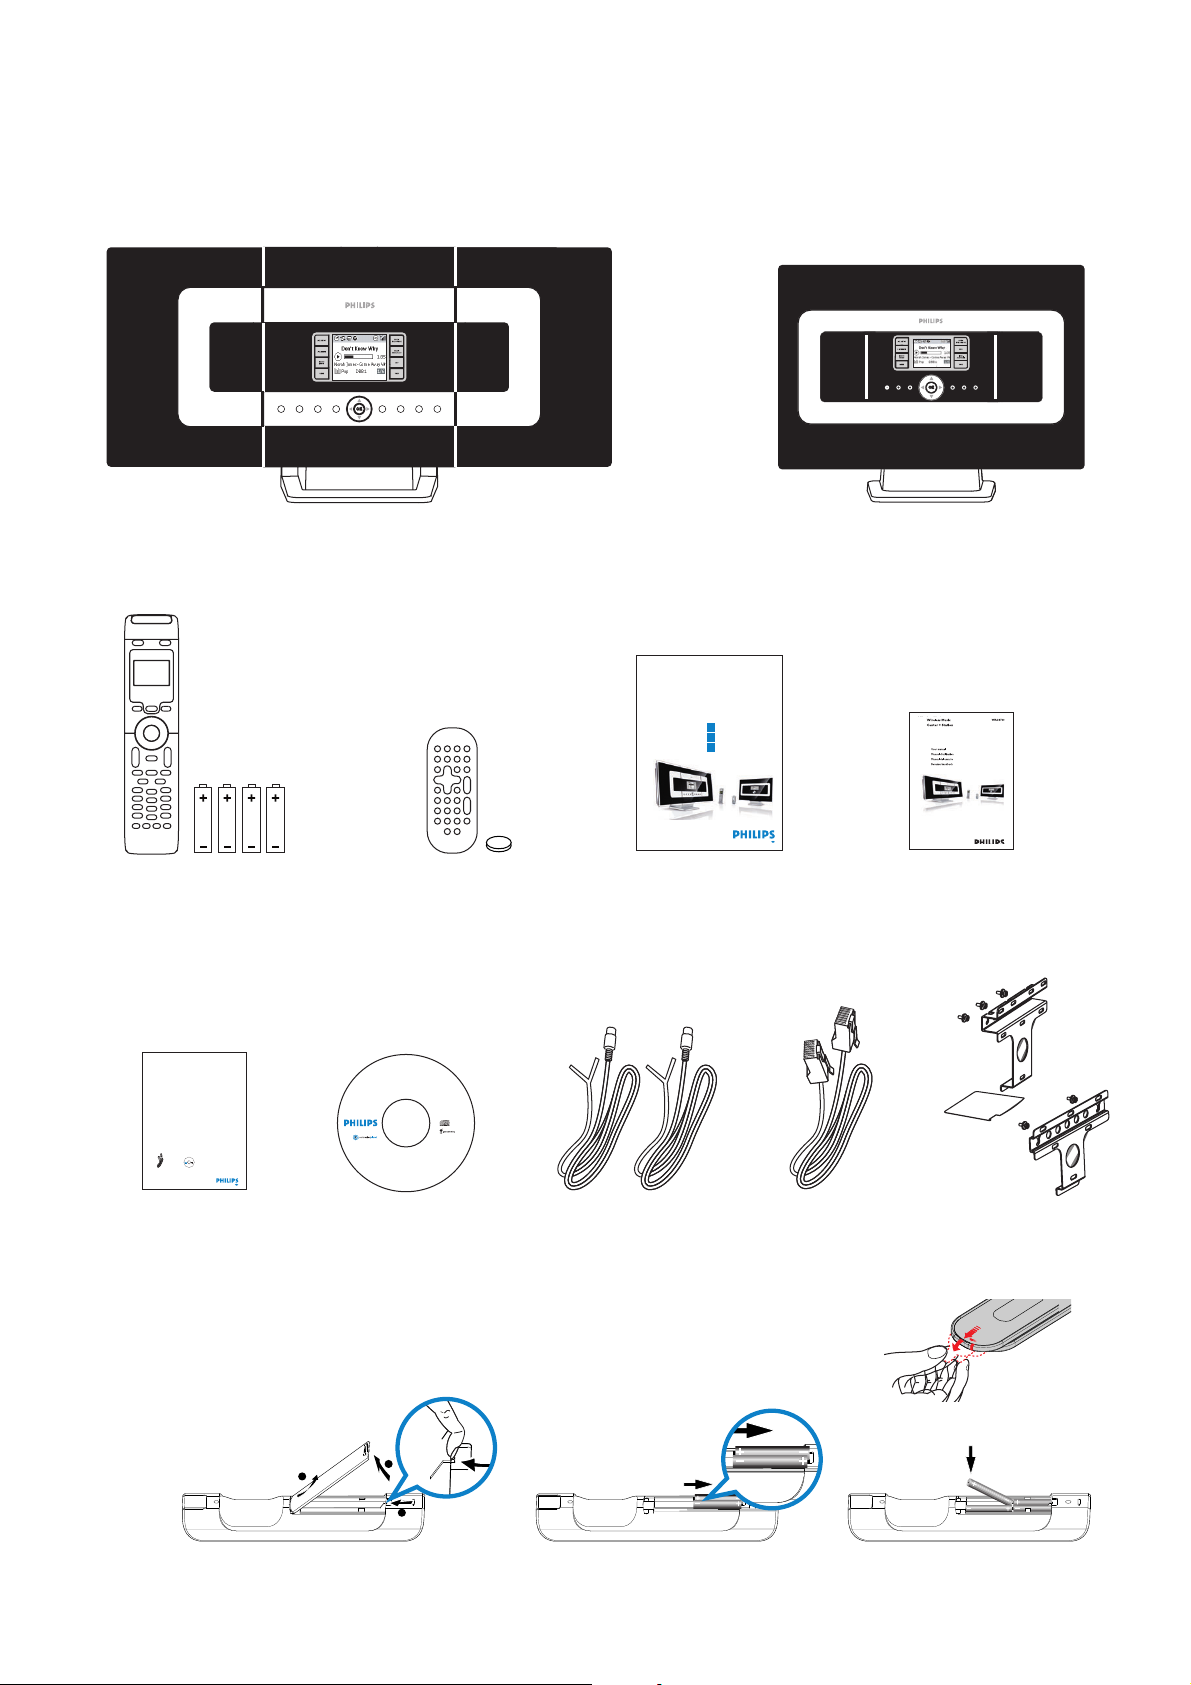
What’s in the box
Wireless music station WAS 700
User manualQuick start guideStation’s remote control
1xCR2025 batteries
Center’s remote control
4xAAA batteries
1 x Ethernet cable 2 x Mounting kit
for center & station
Center
Station
2 x FM wire antenna
PC installer
Connect to your PC
• Remove the protective plastic tab from the Station’s remote control
• Insert 4 AAA batteries into Center’s remote control as shown
Center’s remote control
Station’s remote
control
Before using the remote control:
W
noitatS + retneC cisuM sseleri
AW
007SC
CP ruoy ot tcennoC
? DC rellatsnI CP
ruoy htiw
od nac
uoy
tahW
– retuor deriw aiv,yltcerid krowten emoh ro CP ruoy ot retneC 007CAW ruoy tcennoC
tniop ssecca sseleriw aiv ro
– aiv noitcelloc cisum ruoy eganaM )MMD( reganaM aideM latigiD ,:gnidulcni
• selif cisum refsnart dna noitamrofni kcart tide,skcart/stsilyalp emaner dna etaerC
retneC 007CAW ot CP morf
®e
• noitamrofni csid tsetal eht rof ecivres noitingocer cisum
tonecarG etadpU
• 007SCAW rof sedargpu erawmrif dna erawtfos MMD tsetal eht niatbO
sedargpu rof stcudorp retsigeR –
stnemeriuqer metsys CP
–)lanoisseforP ro emoH( PX/0002 swodniW
P–rehgih ro rossecorp zHM003 III muitne
–retpada krowten tenrehtE
–evirdMOR–DC
tahW
erawtfos eht rof BM001:ecaps ksid drah eerF –
? deen ll'uo
le
y es
l
o
l
t
A
h
.
e
p
r
r
t
o
r
a
C
d
t
e
f
m
o
s
a
o
r
r
k
c
s
i
b
M
e
f
l
o
o
n
s
g
k
r
t
a
o
m
t
h
e
e
d
i
a
r
r
t
r
e
e
s
r
p
a
e
c
m
t
u
i
i
v
t
e
n
o
e
w
P
n
d
e
n
r
a
s
s
.
w
o
d
n
i
W
.
1
7
0
0
retneC cisuM sseleriW
7
8
7
0
1
4
1
3
rellatsni CP
C
N
2
1
.
t
r
o
p
p
u
s
\
m
o
c
.
s
p
i
l
i
h
p
.
w
w
w
/
m
o
c
.
s
p
i
l
i
h
p
.
w
w
w
s
c
i
n
o
r
t
c
e
l
E
s
p
i
l
i
h
P
l
a
y
o
R
:stnemeriuqer metsyS
:sniatnoc DC
4
0
0002 / EM / )ES( 8
PX /
9 swodniW •
reganaM aideM latigiD
•
0
2
)lanoisseforP dna emoH(
puteS krowteN
•
©
.
•
rehgih ro rossecorp zHM003 ssalC muitneP
sQAF & launaM •
d
e
t
i
DC •-evird MOR
sedargpU & noi
tsigeR
tar
•
b
i
h
o
nrehtE •trop te
r
p
5 ecaps ksid drah e
•
BM00
erF
g
n
i
A
t
s
l
erawtfos eht rof
l
a
r
c
i
d
g
a
h
o
t
s
r
b
r
e
d
s
n
e
a
r
v
e
e
c
d
n
.
a
U
m
n
r
a
o
u
f
r
t
h
e
o
p
r
c
i
i
z
l
e
b
d
u
p
c
o
,
g
p
n
y
i
i
n
d
g
n
,
e
l
r
,
e
g
p
n
r
i
o
r
i
d
h
u
,
c
n
t
o
i
DC rellatsnI CP deilppuS elbac tenrehtE deilppuS
)elbac thgiarts(
BG
AW007SC
noitatS + retneC cisuM sseleriW
!tsriF eM daeR
ediug trats kciuQ
puteS/tcennoC
A
yojnE
B
QAF
C
G
B
Page 3
1
3
2
A
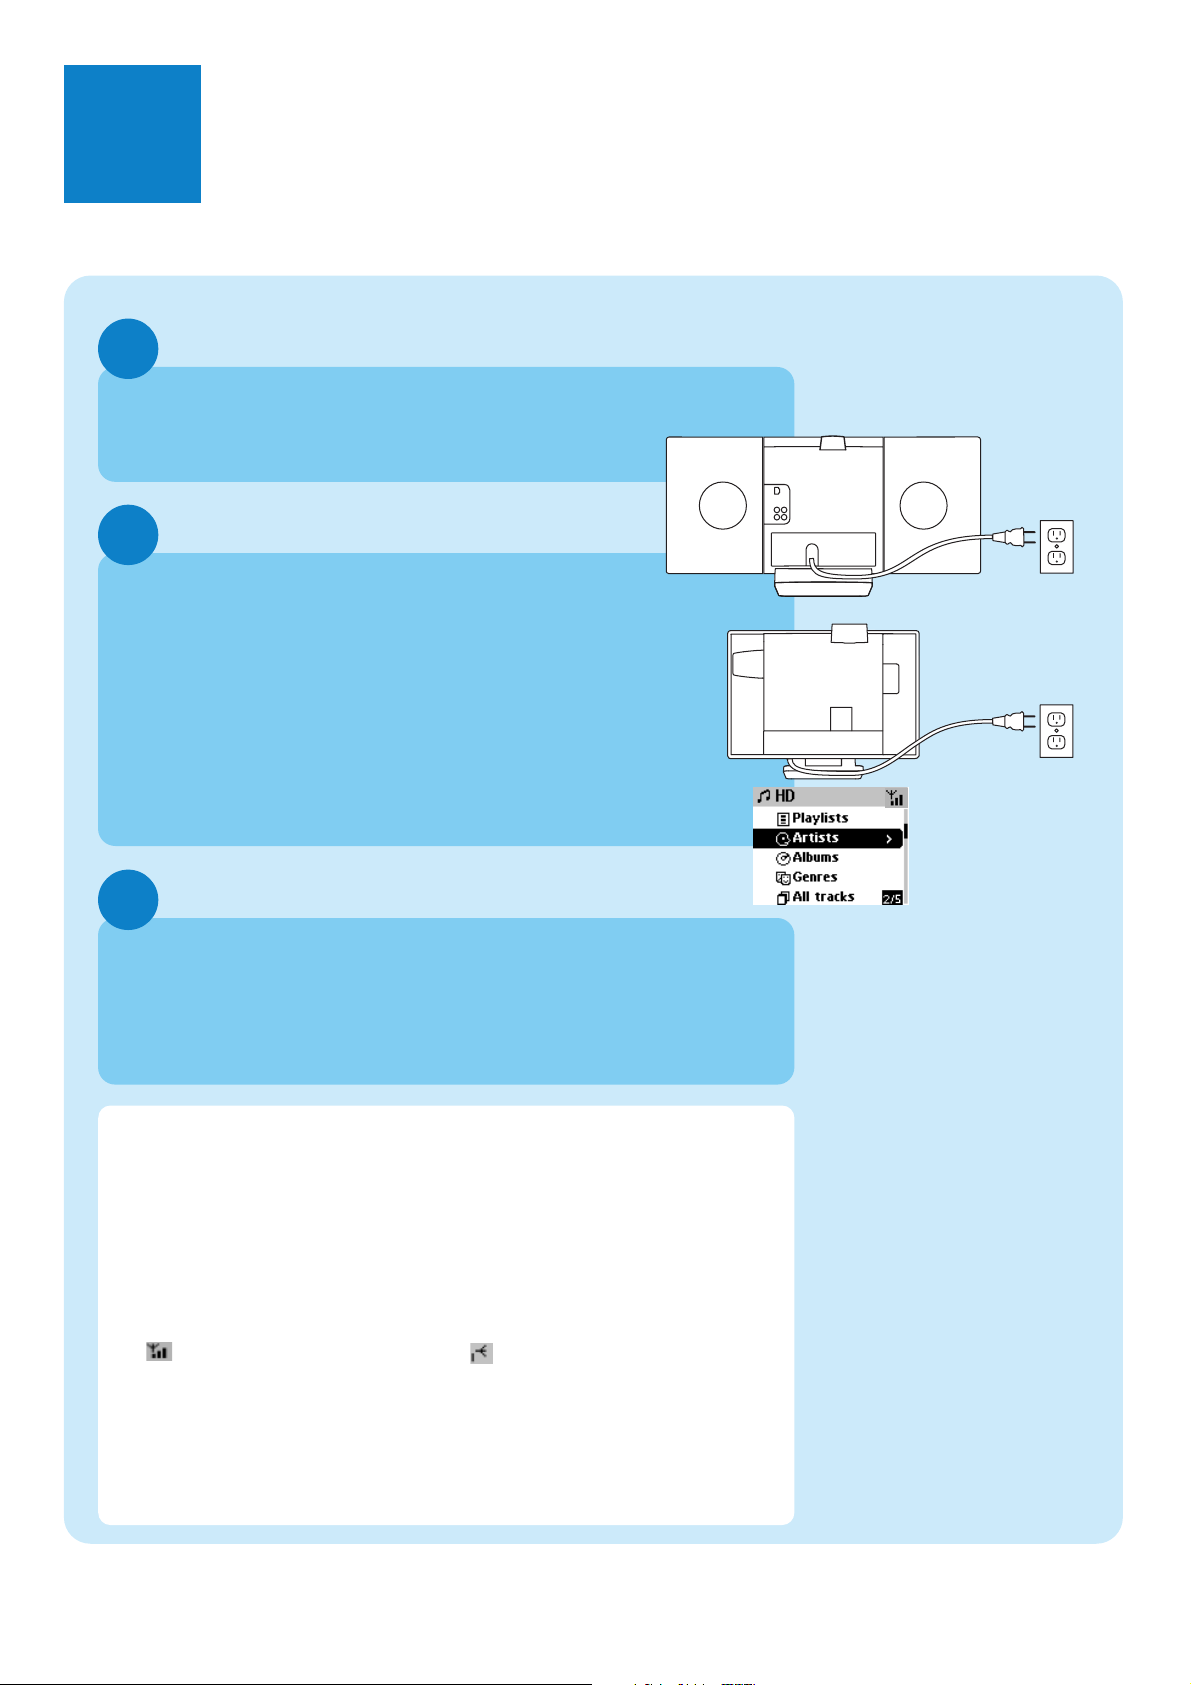
Set up Wi-Fi connection between Center and Station
The first time you set up the Wi-Fi connection, place
WAC700 Center and WAS700 Station side by side
on a flat and firm surface.
Connect WACS700 to power supply, first the Center and then the
Station
Center/Station: • The screen lights up
Auto installation/connection starts
• When the installation/connection is completed,
both Center & Station will enter HD(Harddisk)
mode (see screen illustration at the right)
(Make sure you have powered up the Center before powering up Station)
Finally, to relocate Center and Station as you desire:
• Simply unplug your Center or Station and power them up
in different rooms
•You will be able to playback music stored in the HD to both the
Center and the Station
Connect/Setup
Center
Station
AC
AC
HD mode (Harddisk)
IMPORTANT!
•Avoid thick walls. Separating your Center and Station by 2 or more
walls may cause poor streaming connection.
•Keep your Center and Station away from the source of interference,
for example: plasma TVs, microwave ovens, DECT phones, bluetooth
devices, cordless phones, other Wi-Fi products.
•For best streaming connection, adjust the location of your Center and
Station according to the reception status of Wi-Fi signals
: indicates maximum reception; : indicates minimum reception
•For wall mounting, please refer to the User Manual, Appendix:
How to mount your Center and Station onto walls. You may
need assistance from the qualified service personnel.
Page 4
Enjoy
B
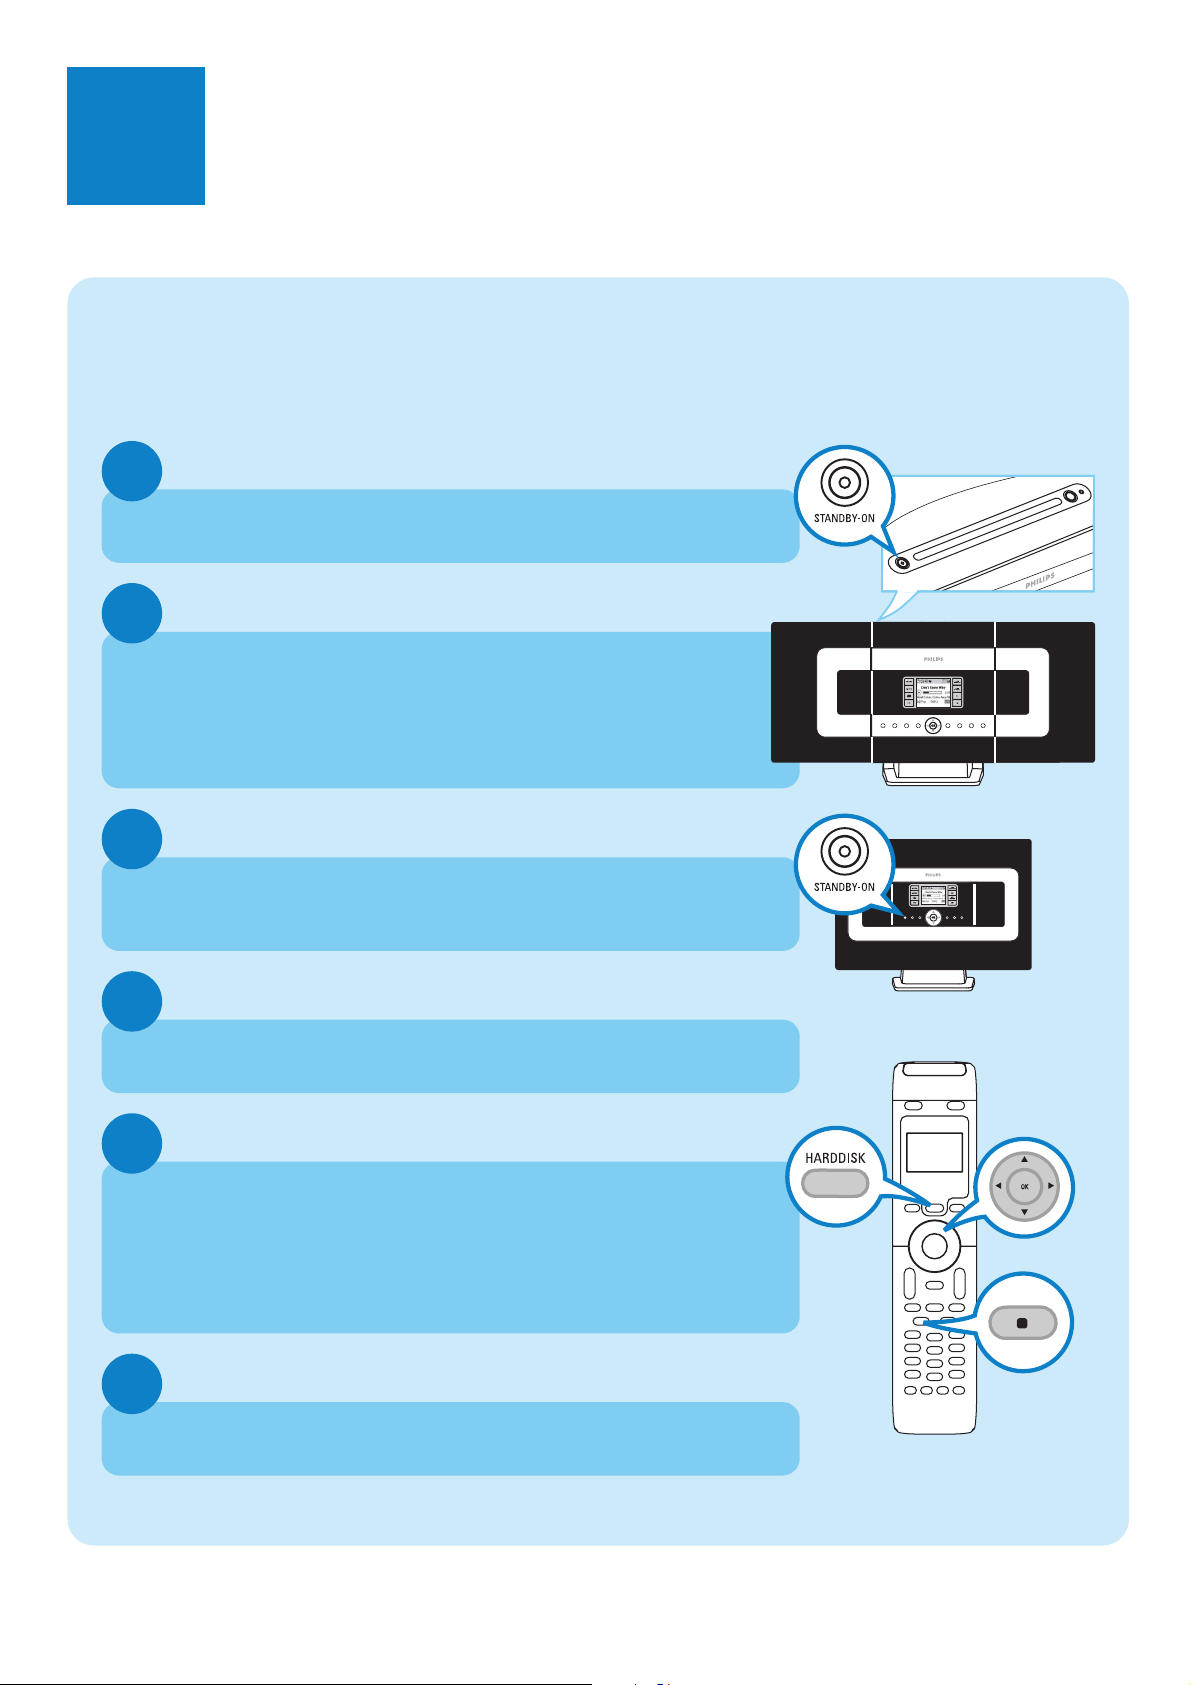
Play Harddisk (HD)
On the WAC700 Music Center's 40GB* hard disk, you can
store up to 750 audio CDs centrally.
Philips has preloaded 6 demo tracks in the Playlist 00000WA
and 6 music tracks in the Playlist_001- Playlist_004.
1
Press STANDBY ON to switch on the Center or Station
2
Both Center and Station should be in HD mode. If not, press
SOURCE until Center or Station enters HD mode
• You can select and playback music at both the Center as well as the
Station.
Center
3
With the round button, press the navigation controls 3 4 1 2 to select
playback options: e.g. by “Playlist” 2 , “Playlis_001” 4, OK
4
Press OK or 2 to start playback
5
To change your playback options,
a. press 1 to enter the previous option lists
b. Use the navigation controls 3 4 1 2 to select
c. Press OK or 2 to confirm
6
Station
To stop playback, press STOP / 9
* Available storage space for music is around 33GB, due to capacity reserved for system purpose
Page 5

Stream between Center and Station
Up to 5 WAS700 Stations can be connected to WAC700 Center at the same time.
Music can be streamed from the Center to all the Stations via its WiFi link.Your family will be able to enjoy and share music with ease from different parts of your house.
MUSIC FOLLOWS ME
As you move around at home, your music can move
together with you, either from Center to Station or
from Station to Center.
1
On the first unit (Center or Station), while music is playing from the
HD (Harddisk).
Press MUSIC FOLLOWS ME to activate function
•The icon appears
2
Move to the second unit (Center or Station), you will find the icon
on display (limited for 5 minutes).
If the second unit is on standby, press STANDBY ON to turn it on and
select SOURCE to HD mode
Press MUSIC FOLLOWS ME to take up the music
• Music playback from the first unit will now stop and continue on the
second unit.
•The icon disappears
3
To stop MUSIC FOLLOWS ME,press STOP on the second unit
IMPORTANT!
•
Check you have selected HD for Center and Station.
•
You must press MUSIC FOLLOWS ME on the first unit before pressing MUSIC
FOLLOWS ME on the second unit.
Page 6

MUSIC BROADCAST
MUSIC BROADCAST allows you to broadcast music from Center to all
connected Station(s).
1
On Center
While music is playing from the HD (Harddisk) in the Music
Center, press MUSIC BROADCAST to activate.
•The icon appears on the Center. The Station will now
synchronize with the Center.
2
On Center and Station
• The selected music will be played at both the center and the station
after 15-20 seconds
3
To stop MUSIC BROADCAST, press
Tips:
•
Check you have selected HD for Center and Station.
You may still cancel
•
Press STOP in one Station, broadcast will still remain.
•
To broadcast again
Before you press MUSIC BROADCAST, please check if an earlier broadcasting
is still active.
If the icon is displayed. press STOP on Center.
•
During broadcasting, there may be slight playback delay between the
Center and the Station.
MUSIC BROADCAST
STOP on Center.
within 5 seconds.
Page 7

1
2
3
4
5
B
CD(RW)
P
r
i
n
t
e
d
S
i
d
e
OK
Build music library on Center
You can store up to 750 audio CDs on Center’s 40GB harddisk by
ripping CDs and converting into MP3 files.
Ripping CDs
Insert a CD into the Center’s CD loader, with the printed graphics
facing you.
• Reading CD appears.
• Audio CD: List of tracks appears
• For CD recorded with MP3/WMA music files: List of file
folders appears.To enter a track list, press 2 on a highlighted file
folder
While the list of music tracks is on display, press RECORD.
• List of tracks and checkboxes appears for all tracks.
Use the navigation controls 3 or 4 and 2 to highlight particular tracks,
press MARK • UNMARK to select or deselect the tracks for recording
• Press and hold MARK • UNMARK to select/deselect all displayed
tracks at once.
Your center is pre-set to CD ripping at 4 time speed and best quality. In
case there is difficulty to read a particular CD, please try a lower recording
speed.You can also select to use a lower quality in case of voice only content (see the User Manual, HD: Building music library on Center
for details)
Center
To start recording, press RECORD or OK
• CD-Rec appears. Display shows the track and album name of the track
being recorded.
Page 8

6
1
2
To find your ripped tracks
After MP3 conversion is completed, you can find and playback the ripped
tracks from the HD under Albums.
Press SOURCE to select HD mode.
In Albums, use the navigation controls 3 4 1 2 to find the album
of recorded tracks.
Importing from your PC
See the manual Connect to your PC
Recording from Radio or External source
A maximum of 3-hour recording can be made from the radio or external
source. See User manual, Build music library on Center
To stop recording, press STOP
IMPORTANT!
• It takes some time to convert the ripped tracks into MP3 files. If
power failure occurs during the conversion, you will lose all the
tracks not converted yet.
Page 9

1
2
3
4
5
P
r
i
n
t
e
d
S
i
d
e
Play CDs (on Center only)
You can playback the following
• All audio CDs
• All CDs containing WMA, MP3 files
Note: CDR, CDRW discs must be finalized first.
Discs with “Digital Rights Management” cannot be played.
Center
Insert a CD into the Center’s CD loader, with the the printed graphics
side facing you.
Use the navigation controls 3 4 1 2 to select a track or a folder.
To start playback, press 2 or OK
To stop playback, press STOP
To remove the CD, press EJECT
Page 10

Listen to FM Radio
1
Connect the supplied FM wire antenna to your Center and
Station (see User manual, Installation)
2
Press SOURCE until the Center or Station enters Radio mode. (on the
remote control, press TUNER/AUX once or more)
3
ETHERNET
R L
AUX
IN
LINE
OUT
R L
75 FM ANTENNA
VOLTAGE
SELECTOR
NOT FOR ALL
VERSIONS
Center
To pre-store available radio stations:
a. press MENU
b. Use the navigation controls 3 or 4 and 2 to select and activate
Autostore radio function.
•
Display shows: Autostore Please wait...When autostore is
completed, a list of radio stations will be displayed, and the first station
will start playing
•
You can store up to 40 preset radio stations in the memory
(including a maximum of 10 RDS stations).
4
Use the navigation controls 3 or 4 and 2 to select your desired station
To find out more about product features and how to activate them please
read the supplied manual:
•
User manual:for further details and also troubleshooting
•
Connect to your PC: to connect to your PC, set up networks, transfer
and manage your music collection using the Philips Digital Media
Manager (supplied)
Station
2005 © Koninklijie Philips Electronics N.V.
All rights reserved.
3141 075 20764
GB
www.philips.com
Page 11

FAQ
C
Most Frequently Asked Questions
About the Environment
Q
:
Is there a maximum
distance of transmission
between the Music Center
and the Music Stations for
effective streaming?
Q
:
Do I need a computer and
home network to use the
WACS700?
Q
:
Would my neighbours be
able to access the music
stored on my Music Center if
they also have the Philips
Music Station?
A
:
measured in open space. However in a home environment there are inevitable
solid obstacles such as walls and doors, which may reduce the effective
transmission distance significantly to approximately 50-100m. Try re-position the
sets if you experience transmission problems.
A
:
You can convert your CDs into MP3s on the Music Center, and stream the music
to your Music Stations without any computer or home networking structure.
A
:
recognized by the Music Center during the installation process.
Ye s.The maximum distance of Wi-Fi transmission for the system is 250m
No.Your WACS700 is designed to work independently of the computer.
No. Every Music Station has a unique encryption code that has to be
About Ripping/Track Information
Q
:
What does it mean by
"ripping" and what functions
can I use while ripping is in
progress?
Q
:
Do I need to immediately
update the CDDB database
stored in the Music Center
straight after bringing it home?
Q
:
Does Philips provide
CDDB database updates?
A
:
Ripping is the process by which a CD track is converted into compressed MP3
format which is then stored on the Music Center's internal hard disk for playback
and music streaming. In the Music Center "ripping" takes two steps: first, it reads
the CD content and store it temporarily on the hard disk; second, it converts this
temporary CD content into the MP3 format - a process called "background
encoding". It takes 1 hour to convert 1 hour of CD music. Make sure you do not
choose the "Eco Standby" mode or unplug your Music Center from the electrical
socket.
A
:
No.There is already a massive CD-tracks database pre-stored in the Music
Center, which should match most of the CDs released within the last six months.
A
:
Ye s.We provide quarterly updates of the CDDB database through our website
at http://www.philips.com/support. Simply download the file, burn it on a CD-ROM
and follow the step by step procedure to complete the update.
Page 12

About Music Management
Q
:
What is Philips Digital
Media Manager (DMM)?
Q
:
How do I transfer the MP3
songs that I already have on
my PC to my new Music
Center?
Q
:
Is the Music Center
upgradeable?
A
:
The main function of the Philips Digital Media Manager is to collect MP3 tracks
you have on your PC and transfer them to the Music Center. In addition it
provides a one-stop solution to help you manage and organize your MP3 digital
music contents such as create playlists, rename tracks and playlist contents as well
as CDDB update.
A
:
Once you have installed the Philips Digital Media Manager (DMM) and
connected your PC to the Music Center with the supplied Ethernet cable, you can
use this software to locate all the MP3 tracks on your PC and then just drag and
drop them into the "device window" of DMM.Transfer of track will start
automatically and the average time it takes to transfer one track is 4-6 seconds.
Refer to the manual Connect to your PC
A
:
Yes, both the Music Center and the Music Station are software upgradeable
which means they are prepared for future function upgrades should they become
available. Check our website regularly for latest news on new features and
improvements at http://www.philips.com/support
Need help?
www.philips.com/support
or
call our helpdesk
CountryCountry HelpdeskHelpdesk Tariff / minTariff / min Keep readyKeep ready
0820 901115
070 253 010
3525 8761
09 2290 1908
08 9165 0006
0180 5 007 532
0 0800 3122 1223
01 601 1161
199 404 042
26 84 30 00
0900 0400 063
2270 8250
2 1359 1440
902 888 785
08 632 0016
02 2310 2116
0906 1010 017
 Loading...