

Page 1

VoiceTracer
智能录音笔
VTR9000
使用手册
User manual
Page 2

Page 3

目录
6 边录边写 10
1 欢迎 4
1.1 产品特点 4
2 重要须知 5
2.1 安全 5
2.2 听力保护 5
3 您的录音笔 6
3.1 供货范围 6
3.2 概览 6
4 开始使用 7
4.1 开 / 关机 7
5 主界面功能 8
5.1 标准 8
5.2 备忘 9
7 文件 11
8 用户 12
9 充电方法 13
9.1 连接电脑 13
10 常见问题 14
10.1 无法启动 14
10.2 转写不出来 14
10.3 机器死机 14
11 技术参数 15
11.1 存储器 15
11.2 尺寸和重量 15
11.3 系统要求 15
11.4 录音 15
11.5 运行条件 15
Page 4

1 欢迎
欢迎来到飞利浦世界!您能选择和购买飞利浦的产品,我们非
常高兴。您可在我们的官方网站上获得飞利浦公司的全方位技
术支持,如:使用手册、软件下载、保修信息等。
www.philips.com
1.1 产品特点
• 内置高性能编解码芯片。
• 以常见的 WAV 格式录音,支持 96KHz,16 位 PCM 录音。
• 支持录音文件转文本。
• 互联互通。
• 支持文件分享功能。
• 支持扩展 SD 卡。
• 使用高速 Type-C 快速存取录音文件和数据。
• 可作为 MTP 存储设备,确保最大的兼容性。
4 ZH
Page 5

中文
2 重要须知
2.1 安全
为了避免短路,切勿将产品放置在触水受潮处。
不要将产品放在加热设备附近或阳光直射的地方。
请注意,切勿挤压电缆,特别是插头处。
小心
• 特别声明:使用本产品前请仔细阅读本说明书,如因人为
操作或不可抗力因素而导致数据丢失,本公司一概不予负
责。特别提醒用户小心操作,注意将资料另外备份。
• 图像仅作参考。飞利浦保留更改颜色 / 外观 / 设计 / 参数 /
产品功能的权利,硬件、软件、APP 如有更新,恕不另行通知。
2.2 听力保护
使用耳机时请遵守下列原则:
• 调整至合适的音量,切勿长时间使用耳机。
• 特别需要注意,切勿将音量调至耳朵所能承受的范围之外。
• 切勿将音量调至盖过周边环境的声音。
• 在危险环境下请小心或暂停使用耳机。
• 在驾驶汽车、骑自行车、玩滑板时、切勿使用耳机。否则会
导致交通事故,且违反相关法律法规。
ZH 5
Page 6

3 您的录音笔
卡
3.1 供货范围 :
3.2 概览 :
6 ZH
1 音量“+”键
3 电源键
5 咪头
7 喇叭
录音键
9
2 音量“-”键
4 内存卡/SIM
6 工作指示灯
8 USB
Page 7

中文
4 开始使用
4.1 开 / 关机
注意
• 第一次使用机器时,建议对该机器充电 3 小时左右以确保
机器有电工作!
长按开关键,约 3 秒至 4 秒后开机,开机界面显示飞利浦图标,
如下图所示:
然后机器进入主界面界面 , 如下图所示:
ZH 7
Page 8

5 主界面功能
在主页面菜单下包含各个形式的录音模式,参考界面如下:
主界面菜单功能分为 6 个模块,分别为:标准、会议、采访、
演讲、课堂、备忘。
标准:可用于在普通场所中进行录音
会议:可用于在会议场所中进行录音
采访:可用于对被采访人员的对话录音
演讲:可用于在演讲场所中进行录音
课堂:可用于在课堂场所中进行录音
8 ZH
备忘:可用于记录事件中进行录音
点击“搜索”栏可以快捷切换到“文件”界面,输入关键字可
以快捷搜索想要查找的文件。
在主界面或文件列表以及用户列表界面,按侧面录音键可以直
接进去录音。
5.1 标准
在主页菜单下点击“标准”,可进入如下图标准录音界面:
在录音状态下,点击“ ”可暂停录音,再次点击可取消暂停,
继续录音,点右边的“完成”可保存录音。点击“ ”可返回
Page 9

中文
到主界面。在录音的时候,在某个时间点,标记重要的事情,
可以点击“标记”,标记当前的时间,在文件回放的时候选择“查
看标记”,定位到标记的时间点进行播放。
采访、会议、演讲、课堂录音操作可参考 5.1 的标准录音。
5.2 备忘
在主页菜单下点击“备忘”,可进入如下图备忘录音界面:
备忘录音更易于方便保存,适用于记录事件时所使用的模式。
进入备忘界面,长按“ ”会弹出识别语音弹框,开始识别语音,
点击“ ”结束语音并保存。点击保存的文件可以查看文本
并编辑,点击“ ”可以播放音频。如下图:
ZH 9
Page 10

6 边录边写
点击主界面下面的“边录边写”参考界面如下图:
在边录边写界面下点击“ ”后可进行边录边转写功能,录音
转写后,如下图所示:
10 ZH
点击右下角“完成”即可保存。
点击右上角“ ”会弹出“打开翻译”的弹框,这里可以选
择打开 / 关闭翻译,还可以选择想要翻译的语言。
Page 11
中文
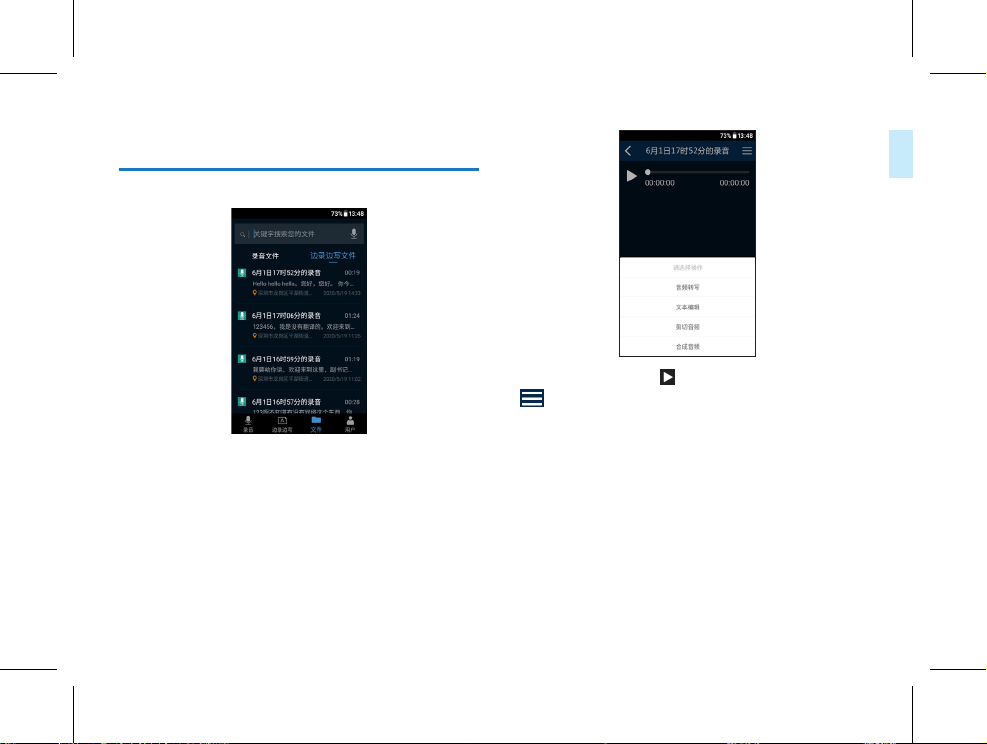
7 文件
点击主界面下面的“文件”参考界面如下图:
(1)在主界面录音后的文件和边录边写录音后的文件保存储存
在这里,分为“录音文件”和“边录边写文件”,点击可打开查看,
播放界面如下图:
(2)在播放界面点击“ ”可以播放文件,点击右上角
“ ”可以选择“音频转写”、“文本编辑”、“剪切音频”
和“合成音频”。
(3)点击“音频转写”,选择所需要识别的语言开始转写,转
写完成后点击“保存”;点击“文本编辑”可编辑已转写的文本;
点击“剪切音频”可以截取音频;点击“合成音频”可以合成音频。
(4)如果录音文件有标记,可以选择“查看标记”,点击想要
查看的标记时间点,定位到那个时间点进行播放。
ZH 11
Page 12
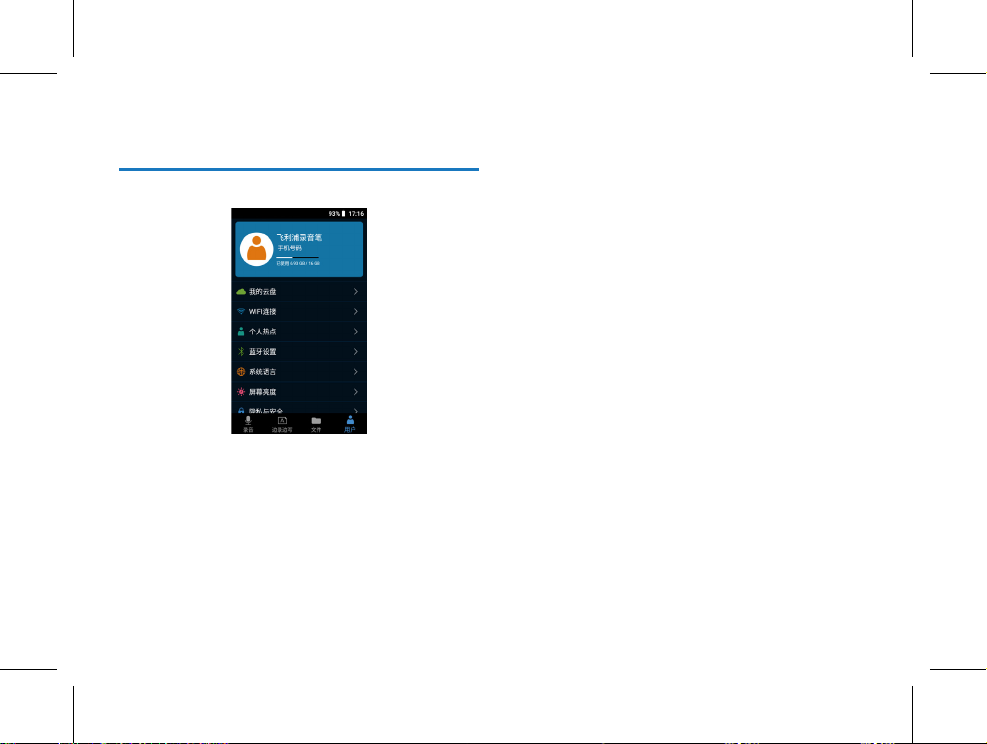
8 用户
点击主界面下面的“用户”参考界面如下图:
用户界面包含我的云盘、WIFI 连接、个人热点、蓝牙设置、系
统语言、屏幕亮度、隐私与安全等操作选项。
12 ZH
Page 13
中文
9 充电方法
使用 USB 数据线将本机与 PC 相连接。
请使用专用充电器充电,充电时指示灯亮,充满电,指示灯灭。
9.1 连接电脑
录音笔作为存储设备,可使用 USB 数据线将录音笔与电脑相连
对文件进行存储、备份和移动,且无须安装软件。
提示
• 在文件移入或移出录音笔时,请不要断开录音笔与电脑的
连接,否则会损坏文件。
ZH 13
Page 14

10 常见问题
此处列举了常见问题的解答,可帮助解决智能录音笔出现的简
单问题。如果故障仍无法排除,请咨询经销商或访问我们的官
方网站:www.philips.com/support
10.1 无法启动
电池电量已耗尽请及时充电。
10.2 转写不出来
检查确认网络信号是否正常。
10.3 机器死机
长按电源键 10 秒,复位即可。
14 ZH
Page 15

中文
11 技术参数
11.1 存储器
内置存储空间
内置存储器类型:EMMCP
移动存储器 (PC):是
存储卡:是
WIFI:是
11.2 尺寸和重量
宽 × 高 × 深: 112 x 52 x 11.5 (mm)
重量 (含电池):105 (g)
11.3 系统要求
操作系统:Windows 7/8/10/Vista/2000, Mac OS X, Linux
接口:USB 接口
11.4 录音
标准录音:1411.2Kbps, 44.1KHz-16bit。
会议录音:3072Kbps, 96KHz-16bit。
采访录音:705.6Kbps, 44.1KHz-16bit。
演讲录音:1536Kbps, 48KHz-16bit。
课堂录音:1411.2Kbps, 44.1KHz-16bit。
备忘录音:256Kbps, 16KHz-16bit。
11.5 运行条件
温度:5° C–45° C
空气湿度:10% – 90%, 不凝结
ZH 15
Page 16

Content
8 User 25
1 Welcome 17
1.1 Product features 17
2 Important Notes 18
2.1 Safety 18
2.2 Hearing protection 18
3 Your Voice Recorder 19
3.1 What's in the box 19
3.2 Overview 19
4 Start Using 20
4.1 Switch on/off 20
5 Functions on Main Screen 21
5.1 Standard recording 21
5.2 Memo 22
6 Voice-to-text 23
7 Files 24
16 EN
9 Charging 26
9.1 PC connection 26
10 FAQs 27
10.1 Failure to start 27
10.2 Failure to transcribe 27
10.3 Dead halt 27
11 Technical Parameters 28
11.1 Memory 28
11.2 Dimensions and weight 28
11.3 System requirements 28
11.4 Recording 28
11.5 Operating conditions 28
Page 17

English
1 Welcome
Welcome to the world of Philips! We are honored by your
choice and purchase of Philips’ products. You can have Philips’
comprehensive technical supports from our website, e.g. user’s manuals, software downloading and warranty information
etc.
www.philips.com
1.1 Product features
• Built-in high-performance coding and decoding chip;
• Recording in the common WAV format, supporting
96KHz,16-digit PCM recording;
• Supporting the conversion of audio files into texts;
• Supporting WIFI;
• Supporting file sharing;
• Supporting expanded SD cards;
• Using high-speed Type-C to access audio files and data
quickly;
• Ensuring maximum compatibility as an MTP storage
device.
EN 17
Page 18

2 Important Notes
2.1 Safety
Do not expose this unit to water and moisture to avoid
short circuit.
Do not expose this unit to any heating device or direct
sunlight.
Do not pinch the cable, especially at the plug.
Warning
• Special Announcement: Before using the product, please
read the Manual carefully. The Company shall not be held
liable for any data loss due to incorrect manual operation
or force majeure. We specially recommend that users
make additional copies of the files in the device.
• Images are for reference only. Philips reserves the right to
change the color/appearance/design/parameters/product
functions without prior notice.
18 EN
2.2 Hearing protection
Please observe the following provisions when using the earphone:
• Adjust it to an appropriate volume, and do not use it for
an extended period of time.
• In particular, do not set the volume out of the tolerable
range of the ear.
• Do not set the volume beyond ambient sounds.
Please use the earphone carefully or suspend using it in a
dangerous environment.
• Do not use the earphone while driving, cycling or skating,
or else a traffic accident may occur, and a violation of the
applicable laws and regulations may be committed.
Page 19
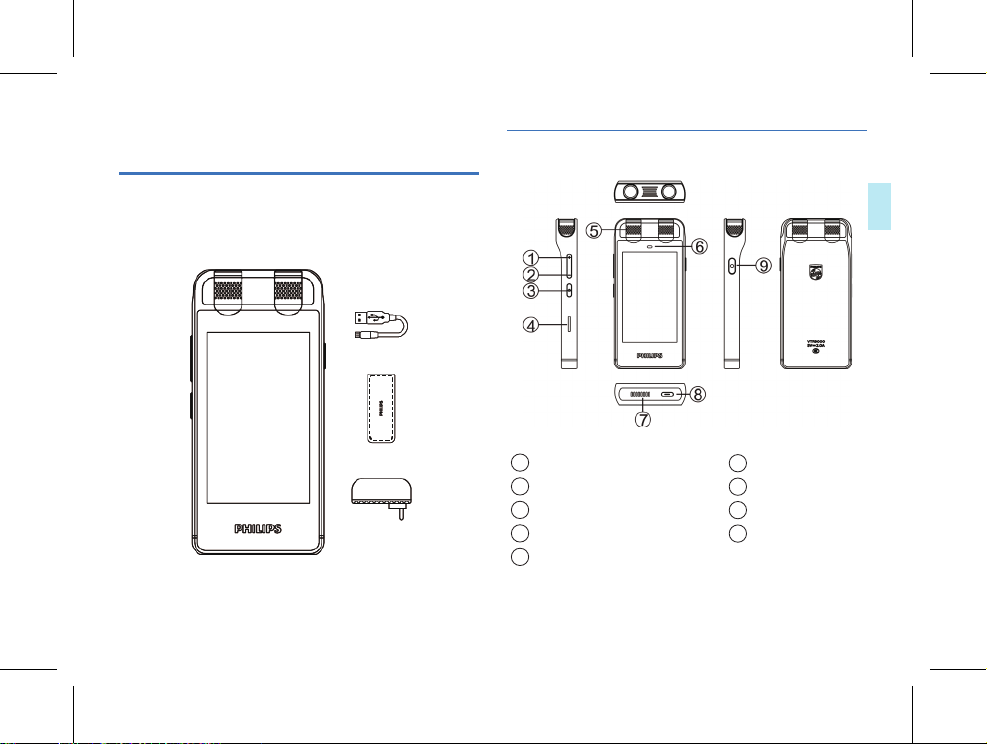
3 Your Voice Recorder
3.2 Overview:
3.1 What's in the box:
1 Volume “+” key
3 Power key
5 Microphone
7 Speaker
9 Record key
English
2 Volume “-” key
4 Memory card / SIM card
6 Work indicator lamp
8 USB
EN 19
Page 20
4 Start Using
4.1 Switch on/off
Note
• Please recharge the device for about three hours before
using it for the first time!
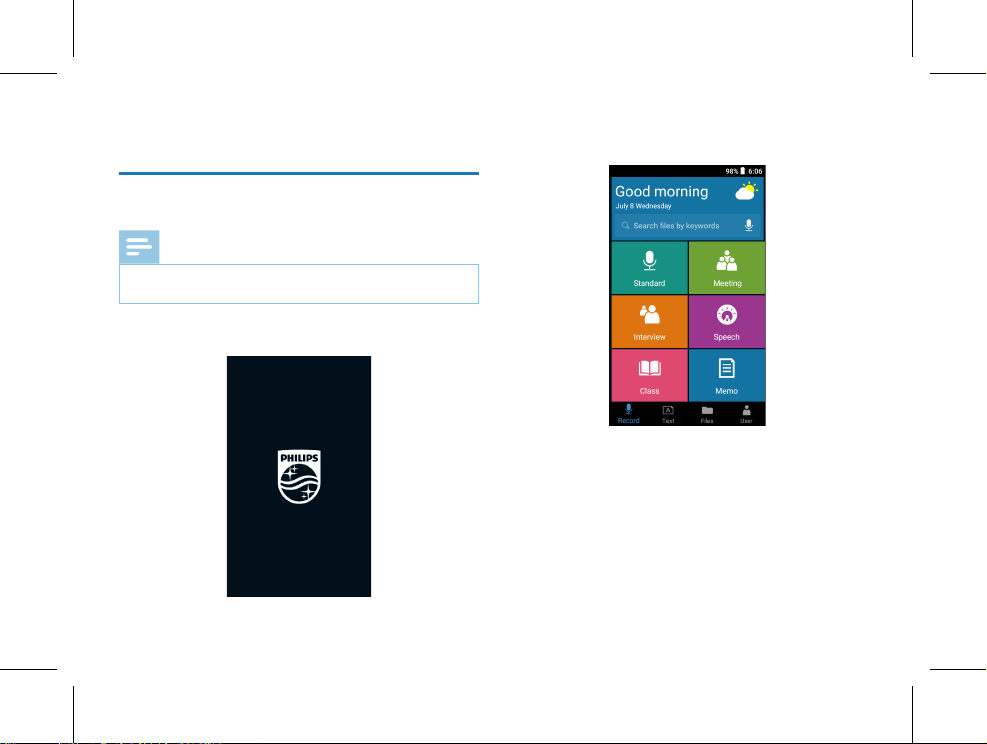
Hold down the power switch for 3-4 seconds to start this
unit. Then the Philips logo is displayed, as shown below:
20 EN
This unit will then enter the main screen, as shown below:
Page 21
English
5 Functions on Main Screen
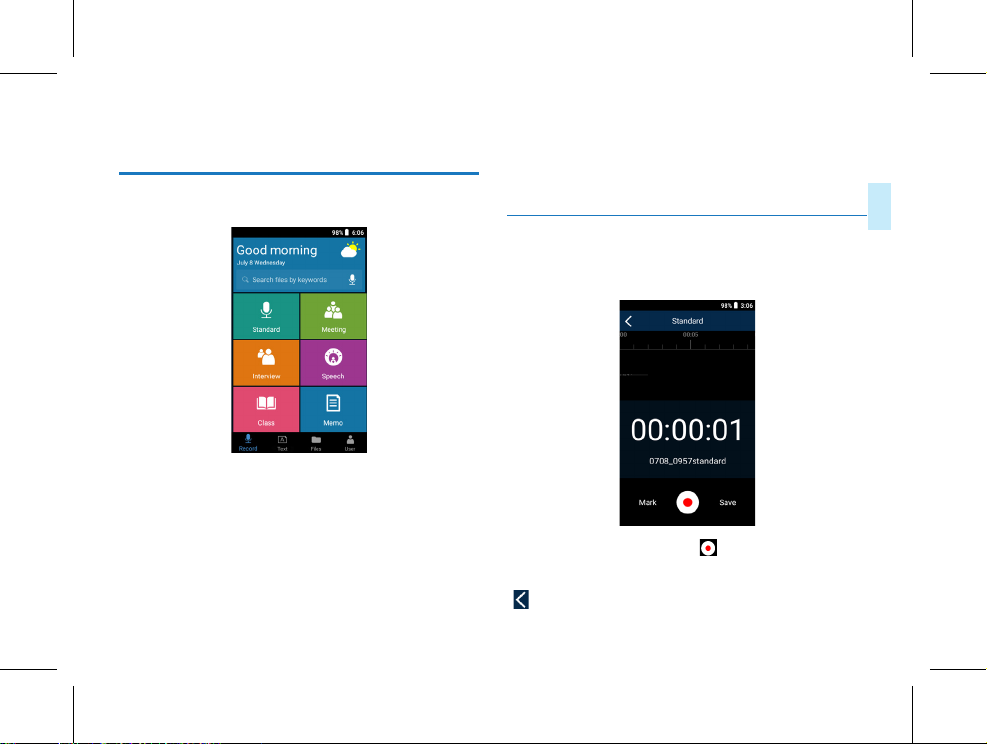
The main screen menu includes various recording mode. The
reference screen is as follows:
The main screen menu has 6 functional modules, which are
standard, meeting, interview, speech, class and memo.
Standard: used for recording in ordinary places
Meeting: used for recording at conferences
Interview: used to record dialogues of interviewees
Speech: used to record speeches
Class: used for recording in classrooms
Memo: used to record events
Click on the search bar to switch quickly to the file screen,
and enter a keyword to search for your desired file quickly.
In the main interface, file list or user list interface, press the
record button of device to directly enter the recording.
5.1 Standard recording
Click on “Standard” in the main screen menu to enter the
following standard recording screen:
In the recording state, click the “ ” to pause the recording,
click again to cancel the pause and continue recording, then
click the “Save” on the right to save the recording. Click on
“ ” to return to the main screen. To mark an important
EN 21
Page 22
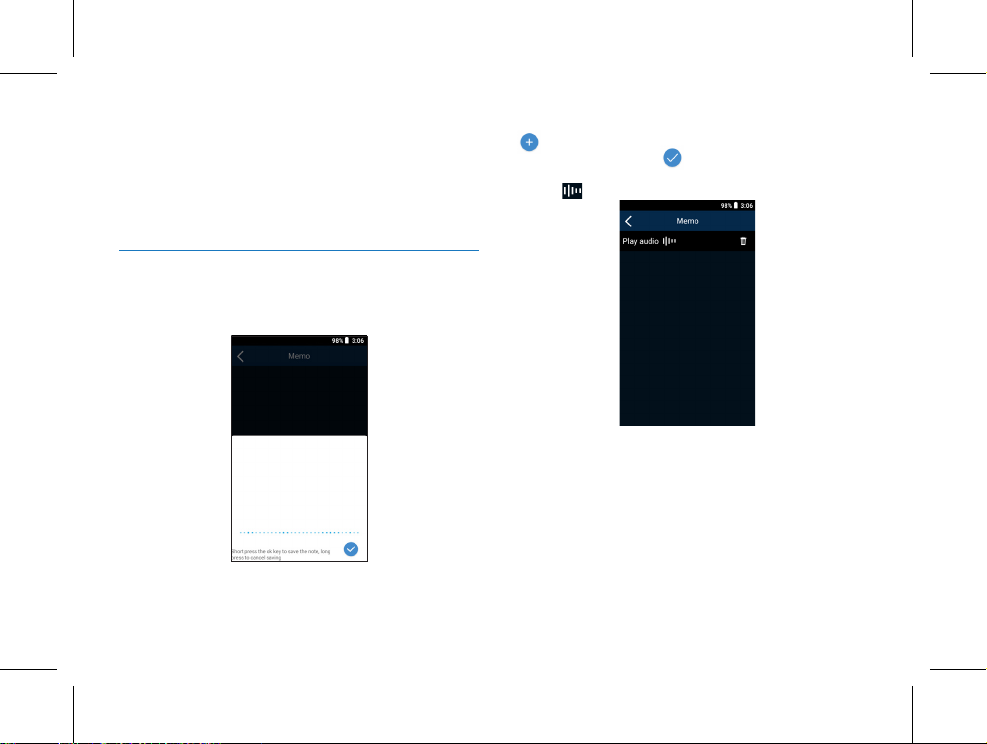
thing during recording, click on “Mark” at the corresponding
time point to mark the current time; during file playback,
select “View Mark” to go to the marked time point for playback.
Meeting, interview, speech, class recording operation please
refer to 5.1 standard recording.
5.2 Memo
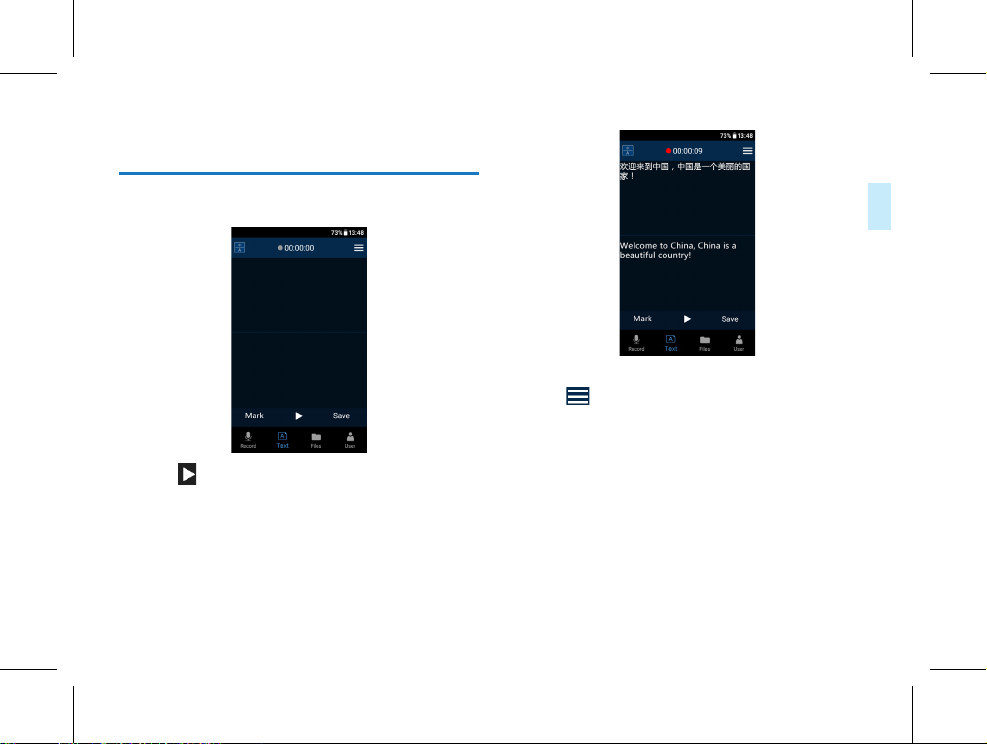
Click on “Memo” in the main screen menu to enter the
following memo recording screen:
The memo is easier for saving, and applies to event recording.
After entering the memo recording screen, hold down
22 EN
“ ” to pop up a voice recognition box and start voice
recognition, and click on “ ” to end voice recognition and
save. Click on the saved file to view and edit the text, and
click on “ ” to play the audio file, as shown below:
Page 23
English
6 Voice-to-text
Click on “Text” in the lower part of the main screen. The
reference screen is as follows:
Click on “ ” on the screen of Record while writing, to sync
transcribe being recorded. The screen after transcription is
shown as follows:
Click on “Save” in the lower right corner to save it.
Click on “ ” in the upper right corner to pop up an “turn
on smart translation” box, where you can switch on / o the
translation, and select your desired language.
EN 23
Page 24
7 Files
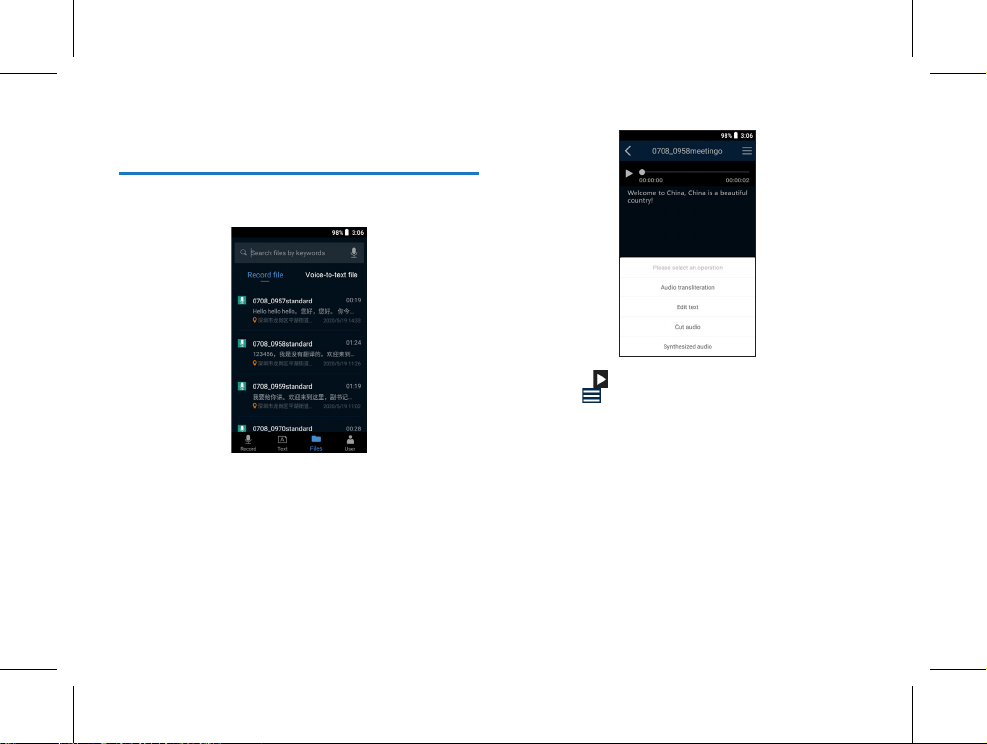
Click on “Files” in the lower part of the main screen. The
reference screen is as follows:
(1) Files recorded on the main screen and those generated
after concurrent recording and writing are stored here,
and divided into “Record file” and “Voice-to-text file”.
Click on them to open and view them, recording screen as
shown below:
24 EN
(2) Click on “ ” on the playback screen to play files, and
click on “ ” in the upper right corner to select “Audio
transliteration”, “Edit text”, “Cut audio” and “Synthesized
audio”.
(3) Click on “Audio transliteration” to select your desired
language for transcription; after transcription, click on
“Save”; click on “Edit text” to edit the transcribed text;
click on “Cut audio” to clip an audio file; click “Synthesized
audio” to synthesize the audio.
(4) If an audio file has a mark, select “View Mark” and click
on the desired marked time point to go to that time point
for playback.
Page 25
English
8 User
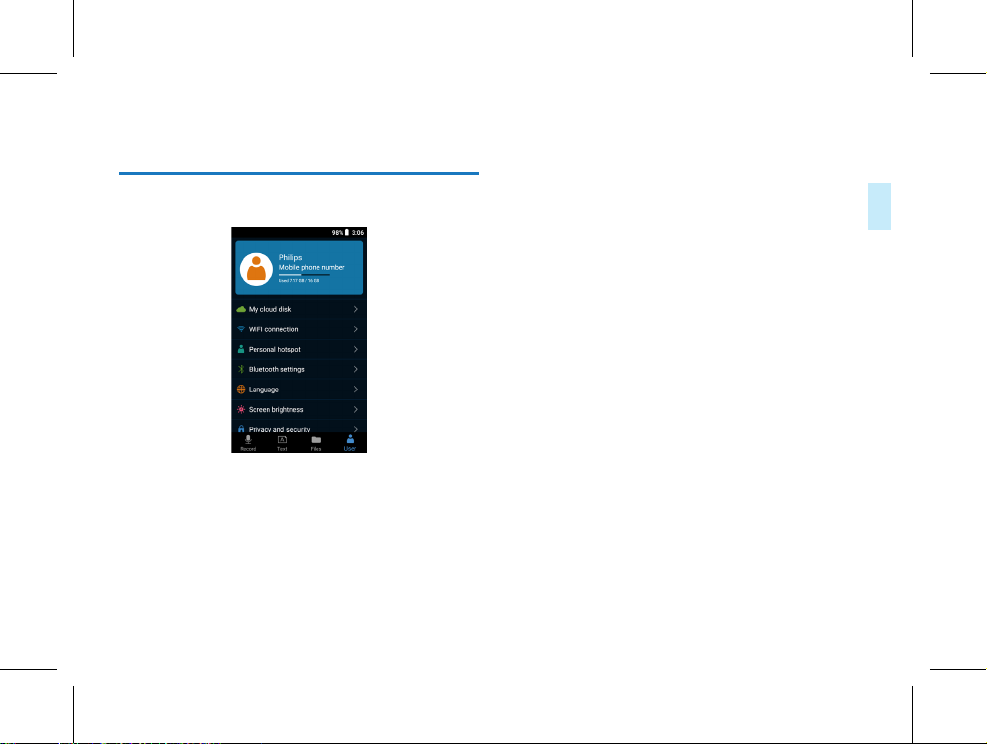
Click on “User” in the lower part of the main screen. The
reference screen is as follows:
The user interface includes such as My cloud disk, WIFI
connection, Personal hotspot, Bluetooth settings, Language,
Screen brightness, Privary and security, etc.
EN 25
Page 26
9 Charging
Use a USB data cable to connect this unit to a PC.
Please use the dedicated charger for charging. The indicator will be illuminated during charging, and go out after full
charging.
9.1 PC connection
As a storage device, the recorder may be connected to a PC
with a USB data cable for file storage, backup and moving
without installing any software.
Reminder
• In case that the document is moved into or out of the
recorder, please do not disconnect the recorder away
from the computer; otherwise, the document may be
damaged.
26 EN
Page 27

English
10 FAQs
Here, we list the answers to FAQs to help you solve simple
problems regarding this intelligent recorder. If the fault still
cannot be eliminated, please consult the dealer or visit our
ocial website: www.philips.com/support.
10.1 Failure to start
The battery has run out. Please charge it timely.
10.2 Failure to transcribe
Check if the network signal is normal.
10.3 Dead halt
Hold down the power key for 10 seconds to reset it.
EN 27
Page 28

11 Technical Parameters
11.1 Memory
Built-in storage space
Built-in memory type: EMMCP
Mobile memory (PC): Yes
Storage card: Yes
WIFI: Yes
11.2 Dimensions and weight
Width × height × depth: 112 x 52 x 11.5 (mm)
Weight (including battery): 105 (g)
11.3 System requirements
Operating system: Windows 7/8/10/Vista/2000, Mac OS X,
Linux
Interface: USB
11.4 Recording
28 EN
Standard recording: 1411.2Kbps, 44.1KHz-16bit
Meeting recording: 3072Kbps, 96KHz-16bit
Interview recording: 705.6Kbps, 44.1KHz-16bit
Speech recording: 1536Kbps, 48KHz-16bit
Class recording: 1411.2Kbps, 44.1KHz-16bit
Memo recording: 256Kbps, 16KHz-16bit
11.5 Operating conditions
Temperature: 5°C-45°C
Air humidity: 10%-90%, non-condensing
Page 29

English
EN 29
Page 30
VTR9000
Page 31

Page 32

© 2020 Speech Processing Solutions GmbH.
版权所有文档版本
1.0, 2020/08/13
Register your product and get support at
www.philips.com/welcome
 Loading...