

Page 1
VT
VoiceTracer
音视频记录仪
VTR8400
使用手册
User manual
Page 2

Page 3

中文
目录
7 录音 13
1 欢迎 5
1.1 产品特点 5
2 重要须知 6
2.1 安全 6
3 您的音视频记录仪 7
3.1 供货范围 7
3.2 主机概览 7
4 开始使用 8
4.1 开 / 关机 8
4.2 充电方法 8
4.3 连接电脑 9
5 录像 10
6 拍照 12
8 一键回放模式 14
9 红蓝爆闪功能 15
10 视频模式 16
10.1 视频播放 16
11 照片模式 17
12 语音模式 18
12.1 语音播放 18
13 设置模式 19
13.1 录音设置 19
13.2 录像设置 19
13.3 拍照设置 20
13.4 系统设置 21
ZH 3
Page 4

14 安装下载 APP 26
14.1 连接使用 26
14.2 APP 功能介绍 28
15 背夹的装取 32
16 常见问题 33
16.1 无法启动音视频记录仪 33
16.2 显示时间 / 日期不正确 33
16.3 拍照 / 录像图像模糊,不清楚 33
16.4 音视频记录仪无法录音或者录像 33
16.5 音视频记录仪无法播放录音或者录像 33
16.6 音视频记录仪死机后如何处理 33
17 技术参数 34
17.1 存储器 34
17.2 尺寸和重量 34
17.3 系统要求 34
17.4 录音 34
17.5 运行条件 34
4 ZH
Page 5

中文
1 欢迎
欢迎来到飞利浦世界!您能选择和购买飞利浦的产品,我们非
常高兴。您可在我们的官方网站上获得飞利浦公司的全方位技
术支持,如:使用手册、软件下载、保修信息等。
www.philips.com
1.1 产品特点
• 一键录音:仅仅按下录音键即可实现录音,再按一下录音键
保存录音。
• 一键录像:仅仅按下录像键即可实现录像,再按一下录像键
保存录像。
• 一键回放:在预览界面下,短按右键回放当前最新录制文件。
• 语音播报:开启语音播放功能,机器就可以进行语音播报。
• WIFI 远程控制:连接手机可远程操控机器录像、录音和拍照,
并支持在线播放,支持本地下载并分享。
• 支持红蓝爆闪灯,快速闪烁起到警示作用。
• 超大广角镜头,录像无死角。
• 超大光圈镜头 , 进光量更充足 , 画面更清晰通透。
• 双滤光片切换器,白天不偏色,夜晚更清晰。
• 字符叠加功能,所有视频和照片都附加时间、产品编号、使
用者编号等信息,无法剪辑,更具法律证据效力。
• 超长文件名,所有录像文件的文件名都包含产品编号、时间、
使用者编号等信息,方便数据存档、检索。
• 录像资料自动分割保存,防止误操作造成资料丢失。
• 外置存储卡,最大支持 256G。
• 高清扬声器:采用高品质喇叭 , 无论播放录音文件或录像文
件,都给人身临其境的享受。
• 以常见的 MP3 格式录音。
• 使用高速 USB 2.0 快速存取录音文件和数据。
• 可作为大容量的 USB 存储设备,确保最大的兼容性。
• 可调节任意角度的阻尼轴背夹,佩戴灵活可靠。
ZH 5
Page 6
2 重要须知
2.1 安全
注意
• 请注意,切勿挤压电缆,特别是插头处。
小心
• 特别声明:使用本产品前请仔细阅读本说明书,如因人为
操作或不可抗力因素而导致数据丢失,本公司一概不予负
责。特别提醒用户小心操作,注意将资料另外备份。
• 图像仅作参考。飞利浦保留更改颜色 / 外观 / 设计 / 参数 /
产品功能的权利,硬件、软件、APP 如有更新,恕不另行通知。
6 ZH
Page 7
3 您的音视频记录仪
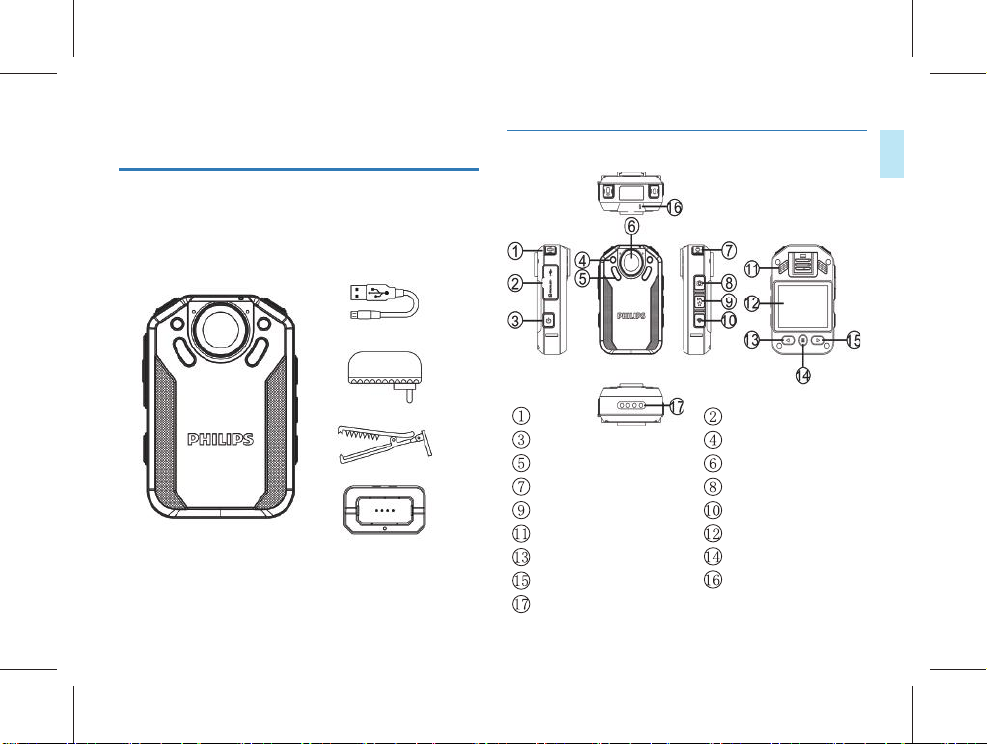
3.1 供货范围:
3.2 主机概览:
中文
录像键
电源开/关
红外灯
录音键/白光灯开关
星标/红外灯开关
扬声器
上键/快退
下键/快进
充电座连接口
USB接口/TF卡插口/复位孔
光敏
镜头
拍照键/爆闪灯开关
WIFI开关
屏幕
菜单键/返回键
指示灯
ZH 7
Page 8
4 开始使用
4.1 开 / 关机
注意
• 第一次使用机器时,请对该机器充电三小时以确保机器有
电工作!
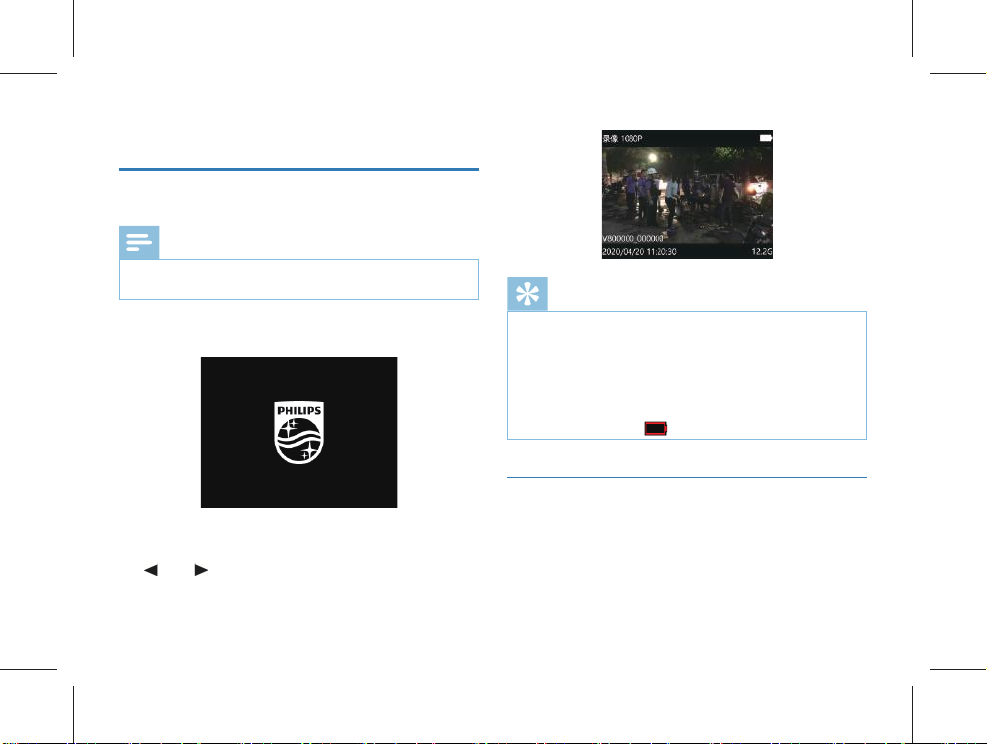
关机状态下,长按开机键 3s 开机,然后显示飞利浦图标,如下
图所示:
然后机器进入预览界面,如下图所示,预览状态下,工作状态
指示灯亮绿灯,在此界面短按菜单键,机器回到设置界面。长
按“
”或“ ”键缩小或放大预览界面,实现数码变焦功能。
8 ZH
提示
• 本机使用不可拆卸锂电池供电,如果长时间不使用音视频
记录仪,请长按开关机键 3s 关掉机器。
• 如果音视频记录仪无法正常工作,请确认机器是否已没电。
• 机器工作过程中,请勿直接把外置卡拔出,否则会损坏文
件或导致机器导常。
• 当电量指示标志为“
”时,请及时充电。
4.2 充电方法
使用 USB 数据线将本机和出厂配备的充电器进行充电,充电过
程中充电指示灯常亮绿色,充满后熄灭。
Page 9
中文
提示
• 本机充电可以使用关机充电和开机充电的方式,一般情况
下,关机充满电需要 4 小时左右(建议关机充电)。
• 充电座只适合于充电,不支持传输数据。
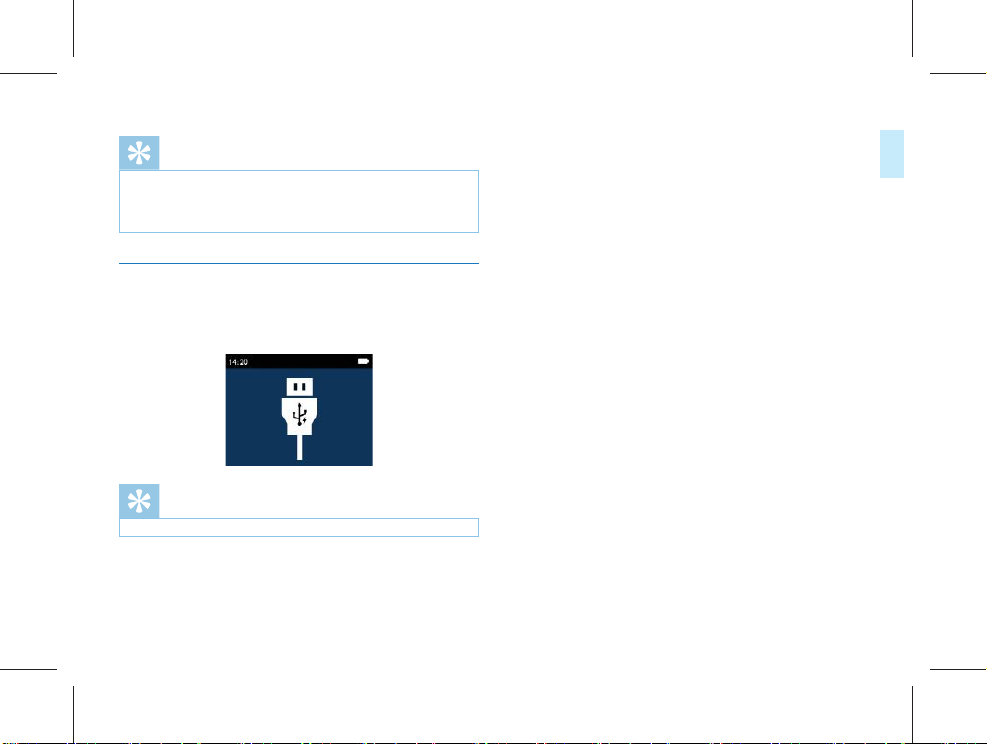
4.3 连接电脑
音视频记录仪可作为大容量的 USB 存储设备连接设备,音视频
记录仪会自动显示为可移动设备。连接电脑图标如下图所示。
提示
• 在文件移入或移出机器时,请不要断开机器与电脑的连接。
ZH 9
Page 10
5 录像
当您初次使用音视频记录仪录像时,请注意本节中的内容说明!
(1) 在摄像预览状态下,短按录像键开始录像,状态指示灯将
红灯闪烁。
(2) 短按录像键结束录像,红色指示灯灭,并回到摄像预览状
态界面,状态指示灯亮绿色。
(3) 在预览界面长按“
变焦功能。
(4) 在黑夜或者光线暗的环境下录像时,如果红外切换为手动
切换,可以长按 IR 键,此时红外灯开启进入到夜视摄录模
式, 画面颜色为黑白模式。长按录音键,照明灯将打开,
补充光源。
(5) 按“拍照”键可以抓拍当前摄录画面。
(6) 录像过程中短按星标键,文件将会标记为重要文件,循环
录像打开时,标记的文件不会被删除。
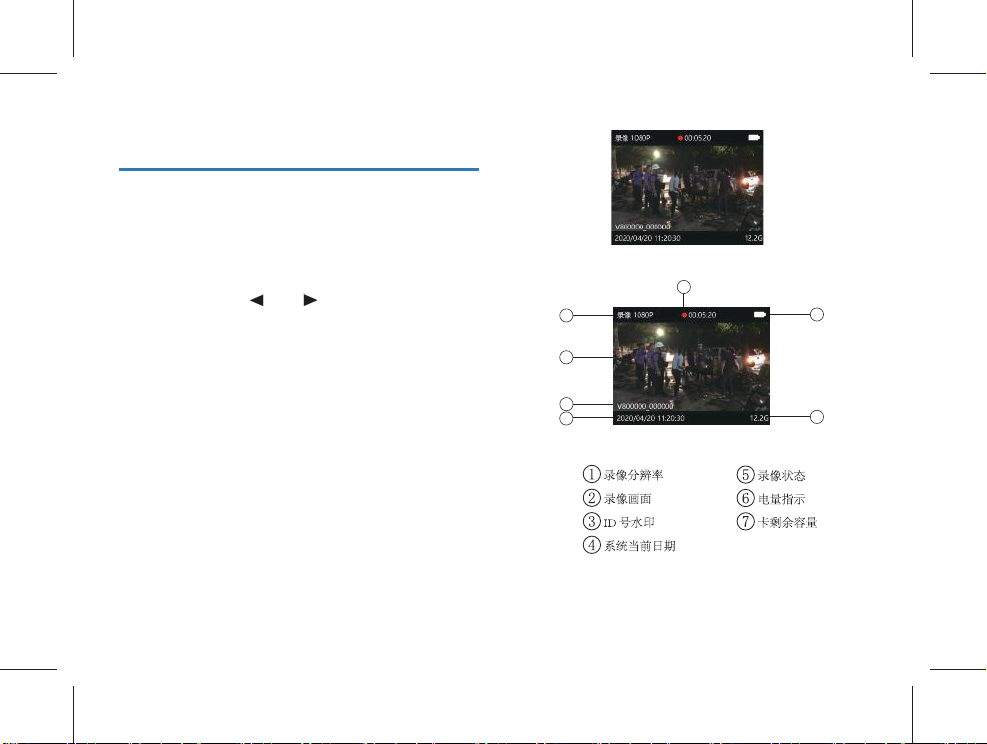
(7) 录像参考界面如下如所示:
10 ZH
”或“ ”键缩小或放大,实现数码
录像界面说明
1
2
3
4
5
6
7
Page 11
中文
注意
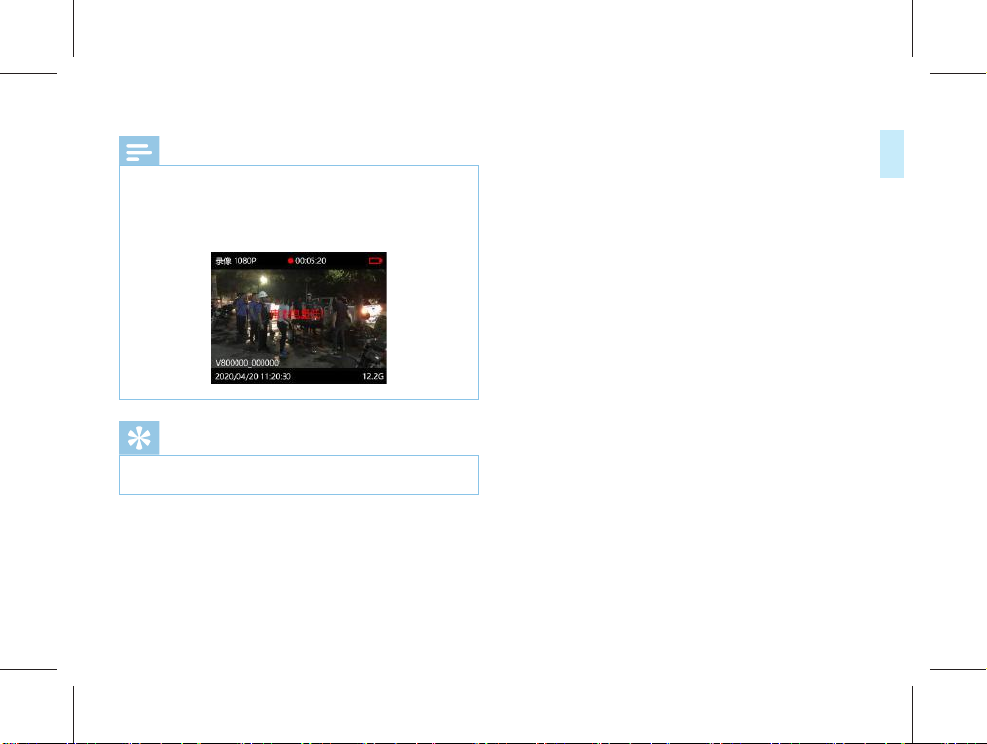
• 电池标记符显示空格时,表明低电。低电时系统会自动关机。
如果正在录像或者录音,系统自动保存录像或者录音文件
后再关机。电量不足时,请及时充电。低电关机时显示屏
会有相应的提示,显示屏的提示图标如下所示。
提示
• 录像前,请先设置所需的录像参数。
• 请先删除一些不必要的文件再录。
ZH 11
Page 12

6 拍照
当您初次使用音视频记录仪拍照时,请注意本节中的内容说明!
在摄像预览状态下,直接按拍照按键进行拍照,拍照时红色指
示灯亮,并发出“咔嚓”一声,在黑夜或者光线暗的环境下拍
摄需要开启机器红外灯或补光灯进行拍摄。在录像状态下,按
下拍照按键可以抓拍当时摄录照片。
12 ZH
Page 13
中文
7 录音
当您初次使用音视频记录仪录音时,请注意本节中的内容说明!
(1) 在摄像预览状态按下“录音键”开始录音;工作状态指示
灯将亮黄灯; 请将内置麦克风对准音源。
(2) 按下“录音”键结束录音,并回到预览界面。
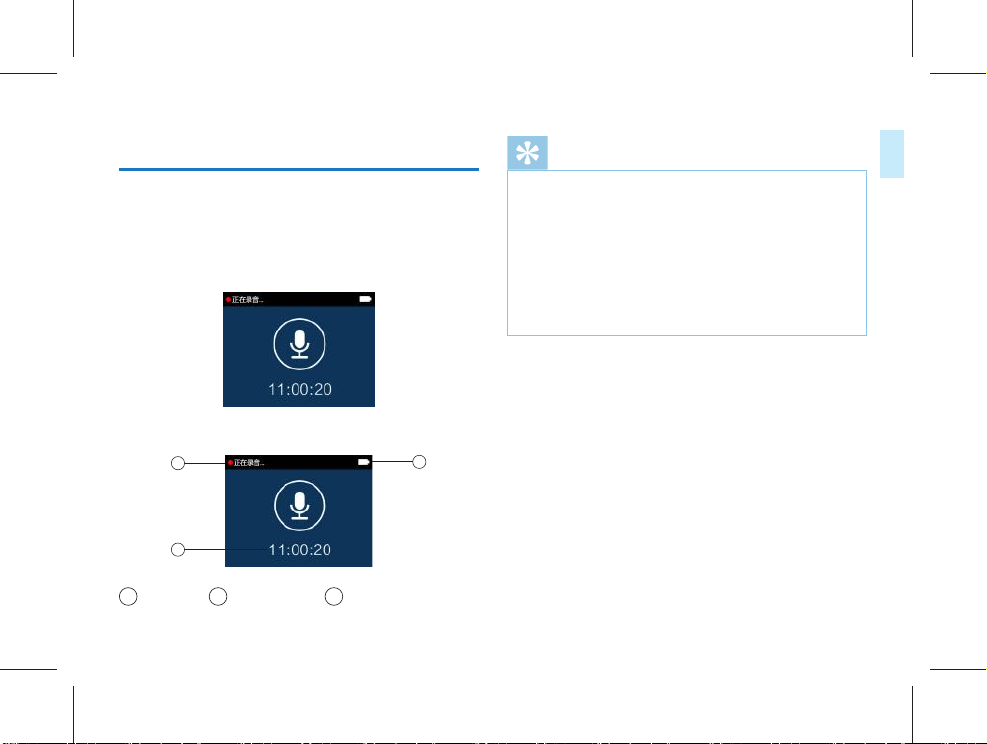
录音参考界面如下图所示:
录音界面说明
提示
• 录音前,请先设置所需的录音灵敏度。
• 请先删除一些不必要的文件再录。
• 请先测试录音,以确认音视频记录仪设置是否正确。
• 在录音或者录像过程中禁止直接将卡拔出,否则可能导致
文件损坏。
• 录音或者录像时请勿断电,否则这会导致音视频记录仪故
障,文件丢失或文件损坏等问题。
• 如果需要长时间使用,请在录音前充电。
1
2
录音状态 2 当前录音时长 3电量指示
1
3
ZH 13
Page 14

8 一键回放模式
请注意本节中的内容说明:在摄像预览状态下,录像保存后,
短 按“
”键,音视频记录仪将直接播放你刚刚摄录的录像文件。
录音保存后短按“
音文件。机器刚刚开机启动,一键回放功能默认为播放最近摄
录的录像文件。
14 ZH
”键, 音视频记录仪将直接播放你录的录
Page 15

中文
9 红蓝爆闪功能
在待机状态下,长按机器拍照鍵开启红蓝爆闪功能,此时机器
发出警报声并亮警示灯,“警示灯”由红蓝两种指示灯交替闪烁。
开启红蓝爆闪功能后,长按拍照鍵关闭警报声,再次长按拍照
鍵关闭警示灯。
ZH 15
Page 16
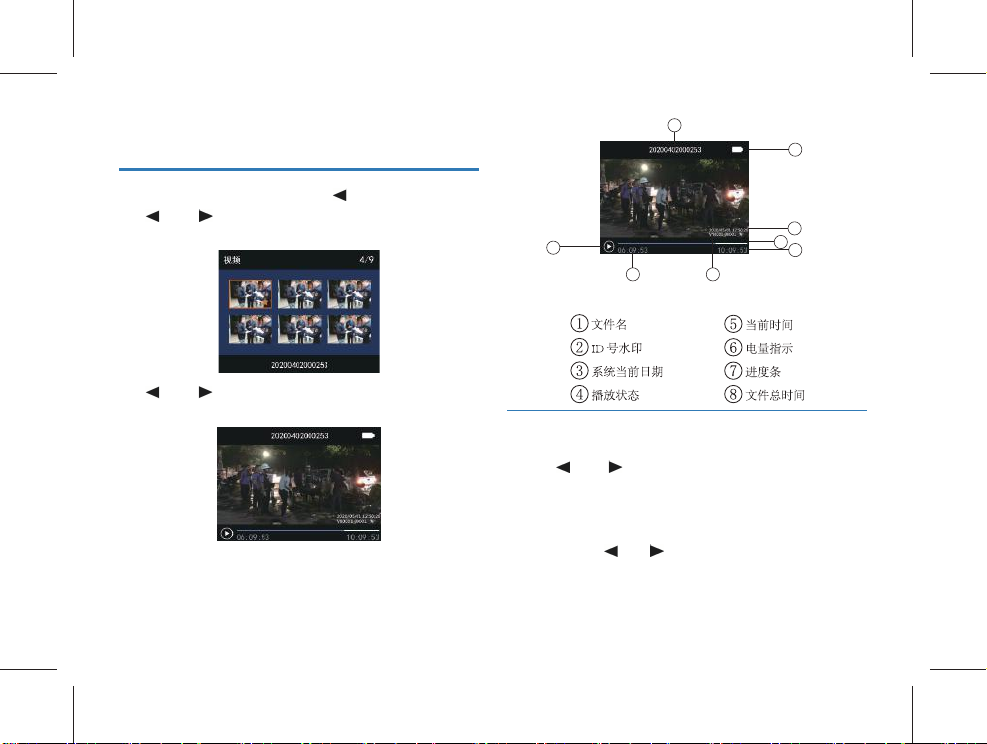
10 视频模式
在摄像预览状态界面中,你可以使用“ ”键进入查阅回放界面,
按“
”或“ ”键,选择视频选项,然后短按菜单键确认进
入视频文件列表界面,视频文件列表参考界面如下图所示:
1
6
3
4
5 2
7
8
按“ ”或“ ”键选择需要播放的视频文件,短按菜单键进
入视频播放界面,视频播放参考界面如下图所示:
文件的删除需通过连接电脑才可以进行。
录像文件播放界面说明:
16 ZH
10.1 视频播放
(1) 按“ ”或“ ”键,选择要播放的文件。
(2) 按“菜单”键开始播放,工作状态指示灯将亮绿灯。
(3) 播放过程中,按“菜单”键暂停播放,再次按下“菜单”键,
将继续先前位置的播放。
(4) 播放时短按“
32 倍,64 倍,128 倍快退或快进当前正在播放的文件。
”或“ ”键,可选择 2 倍,4 倍,8 倍,16倍,
Page 17
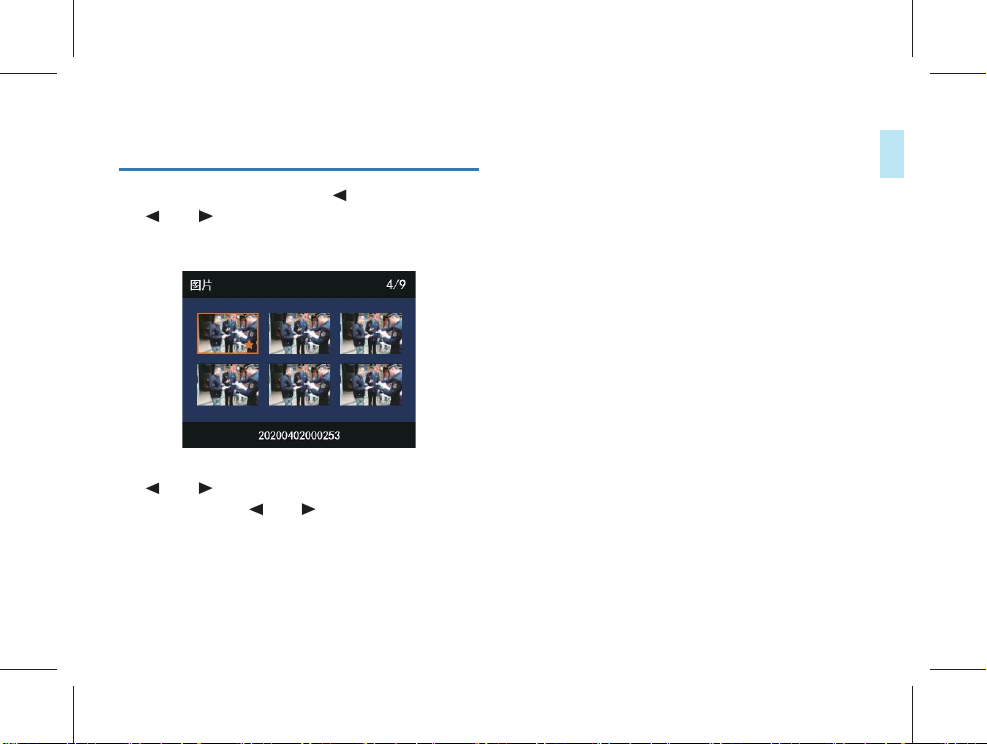
11 照片模式
在摄像预览状态界面中,你可以使用“ ”键进入查阅回放界面,
按“
”或“ ”键,选择拍照选项,然后短按菜单键进入拍
照文件列表界面,拍照文件列表参考界面如下图所示:
按“ ”或“ ”键选择需要播放的照片文件,短按菜单键进
入照片浏览状态,按“
”或“ ”键切换照片。
中文
ZH 17
Page 18
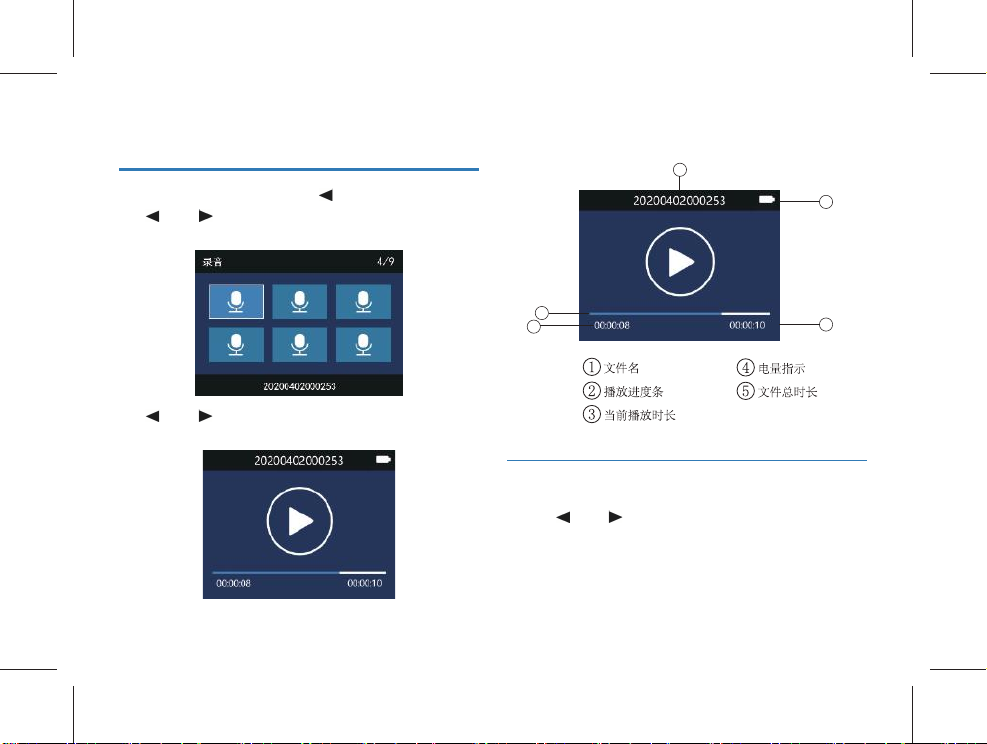
12 语音模式
在摄像预览状态下,你可以使用“ ”键进入查阅回放界面,
按“
”或“ ”键,选择录音选项,然后短按菜单键进入语
音文件列表界面,语音文件列表参考界面如下图所示:
语音文件播放界面说明:
1
4
按“ ”或“ ”键选择需要播放的音频文件,短按菜单键进
入语音播放界面,语音播放参考界面如下图所示:
18 ZH
2
3
5
12.1 语音播放
(1) 按“ ”或“ ”键,选择要播放的文件。
(2) 按“菜单”键开始播放,工作状态指示灯将亮绿灯。
(3) 播放过程中,按菜单键暂停播放,再次按下菜单键,将继
续播放。
Page 19
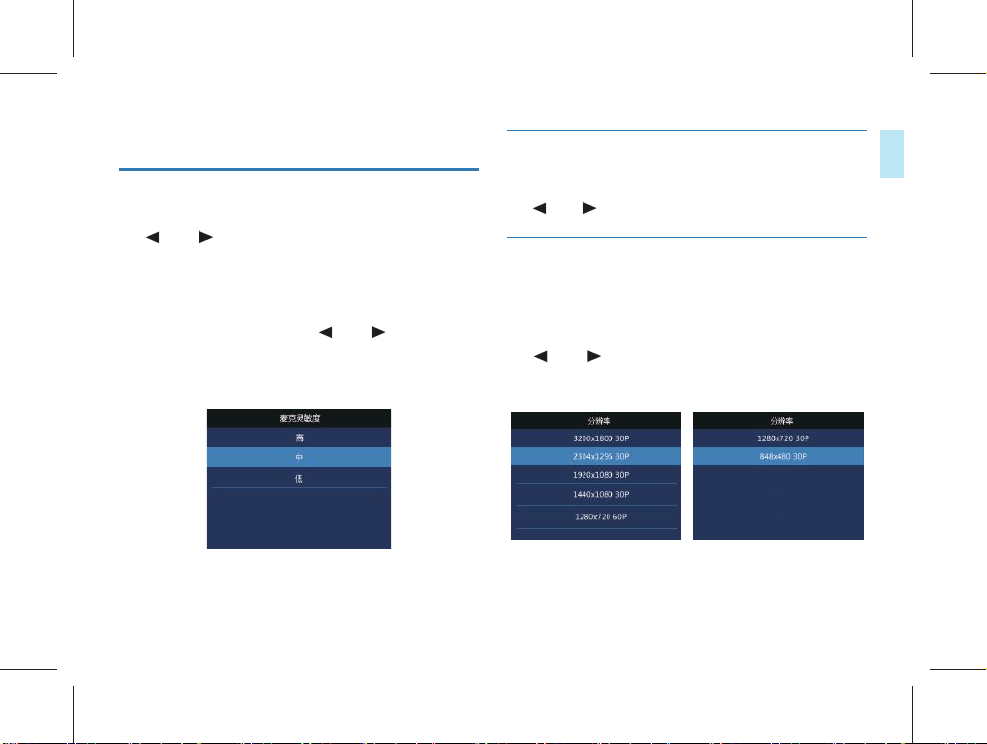
13 设置模式
在摄像预览状态界面按下菜单键,系统将会进入功能设置界面。
功能设置包括:录音设置,录像设置,拍照设置和系统设置。
按“
”或“ ”键选择 , 短按菜单键进入选中的选项,长按
菜单键返回到上一级菜单。
13.1 录音设置
按“菜单”键进入功能设置,按“ ”或“ ”键选择录音设
置菜单栏,按“菜单“键选择,弹出:高、中、低 选择不同的
麦克灵敏度可以达到不同的录音效果。
13.2 录像设置
录像设置菜单栏包括:分辨率,视频质量,视频预录,视频延录。
按“
”或“ ” 键 选 择 所 需 设 置 的 选 项 , 然 后 按 菜 单 键 进 入 。
13.2.1 分辨率
录像分 辨 有 3200*1800 30P、2304*1296 30P、1920*1080 30P
1440*1080 30P、1280*720 60P、1280*720 30P、848*480 30P
七种分辨率,多种录像分辨率选择,可满足大部分应用场合,
按“
”或“ ”键选择合适的分辨率,选择完成后按菜单键
确定,长按菜单键可返回上一级菜单。
参考界面如下图所示:
中文
ZH 19
Page 20
13.2.2 视频质量
(5632x3168)、13M(4800x2700)、9M(4032x2268)、6M(3200x1800)、
在视频质量菜单中有三种画质可供选择:“超精细,良好,正常”。
根据不同的需求选择不同的画质效果,画质越好,相同录像时
间所占的内存越大。
13.2.3 视频预录
使用视频预录功能,你可以提前录制事件触发前十几秒的画面,
视频预录有关闭和打开两种选择,按“
选择完成后按菜单键确定,长按菜单键可返回上一级菜单。
预 录 时 间 : 约 17 秒 。
”或“ ”键进行选择,
13.2.4 视频延录
使用视频延录功能,你可以在按下按键保存录像后继续摄录设
定的时间,视频延录设置关闭、5 秒、10 秒、20 分钟、30 分钟
五个选择,按“
键确定,长按菜单键可返回上一级菜单。
20 ZH
”或“ ”键进行选择,选择完成后按菜单
13.3 拍照设置
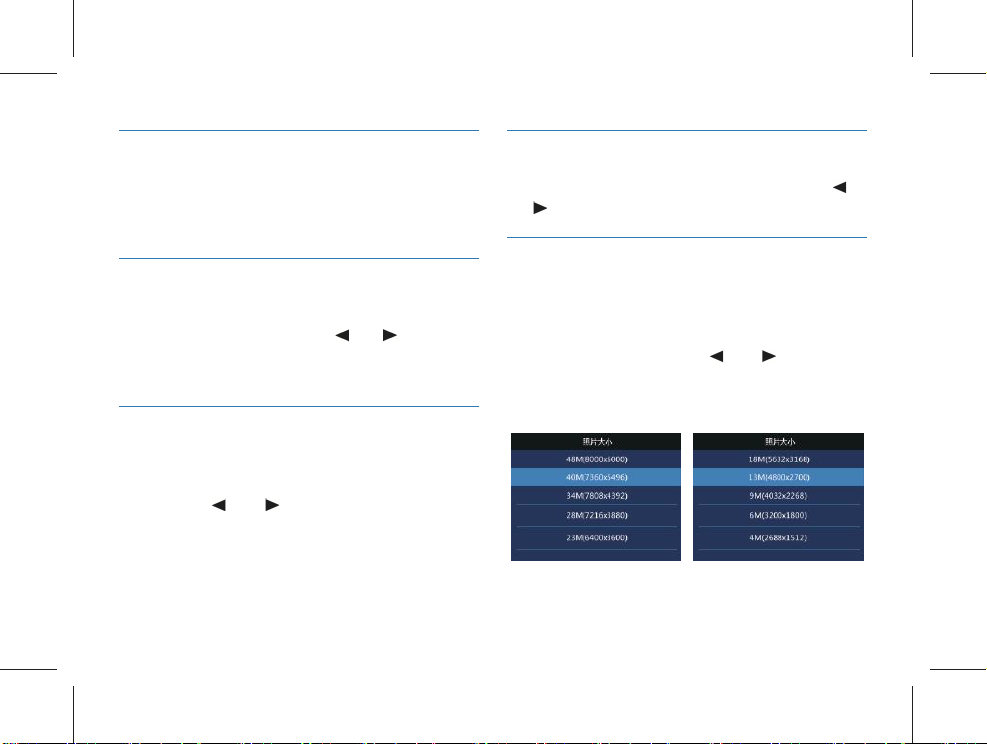
拍照设置菜单栏包括:照片大小,照片质量,连拍。按“ ”
或“
” 键 选 择 所 需 设 置 的 选 项 , 然 后 按 菜 单 键 进 入 。
13.3.1 照片大小
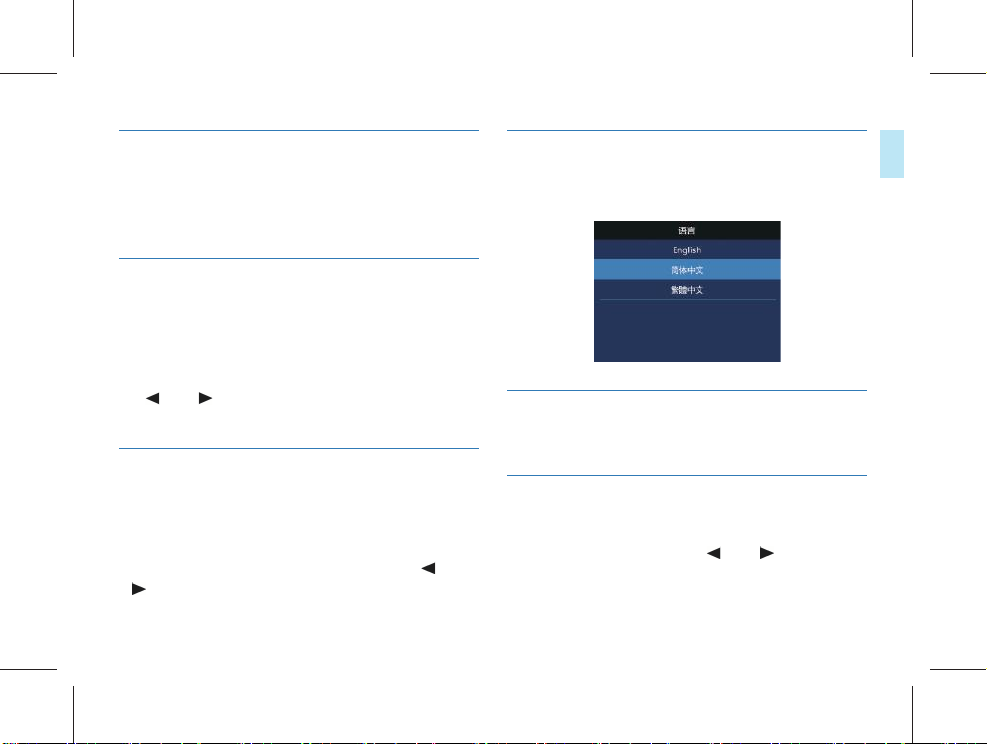
拍照照片的大小有 48M(8000x6000)、40M(7360x5496)、34M
(7808x4392)、28M(7216x3880)、23M(6400x3600)、18M
4M(2688x1512)这十个级别,按“ ”或“ ”键选择合适的
分辨率,选择完成后按菜单键确定,长按菜单键可返回上一级
菜单。参考界面如下图所示:
Page 21
13.3.2 照片质量
在照片质量菜单中有三种画质可供选择:“超精细,良好,正常”。
根据不同的需求选择不同的画质效果,画质越好,照片所占的
内存越大。
13.3.3 连拍
连拍是指在取景预览模式下或在录像过程中,按一次拍照键机
器能够连续拍摄照片。
在拍照设置菜单中,选择“连拍”菜单,再按菜单键进入连拍菜单。
连拍设置可以设置关闭、3 张、5 张、10 张、20 张五个选择,
按“
”或“ ”键选择合适的连拍张数,选择完成后按菜单
键 确 定 , 长 按 菜 单 键 可 返 回 上 一 级 菜 单 。
13.4 系统设置
系统设置菜单栏包括:语言,默认设置,屏亮度,系统时间,
自动关机,自动关屏,音量,车载模式,循环录像,车载录音,
分段录像,按键音,指示灯,红外切换,语音播报,整点播报,
移动侦测,曝光补偿,WIFI,ID 号和系统信息。按“
“
” 键 选 择 所 需 设 置 的 选 项 , 然 后 按 菜 单 键 进 入 。
”或
13.4.1 语言
在语言选择菜单中,你可以选择一种语言作为系统语言。语言
选择参考界面如下:
13.4.2 默认设置
使 用 此 功 能 , 你 可 以 重 置 机 器 的 设 置 选 项 。
13.4.3 屏亮度
使用此功能,可以根据需要调节显示屏的亮度。屏亮度设置可
以设置高、中、低三个级别,按“
选 项 ,选 择 完 成 后 按 菜 单 键 确 定 , 长 按 菜 单 键 可 返 回 上 一 级 菜 单 。
”或“ ”键选择合适的
ZH 21
中文
Page 22
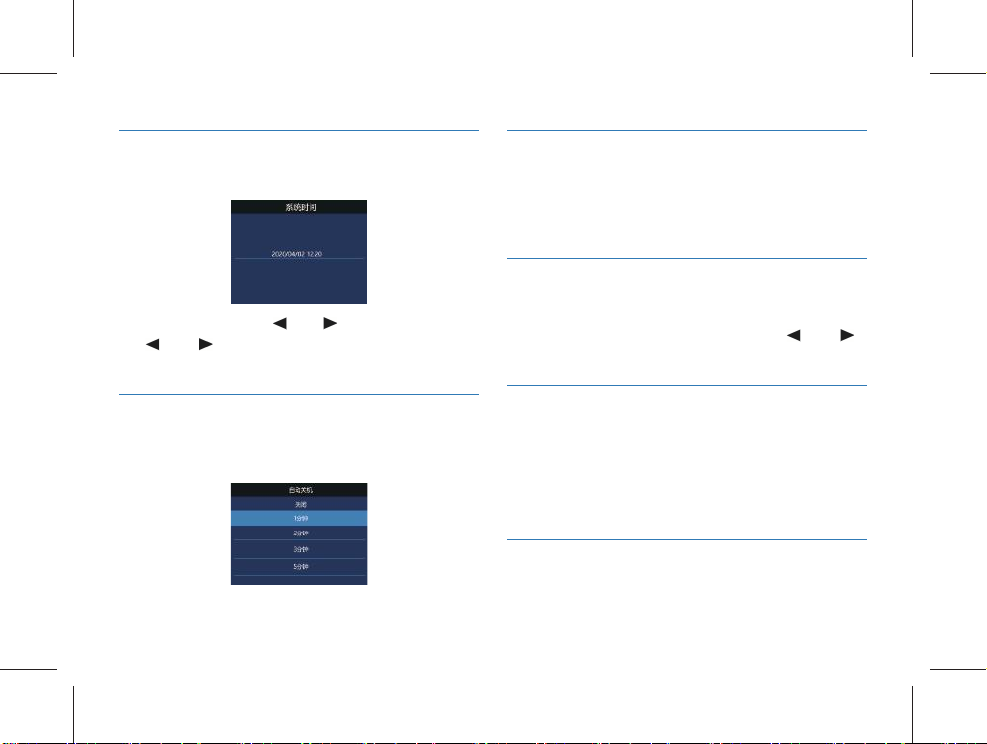
13.4.4 系统时间
系统时间设置界面,参考图片如下:
在此界面下,按菜单键与“ ”或“ ”键可以设置实时时间。
按“
”或“ ”键改变相应位置数值,短按菜单键确认,长
按 菜 单 键 返 回 上 一 级 菜 单 。
13.4.6 自动关屏
自动关屏时间有四种时长可供选择:关闭、30 秒、1 分钟、
3 分钟。如果在设定的时间内没对机器做任何操作,显示屏将
会自动灭。如果选择“关闭”,显示屏将会常亮。
13.4.7 音量
使用此功能,你可以设置机器的输出音量。
音量设置可以从 0~10 之间 11 个数值选择,按“
键 选 择 合 适 的 音 量 值 , 选 择 完 成 后 按 菜 单 键 确 定 。
”或“ ”
13.4.5 自动关机
如果在设定的时间内没对机器做任何操作,系统将会自动关机。
自动关机设置参考界面如下:
22 ZH
13.4.8 车载模式
车载模式选择“开启”后,“循环录像”和“车载录音”这两
个菜单选项变为可选;当车载模式选择“关闭”后,“循环录像”
和“车载录音”这两个菜单选项变为灰色,不可选;车载模式
默 认 出 厂 值 为 “ 关 闭 ” ; “ 车 载 录 音 ” 默 认 出 厂 值 为 “ 关 闭 ” 。
13.4.9 循环录像
在录像设置菜单中,选择“循环录像”菜单,再按菜单键进入
Page 23
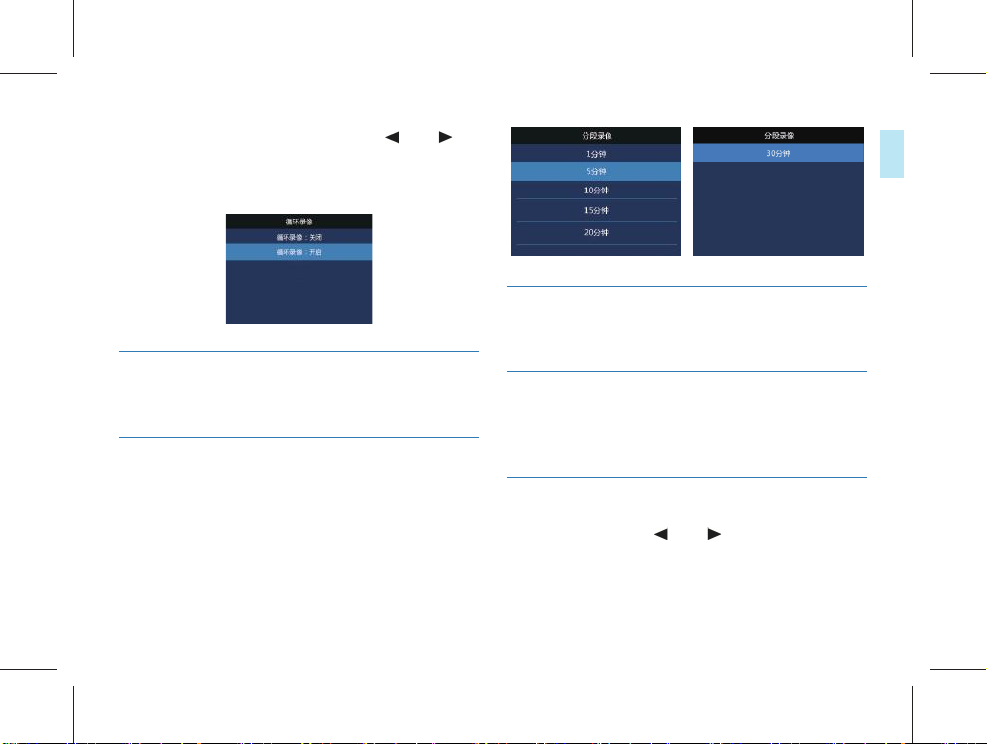
循环录像菜单。有关闭和开启两种选择,按“ ”或“ ”键
进行选择,选择完成后按菜单键确定,长按菜单键返回上一级
菜单。
参考界面如下图所示:
中文
13.4.10 车载录音
使 用 此 功 能 , 你 可 以 选 择 是 否 需 要 录 下 车 内 的 声 音 。
13.4.11 分段录像
视频 分段有 1 分 钟、5 分 钟、10 分 钟、15 分钟、20 分钟 和 30
分钟六个级别,在录像过程中,视频分段在所设定的时间自动
将视频文件分段保存并自动进入下一个文件录像,并且是无缝
切换。视频分段功能参考界面如下图所示:
13.4.12 按键音
使 用 此 功 能 , 按 键 操 作 将 会 有 声 音 提 示 。
13.4.13 指示灯
使用此功能,你可以根据需要打开或者关闭状态指示灯。
13.4.14 红外切换
在系统设置菜单中,按“ ”或“ ”键选择“红外”菜单,
再按菜 单键进入红外切换菜单。红外切换可以设置手动、自动
两种选择, 选择完成后按菜单键确定,长按菜单键可返回到上
一级菜单。
ZH 23
Page 24
13.4.15 语音播报
开启功能,机器对指定操作进行语音播报提示。
13.4.16 整点播报
开启语音播报功能后,才能开启整点播报功能,机器对整点时
间 进 行 语 音 播 报 提 示 。
13.4.17 移动侦测
音视频记录仪开启移动侦测后,短按录像键,当有物体进入音
视频记录仪拍摄范围内后自动开启录像功能,物体离开音视频
记录仪拍摄范围内大概过了 10 秒后结束录像功能并保存录像文
件。移动侦测功能设置可选择:关闭 ,开启。
13.4.18 曝光补偿
曝光补偿是一种曝光控制方式,曝光补偿可以让照片更明亮或
者更昏暗的拍摄手法。可以根据自己的想法调节照片的明暗程
度,创造出独特的视觉效果等。
曝光补偿设置可以从 -2.0~+2.0 之间 13 个数值选择,按“
24 ZH
或“ ”键选择合适的曝光值,选择完成后按菜单键确定。
13.4.19 WIFI
开启 WIFI 功能,连接手机可远程操控机器录像、录音和拍照,
并 支 持 在 线 播 放 , 支 持 本 地 下 载 并 分 享 。
13.4.20 ID 号
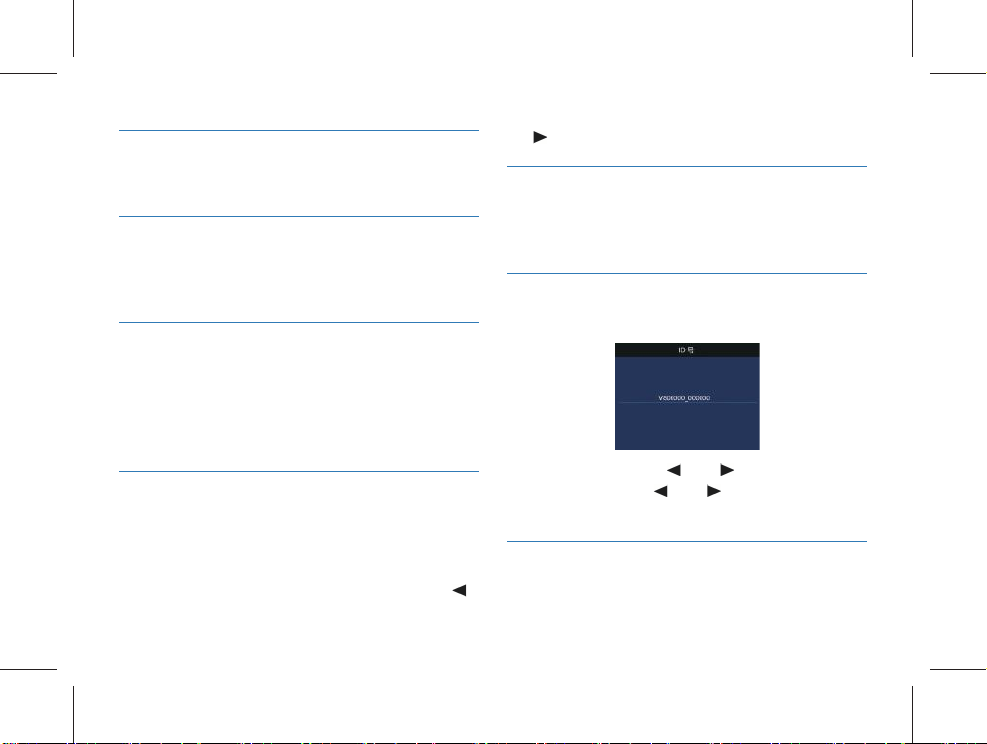
ID 号设置界面,参考图片如下:
在此界面下,按菜单键与“ ”或“ ”键可以设置机器的设
备编号和用户编号。按“
短 按 菜 单 键 确 认 , 长 按 菜 单 键 返 回 上 一 级 菜 单 。
”或“ ”键改变相应位置数值,
13.4.21 系统信息
”
系统信息菜单中包括:总存储容量,可用空间,可用录像时间,
Page 25

中文
可用录音时间,电池电量和版本号。
总存储容量:本机内存大小信息。
可用空间:剩余空间信息。
可用录像时间:当前录像分辨率可录像时长。
可用录音时间:当前录音类型可录音时长。
电池电量:当前电池电量信息。
版本号:固件版本信息。
ZH 25
Page 26
14 安装下载 APP
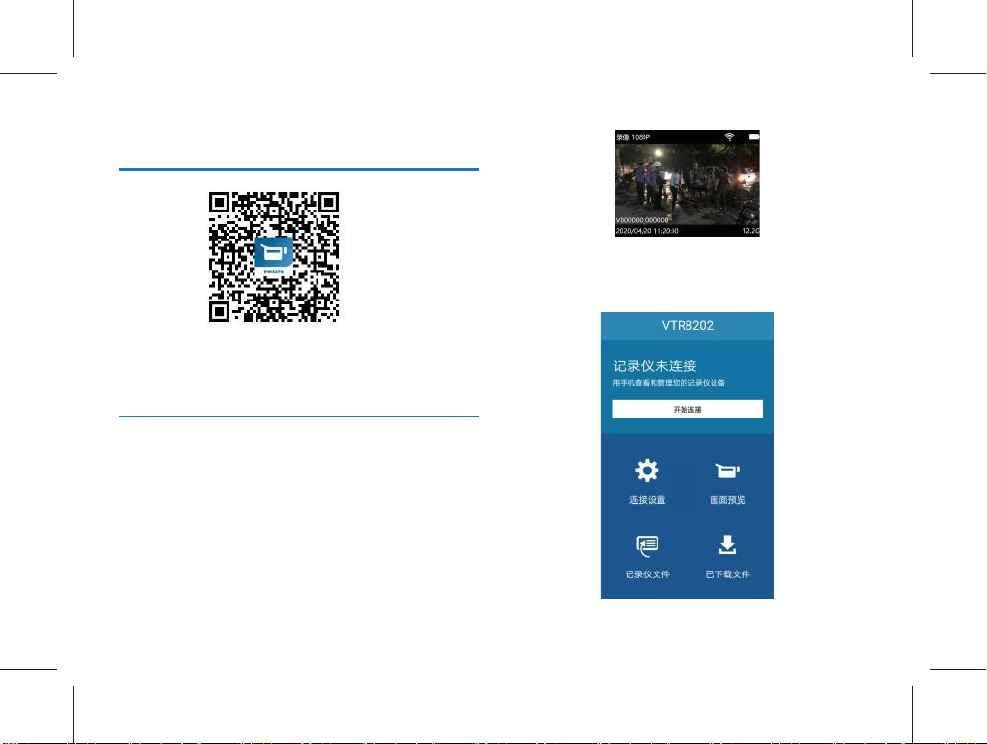
安卓手机描此二维码,安装下载 APP,安装过程中弹出的权限,
请都点击“允许”项,否则不能使用,个别手机需要关闭“移
动网络”才能连接使用,请知悉。
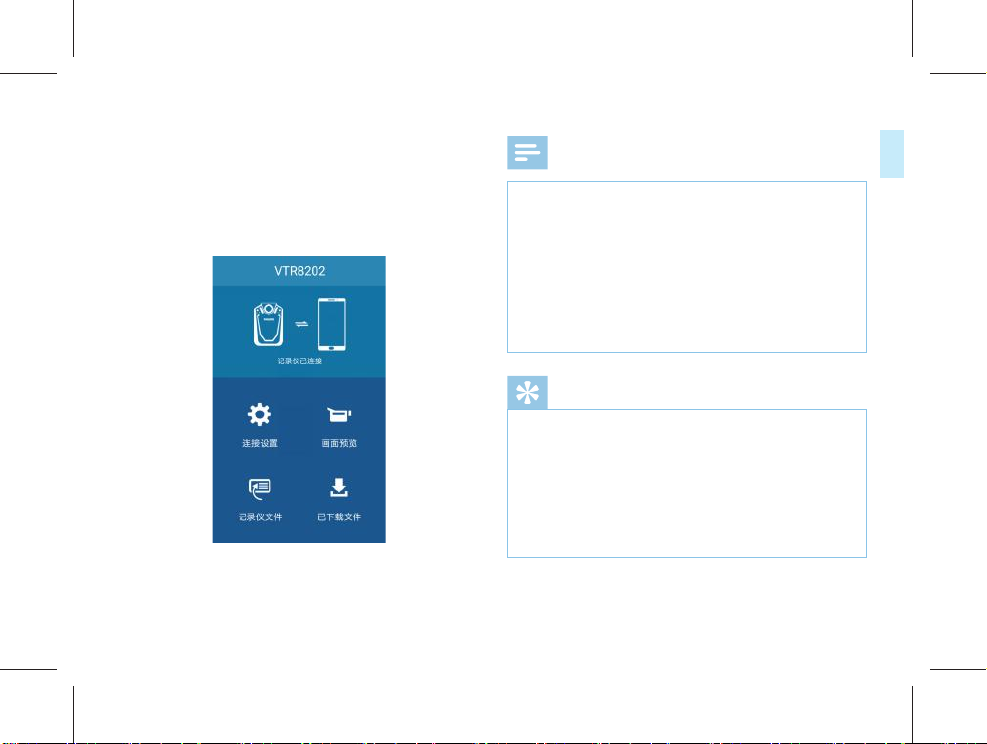
第二步:打开手机 APP,第一次打开手机 APP 时,手机 APP 界
面会有一个“引导提示”界面,点击引导界面上的“下一步”
按钮,进入手机 APP 连接界面,如下图所示:
14.1 连接使用
第一步:记录仪开机后,短按 Wifi 键打开 Wifi,图标显示白色 ,
参考界面如图所示:
26 ZH
Page 27
中文
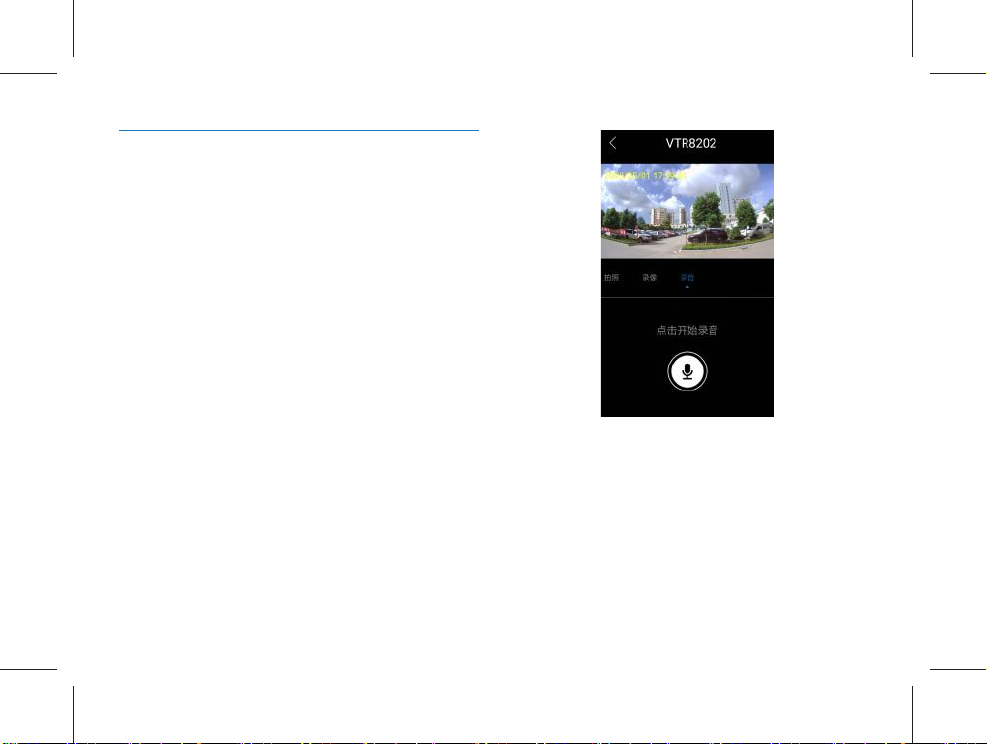
第三步:点击手机APP界面上“开始连接”按钮,进入手机
WLAN 列表界面,手动连接 VTR8202 网络,并输入密码“88888888”
连接成功后显示“已连接(不可上网)”,此时机器端 WiFi 图
标显示绿色,按手机返回键回到手机 APP 连接界面,界面显示“记
录仪已连接”如下图所示:
注意
由于不同品牌手机,不同版本系统的差异性,连接 APP 使用时
会有不同的提示及要求,当记录仪与手机 APP 连接不成功时,
请检查手机的设置:
1. 检查手机的移动网络是否为关闭状态,需要设置为关闭;
2. 检查手机设置里的 WIFI“双通道网络加速”是否为关闭状态,
需设置为关闭;
3. 手机设置的 WIFI 助理处“智能选择 wifi 或移动网络”设
置为关闭。
提示
1. 当记录仪与手机 APP 连接成功后,APP界面弹出“WLAN 连
接不可上网,是否智能地切换到其它网络?”时,请选择
“否”/“不使用”/“保持连接”等,不同手机弹出的提
示会不一样。
2. 记录仪与手机 APP 连接使用时,如果弹出提示“无法连接
到服务器,请检查你的网络设置”时,请忽略,因为这是
正常的,手机连接的是记录仪的 WIFI。
ZH 27
Page 28
14.2 APP 功能介绍
1. APP 设置
主界面选择“设置”可以连接设置,参数设置,关于应用声明。
连接设置可以修改记录仪 WiFi 和密码。参数设置,记录仪参数
设置包括录像分辨率,照片大小,曝光,同步时间,软件版本,
更改参数后手机发送指令给记录仪,并转成相对应的参数。
2.APP 画面预览
连接 APP 后,在主界面选择“画面预览”手机会进入预览界面,
记录仪界面 出现“WIFI CAM”字符。APP 画面预览包 括 APP 操
作录像,APP 操作录音,APP 操作拍照功能。APP 画面预览界面
如下图所示:
28 ZH
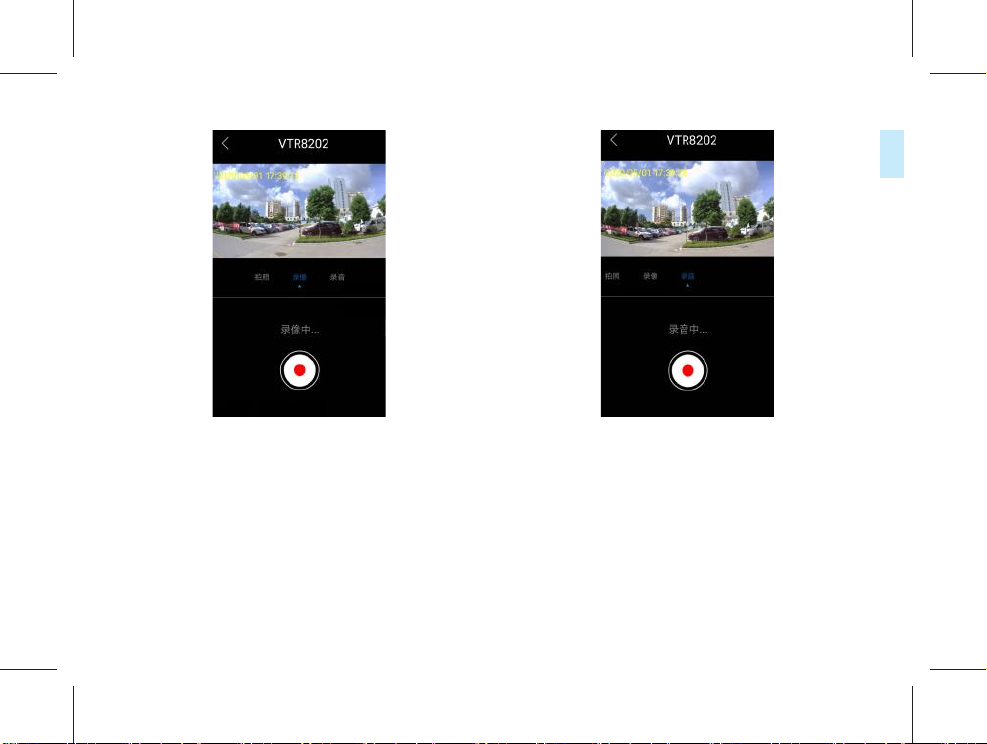
APP 操作录像,连接 APP 后,在主界面选择“画面预览”手机
会进入预录界面,记录仪界面出现“WIFI CAM”字符,此时点
击 APP 上录像图标,记录仪开始录像,再次点击图标保存录像。
APP 操作录像界面如下图所示:
Page 29
中文
APP 操作录音,连接 APP 后,在主界面选择“画面预览”手机
会进入预录界面,记录仪界面出现“WIFI CAM”字符,此时向
右滑动到录音界面点击 APP 上录音图标,记录仪开始录音,再
次点击图标保存录音。APP 操作录音界面如下图所示:
APP 操作拍照,连接 APP 后,在主界面选择“画面预览”手机
会进入预录界面,记录仪界面出现“WIFI CAM”字符,此时向
左滑动到拍照界面,点击 APP 上拍照图标,记录仪进行拍照。
3.APP 端记录仪文件
点击主界面“记录仪文件”图标,进入界面可以下载,查看记
录仪中的录像,录音和拍照文件。APP 端记录仪文件界面显示
如下图所示:
ZH 29
Page 30
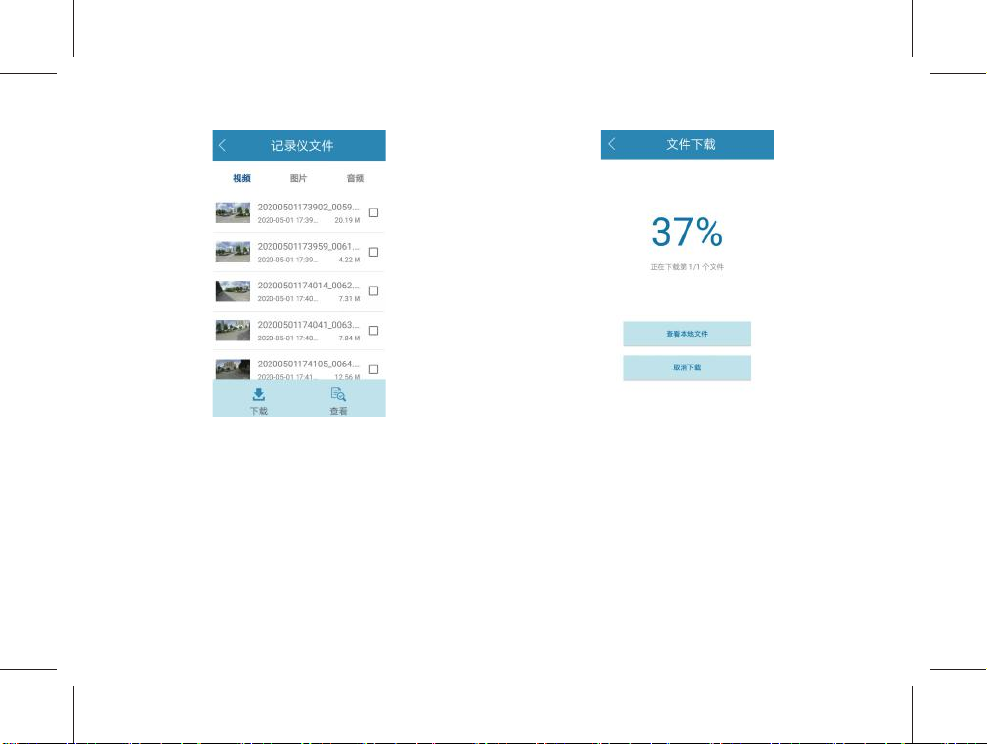
APP 文件下载:手机 APP 在与记录仪连接的状态下,APP 可以把
记录仪中的录像,录音,拍照文件下载到手机上。选择您需要
下载的文件,点击 APP 上的下载图标,手机端会显示文件下载
百分比,参考图如下所示:
30 ZH
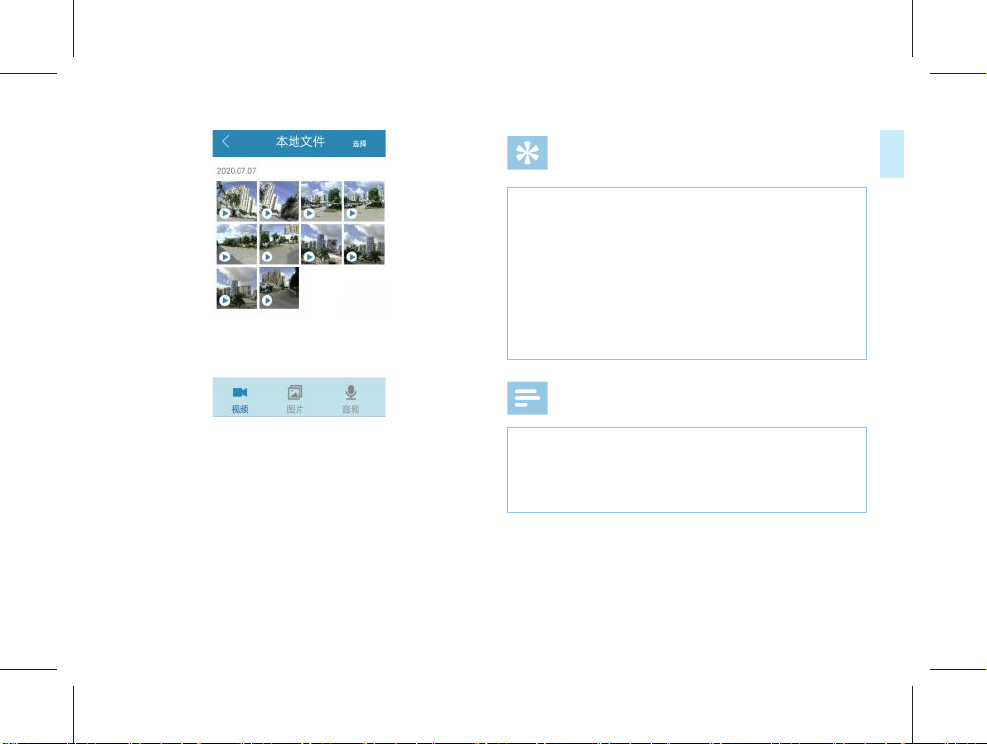
4.APP 已下载文件
APP 主界面选择“已下载文件”图标,界面显示已下载的视频,
图片和音频,可以选择分享和删除。参考如下图所示:
Page 31
中文
提示
1. 进入 APP 画面预览界面时,如果手机和记录仪距离在 2 米内,
由于声音串扰手机会发出啸叫声,此时您可以将手机音量
适当调小,可以消除此声音。
2. 因环境因素和不同品牌手机差异,为了更好的操作,请保
持设备与手机在有效的距离内。
3. APP 操作记录仪工作,超出有效距离时,APP 断开,记录仪
端录像,录音继续,此时需要手动操作记录仪端“录像”“录
音”按钮,保存录像,录音文件。
注意
1. 当机器低电时,机器端 WIFI 自动与 APP 端断开连接;
2. 机器端打开移动侦测后,APP 端控制机器录像,此时移动
侦测不起作用;
3. APP 控制机器录像不支持 3200*1800 30P 分辨率。
ZH 31
Page 32
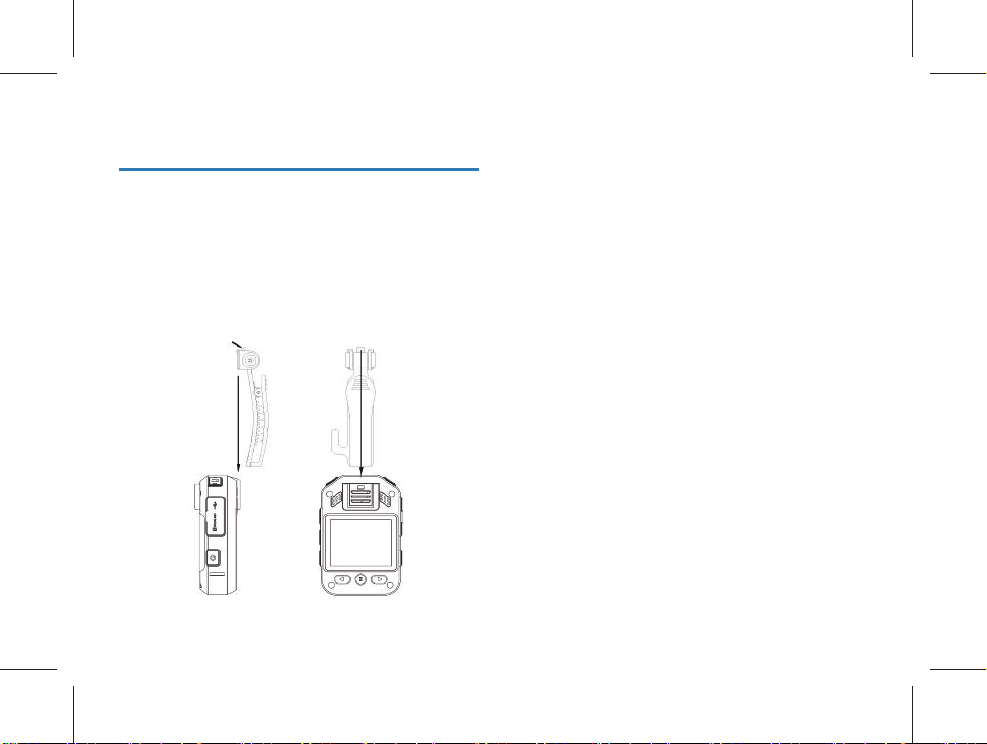
15 背夹的装取
① 如需装上背夹,手握主机,另一手持背夹,按图示方位将背
夹的连接支架对正主机槽口后,缓慢推进背夹直至连接支
架顶到主机槽口底部,且连接支架的底部凸起扣进主机凹
坑中为止。
② 如需取下背夹,手握主机,另一手持背夹,先用拇指按压图
示方位的指定部位,使得背夹的连接支架底部凸起离开主
机凹坑后,缓慢推出背夹直至连接支架离开主机为止。
32 ZH
Page 33

中文
16 常见问题
此处列举了常见问题的解答,可帮助解决音视频记录仪出现的
简单问题。如果故障仍无法排除,请咨询经销商或访问我们的
官方网站:www.philips.com/support
16.1 无法启动音视频记录仪
电池 电 量已耗 尽 请及 时 充电。
16.2 显示时间 / 日期不正确
音视频记录仪时间不准确,请在菜单上重新设置时间。
16.3 拍照 / 录像图像模糊,不清楚
镜头不干净。请用干净的绒布清洁镜头。
16.4 音视频记录仪无法录音或者录像
音视频记录仪存储空间已满并且未开启循环录像。请删除部分
文 件 或 将 其 移 至 外 部 存 储 设 备 。
16.5 音视频记录仪无法播放录音或者录像
电 池 电 量 已 耗 尽 , 请 充 电 。
16.6 音视频记录仪死机后如何处理
你有时在操作中会遇到开不了机,黑屏,操作不了等死机现像,
通常处理方法是,复位一下,复位键位置:打开 USB 盖,槽内
有一个小孔,用镊子或尖的东西点按一下小孔即可。
注:本操作不会造成文件数据丢失或者损坏。
ZH 33
Page 34

17 技术参数
17.1 存储器
外置存储空间
参考录音时间(16GB):录音时间约 290 小时
内置存储器类型:C10 TF 卡
移动存储器 (PC):是
17.2 尺寸和重量
长 × 宽 × 高:80×53.5×25 (mm)
重量 (含电池): 124g( 不含背夹)
17.3 系统要求
操作系统:Windows 7/8/10/Vista/XP/2000, Mac OS X, Linux
接口:USB 接口
17.4 录音
单声道:比特率为 128kbps,格式为 MP3
34 ZH
17.5 运行条件
温度:-30℃ ~55℃
空气湿度:10% – 90%, 不凝结
Page 35

中文
ZH 35
Page 36

Content
8 One-touch Playback Mode 48
1 Welcome 38
1.1 Product features 38
2 Important Notice 39
2.1 Safety 39
3 Your Audio/Video Recorder 40
3.1 What's in the box 40
3.2 Overview of your audio recorder 40
4 Start to Use 41
4.1 Turn ON/OFF 41
4.2 Charging methods 42
4.3 Connecting to computer 42
5 Video Recording 43
6 Photo 45
7 Voice Recording 46
36 EN
9 Flashing Warning Function 49
10 Video Mode 50
10.1 Video playing 50
11 Photo Mode 51
12 Audio Mode 52
12.1 Voice play 53
13 Setting Mode 54
13.1 Voice recording 54
13.2 Recording setting 54
13.3 Photo setting 55
13.4 System setting 56
14 Download and install APP 62
14.1 Connection 62
14. 2 Introduction to APP 64
Page 37

English
15 Mounting of Shoulder Clip 68
16 FAQ 69
16.1 Unable to start audio and video recorder 69
16.2 Incorrect time/date 69
16.3 Unclear image 69
16.4 Fail to record audio/video 69
16.5 Unable to play audio or video files 69
16.6 How to respond to recorder failure 69
17 Technical Parameters 70
17.1 Memory 70
17.2 Dimensions and weight 70
17.3 PC Interface 70
17.4 Voice recording 70
17.5 Operating conditions 70
EN 37
Page 38

1 Welcome
Welcome to the world of Philips! We are honored by your
choice and purchase of Philips’ products. You can have Philips’
comprehensive technical supports from our website, e.g. user
manuals, software downloading and warranty information etc.
www.philips.com
1.1 Product features
• One-touch voice recording: Just press the “Voice record”
button to start recording, and then press again to save the
file.
• One-touch video recording: Just press the “Video record”
button to start recording, and then press again to save the
file.
• One-touch playback: In the preview interface, press the
right button quickly to play the latest recording file.
• Voice broadcast: Turn on the voice broadcast function, and
the device can broadcast voice.
• WIFI remote control: The mobile phone can remotely
control the device to record video and audio, and take
photos. It also supports online playback, local download
and sharing.
• Flashing warning light: Fast flashing for warning.
38 EN
• Super-wide angle lens to get a fuller picture.
• Super-wide angle lens with more charge to get a clearer
picture.
• Double-filter switcher for images without color deviation
during the day and clearer images at night.
• On-Screen Display function ensures that all videos and
photos contain un-editable timing, product serial number
and user serial number that ensure legal validity of such
evidence.
• Super long file name: All recorded video files contain
information such as product serial number, recording time
and user serial number, which ensure convenient data
storage and retrieval.
• All recorded video files are automatically cut and saved to
prevent data loss due to incorrect operation.
• External memory card supports 256G.
• High-definition speaker: Use high-quality speaker to give
you a live feel during audio or video play.
• Record in a common MP3 format.
• Access to the audio file and data by using high-speed USB
2.0.
• It is able to be used as a large capacity USB storage device
to ensure the maximum compatibility.
• The damper shaft back clip can be adjusted at any angle,
which is flexible and reliable to wear.
Page 39
English
2 Important Notice
2.1 Safety
Notice
• Protect the cables from being pinched, particularly at
plugs.
Warning
• Special Announcement: Before using the product, please
read the Manual carefully. The Company shall not be held
liable for any data loss due to incorrect manual operation
or force majeure. We specially recommend that users
make additional copies of the files in the device.
• Images are for reference only. Philips reserves the right to
change the color/appearance/design/parameters/product
functions without prior notice.
EN 39
Page 40
3 Your Audio/Video Recorder
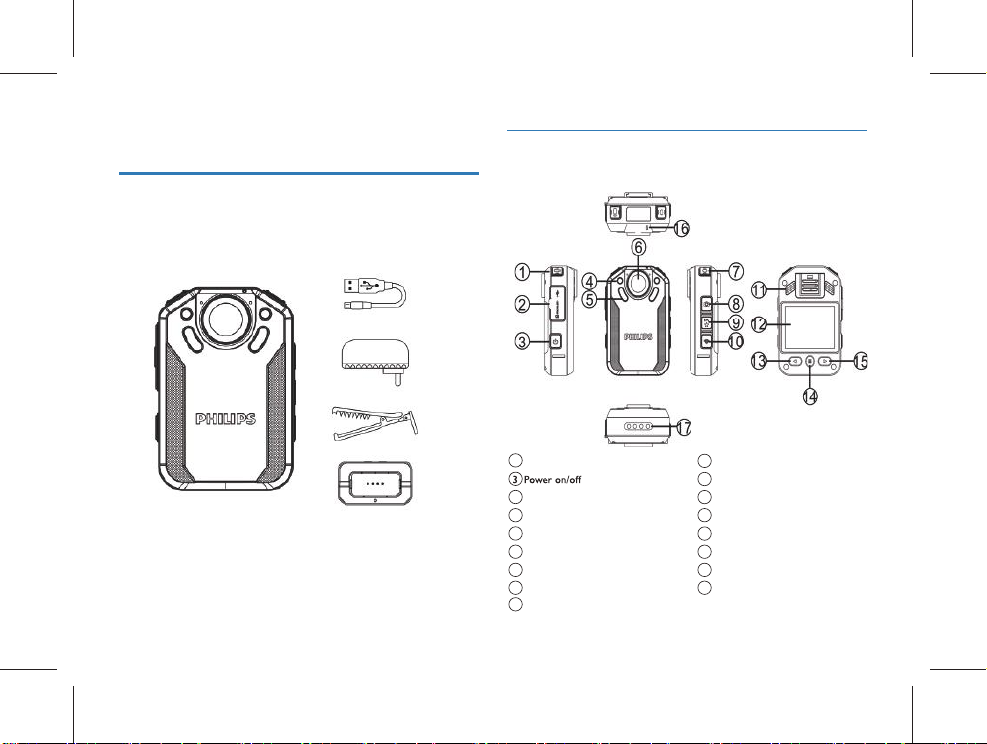
3.1 What's in the box
3.2 Overview of your audio recorder
40 EN
1 Video recording button
5 Infrared lamp
7 Voice recording/Additional light button
9 Star/IR button
Loudspeaker
13
Up/FB
15
Down/FF
17
Charging connection via docking station
2 USB interface/TF card socket/Reset
4 Photosensitive
6 Lens
8 Photo/Flashing light button
10
WIFI button
1211
Screen
14
Menu button/Return button
16
Indicator light
Page 41
4 Start to Use
“
” or “ ” to zoom out or in on the preview interface for
digital zoom.
4.1 Turn ON/OFF
Notice
• Please recharge the device for three hours before using it
for the first time!
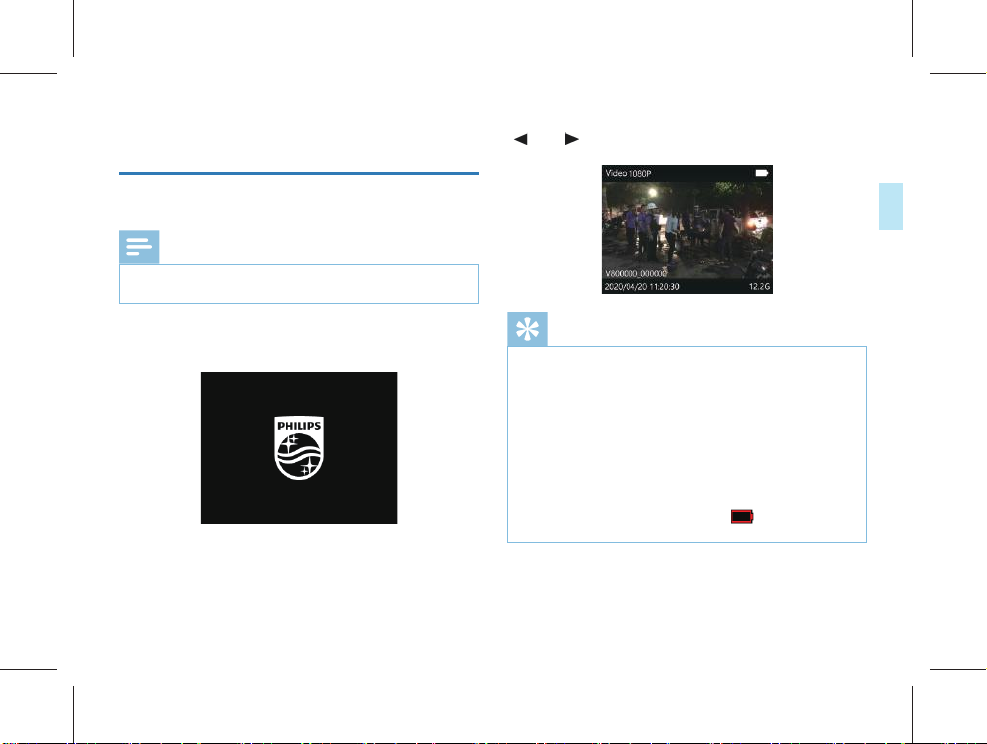
During shutdown mode, long press the “Turn ON” button
for 3 seconds, and the device will be turned on, showing the
Philips logo, as shown below:
Then the device enters the preview interface, as shown in
the fi gure below. In the preview state, the working indicator
lights up in green. On this interface, press the “Menu” button
and the device returns to the setting interface. Long press
Notice
• This device is powered by a non-removable lithium
battery. If you do not use the audio and video recorder
for a long time, long press the “Power” button for 3
seconds to turn off the device.
• If the record does not work properly, please check if the
device is out of power.
• During the operation please do not pull out the external
memory card. Otherwise, damage might be caused to
the files or the device.
• When the battery sign shows “
your device in time.
” , please charge
EN 41
English
Page 42
4.2 Charging methods
(1)Use USB cable and the connector to charge the device.
The device indicator will show green light first, which will
be extinguished after the device is fully charged.
Reminder
• The device can be charged either during ON or OFF
mode. Normally, during OFF mode charging, it takes
around 4 hours for full charging. (we recommend that
you use OFF mode charging).
• The docking station is only suitable for charging and does
not support data transmission.
4.3 Connecting to computer
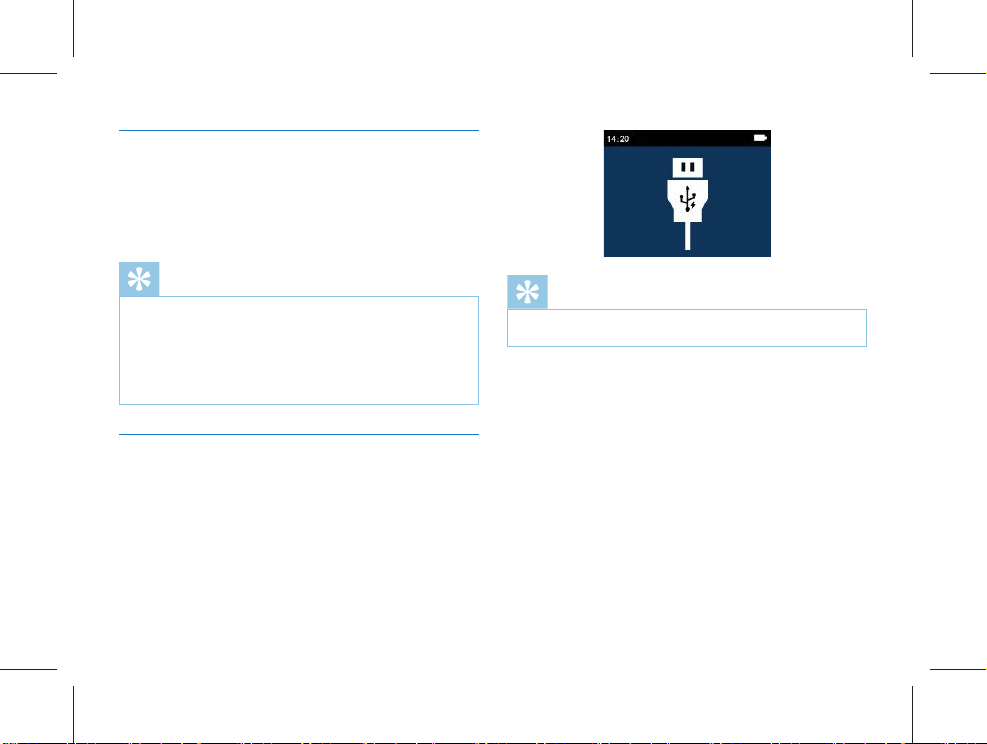
The recorder can be used as a large-volume USB storage device, which can be connected to the computer. The recorder
will be shown as a portable device. The icon of connecting to
computer is shown in the figure below.
42 EN
Reminder
• When the file are moved from the PC to the VideoTracer,
please do not disconnect the device from the PC.
Page 43
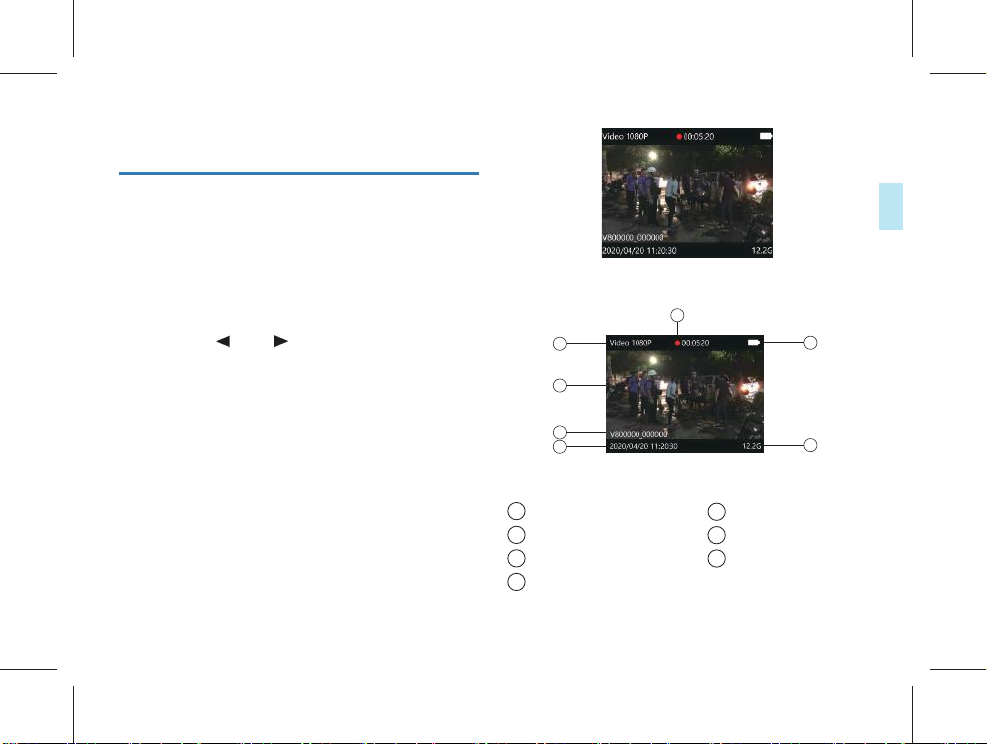
5 Video Recording
When you use the recorder for the fi rst time, please pay
attention to the requirements in this section!
(1)On the Preview interface, press the “Video Record”
button to start recording and the state indicator flickers
red.
(2)Short press the recording button to end the recording, the
red indicator will go off, and return to the camera preview
interface. The status indicator will be become green.
(3)Long press“
zoom out or in on the preview interface for digital zoom.
(4) When recording at night, in a low light environment or of
the infrared is in manual mode, please long press the “IR”
button to change to night recording mode. The screen will
become black/white. Long press the recording button and
the additional light will be turned on to supplement the
light source.
(5) Press the “Photo” button to capture the current recording
screen.
(6) Short press the “Star” button during video recording. The
file will be marked as important file, and the marked file
will not be deleted when the loop video files are turned
up.
(7) The reference video recording interface is shown below:
”or “ ” on the preview interface to
Recording Interface Illustration
1
2
3
4
1 Recording resolution
2 Video recording
3 ID watermark
4 System current date and time
English
5
6
7
5 Recording mode
6 Battery
7 Remaining card capacity
EN 43
Page 44
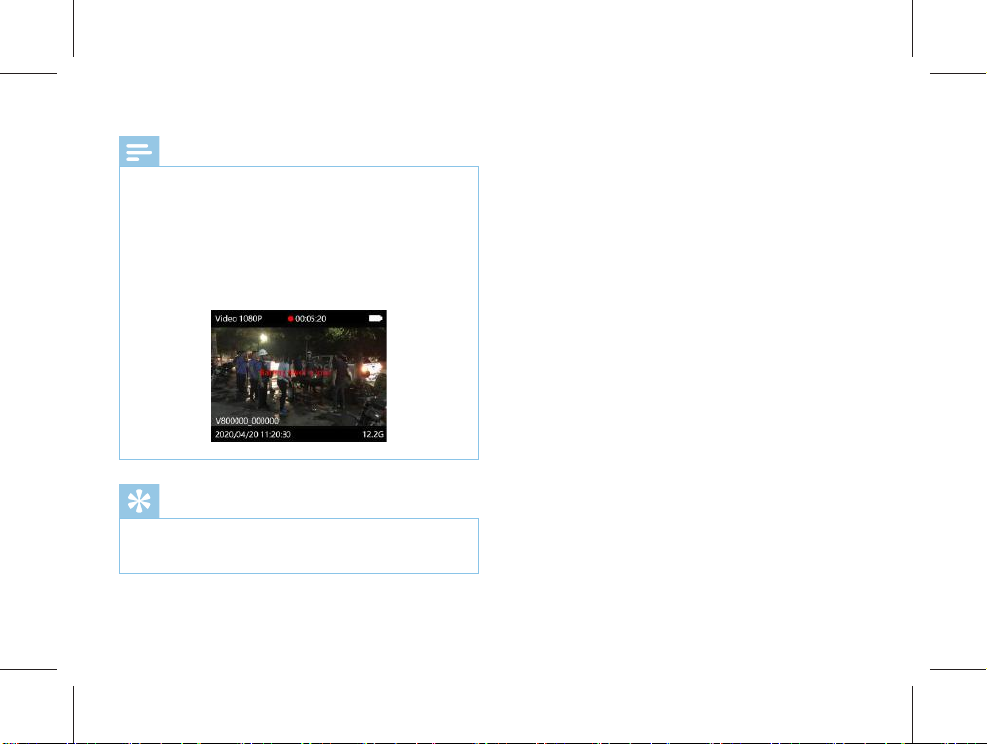
Notice
• When the battery icon is showing empty, it means low
on battery. When the low battery icon occurs, the
system will automatically shut down. If you are recording,
the system will automatically save the recorded files then
shut down. In case of low battery, please charge your
device timely. During low battery, the device gives you
"Low Battery" notice as shown below.
Reminder
• Before recording, please adjust the recording parameters
first.
• Please delete some unnecessary files before recording.
44 EN
Page 45

English
6 Photo
Please note the instructions in this section when you take the
first photo with your Video Tracer! On the preview interface,
press the “Camera” button to take a photo. While taking a
photo, a red light appears with a “Click” sound. If taking a
photo in a dark environment, the device needs its infrared
lamp or additional lamp to secure good quality videos. During
the video recording the user can press the “Camera” button
to make a photo.
EN 45
Page 46
7 Voice Recording
When you use the device for audio recording for the first
time, please read the instructions in this section!
(1)Press the “Voice” button in the video preview state to
start recording; the working indicator lights on in yellow;
please point the built-in microphone to the voice source.
(2)Press the “Voice” button to end the recording and return
to the preview interface.
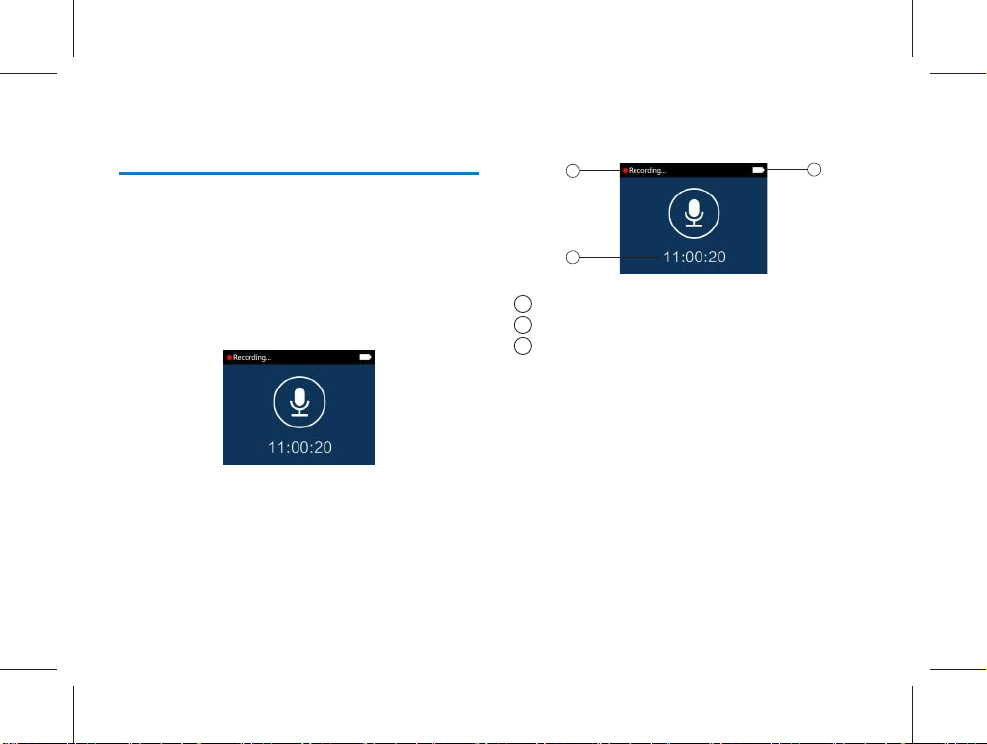
The recording interface is shown below:
46 EN
Audio recording interface
1
2
Recording status
1
Current recording duration
2
Battery status
3
3
Page 47

English
Reminder
• Before recording, please adjust the desired recording
sensitivity.
• Please delete some unnecessary files before recording.
• Please test the voice recording first to confirm that the
audio and video recorder settings are correct.
• Do not pull out the memory card during audio/video
recording mode. Otherwise, damage might be caused to
the files.
• Do not cut off power during audio/video recording mode.
Otherwise, damage might be caused to the recorder and
the files might be lost or damaged.
• If you intend to use the device for a long period of time,
please charge the device before recording.
EN 47
Page 48

8 One-touch Playback Mode
Please note the instructions in this section. On the Preview
interface, press the “
cording fi le is saved, the Voice Tracer will directly play the fi le.
Press the “
is saved, the Video Tracer will directly play the fi le. By default,
the one-touch playback will play the latest video recording
fi le as soon as the device is powered on.
48 EN
” button quickly after the video re-
” button quickly after the voice recording fi le
Page 49

English
9 Flashing Warning Function
In standby mode, long press the “Photo” button to turn on
the flashing warning function. At this time, the device will
alarm and light up the warning light. The “Warning light” will
flash alternately by the red and blue indicator lights. After
turning on flashing warning function, long press the “Photo”
button to turn o the alarm sound, and another long press to
turn o the warning light.
EN 49
Page 50
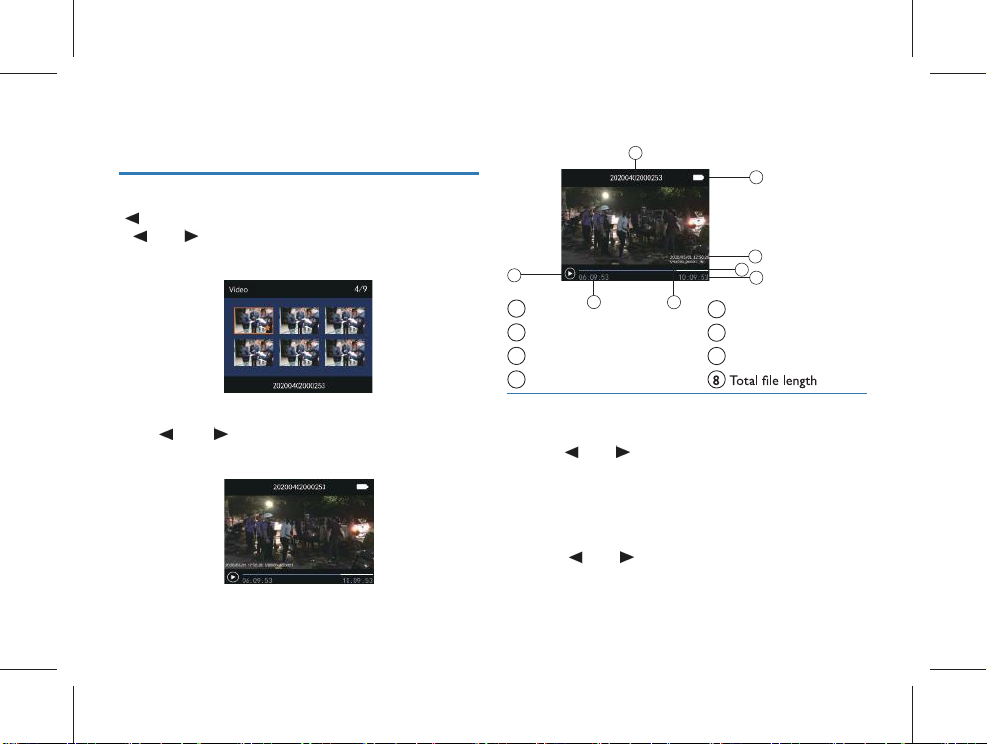
10 Video Mode
On the camera preview status interface, you can use the
“
“ button to enter the review playback interface, press
“
” or “ ”to select the video option, and then press the
“Menu” button to confi rm the video fi le list interface. The
video fi le list reference interface is shown below:
Recorded File Playing Illustration:
4
1 File name
1
5 2
2 ID watermark
3 System current date and time
4 Recording mode
6
3
7
8
5 Current duration
6 Battery
7 Progress bar
Press“ ” or “ ” to select the video fi le. Press the “Menu”
button to enter the video playback interface. The video
playback reference interface is as shown below:
The deletion of the fi le can be done by connecting to a computer.
50 EN
10.1 Video playing
(1)Press“ ” or “ ”to select the fi le you need to play.
(2)Press the “Menu” button to start playback, and the
working indicator will light on in green.
(3)During playback, press the “Menu” button to pause
playback, press the “Menu” button again, and the playback
will return to the previous position.
(4)Press “
4 times, 8 times, 16 times, 32 times, 64 times, 128 times
” or “ ”during playback to select 2 times,
to fast backward or fast forward the currently playing fi le.
Page 51
11 Photo Mode
In the camera preview status interface, the “ ” button can
be used to enter the review playback interface. Press “
“
”button to select the camera option, then press the
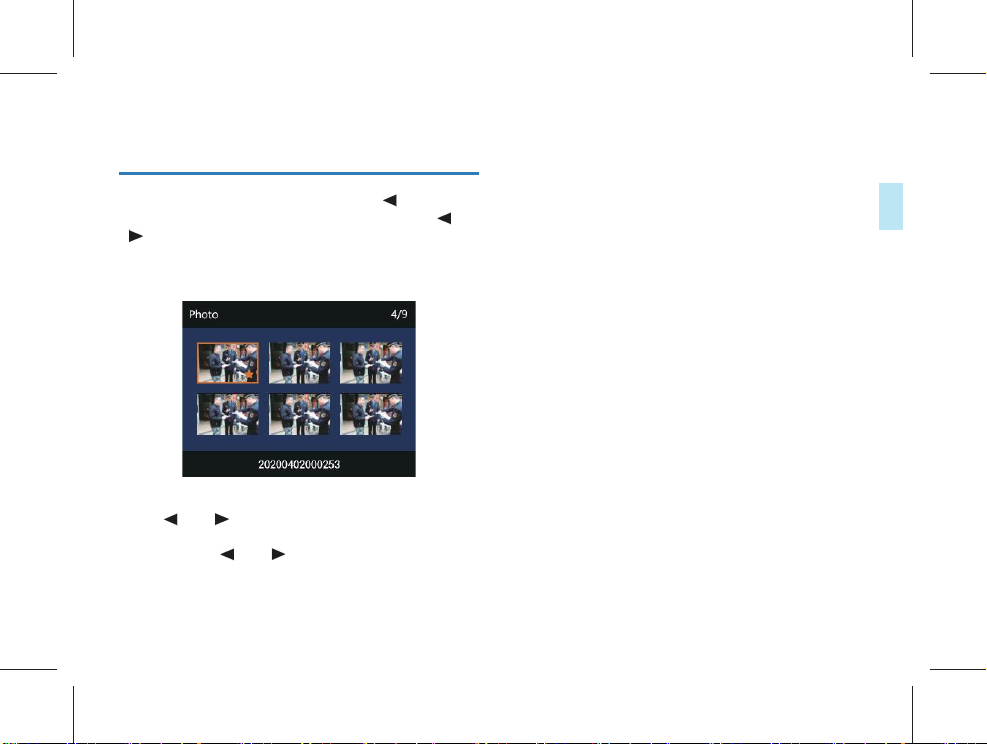
“Menu” button to enter the camera fi le list interface. The
camera fi le list reference interface is shown below:
Press “ ” or “ ” button to select the photo fi le to be
played; press the “Menu” button to enter the photo browsing state, press “
” or “ ” to switch the photo.
” or
English
EN 51
Page 52
12 Audio Mode
In the camera preview state, you can use the “ “ button to
enter the review playback interface, press the “
“
” button to select the voice recording option, and then
press the “Menu” button to enter the voice fi le list interface.
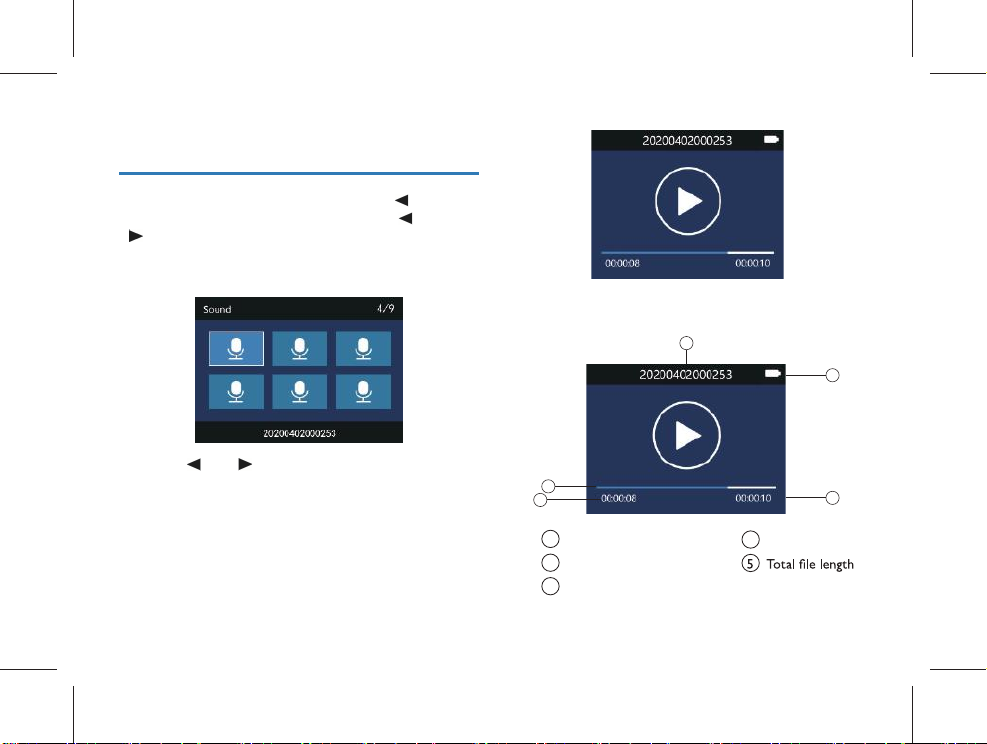
The voice fi le list reference interface is as shown below:
Press the “ ” or “ ” button to select the audio fi le to be
played; press the “Menu” button to enter the voice playback
interface. The voice playback reference interface is as shown
below:
52 EN
” or
Audio File Playing Interface Illustration:
1
2
3
1 File name
2 Progress bar
3 Current duration
4
5
4 Battery
Page 53

12.1 Voice play
(1) Press “ ” or “ ” button to select the file you want to
play.
(2) Press the “Menu” button to start playback, the working
indicator will light on in green.
(3) During playback, press the “Menu” button to pause
playback and press the “Menu” button again to resume
playback.
English
EN 53
Page 54
13 Setting Mode
Press the “Menu” button in the camera preview status
interface, the system will enter the setting interface. System
settings include: voice recording setting, video recording
setting, camera setting and system setting.
Press the “
menu button to enter the selected option. Long press the
“Menu”button to return to the preview interface.
13.1 Voice recording
Press “Menu” to enter the setting mode, press “ ” or
“
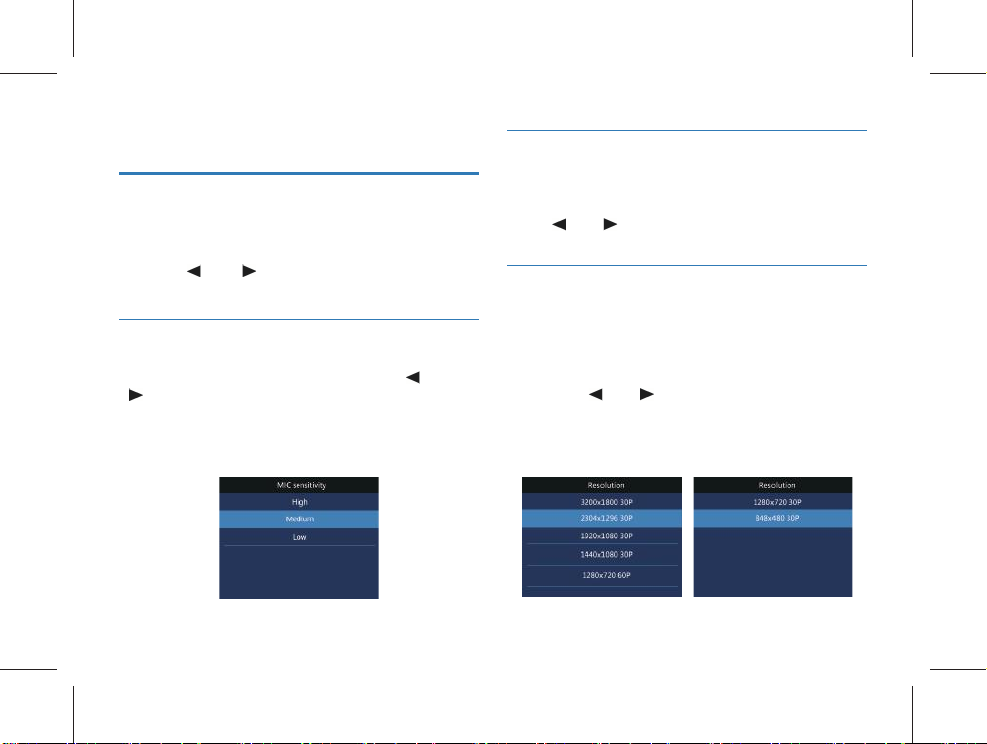
“Menu” to select, and the options of high, medium and low
will pop up. Select di erent levels of microphone sensitivity
to achieve di erent recording e ects.
” or “ ” button to select and press the
” to select the voice recording setting “Menu”, press
13.2 Recording setting
The video settings “Menu” includes: resolution, video quality,
video pre-recording, video delay recording.
Press “
” or “ ” to select the option you want to set, and
then press the “Menu” button to enter.
13.2.1 Resolution
Video resolution is of seven levels, namely 3200×1800 30P,
2304×1296 30P, 1920×1080 30P, 1440×1080 30P, 1280×720
60P, 1280×720 30P, 848×480 30P. Di erent video resolution
options can meet the requirements in most application occasions. Press “
Press the “Menu” button when the selection is completed,
and long press the “Menu” button to return to the previous
“Menu”.
The reference interface is shown below:
” or “ ” to select appropriate resolution.
54 EN
Page 55

13.2.2 Video quality
There are three quality options to choose from on the Video
Quality menu: “Highres”, “Good”, “Normal”. According to
di erent needs, di erent quality e ects are selected. The
better the video quality, the larger the memory occupied by
the same video length.
13.2.3 Video pre-recording
Apply the video pre-recording function to start the recording
around the fi rst ten seconds, before the “Record” button is
activated. The video pre-recording has two options: o and
on. Press “
button to confi rm. Long press the “Menu” button to return
to the previous “Menu”.
Pre-recording time: about 17 seconds.
” or “ ” to select, and press the “Menu”
13.2.4 Delayed recording
Apply the delayed recording function to continue the
recording for a certain time after pushing the button to save
the recording. There are fi ve options for delayed recording:
setting o , 5 sec, 10 sec, 20 min and 30 min. Press “
“
” to select and press the “Menu” button to confi rm after
” or
the selection is completed. Long press the “Menu” button to
return to the previous menu.
13.3 Photo setting
The photo settings menu includes: photo size, photo quality,
auto shooting and continuous shooting. Press “
“
”to select the option you want, and then press the
“Menu” button to enter.
” or
13.3.1 Photo size
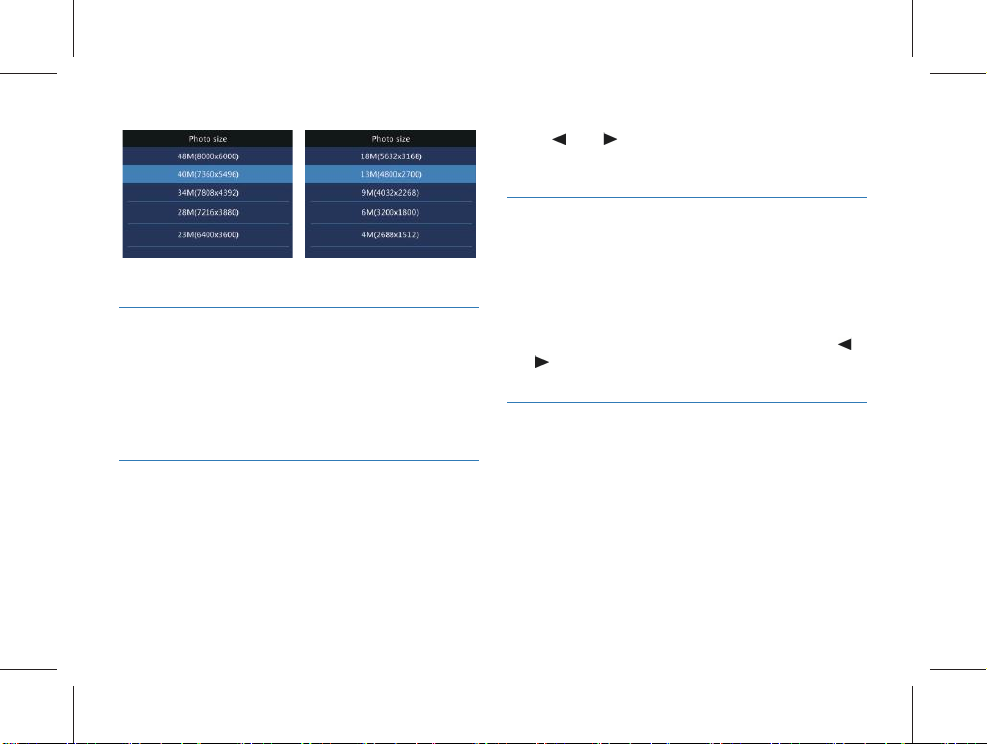
The sizes of the photos are of 48M(8000x6000),
40M(7360x5496), 34M(7808x4392), 28M(7216x3880),
23M(6400x3600), 18M(5632x3168), 13M(4800x2700),
9M(4032x2268), 6M(3200x1800), 4M(2688x1512).
Press “
”or “ ” to select the appropriate resolution.
After the selection is completed, press the “Menu” button
to confi rm. Long press the menu button to return to the previous menu. The reference interface is shown below
:
EN 55
English
Page 56
13.3.2 Photo quality
There are three quality options to choose from on the Photo
Quality menu: “Highres”, “Good”, “Normal”. According to
di erent needs, di erent quality e ects are selected. The
better the picture quality, the larger the memory occupied by
the photo.
13.3.3 Continuous shooting
Continuous shooting means press the “Photo” button to take
photos during preview or recording mode.
On the camera setting menu, select “Photo rate” and press
the “Menu” button to enter. Continuous shooting o ers fi ve
options: O , 3 photos, 5 photos, 10 photos and 20 photos.
56 EN
Press “ ” or “ ” to select. Press the “Menu” button to
confi rm after the selection is completed. Long press the
“Menu” button to return to the previous menu.
13.4 System setting
System settings menu includes: language, default settings,
screen brightness, system time, auto power o , auto screen
o , volume, in-car mode, video loop, in-car record, segmented video, key tone, indicator light, infrared switch, voice
broadcast, plenary broadcast, motion detect, exposure
compensation, WIFI, ID number and system info. Press “
or “
” to select the option you want to set, and then press
the “Menu” button to enter.
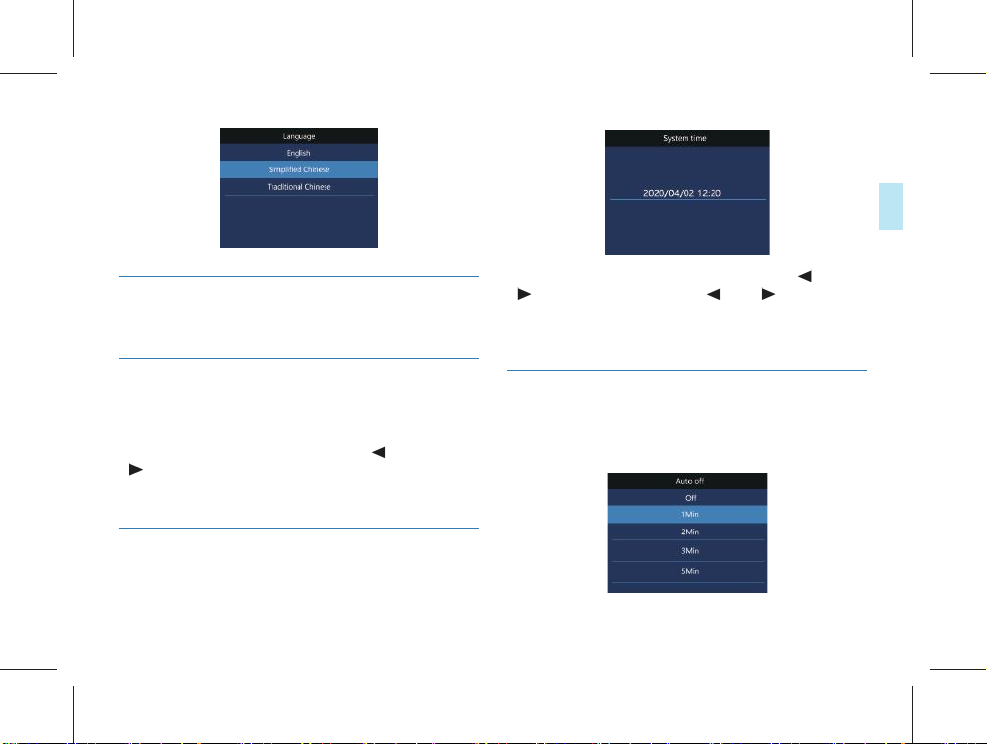
13.4.1 Language
In the language selection menu, you can select a language
as the system language. The reference interface of language
selection is as follow:
”
Page 57
13.4.2 Default settings
Apply the function to reset the device’s setting options.
On this interface, press the “Menu” button and “ ” or
“
” to set the real time. Press “ ” or “ ” to change the
value. Press the “Menu” button to confi rm after the selection
is completed. Long press the “Menu” button to return to the
previous menu.
English
13.4.3 Brightness
When you want to use this function, you can adjust the
brightness of the screen. The screen brightness can be set to
three levels: high, medium and low. Press “
“
” to select the appropriate option. Press the “Menu”
button to confi rm after the selection is completed. Long
press the “Menu” button to return to the previous menu.
” or
13.4.4 System time
The system time setting interface is as shown below:
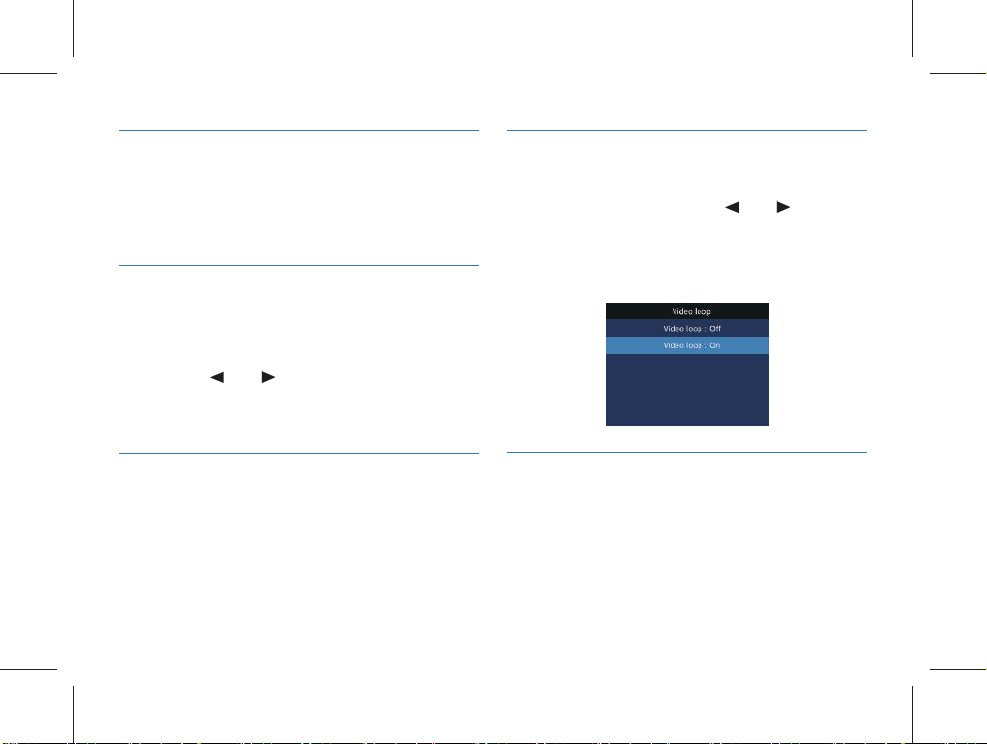
13.4.5 Auto off
If there is no operation on the device, the VideoTracer
automatically shuts down after a certain period of time. The
interface looks like following:
EN 57
Page 58
13.4.6 Auto screen off
There are four options for the auto screen o time: O , 30
sec, 1Min, 3Min. If no operation is done to the device within
the given time, the screen will black out. If “ O ” is selected,
the display will be constantly lit.
13.4.7 Volume
When you use this function, you can adjust the volume of the
device.
The volume setting can be selected from 11 values between 0
and 10. Press “
value. After the selection is completed, press the “Menu”
button to confi rm.
” or “ ” to select the appropriate volume
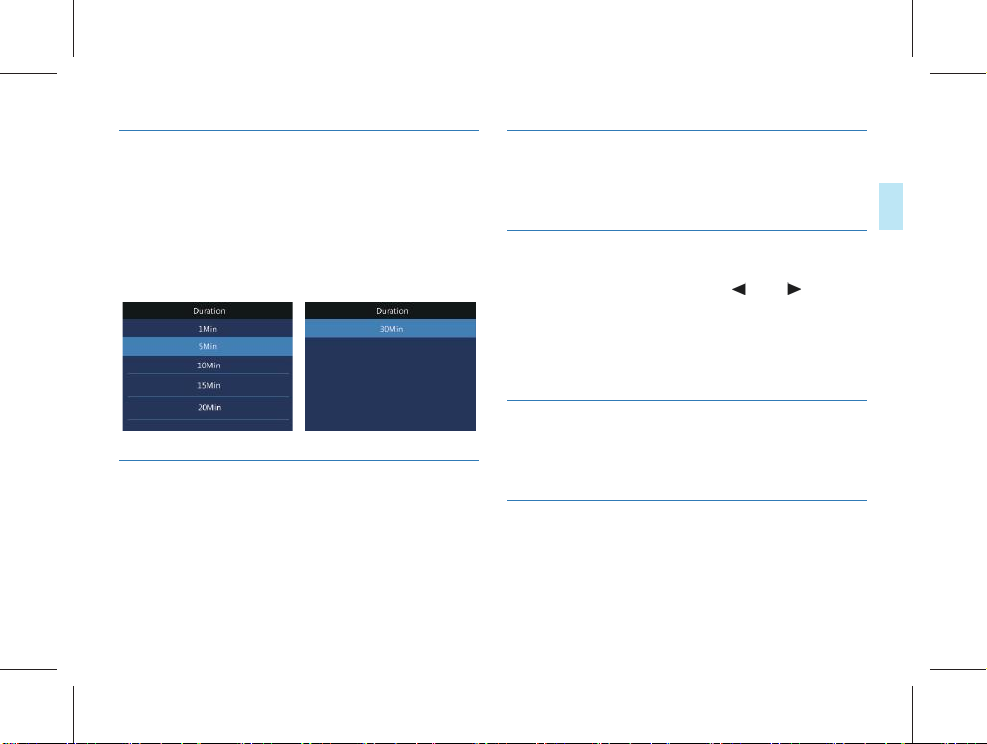
13.4.9 Video loop
On the video settings menu, select “Video loop” and press
the “Menu” button to enter. Press “
from the two options: on and o . After the selection is
completed, press the “Menu” button to confi rm. Press the
“Menu” button to return to the previous menu.
The reference interface is shown below:
” or “ ” to choose
13.4.8 In-car mode
When the “In-car mode” is on, “Video loop” and “In-car
record” are available; when the “In-car mode” is o , “Video
loop” and ““In-car record” are unavailable. “In-car mode”
defaults to “O ” and “In-car record” defaults to “O ”. .
58 EN
13.4.10 In-car record
When the function is used, you can choose whether you
want to record the sound inside the car.
Page 59
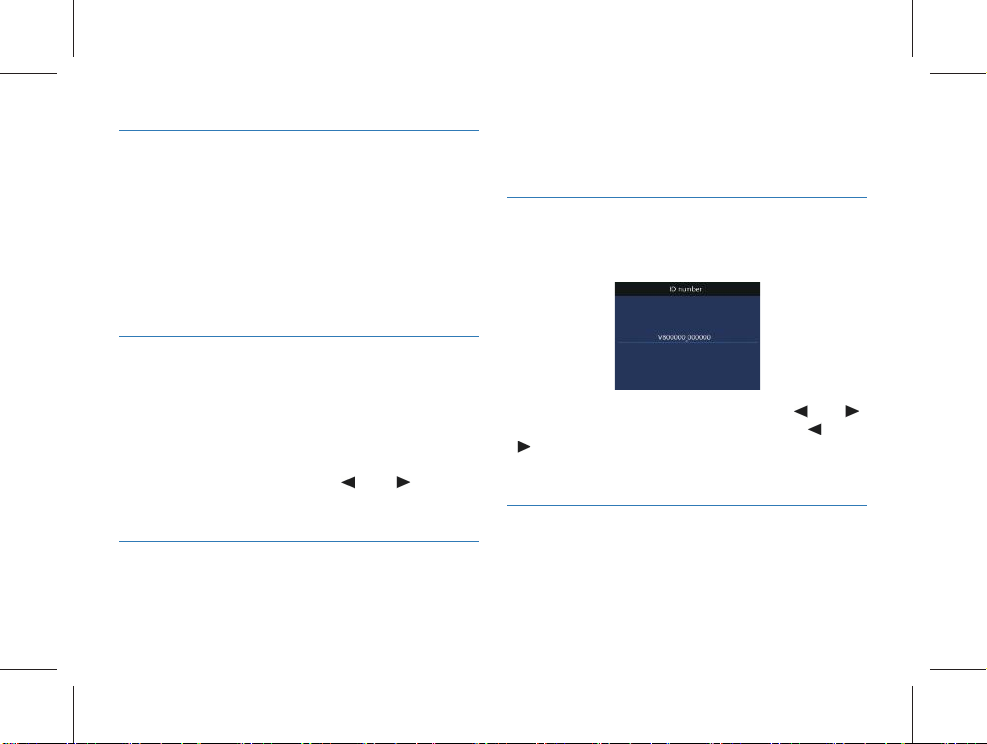
13.4.11 Segmented video
The segmented video has six levels: 1minute, 5 minutes, 10
minutes, 15 minutes, 20 minutes, and 30 minutes. During the
recording process, the segmented video automatically saves
the video fi le in segments and automatically switches to the
next video recording.
The video segmentation function reference interface is shown
below:
13.4.12 Key tone
When the function is used, there will be an audible prompt
for button operation.
13.4.13 Indicator light
When the function is used, you can turn on or o the status
indicator as needed.
13.4.14 Infrared switch
On the System Settings menu, press “ ” or “ ” button to
select the “Infrared” menu, and then press the “Menu” button to enter the Infrared Switch menu. The menu o ers two
options: Manual and Auto. After the selection is completed,
press the “Menu” button to confi rm. Long press the “Menu”
button to return to the previous menu.
13.4.15 Voice broadcast
Turn on the function, it will prompt the voice broadcast for
the specifi ed operation.
13.4.16 Plenary broadcast
Only after the voice broadcast function is enabled, the plenary broadcast function can be turned on. Turn on the function,
it will prompt the voice broadcast for the whole time.
EN 59
English
Page 60
13.4.17 Motion detect
After the audio and video recorder turns on the motion
detection, please press the “Record” button. The audio and
video recorder automatically turns on the recording function
after an object enters the shooting range of the audio and
video recorder. After the object leaves the shooting range for
10 seconds, the recording function ends and the recording
fi le is saved. The motion detection function setting can be
selected: o / on.
13.4.18 EV
Exposure compensation is an exposure control method that
compensates for brighter or darker shots. You can adjust
the brightness of your photos to create unique visual e ects
according to your own needs.
The exposure compensation setting can be selected from 13
values between -2.0 and +2.0. Press “
the appropriate value. When the selection is completed,
press the “Menu” button to confi rm.
“ or “ ” to select
13.4.19 WIFI
Turn the WIFI function and connect mobile phone to
60 EN
remotely control the device to video, audio and take photos.
Also, this function supports online play, local download and
sharing.
13.4.20 ID number
ID number setting interface is as shown below:
On this interface, press the “Menu” button and “ ”or “ ”
to set the device number and user number. Press “
“
” to change the corresponding position value, and press
the “Menu” button to confi rm. Long press the menu to
return to the previous menu.
” or
13.4.21 System info
The system information menu includes: total storage capacity,
available space, available video time, available audio time,
battery power and version number.
Page 61

English
Total storage capacity: local memory size information.
Available space: remaining space information.
Available video time: the time length for the current video
recording resolution.
Available audio time: the time length for the current audio
recording type.
Battery level: current battery level information.
Version number: firmware version information.
EN 61
Page 62
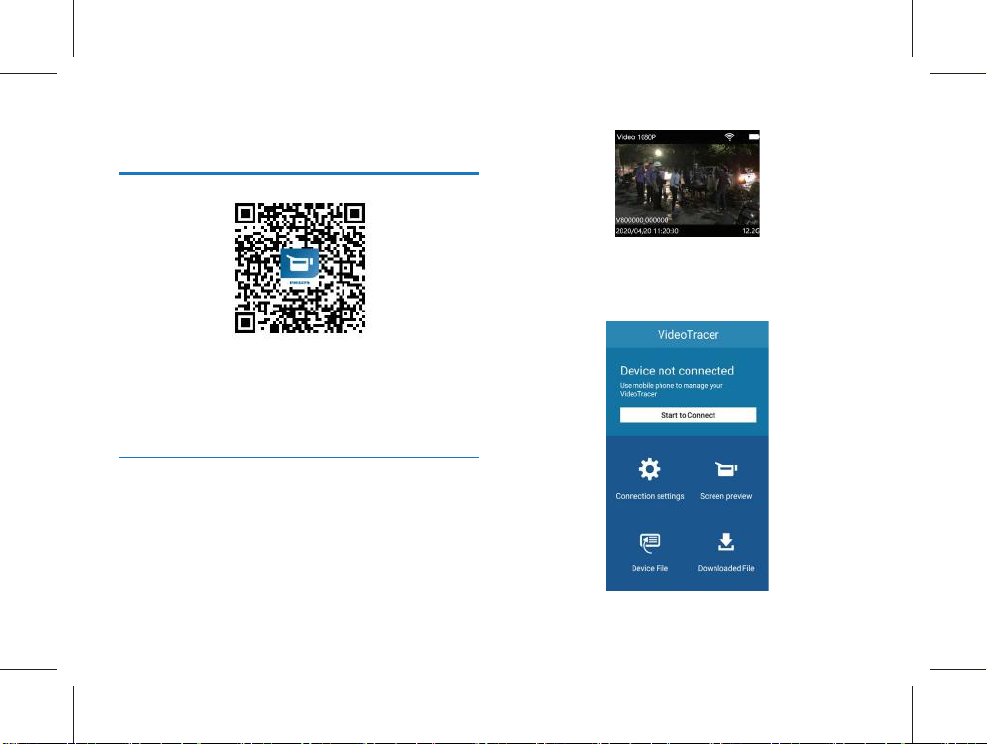
14 Download and install APP
Scan the QR code below to download and install the APP
with phone. Choose “Always allow” if there is a prompt that
the application requires the permission of the mobile phone,
otherwise it cannot be used. Very few mobile phones need to
turn o “Mobile network” to connect.
14.1 Connection
Step 1: After the recorder is on, press the “WIFI” button to
turn on the WIFI, and the icon turns white.
The reference interface is as shown below:
62 EN
Step 2: Open the APP. When you open the APP for the first
time, there will be a “Guide prompt” interface. Click the
“Next” button on the guide interface to enter the connection interface, as shown in the below:
Page 63
English
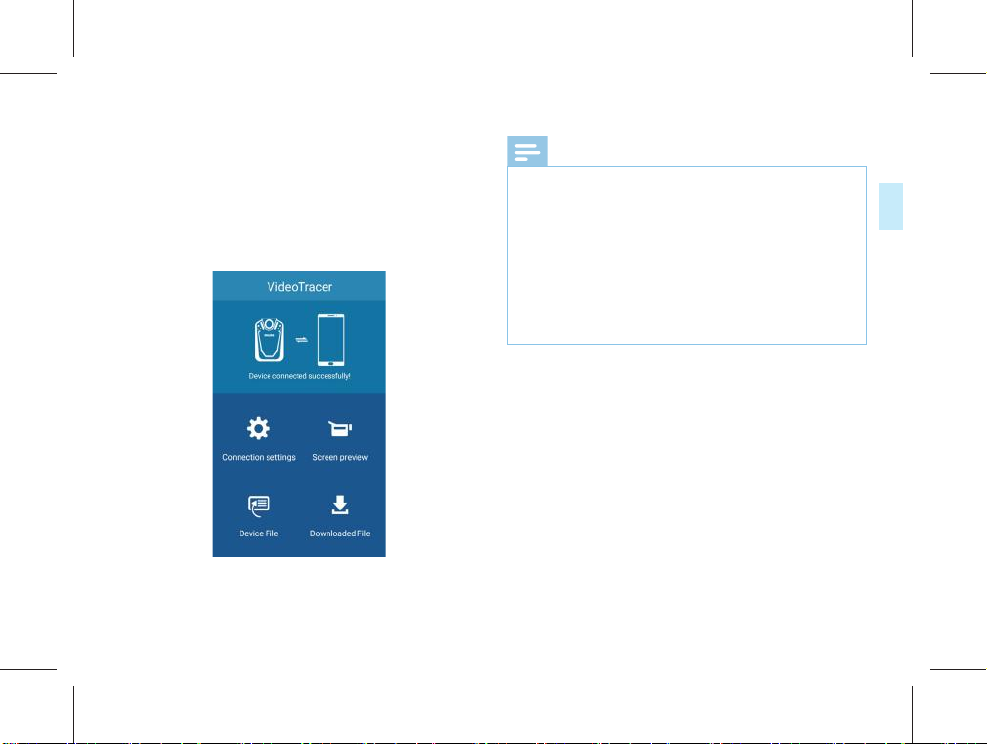
Step 3: Click the “Start connection” button on the APP
interface to enter the WLAN list interface, manually connect
to the VTR8202 network with password “88888888”. After
successful connection, the “Connected (not allowed to
access the Internet)” will be displayed. The WIFI icon will
display green, and press the “Return” button to return to
the connection interface. The interface shows “Recorder
connected”, as shown in the below:
Notice
Owing to different brands of mobile phones and versions
of their system, there will be different prompts and
requirements when connecting the APP. When the recorder
fails to connect with the APP, check the settings:
1. Check whether the mobile network is o. If not, please
set it to o;
2. Check whether WIFI “Dual channel network acceleration” setting is o. If not, please set it to o;
3. Set “Smart select WIFI or mobile network” settings of
WIFI assistant to o.
EN 63
Page 64
Reminder
1. When the recorder is connected to the APP successfully,
the APP interface will pop up “No Internet access, switch
to other available networks?” Please select “No / Do
not use / Keep connected”, etc. The prompt varies with
different mobile phones.
2. When the recorder is connected to the APP, if the
prompt “Unable to connect to the server, please check
your network settings” pops up, please ignore it, because
this is normal. What the mobile phone connected is the
recorder’s WIFI.
14. 2 Introduction to APP
1. APP settings
Select “Settings” in the main interface to connection settings,
parameter settings and application statements. The connection settings can change WIFI and password. Parameter setting and recorder parameter setting include video resolution,
photo size, exposure, synchronization time, software version.
After changing the parameters, the mobile phone sends instructions to the recorder and converts it into corresponding
parameters.
64 EN
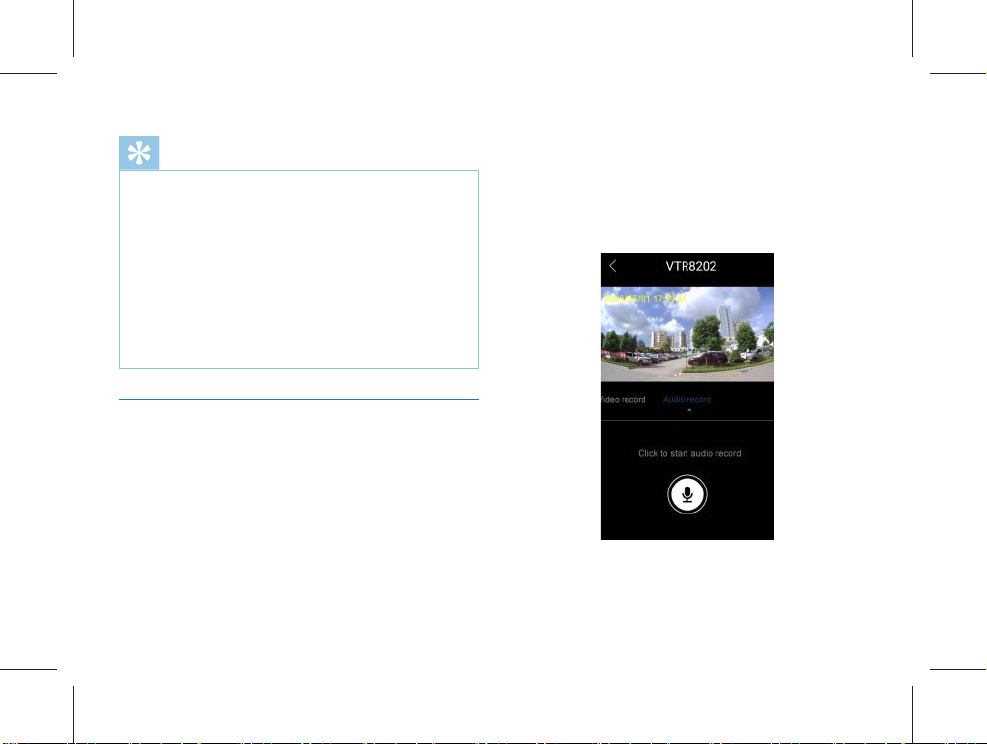
2. APP screen preview
After connecting the APP, select “Screen preview” in the
main interface to enter the preview interface, and the “WIFI
CAM” character will appear. APP screen preview includes
APP operating video& audio& photo function. The APP
screen preview interface is shown as follows:
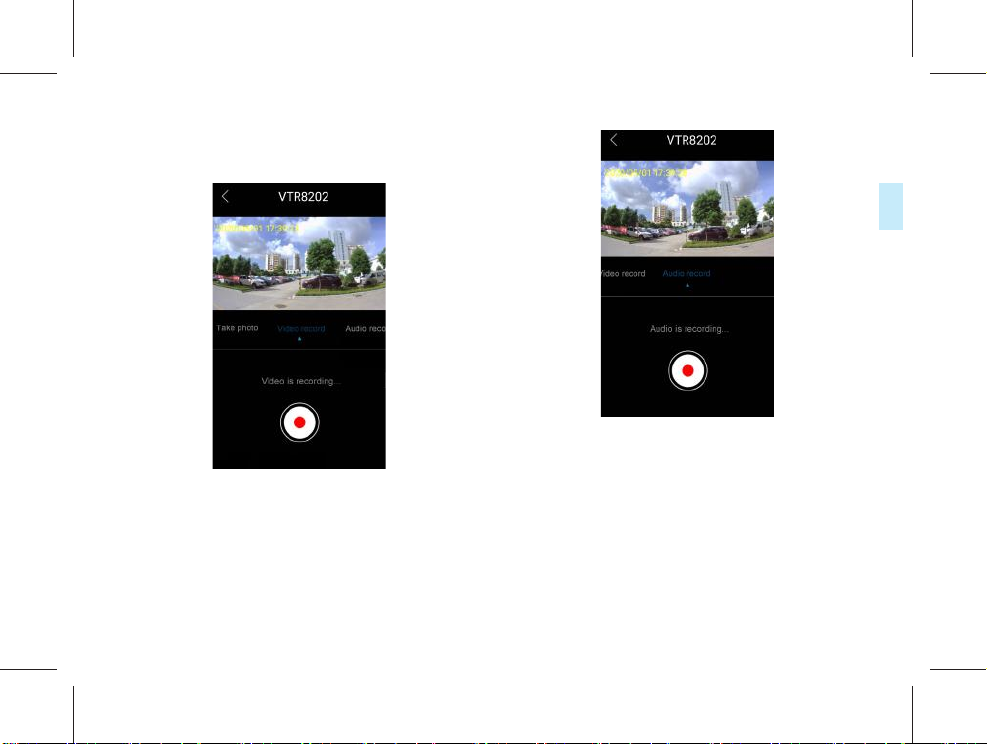
APP operating video. After connecting the APP, select “Screen
preview” in the main interface to enter the pre-recording
interface, and the “WIFI CAM” character will appear. Then,
Page 65
English
click the “Video” to start video recording, and click the icon
again to save the recording. The APP operating video interface is shown as follows:
APP operating audio. After connecting the APP, select “Screen
preview” in the main interface to enter the pre-recording
interface, and the “WIFI CAM” character will appear. Then,
slide to the right and click the “Audio” to start audio recording, and click the icon again to save the recording. The APP
operating audio interface is shown as follows:
APP operating photo. After connecting the APP, select “Screen
preview” in the main interface to enter the pre-recording
interface, and the “WIFI CAM” character will appear. Then,
slide to the left and click the “Photo” to start photo taking.
3. APP recorder file
Click the “Recorder file” icon in the main interface to enter
the interface to download, view the video, audio and photo
files in the recorder. The interface of APP recorder file is
shown as follows:
EN 65
Page 66
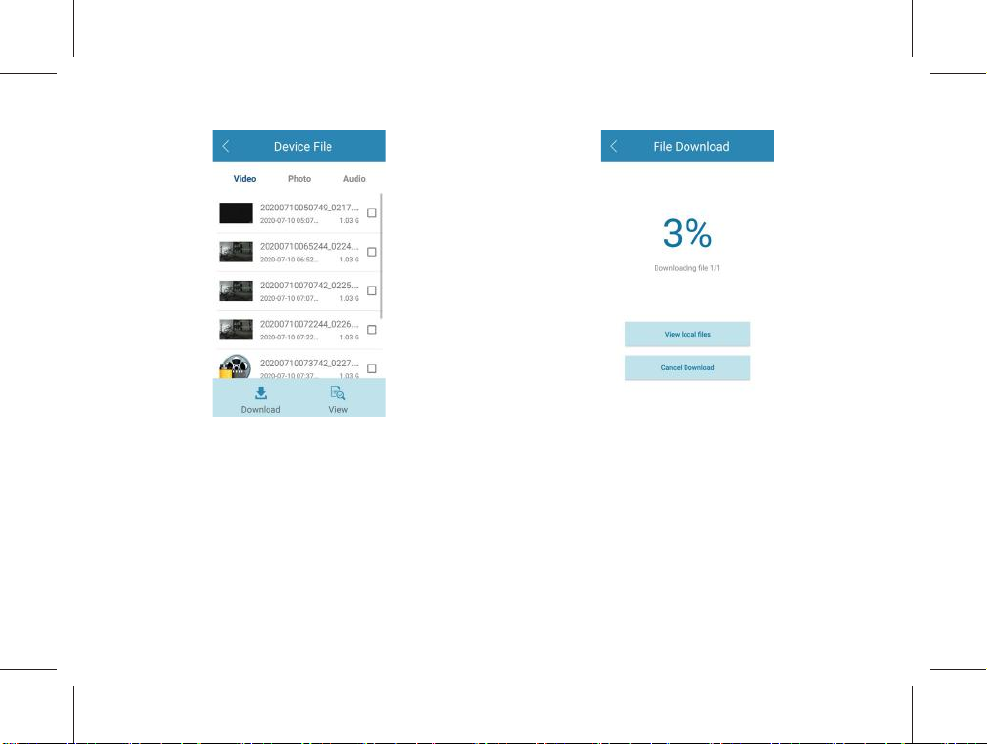
APP file download: When the mobile APP is connected to
the recorder, the APP can download the video, audio and
photo files to the mobile phone. Select the file you want to
download and click the “Download” icon. The download
percentage will be displayed, as shown below:
66 EN
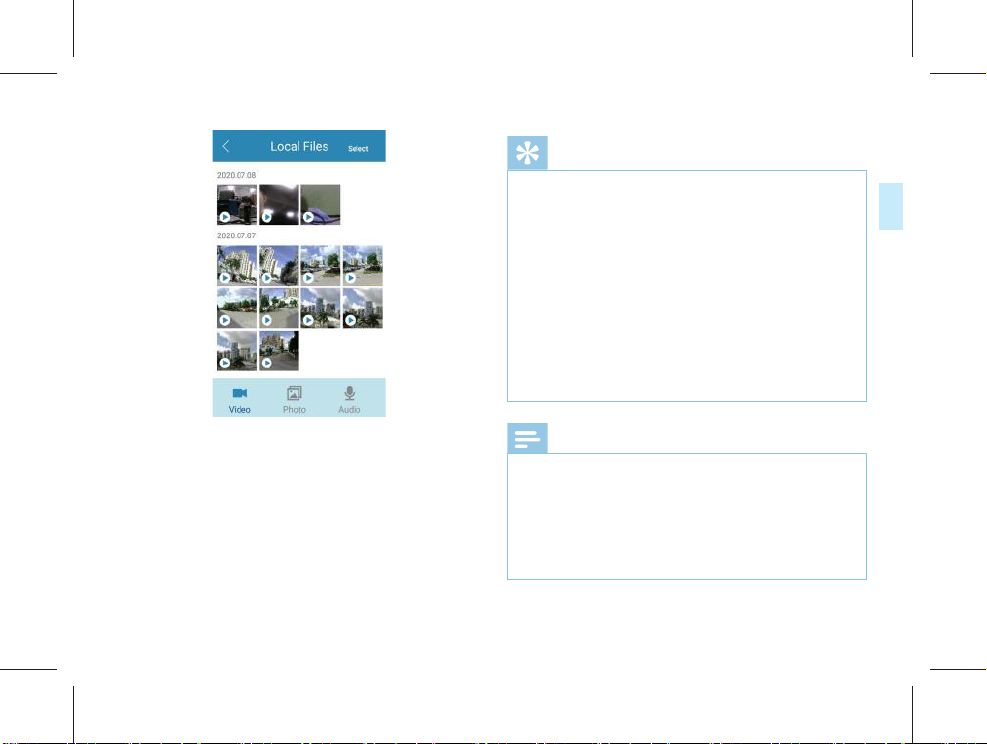
4. APP downloaded files
Select the “Downloaded file” icon in the main interface of
APP, and the downloaded video, photo and audio will be
displayed. You can choose to share and delete. The reference
is shown as follows:
Page 67
English
Reminder
1.When entering the APP screen preview interface, if the
distance between the mobile phone and the recorder is
within 2 meters, the phone will emit a howling sound due
to the noise crosstalk. At this time, you can turn down the
volume to eliminate this sound.
2.Due to environmental factors and dierent brands of
mobile phones, for better operation, please keep the device
and the mobile phone in an eective distance.
3.When the APP operating recorder beyond the eective
distance, the APP will be disconnected while video/audio
recording will continue. At this time, it is necessary to
manually click the “Video” and “Audio’’ buttons to save the
video and audio files.
Notice
1. When the power gets low, the WIFI of the device will be
disconnected from the APP end automatically;
2. After the mobile detection is turned on, the APP terminal
controls the video recording, and the motion detection
does not work at this time;
3. While the APP control the video recording, it does not
support the 3200*1800 30P resolution.
EN 67
Page 68
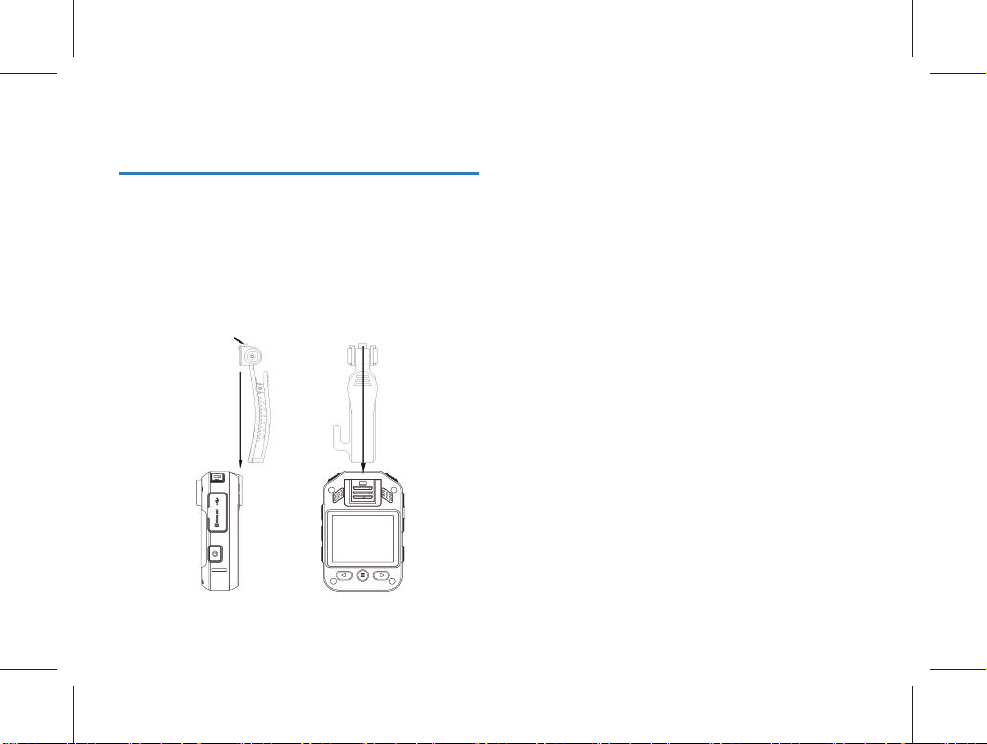
15 Mounting of Shoulder Clip
When mounting the shoulder clip, align the connecting
①
bracket of the clip into the main slot according to the
shown position, and then slowly push it until the top of
the clip reaches the bottom of the slot.
When removing the shoulder clip, hold it with one hand,
②
hold the device body with the other hand and hold the
clip. Gently push it out until the connecting bracket leaves
the device. It is as shown below:
68 EN
Page 69

English
16 FAQ
This section has listed all the frequently asked questions to
help you address the simple issues during use of the voice/
video recorder. If such issues persist, please consult our
dealers or visit our ocial website: www.philips.com/support
16.1 Unable to start audio and video recorder
The batter has run out and you need to charge your device.
16.2 Incorrect time/date
The audio and video recorder time is not accurate, and
please reset the time on the menu.
16.3 Unclear image
Unclean lens has caused it. Please use clean cloth to clean it.
16.4 Fail to record audio/video
The internal storage of audio/video recorder has run out and
no recycling shooting mode has been turned on. Please delete
some of the files or transfer such files to external storage
device.
16.5 Unable to play audio or video les
The batter y is used up, please charge your device.
16.6 How to respond to recorder failure
Sometimes you will encounter in the operation the problems such as fail to power on or black screen, etc. The usual
processing method is to reset it. The position of the “Reset”
button: open the USB cover, and you’ll find a small hole in the
slot; use tweezers or pointed item to click on the hole.
Note: This operation will not cause data loss or destruction.
EN 69
Page 70

17 Technical Parameters
17.1 Memory
External Memory
Recording time reference(16GB): about 290 hours
Type of Internal Storage: C10 TF card
Mobile storage device (PC): Yes
17.2 Dimensions and weight
Width × Height × Depth: 80×53.5×25 (mm)
Weight (with battery): 124g (without back clip)
17.3 PC Interface
Operating System: Windows 7,8,10/Vista/XP/2000, Mac OS X,
Linux
Port: USB
17.4 Voice recording
Mono: The bit rate is 128kbps, and the format is MP3
70 EN
17.5 Operating conditions
Temperature: -30℃ ~ 55
Air humidity: 10% – 90%, non-condensing
℃
Page 71

English
EN 71
Page 72
VTR8202
Page 73

Page 74

© 2020 Speech Processing Solutions GmbH.
版权所有文档版本
1.0, 2020/09/04
Register your product and get support at
www.philips.com/welcome
 Loading...