

Page 1
使用手册
User manual
Page 2

2 ZH
Page 3

目录
1 欢迎 5
1.1 产品特点 5
2 重要须知 6
2.1 安全 6
2.2 听力保护 6
6.1 PC 端软件 10
中文
7 娱乐休闲 14
7.1 唱歌模式 14
7.2 直播模式 14
7.3 清唱模式 15
8 DIY 音效制作 16
3 您的多功能语音麦克风 7
3.1 供货范围 7
3.2 概览 7
4 开始使用 8
4.1 开 / 关机 8
5 录音 9
5.1 录音 9
6 现场语音转文本 10
9 回放模式 17
10 鼠标功能 18
11 指示灯说明 19
12 常见故障排除 20
12.1 无法启动 20
12.2 麦克风无法录音 20
12.3 麦克风无法播放录音 20
12.4 麦克风无法监听到话筒声音或无伴奏 20
12.5 其他注意事项 20
Page 4

13 技术参数 21
13.1 存储器 21
13.2 尺寸和重量 21
13.3 系统要求 21
13.4 录音 21
13.5 运行条件 21
4 ZH
Page 5

1 欢迎
欢迎来到飞利浦世界!您能选择和购买飞利浦的产品,我们非
常高兴。您可在我们的官方网站上获得飞利浦公司的全方位技
术支持,如:使用手册、软件下载、保修信息等。
www.philips.com
1.1 产品特点
• 多场景、多模式一键录音;
• 现场语音转文本、适合会议、演讲;
• 现场录音、带音效录音、音乐演唱录音;
• 休闲娱乐、唱歌、直播、清唱以及 DIY 音效多种功能;
• 独具特色的快捷鼠标按键功能。
中文
Page 6

2 重要须知
2.1 安全
• 为了避免短路,切勿将产品放置在触水受潮处。
• 不要将产品放在加热设备附近或阳光直射的地方。
特别声明:使用本产品前请仔细阅读本说明书,如因人为操作
或不可抗力因素而导致数据丢失,本公司一概不予负责。特别
提醒用户小心操作,注意将资料另外备份。
2.2 听力保护
使用耳机时请遵守下列原则:
• 调整至合适的音量,切勿长时间使用耳机。
• 特别需要注意,切勿将音量调至耳朵所能承受的范围之外。
• 切勿将音量调至盖过周边环境的声音。
• 在危险情况下请小心或暂停使用耳机。
6 ZH
Page 7
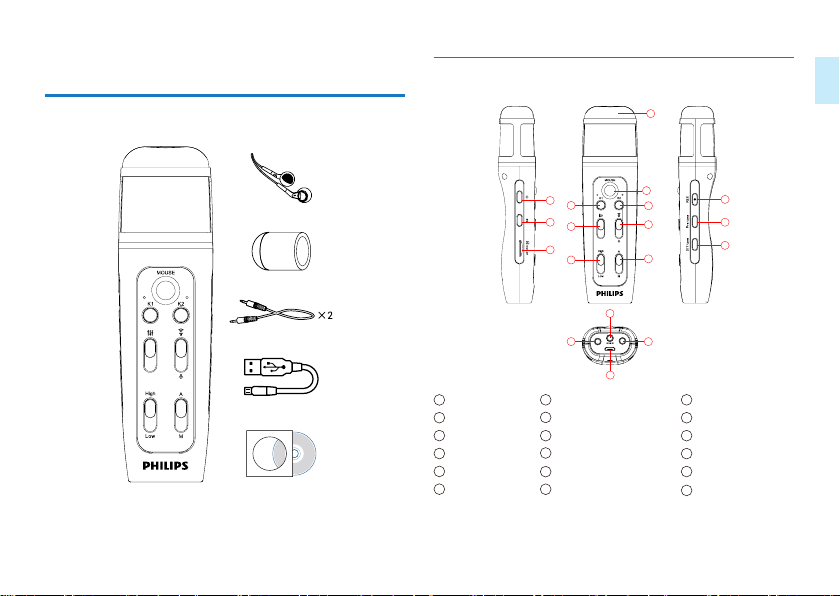
3 您的多功能语音麦克风
3.1 供货范围
3.2 概览
中文
4
1
5
2
6
3
7
17
1
开关机 播放键 SD卡
4
话筒 K1键/鼠标左键 音效键
7
高低音键 轨迹球 K2键/ 鼠标右键
10
音量键 锁键 录音键
13
特殊音效键 DIY键 Line-in
16
耳机 Line-out USB
2
5
8
11
14
17
8
9
10
11
15
16
18
12
13
14
3
6
9
12
15
18
Page 8

4 开始使用
4.1 开 / 关机
长按开机键 2 到 3 秒钟后,本机立即自动开机或关机。开机时
K1 LED 灯亮,接着 K2 LED 灯亮,最后 K2 LED 灯熄灭,机器进
入 K1 唱歌模式。
(1) 音效键6: 推动推扭调整大小,将“音效键”往上推到顶,
此时混响为最大,将“音效键”往下推到底,此时混响为最小。
(2) 音量键10: 推动推扭调整音量大小,将“音量键”往上推
到顶,为音量最大,将“音量键”往下推到底,此时为音
量最小。
(3) 高低音键7: 推动推扭调整高低音调节,将“高低音键”
往上推到顶,此时音调最高,将“高低音键”往下推到底,
此时音调最低。
(4) 锁定键11: 推动推扭至“A”位置时,机器将切换到智能模式,
并自动配置成最佳效果,此时“音效键”和“高低音调节键”
不能调节。把锁定键推扭推至“M”时,解除智能模式,机
器按键恢复到正常可调节模式,用户可根据个人喜欢调节
音效。
8 ZH
Page 9

5 录音
当您初次使用设备录音时,请注意本节中的内容说明!
(1) 确保麦克风插入 SD 卡。
(2) 确保 SD 卡能使用(使用前建议格式化卡)。
(3) 确保 SD 卡有足够内存。
(4) 确保麦克风电量充足。
(5) 本机不支持 line-out 录音。
5.1 录音
1、长按“录音”键进入录音, K1,K2 的 LED 灯会一起亮,开
始录音时 K1,K2 的 LED 灯会交替闪烁。
2、短按“录音”键保存并退出录音,K1,K2的 LED指示灯不
再交替闪烁,并返回 K 歌模式。
中文
Page 10
6 现场语音转文本
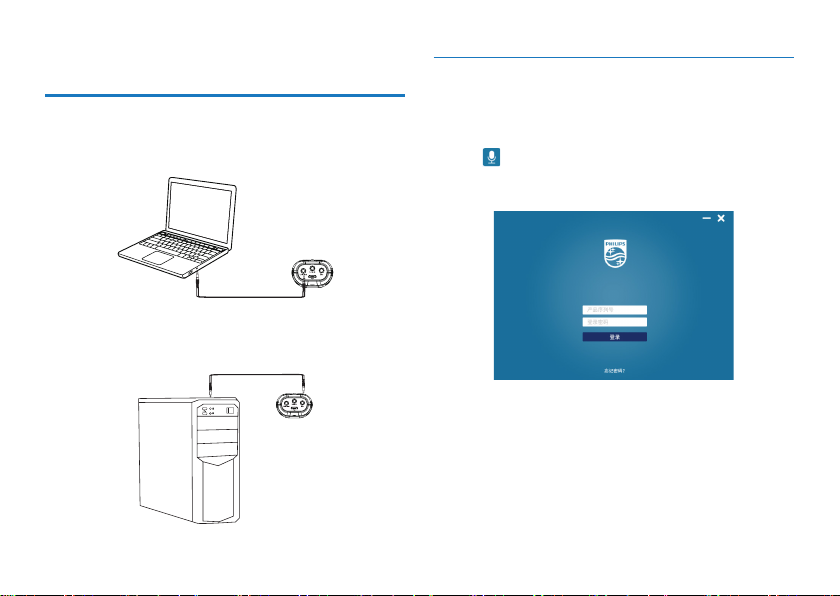
1、笔记本电脑连接:用 Line-out 线 / 直播线将设备与笔记本
电脑相连,线的一头接设备的 Line-out 接口,另一头接电
脑的耳机口。
Line out
2、台式电脑连接:用 line-in 线 / 伴奏线将设备与台式电脑相
连,线的一头接设备的 Ear 接口,另一头接电脑的 MIC 接口。
6.1 PC 端软件
1、将麦克风出厂配带的光盘插入电脑的光驱,把光盘里的整个
VTR5160 文件夹拷贝到电脑上,再打开 VTR5160 文件夹,选
择“ ”双击进去登录界面。
登录界面:输入正确的产品序列号,输入密码(初始密码:
123456),点击登录即可使用此软件,如下图:
10 ZH
Line-in
2、使用 PC 端软件之前,先把设备设置为语音转文本模式。设
备开机后,长按 K1 键进去语音转文本模式,此时 K1 和 K2
指示灯长亮。
3、如与笔记本电脑连接使用,请参考上面的第一点说明,与台
式电脑连接使用,参考第二点说明。
4、line-in 线(三节头),line-out 线(四节头)如下图。
Page 11
5、电脑没有光驱不能读取 PC 软件时,可以点击如下网站下载
http://nmapi.car-boy.com.cn/VoiceTracer/VTR5160.rar
软件:
如还有疑问可直接拔打 400 800 7890 客服热线。
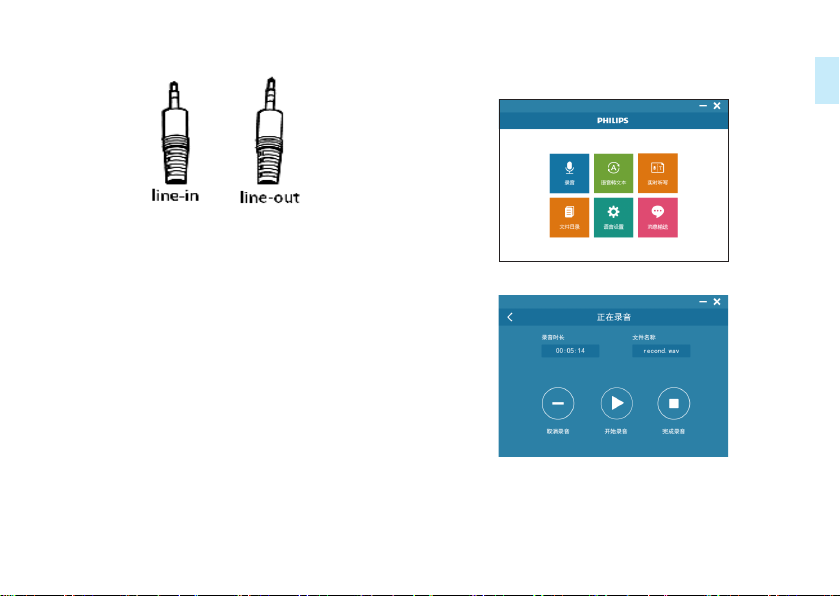
主界面:录音、语音转文本、实时听写、文件目录、语言设置、
消息输送。
录音界面:开始录音、暂停录音、保存录音。
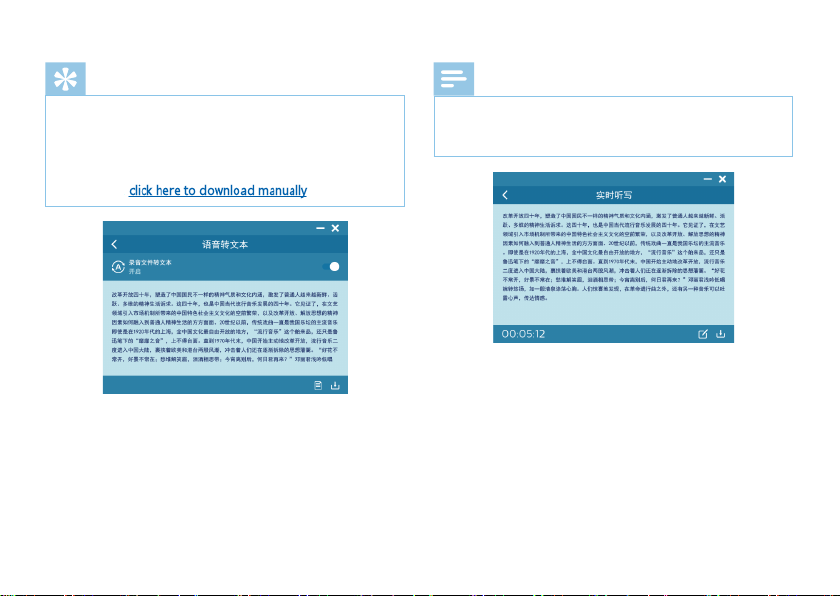
语音转文本:语音转文本界面可以保存文本,编辑文本。
中文
Page 12
提示
• 安装下载 PC 端软件后,登录软件必须确保网络已连接。
• 电脑端若提示需要安装 framwork4.0 的框架时,则需要安
装才能 使用,链接网址:https://www.microsoft.com/enus/download/confirmation.aspx?id=17851, 打 开 网 址 后
点击下载 此文件。
实时听写:选择实时听写菜单,进去后,点击开始,即可以边
说边翻译,在此界面也可以对翻译后的文本编辑、保存。
12 ZH
注意
• 当网络连接不稳定和信号差时,将会影响翻译的速度以及
准确率,建议在网速较好的情况下使用 PC 端软件。
• 光盘里的 PC 端软件,必须拷贝到电脑上才能使用。
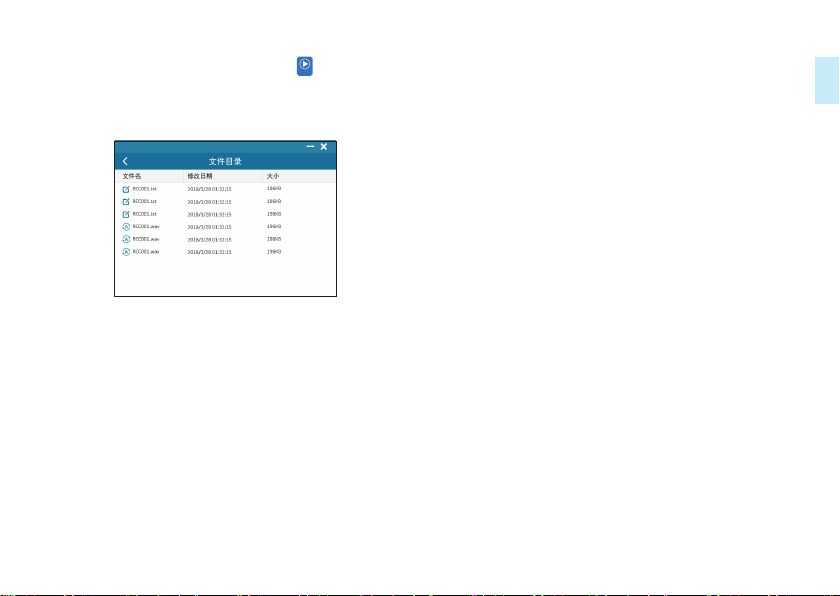
文件目录:选择文件目录菜单,进去后,可以浏览录音文件和
文本文件列表。可点击打开文本文件的内容。
Page 13
选择“消息输送”窗口菜单进去后,点击“
示后按“确定”,鼠标去点击对应输入框即可传送语音转文本
”图标,弹出提
开始输送
消息。
中文
Page 14
7 娱乐休闲
7.1 唱歌模式
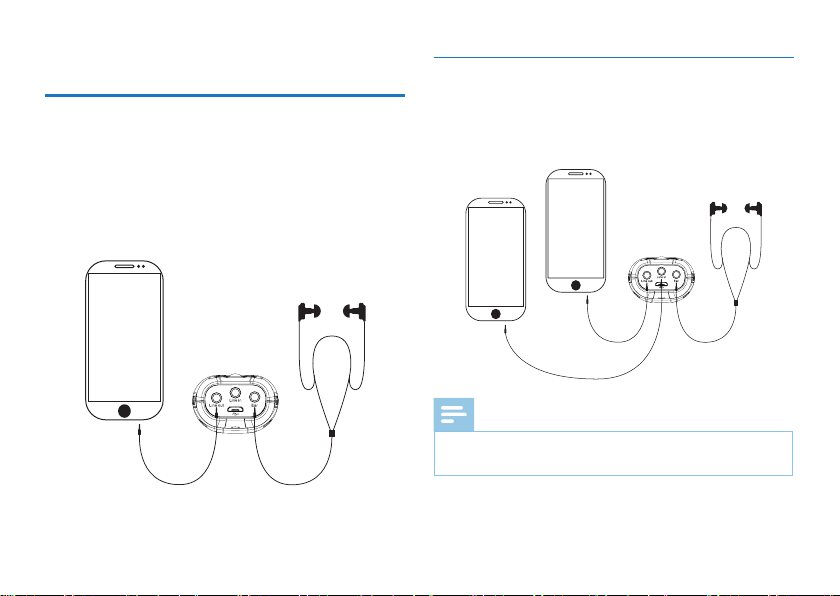
短按 K1按键即可进入唱歌模式,在此唱歌模式下打开接入
Line-out 线,打开手机的唱歌平台如(唱吧、全民 K 歌等平台)
即可进入唱歌模式。可以通过调节混响、高低音、声音大小来
调节音效达到一个最佳的唱歌模式。连线如下图所示:
7.2 直播模式
短按 K1 按键即可进入直播模式,在此模式下可以通过调节混响、
高低音、声音大小来调节音效达到一个最佳的直播模式。直播
连线如下图所示:
14 ZH
伴奏 回放
手机
伴奏
回放
注意
• 在清唱和直播模式下可以通过短按 Pre-Tone 和 DIY 按键增
加娱乐音效
Page 15
7.3 清唱模式
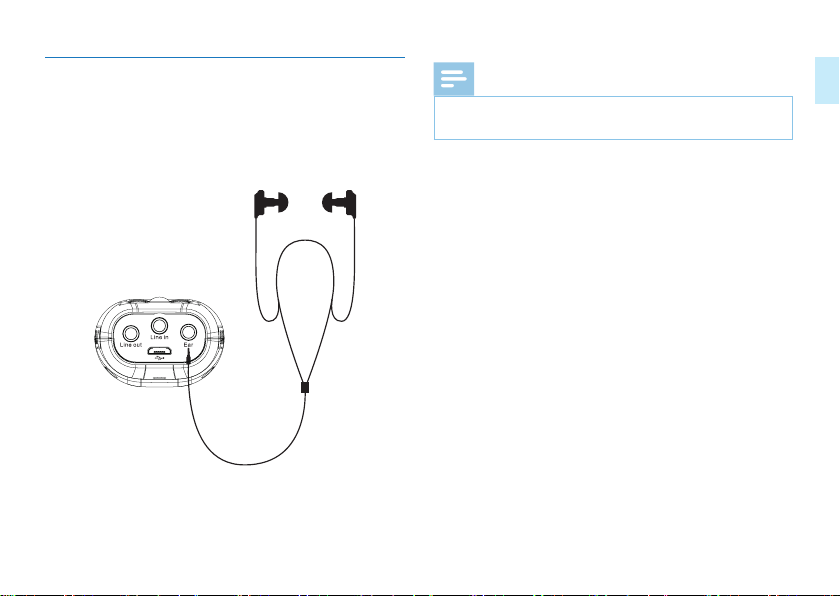
在短按 K2 按键即可进入清唱模式。在此模式下你可以通过调节
混响、高低音、音量大小滑动按键来调节音效达到一个最佳清
唱状态。清唱界面接线图如下图所示:
耳机
注意
• 在清唱和唱歌模式下可以通过短按 Pre-Tone 和 DIY 按键增
加娱乐音效
中文
Page 16

8 DIY 音效制作
(1)长按“DIY 键”进入录音, K1,K2 的 LED 灯同时 亮起,
开始录音时 K1,K2 的 LED 灯交替闪烁。
(2)短按“DIY 键”保存并退出录音,音效录音制作“30 秒”
会自动保存并退出。
16 ZH
Page 17

9 回放模式
录音回放:在待机模式下,短按 PLAY 键回放当前的录音文件。
DIY 音效回放:短按“DIY 键”回放当前的 DIY 文件。
提示
• 本机只播放最后一个录音文件。
中文
Page 18

10 鼠标功能
设备可作为鼠标来使用(连接电脑后,可以滑动轨迹球选择菜单,
滑动轨迹球到要打开的菜单上,连续按两下 K1 键可以直接打开
窗口 / 文件),按一下 K2 键(相当于右键打开菜单)选择。
提示
• 在文件移入或移出麦克风时,请不要断开麦克风与电脑的
连接。当麦克风与电脑连接时,可短按 PLAY 键退出 USB 卡
盘模式。
18 ZH
Page 19

11 指示灯说明
1、充电时,呼吸灯红色指示灯闪烁,充满后红色指示灯长亮。
2、低电时,呼吸灯红色指灯快闪三次,然后关机。
3、卡出错不能录音时,K1K2 灯同时长亮。
4、卡满时 / 目录满,K1K2 灯同时闪烁三次,然后自动退出来
中文
Page 20

12 常见故障排除
此处列举了常见问题的解答,可帮助解决 VTR5160 出现的简单
问题。如果故障仍无法排除,请咨询经销商或访问我们的官方
网站:www.philips.com/support
12.4 麦克风无法监听到话筒声音或无伴奏
1、检查是否与手机连接成功;
2、检查话筒声音是否调小;
3、检查是否切换到 K2 清唱模式。
12.1 无法启动
电 池 电 量 已 耗 尽 , 接 入 U S B 进 行 充 电 , 确 认 能 否 正 常 启 动 。
12.2 麦克风无法录音
1、麦克风 TF 卡储存空间已满。
2、未插入 TF 卡。
12.3 麦克风无法播放录音
1、确认麦克风有无插入 TF 卡。
2、确认麦克风的 TF 卡有无录音文件。
20 ZH
12.5 其他注意事项
1、注意防水、防尘、防震、防火;
2、定期给产品充电;
3、不得擅自拆卸和改装、由此产生的任何功能、安全问题由用
户承担。
Page 21

13 技术参数
13.1 存储器
支持 4G 到 64G 的 micro SD
13.2 尺寸和重量
宽 × 高 × 深:40×142×27.2(mm)
重量 (含电池):107.4g
13.3 系统要求
操作系统:
Windows 10/Windows 8/Windows 7/Vista/XP/2000, Mac OS X,
Linux
接口 :US B 接 口
录音参数:采样率 32khz、比特率 192kbps、格式为 MP3
信噪比:88db
充电电流:≤ 0.5A
拾音器:14mm 电容式独立悬挂振膜音头
13.4 录音
32Khz/16bit:比特率为 192Khz,格式为 MP3
13.5 运行条件
温度:5° –45° C
空气湿度:10% – 90%, 不凝结
中文
Page 22

Content
7.1 Singing mode 32
7.2 Live broadcast mode 32
1 Welcome 23
1.1 Product Features 23
2 Important 24
2.1 Safety 24
2.2 Hearing protection 24
3 Your VoiceTracer 25
3.1 What’s in the gift box? 25
3.2 Overview 25
4 Start to Use 26
4.1 Power on/off 26
5 Recording 27
5.1 Recording 27
6 Realtime Voice to Text 28
6.1 PC software 28
7 Entertainment & Leisure 32
22 EN EN 23
8 DIY Audio Effect Production 34
9 Playback Mode 35
10 Mouse Function 36
11 Explanations to the indicators 37
12 Frequently Asked Questions 38
12.1 Unable to switch on the device 38
12.2 Unable to record with the device 38
12.3 The device cannot play recorded audio 38
12.4 The device cannot hear the mike sound or is
unaccompanied 38
12.5 Other notes 38
13 Technical Parameters 39
13.1 Memory 39
13.2 System Requirements 39
13.3 Dimensions and Weight 39
13.4 Operating conditions 39
Page 23

1 Welcome
Welcome to the world of Philips! We are honored by your
choice and purchase of Philips’ products. You can have Philips’
comprehensive technical supports from our website, e.g. user’s manuals, software downloading and warranty information
etc.
www.philips.com
1.1 Product Features
• One-touch recording on multiple scenes and multiple
modes;
• Realtime voice to text, suitable for meetings and speeches;
• Live recording, sound recording, and music recording;
• Device for leisure, entertainment, singing, live broadcasting,
and unaccompanied singing with DIY sound effects
• Unique quick mouse button functionality.
English
EN 23
Page 24

2 Important
2.1 Safety
• To avoid a short circuit, do not expose the product to rain
or water.
• Do not expose the device to excessive heat caused by
heating equipment or direct sunlight.
Attention! Before using the device, please read this User’s
Manual carefully. The company shall not be liable for any data
loss due to erroneous operation or causes of a force majeure. Special attention should be given to correct operations
and files back up.
2.2 Hearing protection
Observe the following guidelines when using your earphone:
• Adjust to suitable volume; do not use the earphone for a
long time.
• You must remember never to turn the volume up beyond
your tolerance.
• Do not turn up the volume so high that you can’t hear
what’s around you.
• Be cautious and stop using our earphone in hazardous
situaitons.
24 EN EN 25
Page 25
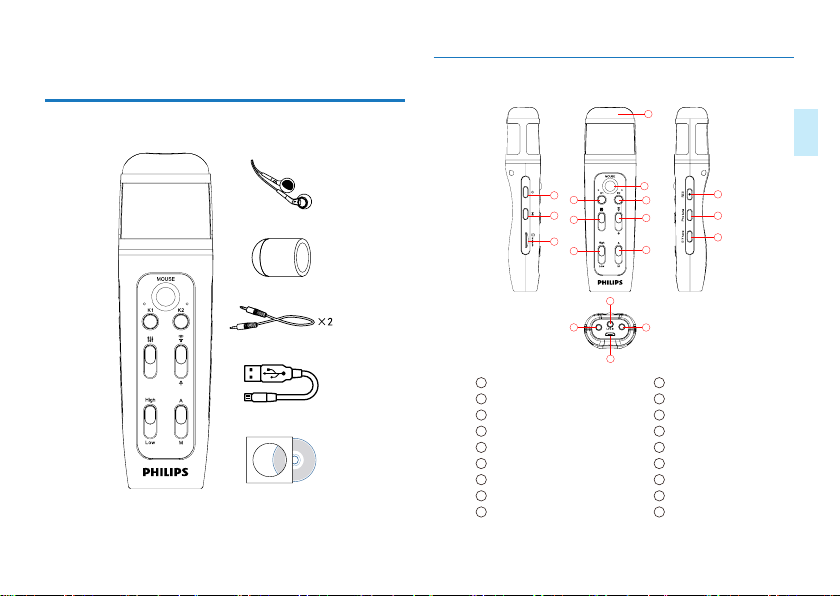
3 Your VoiceTracer
3.1 What’s in the gift box?
3.2 Overview
4
English
1
5
2
6
3
7
15
17
18
1
Power on/off
3
SD card
5
K1 key/left mouse button
7
Treble & bass button
9
K2 button/right mouse button
11
Lock button
13
Special sound effect key
15
Line-in
17
Line-out
8
9
10
11
16
2
Play
4
Microphone
6
Sound effect key
8
Trackball
10
Volume button
12
Record button
14
DIY button
16
Earphone
18
USB
12
13
14
EN 25
Page 26

4 Start to Use
4.1 Power on/off
Press the power button for 2 to 3 seconds to turn on or
turn o the device. The K1 LED indicator lights up when the
device is turned on, and then the K2 LED will light up. When
the K2 LED indicator is o, the device enters the K1 singing
mode.
(1)Slide the sound effect button6 up to the top to reach
the maximum reverberation and slide it down to the
bottom for minimum reverberation.
(2)Slide the volume button10 up to the top to reach
maximum volume and slide it down to the bottom for
minimum volume.
(3)Slide the treble & bass button 7 up to the top to reach
treble and slide it down to the bottom for bass.
(4)When sliding the lock button11to the "A" position,
the device will be switched to the smart mode which is
automatically adjusted for optimal effect. In this mode, the
sound effect button and the treble & bass button will be
locked and cannot be adjusted. When sliding it to "M", the
buttons will be unlocked and can function normally.
26 EN EN 27
Page 27

5 Recording
When you use VTR5160 for the first time, please read the
following instructions CAREFULLY.
(1)Make sure the SD card is inserted into the microphone.
(2)Make sure the SD card functions normally (Formatting is
recommended before use).
(3)Make sure the SD card has enough memory.
(4)Make sure the microphone is fully charged.
(5)The device cannot support line-out recording
5.1 Recording
1. Long press "Record" button to start recording and K1, and
K2 LED lights will be on together. When recording starts,
K1 and K2 LED lights will flash alternately.
2. Short press the “Record” button to save and exit the
recording. The LED indicators of K1 and K2 will no longer
blink alternately. The device returns to the karaoke mode.
English
EN 27
Page 28
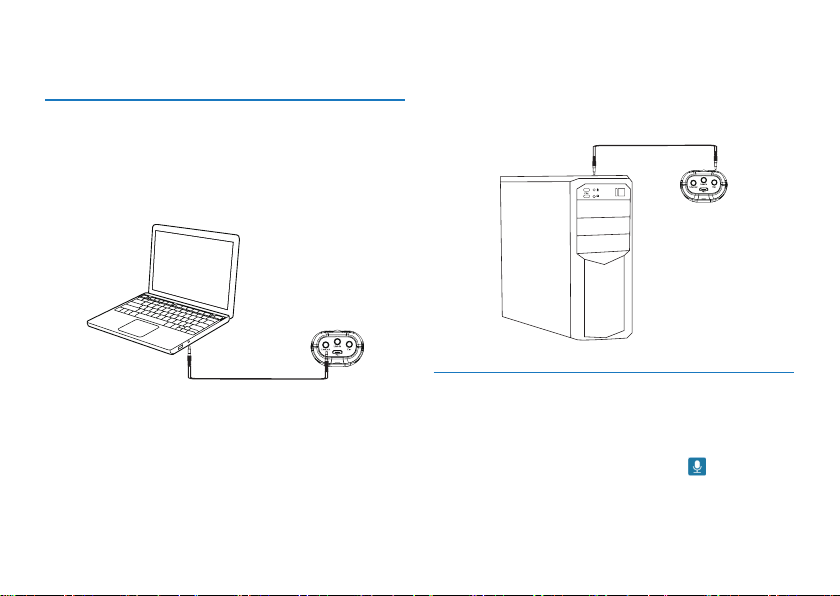
6 Realtime Voice to Text
(1)Connection to laptops: Use a line-out wire to connect
the device with a laptop. Plug one end of the wire into
the Line-out of the device and the other end into the
headphone jack of the laptop. The connection diagram is
shown in the following figure:
(2)Connection to desktop computers: Use a line-in wire to
connect the device with a desktop computer. Plug one
end of the wire into the headphone jack of the device and
the other end into the MIC jack of the computer.
Line-in
Line out
6.1 PC software
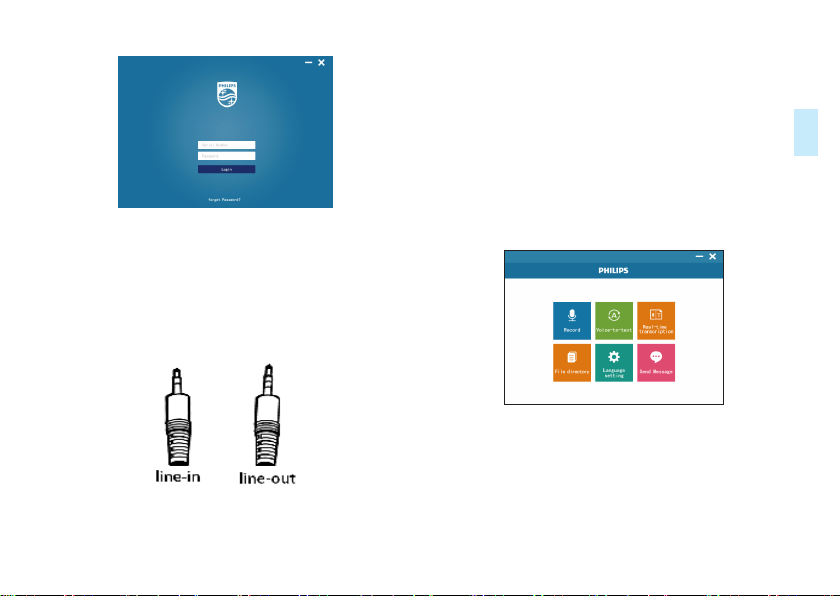
(1)Please insert the CD into the PC CD-ROM and copy the
fles “VTR5160” from CD to PC.Then open the
“VTR5160” directory and double click “ ” to enter into
registration interface.Then enter the correct product
serial number and the Initial password(123456), click Login
to use , as shown below:
28 EN EN 29
Page 29
(2)Before using the PC-side software,please set the device
to voice-to-text mode. Long press the K1 button in the
normal standby to enter the voice-to-text mode,In this
mode, the K1 and K2 LED indicators will light up at the
same time.
(3)Line-in wire with three-section end while Line-out wire
with four-section end ,as shown below:
(4)If the computer does not have a disk drive, please
enter the link to download the software as follow:
Link:http://nmapi.car-boy.com.cn/VoiceTracer/VTR5160.rar
(5)If you still have questions,please call 400 800 7890 for help.
Main interface: recording icon,voice file to text icon,
real-time voice to text icon,catalog,language selection icon,as
shown below:
EN 29
English
Page 30
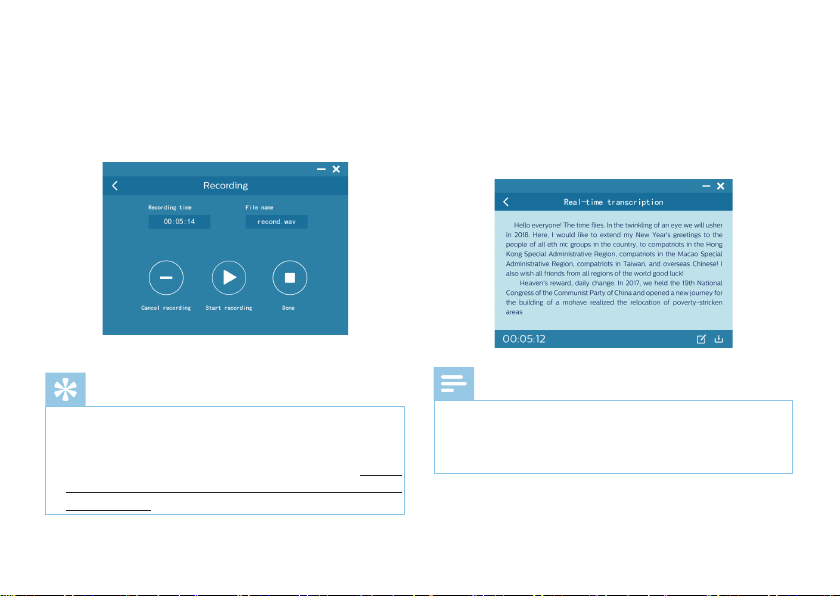
Recording interface: start recording, pause recording and save
recording
Voice file to text: Select a voice file recorded in this software
to convert voice into text. In this mode, you may save and
edit text.
Reminder
• After installing and downloading the PC software, please
ensure that the network is connected.
• If the computer prompts to install the framework of
framwork4.0, you need to install it to use it. URL:https://
Note
• When the network connection is unstable and the
signal is poor, it will affect the speed and accuracy of
translation. So that the PC software is recommended to
use when the network is good.
www.microsoft.com/enus/download/confirmation.
aspx?id=17851
30 EN EN 31
Page 31
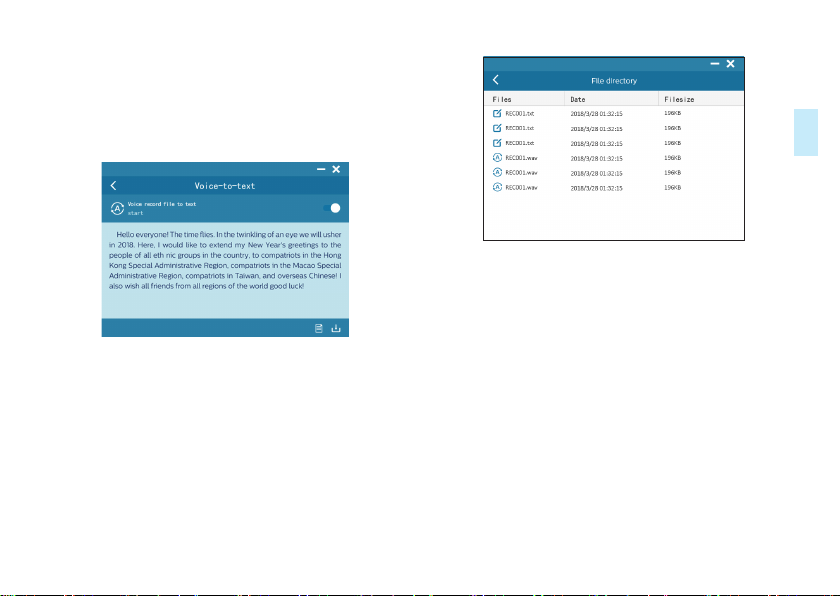
Voice to text: In the voice to text interface, you can save and
edit text.
File browsing: You can browse recorded files and text files.
You may convert recorded voice into text and browse
through it.
English
EN 31
Page 32
7 Entertainment & Leisure
7.1 Singing mode
Short press the K1 button to enter the karaoke mode. In
this mode, connect the line-out and open the phone’s singing
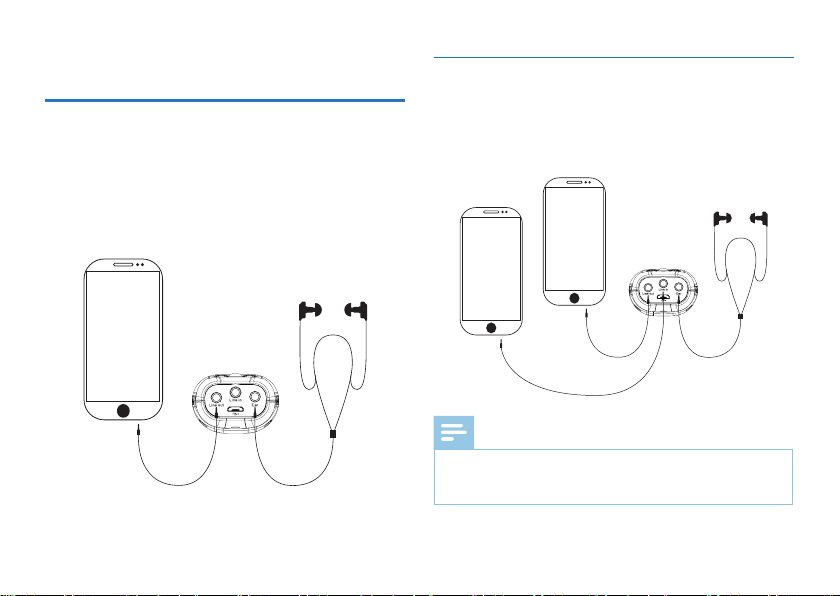
7.2 Live broadcast mode
Short press K1 button to enter into the live broadcast mode.
In this mode, you can adjust the reverb, treble & bass and volume to achieve an optimal singing eect. The line connection
is shown below:
apps such as (singing it, K-pop, etc.) . You can adjust the reverb, treble & bass and volume to achieve an optimal singing
eect. The line-out connection is shown below:
ReplayVia phone
Acconpaniment
Note
Acconpaniment Replay
• You can gain voice entertainment effect by short pressing
Pre-Tone and DIY buttons in the unaccompanied singing
mode and live broadcasting mode.
32 EN EN 33
Page 33
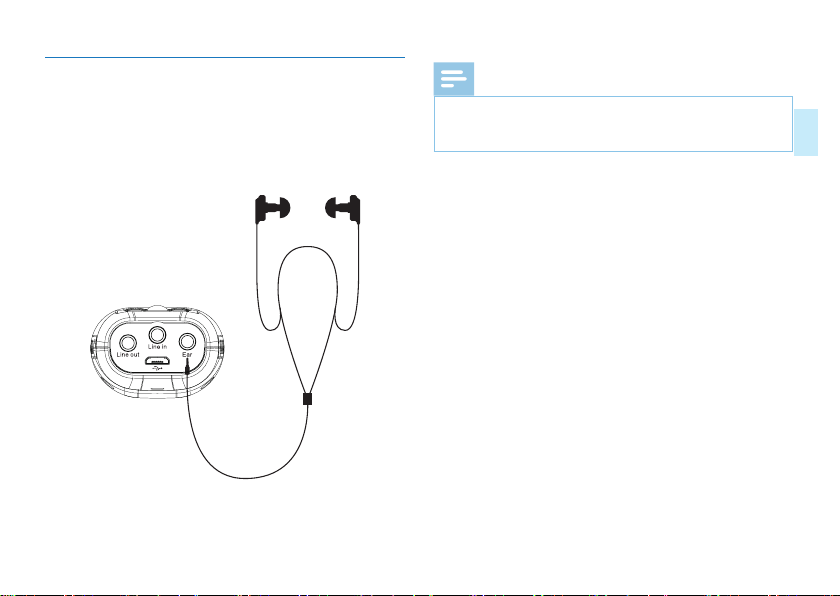
7.3 Unaccompanied Singing Mode
Short press K2 button to start theunaccompanied singing
mode. In this mode, you can adjust the reverb, treble & bass
and volume to achieve an optimal unaccompanied singing
eect. The line connection is shown below:
Headphone
Note
• You can gain voice entertainment effect by short pressing
Pre-Tone and DIY buttons in the unaccompanied mode
and singing mode.
EN 33
English
Page 34

8 DIY Audio Effect Production
(1)Long press "DIY" button to enter recording. The K1 and
K2 LED indicators will both light up at the same time.
When recording starts, the K1 and K2 indicators will flash
alternately while the “breath light” remains red.
(2)Short press "DIY" button to save and exit recording. Audio
effect production will be saved automatically and exit in “30
seconds”.
34 EN EN 35
Page 35

9 Playback Mode
Recording playback: In the standby mode, short press PLAY
button to play back the current recording file.
DIY audio eect playback: Short press “DIY” to play back the
current DIY file.
Reminder
• This device only plays the last recorded file.
English
EN 35
Page 36

10 Mouse Function
VTR5160 may be used as a mouse. Once connected to the
computer, you can slide the trackball to select the menu,
move it to the item you want to open, click the K1 button
twice to open the window/file. Press the K2 button to select
(Equivalent to the right button for opening the menu).
Reminder
• Do not disconnect the microphone from the computer
while tranfering files into or out of the microphone.
When the microphone is connected to the computer,
you can short press the PLAY button to exit the USB
mode.
36 EN EN 37
Page 37

11 Explanations to the indicators
1. When the device is being recharged, the red light will keep
flashing. When the battery is full, the light will remain red
without flashing.
2. When battery is low, the red light will flash three times
before the device is turned off.
3. When the card is out of order, the K1 and K2 indicators
will light up continuously.
4. When the card is full, the K1 and K2 indicators will flash
three times before the recording exits automatically.
English
EN 37
Page 38

12 Frequently Asked Questions
Answers to the frequently asked questions are listed here
to solve simple problems that may occur with the VTR5160
model. If the problem cannot be solved, please contact the
dealer or visit our ocial.
website:
www.philips.com/support.
12.4 The device cannot hear the mike sound
or is unaccompanied
• Check whether the connection with the mobile phone is
successful;
• Check whether the microphone sound is turned down;
• Check whether the device is switched to the K2
unaccompanied singing mode.
12.5 Other notes
12.1 Unable to switch on the device
• The battery is empty. Connect USB to charge it. Then
check again.
12.2 Unable to record with the device
• The Microphone SD memory card is full.
• The SD card is not inserted.
• Pay attention to waterproof, dust-proof, shockproof, fire
prevention;
• Regularly charge the product;
• Can not be disassembled and modified without
authorization, any resulting function, safety issues borne by
the user.
12.3 The device cannot play recorded audio
• Make sure the SD card is inserted into the microphone.
• Check if the SD card has any audio file to play.
38 EN EN 39
Page 39

13 Technical Parameters
13.1 Memory
It supports 4G to 64G micro SD
13.2 System Requirements
Operating system:
Windows 10/Windows 8/Windows 7/Vista/XP/2000, Mac OS
X, Linux
Port: USB
Recording parameters: sampling rate 32khz, bit rate 192kbps,
format MP3
Signal to noise ratio: 88db
Charging current: ≤0.5A
Pickup: 14mm Capacitive Independent Suspension Diaphragm
Head
13.3 Dimensions and Weight
Width * Height* Length:
Weight (with battery): 107.4 (g)
40×142×27.2(mm)
13.4 Operating conditions
Temperature: 5°–45°C
Air humidity: 10% – 90%, no condensation
English
EN 39
Page 40

40 EN
Page 41
VTR5160
Page 42

Page 43

Page 44

© 2018 Speech Processing Solutions GmbH.
版权所有文档版本
1.0, 2018/04/16
Register your product and get support at
www.philips.com/welcome
 Loading...