

Page 1

Vt
PHILIPS
o
Page 2

Page 3

OPERATING MANUAL VR 727
CONTENTS
With this Video Cassette Recorder (VCR) you are now the
owner of one of the most sophisticated and simple-to-use
video recorders on the market.
Naturaily, you can't wait to get it going, but, before you do,
it's worthwhiie taking some time to read through this op
erating manual. You wiil learn how to use the video re
corder without any problems.
You can practise using the video recorder without any wor
ries because you cannot damage it no matter which buttons
you press.
This video recorder employs the VHS cassette standard.
We recommend thatyou use PHILIPS VHS video
cassettes to ensure the best possible picture quality from
your video recorder.
Use only cassettes of a well-known brand which display
the VHS symbol:
WS
PAL SECAM
This video recorder is equipped with VIDEOplus+ pro
gramming. VlDEOplus+ and PlusCode are trademark of
Gemstar Development Corp.. VIDEOplus-t- system is
manufactured under licence from Gemstar Development
Corporation.
VIDE
This operating manual is printed on chlorine-free paper.
This is to help protect our environment.
Used batteries should not be thrown away with ordinary
domestic refuse. Deposit old batteries at the relevant
collection points.
Chapter INTRODUCTION Page
1 INSTALLATION 3
Preparing the remote control for use
Connecting to the mains and the aerial
Connecting to the TV set
Emergency interrupt
Setting the display language and the clock
Connecting a decoder
2 STORING TV CHANNELS 8
3 PLAYING A CASSETTE 14
Tape position
Picture sharpness control
Continuous playback
Selecting the audio track, audio mix
NTSC playback
4 HOW CAN I RECORD DIRECTLY? 20
Auto-assembling
Long play function
Stereo reception
5 HOW DO I PROGRAMME A RECORDING? 22
TODAY programming
Programming with VIDEOplus +
Programming on the remote control
Correcting/cancelling a TIMER block
6 OTHER RECORDING POSSIBILITIES 28
Audio dubbing
Synchro-Edit
'Audio only' recording
Simulcast recording
Insert function
Externally controlled recording
Recording from another video recorder
7 SPECIAL FUNCTIONS AND EXTRAS 32
Tuner mode
TV monitor function
Child lock
VCR 1A/CR 2 switch-over
Auto-dimmer
The 16:9 wide screen standard
8 CONTROLS AND CONNECTIONS 34
9 BEFORE YOU CALL AN ENGINEER 36
10 TECHNICAL DATA, ACCESSORIES 37
(■Ji
Page 4

Safety instructions
Important for the United Kingdom
• The manufacturer cannot be held responsible for any
damage which is incurred by not using the video recorder
in compliance with the national guarantee conditions or
safety instructions.
• First check if your supply voltage is the same as that writ
ten on the type plate at the rear of your video recorder.
• Danger - high voltage in this appliance! Do not open! The
video recorder does not contain any parts that can be
repaired by the user. As iong as the video recorder is
connected to the mains, there are parts of it stil! in opera
tion. To switch off the video recorder compietelyyou must
disconnect itfrom the mains.
• Ensure that air can circuiate freeiy through the video re
corder's ventilation openings. Do not place the video re
corder on soft surfaces.
• Do not place the video recorder close to a source of heat
(radiator, etc.).
• Protect this video recorder from rain and damp. Ensure
that no objects or liquids enter it. If liquid is spilt into the
video recorder, disconnect the video recorder from the
mains and consult a qualified service technician.
Precautions
This apparatus is fitted with an approved moulded 13 Amp
plug.
To change a fuse in this type of plug proceed as follows:
O Remove fuse cover and fuse.
O Fix new fuse which should be a BS13B3 3A, A.S.T.A. or
BSI approved type.
O Refit the fuse cover.
If the fitted plug is not suitable for your socket outlets, it
should be cut off and an appropriate plug fitted in its place.
If the mains plug contains a fuse, this should have a value
of 3A. If a plug without a fuse is used, the fuse at the dis
tribution board should not be greater than 5A.
Note: The severed plug must be destroyed to avoid a possi
ble shock hazard should it be inserted into a 13A socket
elsewhere.
How to connect a plug:
The wires in the mains lead are coloured in accordance
with the following code:
BLUE - "NEUTRAL" ("N")
BROWN - "LIVE" ("L")
Before the video recorder is installed, it should be al
lowed to acclimatise for at least three hours after unpack
ing.
Do not use your video recorder immediately after moving
it from a cold to a warm location or vice versa, or under
conditions of high humidity.
Ensure that there is a vertical distance of at least 20 cm
between the video recorder and yourTV set.
Do not place the video recorder near appliances generat
ing strong magnetic fields (e.g. motors, loudspeakers and
transformers).
Do not use the video recorder in dusty places or where it
may be subject to vibration. During heavy thunderstorms
(with lightning) we recommend disconnection from the
mains and the aerial : nn ■.
Do not put your fingers or any other foreign bodies into
the cassette loading slot as this could damage the mecha
nism. Be careful, particularly with children.
If you have to transport your video recorder, be sure to
remove the video cassette from the cassette loading slot
and avoid sudden or violent jolts.
O The BLUE wire must be connected to the terminal which
is marked with the letter "N" or coloured BLACK.
O The BROWN wire must be connected to the terminal
which is marked with the letter "L" or coloured RED.
O Do not connect either wires to the earth terminal in the
plug which is marked with the letter 'E" or by the safety
earth symbol or coloured green or green-and-yellow.
Before replacing the plug cover, make certain that the cord
grip is clamped over the sheath of the lead - not simply
over the two wires.
Page 5

INSTALLATION: HOW
DO I INSTALL THE VIDEO
RECORDER?
1
Preparing the remote contrai for use
How do I insert batteries into the remote control?
O Remove the cover from the back of the remote control.
O Insert the batteries as indicated into the battery com
partment and close the cover.
Connecting to the mains
O Insert the female plug of the mains cable into the mains
socket at the rear of the video recorder.
O Insert the plug at the other end of the mains cable into
the wall socket.
Some general notes for subsequent operation:
• The video recorder should remain connected to the mains
at all times to ensure that programmed recordings can be
made and that the television works. The power consump
tion is very low.
• No special button is required to switch on the video re
corder. It will switch itself on as soon as a cassette is load
ed or when any of the tape transport buttons are pressed
(e.g. LiSTOPJ).
Note: Do not use rechargeable batteries in this remote
ontrol.
How do I set the clock on the remote control?
Should the clock not be correctly adjusted (after having
changed the batteries, for example), the data will flash on
the remote control display.
O Press ,CL,pCI<...3 (buttons KiXQ.DAY.tJ and
CASSETTE....: together) on the remote control.
1_________________________________________1
>
iCt
')
y
X
standby
©
/\
record/otr tinier rc
K fét ' ' today cassette :::
Woo
, ; . —set clock— vi
traci:
The word 'CLOCK' will flash in the remote control display.
.t„.lf..Y.QU.haye switched off the video recorder with button
ii„sMiS„DBY.ig, the display will show, e.g.:
1 lOl\/
I Ul ÌIM
U.J on.nn
_i_( LU'ULJ
O Now set the precise time.by.pressing button iSt or ifci
or use the digit buttons il0.-9ji. The clock will start again
only after step O has been completed.
If you do npt vyish tp change data displayed, press
button i.i.SJAN,DBY„.Q^ ..(S Di on the remote control.
O Then press i.;SHr..C.LQ,C.K',::i: again.
iS)
Page 6

Connecting the aerial
Connecting to the TV set
Your video recorder is actually a 'TV set without a screen'.
This is why you have to connect it to an aerial as well as to
the TV set. Only then can you make recordings and play
cassettes.
O Remove the aerial cabje plug from the TV set and insert
it into the socket iOQiat the rear of the video recorder.
O Use the aerial cable provided to connect the socket :l(§i
on the video recorder to the aerial input socket on your
TV set.
The connection to the TV set can be made in two different
ways.
Whether you choose Method 1 or Method 2 depends on
yourTV model.
Method 1:
If yourTV set has an AV-Euro-socket (scart-socket) or a DIN
AV-socket:
We recommend that you use the AV-Euro-cable (scart-ca-
ble) supplied. This will guarantee the best possible picture
and sound quality.
O Use the AV-Eurp-cable to connect the TV set to the AV-
Euro-socket i.i.lEXJERNAL ,11on your video recorder.
Both the TV set and the video recorder are now connected
to the aerial.
O Switch on the TV set and select the programme number
'AV' (= Audio/Video input) for the video recorder. This
is explained in the operating manual for your TV set.
Important note: Many modern TV sets automatically switch
over to the programme number 'AV' during playback on the
video recorder. If your TV set does this, you do not need to
select the programme number on the TV set in the following
chapters.
Your video recorder is now fully connected to the TV set.
Page 7

Special note: Your video recorder occupies channel UHF-36
or 37.
However, it is possible that, in your reception area, this
channel is already occupied by another TV channel.
In this case you will notice a change in the picture quality
on the TV set, e.g. wavy lines in the picture, during
subsequent use of the video recorder.
You can easily solve this problem as follows:
O Switch on the video recorder with button .
Method 2:
If your TV set does not have an AV-Euro-socket:
The aerial cable which is already connected will act as the
connection between your TV set and the video recorder.
O Switch on the TV set and select the programme number
reserved for video playback. (This is explained in the
operating manual for your TV set).
O Use a small screwdriver to turn the channel control
Li+.wr.i:i at the rear of the video recorder less than half a
revolution until the interference has gone.
o If the interference cannot be cleared, you will have to
switch off the 'modulator'. There must not be a cassette
in the video recorder.at thisjriomen_t.
Press buttons i:i.PLAYi.iand simultaneously.
The current position of the switch 'MODUL ON' will be
shown in the display. If you press both buttons for five
seconds, you switch over to 'MODUL OFF'.
In the same way you can also switch it on again.
Important: Only playback with the AV-Euro-cable (=
Method 1 )is now possible. Playback using the aerial ca
ble (= Method 2) is no longer possible.
O Disconnect the aerial cable from the aerial socket iOlS
of the video recorder so that only the cable connection
between the TV set and the video recorder remains.
O Switch off the video recorder with button SlSjAiy.RSLi;l
and press button .
The buttons are located behind a cover on the right side of
the front of the video recorder.
The video recorder is now transmitting a test picture which
the TV set should receive.
O Switch off the video recorder with button it.§TA.N,®Yj|.
O Tune the TV set in the UHF range until this test picture
appears. The video recorder is set to channel UHF-36 or
37 in our factory.
In order to find out how to tune to the right channel and to
store this on your TV set, please consult the operating man
ual for your TV set.
Note: During subsequent playback with the video recorder,
check the sound and picture quality of reception on the TV
set. If required, you can improve the picture, colour and
sound by adjusting the channel on the TV set.
Page 8
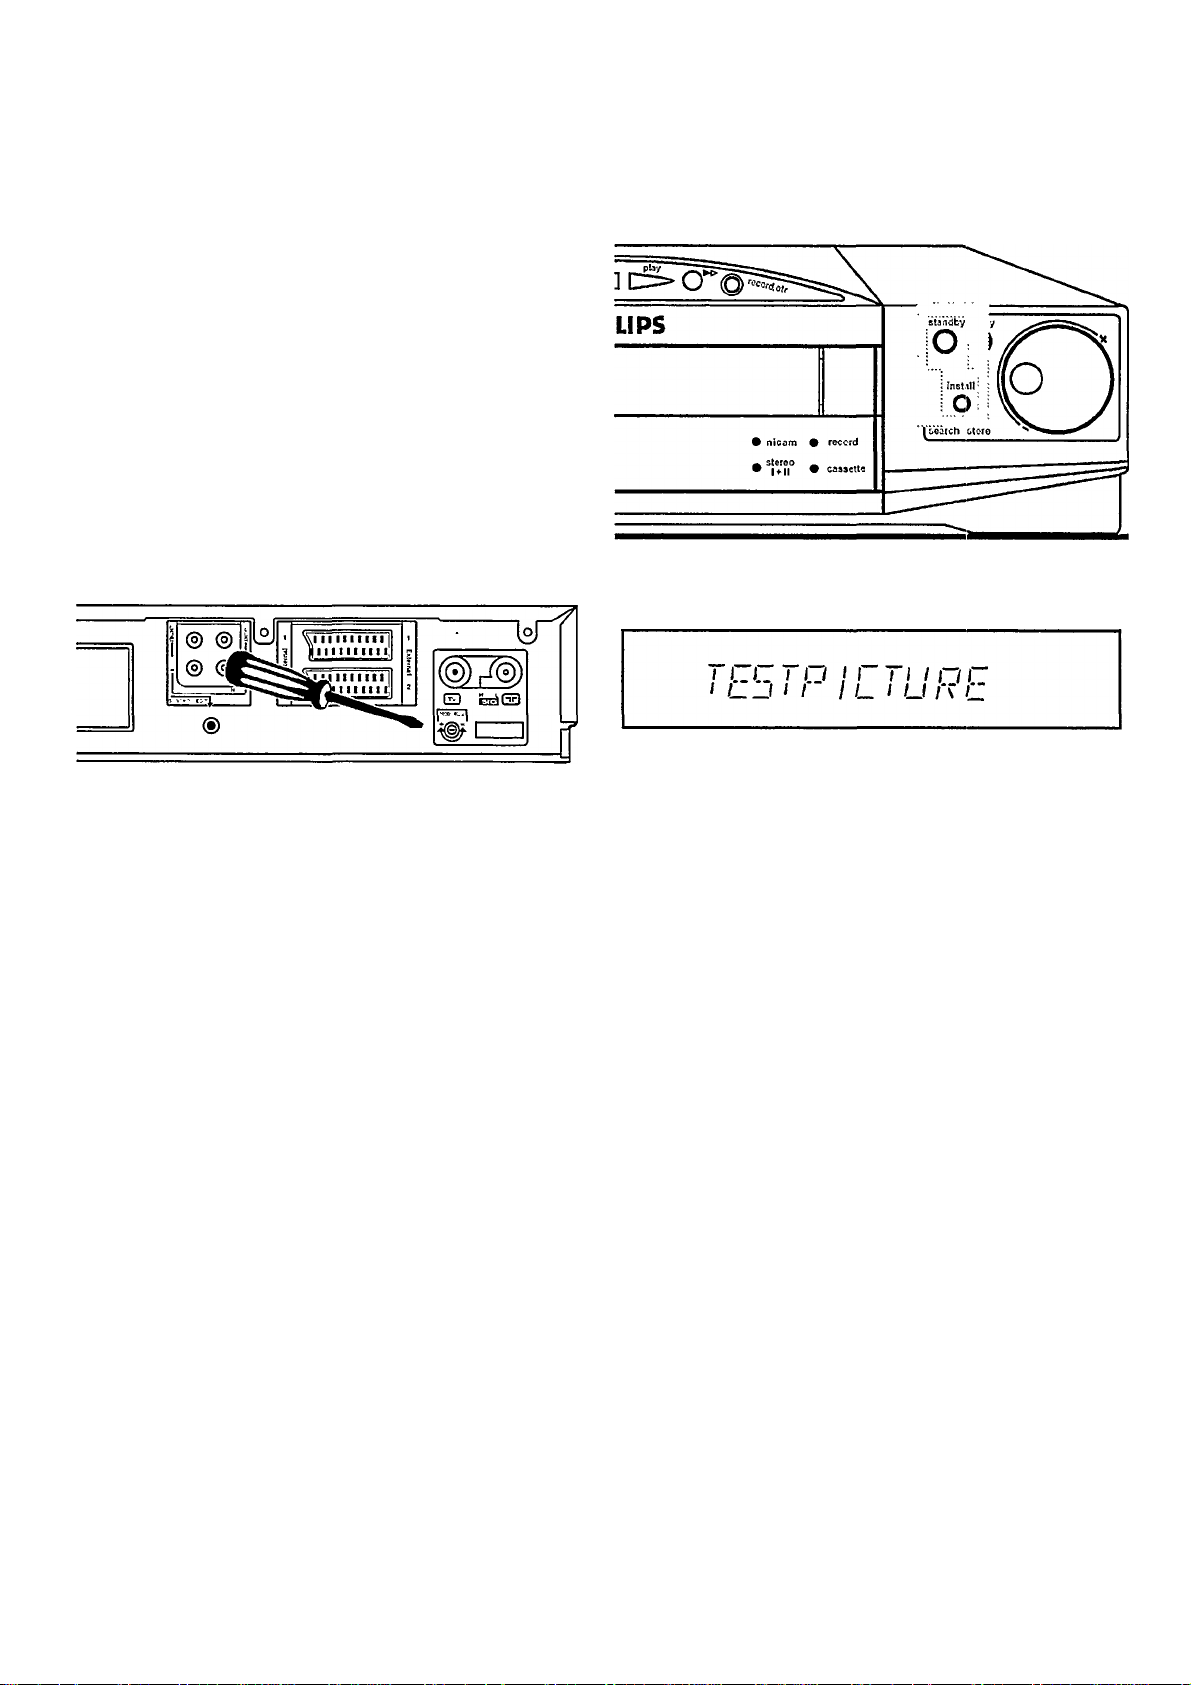
O Insert the aerial cable again into the aerial socket
:.^l~ii. You have now tuned the TV set to the video re
corder.
Note: Your video recorder occupies channel UHF-36 or 37.
However, it is possible that, in your reception area, this
channel is already occupied by another TV channel.
In this case you will experience a reduction in picture qual
ity on the TV set when receiving one or more TV channels.
If this occurs, proceed in this way:
O Check if the quality of reception on all TV channels
stored in the TV set is unchanged.
O If the picture quality of one or more TV channels has
deteriorated, switch off the video recorder with button
STANDBY.;.:;. Check al I the TV channels on the TV set
once again.
O If interference to the picture quality only occurs when
the video recorder is switched on, use a small
screwdriver to turn the channel control Ll+^ri;; at the
rear of the video recorder by less than half a revolution:
Setting the display language and the clock
O Switch off the video recorder with button : STANDBY
and press button i.lllN.SjAkL
The buttons are located behind a cover on the right side of
the front of the video recorder.
On the video recorder display appears:
O Tune the TV set once more to the video recorder (steps
0
to O) until you see the test picture again.
0
Check again all the TV channels.stpred on your TV set.
Repeat the channel adjustment (steps O and
O) until you cannot notice any difference between the
picture quality when the video recorder is on and when
it is off.
o Switch off the video recorder with button L .StANDBY
Emergency interrupt
The video recorder and the remote control have an 'Emer
gency interrupt' function. You can interrupt any function by
pressing button STANDBY. Only the 'child lock' func
tion is not affected.
Whenever you have any problems while operating the vid
eo recorder, you can simply interrupt any function and start
again.
You can practise using the video recorder without worry
ing. No matter which buttons you press, you won't damage
the video recorder.
0
Press button Ll.lNSf ALL,:,; again. Use the rotary control
to select the display language of your choice, e.g.
'ENGLISH'.
f-i'/Ci I cu
l-IMUU I "II I
O Press the il.iNS,tALL . J button. '4:3 TV' appears on the
display. If you have prie.of the new wide screen TV sets,
then use the [nl.SELECtbutton (remote control) to
switch over to the '16:9' format. Otherwise, leave the
setting at '4:3'.
U }i^ ../ f I /
I _J I //
(a
Page 9

O Press button i.jjN.SXA.LL.y again. The display will show
TIME'. Now use the rotary control ;iZS.!lto set the cur
rent time.
I I
I I I lU
O Press button iilijWSXA.LL.y^ again. The display will show
'YEAR'. Now set the current year.
.:^o\\ I /
- on.nri
''L.U'UU
^ / / I \ \
Connecting a decoder
Some TV broadcasters transmit encoded TV signals which
you can only see with a bought or hired decoder. You can
connect such a decoder (descrambler) to this video
recorder.
O Use an AV-Euro-cable to connect the decoder to the
video recorder (socket ASSiBS®L2iJ).
You will find a description of how to store TV channels
with the 'decoder' in the chapter 'Storing TV
channels'.
_______
'/ i_ uu - in nn
I l_l -13 33
.:>-W I /
^ / / I \ \
O Press button again. The display will show
'MONTH'. Now set the current month.
A// rii\ IT I I
I lUlM I II
O Press button i.LIN.SXAtLiii again. The display will show
'DATE'. Set today's date.
110 T c
±1111 /_
-u I
y / I \
\\l /y
-u I
y/t\
/y
I
I
O Press button L.tlMSTML.:..; again. You have now finished
setting the display language and the clock.
Note: * If you have tuned the video recorder and TV set to
different TV channels, you can only use the decoder for one
of them.
* Select on the video recorder a programme number that
was linked to the 'DECODER' function when you were stor
ing the TV channels. The video recorder then automatically
uses the decoder.
* When you are buying the decoder, ask about the right
channel number for the TV station. This will make it easier
for you when you install it later.
Page 10

AV-Euro-sockets (scart-sockets}
This video recorder has two AV-Euro-sockets. You can con
nect a second appliance, e.g. a second video recorder, a
satellite.receiyer or a yideo-CD player, to the AV-Eurosocket i..i EXXERIVAi.2.:,,,i. Connect the TV set to the socket
jEXTEBIVIAUIll.
O Use an AVrEuro-paWe to connect the video recorder
(socket LJ.EXTERNAL.?,-.,) to the second appliance.
O Connect the TV set to the socket iiJKtERNAL..iJiil.
Connecting to Hi-Fi equipment
Use an audio cable to connect the socket ll.AUDIp.JNJ.ito
the corresponding output socket on the audio amplifier.
You can buy this cable from your dealer.
Connect the socket !.i..AUb,IO,dU,T.!.; to the corresponding
input socket on the audio amplifier.
iS
Page 11

Page 12

Automatic channel search
O Switch on the TV set and select the programme number
for the video recorder.
In Chapter 1 you connected your TV set to the video re
corder, thus enabling you to play a cassette.
Your video recorder has its own receiver. Because of this, it
can be used independently of the TV set.
In order to be able to record TV programmes, you first have
to store each TV channel (e.g. 'BBC 1') in the video recorder.
Each TV channel is transmitted on a specific 'channel num
ber'.
So that you don't have to remember these channel num
bers, assign a programme number in your video recorder to
each TV channel.
For the subsequent use of 'Programming with VIDEOplus-н'
you also have to assign a so called 'aerial code' to each TV
channel. The relevant aerial codes (3 digits) are given in a
appended list.
For example: BBC 2 is assigned, by you :
- a channel number e.g. 'C 30'
- a programme number e.g. 'P 2' and
- an aerial code e.g. '002'.
In this instance, use the same programme numbers as used
on your TV set.
You can store up to 42 TV channels.
O Switch on the video recorder with button . iSTOP ;.
O Press button E SEARCH...
When the automatic channel search finds a TV channel, its
picture will appear on the TV screen. The display will show,
e.g.:
You have two possibilities for storing TV channels:
• If you do not know the channel number: Please read the
following section 'Automatic channel search'.
• If you do know the channel number: Please read the sec
tion 'Direct channel storage'.
A general note: If you store a TV channel with a programme
number that has already been used, the original channel
number stored will be deleted.
A tip: In rare cases, two TV channels may be on one channel
number. In this case, the video recorder will not find one of
these TV channels.
Then run through all the channel numbers again with the
'Automatic channel search'. Each time you find a TV chan
nel, press button ¡....TRACKING >3. on the remote control.
The automatic fine tuning then begins. Whenever you find
the sought TV channel, store it.
Have you used an AV-Euro-cable to connect the video re
corder to your TV set and does your TV set respond to the
switch-over with button ¡.iMONlTOR(remote control)? If
so, you can now switch to and fro between TV reception
and video recorder reception. This is the easiest way for
you to assign the same TV channels to the same pro
gramme numbers on both appliances.
If this is not the required TV channel, or if the picture qual
ity is poor, press button SEARCH...: again. The video re
corder then searches for the next TV channel.
If this TV channel is encoded and the video recorder is con
nected to a decoder, press button ■SELECT (remote
control). The display will show'DECODER'.
From now on, the video recorder will activate the decoder
function for this TV channel (= this 'programme number').
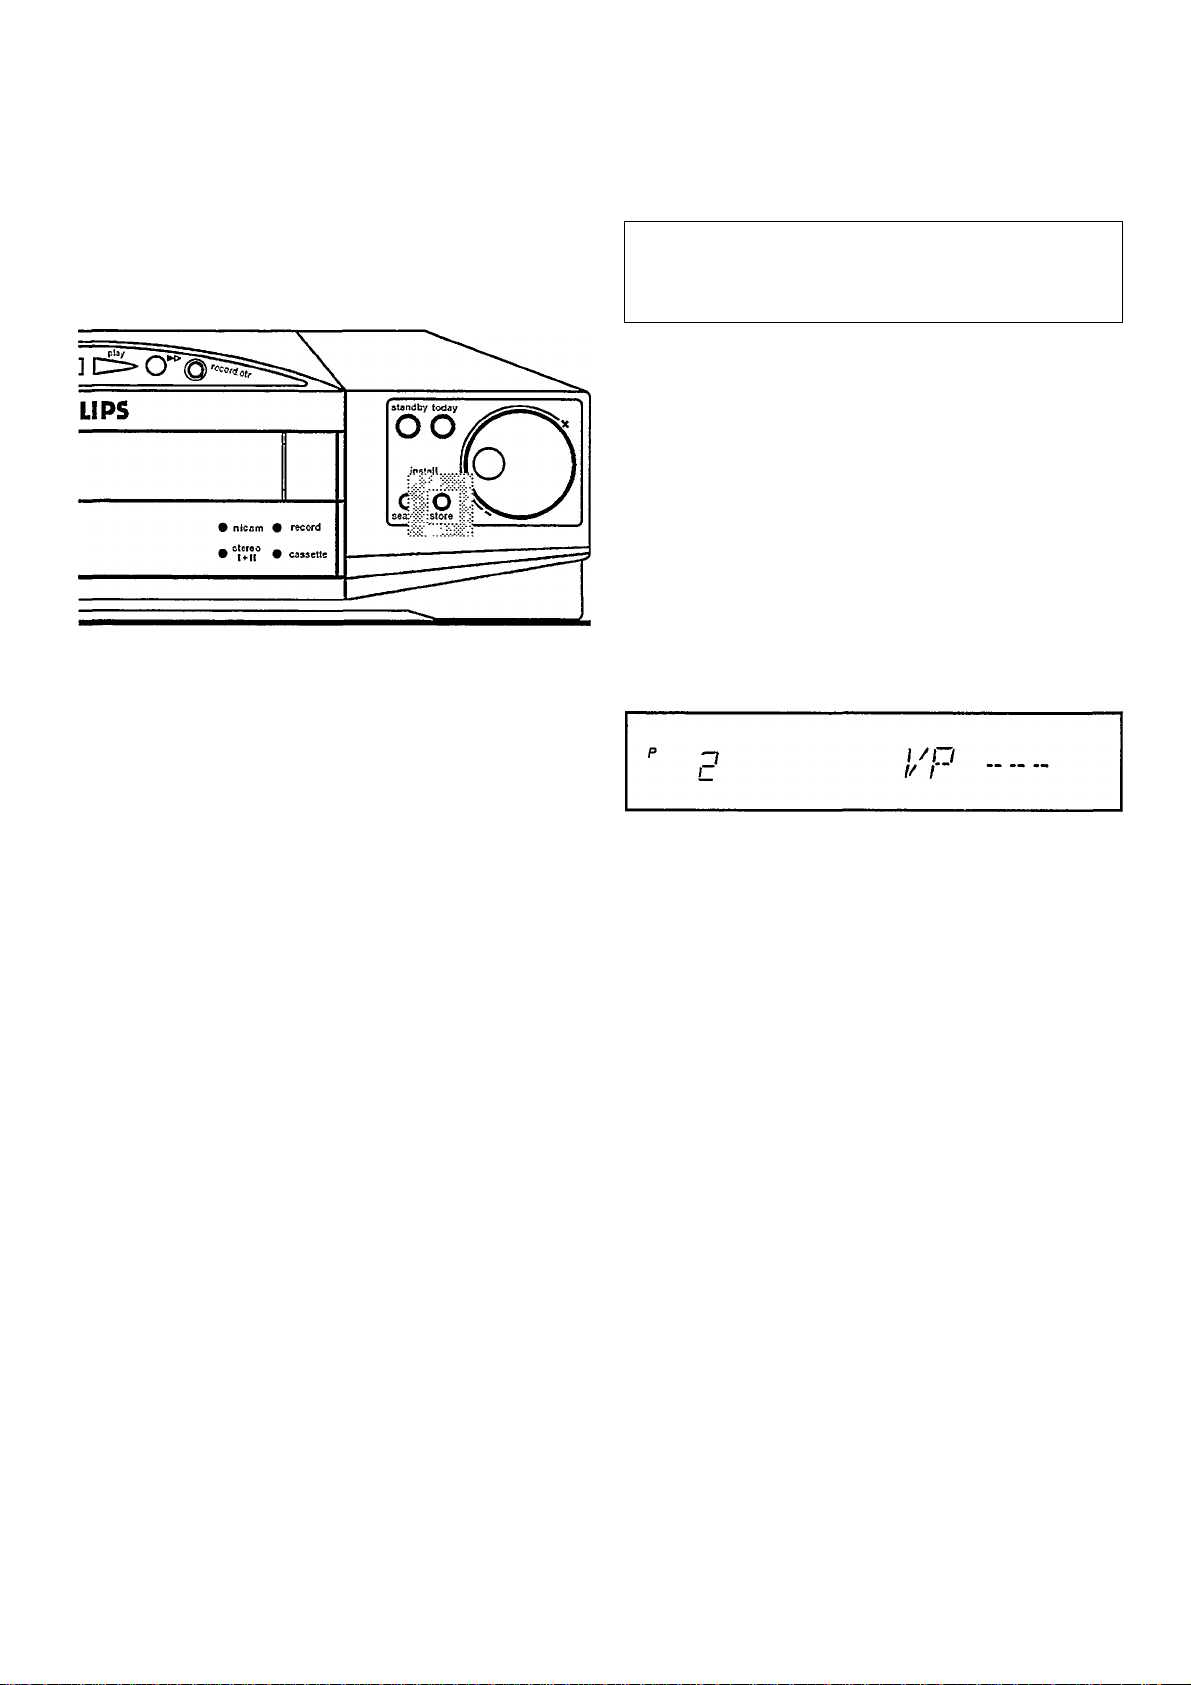
O The video recorder will propose a programme number
under which to store the TV channel (e.g. 'P 2' in the
diagram), if you wish to store it under another pro
gramme number, use the rotary control :~0* - to change
it.
Note: The programme number proposed by the video re
corder will automatically increase by one each time a TV
channel is stored.
10
Page 13

о If the programme number is correct, store it by pressing
button
О Now you can give the TV channel a name (e.g. 'BBC 2')
or change the present name. This TV channel name will
appear in the display whenever you select this TV chan
nel.
If you do not wish to give a name, go directly to
step О ■
p
П
L
?7i\s:
Use the remote control to enter the name. Proceed as fol
lows:
* Press button il+:iori”ito select the desired numbers or
letters.
" By pressing button i;;.LSELECf Ji you can choose the posi
tion where you want to place the character (up to 5 char
acters are possible).
A /ОА//С Г
/\Г/ II //_ {_ !_ 1
" By pressing button iiLQLEjftRji you can reset the chosen
position to a 'blank space' or delete the contents.
О Press button on the video recorder.
O For your convenience, witrh the first four programme
numbers we have stored the correct 'aerial code' for
VIDEOplus+ programming. Ignore the following sen
tence and store directly at step ©.
For other programme numbers use digit buttons i.0,-9i
to select the correct aerial, code for VIDEOplus+
Clear it with button LLG.LEARi:i. See appended list.
О Store with button .
© Repeat steps © to © until you have stored all the TV
channels that you want.
(2) 11
Page 14
Direct channel storage
O Switch on the TV set and select the programme number
for the video recorder.
O Switch on the video recorder with button IlSJOPjii.
О Now you can give the TV channel a name (e.g. 'BBC 2')
or change the present name. This TV channel name will
appear in the display whenever you select this TV chan
nel.
If you do not wish to give a name, go directly to step
O Use the rotary control itSSi to select the programme
number under which you wish to store the TV channel.
О Press button i-iStOBliJ.
A flashing channel number will be displayed:
p 3
I
C T n о c
_/ I /_f /' /_
-r Zl~l
-L i_ I
^ у / I \ \
p
L-
Use the remote control to enter the name. Proceed as fol
lows:
* Press button L+i-i or i to select the desired numbers or
letters.
* By pressing button i..j..SELECT .i. iyou can choose the posi
tion where you want to place the character (up to 5 char
acters are possible).
* By pressing button LiPLEAR.i [you can reset the chosen
position to a 'blank space' or delete the contents.
/VI/ I/ //_ L
1' г
nn
L 1
О Press button iiSXQ.R.I IJ on the video recorder.
I /
Use the rotary control -i“ 0.1 i or the digit buttons sQ-Si; on
the remote control to select the desired channel number.
If this TV channel is encoded and the video recorder is con
nected to a decoder, press button iiiL.SELECX..!.;; (remote
control). The display will show 'DECODER'.
From now on, the video recorder will activate the decoder
function for this TV channel (= this 'programme number').
O A TV channel now appears on the TV screen.
Have you used an AV-Euro-cable to connect the video re
corder to the TV set and does your TV set respond to a
switch-over with button LiIViP.NITO.R.ili (remote control)? In
this case, you can now switch to and fro between TV recep
tion and video recorder reception. This is the easiest way
for you to assign the same TV channels to the same pro
gramme numbers on both appliances.
When you have found the right TV channel, store it with
buttonSTORE iJ.
O For your convenience, witrh the first four programme
numbers we have stored the correct 'aerial code' for
VIDEOplus+ programming. Ignore the following sen
tence and store directly at step O •
For other programme numbers use digit buttons 0-9 ,
to select the correct aerial code for VIDEOplus+.
Clear it with button CLEAR L;. See appended list.
O Store with button Li.SXQRE.L:.
0 Repeat steps O to O until you have stored all the TV
channels that you want.
12
iCl
Page 15

(ö
13
Page 16
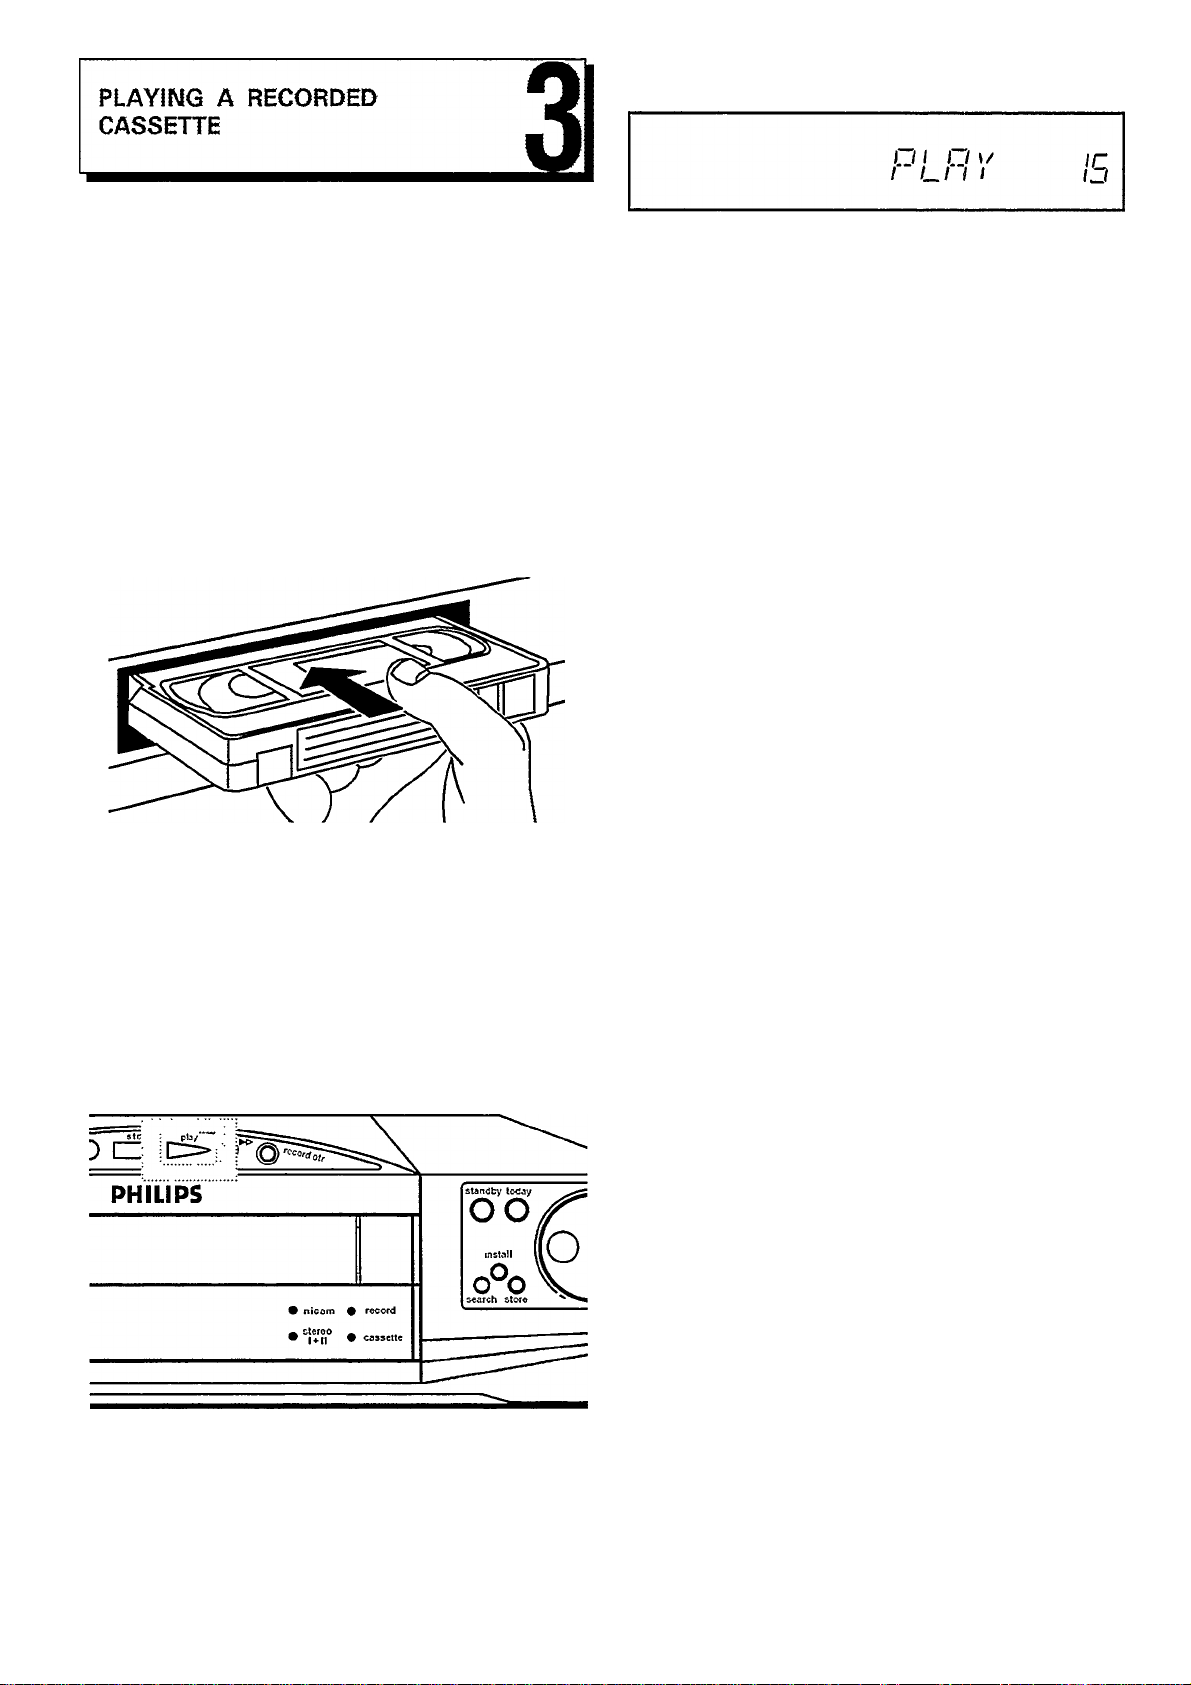
In Chapter 1 you connected your video recorder to the TV
set. Playing a cassette is now very simple.
If you want to record something immediately, first read
Chapter 4.
The display will show, e.g.:
You will see the recorded programme on the TV screen.
O Switch on the TV set and select the programme number
reserved for video playback.
Many modern TV sets automatically switch over to the
programme number for the video recorder when a
cassette is being played. However, this functions only if
you have used an AV-Euro-cable to connect the video
recorder to your TV set.
O Insert the cassette into the cassette slot with the title
label facing towards you. The window must be facing
upwards.
Press against the centre of the cassette until the cassette is
automatically pulled inside.
Only one side ofVHS cassettes can be used for recording
or playback.
O If you wish to interrupt playback, press button ...STOP
The display will show, e.g.:
p
i~
O If you wish to remove the cassette, press button
r^ECtiJ.
Note: * Each time a cassette is loaded or removed the vid
eo recorder automatically cleans the video heads. In this
way the best playback quality is maintained.
* When playing a long play recording, the video recorder
automatically switches over to this speed. The display will
show 'LP'.
How do I remove picture interference (Auto-tracking)?
Each time a cassette is loaded, the video recorder
automatically adjusts to the correct tracking position.
For recordings made on another video recorder you may be
able to improve the automatic optimum position as
follows:
C Tno
-I ! Ul
no
LIU
When you insert a cassette, the video recorder automati
cally switches itself on, and the indicator for 'CASSETTE'
(= cassette loaded) lights up on the display.
O Press button i.iPLAYj.j.
O Press button ilil^iion the remote control.
O Press button LlT^CKiNG ^ L,. on the remote control.
O Press button hS*'!: as soon as the optimal playback qual
ity has been reached. This setting will remain until you
remove the cassette.
14
Page 17

Other functions
Variable slow motion:
Fast wind and rewind:
O Press button .
O Press button .SPEEDJii (rewind) or
■....L.§PEEP„^I> (wind). The tape will wind or rewind at
high speed.
O Press button ii.SJPL„llii or illSi as soon as you have
reached the required position on the tape.
Picture search (scanning):
With this function you can choose between various speeds
for searching forwards or backwards for a picture.
O Press button iifei.
O Now press button L.:0ii„..S.PEED or SPEED.j^li
several times until you have reached the desired
speeds.
The sequence of the speeds is:
SCANNING, FAST REV, REVERSE, PLAY, FAST PLAY,
SCANNING forwards.
O Press button ilitii when you have found the desired pas
sage.
O Press button liEbii.
The recorded TV programme is shown as a still picture.
© By pressing button i.JLâi™S,PEED, or .SPËED„ïs0:U
you can change the speed of the slow-motion playback
in three steps, e.g. 1/6,1//10,1/14 of normai playback
speed.
During slow motion the sound is muted.
O Press button y.felto return to the normal playback
speed.
ooo
rec mode sp/lp audio nicam
timer vcr
oooo
still stop ©
Note: During scanning, the picture quality is affected and
the sound is muted.
This does not mean that the function is faulty.
Still picture/Super-sIow motion:
O Press button liitrii.
O Press button L.i^y. The.p.icture stands still.
Each time you press again, the picture moves one
step further.
Hold down button Ll^ï;. The picture will be played in
super-slow motion.
O Press button yIEiito return playback to its normal
speed.
Special note: If the stM! picture yib^^^^ vertically, keep
pressing button i::y.T.RACKÎNG...ii3,J,, ; until the vibration is
minimized.
If you pass the optimum setting, you can repeat this step
with button i...;.Xfï^CKÎN,G.,.i3.Jd
You only have to find the optimum setting once as the vid
eo recorder stores it automatically.
Please note, however, that interference may still occur with
hired cassettes of poor quality.
This is not caused by your video recorder.
programme volume
tv
15
Page 18
It is handy to know for how long a cassette has already
been playing or how long is still left.
To indicate this, your video recorder offers you three dif
ferent display possibilities (in step O )•
First, you must enter the tape length of the loaded cassette.
This is necessary if the correct playing time is to be in
dicated. The tape length is given on the cassette in min
utes, e.g. 'El80' corresponds to 180 minutes of playing
time. You will find the length printed on the left of the front
narrow edge. The actual length, however, may be a little
longer than indicated.
O Press button
cassette length will appear in the display of the remote
control, e.g.:
„CASSETTE..;..: on the remote control. A
w\ I ///
CASSETTE
VCR I O)))
c / on
L / UU
Please also note: * With newly loaded cassettes, the video
recorder must first calculate the playing time. The video
recorder first shows, e.g.and waits a few seconds be
fore displaying the correct playing time.
* The time display works accurately only with
PAUSECAM-VHS cassettes.
Cassettes made for NTSC-VHS equipment can show only
the tape position and not an e,xact time.
.....
....
today cassette select
tracking..QQO
®
index
0
©(!
o © © G
write
o
monitor VIDEOplus+
00(l ÌO
O Now press button L+iiorin order to select the right
cassette length. The possibilities available appear in
this order: E30, E60, E90, E105, E120, E150, E180, E195,
E200, E210, E240, E260, E300, EC30, EC45, E30, etc.
O Point the rernpte control at the video recorder. Press
button i.„.CASSET.TE..;.: on the remote control.
In this way, you transmit the data to the video recorder.
When it has received the data, the display will show,
e.g.:
rOiri~l~ TTC
I-I I—I—IL. I I L
C I on
L. I UU
O Now you can use button :;::!..SELEC,t..l::i on the remote
control to select from the following three display pos
sibilities:
elapsed playing time
remaining playing time
counter
Display iMi (= time
used)
Display SA.ii (= time
left)
Indication of tape posi
tion
You can read this display during winding and rewinding,
during recording, playback and stop.
If you want to reset the counter indication of the tape posi
tion to 'O', press button il^EAlJi.
16
Page 19
How do I find a particular position on the tape?
The VHS Index Search System ('VISS');
Sometimes you may have recorded two or even more TV
programmes on one cassette. In this case, it is worthwhile
making a note of the tape position at which the recordings
start and end.
So that you do not have to search for a long time, your
video recorder offers you two methods for automatic
searching: 'GO TO' and 'VISS'.
Search for tape position (GO TO):
O Press button i;iGOLXPJ.i on the remote control.
Irackir.
Cs
c
c
monit
o<
O Now use the digit buttons to enter the (4-digit)
tape position that you wish to find.
O0© r\
inde>-
0 © © hJ
write'
0 © ©^
© D
tunes : goto i . .
COO
cr
O You may now select the function to be started from that
position, e.g.: i.LST.QP„.MB, or LiREQpRD„L.i^^ .
The video recorder winds the tape to the chosen posi
tion and then continues automatically with the selected
function.
The video recorder writes VISS code marks on the tape every time the record button is pressed. Using the button
iiilNJDEXJi you can search for these VISS code marks on the
tape.
You cannot use the VISS function with recordings made on
another videorecorder that does not have the VISS func
tion.
Intro-Scan:
This VISS function will give you a survey of all the TV pro
grammes recorded on the tape.
O Press button ilMDEXJl. The display will show 'INDEX -'.
O Press button ilSfc:. The tape will play for 10 seconds,
then wind on to the next VISS code mark and play for
another 10 seconds, and so on.
When the end of the tape is reached, the tape is rewound to
the beginning.
Note: When yoju press any tape transport button (e.g. button
iifei or ilSjOpj.ii the video recorder interrupts the 'In
tro-scan' function.
VISS search;
Select this function if you are looking fora particular VISS
code mark.
O First press button (remote control), and then
button ^irhiito select the following code mark, or button
to select the previous one.
If you are looking fpr.a code mark that is not the next
one, press button or ii“l as often as is necessary.
. , . ^— set clock—^
tracking
t^©0(3
index
O © © (3
O0® (^
monitor VIDEOdIus+ cler
oo®c
tuner go to repeat
c^r:>r^
The display of the video recorder will show, e.g.:
/ A / Tli_ t/ ;
> I /V >
CD)
17
Page 20

O Select the function that is to follow after the code mark
is found (e.g: 'playback').
When the code mark is found, the video recorder then
begins with the function you chose.
Note : Vyhen you press any tape transport button (e.g. but
ton or :; .SXOP., ■ : ■ ' —
search.
Setting or erasing VISS code marks manually:
J), the video recorder interrupts the
----
*u.
Continuous playback
This function will permit continuous viewing (i.e, playback
- rewind - playback) between any two freely chosen posi
tions on the tape.
O Locate the fj|.g^ {gpg position (start). Press button
iiLREP^T..! (remote control). The tape position is stored.
The display will show 'REPEAT PLAY' and 'START'.
To find certain positions on the tape quickly, you can set
and erase code marks by yourself.
This only works with cassettes which are not protected
against recording.
If you want to set a code mark, proceed as follows:
O During playback, search for the position on the tape to
be marked.
O At the right position, press button ilWRllfe*. A code
mark will be set.
If you want to erase a code mark, proceed as follows:
O Press button i.LiNDEXj.i. Use button iu+ii or ii~] to select
the code mark that you want to erase.
O Then press button !..^CLEABj.j immediately. The video re
corder will now search for the code mark. When it is
found, the video recorder switches to the 'STILL' posi
tion. 'CLEAR INDEX' will then flash in the display.
O Press button cLeAR.U again. The video recorder re
turns to playback, erases the code mark and remains in
the 'STOP' position.
Note: Please make sure that you select the same speed
(SP/LP) as was used for recording.
“ If you want to erase a VISS code mark with 'Audio only
recording', switch the video recorder to the 'AUDIO ONLY'
mode before step O ■ You can find the description of this
in the chapter 'Other recording possibilities' section 'Audio
only recording'.
O Locate the second tape position (end of the playback).
Press button LlREP^tj.
The video recorder will begin to play at the first posi
tion on the tape.
O You can cancel continuous playback by pressing button
Note: ^ If no stereo sound has been recorded on the cas
sette, the video recorder automatically switches over to
mono sound.
* With the 'Audio Mix' function, you can play the mono
sound of the normal ('linear') audio tracf together with the
sound of the stereo audio track (see recording with 'audio
dubbing').
* Stereo playback is only possible if the video recorder is
connected to a stereo TV set or a Hi-Fi audio system via a
connecting cable (socket 'EXTERNAL 1/2' or 'AUDIO OUT').
NTSC playback
You can also use this video recorder to play cassettes
which were recorded in the NTSC TV standard.
During playback with some types of TV sets, the pictures
can vibrate vertically or roll, or there may be a loss of col
our. This does not mean that your video recorder is faulty.
The sound will only be heard in mono and not in stereo.
Picture sharpness control
You can adjust the picture sharpness in playback in seven
steps as you require.
O Press button
O Press button L+:i or ii“.;. The display will show the cur
rent setting; from '+3' to '-3' (+3 is maximum sharp
ness).
You can change the current setting by pressing button
i.+i; or ;i~i again within five seconds.
The number '0' indicates the medium setting.
18
Page 21

19
Page 22
HOW CAN I RECORD DIRECTLY?
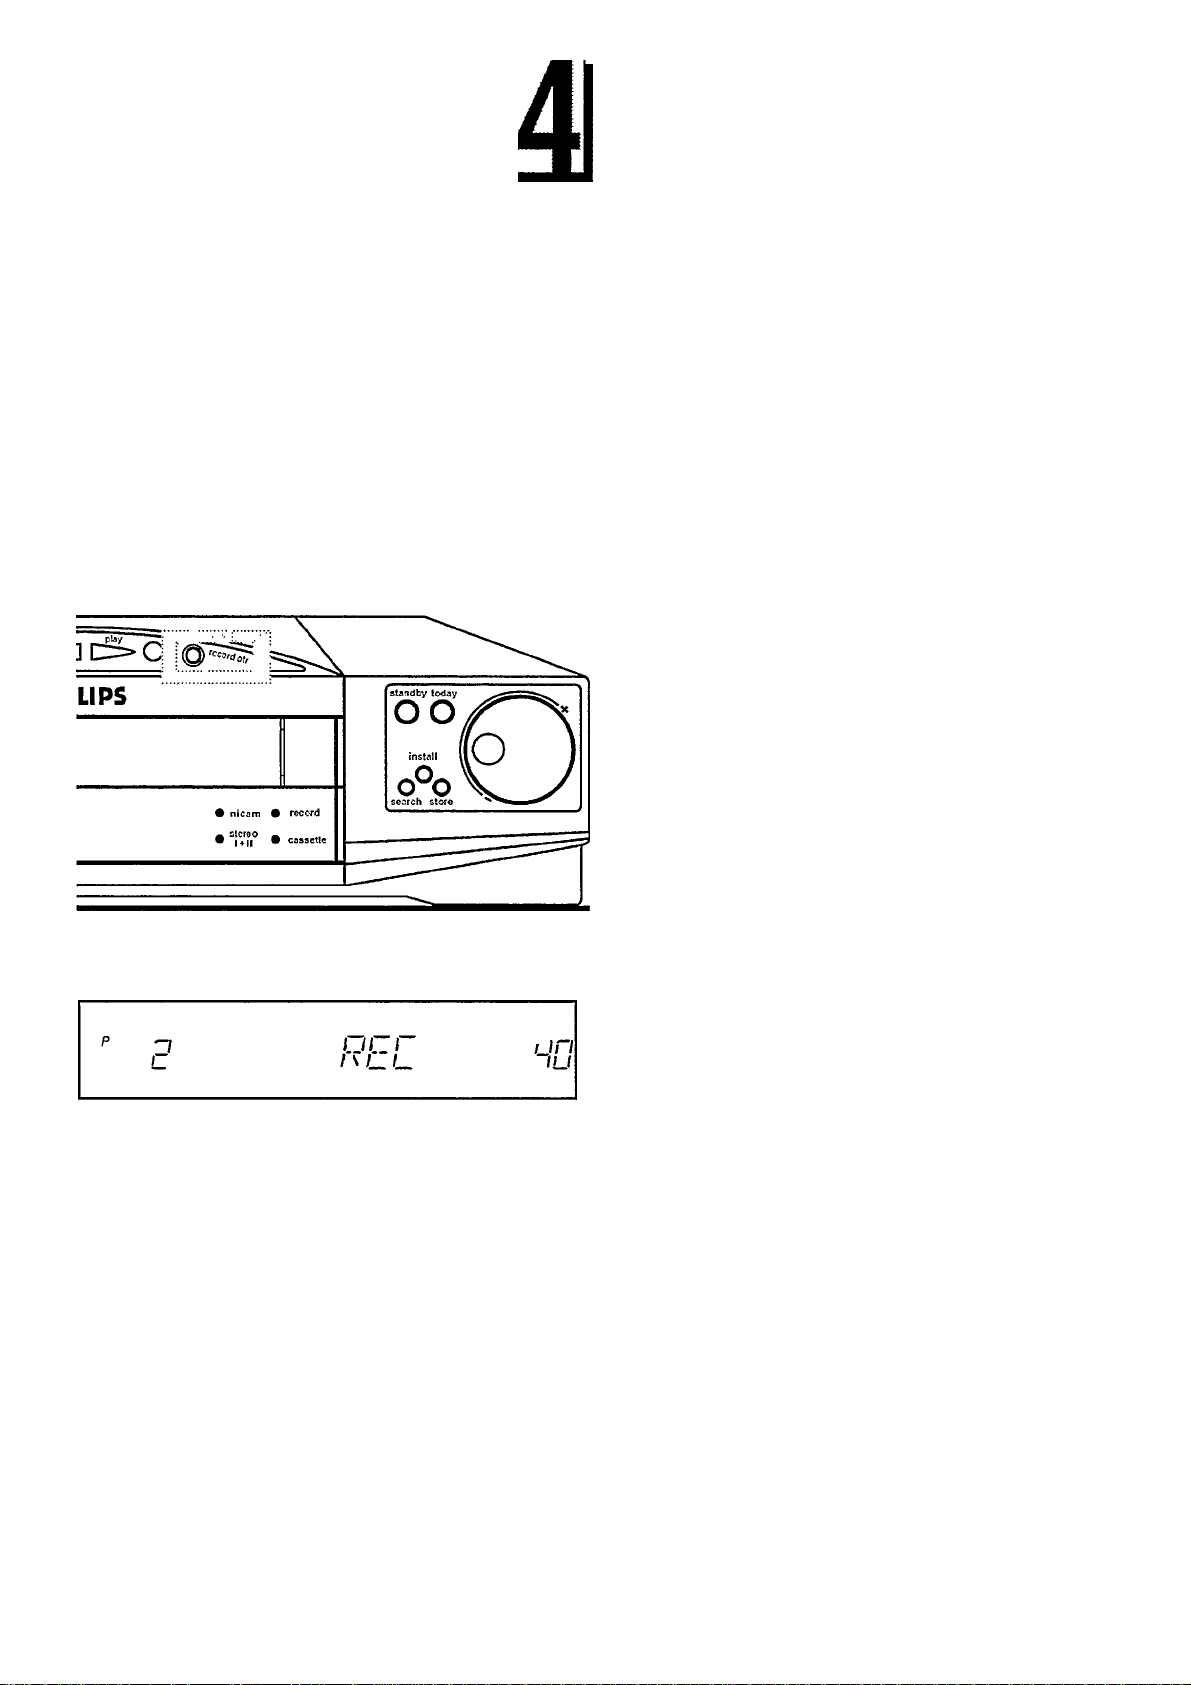
The easiest way of recording is to directly record a TV pro
gramme that is currently being transmitted.
Note: If you do not want to record to the end of the cassette,
press button :.;.REC0RD.,/..0TRL. again. The display will
show the end time of the recording (also known as the OTR
time). Each time you press button :J.RECORD / OTR again,
you can add another 30 minutes.
If you have pressed it too many times, you can return to
normal recording by pressing button :,LCLPAR ^; (remote
control).
And this is how to go about it:
O Insert a cassette. The video recorder will switch on
automatically.
O Use the rotary controlor the digit buttons
(remote control) to select the programme number of the
TV channel from which you wish to record.
The programme numbers 'El' and 'E2' are reserved for
recording from external sources (via AV-Euro-sockets 'EXTERNAL 1/2') e.g, satellite tuner.
Press button LiSPy.LPj.j to select a different recording
speed (SP/LP).
O When you want to start recording, press button
h: RECORD IPJRU.
The display of the video recorder will show, e.g.:
As soon as the end time is reached, the video recorder will
switch off automatically.
Can I switch off the TV set during recording?
Yes. Your video recorder has its own receiver, enabling it
to record TV programmes. This means that you can use the
TV set independently of the video recorder while recording.
You can switch it off and on or watch another TV channel
without disturbing the recording.
If you would like to check what you are currently recording,
select on the TV set the programme number assigned to the
video recorder.
General notes: * While recording one TV programme, do
you wish to switch to another TV channel and record that?
To do this, you have to interrupt the current recording with
button ySTOPl;. Then select the new programme number
and start recording the TV programme you want with button
uMcoj^LPTRU.
* If you forget to load a cassette before recording, the dis
play will warn you by showing 'EJECT'.
* If you accidentally load a cassette with erase protection
for a recording, the indication 'PROTECTED' will appear in
the display.
After a few seconds the cassette will be automatically
ejected.
* If the end of the cassette is reached during recording, it
will be automatically ejected. The video recorder switches
itself off.
* When you make a new recording on a video cassette, it
will automatically record over and delete any recordings
already on the cassette.
The video recorder will record the TV programme you have
chosen. The small red 'RECORD' lamp will light up on the
display.
O You can stop recording by pressing button l.iSJOP y.
20
Page 23
Erase protection
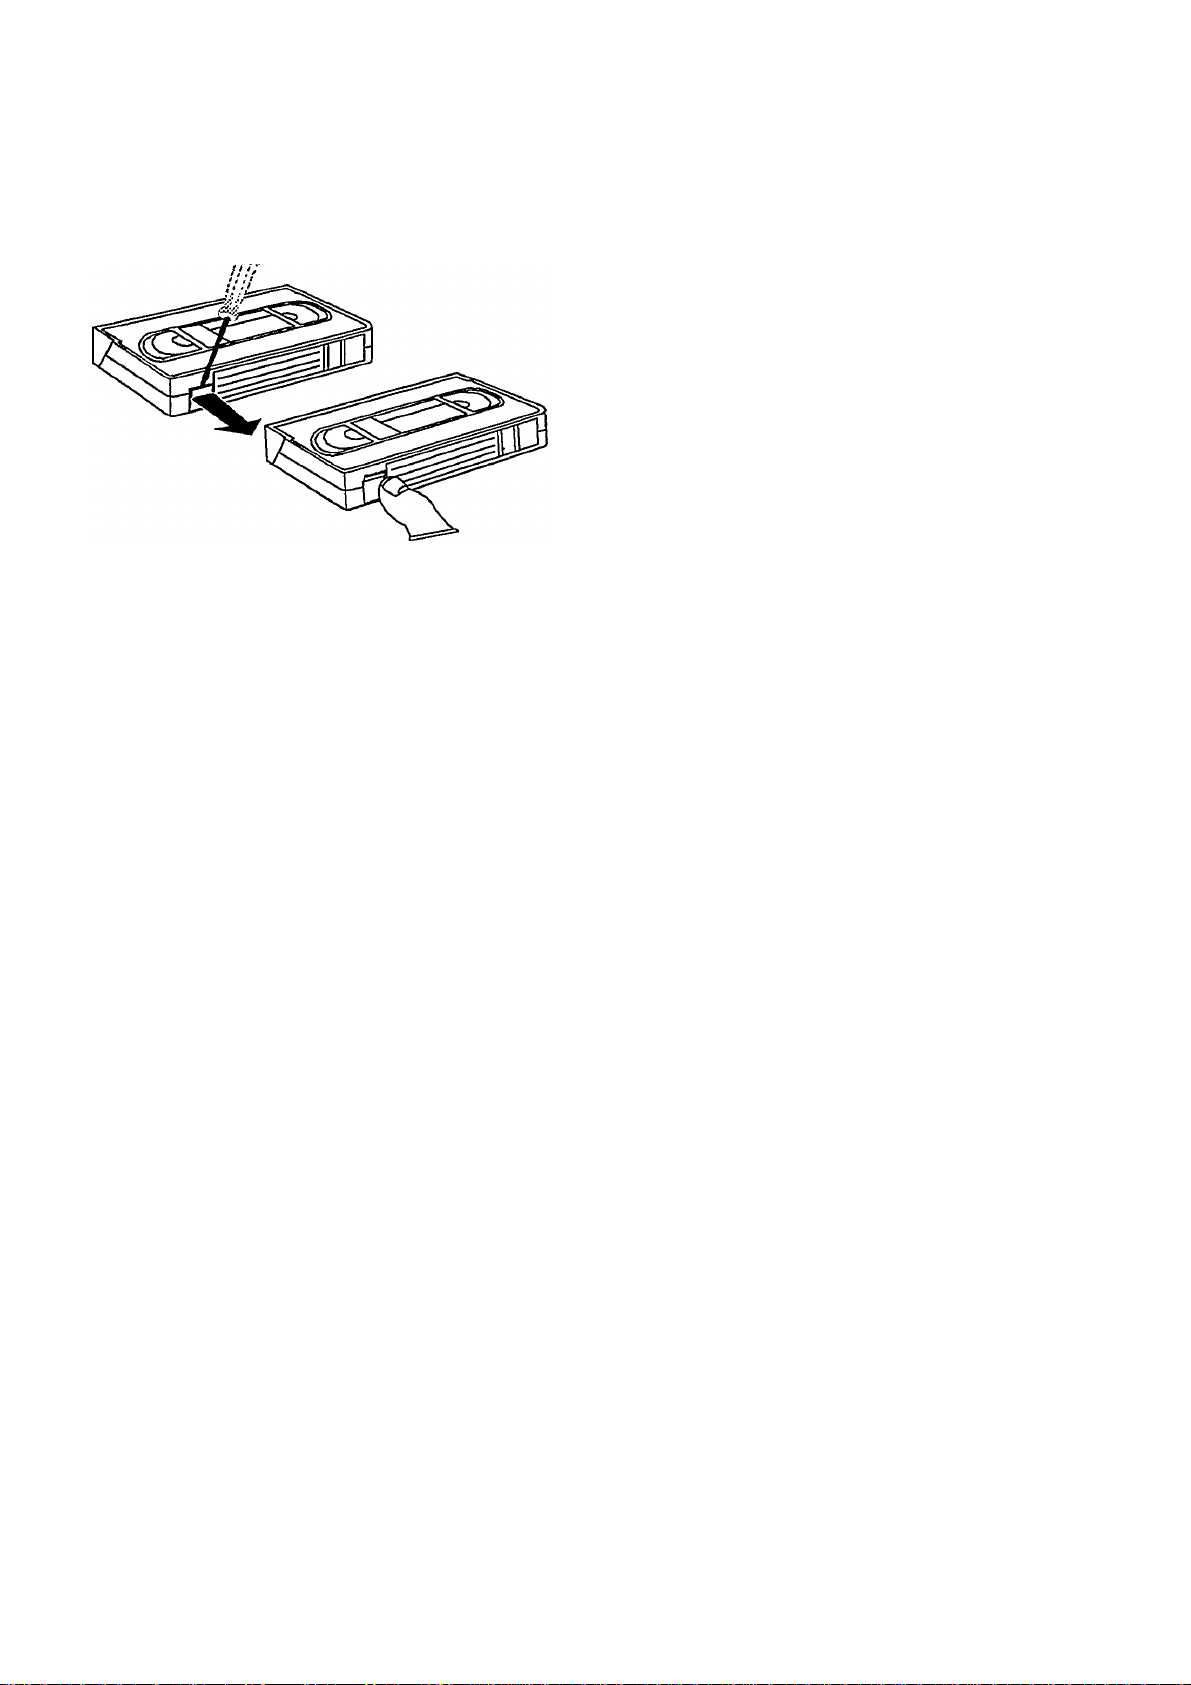
Digitai stereo reception (NfCAM)
So that you don't accidentally delete an important record
ing, you can remove the special tab (erase protection) on
the back of the cassette with a screwdriver.
Later, if you no iongerwant the erase protection, you can
seai the gap again with adhesive tape.
Auto-assembting
When a TV programme is being transmitted in digitai ste
reo sound, one of the foiiowing indicators appears in the
dispiay:
STEREO/1+ i
NiCAM
Normally the NICAM stereo reception is aiways switched
on. However, you can switch 'NiCAM' off.
for digitai stereo sound or two
languages (bilingual)
for digital sound
O Press button iiMCAMji. The dispiay wili show 'NICAM
ON'.
O You can switch 'NiCAM' off by pressing button
iNICAMji!: again within five seconds. The display shows
'NICAM OFF.
Note: Whenever you change the programme number,
'NICAM' automatically switches itseif on again.
You can use the auto-assembiing function to iink up individuai recordings without any disturbing picture transition
('fiickering').
O Press button i.iPLAYj.i. Search for the correct position
on the tape and then stop the playback with button
liSJQP .1 ■
O Now start recording as usuai with button
iMcordXpjM.
Long play function
You can reduce the recording speed by haif. This makes it
possibie to record, for exampie, 8 hours instead of 4 hours
with a 'E240' cassette.
O Before recording, use button i.SP/LPj:! to select the re
cording speed 'LP' (LP = Long Play).
O During playback, the video recorder automaticaiiy se-
iects the correct piayback speed.
21
Page 24

HOW DO I PROGRAMME A RECORDING?
In this chapter you will learn how to programme the video
recorder. It switches itself on automatically, records the TV
programme you want, and then switches itself off again
automatically.
What information is needed by the video recorder?
For every programmed recording you must give the video
recorder the following information:
" the date on which the recording is to be made
** the programme number
the start time of the recording
” the end time of the recording
The video recorder stores all this information required for
recording in what is known as a TIMER block. And, that up
to one month in advance.
Your video recorder can store up to 7 of these TIMER
blocks.
An eighth block is used for TODAY programming.
The video recorder allows you one minute for each entry
step.
Please note that the timing of the TIMER blocks may not
overlap. The video recorder must first finish one TIMER
block before starting the next block.
How to programme the video recorder
With this video recorder you have a choice of three dif
ferent kinds of programmed recording:
The simple way of programming a recording on the same
day is called 'TODAY programming'.
'Programming with VIDEOpIus+' is as easy as dialing a
telephone number.
You can enter the data that you want to programme into the
remote control and then transmit this data to the video
recorder. We call this possibility 'Programming on the
remote control'.
22
Page 25

TODAY programming
Cancelling TODAY programming
You can carry out this programming on the remote control
or on the video recorder. We explain it here for the video
recorder.
It is very easy to programme a recording for TODAY. You
only need to enter the programme number and the start
time.
Please note that only one TODAY programming is possible
per day.
The recording will be made until the end of the loaded cas
sette.
O Press button Li.XQDAYji'i.
The programme number currently selected will flash in
the display of the video recorder:
Wl//
____________________
'’-nz/: on.nri
"UL' I / s (_!/_//^ / It II lf_ L.LJ'UU
y' / l \ '■
Use the rotary control iil&l; or the digit buttons
(remote control) to select the programme number of the TV
channel from which you want to record.
_ SMRT
O Press button iiiTODAYiij and then button i.£LEAjSj;! (re
mote control).
To confirm this, the display shows the following for a
few seconds:
Ti~l Tl n t/
‘ U ±11 I I
i~oiro
I I ^L.L.
O You have now cancelled the programming.
O Press button iit.QDAYiJ again. The start time flashes in
the display:
~^TART, , /
ZI i. I UU I T I i\/n~
L ^Illusi I I I liZ
Enter the start time.
N \ I /
-Zin.nri
'i_ u*i_/u
-y y / I \ ^
O To finish, press button i.iTQDAY.Iii again.
If you only want to check the d you can end this pro
cess with button ilSI^DBY.ii.
Important note: The TIMER only switches on the video re
corder automatically if it is switched off at the start time of
the programmed recording.
Make sure that the vjdeo recorder is always switched off
with button LLSTANDB.Y..Pbw,...0^ use.
23
Page 26
Programming with VIDEOpius-f
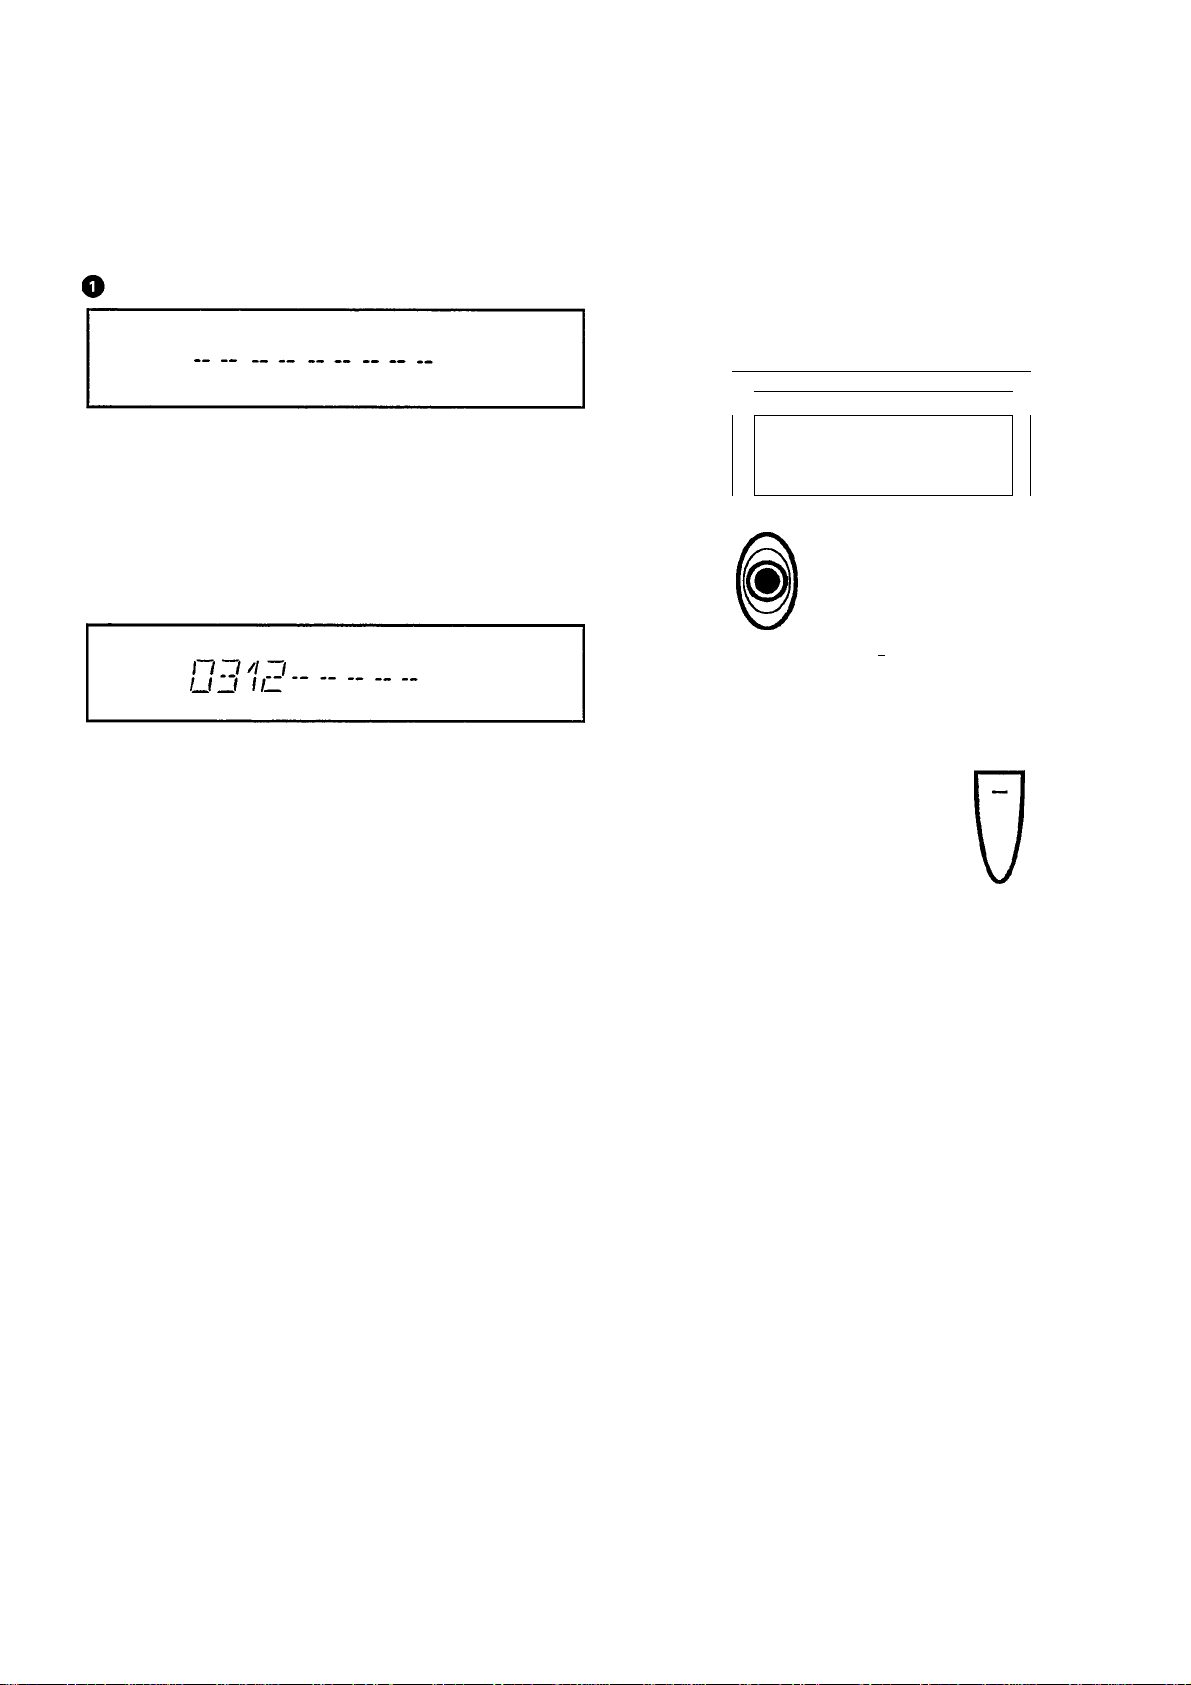
With this method the programming will be as easy as dial
ing a telephone number. You only have to select the
'VIDEOplus+ code' (2 to 9 digits) printed in your TV maga
zine next to the start time of a TV programme. Make sure,
beforehand that the internal clock and the aerial codes are
set.
Press button L.;.VjpÉ.Q..,PiÜS,rÎr,:l on the remote control.
* If you cannot find, or do not want to use, the aerial code
for certain TV channels, then you must use one of the other
two programming methods.
* If 'CODE ERROR' appears in the display, the code was In
correct or incorrectly entered. Repeat the entry or end with
button £LCLEAS.U .
The display of the video recorder shows a number of
dashes. To exit from this function press button iliCLEAR
O Enter the 'VIDEOp|us+ code' in your TV magazine with
the digit buttons :i.0,-9J.
If you entered a wrong code number, clear it with but
ton clear.I.i.
O If you want to repeat programming at daily or weekly
intervals, push button
display switches between an additional 'D' (=daily) or
'W' (=weekly). The daily function can only be used for
recordings to be made Mondays to Fridays inclusive.
Push the button L..yiDEQ.,.PL.QS..ti'?. The programmed
data is now decoded by the video recorder. If the video
recorder has decoded the data correctly, the video re
corder display shows the data. The time is shown in the
24 hour mode.
If the data is wrong, clear with button i.lCLEAR.s.;.
SELECT
once or twice. The
vcm
zin.nn
CU'UU
record/otr timer rc
»
today cassette select
PQO ^
, . set clock—^
tracKing _
Ca>O©0 A
index / I
O© © ©M
monil-!!iVIDEOplus+ clear
010(0
.peat
ooo
rec mode sp/lp audio nicam
timer vcr
oooo
h
standby
0
START
7 T
O T7C
TIMER JLI I
O Confirm the correct data with button
I I
nUI n
I I
n
U
I on.on
I !-U’UU
; vibEd pLus;-fr::.
Notes: ” To identify a TV channel correctly the video re
corder needs the correct aerial code for 'VIDEOplus+'. If
this is unknown the video recorder display shows 'VP UN
KNOWN' and then the programme number 'E 2'.
You then have two possibilities:
1. To interrupt programming with button iT CLEARj;. Then
enter, as described in Chapter 2 'Storing TV channels', the
correct aerial code and repeat the programming.
2. To use programme number 'E 2' to record from an exter
nal source (e.g. satejiite.tuner) confirm .the display in
step O with button i..:.yj,DIEO, .PLyslS-.l.^
24
C30E>
still clop
programme
volume
Page 27
Programming on the remote control
You can enter and store the data for one recording in the
remote control.
The remote control display shows you all the programming
steps. Use the digit buttons or button liii or to
enter the data.
With the last press of the button you transmit the pro
grammed data to the video recorder. The data will be
stored in the next free TIMER block of the video recorder.
Make sure that you have not inserted a cassette with erase
protection.
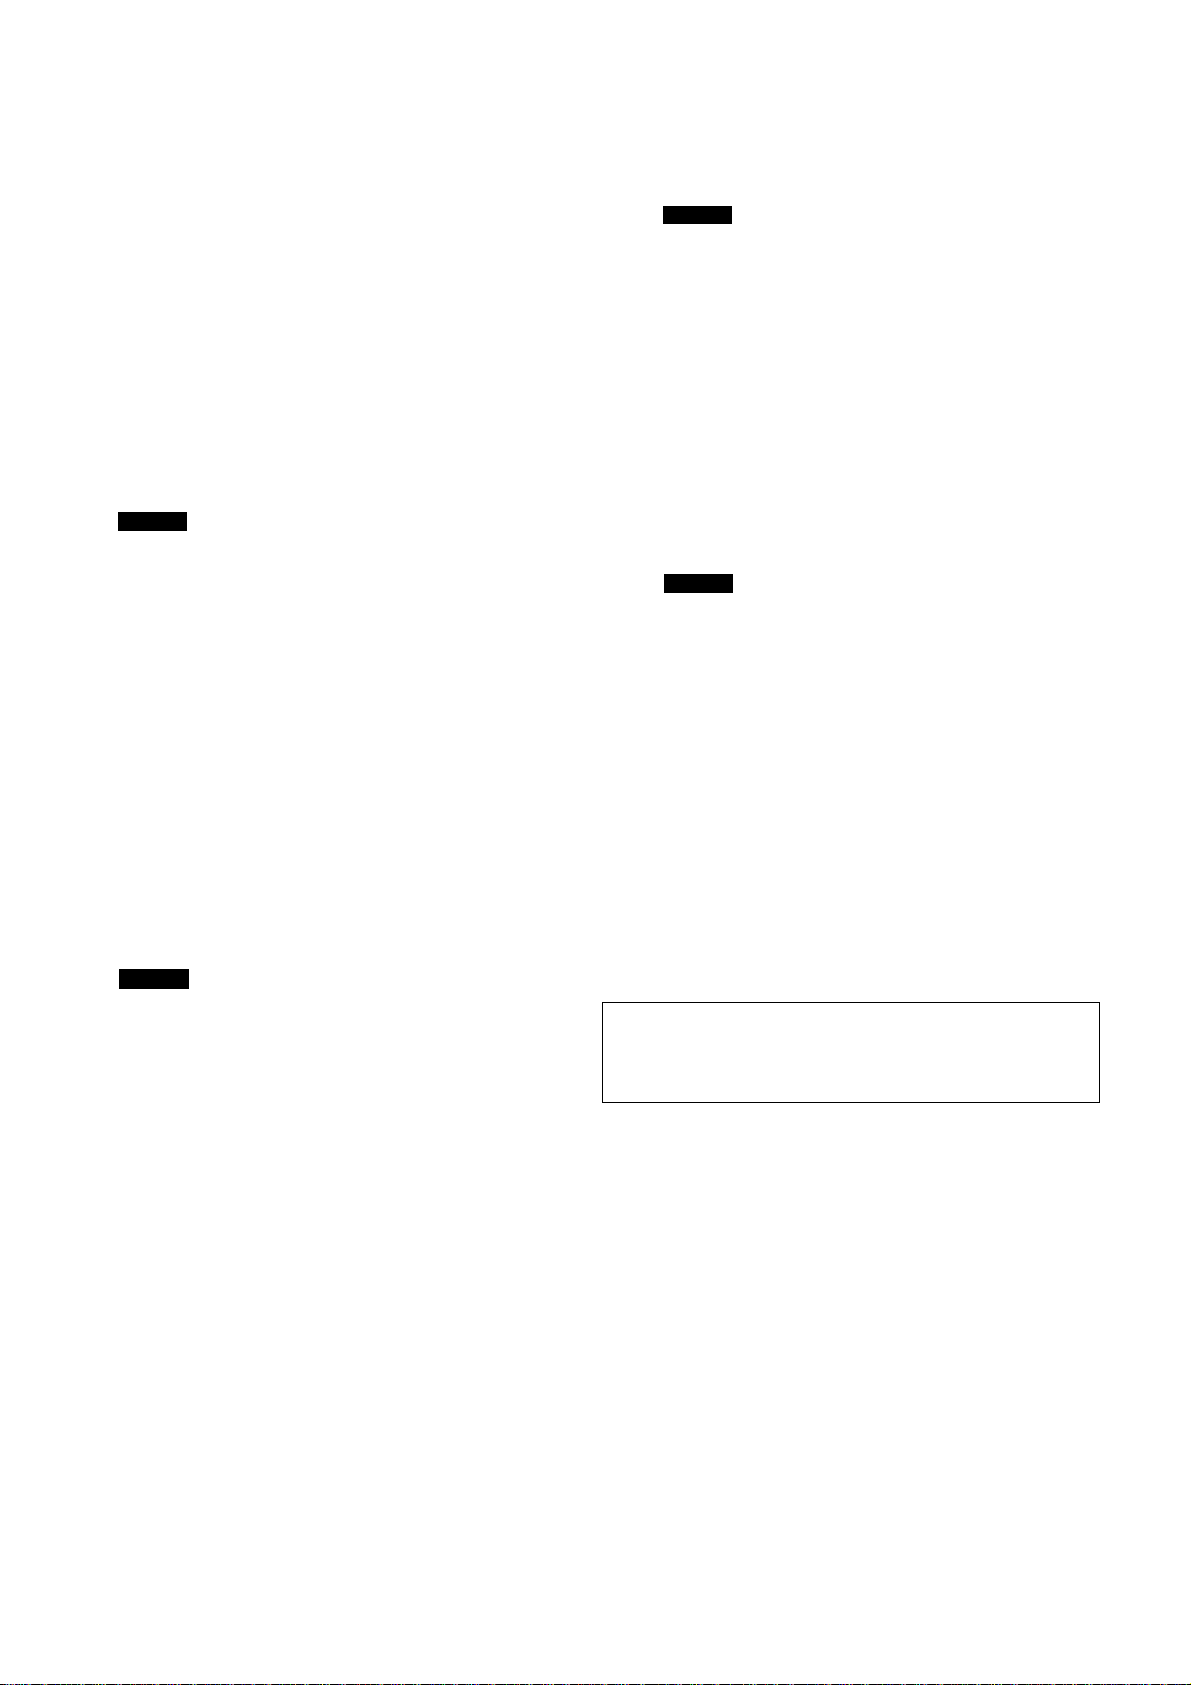
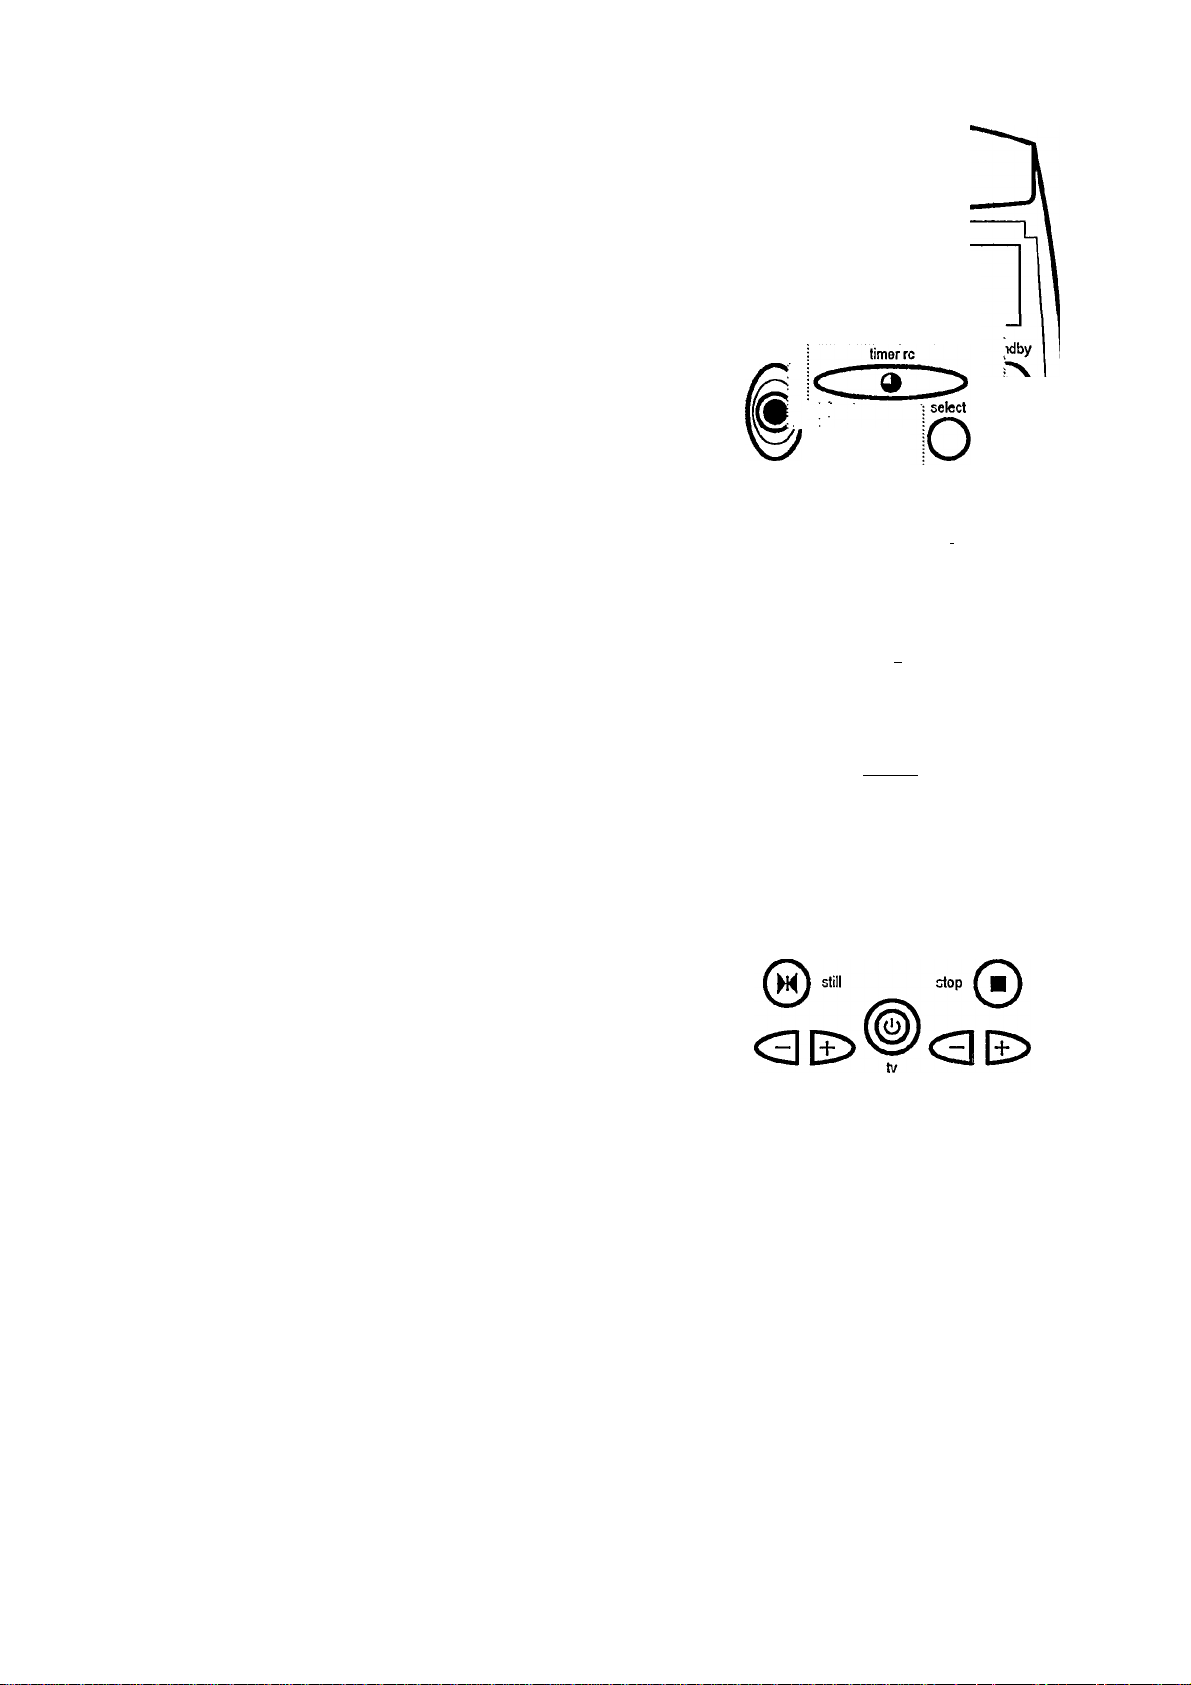
O Press button i::iTiMER„RC JijEj.
O Press button Si5lf.lMER__8£ display wil
show, e.g.:
TIMER
on.nn
L U*ULI
\\ \ ! / *
-START-
YCRl
orunn
L URLILI
END
The remote control display will show, e.g.:
TIMER
VCR]
n I
LI I
*V.\\ I /y
= DATE i
The data last entered will appear.
Now enter the date on which the recording is to be made.
If the dispjay also shows the indicator 'D' or 'W', press but
ton i..i..SELECT,.i..i one or more times until only 'DATE' is
shown.
PROG
O Press button L.J.TIMER..R.C The display will show,
e.g.:
TIMER
VCR]
Now enter the start time of the recording.
O Press button The display will show,
e.g.:
w\ I //,
TIMER
on. 10
LLI* IJ
START
Now enter the end time of the recording.
VCRIlO)]) z
// /1
i/n.nn
L U’UU
■S. \\ I />» X'
H TND ^
O Transmit the data to the video recorder. To do this,
point the rempte cpntrpi at the video recorder and press
button Sii.TJMER,..BP. .0J?y.
The programmed data is now sent to the video recorder.
If the video recorder has correctly received the data, the
video recorder display shows, e.g.:
n I
LI I
DATE
Now enter the programme number of the TV channel from
which you want to record.
= PROG s
1
TIMER I
Programming is now complete. The data has been stored in
a TIMER block (e.g. 'TIMER 1').
OOO Ti
1'^ t—l l±l ‘
0Ì 25
Page 28
To programme a TV programme that is on every day or
every week:
You don't have to programme a series each time afresh.
When you are entering the recording date, you can pro
gramme a daily or weekly repeat at the same time.
Programme the TIMER block as usual. Press button
i.J SELECT.J,J when you are entering the recording date in
step O •
In addition to 'DATE', the display will show:
Press once = 'D'for recording every day (Daily)
Press twice = 'W' for recording every week
(Weekly)
Some general notes: “ The TIMER switches on the video
recorder automatically only if the video recorder is
switched off at the start time of the programmed recording.
** If you don't press any button for one minute during pro
gramming, the remote control automatically interrupts the
process. You then have to begin programming anew.
The contents of the TIMER block remain stored in the re
mote control as long as you have transmitted the data to the
video recorder. If, after entering the end time, you do not
wish to transmit the data to the video recorder, press button
i i STAlMDBV b-if Ojj.
** While a programmed recording is being made, you cannot
use the video recorder manually.
If you want to interrupt the programmed recording, press
button ;j.sTANbBY o^:c^.
^ If the end of the cassette is reached during a programmed
recording, the video recorder automatically ejects the cas
sette and switches off.
" If you forget to load a cassette after programming, the
word 'EJECT' appears in the display of the video recorder.
” If you insert a cassette with erase protection for the re
cording, the Indication 'PROTECTED' appears for a few sec
onds in the display of the video recorder.
The cassette is then ejected.
" If you have programmed all TIMER blocks, the display of
the video recorder will show 'MEMORY FULL'.
” The programmed recording is always made at the record
ing speed (SP/LP) that has just been selected on the video
recorder.
vati
Ziri.nn
CLfUU
u u
tracking
set clock--;
® О © 0
index __ .
o© © ©
o©® ®F]
monitor VIDEQp|us+ clear I I
00©0\7
tuner go to repeat
ooo
rec mode sp/lp audio nioam
timer vcr
oooo
<30E>
programme
volume
26
¡a
Page 29

How do 1 record from a satellite tuner
How can I check or correct a TIMER block?
You can also programme recordings from an external sat
ellite tuner.
:iE>o:ERNiaOli.MakeO Connect the tuner to the socket i
sure that the tuner is switched on and that the correct
SAT channel has been selected.
O Use one of the three available programming methods to
programme a TIMER. Use programme number 'E 2' in
the programming procedure for this external recording
source.
Note:* If you use 'VIDEOplus+ programming' for such an
'external' satellite TV programme, the video recorder auto
matically selects 'E2'.
The error message 'VP UNKNOWN' can be ignored.
O Press button kSXIMETr,jfCR„0Jii:J on the remote con
trol.
O Use button liiS or -iniito select the TIMER block that you
wish to check or correct.
O Now press button iiiJJJMEfTJZiPlRj® several times.
The recording date, the programme number, the start
time and the end time will be displayed one after an
other on the video recorder.
You can change alj. data with button lis or kzs or with
the digit buttons .
You can select between daily/weekly/date programming
with button ilLSELK?U..i, during step 'DATE'.
O Finally, press button S;JjiMER,..VCEAJS^^ If you
have made any corrections, the data is now up to date.
Notes: * By following the above instructions, you can not
only check any programmed TIMER block but also pro
gramme a new block.
To do this, select a free TIMER block. Enter the data as out
lined in step O ■ Durjng.the^programme number' step, you
can also use button ii;LSELECX,Lii to programme the record
ing mode 'SIMULCAST' or 'AUDIO ONLY'.
* Daily programming can only be used for recordings to be
made Mondays to Fridays inclusive.
* Daily/weekly programming can only be used up to one
week in advance.
How can I cancel a TIMER block?
O Press button !mJiMER_VCFL®Jilon the remote con
trol.
O Use button Sx or i~ i to select the TIMER block that you
want to cancel.
O Press button i.CLEAEi and the TIMER block is can
celled. The display on the video recorder will show, e.g.:
TIMER 1
1
op p p
1 /'/_/_
27
Page 30
OTHER RECORDING
POSSIBILITIES
1
You have a choice of several recording modes. You can se
lect them by pressing button iJB.EC,.W.QD,Ei;i (remote con
trol). To return to the normal recording mode, switch off
the function with button i;i.STAN,DB„Y.i,.i or press button
MBEC.MOPEj j one or more times until the display shows
'STOP'.
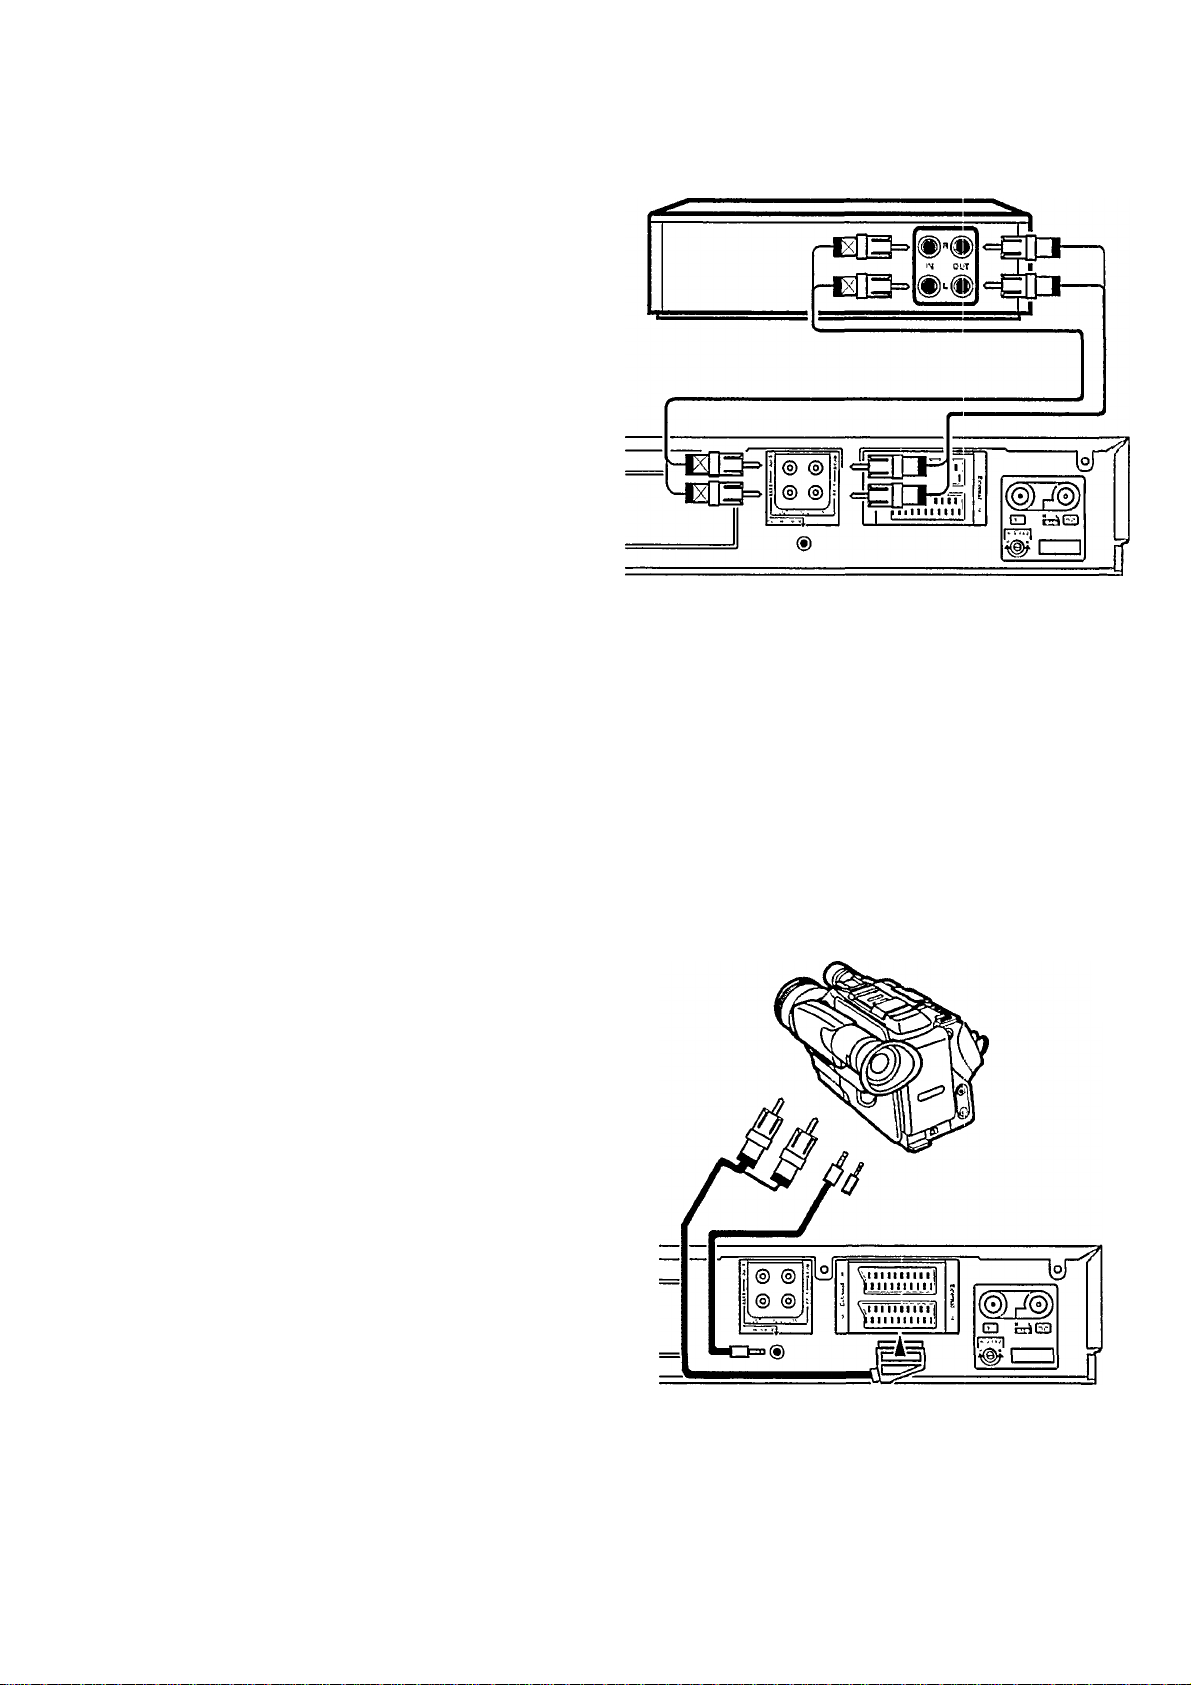
Audio dubbing
This function enables you to replace (dub) the sound track
of a previously rnade recording with another sound record
ing (socket :.i. AUDl.Q.JNJ.i).
Only the normal (linear) sound track is changed. The stereo
sound track and the video image remain unchanged.
O Press button yPLAYj.ito locate the position at which the
audio dubbing is to start.
O Press button LLSt.QPj.i. The video recorder is now in the
'STOP' position.
Note: You can mix the original Hi-Fi sound with the sound
from an external audio source by connecting a mixing panel
to the video recorder. The sound cannot be heard during
recording.
Synchronous Editing (Synchro-Edit)
O Press button i.;REC,MdbE;; (remote control). The dis
play on the video recorder will show:
I UI IT/ I n Til I V V
L. I I U±l I l_J ±1 U ±!±l
uri
lU
O Press button Li RECORD.. / .bTR.iH:.
The video recorder will start to record the sound input from
the audio source, replacing the normal sound track. Audio
output is controlled automatically.
If you want to listen to the sound recording, select the
'mono' sound track.
o You can finish the recording with button i.i.SXQP.Li.
O Switch off the video recorder with button iL STANDBY.;.;.
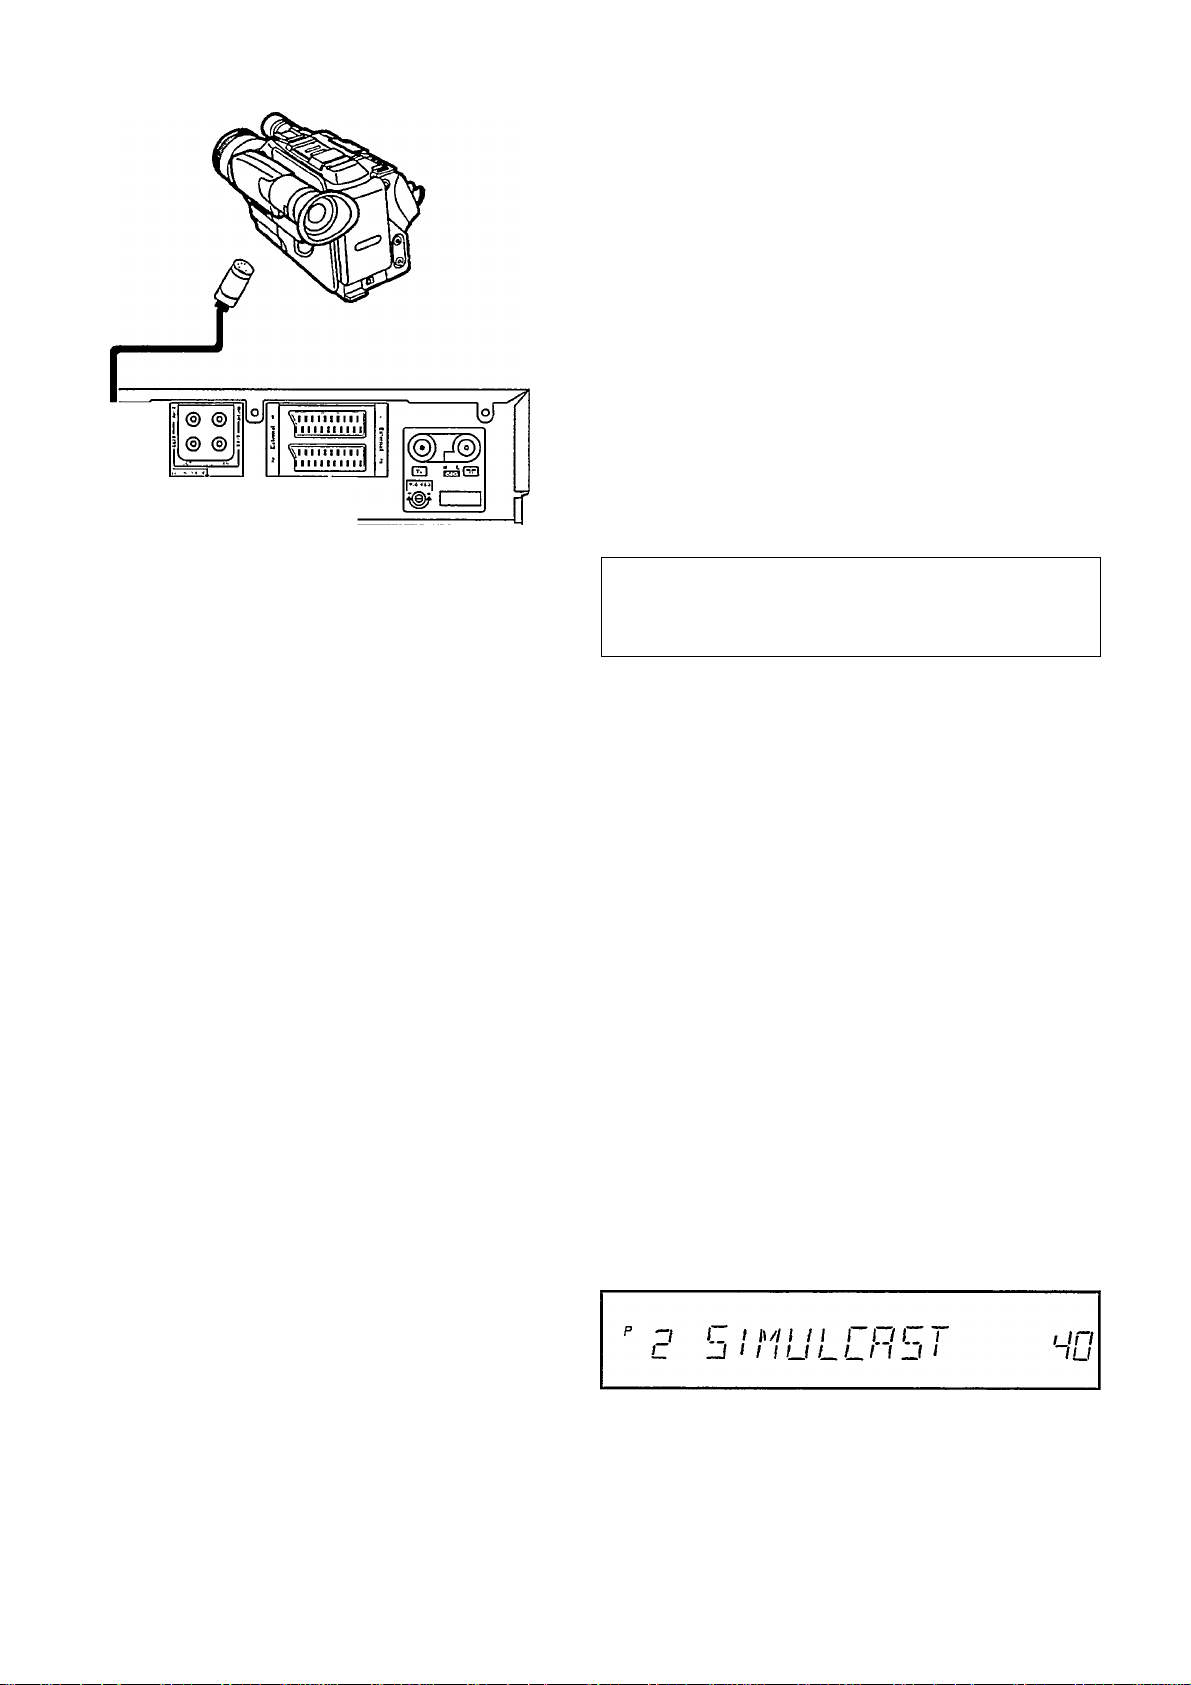
You can edit synchronously with a connection cable be
tween an appropriately equipped camcorder and the video
recorder. For example, cable SBC1085 + SBC5512 for Vari
ant 1. Both appliances are started at the right time with the
help of a synchronized pulse and the adjustable pre-roll
time.
Two different operating and cabling variations are possi
ble. Connect both appliances while they are switched off.
Variant 1;
28 (C)
Page 31
Variant 2:
Pay attention to the operating instructions for your camcor
der. The videp/audio the video recorder via
the socket .
O Press button several times until 'EDIT'
appears in the display.
Note: If the start of the scene to be edited is missing, then
the setting for the pre-roll time is too long. Simply set a
shorter time (e.g. 1:40) as described in step ©. If the re
cording starts before the scene to be edited, the setting for
the pre-roll time is too short. Then you must increase the set
time, e.g. to 2:10.
^Audlo only' recording
You can also make 'Audio only' recordings (audio record
ings) with this video recorder. To do thjs,„connect the video
recorder to an audio system (socket i(LAUP10J.W.Ii).
The recording is made at half-speed. This gives you twice
as much recording time as is indicated on the cassette.
'LP' will appear in the display.
O Insert a cassette.
O Press button isBEp/MQDEi.i until the display shows:
f
/_
O 1 ITI 1 n
1 1 U ±1 1 u
n l\ 1 1
U l\l U t
1 in
lU
O Y.P.li can change the pre-roll time with the buttons ffiior
:i.The display will show, e.g. 'START 1:56' (seconds).
O Confirm your setting with button iSIQEil.
O Locate the right tape position on the video recorder for
recording. Press button IJSJOPJI again.
O Locate the right tape position on the camcorder.
O Press button 'PAUSE' on the camcorder.
O In accordance with the above cabling, there are two
ways to start editing.
Variant 1
O Start the editj^ button
i.i.RECORD,../.„QTR.i.ion the video recorder. The camcor
der starts with 'PLAYBACK' and the video recorder starts
synchronousiy with 'RECORD'.
O Stop the recording with button iSTOPj.; on the video
recorder.
© Switch off the video recorder with button il.SfAN.DBYJI.
O Press button iS.RECP.Rll„^„bjRis. The video recorder
starts to record the sound input. Any previous (video)
recording is, thereby, erased.
O Finish recording by pressing button iiLSJ.OPji.
Note: For a programmed 'AUDIO ONLY' recording, read the
note in Section 'Correcting/Cancelling a TIMER block'.
Simulcast recording
The stereo sound of some TV programmes is broadcast si
multaneously on FM radio. In order to get the best stereo
sound quality you can record the picture from the TV chan
nel and simultaneously record the stereo sound from the
radio.
To do this, connect the radio to the socket i.LAUPJbJ.N..i
using an audio cable.
O Tune your radio and the video recorder to the desired
programme.
O Press button iiLMQuMbPEi.: (remote control) until the
display on the video recorder shows:
Variant 2
O Start editing, e.g. with button 'EDIT' on the camcorder.
The camcorder starts with 'PLAYBACK' and the video
recorder starts synchronously with 'RECORD'.
O Stop the recording with button 'PAUSE' on the
camcorder.
© Switch off the video recorder with button .
O Press button n.R^EQQRb„./LbjBji.
The video recorder starts recording the sound from the
radio and the pictures from the TV channel.
O Finish the recording with button I'iSMPjJ.
29
Page 32

Notes: ** Simulcast recording without a video signal is not
possible.
For a programmed simulcast recording, read the note in
the Section 'Correcting/Cancelling a TIMER block'.
Insert function
This function enables you to insert a new scene into an
existing recording without a disturbing transition.
O Locate the positipn.at which you want to insert a scene
with the button .
Externally controlled recording
Do you have another device, e.g. a satellite receiver, with a
built-in clock through which other equipment can be con
trolled? With this video recorder, you can control the re
cording from an external device via the socket
Lll^RNAL.2y.
O While.the video recorder is switched off, press button
!lMPNlXQR.i:l for five seconds. The display will show
'RECORD PREP'. The video recorder is now ready to
record.
O Press button L^STOP. .
O Press button L+ii or or the digit buttons (re
mote control) to select the programme number of the TV
channel from which you want to record.
O Press button Li.BBC^W.QPEj.i (remote control) until the
display of the video recorder shows:
p
n
1 I'/CCHT
1 1 s 1
I in
lU
O Press button i.i.BECORD, / ..djfR.i.i.
O Finish the recording with button i.i.ST.dPji;.
Notes: ** Inserted scenes are inserted with a diminished pic
ture quality. During playback, inserted scenes may show a
slight colour distortion and instability.
If you wish to end the insert recording automatically,
search for the desired end on the cassette.
Select the counter indication of the tape position and reset
it to '0' with the button ;.;,CLEARj;;i.
Now rewind to the beginning of the recording and start re
cording. The video recorder will automatically end the re
cording when the counter reaches 'O'.
O The start and end of the recording is remote-controlled
via socket EXTERNAL.? i '.
O If you want to interrupt this function, press button
f:iJSTANDByj.:,
Note: * It is not possible to use a decoder with this func
tion.
* The 'record prepared' function may not operate success
fully when another programming function (TIMER) has also
been used.
30
Page 33
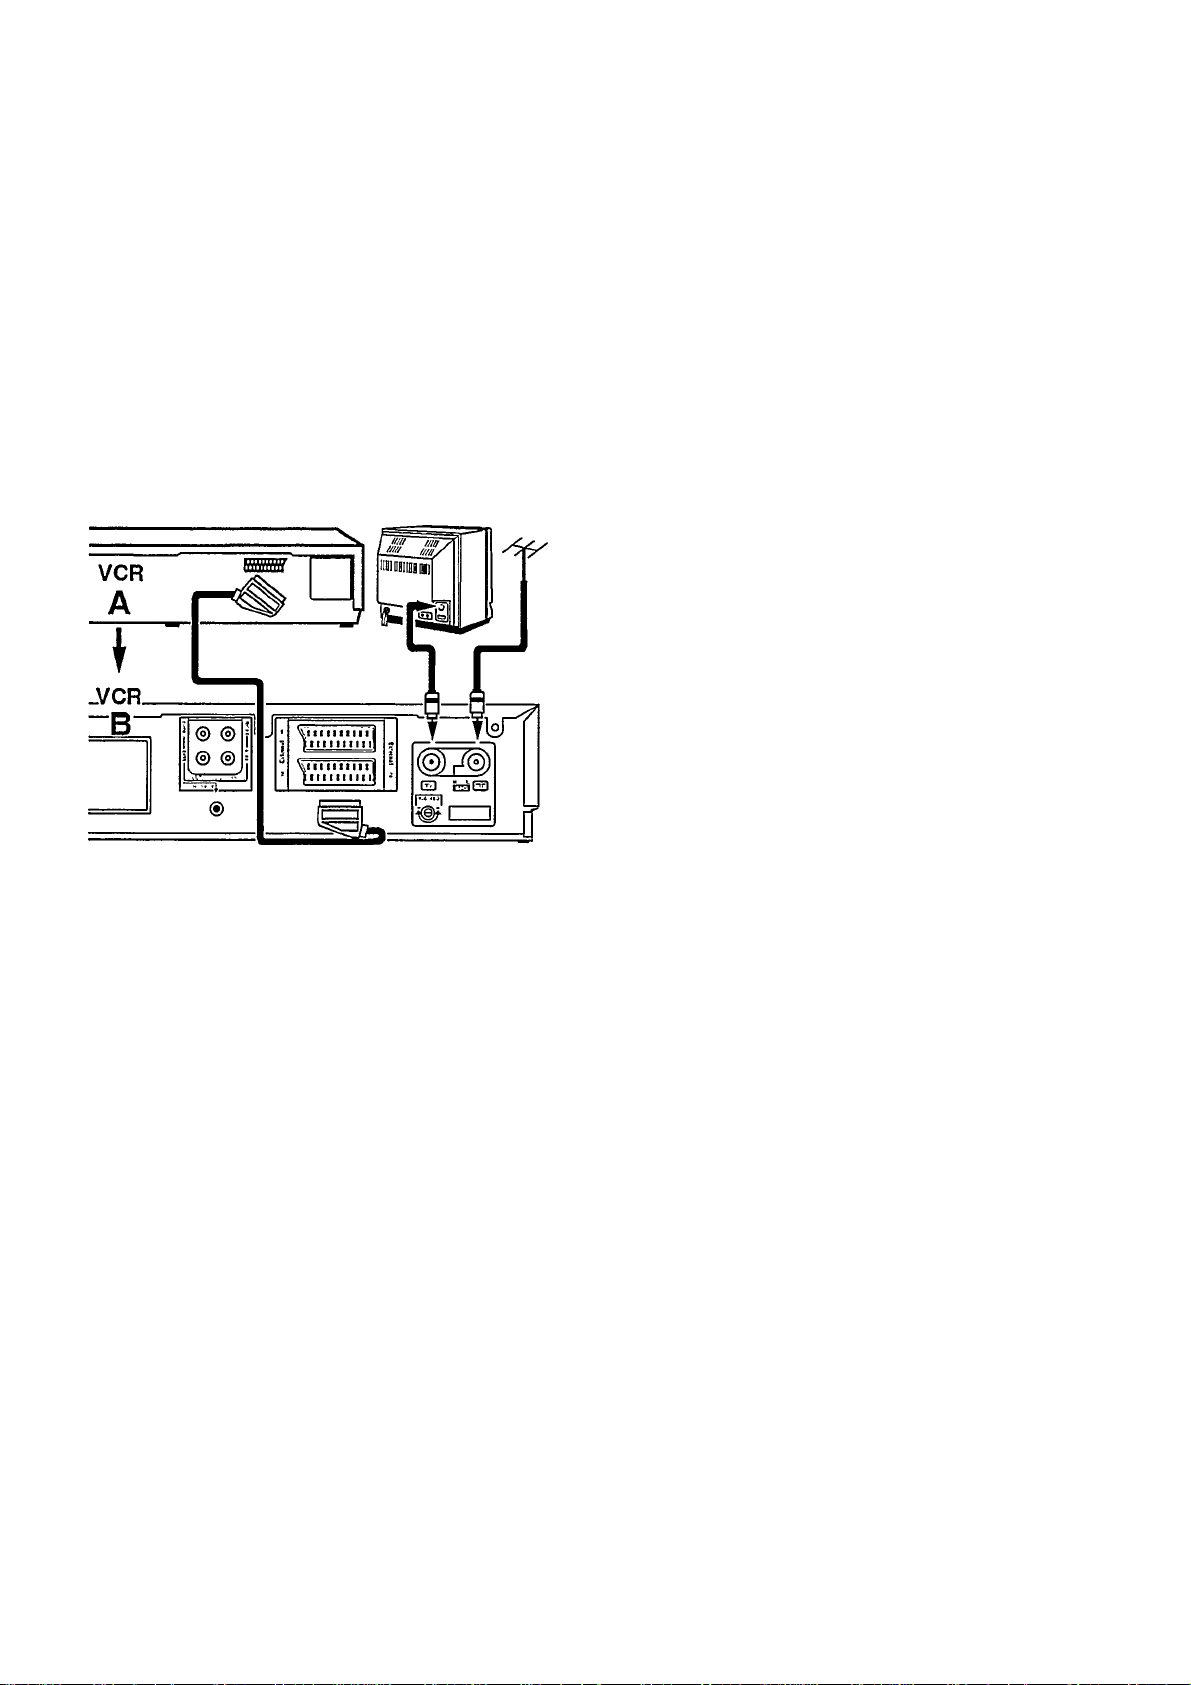
Recording from another video recorder
With this video recorder, you can make recordings from an
externai source, e.g. copying onto this video recorder from
a second video recorder.
To do this, you wiil need an AV-Euro-cabie (scart-cabie).
O Connect this video recorder to the appiiance from
which you want to record, e.g. a second video recorder.
To do this, insert the AV-Euro-cabie on each set into the
AV-Eurosocket. This is socket LiilEtlRMALlSi on this vid
eo recorder.
Note: In the following description, this video recorder is to
be used for recording and will be referred to as VCR B. The
other set is used for playback and will be referred to as
VCR A.
O Insert the recorded cassette into VCR A and a blank cas
sette into VCR B.
O Now select the programme number 'E2' on VCR B. 'E2' is
next to programme number 'PI' (PI - El - E2). Use the
rotary control iC.Qiii.
O To start the recording, press the recording button
Li.RECbRb.../„6TR i:Jon VCR B and the playback button
LiPLAynon VCR A.
O yyhen you want to finish copying, press the stop button
iJRTOPi.ion both video recorders.
31
Page 34

SPECIAL FUNCTIONS AND EXTRAS OF YOUR VIDEO RECORDER
Apart from the functions that have already been described,
your video recorder has other special functions and extras
designed to make operating your video recorder as conve
nient as possible.
In this chapter you will find out more about them.
Chifd lock
This function prevents the unauthorized operation of your
video recorder. All button functions are blocked. If a button
is pressed, 'LOCKED' appears for a few seconds in the dis
play. But don't worry: Programmed recordings are made
despite the child lock and cannot be interrupted.
O Press button LLSTANDBY.0»^ :j on the remote con
trol for more than five seconds until 'LOCKED' appears
in the display. The child lock is now activated.
Keep the remote control in a safe place.
Tuner mode.
Your video recorder as an extension of your TV set
You can also use your video recorder as a TV receiver (tun
er). This is handy if your TV set does not have remote con
trol or if it has fewer channel buttons than the number of
channels it could actually receive.
This is how you go about it;
O Switch on the TV set. Select the programme number re
served for video playback.
O Press button LLT.QNEBJJ on the remote control.
The display will show, e.g.:
p
n
O Use the rotary control iT i or the digit buttons £.0-9ji
(remote control) to select the TV channel that you want
to see on the TV screen.
Tt li\ ic o
1 Ul V/_/ ' LU’UU
nn.nn
© When you wan.t off the child lock, press button
LLS,TANPB.Y..9t»t .O.JJ again for more than five seconds.
After five seconds 'UNLOCKED' appears in the display.
An extra feature of this remote control
If you have a TV set that can accept the remote control code
of this remote control, you can also use the remote control
for some TV functions:
* Programme number +/* TV volume +/^ Switch off TV
O Switch off the video recoder with button
you no longer want to watch TV.
The TV monitor function
You can press button i.iMPMtPRj.ito switch the TV set to
programme number 'AV' (= Audio/Video input). The video
recorder must be switched on.
The display shows 'VCR MONITOR' for a few seconds. Press
the button again to switch the monitor function off.
An important note: The monitor function responds only if
the TV set is also equipped for this switch-over and you use
an AV-Euro-cable for the connection to the TV set.
:.SJANPBy,i!J if
32
Page 35
VCR t / VCR 2 switch-over
View mode
This is an important function for you if you have two video
recorders which accept the same remote control code.
You can quite easiiy change the remote control code for
this video recorder and this remote control, so as to pre
vent the unintentional operation of the wrong video record
er.
O Switch off the video recorder with button iiSIAN.DBSi
Now press button l;iLlN.STALL;,j on the video recorder.
The dispiay of the video recorder wili show the indica
tor for the 'TEST PICTURE'.
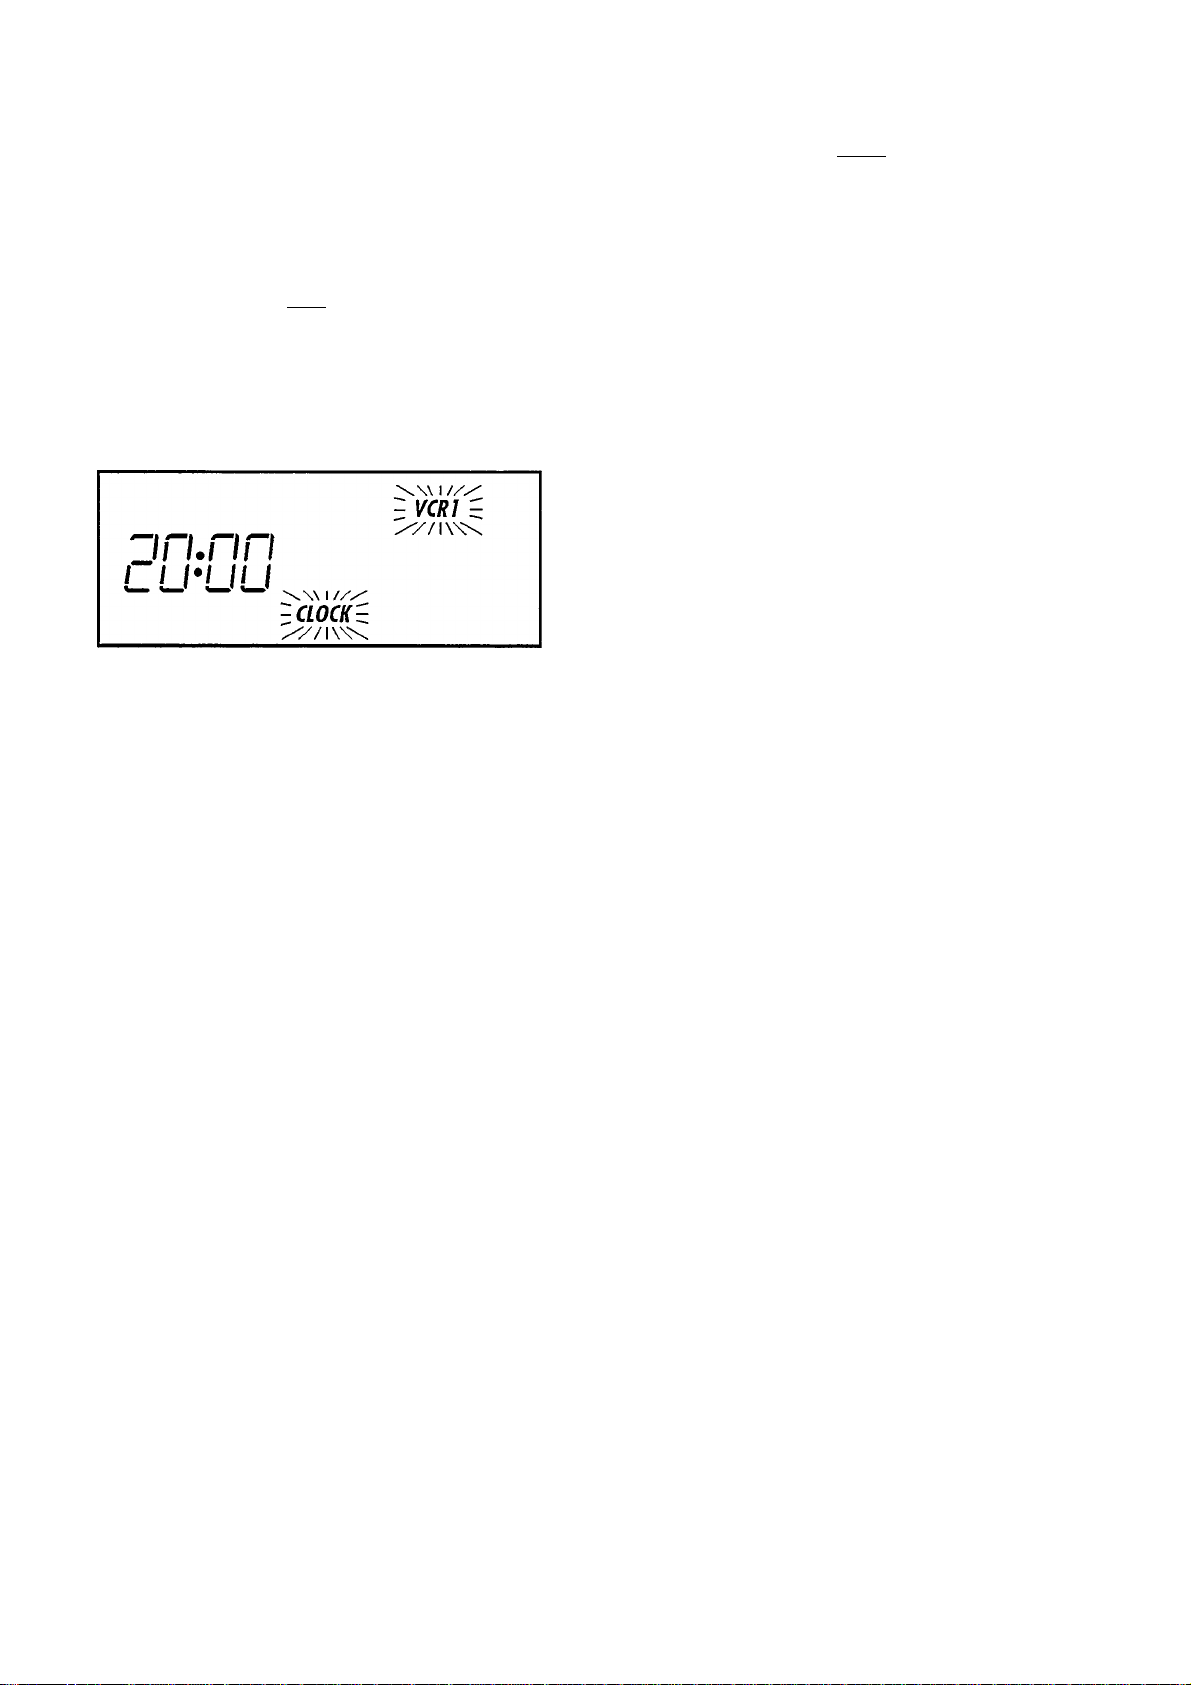
Press i.;SET....Cl,OCK on the jemote control (buttons
JjQPA^i.i and CASSETJEjltogether). The remote
control display will show, e.g.:
O Press button i..i..SELECX„L,i (remote control) for more
than five seconds until 'VCR 2' appears in the display.
You can make use of extra functions with an appliance con
nected to socket ii.SOLERC^L„2i.;i. This appliance could be
another video recorder, a decoder, a satellite receiver, or a
video-CD player.
When the video recorder is switched off, the AV-Euroconnection from the second appliance to the TV set is still con
nected.
If your second appliance transmits a control signal, for ex
ample, during playback, this video recorder recognises this
and automatically switches over to 'View Mode'. You can
switch the 'View Mode' on and off with button
liviMiioRli
p
I
Note: If you have selected an external AV-Eurosocket for the
programme number ('El' or 'E2'), the video recorder cannot
switch over to 'View Mode'.
The new 16:9 wide screen standard
I y t O I I
u I /_ //\f
on.nn
LU’UU
O Press i.;SET.. CUCCKiJon the remote control.
O Press button on the remote con
trol. The video recorder is now switched over.
O If you want to switch the set back to 'VCR 1', simply
follow the same sequence.
The remote control again shows 'VCR 1'.
Auto-dimmer
You can choose the brightness of the display on the video
recorder when it is switched off.
To do this, switch off the video recorder with button
Li.STANPBY,,0^:Ol and use button ¿+¡5 or on the
remote control to select the brightness you require.
Automatic switch-off
If the video recorder is not operated for several minutes
during one of the following functions, the function is
switched off.
This protects your cassette and prevents unnecessary pow
er consumption.
This video recorder is suitable for wide screen TV sets.
If a wide screen '16:9' identification is received during a
video recording from an external source (e.g.: MAC-decoder) via the EXTERNAL 2 socket, this identification is re
corded too.
P.Hr.i.0.9..P.!.ayback, this identification is conveyed from the
!:S.^TjRNAL.iji socket via an AV-Euro-cable to the TV set.
If the TV set is not equipped for playing back wide screen
pictures or cannot handle the identification, switch the vid
eo recorder to the normal 4:3 format. To do this, look it up
in Chapter 1, section 'Setting the display language and the
clock', step O •
The video recorder is:
in STOP
in EJECT
in STILL
in SCANNING
it switches off
it switches off
it switches to PLAYBACK
it switches to PLAYBACK
33
Page 36
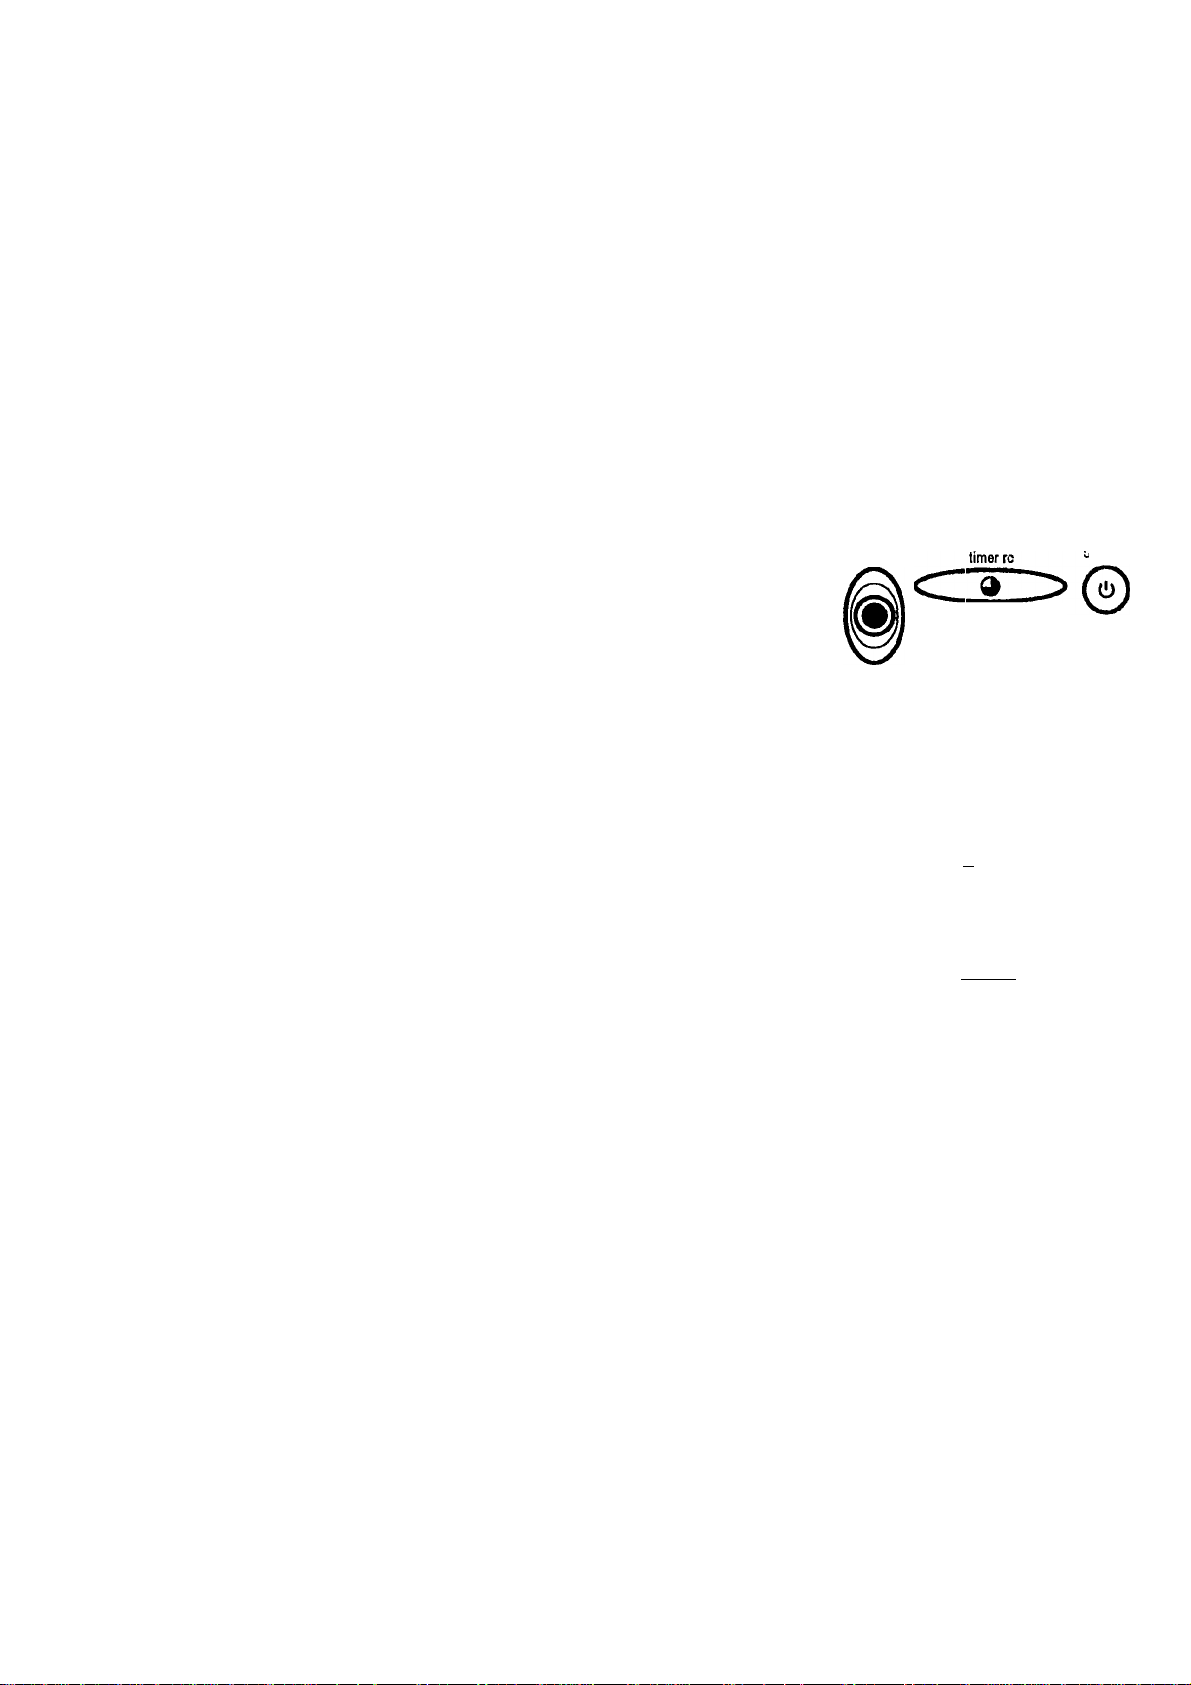
SUMMARY OF CONTROLS AND CONNECTIONS
Detailed information concerning the various functions is given in the relevant sections.
Symbol on the remote control . .Function
; i.RECORD,.,/...OTR i
iTIMER. RC L..;
J.STANDRY.Otw c5.y
; iTODAYLi ...
L CASSETTE,...............................Tape length selector
: I
i SET CLOCK
...TRACKING ,iQ I
¡"hi ...............................................Increase/Plus
:i~ i . ..^.;.......................................Decrease/Minus
INDEX i,;
Li WRITE i:i
MONITOR i _ _
;..VIDRO..PLUS.ii:..:,Vi
i:CLEAR;.; ....................................Reset/Clear
iiNICAMLi .....................................NICAMon/off
i.iTUNERi.i
TO;. I ...................................
..iTIMER. VCR.® i ...
l iREC.MbDEi i
LREPEAT,; ...................................Continuous function
AUDIO........................................Sound track selection
LiSP/LP;:.......................................
..^M SPEED;
SPEED ►>
:.;STOP.B;,i ..................................Stop
Additional TV functions (only for TV sets with the same remote control code):
i.TV PROGRAMME,. +,/-§,
..; TV VOLUME + /-a
; TV C!) .
................................
...............................
..........................................
...................................
.......
...................................
..............................
.
...........................................
........................................
..................
.....
...................
..................
..............................
.......................
..............
...........................
.................
.............................
.............................
i;i.XODAY.is and :..LCASSEtTEJ;isimultaneously)
............Set VISS marker
................
Record
TIMER programming on the remote control
Switch off (standby) / Child lock
TODAY programming
Function selector
Setting, clock on rem^^
Auto-tracking/Fine tuning
Digit buttons
VISS search function
Activate the TV monitor function
VIDEOplus+ programming
Tuner mode
Search for tape position (GO TO)
Correct/cancel TIMER
Recording mode
Tape speed (SP/LP)
Rewind/ Reverse scanning
Playback
Forward wind / Forward scanning
Still picture
, .TV programme +/, .TV volume +/, .Switch off TV
c
VCR I
Zin.nn
CU'UU
record/otr
today cassette select
PQO
. ,. cot clock—^
tracking
®o©© A
index / \
o© © ©M
o©® ©F]
nonitor VIDEOplus+. clear I |
00©0\7
tuner go to repeat
ooo
rec mode sp/lp audio nicam
timer vcr
oooo
ilandby
34
iO
<
30
still stop
<ЗЕ>Ф<312>
programme
E>
volume
Page 37
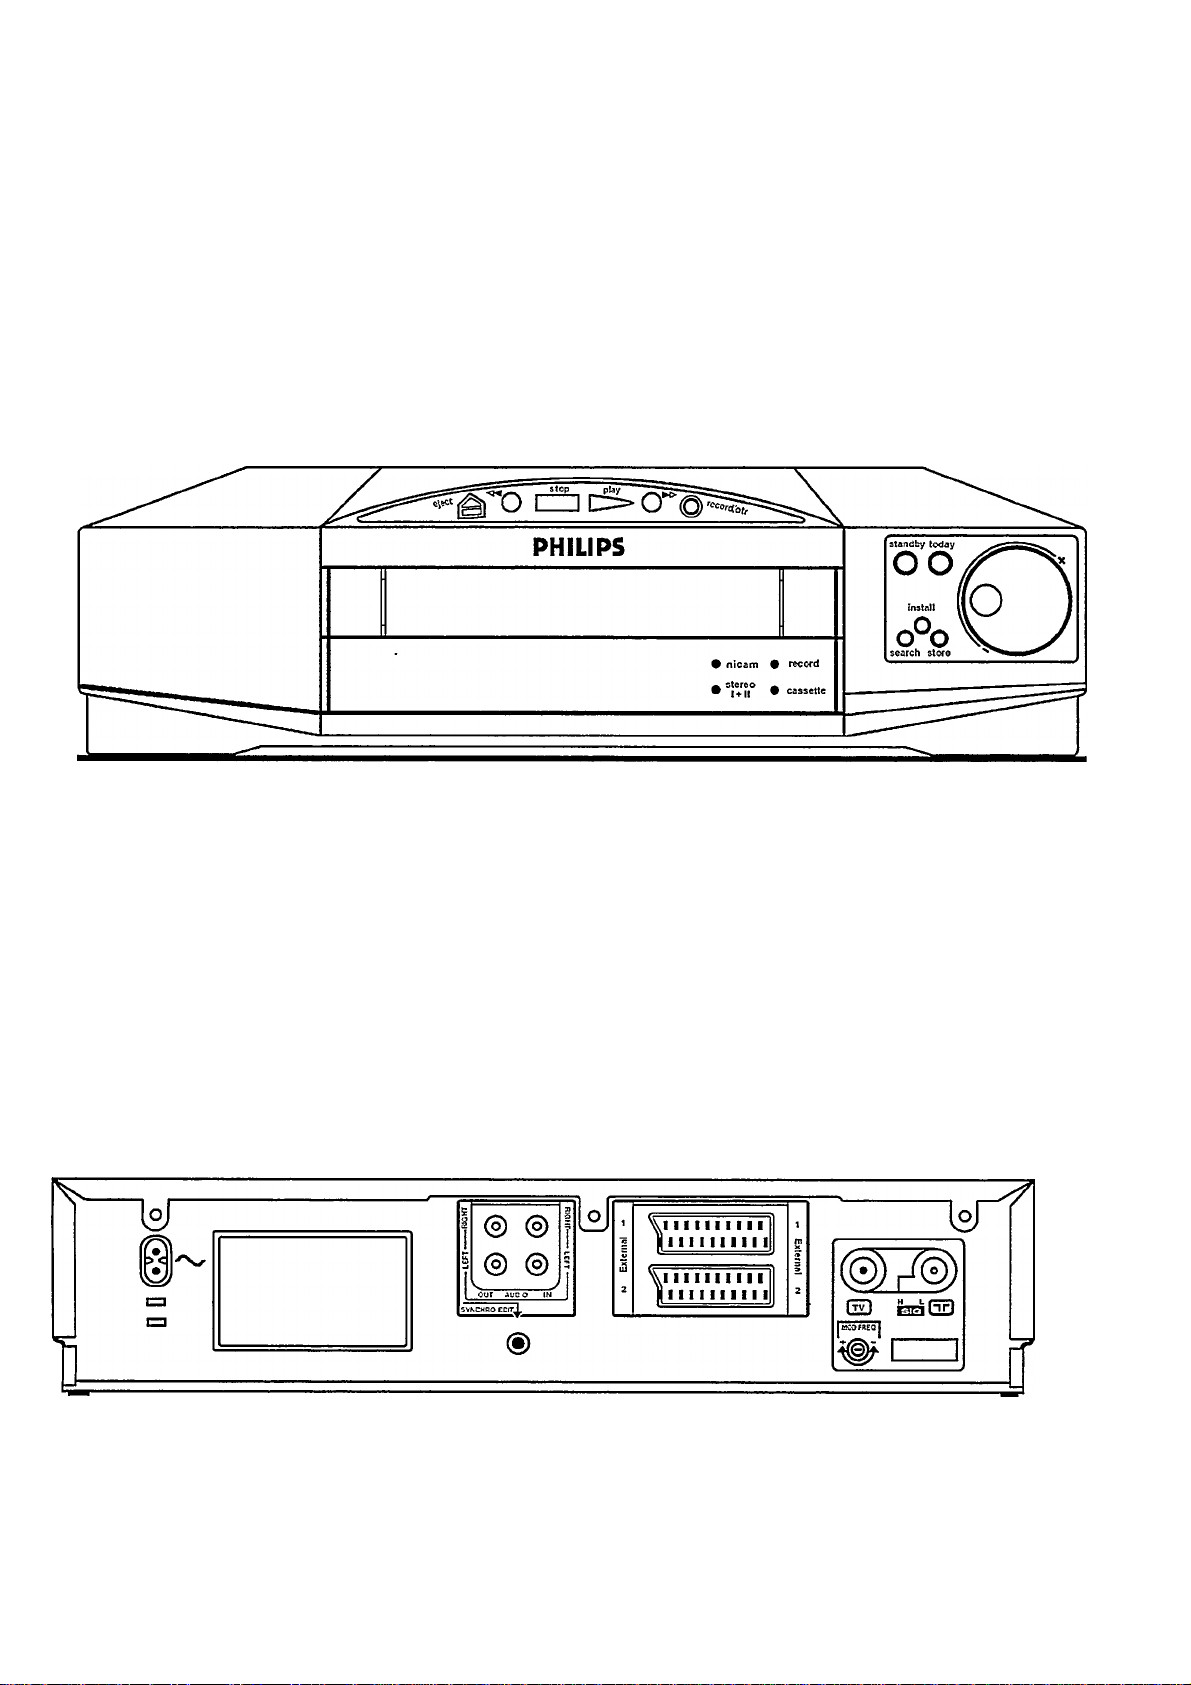
Symbol on the
video recorder
Function
. EJEQTTjj
...........
.........
jPLAVTi
>t>D
i RECORDj'oifRi
.............
...................
, STANDBY Jj....
itoMyXi
iSEARCH,J ....
.UnstaO ....
^StpilLl
...............
..............
............
.Cassette eject
■ Rewind / Reverse scanning
■ Stop
■ Playback
■ Forward wind / Forward scanning
■ Recording
■ Switch off
■TODAY programming
■ Channel search
■ Installation
■Channel storage
■ +/- rotary control
Symbol on the
rear side of the video
recorder
j'Vii
(S)i
nh]...........................
...iEXtHRNALlG ■■
,j EXTERNAL 2 □ ..
LSYNCHiram
......................
.................
J ^UPi5 ¡N'Rieirri ,
J AUOiQ:iN.LEi=ty ■,
i ALiblQ.bUt RIGHT:
J AUDIO but.LERTLi
Function
■ Mains socket
■Aerial output socket
■Aerial input socket
■AV-Euro-socket 1 (scart)
■AV-Euro-socket 2 (scart)
■ Synchro-Edit socket
■ Channei control
■Audio input, right channel
■Audio input, left channel
■Audio output, right channel
■Audio output, left channel
35
Page 38

Problem
The video recorder does not respond to any button
being pressed
Possible cause
* No power supply
* Child lock is activated
* Programmed recording is being made
* Technical disturbance: disconnect from the mains
for 30 seconds, then reconnect. If this does not have
any effect, you can: 1. Disconnect from mains. 2. Re
connect to.mains while holding down buttons
LiPL^Y;:!, iiSJANDBY.i.iand i:i ¿JECT..;,]. All data stored
will be reset (deleted).
Remote control does not work
No playback from the video recorder
Poor playback from the video recorder
Recording is not possible
Programmed recording does not start
* Batteries are exhausted
* Interference from fluorescent lamps or bright sun
light
^ Child lock activated
* VCR 1A/CR 2 definition is wrong
* Technical disturbance: remove batteries for a minute
and then replace them
* No recording on the cassette
* Cassette has reached the end
* The programme number for the video recorder was
incorrectly selected or wrongly set
* The connection cable between the TV set and the
video recorder has come loose
“ 'Modulator' not in 'ON' position
^ Use 'Auto-tracking' with hired cassettes
Cassette is badly worn or of poor quality
Channel control or TV set not properly ad
justed
^ Video heads are dirty. Load/remove a cassette sev
eral times. This activates the head cleaning function
* TV channel is not stored or has been wrongly se
lected
^ A cassette with erase protection has been loaded
* The recording data has been incorrectly pro
grammed
^ Clock/date has been incorrectly set
* A cassette with erase protection has been loaded
^ Cassette has been wound to the end
* Video recorder was in 'Tuner mode'
36
ca
Page 39

This video recorder complies with the EC radio interference
regulations (82/499/EEC).
Mains voltage
Mains frequency
Power consumption
Wind/rewlnd Urne
Ambient temperature during opera
tion
Reiatlve humidity
Dimensions
Weight
Position for use
VHS video resoiution
FM audio
220 to 240 V
48 to 52 Hz
19 W typical (12 W typical in standby)
95 sec. typical for E-ISO
+ 10® C to+35^*0
20% to 80%
380 X 338 X 86 mm (incl. feet)
6.5 kg approx.
max. 15® inclination on all sides
> 240 lines
20 Hz - 20KHZ (<3dB)
List of accessories:
* Aerial cable
* Mains cable
* Remote control and batteries
* AV-Euro cable (scart cable)
IIMTERFEREIMCE
The Department of Trade and Industry operates a Radio
Investigation Service to help TV licence holders improve
reception of BBC and FTC programmes where these are
being spoilt by interference.
If your dealer cannot help, ask at a Main Post Office for the
booklet'How to Improve Television and Radio Reception'.
Page 40

3103 166 09331
3274/001
©
Ca)
00
VR 727
Page 41

Page 42

■4^
Olin
 Loading...