

Page 1

VR454/50
MH
PHILIPS
Page 2

2 Table of Contents
Safety Precautions
WARNING: DANGEROUS VOLTAGE INSIDE
WARNING: TO PREVENT FIRE OR SHOCK
HAZARD, DO NOT EXPOSE THIS
UNIT TO RAIN OR MOISTURE.
• The POWER button does not completely shut off
mains power from the unit, but switches operating
current on and off.
•The rating plate and the safety caution are on the
rear of the unit.
Getting Started
Description of Controls
Before Using Your VCR
Hook Up Your VCR
Turn On Your VCR
Set the Clock........................................................9
Play a Tape
........................................................
Record on a Tape...............................................11
Record One Channel/See Another......................12
On Screen Displays............................................13
.....................................
......................................
.........................................
............................................
3-5
7-8
10
Doing More
One Touch Recording (OTR).............................14
Timer Recording...........................................15-16
Special Playback Features.............................17-18
Re-Recording (Tape Duphcation)
Tape Operation..................................................20
Re-Setting Your VCR’s Tuner
......................
..........................
19
21
6
8
Introduction
Congratulations on purchasing your new VCR (Video
Cassette Recorder). It is one of the most sophisticated
yet simple-to-use home video recorders you can buy.
It will give you many hours of enjoyment, whether you
use it for playing back prerecorded cassettes of your
favourite films, or for recording TV programs which
you would otherwise have missed. Alternatively, you
may find it an invaluable business aid.
You can't wait to get it working, but before you do,
spare a few moments to read this brief introduction to
the world of video recording. It may repay you
handsomely in terms of improved results, or avoiding
of costly mistakes.
Your VCR is prepared for reception of NTSC
programs.
IMPORTANT
Audio-Visual material may consist of copyrighted
works which must not be recorded without the
authority of the owner of the copyright.
Please refer to relevant laws in your country.
Information You May Need
Notes on Operations...........................................22
Before Requesting Service
Specifications
What is a video recorder?
Simply, it is a machine which stores pictures and
sound on magnetic tape. This VCR uses VHS
cassettes, and since VHS is the most popular video
system in the world, there are plenty to choose from.
Suffice it to say that a cassette from another kind of
VCR cannot be used on this VCR. Ensure that you
only buy VHS cassettes of the best quality to get the
best results from this VCR.
The VCR is a television receiver in its own right. When
you record a TV program, it is being received by the
video recorder, not by your TV set. This means that
you can record one TV program on the VCR while you
watch another which is being received by the TV set.
Your VCR has two big enemies: other electrical
machines, and condensation. Read the instructions for
installation carefully, with special regard to the
proximity of other electrical devices, and make sure
that you never, either during installation or ever in the
future — put a cassette, still cold from your shopping
basket or car, into the VCR without first letting it stand
in the room for at least two hours to acclimatize.
Positioning
Do not place the VCR directly on top of, or
underneath, your TV set. Ensure that there is at least
20 cm between the VCR and the TV set, and that air
can circulate freely through the ventilation openings of
the VCR.
.....................................................
.............................
23-24
24
Page 3
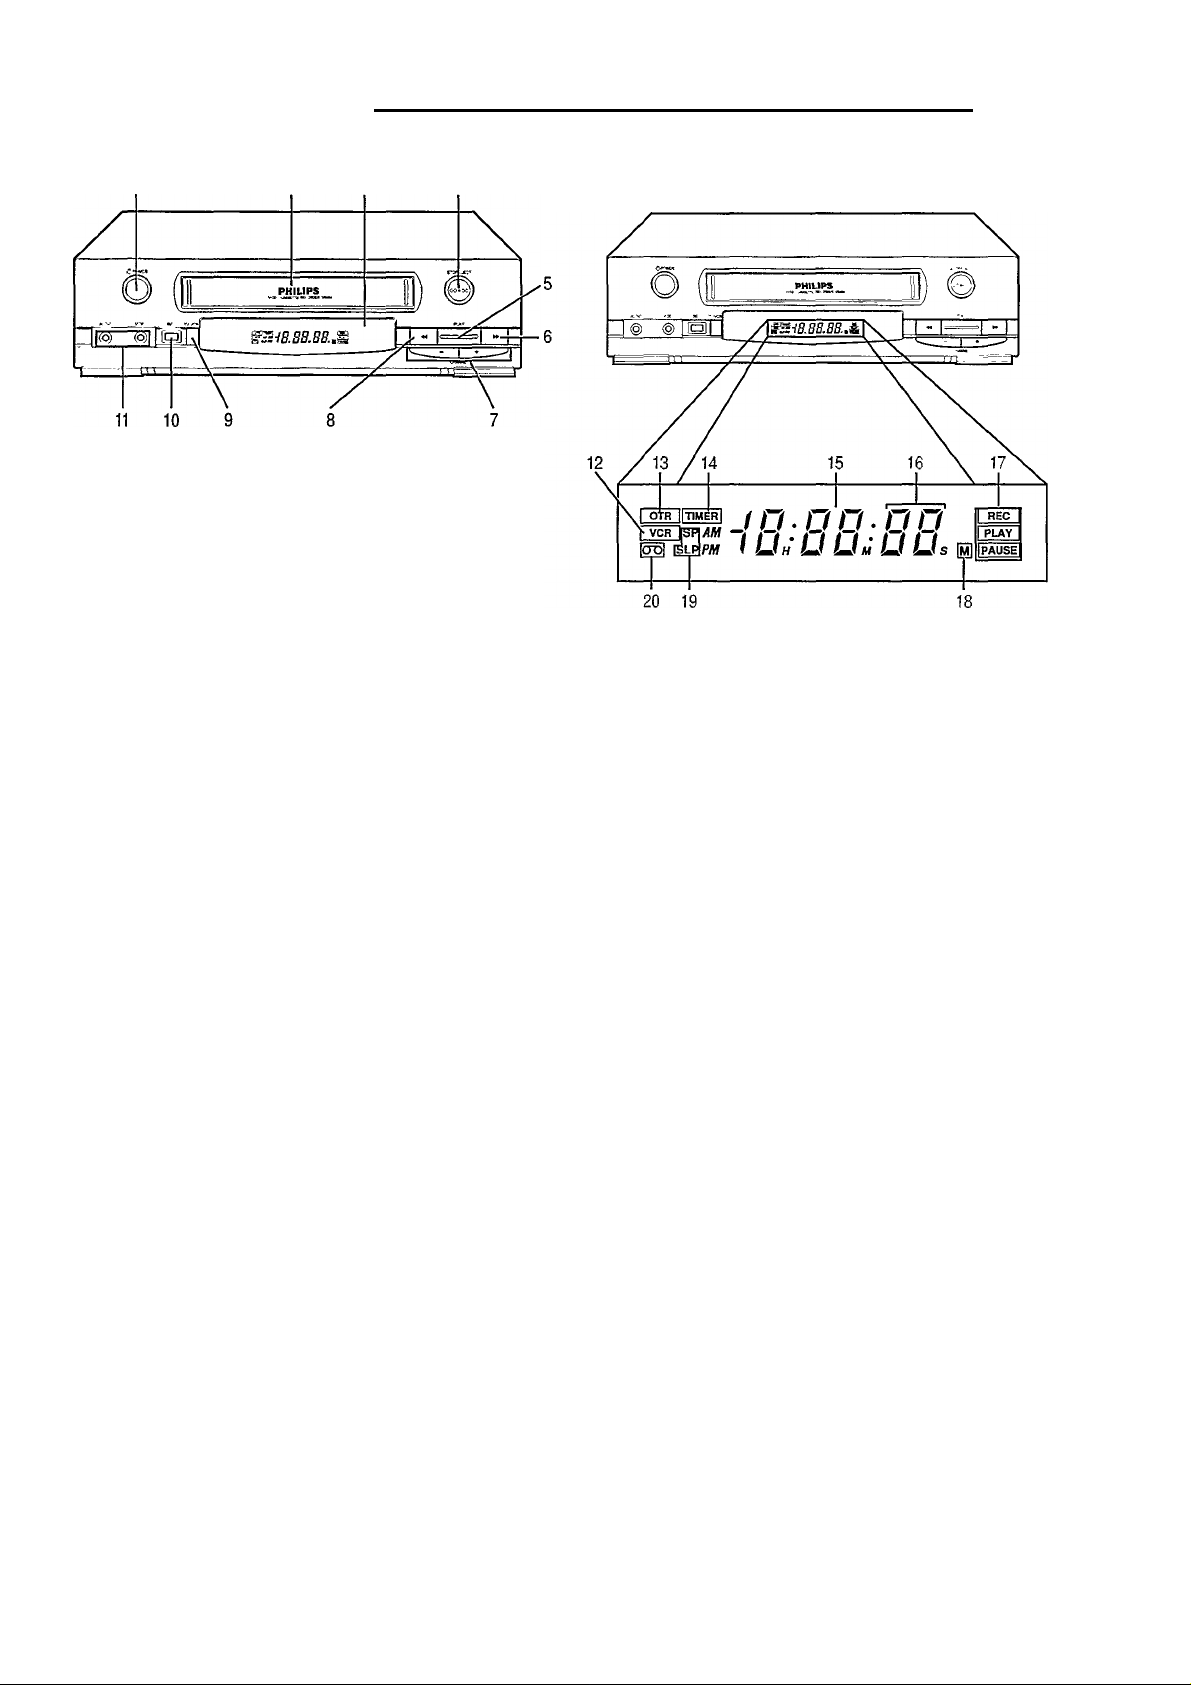
Description of Controls 3
Front Panel
1 POWER Button
Press to turn the VCR (\^deo Cassette Recorder) on and
off. To set the VCR for unattended recordings after timer
settings have been completed.
2 Cassette Compartment
Where the video cassette is inserted.
3 Wireless Remote Sensor
Receives the signal from the (wireless) remote control.
4 STOP/EJECT Button
Press to stop the tape. Press again after the tape has
stopped to eject the cassette.
5 PLAY Button
• Press to play back a tape.
• Press to release the Slow or Search mode and return to
playback.
VCR Display Panel
12 VCR Indicator
Lights up when the VCR mode is selected.
13 OTR Indicator
Lights up when the One Touch Recording (OTR) feature
is in use.
14 Timer Indicator ‘TIMER”
Lights up when the VCR is set for unattended recording.
15 Digital Clock/Counter
After setting the clock, the present time is displayed.
6 FF (Fast Forward)/SEARCH Button
Press to move the tape forward rapidly. Also, during
playback, press this button for rapid forward visual
search.
7 CHANNEL UP/DOWN Buttons
Press to scan up or down through the VCR’s channels.
8 REW(ind)/SEARCH Button
Press to rewind tapes. Also, during playback, press this
button for reverse visual search.
9 TVA/CR Button
Press to select the signal source that your TV receives.
TV position
(VCR indicator on the display panel: OFF)
To watch TV or to watch one program while recording
another.
VCR position
(VCR indicator on the display panel: ON)
To watch a tape, monitor a recording, or watch a TV
broadcast selected with the VCR’s channel selector.
10 REC(ord) Button
Press to start recording.
16 Channel/Input Signal Indicator
Shows the channel number. (“L” means External Line
Input Signal is selected.)
Select Line mode by pressing NUMBER buttons 0-0.
To exit Line mode, press any other number, for example,
0-2.
17 Mode Indicator
Displays which feature the VCR is currently performing.
REC - Recording
PLAY-Playback
PAUSE - Still, Slow, Record-Pause
18 Memory Indicator
Lights up when the Memory function is selected.
19 Speed Indicator “SP,” “SLP”
Shows the tape speed during recording and playback
(“SP”or“SLP”).
SP - Standard Play
SLP - Super Long Play
20 Cassette-Inside Indicator
Lights up when there is a cassette in the unit.
11 Front AUDIOA/IDEO IN(put) jack
For audio and video input connection from another VCR
or a portable video camera.
When connected these jacks automatically have priority
over the rear input jacks.
Page 4
4 Description of Controls (conf d)
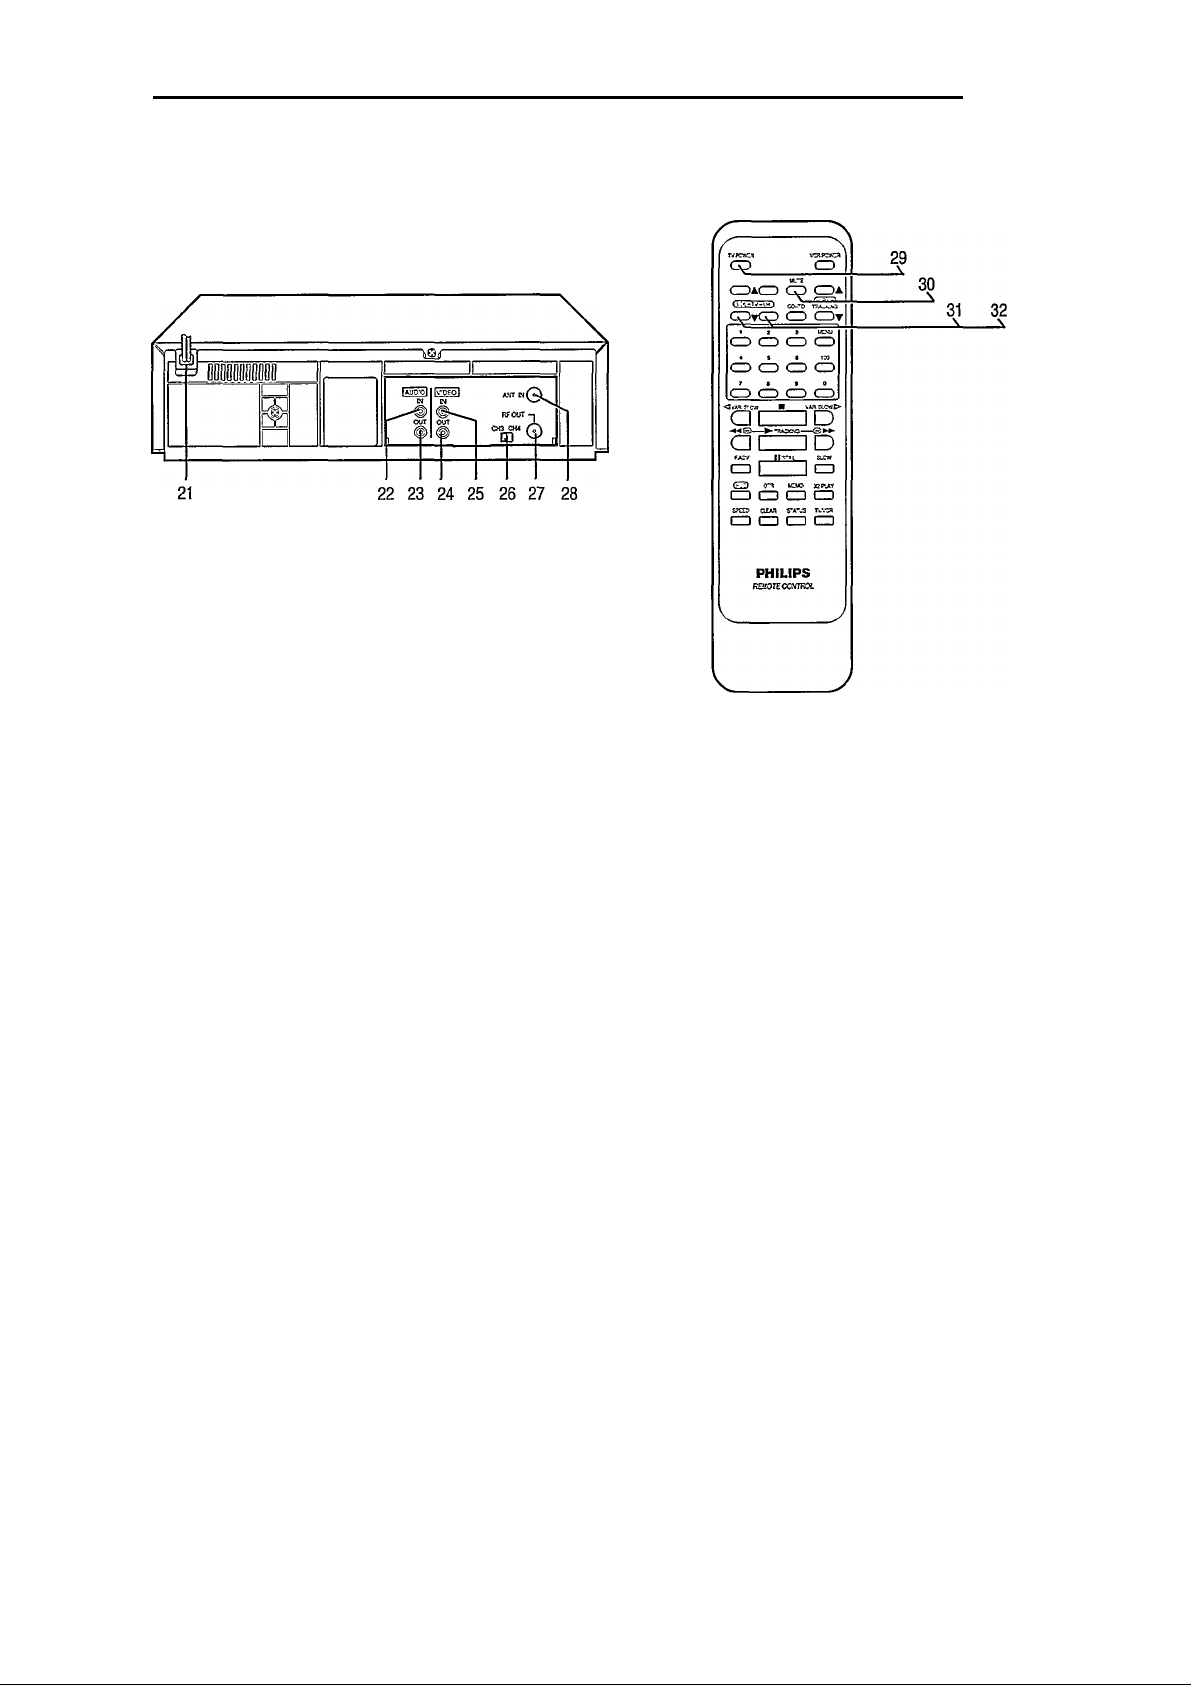
Rear Panel
Remote Control Transmitter
TV Controls
21 AC (Alternating Current) Power Cord
Connect the AC Power Cord to a household outlet.
22 AUDIO IN(put) jack
For audio input connection from the output jack of a
portable video camera, another VCR, or another audio
source.
The Front Audio IN(put) jack has priority over the Rear
Audio IN(put) jack.
23 AUDIO OUT(put) Jack
For coimection to the audio input coimector on a TV,
another VCR, or an audio tape recorder.
24 VIDEO OUT(put) Jack
For video output coimection to a TV or another VCR.
25 VIDEO IN(put) jack
For video input coimection from the output jack of a
portable video camera, another VCR, or another video
source.
The Front Video IN(put) jack has priority over the Rear
Video IN(put) jack.
26 CH3/CH4 Switch
Set to channel 3 or 4 (whichever is not used for regular
TV broadcasting in your area) to use your TV as a screen
for your VCR. See “Hook Up Your VCR.”
29 TV POWER Button *
Press to turn TV power ON or OFF.
30 MUTE Button *
Press to instantly reduce the TV’s sound level. Press
again to return to previous setting.
31 VOLUME UP/DOWN Buttons *
Press “ A ” or “ V” to increase or decrease the TV’s
sound volume.
32 TV CHANNEL UP/DOWN Buttons *
Press “ A ” or “ V” to scan up or down through the TV
charmels. Release at desired chaimel.
* NOTE: Only applicable for Philips TV.
27 RF OUT(put) Jack (out to TV set)
Use the supplied cable to connect this terminal to the
UHFA^HF input terminal on your TV set
28 ANT(enna) IN(put) Jack (in from Antenna)
Coimect your anteima or cable to this terminal.
Page 5
Description of Controls (cont’d) 5
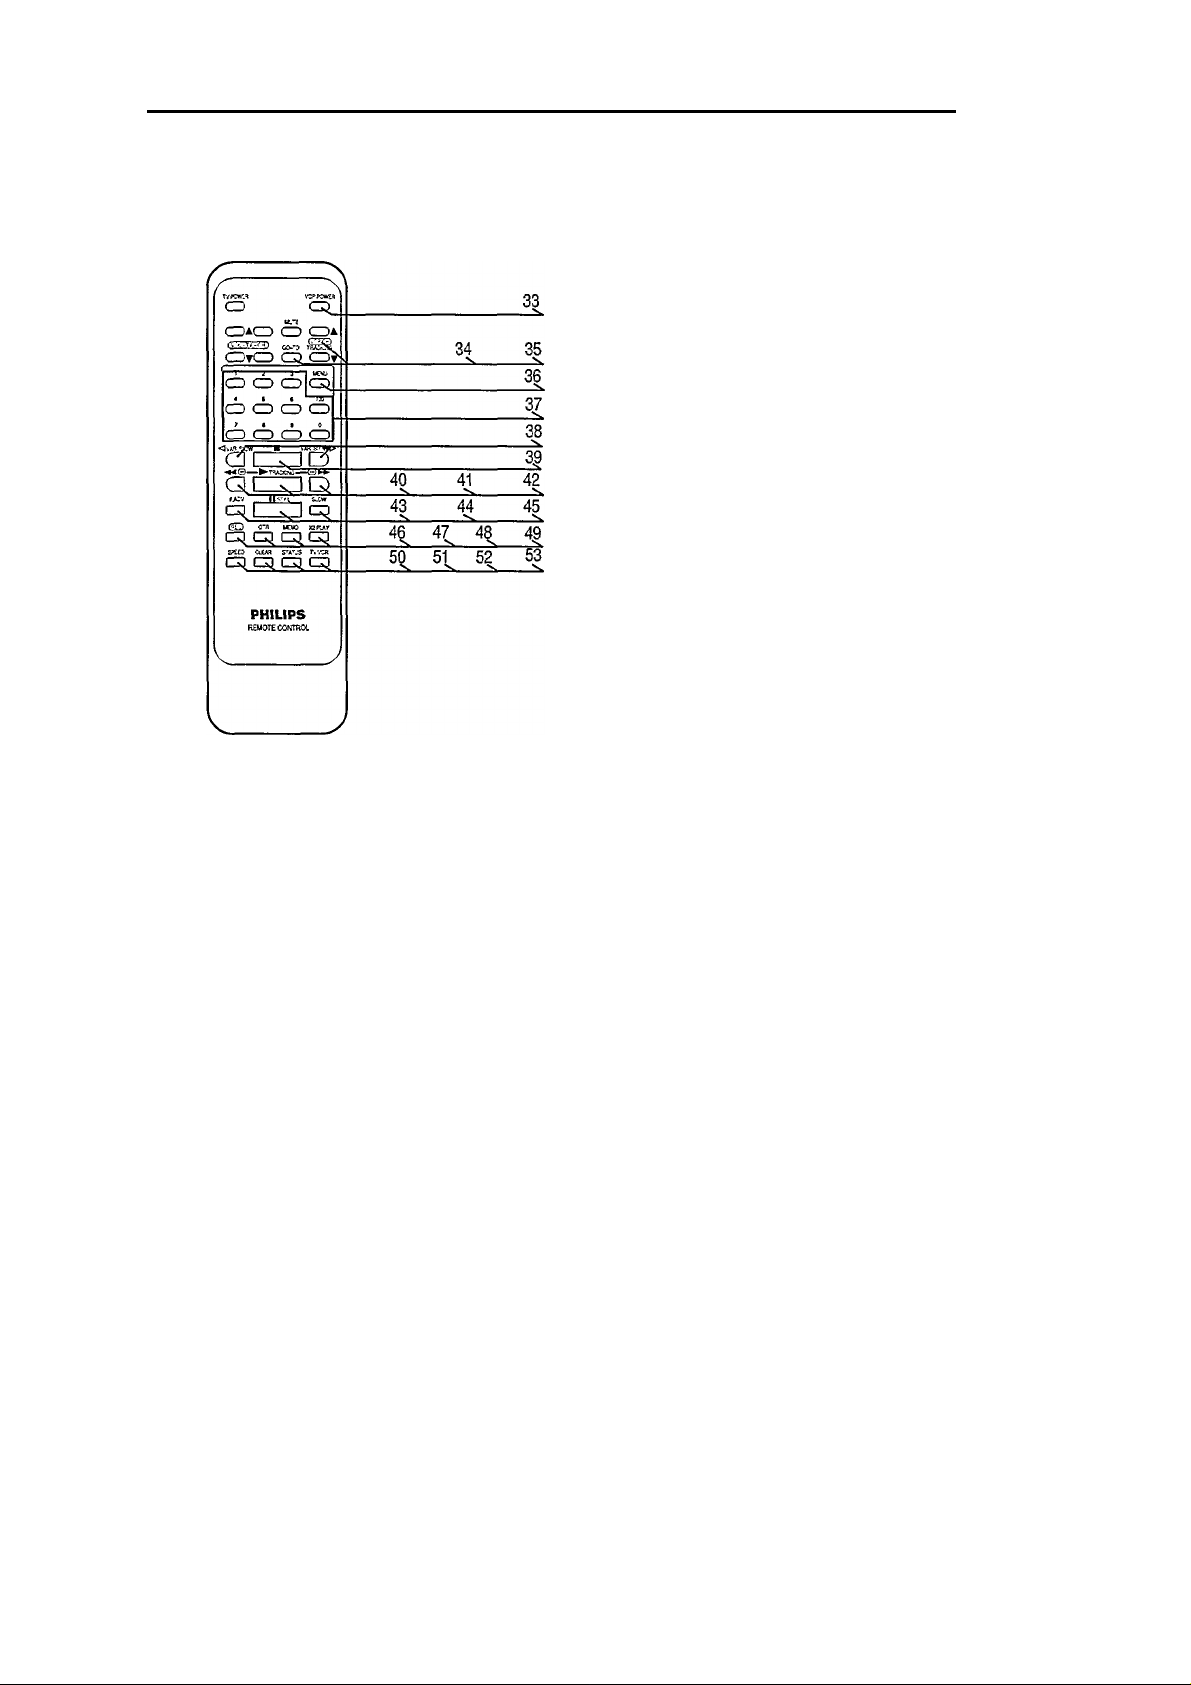
Remote Control Transmitter
VCR Controls
41 PLAY Button
• Press to play back a tape.
• Press to release the Slow or Search mode and return to
playback.
42 FF (Fast Forward)/SEARCH Button
To move the tape forward at high speed. Also, during
playback, press this button for rapid forward visual
search.
43 F(rame) ADV(ance) Button
Press this button while in the Still mode to advance the
picture one frame at a time (Frame Advance).
44 PAUSE/STILL Button
• Press once to temporarily stop the tape during
recording (Pause).
• Press once to freeze the tape picture during playback
(StiU).
• Press again when you want to resume normal
playback or recording.
45 SLOW Button
Press during SP or SLP playback to view a slow-motion
picture.
46 REC(ord) Button
33 VCR POWER Button
Press to turn VCR power ON or OFF. Also, used to set
the VCR for unattended tinier recording.
34 GO-TO Button
This button can make search easier by allowing you to
skip back or ahead on a tape. Press this button and select
desired counter number with NUMBER buttons,
followed by PLAY/STOP button.
35 VCR CH(annel) UP/DOWN, TRACKING Buttons
• Press “ A” or “ V” to scan up or down through the
VCR’s channels. Release at desired channel.
• In the Play and Slow modes, when playing a tape, press
TRACKING “ A ” or “ V ” button to adjust the tracking.
36 MENU Button
Press to call up the on-screen menu display.
37 NUMBER Buttons
(0,1,2,3,4,5,6,7,8 and 9)
Use for channel selection, on-screen menu selection,
clock setting, program setting, etc. For selecting chaimels
1 to 9, first press “0” button and then press “1” to “9.”
(100)
Press this button first when selecting channels 100 and
higher.
38 SLOW/VAR(iable) SLOW Buttons
First press the SLOW button during SP or SLP playback
to view a slow-motion picture. The speed can be varied
from about 1/6 to about 1/30 of normal speed with the
VAR(iable) SLOW button.
39 STOP Button
Press to stop the tape.
40 REW(ind)/SEARCH Button
Press to rewind the tape at high speed. Also, during
playback, press this button to view the picture in rapid
reverse visual search.
Press to start recording.
47 ONE TOUCH RECORDING (OTR) Button
Select the channel and press this button to start an
immediate recording 30 minutes to 9 hours long. Each
press delays the shut-off time by 30 minutes. Power shut
off is automatic.
48 MEMO(ry) Button
Press to memorize the tape position at which the counter
was reset to “0:00:00.”
49 X2 PLAY Button
Press during playback mode to view a tape at 2 times
normal playback speed.
50 Tape SPEED Button
Press to select recording speed (SP, SLP). In playback,
the tape speed is automatically selected (SP, LP, SLP).
51 CLEAR Button
• To erase incorrect or unwanted data in on-screen
menu operation.
• To reset the tape counter. “0:00:00” will appear on the
TV screen.
52 STATUS Button
Press this button to display the time counter, time,
function, and channel number.
53 TV/VCR Button
Press to select the signal source that your TV receives.
TV position
(VCR indicator on the display panel: OFF)
To watch TV or to watch one program while recording
another.
VCR position
(VCR indicator on the display panel: ON)
To watch a tape, monitor a recording, or watch a TV
broadcast selected with the VCR’s channel selector.
Page 6
Your VCR
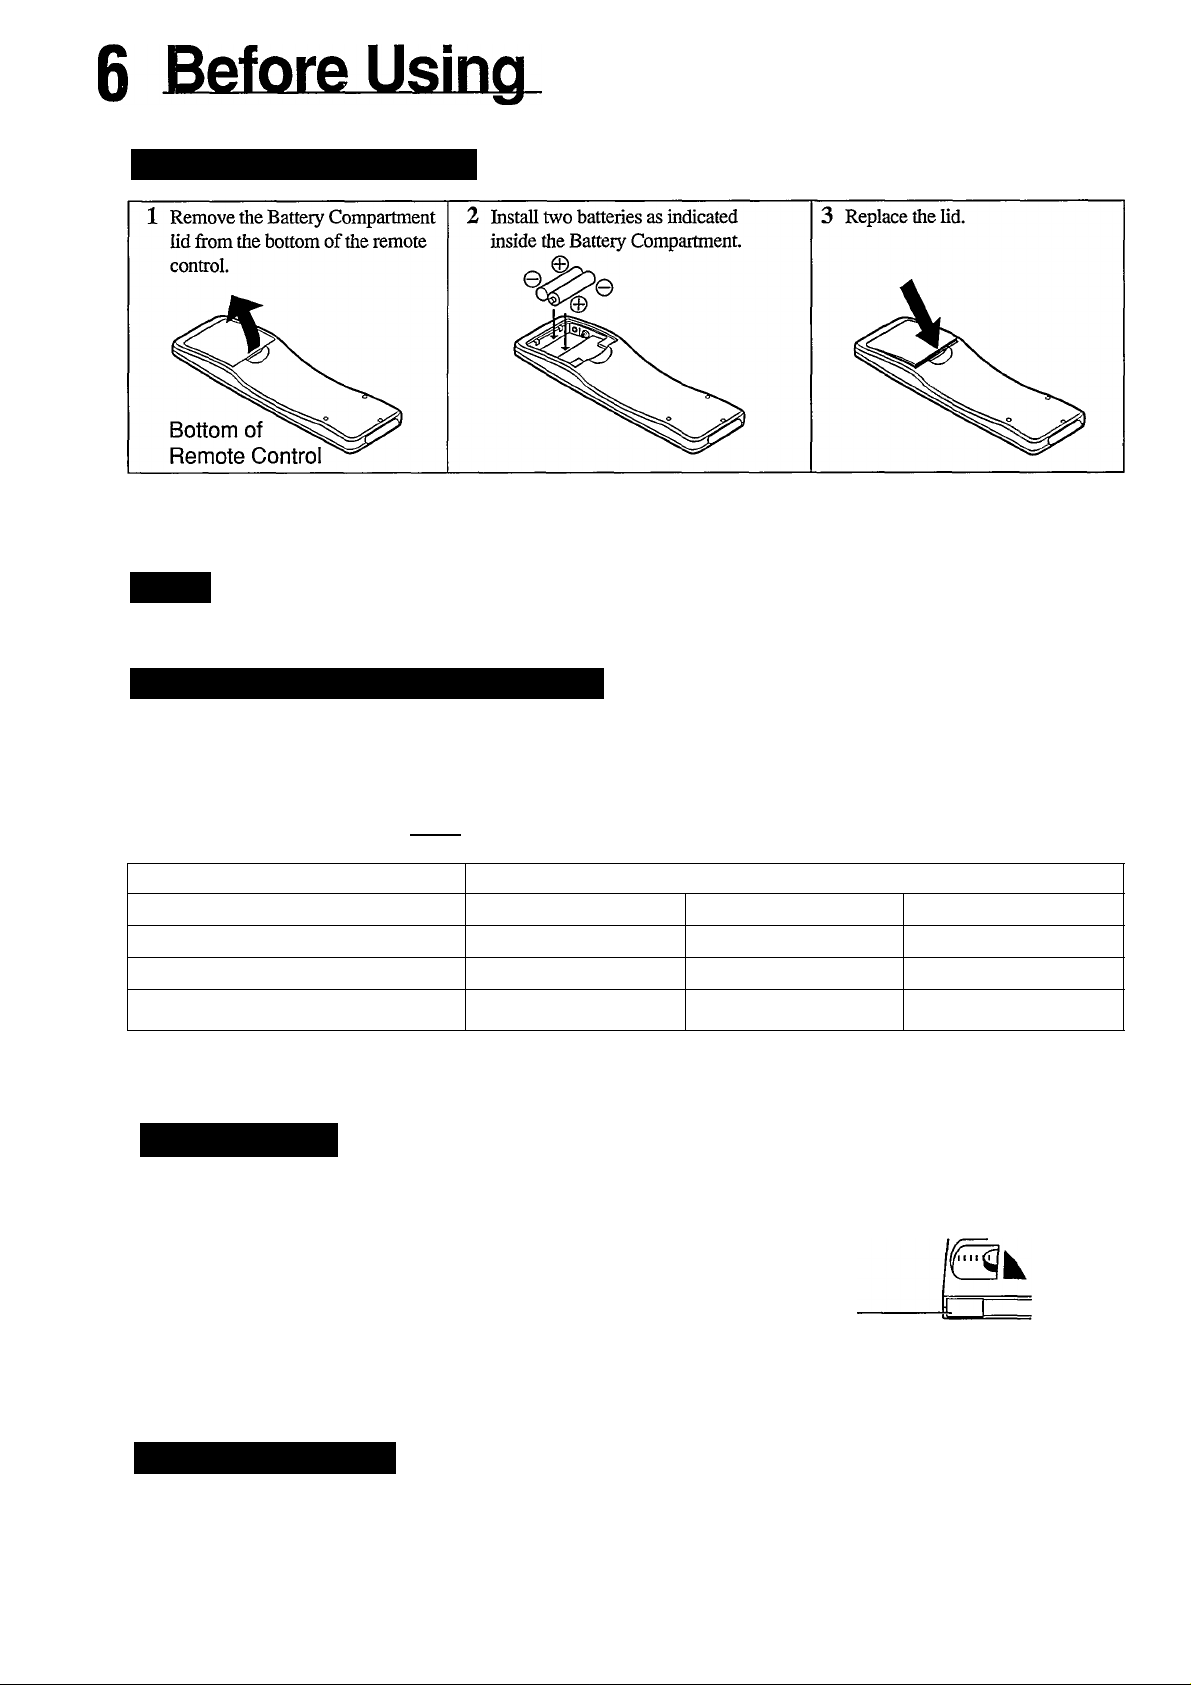
Lo^d The Batteries as Follows:
1
Battery Replacement Caution
• Do not mix old and new batteries. (Also never mix alkaline batteries with manganese batteries.)
NOtE:
This remote control and batteries are supplied accessories. Please check to make sure they are included.
Also, check the Specifications to see what other accessories are included.
Types of Video Cassettes and Tape Speeds
You can change the recording speed for a tape using the Tape SPEED button.
2 Recording speeds: SP, SLP
3 Playback speeds: SP, LP, SLP
In this VCR, use only tapes with the IVHSI mark. The chart below shows the recording/playback time for 3 types of tapes (T160,
T120,T60).
Tape Speed Selector Position
Type of Tapes
SP (Standard Play)
LP (Long Play)(Playback only) 5 Hours 20 Minutes
SLP (Super Long Play)
' During Playback, the VCR selects the tape speed, SP, LP, or SLP, automatically.
T160
2 Hours 40 Minutes 2 Hours
8 Hours 6 Hours
Maximum Record/Playback Time
T120
4 Hours
T60
1 Hour
2 Hours
3 Hours
Eiase Protection
Cassettes have a Record Tab to ensure that recordings are not accidentally erased.
• To prevent accidental erasure: • To record again:
VCR Tape Cassette—
Break off the tab with a screwdriver.
:sL
Pikse Read and Relax
Please read all the instmctions for each feature before attempting that
feature. For example, read all the steps for Timer Recording (pages
15-16) before doing a Timer Recording.
Cover the hole with
cellophane tape.
Now, turn the page to begin hooking
up your VCR.
Page 7
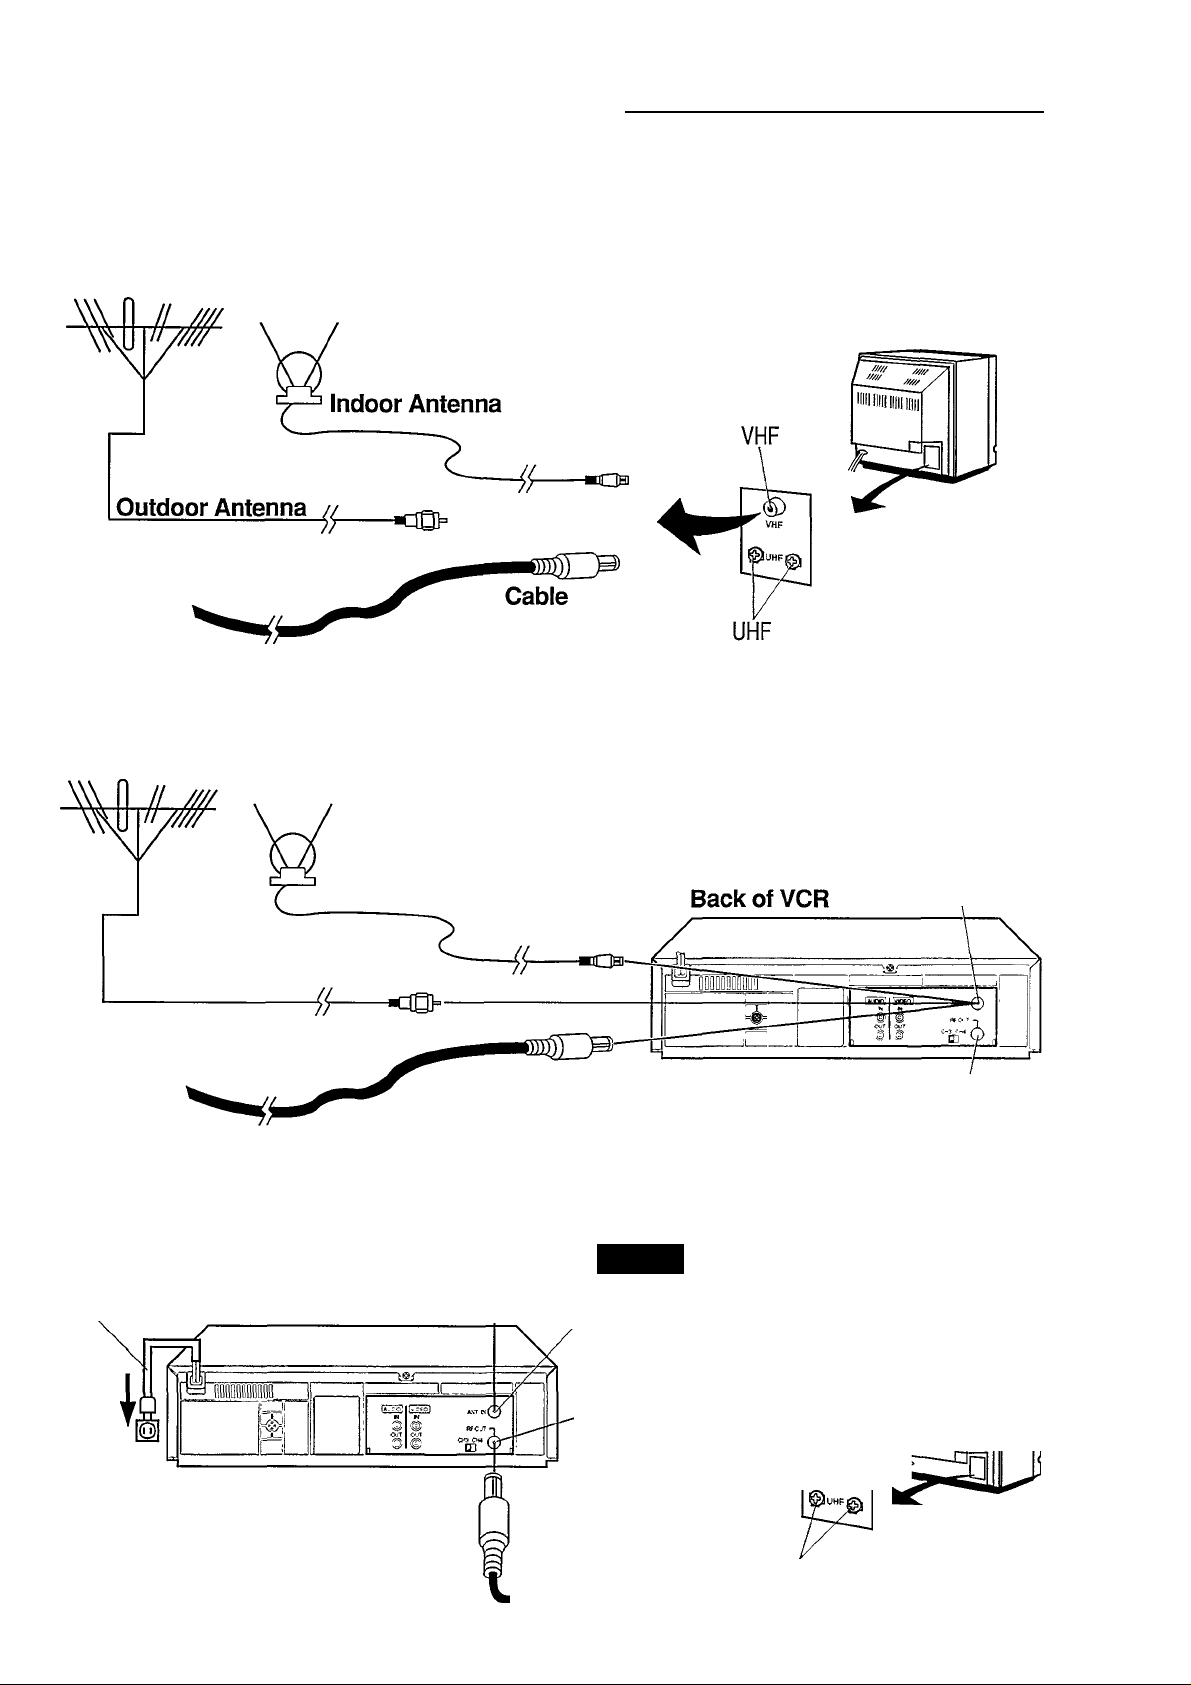
Hook Up Your VCR 7
VCR to TV Connection
1
Step 1: Disconnect the Antenna or Cable from Your TV.
Back of TV (example only)
Step 2 I Connect Your Antenna or Cable to Your VCR.
Step 3 ! Connect Your VCR to Your TV.
-------r/
Antenna or Cable
AC Power Cord Ba^k of VCR
---------
NOTE:
ANT IN
Both ends of the black RF cable are the
same. Plug either end into the VCR. Now,
plug the other end into the TV.
ANT. IN
(In from Antenna)
Out to TV
TV
Out to TV
RF Coaxial Cable
(supplied)
Í
VHF
is
UHF
(Continued on next page.)
Page 8
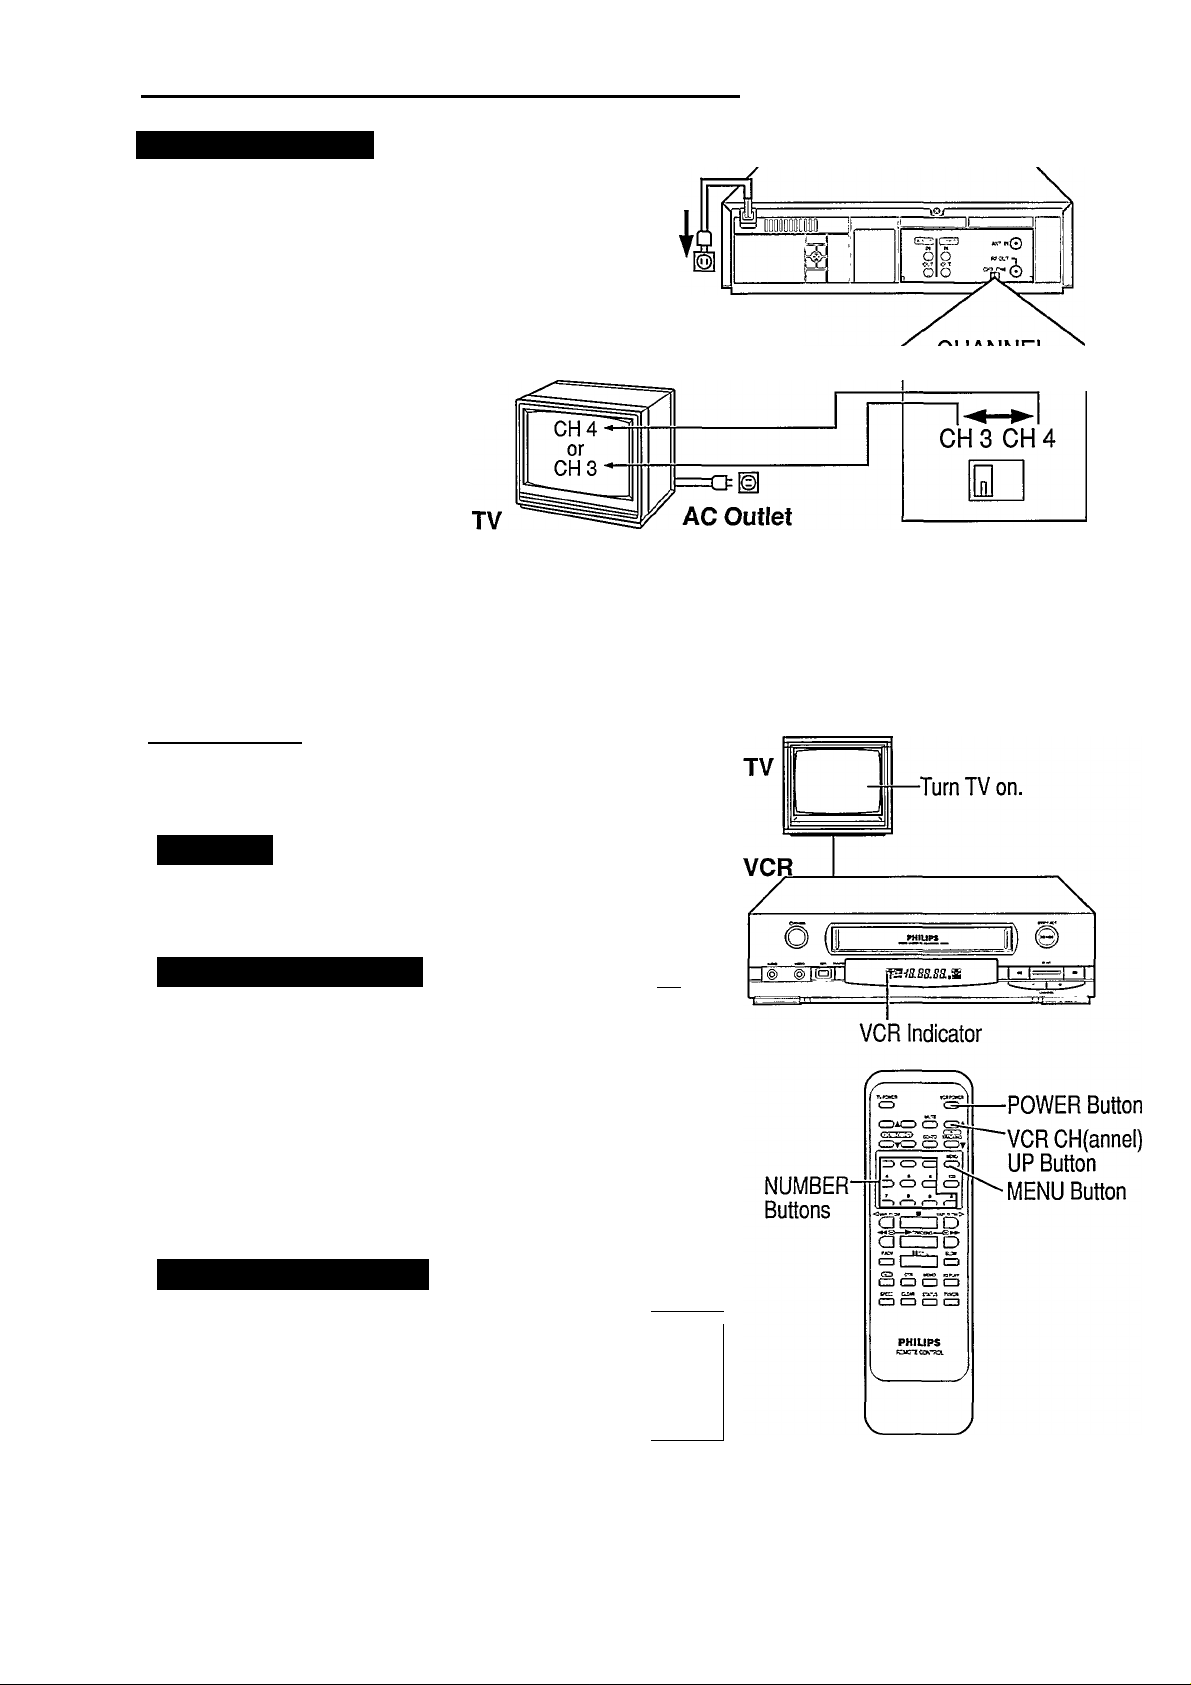
8 Hook Up Your VCR (conf d)
Select Channel 3 or 4
Back of VCR
21
Set the CH3/CH4 switch on the back of the VCR to channel
3 or 4. To operate the VCR with your TV, set your TV to the
same channel. For example, if your switch is set to channel 3
(CH3), turn your TV to channel 3.
To avoid local interference, the CH3/CH4 switch position you
choose should correspond to the local TV channel that is not
used or least used.
If both are used, select the channel that gives you the best
picture when playing a tape.
AC Outlet
Now, turn ON the VCR’s power to see if you have made the right connections.
Turn On Your VCR
CHANNEL
3/4 Switch
1
Make sure ...|-------------------------------------------------
the batteries are loaded in the remote control and the coimections
have been completed before continuing to the steps below.
At the TV
I Turn the TV on. Set the TV to the same channel as the switch on
the back of the VCR (CH3/CH4).
Choose Your Language
Press the VCR POWER button.
The VCR (Video Cassette Recorder) Power will
come on.
The language select menu appears, asking you
I whether you prefer to have messages displayed
on your TV screen in English or in Spanish.
é
Press the NUMBER 1 button if you want English.
Press the NUMBER 2 button if you want Spanish.
Press the MENU button to continue to the next step.
• To change your selection later on, see the instructions on page 13.
(TO SELECT PUSH NO. SHOWN ^
Setting the VCR’s Tuner
Press the VCR CH(aimel) UP button to start
I
automatic tuner setting.
• “AUTO SET PROCEEDING, PLEASE WATT’
will be displayed on the TV screen. If you made
all connections properly, the local channels that
are receivable in your area will be automatically
placed in your VCR’s tuner.
(If the tuner has already been set, press the STOP button.)
• When completed, “AUTO SET COMPLETED” will be displayed
and the VCR will tune in to the lowest receivable chaimel.
• If proper antenna or cable coimections were not made, “NO TV
SIGNALS” will be displayed. Please make connections and press
the VCR CH(annel) UP button again.
(
V
"•n
1 ENGLISH [ON]
2 ESPASOL
MAKE SELECTION OR
PUSHMENU TO CONTINUE
AUTO SET PROCEEDING
PLEASE WAIT
______________________
\
j
Remote Control
Now, turn to the next page and set the
VCR’s clock
Page 9
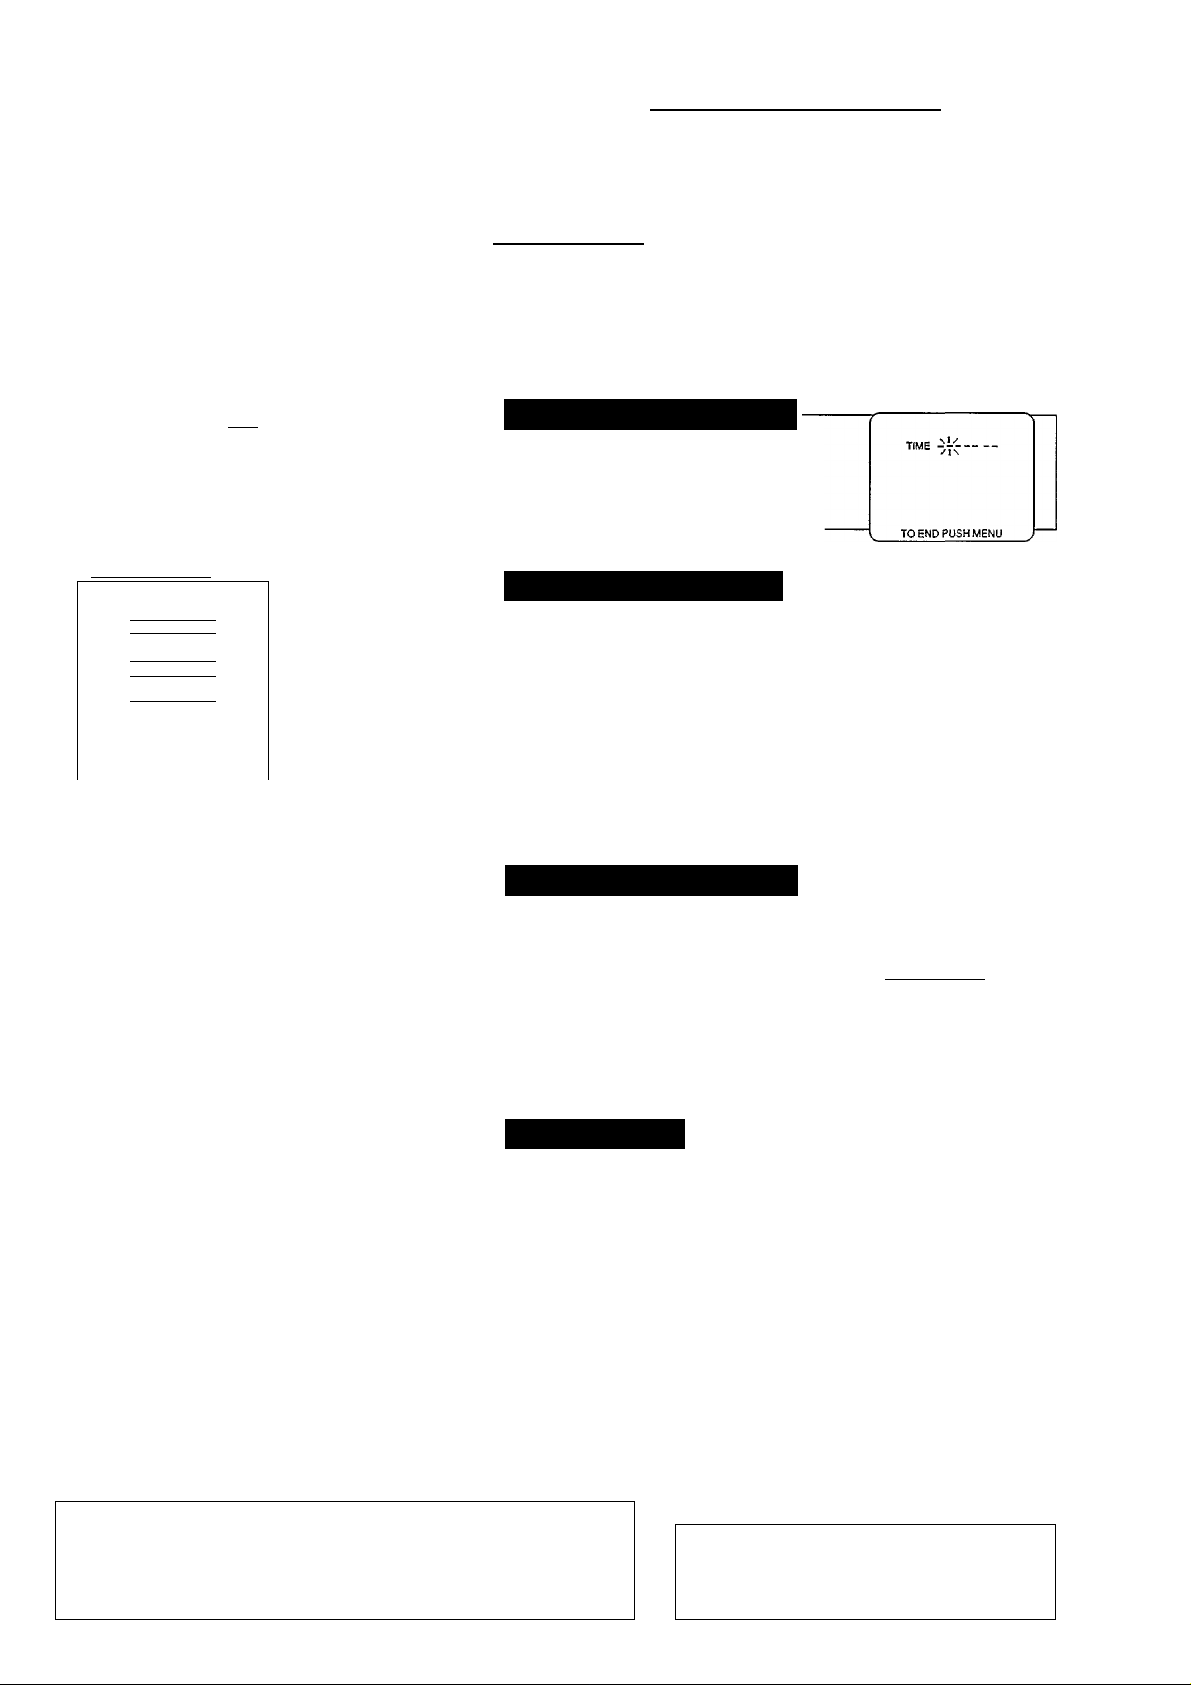
Set the Clock 9
o set your VCR to the present day and time, follow steps 1-4 below. Once set, your VCR (Video Cassette Recorder)
will maintain the time in its internal clock, and will make timer recording possible.
T
TVPO’^R
CD
CDACD CD CDA
GäHEcH) Go-To tS
CDyCD CD CDt
CD CD O Ö
CD CD CD CD
CD CD CD CD
<VAR SLOW ■
aiz:
u
FAD7
CD
(ZD (ZD
SPEED CLEAR
IZD
VAR SLOW>
IDD
■^►/TRACKiNQ —
1
Z] D
IISTiU.
1
_
_l
OTR
CD
MEMO
(ZD
STATUS
CD-
(EtS)
PHILIPS
REMOTE CONTROL
VCRPOWER
CD
(VCRCK)
SLOW
(ZD
X2PIAY
(ZD
TV,VCR
! t—
MENU
Button
NUMBER
Buttons
STATUS
Button
CLEAR
Button
I Make sure... I
• your VCR and TV are connected and turned on.
• the VCR indicator says “VCR”.
• to make each entry within 10 seconds, otherwise the VCR will exit
the Clock Set mode and you will have to start over.
-----------------------------------------------------
Select the Clock Set Mode
Press the MENU button. Then press the 5
button to select “CLOCK SET” from the
menu screen.
Set the Time & AM or PM
First, press two NUMBER buttons for the hour, then two NUMBER
' buttons for the minutes, and finally press “1” for AM or “2” for PM.
For example, for 10:30 PM, press the NUMBER buttons 1-0,3-0,2.
When setting the clock for the first time, entries that do not
match the VCR’s internal calendar will cause a “?” to appear.
Always enter “0” before any single-number entries.
To make corrections, press the CLEAR button repeatedly to move
back to an item then enter the correct number.
Set the Month, Day & Year
Press two numbers for the month, two
numbers for the day, and two numbers for
the year.
For example, for July 1,1994, press the
NUMBER buttons 0-7,0-1,9-4.
TIME 10 30 PM
TO CORRECT PUSH CLEAR
TO END PUSH MENU
TIME 10 30 PM
DATE07i0L94
_______
FRI
Remote Control
Start the. Clock
1 Press the MENU button.
Clock starts and the screen returns to the program you were on.
To display the time, press the STATUS button.
To Reset the Clock
Press the MENU button. The TV and VCR must be on and the VCR
in the “VCR” mode. The menu screen will appear. Press the
NUMBER 5 button and follow the clock set
guide to re-enter the new date and time.
Power failures can cause you to lose your clock setting placed in the
VCR’s memory. Should this happen, repeat steps on pages 8 and 9
before doing anything else.
TO CORRECT PUSH CLEAR
TO END PUSH MENU
TO SELECT PUSH NO SHOWN
1 PROGRAM
2 VCR SET UP
3 TUNER SETUP
4 INPUT SELECT
5 CLOCK SET
6 DAYLIGHT SAV TIME
. TO END PUSH MENU
Your VCR should now be properly set-up.
Go to the next page and try playing a tape.
Page 10
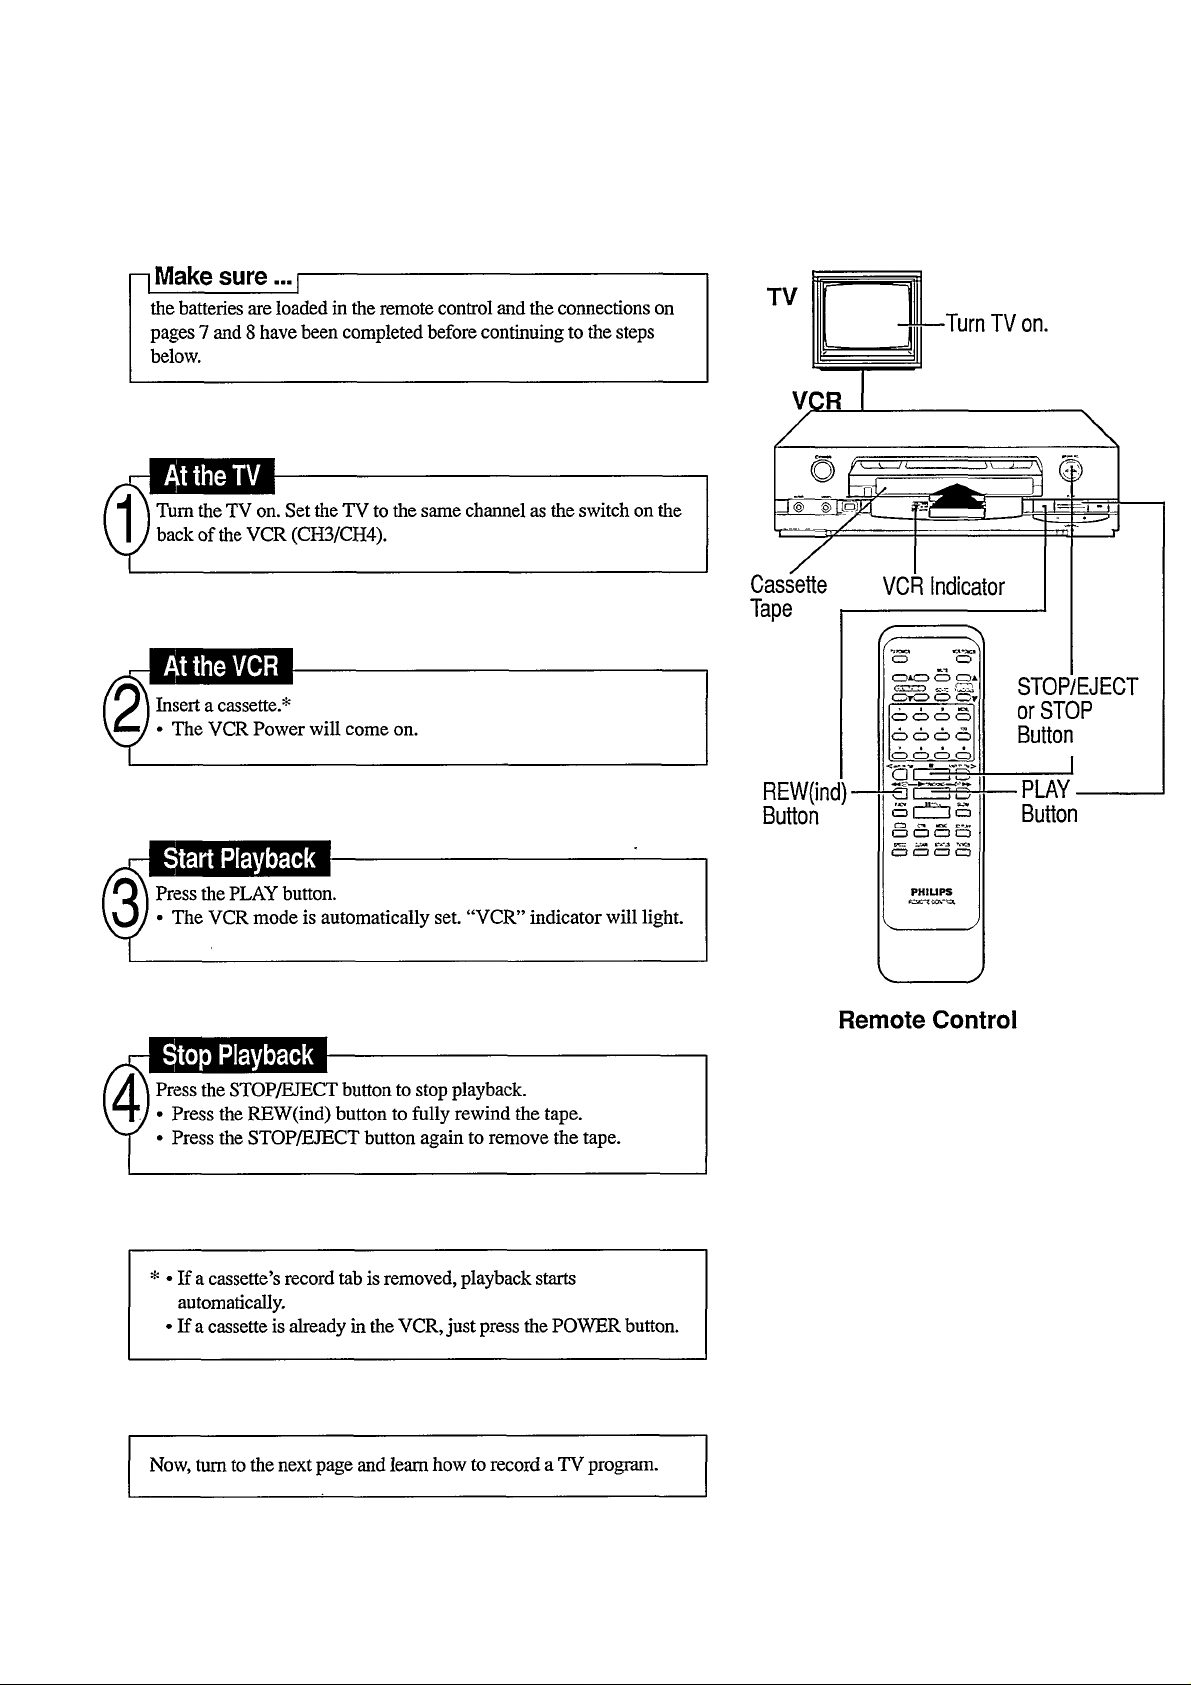
10 Play a Tape
■'o play a tape, follow steps 1-4 below.
Page 11
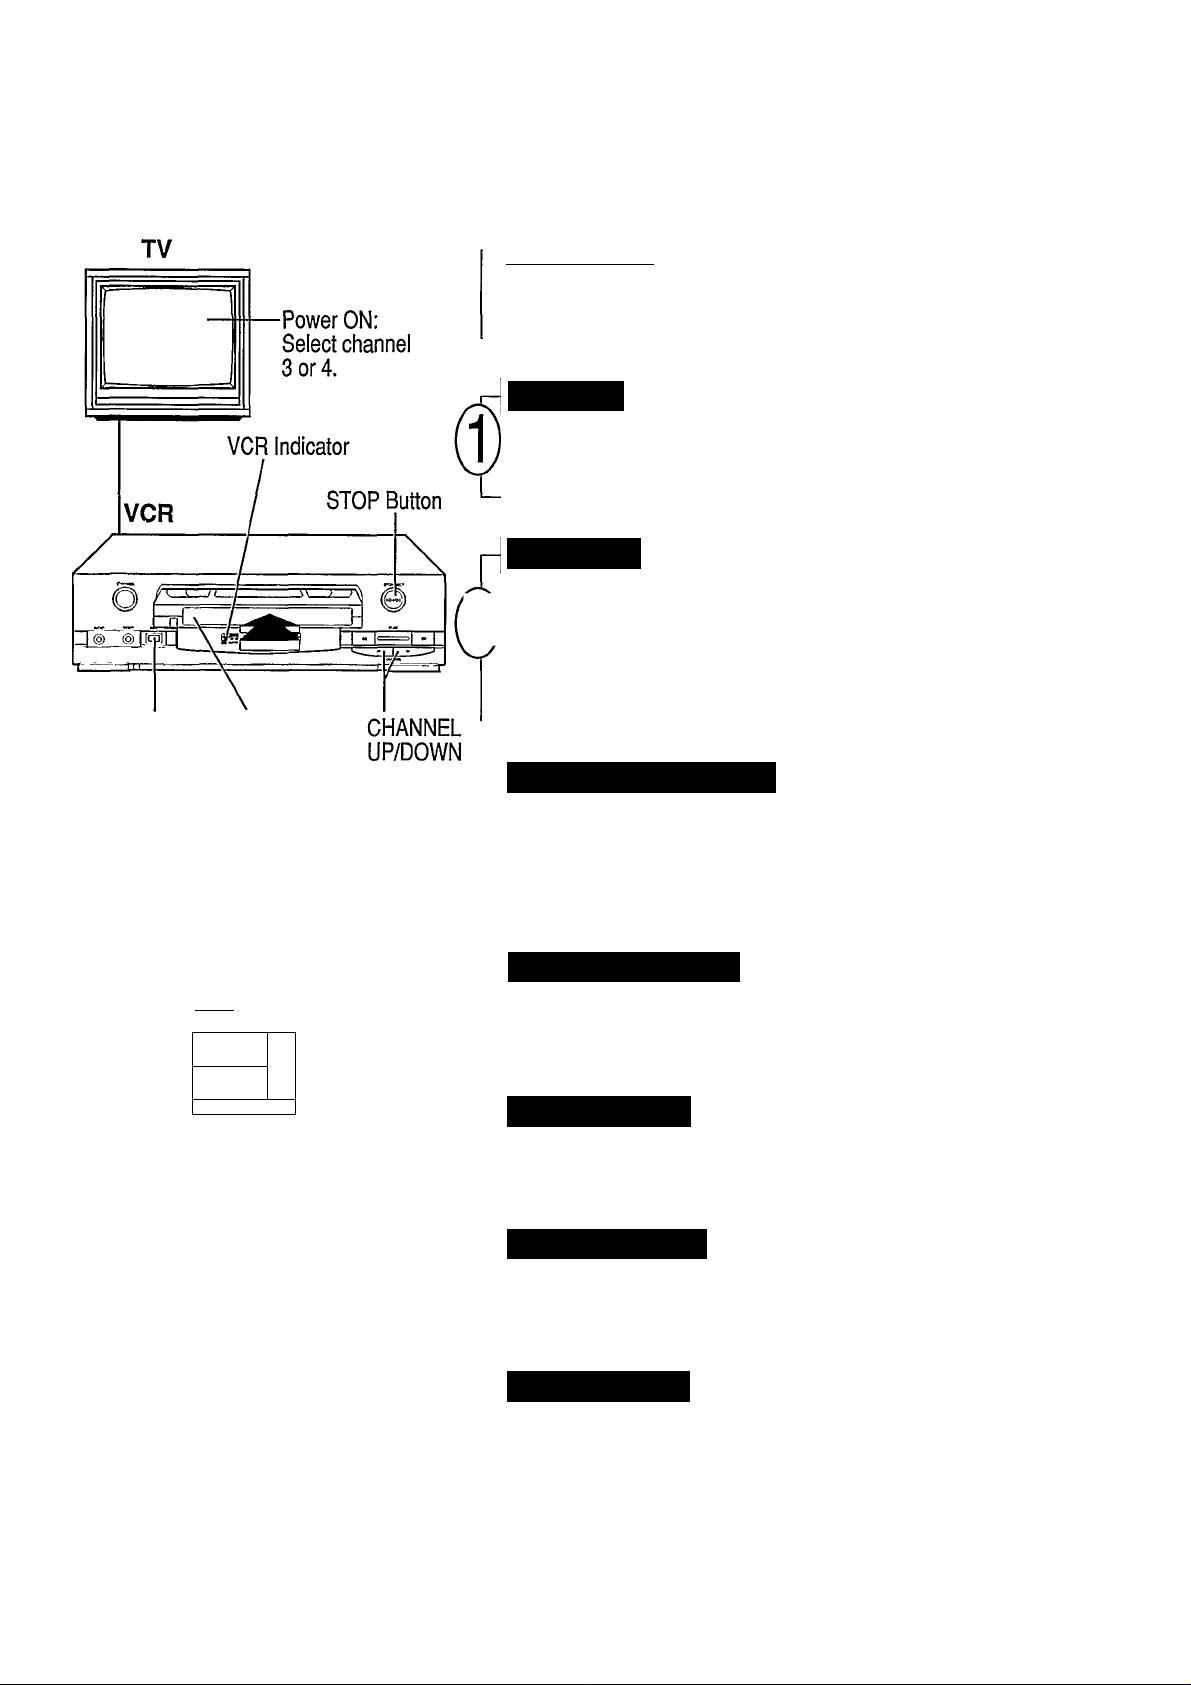
Record on a Tape 11
record on a cassette tape, follow steps 1-7 below. Read all the instructions before starting. You must use your
Tr.
remote control.
REC(ord) Cassette Button Tape
Buttons
Make sure — |
-------------------------------------------
the steps in “Hook Up Your VCR” on pages 7-8 have been
completed.
At the TV
Turn the TV on. Turn to channel 3 if the VCR CH3/CH4 switch is
set to “CH3.” Turn to channel 4 if the VCR is set to “CH 4.”
At the VCR
Insert a cassette with the record tab in place.
2^ Th® power will come on.
If the cassette is already in the VCR, press the POWER button.
If the VCR display lights on the VCR, do nothing.
If it isn’t, press the TVA^CR button.
Choose the Tape Speed
(You may skip this step if the desired tape speed is already
selected.)
Press the Tape SPEED button on the remote control until the desired
tape speed (SP, SLP) appears on the TV screen.
O CD
NUMBER.
Buttons
QaQ S C3*-
CDyCD Q Or
±> CD CD
-Ò CD CD
^ <C> CD
s
CD
■VCR
CH(annel)
UP/DOWN
Buttons
STOP — Button
REC(ord)Button
Tape —
SPEED
ai □ D
CD
(SD d >3>ur
& CD CD CD
tna
T
PHILIPS
ROISTE
•PAUSE/
STILL
Button
Button
Remote Control
Other recording options are available on
pages 14-16,19.
Choose the Channel
Press the VCR CH(annel) UP/DOWN or NUMBER buttons to
select the channel to be recorded.
Start Recording
Press the REC(ord) button.
Pause Recording
I To pause, press the PAUSE/STILL button. To continue recording,
press this button again.
Stop Recording
I
To stop, press the STOP button.
Now, go to the next page and learn how to record one channel while
watching another.
Page 12
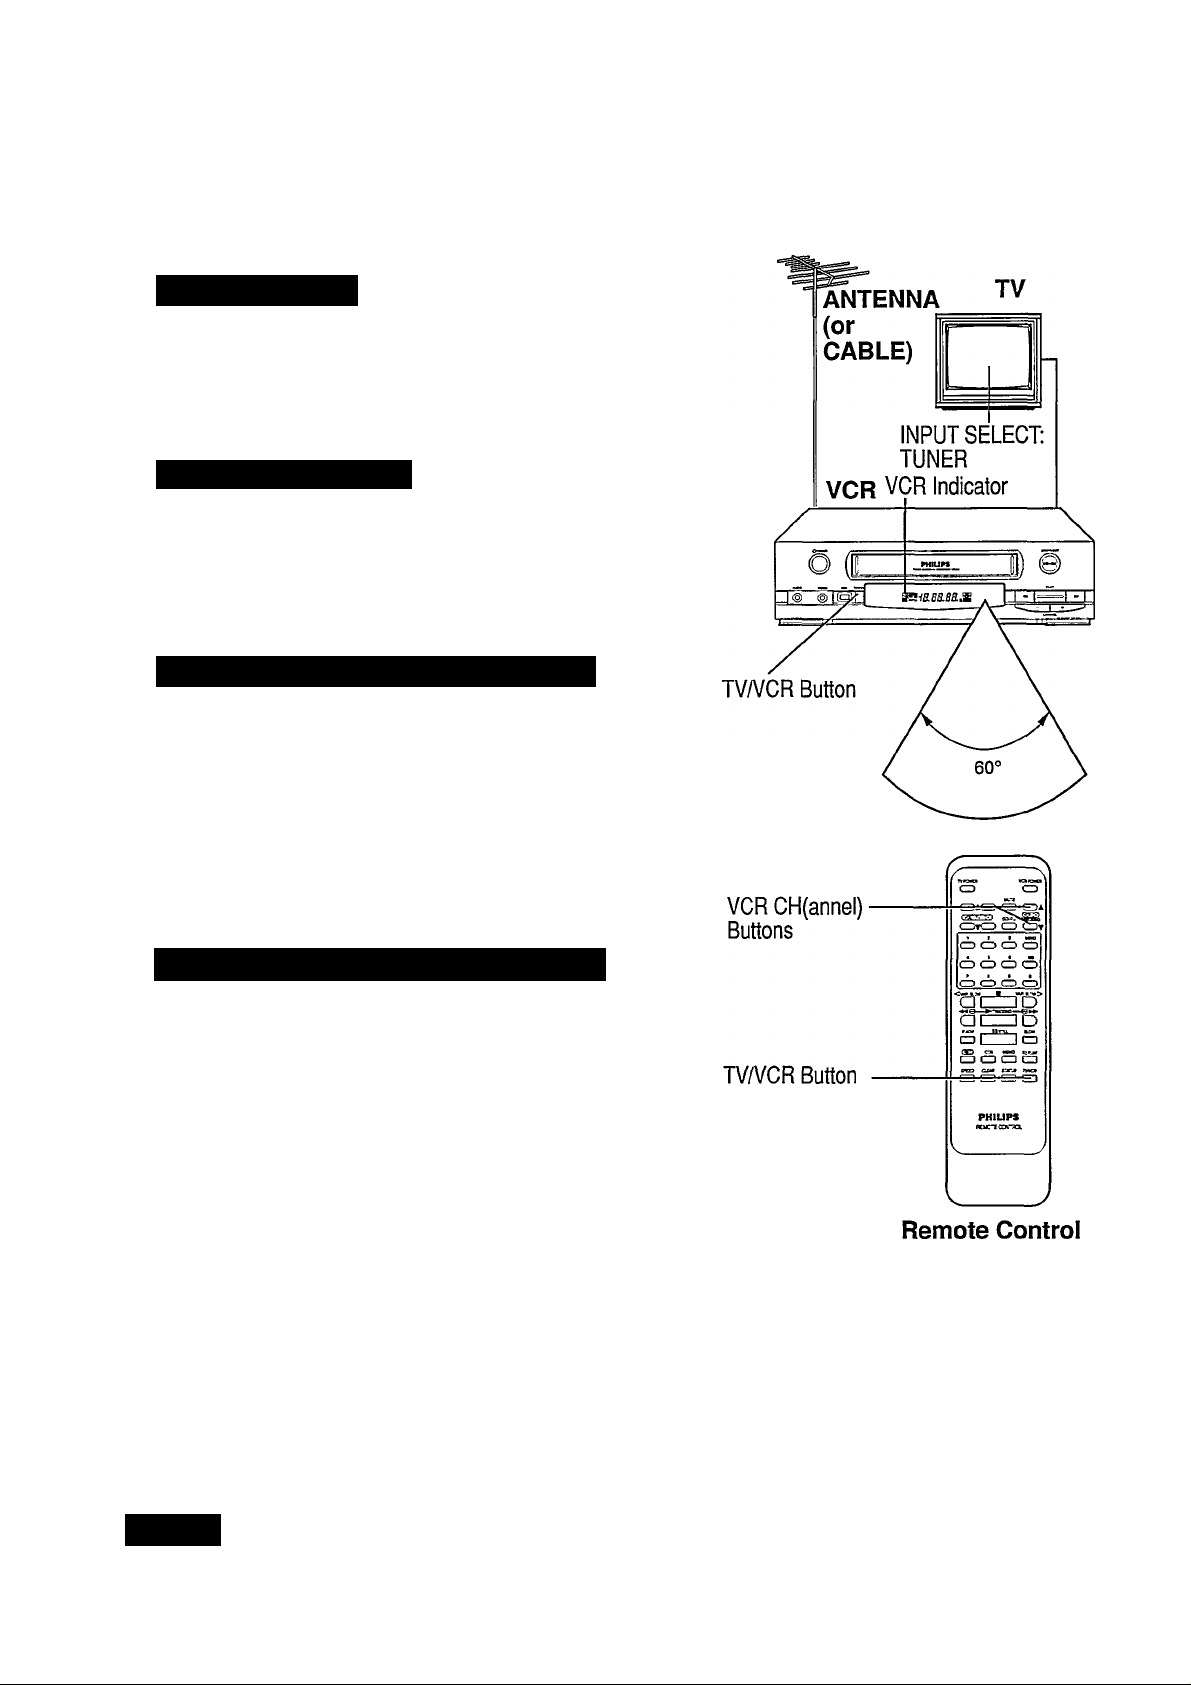
12 Record One Channel/See Another
o record one channel while viewing another, follow steps 1-4 below. Please read all the instructions. You
must use your remote control.
T
Start a Recording
I Start a recording as described on page 11.
Set the VCR/TV Button
I Press the TV/VCR button to select the TV mode. The VCR
' indicator disappears.
Select the Channel at the TV for Viewing
I Select the channel to be viewed at the TV, using the channel
' controls on the TV or TV remote control.
The channel selected with the TV channel controls appears on the
TV screen. The channel selected with the VCR channel control is
recorded on the tape.
jo Return to the Channei Being Recorded
I First, using the channel controls on the TV or TV remote control,
I
return the TV to either chaimel 3 or 4 (Please see “Hook Up Your
VCR.”)
Now, press the TV/VCR button to view again the channel being
recorded.
* If you are not receiving channels, please repeat the
steps on page 7 - 8 of this book. Also, follow
carefully the instractions listed above.
NOjE:
If you use a converter box or satellite
system hook-up, you may not be able to do
this feature.
Point the transmitter toward the remote sensor, within
the angle shown in the illustration above.
Congratulations! You’ve taken many steps. Now, turn to
the next page and find out a little more about your VCR
and remote control.
Page 13

On-Screen Displays (OSD) 13
TO SELECT PUSH NO. SHOWN
1 PROGRAM
2 VCR SETUP
3TUNER SETUP
4 INPUT SELECT
5 CLOCK SET
6 DAYLIGHT SAV. TIME
TO END PUSH MENU
Main Menu
TO SELECT PUSH NO. SHOWN
1. NORMAL PLAY (ON)
2. REPEAT PLAY
3. ON SCREEN MODE
4. LANGUAGE
. TO END PUSH MENU
VCR Set Up
Button
Pressed Time
( STOP 12;0bAM ^
, SLP M 1:23:45
Tape Counter and Speed Counter Memory
CH12-
OSD Main Menu Screen
Press the MENU button on the remote to display the main menu screen.
Then press the NUMBER button on the remote control for the desired
feature displayed on the menu. When you select a feature, mm to the
section in this manual and read the accompanying instractions.
VCR Status Display
1. Press the MENU button.
2. Next, press the 2 button to select “VCR SET UP.”
3. Then, press the 3 button to select “ON SCREEN MODE.”
4. Now, press the 1,2, or 3 button to select “ON SCREEN ON,’
“COUNTER ONLY” or “ON SCREEN OFF.”
“[ON]” appears beside the selection made.
POSITION
ON SCREEN ON: Whenever a function button (Stop, FF, etc.) is pressed,
a 5 second VCR Stams Display appears.
COUNTER ONLY: Whenever a function button (Stop, FF, etc.) is pressed,
a 5 second VCR Stams Display appears.
After 5 seconds, the counter information will remain on the screen.
ON SCREEN OFF: In this position, there will be no indication when
normal functions are pressed.
VCR Status Display
" TO SELECT PUSH NO SHOWN ' ' ESCOJA PULSANDO NUMERO '
1. ENGLISH (ON)
2. ESPAÑOL
MAKE SELECTION OR
TO END PUSH MENU
1. ENGLISH
2. ESPAÑOL (SI)
ESCOJA O
^ USE MENU PARA TERMINAR
Language Selection Menu
TO SELECT PUSH NO. SHOWN
1. NORMAL PLAY
2. REPEAT PLAY (ON)
3. ON SCREEN MODE
4. UNGUAGE
MAKE SELECTION OR
TO END PUSH MENU
Repeat Playback Selection
OSD Language Select
1. Press the MENU button.
2. Next, press the 2 button to select “VCR SET UR”
3. Then, press the 4 button to select “LANGUAGE.”
4. Now, press the 1 or 2 button to select “ENGLISH” or “SPANISH.”
All OSD (On-Screen Displays) will appear in the language you select.
“[ON]” will appear beside the selection if you choose English and
“[SI]” will appear if you choose Spanish.
Repeat Playback
1. Press the MENU button.
2. Next, press the 2 button to select “VCR SET UP.”
3. Then, press the 2 button to select “REPEAT PLAY.”
“[ON]” will appear beside the selection.
• The PLAY hght on the display panel will blink.
• The tape will be played all the way to the end, 20 times automatically
and then stop.
• When the STATUS button is pressed during Repeat Playback, “PLAY”
blinks on the TV screen.
• To stop the tape during Repeat Playback, press STOP.
DAYLIGHT SAVINSS TIME
SELECT D.S.T. (ON)
1. ON
a OFF
TO END PUSH MENU
Daylight Saving Time
Daylight Saving Time
1. Press the MENU button.
2. Next, press the 6 button to select “DAYLIGHT SAV. TIME.”
3. Then, press the 1 button to select “ON.”
• With this feature ON, the clock will automatically set forward one hour
at 2:00AM on the first Sunday in April, and will automatically set back
one hour at 2:00AM on the last Sunday in October.
Page 14
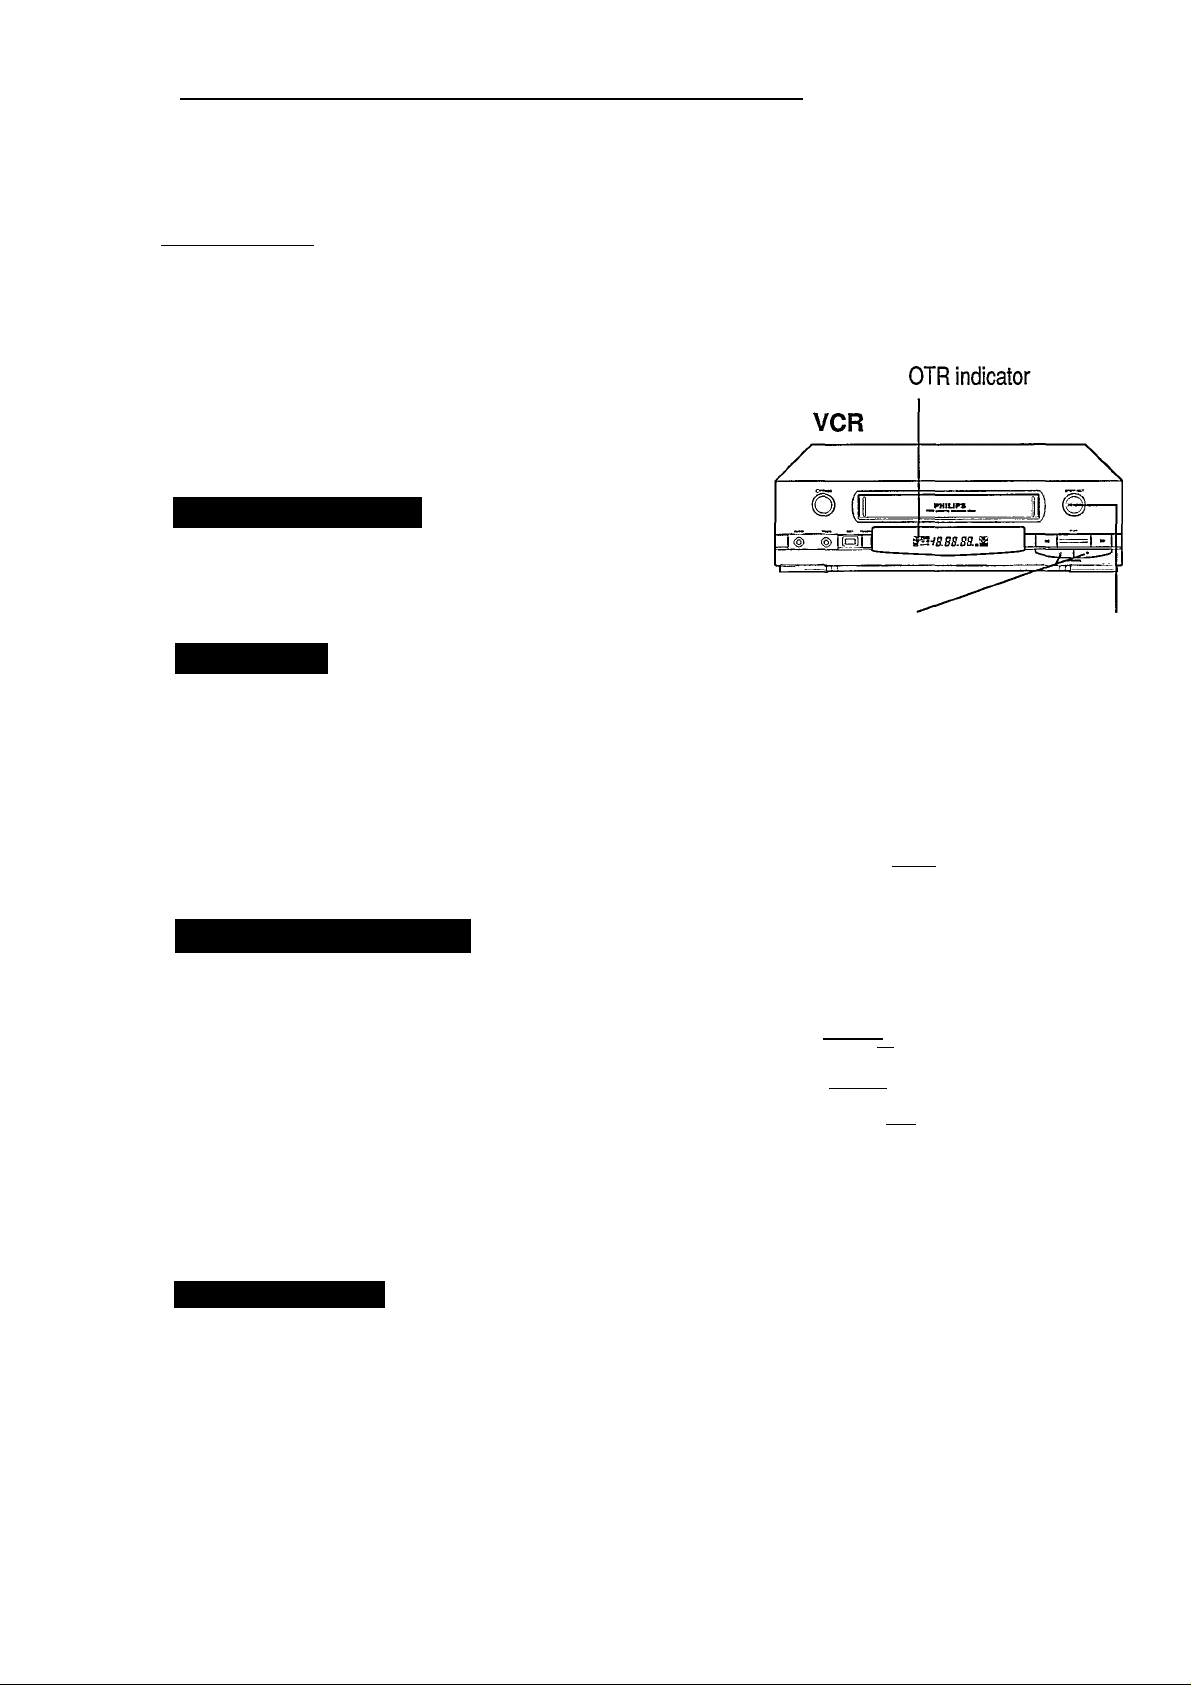
14 One Touch Recording (OTR)
o set the VCR (Video Cassette Recorder) to automatically shut off after recording is completed, follow steps 1-3
below. OTR lets you quickly specify how long you want recording to continue. You don’t have to program the
T
timer with this function. You must use your remote control.
1 Make sure... |------------------------------------------------------
• the steps in “Hook Up Your VCR” are done, chaimels are
programmed into the VCR’s memory, and the TV and VCR are
both turned on.
• the clock is set to the correct time.
• the desired tape speed (SP, SLP) is selected. Use the tape SPEED
button.
• the record tab is in place on the cassette.
• the tape is long enough to record the programs.
Choose a TV Program
Press the VCR CH(annel) UP/DOWN or NUMBER buttons on the
remote control.
Start an OTR
Press the OTR button on the remote control.
The screen below appears.
Recording begins immediately.
OTR will flash on the VCR display.
OTR (030)
CHANNEL STOP Button
UP/DOWN
Buttons
This indicates that the VCR
will automatically shut off after"
30 minutes of recording.
Select a Recording Length
Continue pressing the OTR button until the desired recording length
is displayed.
Each press of the button will add 30 minutes, up to 9 hours.
If pressed beyond 9 hours, “REC” appears on the TV screen.
• To check time remaining after an OTR has been set, press the
STATUS button.
[- To Change the Recording Length
Press the OTR button until the desired length is displayed.
To Cancel an OTR
To stop recording before the preset recording length is reached,
simply press the STOP button. If you want to cancel the OTR
mode but continue recording, press the OTR button several times
until the OTR indicator disappears. “REC” remains on the VCR
Display Panel.
• During recording, the displayed time counts down. When 0:00
is reached, recording stops and the power is switched off
automatically.
• If OTR is engaged in the Record-Pause mode, the timer will
count down normally, but recording will not begin until the
PAUSE/STILL button is pressed.
rVPCAW \t«PCAC»
CD CD
CDACD CD C^A-
CDtCD CD
:Z) CD CD CD
:o CD CD
) CD (—)
a
ni
CD
CD CD CD EEI-
SPEED aUA STATUS TV •.'ca
CD CD Cp CD
PHILIPS
REMOTE CONTROL
» 9
----
FAT/ Usm stew
OTR U3IO S2FUY
(»CRCH3 . ■
C25y
2 A I ie>a)
-e-
Remote Control
VCR CH(annel) UP/DOWN Buttons
NUMBER Buttons
STOP Button
PAUSE/STILL Button
• OTR Button
STATUS Button
Page 15
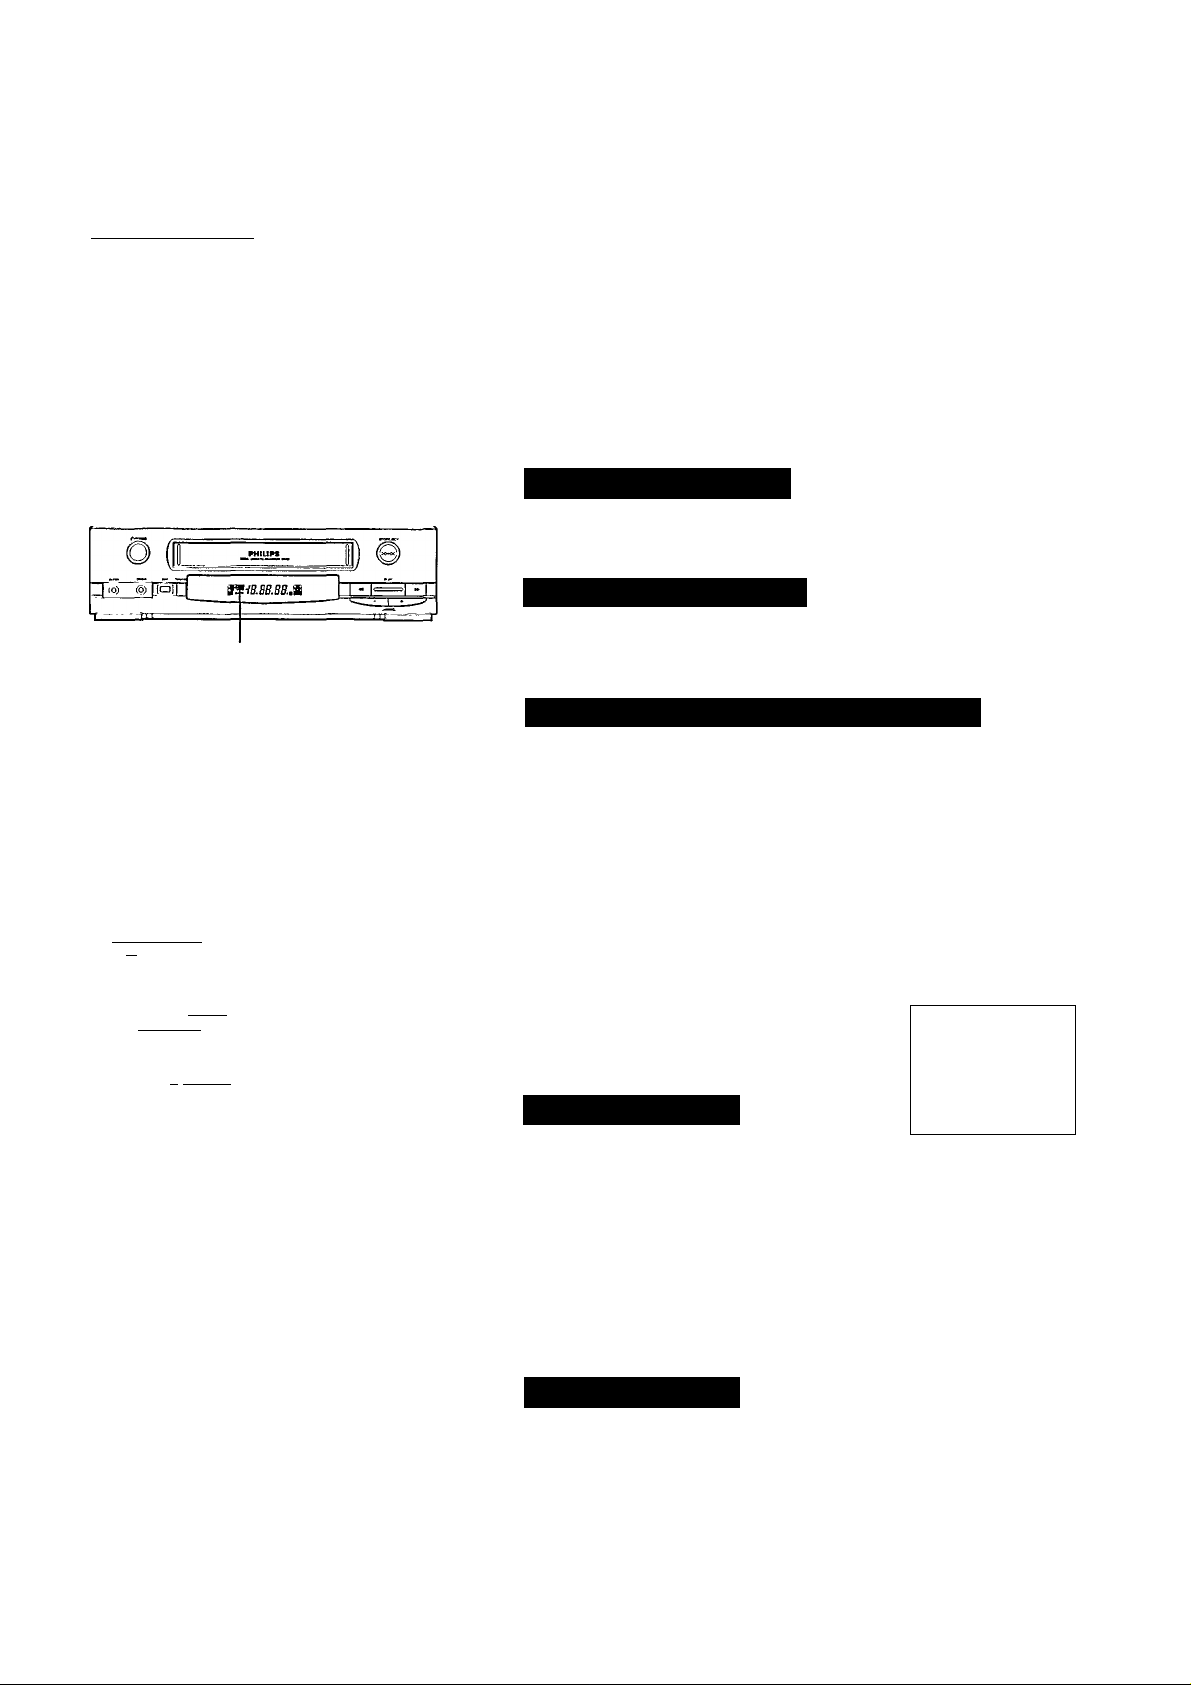
Timer Recording 15
o record while you’re away, follow steps 1—12 below. For each program you set, the VCR will turn itself on. do the
recording, and turn off automatically. You can store up to eight programs. Instmctions for each step appear on the TV screen
T
after you begin. You must use your remote control.
1 Make sure — |-----------------------------------------
• the steps in “Hook Up Your VCR” have been
completed, an antenna or cable system is connected to
the VCR, and the VCR and TV are turned on.
• CABLE or NORMAL has been selected and channels
have been programmed into the VCR’s memory. See
“Turn On Your VCR” and “Adding/Deleting a
Channel”.
• the TVA^CR selector is set to “VCR.”
• the clock is set to the correct time.
• a cassette tape is inserted in the VCR and the record
tab is in place on the cassette.
• the tape is long enough to record the programs.
FOR EACH STEP BELOW, YOU HAVE 60 SECONDS
TO COMPLETE IT. IF YOU DON’T, PROGRAMMING
WILL HAVE TO BE RESTARTED FROM STEP 1.
VCR
TIMER Indicator
TVPCWA
CD
CDACD CD CDA
CDtCD CD CDt
O CD CD
4 5»
CD CD CD CC
r S 9 0
O CD CD CC
new
a ■
QE
FAC-/ ll-rru SLCrt
CD I I CD
CD CD CD CD
citrci ettwt sTATi.'s tv vea
CD C^-CD CD-
PHILIPS
REMOTE CONTOOL
VCnPCWM
vjrt
D
►-T!WOCN3—©►►
----
ID
GHD Ota uni? X2PIAY
Remote Control
•POWER Button'
.MENU Button
•NUMBER
Buttons
-CLEAR Button
TO SELECT PUSH NO SHOWN
Select the Menu Screen
I
Press the MENU button on the remote control.
The main menu screen at right will appear.
1 PROGRAM
2 VCR SET UP
3 TUNER SET UP
4 INPUT SELECT
5 CLOCK SET
6 DAYLIGHT SAV TIME
TO END PUSH MENU
Select the Program Mode
, Press the NUMBER 1 button on the remote control to select the
Program mode.
Remember, use the NUMBER buttons on your remote control.
Select Normal, Daily or Weekly Recording
I Normal Recording
Press the 1 button to record a TV show on any
day you choose up to 12 months away.
TO SELECT PUSH NO SHOWN
1 NORMAL
2 DAILY
3 WEEKLY
4 PROGRAM REVIEW
Or
Daily Recording
Press the 2 button to record a TV show every
day (Monday through Friday) at the same time
and length.
TO END PUSH MENU
DAILY PROGRAM. (MON-FRI)
\ \ 1 1 I I / / /
PROGRAM-1 2 3 4 5 6 7 8-
^ / I i \ \ \ W
Or
Weekly Recording
Press the 3 button to record a TV show once a
week at the same day, time, and length.
Select the Position
Press the NUMBER buttons 1-8 to select one of the 8 positions to
store a timer record program. The flashing numbers indicate an open
position where a program can be stored.
If you select a position number that has ^
already been set, “PREVIOUSLY SET
PROGRAM” appears for a few seconds,
then the position contents will be displayed.
If this happens, press the MENU button
twice and start over.
SELECT PROGRAM NUMBER
TO END PUSH MENU
( WEEKLY PROGRAM
PROGRAM-1 234 56 78-
SELECT PROGRAM NUMBER
V TO END PUSH MENU
N \ \ \ 1 1
k' / / / 1 1 l V \
_______________
PREVIOUSLY SET PROGRAM
1 /
j
r- To Make Corrections...
Press the CLEAR button while the screen
you wish to change is displayed. This
moves the flashing indicator to the number
you want to change. Now, enter the correct
number. You may have to press the
CLEAR button more than once to reach
the numbers you want to change.
Select the Channel
Enter two numbers for the TV channel. For
channels above 100, press the 100 button, then
two numbers for the channel.
For example, for channel 10, press NUMBER
button 1, then 0. Or, for channel 115, press 100,
then press 1 and 5. To record from line input,
press 0 and 0. “AJW IN” will appear on the screen.
(Continued on next page.)
NORMAL PROGRAM
PROGRAM .1
CHANNEL -,r(-
TO CORRECT PUSH CLEAR
TO END PUSH MENU
Page 16
16 Timer Recording (confd)
Select the “TIME ON”
I First, press two NUMBER buttons for the hour.
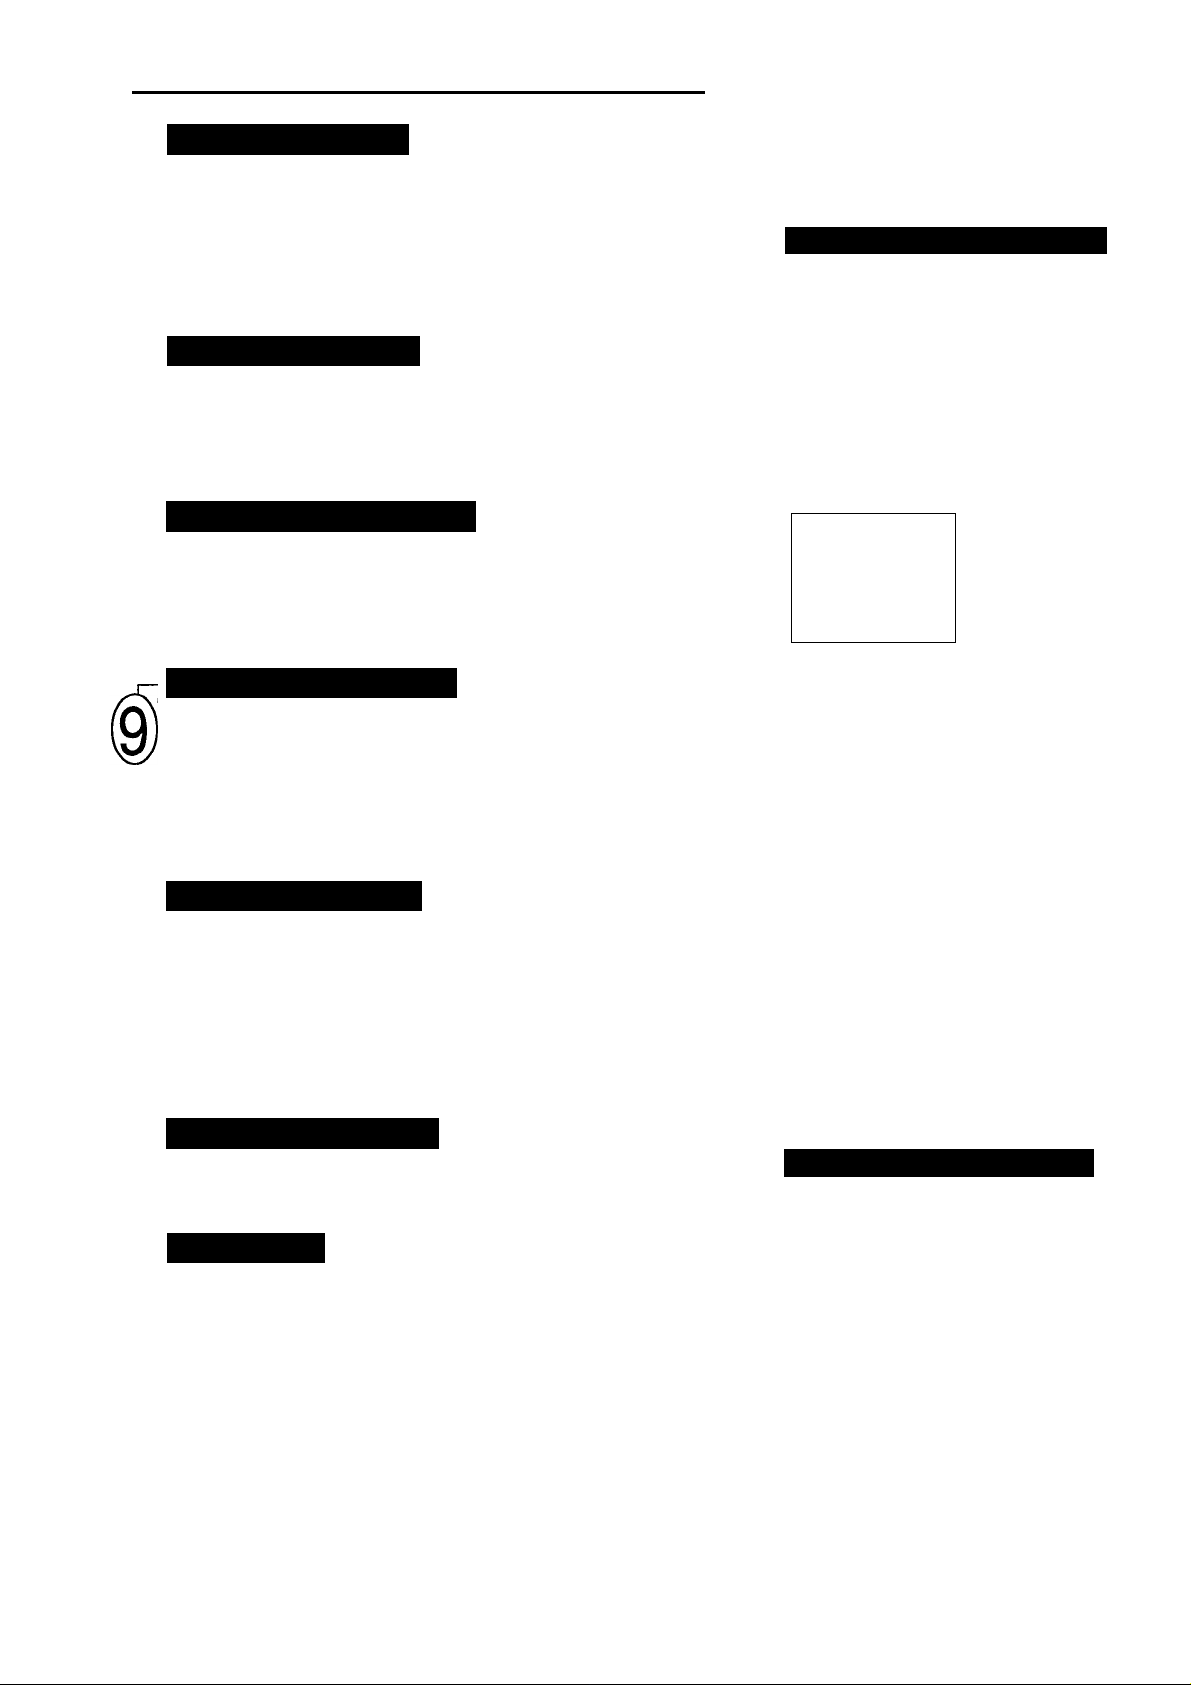
f NORMAL PRCX3RAM
PROGRAM 1
CHANNEL ^0
Next, press two NUMBER buttons for the
minute.
Now, press NUMBER button “1” for AM or
“2” for PM.
TO CORRECTPUSH CLEAR
TO END PUSH MENU
For example, for 9:30 PM, press NUMBER buttons 0-9,3-0,2.
Select the “TIME OFF”
I First, press two NUMBER buttons for the hour.
Next, press two NUMBER buttons for the
NORMAL PROGRAM
PROGRAM 1
CHANNEL 10
TIME ON 0930 PM
TIME OFF
minute.
For example, for 10:00 PM, press 1-0,0-0,2.
Select the Recording Speed
Press the 1 or 2 button to choose SP (Standard
Play) or SLP (Super Long Play).
You cannot use the SPEED button on the
remote control to choose the recording speed.
TO CORRECT PUSH CLEAR
TO END PUSH MENU
NORMAL PROGRAM
PROGRAM 1
CHANNEL 10
TIME ON 0930 PM
TIME OFF 4930 PM
REC SPEED
Spai SLP»
TO CORRECT PUSH CLEAR
TO END PUSH MENU
Select the “START DATE”
First, press two NUMBER buttons for the month.
Next, press two NUMBER buttons for the day.
For example, to make a recording on Feb. 12,
press 0-2,1-2.
The year and day of the week will be displayed
automatically.
NORMAL PROGRAM
PROGRAM 1
CHANNEL 10
TIME ON 0930 PM
TIME OFF 1030 PM
REC SPEED SP
START DATE 02/12/34
TO CORRECT PUSH CLEAR
TO END PUSH MENU
SAT.
Confirm Your Program
1 Press the MENU button.
“PROGRAM WAS COMPLETED” should appear on the screen.
If “PROGRAM NOT COMPLETED” appears, please dy again
from step 1 on page 15.
After 3 seconds, the display will disappear from the screen, and the
normal TV picture will reappear.
The TIMER indicator will light up on the VCR.
Check or Clear Timer Recordings
1. Turn the VCR on. VCR must be in VCR
mode.
2. First, press the MENU button.
Next, press the 1 button to select
“PROGRAM.”
Now, press the 4 button to select
“PROGRAM REVIEW.”
The Timer Record information for the
lowest numbered position (1 - 8)
appears.
NORMAL PROGRAM
PROGRAM
CHANNEL 10
TIME ON 0930 PM
TIME OFF
REC SPEED SP
START DATE
TO CANCEL PUSH CLEAR
NEXTol
3. Press the 1 button repeatedly to view all
the filled positions.
If you do not press the 1 button, after 10
seconds the display changes to the next
filled position. This continues until all
fiUed positions appear. Finally, the
screen returns to the previous on-screen
menu.
4. Press the CLEAR button to clear a filled
position.
5. At any time, press the MENU button
once to exit the Program Review mode.
6. Repeat steps 1 - 4 to make sure you
have cleared the correct filled positions.
To fill a position, follow “Timer
Recording” steps 1 -12.
NOTE: This function does not work with
OTR (One Touch Recording).
1
10.-00 PM
02/12('94
SAT.
ENDsMENU }
Select the Next Program
I If needed; press the MENU button and repeat steps 2 tolO.
Set the Timer
When finished, press the POWER button to OFF on the remote
control.
After a Timer Recording Has Taken Place
Press the POWER button on the remote control to return your VCR
(Video Cassette Recorder) to normal operation.
I- If the Power Should Fail...
repeat the steps on pages 8 and 9 before setting up a Timer
Recording.
Stop a Started Timer Recording
1. Press the POWER button.
• Timer recording is cancelled and VCR
power turns off.
Today’s recording stops. If it is a Daily or
Weekly recording, future recordings will be
carried out as programmed.
Page 17
Special Playback Features 17
s your VCR (Video Cassette Recorder) connected to your TV (see “Hook Up Your VCR”)? Are you familiar with tape
playback (see “Play a Tape”)? If so, you are ready to enjoy the special playback features described on this page. These
I
features work best in the SP (Standard Play) or SLP (Super Long Play) mode. You must use your remote control.
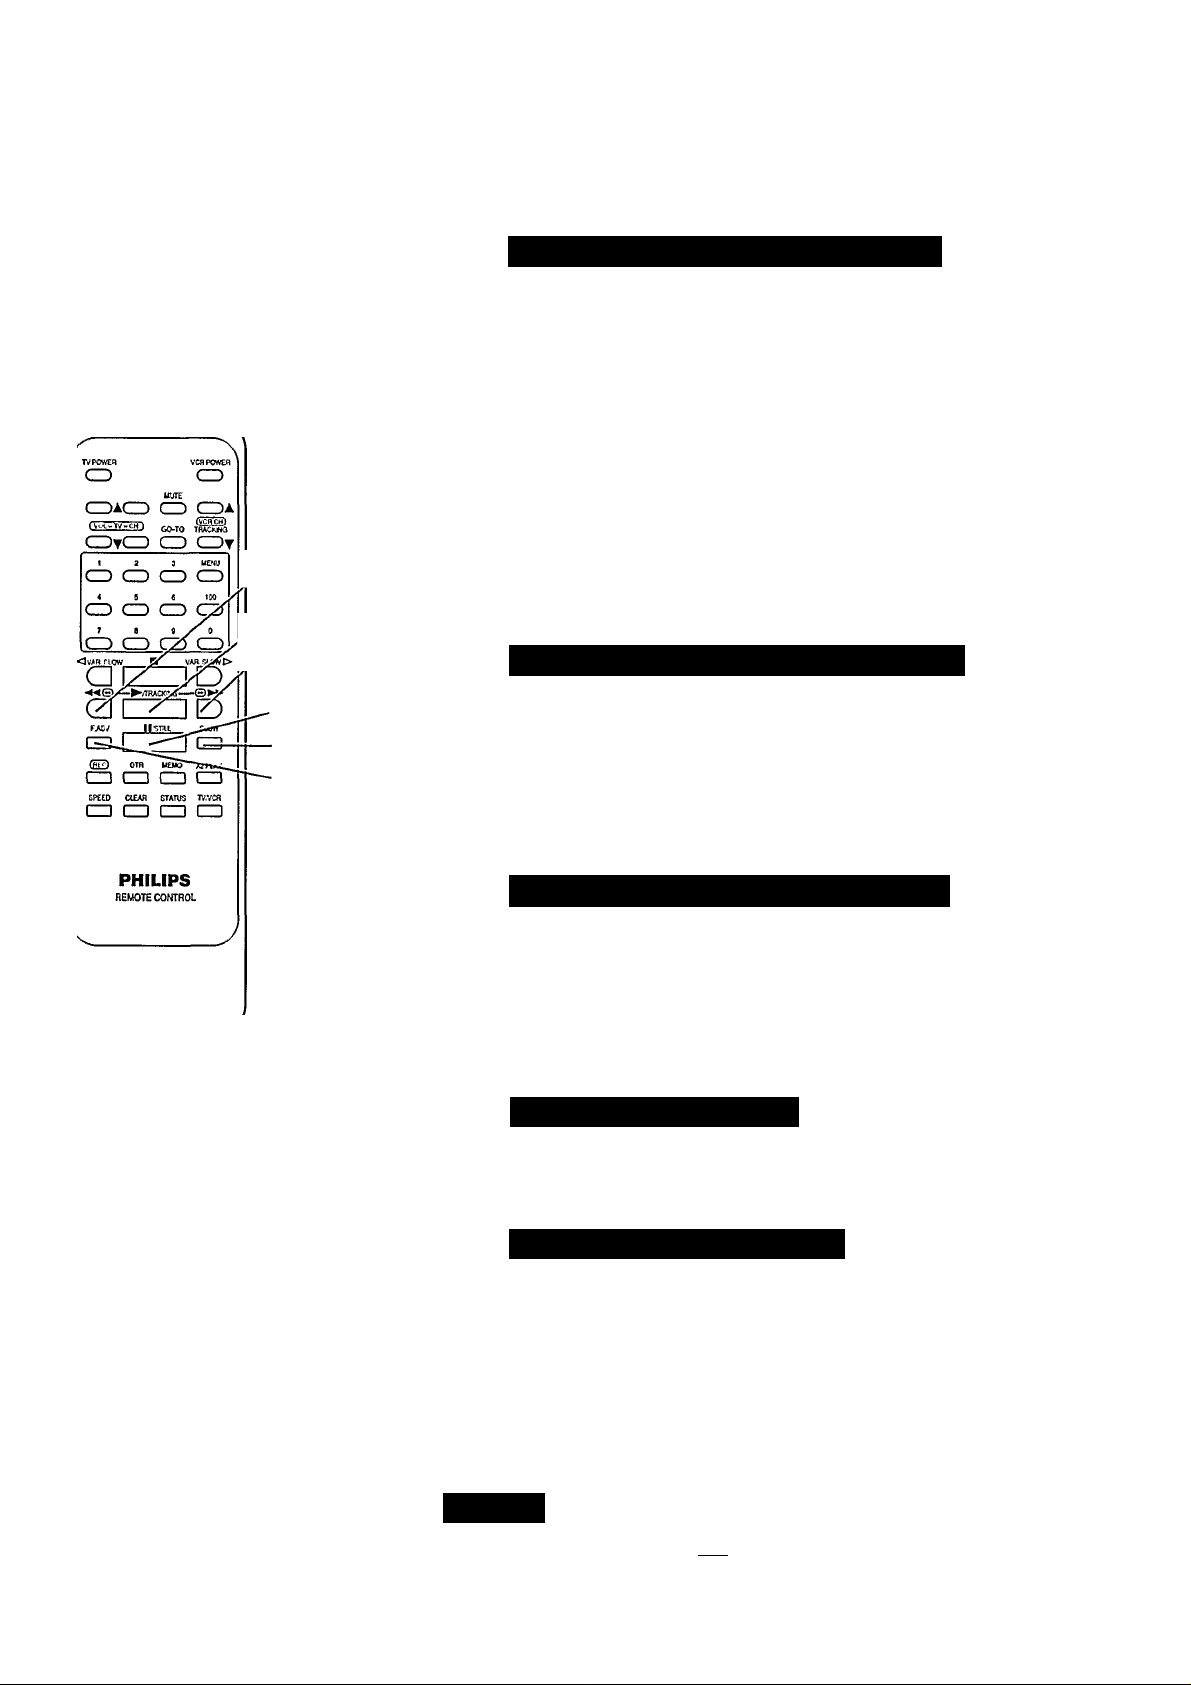
To Rapidly Locate a Particular Segment
I First, press the PLAY button.
Next, press the REW(ind)/SEARCH or FF (Fast
Forward)/SEARCH button.
A rapid forward or reverse picture search begins.
Search speed in SP mode is about 7 times the normal speed.
Search speed in SLP mode is about 21 times the normal speed.
Now, press the PLAY button to return to playback.
If the FF or REW button is held down for more than 2 seconds,
simply releasing it will cancel the Search mode. In this case, the
search speed in SLP mode is about 15 times normal speed.
/ REW(ind)/
^ SEARCH Button
^ PLAY Button
j / FF (Fast Forward)/
/ SEARCH Button
PAUSE/STILL
Button
SLOW Button
F{rame) ADV(ance)
Button
Press the PLAY button to return to playback.
• During search playback, some noise bars will appear on the TV
screen.
To View a Double Speed Playback Picture
I First, press the PLAY button.
Next, press the X2 PLAY button. The picture runs at twice the
playback speed. Sound is muted.
I Now, press the X2 PLAY button again or the PLAY button to release
the tape from double speed playback.
Remote Control
To View a Still Picture (During Playback)
I First, press the PLAY button.
Next, press the PAUSE/STILL button.
A freeze frame (still) playback image appears.
Now, press the PAUSE/STILL or PLAY button again to release the
stilled image and continue playback.
To Advance a Still Picture
In the Still mode, press the FRAME ADVANCE button.
To View a Slow Motion Picture
First, press the PLAY button.
Next, press the SLOW button.
• During slow motion the slow speed can be controlled using the
VAR(iable) SLOW button.
1 Now, press the PLAY or SLOW button to release the Slow mode
and continue playback.
NOTES:
• The sound will be muted during special-effects playback.
• Slow Motion and Still automatically switch to the Stop
mode after 5 minutes to protect the tape and video heads.
(Continued on next page.)
Page 18
18 Special Playback Features (cont’d)
p Auto Operation Functions
Auto Playback
When a tape is inserted, the power comes on.
If the record tab* is removed, playback begins.
Auto Rewind
When a tape reaches its end during playback, fast forward, or manual
record, the VCR rewinds the tape and goes into Stop mode.
Memory Rewind Power Off
When the POWER button is pressed during rewind, the VCR will
turn off after rewind is complete.
Eject Cassette
A cassette may be ejected with power on or off.
* For record tab information, refer to page 6.
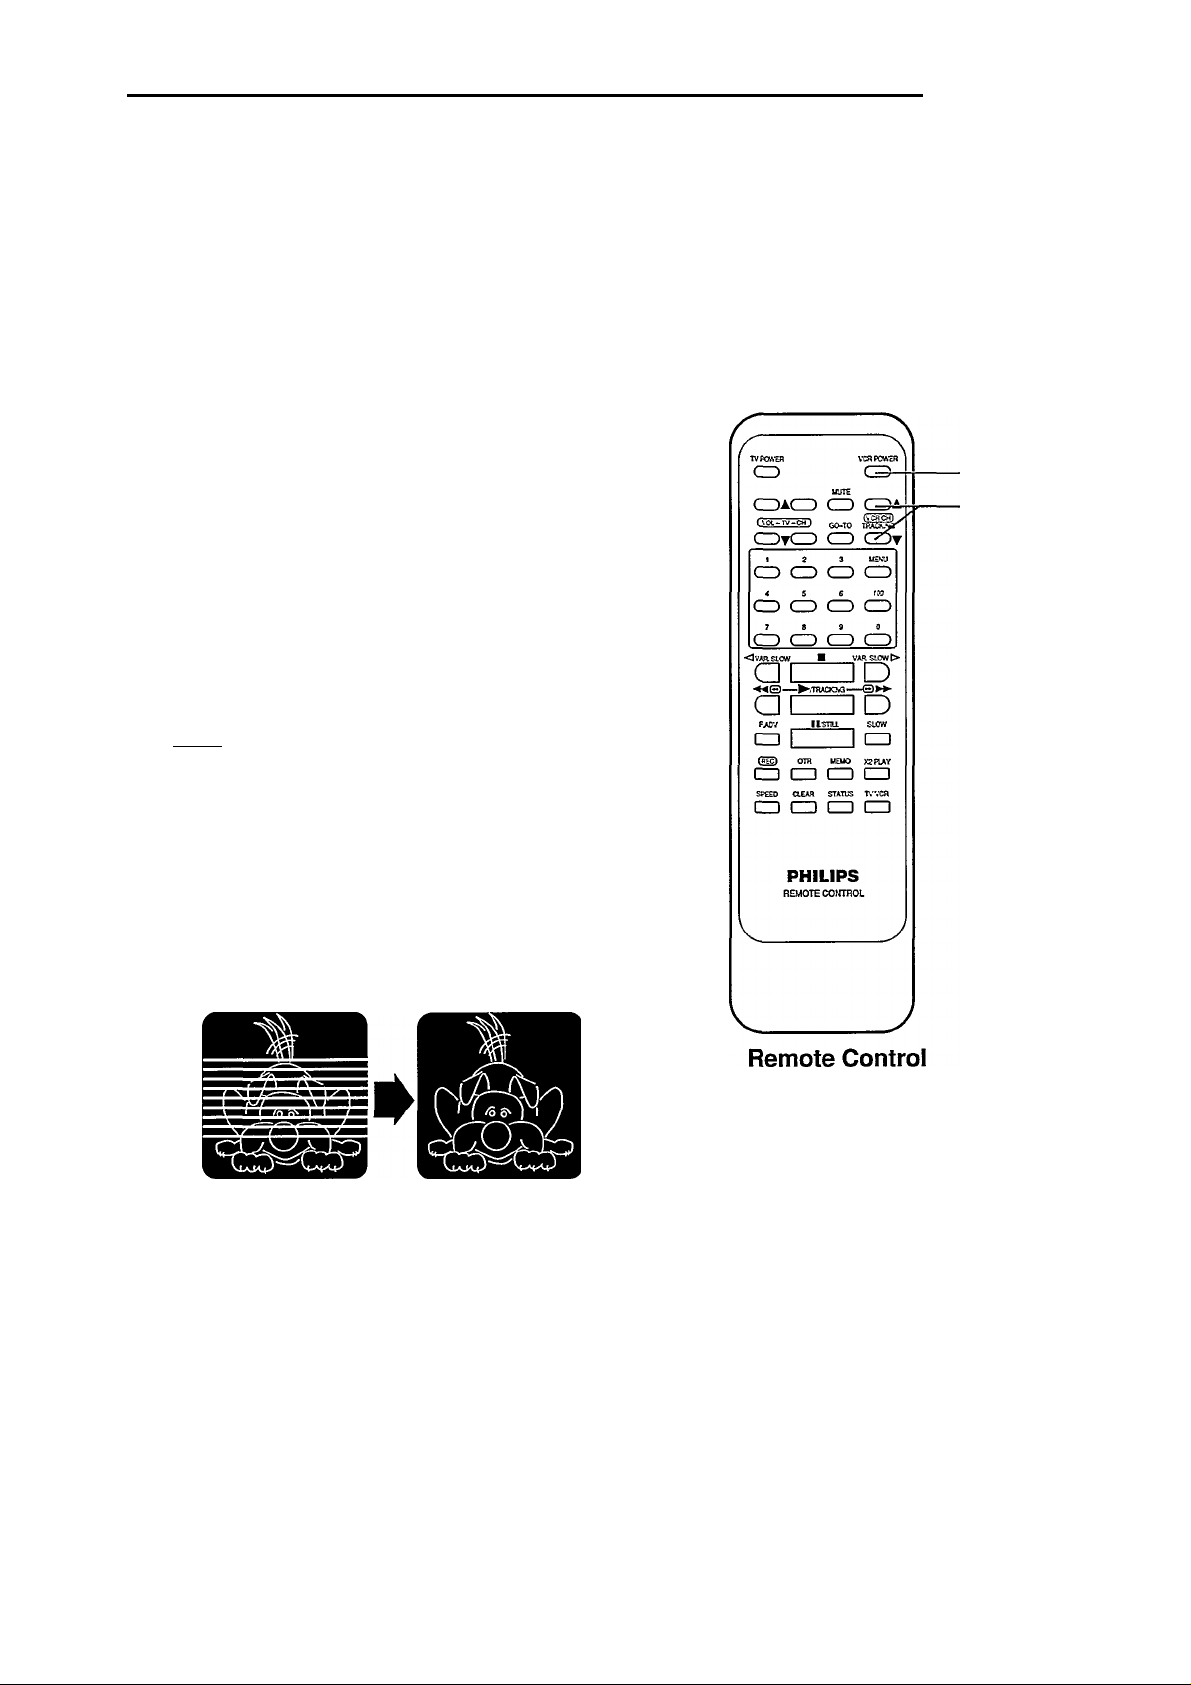
POWER Button
TRACKING
UP/DOWN Buttons
P Auto Tracking Controi
With Auto Tracking there is usually no need for manual adjustments
to minimize noise in playback for most tapes. Auto Tracking
continuously analyzes the signal to adjust for optimum picture
quality for each recording. However, with some recordings you may
get a better result using the TRACKING UP/DOWN buttons.
p
Manual Tracking Controls
Press the TRACKING UP/DOWN button.
Use Manual Tracking adjustment during playback, slow motion, and
double speed playback to minimize noise in the picture.
Also, use these buttons to reduce jitter in a still picture. Once you
make this adjustment, you probably will not have to do it again unless you select Still mode while playing a tape recorded on a
different VCR.
Page 19
Re-Recording (Tape Duplication) 19
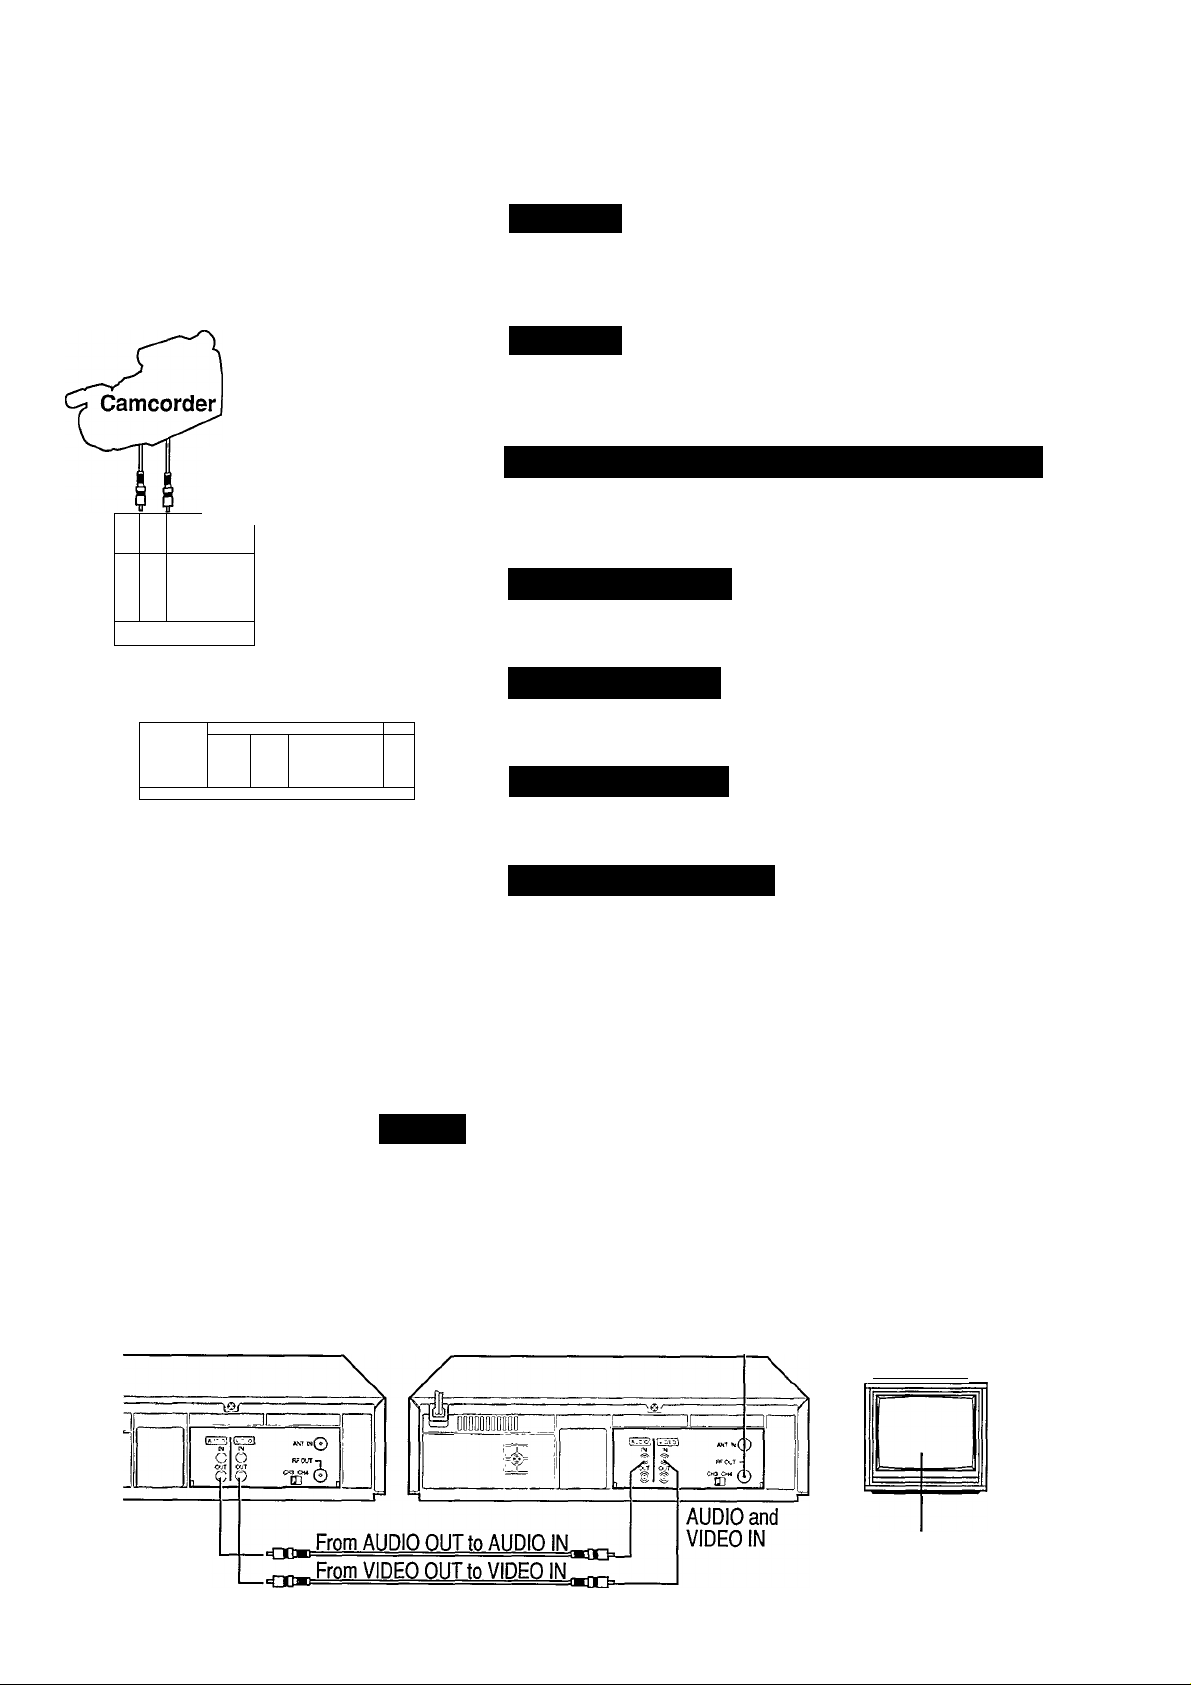
ubbing from any VHS recorder (or camcorder) to another is simple. Just use the connections and steps below. The
example below uses two VCRs like this one. Other VCRs may operate differently.
D
At VCR 1
, Insert a pre-recorded tape. VCR 1 is the VCR (Video Cassette
CONNECTIONS 1
Recorder) that will play your tape. If the record tab is missing
(page 6), playback starts. In that case, press the stop button.
(AA/ outputs)
/
c
1 (LL
oTlcâfl
V ?
7T
T - - rrr------------------------------
illlllll 1'
M Î
(Used for monitoring)
Source
Player
(Front View)
Editing
(Recording) VCR
(A/V inputs)
(Back View)
li ~
1
, o
Ô
Ç3
O Wir."' ^
o .
TV Set
At VCR 2
I Insert a blank tape in the editing VCR. The VCR will turn on
automatically. The VCR indicator hght on the VCR should come on.
If not, press the TVA^CR button on the remote control.
To Monitor the Re-Recording Process On Your TV
Turn the TV on.
Turn the TV channel to either 3 or 4, whichever channel VCR 2 is
set to (see page 8).
Select Input Source
Point your remote control at VCR 2. Press 0-0 on the NUMBER
buttons. “L” appears on the VCR display panel.
Select Tape Speed
Point your remote control at VCR 2. Press Tape SPEED button to
select SP (Standard Play) or SLP (Super Long Play).
Play Back the Tape
Press the PLAY button on VCR 1.
Record (Copy) the Tape
I Press the REC(ord) button on VCR 2.
' Remember: press the buttons in steps 6 and 7 simultaneously to
avoid missing any of the recording.
CONNECTIONS 2
VCR1
Source (Playing) VCR
(Back View)
AUDIO and
VIDEO OUT
NOTE:
CAUTION
Unauthorized recording of copyrighted television programs, films,
video tapes, and other materials may infringe on the rights of
copyright owners and be contrary to copyright laws.
If coiuiections are plugged into the Front A/V Input Jacks they will
automatically take priority over the Rear A/V Input Jacks.
To record from the Rear A/V Input Jacks (Connection 2), follow the
above procedures while discoimecting any connections made to the
Front A/V Input jacks. “L” appears on the display panel and “A/V
IN” on the TV screen.
VCR2
Editing (Recording) VCR
(Back View)
TV Set
(Used for
monitoring)
Channel 3 or 4
Refer to the Optional Accessories page at the end of this manual for information on ordering optional Audio and Video dubbing cables.
Page 20
20 Tape Operation
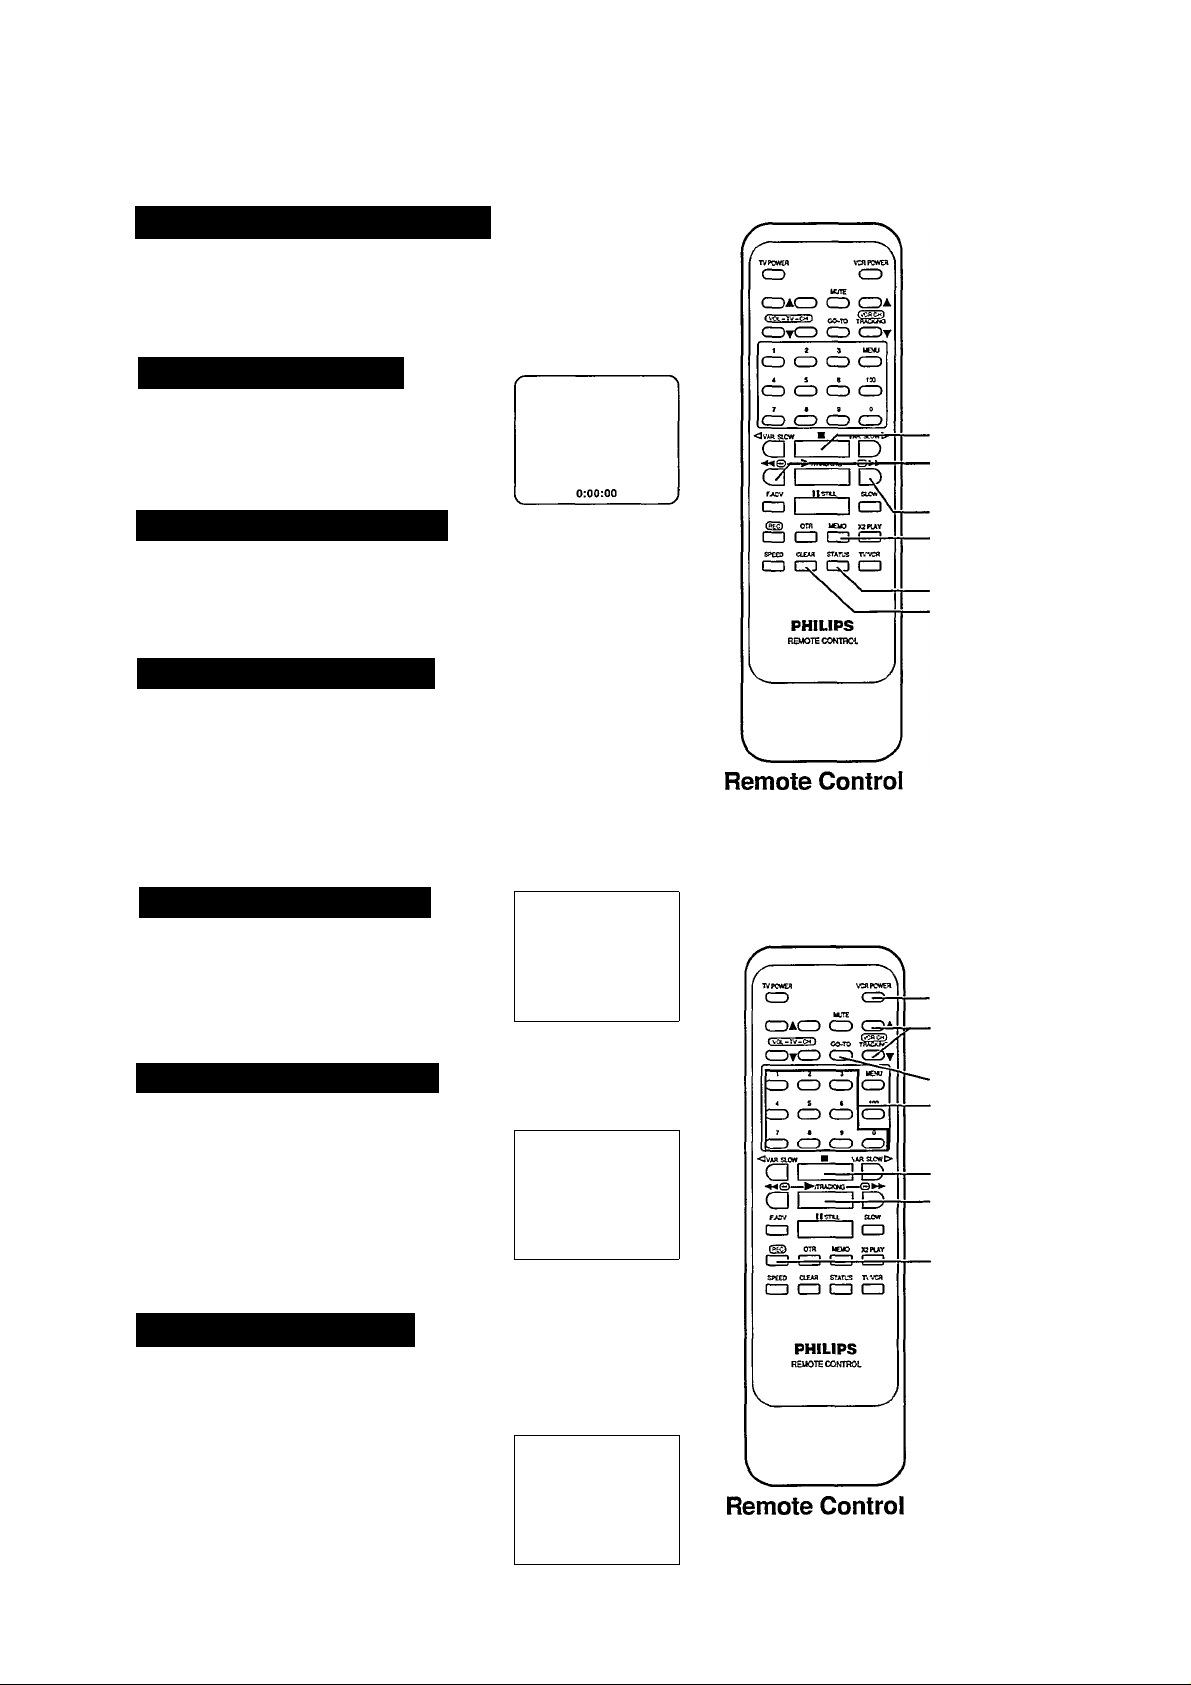
Tape Counter Control
f you always rewind your tapes fully and reset the tape counter, then you’ll be able to use a list of program locations as an
index. You must use your remote control.
I
Select the Tape Counter Display
To select the tape counter display, press the
STATUS button. The tape counter display
appears on the TV screen.
Reset the Tape Counter
, To reset the tape counter, press the CLEAR
' button. You can reset the coimter to zero at
whatever point on the tape you choose.
Select the Memory Function
I To select the memory function, press the
MEMO(ry) button. “M” will appear on the
screen in front of the counter reading.
STOP Button
REW(ind)/SEARCH
Button
FF/SEARCH Button
(Counter) MEMO(ry)
Button
STATUS Button
CLEAR Button
Start the Memory Function
1 To start the memory function, from anywhere on the tape, press the
STOP button, then press the REW(ind) or FF (Fast Forward) button.
The tape will stop automatically wherever “0:00:00” was set.
Go-To Function
ou can have your VCR automatically “go to” and locate the point on the tape with the counter reading that you specify.
You must use your remote control.
1
Y
Select the Go-To Function
I While in the Stop mode, press the GO-TO
button.
©
* The screen at right appears.
* VCR channel must be any channel number
other than “L” (LINE IN) on the front panel.
f NOW 1:00:00
GOTO
\
______________________
Select the Counter Number
, Select the desired counter number by pressing the NUMBER
buttons. For example, by pressing 1,2-0,0-0,
the VCR will automatically go to the point
with counter reading “1:20:00.”
If the counter location you want has a minus
(-) before it, you can enter the minus by
pressing the VCR CH(annel) DOWN button.
To remove the minus, press the VCR CH(annel) UP button.
' NOW
GOTO
1:00:00
1:20:00
\
>
j
•VCR POWER Button
VCR CH(annel)
UP/DOWN Buttons
GO-TO Button
NUMBER Buttons
STOP Button
PLAY Button
REC(ord) Button
Sfart the Go-To Function
I Press the PLAY or RFC or STOP or VCR POWER button.
The Go-To function will Fast Forward or Rewind to the counter
number, and depending on which button you pressed, will enter that
mode.
PLAY button = Will begin playback at that
point.
RFC button = Will begin recording at that
point.
STOP button = \W11 stop at that point.
VCR POWER button = Will turn the VCR’s power off at that point.
' NOW
GOTO
1:20:00
1:20:00
S
j
Page 21

Re-Setting Your VCR’s Tuner 21
o place receivable channels in your VCR (Video Cassette Recorder), follow steps 1- 4 below. This function lets you re
program your VCR’s tuner at any time.With the Add/Delete feature you can add or delete any channel. You must use
T
your remote control.
-| Make sure... p
the steps on pages 7-8 have been completed, and your TV and
VCR are on.
to make each entry within 60 seconds, otherwise the VCR will exit
TVPOAif»
CD
____ ____
l.rjTE
__________
VCflPOftt«
CD
CDA.CD CD
LV^-jy.-rCH)
CDtCD CD
ID CD CD
4 S 6
ZD CD CD CD
r S Q 0
ZD CD CD CZ
now 1
1 vwiscow>
ai_
^ ©—■►yTPACKM —
am _J
FAC/ II
1=) m _J
ffTrl ora
CD CD
CP£iO CL£AB STATfS
CD CD
miD
‘vTiU.
U£U3
CD CD
CD CD
PHILIPS
REMOTE CONTROL
U)
CD
»PLAY
Tvvca
Remote Control
-VCR CH(annel) UP/DOWN Buttons
■ MENU Button
• NUMBER Buttons
SLOW
the Tuner Set Up mode and you will have to start over.
Display the Tuner Set Up Mode
I First, press the MENU button to display the
main menu screen.
Now, press the NUMBER 3 button to select
“TUNER SET UP.”
The screen at right appears.
Start Auto Program
Press the NUMBER 3 button to start Auto
Programming. “AUTO SET PROCEEDING,
PLEASE WAIT” appears on the TV screen.
\
_________________________
Finish Auto Program
I When auto program is complete, “AUTO SET COMPLETED”
appears on the TV screen, and then the lowest channel stored in the
VCR’s memory will appear on the TV screen. To view other stored
charmels, press the VCR CH(annel) UP/DOWN button. Line mode
is always stored in the VCR’s memory. “L” appears on the VCR’s
front panel when selected using the VCR CH(annel) UP/DOWN
button.
TO SELECT PUSH NO SHOWN
t TV (ON)
2 CABLE TV
3 AUTO PROGRAMMING
4 ADD DELETE CH
5 CH MEMORY REVIEW
TO END PUSH MENU
AUTO SET PROCEEDING
PLEASE WAIT
-
Adding and Deleting a Channel
1. Press the MENU button to display the menu screen. Next, press
the 3 button to select “TUNER SET UP.”
2. Press the 2 button to change from “TV” to “CABLE TV.”
Press the 1 button to change from “CABLE TV” to “TV.”
“[ON]” appears beside your selection.
3. Press the 4 button to select the Add/Delete
channel feature. The display shown here
will appear.
4. Press two numbers to add or delete channels
up to 99. For 100 and higher, first press the
100 button, then two numbers.
• Always enter a “0” before any single-digit
entries. For example, 0, then 6 for “6.”
• Refer to “Using the 100 Button” to enter a
three-digit number.
5. Press the 1,2, or 3 button to “ADD,”
“DELETE,” or “SELECT ANOTHER CH”
that is in the VCR’s memory.
If “3” is selected, the display in step 3 will re-appear.
To exit the Add/Delete mode, press the MENU button once.
SELECT CHANNEL NUMBER
TO END PUSH MENU
TO SELECT PUSH N UMBER
CH12
1 ADD
2 DELETE
3 SELECT ANOTHER CH
TO END PUSH MENU
Channel Memory Review
First, press the MENU button. Next, press
the 3 button to select “TUNER SET UP.”
Now, press the 5 button to select “CH
MEMORY REVIEW.” The memorized
chaimel list will appear on the TV screen.
Now, press the 1 button to see the next
channel list. Press the
2 button to see the
previous channel list.
To exit, press the
MENU button.
'memorized channel
17
20
15
323642 43
50
68
81 83 84
90
NEXT=1
V TO END PUSH MENU
21
51 52
66
70 737578 80
86
92 95 104
PREVIOUS 2
27
45 47
64
88 89
107
cable'
31
67
112
Using the 100 Button
To select channel numbers 100 to 125 with
the NUMBER buttons, first press the 100
button and then enter the remaining two
numbers. For example for chaimel 105,
press NUMBER buttons 100,0,5.
J
Page 22

22 Notes on Operations
Hook Up Your VCR
• If the reception on all channels is unsatisfactory, you may
need to re-tune your TV set.
Clock Adjustment
• In the Clock Adjustment mode, be sure to enter the first
digit and all subsequent entries within 10 seconds of one
another. Otherwise, the VCR will automatically leave this
mode and the program you were watching will return to
the screen. If this happens, press the MENU button and
start again.
• Be sure to enter “0” before single-digit numbers.
• The letters indicating the day of the week will appear
when you have entered both digits for the year.
• If the digits entered for the day do not match the calendar,
the entry will be rejected and “?” will appear.
• If you press the MENU button while in the Clock Set
mode, the TV screen will return to the program you were
watching.
Channel Indication
• If the channel you select has no broadcast, the screen will
change to a solid blue field. The screen will remain blue
until an active channel is selected.
Timer Recording
• To do a timer recording in the LINE mode, follow steps
1- 4 in “Timer Recording” section. At step 5, press the
NUMBER button 0 twice (0,0) to engage the LINE
(external source) mode. Complete the rest of the steps
under “Timer Recording” section.
• Timer recording may not be performed or continued if a
power interruption of more than one minute occurs
before or during timer recording, even if power resumes
thereafter. Preset clock and timer data will be lost. This is
indicated by the clock display on the VCR which resets
to - -”. If this happens, reset the clock and program
the timer.
• If the time spans of two preset programs overlap, the
lower-numbered program will have priority and the
second program will start only after the first program has
been executed.
• If the POWER button is pressed to OFF with no cassette
loaded, the TIMER and “Cassette Inside” indicators will
continue blinking.
• If the record tab is missing, the cassette will be ejected
when the POWER button is pressed to OFF, and the
TIMER and “Cassette Inside” indicators will continue
blinking.
Special Playback Features
• During search playback, horizontal noise bars will appear
on the TV screen.
• After the VCR has been in the Still mode for 5 minutes, it
will automatically go to the Stop mode to protect the tape
and video heads.
• Special-effects playback can be used during playback of
tapes recorded in the SP or SLP mode. Tapes recorded in
the LP mode cannot be viewed in special-effects
playback.
To Record
• Although it is possible to change the tape speed while
you are recording, some distortion will appear on the tape
at the point where you make the change.
• After the VCR has been in the Pause mode for 5 minutes,
it will automatically go to the Stop mode to protect the
tape and video heads.
One Touch Recording (OTR)
• If the preset time for a timer recording comes up during
OTR recording, OTR has priority.
Power Failure
• Timer Recordings wiU be erased if the power fails.
Repeat “Set the Cloclc” on page 9 before setting up a
“Timer Recording” on pages 15-16.
Satellite Hook-Up
• Watching one TV channel while recording another may
not be possible with a satellite hook-up.
• You may have to set your VCR to channel 3 or 4 and
make your channel selections at the satellite converter
box.
• If you use accessory Audio and Video cables (not
supplied) to hook-up your VCR to TV, you will have to
set your VCR to Line Input. “AW IN” appears on your
TV screen when you first switch into this mode. “L”
appears on your VCR.
Line Input
• If you accidentally get into the Line mode (“L” appears
on the VCR), simply press the VCR CH(annel)
UP/DOWN button or select a channel using the
NUMBER buttons to exit.
Page 23

Before Requesting Service 23
IMPORTANT NOTE: Periodic maintenance is required in order to maintain the unit’s continued excellent performance. After a
period of time the Video heads will require replacement. If cleaning or replacement of the Video heads is required, this service
should be performed by an authorized Video System Service Center.
Check the following points once again if you are having some difficulty with your VCR (Video Cassette Recorder).
I—Power-
No power...
Power Failure...
—Recording & Playback-
TV program can’t be recorded...
Timer recording can’t be performed...
There is no playback picture, or the playback picture is
noisy or contains streaks...
-Correction-
' Check that the power cord is correctly connected to an AC
(Alternating Current) outlet.
' Check that the Power button is set to on.
■ Please complete “Setting the Clock” on page 9 before
attempting to set up a “Timer Recording” on page 15-16.
-Correction-
' Check the connections between the VCR, the external
antenna, and your TV.
' Make sure that the record tab on the back of the cassette is
stiU intact. (P.6).
' Set the recording start/stop time correctly (P.15 -16).
' Make sure that the POWER button is set to “OFF’ (P.16).
' Timer recording may not be performed or continued if a
power interruption of more than 1 minute occurs before or
during Timer Recording, even if the power resumes
thereafter.
' Select the same channel on your TV as that of the VCR
Channel 3/4 switch (P.8).
■ Set the TV/VCR selector to “VCR”.
’ Check that channel 3 or 4 of the TV is properly adjusted.
■ Adjust the Tracking control slowly in either direction
(P.18).
During special effects playback, the picture may contain
some vertical jitter when using a TV which has an
Automatic Vertical Hold Control...
If the top of your playback picture waves back and forth
excessively...
No picture or sound when re-recording using rear Audio and
Video (AAO jack...
' Set the TV’s Vertical Hold Control, if available, to
“MANUAL” and adjust.
■ Because the VCR playback signal is not as stable as an
off-the-air TV signal, the top of your TV screen may be
bent or unstable during playback. To solve this problem,
slowly turn the HORIZONTAL HOLD control on your
TV to correct the wavy picture. If your TV does not have
the horizontal hold control or adjusting the control does
not help, please contact your local TV service center.
' Make sure everything is disconnected from the front
Audio and Video (A/V) jack.
Page 24

24 Before Requesting Service (cont’d)
r—Remote Control -
VCR can’t be remote controlled...
—Miscellaneous -
You can’t view programs normally on the TV...
Video cassette can’t be inserted...
Video cassette can’t be removed...
Video cassette ejects when the OTR or RECORD button is
pressed, or when the POWER button is pressed off to set the
Timer...
-Correction-
' Aim the Remote Control directly at the remote sensor on
the VCR.
■ Avoid all obstacles which may interfere with the signal
path.
' Inspect or replace the batteries (P.6).
' Make sure batteries are inserted correctly (P.6).
—Correction----------------------------------------
• Set the TV/VCR selector to “TV”.
• Insert the cassette with the window side up and the record
tab facing you.
> Make sure a cassette tape is not already inserted. Press
STOP/EJECT button on VCR.
> Check that the power cord is correctly connected to your
VCR’s back panel and to an AC (Alternating Current)
outlet.
■ If the VCR’s TIMER indicator is lit, press POWER to
disengage the timer first, and then press STOP/EJECT.
> Check the cassette to be sure that the record tab on the
back of the cassette is still intact (P.6).
Specifications
Video Recording System
Video Signal
Antenna
VHF Output Signal
Power Requirement
Power Consumption
Operating Temperature
Relative Humidity
Design and specifications are subject to change without notice.
Rotary four-head helical scan
system
EIA standards: NTSC color
VHF/UHF - 75 ohm external
antenna terminal
Chaimel 3 or 4 (switchable) 75
ohms unbalanced
ACl lOV-127 V-220V ^
50/60 Hz
17W
41°F(5°C)tol04°F(40°C)
10% to 80%
Weight
Dimensions
Tliner
Broadcast Channels
CATV Channels
Accessories
9.3 lbs. (4.2 kg)
14-3/16"(W)x3-3/4"(H)x
12-1/8"(D)
(360 mm X 94 mm x 307 mm)
VHF2-13,UHF14-69
Midband A -1
Superband J-W
Hyperband AA-EEE
Lowband A5-A1
Special channel 5A
Ultraband 65 -125
• Wireless Remote Control
• “AAA” Batteries
• RF Coaxial Cable
• Conversion plug
Page 25

Page 26

Memo
Page 27

Memo
Page 28

Memo
Page 29
THE BEST CHOICE FOR YOUR
VIDEO CASSETTE RECORDER
Philips offers a full range of High Grade &
Extra High Grade Video Cassettes.
W
PHILIPS
PU36278-89
 Loading...