

Page 1

VIDE
Uiz
PHILIPS
Page 2

Page 3
OPERATING INSTRUCTIONS VR 237
Congratulations! You are now the owner of one of
the most sophisticated and simple-to-use video
recorders (VCR) on the market.
But please allow me to introduce myself. I am Philip
and I should like to help you to get to know your
new video recorder.
Naturally, you can't wait to use it, but before you
do, it's worthwhile taking the time to read through
these operating instructions. They will show you
how to make the best use of your equipment.
You can practise using the video recorder without
any worries because you cannot damage it no
matter which buttons you press.
Contents
1. SUMMARY OF BUTTONS AND CONTROLS 2
2. INSTALLATION. HOW DO I INSTALL MY VIDEO 6
RECORDER?
Emergency interrupt 9
Setting the display language 10
Setting the clock and date on the video recorder 10
3. PLAYING A RECORDED CASSETTE 12
4. STORING TV CHANNELS 17
Automatic channel search 17
5. HOW DO I RECORD DIRECTLY? 23
6. HOW DO I PROGRAMME A RECORDING? 26
Programming with ShowView 28
Programming on the video recorder 30
How do I check or correct a TIMER block? 33
7. SPECIAL FUNCTIONS AND EXTRAS ON YOUR 34
VIDEO RECORDER
Playback via the aerial cable 38
Page
8. BEFORE YOU CALL AN ENGINEER 41
9. TECHNICAL DATA, ACCESSORIES 42
£ta 1
Page 4

1. SUMMARY OF BUTTONS AND CONTROLS
Here is a list of all the buttons, controls and sockets that you will find on the video recorder and
the remote control.
You will find detailed descriptions concerning the various functions in the relevant chapters.
The remote control
TUNEH К0ШПН lEREITSGHAFr
О О (D
8РЛР
^ ^ SinwVlev
■MDÜlllGE
ш ш ш
н ш ш
CD
инншш
РЯОв.
ш ш ш
тл»
kZKD-CD'^
LÜSCHEN
/Ф\ /¥\
ШМ PROO. S1APT ВШЕ
^ ^ ^ ^
TIMER
® I
------------------
VPS AUFMHME K0KIR. LÖSCHEN
nOCKlAUF PAU8E/5TDP WIEDEHGAIE VORUUF
А е—•
^
® ® CE) ®
SPUR —INDEX— 8TANDIIU)
(M) © ® ®
DEKGDER SYSTEM
O O (g)
О
о
AUF
Al
TUNER
I MONITOR"
BEREITSCHAFT 6
I SP/LP
BANDLANGE
UHR STELLEN
I AUF.
AB'
I
SHOWVIEW
0-9
IT/W
I LOSCHEN
I DATUM -FT^
PROG. +/-
I START +7^
ENDE +/-
TIMER a
OK
VPS
I AUPNAHMiy
KONTR.
I<M RÜCKLÄ0F~
I PAUSE/STOPIII
I WIEDERGABEN
I VORLAUF W>
I SPUR И
I INDEX
INDEX
I STANDBILD ►H
DEKODER
I SYSTEM
Additional TV functions:
the same remote control c
UK
Tuner mode
TV monitor function
Switch off
No function
Tape length selector
Set clock on video recorder
Up/Plus, programme number
Down/Minus, programme number
'ShowView' programming
Digit buttons 0-9
Daily/weekly programming
Reset/clear
TIMER Date +/TIMER Programme +/TIMER Start time +/TIMER Stop time +/TIMER programming on the video
recorder
Confirm button
VPS on/off
Record (CojOand Laufnahme»~I
buttons simultaneously)
TIMER Control
Rewind/Reverse scanning
Pause/Stop
Playback
Wind/Forward scanning
Tracking/optimum setting
Search function - previous mark
Search function - next mark
Still picture
Decoder on/off
No function
ily function with televisions with
On
ode.
d
Programme number + / TV volume + / Switch off TV
Page 5

Front of video recorder
I KASSETfin Cassette eject
l<i-< RÜCKLAUF I Rewind/Reversescanning
I WIEDERGABE^ Playback
I VORLAUF ►(> I Forward wind/Forward
scanning
I bereitschafTIFI Switch off
PAUSE/STOP II ■ I Pause/Stop
PHILIPS
I AUFNAHME'#"! Record
I AB^I Down/Minus,
programme number
AUF.
Up/Plus,
programme number
LAUIP_SXQRE] store TV channel
.sender.ordnMD Programme 'Preset'
Kassette RQcklaufWIedergabe Verlauf
Ä © ( ^ ©
Bereitschaft Pauee/Step Aufnahme
Autostore
Sender
ordnen
(zz z i cz e
Back of video recorder
1''^! Mains socket
CMH Aerial output socket
E3E] Aerial input socket
Le>oj_I AV-Euro socket (Scart)
L.EXT2 I AV-Euro socket (Scart)
MOD. freqT] Channel control
-SIG I Attenuator switch
Page 6
Safety instructions
The manufacturer cannot be held responsible for
any damage which is incurred by not using the video
recorder in compliance with the national guarantee
conditions and safety regulations.
First check that the supply voltage indicated on the
back of your video recorder is the same as your local
supply voltage.
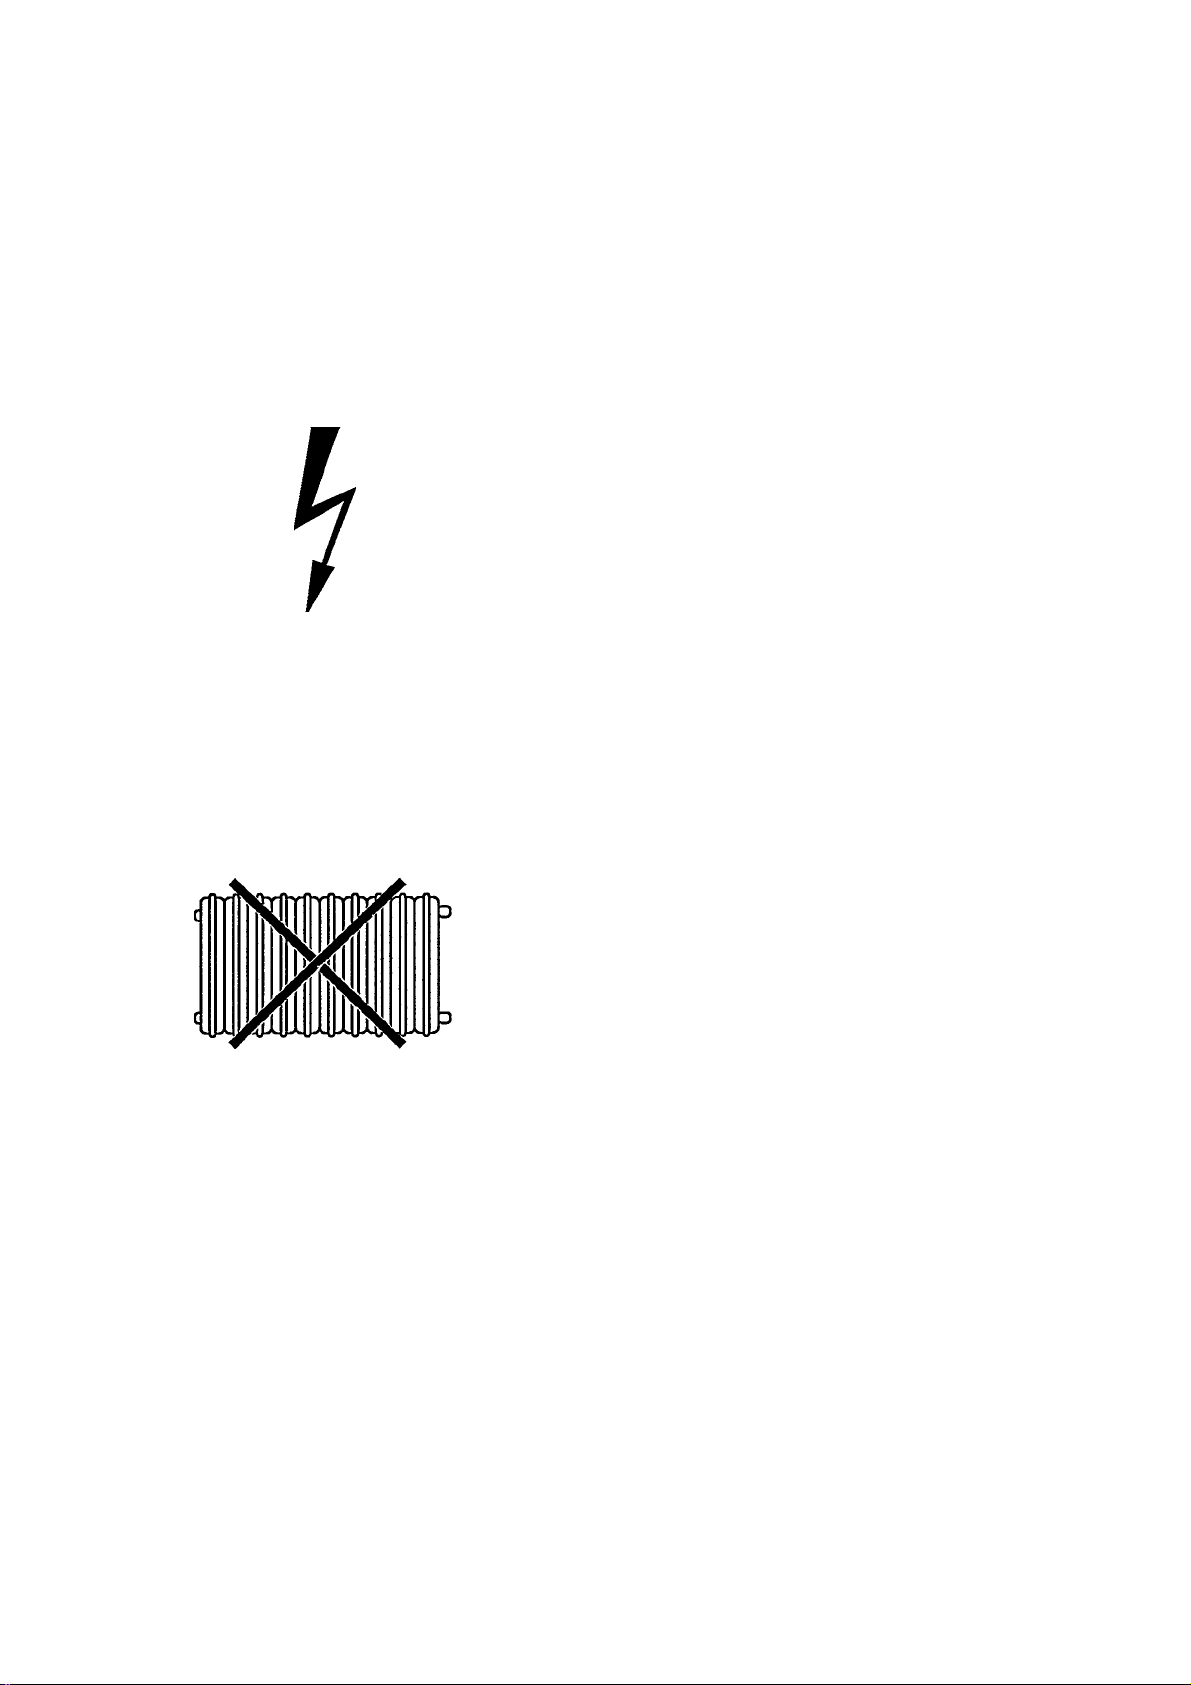
Danger - high voltage in this appliance! Do not open!
The video recorder does not contain any parts that
can be repaired by the user. As long as your video
recorder is connected to the mains there are parts of
it still in operation. To switch off the video recorder
completely you must disconnect it from the mains.
Ensure that air can circulate freely through the
ventilation slots of your video recorder. Do not place
your video recorder on soft surfaces.
Protect your video recorder from rain and damp.
Ensure that no objects or liquids enter the
equipment. If liquid is spilt into the video recorder,
disconnect the video recorder from the mains
immediately and call the After-Sales Service for
advice.
Do not place your video recorder close to a source of
heat (radiator etc).
Precautions
The video recorder should not be used immediately
after transportation from a cold to a hot area or vice
versa, or in conditions of extreme humidity.
After unpacking your video recorder, it should be
allowed to acclimatize for at least three hours before
installation.
£3
Page 7

Do not place your video recorder near appliances
which generate strong magnetic fields (e.g.: motors,
loud speakers or transformers).
Do not use the video recorder in dusty places or
where it may be subject to vibration. We recommend
disconnecting the appliance from both the mains
and the aerial H3r] during heavy thunderstorms.
Ensure that there is a vertical distance of at least 20
cm (8 ins) between the video recorder and your TV
set.
Do not put your fingers or any other foreign objects
into the cassette slot as this could damage the
mechanism. Particular care should be taken when
children are present.
If you have to move your video recorder, be sure to
remove the video cassette from the cassette slot and
avoid sudden or violent jolts.
This video recorder employs the VHS cassette
standard.
Only use cassettes of a well-known brand which
display the VHS symbol. We recommend that you
use PHILIPS VHS video cassettes to ensure the best
possible picture quality from your video recorder.
TV
20 cm
i
Ш
PAL SECAM
These operating instructions have been printed on
chlorine-free paper. This is to help protect our
environment.
Used remote control batteries should not be thrown
away with ordinary domestic refuse. Deposit old
batteries at the relevant collection points.
ShowView is a trademark applied for by Gemstar
Development Corp.. ShowView is manufactured
under licence from Gemstar Development
Corporation.
Ê)
Ö 5
Page 8

2. INSTALLATION. HOW DO I INSTALL MY VIDEO
RECORDER?
How do 1 insert the batteries into the remote control?
O Remove the cover from the back of the remote
control.
O Insert the batteries as indicated into the battery
compartment and close the cover.
Note:
* Do not use rechargeable batteries in this remote
control.
To connect your video recorder
You will find a detailed explanation of this diagram in the following sections.
6
Page 9

Connecting to the mains power supply
O Insert the female plug of the mains cable into the
mains socket I at the back of the video recorder.
O Plug the other end of the mains cable into the wall
socket.
Some general notes for subsequent operation
• Keep your video recorder connected to the mains at
all times to ensure that programmed recordings can
be made and that the television functions. The
power consumption required for this is very low.
l-i
(g)-
PTI
u
• The video recorder switches on automatically as
soon as you insert a cassette or press the button
I PAUSE/STOP II ■ 1
• If you switch your video recorder off using the
I.BEREITSCHAFT _(!) 1 button, the current time will appear
in the display, e.g.: '20:00'.
If the clock has not been set, the display will flash.
:jn.nn
L.
U'UU
Page 10

Connecting to the aerial
Your video recorder is actually a 'TV set without a
screen'. Therefore, you must connect it to the aerial
as well as to the TV set. Only then can you record
TV programmes and play recorded cassettes.
O Remove the aerial cable plug from your TV set and
insert it into the socket [30at the back of the video
recorder.
O Plug one end of the aerial cable provided into the
CMIl socket on the video recorder and the other end
into the aerial input socket on your TV set.
Both the TV set and the video recorder are now
connected to the aerial.
Page 11
Connecting to the TV set
If your television does not have an AV-Euro (Scart)
socket please do not read further here but turn to
Chapter 7, 'Special functions and extras'. In the section
'Playback via the aerial cable' you will find further
information.
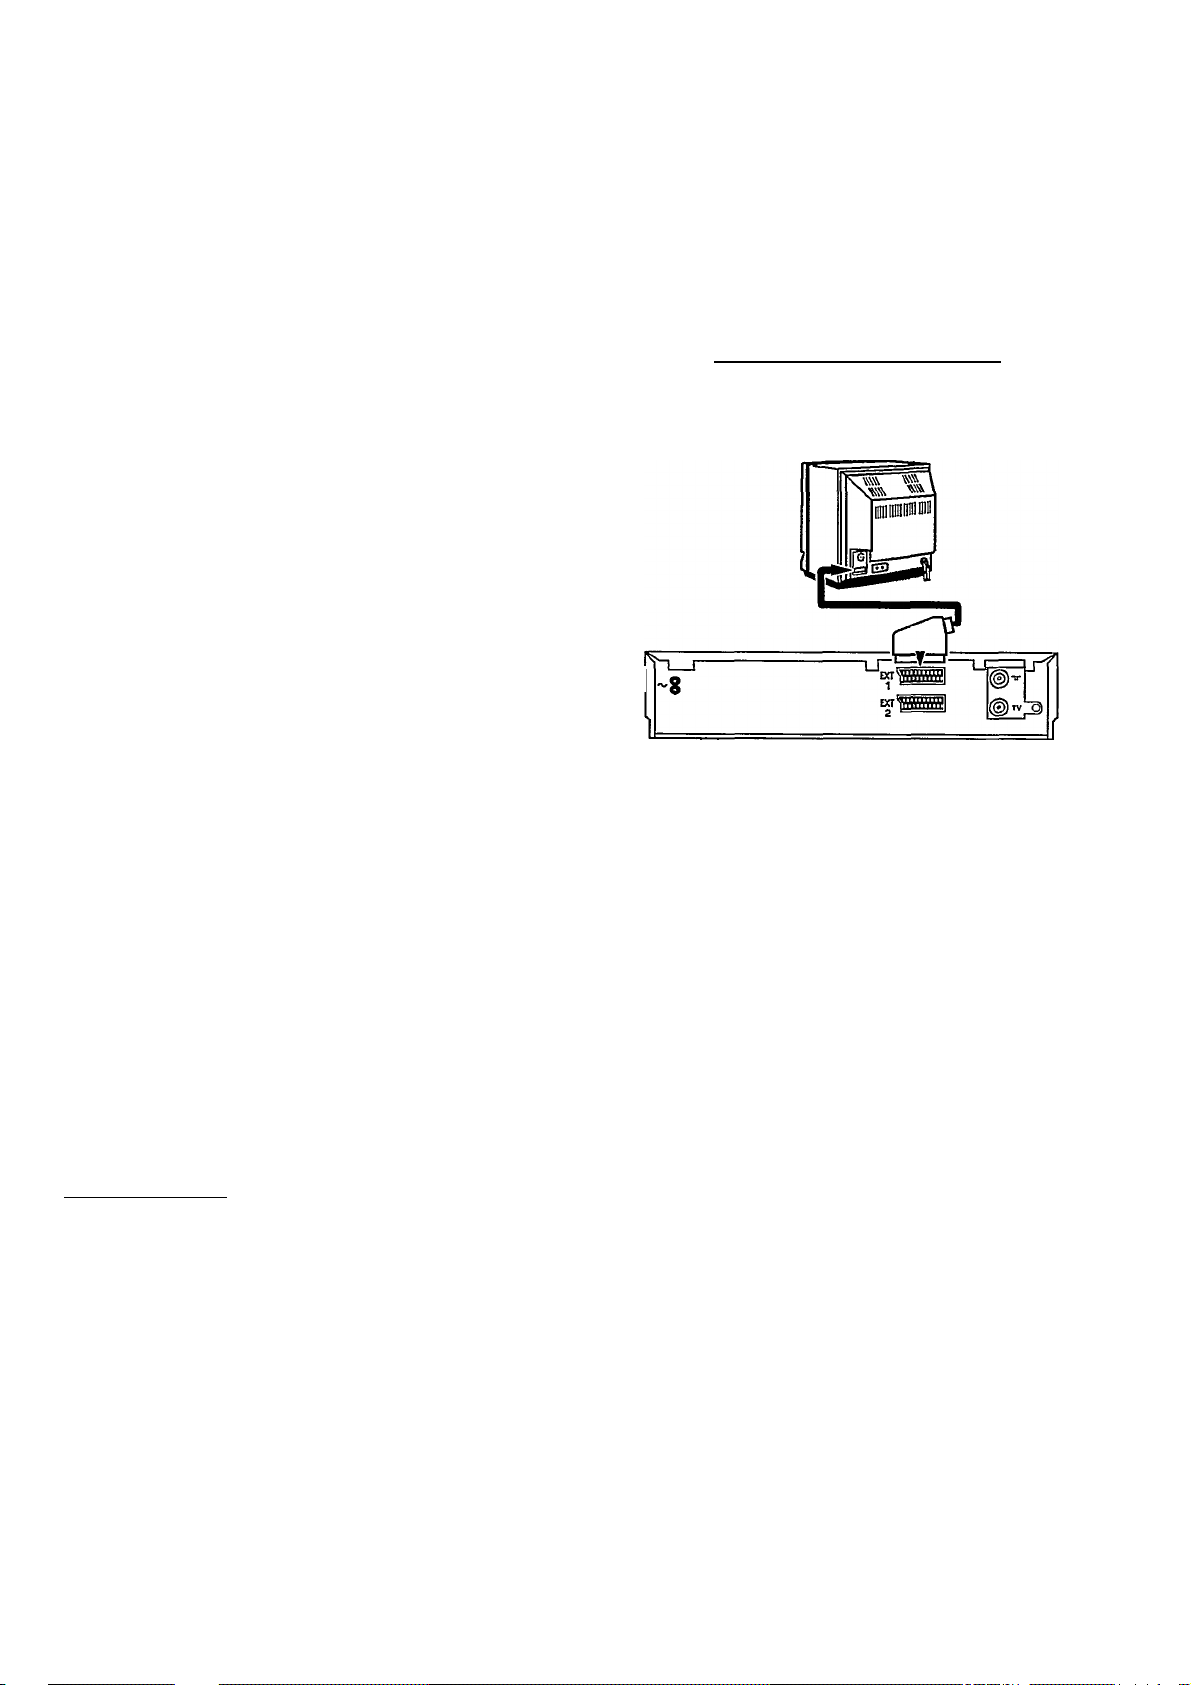
O Plug the orange-marked plug of the AV-Euro cable
provided into the orange AV-Euro socket C^EJZl at
the back of your video recorder. Connect the other
end to the TV set.
O This cable connection causes many modern
televisions to automatically switch to the 'EXT'
(EXTernal) or 'AV' (AudioA^ideo) programme number
when playing a video cassette.
On older televisions you will have to select the 'EXT',
'O', or 'AV' programme number on the TV set manually
to play back from the video recorder.
You will find instructions for this in the operation
manual of your TV set.
I I I I I I I I I
1 M ■ I I ■ ■ ■ ■ ■
Your video recorder is now fully connected to the TV
set.
Emergency interrupt
Both the video recorder and the remote control have an
'Emergency interrupt' button. You can use the
I BEREITSCHAFT 6 ihiittnn to interrupt any function.
Whenever you have trouble operating the video
recorder you can simply interrupt any function and start
again.
You can practise operating your video recorder without
any worries. No matter which button you press, you
won't damage the video recorder.
Page 12

Setting the display language
You can choose from ten languages for the display on
your video recorder.
O Ensure that there is no cassette in the cassette slot.
With your video recorder switched off, press the
I KASSETTE land r WIEDERGABEN Ihiittona
simultaneously.
O' /IT)
T I
it/VlT
I I f ILZ
UCOO
Dill II \
t OU
‘ J3i I
/'
C.y/ u
I J3- I I
/¡O )T/T?
»_) _)_]f
O Use the I abt-| or I auf a | button to select the
required display language, e.g.: 'ENGLISH'.
O Finally, press the I Bereitschaft,,6.1 button.
Setting the clock and date on the video
recorder
In order to be able to programme recordings, you must
first ensure that the video recorder clock is correctly
set. To do this, use the I ab.t |pr 1 auf_a | buttons on the
remote control in all the following steps.
O Press thfil UHR STELLEN I button on the remote
control. 'TIME' will appear in the video recorder
display. Set the current time.
O Press the I okJ button. 'YEAR' will appear in the
display. Set the current year.
I lUI \i ‘ I I
TO TO
±11 1 1 L.
OCOTiU
IM—I IXIU
10
!ia
ITU
ni~
uo
/1
1
'1 O-'i U
I D‘ I 1
O Press the I QK..I button again. 'MONTH' will appear in
the display. Set the current month.
O Press the I QkJ button again. 'DATE' will appear in
the display. Set today's date.
0
Press the I QK..I button again. The time and date have
now been set. In confirmation, 'READY' will appear
briefly in the display.
Page 13
Connecting a decoder
Some TV broadcasters transmit encoded television
signals which you can only see with a purchased or
rented decoder. You can connect such a decoder
(descrambler) to this video recorder.
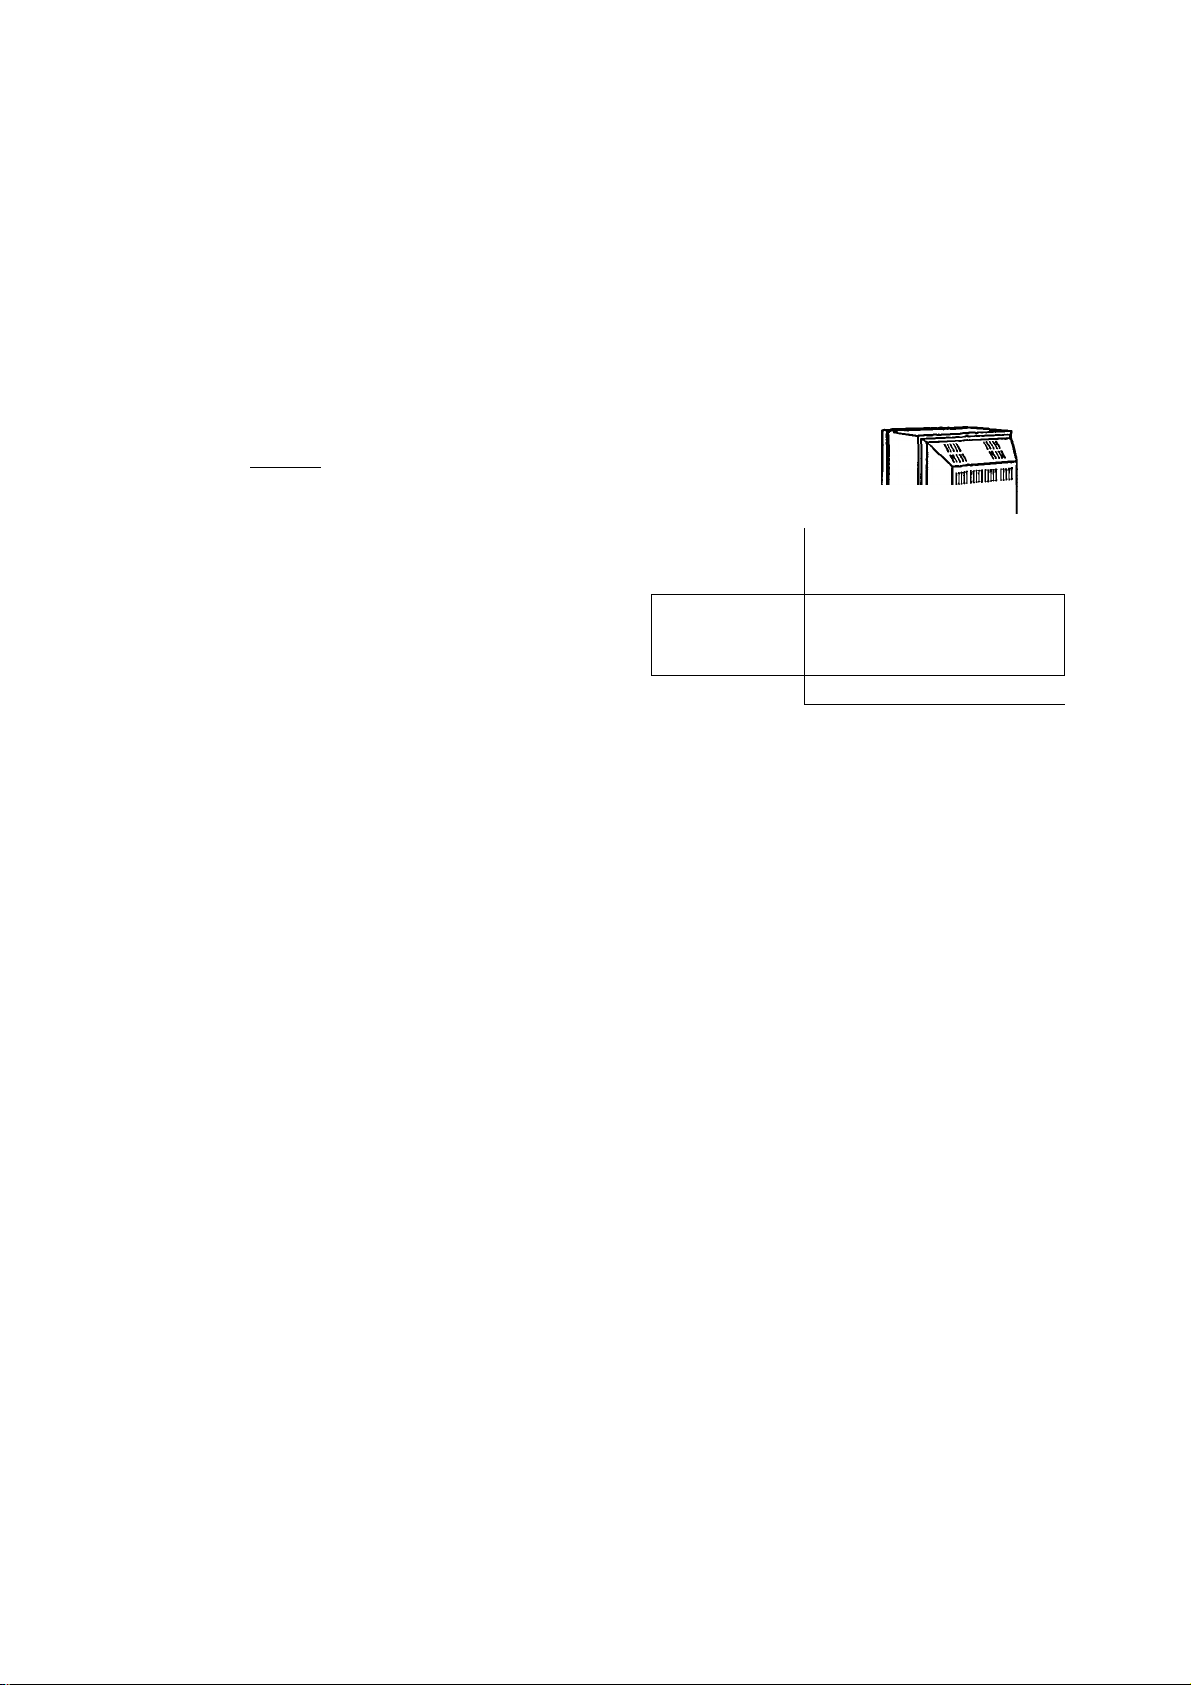
O Connect the decoder to the video recorder with an
AV-Euro cable (I ext 2 IsnnkRt).
You will find a description of how to store TV
channels with the decoder in the chapter 'Storing
TV channels'.
© Connect the TV set to the C^EUIsocket.
Note:
* You cannot use the decoder with your video
recorder and your TV set simultaneously.
* On your video recorder select the programme
number that you allocated to the decoder function
when storing the channel numbers. The video
recorder will then automatically use the decoder.
1
----------------
---------------
Q—
11
Page 14

3. PLAYING A RECORDED CASSETTE
In Chapter 2 you connected your video recorder to your
TV set. Playing a cassette is now very simple.
If you want to record something straight away, first read
Chapters 4 and 5.
O Switch on your TV set.
Many modern TV sets automatically switch over to
the video recorder programme number when a video
is played.
However, this only works if your video recorder is
connected to your TV set with an AV-Euro-cable.
Otherwise select the programme number on your TV
set which you have earmarked for video playback.
O Insert the cassette into the cassette slot with the
label facing towards you. The window must be
facing upwards.
OI ou
r (_nO
on // OOl icn
r u 1 1 1 lUOl"
n.no
U'U—I
n.no
Press against the centre of the cassette until the
cassette is automatically pulled inside. When you insert
a cassette, the video recorder automatically switches
itself on.
Only one side of VHS cassettes can be used for
recording or playback.
O Press the Play button Lwi.edebgabe .
'PLAY' will appear in the display.
O If you wish to interrupt playback, press the
I PAUSE/STOP II ■ I button.
'PAUSE' will appear in the display.
O If you wish to remove the cassette, press the
I KASSETTE^ button.
Note:
* Each time a cassette is loaded or removed the
video recorder automatically cleans the video
heads. In this way the best playback quality is
maintained.
12 &
Page 15

Fast wind and rewind
O Press the I pause / stopTTBI button.
O Press the i<m rocklauf~I (Rewind) or I vorlauf n>~
(Wind) button. The tape is wound at high speed.
O Press thRl PAUSE/STOP II ■ Ihiittnn as soon as you
have reached the required position on the tape.
Picture scanning
You can select from various speeds for scanning
backwards or forwards.
O Press thfi I WIEDERGABE ►Ihiittnn
O Now press the I Rücklauf i or I vorlauf ►> i button
as often as necessary until you have reached the
desired speed.
The display will show: 'SCAN', 'FAST, 'REVERSE'
or 'PLAY'.
]
i { 1 i\ in
i'vr t 1 \i±i
CIQCT
1 rlD
CrOi' 1
i
Util'll
onoi 1
1 Ul S l/M
Cnoi
!
1 ut \
n.no
U'UU
n.no
u-uu
n.no
u-uu
O Press thfi I WIEDERGABE ►~l hi ittnn once you have
found the desired passage.
Note:
* The picture quality is affected during scanning.
The sound is turned off. However, this does not
mean that there is a fault.
13
Page 16

Still picture
rT t 1 /
3 i t i_/_
n.no
U'UU
O Press the I Wiedergabe]
control.
O Press thfil STANDBILD 1 button. The picture will
stand still.
Interference stripes will appear at the edge of the
picture. This is not a fault.
Each time you press I staimdbild ►n I again the
picture will move on one step.
J button on the remote
O Press thfi I WIEDERGABE ►~l hiittnn to continue playing
back at the normal speed.
Special note;
* If the still picture vibrates vertically, keep pressing
thp.l SPUR a I button until the vibration is minimal.
If you pass the optimum setting, repeat this step
with the Ls.PU.R_«J button.
You only need to find the optimum setting once as
the video recorder will store it automatically.
Please note, however, that interference may still
occur with poor quality hired cassettes.
This is not a fault in your video recorder.
14
Page 17

Tape position.
How do I know where I am on the tape?
It is handy to know how long a tape has been playing.
First enter the length of the loaded cassette. This must
be done if the correct playing time is to be indicated.
The tape length will be indicated in minutes, e.g.: 'El80'
corresponds to 180 minutes of playing time.
You will find the length printed on the left of the narrow
front edge. The actual length, however, may be a little
longer than indicated.
O Press the L_b.awdlamg.e_J button on the remote
control. A tape length will appear in the video
recorder display, e.g.: 'CASSETTE E 180'.
© Now press the I auf a. i or I ab^I button in order to
select the right tape length. The alternatives will
appear in this order: E30, E60, E90, E105, E120, E150,
El 80, El 95, E200, E210, E240, E260, E300, EC30,
EC45, E30 etc.
O Point the remote control at the video recorder. Press
the LQ-KJ button on the remote control. This confirms
the data.
The elapsed playing time, given to the exact minute,
appears in the display during Wind, Rewind, Record,
Playback and Pause/Stop.
Special Note:
* When you load a cassette, the video recorder
must first calculate the playing time. Therefore, the
display first indicates and, then, shows the
correct playing time only after the tape has been
running for a few seconds.
* The time display only works accurately with
European PAL/SECAM-VHS cassettes. Cassettes
made for NTSC-VHS equipment do not show an
exact time.
i~QCCC~~C
Oi
OU
I l-t
i_3
C'lOn
n.i-in
U‘UJ.1
(Pi
15
Page 18

Searching for a tape position
Sometimes you may have recorded two or more TV
programmes on one cassette.
So that you do not have to spend time searching, your
video recorder offers you an automatic search facility.
The video recorder marks the tape with code marks
every time you start to record. You can search for these
code marks on the tape using thsl index ■«-land
I INDEX -^hiittnns on your remote control.
it /C»/'
/ML. A J
T
n.ro
U'DO
O Press the
mark or the 1_i.nd.ex
mark.
Either 'NEXT or 'PREVIOUS' will appear in your video
recorder display.
O Once the video recorder finds the code mark it will
automatically switch to playback.
Note:
* When you press any tape transport button (e.g.:
the I WIEDERGABEN I or I PAUSE / STOP 11 ■ I button)
this search function will be stopped.
* You cannot use this function with recordings
made on another video recorder that does not have
this function.
] button to select the next code
3 button for the previous code
How do I eliminate picture interference?
TOOf~ 1/ I i\ ffZ
I I\i lU t\ 1 / MU
16
Every time a cassette is loaded the video recorder will
automatically set the correct tracking position.
For recordings made on another video recorder you
may be able to improve on the automatic setting as
follows:
O Press thfil WIEDERGABEN 1 button on your remote
control.
O Press thfil SPUR « I button on your remote control.
O Press the I Wiedergaben I button as soon as the
playback quality is at its best. This setting will
remain until you remove the cassette.
Page 19
4. STORING TV CHANNELS
In order to be able to record TV programmes you must
first store all the TV channels (e.g.: 'BBC1') in your
video recorder.
You can store up to 42 different TV channels.
Your video recorder has its own receiver. This means
that it can be used independently of your TV set.
For the subsequent use of 'Programming with
ShowView' you also have to allocate a so-called 'aerial
code' to each TV channel. You will find a code table in
your TV guide.
Automatic channel search
The video recorder will search for all TV channels at the
same time and store them in its memory in the order in
which it finds them.
O Switch on the TV set.
Many modern TV sets automatically switch to the
video programme number at step O ■ However, this
will only function if your video recorder is connected
to the TV set with an AV-Euro cable.
Otherwise, select the video programme number on
your TV set.
O With the video recorder switched off, press the
I-autostore I button on your video recorder. The
automatic channel search function starts.
'AUTOSTORE' will appear in the display.
O Wait until the video recorder has found all of the TV
channels. This can take several minutes.
O Identify the TV channel to which you are tuned.
Use the digit buttons 1.0-91 to allocate the correct
'aerial code' to it. You will find a code table in your
TV guide.
If necessary, you can clear with button I l6schei\i~1.
If you do not want, or cannot select, certain aerial
codes at this time, you can also select them later
with the function 'Allocating channel numbers'.
Oi iTnrTno C
I lU
i
UJ i Uf\ o
on fi /ton fZ ri/
I U I lUUr
_f
Of/
I'm
uu
17
Page 20

OOOTiU
IM—I I ±1 -3
O Confirm with button I ok I,
Once all of the TV channels have been located,
'READY' will appear in the display.
O The channel search is now complete and all the TV
channels have been stored.
Note:
* After any subsequent activation of the search
function, the newly-found TV channels will be
added at the end of those previously stored.
* When you activate the 'Automatic channel Search'
function, any TIMER blocks which have been
programmed will be cleared. This is not a fault in
your video recorder.
18 iS)
Page 21

Allocating channel numbers (Programme Preset)
You can allocate any desired programme number to the
TV channels stored by the Automatic Channel Search.
For example, so that they are in the same sequence as
on the TV set.
O Switch on your TV set.
Many modern TV sets automatically switch to the
video programme number at step O - However, this
will only function if your video recorder is connected
to the TV set with an AV-Euro cable.
Otherwise, select the video programme number on
your TV set.
O Press thfil SENDER ORDIMEN Ihiittnn on yOUr videO
recorder.
A frequency number and 'STORE P OT will appear in
the display.
You will find a 'Frequency Table' on the last page of
this Operating Manual.
O Use the I AUF.-*'lorl .ABT| button on your remote
control to select the TV channel to which you wish
to allocate programme number 'P 01'.
Note:
* Have you used an Euro-AV-cable to connect the
video recorder to your TV set and does your TV set
respond to the switch-over with the I monitor~I
button on the remote control? If so, you can switch
to and fro between TV reception and video recorder
reception. This is the easiest way for you to allocate
the same TV channels to the same programme
numbers on both appliances.
№,5
C Tnoci O n /t
D
‘ Ui \U I U I
O Confirm the allocation by pressing thal ok I button
on the remote control.
19
Page 22

on // <'IOn C n/
ru f lOUr _l 3v
O Identify the TV channel to which you are tuned.
Use the digit buttons LSbaJto select or change the
'aerial code' for ShowView . You will find a code
table in your TV guide .
If necessary, you can clear with button
I
LOSCHEN
r rnocin
O I ui"Cjj
O Confirm with button I OK Ion the remote control.
'STORED' will appear briefly in the display.
O The video recorder will now display the next
programme number, 'P 02'. Repeat steps ©to O
until you have numbered all the TV channels.
If you wish to delete a TV channel, for instance, if
the picture quality is too poor, press the LlOschenTI
button instead of CfiHZ](step O).
O When you have finished, press the I senderorpnen
button on your video recorder.
Note:
* Unused (free) programme numbers cannot be
selected.
* By pressing the LV.i^_II button you can display the
name of the TV channel, e.g.: BBC1, while you are
allocating the channel numbers. Of course, the
name can only be displayed when it is indeed being
transmitted by the TV station.
* If a TV station broadcasts encoded programmes
and your video recorder is connected to a decoder,
press thpl DEKODER Ihiittnn on the remote control
at step ©. 'DECODER' appears in the display.
The video recorder will activate the decoder
function from now on when you select this TV
channel number (= this programme number).
20
Page 23

* If you want to fine tune the automatic TV channel
setting (step ©), press the button Fspur a I, Now
you can use the +/- function to vary from the
standard value '0' within a range of +4 to -4.
Important: Such fine re-tuning is only necessary
and useful in special cases, e.g. when there are
stripes on the picture in cable-TV systems.
However, the picture and sound quality may
deteriorate.
Manual channel search
In certain cases the Automatic Channel Search may not
be able to find all of the TV channels (e.g. coded TV
channels). You can then use this manual method to set
the channels.
O Switch on the TV set and select the programme
number for the video recorder.
O Press the I tunerI] button on the remote control.
O Press the I sender ordimen I button on the video
recorder for more than five seconds.
O Hold down the I ABT^Inrl AUFXIhiittnn on the
remote control until you have found the right TV
channel. A changing frequency number will appear
in the display.
You will find a 'Frequency Table' on the last page of
this Operating Manual.
If the TV channel you have found is transmitted
encoded and your video recorder is connected to a
decoder, press thel dekoder I button on your remote
control. 'DECODER' appears in the video recorder
display.
The video recorder will activate the decoder function
from now on when you select this TV channel number
(= this programme number).
on /i
1 U 1
/ion
lOu /
Ti ii\
1 Ul
5
tfZ o
\f«_ f N
it/iQlt /
/
lll/M
T 1
1
unitl ^
mir r—1
21
Page 24
'ton r
lOU / D
r Tnnr o n /i
D I Uis
/_
I U I
O Press thfil OK Ihiittnn on the remote control.
O Use the D^B^Jor [auf a | button on your video
recorder to select the programme number that you
wish to allocate to this TV channel.
O Press the I ok. I button.
on /1 /ion O Ol/
I U I lUUr
czTnoon
-3 ‘
_( 3//
O Identify the TV channel to which you are tuned.
Use the digit buttons 10-r9_lto select or change the
'aerial code' for ShowView.
If necessary, you can clear with button UToschen. I.
O Press thfi I SENDER ordnenTI button. The TV channel
is now stored.
0 Repeat steps ©to © until you have stored all of the
TV channels.
O Switch off the video recorder by pressing the
I BEREITSCHAFTlin button.
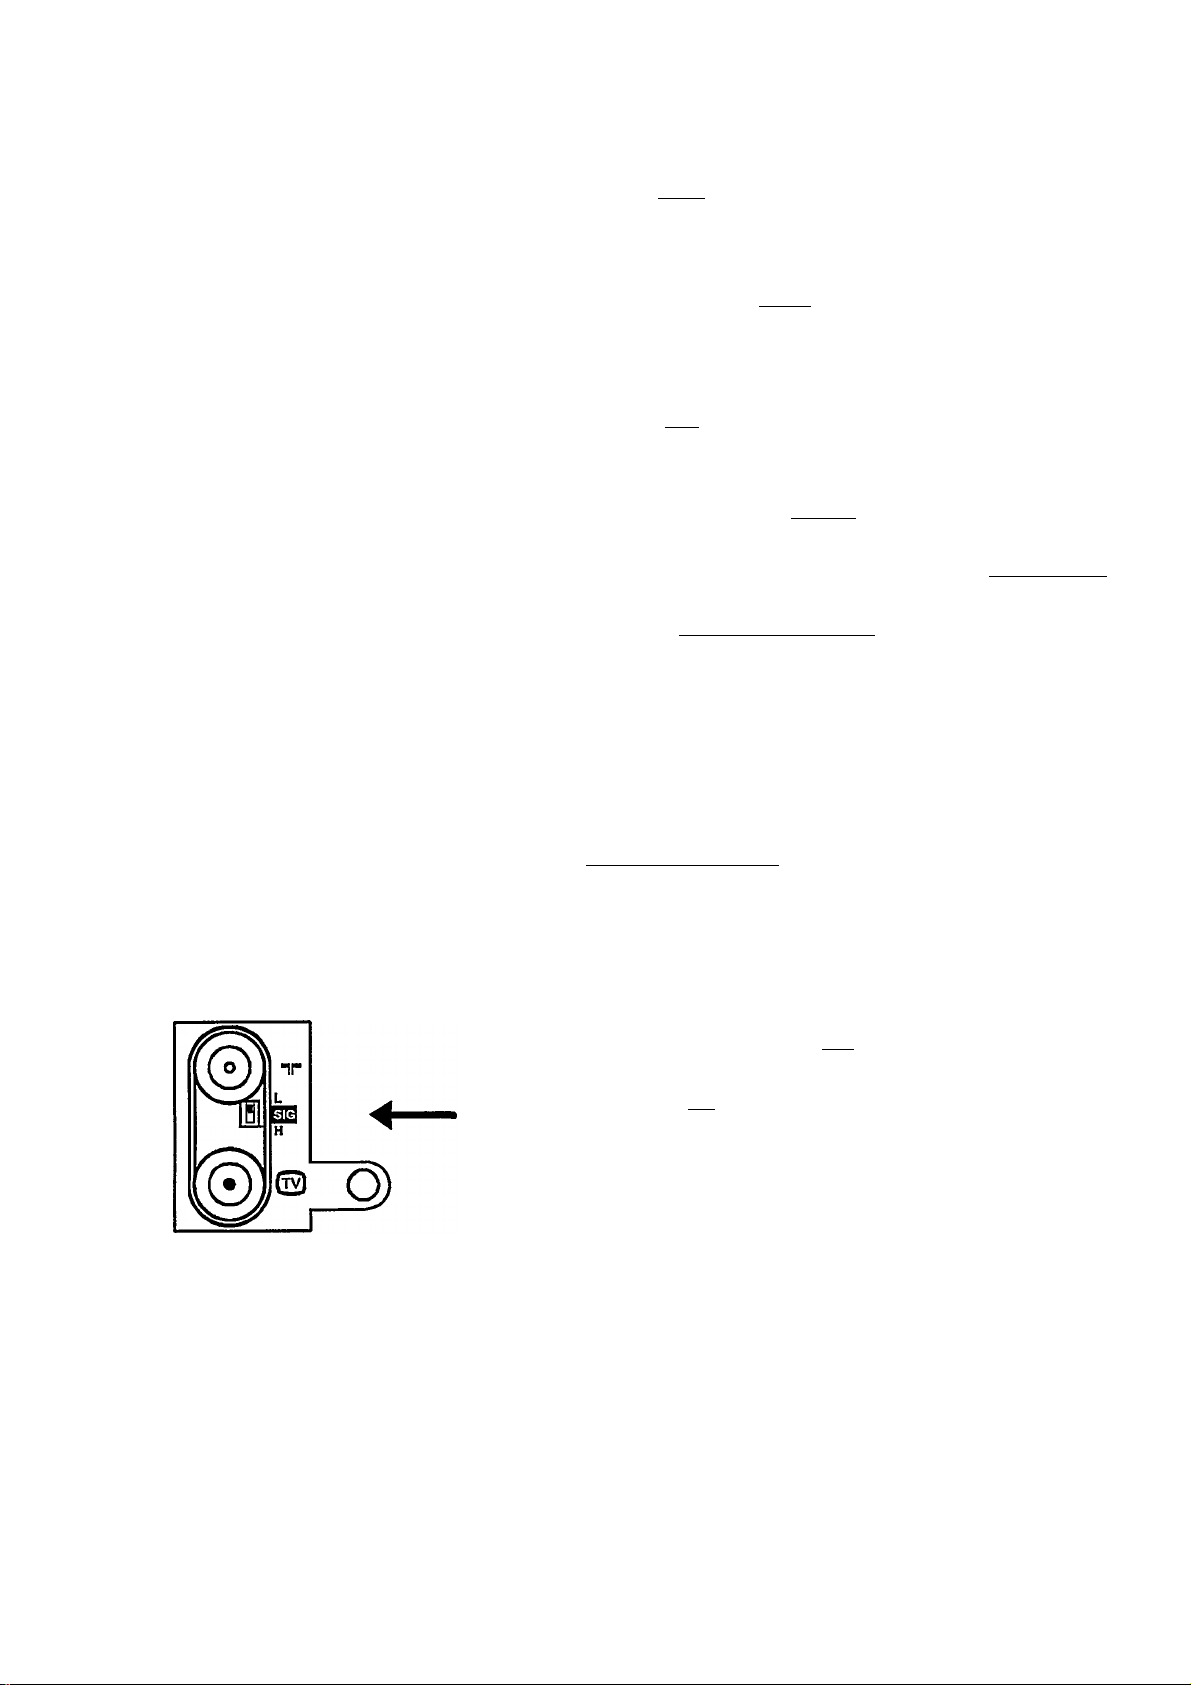
Attenuator switch - SIG
You should normally leave the attenuator switch at the
back of the appliance in the I l I position.
22
Only use the I h .| position if there is a great deal of
interference when receiving TV stations with strong
signals.
Page 25
5. HOW DO I RECORD DIRECTLY?
The easiest way to record is to directly record a TV
programme that is currently being transmitted.
And this is how to go about it:
O Insert a cassette. The video recorder will switch on
automatically. You can also switch it on with the
I PAUSE/STOP II ■ I button.
O Use thal AUFAinrI AB VI button to select the
programme number from which you wish to record,
e.g.: T 01'.
O When you wish to start recording, press the
LAUFNAHME# I button on your video recorder.
If you use the remote control, press the I PK land
L.aufimhmeJlJ buttons simultaneously. This protects
against erroneous recording.
'RECORD' appears in the video recorder display.
The video recorder will record the required TV
programme.
O To stop recording, press the I pause/stop iii
button.
Can I switch off the TV set during recording?
Yes! Your video recorder has Its own receiver which
enables it to record TV programmes. This means that
you can use the TV set independently of the video
recorder whilst recording. You can switch it off and on
or watch another TV channel without disturbing the
recording.
on
I u
oorn 07?
IMS
n.nn
U'UU
23
Page 26
Some general notes:
* Programme numbers 'E 1 ' and 'E 2 ' are provided
for recording from external sources (via the 'EXT 1
or 2' AV-Euro socket).
* Have you started to record one TV programme
and now want to switch to another TV channel to
record a different TV programme? To do this, you
have to interrupt the current recording by pressing
the LPAUjS.E./jsTOiLi.LMJ button. Now select the new
programme number and start this recording by
pressing th^l aufnahme» I button.
* If you have forgotten to load a cassette, the
warning 'NO CASSETTE' will appear in the display.
* If you accidentally load a cassette with erase
protection and try to record on it, the warning
'PROTECTED CASS' will appear in the display.
After a few seconds the cassette will be
automatically ejected.
* If the end of the cassette is reached during
recording, the cassette will be automatically
ejected. The video recorder will then switch itself
off after a few minutes.
* When you make a new recording on a video
cassette, it will automatically record over and delete
any recordings already on the cassette.
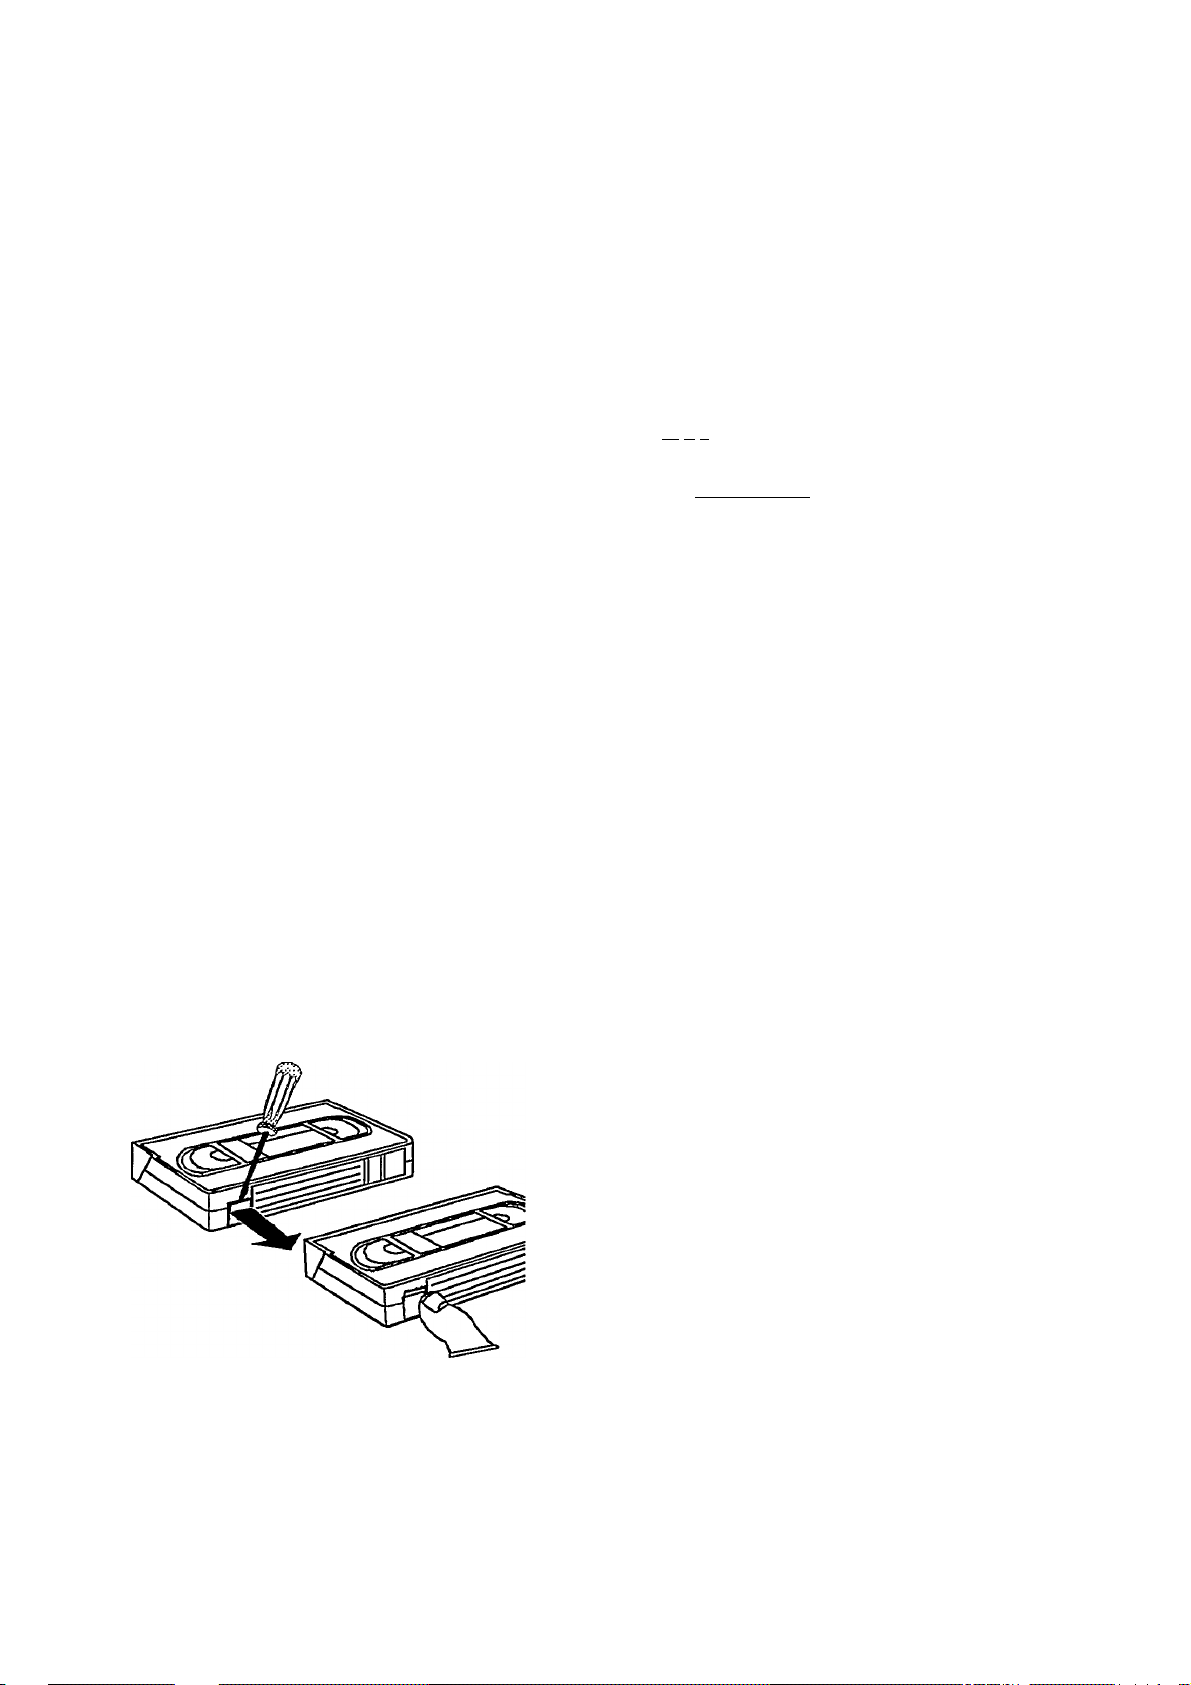
Erase protection
So that you don't accidentally delete an important
recording, you can remove the special tab (erase
protection) on the narrow side of the cassette with a
screwdriver.
Later, if you no longer want the cassette to be erase
protected, you can seal the gap again with adhesive
tape.
24
Page 27

Auto-assembling
You can use the auto-assembling function to join
individual recordings without any annoying flickering
between the recordings.
O Press thR I WIEDERGABE ►~l hiittnn. Search for the
correct position on the tape and then stop the
playback by pressing thal pause/stopiiB~lbutton
'PAUSE' will appear in the display.
O Now start recording as usual by pressing the
[AUFNAHMiB button.
pr?
'! OOI
t U 1 t t tu IJilZ
/cc
n.no
u-uu
25
Page 28
6. HOW DO I PROGRAMME A RECORDING?
In this chapter you will learn how to programme your
video recorder. It switches itself on automatically,
records the TV programme you want and then
automatically switches itself off again.
What information does the video recorder need?
You must give the video recorder the following
information for every programmed recording you want
to make:
* the date on which the recording is to be made
* the programme number for the TV channel
* the start time of the recording
* the stop time of the recording
* VPS on or off
The video recorder stores all the information it needs
for recording in what is known as a TIMER block. And
you can set this up to one month in advance.
Your video recorder can store up to 6 of these TIMER
blocks.
Please note that the timing of the TIMER blocks must
not overlap. The video recorder must first finish one
TIMER block before starting the next block.
26
iia
Page 29

What is VPS (Video Programming System)?
With VPS, the TV station controls when the video
recorder is switched on and off. This means that the
video recorder switches on and off at the right time
even if a TV programme you have programmed begins
earlier or finishes later than expected.
Assuming, that is, that the TV station actually transmits
VPS.
Not all TV stations transmit a VPS signal.
You can see if a TV station is transmitting a VPS time
code by the indication 'VPS' that appears in the display
in the 'STOP' or 'PAUSE' mode.
Please pay close attention to the VPS information
alongside the individual TV programmes in your TV
guide. Usually the start time and the VPS time code are
the same. If, however, in the TV guide, in addition to a
TV programme's start time, a different VPS time code is
given, e.g.: '20.15 (VPS 20.14)', you have to enter '20.14'
as the start time when programming the VPS time code
and switch on VPS.
This is because a VPS recording will only function if
you set the VPS time code to the exact minute.
If you want to set a time which differs from the VPS
time code, you must switch off the VPS indication with
the LVPS.J button in the following section.
on 'i
tu I
oni irr
I I tu oc
n.
U‘L
no VPS I
Note:
* VPS only functions faultlessly with good TV
reception. When reception is poor, some
programmed recordings with VPS may not function
correctly. This is not a fault in the video recorder.
¿a
27
Page 30
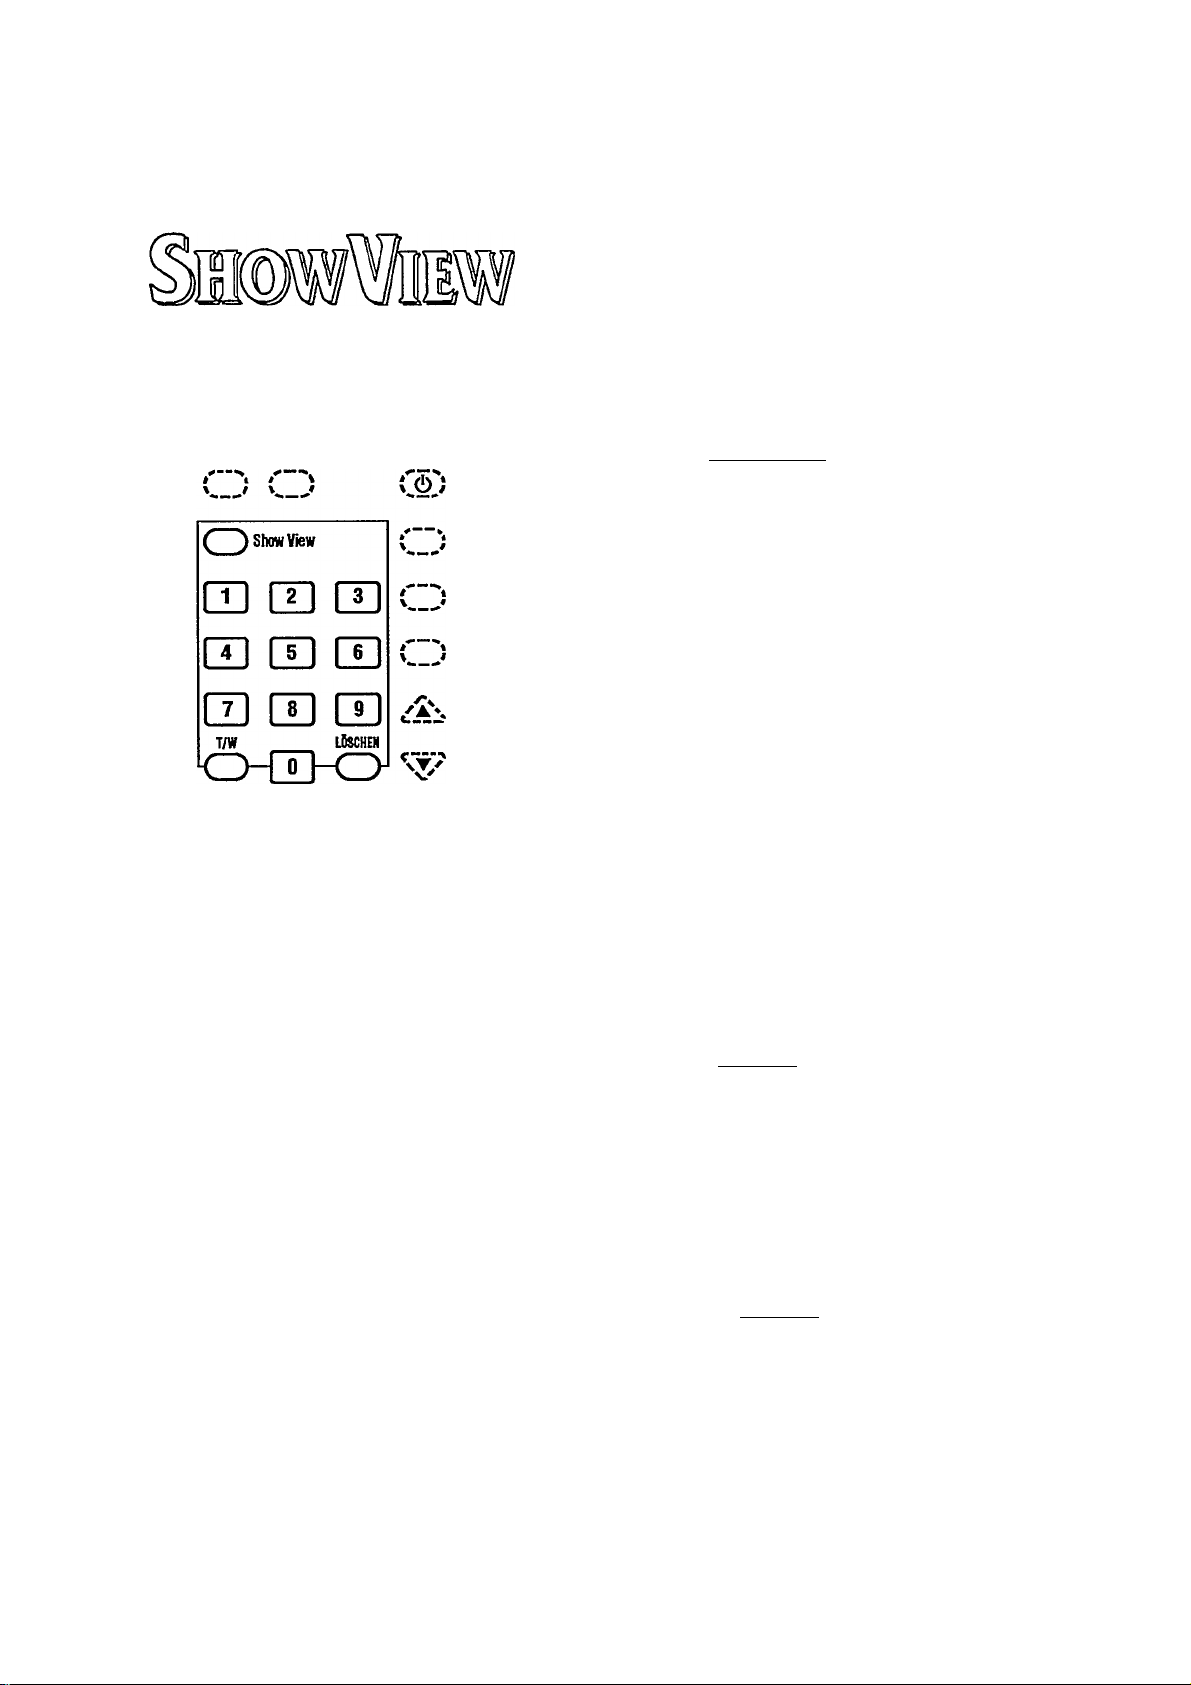
Programming with ShowView
With this method the programming will be as easy as
dialing a telephone number. You only have to select the
'ShowView code' (2 to 9 digits) printed in your TV guide
next to the start time of a TV programme.
Make sure beforehand that the internal clock and the
aerial codes are set.
O Press button I SHOWViEWinn the remote control.
cn //D oo
ou II
_________
__________
lU
The video recorder display shows a series of dashes. To
exit from this function press button OSlcHlSD.
O Enter the entire 'ShowView code' with the digit
buttons CSS. This code (2 to 9 digits) is found next
to the start time of a TV programme in your TV
guide.
If you entered an incorrect code number, clear it
with button L-LOScheiQ .
O If you want to repeat programming at daily or weekly
intervals, press button CxZw]once or twice. The
display shows an additional 'DLY' (= daily) or 'WLY'
{= weekly). The 'daily' function can only be used for
recordings to be made on Mondays to Fridays
inclusive.
O Press the button Ishowvie^. The programmed
code is now decoded by the video recorder. If the
video recorder has decoded correctly, the display
shows the resultant data. The time is shown in the
24 hour mode.
28
Page 31

If necessary the data can now be changed with buttons
I DATUM +7=~1^ I PROG. +7^, I START +/~^anH
I ENDE +7^
If you use 'VPS' take care that the display shows 'VPS'.
Switch VPS on or off with button Lvps_I.
O Confirm the correct data with button I showvie^
Note:
* To identify a TV channel correctly the video
recorder needs the correct 'aerial code' for
ShowView. If this is missing, the video recorder
display shows 'SV UNKNOWN' and then the
programme number 'E 2'.
You then have two possibilities:
1. To interrupt programming. Press button
LloscheiQtwice. Then enter, as described in
Chapter 4, 'Storing TV channels', section 'Allocating
channel numbers', the correct aerial code and
repeat the programming.
2. To use programme number 'E 2' to record from
an external source (e.g. satellite tuner). Confirm the
data displayed in step Owith button rsHOWViEW 1.
* If you cannot find, or do not want to use, the aerial
code for certain TV channels, then you must use the
programming method described in the next section.
* If 'CODE ERROR' appears in the display, the code
was incorrect or incorrectly entered. Repeat the
entry or end with button I bereitschaft ô I _
* If 'SET CLOCK' appears in the display, the internal
clock is not set. Set the clock.
* 'Daily' programming can only be used for
recordings to be made from Mondays to Fridays
inclusive.
* 'Daily/Weekly' programming can only be used up
to one week in advance.
T I ii/iCO
I t I
OC OTIU
/'«_ / »JJJ
iia
29
Page 32

MIUM PROG. SIART EXDE
^ ^ ^
TIMER
Programming on the video recorder
You can enter and store data for six recordings in your
video recorder.
The video recorder display will indicate all data
simultaneously. Use the four 1I±Z=D buttons on the
remote control to enter the data.
The data will be stored in the next free TIMER block in
the video recorder.
Make sure you have not loaded a cassette with erase
protection.
O Press the I TIMER a | button on the remote control.
гs'
T t h/lOO OCI OT)U
I I I IU/\ / \/_ / IJJJ)
nc
U_3
II II II
^~i.nn
t i-uu
'JO-DD
lU'LJLi
______________
A free TIMER block will appear in the video recorder
display. You will see the current {= todayl) data for the
lU
date, programme number, start time and stop time.
Change the data in any sequence you choose:
• Set the date of the recording with the Ldatum
button.
• Set the programme number with the Lprog. +/- I
button.
• Set thp. .start timfi with thfi I START +/-lhiittnn
• Set the stop time with the I ende
• Switch VPS on or off with the I vps I button.
+f^
O Have you set all the data correctly? Now press the
I OK [button on the remote control.
As confirmation, 'TIMER READY' appears in the video
recorder display.
Programming is now complete.
button.
....
+ /- I
30
The data has been stored in a TIMER block.
One of the squares on the right-hand side of the display
lights up for each TIMER block that is occupied.
Page 33

Some general programming notes:
* The TIMER record function will only work when
the video recorder is switched off. if the video
recorder is switched on before a programmed
recording is due to take place, the warning TIMER
RECORD' will light up on the display.
* If the end of the cassette is reached during a
programmed recording, the video recorder
automatically ejects the cassette.
* If you forget to load a cassette after programming,
'NO CASSETTE' will appear in the video recorder
display.
* If you insert a cassette with erase protection for
the recording, 'PROTECTED CASS' will appear in
the video recorder display for a few seconds.
The cassette will then be ejected.
* If you have programmed all TIMER blocks,
'MEMORY FULL' will appear in the video recorder
display.
Ch
31
Page 34

How do I record from a satellite tuner?
You can also programme recordings from an external
satellite tuner.
O Connect the tuner to the socket. Make sure
that the tuner is switched on and that the correct
SAT channel has been selected.
O Use one of the two available programming methods
to programme a TIMER block. Use programme
number 'E 2' in the programming procedure for this
external recording source.
Note:
* If you use 'ShowView programming' for such an
'external' satellite TV programme, the video
recorder automatically selects 'E 2'.
The error message 'SV UNKNOWN' can be ignored.
How do I stop a TIMER recording?
You cannot operate the video recorder manually while a
programmed recording is being made.
If you want to stop the programmed recording, press
the I bereitschafTITI button.
32
Page 35

How do I check or correct a TIMER block?
O Press the I___k.qi\it.r._| button on the remote control.
O Now press the 1_kqntr.JI] button as often as
necessary until the TIMER block you want to check
or correct appears in the video recorder display.
The TIMER blocks will appear in chronological order
on the display.
O Now press the buttons I datum +/-
I PROG. I START
change the recording date, programme number,
start time or stop time. You can switch VPS on and
off. You can select from daily/weekly/date
programming with button IT/wI.
+F^
I ENDE +/^tn
O Finally, press the LQK-I button. If you have made any
changes, the data will now be up to date. 'TIMER
READY' will appear in the video recorder display.
Note:
* 'Daily' programming can only be used for
recordings to be made from Mondays to Fridays
inclusive.
* 'Daily/Weekly' programming can only be used up
to one week in advance.
How do I clear a TIMER block?
O Press the Lkontr. | button on the remote control.
O Press the button l_KONTR._Jas often as necessary
until the TIMER block you want to clear appears in
the video recorder display.
T I
it/vco
I I / JL/ \ t UJj)
OO nmi
/
O Press the LLOSchen,! button. The TIMER block will
be cleared. 'TIMER CLEARED' will appear in the
video recorder display.
T I It//CO
I I f
/_/_ /_/ »N/_JLi
ri rnrirn
33
Page 36
7. SPECIAL FUNCTIONS AND EXTRAS ON YOUR VIDEO
RECORDER
Apart from the functions that have already been
described, your video recorder has other special
functions and extras designed to make the use of your
video recorder as convenient as possible.
In this chapter you will find out more about them.
Tuner mode. Your video recorder as an
extension of your TV set
You can also use your video recorder as a TV receiver
(tuner). This is handy if your TV set does not have
remote control or if it has fewer storage places for TV
channels than the number of TV channels it could
actually receive.
or? A
I u I
Ti ill ifZ
I Ui I
'
O
This is how you go about it:
O Switch on the TV set. Select the programme number
you have earmarked for playback on the video
recorder.
O With the video recorder switched off, press button
I TUNER Inn the remote control.
'TUNER' and a programme number will appear in the
display.
O Choose the required programme number with the
I auf a I or I AB^I button.
O Switch the video recorder off by pressing the
I BEREiTSCHAFT (Dlhiittnn when you no longer want to
watch television.
34
Page 37

Channel name display
When you are watching or recording from TV channels
that transmit the VPS signal, you can display the name
of the TV channel (e.g.: 'BBCT) on the TV screen.
O Press the CZvreZl button.
Note:
* You can use this function in the Pause, Stop,
Record, Programme Preset and Tuner modes.
View Mode
When you connect another appliance to the I ext2_|
socket you will be able to use the following additional
functions. The appliance can be a second video
recorder, a decoder, a satellite receiver or a CD video
player.
• Thus, if the second appliance transmits a control
signal, for example, during playback, the (switched
on) video recorder will recognize it and
automatically switch to 'View Mode'.
You can switch View Mode on and off with the
I MONITOR~1hiittnn
• Even when the video recorder is switched off, the
AV-Euro connection from the TV set to the second
appliance is still operational.
Note:
*
If you have selected the programme number 'E 1 '
or 'E 2 ', the video recorder cannot switch over to
View Mode. This also applies to programme
numbers for which the decoder function has been
activated.
* The function reacts only if your TV set also has
this switch-over function and you are using an
AV-Euro cable to connect your video recorder to the
TV set.
35
Page 38

TV monitor function
Switch your TV set to the 'AV' programme number
(AudioA/ideo input) by pressing the Lmoimitor I button.
This enables you to see the picture from the video
recorder on the TV screen. Your video recorder must be
switched on.
l^ro
\!
t_/\
Mnii I I
I lUI
'( '
rno
I Ul
V
'VCR MONITOR' will appear in the display for a few
seconds. Press the button again to switch the monitor
function off again.
Note:
* The monitor function will respond only if your TV
set also has this switch-over function and you are
using an AV-Euro cable to connect your video
recorder to the TV set.
* The monitor button does not respond during
playback.
Automatic switch-off
If the video recorder is not operated for a period of
several minutes during one of the following functions,
the function will be switched off.
This protects your cassette and prevents unnecessary
power consumption.
36
(S)
If the video is:
in 'STOP'
in 'NO CASSETTE'
in 'STILL'
in, e.g., 'SCAN'
in 'PAUSE'
it switches off
it switches off
it switches to 'PLAY'
it switches to 'PLAY'
it switches to 'STOP'
Page 39
Recording from another video recorder
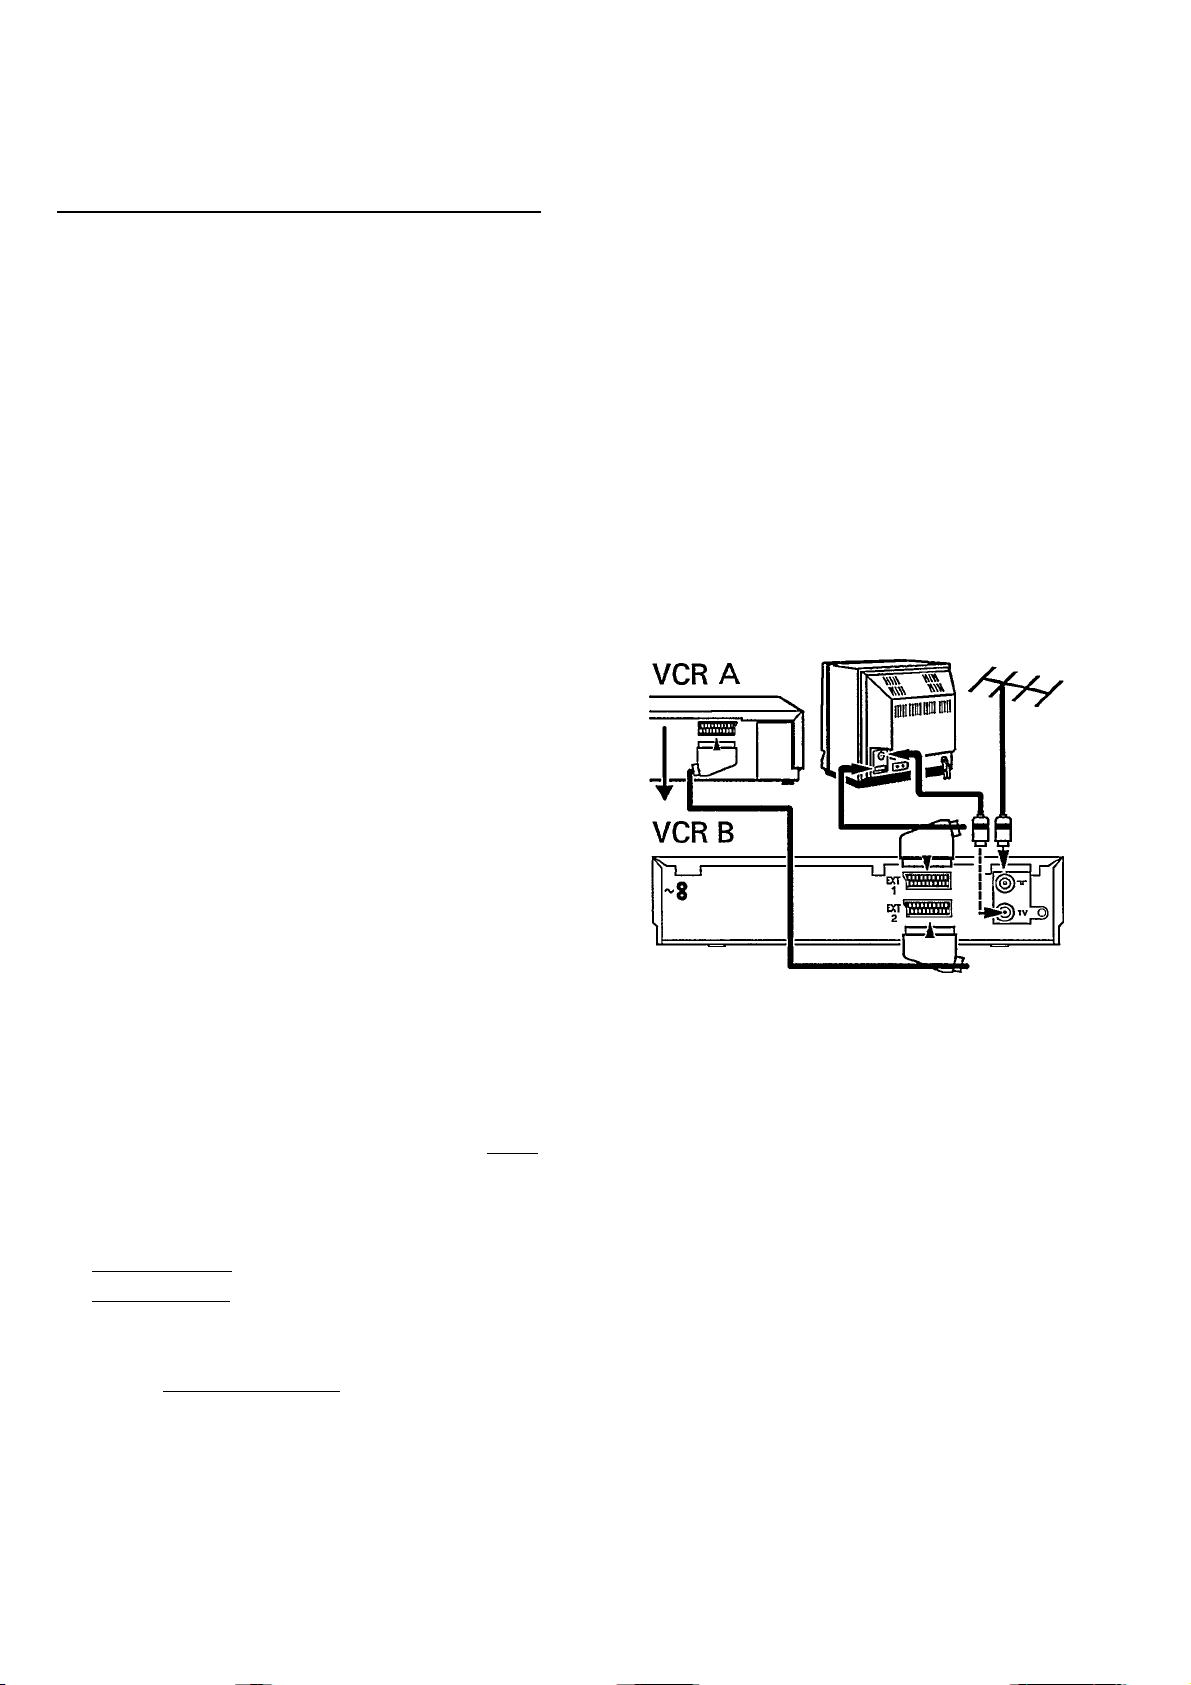
With this video recorder you can make recordings from
an external source, such as copying from another video
recorder or a camcorder.
To do this you will need an AV-Euro cable (Scart cable).
O Connect your video recorder to the appliance from
which you want to record, e.g.: another video
recorder.
Plug the AV-Euro cable into the AV-Euro socket on each
appliance. This is the socket on this video
recorder.
Note:
* In the following description, this video recorder
will be the one used for recording and will be
referred to as VCR B. The other appliance will be
used for playback and will be referred to as VCR A.
O Insert the recorded cassette into VCR A and a blank
cassette into VCR B.
O Now select programme number 'E 2' on VCR B. This
is found near to programme number 'P Or (P 01 - E 1
- E 2 ). To do this, you use the I-AUF^ or I ab ▼!
button.
O To start recording, press the recording button
I AUFiviAHME# Inn VCR B and the playback button
I WIEDERGABT^nn VCR A.
O When you want to finish copying, press the stop
button I PAUSE/STOP II ■ Inn both video recorders.
37
Page 40

Playback via the aerial cable
If your TV set does not have an AV-Euro socket, the
aerial cable which is already connected will act as the
connection between your TV set and the video recorder.
O Switch your TV set on and select the programme
number that you have earmarked for video playback.
(You will find instructions for this in the operating
manual for your TV set).
nr
cCI>
O Disconnect the aerial cable from the aerial socket
LIIC-I of the video recorder so that only the cable
connection between the TV set and the video
recorder remains.
O Make sure the video recorder is switched off and
that there is no cassette in the cassette slot. Press
thfi[~KASSETTE land I WIEDERGABEN Ihiittnns
simultaneously. The display language you have
selected will appear in the display, e.g.: 'ENGLISH'.
O Press the CqEIIbutton. The video recorder will now
transmit a test picture which should be received by
the TV set. 'TESTPICTURE' will appear in the display.
O Tune in the TV set in the UHF wave band until this
test picture appears. The video recorder is tuned to
UHF channel 36 in our factory.
In order to find out how to tune to the right channel and
to store this on your TV set, please consult the
operating manual for your TV set.
38
Note:
* Check the sound and picture quality of reception
on your TV set next time you play back from the
video recorder. If necessary you can improve the
picture, colour and sound by adjusting the channel
on your TV set.
Page 41
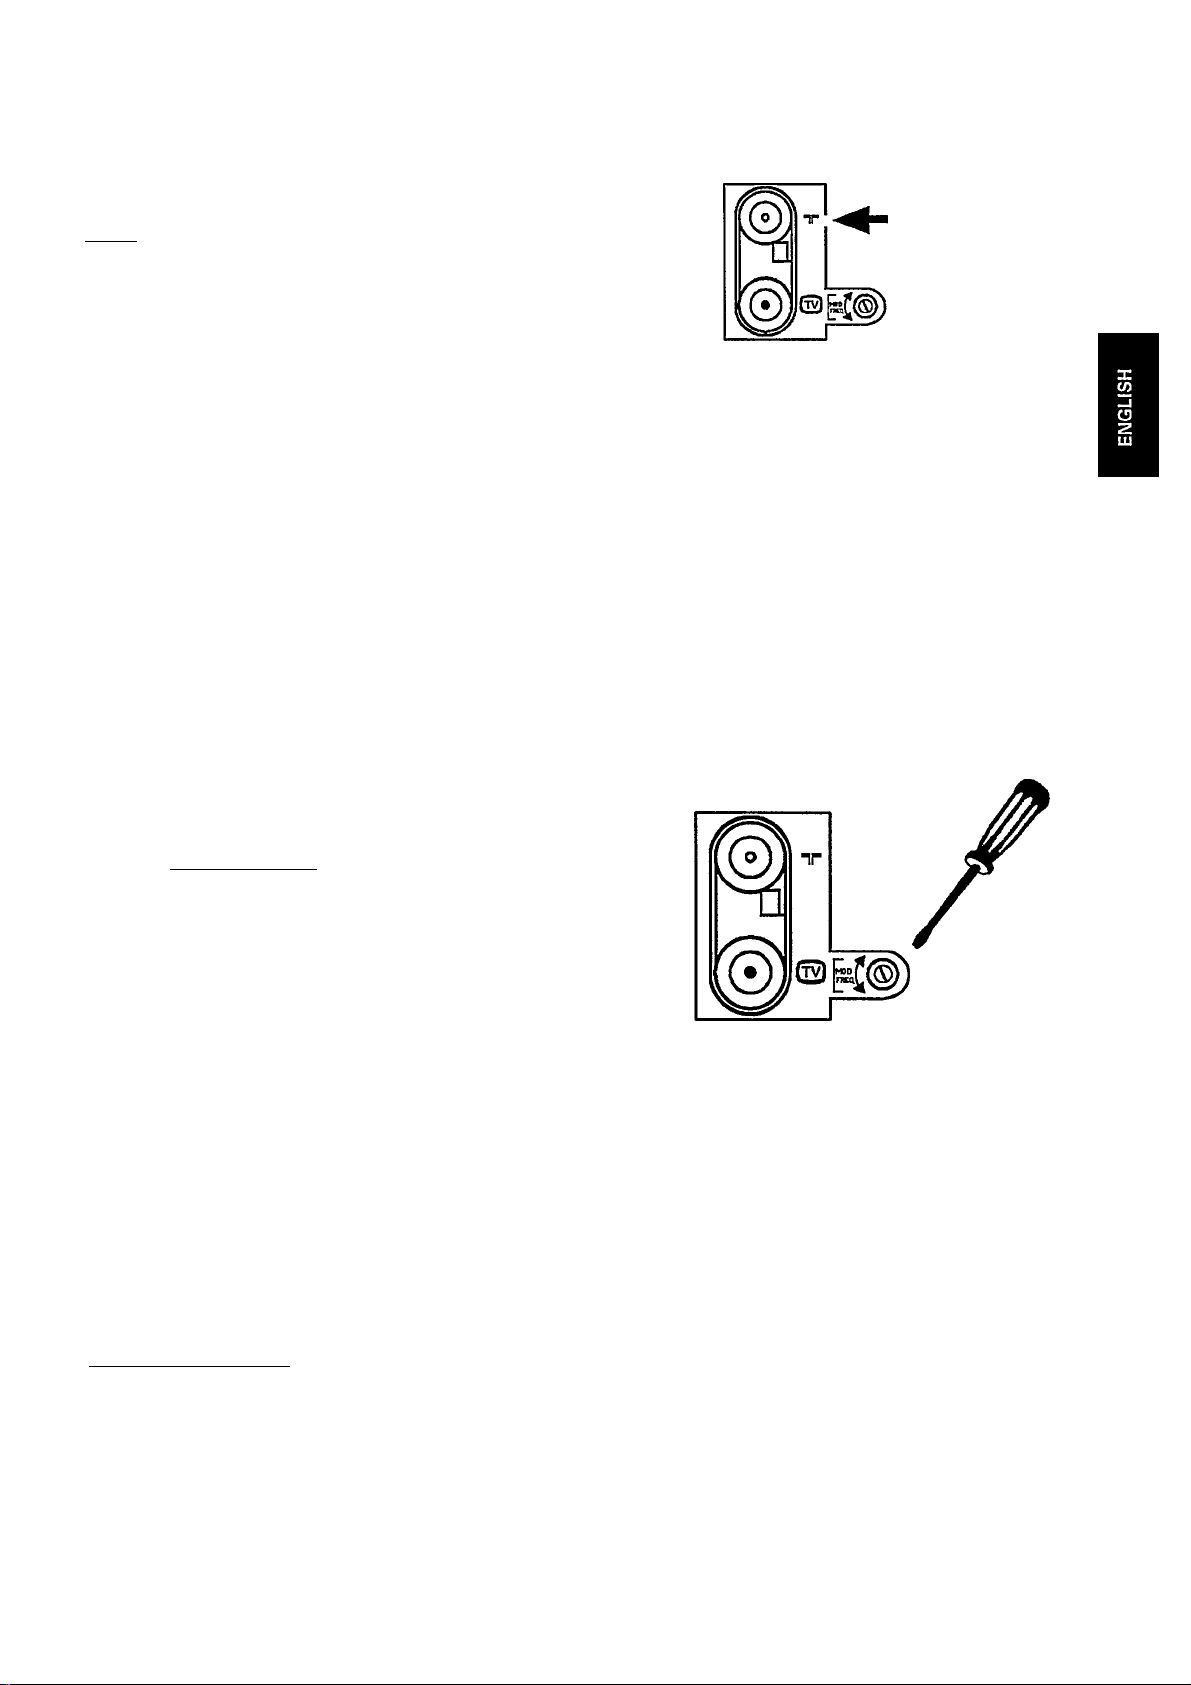
O Plug the aerial cable back Into the aerial socket
I ~ir I. You have now tuned your TV set to the video
recorder.
Information: Your video recorder occupies UHF channel
36. However, this channel might already be occupied by
another TV station in your reception area.
In this case you will find that the picture quality on your
TV set will be poor when receiving one or more TV
channels.
If this happens, follow these steps:
O Check that the quality of reception on all the TV
channels stored in the TV set remains unchanged.
O If the picture quality of one or more TV channels has
deteriorated, switch off the video recorder. Check all
the TV channels on your TV set once again.
o>
O If the picture quality only deteriorates when the
video recorder is switched on, adjust the channel
control I MOD. FREoTlat the back of the video recorder
by less than a quarter-turn with a small screwdriver.
e Re-tune the TV set to the video recorder (steps ©to
O) until the test picture re-appears.
o Check all the TV channels on your TV set again.
Repeat the channel adjustment HMQDTfEiQZ] (steps
0 and 0) until the picture quality is the same
whether the video recorder is on or off.
© Switch off the video recorder with the
1 BEREITSCHAFT (!) I button.
0Ì 39
Page 42

Note:
* If you have not yet set the time/date and the
display language as described in Chapter 2,
'INSTALLATION', turn to that chapter to do so.
Switching the built-in modulator on or off
In the last section we talked about interference that
could occur on the television. If you cannot eliminate
picture or sound interference using the above method
you can switch off the built-in modulator.
You can only do this if you have connected the video
recorder to the TV set using an AV-Euro cable.
n/mni n o~no niu
I fUJJUUt I I U t\ u/^
O Press the I KASSETTE~1anH I PAUSE / STOP 11 ■ I
buttons on the video recorder simultaneously. The
switch's current position will appear in the display
as 'MODULATOR ON'.
O Press thp.l KASSETTE~lanri I PAUSE / STOP 11 ■ I
buttons simultaneously again for more than five
seconds. This will switch to 'MODULATOR OFF'.
Switch the modulator back on in the same way.
40
Page 43

8. BEFORE YOU CALL AN ENGINEER
Problem
The video recorder does not respond to
any button being pressed
Remote control does not work
No playback on video recorder
Poor playback from video recorder
Possible cause
* No power supply
* Programmed recording is currently being made
* Technical disturbance: disconnect from the mains
for 30 seconds, then re-connect. If this does not have
any effect, you can: 1. Disconnect from mains. 2.
Re-connect to mains whilst holding down the
l<M ROCKLAUFl^ I VORLAUFN>~lanH I AB^Ihiittnng All
data stored will be reset (cleared).
* Batteries are exhausted
* Interference from fluorescent lights or bright
sunlight
* No recording on the cassette
* The VCR programme number on the TV set was
incorrectly selected or incorrectly set
* The connecting cable between the TV set and the
video recorder has come loose
* Modulator not in the 'ON' position
* Use I.SPUR jgPwith hired cassettes
* Cassette badly worn or of poor quality
* Channel control I mod. FREoTInr TV set not properly
adjusted
* Video heads dirty. Load - play briefly - remove a
cassette several times. This activates the head
cleaning function
Video recorder will not record
Programmed recording does not work
Picture or sound interference on TV
reception
* TV channel not stored or wrongly selected
* Cassette with erase protection has been loaded
* Time data wrongly programmed
* Time/date not set properly
* A cassette with erase protection has been loaded
* Video recorder in Tuner Mode
* VPS switched on but VPS time code wrong
* Try setting the SIG attenuator switch to the C
position.
* Turn to the Chapter 'Special Functions and Extras'
and read the Note after step O in the section
'Playback via the aerial cable' as well as the section
'Switching off the modulator'.
»3
ila
41
Page 44

9. TECHNICAL DATA, ACCESSORIES
Technical Data
• Mains voltage 220 to 240 V
• Mains frequency 48 - 52 Hz
• Power consumption typically 15 W (typically
12 W in standby)
Wind/rewind time typically 95 sec. for E-180 • Audio (SP) 80 Hz -10 KHz
• Ambient temperature during operation
+ 10®Cto +35®C
• Relative humidity 20% to 80%
• Dimensions 380 x 338 x 86 mm (incl. feet)
Weight approx. 4.6 kg
Position for use max. 15® inclination on all
sides
• VHS video resolution 5: 240 lines
• Back-up power supply: TV channel storage typically 1 year Clock/Timer - typically 7
hours
This video recorder complies with the EC radio
interference regulations (82/499/EEC).
List of accessories
(<,
8 dB)
• Aerial cable
• Mains cable
• Operating instructions
In order to facilitate the identification of your video
recorder in case of theft, enter the serial number
(SER.NR.) in the diagram. The serial number is
printed on the type plate fixed at the rear of your
video recorder. All enquires can be handled more
efficiently if accompanied by the identity card
shown. This is provided for your reference and
should be kept in a safe place.
Remote control and batteries
AV-Euro cable (Scart cable)
TYPE
WDxx SER.NR
VR237
..............
42
Page 45

Table of channel frequencies
PAL-B,G:
channel
wave
band
e2
e3
e4
e5
e6
e7
VHFI 48,25
VHFI 55,25
VHFI 62,25
VHF III
VHF III
VHF III
e8 VHF III
eg
e10
ell
e12
-
-
-
-
-
-
-
-
e21
e22
e23
e24
e25
e26
e27
e28
e29
e30
e31
e32
e33
e34
e35
e36
e37
e38
e39
e40
e41
e42
e43
e44
e45
e46
e47
e48
e49
e50
e51
e52
e53
e54
e55
e56
e57
e58
e59
VHF III
VHF III
VHF III
VHF III
VHFI
VHFI 62,25
VHF II
VHF III
VHF III
VHF III
VHF III
VHF III
UHF
UHF
UHF
UHF
UHF
UHF
UHF
UHF
UHF
UHF
UHF
UHF
UHF
UHF
UHF
UHF
UHF
UHF
UHF
UHF
UHF
UHF
UHF
UHF
UHF
UHF
UHF
UHF
UHF
UHF
UHF
UHF
UHF
UHF
UHF
UHF
UHF
UHF
UHF
frequency
(Mhz)
175,25
182,25
189,25
196,25
203,25
210,25
217,25
224,25
53,75
82,25
175,25
183,25
192,25
201,25
210,25
471,25
479,25
487,25
495,25
503,25
511,25
519,25
527,25
535,25
543,25
551,25
559,25
567,25
575,25
583,25
591,25
599,25
607,25
615,25
623,25
631,25
639,25
647,25
655,25
663,25
671,25
679,25
687,25
695,25
703,25
711,25
719,25
727,25
735,25
743,25
751,25
759,25
767.25
775.25
channel
e60
e61
e62
e63
e64
e65
e66
e67
e68
e59
-
-
-
-
-
-
si
s2
s3
s4
s5
s6
s7
s8
s9
slO
Sl1
si 2
s13
s14
si 5
si 6
s17
s18
s19
s20
s21
s22
s23
s24
s25
s26
s27
s28
s29
s30
s31
s32
s33
s34
s35
s36
s37
s38
s39
s40
s41
wave
band
UHF
UHF
UHF
UHF
UHF
UHF
UHF
UHF
UHF
UHF
VHFI
VHFI
VHFI
VHF II
VHF II
VHF II
VHFI
VHF III
VHF III
VHF III
VHF III
VHF III
VHF III
VHF III
VHF III
VHF III
VHF III
VHF III
VHF III
VHF III
VHF III
VHF III
VHF III
VHF III
VHF III
VHF III
HYP
HYP
HYP
HYP
HYP
HYP
HYP
HYP
HYP
HYP
HYP
HYP
HYP
HYP
HYP
HYP
HYP
HYP
HYP
HYP
HYP
frequency
(Mhz)
783,25
791,25
799,25
807,25
815,25
823,25
831,25
839,25
847,25
855,25
69,25
76,25
83,25
90,25
97,25
104,25
105,25
112,25
119,25
126,25
133,25
140,25
147,25
154,25
161,25
168,25
231,25
238,25
245,25
252,25
259,25
266,25
273,25
280,25
287,25
294,25
303,25
311,25
319,25
327,25
335,25
343,25
351,25
359,25
367,25
375,25
383,25
391,25
399,25
407,25
415,25
423,25
431,25
439,25
447,25
455,25
463,25
43
Page 46

44 Ö
Page 47

Page 48

3103166 09731
3373/001
VR237
ENGLISH
DEUTSCH
Page 49

Page 50

0012
 Loading...