

Philips VR210/55 User Manual

T
ABLE
OF
C
ONTENTS
Safety Precautions
WARNING: DANGEROUS
VOLTAGE INSIDE
WARNING: TO PREVENT FIRE OR SHOCK
HAZARD, DO NOT EXPOSE THIS UNIT
TO RAIN OR MOISTURE.
• The POWER button does not completely shut off the mains power from the
unit, but switches operating current on or off only.
• The rating plate is on the rear of the unit.
Table of Contents
Description of Controls ......................................................................................... 3
Front Panel..................................................................................................3
Remote Control...........................................................................................4
On-Screen Display ...................................................................................... 5
Rear Panel ................................................................................................... 6
Display Window..........................................................................................6
Getting Connected Up........................................................................................... 7
VCR to TV Connection .............................................................................. 7
VCR to TV Connection Using AUDIO/VIDEO Cable............................... 7
Setting Up ............................................................................................................... 8
Setting the Video Channel........................................................................... 8
Menu Operations......................................................................................... 9
Initial Setup................................................................................................. 9
Manual Channel Setting............................................................................ 11
Selecting Colour Mode ............................................................................. 11
Basic Operations.................................................................................................. 12
Playback.................................................................................................... 12
Recording.................................................................................................. 12
Automatic Operations...............................................................................12
Advanced Operations.......................................................................................... 13
Special Effect Playbacks........................................................................... 13
Tracking Adjustments ............................................................................... 13
Index Search..............................................................................................13
Record End Search.................................................................................... 13
Repeat Playback........................................................................................ 13
Child Lock ................................................................................................ 13
One Touch Recording (OTR).................................................................... 14
Using On-Screen Display ......................................................................... 14
SmartPicture.............................................................................................. 14
DSPC ........................................................................................................ 15
Timer Recording ....................................................................................... 15
Turbo T imer .............................................................................................. 16
Tape Duplication ....................................................................................... 18
Operating TV ....................................................................................................... 19
Before Requesting Service .................................................................................. 20
Specifications........................................................................................................ 21
WARNING
Any unauthorized changes or
modifications to this equipment void
the user’s authority to operate it.
PAL NTSC
Introduction
Congratulations on purchasing your
new VCR.
You can’t wait to get it working, but
before you do, spare a few moments to
read this brief introduction to the world
of video recording. It may repay you
handsomely in terms of improved
results, and avoiding of costly mistakes.
Positioning
Do not place the VCR directly on top
of, or underneath, your TV set. Ensure
that there is at least 20 cm between the
VCR and the TV set, and that air can
circulate freely through the ventilation
openings of the VCR.
IMPORTANT
Audio-Visual mater ial may consist of
copyrighted works which must not be
recorded without the authority of the
owner of the copyright.
Please refer to relevant laws in your
country.
D
ESCRIPTION
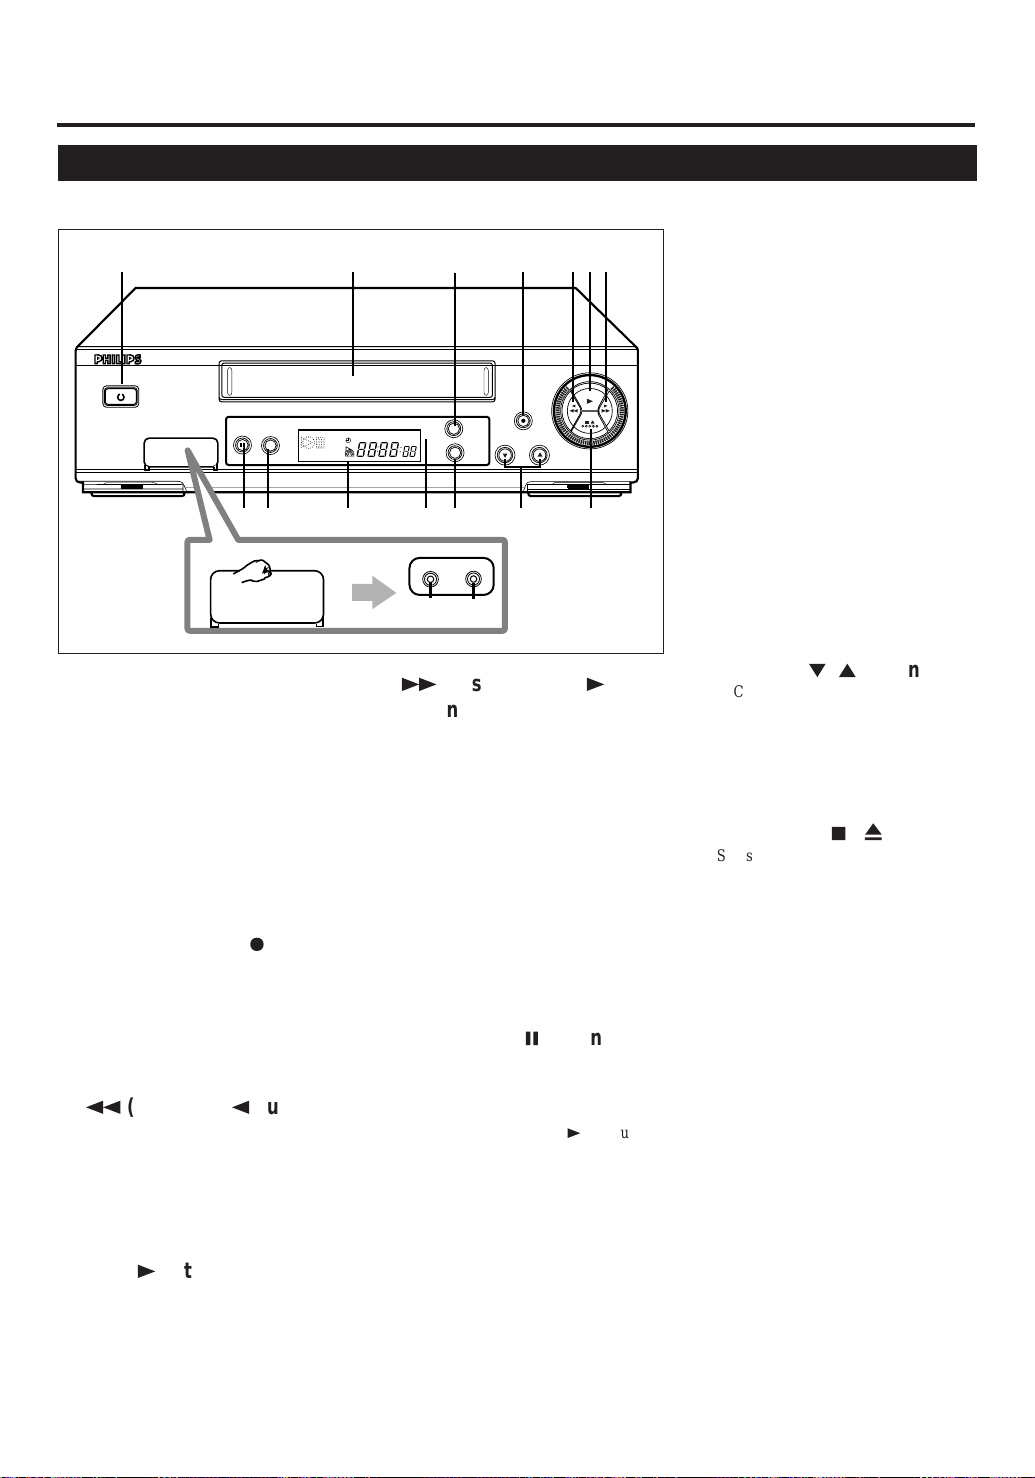
Front Panel
OF
C
ONTROLS
1 4
POWER
STILL/PAUSE
VIDEO AUDIO
1 POWER button
• Turns the VCR on or off.
• Sets the VCR for an unattended
recording (timer recording) after
timer settings are completed. (✈P.16)
COLOUR MODE
11
10 14 15 1613
Flip to open.
VIDEO AUDIO
SPSLP
VCR
12
7
2 Cassette Compartment
Where a video cassette is inserted.
3 MENU button
Display the main menu.
Exits the menu screen when using the
menus . (✈P.9)
8 VIDEO input jack
4 REC (record)/OTR ¶ button
• Starts recording when pressed once.
(✈P.12)
• Starts a recording for 30 minutes to 6
hours long when pressed for more
than once. The shut-off time
increases in 30 minute intervals.
(✈P.14)
5
1
(Rewind) /2 button
• Rewinds the tape when the tape is not
running. (✈P.12)
• Starts reverse rapid visual search
during playback or still picture mode.
(✈P.13)
• Goes back to the previous menu
screen when using the menus. (✈P.9)
9 AUDIO input jacks
10 STILL/PAUSE 8 button
STOP/EJECT
6 752
PLAY
/
3
3
MENU
OK/
STATUS
AUDIO
VIDEO
8
9
¡
(Fast forward) /
REC / OTR
CHANNEL
button
• Fast forwards the tape when the tape
is not running. (✈P.12)
• Starts forward rapid visual search
during playback or still picture mode.
(✈P.12, ✈P.13)
• Changes the setting of a menu item.
(✈P.9)
For connecting to the video output jack
on another VCR or a camcorder.
(✈P.18)
For connecting to the audio output jacks
on another VCR or a camcoder. (✈P.18)
• Stops the tape during recording
(pause) or playback (still picture).
(✈P.12, P.13)
Press again to resume normal
recording. Press PLAY 3 to resume
normal playback.
• Activates slow motion picture when
pressed for more than 2 seconds
during playback. (✈P.13)
11 COLOUR MODE button
Selects the colour mode both for
playback and recording. (✈P.11)
12 Display window
See page 6.
13 IR (infrared) remote sensor
Receives the signal from the (IR)
remote control.
14 OK/STATUS button
• Goes to the next item on the VCR
menu (✈P.9) .
• Displays the time counter, present
time, channel number, and remaining
tape length. (✈P.14)
15 CHANNEL ∞ /5 buttons
• Changes the channels on the VCR.
Release at a desired channel.
• Moves the cursor up and down when
using the menus. (✈P.9)
• Adjusts the tracking during playback,
still picture and slow motion picture.
(✈P.13)
16 STOP/EJECT 7 / 0 button
Stops the tape when the tape is running.
(✈P.12)
Press again to eject the cassette when
the tape is not running. (✈P.12)
6 PLAY 3 button
Starts normal playback. (✈P.12)
— 3 —
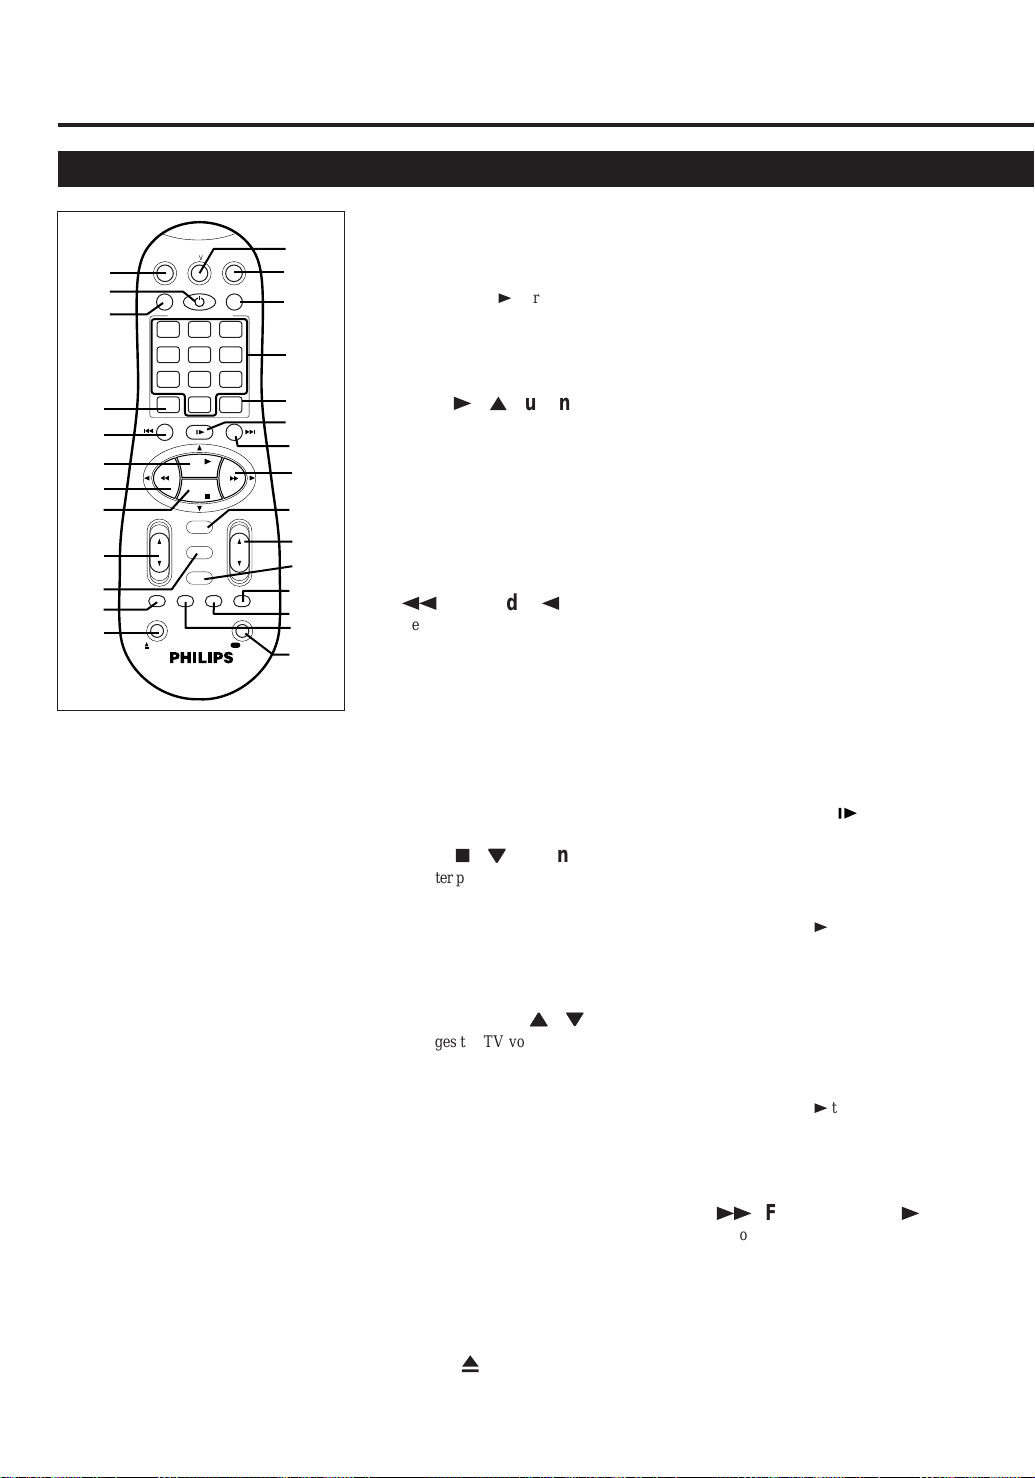
D
ESCRIPTION
Remote Control
OF
C
ONTROLS
(CONTINUED)
+
CHVOL
REC END
SEARCH
REC
13
14
15
16
17
18
19
20
21
22
23
24
25
26
/OTR
27
10
11
12
1
2
3
4
5
6
7
8
9
SMARTPICTURE
POWER
QUICK PROGRAMMING
+
.............
-+-
DAILY
DBS
0
STILL/SLOW
........
PLAY
STOP
OK/STATUS
MENU
TIMER
SKIP
AUDIO
SEARCH
MUTE
VCRTV
.............
WEEKLY
CLEAR
........
CBL / DBS
VCR/TV
123
START STOP DATE
456
789
SPEED
ALT
-
REW FF
TURBO
TIMER
EJECT
Using this remote control to
operate TV
You can use this remote control to
operate your TV.
To operate TV, see page 19.
1 CBL/DBS button
Does not function for this model.
2 POWER button
Before using this button, press VCR or
TV to select your target component.
• After pressing VCR:
– Turns the VCR on or off.
– Sets the VCR for an unattended
recording (timer recording) after
timer settings are completed.
(✈P.16)
• After pressing TV, turns the TV on or
off.
3 VCR/TV button
After pressing TV, select TV mode or
Auxiliary mode at TV.
4 ALT/SPEED button
SPEED:
After pressing the VCR selects the tape
speed for recording (SP, LP or SLP).
During playback, the tape speed is
automatically selected (SP, LP or SLP).
(✈P.12)
ALT:
For some PHILIPS TV only:
After pressing TV, press this button to
go back to the previously selected
channel on TV.
5 STILL/SLOW – /™ button
• During a slow motion picture, adjust
the playback speed in the reverse
direction. (✈P.13)
Press PLAY 3 to resume normal
playback.
• Locates an index marked at the
beginning of every recording.
(✈P.13)
6 PLAY 3 / 5 button
Before using this button, press VCR or
TV to select your target component.
• After pressing VCR:
– Starts normal playback. (✈P.12)
– Moves up the cursor when using
the menus. (✈P.9)
• For some PHILIPS TV only:
After pressing TV, operates the TV’s
menus.
7
1
(Rewind) / 2 button
Before using this button, press VCR or
TV to select your target component.
• After pressing VCR:
– Rewinds the tape. Also, during
playback, starts rapid reverse
visual search. (✈P.12)
– Goes back to the previous menu
screen when using the menus.
(✈P.9)
• For some PHILIPS TV only:
After pressing TV, operates the TV’s
menus.
8 STOP 7 /
• After pressing VCR:
– Stops the tape. (✈P.12)
– Moves down the cursor when
• For some PHILIPS TV only:
After pressing TV, operates the TV’s
menus.
9 VOL (volume)
Changes the TV volume.
Release at desired volume.
∞∞
∞
button
∞∞
using the menus. (✈P.9)
55
∞∞
5
/
∞
55
∞∞
buttons
10 MENU button
Before using this button, press VCR or
TV to select your target component.
• After pressing VCR, calls up the
main menu. (✈P.9)
• Exits the menu screen when using
the menus.
• For some PHILIPS TV only:
After pressing TV, calls up the TV’s
main menu.
11 TURBO TIMER button
Press to engage the Turbo Timer mode.
(✈P.16)
12 EJECT 0 button
— 4 —
Ejects the cassette. (✈P.12)
13 TV button
Makes the remote control ready for
operating the TV.
14 VCR button
Makes the remote control ready for
operating the VCR.
15 SMARTPICTURE button
Selects the SmartPicture mode. (✈P.14)
16 Number buttons
(0, 1, 2, 3, 4, 5, 6, 7, 8 and
9)
Before using these buttons, press VCR
or TV to select your target component.
• Press to select a channel on the VCR
or TV.
To select channels 1 to 9, press 0
then the channel you want. For
example, for channel 4, press 0 then
4.
• Also used to programme the Timer
Recordings. (✈P.15)
17 CLEAR button
• Erases unwanted timer programmes.
(✈P.17)
• Resets counter to 0:00:00.
18 STILL/SLOW button
• Stops the tape during recording
(pause) or playback (still picture)
temporarily. (✈P.12, ✈P.13)
Press again to resume normal
recording.
Press PLAY 3 to resume normal
playback.
• Activates slow motion picture when
pressed for more than 2 seconds
during playback. (✈P.13)
19 STILL/SLOW + /£ button
• During a slow motion picture, adjust
the playback speed in the forward
direction. (✈P.13)
Press PLAY 3 to resume normal
playback.
• Locates an index marked at the
beginning of every recording.
(✈P.13)
20
¡
(Fast forward) /
Before using this button, press VCR or
TV to select your target component.
• After pressing VCR:
– Fast forwards the tape. Also during
playback, starts rapid forward
visual search. (✈P.12)
– Changes the setting of menu item.
(✈P.9)
3
• For some PHILIPS TV only:
After pressing TV, operates the TV’s
menus.
21 OK/STATUS button
Before using this button, press VCR or
TV to select your target component.
• After pressing VCR:
– Goes to the next item on the VCR
menus.
– Displays the time counter, present
time, channel number, and
remaining tape length. (✈P.14)
• After pressing TV:
For some PHILIPS TV only:
– Displays the TV’s on-screen
information.
– Exits from TV’s menu operations
when using the TV’s menus.
For other manufacturers’ TVs:
Functions as the ENTER button if
your TV requires pressing ENTER
after selecting a channel number.
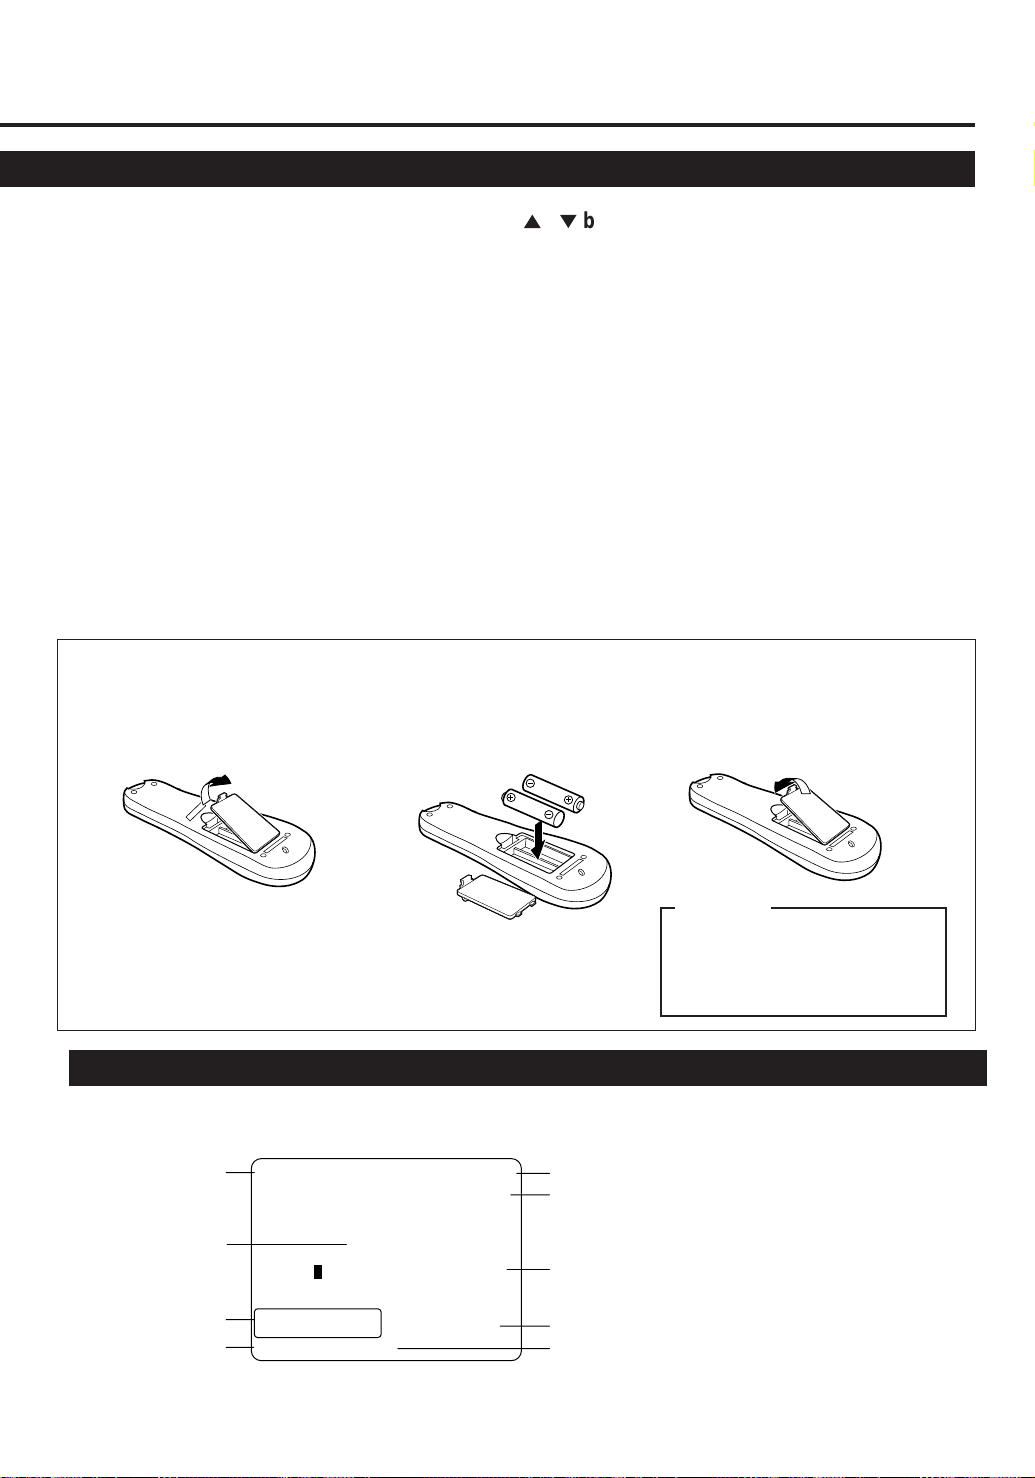
To insert the batteries:
22 CH (channel) 5 / ∞ button
Before using this button, press VCR or
TV.
• After pressing VCR, changes the
channels on the VCR. Release at a
desired channel.
• After pressing TV, changes the
channels on the TV. Release at a
desired channel.
23 TIMER button
Display the Timer Recording menu.
(✈P.15)
24 REC (ord) END SEARCH
button
Press prior to recording a program to
find the end of a previously recorded
program and the unrecorded portion of
a tape.(✈P.13)
25 SKIP SEARCH buttons
Press during tape playback to fast
forward 30 seconds of a tape. (✈P.13)
26 AUDIO/MUTE button
Before using this button, press VCR or
TV.
• After pressing TV, turns off the TV
sound.
27 REC (record)/OTR button
• Start recording when pressed once.
(✈P.12)
• Starts a recording for 30 minutes to 6
hours long. When pressed more than
once, the shut-off time increases in
30-minute intervals. (✈P.14)
1 Remove the battery compartment lid
from the bottom of the remote
control.
2 Install two AA batteries —
R6(SUM-3)/AA — matching
polarity indicated inside the battery
compartment.
Note:
This remote control and batteries are
supplied accessories.
Check to make sure they are included.
Also, check “Specifications” to see what
other accessories are included.
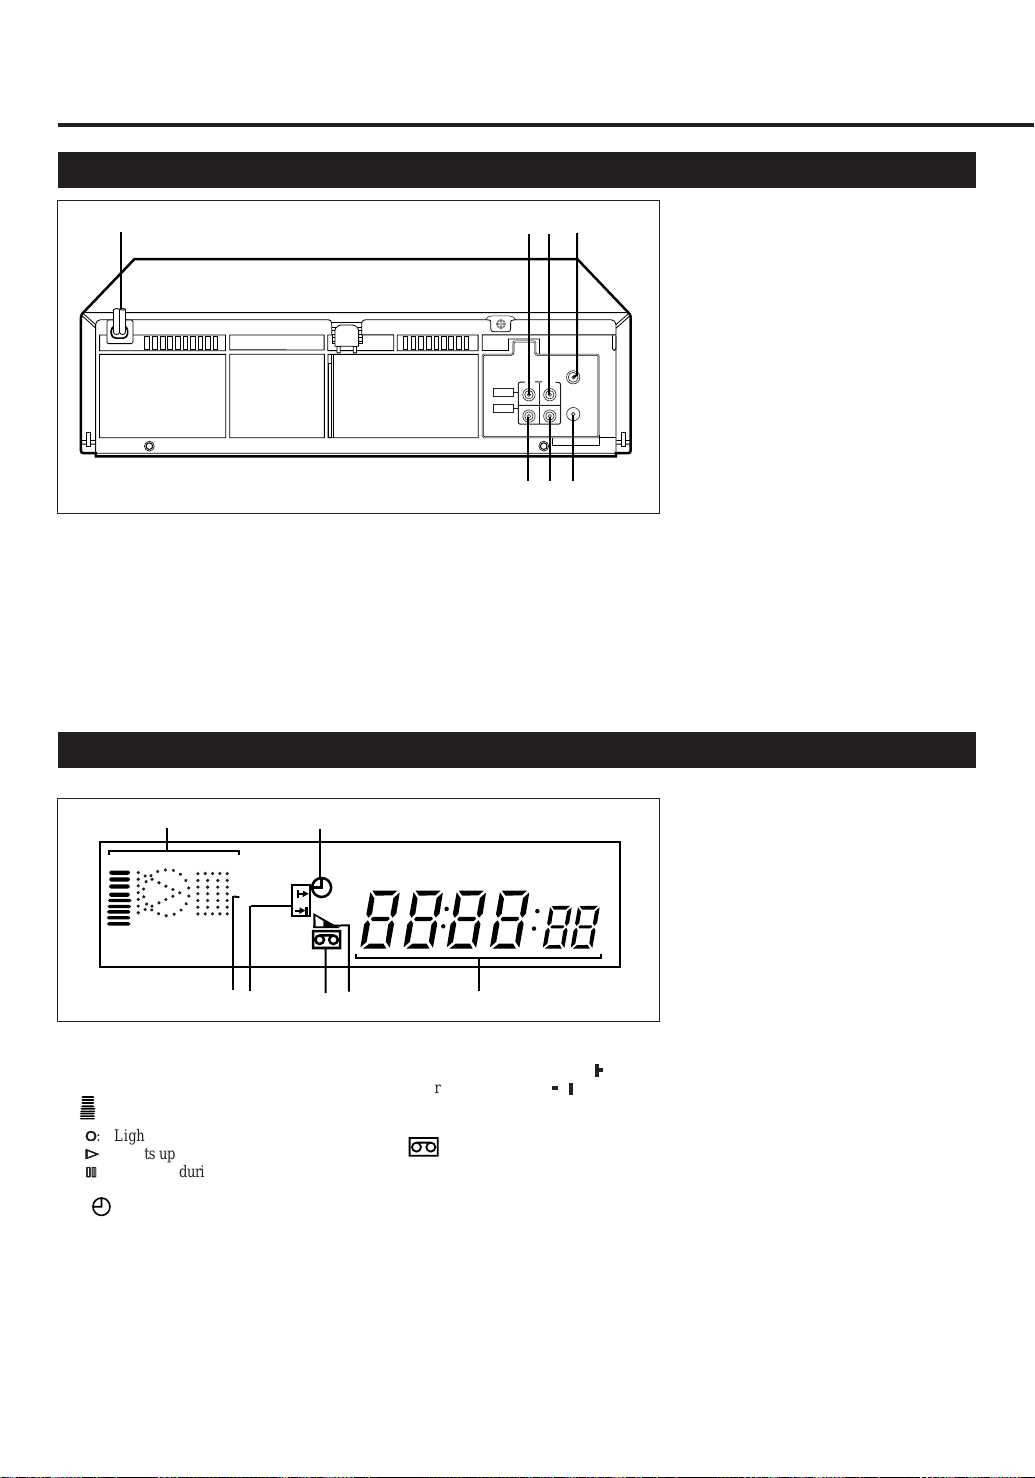
On-Screen Display
The following information (VCR operating status) appears on the TV screen. (✈P.14)
Operation mode
SmartPicture setting
Remaining tape length
Tape speed
PLAY 15:00
CH12
AUTO
B-----+-----+-----+-----+-----+-----E
REMAIN 2:30
INDEX -1
LP 0:00:00
Current time
Channel no.
Tape position indicator
Index no.
Time Counter
3 Replace the lid.
CAUTION
On Battery Replacement
Do not mix old and new batteries.
(Also never mix alkaline batteries
with manganese batteries.)
Note on the displayed information
• The time counter and remaining tape
length will not be correct when playing
back an NTSC tape.
• When you playback a thin tape like an
E-240 cassette tape or compact video
cassette tape (VHS-C), the remaining
tape length will flash.
— 5 —
D
ESCRIPTION
Rear Panel
1
1 AC (alternating current)
power cord
Connect the AC power cord to an AC
outlet.
2 AUDIO IN (input) jacks
For connecting to the audio output jacks
on another VCR. (✈P18)
OF
C
ONTROLS
2
3
4
ANT.IN
IN
OUT
AUDIO
VIDEO
RF OUT
5
6
7
3 AUDIO OUT (output) jacks
For connecting to the audio input jacks
on a TV or another VCR. (✈P.7)
4 ANT. (antenna) IN (input)
terminal (from Antenna)
Connect your antenna or Cable box to
this terminal. (✈P.7)
(CONTINUED)
5 VIDEO IN (input) jack
For connecting to the video output jack
on another VCR. (✈P.18)
6 VIDEO OUT (output) jack
For connecting to the video input jack
on a TV or another VCR. (✈P.7)
7 RF OUT (output) terminal (to
TV)
Use the supplied RF coaxial cable to
connect this terminal to the UHF/VHF
input terminal on the TV. (✈P.7)
Display Window
1
SP SLP
4
3
1 Operation mode/D. S. P. C
indicators
: Lights up from bottom to top while
D.S.P.C. is active. (✈P.15)
‡‡
‡
: Lights up during recording.
‡‡
##
#
: Lights up during playback.
##
**
*
: Lights up during a pause.
**
2 (Timer) indicator
Lights up when the VCR is set for an
unattended recording (timer recording).
(✈P.16)
3 Speed indicator
Indicates the tape speed.
SP – Standard Play
LP – Long Play
SLP –Super Long Play.
(For NTSC signal only)
2
6
5
7
4 Programme time indicators
Show the program start time ( ) and
the program stop time ( ) for Turbo
Timer. (✈P.16)
5 (Cassette-in) indicator
Lights up when there is a cassette in the
VCR.
6 Tape Remaining Time
indicator
Displays the time remaining on tape
after pressing OK/STATUS.
4
4
7 Digital clock/Counter/
Channel indicator
• Normally the present time appears.
• When a tape is inserted, the time
counter appears (and is reset to
0:00:00).
If you always rewind your tapes
completely, you can use this counter
reading as an index to find where a
programme starts.
• A channel number selected with the
TV tuner built in the VCR appears.
When the external line input is
selected:
“L-F” appears for the front panel
jacks or “L-1” appears for the rear
panel jacks.
• “CL” appears blinking when child
lock mode is engaged.(✈P.13)
• Indicates START time, STOP time
and channel number during Turbo
Timer mode. (✈P.16)
• “U:01” appears when the video heads
are dirty. (✈P.20)
— 6 —
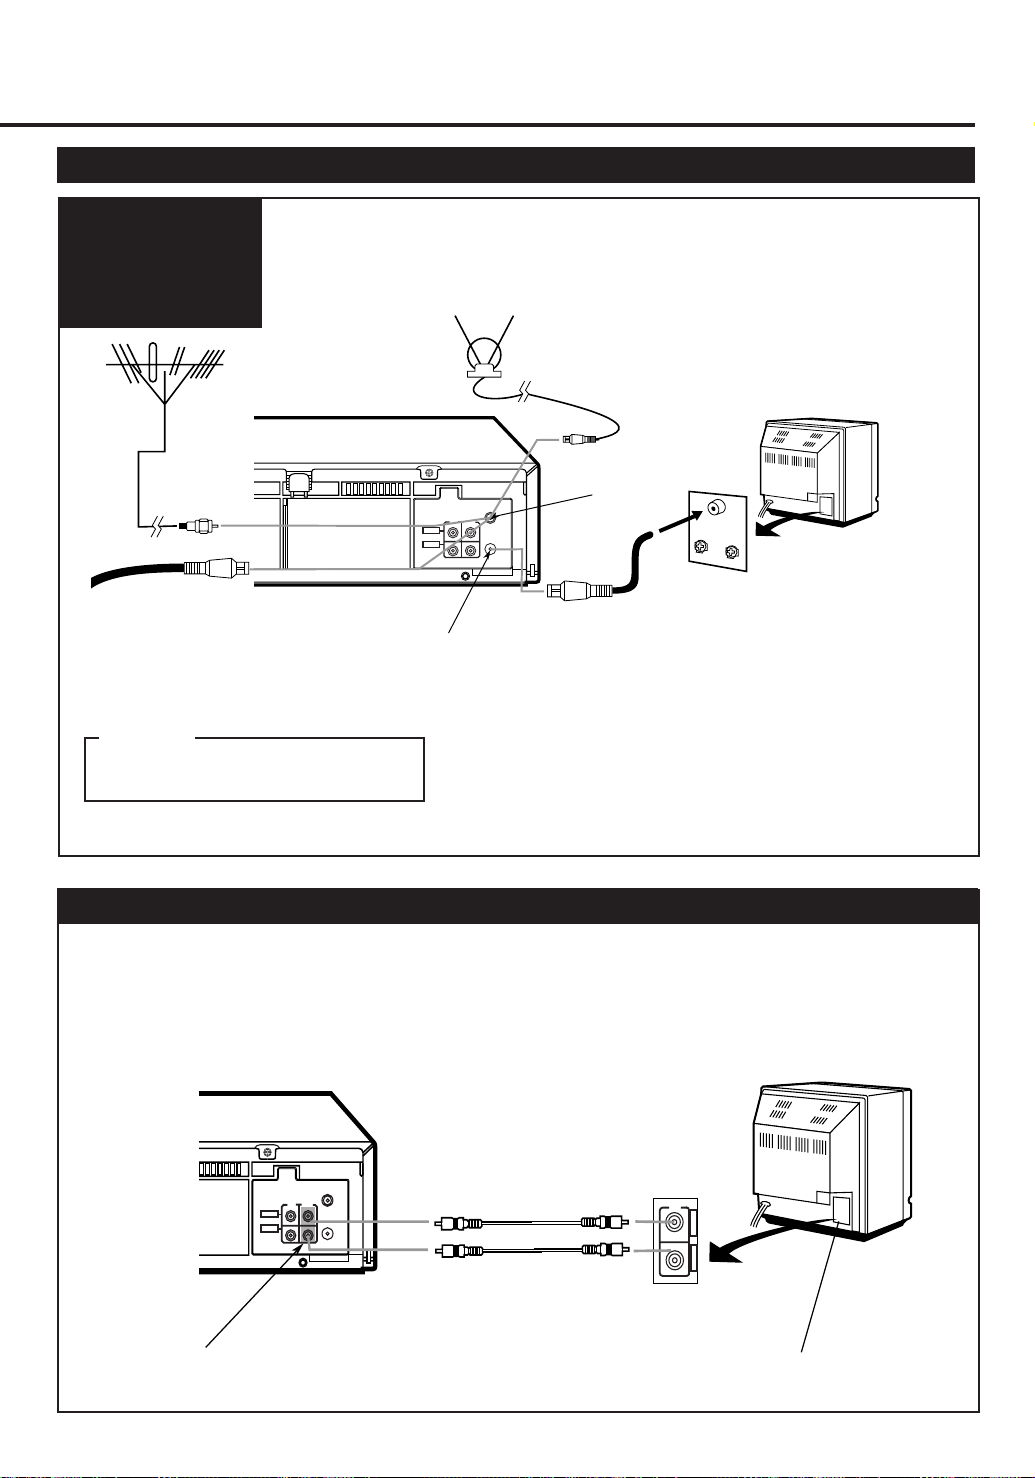
G
ETTING
VCR to TV Connection
Connection
Diagram
C
ONNECTED
U
P
1 Disconnect the antenna or Cable from the TV and the AC
power cord of the TV from the AC outlet.
2 Connect the antenna or Cable to the VCR.
3 Connect the VCR to the TV using the RF coaxial cable.
4 Plug the AC power cords of the VCR and TV into the AC out-
lets.
Outdoor antenna
Back of VCR
Cable
CAUTION
Do not plug the AC power cords until all
connections are completed.
ANT.IN
IN
OUT
AUDIO
VIDEO
RF OUT
RF OUT
To watch a picture from this VCR on the TV, select UHF E36
channel (video channel of this VCR when shipped from the factory).
Indoor antenna
ANT. IN
If you want to change video channel, see “Setting the Video Channel.” (✈P.8)
VCR to AV TV Connection Using AUDIO/VIDEO Cable
With this connection, you can get better pictures and sounds when playing back a tape.
Back of TV
VHF
UHF
RF coaxial cable
(supplied)
To watch a picture from this VCR on the
TV, select the video input on the TV, to which
this VCR is connected.
Back of VCR
ANT.IN
IN
OUT
AUDIO
VIDEO
RF OUT
To VIDEO/AUDIO OUT jacks
Audio cable
Video cable
— 7 —
Back of TV
IN
A
U
D
I
O
V
I
D
E
O
To video and audio
input jacks
 Loading...