

Page 1

CONTENTS
1. HOW TO CONNECT YOUR VIDEO RECORDER 4.........
How to connect your video recorder to the TV set 4.....
Connecting with a scart cable 4......................
Connecting withouta scart cable 5...................
Connecting a decoder or other equipment 5............
2. INSTALLING YOUR VIDEO RECORDER 6...............
Initialinstallation 6..................................
Allocatinga decoder 6..............................
Manual TV channel search 7.........................
Channel number or frequency display 7...............
Satellitereceiver 7..................................
Special installationfunctions 7.......................
AutomaticTV channel search (Autoinstall) 7...........
Monitorfunction 8..................................
Sortingand clearing TV channels manually 8...........
Settingthe time and date 8...........................
3. IMPORTANT NOTES FOR OPERATION 9...............
General information 9...............................
Saving energy 9....................................
Emergencyinterrupt 9...............................
The symbolson your video recorder display 9..........
Summaryofuserguide 10...........................
User guide (OSD) 10.................................
Programminga recording(with’VIDEOPlus+’) 15.......
Programminga recording(without’VIDEOPlus+’) 16....
How to check or change a programmed recording
(TIMER) 17.........................................
How to clear a programmed recording (TIMER) 17......
7. ADDITIONAL FUNCTIONS 18.........................
Settingthe on-screendisplay(OSD) 18................
Continuousplayback 18.............................
Automaticswitch-off(tunermode) 18.................
Poor TV reception - Optimize the modulator 18.........
Switchingoffthe modulator 19.......................
8. Before you call an engineer 20.......................
9. GLOSSARY 21......................................
Technical termsused 21.............................
4. PLAYBACK FUNCTIONS 11..........................
Playinga cassette 11................................
Tape position indication 11...........................
Searching for tape position withthe picture (picture
search) 11.........................................
Stillpicture 11......................................
Searching for tape position withoutthepicture(wind
and rewind) 11.....................................
InstantView 12.....................................
Automaticsearchfora tape position (indexsearch) 12..
Automaticsearchfora blank space on the tape 12.....
Pictureinterference 12..............................
Trackingduring playback 12.........................
Trackingduring stillpicture 12.......................
Cleaning the video heads 12.........................
5. MANUAL RECORDING 13............................
Recording withoutautomaticswitch-off 13............
Recording with automaticswitch-off(OTR
one-touch-recording) 13.............................
Protectingyourrecordings 13........................
Auto-assembling 13.................................
Selecting the recording speed (SP or LP) 14............
Automaticrecordingfromasatellitereceiver(SAT
RECORDING) 14....................................
6. PROGRAMMED RECORDING (TIMER) 15...............
’VPS’ (Video ProgrammingSystem)and’PDC’
(ProgrammeDeliveryControl)(UK) 15.................
3
Page 2
&
OPERATING INSTRUCTIONS IN BRIEF
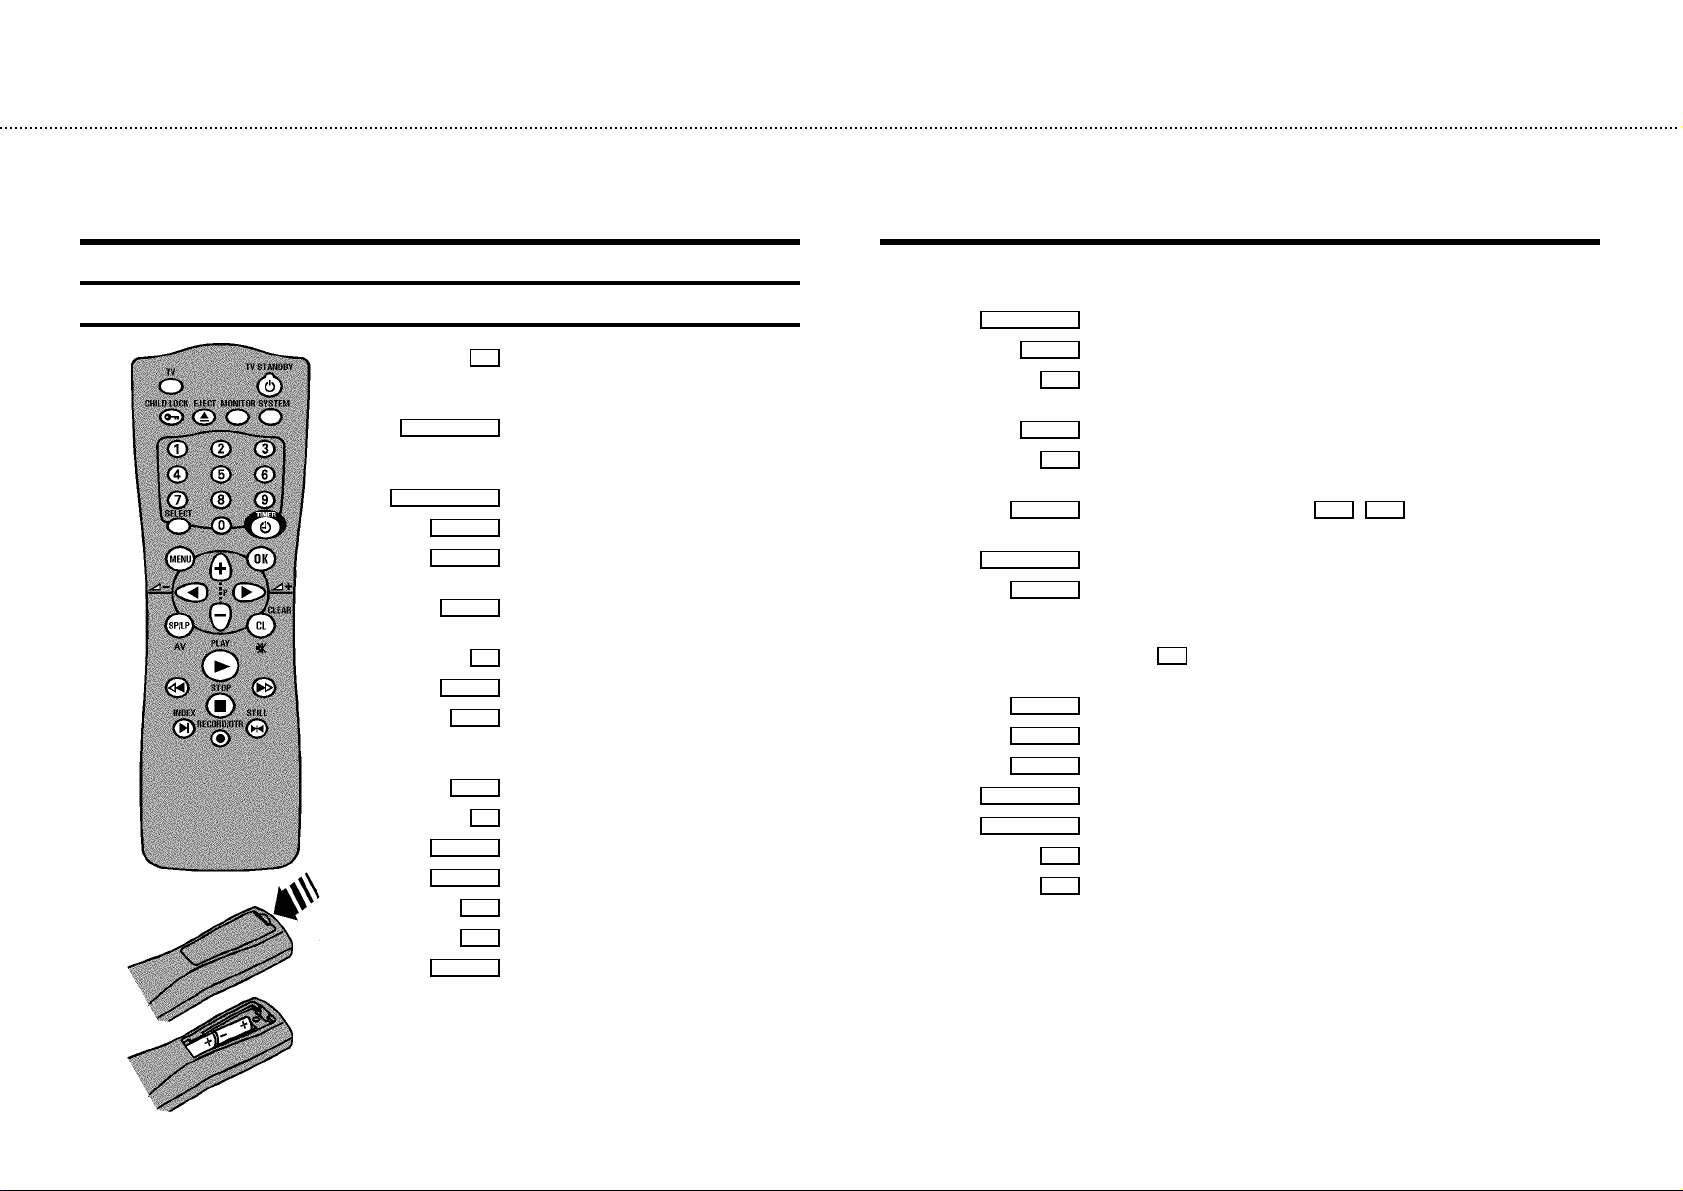
The remote control
TV To callup additional TV functions :Additional
TV functions forTV setswith the same remote
controlcode (RC5)
TV/STANDBYm Switch off :To switchoff set, interrupt menu
function,interrupt a programmed recording
(TIMER)
CHILDLOCK u No function
EJECT J Eject: To eject a cassette
MONITOR TV monitor : To switch between TV reception
and VCR playback
SYSTEM Special function:For instance, to switch on
the test picture
0-9 Number buttons:0-9
SELECT Select: Toselect afunction
TIMER TIMER: To make a manual TIMER
programmingwith VIDEOPlus+ or to alter or
clear a programmedTIMER
MENU Menu:To callup themain menu
OK Store/Confirm:Tostore or confirm entry
D/Sr Select:Cursorleft
C/Sq Select:Cursorright
P q Select: One line or programmenumber up
P r Select: One line or programmenumber down
SP/LP,AV SP/LP: To select the recording speed (Long
Play/StandardPlay)
CLEAR(CL), y Delete :To deletelast entry/Clearprogrammed recording (TIMER)
PLAYG Playback : To play a recorded cassette
[ Rewind : DuringSTOP and STANDBY: rewind, duringPLAYBACK: reverse
scanning
STOPh Pause/Stop:To stopthe tape,except while a TIMER-recording is being made
I Forward wind: DuringSTOP and STANDBY: forward wind,during PLAYBACK:
forwardscanning
INDEXE Indexsearch: In combination with [ / I : to search for previous/next
recording on the cassette.
RECORD/OTRn Record: To record the programmeselected
STILLR Still picture:To stopthe tapeand showa stillpicture
Additional TV functions
Pressthe TV buttonand thecorrect button on the remote control at the same
time
D/Sr TV volume: TV volume down
C/Sq TV volume: TV volume up
SP/LP,AV To switch the TV to Audio-/Video input socket
CLEAR(CL), y TV volume off: Toswitch offthe TV volume
TV/STANDBYm Switchoff : To switch off set
P q TV programme number : TV programme number up
P r TV programme number : TV programme number down
Page 3
&
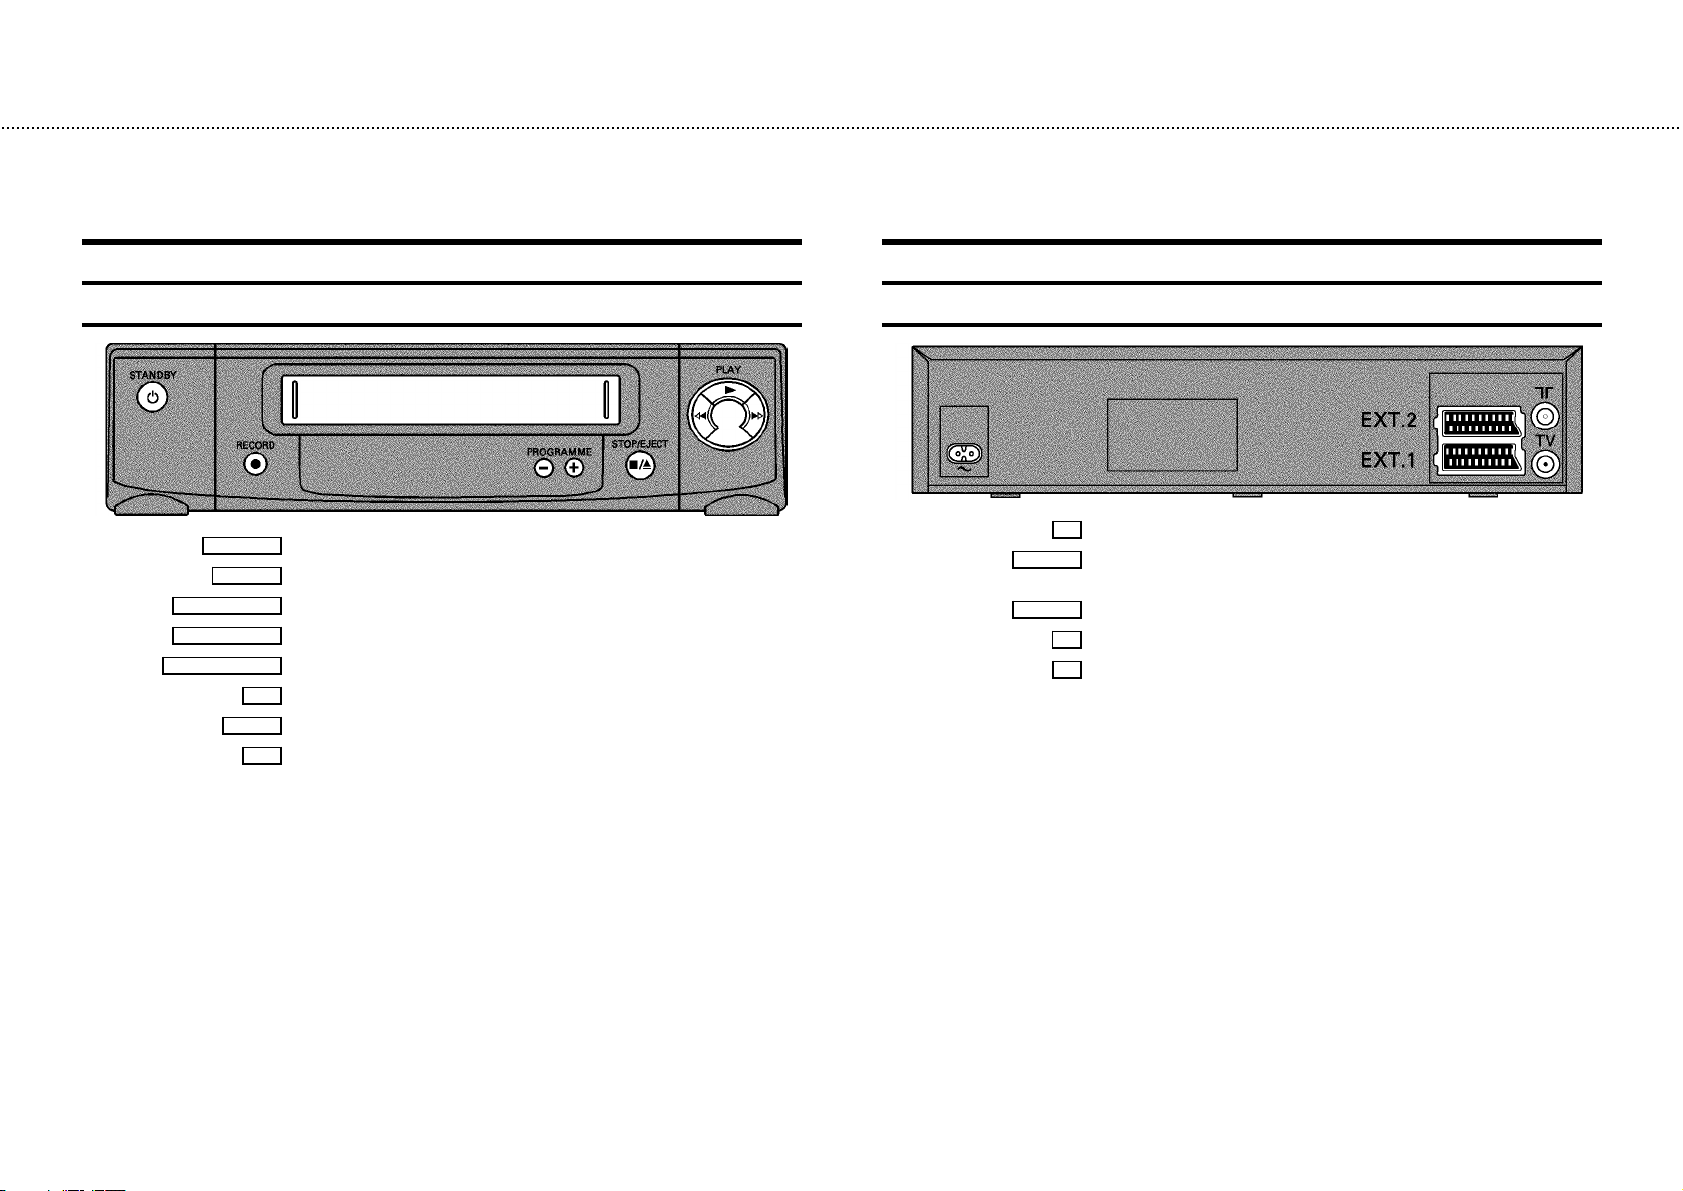
Front of the set
STANDBYm Standby : To switch off, interrupt a function, interrupt a programmed recording (TIMER)
PROGRAMMEr
PROGRAMMEq
STOP/EJECT?
RECORDn
H
PLAYG
I
Record:To record the programmeselected
Select:One line or programmenumber down.
Select:One line or programmenumber up.
Pause/Stop,eject cassette: To stop thetape and eject thecassette
Rewind : During STOP and STANDBY:rewind, during PLAYBACK: reverse scanning
Playback : To play a cassette
Forward wind: During STOP and STANDBY:forward wind, during PLAYBACK: forward
scanning
Back of the set
4 Mainssocket: To connect the mains cable
EXT.2 AV 2
EXT.1 AV 1
Scart socket 2: To connecta satellite receiver, decoder, video recorder, etc. (programme
E2’)
number ’
Scart socket 1: To connectthe TV set (programmenumber’E1’)
Aerial input socket: To connect the aerial cable
2
Aerial output socket: To connect the TV set
3
Page 4

Remote codes
Acura 02 GoldStar 15, 20, 27 Proline 31
Adyson 20 Goodmans 07, 10, 20, 29, 36 Protech 02, 12, 20, 23, 25, 38
Akai 18, 33 Gorenje 35 Quelle 03, 04, 33
Akura 21, 25 Graetz 33 Questa 07
Alba 02, 07, 21 Granada 10, 18, 20 Rank Arena 07
Allorgan 28 Grandin 26 Rediffusion 33
Amplivision 20 Grundig 17 Rex 25
Amstrad 02 HCM 02, 26 Roadstar 02, 21, 25, 38
Anitech 02 Hanseatic 30, 33 SEG 07, 20, 25
Arcam 19, 20 Hinari 02, 07, 21 SEI 12, 28
Asuka 21 Hisawa 26, 40 Saba 15
Audiosonic 15 Hitachi 05, 07, 08, 13, 15, 20, 22 Saisho 02, 04, 25
BPL 26 Huanyu 19, 36 Salora 33
BSR 28 Hypson 25, 26 Sambers 12
BTC 21 ICE 20, 25 Samsung 01, 02, 20, 25, 27, 35
Basic Line 02, 21 ICeS 21 Sandra 19
Baur 03, 33 ITT 33 Sanyo 04, 07, 10, 18
Beko 35 Imperial 23, 35, 38 Schaub Lorenz 33
Binatone 20 Inno Hit 10 Schneider 21, 23, 37
Blaupunkt 17 Interfunk 23, 33 Sei-Sinudyne 03
Blue Sky 21 Intervision 12, 20, 25 Sentra 06
Blue Star 26 Isukai 21 Sharp 07, 11
Bondstec 23 JVC 07, 09 Shorai 28
Boots 20 Kaisui 02, 19, 20, 21, 26 Siarem 12
Brandt 15 Kathrein 01 Siemens 17
Britannia 19 Kingsley 19 Silver 07
Bush 02, 07, 21, 26, 28, 36, 42 Koyoda 02 Sinudyne 12, 28
CGE 23 Leyco 10, 25, 28 Solavox 05
CS Electronics 19 Lloytron 05 Sonitron 18
CTC 23 Luxor 33 Sonoko 02
Carrefour 07 M Electronic 02, 13, 15, 20, 32, 36, 41 Sonolor 18
Cascade 02 Magnadyne 12, 23 Sony 03, 04, 07
Cimline 02 Magnafon 12 Soundwave 38
Clatronic 23, 35 Manesth 20, 25, 30 Standard 02, 20, 21
Condor 30, 35 Marantz 01 Sunkai 28, 31
Contec 02, 07, 19 Matsui 02, 04, 06, 07, 10, 18, 20, 28, 39 Susumu 21
Crown 02, 35, 38 Memorex 02 Tandy 10, 20, 21
Cybertron 21 Metz 34 Tashiko 07, 20
Daewoo 02, 36 Mitsubishi 07, 14, 16 Tatung 10, 20
Dainichi 21 Mivar 19, 27 Tec 20, 23
Dayton 02 Multitech 02, 12, 19 Technema 30
De Graaf 18 Neckermann 01 Technics 24
Decca 10 Nikkai 05, 06, 10, 19, 21, 25 Telefunken 15
Dixi 02 Nobliko 12 Telemeister 30
Dual 42 Nokia 33, 41 Teletech 02
Dual Tec 20 Nordmende 15 Teleton 20
Elite 21, 30 Oceanic 33 Tensai 21, 28, 29, 30
Elta 02 Orion 28, 30, 31 Texet 19, 21
Emerson 33 Osaki 05, 10, 20, 21, 25 Thomson 15
Ferguson 15 Oso 21 Thorn 06, 10, 33
Fidelity 19, 33 Osume 05, 10 Tomashi 26
Finlandia 18, 32 Otake 29 Toshiba 06, 07
Finlux 10, 13, 32 Otto Versand 01, 03, 07, 20, 30 Uher 30
Firstline 02, 19, 20, 23, 28, 31 Palladium 35, 38 Ultravox 12
Fisher 18, 20, 35 Panama 20, 25 Universum 13, 25, 32, 35
Flint 40 Panasonic 24, 34 Videosat 23
Formenti 30 Pathe Cinema 19, 30 Videotechnic 20
Frontech 23, 25 Pausa 02 Visa 02
Fujitsu 10 Perdio 30 Vision 30
Funai 25, 28 Phase 05 Waltham 20
GEC 10, 20 Philco 23 Watson 30
GPM 21 Philips 01, 36 Watt Radio 12
Geloso 02 Pioneer 15 Wega 07
Genexxa 21 Profex 02, 33 White Westinghouse 19, 30
Yoko 20, 25
Page 5
OPERATING INSTRUCTIONS PHILIPS VR200/07
Congratulations!You nowown oneof themost sophisticated
and simple-to-usevideorecorders(VCR) on themarket. With
thisVCR you can record and play VHS-standard cassettes.
Please take the time to read this operating manual before
using your video recorder.
Safety instructions and other notes
ADanger:High voltage!
Do not remove the top cover as there is a risk of an electrical
shock!
AThevideo recorder doesnot contain any components that can
be repaired by the customer.When the applianceis connected
to the power supply there are some componentsthat are
constantlyoperational. To switchoff the videorecorder
completelyyou must disconnectit from thepower supply.
BMakesure that air can circulate freelythrough the ventilation
slotson the video recorder.
So that you can identify your machine in the event of theft,
enter the serial number (PROD.NO)here.Theserialnumberis
printed on the type plate fixed at the rear of the set.
MODEL NO. VR200/07
PROD.NO:......
Thisproduct complies withthe requirements of the Directive
73/23/EEC+ 89/336/EEC + 93/68/EEC.
Interference
The Department of Trade and Industry operatesa Radio
InvestigationServiceto help TVlicence holdersimprove
reception of BBC and ITC programmes where these are being
spoiltbyinterference.
If your dealer cannot help, ask at a Main Post Office for the
booklet’How to ImproveTelevisionandRadioReception’.
BMakesure that no objectsor liquids enter the video recorder.If
liquidis spilt intoit, disconnect thevideo recorder immediately
fromthe power supplyand call the After-salesService for
advice.
BThe video recorder shouldnot be used immediatelyafter
transportation from a cold to a hot area or vice versa,or in
conditionsof extreme humidity.
Afterunpacking the video recorder, it shouldbe allowed to
acclimatize for at least three hours before installation.
C These operating instructions havebeen printed on nonpolluting
paper.
C Depositold batteries atthe relevant collectionpoints.
C Pleasemake use of the facilities availablein your countryfor
disposingof the packaging of the video recorderin a waythat
helpsto protect the environment.
C Thiselectronic equipment containsmany materialsthat can be
recycled.Please inquire about the possibilitiesfor recycling
yourold set.
DVIDEOPlus+ and PlusCodeare registered trademarksof
GemstarDevelopment Corporation.The VIDEO Plus+
systemis manufactured underlicence from Gemstar
DevelopmentCorporation.
Technical information
Measurements in cm (W / H / D): 38.0/ 9.3/ 26.0
Power consumption (Standby) :lessthan6W(Savingenergy
mode)
Voltage : 220-240V/50Hz
Number of heads: 2 Video
Winding time:approx.100seconds (Cassette E-180)
Recording/Playback time :SP(StandardPlay) 4 hours
(CassetteE-240)/ LP (Long Play) 8 hours (Cassette E-240)
1
Page 6

Special functions on your video recorder
Philipshasdevelopeda systemwhichproducesthebestpossibleplayback
quality.Itreducesdisturbanceonold,wornvideocassettes,and emphasises
the detail on very good quality cassettes.
When you connect your video recorder to your televisionand plug it into the
mains,you willbe welcomed with an OSD picture. All you have to do is follow
the instructionsinthe"intelligenthelpline"forthenextstep.EnjoytheAutomatic
TV channel search/savefunctionand the automatic time adjustment.
We guarantee that your video recorder willswitchtothenew millenniumwith
no problems whatsoever.
Recordingsmade on your video recorder can be controlled by an external
satellitereceiver.
Simple programmingsystemfor video recorders. Makes programming as easy
as making a telephone call. Simply enter the programme code which you will
find in your listingsmagazine.
The precision tape drive from Philipswithshortrewindtimesand automatic
tape length recognition.
2
Page 7
1. HOW TO CONNECT YOUR VIDEO RECORDER
Important for the United Kingdom
This machine is fittedwithan approved moulded 13 Amp plug.
To change a fuse in this type of plug, please follow these
instructions.
a Takeoffthe fuse cover and take out the fuse.
b Putin a new fuse which should be a BS1362 3A, A.S.T.A.
or BSI approved type.
c Refitthefusecover.
If the plug fitted is not suitable for your socket,cutitoffand fit
another type.
If the plug you fit contains a fuse, it should be a 3Amp fuse. If
you fit a plug which does not need a fuse, make sure the fuse
on your fuse box is not greater than 5 Amps.
DNote: Please destroytheplugyou have cut off so
that it cannot be used in a 13 Amp socket
somewhereelse.
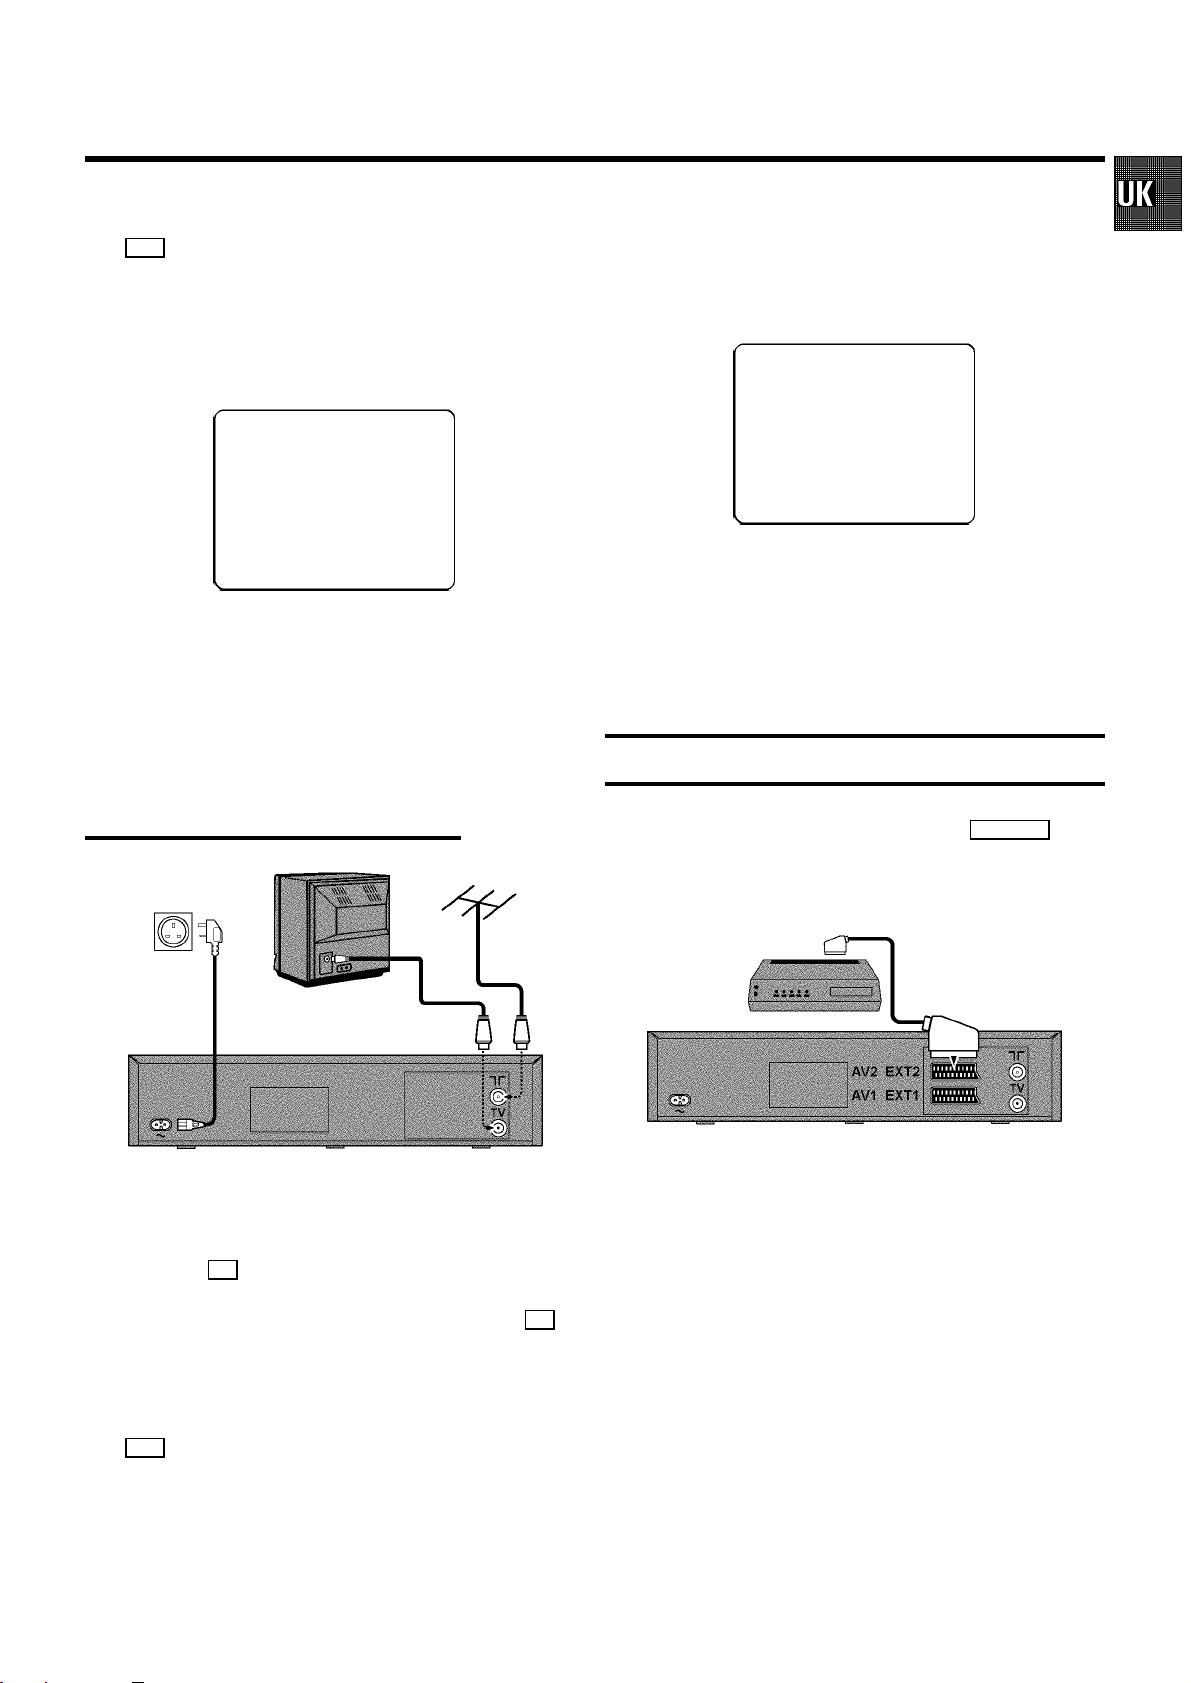
How to connect your video recorder to the
TV set
We recommend the use of a scart cable. This will give you the
best pictureand sound quality.
When you installyourvideorecorderforthefirsttime,please
read:
E If your TV set has a scartsocket and you are using a
scartcable, please read the section ’Connecting with a
scartcable’.
E The section ’Connecting without a scart cable’, if you are
not using a scart cable.
Connecting with a scart cable
How to connect a plug
The wires in the lead from the video recorder are coloured as
follows.
* Blue - ’neutral’ (’N’).
* Brown - ’live’ (’L’).
d Connectthe blue wire to the terminal in the plug which is
markedwiththe letter’N’orcoloured black.
e Connect the brown wire to the terminal in the plug which
is markedwiththe letter’L’orcolouredred.
f Do not connect either of the wires to the terminal in the
plug which is marked with the letter ’E’, the symbol\or
coloured green or green and yellow.
Before you refitthe plug cover, make sure that the grip at the
bottom of the plug is clamped over the plastic cover of the
lead, not just over the two wires.
a SwitchofftheTV set.
b Removetheaerialcable plug from your TV set and insert
it into the 2 socket at the back of the video recorder.
c Plug one end of the aerial cable provided into the 3
socketon the video recorder and the other end into the
aerial input socketon your TV set.
d Plug one end of the scart cable into the EXT.1AV 1 scart
socketat the back of the video recorder and the other
end into the scart socket on your TV set (see instruction
manual TV set).
e Switch on the TV set.
4
Page 8
f Insertoneend of the mains cable into the mains socket
4 at the backof the video recorder and theother end
into the wall socket.
g IfyourTV set automaticallyswitches to programme
number e.g.: ’EXT’, ’0’,or ’AV’,thistextwillappearonthe
TV screen:
CONGRATULATIONS ON THE
PURCHASE OF YOUR NEW
PHILIPS VIDEO RECORDER
TO CONTINUE PRESS OK
DIf your TV set does not switch to programme number
e.g.: ’EXT’, ’0’,or ’AV’ automatically,select the
programmenumberforthe video recordermanually
(see instructionmanualTVset).
f Tune in the TV set in the UHF wave band until the
followingpictureappears.
DThe video recorder will now be sending a
welcoming texton channel 35 or 583MHz:
CONGRATULATIONS ON THE
PURCHASE OF YOUR NEW
PHILIPS VIDEO RECORDER
TO CONTINUE PRESS OK
DIf you were using a video recorder before, you will
probablyneed to retue the ’video channel’ on your
TV to obtain this picture.
g Whenthe TV has been tuned read the paragraph ’Initial
installation’inthenextchapter.
h Then read ’Initialinstallation’in chapter’INSTALLING
YOUR VIDEO RECORDER’.
Connecting without a scart cable
a SwitchofftheTV set.
b Removetheaerialcable plug from your TV set and insert
it into the 2 socket at the back of the video recorder.
c Plug one end of the aerial cable provided into the 3
socketon the video recorder and the other end into the
aerial input socketon your TV set.
Connecting a decoder or other equipment
You can connect additional equipment to the EXT.2AV 2
socket.Forexample:adecoder,a satellitereceiverora
camera recorder.
d Insertoneend of the mains cable into the mains socket
4 at the backof the video recorder and plugthe other
end into the wall socket.
e Switch on your TV set and select the programme number
that you have chosen for video playback (see instruction
manual TV set).
5
Page 9

2. INSTALLING YOUR VIDEO RECORDER
Initial installation
a Open up the battery compartmentof yourremotecontrol
and place the batteries in it as shown in the picture.
b Closethebatterycompartment.
c Confirmthepictureonthe TV screen with the OK button
on the remote control.
d Ifyouhave connected the aerial to the video recorder,
pressthe OK button. ’Autoinstall’starts.This picture will
appear on the screen:
Allocating a decoder
Some TV stations willsend coded TV channels, that you can
only watch when you use a decoder. You can connect such a
decoder (descrambler)toyourvideorecorder.Withthe
followingfunction,theconnecteddecoder will automatically
be activated for the TV programme you want to watch.
a Switchon the TV set. If required, selectthe programme
number for the video recorder.
b Choosethe televisionchannelon which you wish to use
the decoder with the P q or P r buttonson the video
recorderor the number buttons 0-9 onthe remote
control.
c Pressthe MENU button on the remote control. The main
menu will appear.
d Selectthe line ’MANUAL SEARCH’ with the P q or
P r button.
e Confirm with the OK button.
AUTOINSTALL 00
Waituntilall TV channels have been found. This can take
severalminutes.
e When ’AUTOINSTALL’ is complete, ’READY’ will appear
on the TV screen.
DIf the autoinstallprocedureisinterruptedbythe
standbybutton,presstheMENUbuttontoobtainthe
welcome screen again.
f To end, press the MENU button.
The initial installationisnowcomplete.
Check the time and date. Please read ’Setting the time
and date’ in this chapter.
DIf you have connected a decoder, you must install it
as described in the next section.
DIf you have connected a satellite receiver,please
read the section ’satellitereceiver’.
f Pressthe INDEXE button. ’DEC’ will appear in the
display.
CH21
g Confirmwiththe OK button.
h To end, press the OK button again. Then, press the
TV/STANDBYm button.
This channel is now assigned to the decoder.
6
Page 10

Manual TV channel search
Channel number or frequency display
In certain cases the ’AutomaticTV channel search’ may not be
able to find all of the TV channels (e.g. coded TV channels). In
that case, use this manual method to set the channels.
DWhen you search for TV channels manually, you can
choose between the indication for ’channel’ or
’frequency’.Pleasereadthenextparagraph
’Channel number or frequency display’.
a Switchon the TV set. If required, selectthe programme
number for the video recorder.
b Pressthe MENU button on the remote control. The main
menu will appear.
c Selectthe line ’MANUAL SEARCH’ with the P q or
P r button and confirm with the OK button.
CH 26 P01
-----------------------SEARCH g+ 0-9 OK
d Hold the P q buttonuntilyouhave found the right TV
channel. A changing channel number or frequency will
appear on the screen.
You can switch between the display for ’channel number’ or
’frequency’formanualchannel search.
a Switchon the TV set. If required, selectthe programme
number for the video recorder.
b Pressthe MENU button on the remote control. The main
menu will appear.
c Selectthe line ’CHANNEL/FREQUENCY’ with the
P r or Pq button and confirm with the OK button.
d Withthe P q button,select’CHANNEL’or
’FREQUENCY’ and confirm with the OK button.
e To end, press the TV/STANDBYm button.
Satellite receiver
You can receive channels from the satellite receiverviathe
scartsocket EXT.2 AV2 .
To do this, select the channel number ’E2’ by pressing the
buttons P q or P r .Youwillhaveto selectthe channels to
be received by the satellite receiveron the receiveritself.
Special installationfunctions
DIf you know the frequency or channel number of the
desiredTV channel, you can enter the information in
line with the number buttons 0-9 onthe remote
control.
DTo enter a special/hyperband channel, you must
enter a ’9’ before the first channel digit. The
indicationchanges from’CH’to ’CA’. Forexample,
for special channel ’S 30’, enter ’9 30’.
e Confirm with the OK button.
f Withthe P q or P r buttonorwiththenumberbuttons
0-9 , select the programme number you want to give to
thisTV channel, for instance, ’P01’.
g Confirmwiththe OK button.
If you want to allocate more TV channels, repeat steps
d through g .
h To end, press the TV/STANDBY m button.
You can select one of the following installation functions in
order to adapt the video recorder to your own specific
requirements.
Automatic TV channel search (Autoinstall)
The video recorder will search for all TV channels. It storesTV
channels found in the following sequence: BBC 1, BBC 2, ITV,
CH 4, CH 5, SKY, others.
DIf you want to start the automatic TV channel search
again, then follow the instructionsbelow.
a Switchon the TV set. If required, selectthe programme
number for the video recorder.
b Pressthe MENU button on the remote control. The main
menu will appear.
c Selectthe line ’AUTOINSTALL’ with the P r or
P q button.
7
Page 11

d Pressthe OK button. The ’Automatic TV channel search’
starts.
d Withthe P r or P q button,selectthe TVchannel to
which you want to give a programme number (starting
with ’P01’).
e Confirm with the OK button.
AUTOINSTALL 00
Waituntilall TV channels have been found. This can take
severalminutes.
e When Autoinstall is complete, ’READY’ will appear on the
display.
The time and date information have been set.
How to search for a TV channel manually, you can read in the
section’ManualTV channel search’.
Monitor function
You can switch backwards and forwardsbetween TV picture
and video recorder picture with the MONITOR button. But this
only workswhenyou use a scart cable to connect the video
recorderto your TV set and if your TV set responds to this
switch-over.
DIf you want to delete a TV channel, press the
CLEAR(CL), y button.
f Repeatstepsdtoeuntilyouhavegivena programme
number to all TV channels.
g To end, press the TV/STANDBY m button.
Setting the time and date
DIf a TV channel which transmits TXT/PDC is stored
under programme number ’P01’,timeanddate will
automaticallybetakenfromtheTXT/PDC
information.
If the time in the video recorder display is not
corrector if ’--:--’ appears in the display, please
set the clock manually.
a Switchon the TV set. If required, selectthe programme
number for the video recorder.
b Pressthe MENU button on the remote control. The main
menu will appear.
Sorting and clearing TV channels manually
You can assign any programme number to a TV channel that
you have stored and you can also delete unwanted TV
channels.
a Switchon the TV set. If required, selectthe programme
number for the video recorder.
b Pressthe MENU button on the remote control. The main
menu will appear.
c Selectthe line ’CHANNEL ALLOCATION’ with P r or
P q button and confirm with the OK button.
P01 CH26
------------------------
-/+ CL OK
c Selectthe line ’CLOCK’ with the P r or P q button
and confirm with the OK button.
TIME 20:00
YEAR 1999
MONTH 01
DATE 01
------------------------
-/+ 0-9 OK
d Checkthe time in line ’TIME’. If required, please change
the time with the 0-9 buttonson the remote control.
e Confirm with the OK button.
f Check’YEAR’,’MONTH’ and ’DATE’ in the same way.
Confirmeach entrywiththe OK button.
g To end, press the TV/STANDBY m button.
8
Page 12

3. IMPORTANT NOTES FOR OPERATION
General information
DYou can switch on with the STOP h button,the
0-9 buttons or by putting in a cassette.
DIf you do not use the video recorder for a few
minutes,itwillswitchtostandbyautomatically.
Please read the section ’Automaticswitch-off(tuner
mode)’ in chapter ADDITIONALFUNCTIONS.
DIf you have switched the video recorder off with the
TV/STANDBYm button,the time will show in the
display,forinstance,’18:00’.
If the clock has not been set, ’--:--’ will appear.
DKeep your video recorder connected to the mains at
all timesto ensure that programmedrecordingscan
be made and that the television works normally.
DIf the video recorder is not plugged into the mains, it
will usuallystoreTVchannelsfora year,and date
and timer informationforsevenhours.
Saving energy
The symbols on your video recorder display
These symbolscan lightup on your video recorder display:
This is where the current operating mode is shown
as a symbol.
LP When you play a tape that has been recorded in LP
(Long Play).
When a satellite recordinghas been programmed.
DEC When a decoder has been allocated to the TV
channel you have currently selected.
When you are recording a progamme.
When you have programmed a recording or when a
programmedrecordingisbeing made.
There are two ways to switch to standby.
Switching to standby with clock display:Switch to standby
using the TV/STANDBY m button.Thetimewillbedisplayed.
To save energy: Pressthe TV/STANDBY m buttontwice. The
time willdisappearfromthedisplay.
Emergency interrupt
You can use the TV/STANDBY m button on the video recorder
or the remote control to interruptany function.
So if you are having operating problems, you can just interrupt
the function and start again.
And you can practise operating your set without any worries.
No matter which buttonsyou press,youcannotdamage it.
When you have programmed daily recordings.
When you have programmed weeklyrecordings.
When you have put a cassette in the video recorder.
DATE When the date of the programmed recording is
shown.
START When the start time of the programmed recording is
shown.
PROG. When the programme number of the programmed
recording is shown.
END When the end time of the programmed recording is
shown.
Video programmingsystem/programmedelivery
control:when a VPS or PDC code is being
transmitted.
Displayofprogrammenumber/tape position/
channel name / function.
Tape position in seconds, but only if the display
mode ’LINEAR COUNTER’ has been selected.
9
Page 13

Summary of user guide
The OSD menu offers the following functions.Moredetailsoneach can be found in the appropriate chapter.
CLOCK
OSD
CHANNEL ALLOCATION
CHANNEL/FREQUENCY
MANUAL SEARCH
AUTOINSTALL
COUNTER
TIME 20:00
YEAR 1999
MONTH 01
DATE 01
------------------------
-/+ OK
Chapter:’ADDITIONALFUNCTIONS’
User guide (OSD)
The OSD (On-screen display)showsthevariousfunctions in
the form of a menu on the television screen. You can then
choose the settingsyourequire.Thereisa summaryofthe
menus on this page. The main button functions are displayed
in a help line along the bottom of the screen.
E To call up themenu: With the MENU button.
E To select a line:With the P r or P q button.
E To enter or changeyour selection: With the 0-9 , P r
or P q button.
E To cancel: With the MENU button.
E To save or confirm: With the OK button.
E To close the menu:With the TV/STANDBYm button.
------------------------
-/+ 0-9 OK
Chapter:INSTALLINGYOUR VIDEO RECORDER -
’Settingthe date and thetime’
OSD
ON
OFF
------------------------
-/+ OK
Chapter:ADDITIONALFUNCTIONS- ’Switching OSD
Chapter:INSTALLINGYOUR VIDEO RECORDER -
’Sortingand clearing TV channelsmanually’
Informationon or off’
P01 CH26
------------------------
-/+ CL OK
10
CHANNEL
FREQUENCY
------------------------
-/+ OK
Chapter:’INSTALLINGYOUR VIDEO RECORDER -
’Channel number or frequency display’
Page 14

4. PLAYBACK FUNCTIONS
Playing a cassette
a Puta cassetteintothe cassetteslot.’v’willappearon
the display.
b Pressthe PLAY G button.
c To stop, pressthe STOP h button.
d To eject the cassette,pressthe STOP/EJECT ? button
on the video recorder.
DSome functionsswitchoffautomaticallyafter a
while (forexample,pause,stillpicture,picture
search).Thishelpstoprotectthecassetteand
avoidswastingpower.
DThis video recorderwillautomaticallyrecognise the
length of the tape.
DWhen you put a cassette in the video recorder and
you want to see ’TIME LEFT’, the video recorder
mustfirstcalculatethetimeplayed.Therefore,’-:--’
appears firstandonlyafterthetape has been
running for a few seconds the playing time will be
shown.
DIf the video recorder does not find a recording at a
certain tape positionwith’LINEAR COUNTER’
switchedon, the counter will stop.
Searching for tape position withthe picture
(picture search)
a Whilea cassetteisplaying,pressthe [ (reverse)or
I (forward) button once or several times.
b To stop at a certain picture, press the PLAY G button.
DDuring picture search,the picturequalitymaynotbe
so good and there will be no sound.
Still picture
Tape position indication
By pressingthe OK button, you can show the present tape
positionon the TV screen.
If you want to see the tape position, you can select ’LINEAR
COUNTER’ (to show the present positionon the tape in hours,
minutesand seconds)or ’TIME LEFT’.
a Switchon the TV set. If required, selectthe programme
number for the video recorder.
b Pressthe MENU button on the remote control. The main
menu will appear.
c Selectthe line ’COUNTER’ with the P q or P r button
and confirm with the OK button.
d Selectthe typeof counter with the P q buttonand
confirmwiththe OK button.
DTo reset the tape position ’LINEAR COUNTER’to
’0:00:00’,press the CLEAR (CL), y button.
a Pressthe STILLR button.A stillpicturewillappearon
the screen.
Interferencestripeswill appear on thescreen.
b Each time you press STILL R again, the picture will
move on one step.
Searching for tape position withoutthe
picture (wind and rewind)
a Stopthe tape with the STOP h button.
b Pressthe [ (reverse)or I (forward)button.
c To stop at a certain position on the tape, press the
STOPh button.
e To end, press the TV/STANDBYm button.
11
Page 15

Instant View
Tracking during playback
Withthisfunctionyoucan switchto picturesearchduring
wind and rewind.
a Ifyouhold the [ (rewind) or I (wind) button
during wind or rewind, you will switch to picture search.
b Whenyou releasethe button,the video recorderwill
automaticallyswitchback torewind or wind.
Automatic search for a tape position
(index search)
At the start of each recording, the video recorder will writean
index code on the tape.
a Pressthe INDEXE button and then the I button to
selectthe next code mark or the [ button for the
previouscode mark.
b Whenthe video recorderfindsthecode mark, it will
automaticallyswitchto play.
Automatic search for a blank space on the
tape
You can search for a space on the tape (at least 1 minute of
blank tape) for a new recording, for example, after an existing
recording on the tape.
a Whilea cassetteisplaying,holdthe P q buttonuntil
’TRAC’ (tracking)appearsonthedisplay.
b Hold the P r or P q buttonuntilthepicturequalityis
at its best.
c Waita few seconds,until’TRAC’disappearsfromthe
display.Thispicturesettingwill not changeuntil you
eject the cassette.
Tracking during still picture
If the stillpicturevibratesvertically, you can improve the still
picture as follows:
a Duringstillpicture,holdthe P q or P r buttonuntil
the picture qualityisat itsbest.
The video recorder will storethissettingautomatically.
DPlease note, however,thatinterferencemaystill
occur with poor quality cassettes.
Cleaning the video heads
If horizontallinesappearon the screen when you play a
cassette,youshouldcleanthe video heads.
a Pressthe INDEXE button. Then press the STOP h
button:
b Whenthe video recorderfind a blank space, it will
automaticallyswitchto ’pause’.
DIf no empty space has been found when the end of
the tape is reached, the cassette will be ejected.
Picture interference
If the picture qualityispoor when you play a cassette, please
followtheseinstructions.
a Whilea cassetteisplaying,holdthe PLAY G buttonuntil
’HEAD’ appears on the display. The video heads will now
be cleaned. The video recorder will automaticallyswitch
to play again.
12
Page 16

5. MANUAL RECORDING
Use ’Manual Recording’ to make a spontaneous recording (for
example,a programme currentlybeingshown).
E If you want to start and stop a recordingmanually, read
the section: ’Recordingwithoutautomaticswitch-off’.
E If you want to start a recording manually but have it
stopped automatically,readthesection:’Recordingwith
automaticswitch-off’.
E If you want a recordingto be controlled automatically by
a satellitereceiver,readthesectionentitled’Automatic
recording froma satellitereceiver’.
Recording without automaticswitch-off
a Insertacassette.
b Usethe P q or P r buttontoselecttheprogramme
number you want to record, for example, ’P01’.Onthe
displayappears:
BBC1
DWhen a TV channel transmits a channel name, it will
show on the video recorder display.
Recording with automatic switch-off
(OTR one-touch-recording)
a Puta cassettein the machine.
b Usethe P q or P r buttontoselecttheprogramme
number you want to record.
c Pressthe RECORD/OTRn button on the remote control.
d Pressthe RECORD/OTRn button again and again until the
displayon the video recorder showsthe desiredend time
or length of the recording.
DTo cancel this information,pressthe
CLEAR(CL), y button.
Protecting your recordings
So that you don’t accidentally delete an important recording,
removethe special tab on the narrow side of the cassette with
a screwdriverorslidethespecialtabto the left. Later,ifyou
no longer want to protect your recording, you can seal the gap
again with stickytapeor slidethe specialtab to the right.
DProgrammenumbers’E1’and ’E2’ are for recording
from other sources(throughscartsockets
EXT.1AV 1 and EXT.2 AV2 ).
c To startrecording,pressthe RECORD/OTRn button on the
remote controlor RECORDn on the video recorder. On
the displayyou willsee:
0:00
d Stoprecordingwiththe STOP h button.
Auto-assembling
You can use the auto-assembling function to join individual
recordingswithoutanymajorpicturedisturbancebetween
them.
a Whilethecassetteisplaying,searchfor the correct
positionon the tape.
b Stopthe cassettebypressingthe STOPh button.’9’
will appear in the display.
c Nowstartrecordingasusualbypressingthe
RECORD/OTRn button on the remote control.
13
Page 17

Selecting the recording speed (SP or LP)
You can reduce the recording speed by half. This makes it
possibletorecord,forexample,eight-hoursinstead of
four-hoursonan ’E240’(four-hour)cassette.
a Switchon the TV set and, if required, select the
programmenumberforthe video recorder.
b Withthevideorecorderswitchedon,andbefore you
start recording,selecttherecordingspeedwiththe
SP/LP,AV button. On the video recorder display you will
see: ’LP’: Long Play = half recording speed (double
recording time).
’SP’: Standard Play = normal recording speed.
DThe picture quality may sufferwhenyou record at
half speed (LP).
DWhen you play back your recording, the machine
will automaticallyselectthe correctspeed.
Automatic recording from a satellite
receiver (SAT RECORDING)
You can only use this function, when you have a satellite
receiverwhichcan control other equipment by a
’programming’function.
a Usea scart cable to connect the scart socket
EXT.2AV 2 tothescartsocketon thesatellite receiver.
b Puta cassettein the machine. Switch off with the
TV/STANDBYm buttonon the remote control.
c Hold the MONITOR buton on the remote control, until
’SAT.P’appearson the video recorder display.
The video recorder is now ready to record. The
EXT.2AV 2 plugcontrolsthe start and the endof the
recording.
DWhen this functionisswitchedon and the video
recorderisswitchedoff,’x’appearsonthe video
recorderdisplay.
DIf you want to cancel this function before the
recording has started,youmustholdthe
MONITOR button until ’SAT.P’ disappears.
DIf you want to cancel this function while a
programmeisbeing recorded, pressthe
TV/STANDBYm buttonon the remote control.
14
Page 18

6. PROGRAMMED RECORDING (TIMER)
Use programmedrecordingto automaticallystartand stopa
recording at a later date.
To make a programmed recording, your video recorder needs
to know:
* the date you want to make the recording;
* the programme number for the TV channel you want to
record;
* the start and stop time of the recording;
* whether you want to use VPS or PDC
The video recorder storesallthe informationina TIMER block.
You can programme up to 6 TIMER blocks a month in advance.
’VPS’ (Video Programming System)and
’PDC’ (Programme Delivery Control)(UK)
With’VPS and PDC’, the TV station controls the starttimeand
the length of the recording. This means that the video recorder
switchesitselfon andoffattheright time evenifaTV
programmeyou want to record begins earlier or finisheslater
than expected.
You must enter the start time exactly to the minute.
If you want to programme a time that is different fromthe VPS
or PDC time, you must switchoffVPS or PDC.
c Enterthe entirePlusCode-programmingnumber (up to 9
digits)printedinyourTV guide next to the start time of a
TV programme.
For example,5-234-89or 5 234 89
Enter 523489for the PlusCode-programmingnumber.
If you make a mistake,you can clear your instructions
with the CLEAR(CL), y button.
VIDEOPLUS
53124----
ONCE
-----------------------D/WgSELECT CLEAR gCL
0-9 OK
d Usethe SELECT button to select dailyor weekly
programming.
’D’: recordingseverydayfromMondaytoFriday.
’W’: recordingseveryweekonthe same day of the week.
e Confirm with the OK button. Your programming details
will then appear on the TV screen.
DATE PROG START V/P END
01 01 20:00 21:30
Programming a recording
(with ’VIDEO Plus+’)
All the informationrequiredfora programmingiscontainedin
the PlusCode-programmingnumber.
a Switchon the TV set and select the programme number
for the video recorder.
b Pressthe TIMER buttonon the remote control.
-----------------------NEXT gTIMER CLEAR gCL
-/+ 0-9 D/WgSELECT OK
DYou need to confirm the programme number the first
time you programmethe video recorderwithVIDEO
Plus+.
DIf VIDEO Plus+ does not recognise the TV channel,
’SELECT PROG’ will appear on the TV screen.
Insteadof ’E2’, you can select the programme
number you want with the number buttons 0-9 and
confirmwiththe OK button.
DIf ’CODE ERROR’ appears on the TV screen, this
means you entered an incorrect PlusCode number
or the incorrect date. Correct yourinstructionsor
end with the TIMER button.
DIf ’DAILY ERROR’ appears on the TV screen, the
date was incorrectlyentered.Dailyprogramming
can only be used for recordings to be made from
Monday to Friday.
DUse the SELECT button to switch ’VPS/PDC’on or
off.
15
Page 19

DIf you want to set a later end time for a recording,
pressthe P q button.Eachtimeyoupressthe
P q button, you will add 15 minutes to the end time.
Programming a recording
(without ’VIDEO Plus+’)
f Confirmwiththe OK button when the information is
correct.
DThe programming informationhasbeen storedin a
TIMER block.
g Selectthe recordingspeed SP or LP with the
SP/LP,AV button.
h Makesurethatthecassetteyouhaveputin can be
recorded on.
i Switch off with the TV/STANDBYm button.
The programmed recording will only functionwhen the
video recorderisswitched off withthe TV/STANDBY m
button.
DIf any of the TIMER blocks are in use, ’k’ will light up
on the video recorder display.
DWhile a programmed recording is being made, you
cannot operate your video recorder manually.Ifyou
want to cancel the programmed recording, press the
TV/STANDBYm button.
DIf the video recorder is switchedon a few minutes
before a programmed recording is supposed to
begin, ’TIMER RECORD’ will flash on the TV
screen.
DIf you reach the end of the cassette during a
recording,the video recorderwillautomatically
eject the cassette.
DIf you forget to load a cassette, ’NO CASSETTE’
will appear on the TV screen and ’k’ will flash on the
video recorderdisplay.
a Switchon the TV set and select the programme number
for the video recorder.
b Pressthe TIMER buttonon the remote control twice .
c Selecta free TIMER block with the P q or P r button.
Pressthe TIMER button.
DATE PROG START V/P END
01 01 20:00 21:30
-----------------------NEXT gTIMER CLEAR gCL
-/+ 0-9 D/WgSELECT OK
d Withthe TIMER , C/Sq or D/Sr buttonyou
can select ’DATE’ (date), ’PROG’ (programmenumber),
’START’ (starttime)and’END’(end time).
Enter or change your information with the P q or
P r button, or with the number buttons 0-9 .
DUnder ’DATE’, use the SELECT button to select daily
or weeklyprogramming.
’D’: Recording from Mondayto Friday.
’W’: Recordingseveryweekonthe same day.
DUnder ’START’, use the SELECT button to switch
’VPS or PDC’ on or off.
e Confirm with the OK button when theinformation is
correct.
DThe programming informationhasbeen storedin a
TIMER block.
DIf you have put in a cassette which cannot be used
for recording,the video recorderwillautomatically
eject it.
DIf ’TIMER FULL’ appears on the TV screen when
you pressthe TIMER button,you have used up all
the available TIMER blocks.Ifyouwantto clear or
check a TIMER block, select it with the P q or
P r button.
DProgrammenumbers’E1’and ’E2’ are for
recordingsfromothersources(throughscart socket
EXT.1AV 1 or EXT.2 AV2 ).
16
f Makesurethatthecassetteyouhaveputin can be
recorded on.
DUse the SP/LP, AV buttonto select the recording
speed ’SP’ or ’LP’.
g Switchoffwiththe TV/STANDBY m button.
The programmed recording will only functionwhen the
video recorderisswitched off withthe TV/STANDBY m
button.
DIf any of the TIMER blocks are in use, ’k’ will light up
on the video recorder display.
Page 20

DWhile a programmed recording is being made, you
cannot operate your video recorder manually.Ifyou
want to cancel the programmed recording, press the
TV/STANDBYm button.
DIf the video recorder is switchedon a few minutes
before a programmed recording is supposed to
begin, ’TIMER RECORD’ will flash on the TV
screen.
How to check or change a programmed
recording (TIMER)
a Switchon the TV set and select the programme number
for the video recorder.
b Pressthe TIMER buttonon the remote control twice.
DIf you reach the end of the cassette during a
recording,the video recorderwillautomatically
eject the cassette.
DIf you forget to load a cassette, ’NO CASSETTE’
will appear on the TV screen and ’k’ will flash on the
video recorderdisplay.
DIf you have put in a cassette which cannot be used
for recording,the video recorderwillautomatically
eject it.
DIf ’TIMER FULL’ appears on the TV screen when
you pressthe TIMER button,you have used up all
the available TIMER blocks.Ifyouwantto clear or
check a programmed recording (TIMER block),
selectit withthe P q or P r button.
DProgrammenumbers’E1’and ’E2’ are for
recordingsfromothersources(throughscart socket
EXT.1AV 1 or EXT.2 AV2 ).
c Selectthe programmedrecording(TIMER)youwantto
check or change with the P q or P r button.
d Pressthe TIMER button.
e Select the entry field with the D/Sr or C/Sq
button.
f Change any informationwiththe P r or P q buttonor
with the 0-9 buttons.
g Confirmwiththe OK button.
h Makesurethatthecassetteyouhaveputin can be
recorded on. Switch off with the TV/STANDBY m button.
DThe programmed recording will only functionwhen
the video recorder is switched off withthe
TV/STANDBYm button.
DThe video recorder will alwaysrecordthe
programmedrecordingatthe speed you have
selectedbefore the recording starts.
How to clear a programmed recording
(TIMER)
a Switchon the TV set and select the programme number
for the video recorder.
b Pressthe TIMER buttonon the remote control twice.
c Selectthe programmedrecording(TIMER)youwantto
clear with the P r or P q button.
d Pressthe CLEAR(CL), y button.
e Confirm with the OK button.
17
Page 21

7. ADDITIONAL FUNCTIONS
Setting the on-screen display (OSD)
You can switch the on-screen display of the current operating
informationonor off.
a Switchon the TV set and select the programme number
for the video recorder.
b Pressthe MENU button on the remote control. The main
menu will appear.
CLOCK
OSD
CHANNEL ALLOCATION
CHANNEL/FREQUENCY
MANUAL SEARCH
AUTOINSTALL
COUNTER
------------------------
-/+ OK
c Selectthe line ’OSD’ with the P r or P q buttonsand
confirmwiththe OK button.
d Selectone of the options shown with the P q button.
’ON’: Shows the OSD for a few seconds only.
’OFF’: SwitchesofftheOSD.
Automatic switch-off(tuner mode)
If you do not use the video recorder for a few minutes in
certain modes (e.g.:STOP),itwillswitchtostandby
automatically.Youcan cancel this functionto use the video
recorderas a televisionreceiver(tuner).
a Hold the STOP h buttonuntil +appears on the video
recorderdisplay.
b Selectthe programmenumberyouwant withthe P r or
P q button or with the number buttons 0-9 .
c Switchoffthevideorecorderwiththe TV/STANDBY m
button, if you no longer want to watch TV.
Poor TV reception - Optimize the modulator
With’Connectingwithoutscartcable’,themodulator
frequency(583Mhzor UHF channel 35)might already be being
used by another TV station in your reception area.
In this case the picture quality on your TV set will be adversely
affectedwhen receivingone or more TV channels.
e Confirm with the OK button.
Continuous playback
You can automatically play a cassette again and again. When
the video recorder reaches the end of the tape or the end of
the recording, it will rewindand startagain.
a Puta cassettein the machine.
b Pressthe PLAY G button.
c Pressthe MONITOR button on the remote control and the
PLAYG button on the video recorder at the same time .
On the video recorder display you will see:
REP
d Ifyouwant to cancel continuous playback,repeatstep
c .
a Ensurethatno cassettehasbeen loaded. On the video
recorder,hold the SYSTEM button for a few seconds
until e.g.: ’M583’ (583Mhz/channel35) appears in the
display.The video recordertransmitsa testpicture on
thisUHF-channel(orthisfrequency).
MODULATOR 583
------------------------
-/+
ON/OFF gCL OK
DWhen you press the I button, the video recorder
will searchforthe next modulatorfrequency.
b Confirmthenewmodulatorfrequencywiththe OK
button.
c Tune in the TV set to this channel or frequency.
d To end, press the TV/STANDBY m button.
DDuring continuousplayback,nootherbuttonwill
work.Afterapower failure,playbackwill
automaticallystartagain.
18
Page 22

Switching off the modulator
If you cannot clear picture or sound interference, you can
switchoffthe built-inmodulator.
You should only do this if you have connected the video
recorderto the TV set with a scart cable.
a Switchon the TV set and select the programme number
for the video recorder.
b Makesurethatno cassetteisinthe video recorder.On
the video recorder, pressthe SYSTEM button for several
seconds,until,forexample,’M583’appearsonthe video
recorderdisplay.
c Hold the CLEAR(CL), y button,until’MOFF’(modulator
off)appearson the video recorder display.Ifyouwantto
switchthe modulatoron again, hold the CLEAR(CL), y
button, until’M583’ (Modulatorswitchedon)appearson
the display.
d To end, press the TV/STANDBY m button.
19
Page 23

8. Before you call an engineer
If, contrarytoexpectation,youhaveanyproblemsusingthis
video recorder,itmaybe caused by one of the reasons
mentioned below. You can also call the customer service
centre in your country.
You will find the phone number in the enclosed guarantee
leaflet.
Your video recorder does not respond to any button being
pressed:
• There is nopower supply: checkthe power supply
• A programmed recording is currentlybeing made: cancelthe
programmedrecording with the
• Continuous playback is on: switchthe continuous playbackoff.
• There is atechnical problem: switch off the mainspower supply
for30 seconds, then switch it on again. If this doesnot have any
effect,you can:
1.Switch off the mainspower supplyagain.
2.Then switch it on whilst holding down the
on the video recorder.
3.Release the button when’--:--’ or’E1’ appears onthe video
recorderdisplay. Allthe information stored(TV channels, time
and date, TIMER) will be cleared.
TV/STANDBYm button.
STANDBYm button
Cassette is jammed in the video recorder:
• Don’t use force.Pull out themains plug fora moment.
Programmed recording does not work:
• You have not set the TIMER properly:check the TIMERblocks.
• You have programmedthe wrong timeor date: check time and
date.
• You have put in a cassette thatcannot be recorded on:undo the
eraseprotection on the cassette.
• ’PDC’ or ’VPS’ switched on but ’PDC/VPS time’ wrong: enter PDC
orVPS time exactlyto the minute. Haveyour aerial checked.
• After a ’programmedrecording with’VIDEO Plus+’ the
programmenumber of the TIMER block willnot agree with the
requiredprogramme number: when you have confirmedthe
PlusCodeprogramming number, confirm the TIMER block by
pressingthe
numberdisplayed in the’
pressingthe
TIMER button. Then change theprogramme
PROG’entry field and confirm by
TIMER button.
There is picture or sound interference on TV reception:
• Turn to chapter’ADDITIONAL FUNCTIONS’and read ’PoorTV
reception- optimising themodulator’ and ’Switchingoff the
modulator’.
• Have your aerial checked.
Remote control does not work:
• Remote control notpointed toward the video recorder: pointit at
the video recorder.
• Batteries have run out: change thebatteries.
No picture when you play a cassette:
• There is norecording on the cassette: change the cassette.
• You have chosenthe wrong programmenumber on the TVfor
playingcassette: on the TV, select the correctprogramme
numberfor the video recorder.
• The cable connectingthe TV set andthe video recorderhas
comeloose: check the cable.
Poor picture quality when you play a cassette:
• Your TV setis not properlyadjusted.
• The cassette badlyworn or ofpoor quality: usenew cassette.
• Tracking is not properly adjustedor the video headsare dirty:
turnto chapter ’PLAYBACK’and read the section’Cleaning the
videoheads’.
The video recorder will not record:
• The TV channel you want to recordis not storedor you selected
the wrong programme number:check TV channelsstored.
• You have loadeda cassette which cannot be recorded on:undo
the erase protection on thecassette.
20
Page 24

9. GLOSSARY
Technical terms used
Current tape position :The part of the tape currently being
played.
External source : A device connected via a socket (for
example,scartsocket)which istransmitting audio/video
signalstothe video recorder.
Index marking : A marking which is automaticallymade on the
tape at the beginning of every recording. This marking
(recordingID)can be searched for with the Index search
function.
Scart cable : Also known as a Euro-AV cable. This standard
cable is an easy method of connecting various audio and
video devices,computerscreensandtelevisions.Other
signalsin additionto audio and video signals can be
transmittedonit.
TV system : There are varioussystemsfor transmitting
televisionsignals,for example, PAL, SECAM, PAL BG, SECAM
DK, SECAM L/L,NTSCetc. The systemusedbyyourtelevision
depends on which country you are in.
TXT : Also known as Teletext, Fasttext,Videotext,FLOF etc.
OTR : One touch recording. This function enables you to select
the switch-offtimeinintervalsof 30 minutes.
Modulator : An electronic component in a video recorder
which allows audio and video signals to be transmittedviathe
aerial cable. Your televisionreceivesthesignalinthesame
way as a signal from a television station.
Modulator frequency :Thisfrequency/channelindicatesthe
frequency/channelonwhich the audio/videosignalis
transmitted.
UHF frequency range : Channels 21 to 69. The video recorder
’broadcasts’onchannel 35/frequency583 MHz. This
frequency/channelcanbe changed (see the section entitled
’Reducing picture disturbance-optimisingthemodulator’).
OSD (On-screen display): Thelargest possible display area
for the video recorder - the screen on your television set.
21
Page 25

(WwnnNNNwwnwNNnwnWwnNnWnnWwWnnN)
310316622232
9075/010 VR200/07
22
 Loading...