

Philips VR200/05 User Manual

1. HOW TO CONNECT YOUR VIDEO RECORDER 4.........
How to connect your video recorder to the TV set 4.....
Connecting with a scart cable 4......................
Connecting withouta scart cable 5...................
Connecting a decoder or other equipment 5............
2. INSTALLING YOUR VIDEO RECORDER 6...............
Initialinstallation 6..................................
Allocatinga decoder 6..............................
Manual TV channel search 6.........................
Channel number or frequency display 7...............
Satellitereceiver 7..................................
Special installationfunctions 7.......................
AutomaticTV channel search (Autoinstall) 7...........
Monitorfunction 8..................................
Sortingand clearing TV channels manually 8...........
Settingthe time and date 8...........................
3. IMPORTANT NOTES FOR OPERATION 9...............
General information 9...............................
Saving energy 9....................................
Emergencyinterrupt 9...............................
The symbolson your video recorder display 9..........
Summaryofuserguide 10...........................
User guide (OSD) 10.................................
4. PLAYBACK FUNCTIONS 11..........................
Playinga cassette 11................................
Tape position indication 11...........................
Searching for tape position withthe picture (picture
search) 11.........................................
Stillpicture 11......................................
Searching for tape position withoutthepicture(wind
and rewind) 11.....................................
InstantView 12.....................................
Automaticsearchfora tape position (indexsearch) 12..
Automaticsearchfora blank space on the tape 12.....
Pictureinterference 12..............................
Trackingduring playback 12.........................
Trackingduring stillpicture 12.......................
Cleaning the video heads 12.........................
5. MANUAL RECORDING 13............................
Recording withoutautomaticswitch-off 13............
Recording with automaticswitch-off(OTR
one-touch-recording) 13.............................
Protectingyourrecordings 13........................
Auto-assembling 13.................................
Selecting the recording speed (SP or LP) 14............
Automaticrecordingfromasatellitereceiver(SAT
RECORDING) 14....................................
6. PROGRAMMED RECORDING (TIMER) 15...............
’VPS’ (Video ProgrammingSystem)and’PDC’
(ProgrammeDeliveryControl)(UK) 15.................
Programminga recording(with’VIDEOPlus+’) 15.......
Programminga recording(without’VIDEOPlus+’) 16....
How to check or change a programmed recording
(TIMER) 17.........................................
How to clear a programmed recording (TIMER) 17......
7. ADDITIONAL FUNCTIONS 18.........................
Settingthe on-screendisplay(OSD) 18................
Continuousplayback 18.............................
Automaticswitch-off(tunermode) 18.................
Poor TV reception - Optimize the modulator 19.........
Switchingoffthe modulator 19.......................
8. Before you call an engineer 20.......................
9. GLOSSARY 21......................................
Technical termsused 21.............................
CONTENTS
3

The remote control
TV To call up additional TVfunctions:Additional
TV functionsforTVsetswiththesameremote
controlcode(RC5)
TV/STANDBYm Switch off:Toswitchoffset,interruptmenu
function,interruptaprogrammedrecording
(TIMER)
CHILDLOCKu No function
EJECT J Eject: To eject a cassette
MONITOR TVmonitor:Toswitchbetween TV reception
and VCRplayback
SYSTEM Special function: For instance, to switch on
the testpicture
0-9 Numberbuttons:0-9
SELECT Select: To select a function
TIMER TIMER:To make a manual TIMER
programmingwithVIDEOPlus+ortoalteror
clear a programmedTIMER
MENU Menu:Tocallupthemainmenu
OK Store/Confirm:Tostoreorconfirmentry
D/Sr Select:Cursorleft
C/Sq Select:Cursorright
P q Select:Onelineorprogrammenumberup
P r Select:Onelineorprogrammenumberdown
SP/LP,AV SP/LP:To select the recording speed (Long
Play/StandardPlay)
CLEAR(CL), y Delete :Todeletelastentry/Clearprogrammedrecording(TIMER)
PLAYG Playback : To play a recorded cassette
[ Rewind : During STOP and STANDBY:rewind,duringPLAYBACK:reverse
scanning
STOPh Pause/Stop:Tostopthetape,exceptwhileaTIMER-recordingisbeingmade
I Forward wind: During STOP and STANDBY:forwardwind,duringPLAYBACK:
forwardscanning
INDEXE Index search: In combination with [ / I :tosearchforprevious/next
recording on thecassette.
RECORD/OTRn Record: To record the programme selected
STILLR Stillpicture:Tostopthetapeandshowastillpicture
Additional TVfunctions
Pressthe TV button and the correct button on the remote control at the same
time
D/Sr TV volume: TV volume down
C/Sq TV volume: TV volume up
SP/LP,AV To switch the TV to Audio-/Videoinputsocket
CLEAR(CL), y TV volume off:ToswitchofftheTVvolume
TV/STANDBYm Switch off : To switch off set
P q TV programme number : TV programme number up
P r TV programme number : TV programme number down
OPERATING INSTRUCTIONS IN BRIEF
&
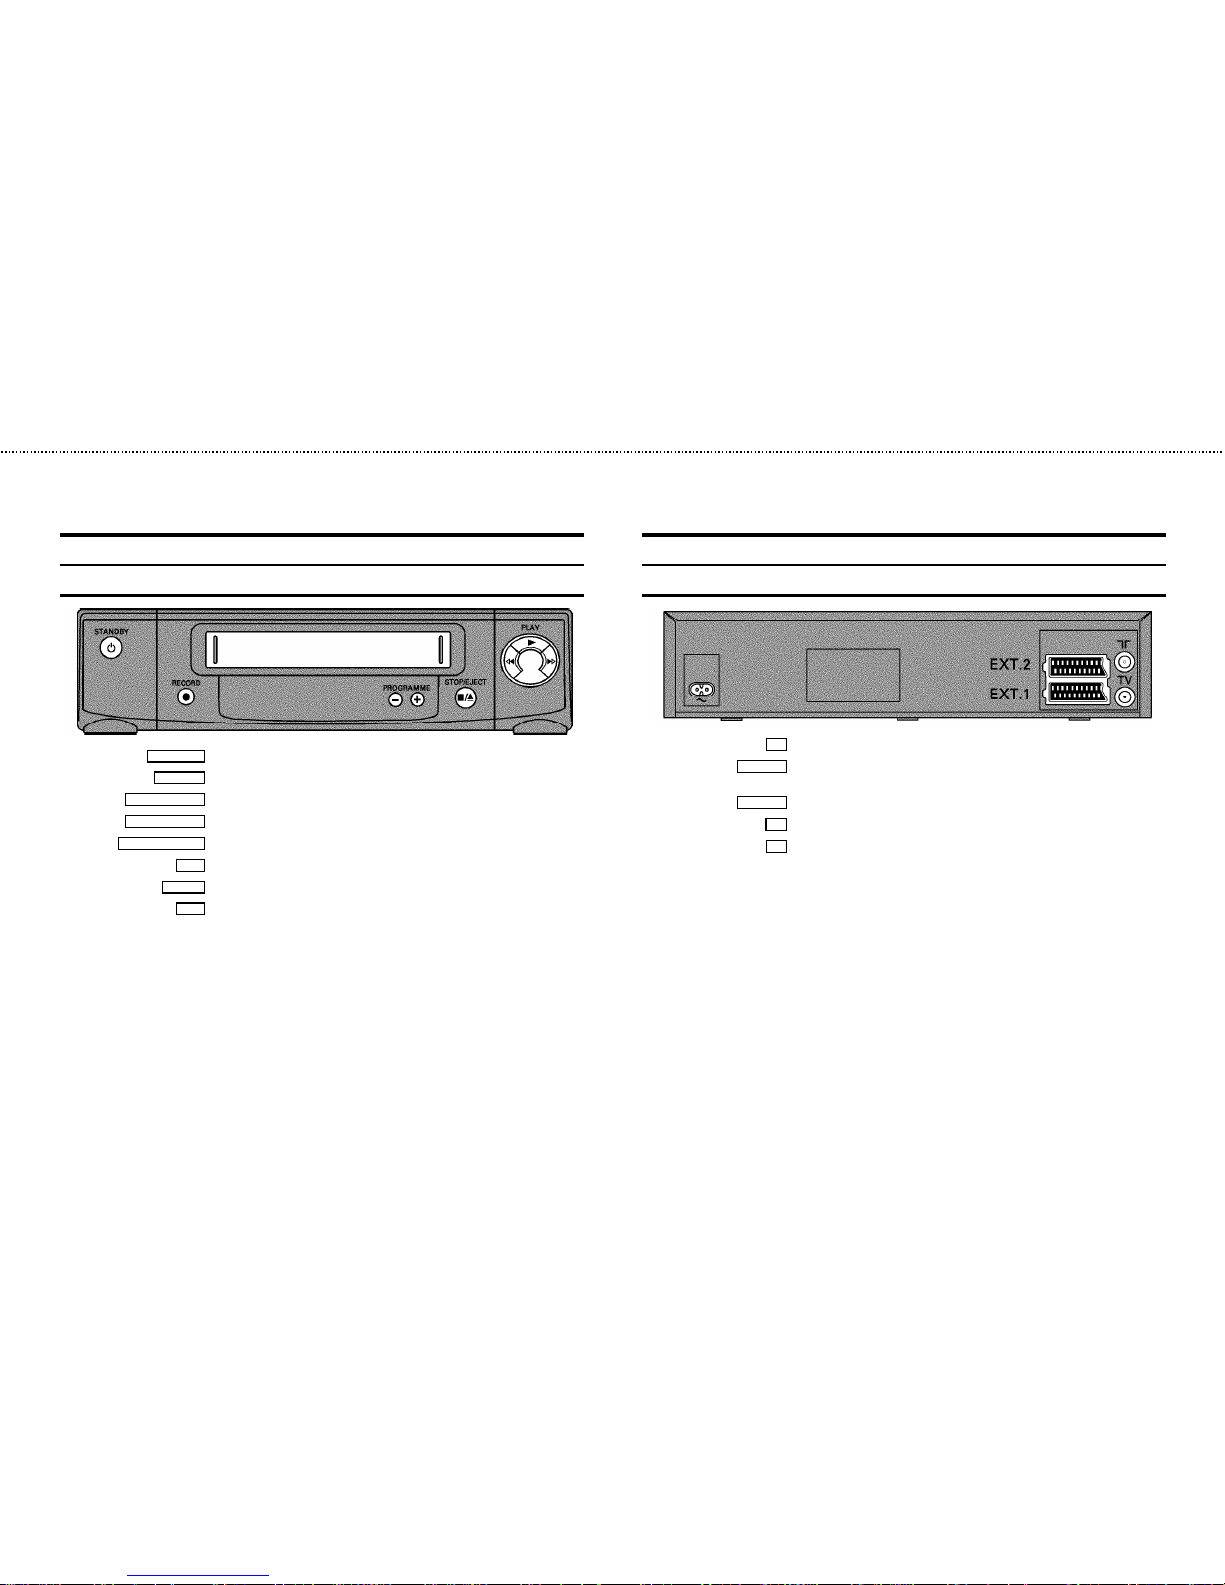
Front of the set
STANDBYm Standby :Toswitchoff, interrupt a function,interruptaprogrammed recording (TIMER)
RECORDn
Record:Torecordtheprogramme selected
PROGRAMMEr
Select:Onelineorprogramme number down.
PROGRAMMEq
Select:Onelineorprogramme number up.
STOP/EJECT?
Pause/Stop,ejectcassette:To stop the tape andejectthecassette
H
Rewind :DuringSTOPand STANDBY: rewind, duringPLAYBACK:reversescanning
PLAYG
Playback :Toplaya cassette
I
Forward wind:DuringSTOP and STANDBY: forwardwind,duringPLAYBACK:forward
scanning
Back of the set
4 Mains socket: To connect themainscable
EXT.2 AV2
Scart socket2:Toconnect a satellite receiver,decoder,videorecorder,etc. (programme
number ’
E2’)
EXT.1 AV1
Scart socket1:Toconnect the TV set (programmenumber’E1’)
2
Aerial inputsocket:To connect the aerial cable
3
Aerial outputsocket:To connect the TV set
&

Acura 02 GoldStar 15, 20, 27 Proline 31
Adyson 20 Goodmans 07, 10, 20, 29, 36 Protech 02, 12, 20, 23, 25, 38
Akai 18, 33 Gorenje 35 Quelle 03, 04, 33
Akura 21, 25 Graetz 33 Questa 07
Alba 02, 07, 21 Granada 10, 18, 20 Rank Arena 07
Allorgan 28 Grandin 26 Rediffusion 33
Amplivision 20 Grundig 17 Rex 25
Amstrad 02 HCM 02, 26 Roadstar 02, 21, 25, 38
Anitech 02 Hanseatic 30, 33 SEG 07, 20, 25
Arcam 19, 20 Hinari 02, 07, 21 SEI 12, 28
Asuka 21 Hisawa 26, 40 Saba 15
Audiosonic 15 Hitachi 05, 07, 08, 13, 15, 20, 22 Saisho 02, 04, 25
BPL 26 Huanyu 19, 36 Salora 33
BSR 28 Hypson 25, 26 Sambers 12
BTC 21 ICE 20, 25 Samsung 01, 02, 20, 25, 27, 35
Basic Line 02, 21 ICeS 21 Sandra 19
Baur 03, 33 ITT 33 Sanyo 04, 07, 10, 18
Beko 35 Imperial 23, 35, 38 Schaub Lorenz 33
Binatone 20 Inno Hit 10 Schneider 21, 23, 37
Blaupunkt 17 Interfunk 23, 33 Sei-Sinudyne 03
Blue Sky 21 Intervision 12, 20, 25 Sentra 06
Blue Star 26 Isukai 21 Sharp 07, 11
Bondstec 23 JVC 07, 09 Shorai 28
Boots 20 Kaisui 02, 19, 20, 21, 26 Siarem 12
Brandt 15 Kathrein 01 Siemens 17
Britannia 19 Kingsley 19 Silver 07
Bush 02, 07, 21, 26, 28, 36, 42 Koyoda 02 Sinudyne 12, 28
CGE 23 Leyco 10, 25, 28 Solavox 05
CS Electronics 19 Lloytron 05 Sonitron 18
CTC 23 Luxor 33 Sonoko 02
Carrefour 07 M Electronic 02, 13, 15, 20, 32, 36, 41 Sonolor 18
Cascade 02 Magnadyne 12, 23 Sony 03, 04, 07
Cimline 02 Magnafon 12 Soundwave 38
Clatronic 23, 35 Manesth 20, 25, 30 Standard 02, 20, 21
Condor 30, 35 Marantz 01 Sunkai 28, 31
Contec 02, 07, 19 Matsui 02, 04, 06, 07, 10, 18, 20, 28, 39 Susumu 21
Crown 02, 35, 38 Memorex 02 Tandy 10, 20, 21
Cybertron 21 Metz 34 Tashiko 07, 20
Daewoo 02, 36 Mitsubishi 07, 14, 16 Tatung 10, 20
Dainichi 21 Mivar 19, 27 Tec 20, 23
Dayton 02 Multitech 02, 12, 19 Technema 30
De Graaf 18 Neckermann 01 Technics 24
Decca 10 Nikkai 05, 06, 10, 19, 21, 25 Telefunken 15
Dixi 02 Nobliko 12 Telemeister 30
Dual 42 Nokia 33, 41 Teletech 02
Dual Tec 20 Nordmende 15 Teleton 20
Elite 21, 30 Oceanic 33 Tensai 21, 28, 29, 30
Elta 02 Orion 28, 30, 31 Texet 19, 21
Emerson 33 Osaki 05, 10, 20, 21, 25 Thomson 15
Ferguson 15 Oso 21 Thorn 06, 10, 33
Fidelity 19, 33 Osume 05, 10 Tomashi 26
Finlandia 18, 32 Otake 29 Toshiba 06, 07
Finlux 10, 13, 32 Otto Versand 01, 03, 07, 20, 30 Uher 30
Firstline 02, 19, 20, 23, 28, 31 Palladium 35, 38 Ultravox 12
Fisher 18, 20, 35 Panama 20, 25 Universum 13, 25, 32, 35
Flint 40 Panasonic 24, 34 Videosat 23
Formenti 30 Pathe Cinema 19, 30 Videotechnic 20
Frontech 23, 25 Pausa 02 Visa 02
Fujitsu 10 Perdio 30 Vision 30
Funai 25, 28 Phase 05 Waltham 20
GEC 10, 20 Philco 23 Watson 30
GPM 21 Philips 01, 36 Watt Radio 12
Geloso 02 Pioneer 15 Wega 07
Genexxa 21 Profex 02, 33 White Westinghouse 19, 30
Yoko 20, 25
Remote codes
3103 166 21961
8392/001 VR800/02
(WwnnNNNwwnwNNnwnWwnNwNnNwNwwnN)

Congratulations!You now ownone of the most sophisticated
and simple-to-usevideo recorders (VCR) on the market. With
thisVCR you can record and play VHS-standard cassettes.
Please take the time to read this operating manual before
using your video recorder.
Safety instructions and other notes
ADanger:High voltage!
Do not remove the top cover as there is a risk of an electrical
shock!
AThevideo recorder does not contain anycomponents that can
be repaired by the customer. When the appliance is connected
to the power supply there are some components that are
constantlyoperational. To switch off the videorecorder
completelyyou must disconnect it from the power supply.
BMakesure that aircan circulate freelythrough the ventilation
slotson the video recorder.
BMakesure that no objects or liquidsenter the videorecorder. If
liquidis spilt into it, disconnect the video recorder immediately
fromthe power supplyand call the After-sales Service for
advice.
BThe video recorder shouldnot be used immediately after
transportation from a coldto a hot areaor vice versa,or in
conditionsof extreme humidity.
Afterunpacking the videorecorder, it should be allowed to
acclimatize for at least three hours before installation.
C Theseoperating instructions have beenprinted on nonpolluting
paper.
C Depositoldbatteries at the relevant collection points.
C Pleasemakeuse of the facilities available in your country for
disposingof the packagingof the video recorder in a way that
helpsto protect the environment.
C Thiselectronicequipment contains manymaterials that can be
recycled.Please inquire about the possibilitiesfor recycling
yourold set.
DVIDEOPlus+ and PlusCodeare registered trademarks of
GemstarDevelopment Corporation.The VIDEO Plus+
systemis manufactured under licence from Gemstar
DevelopmentCorporation.
So that you can identify your machine in the event of theft,
enter the serial number (PROD.NO)here. The serialnumberis
printed on the type plate fixed at the rear of the set.
MODEL NO. VR200/05
PROD.NO:......
Thisproduct complies with the requirementsof the Directive
73/23/EEC+ 89/336/EEC + 93/68/EEC.
Interference
The Department of Trade and Industry operatesa Radio
InvestigationService to help TV licenceholdersimprove
reception of BBC and ITC programmes where these are being
spoiltbyinterference.
If your dealer cannot help, ask at a Main Post Office for the
booklet’How to ImproveTelevisionand RadioReception’.
Technical information
Measurements in cm (W / H / D): 38.0/ 9.3/ 26.0
Power consumption (Standby) : less than 6W (Saving energy
mode)
Voltage : 220-240V/50Hz
Number of heads: 2 Video
Winding time:approx. 100 seconds (Cassette E-180)
Recording/Playback time :SP (Standard Play) 4 hours
(CassetteE-240) / LP (Long Play) 8 hours (Cassette E-240)
OPERATING INSTRUCTIONS PHILIPS VR200/05
1
Special functions on your video recorder
Philipshasdevelopeda systemwhich producesthebestpossibleplayback
quality.Itreducesdisturbance on old, wornvideocassettes,and emphasises
the detail on very good quality cassettes.
When you connect your video recorder to your televisionand plug it into the
mains,you willbe welcomed with an OSD picture. All you have to do is follow
the instructionsin the "intelligenthelp line" forthenextstep.EnjoytheAutomatic
TV channel search/savefunctionand the automatic time adjustment.
We guarantee that your video recorder willswitchto thenew millenniumwith
no problems whatsoever.
Recordingsmade on your video recorder can be controlled by an external
satellitereceiver.
Simple programmingsystemfor video recorders. Makes programming as easy
as making a telephone call. Simply enter the programme code which you will
find in your listingsmagazine.
The precision tape drive from Philipswithshortrewind times and automatic
tape length recognition.
2
Important for the United Kingdom
This machine is fittedwithan approved moulded 13 Amp plug.
To change a fuse in this type of plug, please follow these
instructions.
a Takeoff the fuse cover and take out the fuse.
b Putin a new fusewhichshouldbe a BS13623A,A.S.T.A.
or BSI approved type.
c Refitthe fuse cover.
If the plug fitted is not suitable for your socket,cut itoffand fit
another type.
If the plug you fit contains a fuse, it should be a 3Amp fuse. If
you fit a plug which does not need a fuse, make sure the fuse
on your fuse box is not greater than 5 Amps.
DNote:Pleasedestroythe plug youhave cut off so
that it cannot be used in a 13 Amp socket
somewhereelse.
How to connect a plug
The wires in the lead from the video recorder are coloured as
follows.
* Blue - ’neutral’ (’N’).
* Brown - ’live’ (’L’).
d Connectthe blue wire to the terminalin the plug which is
markedwiththe letter’N’orcoloured black.
e Connect the brownwiretothe terminalin the plug which
is markedwiththe letter’L’or colouredred.
f Donot connect either of the wiresto theterminalin the
plug which is marked with the letter ’E’, the symbol\or
coloured green or green and yellow.
Before you refitthe plug cover, make sure that the grip at the
bottom of the plug is clamped over the plastic cover of the
lead, not just over the two wires.
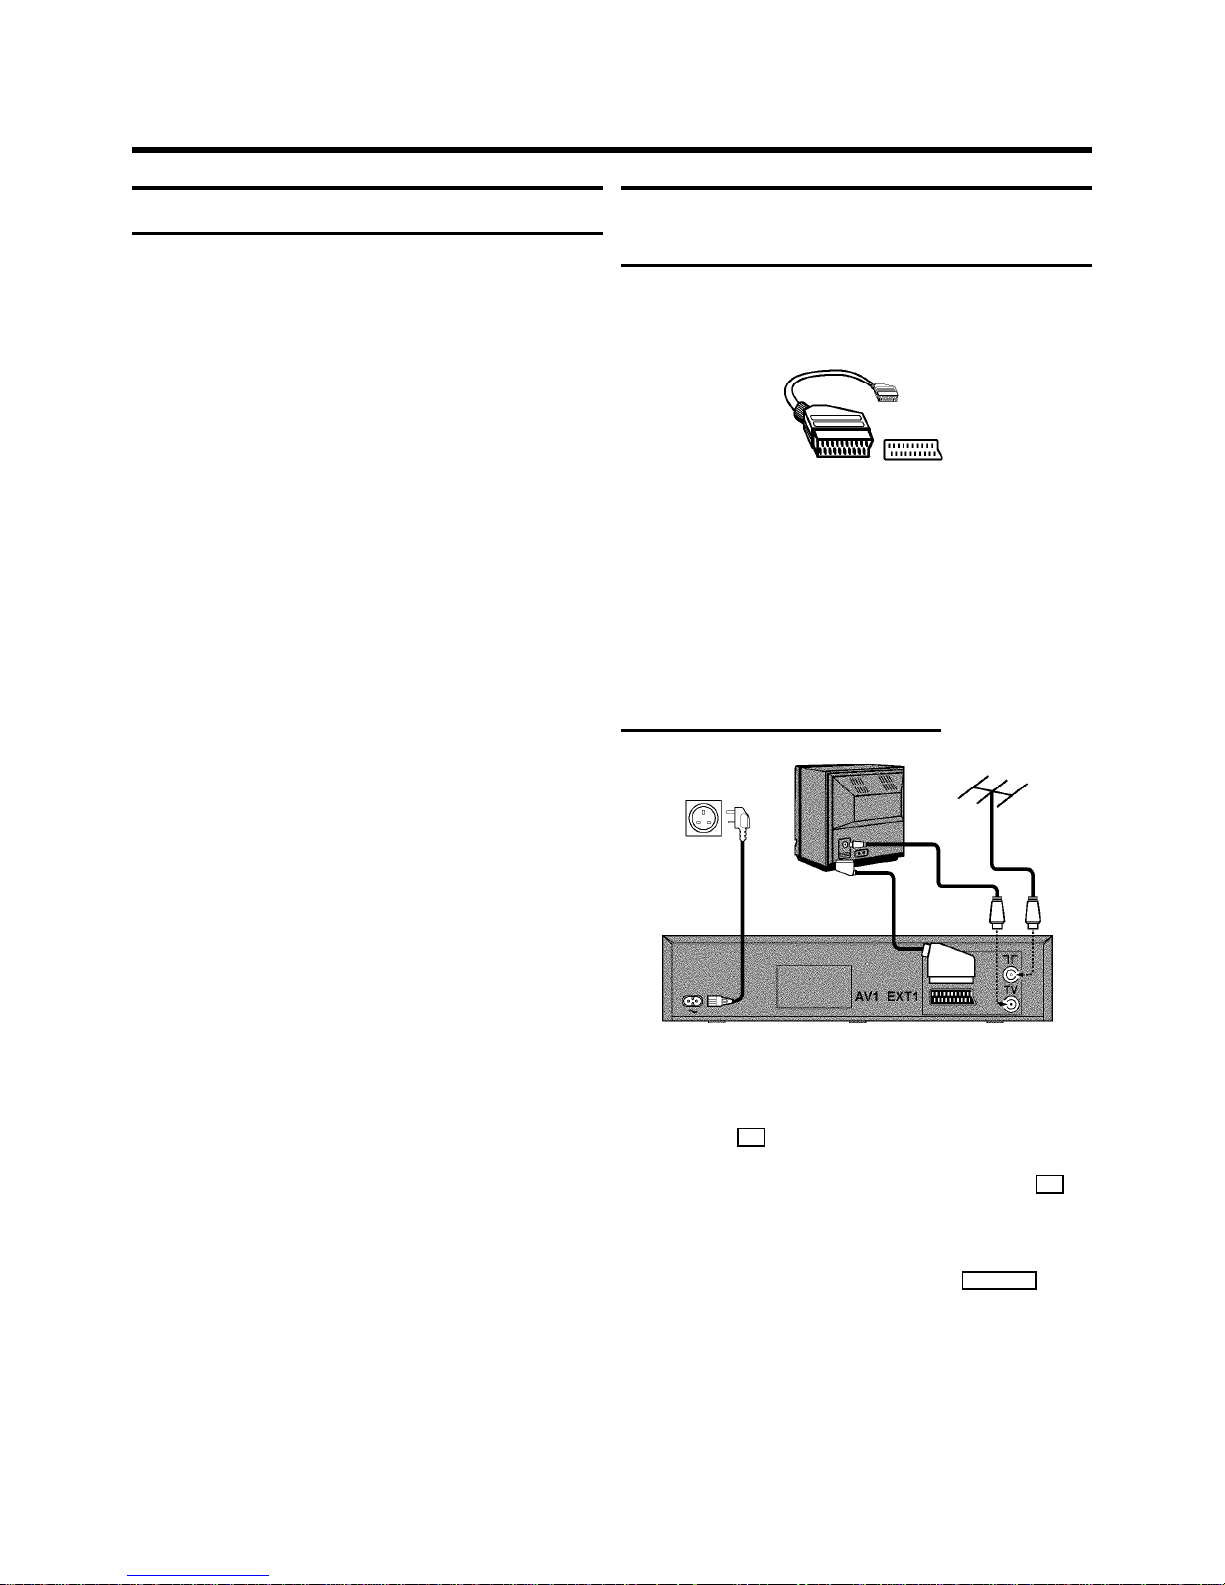
How to connect your video recorder to the
TV set
We recommend the use of a scart cable. This will give you the
best pictureand sound quality.
When you installyourvideorecorderforthefirsttime, please
read:
E If your TV set has a scart socket and you are using a
scartcable, please read the section ’Connecting with a
scartcable’.
E The section ’Connecting without a scart cable’, if you are
not using a scart cable.
Connecting with a scart cable
a Switchoff the TV set.
b Removethe aerial cable plug from your TV set and insert
it into the 2 socket at the back of the video recorder.
c Plugone end ofthe aerial cable provided into the 3
socketon the video recorder and the other end into the
aerial input socketon your TV set.
d Plugone end ofthe scartcable into the EXT.1 AV1 scart
socketat the back of the video recorder and the other
end into the scart socket on your TV set (see instruction
manual TV set).
e Switch on theTV set.
1. HOW TO CONNECT YOUR VIDEO RECORDER
4
f Insertone end of the mains cable into themainssocket
4 at the back of the video recorder and the other end
into the wall socket.
g Ifyour TV set automatically switches to programme
number e.g.: ’EXT’, ’0’,or ’AV’,thistextwill appear on the
TV screen:
CONGRATULATIONS ON THE
PURCHASE OF YOUR NEW
PHILIPS VIDEO RECORDER
TO CONTINUE PRESS OK
DIfyourTV set does not switch to programme number
e.g.: ’EXT’, ’0’,or ’AV’ automatically,select the
programmenumberforthe video recordermanually
(see instructionmanual TV set).
h Thenread ’Initial installation’ in chapter ’INSTALLING
YOUR VIDEO RECORDER’.
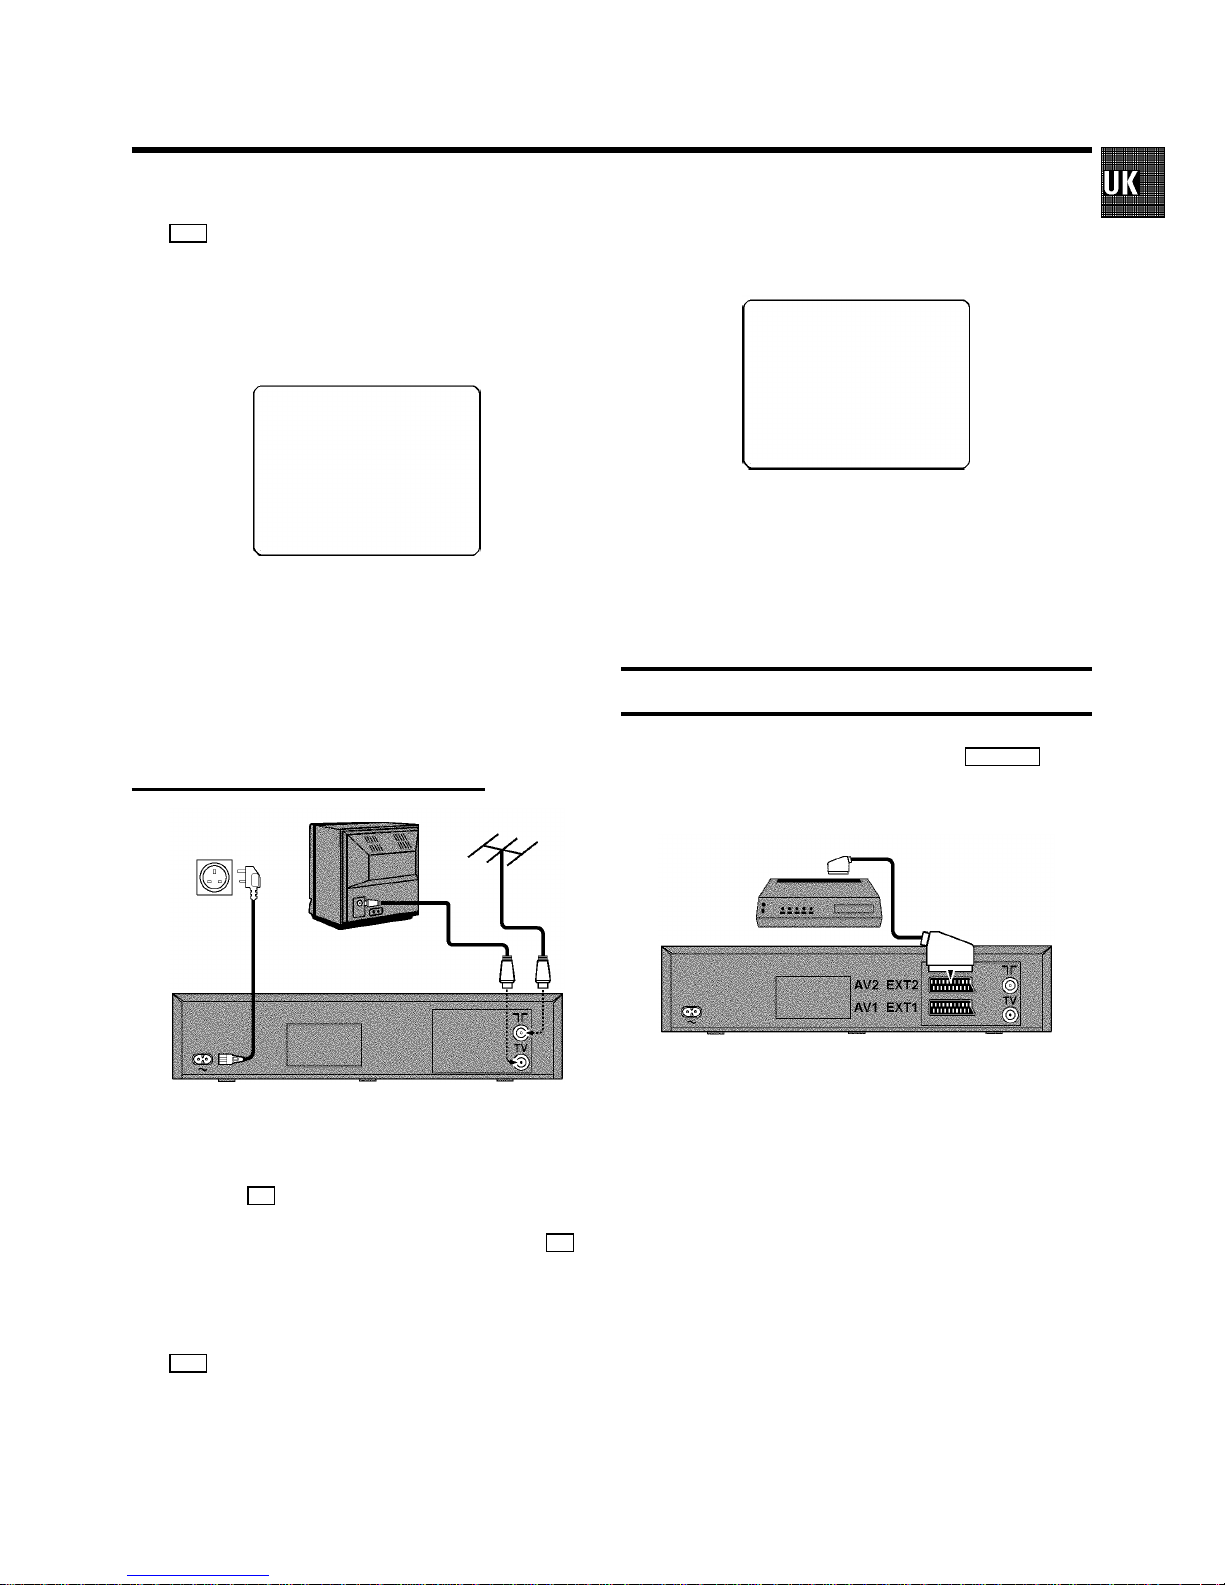
Connecting without a scart cable
a Switchoff the TV set.
b Removethe aerial cable plug from your TV set and insert
it into the 2 socket at the back of the video recorder.
c Plugone end ofthe aerial cable provided into the 3
socketon the video recorder and the other end into the
aerial input socketon your TV set.
d Insertone end of the mains cable into themainssocket
4 at the back of the video recorder and plug the other
end into the wall socket.
e Switch on yourTV setand select the programme number
that you have chosen for video playback (see instruction
manual TV set).
f Tunethe TV setuntilthis picture appears.
DThe video recorder willnow be sending a
welcoming texton channel CH35 or 583MHz:
CONGRATULATIONS ON THE
PURCHASE OF YOUR NEW
PHILIPS VIDEO RECORDER
TO CONTINUE PRESS OK
DIfyou were using a video recorder before, you will
probablyneed to retue the ’video channel’ on your
TV to obtain this picture.
g Whenthe TV has been tuned read the paragraph ’Initial
installation’in the nextchapter.
Connecting a decoder or other equipment
You can connect additional equipment to the EXT.2 AV 2
socket.Forexample: a decoder,a satellitereceiver or a
camera recorder.
5
 Loading...