

Page 1
T
ABLE
OF
C
ONTENTS
Safety Precautions
WARNING: DANGEROUS
VOLTAGE INSIDE
WARNING: TO PREVENT FIRE OR SHOCK HAZARD,
DO NOT EXPOSE THIS UNIT TO RAIN OR
MOISTURE.
•The STANDBY/ON and VCR POWER buttons do not completely shut off
the mains power from the unit, but switch operating current on or off only.
•The rating plate is on the rear of the unit.
Table of Contents
Some Do's and Dont's............................................................................................. 3
Description of Controls.........................................................................................4
Getting Connected Up...........................................................................................9
Setting Up.............................................................................................................11
Basic Operations..................................................................................................21
Advanced Operations..........................................................................................23
System Connections.............................................................................................34
Operating TV.......................................................................................................36
Before Requesting Service..................................................................................37
Specifications........................................................................................................38
VIDEO Plus+ and PlusCode are registered trade-
marks of Gemstar Development Corporation. The
VIDEO Plus+ system is manufactured under license
from Gemstar Development Corporation.
Front Panel..................................................................................................4
Rear Panel...................................................................................................5
On-Screen Display......................................................................................5
Remote Control...........................................................................................6
Display Window..........................................................................................8
VCR to TV Connection using the RF Connection......................................9
VCR to AV TV Connection using the SCART Connection........................9
VCR to AV TV Connection using the S-video Connection......................10
Auto Set Up/Preset Download..................................................................11
Setting the Video Channel.........................................................................14
Power Save Mode.....................................................................................15
Preset Download.......................................................................................15
Auto Channel Setting................................................................................15
Manual Channel Setting............................................................................16
Clock Setting.............................................................................................20
VIDEO Plus+
Playback....................................................................................................21
Recording..................................................................................................22
Automatic Operations...............................................................................22
Special Effect Playbacks...........................................................................23
Tracking Adjustments...............................................................................23
Index Search..............................................................................................23
SmartPicture..............................................................................................24
DSPC........................................................................................................24
Digital TBC/NR........................................................................................25
Digital 3R..................................................................................................25
Receiving/Recording NICAM Stereo and Bilingual Programmes...........25
Selecting Monitor Sound..........................................................................25
Using On-Screen Display.........................................................................26
One Touch Recording (OTR)....................................................................26
Selecting Recording Format.....................................................................27
Selecting AV1 and AV2 Input signal.........................................................27
Automatic Satellite Programme Recording..............................................28
EasyLink Functions..................................................................................28
Timer Recording Using the VIDEO Plus+ System...................................29
Timer Recording.......................................................................................30
Tape Duplication.......................................................................................32
Audio Dubbing.........................................................................................33
Connection To a Satellite Tuner (Simple Connections)............................34
Connection To a Satellite Tuner (Perfect Connections)............................34
Connection To a Decoder..........................................................................35
®
Set Up..............................................................................20
625
Introduction
Congratulations on purchasing your
new VCR.
You can’t wait to get it working, but
before you do, spare a few moments to
read this brief introduction to the world
of video recording. It may repay you
handsomely in terms of improved
results, and avoiding of costly mistakes.
Important for the United
Kingdom.
This machine is fitted with an
approved moulded 13 Amp plug. To
change a fuse in this type of plug,
please follow these instructions.
1
Take off the fuse cover and
take out the fuse.
2
Put in a new fuse which
should be a BS1362 3A,
A.S.T.A or BSI approved
type.
3
Refit the fuse cover.
If the plug fitted is not suitable for
your socket, cut it off and fit
another type.
If the plug you fit contains a fuse, it
should be a 3Amp fuse. If you fit a
plug which does not need a fuse,
make sure the fuse on your fuse box
is not greater than 5 Amps.
i Note: Please destroy the plug
you have cut off so that it
cannot be used in a 13 Amp
socket somewhere else.
How to connect a plug
The wires in the lead from the
video recorder are coloured as
follows.
* Blue - 'neutral' ('N')
* Brown - 'live' ('L')
4
Connect the blue wire to the
terminal in the plug which is
marked with the letter 'N' or
coloured black.
5
Connect the brown wire to
the terminal in the plug
which is marked with the
letter 'L' or coloured red.
6
Do not connect either of the
wires to the terminal in the
plug which is marked with
the letter 'E', the symbol or
coloured green or green and
yellow.
Before you refit the plug cover,
make sure that the grip at the
bottom of the plug is clamped over
the plastic cover of the lead, not just
over the two wires.
— 2 —
Page 2
S
OME
This equipment has been designed and manufactured to meet international safety standards but, like any
electrical equipment, care must be taken if you are to obtain the best results and safety is to be assured.
DOread the operating instructions before you attempt to use the equipment.
DOensure that all electrical connections (including the mains plug, extension leads and interconnections
between pieces of equipment) are properly made and in accordance with the manufacturer's instructions.
Switch off and withdraw the mains plug when making or changing connections.
DOconsult your dealer if you are ever in doubt about the installation, operation or safety of your equipment.
DObe careful with glass panels or doors on equipment.
DON'Tcontinue to operate the equipment if you are in any doubt about it working normally, or if it is damaged
in any way — switch off, withdraw the mains plug and consult your dealer.
DON'Tremove any fixed cover as this may expose dangerous voltages.
DON'Tleave equipment switched on when it is unattended unless it is specifically stated that it is designed for
unattended operation or has a standby mode. Switch off using the switch on the equipment and make
sure that your family knows how to do this. Special arrangements may need to be made for infirm or
handicapped people.
DON'Tuse equipment such as personal stereos or radios so that you are distracted from the requirements of road
safety. It is illegal to watch television whilst driving.
DON'Tlisten to headphones at high volume, as such use can permanently damage your hearing.
DON'Tobstruct the ventilation of the equipment, for example with curtains or soft furnishings. Overheating will
cause damage and shorten the life of the equipment.
DON'Tuse makeshift stands and NEVER fix legs with wood screws — to ensure complete safety always fit the
manufacturer's approved stand or legs with the fixings provided according to the instructions.
DON'Tallow electrical equipment to be exposed to rain or moisture.
D
O'S
A
ND
D
ONT
'
S
ABOVE ALL...
—NEVER let anyone especially children push anything into holes, slots or any other opening in the case —
this could result in a fatal electrical shock;
—NEVER guess or take chances with electrical equipment of any kind — it is better to be safe than sorry!
Positioning
Do not place the VCR directly on top of or underneath your TV set. Ensure that there is at least 20 cm between
the VCR and the TV set, and that air can circulate freely through the ventilation openings of the VCR.
IMPORTANT
Audio-Visual material may consist of copyrighted works which must not be recorded without the authority of the owner of
the copyright.
Please refer to relevant laws in your country.
WARNING
Any unauthorized changes or modifications to this equipment void the user’s authority to operate it.
This product complies with the requirements of the directive 73/23/EEC+89/336/EEC+93/68/EEC.
— 3 —
Page 3
D
ESCRIPTION
Front Panel
OF
C
ONTROLS
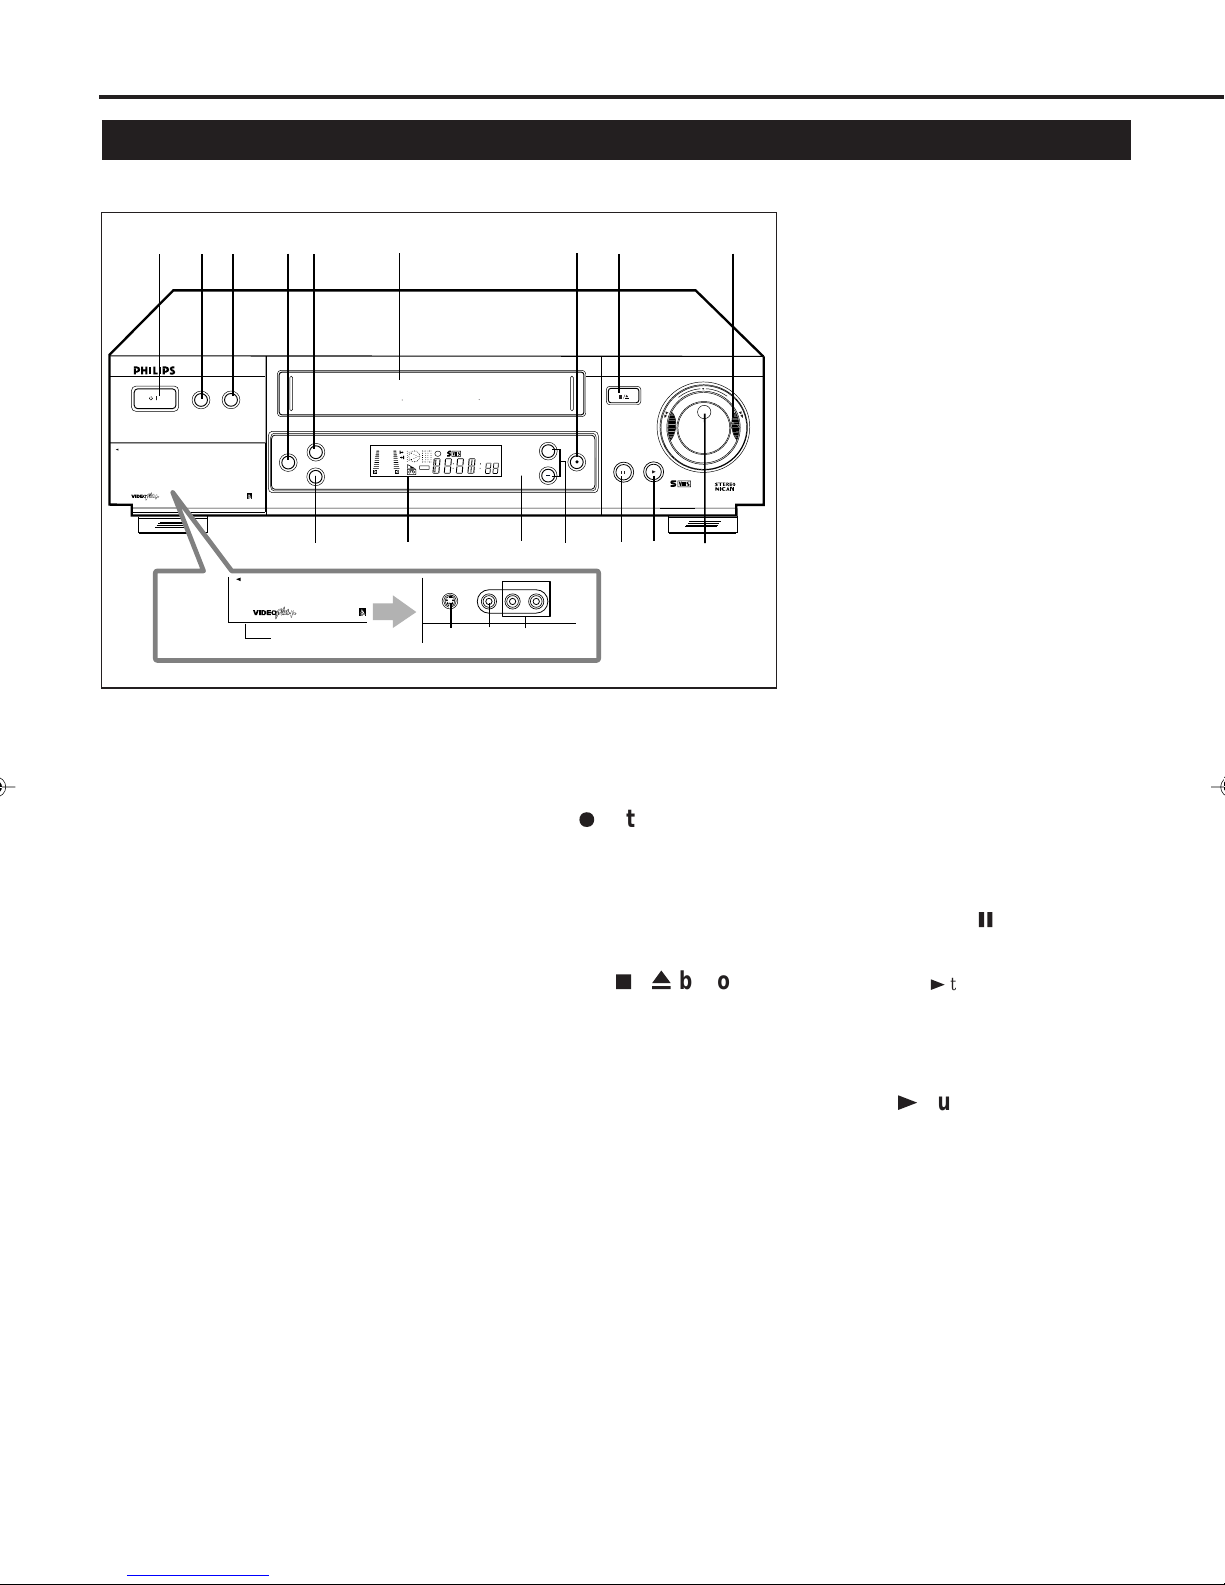
1
VR 1000 VIDEO CASSETTE RECORDER
STANDBY/ON
/
OPEN AV FRONT CONNECTORS
23
REC LINK
DIGITAL TBC/NR
NEX TVIEWLINK
4
5
TIME BASE CORRECTOR DIGITAL NOISE REDUCTION SMARTPICTURE
DISPLAY
SPEED
AUDIO DUBBING
13
OPEN
NEX TVIEWLINK
Open the lid.
1 STANDBY/ON button
• Turns the VCR on or off.
• Sets the VCR for an unattended
recording (timer recording) after
timer settings are completed. (✈P.29,
P.30)
2 REC LINK button
Engages auto satellite programme
record mode. The lamp (the button
itself) will light. (✈P.28)
3 DIGITAL TBC/NR button
Removes jitter from fluctuating video to
deliver a stable picture. The lamp (the
button itself) will light. (✈P.25)
+8
4
0
6
-
15
dB
12
NORM
6
14
SUPER VHS
VPS/PDC
VCR
S-VIDEO
10
REVIEW
SP SLP
VIDEO
11 12
L AUDIO R
15
+
PROGRAMME
7
RECORD
16
6 Cassette compartment
Where a video cassette is inserted.
7 RECORD ¶ button
• Starts recording when pressed once.
(✈P.22)
• Starts a recording for 30 minutes to 6
hours long when pressed more than
once. The shut-off time increases in
30 minute intervals. (✈P.26)
8 STOP/EJECT 7 / 0 button
Stops the tape when the tape is running.
(✈P.21, P.22)
Press again to eject the cassette when
the tape is not running. (✈P.21, P.22)
8
STOP/EJECT
17
PLAYPAUSE/STILL
18
10 S-VIDEO input jack
9
For connecting to the S-Video output
jack on another VCR or a portable
video camera. (✈P.32)
11 VIDEO input jack
For connecting to the video output jack
on another VCR or a portable video
@
F
O
R
D
W
N
I
W
E
R
A
R
D
camera. (✈P.32)
12 AUDIO input jacks
For connecting to the audio output jacks
625
on another VCR or a portable video
camera. (✈P.32)
13 AUDIO DUBBING button
19
Replaces the normal audio sound of a
previously recorded tape with a new
soundtrack, using an audio component
(✈P.33)
14 Display window
See page 8.
15 IR (infrared) remote sensor
Receives the signal from the (IR)
remote control.
16 PROGRAMME +/- buttons
• Changes the channels on the VCR.
Release at a desired channel.
• Adjusts the tracking during playback,
and slow motion picture. (✈P.23)
17 PAUSE/STILL 8 button
Stops the tape during recording (pause)
or playback (still picture). (✈P.21, P.22)
Press PLAY 3 to resume normal
playback or recording.
Activates slow motion picture when
pressed for more than 2 seconds during
playback. (✈P.23)
4 SPEED button
Selects the tape speed for recording (SP,
LP). During playback, the tape speed is
automatically selected (SP, LP or EP
(for NTSC signal only). (✈P.22, P.29,
P.30)
SP, LP : For PAL signal
SP, EP : For NTSC signal
5 DISPLAY button
Switches display between present time,
tape remaining time, time counter and
channel position. (✈P.22)
9 SHUTTLE ring
• Rewinds or fast forwards the tape
when the tape is not running. (✈P.23)
• Starts reverse or forward rapid visual
search during playback or still
picture mode. (✈P. 21, P.23)
— 4 —
18 PLAY 3 button
Starts normal playback. (✈P.21)
19 Jog dial
Advances or reverses the picture frame
by frame in the still picture mode.
(✈P.23)
Page 4
Rear Panel
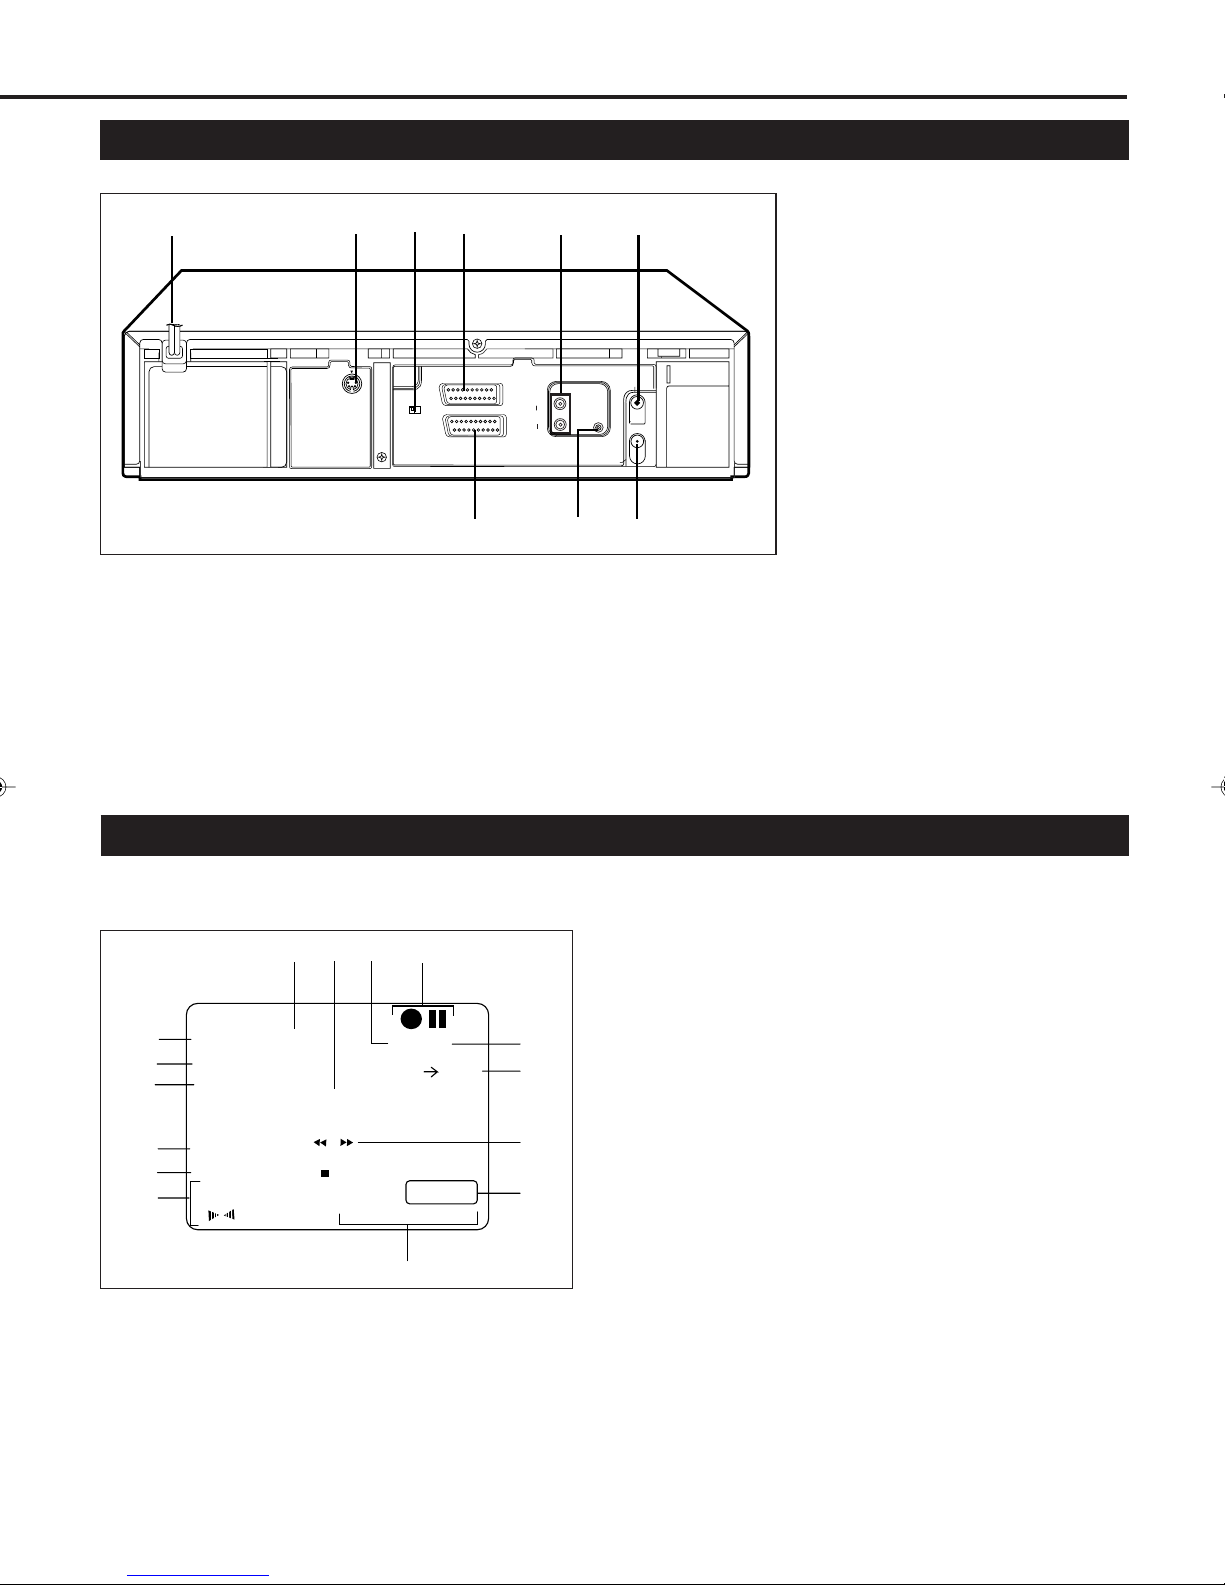
1
2
S OUT
1 AC (alternating current)
power cord
Connect the AC power cord to an AC
outlet.
2 S-VIDEO out jack
For connecting to the S-Video input jack
on a TV or another VCR. (✈P.9, P.32)
AUDIO
OUT
5
L
R
8
3
AV1 OUT
COMP. Y/C
4
AV1 IN/OUT
AV2 IN/DECODER
7
3 AV1 OUT switch
Selects the type of signal output via the
21 pin AV1 IN/OUT connector. (✈P.9)
4 AV1 IN/OUT Connector
(SCART)
For connecting to the AV terminal on
TV or another VCR. (✈P.9, P.32)
PAUSE
RF OUT
6
ANT. IN
9
5 AUDIO OUT jacks
For connecting to the audio input jack
on a TV or another VCR. (✈P.9, P.32)
6 ANT. (antenna) IN (input)
terminal (from Antenna)
Connect your antenna or Cable to this
terminal. (✈P.9)
7 AV2 IN/DECODER Connector
For connecting to the AV terminal on
another VCR, satellite tuner or decoder.
(✈P.32, P.34, P.35)
8 Remote PAUSE Connector
Enables connection to second recorder
equipped with R.A. Edit connector.
9 RF OUT (output) terminal (to
TV)
Use the supplied RF coaxial cable to
connect this terminal to the UHF/VHF
input terminal on the TV. (✈P.9)
On-Screen Display
The following information (VCR operating status) appears on the TV screen. (✈P.26)
1. Operation mode
2. Cassette-In Indicator
3. SmartPicture setting or
Timer warning display
4. TV station name
5. Channel position
number
6. Current time
10
2
34
5
PR. 12 ABC ] SP
6
7
23:59
31.12.99
NTSC PAL
AUTO
8
ST
0------------+---- -----+--------+-----+
9
HIFI 1:23:45
L R REMAIN 1:00
1
11
12
13
14
15
7. Current date
8. Received broadcast
9. Tape position indicator
10. Sound output mode
11. Tape speed
12. NTSC playback display
13. Tape direction
14. Counter display
15. Tape remaining time indicator
— 5 —
Page 5
D
ESCRIPTION
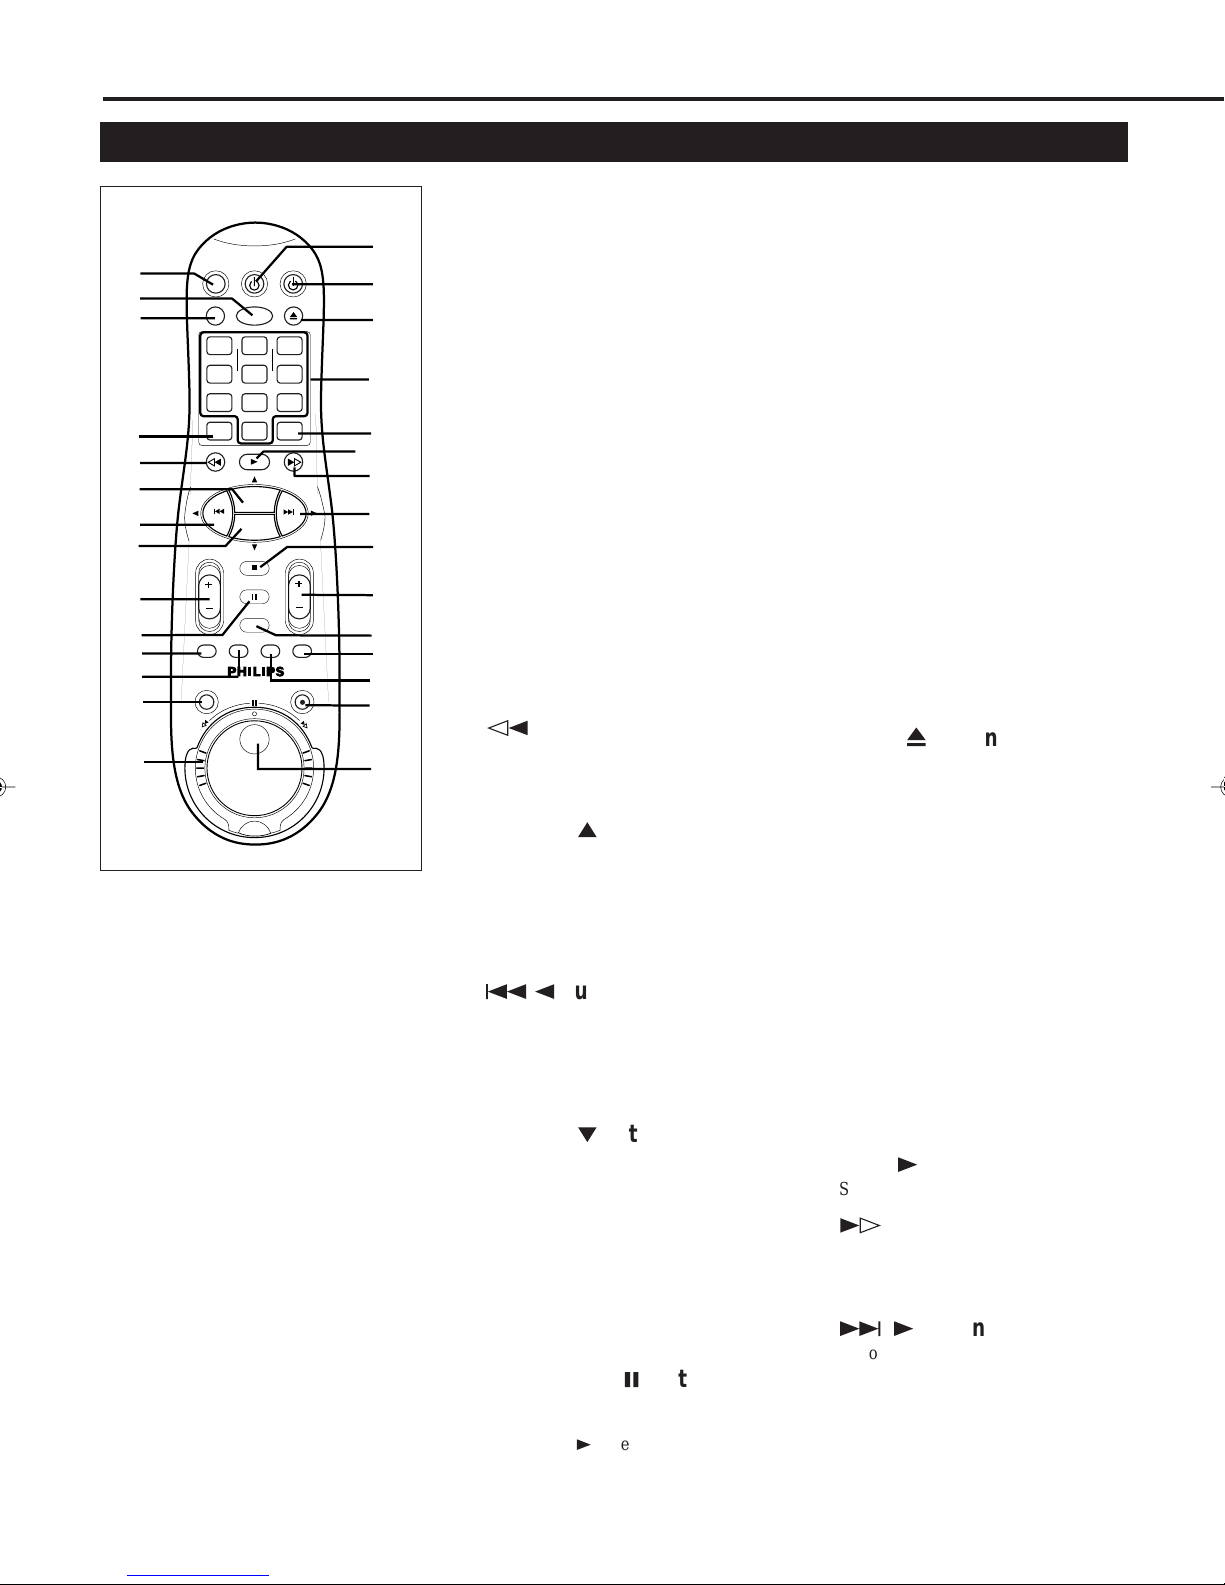
Remote Control
OF
C
ONTROLS
(CONTINUED)
1
2
MUTE
VCR/TV
3
123
START STOP DATE
456
VPS/PDC DAILY
789
4
SPEED
POWER
AUDIO
QUICK PROGRAMMING
+
-+-
0
PLAY
POWER
EJECT
WEEKLY
CLEAR
VCR
TV
5
6
7
8
9
10
11
12
TV VOL
SMART
PICTURE
JOG/SHTL
PROG +
PROG –
STOP
PAUSE/STILL
DISPLAY
MENU
TV CH
OK
TIMER
RECORD
13
14
Using this remote control to
operate TV
You can use this remote control to
operate PHILIPS TV and other
manufacturers’ TV .
To operate TV, see page 36.
15
16
17
18
19
20
21
22
23
24
25
26
27
28
29
1 MUTE button
Minimizes the TV volume instantly.
Press again to return to the previous
volume level.
2 AUDIO button
Selects the sound output mode. (✈P.25)
3 VCR/TV button
ONLY FOR SCART CONNECTION
(✈P.8) USERS:
Switches TV mode between AV and TV.
When pressed and VCR indicator on the
display window lights, TV mode
changes to AV mode.
When pressed and VCR indicator goes
off, TV mode changes to TV mode.
4 SPEED button
• Selects the tape speed for recording
(SP or LP). During playback, the tape
speed is automatically selected (SP or
LP). (✈P.22, P.29, P.30)
• Enables/disables auto tracking mode
during playback (✈P.23).
5 button
Rewinds the tape. Also, during
playback, starts rapid reverse visual
search.
6 PROG. +/5 button
• Moves up the channel position on the
VCR.
• Moves up the cursor when using the
VCR menus.
• Adjusts the tracking during playback
and slow motion picture (✈P.23).
7
4/2
• Locates an index marked at the
• Goes back to the previous menu
button
beginning of every recording.
(✈P.23)
screen when using the menus.
8 PROG. –/∞ button
• Moves down the channel position on
the VCR.
• Moves down the cursor when using
the menus.
• Adjusts the tracking during playback,
and slow motion picture (✈P.23).
9 TV VOL (volume) +/– buttons
Changes the TV volume.
Release at desired volume.
10 PAUSE/STILL 8 button
Stops the tape during recording (pause)
or playback (still picture).
Press PLAY 3 to resume normal
playback or recording.
Activates slow motion picture when
pressed for more than 2 seconds during
playback. (✈P.23)
11 SMARTPICTURE button
Selects the SmartPicture mode. (✈P.24)
12 MENU button
Calls up the main menu.
13 JOG/SHTL (Shuttle) button
and lamp
Activates the jog dial and shuttle ring
on the remote control when the lamp
(the button itself) is lit. (✈P.23)
14 Shuttle ring
Starts reverse or forward rapid visual
search during playback or still picture
mode. (✈P.23)
15 TV POWER button
Turns the TV on or off.
16 VCR POWER button
• Turns the VCR on or off.
• Sets the VCR for an unattended
recording (timer recording) after
timer settings are completed.
17 EJECT 0 button
Ejects the cassette. (✈P.21, P.22)
18 Number buttons
(0, 1, 2, 3, 4, 5, 6, 7, 8 and
9)
• Selects a channel position on the
VCR.
To select channel positions 1 to 9,
press 0 then the channel position you
want. For example, for channel
position 4, press 0 then 4.
• Also used to programme the Timer
Recordings. (✈P.29, P.30)
19 CLEAR button
• Erases unwanted timer programmes.
(✈P.31)
• Resets counter to 0:00:00.
20 PLAY 3 button
Starts normal playback.(✈P.21)
21 button
Fast forwards the tape. Also, during
playback, starts rapid forward visual
search.(✈P.21)
22
¢ /3
• Locates an index marked at the
• Selects the items on the menus or
button
beginning of every recording.(✈P.23)
goes to the next menu screen when
using the menus.
— 6 —
Page 6
R
23 STOP 7 button
Stops the tape.
24 TV CH +/– button
Changes the TV channels. Release at a
desired channel.
25 DISPLAY button
Switches display between present time,
tape remaining time, time counter and
channel position. (✈P.22)
26 TIMER button
Displays the Timer Recording menu.
(✈P.29, P.30)
27 OK button
Changes the selection when using the
menus.
28 RECORD ¶ button
• Starts recording when pressed once.
(✈P.22)
• Starts a recording for 30 minutes to 6
hours long. When pressed more than
once, the shut-off time increases in
30-minute intervals. (✈P.26)
29 Jog dial
Advances or reverses the picture frame
by frame in the still picture mode.
(✈P.23)
Note:
The following buttons will light for 10
seconds when you press one of them.
• PROG. +/
• PROG. –/
•
w2/2
•
¢/3
• TV VOL (ume) +/–
• TV CH (annel) +/–
5
∞
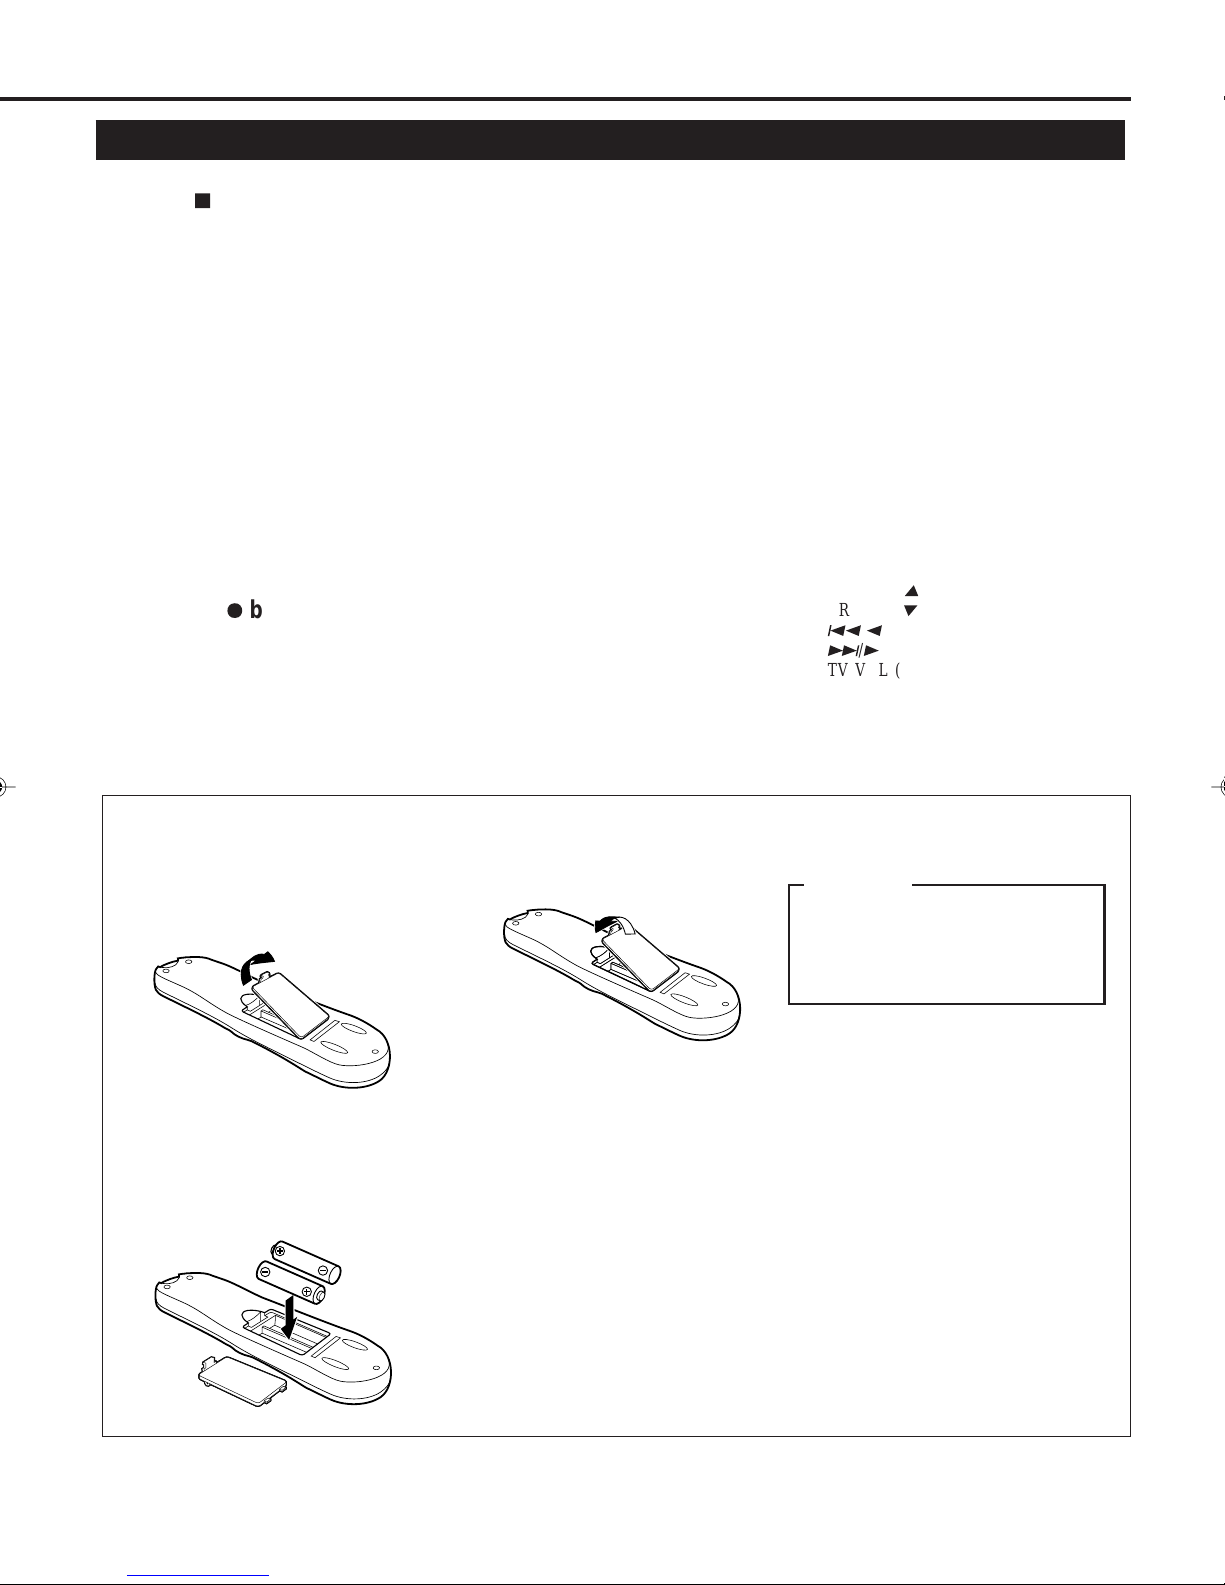
To insert the batteries:
1 Remove the battery compartment lid
from the bottom of the remote
control.
2 Install two AA batteries —
R6(SUM-3)/AA — matching
polarity indicated inside the battery
compartment.
CAUTION
On Battery Replacement
Do not mix old and new batteries.
(Also never mix alkaline batteries
with manganese batteries.)
Note:
This remote control and batteries are
supplied accessories.
Check to make sure they are included.
Also, check “Specifications” to see what
other accessories are included.
— 7 —
Page 7
G
Display Window
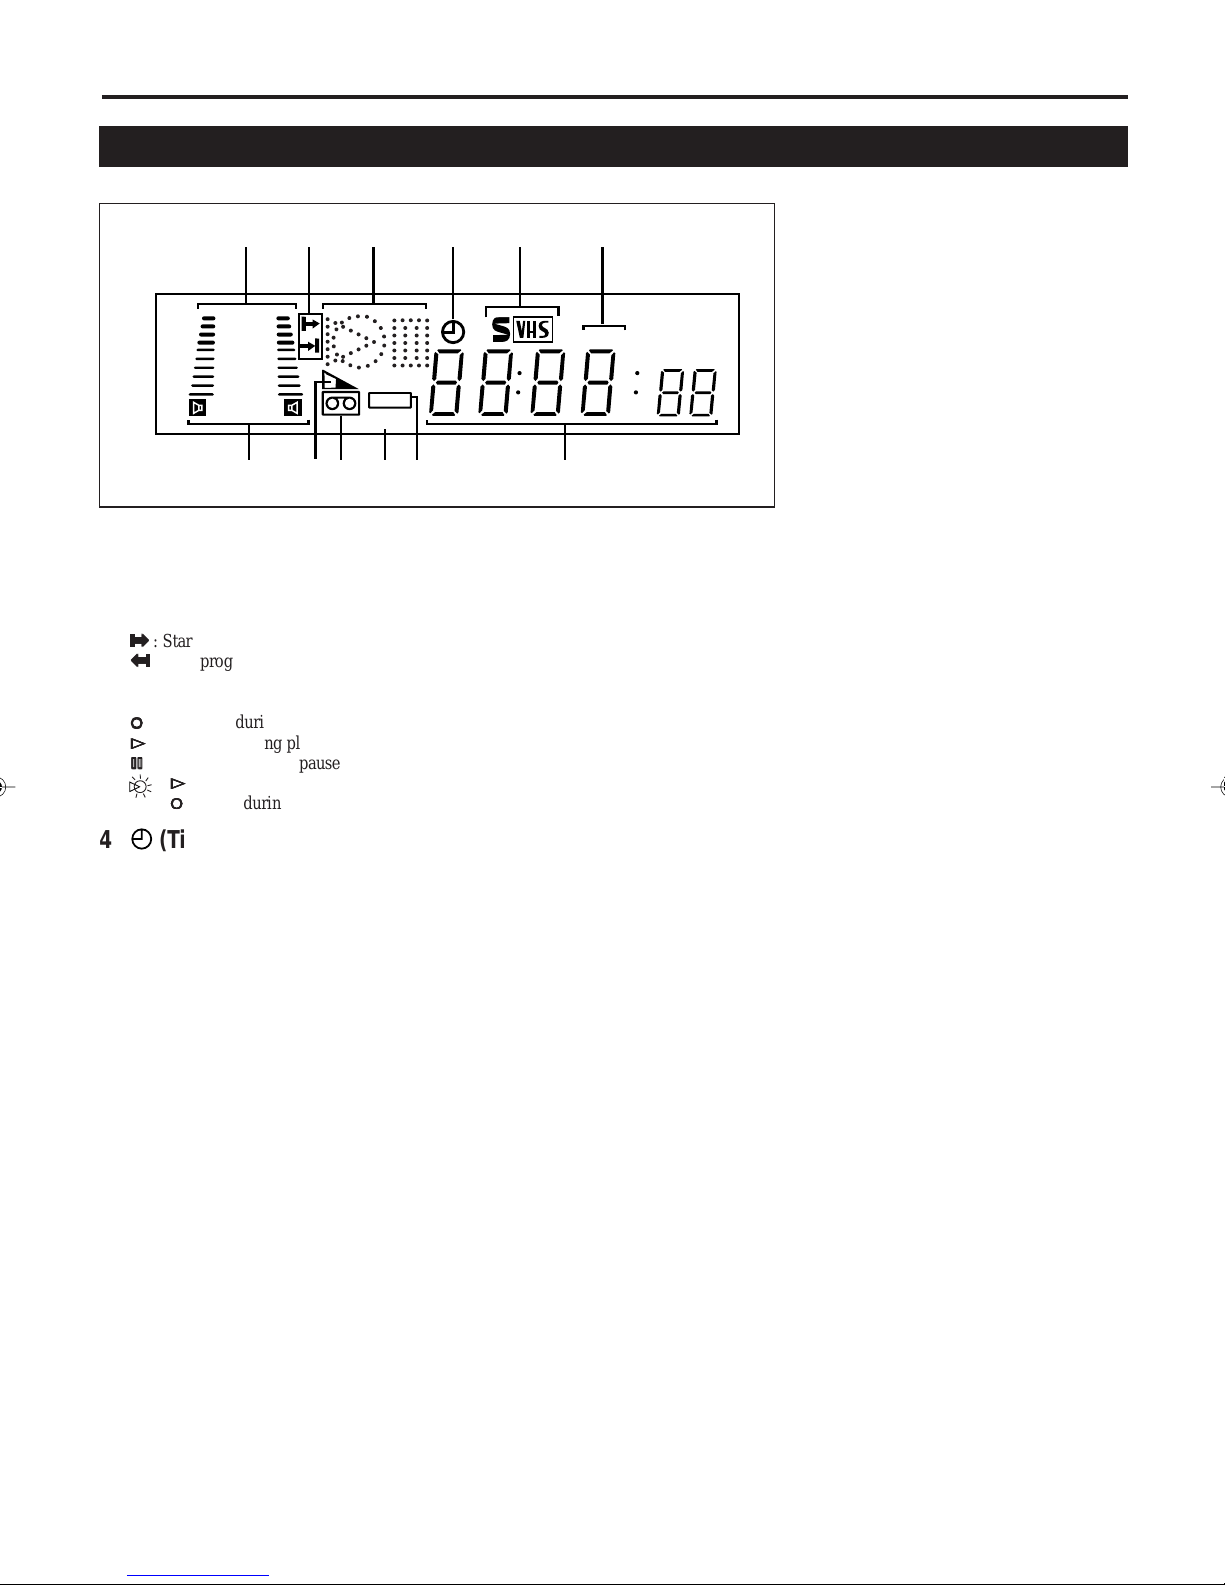
1
+8
4
0
6
-
15
NORM
2
dB
7
3
VPS/PDC
VCR
91011 12
8
1 Sound level indicator
Indicates the audio signal level.
2 Programme Time Indicators
\\
\
: Start programme time.
\\
||
|
: Stop programme time.
||
3 Operation mode indicators
‡‡
‡
: Lights up during recording.
‡‡
##
#
: Lights up during playback.
##
**
*
: Lights up during a pause.
**
##
:“
#
” lights up and
##
‡‡
“
‡
” blinks during audio dubbing.
‡‡
4 (Timer) indicator
Lights up when the VCR is set for an
unattended recording (timer recording).
(✈P.29, P.30)
5 S-VHS indicator
Lights up while playing a tape recorded
in S-VHS format and while recording
on an S-VHS tape using S-VHS format.
4
5
6
SP EP
6 Speed indicator
Indicates the tape speed.
SP – Standard Play
LP – Long Play
EP – Super Long Play
(For NTSC playback only)
7 Sound output mode indicator
Indicates audio output mode currently
selected. (✈P.25)
8 Tape Remaining Time
indicator
Displays the time remaining on tape
after pressing DISPLAY.
9 ] (Cassette-in) indicator
Lights up when there is a cassette in the
VCR.
10 VCR indicator
Lights up when the VCR/TV button is
pressed or when playback is started or
when scrambled broadcast is received.
11 PDC indicator
Lights up when PDC is engaged for
timer recording or when PDC signal is
received.
VPS (Video Programme System) is not
currently available in the U.K. and not
possible with this VCR.
12 Digital clock/counter/
Channel indicator
• Normally the present time appears.
• When a tape is inserted, the time
counter appears (and is reset to
0:00:00).
If you always rewind your tapes
completely, you can use this counter
reading as an index to find where a
programme starts.
• A channel position number selected
with the TV tuner built in the VCR
appears.
When the external line input is
selected, the following display
appears:
• “F-1” for the front panel Audio/
Video jacks.
• “S-1” for the front panel Audio/S-
Video jacks.
• “L-1” for the rear panel AV1 IN/
OUT connector.
• “L-2” for the rear panel AV2 IN/
DECODER connector.
— 8 —
Page 8
G
ETTING
C
ONNECTED
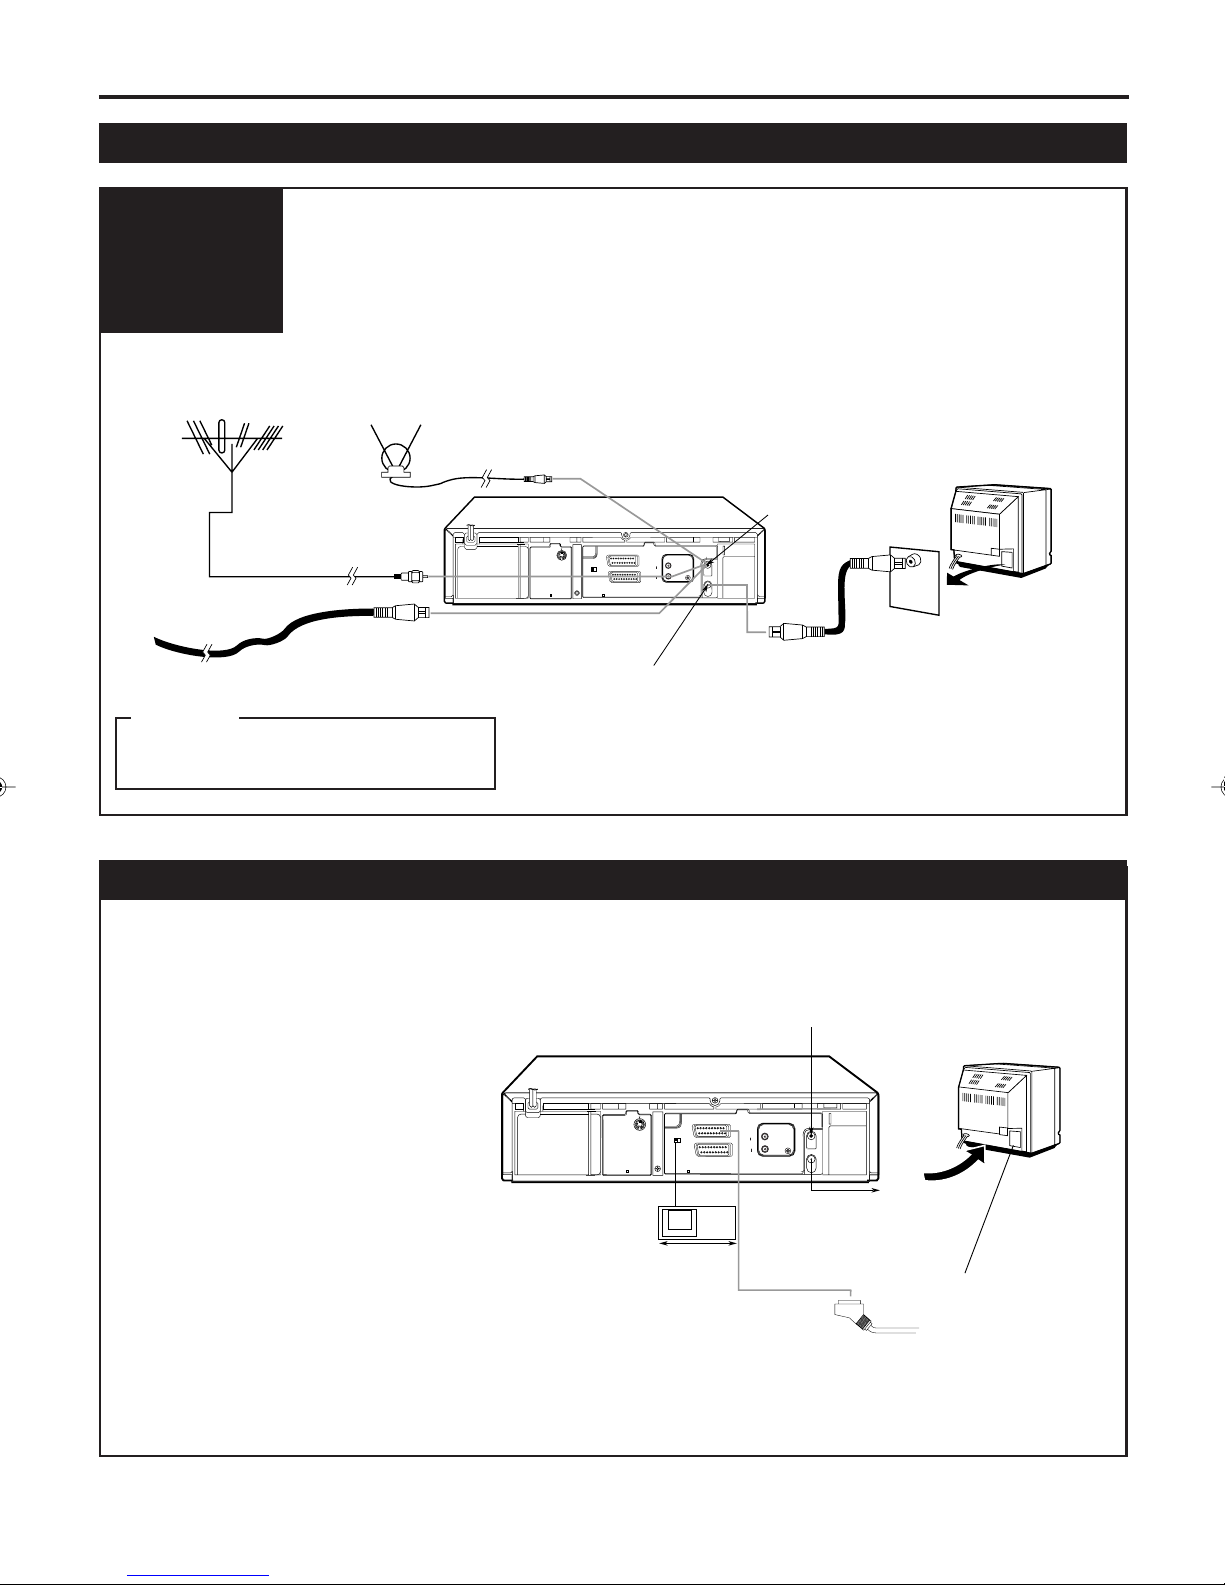
VCR to TV Connection using the RF connection
To connect to a TV with No 21-pin AV input connector.
Connection
Diagram
1 Disconnect the antenna or cable from the TV and the AC power cord
of the TV from the AC outlet.
2 Connect the antenna or cable to the VCR.
3 Connect the VCR to the TV using the RF coaxial cable.
4 Plug the AC power cords of the VCR and TV into the AC outlets.
U
P
Outdoor antenna
Indoor antenna
Back of TV
ANT. IN
ANT. IN
L
AUDIO
OUT
R
PAUSE
RF OUT
Cable
S OUT
AV1 OUT
COMP. Y/C
LP30363-002
LP20654-002
Back of VCR
AV1 IN/OUT
AV2 IN/DECODER
RF coaxial cable
RF OUT
(supplied)
CAUTION
Do not plug the AC power cords until all
connections are completed.
VCR to AV TV Connection Using the SCART Connection
Make this connection if your TV has a 21-pin AV input connector (SCART) in order to reduce the possibility of interference.
And if you are using a stereo TV, you will need this cable in order to enjoy stereo playback of videotapes.
1. Complete the VCR to TV connection
using RF Connection.
2. Connect the scart cable between the AV1
IN/OUT connector of the VCR and the
TV’s 21-pin AV input connector
(SCART).
3. Set the AV1 OUT switch to either one of
the following position,
COMP: If your TV’s SCART is
compatible only with the regular
video signal.
Y/C: If your TV’s SCART is
compatible with a signal which
the luminance and chrominance
signals are separated (Y/C
signal). This setting gives you
high-quality S-VHS pictures.
LP30363-002
— 9 —
S OUT
AV1 OUT
AV1 IN/OUT
COMP. Y/C
AV2 IN/DECODER
LP20654-002
AV1 OUT
COMP. Y/C
From antenna
ANT. IN
L
AUDIO
OUT
R
PAUSE
RF OUT
To TV
21-pin
SCART cable
To TV`s 21-pin
input connector
(SCART)
Page 9
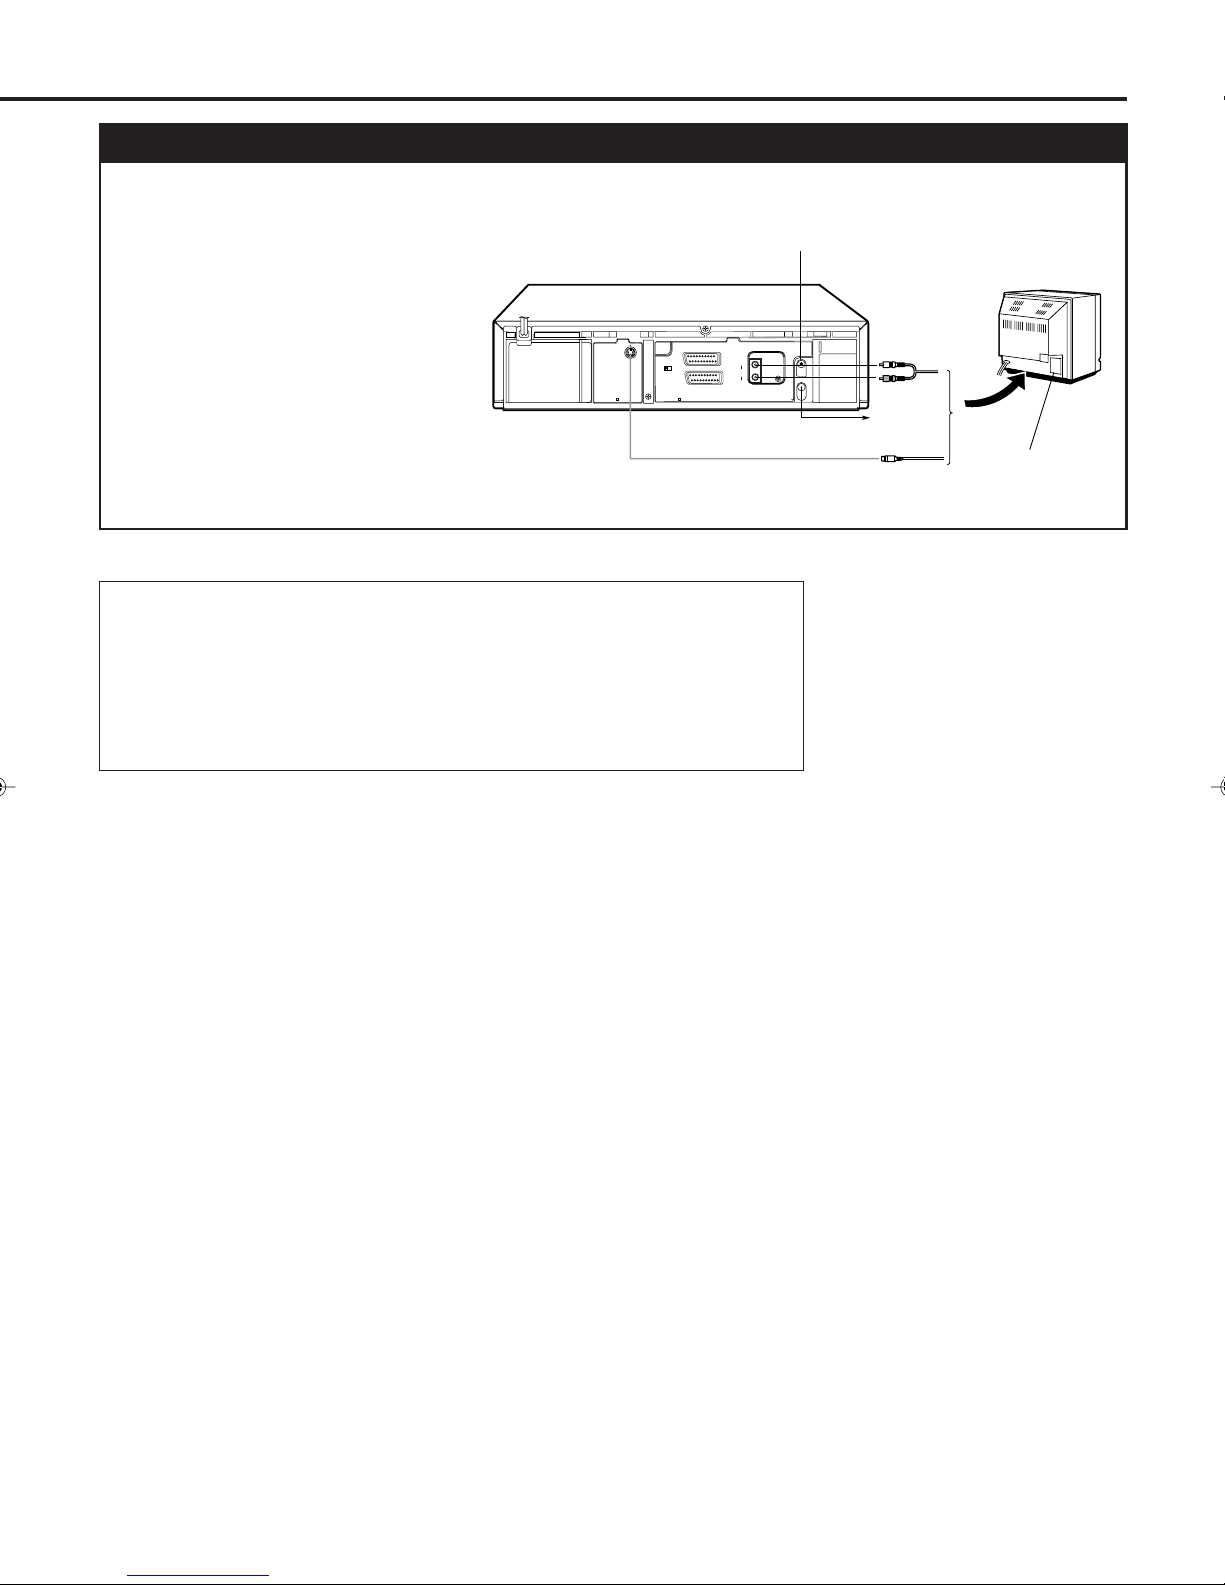
VCR to AV TV Connection Using the S-video Connection
To obtain high-quality S-VHS pictures and Hi-Fi sounds, you can also use the S-VIDEO CONNECTION described below;
1) Complete the VCR to TV connection using the RF Connection.
2) Connect an S-Video/Audio cables between
the S-VIDEO OUT/AUDIO OUT jacks
on the VCR and an S-Video/Audio input
jacks on a TV.
LP30363-002
LP20654-002
AV1 OUT
COMP. Y/C
AV1 IN/OUT
AV2 IN/DECODER
L
AUDIO
OUT
R
S OUT
Notes:
• After you plug the AC power cord into an AC outlet, the Auto Set up/Preset
Download display appears on the TV screen and on the VCR’s display
window when the STANDBY/ON or VCR POWER button is pressed for
the first time to power on the VCR. Go to the next page to perform Auto
Set Up or Preset Download.
• If you are using a Decoder and/or Satellite Tuner, see page 34 and 35 also.
From antenna
ANT. IN
PAUSE
RF OUT
To TV
S-Video Cable
Audio Cable
To S-Video and
audio input jacks
— 10 —
Page 10
S
ETTING
U
P
Auto Set Up/Preset Download
For the first time you press the STANDBY/ON button on the front panel or VCR POWER on the remote control to turn
on the VCR after you plug the AC power cords, the Auto Set up/Preset Download display will appear on the TV screen
and the VCR’s display window.
If you use Auto Set Up function, the video channel (✈P.14), clock** and guide programme numbers** (✈P.20) are also
set automatically.
If you use Preset Download function, the tuner channels are set by downloading preset data from TV.
Also, the clock** and guide programme numbers** (✈P.20) are set automatically. However, you can use this function
only when you connect between VCR and TV equipped with T-V Link, EasyLink, Megalogic, SMARTLINK, Q-Link,
DATALOGIC or NEXTVIEWLINK function via fully-wired 21-pin SCART cable.
Preparation
1 Make sure the TV antenna cable is connected correctly and the VCR’s AC power cord is connected to the AC outlet.
2 If you want to use the on-screen display, set the TV to AV mode (with SCART or S-VIDEO CONNECTION ✈P.9 or
P.10) or UHF channel 52 (with RF connection ✈P.9).
3 Turn on the VCR by pressing the STANDBY/ON button or VCR POWER.
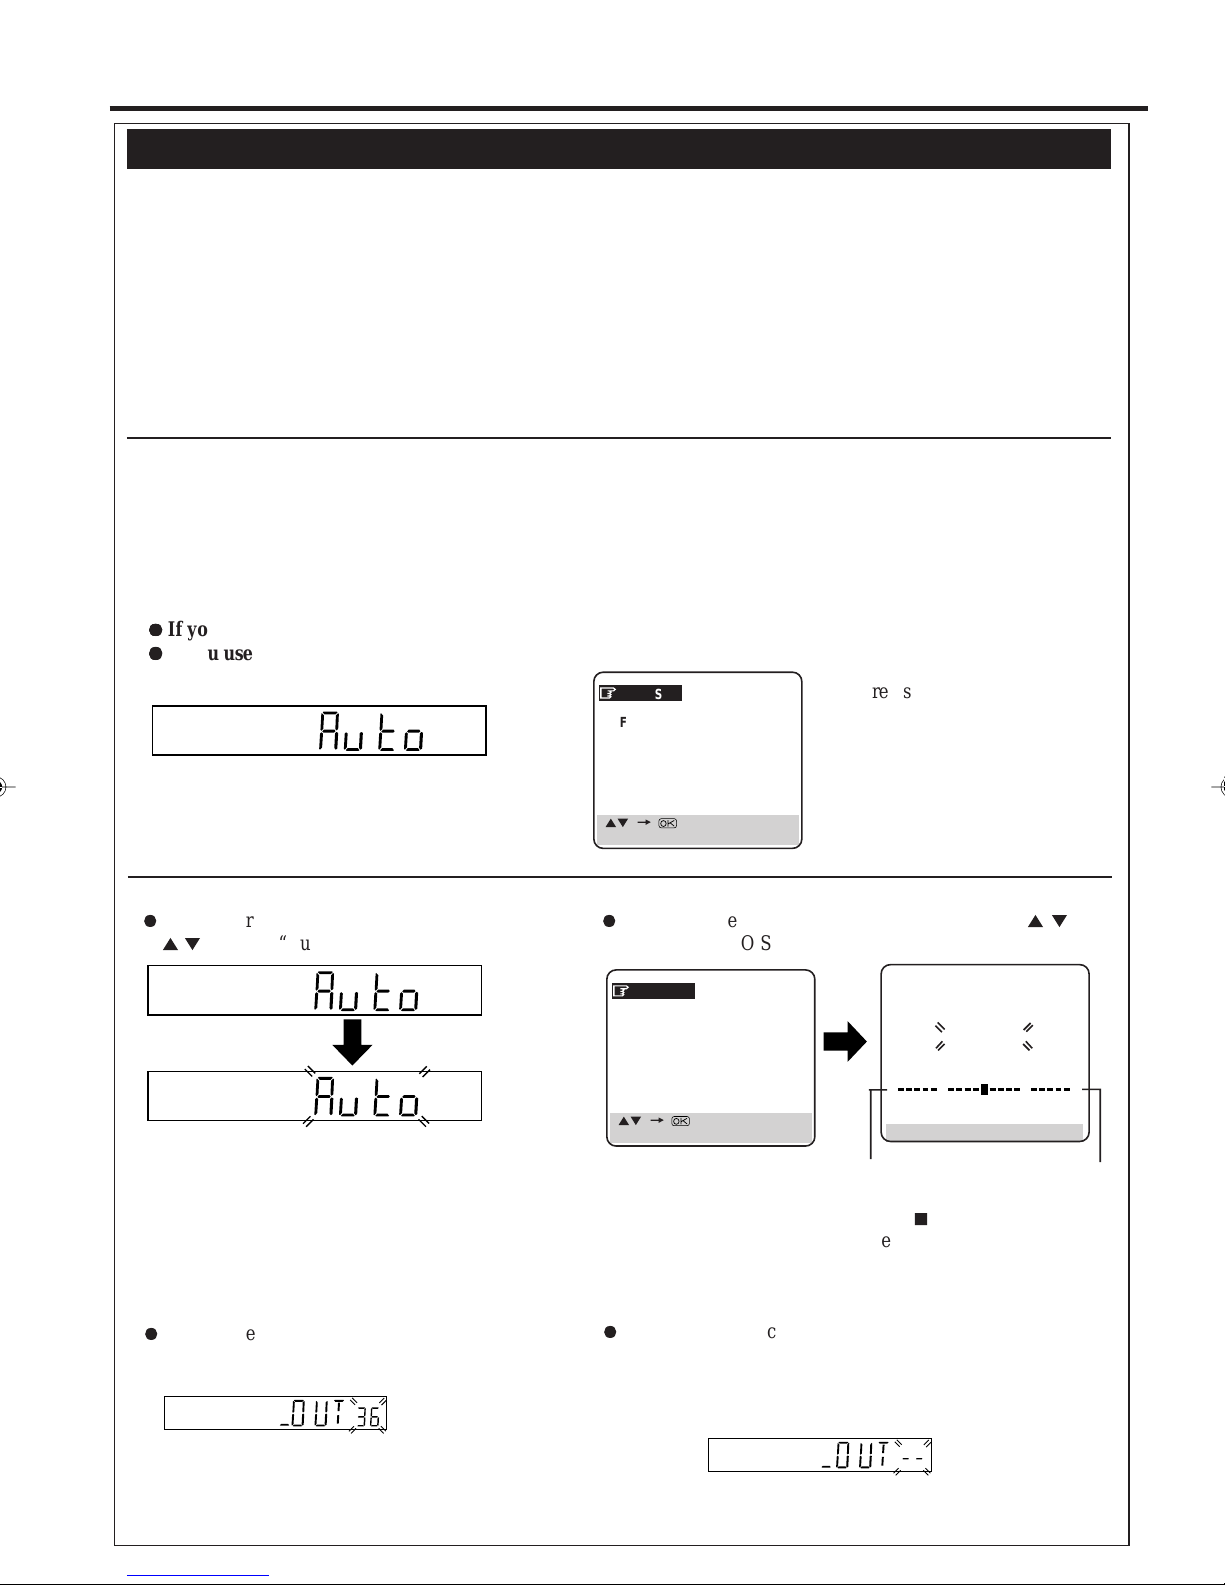
4 The following display appears on the screen and/or display window.
¶¶
¶
If you use Auto Set Up function, go to Auto Set Up below.
¶¶
¶¶
¶
If you use Preset Download function, go to Preset Download on page 13.
¶¶
AUTO SET
FOLLOW TV
[5∞] =
[MENU] : EXIT
If you're using RF connection,
and the on-screen display looks
distorted, refer to the display
window.
Auto Set Up
Before performing the following steps, be sure to finish Preparation above.
1¶If you are referring to the display window, press
5/∞
to select “Auto” and press OK or 4.
Do NOT press any button on the front panel or remote control until display window shows either the display as illustrated
in step 2 or “– –:– –”.
¶
If you are referring to the on-screen display, press 5/
to select “AUTO SET” and press OK or 4.
AUTO SET
FOLLOW TV
[5∞] =
[MENU] : EXIT
0
[MENU] : EXIT
Beginning
As Auto Set Up progresses,
the “7” mark moves from
left to right.
AUTO SET
PLEASE WAIT
∞
+++
End
2¶If you have connected the VCR to TV via an RF
cable only (RF connection), the channel that is
shown on the display window is your Video Channel.
To view picture signals from the VCR, set TV to the
Video Channel. Refer to the instructions supplied
with TV set for how to do this.
¶
If you have connected the VCR to TV via both an RF cable
and a SCART cable or an S-Video cable (SCART connection
or S-Video connection), you do not need the video channel
so you have to set the video channel to off.
Press PROG. – until the video channel changes to “– –” (off).
To view picture signals from the VCR, set TV to its AV
mode. Refer to the instructions supplied with TV set for how
to do this.
— 11 —
To be continued on the next page
Page 11
S
ETTING
¶
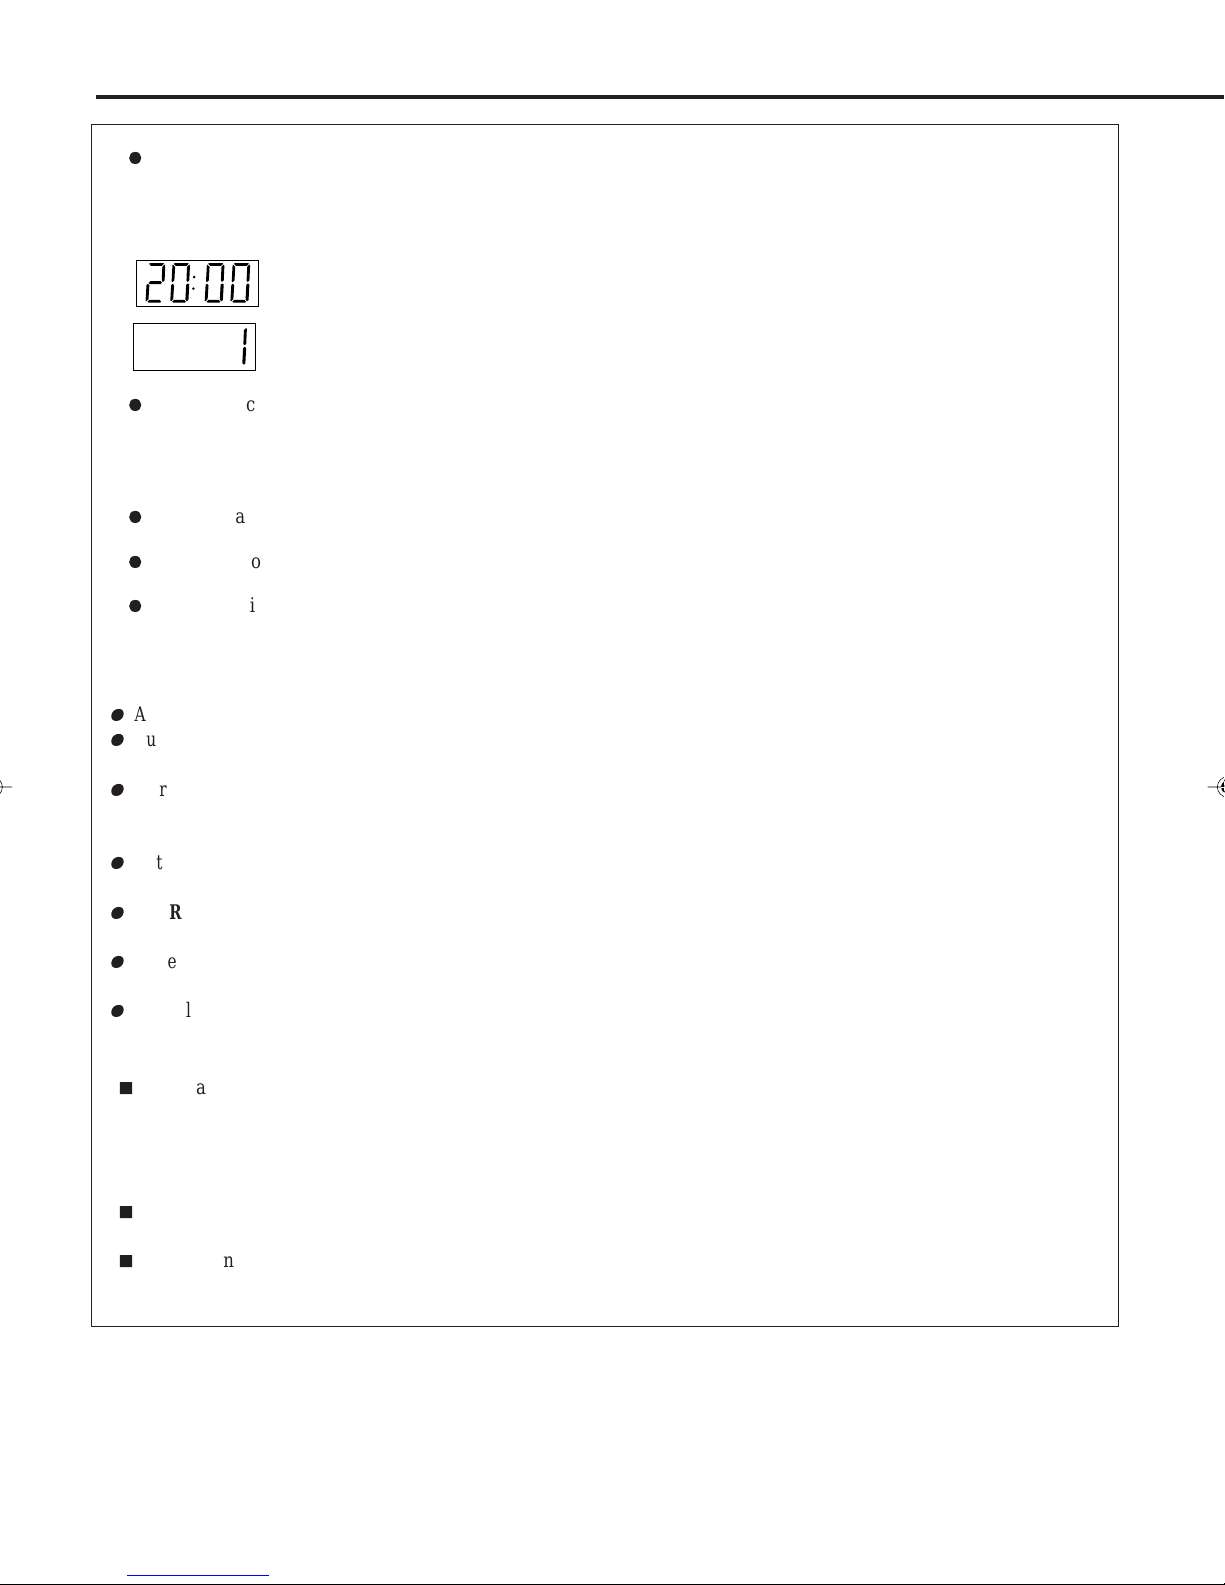
If “––:––” appears, both Auto Channel Set and Auto Clock Set have failed.
Make sure the TV antenna cable is connected correctly and press OK to re-perform the Auto Set Up.
3Press OK.
¶
You can check if the Guide Programme numbers have been set correctly when you perform VIDEO Plus+ Timer
Recording (✈P.29); if the correct channel position number is displayed on VIDEO Plus+ Programme screen, this
confirms that the Guide Programme number for the PlusCode number you enter has been set correctly.
4Press PROG. +/– to make sure that all necessary stations have been stored in the VCR’s memory.
¶
If station names (ID) (✈P.18) have also been stored in the VCR’s memory, the station name will be displayed at the
top left corner of the screen for about 5 seconds when the VCR is tuned to a different station.
¶
If you want to set the tuner manually such as to add or skip channels, to change channel positions, or to set station
names, see pages 16–17.
¶
If no station is stored in the VCR’s memory, make sure the TV antenna cable is connected correctly and turn off the
VCR power once, then turn it back on again. Re-perform from Preparation on page 11.
U
If the correct current time is displayed on the display window, the Auto Channel Set and Clock Set
have been completed successfully. Go to step 4.
If “1” (channel position) is displayed on the display window, the Auto Clock Set has not completed
(only the Auto Channel Set has). Go to step 4 and then perform “Clock Setting” manually. (✈P.20)
P
(CONTINUED)
Notes:
¶
Auto channel set function takes place first; it assigns automatically all receivable stations in your area.
¶
Auto clock set function sets the clock automatically by reading the clock setting data from a station transmitting a
PDC signal while auto channel set is being performed.
¶
During auto channel set, the VCR recognizes each station name of the detected stations and stores them in the VCR’s
memory, then automatically sets VIDEO Plus+ system's assigned Guide Program number for those stations according
to the broadcast area.
¶
In the area where no TV station transmits a PDC signal, the VCR can perform neither auto clock set nor auto Guide
Program number set.
¶
For RF connection users: The VCR detects the channels which are not occupied by local stations and selects one
channel automatically for your Video Channel that is located in the middle of more than 5 vacant channels.
¶
If there is a power cut, or if you press STANDBY/ON, VCR POWER or MENU while Auto Set Up is in progress, Auto
Set Up will be interrupted; be sure to turn off the VCR power once and try again from step 1.
¶
Auto clock may not function properly depending on the reception condition.
IMPORTANT
7
In certain reception conditions, station names may not be stored correctly, and auto Guide Programme Number Set
may not work properly. If the Guide Programme numbers are not set properly, when you timer-record a TV
programme using VIDEO Plus+ system, the VCR will record a TV programme of a different station. When
programming the timer using VIDEO Plus+ system, be sure to check whether the channel position on which your
VCR receives the broadcasting station you wish to record is selected. (✈P.29)
7
Your VCR memorizes all detected stations even if reception of some of them is poor. In these cases picture quality
may be poor. To delete those stations with an unacceptable picture, see page 16.
7
For RF connection users: In certain reception conditions, the Video Channel may not be set correctly and interference
may appear in the TV picture while the VCR’s power is on. Set your Video Channel manually. (✈P.14)
— 12 —
Page 12
Preset Download
Before performing the following steps, be sure to finish Preparation on page 11.
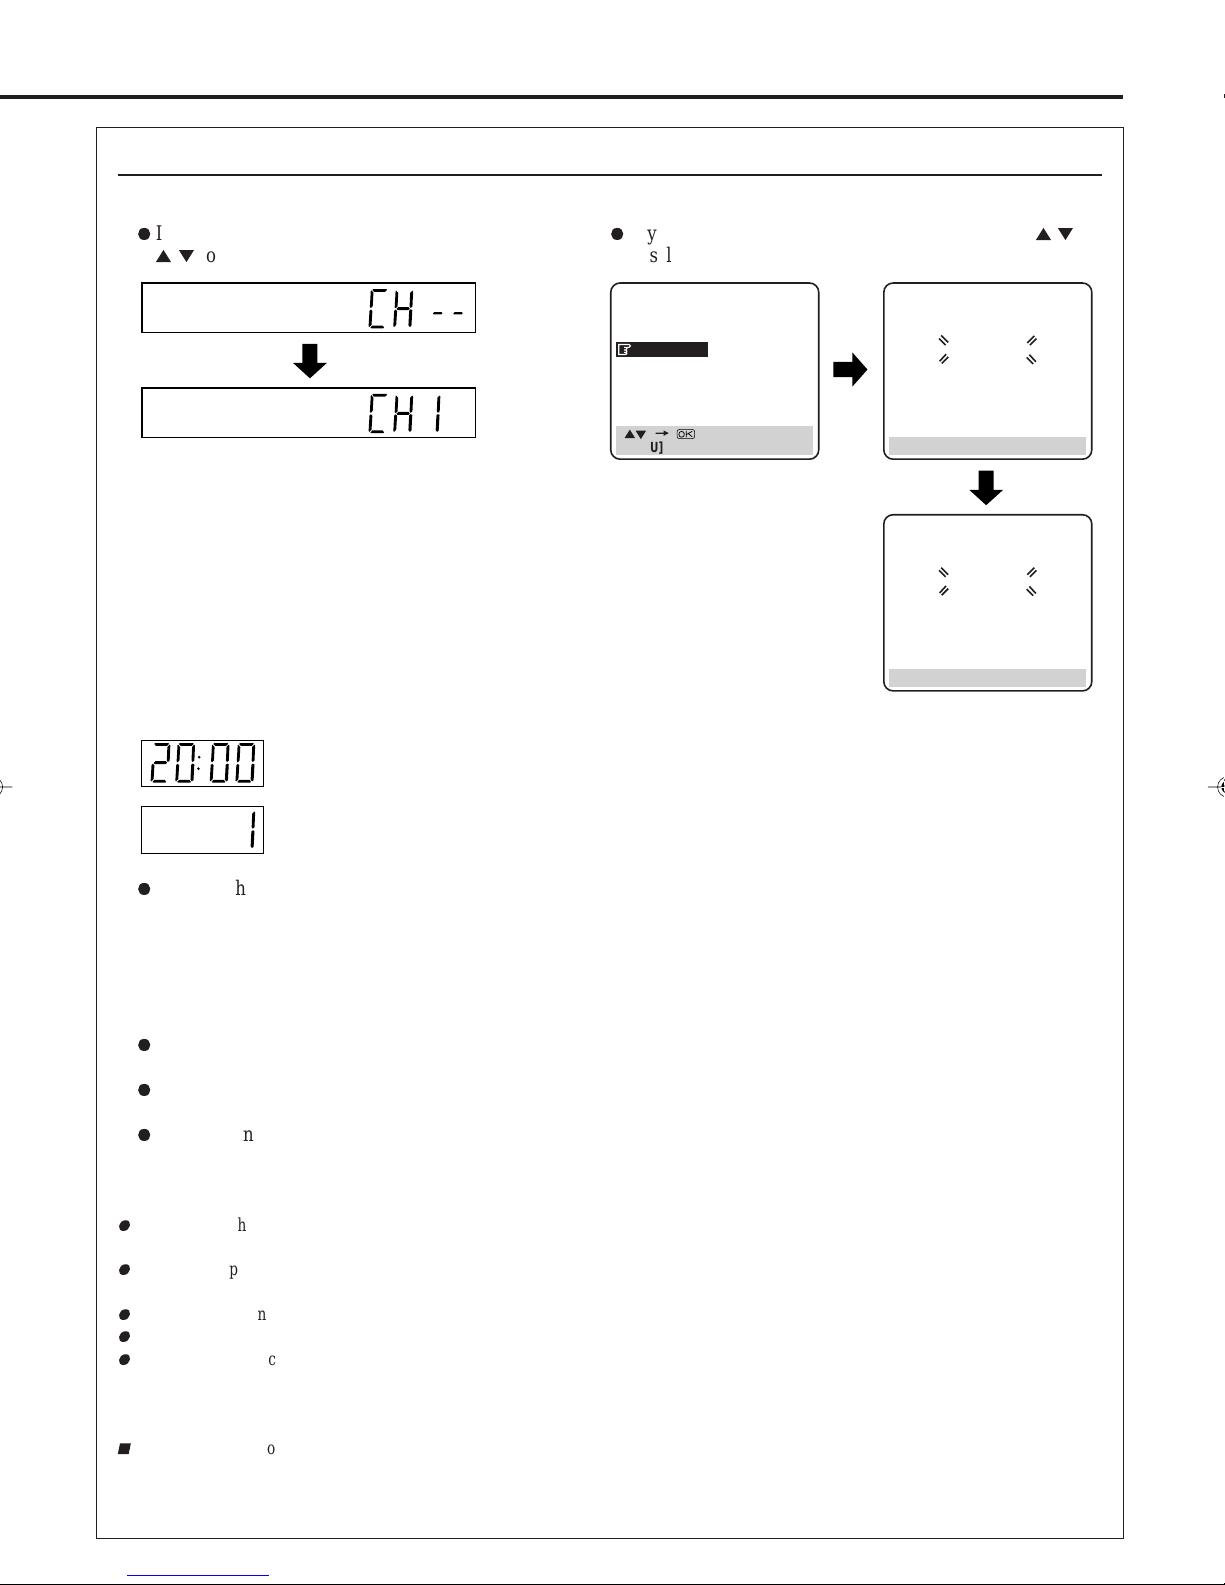
1¶If you are referring to the display window, press
5/∞
to select “CH ––” and press OK or 4.
Channel position number increases from
¶
If you are referring to the on-screen display, press 5/
to select “FOLLOW TV” and press OK or 4.
AUTO SET
FOLLOW TV
[
5∞]
=
[MENU] : EXIT
“CH 1”.
Do NOT press any button on the front panel or remote control until the display
window shows either the display as illustrated in step 2 or “– –:––”.
2
If the correct current time is displayed on the display window, the Auto Channel Set and Clock Set
have been completed successfully. Go to step 3.
∞
FOLLOW TV
PLEASE WAIT
[MENU] : EXIT
GUIDE PROG SET
PLEASE WAIT
[MENU] : EXIT
If “1” (channel position) is displayed on the display window, the Auto Clock Set has not completed
(only the Auto Channel Set has). Go to step 3 and then perform “Clock Setting” manually. (✈P.20)
¶
You can check if the Guide Programme numbers have been set correctly when you perform VIDEO Plus+ Timer
Recording (✈P.29); if the correct channel position number is displayed on the VIDEO Plus+ Programme screen, this
confirms that the Guide Programme number for the PlusCode number you enter has been set correctly.
3Set the Video Channel manually. (✈P. 14)
4Press PROG. +/– to make sure that all necessary stations have been stored in the VCR’s memory.
¶
If station names (ID) (✈P.18) have also been stored in the VCR’s memory, the station name will be displayed at the
top left corner of the screen for about 5 seconds when the VCR is tuned to a different station.
¶
If you want to set the tuner manually such as to add or skip channels, to change channel positions, or to set station
names, see pages 16–17.
¶
If no station is stored in the VCR’s memory, make sure the SCART cable is connected correctly and press OK to reperform Preset Download.
Notes:
¶
In the area where no TV station transmits a PDC signal, the VCR can perform neither auto clock set nor auto Guide
Programme number set.
¶
If there is a power cut, or if you press STANDBY/ON, VCR POWER or MENU while downloading or set up is on progress, it will be
interrupted; be sure to turn off the VCR power once and try again from the beginning.
¶
Auto clock may not function properly depending on the reception condition.
¶
When you perform Preset Download function, be sure to use fullywired 21-pin SCART cable.
¶
On this VCR, the characters available for station’s name (ID) are A-Z, 0-9, -, *, + and (space). Some downloaded station’s name
may differ from those of your TV (✈P.18)
]
Important
7
In certain reception conditions, station names may not be stored correctly, and auto Guide Programme Number Set may not work
properly. If the Guide Programme numbers are not set properly, when you timer-record a TV programme using VIDEO Plus+ system,
the VCR will record a TV programme of a different station. When programming the timer using VIDEO Plus+ system, be sure to
check whether the channel position on which your VCR receives the broadcasting station you wish to record is selected. (✈P.29)
— 13 —
Page 13
S
ETTING
U
P
(CONTINUED)
Setting the Video Channel
The video Channel (RF Output Channel) is the channel on which your TV receives picture and sound signals from the
VCR through the RF cable.
IMPORTANT
Perform the following steps only if –
– Video Channel Set has not been done correctly by the Auto Set Up function. (✈P.11)
– you set up the VCR’s tuner by Preset Download (✈P.13) instead of using the Auto Set Up function.
– interference appears in the TV picture after you have moved to a different area or a new station has started broad-
casting in your area.
– you change the connection between your recorder and TV from RF connection to Scart or S-Video connection, or
vice versa.
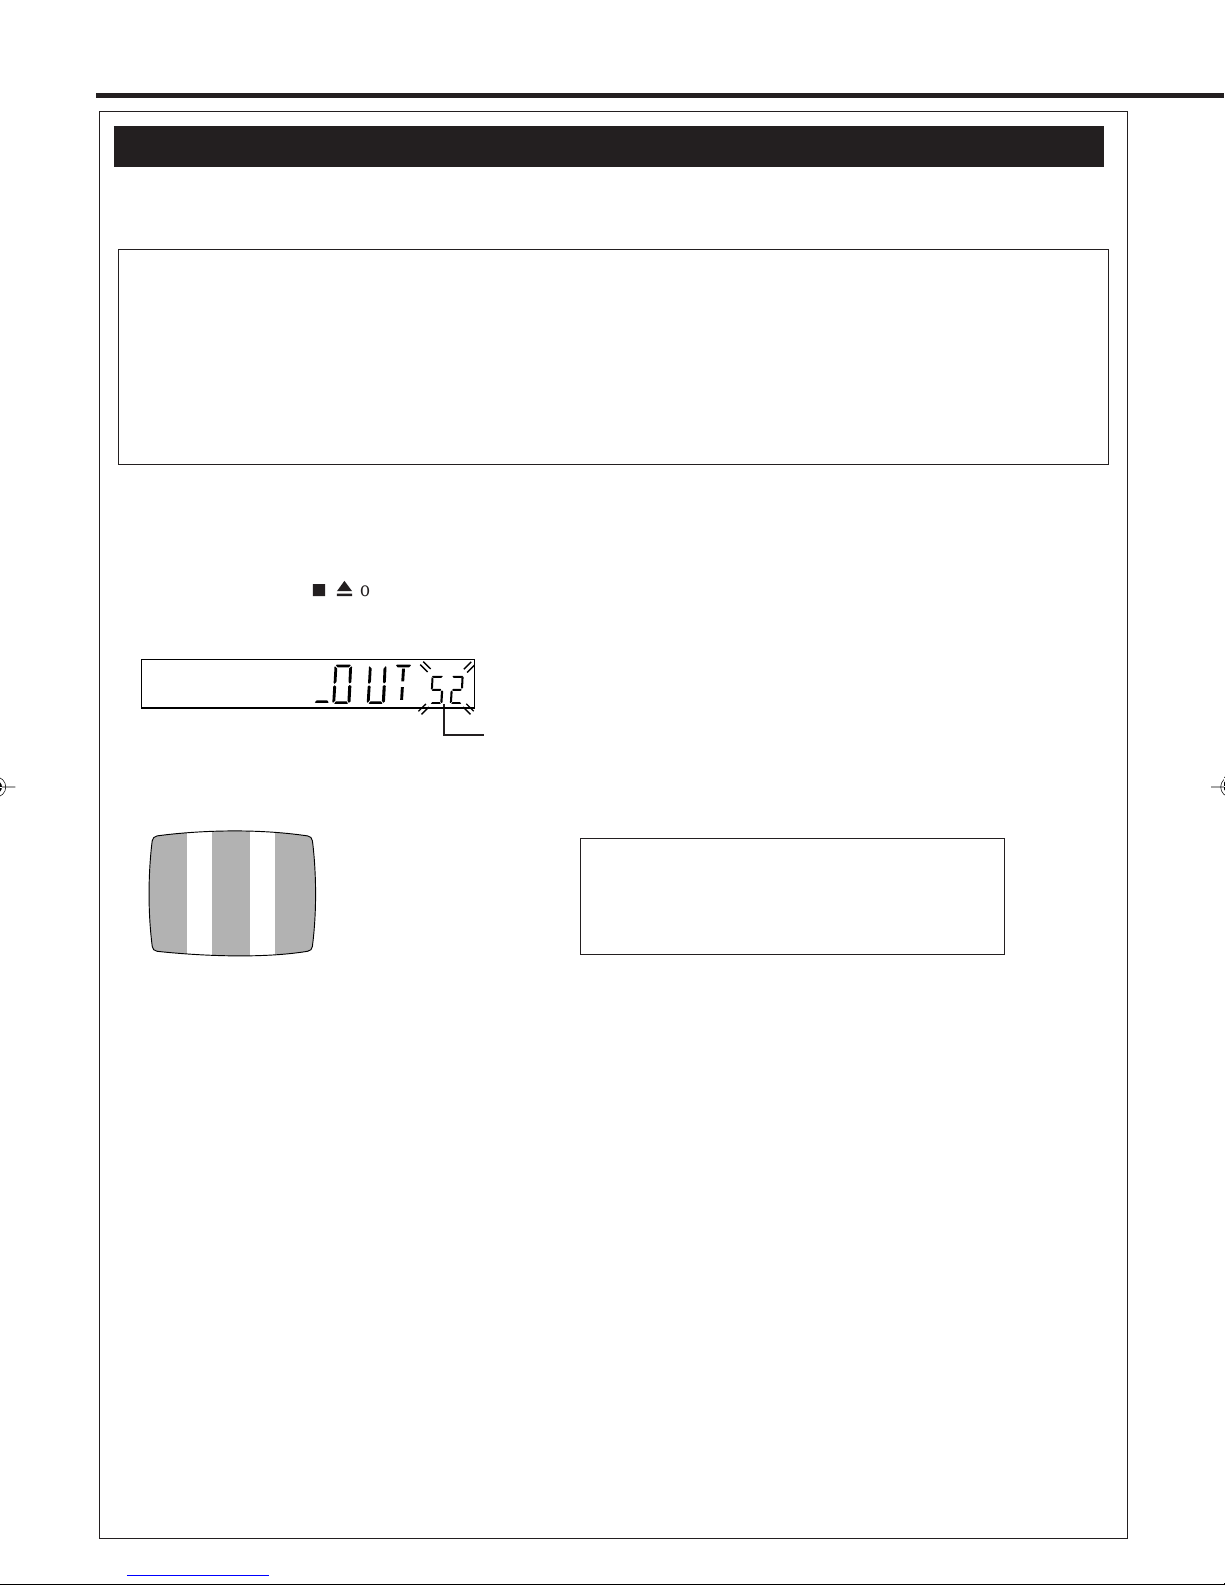
1 Make sure the VCR is turned off and no cassette is inserted.
2 Turn on the TV, and tune it to any UHF channel (between 22 and 69) you want to use as the video channel on the TV.
• Select a channel not used in your area.
3 Press STOP/EJECT
The following indication appears on the display.
7 /0
on the front panel for more than 5 seconds.
Channel number starts flashing.
4 Press PROGRAMME or PROG. +/– to select the channel you have tuned on the TV as the video channel in step 2.
A test signal (two vertical white bars) appears on the TV.
If you use SCART connection or S-Video connection,
You do not need the video channel so you have to set
the video channel to off. To turn it off, press
Test signal
(two vertical white bars)
PROGRAMME – or PROG. – until “– –” appears on
the channel number position.
5 Press OK to finish the video channel setting.
To watch a picture from this VCR on the TV, select the same channel you have selected as the video channel (in step 2
above) on the TV.
— 14 —
Page 14
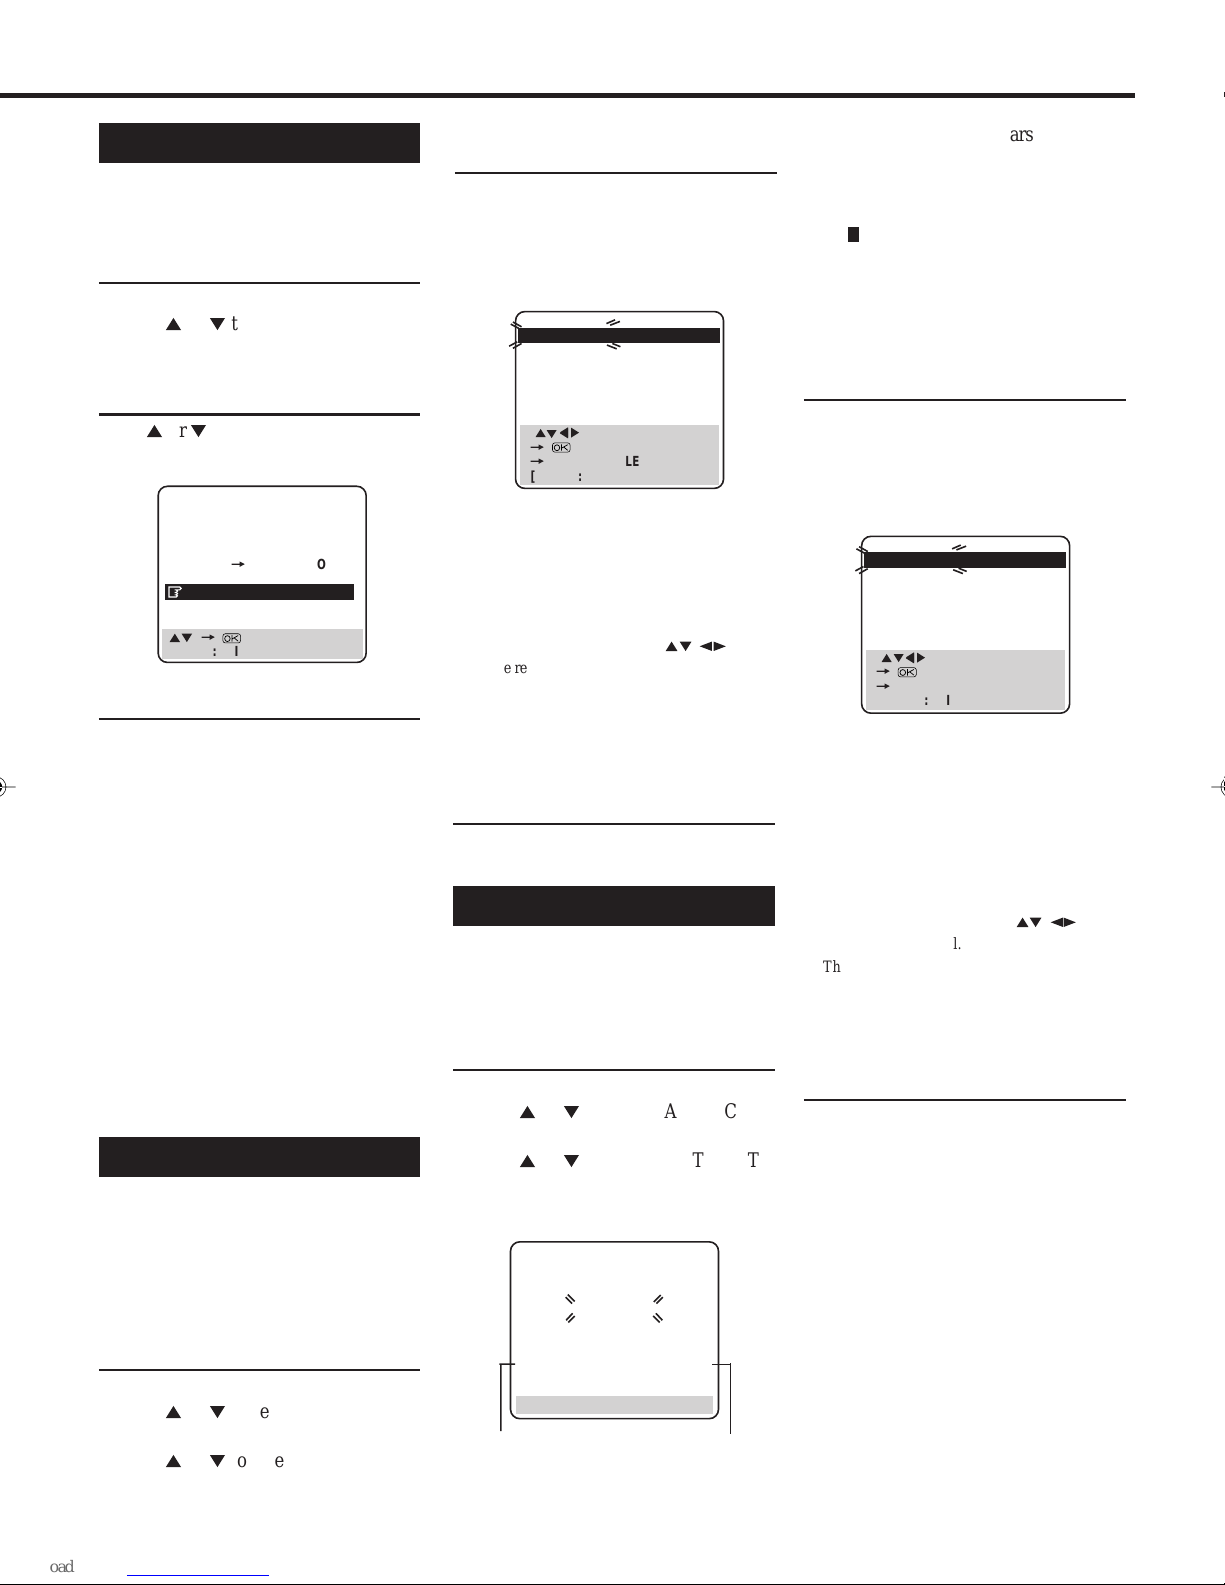
Power Save Mode
You can reduce the power consumption
while the VCR is turned off.
1Select Mode Set Screen
1 Press MENU.
2 Press 5 or ∞ to select “MODE
SET” then press OK or 4.
2Set Power Save Mode
Press 5 or ∞ to select “POWER
SAVE” then press OK or 4 to set to
“ON”.
[5∞]
[MENU] : EXIT
MODE SET
DSPC ON
O. S. D. ON
DIRECT RECORD ON
AUTO SP=LP TIMER OFF
DIGITAL 3R ON
POWER SAVE OFF
S-VHS AUTO
NEXT PAGE
=
3Finish Setting
Press MENU.
• During Power Save, the display window
will be turned off.
• The Just Clock function (✈ P. 20) does not
work while the Power Save mode is
engaged.
• While the VCR is in the Power Save mode,
the picture may be distorted momentarily
when you turn on/off the VCR.
• Power Save does not work when ...
... the VCR is in the Timer mode.
... the VCR's power is turned off after
timer-recording (or One Touch
Recording).
... the Auto Satellite Prog Recording mode
is engaged (✈P. 28).
... “AV2 SELECT” is set to “DECODER”
or “SAT” (✈P. 27).
Preset Download
When you want to perform Preset
Download after setting channels,
perform the following procedure.
For the detail of Preset Download, see
page 11-13.
1Perform Preset Download
1 Press MENU.
2 Press 5 or ∞ to select “AUTO CH
SET”, then press OK or 4.
3 Press 5 or ∞ to select “FOLLOW
TV”, then press OK or 4. The
Follow TV screen appears and then
Guide Prog. Set screen appears.
Confirm Programmed Channel
2
Information List
Once it is completed, “COMPLETED”
is displayed on the screen for about 5
seconds.
The following screen will appear after
5 seconds, or if you press MENU;
PR CH ID PR CH ID
01 26 BBC1 08 ––––
02 33 BBC2 09 ––––
03 23 ITV 10 ––––
04 30 CH4 11 ––––
05 37 CH5 12 ––––
06 –––– 13 ––––
07 –––– 14 ––––
5
5
[
]
∞
5
5
: EDIT
=
=
[CLEAR] : DELETE
[MENU] : EXIT
PR: channel positions
CH: channel numbers
ID: station names (✈P.18)
• The blueback screen and the programme
currently being broadcasted by the blinking
station appear alternately for 8 seconds each.
• To view the next page, use the
on the remote control.
The stations located in the selected country
appear at the top of the list.
• The Guide Programme numbers will also be set
automatically.
5∞ 23
button
3Finish Setting
Press MENU to exit the menu operations.
Auto Channel Setting
If you move to another place, you may
need to tune the VCR tuner again for
your new residential area.
1Perform Auto Channel Set
1 Press MENU.
2 Press 5 or ∞ to select “AUTO CH
SET”, then press OK or 4.
3 Press 5 or ∞ to select “AUTO SET”,
then press OK or 4. The Auto Set
screen appears as below;
AUTO SET
PLEASE WAIT
0–––––+––––■––––+–––––+
[MENU] : EXIT
Beginning
— 15 —
End
The Auto Set screen appears, and
remains on screen while the VCR
searches for receivable stations.
As Auto Channel Set progresses,
” mark on the screen moves
the “
from left to right.
Wait until the screen as shown in step 2
appears.
Confirm Programmed Channel
2
Information List
Once it is completed, “SCAN COMPLETED” is displayed on the screen
for about 5 seconds.
The following screen will appear after
5 seconds, or if you press MENU;
PR CH ID PR CH ID
01 26 BBC1 08 ––––
02 33 BBC2 09 ––––
03 23 ITV 10 ––––
04 30 CH4 11 ––––
05 37 CH5 12 ––––
06 –––– 13 ––––
07 –––– 14 ––––
5
5
]
[
∞
5
5
: EDIT
=
=
[CLEAR] : DELETE
[MENU] : EXIT
C: Cable
PR: channel positions
CH: channel numbers
ID: station names (✈P.18)
• The blueback screen and the programme
currently being broadcasted by the blinking
station
apppear alternately for 8 seconds each.
• To view the next page, use the 5∞23
on the remote control.
The stations located in the selected country
appear at the top of the list.
• The Guide Program numbers will also be set
automatically during Auto Channel Set.
button
3Finish Setting
Press MENU to exit the menu operations.
Notes:
• If you perform Auto Channel Set when the
aerial cable is not connected properly,
“SCAN COMPLETED -NO SIGNAL-”
appears on the screen in step 2. When this
happens, make sure of the aerial
connection and press OK; Auto Channel
Set will take place again.
• Depending on reception conditions, the
stations may not be stored in order, and
the station names may not be stored
correctly.
Page 15
S
ETTING
U
P
(CONTINUED)
Manual Channel Setting
When you want to do channel setting
manually, perform the following
procedures as required.
• If you want to ..........
.......... add channels (See below)
.......... delete unwanted channels
(See next column)
.......... change the channel
positions (See next
column)
.......... perform fine-tuning (See
page 17)
.......... descramble programmes
when receiving scrambled
broadcasts (See page 17)
.......... change station names (See
page 17)
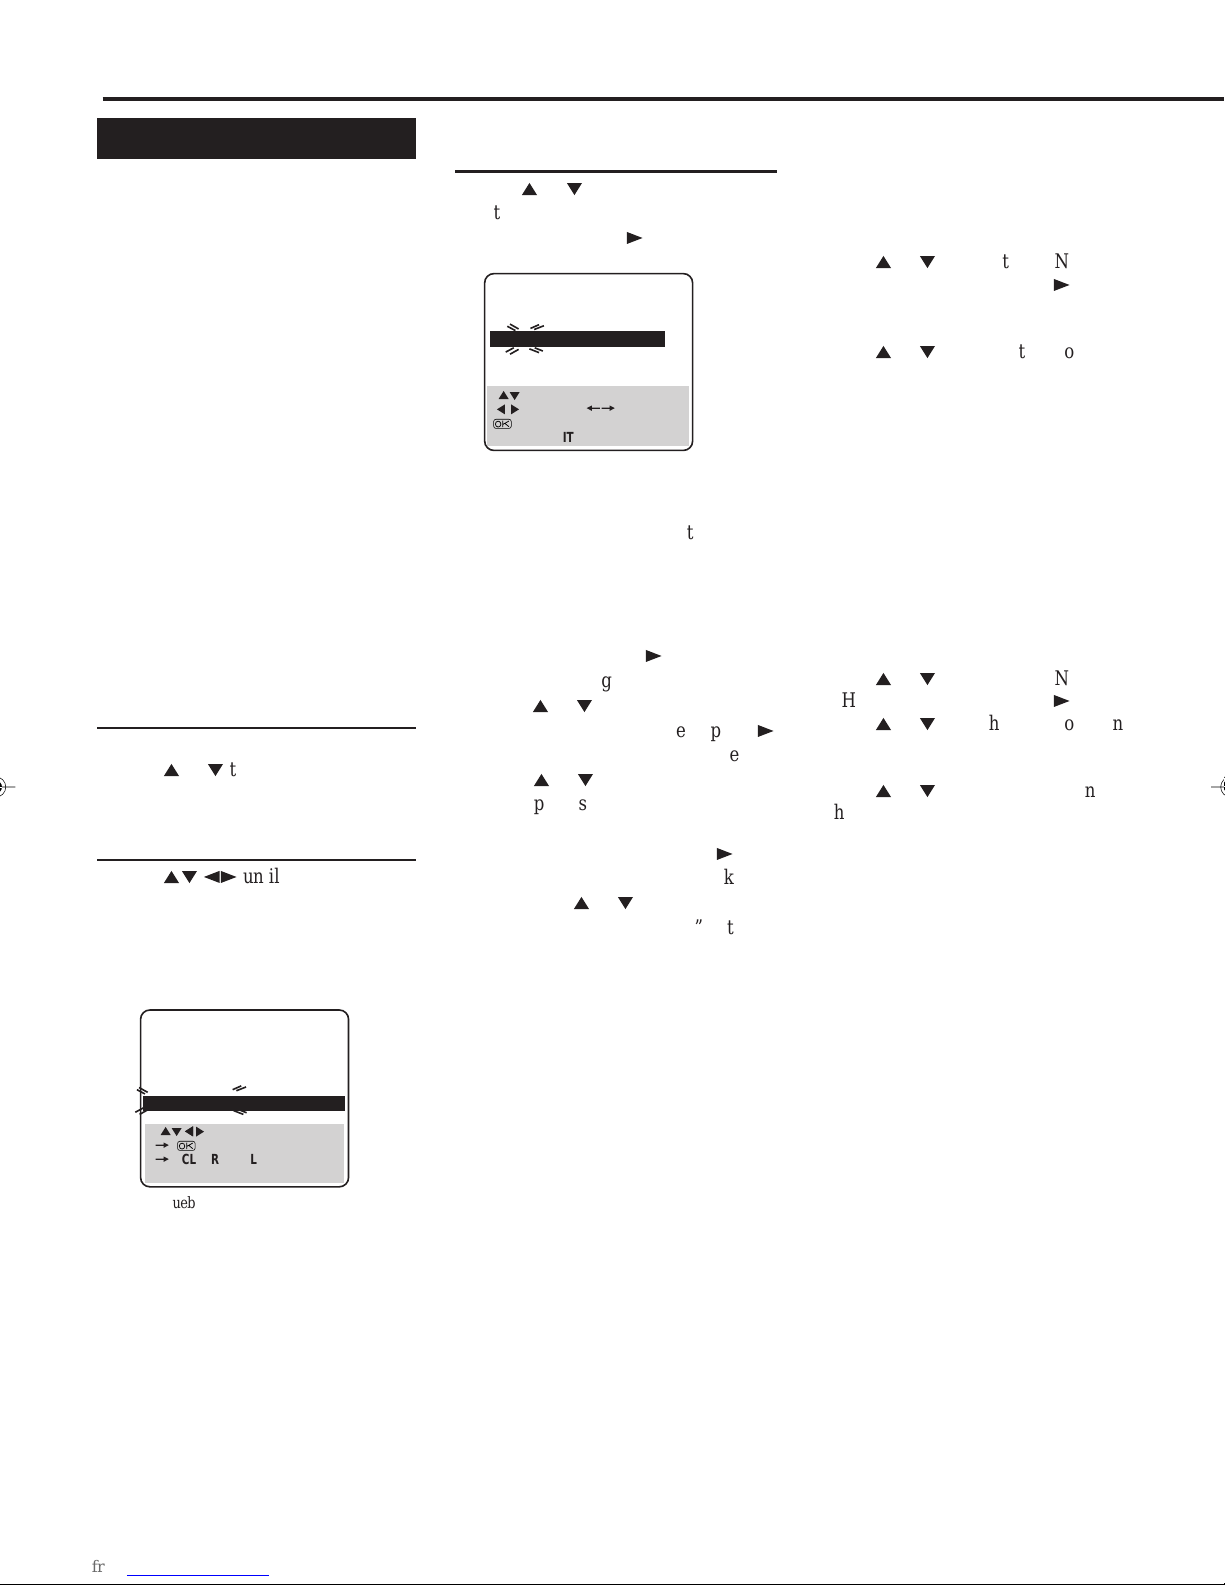
If you want to add channels
Access Programmed Channel
1
Information List
1 Press MENU.
2 Press 5 or ∞ to select “MANUAL
CH SET”, then press OK or 4.
2Select Channel Position
1 Press 5∞ 23
position in which you want to store a
channel begins blinking.
2 Press OK. The Manual Channel Set
screen appears.
PR CH ID PR CH ID
01 26 BBC1 08 ––––
02 33 BBC2 09 ––––
03 23 ITV 10 ––––
04 30 CH4 11 ––––
05 37 CH5 12 ––––
06 –––– 13 ––––
07 –––– 14 ––––
5
[
∞
=
=
[MENU] : EXIT
The blueback screen and the
programme currently being
broadcasted by the selected channel
appear alternately for 8 seconds each.
until a vacant
5
]
5
5
: EDIT
[CLEAR] : DELETE
3Set New Channel Information
1 Press 5 or ∞ to change the band
between CH (regular) and CC
(cable), then press 3.
PR CH ID FINE DECODER
– – – –
06 CH01
5
] : SELECT
[
∞
[ ] : CURSOR
∞
∞
: OK
[MENU] : EXIT
The blueback screen and the
programme currently being broadcasted by the selected channel appear
alternately for 8 seconds each.
2 Press the Number buttons to input
the channel you want to store.
• Input “0” before any single number
entries.
• To input the registered station name
(ID – ✈P.18), press 3 until “----”
(ID setting) begins blinking, then
press 5 or ∞.
• For fine tuning adjustment, press
until “+/–” begins blinking, then
press 5 or ∞. While tuning, “+” or
“–” appears.
• When storing a channel that sends
scrambled broadcasts, press 3 until
“OFF” (Decoder setting) blinks,
then press 5 or ∞ to set DECODER” to “ON” (“OFF” is the
default setting).
When “AV2 SELECT” is set to
“AV2” or “SAT”, the “DECODER”
setting cannot be changed (✈P.27).
+/– OFF
+=
If you want to delete
unwanted channels
You can delete channels manually.
1 Press MENU.
2 Press 5 or ∞ to select “MANUAL
CH SET” then press OK or 3.
The programmed channel information list appears.
3 Press 5 or ∞ until the item you want
to delete begins blinking.
4 Press CLEAR to delete.
The item directly beneath the
cancelled one moves up one line.
5 Press MENU to exit from the menu
operations.
If you want to change the
channel positions
You can also replace the channel
position numbers.
1 Press MENU.
2 Press 5 or ∞ to select “MANUAL
CH SET” then press OK or 3.
3 Press 5 or ∞ until the item you want
3
to change begins blinking, then press
OK.
4 Press 5 or ∞ to move the station to
the new channel position then press
OK.
Example: If you moved the station in
position 4 to position 2, the stations
originally in positions 2 and 3 each
move down one space.
5 Press MENU to exit from the menu
operations.
— 16 —
Page 16
If you want to descramble
programmes when receiving
scrambled broadcasts
When you can receive a scrambled
broadcast, you can descramble the
programme by connecting this VCR to
an external decoder through the VCR’s
AV2 IN/DECODER connector.
Complete the connection described on
page 34 and follow the instructions
below;
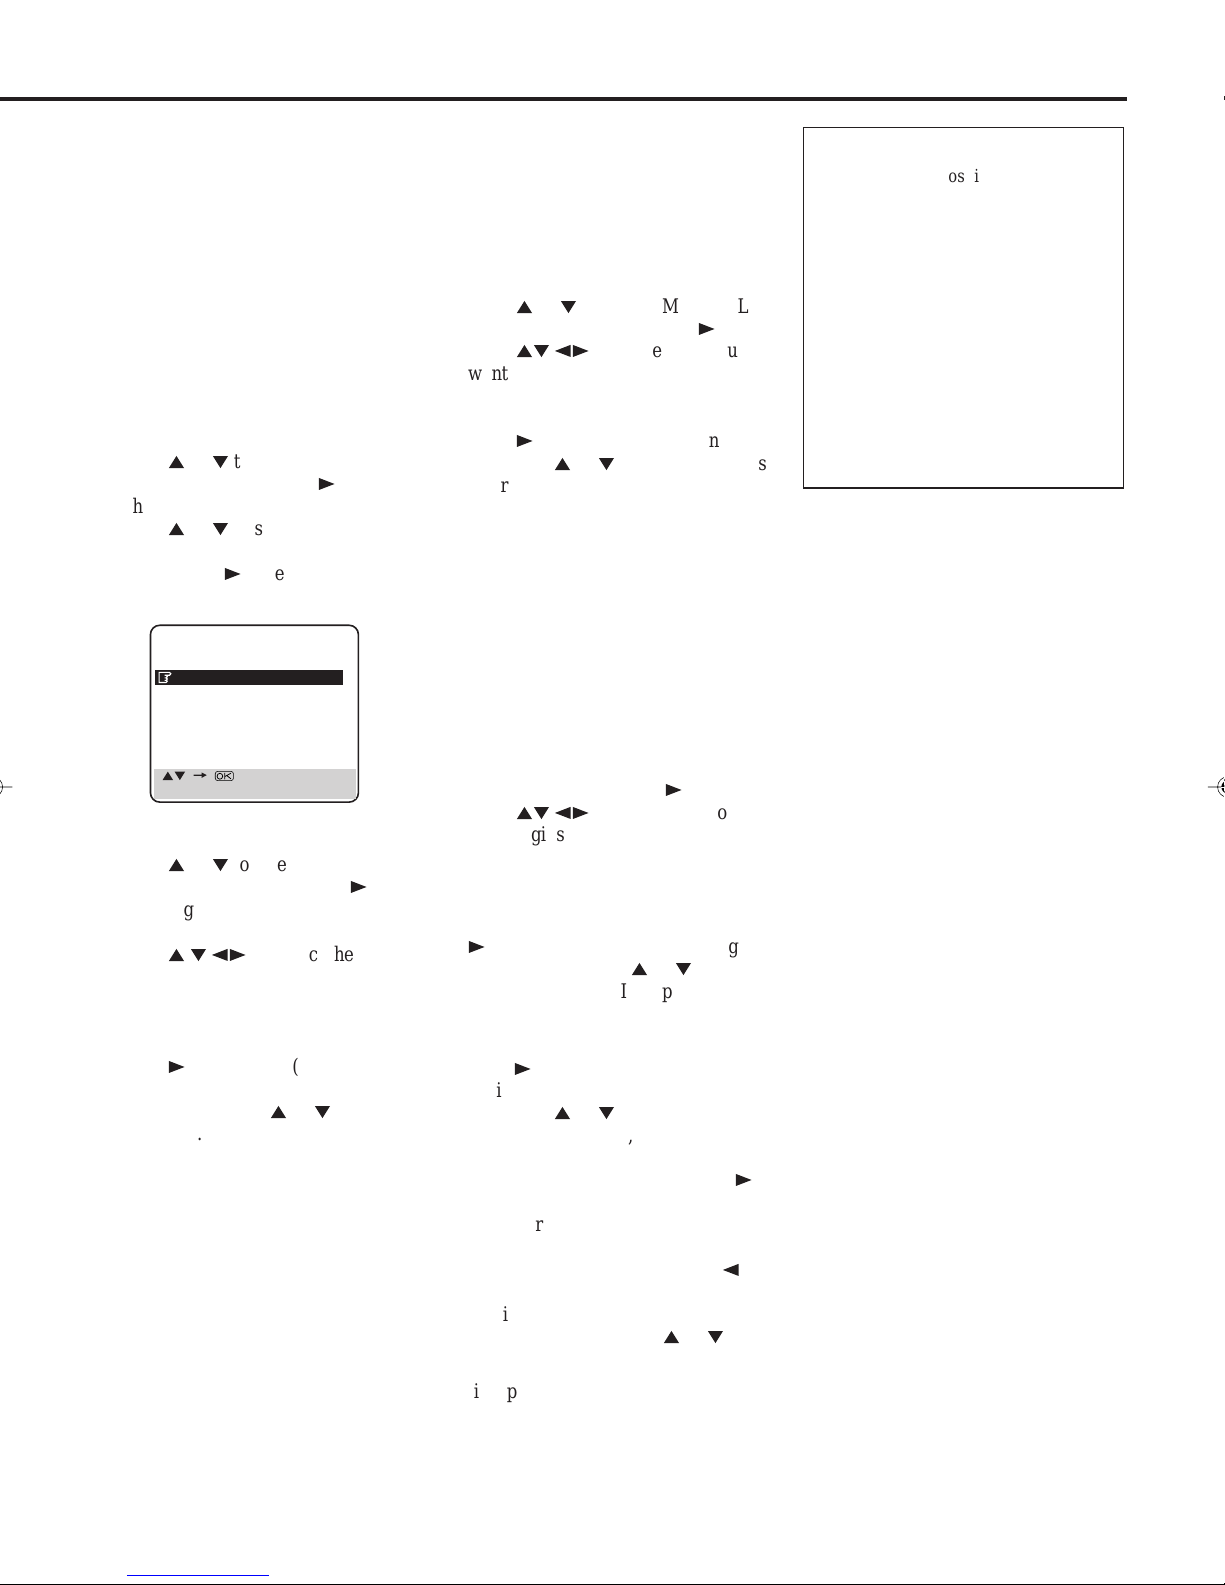
1Press MENU to access main menu
screen.
2Press 5 or ∞ to select “MODE
SET”, then press OK or 3.
The mode set screen appears.
3Press 5 or ∞ to select “AV2
SELECT”.
4Press OK or 3 to select “DE-
CODER” then press MENU to exit.
MODE SET
PREVIOUS PAGE
AV1 SELECT VIDEO
AV2 SELECT AV2
If you want to perform finetuning
Fine-tuning is performed automatically
during Auto Channel Set, but you can
also perform fine-tuning manually.
1Press MENU.
2Press 5 or ∞ to select “MANUAL
CH SET”, then press OK or 3.
3Press 5∞ 23 until the item you
want to tune begins blinking. Press
OK twice. The Manual Channel Set
screen appears.
4Press 3 until “+/–” begins blinking,
then press 5 or ∞ until the picture is
clearest.
5Press OK. The programmed channel
list appears.
6Press MENU to exit the menu
operations.
If you want to change station
names
You can also change the station name
manually.
ATTENTION
•If the channel positions are changed
or deleted, the Guide Programme
numbers that have been set are reset
or changed. If an attempt is made at
timer programming with VIDEO
Plus+ system in this state, the
“GUIDE PROG SET” screen
appears. Input the channel position on
which the broadcast for the PlusCode
number is received.
•If the channels are added, set the
Guide Programme number for that
channel (station). (✈“VIDEO Plus+
Set Up” on page 20)
[5∞]
=
[MENU] : EXIT
5Press MENU again to access the
main menu.
6Press 5 or ∞ to select “MANUAL
CH SET”, then press OK or 3.
The programmed channel information list appears.
7Press 5 ∞
23
to select the
channel position broadcasting
scrambled programmes, then press
OK twice. The Manual Channel Set
screen appears.
8Press 3 until “OFF” (Decoder
setting) begins blinking, and set it to
“ON” by pressing 5 or ∞.
9Press OK. The programmed channel
information list appears.
10Press MENU.
1Press MENU.
2Press to select “MANUAL CH
SET”, then press OK or 3.
3Press 5∞ 23 until the item you
want begins blinking.
4Press OK twice. The Manual
Channel Set screen appears.
5If you want to change the station
name to registered one (P.18), press
3
until the station name (ID) begins
blinking, then press 5 or ∞ until the
new station name (ID) appears.
If you want to change the station
name to other than registered one,
press 3 until the first letter of the
station name (ID) begins blinking,
then press 5 or ∞ to cycle through
the characters (A–Z, 0–9, –, *, +, _
(space) and stop when the desired
character is indicated, then press
3
to enter. Enter the remaining
characters the same way (maximum
of 4).
•If you make a mistake, press
2
until the incorrect character begins
blinking. Then enter the correct
character by pressing 5 or ∞.
6Press OK. The programmed channel
list appears.
7Press MENU to exit menu opera-
tions.
— 17 —
Page 17

S
ETTING
U
P
TV Station And ID List
STATION NAME ID*
Anglia TV ANGL
ARD ARD
ARTE ARTE
BBC Group BBC
BBC1 BBC1
BBC2 BBC2
Berlin 1 BLN1
Berlin 2 BLN2
Border TV BORD
Bayern1 BR1
Bayern3 BR3
BRT1 BRT1
BRT2 BRT2
Children Ch CHLD
Canal + CH+
CNN CNN
Channel TV CHNL
Central TV CNTR
Channel 4 CH 4
Channel 5 CH 5
DRS DRS
DR TV DRTV
DSF DSF
Euronews EURN
Euronews EURO
Eurosports EURS
France1 FR1
France2 FR2
France3 FR3
Granada TV GRNA
Grampian TV GRMP
Hessen1 HR1
Hessen3 HR3
HRT HRT
HTV HTV
ITV Network ITV
Kabelkanal KABL
London LNDN
MDR MDR
MTV MTV
Nord3 N3
NDR1 NDR1
NDR3 NDR3
NED1 NED1
NED2 NED2
NED3 NED3
Network 2 NET2
NRK NRK
N-TV N-TV
Offener Kanal OKAN
ORF1 ORF1
ORF2 ORF2
ORF3 ORF3
OWL 3 OWL3
Premiere PRMI
PR07 PR07
RAI1 RAI1
RAI2 RAI2
RAI3 RAI3
RB1 RB1
RB3 RB3
Rikisutvarpid-S RKPS
RTBF 1 RTB1
RTBF 2 RTB2
RTE 1 RTE1
RTL RTL
RTL 2 RTL2
RTP RTP
(CONTINUED)
STATION NAME ID*
SAT SAT
SAT 1 SAT1
Scottish TV SCOT
SC4 SC4
SDR SDR
SDR1 SDR1
SFB1 SFB1
SFB3 SFB3
SKY SKY
Sky One SKY1
Sky Net SKYN
Sport SPRT
SR 1 SR1
Super RTL SRTL
STV Test STVT
STV 1 STV1
STV 2 STV2
Suedwest3 SWR
SWF 1 SWF1
Schweiz4 SWZ4
TYNE TEES TEES
Text TEXT
TF1 TF1
TNT int TNT
TRT int TRT
TSI TSI
TSR TSR
TSW TSW
TVE TVE
TV Polonia TVPA
TVP 1 TVP1
TVP 2 TVP2
TVS TVS
TV2 TV2
TV5 TV5
Tele Zurich TZUR
Ulster TV ULST
Veronica VERN
VIVA VIVA
VIVA2 VIV2
VOX VOX
VTM VTM
VT4 VT4
West1 WDR1
West3 WDR3
YLE 1 YLE1
YLE 2 YLE2
Yorkshire TV YORK
ZDF ZDF
Zurich 1 ZUR1
3SAT 3SAT
* The "ID" abbreviation is what is shown on-screen in lieu of the
station name. The "ID" abbreviation is listed in the Confirmation
screen and is displayed on the TV screen each time the recorder is
tuned to a different station.
— 18 —
Page 18

TV Station Channel Number Guide
For customers in the U.K.
Only the main stations are listed. There are in addition many relay stations, and full lists are available from the BBC
and ITV.
BBC1 BBC2 ITV CH4 CH5
London & South-East
Bluebell Hill 40 46 43 65 —
Crystal Palace 26 33 23 30 37
Dover 50566653—
Heathfield 49 52 64 67 —
Oxford 57 63 60 53 49
South-West
Beacon Hill 57 63 60 53 —
Caradon Hill 22 28 25 32 —
Huntshaw Cross 55 62 59 65 67
Redruth 51 44 41 47 37
Stockland Hill 33 26 23 29 —
Channel Islands
Fremont Point 51 44 41 47 —
South
Hannington 39 45 42 66 35
Midhurst 61 55 58 68 —
Rowridge 31 24 27 21 —
West
Mendip 58 64 61 54 37
BBC1 BBC2 ITV CH4 CH5
North-West
Caldbeck 30 34 28 32 56
Winter Hill 55 62 59 65 48
North-East
Bilsdale West Moor 33 26 29 23 35
Chatton 39 45 49 42 —
Pontop Pike 58 64 61 54 68
Scotland
Angus 57 63 60 53 —
Black Hill 40 46 43 50 37
Sandale 22 — — — —
Caldbeck — 34 28 32 56
Creigkelly 31 27 24 21 48
Darvel 3326232935
Durris 22 28 25 32 67
Eitshal 33 26 23 29 —
Keelylang Hill 40 46 43 50 —
Knock More 33 26 23 29 —
Rosemarkie 39 45 49 42 67
Rumster Forest 31 27 24 21 —
Selkirk 55 62 59 65 52
East
Sandy Heath 31 27 24 21 39
Sudbury 51 44 41 47 35
Tacolneston 62 55 59 65 52
Midlands
Ridge Hill 22 28 25 32 35
Sutton Coldfield 46 40 43 50 37
The Wrekin 26 33 23 29 35
Waltham 58 64 61 54 35
North
Belmont 22 28 25 32 56
Emley Moor 44 51 47 41 37
Wales
Blaenplwyf 31 27 24 21 56
Carmel 57 63 60 53 —
Llanddona 57 63 60 53 —
Moel-y-Parc 52 45 49 42 —
Presely 46 40 43 50 37
Wenvoe 44 51 41 47 —
Northern Ireland
Brougher Mountain 22 28 25 32 —
Divis 31 27 24 21 37
Limavady 55 62 59 65 —
— 19 —
Page 19
S
ETTING
U
P
(CONTINUED)
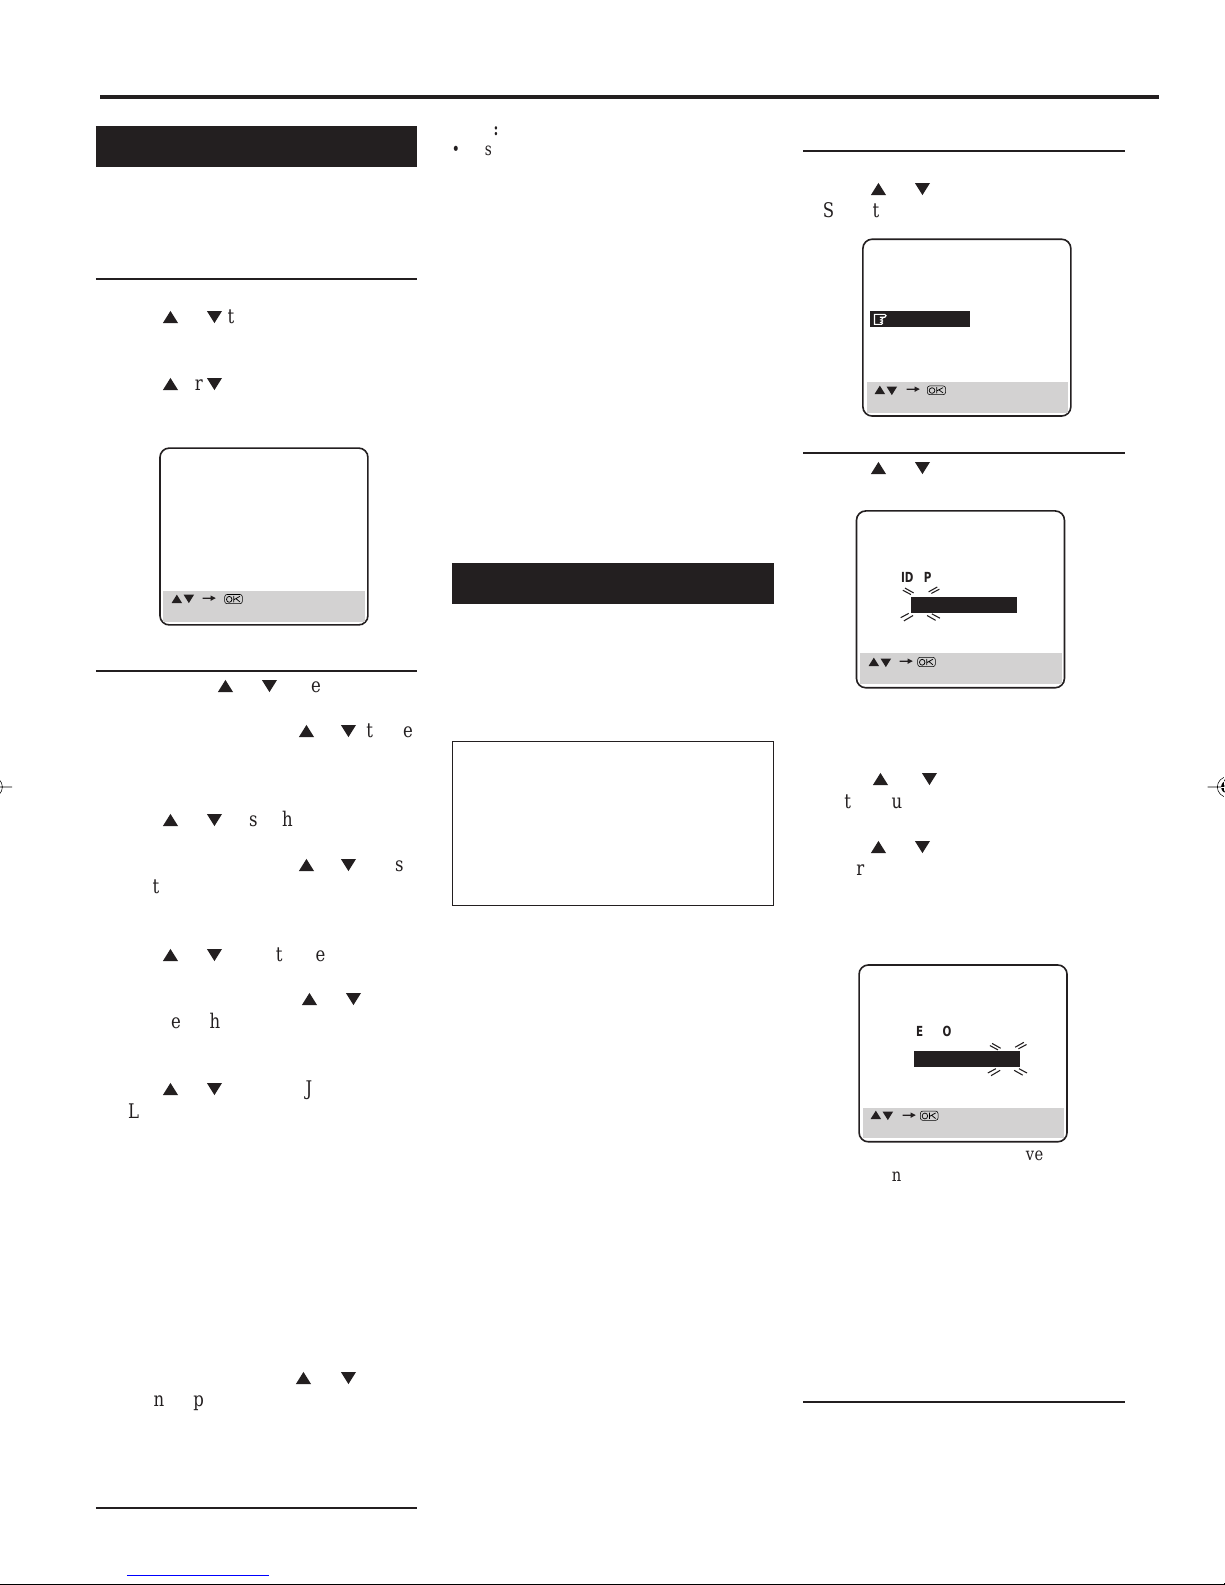
Clock Setting
You can also reset or correct the clock
manually.
1Select Clock Set Screen
1Press MENU.
2Press 5 or ∞ to select “INITIAL
SET ” then press OK or 4.
The Initial Set menu appears.
3Press 5 or ∞ to select “CLOCK
SET” then press OK or 4. The
Clock Set screen appears.
CLOCK SET
TIME DATE YEARMODE
SET22:45 31.07 99
JUST CLOCK : ON
TV PR. : 1
[5∞]
=
[MENU] : EXIT
2Set Clock
1Press PLAY 5 or ∞ to set the time,
then press OK or 4.
•Each time you press 5 or ∞, the set
time changes by 1-minute intervals.
If you hold the button, the set time
changes by 30-minute intervals.
2Press 5 or ∞ to set the date, then
press OK or 4.
•Each time you press 5 or ∞, the set
date changes by 1-day intervals. If
you hold the button, the set date
changes by 15-day intervals.
3Press 5 or ∞ to set the year, then
press OK or 4.
•Each time you press 5 or ∞, the
set year changes by 1-year
intervals. If you hold the button,
the set year changes rapidly.
4Press 5 or ∞ to set the JUST
CLOCK function, then press OK or
4.
ON:To get accurate time keeping
through automatic adjustments at
regular intervals, by reading data
from PDC signal.
OFF:If the clock setting data from PDC
signal is incorrrect, set to “OFF”.
However, setting to “OFF” reduces
the accuracy of the built-in clock,
which could adversely affect timer
recording.
If you set to “ON” press 5 or ∞ to set
the channel position to the station that
transmits the clock setting data, then
press OK or 4.
Notes:
•Just Clock (when set to “ON”) adjusts the
VCR’s built-in clock every hour, except for
23:00, 0:00, 1:00 and 2:00.
•Just Clock is not effective when . . .
–the VCR’s power is “ON”.
–the VCR is in the Timer mode.
–a difference of more than 3 minutes
exists between the built-in clock’s time
and the actual time.
–the VCR is in the Auto Satellite Prog
Rec mode (✈P.28).
–the VCR is in the Power Save mode
(✈P.15).
•If Just Clock is set to “ON”, the VCR’s
clock is automatically adjusted at the
start/end of Summer Time.
•Just Clock may not function properly
depending on the reception condition.
•If a power failure occurs, the clock will
lose its setting.
VIDEO Plus+® System Set Up
To ensure that VIDEO Plus+ Timer
Recording operates correctly, it is
necessary to set the “Guide Programme
(GUIDE PROG)” number for each
station.
“Guide Programme (GUIDE PROG)
number” refers to the assigned TV
station numbers, according to
broadcast area, for VIDEO Plus+
timer recording. The Guide Programme numbers can be found in
most TV listings.
IMPORTANT
Normally, Auto Set Up (✈P. 11), Preset
Download (✈P. 13) or Auto Channel Set
(✈P. 15) sets the Guide Programme
Numbers automatically. You need to set the
Guide Programme Numbers manually only
in the following cases.
a)When timer-programming with VIDEO
Plus+ system, the channel position,
where the station you wish to record is
received on your VCR, is not selected or
when you add a channel after Auto Set
Up, Preset Download or Auto Channel
Set has taken place. In this case, set the
Guide Programme Number for that
station manually.
b)When you delete a channel or change
channel positions manually after Auto
Set Up, Preset Download or Auto
Channel Set has taken place. In this case,
set the Guide Programme Numbers for
all the receivable stations manually.
c) When you wish to timer-record a satellite
programme with VIDEO Plus+ system.
In this case, set the Guide Programme
Numbers for all satellite broadcasts
received on your satellite tuner.
1Select Initial Set Screen
1Press MENU.
2Press 5 or ∞ to select “INITIAL
SET” then press OK or 4.
MAIN MENU
MODE SET
AUTO CH SET
MANUAL CH SET
INITIAL SET
5
[
]
=
∞
[MENU] : EXIT
2Set Guide Programme Number
1Press 5 or ∞ to select “GUIDE
PROG SET” then press OK or 4.
GUIDE PROG SET
GUIDE PROG TV PROG
4 5
[
5∞] =
[MENU] : EXIT
(ex.) When inputting the Guide
Programme number 4 for CH4.
2Press 5 or ∞ or Number buttons to
enter guide programme number
(GUIDE PROG) then press OK or 4.
3Press 5 or ∞ or Number buttons to
enter the number of the recorder’s
channel position on which the Guide
Programme number’s broadcast is
received, then press OK or 4.
GUIDE PROG SET
GUIDE PROG TV PROG
4 4
5
[
] =
∞
[MENU] : EXIT
(ex.) If CH4 is received
on channel position 4.
4Repeat the above procedures until
you set the guide programme number
for all the receivable stations.
•If the satellite broadcast is received
on your VCR’s auxiliary channel “L2”, select “L-2” for the channel
position.
CH4
3Finish Setting
Press MENU.
3Finish Setting
Press MENU to exit. The clock starts to
operate.
— 20 —
Page 20
B
ASIC
O
PERATIONS
Playback
Make sure....
• Your VCR, TV, and antenna are
connected correctly.
1On TV
1 Turn on the TV.
2 Select the video channel (or external
video input).
2On VCR
Insert a cassette.
The VCR turns on automatically and
the counter is reset to 0:00:00.
• If the record tab on a cassette is removed,
playback will start automatically.
• If a cassette is already in the VCR, turn
on the VCR.
3Start Playback
Press PLAY 3. The counter is reset to
0:00:00.
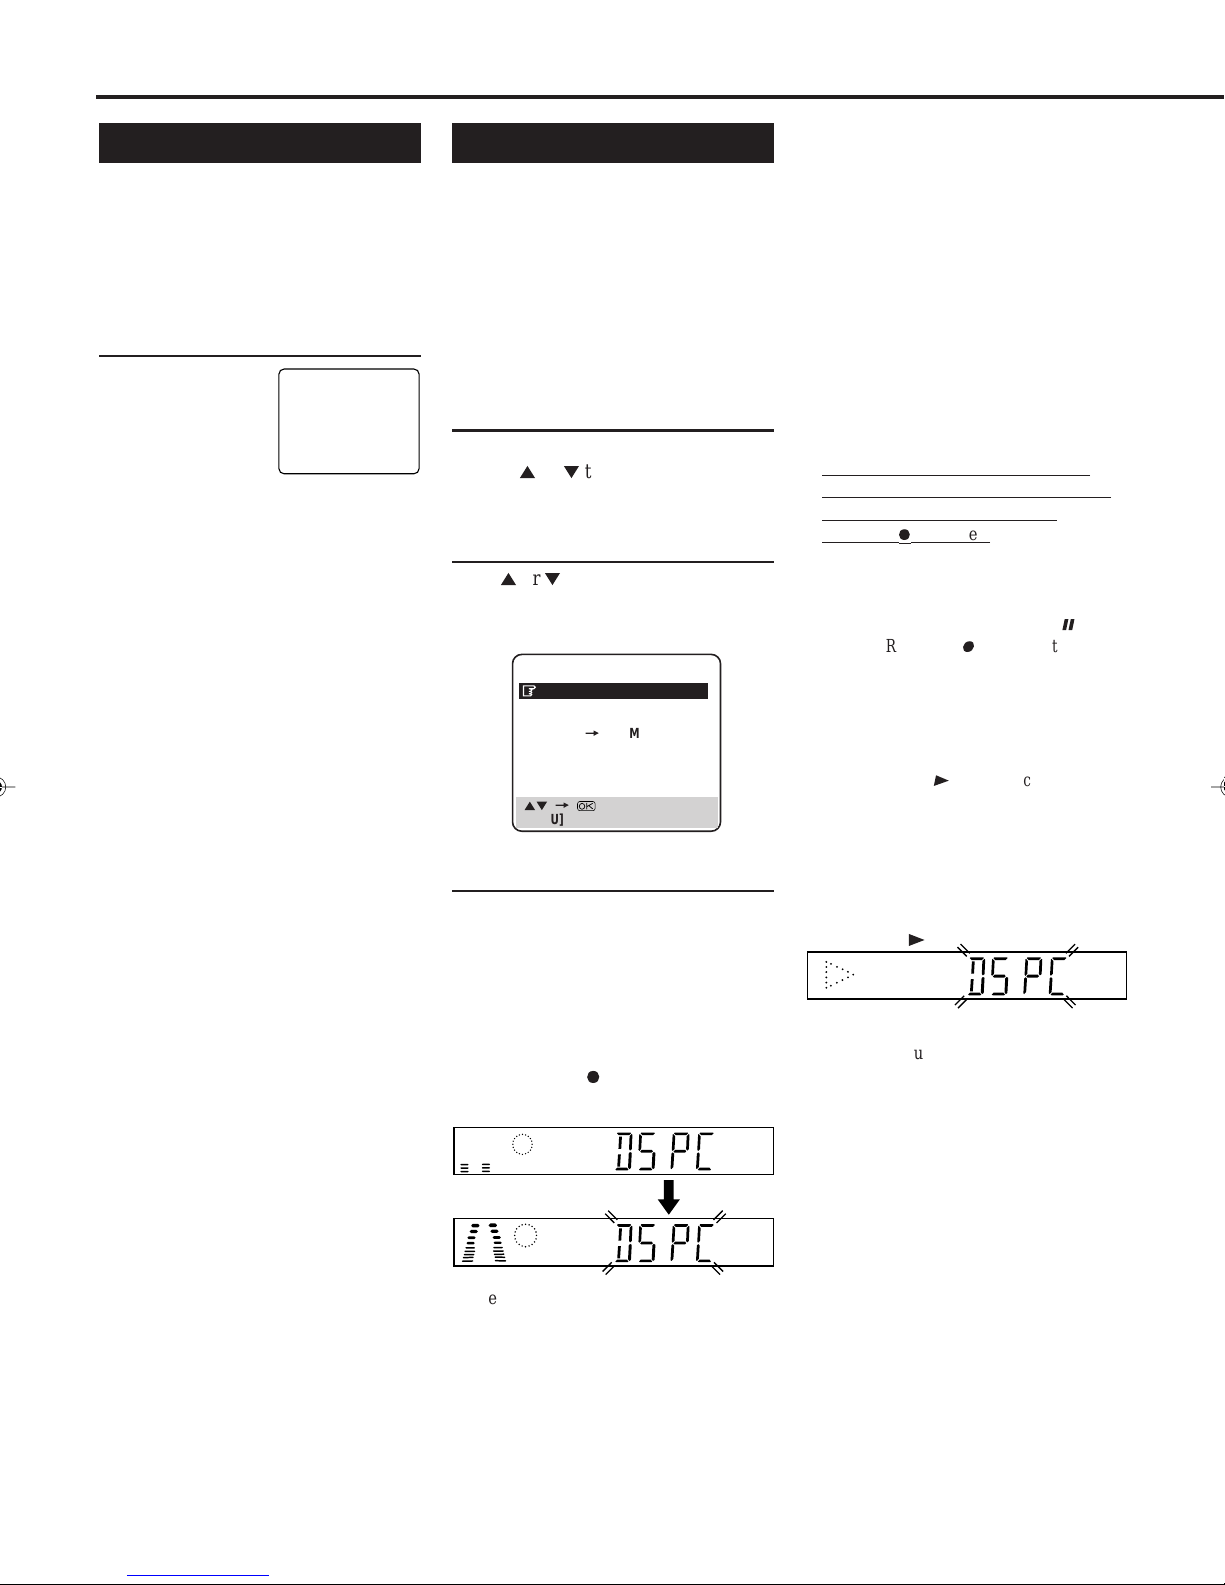
“DSPC” appears blinking in the
recorder’s display panel during
automatic tracking. (✈P.24)
• Playback picture quality of LP recordings
will not be as high as SP recordings.
• Compact VHS camcorder recordings can
be played on this video recorder. Simply
place the recorded cassette into a VHS
Cassette Adapter and it can be used just
like any full-sized VHS cassette .
• This VCR can play both VHS and Super
VHS signals using Super VHS cassettes.
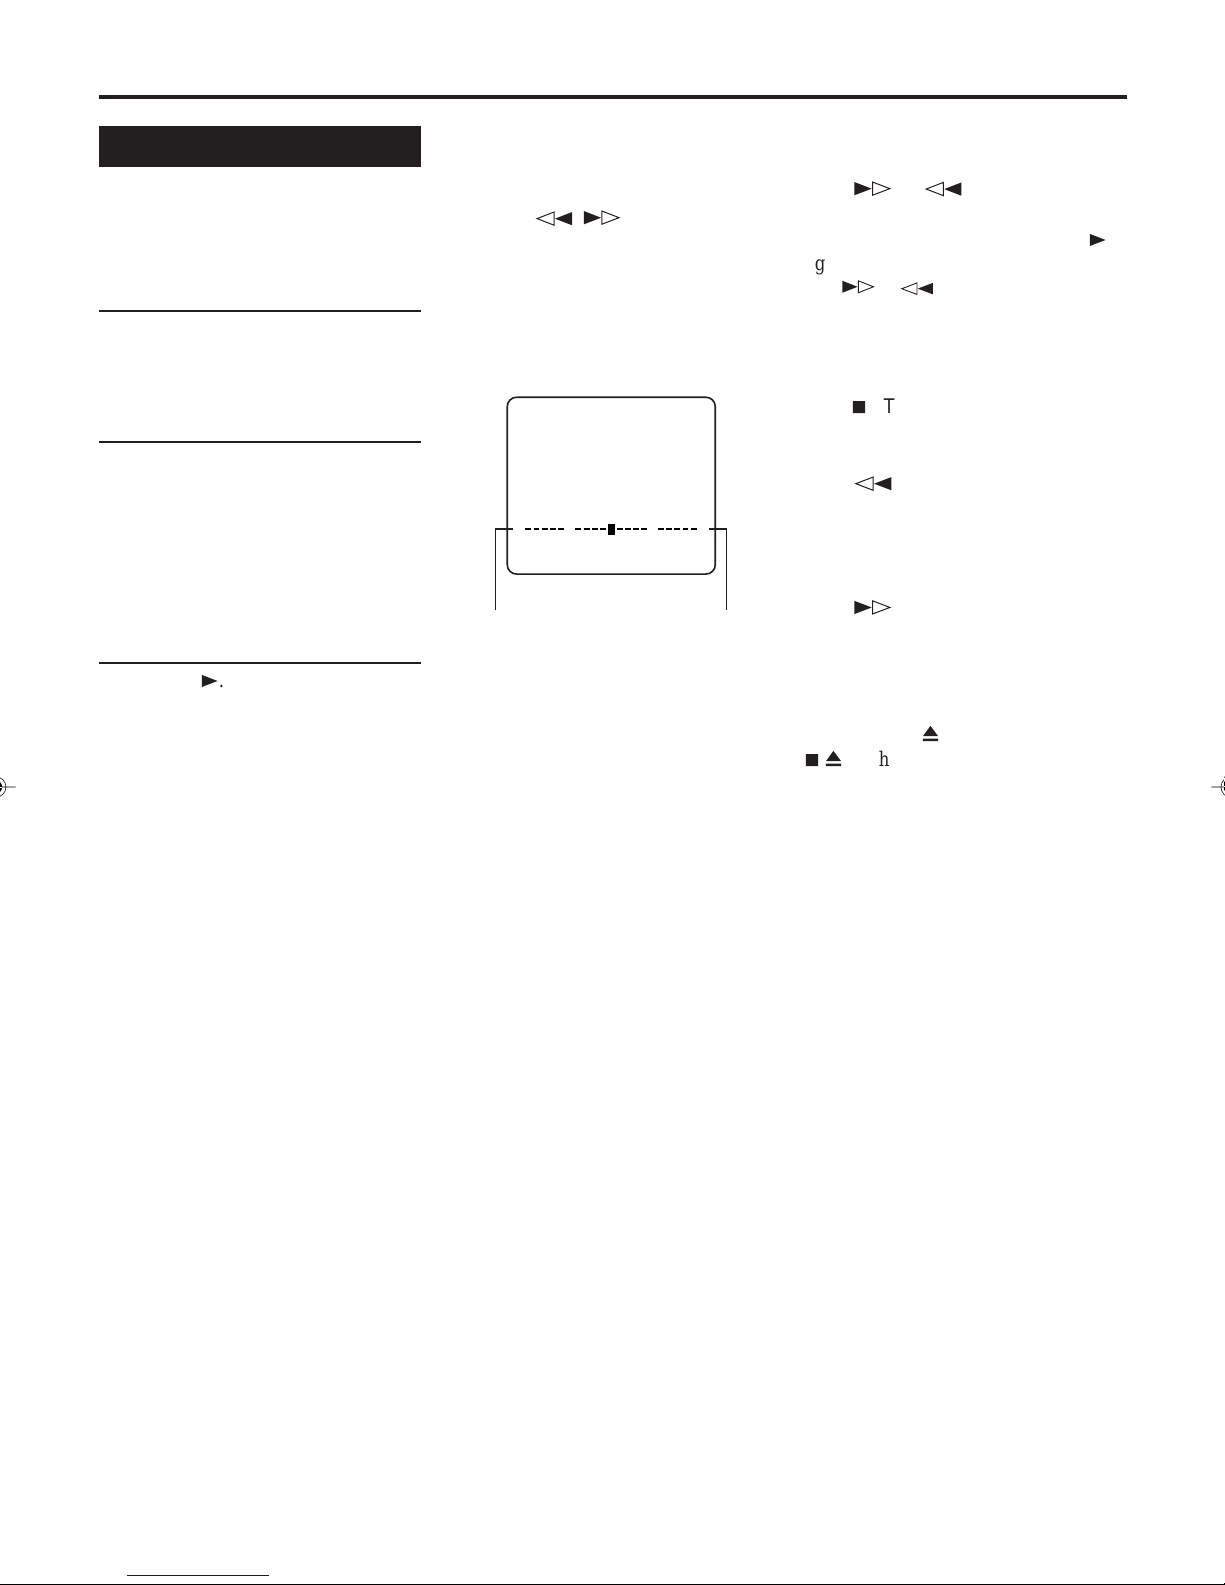
Tape Position Indicator
The tape position indicator appears
on screen when, from the Stop mode,
you press
Index Search. The position of “5” in
relation to “0” (beginning) or “+”
(end) shows you where you are on
the tape.
“O.S.D.” (P.26) must be set to “ON”,
or the indicator will not appear.
Beginning End
Note:
Depending on the type of tape used, there
may be times when the indication is not
correct.
, or perform an
0
3
1:23:45
REMAIN 2:35
+++
To rapidly locate a particular
scene
Press or during playback.
(No sound comes out.)
To resume playback, press PLAY
again.
• If or is held down for more
than 2 seconds, simply releasing it will
cancel the search.
3
To stop playback
Press 7 STOP.
To rewind the tape
Press or turn the shuttle ring on
the front panel counterclockwise when
the tape is not running.
To fast forward the tape
Press or turn the shuttle ring on
the front panel clockwise when the tape
is not running.
To eject the tape
Press EJECT 0 or STOP/EJECT
7/0
on the front panel.
To turn off the VCR
Press VCR POWER or STANDBY/
ON.
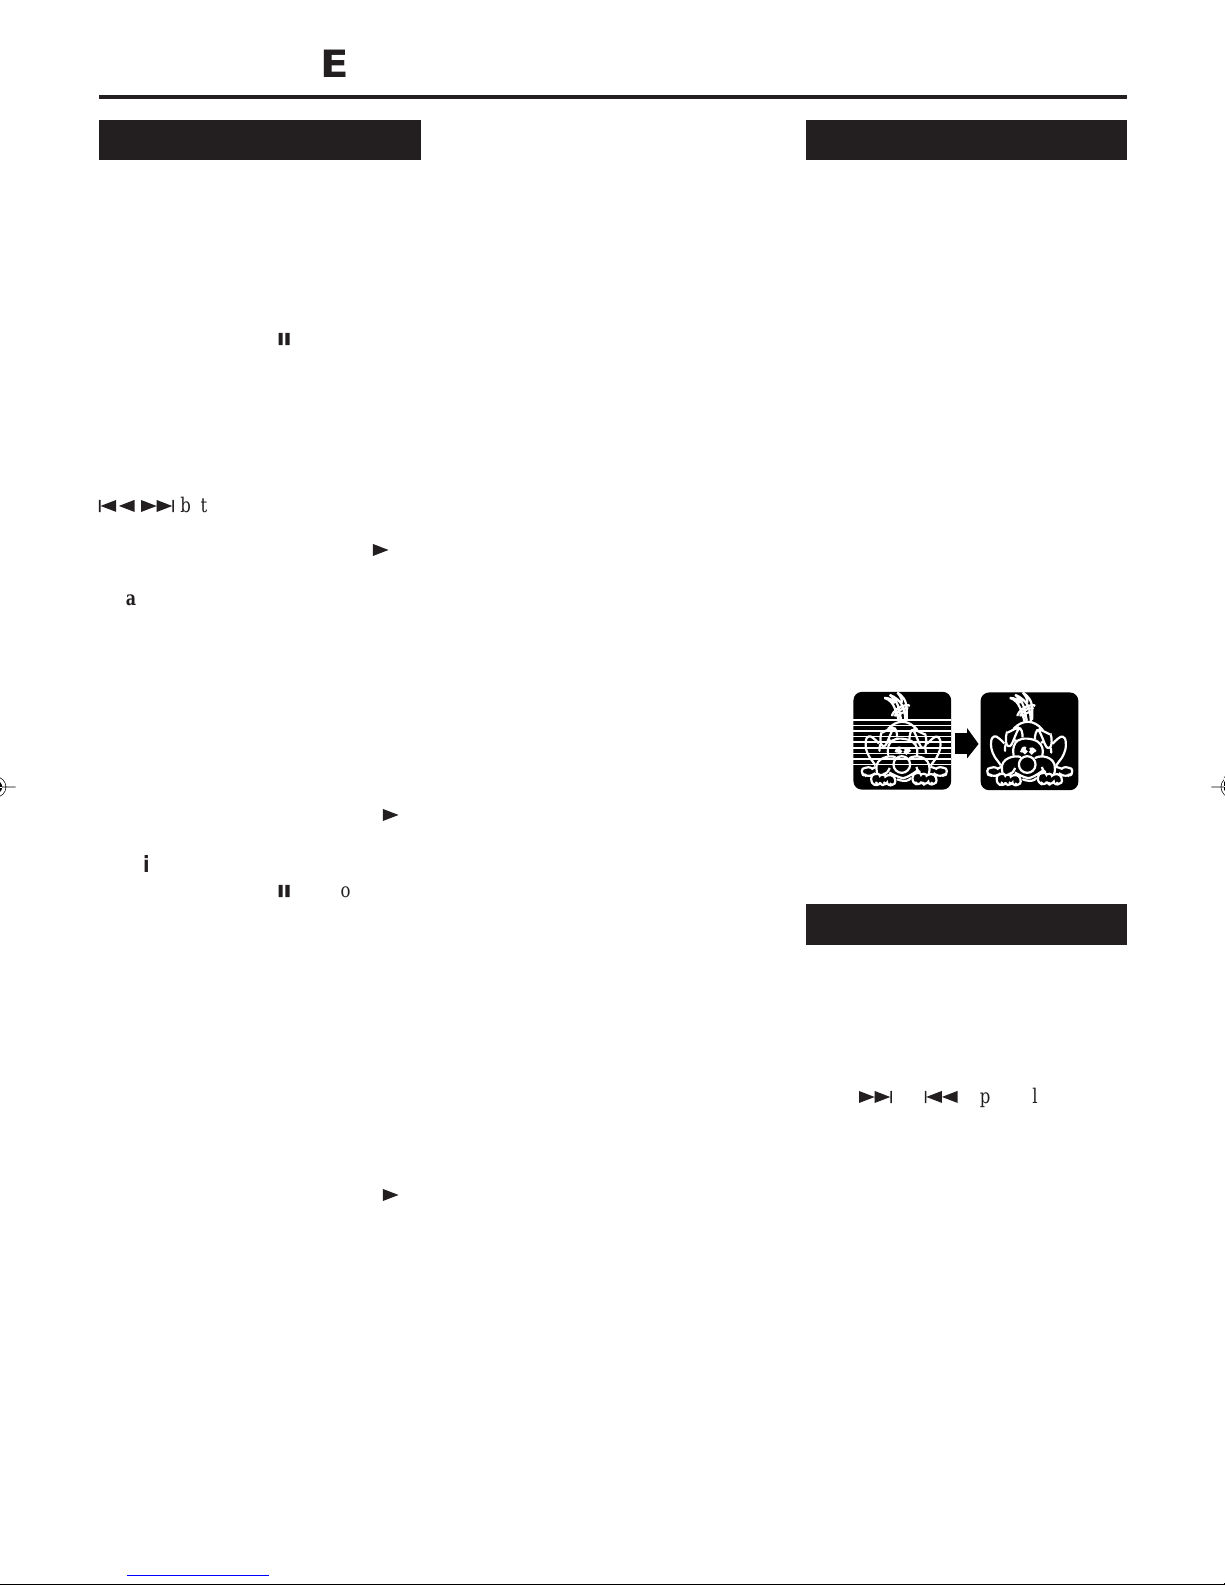
When playing an NTSC tape;
• Some TVs shrink the picture vertically
and place black bars at the top and the
bottom of the TV screen.
• The time counter and remaining tape
length will not be correct.
• The picture may roll up and down. This
can be corrected using the V-HOLD
control found on some TVs. (This cannot
be corrected if the TV does not have a VHOLD control).
— 21 —
Page 21

B
ASIC
O
PERATIONS
(CONTINUED)
Recording
When using this VCR, an index mark is
always marked at the beginning of
every recording. These index marks
make it easier for you to search for the
beginning of the recordings (see “Index
Search” ). (✈P.23)
Make sure....
• The record tab on the cassette is not
removed.
• Your VCR, TV, and antenna are
connected correctly.
1On TV
1 Turn on the TV.
2 Select the video channel (or external
video input).
2On VCR
Insert a cassette with the record tab in
place.
The VCR turns on.
• If a cassette is already in the VCR, turn
on the VCR.
To rewind the tape, press or turn
the shuttle ring on the front panel
counterclockwise.
3 Select Tape Speed
Press SPEED until the desired tape
speed (SP, LP) appears on the display.
4Select a Channel
Press PROG. +/– (or PROGRAMME
+/– on the front panel) or Number
buttons to select the channel position
to record.
If you use a satellite tuner, select the
external line input which is connected to a
satellite tuner.
“L-1” for AV1 IN/OUT connector.
“L-2” for AV2 IN/DECODER connector.
5Start Recording
Press RECORD ¶.
“DSPC” takes place at the beginning of
both the first SP and the first LP
recording after inserting the cassette.
(✈P.24)
• If “DIRECT RECORD” is set to “ON”
(✈P.28), the programme that appears on
the TV screen will be recorded.
• Picture quality of LP recordings will not
be high as on SP recordings.
• This VCR can record on regular VHS and
Super VHS cassettes. By using Super
VHS cassettes, you can record both VHS
and Super VHS signals. For more details,
see “Selecting Recording Format”.
(✈P.27)
To pause recording
Press PAUSE/STILL 8.
To resume recording, press PLAY
button.
• During the Record Pause mode, you can
change the channel position by pressing
the PROG. +/– (or PROGRAMME +/– or
Number buttons).
3
To stop recording
Press 7 STOP.
To watch another TV
programme while recording
1.If your VCR is connected to the TV
using Scart cable, press VCR/TV so
that the VCR indicator goes off from
the display.
2.Select a different channel you want
to watch on the TV.
You can watch the programme of the
selected channel on the TV, without
affecting recording on the VCR.
• If you use a satellite tuner, you cannot
watch another programme while recording.
To display the recording time
indication
Press DISPLAY until a counter reading
appears on the display window.
To display the tape remaining
time
Press DISPLAY until tape remaining time is
displayed. The display panel shows the tape
remaining time with “ ” displayed.
• By pressing the DISPLAY button, you
can change the display to show the
counter reading, channel position*, clock
time or tape remaining time.
*Channel position is not displayed during
playback.
To reset counter
Press CLEAR on the remote control
while the counter reading appears on
the display.
Erase protection
Cassettes have the record tab to ensure
that recordings are not accidentally
erased.
— 22 —
To prevent accidental
erasure:
Break off the record tab
with a screwdriver.
To record again:
Cover the opening
with adhesive tape.
Adhesive tape
Automatic Operations
Auto playback
When a tape is inserted, the VCR turns
on. If the record tab is removed,
playback begins.
Auto rewind
When a tape reaches its end during
playback, fast forwarding or manual
recording, the VCR rewinds the tape
and stops.
Repeat playback
When you press and hold PLAY 3 for
more than 5 seconds, you can playback
the same tape repeatedly (50 times).
Press STOP ■ at any time to stop
playback.
When the tape runs to its end, the VCR
automatically rewinds the tape, and
starts playback.
Memory rewind power off
When you press VCR POWER within
2 seconds after rewinding starts, the
VCR turns off after rewinding is
completed.
Eject cassette
You can eject the tape simply by
pressing EJECT 0 even while the
VCR is turned off.
When you press EJECT 0, the VCR
automatically turns on, ejects the tape,
then turns off.
Page 22
A
DVANCED
O
PERATIONS
Special Effect Playbacks
Are you familiar with tape playback?
If so, you are ready to enjoy the special
effect playback features described
below.
To view a still picture
Press PAUSE/STILL 8 briefly during
playback.
Playback is freezed and a still picture
appears.
Press the button again to activate
frame-by-frame playback (or press
w2 ¢
To resume playback, press PLAY 3.
To advance a still picture:
1 Press JOG/SHTL so that the JOG/
2 Rotate the jog dial clockwise (or
To resume playback, press PLAY 3.
To view a slow motion picture
Press PAUSE/STILL 8 for more than
2 seconds during playback.
To decrease the slow motion speed
(and reverse the slow motion
playback), turn the shuttle ring counter
clockwise.
To increase the slow motion speed
(and forward the slow motion
playback), turn the shuttle ring clock
wise.
To resume playback, press PLAY 3.
button.
SHTL button lights up.
counterclockwise) to advance (or
reverse) a still picture frame by
frame, while the JOG/SHTL button
lights up.
To rapidly locate, then freeze,
a particular scene
During tape playback or Still mode,
follow these steps.
1 Press JOG/SHTL so that the JOG/
SHTL button lights.
2 Turn and hold the Shuttle ring
clockwise (or counterclockwise) to
fast forward (or reverse) a picture.
As you turn the ring further, the
search speed increases. You may
only use the Shuttle ring when the
JOG/SHTL button is lit.
3 Release the Shuttle ring freezes the
picture in still mode.
Notes:
• No sound comes out during special effect
playbacks.
• If you keep viewing slow motion and still
pictures for 5 minutes, the VCR
automatically stops to protect the tape
and video heads.
• During search, still, or frame-by frame
playback, the picture will be distorted,
and there may be a loss of colour.
• During special effect playbacks, some
noise bars will appear on the TV screen.
• When normal playback resumes from
search, still, slow motion or frame-byframe playback, the picture may jitter
vertically momentarily depending on the
type of TV being used.
• When using the jog dial or shuttle ring on
the front panel, you do not have to press
JOG/SHTL on the remote control.
Tracking Adjustments
Auto tracking
Each time a tape is inserted, auto tracking
starts working and continuously analyses
the signal to adjust for optimum picture
quality during playback. So, there is no
need for you to minimize noises in most
tapes during playback.
Manual tracking
• During normal playback:
If auto tracking cannot eliminate noises
well during playback, press SPEED
on the remote control to engage
manual tracking mode, then press
PROGRAMME (or PROG.) + or –.
• During a slow motion picture:
Press PROGRAMME +/– on the
front panel or PROG. +/– on the
remote control to minimize noises in
the slow motion picture.
To cancel manual tracking, stop the
tape, eject the tape, then re-insert it or
press SPEED during playback.
Index Search
You can locate an index marked at the
beginning of each recording on a tape
recorded on this VCR (or an indexed
tape).
Press ¢ or 4 repeatedly until the
appropriate number is displayed on the
TV screen before starting play.
Rapid forward or reverse search begins.
When it finds the designated index,
playback starts automatically.
• Locate an index number by pressing
the button repeatedly, indicating how
many index marks ahead of or
behind that recording you want is
from the tape’s current position.
• Up to ±9th index mark from the
current position on the tape can be
located.
— 23 —
Page 23
A
DVANCED
O
PERATIONS
(CONTINUED)
SmartPicture
You can make the picture softer or
sharper or distinct the picture when
playing the tape.
SmartPicture is set to AUTO when you
receive the VCR.
1Select SmartPicture Mode
1Press the
SMARTPICTURE
button. The
current setting will
appear on the
screen for about 5 seconds.
2While the current setting appears,
press the SMARTPICTURE button
repeatedly, the setting changes as
follows.
AUTO:
Normally select this mode.
DISTINCT:
Select this mode when you want
the distinct picture. The picture
detail is emphasized.
SOFT:
Select this mode when you want
the soft picture. The signal noise of
the picture is softened.
SHARP:
Select this mode when you want
the sharp picture. The picture edge
is emphasized.
Notes:
•It is recommended that the SmartPicture
is set to “SOFT” if playback picture is
noisy.
•When “DSPC” is set to “OFF”,
“AUTO” is switched to “NATURAL”
automatically.
AUTO
DSPC
The DSPC (Digital Studio Picture
Control) system checks the condition
of the tape in use during recording and
playback, and compensates to provide
the highest possible recording and
playback pictures. The default setting
for both recording and playback is
“ON”.
1Select Mode Set Screen
1Press MENU.
2Press 5 or ∞ to select “MODE
SET” then press OK or 4.
2Set DSPC Mode
Press 5 or ∞ to select “DSPC”, then
press OK or 4 to set to “ON” or
“OFF”.
MODE SET
DSPC ON
O. S. D. ON
DIRECT RECORD ON
AUTO SP=LP TIMER OFF
DIGITAL 3R ON
POWER SAVE OFF
S-VHS AUTO
NEXT PAGE
[5∞] =
[MENU] : EXIT
3Finish Setting
Press MENU.
Once the “DSPC” mode is set to “ON”,
the DSPC system works for both
recording & playback, as described
below;
For Recording
Press RECORD ¶.
DURING DSPC
Notes:
•The DSPC system works for both SP and
LP modes only after a tape has been inserted
and the Record mode is first initiated. It does
not work during recording.
•The DSPC system does not work while
Auto Satellite Prog recording is in
progress (✈ P. 28).
•In the case of timer recording, the DSPC
system works before recording is initiated.
•Once the cassette is ejected, the DSPC data
is cancelled. The next time the cassette is
used for recording, DSPC is re-performed.
•When “DSPC” is displayed, the VCR does
not start One Touch Recording (✈P. 26).
• Since the DSPC system works before
recording actually starts, there is a delay
of approximately 7 seconds after
RECORD ¶ is pressed. To make sure you
record the desired scene or programme in
its entirety, first perform the following
steps:
1)Press and hold PAUSE/STILL 8 and
press RECORD ¶ to engage the
RECORD PAUSE mode.
•The VCR then automatically checks the
condition of the tape and, after
approximately 7 seconds, re-enters
RECORD PAUSE.
2)Press PLAY 3 to start recording.
•If you want to bypass the DSPC system
and begin recording immediately, set
“DSPC” to “OFF”.
For Playback
Press PLAY 3.
•The VCR adjusts the playback picture quality based on the quality of the tape in use.
•DSPC is active during Auto Tracking.
“DSPC” appears blinking on the front
panel’s display window.
DSPC COMPLETED
•The VCR spends approximately 7 seconds
assessing the condition of the tape, then
begins recording.
— 24 —
Notes:
•When watching a tape recorded with
“DSPC” set to “ON”, it is recommended
that you leave DSPC to “ON” during
playback as well.
•“DSPC” only appears at the beginning of
automatic tracking. Even though it doesn't
appear after that, the DSPC function is
operative.
Page 24

Digital TBC/NR
Your VCR is equipped with the Digital
TBC (Time Base Corrector) that
removes jitter from fluctuating video
signals to deliver a stable picture even
with old tapes and rental cassettes. The
on/off of Digital 3-DNR (Noise
Reduction) which cuts noise and
enables clear picture reproduction is
also linked to this function.
*The default setting is “ON”.
We recommend that you use the Digital
TBC feature when...
... playing a tape recorded on a
camcorder.
... playing a tape repeatedly.
... using this VCR as the player for tape
duplication.
1Set Digital TBC/NR Mode
Press DIGITAL TBC/NR on the front
panel so that the button lights up.
• Pressing the button again turns off
this function. The lights goes off.
• If you playback a tape recorded
under poor TV reception condition,
there may be cases where the picture
becomes more stable with Digital
TBC/NR set to off.
Digital 3R
Digital 3R picture system applies edge
correction to the luminance signal to
enhance detail.
1Select Mode Set Screen
1 Press MENU.
2 Press 5 or ∞ to select “MODE
SET” then press OK or 4.
2Set Digital 3R Mode
1 Press 5 or
∞
to select
“DIGITAL
3R”.
2 Press OK
or 4 to
select one
of the
following:
ON: Normally select this mode.
OFF: No picture adjustment will be
done.
[5∞] =
[MENU] : EXIT
MODE SET
DSPC ON
O. S. D. ON
DIRECT RECORD ON
AUTO SP=LP TIMER OFF
DIGITAL 3R ON
POWER SAVE OFF
S-VHS AUTO
NEXT PAGE
• It is recommended to keep “DIGITAL
3R” set to “ON”.
• Depending on the type of tape being
used, picture quality may be better
with “DIGITAL 3R” set to “OFF”.
3Finish Setting
Press MENU.
Receiving/Recording NICAM
Stereo And Bilingual
Programmes
This VCR can receive and record stereo
and bilingual programmes, including
the NICAM (Digital Stereo Sound)
broadcasts.
When the recorder is tuned to a
different station, the type of broadcast
being received will be displayed on the
TV screen for a few seconds.
Type of Broadcast
Being Received
Regular Monaural (none)
NICAM Stereo ST NICAM
NICAM Bilingual BIL NICAM
NICAM Monaural NICAM
Notes:
• The NICAM audio programme will be
recorded on the Hi-Fi audio track, and
the Standard audio programme on the
normal audio track.
• If the quality of stereo sound being
received is poor, the broadcast will be
received in monaural with better quality.
• Before playing back a programme recorded
in stereo, or a bilingual programme, refer to
“Selecting Monitor Sound”.
• “O.S.D.” must be set to “ON” or the onscreen displays will not appear.
On-screen Display
— 25 —
Selecting Monitor Sound
This VCR is capable of recording three
soundtracks (Hi-Fi L, Hi-Fi R, and
normal) and will play back the one you
select. Also, this VCR can receive and
record stereo and bilingual programmes
and you can select the sound that you
want to listen to.
1Select Monitor Sound
Press AUDIO. Each time you pressed
the button, the output sound changes as
follows.
HIFI L
For Hi-Fi stereo tapes
OR
For stereo programme
HIFI L
For main audio of bilingual tapes
OR
For main audio of bilingual programme
HIFI
For sub audio of bilingual tapes
OR
For sub audio of bilingual programme
NORM (On-screen display &
Display window)
For audio - dubbed tapes
For standard (regular monaural) audio
of NICAM broadcast
HIFI + NORM (On-screen display)
For audio - dubbed tapes
Notes:
“HIFI L R” ( + ) should normally
be selected during playback. In this mode,
Hi-Fi stereo tapes are played back in stereo,
and the normal audio track is played back
automatically for tapes with only normal
audio.
R (On-screen display)
+ (Display window)
(On-screen display)
(Display window)
R (On-screen display)
(Display window)
+ + NORM (Display window)
Page 25
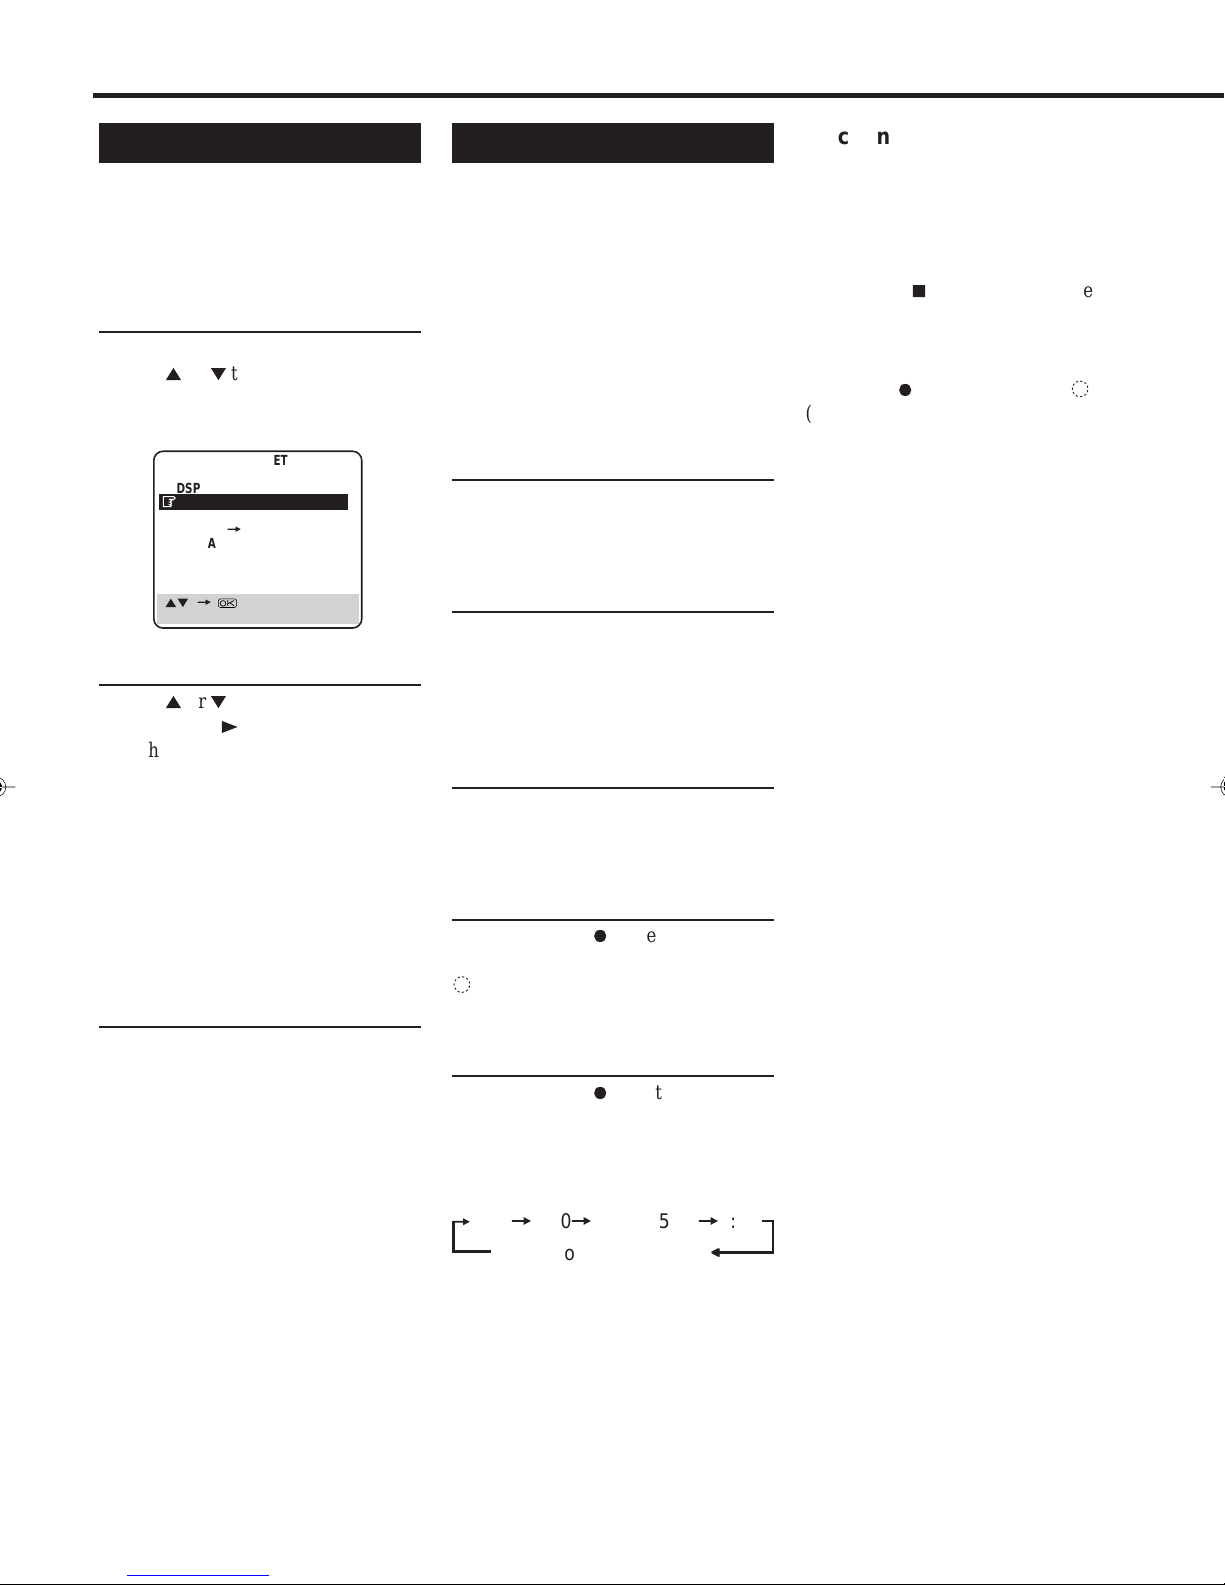
A
DVANCED
O
PERATIONS
(CONTINUED)
Using On-Screen Display
You can display the VCR operating
status on the TV screen.
For the information about what you can
see on the TV screen, see page 5.
1Select MODE SET Screen
1 Press MENU.
2 Press 5 or ∞ to select “MODE
SET” then press OK or 4.
The Mode Set menu appears.
MODE SET
DSPC ON
O. S. D. ON
DIRECT RECORD ON
AUTO SP=LP TIMER OFF
DIGITAL 3R ON
POWER SAVE OFF
S-VHS AUTO
NEXT PAGE
[5∞] =
[MENU] : EXIT
2Set OSD
1 Press 5 or ∞ to select “O.S.D.”
2 Press OK or 3.
Each time you press the button, the
setting changes as follows:
ON:
The VCR operating status appears
on screen (The default setting is
“ON”).
OFF:
The VCR operating status does not
appear on screen.
3Finish Setting
Press MENU.
Notes:
• When you use this VCR as the player for
tape duplication, be sure to set “O.S.D.”
to “OFF” before starting.
• During playback, the operation mode
indicators may be disturbed depending on
the type of tape being used.
One Touch Recording (OTR)
The OTR function lets you quickly
specify how long you want a recording
to continue. You do not have to
programme the timer.
Make sure....
• The record tab on the cassette is not
removed.
• Your VCR, TV and antenna are
connected correctly.
1On TV
1 Turn on the TV.
2 Select the video channel (or video
input).
2On VCR
Insert a cassette with the record tab in
place.
The VCR turns on.
• If a cassette is already in the VCR, turn
on the VCR.
3Select Channel
Press PROG. (or PROGRAMME) +/–
or Number buttons to select the
channel to record.
4Start OTR
Press RECORD ¶ twice.
Recording starts immediately, and the
(Record) indicator lights up and
blinks on the display.
5Select Recording Length
Press RECORD ¶ repeatedly until the
desired recording length appears.
Each time you press the button, the
recording length increases in 30-minute
intervals.
=
0:30=1:00=1:30 5:30=6:00
REC (Normal recording)
.....
++
+
++
To change the recording
length during an OTR
Press RECORD until the desired
length appears.
To cancel an OTR
Press STOP 7 to stop recording before
the preset recording length is reached.
If you want to cancel the OTR mode
but continue recording, press
RECORD ¶ several times until
(Record) indicator stops blinking.
Notes on the indications on the display
while an OTR operation
• During recording, the displayed time
counts down. When “0:00” is reached,
recording stops and the VCR turns off
automatically.
• If an OTR is engaged during pause, the
displayed time counts down normally, but
recording does not begin until you cancel
the pause.
— 26 —
Page 26
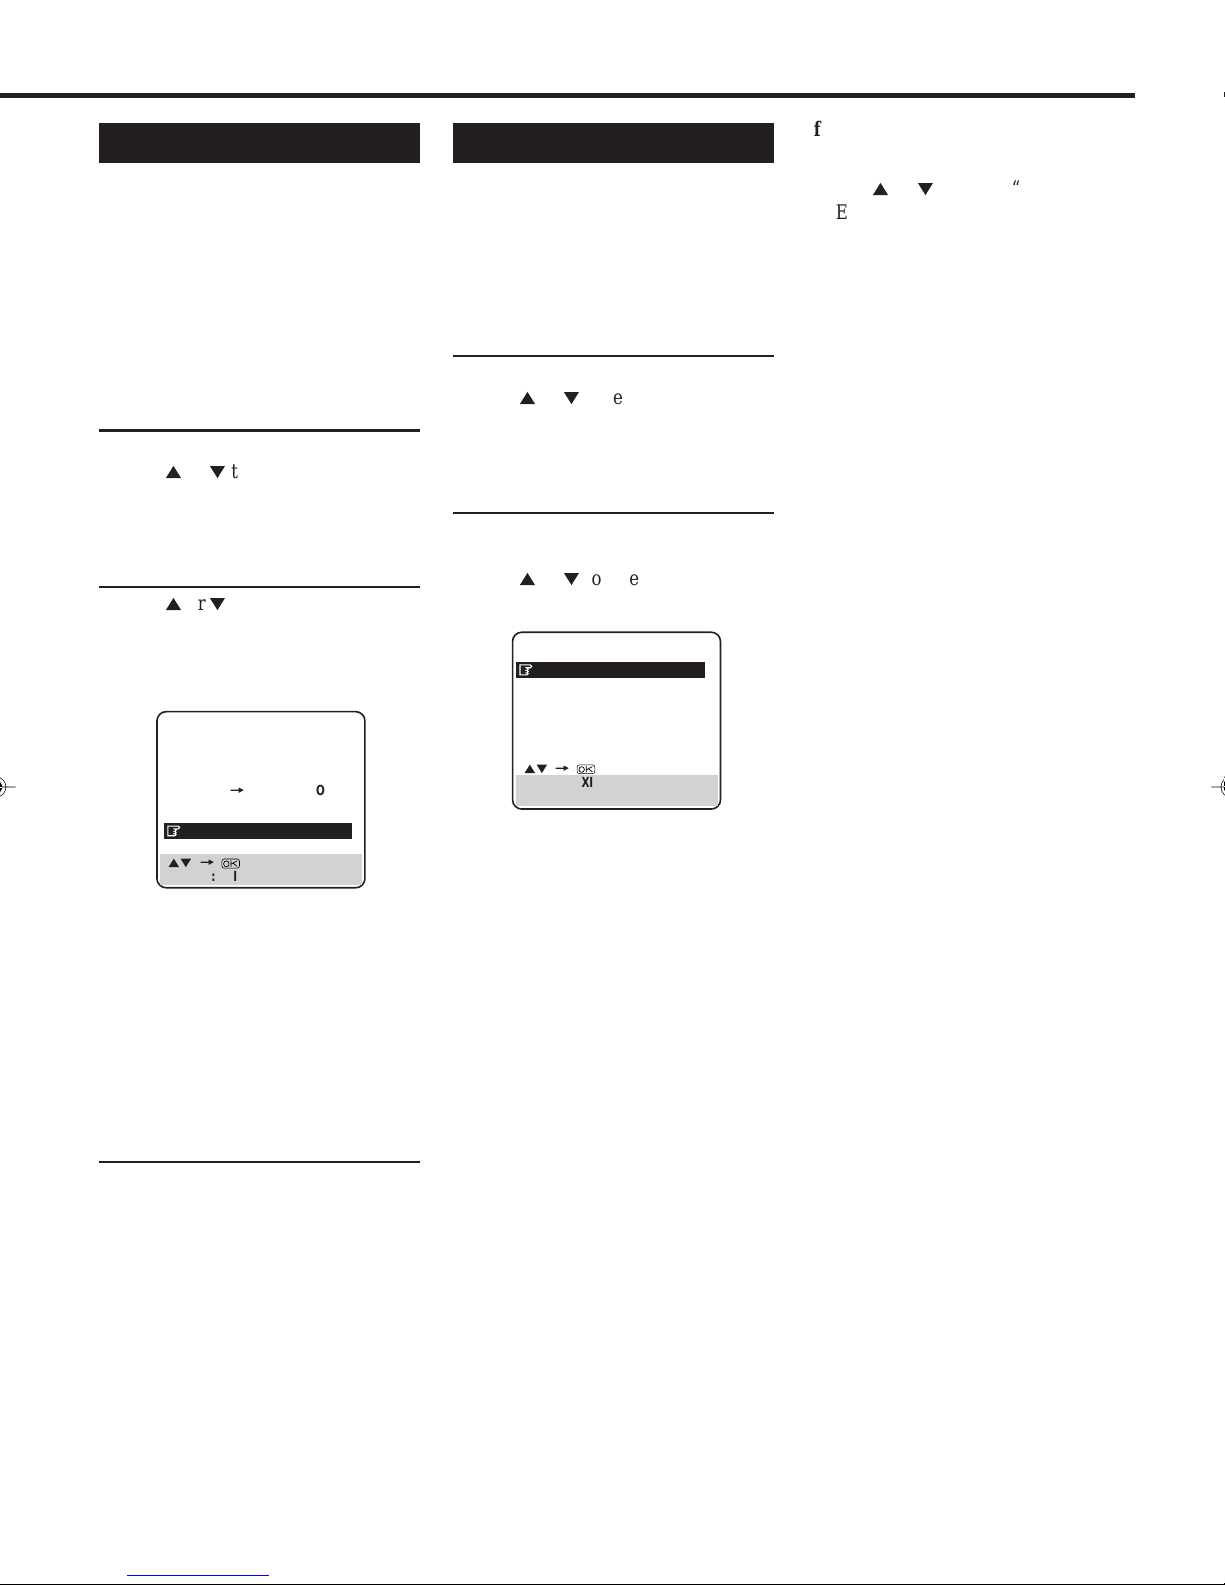
Selecting Recording Format
When shipped from the factory, this
VCR has been set to select
automatically S-VHS format for
recording on an S-VHS tape and VHS
format for recording on a VHS tape. If
you want to make a recording using
VHS format on an S-VHS tape, follow
the procedure below.
1Select Mode Set Screen
1 Press MENU.
2 Press 5 or ∞ to select “MODE
SET” then press OK or 4.
The Mode Set menu appears.
2Select Recording Format
1 Press 5 or ∞ to select “S-VHS”.
2 Press OK or 4.
Each time you press the button, the
setting changes.
MODE SET
DSPC ON
O. S. D. ON
DIRECT RECORD ON
AUTO SP=LP TIMER OFF
DIGITAL 3R ON
POWER SAVE OFF
S-VHS AUTO
NEXT PAGE
[5∞] =
[MENU] : EXIT
AUTO:
Normally select this.
OFF:
Select this when you want to make a
recording using the VHS format on
an S-VHS tape.
3Finish Setting
Press MENU.
Notes:
• When playing a tape that has been
recorded in S-VHS, the S-VHS indicator
lights on the display panel reg ardless of
the “S-VHS” mode setting.
Selecting AV1 and AV2 Input signal
This VCR has two AV input terminals
on the rear panel. You have to correctly
set the input signal depending on the
type of unit connected to these
terminals.
1Select Mode Set Screen
1 Press MENU.
2 Press 5 or ∞ to select “MODE
SET” then press OK or 4.
The Mode Set menu appears.
2Select AV1, AV2
If you are connected to the AV1 IN/
OUT connector:
1 Press 5 or ∞ to select “AV1
SELECT”.
PREVIOUS PAGE
AV1 SELECT VIDEO
AV2 SELECT AV2
[5∞] =
[MENU] : EXIT
2 Press OK or 4 to select one of the
following:
VIDEO : If a connected device’s
output is compatible only
with regular video signals.
S-VIDEO : If a connected device’s
output is compatible with
Y/C signals. This setting
will let you take advantage
of higher quality S-VHS
pictures.
• If “AV2 SELECT” is set to
“DECODER”, it is impossible to set
“AV1 SELECT” to “S-VIDEO”.
3 Press MENU to return to normal
screen.
If you are connected to the AV2 IN/
DECODER connector.
1 Press 5 or ∞ to select “AV2
SELECT”.
2 Press OK or 4 to select one of the
following:
AV2 : To use this recorder as
the recording deck,
where the player is
connected to the AV2
IN/DECODER
connector, or to use the
satellite tuner
connected to the AV2
IN/DECODER
connector.
DECODER : To use a decoder
connected to the AV2
IN/DECODER
connector.
SAT : To view a satellite
programme with the TV
set while the recorder is
in Timer mode, in Stop
mode, recording or
turned off. (✈P. 34)
• If the AV1 OUT switch on the rear
panel is set to Y/C, it is impossible to
set “AV2 SELECT” to
“DECODER”.
3 Press MENU to return to normal
screen.
• If you are not connecting a
decoder or satellite tuner to the
AV2 IN/DECODER connector,
leave “AV2 SELECT” set to
“AV2”.
• The default setting is “AV2”; if
the VCR’s memory backup has
expired due to a power cut or
because the AC was removed
from the VCR, “AV2” will be
automatically selected when the
power is restored to the VCR. If
you are using a decoder, be sure
to set “AV2 SELECT” back to
“DECODER”.
— 27 —
Page 27
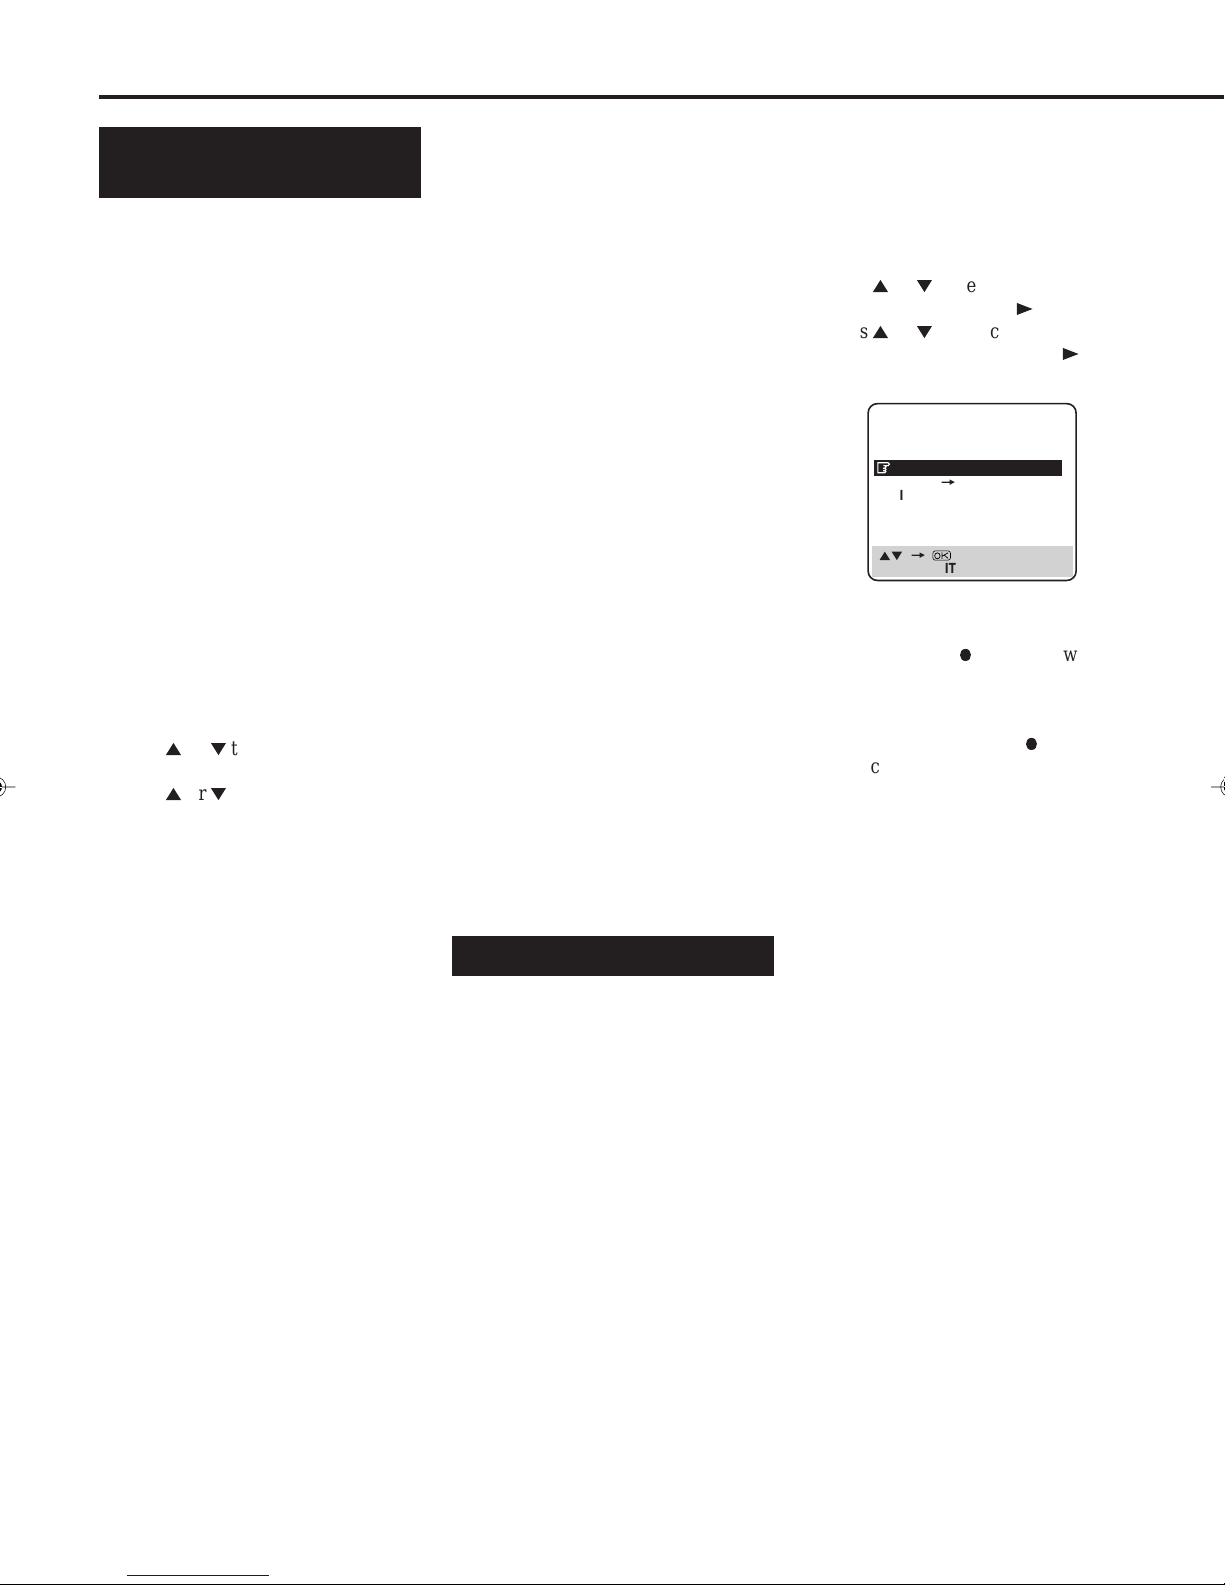
A
DVANCED
O
PERATIONS
(CONTINUED)
Automatic Satellite Programme
Recording
This facility allows you to record
automatically a satellite programme
which is timer-programmed on your
external satellite tuner. Connect a
satellite tuner to the VCR’s AV2 IN/
DECODER connector (✈P.34) and
programme the timer on the satellite
tuner; the VCR starts recording when it
signals input from the satellite tuner to
the AV2 IN/DECODER connector, and
when there is no input signal the VCR
stops recording and the power shuts
off.
Before performing the following steps:
• Make sure the satellite tuner is
connected to the VCR’s AV2 IN/
DECODER connector. (P.34)
• Programme the timer on the satellite
tuner.
• Insert a cassette with the safety tab
in place.
1 Press MENU.
2 Press 5 or ∞ to select “MODE
SET” then press OK or 4.
3 Press 5 or ∞ to select “AV2
SELECT”.
4 Press OK or 4 to set to “SAT”.
5 Press SPEED button to set the tape
speed.
6 Press and hold REC LINK on the
front panel for about 2 seconds so
that the button lights.
The recorder turns off automatically.
To disengage the Auto Satellite Prog
Rec mode press REC LINK again.
The button light goes off.
Notes:
• Be sure not to turn on the satellite tuner
before the programme is executed;
otherwise, the VCR will start recording
when the satellite tuner’s power is turned
on.
• Auto Satellite Prog recording and timer
recording cannot be done at the same
time.
• Auto Satellite Prog recording is not
possible if your satellite tuner does not
have a timer.
• The REC LINK button blinks while Auto
Satellite Prog recording is in progress.
• Pressing theVCR’s STANDBY/ON
button while Auto Satellite Prog
recording is in progress turns off the
VCR’s power and disengage the Auto
Satellite Prog Rec mode.
• If there are more than one satellite
programme you wish to record with Auto
Satellite Prog Recording, it is not possible
to set the different tape speed per each;
the tape speed selected in step 5 will be
applicable to all programmes for Auto
Satellite Prog recording.
• Depending on the type of satellite tuner,
the VCR may not record a slight portion
of the beginning of the programme or
may record slightly longer than the actual
length of the programme.
• If you engage the Auto Satellite Prog
Recording mode when the satellite
tuner’s power is on, the VCR will not
start Auto Satellite Prog recording even
though the REC LINK button blinks.
When the satellite tuner shuts off once
and is turned back on again, the VCR
starts recording.
• When the Auto Satellite Prog Rec mode
is engaged or the VCR’s power is turned
off after Auto Satellite Prog recording is
finished, the VCR will not enter the
Timer mode.
• When you press and hold the VCR’s REC
LINK button to engage the Auto Satellite
Prog Rec mode, if the REC LINK button
does not light but instead blinks quickly
even though your satellite tuner’s power
is off, Auto Satellite Prog Recording will
not work properly with that satellite tuner.
If this is the case, perform “Timer
Recording” (✈P.30) to timer-record a
satellite programme.
• Some satellite tuners output signals
even if the power is off. Auto Satellite
Prog Recording is not possible with
those satellite tuners.
EasyLink Functions
When you connect the VCR and TV
equipped with T-V Link, EasyLink,
MegaLogic, SMARTLINK, Q-Link,
DATA LOGIC, or NEXTVIEWLINK
via fully-wired 21-pin SCART cable
(✈P.9), the following functions are
available.
• Direct Recording
• NextView Link
• TV Auto Power ON
• VCR Auto Standby
For details, refer to the instructions
manual for your TV.
The degree of compatibility and
available functions may differ by
system.
Direct Recording
You can start recording the programme
that you are watching on your TV with
simple operation. Follow the procedure
below to use this function.
1 Press MENU.
2 Press 5 or ∞ to select “MODE
SET” then press OK or 3.
3 Press 5 or ∞ to select “DIRECT
RECORD” then press OK or 3 to
set to “ON”.
MODE SET
DSPC ON
O. S. D. ON
DIRECT RECORD ON
AUTO SP=LP TIMER OFF
DIGITAL 3R ON
POWER SAVE OFF
S-VHS AUTO
NEXT PAGE
[5∞] =
[MENU] : EXIT
4 Press MENU to exit the menu
operation.
5 Press RECORD
¶
. The VCR will
record the programme you currently
watch.
• If “DIRECT RECORD” is set to
“OFF”, the RECORD
¶ button
functions as described in
“Recording”. (✈P.22)
• During the Direct Recording
“CH_ _” appears on the display
panel.
NexTView Link
You can download the EPG (Electronic
Programme Guide) information from
your TV for timer-programming on the
VCR.
VCR must be switched on during EPG
download.
For details, refer to the instruction
manual for your TV.
TV Auto Power ON
You can turn on the TV and set it to
video mode automatically whenever
you play a tape.
For details, refer to the instruction
manual for your TV.
VCR Auto Standby
Y ou can use your TV’ s remote control to
turn off the VCR. For details, refer to the
instruction manual for your TV.
— 28 —
Page 28
Timer Recording Using the
VIDEO Plus+ System
You can simplify the programming
method of timer recording by using the
VIDEO Plus+ system. Whenever you
want to record a TV program, all you
need to do is to find out the programme’s VIDEO Plus+ number.
You can easily find out this number by
checking the TV programme list of
your local newspaper or TV guide
magazine.
Simply entering the programme’s
VIDEO Plus+ using the remote control
will make the VCR programme a timer
recording.
Make sure....
•The clock is set to the correct time
before setting timer recording.
•A cassette is inserted in the VCR and
the record tab of the cassette must
not be removed.
1Select VIDEO Plus+ Mode
1Press TIMER.
2Press 5 or ∞ to select
“VIDEO PLUS+” then press OK or
4. The VIDEO Plus+ entry menu
appears on the TV screen.
2Enter PlusCode Number
1Press Number buttons to enter the
PlusCode number assigned to the TV
programme you want to record.
2Press OK or 4. The VIDEO Plus+
Programme screen appears.
– P1 –
VIDEOPLUS+ 123456789
START STOP
21:00 = 22:00
SP VPS/PDC OFF
DATE TV PROG
25.12 1
: OK
BBC1
yet been set, the GUIDE PROG SET
screen will appear.
Input the number of the channel position
on which the broadcast for the PlusCode
number is received on the VCR, then
press OK or 4 and the VIDEO Plus+
programme screen appears.
3Select Tape Speed
Press SPEED.
•Each time you press the button, the tape
speed alternates between “SP”, or “LP”.
•To change the stop time, press STOP +/–
(number 2 or 5 button).
4Set PDC Mode
Press VPS/PDC (Number button 7) to
select “VPS/PDC ON” or “VPS/PDC
OFF”.
(✈ “PDC Recording” on page 31)
5Finish Settings
Press MENU or OK.
“PROGRAM COMPLETED” appears
on the TV screen.
After 5 seconds, the above message
disappears, and the normal TV picture
resumes.
•If “PROGRAM NOT COMPLETED”
appears, try again from step 1.
If you want to store other
programmes, repeat steps 1 to 5.
6Engage Timer Standby Mode
Press VCR POWER to turn off the
VCR.
The
the display.
The VCR must be turned off for a timer
recording to take place. If you forget to
turn off the VCR, “WARNING-TIMER
RECORDING TO START SOON”
appears on your TV screen five
minutes before a timer recording starts.
To remove the message, press the
CLEAR button.
(timer) indicator lights up on
programme daily, press DAILY
(Number button 8) in step 3. (Press the
button again to cancel).
The VCR will record a TV programme
every day (Monday through Friday) at
the same time and length. (Daily
Recording).
If you want to record the same
programme weekly, press WEEKLY
(Number button 9) in step 3. (Press the
button again to cancel).
The VCR will record a TV programme
once a week at the same day, time, and
length. (Weekly Recording)
If you want to cancel the currently
set programme, press CLEAR.
After a timer recording has taken
place
Press VCR POWER to turn on the
VCR. You can operate your VCR
normally.
To stop a started timer recording
Press STANDBY/ON.
Recording stops and the VCR turns off.
If it is a Daily or Weekly Recording,
future recordings will be carried out as
programmed.
To check or erase the programmes,
see page 31.
To timer-record a satellite broadcast
using the VIDEO Plus+ system:
1Perform steps 1-6.
2Set the satellite tuner to the appropri-
ate channel before the selected
programme begins.
Leave the satellite tuner’s power on.
•If “ERROR” appears on the TV, you have
entered an incorrect PlusCode number. If
this happens, press CLEAR to erase the
number, then enter the correct number.
•If the guide programme number has not
If you want to record the same
— 29 —
Page 29
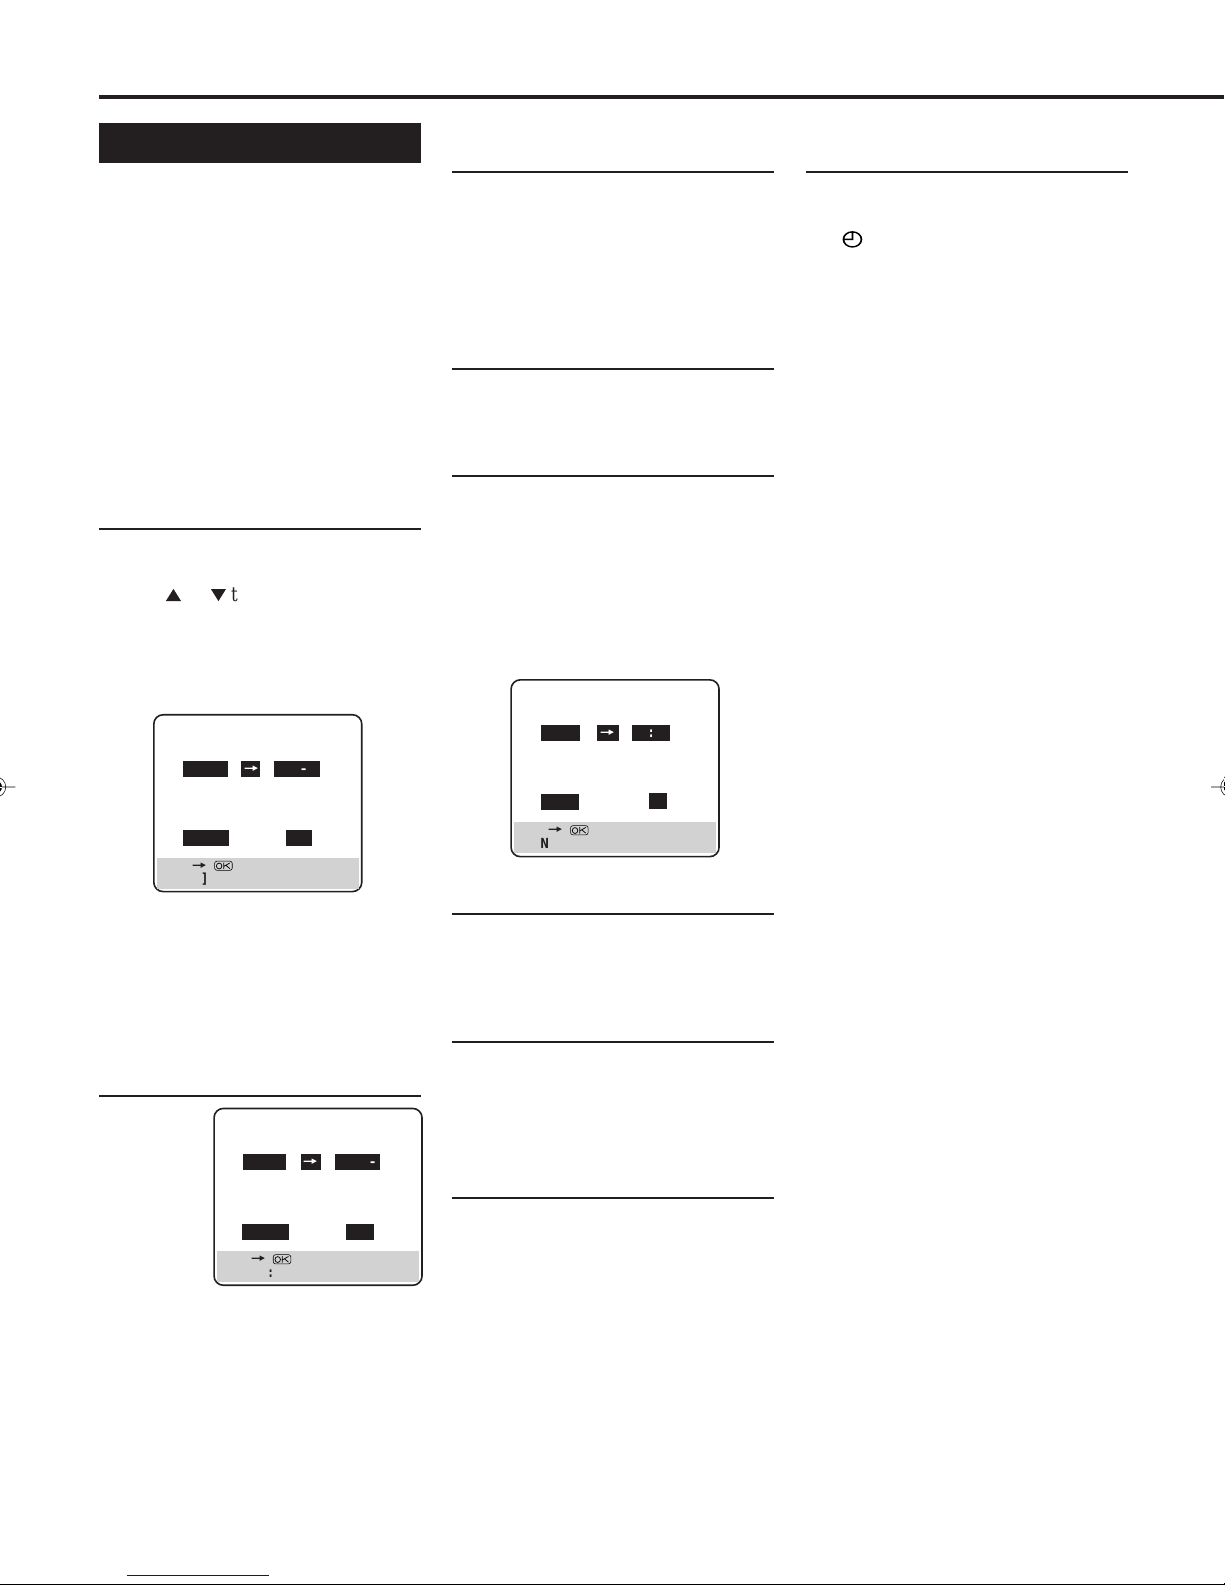
A
DVANCED
O
PERATIONS
(CONTINUED)
Timer Recording
To record while you’re away, follow
step 1 — 9 below. For each programme
you set, the VCR will turn on, start
recording, and turn off automatically.
You can store up to 8 programmes.
Make sure....
• The clock is set to the correct time
before setting timer recording.
• A cassette is inserted in the VCR and
the record tab of the cassette must
not be removed.
1Select Timer Mode
1 Press TIMER. The T imer Recording
menu appears.
2 Press 5 or ∞ to select “QUICK
PROGRAMMING” then press OK
or 4.
The Quick Programming menu
appears.
– P1 –
START STOP
– –:– –
=
– –:– –
SP VPS/PDC OFF
DATE TV PROG
– –.– – – –
[+/–]
=
[MENU] : EXIT
• If you are just starting out, “P1” appears.
• If you have already made 8
programmings, “PROGRAM FULL”
appears and goes back to the Timer
Recording menu. If this happens, delete
unwanted programmes. (✈P.31)
2Select Start Time
Press
START +
or –
(Number
button 1
or 4).
• Each time
you press
the button, the set
time changes by 1-minute intervals. If
you hold the button, the set time changes
by 30-minute intervals.
[+/–]
[MENU] : EXIT
– P1 –
START STOP
21:00
=
– –:– –
SP VPS/PDC OFF
DATE TV PROG
– –.– – – –
=
3Select Stop Time
Press STOP + or –
(Number button 2 or 5).
• Each time you press the button, the set
time changes by 1-minute intervals. If
you hold the button, the set time changes
by 30-minute intervals.
4Select Start Date
Press DATE + or – (Number button 3
or 6).
5Select Channel Position
Press PROG. + or – to enter the TV
PROG channel position.
• To record from external line input, press
PROG. + or – until “L-1” for AV1 IN/
OUT connector, “L-2” for AV2 IN/
DECODER connector, “S-1” for S-Video/
Audio input jacks or “F-1” for Video/
Audio input jacks.
– P1 –
START STOP
21:00
=
22:00
SP VPS/PDC OFF
DATE TV PROG
25.12 1
[+/–]
=
[MENU] : EXIT
BBC1
6Select Tape Speed
Press SPEED.
• Each time you press the button, the tape
speed alternates between “SP” and “LP.”
7Set PDC Mode
Press VPS/PDC (Number button 7) to
select “VPS/PDC ON” or “VPS/PDC
OFF”. (✈“PDC Recording” on page
31.)
8Finish Settings
Press MENU or OK.
“PROGRAM COMPLETED” appears
on the TV screen.
After 5 seconds, the above message
disappears, and the normal TV picture
resumes.
• If “PROGRAM NOT COMPLETED”
appears, try again from step 1.
9Engage Timer Standby Mode
Press VCR POWER to turn off the
VCR.
(Timer) indicator lights up on
The
the display .
The VCR must be turned off for a timer
recording to take place. If you forget to
turn off the VCR, “WARNINGTIMER RECORDING TO START
SOON” appears on your TV screen
five minutes before a timer recording
starts. To remove the message, press
the CLEAR button.
If you want to record the same
programme daily, press DAILY
(Number button 8) during steps 2
through 7. (Press the button again to
cancel).
The VCR will record a TV programme
every day (Monday through Friday) at
the same time and length. (Daily
Recording).
If you want to record the same
programme weekly, press WEEKLY
(Number button 9) during steps 2
through 7. (Press the button again to
cancel).
The VCR will record a TV programme
once a week at the same day, time, and
length. (Weekly Recording)
If you want to cancel the currently
set programme, press CLEAR.
After a timer recording has
taken place
Press VCR POWER to turn on the
VCR. You can operate your VCR
normally.
To stop a started timer
recording
Press VCR POWER or STANDBY/
ON.
Recording stops and the VCR turns off.
If it is a Daily or Weekly Recording,
future recordings will be carried out as
programmed.
If you want to store other
programmes, repeat steps 1 to 8.
— 30 —
Page 30
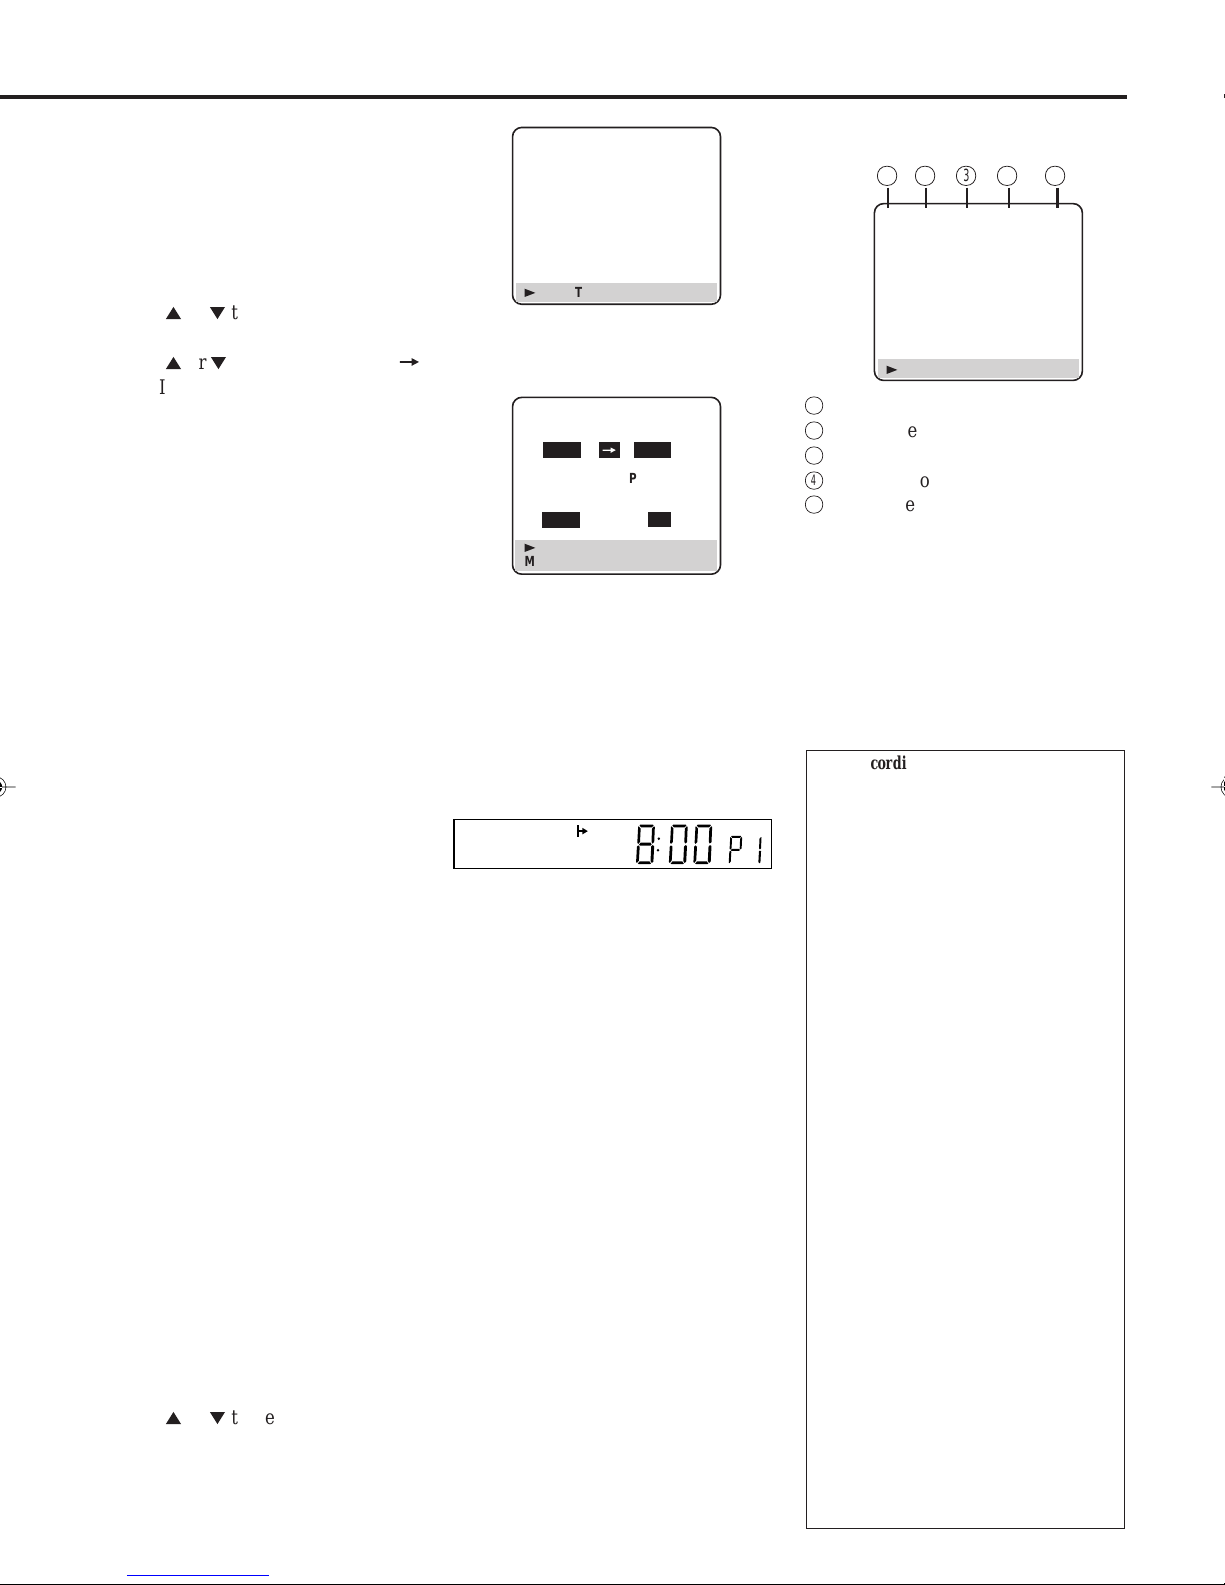
Useful function for Timer
Recording: Auto Tape Speed
With this function activ ated, the VCR can
change the tape speed and record the
programme in LP mode if not enough
tape remains for recording in SP mode.
1 Press MENU.
2 Press 5 or ∞ to select “MODE
SET”, then press OK or 4.
3 Press 5 or ∞ to select “AUTO SP
=
LP TIMER.”
4 Press OK or 4.
Each time you press the button, the
setting changes.
ON:
Select this to allow the VCR to
change the tape speed from SP to
LP when there is not enough tape
length remaining.
OFF:
Select this not to allow the VCR to
change the tape speed.
5 Press MENU to exit from the menu
operations.
Notes:
• The Auto SP-->LP Timer feature is not
available during OTR (One Touch
Recording) and the feature will not work
properly with any tapes longer than E180 or with some tapes of shorter lengths.
• If you have programmed the recorder to
timer-record 2 or more programmes, the
second programme and those hereafter
may not fit on the tape if you set “AUTO
SP-->LP TIMER” to “ON”. In this case,
make sure the mode is not engaged, then
set the tape speed manually during timer
programming.
• In order to ensure that the r ecor ding fits on
the tape, this feature may leave a short nonrecorded section at the end of the tape.
• There may be some picture noise and sound
disturbance at the point on the tape where
the recorder switches from SP to LP mode.
• If you perform timer recording with both
PDC and the Auto SP-->LP Timer
activated, and the programme goes
beyond its originally scheduled length,
there may be times when the programme
cannot be recorded in its entirety.
To check, edit or erase the
programmes
1 Turn on the VCR and TV.
2 Press TIMER.
3 Press 5 or ∞ to select
“PROGRAM REVIEW” then press
OK or 4. The list of the timer
recording programmes appears.
PR START STOP CH DATE
1 8:00 10:00 3 24.12
2 10:00 10:45 2 25.12
3 11:30 13:00 1 25.12
4
5
6
7
8
[3] : NEXT
4 Press OK or 4 repeatedly to view
the more detailed programme
information.
– P1 –
START STOP
8:00
=
10:00
SP VPS/PDC OFF
DATE TV PROG
24.12 3
[3] : NEXT
[MENU] : EXIT
• When you press the button for the first
time, the detailed programme
information for Programme 1 appears.
By pressing this button repeatedly, you
can review the detailed information of
all other programmes.
• The display panel shows the programme start time. Pressing DISPLAY
changes the display to the programme
stop time, then the date and the
channel position.
SP
ITV
6 If you want to change the
programme setting shown on the TV
screen, press the following buttons:
START +/–: Changes the start time.
STOP +/– : Changes the stop time.
SPEED : Changes the tape speed.
VPS/PDC : Changes the setting of
the video programme
system.
DATE +/– : Changes the date.
PROG. +/–: Changes the channel.
If you want to erase the
programme setting shown on the
TV screen, press CLEAR. The
detailed information of the next
programme appears.
7 Press MENU to exit from the menu
operations, if necessary.
Notes:
• You can also check the programmes on
the display panel even when the VCR’s
power is off (unless the VCR is in the
Power Save Mode ✈ P.15) or the VCR is
in the Timer mode. However, it is not
possible to cancel or replace the
programmes.
How to see the programme list
12 3 4 5
PR START STOP CH DATE
1 8:00 10:00 3 24.12
2 10:00 10:45 2 25.12
3 11:30 13:00 1 DAILY
4
5
6
7
8
[3] : NEXT
1
Programme numbers
2
Start time
3
Stop time
4
Channel position numbers
5
Start date
• If the programme has worked
once for the Daily recording,
“DAILY” will be shown instead
of the start date.
• If the programme has worked
once for the Weekly recording,
the following week’s date will be
shown instead of the start date.
PDC Recording
Now available from some TV stations, PDC
(Programme Delivery Control) is a service
designed to assure safe, accurate timer recording.
With this system, special code signals are
transmitted together with the audio/video signals.
These code signals control your video recorder
and have precedence over the adver tised times
which you may have preset into the timer. This
means that your recorder will start and stop
recording when the preset TV programmes
actually start and end – even if the broadcast time
of a preset TV programme is changed. PDC is
currently available nationall y on BBC1, BBC2,
Ch. 4 and Ch. 5, except from a few small relay
transmitters. Ch. 3 operates a PDC service only
in a very few areas. All c hannels intend to of fer
this service in due course. Check your TV
programme listing guide for latest information.
If the channel you intend to record does not offer
a PDC service, your VCR will not star t recording
if PDC has been selected. Be sure to set PDC to
"OFF" if PDC is not available on your selected
channel.
NOTES:
• When you use Timer Programming, set the
start time (PDC time) exactly as advertised
in the TV listing. A different time than
advertised will result in no recording.
• PDC recording is also possible when a
satellite tuner or a cable system is connected
to AV2 IN/DECODER on your recorder.
• PDC recording is also possib le via the AV1
IN/OUT connector.
PDC signal is automatically detected if the
VCR receives PDC signal.
— 31 —
Page 31
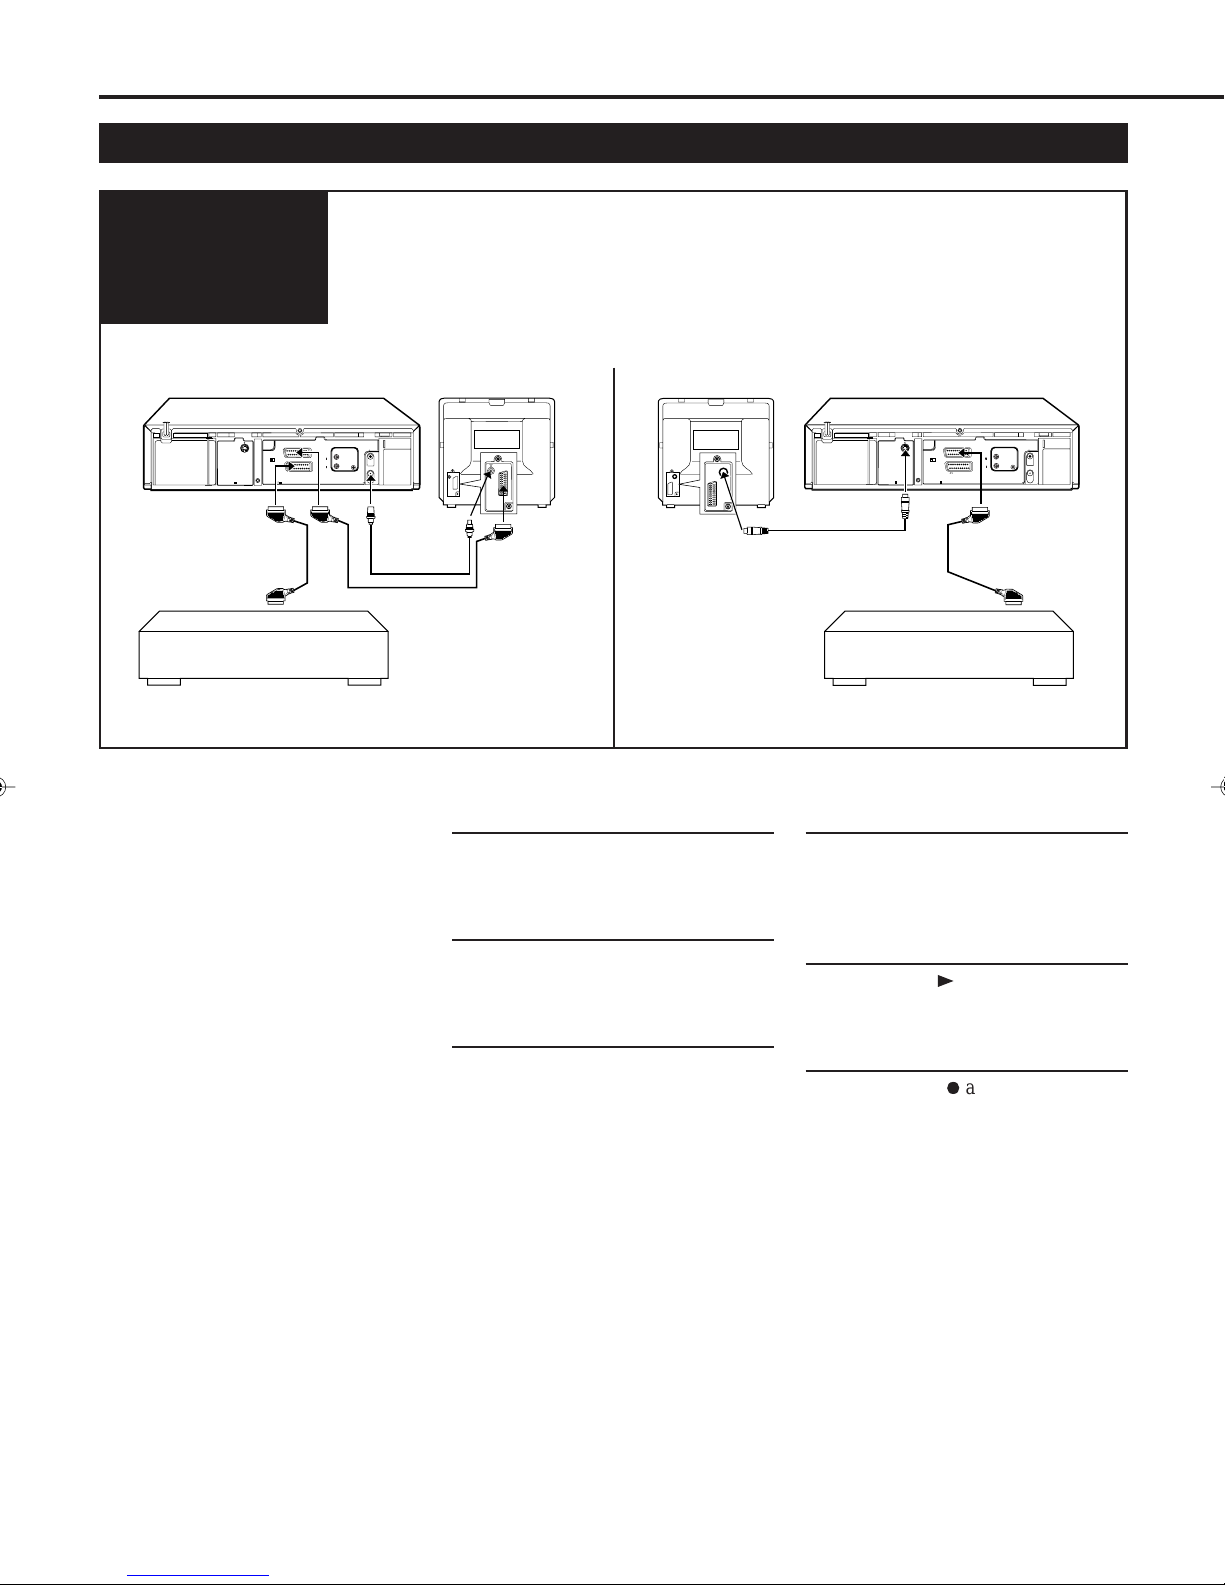
A
DVANCED
Tape Duplication
O
PERATIONS
(CONTINUED)
Connection
1 Connect the recording VCR (this VCR) and the playing
VCR.
Diagram
S OUT
AV1 OUT
COMP. Y/C
LP30363-002
LP20654-002
21-pin SCART Cable
Another VCR
Player Player
Dubbing from any VCR (or video
camera) to another is simple.
Explanations on this page uses this
VCR as the recording VCR.
Refer also to the manual supplied with
the other VCR (for playback).
Note:
When this VCR is using the
recording VCR,
You can also use S-Video or Video/
Audio input jacks on the front panel if
another VCR has S-Video or Video/
Audio output jacks.
When this VCR is using the playing
VCR,
You can use the following connector or
jacks.
• AV1 IN/OUT connector (Rear
panel): if another VCR has Scart
input connector.
Be sure to set the AV1 OUT switch
to appropriate position. (✈P.9)
• S-Video/Audio output jacks (Rear
panel): if another VCR has S-Video/
Audio input jacks.
2 Connect the recording VCR (this VCR) to the TV.
AV1 IN/OUT
AV2 IN/DECODER
Your VCRRecorder
ANT. IN
L
AUDIO
OUT
R
PAUSE
RF OUT
RF Cable
TV Receiver
VIDEO
CHANNEL
or AV
mode
TV Recorder
S-Video Cable
21-pin SCART Cable
1At VCRs
Insert a source tape in the playing VCR
and a blank tape in the recording VCR.
2At TV
Tune the channel on the TV to your
video channel or external line input.
3Select Line Input
Press Number button “0” and/or
PROG. +/– to select the line input.
• L-1: For rear panel AV1 IN/OUT
connector.
• L-2: For rear panel AV2 IN/
DECODER connector.
• S-1: For front panel S-Video/Audio
input jacks.
• F-1: For front panel Video/Audio
input jacks.
If you are using a rear panel AV1 IN/
OUT or AV2 IN/DECODER connector,
be sure to set the “AV1 SELECT” or
“AV2 SELECT” on the Mode Set
Screen to appropriate mode. (✈P.27)
Recorder Your VCR
S OUT
AV1 OUT
AV1 IN/OUT
COMP. Y/C
LP30363-002
AV2 IN/DECODER
LP20654-002
Another VCR
ANT. IN
L
AUDIO
OUT
R
PAUSE
RF OUT
4Select Tape Speed
Press SPEED, until the desired tape
speed (SP or LP) appears on the
display.
5Play Back Tape
Press the PLAY 3 button on the
Playing VCR.
6Record (Copy) Tape
Press RECORD ¶ at this VCR.
Remember: Press the buttons in step 5
and 6 simultaneously to avoid missing
any of the recording.
— 32 —
Page 32
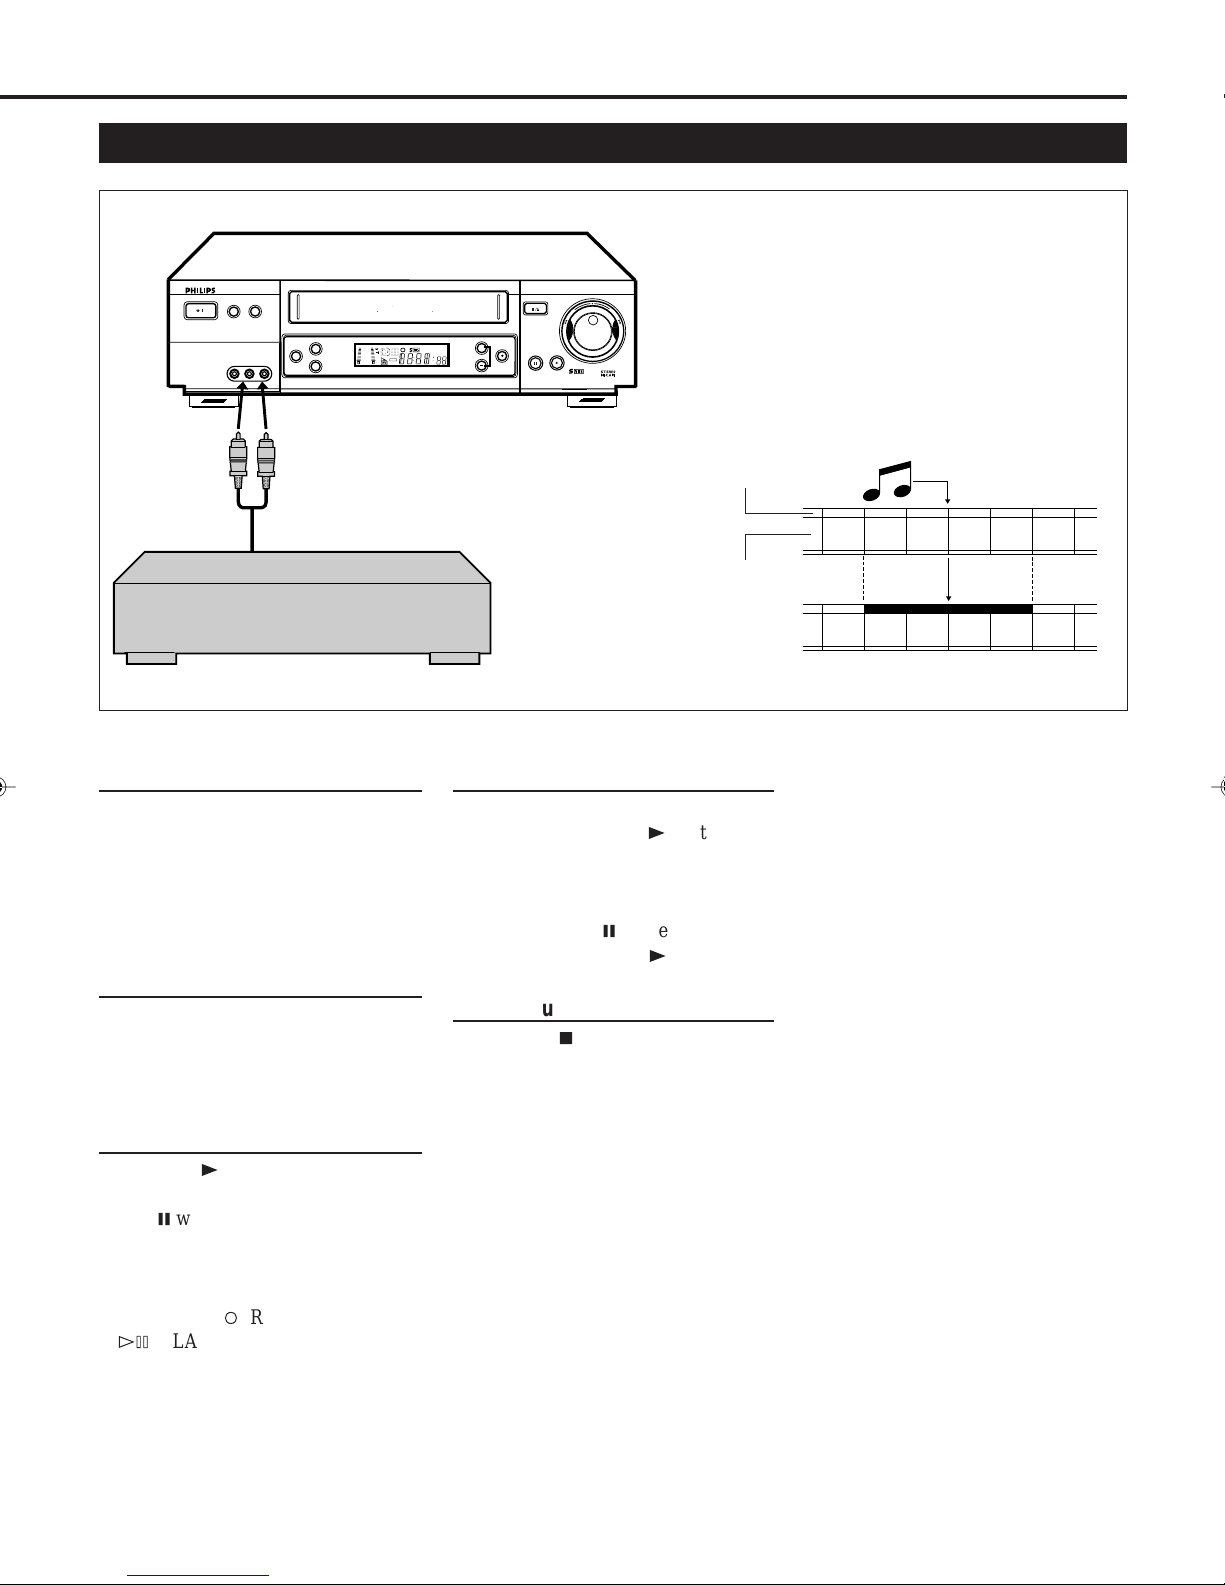
Audio Dubbing
VR 1000 VIDEO CASSETTE RECORDER
POWER
REC LINK
DIGITAL TBC/NR
/
VIDEO L AUDIO R
Audio component
(CD player etc.)
TIME BASE CORRECTOR DIGITAL NOISE REDUCTION SMARTPICTURE
DISPLAY
SPEED
AUDIO DUBBING
12
Audio cable
PROGRAMME
STOP/EJECT
RECORD
+
@
F
O
R
W
D
N
A
I
R
W
D
E
R
PLAYPAUSE/STILL
625
Audio dubbing replaces the normal audio sound of a
SUPER VHS
+8
4
0
6
-
15
dB
NORM
REVIEW
SP SLP
VPS/PDC
VCR
previously recorded tape with a new soundtrack. Use your
VCR as the recorder.
Normal audio track
Pre-recorded tape
Video/Hi-Fi audio
track
Audio-dubbed tape
1Make Connections
Connect an audio component to the
AUDIO IN (L and R) connectors on the
VCR’s front panel.
• When using monaural equipment,
use only VCR’s AUDIO IN L
connector.
2Set Input Mode
Press Number button “0” and or
PROG. +/– on the remote control to
select “F-1” or “S-1” on the display
window.
3Locate Start Point
Press PLAY 3 to start playback of the
tape in the VCR, and press PAUSE/
STILL 8 when you find a point where
you want to start dubbing. Press
AUDIO DUBBING on the front panel.
• Your VCR enters the Audio Dubbing
Pause mode. ‡ (REC) blinks,
#*
(PLAY and PAUSE) lights up on
the display window.
4Start Dubbing
Engage the audio component’s PLAY
mode, then press PLAY 3 to start the
tape in your VCR. Audio Dubbing
begins at this point.
• To stop dubbing temporarily, press
PAUSE/STILL 8. T o resume
dubbing, press PLAY 3.
5End Audio Dubbing
Press STOP 7 to stop the tape in the
VCR, and engage the audio
component’s stop mode.
Note:
• When monitoring the sound during
Audio Dubbing, the normal soundtrack is automatically selected. If you
wish to hear the mixed sound (Hi-Fi
+ Normal soundtracks), press
AUDIO
on the remote control and
select the soundtrack you wish to
hear.
• Audio dubbing stops automatically
when the counter reaches “0:00:00”,
and the recorder enters the Play
mode. Check the counter reading
before dubbing.
• Audio dubbing is also possible using
the rear panel AV1 IN/OUT or AV2
IN/DECODER connector. When
using this connector, make sure to
select the correct input mode in step
2.
• Audio dubbing cannot be performed
on a cassette that has had its record
safety tab removed.
• When playing back an audio-dubbed
tape, press
AUDIO
on the remote
control to select the soundtrack you
✈
wish to hear. (
P.25)
— 33 —
Page 33
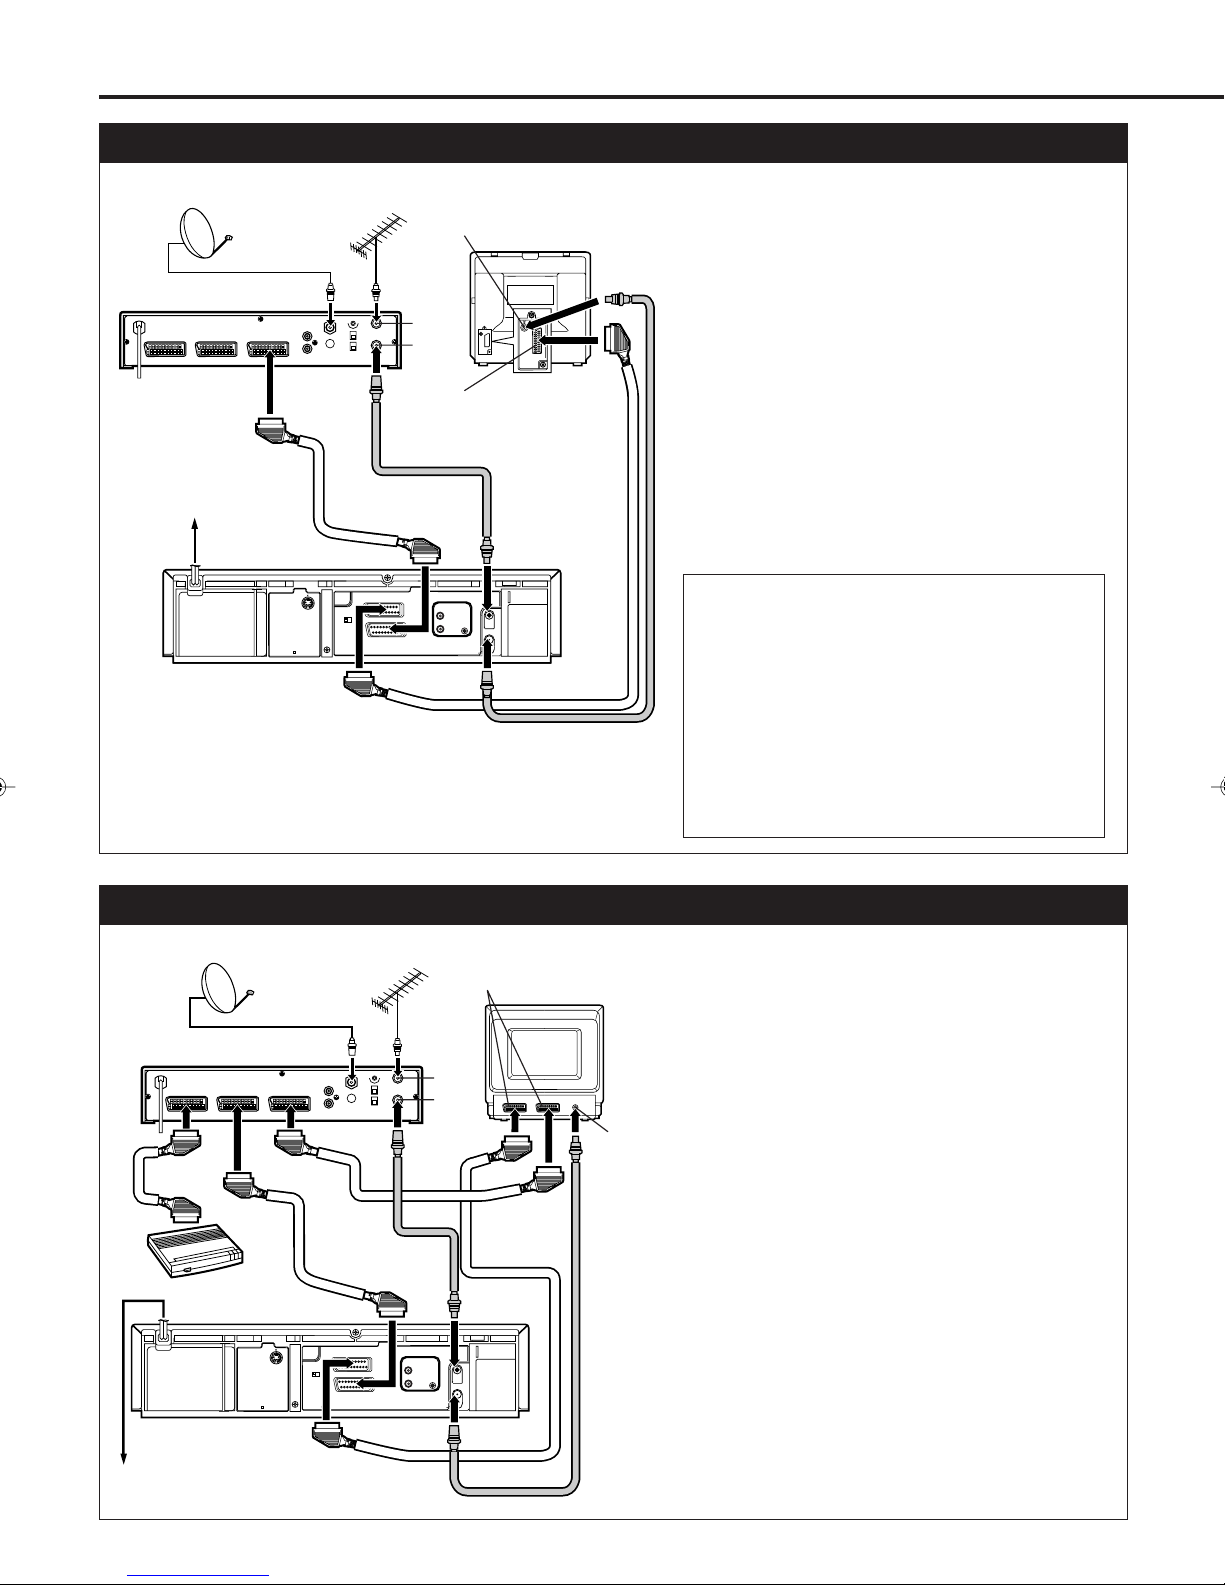
S
YSTEM
C
ONNECTIONS
Connection To a Satellite Tuner (Simple Connections)
Outdoor
Unit
Satellite Cable
Satellite Tuner Unit
DECODER VCR TV
Mains outlet
LP30363-002
This is an example of simple connection if you
don’t have a decoder.
Connect the satellite tuner to the VCR’s AV2 IN/
DECODER connector, then connect the VCR’s AV1
Aerial
Aerial
connector
Back of TV
TV Aerial
cable
IN/OUT connector to the TV’s 21-pin SCART
ANT. IN
RF OUT
21-pin AV input
connector (SCART)
S OUT
AV1 OUT
AV1 IN/OUT
AV2 IN/DECODER
AUDIO
OUT
COMP. Y/C
LP20654-002
ANT. IN
L
R
PAUSE
RF OUT
connector.
NOTES:
• Set “AV2 SELECT” to “AV2”. (✈ P.27)
• You can use Automatic Satellite Program Recording
function (✈ P.28) with this connection.
• To record a programme via the satellite tuner, select L-2
mode by pressing Number buttons and/or PROG. +/–
so that “L-2” appears on the display window.
• For details, refer to the instruction manual for the
satellite tuner.
IMPORTANT
When you set “AV2 SELECT” to “SAT”
(✈P.27), it is possible to view a satellite
broadcast with the TV set to its AV mode even if
the VCR is in Timer mode, in Stop mode,
recording or turned off. When the VCR is in Stop
mode or recording, press VCR/TV on the remote
control to turn off the VCR indicator on the
display window. In this case, be sure to set the
AV1 OUT switch on the rear panel to COMP.
Connection To a Satellite Tuner (Perfect Connections)
TV Aerial
cable
ANT. IN
RF OUT
ANT. IN
PAUSE
RF OUT
21-pin A V input
connector (SCART)
Back of TV
EXT.2 EXT.1
Aerial
connector
Satellite Tuner Unit
DECODER VCR TV
Decoder
Mains outlet
Outdoor
Unit
Satellite Cable
S OUT
LP30363-002
AV1 OUT
COMP. Y/C
LP20654-002
Aerial
AV1 IN/OUT
AV2 IN/DECODER
L
AUDIO
OUT
R
This is an example of recommended connection
if you have both satellite tuner and decoder.
Connect the decoder to the satellite tuner’s
connector, AV1 IN/OUT connector to TV’s
connector, and AV2 IN/DECODER connector to the
satellite tuner’s connector. Then connect the
satellite tuner and TV.
NOTES:
• Set “AV2 SELECT” to “AV2”. (✈P.27)
• You can use Automatic Satellite Program Recording
function (✈P.28) with this connection.
• To record a programme via the satellite, select L-2
mode by pressing Number buttons and/or PROG. +/–
so that “L-2” appears on the display window.
• To receive a scrambled broadcast, descramble the
signal with the satellite tuner.
• For details, refer to the instruction manual for the
satellite tuner and decoder.
— 34 —
Page 34
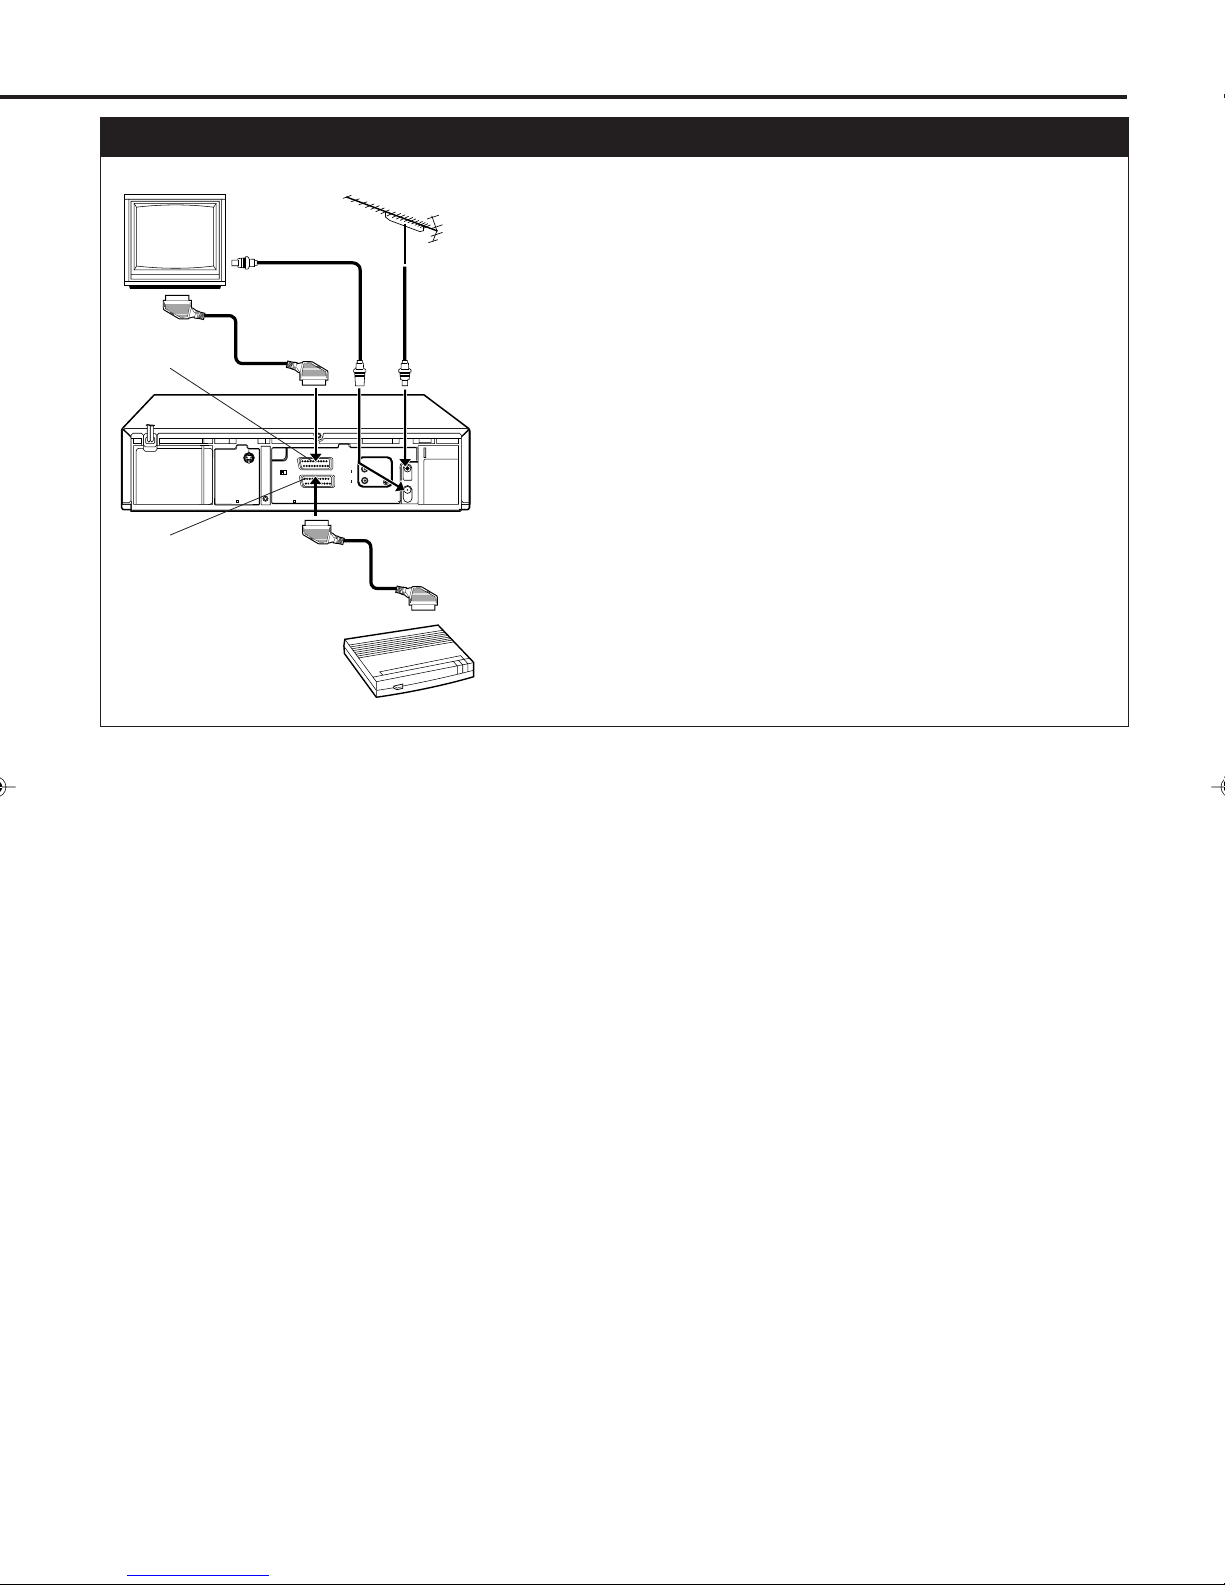
Connection To a Decoder
TV
Receiver
AV1 IN/OUT
AV2 IN/DECODER
RF Cable (provided)
S OUT
AV1 OUT
AV1 IN/OUT
COMP. Y/C
LP20654-002
AV2 IN/DECODER
LP30363-002
Decoder
AUDIO
OUT
The AV2 IN/DECODER connector can be used as an input terminal
for an external decoder (descrambler). Simply connect a decoder and
you can enjoy the variety of programming that is available through
scrambled channels.
Connect your VCR’s AV2 IN/DECODER connector to the decoder’s
TV Aerial
Cable
ANT. IN
L
R
PAUSE
RF OUT
Euroconnector using a 21-pin SCART cable.
NOTES:
• Set “AV2 SELECT” to “DECODER”. (✈P.27)
• Perform the procedure as described in, “if you want to descramble
programme when receiving a scrambled broadcasts” on page 17.
— 35 —
Page 35
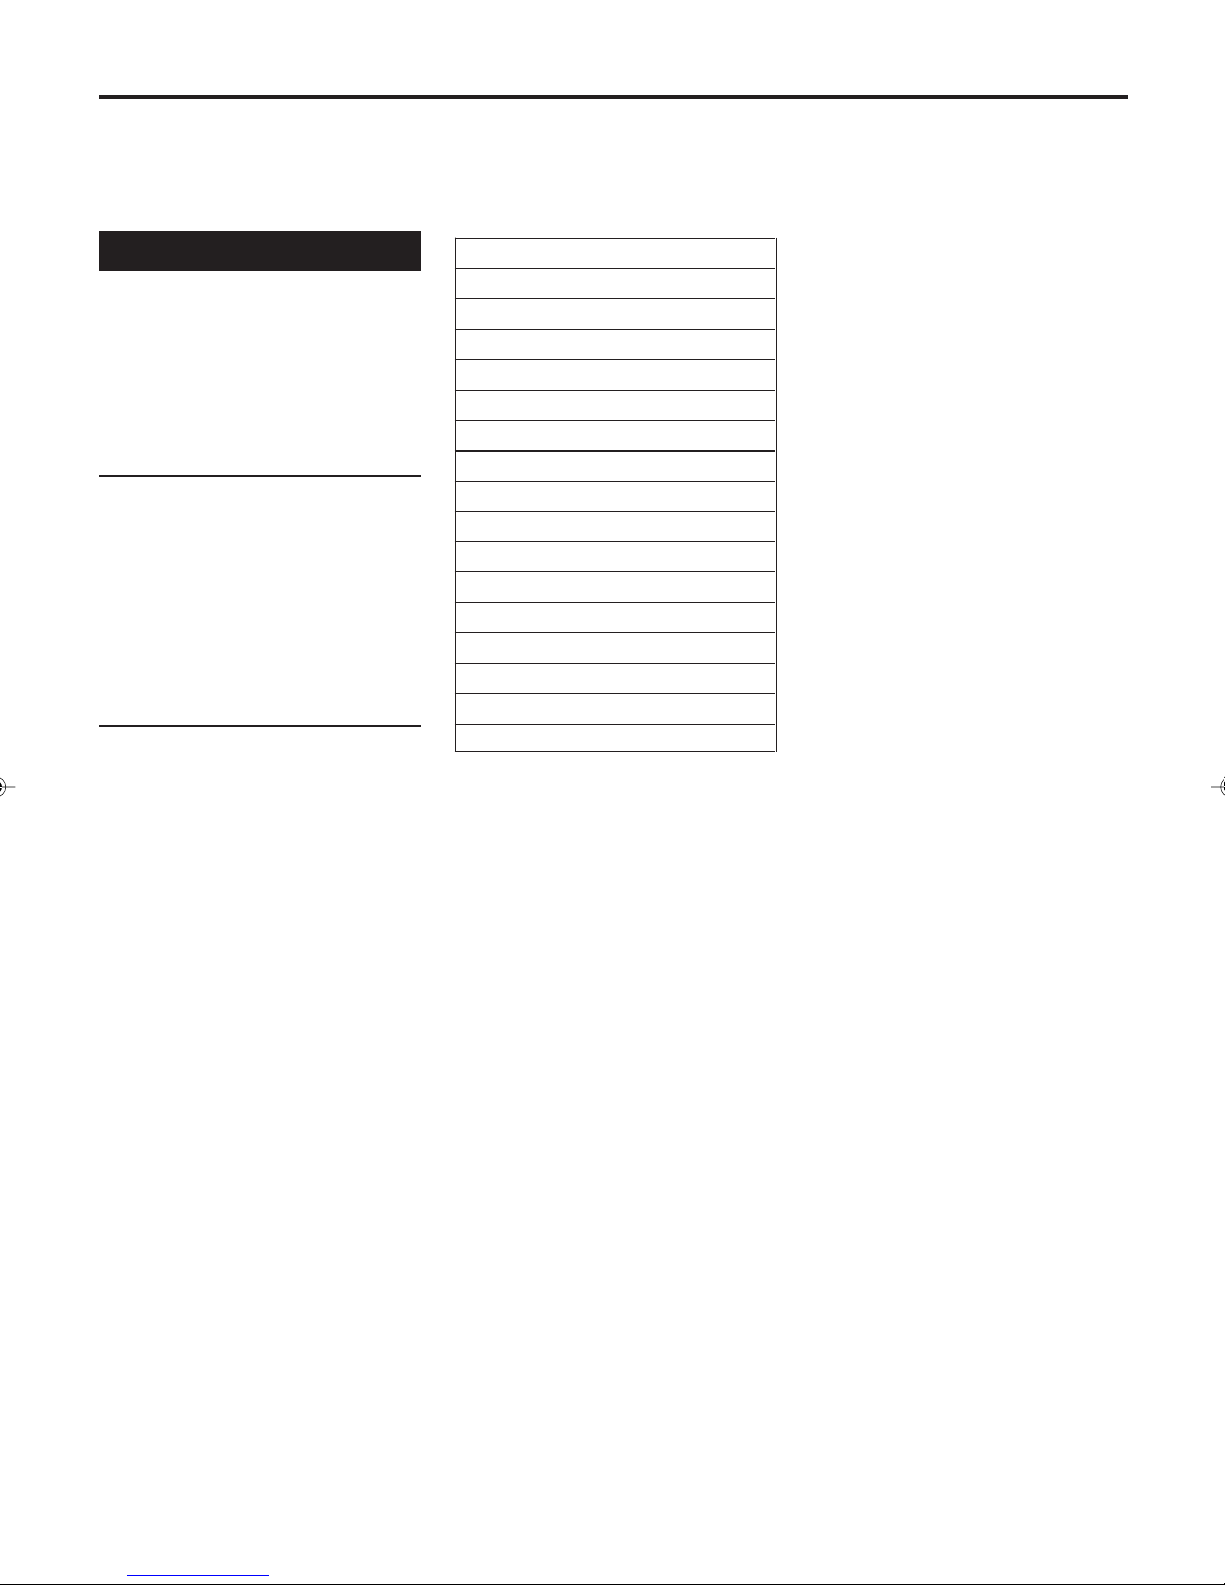
O
PERATING
You can use this remote control to operate your TV. To use this remote control for operating the TV, you first need to set the
manufacturer's code properly.
You first need to set the manufacturer’s code.
TV
For operating TV
Note:
Though this remote control can operate most
of the PHILIPS TVs as well as many other
manufacturers', some of the TVs will not
operate or some functions available on the
TVs will not work with this remote control.
1Set Code
1 Press and hold TV POWER.
2 Press two Number buttons for the
manufacturer’s code number of your
TV, referring to the table to the right.
• For example, for 02, press 0 then
2.
• The remote control can now operate
the TV of the selected code.
2Confirm Setting
Press TV POWER, pointing the
remote control at the TV.
If the TV turns on or off, your setting is
completed.
If not, repeat steps above, using another
code.
TV Manufacturers’ Codes
PHILIPS 01, 02, 03
EMERSON 14
GOLDSTAR 04
GRUNDIG 24, 25
HITACHI 12
JVC 05
MITSUBISHI 13, 26
PANASONIC 07, 17, 19, 20
RCA 10
SAMSUNG 18
SANYO 11
SHARP 16
SONY 09
THOMSON 21, 22, 23
TOSHIBA 08
ZENITH 06, 15
After replacing the batteries
You need to reset the manufacturer’s code
again.
Note:
The buttons you can use to operate your TV
are explained on page 6.
— 36 —
Page 36

B
EFORE
Check the following points once again if you are having some difficulties with your VCR.
IMPORTANT
Periodic maintenance is required in order to maintain the VCR’s continuous excellent performance. After a period of time
the video heads will require replacement. If cleaning or replacement of the video heads is required, this service should be
performed at an authorized video system service center.
R
EQUESTING
S
ERVICE
Power
No power.
Recording & Playback
TV programme cannot be recorded.
Timer recording cannot be performed.
There is no playback picture, or the playback picture is
noisy or contains streaks.
During a still or slow motion picture, the picture
may contain some vertical jitter when using
a TV which has an automatic vertical hold control.
Correction
• Make sure the AC power cord is correctly connected to
an AC outlet.
• Make sure the VCR is turned on.
Correction
• Check the connections between the VCR, the antenna,
and the TV.
• Make sure that the record tab on the back of the cassette
is not removed. (✈P.22)
• Set the timer on-time and timer off-time correctly.
(✈P.29, P.30)
• Make sure that the VCR is turned off after setting is
made. (✈P.29, P.30)
• Timer recording may not be performed or stopped if a
power interruption occurs before or during timer recording. If the power resumes within ten minutes, timer
recording will also resume.
• Select your video channel correctly. (✈P.14)
• Adjust the tracking slowly in either direction. (✈P.23)
• Adjust the vertical hold control manually on the TV, if
available.
If the top of your playback picture waves
back and forth excessively.
Remote Control
The remote control cannot work.
• Because the VCR playback signal is not as stable as an
off-the-air TV signal, the top of your TV screen may be
bent or unstable during playback. To solve this problem,
slowly turn the horizontal hold control on your TV to
correct the wavy picture. If your TV does not have the
horizontal hold control or adjusting the control does not
help, contact your local TV service center.
Correction
• Aim the remote control directly at the remote sensor on
the VCR.
• Avoid all obstacles which may interfere with the signal
path.
• Inspect or replace the batteries. (✈P.7)
• Make sure the batteries are inserted correctly. (✈P.7)
— 37 —
Page 37
B
EFORE
R
EQUESTING
S
ERVICE
(CONTINUED)
Miscellaneous
A cassette cannot be inserted.
The cassette does not eject.
The cassette ejects when you press RECORD, or when
you press VCR POWER or STANDBY/ON to set timer
recording.
S
PECIFICATIONS
General
Mains voltage AC 220 – 240V (AUTO)
Mains frequency 50/60Hz
Power consumption
Power ON Approx. 24 W
Power OFF Approx. 5.5 W
Power Save Mode Approx. 3 W
Ambient temperature +5°C to +40°C
Relative humidity 10% to 80%
Dimensions Approx. 435(W) x 94(H) x 343(D) mm
Position for use Horizontal
Video output channel UHF E36 (adjustable between 22 — 69)
Possible number of TV channel 99
Number of pre-programmable memory blocks 8
Number of days in advance 365 or every day, or every week
Correction
• Insert the cassette with the window side up and the record
tab facing you.
• Check that a cassette tape is not already inserted. Press
EJECT 0.
• Make sure the AC power cord is correctly connected to
an AC outlet.
• If the
VCR POWER or STANDBY/ON to cancel timer
recording, then press EJECT 0.
• Make sure the record tab on the back of the cassette is not
removed. (✈P.22)
Mass Approx. 4.8kg
(Timer) indicator is lit on the display, press
Tuner
Aerial input PAL I
VHF L: 47 — 89 MHz
VHF H: 104 — 300 MHz
302 — 470 MHz
UHF: 470 — 862 MHz
CATV
Video
Input (VIDEO IN) 0.5 to 2.0 Vp-p, 75 ohms
Output (VIDEO OUT) 1.0±0.2 Vp-p, 75 ohms
Resolution 250 lines (VHS)
400 lines (S-VHS)
Signal/noise ratio Better than 45 dB
Audio
Input (AUDIO IN) –8 dBs, 50k ohms (0dBs=0.775 Vrms) – for RCA connector
–8 dBs, 10k ohms (0dBs=0.775 Vrms) – for SCART connector
Output (AUDIO OUT) –8 dBs, 1k ohms (0dBs=0.775 Vrms)
Accessories supplied Remote control unit
RF coaxial cable
Batteries – R6(SUM-3)/AA (only for checking operations)
Design and specifications are subject to change without notice.
— 38 —
 Loading...