

Page 1
Register your product and get support at
www.philips.com/welcome
To insert with
Master EN Telephone Answering Machine
!
Warning
Use only rechargeable batteries.
Charge the handset for 24 hours before use.
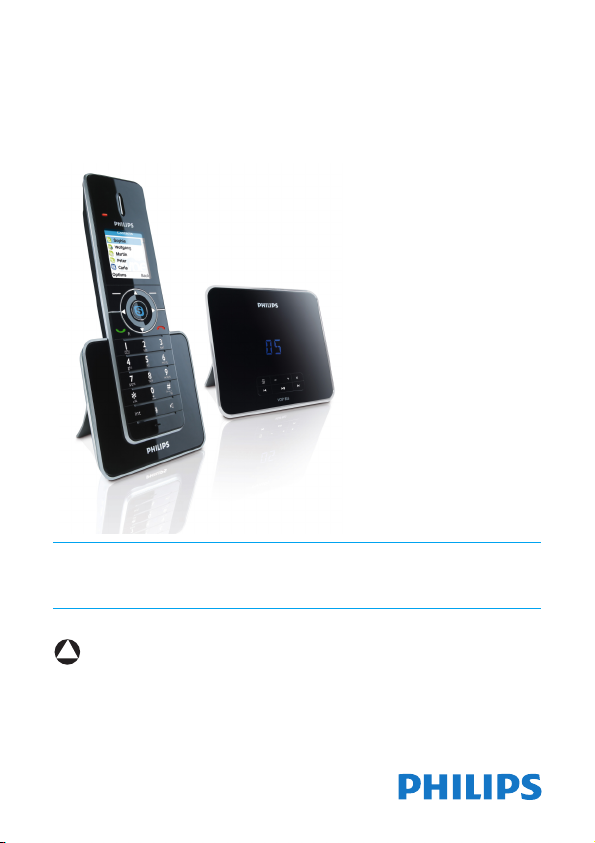
VOIP 855
Page 2

Page 3

Table of contents
1Important 4
1.1 Power requirements 4
1.2 Digital security system 5
1.3 Software licences 5
1.4 Conformity 6
1.5 Environmental 6
1.6 Recycling & disposal 6
1.7 Electric, Magnetic and
Electromagnetic Fields ("EMF") 7
2 Your phone 8
2.1 What’s in the box 8
2.2 What else will you need 8
2.3 Overview of your phone 9
2.4 Overview of the base station 10
2.5 Display icons 10
2.6 The menus 11
3Getting started 12
3.1 Connect the base station 12
3.2 Connect your charger 12
3.3 Install your handset 12
3.4 Checking the battery level 13
3.5 Settings before first use 13
3.6 Log in to Skype 14
4 General description 15
4.1 What is standby mode? 15
4.2 Checking the signal strength 15
4.3 Switching your handset
ON/OFF 15
4.4 Setting the clock 15
4.5 Menu structure 17
5 Skype on your phone 21
5.1 What is Skype? 21
5.2 Skype, landlines and mobiles 21
5.3 Commonly used terms 21
5.4 Using Skype on this phone 21
6Call 24
6.1 Make a regular call 24
6.2 End a call 26
6.3 Answer a call 26
6.4 During a call 26
6.5 Make a second landline call 27
6.6 Answer a second landline call 27
6.7 Answer a second Skype call 27
Table of contents 1
Page 4

Table of contents
7 Intercom and Conference
Calls 28
7.1 Calling another handset 28
7.2 Internal call during an
external call 28
7.3 Transferring a call 28
7.4 Conference call 29
8 Text and Numbers 30
8.1 Entering text and numbers 30
8.2 Switching between uppercase,
lowercase and numeric 30
8.3 Entering symbols 31
9Contact list 32
9.1 View the contact list 32
9.2 Call from the contact list 32
9.3 Shared phonebook 32
9.4 Adding a contact 33
9.5 Send a voicemail to your
Skype contact 33
9.6 Manage your contacts 33
9.7 Handling a contact request 34
10 Your Skype profile 35
10.1 Public details 35
10.2 Private details 35
11 Call History 36
11.1 Call history options 36
12 Custom Options 38
12.1 Personalizing your phone’s
display 38
12.2 Personalizing your phone’s
sounds 39
13 Calling Features 40
13.1 Auto answer 40
13.2 Auto hang-up 40
13.3 Skype call features 40
13.4 Landline call features 41
14 Network Services 44
14.1 Voicemail 44
14.2 Voicemail Call forward 46
14.3 Call back 46
14.4 Cancel call back 46
14.5 Withhold identity 46
15 Extra Features 48
15.1 Keypad lock 48
15.2 Missing handset(s) 48
2Table of contents
Page 5

Table of contents
16 The System 49
16.1 Set your country 49
16.2 Register the handset 49
16.3 Unregister a handset 49
16.4 Change the system PIN 50
16.5 Reset the default settings 50
16.6 Network settings 50
16.7 Country codes list 52
17 The Answering Machine 53
17.1 Turning on the answering
machine 53
17.2 Turning off the answering
machine 53
17.3 Setting the answering
machine language 54
17.4 Setting the answer mode 54
17.5 Outgoing messages (OGM) 54
17.6 Incoming messages (ICM) 55
17.7 Record memo 56
17.8 Call screening 56
17.9 Message alert 57
17.10 Setting the ring delay 57
17.11 Remote access 57
18 Default (pre-programmed)
settings 59
19 Technical Data 61
20 Frequently asked
questions 62
21 Glossary 64
22 Index 66
Table of contents 3
Page 6

4
Page 7

1Important
This product is not designed for making
emergency telephone calls when the
power fails. Skype is not a replacement
for your ordinary telephone and cannot
be used for emergency calling. Alternative
arrangements should be made for access
to emergency services.
1.1 Power requirements
• This product requires an electrical
supply of 100-240 volts, single-phase
alternating current, excluding IT
installations defined in standard EN
60950-1.
• The electrical network is classified as
dangerous according to criteria in the
standard EN 60950-1. The only way to
power down this product is by
unplugging the power supply from the
electrical outlet. Ensure the electrical
outlet is located close to the apparatus
and is always easily accessible.
• The voltage on the network is
classified as TNV-3
(Telecommunication Network
Voltages, as defined in the standard EN
60950-1). Following a power cut, the
call in progress, as well as the date and
time settings will be lost.
!
Warning
• Do not allow the handset to come into
contact with liquids or moisture.
• Do not open the handset, base station
or charger. This could expose you to
high voltages.
• Do not allow the charging contacts or
the battery to come into contact with
conductive materials.
• There is a slight chance that your
product could be damaged by an
electrical storm. We recommend that
you unplug the product from the
power supply and telephone socket
during a storm.
• Do not use the handset in an explosive
hazard area such as where there is gas
leaking.
• It is recommended that this product is
not used near intensive care medical
equipment or by persons with
pacemakers.
• This product can interfere with
electrical equipment such as answering
machines, television, radio, and
computers if placed too close. We
recommend that you position the base
station at least one meter from such
appliances.
• Use only the mains adapter supplied
with this equipment. Incorrect adapter
polarity or voltage can seriously
damage the unit.
• RISK OF EXPLOSION IF BATTERY IS
REPLACED BY AN INCORRECT
TYPE. Never use non-rechargeable
batteries. Use the recommended type
supplied with this product. NiMH
batteries must be disposed of in
accordance with the applicable waste
disposal regulations.
• USE ONLY WITH PROVIDED
ADAPTOR
4Important
Page 8

Base adapter:
Nantong Daming
DM-SC060050 (VDE and UK plug)
Input: 100-240VAC 50/60Hz 0.1A
Output: 6VDC 500mA
Power Systems Technologies (SZ) Co., Ltd.
M901.0170E (VDE plug) & M901.0170X
(UK plug)
Input: 100-240VAC 50/60Hz 0.1A
Output: 6VDC 500mA
Charger adapter:
ESL IW156E (VDE plug) & IW156U (UK
plug)
Input: 100-240VAC 50/60Hz 0.2A
Output: 6VDC 150mA
• USE ONLY WITH PROVIDED
BATTERIES
Recommended battery:
CORUN Ni-MH AAA750 1.2V 750mAh
SANIK Ni-MH SN-AAA75H 1.2V 750mAh
BYD Ni-MH H-AAA750A 1.2V 750mAh
• Handsfree activation could suddenly
increase the volume in the earpiece to
a very high level: make sure the
handset is not too close to your ear.
• This equipment is not designed to
make emergency calls when the power
fails. An alternative has to be made
available to allow emergency calls.
• Do not expose the phone to excessive
heat caused by heating equipment or
direct sunlight.
• Do not drop your phone or allow
objects to fall on your phone.
• Do not use any cleaning agents
containing alcohol, ammonia, benzene,
or abrasives as these may harm the set.
• Do not use the product in places
where there are explosive hazards.
• Do not let small metal objects come
into contact with the product. This can
deteriorate audio quality and damage
the product.
• Active mobile phones in the vicinity
may cause interference.
About operating and storage
temperatures:
• Operate in a place where temperature
is always between 0 and 35º C.
• Store in a place where temperature is
always between -25 and 45º C.
• Battery life may be shortened in low
temperature conditions.
Metallic objects may be retained if placed
near or on the handset receiver.
1.2 Digital security system
Your cordless phone uses a digital
security system to protect against false
ringing, unauthorized access, and charges
to your phone line.
There is a unique digital security code
programmed in each unit. When the base
and the handset are powered up the first
time, the handset automatically links with
the base ready for normal and secure use.
If you have purchased additional
accessory handset(s), you will need to
follow the registration procedure in
“Register the handset” in this manual to
maintain intact the digital security.
1.3 Software licences
This product contains open source
software packages. An overview of these
packages, the licences and/or notices that
apply to them, and the source code for a
Important 5
Page 9
number of these packages are available in
the on-line product documentation,
which is visible on
www.philips.com/support.
1.4 Conformity
We, Philips declare that the product is in
compliance with the essential
requirements and other relevant
provisions of Directive 1999/5/EC. This
product can only be connected to the
analogue telephone networks of the
countries mentioned on the packaging.
You can find the Declaration of
Conformity on www.philips.com/support.
1.5 Environmental
Remember to observe local regulations
regarding the disposal of your packaging
materials, exhausted batteries and old
equipment. Promote their recycling
where possible.
1.6 Recycling & disposal
Disposal instructions for old products:
The purpose of the WEEE directive
(Waste Electrical and Electronic
Equipment; 2002/96/EC) is to ensure that
products are recycled using the best
available treatment, recovery and recycling
techniques to ensure human health and
high environmental protection. Your
product is designed and manufactured with
high quality materials and components
which can be recycled and reused.
Do not dispose of your old product in
your general household waste bin.
Inform yourself about the local separate
collection system for electrical and
electronic products marked by this
symbol.
Use one of the following disposal options:
• Dispose of the complete product
(including its cables, plugs and
accessories) in the designated WEEE
collection facilities.
• If you purchase a replacement
product, hand your complete old
product back to the retailer. The shop
should accept it as required by the
WEEE directive.
Disposal instructions for batteries:
Batteries should not be
disposed of with general
household waste.
Packaging information:
Philips has marked the packaging with
standard symbols designed to promote
the recycling and appropriate disposal of
your eventual waste.
A financial contribution has been
paid to the associated national
recovery & recycling system.
The labelled packaging material is
recyclable.
6Important
Page 10

1.7 Electric, Magnetic and Electromagnetic Fields ("EMF")
1. Philips Royal Electronics
manufactures and sells many
consumer oriented products which
usually, as with any electronic
apparatus, have the ability to emit
and receive electro magnetic signals.
2. One of Philips' leading Business
Principles is to take all necessary
health and safety precautions for our
products, to comply with all
applicable legal requirements and to
stay well within the EMF standards
applicable at the time of producing
the products.
3. Philips is committed to develop,
produce and market products that
cause no adverse health effects.
4. Philips confirms that if its products
are handled properly for their
intended use, they are safe to use
according to scientific evidence
available today.
5. Philips plays an active role in the
development of international EMF
and safety standards, enabling Philips
to anticipate further developments
in standardisation for early
integration in its products.
Important 7
Page 11
2 Your phone
Congratulations on your purchase and welcome to Philips!
To fully benefit from the support that Philips offers, register your product at
www.philips.com/welcome.
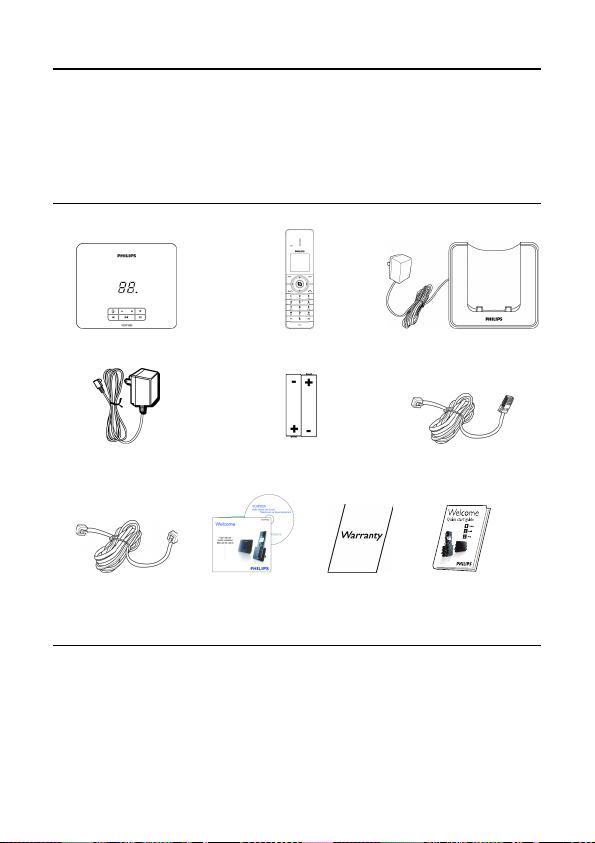
2.1 What’s in the box
HandsetBase station
Power supply
for the base
Line Cord* Quick start guide
NiMH AAA
Rechargeable
Batteries x 2
User Manual on
CDROM
Guarantee
Charger with power
supply
One Ethernet cable
(with RJ45
connector)
* Optional line adaptors may be included in the box.
2.2 What else will you need
• A telephone line and an Internet connection (High speed Internet 512kb minimum
recommended).
• Also needed a router or a modem-router with a free ethernet port.
8 Your phone
Page 12
2.3 Overview of your phone
AEarpiece
B New event LED
New calls, messages, voicemails
C Left Softkey
Select the function displayed on the
handset screen directly above it.
Access main menu
DRight Softkey
Select the function displayed on the
handset screen directly above it.
Redial the last number
Delete text or digit(s)
Cancel operation
Your phone 9
<
C
E Skype key
Access contact list
Confirm of selection during menu
operation
F Up key
Moves cursor up a row
Increase earpiece volume
Enter Skype status menu
GLeft key
Moves cursor left
H Right key
Moves cursor right
IDown key
Moves cursor down a row
Decrease earpiece volume
Enter call history
JTalk/Recall key
Make and receive calls
Send flash signal
K End/On/Off key
End call
Exit menu/operation
Turn handset on/off
LStar key
Dial
Switch between lowercase and
uppercase during editing mode
MPause/Keylock key
Dial # and enter pause
Lock/Unlock keypad
N Intercom/Conference key
Make intercom call
Make conference call
O Mute key
Mute/unmute microphone
P Speaker key
Turn speaker on/off
Q Microphone
:
u
[
]
d
r
e
*
*
#
i
M
v
Page 13
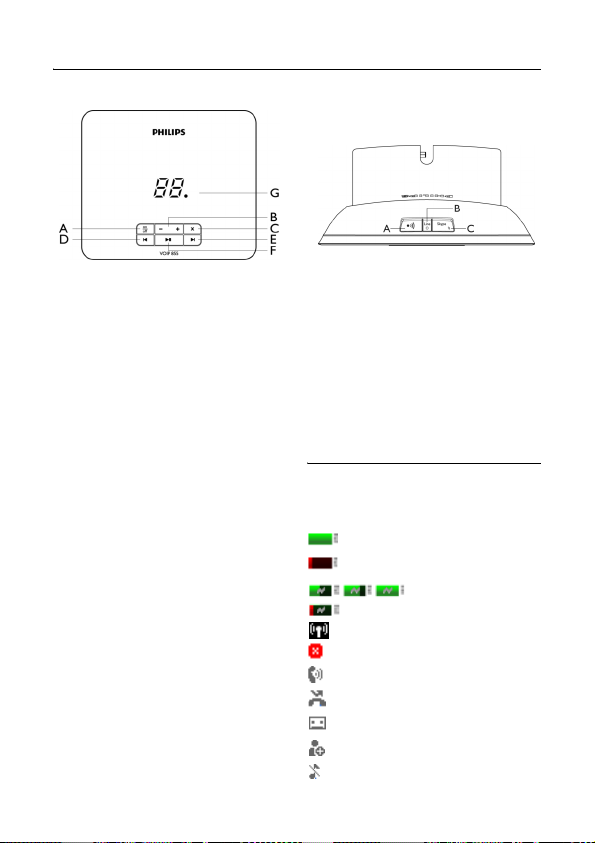
2.4 Overview of the base station
AOn/Off key
Turn the answering machine on/off
B Volume down
Decrease/Increase speaker volume
C Delete key
Delete messages
D Previous key
Skip backward during playback
ENext key
Skip forward during playback
F Play/Stop key
Play messages
Stop message playback
G Message counter
Display message number
Display answering machine operation
Display volume level during setting
10 Your phone
o
,
f
P
F
p
A Paging key
Find handset(s)
Enter registration mode
B Line LED
Blink when receiving a call
Lit when base is on
C Skype line key and LED
Toggle between “Online” and
“Away” status
Lit during “Online” status
2.5 Display icons
Each icon gives you a visual message of
your handset status:
V
L
S
Battery is fully charged*
Battery is low
Battery is charging
In range
Out of range
Speaker on
New missed call
New voicemail
New authorization request
Silent
Page 14
Microphone muted
Keypad locked
Headset attached
*Optimal battery life is reached after 3
cycles of complete charging (over 15
hours) and discharging, allowing
approximately 10 hours of talk-time and
150 hours of stand-by time.
Each icon gives you a visual message of
your Skype status:
Offline
Online
Away
Do Not Disturb
2.6 The menus
Your phone offers a variety of features
and functions grouped in the menus.
2.6.1 Browsing the menus
The main menu includes the Contacts,
History, Skype Status, Add Contact,
Answer Machine and Settings menus.
From standby mode, you can,
•Press
<
MENU
menu.
•Press
•Press
menu.
•Press
Tip
u or d to navigate the menus.
Use
to enter the main
: to view the contact list.
u to enter the
d to enter
Skype Status
History
menu.
Your phone 11
Page 15
3 Getting started
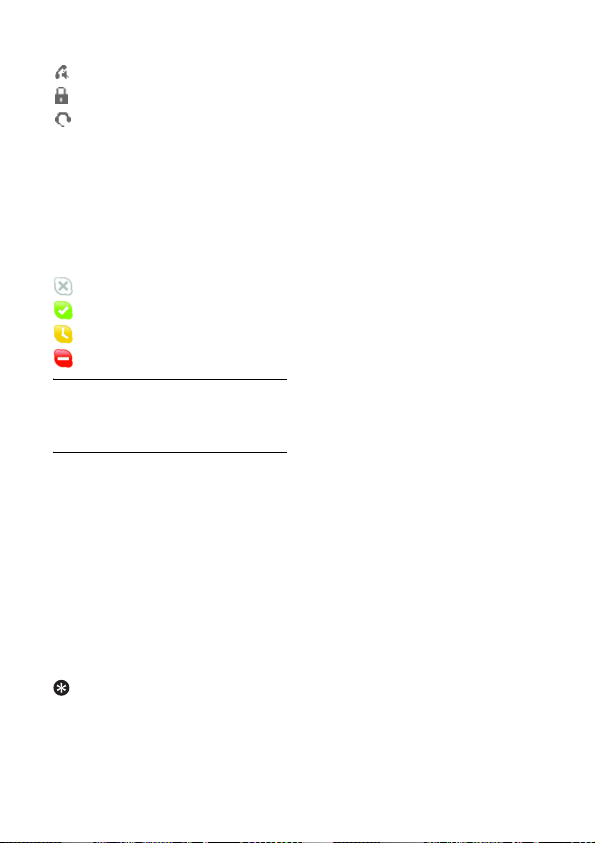
3.1 Connect the base station
Connect the output plug of the
1
mains adapter to the bottom of the
base station and the mains adapter
to a standard wall outlet.
Connect one end of the ethernet
2
cable to the ethernet socket on the
bottom of the base station and the
other end to an ADSL/Cable modem
or a router or a switch/hub
connected to the Internet.
Connect the telephone line cord to
3
the phone socket at the bottom of
the base station and the wall phone
socket.
3.2 Connect your charger
Connect the mains adapter to a
1
standard wall outlet.
3.3 Install your handset
!
Warning
RISK OF EXPLOSION IF BATTERY IS
REPLACED BY AN INCORRECT TYPE.
Never use non-rechargeable batteries.
Use recommended type supplied with
this product. NiMH batteries must be
disposed of in accordance with the
applicable waste disposal regulations.
Note
Charge the handset(s) for 24 hours
before initial use!
The batteries are pre-installed in
1
your handset. Before charging,
remove the pull-tape.
Place the handset on the charger.
2
When the handset is placed
correctly in its charging position, a
tone will be emitted and the battery
icon will scroll , indicating
that the battery is charging. Once
the battery is fully charged, the
battery icon will appear
steadily.
12 Getting started
Page 16
Note
Handset may get warm during initial
charging. This is normal. The handset may
take a few seconds to power up.
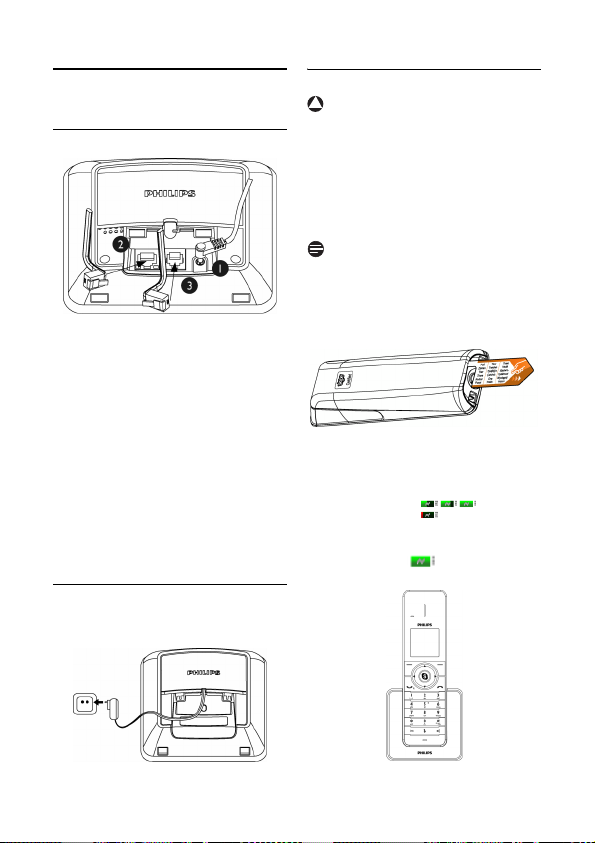
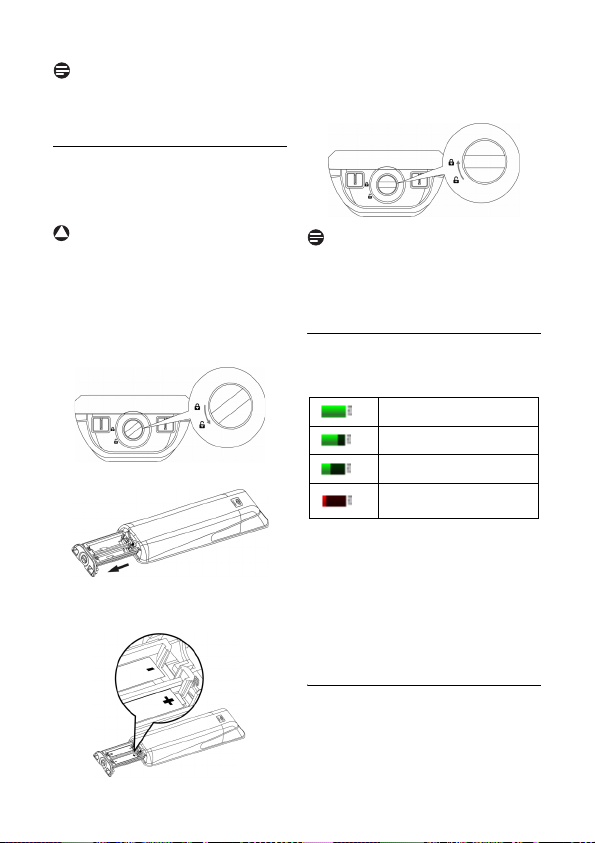
3.3.1 Replacing your batteries
If there is a need to replace your
batteries, always use the recommended
battery type (see page 5).
!
Warning
Check the battery polarity when inserting
in the battery trail. Incorrect polarity may
damage the product.
Use the coin or screwdriver to turn
1
the battery cover screw in an
anticlockwise direction to unlock
the cover.
Pull open the battery trail.
2
Place the new rechargeable bat teries
3
in the correct polarity as indicated
into the battery trail.
Close the trail and turn the battery
4
cover screw in a clockwise direction
to lock the cover.
Note
Please use a coin or screwdriver that is
the right shape and size for the screw that
is used. Otherwise you may damage the
screw when tightening it.
3.4 Checking the battery level
The battery icon displays the current
battery level.
Battery full.
Battery is 2/3 full.
Battery is 1/3 full.
Battery is low. Require
charging.
Your handset may power down shortly if
it is not charged after the battery is
empty. If you are on the phone when the
battery is nearly empty, you will hear
warning tones. Place the handset on the
charger unit to recharge the batteries.
Otherwise, your call may be cut off
shortly after the warning.
3.5 Settings before first use
Before you first use your handset, you
will be asked to set the language, accept
an agreement and select the country
where the phone is to be used.
Getting started 13
Page 17
3.5.1 Setting your language
This setting determines the display
language of the menus and messages.
Select your language.
1
Press
Select
2
Note
If you need to re-configure your language
setting, see “Set the display language” on
page 38.
3.5.2 Review the agreement
Read the agreement carefully. It is
necessary that you understand and accept
the terms and conditions of the
agreement before using the phone.
Press
1
agreement.
Press
2
agreement and proceed.
!
Warning
If you do not accept the agreement, you
will not be able to access Skype features.
3.5.3 Select your country
It is necessary to set the correct country
for the phone to work properly according
to your country’s standards.
Select your country.
1
Press
2
Note
The phone is best configured for the
available countries in the list. Please refer
to the country codes list on page 52 to
see your country's international calling
code.
If you need to re-configure your country
setting, see “Set your country” on
page 49.
14 Getting started
to confirm.
u or d to scroll through the
Accept
to accept the
Select
to confirm.
3.6 Log in to Skype
After an automatic restart, your phone
will prompt you to log in into your Skype
account.
If you do not have a Skype account, you
may create a new account using your
phone.
3.6.1 Logging in as an existing
Skype user
Press
Menu
1
Select
2
Enter your Skype name. Press
3
select your user name if displayed.
Enter your Skype password. Press
4
OK
• The screen prompts you to save your
Press
5
• Your phone will automatically log
OR
5 Press
• Your phone will prompt you to log
3.6.2 Creating a new Skype
Select
1
Select
Follow the steps on page 21 to create a
new Skype user.
.
Skype Status
.
password for auto reconnect in
future.
Yes
into your Skype account every time
the base unit powers up.
No
into your Skype account the next
time the base unit powers up.
account
Create new account
.
>
Sign In
to confirm.
for one-time login.
.
OK
. Press
or
Page 18
4 General description
4.1 What is standby mode?
Your phone is in standby mode when it is
idle. The standby screen displays your
Skype status icon, your Skype ID (if
available), the handset number, the
system time, the signal icon, and the
battery icon. The backlight goes off after
a few seconds. This is a normal status.
4.2 Checking the signal strength
The signal icon displays the link status
between the handset and the base unit.
Signal icon : The handset and base
unit are linked. They can communicate.
No signal icon : The handset and base
unit have lost link. They are not able to
communicate. Take your handset closer
to the base unit to reconnect the link.
Note
If your handset has lost link, you will not
be able to make or receive any calls. You
will also not be able to carry out many of
the phone's functions and features.
4.3.2 Switching on your handset
e.
Press
1
• The handset may take a few
seconds to power up.
4.4 Setting the clock
Your phone has a calendar and digital
clock. Set the date and time before initial
use of the phone.
Note
After resetting the phone, you may have
to set the date and time again.
4.4.1 Set the time
Note
If you use this menu to set the time
manually, your phone will use this new
setting, and stop automatic update until
the base power is reset.
1
2
3
4
Menu
Press
Select
Time
Use digit keys to enter the Hour /
Minute.
Press
• The setting is saved.
.
Settings
>
. Press
OK
Time & Date
Select
.
to confirm the setting.
>
4.3 Switching your handset ON/ OFF
4.3.1 Switching off your handset
Press and hold
1
• The power menu is displayed.
Scroll to
2
• The handset is switched off.
Note
Your handset cannot receive any calls if
the power is switched off.
General description 15
e for 2 seconds.
Switch Off
. Press
Select
4.4.2 Select Daylight saving
Press
1
2
3
4
.
Menu
Select
Settings
Daylight saving
Select the Daylight saving.
Press
OK
to confirm the setting.
• The setting is saved.
.
>
. Press
Time & Date
Select
>
.
Page 19

4.4.3 Select the time format
Press
Menu
1
Select
2
Time format
Select the Time format.
3
Press
4
• The setting is saved.
4.4.4 Set the date
Press
1
Select
2
Date
Use digit keys to enter the Month /
3
Day / Year.
Press
4
• The setting is saved.
4.4.5 Select the date format
Press
1
Select
2
format
Select the date format.
3
Press
4
• The setting is saved.
4.4.6 Select the date separator
The date separator is a symbol such as a
slash that separates the month, day, and
year (i.e. 08/12/2009). Your phone
supports 4 styles (: / . -).
Press
1
Select
2
separator
Select the date separator.
3
Press
4
• The setting is saved.
.
Settings
>
Time & Date
. Press
Select
OK
to confirm the setting.
Menu
.
Settings
>
. Press
OK
Menu
Settings
. Press
OK
Menu
Settings
OK
Time & Date
Select
.
to confirm the setting.
.
>
Time & Date
Select
.
to confirm the setting.
.
>
Time & Date
. Press
Select
to confirm the setting.
>
.
>
>
Date
>
Date
.
16 General description
Page 20
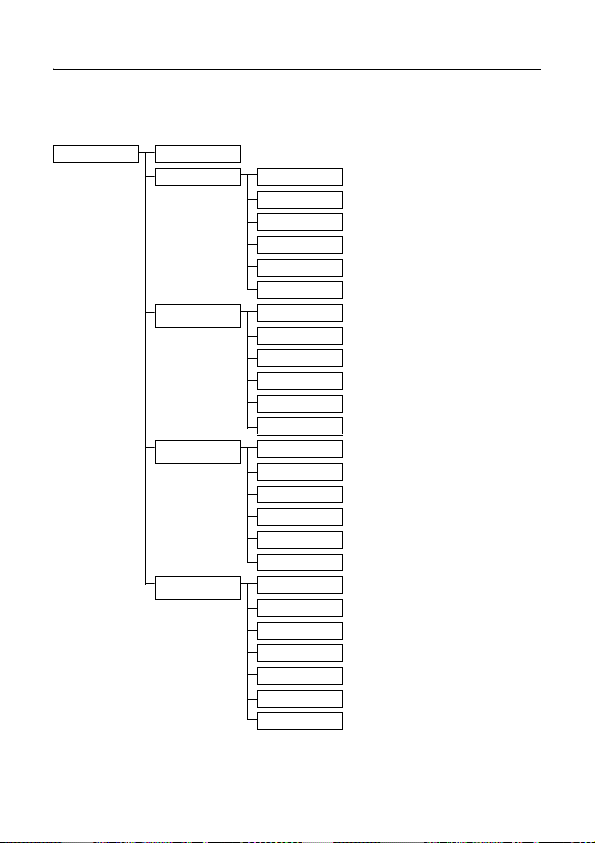
4.5 Menu structure
The table below describes the menu tree of your phone. Press
to enter each option. Use navigation keys
Contacts
Add contact
Online skype contact
Phone number contact
Offline skype contact
Contact details not
known
ud[] to navigate within the menus.
Call
Send voice mail
View profile
Rename
Remove
Block
SkypeOut call
Regular call
Details
Rename
Remove
Share on phone
Call
Send voice mail
View profile
Rename
Remove
Block
Request details
Call
Send voice mail
View profile
Rename
Remove
Block
<
MENU
in idle mode
General description 17
Page 21
Contacts
History
Skype Status
Add contact
Answer machine
Shared contacts SkypeOut call
Regular call
Details
Rename
Remove
Copy to my contacts
All events
Missed calls
Incoming calls
Outgoing calls
Voice mails
Answering Machin e
Contacts requests
Sign in / Switch user
Online Status Online
Away
Do no disturb
Offline
My Profile Limited profile
Private details
Change password
Sign out
Account Status Skype Credits
SkypeIn
Voicemail*
Skype contact
Phone number
Play
Delete all
Record memo
18 General description
Page 22
Answer machine
Settings
Answer mode Answer & Record
Answer Only
Record OGM Answer & Record
Answer Only
Answer On/Off On/Off
Ans. Settings Ring delay 1 /2/3/4/5/6/7/8 rings / Toll Saver
Remote access On / Off
Handset screening On / Off
Base screening On / Off
OGM languages
Phone Handset Name
Auto answer On / Off
Auto hangup On / Off
Registration
De-registration
Language
Preferred line Regular call / SkypeOut call / Always ask
Share contacts On / Off
Sounds Ringtone S kype call
Ring Volume
Notifications On / Off
Keypad Tone On / Off
Confirmation On / Off
Display Brightness
Contrast Level 1/2/3/4/5
Backlight 20 seconds / 30 seconds / 1 min
Screen Saver Off / Clock / St andard
Regular Call Carrier code*
Area code*
List of languages
List of languages
Regular call
Intercom
List of melodies
List of melodies
List of melodies
General description 19
Page 23

Settings
Regular Call Auto prefix Detect number: Replace by:
Skype Call Voicemail*
Time & Date Time
Network Information
Advanced Country*
*This menu item is country-dependent
Recall t ime* Short / Medium / Long
Recall Pause Time* Pause 1/2
Dial mode* Tone / Pulse
PABX* On / Off
1st ring* On / Off
Call back* Call / Define number
Cancel call back* Call / Define number
Withold identity* On / Off / Define number
Voic email* Voice Mail 1 / V oice Mail 2
Call forward
Block call S kype call / SkypeIn call / Blocked users
Time zone
Daylight saving Winter Time / Summer Time
Time format 12 Hr / 24 Hr
Date
Date format
Date separator
TCP/IP
PPPoE
Proxy
Ports
Reset network
List of countries
Reset settings
Change PIN
Software update
Check for update / Auto Update / Device information
20 General description
Page 24

5 Skype on your
phone
5.1 What is Skype?
Call free over the internet to anyone else
who’s on Skype. Skype software works
on computers and many desktop,
cordless and mobile phones.
!
Warning
No Emergency Calls.
replacement for your landline and cannot
be used for emergency calling.
5.2 Skype, landlines and mobiles
It's always free to call Skype-to-Skype.
You can also stay in touch with people
who don't have Skype yet. Call and take
calls from phones and mobiles at great
low rates.
5.2.1 Call phone numbers
Call phones and mobiles on great value
Pay As You Go rates. With a little Skype
Credit, you can also forward incoming
calls to your landline or mobile when
you're offline.
5.2.2 Get your own online number
You can also get an online number that
people can call from phones and mobiles
and you pick up in Skype.
5.2.3 Voicemail
Voicemail takes a message when you're
offline or away from your computer when
someone calls.
Skype on your phone 21
Skype is not a
5.2.4 Skype Voicemail
Skype Voicemail takes your calls when
you are busy or offline.
5.3 Commonly used terms
These are some common terms used to
talk about Skype in this user guide.
• Outgoing call: when you call
someone
• Incoming call: when someone's
calling you
• Missed call: when someone calls you,
but you don't answer in time.
• Skype Credit: Pay As You Go credit
that you can use to call phones and
mobiles and buy some other Skype
products.
Tip
For more information, go to skype.com.
5.4 Using Skype on this phone
This section describes how to use Skype
features on this phone.
5.4.1 Switch users
Up to 5 people can sign in with their
Skype usernames on your phone. This
means that your family or colleagues for
instance can use Skype on your phone, or
you can use all of your accounts if you
have more than one. Only one person can
be signed in at a time.
5.4.1.1 Create an account
Press
Menu
1
Select
2
Create new account
Enter a new Skype Name. Press
3
.
Skype Status
TM
>
Sign in
. Press
>
Select
.
OK
.
Page 25

Enter a password for this account.
4
5
6
5.4.1.2 Switching to another
1
2
3
4
5.4.1.3 Removing an account
1
2
3
OR
3
Removing an account removes that
person's contacts and settings on your
phone. They cannot be recovered.
However, you can add the same
22 Skype on your phone
OK
.
Press
Repeat your password. Press
To continue, agree to Skype’s terms
of use.
Press
Accept
• You’ve set up a new Skype account.
Press
Select
Press
Select a username from the list.
Press
Enter the password for this account.
Press
• This automatically signs out the
Press
Select
Clear user name
Select a username to remove from
the list. Press
• This deletes the account from the
Select
on the list. Press
• This deletes all the saved accounts
!
Warning
.
Skype user
Menu
.
Skype Status
Select
OK
OK
previous user, and signs the new user in.
Menu
Skype Status
phone.
Clear all
from the phone.
>
.
.
.
.
>
. Press
Select
.
to delete everyone
Select
Switch user
Switch user
Select
.
.
username back to your phone by setting
them up as a new user.
OK
.
5.4.2 Change your online status
Press
Menu
1
Select
2
Press
Select the new setting. Press
3
• This saves your new status.
Tip
From standby mode, you can press
access the
.
your online status.
5.4.3 Change your password
Your password is a security feature that
means no one else can sign into your
Skype account. This is different from the
PIN system for your phone.
Press
1
Select
2
password
Enter your password. Press
3
>
Enter your new password. Press
4
Repeat your new password. Press
5
OK
• This saves your new password.
5.4.4 Sign out
If you have set your phone to save the
login settings before (see page 14), your
phone will automatically log into your
Skype account even after you switch your
phone off and on.
To manually sign out of Skype
Press
1
Select
2
Select
Skype Status
Select
Skype Status
Menu
Skype Status
. Press
.
Menu
Skype Status
.
.
.
.
.
>
Online Status
menu to change
>
Change
Select
.
OK
,
>
Sign out
OK
.
u to
.
OK
. Press
.
.
Page 26

OK
to confirm.
Press
3
• This logs out the current user.
Note
After signing out manually, your phone
will not automatically log into your Skype
account when you switch on your phone.
5.4.5 Check your account
Check how much credit you've got in
your account and if you have voicemail or
an online number, when they expire.
Press
Menu
1
Select
2
Status
Select the account to check. Press
3
Select
.
Skype Status
. Press
Select
.
>
Account
.
• This shows your account
information.
Tip
Your Skype Credit balance is displayed
when your phone’s on standby.
5.4.6 Update Skype
Press
Menu
1
Select
2
Software update
Press
Follow the on-screen instructions.
3
Settings
Select
.
.
>
Advanced
>
>
Check for update
5.4.7 Turn on auto update
You can program your phone to notify
you when a new version of Skype is
available. This saves you from manually
checking for updates.
Press
Menu
1
Select
2
Software update
Press
Settings
Select
.
.
>
Advanced
>
Auto Update
>
.
Select the new setting. Press
3
• This displays a confirmation
message.
Press
Yes
Press
to confirm.
OK
.
4
5
• This saves your auto update setting.
Note
When you get an auto update message,
press
OK
to install the update now. Press
Later
to see the reminder again at a later
time.
5.4.8 Check device information
Press
Menu
1
Select
2
Software update
information
.
Settings
. Press
>
Advanced
>
Device
Select
• The information is displayed.
.
Select
.
>
.
Skype on your phone 23
Page 27

6Call
Your phone supports both Skype line and
landline calls. A Skype call is a call using
the Skype line. A Landline call is a call
using your regular phone line.
Note
This telephone is not designed for making
emergency telephone calls when the
power fails.
Alternative arrangements should be made
for access to emergency services.
6.1 Make a regular call
This section describes the different ways
to make a call.
Note
Signal Strength.
before making a call and during a call. For
details, see “Checking the signal strength”
on page 15.
1
2
Call Timer .
time of your current call.
Low Battery.
warning tones if your handset is almost
out of battery. Charge your handset or
your call may soon be cut off. For details,
see “Checking the battery level” on
page 13.
Check the signal strength
r for the landline.
Press
Dial the phone number.
• The number displays on the screen
and is dialed out.
Note
The call timer displays the talk
Note
During a call, you will hear
6.1.1 Assign a preferred line
A preferred line is the line of priority for
calls. After setting the preferred line, all
your calls ( ) will always be dialed
out on the preferred line when you press
r.
You may select either Regular or
SkypeOut call as your preferred line,
otherwise you can set your phone to
prompt you each time you make a call.
Press
Menu
1
Select
2
line
Select the new setting. Press
3
• The setting is saved.
Tip
After the first Skype credit or Landline
call, as a new user, your phone will invite
you to set up a preferred call method.
6.1.2 Pre-dialing
Pre-dialing allows you to view and edit
the number before making the call.
Enter the phone number or Skype
1
contact name.
• The number displays on the screen.
Press
2
• The number is dialed out on the
Tip
Clear
Press
Press and hold
after a digit has been entered.
on the screen.
.
Settings
>
. Press
You can make changes before
dialing out.
Phone > Preferred
Select
.
r to dial out the call.
preferred line. For details on
preferred line, see page 24.
to erase a digit.
# to enter a pause
P
displays
Select
.
24 Call
Page 28

6.1.3 Call from the landline
Enter the phone number.
1
Press
Options
2
Select
3
• The number is dialed out.
6.1.4 Call using Skype Credits
Note
The phone number shall include +, the
international calling code, area code
(country dependent), and subscriber
number.
Enter the phone number.
1
Note
To make a SkypeOut call, it is necessary
to dial the country prefix before dialing
the phone number you are calling, i.e. 00,
011 or +.
For example:
When making calls to North America:
00-1-905-1234567 or 011-1-9051234567
When making international calls:
00-852-12345678 or +852-12345678
Tip
To insert +: Press and hold
Press
2
Select
3
• The number is dialed out.
Note
You need to purchase Skype credits to
make SkypeOut calls. Your phone will
display the remaining amount of your
Skype credits. For more details, please
visit:
http://www.skype.com/allfeatures/
skypecredit/
.
Regular call
Options
.
SkypeOut call
. Press
. Press
Select
0.
Select
.
.
6.1.5 Call from the contact list
: from standby to view the
Press
1
contact list.
. Press
Options
r.
Select
Select
, and then
.
.
r.
Select a contact. Press
2
Note
For details on the contact list, see
page 32.
6.1.6 Redial the last number
Redial
Press
1
• The number displays on the screen.
Press
2
• The number is dialed out on the
6.1.7 Call from the call history
Your phone stores all the call records of
the outgoing, incoming, and missed calls.
The most recent call record is stored at
the top of the list. For details, see “Call
History” on page 36.
Press
1
Select
2
Select a call list. Press
3
Select a call record. Press
4
Note
For all outgoing calls, the number is dialed
out using the same line as before. For
example, if you made the call using
SkypeOut, the call will be dialed out using
SkypeOut again. To dial out on the
preferred line, press
select
.
You can make changes before
dialing out.
r to dial out the call.
preferred line. For details on
preferred line, see page 24.
Menu
.
History
Call
to dial out.
Call 25
Page 29

6.2 End a call
Press
1
Auto hang up.
charger to end the call automatically. See
“Auto hang-up” on page 40.
6.3 Answer a call
1
•
•
When a Skype call comes in, you can
reject the call by pressing
When the handset rings during an
incoming call, do not put the handset too
close to your ear as the ringer volume
may damage your hearing.
6.3.1 Turning off the ringer
For details on ringer setting, see page 39.
6.4 During a call
This section describes the features that
are available during a call.
6.4.1 Adjust the earpiece volume
1
e.
Tip
Place the handset on the
When the phone rings, press
• The call is established.
Note
Caller ID Service:
service provider.
Missed Call Alert:
missed, your phone displays
Missed Calls
options.
Tip
!
Warning
Press
during a call.
• The earpiece volume is adjusted.
Subscribe from your
When a call is
. Press
View
for more
Reject
u or d to adjust the volume
r.
You have
.
6.4.2 Muting the microphone
The mute feature allows you to speak to
someone in the house privately.
M during a call.
Press
1
• The caller cannot hear you, but you
can still hear his voice.
Press M again to unmute the
2
microphone.
• You can now communicate with the
caller.
6.4.3 Using the speaker or
handsfree
!
Warning
Handsfree activation can suddenly
increase the volume in the earpiece to a
very high level. Make sure the handset is
not too close to your hear.
v to turn on/off the
Press
1
speaker.
Tip
Use the speaker to involve everyone in
the room in the conversation.
6.4.4 Use the headset
Note
Headset is optional and not provided. A
headset with 2.5mm jack and minimum 32
ohm speaker impedance must be used. It
is available from retail store.
Plug the headset into the headset jack at
the side of your handset.
Tip
Use the headset to talk privately with the
caller.
26 Call
Page 30

6.5 Make a second landline call
Note
2nd Call Service.
this service from your service provider.
During a call,
Press r.
1
• The current caller is put on hold.
Dial the number you want for the
2
2nd call.
• The number displays on the screen
Press
3
two callers
OR
Press
3
return to standby.
Note
Toggling between two calls is a network
and country dependent feature.
6.6 Answer a second landline call
Note
2nd Call Service.
this service from your service provider.
During a landline call, your phone sounds
a short beep periodically to notify you of
another incoming landline call.
Press
1
• The first call is put on hold, and you
Press
2
two callers
Consult and subscribe
and is dialed out.
r to toggle between the
e to end the current call and
Consult and subscribe
r to answer the call.
are now connected to the second
call.
r to toggle between the
OR
Press
2
6.7 Answer a second Skype call
During a Skype call, your phone sounds a
short beep periodically to notify you of
another incoming Skype call.
1
2
OR
2
e to end the current call and
return to standby.
< to answer the call.
Press
• The first call is put on hold, and you
are now connected to the second
call.
Press
r to toggle between the
two callers
e to end the current call and
Press
return to standby.
Call 27
Page 31

7 Intercom and
Conference Calls
An intercom call is a call to another
handset registered on the same base unit.
This function can only be used with a
multi-handset configuration. It allows you
to make free internal calls, transfer
external calls from one handset to
another and to use the conference
option.
A conference call involves conversation
between other handset(s) and outside
caller(s).
Note
Some of these functions could be
unavailable if the extra handset used is
not a VOIP855.
7.1 Calling another handset
An intercom call can only involve two
handsets registered on the same base
unit.
Note
If the base station only has 2 handsets
(yours and another handset) registered to
it, you can press
handset instantly.
Press
1
for intercom is displayed.
Select the handset you want to call.
2
Press
3
• Wait for the other party to answer
Press
4
intercom call.
INT
to call the other
INT
. The handset(s) available
Call
.
your call.
e to cancel or end the
Tip
To customize your intercom ringer, see
“Personalizing your phone’s sounds” on
page 39.
7.2 Internal call during an external call
While talking on the phone on the Skype
line or landline, you can call another
handset.
Press
INT
1
2
3
To return to the external caller:
4
7.3 Transferring a call
During a call in progress, you can tranfer
the external call to a specific handset.
1
2
3
4
during the call. The
handset(s) available for intercom is
displayed.
Select the handset you want to call.
Press
Call
.
• Wait for the other party to answer
your call.
Press
End
during the intercom call.
• You are now connected to the
external caller.
Press
INT
during the call. The
handset(s) available for intercom is
displayed.
Select the handset you want to call.
Call
.
Press
• Wait for the other party to answer
your call.
Press
e after the other party
answers your call.
• The external call is now transferred
to the other handset.
28 Intercom and Conference Calls
Page 32

7.4 Conference call
Conference call allows one external call
to be shared with two handsets
registered on the same base. The three
people can share the conversation. No
operator subscription is needed.
Press
INT
1
2
3
4
5
during the call. The
handset(s) available for intercom is
displayed.
Select the handset you want to call.
Press
Call
.
• Wait for the other party to answer
your call.
Press
Conf
• You are now on a 3-way conference
Press
call.
.
call.
e to end the conference
Intercom and Conference Calls 29
Page 33

8 Text and Numbers
You can enter text and numbers for
handset name, phonebook records, and
other menu items.
8.1 Entering text and numbers
Find the key with the character you
1
want.
Press it as many times as needed for
2
the character you want.
Tip
Editing.
Press
Clear
character left of the cursor. Press and
hold
Clear
screen.
Input table
Key Characters (Upper case)
0 . 0 , / : ; " ' ! ¡ ? ¿ * + - %
\ ^ ~ |
1 [Sp] 1 @ _ # = < > ( )
& £ $ ¥ [ ] { } ¤ § …
2
A B C 2 À Â Æ Á Ã Ă Ä Å Ą
Ç Ć Č
3
D E F 3 Ď Đ Ě È É Ê Ë Ę ∆ Φ
4
G H I 4 Ğ Í Ì Î Ï İ Γ
5
J K L 5 Λ Ł Ĺ Ľ
6
M N O 6 Ñ Ň Ń Ó Ô Õ Ö Ő
7
P Q R S 7 Ř Ş Š Ś β Π Θ Σ
8
T U V 8 Ţ Ť Ù Ú Û Ü Ů Ű
9
W X Y Z 9 Ý Ž Ż Ø Ω
Ξ Ψ
to delete the
to delete all the characters on
€
Key Characters (Lower case)
0 . 0 , / : ; "
\ ^ ~ |
1 [Sp] 1 @ _ # = < > ( )
& £ $ ¥ [ ] { } ¤ § …
2 a b c 2 à â Æ á ã ă ä å ą ç ć č
3 d e f 3 ď đ ě è é ê ë ę ∆ Φ
4
g h i 4 ğ í ì î ï I Γ
j k l 5 Λ ł ĺ ľ
5
6
m n o 6 ñ ň ń ó ô õ ö ő
7 p q r s 7 ř ş š ś β Π Θ Σ
8
t u v 8 ţ ú ù ú û ü ů ű µ
9
w x y z 9 ý ž ź ż ƒ ø Ω Ξ Ψ
Example to write "
Press
7
once:
Press 2 once:
Press 8 two times:
Press 5 three times:
Note
Input table is dependent on your country
setting.
8.2 Switching between
uppercase, lowercase and
numeric
By default, all characters entered will be
in uppercase. You can press
switch between uppercase and lowercase
letters.
Tip
The lower right hand corner displays the
method you have currently selected.
for upper case;
numeric mode.
' ! ¡ ? ¿ * + - %
€
PAUL
P
A
U
L
a
for lower case; 1 for
"
* to
A
30 Text and Numbers
Page 34

8.3 Entering symbols
You can enter special symbols such as
and many more.
( )
1 Press * while editing in lower
case or upper case mode.
• A table of symbols is displayed.
Use
u, d, [, ] to select the symbol
2
that you want.
Press
Select
3
Tip
To insert
to enter the symbol.
+
: press and hold 0.
? ! :
Text and Numbers 31
Page 35

9 Contact list
Your phone can store a total of 200 Skype
and phone number contacts.
9.1 View the contact list
: to enter the contact list.
Press
1
Select the contact you want to view.
2
Press
Options
3
Select
4
• The details of the contact are
displayed.
Note
Unknown details.
are not known, you can request details or
view the profile of the contact. Press
Options
, then select
View profile
9.1.1 Search a contact
You can search a contact list by scrolling
or by searching the first character.
9.1.1.1 Searching by scrolling
While in the contact list, press
1
d to scroll.
9.1.1.2 Searching by the first
While in the contact list, press the
1
digit key that contains the character
you want to search by.
.
View Profile
. Press
character
. Press
If the contact’s details
Request details
Select
to confirm.
Select
.
or
u or
9.2 Call from the contact list
See page 25.
9.3 Shared phonebook
You can use this feature to share your
contacts with other users of the phone.
Your shared phonebook can store a total
of 100 Skype and phone number contacts.
9.3.1 Activating your shared
phonebook
Press
Menu
1
Select
2
contacts
Select the new setting. Press
3
• The setting is saved.
Tip
The icon displayed in front of each
contact will indicate if it is a Skype, phone
number or shared number:
9.3.2 Copy a shared contact
When the shared phonebook is on, you
can copy a shared contact to your own
contact list.
Press : to enter the contact list.
1
Select the shared contact you want
2
to copy. Press
Select
3
Select
• The contact is saved to your contact
.
Settings
>
Phone
Select
Options
>
.
.
. Press
Skype contact
SkypeOut contact
Shared phonebook contact
Copy to my contacts
.
list.
Share
Select
. Press
.
32 Contact list
Page 36

9.4 Adding a contact
Note
Memory Full.
handset displays a notification message.
Delete some contacts before adding new
ones.
9.4.1 Adding a Skype contact
1
2
3
4
5
6
If shared phonebook is on, the new
contact will be available to all users.
9.4.2 Adding a phone contact
1
2
3
If your contact list is full, the
Press
Menu
Select
Skype contact
Enter the name (Skype name or full
name) or email of the Skype user.
Press
• A list of matching names is
Scroll to the contact you want. Press
Select
Press
request to see his/her contact
details.
Edit the request details if you want
and press
• An authorization request is sent to
Note
Press
Select
Phone number
Enter the number in this format (+,
international calling code, area code,
and the phone number). Press
.
Contacts > Add Contact
. Press
OK
.
displayed.
.
Yes
if you wish to send a
OK
.
the contact. The new contact will be
added after the user accepts your
request.
Menu
.
Contacts
>
Add Contact
. Press
Select
Select
>
.
>
.
OK
Enter the name of the phone contact
4
user. Press
Continue to step 5 if shared
phonebook is on.
Select
5
share this contact or
account
• The new contact is saved.
Note
Contacts with identical numbers cannot
be saved.
9.5 Send a voicemail to your
Press
1
Select a Skype contact. Press
2
Options
Select
3
• A voicemail call is initiated.
9.6 Manage your contacts
You can rename, block or remove each
contact on your contact list.
9.6.1 Rename a contact
You can change the display name of a
contact.
Press
1
Select the contact you want to
2
rename. Press
Select
3
Edit the name. Press
4
corrections.
Press
5
• The edited name is saved.
.
OK
.
All phone users
if otherwise.
Skype contact
if you want to
Only my
: to enter the contact list.
.
Send voice mail
: to enter the contact list.
Options
Rename
. Press
Clear
OK
to confirm.
. Press
.
Select
to make
Select
.
.
Contact list 33
Page 37

9.6.2 Remove a contact
: to enter the contact list.
Press
1
Select the contact you want to
2
block. Press
Select
3
• A confirmation request is displayed.
Press
4
• The contact is removed.
9.6.3 Block a contact
You can block a user from contacting you
and vice versa. You will always appear as
offline to the user that you have blocked.
Press
1
Select the contact you want to
2
block. Press
Select
3
• A confirmation request is displayed.
Press
4
Note
To unblock a contact, see page 41.
9.6.4 Share a contact
You can selectively share your contacts
with other users of the phone. For this
option to be available, the shared
phonebook feature must be activated.
Press
1
Select the contact you want to
2
share. Press
Select
3
• The contact is now available to other
Options
. Press
.
Select
Remove
Yes
to confirm.
: to enter the contact list.
Options
. Press
.
Select
.
Block
Yes
to confirm.
: to enter the contact list.
Options
Share on phone
users.
.
. Press
.
Select
9.7 Handling a contact request
You will be able to view the details of the
contact before you choose to accept/
decline the contact request or block the
new contact.
9.7.1 Viewing the contact’s details
Press
Menu
1
Select
2
Press
• The contact’s name is displayed.
Press
3
message.
9.7.2 Accepting, declining or
Press
1
Select
2
Press
• The contact’s name is displayed.
Press
3
Press
4
Select
5
the new contact to your contact list.
OR
Select
5
the contact request.
OR
Select
5
the contact request and block the
contact.
.
Note
Once a contact is blocked, you will not
receive any further authorization request
from the contact even if another contact
request is made.
.
History
>
Contacts requests
Select
.
View Details
blocking a contact request
Menu
History
Select
Details
Options
Accept
Decline
Block
to read the
.
>
Contacts requests
.
to read the message.
.
. Press
Select
. Press
Select
. Press
Select
.
.
to add
to reject
to reject
34 Contact list
Page 38

10 Your Skype profile
Your Skype profile stores information
about you such as your name, gender,
birthdate, phone numbers, etc. Your
profile has public and private details.
Public details can be viewed by other
Skype users, but private details cannot.
You are not required to enter any
information into your profile. It is strictly
optional.
10.1 Public details
10.1.1 View or add/edit the details
Press
Menu
1
Select
2
Limited profile
• The current setting is displayed.
Modify the setting.
3
Press
4
• The setting is saved.
10.2 Private details
The only information stores as private
detail is your email addresses (up to 3).
Your friends can easily find you on the
Skype network if they know your email
address.
10.2.1 View the details
Press
1
Select
2
Limited profile
• The current setting is displayed.
.
Skype Status
. Press
OK
when finished.
Menu
.
Skype Status
. Press
>
My Profile
Select
>
My Profile
Select
>
.
>
.
10.2.2 Add an email address
Press
Menu
1
Select
2
Private details
• The current setting is displayed.
Press
3
Select
4
Enter the new email address. Press
5
OK
• The setting is saved.
10.2.3 Edit an email address
Press
1
Select
2
Private details
• The current setting is displayed.
Select the email address. Press
3
Options
Select
4
corrections.
Press
5
• The setting is saved.
10.2.4 Delete an email address
Press
1
Select
2
Private details
• The current setting is displayed.
Select the email address. Press
3
Options
Select
4
• A confirmation request is displayed.
Press
5
• The email address is deleted.
.
Skype Status
. Press
Options
.
Add
. Press
when finished.
Menu
.
Skype Status
. Press
.
Edit
. Press
Enter
when finished.
Menu
.
Skype Status
. Press
.
Remove
.
Yes
to confirm.
>
Select
>
Clear
>
My Profile
Select
.
.
My Profile
Select
.
to make
My Profile
Select
.
>
>
>
Your Skype profile 35
Page 39

11.1 Call history options
11 Call History
Your phone stores the call history
composed of four lists:
• All Events: Include all missed,
incoming, and outgoing calls.
• Missed: Calls that you received
but did not answer. Up to 50 missed
calls.
• Incoming: Calls that you
received and answered. Up to 50
incoming calls.
• Outgoing: Calls that you made.
Up to 20 outgoing calls.
A call history record is saved for each call
and includes information of the caller
name, number, call time, and date.
Your phone also saves a history of
received Skype voicemail, new request(s),
and Landline voicemail.
If the identity of the caller is not withheld,
the name (or number) of the caller will be
displayed. The call records are displayed
in chronological order with the most
recent received call at the top of the list.
Note
Your phone will not store any call history
(except for PSTN calls) if you are not
signed in to Skype.
When you sign out from Skype, your
phone clears all the call history,
voicemails, and new requests saved under
your account. When you or another user
signs in to Skype again, your phone starts
saving the new call history under the
signed-in account.
36 Call History
Press
Menu
1
Select
2
Select the call list you need. Press
3
Select
• The call records are displayed.
Select a call record and press
4
Options
following options*:
SkypeOut
call
Regular
call
Save to
contacts
Details
Delete
Delete all
*Not all options are available for the selected
call record. The options that are available vary
according to the status of your contact (online/
offline) and the type of contact, whether it is a
online number or phone number contact.
Press
5
Tip
From standby mode, you can press
enter
History
11.1.1 Viewing details of a call
After selecting the call record,
Press
1
.
History
. Press
.
to choose one of the
Make a call to the
caller using Skype
Make a call to the
caller using Landline
Save the number to
your Contact list (if
the caller’s contact is
not already in your
Contact list)
View details of caller
Delete the current call
record
Delete all call history
records
Select
.
menu.
record
Options
.
Select
.
d to
Page 40

Details
. Press
Select
Select
2
• The details of the caller are
displayed.
11.1.2 Returning a call
To return a call from the missed or
incoming call lists, see “Call from the call
history” on page 25.
11.1.3 Redialing a call
To redial a call that you have made
previously, see “Call from the call
history” on page 25.
11.1.4 Saving a call record to your
contact list
After selecting the call record,
Press
Options
1
Select
2
Enter the name of the contact. Press
3
OK
Continue to step 4 if shared
phonebook is on.
Select
4
share this contact or
account
• The new contact is saved.
Note
Contacts with identical numbers cannot
be saved.
11.1.5 Deleting a call record
After selecting the call record,
Press
1
Select
2
• The call record is deleted.
.
Save to contacts
.
All phone users
if otherwise.
Options
.
Remove
. Press
.
. Press
Select
if you want to
Only my
Select
.
11.1.6 Deleting all call records
Press
Options
1
Select
2
Press
3
• All call records in the call list are
.
Delete all
Yes
deleted.
.
. Press
to confirm
Select
.
Call History 37
Page 41

12 Custom Options
Make this your phone - change the look
and sound of the handset to suit your
needs and preference.
12.1 Personalizing your phone’s
display
12.1.1 Naming your handset
Each handset can have its own name. It is
displayed on the screen in standby.
Press
Menu
1
Select
2
Name
Enter or edit the name. Use
3
make corrections.
Press
4
• The setting is saved.
12.1.2 Set the display language
This feature only applies to model(s) with
multiple-language support.
Note
Available languages for selection vary with
different countries.
Press
1
Select
2
Press
Select the new setting. Press
3
• The setting is saved.
.
Settings
. Press
OK
to confirm.
Menu
.
Settings
Select
Select
.
>
>
Phone
.
Phone
>
Handset
>
Language
Clear
Select
to
12.1.3 Adjusting the screen
brightness level
Press
Menu
1
Select
2
Brightness
Adjust your brightness level using
3
and
display while you are browsing
through the different brightness
levels. Press
• The setting is saved.
12.1.4 Adjusting the screen
Press
1
Select
2
Press
Adjust your contrast level using
3
and
display while you are browsing
through the different contrast levels.
Press
• The setting is saved.
12.1.5 Adjusting the screen
Press
1
Select
2
Press
.
Select the new setting. Press
3
• The setting is saved.
12.1.6 Selecting the Screen Saver
Press
1
Select
2
Screen Saver
Select the new setting. Press
3
• The setting is saved.
.
Settings
>
Display
.
] keys. The brightness effect will
OK
to confirm.
contrast level
Menu
.
Settings
>
Select
Display
.
] keys. The contrast effect will
OK
to confirm.
backlight duration
Menu
.
Settings
>
Display
Select
.
Menu
.
Settings
>
Display
. Press
Select
>
>
Contrast
>
Backlight
>
.
Select
Select
[
.
[
.
.
.
38 Custom Options
Page 42

12.2 Personalizing your phone’s sounds
12.2.1 Setting your handset’s
ringer melody
You can choose from 20 different ringer
melodies for your Skype call, regular
(Landline) call and Intercom.
To change the melody of your Skype or
Landline or Intercom call:
Press
Menu
1
Select
2
Select either
3
Intercom
Select the new setting. Press
4
• The setting is saved.
12.2.2 Setting your handset’s
There are 5 ringer volume levels
(including ringer off) and a progressive
setting.
Press
1
Select
2
Volume
Adjust the volume level using
3
] keys. Press
• The setting is saved.
.
Settings
>
Skype
. Press
Select
ringer volume
Menu
.
Settings
>
. Press
Select
Select
Sounds
or
Landline
.
Sounds
.
to confirm.
>
Ringtone
>
Ring
or
Select
[ and
12.2.3 Setting your handset’s
keypad tone
The keypad tone can be turned on or off.
Press
Menu
1
Select
2
Tone
Select the new setting. Press
3
• The setting is saved.
12.2.4 Setting your handset’s
The notification tone can be turned on or
.
off.
Press
1
Select
2
.
Notifications
Select the new setting. Press
3
• The setting is saved.
12.2.5 Setting your handset’s
The confirmation tone can be turned on
or off.
Press
1
Select
2
Confirmation
Select the new setting. Press
3
• The setting is saved.
.
Settings
>
Select
.
>
. Press
.
>
. Press
Sounds
.
Sounds
Select
Sounds
Select
. Press
notification sounds
Menu
Settings
confirmation tone
Menu
Settings
>
>
.
>
.
Keypad
Select
Select
Select
.
.
.
Custom Options 39
Page 43

13 Calling Features
Your phone supports a number of callrelated features to help you handle and
manage your calls more effectively and
conveniently. This section describes the
call-related features that apply to both
the Skype line and landline.
13.1 Auto answer
Auto answer enables you to answer an
incoming call by simply picking up the
handset from the charging cradle. You do
not need to press a key to answer the call.
13.1.1 Activating/deactivating auto
answer
Press
Menu
1
Select
2
answer
Select the new setting. Press
3
• The setting is saved.
13.2 Auto hang-up
Auto hang up allows you to end a call by
placing the handset on the charger
without pressing any key.
13.2.1 Activating/deactivating auto
Press
1
Select
2
hangup
Select the new setting. Press
3
• The setting is saved.
Settings
. Press
hang-up
Menu
Settings
. Press
.
>
Select
.
>
Select
Phone > Auto
.
Select
Phone > Auto
.
Select
13.3 Skype call features
Skype offers a lot call-related features.
This section describes the call-related
features that apply to the Skype line only.
13.3.1 Preferred line
See “Assign a preferred line” on page 24.
13.3.2 Do not disturb
Change your Skype status to Do not
disturb, and Skype turns off all the ringers
for all phone and online number calls.
Your handset will not ring when it
receives Skype calls.
Press
Menu
1
Select
2
Do not disturb
• The setting is saved.
Tip
From standby mode, you can press
access the
.
your Skype status.
13.3.3 Skype Call forward
If you do not want to miss a call you can
re-direct Skype calls to another landline
or mobile number when you are away
from your home or office.
13.3.3.1 Activating Call forward
Press
1
Select
2
forward
Enter the number you wish to
3
.
forward your calls to. Press
confirm.
• The setting is saved.
.
Skype Status
. Press
Skype Status
Menu
.
Settings
>
> On. Press
>
Online Status >
Select
menu to change
Skype Call > Call
Select
.
u to
.
OK
to
40 Calling Features
Page 44

Note
Skype Voicemail Disabled.
After you have
activated call forwarding, all your calls will
be diverted to the forwarded number. If
you are unable to answer calls, callers will
not be able to leave a message at your
13.3.4.3 Blocked Users
Displays the list of users that have been
blocked by the privacy feature. You may
use this feature to remove the privacy
feature on certain users.
Skype voicemail until you have
deactivated call forwarding.
13.3.3.2 Deactivating Call
forward
Press
Menu
1
2
Select
forward
.
Settings
>
Off
>
Skype Call > Call
. Press
Select
.
• The setting is saved.
13.3.4 Block call
The privacy feature lets you configure
which contact can call you. It is possible
to configure Skype so that anyone can call
you or only your contacts can call you or
only authorized users can call you.
13.3.4.1 Blocking Skype calls
Press
Menu
1
Select
2
call
Select the new setting. Press
3
Settings
>
Skype call
.
>
Skype Call > Block
. Press
Select
.
Select
• The setting is saved.
13.3.4.3.1 Unblocking users
Press
Menu
1
Select
2
call
Settings
>
Blocked users
.
>
Skype Call > Block
. Press
• The list of blocked users are
displayed.
Select the user you wish to unblock.
3
Press
Unblock
.
• The user is unblocked.
13.4 Landline call features
This section describes the call-related
features that apply to the landline only.
13.4.1 Carrier code
This feature only applies to model(s) with
carrier code support.
For some telephone service providers,
you may need to add the carrier code
when making a call outside of your local
area. The area code feature automatically
.
helps you decide if the carrier code is
needed when you are returning a call
Select
.
from the incoming call log.
13.3.4.2 Blocking Online number
calls
Press
Menu
1
Select
2
call
Select the new setting. Press
3
Settings
>
SkypeIn call
.
>
Skype Call > Block
. Press
Select
Select
• The setting is saved.
You only have to program the carrier
code of your service provider, and your
phone will do the rest for you.
Note
Carrier Code.
.
represents a service provider. Consult
.
your service provider to find out its code.
1
It is a 2 or 3-digit code that
Press
Menu
.
Calling Features 41
Page 45

Settings
>
Select
2
Carrier code
Enter the carrier code. Press
3
• The setting is saved.
13.4.2 Area code management
This feature only applies to model(s) with
area code support.
This feature automatically removes the
area code of an incoming call. You can
define an area code (up to 5 digits) you
want to remove. The phone number will
be saved in the call log without the area
code.
13.4.3 Activating area code
removal
Press
1
2
3
13.4.4 Deactivating area code
1
2
3
13.4.5 Auto prefix
The auto prefix feature checks and
formats your outgoing call number before
it is dialed out. If the first few digits of the
number match the detect number you set
in the menu, they will be replaced by the
prefix number you set in the menu.
For example, you set the detect number
42 Calling Features
Menu
Select
Settings
. Press
code
Enter the area code. Press
• The setting is saved.
removal
Press
Menu
Select
Settings
. Press
code
Use
BACK
Press
OK
• The setting is saved.
Regular Call >
. Press
Select
.
.
>
Regular Call > Area
Select
.
OK
.
>
Regular Call > Area
Select
.
to delete all the digits.
.
as 604 and prefix number as 1250.
When you have dialed out a number such
as 6043338888, your phone will change
OK
.
the number to 12503338888 when it dials
out.
Note
The maximum length of detect digits is 5
digits. The maximum length o f au to pr efi x
number is 10 digits.
Press
Menu
1
Select
2
prefix
Enter the Detect number. Press
3
Enter the Prefix number. (To enter a
4
pause, press and hold
OK
• The setting is saved.
Note
Empty Detect Number.
sets the prefix number and leaves the
.
detect number empty, the prefix number
will be added to all outgoing calls.
Note
Dialed Number.
starts with *, # or P, the handset will not
do any reformatting.
13.4.6 Recall selection
Recall is a signal that needs to be sent to
the network when making or answering a
second call. Your phone shall already be
set up for use in your country. For details,
consult your service provider.
13.4.7 Setting the recall duration
There are 3 recall time options: Short,
Medium, and Long. The number of available
options varies with different countries.
Press
1
.
Settings
. Press
Select
.
If the dialed number
Menu
.
>
Regular Call > Auto
.
#.) Press
If the user only
OK
.
Page 46

Settings
>
Select
2
Recall time
Select the new setting. Press
3
• The setting is saved.
13.4.7.1 Setting the recall pause
There are 2 recall pause time options:
Pause 1 and Pause 2.
Press
1
2
3
13.4.8 Dial mode
This feature only applies to model(s) that
support both tone and pulse dialing.
Dial mode is the telephone signal used in
your country. Your phone supports tone
(DTMF) and pulse (rotary) dialing. Your
phone shall already be set up for use in
your country. For details, consult your
service provider.
13.4.9 Setting the dial mode
1
2
3
Temporary Tone
dialing, press
temporary tone mode. '*' displays. Digits
entered after '*' are sent out as tone
signals (for this call only).
Calling Features 43
Menu
Select
Settings
Recall Pause Time
Select the new setting. Press
• The setting is saved.
Press
Menu
Select
Settings
. Press
mode
Select the new setting. Press
• The setting is saved.
Tip
Regular Call >
. Press
Select
.
time
.
>
Regular Call >
. Press OK.
.
>
Regular Call > Dial
Select
.
. If your phone is in pulse
* during a call for
OK
OK
Select
13.4.10 Pause selection
This feature only applies to model(s) with
.
pause selection support.
A pause is a break you can enter when
making a call. A pause is used for calls
such as PABX and operator services. For
details, consult your service provider.
13.4.10.1 Activating PABX
Press
Menu
1
Select
2
.
PABX
Select the new setting. Press
3
• The setting is saved.
13.4.11 First Ring
This feature only applies to model(s) with
first ring support.
If you have subscribed for Caller ID
service with your service provider, your
phone can suppress the first ring before
the Caller ID. After resetting, your phone
will automatically detect if Caller ID
service is subscribed and start to
suppress the first ring. You can change
this setting to suit your preference.
13.4.12 Turning first ring on/off
Press
1
.
Select
2
ring
Select the new setting. Press
3
• The setting is saved.
Note
Reset First Ring Status.
ring status, you can reset the system from
the Reset menu. See “Reset the default
settings” on page 50.
Settings
. Press OK.
Menu
Settings
. Press
.
>
Regular Call >
.
>
Regular Call > 1st
Select
.
To reset the first
OK
OK
.
.
Page 47

14 Network Services
The network services feature allows you
to listen to information provided by your
network provider. The availability of
these features is dependant on your
country and your subscription with the
network provider. This information is
stored by the network rather than in
your handset itself. Contact your
network provider for more information
about this feature.
Note
Incorrect codes.
not work if the incorrect activation and/
or deactivation codes are entered.
14.1 Voicemail
The voicemail waiting indicator icon
Network services may
Play
Details
Delete
Call
Send
Voicemail
View
Profile
Add to
Contact
My
Greeting
4
Press
Play your voicemail
View details of your
voicemail
Delete voicemail
Return a call to the
sender
Record a voicemail for
the sender
View profile of the
sender
Add sender to your
Contact list (if the
sender’s contact is not
already in your
Contact list)
Play, re-record or
reset your Skype
voicemail greeting
Select
.
appears on your handset’s screen when
there there are new voicemails. When all
the voicemails are heard, the icon
disappears.
You can receive voicemails from both
your Skype and Landline callers.
14.1.1 Skype Voicemail
TM
Skype VoicemailTM takes your calls when
you are busy or offline. Consult and
subscribe this service from Skype.
Press
Menu
1
Select
2
SkypeVM
A list of voicemails appears. Select a
3
Skype voicemail and press
History
. Press
.
>
Voice mails
Select
.
>
Options
to choose one of the following
options:
44 Network Services
14.1.1.1 My Greeting
You may personalise your own Skype
voicemail greeting message using this
feature. This greeting will be played to
your Skype caller when you are busy or
offline.
14.1.1.1.1 Playing your voicemail
greeting
Press
Menu
1
Select
2
SkypeVM
A list of voicemails appears. Select a
3
Skype voicemail and press
Select
4
Press
.
History
>
. Press
My Greeting
Select
.
Voice mails
Select
>
Options
• Your voicemail greeting starts
playing.
.
>
Options
>
Play
.
.
Page 48

14.1.1.1.2 Recording your voicemail
1
2
3
4
5
greeting
Press
Menu
Select Select
SkypeVM
A list of voicemails appears. Select a
Skype voicemail and press
Select
Record
Press
new voicemail greeting. To stop,
press
• Your new voicemail greeting is now
.
History
. Press
My Greeting
.
Select
to start recording your
OK
.
saved.
Select
>
>
Voice mails
.
Options
Options
>
14.1.2.1 Retrieving voicemail
Call your voicemail service center to
retrieve your Landline voicemail. Your
handset supports 2 voicemail service
>
numbers.
Press
Menu
1
.
Select
2
Voicemail
A list of voicemail service centres
3
appears. Select a voicemail service
centre and press
Select
4
• A call is made to the service centre.
.
Settings
>
Regular Call >
. Press
Select
. Press
Select
Select
Call
Wait for voice instruction.
.
.
.
14.1.1.1.3 Resetting your voicemail
This feature resets your current
voicemail greeting to the default greeting
provided by Skype.
1
2
3
4
14.1.2 Landline Voicemail
The voicemail service number must be
defined in your handset before you can
make a call to retrieve your Landline
voicemail. Consult and subscribe this
service from your service provider.
Network Services 45
greeting
Press
Menu
Select Select
SkypeVM
A list of voicemails appears. Select a
Skype voicemail and press
Select
Reset Default
• Your voicemail greeting is reset.
.
History
. Press
My Greeting
. Press
Select
>
>
Voice mails
.
Options
Select
Options
>
.
14.1.2.2 Editing the voicemail
1
2
3
>
4
.
5
14.1.2.3 Deleting voicemail
1
2
3
4
service number
Press
Menu
Select
Voicemail
A list of voicemail service centres
appears. Select a voicemail service
centre and press
Select
to start editing.
Press
• The service number is saved.
Press
Select
Landline VM
A list of voicemail service centres
appears. Select a voicemail service
centre and press
Select
• The voicemail notification is deleted.
.
Settings
>
. Press
Define number
Select
.
Menu
.
History
>
Voice mails
. Press
Delete
. Press
Regular Call
Select
.
Select
.
. Press
Select
.
Select
.
Select
.
>
Select
>
Page 49

14.2 Voicemail Call forward
This feature allows you to forward your
voicemails to another landline or mobile
number.
14.2.1 Activating/deactivating
voicemail call forward
Press
Menu
1
Select
2
Voicemail
Press
Select the new setting. Press
3
.
Settings
>
Skype Call >
>
Forward unanswered
Select
.
.
Select
• The setting is saved.
14.3 Call back
The call back service allows you to make
a call to the person who last called you.
You can also define or change the call
back number manually.
14.3.1 Activating call back
Press
Menu
1
Select
2
back
Settings
>
Call
.
>
Regular Call > Call
. Press
Select
.
• A call to the number will be initiated.
14.3.2 Defining call back number
Menu
Press
1
Select
2
back
Enter a new number or edit the
3
.
Settings
>
Define number
>
Regular Call > Call
. Press
Select
existing call back number.
Press
OK
4
to confirm.
• The setting is saved.
14.4 Cancel call back
The cancel call back service notifies you
when a party you have tried to call
becomes available. You can also define or
change the cancel call back number
manually.
14.4.1 Activating cancel call back
Press
Menu
1
Select
2
Cancel call back
.
Settings
>
Regular Call >
>
Call
. Press
• A call to the number will be initiated.
14.4.2 Defining cancel call back
.
number
Press
Menu
1
Select
2
Cancel call back
Press
Enter a new number or edit the
3
Settings
Select
.
>
Regular Call >
>
.
Define number
existing cancel call back number.
Press
OK
4
to confirm.
• The setting is saved.
14.5 Withhold identity
This feature enables you to prevent the
person you are calling from seeing your
name or number caller identity.
14.5.1 Activating withhold identity
Press
Menu
1
2
.
Select
Withhold identity
• The setting is saved.
.
Settings
>
Regular Call >
> On. Press
14.5.2 Deactivating withhold
identity
Press
Menu
1
Select
2
Withhold identity
.
Settings
>
Regular Call >
>
Off
. Press
• The setting is saved.
Select
Select
Select
.
.
.
.
46 Network Services
Page 50

14.5.3 Defining withhold identity
number
Press
Menu
1
Select
2
Withhold identity
Enter the number you wish to
3
withhold your identity from. Press
OK
• The setting is saved.
.
Settings
to confirm.
>
Regular Call >
> On. Press
Select
.
Network Services 47
Page 51

15 Extra Features
Discover and explore the additional
features your phone offers! Find out how
these features can benefit you and help
you make the most from your phone.
15.1 Keypad lock
You can lock the keypad to prevent
accidental presses on the handset while
you are carrying it around.
15.1.1 Locking the keypad
Press and hold
1
standby.
• The keypad is locked, and is
displayed.
Note
Calls.
You will not be able to make any
calls including emergency calls when the
keypad is locked. You can still answer
incoming calls. The keypad will be
unlocked during the call, and then it will
be re-locked automatically after you finish
the call.
15.1.2 Unlocking the keypad
Press
1
*.
• The keypad is unlocked.
# during
Unlock
, then press and hold
15.2 Missing handset(s)
V on the base unit.
Press
1
• All the handsets connected to this
base station ring.
Press V on the base station
2
again to stop paging.
• All the handsets stop ringing.
OR
Press any key on the handset to stop the
paging for that handset.
48 Extra Features
Page 52

16 The System
16.1 Set your country
The country setting of your phone has
been set during the initial set up of your
phone. You can make changes to the
country setting on your phone. The
country code is the international calling
code for a country (example, “1” for
Canada), see “Country codes list” on
page 52.
Please refer to glossary for details about
country code, see page 64.
Press
Menu
1
Select
2
Country
Select the new setting. Press
3
• The setting is saved.
!
Warning
The phone may not work properly
without correct country code entry.
16.2 Register the handset
Registration allows communication
between the base unit and handset(s). If
the handset cannot communicate with its
base, you will not be able to make any call
or use many of the functions and features
on the phone.
Note
Your handset should be already
registered on the base unless you have
de-registered a handset.
!
Warning
Make sure you have configured the
language, country code, and area code of
.
Settings > Advanced
. Press
Select
.
>
OK
.
your phone before registering additional
handsets.
16.2.1 Manual Registration
Press
1
2
3
4
5
If registration failed, repeat the above
procedure.
The base can register up to 4 handsets,
then the base unit registration memory is
full. If you attempt to register an
additional handset, the registration
process will be aborted.
16.3 Unregister a handset
Use one handset to unregister another
handset that shares the same base unit.
1
2
3
The handset number displays beside the
word “Skype” during standby. For
example, Skype (1).
Menu > Settings > Phone
Registration
Press the Base page key for more
than 3 seconds.
Press
Enter PIN code (Default: 0000).
Press
Press
• Your handset starts searching for
• If registration is successful, the signal
Tip
Note
Press
Select
De-registration
Select the new setting. Press
Tip
.
OK
on the handset.
Clear
to correct typing errors.
OK
.
the base.
icon displays steadily.
Menu
.
Settings
>
Phone
. Press OK.
>
>
OK
.
The System 49
Page 53

16.4 Change the system PIN
The system PIN is used for registering,
deleting handsets, and protecting the
access rights to some of the other menus.
The default system PIN is 0000. You can
personalize the PIN for greater security.
Press
Menu
1
Select
2
PIN
Enter the system PIN. Press
3
Clear
Enter the new system PIN. Press
4
Enter
Enter the new system PIN again for
5
verification. Press
• The setting is saved.
Note
Write down your PIN and save it for
future use. If you have forgotten the PIN,
call your dealer for assistance.
16.5 Reset the default settings
The default settings are the original
factory settings of your phone.
Press
1
Select
2
settings
Select
3
settings including the network
settings,
OR
Select
3
settings except the network settings.
Press
4
Press
make corrections.
• A confirmation request is displayed.
.
Settings
>
. Press
to make corrections.
.
Menu
Select
Enter
Advanced
Select
.
Enter
.
Settings
>
Advanced
. Press
Select
Reset all
Keep Network
.
to reset all the
to reset all the
. Enter the system PIN.
to confirm. Use
.
>
Change
OK
>
Clear
. Use
Reset
to
Press
Yes
5
After reset, your base's power switches
off. It will switch back on in a few seconds
after updating all the settings.
See “Default (pre-programmed) settings”
on page 59 for the original factory
settings.
16.6 Network settings
This section describes the information on
viewing and changing the Internet
network settings of your phone. You shall
not need to configure the network after
setting up the phone. This section is
recommended for advanced users who
want to configure the network with their
static IP address.
!
Incorrect settings will affect Skype usage
on this phone. We recommend that you
consult your network administrator or
service provider before making any
changes to the network settings.
16.6.1 View your network setting
1
2
3
16.6.2 DHCP
By default, DHCP is activated. If you
configure the network to use your own
static IP address, DHCP will be
deactivated. You can re-activate DHCP.
to confirm
• All settings have reset.
Note
Warning
Menu
Press
Select
Information
View the information. Press
when finished.
.
Settings
. Press Select.
>
Network
>
OK
50 The System
Page 54

16.6.2.1 Activate DHCP
Press
Menu
1
Select
2
Press
Select
3
• An activation request is displayed.
Press
4
• Your IP address is displayed. The
16.6.3 PPPoE
If your Internet service provider requires
you to use PPPoE, you can configure your
user name and password for the PPPoE
connection.
16.6.3.1
Press
1
Select
2
Press
Enter username. Press
3
Enter password. Press
4
• An activation request is displayed.
Press
5
• The new setting is saved.
16.6.4 Configure a static IP
You can configure the network to use
your own static IP.
Press
1
Select
2
Press
Select
3
• A confirmation request is displayed.
Press
4
Follow the on-screen instruction to
5
finish configuring your network.
.
Settings
>
Select
OK
new setting is saved.
Menu
Yes
OK
Menu
Select
Yes
Network
.
DHCP
. Press OK.
to confirm.
Activate PPPoE
.
Settings
>
Network
.
to confirm.
.
Settings
>
Network
.
Static IP
. Press
to confirm.
OK
Enter
Select
>
>
.
>
TCP/IP
PPPoE
.
TCP/IP
.
16.6.5 Configure individual
.
.
.
network settings
After configuring to use your own static
IP, you can also make changes to other
settings in the network such as subnet
mask, gateway address, DNS, etc.
Press
Menu
1
Select
2
Press
Select the item you want to change.
3
Press
Edit the information. Press
4
• The setting is saved.
16.6.6 Reset the Network
Press
1
Select
2
network
• A confirmation request is displayed.
Press
3
• The network setting is reset.
.
Settings
Select
Select
Menu
.
Settings
. Press
Yes
to confirm.
.
.
>
Network
>
Network
Select
.
>
OK
>
TCP/IP
.
Reset
.
The System 51
Page 55

16.7 Country codes list
The country code is the international
calling code for a country, see page 14
and page 49 for details.
Abbreviation - Country Code
AU Australia 61
AT Austria 43
BE Belgium 32
CA Canada 1
CZ Czech Republic 420
DK Denmark 45
FI Finland 358
FR France 33
DE Germany 49
GR Greece 30
IE Ireland 353
IT Italy 39
LU Luxembourg 352
NL Netherlands 31
NZ New Zealand (Aotearoa) 64
NO Norway 47
PL Poland 48
PT Portugal 351
RO Romania 40
SK Slovak Republic 421
ES Spain 34
SE Sweden 46
CH Switzerland 41
TR Turkey 90
GB United Kingdom 44
US United States 1
52 The System
Page 56

17 The Answering
Machine
Your phone includes a telephone
answering machine that records
unanswered calls when it is on. Once
switched on, your answering machine is
ready to be used. By default, your
answering machine is set to Answer and
Record mode. You can also access the
answering machine remotely.
The LED message counter on the base
will show the number of the messages
when the answering machine is on.
. The answering machine is on
with no new messages.
--. Memory full
Recording
3. The 2-digit number shows:
- The volume level during
adjustment,
or
- The message number
(blink for new messages)
You can use the answering machine menu
on the handset to change the settings of
the answering machine.
17.1 Turning on the answering machine
You can turn on the answering machine
either through the base or the handset.
Through the handset,
Press
Menu
1
Select
2
Off
Select
3
• The setting is saved.
Through the base,
Press
1
answering machine during standby.
Note
Once switched on, your answering
machine will answer incoming calls after a
certain number of rings depending on the
ring delay setting. See “Setting the ring
delay” on page 57.
17.2 Turning off the answering
You can turn off the answering machine
either through the base or the handset.
Through the handset,
Press
1
Select
2
Off
Select
3
• The setting is saved.
Through the base,
Press
1
answering machine during standby.
Note
Once switched off, the message counter
turns off.
.
Answer machine > Answer On/
. Press
Select
.
On
. Press OK.
o to turn on the
machine
Menu
.
Answer machine > Answer On/
. Press
Select
.
Off
. Press OK.
o to turn off the
The Answering Machine 53
Page 57

17.3 Setting the answering machine language
This feature only applies to model(s) with
multiple-language support.
The answering machine language is the
language for the pre-recorded outgoing
messages (OGM) announced by the
answering machine.
Press
Menu
1
Select
2
Settings
Select
Select the new setting. Press
3
.
Answer machine > Ans.
>
OGM languages
. Press
.
OK
.
• The setting is saved.
17.4 Setting the answer mode
By default, the answering machine is set
to Answer & Record mode (message can
be left by the callers), this can be changed
to Answer Only (no message can be left
by the callers. The caller will be prompted
to call back later.)
Press
Menu
1
Select
2
mode
Select the new setting. Press
3
.
Answer machine > Answer
. Press
Select
.
OK
.
• The setting is saved.
Note
Memory Full.
Answering machine
automatically switches to answer only mode.
17.5 Outgoing messages (OGM)
The outgoing message is the message your
caller hears when the answering machine
picks up the call. Your answering machine
comes with 2 pre-recorded outgoing
messages: one for Answer and Record
mode and one for Answer Only mode.
17.5.1 Recording an outgoing
message
The maximum length of the outgoing
message is 60 seconds. After recording,
your new outgoing message will
automatically replace the old one.
Press
Menu
1
Select
2
OGM
Select
3
only
Select
4
Press
5
Press
6
.
Answer machine > Record
. Press
Select
Answer & Record
. Press
Record
Start
Stop
.
or
Select
.
. Press
Select
to start recording.
to stop recording or
Answer
.
recording will stop after 60 seconds.
• The recorded outgoing message will
play back automatically for review.
Tip
Restore Pre-recorded outgoing message.
you want to restore the pre-recorded
outgoing message, simply delete your
current outgoing message.
17.5.2 Listening to the outgoing
message
Press
Menu
1
Select
2
OGM
Select
3
only
.
Answer machine > Record
. Press
Select
Select
.
or
.
Answer & Record
. Press
Answer
• The handset plays the outgoing
message.
If
54 The Answering Machine
Page 58

17.5.3 Deleting an outgoing
message
Press
Menu
1
Select
2
OGM
Select
3
only
Select
4
• The handset displays a confirmation
Press
5
• The pre-recorded outgoing message
Note
The pre-recorded outgoing message
cannot be deleted.
17.6 Incoming messages (ICM)
Each message can be up to 3 minutes
long. When you have received new
messages on your answering machine, the
answering machine display will keep
flashing the number of new messages
received and the handset will display a
notification message. If you pick up the
phone when the caller is leaving a
message, the recording will stop and you
can talk to the caller directly.
Note
Memory Full.
automatically switches to answer only
mode. Delete some messages to allow
room for new messages.
17.6.1 Playing incoming messages
Incoming messages will be played back in
the sequence they were recorded.
The Answering Machine 55
.
Answer machine > Record
. Press
Select
Answer & Record
. Press
Delete
request.
OK
is restored.
.
Select
.
. Press
Select
to confirm.
The answering machine
or
Answer
.
From the base
p. Press to start or
Press
1
stop message playback.
Adjust the volume.
•
increase or
speaker's volume.
Skip backward.
•
- During message playback, press
Press + to
- to decrease the
P to replay the message
from the beginning.
- During the first second of the
current message, press
play the previous message.
Skip forward.
•
to the next message.
Stop playback.
•
•
Delete current message.
Press f.
Note
Deleted message(s) cannot be recovered.
From the handset
Press
Menu
1
Select
2
New messages start playing.
Old messages start playing if there is no
new message.
•
•
•
Tip
From standby mode, you can press
enter
Machine
.
Answer machine > Play
Stop playback
Enter options menu
Options
.
Adjust the volume
increase or
volume.
History
to access your new messages.
d decrease the
menu. Select
P to
Press F to skip
Press p.
.
. Press
Stop
.
. Press
. Press u to
d to
Answering
Page 59

17.6.2 Deleting an incoming
message
From the base
f during message
Press
1
playback.
• The current message is deleted.
From the handset
During message playback, press
1
Options
to enter the options menu.
Select
Delete
2
• The current message is deleted.
17.6.3 Deleting all old incoming
From the base
Press and hold
1
standby.
• All old messages are permanently
From the handset
Press
1
Select
2
Press
• The handset displays a confirmation
Press
3
• All old messages are permanently
Note
Unread message(s) cannot be deleted,
and deleted message(s) cannot be
recovered.
. Press OK.
messages
f during
deleted.
Menu
.
Answer machine > Delete all
Select
.
request.
Yes
to confirm.
deleted.
17.7 Record memo
Press
Menu
1
Select
2
memo
Press
3
Press
4
recording will stop after 3 minutes.
17.8 Call screening
Call screening allows you to hear the
caller while he is leaving a message. You
can then decide if you want to talk to the
caller directly.
From the base
You can use
speaker's volume during call screening.
The lowest volume level turns call
screening off.
From the handset
The call screening feature on the handset
can be changed from the handset menu.
Press
1
Select
2
.
Settings
Select
Select new setting.
3
Press
4
• The setting is saved.
Note
During call screening, use
adjust the screening volume.
Tip
Handset Call Screening.
your handset. Your handset automatically
turns on the speaker for handset screening.
.
Answer machine > Record
. Press
Select
Start
Stop
.
to start recording.
to stop recording or the
, to adjust the
Menu
on the handset.
Answer machine > Ans.
>
Handset screening
.
OK
.
u and d to
Press
Listen
. Press
on
56 The Answering Machine
Page 60

. Press
v to
Select
OK
.
.
To listen from the earpiece, press
turn off the speaker.
Note
The call screening on/off setting can be
changed when the phone is recording
incoming messages. However, the new
setting will only apply starting from the
next call.
17.9 Message alert
Message alert gives you an indication that
the answering machine has new
message(s). You will see the number of
new messages flashing on the base, and
you will also see the icon and a
notification message on the handset.
17.10 Setting the ring delay
Ring delay is the number of times your
phone will ring before the answering
machine picks up the call. This setting
only applies when your answering
machine is switched on. You can change
this setting from 1 - 8 rings or Toll Saver.
Press
Menu
1
Select
2
Settings
Select the new setting. Press
3
• The setting is saved.
Tip
Toll Saver.
manage your messages when accessing
your answering machine remotely. When
economy is selected, your answering
machine will pick up the call after 3 rings
if you have new messages or 5 rings if you
do not have any messages.
.
Answer machine > Ans.
>
Ring delay
This is a cost effective way to
17.11 Remote access
You can operate your answering machine
when you are away from home by calling
your phone from a touch tone phone and
entering your 4-digit PIN code.
Note
The remote access PIN code is the same
as your system PIN. To change your PIN,
see “Change the system PIN” on page 50.
17.11.1 Activating/deactivating
remote access
You can allow or block remote access to
your answering machine.
Press
Menu
1
Select
2
Settings
Select
Select the new setting. Press
3
• The setting is saved.
17.11.2 Accessing your answering
Make a call to your home number
1
from a touch tone phone.
Press
2
starts playing.
Enter your PIN code. You now have
3
access to your answering machine,
and new message(s) starts playing.
Note
You have 2 attempts to enter the correct
PIN code before your phone hangs up.
Press a key to carry out a function.
4
See the Remote access commands
table below for a list of available
functions.
.
Answer machine > Ans.
>
Remote access
.
machine remotely
#
when the outgoing message
. Press
OK
.
The Answering Machine 57
Page 61

Note
When no message is playing, your phone
will hang up automatically if no key is
pressed for 8 seconds.
Remote access commands
Key Function
1 Repeat current or play previous
message
2 Play messages
3 Skip to next message
6 Delete current message
7 Switch answering machine on
(not available during playback)
8 Stop message playback
9 Switch answering machine off
(not available during playback)
58 The Answering Machine
Page 62

18 Default (pre-programmed) settings
These are the factory pre-programmed settings of your phone.
General Setting
Language Country 1 Time Zone GMT
Date 2009/01/01 Time 00:00
Handset name Empty Time Format Country 1
Date Format Country 1 Time Separator Country 1
Date Separator Country 1 Auto Answer Off
Backlight 30 seconds Auto Hang-up On
LCD Contrast Level 2 LCD Brightness Mid Level
Preferred Line Always Ask Pause Selection Pause 1
Dial Mode Country 1 Skype User Name Empty
Recall Recall one Time out 1 minute
Area Code number Empty VMWI indication Reset
Skype Password Empty PABX Off
Auto Update On First ring On
CID format
(if applicable)
Sound Setting
Skype Ring Melody Melody 1 Landline Ring Melody Melody 1
Intercom Ring Melody Melody 1 Receiver Volume Volume 3
Ring Volume Medium Notification Tone On
Ring Type Ringer On Confirmation Tones On
Keypad Tone On
Call History Setting
All Events List Keep all Incoming Call List Keep all
Missed Call List Keep all Outgoing Call List Keep all
Voicemail Indicator Reset
System Setting
PIN Code 0000 Base Selection Auto
Country Reset
Disabled Share contacts Off
Default (pre-programmed) settings 59
Page 63

Network Setting
DHCP Enable Network Proxy Option Off
Ports 0 Alternative Ports YES
IP address DHCP Subnet mask DHCP
Primary DNS DHCP Secondary DNS DHCP
Answering Machine Setting
Ans Machine Status On Outgoing message
Ans Machine Mode Ans & Rec Incoming message
Base Call Screening On Remote access Off
Handset Call Screening Off Ring delay 5 Rings
Speaker Volume Level 5
memory
memory
Pre-recorded
OGM
Empty
60 Default (pre-programmed) settings
Page 64

19 Technical Data
Display
• High quality 1.5” display
• 65k colours
• 128 x 128 pixel
• Progressive LCD backlight
General telephone features
• Caller name & number identification
• Skype and Landline calls
• Skype and Landline voicemails
• Conference call and intercom
•Ring profiles
• Shared phonebook
Contacts list and Call history list
• 200 Skype and phone number
contacts
• Call history list with 50 missed calls,
50 incoming calls, 20 outgoing calls
Battery
• 2 x AAA NiMH Rechargeable
750mAh batteries
Power consumption
• Power consumption at idle mode:
around 1.3W
Weight and dimensions
• Handset: 96 grams
• 163.8 x 25.2 x 46 mm (H x D x W)
• Base: 216.5 grams
• 137.2 x 68.7 x 118.4 mm (H x D x W)
• Charger: 135.5 grams
• 76.05 x 79.3 x 57.9 mm (H x D x W)
Temperature range
•Operation: 0°C to +35°C
•Storage: -25°C to +45°C
Relative humidity
• Operation: Up to 95% at 40°C
• Storage: Up to 95% at 40°C
Technical Data 61
Page 65

20 Frequently asked
questions
www.philips.com/support
In this chapter, you will find the most
frequently asked questions and answers
about your phone.
Connection
No Signal icon
• The handset may be out of range.
Move closer.
• If the handset displays
register the handset. See page 49.
Set-up
Registration fails continuously
• Your base memory may be full. Delete
an un-used handset and try again. See
page 49.
Sound
No dialing tone on landline
• Check your phone connections.
• The handset may be out of range.
Move closer.
No parking tone
• The handset may not be placed
properly on the cradle. Try again.
• Charging contacts may be dirty.
Disconnect the power supply first and
then clean contacts with a damp cloth.
62 Frequently asked questions
Unregistered
Product behaviour
I cannot change the settings of my
voice mail
• Operator voice mail is managed by
your operator and not the phone
,
itself. Please contact your operator
should you want to change the
settings.
Handset on the charger does not
charge
• Check that the batteries are inserted
correctly.
• Make sure the handset is placed
properly on the charger. The battery
icon animates while charging.
• Batteries may be defective. Purchase
new ones from your dealer.
No display
• Check that the batteries are charged.
• Check the power and phone
connections.
Bad audio (crackles, echo, etc.)
• The handset may be nearly out of
range. Move closer to the base.
• The phone may be receiving
interference from nearby electrical
appliances. Move the base.
Page 66

• The phone may be at a location with
thick walls. Move the base.
Handset does not ring
• Check that the handset ringer is
turned on. See page 39.
Caller ID does not display
• Service may not be activated. Check
with your service provider.
• The caller's information may be
withheld or is unavailable.
Cannot make / answer a 2nd call
• Service may not be activated. Check
with your service provider.
• Check that the recall selection is
correct. See page 42.
Note
If the above solutions do not help,
remove the power from both the handset
and the base. Wait for 1 minute and try
again.
Frequently asked questions 63
Page 67

21 Glossary
A
Area Code
Area codes usually indicate geographical
areas within one country that are
covered by one or more telephone
exchanges. You may need this to return
local, national or international calls
received on the landline (for example,
area code 20 is added in front of the local
number if you are calling to London from
outside of the London area in UK).
C
Country Code
This is the international calling code for
your country (for example, 1 for US, 44
for UK or 33 for France).
Proper country code entry is required to
ensure landline functionality configured
to correspond to your country.
D
DHCP
Dynamic Host Configuration Protocol
(automating the configuration of devices
that use TCP/IP).
DNS
Domain Name System (an Internet
service that translates domain names into
IP addresses.
Example: domain name
www.example.com may translate to
198.103.243.5).
G
Gateway Address
A default gateway is a router on a
computer network that serves as an
access point to another network.
In homes, the gateway is the ISP that
connects the user to the Internet.
I
IP Address
A unique number that devices use for
identification and communication
purpose with each other on a network
utilizing the Internet Protocol standard.
L
LCD
Liquid Crystal Display (a thin, flat display
device made up of any number of color or
monochrome pixels)
P
Ports
A port is an endpoint to a logical
connection. Port numbers range from 0
to 65536. (Example: ftp uses port 21).
PPPoE
Point-to-Point Protocol Over Ethernet
(used mainly in ADSL services).
Proxy Server
A device that offers a network service to
allow clients to make indirect network
connections to other network services.
64 Glossary
Page 68

S
Static IP Address
A constant IP address used to identify
semi permanent devices such as servers.
Subnet Mask
A mask used to determine what
subnetwork an IP address belongs to.
(Example: 255.255.255.0).
V
VMWI
Voice Mail Waiting Indication (for
Landline only).
Glossary 65
Page 69

22 Index
A
Adding a contact 33
Adding a Skype contact
Adjust the earpiece volume
Answer a call
Answer mode
Answering Machine
Area code management
Auto answer
Auto hang-up
Auto prefix
42
26
40
40
54
53
33
42
26
B
Backlight duration 38
Battery level
Block call
Brightness level
41
13
38
C
Call back 46
Call from the call history
Call from the contact list
Call History
Call screening
Cancel call back
Carrier code
Change the system PIN
Clock settings
Conference call
Confirmation tone
Conformity
Connect the base station
Connect your charger
Contact list
Contact request
Contrast level
Country codes list
Country setting
Creating a new Skype account
Custom Options 38
66 Index
36
6
32
56
41
15
38
46
29
34
14
39
52
12
50
25
25
12
14
D
Date format 16
Date separator
Date setting
Daylight saving
Default (pre-programmed) settings
Deleting a call record
Dial mode
Digital security system
Display icons
Display language
Do not disturb
43
16
10
16
15
40
37
5
38
E
End a call 26
F
First Ring 43
Frequently asked questions
62
G
Glossary 64
H
Handsfree 26
26
Headset
I
Incoming messages (ICM) 55
Install your handset
Internal call
28
12
K
Keypad lock 48
Keypad tone
39
L
Landline call 25
Landline Voicemail 45
14
Language
Log in to Skype
14
59
Page 70

M
Make a regular call 24
Manage your contacts
Manual Registration of handset
Menu structure
Message alert
Missing handset(s)
Muting the microphone
My Greeting
44
57
17
48
33
49
26
N
Naming your handset 38
Network Services
Network settings
Notification sounds
44
50
39
O
Outgoing messages (OGM) 54
Overview of the base station
Overview of your phone
10
9
P
Pause selection 43
Power requirements
Pre-dialing
Preferred line
24
4
24
R
Recall selection 42
Record memo
Recycling & disposal
Redial the last number
Redialing a call
Register the handset
Remote access
Replacing your batteries
Reset phone
Returning a call
Ring delay
Ringer melody
Ringer volume
57
50
56
37
57
39
39
37
6
25
49
13
S
Saving a call record 37
Screen Saver
Second landline call
Index 67
38
27
Second Skype call
Share a contact
Shared phonebook
Signal strength
Skype
auto update
change password
change your online status
check account
create an account
online numbers
phone numbers
removing an account
sign out
skype credit
switch users
voicemail
Skype call features
Skype Call forward
Skype profile
SkypeOut calls
Software licences
Standby mode
Switching your handset ON/OFF
T
Technical Data 61
Text and Numbers
Time setting
Transferring a call
Turning off the ringer
U
Unregister a handset 49
V
Voicemail 44
Voicemail Call forward
W
What’s in the box 8
Withhold identity
35
15
15
22
15
34
25
21
5
27
23
28
46
32
21
21
40
40
30
23
21
21
26
46
22
22
21
22
15
Page 71

ENGLISH
Page 72

© 2008 Koninklijke Philips Electronics N.V.
All rights reserved
Reproduction in whole or in part is prohibited without the
written consent of the copyright owner
P r i n t e d i n C h i n a
 Loading...