

WARNING
Never use non-rechargeable batteries.
Ne pas ulitiser des batteries non rechargeables.
¡Nunca use pilas no recargables!
Xtra HS_VOIP841_US-EN.book Seite 1 Dienstag, 13. Februar 2007 11:42 11
www.philips.com/support
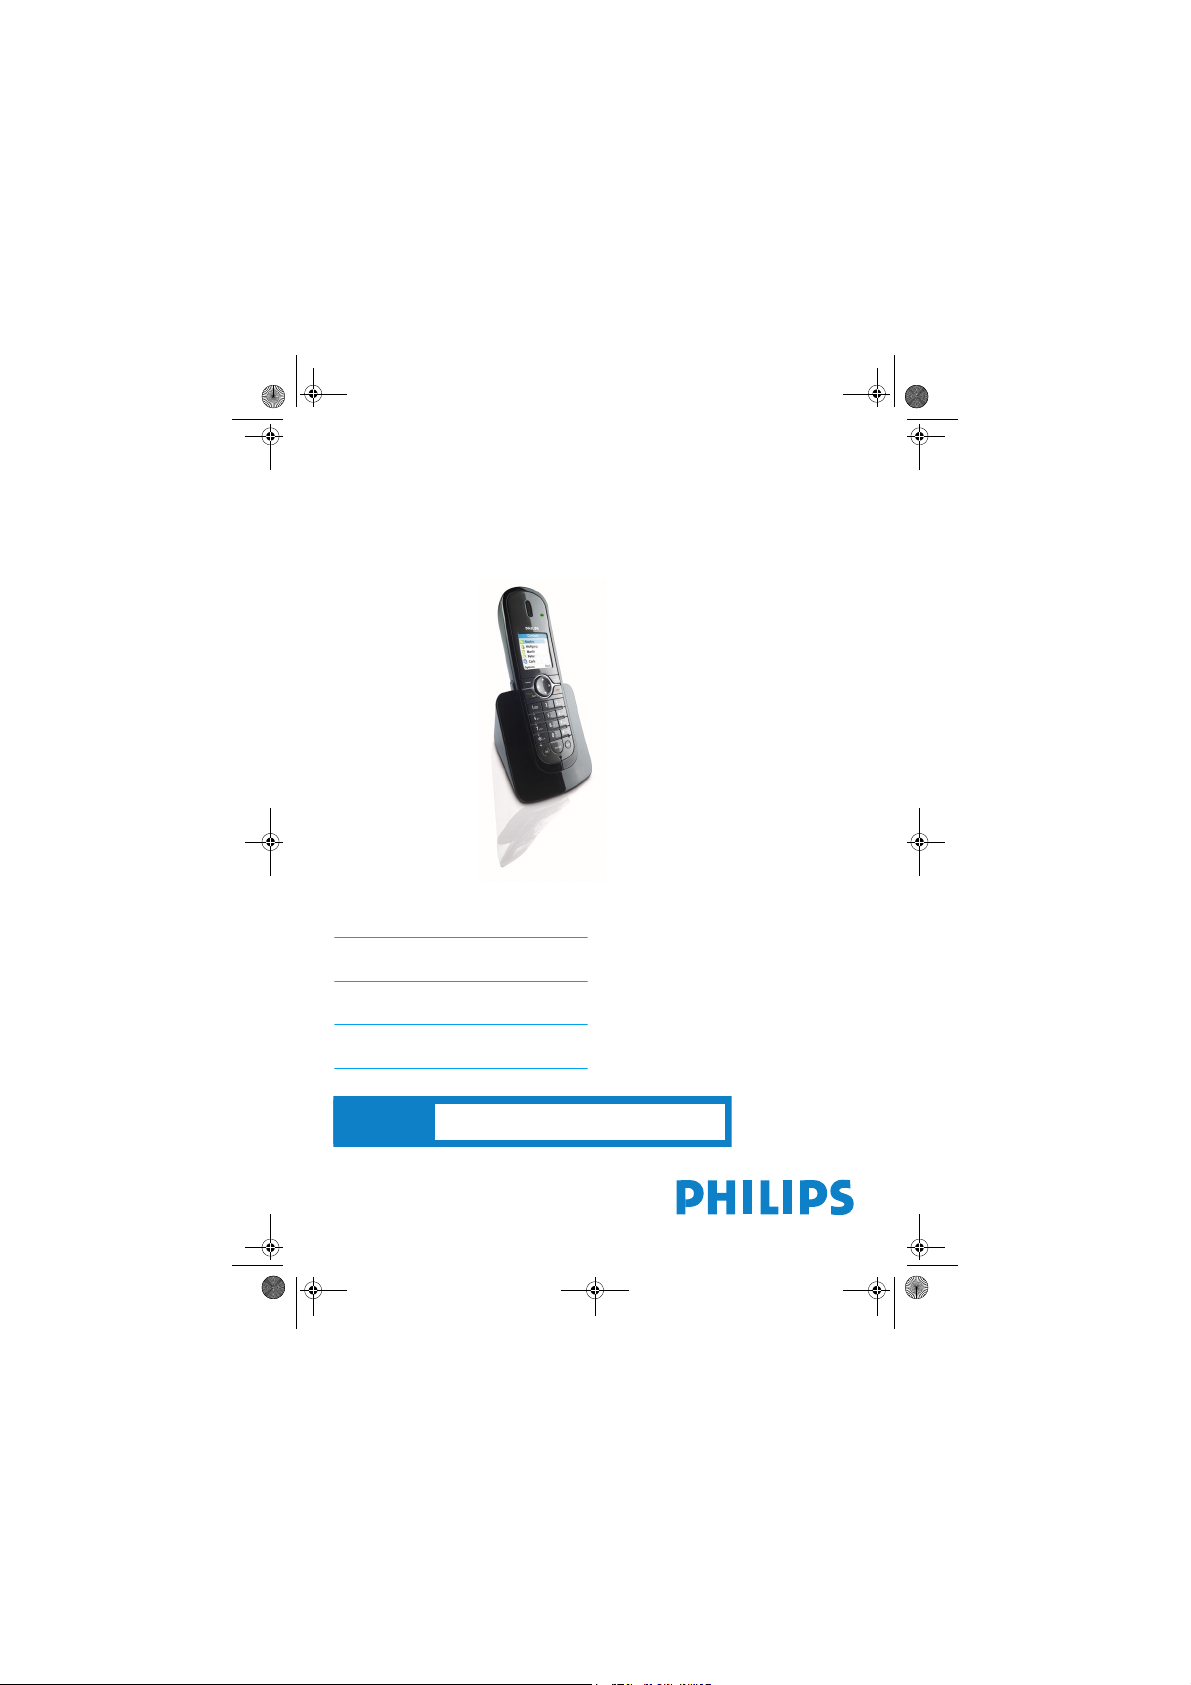
EN Telephone 1
VOIP841
FR Téléphone 27
ES Teléfono 57

Xtra HS_VOIP841_US-EN.book Seite 2 Dienstag, 13. Februar 2007 11:42 11
Xtra HS_VOIP841_US-EN.book Seite 1 Dienstag, 13. Februar 2007 11:42 11
Table of contents
Important Safety Information for USA
and Canada 2
1 Important safety information 3
1.1 Power requirements 3
1.2 Digital security system 3
1.3 Hearing aid compatibility (HAC) 3
1.4 Noise 4
1.5 Software licences 4
1.6 Conformity 4
1.7 Recycling and disposal 4
1.8 Warranty 4
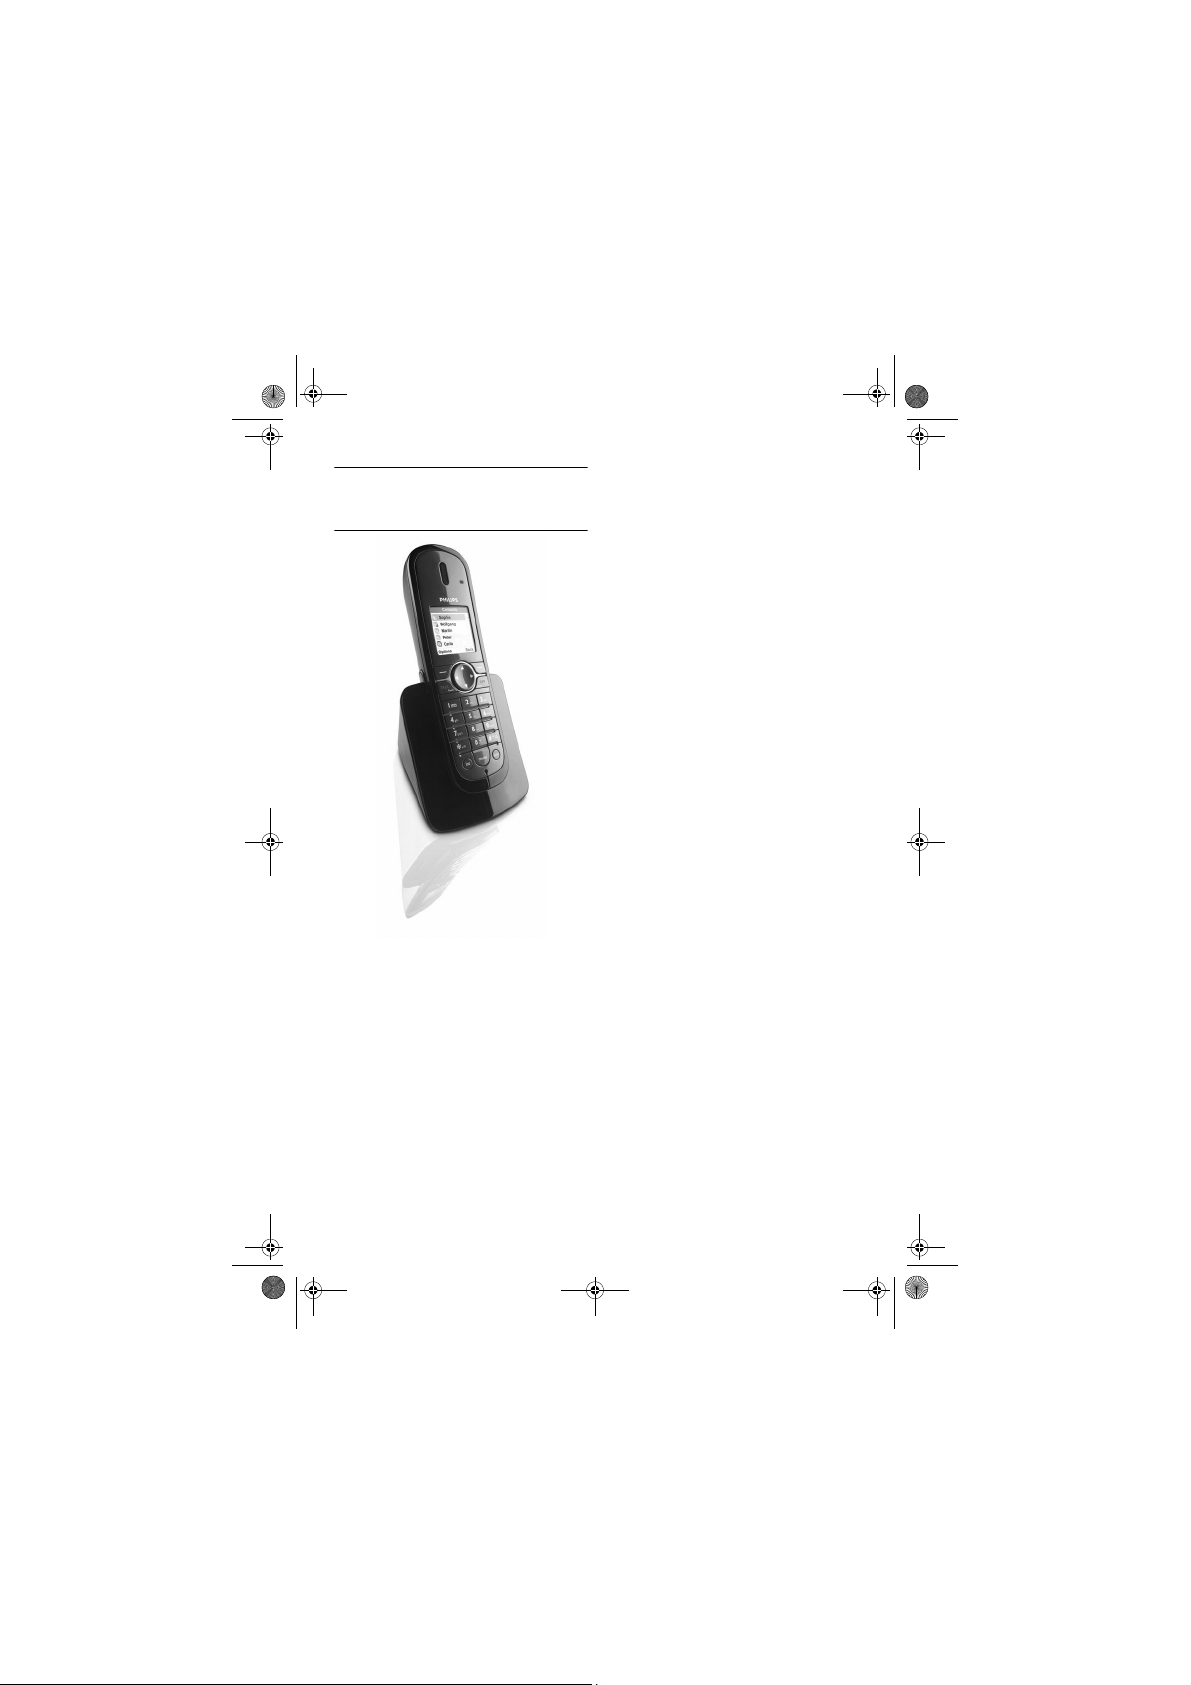
2 Your phone 5
2.1 What’s in the box 5
2.2 What else will you need 5
2.3 Overview of the phone 6
2.4 Display icons 7
3 Getting started 8
3.1 Connect the charger 8
3.2 Insert the batteries 8
3.3 Register the handset 8
3.4 Turn the handset ON/OFF 9
4 Skype® and Skype tools 10
4.1 What is Skype®? 10
4.2 Other Skype products 10
4.3 Common terminologies 10
5 Using your phone 11
5.1 Call 11
5.2 End a call 12
5.3 Answer a call 12
5.4 Intercom and Conference Calls 13
5.5 Skype incoming call is received during
6 Settings 15
6.1 Personalize your phone’s di splay 15
6.2 Personalize your phone’s sounds 15
6.3 Extra features 16
6.4 System settings 16
7 Handset default settings 18
8 Menu structure 19
9 Technical data 20
10 Frequently asked questions 21
11 Appendix 22
12 Index 24
13 Contact information 26
ENGLISH
Landline call 14
Table of contents
1

Xtra HS_VOIP841_US-EN.book Seite 2 Dienstag, 13. Februar 2007 11:42 11
Important Safety Information
!
for USA and Canada
Before using your telephone equipment, basic
safety precautions should always be followed to
reduce the risk of fire, electric shock and injury,
including the the following.
• Read and follow all warnings and instructions
marked on the product.
• Do not use this product near water, laundry
tub, in a wet basement, or near a swimming
pool.
• Do not place this product on an unstable table.
The product may fall and be damaged.
• This product should never be placed near or
over a radiator or heat register.
• This product should be operat ed only from the
type of power source indicated on the label.
• Do not allow anything to rest on the power
cord. Do not locate this product where the
cord will be abused by people walking on it.
• Do not overload wall outlets and extension
cords as this can result in the risk of fire or
electric shock.
• Avoid using a telephone during a storm or
severe weather with lightning. There may be a
risk of el ectric shock from lightning.
• Do not use this product to report a gas leak in
the vicinity of the leak.
• Do not use this product near intensive care
medical equipment or by any people with
pacemakers.
• Due to the radio signals between base station
and handset, wearers of hearing aids may
experience interference in the form of a
humming noise.
Batteries
• Use only the battery type listed in the
instruction manual. Do not use lithium or nonrechargeable batteries.
• Do not dispose of the battery in a fire, as they
can explode.
• Do not open or mutilate the battery. Released
electrolyte is corrosive and can cause damage
to the eyes or skin. It can be toxic if swallowed.
• Avoid contact with metal objects when
handling the battery. These objects could make
short circuit across the battery terminals that
could cause the batteries or conductor to
overheat resulting in burns.
• Do not attempt to recharge the battery cell by
heating it. Sudden release of battery electrolyte
can cause burns or irritation to the eyes or
skin.
• Observe the proper polarity, or direction, of
any battery. Reverse insertion of the battery
cell can result in leakage or explosion.
• Remove the battery cells if you do not plan to
use the product for several months at a time.
• Discard any “dead” batteries because they are
likely to leak into the product.
• Do not store this product or the battery in a
high temperature area. Battery stored in a
freezer or refrigerator should be protected
from condensation during storage and
defrosting. Battery should be stabilized at room
temperature before using.
• Your battery is rechargeable and can be
recycled once it outlives its usefulness.
Depending upon your local and state law, it
might be illegal to dispose of this battery into a
municipal waste system. Check with your local
solid waste company for more information on
your recycling options for the battery cells.
Save These Instructions
2
Important
Xtra HS_VOIP841_US-EN.book Seite 3 Dienstag, 13. Februar 2007 11:42 11
Alternative arrangements should be made for
1Important safety
information
Take time to read this user manual before you
use your Telephone. It contains important
information and notes regarding your Telephone.
1.1 Power requirements
• This product requires an electrical supply of
120 V AC for North America and 230 V AC for
Europe. Observe the electrical ratings and
other markings on the power adapters and
make sure they are appropriate for use with
the outlet supply.
• In case of power failure, the communication
can be lost as well as the date and time settings.
• The Electrical network is classified as
hazardous. The only way to power down the
charger is to unplug the power supply from the
electrical outlet. Ensure that the electrical
outlet is alway easily accessible.
!
War nin g
• Use only the mains adapter supplied with this
equipment. Incorrect adapter polarity or
voltage can seriously damage the unit.
• Do not allow the charging contacts or the
battery to come into contact with conductive
materials.
• Do not allow the handset to come into contact
with liquids or moisture.
• Never use any other battery than the one
delivered with the product or recommended
by Philips: risk of explosion.
• Always use the cables provided with the
product.
• Handsfree activation could suddenly increase
the volume in the earpiece to a very high level:
make sure the handset is not too close to your
ear.
• This equipment is not designed to make
emergency calls when the power fails.
access to emergency services.
• No Emergency Calls for Skype line. Skype is
not a replacement for your ordinary telephone
and cannot be used for emergency calling.
• Do not open the handset, base unit or charger.
This could expose you to high voltages.
• There is a slight chance that your product
could be damaged by an electrical storm.
Unplug the product from the power supply and
telephone socket during a storm.
• Do not use the handset in an explosive hazard
area such as where there is gas leaking.
• Do not use this product near intensive care
medical equipments or by persons with
pacemakers.
• This product can interfere with electrical
equipment such as answering machine,
television, radio, and computers if placed too
close. Put the base unit at least one meter from
such appliances.
1.2 Digital security system
Your cordless phone uses a digital security
system to protect against false ringing,
unauthorized access, and charges to your phone
line.
There is a unique digital security code
programmed in each unit. When the base and the
handset are powered up the first time, the
handset automatically links with the base ready
for normal and secure use. If you have purchased
additional accessory handset(s), you will need to
follow the registration procedure in “Handset
Registration” in this manual to maintain intact the
digital security.
1.3 Hearing aid compatibility (HAC)
This telephone system meets FCC and Industry
Canada standards for Hearing Aid Compatibility.
Please note that this telephone works by sending
radio signals between the base unit and the
handset. These signals may interfere with some
hearing aids, causing a humming noise.
ENGLISH
Important safety information
3
Xtra HS_VOIP841_US-EN.book Seite 4 Dienstag, 13. Februar 2007 11:42 11
Do not dispose of your old product in your
1.4 Noise
Electrical pulse noise is present at one time or
another. This is most intense during electrical
storms. Certain kinds of electrical equipment,
such as light dimmers, fluorescent bulbs, motors,
fans, etc., also generate pulse noise.
Because radio frequencies are susceptible to this,
you may on occasion hear pulse noise through
the base unit. This is usually only a minor
annoyance and should not be interpreted as a
defect of the unit. Humming noice, if present in
hearing aid through the handset, falls into the
same category.
1.5 Software licences
This product contains open source software
packages. An overview of these packages, the
licences and/or notices that apply to them, and
the source code for a number of these packages
are available in the on-line product
documentation, which is visible on
www.phili ps.com/support.
1.6 Conformity
We, Philips declare that the product is in
compliance with the essential requirements and
other relevant provisions of R&TTE Directive
1999/5/EC.
You can find the Declaration of Conformity on
www.phili ps.com/support.
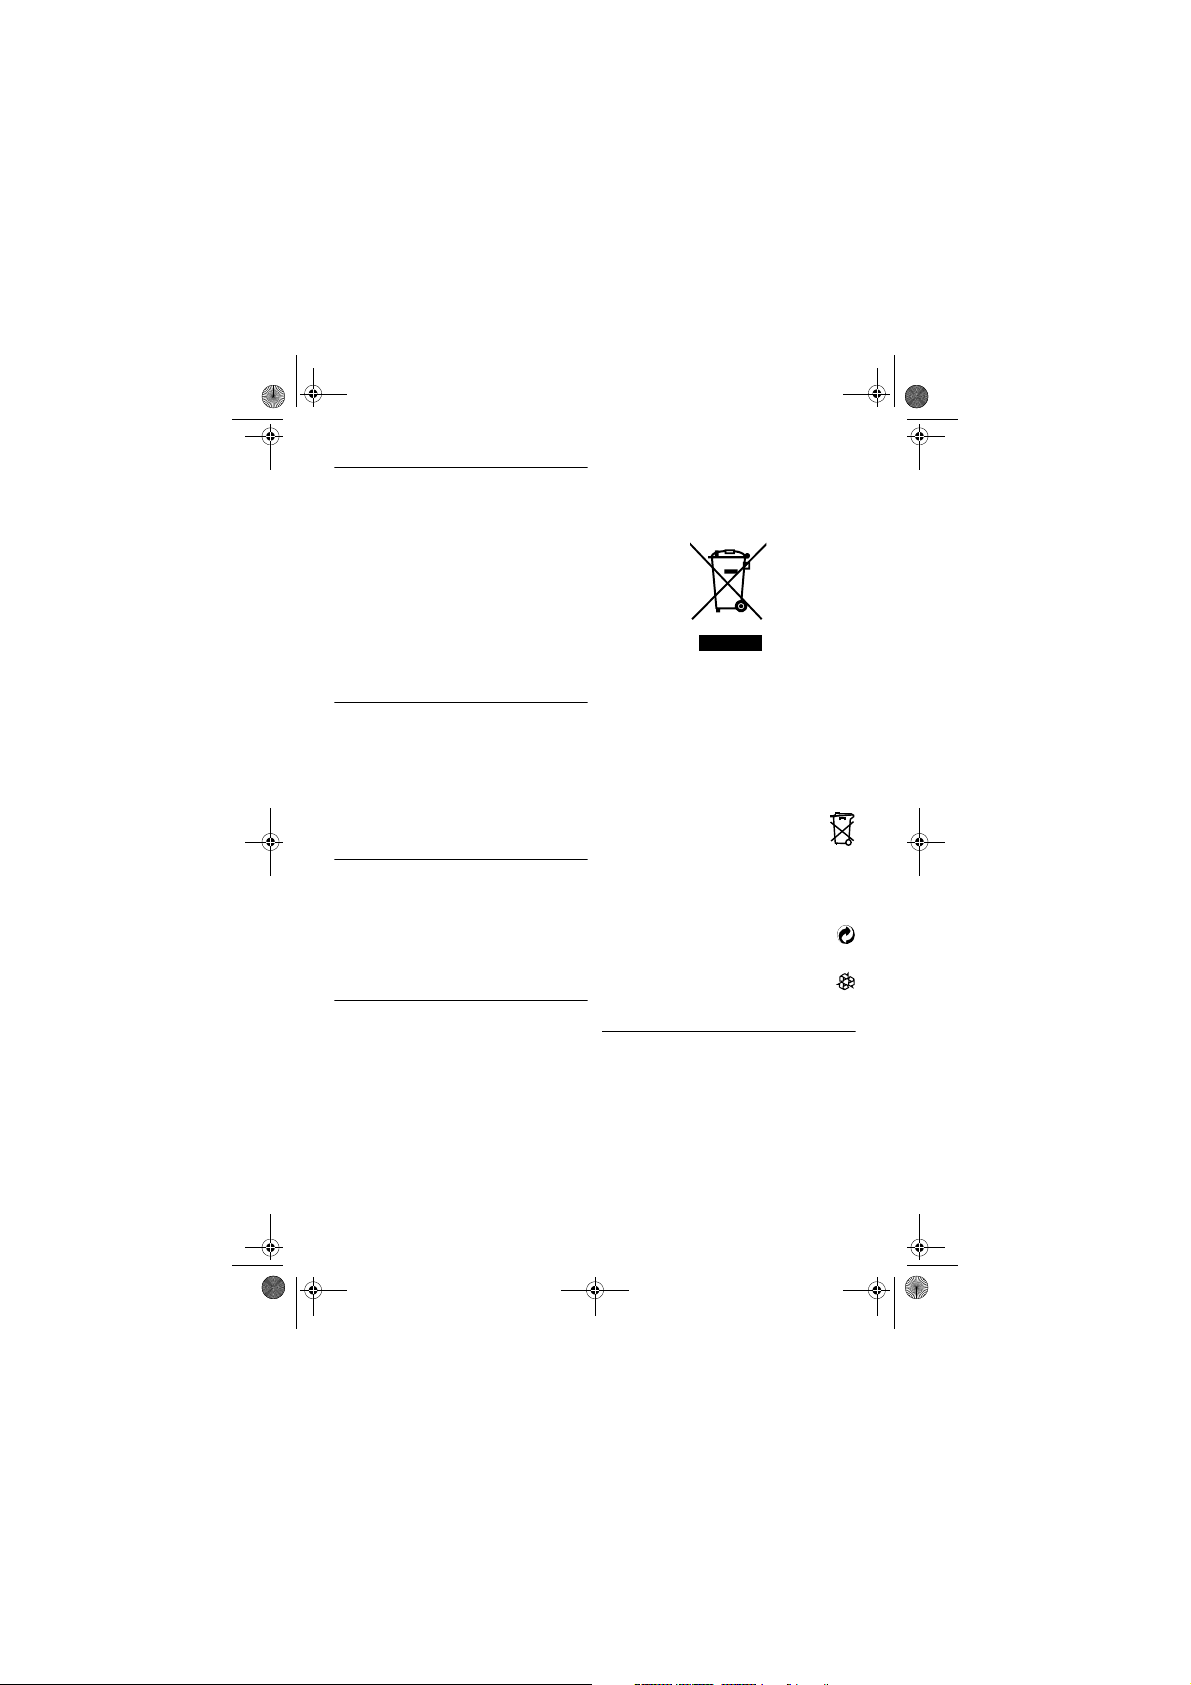
1.7 Recycling and disposal
Disposal instructions for old products:
The WEEE directive (Waste Electrical and
Electronic Equipment Directi ve ; 2000/96/EC) has
been put in place to ensure that products are
recycled using best available treatment, recovery
and recycling techniques to ensure human health
and high environmental protection.
Your product is designed and manufactured with
high quality materials and components, which can
be recycled and reused.
general household waste bin.
Inform yourself about the local separate
collection system for electrical and electronic
products marked by this symbol.
Use one of the following disposal options:
• Dispose of the complete product (including its
cables, plugs and accessories) in the designated
WEEE collection facilities.
• If you purchase a replacement product, hand
your complete old product back to the retailer.
The shop should accept it as required by the
WEEE directive.
Disposal instructions for batteries:
Batteries should not be disposed of with
general household waste.
Packaging information:
Philips has marked the packaging with standard
symbols designed to promote the recycling and
appropriate disposal of your eventual waste.
A financial contribution has been paid to
the associated national recovery &
recycling system.
The labeled packaging material is
recyclable.
1.8 Warranty
The warranty informations are available on
www.philips.com/support
4
Important safety information

Xtra HS_VOIP841_US-EN.book Seite 5 Dienstag, 13. Februar 2007 11:42 11
2Your phone
2.1 What’s in the box
One telephone
handset
One handset
battery cover
Quick start guide
Charger
One charger power
adapter
User guide
One belt clip
Two NiMH AAA
750mAh batteries
ENGLISH
2.2 What else will you need
• A VOIP8411B/37 base station
Your phone
5
Menu
Xtra HS_VOIP841_US-EN.book Seite 6 Dienstag, 13. Februar 2007 11:42 11
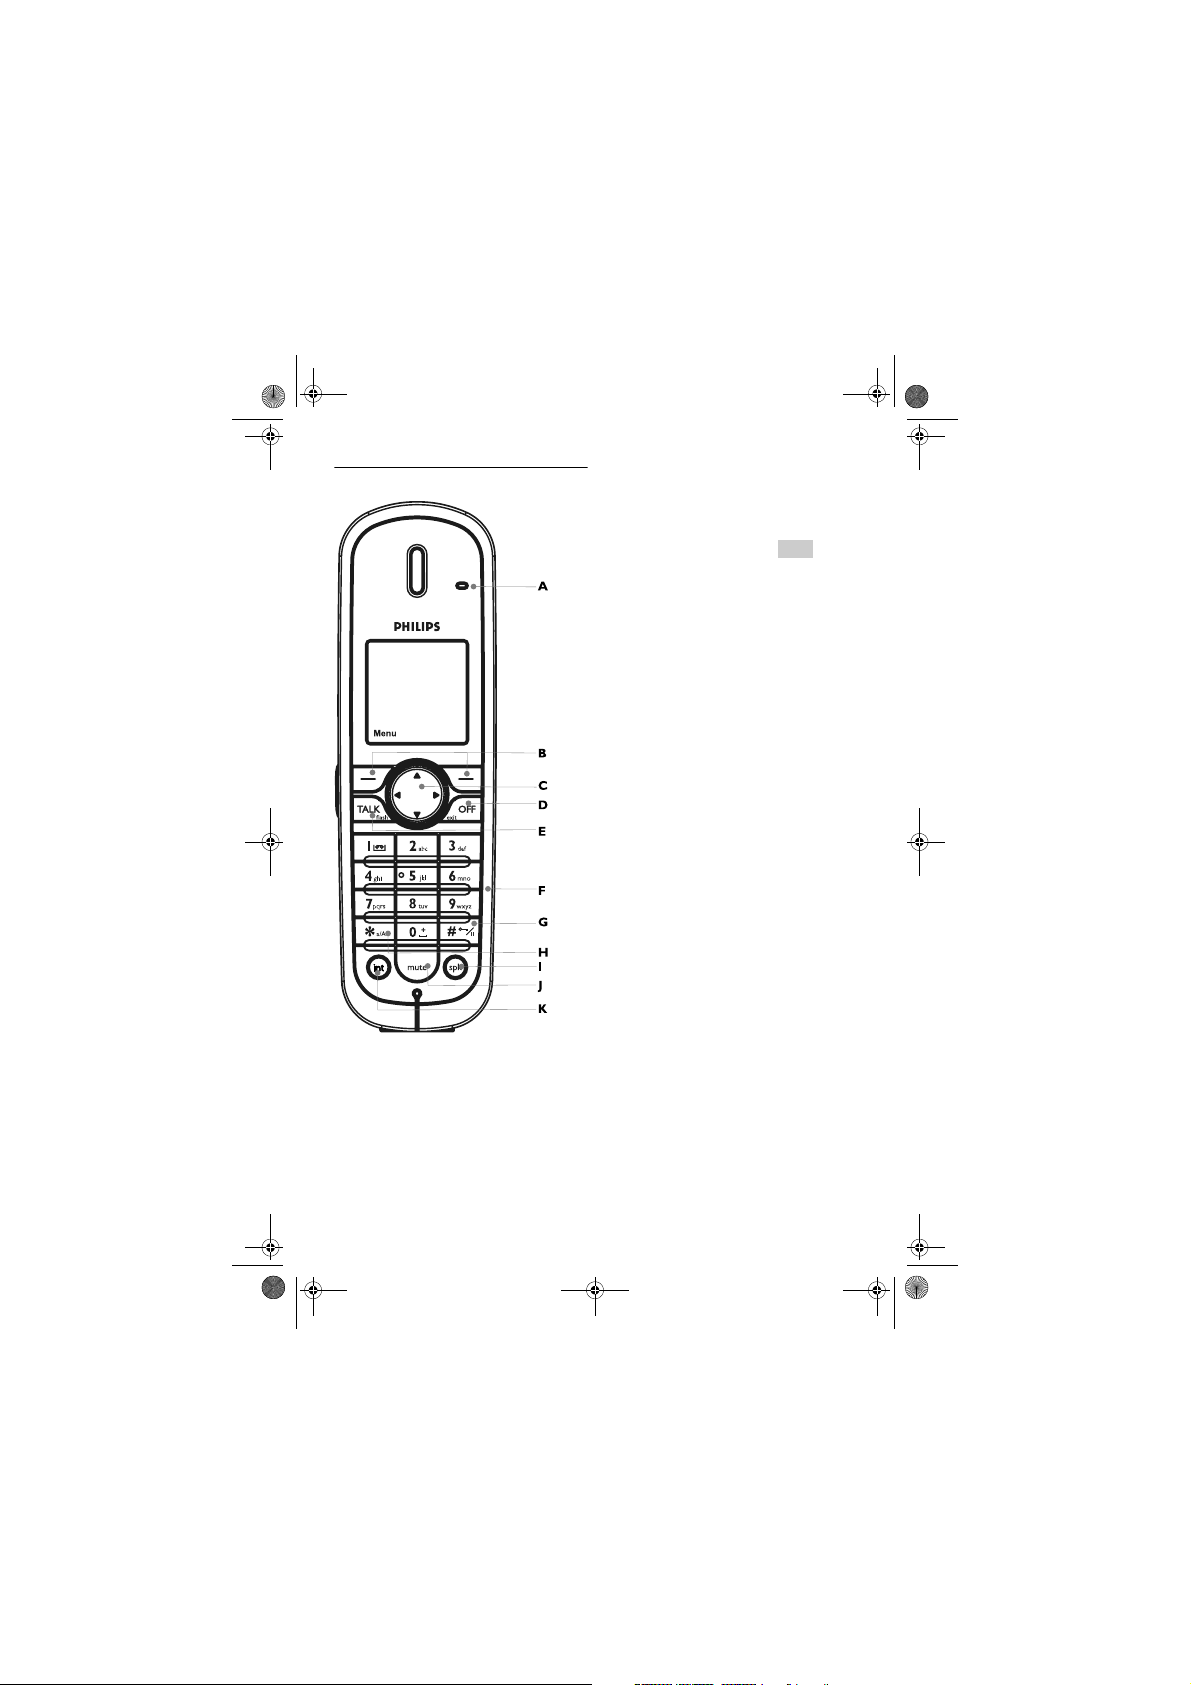
A Handset Indicator
2.3 Overview of the phone
Lit when call in progress.
Blink when receiving a call or new voicemail(s).
BSoft keys
Use to perform function displayed above the key.
It is displayed as text in a box (i.e ) in this
guide.
C Navigation keys
Left/Right: To move the cursor or to change
selection.
Up: Shortcut to Skype Change Status menu.
Down: Shortcut to All Calls List.
D End and On/Off key
To end a call or to exit menus. To power on the
handset or to enter the power menu.
E Talk and Recall key
To make and receive calls. To send flash signal for
landline calls.
F Digit keys
To enter digits and characters.
G Pound, Keylock and Pause key
To enter character # or to insert a pause. In idle
mode, press to lock the keypad or to display the
symbols matrix.
H Star and Text edit key
Short press to insert *.
Long press to enter editing mode.
I Loudspeaker
During a call, the loudspeaker can be switched
on/off.
JMute key
To mute/un-mute the handset microphone
during a call.
K Call Tranfer/Intercom
To initiate an internal call (a second handset is
needed to inititate an internal call).
To scroll up menu items or to increase
the ringer and receiver volume.
To scroll down menu items or to reduce
the ringer and receiver volume.
6
Your phone
Xtra HS_VOIP841_US-EN.book Seite 7 Dienstag, 13. Februar 2007 11:42 11
2.4 Display icons
Each icon gives you a visual message of what is
happening on your handset.
Signal strength
Call in progress
Speaker on
Ringer Off
New mis sed cal l
Skype network alert
Note
This icon informs you about :
- SkypeOut credit low
- SkypeIn expiry date
- VoiceMail expiry date
Handset lost link
Battery level
Line on hold
Micr ophone mut ed
New voi cema il
New request waiting
Keypad locked
ENGLISH
Your phone
7
1
2
1
2!1
Reg.2Clear3Enter
Xtra HS_VOIP841_US-EN.book Seite 8 Dienstag, 13. Februar 2007 11:42 11
• The battery icon appears on the screen:
3 Getting started
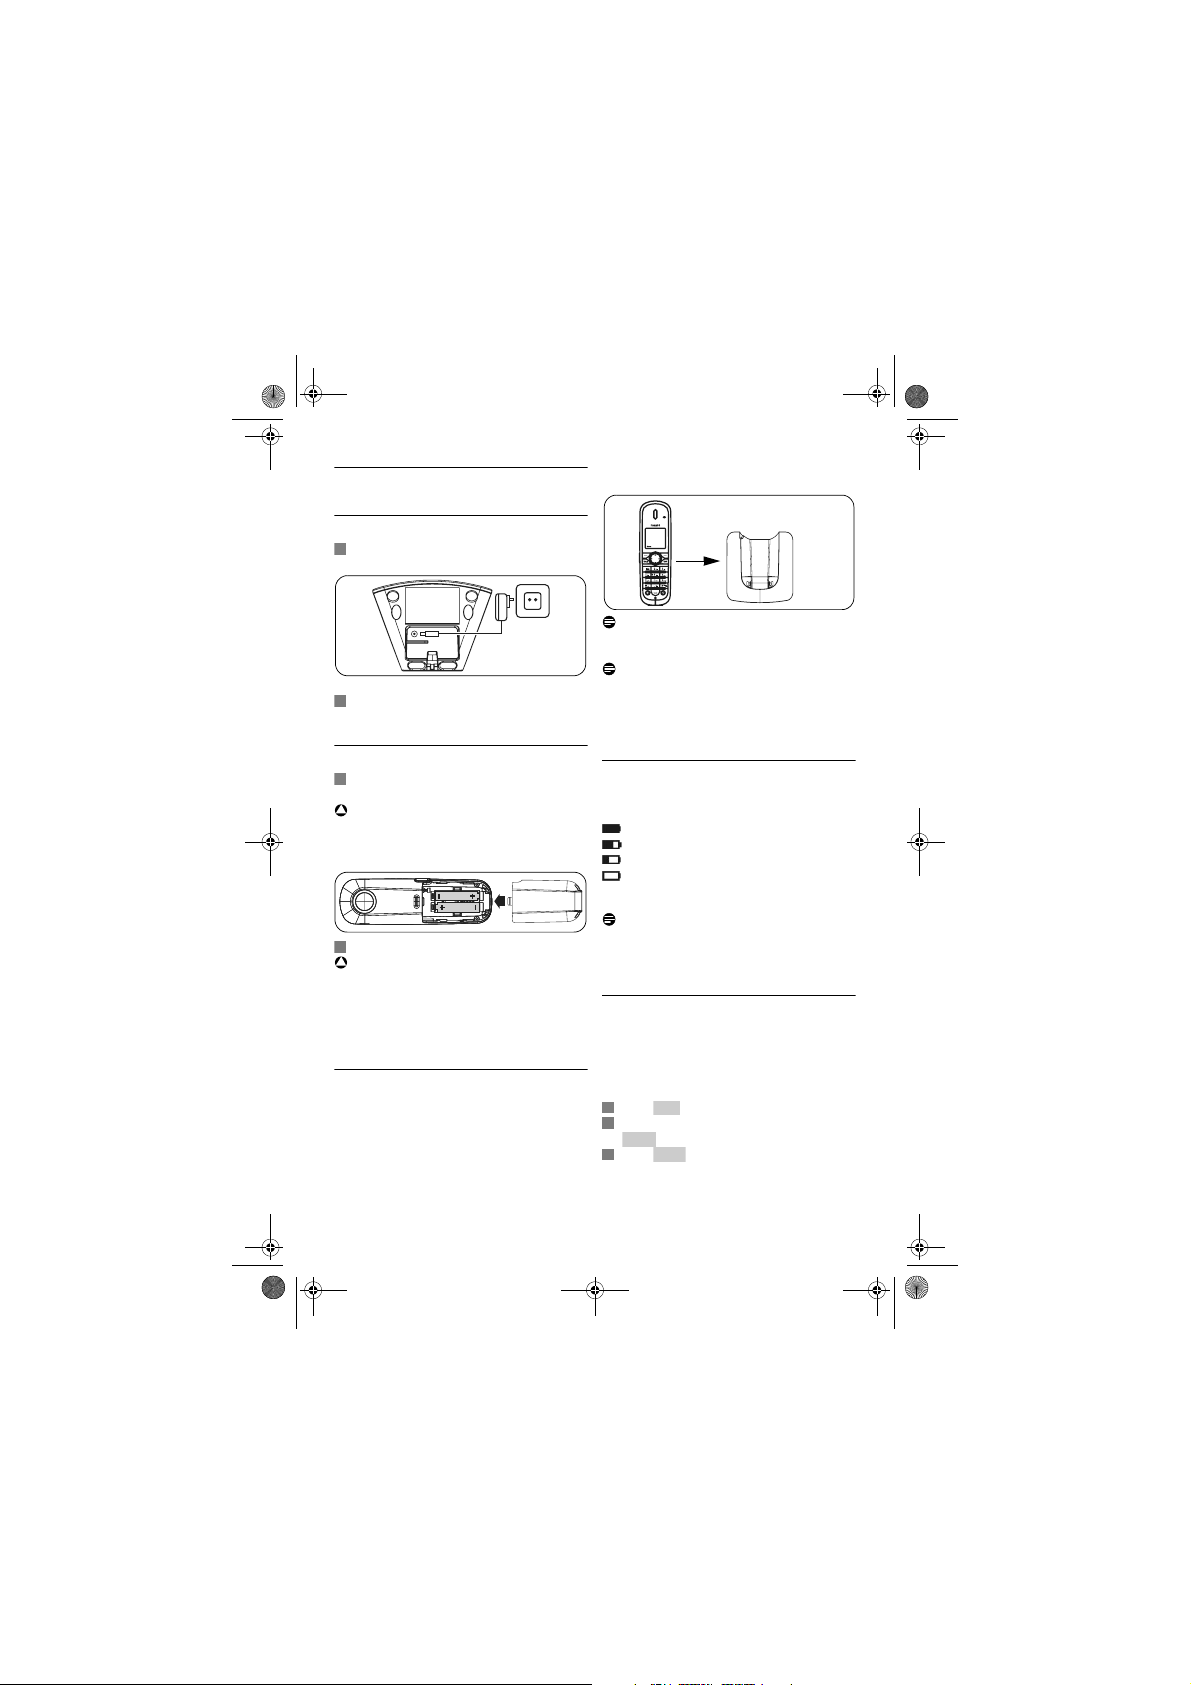
3.1 Connect the charger
Insert the plug of the charger power adapter
into the socket on the bottom of the charger.
Note
Leave the handset(s) on the charger for at least
14 hours before first use.
Note
If the batteries are completely exhausted, the
Plug the power adapter into your power
outlet.
3.2 Insert the batteries
Place the two rechargeable batteries
(included) into the battery compartment.
!
War nin g
Verify the batteries polarity when inserting the
batteries. Incorrect polarity may damage the
product.
Slide the battery door firmly into place.
War nin g
RISK OF EXPLOSION IF BATTERY IS
REPLACED BY AN INCORRECT TYPE. USE
RECOMMENDED TYPE SUPPLIED WITH THIS
PRODUCT. NEVER USE NONRECHARGEABLE BATTERIES.
3.2.1 Place the handset on the charger
Place the handset on the charger. The power
supply of the charger must be connected to the
power outlet.
product will not be able to power-on
immediately. Handset may get warm during initial
charge. This is normal.
3.2.2 Verify the battery level
The battery icon displays the current battery
level:
100% full
60% full
30% full
Empty. Require charging.
Your handset may power down shortly if it is not
charged after the battery is empty.
Note
If you are on the phone while the battery is nearly
empty, you will hear warning tones. Your call
maybe cut off shortly after the warning.
3.3 Register the handset
Registration allows communication between the
base unit and handset(s). If the handset cannot
communicate with its base, you will not be able to
make any call or use many of the functions and
features on the phone.
Press . Register shall be highlighted.
Enter the system PIN (Default: 0000). Use
Press to confirm.
• Your handset starts searching for the base.
charging has started.
to correct typing errors.
8
Getting started
4
1
2
Select
Xtra HS_VOIP841_US-EN.book Seite 9 Dienstag, 13. Februar 2007 11:42 11
Press on the base unit until the two
indications turn off.
• If registration is successful, the signal icon
displays steadily.
Tip
If registration failed, repeat the above procedure.
Note
The base can register up to 4 handsets, then the
base unit registration memory is full. If you
attempt to register an additional handset, the
registration process will be aborted. You can use
additional base units, see “Register your
handset(s) with additional base”, page 16.
3.3.1 Verify the signal strength
The signal icon displays the link status
between the handset and the base unit.
Signal icon : The handset and base unit are
linked. They can communicate.
No signal icon : The handset and base unit
have lost link. They are not able to communicate.
Take your handset closer to the base unit to
reconnect the link.
If you move too far away from the base unit while
you are on the phone, you will hear warning
tones notifying you that the handset is almost out
of range - lost li nk. Take the handset closer to the
base unit or your call will be cut off shortly after
the warning.
Note
If your handset has lost link, you will not be able
to make or receive any call. In addition, you will
not be able to carry out many of the phone
functions and features.
3.4.2 Turn the handset OFF
Press and hold for 2 seconds.
• The power menu is displ ayed.
Scroll to Switch Off. Press .
• The handset is switched off.
Note
The handset cannot receive any call if the power
is switched off.
ENGLISH
3.4 Turn the handset ON/OFF
3.4.1 Turn the handset ON
Press
.
• The handset may take a few seconds to power
up.
Getting started
9

Xtra HS_VOIP841_US-EN.book Seite 10 Dienstag, 13. Februar 2007 11:42 11
4Skype® and Skype tools
4.1 What is Skype®?
®
Skype
is a little piece of software that lets you
make free Internet calls to your friends all over
the world.
!
War nin g
No Emergency Calls. Skype is not a replacement
for your ordinary telephone and cannot be used
for emergency calling.
4.2 Other Skype products
You can talk to anyone over the Internet for free
with Skype, and you will always be able to do that.
There are some other us eful things you can d o on
Skype that are not free (but they are pretty
cheap, actually).
4.2.1 SkypeOut™
SkypeOut is a cheap way to call out from Skype
to landlines and mobile phones. You can also use
SkypeOut when you are on the move, to forward
your Skype calls to any phone.
4.2.2 SkypeIn™ with free Skype
Voicemail™
SkypeIn is a number your friends can call you
from any phone. You answer in Skype. You can
get numbers in one or more of the places off ered,
and receive calls in Skype from anywhere in the
world.
4.3 Common terminologies
These are some of the Skype terminologies used
in this user guide.
• Outgoing cal l: When A calls B.
• Incoming call: When A receives a call from B.
• Missed call: When A receives a call from B
but fails to answer it.
• SkypeOut: Calling regular landline or mobile
phone from Skype.
• SkypeIn: Calling a regular number which
connects the call to a Skype account.
• Skype credit: Skype credit allows you to
purchase a number of different products and
services from Skype. Skype credit can be used
to place SkypeOut calls and purcha se a SkypeIn
subscription.
Tip
All information obtained from Skype content
guideline and website. For more information, visit
skype.com.
4.2.3 Skype Voicemail™
Skype Voicemail takes your calls when you are
busy or offline.
10
Skype® and Skype tools
1
2
1
Clear
2
1
2
Opti ons
3
4
Select
1
2
Opti ons
3
4
Select
1
Contact
2
3
Xtra HS_VOIP841_US-EN.book Seite 11 Dienstag, 13. Februar 2007 11:42 11
Tip
5Using your phone
5.1 Call
Your phone supports both Skype line and PSTN
landline calls. A Skype call is a call using the Skype
line. A landline call is a call using your regular
phone line.
Note
This telephone is not designed for making
emergency telephone calls when the power fails.
Alternative arrangements should be made for
access to emergency services.
Tip
Use (Up or Down) to navigate in the menus.
5.1.1 Make a call
Press for the landline.
Enter the phone number.
• The number is dialed out on the landline.
Note
Check the signal strength before making a cal l and
during a call. For details, see “Verify the signal
strength”, page 9.
5.1.2 Pre-dial
Enter the phone number or Skype contact
name.
Note
Press and hold to enter alphanumeric mode
during standby. You can enter any Skype contact
name you want to call. For details, see “Text and
number entry”, page 25.
Tip
• Press to erase a digit.
• Use Left and Right to move the cursor.
• Press and hold to enter a pause after a
digit has been entered. P displays on the
screen.
Press .
• The number is dial ed out on the preferred line.
• During a call, the call timer displays the talk
time of your current call.
You can also use the SkypeOut Shortcut: Press
twice to call from SkypeOut. The preferred
line setting will be ignored.
5.1.3 Call from the landline
Enter the phone number.
Press .
Scroll to Landline.
Press .
• The number is dialed out.
5.1.4 Call from SkypeOut
Enter the phone number. The phone number
shall include +, the international calling code,
area code, and subscriber number.
Tip
To insert +: Press and hold 0.
Press .
Scroll to SkypeOut.
Press .
• The number is dialed out.
Note
You need to purchase Skype credit to make
SkypeOut calls. Your phone will give you an alert
when your account is low on Skype credits or
have no credits.
5.1.5 Call from the contact list
In idle mode:
Press .
Scroll to the contact.
Press .
• The number is dialed out on the preferred line.
Note
For details on the contact list, see “Contact List”,
page 22.
ENGLISH
Using your phone
11
Redial1Menu2Select3Select
4
5
5
Opti ons
1
Menu2Select3Select
4
5
View
Reject
Xtra HS_VOIP841_US-EN.book Seite 12 Dienstag, 13. Februar 2007 11:42 11
OR
5.1.6 Redial the last number
In idle mode:
Press twice within 1 second.
• The last number you cal led is dialed out using
the same line as before.
Tip
To redial the last landline number: Press ,
and then press . The last number you
called using the landline will be dialed out.
5.1.7 Call from the outgoing call list
The outgoing call list stores the number(s) you
have dialed. The most recent dialed number is
stored at the top of the list. For details on the
outgoing call list, see “Call History”, page 24.
In idle mode:
Press .
Scroll to History. Press .
Scroll to Out going. Press .
Scroll to the number you want.
Press .
• The number is dialed out using the same line
as before. For example, if you made the call
using SkypeOut, t he call will be diale d out using
SkypeOut again.
OR
Press , and then select Call to dial
on the preferred line.
5.1.8 Call from the call history
Your phone stores the outgoing, incoming, and
missed calls. For details, see “Call History”,
page 24.
In idle mode:
Press .
Scroll to History. Press .
Scroll to the call list you want. Press .
Scroll to the record you want.
Press .
• The number is dialed out on the preferred line.
5.2 End a call
Press
place the handset on the charger.
• The call ends.
5.3 Answer a call
When the phone rings, press .
• The call is established.
Notes
• Caller ID Service: Consult and subscribe from
your service provider.
• Missed Call Alert: When a call is missed, your
phone displays You have Mis sed Calls. Press
Tip
When a Skype call comes in, you can reject the
call by pressing .
5.3.1 Adjust the earpiece volume
During a call press (Up or Down) t o
adjust the volume.
5.3.2 Mute / Unmute the microphone
This feature enables you to mute / unmute the
microphone. When the microphone is muted, the
other party cannot hear you.
During a call, press
microphone.
• The caller cannot hear you, but you can still
hear his voice.
When the microphone is muted, press
to unmute the microphone.
• You can now communicate with the caller.
5.3.3 Switch handsfree ON / OFF
!
War nin g
Handsfree activation can suddenly increase the
volume in the earpiece to a very high level. Make
sure the handset is not too close to your hear.
The handsfree features let you talk on the phone
without holding onto the handset.
Tips
• Use the speaker to involve everyone in the
room in the conversation.
for more options.
to mute the
12
Using your phone
1
2
123
Call
4
1
2
3
Call
End
1
2
3
Call
4
1
2
3
Call4Conf.
5
Xtra HS_VOIP841_US-EN.book Seite 13 Dienstag, 13. Februar 2007 11:42 11
• Use the headset to talk privately with the
caller.
During a call, press .
• The speaker is turned on. Start talking.
Press again to turn off the speaker.
5.3.4 Use the headset
Note
Headset is optinonal and not provided. A headset
with 2.5mm j ack and mi nimum 32 ohm speaker
impedance must be used. It is available from retail
store.
Plug the headset into the headset jack at the
side of your handset.
5.4 Intercom and Conference Calls
An intercom call is a call to another handset
registered on the same base unit. This function
can only be used with a multi-handset
configuration. It allows you to make free internal
calls, transfer external calls from one handset to
another and to use the conference option.
A conference call involves conversation between
other handset(s) and outside caller(s).
Note
Some of these functions could be unavailable if
the extra handset used is not a VOIP841.
Tip
Use (Up or Down) to navigate in the menus.
5.4.1 Call another handset
An intercom call can only involve two handsets
registered on the same base unit.
In idle mode:
Press .
Scroll to the handset you want to call.
Press .
• Wait for the other party to answer your call.
Press to cancel or end the intercom call.
Tip
To customize your intercom ringer, see
“Personalize your phone’s sounds”, page 15.
5.4.2 Internal call during an external call
While talking on the phone on the Skype line or
landline, you can call another handset.
Press during the call.
Scroll to the handset you want to call.
Press .
• Wait for the other party to answer your call.
To return to the external caller:
Press during the intercom call.
• You are now connected to the external caller.
5.4.3 Call transfer
During a call in progress you can tranfer the
external call to a specific handset.
Press during the call.
Scroll to the handset you want to call.
Press .
Press after the other party answers
your call.
• The external call is now transferred to the
other handset.
5.4.4 Conference call
Conference call allows one external call to be
shared with two handsets registered on the same
base. The three people can share the
conversation. No operator subscription is
needed.
Press during the call with the external
caller.
Scroll to the handset you want to call.
Press .
• Wait for the other party to answer your call.
Press .
• You are now on a 3-way conference call.
Press to end the conference call.
5.4.5 During an intercom call
While talking on the intercom call, an external
incoming call from either Skype line or Landline
can be received.
ENGLISH
Using your phone
13

1
End
2
3
Answer4End
1
Answer
2
End
Xtra HS_VOIP841_US-EN.book Seite 14 Dienstag, 13. Februar 2007 11:42 11
When external incoming call is received during
intercom call, a call waiting tone will be emitted
on the earpiece of both handsets. Caller ID
information, if available will be shown on both
handsets.
Press or to end the intercom call.
• Both handsets will return to standby mode.
Normal incoming ring for the external call
will ring on both handsets again.
Press to answer the call.
Press or to end the external call.
5.5 Skype incoming call is received during
Landline call
While talking on the Landline call, incoming call
from the Skype line may come in. When incoming
Skype call is received during the Landline call, a
call waiting tone can be heard on the off hook
handset. Caller ID information, if any, for the
Skype call will be shown on the handset screen.
Press to answer the incoming Skype
call.
• The Landline call will be ended automatically.
Press or to end the Skype call.
Note
• If there is more than one handset registered to
the same base, when incoming call is received
from the Skype line while Landline is being used
by one handset, the other handsets in standby
mode will ring the incoming Skype call
normally. Caller ID information, if any, will be
shown on the handset screens. The handsets in
standby mode may Answer or Reject the Skype
incoming call by pressing the respective soft
keys.
• May also receive incoming Landline call during
a Skype call by following the above procedure;
however, incoming Landline call may not be
rejected.
14
Using your phone
1
Menu2Select3Select4Select5OK1Menu2Select3Select4Select5OK
1
Menu2Select
3
Select
4
Select
5
6
OK1Menu2Select3Select4Select
5
6
OK1Menu2Select3Select4Select5Select6OK1Menu2Select3Select4Select
5
6
Select
Xtra HS_VOIP841_US-EN.book Seite 15 Dienstag, 13. Februar 2007 11:42 11
Scroll to Contrast. Press .
6Settings
Make this your handset - change the look and
sound to suit your needs and tastes. From the
display to sound, this section shows you how to
set your preference.
6.1 Personalize your phone’s display
Set the display language
This section only applies to model(s) with
multiple language support.
In idle mode:
Press .
Scroll to Settings. Press .
Scroll to Gene ral. Press .
Scroll to Language. Press .
Scroll to the new setting. Press .
• The new setting is saved.
Set the backlit
Backlit is the background light of the screen. The
backlit turns on when you press a key on the
handset, and it turns off after the time-out period
to save power. You can set the backlit time-out
period. For example, if the time-out period is
1 minute, the backlit turns off after 1 minute from
the last key press.
In idle mode:
Press .
Scroll to Settings. Press .
Scroll to Screen. Press .
Scroll to Backlight. Press .
Scroll to the new setting. Press .
• The new setting is saved.
Adjusting LCD contrast
Contrast is the intensity of the text and
background color displayed on the screen.
Adjusting the contrast changes the darkness of
the text and background color.
In idle mode:
Press .
Scroll to Settings. Press .
Scroll to Screen. Press .
Press (Left or Right) to adjust the
contrast.
Press .
• The new setting is saved.
Adjust LCD brightness
Brightness is the amount of l ight emitted from the
screen.
In idle mode:
Press .
Scroll to Settings. Press .
Scroll to Screen. Press .
Scroll to Brightness. Press .
Press (Left or Right) to adjust the
brightness.
Press .
• The new setting is saved.
6.2 Personalize your phone’s sounds
Set your handset's ringer melody
Your handset has 4 ringers: Skype, SkypeIn,
Landline, and Intercom. You can change the
melody of each ringer.
In idle mode:
Press .
Scroll to Settings. Press .
Scroll to Tones. Press .
Scroll to Ring Tone. Press .
Scroll to the ringer you want. Press .
Scroll to the melody you want. Press .
• The new setting is saved.
Set your handset's ringer volume
Your handset has 5 ringer volume levels. This
setting changes the volume level of all ringers.
In idle mode:
Press .
Scroll to Settings. Press .
Scroll to Tones. Press .
Scroll to Ring Volume. Press .
Press (Up or Down) to select the volume
level.
Press
• The new setting is saved.
ENGLISH
Settings
15
1
Menu2Select
3
Select4Select5OK1Menu2Select3Select4Select5OK
1
Menu2Select3Select4Select5OK
1
Menu2Select3Select4Select5OK1Unlock
2
1
2
2
Xtra HS_VOIP841_US-EN.book Seite 16 Dienstag, 13. Februar 2007 11:42 11
Set your handset's ringer style
Your handset has 5 ringer styles: Ringing,
Ascending, Ring Once, Beep Once, Off. This
setting changes the ringer type of all ringers.
In idle mode:
Press .
Scroll to Settings. Press .
Scroll to Tones. Press .
Scroll to Ring Type. Press .
Scroll to the new setting. Press .
• The new setting is saved.
Set the notification tones
Notification tones will sound when you have a
new missed call, new voicemail or new
request(s).
In idle mode:
Press .
Scroll to Settings. Press .
Scroll to Tones. Press .
Scroll to Notification. Press .
Scroll to the new setting. Press .
• The new setting is saved.
Set the keypad tone
Key tone is the sound you hear when you press a
key on your handset.
In idle mode:
Press .
Scroll to Settings. Press .
Scroll to Tones. Press .
Scroll to Keypad Tone. Press .
Scroll to the new setting. Press .
• The new setting is saved.
Set the confirmation tones
Handset tones will sound upon a successful or
unsuccessful operation and upon placing the
handset on the charger.
In idle mode:
Press .
Scroll to Settings. Press .
Scroll to Tones. Press .
Scroll to Confirmation. Press .
Scroll to the new setting. Press .
• The new setting is saved.
6.3 Extra features
Discover and explore the additional features your
phone offers! Find out how these features can
benefit you and help you make the most from
your phone.
6.3.1 Keypad lock
You can lock the keypad to prevent accidental
presses on the handset while you are carrying it
around.
Lock the keypad
In idle mode:
Press and hold .
• The keypad is locked, and is displayed.
Unlock the keypad
In idle mode:
Press .
• Press * to unlock? is displayed.
Press to unlock.
• The keypad is unlocked.
6.3.2 Search missing handset(s)
In idle mode:
Press on the base unit.
• All the handsets connected to this base unit
ring.
Press on the base unit again to stop
paging.
• All the handsets stop ringing.
OR
Press any key on the handset to stop the
paging of that handset.
6.4 System settings
6.4.1 Register your handset(s) with
This section shows you how to register your
handset to additional base unit(s). If your handset
displays Unregistered, refer to “Register the
handset”, page 8.
additional base
16
Settings

1
Menu
2
Select3Select4Select
5
Clear
6
Enter
7
1
Menu2Select3Select4Select
5
6
Select
1
Menu
2
Select
3
Select
4
Select
5
Enter6Clear7Enter
1
Menu2Select3Select4Select
5
Enter
Clear6Enter7Enter
Xtra HS_VOIP841_US-EN.book Seite 17 Dienstag, 13. Februar 2007 11:42 11
In idle mode:
Press .
Scroll to Settings. Press .
Scroll to Handset. Press .
Scroll to Register. Press .
Enter the system PIN (Default: 0000). Use
to make corrections.
Press to confirm.
• Your handset starts searching for the base.
Press on the base unit until the two
indicators start blinking.
Note
Each handset ca n register up to 4 base uni ts. After
registering to 4 base units, your handset
registration memory is full.
6.4.2 Select a base unit
You can switch your handset between different
base units if your handset has registered to these
base units. For your convenience, you can
program the handset to automatically connect to
the closest base unit. You can also program the
handset to only connect to a fixed base unit you
have specified.
Note
Your handset must be registered t o the base units
you want to select beforehand.
In idle mode:
Press .
Scroll to Settings. Press .
Scroll to Handset. Press .
Scroll to Select Base. Press .
Scroll to the base unit you want or select
Auto if you want your handset to
automatically connect to the closest base
unit.
Press .
• The new setting is saved.
Scroll to Handset. Press .
Scroll to De-register. Press .
Scroll to the handset (number) you want to
delete. Press .
Tip
The handset number displays beside the word
“Skype” during standby. For example, Skype (1).
Enter the system PIN (Default: 0000). Use
to make corrections.
Press to confirm.
• The handset is unregistered.
6.4.4 Change the system PIN
The system PIN is used for registering, deleting
handsets, and protecting the access rights to
some of the other menus. The default system PIN
is 0000. You can personalize the PIN for greater
security.
In idle mode:
Press .
Scroll to Settings. Press .
Scroll to Handset. Press .
Scroll to Change PIN. Press .
Enter the system PIN. Press to
confirm. Use to make corrections.
Enter the new system PIN. Press .
Enter the new system PIN again for
verification. Press .
• The new setting is saved.
Note
Write down your PIN and save it for future use.
If you have forgotten the PIN, call your dealer for
assistance.
ENGLISH
6.4.3 Unregister a handset
Use one handset to unregister another handset
that shares the same base unit.
In idle mode:
Press .
Scroll to Settings. Press .
Settings
17
Xtra HS_VOIP841_US-EN.book Seite 18 Dienstag, 13. Februar 2007 11:42 11
7 Handset default settings
These are the factory pre-programmed settings of your phone.
General Setting
Language Language 1 Time Zone GMT
Date Jan 1 2006 Time 12:00 AM
Date Format Country 1 Time Format Country 1
Date Separator Country 1 Time Separator Country 1
Backlit 1 minute Auto Answer OFF
LCD Contrast Mid Lev el LCD Brightness Mi d Level
Preferred Line Always Ask Auto Sign in Yes
Dial Mode Country 1 Category Number OFF
Recall Recall one Pause Selection Pause one
Area Code number Empty Skype User Name Empty
Skype Password Empty Time out 1 minute
Auto Update No VMWI indication Reset
CID format
(if applicable)
Sound Setting
Skype Ring Melody Me lody 2 Landline Ring Melody Mel ody 1
SkypeIn Ring Melody Melo dy 1 Intercom Ring Melody Mel ody 1
Ring Volume Volume 3 Receiver Volume Volume 3
Ring Type Ringer ON Notification Tone ON
Keypad Tone ON Confirmation Tones ON
Call History Setting
All Calls List Keep all Incoming Call List Keep all
Missed Call List Keep all Outgoing Call List Keep all
Voicemail Indicator Reset
System Setting
PIN Code 0000 Base Selection Auto
Country Reset
Network Setting
DHCP Enabled Network Proxy
Network Proxy Host Auto detect Network Proxy Port Auto detect
Proxy Authentication Disabled Authentication User
Authentication
Password Empty
Alternate Application
Ports Skype default
Subnet mask DHCP Default gateway DHCP
Primary DNS DHCP Secondary DNS DHCP
Disabled
Opti on Auto detect
Name Empty
Application Port Skype default
IP address DHCP
18
Default settings

Menu
Xtra HS_VOIP841_US-EN.book Seite 19 Dienstag, 13. Februar 2007 11:42 11
8 Menu structure
The table below describes the menu tree of your phone.
Reminder: Press to enter the main menu.
Use (Up or Down) to navigate the menus.
Press to exit from any menu instantly.
Contacts History Status Add Contact
Opti ons
Call
Send voicemail
View profile
Rename
Remove
Block
Request detail
All calls
Missed calls
Incoming calls
Outgoing calls
Voicemails
New contact
Change status
My prof ile
Sign out
Skype
SkypeOut
Search Services Settings
Enter name Skype credit
SkypeIn
Voicemail
General
Call settings
Privacy
Tones
Screen
Time & Date
Network
Handset
Information
Advanced
ENGLISH
Menu structure
19

Xtra HS_VOIP841_US-EN.book Seite 20 Dienstag, 13. Februar 2007 11:42 11
9 Technical data
Display
• High quali ty 1.5" display
•65k colors
• 128 x 128 pixels
• Progressive LCD backlight
General telephone features
• Caller name & number identification
• Skype and Landline calls
• Skype and Landline voicemails
• Ring profiles
Contacts list and Call history list
• 500 Skype and SkypeOut contacts
• Call history list with 50 missed calls,
50 incoming calls, 20 outgoing calls
Battery
• 2 x AAA NiMH 750mAh batt eries
Weight and dimensions
• Handset: 140 grams
151.7 x 28.3 x 45.7 mm (H x D x W)
Temperature range
• Operation: 0°C to +46°C
• Storage: -25°C to +70°C
Relative humidity
• Operation: Up to 95% at 40°C
• Storage: Up to 95% at 40°C
20
Technical data
Unlock
Xtra HS_VOIP841_US-EN.book Seite 21 Dienstag, 13. Februar 2007 11:42 11
No parking tone from the handset.
10 Frequently asked questions
In this chapter you will find the most frequently
asked questions and answers about your phone.
Set up
The handset does not switch on.
• Charge the battery: Put the handset on
charger. The battery icon is animated while
charging. After a few moments the phone will
switch on.
The handset does not charge.
• Check charger connections.
• The battery may be defective. Purchase new
battery from your dealer.
• Check that the batteries are inserted correctly.
Communication is lost during a call.
• Charge the battery.
• Move closer to the basestation.
“Range” icon is flashing
• Move closer to the basestation.
• If the handset displays Unregistered, it is unregistered. Register the handset, see page 8.
No dial tone on landline.
• Check the phone and power connections.
• The handset may be out of range. Move closer
to the basestation.
• The battery capacity may be low. Charge
battery.
Sound
Handset does not ring.
Check that the handset ringer is turned on. See
page 16.
Caller does not hear me.
Microphone may be muted: during call, press
to unmute the microphone.
• Check the power connections of the charger.
• The handset may not be placed properly. Try
again.
• Charging contacts may be dirt y. Clean contacts
with a damp cloth.
• Turn on the handset tone. See page 16.
• Switch on the handset's power. See page 9.
Product behaviour
Keypad does not work.
Unlock your keypad: press and press
to unlock.
The handset warms up when making a long
call.
This is normal behavior. The handset consumes
energy while calling.
Bad audio quality (crackles, echo, etc.)
during a call
• The handset may be nearly out of range. Move
closer.
• The phone may be interfered by nearby
electrical appliance. Move the base unit to a
different location.
• The phone may be at a location with thick
walls. Move the base unit to a different
location.
Caller ID does not display
• Caller ID service may not be activated. Check
with your service provider.
• The caller's information may be withheld or is
unavailable.
Make/answer a second call does not work.
• Second call service may not be activated. The
second call service may not be available from
your telephone operator, check availability of
the service with your telephone service
provider.
• Check that the recall selection is correct.
ENGLISH
Frequently asked questions
21

Xtra HS_VOIP841_US-EN.book Seite 22 Dienstag, 13. Februar 2007 11:42 11
own telephone equipment if you are on a party
11 Appendix
Equipment compliance information for
USA and Canada
Your telephone equipment is certified for
connection to the Public Switched Telephone
Network and is in compliance with Part 68 of
FCC Rules and Regulations, and the Technical
Requirements for Telephone Terminal
Equipment adopted by ACTA.
Notification to the Local Telephone
Company
On the bottom of this equipment is a label
indicating, among other information, the US
number and Ringer Equivalence Number (REN)
for the equipment. You must, upon request,
provide this information to your telephone
company.
The REN is useful in determining the number of
devices you may connect to your telephone line
and still have all of these devices ring when your
telephone number is called. In most (but not all)
areas, the sum of the RENs of all devices
connected to one PSTN line should not exceed 5.
To be certain of the number of devices you may
connect to your line as determined by the REN,
you should contact your local telephone
company.
A plug and jack used to connect this equipment to
the premise wiring and telephone network must
comply with the applicable FCC Part 68 rules and
requirements adopted by the ACTA. A compliant
telephone cord set with modular plugs is
provided with this product. It is designed to be
connected to a compatible modular jack that is
also compliant. See installation instructions for
details.
Notes
• This equipment may not be used on coin
service provided by the telephone company.
• Party lines are subject to state tariffs, and
therefore, you may not be able to use your
line. Check with your local telephone company.
• Notice must be given to the telephone
company upon permanent disconnection of
your telephone from your line.
• If your home has specially wired alarm
equipment connected to the telephone line,
ensure the installation of this product does not
disable your alarm equipment. If you have
questions about what will disable alarm
equipment, consult your alarm equipment
supplier or a qualified installer.
Rights of the Telephone Company
Should your equipment cause trouble on your
line which may harm the telephone network, the
telephone company shall, where practicable,
notify you that temporary discontinuance of
service may be required. Where prior notice is
not practicable and the circumstances warrant
such action, the telephone company may
temporarily discontinue service immediately. In
case of such temporary discontinuance, the
telephone company must: (1) promptly notify you
of such temporary discontinuance; (2) afford you
the opportunity to correct the situation; and (3)
inform you of your right to bring a complaint to
the Commission pursuant to procedures set
forth in Subpart E of Part 68, FCC Rules and
Regulations.
THE TELEPHONE COMPANY MAY MAKE
CHANGES IN ITS COMMUNICATIONS
FACILITIES, EQUIPMENT, OPERATIONS OR
PROCEDURES WHERE SUCH ACTION IS
REQUIRED IN THE OPERATION OF ITS
BUSINESS AND NOT INCONSISTENT WITH
FCC RULES AND REGULATIONS. IF THESE
CHANGES ARE EXPECTED TO AFFECT THE
USE OR PERFORMANCE OF YOUR
TELEPHONE EQUIPMENT, THE TELEPHONE
COMPANY MUST GIVE YOU ADEQUATE
NOTICE, IN WRITING, TO ALLOW YOU TO
MAINTAIN UNINTERRUPTED SERVICE.
22
Appendix

Xtra HS_VOIP841_US-EN.book Seite 23 Dienstag, 13. Februar 2007 11:42 11
Interference information
This device complies with Part 15 of the FCC
Rules. Operation is subject to the following two
conditions: (1) This device may not cause harmful
interference; and (2) This device must accept any
interference received, including interference that
may cause undesired operation.
This equipment has been tested and found to
comply with the limits for a Class B digital device,
pursuant to Part 15 of the FCC Rules. These
limits are designed to provide reasonable
protection against harmful interference in a
residential installation.
This equipment generates, uses, and can radiate
radio frequency energy and, if not installed and
used in accordance with the instructions, may
cause harmful interference to radio
communications. However, there is no guarantee
that interference will not occur in a particular
installation.
If this equi pment does cause harmful interference
to radio or television reception, which can be
determined by turning the equipment off and on,
the user is encouraged to try to correct the
interference by one or more of the following
measures:
• Reorient or relocate the receiving antenna
(that is, the antenna for radio or television that
is "receiving" the interference).
• Reorient or relocate and increase the
separation between the telecommunications
equipment and receiving antenna.
• Connect the telecommunications equipment
into an outlet on a circuit different from that to
which the receiver is connected.
• If these measures do not eliminate the
interference, consult your dealer or an
experienced radio/television technician for
additional suggestions. Also, the Federal
Communicati ons Commiss ion has prepared a
helpful booklet, "How To Identify and Resolve
Radio/TV Interference Problems." This booklet
is available from the U.S. Government Printing
Office, Washington, D.C. 20402. Please specify
stock number 004-000-00345-4 when ordering
copies.
FCC RF radiation exposure statement
This equipment complies with FCC RF radiation
exposure limits set forth for an uncontrolled
environment. This equipment should be installed
and operated with a minimum distance of 20
centimeters between the radiator and your body.
For hand-held operation, this phone has been
tested and meets the FCC RF exposure
guidelines. For body-worn operation, use only
with the belt clip supplied. Use of other
accessories may not ensure compliance with FCC
RF exposure guidelines. This transmitter must
not be co-located or operating in conjunction
with any other antenna or transmitter.
Privacy of communications
Privacy of communications may not be ensured
when using this telephone.
Industry Canada notice
Terminal equipment
This equipment meets the applicable Industry
Canada Terminal Equi pment Technical
Specifications.
This is confirmed by the registration number,
same as the certification number for Radio
Equipment. The abbreviation, IC, before the
registration number signifies that registration was
performed based on a Declaration of Conformity
indicati ng that Industry Canada technical
specifications were met. It does not imply that
Industry Canada approved the equipment.
Radio equipment
The term "IC:" before the radio certification
number signifies that Industry Canada technical
specifications RSS-213 and ICES-003 were met.
RF radiation exposure statement
The equipment has been evaluated and found
compliant in accordance with Industry Canada
RSS-102 with respect to Health Canada Code 6
for Exposure of Humans to RF Fields.
ENGLISH
Appendix
23

A
B
C
D
E
F
H
I
K
M
N
P
R
S
Xtra HS_VOIP841_US-EN.book Seite 24 Dienstag, 13. Februar 2007 11:42 11
12 Index
Additional base, register 16
Answer a call 12
Appendix 22
Backlit, set 15
Base unit, select 17
Batteries 8
Battery 20
Battery level 8
Brightness, adjust 15
Call another handset 13
Call from SkypeOut 11
Call from the call history 12
Call from the contact list 11
Call from the landline 11
Call from the outgoing call list 12
Call transfer 13
Charger 8
Conference Cal ls 13
Confirmation tones, set 16
Conformi ty 4
Connect the charger 8
Contact information 26
Contrast, adjust 15
Digital security system 3
Display icons 7
Display language, set 15
Disposal 4
During an intercom call 13
Handset default settings 18
Handset ON/OFF 9
Handset, charge 8
Handsfree ON / OFF 12
Headset 13
Hearing aid compatibility (HAC) 3
Information for USA 2
Insert the batteries 8
Intercom 13
Internal call during an external call 13
Keypad l ock 16
Keypad tone, set 16
Make a call 11
Menu structure 19
Mute / Unmute the microphone 12
Noise 4
Notification tones, set 16
Phone, overview 6
Power requirements 3
Recycling 4
Redial the last number 12
Register the handset 8
Register your handset(s) with additional base 16
Ringer melody, set 15
Ringer style, set 16
Ringer volume, set 15
Earpiece volume, adjust 12
End a call 12
Frequently asked questions 21
24
Search missing handset(s) 16
Signal stength, verify 9
Skype incoming call is received during Landline
call 14
Skype products 10
Skype terminologies 10
Index

T
U
U
W
Xtra HS_VOIP841_US-EN.book Seite 25 Dienstag, 13. Februar 2007 11:42 11
Skype Voicemail™ 10
Skype® and Skype tools 10
SkypeIn™ with free Skype Voicemail™ 10
SkypeOut™ 10
Software licences 4
System PIN, change 17
Technical data 20
Unregister a handset 17
What else will you need 5
What ’ s i n t he box 5
ENGLISH
Index
25
Xtra HS_VOIP841_US-EN.book Seite 26 Dienstag, 13. Februar 2007 11:42 11
Contact information
Web address: http://www.philips.com/support
26
Contact information
 Loading...