

Philips VOIP3212G-37 User Manual
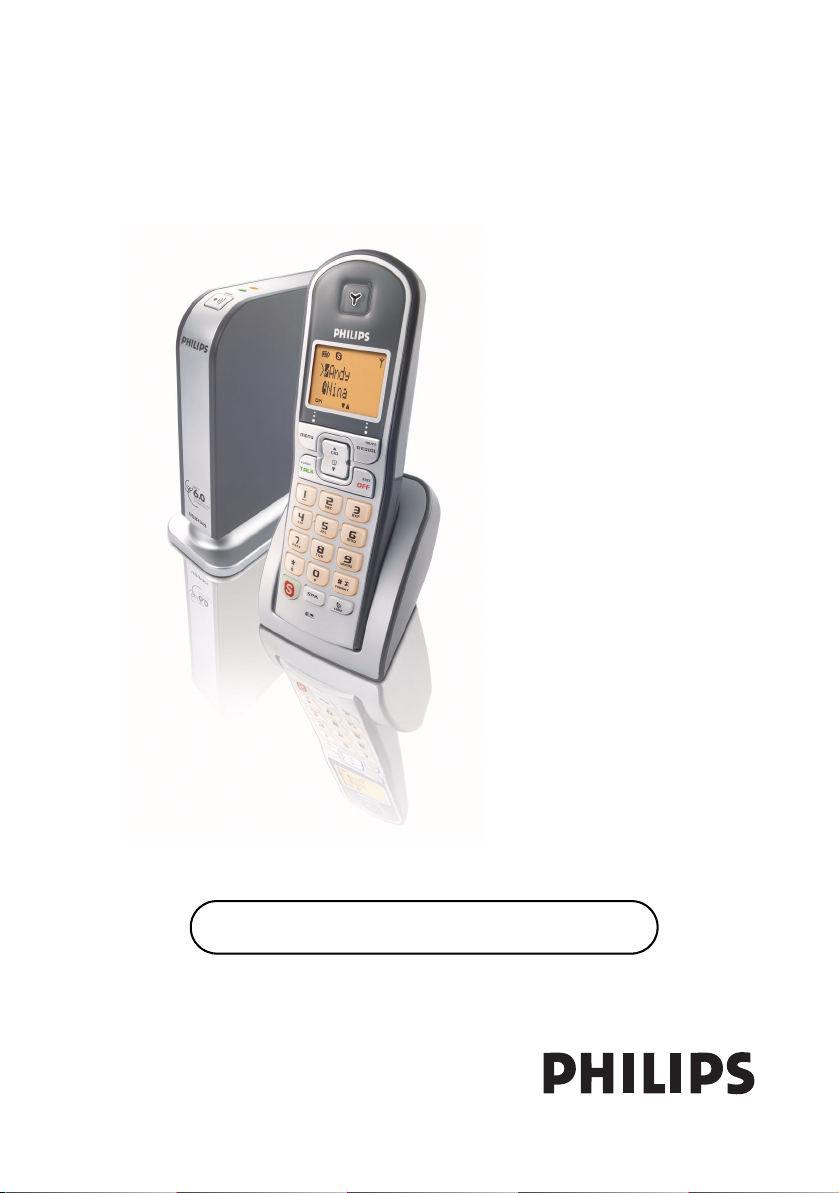
User manual
Charge the handset(s) for 24 hours before use !


Contents
3Contents
4 Important Safety Instructions
5 Environment and safety
7 What’s in the box
8 Your VOIP 321
10 Icons on the handset display
11 Install
13 Connect
14 Main menu
15 Call
22 Phonebook
25 Call log
27 Redial list
29 Other features
37 Using the intercom
39 Default settings
40 Troubleshooting
41 Information
43 Index
45 FCC and IC statements
US
3

US
Important Safety Instructions
Some of the following information may not apply to your
particular product; however, when using telephone
equipment, basic safety precautions should always be
followed to reduce the risk of fire, electric shock and injury
to persons, including the following :
1. Read and understand all instructions.
2. Follow all warnings and instructions marked on the
product.
3. Unplug this product from the wall outlet before cleaning.
Do not use liquid cleaners or aerosol cleaners. Use a
damp cloth for cleaning.
4. Telephones should not be used while you are in a
bathtub, shower or pool. Immersion of the telephone or
handset in water could cause an electrical shock.
5. Slots and openings in the cabinet back or bottom are
provided for ventilation, to protect it from overheating.
These openings must not be blocked or covered. The
openings should never be blocked by placing the product
on the bed, sofa, rug, or other similar surface. This
product should not be placed in a built-in installation
unless proper ventilation is provided.
6. This product should be operated only from the type of
power source indicated on the marking label. If you are
not sure of the type of power supply to your home,
consult your dealer or local power company.
7. Do not allow anything to rest on the power cord. Do not
locate this product where the cord will be abused by
persons walking on it.
8. Do not overload wall outlets and extension cords as this
can result in the risk of fire or electric shock.
9. Never push objects of any kind into this product through
cabinet slots as they may touch dangerous voltage points
or short out parts that could result in a risk of fire or
electric shock. Never spill liquid of any kind on the
product.
10. To reduce the risk of electric shock, do not disassemble
this product, but take it to a qualified service personnel
when service or repair work is required. Opening or
removing covers may expose you to dangerous voltages
or other risks. Incorrect reassembly can cause electric
shock when the appliance is subsequently used.
11. Do not expose the product to extreme temperatures
such as areas near a hot radiator or stove or in a hot car.
12. Do not place lighted candles, cigarettes, cigars, etc., on
the telephone.
13. Never touch uninsulated telephone wires or terminals
unless the telephone line has been disconnected at the
network interface.
14. Never install or modify telephone wiring during a
lightning storm.
15. Never install telephone jacks in wet locations unless the
jack is specifically designed for wet locations.
16. Use caution when installing or modifying telephone lines
to prevent electrical shock and/or fire.
17. Unplug this product from the wall outlet and refer
servicing to qualified service personnel under the
following conditions:
A. When the power supply cord or plug is damaged or
frayed.
B. If the product has been exposed to rain or water.
C. If the product does not operate normally by following the
operating instructions.
D. If the product’s cabinet has been damaged.
E. If the product exhibits a distinct change in performance.
18. Avoid using a telephone (other than a cordless type)
during an electrical storm. There may be a remote risk of
electric shock from lightning.
19. Do not use the telephone to report a gas leak in the
vicinity of the leak.
20. Do not place this product on an unstable cart, stand or
table. The product may fall, causing serious damage to the
product.
IF YOUR PRODUCT UTILIZES BATTERIES, THE
FOLLOWING ADDITIONAL PRECAUTIONS
SHOULD BE OBSERVED :
1. Use only the type and size of battery(ies) specified in the
user manual.
2. Do not dispose of the battery(ies) in fire. They may
explode. Check with local codes for possible special
disposal instructions.
3. Do not open or mutilate the battery(ies). Released
electrolyte is corrosive and may cause damage to the
eyes or skin. It may be toxic if swallowed.
4. Exercise care in handling battery(ies) in order not to
short out the battery(ies) with conducting materials such
as rings, bracelets, and keys. The battery(ies) or
conductor may overheat and cause burns.
5. Do not attempt to recharge the battery(ies) provided
with or identified for use with this product that are not
intended to be charged. The battery(ies) may leak
corrosive electrolyte or explode.
6. Do not attempt to rejuvenate the battery(ies) provided
with or identified for use with this product by heating
them. Sudden release of the battery(ies) electrolyte may
occur causing burns or irritation to eyes or skin.
7. When replacing battery(ies), all batteries should be
replaced at the same time. Mixing fresh and discharged
batteries could increase internal cell pressure and
rupture the discharged battery(ies). (Applies to products
employing more than one separately replaceable primary
battery.)
8. When inserting battery(ies) into this product, the proper
polarity or direction must be observed. Reverse insertion
of battery(ies) can cause charging, and that may result in
leakage or explosion.
9. Remove battery(ies) from this product if storing over 30
days because the battery(ies) could leak and damage the
product.
10. Discard “dead” battery(ies) as soon as possible since
“dead“ batteries are more likely to leak in a product.
11. Do not store this product, or the battery(ies) provided
with or identified for use with this product, in hightemperature areas.
Batteries that are stored in a freezer or refrigerator for
the purpose of extending shelf life should be protected
from condensation during storage and defrosting.
Batteries should be stabilized at room temperature prior
to use after cold storage.
12. If your product uses rechargeable battery(ies), charge the
battery(ies) only in accordance with the instructions and
limitation specified in the User Manual.
SAVE THESE INSTRUCTIONS
4

Environment and safety
Safety information
This telephone is not designed for making emergency telephone calls when the power fails. An alternative
should be made available for access to emergency calling.
Power requirements
The product requires an electrical supply of 120 volts, single phase alternating current, excluding IT installations
defined in standard EN UL 60950.
Battery requirements
The handset requires power source of two rechargeable NiMH batteries, size AAA 1.2V 650mAh (Hr11/45).
IF THE INCORRECT TYPE OF BATTERIES ARE USED, A WARNING MESSAGE WILL BE DISPLAYED.
US
WARNING :
UL 60950. The only way to power down this product is by unplugging the power supply from the
electrical outlet. Ensure the electrical outlet is located close to the apparatus and is always easily
accessible.
The electrical network is classified as dangerous according to criteria in the standard
Telephone connection
The voltage on the network is classified as TNV-3 (Telecommunication Network Voltages, as defined in the
standard UL 60950). Following a power cut, the call in progress is lost.
Safety precautions
> Do not allow the handset to come into contact with liquids or moisture.
> Do not open the handset, base station or charger. This could expose you to high voltages.
> Do not allow the charging contacts of the charger or the battery to come into contact with extraneous
conductive materials.
> There is a slight chance that the telephone could be damaged by an electrical storm. It is recommended
that users unplug the phone from the USB socket and the phone line from the phone wall socket during
a storm.
> Do not use the handset in an explosive hazard area such as where there is gas leaking.
> Young children should be supervised to ensure that they do not play with the telephone.
> Because the phone works by sending radio signals between the base unit and the handset, wearers of
hearing aids may experience interference in the form of a humming noise.
> We advise that this phone should not be used near intensive care medical equipment or by persons with
pacemakers.
> Your phone can interfere with electrical equipment such as answering machines, TV and radio sets if placed
too close. It is recommended that you position the base unit at least one meter from such appliances.
CAUTION : Use only the mains adapter supplied with this telephone. Incorrect adapter polarity
or voltage can seriously damage the unit.
Base adapter Charger adapter
Input : 120VAC 60 Hz Input : 120VAC 60 Hz
Output : 9VDC 300mA Output: 9VDC 150mA
CAUTION :
Never use non-rechargeable batteries; use recommended type supplied with this telephone. NiMH
batteries must be disposed of in accordance with the applicable waste disposal regulations.
FCC CERTIFICATION NUMBER IS LOCATED ON THE CABINET BOTTOM
RISK OF EXPLOSION IF BATTERY IS REPLACED BY AN INCORRECT TYPE.
5

US
Important information
The term „IC:“ before the certification number signifies that Industry Canada technical
specifications were met. This certification means that the equipment meets certain radio
communications and operational requirements.
Hereby, Philips declares that the VOIP321 is in compliance with the essential
requirements and other relevant provisions of Directive 1999/5/EC. This product can only
be connected to the analog telephone network of the country indicated on the sticker
located under the base station.
Install requirements
In order to use the phone, your computer should meet the following requirements :
• PC running Windows 2000 or XP
• 400 MHz processor
•128 MB RAM
• Free USB slot on the PC
• Internet Connection (boardband recommended)
Need help
For more information on troubleshooting and FAQ’s:
Online help : www.p4c.philips.com
Troubleshooting : see page 40
DFU update on : www.p4c.philips.com
6
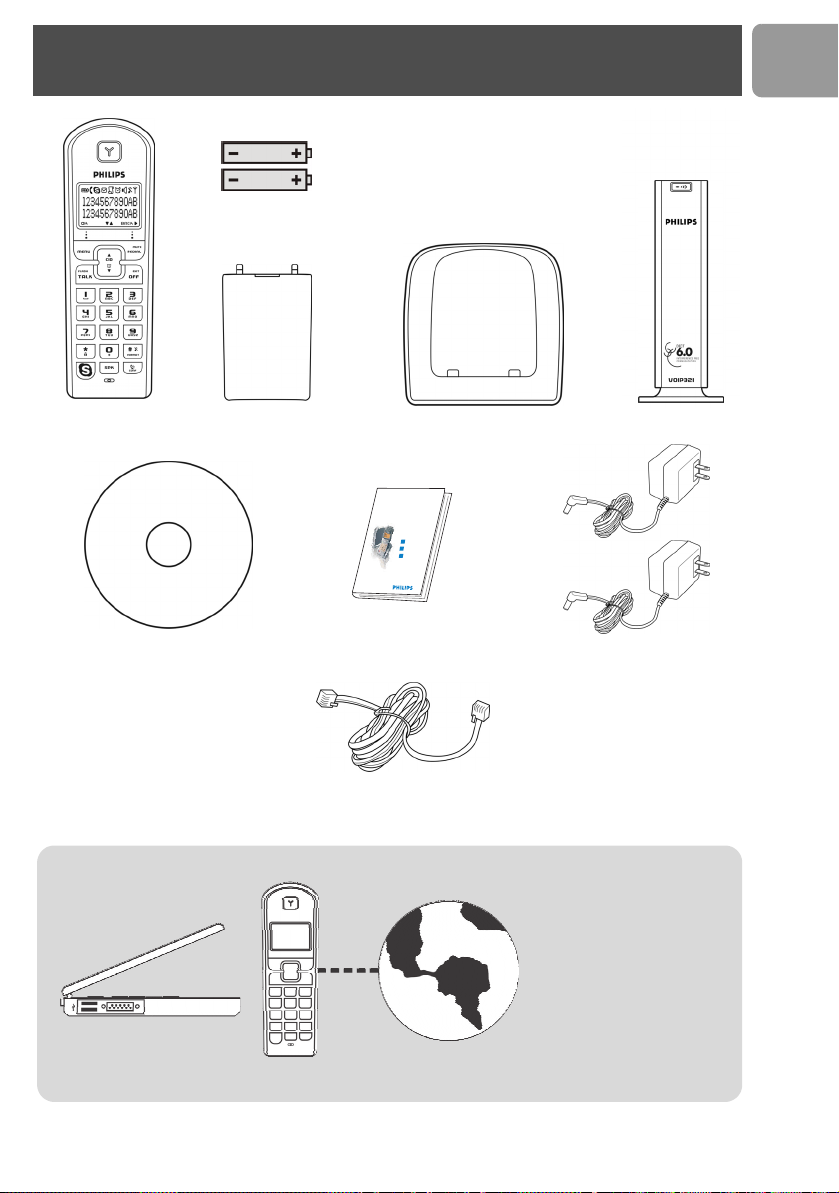
What’s in the box
2 AAA Battery
US
Handset VOIP 321
Installation CDROM
What else you need :
A desktop or a laptop
with free USB port
Battery door
Welcome
Quick start guide
1
Connect
2
Install
Enjoy
3
Quick Start Guide
Line Cord to plug the RJ11/RJ11 Line Cord
(see below) in your wall plug
A telephone line
Charger
Base station VOIP 321
1 power supply for base station
and 1 power supply for charger
• Internet connection
(broadband recommended)
• Only the Skype version
printed on the CD ROM
is granted for a full
compatibility. New
feature may not work
with VOIP 321 when
upgrading Skype.
7
US
16
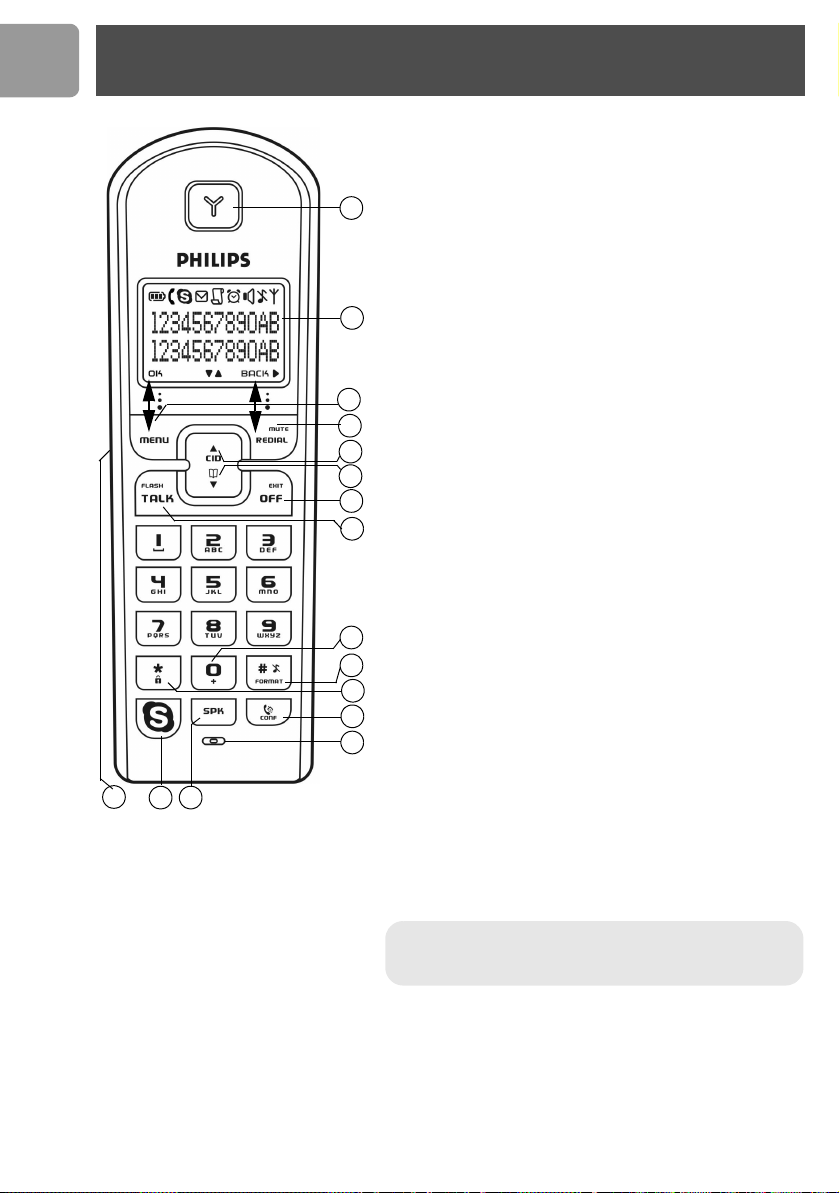
Your VOIP 321
Overview handset
1
Earpiece
2 Display, icons see page 10
3 Menu key & Softkey OK
Use to enter menus.
1
2
3
4
5
6
7
8
9
10
11
12
13
1415
Use to select menu.
Use to confirm an operation.
4 Redial, Mute & Softkey Back
Use to switch between call details.
Use to enter dial list.
Use to redial last dialed number.
Use to mute/unmute a call
Use to delete text and digits.
5 CID & Scroll up Key
Use to enter call list.
Use to scroll up items
Use to increase ringer and receiver volume.
6 Phonebook & Scroll down Key
Use to access phonebook.
Use to scroll down items.
Use to reduce ringer and receiver volume.
7Off & Exit Key
Use to end a call.
Use to exit menus.
Use to turn the hanset ON/OFF.
8 Talk & Flash Key
Use to make and receive calls.
Use to send flash signal.
Use to pick up or make second incoming calls on Skype.
90 and + key
Use to enter 0 when making a call.
Press and hold to enter + while making SkypeOut calls.
10 Pound, Ringer off, Pause Key & Format Key
Use to enter a pause.
Use to turn the ringer on/off.
11 Star & Key lock Key
Use to lock the keypad.
12 Intercom and Conference Key
Use to make intercom calls.
Use to set up 3-way conference.
13 Microphone
14 Loudspeaker Key*
Use to turn the speaker on/off.
15 Skype key
Use to make SkypeOut calls.
Use to launch Skype contact list.
16 Headset jack
Allow communication through the headset.
*Warning !
the volume in the loudspeaker to a very high level. Make
sure the handset is not too close to your ear.
Handsfree activation could suddenly increase
8

Main features
Your VOIP 321
Overview base station
1 LED on base station
1
2
2 Paging key
• Contact list display on handset.
• Connection and Skype status display.
• Skype status display for each contact on the contact list.
• Change your online status on the handset.
- On when the base is powered up.
- Blinks normally when there is an incoming telephone call or
during a telephone call.
- Blinks slowly while paging the handset.
- Blinks quickly during registration mode.
- Steady ON when the USB is plugged in and the base is powered
up.
- Flash when there is data communication with USB.
Use to page the handset.
Use to register a handset.
US
Dual line phone
• Able to receive calls from Skype as well as from regular telephone line.
• User selectable melodies for each line for easy recognition.
• Call waiting alert when there is another incoming call from another line.
9

US
Icons on the handset display
When being used for the first time, it is sometimes necessary to wait until the battery is
sufficiently charged before the icons appear on the display.
The display gives information about the operation of your telephone. Following icons can be
shown in the headline of the display.
Base/Handset link.
Telephone call in progress.
Battery full; 2/3 full; 1/3 full; Empty, please charge.
Loudspeaker is turned on.
The alarm clock is turned on.
The ringer is turned off.
There is a new Caller ID record or Caller ID records are being reviewed.
Message Waiting Indicator.
10
Skype call in progress.
Digits/characters on the right.
More menu options are available upward.
More menu options are available downward.
OK/Confirmation of selection.
Press to return to the previous screen.
Press to erase text or digits.
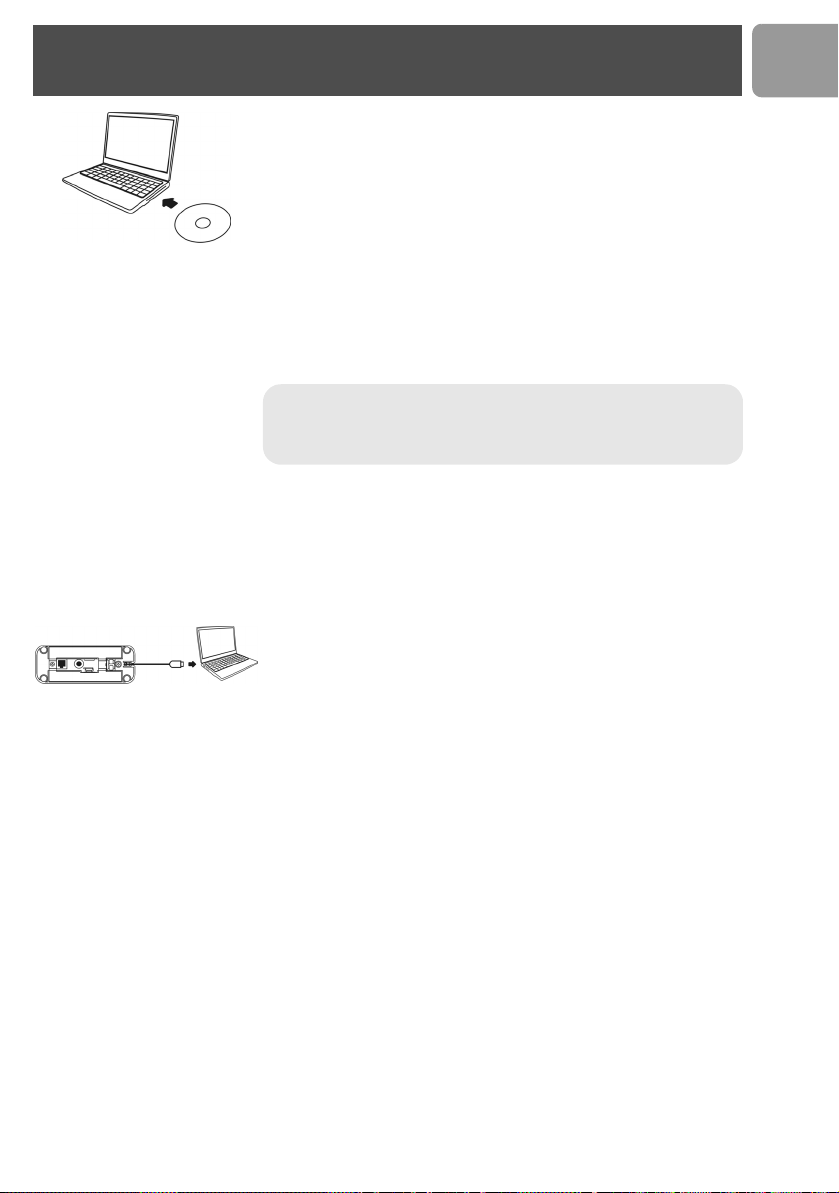
Install
How to install the software
Before using your phone, please install the VOIP321 driver provided in the
enclosed CD.
To install the VOIP321 driver :
1. Insert the installation CD into the PC's CD ROM (or DVDROM)
drive.
2. The installation program will start automatically.
3. Follow the instructions on the screen.
4. Click on Quit.
5. Remove the installation CD from the PC's CD ROM (or DVDROM)
drive.
TIP :
If for some reason the installation does not start automatically :
- Click on Windows START and then Run.
- Type explorer and navigate to the CD ROM (or DVDROM) drive.
- Double-click on Setupwizard.exe.
> If your operating system is Windows 2000, you need to restart your PC to
complete the setup.
> The VOIP 321 driver should autostart if this option is checked during
installation.
Getting Ready
To start making Skype call
1. Power up your base and connect your USB base on a free USB port of
your PC if you have not already done so.
2. Start the VOIP 321driver by double clicking on the shortcut icon
created on your desktop if it is not already started.
3. If this is the first time you use the VOIP 321 driver, you will see the
message ANOTHER PROGRAM WANTS TO USE SKYPE.
Simply select
press OK.
4. Start Skype if the VOIP 321driver has not started Skype for you; login
to your Skype account.
5. From Skype, click on To o l s . Select Options. Select Sound Devices
from the left.
6. For XP user, select Philips VOIP321 from Audio IN, Audio OUT
and Ringing pull down box. Press SAVE.
For Windows 2000 user, select USB Audio Device from Audio IN,
Audio OUT and Ringing pull down box. Press SAVE.
7. Now your phone is ready for use. The status icon should be shown on
the handset to indicate your current status.
About the VOIP321 Driver
Once VOIP 321driver is installed and started on your PC, a tray icon will
be shown when the VOIP321 driver is loaded.
ALLOW THIS PROGRAM TO USE SKYPE
and
US
11
US
Install
Double click on the tray icon will return the ABOUT page of the
VOIP 321driver, where the current status will be shown. If there are
problems with the connection, the problem will be displayed; otherwise
CONNECTED will be shown.
Right click on the tray icon either to stop the VOIP 321 driver or to see
the status of VOIP 321 driver.
Adjusting the handset speaker volume on your PC
The earpiece volume setting on your PC affects the sound quality of your
phone.
Please follow the steps below to adjust your earpiece volume.
On the PC, click on the Start button and select
Panel.
For Windows 2000 users,
•Click on Sound and Multimedia.
• Under Sounds and Multimedia Properties, select the Audio tab.
• To adjust the earpiece volume, select USB audio Device from the
Preferred device pulldown menu under Sound Playback; to adjust
the microphone volume, select USB audio Device from the
Preferred device under Sound Recording.
•Click the Vol um e button.
• Adjust the volume using the slider. Close the window when finished.
• When finished, click CANCEL to retain audio driver selection.
For Windows XP users,
•Click on Sound and Audio Devices.
• Select the Audio tab.
• To adjust the earpiece volume, select
Default device pulldown menu under Sound Playback; to adjust
the microphone volume, select USB audio Device from the Default
device
•Click the Vol um e button.
• Adjust the volume using the slider. Close the window when finished.
• When finished, click
Sound Recording
under
CANCEL
to retain audio driver selection.
Settings
Philips VOIP321
.
. Select
from the
Control
12
Note : Before exiting sound and audio properties, please make sure
that Use only Preferred Devices (for Windows 2000 user) or
Use only Default Devices (for Windows XP user) checkbox is
checked. Once this checkbox is checked, you will be able to separate
the audio path of your PC, such that audio from Skype will come out
from the handset and audio from other PC applications will come out
from the preferred audio device.

Connect
Note :
Install the drivers and software first (see page 11) and
connect the USB phone only once it is done.
1. Connect the output plug of the base adapter to the adapter socket on
the back of the base unit and the base adapter to the wall main supply.
A click should be heard when the cord is properly connected to the
base.
2. Connect the USB plug directly to your PC's USB slot.
3. Connect the telephone line cord to the phone socket on the back of
the base unit and to the plug (optional and country dependent) then
to the wall phone socket.
Note : You may find in the box the line adaptor delivered separately
from the line cord. In this case, please, first plug this line adaptor onto
the line cord before connecting it to the line socket.
4. Each handset comes with a charger and an adapter. Connect the
adapter to the wall main supply.
5. Place the 2 rechargeable NiMH AAA batteries (included), observing
their polarities, into the battery compartment on the handset.
6. Slide the battery door firmly into place.
US
7. Place the handset on the charger and let the batteries continuously
charge for 24 hours before using. The handset may get warm during
the initial charge. This is normal.
8. Please note that handset may not turn ON for up to 15 minutes if the
batteries are too low.
Note : Before first use, put the product on the charger and charge
batteries for 24 hours minimum.
13

US
Main menu
Your phone offers a variety of functions and features that are grouped in the menus.
To access the main menu, press and press UP / DOWN to browse the menu.
Press to exit the menus.
Main menu
SKYPE PHONEBOOK
Contacts
User Status
Voi c em ai l
Credits
CLOCK / ALARM PERSONAL SET ADVANCED SET
Set Clock
Set Alarm
Alarm Tone
Private Shared
View
Add
Edit
Quick Dial
To S ha re d
Delete
Delete All
Status
Handset Tone
Handset Name
Contrast
Auto Answer
Backlit
Language
View
Add
Edit
To P ri va te
Delete
Delete All
Status
Flash Time
Dial Mode
Pause
PAB X
Baby Call
Registration
Base Select
Delete HS
Area Code
Reset
Call records menu
Missed Received Dialed
To P ri va te
To S ha re d
Delete
Delete All
To P ri va te
To S ha re d
Delete
Delete All
To P ri va te
To S ha re d
Delete
Delete All
14
Call
General Information
Before any call is made, please note the following.
Emergency Calls
Skype does not support emergency call; all emergency calls will be routed to the telephone line.
Low battery warning
If your phone is almost out of battery during a call, it will sound an alert tone. Place your phone on the charger
for charging as soon as possible or it would turn off when it is out of battery. Placing the phone on the charger
for charging will end the current call.
Call timer
The call timer shows the duration of your current call on display. It is shown in minutes and seconds (MM-SS)
in the first hour. After that, it will be shown in hours and minutes (HH-MM).
Make a Skype call
1. Press to access Skype contact list.
2. Press UP / DOWN to select the Skype user you would like to call.
3. Press or to call the selected contact. The selected contact's name will be displayed and
called.
Note : The contact list shows the Skype contact list of the user who is currently logged in to Skype on
the PC. The icon on the left of each entry shows the online status of that entry. See page 36 for user
status display icon.
US
TIP : Search by letter - Using the keypad, enter the first letter of the name you wish to find.
E.g. If you want to find the contact name "Peter", press once should return the first contact begins
with the letter P.
E.g. If you want to find "Sam", press four times, the first contact begins with the letter S will be
selected.
Note : You can also change your online status on the handset. Refer to the menu - Skype section for
instruction on how to change online status, see page 36.
Note : The f ull nam e of the con tac ts o n th e co nta ct l ist will be shown. If you want to view the contact's
Skype ID, press when the contact is selected. If a SkypeOut entry is selected, the number of the
entry will be shown.
Making a Skype call while the Telephone line is in used
If you have two handsets, you can make a Skype call while another handset is on a Telephone call.
To make a Skype call while the telephone line is in used, follow the instruction in “Make a Skype call”,
page 15. If the Skype line is in used, UNAVAILABLE will be shown when you attempt to launch the
contact list, or busy tone will be returned.
15
 Loading...